

Page 1

DMA-1100P
Digital Media Adapter
User’s Guide
Version 1.00
11/2007
Edition 1
www.zyxel.com
Page 2

Page 3

About This User's Guide
About This User's Guide
Intended Audience
This manual is intended for people who want to use and configure the DMA-1100P. You
should have at least basic computer usage knowledge.
Related Documentation
• Quick Start Guide
The Quick Start Guide is designed to help you get up and running right away. It contains
information on setting up your network and configuring for Internet access.
• Supporting Disk
Refer to the included CD for software and support documents.
• ZyXEL Web Site
Please refer to www.zyxel.com
certifications.
for additional support documentation and product
User Guide Feedback
Help us help you. Send all User Guide-related comments, questions or suggestions for
improvement to the following address, or use e-mail instead. Thank you!
The Technical Writing Team,
ZyXEL Communications Corp.,
6 Innovation Road II,
Science-Based Industrial Park,
Hsinchu, 300, Taiwan.
E-mail: techwriters@zyxel.com.tw
DMA-1100P User’s Guide
3
Page 4

Document Conventions
Document Conventions
Warnings and Notes
These are how warnings and notes are shown in this User’s Guide.
1 Warnings tell you about things that could harm you or your device.
" Notes tell you other important information (for example, other things you may
need to configure or helpful tips) or recommendations.
Syntax Conventions
• The DMA-1100P may be referred to as the “DMA”, the “device”, the “system” or the
“product” in this User’s Guide. Distinctions are made were needed.
• Product labels, screen names, field labels and field choices are all in bold font.
• A key stroke is denoted by square brackets and uppercase text, for example, [ENTER]
means the “enter” or “return” key on your keyboard.
• “Enter” means for you to type one or more characters and then press the [ENTER] key.
“Select” or “choose” means for you to use one of the predefined choices.
• A right angle bracket ( > ) within a screen name denotes a mouse click. For example,
Maintenance > Log > Log Setting means you first click Maintenance in the navigation
panel, then the Log sub menu and finally the Log Setting tab to get to that screen.
• Units of measurement may denote the “metric” value or the “scientific” value. For
example, “k” for kilo may denote “1000” or “1024”, “M” for mega may denote “1000000”
or “1048576” and so on.
4
DMA-1100P User’s Guide
Page 5

Document Conventions
Icons Used in Figures
Figures in this User’s Guide may use the following generic icons. The DMA icon is not an
exact representation of your device.
DMA DMA with Remote Control Notebook computer
Computer Television (TV) USB Memory Stick
Server Firewall Switch
Router Powerline
DMA-1100P User’s Guide
5
Page 6

Safety Warnings
Safety Warnings
1 For your safety, be sure to read and follow all warning notices and instructions.
• Do NOT use this product near water, for example, in a wet basement or near a swimming
pool.
• Do NOT expose your device to dampness, dust or corrosive liquids.
• Do NOT store things on the device.
• Do NOT install, use, or service this device during a thunderstorm. There is a remote risk
of electric shock from lightning.
• Connect ONLY suitable accessories to the device.
• Do NOT open the device or unit. Opening or removing covers can expose you to
dangerous high voltage points or other risks. ONLY qualified service personnel should
service or disassemble this device. Please contact your vendor for further information.
• Make sure to connect the cables to the correct ports.
• Place connecting cables carefully so that no one will step on them or stumble over them.
• Always disconnect all cables from this device before servicing or disassembling.
• Use ONLY an appropriate power adaptor or cord for your device. Connect it to the right
supply voltage (for example, 110V AC in North America or 230V AC in Europe).
• Do NOT allow anything to rest on the power adaptor or cord and do NOT place the
product where anyone can walk on the power adaptor or cord.
• Do NOT use the device if the power adaptor or cord is damaged as it might cause
electrocution.
• If the power adaptor or cord is damaged, remove it from the device and the power source.
• Do NOT attempt to repair the power adaptor or cord. Contact your local vendor to order a
new one.
• Do not use the device outside, and make sure all the connections are indoors. There is a
remote risk of electric shock from lightning.
• If you wall mount your device, make sure that no electrical lines, gas or water pipes will
be damaged.
6
This product is recyclable. Dispose of it properly.
DMA-1100P User’s Guide
Page 7

Safety Warnings
DMA-1100P User’s Guide
7
Page 8

Safety Warnings
8
DMA-1100P User’s Guide
Page 9

Contents Overview
Contents Overview
Introduction ............................................................................................................................21
Introducing the DMA ..................................................................................................................23
Hardware ................................................................................................................................... 25
Using the DMA .......................................................................................................................29
DMA Menus ............................................................................................................................... 31
VIDEO Menu ......................................... ... ... .... ... ... ... ................................................................. 39
MUSIC Menu ............................................................................................................................. 43
PHOTO Menu ............................................................................................................................ 49
Favorites (Playlists) ................................................................................................................... 53
SERVER Menu ..........................................................................................................................57
USB Menu ................................... .... ... .......................................................... ... ... .... ... ................61
DMA Setup and Troubleshooting .........................................................................................63
Configuring the DMA ................................................................................................................. 65
Media Server Software .......... ... ... .... ... .......................................................... ... ... .... ... ... ... ... ....... 81
The ENCRYPT Button ...............................................................................................................83
Troubleshooting ..................................................... .................................................................... 87
Appendices and Index ...........................................................................................................95
DMA-1100P User’s Guide
9
Page 10

Contents Overview
10
DMA-1100P User’s Guide
Page 11

Table of Contents
Table of Contents
About This User's Guide..........................................................................................................3
Document Conventions............................................................................................................4
Safety Warnings ........................................................................................................................6
Contents Overview ...................................................................................................................9
Table of Contents....................................................................................................................11
List of Figures.........................................................................................................................15
List of Tables...........................................................................................................................19
Part I: Introduction................................................................................. 21
Chapter 1
Introducing the DMA...............................................................................................................23
1.1 Overview ............. .......................................................... ... .... ... ... .......................................... 23
1.1.1 Play Movies, Music or Photos on Your TV ................................................................. 23
1.1.2 Play Files from Your Computer or on USB ................................. ... ... ... .... ... ... ... ..........23
1.1.3 Connect your DMA to Your Home (Powerline) Network ............................................. 24
1.1.4 Use the Remote Control to Select From the On-Screen Menu ..................................24
Chapter 2
Hardware..................................................................................................................................25
2.1 Overview ............. .......................................................... ... .... ... ... .......................................... 25
2.2 Using the Remote Control ...................................................................................................25
2.3 LEDs ............................................................................................. ... .................................... 27
Part II: Using the DMA ........................................................................... 29
Chapter 3
DMA Menus .............................................................................................................................31
3.1 Menus Overview .................................... .... ... .......................................................... ... ... ....... 31
3.2 Menu Navigation ................. ... .... ... .......................................................... ... ... .... ... ... ... ..........32
3.3 VIDEO, MUSIC and PHOTO Menus .................. .... ... ... ... .... ................................................ 33
DMA-1100P User’s Guide
11
Page 12

Table of Contents
3.4 VIDEO, MUSIC and PHOTO File Folders ........................................................................... 34
3.5 The TOOL Button ................................................................................................................ 34
3.5.1 VIDEO, MUSIC and PHOTO Menus: TOOL .................................................... ... .......35
3.5.2 Using the TOOL Menu From a File Album ................................................................. 35
3.5.3 Keyboard Input .................................................... .......................................................36
Chapter 4
VIDEO Menu ............................................................................................................................39
4.1 Playing a Video .................................................................................................................... 39
4.1.1 A-B ......................................... .......................................................... ... .......................41
4.1.2 Using the TOOL Menu During Video Playback ............................................. ............. 41
Chapter 5
MUSIC Menu............................................................................................................................43
5.1 MUSIC Menu ............................................................. ... ... .................................................... 43
5.1.1 Using the TOOL Menu While Playing Music ..............................................................44
5.2 Podcast (RSS) .................................... ... .... .......................................................... ... ... .......... 45
5.3 Podcast Menu ............... ... .......................................................... ... ... .... ... ............................. 45
5.3.1 Importing Podcasts .......... ... ... .......................................................... ... .... ... ... ... ... .... ... 46
5.3.2 Adding Podcasts .................................... ... .... .......................................................... ... 46
Chapter 6
PHOTO Menu...........................................................................................................................49
6.1 PHOTO Menu ..................................... ... .... ... ... ... .... ... ... ....................................................... 49
6.2 Organizing Your Photos ....................................................................................................... 50
6.3 Slideshow .................................. ... ... .......................................................... ... .... ... ... .............50
6.3.1 Configuring Slideshow Settings ............. ... .... ... ... ... .... ... ... .......................................... 51
Chapter 7
Favorites (Playlists)................................................................................................................53
7.1 Favorites (Playlists) Introduction ..........................................................................................53
7.2 Adding a File to a Favorites Folder .. ... .......................................................... .... ... ... ... ... .... ... 53
7.3 Editing a Favorites Folder .................................................................................................... 54
7.3.1 Changing the Name of a Favorite Folder ............... .... ... ... ... ... .... ... ............................. 54
7.3.2 Changing the Contents of a Favorites Folder ..... ... .... ... ............................................. 55
7.4 Favorites Playback .......................... ... .......................................................... .... ... ... ... ..........55
Chapter 8
SERVER Menu.........................................................................................................................57
8.1 Accessing the SERVER Menu .............................................................................................57
8.2 SERVER Menu .......................................... ... ... ... .......................................................... ....... 57
Chapter 9
USB Menu................................................................................................................................61
12
DMA-1100P User’s Guide
Page 13

Table of Contents
9.1 USB Menu .................................... ... ... .......................................................... .... ... ... ... .......... 61
Part III: DMA Setup and Troubleshooting............................................ 63
Chapter 10
Configuring the DMA..............................................................................................................65
10.1 Accessing the OPTION Menu ............................................ ... ... ... ....................................... 65
10.2 HomePlug Settings ............................................................................................................66
10.2.1 Connecting to a Single Computer with HomePlug ............... .... ... ... ... .... ...................66
10.2.2 Connecting to a Wired Home Network with Powerline ............................................. 68
10.3 Network Settings ...............................................................................................................68
10.3.1 DNS Server Address ......................... .......................................... ............................. 69
10.3.2 MAC Address ........................................................................................................... 69
10.4 Network Settings Menu .....................................................................................................69
10.5 Wired LAN Settings ........................................................................................................... 69
10.6 Video Modes ...................................................................................................................... 71
10.7 TV Settings ........................................................................................................................ 71
10.8 Audio Settings ...................................................................................................................72
10.8.1 Audio Formats .......................................................................................................... 73
10.9 Language Settings ............................................................................................................. 74
10.10 Settings For Ease of Use .................................................................................................75
10.11 Reset Settings .................................................................................................................. 75
10.12 Registration Code ............................................................................................................76
10.13 Software Update ..............................................................................................................77
10.14 Device Information ........................................................................................................... 78
10.15 Screen Saver ...................................................................................................................79
Chapter 11
Media Server Software ...........................................................................................................81
11.1 Media Server Introduction .................................................................................................. 81
11.2 Media Server Tool ..............................................................................................................81
11.3 Configuring the Media Server Software .............................................................................82
11.4 Windows Media Connect Server ........................................................................................ 82
Chapter 12
The ENCRYPT Button.............................................................................................................83
12.1 ENCRYPT Button Overview .............................................................................................. 83
12.2 Set Up a HomePlug AV Network with ENCRYPT .............................................................. 83
12.3 Setting Up Multiple Networks ............................................................................................85
Chapter 13
Troubleshooting......................................................................................................................87
DMA-1100P User’s Guide
13
Page 14

Table of Contents
13.1 Power, Hardware Connections, and LEDs .... ... .... ... ... ... .... ... ............................................. 87
13.2 DMA Usage ....................................................................................................................... 88
13.3 Powerline Problems ........................................................................................................... 91
13.4 ENCRYPT Button Problems ..............................................................................................92
Part IV: Appendices and Index ............................................................. 95
Appendix A Product Specifications.........................................................................................97
Appendix B Setting up Your Computer’s IP Address............................................................107
Appendix C Windows Vista Media Server............................................................................129
Appendix D Open Software Announcements.......................................................................137
Appendix E Legal Information ..............................................................................................183
Appendix F Customer Support.............................................................................................187
Index.......................................................................................................................................193
14
DMA-1100P User’s Guide
Page 15

List of Figures
List of Figures
Figure 1 DMA with USB ......................................................................................................................... 23
Figure 2 Connect the DMA to Your Home Powerline Network ............................................................... 24
Figure 3 Remote Control ........................................................................................................................ 26
Figure 4 LEDs ......................................................................................................................................... 27
Figure 5 HOME Menu ............................................................................................................................. 31
Figure 6 Main Menu Description ............................ .................... ................... ................... ....................... 33
Figure 7 File Folder Menu Description ................................................................................................... 34
Figure 8 VIDEO: TOOL > Change View .................. .... ... ... ... .... ... ... ... .................................................... 35
Figure 9 VIDEO > File Album: TOOL ..................................................................................................... 35
Figure 10 Keyboard Input ....................................................................................................................... 36
Figure 11 VIDEO Icon .............................................................................................................................39
Figure 12 VIDEO Menu .......................................................................................................................... 39
Figure 13 VIDEO > All Videos ................................................................................................................40
Figure 14 VIDEO Playback Information Example ...................................................................................40
Figure 15 VIDEO > All Videos > File: TOOL ..........................................................................................41
Figure 16 MUSIC Icon ........................ ... ... .... ... ... ... ... .... ... .......................................................................43
Figure 17 MUSIC Menu ...................................................... ... ................................................................. 43
Figure 18 MUSIC > Album > File: TOOL ................................................................................................44
Figure 19 RSS Feed Icon ...................... ... .... ... ... ... ... .... ... .......................................................................45
Figure 20 MUSIC > Podcast: TOOL ....................................................................................................... 45
Figure 21 MUSIC > Podcast: TOOL: Add Podcast ................................................................................47
Figure 22 MUSIC > Podcast: TOOL: Add Podcast: Keyboard Input. ................................. ... ... ... ..........47
Figure 23 PHOTO Icon ........................................................................................................................... 49
Figure 24 PHOTO Menu ......................................................................................................................... 49
Figure 25 PHOTO > Album: TOOL ......................................................................................................... 50
Figure 26 PHOTO > Album > File: TOOL ............................................................................................... 51
Figure 27 Adding a Favorite Example. ................................................................................................... 53
Figure 28 Favorites: TOOL Menu .................................... .......................................................... .............54
Figure 29 Favorites > Favorite folder: TOOL Menu ................................................... ............................. 55
Figure 30 SERVER Icon .........................................................................................................................57
Figure 31 SERVER Menu > Server .......................................................................................................58
Figure 32 SERVER Menu ....................................................................................................................... 58
Figure 33 SERVER > User Files ........................................................................................................... 59
Figure 34 USB Icon ............................................ ... ... .... ... ... ... ................................................................. 61
Figure 35 OPTION Icon ................................................... ... ... .... ... ... ... .... ... ... ... ... .................................... 65
Figure 36 OPTION Menu ....................... ... .............................................................. ... .............................65
Figure 37 Connect Directly to a Computer with Powerline .......... ... ....................................................... 66
Figure 38 Option > Homeplug Settings: NMK Setup ..............................................................................67
DMA-1100P User’s Guide
15
Page 16

List of Figures
Figure 39 OPTION > Homeplug Settings: Keyboard Input ....................................................................67
Figure 40 Connect to a Computer on Your Home (wired) Network .......................................................68
Figure 41 OPTION > Network Settings ................................................................................................. 69
Figure 42 OPTION > Network Settings > Wired LAN Settings .............................................................. 70
Figure 43 OPTION > TV Settings ................................... ... ... .... ... ... ... .... ... ... ... ... .... ... ... ... .... ...................71
Figure 44 OPTION > Audio Output Settings ..........................................................................................72
Figure 45 OPTION > Language Settings ........................................... .... ... ... ... ....................................... 74
Figure 46 OPTION > Settings for Ease of Use ...................................................................................... 75
Figure 47 OPTION > Reset Settings ................................................. .... ... ... ... ... .... ... ... ... .... ... ... .............76
Figure 48 OPTION > DivX Registration Code. ....................................................................................... 77
Figure 49 OPTION > Software Update .................................................................................................. 78
Figure 50 OPTION > Device Information ............................................................................................... 79
Figure 51 Media Server Tool Icon ......................................................... ... ... ... ....................................... 82
Figure 52 ENCRYPT Connection Procedure ..................................................... .... ... ... ... .... ... ... ... ... .... ... 84
Figure 53 Adding More Powerline Adapters to Your Network ............................................................... 84
Figure 54 One Existing Powerline Network ........................................................................................... 85
Figure 55 Two Separate Powerline Networks ....................................................................................... 85
Figure 56 Wall-mounting Example ........................................................................................................ 104
Figure 57 Masonry Plug and M4 Tap Screw .........................................................................................104
Figure 58 WIndows 95/98/Me: Network: Configuration ....................................................... ... ... ... ... .... . 108
Figure 59 Windows 95/98/Me: TCP/IP Properties: IP Address ............................................................ 109
Figure 60 Windows 95/98/Me: TCP/IP Properties: DNS Configuration ..................... ... ... .... ... ... ... .........110
Figure 61 Windows XP: Start Menu ................. ......................................................................................111
Figure 62 Windows XP: Control Panel ............................................... .... ... ... ... ... .... ... ... .........................111
Figure 63 Windows XP: Control Panel: Network Connections: Properties ............................................112
Figure 64 Windows XP: Local Area Connection Properties ..................................................................112
Figure 65 Windows XP: Internet Protocol (TCP/IP) Properties ........................................... ... ... ... ... .... .. 113
Figure 66 Windows XP: Advanced TCP/IP Properties .............. ... ... ... .... ... ... ... ... .... ... ... ... .... ... ... ... ... .... ..114
Figure 67 Windows XP: Internet Protocol (TCP/IP) Properties ........................................... ... ... ... ... .... .. 115
Figure 68 Windows Vista: Start Menu ....................................................................................................116
Figure 69 Windows Vista: Control Panel .................. .... ... ... ... .... ... ... ... .... ... ... ... ... .... ...............................116
Figure 70 Windows Vista: Network And Internet ...................................................................................116
Figure 71 Windows Vista: Network and Sharing Center ........................................................................116
Figure 72 Windows Vista: Network and Sharing Center ........................................................................117
Figure 73 Windows Vista: Local Area Connection Properties ............................ .... ... ... ... .... ... ... ... ... .... ..117
Figure 74 Windows Vista: Internet Protocol Version 4 (TCP/IPv4) Properties .................................... ..118
Figure 75 Windows Vista: Advanced TCP/IP Properties .............................. .........................................119
Figure 76 Windows Vista: Internet Protocol Version 4 (TCP/IPv4) Properties .................................... . 120
Figure 77 Macintosh OS 8/9: Apple Menu ............................................................................................121
Figure 78 Macintosh OS 8/9: TCP/IP ...................................................................................................121
Figure 79 Macintosh OS X: Apple Menu ..............................................................................................122
Figure 80 Macintosh OS X: Network ....................................................................................................123
Figure 81 Red Hat 9.0: KDE: Network Configuration: Devices ........................................................... 124
16
DMA-1100P User’s Guide
Page 17

List of Figures
Figure 82 Red Hat 9.0: KDE: Ethernet Device: General .................................................................... 124
Figure 83 Red Hat 9.0: KDE: Network Configuration: DNS ................................................................. 125
Figure 84 Red Hat 9.0: KDE: Network Configuration: Activate .......................................................... 125
Figure 85 Red Hat 9.0: Dynamic IP Address Setting in ifconfig-eth0 ................................................. 126
Figure 86 Red Hat 9.0: Static IP Address Setting in ifconfig-eth0 ... .... ... ... ... ... .... ... ... ... .... ... ... ... ... .... . 126
Figure 87 Red Hat 9.0: DNS Settings in resolv.conf ..........................................................................126
Figure 88 Red Hat 9.0: Restart Ethernet Card ...................................................................................126
Figure 89 Red Hat 9.0: Checking TCP/IP Properties ......................................................................... 127
Figure 90 DMA with Windows Vista Computer ....................................................................................129
Figure 91 Start WIndows Media Player .............. ..................................................................................130
Figure 92 Start WIndows Media Player .............. ..................................................................................131
Figure 93 WIndows Media Player Tools> Options ................................................................................131
Figure 94 Library .................................................................................................................................131
Figure 95 Media Sharing ................................................. .....................................................................132
Figure 96 Network and Sharing Center ................................................................................................ 132
Figure 97 Set Network Location: Customize network settings ............................................................. 133
Figure 98 Set Network Location: Successfully set network settings ......................... ... ... .... ... ... ... ... .... . 133
Figure 99 Network ................................................................................................................................ 134
Figure 100 Media Sharing ....................................................................................................................134
Figure 101 Media Sharing: Select DMA ...............................................................................................135
Figure 102 Library ...............................................................................................................................135
Figure 103 Add To Library .................................................................................................................... 136
Figure 104 Add To Library > Advanced ................................................................................................ 136
Figure 105 Add To Library Search ........................................................................................................ 136
DMA-1100P User’s Guide
17
Page 18

List of Figures
18
DMA-1100P User’s Guide
Page 19

List of Tables
List of Tables
Table 1 LEDs .........................................................................................................................................27
Table 2 Menus Summary ....................................................................................................................... 31
Table 3 Main Menu Description ............................................................................................................. 33
Table 4 File Folder Menu Description ................................... .... ............................................................. 34
Table 5 VIDEO > File Album: TOOL ...................................................................................................... 36
Table 6 Keyboard Input ..........................................................................................................................37
Table 7 VIDEO Playback Information .................................................................................................... 41
Table 8 VIDEO > All Videos > File: TOOL Menu ...................................................................................42
Ta ble 9 MUSIC > Album > File: TOOL Menu ........................... ... ... ... .... ... ... ... ... .... ... ... ... .... ... ... ... ... .... ... 44
Table 10 MUSIC > Podcast: TOOL Menu .............................................................................................. 45
Ta ble 11 PHOTO > Album > File: TOOL ................................................ ... ... ... ... .... ... .............................51
Table 12 Favorite > TOOL Menu ........................................................................................................... 54
Table 13 Favorites > Favorite folder: TOOL Menu ................................................................................55
Ta ble 14 OPTION > Network Settings ......................................... ... ... .... ... ... ... ... .................................... 70
Ta ble 15 OPTION > TV Settings . .... ... ... .......................................................... ... .... ... ... ... .... ... ... .............71
Table 16 OPTION > Audio Output Settings ........................................................................................... 72
Ta ble 17 OPTION > Language Settings .................. .... ... ... ... .... ... ... ... .... ... ............................................. 74
Table 18 OPTION > Settings for Ease of Use .......................................................................................75
Ta ble 19 OPTION > Reset Settings ...................... ... .... ... ... ... .... ... ... ... .................................................... 76
Table 20 OPTION > Software Update ...................................................................................................78
Ta ble 21 OPTION > Device Information ............ ... ... .... ... ... .................................................................... 79
Table 22 Hardware Specifications ......................................................................................................... 97
Table 23 Software Specifications ...........................................................................................................98
Table 24 Standards Supported ..............................................................................................................98
Table 25 MPEG PS Video File Specifications ........................................................................................99
Table 26 MPEG-2 TS/TTS Video File Specifications ...................................... ..................................... 100
Table 27 WMV Video File Specifications ............................................................................................. 100
Table 28 AVI Video File Specifications ................................................................................................. 100
Table 29 MPEG4 Video File Specifications .........................................................................................101
Table 30 DVR-MS Video File Specifications ........................................................................................ 101
Ta ble 31 IFO Video File Specifications .................... .............................................................. ... ...........101
Ta ble 32 Music File Specifications ............................................... ... ... .... ... ... ... ... .... ... ... ... .... ... ..............102
Table 33 Photo File Specifications ....................................................................................................... 103
Table 34 Ethernet Cable Pin Assignments .......................................................................................... 105
DMA-1100P User’s Guide
19
Page 20

List of Tables
20
DMA-1100P User’s Guide
Page 21

PART I
Introduction
Introducing the DMA (23)
Hardware (25)
21
Page 22

22
Page 23

CHAPTER 1
Introducing the DMA
This chapter introduces the main applications and features of the DMA. See the Quick Start
Guide for instructions on connecting the DMA.
1.1 Overview
The DMA lets you play DVD-quality movie, music and photo files on your television from
your computer, USB memory stick or other file storage device. You ca n connect the DMA to
your computer directly or to multiple computers on your home network. The DMA is
HomePlug compatible, so you can also connect your DMA to other devices with a HomePlug
connection using standard home electrical wiring. After you connect to your computer or other
file storage device, select the files you want to play from the DMA menu that appears on your
TV screen using the remote control included with the DMA.
1.1.1 Play Movies, Music or Photos on Your TV
The DMA supports a large number of file formats (see Appendix A on page 99 for a list of
supported file formats). It also supports HDMI (High Definition Multimedia Interface) for
high quality digital video and audio output.
1.1.2 Play Files from Your Computer or on USB
Use standard LAN (Ethernet) cables to connect the DMA directly to your computer or file
storage device, such as ZyXEL’s NSA-220 network storage appliance. See the Quick Start
Guide to install the included media server software on Windows XP computers to use them as
media servers.
The DMA can also play media files stored on a USB device like a memory stick or hard drive.
Figure 1 DMA with USB
DMA-1100P User’s Guide
23
Page 24
Chapter 1 Introducing the DMA
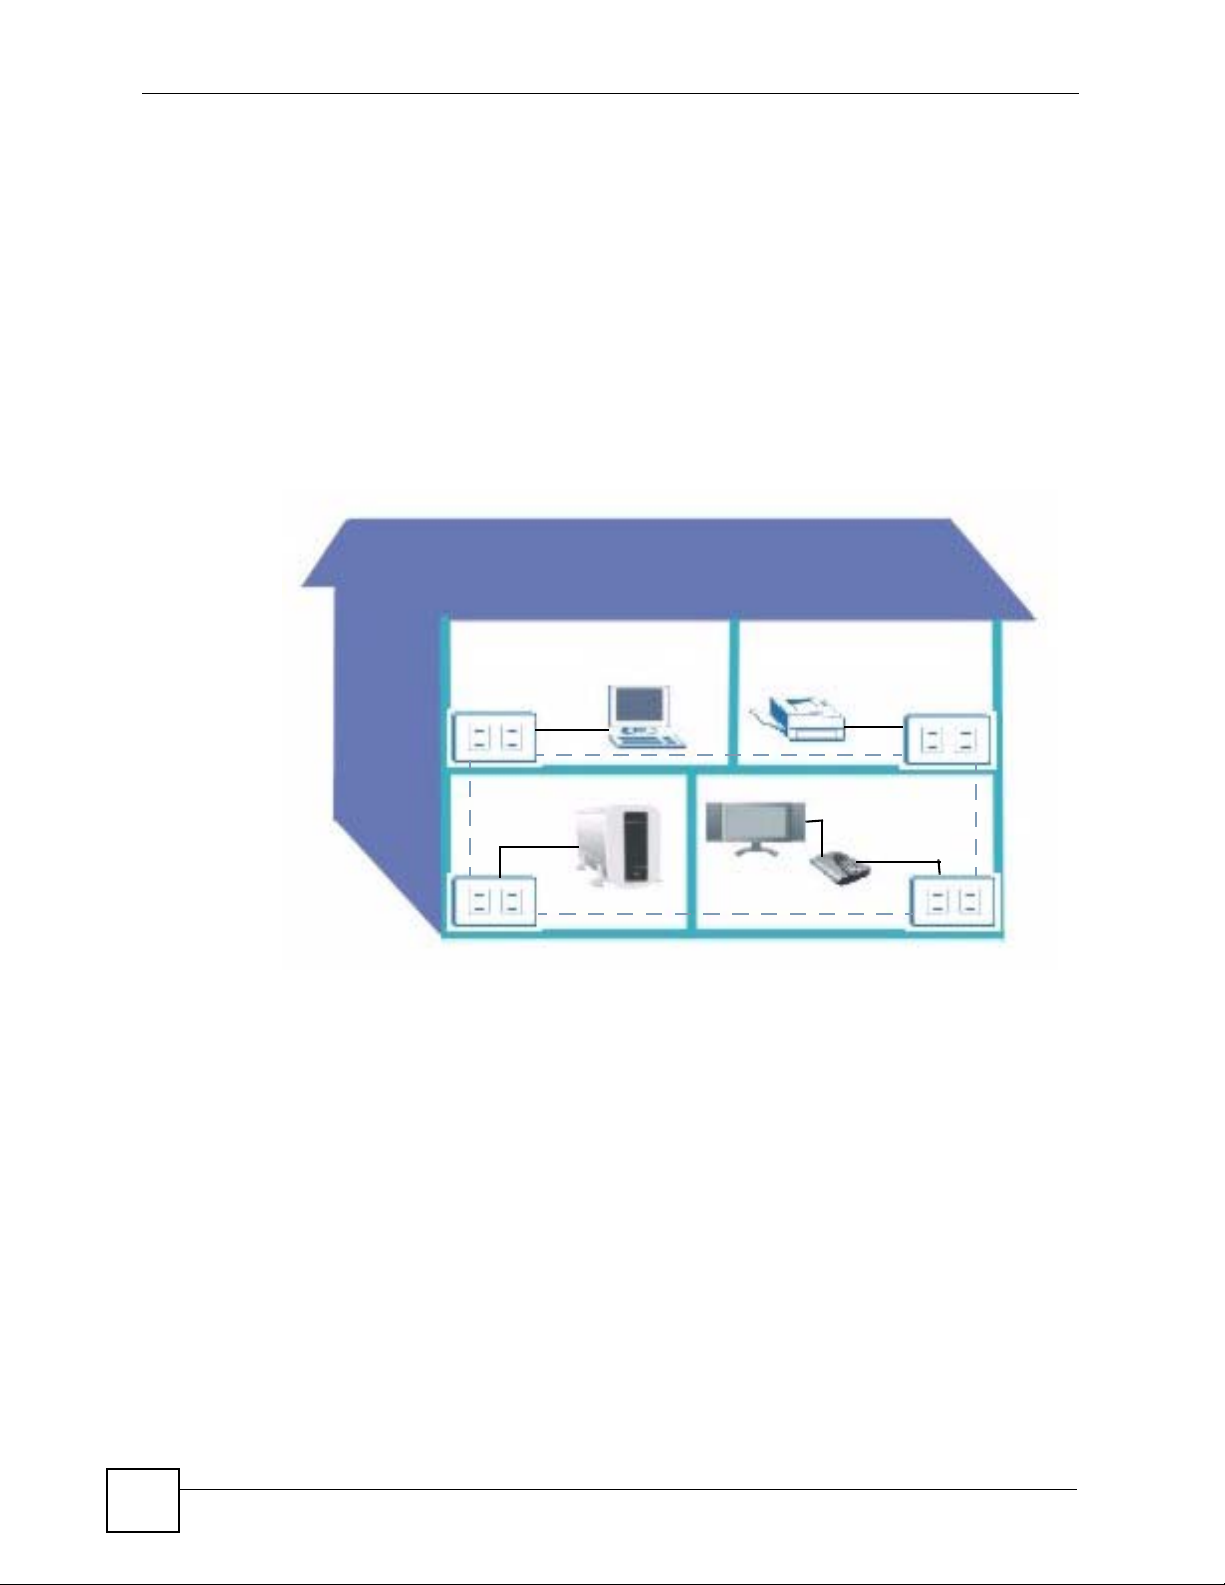
1.1.3 Connect your DMA to Your Home (Powerline) Network
You can connect the DMA to your wired home network to access multiple computers and file
storage devices. See Chapter 10 on page 68 for information on wired network settings.
You can use the DMA’s powerline feature to connect your DMA to your home computer or
file storage device on your home powerline network using the electrical wiring you have in
your house. The DMA is HomePlug AV compatible, providing high speed data transfer rates
over the range of an average house. See Appendix A on page 97 for speeds and range currently
supported.
The figure below shows the DMA connected to a home computer and file storage device on a
home powerline network.
Figure 2 Connect the DMA to Your Home Powerline Network
1.1.4 Use the Remote Control to Select From the On-Screen Menu
Use the remote control that came in the package to make selections from the DMA menu that
appears on your television screen. The remote control lets you easily browse and play your
digital content files and configure the DMA’s settings.
24
DMA-1100P User’s Guide
Page 25

CHAPTER 2
Hardware
2.1 Overview
This chapter describes the DMA’s hardware: the remote control and the LEDs (lights).
2.2 Using the Remote Control
Use the remote control to navigate the menus, play files and configure the DMA. The
following figure describes the function of each button on the remote control.
Point the remote control at the front of the DMA.
DMA-1100P User’s Guide
25
Page 26
Chapter 2 Hardware
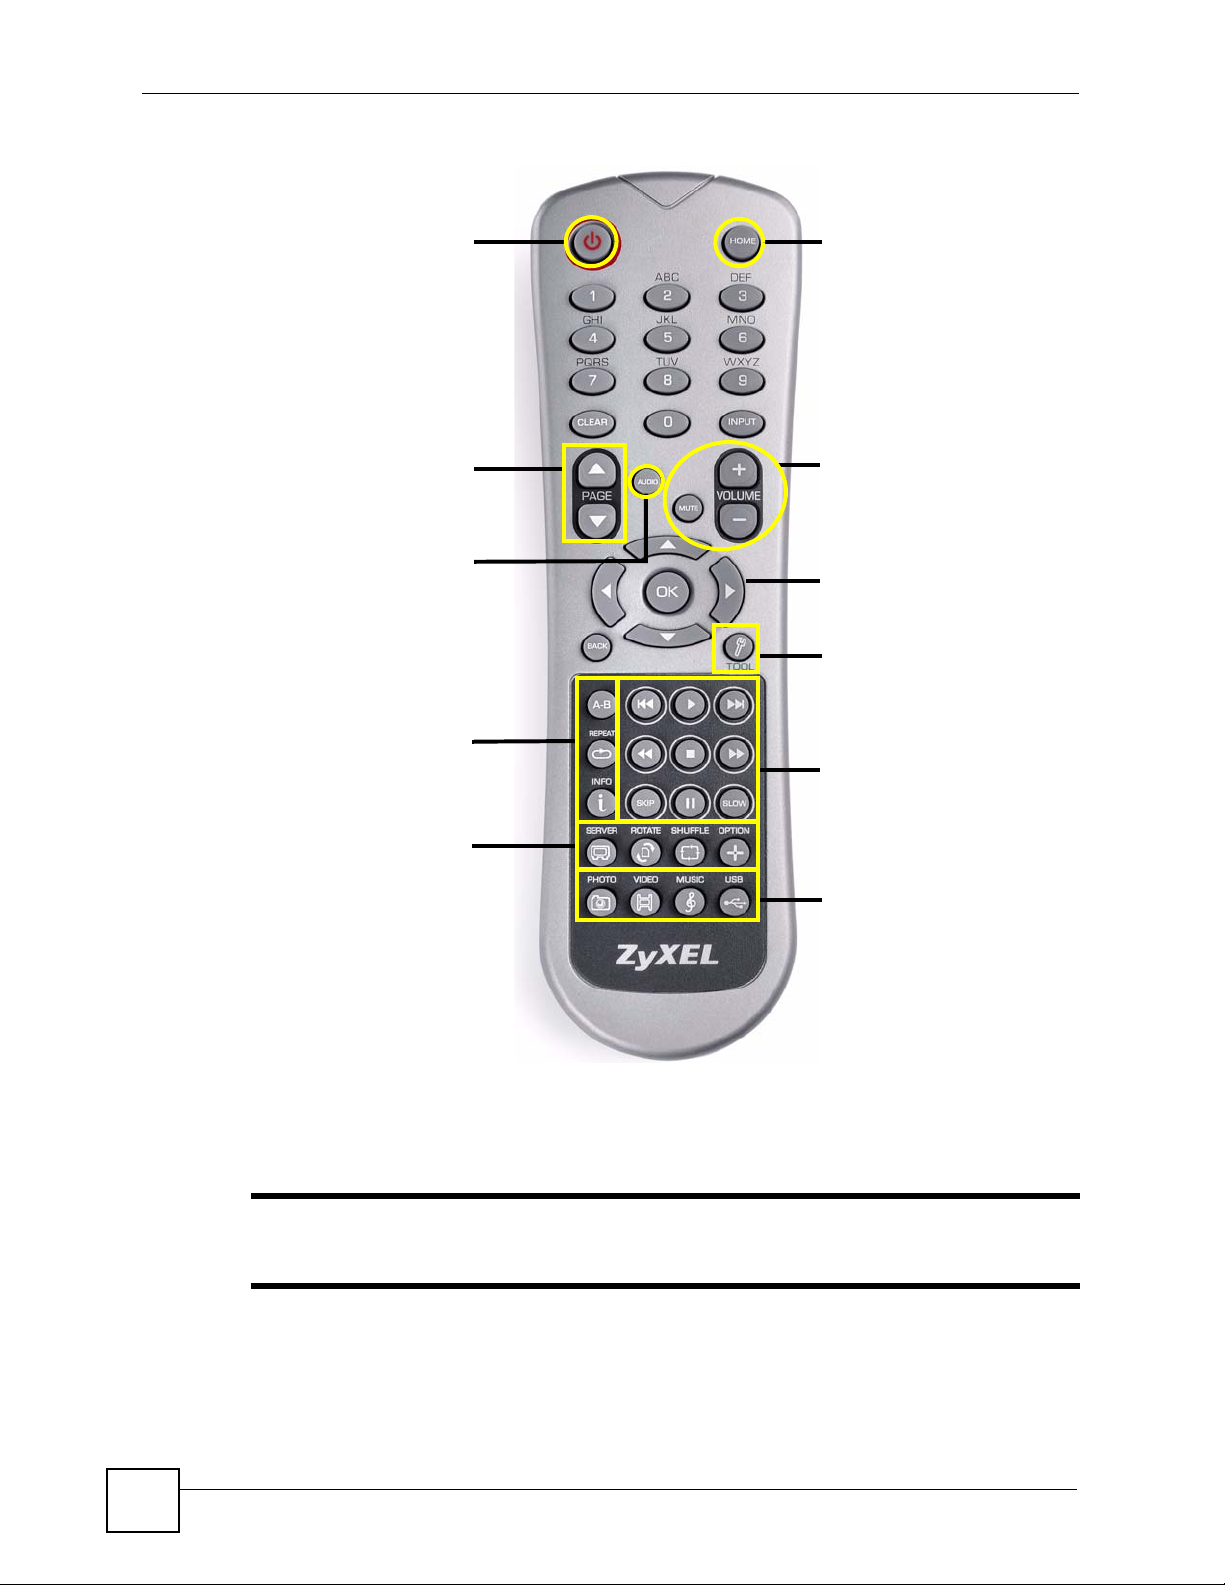
Figure 3 Remote Control
Power switches between on
and standby.
PAGE up/down scroll up or
down a list to the previous or
next page.
AUDIO switches audio output
between left, right and stereo
speakers.
A-B lets you select start and
stop times to repeat an
interval.
REPEAT keeps playing the
file.
INFO displays details about
the file playing.
SERVER opens a menu
where you select a media
server.
ROTATE turns a photo 90°
clockwise.
SHUFFLE plays your playlist
(favorites) files in random
order.
OPTION opens the menu
where you configure the
DMA’s settings.
HOME returns to the main
menu.
MUTE turns off the sound.
VOLUME up/down adjusts
the volume.
Use the OK, BACK and
arrow buttons to go through
the menus, select options
and play your files.
TOOL opens the TOOL menu
for additional options.
These buttons perform the
previous, play, next, reverse,
stop, fast forward, skip, pause
and slow motion functions
during file playback.
PHOTO opens a menu of
picture files to view.
VIDEO opens a menu of
video files to play.
MUSIC opens a menu of
music files to play.
USB opens a menu of files on
your USB device.
" You cannot use the SERVER, OPTION, PHOTO, MUSIC or VIDEO buttons
while a dialog box, popup screen or TOOL menu is displayed.
26
DMA-1100P User’s Guide
Page 27
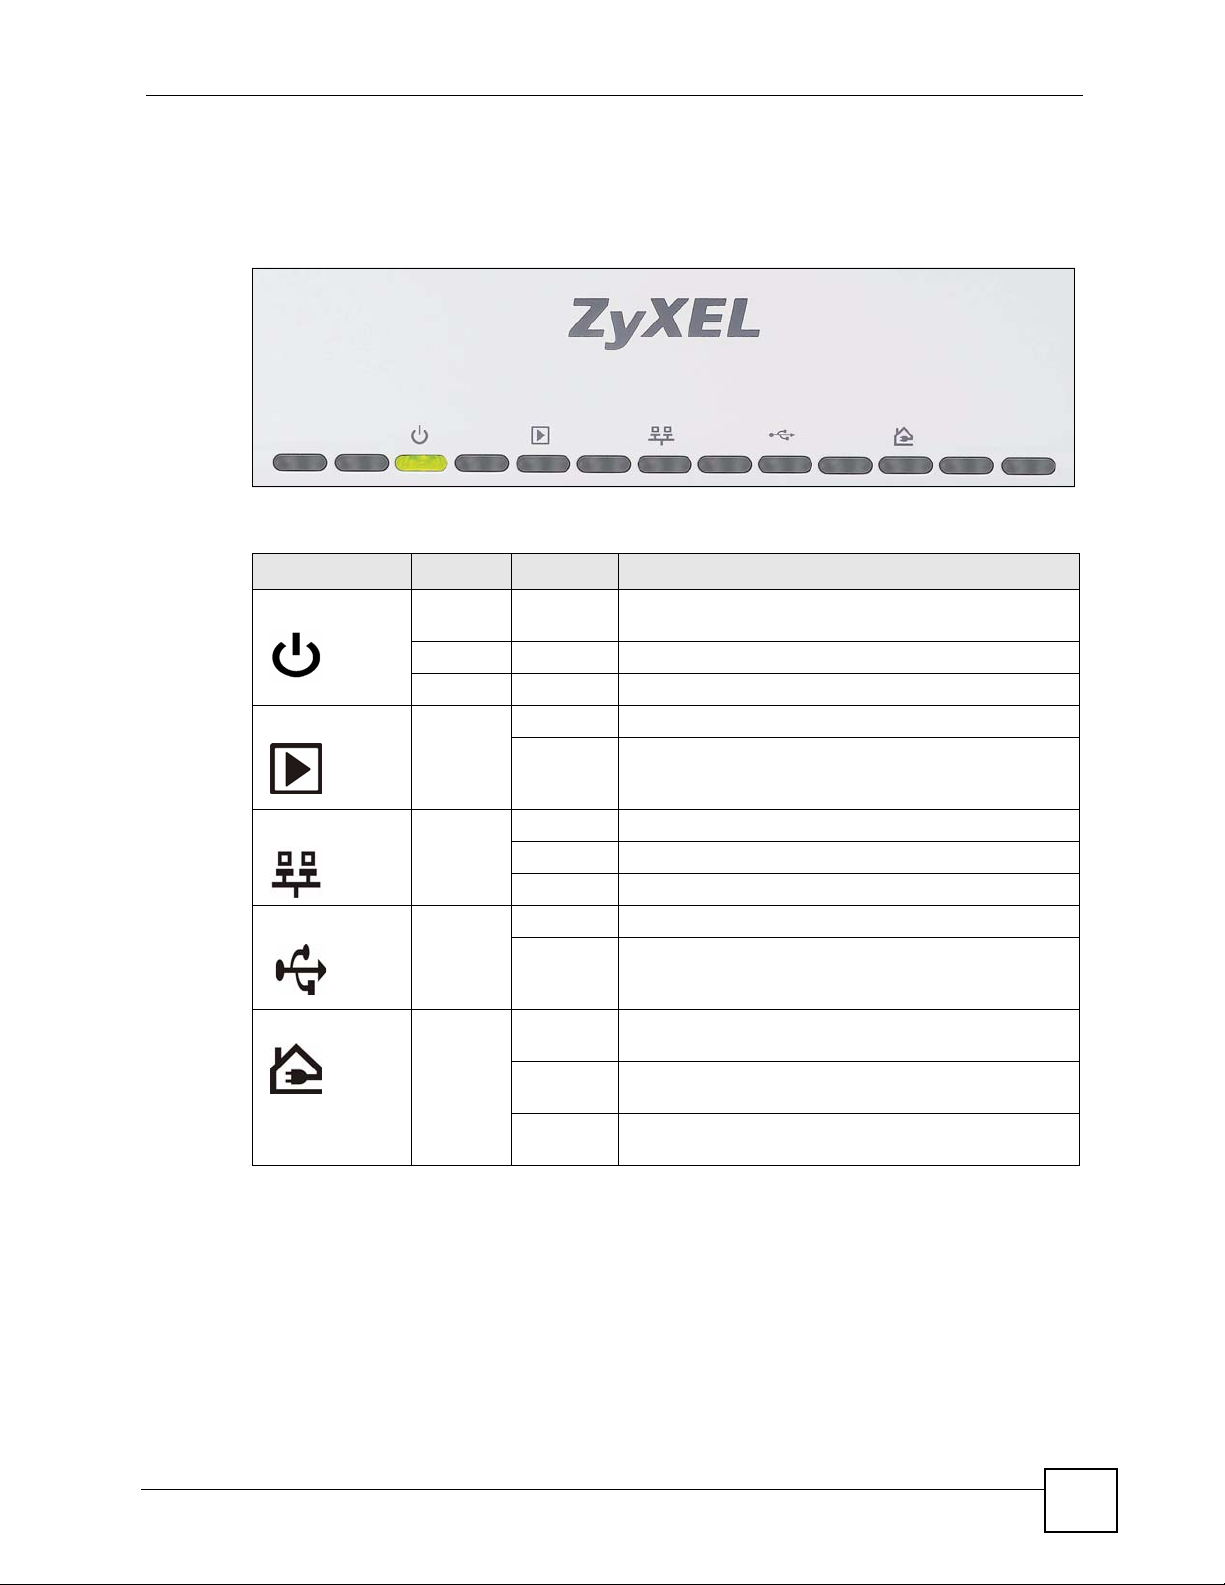
2.3 LEDs
The LEDs (lights) tell you about the current status of the DMA.
Figure 4 LEDs
The following table describes the DMA LEDs.
Table 1 LEDs
LED COLOR STATUS DESCRIPTION
POWER Green On The DMA is receiving power and in operation mode
PLAY Blue Blinking The DMA is playing a file.
Chapter 2 Hardware
(on).
Red On The DMA is receiving power and in standby mode (off).
Off The DMA is not receiving power.
Off The DMA is not playing a file.
LAN Green On The DMA has a successful Ethernet connection.
Blinking The DMA is sending/receiving data on this port.
Off The DMA does not have a connection on this port.
USB
HomePlug Green On The DMA has a powerline connection with a HomePlug
Green On The DMA has a USB stick (or hard drive) connected.
Off The DMA does not have a USB stick connected.
AV compatible device.
Blinking The DMA is sending/receiving data on its powerline
connection.
Off The DMA does not have a powerline connection with a
HomePlug AV compatible device.
DMA-1100P User’s Guide
27
Page 28

Chapter 2 Hardware
28
DMA-1100P User’s Guide
Page 29

PART II
Using the DMA
DMA Menus (31)
VIDEO Menu (39)
MUSIC Menu (43)
PHOTO Menu (49)
Favorites (Playlists) (53)
SERVER Menu (57)
USB Menu (61)
29
Page 30

30
Page 31

CHAPTER 3
DMA Menus
This chapter introduces the DMA’s menus and how to navigate them.
3.1 Menus Overview
The DMA uses menus that display on your television screen. The HOME menu is the first
menu you see when you turn on the DMA.
Figure 5 HOME Menu
This table describes the HOME menu.
Table 2 Menus Summary
MENU DESCRIPTION
DMA-1100P User’s Guide
This menu shows video files on the media server you are accessing. Video files on a
USB stick that you add to a favorites folder also display here. See Chapter 4 on page 39
for details.
This menu shows music files on the media server you are accessing. Music files on a
USB stick that you add to a favorites folder also display here. See Chapter 5 on page 43
for details.
31
Page 32

Chapter 3 DMA Menus
Table 2 Menus Summary
MENU DESCRIPTION
This menu shows photos on the media server you are accessing. Photos on a USB stick
that you add to a favorites folder also display here. See Chapter 6 on page 49 for
details.
Select a media server with content files that you want to play. See Chapter 8 on page 57
for details.
This menu displays the files on an attached USB device. See Chapter 9 on page 61 for
details.
Use this menu to change the DMA’s settings. See Chapter 10 on page 65 for details.
This is the number of media servers the DMA has detected. If it is two or more, use the
SERVER menu to select the one you want to use. See Section 8.2 on page 57 for
details.
3.2 Menu Navigation
Use the remote control’s OK, BACK and arrow buttons to go through the menus, configure
the DMA and play your files.
" Use the remote control’s arrow and OK buttons to select fields and field
options.
32
DMA-1100P User’s Guide
Page 33

3.3 VIDEO, MUSIC and PHOTO Menus
The VIDEO, MUSIC and PHOTO menus work in a similar way. (The specific features of the
VIDEO, MUSIC and PHOTO menus are described in the VIDEO, MUSIC and PHOTO
chapters in this User’s Guide.) The VIDEO menu is shown below as an example.
Figure 6 Main Menu Description
A
Chapter 3 DMA Menus
B
C
This table describes the main VIDEO, MUSIC and PHOTO menus.
Table 3 Main Menu Description
AREA DESCRIPTION
A This is a list of the file folders. The currently selected item is white. The arrows show that
B This shows which remote control buttons to use in the menu. For example, in this menu,
C This displays the number of the selected menu item followed by the total number of
you can move up or down in the menu.
The DMA categorizes files into album, artist and genre folders according to the
information stored in your files. Files may not appear in the proper folders if they have
missing, incorrect or incomplete information.
Album - Search for videos, music or photos by album (VIDEO, MUSIC and PHOTO
folders).
Artist - Search for music by artist (MUSIC folder only).
Genre - Search for videos or music by genre (VIDEO and MUSIC folders).
All Music / All Videos / All Photos - All of the menu’s files display here.
Favorites - This section contains folders of the files you have marked as favorites. You
can use a favorites folder to have the DMA play the entire list of files (this is also known
as a playlist).
use the remote control’s arrow and OK buttons to select a folder to see the files sorted
by that criteria. Or use the BACK button to go up in the menu structure (return to the
HOME screen).
items. In this example menu, the first of four items is selected.
DMA-1100P User’s Guide
33
Page 34

Chapter 3 DMA Menus
3.4 VIDEO, MUSIC and PHOTO File Folders
This section describes a file folder menu of videos, music or photos.
Select a folder (or sub-folder, if that is where your files are) in the VIDEO, MUSIC or
PHOTO menus and click OK to reach a list of files. The file folder menu displays.
The VIDEO > All V ideos menu is shown as an example. The MUSIC and PHOTO menu file
folders work the same way.
Figure 7 File Folder Menu Description
B
A
This table describes a VIDEO file folder menu. MUSIC and PHOTO file folders have similar
features.
Table 4 File Folder Menu Description
AREA DESCRIPTION
A Details about the currently selected file.
TITLE - The name of the file.
ARTIST - The name of the artist (MUSIC folder only).
ALBUM - Which album the file belongs to.
DATE - The date the file was created (or last modified).
DURA TION - The play time of the file in hours:minutes:seconds.
SERVER - The name of the media server where the file is located.
B This is a list of files in your file folder.
3.5 The TOOL Button
Use the TOOL button on your remote to set how you view files in the VIDEO, MUSIC and
PHOTO menus and file folders. See the VIDEO, MUSIC and PHOTO sections for
information on using the TOOL button while playing back files.
34
DMA-1100P User’s Guide
Page 35

3.5.1 VIDEO, MUSIC and PHOTO Menus: TOOL
In the VIDEO, MUSIC or PHOTO menus, select TOOL > Change View to view files as a
list and/or as thumbnails.
Figure 8 VIDEO: TOOL > Change View
Chapter 3 DMA Menus
3.5.2 Using the TOOL Menu From a File Album
In a VIDEO, MUSIC or PHOTO album, use the remote’s TOOL button to set up file
options.
Figure 9 VIDEO > File Album: TOOL
DMA-1100P User’s Guide
35
Page 36

Chapter 3 DMA Menus
The following table describes the options in this menu.
Table 5 VIDEO > File Album: TOOL
LABEL DESCRIPTION
Add Favorite Use this to add the photo to a favorite photos list.
Change View Use this to select how the files display in the favorites menu. You can have them
Sorting Use sorting to set whether the files display in ascending or descending order
Filtering Use the filter to search for files by title (or part of a title). After you select this
Continuous
Playback
Slideshow
Settings
Detailed
Information
View Current
Slideshow Music
Back Use this to exit the menu.
Note: After adding to or editing a favorites list, use the remote
control’s Power button to turn the DMA off and then back on
to save your change.
display as a List, Thumbnails, or a List with Thumbnails.
according to TITLE, GENRE, DATE,.
option and select OK, the on-screen keyboard displays (see Figure 10 on page
36). Use the on-screen keyboard to specify up to 16 characters of text that you
want to search for in the file titles.
This option is for VIDEO folders only. Select this option to replay the file without
stopping.
Use this to configure how the slideshow changes from one photo file to the next
and how long it displays each photo file. You can choose slide transition effects
such as Auto, Fade to White, Fade to Black and None. You can set the viewing
time for each photo from three seconds to one minute.
Select this option to view detailed information about the highlighted file. Not
available for music files in the file folder.
You can play music while you navigate the DMA’s menus and play photo files or
slideshows. When a music file is playing, you can use this option to go to the
music file that is playing.
3.5.3 Keyboard Input
When you use the Change Name option, you use an on-screen keyboard to edit the name.
Figure 10 Keyboard Input
36
DMA-1100P User’s Guide
Page 37

Chapter 3 DMA Menus
The following table describes the options in this menu.
Table 6 Keyboard Input
TOOL MENU DESCRIPTION
Favorite Name This is the playlist name that you are editing. Use the fields below to edit the name
Number Select this to change the text input mode to numbers. A check mark displays next
Lower Select this to change the text input mode to lower-case letters. A check mark
Upper Select this to change the text input mode to upper-case letters. A check mark
Symbol Select this to change the text input mode to symbols. A check mark displays next
Text Input
Characters
Delete Select this option and press OK to back space (delete individual characters from
Clear Select this option to delete the whole name.
Space Select this option and press OK to add a space in the name. Press the OK button
OK Select this to save your changes back to the DMA.
CANCEL Select this to exit this screen without saving your changes.
in this field.
to the selected input mode.
displays next to the selected input mode.
displays next to the selected input mode.
to the selected input mode.
Select characters from the center section of the screen to display in the name
field.
the name starting on the righ t). Pr ess the OK button once for each charact er you
want to delete.
once for each space you want to add.
DMA-1100P User’s Guide
37
Page 38

Chapter 3 DMA Menus
38
DMA-1100P User’s Guide
Page 39

CHAPTER 4
VIDEO Menu
This chapter shows how to use the VIDEO menu.
4.1 Playing a Video
The DMA automatically arranges the video files on the media server into folders in the
VIDEO menu. Here is an example of how to play a video file in the All Videos file folder.
1 Press the VIDEO button on the remote control or use the arrow and OK buttons to select
the VIDEO icon in the HOME menu.
Figure 11 VIDEO Icon
2 The Video menu opens. You can choose a video according to the Album (folder) it is in,
its Genre, All Videos, or you can choose from your Favorites.
Figure 12 VIDEO Menu
DMA-1100P User’s Guide
39
Page 40

Chapter 4 VIDEO Menu
3 Use the remote control’s arrow and OK buttons to select the All V ideos folder. A list
of videos appears.
Figure 13 VIDEO > All Videos
4 Use the remote’s arrow and OK buttons to select and play a video file.
• During playback, use the remote control’s buttons for fast forward, reverse and pause.
• Press the remote control’s INFO button to display i nformation on the screen as shown
in the following figure.
Figure 14 VIDEO Playback Information Example
AB CDE
40
DMA-1100P User’s Guide
Page 41

The following table describes the information you can display during video playback.
Table 7 VIDEO Playback Information
4.1.1 A-B
The following example use the A-B function to set the DMA to keep repeating a section of the
video starting at ten seconds into the video and ending at 30 seconds into the video.
Chapter 4 VIDEO Menu
AREA DESCRIPTION
A Current function.
BElapsed time.
C Audio (Left, Right or Stereo).
D The A-B function lets you repeat a certain section of a video or music file. This can be
useful for language learners wanting to repeat a particular word or phrase. See Section
4.1.1 on page 41 for an example.
E Repeat - Keep playing (looping) the file.
1 Play a video or music file.
2 Press A-B at 0:10. The “A-” part of the A-B icon on the screen lights up.
3 Press A-B at 0:30. The rest of the A-B icon on the screen lights up.
4 The video or music repeats playing from A to B (0:10 to 0:30).
4.1.2 Using the TOOL Menu During Video Playback
While a video file is playing, press the remote control’s TOOL button to open the TOOL
menu.
Figure 15 VIDEO > All Videos > File: TOOL
DMA-1100P User’s Guide
41
Page 42

Chapter 4 VIDEO Menu
The following table describes the options in this menu.
Table 8 VIDEO > All Videos > File: TOOL Menu
LABEL DESCRIPTION
Add Favorite Use this to add the video to a favorite videos list (which you can use as a playlist).
Time Search Select this to skip to a specific time in the video. After you select this, use the
Back Use this to exit the menu.
Note: After adding to or editing a favorites list, use the remote
control’s Power button to turn the DMA off and back on to
save your change.
arrow and OK buttons to select the HOUR and MINUTES input boxes. Then press
numbers and the OK button to enter the start time. Then use the arrow and OK
buttons to select OK.
42
DMA-1100P User’s Guide
Page 43

CHAPTER 5
MUSIC Menu
This chapter covers how to use the MUSIC menus.
5.1 MUSIC Menu
The DMA automatically arranges the music files on the media server into folders in the
MUSIC menu. Use the MUSIC menu to select music files to play.
To open the MUSIC menu, press the MUSIC button on the remote control or use the arrow
and OK buttons to select the MUSIC icon in the HOME screen.
Figure 16 MUSIC Icon
The following menu appears on your screen. You can select music according to its Album
(folder), Artist, Genre, or from All Music or your list of Favorites (see Chapter 7 on page
53). You can also play Podcasts (see Section 5.2 on page 45).
Figure 17 MUSIC Menu
DMA-1100P User’s Guide
43
Page 44

Chapter 5 MUSIC Menu
Playing music files is similar to playing video files (see Section 4.1 on p age 39 for an example
of how to play a video file).
You can also play music files while you use the DMA’s menus or play photo files or
slideshows (use the TOOL menu and the View Current Slideshow Music option to identify a
music file that is playing).
5.1.1 Using the TOOL Menu While Playing Music
You can also use the TOOL button to make adjustments while playing music.
Figure 18 MUSIC > Album > File: TOOL
The following table describes the options available.
Table 9 MUSIC > Album > File: TOOL Menu
LABEL DESCRIPTION
Add Favorite Use this to add the song to a favorite songs list (which you can use as a playlist).
Note: After adding to or editing a favorites list, use the remote
control’s Power button to turn the DMA off and back on to
save your change.
Time Search Select this to skip to a specific time in the song.
1. Use the OK button to highlight the minute box and/or the seconds box.
2. Then use the remote control to enter the time in the box you have highlighted.
3. Press the OK button on your remote control to set the start time you have
entered.
4. Then use the arrow and OK buttons to select OK in the screen.
Auto Volume
Control Strength
Back Use this to exit the menu.
Select the music playback volume. Options are None, Small, Moderate and
Strong.
44
DMA-1100P User’s Guide
Page 45

5.2 Podcast (RSS)
Podcasting is a way of publishing frequently updated audio files on the Internet. You use an
aggregator (also called a reader) to subscribe to podcasts. Subscribe to a podcast and you can
access new audio files as they are added. You usually play the content on your computer or a
portable music player like an iPod.
At the time of writing, the DMA servers as a reader for audio podcasts that use Really Simple
Syndication (RSS 2.0) and iTunes RSS feeds. Websites with an RSS feed usually display an
RSS icon (shown next). Add the podcast’s URL in the DMA’s Podcast menu to be able to
play the feed’s audio files.
Figure 19 RSS Feed Icon
5.3 Podcast Menu
Go to the Podcast menu within the MUSIC menu and press the remote control’s TOOL
button to open the TOOL menu. Use this menu to configure podcast and slideshow
settings.
Chapter 5 MUSIC Menu
Figure 20 MUSIC > Podcast: TOOL
The following table describes the items related to podcast settings.
Table 10 MUSIC > Podcast: TOOL Menu
TOOL MENU DESCRIPTION
Import You can use your computer to import a podcast URL information from your USB
memory stick. See Section 5.3.1 on page 46 for details.
Add Podcast Use this to add the URL of an RSS feed that you want to listen to. See Section
5.3.2 on page 46 for details.
DMA-1100P User’s Guide
45
Page 46

Chapter 5 MUSIC Menu
Table 10 MUSIC > Podcast: TOOL Menu
TOOL MENU DESCRIPTION
Change Podcast Do the following to edit a podcast URL entry.
1. Select a podcast URL entry in the MUSIC menu.
2. Open the TOOL menu.
3. Select Change Podcast to edit the podcast URL entry from the DMA.
Delete Podcast Do the following to remove a podcast URL entry.
1. Select a podcast entry in the MUSIC menu.
2. Open the TOOL menu.
3. Select Delete Podcast to remove the podcast entry from the DMA.
Slideshow
Settings
View Current
Slideshow Music
Back Use this to exit the menu.
Use this to configure how the slideshow changes from one photo file to the next
and how long it displays each photo file. You can choose slide transition effects
such as Auto, Fade to White, Fade to Black and None. You can set the viewing
time for each photo from three seconds to one minute.
You can play music while you navigate the DMA’s menus and play photo files or
slideshows. When a music file is playing, you can use this option to go to the
music file that is playing.
5.3.1 Importing Podcasts
You can import a song list from the iTunes Podcast website. You must have the iTunes
program installed on your computer to do this.
1 Go to the iTunes Podcast website and select a song list.
2 Export the song list in opml format.
3 Copy the exported file onto a USB stick. Use the root (top) level, in the USB stick. Do
not put the file in a folder.
4 Insert the USB stick into the DMA.
5 Press the remote control’s TOOL button to open the TOOLS menu.
6 Select Import.
5.3.2 Adding Podcasts
You can also add a podcast by setting the DMA to play a podcast directly from an URL.
1 From MUSIC > Podcast > TOOL select Add Podcast. The following screen appears.
46
DMA-1100P User’s Guide
Page 47

Chapter 5 MUSIC Menu
Figure 21 MUSIC > Podcast: TOOL: Add Podcast
Use arrows to make sure the URL field is highlighted, then press OK on your remote. use the
following screen to input the correct URL for your podcast.
Figure 22 MUSIC > Podcast: TOOL: Add Podcast: Keyboard Input.
See Section 3.5.3 on page 36 for information on how to use the on-screen keyboard.
DMA-1100P User’s Guide
47
Page 48

Chapter 5 MUSIC Menu
48
DMA-1100P User’s Guide
Page 49

CHAPTER 6
PHOTO Menu
This chapter explains how to use the PHOTO menu.
6.1 PHOTO Menu
The DMA automatically arranges the photo files on the media server into folders in the
PHOTO menu. Use the PHOTO menu to select photo files to view.
To open the PHOTO menu, press the PHOTO button on the remote control or use the arrow
and OK buttons to select the PHOTO icon in the HOME screen.
Figure 23 PHOTO Icon
The following menu appears on your screen.
Figure 24 PHOTO Menu
DMA-1100P User’s Guide
49
Page 50

Chapter 6 PHOTO Menu
6.2 Organizing Your Photos
The DMA automatically organizes your files by album according to their filenames and the
folders in which they are stored.
• You can use your computer to arrange your photo files in folders to make them easier to
browse.
• You can also use the TOOL menu to add photo files to favorites folders in the DMA to
make them easier to find (see Section 7.4 on page 55 for details).
• You can use the TOOL menu from within an album to change the way you view photo
files.
•Use Change View to view photos as a list and/or as thumbnails.
•Use Sorting to specify how files are ordered. You can order them according to title
and date, in ascending or descending order.
•Use Filter to search for a file name.
Figure 25 PHOTO > Album: TOOL
6.3 Slideshow
Start a slideshow from within a PHOTO album (you may have to click through your folders
more than once to reach your photos) by using the arrow buttons to choose a photo and then
pressing the Play button. The photos display in clockwise order starting from the selected
photo.
• During a slideshow, use the Previous, Play, Next, Stop, and Pause buttons to control the
file playback.
• Press the ROTATE or Fast Forward button to rotate a photo 90 degrees clockwise.
• Use the Reverse button to rotate the photo 90 degrees counter-clockwise.
50
DMA-1100P User’s Guide
Page 51

6.3.1 Configuring Slideshow Settings
During a slideshow, or in a photo album, press the remote’s TOOL button to open the TOOL
menu to configure the slideshow’s settings.
Figure 26 PHOTO > Album > File: TOOL
Chapter 6 PHOTO Menu
The following table describes the options in this menu.
Table 11 PHOTO > Album > File: TOOL
LABEL DESCRIPTION
Add Favorite Use this to add the photo to a favorite photos list.
Note: After adding to or editing a favorites list, use the remote
control’s Power button to turn the DMA off and back on to
save your change.
Slideshow Music
Settings
Slideshow
Settings
Back Use this to exit the menu.
Select this to choose a music playlist (favorites list) to play during the slideshow.
Use this to set how the slideshow changes from one photo file to the next and how
long it displays each photo file. You can choose slide transition effects such as
Auto, Fade to White, Fade to Black and None. You can set the viewing time for
each photo from three seconds to one minute.
DMA-1100P User’s Guide
51
Page 52

Chapter 6 PHOTO Menu
52
DMA-1100P User’s Guide
Page 53

CHAPTER 7
Favorites (Playlists)
This chapter introduces the DMA’s favorites feature.
7.1 Favorites (Playlists) Introduction
You can have the DMA play video, music and photo files in a favorites folder. This is also
known as a playlist.
• See Section 7.2 on page 53 for how to add files to favorites folders.
• See Section 7.3 on page 54 for how to edit a favorites folder.
• See Section 7.4 on page 55 for how to play a favorites folder.
7.2 Adding a File to a Favorites Folder
You can add video, music or photo files to favorites folders during playback.
1 While playing a file press the TOOL button.
2 Select Add Favorite and click OK on your remote control.
3 Select a Favorite group to add your file to and click OK on the on-screen menu.
Figure 27 Adding a Favorite Example.
DMA-1100P User’s Guide
53
Page 54

Chapter 7 Favorites (Playlists)
7.3 Editing a Favorites Folder
You can edit a favorites folder from within Favorites or from within the favorites folder you
wish to edit.
7.3.1 Changing the Name of a Favorite Folder
From Favorites you can use the TOOL button to edit a playlist name.
1 From within Favorites, press the remote’s TOOL butto n to open the TOOL menu.
2 Select Change Name.
3 The Change Name screen appears. Select the highlighted name field and click OK on
your remote control.
4 Use the Keyboard Input screen to input a new name for your favorites folder.
Figure 28 Favorites: TOOL Menu
54
The following table describes the options in this menu.
Table 12 Favorite > TOOL Menu
TOOL MENU DESCRIPTION
Change View Use this to select how the files display in the favorites menu. You can have them
display as a list, thumbnails, or a list with thumbnails.
Change Name Use this to change the name of the currently selected playlist. After you select
Slideshow
Settings
View Current
Slideshow Music
Back Use this to exit the menu.
Change Name, select the folder’s name and press OK to use an on-screen
keyboard to edit the name. See Section 3.5.3 on page 36 for how to use the
software keyboard. You can enter up to 21 characters.
Use this to configure how a slideshow changes from one photo file to the next and
how long it displays each photo file.
You can play music while you navigate the DMA’s menus and play photo files or
slideshows. When a music file is playing, you can use this option to go to the
music file that is playing.
DMA-1100P User’s Guide
Page 55

7.3.2 Changing the Contents of a Favorites Folder
You can also move and remove files from a favorites folder.
In Favorites, open a favorites folder and click the TOOL button to display the following
screen.
Figure 29 Favorites > Favorite folder: TOOL Menu
Chapter 7 Favorites (Playlists)
The following table describes the options in this menu.
Table 13 Favorites > Favorite folder: TOOL Menu
TOOL MENU DESCRIPTION
Change View Use this to select how the files display in the favorites menu. You can have them
Move Use this to move a file from a source location to a destination location.
Remove from
Favorites
Slideshow
Settings
Detailed
Information
View Current
Slideshow Music
Back Use this to exit the menu.
display as a list, thumbnails, or a list with thumbnails.
Use this to delete the currently selected file from the playlist.
Use this to configure how a slideshow changes from one photo file to the next and
how long it displays each photo file.
Use this to view details about the currently selected file.
You can play music while you navigate the DMA’s menus and play photo files or
slideshows. When a music file is playing, you can use this option to go to the
music file that is playing.
7.4 Favorites Playback
In the Favorites folder, select a favorites folder (playlist) and press OK to go to that list.
• Press Play to start playing the play list.
• Select a file and press OK to play the individual file.
DMA-1100P User’s Guide
55
Page 56

Chapter 7 Favorites (Playlists)
56
DMA-1100P User’s Guide
Page 57

CHAPTER 8
SERVER Menu
This chapter covers how to use the SERVER menu.
8.1 Accessing the SERVER Menu
If you have content files stored on more than one media server, use the SERVER menu to
select the one you want to use.
To open the SERVER menu:
• Press the SERVER button on the remote control.
or
•From the HOME menu, use the remote control’s arrow and OK buttons to select the
SERVER icon.
Figure 30 SERVER Icon
8.2 SERVER Menu
After you are in the SERVER menu, use the remote control’s arrow and OK buttons to select
the media server you want to use.
DMA-1100P User’s Guide
57
Page 58

Chapter 8 SERVER Menu
Figure 31 SERVER Menu > Server
After successfully connecting to a media server, the following screen displays.
Figure 32 SERVER Menu
Use the remote control to navigate to the files you want to play (or use the main menus to do
so).
You can click on User Files to display the shared folders on your computer.
58
DMA-1100P User’s Guide
Page 59

Figure 33 SERVER > User Files
Chapter 8 SERVER Menu
DMA-1100P User’s Guide
59
Page 60

Chapter 8 SERVER Menu
60
DMA-1100P User’s Guide
Page 61

CHAPTER 9
USB Menu
This chapter covers how to use the USB menu.
9.1 USB Menu
Use the USB menu to browse the contents stored on a USB device connected to the DMA such
as a USB memory stick or USB hard drive.
To open the USB menu:
• Press the USB button on the remote control.
or
• Use the arrow and OK buttons to select the USB icon in the HOME menu.
Figure 34 USB Icon
The USB menu displays your USB devices. Select a USB device to browse through its folders
for files to play. The USB device’s folders and files may just display automatically if this is the
same USB device that the DMA last accessed.
DMA-1100P User’s Guide
61
Page 62

Chapter 9 USB Menu
62
DMA-1100P User’s Guide
Page 63

PART III
DMA Setup and
Troubleshooting
Configuring the DMA (65)
Media Server Software (81)
The ENCRYPT Button (83)
Troubleshooting (87)
63
Page 64

64
Page 65

CHAPTER 10
Configuring the DMA
This chapter explains how you use the remote control to configure the DMA.
10.1 Accessing the OPTION Menu
Use the OPTION menu to configure the DMA.
Figure 35 OPTION Icon
1 To open the OPTION menu, press the OPTION button on the remote control or use the
arrow and OK buttons to select the OPTION icon in the HOME screen.
Figure 36 OPTION Menu
DMA-1100P User’s Guide
65
Page 66

Chapter 10 Configuring the DMA
2 Use the remote’s arrow and OK buttons to select an option sub-menu to configure.
10.2 HomePlug Settings
You can use your existing home electrical wiring to connect the DMA to a computer (or file
storage device) directly, through your wired home network, or through a powerline HomePlug
AV network.
" Powerline refers to the wiring you can use to connect devices such as your
computer on a network. HomePlug refers to the network standards which are
used for this kind of networking. The DMA uses HomePlug AV, which is one
kind of HomePlug standard used for powerline networks.
10.2.1 Connecting to a Single Computer with HomePlug
Follow the instructions below to connect your DMA to a single computer (or other file storage
device) with powerline.
1 Connect your DMA directly to a power outlet.
2 You will need to use a powerline adapter such as ZyXEL’s PLA-400 (A) to connect your
computer to a power outlet.
Figure 37 Connect Directly to a Computer with Powerline
A
66
3 Set a new Network name on your powerline adapter. This is also known as the network
password, NMK or Network Membership Key. Follow the instructions that came with
your ZyXEL powerline adapter on setting the Network name.
DMA-1100P User’s Guide
Page 67

Chapter 10 Configuring the DMA
4 Then change Network name the Go to OPTION > Powerlin e on your DMA’s onscreen
menu. The screen shown below displays.
5 Click OK with your remote control when the Network name field is highlighted, as
shown in the screen below.
Figure 38 Option > Homeplug Settings: NMK Setup
6 The Keyboard Input screen appears. See Figure 10 on page 36 for instructions on how
to use this screen.
7 Enter the same Network name that you set on your computer’s powerline adapter.
Figure 39 OPTION > Homeplug Settings: Keyboard Input
DMA-1100P User’s Guide
67
Page 68

Chapter 10 Configuring the DMA
" HomePlugAV is the default Network name. For better security choose a
secure password for your powerline connection.
10.2.2 Connecting to a Wired Home Network with Powerline
You can also connect your DMA to your home wired network.
1 Connect your DMA directly to a power outlet.
2 Connect the router on your network (A) to a powerline adapter such as ZyXEL’s PLA-
400 (B) using an Ethernet cable.
If your router already has a powerline feature, you can connect your router directly to a
power outlet without using a powerline adapter.
3 Follow the instructions given above for setting the Network name on both your router’s
powerline adapter and your DMA.
Figure 40 Connect to a Computer on Your Home (wired) Network
10.3 Network Settings
The DMA needs an IP address to communicate with the media servers on your network. The
DMA can get an IP address automatically if you have a device on your network that gives
them out. Or you can assign the DMA a static (fixed) IP address.
A
A
B
68
DMA-1100P User’s Guide
Page 69

10.3.1 DNS Server Address
A DNS (Domain Name System) server maps domain names (like www.zyxel.com) to their
corresponding IP addresses (204.217.0.2 in the case of www.zyxel.com). This lets you use
domain names to access web sites without having to know their IP addresses. The DMA can
receive the IP address of a DNS server automatically (along with the DMA’s own IP address).
You can also manually enter a DNS server IP address in the DMA.
10.3.2 MAC Address
Every Ethernet device has a unique MAC (Media Access Control) address. The MAC address
is assigned at the factory and consists of six pairs of hexadecimal characters, for example,
00:A0:C5:00:00:02.
10.4 Network Settings Menu
Use this menu to configure your DMA’s settings for connecting to your wired Ethernet
network.
Chapter 10 Configuring the DMA
Select OPTION > Network Settings to open the following menu.
Figure 41 OPTION > Network Settings
10.5 Wired LAN Settings
Use this menu to configure the DMA’s wired LAN settings.
DMA-1100P User’s Guide
69
Page 70

Chapter 10 Configuring the DMA
Figure 42 OPTION > Network Settings > Wired LAN Settings
The following table describes the fields in this menu.
Table 14 OPTION > Network Settings
LABEL DESCRIPTION
Get IP Address Use the arrow and OK buttons to select this field. Then use the arrow and OK
buttons to select an option.
Select YES to have the DMA get IP address information automatically.
If no IP address information is assigned, the DMA uses Auto-IP to assign itself an
IP address and subnet mask. For example, you could connect the DMA directly to
your media server computer. If the computer is also set to get an IP address
automatically, the computer and the DMA will choose addresses for themselves
and be able to communicate.
Select NO if you want to assign the DMA a static (fixed) IP address.
IP Address Enter the IP address in this field if you selected NO in the Get IP Address field.
Subnet Mask Enter the IP subnet mask in this field if you selected NO in the Get IP Address
Default gateway Enter the gateway IP address in this field if you selected NO in the Get IP Address
DNS server Enter the DNS server IP address (if your ISP gave you one) in this field if you
MAC Address This field displays the MAC address of the DMA. The MAC (Media Access Control)
OK Select this to save your changes back to the DMA.
CANCEL Select this to exit this screen without saving your changes.
field.
field.
selected NO in the Get IP Address field.
or Ethernet address on a LAN (Local Area Network) is unique to your computer (six
pairs of hexadecimal notation).
A network interface card such as an Ethernet adapter has a hardwired address that
is assigned at the factory. This address follows an industry standard that ensures
no other adapter has a similar address.
70
DMA-1100P User’s Guide
Page 71

10.6 Video Modes
The DMA supports 480i, 480p, 720p and 1080i video modes. 720p and 1080i are high
definition television modes. 480i is used with most standard definition televisions. The
number (“1080” for instance) stands for the number of lines of vertical resolution. The letter
“i” stands for interlaced scan. The letter “p” stands for progressive scan. Progressive scan
provides higher picture quality than interlaced but requires twice the bandwidth.
10.7 TV Settings
Use this menu to configure the video output that the DMA sends to your television.
Select OPTION > TV Settings to open the following menu.
Figure 43 OPTION > TV Settings
Chapter 10 Configuring the DMA
The following table describes the fields in this menu.
Table 15 OPTION > TV Settings
LABEL DESCRIPTION
Output Type Select Digital if your television accepts digital input.
Screen Size Select 16:9 if your television supports the 16:9 format (widescreen).
Resolution Select a video mode. Use the highest number that your television supports.
OK Select this to save your changes back to the DMA.
CANCEL Select this to exit this screen without saving your changes.
DMA-1100P User’s Guide
Select Analog if your television only accepts analog input.
Select 4:3 if your television supports the 4:3 format (traditional television).
Select from 480i, 480p, 720p and 1080i.
You can also select Auto when the Output Type is set to Digital.
71
Page 72

Chapter 10 Configuring the DMA
10.8 Audio Settings
" The DMA only provides 2 channel (stereo) output. When the DMA plays 5.1
channel files, it downmixes the analog or digital input and provides 2 channel
(stereo) analog or digital output.
Use this menu to configure the DMA’s audio output for music playback. You can turn the S/
PDIF connector’s output (the DMA’s digital output) on or off for individual audio formats.
The analog output is always on. You can also select how much volume smoothing you want
during audio file playback.
See Section 10.8.1 on page 73 for details on the individual audio formats.
Select OPTION > Audio Output Settings to open the following menu.
Figure 44 OPTION > Audio Output Settings
72
The following table describes the fields in this menu.
Table 16 OPTION > Audio Output Settings
LABEL DESCRIPTION
Analog Output The DMA sends two channel (also called left and right or stereo) audio output
through the LEFT and RIGHT audio connectors for music files.
S/PDIF Output Use this column to turn the S/PDIF connector’s output (the DMA’s digital output) on
or off for individual audio formats.
AAC Select whether or not the DMA sends digital audio output through the S/PDIF audio
connector for AAC music files.
Select LPCM to turn on the channel digital output (also called left and right or
stereo) for AAC music files.
Select OFF to turn off the digital output for AAC music files.
DMA-1100P User’s Guide
Page 73

Chapter 10 Configuring the DMA
Table 16 OPTION > Audio Output Settings (continued)
LABEL DESCRIPTION
Dolby Digital Select whether or not the DMA sends digital audio output through the S/PDIF audio
connector for Dolby Digital music files.
Select LPCM to turn on the channel digital output (also called left and right or
stereo) for Dolby Digital music files.
Select OFF to turn off the digital output for Dolby Digital music files.
WMA Select whether or not the DMA sends digital audio output through the S/PDIF audio
connector for WMA music files.
Select LPCM to turn on the channel digital output (also called left and right or
stereo) for WMA music files.
Select OFF to turn off the digital output for WMA music files.
Auto Volume
Control Strength
OK Select this to save your changes back to the DMA.
CANCEL Select this to exit this screen without saving your changes.
Automatic volume control averages the volume during music playback to help
smooth out the sound level. Select the amount of volume smoothing you want for
music playback.
None provides no volume smoothing.
Small provides a low degree of volume smoothing.
Moderate provides some volume smoothing.
Strong provides the greatest degree of volume smoothing.
10.8.1 Audio Formats
This section provides background information on audio formats mentioned in the previous
section.
10.8.1.1 S/PDIF
S/PDIF (Sony/Philips Digital Interface Format) is also IEC 958 type II, part of IEC-60958. S/
PDIF is a collection of low-level protocol and hardware specifications for carrying digital
audio signals between devices and stereo equipment.
10.8.1.2 AAC
AAC (Advanced Audio Coding) is a standardized digital audio compression method. Sony,
AT&T, Dolby, Nokia, Fraunhofer (FhG) and other companies coop erated to deve lop AAC to
provide improved performance compared to MP3 (MPEG-1 Audio Layer 3). Various products
including Apple’s iTunes and iPod, the Sony PlayStation 3 and many cell phones support
AAC playback. AAC has been promoted as the successor to MP3 although at the time of
writing, MP3 still remains popular. AAC is also known as MPEG-4 AAC because it is
included in the Moving Pictures Experts Group (MPEG) MPEG-4 standard.
10.8.1.3 Dolby Digital
Dolby Digital is one of several audio compression technologies (codecs) produced by Dolby
Laboratories.
Dolby Digital (also called AC-3) is the most common version. It contains up to six discrete
channels of sound. Five channels for normal-range speakers (right front, center, left front,
right rear and left rear) and one channel for the subwoofer. This is often abbreviated as 5.1.
The Dolby Digital format also supports mono and ster e o us ag e.
DMA-1100P User’s Guide
73
Page 74

Chapter 10 Configuring the DMA
Dolby Digital is also known as DD, DD 5.1, Dolby Surround AC-3 Digital, Dolby Stereo
Digital, Dolby SR-Digital, SR-D, Adaptive Transform Coder 3, AC-3, Audio Codec 3,
Advanced Codec 3, Acoustic Coder 3, ATSC A/52, and ATSC A/52 Rev. B.
10.8.1.4 WMA
WMA (Windows Media Audio) is Microsoft’s proprietary audio compression format.
Although WMA has not been nearly as popular as MP3, WMA Pro is part of Microsoft's
Windows Media framework and is positioned as a competitor to AAC. Many consumer
devices and media players support the playback of WMA files.
10.8.1.5 LPCM
LPCM (Linear Pulse Code Modulation is a method for digitally encoding audio information.
In LPCM an audio waveform is represented by a sequence of amplitude values recorded at a
sequence of times. LPCM most commonly supports two audio channels (stereo).
10.9 Language Settings
Use this menu to select the language that the DMA menus use.
Select OPTION > Language Settings to open the following menu.
Figure 45 OPTION > Language Settings
The following table describes the fields in this menu.
Table 17 OPTION > Language Settings
LABEL DESCRIPTION
Language
Settings
OK Select this to save your changes back to the DMA.
CANCEL Select this to exit this screen without saving your changes.
Select the language that you want the DMA menus to use.
A check mark appears next to the current display language.
74
DMA-1100P User’s Guide
Page 75

10.10 Settings For Ease of Use
Use this menu to configure settings that control the DMA’s operation.
Select OPTION > Settings for Ease of Use to open the following menu.
Figure 46 OPTION > Settings for Ease of Use
Chapter 10 Configuring the DMA
The following table describes the fields in this menu.
Table 18 OPTION > Settings for Ease of Use
LABEL DESCRIPTION
Connect to last
accessed server
automatically
Connect to single
server/USB
automatically
Resume last
screen from
standby
Sound effect Set how loud you want the DMA to beep when you press buttons on the remote
OK Select this to save your changes back to the DMA.
CANCEL Select this to exit this screen without saving your changes.
When the DMA starts up, this option has it automatically connect to the media
server that you last used.
A check mark appears next to the option if it is selected.
When the DMA starts up, this option has it automatically connect to the media
server or USB device that you last used.
A check mark appears next to the option if it is selected.
If you were playing a file when you turned off the DMA, this option has the DMA
automatically continue playback from where you left off when you turn the DMA
back on.
A check mark appears next to the option if it is selected.
control.
10.11 Reset Settings
Use this menu to set the DMA back to the factory default settings.
DMA-1100P User’s Guide
75
Page 76

Chapter 10 Configuring the DMA
V You will lose all of your changes when you reset to the default settings.
Select OPTION > Reset Settings to open the following menu.
Figure 47 OPTION > Reset Settings
The following table describes the fields in this menu.
Table 19 OPTION > Reset Settings
LABEL DESCRIPTION
RESET Select this to restore all of the DMA’s settings to the factory defaults.
CANCEL Select this to exit this screen without saving your changes.
10.12 Registration Code
Use this menu to display information about the DivX VOD Registration Code
76
DMA-1100P User’s Guide
Page 77

Figure 48 OPTION > DivX Registration Code.
Chapter 10 Configuring the DMA
10.13 Software Update
Use this menu to upload new software to the DMA.
1 Only use software for your device’s specific model. Refer to the label on the
bottom of your DMA.
Select OPTION > Software Update to open the following menu.
DMA-1100P User’s Guide
77
Page 78

Chapter 10 Configuring the DMA
Figure 49 OPTION > Software Update
The following table describes the fields in this menu.
Table 20 OPTION > Software Update
LABEL DESCRIPTION
Update over
Internet
Update from USB Select this option and follow the on-screen instructions to have the DMA download
OK Select this to save your changes back to the DMA.
CANCEL Select this to exit this screen without saving your changes.
Select this option and follow the on-screen instructions to have the DMA check for
and download new software from a server. The DMA must be connected to the
Internet in order to do this.
A check mark appears next to the option if it is selected.
new software from a USB stick. You must first download the software file, unzip it
and put the folder on a USB stick. Find software at www.zyxel.com in a file that
(usually) uses the system model name with a .bin extension, for example, "DMA-
1 100P.bin".
A check mark appears next to the option if it is selected.
1 Do not turn off the DMA while software upload is in progress!
The upload process may take up to two minutes. After a successful upload, the system will
reboot. See Section 10.14 on page 78 for how to check the software version to know if the new
software upload was successful.
10.14 Device Information
Use this menu to display information about the DMA.
Select OPTION > Device Information to open the following menu.
78
DMA-1100P User’s Guide
Page 79

Figure 50 OPTION > Device Information
Chapter 10 Configuring the DMA
The following table describes the fields in this menu.
Table 21 OPTION > Device Information
LABEL DESCRIPTION
Device Name This is the name of the series to which your device belongs.
Version This is the version of the software currently on the DMA. See Section 10.13 on
page 77 for how to update software when there is a new version.
Wired LAN MAC
Address
OK Select this to exit this screen.
This field displays the MAC address of the DMA’s wired Ethernet interface.
10.15 Screen Saver
The DMA automatically displays a screen saver when it is on and you are not using it. Press
any button on the remote control to return to the normal screens.
DMA-1100P User’s Guide
79
Page 80

Chapter 10 Configuring the DMA
80
DMA-1100P User’s Guide
Page 81

CHAPTER 11
Media Server Software
This chapter introduces the media server software included on the CD.
11.1 Media Server Introduction
The DMA can play files on DLNA (Digital Living Network Alliance) compliant media
servers. The DLNA is a group of leading personal computer and electronics companies that
works to make products compatible and able to work in a home network in order to make
digital living easy and seamless. The group’s members include Nokia, Intel, Microsoft, Sony,
Motorola, Philips, Samsung, Matsushita, and Hewlett-Packard.
Install the included DLNA-compliant media server software on your Windows XP computers
to let the DMA play files stored on the computers.
• The software requires Windows XP.
• If you do not have Windows XP or do not want to install software, you can put your files
on a USB stick. The USB stick connects directly to the DMA without need of the media
server software
• You must install the media server software on each computer that you will use to share
files with the DMA.
• See the Quick Start Guide for how to install the media server software and the requirement
details.
The NSA-220 network storage appliance is also a media server.
11.2 Media Server Tool
Use the media server tool to configure the media server settings. Do one of the following to
start the media server tool.
• Click Start > All Programs > DigiOn > DiXiM Media Server Tool.
• Double-click the DiXiM icon in the system tray (see the following figure).
DMA-1100P User’s Guide
81
Page 82

Chapter 11 Media Server Software
Figure 51 Media Server Tool Icon
11.3 Configuring the Media Server Software
Refer to the Quick Start Guide and the help (Start > All Programs > DigiOn > Help) for
details on how to configure and use the media server software.
11.4 Windows Media Connect Server
Windows Media Digital Rights Management (DRM) restricts the playback of protected files
to computers which have a license key. To play a media file protected by Windows Media
DRM:
1 Play the file on the same computer you use as your media server. This unlocks the file.
2 Use Windows Media Connect, which is included in Windows Media Player 11 (or
higher), as your media server.
82
DMA-1100P User’s Guide
Page 83

CHAPTER 12
The ENCRYPT Button
Use the ENCRYPT button to automatically set up a secure powerline connection between
your powerline devices.
12.1 ENCRYPT Button Overview
The ENCRYPT button allows you to set up a secure powerline connection with other
HomePlug AV compliant powerline devices which also support the ENCRYPT feature. No
other powerline setting changes are required to connect.
You can use the ENCRYPT button to:
• set up a new powerline network
• add a powerline device to the network
• separate an existing powerline network into multiple networks
12.2 Set Up a HomePlug AV Network with ENCRYPT
You can connect a number of devices on a powerline network, but you can use the ENCRYPT
button on only two devices at a time. The DMA and PLA-400 v2 are shown below as
examples.
1 Place a powerline device close to another powerline device so you have time to set up
each one. After you set up the first powerline device, you have 120 seconds to set up the
second powerline device.
2 You can disconnect them from your computer or modem (or other networking
equipment) if you need to move them close to each other, but the powerline devices
need to be plugged into power outlets.
3 Press the ENCRYPT button at the rear of your powerline device for more than 10
seconds until the HomePlug ( ) turns off. This resets the network name to a random
value and removes your device from any network it may belong to.
4 Press the ENCRYPT button at the rear of your powerline device for 1~2 seconds.
DMA-1100P User’s Guide
83
Page 84

Chapter 12 The ENCRYPT Button
Figure 52 ENCRYPT Connection Procedure
press 2 seconds
press 2 seconds
within 2
minutes
5 Repeat step 4 in this section for the other powerline device you wish to connect. This
must be done within 120 seconds of pressing the ENCRYPT button on the DMA.Wait
for about one minute while your powerline devices connect.
V If the HomePlug ( ) lights on both powerline devices do not light up, the
powerline devices are not connected. Repeat steps 4 and 5 in this section. If
that doesn’t work, see Section 13.3 on page 91 for suggestions.
6 To add more powerline devices to your network, press the ENCRYPT button on device
C (shown below) for more than 10 seconds until the HomePlug ( ) turns off.
7 Then repeat steps 4 and 5 in this section using any powerline device (A or B) you have
connected using ENCRYPT and the powerline device you want to connect (C). You
must use the ENCRYPT button on both devices.
Figure 53 Adding More Powerline Adapters to Your Network
A
OR
AB
C
8 If you disconnected your computer or modem (or any other networking product
connected to your powerline device) in step 1 of this section, you can now reconnect
them.
This sets up your powerline network between your powerline devices.
B
84
DMA-1100P User’s Guide
Page 85

12.3 Setting Up Multiple Networks
You can use the ENCRYPT button to set up multiple powerline networks using your existing
powerline network.
For example, you have already set up a powerline network in your home (A) which accesses a
printer (B). Now you want a separate powerline network connection from your laptop to your
printer (C).
Figure 54 One Existing Powerline Network
A
Chapter 12 The ENCRYPT Button
C
B
1 Click the ENCRYPT button on (A) for more than 10 seconds until the HomePlug ( )
turns off. This disconnects (A) from (B).
2 Click the ENCRYPT button on (A) and (C) for 1~2 seconds and within two minutes of
each other.
3 Wait for roughly one minute while (A) and (C) connect.
4 Check the LEDs on both (A) and (C). When the HomePlug ( ) lights shine steadily,
the devices are connected.
Figure 55 Two Separate Powerline Networks
B
A
DMA-1100P User’s Guide
C
85
Page 86

Chapter 12 The ENCRYPT Button
Congratulations. You now have two separate powerline networks as shown above.
V If the HomePlug ( ) lights on both powerline devices do not light up, the
powerline devices are not connected. Repeat the connection process, making
certain you press the ENCRYPT buttons for the correct time and within two
minutes of each other. If that does not work see Section 13.3 on page 91 for
suggestions.
86
DMA-1100P User’s Guide
Page 87

CHAPTER 13
Troubleshooting
This chapter offers some suggestions to solve problems you might encounter. The potential
problems are divided into the following categories.
• Power, Hardware Connections, and LEDs
• DMA Usage
• Powerline Problems
13.1 Power, Hardware Connections, and LEDs
V None of the LEDs turn on.
1 Make sure the DMA is turned on.
2 Make sure you are using the power adaptor or cord included with the DMA.
3 Make sure the power adaptor or cord is connected to the DMA and plugged in to an
appropriate power source. Make sure the power source is turned on.
4 Turn the DMA off and on usin g the power switch on the rear panel (instead of the Power
button on the remote control).
5 If the problem continues, contact the vendor.
V One of the LEDs does not behave as expected.
1 Make sure you understand the normal behavior of the LED (see Section 2.3 on page 27).
2 Check the hardware connections. See the Quick Start Guide and Section 13.1 on page
87.
3 Inspect your cables for damage. Contact the vendor to replace any damaged cables.
4 Turn the DMA off and on usin g the power switch on the rear panel (instead of the Power
button on the remote control).
5 If the problem continues, contact the vendor.
DMA-1100P User’s Guide
87
Page 88

Chapter 13 Troubleshooting
13.2 DMA Usage
V I cannot see the DMA menus on the television screen.
1 Check the hardware connections, and make sure the LEDs are behaving as expected. See
the Quick Start Guide and Section 13.1 on page 87.
2 Make sure your television is set to display the DMA’s input. If you used an HDMI
connection between the television and the DMA, make sure the television input is set to
HDMI.
3 Turn the DMA off and on usin g the power switch on the rear panel (instead of the Power
button on the remote control).
4 If the problem continues, contact the vendor.
V I cannot see or access the media server folders on the television screen.
1 If the server icon in the bottom right of the screen has a 0, try turning the DMA off and
on using the power switch on the rear panel (instead of the Power button on the remote
control).
2 Check the hardware connections, and make sure the LEDs are behaving as expected. See
the Quick Start Guide and Section 13.1 on page 87.
3 Make sure the media server computer is on and has an IP address in the same subnet as
the DMA. (If you know that there are routers between your computer and the DMA, skip
this step.)
4 Check the media server program’s Published Folder and Security settings. If you have
to change these settings, turn the DMA off and on again afterwards.
5 Check the security settings of any software firewalls on the media server computer.
Make sure that any software firewalls on the media server computer are configured to
allow the DMA to access the media server. See the The DMA cannot access the media
server. If you have to change any firewall settings, turn the DMA off and on again
afterwards.
V The DMA cannot access the media server.
Make sure that any software firewalls on the media server computers are configured to allow
the DMA to access the media server.
88
The media server installation wizard can automatically configure the Windows XP firewall.
See the media server help (Start > All Prog rams > DigiOn > Help) for instructions on how to
manually configure the Windows XP firewall.
DMA-1100P User’s Guide
Page 89

Chapter 13 Troubleshooting
You need to configure any other software firewalls (like ZoneAlarm for example). Your
software firewall may automatically prompt you when it detects the DMA’s access attempts
and give you the option to allow or deny access.
Use the following information to manually configure your software firewall’s settings if the
firewall does not automatically prompt you to allow or deny access.
APPLICATION
DiXiM Media
Server
A. This file will be installed into the C:\Program Files\DigiOn\DiXiM Media Server folder by default during
the installation.
B. The DMA uses SSDP (Simple Service Discovery Protocol) to find the media server.
PROGRAM FILE
NAME
A
dmsf.exe
FUNCTION
DiXiM SSDPB Discovery
DiXiM Media Server Device 30000 TCP
DiXiM Media Server HTTP 30001 TCP
PORT
NO.
1900 UDP
PROTOC
OL
V The number of items in a list does not match the number of files in a media
server folder.
1 Files with unsupported formats or codecs may not display in the list. See Appendix A on
page 99 for details on the supported file formats and codecs.
2 You may have Windows Media Center (WMC) and the DiXiM media server on the
same computer and be sharing out the same folder. Either uninstall one of the media
servers or set them to share out different folders.
V Some of the files in my media server folder do not display in the list on the
DMA.
Files with unsupported formats or codecs may not display in the list. See Appendix A on page
99 for details on the supported file formats and codecs.
V Some of the files in my DMA’s list do not play or do not play properly.
• Files with unsupported formats or codecs may not play or may not play properly. See
Appendix A on page 99 for details on the supported file formats and codecs.
• Files which are digitally protected may not be playable. For files that have Windows
Media Digital Rights Management (DRM) protection, first play the file on the same
computer you use as your media server. This unlocks the file. Then use Windows Media
Connect, which is included in Windows Media Player 11 (or higher), as your media
server.
DMA-1100P User’s Guide
89
Page 90

Chapter 13 Troubleshooting
V Some of my photo files do not display thumbnails.
Some files do not support thumbnails and thus will not display them.
V I cannot see the files on my USB device.
1 Make sure you have the USB device properly connected to the USB port. See the Quick
Start Guide for details.
2 Files with unsupported formats or codecs may not play or may not play pr operly. See
Section on page 99 for details on the supported file formats and codecs.
3 Turn the DMA off and on usin g the power switch on the rear panel (instead of the Power
button on the remote control)
4 Try using a different USB stick.
V The A-B function does not work on some files.
Some files do not have time tags and cannot support the A-B function.
V My favorites settings were not saved.
After adding to or editing a favorites list, press the remote’s Power button to make the DMA
enter standby mode to save your change. Then press the Power button again to return to
operation mode.
V I connected the DMA to two televisions but it only displays on one.
The DMA only provides output through one connection at a time (either the HDM I connection
or the S-Video connection). Not both at the same time.
V The DMA menu display does not fill my television screen.
Check the DMA’s video output settings (see Section 10.7 on page 71).
90
DMA-1100P User’s Guide
Page 91

Chapter 13 Troubleshooting
V The content playback does not fill my television screen.
1 Check the DMA’s video output settings (see Section 10.7 on page 71).
2 The content may be a different format from your television. For example, a 4:3 format
video file will not fill the width of a 16:9 (widescreen) format television.
V The audio on my 5.1 channel speakers does not sound right or I only hear
audio from my rear left and right speakers.
When the DMA plays 5.1 channel files, it downmixes the analog or digital input and provides
2-channel (stereo) analog or digital output.
• On some 5.1 channel audio systems will only play on the rear left and right speakers.
• Some 5.1 channel audio systems can simulate the 2 channels to 5.1 channels, but the
sound will not be as good as with original 5.1 channel output.
13.3 Powerline Problems
V The HomePlug LED does not turn on.
1 Use the PLA-4xx Series Configuration Utility to detect all other ZyXEL HomePlug
AV -compliant devices on your powerline network. Make sure that the network password
is the same on all of your powerline adapters. Download the Utility from the ZyXEL
website.
2 Check the DAK and MAC address for all powerline adapters are typed correctly.
3 Make sure that all your powerline adapters are HomePlug AV compliant. Check the
package it came in or ask your vendor. This DMA can no t detect earlier versions of
HomePlug powerline adapters such as HomePlug 1.0 or 1.0.1. (Although they can
coexist on the same electrical wiring without interfering with each other.)
4 Make sure that the powerline adapters on your network are all on the same electrical
wiring. Connect another powerline adapter into an outlet close to your DMA’s power
outlet. They are probably now on the same electrical wiring. Check the Link LED. If
it now lights up your powerline adapter was probably previously on separate electrical
wiring. Ask an electrician for more information on the electrical wiring in your building.
5 If your powerline network is using coaxial cable, check all powerline adapters are on the
same coaxial cable.
6 If your powerline network is using electrical wiring (not coaxial cable), check you do not
have a power meter between powerline adapters. Powerline signals cannot pass this.
DMA-1100P User’s Guide
91
Page 92

Chapter 13 Troubleshooting
V The signal on my powerline network is weak.
1 Your powerline adapters may be connected to electrical surge protectors. Connect them
to standard power outlets.
2 Your powerline adapters may be located close to large appliances such as refrigerators or
air-conditioners that cause interference with the powerline signal. Move the adapters
further away from such appliances to reduce interference.
3 Your powerline adapters may be placed close to electrical devices such as electrical
insect-killers which produce radio waves. These may interfere with the powerline
signals. Move the adapters further away from such electrical devices.
4 Your wiring may be old and/or low quality or with a long wiring path.
13.4 ENCRYPT Button Problems
This section applies only to DMAs with the ENCRYPT button.
V The HomePlug light is already on, but I haven’t pressed the ENCRYPT button
yet.
Your device has already connected to another powerline device. Press the ENCRYPT button
for more than 10 seconds to release the connection.
V The HomePlug light does not turn on.
• Ensure you have pressed the ENCRYPT button on both devices.
• Wait for about a minute while the devices set up a connection.
• If that does not work, try again with both devices connected to a power strip next to each
other. If they now connect, then the devices were not on the same electrical circuit before.
V The POWER lights on both devices finished blinking, but only one device’s
HomePlug light is on.
92
One device may have connected to a third powerline device. To check device A is connected
to device B and not another device, disconnect device B from its power source. Device A’s
HomePlug ( ) light will turn off if the connection is with Device B. Press the ENCRYPT
button on both devices for more than 10 seconds, then try to reconnect, pressing the
ENCRYPT button for less than 3 seconds on both devices.
DMA-1100P User’s Guide
Page 93

Chapter 13 Troubleshooting
V I pressed the ENCRYPT button for more than 10 seconds, but the HomePlug
light is still on.
The HomePlug light is on, indicating it is still connected to another powerline device. Try
again, pressing the ENCRYPT button for more than 10 seconds.
DMA-1100P User’s Guide
93
Page 94

Chapter 13 Troubleshooting
94
DMA-1100P User’s Guide
Page 95

PART IV
Appendices and
Index
Product Specifications (97)
Setting up Your Computer’s IP Address (107)
Windows Vista Media Server (129)
Open Software Announcements (137)
Legal Information (183)
Customer Support (187)
Index (193)
95
Page 96

96
Page 97

APPENDIX A
Product Specifications
General Specifications
The following tables summarize the DMA’s hardware and software features.
Table 22 Hardware Specifications
Dimensions 244 mm (W) x 165.44 mm (D) x 38.8 mm (H)
Device Weight 0.597 kg
Power Specification 100 - 240 V AC, 50/60 Hz
Ethernet Port Auto-negotiating: 10 Mbps or 100 Mbps in either half-duplex or full-duplex
mode.
Powerline Port 1 x 200 Mbps Powerline port compliant with HomePlug AV standard
Television Connectors HDMI
Composite Video RCA connector
Left/Right Video RCA connectors
S/PDIF coaxial RCA connector
Remote Control Recommended operating range up to 5 m.
Point the remote control at the front of the DMA at an angle of no less than
30 degrees.
USB Port USB version 2.0, type A
Operation Environment Temperature: 5º C ~ 45º C
Humidity: 5% ~ 85% RH (Noncondensing)
Storage Environment Temperature: 0º C ~ 65º C
Humidity: 5% ~ 95% RH (Noncondensing)
Distance between the
centers of the holes (for
wall mounting) on the
device’s back.
Recommended type of
screws for wall-mounting
Certifications Safety: CSA C22.2 No 60950-1, UL60950-1, EN60950-1
137 mm
M4 Tap Screw, see Figure 57 on page 104.
EMC: EN55022 Class B (1988), FCC Part 15 (Class B)
DMA-1100P User’s Guide
97
Page 98

Appendix A Product Specifications
Table 23 Software Specifications
FEATURE DESCRIPTION
Default IP Address DHCP client. If no DHCP server is found, the DMA uses Auto-IP to
Default Subnet Mask DHCP client by default. If no DHCP server is fou nd, the sub net mask
Device Management Make selections and configure settings on a (television) screen using the
Software Upgrade Upload new software (when available) from the ZyXEL website.
Configuration Reset The DMA provides an option for restoring the default settings.
DHCP (Dynamic Host
Configuration Protocol)
Client
Universal Plug and Play
(UPnP)
Media Sharing DLNA compliant client.
Favorites (Playlist) Set up lists of files to play.
Audio Input Formats
Supported
Podcast RSS Feeds
Supported
Video Input Formats
Supported
Photo Input Formats
Supported
Video Output Formats Digital, analog
Audio Output Formats two channel (stereo)
choose an IP address in the 169.254.X.X subnet (where X is a number
from 1 to 254).
defa ults to 255.255.25 5.0 (24 bits).
remote control.
Use the PLA-4xx Series Configuration Utility to configure the DMA
powerline settings.
Or download the new software from the ZyXEL website and use a USB
stick to put it on the DMA.
Note: Only upload software for your specific model!
The DMA can receive IP addresses, an IP default gateway and DNS
servers via DHCP.
A UPnP-enabled device can dynamically join a network, obtain an IP
address and convey its capabilities to other devices on the network.
Dolby Digital, DVD-Audio, MPEG-1 and MPEG-2 Layers I, II and
III(MP3), MPEG-2 BC multi-channel Layers I, II and III, MPEG-2 and
MPEG-4 AAC-LC, WMA9. See page 99 for details.
RSS 2.0 and iTunes RSS
MPEG-1, MPEG-2 MP@ML, MPEG-4 simple and advanced simple
profile, MPEG-4 AVI files and WMV version 9. See page 99 for details.
TIFF, PNG, GIF, BMP, JPEG, and JPEG2000. See page 99 for details.
4:3, 16:9
480i, 480p, 720p and 1080i
98
The following list, which is not exhaustive, illustrates the standards supported in the DMA.
Table 24 Standards Supported
STANDARD DESCRIPTION
DLNA v1 Client The DLNA (Digital Living Network Alliance) group of personal computer
and electronics companies works to make products compatible and able
to work in a home network in order to make digital living easy and
seamless.
HDMI HDMI (High Definition Multimedia Interface) is an interface that allows
high quality, all-digital video and audio streams.
DMA-1100P User’s Guide
Page 99

Table 24 Standards Supported (continued)
STANDARD DESCRIPTION
USB 2.0 USB (Universal Serial Bus) version 2.0 allows for interfacing devices with
data transfers rates of up to 480 Mbps.
HomePlug AV The HomePlug A V standard specifies how network devices communicate
using standard electrical wiring.
It supports a data transfer rate of up to 200Mbps.
Data is encrypted using 128-bit AES (Advanced Encryption Standard).
HomePlug AV comp atible devices co-exist with HomePlug 1.0 devices but
do not detect each other.
The range of a HomePlug AV network is 300 meters/984 feet in optimal
conditions.
HomePlug AV is compatible with all OSs.
The maximum number of powerline devices on a single network is 64.
Windows Media Digital
Rights Management
(DRM)
This Windows standard restricts the playback of protected media to
computers holding a license key for the media file.
Supported Content Formats and Codecs
Appendix A Product Specifications
The following describes the details about the files that the DMA can play. Files with
specifications lower or higher than the listed ranges may not play or may not play properly.
For the media server software included on the CD, refer to the help (Start > All Programs >
DigiOn > Help) for a list of file formats that the media server software can play.
Video File Formats Supported
Table 25 MPEG PS Video File Specifications
Extensions mpg
Video Stream MPEG-1, MPEG-2
Audio Stream MPEG-1/2 Layer-II
mpeg
mpe
m2p
Profile Level: up to MP@HL
Resolution: Maximum 1920 x 1080
Bit rate: VBR/CBR, Maximum 15 Mbps
Sample Frequency: Maximum 48 kHz
Channels: Maximum 2 Channels
Bit rate: VBR/CBR, Maximum 384 kbps
LPCM
Sample Frequency: Maximum 48 kHz
Bits per sample: Maximum 16 bit
Channels: Maximum 2 Channels
AC3
Sample Frequency: Maximum 48 kHz
Channels: Maximum 6 Channels
Bit rate: Maximum 640 kbps
DMA-1100P User’s Guide
99
Page 100

Appendix A Product Specifications
Table 26 MPEG-2 TS/TTS Video File Specifications
Extensions The DMA supports the playback of mpeg, mpg, and mpe MPEG-2 TS
Video Stream MPEG-2
Audio Stream MPEG-1/2 Layer-II
and TTS video files. The DMA cannot play MPEG-2 TTS files from a
USB device. The DMA can play MPEG-2 TTS files shared on a media
server that supports them (although the included media server software
does not support them).
Profile Level: up to MP@HL
Resolution: Maximum 1920 x 1080
Bit rate: VBR/CBR, Maximum 25 Mbps
Sample Frequency: Maximum 48 kHz
Channels: Maximum 2 Channels
Bit rate: VBR/CBR, Maximum 448 kbps
AC3
Sample Frequency: Maximum 48 kHz
Channels: Maximum 6 Channels
Bit rate: Maximum 448 kbps
MPEG-2/4 AAC LC
Sample Frequency: Maximum 48 kHz
Channels: Maximum 6 Channels
Bit rate: VBR/CBR, Maximum 384 kbps
Table 27 WMV Video File Specifications
Extensions asf
wmv
Video Stream WMV9
Profile Level: up to MP@HL
Resolution: Maximum 1920 x 1080
Bit rate: VBR/CBR, Maximum 10 Mbps
Audio Stream WMA8
Sample Frequency: Maximum 48 kHz
Channels: Maximum 2 Channels
Bit rate: Maximum 320 kbps
WMA9, WMA9 Professional (WMA Lossless and Voice formats are not
supported.)
Sample Frequency: Maximum 48 kHz
Channels: Maximum 6 Channels
Bit rate: VBR/CBR, Maximum 768 kbps
Notes Combination of WMV HD and WMA Pro may result in frames being
dropped.
Depending on some WMV HD contents, noise may be generated in the
audio signal when starting playback or during the seek operation.
Contents with a Complex decoder complexity are not supported.
Table 28 AVI Video File Specifications
Extensions avi
100
DMA-1100P User’s Guide
 Loading...