


Default Login Details
User’s Guide
ZyWALL ATP Series
Login IP Address https://(IP assigned by NCC)
or
https://myrouter.local
or
https://192.168.1.1
User Name admin
Password 1234
Version 5.35 Edition 1, 1/2023
Copyright © 2023 Zyxel and/or its affiliates. All rights reserved.

IMPORTANT!
READ CAREFULLY BEFORE USE.
KEEP THIS GUIDE FOR FUTURE REFERENCE.
This is a User’s Guide for a series of products. Not all products support all firmware features. Screenshots
and graphics in this book may differ slightly from your product due to differences in product features or
web configurator brand style. Every effort has been made to ensure that the information in this manual
is accurate.
Note: The version number on the cover page refers to the Zyxel Device’s latest firmware
version to which this User’s Guide applies.
Related Documentation
•Quick Start Guide
The Quick Start Guide shows how to connect the Zyxel Device and access the Web Configurator
wizards. (See the wizard real time help for information on configuring each screen.) It also contains a
connection diagram and package contents list.
•CLI Reference Guide
The CLI Reference Guide explains how to use the Command-Line Interface (CLI) to configure the
Zyxel Device.
Note: It is recommended you use the Web Configurator to configure the Zyxel Device.
• Web Configurator Online Help
Click the help icon in any screen for help in configuring that screen and supplementary information.
•More Information
Go to support.zyxel.com to find other information on Zyxel Device.
ATP Series User’s Guide
2

Document Conventions
Document Conventions
Warnings and Notes
These are how warnings and notes are shown in this guide.
Warnings tell you about things that could harm you or your device.
Note: Notes tell you other important information (for example, other things you may need to
configure or helpful tips) or recommendations.
Syntax Conventions
• All models in this series may be referred to as the “Zyxel Device” in this guide.
• Product labels, screen names, field labels and field choices are all in bold font.
• A right angle bracket ( > ) within a screen name denotes a mouse click. For example, Configuration >
Network > Interface > Ethernet means you first click Configuration in the navigation panel, then
Network, then the Interface sub menu and finally the Ethernet tab to get to that screen.
Icons Used in Figures
Figures in this user guide may use the following generic icons. The Zyxel Device icon is not an exact
representation of your device.
Zyxel Device Generic Router Wireless Router / Access Point
Switch Firewall Server
Internet Network Cloud Smartphone
USB Dongle
ATP Series User’s Guide
3

Contents Overview
Contents Overview
Introduction ........................................................................................................................................... 27
Initial Setup Wizard ............................................................................................................................... 64
Hardware, Interfaces and Zones ........................................................................................................ 91
Quick Setup Wizards ........................................................................................................................... 101
Dashboard .......................................................................................................................................... 148
Monitor ................................................................................................................................................. 159
Licensing .............................................................................................................................................. 248
Interfaces ............................................................................................................................................. 256
Routing ................................................................................................................................................. 368
DDNS ................................................................................................................................................... 395
NAT ....................................................................................................................................................... 401
Redirect Service .................................................................................................................................. 419
Wireless ................................................................................................................................................. 425
ALG ....................................................................................................................................................... 475
UPnP ..................................................................................................................................................... 482
IP/MAC Binding ................................................................................................................................... 497
Layer 2 Isolation .................................................................................................................................. 502
DNS Inbound LB .................................................................................................................................. 506
IPSec VPN ............................................................................................................................................ 512
SSL VPN ................................................................................................................................................ 550
L2TP VPN .............................................................................................................................................. 556
Remote AP VPN .................................................................................................................................. 562
BWM (Bandwidth Management) ..................................................................................................568
Web Authentication .......................................................................................................................... 585
Security Policy ..................................................................................................................................... 604
Application Patrol ............................................................................................................................... 635
Content Filter ....................................................................................................................................... 644
Anti-Malware ....................................................................................................................................... 686
Reputation Filter .................................................................................................................................. 707
IPS ......................................................................................................................................................... 740
Sandboxing ......................................................................................................................................... 767
Email Security ...................................................................................................................................... 771
Collaborative Detection & Response .............................................................................................. 790
SSL Inspection ...................................................................................................................................... 804
IP Exception ......................................................................................................................................... 829
Astra Cloud Security ........................................................................................................................... 832
Object .................................................................................................................................................. 835
Device HA ........................................................................................................................................... 961
Mgmt. & Analytics ............................................................................................................................. 968
ATP Series User’s Guide
4

Contents Overview
System .................................................................................................................................................. 980
Log and Report ................................................................................................................................. 1042
File Manager ..................................................................................................................................... 1056
Diagnostics ....................................................................................................................................... 1077
Packet Flow Explore ......................................................................................................................... 1098
Shutdown ........................................................................................................................................... 1105
Troubleshooting ................................................................................................................................ 1108
ATP Series User’s Guide
5

Table of Contents
Table of Contents
Document Conventions ............................................ ............................................ .... ... .... ...................3
Contents Overview .............................................................................................................................4
Table of Contents.................................................................................................................................6
Part I: User’s Guide.......................................................................................... 26
Chapter 1
Introduction ........................................................................................................................................27
1.1 Overview ......................................................................................................................................... 27
1.1.1 Model Feature Differences .................................................................................................. 27
1.2 On Premises Mode ......................................................................................................................... 28
1.3 Nebula Mode .................................................................................................................................. 29
1.3.1 NCC Portal ............................................................................................................................. 30
1.3.2 Your Zyxel Device .................................................................................................................. 30
1.3.3 Your Email Account for ZTP .................................................................................................. 31
1.4 Change the Mode ......................................................................................................................... 31
1.4.1 From Nebula Mode to On Premises Mode ........................................................................ 31
1.4.2 From On Premises Mode to Nebula Mode ........................................................................ 32
1.5 Registration at myZyxel .................................................................................................................. 33
1.5.1 Grace Period ......................................................................................................................... 34
1.5.2 Applications ........................................................................................................................... 34
1.6 Management Overview ................................................................................................................ 37
1.7 Web Configurator ........................................................................................................................... 38
1.7.1 Web Configurator Access .................................................................................................... 38
1.7.2 Security Check for Web Interface Overview ..................................................................... 41
1.7.3 The Security Check for Web Interface Screen .................................................................. 44
1.7.4 Remote Access to the Zyxel Device Networks .................................................................. 46
1.7.5 Web Configurator Screens Overview ................................................................................. 46
1.7.6 Navigation Panel .................................................................................................................. 51
1.7.7 Tables and Lists ...................................................................................................................... 60
Chapter 2
Initial Setup Wizard.............................................................................................................................64
2.1 Initial Setup Wizard: Select Management Mode ........................................................................ 64
2.1.1 Welcome Screen .................................................................................................................. 65
2.1.2 Internet Access Setup - WAN Interface .............................................................................. 65
ATP Series User’s Guide
6

Table of Contents
2.1.3 Internet Access: Ethernet .................................................................................................... 67
2.1.4 Internet Access: PPPoE ......................................................................................................... 68
2.1.5 Internet Access: PPTP ........................................................................................................... 69
2.1.6 Internet Access: L2TP ............................................................................................................ 71
2.1.7 Internet Access Setup - Second WAN Interface ............................................................... 73
2.1.8 Internet Access: Congratulations ....................................................................................... 74
2.1.9 Date and Time Settings ........................................................................................................ 75
2.1.10 Register Device ................................................................................................................... 75
2.1.11 Activate Service .................................................................................................................. 77
2.1.12 Service Settings .................................................................................................................... 78
2.1.13 Service Settings: SecuReporter ..........................................................................................79
2.1.14 Wireless Settings: Management Mode ............................................................................. 80
2.1.15 Wireless Settings: AP Controller ......................................................................................... 81
2.1.16 Wireless Settings: SSID & Security ...................................................................................... 81
2.1.17 Remote Management ......................................................................................................82
2.2 Nebula Mode Initial Setup Wizard ................................................................................................ 83
2.2.1 Connect to Internet (WAN) ................................................................................................. 84
2.2.2 Internet Access: Ethernet ..................................................................................................... 85
2.2.3 Internet Access: PPPoE ......................................................................................................... 86
2.2.4 Internet Access: Congratulations ....................................................................................... 88
2.2.5 QR Code ................................................................................................................................ 89
Chapter 3
Hardware, Interfaces and Zones......................................................................................................91
3.1 Hardware Overview ....................................................................................................................... 91
3.1.1 Front Panels ............................................................................................................................ 91
3.1.2 Rear Panels ............................................................................................................................ 93
3.2 Installation Scenarios ..................................................................................................................... 94
3.2.1 Desktop Installation Procedure ...........................................................................................95
3.2.2 Rack-mounting ...................................................................................................................... 96
3.2.3 Wall-mounting ....................................................................................................................... 97
3.3 Default Zones, Interfaces, and Ports ............................................................................................ 98
3.4 Stopping the Zyxel Device .......................................................................................................... 100
Chapter 4
Quick Setup Wizards........................................................................................................................101
4.1 Quick Setup Overview ................................................................................................................. 101
4.2 WAN Interface Quick Setup ........................................................................................................ 102
4.2.1 Choose an Ethernet Interface ........................................................................................... 102
4.2.2 Select WAN Type ................................................................................................................. 103
4.2.3 Configure WAN IP Settings ................................................................................................. 103
4.2.4 ISP and WAN and ISP Connection Settings ...................................................................... 104
4.2.5 Quick Setup Interface Wizard: Summary ......................................................................... 107
ATP Series User’s Guide
7

Table of Contents
4.3 Remote Access VPN Setup-Scenario ......................................................................................... 108
4.3.1 IKEv2 IPSec Client- VPN Configuration ............................................................................. 109
4.3.2 IKEv2 IPSec Client- User Authentication ............................................................................ 111
4.3.3 IKEv2 IPSec Client- Summary ..............................................................................................111
4.3.4 IKEv2 IPSec Client-Config Provision ................................................................................... 112
4.3.5 L2TP over IPSec Client-VPN Configuration ....................................................................... 113
4.3.6 L2TP over IPSec Client- User Authentication .................................................................... 114
4.3.7 L2TP over IPSec Client- Summary ...................................................................................... 115
4.3.8 L2TP over IPSec Client-Config Provision ............................................................................ 116
4.4 VPN Setup Wizard ......................................................................................................................... 116
4.4.1 Welcome .............................................................................................................................. 116
4.4.2 VPN Setup Wizard: Wizard Type ........................................................................................ 117
4.4.3 VPN Express Wizard - Scenario .......................................................................................... 118
4.4.4 VPN Express Wizard - Configuration ................................................................................. 119
4.4.5 VPN Express Wizard - Summary ......................................................................................... 119
4.4.6 VPN Express Wizard - Finish ................................................................................................ 120
4.4.7 VPN Advanced Wizard - Scenario ................................................................................... 121
4.4.8 VPN Advanced Wizard - Phase 1 Settings ...................................................................... 122
4.4.9 VPN Advanced Wizard - Phase 2 ..................................................................................... 124
4.4.10 VPN Advanced Wizard - Summary ................................................................................ 125
4.4.11 VPN Advanced Wizard - Finish ....................................................................................... 127
4.5 VPN Settings for Configuration Provisioning Wizard: Wizard Type ........................................... 128
4.5.1 Configuration Provisioning Express Wizard - VPN Settings ............................................. 128
4.5.2 Configuration Provisioning VPN Express Wizard - Configuration .................................. 129
4.5.3 VPN Settings for Configuration Provisioning Express Wizard - Summary ...................... 130
4.5.4 VPN Settings for Configuration Provisioning Express Wizard - Finish .............................. 131
4.5.5 VPN Settings for Configuration Provisioning Advanced Wizard - Scenario ................. 132
4.5.6 VPN Settings for Configuration Provisioning Advanced Wizard - Phase 1 Settings .... 133
4.5.7 VPN Settings for Configuration Provisioning Advanced Wizard - Phase 2 .................. 134
4.5.8 VPN Settings for Configuration Provisioning Advanced Wizard - Summary ................ 135
4.5.9 VPN Settings for Configuration Provisioning Advanced Wizard - Finish ....................... 138
4.6 VPN Settings for L2TP VPN Settings Wizard ................................................................................. 138
4.6.1 L2TP VPN Settings ................................................................................................................ 139
4.6.2 L2TP VPN Settings ................................................................................................................ 140
4.6.3 VPN Settings for L2TP VPN Setting Wizard - Summary .................................................... 140
4.6.4 VPN Settings for L2TP VPN Setting Wizard - Completed ................................................ 142
4.7 Wireless Setup Wizard ................................................................................................................... 142
4.7.1 Management Mode ........................................................................................................... 143
4.7.2 SSID ....................................................................................................................................... 143
4.7.3 Radio .................................................................................................................................... 145
4.7.4 Summary .............................................................................................................................. 146
4.7.5 Wizard Completed ............................................................................................................. 147
ATP Series User’s Guide
8

Table of Contents
Chapter 5
Dashboard........................................................................................................................................148
5.1 Overview ....................................................................................................................................... 148
5.1.1 What You Can Do in this Chapter ..................................................................................... 148
5.2 The General Screen ..................................................................................................................... 148
5.2.1 Device Information Screen ................................................................................................150
5.2.2 System Status Screen .......................................................................................................... 151
5.2.3 Tx/Rx Statistics ...................................................................................................................... 151
5.2.4 The Latest Logs Screen ....................................................................................................... 152
5.2.5 System Resources Screen ................................................................................................... 152
5.2.6 DHCP Table Screen ............................................................................................................. 153
5.2.7 Number of Login Users Screen ........................................................................................... 154
5.2.8 Current Login User ............................................................................................................... 155
5.2.9 VPN Status ............................................................................................................................ 155
5.2.10 SSL VPN Status .................................................................................................................... 156
5.3 The Advanced Threat Protection Screen .................................................................................. 156
Part II: Technical Reference.........................................................................158
Chapter 6
Monitor..............................................................................................................................................159
6.1 Overview ....................................................................................................................................... 159
6.1.1 What You Can Do in this Chapter ..................................................................................... 159
6.2 The Port Statistics Screen ............................................................................................................ 161
6.2.1 The Port Statistics Graph Screen ....................................................................................... 162
6.3 Interface Status Screen ................................................................................................................ 163
6.4 The Traffic Statistics Screen .......................................................................................................... 167
6.5 The Session Monitor Screen ........................................................................................................ 170
6.6 The DHCP Table Screen ............................................................................................................... 172
6.7 The Device Insight Screen ........................................................................................................... 173
6.7.1 The Device Insight Edit Screen ...........................................................................................176
6.7.2 The Device Insight Feedback Screen ............................................................................... 177
6.8 The Login Users Screen ................................................................................................................. 178
6.9 IGMP Statistics ............................................................................................................................... 179
6.10 The DDNS Status Screen ............................................................................................................. 180
6.11 IP/MAC Binding ........................................................................................................................... 181
6.12 Cellular Status Screen ................................................................................................................ 181
6.12.1 More Information .............................................................................................................. 184
6.13 The UPnP Port Status Screen ..................................................................................................... 185
6.14 USB Storage Screen .................................................................................................................... 186
6.15 Ethernet Neighbor Screen ........................................................................................................ 187
ATP Series User’s Guide
9

Table of Contents
6.16 FQDN Object Screen ................................................................................................................ 188
6.17 Virtual Server Load Balancing .................................................................................................. 190
6.18 AP Information: AP List ............................................................................................................... 191
6.18.1 AP List: More Information ................................................................................................ 196
6.18.2 AP List: Edit AP ................................................................................................................... 198
6.19 AP Information: Radio List .......................................................................................................... 202
6.19.1 Radio List: More Information ............................................................................................204
6.20 AP Information: Built-in AP ........................................................................................................ 205
6.21 AP Information: Top N APs ........................................................................................................ 206
6.22 AP Information: Single AP .......................................................................................................... 207
6.23 ZyMesh ......................................................................................................................................... 208
6.24 SSID Info ....................................................................................................................................... 209
6.25 Station Info: Station List .............................................................................................................. 210
6.26 Station Info: Top N Stations ........................................................................................................ 212
6.27 Station Info: Single Station ......................................................................................................... 213
6.28 Detected Device ....................................................................................................................... 214
6.29 Wireless Health ............................................................................................................................ 216
6.30 The IPSec Screen ........................................................................................................................ 217
6.30.1 Regular Expressions in Searching IPSec SAs ................................................................... 218
6.31 The SSL Screen ............................................................................................................................. 218
6.32 The L2TP over IPSec Screen ....................................................................................................... 219
6.33 The Remote AP VPN Screen ...................................................................................................... 220
6.34 The App Patrol Screen ............................................................................................................... 221
6.35 The Content Filter Screen .......................................................................................................... 222
6.35.1 Web Content Filter ............................................................................................................ 222
6.35.2 DNS Content Filter ............................................................................................................. 224
6.36 The Anti-Malware Screen .......................................................................................................... 225
6.37 The Reputation Filter Screen ...................................................................................................... 227
6.37.1 IP Reputation ..................................................................................................................... 227
6.37.2 DNS Threat Filter ................................................................................................................. 229
6.37.3 URL Threat Filter .................................................................................................................. 230
6.38 The IPS Screen ............................................................................................................................. 231
6.39 Sandboxing ................................................................................................................................ 234
6.40 The Email Security Screens ......................................................................................................... 235
6.40.1 Email Security Summary ................................................................................................... 235
6.40.2 The Email Security Status Screen ..................................................................................... 237
6.41 Collaborative Detection & Response (CDR) ........................................................................... 239
6.41.1 CDR History ........................................................................................................................ 240
6.42 The SSL Inspection Screens ........................................................................................................ 241
6.42.1 Certificate Cache List ....................................................................................................... 242
6.43 Log Screens ................................................................................................................................. 243
6.43.1 View Log ............................................................................................................................ 244
6.43.2 View AP Log ....................................................................................................................... 245
ATP Series User’s Guide
10

Table of Contents
Chapter 7
Licensing...........................................................................................................................................248
7.1 Registration Overview .................................................................................................................. 248
7.1.1 What you Need to Know ....................................................................................................248
7.1.2 Registration Screen ............................................................................................................. 249
7.1.3 Service Screen ..................................................................................................................... 249
7.2 Signature Update ......................................................................................................................... 253
7.2.1 What you Need to Know ....................................................................................................254
7.2.2 The Signature Screen .......................................................................................................... 254
7.2.3 Auto Update ........................................................................................................................ 254
Chapter 8
Interfaces..........................................................................................................................................256
8.1 Interface Overview ...................................................................................................................... 256
8.1.1 What You Can Do in this Chapter ..................................................................................... 256
8.1.2 What You Need to Know ................................................................................................... 257
8.1.3 What You Need to Do First ................................................................................................. 261
8.2 Port Role ......................................................................................................................................... 261
8.3 Port Group ..................................................................................................................................... 262
8.4 Port Configuration ........................................................................................................................ 263
8.5 Ethernet Summary Screen ........................................................................................................... 265
8.5.1 Ethernet Edit ........................................................................................................................ 267
8.5.2 Proxy ARP ............................................................................................................................. 283
8.5.3 Virtual Interfaces ................................................................................................................ 284
8.5.4 References ........................................................................................................................... 286
8.5.5 Add/Edit DHCPv6 Request/Release Options ................................................................... 286
8.5.6 Add/Edit DHCP Extended Options ................................................................................... 287
8.6 PPP Interfaces ............................................................................................................................... 289
8.6.1 PPP Interface Summary ...................................................................................................... 289
8.6.2 PPP Interface Add or Edit .................................................................................................. 291
8.7 Cellular Configuration Screen ..................................................................................................... 296
8.7.1 Cellular Choose Slot ........................................................................................................... 299
8.7.2 Add / Edit Cellular Configuration ...................................................................................... 299
8.8 Tunnel Interfaces .......................................................................................................................... 305
8.8.1 Configuring a Tunnel .......................................................................................................... 307
8.8.2 Tunnel Add or Edit Screen .................................................................................................. 308
8.9 VLAN Interfaces ........................................................................................................................... 312
8.9.1 VLAN Summary Screen ....................................................................................................... 313
8.9.2 VLAN Add/Edit ................................................................................................................... 314
8.10 Bridge Interfaces ........................................................................................................................ 326
8.10.1 Bridge Summary ................................................................................................................ 327
8.10.2 Bridge Add/Edit ................................................................................................................ 329
8.11 LAG .............................................................................................................................................. 339
ATP Series User’s Guide
11

Table of Contents
8.11.1 Available Interfaces for LAG ........................................................................................... 340
8.11.2 LAG Summary Screen ....................................................................................................... 340
8.11.3 LAG Add/Edit ................................................................................................................... 341
8.12 VTI ................................................................................................................................................. 351
8.12.1 Restrictions for IPSec Virtual Tunnel Interface ................................................................ 351
8.12.2 VTI Screen .......................................................................................................................... 352
8.12.3 VTI Add/Edit ....................................................................................................................... 352
8.13 Trunk Overview ........................................................................................................................... 356
8.13.1 What You Need to Know ................................................................................................. 356
8.14 The Trunk Summary Screen ........................................................................................................ 359
8.14.1 Configuring a User-Defined Trunk ................................................................................... 360
8.14.2 Configuring the System Default Trunk ............................................................................ 362
8.15 Interface Technical Reference ................................................................................................. 363
Chapter 9
Routing..............................................................................................................................................368
9.1 Policy and Static Routes Overview ............................................................................................. 368
9.1.1 What You Can Do in this Chapter ..................................................................................... 368
9.1.2 What You Need to Know .................................................................................................. 369
9.2 Policy Route Screen ..................................................................................................................... 370
9.2.1 Policy Route Edit Screen .................................................................................................... 372
9.3 IP Static Route Screen .................................................................................................................. 377
9.3.1 Static Route Add/Edit Screen ............................................................................................ 377
9.4 Policy Routing Technical Reference .......................................................................................... 379
9.5 Routing Protocols Overview ....................................................................................................... 379
9.5.1 What You Need to Know ................................................................................................... 380
9.6 The RIP Screen ............................................................................................................................... 380
9.7 The OSPF Screen ........................................................................................................................... 382
9.7.1 Configuring the OSPF Screen ............................................................................................ 385
9.7.2 OSPF Area Add/Edit Screen ............................................................................................. 386
9.7.3 Virtual Link Add/Edit Screen ............................................................................................. 388
9.8 BGP (Border Gateway Protocol) ................................................................................................ 389
9.8.1 Allow BGP Packets to Enter the Zyxel Device .................................................................. 390
9.8.2 Configuring the BGP Screen .............................................................................................. 390
9.8.3 The BGP Neighbors Screen ................................................................................................ 392
9.8.4 Example Scenario ............................................................................................................... 393
Chapter 10
DDNS ................................................................................................................................................395
10.1 DDNS Overview ........................................................................................................................... 395
10.1.1 What You Can Do in this Chapter ................................................................................... 395
10.1.2 What You Need to Know ................................................................................................. 395
10.2 The DDNS Screen ........................................................................................................................ 396
ATP Series User’s Guide
12

Table of Contents
10.2.1 The Dynamic DNS Add/Edit Screen ................................................................................ 397
Chapter 11
NAT....................................................................................................................................................401
11.1 Overview ..................................................................................................................................... 401
11.2 NAT Overview ............................................................................................................................. 401
11.2.1 What You Can Do in this Chapter ................................................................................... 401
11.2.2 What You Need to Know ................................................................................................. 402
11.3 The NAT Screen ........................................................................................................................... 403
11.3.1 The NAT Add/Edit Screen .................................................................................................404
11.4 NAT Technical Reference .......................................................................................................... 407
11.5 Virtual Server Load Balancing ................................................................................................... 409
11.5.1 Load Balancing Example 1 .............................................................................................. 409
11.5.2 Load Balancing Example 2 .............................................................................................. 410
11.5.3 Virtual Server Load Balancing Process ........................................................................... 411
11.5.4 Load Balancing Rules ....................................................................................................... 412
11.5.5 Virtual Server Load Balancing Algorithms ...................................................................... 413
11.6 The Virtual Server Load Balancer Screen ................................................................................. 414
11.6.1 Adding/Editing a Virtual Server Load Balancing Rule .................................................. 414
Chapter 12
Redirect Service...............................................................................................................................419
12.1 Overview ..................................................................................................................................... 419
12.1.1 HTTP Redirect ..................................................................................................................... 419
12.1.2 SMTP Redirect .................................................................................................................... 419
12.1.3 What You Can Do in this Chapter ................................................................................... 420
12.1.4 What You Need to Know ................................................................................................. 420
12.2 The Redirect Service Screen ..................................................................................................... 422
12.2.1 The Redirect Service Edit Screen ..................................................................................... 423
Chapter 13
Wireless.............................................................................................................................................425
13.1 Overview ..................................................................................................................................... 425
13.1.1 What You Can Do in this Chapter ................................................................................... 425
13.1.2 What You Need to Know ................................................................................................. 425
13.2 Built-in AP .................................................................................................................................... 427
13.2.1 Wireless > Built-in AP > General >Add/Edit SSID ............................................................. 428
13.2.2 Wireless > Built-in AP > Radio ............................................................................................ 432
13.3 Controller Screen ....................................................................................................................... 438
13.3.1 Connecting an AP to the Zyxel Device .......................................................................... 439
13.3.2 Connecting an AP to the Zyxel Device Manually ......................................................... 439
13.3.3 Connecting an AP to the Zyxel Device Using DHCP Option 138 ................................ 439
13.4 AP Management Screens ......................................................................................................... 440
ATP Series User’s Guide
13

Table of Contents
13.4.1 Mgnt. AP List ..................................................................................................................... 440
13.4.2 AP Policy ............................................................................................................................ 456
13.4.3 AP Group ........................................................................................................................... 457
13.4.4 Firmware ............................................................................................................................. 463
13.5 Rogue AP ..................................................................................................................................... 465
13.5.1 Add/Edit Rogue/Friendly List ............................................................................................467
13.6 Wireless Health ............................................................................................................................ 468
13.7 Auto Healing ............................................................................................................................... 469
13.8 RTLS Overview ............................................................................................................................. 470
13.8.1 What You Can Do in this Chapter ................................................................................... 471
13.8.2 Before You Begin ............................................................................................................... 471
13.8.3 Configuring RTLS ................................................................................................................ 472
13.9 Technical Reference .................................................................................................................. 472
13.9.1 Dynamic Channel Selection ............................................................................................ 472
13.9.2 Load Balancing ................................................................................................................. 474
Chapter 14
ALG....................................................................................................................................................475
14.1 ALG Overview ............................................................................................................................. 475
14.1.1 What You Need to Know ................................................................................................. 475
14.1.2 Before You Begin ............................................................................................................... 478
14.2 The ALG Screen .......................................................................................................................... 478
14.3 ALG Technical Reference ......................................................................................................... 480
Chapter 15
UPnP...................................................................................................................................................482
15.1 UPnP and NAT-PMP Overview ................................................................................................... 482
15.2 What You Need to Know ........................................................................................................... 482
15.2.1 NAT Traversal ..................................................................................................................... 482
15.2.2 Cautions with UPnP and NAT-PMP .................................................................................. 483
15.3 UPnP Screen ................................................................................................................................ 483
15.4 Technical Reference .................................................................................................................. 484
15.4.1 Turning on UPnP in Windows 7 Example ......................................................................... 484
15.4.2 Turn on UPnP in Windows 10 Example ............................................................................ 488
15.4.3 Auto-discover Your UPnP-enabled Network Device .................................................... 490
15.4.4 Web Configurator Easy Access in Windows 7 ............................................................... 493
15.4.5 Web Configurator Easy Access in Windows 10 ............................................................. 495
Chapter 16
IP/MAC Binding................................................................................................................................497
16.1 IP/MAC Binding Overview ......................................................................................................... 497
16.1.1 What You Can Do in this Chapter ................................................................................... 497
16.1.2 What You Need to Know ................................................................................................. 497
ATP Series User’s Guide
14

Table of Contents
16.2 IP/MAC Binding Summary ......................................................................................................... 498
16.2.1 IP/MAC Binding Edit .......................................................................................................... 499
16.2.2 Static DHCP Edit ................................................................................................................ 500
16.3 IP/MAC Binding Exempt List ....................................................................................................... 501
Chapter 17
Layer 2 Isolation...............................................................................................................................502
17.1 Overview ..................................................................................................................................... 502
17.1.1 What You Can Do in this Chapter ................................................................................... 502
17.2 Layer-2 Isolation General Screen ............................................................................................. 502
17.3 Allow List Screen ......................................................................................................................... 503
17.3.1 Add/Edit Allow List Rule ................................................................................................... 504
Chapter 18
DNS Inbound LB................................................................................................................................506
18.1 DNS Inbound Load Balancing Overview ................................................................................. 506
18.1.1 What You Can Do in this Chapter ................................................................................... 506
18.2 The DNS Inbound LB Screen ...................................................................................................... 507
18.2.1 The DNS Inbound LB Add/Edit Screen ............................................................................ 508
18.2.2 The DNS Inbound LB Add/Edit Member Screen ............................................................ 510
Chapter 19
IPSec VPN .........................................................................................................................................512
19.1 Virtual Private Networks (VPN) Overview ................................................................................. 512
19.1.1 What You Can Do in this Chapter ................................................................................... 514
19.1.2 What You Need to Know ................................................................................................. 514
19.1.3 Before You Begin ............................................................................................................... 517
19.2 The VPN Connection Screen ..................................................................................................... 517
19.2.1 The VPN Connection Add/Edit Screen .......................................................................... 519
19.3 The VPN Gateway Screen ......................................................................................................... 526
19.3.1 The VPN Gateway Add/Edit Screen ............................................................................... 528
19.4 VPN Concentrator ..................................................................................................................... 535
19.4.1 VPN Concentrator Requirements and Suggestions ...................................................... 536
19.4.2 VPN Concentrator Screen ............................................................................................... 536
19.4.3 The VPN Concentrator Add/Edit Screen ........................................................................ 537
19.5 Zyxel Device IPSec VPN Client Configuration Provisioning .................................................... 538
19.6 IPSec VPN Background Information ......................................................................................... 540
Chapter 20
SSL VPN..............................................................................................................................................550
20.1 Overview ..................................................................................................................................... 550
20.1.1 What You Can Do in this Chapter ................................................................................... 550
20.1.2 What You Need to Know ................................................................................................. 550
ATP Series User’s Guide
15

Table of Contents
20.2 The SSL Access Privilege Screen ................................................................................................ 551
20.2.1 The SSL Access Privilege Policy Add/Edit Screen ......................................................... 552
20.3 The SSL Global Setting Screen ................................................................................................... 554
Chapter 21
L2TP VPN..................................... ... .... .... ............................................ ... .... .........................................556
21.1 Overview ..................................................................................................................................... 556
21.1.1 What You Can Do in this Chapter ................................................................................... 556
21.1.2 What You Need to Know ................................................................................................. 556
21.2 L2TP VPN Screen ......................................................................................................................... 557
21.2.1 Example: L2TP and Zyxel Device Behind a NAT Router ................................................ 559
Chapter 22
Remote AP VPN................................................................................................................................562
22.1 Overview ..................................................................................................................................... 562
22.2 Configuring a Remote AP ......................................................................................................... 563
22.3 Remote AP VPN Screen ............................................................................................................. 567
Chapter 23
BWM (Bandwidth Management) .................................................................................................568
23.1 Overview ..................................................................................................................................... 568
23.1.1 What You Can Do in this Chapter ................................................................................... 568
23.1.2 What You Need to Know ................................................................................................ 568
23.2 The Bandwidth Management Configuration .......................................................................... 572
23.2.1 The Bandwidth Management Add/Edit Screen ............................................................ 575
Chapter 24
Web Authentication ........................................................................................................................585
24.1 Web Auth Overview ................................................................................................................... 585
24.1.1 What You Can Do in this Chapter ................................................................................... 585
24.1.2 What You Need to Know ................................................................................................. 586
24.2 Web Authentication General Screen ...................................................................................... 586
24.2.1 User-aware Access Control Example ............................................................................. 592
24.2.2 Authentication Type Screen ............................................................................................ 598
24.2.3 Custom Web Portal / User Agreement File Screen ....................................................... 602
Chapter 25
Security Policy..................................................................................................................................604
25.1 Overview ..................................................................................................................................... 604
25.2 One Security ................................................................................................................................ 605
25.3 What You Can Do in this Chapter ............................................................................................ 608
25.3.1 What You Need to Know ................................................................................................. 608
25.4 The Security Policy Screen ......................................................................................................... 610
ATP Series User’s Guide
16

Table of Contents
25.4.1 Configuring the Security Policy Control Screen ............................................................ 611
25.4.2 The Security Check for Web Interface Screen .............................................................. 614
25.4.3 The Security Policy Control Add/Edit Screen ................................................................. 616
25.5 Anomaly Detection and Prevention Overview ...................................................................... 618
25.5.1 The Anomaly Detection and Prevention General Screen ........................................... 618
25.5.2 Creating New ADP Profiles ..............................................................................................620
25.5.3 Traffic Anomaly Profiles ................................................................................................... 622
25.5.4 Protocol Anomaly Profiles ................................................................................................ 624
25.5.5 The ADP Allow List Screen ................................................................................................ 628
25.5.6 Creating New ADP Allow List Rule ................................................................................... 629
25.6 The Session Control Screen ........................................................................................................ 629
25.6.1 The Session Control Add/Edit Screen .............................................................................. 631
25.7 Security Policy Example Applications ......................................................................................632
Chapter 26
Application Patrol............................................................................................................................635
26.1 Overview ..................................................................................................................................... 635
26.1.1 What You Can Do in this Chapter ................................................................................... 635
26.1.2 What You Need to Know ................................................................................................ 635
26.2 Application Patrol Profile ........................................................................................................... 636
26.2.1 Profile Action: Apply to a Security Policy ....................................................................... 637
26.2.2 Application Patrol Profile > Add/Edit - My Application ............................................... 640
26.2.3 Application Patrol Profile > Add/Edit - Query Result ..................................................... 641
Chapter 27
Content Filter ....................................................................................................................................644
27.1 Overview ..................................................................................................................................... 644
27.1.1 What You Can Do in this Chapter ................................................................................... 644
27.1.2 What You Need to Know ................................................................................................. 644
27.1.3 Before You Begin ............................................................................................................... 646
27.2 Web Content Filter General Screen .........................................................................................647
27.2.1 Apply to a Security Policy ................................................................................................ 648
27.2.2 Web Content Filter Add Category Service .................................................................... 651
27.2.3 Content Filter Add Filter Profile Custom Service ........................................................... 664
27.3 Web Content Filter Trusted Web Sites Screen ........................................................................ 667
27.4 Web Content Filter Forbidden Web Sites Screen ................................................................... 668
27.5 DNS Content Filter General Screen .......................................................................................... 669
27.5.1 DNS Content Filter Add Profile ......................................................................................... 671
27.6 DNS Content Filter Allow List Screen ......................................................................................... 683
27.7 DNS Content Filter Block List Screen ......................................................................................... 684
27.8 Content Filter Technical Reference ......................................................................................... 684
Chapter 28
Anti-Malware....................................................................................................................................686
ATP Series User’s Guide
17

Table of Contents
28.1 Overview ..................................................................................................................................... 686
28.1.1 What You Can Do in this Chapter ................................................................................... 690
28.2 Anti-Malware Screen ................................................................................................................. 691
28.3 The Allow List Screen .................................................................................................................. 695
28.4 The Block List Screen .................................................................................................................. 696
28.5 Anti-Malware Signature Searching ........................................................................................... 698
28.6 Anti-Malware Profile ................................................................................................................... 698
28.6.1 Add or Edit an Anti-Malware Profile ............................................................................... 699
28.6.2 Link a Profile ....................................................................................................................... 701
28.6.3 Anti-Malware Advance Screen ...................................................................................... 702
28.6.4 Remove Profiles ................................................................................................................. 704
28.7 Anti-Malware Technical Reference ......................................................................................... 705
Chapter 29
Reputation Filter ...............................................................................................................................707
29.1 Overview ..................................................................................................................................... 707
29.1.1 What You Need to Know ................................................................................................. 707
29.1.2 What You Can Do in this Chapter ................................................................................... 707
29.2 IP Reputation Screen .................................................................................................................. 708
29.2.1 IP Reputation Allow List Screen ........................................................................................ 711
29.2.2 IP Reputation Block List Screen ........................................................................................ 712
29.2.3 IP Reputation External Block List Screen ......................................................................... 713
29.2.4 IP Reputation External Block List Screen Add/Edit ........................................................ 714
29.3 DNS Threat Filter Screen ............................................................................................................. 715
29.3.1 DNS Threat Filter Allow List Screen ................................................................................... 718
29.3.2 DNS Threat Filter Block List Screen ................................................................................... 719
29.4 DNS Threat Filter Profile ............................................................................................................... 721
29.4.1 Add or Edit a DNS Threat Filter Profile ............................................................................. 722
29.4.2 Link a Profile ....................................................................................................................... 723
29.4.3 DNS Threat Filter Advance Screen .................................................................................. 724
29.4.4 Remove Profiles ................................................................................................................. 726
29.5 URL Threat Filter Screen .............................................................................................................. 727
29.5.1 URL Threat Filter Allow List Screen .................................................................................... 730
29.5.2 URL Threat Filter Block List Screen .................................................................................... 731
29.5.3 URL Threat Filter External Block List Screen ..................................................................... 731
29.6 URL Threat Filter Profile ................................................................................................................ 733
29.6.1 Add or Edit a URL Threat Filter Profile .............................................................................. 734
29.6.2 Link a Profile ....................................................................................................................... 736
29.6.3 URL Threat Filter Advance Screen ................................................................................... 737
29.6.4 Remove Profiles ................................................................................................................. 739
Chapter 30
IPS......................................................................................................................................................740
ATP Series User’s Guide
18

Table of Contents
30.1 Overview ..................................................................................................................................... 740
30.1.1 What You Can Do in this Chapter ................................................................................... 740
30.1.2 What You Need To Know ................................................................................................. 740
30.1.3 Before You Begin ............................................................................................................... 741
30.2 The IPS Screen ............................................................................................................................. 741
30.2.1 Query Example .................................................................................................................. 748
30.3 IPS Custom Signatures ............................................................................................................... 749
30.3.1 Add / Edit Custom Signatures ......................................................................................... 750
30.3.2 Custom Signature Example ............................................................................................. 754
30.3.3 Applying Custom Signatures ............................................................................................ 756
30.3.4 Verifying Custom Signatures ............................................................................................ 757
30.4 The Allow List Screen ................................................................................................................. 757
30.5 IPS Profile ...................................................................................................................................... 758
30.5.1 Add or Edit an IPS Profile .................................................................................................. 759
30.5.2 Link a Profile ....................................................................................................................... 761
30.5.3 The IPS Advance Screen ..................................................................................................762
30.5.4 Remove Profiles ................................................................................................................. 763
30.6 IPS Technical Reference ............................................................................................................ 764
Chapter 31
Sandboxing ......................................................................................................................................767
31.1 Overview ..................................................................................................................................... 767
31.1.1 What You Need to Know ................................................................................................. 768
31.2 Sandboxing Screen .................................................................................................................... 768
Chapter 32
Email Security...................................................................................................................................771
32.1 Overview ..................................................................................................................................... 771
32.1.1 What You Can Do in this Chapter ................................................................................... 771
32.1.2 What You Need to Know ................................................................................................. 771
32.2 Before You Begin ........................................................................................................................ 772
32.3 The Email Security Screen ......................................................................................................... 773
32.4 The Allow List Screen .................................................................................................................. 775
32.5 The Block List Screen .................................................................................................................. 776
32.5.1 The Block or Allow List Add/Edit Screen ......................................................................... 777
32.5.2 Regular Expressions in Block or Allow List Entries ............................................................ 779
32.6 Email Security Profile ................................................................................................................... 779
32.6.1 Add or Edit Email Security Profile ..................................................................................... 780
32.6.2 Link a Profile ....................................................................................................................... 782
32.6.3 The Email Security Advance Screen .............................................................................. 783
32.6.4 Remove Profiles ................................................................................................................. 786
32.7 Email Security Technical Reference ......................................................................................... 786
ATP Series User’s Guide
19

Table of Contents
Chapter 33
Collaborative Detection & Response.............................................................................................790
33.1 Overview ..................................................................................................................................... 790
33.1.1 What You Can Do in this Chapter ................................................................................... 791
33.2 Before You Begin ........................................................................................................................ 791
33.3 The Collaborative Detection & Response Screen ................................................................. 793
33.3.1 Add VLAN ......................................................................................................................... 795
33.4 The Exempt List Screen ............................................................................................................... 802
Chapter 34
SSL Inspection...................................................................................................................................804
34.1 Overview ..................................................................................................................................... 804
34.1.1 What You Can Do in this Chapter ................................................................................... 804
34.1.2 What You Need To Know ................................................................................................. 805
34.1.3 What You Can Do in this Chapter ................................................................................... 805
34.1.4 Before You Begin ............................................................................................................... 805
34.2 The SSL Inspection Profile Screen .............................................................................................. 805
34.2.1 Apply to a Security Policy ................................................................................................ 808
34.2.2 Add / Edit SSL Inspection Profiles .................................................................................... 811
34.3 Exclude List Screen .................................................................................................................... 812
34.4 Certificate Update Screen ....................................................................................................... 825
34.5 Install a CA Certificate in a Browser ......................................................................................... 826
Chapter 35
IP Exception......................................................................................................................................829
35.1 Overview ..................................................................................................................................... 829
35.2 The IP Exception Screen ............................................................................................................. 829
35.2.1 The IP Exception Add/Edit Screen ................................................................................. 830
Chapter 36
Astra Cloud Security....................................... ... .... ..........................................................................832
36.1 Overview ..................................................................................................................................... 832
36.2 Astra Cloud Security Screen ...................................................................................................... 833
Chapter 37
Object...............................................................................................................................................835
37.1 The Device Insight Screen ......................................................................................................... 835
37.1.1 Device Insight Add/Edit Screen ...................................................................................... 836
37.1.2 Example: Block a Profile ................................................................................................... 837
37.2 Zones Overview .......................................................................................................................... 841
37.2.1 What You Need to Know ................................................................................................. 842
37.2.2 The Zone Screen ................................................................................................................ 843
37.3 User/Group Overview ................................................................................................................ 844
ATP Series User’s Guide
20

Table of Contents
37.3.1 What You Need To Know ................................................................................................. 845
37.3.2 User/Group User Summary Screen .................................................................................. 847
37.3.3 User Add/Edit General Screen ........................................................................................ 848
37.3.4 User Add/Edit Two-factor Authentication Screen ........................................................ 852
37.3.5 User/Group Group Summary Screen .............................................................................. 855
37.3.6 User/Group Setting Screen ............................................................................................. 856
37.3.7 User/Group MAC Address Summary Screen ................................................................ 861
37.3.8 User /Group Technical Reference .................................................................................. 863
37.4 AP Profile Overview .................................................................................................................... 864
37.4.1 Radio Screen ..................................................................................................................... 866
37.4.2 SSID Screen ....................................................................................................................... 872
37.5 MON Profile ................................................................................................................................. 891
37.5.1 Configuring MON Profile .................................................................................................. 892
37.5.2 Add/Edit MON Profile ....................................................................................................... 893
37.5.3 Technical Reference ........................................................................................................ 894
37.6 ZyMesh Overview ....................................................................................................................... 895
37.6.1 ZyMesh Profile .................................................................................................................... 897
37.6.2 Add/Edit ZyMesh Profile ................................................................................................... 898
37.7 Address/Geo IP Overview ......................................................................................................... 898
37.7.1 What You Need To Know ................................................................................................. 899
37.7.2 Address Summary Screen ................................................................................................ 899
37.7.3 Address Group Summary Screen .................................................................................... 903
37.7.4 Geo IP Summary Screen .................................................................................................. 905
37.8 Service Overview ........................................................................................................................ 908
37.8.1 What You Need to Know ................................................................................................. 908
37.8.2 The Service Summary Screen .......................................................................................... 909
37.8.3 The Service Group Summary Screen ............................................................................. 911
37.9 Schedule Overview ................................................................................................................... 913
37.9.1 What You Need to Know ................................................................................................. 913
37.9.2 The Schedule Screen ........................................................................................................ 914
37.9.3 The Schedule Group Screen ............................................................................................ 917
37.10 AAA Server Overview ............................................................................................................. 918
37.10.1 Directory Service (AD/LDAP) ......................................................................................... 919
37.10.2 RADIUS Server .................................................................................................................. 919
37.10.3 ASAS .................................................................................................................................. 919
37.10.4 What You Need To Know ............................................................................................... 920
37.10.5 Active Directory or LDAP Server Summary ................................................................... 921
37.10.6 RADIUS Server Summary ................................................................................................. 925
37.11 Auth. Method Overview ......................................................................................................... 928
37.11.1 Before You Begin ............................................................................................................. 928
37.11.2 Example: Selecting a VPN Authentication Method ................................................... 928
37.11.3 Authentication Method Objects ................................................................................... 929
37.11.4 Two-Factor Authentication ............................................................................................ 931
ATP Series User’s Guide
21

Table of Contents
37.11.5 Two-Factor Authentication VPN Access ...................................................................... 934
37.11.6 Two-Factor Authentication Admin Access .................................................................. 936
37.12 Certificate Overview ................................................................................................................ 937
37.12.1 What You Need to Know ............................................................................................... 938
37.12.2 Verifying a Certificate .................................................................................................... 939
37.12.3 The My Certificates Screen ............................................................................................ 940
37.12.4 The Trusted Certificates Screen .................................................................................... 949
37.12.5 Certificates Technical Reference ................................................................................. 954
37.13 ISP Account Overview ............................................................................................................ 954
37.13.1 ISP Account Summary ....................................................................................................954
37.14 DHCPv6 Overview .................................................................................................................... 957
37.14.1 The DHCPv6 Request Screen ......................................................................................... 957
37.14.2 DHCPv6 Lease Screen ....................................................................................................959
Chapter 38
Device HA.........................................................................................................................................961
38.1 Device HA Overview .................................................................................................................. 961
38.1.1 What You Can Do in These Screens ................................................................................ 961
38.2 Device HA Status ........................................................................................................................ 961
38.3 Device HA Pro ............................................................................................................................. 963
38.3.1 Deploying Device HA Pro ................................................................................................ 964
38.3.2 Configuring Device HA Pro .............................................................................................. 964
38.4 View Log ...................................................................................................................................... 966
Chapter 39
Mgmt. & Analytics...........................................................................................................................968
39.1 Mgmt. & Analytics Overview ..................................................................................................... 968
39.1.1 What You Can Do in this Chapter ................................................................................... 968
39.2 Cloud CNM SecuManager ....................................................................................................... 968
39.3 Cloud CNM SecuReporter ......................................................................................................... 971
39.4 Nebula ......................................................................................................................................... 976
39.4.1 Scenario A-Native Mode ................................................................................................. 976
39.4.2 Scenario B-Zero Touch Provisioning (ZTP) ....................................................................... 978
Chapter 40
System...............................................................................................................................................980
40.1 Overview ..................................................................................................................................... 980
40.1.1 What You Can Do in this Chapter ................................................................................... 980
40.2 Host Name ................................................................................................................................... 981
40.3 USB Storage ................................................................................................................................. 981
40.4 Date and Time ............................................................................................................................ 983
40.4.1 Pre-defined NTP Time Servers List ..................................................................................... 986
40.4.2 Time Server Synchronization ............................................................................................ 986
ATP Series User’s Guide
22

Table of Contents
40.5 Console Port Speed ................................................................................................................... 987
40.6 DNS Overview ............................................................................................................................. 988
40.6.1 DNS Server Address Assignment ...................................................................................... 988
40.6.2 Configuring the DNS Screen ............................................................................................ 988
40.6.3 (IPv6) Address Record ...................................................................................................... 992
40.6.4 PTR Record ......................................................................................................................... 992
40.6.5 Adding an (IPv6) Address/PTR Record .......................................................................... 992
40.6.6 CNAME Record ................................................................................................................. 993
40.6.7 Adding a CNAME Record ................................................................................................ 993
40.6.8 Domain Zone Forwarder ................................................................................................. 994
40.6.9 Adding a Domain Zone Forwarder ................................................................................. 994
40.6.10 MX Record ...................................................................................................................... 995
40.6.11 Adding a MX Record ...................................................................................................... 995
40.6.12 Security Option Control .................................................................................................. 996
40.6.13 Editing a Security Option Control .................................................................................. 996
40.6.14 Adding a DNS Service Control Rule .............................................................................. 997
40.7 WWW Overview .......................................................................................................................... 998
40.7.1 Service Access Limitations ............................................................................................... 998
40.7.2 System Timeout .................................................................................................................. 998
40.7.3 HTTPS ................................................................................................................................... 998
40.7.4 Configuring WWW Service Control ................................................................................. 999
40.7.5 Service Control Rules ...................................................................................................... 1002
40.7.6 Customizing the WWW Login Page .............................................................................. 1003
40.7.7 HTTPS Example ................................................................................................................. 1008
40.8 SSH ........................................................................................................................................... 1015
40.8.1 SSH Implementation on the Zyxel Device .................................................................... 1016
40.8.2 Requirements for Using SSH ............................................................................................ 1016
40.8.3 Configuring SSH ............................................................................................................... 1016
40.8.4 Service Control Rules ...................................................................................................... 1017
40.8.5 SSH Example .................................................................................................................... 1018
40.9 Telnet ......................................................................................................................................... 1019
40.9.1 Configuring Telnet ........................................................................................................... 1019
40.9.2 Service Control Rules ...................................................................................................... 1021
40.10 FTP ............................................................................................................................................ 1021
40.10.1 Configuring FTP .............................................................................................................. 1021
40.10.2 Service Control Rules .................................................................................................... 1023
40.11 SNMP ....................................................................................................................................... 1023
40.11.1 SNMPv3 and Security ....................................................................................................1024
40.11.2 Supported MIBs ............................................................................................................. 1025
40.11.3 SNMP Traps ..................................................................................................................... 1025
40.11.4 Configuring SNMP ......................................................................................................... 1025
40.11.5 Add SNMPv3 User .......................................................................................................... 1027
40.11.6 Service Control Rules .................................................................................................... 1028
ATP Series User’s Guide
23

Table of Contents
40.12 Authentication Server ............................................................................................................ 1029
40.12.1 Add/Edit Trusted RADIUS Client .................................................................................. 1030
40.13 Notification > Mail Server ....................................................................................................... 1031
40.14 Notification > SMS ................................................................................................................... 1033
40.15 Notification > Response Message ....................................................................................... 1034
40.16 Language Screen ................................................................................................................... 1035
40.17 IPv6 Screen .............................................................................................................................. 1036
40.18 Zyxel One Network (ZON) Utility ........................................................................................... 1036
40.18.1 Requirements ................................................................................................................. 1037
40.18.2 Run the ZON Utility ......................................................................................................... 1037
40.18.3 Zyxel One Network (ZON) System Screen .................................................................. 1041
Chapter 41
Log and Report....... .... ... ............................................. ... .... ............................................ .................1042
41.1 Overview ................................................................................................................................... 1042
41.1.1 What You Can Do In this Chapter ................................................................................ 1042
41.2 Email Daily Report ..................................................................................................................... 1042
41.3 Log Setting Screens ................................................................................................................. 1044
41.3.1 Log Setting Summary ...................................................................................................... 1044
41.3.2 Edit System Log Settings ................................................................................................ 1046
41.3.3 Edit Log on USB Storage Setting ................................................................................... 1050
41.3.4 Edit Remote Server Log Settings ................................................................................... 1051
41.3.5 Log Category Settings Screen ....................................................................................... 1053
Chapter 42
File Manager ..................................................................................................................................1056
42.1 Overview ................................................................................................................................... 1056
42.1.1 What You Can Do in this Chapter ................................................................................. 1056
42.1.2 What you Need to Know ................................................................................................ 1056
42.2 The Configuration Screen ........................................................................................................ 1060
42.2.1 The Configuration Schedule Backup Screen .............................................................. 1065
42.3 Firmware Management ......................................................................................................... 1066
42.3.1 Cloud Helper ................................................................................................................... 1066
42.3.2 The Firmware Management Screen ............................................................................. 1069
42.3.3 Firmware Upgrade via USB Stick .................................................................................... 1073
42.3.4 Firmware Integrity Check ............................................................................................... 1073
42.4 The Shell Script Screen ............................................................................................................ 1074
Chapter 43
Diagnostics ....................................................................................................................................1077
43.1 Overview ................................................................................................................................... 1077
43.1.1 What You Can Do in this Chapter ................................................................................. 1077
43.2 The Diagnostics Screens .......................................................................................................... 1077
ATP Series User’s Guide
24

Table of Contents
43.2.1 Scripts ............................................................................................................................... 1077
43.2.2 The Diagnostics Controller Screen ................................................................................ 1078
43.2.3 The Diagnostics AP Screen ............................................................................................. 1080
43.2.4 The Diagnostics Files Screen .......................................................................................... 1082
43.3 The Packet Capture Screen .................................................................................................... 1083
43.3.1 The Packet Capture on AP Screen ............................................................................... 1085
43.3.2 The Packet Capture Files Screen .................................................................................. 1088
43.3.3 The Packet Capture Remote Capture Screen ............................................................ 1089
43.4 The CPU / Memory Status Screen ........................................................................................... 1090
43.5 The System Log Screen ............................................................................................................ 1092
43.6 The Network Tool Screen ......................................................................................................... 1092
43.7 The Routing Traces Screen ...................................................................................................... 1095
43.8 The Wireless Frame Capture Screen ...................................................................................... 1096
43.8.1 The Wireless Frame Capture Files Screen .................................................................... 1097
Chapter 44
Packet Flow Explore ......................................................................................................................1098
44.1 Overview ................................................................................................................................... 1098
44.1.1 What You Can Do in this Chapter ................................................................................. 1098
44.2 Routing Status .......................................................................................................................... 1098
44.3 The SNAT Status Screen ............................................................................................................ 1102
Chapter 45
Shutdown........................................................................................................................................1105
45.1 Overview ................................................................................................................................... 1105
45.1.1 What You Need To Know ............................................................................................... 1105
45.2 The Shutdown / Reboot Screen ..............................................................................................1105
Part III: Appendices and Troubleshooting................................................1107
Chapter 46
Troubleshooting..............................................................................................................................1108
46.1 Resetting the Zyxel Device ...................................................................................................... 1127
46.2 Getting More Troubleshooting Help ....................................................................................... 1127
Appendix A Product Features ..................................................................................................... 1128
Appendix B Legal Information..................................................................................................... 1132
ATP Series User’s Guide
25

PART I
User’s Guide
26

1.1 Overview
Zyxel Device refers to these models as outlined below.
• ATP100
• ATP100W
• ATP200
• ATP500
• ATP700
• ATP800
1.1.1 Model Feature Differences
CHAPTER 1
Introduction
Note the following differences between the ATP models:
Table 1 ATP Model Feature Comparison
FEATURE/MODEL ATP100 ATP100W ATP200 ATP500 ATP700 ATP800
Microsoft Azure YES YES YES YES YES YES
Amazon VPC CLI only CLI only CLI only CLI only CLI only CLI only
Anomaly Detection & Prevention YES YES YES YES YES YES
Firewall as a Service (FaaS) YES NO YES NO NO NO
Email Security (Anti-Spam) YES YES YES YES YES YES
IPS (IDP) YES YES YES YES YES YES
Anti-Malware YES YES YES YES YES YES
App Patrol YES YES YES YES YES YES
Web Security (Content Filtering) YES YES YES YES YES YES
SecuReporter YES YES YES YES YES YES
Reputation Filter (IP & DNS) YES YES YES YES YES YES
URL Threat Filter YES YES YES YES YES YES
Sandboxing YES YES YES YES YES YES
IP Exception YES YES YES YES YES YES
AP Controller YES YES YES YES YES YES
Device HA Pro NO NO NO YES YES YES
Easy Mode NO NO NO NO NO NO
Hotspot Management NO NO NO NO NO NO
Concurrent Device Upgrade NO NO NO NO NO NO
LAG NO NO NO YES YES YES
ATP Series User’s Guide
27

Chapter 1 Introduction
Table 1 ATP Model Feature Comparison (continued)
FEATURE/MODEL ATP100 ATP100W ATP200 ATP500 ATP700 ATP800
Port Group NO NO NO YES YES YES
Port Role YES YES YES NO NO NO
SD-WAN Mode NO NO NO NO NO NO
SSL Application YES YES YES YES YES YES
SSL encrypted traffic inspection YES YES YES YES YES YES
Bundled UTM Feature License Validity 1 year 1 year 1 year 1 year 1 year 1 year
WiFi functionality (built-in) NO YES NO NO NO NO
Virtual Server Load Balancing YES YES YES YES YES YES
Built-in AP NO YES NO NO NO NO
Management by Nebula Control YES YES YES YES YES YES
• Not all models support all features. See Table 1 on page 27 for the specific features that your model
supports.
Table 2 Security Feature List
• Application Security (Application Patrol) • Intrusion Prevention System (IPS)
• Anomaly Detection & Prevention (ADP) • Web Filtering (Content Filtering)
• Malware Blocker (Anti-Virus) • Email Security (Anti-Spam)
• Secure Socket Layer (SSL) encrypted traffic
Inspection
The following security features work without a security license:
• Configuration > Content Filter > Trusted Web Sites
• Configuration > IPS > Custom Signatures
• Configuration > Anti-Virus > Black/White List
• Configuration > Anti-Spam/Email Security > Block/Allow List
For information on interface names by model, default port or interface name mapping, and default
interface or zone mapping please see
See the product’s datasheet for detailed information on a specific model.
1.2 On Premises Mode
When you log into the Web Configurator for the first time or when you reset the Zyxel Device to its
default configuration, the Initial Setup Wizard screen displays. Choose On Premises Mode to manage
your Zyxel Device directly using either the browser-based Web Configurator or the Command Line
Interface (CLI).
Section 3.3 on page 98.
ATP Series User’s Guide
28
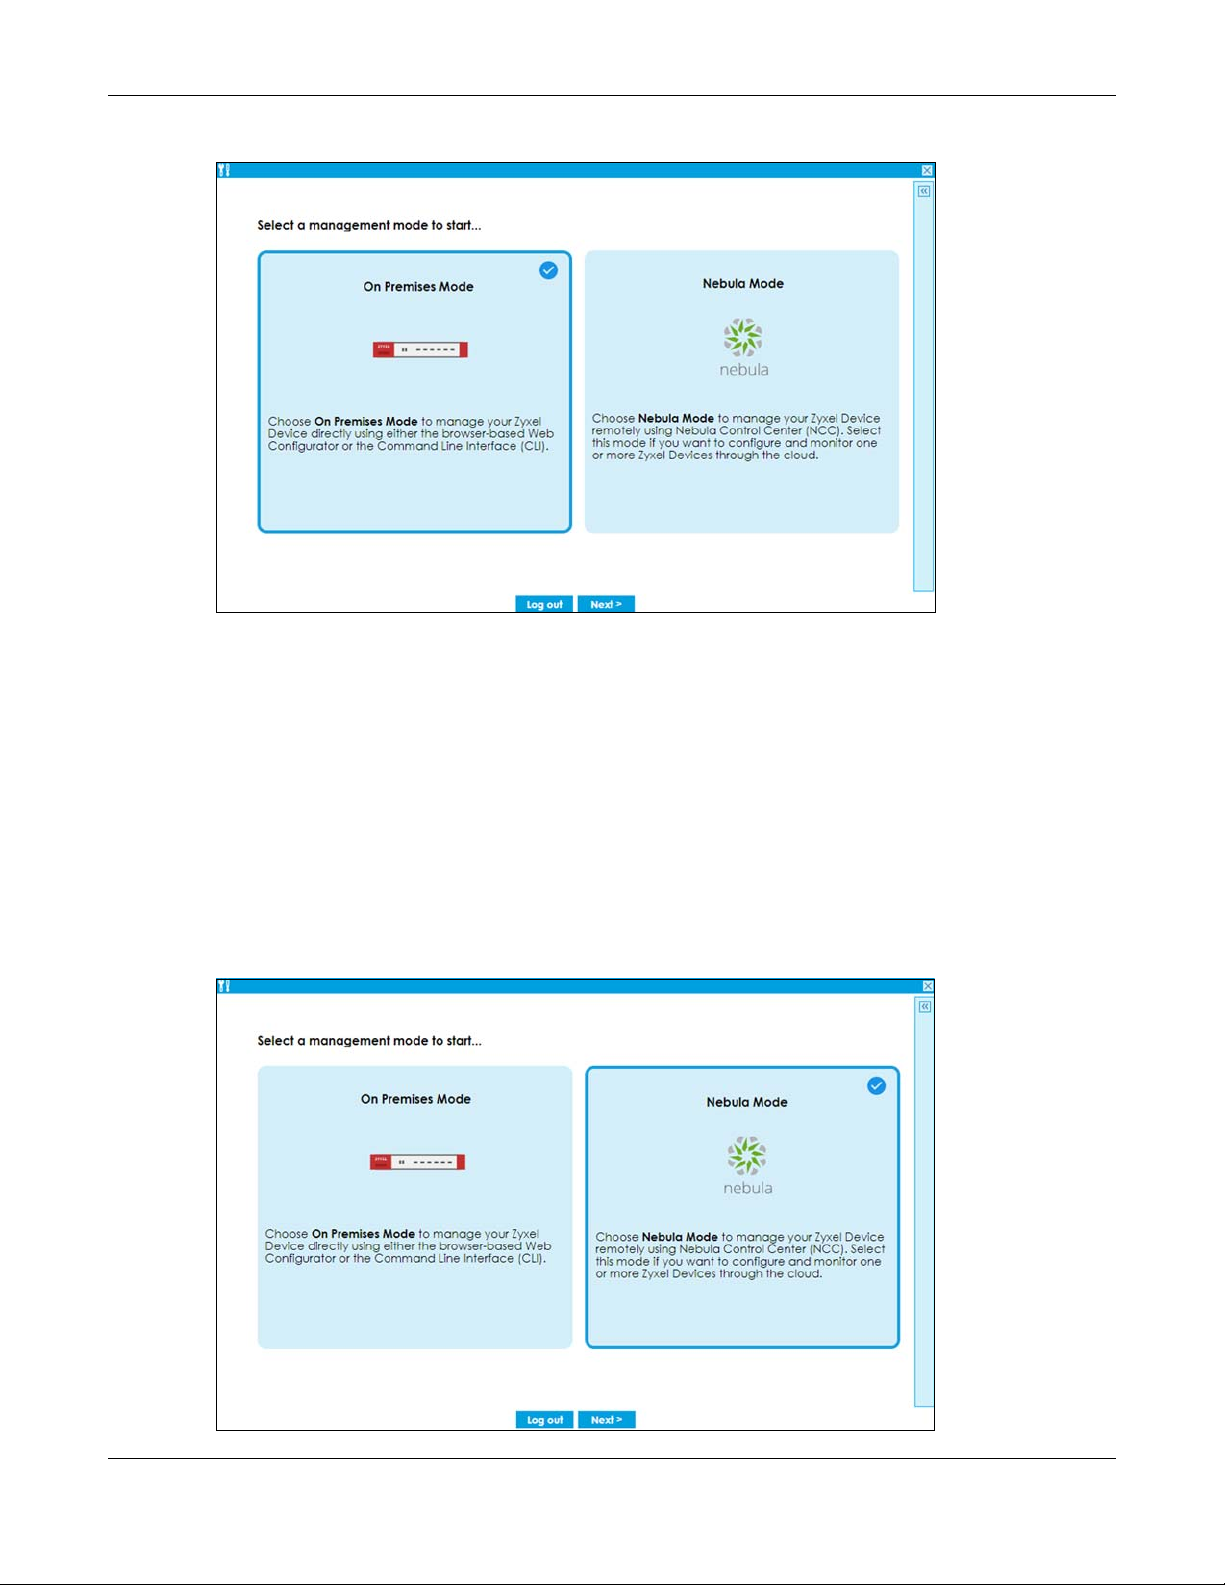
Chapter 1 Introduction
Figure 1 On Premises Mode
Follow the wizard to configure the Zyxel Device network settings to manage your Zyxel Device directly.
Note that once you complete the device registration step and register your Zyxel Device at
portal.myzyxel.com, you cannot change to Nebula Mode unless you reset the Zyxel Device.
1.3 Nebula Mode
When you log into the Web Configurator for the first time or when you reset the Zyxel Device to its
default configuration, the Initial Setup Wizard screen displays. Choose Nebula Mode to manage your
Zyxel Device remotely using Nebula Control Center (NCC). Select this mode if you want to configure
and monitor one or more Zyxel Devices through the cloud.
Figure 2 Nebula Mode
ATP Series User’s Guide
29

Follow the wizard to configure the Zyxel Device network settings to connect to NCC. Note that once you
complete th WAN configuration step, you cannot change to On Premises Mode unless you reset the
Zyxel Device.
Nebula Control Center (NCC) is an Internet portal that allows you to configure and monitor groups of
Zyxel Devices in organizations. You cannot manage a Zyxel Device directly through the Web
Configurator or Command Line Interface (CLI) when NCC is managing the Zyxel Device. See
page 27 to see which Zyxel Devices can be managed by NCC.
Follow this procedure to have NCC manage your Zyxel Device.
1.3.1 NCC Portal
You should already have created an account at myZyxel.com. Follow these steps at the NCC portal.
1 Log into Nebula (https://nebula.zyxel.com) with your myZyxel account. If you do not have a myZyxel
account, you will be redirected to another screen to create one.
2 After you log in, click Go under Nebula Control Center and then Let’s Start to run the Nebula setup
wizard. Create an organization and a site or select an existing site.
Chapter 1 Introduction
Table 1 on
3 Add the Zyxel Device to this site by entering its MAC address and serial number. You’ll find the MAC
address and serial number of the Zyxel Device on its label or scan the QR code using the Nebula app.
4 Configure the WAN interface that the Zyxel Device will use to connect to Nebula through the Internet.
5 If you’re given a choice, select Native Mode. If you cannot select Native Mode, configure the email
address of the person who will configure the Zyxel Device for management by Nebula. An email will be
sent to this person containing an activation link that allows automatic management of the Zyxel Device
by Nebula (Zero Touch Provisioning (ZTP)).
1.3.2 Your Zyxel Device
The person who will configure the Zyxel Device for management by Nebula should follow this
procedure.
1 Use an Ethernet cable to connect the WAN port of the Zyxel Device (P1 or P2) to the Ethernet port of a
device that will provide Internet access.
2 Use another Ethernet cable to connect the LAN port of the Zyxel Device (P3 or P4) to your computer.
Make sure your computer can receive an IP address automatically. This is the default for all computers,
so the computer should be fine unless you changed it.
3 Connect the power port to an appropriate power source and turn on the Zyxel Device. Wait for the SYS
LED to turn solid green.
4 Back up your current configuration before passing management to Nebula. Log into the web
configurator, and go to Maintenance > File Manager > Configuration File. Select startup-config.conf,
then click Download.
ATP Series User’s Guide
30

Chapter 1 Introduction
5 If you cannot select Native Mode, reset the Zyxel Device to the factory defaults. Push the Reset button
until the port connection LEDs turn off (after about 5 seconds). Your Zyxel Device will reboot to the
factory defaults and all previous configurations will be erased.
Skip this step if you did not configure your Zyxel Device before (including just logging in and changing
the default password.). You must reset the Zyxel Device if it does not have the factory default
configuration.
1.3.3 Your Email Account for ZTP
If you cannot select Native Mode in the Nebula setup wizard, do the following after the Zyxel Device is
on:
1 Check your mailbox for an email from Nebula. You may need to check your spam folder
2 Follow the instructions in the email if you did not complete the instructions above. Look for an activation
link in the email. Click the activation link or copy the link to your web browser. You will see a screen
saying that Nebula registration is in process. Please wait.
3 When you see a screen saying Nebula registration has succeeded, management of your Zyxel Device
has passed to Nebula Control Center. The Nebula administrator can now configure and manage your
device.
1.4 Change the Mode
Follow the steps below to change your Zyxel Device from On Premises Mode to Nebula Mode or from
Nebula Mode to On Premises Mode.
1.4.1 From Nebula Mode to On Premises Mode
Follow this procedure if you want to manage the Zyxel Device directly.
1 Log into Nebula (https://nebula.zyxel.com) with your myZyxel account.
2 Go to Organization-wide > Configuration > Inventory.
ATP Series User’s Guide
31

Chapter 1 Introduction
3 Select the Zyxel Device you want to remove from Nebula.
4 Click Remove.
5 Nebula will automatically reset your Zyxel Device. The Zyxel Device will reboot to the factory defaults. All
Nebula configurations for the Zyxel Device will be erased.
6 Log into the Zyxel Device. Run the wizard and choose On Premises Mode.
7 To restore your previous configuration, log into the web configurator, and go to Maintenance > File
Manager > Configuration File.
8 Under Upload Configuration File, click Browse, select the startup-config.conf on your computer that you
backed up previously and click Upload. The Zyxel Device will then return to the previous settings.
1.4.2 From On Premises Mode to Nebula Mode
1 Back up your current configuration in Maintenance > File Manager > Configuration File.
2 Reset the Zyxel Device to the factory default by pushing the Reset button until the port connection LEDs
turn off (after about 5 seconds). Your Zyxel Device will reboot to the factory defaults.
3 Log into the Zyxel Device. Run the wizard and choose Nebula Mode.
ATP Series User’s Guide
32

Chapter 1 Introduction
4 If you have a choice of Native Mode or ZTP, select Native Mode.
1.5 Registration at myZyxel
myZyxel is Zyxel’s online services center where you can register your Zyxel Device and manage
subscription services available for your Zyxel Device (see Configuration > Licensing > Registration >
Service for services available for your Zyxel Device).
• For Zyxel Devices that already have firmware version 4.25 or later, you have to register your Zyxel
Device and activate the corresponding service at myZyxel (through your Zyxel Device).
• For Zyxel Devices upgrading to firmware version 4.25 or later, you may skip registering your Zyxel
Device and activating the corresponding service at myZyxel (through your Zyxel Device). However, it
is highly recommended to at least register your Zyxel Device. At the time of writing, the Firmware
Upgrade license providing Cloud Helper new firmware notifications, is free when you register your
Zyxel Device.
Note: You need to create a myZyxel account at http://portal.myZyxel.com before you can
register your device and activate the services at myZyxel.
You may need your Zyxel Device’s serial number and LAN MAC address to register it at
myZyxel. See the label at the back of the Zyxel Device’s for details.
ATP Series User’s Guide
33

Figure 3 myZyxel Login
1.5.1 Grace Period
SecuReporter and service licenses have a 15-day grace period after a license expires. Services will
continue to work in this period during which you will receive notifications to renew your licenses. New
licenses are valid for 1 year from the date of purchase.
Chapter 1 Introduction
1.5.2 Applications
These are some Zyxel Device application scenarios.
Security Router
Security includes a Stateful Packet Inspection (SPI) firewall.
Figure 4 Applications: Security Router Applications: Security Router
ATP Series User’s Guide
34

Chapter 1 Introduction
IPv6 Routing
The Zyxel Device supports IPv6 Ethernet, PPP, VLAN, and bridge routing. You may also create IPv6 policy
routes and IPv6 objects. The Zyxel Device can also route IPv6 packets through IPv4 networks using
different tunneling methods.
Figure 5 Applications: IPv6 Routing
VPN Connectivity
Set up VPN tunnels with other companies, branch offices, telecommuters, and business travelers to
provide secure access to your network. AS is an Authentication Server in the below figure.
Figure 6 Applications: VPN Connectivity
SSL VPN Network Access
SSL VPN lets remote users use their web browsers for a very easy-to-use VPN solution. A user just browses
to the Zyxel Device’s web address and enters his user name and password to securely connect to the
Zyxel Device’s network. Here full tunnel mode creates a virtual connection for a remote user and gives
him a private IP address in the same subnet as the local network so he can access network resources in
the same way as if he were part of the internal network.
ATP Series User’s Guide
35

Chapter 1 Introduction
Web Mail File Share
Web-based Application
https://
Application Server
Non-Web
LAN (192.168.1.X)
Figure 7 SSL VPN With Full Tunnel Mode
User-Aware Access Control
Set up security policies to restrict access to sensitive information and shared resources based on the user
who is trying to access it. In the following figure user A can access both the Internet and an internal file
server. User B has a lower level of access and can only access the Internet. User C is not even logged in,
so and cannot access either the Internet or the file server.
Figure 8 Applications: User-Aware Access Control
Load Balancing
Set up multiple connections to the Internet on the same port, or different ports, including cellular
interfaces. In either case, you can balance the traffic loads between them.
Figure 9 Applications: Multiple WAN Interfaces
ATP Series User’s Guide
36

Chapter 1 Introduction
1.6 Management Overview
You can manage the Zyxel Device in the following ways.
Web Configurator
The Web Configurator allows easy Zyxel Device setup and management using an Internet browser. This
User’s Guide provides information about the Web Configurator.
Figure 10 Managing the Zyxel Device: Web Configurator
Command-Line Interface (CLI)
The CLI allows you to use text-based commands to configure the Zyxel Device. Access it using remote
management (for example, SSH or Telnet) or via the physical or Web Configurator console port. See the
Command Reference Guide for CLI details. The default settings for the console port are:
Table 3 Console Port Default Settings
SETTING VALUE
Speed 115200 bps
Data Bits 8
Parity None
Stop Bit 1
Flow Control Off
ATP Series User’s Guide
37

Chapter 1 Introduction
FTP
Use File Transfer Protocol for firmware upgrades and configuration backup or restore.
SNMP
The device can be monitored and/or managed by an SNMP manager. See Section 40.11 on page 1023.
CloudCNM
Use the CloudCNM screen (see Section 40.16 on page 1035) to enable and configure management of
the Zyxel Device by a Central Network Management system.
Management Authentication
Managers must be authenticated with a username and password, using one of:
•Local Zyxel Device authentication
• An external RADIUS server
• An external LDAP server
• Certificates
1.7 Web Configurator
The Web Configurator is an HTML-based management interface that allows easy system setup and
management through Internet browser. Use a browser that supports HTML5, such as Microsoft Edge,
Internet Explorer 11, Mozilla Firefox, or Google Chrome.
In order to use the Web Configurator you need to allow:
• Web browser pop-up windows from your device.
• JavaScript (enabled by default).
• Java permissions (enabled by default).
The recommended minimum screen resolution is 1024 x 768 pixels.
Note: Screenshots and graphics in this book may differ slightly from your product due to
differences in product features or Web Configurator brand style.
1.7.1 Web Configurator Access
1 Make sure your Zyxel Device hardware is properly connected. See the Quick Start Guide.
2 In your browser go to https://192.168.1.1 or https://myrouter.local. By default, the Zyxel Device
automatically routes this request to its HTTPS server, and it is recommended to keep this setting. The Login
screen appears.
ATP Series User’s Guide
38

Chapter 1 Introduction
If you want to change the display language for the Zyxel Device’s Web Configurator screens, select
from the drop-down list box. You can also change the display language in Configuration> System>
Language
3 Type the user name (default: “admin”) and password (default: “1234”).
4 Click Login. After you log in for the first time using the default user name and password, you must
change the default admin password in the Update Admin Info screen. Enter a new password of from 1
to 64 characters.
In Configuration > Object > User/Group > Setting, you can enable Password Complexity to require a
new password to consist of at least 8 characters and at most 64, where at least 1 character must be a
number, at least 1 a lower case letter, at least 1 an upper case letter and at least 1 a special character
from the keyboard, such as !@#$%^&*()_+. You can also require periodic changing of the password in
that screen by configuring Password must changed every (days).
Make a note of your new password, enter it in the following screen, then click Apply.
5 A Terms of Use screen displays. Read the statement, then click Acknowledge to proceed.
Note: If you are using an Internet Explorer browser, the Terms of Use will be downloaded
automatically.
ATP Series User’s Guide
39

Chapter 1 Introduction
6 The Password Change Notification screen displays. Use this screen to view all the admin accounts expiry
information. We recommend you to change your password regularly in Configuration> Object> User/
Group> User. Select how often to display the screen and click OK.
7 The Network Risk Warning screen displays any unregistered or disabled security services. If your Zyxel
Device is not registered, you will see a prompt to register it. Select how often to display the screen and
click OK.
ATP Series User’s Guide
40

Chapter 1 Introduction
If you select Never and you later want to bring this screen back, use these commands (note the space
before the underscore).
Router> enable
Router#
Router# configure terminal
Router(config)#
Router(config)# service-register _setremind
after-10-days
after-180-days
after-30-days
every-time
never
Router(config)# service-register _setremind every-time
Router(config)#
See the Command Line Interface (CLI) Reference Guide (RG) for details on all supported commands.
8 Follow the directions in the Update Admin Info screen. If you change the default password, the Login
screen appears after you click Apply. If you click Ignore, the Installation Setup Wizard opens if the
ZyWALL is using its default configuration; otherwise the dashboard appears.
1.7.2 Security Check for Web Interface Overview
Use this screen to configure settings to secure your Zyxel Device. You can configure:
• Secure SSL access from the Internet to the Zyxel Device.
• Secure SSL access from the Internet to the network behind the Zyxel Device.
ATP Series User’s Guide
41

Chapter 1 Introduction
• The default port that IPSec VPN clients use to retrieve VPN rule settings from the Zyxel Device.
• The default port for two-factor authentication for VPN clients to access the network behind the Zyxel
Device.
1.7.2.1 Secure SSL Access from the Internet to the Zyxel Device
You can configure up to 3 trusted computers to access the Zyxel Device using secure SSL. The default
HTTPS SSL port is 443. If you change this, remote connections from the Internet must use this port. For
example, if you change this to port 8800 and the Zyxel Device is using IP address 1.1.1.1, then remote
users must use htttps://1.1.1.1:8800.
In Figure 11 on page 42, A, B and C can connect to the Zyxel Device to access the Zyxel Device web
configurator for remote management.
Configure a new port between 1024 to 65535 that is not in use by other services.
Figure 11 Secure SSL Access Example
1.7.2.2 Secure SSL VPN Access from the Internet to the Network Behind the Zyxel Device
The default SSL VPN port is 443. If you change the default SSL VPN port on the Zyxel Device, make sure to
make the same change to SecuExtender, the SSL VPN client software. Configure a new port between
1024 to 65535 that is not in use by other services.
You can also restrict SSL VPN access to up to 3 locations on the Internet.
ATP Series User’s Guide
42

Chapter 1 Introduction
Figure 12 Secure SSL VPN Access Example
The table below describes the abbreviations used in the figure.
Table 4 Countries Abbreviations
ABBREVIATION COUNTRY
JP Japan
KR Korea
FR France
1.7.2.3 Change the Default IPSec VPN Provisioning Port
Change the default port that IPSec VPN clients use to retrieve VPN rule settings from the Zyxel Device.
The default is 443 which is already in use for remote management by default. If you change the default
IPSec VPN port on the Zyxel Device, make sure to make the same change to the Zyxel IPSec VPN client.
Configure a new port between 1024 to 65535 that is not in use by other services.
Figure 13 IPSec VPN Provisioning Example
Note: The remote management port, the SSL VPN port and the IPSec VPN port all use 443 by
default. If you do not change the default ports, then only 3 connections of the remote
management and SSL VPN will be allowed at one time.
1.7.2.4 Change the Default Port for Two-Factor VPN Access Authentication
Change the default port for two-factor authentication for VPN clients to access the network behind the
Zyxel Device. VPN clients do not need to change the port number on their devices, because the link to
access the network behind the Zyxel Devices will contain the new port number. For example, if you
change this to port 8008 and the link is using a.b.c.d, then VPN clients will see this link in their email or SMS
to retrieve settings: htttps://a.b.c.d:8008.
You can also change this port in Object > Auth. Method > Two-factor Authentication > VPN Access. See
Section 37.11.4 on page 931 for more information on two-factor authentication.
Configure a new port between 1024 to 65535 that is not in use by other services.
ATP Series User’s Guide
43

Chapter 1 Introduction
Figure 14 Two-Factor Authentication Example
Overall Port Configuration Example
Below is an example of configuring these ports to avoid port conflict.
Table 5 Port Configuration Example
REMOTE
MANAGEMENT
8800 8080 443 (default) 8008
SSL VPN
IPSEC VPN
PROVISIONING
TWO-FACTOR VPN
ACCESS
AUTHENTICATION
1.7.2.5 Other Security Measures
New firmware contains patches to enhance security. Make sure to check for new firmware regularly
and update firmware in Maintenance > Firmware Management.
Change admin passwords regularly. Select Enable Password Complexity in Object > User/Group >
Setting to require the user to use a password that's not easy to guess. The password must include:
• at least 8 characters
• at least one upper case alphabetic character and at least one lower case alphabetic character
•one numeric character
• one special character such as @#$%^
1.7.3 The Security Check for Web Interface Screen
The following screen appears when the Zyxel Device detects a rule that allows traffic such as HTTP,
HTTPS, SSL and so on to access to your Zyxel Device from any IPv4 source on the WAN. This may expose
your Zyxel Device to a security risk. Configure settings in this screen to allow access only from specified IP
addresses, FQDNs or regions to secure your Zyxel Device.
ATP Series User’s Guide
44

Chapter 1 Introduction
Figure 15 Security Check for Web Interface
The following table describes the labels in this screen.
Table 6 Security Check for Web Interface
LABEL DESCRIPTION
Allow secure remote management
from WAN
Port Configure a new port between 1024 to 65535 to use it to access the web
Trusted Host 1-3 Configure the IP addresses or FQDNs that are allowed to access the Zyxel
Allow SSL VPN access from WAN Select this to allow SSL VPN clients to access the Zyxel Device only from
Port Configure a new port between 1024 to 65535 to use it to access the web
Trusted Geolocation 1-3 Select the regions that are allowed to access the Zyxel Device from the
Select this to allow access to the Zyxel Device remotely only from
specified IP addresses or Fully Qualified Domain Names (FQDNs), such as
1.1.1.1 or www.zyxel.com. See
information.
configurator. Do not use a port number that has been used.
For example, use https://1.1.1.1:8800 if you changed the default HTTPS
port to 8800.
Device.
specified regions. See
configurator using SSL VPN. Do not use a port number that has been used.
The port you configure here must be the same as the port you use in
SecuExtender. See
SecuExtender.
drop-down list box.
Section 1.7.2.2 on page 42 for more information.
Section 1.7.2.2 on page 42 for more information on
Section 1.7.2.1 on page 42 for more
ATP Series User’s Guide
45

Chapter 1 Introduction
Table 6 Security Check for Web Interface (continued)
LABEL DESCRIPTION
Change Two-Factor Authentication
Port
Change Zyxel IPSec VPN Client
Provisioning Port
Please remind me Select how often to display the screen from the drop-down list box.
OK Click OK to save your changes back to the Zyxel Device.
Cancel Click Cancel to exit this screen without saving your changes.
Select this to change the port VPN clients use to access the Zyxel Device
LAN with two-factor authentication. See
more information.
Configure a new port between 1024 to 65535. Do not use a port number
that has been used.
Select this to change the port IPSec VPN clients use to retrieve VPN rule
settings from the Zyxel Device. See
information.
Configure a new port between 1024 to 65535. Do not use a port number
that has been used.
The port you configure here must be the same as the port you use when
logging in as a Zyxel IPSec VPN client.
1.7.4 Remote Access to the Zyxel Device Networks
Section 1.7.2.4 on page 43 for
Section 1.7.2.3 on page 43 for more
Your Zyxel Device keeps your networks safe while allowing external access by applying the security
measures below:
• Two-Factor Authentication: Use two-factor authentication to have double-layer security to access a
secured network behind the Zyxel Device. The first layer is the VPN client/Zyxel Device’s login user
name / password. The second layer is an authorized SMS (via mobile phone number) or email
address. See
Section 37.11.4 on page 931 for more information on two-factor authentication.
• Device Insight: The Zyxel Device can identify and display the basic information and status of clients
that are connected to the Zyxel Device networks in Monitor > Network Status > Device Insight. See
Section 6.7 on page 173 for more information on viewing the device insight.
Create device insight profiles in Configuration > Object > Device Insight to block specified clients from
accessing the Internet or the Zyxel Device. See Section 37.1 on page 835 for more information on
creating and using the device insight profiles.
• IPSec VPN: You can create highly secure connections with IKEv2 or EAP authentication to access
networks behind the Zyxel Device. For example, home workers can securely access company
resources if they have proper authentication. See
IPSec VPN.
• Upload Bandwidth Limit: Zyxel subscription-based SecuExtender IPSec VPN clients with Windows
version 5.6.80.007 or later or macOS version 1.2.0.7 or later support upload bandwidth limit. Use this to
set the maximum bandwidth for uploading traffic from IPSec VPN clients over IPSec VPN tunnels. See
Section 19.5 on page 538 for more information on upload bandwidth limit.
1.7.5 Web Configurator Screens Overview
Chapter 19 on page 512 for more information on
The Web Configurator screen is divided into these parts:
• A – title bar
• B – navigation panel
• C – main window
ATP Series User’s Guide
46

Chapter 1 Introduction
A
C
B
Figure 16 Web Configurator Screen Overview
Title Bar
Figure 17 Title Bar
The title bar icons in the upper right corner provide the following functions.
Table 7 Title Bar: Web Configurator Icons
LABEL DESCRIPTION
SecuReporter This icon shows when SecuReporter is enabled and the Zyxel Device is added to an
Web Console Click this to open one or multiple console windows from which you can run command line
CLI Click this to open a popup window that displays the CLI commands sent by the Web
Reference Click this to check which configuration items reference an object.
Site Map Click this to see an overview of links to the Web Configurator screens.
Forum Go to https://businessforum.zyxel.com for product discussions.
Help Click this to open the help page for the current screen.
organization.
Click this to open the SecuReporter portal page.
interface (CLI) commands. You will be prompted to enter your user name and password. See
the Command Reference Guide for information about the commands.
Logging in to the Zyxel Device with HTTPS, so you can open one or multiple console windows.
Configurator to the Zyxel Device.
ATP Series User’s Guide
47

Chapter 1 Introduction
Table 7 Title Bar: Web Configurator Icons (continued)
LABEL DESCRIPTION
Notification Only Admin or Limited Admin can see notifications. Notifications display what’s new in the Zyxel
Device firmware (ZLD), information on security services about to expire.
Slide the switch to Off if you don’t want notifications. Click an item to see more details on it.
Click the Refresh icon or refresh the browser page to update notifications. The latest
notification appears at the top. An item is removed once it has been read.
Up to five notifications can be shown here. If there are more than five notifications, then click
All Notifications to see them.
About Click this to display basic information about the Zyxel Device.
Logout Click this to log out of the Web Configurator.
About
Click About to display basic information about the Zyxel Device.
Figure 18 About
This table describes the fields in this screen.
Table 8 About
LABEL DESCRIPTION
Current Version This shows the firmware version of the Zyxel Device.
Released Date This shows the date (yyyy-mm-dd) and time (hh:mm:ss) when the firmware is released.
System
Protection
Signature
OK Click this to close the screen.
This shows the system protection signature version of the Zyxel Device. These signatures do not
require a license. The Zyxel Device will synch with the Cloud Helper Server every day to update
these signatures automatically.
System protection signatures protect your Zyxel Device and local networks from web attacks,
such as command injection, cross-site scripting and path traversal.
Command injection: This is an attack in which an attacker uses the Zyxel Device vulnerabilities
to execute commands to control your Zyxel Device.
Cross-site scripting: This is an attack in which an attacker implants malicious scripts in a website.
When you visit this website, the malicious scripts are sent and executed on your web browser.
Path traversal: This is an attack that allows an attacker to access files you store in the web root
folder.
Site Map
Click Site MAP to see an overview of links to the Web Configurator screens. Click a screen’s link to go to
that screen.
ATP Series User’s Guide
48

Figure 19 Site Map
Chapter 1 Introduction
Web Console
Click Web Console to open one or multiple console windows from which you can run CLI commands.
You will be prompted to enter your user name and password. See the Command Reference Guide for
information about the commands. Logging in to the Zyxel Device with HTTPS, so you can open one or
multiple console windows.
Figure 20 Web Console Window
Reference
Click Reference to open the Reference screen. Select the type of object and the individual object and
click Refresh to show which configuration settings reference the object.
ATP Series User’s Guide
49

Chapter 1 Introduction
Figure 21 Reference
The fields vary with the type of object. This table describes labels that can appear in this screen.
Table 9 Reference
LABEL DESCRIPTION
Type Select an object type to see the services.
Name This identifies the object for which the configuration settings that use it are displayed. Click the
# This field is a sequential value, and it is not associated with any entry.
Service This is the type of setting that references the selected object. Click a service’s name to display the
Priority If it is applicable, this field lists the referencing configuration item’s position in its list, otherwise N/A
Name This field identifies the configuration item that references the object.
Description If the referencing configuration item has a description configured, it displays here.
Refresh Click this to update the information in this screen.
Cancel Click Cancel to close the screen.
object’s name to display the object’s configuration screen in the main window.
service’s configuration screen in the main window.
displays.
CLI Messages
Click CLI to look at the CLI commands sent by the Web Configurator. Open the pop-up window and
then click some menus in the Web Configurator to display the corresponding commands.
ATP Series User’s Guide
50

Figure 22 CLI Messages
1.7.6 Navigation Panel
Use the navigation panel menu items to open status and configuration screens. Click the arrow in the
middle of the right edge of the navigation panel to hide the panel or drag to resize it. The following
sections introduce the Zyxel Device’s navigation panel menus and their screens.
Figure 23 Navigation Panel
Chapter 1 Introduction
Dashboard
The dashboard displays general device information, system status, system resource usage, licensed
service status, and interface status in widgets that you can re-arrange to suit your needs. See the Web
Help for details on the dashboard.
ATP Series User’s Guide
51

Chapter 1 Introduction
Monitor Menu
The monitor menu screens display status and statistics information.
Table 10 Monitor Menu Screens Summary
FOLDER OR LINK TAB FUNCTION
Traffic Statistics
Port Statistics Port Statistics Displays packet statistics for each physical port.
Interface Status Interface
Summary
Traffic Statistics Traffic
Statistics
Session Monitor Session
Network Status
DHCP Table DHCP Table Displays a list of interfaces and their DHCP-assigned IP addresses.
Device Insight Device
Login Users Login Users Lists the users currently logged into the Zyxel Device.
IGMP Statistics IGMP
DDNS Status DDNS Status Displays the status of the Zyxel Device’s DDNS domain names.
IP/MAC Binding IP/MAC
Cellular Status Cellular
UPnP Port Status Port Statistics Displays details about UPnP connections going through the Zyxel Device.
USB Storage Storage
Ethernet
Neighbor
FQDN Object FQDN Object Displays FQDN (Fully Qualified Domain Name) object cache lists used in DNS
Virtual Server LB Virtual Server
Wireless
AP Information AP List Lists APs managed by the Zyxel Device.
ZyMesh ZyMesh Link
Monitor
Insight
Statistics
Binding
Status
Information
Ethernet
Neighbor
Load
Balancer
Status
Radio List Lists wireless details of APs managed by the Zyxel Device.
Built-in AP Displays associated wireless client usage and number. (For Zyxel Device
Top N APs Lists managed APs with the most wireless traffic usage and most associated
Single AP Lists APs wireless traffic usage and associated wireless stations for a managed
Info
Displays general interface information and packet statistics.
Collect and display traffic statistics.
Displays the status of all current sessions.
Displays a list of WiFi and wireless clients connected to the Zyxel Device
networks.
Collect and display IGMP statistics.
Lists the devices that have received an IP address from Zyxel Device
interfaces using IP/MAC binding.
Displays details about the Zyxel Device’s mobile broadband connection
status.
Displays details about USB device connected to the Zyxel Device.
View and manage the Zyxel Device’s neighboring devices via Smart
Connect (Layer Link Discovery Protocol (LLDP)). Use the Zyxel One Network
(ZON) utility to view and manage the Zyxel Device’s neighboring devices via
the Zyxel Discovery Protocol (ZDP).
queries.
Displays traffic statistics between a client and a real server.
model names containing ‘W’.)
wireless stations.
AP.
Display statistics about ZyMesh wireless connections between managed APs.
ATP Series User’s Guide
52

Chapter 1 Introduction
Table 10 Monitor Menu Screens Summary (continued)
FOLDER OR LINK TAB FUNCTION
SSID Info SSID Info Display information about the AP’s wireless clients.
Station Info Station List Lists wireless clients associated with the APs managed by the Zyxel Device.
Top N
Stations
Single Station Lists wireless traffic usage for an associated wireless station.
Detected
Device
Wireless Health Wireless
VPN Monitor
IPSec IPSec Displays and manages the active IPSec SAs.
SSL SSL Lists users currently logged into the VPN SSL client portal. You can also log out
L2TP over IPSec L2TP over
Remote AP VPN Remote AP
Security Statistics
App Patrol Summary Displays application patrol statistics.
Content Filter Web
Anti-Malware Summary Collect and display statistics on the malware that the Zyxel Device has
Reputation Filter Summary Displays counts, IP addresses and URLs that are blocked by the Zyxel Device.
IPS Summary Collect and display statistics on the intrusions that the Zyxel Device has
Sandboxing Summary Displays the sandboxing statistics.
Email Security Summary Collect and display spam statistics.
CDR Containment
SSL Inspection Summary Collect and display SSL Inspection statistics.
Log View Log Lists log entries.
Detected
Device
Health
IPSec
VPN
Content Filter
DNS Content
Filter
Status Displays how many mail sessions the ZyWALL is currently checking and DNSBL
List
History Displays what clients were and are contained by Collaborative Detection &
Certificate
Cache List
View AP Log Lists AP log entries.
Lists wireless stations with the most wireless traffic usage.
Display information about suspected rogue APs.
Displays information about health or wireless networks for your APs and
connected wireless clients.
individual users and delete related session information.
Displays details about current L2TP sessions.
Displays and manages the active remote APs.
Collect and display web content filter statistics.
Collect and display DNS content filter statistics.
detected.
detected.
(Domain Name Service-based spam Black List) statistics.
Displays what clients are currently contained by Collaborative Detection &
Response (CDR).
Response (CDR).
Displays traffic to destination servers using certificates.
ATP Series User’s Guide
53

Chapter 1 Introduction
Configuration Menu
Use the configuration menu screens to configure the Zyxel Device’s features.
Table 11 Configuration Menu Screens Summary
FOLDER OR LINK TAB FUNCTION
Quick Setup Quickly configure WAN interfaces or VPN connections.
Licensing
Registration Registration Register the device and activate trial services.
Service View the licensed service status and upgrade licensed services.
Signature
Update
Wireless
Built-in AP General Allow WiFi clients to access your Zyxel Device wirelessly to connect to
Controller Configuration Configure manual or automatic controller registration.
AP
Management
Rogue AP Rogue/Friendly AP
Wireless Health Wireless Health Enable wireless health to improve the APs wireless network
Auto Healing Auto Healing Enable auto healing to extend the wireless service coverage area of
RTLS Real Time Location
Network
Interface Port
Signature Update signatures immediately or by a schedule.
the network.
Mgnt AP List Edit or remove entries in the lists of APs managed by the Zyxel Device.
AP Policy Configure the AP controller’s IP address on the managed APs and
determine the action the managed APs take if the current AP
controller fails.
AP Group Create groups of APs, define their radio, VLAN, port and load
balancing settings.
Firmware Update the firmware on APs connected to your Zyxel Device.
List
System
Port Role/Port
Group/ Port
Configuration
Ethernet Manage Ethernet interfaces and virtual Ethernet interfaces.
PPP Create and manage PPPoE and PPTP interfaces.
Cellular Configure a cellular Internet connection for an installed mobile
Tunnel Configure tunneling between IPv4 and IPv6 networks.
VLAN Create and manage VLAN interfaces and virtual VLAN interfaces.
Bridge Create and manage bridges and virtual bridge interfaces.
LAG Configure interface and LAG parameters for each LAG interface.
VTI Configure IP address assignment and interface parameters for VTI
Trunk Create and manage trunks (groups of interfaces) for load balancing.
Configure how the Zyxel Device monitors rogue APs.
performance in Zyxel Device networks.
the managed APs when one of the APs fails.
Use the managed APs as part of an Ekahau RTLS to track the location
of Ekahau WiFi tags.
Use this screen to set the Zyxel Device’s flexible ports such as LAN, OPT,
WLAN, or DMZ.
broadband card.
(Virtual Tunnel Interface).
ATP Series User’s Guide
54

Chapter 1 Introduction
Table 11 Configuration Menu Screens Summary (continued)
FOLDER OR LINK TAB FUNCTION
Routing Policy Route Create and manage routing policies.
Static Route Create and manage IP static routing information.
RIP Configure device-level RIP settings.
OSPF Configure device-level OSPF settings, including areas and virtual links.
BGP Configure exchange of Border Gateway Protocol (BGP) information
over an IPSec tunnel.
DDNS DDNS Define and manage the Zyxel Device’s DDNS domain names.
NAT NAT Set up and manage port forwarding rules.
Virtual Server Load
Balancer
Redirect
Service
ALG ALG Configure SIP, H.323, and FTP pass-through settings.
UPnP UPnP Configure interfaces that allow UPnP and NAT-PMP connections.
IP/MAC Binding Summary Configure IP to MAC address bindings for devices connected to each
Layer 2 Isolation General Enable layer-2 isolation on the Zyxel Device and the internal
DNS Inbound LB DNS Load Balancing Configure DNS Load Balancing.
VPN
IPSec VPN VPN Connection Configure IPSec tunnels.
SSL VPN Access Privilege Configure SSL VPN access rights for users and groups.
L2TP VPN L2TP VPN Configure L2TP over IPSec tunnels.
Remote AP VPN Remote AP VPN Configure the IP address pool for the Zyxel Device to assign an IP
BWM BWM Enable and configure bandwidth management rules.
Web
Authentication
Security Policy
Policy Control Policy Create and manage level-3 traffic rules and apply Security Service
Redirect Service Set up and manage HTTP and SMTP redirection rules.
Exempt List Configure ranges of IP addresses to which the Zyxel Device does not
Allow List Enable and configure the allow list.
VPN Gateway Configure IKE tunnels.
Concentrator Combine IPSec VPN connections into a single secure network
Configuration
Provisioning
Global Setting Configure the Zyxel Device’s SSL VPN settings that apply to all
Web Authentication
General/
Authentication
Type/Custom
Web Portal File/
Custom User
Agreement File
SSO Configure the Zyxel Device to work with a Single Sign On agent.
Configure virtual server load balancer rules that distribute incoming
connection requests to a virtual server between multiple real
(physical) servers
supported interface.
apply IP/MAC binding.
interfaces.
Set who can retrieve VPN rule settings from the Zyxel Device using the
Zyxel Device IPSec VPN Client.
connections.
address to the outgoing interface of each RAP IPSec tunnel.
Define a web portal and exempt services from authentication.
profiles.
ATP Series User’s Guide
55

Chapter 1 Introduction
Table 11 Configuration Menu Screens Summary (continued)
FOLDER OR LINK TAB FUNCTION
ADP General Display and manage ADP bindings.
Profile Create and manage ADP profiles.
Allow List Create an allow list for certain IP or services to let them pass the ADP
flood detection.
Session Control Session Control Limit the number of concurrent client NAT/security policy sessions.
Security Service
AppPatrol Profile Manage different types of traffic in this screen. Create App Patrol
template(s) of settings to apply to a traffic flow using a security policy.
Content Filter Web Content Filter:
General
Web Content Filter:
Trusted Web Sites
Web Content Filter:
Forbidden Web Sites
DNS Content Filter:
General
DNS Content Filter:
Allow List
DNS Content Filter:
Block List
Anti-Malware Anti-Malware Enable, specify actions to take when encountering malware or
Block/Allow List Set up a block list to identify spam and an allow list to identify
Signature Search for particular signatures to get more information about them.
Create and manage the detailed filtering rules for content filtering
profiles and then apply to a traffic flow using a security policy.
Create a list of allowed web sites that bypass content filtering policies.
Create a list of web sites to block regardless of content filtering
policies.
Create and manage the detailed filtering rules for DNS content
filtering profiles and then apply to a traffic flow using a security policy.
Create a list of allowed web sites that bypass DNS content filtering
policies.
Create a list of web sites to block regardless of content filtering
policies.
compressed files, and set up a black list to identify files with malware
file patterns and a white list to identify files that should not be checked
for malware.
legitimate email.
ATP Series User’s Guide
56

Chapter 1 Introduction
Table 11 Configuration Menu Screens Summary (continued)
FOLDER OR LINK TAB FUNCTION
Reputation
Filter
IPS IPS Enable and configure IPS settings. Create, import, or export custom
Sandboxing Sandboxing Enable sandboxing, and specify the actions the Zyxel Device takes
Email Security Email Security Turn email security on or off and manage email security policies.
CDR Collaborative
SSL Inspection Profile Decrypt HTTPS traffic for Security Service inspection. Create SSL
IP Reputation
General/Allow List/
Block List/ External
Block List
DNS Threat Filter
General/Profile/
Allow List/ Block List
General/Allow List/
Block List/ External
Block List
Allow List Configure signatures that will be exempted from IPS inspection.
Block/Allow List Set up a block list to identify spam and an allow list to identify
Detection &
Response
Exempt List Set up a list of devices that are exempt from Collaborative Detection
Exclude List Configure services to be excluded from SSL Inspection.
Certificate Update Use this screen to update the latest certificates of servers using SSL
Enable IP reputation and specify what action the Zyxel Device takes
when any IP address with bad reputation is detected.
You can also set up an allow list to identify which IPv4 addresses
should be allowed, and a block list to identify which IPv4 addresses
should be blocked.
Set up an external block list which uses block list entries stored in a file
on a web server that supports HTTP or HTTPS and is reachable from the
Zyxel Device. The Zyxel Device will block incoming and outgoing
packets from the black list entries in this file.
Enable DNS threat filtering and specify what action the Zyxel Device
takes when a access attempt to a blocked Fully Qualified Domain
Name (FQDN) is detected.
You can also set up an allow list to identify which FQDNs should be
allowed, and a block list to identify which FQDNs should be blocked.
Enable URL filtering and specify what action the Zyxel Device takes
when a access attempt to a blocked website is detected.
You can also set up an allow list to identify which IPv4 addresses and/
or URLs should be allowed, and a block list to identify which IPv4
addresses and/or URLs should be blocked.
Set up an external block list which uses block list entries stored in a file
on a web server that supports HTTP or HTTPS and is reachable from the
Zyxel Device. The Zyxel Device will block incoming and outgoing
packets from the black list entries in this file.
signatures.
when malicious or suspicious files are detected.
Create email security templates of settings to apply to a traffic flow
using a security policy.
legitimate email.
Turn CDR on or off and manage CDR policies. Create CDR templates
of settings to apply to a traffic flow using a security policy.Configure
Collaborative Detection & Response triggering policies with
containment actions.
& Response checking.Configure IPv4 and/or MAC addresses of
devices that are exempt from CDR checking.
Inspection templates of settings to apply to a traffic flow using a
security policy.
connections to the Zyxel Device network.
ATP Series User’s Guide
57

Chapter 1 Introduction
Table 11 Configuration Menu Screens Summary (continued)
FOLDER OR LINK TAB FUNCTION
IP Exception IP Exception Use this screen to view the IP exception list for the anti-malware and
IPS (Intrusion Prevention System) features.
The Zyxel Device will not intercept nor inspect the incoming packets
that match the rules in the IP exception list for the anti-malware and/
or IPS (Intrusion Prevention System) features.
Object
Device Insight Device Insight Configure profiles to block specified clients from accessing the
Zone Zone Configure zone templates used to define various policies.
User/Group User Create and manage users.
Group Create and manage groups of users.
Setting Manage default settings for all users, general settings for user sessions,
MAC Address Configure the MAC addresses of wireless clients for MAC
AP Profile Radio Create templates of radio settings to apply to policies as an object.
SSID Create templates of wireless settings to apply to radio profiles or
MON Profile MON Profile Create and manage rogue AP monitoring files that can be
ZyMesh Profile ZyMesh Profile Create and manage ZyMesh files that can be associated with
Address/Geo IP Address Create and manage host, range, and network (subnet) addresses.
Address Group Create and manage groups of addresses to apply to policies as a
Geo IP Update the database of country-to-IP address mappings and
Service Service Create and manage TCP and UDP services.
Service Group Create and manage groups of services to apply to policies as a single
Schedule Schedule Create one-time and recurring schedules.
Schedule Group Create and manage groups of schedules to apply to policies as a
AAA Server Active Directory Configure the Active Directory settings.
LDAP Configure the LDAP settings.
RADIUS Configure the RADIUS settings.
Auth. Method Authentication
Method
Two-factor
Authentication
Certificate My Certificates Create and manage the Zyxel Device’s certificates.
Trusted Certificates Import and manage certificates from trusted sources.
ISP Account ISP Account Create and manage ISP account information for PPPoE/PPTP
Internet or the Zyxel Device.
and rules to force user authentication.
authentication using the local user database.
policies as an object.
associated with different APs.
different APs.
single objects.
manually configure country-to-IP address mappings for geographic
address objects that can be used in security policies.
object.
single object.
Create and manage ways of authenticating users.
Configure SMS or email authentication to access a secured network
behind the Zyxel Device via a VPN tunnel.
interfaces.
ATP Series User’s Guide
58

Chapter 1 Introduction
Table 11 Configuration Menu Screens Summary (continued)
FOLDER OR LINK TAB FUNCTION
DHCPv6 Request Configure IPv6 DHCP request type and interface information.
Lease Configure IPv6 DHCP lease type and interface information.
Device HA Device HA Status See the license status for Device HA Pro, and see the status of the
active and passive devices.
Device HA Pro Configure Device HA Pro global settings, monitored interfaces and
synchronization settings.
View Log See logs of the active and passive devices
Mgmt. & Analytics SecuManager Enable and configure management of the Zyxel Device by a Central
SecuReporter Enable SecuReporter logging and access the SecuReporter security
Nebula Use this screen to let Nebula manage your Zyxel Device.
System
Host Name Host Name Configure the system and domain name for the Zyxel Device.
USB Storage Settings Configure the settings for the connected USB devices.
Date/Time Date/Time Configure the current date, time, and time zone in the Zyxel Device.
Console Speed Console Speed Set the console speed.
DNS DNS Configure the DNS server and address records for the Zyxel Device.
WWW Service Control Configure HTTP, HTTPS, and general authentication.
Login Page Configure how the login and access user screens look.
SSH SSH Configure SSH server and SSH service settings.
TELNET TELNET Configure telnet server settings for the Zyxel Device.
FTP FTP Configure FTP server settings.
SNMP SNMP Configure SNMP communities and services.
Auth. Server Auth. Server Configure the Zyxel Device to act as a RADIUS server.
Notification Mail Server Configure a mail server with authentication to send reports and
SMS Enable the SMS service to send dynamic guest account information in
Response Message Create a web page when access to a website is restricted due to a
Language Language Select the Web Configurator language.
IPv6 IPv6 Enable IPv6 globally on the Zyxel Device here.
ZON ZON Use the Zyxel One Network (ZON) utility to view and manage the Zyxel
Log & Report
Email Daily
Report
Log Settings Log Settings Configure the system log, email logs, and remote syslog servers.
Email Daily Report Configure where and how to send daily reports and what reports to
Network Management system.
analytics portal that collects and analyzes logs from your Zyxel Device
in order to identify anomalies, alert on potential internal or external
threats, and report on network usage.
password expiration notification emails.
text messages and authorization for VPN tunnel access to a secured
network.
security service.
Device’s neighboring devices via the Zyxel Discovery Protocol (ZDP).
send.
ATP Series User’s Guide
59

Chapter 1 Introduction
Maintenance Menu
Use the maintenance menu screens to manage configuration and firmware files, run diagnostics, and
reboot or shut down the Zyxel Device.
Table 12 Maintenance Menu Screens Summary
FOLDER
OR LINK
File
Manager
Diagnostics Diagnostics Collect diagnostic information.
Packet
Flow
Explore
Shutdown/
Reboot
TAB FUNCTION
Configuration File Manage and upload configuration files for the Zyxel Device.
Firmware
Management
Shell Script Manage and run shell script files for the Zyxel Device.
Packet Capture Capture packets for analysis.
CPU/Memory
Status
System Log Connect a USB device to the Zyxel Device and archive the Zyxel Device system
Network Tool Identify problems with the connections. You can use Ping or Traceroute to help
Routing Traces Configure traceroute to identify where packets are dropped for
Wireless Frame
Capture
Routing Status Check how the Zyxel Device determines where to route a packet.
SNAT Status View a clear picture on how the Zyxel Device converts a packet’s source IP
Shutdown/ Reboot Turn off or restart the Zyxel Device.
View the current firmware version and upload firmware. Reboot with your
choice of firmware.
This screen includes the sub-tabs below:
•Controller
•AP
• Filer
This screen includes the sub-tabs below:
•Capture
•Capture on AP
• Files
•Remote Capture
View CPU and memory usage statistics.
logs to it here.
you identify problems.
troubleshooting.
Capture wireless frames from APs for analysis.
address and check the related settings.
1.7.7 Tables and Lists
Web Configurator tables and lists are flexible with several options for how to display their entries.
Click a column heading to sort the table’s entries according to that column’s criteria.
ATP Series User’s Guide
60

Chapter 1 Introduction
Figure 24 Sorting Table Entries by a Column’s Criteria
Click the down arrow next to a column heading for more options about how to display the entries. The
options available vary depending on the type of fields in the column. Here are some examples of what
you can do:
• Sort in ascending or descending (reverse) alphabetical order
• Select which columns to display
•Group entries by field
•Show entries in groups
• Filter by mathematical operators (<, >, or =) or searching for text
Figure 25 Common Table Column Options
Select a column heading cell’s right border and drag to re-size the column.
Figure 26 Resizing a Table Column
Select a column heading and drag and drop it to change the column order. A green check mark
displays next to the column’s title when you drag the column to a valid new location.
ATP Series User’s Guide
61

Chapter 1 Introduction
Figure 27 Moving Columns
Use the icons and fields at the bottom of the table to navigate to different pages of entries and control
how many entries display at a time.
Figure 28 Navigating Pages of Table Entries
The tables have icons for working with table entries. You can often use the [Shift] or [Ctrl] key to select
multiple entries to remove, activate, or deactivate.
Figure 29 Common Table Icons
Here are descriptions for the most common table icons.
Table 13 Common Table Icons
LABEL DESCRIPTION
Add Click this to create a new entry. For features where the entry’s position in the numbered list is
Edit Double-click an entry or select it and click Edit to open a screen where you can modify the entry’s
Remove To remove an entry, select it and click Remove. The Zyxel Device confirms you want to remove it
Activate To turn on an entry, select it and click Activate.
Inactivate To turn off an entry, select it and click Inactivate.
Connect To connect an entry, select it and click Connect.
Disconnect To disconnect an entry, select it and click Disconnect.
References Select an entry and click References to check which settings use the entry.
Move To change an entry’s position in a numbered list, select it and click Move to display a field to type a
important (features where the Zyxel Device applies the table’s entries in order like the security policy
for example), you can select an entry and click Add to create a new entry after the selected entry.
settings. In some tables you can just click a table entry and edit it directly in the table. For those types
of tables small red triangles display for table entries with changes that you have not yet applied.
before doing so.
number for where you want to put that entry and press [ENTER] to move the entry to the number that
you typed. For example, if you type 6, the entry you are moving becomes number 6 and the previous
entry 6 (if there is one) gets pushed up (or down) one.
ATP Series User’s Guide
62

Chapter 1 Introduction
Working with Lists
When a list of available entries displays next to a list of selected entries, you can often just double-click
an entry to move it from one list to the other. In some lists you can also use the [Shift] or [Ctrl] key to
select multiple entries, and then use the arrow button to move them to the other list.
Figure 30 Working with Lists
ATP Series User’s Guide
63

CHAPTER 2
Initial Setup Wizard
2.1 Initial Setup Wizard: Select Management Mode
When you log into the Web Configurator for the first time or when you reset the Zyxel Device to its
default configuration, the Initial Setup Wizard screen displays. This wizard helps you configure Internet
connection settings and activate subscription services.
Note: For Zyxel Devices that already have firmware version 4.25 or later, you have to register
your Zyxel Device and activate the corresponding service at myZyxel (through your
Zyxel Device).
This chapter provides information on configuring the Web Configurator's Initial Setup Wizard. See the
feature-specific chapters in this User’s Guide for background information.
• Click the double arrow in the upper right corner to display or hide the help.
• Click Logout to exit the In itial Setup Wizard or click Next to continue the wizard. Click Finish at the end
of the wizard to complete the wizard.
Select On Premises Mode to manage your Zyxel Device using the Web Configurator or the Command
Line Interface (CLI). Use this mode to secure your networks with the Zyxel Device security services. Follow
the On Premises mode wizard to set up your Zyxel Device, such as configuring the WAN settings,
registering your Zyxel Device and allowing remote access to your Zyxel Device.
Select Nebula Mode to manage your Zyxel Device using Nebula Control Center (NCC). NCC is a cloud
based network management system that allows you to remotely manage and monitor your Zyxel
Device. Use this mode to manage your Zyxel Device with accounts at different privilege levels. You can
also manage your Zyxel Device licenses and status through NCC.Follow the Nebula mode wizard to
configure the WAN settings to pass the management of your Zyxel Device to NCC.
Note: You need to press the reset button to change the Zyxel Device mode once you finish
the wizard. You will not see this screen if you reset the Zyxel Device through the web
configurator or the CLI.
ATP Series User’s Guide
64

Chapter 2 Initial Setup Wizard
Figure 31 Management Mode: On Premises Mode
2.1.1 Welcome Screen
Select On Premises Mode in the previous screen to show the Welcome screen. Use this screen to see the
settings you can configure using the On Premises mode initial setup wizard.
Figure 32 On Premises Mode- Welcome
2.1.2 Internet Access Setup - WAN Interface
Use this screen to set how many WAN interfaces to configure and the first WAN interface’s type of
encapsulation and method of IP address assignment.
ATP Series User’s Guide
65

Chapter 2 Initial Setup Wizard
The screens vary depending on the encapsulation type. Refer to information provided by your ISP to
know what to enter in each field.
Note: Enter the Internet access information exactly as your ISP gave it to you. Leave a field
blank if you don’t have that information.
• I have two ISPs: Select this option to configure two Internet connections. Leave it cleared to configure
just one. This option appears when you are configuring the first WAN interface.
• VLAN Tagged: Select this to tag the traffic going out from the Zyxel Device. Enter a VLAN ID. This 12-bit
number uniquely identifies each VLAN. Allowed values are 1-4080.
• Encapsulation: Choose the Ethernet option when the WAN port is used as a regular Ethernet. Choose
PPPoE, PPTP or L2TP for a dial-up connection according to the information from your ISP.
• MTU: The Maximum Transmission Unit. Type the maximum size of each data packet, in bytes, that can
move through this interface. If a larger packet arrives, the Zyxel Device divides it into smaller
fragments. Allowed values are 576-1500. Usually, this value is 1500.
• WAN Interface: This is the interface you are configuring for Internet access.
• Zone: This is the security zone to which this interface and Internet connection belong.
• IP Address Assignment: Select Auto if your ISP did not assign you a fixed IP address.
Select Static if the ISP assigned a fixed IP address.
• DHCP Option 60: This field will show if you choose Auto as the IP Address Assignment. DHCP Option 60
is used by the Zyxel Device for identification to the DHCP server using the VCI (Vendor Class Identifier)
on the DHCP server. The Zyxel Device adds it in the initial DHCP discovery message that a DHCP client
broadcasts in search of an IP address. The DHCP server can assign different IP addresses or options to
clients with the specific VCI or reject the request from clients without the specific VCI.
Type a string using up to 63 of these characters [a-zA-Z0-9!\"#$%&\'()*+,-./:;<=>?@\[\\\]^_`{}] to
identify this Zyxel Device to the DHCP server. For example, Zyxel-TW.
Figure 33 Internet Access
ATP Series User’s Guide
66

Chapter 2 Initial Setup Wizard
2.1.3 Internet Access: Ethernet
This screen is read-only if you set the previous screen’s IP Address Assignment field to Auto. If you set the
previous screen’s IP Address Assignment field to Static, use this screen to configure your IP address
settings.
•VLAN ID: This displays the VLAN ID tag for the traffic going out from the Zyxel Device, which you
configured in the previous screen.
• Encapsulation: This displays the type of Internet connection you are configuring.
• MTU: This displays the maximum size of each data packet that can move through this interface.
• First WAN Interface: This is the number of the interface that will connect with your ISP.
• Zone: This is the security zone to which this interface and Internet connection will belong.
• IP Address: Enter your (static) public IP address. Auto displays if you selected Auto as the IP Address
Assignment in the previous screen.
• DHCP Option 60: This field will show if you selected Auto as the IP Address Assignment in the previous
screen. This displays the string you configured to identify DHCP server using VCI.
The following fields display if you selected static IP address assignment.
• IP Subnet Mask: Enter the subnet mask for this WAN connection's IP address.
• Gateway IP Address: Enter the IP address of the router through which this WAN connection will send
traffic (the default gateway).
• First / Second DNS Server: These fields display if you selected static IP address assignment. The Domain
Name System (DNS) maps a domain name to an IP address and vice versa. Enter a DNS server's IP
address(es). The DNS server is extremely important because without it, you must know the IP address
of a computer before you can access it. The Zyxel Device uses these (in the order you specify here) to
resolve domain names for VPN, DDNS and the time server. Leave the field as 0.0.0.0 if you do not want
to configure DNS servers.
2.1.3.1 Possible Errors
• Check that your cable connection is coming from the correct interface you’re using for the WAN
connection on the Zyxel Device.
• Check that the interface is connected to the device you’re using for Internet access such as a
broadband router and that the router is turned on. The LED of the interface you’re using for the WAN
connection on the Zyxel Device should be orange.
• If your Zyxel Device was not able to obtain an IP address, check that your Internet access information
uses DHCP as the WAN connection type. If it fails again, check with your Internet service provider or
administrator for correct WAN settings.
• If your Zyxel Device was not able to use the IP address entered, check that you were given an IP
address, subnet mask and gateway address as part of your Internet access information. Re-enter your
IP address, subnet mask and gateway IP address exactly as given. If it fails again, check with your
Internet service provider or administrator for correct IP address, subnet mask and gateway address
and other WAN settings.
ATP Series User’s Guide
67

Chapter 2 Initial Setup Wizard
Figure 34 Internet Access: Ethernet Encapsulation
2.1.4 Internet Access: PPPoE
2.1.4.1 Internet Access - First WAN Interface
•VLAN ID: This displays the VLAN ID tag for the traffic going out from the Zyxel Device, which you
configured in the previous screen.
2.1.4.2 ISP Parameters
•VLAN ID: This displays the VLAN ID tag for the traffic going out from the Zyxel Device, which you
configured in the previous screen.
• Encapsulation: This displays the type of Internet connection you are configuring.
• MTU: This displays the maximum size of each data packet that can move through this interface.
• Type the PPPoE Service Name from your service provider. PPPoE uses a service name to identify and
reach the PPPoE server. You can use alphanumeric and -_@$./ characters, and it can be up to 64
characters long.
• Authentication Type - Select an authentication protocol for outgoing connection requests. Options
are:
• Chap/PAP - Your Zyxel Device accepts either CHAP or PAP when requested by the remote node.
• Chap - Your Zyxel Device accepts CHAP only.
• PAP - Your Zyxel Device accepts PAP only.
• MSCHAP - Your Zyxel Device accepts MSCHAP only.
• MSCHAP-V2 - Your Zyxel Device accepts MSCHAP-V2 only.
• Type the User Name given to you by your ISP. You can use alphanumeric and -_@$./ characters, and
it can be up to 31 characters long.
•Type the Password associated with the user name. Use up to 64 ASCII characters except the [] and ?.
This field can be blank.
•Select Nailed-Up if you do not want the connection to time out. Otherwise, type the Idle Timeout in
seconds that elapses before the router automatically disconnects from the PPPoE server.
ATP Series User’s Guide
68

Chapter 2 Initial Setup Wizard
2.1.4.3 WAN IP Address Assignments
• WAN Interface: This is the name of the interface that will connect with your ISP.
• Zone: This is the security zone to which this interface and Internet connection will belong.
• IP Address: Enter your (static) public IP address. Auto displays if you selected Auto as the IP Address
Assignment in the previous screen.
• First / Second DNS Server: These fields display if you selected static IP address assignment. The Domain
Name System (DNS) maps a domain name to an IP address and vice versa. Enter a DNS server's IP
address(es). The DNS server is extremely important because without it, you must know the IP address
of a computer before you can access it. The Zyxel Device uses these (in the order you specify here) to
resolve domain names for VPN, DDNS and the time server. Leave the field as 0.0.0.0 if you do not want
to configure DNS servers. If you do not configure a DNS server, you must know the IP address of a
machine in order to access it.
2.1.4.4 Possible Errors
• Check that you’re using the correct PPPoE Service Name and Authentication Type.
• Make sure that your Internet access information uses PPPoE as the WAN connection type. Re-enter
your PPPoE user name and password exactly as given. If it fails again, check with your Internet service
provider or administrator for correct WAN settings and user credentials.
• If you were given an IP address and DNS server information as part of your Internet access
information, re-enter them exactly as given. If it fails again, check with your Internet service provider
or administrator for correct IP address, subnet mask and gateway address and other WAN settings.
Figure 35 Internet Access: PPPoE Encapsulation
2.1.5 Internet Access: PPTP
2.1.5.1 ISP Parameters
• MTU: This displays the maximum size of each data packet that can move through this interface.
• Authentication Type - Select an authentication protocol for outgoing calls. Options are:
• Chap/PAP - Your Zyxel Device accepts either CHAP or PAP when requested by the remote node.
• Chap - Your Zyxel Device accepts CHAP only.
ATP Series User’s Guide
69

• PAP - Your Zyxel Device accepts PAP only.
• MSCHAP - Your Zyxel Device accepts MSCHAP only.
• MSCHAP-V2 - Your Zyxel Device accepts MSCHAP-V2 only.
• Type the User Name given to you by your ISP. You can use alphanumeric and -_@$./ characters, and
it can be up to 31 characters long.
•Type the Password associated with the user name. Use up to 64 ASCII characters except the [] and ?.
This field can be blank. Re-type your password in the next field to confirm it.
•Select Nailed-Up if you do not want the connection to time out. Otherwise, type the Idle Timeout in
seconds that elapses before the router automatically disconnects from the PPTP server.
2.1.5.2 PPTP Configuration
• Base Interface: This identifies the Ethernet interface you configure to connect with a modem or router.
•Type a Base IP Address (static) assigned to you by your ISP.
• Type the IP Subnet Mask assigned to you by your ISP (if given).
• Gateway IP Address: Enter the IP address of the router through which this WAN connection will send
traffic (the default gateway).
• Server IP: Type the IP address of the PPTP server.
•Type a Connection ID or connection name. It must follow the “c:id” and “n:name” format. For
example, C:12 or N:My ISP. This field is optional and depends on the requirements of your broadband
modem or router. You can use alphanumeric and -_: characters, and it can be up to 31 characters
long.
Chapter 2 Initial Setup Wizard
2.1.5.3 WAN IP Address Assignments
• First WAN Interface: This is the connection type on the interface you are configuring to connect with
your ISP.
• Zone This is the security zone to which this interface and Internet connection will belong.
• IP Address: Enter your (static) public IP address. Auto displays if you selected Auto as the IP Address
Assignment in the previous screen.
• First / Second DNS Server: These fields display if you selected static IP address assignment. The Domain
Name System (DNS) maps a domain name to an IP address and vice versa. Enter a DNS server's IP
address(es). The DNS server is extremely important because without it, you must know the IP address
of a computer before you can access it. The Zyxel Device uses these (in the order you specify here) to
resolve domain names for VPN, DDNS and the time server. Leave the field as 0.0.0.0 if you do not want
to configure DNS servers.
2.1.5.4 Possible Errors
• Check that you’re using the correct PPPT Service IP, Base IP Address, IP Subnet Mask, Gateway IP
Address, Connection ID and Authentication Type.
• Make sure that your Internet access information uses PPTP as the WAN connection type. Re-enter your
PPTP user name and password exactly as given. If it fails again, check with your Internet service
provider or administrator for correct WAN settings and user credentials.
• If you were given an IP address and DNS server information as part of your Internet access
information, re-enter them exactly as given. If it fails again, check with your Internet service provider
or administrator for correct IP address, subnet mask and gateway address and other WAN settings.
ATP Series User’s Guide
70

Chapter 2 Initial Setup Wizard
Figure 36 Internet Access: PPTP Encapsulation
2.1.6 Internet Access: L2TP
2.1.6.1 ISP Parameters
• Authentication Type - Select an authentication protocol for outgoing connection requests. Options
are:
• Chap/PAP - Your Zyxel Device accepts either CHAP or PAP when requested by the remote node.
• Chap - Your Zyxel Device accepts CHAP only.
• PAP - Your Zyxel Device accepts PAP only.
• MSCHAP - Your Zyxel Device accepts MSCHAP only.
• MSCHAP-V2 - Your Zyxel Device accepts MSCHAP-V2 only.
• Type the User Name given to you by your ISP. You can use alphanumeric and -_@$./ characters, and
it can be up to 31 characters long.
•Type the Password associated with the user name. Use up to 64 ASCII characters except the [] and ?.
This field can be blank.
•Select Nailed-Up if you do not want the connection to time out. Otherwise, type the Idle Timeout in
seconds that elapses before the router automatically disconnects from the PPPoE server.
2.1.6.2 L2TP Configuration
• Base Interface: This identifies the Ethernet interface you configure to connect with a modem or router.
•Type a Base IP Address (static) assigned to you by your ISP.
• IP Subnet Mask: Enter the subnet mask for this WAN connection's IP address.
ATP Series User’s Guide
71

Chapter 2 Initial Setup Wizard
• Gateway IP Address: Enter the IP address of the router through which this WAN connection will send
traffic (the default gateway).
• Server IP: Type the IP address of the L2TP server.
2.1.6.3 WAN IP Address Assignments
• WAN Interface: This is the name of the interface that will connect with your ISP.
• Zone: This is the security zone to which this interface and Internet connection will belong.
• IP Address: Enter your (static) public IP address. Auto displays if you selected Auto as the IP Address
Assignment in the previous screen.
• First / Second DNS Server: These fields display if you selected static IP address assignment. The Domain
Name System (DNS) maps a domain name to an IP address and vice versa. Enter a DNS server's IP
address(es). The DNS server is extremely important because without it, you must know the IP address
of a computer before you can access it. The Zyxel Device uses these (in the order you specify here) to
resolve domain names for VPN, DDNS and the time server. Leave the field as 0.0.0.0 if you do not want
to configure DNS servers.
2.1.6.4 Possible Errors
• Check that you’re using the correct L2PT Server IP, Subnet Mask, Gateway IP Address, IP Subnet Mask
and Authentication Type.
• Make sure that your Internet access information uses L2TP as the WAN connection type. Re-enter your
L2TP user name and password exactly as given. If it fails again, check with your Internet service
provider or administrator for correct WAN settings and user credentials.
• If you were given an IP address and DNS server information as part of your Internet access
information, re-enter them exactly as given. If it fails again, check with your Internet service provider
or administrator for correct IP address, subnet mask and gateway address and other WAN settings.
ATP Series User’s Guide
72

Chapter 2 Initial Setup Wizard
Figure 37 Internet Access: L2TP Encapsulation
2.1.7 Internet Access Setup - Second WAN Interface
If you selected I have two ISPs, after you configure the First WAN Interface, you can configure the
Second WAN Interface. The screens for configuring the second WAN interface are similar to the first (see
Section 2.1.2 on page 65).
ATP Series User’s Guide
73

Chapter 2 Initial Setup Wizard
Figure 38 Internet Access: Step 3: Second WAN Interface
2.1.8 Internet Access: Congratulations
You have set up your Zyxel Device to access the Internet. A screen displays with your settings. Click
Connection Test to check that you can access the Internet. If you cannot, click Back and confirm that
you entered the settings correctly. If you have, check that you got the correct settings from your ISP or
network administrator.
Figure 39 Internet Access: Summary
ATP Series User’s Guide
74

2.1.9 Date and Time Settings
It’s important to have correct date and time values in the logs. The Zyxel Device can automatically
update the time and date by detecting your time zone and whether Daylight Savings is in effect in that
time zone.
If your Zyxel Device cannot get the correct date and time, it may not able to connect to a time server.
Check that the Zyxel Device has Internet access, then click Sync. Now.
Figure 40 Date and Time Settings
Chapter 2 Initial Setup Wizard
2.1.10 Register Device
Click the Register button in this screen to register your device at portal.myzyxel.com.
Note: The Zyxel Device must be connected to the Internet in order to register.
ATP Series User’s Guide
75

Figure 41 Register Device
Chapter 2 Initial Setup Wizard
You may need the Zyxel Device’s serial number and LAN MAC address to register it at myZyxel if you
have not already done so. Refer to the label at the back of the Zyxel Device’s for details.
Figure 42 myZyxel Login
Click Refresh or use the Configuration > Licensing > Registration screen to update your Zyxel Device
registration status. Please note that you cannot change to Nebula Mode once you click Next unless you
reset the Zyxel Device.
ATP Series User’s Guide
76

Figure 43 Registered Device
2.1.11 Activate Service
Chapter 2 Initial Setup Wizard
After you register your Zyxel Device, you can register for the services supported by your model. See
Subscription Services Available on page 248 for more information on the subscription services for the two
types of security packs.
Here are the services available for the Zyxel Device.
• Web Security: access a database that can block websites by category.
• Application Security: use signatures for application patrol inspection to manage the use of various
applications on the network, and anti-spam signatures to mark or discard spam (unsolicited
commercial or junk email).
• Malware Blocker: use signatures to detect malware patterns in files.
• Intrusion Prevention: use this feature to detect Intrusion Detection and Prevention attacks.
• Geo Enforcer: use this feature to access a database of country-to-IP address mappings to filter traffic
by country.
• Sandboxing: use this feature to provide a safe environment to separate running programs from your
network and host devices
• Reputation Filter: recognize packets coming from suspect IPv4 addresses.
• SecuReporter: collect and analyze logs from your Zyxel Device in order to identify anomalies, notify
you of potential internal or external threats, and report on network usage.
• Managed AP Service: manage more than the default number of APs for your Zyxel Device when the
AP controller is enabled.
ATP Series User’s Guide
77

Chapter 2 Initial Setup Wizard
Figure 44 ATP100WNS5000 Activate Service
Click Refresh and wait a few moments for the registration information to update in this screen. If the
page does not refresh, make sure the Internet connection is working and click Refresh again. To check
your Internet connection, try to access the Internet from a computer connected to a LAN port on the
Zyxel Device. If you cannot, then check your Internet access settings on the Zyxel Device.
2.1.12 Service Settings
You can enable or disable the following features in this screen. This screen varies depending on the
security pack that you purchase. See
on the subscription services for the two types of security packs.
Note: Select the I have read SecuReporter GDPR and agree policy check box to have
SecuReporter collect and analyze logs from this Zyxel Device. This check box won’t
appear again if you have already selected this before.
• Use this feature to detect and block access to specific URLs, by comparing URL addresses of sites that
users attempt to access with a database of either permitted or blocked sites.
• Anti-Malware: Use this feature to detect malware patterns in files.
• IDP: Use this feature to detect Intrusion Detection and Prevention attacks.
• IP Reputation: Use this feature to recognize packets coming from suspect IPv4 addresses.
• DNS Threat Filter: Use this feature to inspect DNS queries made by clients on your network and
compare the queries against a database of blocked or allowed Fully Qualified Domain Names
(FQDNs).
• Content Filter: Use this feature to access a database that can block websites by category.
• App Patrol: Use this feature to manage the use of various applications on the network.
• Sandboxing: Use this feature to provide a safe environment to separate running programs from your
network and host devices.
• Email Security: Use this feature to mark or discard spam (unsolicited commercial or junk email).
• SecuReporter: Use this feature to collect and analyze logs from your Zyxel Device in order to identify
anomalies, notify you of potential internal or external threats, and report on network usage.
Subscription Services Available on page 248 for more information
ATP Series User’s Guide
78

Figure 45 ATP Service Settings
Chapter 2 Initial Setup Wizard
2.1.13 Service Settings: SecuReporter
Use this screen to add the Zyxel Device to a new or existing organization, and choose the level of data
protection for traffic going through this Zyxel Device.
• Server Status: This is the connection status between the Zyxel Device and the SecuReporter server. This
field shows Connected when the Zyxel Device can synchronize with the SecuReporter server. This field
shows Timeout when the Zyxel Device can’t synchronize with the SecuReporter server. This field shows
Fail when the connection between the Zyxel Device and the SecuReporter server is down.
• Device Name: Enter the name of the Zyxel Device. This Zyxel Device will be added to a new or existing
organization.
• Organization: This field appears if you haven’t created an organization in the SecuReporter server.
Type a name of up to 255 characters and description to create a new organization.
• Select from existing organization: Select an existing organization from the drop-down list box to add
the Zyxel Device to the selected organization.
• Create new organization: Type a name of up to 255 characters and description to create a new
organization.
• Partially Anonymous: Select this and personal data, such as user names, MAC addresses, email
addresses, and host names, will be replaced with artificial identifiers in downloaded logs.
• Fully Anonymous: Select this and personal data, such as user names, MAC addresses, email
addresses, and host names, will be replaced with anonymized information in downloaded logs.
• Non-Anonymous: Select this and personal data, such as user names, MAC addresses, email
addresses, and host names, will be identifiable in downloaded logs.
ATP Series User’s Guide
79

Chapter 2 Initial Setup Wizard
Figure 46 SecuReporter Settings
The following screen appears when the Zyxel Device is already added in an organization.
Figure 47 SecuReporter Settings
2.1.14 Wireless Settings: Management Mode
The Management Mode screen appears for Zyxel Devices that have a built-in AP. Select Built-in AP if you
want WiFi clients to access your Zyxel Device wirelessly. Select AP Controller to allow the Zyxel Device to
manage APs in the same network as the Zyxel Device. Both modes cannot work simultaneously. Click
Next to continue the wizard.
ATP Series User’s Guide
80

Chapter 2 Initial Setup Wizard
Figure 48 Wireless Setup Wizard > Management Mode (Models with Built-in AP)
2.1.15 Wireless Settings: AP Controller
The Zyxel Device can act as an AP Controller that can manage APs in the same network as the Zyxel
Device. Select Yes if you want your Zyxel Device to manage APs in your network; otherwise select No.
Figure 49 Wireless Setup Wizard > Management Mode
2.1.16 Wireless Settings: SSID & Security
Configure SSID and wireless security in this screen.
SSID Setting
• SSID - Enter a descriptive name of up to 32 printable characters for the wireless LAN.
• Security Mode - Select Pre-Shared Key to add security on this wireless network. Otherwise, select None
to allow any wireless client to associate this network without authentication.
• Pre-Shared Key - Enter a pre-shared key of between 8 and 63 case-sensitive ASCII characters
(including spaces and symbols) or 64 hexadecimal characters.
ATP Series User’s Guide
81

Chapter 2 Initial Setup Wizard
• Hidden SSID - Select this option if you want to hide the SSID in the outgoing beacon frame. A wireless
client then cannot obtain the SSID through scanning using a site survey tool.
• Enable Intra-BSS Traffic Blocking - Select this option if you want to prevent crossover traffic from within
the same SSID. Wireless clients can still access the wired network but cannot communicate with each
other.
For Zyxel Devices with Built - in AP Only
Bridged to: Zyxel Devices with W in the model name have a built-in AP. Select an interface to bridge with
the built-in AP wireless network. Devices connected to this interface will then be in the same broadcast
domain as devices in the AP wireless network.
Figure 50 Wireless Settings: SSID & Security
2.1.17 Remote Management
Configure settings in this screen to add a rule that has priority over other rules in Policy Control. It restricts
access to the web configurator and SSL VPN service from the Internet.
ATP Series User’s Guide
82

Chapter 2 Initial Setup Wizard
Figure 51 Remote Management
• Enable Allow secure remote management from WAN to create a rule in the Policy Control screen. It
allows you to access the Zyxel Device from the WAN using HTTPS.
• Enable Restrict access only to trusted host to have the Zyxel Device allow access only from the IP
addresses or FQDNs specified in the fields below.
• Enable Allow SSL VPN access from WAN to allow access to the Zyxel Device remotely through the SSL
VPN tunnel.
• Enable Restrict access by GeoIP to have the Zyxel Device allow access only from countries specified
in the fields below.
Figure 52 Object > Service > Service Group - HTTPS
2.2 Nebula Mode Initial Setup Wizard
Select Nebula Mode to manage and monitor your Zyxel Device remotely. Follow the wizard to configure
the WAN settings to pass the management of your Zyxel Device to NCC.
ATP Series User’s Guide
83

Chapter 2 Initial Setup Wizard
Figure 53 Management Mode: Nebula Mode
2.2.1 Connect to Internet (WAN)
Configure the WAN interface that the Zyxel Device will use to connect to Nebula through the Internet.
Use this screen to set how many WAN interfaces to configure and the first WAN interface’s type of
encapsulation and method of IP address assignment.
The screens vary depending on the encapsulation type. Refer to information provided by your ISP to
know what to enter in each field.
Note: Enter the Internet access information exactly as your ISP gave it to you. Leave a field
blank if you don’t have that information.
• I have two ISPs: Select this option to configure two Internet connections. Leave it cleared to configure
just one. This option appears when you are configuring the first WAN interface.
• VLAN Tagged: Select this to tag the traffic going out from the Zyxel Device. Enter a VLAN ID. This 12-bit
number uniquely identifies each VLAN. Allowed values are 1-4080.
• Encapsulation: Choose the Ethernet option when the WAN port is used as a regular Ethernet. Choose
PPPoE for a dial-up connection according to the information from your ISP.
• MTU: The Maximum Transmission Unit. Type the maximum size of each data packet, in bytes, that can
move through this interface. If a larger packet arrives, the Zyxel Device divides it into smaller
fragments. Allowed values are 576-1500. Usually, this value is 1500.
• WAN Interface: This is the interface you are configuring for Internet access.
• IP Address Assignment: Select Auto if your ISP did not assign you a fixed IP address.
Select Static if the ISP assigned a fixed IP address.
ATP Series User’s Guide
84

Chapter 2 Initial Setup Wizard
• DHCP Option 60: This field will show if you choose Auto as the IP Address Assignment. DHCP Option 60
is used by the Zyxel Device for identification to the DHCP server using the VCI (Vendor Class Identifier)
on the DHCP server. The Zyxel Device adds it in the initial DHCP discovery message that a DHCP client
broadcasts in search of an IP address. The DHCP server can assign different IP addresses or options to
clients with the specific VCI or reject the request from clients without the specific VCI.
Type a string using up to 63 of these characters [a-zA-Z0-9!\"#$%&\'()*+,-./:;<=>?@\[\\\]^_`{}] to
identify this Zyxel Device to the DHCP server. For example, Zyxel-TW.
Figure 54 Internet Access
2.2.2 Internet Access: Ethernet
This screen is read-only if you set the previous screen’s IP Address Assignment field to Auto. If you set the
previous screen’s IP Address Assignment field to Static, use this screen to configure your IP address
settings.
•VLAN ID: This displays the VLAN ID tag for the traffic going out from Zyxel Device you configured in the
previous screen.
• Encapsulation: This displays the type of Internet connection you are configuring.
• MTU: This displays the maximum size of each data packet that can move through this interface.
• First WAN Interface: This is the number of the interface that will connect with your ISP.
• IP Address: Enter your (static) public IP address. Auto displays if you selected Auto as the IP Address
Assignment in the previous screen.
• DHCP Option 60: This field will show if you selected Auto as the IP Address Assignment in the previous
screen. This displays the string you configured to identify DHCP server using VCI.
The following fields display if you selected static IP address assignment.
• IP Subnet Mask: Enter the subnet mask for this WAN connection's IP address.
• Gateway IP Address: Enter the IP address of the router through which this WAN connection will send
traffic (the default gateway).
ATP Series User’s Guide
85

• First / Second DNS Server: These fields display if you selected static IP address assignment. The Domain
Name System (DNS) maps a domain name to an IP address and vice versa. Enter a DNS server's IP
address(es). The DNS server is extremely important because without it, you must know the IP address
of a computer before you can access it. The Zyxel Device uses these (in the order you specify here) to
resolve domain names for VPN, DDNS and the time server. Leave the field as 0.0.0.0 if you do not want
to configure DNS servers. If you do not configure a DNS server, you must know the IP address of a
machine in order to access it.
2.2.2.1 Possible Errors
• Check that your cable connection is coming from the correct interface you’re using for the WAN
connection on the Zyxel Device.
• Check that the interface is connected to the device you’re using for Internet access such as a
broadband router and that the router is turned on. The LED of the interface you’re using for the WAN
connection on the Zyxel Device should be orange.
• If your Zyxel Device was not able to obtain an IP address, check that your Internet access information
uses DHCP as the WAN connection type. If it fails again, check with your Internet service provider or
administrator for correct WAN settings.
• If your Zyxel Device was not able to use the IP address entered, check that you were given an IP
address, subnet mask and gateway address as part of your Internet access information. Re-enter your
IP address, subnet mask and gateway IP address exactly as given. If it fails again, check with your
Internet service provider or administrator for correct IP address, subnet mask and gateway address
and other WAN settings.
Figure 55 Internet Access: Ethernet Encapsulation
Chapter 2 Initial Setup Wizard
2.2.3 Internet Access: PPPoE
Internet Access - First WAN Interface
•VLAN ID: This displays the VLAN ID tag for the traffic going out from the Zyxel Device, which you
configured in the previous screen.
ISP Parameters
• Encapsulation: This displays the type of Internet connection you are configuring.
ATP Series User’s Guide
86

Chapter 2 Initial Setup Wizard
• MTU: This displays the maximum size of each data packet that can move through this interface.
• Type the PPPoE Service Name from your service provider. PPPoE uses a service name to identify and
reach the PPPoE server. You can use alphanumeric and -_@$./ characters, and it can be up to 64
characters long.
• Authentication Type - Select an authentication protocol for outgoing connection requests. Options
are:
• Chap/PAP - Your Zyxel Device accepts either CHAP or PAP when requested by the remote node.
• Chap - Your Zyxel Device accepts CHAP only.
• PAP - Your Zyxel Device accepts PAP only.
• MSCHAP - Your Zyxel Device accepts MSCHAP only.
• MSCHAP-V2 - Your Zyxel Device accepts MSCHAP-V2 only.
• Type the User Name given to you by your ISP. You can use alphanumeric and -_@$./ characters, and
it can be up to 31 characters long.
•Type the Password associated with the user name. Use up to 64 ASCII characters except the [] and ?.
This field can be blank.
IP Address Assignments
• WAN Interface: This is the name of the interface that will connect with your ISP.
• IP Address: This displays Auto as the IP Address Assignment is set to Auto in the previous screen.
The following fields display if you selected static IP address assignment.
• IP Subnet Mask: Enter the subnet mask for this WAN connection's IP address.
• Gateway IP Address: Enter the IP address of the router through which this WAN connection will send
traffic (the default gateway).
• First / Second DNS Server: These fields display if you selected static IP address assignment. The Domain
Name System (DNS) maps a domain name to an IP address and vice versa. Enter a DNS server's IP
address(es). The DNS server is extremely important because without it, you must know the IP address
of a computer before you can access it. The Zyxel Device uses these (in the order you specify here) to
resolve domain names for VPN, DDNS and the time server. Leave the field as 0.0.0.0 if you do not want
to configure DNS servers. If you do not configure a DNS server, you must know the IP address of a
machine in order to access it.
2.2.3.1 Possible Errors
• Make sure that your Internet access information uses PPPoE as the WAN connection type. Re-enter
your PPPoE user name and password exactly as given. If it fails again, check with your Internet service
provider or administrator for correct WAN settings and user credentials.
ATP Series User’s Guide
87

Chapter 2 Initial Setup Wizard
Figure 56 Internet Access: PPPoE Encapsulation
2.2.4 Internet Access: Congratulations
You have set up your Zyxel Device to access the Internet. A screen displays with your settings. Click
Connection Test to check that you can access the Internet. If you cannot, click Back and confirm that
you entered the settings correctly. If you have, check that you got the correct settings from your ISP or
network administrator.
Click Next to go to the next screen to finish the Nebula mode wizard. Please note that you cannot
change to On Premises Mode once you click Next unless you reset the Zyxel Device.
If you cannot access Nebula through the Internet after you left this screen, log in to the Zyxel Device
using the support account. Use the Local GUI web configurator for troubleshooting.
ATP Series User’s Guide
88

Chapter 2 Initial Setup Wizard
Figure 57 Internet Access: Summary
2.2.5 QR Code
Click the link to go to Nebula. Follow the steps in this screen to run the Nebula setup wizard.
Create an organization and a site. Add the Zyxel Device to this site by entering its MAC address and
serial number. Select Native Mode when you’re given a choice. Click Finish to close the wizard.
Figure 58 Go to Nebula
If you see this screen right after you select Nebula Mode, click the link or the Go to Nebula button to go
to Nebula directly. Follow the steps in this screen to run the Nebula setup wizard.
ATP Series User’s Guide
89

Chapter 2 Initial Setup Wizard
Configure the WAN interface that the Zyxel Device will use to connect to Nebula through the Internet on
the Nebula setup wizard. Configure an email address to receive the activation link. Follow the steps in
the email to allow automatic management of the Zyxel Device by Nebula (ZTP). Click Back to go back
to the management mode selection screen.
Figure 59 Go to Nebula
ATP Series User’s Guide
90

Hardware, Interfaces and
3.1 Hardware Overview
This section describes the front and rear panels for each model.
Note: Your Zyxel Device may not support SFP if its hardware version is HW:Rev 2.0. Please
check your Zyxel Device label.
The following table summarizes the port features of the Zyxel Device by model.
Table 14 ATP Series Port Comparison Table
ATP MODELS
USB 3.0 Ports 1 2 2 2
1 Gbps SFP interface 1 1 1 2
10/100/1000 Mbps Ethernet WAN Ports 1 2 - -
10/100/1000 Mbps Ethernet Ports 4 4 7 12
Console Port 1 1 1 1
ATP100 /
ATP100W
CHAPTER 3
Zones
ATP200 ATP500
ATP700 /
ATP800
For information on interface names by model, default port or interface name mapping, and default
interface or zone mapping please see
3.1.1 Front Panels
The LED indicators are located on the front panel.
Figure 60 ATP100 Front Panel
Figure 61 ATP100W Front Panel
Section 3.3 on page 98.
ATP Series User’s Guide
91

Chapter 3 Hardware, Interfaces and Zones
Figure 62 ATP200 Front Panel
Figure 63 ATP500 Front Panel
Figure 64 ATP700 / ATP800 Front Panel
The following table describes the front panel LEDs.
Table 15 LED Descriptions
LED COLOR STATUS DESCRIPTION
PWR Off The Zyxel Device is turned off.
Green On The Zyxel Device is turned on.
Red On There is a hardware component failure. Shut down the device, wait for a few
SYS Green Off The Zyxel Device is not ready or has failed.
On The Zyxel Device is ready and running.
Blinking The Zyxel Device is booting.
Red On The Zyxel Device has an error or has failed.
2.4G Green Off The 2.4G wireless interface is off.
On The 2.4G wireless interface is ready.
Blinking The 2.4G wireless connection is active.
5G Green Off The 5G wireless interface is off.
On The 5G wireless interface is ready.
Blinking The 5G wireless connection is active.
P1 (SFP)
LINK Yellow Off There is no connection on this port.
On This port has a successful 1000 Mbps link.
Green Off There is no connection on this port.
On This port has a successful 100 Mbps link.
ACT Green Off There is no traffic on this port.
Blinking The Zyxel Device is sending or receiving packets on this port at 100/1000 Mbps.
minutes and then restart the device. If the LED turns red again, then please
contact your vendor.
ATP Series User’s Guide
92

Chapter 3 Hardware, Interfaces and Zones
Table 15 LED Descriptions (continued)
LED COLOR STATUS DESCRIPTION
P2, P3...
(WAN/
LAN/
DMZ)
Yellow Off There is no connection on this port.
On This port has a successful 1000 Mbps link.
Blinking The Zyxel Device is sending or receiving packets on this port at 1000 Mbps.
Green Off There is no connection on this port.
On This port has a successful 10/100 Mbps link.
Blinking The Zyxel Device is sending or receiving packets on this port at 10/100 Mbps.
The following table describes the ports on the front panel.
Table 16 Front Panel Ports
LABEL DESCRIPTION
RESET Press the button in for about 5 seconds (or until the SYS LED starts to blink), then release it to
return the Zyxel Device to the factory defaults (password is 1234, LAN IP address 192.168.1.1 and
so on).
CONSOLE You can use the console port to manage the Zyxel Device using CLI commands. You will be
prompted to enter your user name and password. See the Command Reference Guide for
more information about the CLI.
When configuring using the console port, you need a computer equipped with
communications software configured to the following parameters:
• Speed 115200 bps
• Data Bits 8
•Parity None
•Stop Bit 1
• Flow Control Off
USB Connect a storage device for system logs (see Maintenance > Diagnostics > System Log) and
P2-P7 (ATP200 )
storage (see Configuration > System > USB Storage).
These are 1G RJ-45 Ethernet ports.
P2-P8 (ATP500 )
P1-P12 (ATP700/
ATP800 )
3.1.2 Rear Panels
The connection ports are located on the rear panel.
Figure 65 ATP100 Rear Panel
Figure 66 ATP100W Rear Panel
ATP Series User’s Guide
93

Chapter 3 Hardware, Interfaces and Zones
Figure 67 ATP200 Rear Panel
Figure 68 ATP500 Rear Panel
Figure 69 ATP700 / ATP800 Rear Panel
Note: Make sure you connect the Zyxel Device's power cord to a socket-outlet with an
earthing connection or its equivalent.
The following table describes the items on the rear panel.
Table 17 Rear Panel Items
LABEL DESCRIPTION
Console You can use the console port to manage the Zyxel Device using CLI commands. You will be
prompted to enter your user name and password. See the Command Reference Guide for
more information about the CLI.
When configuring using the console port, you need a computer equipped with
communications software configured to the following parameters:
• Speed 115200 bps
• Data Bits 8
•Parity None
•Stop Bit 1
• Flow Control Off
Power Use the included power cord to connect the power socket to a power outlet. Turn the power
switch on if your Zyxel Device has a power switch.
Lock Attach a lock-and-cable from the Kensington lock (the small, metal-reinforced, oval hole) to a
permanent object, such as a pole, to secure the Zyxel Device in place.
Fan The fans are for cooling the Zyxel Device. Make sure they are not obstructed to allow maximum
ventilation.
Note: Use an 8-wire Ethernet cable to run your Gigabit Ethernet connection at 1000 Mbps.
Using a 4-wire Ethernet cable limits your connection to 100 Mbps. Note that the
connection speed also depends on what the Ethernet device at the other end can
support.
3.2 Installation Scenarios
The Zyxel Device can be:
ATP Series User’s Guide
94

Chapter 3 Hardware, Interfaces and Zones
• Placed on a desktop.
• Wall-mounted on a wall.
• Rack-mounted on a standard EIA rack.
The following table summarizes the installation scenarios of the Zyxel Device by model.
Table 18 ATP Series Installation Comparison Table
ATP MODELS
Rubber feet for desktop placement Yes Yes Yes No
Wall Mounting Yes Yes No No
Rack Mounting No Yes Yes Yes
The following table summarizes the installation scenarios of the Zyxel Device by model.
Table 19 ATP Series Installation Comparison Table
ATP MODELS
Rubber feet for desktop placement Yes Yes Yes No
Wall Mounting Yes Yes No No
Rack Mounting No Yes Yes Yes
ATP100 /
ATP100W
ATP100 /
ATP100W
ATP200 ATP500
ATP200 ATP500
ATP700 /
ATP800
ATP700 /
ATP800
WARNING! Do NOT block the ventilation holes on the Zyxel Device.
Allow 100 mm clearance for the ventilation holes to prevent your Zyxel
Device from overheating. Do not store things on the Zyxel Device. Do
not place a Zyxel Device on another high temperature device.
Overheating could affect the performance of your Zyxel Device, or
even damage it.
3.2.1 Desktop Installation Procedure
1 Make sure the Zyxel Device is clean and dry.
2 Remove the adhesive backing from the rubber feet.
3 Attach the rubber feet to each corner on the bottom of the Zyxel Device. These rubber feet help
protect the Zyxel Device from shock or vibration, and allow air circulation.
ATP Series User’s Guide
95

Chapter 3 Hardware, Interfaces and Zones
Figure 70 Attaching Rubber Feet
4 Set the Zyxel Device on a smooth, level surface strong enough to support the weight of the Zyxel Device
and the connected cables. Make sure there is a power outlet nearby.
Note: Make sure to use the rubber feet when stacking the Zyxel Devices on a desk.
3.2.2 Rack-mounting
Use the following steps to mount the Zyxel Device on an EIA standard size, 19-inch rack or in a wiring
closet with other equipment using a rack-mounting kit. Make sure the rack will safely support the
combined weight of all the equipment it contains and that the position of the ZyWALL does not make
the rack unstable or top-heavy. Take all necessary precautions to anchor the rack securely before
installing the unit.
Use a #2 Phillips screwdriver to install the screws.
Note: Failure to use the proper screws may damage the unit.
1 Align one bracket with the holes on one side of the Zyxel Device and secure it with the included bracket
screws (smaller than the rack-mounting screws).
2 Attach the other bracket in a similar fashion.
ATP Series User’s Guide
96

Chapter 3 Hardware, Interfaces and Zones
Figure 71 Attach Brackets
3 After attaching both mounting brackets, position the Zyxel Device in the rack and match up the bracket
holes with the rack holes. Secure the Zyxel Device to the rack with the rack-mounting screws.
Figure 72 Mount on Rack
Note: Make sure there is at least 100 mm of clearance at the sides and 100 mm in the rear to
allow air circulation and the attachment of cables and the power cord. When stacking
in a rack, make sure there is at least 40 mm of clearance between Zyxel Devices.
3.2.3 Wall-mounting
Do the following to attach your Zyxel Device to a wall.
The following table lists the distance “X” between mounting holes for each model:
Table 20 Distance “X” Between ATP Mounting Holes
MODEL NAME DISTANCE “X”
ATP100 174 mm (6.85”)
ATP100W 174 mm (6.85”)
ATP200 206 mm (8.11”)
1 Drill into a wall two holes 3 mm – 4 mm (0.12" – 0.16") wide, 20 mm – 30 mm (0.79” – 1.18”) deep and a
distance X (see the preceding table) apart. Place two screw anchors in the holes.
ATP Series User’s Guide
97

Chapter 3 Hardware, Interfaces and Zones
Figure 73 Wall Mounting Screw Specifications
2 Screw two screws with 6 mm – 8 mm (0.24" – 0.31") wide heads into the screw anchors. Do not screw the
screws all the way in to the wall; leave a small gap between the head of the screw and the wall.
The gap must be big enough for the screw heads to slide into the screw slots and the connection cables
to run down the back of the Zyxel Device.
Note: Make sure the screws are securely fixed to the wall and strong enough to hold the
weight of the Zyxel Device with the connection cables.
3 Use the holes on the bottom of the Zyxel Device to hang the Zyxel Device on the screws.
Figure 74 Wall Mounting
Note: Wall-mount the Zyxel Device horizontally. The Zyxel Device's side panels with ventilation
slots should not be facing up or down as this position is less safe.
Make sure there is 100 mm of clearance at the sides and 1 – 1.5 mm distance between
the screw head and the wall to allow air circulation and the attachment of cables and
the power cord.
3.3 Default Zones, Interfaces, and Ports
The default configurations for zones, interfaces, and ports are as follows. References to interfaces may
be generic rather than the specific name used in your model. For example, this guide may use “the
WAN interface” rather than “wan1” or “wan2”, “ge2” or” ge3”.
ATP Series User’s Guide
98

Chapter 3 Hardware, Interfaces and Zones
An OPT (optional) Ethernet port can be configured as an additional WAN port, LAN, WLAN, or DMZ port.
The following table shows the default physical port and interface mapping for each model at the time
of writing.
Table 21 Default Physical Port – Interface Mapping
PORT / INTERFACE P1 P2 P3 P4 P5 P6 P7 P8
ATP100/ATP100W sfp wan lan1 lan1 lan1 opt
ATP200 sfp wan wan lan1 lan1 lan1 lan1
ATP500 ge1 ge2 ge3 ge4 ge5 ge6 ge7 ge8
Table 22 Default Physical Port – Interface Mapping – ATP700 / ATP800
PORT /
INTERFACE
ATP700 /
ATP800
P1 P2 P3 P4 P5 P6 P7 P8 P9 P10 P11 P12 P13 P14
ge1 ge2 ge3 ge4 ge5 ge6 ge7 ge8 ge9 ge10 ge11 ge12 ge13 ge14
The following table shows the default interface and zone mapping for each model at the time of
writing.
Table 23 Default Zone – Interface Mapping
ZONE / INTERFACE SFP WAN LAN1 LAN2 DMZ OPT
ATP100/ATP100W sfp_ppp WAN1_PPP LAN1 LAN2 DMZ opt_ppp
Table 24 Default Zone – Interface Mapping
ZONE / INTERFACE WAN LAN1 LAN2 DMZ OPT
ATP200 WAN1
WAN1_PPP
WAN2
WAN2_PPP
LAN1 LAN2 DMZ SFP
SFP_PPP
DEFAULT
GE7
GE7_PPP
GE8
GE8_PPP
Table 25 Default Zone – Interface Mapping
ZONE / INTERFACE WAN LAN DMZ OPT NO DEFAULT ZONE
ATP500 GE2
GE2_PPP
GE3
GE3_PPP
ATP700
ATP800
GE1
GE1_PPP
GE2
GE2_PPP
GE4
GE5
GE3
GE4
GE6 GE1
GE1_PPP
GE5 GE13
GE13_PPP
GE14
GE14_PPP
GE7
GE7_PPP
GE8
GE8_PPP
GE6~GE12
GE6_PPP~GE12_PPP
NO
ZONE
ATP Series User’s Guide
99

Chapter 3 Hardware, Interfaces and Zones
3.4 Stopping the Zyxel Device
Always use Maintenance > Shutdown > Shutdown or the shutdown command before you turn off the
Zyxel Device or remove the power. Not doing so can cause the firmware to become corrupt.
ATP Series User’s Guide
100
 Loading...