

Page 1
Default Login Details
User’s Guide
ZyWALL ATP Series
LAN Port IP Address https://192.168.1.1
User Name admin
Password 1234
Version 4.55 Edition 1, 6/2020
Copyright © 2020 Zyxel Communications Corporation
Page 2

IMPORTANT!
READ CAREFULLY BEFORE USE.
KEEP THIS GUIDE FOR FUTURE REFERENCE.
This is a User’s Guide for a series of products. Not all products support all firmware features. Screenshots
and graphics in this book may differ slightly from your product due to differences in product features or
web configurator brand style. Every effort has been made to ensure that the information in this manual
is accurate.
Note: The version number on the cover page refers to the Zyxel Device’s latest firmware
version to which this User’s Guide applies.
Related Documentation
•Quick Start Guide
The Quick Start Guide shows how to connect the Zyxel Device and access the Web Configurator
wizards. (See the wizard real time help for information on configuring each screen.) It also contains a
connection diagram and package contents list.
•CLI Reference Guide
The CLI Reference Guide explains how to use the Command-Line Interface (CLI) to configure the
Zyxel Device.
Note: It is recommended you use the Web Configurator to configure the Zyxel Device.
• Web Configurator Online Help
Click the help icon in any screen for help in configuring that screen and supplementary information.
•More Information
Go to support.zyxel.com to find other information on Zyxel Device.
ZyWALL ATP Series User’s Guide
2
Page 3
Document Conventions
Warnings and Notes
These are how warnings and notes are shown in this guide.
Warnings tell you about things that could harm you or your device.
Note: Notes tell you other important information (for example, other things you may need to
configure or helpful tips) or recommendations.
Syntax Conventions
• All models in this series may be referred to as the “Zyxel Device” in this guide.
• Product labels, screen names, field labels and field choices are all in bold font.
• A right angle bracket ( > ) within a screen name denotes a mouse click. For example, Configuration >
Network > Interface > Ethernet means you first click Configuration in the navigation panel, then
Network, then the Interface sub menu and finally the Ethernet tab to get to that screen.
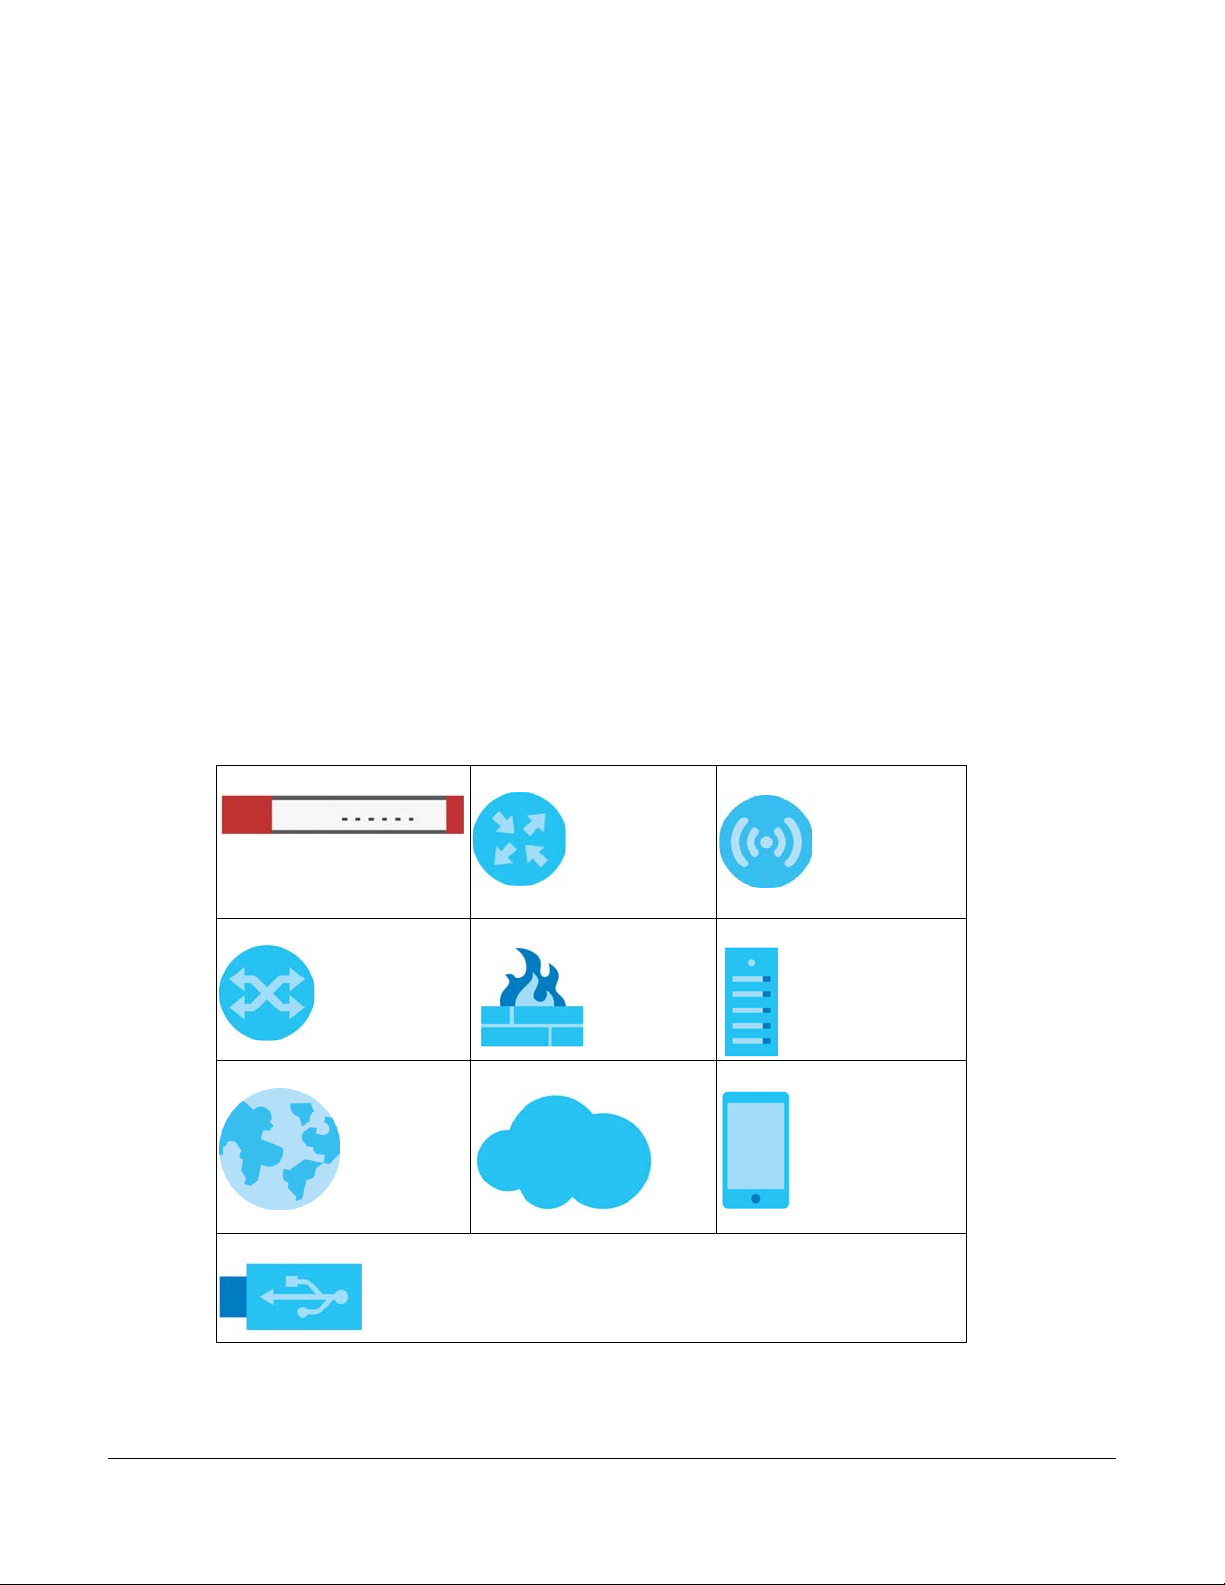
Icons Used in Figures
Figures in this user guide may use the following generic icons. The Zyxel Device icon is not an exact
representation of your device.
Zyxel Device Generic Router Wireless Router / Access Point
Switch Firewall Server
Internet Network Cloud Smartphone
USB Dongle
ZyWALL ATP Series User’s Guide
3
Page 4

Contents Overview
Contents Overview
Introduction ........................................................................................................................................... 25
Initial Setup Wizard ............................................................................................................................... 50
Hardware, Interfaces and Zones ........................................................................................................ 69
Quick Setup Wizards ............................................................................................................................. 79
Dashboard .......................................................................................................................................... 118
Monitor ................................................................................................................................................. 129
Licensing .............................................................................................................................................. 198
Wireless ................................................................................................................................................. 204
Interfaces ............................................................................................................................................. 238
Routing ................................................................................................................................................. 335
DDNS ................................................................................................................................................... 362
NAT ....................................................................................................................................................... 368
Redirect Service .................................................................................................................................. 376
ALG ....................................................................................................................................................... 382
UPnP ..................................................................................................................................................... 389
IP/MAC Binding ................................................................................................................................... 404
Layer 2 Isolation .................................................................................................................................. 409
DNS Inbound LB .................................................................................................................................. 413
IPSec VPN ............................................................................................................................................ 419
SSL VPN ................................................................................................................................................ 455
L2TP VPN .............................................................................................................................................. 461
BWM (Bandwidth Management) ..................................................................................................467
Web Authentication .......................................................................................................................... 483
Security Policy ..................................................................................................................................... 512
Application Patrol ............................................................................................................................... 538
Content Filter ....................................................................................................................................... 547
Anti-Malware ....................................................................................................................................... 572
Reputation Filter .................................................................................................................................. 586
IDP ........................................................................................................................................................ 596
Sandboxing ......................................................................................................................................... 614
Email Security ...................................................................................................................................... 618
SSL Inspection ...................................................................................................................................... 629
IP Exception ......................................................................................................................................... 641
Object .................................................................................................................................................. 644
Device HA ........................................................................................................................................... 747
Cloud CNM ........................................................................................................................................ 754
System .................................................................................................................................................. 762
Log and Report ................................................................................................................................... 823
File Manager ....................................................................................................................................... 836
ZyWALL ATP Series User’s Guide
4
Page 5

Contents Overview
Diagnostics ......................................................................................................................................... 851
Packet Flow Explore ........................................................................................................................... 870
Shutdown ............................................................................................................................................. 877
Troubleshooting .................................................................................................................................. 879
ZyWALL ATP Series User’s Guide
5
Page 6

Table of Contents
Table of Contents
Document Conventions ............................................ ............................................ .... ... .... ...................3
Contents Overview .............................................................................................................................4
Table of Contents.................................................................................................................................6
Part I: User’s Guide.......................................................................................... 24
Chapter 1
Introduction ........................................................................................................................................25
1.1 Overview ......................................................................................................................................... 25
1.1.1 Model Feature Differences .................................................................................................. 25
1.2 Registration at myZyxel .................................................................................................................. 26
1.2.1 Grace Period ......................................................................................................................... 27
1.2.2 Applications ........................................................................................................................... 27
1.3 Management Overview ................................................................................................................ 30
1.4 Web Configurator ........................................................................................................................... 31
1.4.1 Web Configurator Access .................................................................................................... 31
1.4.2 Web Configurator Screens Overview ................................................................................. 34
1.4.3 Navigation Panel .................................................................................................................. 38
1.4.4 Tables and Lists ...................................................................................................................... 46
Chapter 2
Initial Setup Wizard.............................................................................................................................50
2.1 Initial Setup Wizard Screens .......................................................................................................... 50
2.1.1 Internet Access Setup - WAN Interface ............................................................................. 50
2.1.2 Internet Access: Ethernet .................................................................................................... 51
2.1.3 Internet Access: PPPoE ......................................................................................................... 52
2.1.4 Internet Access: PPTP ........................................................................................................... 54
2.1.5 Internet Access: L2TP ............................................................................................................ 56
2.1.6 Internet Access Setup - Second WAN Interface ............................................................... 58
2.1.7 Internet Access: Congratulations ....................................................................................... 59
2.1.8 Date and Time Settings ........................................................................................................ 60
2.1.9 Register Device ..................................................................................................................... 60
2.1.10 Activate Service .................................................................................................................. 62
2.1.11 Service Settings .................................................................................................................... 63
2.1.12 Service Settings: SecuReporter ..........................................................................................64
2.1.13 Wireless Settings: Management Mode ............................................................................. 65
ZyWALL ATP Series User’s Guide
6
Page 7

Table of Contents
2.1.14 Wireless Settings: AP Controller ......................................................................................... 66
2.1.15 Wireless Settings: SSID & Security ...................................................................................... 66
2.1.16 Remote Management ......................................................................................................67
Chapter 3
Hardware, Interfaces and Zones......................................................................................................69
3.1 Hardware Overview ....................................................................................................................... 69
3.1.1 Front Panels ............................................................................................................................ 69
3.1.2 Rear Panels ............................................................................................................................ 71
3.2 Installation Scenarios ..................................................................................................................... 72
3.2.1 Desktop Installation Procedure ...........................................................................................73
3.2.2 Rack-mounting ...................................................................................................................... 74
3.2.3 Wall-mounting ....................................................................................................................... 75
3.3 Default Zones, Interfaces, and Ports ............................................................................................ 77
3.4 Stopping the Zyxel Device ............................................................................................................ 78
Chapter 4
Quick Setup Wizards..........................................................................................................................79
4.1 Quick Setup Overview ................................................................................................................... 79
4.2 WAN Interface Quick Setup .......................................................................................................... 80
4.2.1 Choose an Ethernet Interface .............................................................................................80
4.2.2 Select WAN Type ................................................................................................................... 81
4.2.3 Configure WAN IP Settings ................................................................................................... 81
4.2.4 ISP and WAN and ISP Connection Settings ........................................................................ 82
4.2.5 Quick Setup Interface Wizard: Summary ........................................................................... 85
4.3 VPN Setup Wizard ........................................................................................................................... 86
4.3.1 Welcome ................................................................................................................................ 86
4.3.2 VPN Setup Wizard: Wizard Type .......................................................................................... 87
4.3.3 VPN Express Wizard - Scenario ............................................................................................ 88
4.3.4 VPN Express Wizard - Configuration ................................................................................... 89
4.3.5 VPN Express Wizard - Summary ........................................................................................... 89
4.3.6 VPN Express Wizard - Finish .................................................................................................. 90
4.3.7 VPN Advanced Wizard - Scenario ..................................................................................... 91
4.3.8 VPN Advanced Wizard - Phase 1 Settings ........................................................................ 92
4.3.9 VPN Advanced Wizard - Phase 2 ....................................................................................... 94
4.3.10 VPN Advanced Wizard - Summary .................................................................................. 95
4.3.11 VPN Advanced Wizard - Finish ......................................................................................... 97
4.4 VPN Settings for Configuration Provisioning Wizard: Wizard Type ............................................. 98
4.4.1 Configuration Provisioning Express Wizard - VPN Settings ............................................... 98
4.4.2 Configuration Provisioning VPN Express Wizard - Configuration .................................... 99
4.4.3 VPN Settings for Configuration Provisioning Express Wizard - Summary ...................... 100
4.4.4 VPN Settings for Configuration Provisioning Express Wizard - Finish .............................. 101
4.4.5 VPN Settings for Configuration Provisioning Advanced Wizard - Scenario ................. 102
ZyWALL ATP Series User’s Guide
7
Page 8

Table of Contents
4.4.6 VPN Settings for Configuration Provisioning Advanced Wizard - Phase 1 Settings .... 103
4.4.7 VPN Settings for Configuration Provisioning Advanced Wizard - Phase 2 .................. 104
4.4.8 VPN Settings for Configuration Provisioning Advanced Wizard - Summary ................ 105
4.4.9 VPN Settings for Configuration Provisioning Advanced Wizard - Finish ....................... 108
4.5 VPN Settings for L2TP VPN Settings Wizard ................................................................................. 108
4.5.1 L2TP VPN Settings ................................................................................................................ 109
4.5.2 L2TP VPN Settings ................................................................................................................ 110
4.5.3 VPN Settings for L2TP VPN Setting Wizard - Summary .................................................... 110
4.5.4 VPN Settings for L2TP VPN Setting Wizard - Completed ................................................ 112
4.6 Wireless Setup Wizard .................................................................................................................. 112
4.6.1 Management Mode ........................................................................................................... 113
4.6.2 SSID ...................................................................................................................................... 113
4.6.3 Radio ................................................................................................................................... 115
4.6.4 Summary ............................................................................................................................. 116
4.6.5 Wizard Completed ............................................................................................................ 117
Chapter 5
Dashboard........................................................................................................................................118
5.1 Overview ....................................................................................................................................... 118
5.1.1 What You Can Do in this Chapter ..................................................................................... 118
5.2 The General Screen ..................................................................................................................... 118
5.2.1 Device Information Screen ................................................................................................120
5.2.2 System Status Screen .......................................................................................................... 121
5.2.3 Tx/Rx Statistics ...................................................................................................................... 121
5.2.4 The Latest Logs Screen ....................................................................................................... 122
5.2.5 System Resources Screen ................................................................................................... 122
5.2.6 DHCP Table Screen ............................................................................................................. 123
5.2.7 Number of Login Users Screen ........................................................................................... 124
5.2.8 Current Login User ............................................................................................................... 125
5.2.9 VPN Status ............................................................................................................................ 125
5.2.10 SSL VPN Status .................................................................................................................... 126
5.3 The Advanced Threat Protection Screen .................................................................................. 126
Part II: Technical Reference.........................................................................128
Chapter 6
Monitor..............................................................................................................................................129
6.1 Overview ....................................................................................................................................... 129
6.1.1 What You Can Do in this Chapter ..................................................................................... 129
6.2 The Port Statistics Screen ............................................................................................................ 131
6.2.1 The Port Statistics Graph Screen ....................................................................................... 132
ZyWALL ATP Series User’s Guide
8
Page 9

Table of Contents
6.3 Interface Status Screen ................................................................................................................ 133
6.4 The Traffic Statistics Screen .......................................................................................................... 137
6.5 The Session Monitor Screen ........................................................................................................ 139
6.6 The Login Users Screen ................................................................................................................ 141
6.7 IGMP Statistics ............................................................................................................................... 143
6.8 The DDNS Status Screen ............................................................................................................... 144
6.9 IP/MAC Binding ............................................................................................................................. 144
6.10 Cellular Status Screen ................................................................................................................ 145
6.10.1 More Information .............................................................................................................. 148
6.11 The UPnP Port Status Screen ..................................................................................................... 149
6.12 USB Storage Screen .................................................................................................................... 150
6.13 Ethernet Neighbor Screen ........................................................................................................ 151
6.14 FQDN Object Screen ................................................................................................................ 152
6.15 AP Information: AP List ............................................................................................................... 154
6.15.1 AP List: More Information ................................................................................................ 157
6.15.2 AP List: Config AP ............................................................................................................. 160
6.16 AP Information: Radio List .......................................................................................................... 162
6.16.1 Radio List: More Information ............................................................................................164
6.17 AP Information: Built-in AP ........................................................................................................ 165
6.18 AP Information: Top N APs ........................................................................................................ 166
6.19 AP Information: Single AP .......................................................................................................... 168
6.20 ZyMesh ......................................................................................................................................... 169
6.21 SSID Info ....................................................................................................................................... 170
6.22 Station Info: Station List .............................................................................................................. 170
6.23 Station Info: Top N Stations ........................................................................................................ 171
6.24 Station Info: Single Station ......................................................................................................... 172
6.25 Detected Device ....................................................................................................................... 173
6.26 The IPSec Screen ........................................................................................................................ 174
6.27 The SSL Screen ............................................................................................................................. 176
6.28 The L2TP over IPSec Screen ....................................................................................................... 176
6.29 The App Patrol Screen ............................................................................................................... 177
6.30 The Content Filter Screen .......................................................................................................... 178
6.31 The Anti-Malware Screen .......................................................................................................... 180
6.32 The Reputation Filter Screen ...................................................................................................... 182
6.33 The IDP Screen ............................................................................................................................ 184
6.34 Sandboxing ................................................................................................................................ 186
6.35 The Email Security Screens ......................................................................................................... 187
6.35.1 Email Security Summary ................................................................................................... 187
6.35.2 The Email Security Status Screen ..................................................................................... 189
6.36 The SSL Inspection Screens ........................................................................................................ 191
6.36.1 Certificate Cache List ....................................................................................................... 192
6.37 Log Screens ................................................................................................................................. 193
6.37.1 View Log ............................................................................................................................ 193
ZyWALL ATP Series User’s Guide
9
Page 10

Table of Contents
6.37.2 View AP Log ....................................................................................................................... 195
Chapter 7
Licensing...........................................................................................................................................198
7.1 Registration Overview .................................................................................................................. 198
7.1.1 What you Need to Know ....................................................................................................198
7.1.2 Registration Screen ............................................................................................................. 199
7.1.3 Service Screen ..................................................................................................................... 200
7.2 Signature Update ......................................................................................................................... 201
7.2.1 What you Need to Know ....................................................................................................201
7.2.2 The Signature Screen .......................................................................................................... 202
7.2.3 Auto Update ........................................................................................................................ 202
Chapter 8
Wireless.............................................................................................................................................204
8.1 Overview ....................................................................................................................................... 204
8.1.1 What You Can Do in this Chapter ..................................................................................... 204
8.2 Built-in AP ...................................................................................................................................... 204
8.2.1 Wireless > Built-in AP > General >Add/Edit SSID ............................................................... 206
8.2.2 Wireless > Built-in AP > Radio .............................................................................................. 209
8.3 Controller Screen ......................................................................................................................... 215
8.3.1 Connecting an AP to the Zyxel Device ............................................................................ 215
8.3.2 Connecting an AP to the Zyxel Device Manually ........................................................... 216
8.3.3 Connecting an AP to the Zyxel Device Using DHCP Option 138 .................................. 216
8.4 AP Management Screens ........................................................................................................... 217
8.4.1 Mgnt. AP List ....................................................................................................................... 217
8.4.2 AP Policy .............................................................................................................................. 222
8.4.3 AP Group ............................................................................................................................. 223
8.4.4 Firmware ............................................................................................................................... 229
8.5 Rogue AP ....................................................................................................................................... 230
8.5.1 Add/Edit Rogue/Friendly List .............................................................................................. 232
8.6 Auto Healing ................................................................................................................................. 233
8.7 RTLS Overview ............................................................................................................................... 234
8.7.1 What You Can Do in this Chapter ..................................................................................... 234
8.7.2 Before You Begin ................................................................................................................. 234
8.7.3 Configuring RTLS .................................................................................................................. 235
8.8 Technical Reference .................................................................................................................... 236
8.8.1 Dynamic Channel Selection .............................................................................................. 236
8.8.2 Load Balancing ................................................................................................................... 237
Chapter 9
Interfaces..........................................................................................................................................238
9.1 Interface Overview ...................................................................................................................... 238
ZyWALL ATP Series User’s Guide
10
Page 11

Table of Contents
9.1.1 What You Can Do in this Chapter ..................................................................................... 238
9.1.2 What You Need to Know ................................................................................................... 238
9.1.3 What You Need to Do First ................................................................................................. 243
9.2 Port Role ......................................................................................................................................... 243
9.3 Port Configuration ........................................................................................................................ 244
9.4 Ethernet Summary Screen ........................................................................................................... 245
9.4.1 Ethernet Edit ........................................................................................................................ 247
9.4.2 Proxy ARP ............................................................................................................................. 263
9.4.3 Virtual Interfaces ................................................................................................................ 264
9.4.4 References ........................................................................................................................... 265
9.4.5 Add/Edit DHCPv6 Request/Release Options ................................................................... 266
9.4.6 Add/Edit DHCP Extended Options ................................................................................... 267
9.5 PPP Interfaces ............................................................................................................................... 268
9.5.1 PPP Interface Summary ...................................................................................................... 269
9.5.2 PPP Interface Add or Edit .................................................................................................. 270
9.6 Cellular Configuration Screen ..................................................................................................... 275
9.6.1 Cellular Choose Slot ........................................................................................................... 278
9.6.2 Add / Edit Cellular Configuration ...................................................................................... 278
9.7 Tunnel Interfaces .......................................................................................................................... 284
9.7.1 Configuring a Tunnel .......................................................................................................... 286
9.7.2 Tunnel Add or Edit Screen .................................................................................................. 287
9.8 VLAN Interfaces ........................................................................................................................... 291
9.8.1 VLAN Summary Screen ....................................................................................................... 292
9.8.2 VLAN Add/Edit ................................................................................................................... 293
9.9 Bridge Interfaces .......................................................................................................................... 304
9.9.1 Bridge Summary .................................................................................................................. 306
9.9.2 Bridge Add/Edit .................................................................................................................. 307
9.10 VTI ................................................................................................................................................. 318
9.10.1 Restrictions for IPSec Virtual Tunnel Interface ................................................................ 318
9.10.2 VTI Screen .......................................................................................................................... 319
9.10.3 VTI Add/Edit ....................................................................................................................... 319
9.11 Trunk Overview ........................................................................................................................... 323
9.11.1 What You Need to Know ................................................................................................. 323
9.12 The Trunk Summary Screen ........................................................................................................ 326
9.12.1 Configuring a User-Defined Trunk ................................................................................... 327
9.12.2 Configuring the System Default Trunk ............................................................................ 329
9.13 Interface Technical Reference ................................................................................................. 330
Chapter 10
Routing..............................................................................................................................................335
10.1 Policy and Static Routes Overview ........................................................................................... 335
10.1.1 What You Can Do in this Chapter ................................................................................... 335
10.1.2 What You Need to Know ................................................................................................ 336
ZyWALL ATP Series User’s Guide
11
Page 12

Table of Contents
10.2 Policy Route Screen ................................................................................................................... 337
10.2.1 Policy Route Edit Screen .................................................................................................. 339
10.3 IP Static Route Screen ................................................................................................................ 344
10.3.1 Static Route Add/Edit Screen .......................................................................................... 344
10.4 Policy Routing Technical Reference ........................................................................................346
10.5 Routing Protocols Overview ..................................................................................................... 346
10.5.1 What You Need to Know ................................................................................................. 347
10.6 The RIP Screen ............................................................................................................................. 347
10.7 The OSPF Screen ......................................................................................................................... 349
10.7.1 Configuring the OSPF Screen .......................................................................................... 352
10.7.2 OSPF Area Add/Edit Screen ........................................................................................... 353
10.7.3 Virtual Link Add/Edit Screen ...........................................................................................355
10.8 BGP (Border Gateway Protocol) .............................................................................................. 356
10.8.1 Allow BGP Packets to Enter the Zyxel Device ................................................................ 357
10.8.2 Configuring the BGP Screen ............................................................................................ 357
10.8.3 The BGP Neighbors Screen .............................................................................................. 359
10.8.4 Example Scenario ............................................................................................................. 360
Chapter 11
DDNS ................................................................................................................................................362
11.1 DDNS Overview ........................................................................................................................... 362
11.1.1 What You Can Do in this Chapter ................................................................................... 362
11.1.2 What You Need to Know ................................................................................................. 362
11.2 The DDNS Screen ........................................................................................................................ 363
11.2.1 The Dynamic DNS Add/Edit Screen ................................................................................ 364
Chapter 12
NAT....................................................................................................................................................368
12.1 NAT Overview ............................................................................................................................. 368
12.1.1 What You Can Do in this Chapter ................................................................................... 368
12.1.2 What You Need to Know ................................................................................................. 368
12.2 The NAT Screen ........................................................................................................................... 369
12.2.1 The NAT Add/Edit Screen .................................................................................................371
12.3 NAT Technical Reference .......................................................................................................... 374
Chapter 13
Redirect Service...............................................................................................................................376
13.1 Overview ..................................................................................................................................... 376
13.1.1 HTTP Redirect ..................................................................................................................... 376
13.1.2 SMTP Redirect .................................................................................................................... 376
13.1.3 What You Can Do in this Chapter ................................................................................... 377
13.1.4 What You Need to Know ................................................................................................. 377
13.2 The Redirect Service Screen ..................................................................................................... 379
ZyWALL ATP Series User’s Guide
12
Page 13

Table of Contents
13.2.1 The Redirect Service Edit Screen ..................................................................................... 380
Chapter 14
ALG....................................................................................................................................................382
14.1 ALG Overview ............................................................................................................................. 382
14.1.1 What You Need to Know ................................................................................................. 382
14.1.2 Before You Begin ............................................................................................................... 385
14.2 The ALG Screen .......................................................................................................................... 385
14.3 ALG Technical Reference ......................................................................................................... 387
Chapter 15
UPnP...................................................................................................................................................389
15.1 UPnP and NAT-PMP Overview ................................................................................................... 389
15.2 What You Need to Know ........................................................................................................... 389
15.2.1 NAT Traversal ..................................................................................................................... 389
15.2.2 Cautions with UPnP and NAT-PMP .................................................................................. 390
15.3 UPnP Screen ................................................................................................................................ 390
15.4 Technical Reference .................................................................................................................. 391
15.4.1 Turning on UPnP in Windows 7 Example ......................................................................... 391
15.4.2 Turn on UPnP in Windows 10 Example ............................................................................ 395
15.4.3 Auto-discover Your UPnP-enabled Network Device .................................................... 397
15.4.4 Web Configurator Easy Access in Windows 7 ............................................................... 400
15.4.5 Web Configurator Easy Access in Windows 10 ............................................................. 402
Chapter 16
IP/MAC Binding................................................................................................................................404
16.1 IP/MAC Binding Overview ......................................................................................................... 404
16.1.1 What You Can Do in this Chapter ................................................................................... 404
16.1.2 What You Need to Know ................................................................................................. 404
16.2 IP/MAC Binding Summary ......................................................................................................... 405
16.2.1 IP/MAC Binding Edit .......................................................................................................... 406
16.2.2 Static DHCP Edit ................................................................................................................ 407
16.3 IP/MAC Binding Exempt List ....................................................................................................... 408
Chapter 17
Layer 2 Isolation...............................................................................................................................409
17.1 Overview ..................................................................................................................................... 409
17.1.1 What You Can Do in this Chapter ................................................................................... 409
17.2 Layer-2 Isolation General Screen ............................................................................................. 409
17.3 White List Screen ......................................................................................................................... 410
17.3.1 Add/Edit White List Rule ................................................................................................... 411
Chapter 18
DNS Inbound LB................................................................................................................................413
ZyWALL ATP Series User’s Guide
13
Page 14

Table of Contents
18.1 DNS Inbound Load Balancing Overview ................................................................................. 413
18.1.1 What You Can Do in this Chapter ................................................................................... 413
18.2 The DNS Inbound LB Screen ...................................................................................................... 414
18.2.1 The DNS Inbound LB Add/Edit Screen ............................................................................ 415
18.2.2 The DNS Inbound LB Add/Edit Member Screen ............................................................ 417
Chapter 19
IPSec VPN .........................................................................................................................................419
19.1 Virtual Private Networks (VPN) Overview ................................................................................. 419
19.1.1 What You Can Do in this Chapter ................................................................................... 421
19.1.2 What You Need to Know ................................................................................................. 421
19.1.3 Before You Begin ............................................................................................................... 424
19.2 The VPN Connection Screen ..................................................................................................... 424
19.2.1 The VPN Connection Add/Edit Screen .......................................................................... 426
19.3 The VPN Gateway Screen ......................................................................................................... 433
19.3.1 The VPN Gateway Add/Edit Screen ............................................................................... 434
19.4 VPN Concentrator ..................................................................................................................... 441
19.4.1 VPN Concentrator Requirements and Suggestions ...................................................... 441
19.4.2 VPN Concentrator Screen ............................................................................................... 442
19.4.3 The VPN Concentrator Add/Edit Screen ........................................................................ 442
19.5 Zyxel Device IPSec VPN Client Configuration Provisioning .................................................... 443
19.6 IPSec VPN Background Information ......................................................................................... 445
Chapter 20
SSL VPN..............................................................................................................................................455
20.1 Overview ..................................................................................................................................... 455
20.1.1 What You Can Do in this Chapter ................................................................................... 455
20.1.2 What You Need to Know ................................................................................................. 455
20.2 The SSL Access Privilege Screen ................................................................................................ 456
20.2.1 The SSL Access Privilege Policy Add/Edit Screen ......................................................... 457
20.3 The SSL Global Setting Screen ................................................................................................... 459
Chapter 21
L2TP VPN..................................... ... .... .... ............................................ ... .... .........................................461
21.1 Overview ..................................................................................................................................... 461
21.1.1 What You Can Do in this Chapter ................................................................................... 461
21.1.2 What You Need to Know ................................................................................................. 461
21.2 L2TP VPN Screen ......................................................................................................................... 462
21.2.1 Example: L2TP and Zyxel Device Behind a NAT Router ................................................ 464
Chapter 22
BWM (Bandwidth Management) .................................................................................................467
22.1 Overview ..................................................................................................................................... 467
ZyWALL ATP Series User’s Guide
14
Page 15

Table of Contents
22.1.1 What You Can Do in this Chapter ................................................................................... 467
22.1.2 What You Need to Know ................................................................................................ 467
22.2 The Bandwidth Management Configuration .......................................................................... 471
22.2.1 The Bandwidth Management Add/Edit Screen ............................................................ 474
Chapter 23
Web Authentication ........................................................................................................................483
23.1 Web Auth Overview ................................................................................................................... 483
23.1.1 What You Can Do in this Chapter ................................................................................... 483
23.1.2 What You Need to Know ................................................................................................. 484
23.2 Web Authentication General Screen ...................................................................................... 484
23.2.1 User-aware Access Control Example ............................................................................. 489
23.2.2 Authentication Type Screen ............................................................................................ 495
23.2.3 Custom Web Portal / User Agreement File Screen ....................................................... 499
23.3 SSO Overview .............................................................................................................................. 500
23.4 SSO - Zyxel Device Configuration ............................................................................................. 502
23.4.1 Configuration Overview ................................................................................................... 502
23.4.2 Configure the Zyxel Device to Communicate with SSO .............................................. 502
23.4.3 Enable Web Authentication ............................................................................................ 503
23.4.4 Create a Security Policy ................................................................................................... 505
23.4.5 Configure User Information ..............................................................................................506
23.4.6 Configure an Authentication Method ........................................................................... 507
23.4.7 Configure Active Directory ..............................................................................................508
23.5 SSO Agent Configuration .......................................................................................................... 509
Chapter 24
Security Policy..................................................................................................................................512
24.1 Overview ..................................................................................................................................... 512
24.2 One Security ................................................................................................................................ 513
24.3 What You Can Do in this Chapter ............................................................................................ 516
24.3.1 What You Need to Know ................................................................................................. 516
24.4 The Security Policy Screen ......................................................................................................... 518
24.4.1 Configuring the Security Policy Control Screen ............................................................ 519
24.4.2 The Security Policy Control Add/Edit Screen ................................................................. 523
24.5 Anomaly Detection and Prevention Overview ...................................................................... 524
24.5.1 The Anomaly Detection and Prevention General Screen ........................................... 525
24.5.2 Creating New ADP Profiles ..............................................................................................526
24.5.3 Traffic Anomaly Profiles ................................................................................................... 527
24.5.4 Protocol Anomaly Profiles ................................................................................................ 530
24.6 The Session Control Screen ........................................................................................................ 533
24.6.1 The Session Control Add/Edit Screen .............................................................................. 534
24.7 Security Policy Example Applications ......................................................................................535
ZyWALL ATP Series User’s Guide
15
Page 16

Table of Contents
Chapter 25
Application Patrol............................................................................................................................538
25.1 Overview ..................................................................................................................................... 538
25.1.1 What You Can Do in this Chapter ................................................................................... 538
25.1.2 What You Need to Know ................................................................................................ 538
25.2 Application Patrol Profile ........................................................................................................... 539
25.2.1 Profile Action: Apply to a Security Policy ....................................................................... 540
25.2.2 Application Patrol Profile > Add/Edit - My Application ............................................... 543
25.2.3 Application Patrol Profile > Add/Edit - Query Result ..................................................... 544
Chapter 26
Content Filter ....................................................................................................................................547
26.1 Overview ..................................................................................................................................... 547
26.1.1 What You Can Do in this Chapter ................................................................................... 547
26.1.2 What You Need to Know ................................................................................................. 547
26.1.3 Before You Begin ............................................................................................................... 549
26.2 Content Filter Profile Screen ...................................................................................................... 549
26.2.1 Apply to a Security Policy ................................................................................................ 550
26.2.2 Content Filter Add Profile Category Service .................................................................. 553
26.2.3 Content Filter Add Filter Profile Custom Service ........................................................... 566
26.3 Content Filter Trusted Web Sites Screen ................................................................................. 568
26.4 Content Filter Forbidden Web Sites Screen ............................................................................ 569
26.5 Content Filter Technical Reference ......................................................................................... 570
Chapter 27
Anti-Malware....................................................................................................................................572
27.1 Overview ..................................................................................................................................... 572
27.1.1 What You Can Do in this Chapter ................................................................................... 576
27.2 Anti-Malware Screen ................................................................................................................. 577
27.3 The White List Screen .................................................................................................................. 581
27.4 The Black List Screen .................................................................................................................. 582
27.5 Anti-Malware Signature Searching ........................................................................................... 583
27.6 Anti-Malware Technical Reference ......................................................................................... 584
Chapter 28
Reputation Filter ...............................................................................................................................586
28.1 Overview ..................................................................................................................................... 586
28.1.1 What You Need to Know ................................................................................................. 586
28.1.2 What You Can Do in this Chapter ................................................................................... 586
28.2 IP Reputation Screen .................................................................................................................. 586
28.2.1 IP Reputation White List Screen ....................................................................................... 590
28.2.2 IP Reputation Black List Screen ........................................................................................ 590
28.3 URL Threat Filter Screen .............................................................................................................. 591
ZyWALL ATP Series User’s Guide
16
Page 17

Table of Contents
28.3.1 URL Threat Filter White List Screen ................................................................................... 593
28.3.2 URL Threat Filter Black List Screen .................................................................................... 594
Chapter 29
IDP .....................................................................................................................................................596
29.1 Overview ..................................................................................................................................... 596
29.1.1 What You Can Do in this Chapter ................................................................................... 596
29.1.2 What You Need To Know ................................................................................................. 596
29.1.3 Before You Begin ............................................................................................................... 596
29.2 The IDP Screen ............................................................................................................................ 597
29.2.1 Query Example .................................................................................................................. 601
29.3 IDP Custom Signatures .............................................................................................................. 602
29.3.1 Add / Edit Custom Signatures ......................................................................................... 603
29.3.2 Custom Signature Example ............................................................................................. 607
29.3.3 Applying Custom Signatures ............................................................................................ 609
29.3.4 Verifying Custom Signatures ............................................................................................ 610
29.4 The White List Screen ................................................................................................................. 610
29.5 IDP Technical Reference ........................................................................................................... 611
Chapter 30
Sandboxing ......................................................................................................................................614
30.1 Overview ..................................................................................................................................... 614
30.1.1 What You Need to Know ................................................................................................. 615
30.2 Sandboxing Screen .................................................................................................................... 615
Chapter 31
Email Security...................................................................................................................................618
31.1 Overview ..................................................................................................................................... 618
31.1.1 What You Can Do in this Chapter ................................................................................... 618
31.1.2 What You Need to Know ................................................................................................. 618
31.2 Before You Begin ........................................................................................................................ 619
31.3 The Email Security Screen .......................................................................................................... 620
31.4 The Black List / White List Screen ............................................................................................... 622
31.4.1 The Black or White List Add/Edit Screen ......................................................................... 623
31.4.2 Regular Expressions in Black or White List Entries ........................................................... 625
31.5 Email Security Technical Reference ......................................................................................... 625
Chapter 32
SSL Inspection...................................................................................................................................629
32.1 Overview ..................................................................................................................................... 629
32.1.1 What You Can Do in this Chapter ................................................................................... 629
32.1.2 What You Need To Know ................................................................................................. 629
32.1.3 Before You Begin ............................................................................................................... 630
ZyWALL ATP Series User’s Guide
17
Page 18

Table of Contents
32.2 The SSL Inspection Profile Screen .............................................................................................. 630
32.2.1 Apply to a Security Policy ................................................................................................ 631
32.2.2 Add / Edit SSL Inspection Profiles .................................................................................... 634
32.3 Exclude List Screen .................................................................................................................... 635
32.4 Certificate Update Screen ....................................................................................................... 637
32.5 Install a CA Certificate in a Browser ......................................................................................... 638
Chapter 33
IP Exception......................................................................................................................................641
33.1 Overview ..................................................................................................................................... 641
33.2 The IP Exception Screen ............................................................................................................. 641
33.2.1 The IP Exception Add/Edit Screen ................................................................................. 642
Chapter 34
Object...............................................................................................................................................644
34.1 Zones Overview .......................................................................................................................... 644
34.1.1 What You Need to Know ................................................................................................. 644
34.1.2 The Zone Screen ................................................................................................................ 645
34.2 User/Group Overview ................................................................................................................ 647
34.2.1 What You Need To Know ................................................................................................. 647
34.2.2 User/Group User Summary Screen .................................................................................. 649
34.2.3 User/Group Group Summary Screen .............................................................................. 654
34.2.4 User/Group Setting Screen ............................................................................................. 655
34.2.5 User/Group MAC Address Summary Screen ................................................................ 660
34.2.6 User /Group Technical Reference .................................................................................. 662
34.3 AP Profile Overview .................................................................................................................... 662
34.3.1 Radio Screen ..................................................................................................................... 663
34.3.2 SSID Screen ....................................................................................................................... 669
34.4 MON Profile ................................................................................................................................ 678
34.4.1 Overview ............................................................................................................................ 678
34.4.2 Configuring MON Profile ................................................................................................. 679
34.4.3 Add/Edit MON Profile ....................................................................................................... 680
34.4.4 Technical Reference ........................................................................................................ 681
34.5 ZyMesh Overview ....................................................................................................................... 682
34.5.1 ZyMesh Profile .................................................................................................................... 684
34.5.2 Add/Edit ZyMesh Profile ................................................................................................... 685
34.6 Address/Geo IP Overview ......................................................................................................... 685
34.6.1 What You Need To Know ................................................................................................. 686
34.6.2 Address Summary Screen ................................................................................................ 686
34.6.3 Address Group Summary Screen .................................................................................... 690
34.6.4 Geo IP Summary Screen .................................................................................................. 692
34.7 Service Overview ........................................................................................................................ 695
34.7.1 What You Need to Know ................................................................................................. 695
ZyWALL ATP Series User’s Guide
18
Page 19

Table of Contents
34.7.2 The Service Summary Screen .......................................................................................... 696
34.7.3 The Service Group Summary Screen ............................................................................. 698
34.8 Schedule Overview ................................................................................................................... 700
34.8.1 What You Need to Know ................................................................................................. 700
34.8.2 The Schedule Screen ........................................................................................................ 701
34.8.3 The Schedule Group Screen ............................................................................................ 704
34.9 AAA Server Overview ............................................................................................................... 705
34.9.1 Directory Service (AD/LDAP) ........................................................................................... 706
34.9.2 RADIUS Server .................................................................................................................... 706
34.9.3 ASAS .................................................................................................................................... 706
34.9.4 What You Need To Know ................................................................................................. 707
34.9.5 Active Directory or LDAP Server Summary ..................................................................... 708
34.9.6 RADIUS Server Summary ...................................................................................................712
34.10 Auth. Method Overview ........................................................................................................ 715
34.10.1 Before You Begin ............................................................................................................. 715
34.10.2 Example: Selecting a VPN Authentication Method ................................................... 715
34.10.3 Authentication Method Objects ................................................................................... 716
34.10.4 Two-Factor Authentication VPN Access ...................................................................... 718
34.10.5 Two-Factor Authentication Admin Access .................................................................. 721
34.11 Certificate Overview ............................................................................................................... 723
34.11.1 What You Need to Know ............................................................................................... 723
34.11.2 Verifying a Certificate .................................................................................................... 725
34.11.3 The My Certificates Screen ............................................................................................ 726
34.11.4 The Trusted Certificates Screen .................................................................................... 735
34.11.5 Certificates Technical Reference ................................................................................. 740
34.12 ISP Account Overview ............................................................................................................ 740
34.12.1 ISP Account Summary ....................................................................................................740
34.13 DHCPv6 Overview .................................................................................................................... 743
34.13.1 The DHCPv6 Request Screen ......................................................................................... 743
34.13.2 The DHCPv6 Lease Screen ............................................................................................. 745
Chapter 35
Device HA.........................................................................................................................................747
35.1 Device HA Overview .................................................................................................................. 747
35.1.1 What You Can Do in These Screens ................................................................................ 747
35.2 Device HA Status ........................................................................................................................ 747
35.3 Device HA Pro ............................................................................................................................. 749
35.3.1 Deploying Device HA Pro ................................................................................................ 750
35.3.2 Configuring Device HA Pro .............................................................................................. 750
35.4 View Log ...................................................................................................................................... 752
Chapter 36
Cloud CNM......................................................................................................................................754
ZyWALL ATP Series User’s Guide
19
Page 20

Table of Contents
36.1 Cloud CNM Overview ................................................................................................................ 754
36.1.1 What You Can Do in this Chapter ................................................................................... 754
36.2 Cloud CNM SecuManager ....................................................................................................... 754
36.3 Cloud CNM SecuReporter ......................................................................................................... 757
Chapter 37
System...............................................................................................................................................762
37.1 Overview ..................................................................................................................................... 762
37.1.1 What You Can Do in this Chapter ................................................................................... 762
37.2 Host Name ................................................................................................................................... 763
37.3 USB Storage ................................................................................................................................. 763
37.4 Date and Time ............................................................................................................................ 764
37.4.1 Pre-defined NTP Time Servers List ..................................................................................... 767
37.4.2 Time Server Synchronization ............................................................................................ 767
37.5 Console Port Speed ................................................................................................................... 768
37.6 DNS Overview ............................................................................................................................. 769
37.6.1 DNS Server Address Assignment ...................................................................................... 769
37.6.2 Configuring the DNS Screen ............................................................................................ 769
37.6.3 (IPv6) Address Record ...................................................................................................... 773
37.6.4 PTR Record ......................................................................................................................... 773
37.6.5 Adding an (IPv6) Address/PTR Record .......................................................................... 773
37.6.6 CNAME Record ................................................................................................................. 774
37.6.7 Adding a CNAME Record ................................................................................................ 774
37.6.8 Domain Zone Forwarder ................................................................................................. 775
37.6.9 Adding a Domain Zone Forwarder ................................................................................. 775
37.6.10 MX Record ...................................................................................................................... 776
37.6.11 Adding a MX Record ...................................................................................................... 776
37.6.12 Security Option Control .................................................................................................. 777
37.6.13 Editing a Security Option Control .................................................................................. 777
37.6.14 Adding a DNS Service Control Rule .............................................................................. 778
37.7 WWW Overview .......................................................................................................................... 779
37.7.1 Service Access Limitations ............................................................................................... 779
37.7.2 System Timeout .................................................................................................................. 779
37.7.3 HTTPS ................................................................................................................................... 779
37.7.4 Configuring WWW Service Control ................................................................................. 780
37.7.5 Service Control Rules ........................................................................................................ 783
37.7.6 Customizing the WWW Login Page ................................................................................ 784
37.7.7 HTTPS Example ................................................................................................................... 789
37.8 SSH ............................................................................................................................................. 796
37.8.1 How SSH Works .................................................................................................................. 797
37.8.2 SSH Implementation on the Zyxel Device ...................................................................... 798
37.8.3 Requirements for Using SSH ..............................................................................................798
37.8.4 Configuring SSH ................................................................................................................. 798
ZyWALL ATP Series User’s Guide
20
Page 21

Table of Contents
37.8.5 Service Control Rules ........................................................................................................ 799
37.8.6 Secure Telnet Using SSH Examples .................................................................................. 800
37.9 Telnet ........................................................................................................................................... 801
37.9.1 Configuring Telnet ............................................................................................................. 801
37.9.2 Service Control Rules ........................................................................................................ 803
37.10 FTP .............................................................................................................................................. 803
37.10.1 Configuring FTP ................................................................................................................ 803
37.10.2 Service Control Rules ...................................................................................................... 805
37.11 SNMP ......................................................................................................................................... 805
37.11.1 SNMPv3 and Security ...................................................................................................... 806
37.11.2 Supported MIBs ............................................................................................................... 807
37.11.3 SNMP Traps ....................................................................................................................... 807
37.11.4 Configuring SNMP ........................................................................................................... 807
37.11.5 Add SNMPv3 User ............................................................................................................ 810
37.11.6 Service Control Rules ...................................................................................................... 810
37.12 Authentication Server .............................................................................................................. 811
37.12.1 Add/Edit Trusted RADIUS Client .................................................................................... 813
37.13 Notification > Mail Server ......................................................................................................... 813
37.14 Notification > SMS ..................................................................................................................... 815
37.15 Language Screen ..................................................................................................................... 816
37.16 IPv6 Screen ................................................................................................................................ 817
37.17 Zyxel One Network (ZON) Utility ............................................................................................. 817
37.17.1 Requirements ................................................................................................................... 818
37.17.2 Run the ZON Utility ........................................................................................................... 818
37.17.3 Zyxel One Network (ZON) System Screen .................................................................... 822
Chapter 38
Log and Report....... .... ... ............................................. ... .... ............................................ ...................823
38.1 Overview ..................................................................................................................................... 823
38.1.1 What You Can Do In this Chapter .................................................................................. 823
38.2 Email Daily Report ....................................................................................................................... 823
38.3 Log Setting Screens ................................................................................................................... 825
38.3.1 Log Setting Summary ........................................................................................................ 825
38.3.2 Edit System Log Settings .................................................................................................. 826
38.3.3 Edit Log on USB Storage Setting ..................................................................................... 830
38.3.4 Edit Remote Server Log Settings ..................................................................................... 831
38.3.5 Log Category Settings Screen ......................................................................................... 833
Chapter 39
File Manager ....................................................................................................................................836
39.1 Overview ..................................................................................................................................... 836
39.1.1 What You Can Do in this Chapter ................................................................................... 836
39.1.2 What you Need to Know .................................................................................................. 836
ZyWALL ATP Series User’s Guide
21
Page 22

Table of Contents
39.2 The Configuration File Screen ................................................................................................... 838
39.3 Firmware Management ........................................................................................................... 842
39.3.1 Cloud Helper ..................................................................................................................... 842
39.3.2 The Firmware Management Screen ............................................................................... 845
39.3.3 Firmware Upgrade via USB Stick ...................................................................................... 848
39.4 The Shell Script Screen .............................................................................................................. 848
Chapter 40
Diagnostics ......................................................................................................................................851
40.1 Overview ..................................................................................................................................... 851
40.1.1 What You Can Do in this Chapter ................................................................................... 851
40.2 The Diagnostics Screens ............................................................................................................ 851
40.2.1 The Diagnostics Collect Screen ....................................................................................... 852
40.2.2 The Diagnostics Collect on AP Screen ........................................................................... 853
40.2.3 The Diagnostics Files Screen ............................................................................................854
40.3 The Packet Capture Screen ...................................................................................................... 855
40.3.1 The Packet Capture on AP Screen ................................................................................. 858
40.3.2 The Packet Capture Files Screen .................................................................................... 861
40.4 The CPU / Memory Status Screen ............................................................................................. 862
40.5 The System Log Screen .............................................................................................................. 864
40.6 The Network Tool Screen ........................................................................................................... 864
40.7 The Routing Traces Screen ........................................................................................................ 867
40.8 The Wireless Frame Capture Screen ........................................................................................868
40.8.1 The Wireless Frame Capture Files Screen ...................................................................... 869
Chapter 41
Packet Flow Explore ........................................................................................................................870
41.1 Overview ..................................................................................................................................... 870
41.1.1 What You Can Do in this Chapter ................................................................................... 870
41.2 Routing Status ............................................................................................................................ 870
41.3 The SNAT Status Screen .............................................................................................................. 874
Chapter 42
Shutdown..........................................................................................................................................877
42.1 Overview ..................................................................................................................................... 877
42.1.1 What You Need To Know ................................................................................................. 877
42.2 The Shutdown Screen ................................................................................................................ 877
Part III: Appendices and Troubleshooting..................................................878
Chapter 43
Troubleshooting................................................................................................................................879
ZyWALL ATP Series User’s Guide
22
Page 23

Table of Contents
43.1 Resetting the Zyxel Device ........................................................................................................ 892
43.2 Getting More Troubleshooting Help .........................................................................................893
Appendix A Customer Support ..................................................................................................... 894
Appendix B Product Features........................................................................................................ 900
Appendix C Legal Information ...................................................................................................... 903
Index.................................................................................................................................................912
ZyWALL ATP Series User’s Guide
23
Page 24

PART I
User’s Guide
24
Page 25

1.1 Overview
Zyxel Device refers to these models as outlined below.
• ATP100
• ATP100W
• ATP200
• ATP500
• ATP700
• ATP800
1.1.1 Model Feature Differences
CHAPTER 1
Introduction
Note the following differences between the ATP models:
Table 1 ATP Model Feature Comparison
FEATURE/MODEL ATP100 ATP100W ATP200 ATP500 ATP700 ATP800
Microsoft Azure YES YES YES YES YES YES
Amazon VPC YES YES YES YES YES YES
Anomaly Detection & Prevention YES YES YES YES YES YES
Anti-Spam YES YES YES YES YES YES
IDP YES YES YES YES YES YES
Anti-Malware YES YES YES YES YES YES
App Patrol YES YES YES YES YES YES
Content Filtering YES YES YES YES YES YES
SecuReporter Premium YES YES YES YES YES YES
Reputation Filter YES YES YES YES YES YES
URL Threat Filter YES YES YES YES YES YES
Sandboxing YES YES YES YES YES YES
IP Exception YES YES YES YES YES YES
AP Controller YES YES YES YES YES YES
Device HA Pro NO NO NO YES YES YES
Easy Mode NO NO NO NO NO NO
Port Group YES YES YES YES YES YES
Port Role YES YES YES YES YES YES
SSL Application YES YES YES YES YES YES
SSL encrypted traffic inspection YES YES YES YES YES YES
ZyWALL ATP Series User’s Guide
25
Page 26
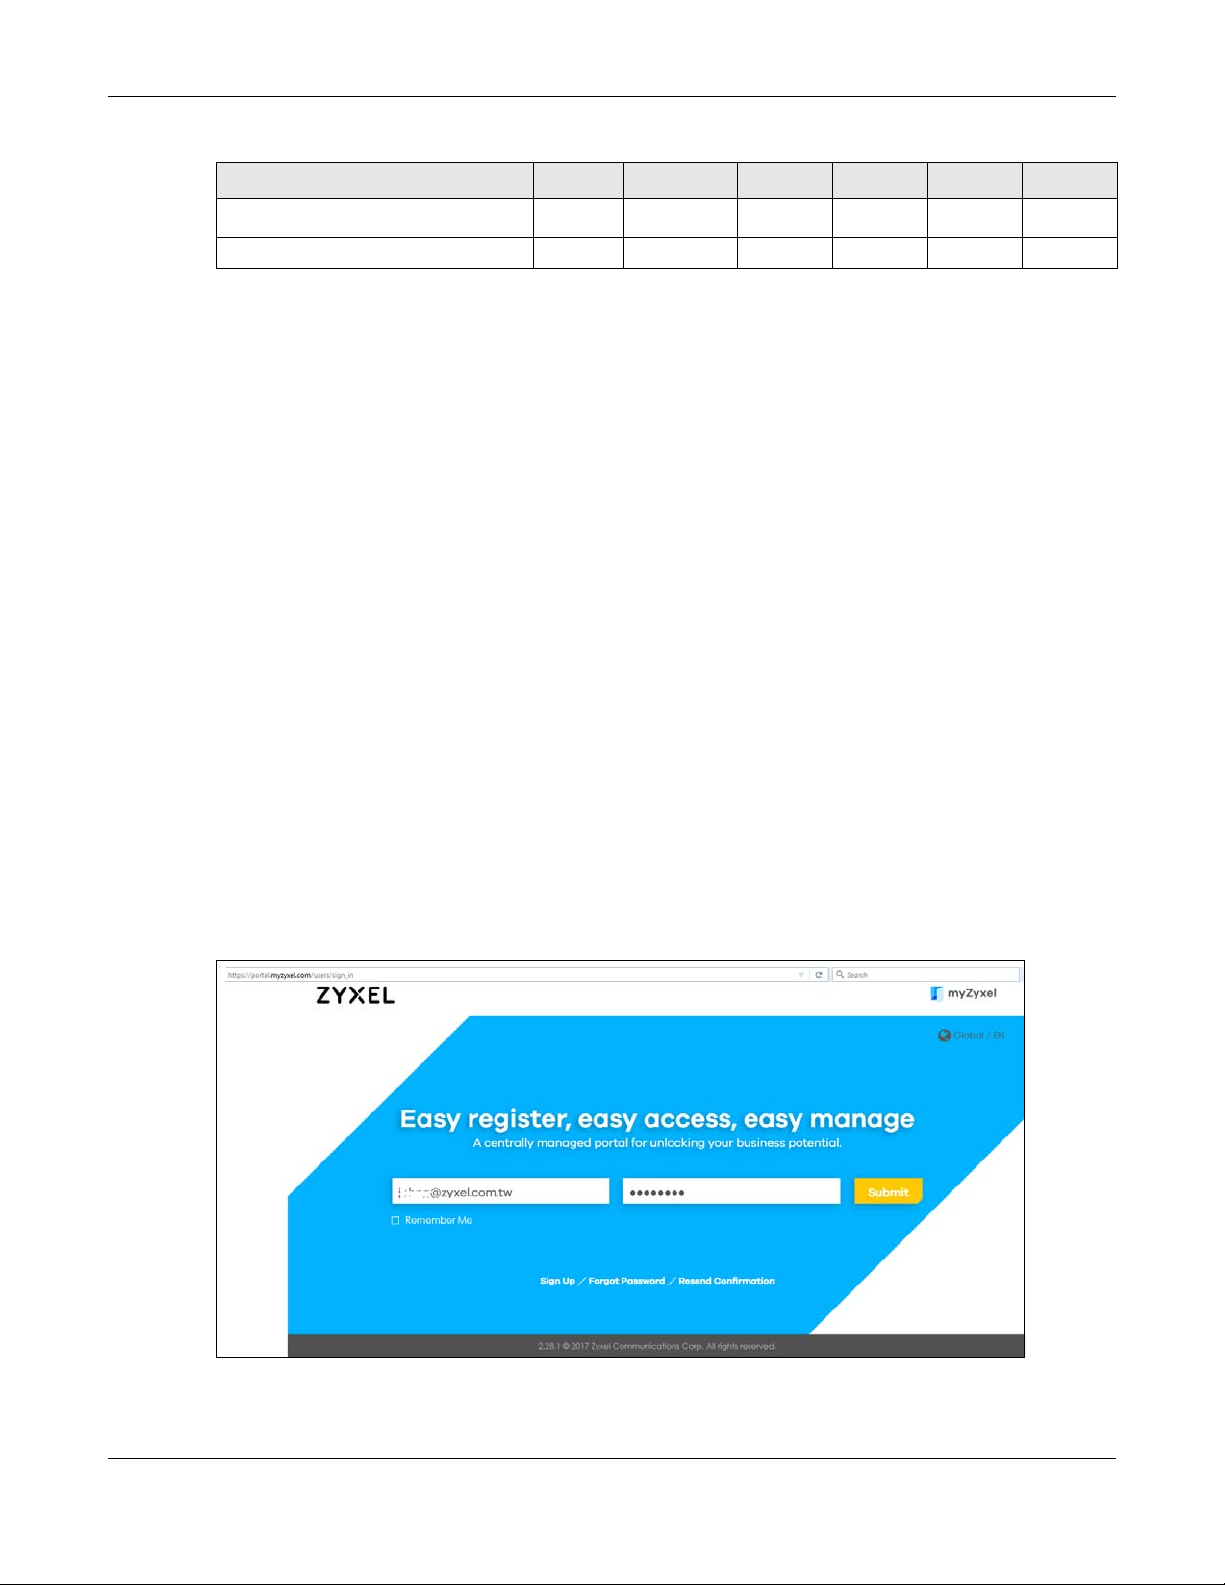
Chapter 1 Introduction
Table 1 ATP Model Feature Comparison (continued)
FEATURE/MODEL ATP100 ATP100W ATP200 ATP500 ATP700 ATP800
Bundled UTM Feature License Validity 1 year 1 year 1 year 1 year 1 year 1 year
WiFi functionality (built-in) NO YES NO NO NO NO
For information on interface names by model, default port / interface name mapping, and default
interface / zone mapping please see Section 3.3 on page 77.
See the product’s datasheet for detailed information on a specific model.
1.2 Registration at myZyxel
myZyxel is Zyxel’s online services center where you can register your Zyxel Device and manage
subscription services available for your Zyxel Device (see Configuration > Licensing > Registration >
Service for services available for your Zyxel Device).
• For Zyxel Devices that already have firmware version 4.25 or later, you have to register your Zyxel
Device and activate the corresponding service at myZyxel (through your Zyxel Device).
• For Zyxel Devices upgrading to firmware version 4.25 or later, you may skip registering your Zyxel
Device and activating the corresponding service at myZyxel (through your Zyxel Device). However, it
is highly recommended to at least register your Zyxel Device. At the time of writing, the Firmware
Upgrade license providing Cloud Helper new firmware notifications, is free when you register your
Zyxel Device.
Note: You need to create a myZyxel account at http://portal.myZyxel.com before you can
register your device and activate the services at myZyxel.
You may need your Zyxel Device’s serial number and LAN MAC address to register it at
myZyxel. See the label at the back of the Zyxel Device’s for details.
Figure 1 myZyxel Login
ZyWALL ATP Series User’s Guide
26
Page 27
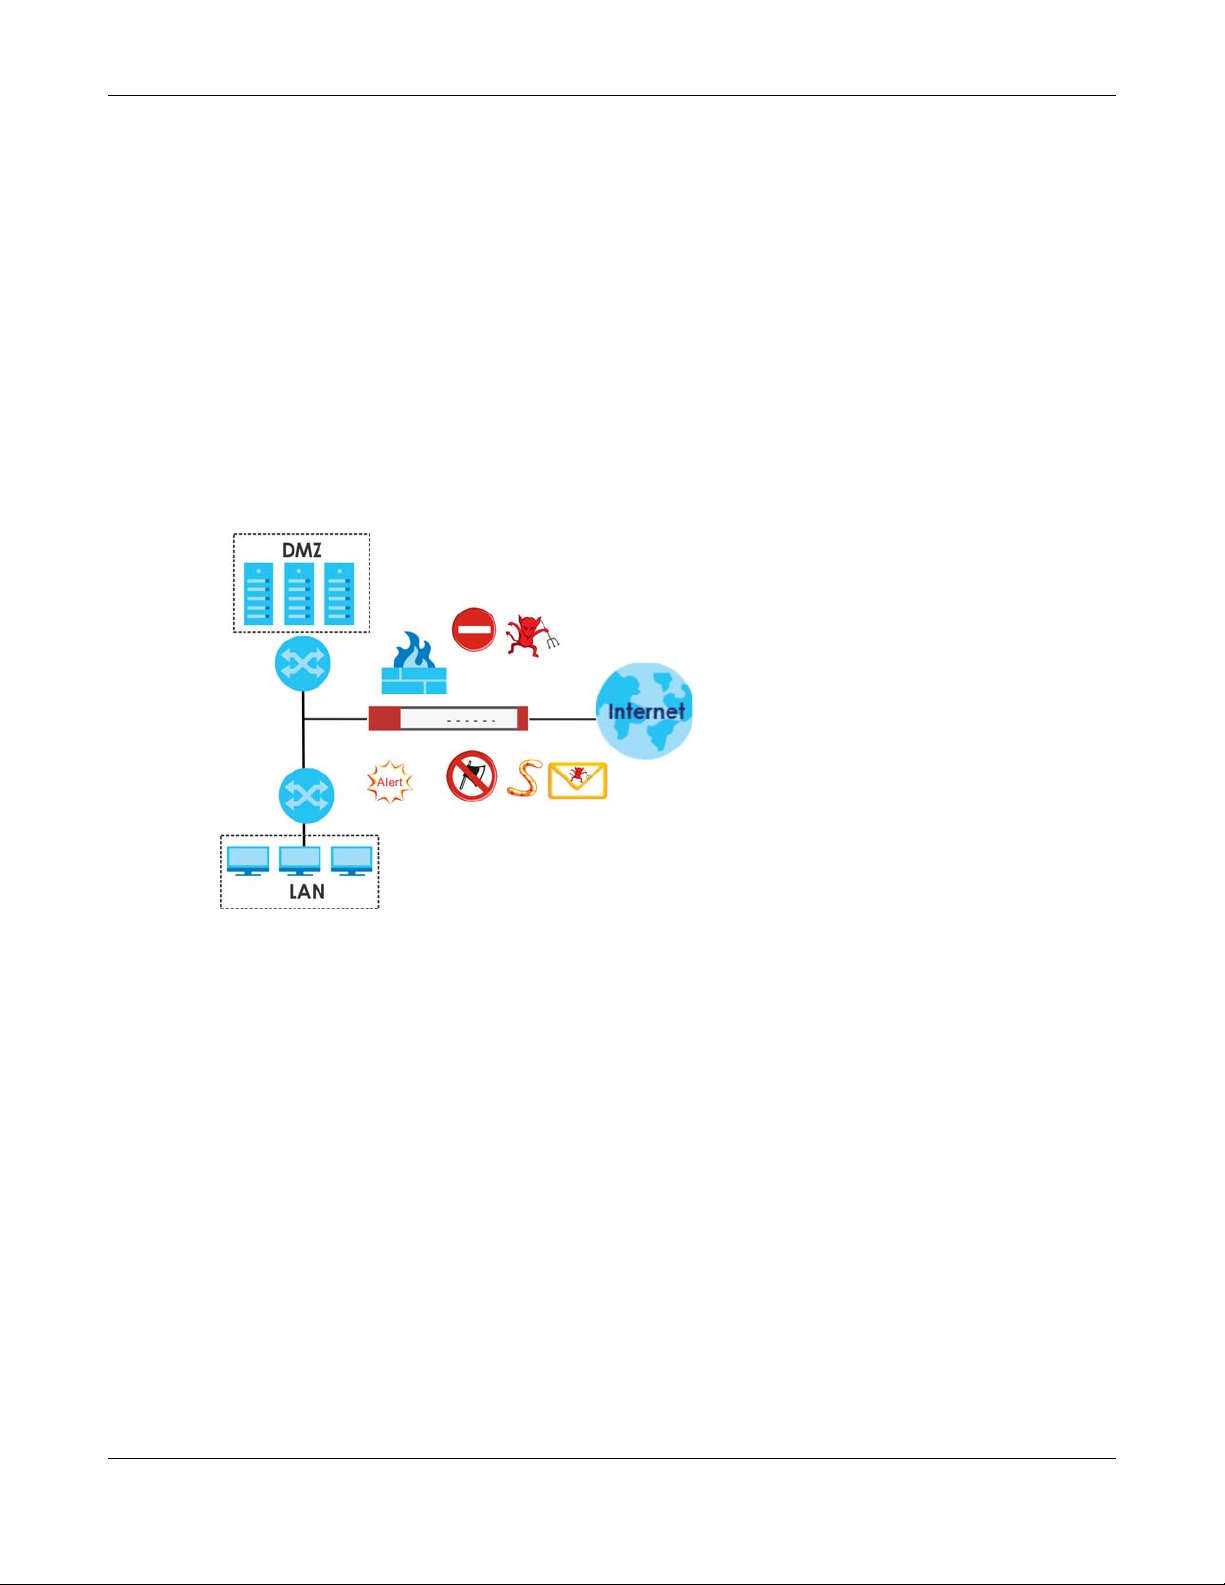
1.2.1 Grace Period
SecuReporter and service licenses have a 15-day grace period after a license expires. Services will
continue to work in this period during which you will receive notifications to renew your license(s). New
license(s) are valid for 1 year from the date of purchase.
1.2.2 Applications
These are some Zyxel Device application scenarios.
Security Router
Security includes a Stateful Packet Inspection (SPI) firewall.
Figure 2 Applications: Security Router Applications: Security Router
Chapter 1 Introduction
IPv6 Routing
The Zyxel Device supports IPv6 Ethernet, PPP, VLAN, and bridge routing. You may also create IPv6 policy
routes and IPv6 objects. The Zyxel Device can also route IPv6 packets through IPv4 networks using
different tunneling methods.
ZyWALL ATP Series User’s Guide
27
Page 28
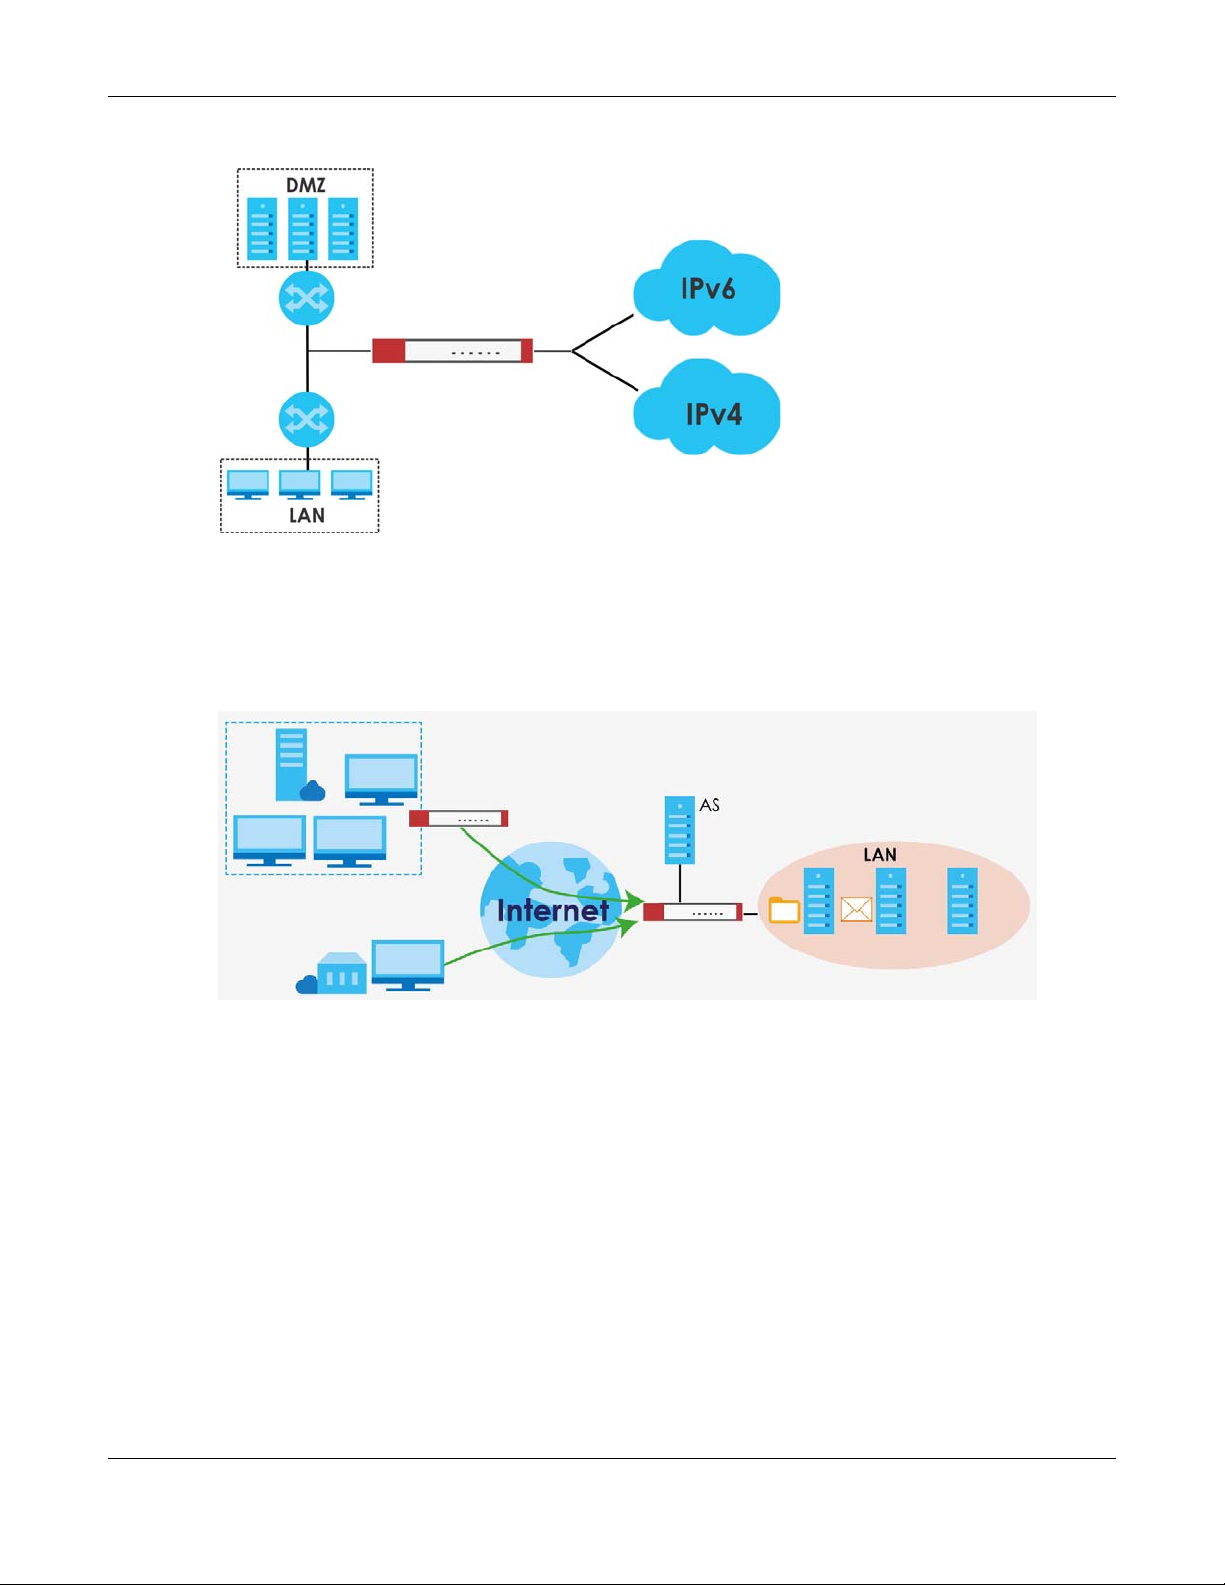
Chapter 1 Introduction
Figure 3 Applications: IPv6 Routing
VPN Connectivity
Set up VPN tunnels with other companies, branch offices, telecommuters, and business travelers to
provide secure access to your network. AS is an Authentication Server in the below figure.
Figure 4 Applications: VPN Connectivity
SSL VPN Network Access
SSL VPN lets remote users use their web browsers for a very easy-to-use VPN solution. A user just browses
to the Zyxel Device’s web address and enters his user name and password to securely connect to the
Zyxel Device’s network. Here full tunnel mode creates a virtual connection for a remote user and gives
him a private IP address in the same subnet as the local network so he can access network resources in
the same way as if he were part of the internal network.
ZyWALL ATP Series User’s Guide
28
Page 29
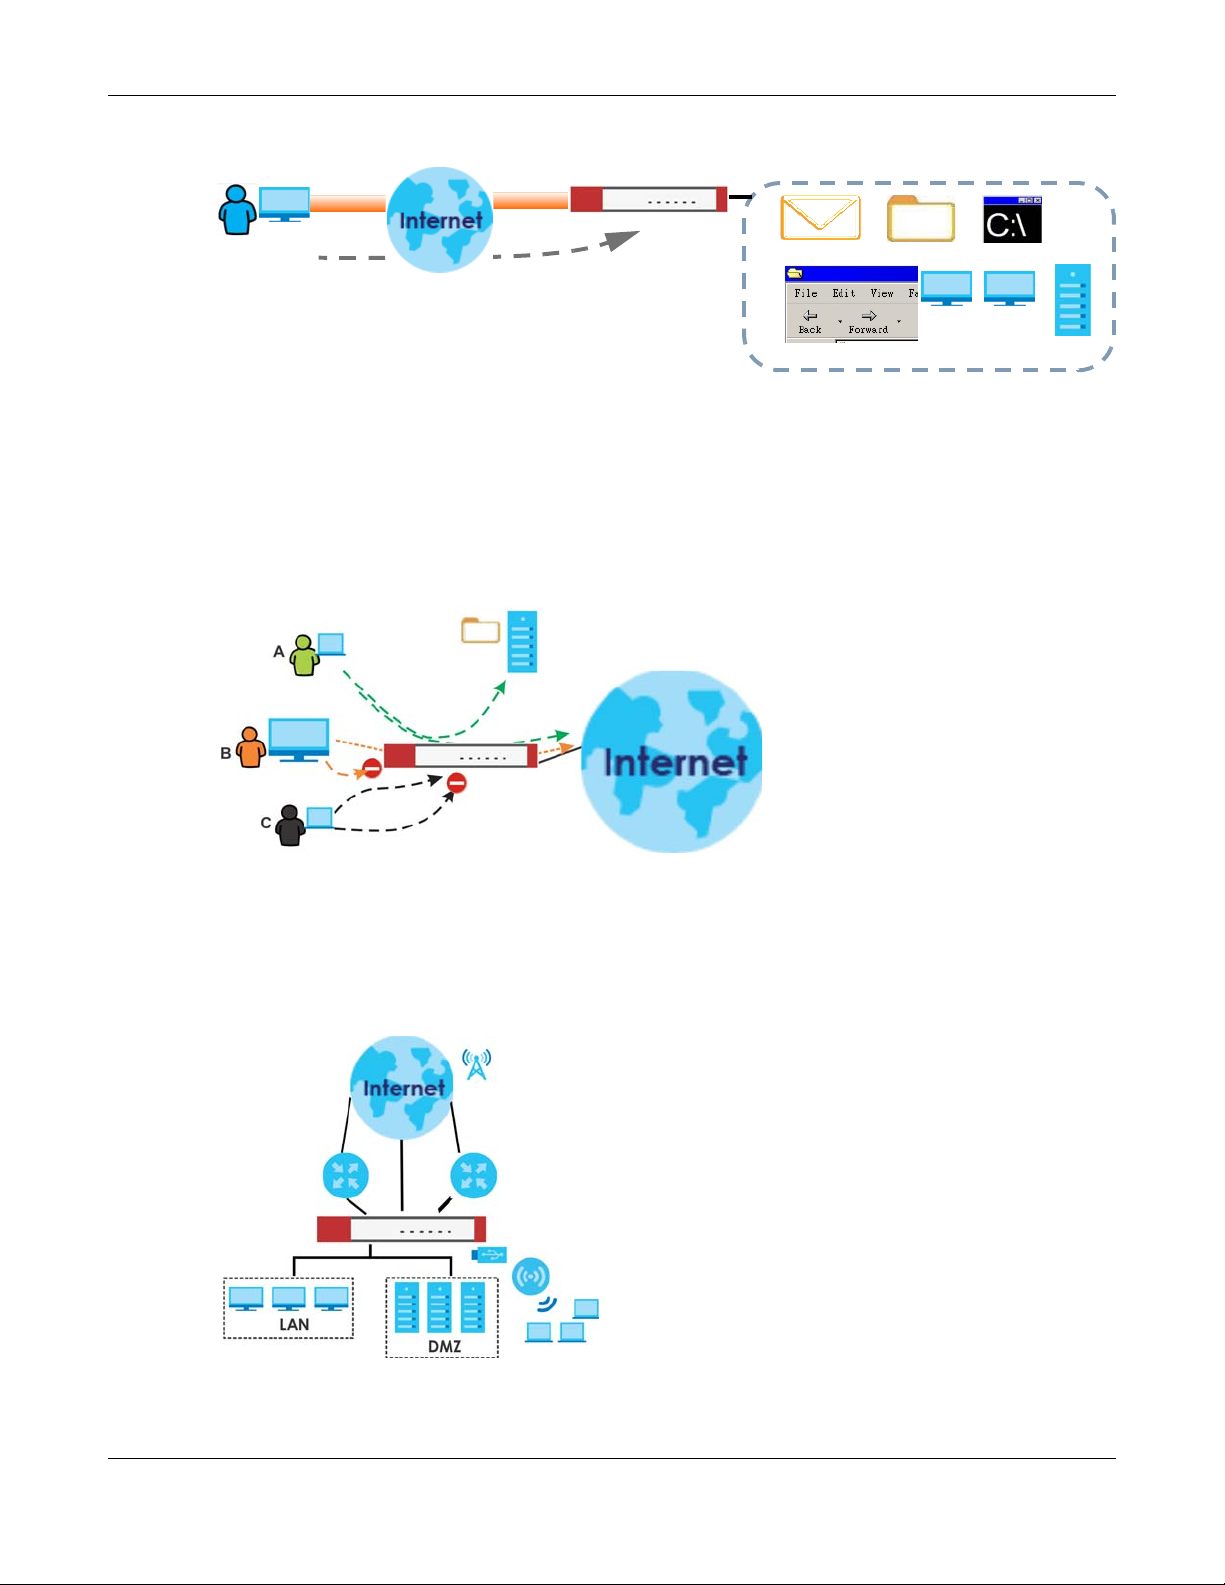
Chapter 1 Introduction
Web Mail File Share
Web-based Application
https://
Application Server
Non-Web
LAN (192.168.1.X)
Figure 5 SSL VPN With Full Tunnel Mode
User-Aware Access Control
Set up security policies to restrict access to sensitive information and shared resources based on the user
who is trying to access it. In the following figure user A can access both the Internet and an internal file
server. User B has a lower level of access and can only access the Internet. User C is not even logged in,
so and cannot access either the Internet or the file server.
Figure 6 Applications: User-Aware Access Control
Load Balancing
Set up multiple connections to the Internet on the same port, or different ports, including cellular
interfaces. In either case, you can balance the traffic loads between them.
Figure 7 Applications: Multiple WAN Interfaces
ZyWALL ATP Series User’s Guide
29
Page 30
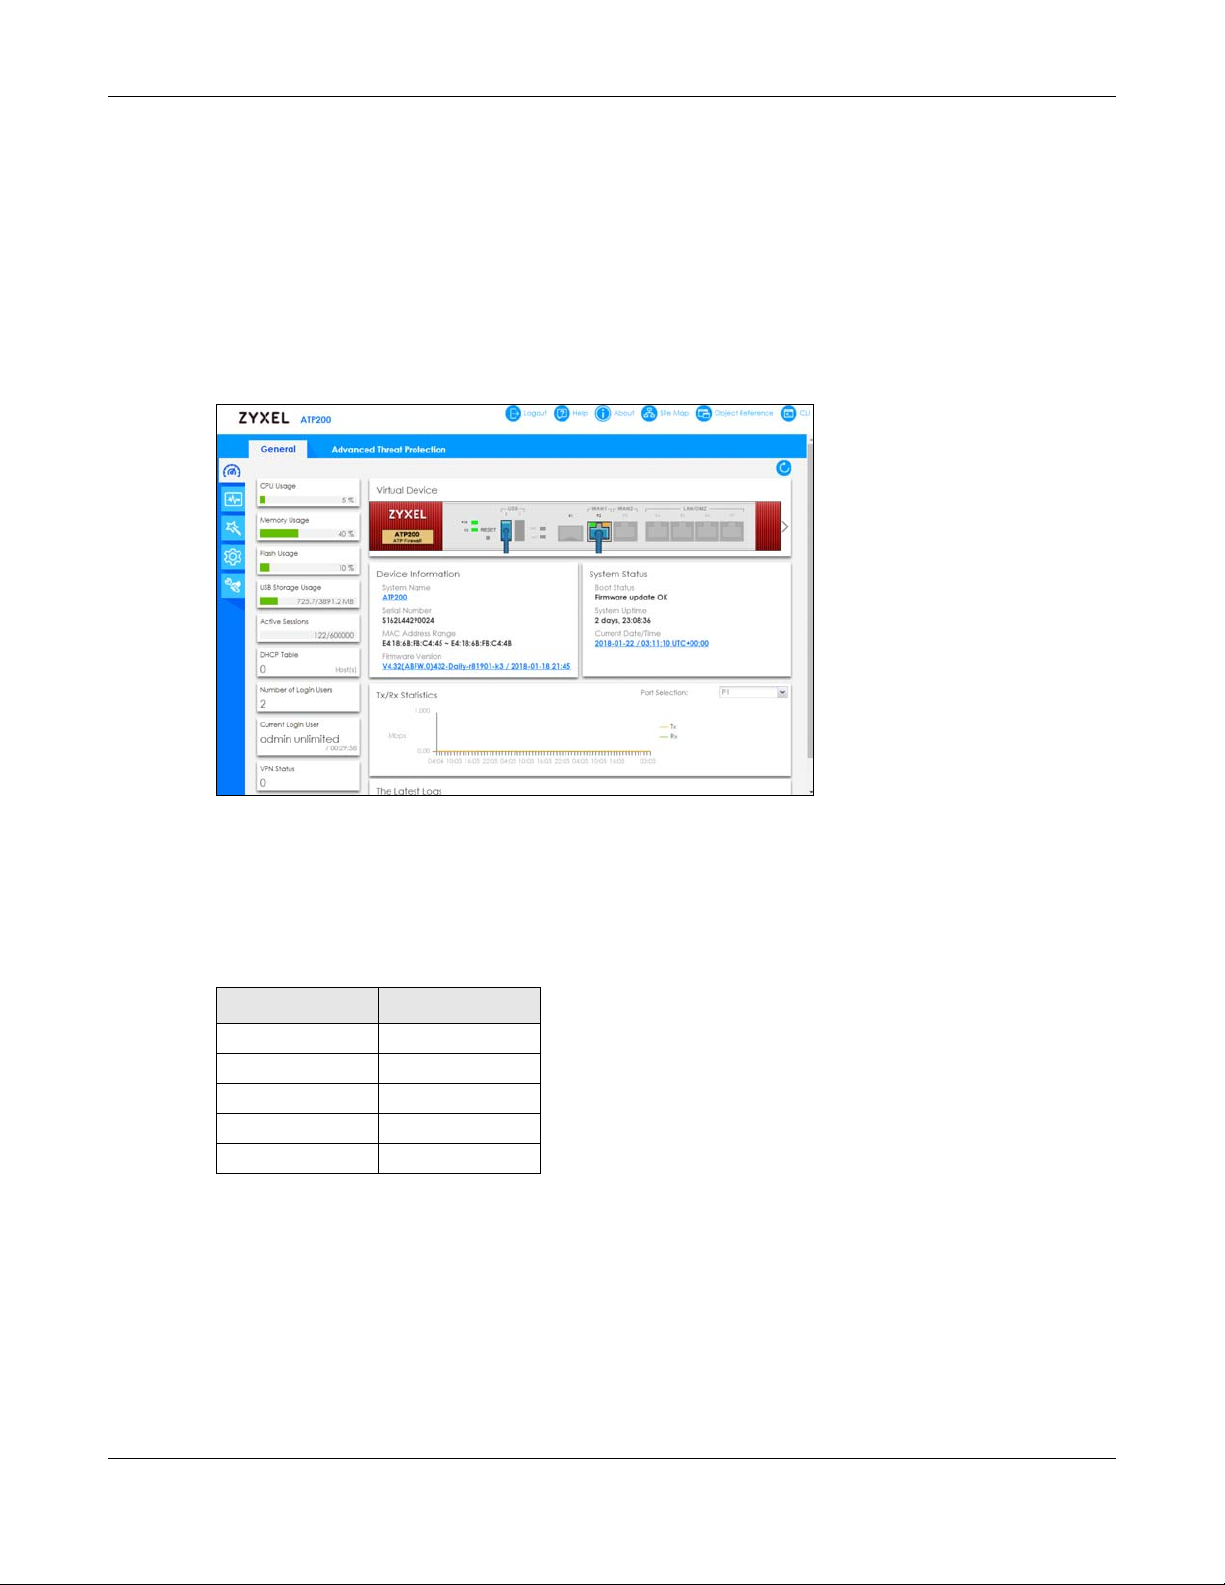
Chapter 1 Introduction
1.3 Management Overview
You can manage the Zyxel Device in the following ways.
Web Configurator
The Web Configurator allows easy Zyxel Device setup and management using an Internet browser. This
User’s Guide provides information about the Web Configurator.
Figure 8 Managing the Zyxel Device: Web Configurator
Command-Line Interface (CLI)
The CLI allows you to use text-based commands to configure the Zyxel Device. Access it using remote
management (for example, SSH or Telnet) or via the physical or Web Configurator console port. See the
Command Reference Guide for CLI details. The default settings for the console port are:
Table 2 Console Port Default Settings
SETTING VALUE
Speed 115200 bps
Data Bits 8
Parity None
Stop Bit 1
Flow Control Off
FTP
Use File Transfer Protocol for firmware upgrades and configuration backup/restore.
SNMP
The device can be monitored and/or managed by an SNMP manager. See Section 37.11 on page 805.
ZyWALL ATP Series User’s Guide
30
Page 31

Chapter 1 Introduction
CloudCNM
Use the CloudCNM screen (see Section 37.15 on page 816) to enable and configure management of
the Zyxel Device by a Central Network Management system.
Management Authentication
Managers must be authenticated with a username and password, using one of:
•Local
• An external RADIUS server
• An external LDAP server
• Certificates
Zyxel Device authentication
1.4 Web Configurator
In order to use the Web Configurator, you must:
• Use one of the following web browser versions or later:
• Internet Explorer 10.x, 11.x
• Chrome latest version (45 or above)
• Firefox latest version (45 or above)
• Safari latest version (9.0 or above)
• Allow pop-up windows (blocked by default in some browsers)
• Enable JavaScripts, Java permissions, and cookies
The recommended screen resolution is 1024 x 768 pixels.
Note: Screenshots and graphics in this book may differ slightly from your product due to
differences in product features or web configurator brand style. Most screen shots in this
guide come from the USG110 and USG60W.
1.4.1 Web Configurator Access
1 Make sure your Zyxel Device hardware is properly connected. See the Quick Start Guide.
2 In your browser go to http://192.168.1.1. By default, the Zyxel Device automatically routes this request to
its HTTPS server, and it is recommended to keep this setting. The Login screen appears.
ZyWALL ATP Series User’s Guide
31
Page 32
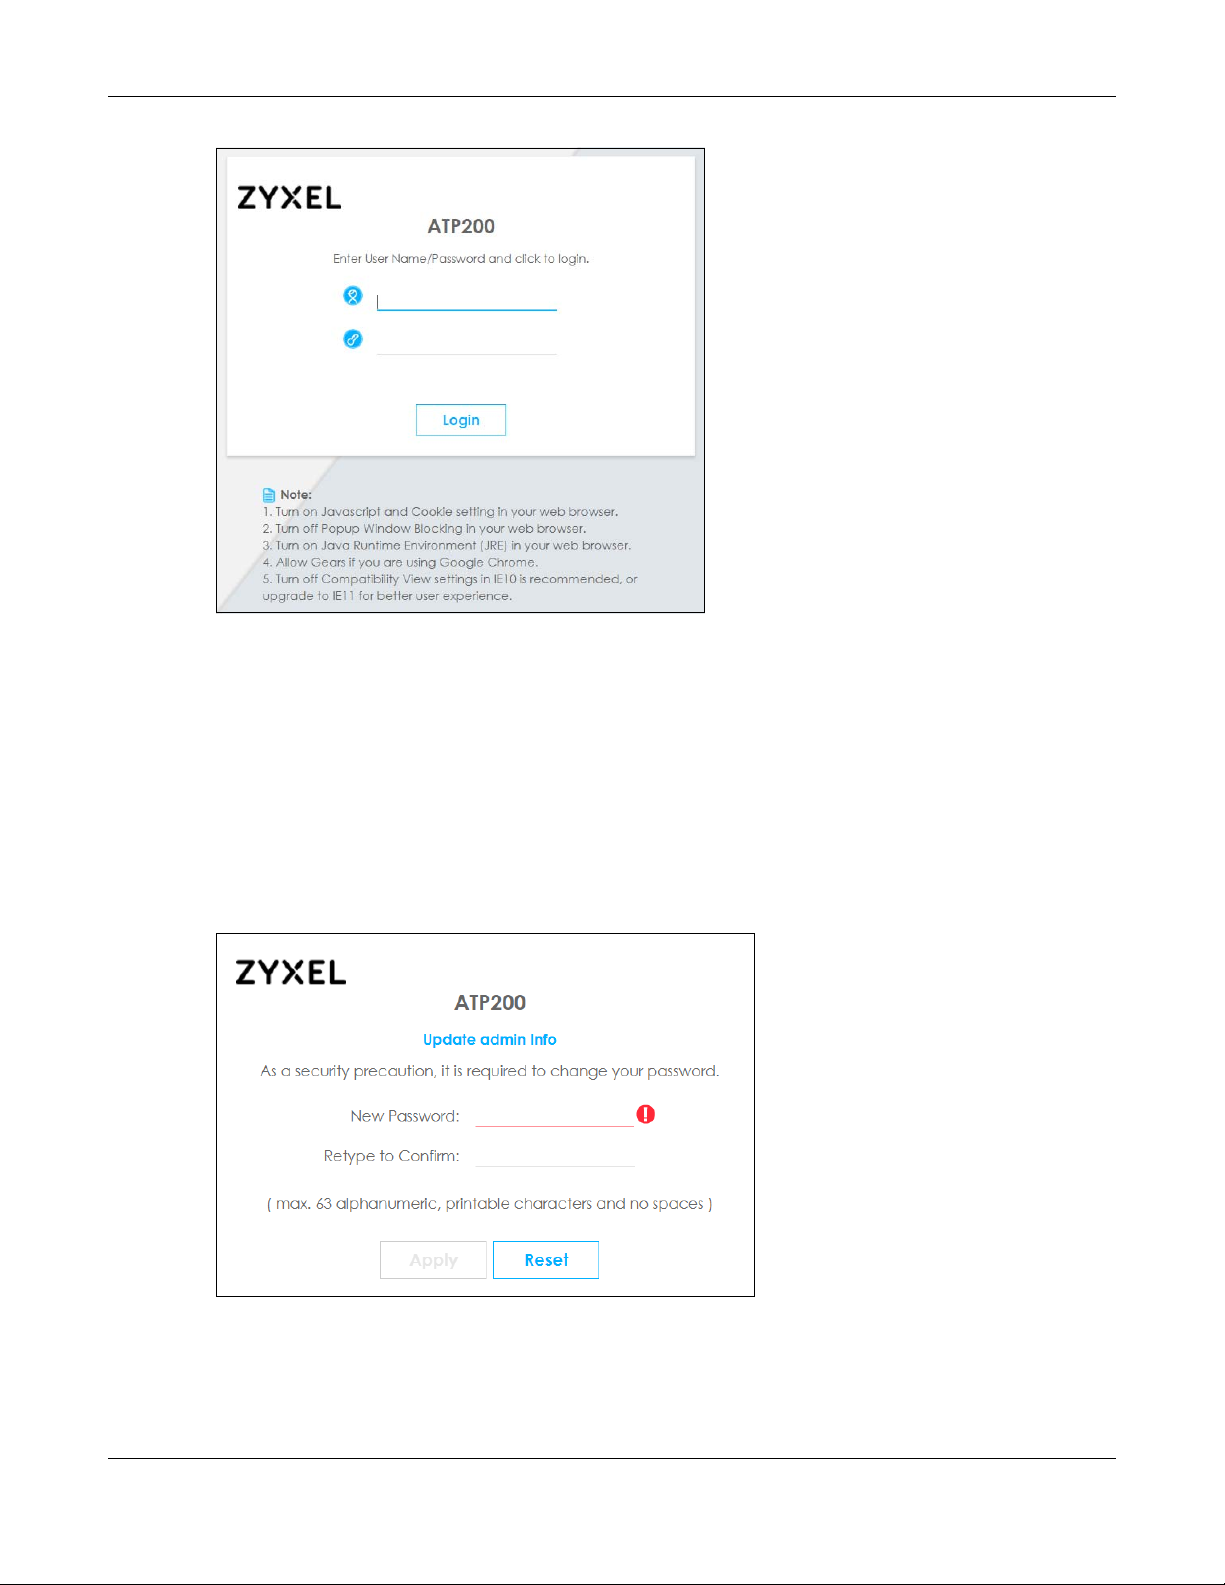
Chapter 1 Introduction
3 Type the user name (default: “admin”) and password (default: “1234”).
4 Click Login. After you log in for the first time using the default user name and password, you must
change the default admin password in the Update Admin Info screen. Enter a new password of from 1
to 64 characters.
In Configuration > Object > User/Group > Setting, you can enable Password Complexity to require a
new password to consist of at least 8 characters and at most 64, where at least 1 character must be a
number, at least 1 a lower case letter, at least 1 an upper case letter and at least 1 a special character
from the keyboard, such as !@#$%^&*()_+. You can also require periodic changing of the password in
that screen by configuring Password must changed every (days).
Make a note of your new password, enter it in the following screen, then click Apply.
5 A Terms of Use screen displays. Read the statement, then click Acknowledge to proceed.
Note: If you are using an Internet Explorer browser, the Terms of Use will be downloaded
automatically.
ZyWALL ATP Series User’s Guide
32
Page 33
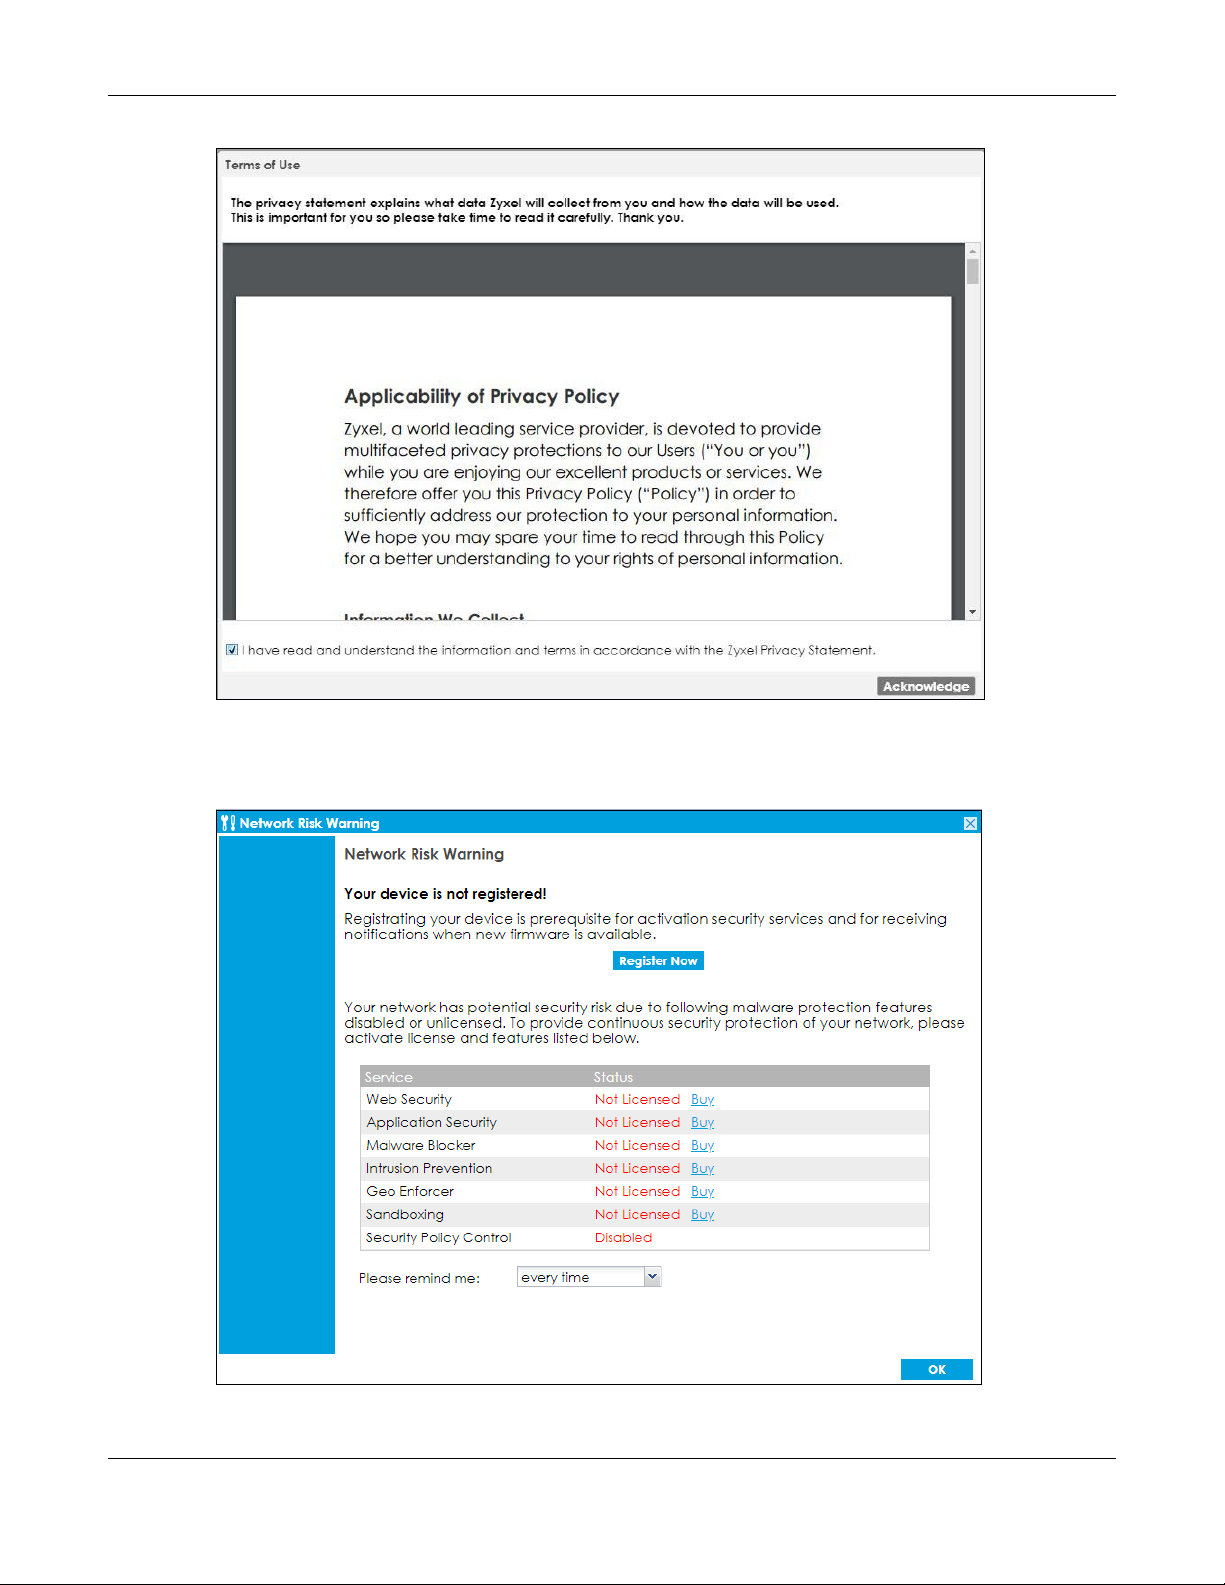
Chapter 1 Introduction
6 The Network Risk Warning screen displays any unregistered or disabled security services. If your Zyxel
Device is not registered, you will see a prompt to register it. Select how often to display the screen and
click OK.
ZyWALL ATP Series User’s Guide
33
Page 34

Chapter 1 Introduction
If you select Never and you later want to bring this screen back, use these commands (note the space
before the underscore).
Router> enable
Router#
Router# configure terminal
Router(config)#
Router(config)# service-register _setremind
after-10-days
after-180-days
after-30-days
every-time
never
Router(config)# service-register _setremind every-time
Router(config)#
See the Command Line Interface (CLI) Reference Guide (RG) for details on all supported commands.
7 Follow the directions in the Update Admin Info screen. If you change the default password, the Login
screen appears after you click Apply. If you click Ignore, the Installation Setup Wizard opens if the
ZyWALL is using its default configuration; otherwise the dashboard appears.
1.4.2 Web Configurator Screens Overview
The Web Configurator screen is divided into these parts:
• A - title bar
• B - navigation panel
• C - main window
ZyWALL ATP Series User’s Guide
34
Page 35
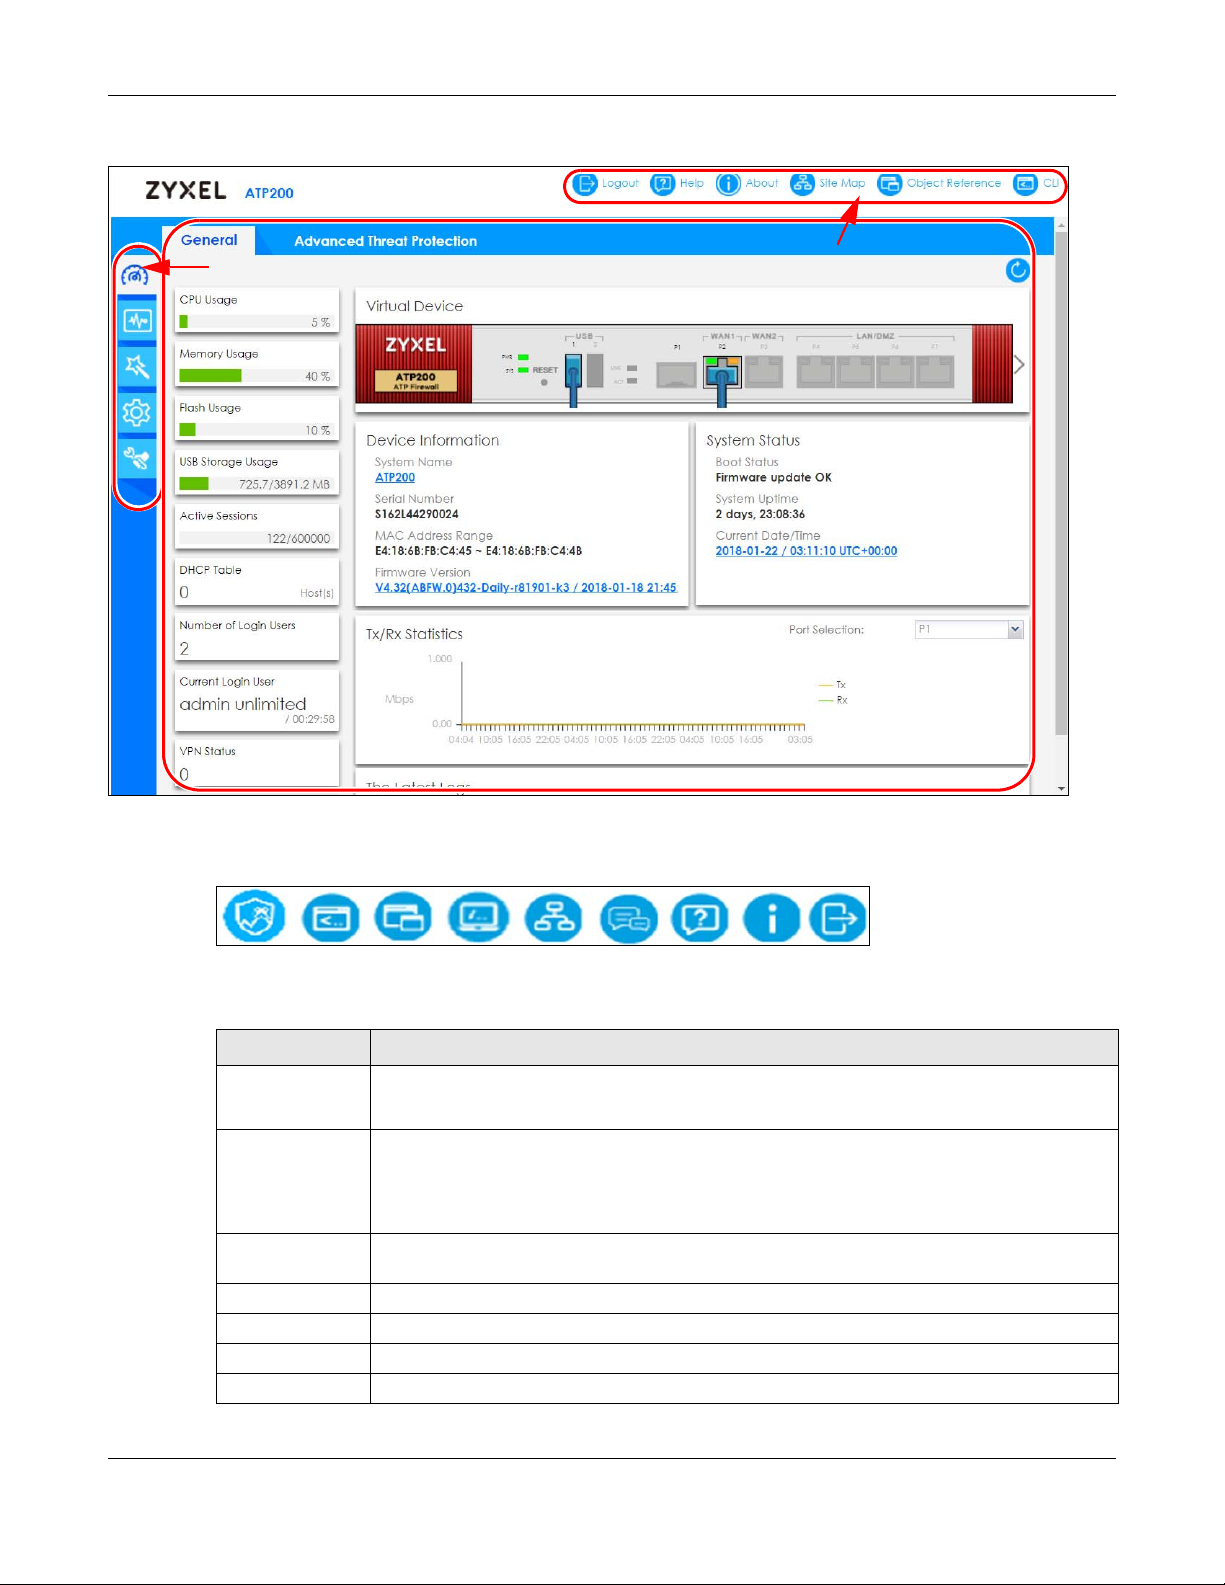
Chapter 1 Introduction
A
C
B
Figure 9 Web Configurator Screen Overview
Title Bar
Figure 10 Title Bar
The title bar icons in the upper right corner provide the following functions.
Table 3 Title Bar: Web Configurator Icons
LABEL DESCRIPTION
SecuReporter Click this to open the SecuReporter portal page.
This icon shows when the Zyxel Device is added to an organization.
Web Console Click this to open one or multiple console windows from which you can run command line
interface (CLI) commands. You will be prompted to enter your user name and password. See
the Command Reference Guide for information about the commands.
Logging in to the Zyxel Device with HTTPS, so you can open one or multiple console windows.
CLI Click this to open a popup window that displays the CLI commands sent by the Web
Configurator to the Zyxel Device.
Reference Click this to check which configuration items reference an object.
Site Map Click this to see an overview of links to the Web Configurator screens.
Forum Go to https://businessforum.zyxel.com for product discussions.
Help Click this to open the help page for the current screen.
ZyWALL ATP Series User’s Guide
35
Page 36
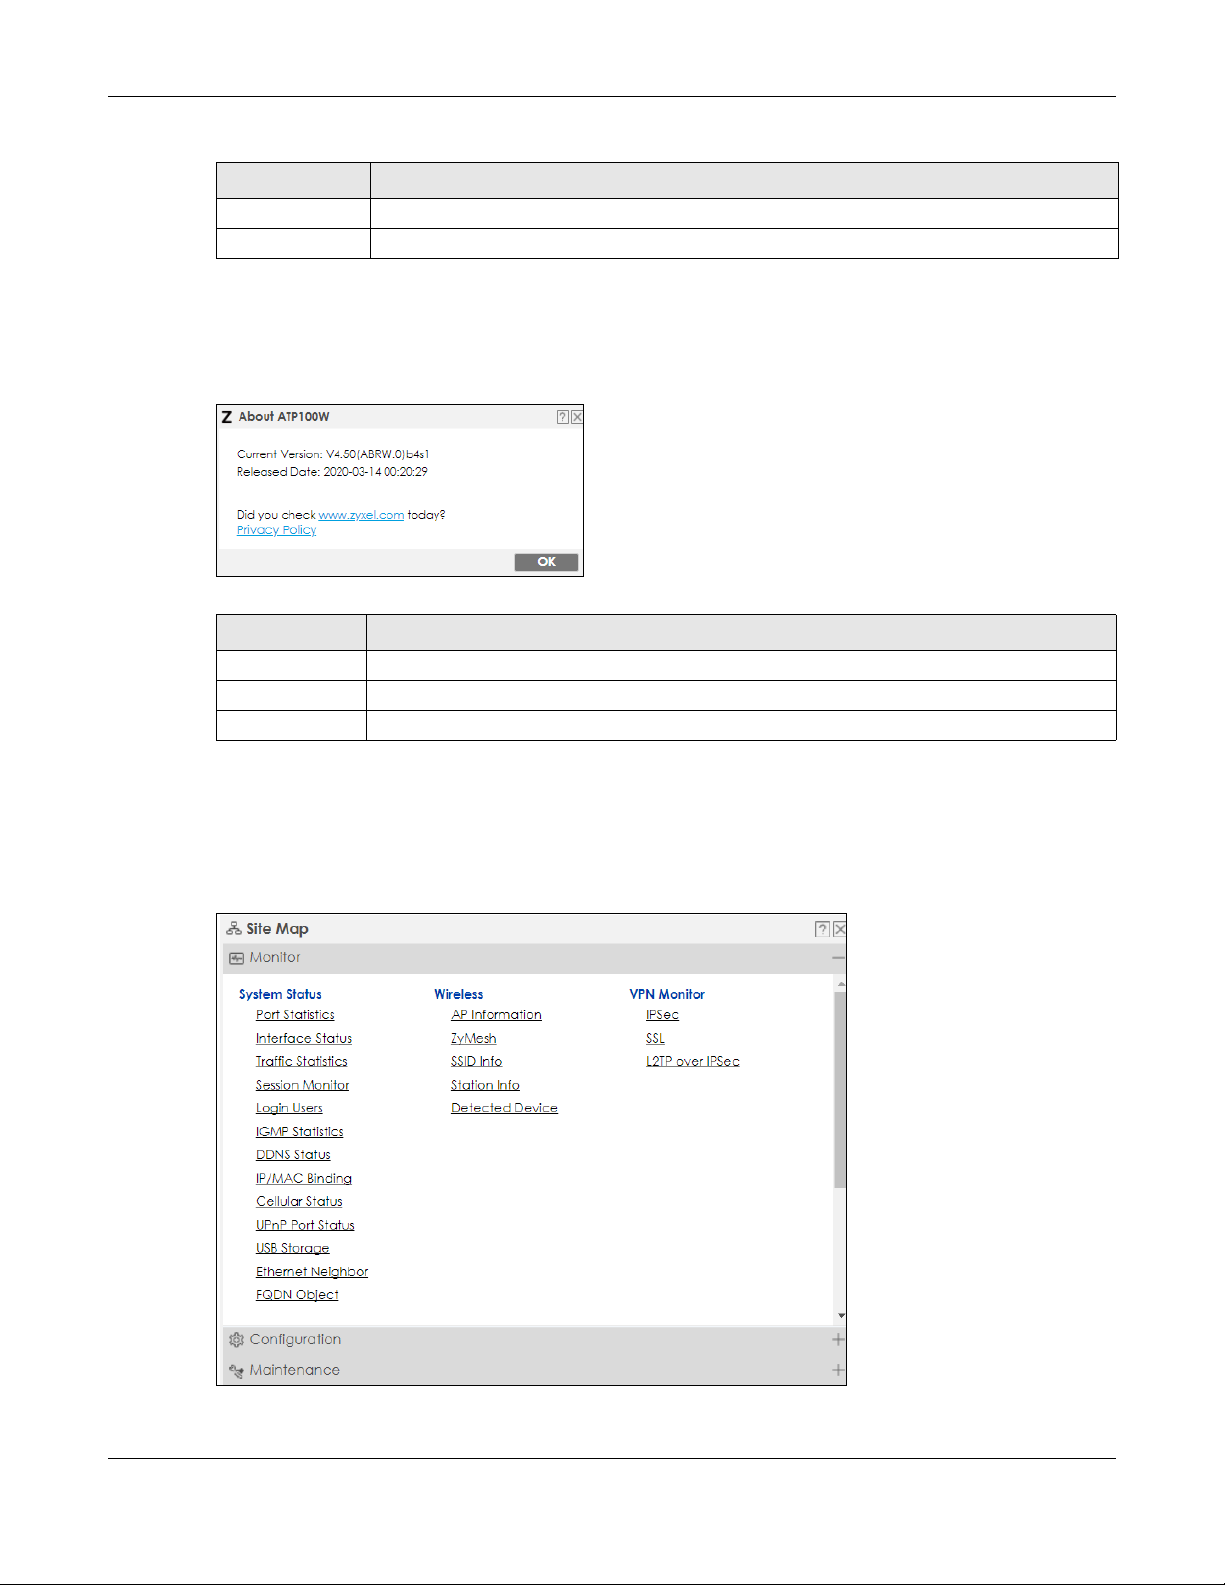
Chapter 1 Introduction
Table 3 Title Bar: Web Configurator Icons (continued)
LABEL DESCRIPTION
About Click this to display basic information about the Zyxel Device.
Logout Click this to log out of the Web Configurator.
About
Click About to display basic information about the Zyxel Device.
Figure 11 About
Table 4 About
LABEL DESCRIPTION
Current Version This shows the firmware version of the Zyxel Device.
Released Date This shows the date (yyyy-mm-dd) and time (hh:mm:ss) when the firmware is released.
OK Click this to close the screen.
Site Map
Click Site MAP to see an overview of links to the Web Configurator screens. Click a screen’s link to go to
that screen.
Figure 12 Site Map
ZyWALL ATP Series User’s Guide
36
Page 37
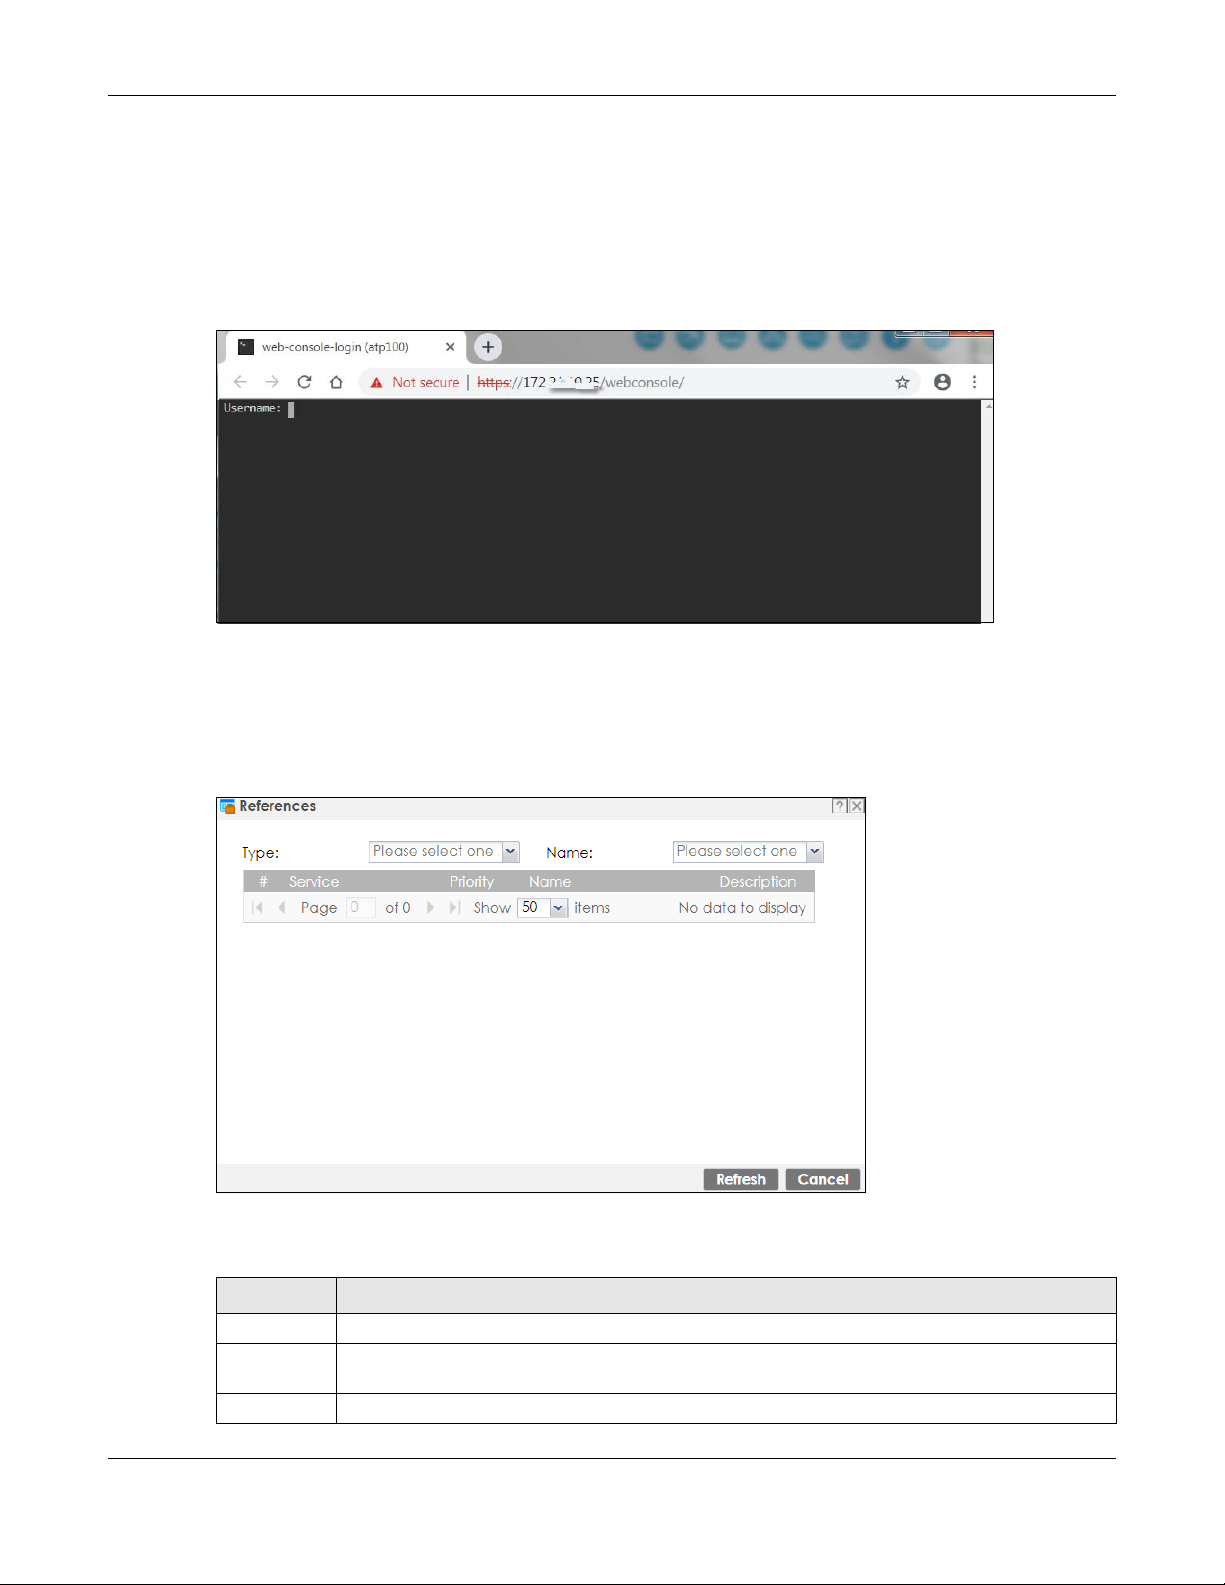
Chapter 1 Introduction
Web Console
Click Web Console to open one or multiple console windows from which you can run CLI commands.
You will be prompted to enter your user name and password. See the Command Reference Guide for
information about the commands. Logging in to the Zyxel Device with HTTPS, so you can open one or
multiple console windows.
Figure 13 Web Console Window
Reference
Click Reference to open the Reference screen. Select the type of object and the individual object and
click Refresh to show which configuration settings reference the object.
Figure 14 Reference
The fields vary with the type of object. This table describes labels that can appear in this screen.
Table 5 Reference
LABEL DESCRIPTION
Type Select an object type to see the services.
Name This identifies the object for which the configuration settings that use it are displayed. Click the
object’s name to display the object’s configuration screen in the main window.
# This field is a sequential value, and it is not associated with any entry.
ZyWALL ATP Series User’s Guide
37
Page 38
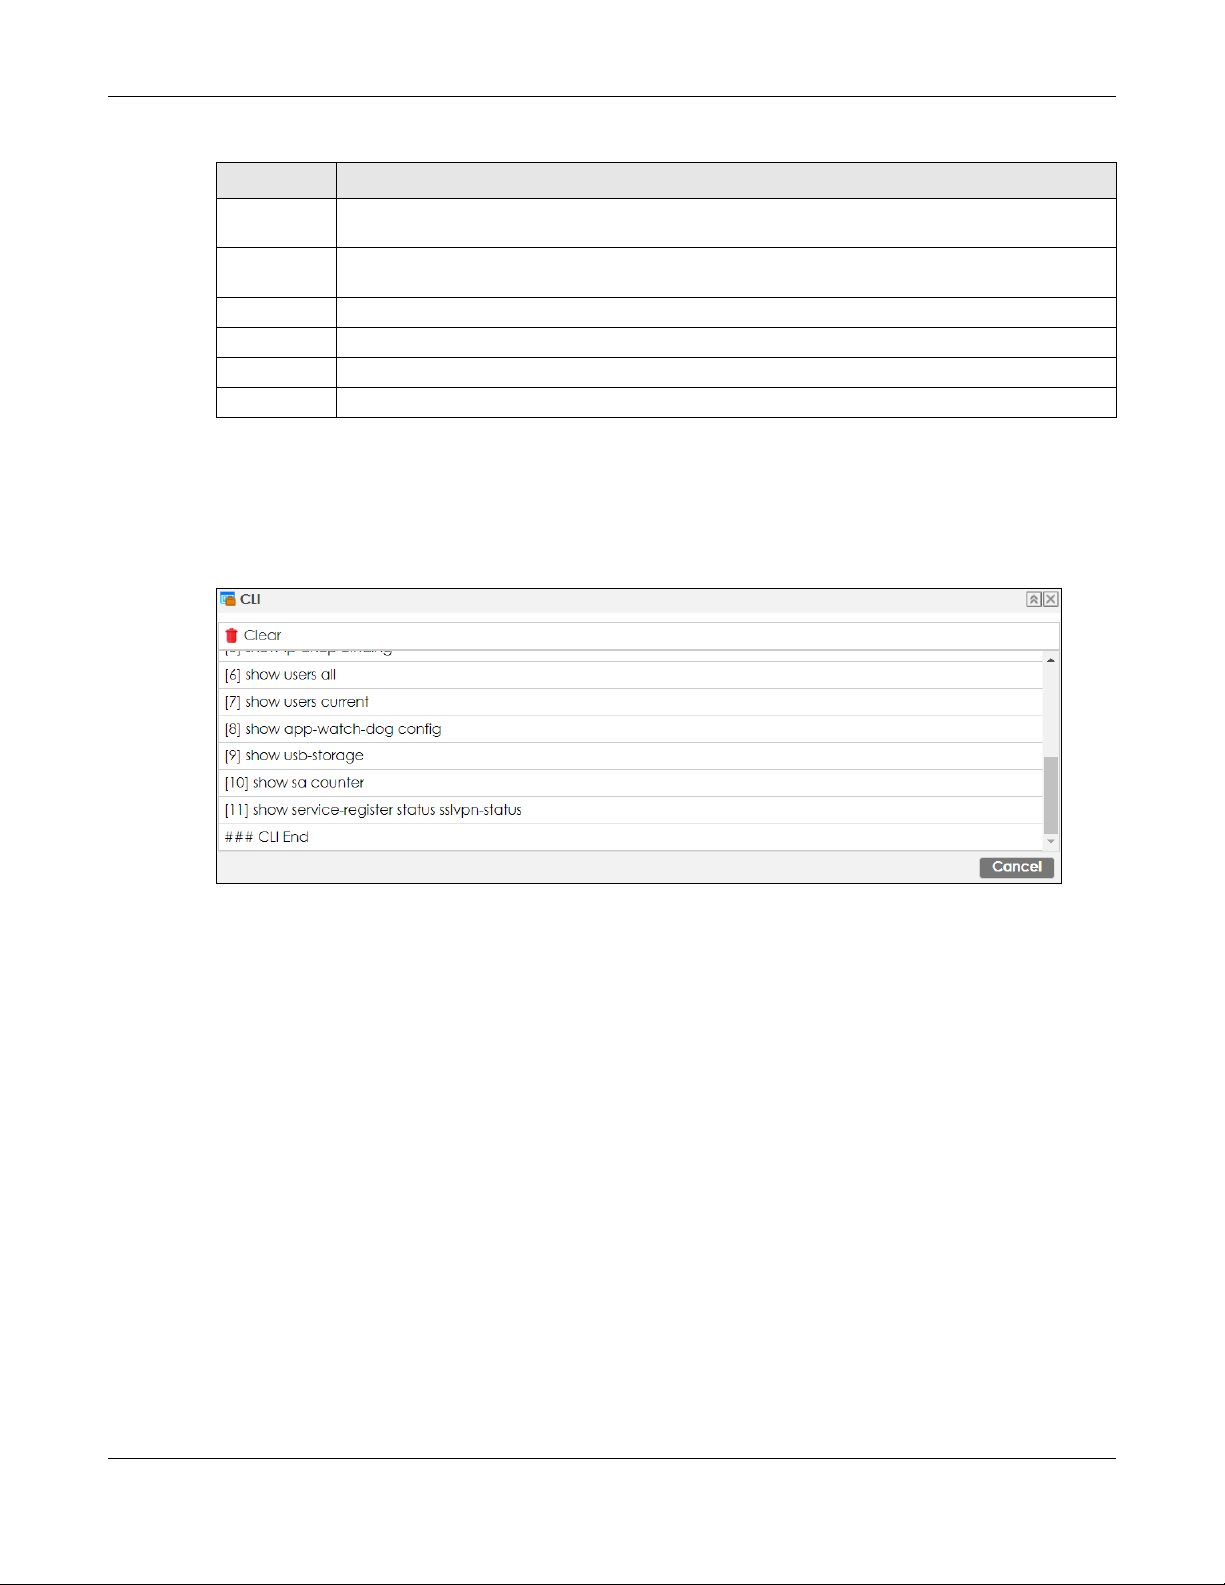
Chapter 1 Introduction
Table 5 Reference (continued)
LABEL DESCRIPTION
Service This is the type of setting that references the selected object. Click a service’s name to display the
service’s configuration screen in the main window.
Priority If it is applicable, this field lists the referencing configuration item’s position in its list, otherwise N/A
displays.
Name This field identifies the configuration item that references the object.
Description If the referencing configuration item has a description configured, it displays here.
Refresh Click this to update the information in this screen.
Cancel Click Cancel to close the screen.
CLI Messages
Click CLI to look at the CLI commands sent by the Web Configurator. Open the pop-up window and
then click some menus in the web configurator to display the corresponding commands.
Figure 15 CLI Messages
1.4.3 Navigation Panel
Use the navigation panel menu items to open status and configuration screens. Click the arrow in the
middle of the right edge of the navigation panel to hide the panel or drag to resize it. The following
sections introduce the Zyxel Device’s navigation panel menus and their screens.
ZyWALL ATP Series User’s Guide
38
Page 39
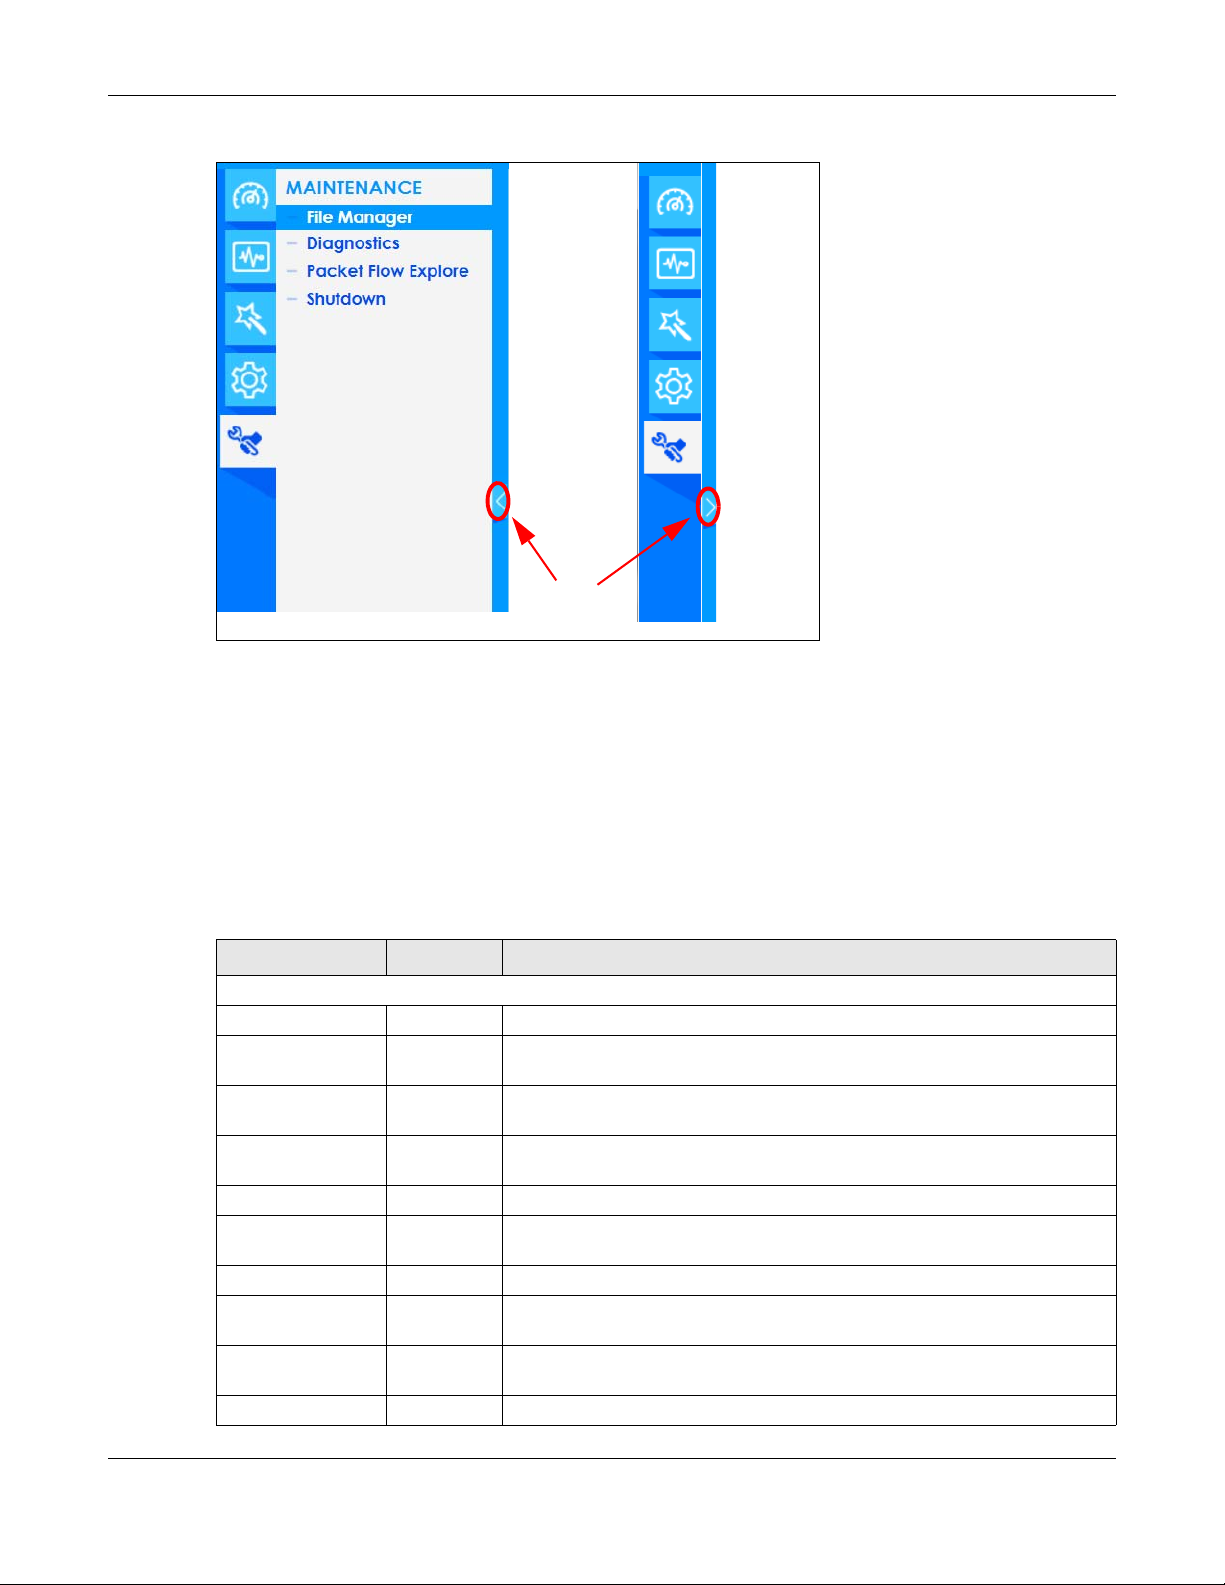
Figure 16 Navigation Panel
Chapter 1 Introduction
Dashboard
The dashboard displays general device information, system status, system resource usage, licensed
service status, and interface status in widgets that you can re-arrange to suit your needs. See the Web
Help for details on the dashboard.
Monitor Menu
The monitor menu screens display status and statistics information.
Table 6 Monitor Menu Screens Summary
FOLDER OR LINK TAB FUNCTION
System Status
Port Statistics Port Statistics Displays packet statistics for each physical port.
Interface Status Interface
Summary
Traffic Statistics Traffic
Statistics
Session Monitor Session
Monitor
Login Users Login Users Lists the users currently logged into the Zyxel Device.
IGMP Statistics IGMP
Statistics
DDNS Status DDNS Status Displays the status of the Zyxel Device’s DDNS domain names.
IP/MAC Binding IP/MAC
Binding
Cellular Status Cellular
Status
UPnP Port Status Port Statistics Displays details about UPnP connections going through the Zyxel Device.
Displays general interface information and packet statistics.
Collect and display traffic statistics.
Displays the status of all current sessions.
Collect and display IGMP statistics.
Lists the devices that have received an IP address from Zyxel Device
interfaces using IP/MAC binding.
Displays details about the Zyxel Device’s mobile broadband connection
status.
ZyWALL ATP Series User’s Guide
39
Page 40

Chapter 1 Introduction
Table 6 Monitor Menu Screens Summary (continued)
FOLDER OR LINK TAB FUNCTION
USB Storage Storage
Information
Ethernet
Neighbor
FQDN Object FQDN
Wireless
AP Information AP List Lists APs managed by the Zyxel Device.
ZyMesh ZyMesh Link
SSID Info SSID Info Display information about the AP’s wireless clients.
Station Info Station List Lists wireless clients associated with the APs managed by the Zyxel Device.
Detected
Device
VPN Monitor
IPSec IPSec Displays and manages the active IPSec SAs.
SSL SSL Lists users currently logged into the VPN SSL client portal. You can also log out
L2TP over IPSec L2TP over
Security Statistics
App Patrol Summary Displays application patrol statistics.
Content Filter Summary Collect and display content filter statistics
Anti-Malware Summary Collect and display statistics on the malware that the Zyxel Device has
Reputation Filter Summary Displays counts, IP addresses and URLs that are blocked by the Zyxel Device.
IDP Summary Collect and display statistics on the intrusions that the Zyxel Device has
Sandboxing Summary Displays the sandboxing statistics.
Email Security Summary Collect and display spam statistics.
Ethernet
Neighbor
Object
Radio List Lists wireless details of APs managed by the Zyxel Device.
Built-in AP Displays associated wireless client usage and number. (For Zyxel Device
Top N APs Lists managed APs with the most wireless traffic usage and most associated
Single AP Lists APs wireless traffic usage and associated wireless stations for a managed
Info
Top N
Stations
Single
Station
Detected
Device
IPSec
Status Displays how many mail sessions the ZyWALL is currently checking and DNSBL
Displays details about USB device connected to the Zyxel Device.
View and manage the Zyxel Device’s neighboring devices via Smart
Connect (Layer Link Discovery Protocol (LLDP)). Use the Zyxel One Network
(ZON) utility to view and manage the Zyxel Device’s neighboring devices via
the Zyxel Discovery Protocol (ZDP).
Displays FQDN (Fully Qualified Domain Name) object cache lists used in DNS
queries.
model names containing ‘W’.)
wireless stations.
AP.
Display statistics about ZyMesh wireless connections between managed APs.
Lists wireless stations with the most wireless traffic usage.
Lists wireless traffic usage for an associated wireless station.
Display information about suspected rogue APs.
individual users and delete related session information.
Displays details about current L2TP sessions.
detected.
detected.
(Domain Name Service-based spam Black List) statistics.
ZyWALL ATP Series User’s Guide
40
Page 41
Chapter 1 Introduction
Table 6 Monitor Menu Screens Summary (continued)
FOLDER OR LINK TAB FUNCTION
SSL Inspection Report Collect and display SSL Inspection statistics.
Certificate
Cache List
Log View Log Lists log entries.
View AP Log Lists AP log entries.
Displays traffic to destination servers using certificates.
Configuration Menu
Use the configuration menu screens to configure the Zyxel Device’s features.
Table 7 Configuration Menu Screens Summary
FOLDER OR LINK TAB FUNCTION
Quick Setup Quickly configure WAN interfaces or VPN connections.
Licensing
Registration Registration Register the device and activate trial services.
Service View the licensed service status and upgrade licensed services.
Signature
Update
Wireless
Built-in AP General Allow WiFi clients to access your Zyxel Device wirelessly to connect to
Controller Configuration Configure manual or automatic controller registration.
AP
Management
Rogue AP Rogue/Friendly AP
Auto Healing Auto Healing Enable auto healing to extend the wireless service coverage area of
RTLS Real Time Location
Network
Signature Update signatures immediately or by a schedule.
the network.
Mgnt AP List Edit or remove entries in the lists of APs managed by the Zyxel Device.
AP Policy Configure the AP controller’s IP address on the managed APs and
determine the action the managed APs take if the current AP
controller fails.
AP Group Create groups of APs, define their radio, VLAN, port and load
balancing settings.
Firmware Update the firmware on APs connected to your Zyxel Device.
Configure how the Zyxel Device monitors rogue APs.
List
the managed APs when one of the APs fails.
Use the managed APs as part of an Ekahau RTLS to track the location
System
of Ekahau Wi-Fi tags.
ZyWALL ATP Series User’s Guide
41
Page 42

Chapter 1 Introduction
Table 7 Configuration Menu Screens Summary (continued)
FOLDER OR LINK TAB FUNCTION
Interface Port
Port Role/Port
Configuration
Ethernet Manage Ethernet interfaces and virtual Ethernet interfaces.
PPP Create and manage PPPoE and PPTP interfaces.
Cellular Configure a cellular Internet connection for an installed mobile
Tunnel Configure tunneling between IPv4 and IPv6 networks.
VLAN Create and manage VLAN interfaces and virtual VLAN interfaces.
Bridge Create and manage bridges and virtual bridge interfaces.
VTI Configure IP address assignment and interface parameters for VTI
Trunk Create and manage trunks (groups of interfaces) for load balancing.
Routing Policy Route Create and manage routing policies.
Static Route Create and manage IP static routing information.
RIP Configure device-level RIP settings.
OSPF Configure device-level OSPF settings, including areas and virtual links.
BGP Configure exchange of Border Gateway Protocol (BGP) information
DDNS DDNS Define and manage the Zyxel Device’s DDNS domain names.
NAT NAT Set up and manage port forwarding rules.
Redirect
Service
ALG ALG Configure SIP, H.323, and FTP pass-through settings.
UPnP UPnP Configure interfaces that allow UPnP and NAT-PMP connections.
IP/MAC Binding Summary Configure IP to MAC address bindings for devices connected to each
Layer 2 Isolation General Enable layer-2 isolation on the Zyxel Device and the internal
DNS Inbound LB DNS Load Balancing Configure DNS Load Balancing.
VPN
IPSec VPN VPN Connection Configure IPSec tunnels.
SSL VPN Access Privilege Configure SSL VPN access rights for users and groups.
L2TP VPN L2TP VPN Configure L2TP over IPSec tunnels.
BWM BWM Enable and configure bandwidth management rules.
Redirect Service Set up and manage HTTP and SMTP redirection rules.
Exempt List Configure ranges of IP addresses to which the Zyxel Device does not
White List Enable and configure the white list.
VPN Gateway Configure IKE tunnels.
Concentrator Combine IPSec VPN connections into a single secure network
Configuration
Provisioning
Global Setting Configure the Zyxel Device’s SSL VPN settings that apply to all
Use this screen to set the Zyxel Device’s flexible ports such as LAN, OPT,
WLAN, or DMZ.
broadband card.
(Virtual Tunnel Interface).
over an IPSec tunnel.
supported interface.
apply IP/MAC binding.
interface(s).
Set who can retrieve VPN rule settings from the Zyxel Device using the
Zyxel Device IPSec VPN Client.
connections.
ZyWALL ATP Series User’s Guide
42
Page 43

Chapter 1 Introduction
Table 7 Configuration Menu Screens Summary (continued)
FOLDER OR LINK TAB FUNCTION
Web
Authentication
Security Policy
Policy Control Policy Create and manage level-3 traffic rules and apply Security Service
ADP General Display and manage ADP bindings.
Session Control Session Control Limit the number of concurrent client NAT/security policy sessions.
Security Service
AppPatrol Profile Manage different types of traffic in this screen. Create App Patrol
Content Filter Profile Create and manage the detailed filtering rules for content filtering
Anti-Malware Anti-Malware Enable, specify actions to take when encountering malware or
Reputation
Filter
IDP IDP Enable and configure IDP settings. Create, import, or export custom
Sandboxing Sandboxing Enable sandboxing, and specify the actions the Zyxel Device takes
Email Security Email Security Turn email security on or off and manage email security policies.
Web Authentication
General/
Authentication
Type/Custom
Web Portal File/
Custom User
Agreement File
SSO Configure the Zyxel Device to work with a Single Sign On agent.
Profile Create and manage ADP profiles.
Trusted Web Sites Create a list of allowed web sites that bypass content filtering policies.
Forbidden Web Sites Create a list of web sites to block regardless of content filtering
Black/White List Set up a black list to identify spam and a white list to identify
Signature Search for particular signatures to get more information about them.
IP Reputation
General/White List/
Black List
URL Threat Filter
General/White List/
Black List
White List
Black/White List Set up a black list to identify spam and a white list to identify
Define a web portal and exempt services from authentication.
profiles.
template(s) of settings to apply to a traffic flow using a security policy.
profiles and then apply to a traffic flow using a security policy.
policies.
compressed files, and set up a black list to identify files with malware
file patterns and a white list to identify files that should not be checked
for malware.
legitimate e-mail.
Enable IP reputation and specify what action the Zyxel Device takes
when any IP address with bad reputation is detected.
You can also set up a white list to identify which IPv4 addresses should
be allowed, and a black list to identify which IPv4 addresses should be
blocked.
Enable URL filtering and specify what action the Zyxel Device takes
when a access attempt to a blocked website is detected.
You can also set up a white list to identify which IPv4 addresses and/or
URLs should be allowed, and a black list to identify which IPv4
addresses and/or URLs should be blocked.
signatures.
when malicious or suspicious files are detected.
Create email security template(s) of settings to apply to a traffic flow
using a security policy.
legitimate email.
ZyWALL ATP Series User’s Guide
43
Page 44

Chapter 1 Introduction
Table 7 Configuration Menu Screens Summary (continued)
FOLDER OR LINK TAB FUNCTION
SSL Inspection Profile Decrypt HTTPS traffic for Security Service inspection. Create SSL
Inspection template(s) of settings to apply to a traffic flow using a
security policy.
Exclude List Configure services to be excluded from SSL Inspection.
Certificate Update Use this screen to update the latest certificates of servers using SSL
IP Exception IP Exception Use this screen to view the IP exception list for the anti-malware and
Object
Zone Zone Configure zone template(s) used to define various policies.
User/Group User Create and manage users.
Group Create and manage groups of users.
Setting Manage default settings for all users, general settings for user sessions,
MAC Address Configure the MAC addresses of wireless clients for MAC
AP Profile Radio Create template(s) of radio settings to apply to policies as an object.
SSID Create template(s) of wireless settings to apply to radio profiles or
MON Profile MON Profile Create and manage rogue AP monitoring files that can be
ZyMesh Profile ZyMesh Profile Create and manage ZyMesh files that can be associated with
Address/Geo IP Address Create and manage host, range, and network (subnet) addresses.
Address Group Create and manage groups of addresses to apply to policies as a
Geo IP Update the database of country-to-IP address mappings and
Service Service Create and manage TCP and UDP services.
Service Group Create and manage groups of services to apply to policies as a single
Schedule Schedule Create one-time and recurring schedules.
Schedule Group Create and manage groups of schedules to apply to policies as a
AAA Server Active Directory Configure the Active Directory settings.
LDAP Configure the LDAP settings.
RADIUS Configure the RADIUS settings.
Auth. Method Authentication
Method
Two-factor
Authentication
Certificate My Certificates Create and manage the Zyxel Device’s certificates.
Trusted Certificates Import and manage certificates from trusted sources.
connections to the Zyxel Device network.
IDP (Intrusion, Detection, and Prevention) features.
The Zyxel Device won’t intercept nor inspect the incoming packets
that match the rules in the IP exception list for the anti-malware and/
or IDP (Intrusion, Detection, and Prevention) features.
and rules to force user authentication.
authentication using the local user database.
policies as an object.
associated with different APs.
different APs.
single objects.
manually configure country-to-IP address mappings for geographic
address objects that can be used in security policies.
object.
single object.
Create and manage ways of authenticating users.
Configure SMS/email authentication to access a secured network
behind the Zyxel Device via a VPN tunnel.
ZyWALL ATP Series User’s Guide
44
Page 45

Chapter 1 Introduction
Table 7 Configuration Menu Screens Summary (continued)
FOLDER OR LINK TAB FUNCTION
ISP Account ISP Account Create and manage ISP account information for PPPoE/PPTP
interfaces.
DHCPv6 Request Configure IPv6 DHCP request type and interface information.
Lease Configure IPv6 DHCP lease type and interface information.
Device HA Device HA Status See the license status for Device HA Pro, and see the status of the
active and passive devices.
Use the screen (Section 36.4 on page 723) to
Device HA Pro Configure Device HA Pro global settings, monitored interfaces and
synchronization settings.
View Log See logs of the active and passive devices
Cloud CNM SecuManager Enable and configure management of the Zyxel Device by a Central
SecuReporter Enable SecuReporter logging and access the SecuReporter security
System
Host Name Host Name Configure the system and domain name for the Zyxel Device.
USB Storage Settings Configure the settings for the connected USB devices.
Date/Time Date/Time Configure the current date, time, and time zone in the Zyxel Device.
Console Speed Console Speed Set the console speed.
DNS DNS Configure the DNS server and address records for the Zyxel Device.
WWW Service Control Configure HTTP, HTTPS, and general authentication.
Login Page Configure how the login and access user screens look.
SSH SSH Configure SSH server and SSH service settings.
TELNET TELNET Configure telnet server settings for the Zyxel Device.
FTP FTP Configure FTP server settings.
SNMP SNMP Configure SNMP communities and services.
Auth. Server Auth. Server Configure the Zyxel Device to act as a RADIUS server.
Notification Mail Server Configure a mail server with authentication to send reports and
SMS Enable the SMS service to send dynamic guest account information in
Language Language Select the Web Configurator language.
IPv6 IPv6 Enable IPv6 globally on the Zyxel Device here.
ZON ZON Use the Zyxel One Network (ZON) utility to view and manage the Zyxel
Log & Report
Email Daily
Report
Log Settings Log Settings Configure the system log, email logs, and remote syslog servers.
Email Daily Report Configure where and how to send daily reports and what reports to
Network Management system.
analytics portal that collects and analyzes logs from your Zyxel Device
in order to identify anomalies, alert on potential internal / external
threats, and report on network usage.
password expiration notification emails.
text messages and authorization for VPN tunnel access to a secured
network.
Device’s neighboring devices via the Zyxel Discovery Protocol (ZDP).
send.
ZyWALL ATP Series User’s Guide
45
Page 46
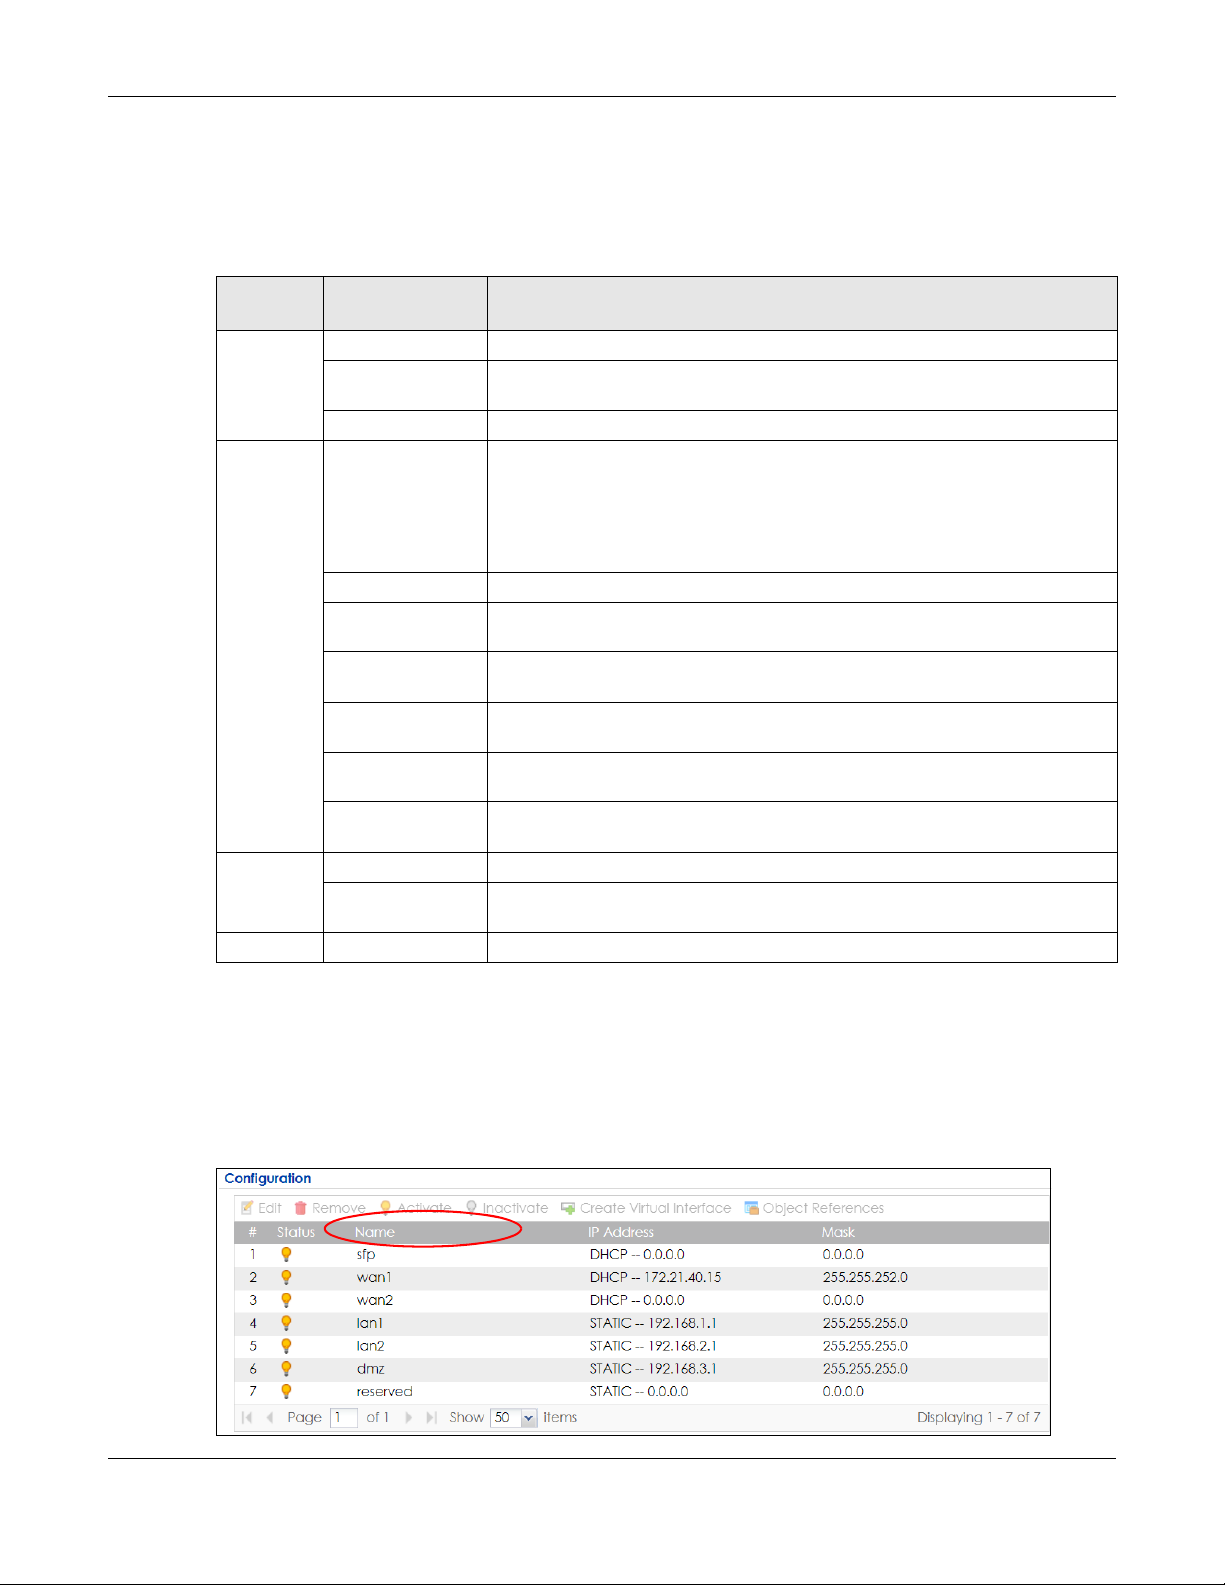
Chapter 1 Introduction
Maintenance Menu
Use the maintenance menu screens to manage configuration and firmware files, run diagnostics, and
reboot or shut down the Zyxel Device.
Table 8 Maintenance Menu Screens Summary
FOLDER
OR LINK
File
Manager
Diagnostics Diagnostics
Packet
Flow
Explore
Shutdown Shutdown Turn off the Zyxel Device.
TAB FUNCTION
Configuration File Manage and upload configuration files for the Zyxel Device.
Firmware
Management
Shell Script Manage and run shell script files for the Zyxel Device.
Collect
Collect on AP
Packet Capture Capture packets for analysis.
CPU/Memory
Status
System Log Connect a USB device to the Zyxel Device and archive the Zyxel Device system
Network Tool Identify problems with the connections. You can use Ping or Traceroute to help
Routing Traces Configure traceroute to identify where packets are dropped for
Wireless Frame
Capture
Routing Status Check how the Zyxel Device determines where to route a packet.
SNAT Status View a clear picture on how the Zyxel Device converts a packet’s source IP
View the current firmware version and upload firmware. Reboot with your
choice of firmware.
Collect diagnostic information.
Files
View CPU and memory usage statistics.
logs to it here.
you identify problems.
troubleshooting.
Capture wireless frames from APs for analysis.
address and check the related settings.
1.4.4 Tables and Lists
Web Configurator tables and lists are flexible with several options for how to display their entries.
Click a column heading to sort the table’s entries according to that column’s criteria.
Figure 17 Sorting Table Entries by a Column’s Criteria
ZyWALL ATP Series User’s Guide
46
Page 47
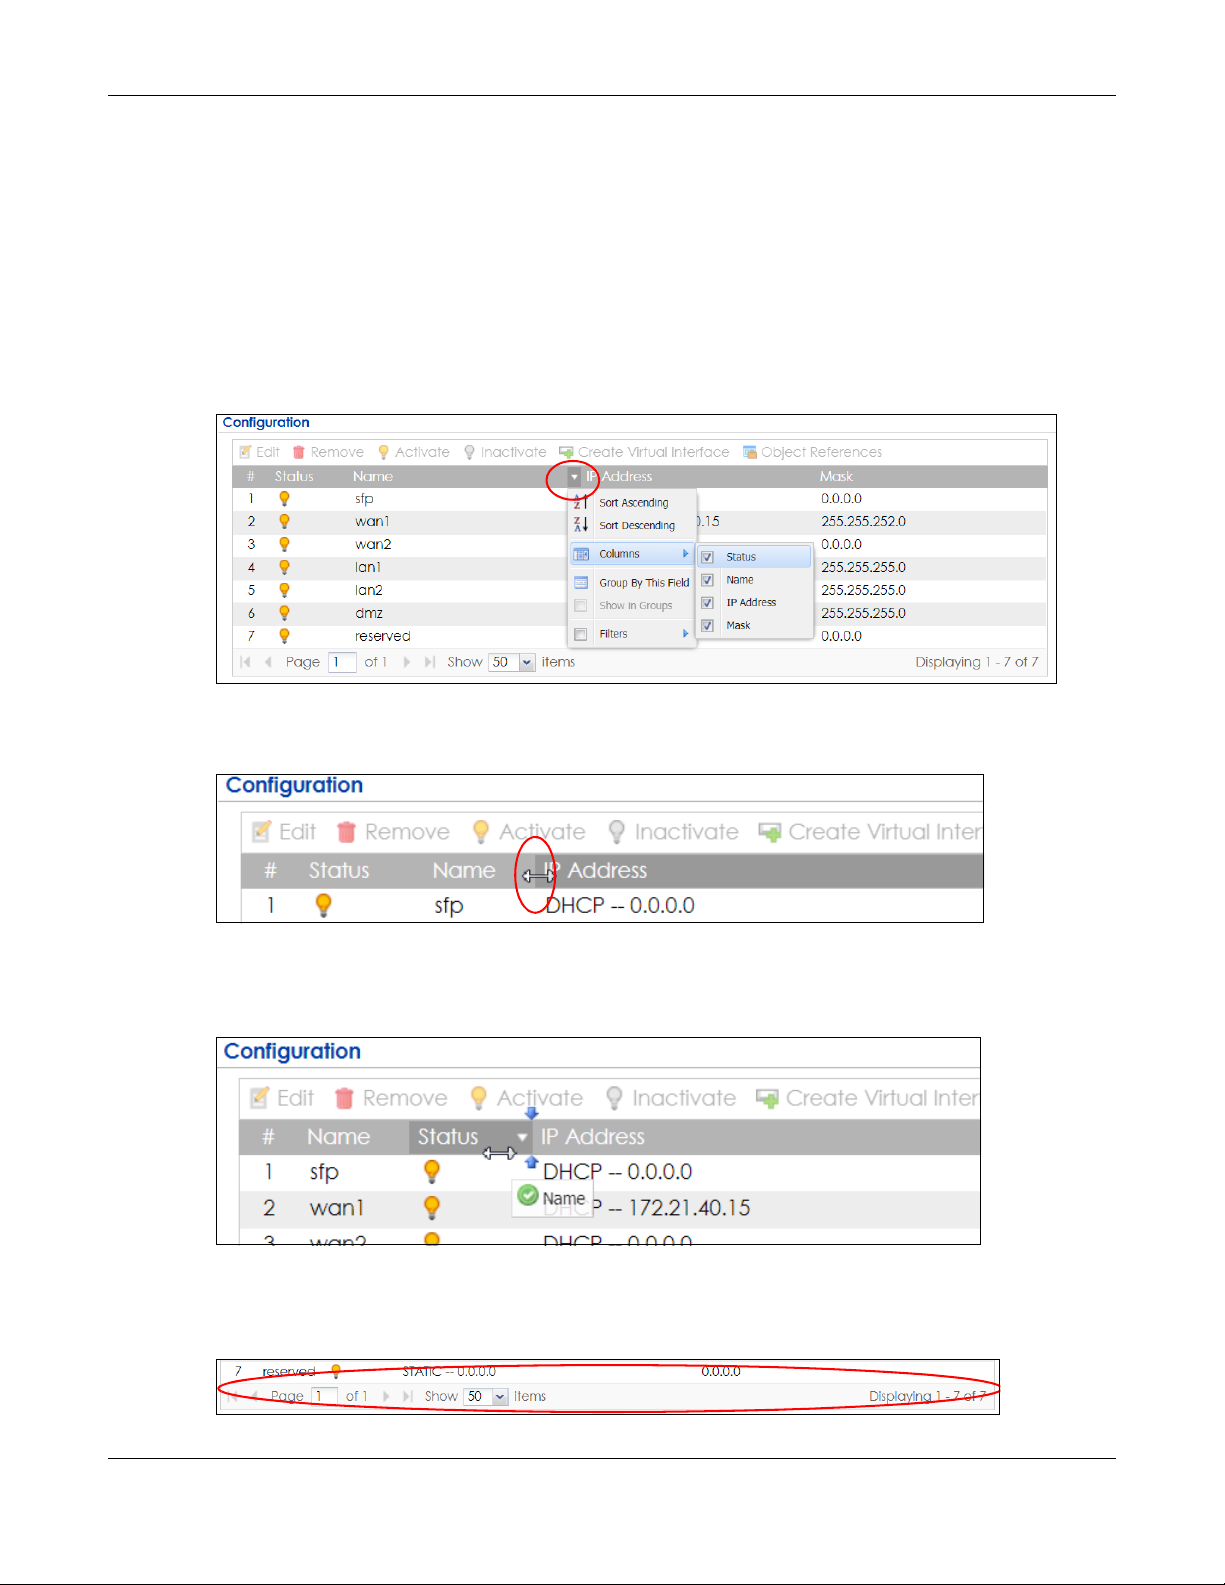
Chapter 1 Introduction
Click the down arrow next to a column heading for more options about how to display the entries. The
options available vary depending on the type of fields in the column. Here are some examples of what
you can do:
• Sort in ascending or descending (reverse) alphabetical order
• Select which columns to display
•Group entries by field
•Show entries in groups
• Filter by mathematical operators (<, >, or =) or searching for text
Figure 18 Common Table Column Options
Select a column heading cell’s right border and drag to re-size the column.
Figure 19 Resizing a Table Column
Select a column heading and drag and drop it to change the column order. A green check mark
displays next to the column’s title when you drag the column to a valid new location.
Figure 20 Moving Columns
Use the icons and fields at the bottom of the table to navigate to different pages of entries and control
how many entries display at a time.
Figure 21 Navigating Pages of Table Entries
ZyWALL ATP Series User’s Guide
47
Page 48
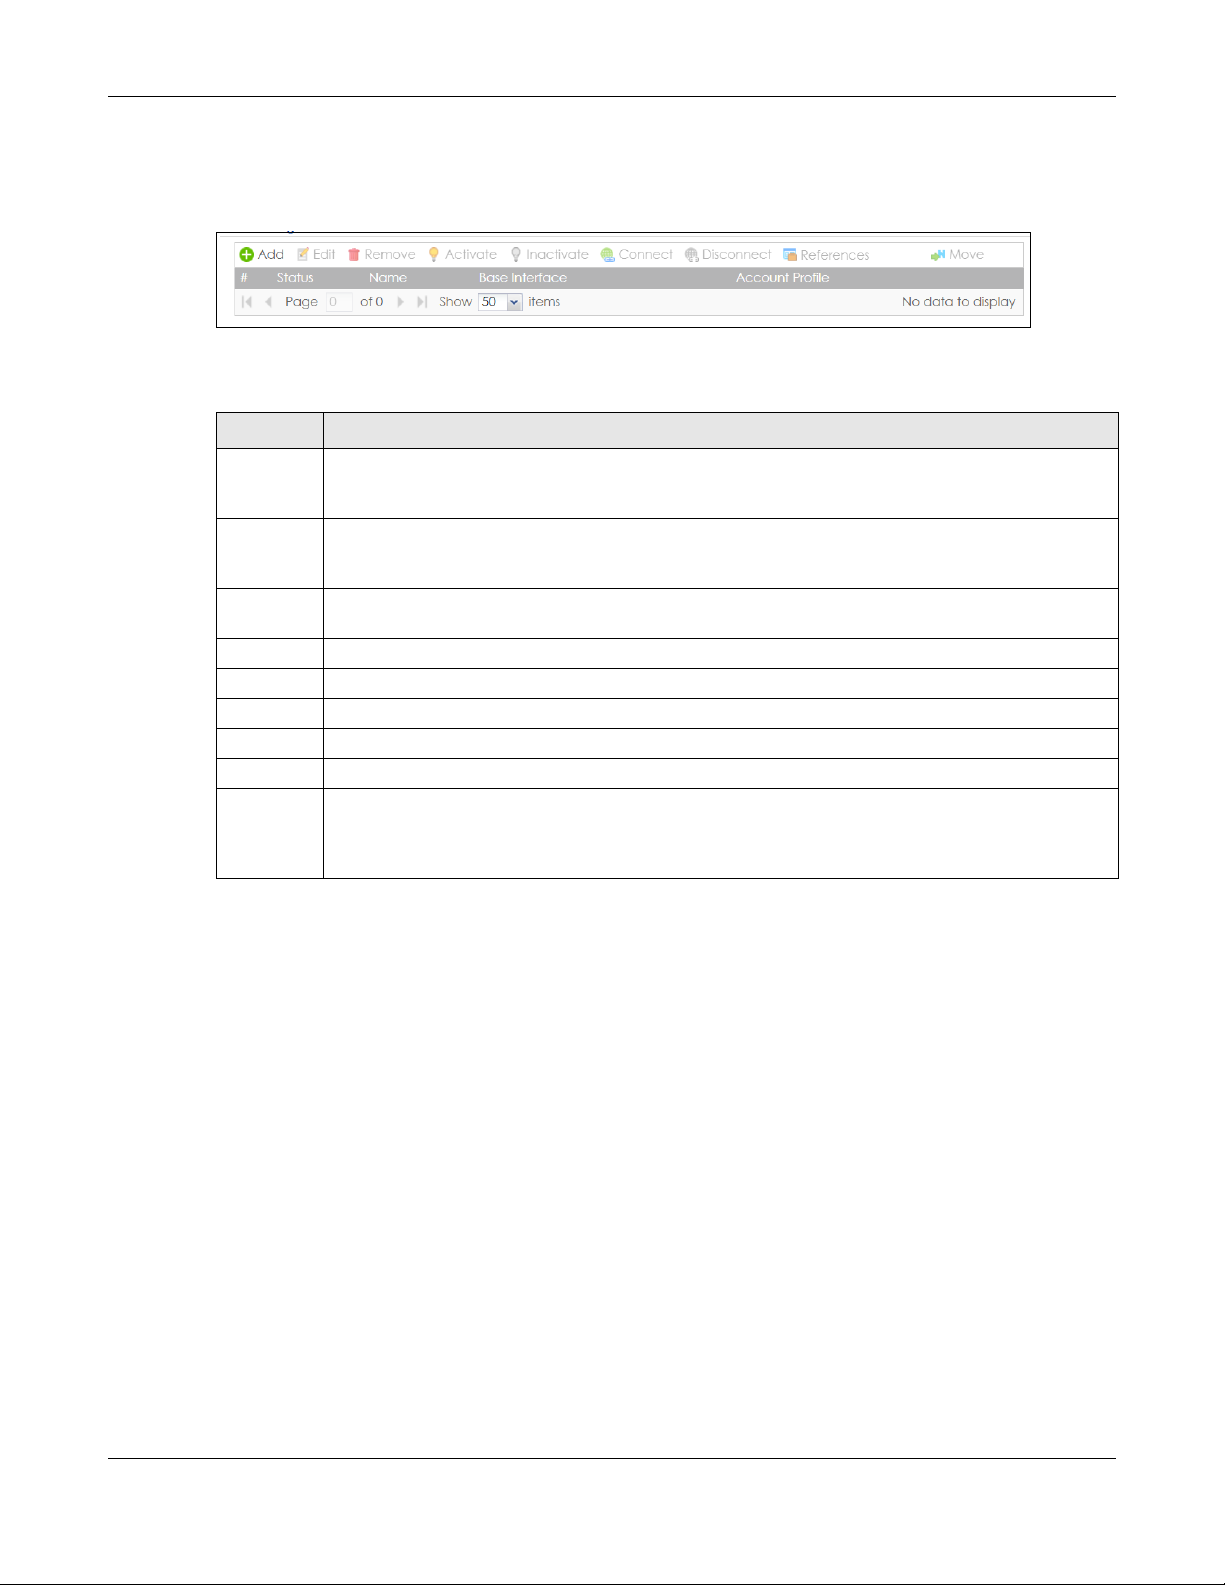
Chapter 1 Introduction
The tables have icons for working with table entries. You can often use the [Shift] or [Ctrl] key to select
multiple entries to remove, activate, or deactivate.
Figure 22 Common Table Icons
Here are descriptions for the most common table icons.
Table 9 Common Table Icons
LABEL DESCRIPTION
Add Click this to create a new entry. For features where the entry’s position in the numbered list is
important (features where the Zyxel Device applies the table’s entries in order like the security policy
for example), you can select an entry and click Add to create a new entry after the selected entry.
Edit Double-click an entry or select it and click Edit to open a screen where you can modify the entry’s
Remove To remove an entry, select it and click Remove. The Zyxel Device confirms you want to remove it
Activate To turn on an entry, select it and click Activate.
Inactivate To turn off an entry, select it and click Inactivate.
Connect To connect an entry, select it and click Connect.
Disconnect To disconnect an entry, select it and click Disconnect.
References Select an entry and click References to check which settings use the entry.
Move To change an entry’s position in a numbered list, select it and click Move to display a field to type a
settings. In some tables you can just click a table entry and edit it directly in the table. For those types
of tables small red triangles display for table entries with changes that you have not yet applied.
before doing so.
number for where you want to put that entry and press [ENTER] to move the entry to the number that
you typed. For example, if you type 6, the entry you are moving becomes number 6 and the previous
entry 6 (if there is one) gets pushed up (or down) one.
Working with Lists
When a list of available entries displays next to a list of selected entries, you can often just double-click
an entry to move it from one list to the other. In some lists you can also use the [Shift] or [Ctrl] key to
select multiple entries, and then use the arrow button to move them to the other list.
ZyWALL ATP Series User’s Guide
48
Page 49
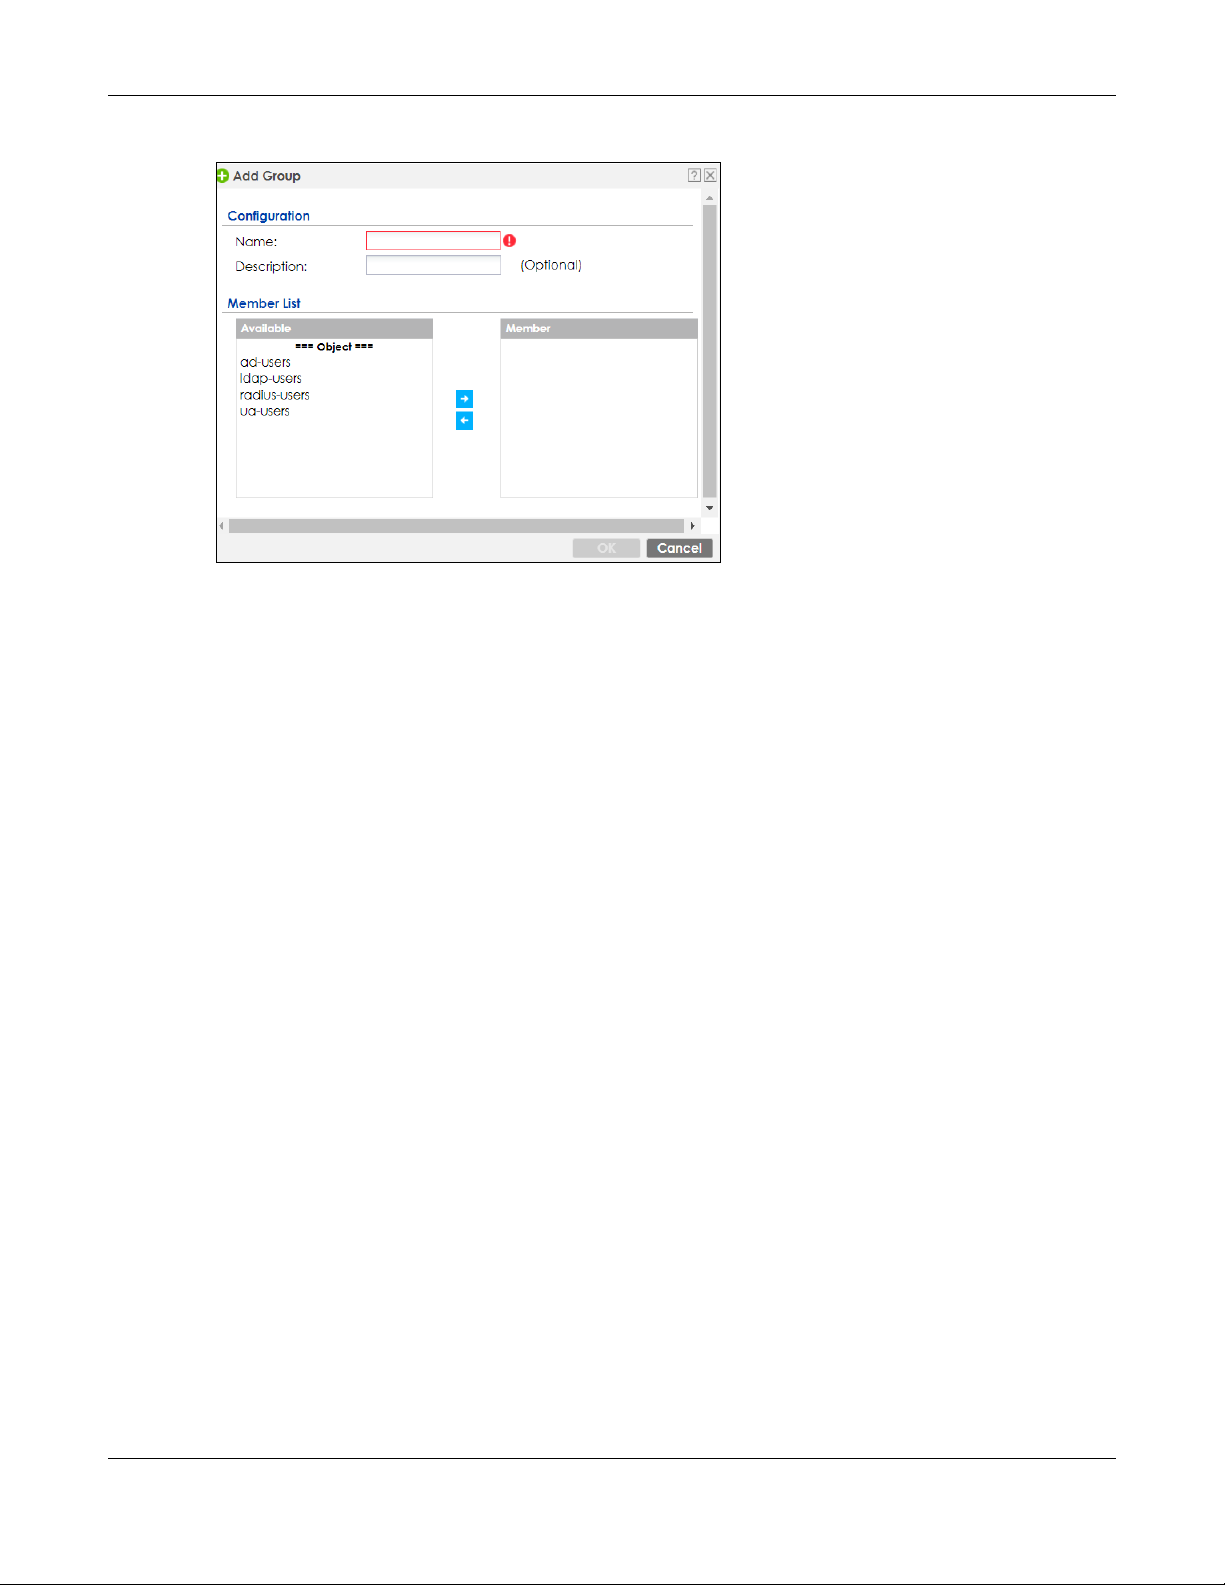
Figure 23 Working with Lists
Chapter 1 Introduction
ZyWALL ATP Series User’s Guide
49
Page 50
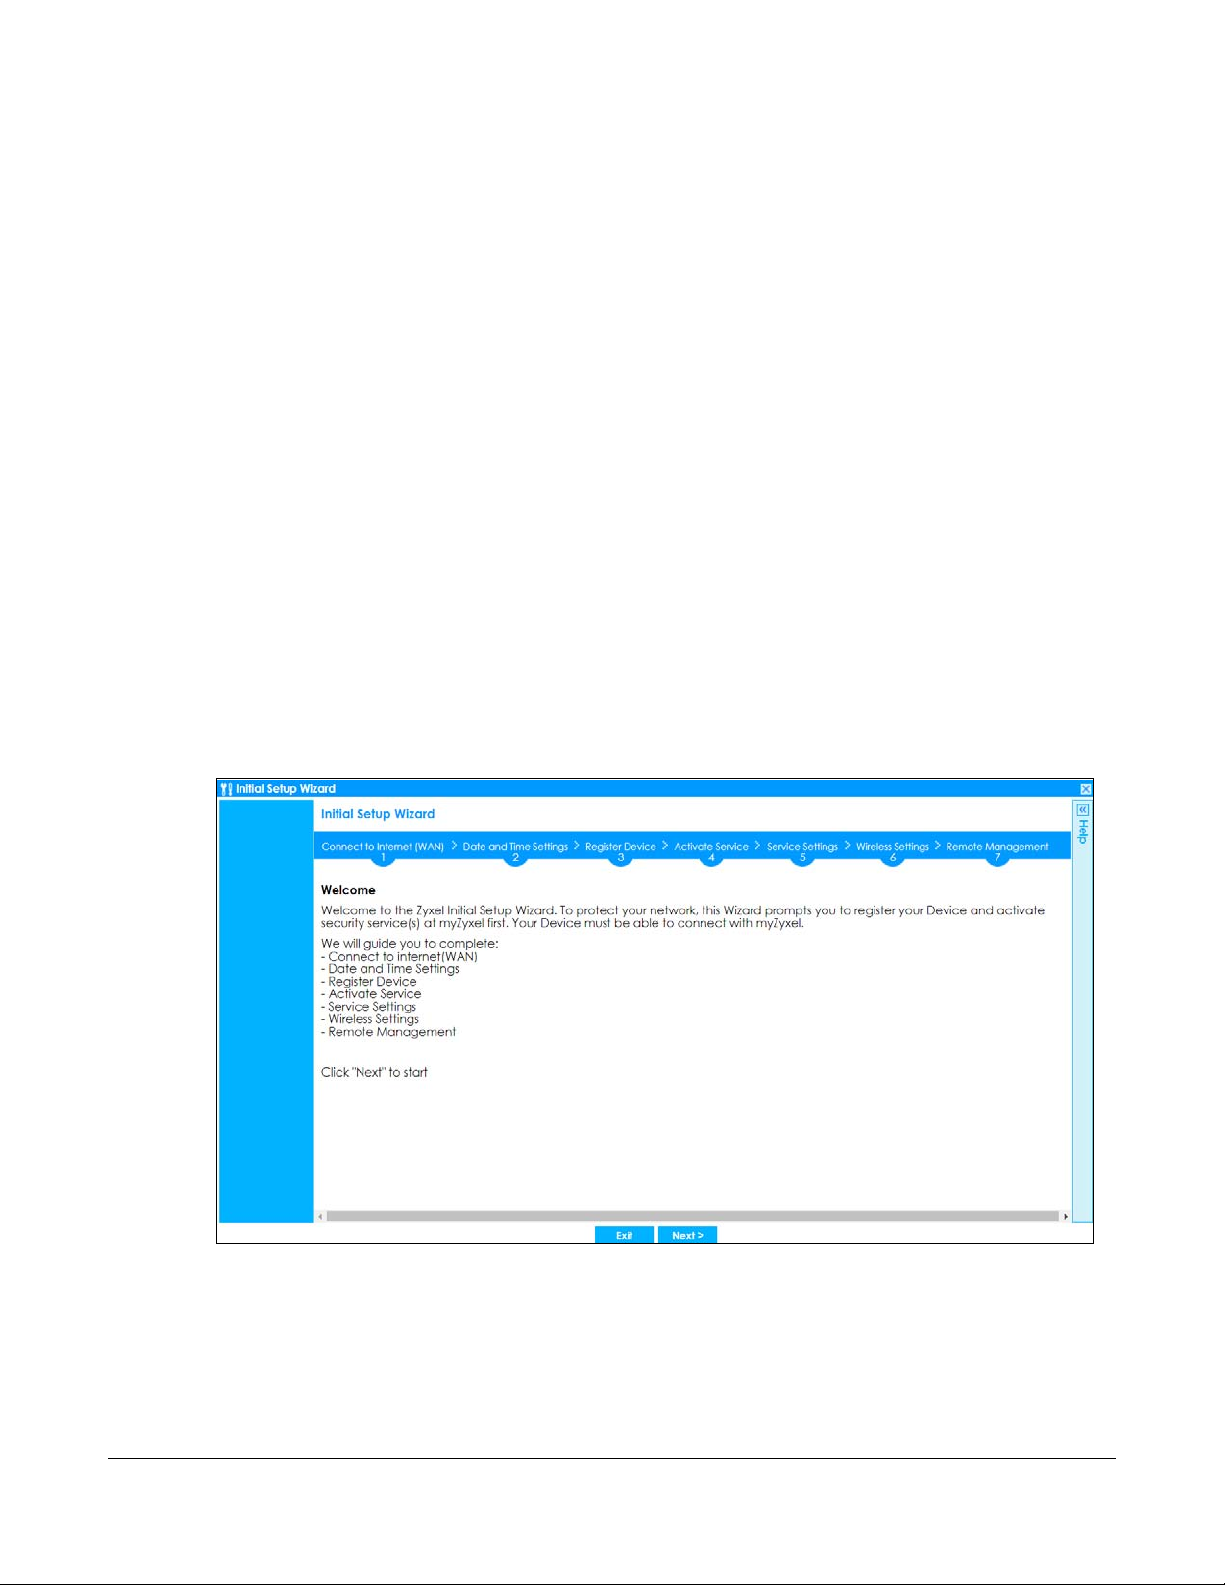
Initial Setup Wizard
2.1 Initial Setup Wizard Screens
When you log into the Web Configurator for the first time or when you reset the Zyxel Device to its
default configuration, the Initial Setup Wizard screen displays. This wizard helps you configure Internet
connection settings and activate subscription services.
Note: For Zyxel Devices that already have firmware version 4.25 or later, you have to register
your Zyxel Device and activate the corresponding service at myZyxel (through your
Zyxel Device).
This chapter provides information on configuring the Web Configurator's Initial Setup Wizard. See the
feature-specific chapters in this User’s Guide for background information.
• Click the double arrow in the upper right corner to display or hide the help.
• Click Logout to exit the In itial Setup Wizard or click Next to continue the wizard. Click Finish at the end
of the wizard to complete the wizard.
Figure 24 Initial Setup Wizard
CHAPTER 2
2.1.1 Internet Access Setup - WAN Interface
Use this screen to set how many WAN interfaces to configure and the first WAN interface’s type of
encapsulation and method of IP address assignment.
ZyWALL ATP Series User’s Guide
50
Page 51
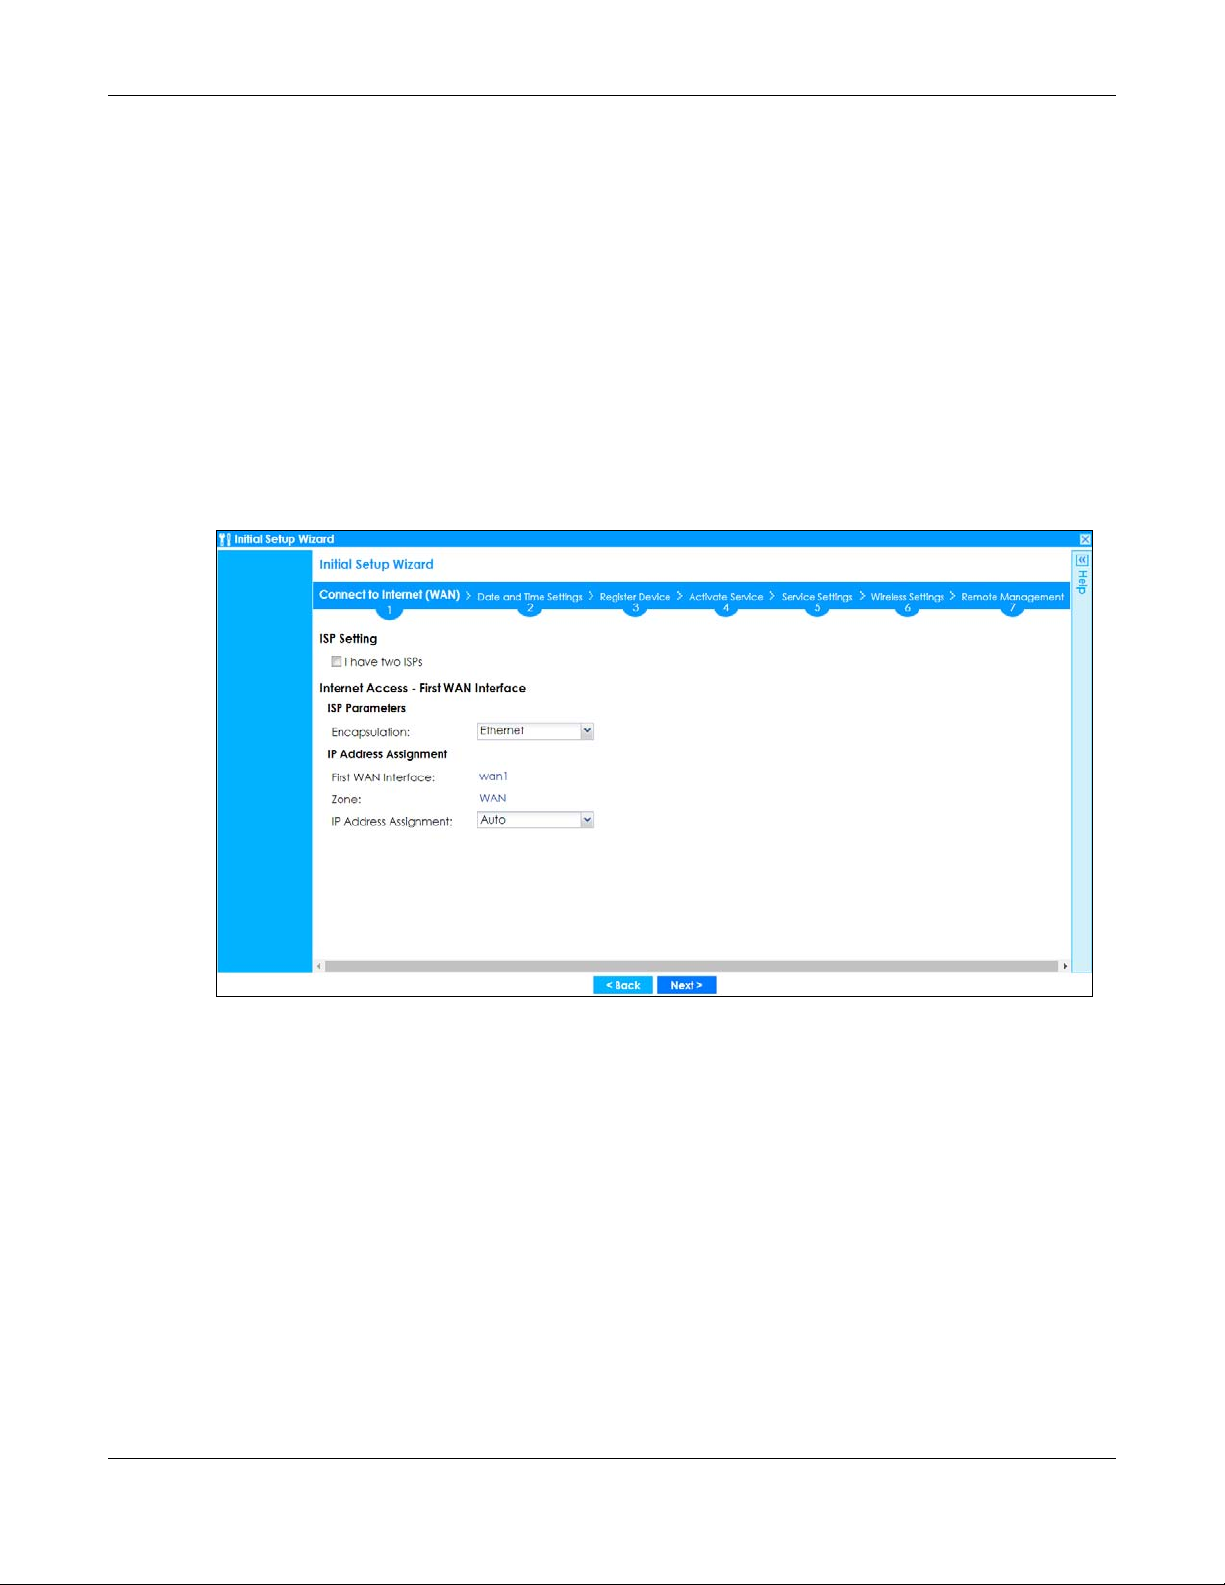
Chapter 2 Initial Setup Wizard
The screens vary depending on the encapsulation type. Refer to information provided by your ISP to
know what to enter in each field.
Note: Enter the Internet access information exactly as your ISP gave it to you. Leave a field
blank if you don’t have that information.
• I have two ISPs: Select this option to configure two Internet connections. Leave it cleared to configure
just one. This option appears when you are configuring the first WAN interface.
• Encapsulation: Choose the Ethernet option when the WAN port is used as a regular Ethernet. Choose
PPPoE, PPTP or L2TP for a dial-up connection according to the information from your ISP.
• WAN Interface: This is the interface you are configuring for Internet access.
• Zone: This is the security zone to which this interface and Internet connection belong.
• IP Address Assignment: Select Auto if your ISP did not assign you a fixed IP address.
Select Static if the ISP assigned a fixed IP address.
Figure 25 Internet Access
2.1.2 Internet Access: Ethernet
This screen is read-only if you set the previous screen’s IP Address Assignment field to Auto. If you set the
previous screen’s IP Address Assignment field to Static, use this screen to configure your IP address
settings.
• Encapsulation: This displays the type of Internet connection you are configuring.
• First WAN Interface: This is the number of the interface that will connect with your ISP.
• Zone: This is the security zone to which this interface and Internet connection will belong.
• IP Address: Enter your (static) public IP address. Auto displays if you selected Auto as the IP Address
Assignment in the previous screen.
The following fields display if you selected static IP address assignment.
• IP Subnet Mask: Enter the subnet mask for this WAN connection's IP address.
ZyWALL ATP Series User’s Guide
51
Page 52
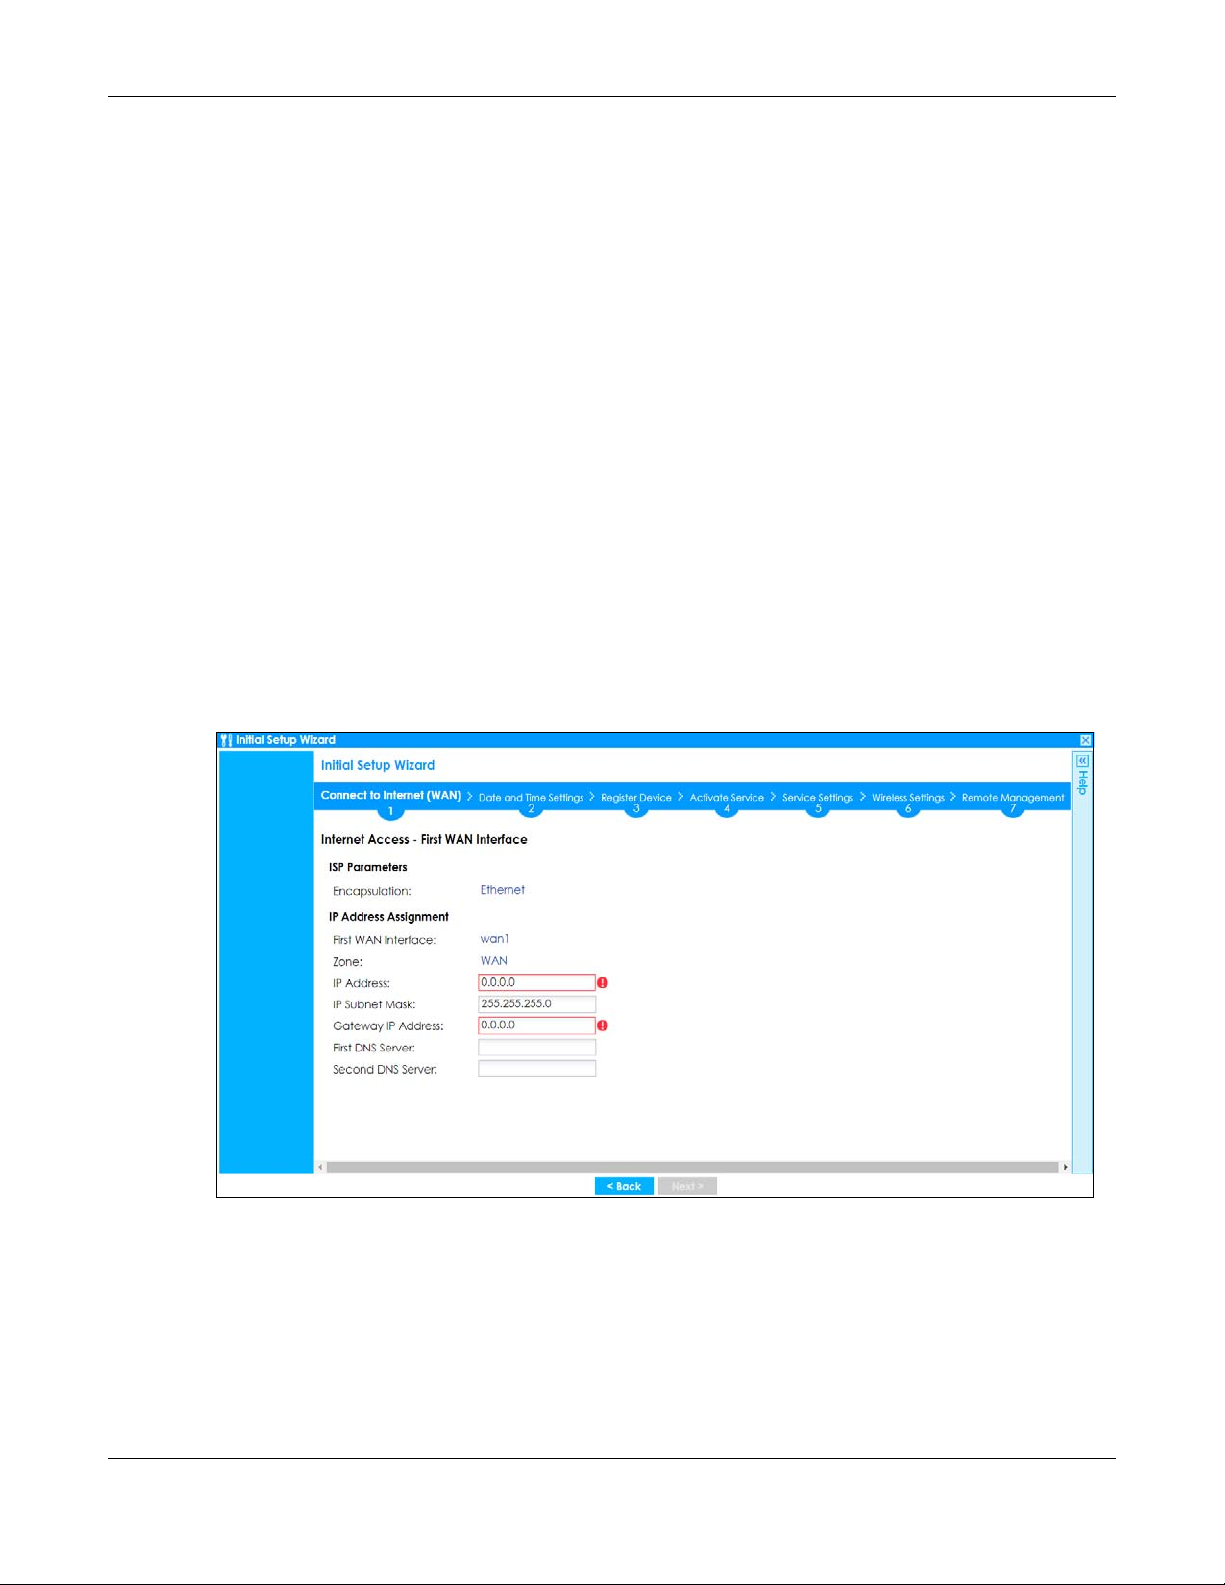
• Gateway IP Address: Enter the IP address of the router through which this WAN connection will send
traffic (the default gateway).
• First / Second DNS Server: These fields display if you selected static IP address assignment. The Domain
Name System (DNS) maps a domain name to an IP address and vice versa. Enter a DNS server's IP
address(es). The DNS server is extremely important because without it, you must know the IP address
of a computer before you can access it. The Zyxel Device uses these (in the order you specify here) to
resolve domain names for VPN, DDNS and the time server. Leave the field as 0.0.0.0 if you do not want
to configure DNS servers.
2.1.2.1 Possible Errors
• Check that your cable connection is coming from the correct interface you’re using for the WAN
connection on the Zyxel Device.
• Check that the interface is connected to the device you’re using for Internet access such as a
broadband router and that the router is turned on. The LED of the interface you’re using for the WAN
connection on the Zyxel Device should be orange.
• If your Zyxel Device was not able to obtain an IP address, check that your Internet access information
uses DHCP as the WAN connection type. If it fails again, check with your Internet service provider or
administrator for correct WAN settings.
• If your Zyxel Device was not able to use the IP address entered, check that you were given an IP
address, subnet mask and gateway address as part of your Internet access information. Re-enter your
IP address, subnet mask and gateway IP address exactly as given. If it fails again, check with your
Internet service provider or administrator for correct IP address, subnet mask and gateway address
and other WAN settings.
Figure 26 Internet Access: Ethernet Encapsulation
Chapter 2 Initial Setup Wizard
2.1.3 Internet Access: PPPoE
2.1.3.1 ISP Parameters
• Type the PPPoE Service Name from your service provider. PPPoE uses a service name to identify and
reach the PPPoE server. You can use alphanumeric and -_@$./ characters, and it can be up to 64
characters long.
ZyWALL ATP Series User’s Guide
52
Page 53

Chapter 2 Initial Setup Wizard
• Authentication Type - Select an authentication protocol for outgoing connection requests. Options
are:
• Chap/PAP - Your Zyxel Device accepts either CHAP or PAP when requested by the remote node.
• Chap - Your Zyxel Device accepts CHAP only.
• PAP - Your Zyxel Device accepts PAP only.
• MSCHAP - Your Zyxel Device accepts MSCHAP only.
• MSCHAP-V2 - Your Zyxel Device accepts MSCHAP-V2 only.
• Type the User Name given to you by your ISP. You can use alphanumeric and -_@$./ characters, and
it can be up to 31 characters long.
•Type the Password associated with the user name. Use up to 64 ASCII characters except the [] and ?.
This field can be blank.
•Select Nailed-Up if you do not want the connection to time out. Otherwise, type the Idle Timeout in
seconds that elapses before the router automatically disconnects from the PPPoE server.
2.1.3.2 WAN IP Address Assignments
• WAN Interface: This is the name of the interface that will connect with your ISP.
• Zone: This is the security zone to which this interface and Internet connection will belong.
• IP Address: Enter your (static) public IP address. Auto displays if you selected Auto as the IP Address
Assignment in the previous screen.
• First / Second DNS Server: These fields display if you selected static IP address assignment. The Domain
Name System (DNS) maps a domain name to an IP address and vice versa. Enter a DNS server's IP
address(es). The DNS server is extremely important because without it, you must know the IP address
of a computer before you can access it. The Zyxel Device uses these (in the order you specify here) to
resolve domain names for VPN, DDNS and the time server. Leave the field as 0.0.0.0 if you do not want
to configure DNS servers. If you do not configure a DNS server, you must know the IP address of a
machine in order to access it.
2.1.3.3 Possible Errors
• Check that you’re using the correct PPPoE Service Name and Authentication Type.
• Make sure that your Internet access information uses PPPoE as the WAN connection type. Re-enter
your PPPoE user name and password exactly as given. If it fails again, check with your Internet service
provider or administrator for correct WAN settings and user credentials.
• If you were given an IP address and DNS server information as part of your Internet access
information, re-enter them exactly as given. If it fails again, check with your Internet service provider
or administrator for correct IP address, subnet mask and gateway address and other WAN settings.
ZyWALL ATP Series User’s Guide
53
Page 54
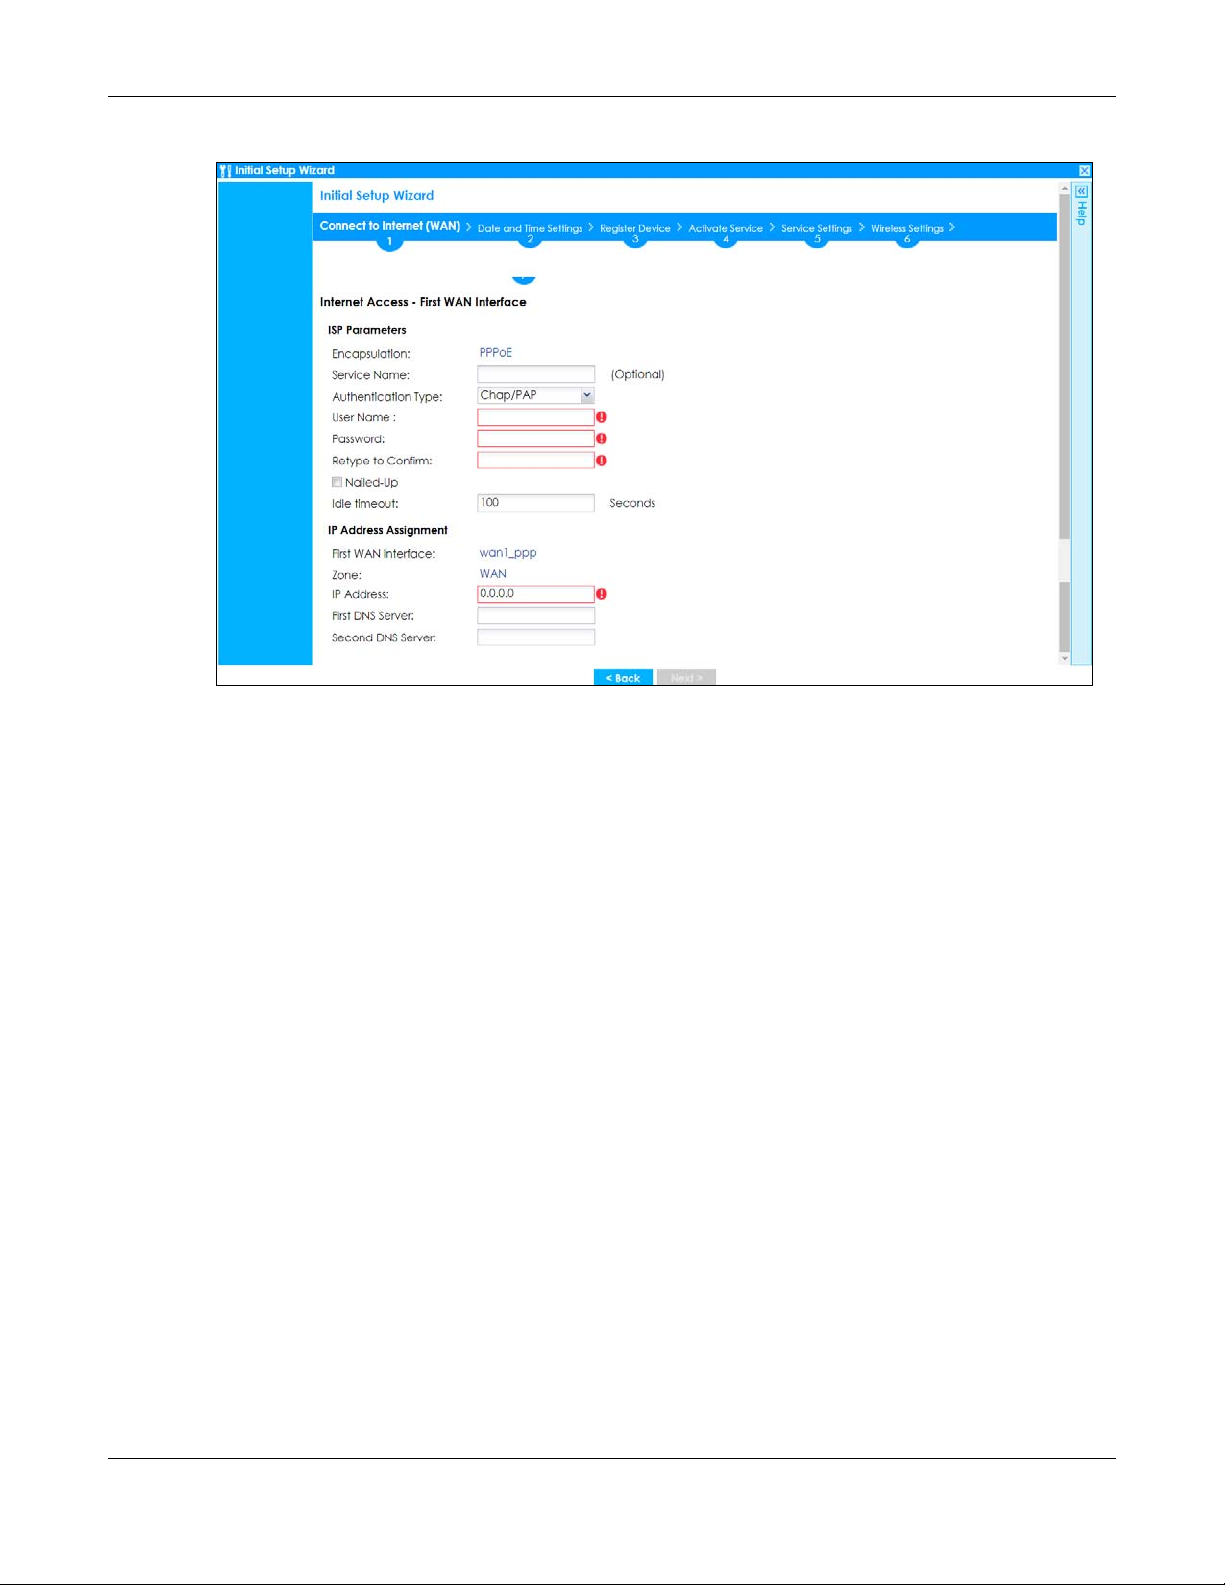
Chapter 2 Initial Setup Wizard
Figure 27 Internet Access: PPPoE Encapsulation
2.1.4 Internet Access: PPTP
2.1.4.1 ISP Parameters
• Authentication Type - Select an authentication protocol for outgoing calls. Options are:
• Chap/PAP - Your Zyxel Device accepts either CHAP or PAP when requested by the remote node.
• Chap - Your Zyxel Device accepts CHAP only.
• PAP - Your Zyxel Device accepts PAP only.
• MSCHAP - Your Zyxel Device accepts MSCHAP only.
• MSCHAP-V2 - Your Zyxel Device accepts MSCHAP-V2 only.
• Type the User Name given to you by your ISP. You can use alphanumeric and -_@$./ characters, and
it can be up to 31 characters long.
•Type the Password associated with the user name. Use up to 64 ASCII characters except the [] and ?.
This field can be blank. Re-type your password in the next field to confirm it.
•Select Nailed-Up if you do not want the connection to time out. Otherwise, type the Idle Timeout in
seconds that elapses before the router automatically disconnects from the PPTP server.
2.1.4.2 PPTP Configuration
• Base Interface: This identifies the Ethernet interface you configure to connect with a modem or router.
•Type a Base IP Address (static) assigned to you by your ISP.
• Type the IP Subnet Mask assigned to you by your ISP (if given).
• Gateway IP Address: Enter the IP address of the router through which this WAN connection will send
traffic (the default gateway).
• Server IP: Type the IP address of the PPTP server.
ZyWALL ATP Series User’s Guide
54
Page 55

Chapter 2 Initial Setup Wizard
•Type a Connection ID or connection name. It must follow the “c:id” and “n:name” format. For
example, C:12 or N:My ISP. This field is optional and depends on the requirements of your broadband
modem or router. You can use alphanumeric and -_: characters, and it can be up to 31 characters
long.
2.1.4.3 WAN IP Address Assignments
• First WAN Interface: This is the connection type on the interface you are configuring to connect with
your ISP.
• Zone This is the security zone to which this interface and Internet connection will belong.
• IP Address: Enter your (static) public IP address. Auto displays if you selected Auto as the IP Address
Assignment in the previous screen.
• First / Second DNS Server: These fields display if you selected static IP address assignment. The Domain
Name System (DNS) maps a domain name to an IP address and vice versa. Enter a DNS server's IP
address(es). The DNS server is extremely important because without it, you must know the IP address
of a computer before you can access it. The Zyxel Device uses these (in the order you specify here) to
resolve domain names for VPN, DDNS and the time server. Leave the field as 0.0.0.0 if you do not want
to configure DNS servers.
2.1.4.4 Possible Errors
• Check that you’re using the correct PPPT Service IP, Base IP Address, IP Subnet Mask, Gateway IP
Address, Connection ID and Authentication Type.
• Make sure that your Internet access information uses PPTP as the WAN connection type. Re-enter your
PPTP user name and password exactly as given. If it fails again, check with your Internet service
provider or administrator for correct WAN settings and user credentials.
• If you were given an IP address and DNS server information as part of your Internet access
information, re-enter them exactly as given. If it fails again, check with your Internet service provider
or administrator for correct IP address, subnet mask and gateway address and other WAN settings.
ZyWALL ATP Series User’s Guide
55
Page 56
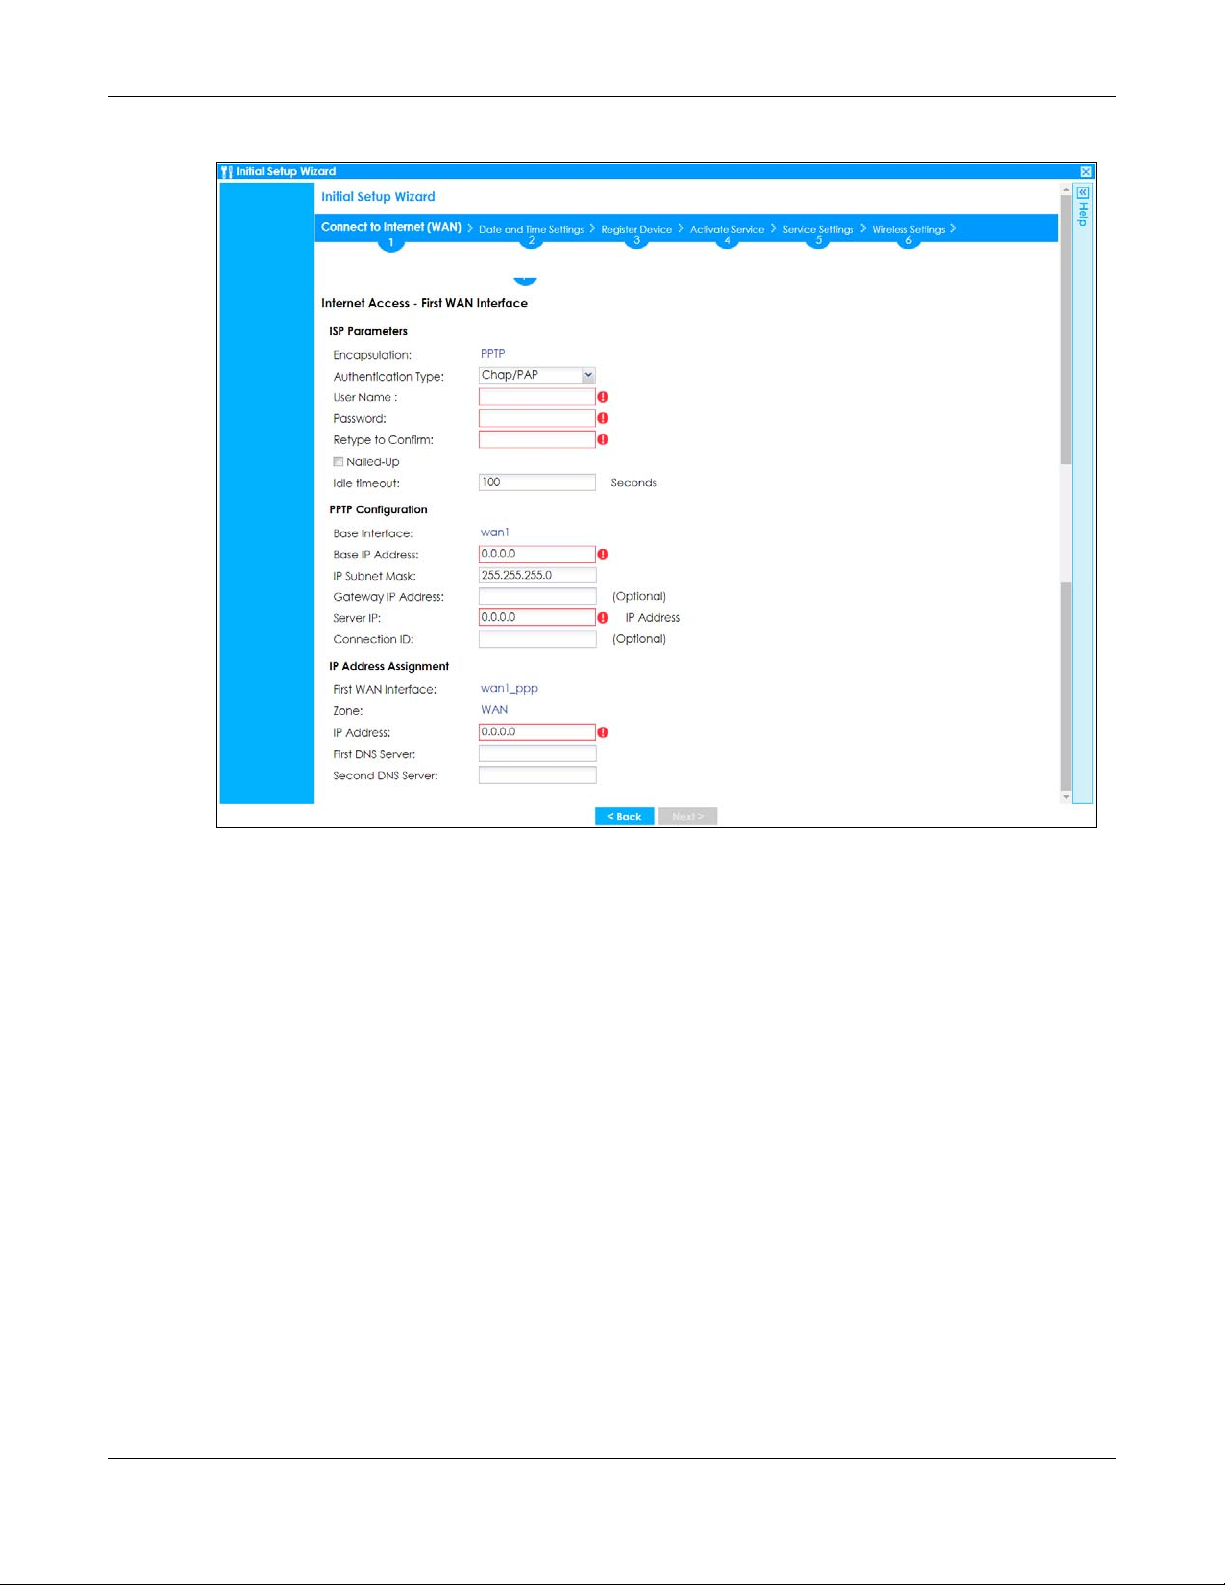
Chapter 2 Initial Setup Wizard
Figure 28 Internet Access: PPTP Encapsulation
2.1.5 Internet Access: L2TP
2.1.5.1 ISP Parameters
• Authentication Type - Select an authentication protocol for outgoing connection requests. Options
are:
• Chap/PAP - Your Zyxel Device accepts either CHAP or PAP when requested by the remote node.
• Chap - Your Zyxel Device accepts CHAP only.
• PAP - Your Zyxel Device accepts PAP only.
• MSCHAP - Your Zyxel Device accepts MSCHAP only.
• MSCHAP-V2 - Your Zyxel Device accepts MSCHAP-V2 only.
• Type the User Name given to you by your ISP. You can use alphanumeric and -_@$./ characters, and
it can be up to 31 characters long.
•Type the Password associated with the user name. Use up to 64 ASCII characters except the [] and ?.
This field can be blank.
•Select Nailed-Up if you do not want the connection to time out. Otherwise, type the Idle Timeout in
seconds that elapses before the router automatically disconnects from the PPPoE server.
2.1.5.2 L2TP Configuration
• Base Interface: This identifies the Ethernet interface you configure to connect with a modem or router.
•Type a Base IP Address (static) assigned to you by your ISP.
ZyWALL ATP Series User’s Guide
56
Page 57

Chapter 2 Initial Setup Wizard
• IP Subnet Mask: Enter the subnet mask for this WAN connection's IP address.
• Gateway IP Address: Enter the IP address of the router through which this WAN connection will send
traffic (the default gateway).
• Server IP: Type the IP address of the L2TP server.
2.1.5.3 WAN IP Address Assignments
• WAN Interface: This is the name of the interface that will connect with your ISP.
• Zone: This is the security zone to which this interface and Internet connection will belong.
• IP Address: Enter your (static) public IP address. Auto displays if you selected Auto as the IP Address
Assignment in the previous screen.
• First / Second DNS Server: These fields display if you selected static IP address assignment. The Domain
Name System (DNS) maps a domain name to an IP address and vice versa. Enter a DNS server's IP
address(es). The DNS server is extremely important because without it, you must know the IP address
of a computer before you can access it. The Zyxel Device uses these (in the order you specify here) to
resolve domain names for VPN, DDNS and the time server. Leave the field as 0.0.0.0 if you do not want
to configure DNS servers.
2.1.5.4 Possible Errors
• Check that you’re using the correct L2PT Server IP, Subnet Mask, Gateway IP Address, IP Subnet Mask
and Authentication Type.
• Make sure that your Internet access information uses L2TP as the WAN connection type. Re-enter your
L2TP user name and password exactly as given. If it fails again, check with your Internet service
provider or administrator for correct WAN settings and user credentials.
• If you were given an IP address and DNS server information as part of your Internet access
information, re-enter them exactly as given. If it fails again, check with your Internet service provider
or administrator for correct IP address, subnet mask and gateway address and other WAN settings.
ZyWALL ATP Series User’s Guide
57
Page 58
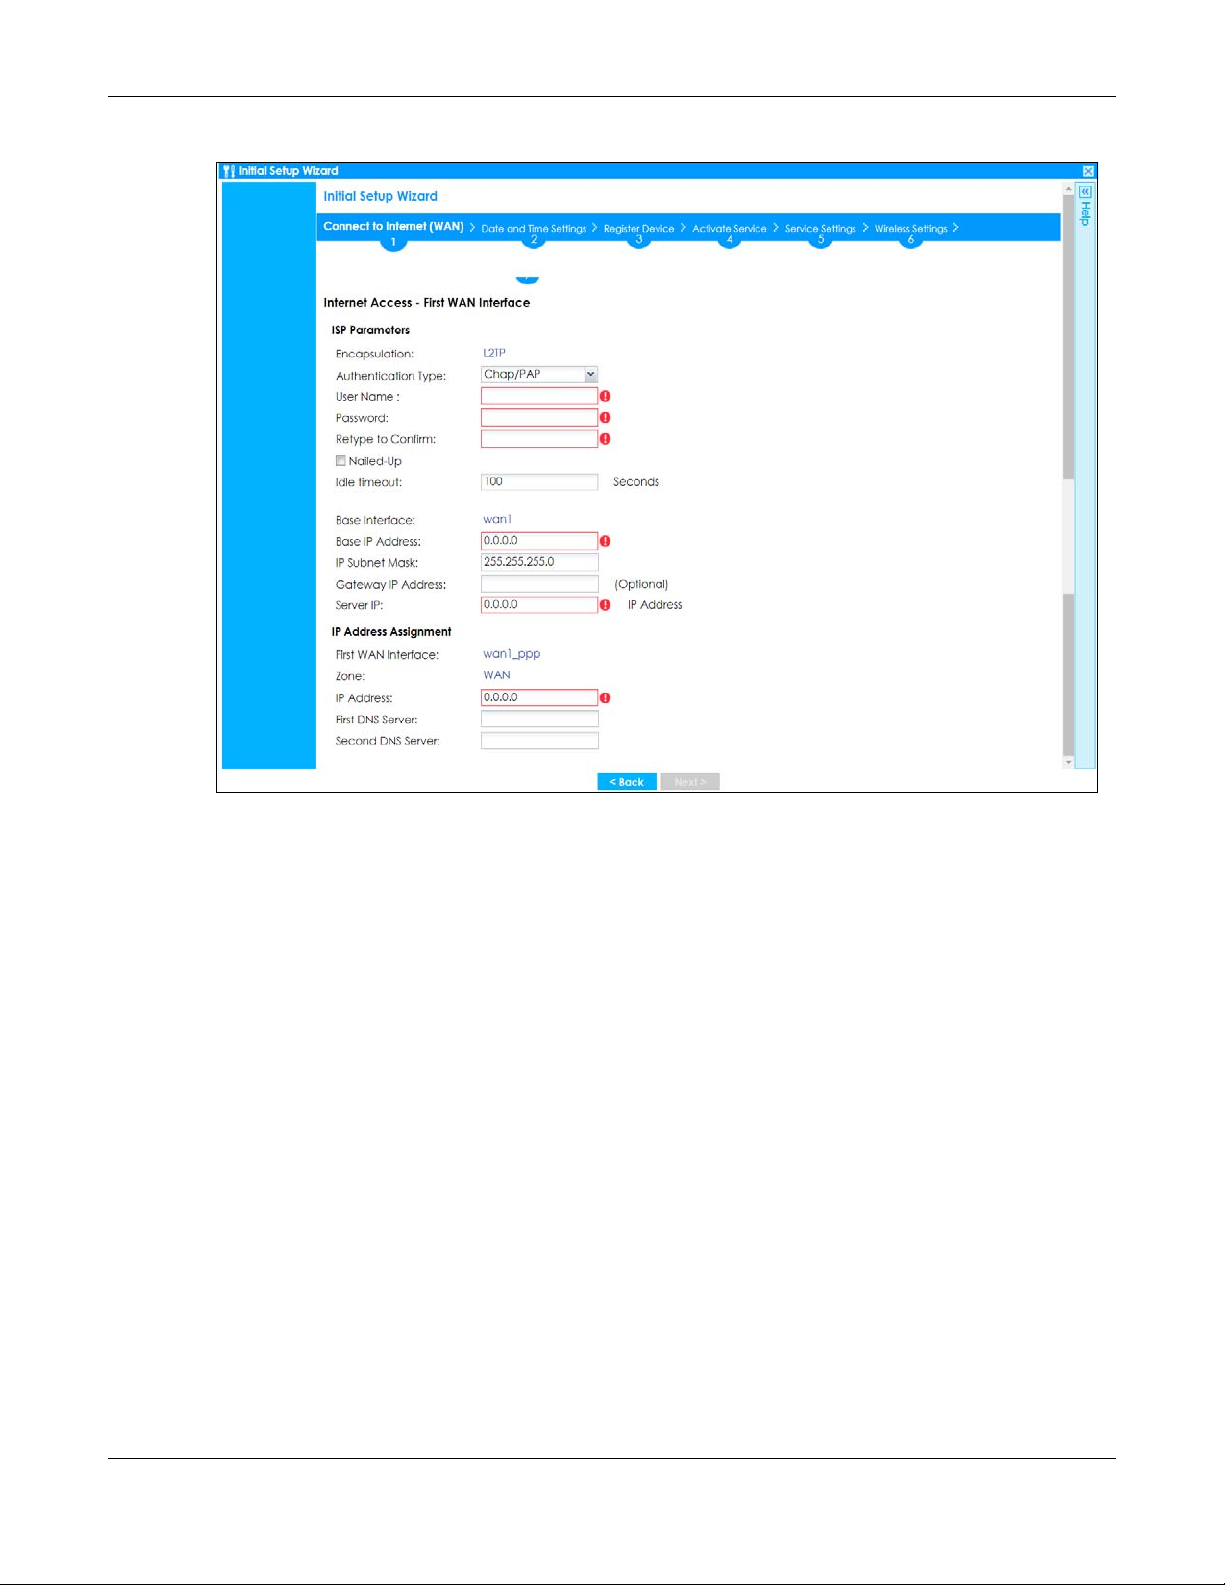
Chapter 2 Initial Setup Wizard
Figure 29 Internet Access: L2TP Encapsulation
2.1.6 Internet Access Setup - Second WAN Interface
If you selected I have two ISPs, after you configure the First WAN Interface, you can configure the
Second WAN Interface. The screens for configuring the second WAN interface are similar to the first (see
Section 2.1.1 on page 50).
ZyWALL ATP Series User’s Guide
58
Page 59
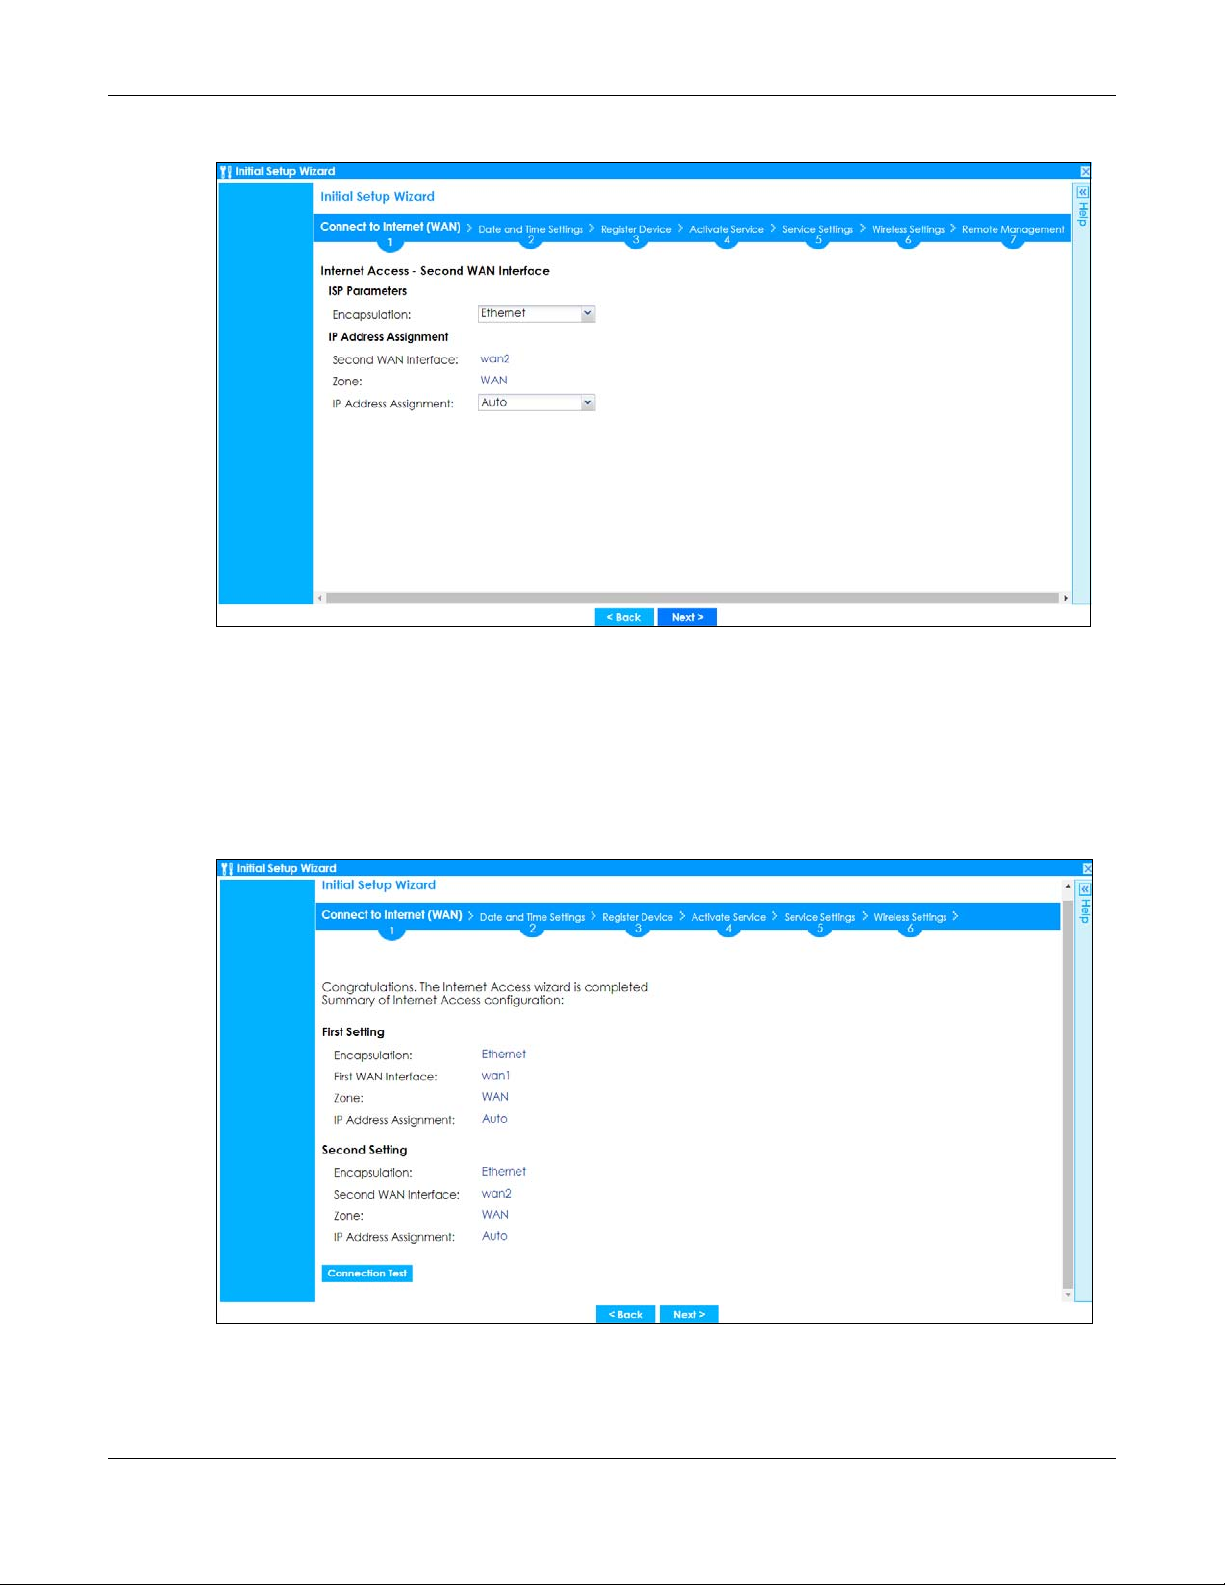
Chapter 2 Initial Setup Wizard
Figure 30 Internet Access: Step 3: Second WAN Interface
2.1.7 Internet Access: Congratulations
You have set up your Zyxel Device to access the Internet. A screen displays with your settings. Click
Connection Test to check that you can access the Internet. If you cannot, click Back and confirm that
you entered the settings correctly. If you have, check that you got the correct settings from your ISP or
network administrator.
Figure 31 Internet Access: Summary
ZyWALL ATP Series User’s Guide
59
Page 60
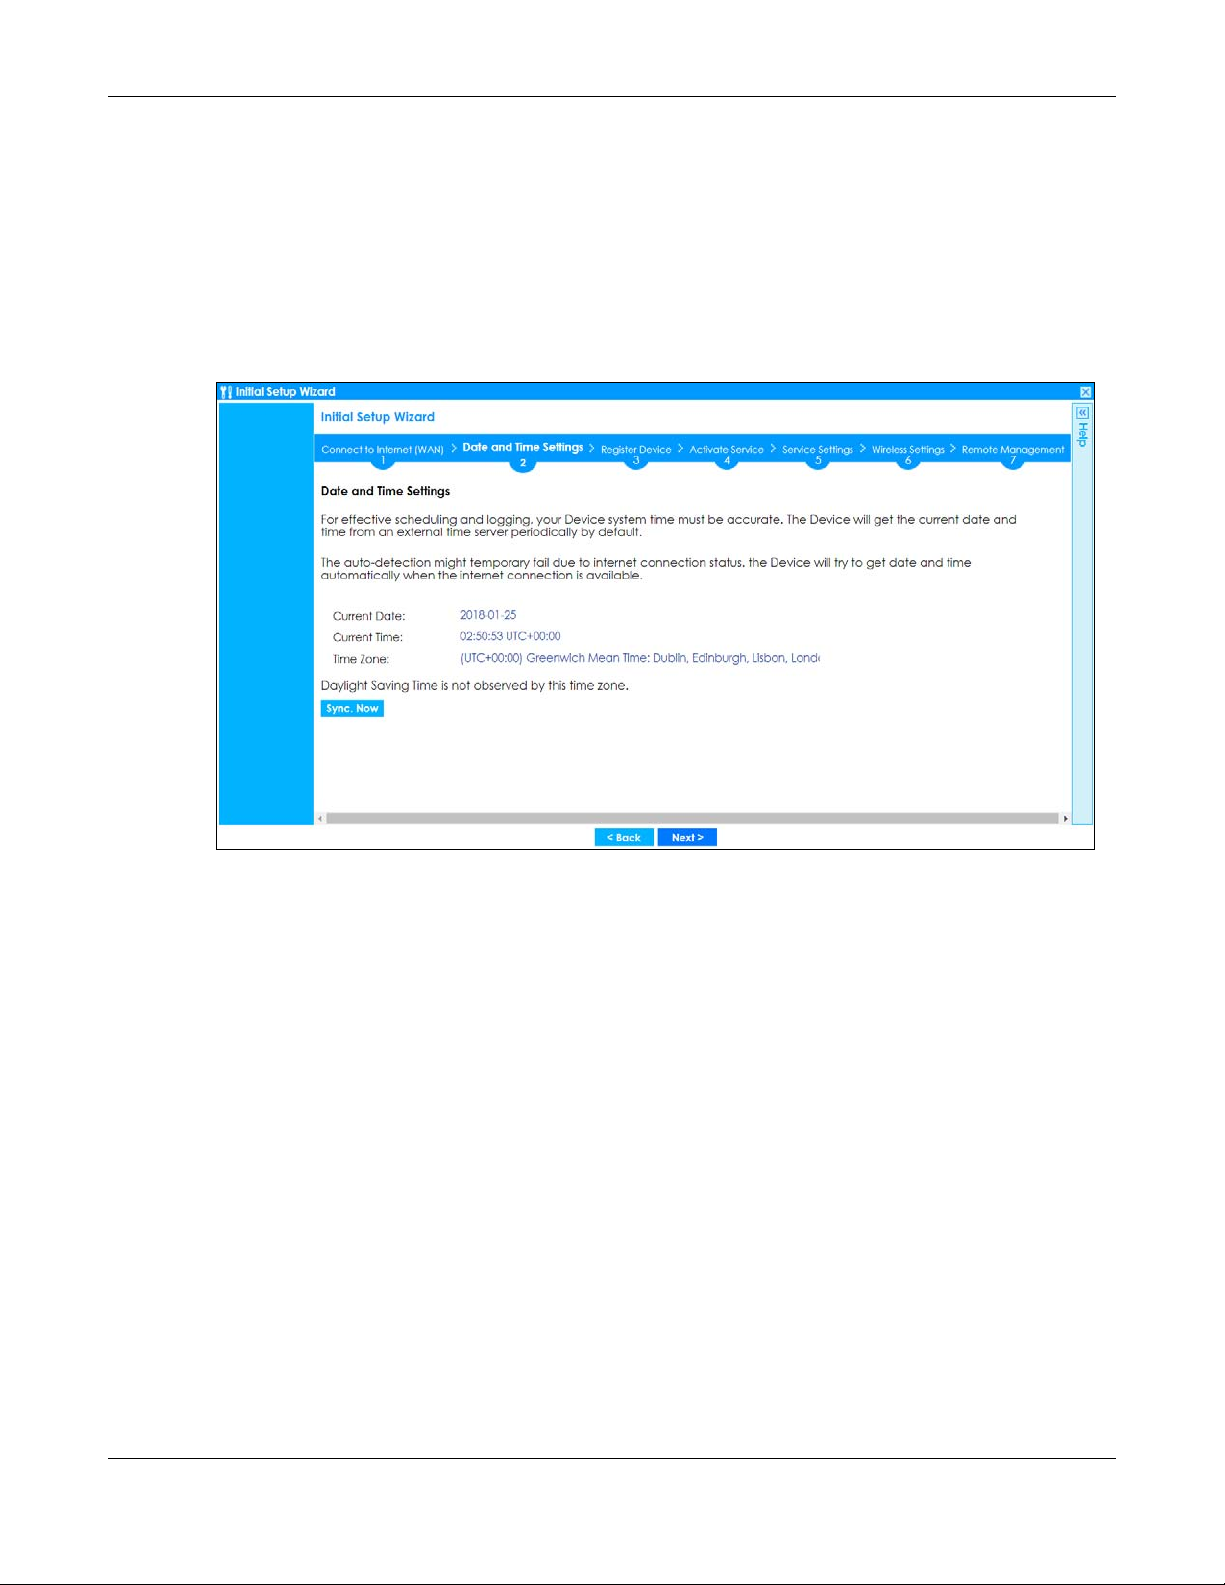
2.1.8 Date and Time Settings
It’s important to have correct date and time values in the logs. The Zyxel Device can automatically
update the time and date by detecting your time zone and whether Daylight Savings is in effect in that
time zone.
If your Zyxel Device cannot get the correct date and time, it may not able to connect to a time server.
Check that the Zyxel Device has Internet access, then click Sync. Now.
Figure 32 Date and Time Settings
Chapter 2 Initial Setup Wizard
2.1.9 Register Device
Click the Register button in this screen to register your device at portal.myzyxel.com.
Note: The Zyxel Device must be connected to the Internet in order to register.
ZyWALL ATP Series User’s Guide
60
Page 61
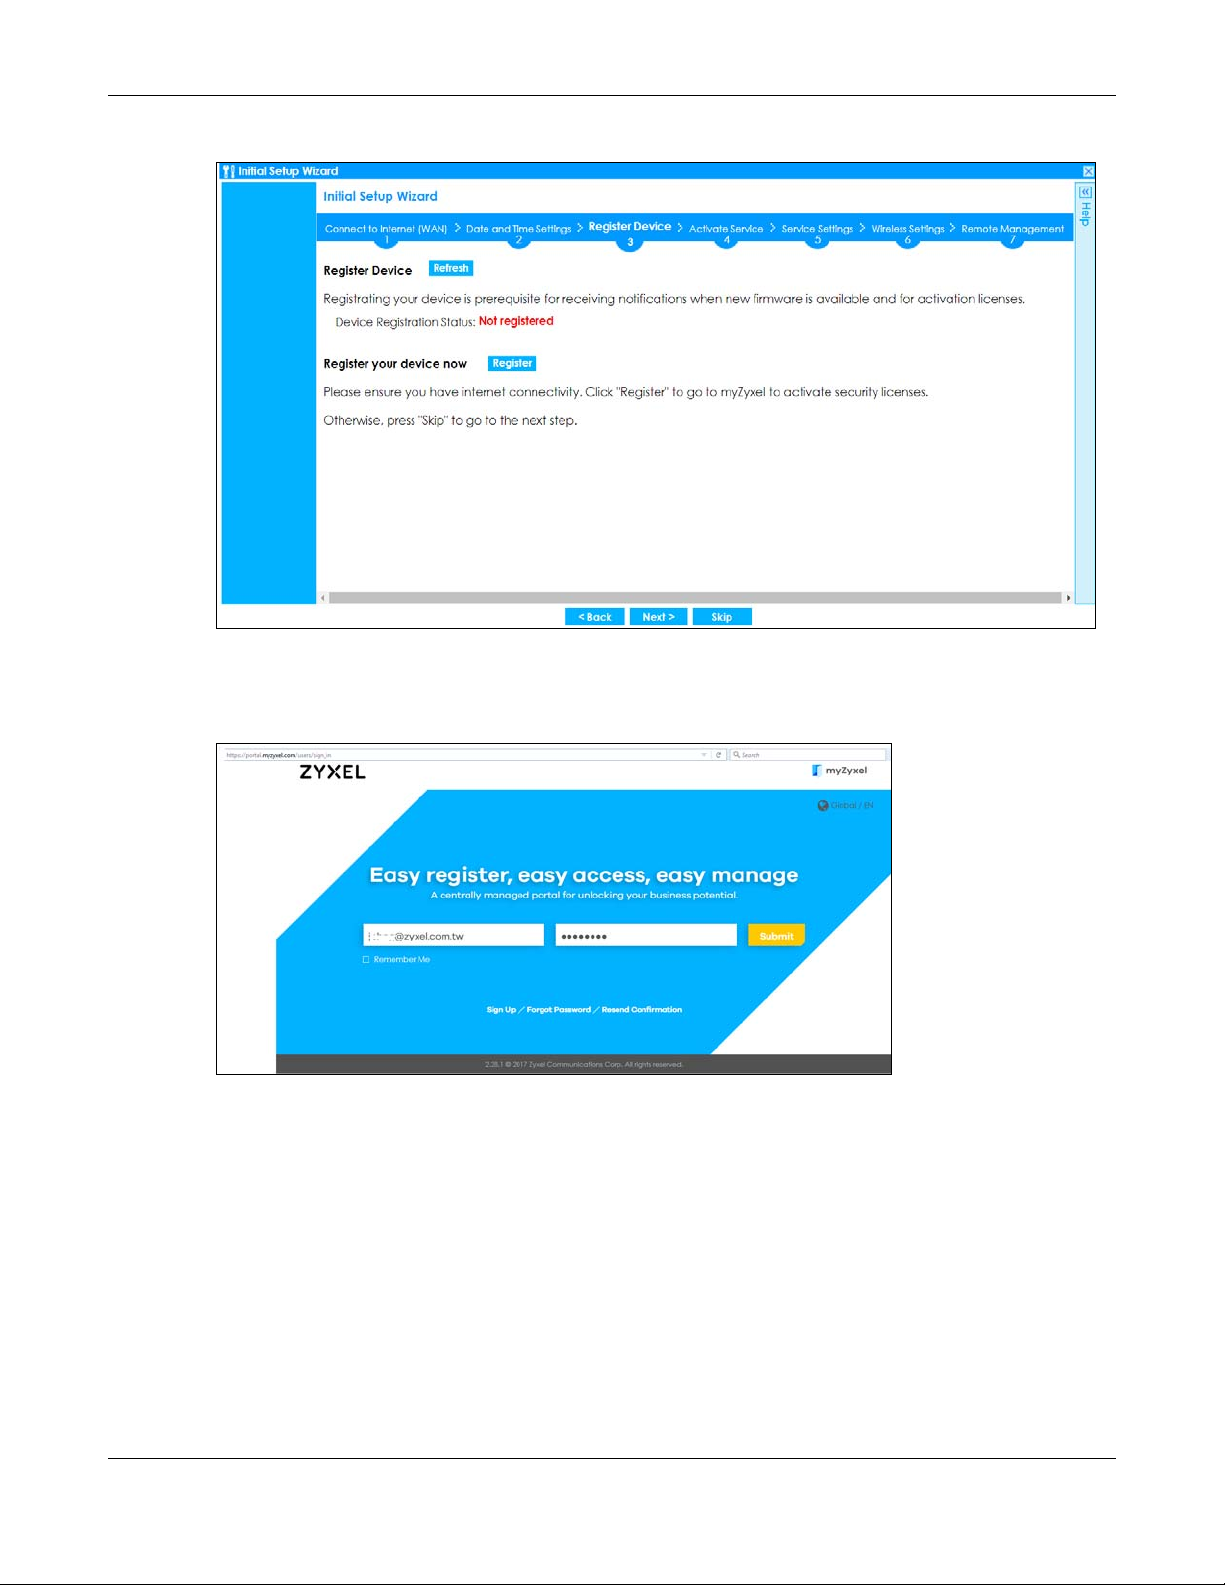
Figure 33 Register Device
Chapter 2 Initial Setup Wizard
You may need the Zyxel Device’s serial number and LAN MAC address to register it at myZyxel if you
have not already done so. Refer to the label at the back of the Zyxel Device’s for details.
Figure 34 myZyxel Login
Click Refresh or use the Configuration > Licensing > Registration screen to update your Zyxel Device
registration status.
ZyWALL ATP Series User’s Guide
61
Page 62
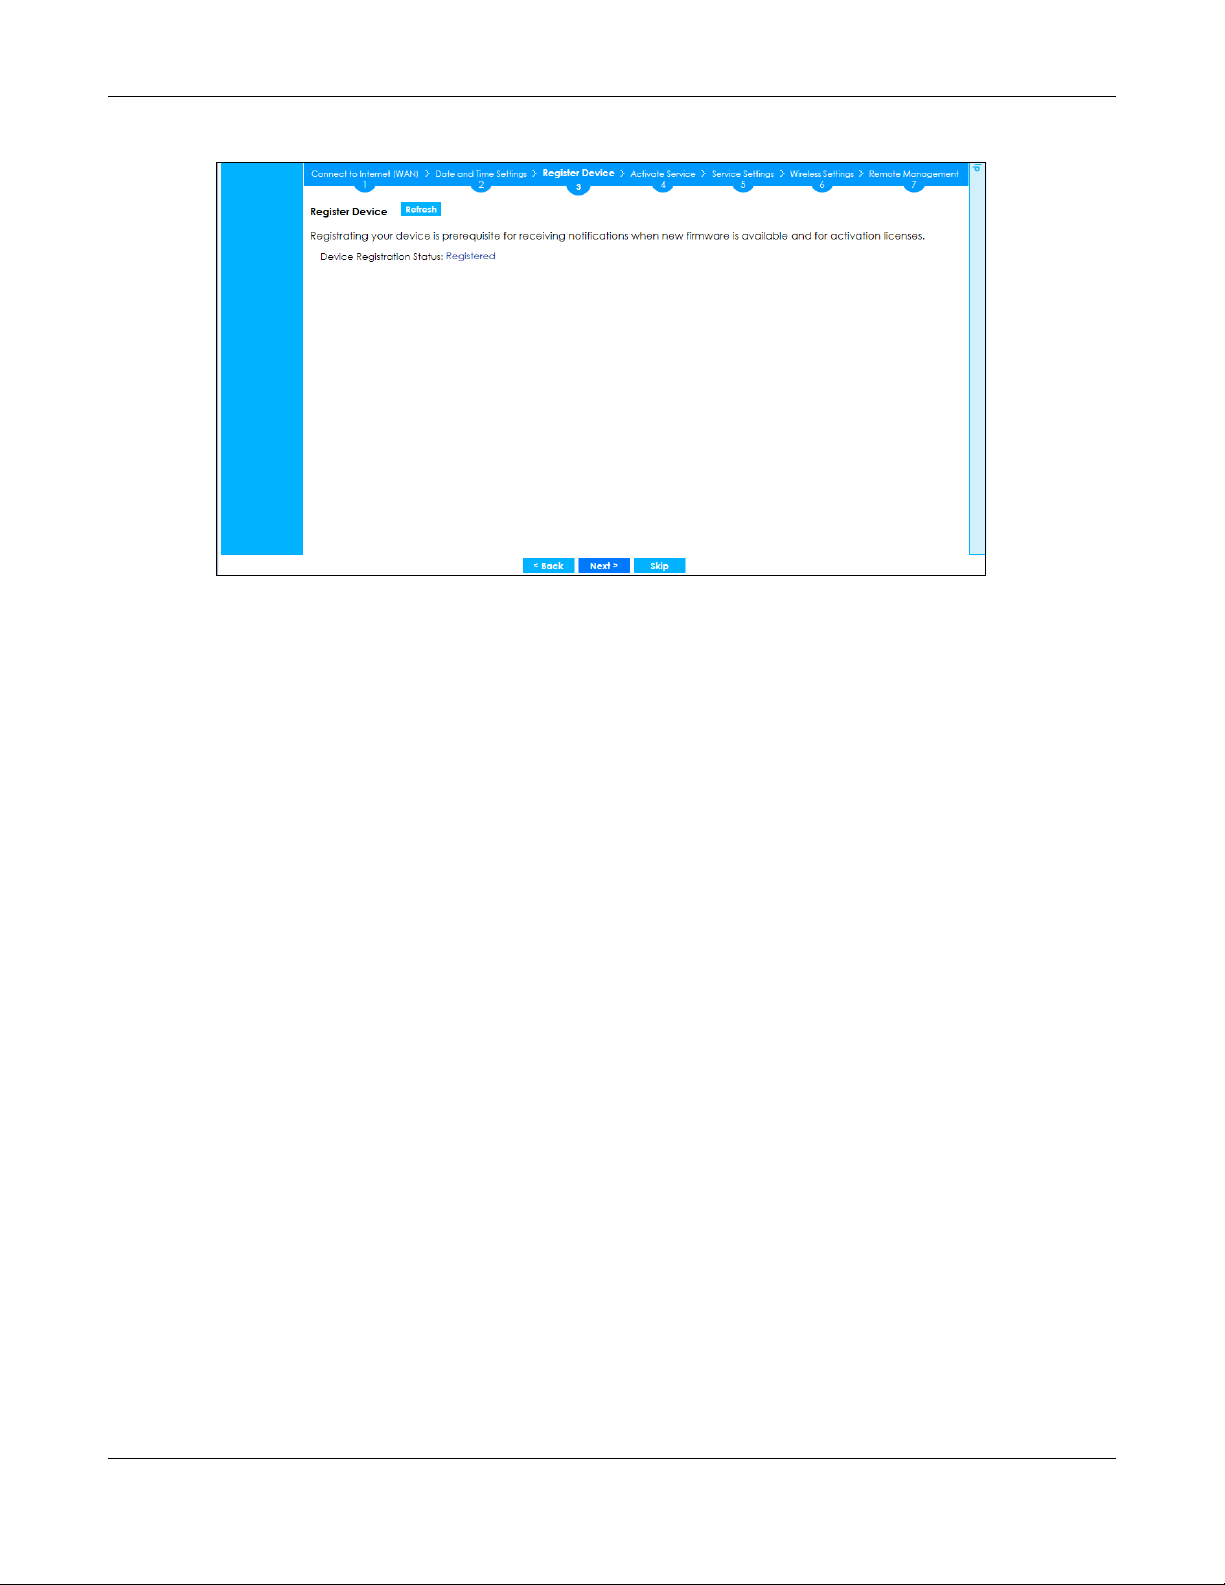
Figure 35 Registered Device
2.1.10 Activate Service
Chapter 2 Initial Setup Wizard
After you register your Zyxel Device, you can register for the services supported by your model. See
Subscription Services Available on page 198 for more information on the subscription services for the two
types of security packs.
Here are the services available for the Zyxel Device.
• Web Security: access a database that can block websites by category.
• Application Security: use signatures for application patrol inspection to manage the use of various
applications on the network, and anti-spam signatures to mark or discard spam (unsolicited
commercial or junk email).
• Malware Blocker: use signatures to detect malware patterns in files.
• Intrusion Prevention: use this feature to detect Intrusion Detection and Prevention attacks.
• Geo Enforcer: use this feature to access a database of country-to-IP address mappings to filter traffic
by country.
• Sandboxing: use this feature to provide a safe environment to separate running programs from your
network and host devices
• Reputation Filter: recognize packets coming from suspect IPv4 addresses.
• SecuReporter Premium: collect and analyze logs from your Zyxel Device in order to identify
anomalies, notify you of potential internal or external threats, and report on network usage.
• Managed AP Service: manage more than the default number of APs for your Zyxel Device when the
AP controller is enabled.
ZyWALL ATP Series User’s Guide
62
Page 63
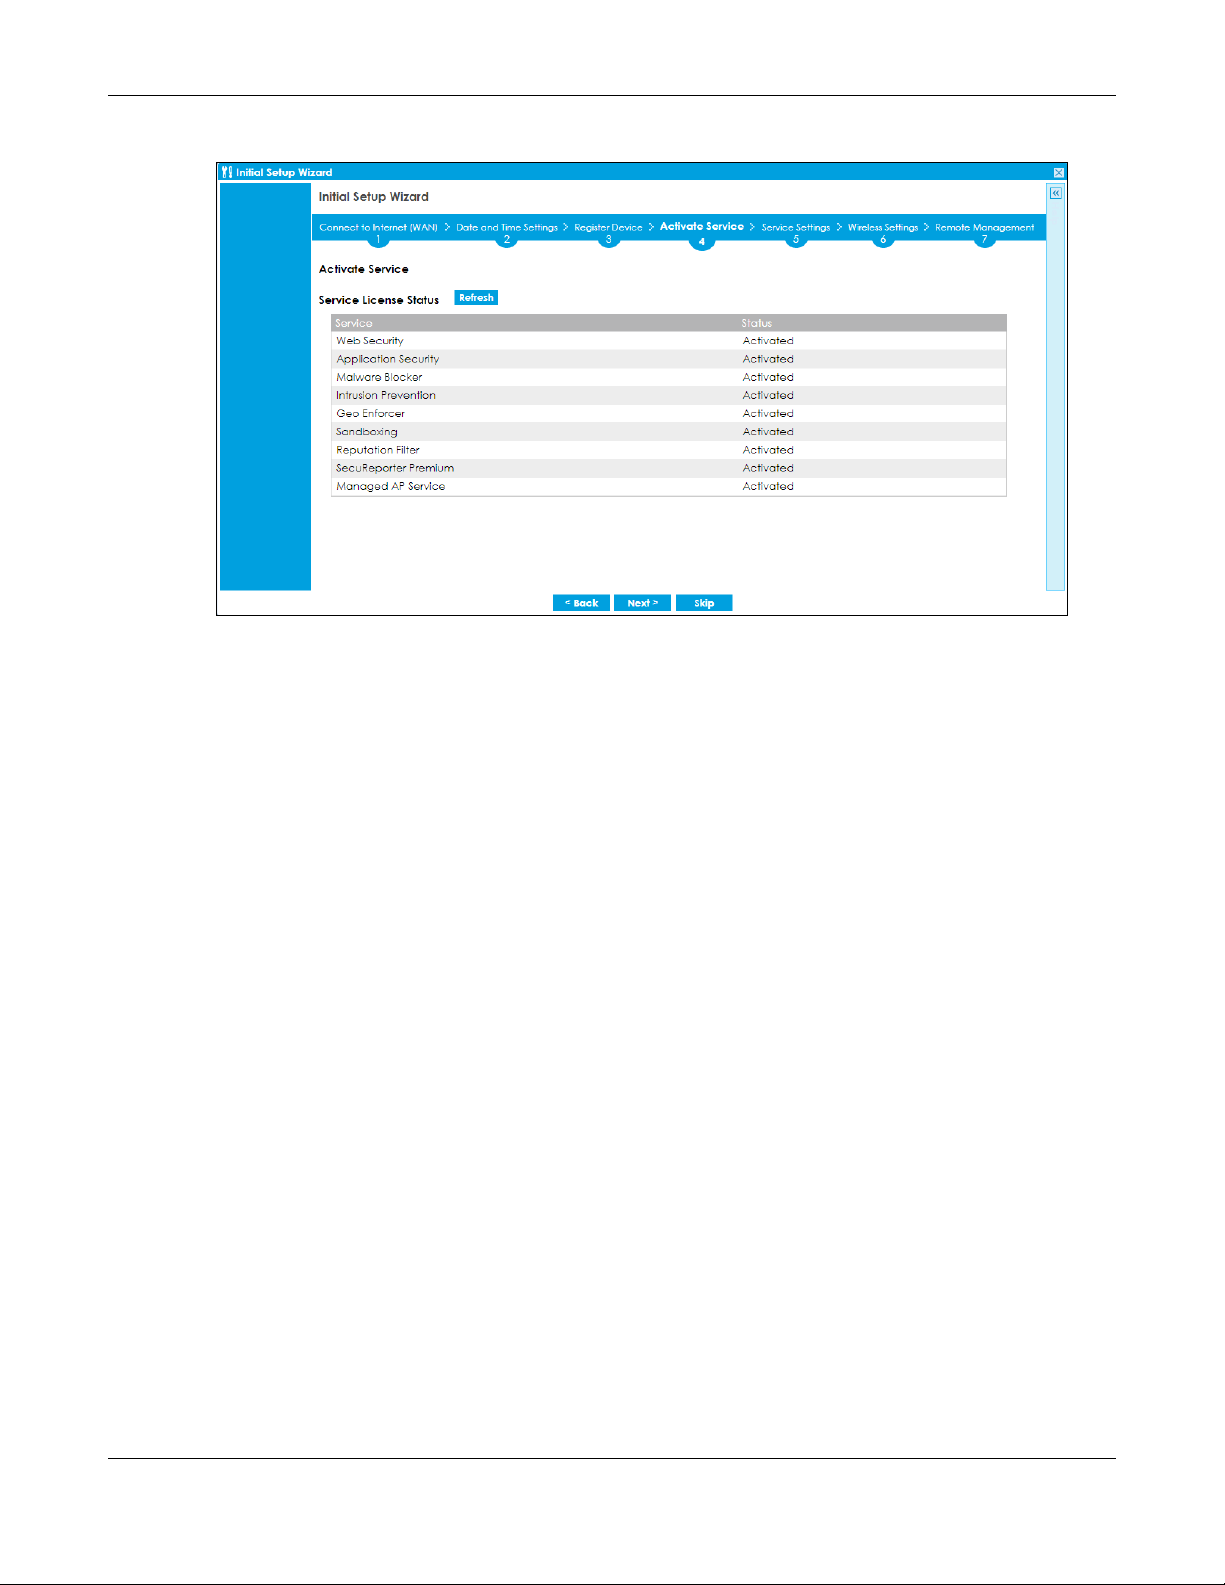
Chapter 2 Initial Setup Wizard
Figure 36 ATP100W Activate Service
Click Refresh and wait a few moments for the registration information to update in this screen. If the
page does not refresh, make sure the Internet connection is working and click Refresh again. To check
your Internet connection, try to access the Internet from a computer connected to a LAN port on the
Zyxel Device. If you cannot, then check your Internet access settings on the Zyxel Device.
2.1.11 Service Settings
You can enable or disable the following features in this screen. This screen varies depending on the
security pack that you purchase. See Subscription Services Available on page 198 for more information
on the subscription services for the two types of security packs.
Note: Select the I have read SecuReporter GDPR and agree policy check box to have
SecuReporter collect and analyze logs from this Zyxel Device. This check box won’t
appear again if you have already selected this before.
• URL Threat Filter: Use this feature to detect and block access to specific URLs, by comparing URL
addresses of sites that users attempt to access with a database of either permitted or blocked sites.
• Anti-Malware: Use this feature to detect malware patterns in files.
• IDP: Use this feature to detect Intrusion Detection and Prevention attacks.
• IP Reputation: Use this feature to recognize packets coming from suspect IPv4 addresses.
• Content Filter: Use this feature to access a database that can block websites by category.
• App Patrol: Use this feature to manage the use of various applications on the network.
• Sandboxing: Use this feature to provide a safe environment to separate running programs from your
network and host devices.
• Email Security: Use this feature to mark or discard spam (unsolicited commercial or junk email).
• SecuReporter: Use this feature to collect and analyze logs from your Zyxel Device in order to identify
anomalies, notify you of potential internal or external threats, and report on network usage.
ZyWALL ATP Series User’s Guide
63
Page 64
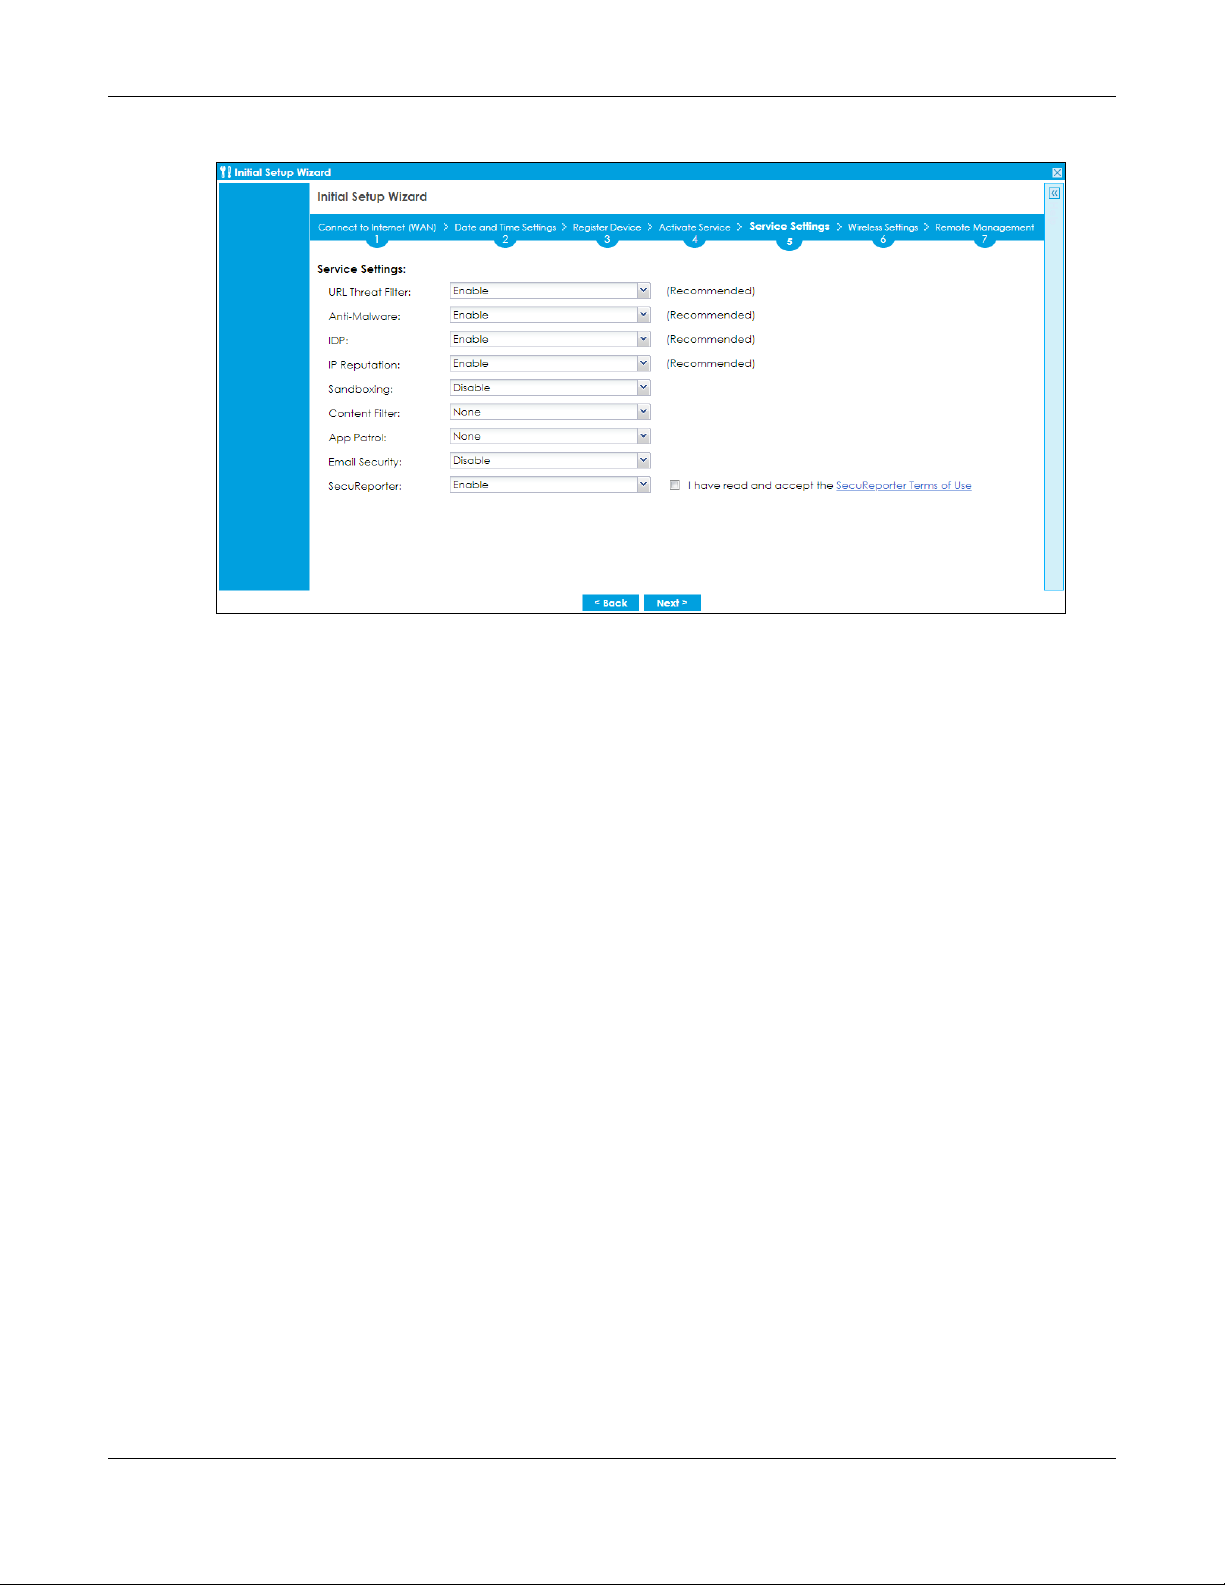
Figure 37 ATP Service Settings
Chapter 2 Initial Setup Wizard
2.1.12 Service Settings: SecuReporter
Use this screen to add the Zyxel Device to a new or existing organization, and choose the level of data
protection for traffic going through this Zyxel Device.
• Server Status: This is the connection status between the Zyxel Device and the SecuReporter server. This
field shows Connected when the Zyxel Device can synchronize with the SecuReporter server. This field
shows Timeout when the Zyxel Device can’t synchronize with the SecuReporter server. This field shows
Fail when the connection between the Zyxel Device and the SecuReporter server is down.
• Device Name: Enter the name of the Zyxel Device. This Zyxel Device will be added to a new or existing
organization.
• Organization: This field appears if you haven’t created an organization in the SecuReporter server.
Type a name of up to 255 characters and description to create a new organization.
• Select from existing organization: Select an existing organization from the drop-down list box to add
the Zyxel Device to the selected organization.
• Create new organization: Type a name of up to 255 characters and description to create a new
organization.
• Partially Anonymous: Select this and personal data, such as user names, MAC addresses, email
addresses, and host names, will be replaced with artificial identifiers in downloaded logs.
• Fully Anonymous: Select this and personal data, such as user names, MAC addresses, email
addresses, and host names, will be replaced with anonymized information in downloaded logs.
• Non-Anonymous: Select this and personal data, such as user names, MAC addresses, email
addresses, and host names, will be identifiable in downloaded logs.
ZyWALL ATP Series User’s Guide
64
Page 65
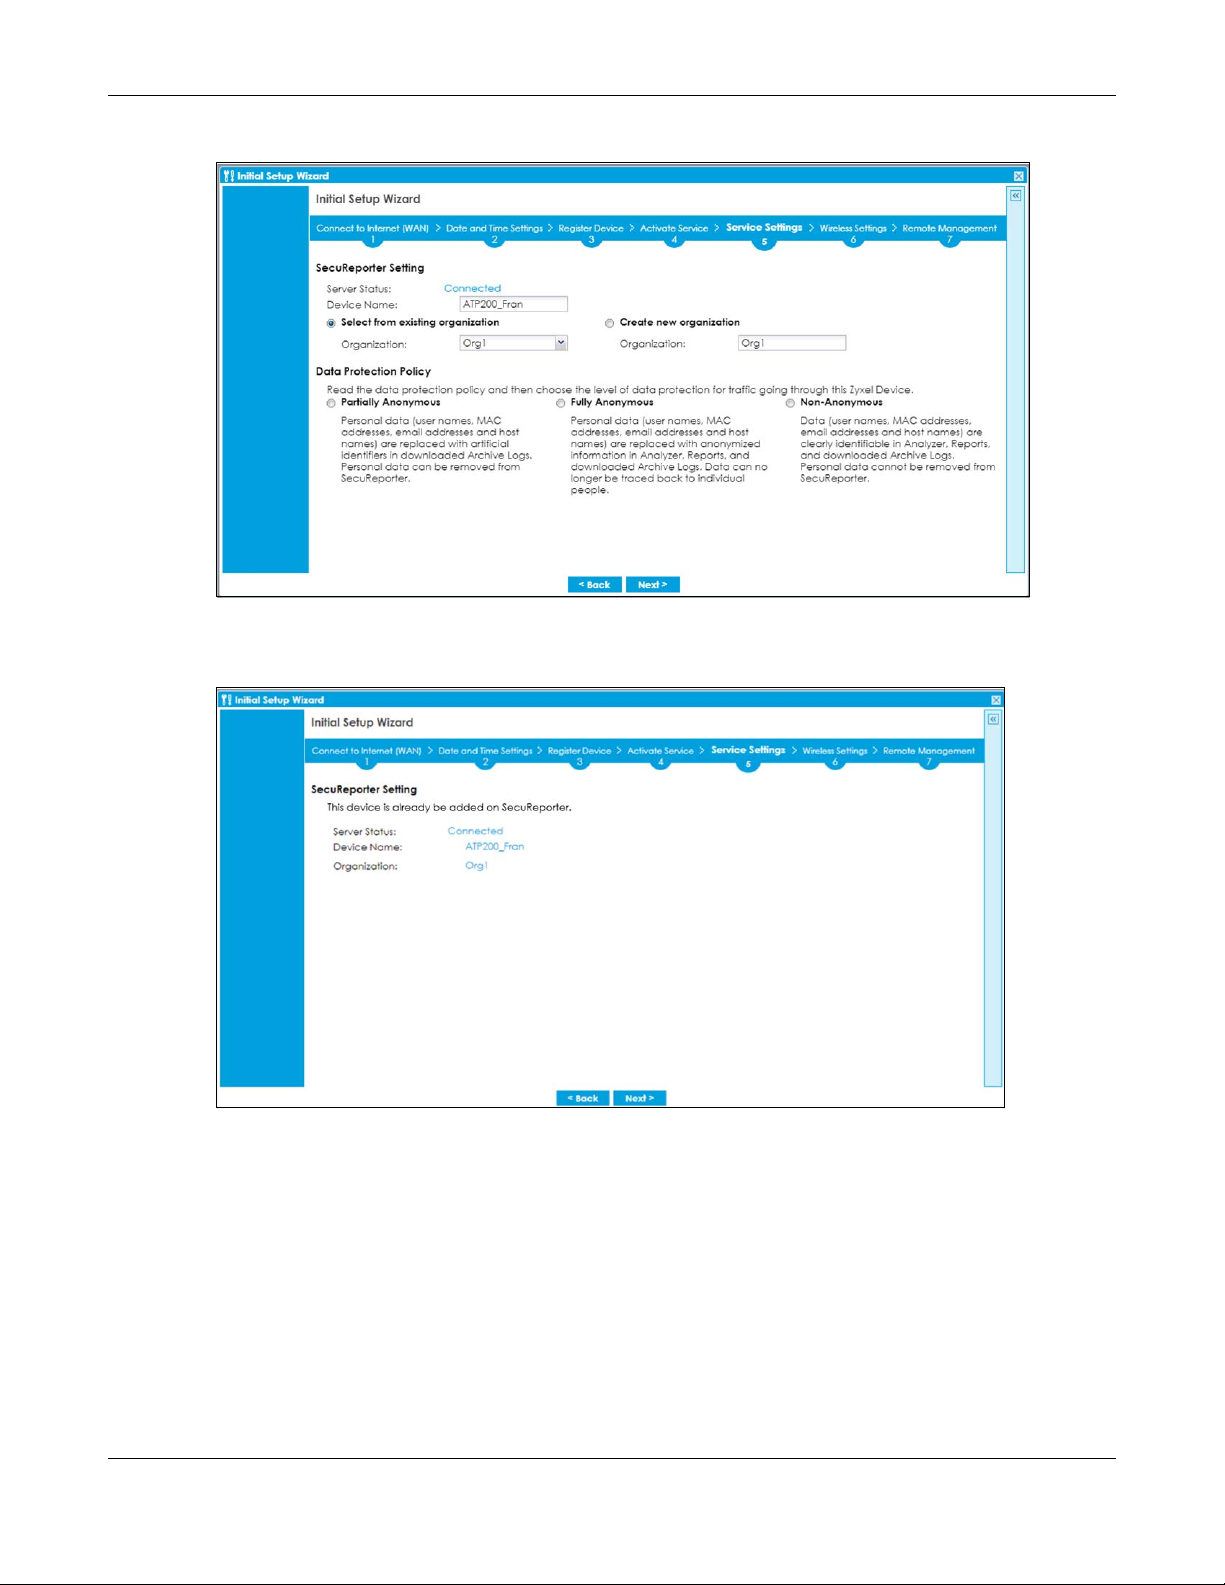
Chapter 2 Initial Setup Wizard
Figure 38 SecuReporter Settings
The following screen appears when the Zyxel Device is already added in an organization.
Figure 39 SecuReporter Settings
2.1.13 Wireless Settings: Management Mode
The Management Mode screen appears for Zyxel Devices that have a built-in AP. Select Built-in AP if you
want WiFi clients to access your Zyxel Device wirelessly. Select AP Controller to allow the Zyxel Device to
manage APs in the same network as the Zyxel Device. Both modes cannot work simultaneously. Click
Next to continue the wizard.
ZyWALL ATP Series User’s Guide
65
Page 66
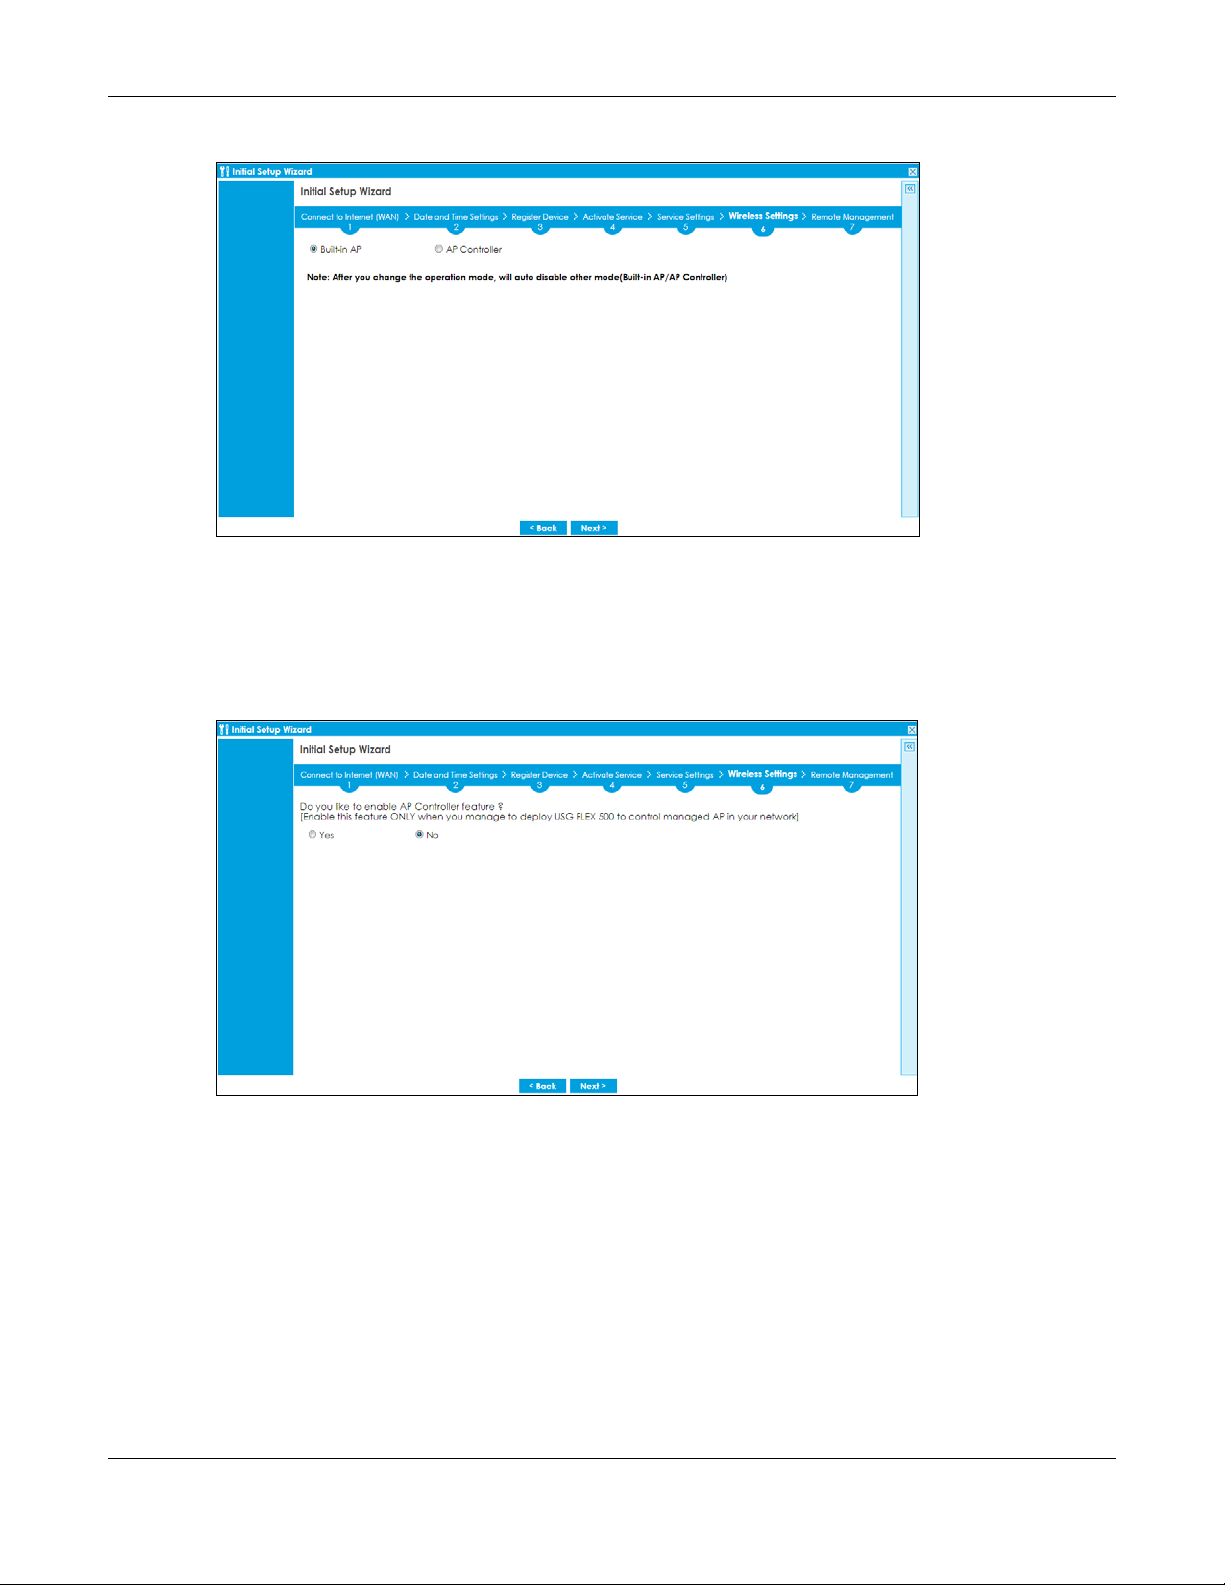
Chapter 2 Initial Setup Wizard
Figure 40 Wireless Setup Wizard > Management Mode (Models with Built-in AP)
2.1.14 Wireless Settings: AP Controller
The Zyxel Device can act as an AP Controller that can manage APs in the same network as the Zyxel
Device. Select Yes if you want your Zyxel Device to manage APs in your network; otherwise select No.
Figure 41 Wireless Setup Wizard > Management Mode
2.1.15 Wireless Settings: SSID & Security
Configure SSID and wireless security in this screen.
SSID Setting
• SSID - Enter a descriptive name of up to 32 printable characters for the wireless LAN.
• Security Mode - Select Pre-Shared Key to add security on this wireless network. Otherwise, select None
to allow any wireless client to associate this network without authentication.
• Pre-Shared Key - Enter a pre-shared key of between 8 and 63 case-sensitive ASCII characters
(including spaces and symbols) or 64 hexadecimal characters.
ZyWALL ATP Series User’s Guide
66
Page 67
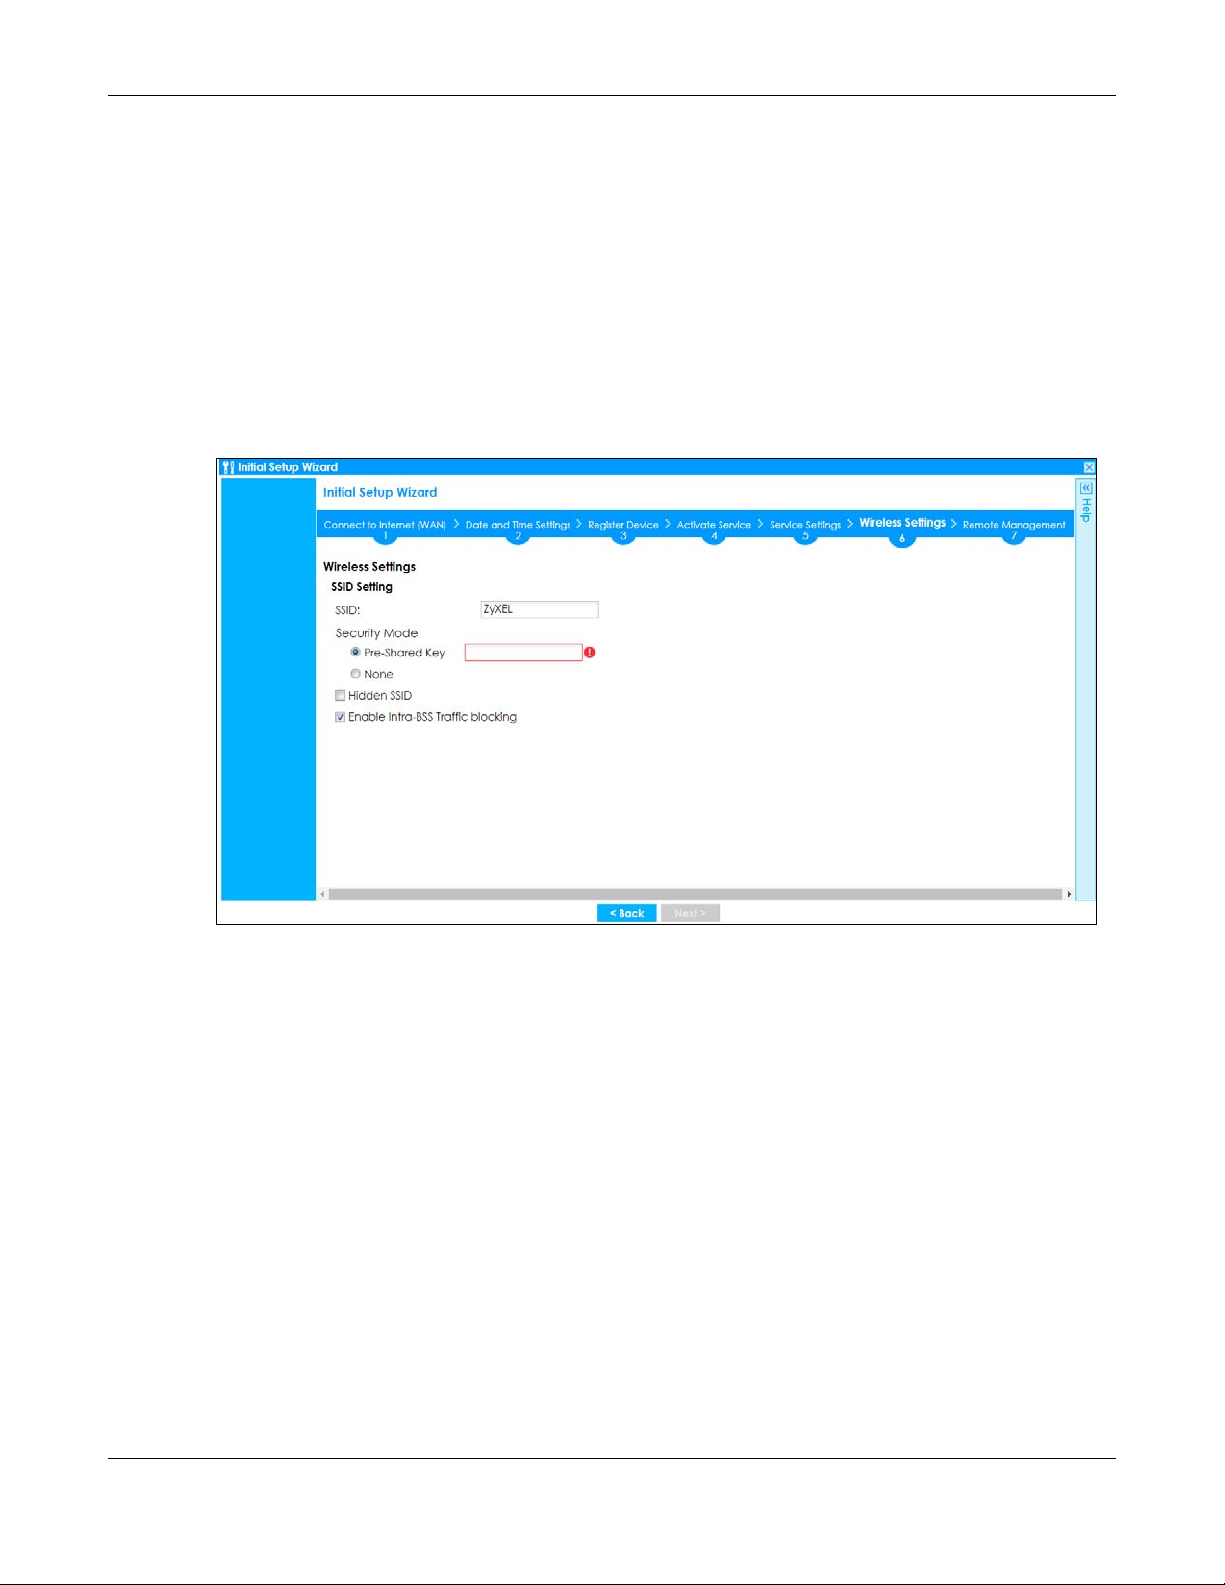
Chapter 2 Initial Setup Wizard
• Hidden SSID - Select this option if you want to hide the SSID in the outgoing beacon frame. A wireless
client then cannot obtain the SSID through scanning using a site survey tool.
• Enable Intra-BSS Traffic Blocking - Select this option if you want to prevent crossover traffic from within
the same SSID. Wireless clients can still access the wired network but cannot communicate with each
other.
For Zyxel Devices with Built-in AP Only
Bridged to: Zyxel Devices with W in the model name have a built-in AP. Select an interface to bridge with
the built-in AP wireless network. Devices connected to this interface will then be in the same broadcast
domain as devices in the AP wireless network.
Figure 42 Wireless Settings: SSID & Security
2.1.16 Remote Management
Select this to allow access to the Zyxel Device using HTTP or HTTPS from the Internet.
ZyWALL ATP Series User’s Guide
67
Page 68

Chapter 2 Initial Setup Wizard
Figure 43 Remote Management
HTTPS is added to the Default_Allow_WAN_to_ZyWALL rule in Object > Service > Service Group screen
when you enable Remote Management.
Figure 44 Object > Service > Service Group - HTTPS
ZyWALL ATP Series User’s Guide
68
Page 69
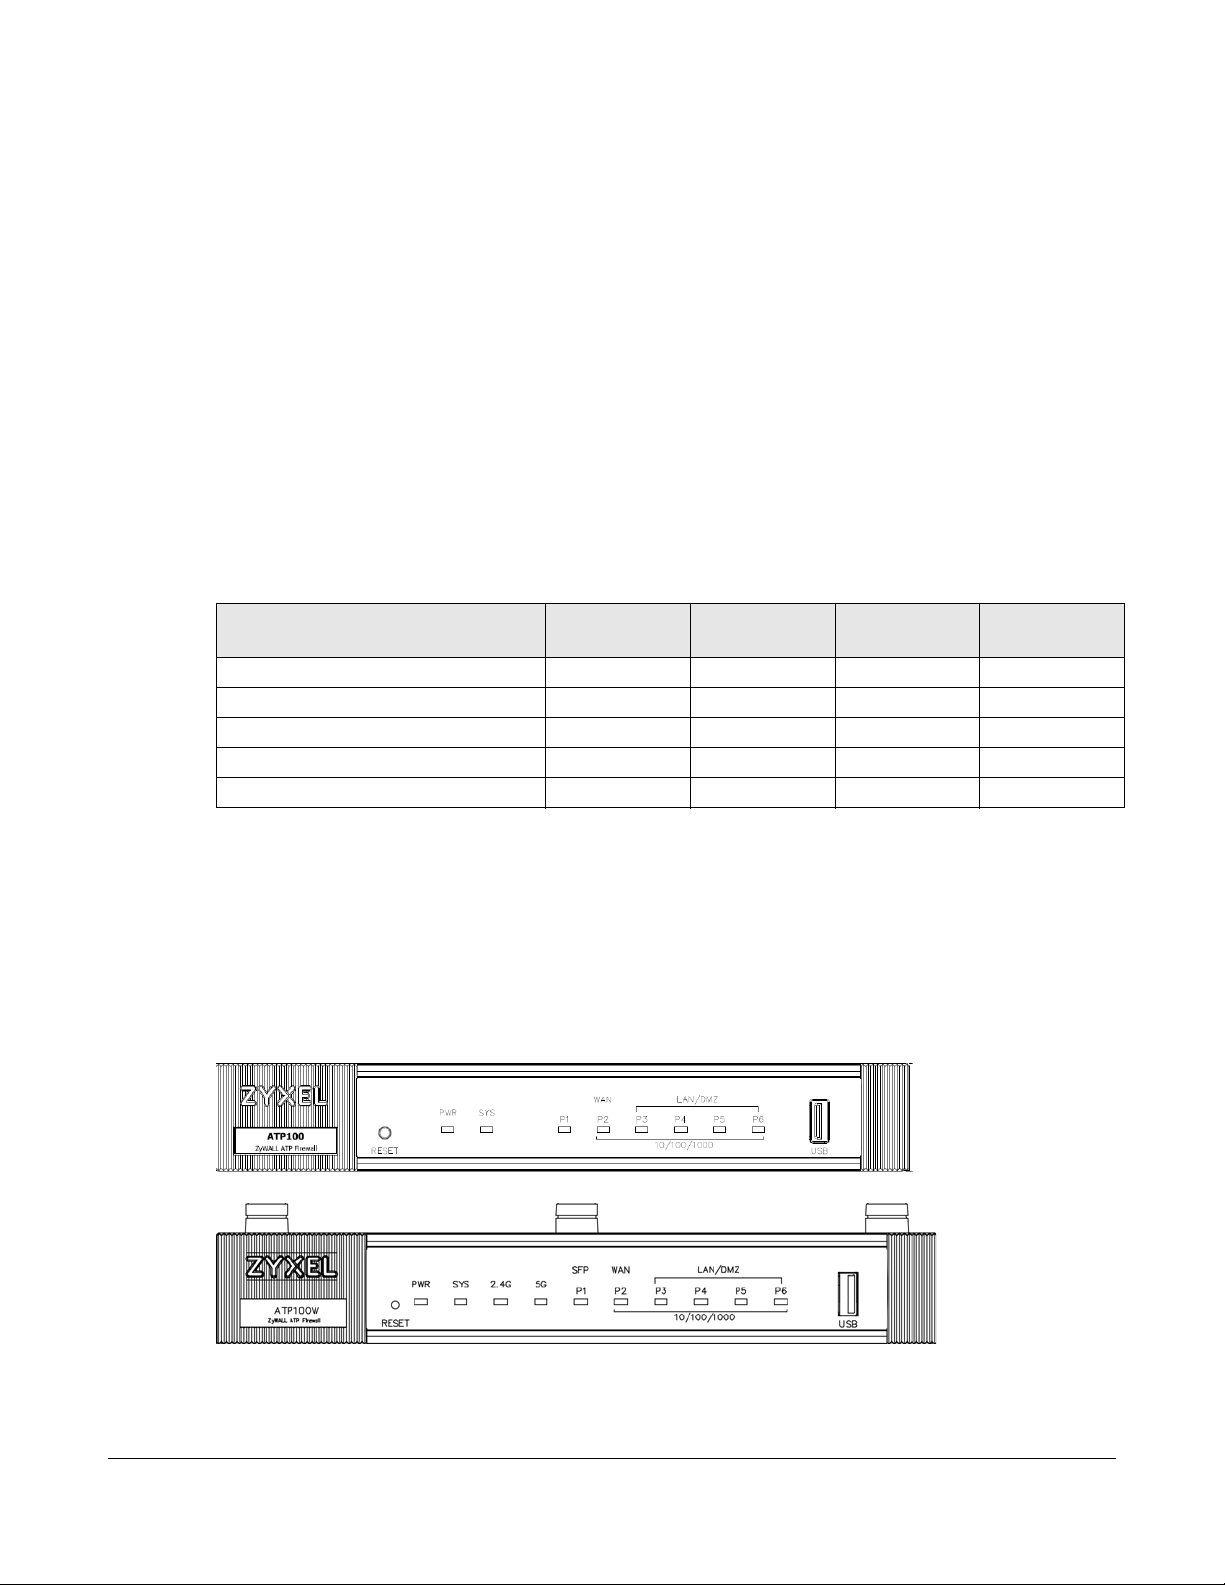
Hardware, Interfaces and
3.1 Hardware Overview
This section describes the front and rear panels for each model.
The following table summarizes the port features of the Zyxel Device by model.
Table 10 ATP Series Port Comparison Table
ATP MODELS
USB 3.0 Ports 1 2 2 2
1 Gbps SFP interface 1 1 1 2
10/100/1000 Mbps Ethernet WAN Ports 1 2 - -
10/100/1000 Mbps Ethernet Ports 4 4 7 12
Console Port 1111
ATP100 /
ATP100W
CHAPTER 3
Zones
ATP200 ATP500
ATP700 /
ATP800
The following table summarizes the port features of the Zyxel Device by modelFor information on
interface names by model, default port / interface name mapping, and default interface / zone
mapping please see Section 3.3 on page 77.
3.1.1 Front Panels
The LED indicators are located on the front panel.
Figure 45 ATP100 Front Panel
Figure 46 ATP100W Front Panel
ZyWALL ATP Series User’s Guide
69
Page 70
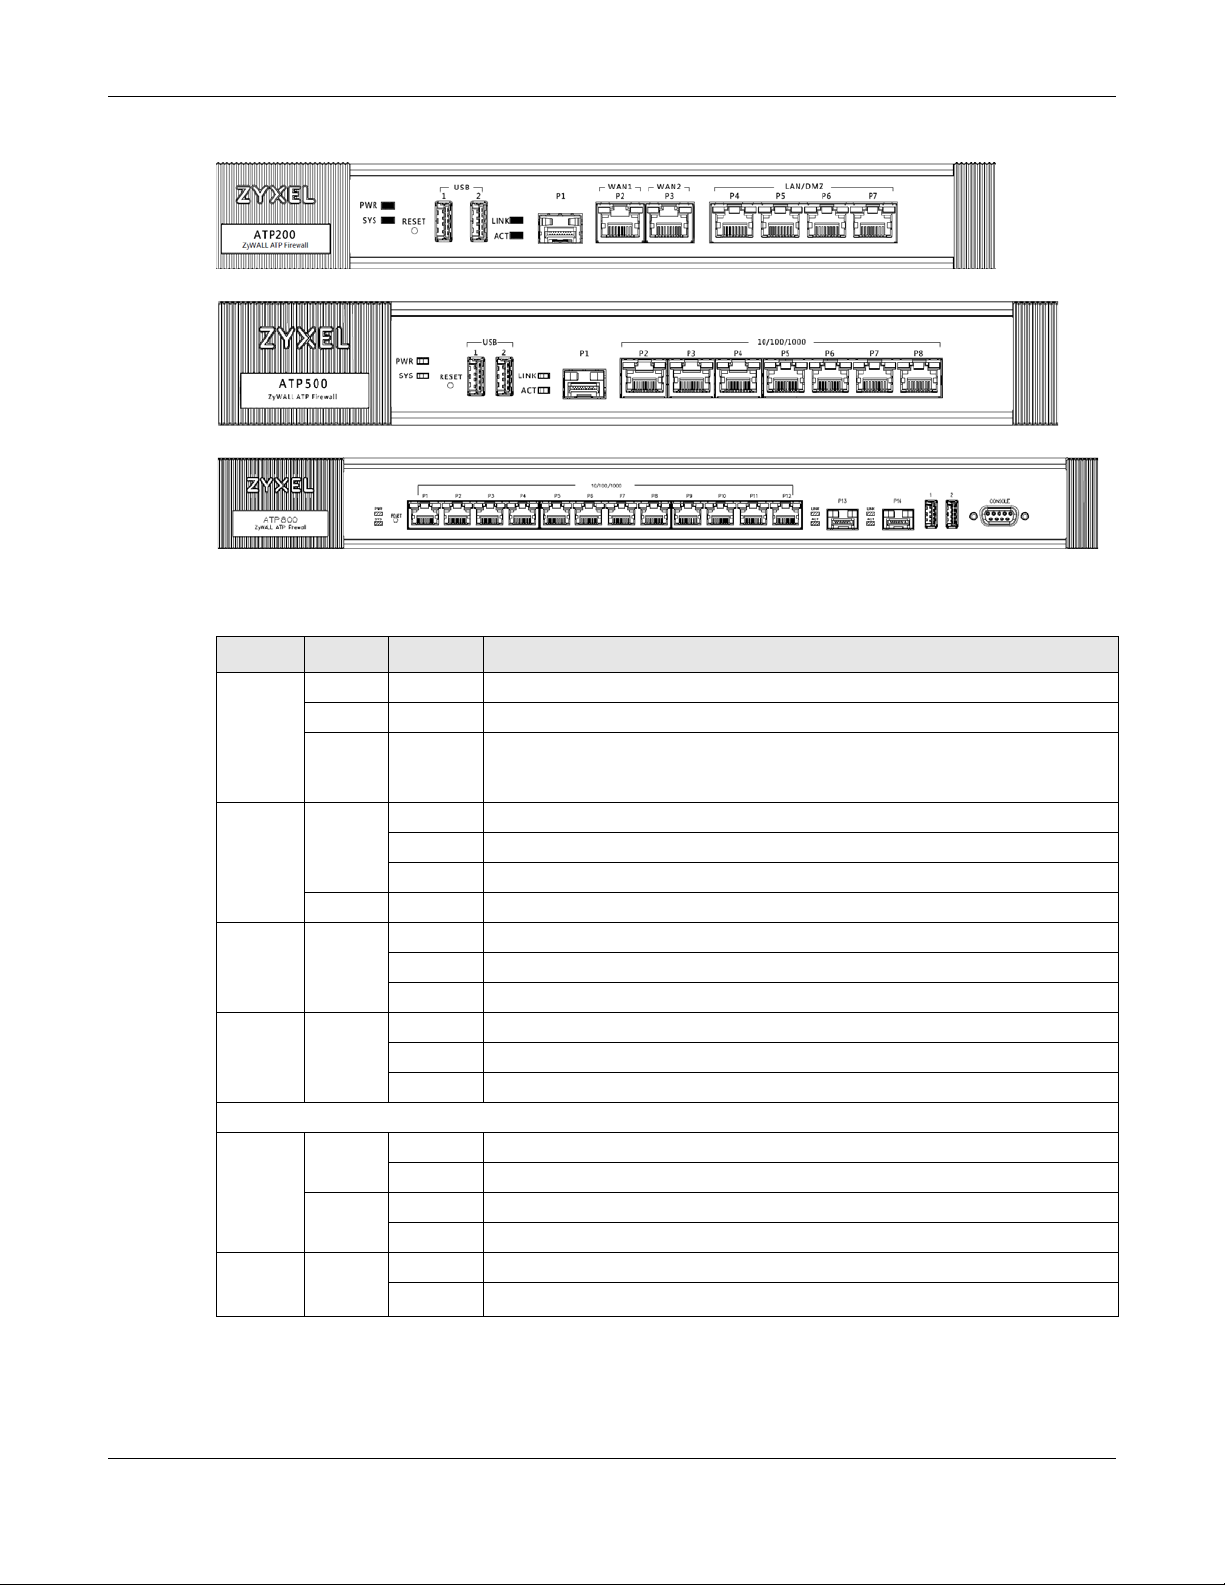
Chapter 3 Hardware, Interfaces and Zones
Figure 47 ATP200 Front Panel
Figure 48 ATP500 Front Panel
Figure 49 ATP700 / ATP800 Front Panel
The following table describes the front panel LEDs.
Table 11 LED Descriptions
LED COLOR STATUS DESCRIPTION
PWR Off The Zyxel Device is turned off.
Green On The Zyxel Device is turned on.
Red On There is a hardware component failure. Shut down the device, wait for a few
SYS Green Off The Zyxel Device is not ready or has failed.
On The Zyxel Device is ready and running.
Blinking The Zyxel Device is booting.
Red On The Zyxel Device has an error or has failed.
2.4G Green Off The 2.4G wireless interface is off.
On The 2.4G wireless interface is ready.
Blinking The 2.4G wireless connection is active.
5G Green Off The 5G wireless interface is off.
On The 5G wireless interface is ready.
Blinking The 5G wireless connection is active.
P1 (SFP)
LINK Yellow Off There is no connection on this port.
On This port has a successful 1000 Mbps link.
Green Off There is no connection on this port.
On This port has a successful 100 Mbps link.
ACT Green Off There is no traffic on this port.
Blinking The Zyxel Device is sending or receiving packets on this port at 100/1000 Mbps.
minutes and then restart the device. If the LED turns red again, then please
contact your vendor.
ZyWALL ATP Series User’s Guide
70
Page 71
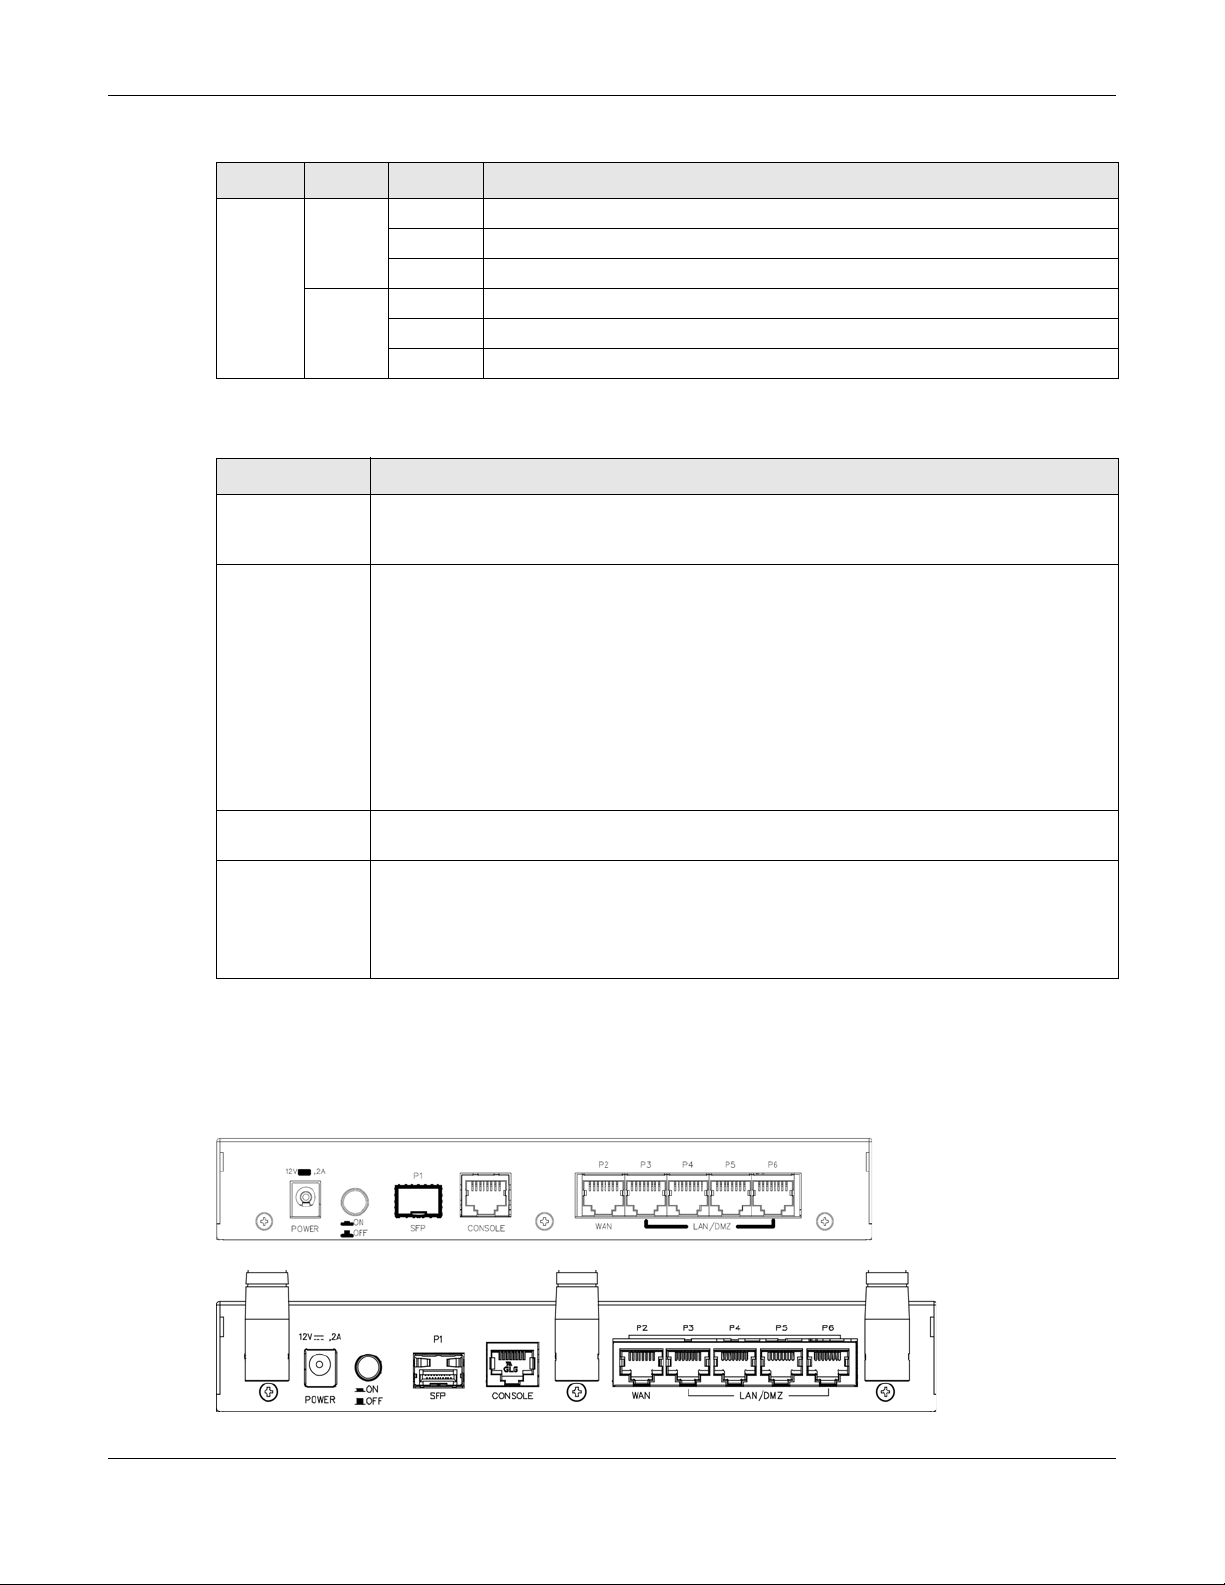
Chapter 3 Hardware, Interfaces and Zones
Table 11 LED Descriptions (continued)
LED COLOR STATUS DESCRIPTION
P2, P3...
(WAN/
LAN/
DMZ)
Yellow Off There is no connection on this port.
On This port has a successful 1000 Mbps link.
Blinking The Zyxel Device is sending or receiving packets on this port at 1000 Mbps.
Green Off There is no connection on this port.
On This port has a successful 10/100 Mbps link.
Blinking The Zyxel Device is sending or receiving packets on this port at 10/100 Mbps.
The following table describes the ports on the front panel.
Table 12 Front Panel Ports
LABEL DESCRIPTION
RESET Press the button in for about 5 seconds (or until the SYS LED starts to blink), then release it to
return the Zyxel Device to the factory defaults (password is 1234, LAN IP address 192.168.1.1
etc.)
CONSOLE You can use the console port to manage the Zyxel Device using CLI commands. You will be
prompted to enter your user name and password. See the Command Reference Guide for
more information about the CLI.
When configuring using the console port, you need a computer equipped with
communications software configured to the following parameters:
• Speed 115200 bps
• Data Bits 8
•Parity None
•Stop Bit 1
• Flow Control Off
USB Connect a storage device for system logs (see Maintenance > Diagnostics > System Log) and
P2-P7 (ATP200 )
storage (see Configuration > System > USB Storage).
These are 1G RJ-45 Ethernet ports.
P2-P8 (ATP500 )
P1-P12 (ATP700/
ATP800)
3.1.2 Rear Panels
The connection ports are located on the rear panel.
Figure 50 ATP100 Rear Panel
Figure 51 ATP100W Rear Panel
ZyWALL ATP Series User’s Guide
71
Page 72
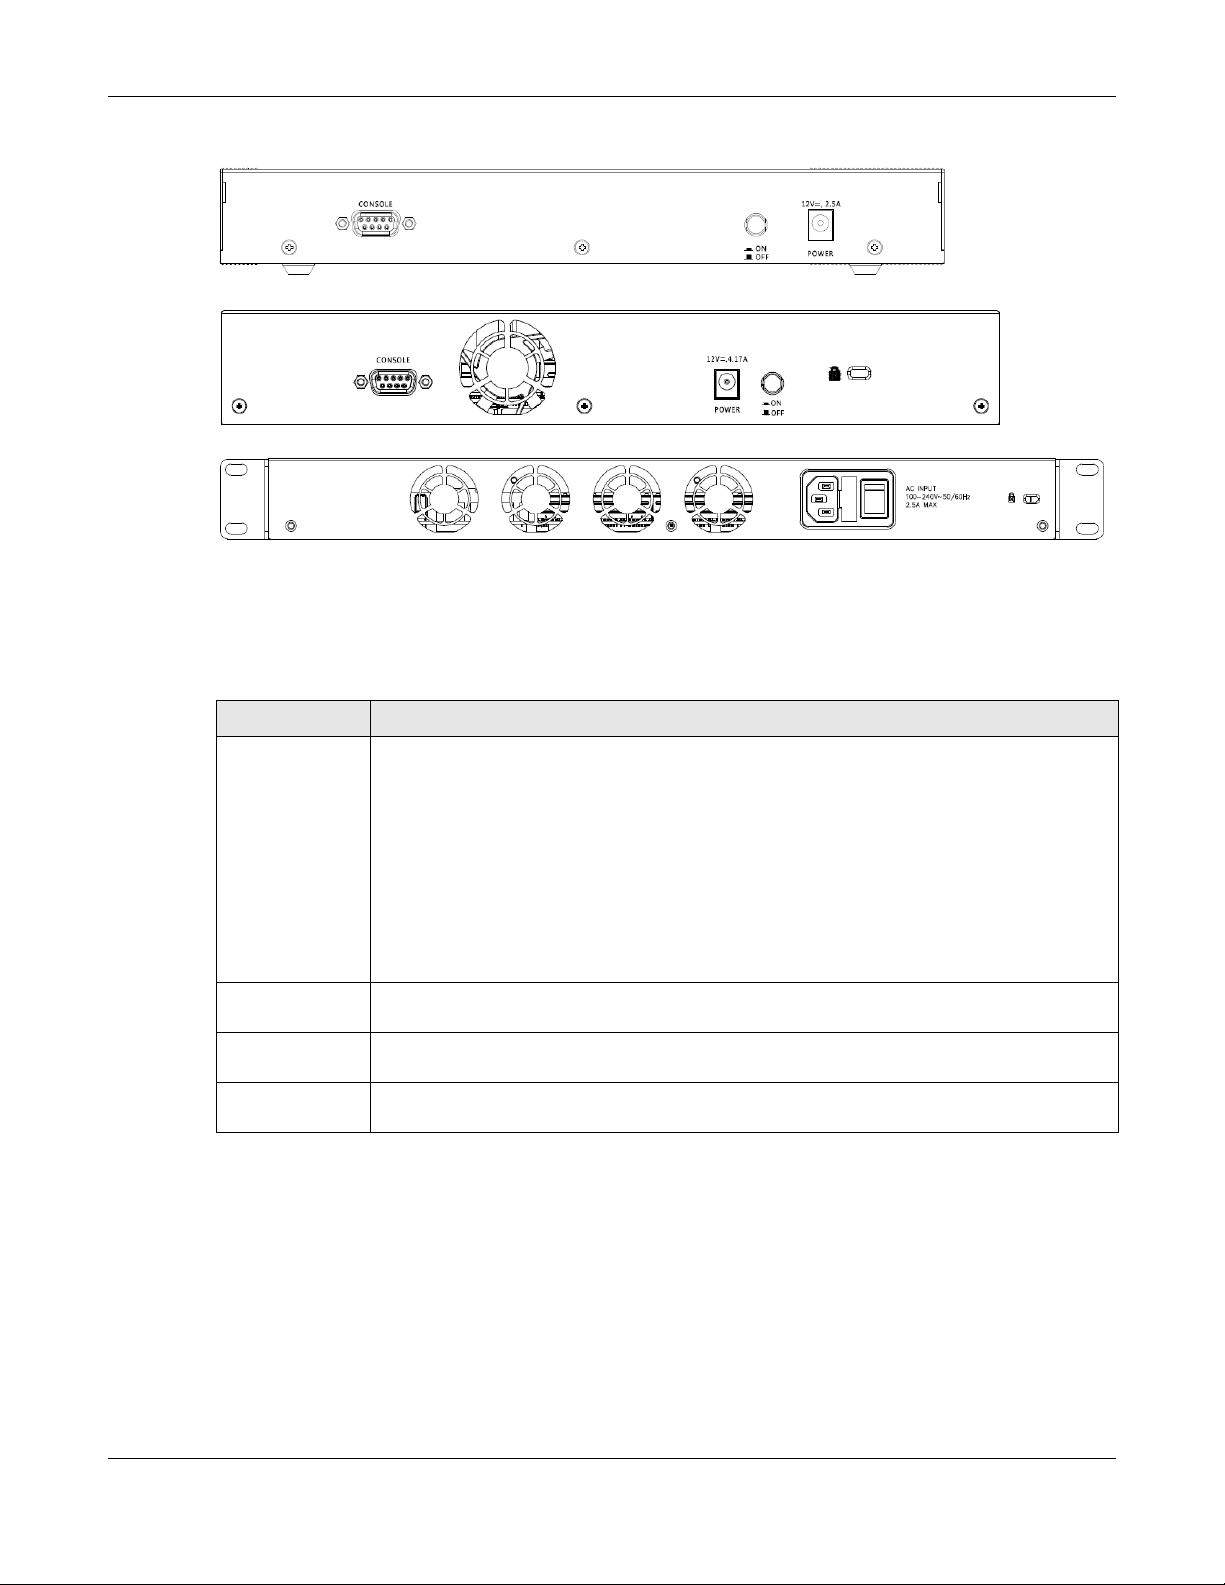
Chapter 3 Hardware, Interfaces and Zones
Figure 52 ATP200 Rear Panel
Figure 53 ATP500 Rear Panel
Figure 54 ATP700 / ATP800 Rear Panel
Note: Make sure you connect the Zyxel Device's power cord to a socket-outlet with an
earthing connection or its equivalent.
The following table describes the items on the rear panel.
Table 13 Rear Panel Items
LABEL DESCRIPTION
Console You can use the console port to manage the Zyxel Device using CLI commands. You will be
prompted to enter your user name and password. See the Command Reference Guide for
more information about the CLI.
When configuring using the console port, you need a computer equipped with
communications software configured to the following parameters:
• Speed 115200 bps
• Data Bits 8
•Parity None
•Stop Bit 1
• Flow Control Off
Power Use the included power cord to connect the power socket to a power outlet. Turn the power
switch on if your Zyxel Device has a power switch.
Lock Attach a lock-and-cable from the Kensington lock (the small, metal-reinforced, oval hole) to a
permanent object, such as a pole, to secure the Zyxel Device in place.
Fan The fans are for cooling the Zyxel Device. Make sure they are not obstructed to allow maximum
ventilation.
Note: Use an 8-wire Ethernet cable to run your Gigabit Ethernet connection at 1000 Mbps.
Using a 4-wire Ethernet cable limits your connection to 100 Mbps. Note that the
connection speed also depends on what the Ethernet device at the other end can
support.
3.2 Installation Scenarios
The Zyxel Device can be:
ZyWALL ATP Series User’s Guide
72
Page 73
Chapter 3 Hardware, Interfaces and Zones
• Placed on a desktop.
• Wall-mounted on a wall.
• Rack-mounted on a standard EIA rack.
The following table summarizes the installation scenarios of the Zyxel Device by model.
Table 14 ATP Series Installation Comparison Table
ATP MODELS
Rubber feet for desktop placement Yes Yes Yes No
Wall Mounting Yes Yes No No
Rack Mounting No Yes Yes Yes
ATP100 /
ATP100W
ATP200 ATP500
ATP700 /
ATP800
WARNING! Do NOT block the ventilation holes on the Zyxel Device.
Allow 100 mm clearance for the ventilation holes to prevent your Zyxel
Device from overheating. Do not store things on the Zyxel Device. Do
not place a Zyxel Device on another high temperature device.
Overheating could affect the performance of your Zyxel Device, or
even damage it.
3.2.1 Desktop Installation Procedure
1 Make sure the Zyxel Device is clean and dry.
2 Remove the adhesive backing from the rubber feet.
3 Attach the rubber feet to each corner on the bottom of the Zyxel Device. These rubber feet help
protect the Zyxel Device from shock or vibration, and allow air circulation.
ZyWALL ATP Series User’s Guide
73
Page 74
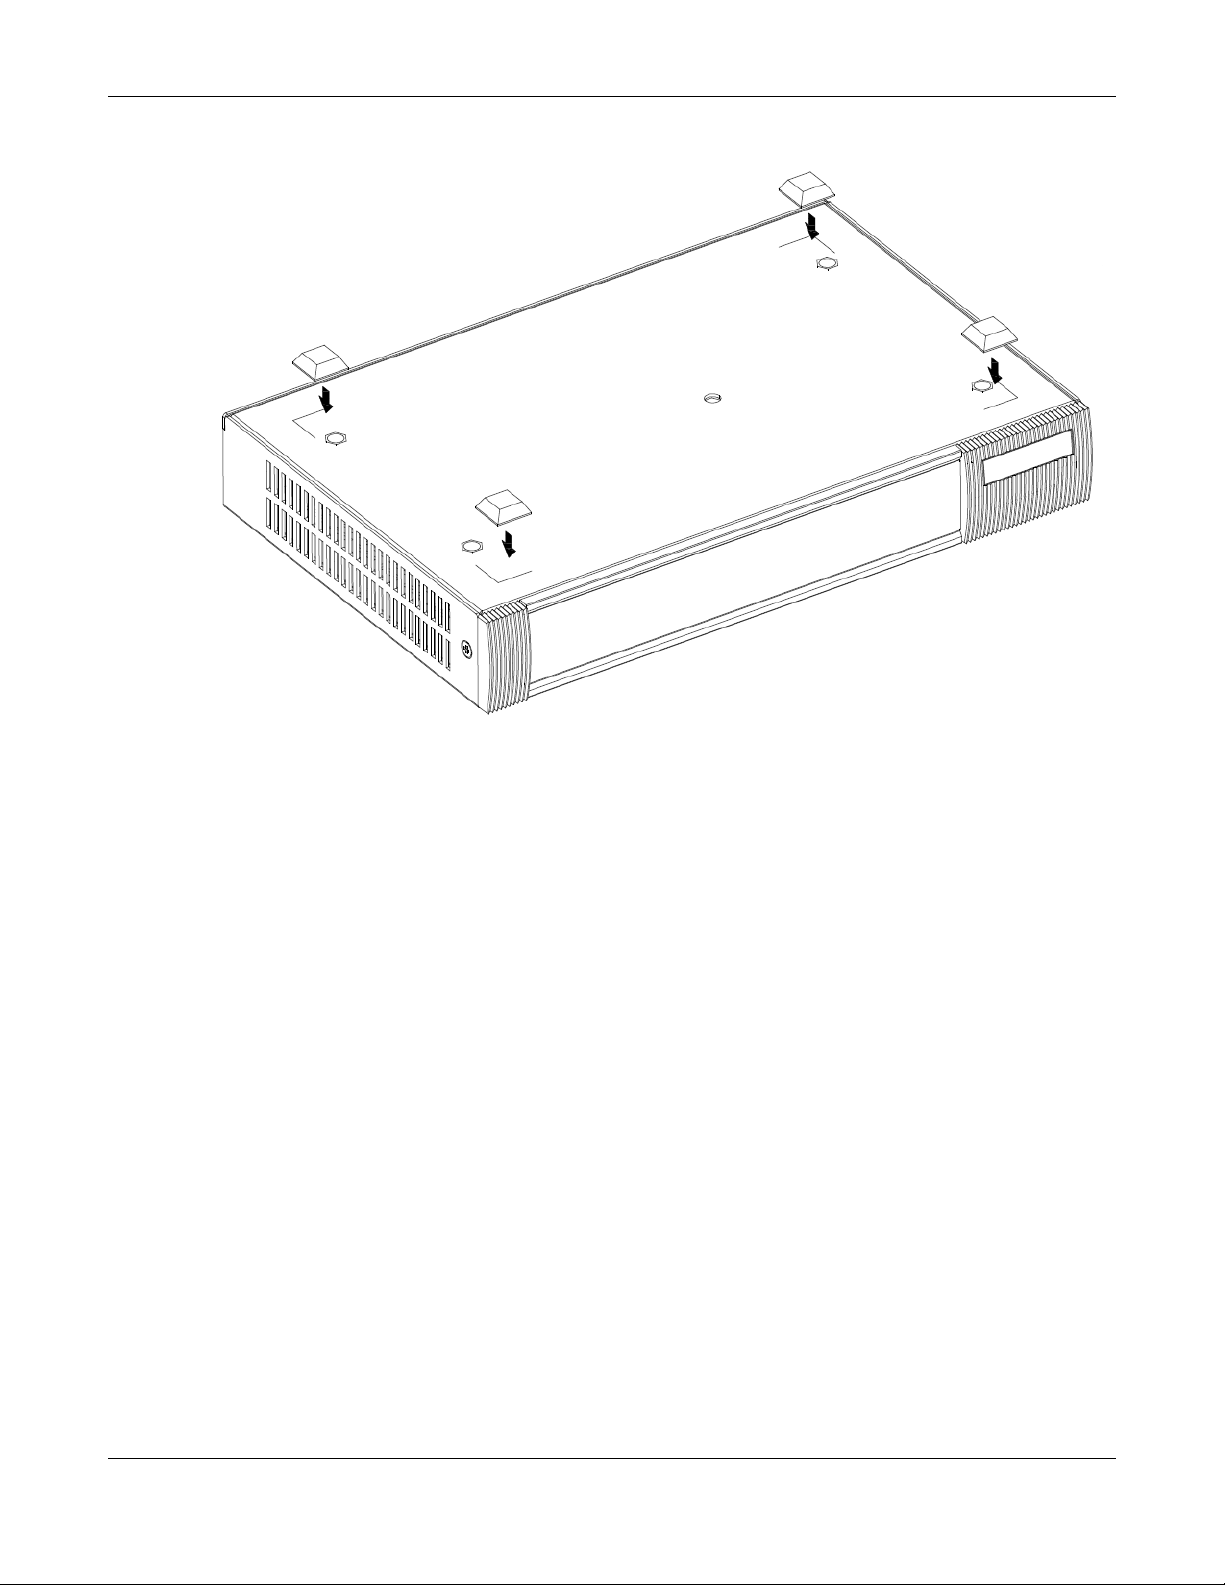
Chapter 3 Hardware, Interfaces and Zones
Figure 55 Attaching Rubber Feet
4 Set the Zyxel Device on a smooth, level surface strong enough to support the weight of the Zyxel Device
and the connected cables. Make sure there is a power outlet nearby.
Note: Make sure to use the rubber feet when stacking the Zyxel Devices on a desk.
3.2.2 Rack-mounting
Use the following steps to mount the Zyxel Device on an EIA standard size, 19-inch rack or in a wiring
closet with other equipment using a rack-mounting kit. Make sure the rack will safely support the
combined weight of all the equipment it contains and that the position of the ZyWALL does not make
the rack unstable or top-heavy. Take all necessary precautions to anchor the rack securely before
installing the unit.
Use a #2 Phillips screwdriver to install the screws.
Note: Failure to use the proper screws may damage the unit.
1 Align one bracket with the holes on one side of the Zyxel Device and secure it with the included bracket
screws (smaller than the rack-mounting screws).
2 Attach the other bracket in a similar fashion.
ZyWALL ATP Series User’s Guide
74
Page 75
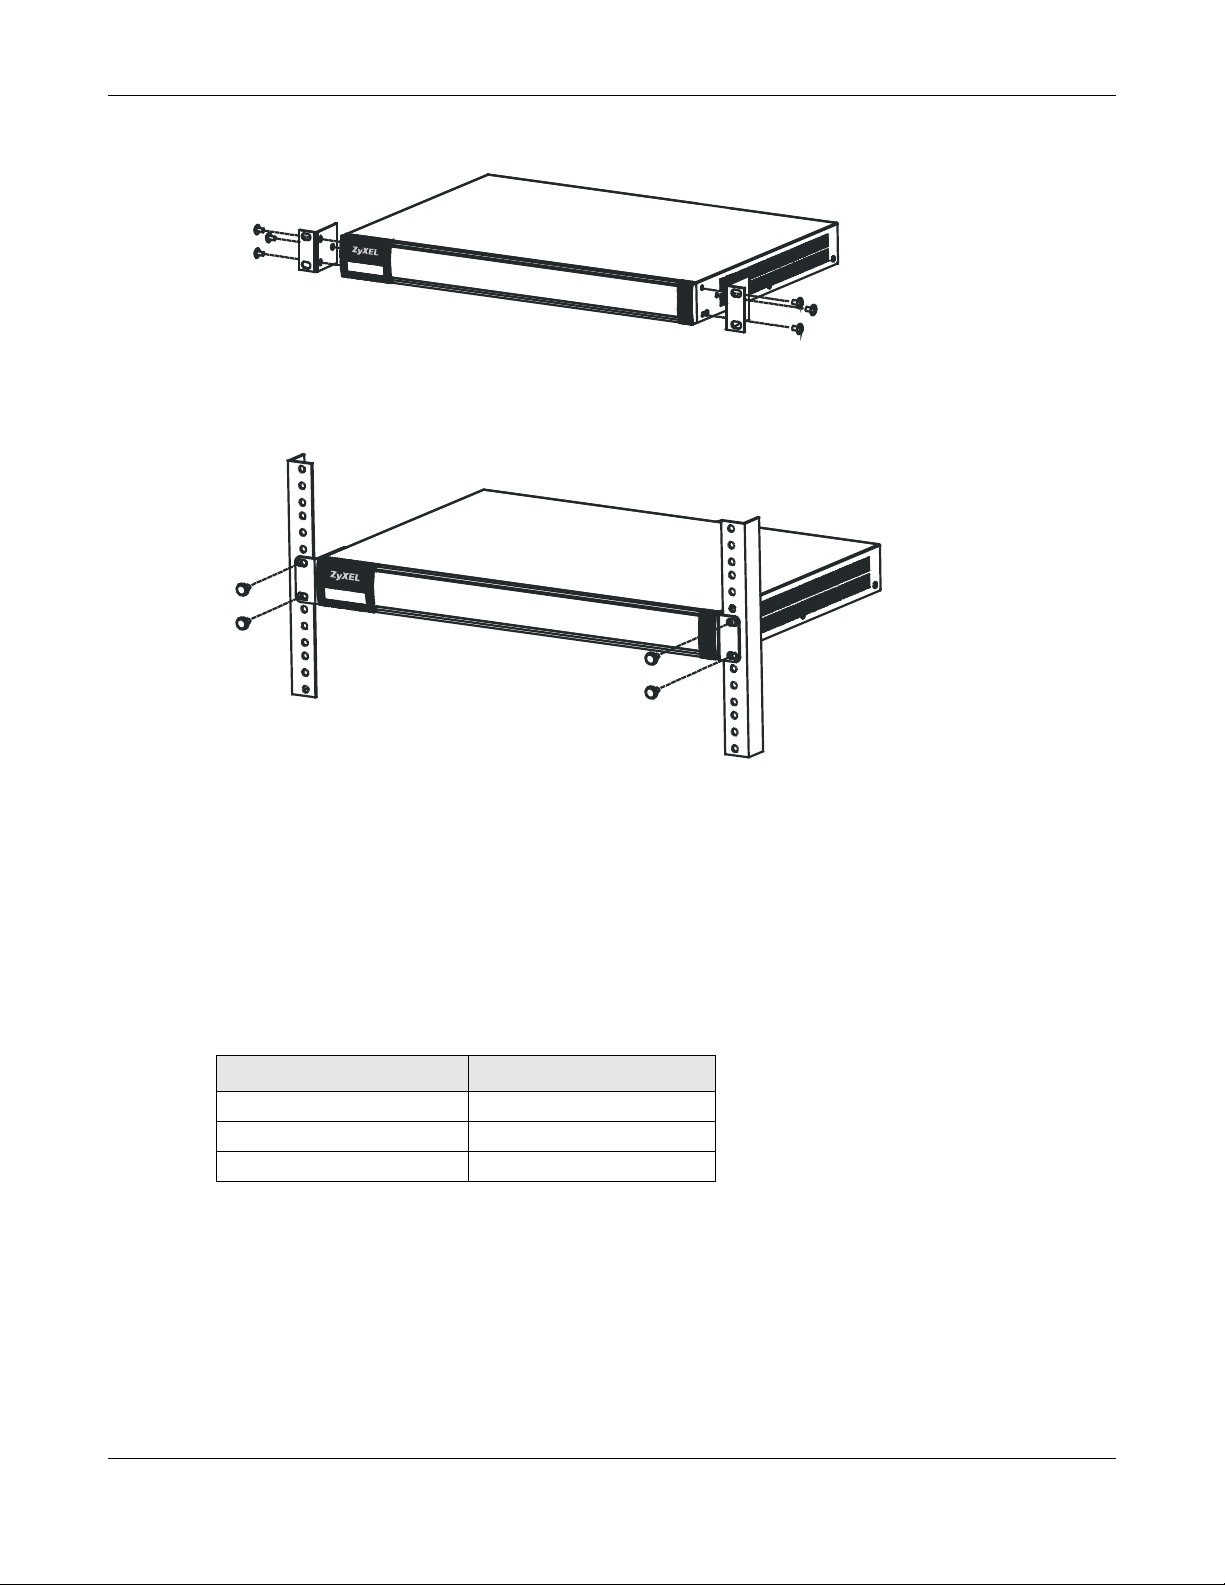
Chapter 3 Hardware, Interfaces and Zones
Figure 56 Attach Brackets
3 After attaching both mounting brackets, position the Zyxel Device in the rack and match up the bracket
holes with the rack holes. Secure the Zyxel Device to the rack with the rack-mounting screws.
Figure 57 Mount on Rack
Note: Make sure there is at least 100 mm of clearance at the sides and 100 mm in the rear to
allow air circulation and the attachment of cables and the power cord. When stacking
in a rack, make sure there is at least 40 mm of clearance between Zyxel Devices.
3.2.3 Wall-mounting
Do the following to attach your Zyxel Device to a wall.
The following table lists the distance “X” between mounting holes for each model:
Table 15 Distance “X” Between ATP Mounting Holes
MODEL NAME DISTANCE “X”
ATP100 174 mm (6.85”)
ATP100W 174 mm (6.85”)
ATP200 206 mm (8.11”)
1 Drill into a wall two holes 3 mm - 4 mm (0.12" - 0.16") wide, 20 mm - 30 mm (0.79” - 1.18”) deep and a
distance X (see the preceding table) apart. Place two screw anchors in the holes.
ZyWALL ATP Series User’s Guide
75
Page 76
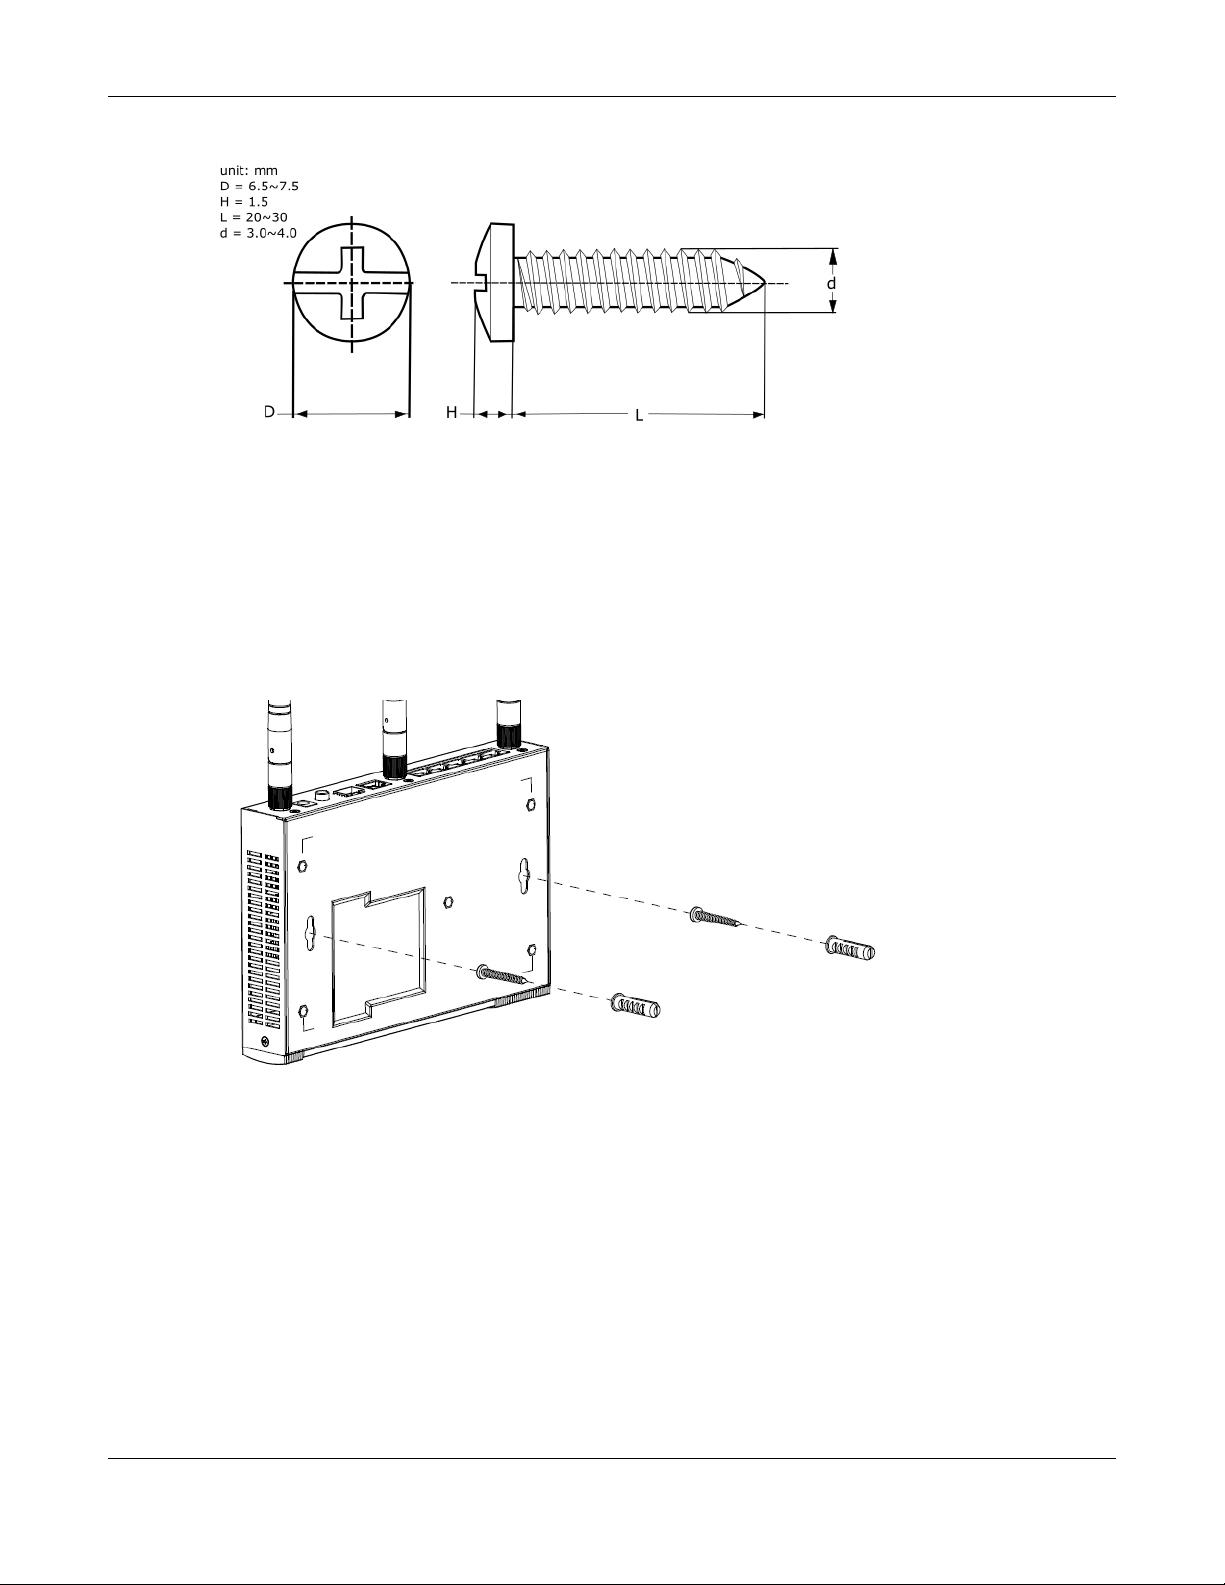
Chapter 3 Hardware, Interfaces and Zones
Figure 58 Wall Mounting Screw Specifications
2 Screw two screws with 6 mm - 8 mm (0.24" - 0.31") wide heads into the screw anchors. Do not screw the
screws all the way in to the wall; leave a small gap between the head of the screw and the wall.
The gap must be big enough for the screw heads to slide into the screw slots and the connection cables
to run down the back of the Zyxel Device.
Note: Make sure the screws are securely fixed to the wall and strong enough to hold the
weight of the Zyxel Device with the connection cables.
3 Use the holes on the bottom of the Zyxel Device to hang the Zyxel Device on the screws.
Figure 59 Wall Mounting
Note: Wall-mount the Zyxel Device horizontally. The Zyxel Device's side panels with ventilation
slots should not be facing up or down as this position is less safe.
Make sure there is 100 mm of clearance at the sides and 1 - 1.5 mm distance between
the screw head and the wall to allow air circulation and the attachment of cables and
the power cord.
ZyWALL ATP Series User’s Guide
76
Page 77
Chapter 3 Hardware, Interfaces and Zones
3.3 Default Zones, Interfaces, and Ports
The default configurations for zones, interfaces, and ports are as follows. References to interfaces may
be generic rather than the specific name used in your model. For example, this guide may use “the
WAN interface” rather than “wan1” or “wan2”, “ge2” or” ge3”.
An OPT (optional) Ethernet port can be configured as an additional WAN port, LAN, WLAN, or DMZ port.
The following table shows the default physical port and interface mapping for each model at the time
of writing.
Table 16 Default Physical Port - Interface Mapping
PORT / INTERFACE P1 P2 P3 P4 P5 P6 P7 P8
• ATP100/ATP100W sfp wan lan1 lan1 lan1 opt
• ATP200 sfp wan wan lan1 lan1 lan1 lan1
• ATP500 ge1 ge2 ge3 ge4 ge5 ge6 ge7 ge8
Table 17 Default Physical Port - Interface Mapping - ATP700 / ATP800
PORT /
INTERFACE
ATP700 / ATP800 ge1 ge2 ge3 ge4 ge5 ge6 ge7 ge8 ge9 ge10 ge11 ge12 ge13 ge14
P1 P2 P3 P4 P5 P6 P7 P8 P9 P10 P11 P12 P13 P14
The following table shows the default interface and zone mapping for each model at the time of
writing.
Table 18 Default Zone - Interface Mapping
ZONE / INTERFACE SFP WAN LAN1 LAN2 DMZ OPT
• ATP100/ATP100W
sfp_ppp WAN1_PPP LAN1 LAN2 DMZ opt_ppp
Table 19 Default Zone - Interface Mapping
NO
ZONE / INTERFACE WAN LAN1 LAN2 DMZ OPT
DEFAULT
ZONE
• ATP200
WAN1
WAN1_PPP
WAN2
WAN2_PPP
LAN1 LAN2 DMZ SFP
SFP_PPP
GE7
GE7_PPP
GE8
GE8_PPP
Table 20 Default Zone - Interface Mapping
ZONE / INTERFACE WAN LAN DMZ OPT NO DEFAULT ZONE
• ATP500
• ATP700
• ATP800
GE2
GE2_PPP
GE3
GE3_PPP
GE1
GE1_PPP
GE2
GE2_PPP
GE4
GE5
GE3
GE4
GE6 GE1
GE1_PPP
GE5 GE13
GE13_PPP
GE14
GE14_PPP
GE7
GE7_PPP
GE8
GE8_PPP
GE6~GE12
GE6_PPP~GE12_PPP
ZyWALL ATP Series User’s Guide
77
Page 78

Chapter 3 Hardware, Interfaces and Zones
3.4 Stopping the Zyxel Device
Always use Maintenance > Shutdown > Shutdown or the shutdown command before you turn off the
Zyxel Device or remove the power. Not doing so can cause the firmware to become corrupt.
ZyWALL ATP Series User’s Guide
78
Page 79
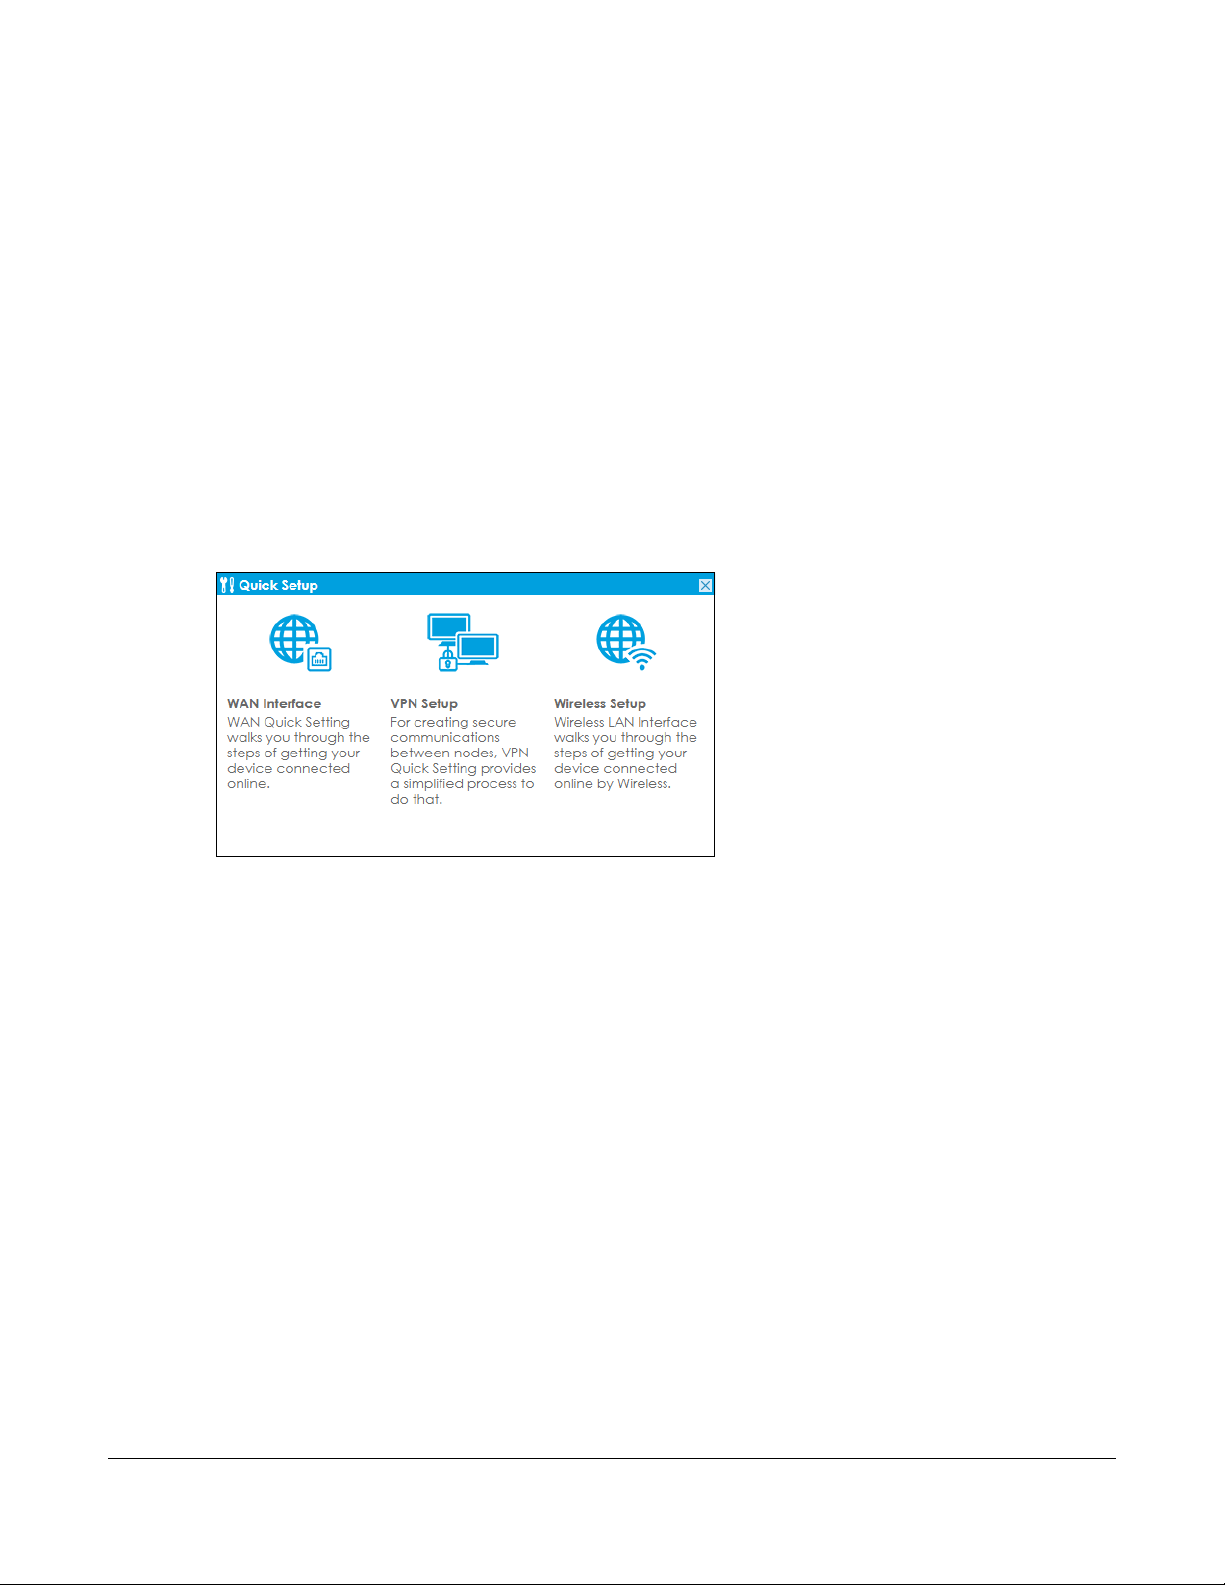
Quick Setup Wizards
4.1 Quick Setup Overview
The Web Configurator's quick setup wizards help you configure Internet and VPN connection settings.
This chapter provides information on configuring the quick setup screens in the Web Configurator. See
the feature-specific chapters in this User’s Guide for background information.
In the Web Configurator, click Quick Setup to open the first Quick Setup screen.
Figure 60 ATP Quick Setup
CHAPTER 4
• WAN Interface
Click this link to open a wizard to set up a WAN (Internet) connection. This wizard creates matching ISP
account settings in the Zyxel Device if you use PPPoE or PPTP. See Section 4.2 on page 80.
• VPN Setup
Use VPN Setup to configure a VPN (Virtual Private Network) rule for a secure connection to another
computer or network. Use VPN Settings for Configuration Provisioning to set up a VPN rule that can be
retrieved with the Zyxel Device IPSec VPN Client. You only need to enter a user name, password and
the IP address of the Zyxel Device in the IPSec VPN Client to get all VPN settings automatically from
the Zyxel Device. See Section 4.3 on page 86. Use VPN Settings for L2TP VPN Settings to configure the
L2TP VPN for clients.
• Wireless Se tup
Use this wizard to configure the Zyxel Device as an AP Controller that can manage APs in the same
network as the Zyxel Device or the built-in AP if your Zyxel Device has this feature.
ZyWALL ATP Series User’s Guide
79
Page 80
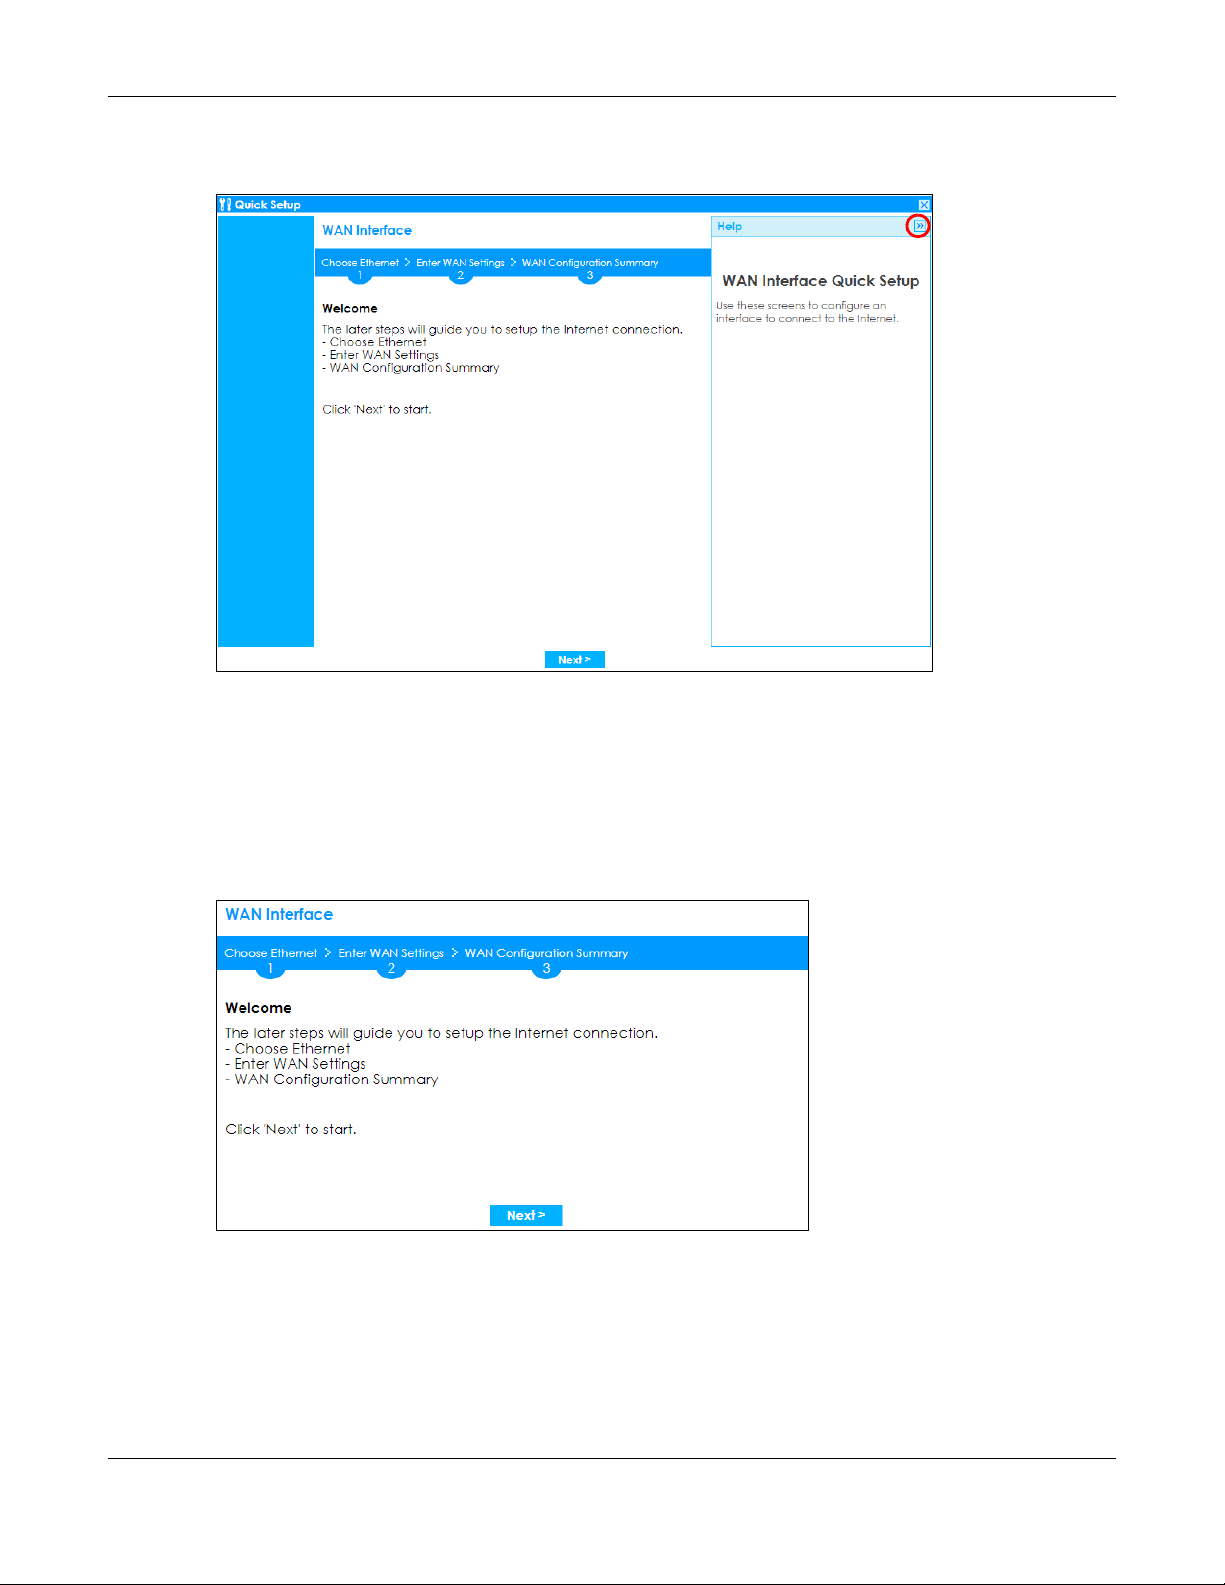
Chapter 4 Quick Setup Wizards
• Wizard Help
If the help does not automatically display when you run the wizard, click the arrow to display it.
4.2 WAN Interface Quick Setup
Click WAN Interface in the main Quick Setup screen to open the WAN Interface Quick Setup Wizard
Welcome screen. Use these screens to configure an interface to connect to the Internet. Click Next.
Figure 61 WAN Interface Quick Setup Wizard
4.2.1 Choose an Ethernet Interface
Select a WAN interface (names vary by model) that you want to configure for a WAN connection and
click Next.
ZyWALL ATP Series User’s Guide
80
Page 81
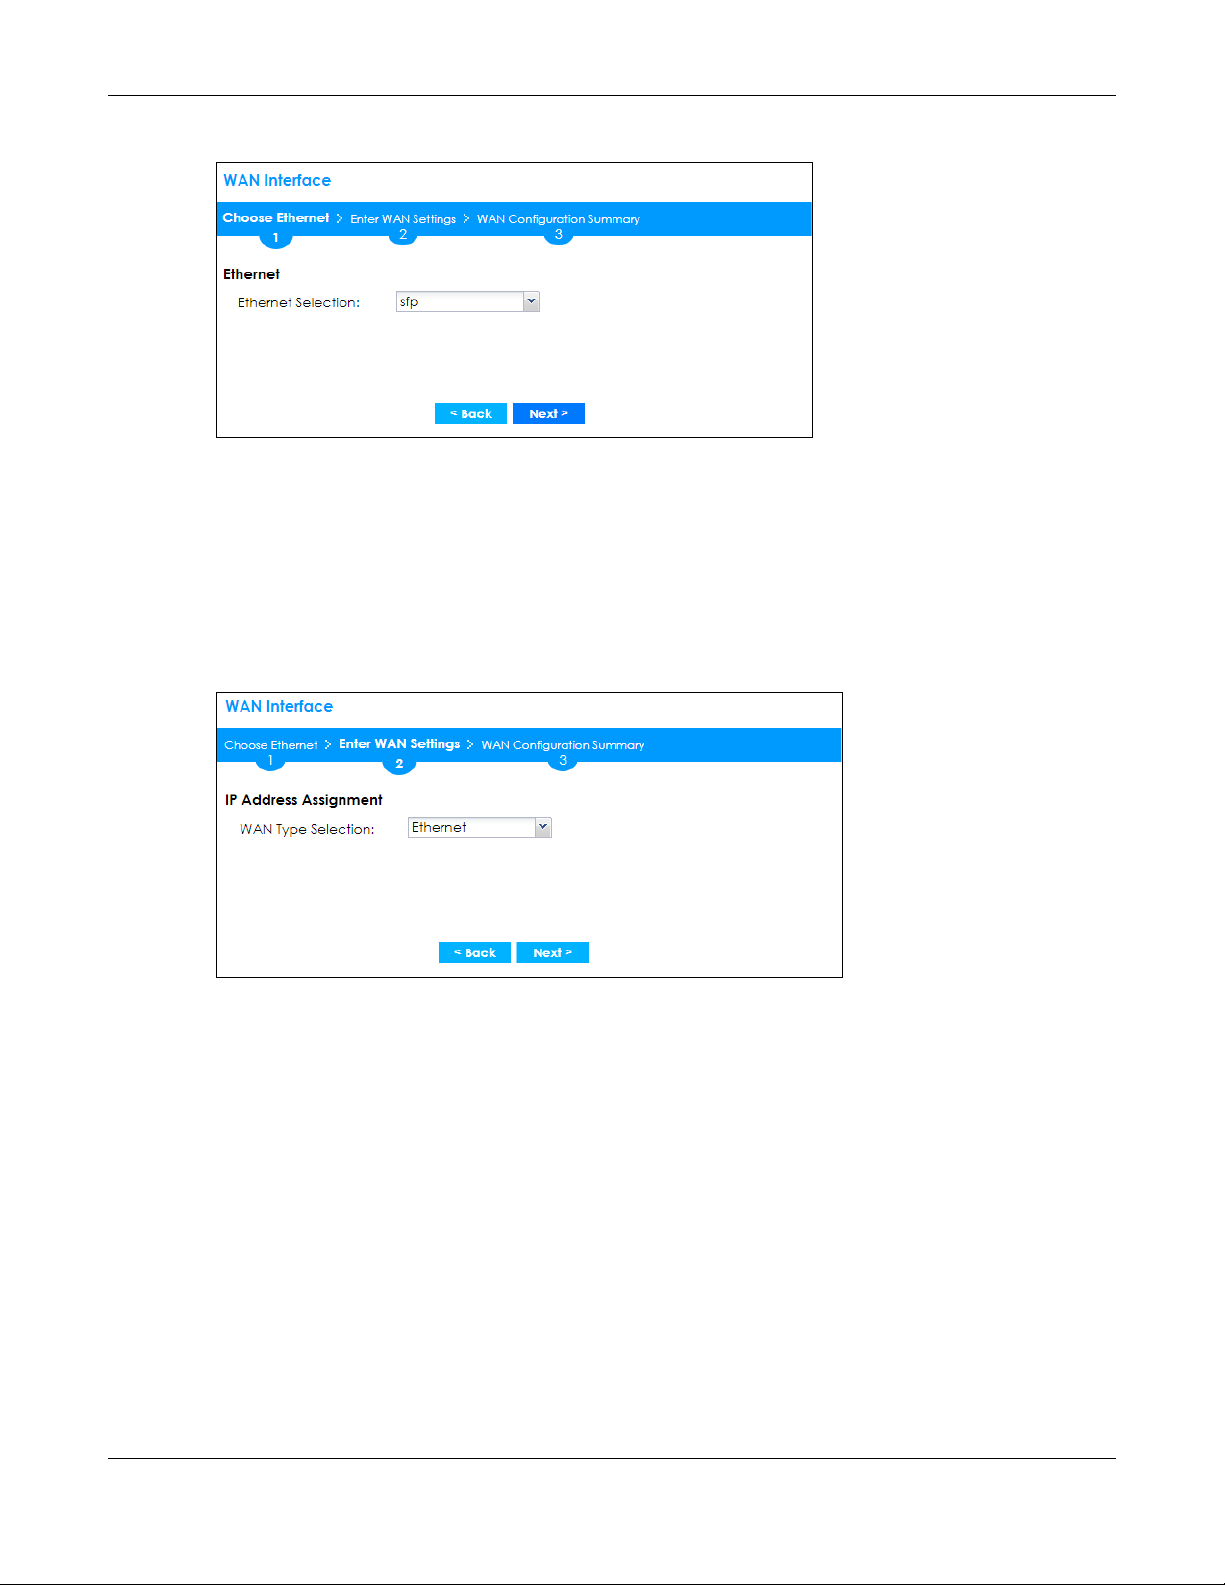
Figure 62 Choose an Ethernet Interface
4.2.2 Select WAN Type
WAN Type Selection: Select the type of encapsulation this connection is to use. Choose Ethernet when
the WAN port is used as a regular Ethernet.
Otherwise, choose PPPoE, PPTP or L2TP for a dial-up connection according to the information from your
ISP.
Chapter 4 Quick Setup Wizards
Figure 63 WAN Interface Setup: Step 2
The screens vary depending on what encapsulation type you use. Refer to information provided by your
ISP to know what to enter in each field. Leave a field blank if you don’t have that information.
Note: Enter the Internet access information exactly as your ISP gave it to you.
4.2.3 Configure WAN IP Settings
Use this screen to select whether the interface should use a fixed or dynamic IP address.
ZyWALL ATP Series User’s Guide
81
Page 82
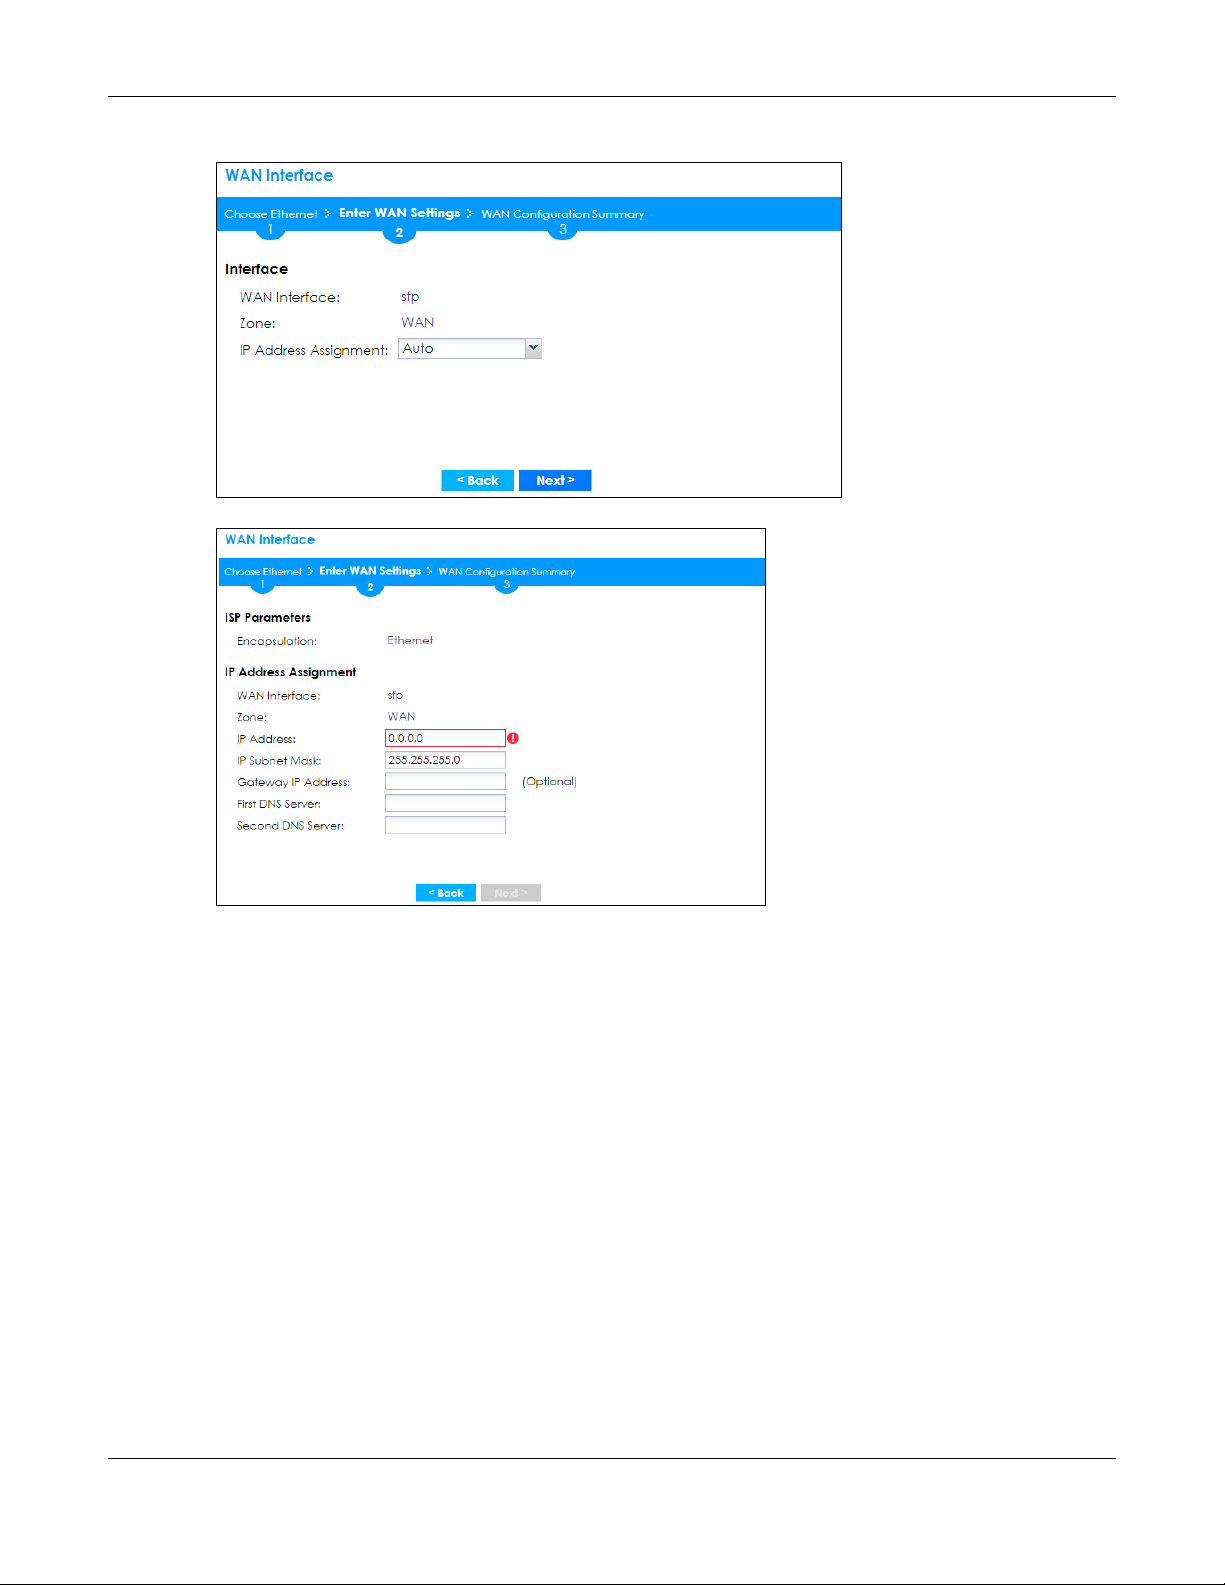
Chapter 4 Quick Setup Wizards
Figure 64 WAN Interface Setup: Step 2 Ethernet Dynamic IP
Figure 65 WAN Interface Setup: Step 2 Ethernet Static IP
• WAN Interface: This is the interface you are configuring for Internet access.
• Zone: This is the security zone to which this interface and Internet connection belong.
• IP Address Assignment: Select Auto If your ISP did not assign you a fixed IP address.
Select Static if you have a fixed IP address and enter the IP address, subnet mask, gateway IP address
(optional) and DNS server IP address(es).
4.2.4 ISP and WAN and ISP Connection Settings
Use this screen to configure the ISP and WAN interface settings. This screen is read-only if you select
Ethernet and set the IP Address Assignment to Auto. If you set the IP Address Assignment to Static and/or
select PPTP or PPPoE, enter the Internet access information exactly as your ISP gave it to you.
Note: Enter the Internet access information exactly as your ISP gave it to you.
ZyWALL ATP Series User’s Guide
82
Page 83
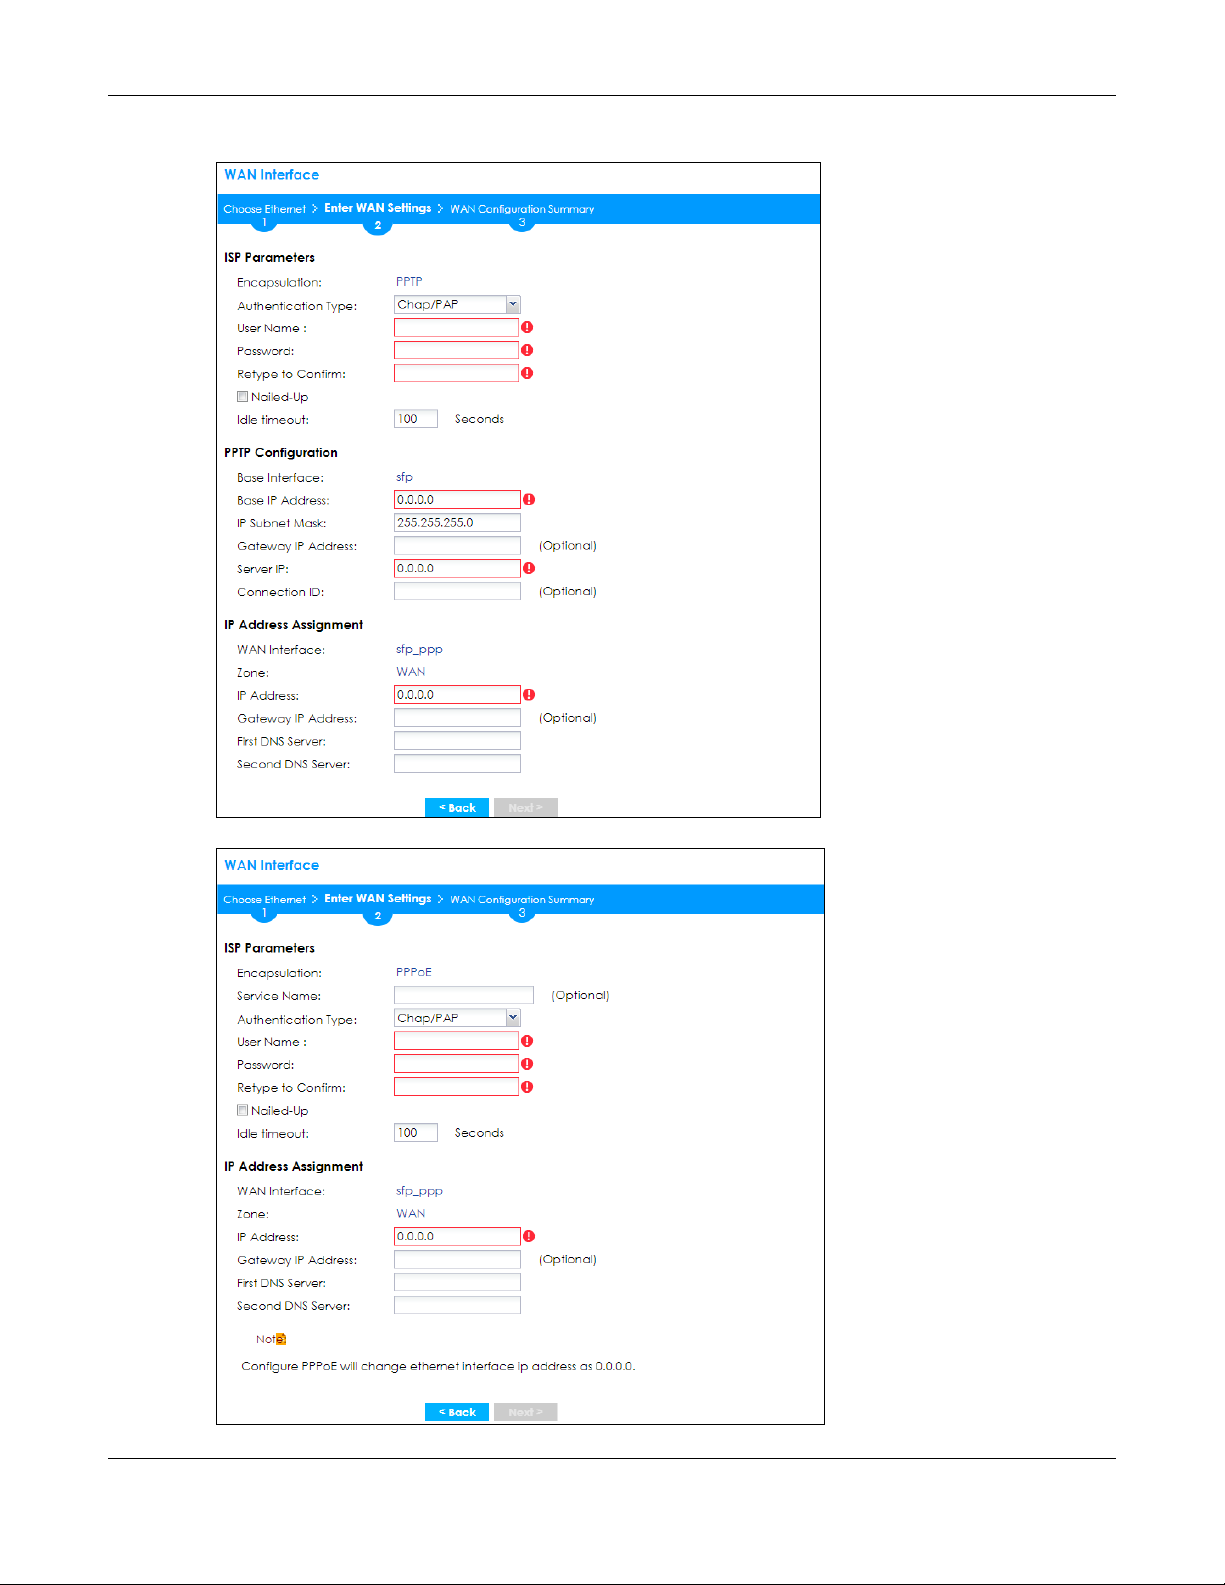
Chapter 4 Quick Setup Wizards
Figure 66 WAN and ISP Connection Settings: (PPTP)
Figure 67 WAN and ISP Connection Settings: (PPPoE)
ZyWALL ATP Series User’s Guide
83
Page 84
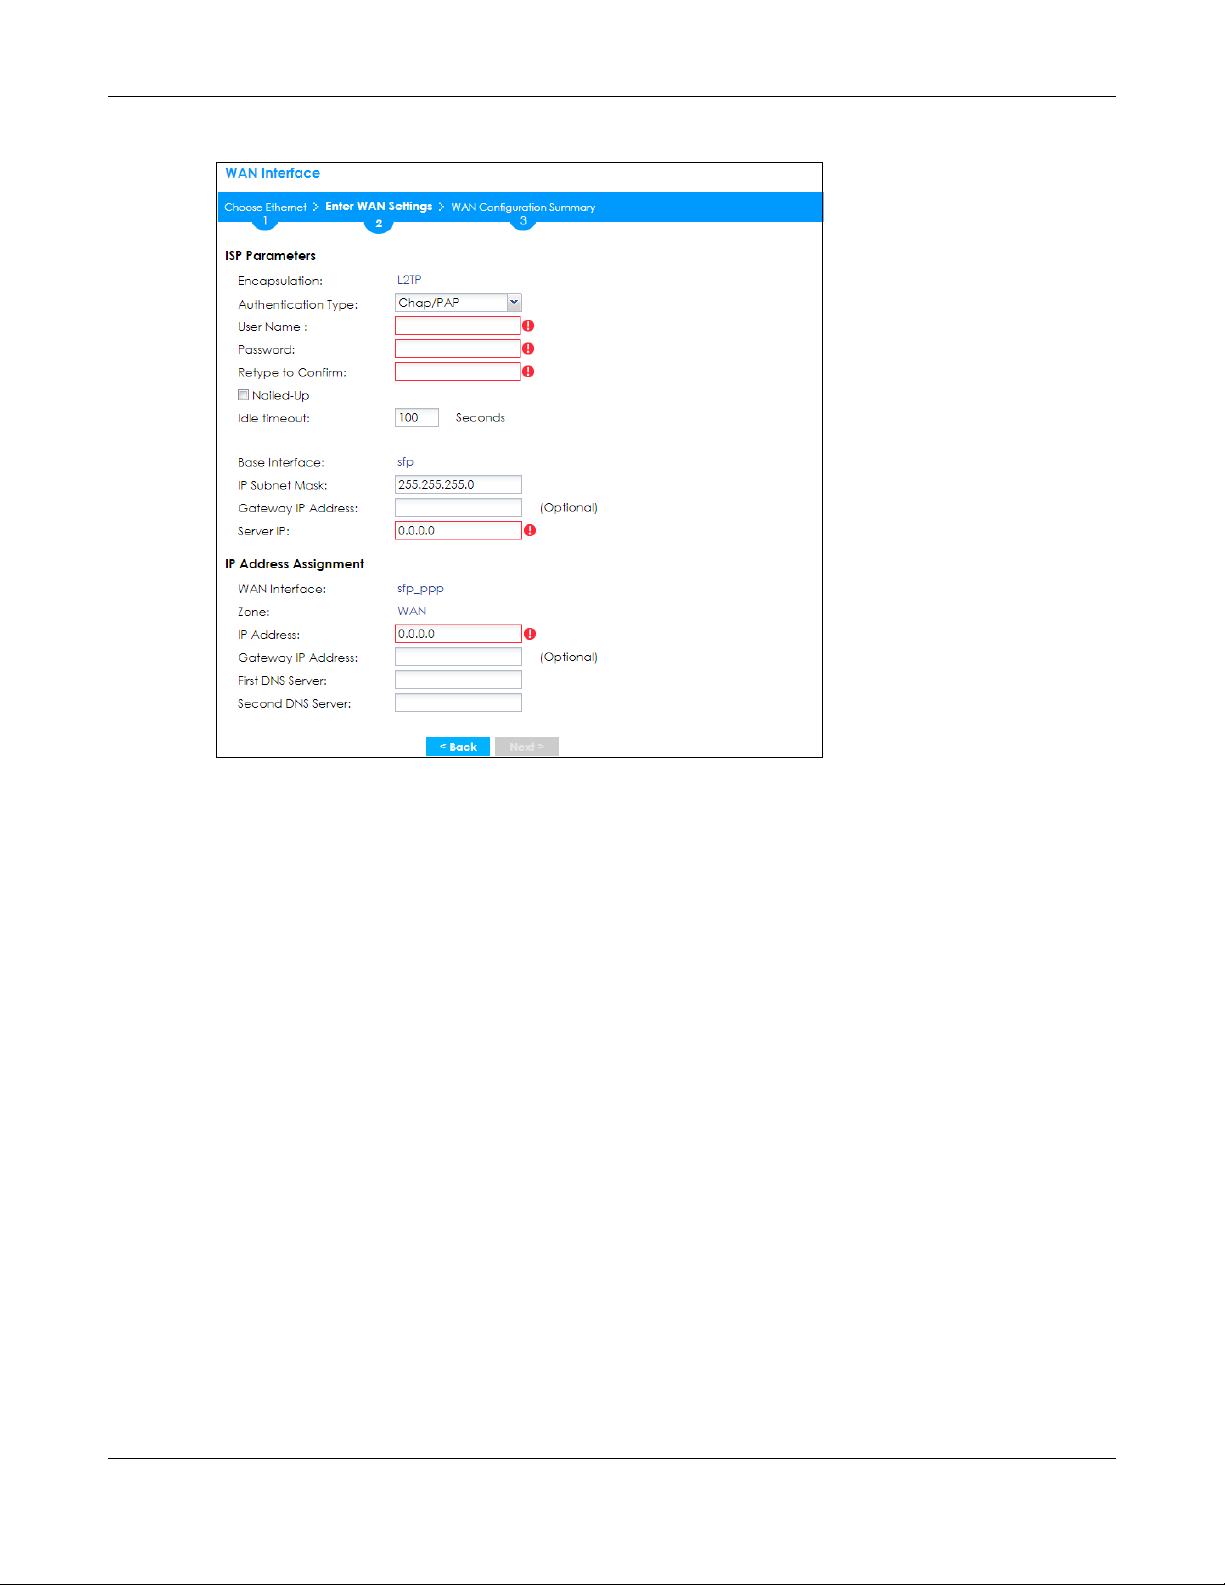
Chapter 4 Quick Setup Wizards
Figure 68 WAN and ISP Connection Settings: (L2TP)
ISP Parameter: This section appears if the interface uses a PPPoE or PPTP Internet connection.
• Encapsulation: This displays the type of Internet connection you are configuring.
• Service Name: Type the PPPoE service name if you were given one by your ISP.
• Authentication Type: Use the drop-down list box to select an authentication protocol for outgoing
calls. Options are:
• CHAP/PAP - Your Zyxel Device accepts either CHAP or PAP when requested by this remote node.
• CHAP - Your Zyxel Device accepts CHAP only.
• PAP - Your Zyxel Device accepts PAP only.
• MSCHAP - Your Zyxel Device accepts MSCHAP only.
• MSCHAP-V2 - Your Zyxel Device accepts MSCHAP-V2 only.
• User Name: Type the user name given to you by your ISP. You can use alphanumeric and -_
characters, and it can be up to 31 characters long.
• Password: Type the password associated with the user name above. Use up to 64 ASCII characters
except the [] and ?. This field can be blank.
• Retype to Confirm: Type your password again for confirmation.
• Nailed-Up: Select Nailed-Up if you do not want the connection to time out.
• Idle Timeout: Type the time in seconds that elapses before the router automatically disconnects from
the PPPoE server. 0 means no timeout.
• PPTP Configuration: This section only appears if the interface uses a PPTP Internet connection.
• Base Interface: This displays the identity of the Ethernet interface you configure to connect with a
modem or router.
• Base IP Address: Type the (static) IP address assigned to you by your ISP.
@$./
ZyWALL ATP Series User’s Guide
84
Page 85
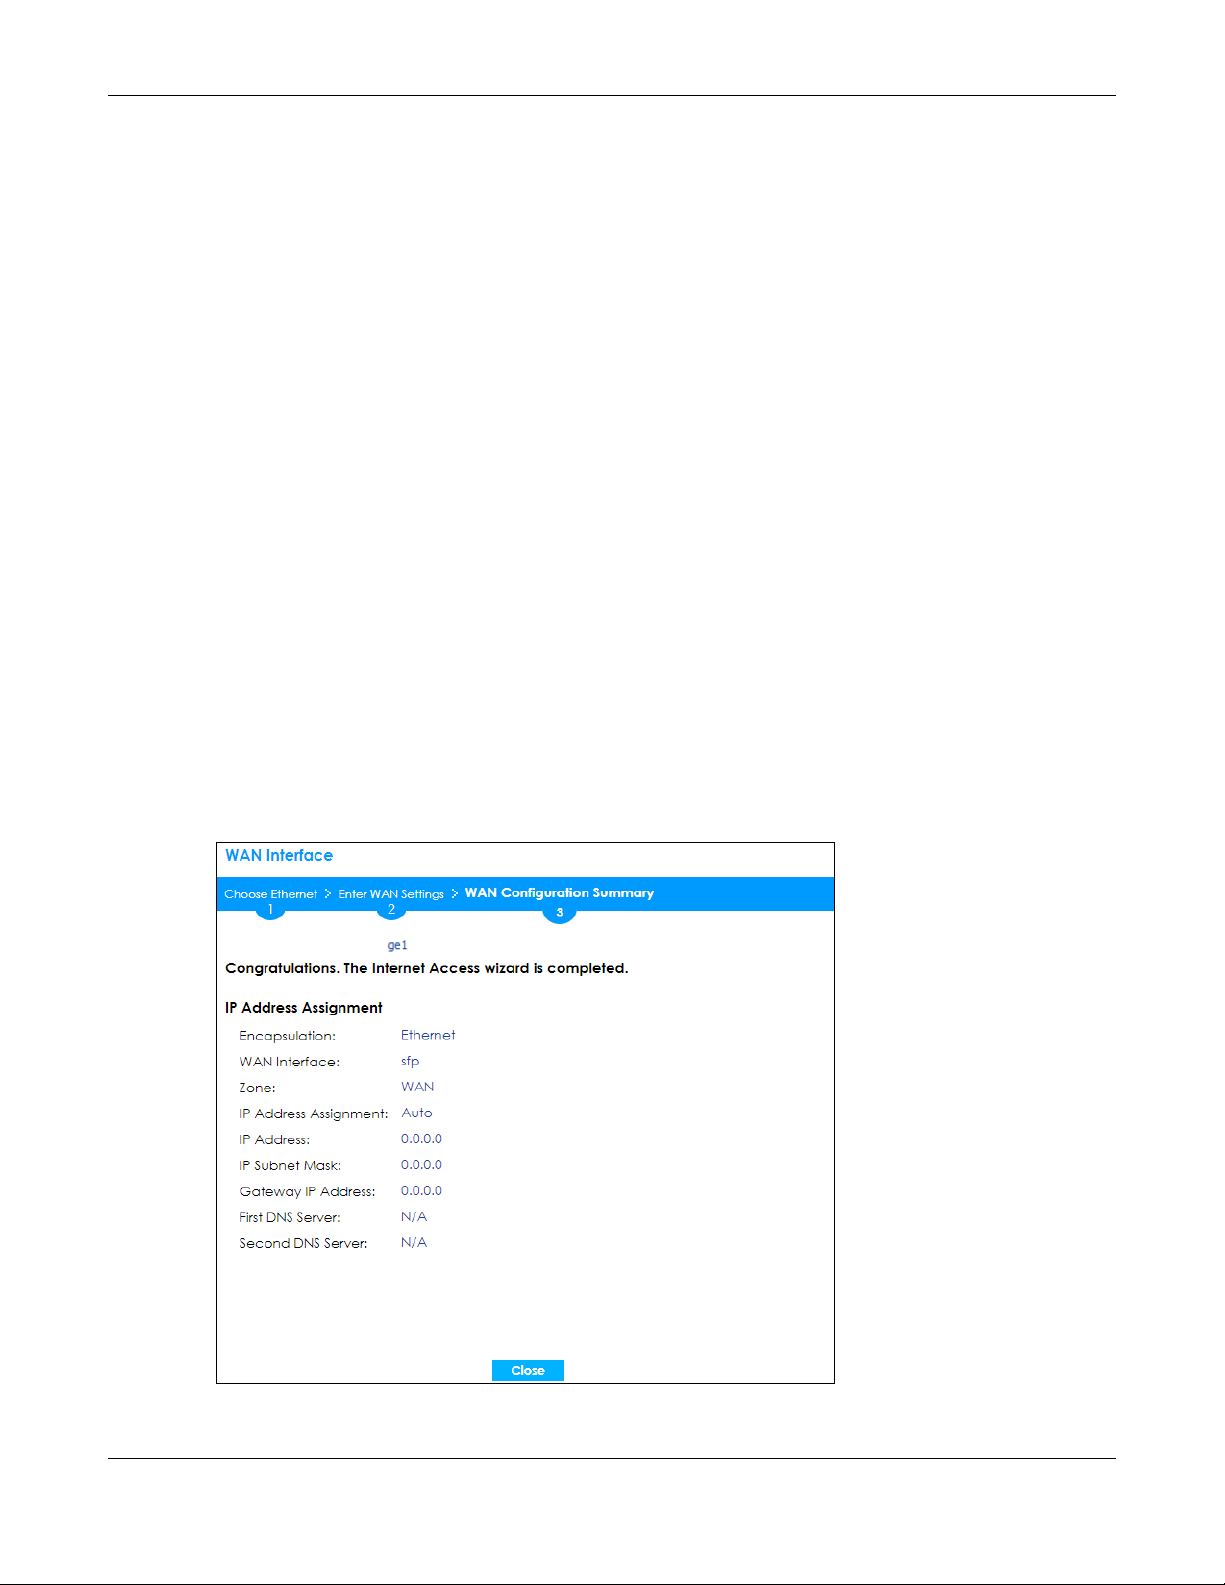
Chapter 4 Quick Setup Wizards
• IP Subnet Mask: Type the subnet mask assigned to you by your ISP (if given).
• Gateway IP Address: For PPTP or L2TP, type the gateway IP address if you were given one by your ISP.
• Server IP: Type the IP address of the PPTP server.
• Connection ID: Enter the connection ID or connection name in this field. It must follow the "c:id" and
"n:name" format. For example, C:12 or N:My ISP. This field is optional and depends on the
requirements of your DSL modem. You can use alphanumeric and -_
31 characters long.
IP Address Assignment
• WAN Interface: This displays the identity of the interface you configure to connect with your ISP.
• Zone: This field displays to which security zone this interface and Internet connection will belong.
• IP Address: This field is read-only when the WAN interface uses a dynamic IP address. If your WAN
interface uses a static IP address, enter it in this field.
• IP Subnet Mask: If your WAN interface uses Ethernet encapsulation with a static IP address, enter the
subnet mask in this field.
• Gateway IP Address: Type the IP address of the Ethernet device connected to this WAN port.
• First DNS Server / Second DNS Server: These fields only display for an interface with a static IP address.
Enter the DNS server IP address(es) in the field(s) to the right. Leave the field as 0.0.0.0 if you do not
want to configure DNS servers. If you do not configure a DNS server, you must know the IP address of
a machine in order to access it.
: characters, and it can be up to
4.2.5 Quick Setup Interface Wizard: Summary
This screen displays an example WAN interface’s settings.
Figure 69 Interface Wizard: Summary WAN
• Encapsulation: This displays what encapsulation this interface uses to connect to the Internet.
ZyWALL ATP Series User’s Guide
85
Page 86
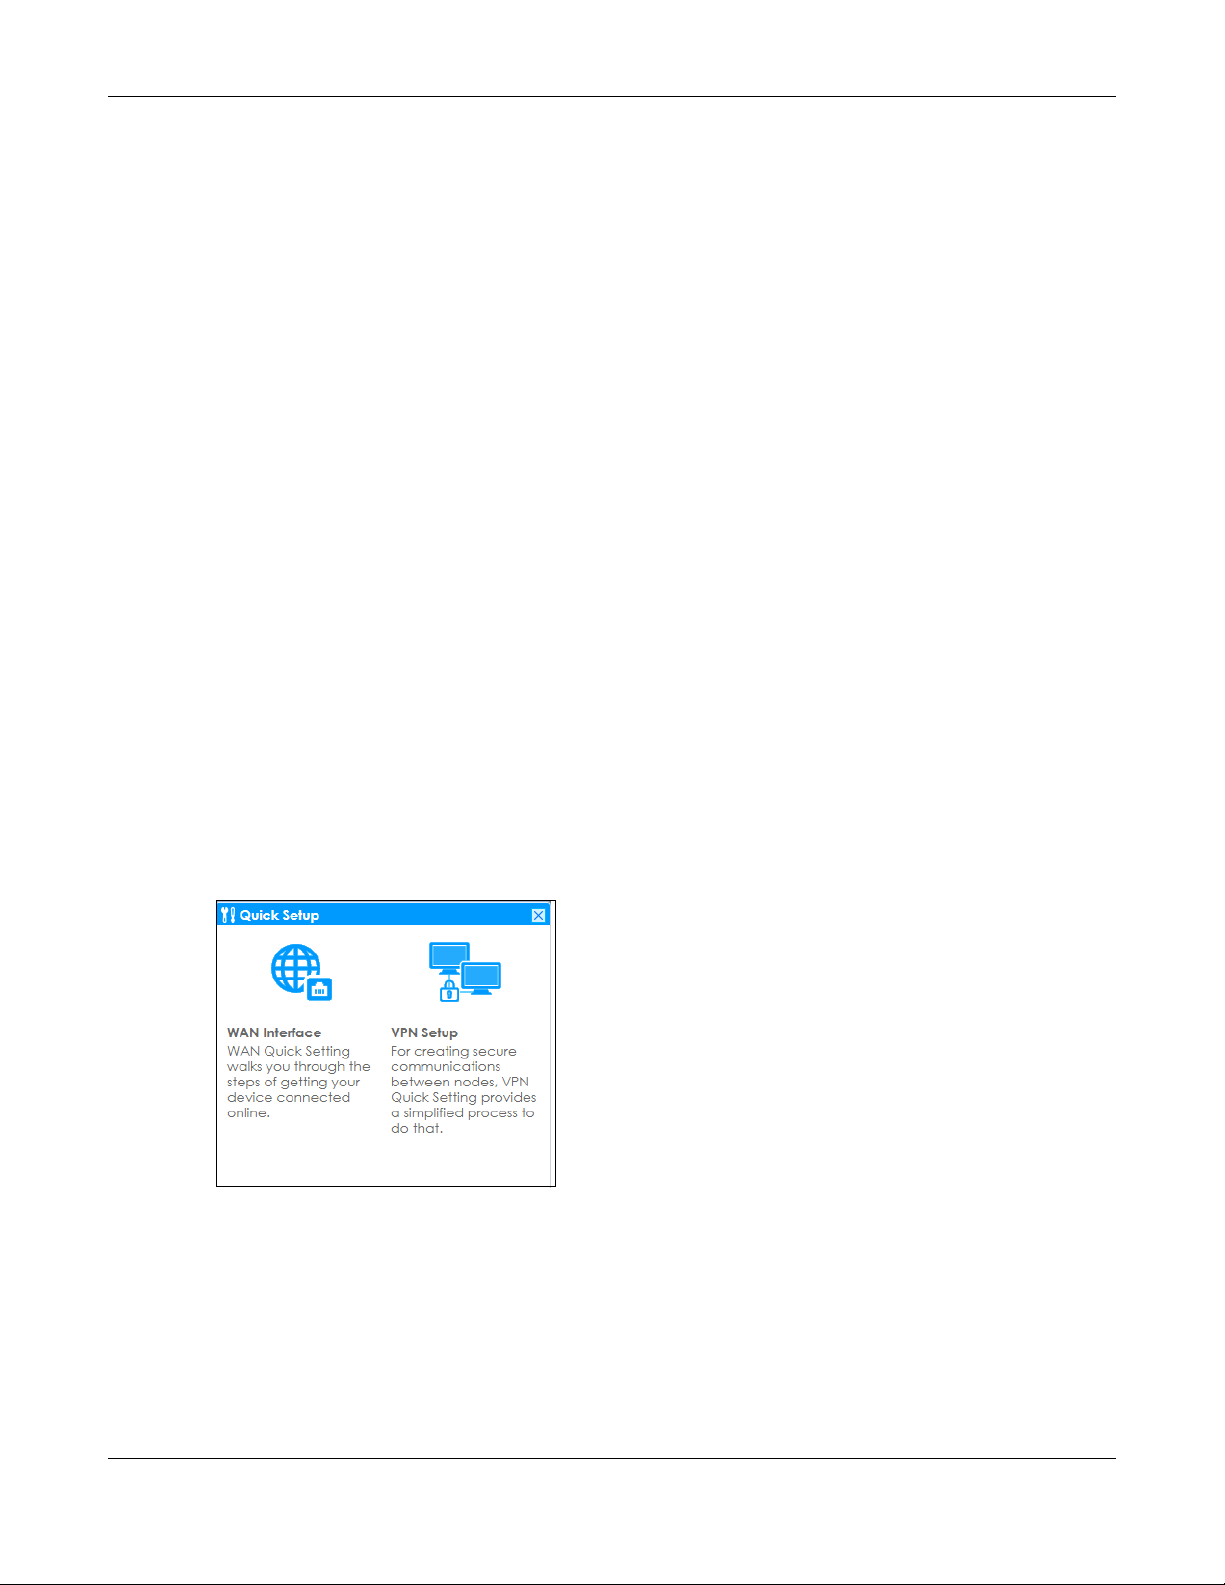
Chapter 4 Quick Setup Wizards
• Service Name: This field only appears for a PPPoE interface. It displays the PPPoE service name
specified in the ISP account.
• Server IP: This field only appears for a PPTP interface. It displays the IP address of the PPTP server.
• User Name: This is the user name given to you by your ISP.
• Nailed-Up: If No displays the connection will not time out. Yes means the Zyxel Device uses the idle
timeout.
• Idle Timeout: This is how many seconds the connection can be idle before the router automatically
disconnects from the PPPoE server. 0 means no timeout.
• Connection ID: If you specified a connection ID, it displays here.
• WAN Interface: This identifies the interface you configure to connect with your ISP.
• Zone: This field displays to which security zone this interface and Internet connection will belong.
• IP Address Assignment: This field displays whether the WAN IP address is static or dynamic (Auto).
• IP Address: This field displays the current IP address of the Zyxel Device WAN interface selected in this
wizard.
• IP Subnet Mask: This field displays the subnet mask of the Zyxel Device WAN interface selected in this
wizard.
• Gateway IP Address: This field displays the IP address of the Ethernet device connected to this WAN
port.
• First DNS Server /Second DNS Server: If the IP Address Assignment is Static, these fields display the DNS
server IP address(es).
4.3 VPN Setup Wizard
Click VPN Setup in the main Quick Setup screen to open the VPN Setup Wizard Welcome screen.
Figure 70 VPN Setup Wizard
4.3.1 Welcome
Use wizards to create Virtual Private Network (VPN) rules. After you complete the wizard, the Phase 1 rule
settings appear in the Configuration > VPN > IPSec VPN > VPN Gateway screen and the Phase 2 rule
settings appear in the Configuration > VPN > IPSec VPN > VPN Connection screen.
• VPN Settings configures a VPN tunnel for a secure connection to another computer or network.
ZyWALL ATP Series User’s Guide
86
Page 87
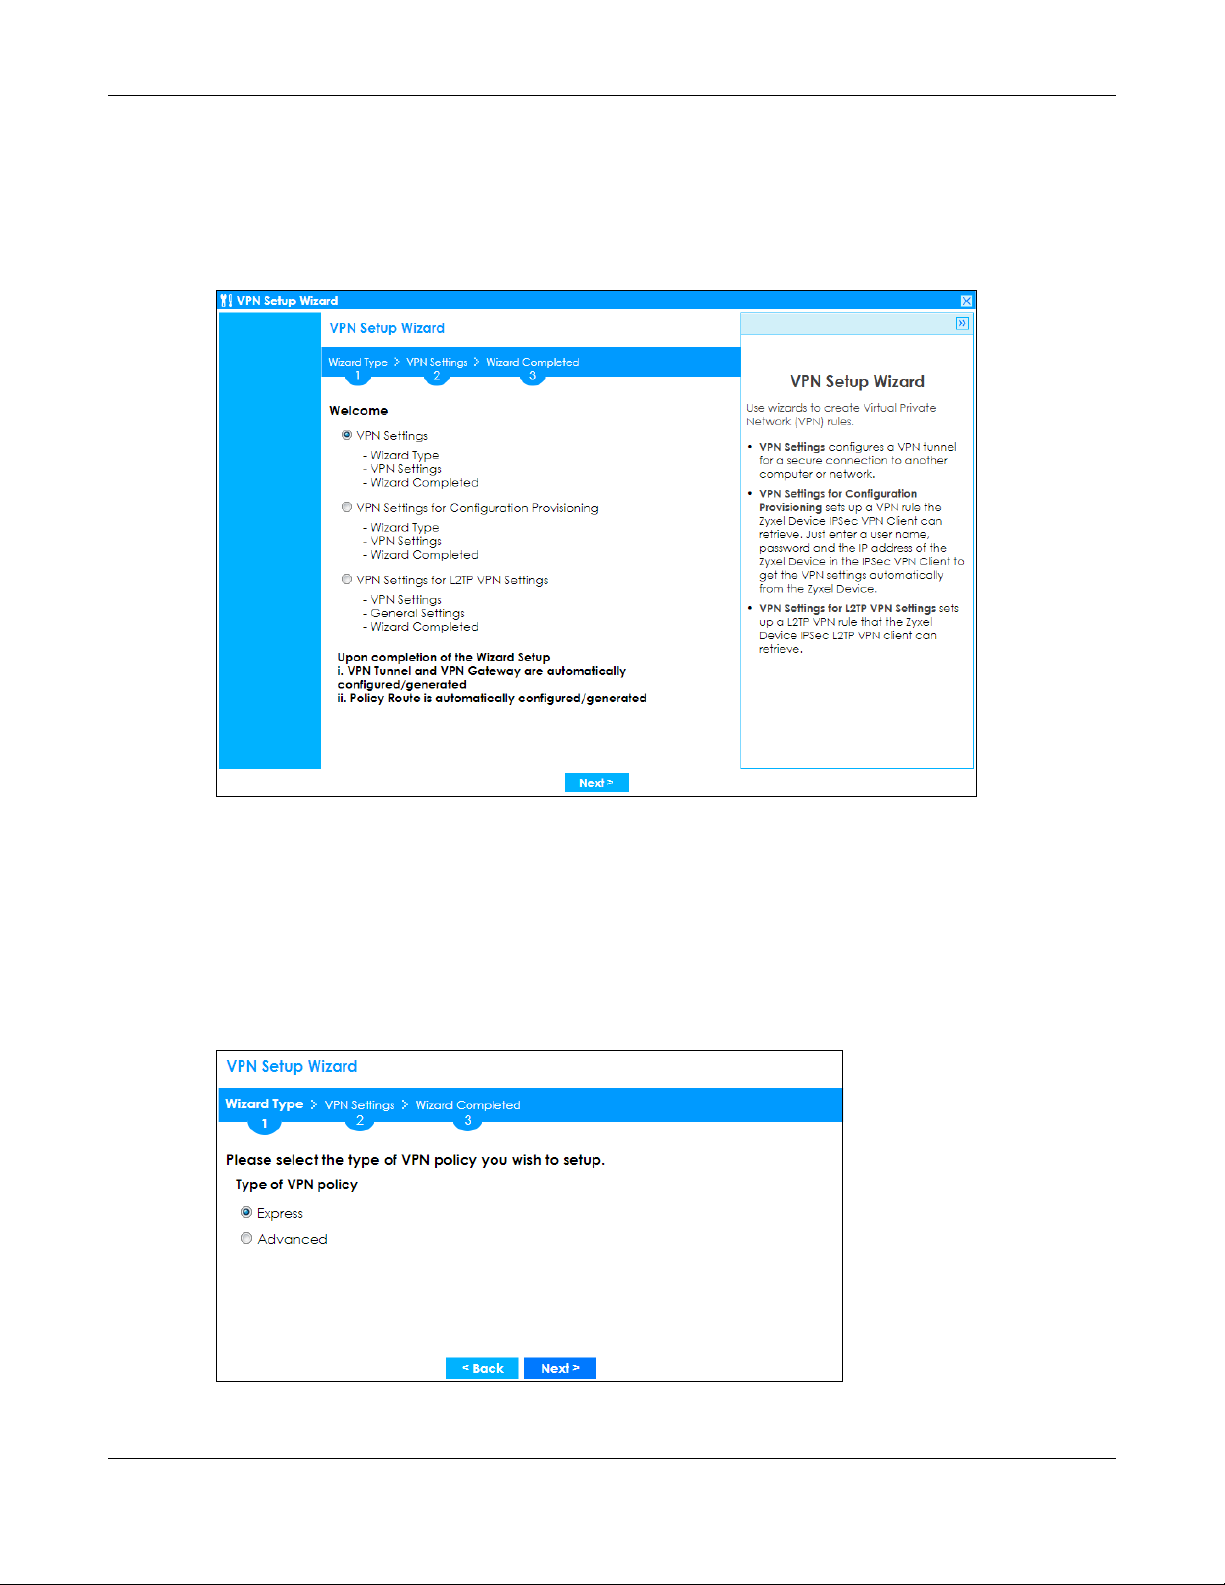
Chapter 4 Quick Setup Wizards
• VPN Settings for Configuration Provisioning sets up a VPN rule the Zyxel Device IPSec VPN Client can
retrieve. Just enter a user name, password and the IP address of the Zyxel Device in the IPSec VPN
Client to get the VPN settings automatically from the Zyxel Device.
• VPN Settings for L2TP VPN Settings sets up a L2TP VPN rule that the Zyxel Device IPSec L2TP VPN client
can retrieve.
Figure 71 VPN Setup Wizard Welcome
4.3.2 VPN Setup Wizard: Wizard Type
Choose Express to create a VPN rule with the default phase 1 and phase 2 settings to connect to
another ZLD-based Zyxel Device using a pre-shared key.
Choose Advanced to change the default settings and/or use certificates instead of a pre-shared key to
create a VPN rule to connect to another IPSec device.
Figure 72 VPN Setup Wizard: Wizard Type
ZyWALL ATP Series User’s Guide
87
Page 88
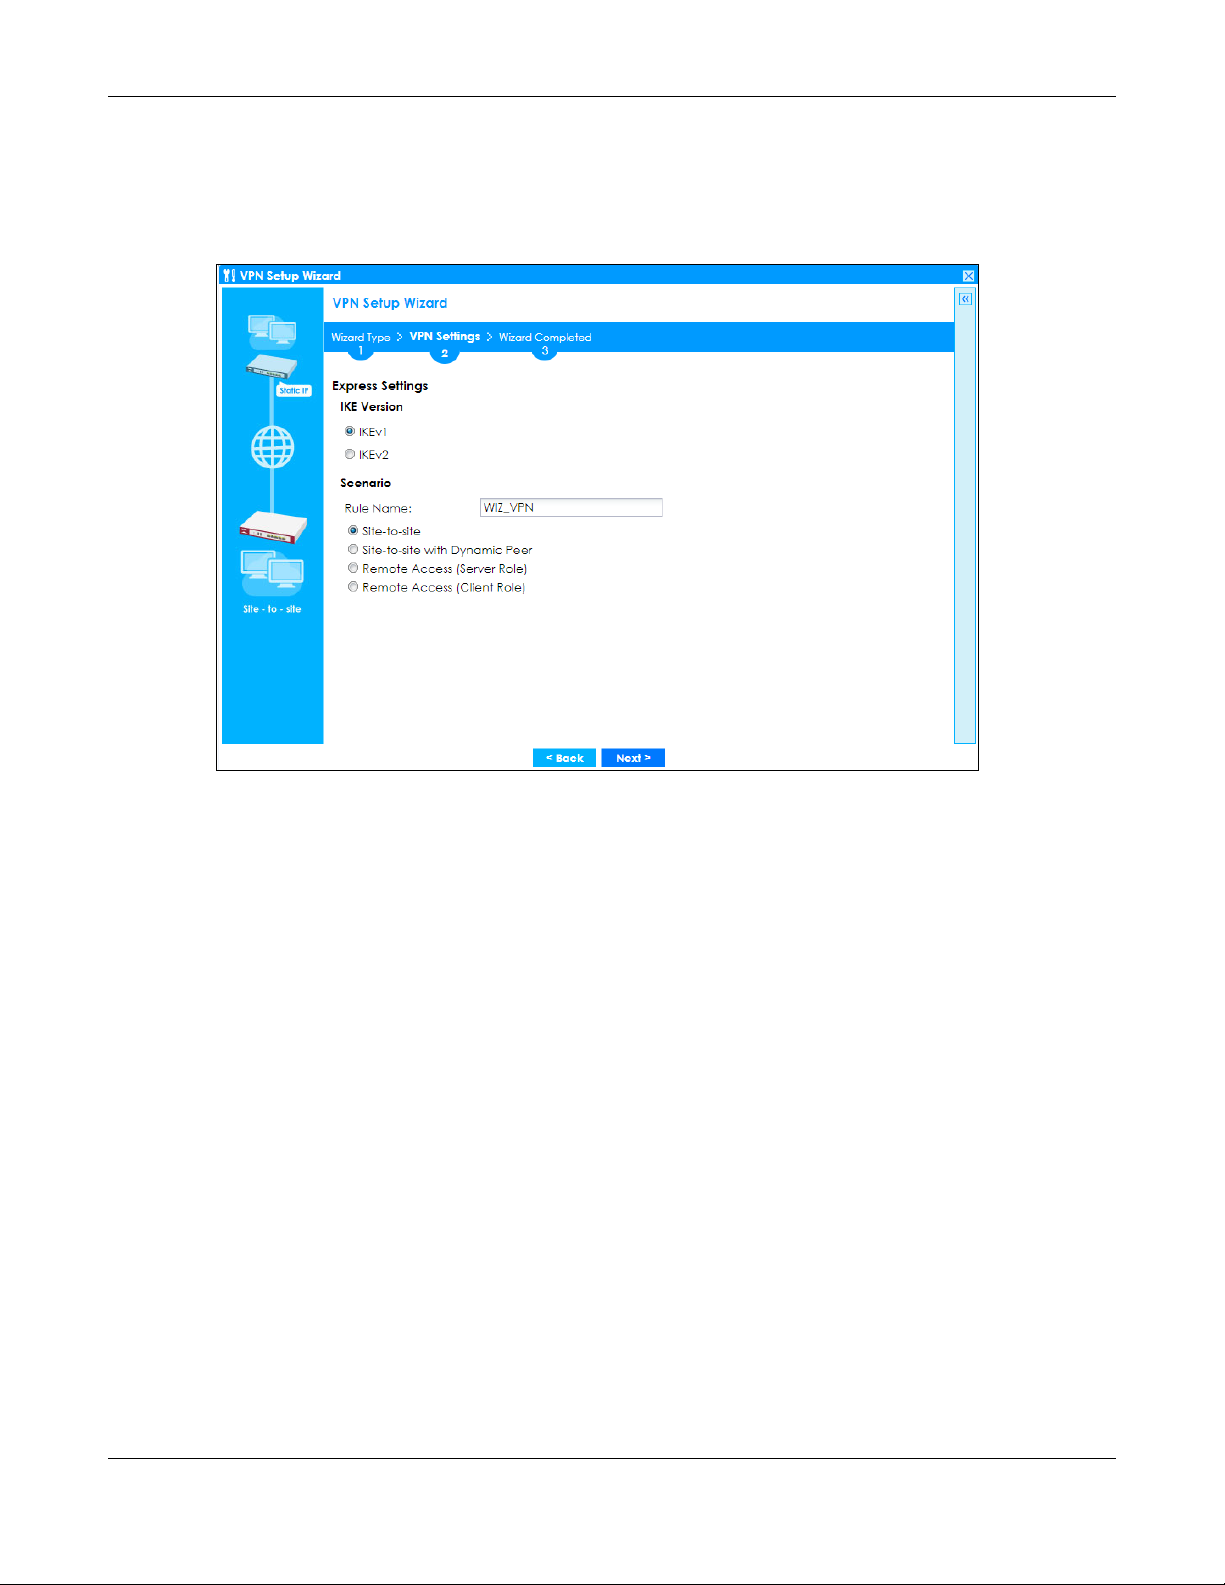
Chapter 4 Quick Setup Wizards
4.3.3 VPN Express Wizard - Scenario
Click the Express radio button as shown in Figure 72 on page 87 to display the following screen.
Figure 73 VPN Express Wizard: Scenario
IKE (Internet Key Exchange) Version: IKEv1 and IKEv2
IKE (Internet Key Exchange) is a protocol used in security associations to send data securely. IKE uses
certificates or pre-shared keys for authentication and a Diffie–Hellman key exchange to set up a shared
session secret from which encryption keys are derived.
IKEv2 supports Extended Authentication Protocol (EAP) authentication, and IKEv1 supports X-Auth. EAP is
important when connecting to existing enterprise authentication systems.
Scenario
Rule Name: Type the name used to identify this VPN connection (and VPN gateway). You may use 1-31
alphanumeric characters, underscores (_), or dashes (-), but the first character cannot be a number.
This value is case-sensitive.
Select the scenario that best describes your intended VPN connection. The figure on the left of the
screen changes to match the scenario you select.
• Site-to-site - The remote IPSec device has a static IP address or a domain name. This Zyxel Device can
initiate the VPN tunnel.
• Site-to-site with Dynamic Peer - The remote IPSec device has a dynamic IP address. Only the remote
IPSec device can initiate the VPN tunnel.
• Remote Access (Server Role) - Allow incoming connections from IPSec VPN clients. The clients have
dynamic IP addresses and are also known as dial-in users. Only the clients can initiate the VPN tunnel.
ZyWALL ATP Series User’s Guide
88
Page 89
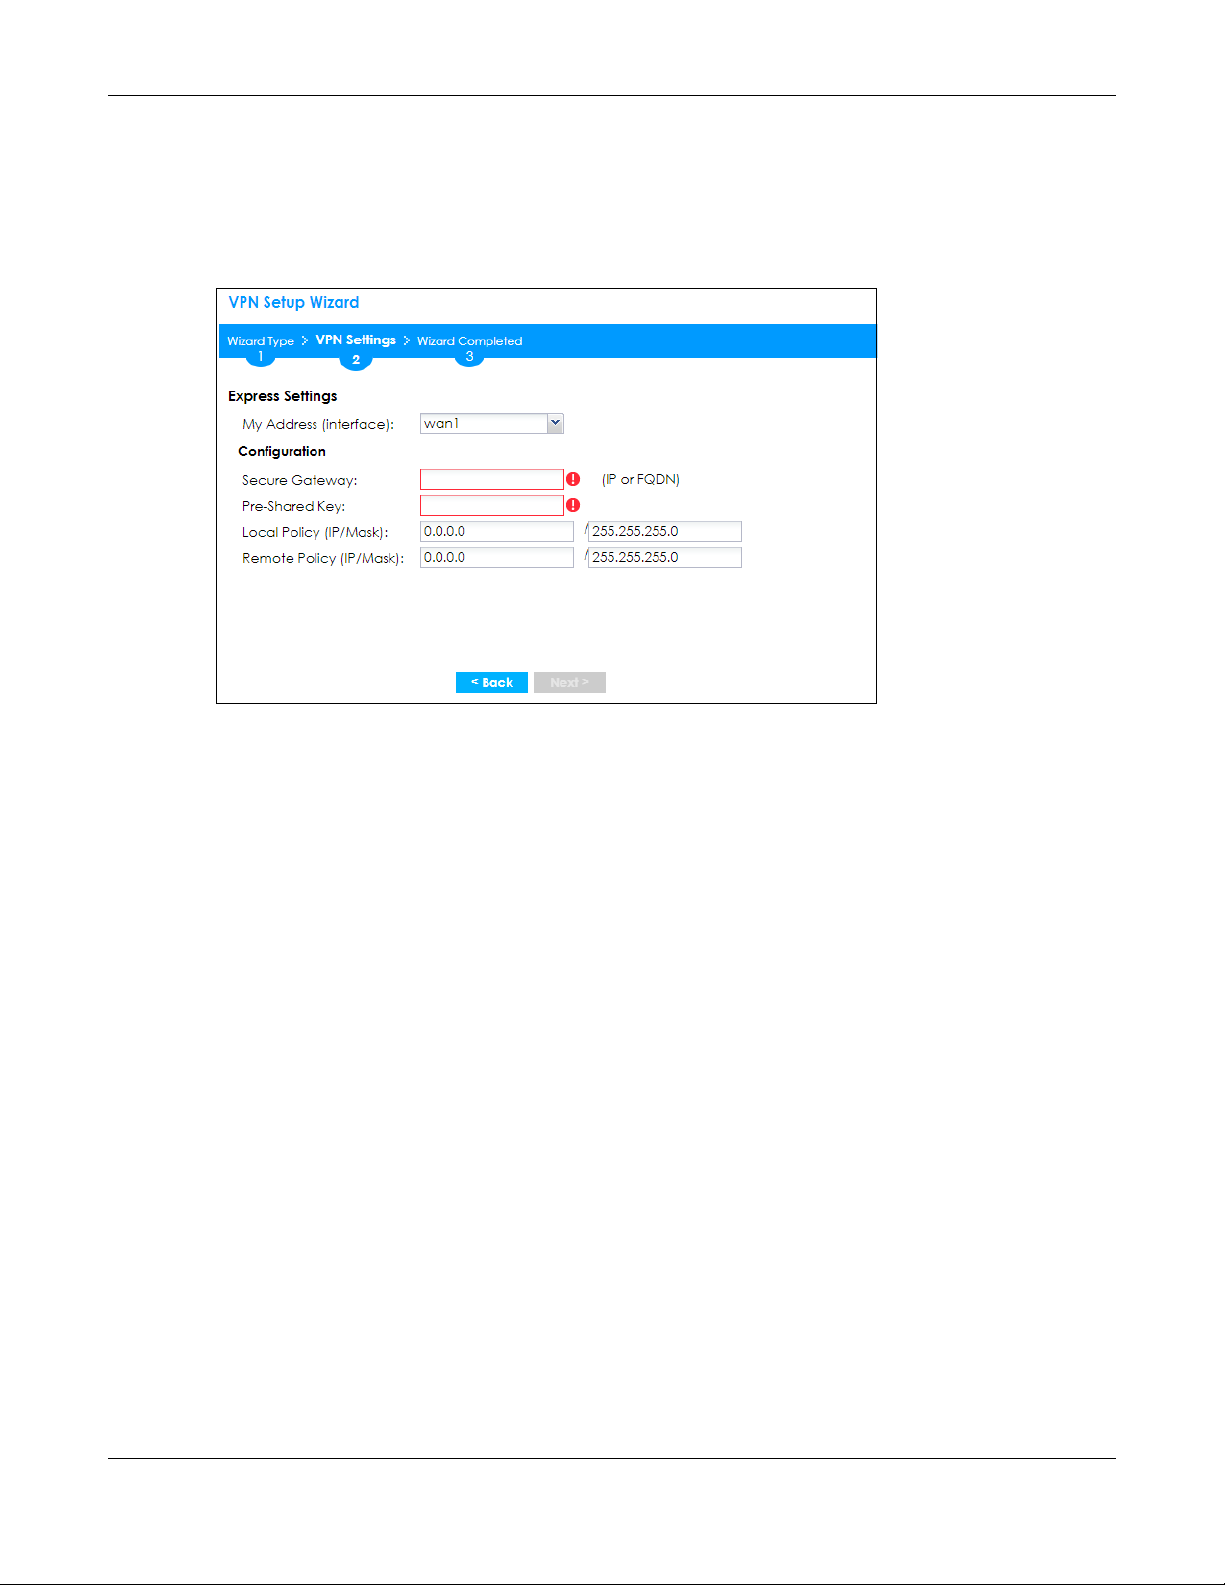
Chapter 4 Quick Setup Wizards
• Remote Access (Client Role) - Connect to an IPSec server. This Zyxel Device is the client (dial-in user)
and can initiate the VPN tunnel.
4.3.4 VPN Express Wizard - Configuration
Figure 74 VPN Express Wizard: Configuration
• My Address (interface): Select an interface from the drop-down list box to use on your Zyxel Device.
• Secure Gateway: Any displays in this field if it is not configurable for the chosen scenario. Otherwise,
enter the WAN IP address or domain name of the remote IPSec device (secure gateway) to identify
the remote IPSec router by its IP address or a domain name. Use 0.0.0.0 if the remote IPSec router has
a dynamic WAN IP address.
• Pre-Shared Key: Type the password. Both ends of the VPN tunnel must use the same password. Use 8
to 31 case-sensitive ASCII characters or 8 to 31 pairs of hexadecimal (“0-9”, “A-F”) characters.
Proceed a hexadecimal key with “0x”. You will receive a PYLD_MALFORMED (payload malformed)
packet if the same pre-shared key is not used on both ends.
• Local Policy (IP/Mask): Type the IP address of a computer on your network that can use the tunnel.
You can also specify a subnet. This must match the remote IP address configured on the remote IPSec
device.
• Remote Policy (IP/Mask): Any displays in this field if it is not configurable for the chosen scenario.
Otherwise, type the IP address of a computer behind the remote IPSec device. You can also specify
a subnet. This must match the local IP address configured on the remote IPSec device.
4.3.5 VPN Express Wizard - Summary
This screen provides a read-only summary of the VPN tunnel’s configuration and commands that you
can copy and paste into another ZLD-based Zyxel Device’s command line interface to configure it.
ZyWALL ATP Series User’s Guide
89
Page 90
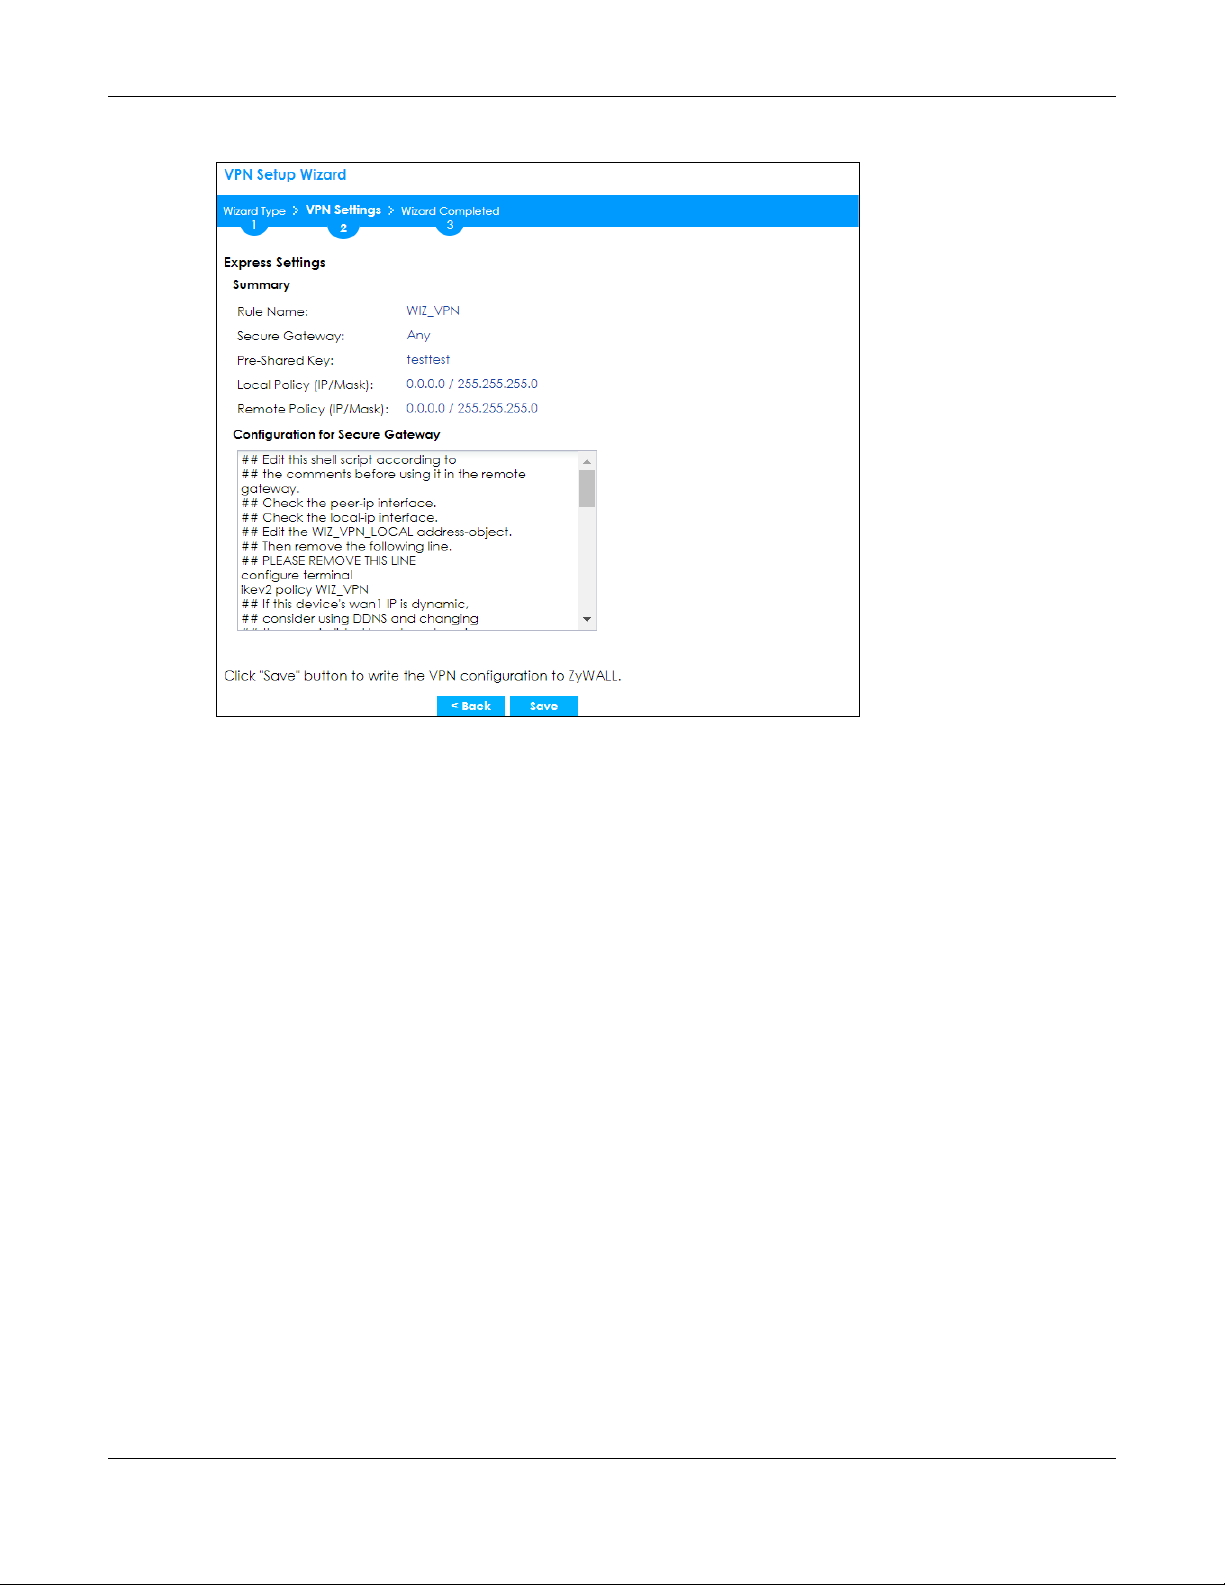
Chapter 4 Quick Setup Wizards
Figure 75 VPN Express Wizard: Summary
• Rule Name: Identifies the VPN gateway policy.
• Secure Gateway: IP address or domain name of the remote IPSec device. If this field displays Any,
only the remote IPSec device can initiate the VPN connection.
• Pre-Shared Key: VPN tunnel password. It identifies a communicating party during a phase 1 IKE
negotiation.
• Local Policy: IP address and subnet mask of the computers on the network behind your Zyxel Device
that can use the tunnel.
• Remote Policy: IP address and subnet mask of the computers on the network behind the remote
IPSec device that can use the tunnel. If this field displays Any, only the remote IPSec device can
initiate the VPN connection.
• Copy and paste the Configuration for Secure Gateway commands into another ZLD-based Zyxel
Device’s command line interface to configure it to serve as the other end of this VPN tunnel. You can
also use a text editor to save these commands as a shell script file with a “.zysh” filename extension.
Use the file manager to run the script in order to configure the VPN connection. See the commands
reference guide for details on the commands displayed in this list.
4.3.6 VPN Express Wizard - Finish
Now the rule is configured on the Zyxel Device. The Phase 1 rule settings appear in the VPN > IPSec VPN
> VPN Gateway screen and the Phase 2 rule settings appear in the VPN > IPSec VPN > VPN Connection
screen.
ZyWALL ATP Series User’s Guide
90
Page 91
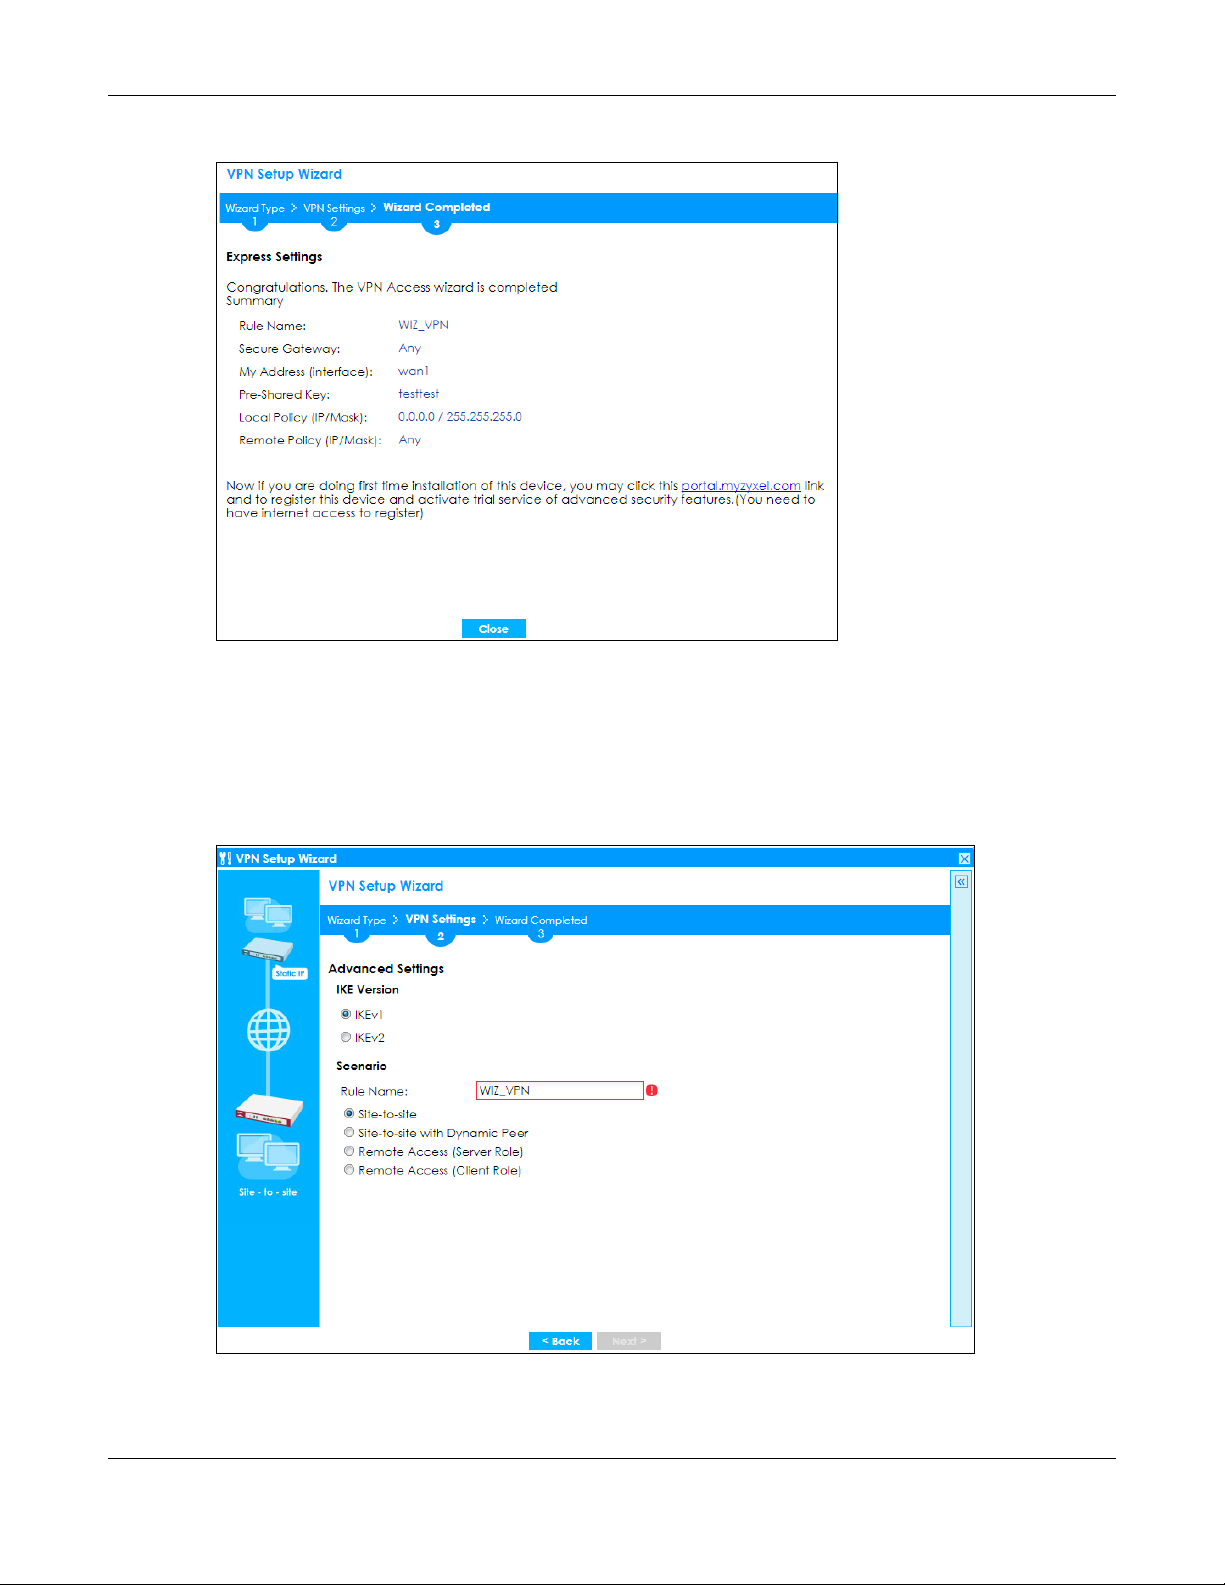
Chapter 4 Quick Setup Wizards
Figure 76 VPN Express Wizard: Finish
Click Close to exit the wizard.
4.3.7 VPN Advanced Wizard - Scenario
Click the Advanced radio button as shown in Figure 72 on page 87 to display the following screen.
Figure 77 VPN Advanced Wizard: Scenario
ZyWALL ATP Series User’s Guide
91
Page 92

Chapter 4 Quick Setup Wizards
IKE (Internet Key Exchange) Version: IKEv1 and IKEv2
IKE (Internet Key Exchange) is a protocol used in security associations to send data securely. IKE uses
certificates or pre-shared keys for authentication and a Diffie–Hellman key exchange to set up a shared
session secret from which encryption keys are derived.
IKEv2 supports Extended Authentication Protocol (EAP) authentication, and IKEv1 supports X-Auth. EAP is
important when connecting to existing enterprise authentication systems.
Scenario
Rule Name: Type the name used to identify this VPN connection (and VPN gateway). You may use 1-31
alphanumeric characters, underscores (_), or dashes (-), but the first character cannot be a number.
This value is case-sensitive.
Select the scenario that best describes your intended VPN connection. The figure on the left of the
screen changes to match the scenario you select.
• Site-to-site - The remote IPSec device has a static IP address or a domain name. This Zyxel Device can
initiate the VPN tunnel.
• Site-to-site with Dynamic Peer - The remote IPSec device has a dynamic IP address. Only the remote
IPSec device can initiate the VPN tunnel.
• Remote Access (Server Role) - Allow incoming connections from IPSec VPN clients. The clients have
dynamic IP addresses and are also known as dial-in users. Only the clients can initiate the VPN tunnel.
• Remote Access (Client Role) - Connect to an IPSec server. This Zyxel Device is the client (dial-in user)
and can initiate the VPN tunnel.
4.3.8 VPN Advanced Wizard - Phase 1 Settings
There are two phases to every IKE (Internet Key Exchange) negotiation – phase 1 (Authentication) and
phase 2 (Key Exchange). A phase 1 exchange establishes an IKE SA (Security Association).
ZyWALL ATP Series User’s Guide
92
Page 93
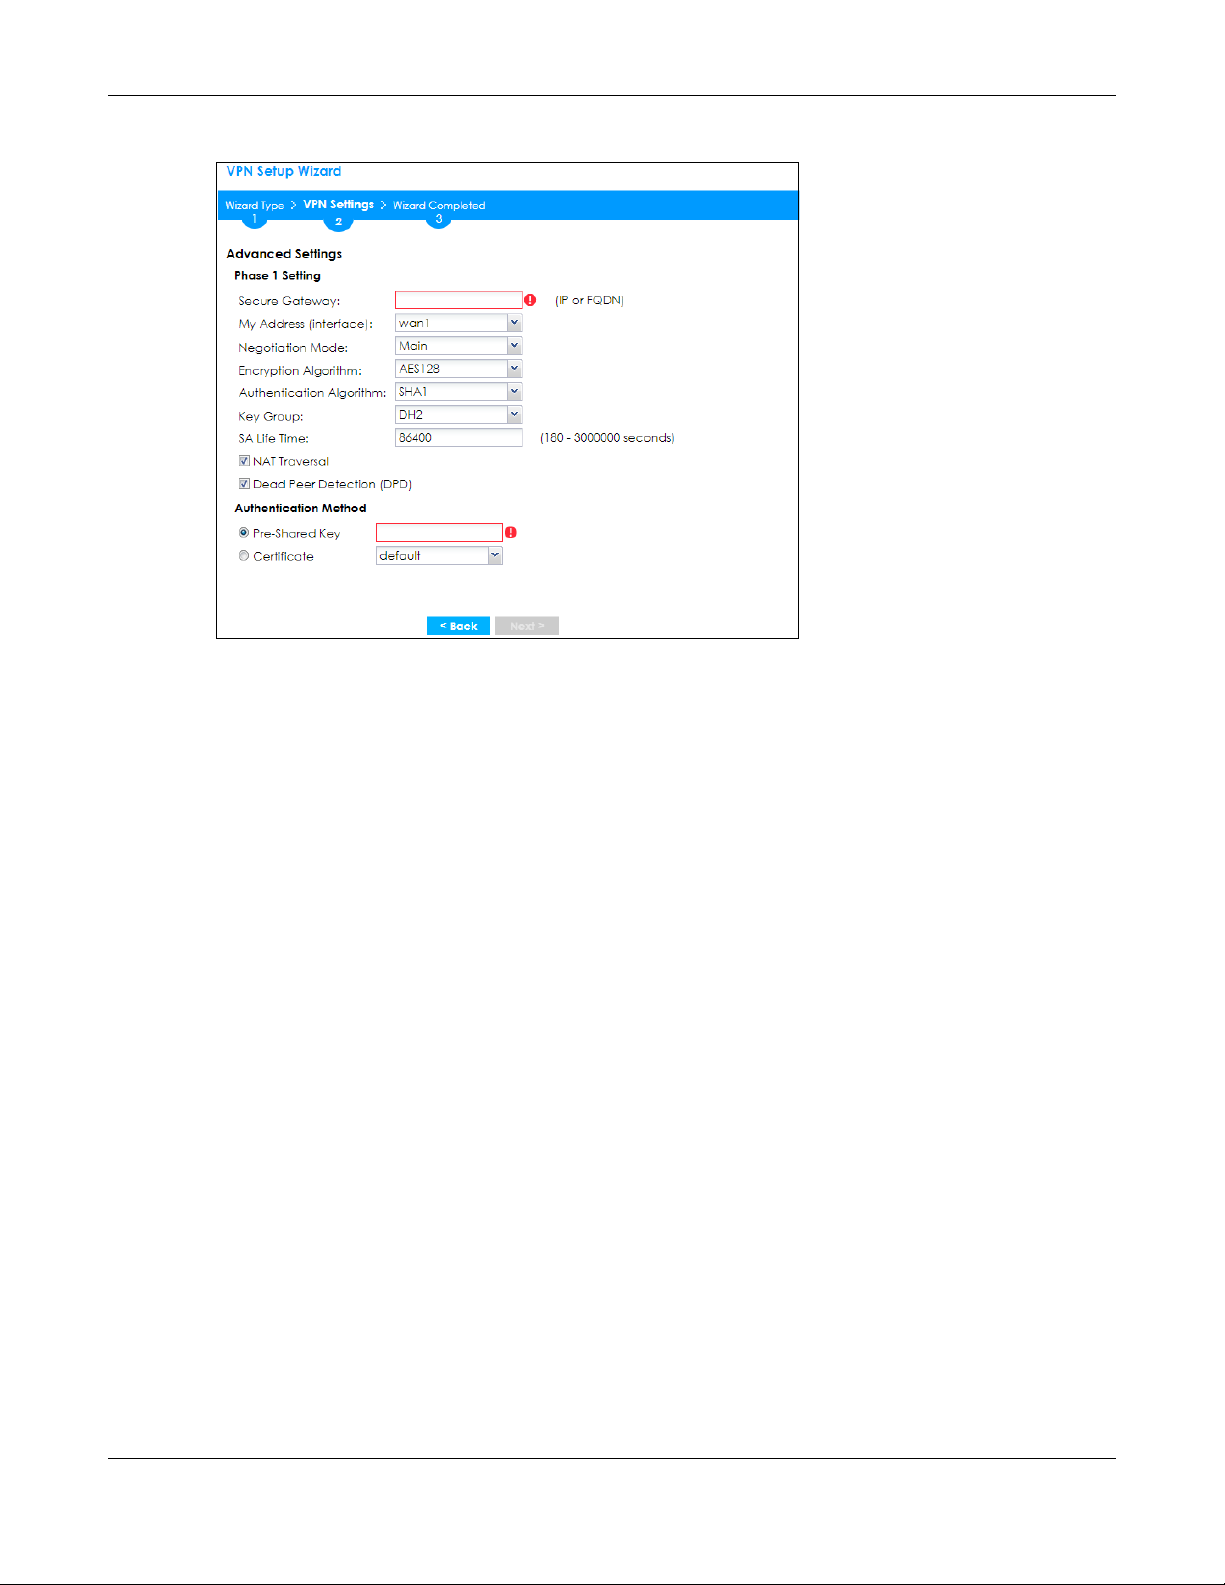
Chapter 4 Quick Setup Wizards
Figure 78 VPN Advanced Wizard: Phase 1 Settings
• Secure Gateway: Any displays in this field if it is not configurable for the chosen scenario. Otherwise,
enter the WAN IP address or domain name of the remote IPSec device (secure gateway) to identify
the remote IPSec device by its IP address or a domain name. Use 0.0.0.0 if the remote IPSec device
has a dynamic WAN IP address.
• My Address (interface): Select an interface from the drop-down list box to use on your Zyxel Device.
• Negotiation Mode: This displays Main or Aggressive:
• Main encrypts the ZyWALL/USG’s and remote IPSec router’s identities but takes more time to
establish the IKE SA.
• Aggressive is faster but does not encrypt the identities.
The ZyWALL/USG and the remote IPSec router must use the same negotiation mode. Multiple SAs
connecting through a secure gateway must have the same negotiation mode.
• Encryption Algorithm: 3DES and AES use encryption. The longer the key, the higher the security (this
may affect throughput). Both sender and receiver must use the same secret key, which can be used
to encrypt and decrypt the message or to generate and verify a message authentication code. The
DES encryption algorithm uses a 56-bit key. Triple DES (3DES) is a variation on DES that uses a 168-bit
key. As a result, 3DES is more secure than DES. It also requires more processing power, resulting in
increased latency and decreased throughput. AES128 uses a 128-bit key and is faster than 3DES.
AES192 uses a 192-bit key, and AES256 uses a 256-bit key.
• Authentication Algorithm: MD5 gives minimal security and SHA512 gives the highest security. MD5
(Message Digest 5) and SHA (Secure Hash Algorithm) are hash algorithms used to authenticate
packet data. The stronger the algorithm the slower it is.
• Key Group: DH5 is more secure than DH1 or DH2 (although it may affect throughput). DH1 (default)
refers to Diffie-Hellman Group 1 a 768 bit random number. DH2 refers to Diffie-Hellman Group 2 a 1024
bit (1Kb) random number. DH5 refers to Diffie-Hellman Group 5 a 1536 bit random number.
• SA Life Time: Set how often the Zyxel Device renegotiates the IKE SA. A short SA life time increases
security, but renegotiation temporarily disconnects the VPN tunnel.
• NAT Traversal: Select this if the VPN tunnel must pass through NAT (there is a NAT router between the
IPSec devices).
ZyWALL ATP Series User’s Guide
93
Page 94
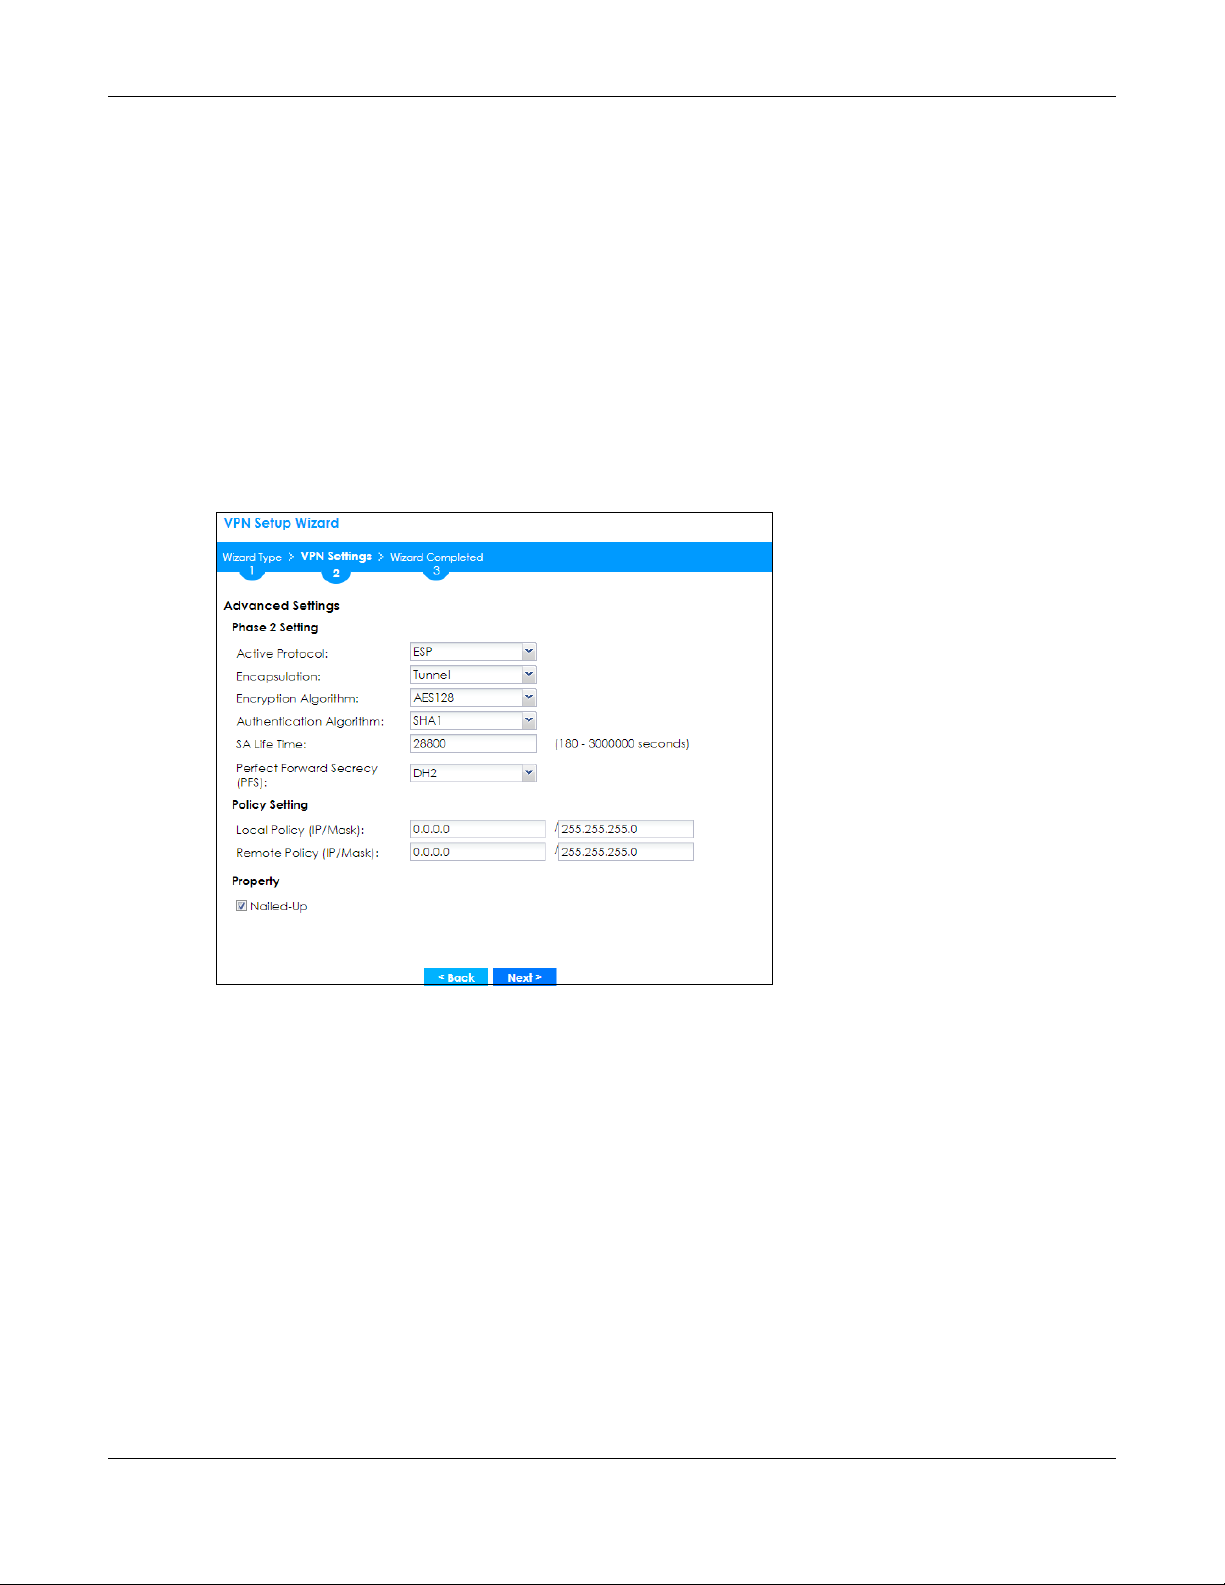
Chapter 4 Quick Setup Wizards
Note: The remote IPSec device must also have NAT traversal enabled. See the help in the
main IPSec VPN screens for more information.
• Dead Peer Detection (DPD) has the Zyxel Device make sure the remote IPSec device is there before
transmitting data through the IKE SA. If there has been no traffic for at least 15 seconds, the Zyxel
Device sends a message to the remote IPSec device. If it responds, the Zyxel Device transmits the
data. If it does not respond, the Zyxel Device shuts down the IKE SA.
• Authentication Method: Select Pre-Shared Key to use a password or Certificate to use one of the Zyxel
Device’s certificates.
4.3.9 VPN Advanced Wizard - Phase 2
Phase 2 in an IKE uses the SA that was established in phase 1 to negotiate SAs for IPSec.
Figure 79 VPN Advanced Wizard: Phase 2 Settings
• Active Protocol: ESP is compatible with NAT, AH is not.
• Encapsulation: Tunnel is compatible with NAT, Transport is not.
• Encryption Algorithm: 3DES and AES use encryption. The longer the AES key, the higher the security
(this may affect throughput). Null uses no encryption.
• Authentication Algorithm: MD5 gives minimal security and SHA512 gives the highest security. MD5
(Message Digest 5) and SHA (Secure Hash Algorithm) are hash algorithms used to authenticate
packet data. The stronger the algorithm the slower it is.
• SA Life Time: Set how often the Zyxel Device renegotiates the IKE SA. A short SA life time increases
security, but renegotiation temporarily disconnects the VPN tunnel.
• Perfect Forward Secrecy (PFS): Disabling PFS allows faster IPSec setup, but is less secure. Select DH1,
DH2 or DH5 to enable PFS. DH5 is more secure than DH1 or DH2 (although it may affect throughput).
DH1 refers to Diffie-Hellman Group 1 a 768 bit random number. DH2 refers to Diffie-Hellman Group 2 a
1024 bit (1Kb) random number. DH5 refers to Diffie-Hellman Group 5 a 1536 bit random number (more
secure, yet slower).
• Local Policy (IP/Mask): Type the IP address of a computer on your network. You can also specify a
subnet. This must match the remote IP address configured on the remote IPSec device.
ZyWALL ATP Series User’s Guide
94
Page 95
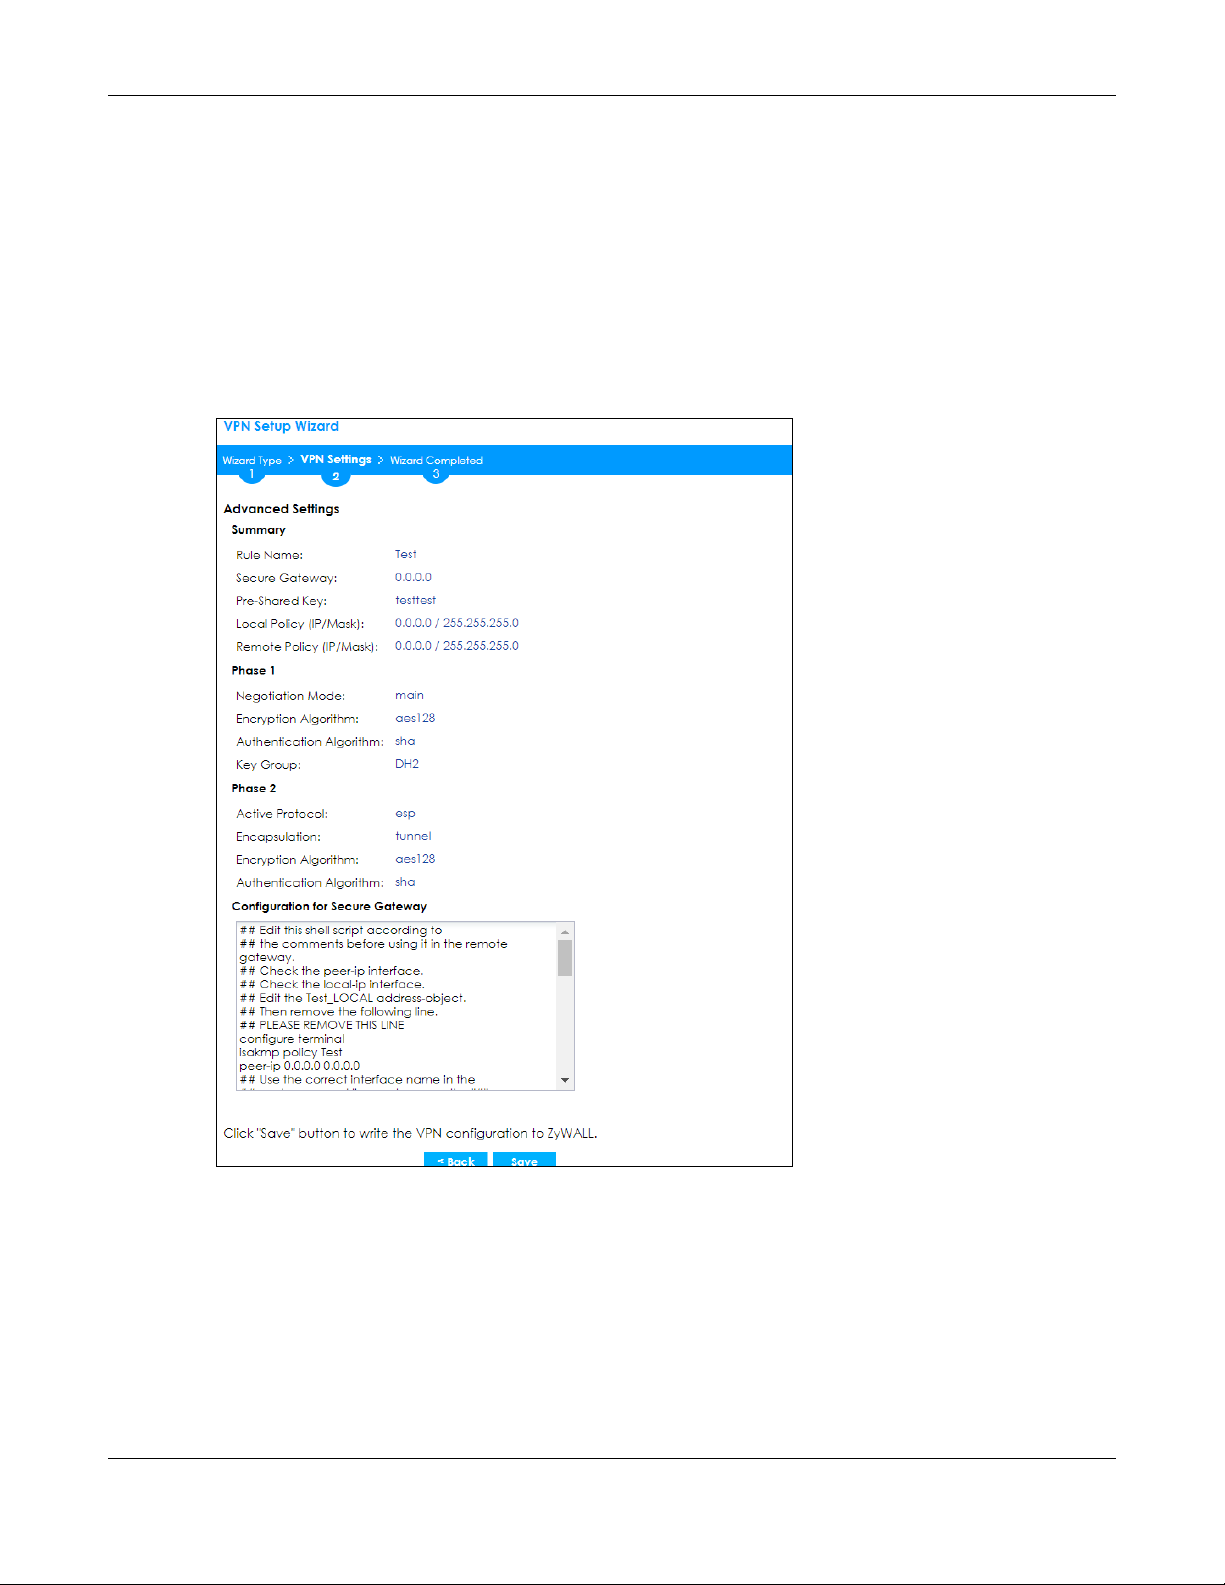
Chapter 4 Quick Setup Wizards
• Remote Policy (IP/Mask): Type the IP address of a computer behind the remote IPSec device. You
can also specify a subnet. This must match the local IP address configured on the remote IPSec
device.
• Nailed-Up: This displays for the site-to-site and remote access client role scenarios. Select this to have
the Zyxel Device automatically renegotiate the IPSec SA when the SA life time expires.
4.3.10 VPN Advanced Wizard - Summary
This is a read-only summary of the VPN tunnel settings.
Figure 80 VPN Advanced Wizard: Summary
• Rule Name: Identifies the VPN connection (and the VPN gateway).
• Secure Gateway: IP address or domain name of the remote IPSec device.
• Pre-Shared Key: VPN tunnel password.
• Certificate: The certificate the Zyxel Device uses to identify itself when setting up the VPN tunnel.
• Local Policy: IP address and subnet mask of the computers on the network behind your Zyxel Device
that can use the tunnel.
• Remote Policy: IP address and subnet mask of the computers on the network behind the remote
IPSec device that can use the tunnel.
ZyWALL ATP Series User’s Guide
95
Page 96

Chapter 4 Quick Setup Wizards
Phase 1
• Negotiation Mode: This displays Main or Aggressive:
• Main encrypts the ZyWALL/USG’s and remote IPSec router’s identities but takes more time to
establish the IKE SA.
• Aggressive is faster but does not encrypt the identities.
The ZyWALL/USG and the remote IPSec router must use the same negotiation mode. Multiple SAs
connecting through a secure gateway must have the same negotiation mode.
• Encryption Algorithm: This displays the encryption method used. The longer the key, the higher the
security, the lower the throughput (possibly).
• DES uses a 56-bit key.
• 3DES uses a 168-bit key.
• AES128 uses a 128-bit key.
• AES192 uses a 192-bit key.
• AES256 uses a 256-bit key.
• Authentication Algorithm: This displays the authentication algorithm used. The stronger the algorithm,
the slower it is.
• MD5 gives minimal security.
• SHA1 gives higher security.
• SHA256 gives the highest security.
• Key Group: This displays the Diffie-Hellman (DH) key group used. DH5 is more secure than DH1 or DH2
(although it may affect throughput).
• DH1 uses a 768 bit random number.
• DH2 uses a 1024 bit (1Kb) random number.
• DH5 uses a 1536 bit random number.
Phase 2
• Active Protocol: This displays ESP (compatible with NAT) or AH.
• Encapsulation: This displays Tunnel (compatible with NAT) or Transport.
• Encryption Algorithm: This displays the encryption method used. The longer the key, the higher the
security, the lower the throughput (possibly).
• DES uses a 56-bit key.
• 3DES uses a 168-bit key.
•
AES128 uses a 128-bit key.
• AES192 uses a 192-bit key.
• AES256 uses a 256-bit key.
• Null uses no encryption.
• Authentication Algorithm: This displays the authentication algorithm used. The stronger the algorithm,
the slower it is.
• MD5 gives minimal security.
• SHA1 gives higher security.
• SHA256 gives the highest security.
ZyWALL ATP Series User’s Guide
96
Page 97
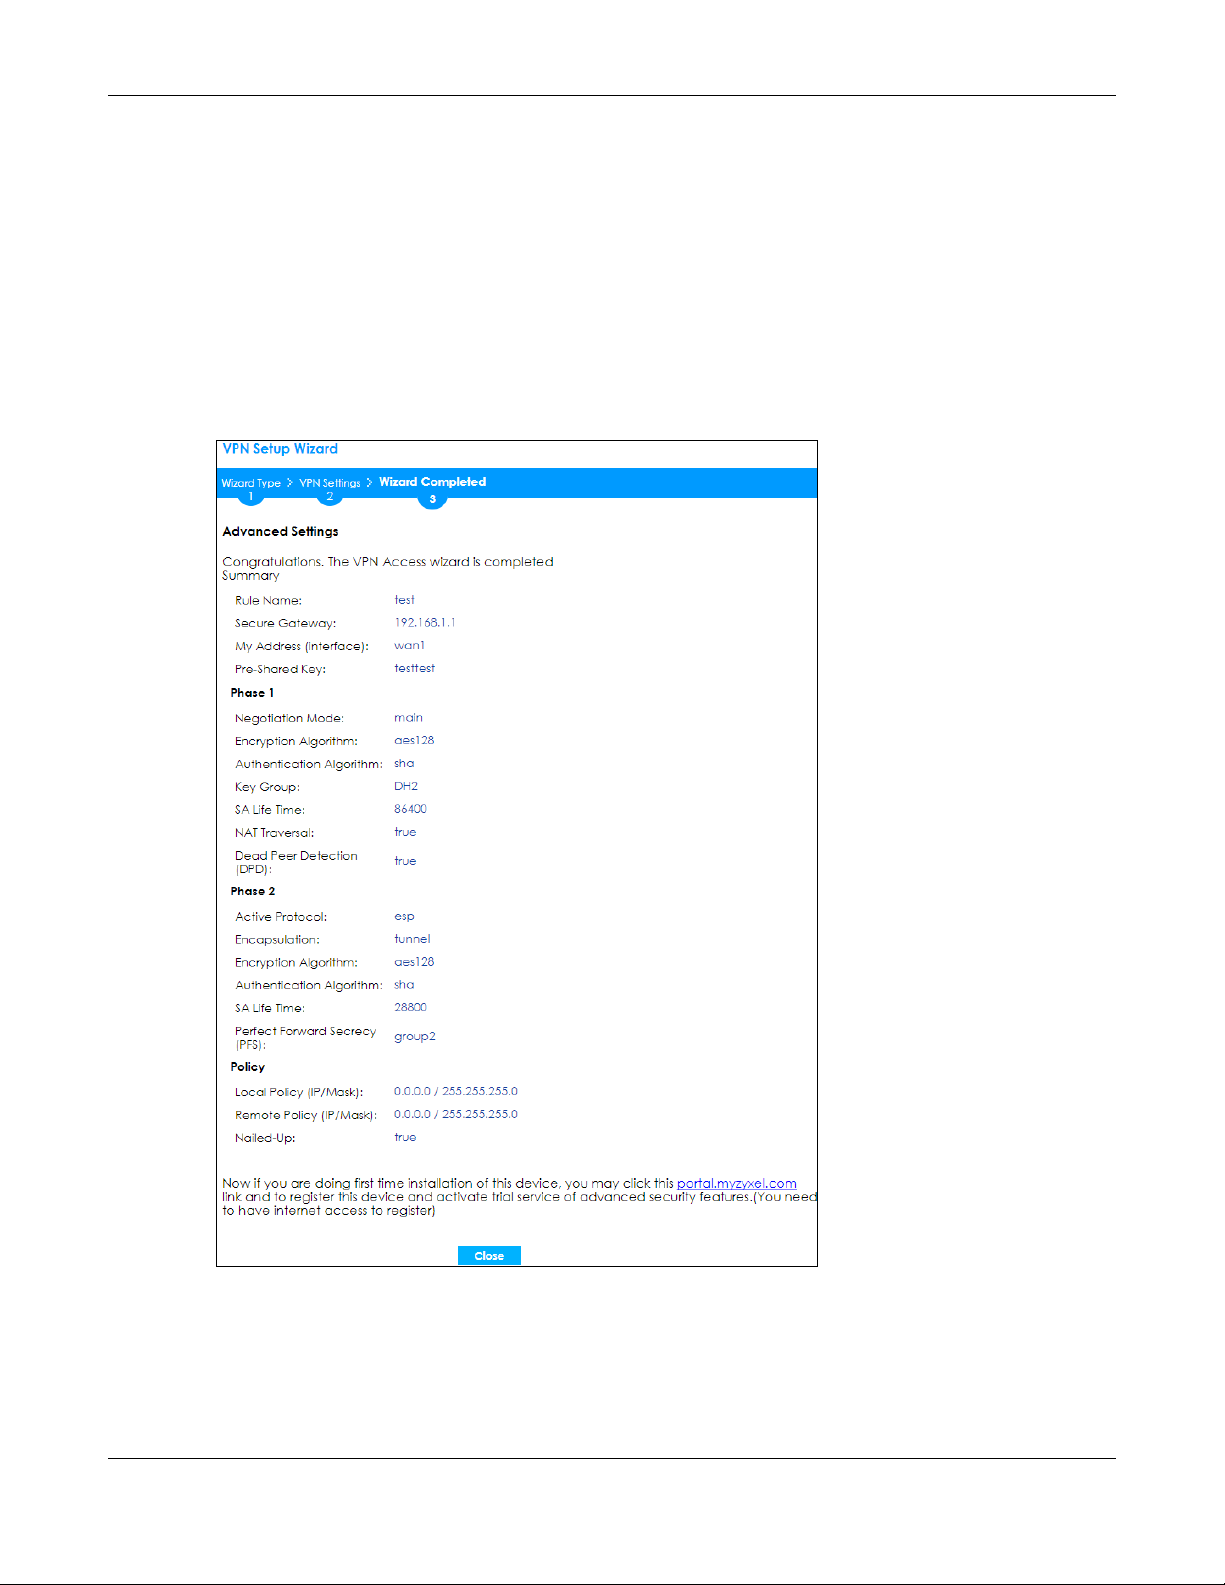
Chapter 4 Quick Setup Wizards
Copy and paste the Configuration for Remote Gateway commands into another ZLD-based Zyxel
Device’s command line interface.
Click Save to save the VPN rule.
4.3.11 VPN Advanced Wizard - Finish
Now the rule is configured on the Zyxel Device. The Phase 1 rule settings appear in the VPN > IPSec VPN
> VPN Gateway screen and the Phase 2 rule settings appear in the VPN > IPSec VPN > VPN Connection
screen.
Figure 81 VPN Wizard: Finish
Click Close to exit the wizard.
ZyWALL ATP Series User’s Guide
97
Page 98
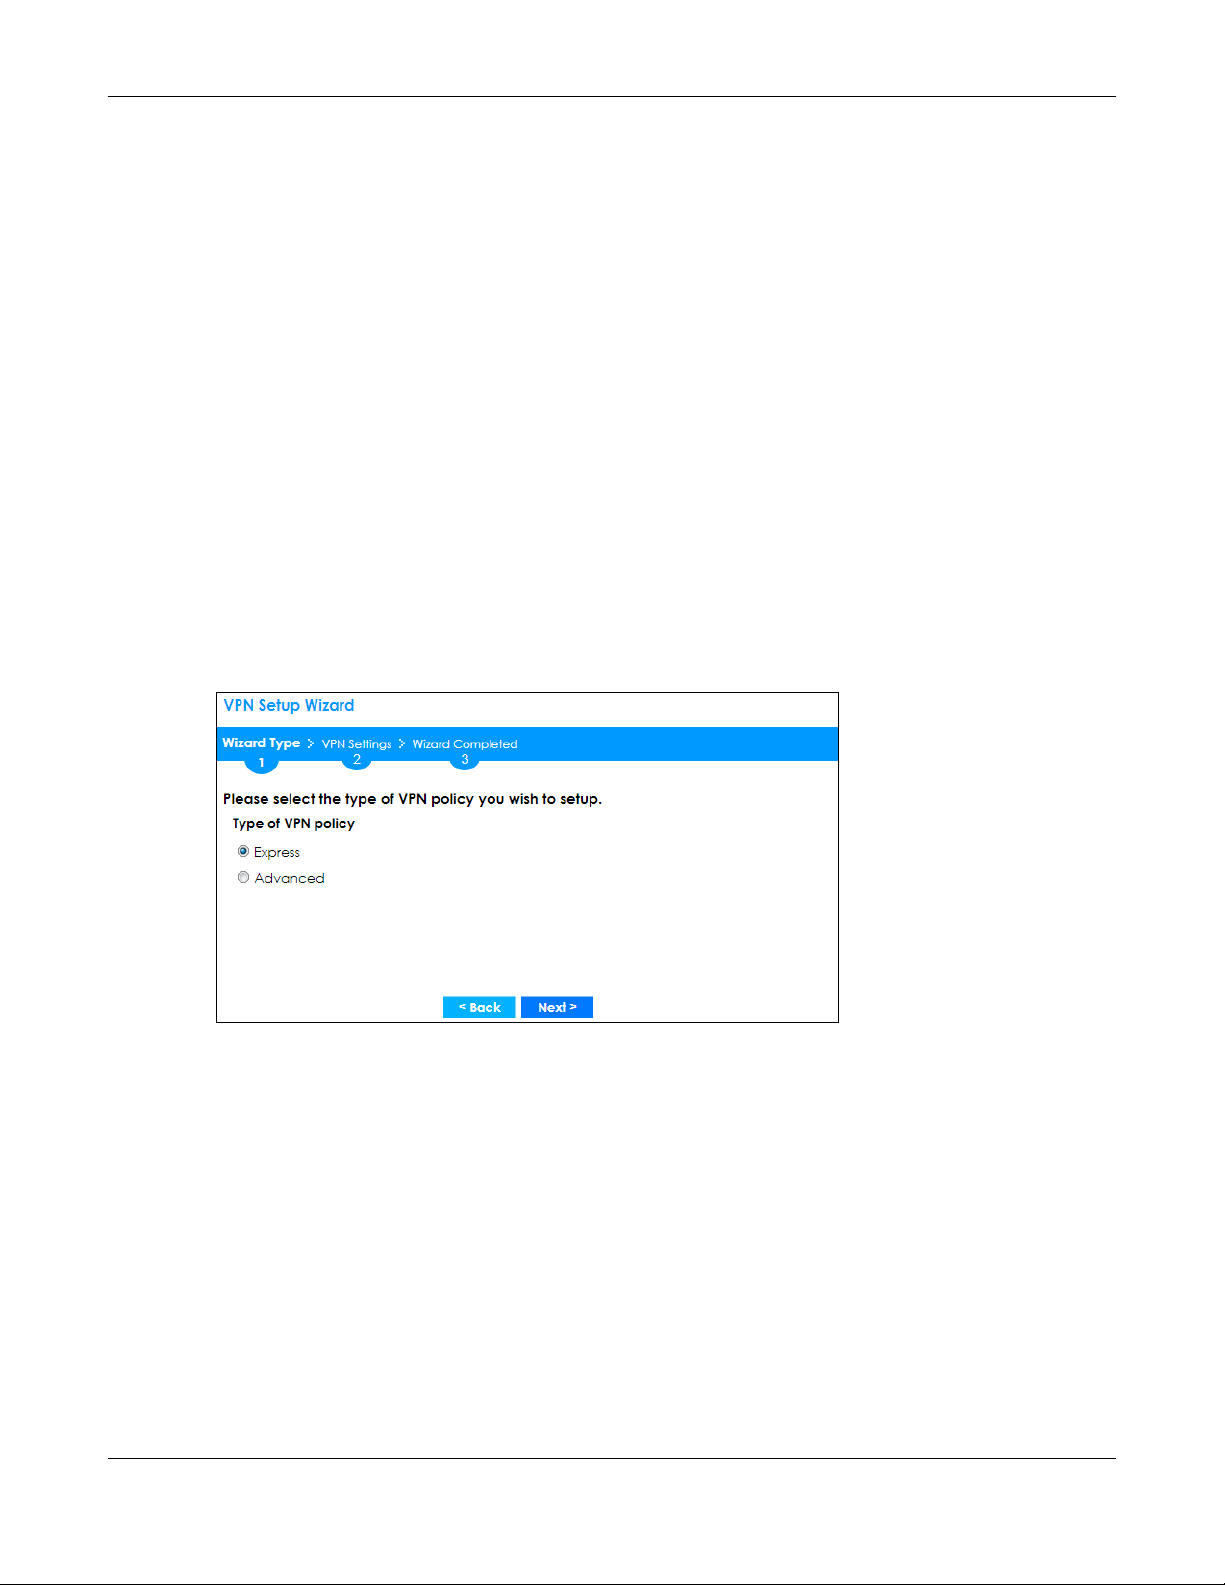
Chapter 4 Quick Setup Wizards
4.4 VPN Settings for Configuration Provisioning Wizard: Wizard Type
Use VPN Settings for Configuration Provisioning to set up a VPN rule that can be retrieved with the Zyxel
Device IPSec VPN Client.
VPN rules for the Zyxel Device IPSec VPN Client have certain restrictions. They must not contain the
following settings:
• AH active protocol
• NULL encryption
• SHA512 authentication
• A subnet or range remote policy
Choose Express to create a VPN rule with the default phase 1 and phase 2 settings and to use a pre-
shared key.
Choose Advanced to change the default settings and/or use certificates instead of a pre-shared key in
the VPN rule.
Figure 82 VPN Settings for Configuration Provisioning Express Wizard: Wizard Type
4.4.1 Configuration Provisioning Express Wizard - VPN Settings
Click the Express radio button as shown in the previous screen to display the following screen.
ZyWALL ATP Series User’s Guide
98
Page 99
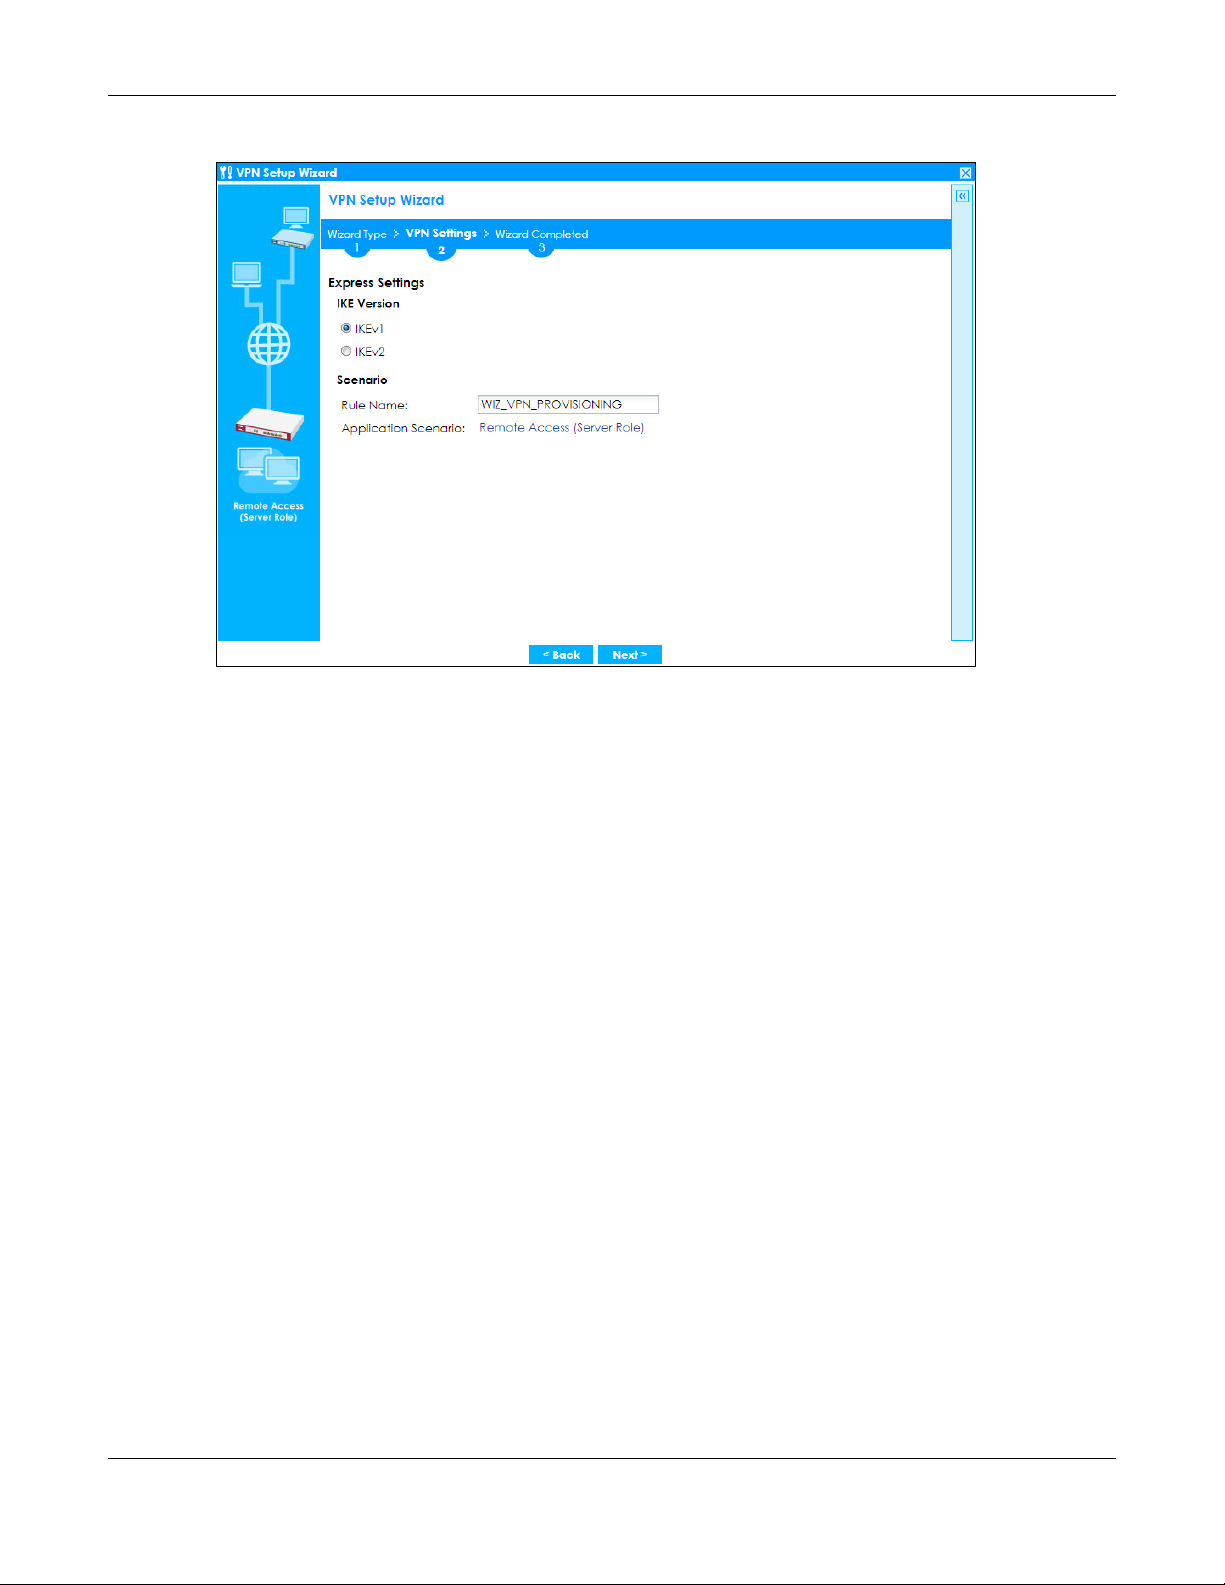
Chapter 4 Quick Setup Wizards
Figure 83 VPN for Configuration Provisioning Express Wizard: Settings Scenario
• IKE (Internet Key Exchange) is a protocol used in security associations to send data securely. IKE uses
certificates or pre-shared keys for authentication and a Diffie–Hellman key exchange to set up a
shared session secret from which encryption keys are derived.
• IKEv2 supports Extended Authentication Protocol (EAP) authentication, and IKEv1 supports X-Auth.
EAP is important when connecting to existing enterprise authentication systems.
• Rule Name: Type the name used to identify this VPN connection (and VPN gateway). You may use 131 alphanumeric characters, underscores (_), or dashes (-), but the first character cannot be a
number. This value is case-sensitive.
• Application Scenario: Only the Remote Access (Server Role) is allowed in this wizard. It allows
incoming connections from the Zyxel Device IPSec VPN Client.
4.4.2 Configuration Provisioning VPN Express Wizard - Configuration
Click Next to continue the wizard.
ZyWALL ATP Series User’s Guide
99
Page 100
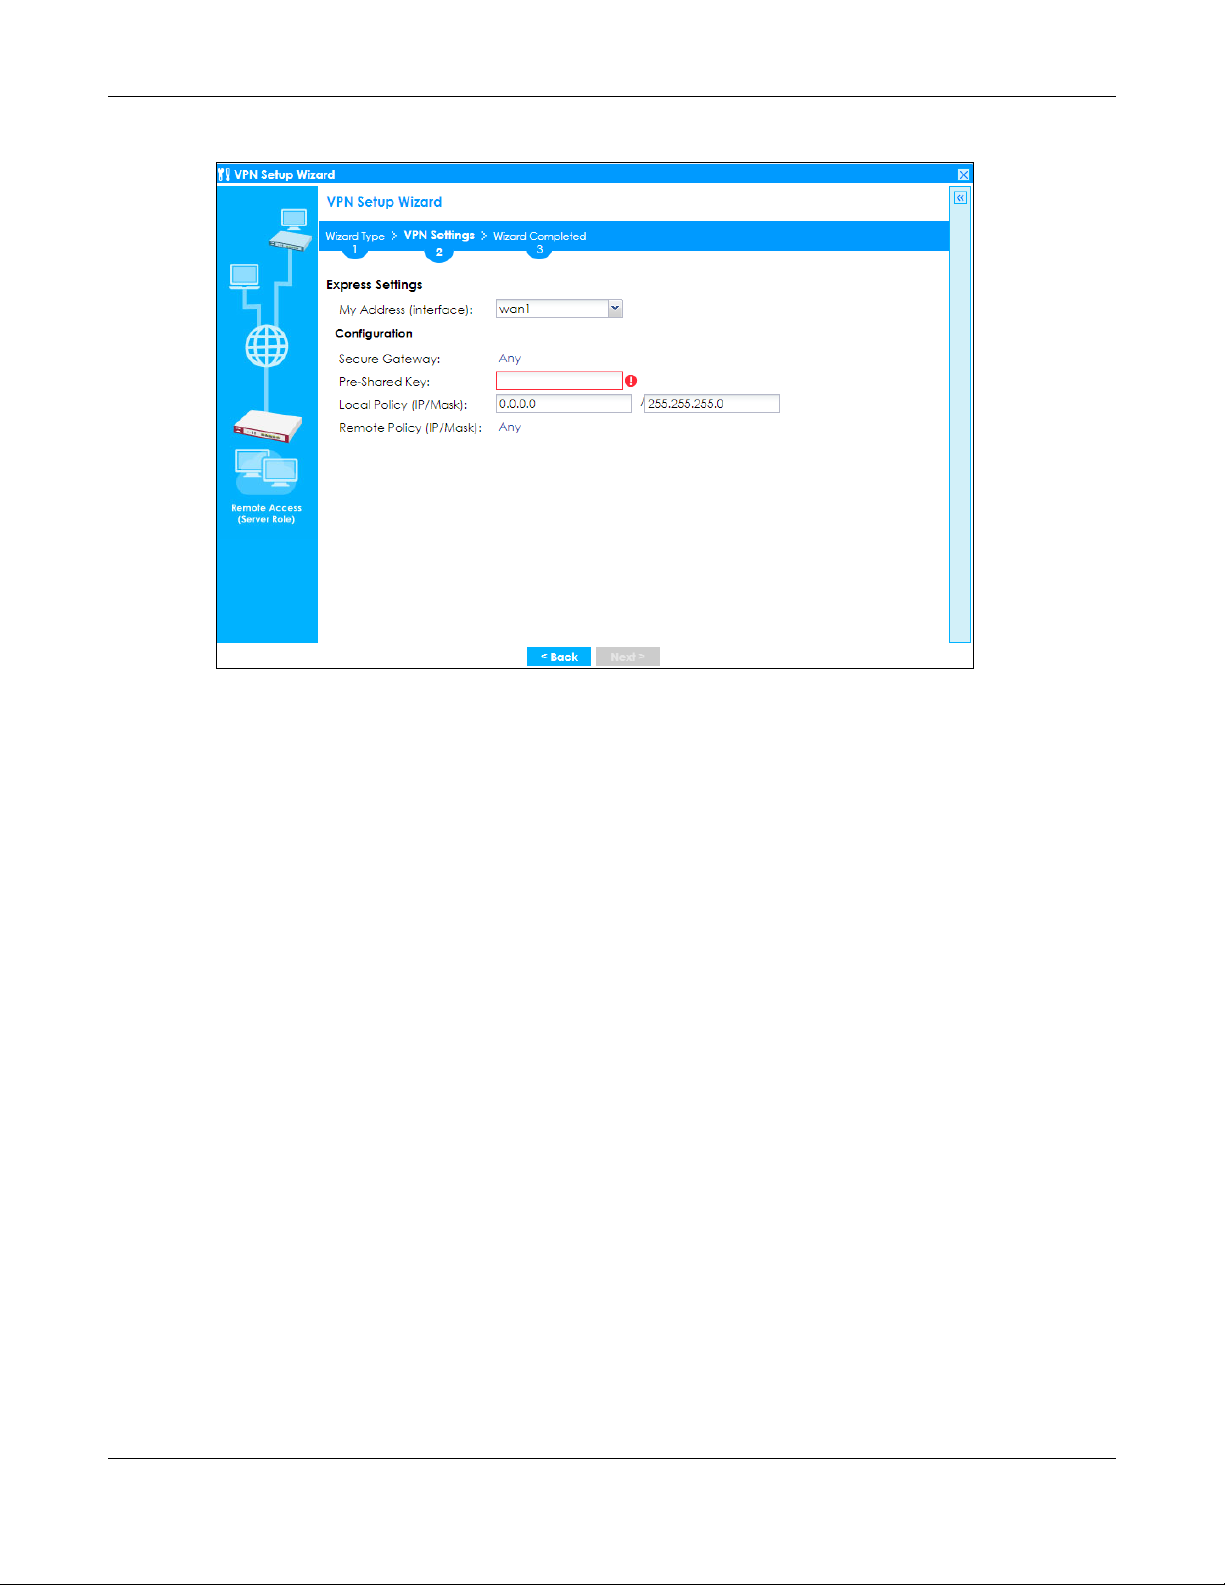
Chapter 4 Quick Setup Wizards
Figure 84 VPN for Configuration Provisioning Express Wizard: Configuration
• My Address (interface): Select an interface from the drop-down list box to use on your Zyxel Device.
• Secure Gateway: Any displays in this field because it is not configurable in this wizard. It allows
incoming connections from the Zyxel Device IPSec VPN Client.
• Pre-Shared Key: Type the password. Both ends of the VPN tunnel must use the same password. Use 8
to 31 case-sensitive ASCII characters or 8 to 31 pairs of hexadecimal (“0-9”, “A-F”) characters.
Proceed a hexadecimal key with “0x”. You will receive a PYLD_MALFORMED (payload malformed)
packet if the same pre-shared key is not used on both ends.
• Local Policy (IP/Mask): Type the IP address of a computer on your network. You can also specify a
subnet. This must match the remote IP address configured on the remote IPSec device.
• Remote Policy (IP/Mask): Any displays in this field because it is not configurable in this wizard.
4.4.3 VPN Settings for Configuration Provisioning Express Wizard - Summary
This screen has a read-only summary of the VPN tunnel’s configuration and commands you can copy
and paste into another ZLD-based Zyxel Device’s command line interface to configure it.
ZyWALL ATP Series User’s Guide
100
 Loading...