

Page 1
Vocal Processor
Operation Manual
You must read the Usage and Safety Precautions before use.
© 2019 ZOOM CORPORATION
Copying or reprinting this manual in part or in whole without permission is prohibited.
Product names, registered trademarks and company names in this document are the property of their respective companies. All trademarks and regis-
tered trademarks in this document are for identification purposes only and are not intended to infringe on the copyrights of their respective owners.
Proper display is not possible on grayscale devices.
Page 2

■Operation Manual overview
You might need this manual in the future. Always keep it in a place where you can access it easily.
The contents of this document and the specications of the product could be changed without notice.
®
Windows
•
Mac and macOS are trademarks or registered trademarks of Apple Inc.
•
iOS is a trademark or registered trademark of Cisco Systems, Inc. and used under license.
•
Other product names, registered trademarks and company names in this document are the property of
•
their respective companies.
Note: All trademarks and registered trademarks in this document are for identication purposes only and
are not intended to infringe on the copyrights of their respective owners.
is a trademark or registered trademark of Microsoft® Corporation.
Page 3
Introduction
Thank you very much for purchasing a ZOOM Vocal Processor.
The
vocal sounds. After adjusting volume and clarity, you can, for example, correct the pitch of vocals while adding
harmony and reverb.
Setting values and combinations can be saved as patch memories in the unit to be used whenever you like.
You can try out a variety of vocal effects right away by switching among the preset patch memories.
With other features that include a unique formant pedal that can be used to change vocal characteristics, a
looper that can record overdubs for up to 3.5 minutes and a super-directional ZOOM SGV-6 mic, this vocal processor is perfect for live performances.
We hope you will enjoy using it for many years.
has numerous functions for transforming vocals and is easy-to-use, so anyone can achieve powerful
Main features of the
Easy sound creation
Creating sounds is as easy as turning knobs and pressing switches.
Super-directional ZOOM SGV-6 mic
The super-directional ZOOM SGV-6 mic, which is based on shotgun mic technologies, catches the sound
of the vocalist with focused directionality. Using the SGV-6 suppresses feedback and interference from
nearby instruments when capturing a voice, enabling more accurate pitch correction and harmonization.
Voice character manipulation pedal
The FORMANT pedal can be used to change vocal characteristics without changing pitch, making it sound like
the voice of a different person.
The vocal automatically returns to its original character when the foot is removed from the pedal.
Singing assistance
Using the compressor to even out volume and the enhance function to add clarity helps make singing easier.
Voice, harmony and effect sections
The VOICE section allows you to easily pitch-correct vocals or create a robotic sound, for example.
The HARMONY section can be used to automatically generate third-degree and fth-degree harmonies according to the KEY setting.
The EFFECT section is optimized for vocalists. The 10 types of effects include echo and reverb as well as aggressive distortion.
3.5-minute looper great for improvisations
The looper can be used to overdub processed vocals as many times as desired, greatly expanding performance possibilities.
Convenient undo and redo functions can be easily performed with a footswitch.
USB audio interface
The can be used as a 2-IN/2-OUT audio interface.
3
Page 4

Terms used in this manual
Patch memory
Records of voice, harmony and effect settings are called “patch memories” and can be used to easily recall settings. Up to 100 patch memories can be stored.
Looper
Vocal loops can be recorded for up to 3.5 minutes and played back.
Loops can be layered for a variety of live performance techniques, including a cappella choruses and vocal percussion.
Memory mode
Use this mode to select patch memories with the footswitches.
Looper mode
Use this mode to operate the looper with the footswitches.
VOICE
This section can alter the sound of the voice. For example, use it to correct pitch according to the key or
give the voice a childlike, synthesized or vocoder sound.
HARMONY
This can add up to two harmonizing voices. This generates optimal harmonies automatically according to
the key.
EFFECT
This section adds reverb, distortion or another effect to the original sound to change its tone.
FORMANT
Formants are vocal characteristics created by differences in mouth and throat shapes.
The FORMANT pedal of the can be used to change vocal characteristics without changing the pitch.
COMP (compressor)
Input sounds over a certain level can be compressed to lower their volume and even out the overall volume.
ENHANCE
This can make singing clearer by emphasizing high frequencies, and it can make the voice sound pleasanter by suppressing sibilant sounds as in “hiss” and “shhh”.
ECO mode
This function will automatically turn the power off 10 hours after the last operation.
4
Page 5

Contents
Introduction ����������������� 3
Terms used in this manual ���������� 4
Contents ������������������ 5
structure ����������������� 6
Names and functions of parts �������� 7
Making connections ������������ 10
ZOOM SGV-6 mic overview ��������� 11
Turning the power on ����������� 12
Using batteries ������������� 13
Adjusting the volume and tone ������� 14
Adjusting the mic input volume ������ 14
Reducing volume variation (compressor function) ������������������ 14
Bringing out vocal character (enhance function)
��������������������� 15
Adjusting headphone volume ������� 15
Making other settings ����������� 29
Setting the standard pitch for voices and harmonies ������������������� 29
Setting the type of batteries used ����� 30
Setting ECO mode to turn the power off automatically when not used ��������� 31
Restoring factory default settings ����� 32
Using audio interface functions ������� 33
Installing the driver ����������� 33
Connecting to a computer �������� 34
Updating the rmware ����������� 35
Troubleshooting �������������� 36
Specications ��������������� 38
Selecting patch memories ��������� 16
Using the VOICE section ���������� 17
Using the HARMONY section �������� 19
Using the EFFECT section ��������� 21
Saving settings in patch memories ����� 23
Using the FORMANT pedal ��������� 24
Adjusting the stiffness of the FORMANT pedal 24
Using the looper �������������� 25
Activating the looper ����������� 25
Recording and playing loops ������� 25
Overdubbing loops ����������� 26
Clearing the loop ������������ 27
Display indicators ������������ 27
Bypassing the effect of the
������� 28
5
Page 6
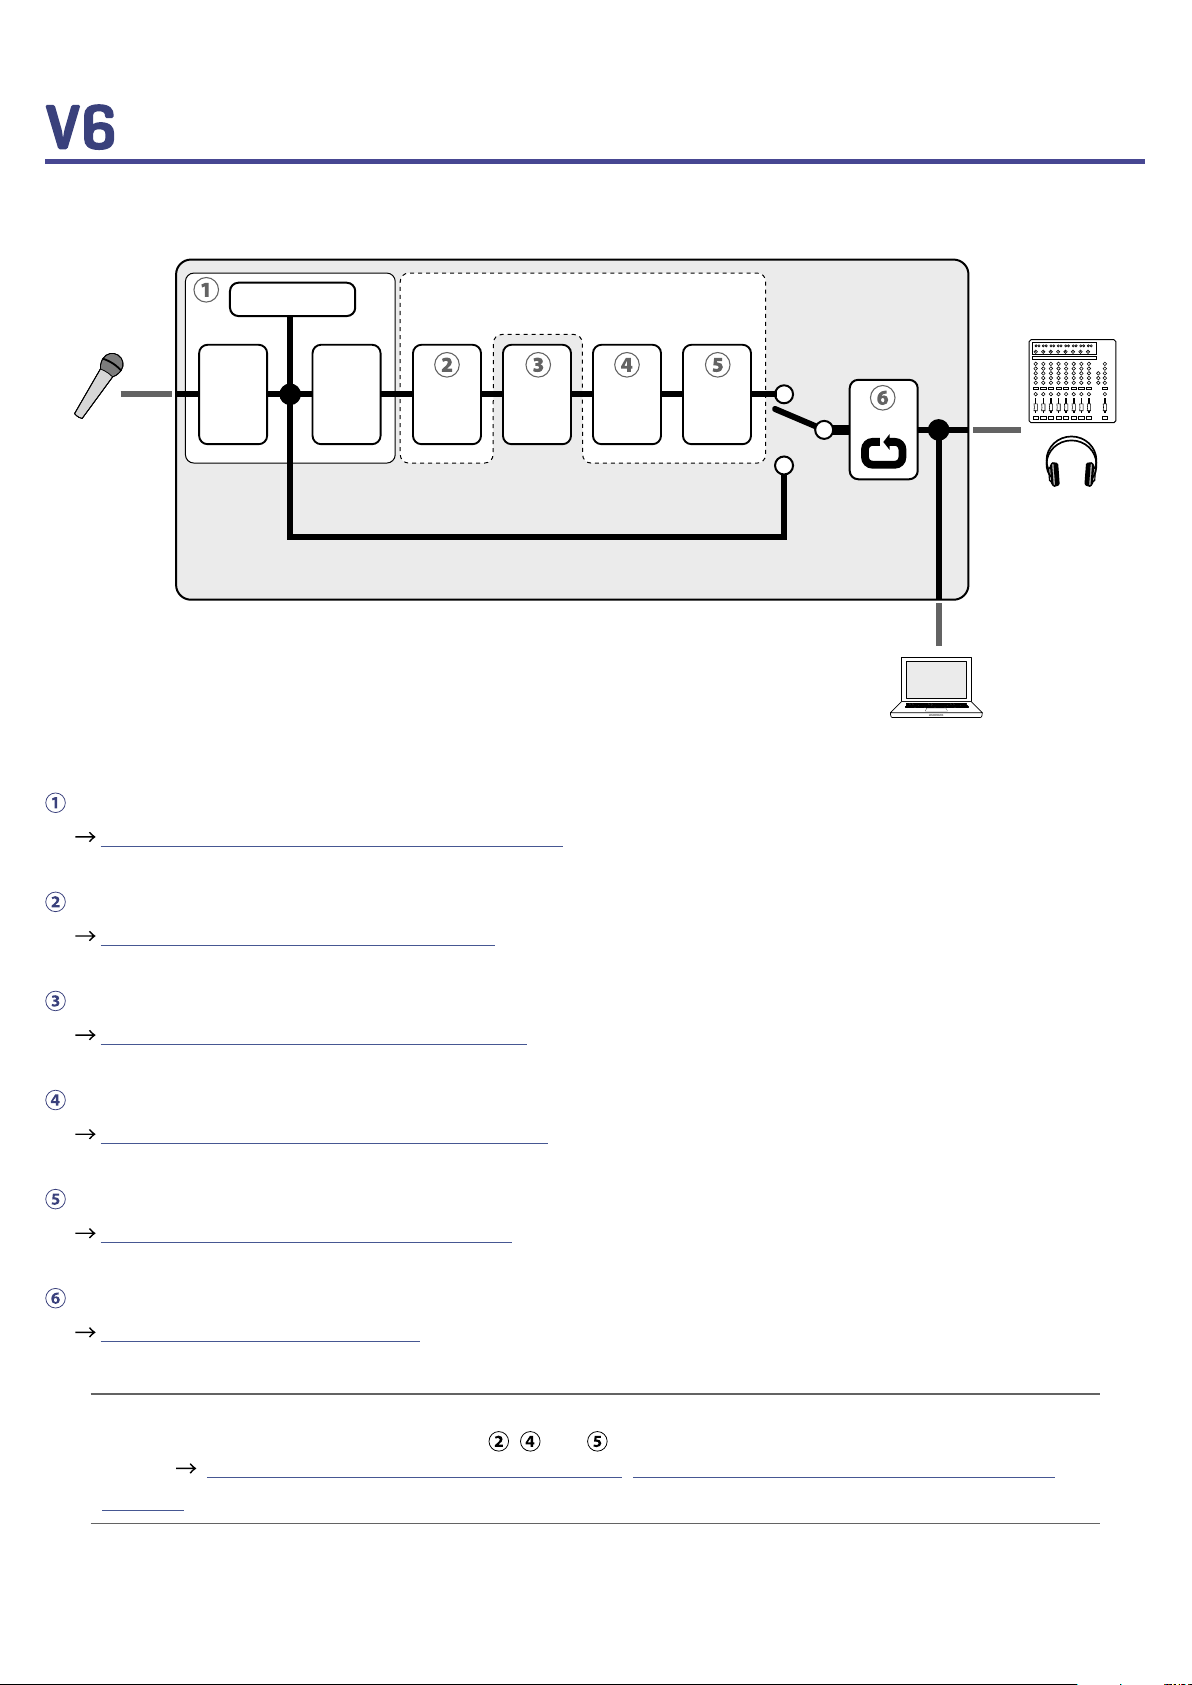
structure
■Signal ow
Settings saved in patch memories
Voice
Formant
Bypass
Harmony
EffectVolume
INPUT
Clip LED
Compressor
Enhance
The volume and tone of the input from the mic can be adjusted.
( “Adjusting the volume and tone” on page 14)
PA system
Looper
OUTPUT
Headphones
USB Audio
Computer
This can alter vocals with pitch correction, pitch shifting, vocoder and other options.
( “Using the VOICE section” on page 17)
The FORMANT pedal can be used to change vocal characteristics without changing the pitch.
( “Using the FORMANT pedal” on page 24)
This can add up to two harmonizing voices.
( “Using the HARMONY section” on page 19)
Use this to apply delay, reverb or another effect.
( “Using the EFFECT section” on page 21)
Recorded loops can be played back repeatedly.
( “Using the looper” on page 25)
HINT
VOICE, HARMONY and EFFECT settings (
called.
( “Selecting patch memories” on page 16, “Saving settings in patch memories” on
, and ) can be saved in patch memories and easily re-
page 23)
6
Page 7
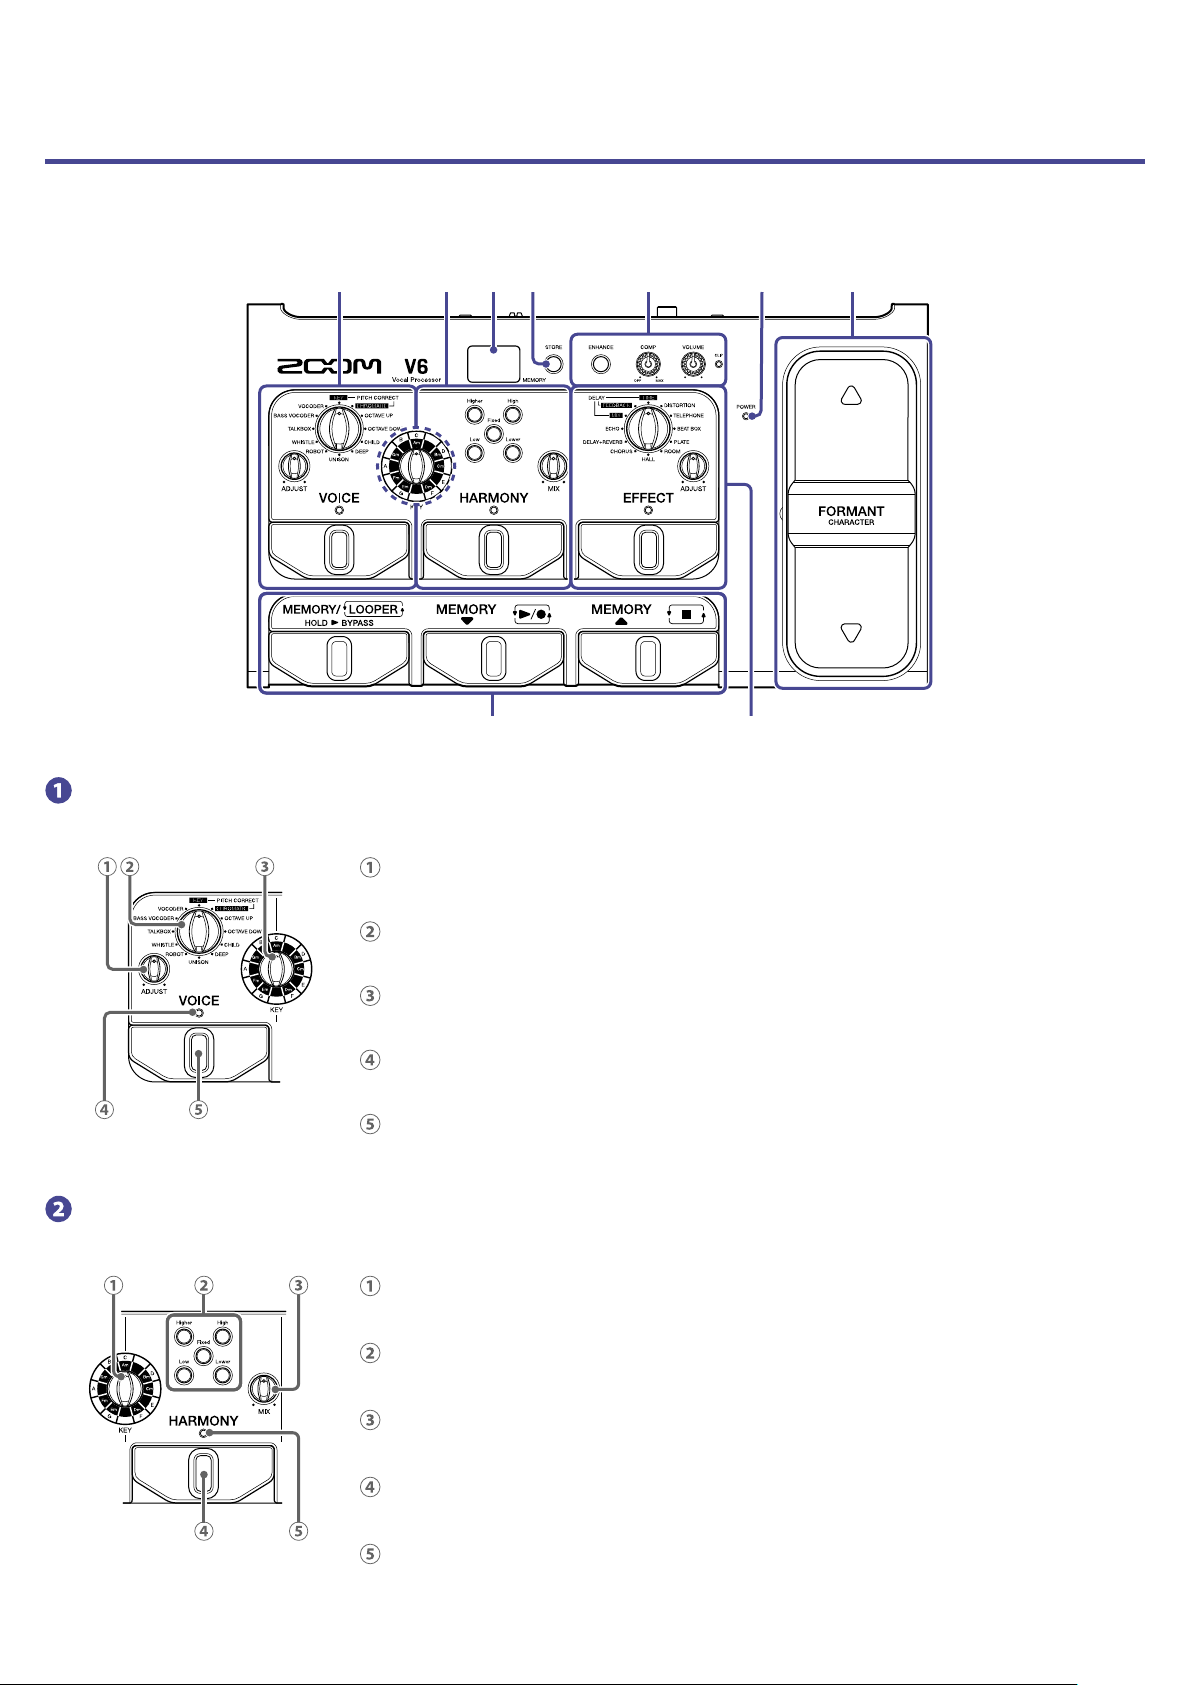
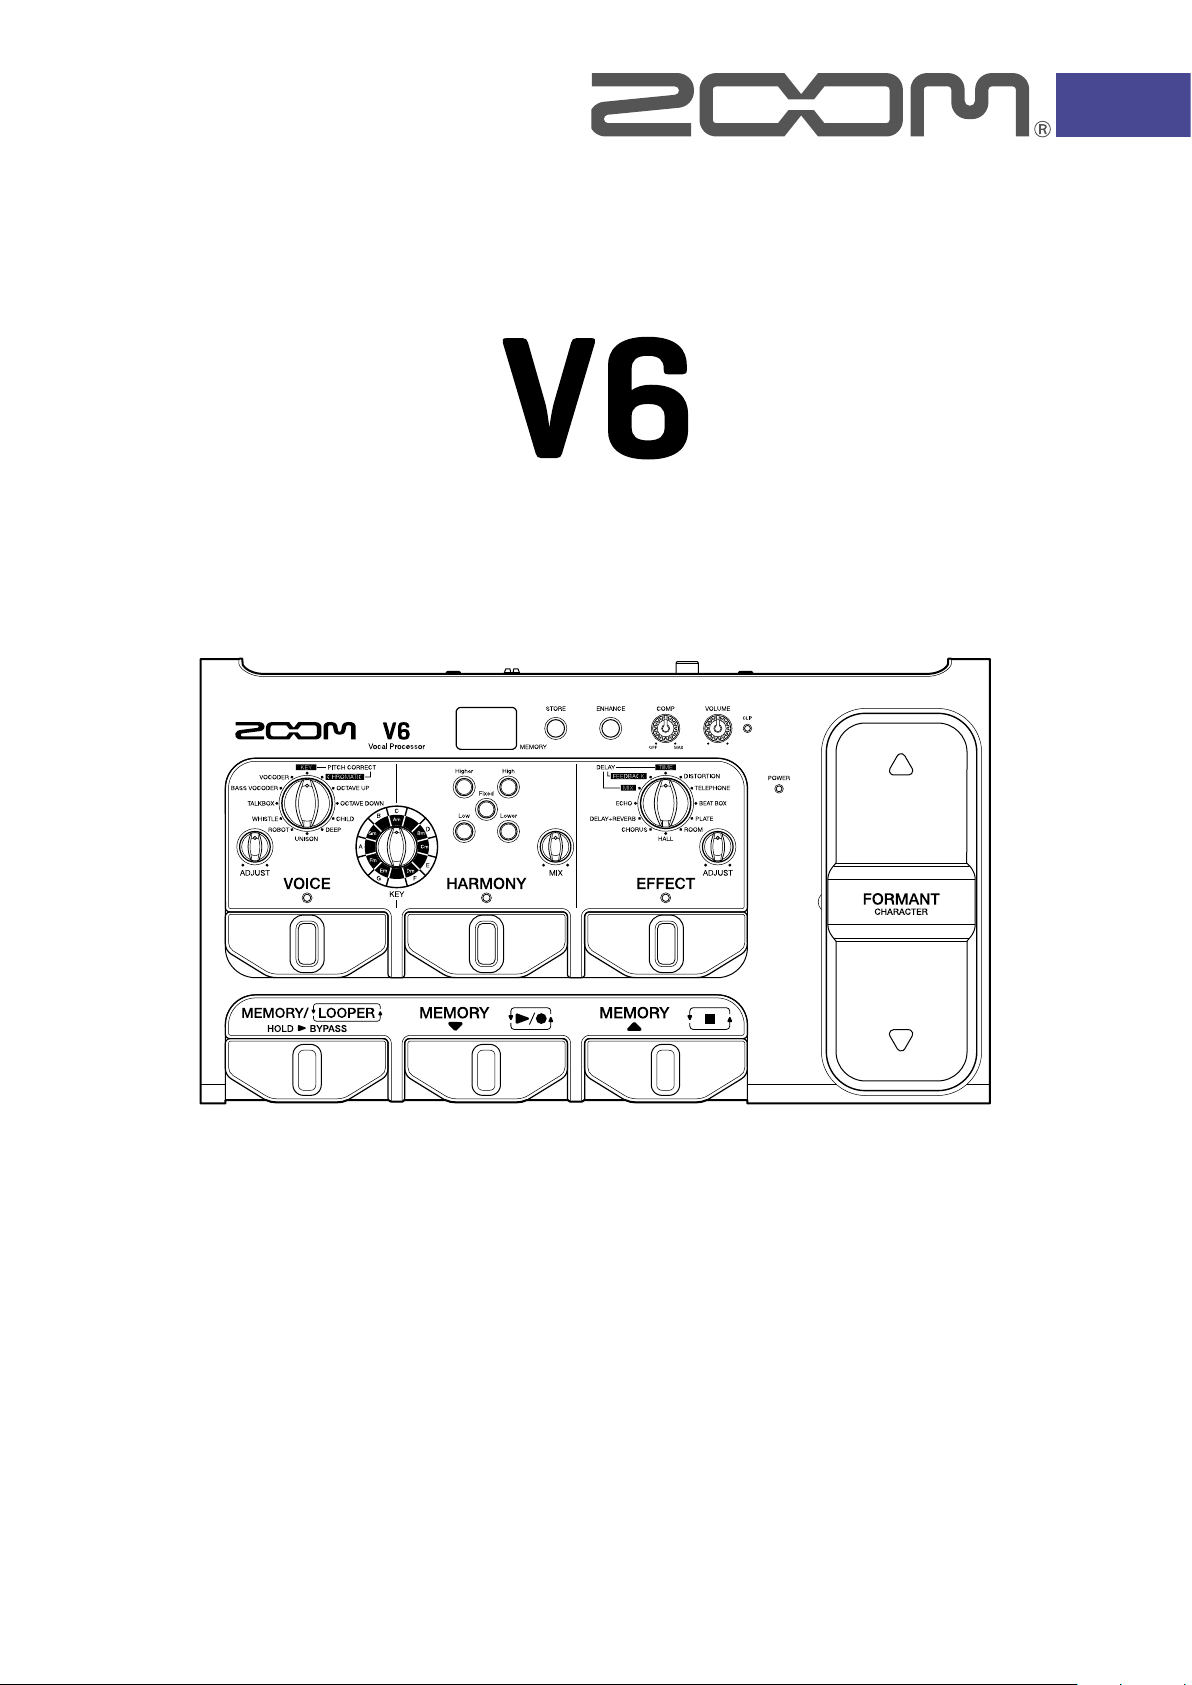
Names and functions of parts
■Front panel
❶ ❷ ❺❸ ❹ ❻ ❼
❽ ❾
VOICE section
Alter vocals with pitch correction, pitch shifting, vocoder and other options.
VOICE ADJUST knob
Use to adjust the voice.
VOICE selection knob
Select the voice type.
KEY selection knob
Select the key for pitch correction.
VOICE indicator
This shows whether the VOICE section is on or off.
VOICE footswitch
Turn the VOICE section on/off.
HARMONY section
Add up to two harmonizing voices.
KEY selection knob
Select the key for harmonization.
HARMONY style buttons
Press to activate harmony types.
HARMONY MIX knob
Adjust the balance between the vocal and the harmony.
HARMONY footswitch
Turn the HARMONY section on/off.
HARMONY indicator
This shows whether the HARMONY section is on or off.
7
Page 8
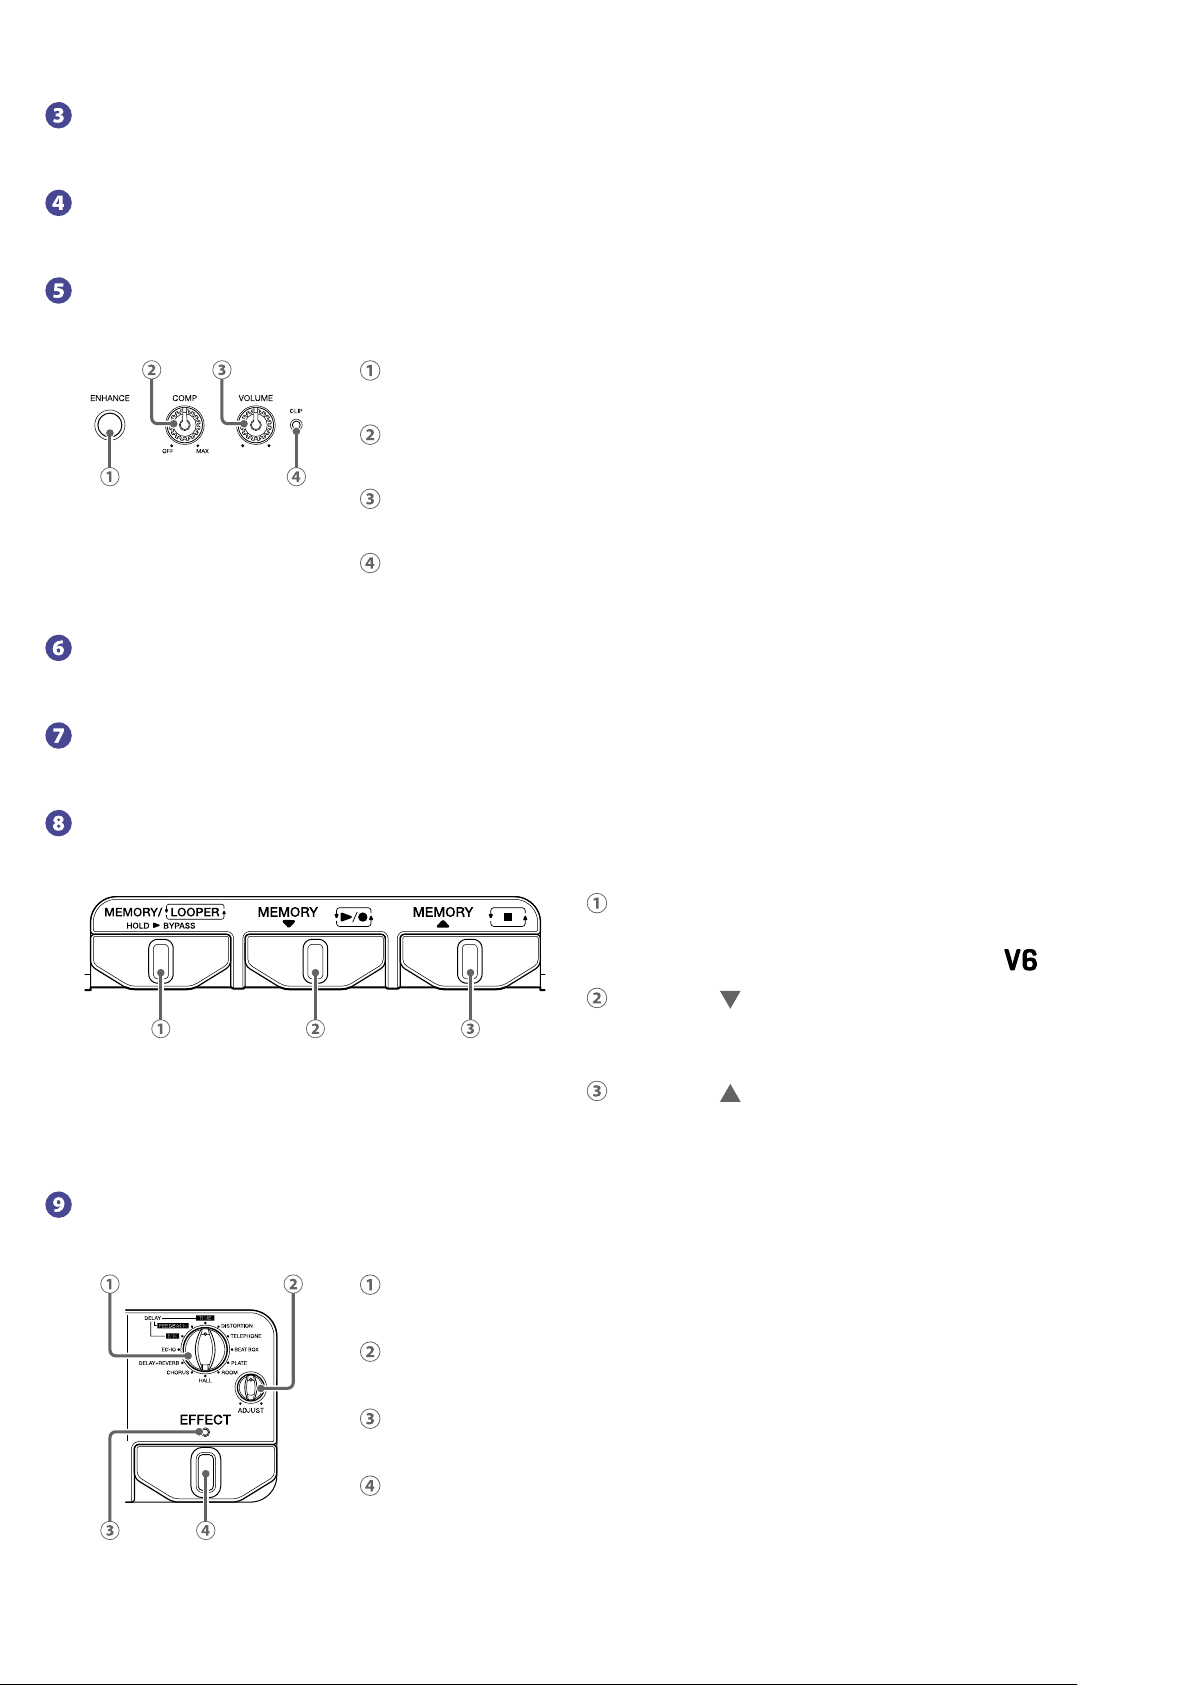
Display
This shows the selected patch memory number and looper status.
STORE button
Press to save the current settings to a patch memory.
Input control section
Adjust the volume and tone of the input from the mic.
ENHANCE button
Turn the ENHANCE function on/off.
COMP knob
Adjust the amount of compression.
VOLUME knob
Adjust the mic input volume.
CLIP indicator
This shows the status of the input sound.
POWER indicator
This shows whether the power is on or off and the remaining battery charge.
FORMANT pedal
Change the character of the voice.
Patch memory/looper control section
Select patch memories and operate the looper.
EFFECT section
Apply delay, reverb or another effect.
EFFECT selection knob
Select the effect.
MEMORY/LOOPER footswitch
Switch between memory and looper modes.
Press and hold to bypass the effect of the
.
MEMORY footswitch
Use to select patch memories.
When in looper mode, use to record and play loops.
MEMORY footswitch
Use to select patch memories.
When in looper mode, use to stop loops.
EFFECT ADJUST knob
Adjust the effect.
EFFECT indicator
This shows whether the EFFECT section is on or off.
EFFECT footswitch
Turn the EFFECT section on/off.
8
Page 9
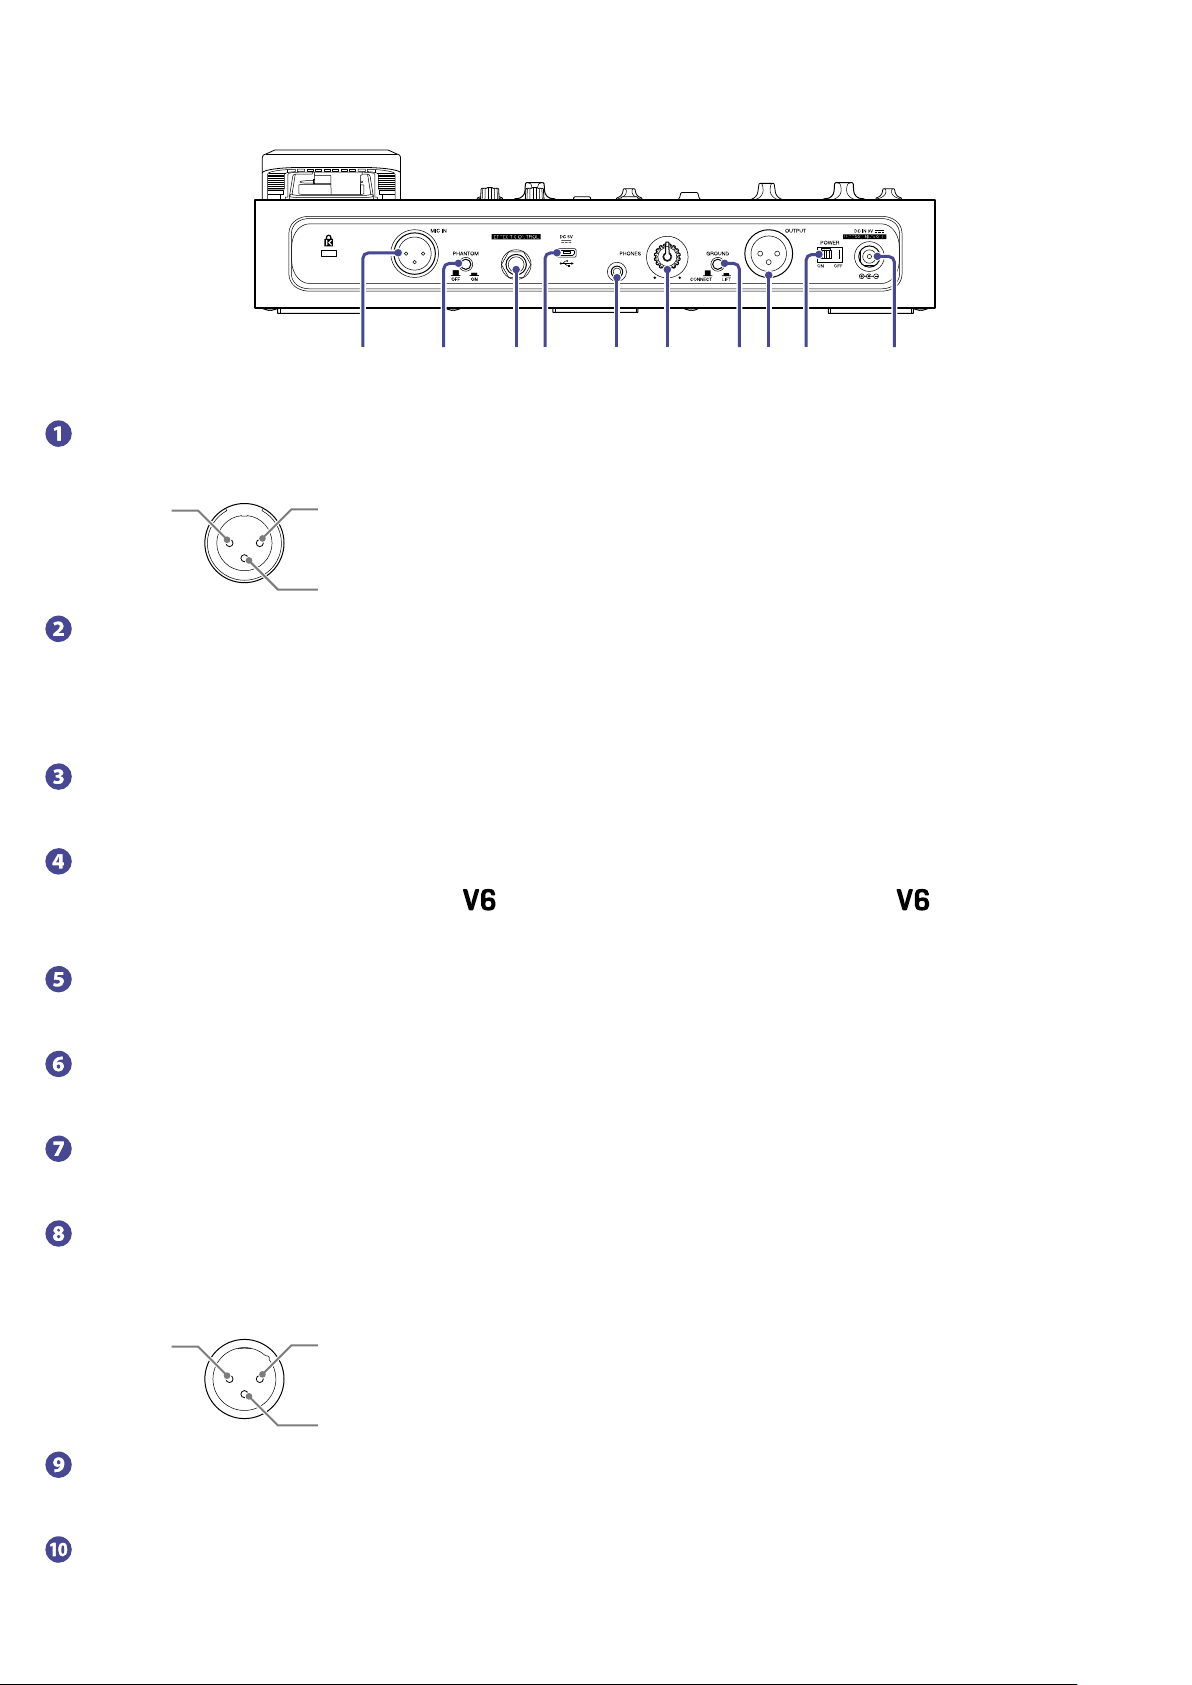
■Rear panel
❶ ❷ ❺❸❹ ❻ ❼❽ ❾
MIC IN jack
Connect a mic here.
2: HOT 1: GND
3: COLD
PHANTOM switch
Turn +48V phantom power ON/OFF.
Turn this ON when connecting a ZOOM SGV-6 mic or a condenser mic that requires phantom power,
for example.
EFFECT CONTROL connector
An expression pedal (ZOOM FP02M) can be connected here to control the effect.
USB port
Connect a computer here to use the
A mobile battery, for example, can also be connected here to provide power.
PHONES output jack
Connect headphones here.
PHONES output volume knob
Adjust the headphone output volume.
GROUND LIFT switch
This connects/disconnects the output jack ground.
OUTPUT jack
Connect this to a mixer, other PA system, recorder or other audio device that can adjust sound balance.
1: GND 2: HOT
as an audio interface or to update the rmware.
3: COLD
POWER switch
Turn the power on/off.
DC 9V AC adapter connector
Connect a dedicated AC adapter (ZOOM AD-16) here.
9
Page 10
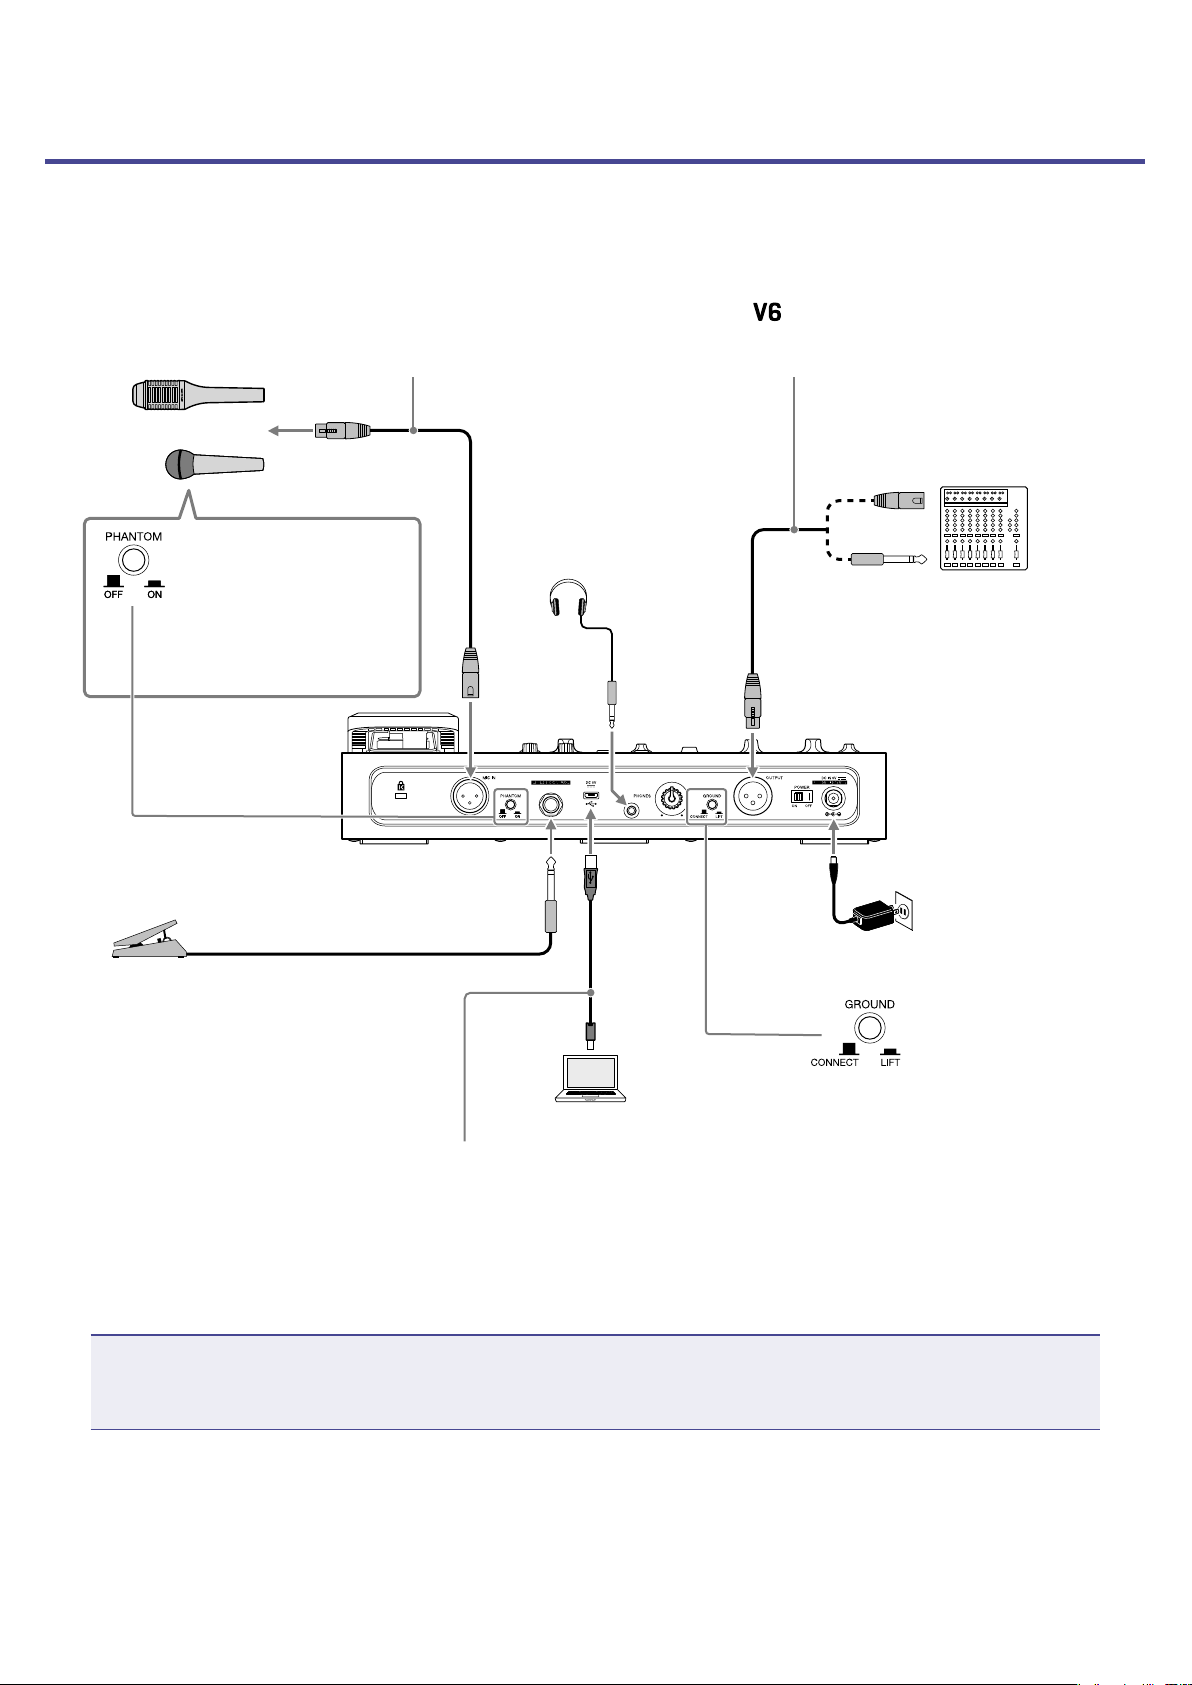
Making connections
Mic (ZOOM SGV-6 or
commercially-available mic)
Use a mic cable to
connect it to the MIC
IN jack.
Connect a cable with an XLR connector
(female) to the OUTPUT jack.
Use a cable with a connector that suits
the PA system or recorder input jack.
The
Connect it to a line input jack on the other
equipment.
output is line level.
or
When connecting a
ZOOM SGV-6, condenser mic or other device
that requires phantom
power, set the PHANTOM switch to ON.
Expression pedal (ZOOM
FP02M)
Connected to the EFFECT
CONTROL jack, the pedal
can be used to control the
effect.
Use a Micro USB cable to connect to the
USB port.
Stereo mini plug
headphones
Computer
Mixer, PA system, recorder,
etc.
or
AC adapter (ZOOM
AD-16)
This connects/disconnects the output jack ground.
• CONNECT: The grounding pin is
connected to the ground.
• LIFT: The grounding pin is disconnected from the ground. This is
effective if noise is caused by a
ground loop.
NOTE
Always set the PHANTOM switch to OFF when connecting a device that does not support phantom power. The device could be damaged if this is not done.
10
Page 11
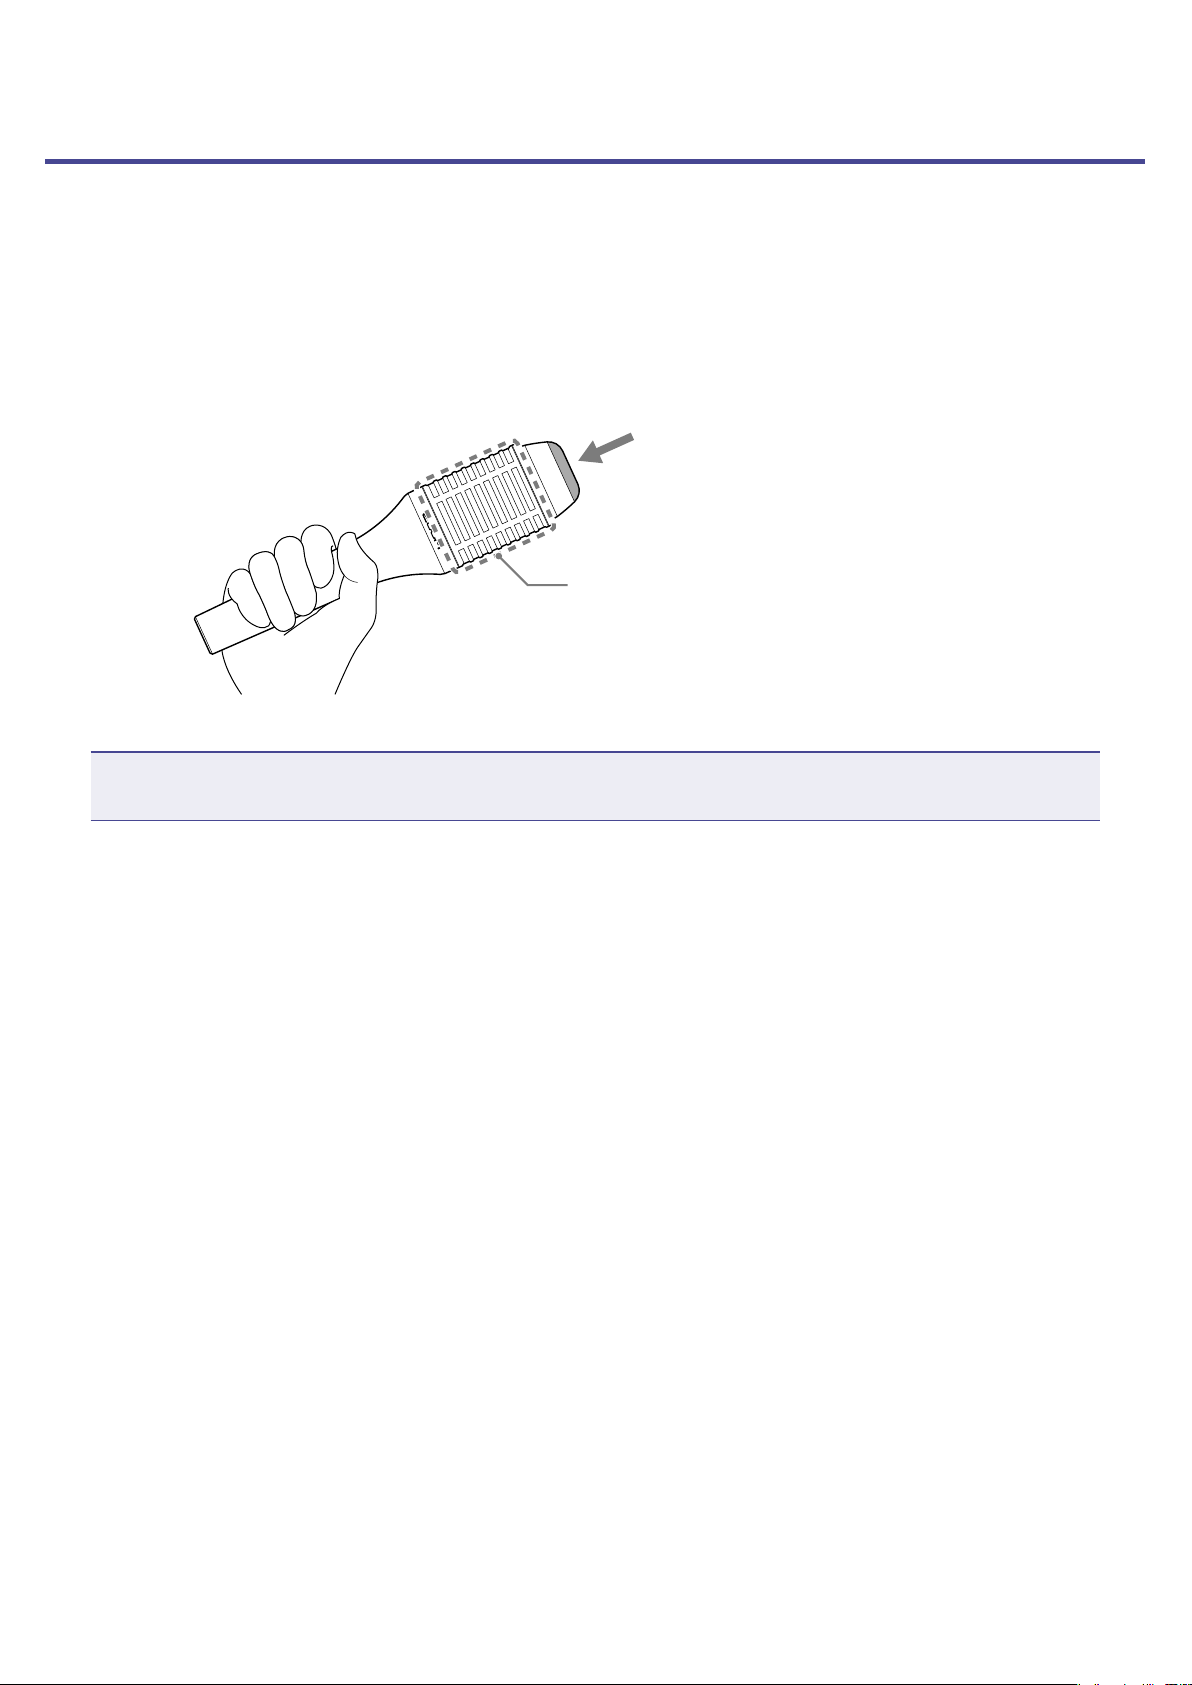
ZOOM SGV-6 mic overview
The SGV-6 is a mic with focused directionality based on the technologies of shotgun mics, which are designed to capture sound in the direction they are pointed.
By capturing only the vocal, sounds from other instruments on stage are suppressed, enabling accurate
pitch correction and harmonization.
■Using the SGV-6
Sing towards this end.
Holding this part will change its directionality, preventing it from functioning correctly.
Avoid holding it during use.
NOTE
The SGV-6 is a delicate device. Do not drop it or hit it with excessive force.
11
Page 12

Turning the power on
Minimize the volume of output devices.
1.
Set to ON.
2.
This turns the
Raise the volume of output devices.
3.
HINT
•4 AA batteries can also be used. Use only one type of battery (alkaline, NiMH or lithium) at a time. (
“Using batteries” on page 13)
•Power for operation can also be supplied through the USB port.
ECO mode overview
•By default, ECO mode is set to ON, so the power will automatically turn off if no use occurs for 10
hours.
•ECO mode can also be set to OFF on the SETTING screen. ( “Setting ECO mode to turn the power off
automatically when not used” on page 31)
on, and lights green.
12
Page 13

Using batteries
Open the battery compartment cover on the bottom of the product and insert 4 AA batteries.
NOTE
•Set the type of battery used correctly so that the amount of remaining battery charge can be shown
accurately. ( “Setting the type of batteries used” on page 30)
•
lights red when the remaining battery power becomes low. Replace the batteries with new ones.
13
Page 14

Adjusting the volume and tone
Adjusting the mic input volume
Turn .
1.
While singing, adjust it so
Quieter Louder
NOTE
Adjust the mic input volume to a level that enables the VOICE and HARMONY sections to function properly.
Volume too high
•
•
Volume suitable
•
Volume too low
lights green.
Reducing volume variation (compressor function)
Input sounds over a certain level can be compressed to lower their volume and even out the overall volume.
If a single song contains both shouting or other loud singing and quiet whisper-like singing, for example,
matching the level to the loud singing will cause the quiet singing to become inaudible. Compressing the
volume of loud singing to reduce overall volume differences makes quiet singing easier to hear.
Overall volume is raised by
amount loud part compressed
Loud voice Quiet voice Loud part is compressed
Turn .
1.
Turn it right to increase the effect.
Turn it completely left to turn the compressor function off.
Overall volume difference is reduced
Quiet voice becomes
easier to hear
14
Page 15

Bringing out vocal character (enhance function)
The enhance function has two effects.
•Bringing out vocal character
By emphasizing high frequencies, this can make singing clearer, so that it is not lost in the sound of a
band.
•Suppressing “s” sounds and other sibilant sounds
Sibilant sounds are produced by air pushed through gaps between teeth and include hissing “s”
sounds. Suppressing sibilant sounds that become distracting when the mic volume is turned up can
make voices sound pleasanter.
Press .
1.
This turns the enhance function on and
lights.
Adjusting headphone volume
When using headphones to listen to the , turn the PHONES knob to adjust the volume.
Turn .
1.
Quieter
Louder
15
Page 16

Selecting patch memories
The comes with patch memories that allow a variety of vocal sounds to be tried right away.
Patch memories store all VOICE, HARMONY and EFFECT section settings.
Up to 100 patch memories can be stored.
Press or .
1.
Use these to select patch memories.
The selected patch memory number is shown on the display.
HINT
•When the
display will show the patch memory number.
•If VOICE, HARMONY or EFFECT settings are adjusted, will light, showing that they are different from
power is turned on, the settings of the patch memory last used will be loaded and the
the saved settings. Save the settings as needed. (
mode overview
The
•In memory mode, patch memories can be selected.
•In looper mode, the looper can be used.
Press
Memory mode is active when the
has two modes: memory and looper.
to switch between the modes.
power is turned on.
“Saving settings in patch memories” on page 23)
16
Page 17

Using the VOICE section
Use this section to alter the sound of the voice. For example, use it to correct pitch according to the key or
give the voice a childlike, synthesized or vocoder sound.
Press .
1.
The VOICE section is activated, and
Turn .
2.
This selects the voice.
Turn .
3.
This adjusts the voice.
Voice Explanation ADJUST function
This corrects the pitch to the set key.*
PITCH CORRECT - KEY**
PITCH CORRECT - CHROMATIC**
This can be adjusted from a gentle pitch correction
to a mechanical effect that changes the pitch in
steps.
This corrects the pitch to semitones.
This can be adjusted from a gentle pitch correction
to a mechanical effect that changes the pitch in
steps. We recommend this setting when a song is
in an unknown key or it has numerous key changes.
lights.
Pitch correction amount
Pitch correction amount
OCTAVE UP
OCTAVE DOWN
CHILD**
DEEP**
UNISON
This doubles the voice one octave up.
Together with the HARMONY function, rich harmonies with three voices can be generated.
This doubles the voice one octave down.
Together with the HARMONY function, rich harmonies with three voices can be generated.
This makes the voice high-pitched and childlike by
raising the pitch and changing the character greatly.
This also corrects pitch to the set key.*
This makes the voice low-pitched and deep by lowering the pitch and changing the character greatly.
This also corrects pitch to the set key.*
This creates an effect like singing the same part
twice by duplicating the sound with the pitch and
timing slightly shifted.
17
Balances original and effect sounds
Balances original and effect sounds
Pitch correction amount
Pitch correction amount
Effect mix level
Page 18

ROBOT**
WHISTLE
This transforms the sound into a robotic voice output at the root note of the set key.*
Using this during intros and interludes can enhance the performance of a song.
This has the effect of sounding like whistling even
when just singing.
The octave of the whistling is different according
to whether the setting of the ADJUST knob is on
the left or right half. Choose the octave according
to the pitch of the singing and adjust the loudness
of the original sound.
+2 octaves
+3 octaves
Robot voice octave
Amount of original
sound in mix/whistle
octave
TALKBOX**
BASS VOCODER**
VOCODER**
Maximum
original sound
This creates a talk box sound effect.
This corrects the pitch to the set key.* TALKBOX
pitch correction follows a blue note scale and adds
3 to major scales and a 5 to natural minor
a
scales.
This creates a vocoder sound effect lowered one
octave.
This corrects the pitch to the set key.* Increasing
the pitch correction brings the sound closer to the
pitch of the same note played on a keyboard.
This creates a vocoder sound effect.
This corrects the pitch to the set key.* Increasing
the pitch correction brings the sound closer to the
pitch of the same note played on a keyboard. Use
this together with the HARMONY function for even
greater effect.
Maximum
original sound
Pitch correction amount
Pitch correction amount
Pitch correction amount
*For details about setting the key, see step 2 of “Using the HARMONY section” on page 19.
**This follows the standard pitch setting (
“Setting the standard pitch for voices and harmonies” on
page 29).
18
Page 19

Using the HARMONY section
In the HARMONY section, two of the ve options can be selected to generate harmonies automatically
based on the KEY setting.
Press .
1.
The HARMONY section is activated, and
Turn .
2.
lights.
Set the key of the song being sung.
When using sheet music, the key can be determined from the key signature.
♭
♭
♭
♭
E
B
F
Am
Am
C
Cm
Gm
Dm
A
D
G
C
F♯m
Bm
Em
Major key
Minor key
Major key
Minor key
What is a key?
A key is a musical scale of 7 notes used in a song. Bright-sounding scales are known as major keys and
dark-sounding scales are known as minor keys. The rst note in the scale gives the key its name (A–G).
For example, the bright-sounding scale that begins with C (Do) and has the seven notes C, D, E, F, G, A
and B (Do, Re, Mi, Fa, Sol, La and Ti) is called the C major key. Likewise, the dark-sounding scale that
contains the same notes, but begins with A (La) is the A minor (Am) key.
A
Fm
C♯m
D
B♭m
♯
B
E
G♯m
F
D♯m
C
Major
Do, Re, Mi, Fa, Sol, La, Ti
C/Do, D/Re, E/Mi, F/Fa,
G/Sol, A/La, B/Ti
Press , , , or .
3.
A
Minor
La, Ti, Do, Re,
Mi, Fa, Sol
A/La, B/Ti, C/Do, D/
Re, E/Mi, F/Fa, G/Sol
lights, and the selected harmony is added. Press repeatedly to cycle through volume levels:
high
medium low off. The brightness changes with the level.
Up to two harmony options can be activated. Activating a third harmony option will cancel the rst
one that was activated.
19
Page 20

Harmony Explanation
Higher +5 or +6 degrees
High +3 or +4 degrees
Fixed The note of the key selected in step 2 (xed)
Low –3 or –4 degrees
Lower –5 or –6 degrees
Higher harmony
High harmony
Sung pitch
Low harmony
Lower harmony
Each harmony is generated automatically according to the key selected in step 2.
Example 1: Singing a C note when the key is C major with High and Higher selected will produce
the following notes.
Higher harmony
High harmony
Sung pitch
Example 2: Singing C, D, E, F, G, A and B (Do, Re, Mi, Fa, Sol, La and Ti) when the key is C major
will produce the following notes.
Higher: G, A, C, C, D, E, F (Sol, La, Do, Do, Re, Mi, Fa)
High: E, F, G, A, C, C, D (Mi, Fa, Sol, La, Do, Do, Re)
Sung pitch: C, D, E, F, G, A, B (Do, Re, Mi, Fa, Sol, La, Ti)
Low: G, A, C, C, D, E, F (Sol, La, Do, Do, Re, Mi, Fa)
Lower: E, F, G, A, C, C, D (Mi, Fa, Sol, La, Do, Do, Re)
Pitches added with the HARMONY function
“Degrees” are the number of steps in the scale from the fundamental pitch of the key.
–8 –7 –6 –5 –4 –3 –2
Do Re Mi Fa
For example, when “Higher” is activated, Harmony will automatically be generated +5 or +6 degrees
above the sung pitch.
Turn .
4.
Sol
La Ti Do Re Mi Fa
Original note
+2 +3 +4 +5 +6 +7 +8
Sol
La Ti Do
This adjusts the balance of the original with the harmony sounds.
Only the harmony sound will be output when turned all the way to the right.
20
Page 21

Using the EFFECT section
This section adds reverb, distortion or another effect to the original sound to change its tone.
Press .
1.
The EFFECT section is activated, and
Turn .
2.
This selects the effect.
Turn .
3.
This adjusts the effect.
Effect Explanation ADJUST function
DISTORTION Distorts the voice heavily Distortion amount
TELEPHONE Retro-sounding telephone emulation Frequency band affected
Adds impact for beat boxing.
This adds power to kick and snare sounds
BEAT BOX
while emphasizing the sharpness of high
hats. A moderate amount of compression
also evens out the volumes of kick, snare and
high hat sounds, which tend to vary greatly.
lights.
Boost amount
PLATE* Plate reverb simulation
ROOM* Tight reverb that simulates room acoustics
HALL* Dense reverb that simulates hall acoustics
CHORUS Thick, gentle chorus Effect mix level
DELAY+REVERB* Combines delay and reverb
ECHO Crisp short delay that brings out clarity Effect mix level
TIME
DELAY**
*This produces a stereo effect. (Stereo output is possible from the PHONES OUT jack.)
**The DELAY effect is set by its TIME, FEEDBACK and MIX settings.
FEEDBACK Feedback amount
MIX Effect mix level
Clear-sounding delay that allows detailed parameter settings
Reverb duration and mix
amount
Reverb duration and mix
amount
Reverb duration and mix
amount
Reverb duration and mix
amount
Delay time
21
Page 22

Notes about effects
TELEPHONE: This cuts high and low frequencies and distorts the sound to give it a lo- quality.
REVERB: Adding reverberations gives the sound width and depth.
CHORUS: Adding just a small amount of uctuation gives the sound thickness and textural variation.
DELAY: By repeating the sound at regular intervals, an effect that follows the rhythm can be created.
Adjusting the delay
DELAY TIME: This adjusts the amount of time before the delay sound. This can be set to up to 2 seconds.
FEEDBACK amount: This adjusts the number of times the delay sound is repeated.
Singing
Feedback amount
La… La… La… La… La…
Delay time
HINT
•When DELAY - TIME is selected,
repeatedly to set the delay time to the interval between presses.
•If an expression pedal (ZOOM FP02M) is connected, it can be used to adjust the effect (same as turning
). Adjustments made with a pedal are not saved in the patch memory.
functions as a tap tempo setting switch for the delay time. Press
22
Page 23

Saving settings in patch memories
VOICE, HARMONY, and EFFECT settings can be saved as patch memories.
Press .
1.
The display blinks.
Press or .
2.
Select the destination patch memory.
The selected patch memory number is shown on the display.
Press .
3.
The current settings are saved.
HINT
Press
to cancel saving.
23
Page 24

Using the FORMANT pedal
Formants are vocal characteristics created by differences in mouth and throat shapes.
By using the FORMANT pedal to change the formant, vocal characteristics can be changed without changing the pitch.
Operate the FORMANT pedal.
1.
This changes the character of the voice.
Press forward (toe)
This makes the voice higher and cuter.
Press backward (heel)
This makes the voice lower and heavier.
Unpressed state
The vocal automatically returns to its regular character when the foot is removed.
Adjusting the stiffness of the FORMANT pedal
The FORMANT pedal torque can be adjusted so that it responds as you like to pressing.
Insert a 5mm hex wrench into the torque adjustment screw on the side of the pedal.
1.
Turn it clockwise to tighten the pedal and counterclockwise to loosen it.
2.
Loosen Tighten
NOTE
Be careful because loosening the torque adjustment screw too much could cause it to become disconnected internally, making it impossible to keep the pedal in a xed position.
24
Page 25

Using the looper
Vocals can be recorded and loops created for up to 3.5 minutes.
Loops can be layered for a variety of live performance techniques, including a cappella choruses and vocal percussion.
Activating the looper
When in memory mode, press .
1.
appears on the display.
HINT
Press
to return to memory mode.
Recording and playing loops
Press .
1.
The recording starts, and
HINT
Press
Press again.
2.
to cancel recording ( will appear on the display).
appears on the display.
Recording starts, playback stops, and
If the maximum recording time is reached, recording will stop automatically and loop playback will
start.
Press .
3.
Playback stops and
blinks on the display.
appears on the display.
25
Page 26

Overdubbing loops
Additional performances can be added to the recorded loop.
Press during loop playback.
1.
Overdubbing starts, and
When the end of the loop is reached, loop playback will continue from the beginning, and overdubbing can be repeated.
Press during overdubbing.
2.
This stops overdubbing, but continues loop playback.
appears on the display.
■Removing the last recorded loop
During loop playback, press twice quickly.
1.
After
blinks on the display, appears.
appears on the display.
■Restoring the removed loop
After removing a loop, press twice quickly again.
1.
After
blinks on the display, appears.
26
Page 27

Clearing the loop
When loop playback is stopped, press and hold .
1.
The recorded loop is cleared, and
Display indicators
Indicator Explanation
LOOPER:
REC:
PLAY:
UNDO:
REDO:
No loop recorded
Loop being recorded
Loop being played back (blinks when stopped)
Last overdubbed loop being removed
Loop removed using UNDO being restored
appears on the display.
27
Page 28

Bypassing the effect of the
Press and hold .
1.
The effect of the
In memory mode
In looper mode
Press
is bypassed, and the display appears as follows.
The patch memory number and ”bP” appear alternately.
The looper status and ”bP” appear alternately.
to stop bypassing.
28
Page 29

Making other settings
Setting the standard pitch for voices and harmonies
This adjusts the standard pitch used for correcting vocal pitch and adding harmony.
While pressing and holding , set to ON.
1.
After
Press or .
2.
Set the standard pitch in 1Hz intervals (the default is 440 Hz).
What is the standard pitch?
The pitch used for “A” (La) is expressed in hertz (Hz).
Vocal and harmony pitches can be matched to the instruments being played together by setting the standard pitch used by the
Press .
3.
appears on the display, the current setting value appears.
435 Hz
445Hz
to the same pitch.
The display blinks rapidly, the setting is saved, and the
HINT
Press to cancel the setting change.
29
starts normal operation.
Page 30

Setting the type of batteries used
Set the type of battery used correctly so that the amount of remaining battery charge can be shown accurately.
While pressing and holding , set to ON.
1.
After
Press or .
2.
Set the type of batteries used.
•
•
•
Press .
3.
The display blinks rapidly, the setting is saved, and the
HINT
Press to cancel the setting change.
appears on the display, the current setting value appears.
Alkaline batteries
Nickel-metal hydride batteries
Lithium batteries
starts normal operation.
30
Page 31

Setting ECO mode to turn the power off automatically when not used
This function can be used to turn the power off automatically if unused for 10 hours.
While pressing and holding , set to ON.
1.
After
Press or .
2.
Select the setting.
•
•
Press .
3.
The display blinks rapidly, the setting is saved, and the
HINT
Press to cancel the setting change.
appears on the display, the current setting value appears.
The power will automatically turn off if unused for 10 hours.
ECO mode is off.
starts normal operation.
31
Page 32

Restoring factory default settings
While pressing and holding , set to ON.
1.
blinks on the display.
Press .
2.
The display blinks rapidly, initialization occurs, restoring settings to their factory defaults, and the
starts normal operation.
NOTE
Initialization will overwrite all settings, including patch memories, to their factory defaults. Be certain
before using this function.
HINT
Press to cancel the setting change.
32
Page 33

Using audio interface functions
Installing the driver
■Windows
Download the “ZOOM V6 Driver” from www.zoom.co.jp to the computer.
1.
NOTE
•You can download the latest “ZOOM V6 Driver” from the above website.
•Download the driver for the operating system that you are using.
Launch the installer and follow the instructions to install the ZOOM V6 Driver.
2.
NOTE
•See the Installation Guide included in the driver package for detailed installation procedures.
•If the power supplied by the USB bus is low, or you want to operate the unit with an adapter, use the
dedicated AC adapter (ZOOM AD-16).
■Mac and iOS devices
A driver is not necessary when using a Mac or iOS device.
33
Page 34

Connecting to a computer
Use a USB cable to connect the with the computer or iOS device.
1.
NOTE
When connecting to an iOS device, use a Lightning to USB camera adapter (or Lightning to USB 3 camera adapter).
Set to ON.
2.
After the
When connecting to a computer, continue to step 3.
Set the as the sound device for use with the computer.
3.
turns on, it will connect to an iOS device.
34
Page 35

Updating the rmware
Check the ZOOM website (www.zoom.co.jp), and download rmware for the .
Use a USB cable to connect the and the computer.
1.
While pressing both and , set to ON.
2.
This turns the
appears on the display.
Launch the rmware update application on the computer.
3.
Execute the update.
4.
While updating,
When updating completes,
NOTE
•Do not disconnect the USB cable during a rmware update.
•In the unlikely event that a rmware update fails while in progress,
appear on the display. Conduct the rmware update again from the rst step in these procedures.
After updating completes, set to OFF and disconnect the USB cable.
5.
HINT
Updating the rmware will not erase saved patch memories.
on, and lights orange.
blinks orange.
lights green.
will light red and will
35
Page 36

Troubleshooting
The unit will not power on
•Conrm that the POWER switch is set to ON. ( “Turning the power on” on page 12)
•If using batteries, conrm that they are still charged. ( “Turning the power on” on page 12)
There is no sound or output is very quiet
•Check the connections. ( “Making connections” on page 10)
•Raise the volume of output devices.
•If using headphones, raise the headphone volume. ( “Adjusting headphone volume” on page 15)
There is a lot of noise
•Conrm that a shielded cable is not the cause.
•Use a genuine ZOOM AC adapter. ( “Making connections” on page 10)
•Check the GROUND LIFT switch setting. ( “Making connections” on page 10)
The sound distorts strangely or has an odd timbre
•Adjust the input volume to a suitable level. ( “Adjusting the mic input volume” on page 14)
•Adjust the amount of compression. ( “Reducing volume variation (compressor function)” on page 14)
The VOICE function has no effect
•Adjust the VOICE ADJUST knob. ( “Using the VOICE section” on page 17)
The HARMONY function has no effect
•Use the HARMONY MIX knob to adjust the harmony volume. ( “Using the HARMONY section” on
page 19)
•Use the KEY selection knob to set the key correctly. ( “Using the HARMONY section” on page 19)
The EFFECT function has no effect
•Adjust the EFFECT ADJUST knob. ( “Using the EFFECT section” on page 21)
36
Page 37

Batteries lose their charge quickly
•Conrm that you are not using manganese batteries. Alkaline batteries should provide about 3.5 hours
of continuous operation.
•Conrm the battery setting.
The setting must match the batteries being used in order to show the remaining battery charge accurately. ( “Setting the type of batteries used” on page 30)
•Due to battery characteristics, they are discharged more quickly when used in places with low temperatures.
37
Page 38

Specications
VOICE section 12 types
EFFECT section 10 types
HARMONY section 5 types
Number of patch memories 10 0
Sampling frequency 44.1 kHz
A/D conversion 24-bit 128× oversampling
D/A conversion 24-bit 128× oversampling
Signal processing 32-bit
Frequency response 20 Hz–20 kHz (+1 dB/−3 dB) (200 kΩ load)
Display 2-digit 7-segment LED
Input SGV-6 Directionality: Super cardioid (3 directional mic units)
MIC IN XLR jack
Outputs OUTPUT XLR jack
PHONES Stereo mini jack
Equivalent input noise (when phantom power off)
Noise oor (residual noise) –75 dBu
Control input FP02 input
Power AC adapter (9 V DC 500 mA, center negative) (ZOOM AD-16)
USB Connector: Micro USB
External dimensions 181 mm (D) × 320 mm (W) × 77 mm (H)
Weight 1.56 kg (excluding batteries)
Optional FP02 expression pedal
Note: 0 dBu = 0.775 V
Sensitivity: –46 dB/Pa at 1 kHz (each mic unit)
Maximum sound pressure input: 140 dBSPL
Input gain: +3 – +40 dB
Maximum input level: +4 dBu
Input impedance: 3 kΩ or higher (1 kHz)
Phantom power: +48 V
Maximum output level: +8 dBu
Output impedance: 50 Ω (HOT-GND, COLD-GND, 1 kHz)
100 Ω (HOT-COLD , 1 kHz)
GROUND LIFT (switchable)
Maximum output level:
20 mW + 20 mW (into 32 Ω load)
–125 dBu or less (A-weighted, 150 Ω input, +40 dBu input gain)
4 AA batteries (about 3.5 hours continuous operation time when using alkaline batteries)
Audio interface operation: 2-in/2-out USB2.0 Full Speed, 44.1 kHz, 16/24/32-bit
•PowercanalsobesuppliedthroughtheUSBport.
•Whenusingacabledesignedonlyforpower,otherUSBfunctionscannotbeused.
38
Page 39

ZOOM CORPORATION
4-4-3 Kanda-surugadai, Chiyoda-ku, Tokyo 101-0062 Japan
www.zoom.co.jp
Z2I-3647-02
 Loading...