

Page 1

ZoomAir
ZoomAir
ZoomAirZoomAir
USB Client
USB Client
USB ClientUSB Client
Installation Guide
&
Reference Manual
™
Page 2

NOTICE
NOTICE
NOTICENOTICE
This document contains proprietary information protected by copyright, and
this Manual and all the accompanying hardware, software, and
documentation are copyrighted. All rights are reserved. No part of this
document may be photocopied or reproduced by mechanical, electronic, or
other means in any form.
The manufacturer does not warrant that the hardware will work properly in
all environments and applications, and makes no warranty or representation,
either expressed or implied, with respect to the quality, performance,
merchantability, or fitness for a particular purpose of the software or
documentation. The manufacturer reserves the right to make changes to the
hardware, software, and documentation without obligation to notify any
person or organization of the revision or change.
All brand and product names are the trademarks of their respective owners.
© Copyright 2002
All rights reserved.
Page 3

Contents
1 INSTALLING YOUR ZOOMAIR USB CLIENT ............................ 5
P
ACKAGE CONTENTS................................................................ 5
I
NSTALLING THE USB SOFTWARE ............................................... 6
ONNECTING THE USB CLIENT TO YOUR COMPUTER ....................... 8
C
SING YOUR ZOOMAIR USB CLIENT.................................. 11
2 U
S
ETTING THE WINDOWS NETWORK PROPERTIES............................11
U
SING YOUR CLIENT WITH OTHER ZOOMAIR PRODUCTS .................12
IEWING OTHER COMPUTERS ...................................................14
V
SAGE AND MAINTENANCE TIPS ................................................15
U
F
INDING MORE INFORMATION ..................................................15
3 U
PGRADING OR REMOVING YOUR USB CLIENT .................... 17
U
PGRADING .........................................................................17
EMOVING ...........................................................................18
R
4 A
DVANCED FEATURES....................................................... 21
A
PPENDIX A WIRELESS NETWORKING OVERVIEW ................... 33
A
DHOC VS. INFRASTRUCTURE ...................................................33
A
PPENDIX B TROUBLESHOOTING .......................................... 35
PPENDIX C REGULATORY INFORMATION............................... 37
A
I
MPORTANT INFORMATION TABLE ......................................... 40
Page 4

Page 5

1
Installing Your
ZoomAir USB Client
This chapter explains how to install your USB Client, including
• Installing the USB software
• Connecting the USB Client to a computer.
Note:
Package Contents
Your USB Client package contains the following components:
If any of these items is missing or appears to be damaged, please
contact your supplier.
Before beginning, please fill out the Important Information table
on page 40. This table lists all pertinent information about your
ZoomAir product in case you need to contact Customer Service.
Your USB Client works with Windows 98, 2000, Me, and
XP.
• ZoomAir USB Client device
• Documentation
• CD containing drivers, software, and electronic
documentation
• USB cable
• Laptop mounting clip.
Chapter 1 Installing Your ZoomAir USB Client 5
Page 6
Installing the USB Software
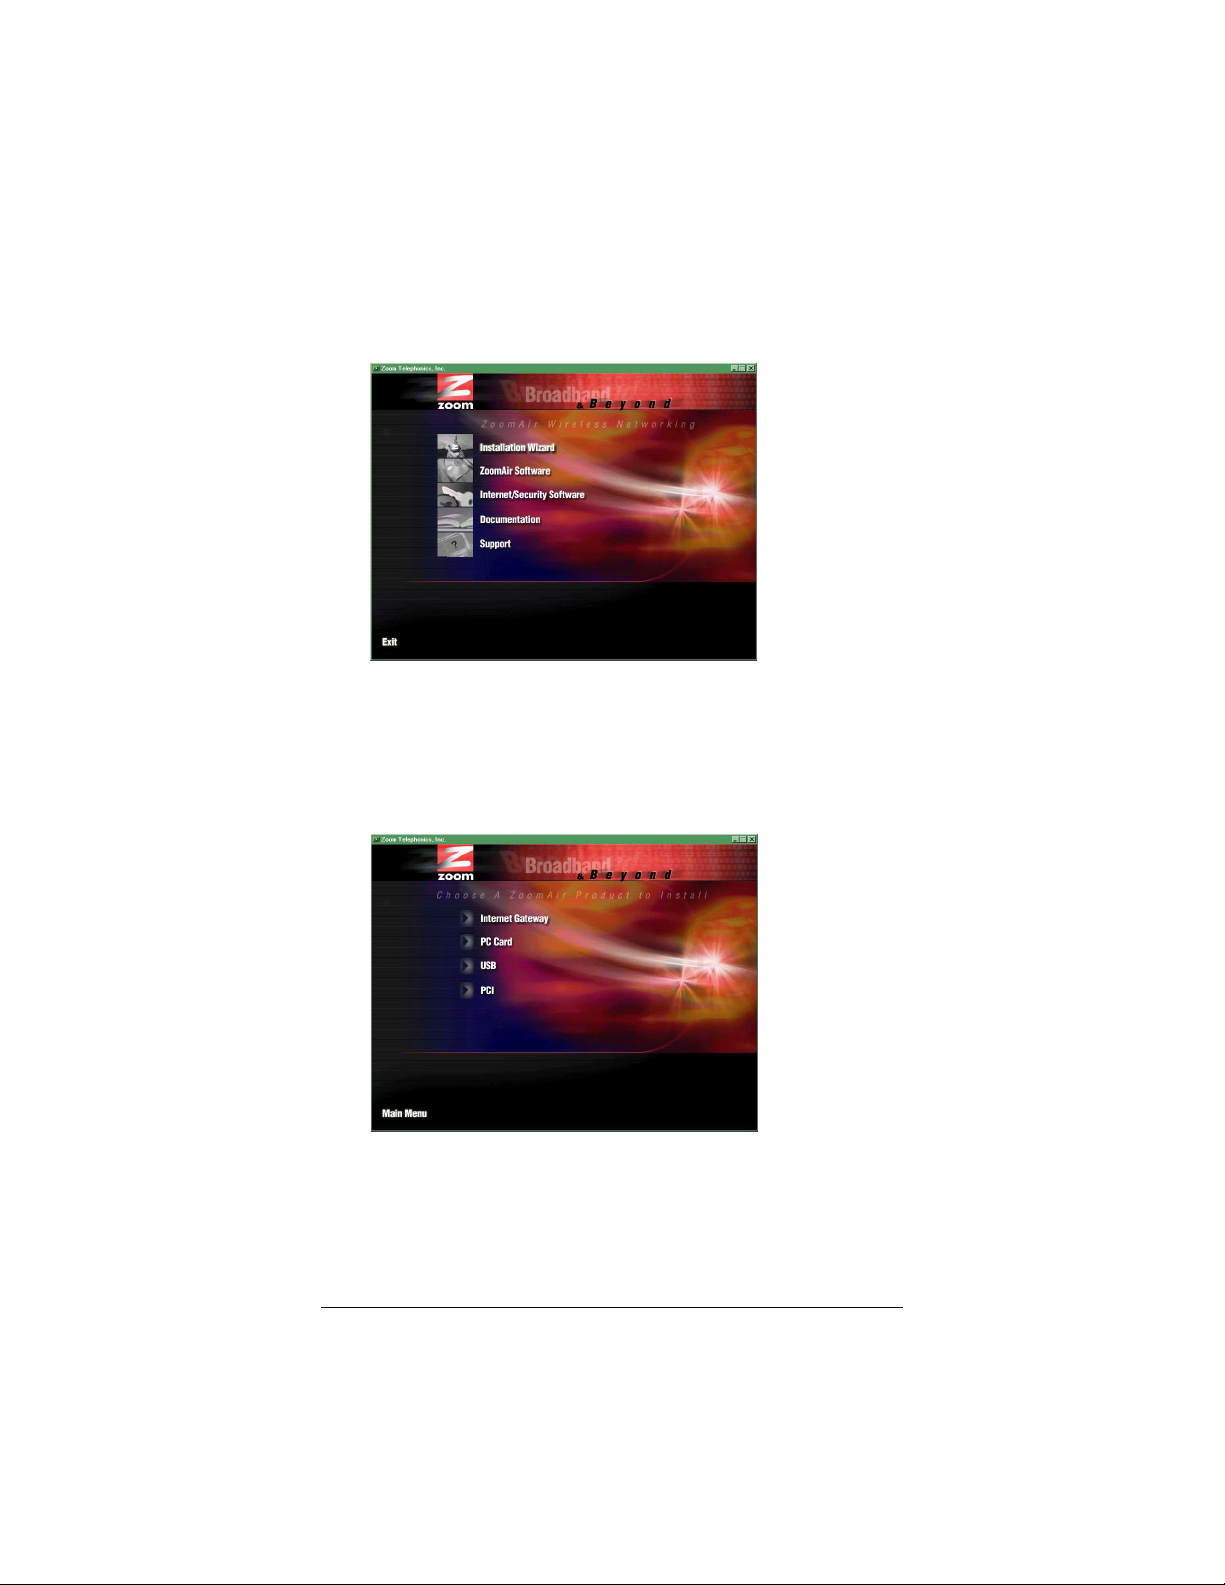
Insert the ZoomAir CD in your computer’s CD-ROM drive.
1111
The CD starts automatically and the Main Menu opens:
Click Installation Wizard.
Note: If the CD does not start automatically, from the
desktop, go to Start | Run and then type d:\setup.exe,
where d is the letter of your CD-ROM drive.
When the following menu appears, click USB.
2222
6 ZoomAir USB Client Installation Guide & Reference Manual
Page 7
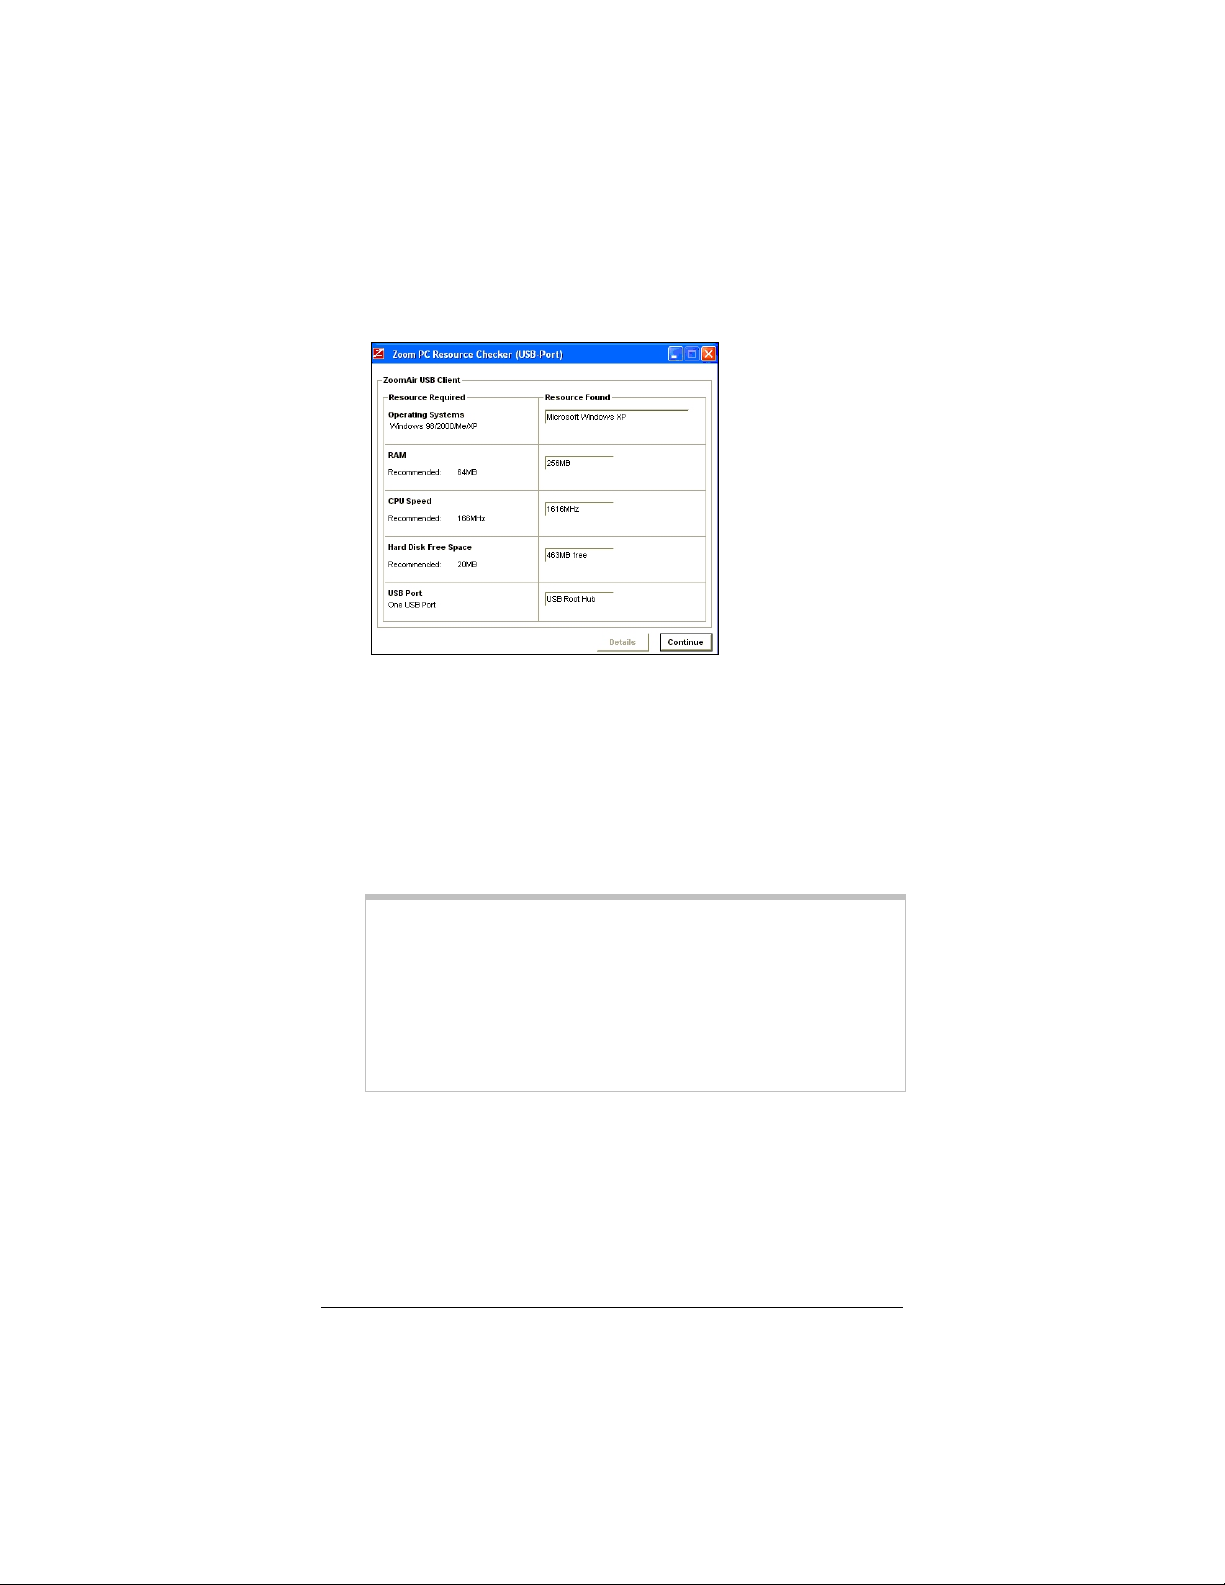
The Zoom PC Resource Checker checks your computer to
3333
verify that it has appropriate resources to support your USB
Client. You will see a screen similar to the one below.
• If your computer has the recommended resources, click
Continue to proceed.
• If your computer does not have the recommended
resources, click Details and follow the instructions to
rectify the problem.
Follow the prompts.
4444
WINDOWS 98 USERS, TAKE NOTE:
You may be asked for the Windows 98 installation CD that
came with your computer. If so, replace your ZoomAir CD
with the Windows 98 CD and click OK.
When the Copying Files dialog box opens, make sure that
the path to the CD is correct. For example, if F is the letter of
your CD-ROM drive, the path to it is F:\win98.
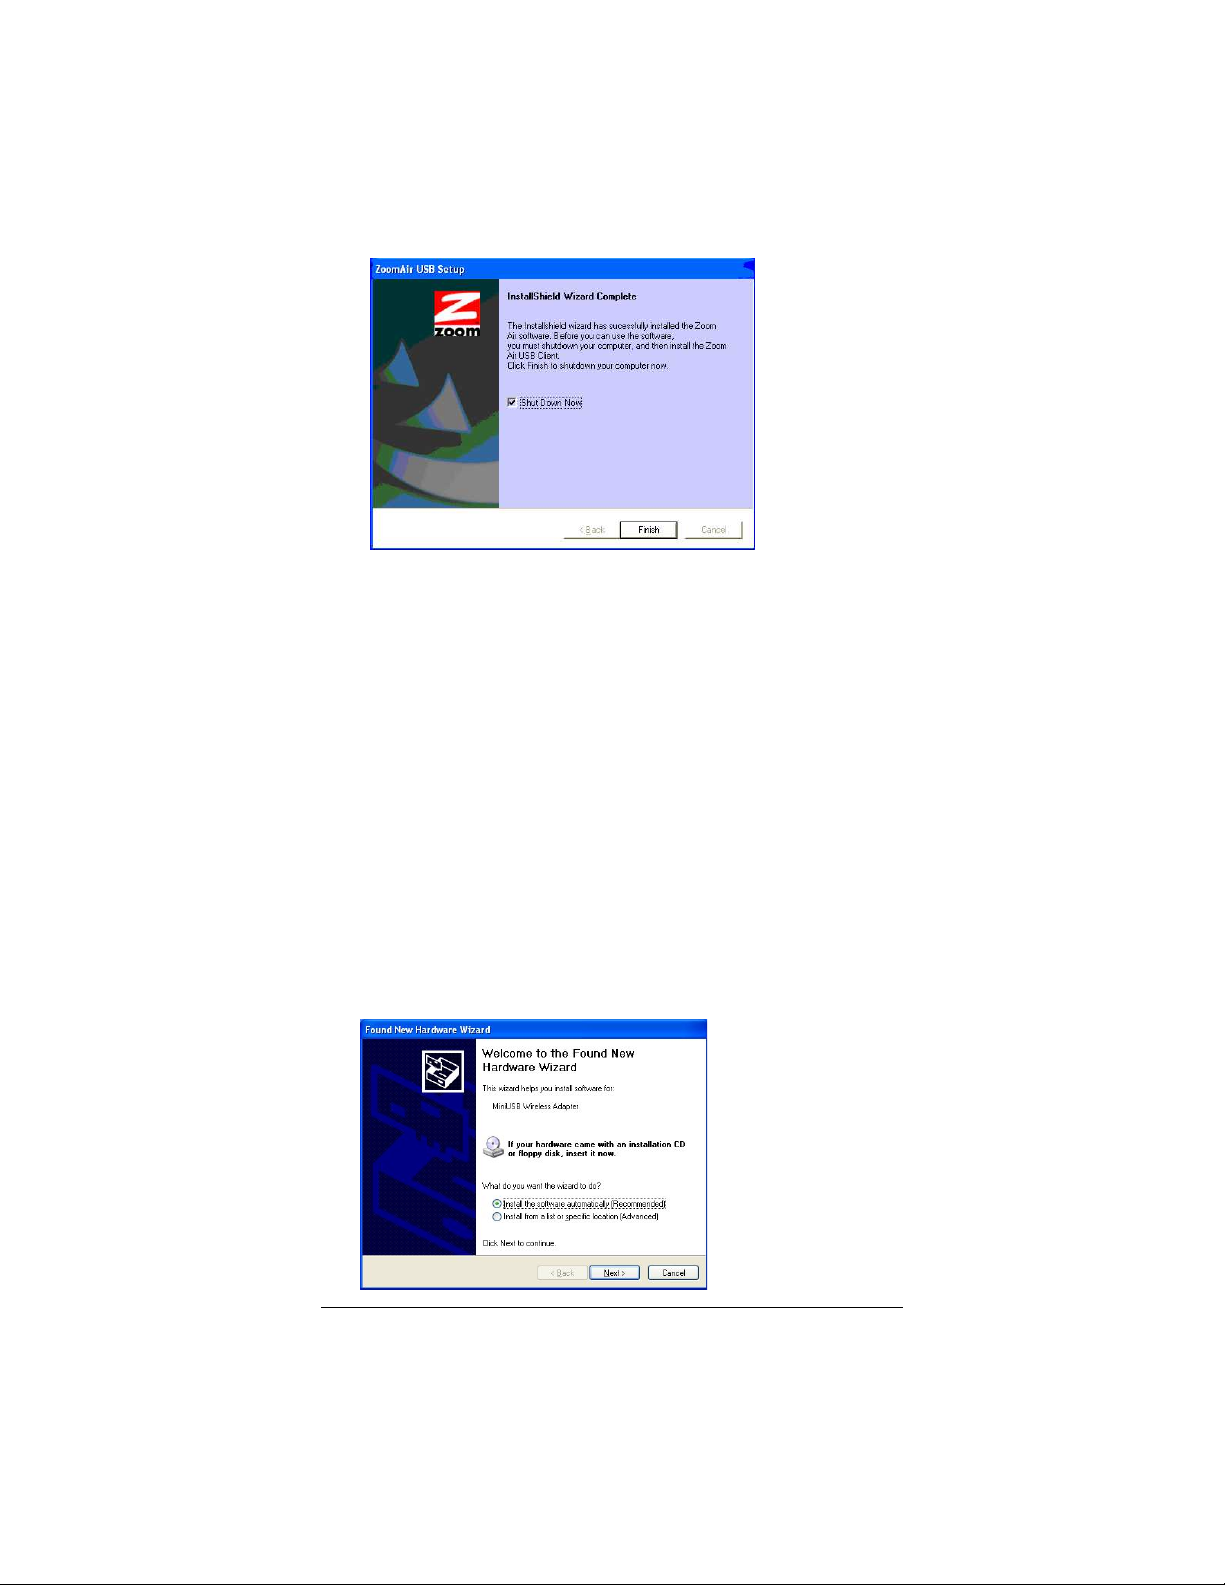
When the InstallShield Wizard Complete dialog box
displays, click Finish. Your computer will shut down.
Chapter 1 Installing Your ZoomAir USB Client 7
Page 8
The next stage is to connect the USB hardware to your computer.
Connecting the USB Client to Your
Computer
Plug one end of the supplied USB cable into a free USB port
1
on your computer or laptop and plug the other end into the
USB Client.
Restart your computer.
2
Windows XP Users Only:
3
You will see the following dialog box. Make sure the option
“Install the software automatically” is selected. Then click
Next.
8 ZoomAir USB Client Installation Guide & Reference Manual
Page 9
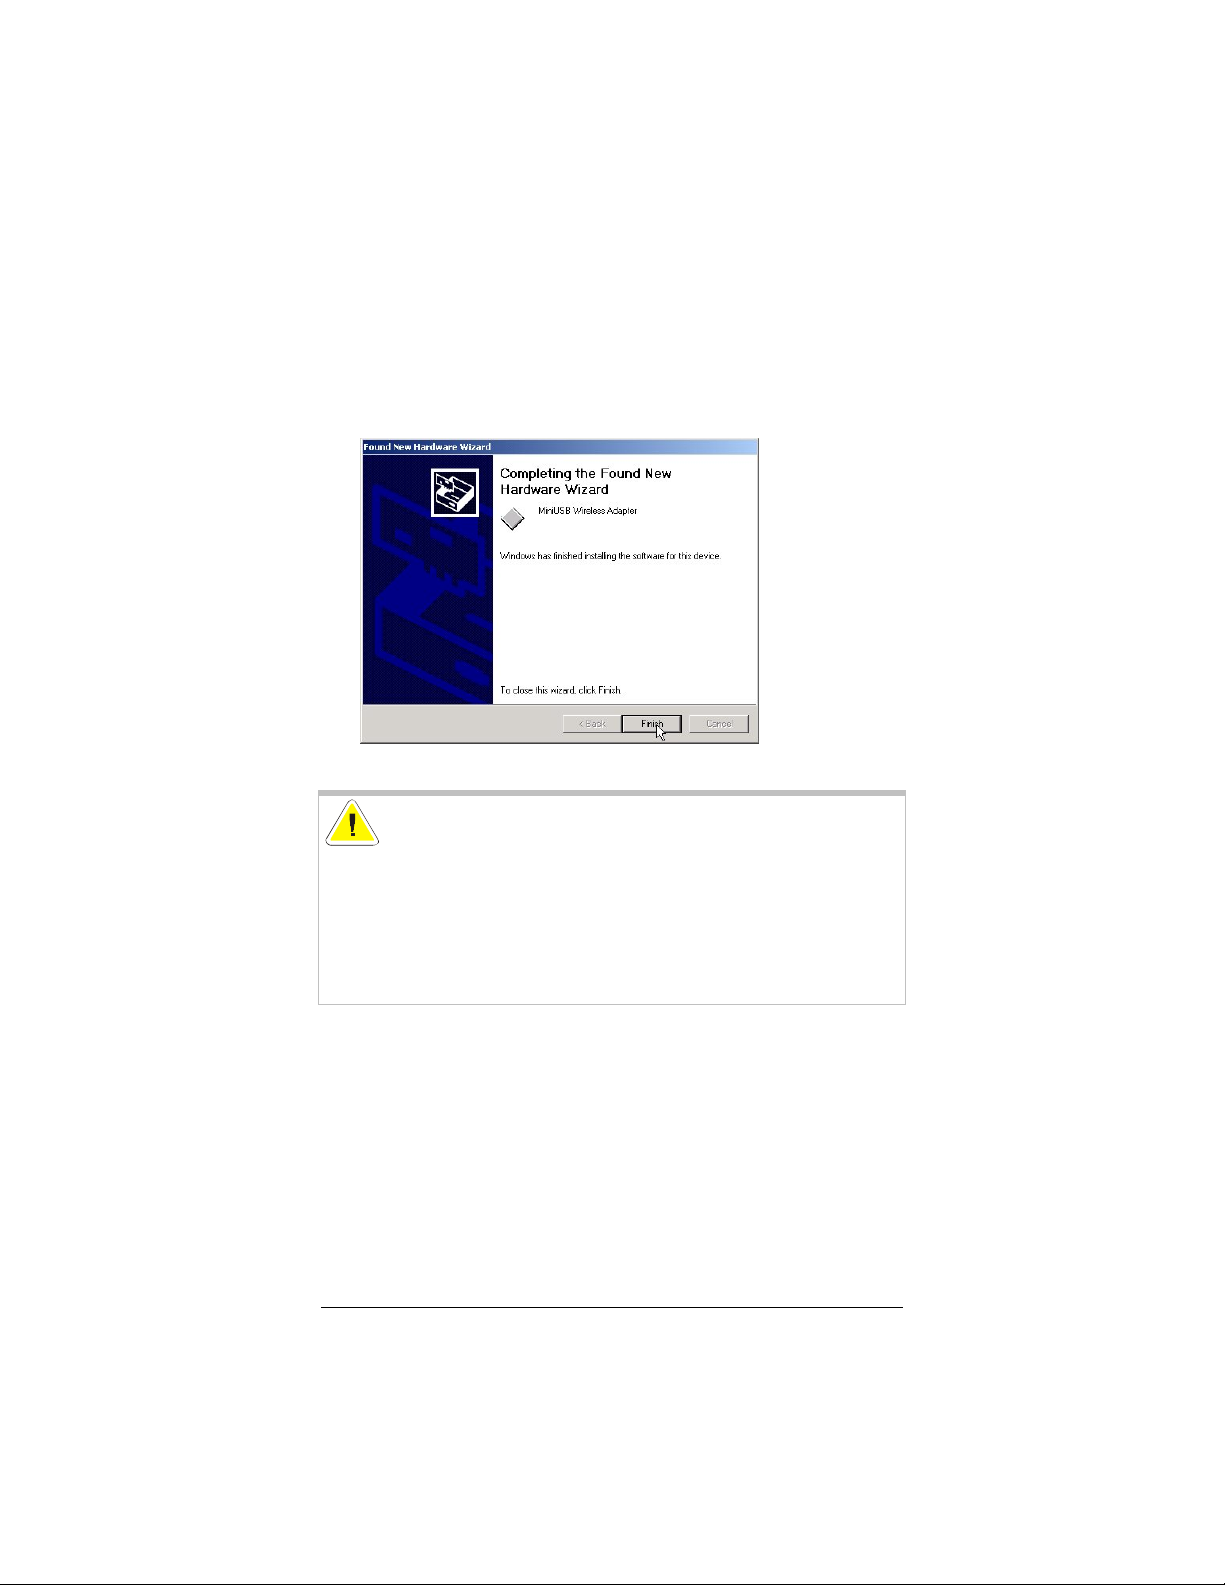
When you see a dialog box similar to the one below, click
4
Finish. If you are prompted to restart your computer again, do
so. Otherwise, your USB installation is complete.
Windows 2000 and XP Users:
dialog box stating Digital Signature Not Found. You can
safely click Yes and the installation will complete successfully.
CAUTION: Multiple USB-compatible devices can share
one USB port through the use of a hub or splitter cables.
Because the ZoomAir USB Client is a high-speed network
device, we advise against sharing its USB port with a lowspeed device such as a printer or joystick. You can share
the Client’s USB port with other high-speed devices such
as external CD-ROM drives.
You may also see a
Chapter 1 Installing Your ZoomAir USB Client 9
Page 10

Page 11
2
Using Your ZoomAir USB Client
This chapter provides information about using your USB Client,
including the following:
• Setting the Windows Network properties, if necessary
• Using your USB Client with other ZoomAir products
• Viewing other computers
• Usage and maintenance tips
• Finding more information.
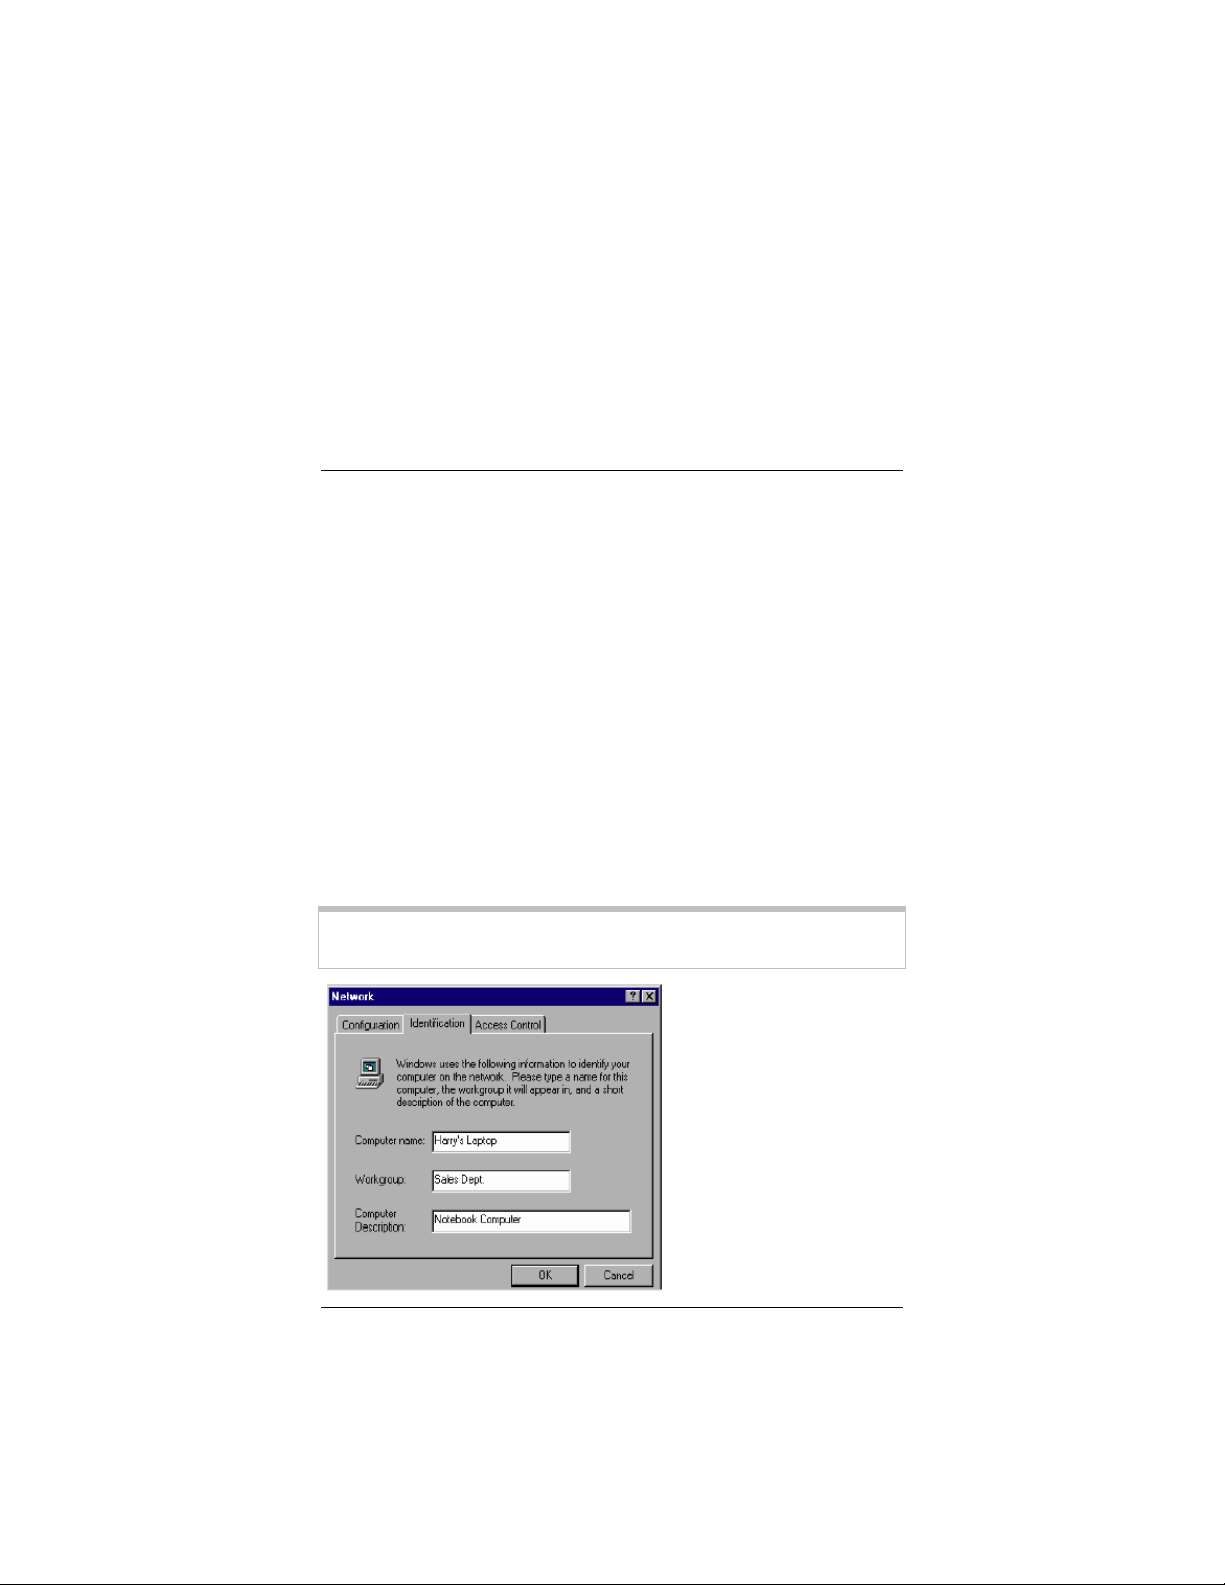
Setting the Windows Network Properties
If this is the first time that network support is installed onto your
computer, the Network dialog box (shown below) will
automatically open.
If it doesn’t, do the following: Go to Start |Settings | Control
Panel | Network. Click the Identification tab.
Note:
Chapter 2 Using Your ZoomAir USB Client 11
If network support is already installed, you do not need to
read these instructions.
Page 12

The Windows operating system will prompt you to enter a
Computer and Workgroup name. These names will be used to
identify your computer in the Microsoft Network Neighborhood.
In the Computer name field, enter a unique name for your
1
computer.
In the Workgroup field, enter the name of your network.
2
(Optional) In the Computer Description field, provide a
3
description of the computer.
If you require more information about your Windows Network
properties, consult your Windows documentation or online help.
Using Your Client with Other ZoomAir Products
The ZoomAir USB Client includes a utility that simplifies the
process of communicating with other devices.
WINDOWS XP USERS, TAKE NOTE:
Windows XP has a built-in Automatic Wireless Network
Configuration capability, so you do not need to use the
ZoomAir WLAN Utility. If you prefer to use our utility
instead, you must first disable the XP feature.
1. From the system tray, right-click the Open Wireless
Network Connections icon and select Properties.
2. Navigate to the Wireless Networks tab.
3. Uncheck the box that states “Use Windows to configure
my wireless network settings” and click OK.
To display this WLAN Utility dialog box, click its step-shaped icon
in your computer’s system tray. (This icon is installed as part of the
USB Client software installation process.)
12 ZoomAir USB Client Installation Guide & Reference Manual
Page 13

A dialog box similar to the following displays.
By default, all ZoomAir products have WEP disabled. WEP, or
Wireless Equivalent Privacy, is a form of data encryption intended
to prevent unauthorized wireless clients from accessing data
transmitted over the network. If you decide you want to enable
WEP, turn to page 24 for instructions.
The default Network Type is Infrastructure—this mode uses an
Access Point or Gateway to access a company network or the
Internet.
If Infrastructure is the mode you want, you don’t have to do
anything else. Note: All wireless clients associating to any Access
Point need to have the same ESS ID; because the default ESS ID is
any, your USB Client will automatically associate to any ZoomAir
Access Point or Gateway in the vicinity.
Click OK to close the WLAN Utility dialog box and you’re done!
You can now use your USB Client to communicate wirelessly.
If you want to select another mode, please turn to page 23 in
Chapter 4, Advanced Features.
Chapter 2 Using Your ZoomAir USB Client 13
Page 14

Viewing Other Computers
When multiple computers equipped with ZoomAir products are
running on your wireless network, you can use the following
procedure to view them.
Start Windows Explorer.
1
Scroll to and double-click Network Neighborhood to display
2
all stations in your Microsoft Networking Group. (The
Network Neighborhood icon may be on your desktop.)
To display other workgroups in the network environment,
3
double-click the Entire Network
If there is a second network operating system running in your
4
network environment (for example, a Novell NetWare
network), the Entire Network window will also display
available servers running under the second network operating
system.
If you click on these servers, you may be asked to enter the
user name and password that applies to the other network
operating system.
icon.
If you cannot find other ZoomAir networked computers, verify
whether they are:
• On and logged on to the network. Logged on means that
the user has entered a name and password and clicked OK
when beginning. If Cancel is clicked, the user is not truly
logged on to the network.
• Configured to operate with identical Microsoft Network
settings, including Networking Protocol, Wireless Network
Name, and Workgroup Name.
To view or modify the Station Name or Workgroup, follow these
steps:
Click Start | Settings | Control Panel.
1
Double-click the Network icon.
2
14 ZoomAir USB Client Installation Guide & Reference Manual
Page 15

In the Network Settings window, click the Identification tab
3
to verify or change the Station Name
or Workgroup.
Note:
Except for Windows 2000 and XP, you must restart your
computer for Network Settings changes to take effect.
Usage and Maintenance Tips
The built-in radio and antennas in your ZoomAir USB Client
perform best in an open environment where there are as few
obstacles as possible. To achieve the maximum range for wireless
communications, do not cover the USB unit with any objects.
To clean the USB Client, gently wipe it with a soft damp cloth. To
avoid damage to the unit, do not use abrasive materials, and do not
rinse the unit with liquids.
Finding More Information
The remainder of this manual contains additional information such
as descriptions of advanced features, how to remove the USB
client, and troubleshooting tips. Refer to the Table of Contents if
you are looking for a particular topic.
If you are looking for more information than is available in this
manual, please consult the online help system. On the CD, click
the Help button or press the F1 function key on your keyboard.
The FAQs (Frequently Asked Questions) on your ZoomAir CD
may also be helpful. Access them from the CD’s Support section.
Chapter 2 Using Your ZoomAir USB Client 15
Page 16

Page 17

3
Upgrading or Removing Your
USB Client
You may want to upgrade or remove your ZoomAir USB Client
in one of the following situations:
• New USB Client features have become available
• You have installed a newer version of the WLAN Utility
• You have been alerted to a driver/firmware mismatch
• You no longer need the wireless connectivity of your
ZoomAir USB Client.
WINDOWS 2000 USERS, TAKE NOTE:
The Windows 2000 USB Client Properties window includes a
special “update” button, but it is not guaranteed that this button
will always update all driver files. We recommend that you remove
and re-install the driver to ensure a complete upgrade.
Upgrading
Click Start | Settings | Control Panel.
1
Double-click the System icon.
2
In the System Properties window, select the tab Device
3
Manager.
Chapter 3 Upgrading or Removing Your USB Client 17
Page 18
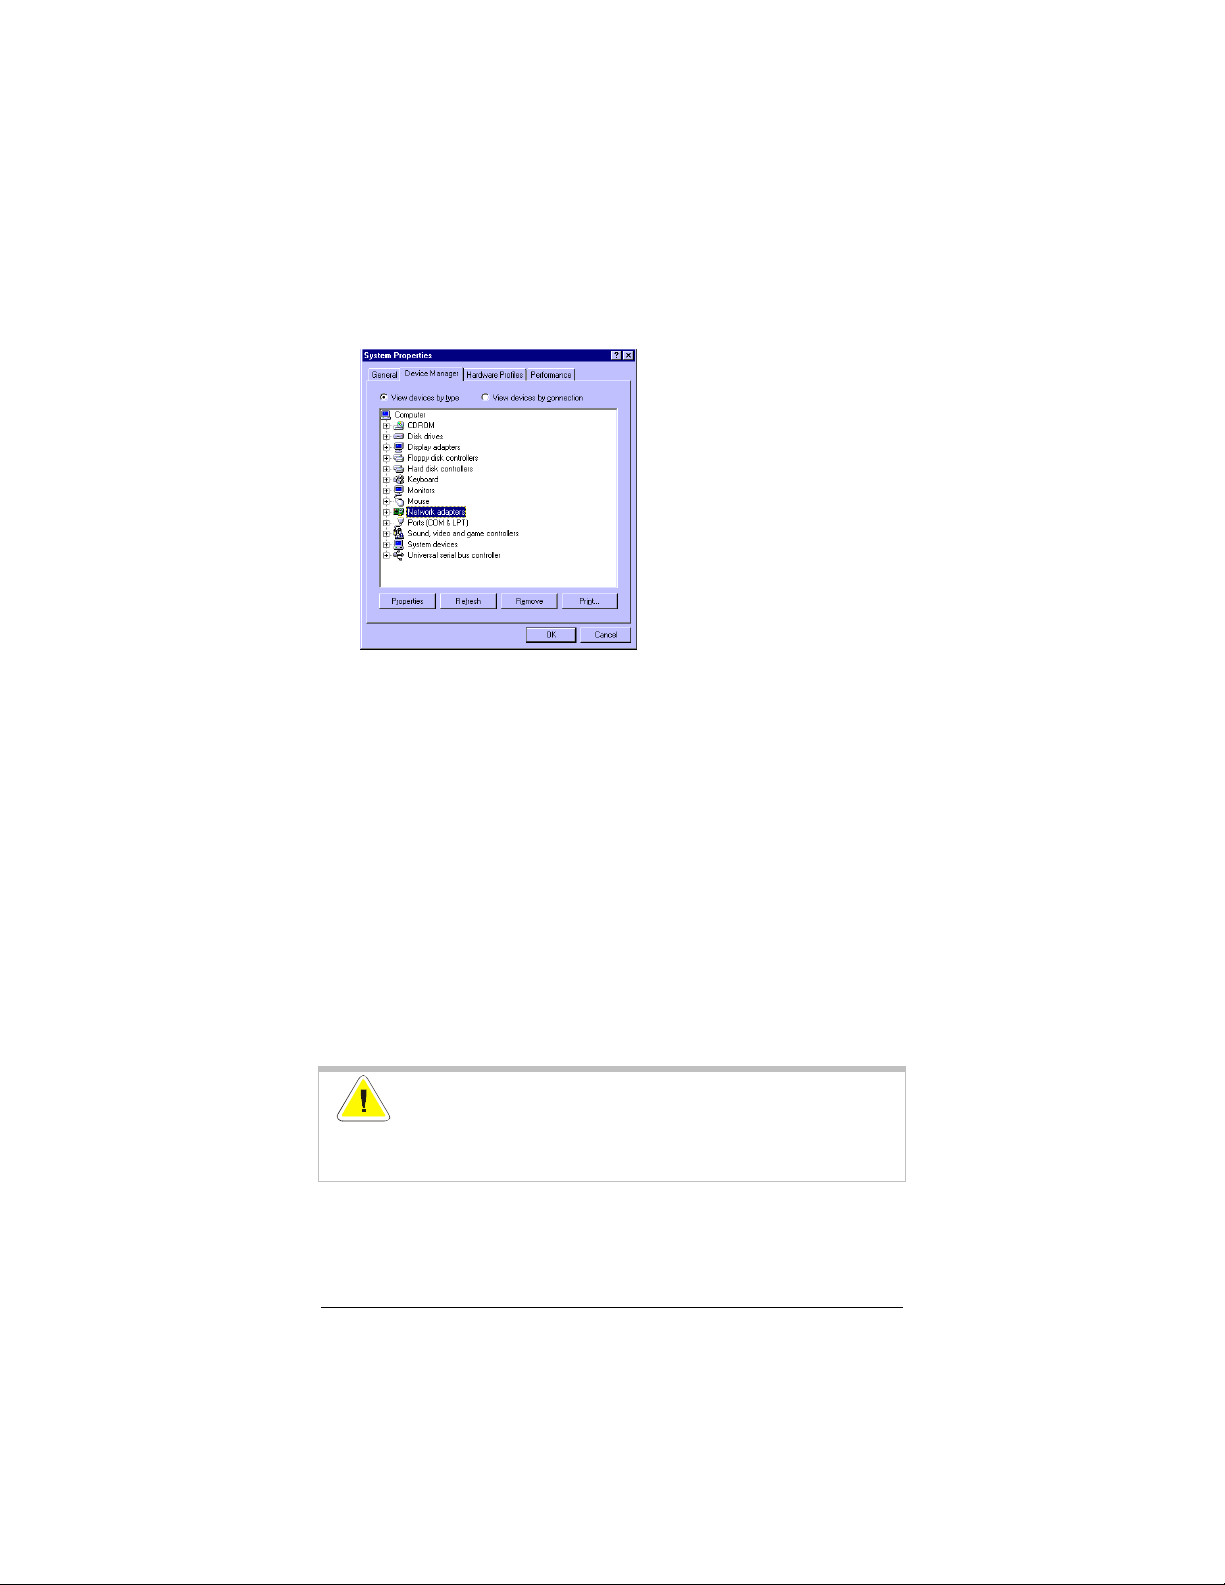
In the top section of the Device Manager tab, select the
4
option View devices by type. Then, in the list of PC Devices,
double-click Network Adapters.
Select the item ZoomAir USB Client and click the Properties
5
button.
In the ZoomAir USB Client Properties window, select the
6
Driver tab. To display information about the currently
installed driver, click the Driver File Details
• To upgrade your current driver to a newer version, click
the Update Driver
displayed on your screen.
button and follow the instructions
button.
Restart your computer. This step completes the upgrade
7
procedure and loads the new driver.
Removing
!
18 ZoomAir USB Client Installation Guide & Reference Manual
CAUTION:
lose your network connection. Make sure to close all files
and network applications before beginning.
When you remove the USB Client, you will
Page 19

Be sure to quit the WLAN Configuration Utility before
1
attempting to remove your USB Client: Right-click the
taskbar icon and select Exit. Otherwise, you will receive
an error message.
From the desktop, go to Start | Programs | ZoomAir and
select Uninstall USB Client.
Click Next when prompted to do so.
When the following dialog box displays, click Finish.
2
Do not shut down your computer yet.
Chapter 3 Upgrading or Removing Your USB Client 19
Page 20

If you are prompted to remove any additional software, click
3
Yes.
You may see a dialog box similar to the one below. If so, check
4
the box “Don’t display this message again” and click Yes.
Be sure to remove any CD remaining in the computer and
5
click Finish.
Shut down your computer and unplug the USB Client from the
6
computer.
IMPORTANT:
computer before restarting your computer.
20 ZoomAir USB Client Installation Guide & Reference Manual
Be sure to unplug the USB Client from the
Page 21

4
Advanced Features
This chapter describes some of your USB Client’s advanced
capabilities. These include the following:
• How to make configuration changes
• How to set up WEP
• How to monitor the status of your USB Client connection
• How to perform diagnostics
WINDOWS XP USERS, TAKE NOTE:
Windows XP includes an Automatic Wireless Network
Configuration feature, so you do not need to use the ZoomAir
WLAN Utility. If you prefer to use our WLAN utility instead,
you must first disable the XP feature.
1. From the system tray, right-click the Open Wireless
Network Connections icon and select Properties.
2. Navigate to the Wireless Networks tab.
3. Uncheck the box that states “Use Windows to configure
my wireless network settings” and click OK.
The WLAN Utility is represented by a step-shaped icon in your
computer’s system tray.
The icon can be one of three colors, blue, yellow, or red.
• Blue indicates an excellent or good link.
• Yellow indicates a weak but usable link.
• Red indicates no link or a link of very poor quality.
Chapter 4 Advanced Features 21
Page 22

When you open the WLAN Utility dialog box, you’ll see five tabs:
• Configuration
• Loop Back
• AP Browser
• Site Survey
• About.
These tabbed boxes allow you to make configuration changes and
perform user-level diagnostics. Descriptions of these tabbed boxes
follow.
Configuration
The Configuration dialog box allows you to modify configuration
parameters such as Profile, Network Type, Transmit Rate, ESS
ID, WEP, RTS/CTS, Fragment Threshold, and Power Save.
You can also monitor the USB Client’s current status, including
State, Current Channel, Current Tx Rate, Throughput, Link
Quality and Signal Strength.
Descriptions of these parameters and how to set them follow.
22 ZoomAir USB Client Installation Guide & Reference Manual
Page 23

Network—The Network Type dropdown list tells you what type
of network the USB client is connected to: Infrastructure or
AdHoc. (For additional explanation of these network types, turn
to page 33.)
• The default is Infrastructure—this mode uses an Access Point
or Gateway to access a company network or the Internet.
Note:
If there are two Access Points with the same ESS ID,
check the BSS ID box and enter the MAC address of the
Access Point you want to connect to. Then type the ESS
ID in the accompanying field.
• The AdHoc mode allows you to set up a group of wireless
clients for file and printer sharing without using an Access
Point or a Gateway.
If you select AdHoc, be sure that all the wireless clients are set to
the same Current Channel and the same ESS ID. If you don’t
want to use the default ESS ID of any, check the ESS ID
checkbox to indicate that you want to specify it yourself, then type
the ESS ID in the field next to it. The software will attempt to
associate with all Access Points or clients with the same ESS ID.
The ESS ID is case-sensitive and can be a maximum of 32
characters.
Profile—The Profile field allows you to define profiles and set
values for all necessary parameters. Subsequently, you can select
from the dropdown list of defined Profiles.
To create a profile, go to the Profile field, type a profile name and
set the corresponding parameters. After specifying the profile
parameters that you want, save the profile by clicking Apply. You
can have multiple profiles and modify profiles at any time. If you
Chapter 4 Advanced Features 23
Page 24

no longer want to use a profile, you can remove it by clicking the
Delete button.
Tip:
You can also select a profile by right-clicking the WLAN icon
in the system tray.
Transmit Rate—The USB Client provides several data rate
options, including Fully Auto, 2 Mb, Auto 1 or 2 Mb, 5.5 Mb,
and 11 Mb.
For most networks, the factory default Fully Auto will prove the
most efficient. This setting allows the USB Client to adjust and
operate at the maximum possible data rate. When the
communication quality drops below a certain level, the Client
automatically switches to a lower data rate (transmissions at lower
data speeds are usually more reliable). When the communications
quality improves again, the unit gradually increases the data rate
until it has achieved the highest available transmit rate.
WEP—Wireless Equivalent Privacy is meant to prevent
unauthorized wireless clients from accessing data transmitted over
the network.
To activate WEP, check the WEP Enabled check box that
appears under the Profile field.
An Encryption dialog box displays.
24 ZoomAir USB Client Installation Guide & Reference Manual
Page 25

• Pull down the Encryption (WEP) menu and select either 64
bit or 128 bit.
• Specify the encryption keys. There are two methods to set the
WEP keys, as described below:
To Create Encryption Keys Using a Passphrase:
Follow these steps.
Click the Create Key with Passphrase check box and type a
1
character string of your choice in the Passphrase field. As you
type, the utility uses an algorithm to generate one key (in the
case of 128-bit) or four keys (in the case of 64-bit)
automatically. (Remember, you have already selected either 64
bit or 128 bit.)
Select one key out of the four and click OK. Note: With 64-bit,
2
the first key is the default and is usually fine.
Navigate back to the Configuration tab and click the Apply
3
button and then OK to have the setting take effect.
To Create Encryption Keys Manually
If you have selected 64-bit encryption, follow these steps.
Click the Create Key with Manual check box.
1
You have a choice of selecting an Alphanumeric or a
2
Hexadecimal scheme.
• Alphanumeric: 5 case-sensitive characters ranging from
“a-z”, “A-Z”, and “0-9” (for ex., MyKey)
• Hexadecimal: 10 hexadecimal digits in the range of “A-
F”, “a-f”, and “0-9” (for ex., 11AA22BB33).
Enter your WEP key of choice in the key field, select one key
3
as the active key, and click OK.
Navigate back to the Configuration tab and click the Apply
4
button and OK to have the setting take effect.
If you have selected 128-bit encryption, follow these steps.
Chapter 4 Advanced Features 25
Page 26

Click the Create Key with Manual check box.
1
You have a choice of selecting an Alphanumeric or a
2
Hexadecimal scheme.
• Alphanumeric: 13 case-sensitive characters ranging from
“a-z”, “A-Z”, and “0-9” (for ex., MyKey12345678)
• Hexadecimal: 26 hexadecimal digits in the range of “A-
F”, “a-f”, and “0-9” (for ex.,
00112233445566778899AABBCC).
Navigate back to the Configuration tab and click the Apply
3
button and OK to have the setting take effect.
Note:
The WEP key must be set up exactly the same on any
wireless LAN stations and Access Points. For example, if
you set “MyKey” for a wireless LAN Card, the same
“MyKey” must be assigned to the Access Point or other
stations.
Advanced Configuration Options
The WLAN Utility also includes more advanced configuration
options for users in certain network environments. These options
include Power Management, RTS/CTS, and Fragmentation
Threshold.
Navigate back to the Configuration tab and then click the
Advance button to display the Advanced Configuration dialog
box.
26 ZoomAir USB Client Installation Guide & Reference Manual
Page 27

Power Management—The Power Save option is designed to
conserve your computer’s battery life. If you click the Power Save,
your wireless LAN Card will go into sleep mode, minimizing power
consumption.
Note:
If you enable power saving, the Access Points you use
need to support power saving as well—otherwise
communication cannot be established.
RTS Threshold—RTS Threshold is intended to prevent the
problem of “Hidden Nodes.” Hidden Nodes involve two stations
that are within range of the same Access Point, but are not within
range of each other—they cannot hear each other. When one
station begins transmitting data via the Access Point, it might not
notice that the other station is already active. When these two
stations send data at the same time, they may collide when arriving
at the Access Point. Such collisions result in a loss of messages for
both stations.
Click Enable to use RTS Threshold on a suspect hidden station.
The station and its Access Point will then use a Request to
Send/Clear to Send protocol (RTS/CTS). The station will send an
RTS to the Access Point, informing that it is going to transmit data.
On receipt, the Access Point responds with a CTS message to all
stations within range, notifying them to defer transmission.
Chapter 4 Advanced Features 27
Page 28

Note:
There is an implicit tradeoff when enabling RTS
Threshold. It could cause redundant network overhead
that could negatively affect throughput, instead of
providing a remedy.
Be sure to also specify the packet size. The RTS
mechanism will be activated if the data size exceeds the
value you set.
Frag. Threshold—Enabling Fragmentation Threshold improves
efficiency when high traffic is flowing along the wireless network.
If your USB Client often transmits large files and you enable Frag.
Threshold, the mechanism will split the packet. Value can be set
from 256 to 1500.
Status
The bottom half of the Configuration dialog box contains information about the status of your wireless connection. The following table defines this information.
State—
this field shows the MAC address of the Access Point that the USB
Client is communicating with. When the USB Client is operating in
AdHoc mode, it shows the virtual MAC address used by
computers participating in the AdHoc network.
When the USB Client is operating in Infrastructure mode,
Current Channel—Shows the channel on which the connection is
made.
Current Tx Rate—Shows the highest transmit rate of the current
association.
28 ZoomAir USB Client Installation Guide & Reference Manual
Page 29

Throughput—
Shows the short term transmit and receive
throughput in bytes/second, and is continuously updated.
Link Quality—Based on the quality of the received signal of the
Access Point beacon. There are four states of link quality:
100%-80% Excellent
80%-60% Good
60%-30% Fair
Under 30% Poor or no connection
Signal Strength—Based on the received signal strength
measurement of the baseband processor of the Beacon signal.
Same as link quality, there are four states of signal strength:
100%-80% Excellent
80%-60% Good
60%-30% Fair signal strength
Under 30% Poor or no signal strength
You can click the Rescan button to force the radio to rescan all
available channels. If your link quality or signal strength is poor,
rescanning can be used to push the radio off a weak Access Point
and search for a better link with another Access Point.
Loop Back
The Loop Back dialog box helps you examine data transmission
quality between your USB Client and any workstation on the
network. Enter the IP address of one local client and one remote
client, adjust the Ping Interval and Packet Size (if necessary), and
click Ping. If there is a reply, communication is successful.
In addition, you can run a proprietary loopback test by clicking the
Loop Back button; this will verify the communication quality
between your wireless client and Access Point. Click the Refresh
button to set the counters back to 0.
Chapter 4 Advanced Features 29
Page 30

AP Browser
If you click the Rescan button, the AP Browser displays all
Access Points in the vicinity. Besides listing the ESS ID of each
Access Point, the AP Browser box displays BSS ID, Channel,
Signal, Quality and Supported Rates. It also indicates if WEP is
enabled.
To join any of the displayed Access Points, highlight the Access
Point you desire to connect with and click the Join ESS button to
join the group. Note: Click Join BSS when there are more than
two Access Points with the same ESS ID.
30 ZoomAir USB Client Installation Guide & Reference Manual
Page 31

Site Survey
By displaying the Site Survey dialog box, you can review the
channel quality of all 14 radio channels. A blue bar indicates that
channel quality is clear and good—the higher the blue bar, the
better the quality (i.e., less interference). A yellow bar indicates that
the channel quality is fair. A red bar indicates that a channel is busy
or experiencing severe interference.
Chapter 4 Advanced Features 31
Page 32

About
The About box shows the current versions of the Wireless LAN
Utility, driver, and firmware. It also displays the NIC card’s MAC
address and frequency domain.
32 ZoomAir USB Client Installation Guide & Reference Manual
Page 33

Appendix A
Wireless Networking Overview
You can use the ZoomAir USB Client in two types of networks,
AdHoc (also called Peer-to-Peer) or Infrastructure. This
Appendix explains the basic difference between the two.
AdHoc vs. Infrastructure
A network is a group of individual computers called “clients”
connected together so that they can share information, an Internet
connection, printers, and other resources. A network can be wired,
wireless, or a combination of the two.
The simplest wireless network is called a “peer-to-peer “ or
“adhoc” network. In a peer-to-peer network, each client computer
communicates directly with every other client computer on the
network.
To set up a peer-to-peer network, all you need are two or more
computers equipped with wireless networking devices. The
downside of a peer-to-peer network is that the number of users
and the range are somewhat limited.
PEER-TO-PEER NETWORK
(( ))
PC w ith W irele ss Ada pter
(( ))
Laptop with PC Card
Appendix A Wireless Networking Overview 33
(( ))
Laptop with PC Card
Page 34

More complicated wireless networks, typically called
“infrastructure networks,” usually have an “Access Point” or
“Gateway” to manage the connections between computers in the
wireless network and other elements of the network.
In an infrastructure network, a wireless Gateway or Access Point
increases the range of the network and connects the wireless
network to a wired network.
INFRASTRUCTURE NETWORK
(( ))
PC wit h W irele ss A dap ter
PC with Wired Connections
(( ))
Access Point
or Gateway
INT ER NE T
(( ))
Laptop with PC Card
Modem
34 ZoomAir USB Client Installation Guide & Reference Manual
Page 35

Appendix B
Troubleshooting
Referring to this Appendix may help you troubleshoot your
ZoomAir product and avoid a call to Technical Support. Two
other good sources of help are the FAQs on the ZoomAir CD
and the ZoomAir section our web site www.zoom.com
Difficulty using or installing your ZoomAir USB Client may be due
to several causes:
• The Client may be out-of-range, which prevents it from
establishing a wireless connection with the network.
• A configuration mismatch may prevent the Client from
establishing a wireless connection with the correct
network.
• There may be a conflict with the ZoomAir driver (or it
may be missing).
• There may be a problem with USB Client connector,
which prevents the Client from coming on.
www.zoom.com.
www.zoom.comwww.zoom.com
• There may be a conflict between the ZoomAir hardware
and another device.
Appendix B Troubleshooting 35
Page 36

If You Cannot Connect to the Network
If your USB Client seems to be working fine, but you are unable to
connect to the network, it may be due to a configuration mismatch.
It is likely there is a configuration mismatch pertaining to either the
Network Name (this value is case-sensitive) or the WEP key.
Other causes may be attributed to the following:
• No USB driver is loaded.
• Station is not authorized to access the network.
• USB Client has a defect.
Referring to this manual’s Table of Contents, go to the appropriate
chapter and verify that you have performed all steps correctly. If
necessary, contact Technical Support.
Check Your TCP/IP Settings
First consult your LAN Administrator for the correct TCP/IP
settings. Then follow these steps.
From the desktop, click Start | Settings | Control Panel.
1
Double-click the Network icon to view the Network
2
Properties. From the list of installed components, check if the
TCP/IP r>ZoomAir USB Client protocol is installed.
• If this protocol is not installed, click the Add button and
select the TCP/IP
Windows Help for more information.
• If this protocol is installed, select it and click the
Properties button. Check that the parameters resemble
the settings you received from your LAN Administrator.
Make changes if necessary, and click OK when you are
done.
When prompted, restart your computer.
3
36 ZoomAir USB Client Installation Guide & Reference Manual
protocol from the list. Refer to the
Page 37

Appendix C
Regulatory Information
U.S. FCC 47 CFR Part 15 Emissions Statement
This equipment has been tested and found to comply with the limits for a Class B
digital device, pursuant to part 15 of the Rules. These limits are designed to
provide reasonable protection against harmful interference in a residential
installation. This equipment generates, uses and can radiate radio frequency and, if
not installed and used in accordance with the instructions, may cause harmful
interference to radio communications.
However, there is no guarantee that interference will not occur in a particular
installation. If this equipment does cause harmful interference to radio or
television reception, which can be determined by turning the equipment off and
on, the user is encouraged to try to correct the interference by one or more of the
following measures:
Reorient or relocate the receiving antenna.
•
Increase the separation between the equipment and receiver.
•
Connect the equipment into an outlet on a circuit different from that to
•
which the receiver is connected.
Consult the dealer or an experienced radio/TV technician for help.
•
U.S. FCC Part 15 C Emissions Statement
This equipment is approved under Subpart C of FCC Part 15, under the FCC
Identifier M4Y-07250.
FCC Warning
Warning: Changes or modifications to this unit not expressly approved by the
party responsible for compliance could void the user's authority to operate the
equipment.
Caution: For the purpose of satisfying FCC RF exposure compliance
requirements, antennas should be positioned in such a way that a separation
distance of at least 20cm is maintained between the transmitter's radiating
structures and the body of the user or nearby persons.
Appendix C Regulatory Information 37
Page 38

European Union Member States: Intended Use
The intended use for this RLAN equipment is operation in the 2.4GHz frequency
band.
Member states in the EU with restrictive use for this device are grayed out in the
table below.
AUSTRIA BELGIUM DENMARK FINLAND
FRANCE
ITALY LUXEMBOURG NETHERLANDS PORTUGAL
SPAIN SWEDEN UK
This device is also authorized for use in the EFTA member states of Switzerland,
Iceland, Liechtenstein, and Norway.
GERMANY GREECE IRELAND
0560
Important Notice
This device is a 2.4GHz low-power RF device intended for office and home use in
all EU and EFTA member states except in France where restrictive use applies.
In France, use is limited to the following frequency band: 2446.5 - 2483.5 MHz.
This frequency band correlates to Channels 8 - 13.
Declaration of Conformity
The manufacturer declares under sole responsibility that this equipment is
compliant to Directive 1999/5/EC (R&TTE Directive) via the following
standards. These Products are CE marked.
EN 60950
EN 300 328-2
EN 301 489-1
EN 301 489-17
38 ZoomAir USB Client Installation Guide & Reference Manual
Page 39

Department of Commerce End User Statement
This item falls under the jurisdiction of the Department of Commerce,
and as such, the requirement set forth in section 740-17 of the Export
Administration Regulation must be complied with. See the following Web
sites for more information:
Bureau of Export Administration
http://www.bxa.doc.gov/DPL/Default.shtm
http://www.bxa.doc.gov/Entities/
Code of Federal Regulations
http://w3.access.gpo.gov/bxa/ear/ear_data.html
Federal law prohibits the sale or distribution of certain products to certain
individuals and organizations. Denied persons or organizations may not,
directly or indirectly, participate in any way in any transaction involving
any commodity, software or technology exported or to be exported from
the United States that is subject to Export Administration Regulations.
The above Web sites provide a detailed list of individuals and
organizations that have been determined to present an unacceptable risk
of diversion to developing weapons of mass destruction or missiles used
to deliver those weapons.
Electrostatic Discharge (ESD) Statement
This unit may require resetting after a severe ESD event.
Appendix C Regulatory Information 39
Page 40

Important Information Table
We recommend that you take a few moments to fill in the
following information for future reference. In the event you need
to call Technical Support, you will need the information below.
ZoomAir Model _______________________
(located on the box)
Serial Number _______________________
(located on the device)
MAC Address _______________________
(located on the device)
Date of Purchase _______________________
Store or Dealer _______________________
1412-A 27256 2002
 Loading...