

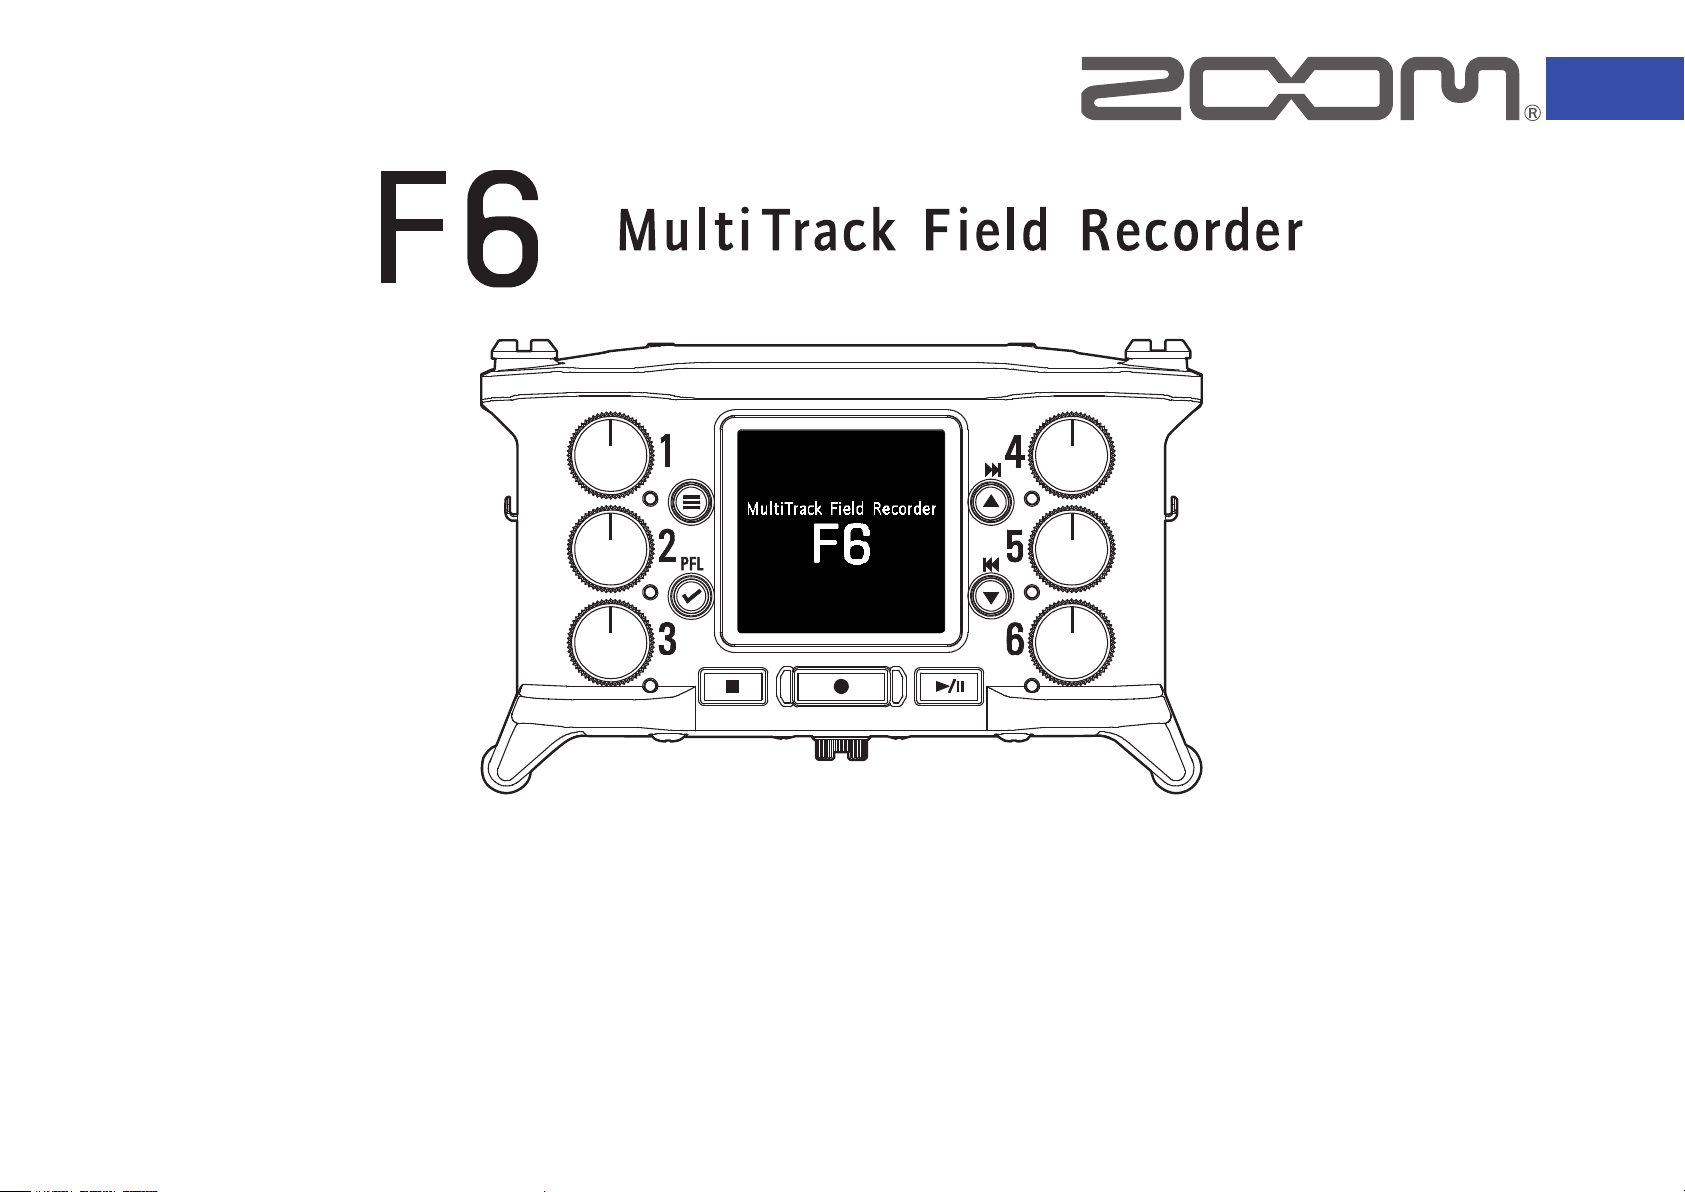
Operation Manual
You must read the Usage and Safety Precautions before use.
© 2020 ZOOM CORPORATION
Copying or reprinting this manual in part or in whole without permission is prohibited.
Product names, registered trademarks and company names in this document are the property of their respective companies. All trademarks and regis-
tered trademarks in this document are for identification purposes only and are not intended to infringe on the copyrights of their respective owners.
Proper display is not possible on grayscale devices.

Notes about this Operation Manual
You might need this manual in the future. Always keep it in a place where
you can access it easily. The contents of this document and the specications of the product could be changed without notice.
Windows® is a trademark or registered trademark of Microsoft® Cor-
◎
poration.
Mac, macOS, iPad, iPhone and iPod touch are trademarks or registered
◎
trademarks of Apple Inc.
The SD, SDHC and SDXC logos are trademarks.
◎
The Bluetooth® word mark and logo are registered trademarks of Blue-
◎
tooth® SIG, Inc. and these marks are used under license by Zoom Corporation.
Other product names, registered trademarks and company names in
◎
this document are the property of their respective companies.
Note: All trademarks and registered trademarks in this document are for
identication purposes only and are not intended to infringe on the
copyrights of their respective owners.
Recording from copyrighted sources, including CDs, records, tapes, live
performances, video works and broadcasts, without permission of the
copyright holder for any purpose other than personal use is prohibited by
law. Zoom Corporation will not assume any responsibility related to infringements of copyrights.
02

Introduction
Thank you very much for purchasing a ZOOM multitrack eld recorder.
The
●
provides the following features in a compact form.
Record the quietest and loudest sounds at high quality with
32-bit oat WAV format
The high-quality analog input circuits can handle signals ranging from the
most delicate to a professional maximum level of +24 dBu.
In addition to 16/24-bit WAV recording, 32-bit oat WAV recording, which
does not require input level adjustment, is also supported.
With 32-bit float WAV format, the recording resolution can be retained
even when changing levels greatly after recording.
Simultaneously record 6 channels and 14 tracks
●
Up to 14 tracks can be recorded simultaneously, including 16/24-bit WAV
and 32-bit float WAV for Inputs 1–6 along with left and right tracks of a
stereo mix.
Support for three types of batteries
●
A USB mobile battery, L battery or AA batteries can be used for power.
Two remote control options
●
Wireless control is possible by installing a ZOOM wireless adapter (e.g.
BTA-1) and using the F6 Control iOS app.
Moreover by connecting an F6 Control, which is a mixer-style controller
designed especially for F Series recorders, with a USB cable, 60mm track
faders, LED level meters and various transport buttons can be used for intuitive sound control. Combined with the F6 Control iOS app, iPhones and
iPads can also be used as large meters with excellent visibility.
Support for SMPTE timecode input and output along with
●
wireless timecode input
The uses a high-precision oscillator that enables it to independently
generate accurate timecode with a discrepancy of less than 0.5 frames
per 24 hours.
If a BTA-1 dedicated wireless adapter is installed, wireless timecode can
be received from a Timecode Systems UltraSync BLUE and written to re-
corded les.
Headphone jack with 100mW+100mW maximum output
●
Clear headphone monitoring is possible using the digital boost function
while sending audio signals to a video camera or other device from the
LINE OUT jack.
Flexible signal routing also makes mixer use possible
●
Pre-fader and post-fader signals from inputs 1–6 can be routed to outputs
freely.
Phantom power supply (+24 V or +48 V)
●
This can be set for each input separately.
USB audio interface use with up to 6 ins and 4 outs possible
●
Use as a 2-in/2-out or 6-in/4-out audio interface (driver required for Windows).
Output multitrack audio by USB while recording
●
While recording to the installed SD card, multitrack audio can be sent to
and from a computer by USB with up to 8 inputs (6 inputs + L/R stereo
mix) and 4 outputs.
This enables simultaneous backup recording and Internet live streaming.
360º audio
●
Ambisonic mode enables 360º spatial audio recording using VR mics. Decoding from Ambisonic format A to format B is supported along with gain
and setting link functions.
03
Achieving high audio quality throughout recording and editing
With the dual A/D converter circuits and support for 32-bit oat WAV les, the can maintain the highest audio quality from recording to post-production.
Recording
Dual A/D converter circuit enables recording both loud
and quiet sounds without making gain adjustments
Post-production
32-bit float WAV file format maintains audio
quality from recording when editing
04
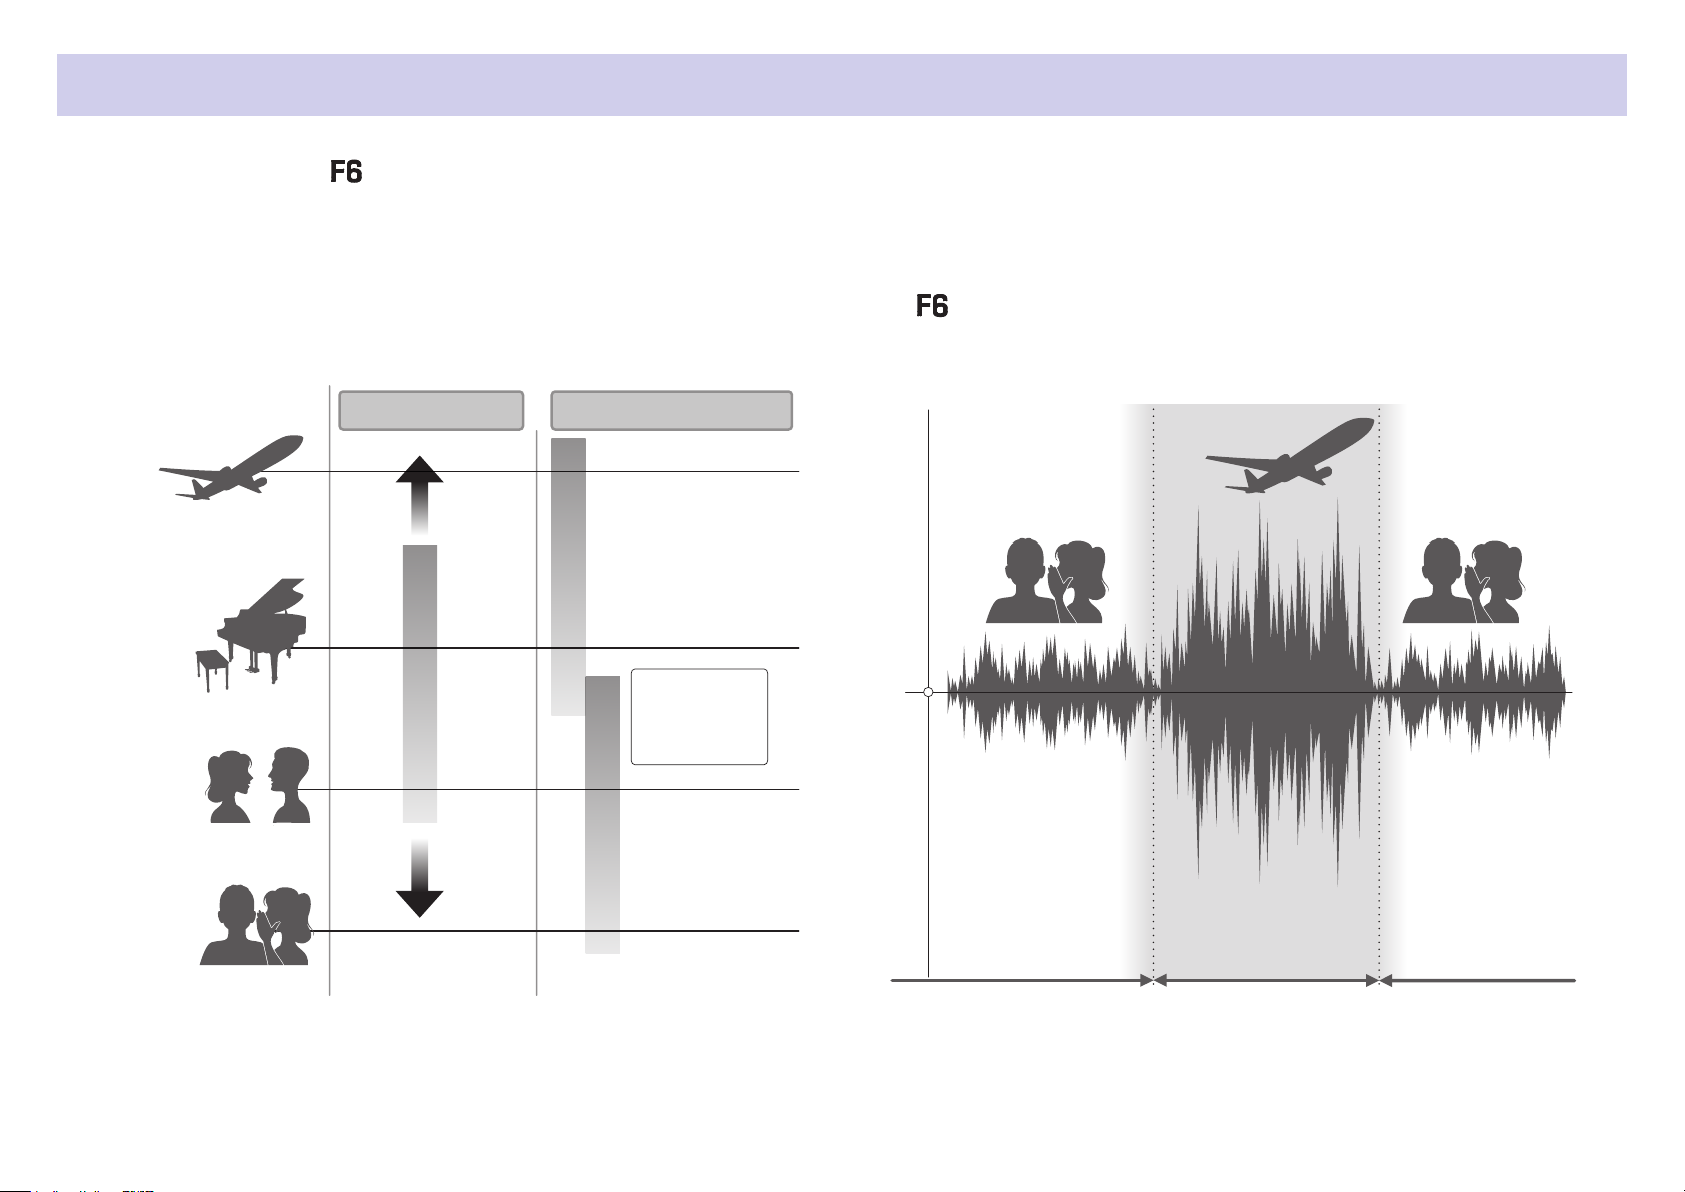
• Late night in suburb
according to desired
by two A/D converters
Dual A/D converter circuit overview
For each input circuit, the
has two A/D converters with different input gains. This design enables high-quality audio recording without the need to
adjust gain settings, a step that is normally indispensable.
Providing amazing dynamic range
By combining two A/D converters, a wide dynamic range not possible
with a single A/D converter has been realized.
Conventional product
• Airplane
• Nearby thunder
• Train passing on tracks overhead
• Inside train
• Shouting
• Grand piano
Dual A/D converter
Low-gain
A/D converter
A/D converter
switches in
response to
input level
Switching between two A/D converters
The constantly monitors data from the two A/D converters, and automatically selects the one that provides the best recording results.
• Noisy street
• Chimes
• Ordinary conversation
• Whispering
• Quiet library
Adjust input gain
High-gain
A/D converter
Wide dynamic range covered
05
Low noise because
high-gain A/D
converter selected
No clipping because
low-gain A/D
converter selected
Low noise because
high-gain A/D
converter selected
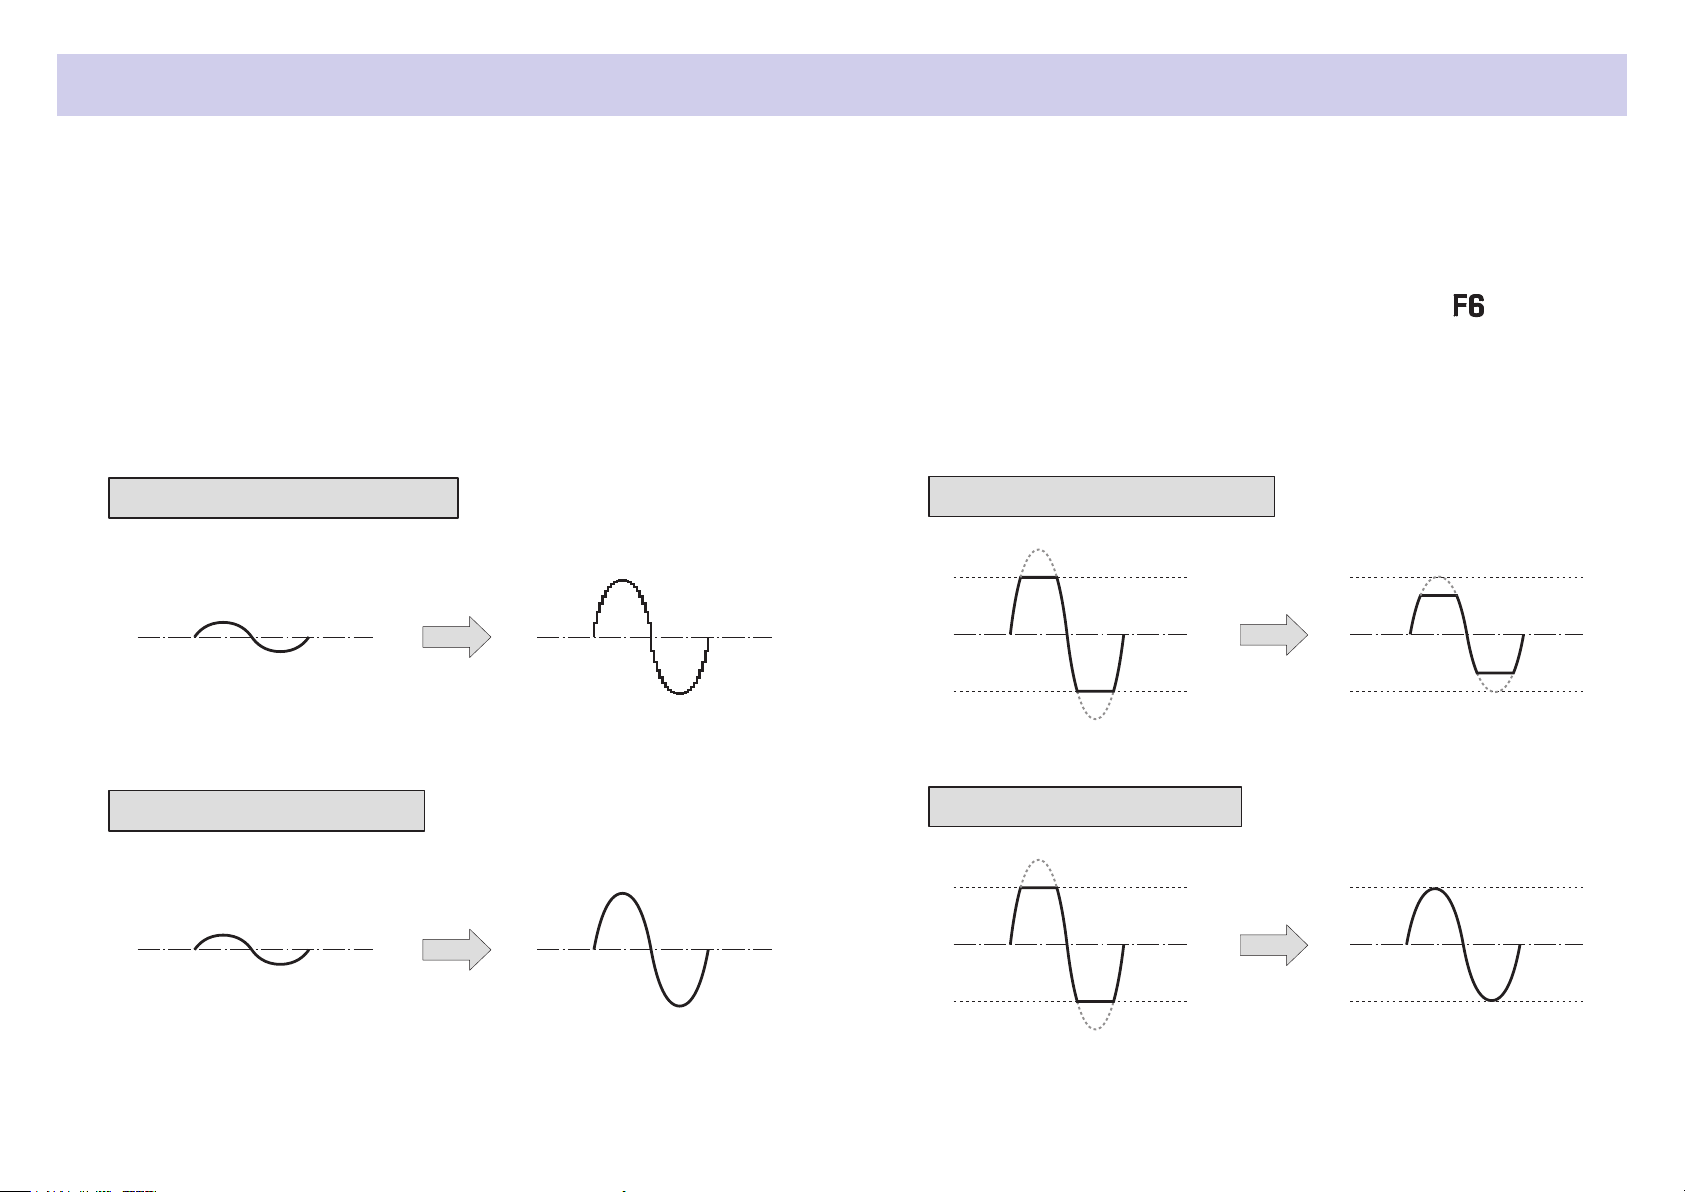
32-bit oat WAV le overview
32-bit oat WAV les have the following advantages over conventional 16/24-bit linear WAV les.
These features enable the quality of the sound during recording to be maintained even during post-production.
Resolution advantage
32-bit oat WAV les have the advantage of being able to maintain high
resolution even at low volumes. As a result, quiet sounds can be made
louder when editing after recording without degrading their quality.
16/24-bit linear WAV
Resolution low
Volume raised
32-bit float WAV
Resolution high
Clipping advantage
If a waveform sounds clipped when output from the or in a DAW,
it can be edited after recording to lower its volume and restore an un-
clipped waveform because the data in the 32-bit oat WAV le itself is
not clipped.
16/24-bit linear
Clipped recording
Still clipped
Volume lowered
32-bit float
Saved in data
Not clipped
Volume raised
Volume lowered
06

Contents
Notes about this Operation Manual ......................................................................... 02
Introduction .................................................................................................................... 03
Achieving high audio quality throughout recording and editing .......................04
Dual A/D converter circuit overview ................................................................................... 05
32-bit oat WAV le overview .............................................................................................. 06
Contents .........................................................................................................................07
Names of parts ............................................................................................................. 09
Connecting mics/other devices to Inputs 1–6 .....................................................11
Equipment connection examples .......................................................................................12
Display overview ........................................................................................................... 13
Preparations ..................................................................................................................16
Supplying power ..................................................................................................................... 16
Loading SD cards ................................................................................................................... 18
Turning the power on and off ..............................................................................................19
Setting the language .............................................................................................................. 20
Setting the date and time ..................................................................................................... 21
Setting the power supply used ............................................................................................ 23
Recording .......................................................................................................................25
Recording process ................................................................................................................. 25
Setting the recording le format .........................................................................................26
Selecting inputs and adjusting levels ................................................................................. 27
Recording .................................................................................................................................29
Setting the sampling rate......................................................................................................30
Setting the recording mode (bit depth) .............................................................................. 32
Setting MP3 le bit rate (MP3) ............................................................................................34
Setting the LR Track ............................................................................................................... 36
Capturing audio before recording starts ........................................................................... 38
Setting the recording time display ...................................................................................... 39
Setting the playback time display ....................................................................................... 41
Folder and le structure ........................................................................................................ 43
Move the previously recorded take to the FALSE TAKE folder. ..................................... 45
Recorded take settings ............................................................................................... 46
Changing the note for the next take recorded .................................................................. 46
Setting and managing recorded scene names ................................................................ 48
Changing the track name of the next take recorded (Track Name) ............................. 51
Changing the number of the next take recorded ............................................................. 53
Playback .........................................................................................................................54
Playing recordings ..................................................................................................................54
Mixing takes ............................................................................................................................ 55
Monitoring the playback signals of specic tracks during playback ...........................57
Changing the repeat playback setting ................................................................................59
Take and folder operations ........................................................................................60
Working with takes and folders ........................................................................................... 60
Overview of metadata (take information) stored in les ................................................ 66
Checking and editing take metadata ..................................................................................67
Writing a sound report ........................................................................................................... 76
Input settings .................................................................................................................79
Adjusting the input signal monitoring balance ................................................................. 79
Monitoring the input signals of specied tracks .............................................................. 80
Setting the input source ........................................................................................................ 81
Setting the monitoring volume on the PFL screen .......................................................... 83
Cutting low-frequency noise ................................................................................................ 85
Input limiter ............................................................................................................................. 87
Inverting the input phase ...................................................................................................... 93
Changing the phantom power settings ............................................................................. 95
Applying delay to input signals ............................................................................................ 97
Linking inputs as a stereo pair .............................................................................................99
Adjusting multiple track input levels together ................................................................101
Changing the automatic mixing setting ...........................................................................102
Setting the Ambisonic format ............................................................................................104
Setting the mic position used for Ambisonic recording ...............................................107
07

Output settings ...........................................................................................................109
Setting signals sent to the headphone output ...............................................................109
Outputting alerts through headphones ............................................................................ 112
Setting the headphone output volume curve ..................................................................113
Boosting headphone output to alleviate interference from recorded sound............114
Setting the output level .......................................................................................................116
Applying delay to the output ..............................................................................................118
Output Limiter .......................................................................................................................119
Selecting signals sent to the line outputs ........................................................................123
Timecode ...................................................................................................................... 125
Timecode overview ..............................................................................................................125
Setting timecode ..................................................................................................................127
Setting the automatic timecode recording delay ...........................................................136
Setting timecode initialization used at startup ............................................................... 137
Using USB functions ..................................................................................................139
Exchanging data with a computer ....................................................................................139
Using as an audio interface ................................................................................................141
Using SD card recording and audio interface functions at the same time ...............143
Audio interface settings ......................................................................................................145
Using an FRC-8 as a controller..........................................................................................146
Setting the type of keyboard connected to the FRC-8 ..................................................148
Setting user keys for the FRC-8 ........................................................................................150
Setting the FRC-8 LED brightness ....................................................................................152
Updating the FRC-8 rmware ............................................................................................154
Operating with an iOS device .............................................................................................157
Other settings ..............................................................................................................164
Setting the level meter peak hold time .............................................................................164
Setting the LED brightness .................................................................................................165
Making display settings ......................................................................................................167
Setting how marks are added manually ..........................................................................170
Setting the buttons held ......................................................................................................172
Other functions ...........................................................................................................174
Checking SD card information ...........................................................................................174
Testing SD card performance ............................................................................................175
Formatting SD cards............................................................................................................178
Checking the F6 Shortcut List ...........................................................................................179
Backing up and loading F6 settings .................................................................................180
Restoring default setting values ........................................................................................183
Checking the rmware version ..........................................................................................184
Updating the rmware .........................................................................................................185
Appendix .......................................................................................................................186
Troubleshooting ...................................................................................................................186
Metadata list .........................................................................................................................188
List of shortcuts ...................................................................................................................192
Block diagrams .....................................................................................................................193
Specications........................................................................................................................200
08
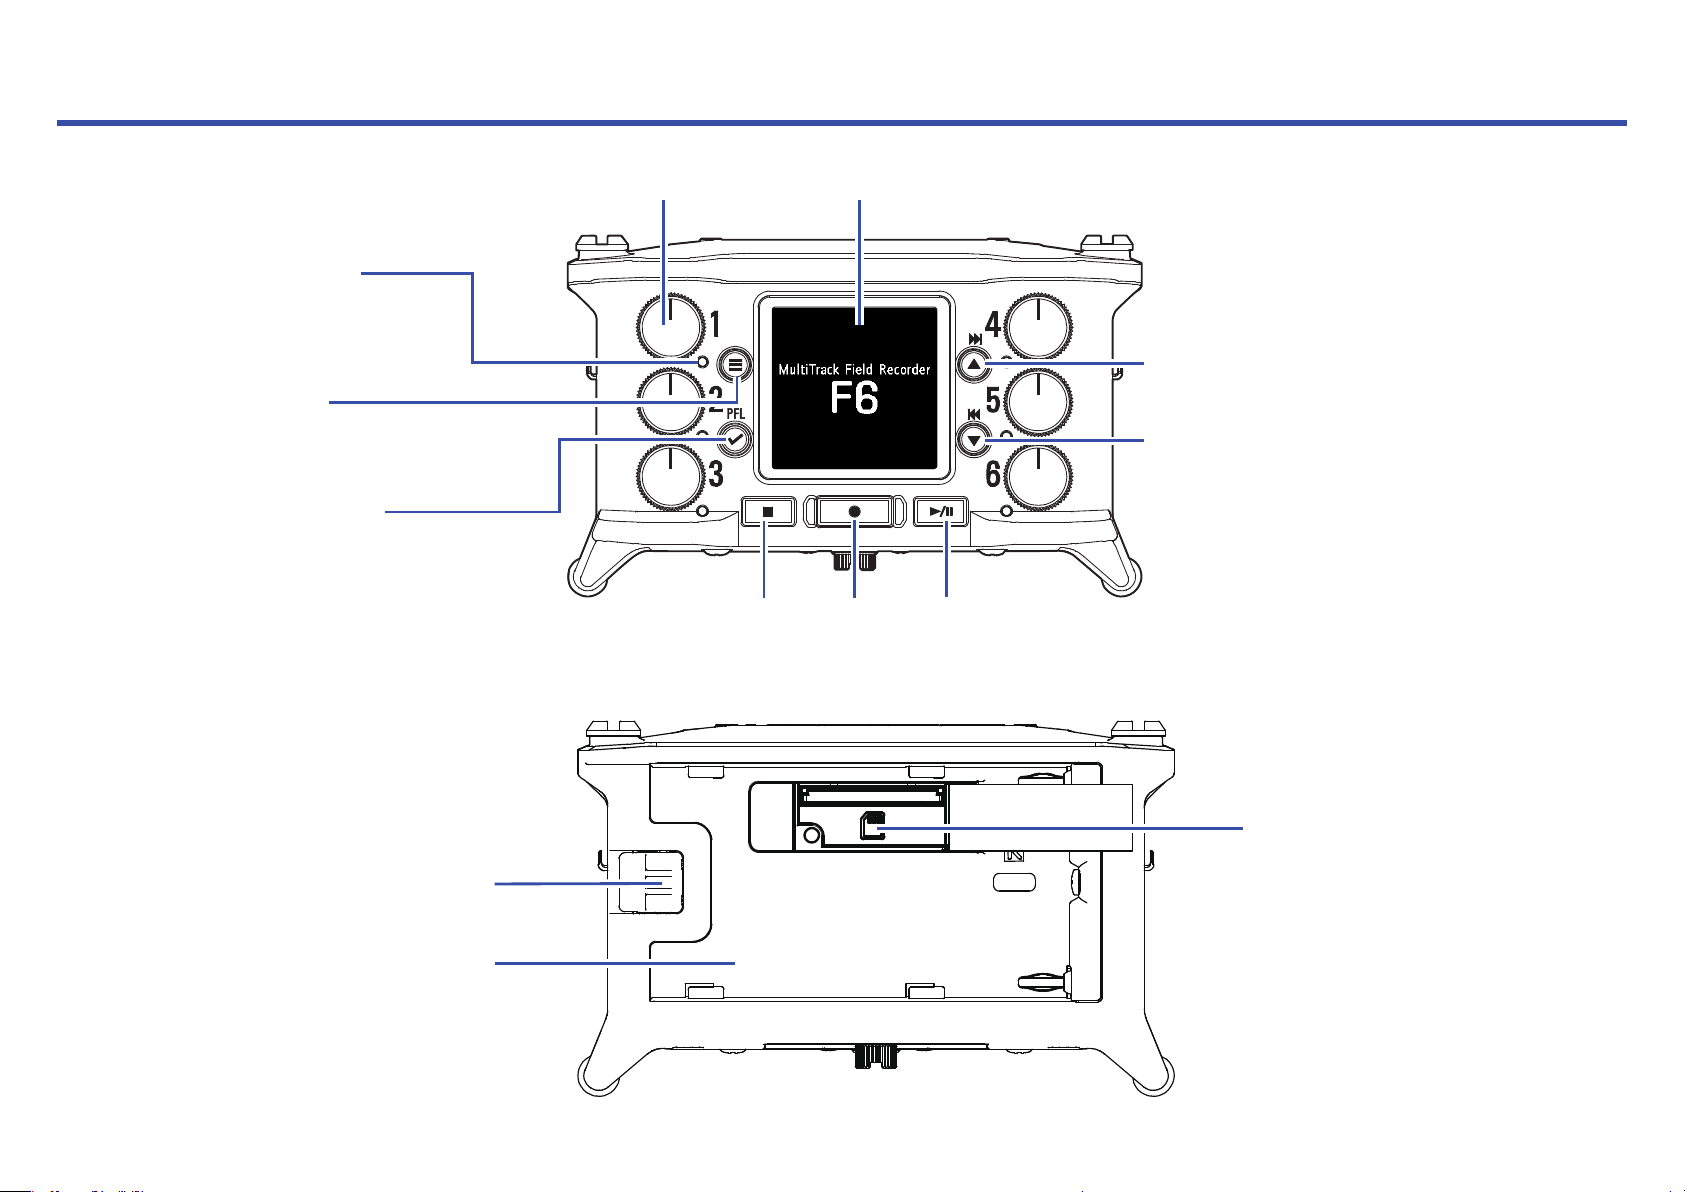
Names of parts
■ Front
Status indicator
Red: Input enabled
Green: Playback track
enabled
Orange: PFL monitoring
Unlit: Input disabled
MENU button
Home Screen: Open Menu Screen
Menu Screen: Return to previous
screen
PFL/ENTER button
Home Screen: Open PFL Screen
Menu Screen: Confirm menu item
■ Back
Track knob Display
STOP
button
REC
button
FF/↑ button
Home Screen: Select playback take
Menu Screen: Select menu item
RWD/↓ button
Home Screen: Select playback take
Menu Screen: Select menu item
PLAY/PAUSE
button
L battery lock button
L battery mount
SD card slot
09
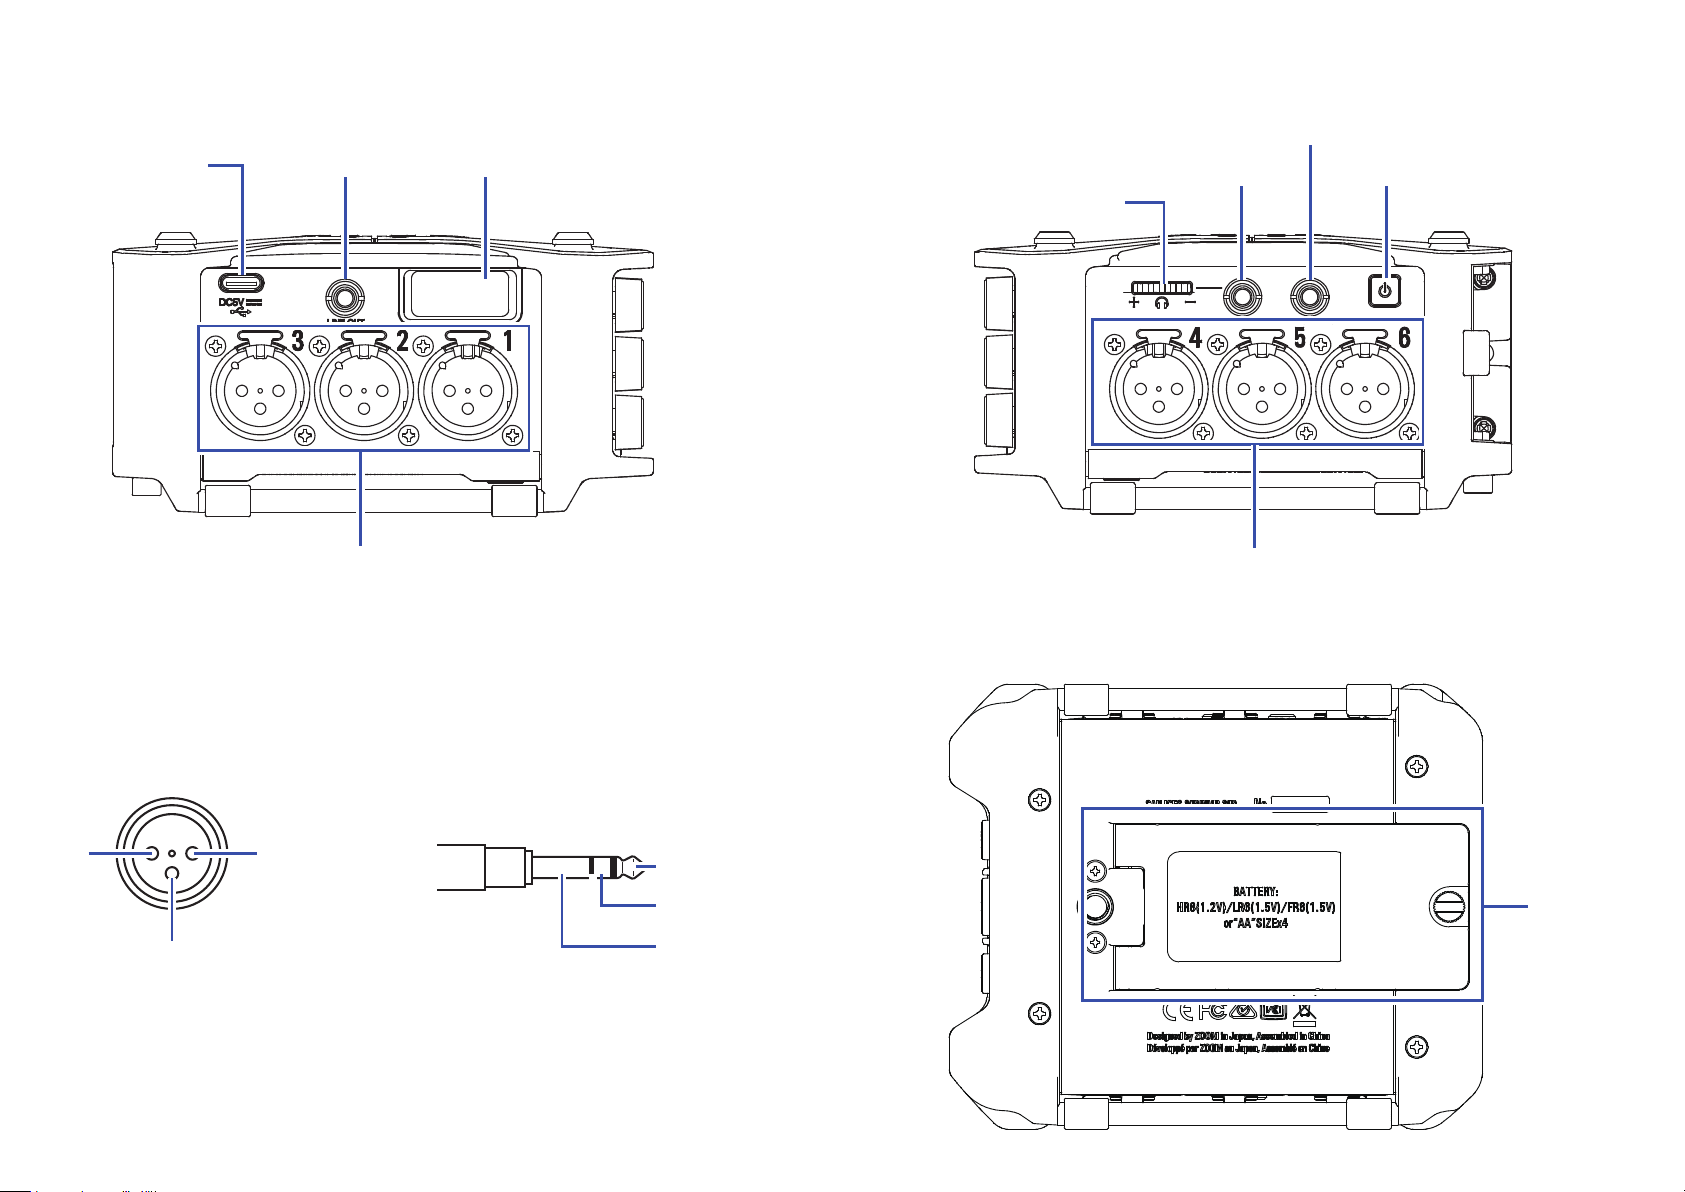
■ Left side
USB port LINE OUT jack Zoom wireless adapter (e.g. BTA-1)
■ Right side
TIMECODE IN/OUT jack
HEADPHONE jack POWER switch
Headphone volume
Inputs 1–3
Inputs 1–6 TIMECODE IN/OUT
3
XLR
12
1:GND
2:HOT
3:COLD
TRS
TIP: Input to F6
(output from external device)
RING: Output from F6
(input to external device)
SLEEVE: GND
Inputs 4–6
Battery
cover
10
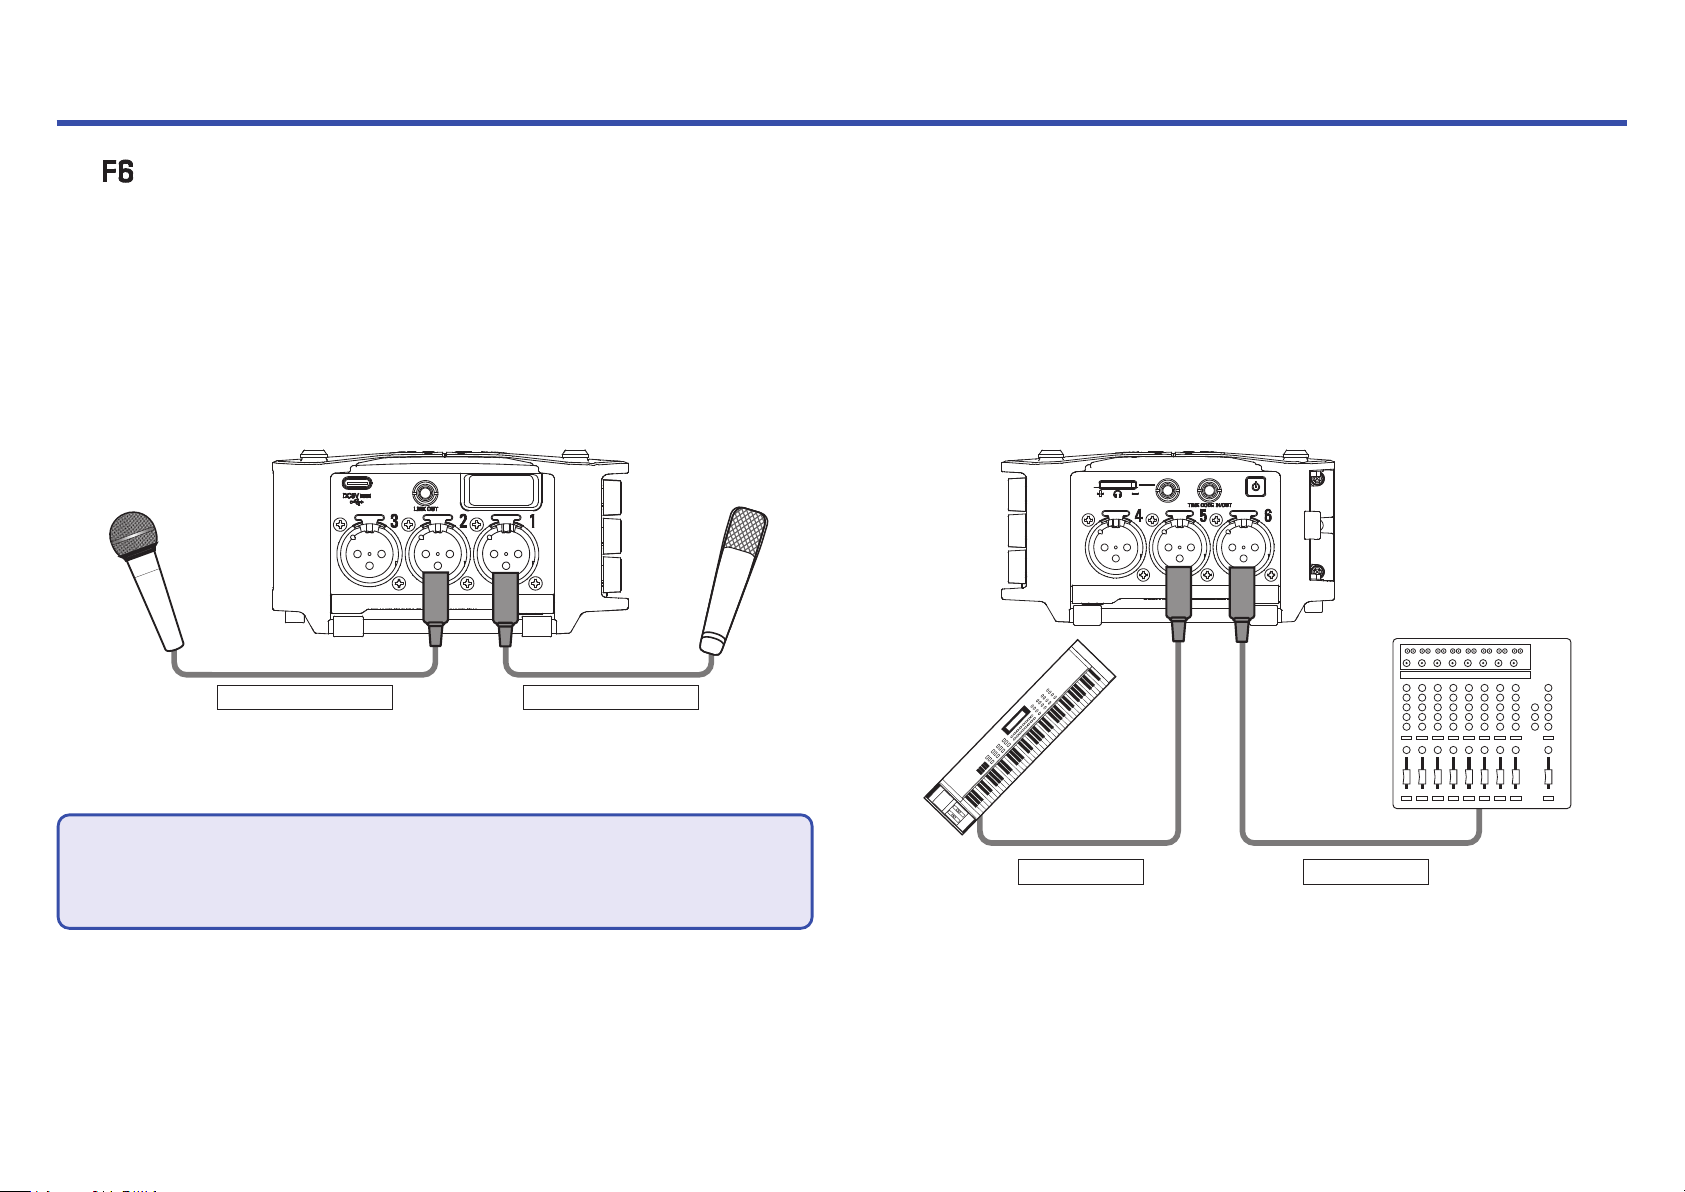
Connecting mics/other devices to Inputs 1–6
The can record 6 individual tracks that correspond to Inputs 1–6 and a stereo mix of these inputs with left and right tracks.
Mics and the outputs of instruments and audiovisual equipment, for example, can be connected to Inputs 1–6 and recorded to tracks 1–6.
Connecting mics
Connect dynamic and condenser mics with XLR plugs to Inputs 1–6.
Phantom power (+24 V/+48 V) can be supplied to condenser mics.
( →P.81)
Connecting line level equipment
Connect XLR cables from keyboards and mixers directly to Inputs 1–6.
Direct input of passive guitars and basses is not supported. Connect
these instruments through a mixer or effects device.
Dynamic mic
(XLR cable)
NOTE
When disconnecting an XLR cable, pull the XLR plug while pushing the connector lock release button.
Condenser mic
(XLR cable)
11
Keyboard
(XLR cable)
Mixer
(XLR cable)
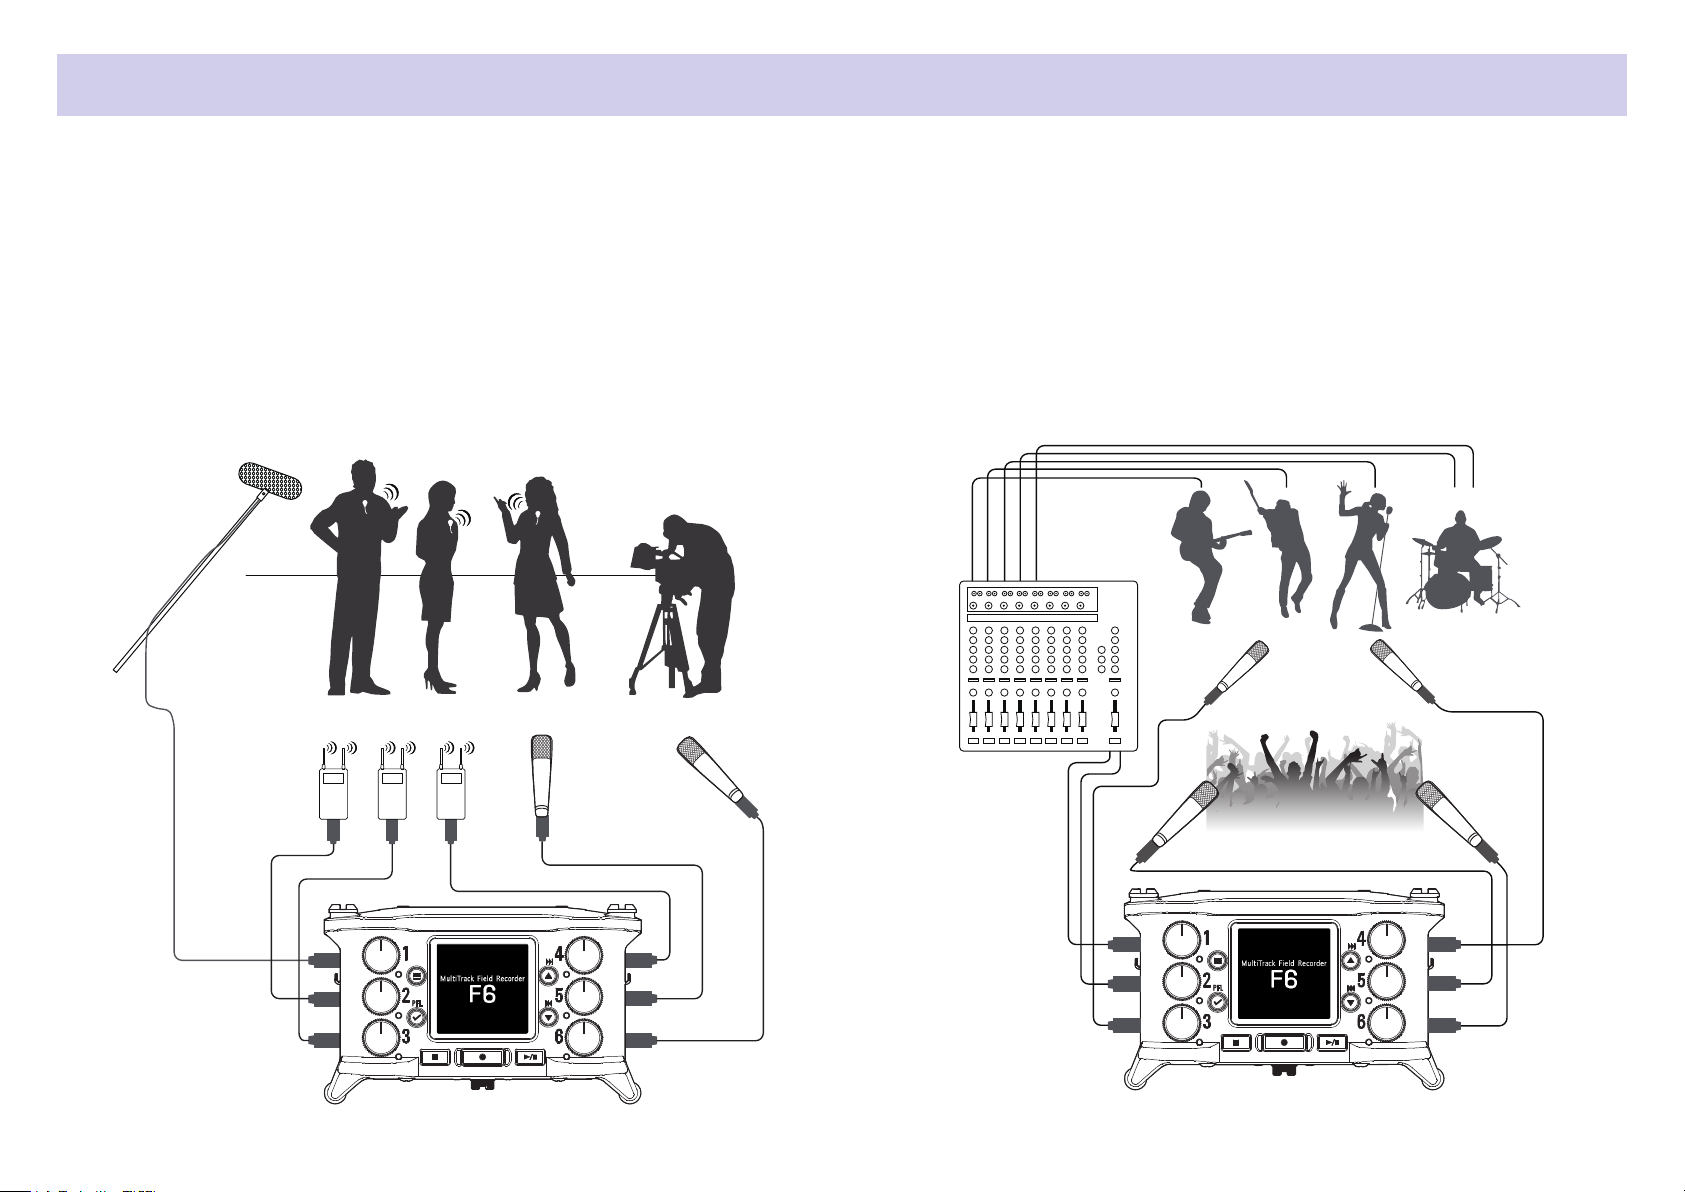
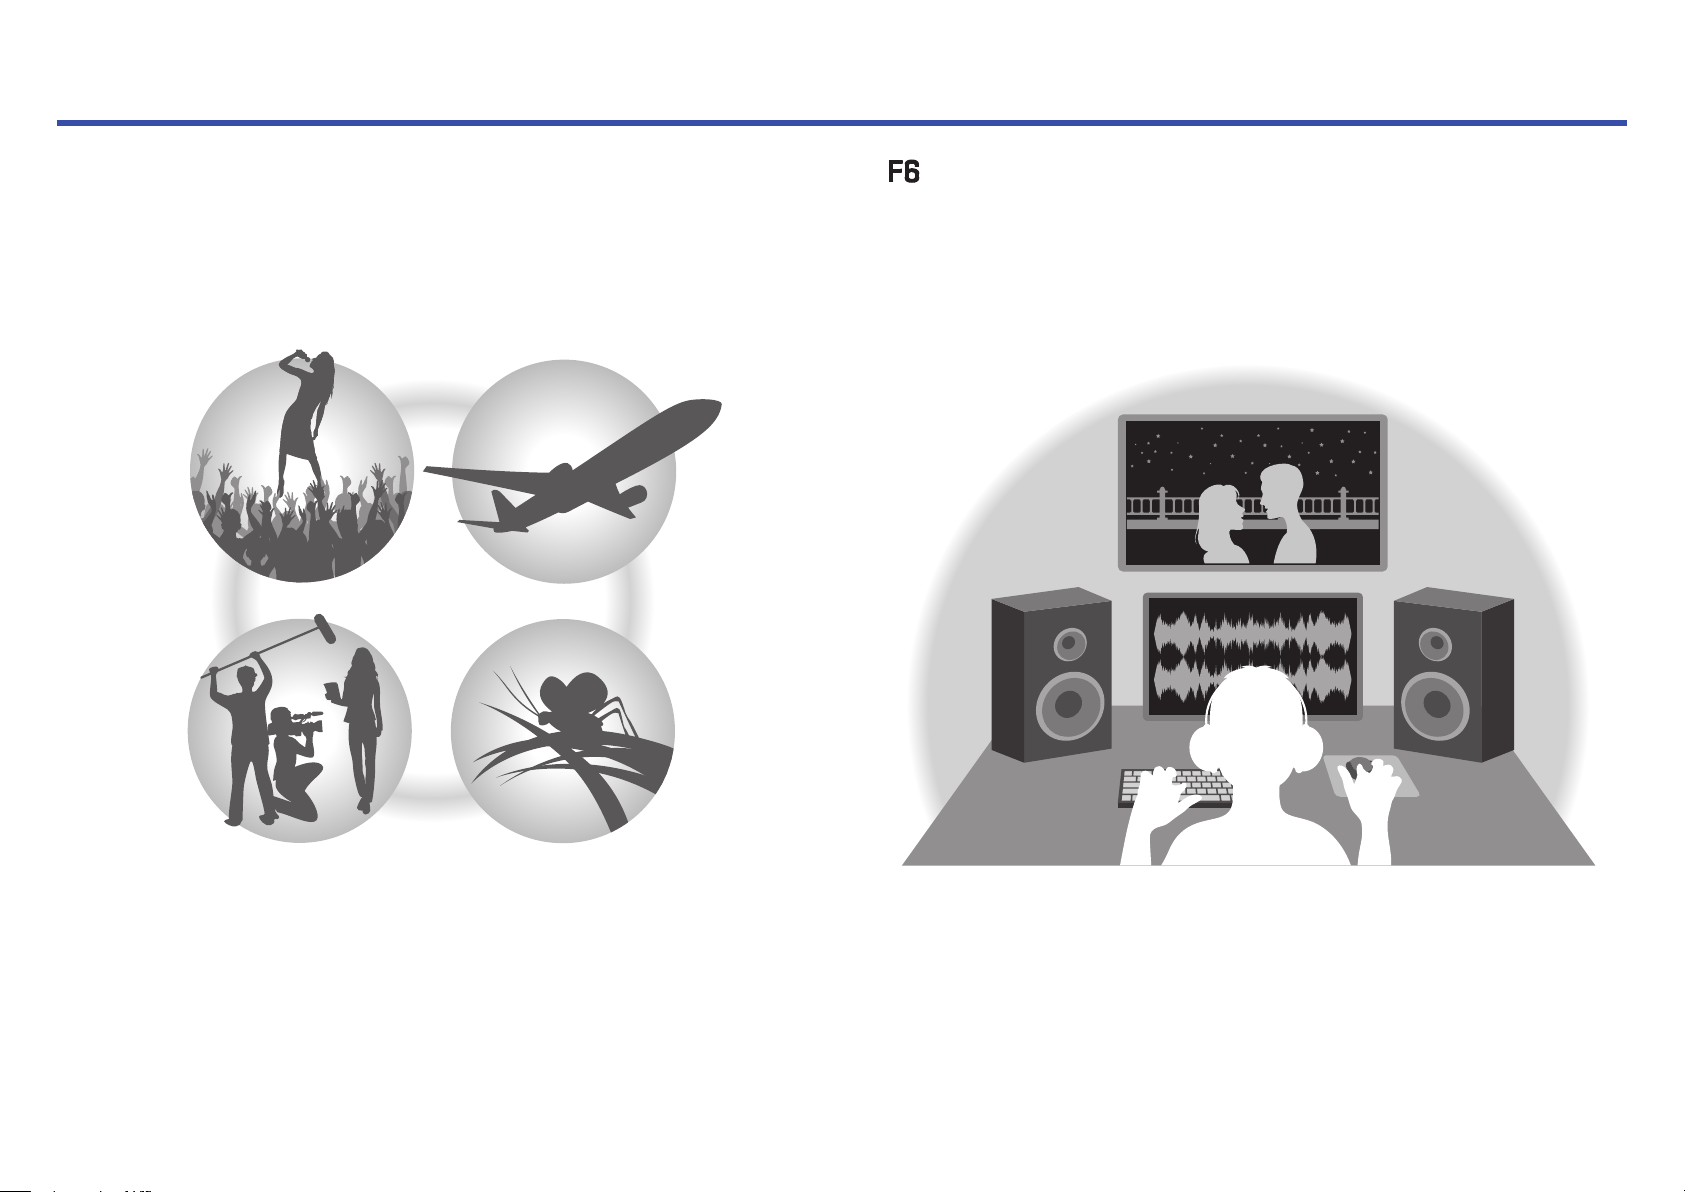
Equipment connection examples
Recording is possible in a variety of situations like these.
While lming
• Input 1: gun mic for main subject sound
• Inputs 2–4: lapel mics for performers
• Inputs 5–6: mics for ambient sound
Gun mic
Pin mics
Pin mics
Ambient
mics
Concert recording
• Inputs 1–2: line inputs for outputs from mixer
• Inputs 3–4: mics for stage performance
• Inputs 5–6: ambient mics for audience sound
Mics
(Stage performance)
PA mixer
Ambient mics
(Audience voices)
1
2
3
4
5
6
1
2
3
4
5
6
12

Display overview
■ Home Screen
Status icons
Stopped
Paused
Counter
During recording: Elapsed/remaining recording time
During playback: Elapsed/remaining playback time
Recording
Recording/playback
sample rate
Clip indicator
Level meter
Track number
Red: Input enabled
Green: Playback track enabled
Gray: Input disabled
Input link settings are shown by
connected adjacent track numbers.
Mono
Playing back
Power type and remaining amount
USB: Power supply connected to port
EXT: L battery
AA: AA batteries
Recording/playback take name
When stopped, press and hold
to show the name that will be
given to the next recorded take.
Recording/playback timecode
Frame rate
INT: Internal timecode enabled
EXT: External timecode input enabled
Stereo
Ambisonic
HINT
•
When the Home Screen is not open, press and hold
• Some of the screen will appear differently when the recording mode is Float (32 bit).
to return to the Home Screen.
13
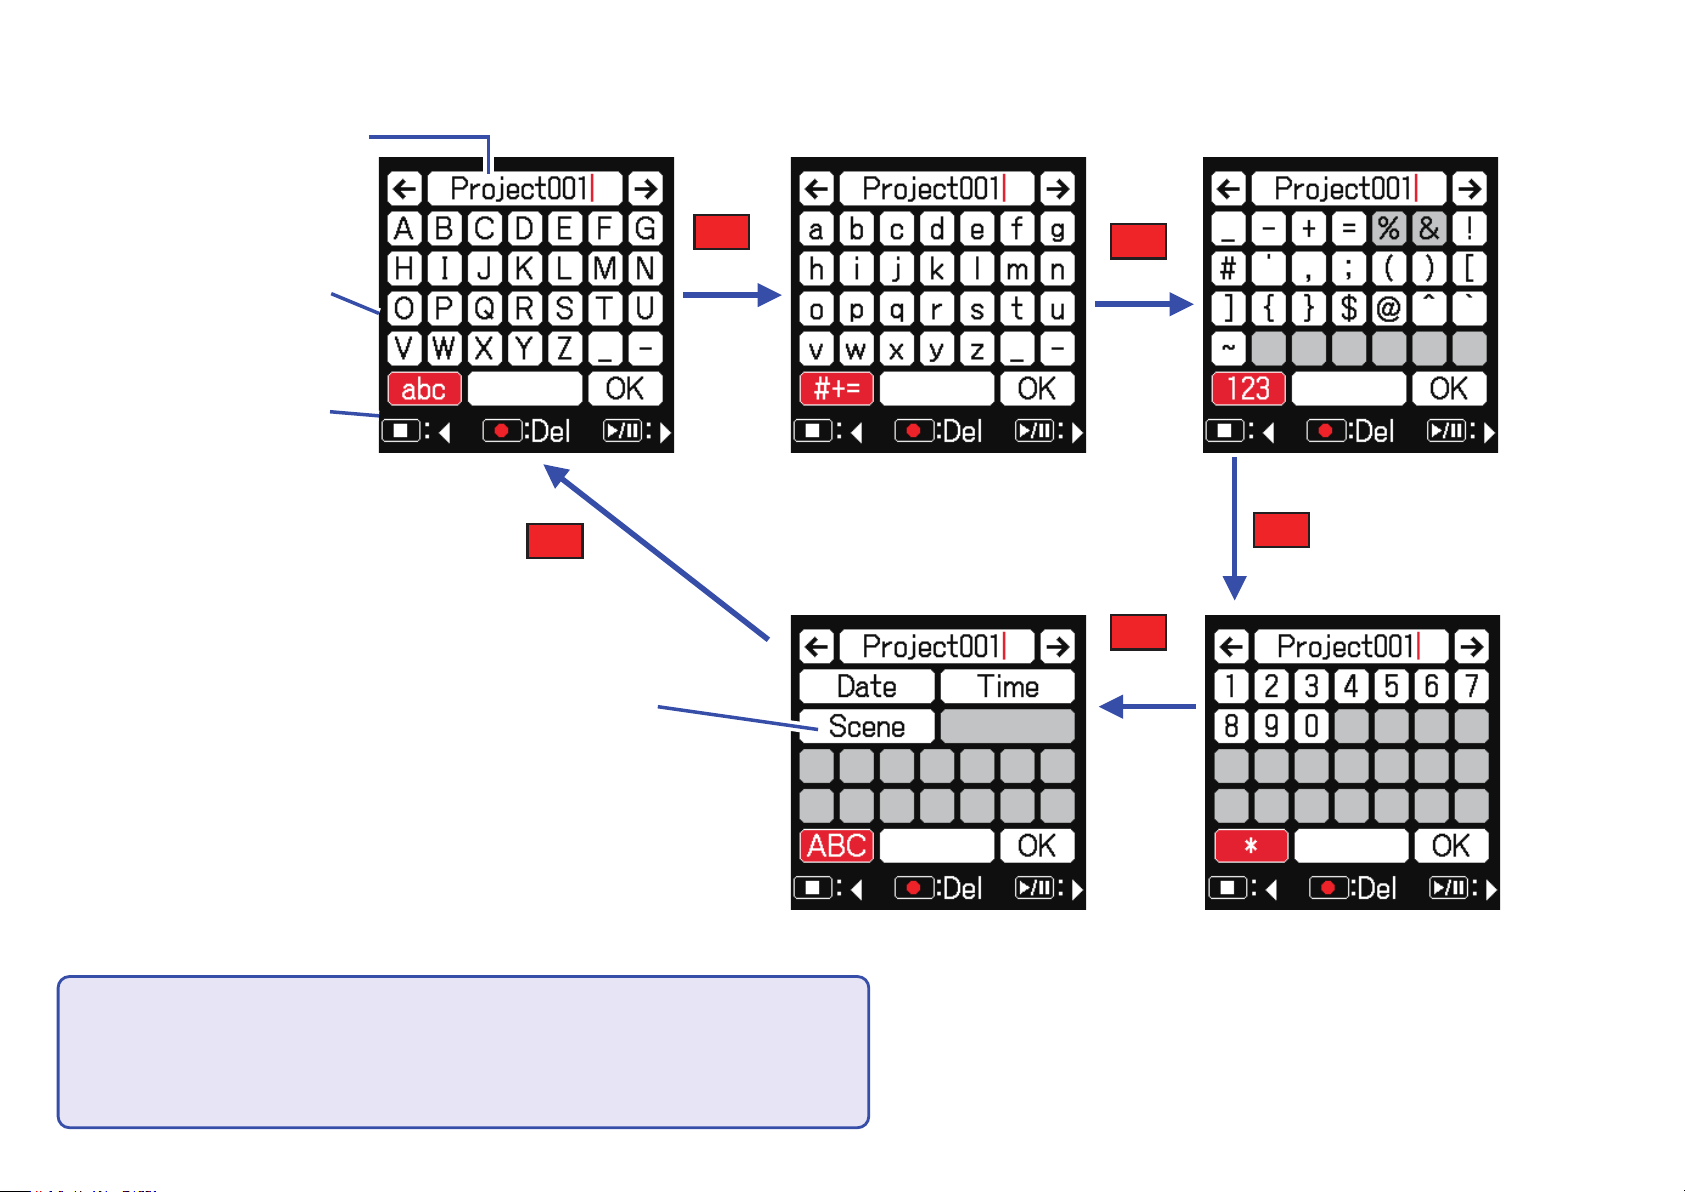
■ Character input screen
Text box
Keyboard
Operation
indicator
Press
input button
*
Automatic
Press
abc
Press
#+=
Press
123
Press
*
NOTE
• The following characters can be used in project names.
• (space) ! # $ ' ( ) + , - 0 1 2 3 4 5 6 7 8 9 ; = @ A B C D E F G H I J K L M N O P Q
R S T U V W X Y Z [ ] ^ _ ` a b c d e f g h i j k l m n o p q r s t u v w x y z { }
14
■ Editing operations
Move cursor in
text box
Select characters
(vertical)
Select characters
(horizontal)
Conrm
characters
Delete characters
Use “ ←” and “ →” to move and press
Press
Press
Move the cursor to the character to input, and
press
Move cursor before the character to delete in the
text box, and press
or
or
Complete editing
Cancel editing
Move cursor to "OK" and press
Press
■ Automatic input keys
(Date): This automatically inputs the date. Example: 190210
(Time): This automatically inputs the time. Example: 180950
(Scene): This automatically inputs the current scene name.
15
Preparations
Supplying power
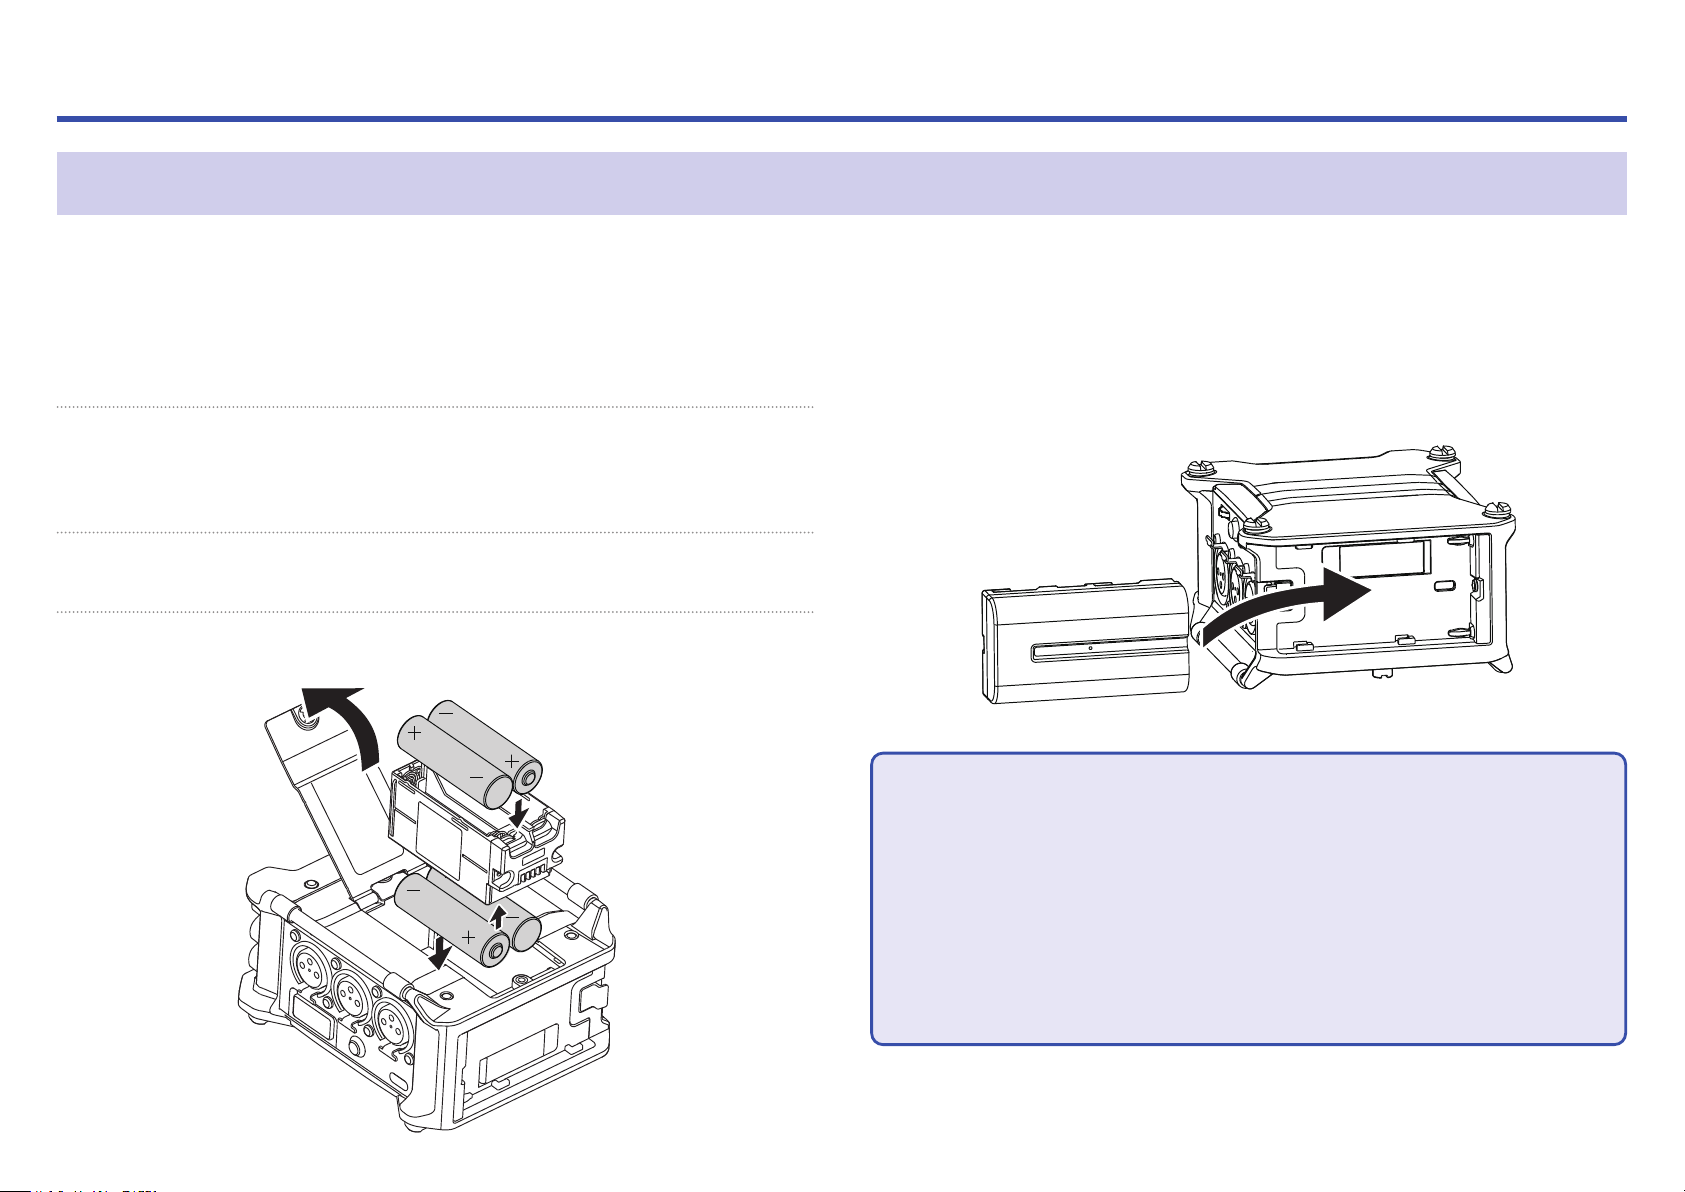
Power can be supplied three ways using AA batteries, an L battery or USB.
■ Using AA batteries
1. Loosen the screw in the battery cover on the bottom.
2. Open the battery compartment cover on the bottom,
remove the battery case, and insert 4 AA batteries.
3. Put the case into the compartment.
4. Close the battery cover and tighten the screw.
■ Using an L battery
1. Slide the battery in the direction of the arrow while
pressing it toward the recorder.
NOTE
• Be careful because the battery case could become loose unexpectedly if
the battery compartment cover screw is not tightened rmly.
• Use only one type of batteries (alkaline, NiMH or lithium) at a time.
• After loading AA batteries, set "Power Source" to the correct type of bat-
tery. ( →P.23)
• If the remaining battery power indicator becomes red, turn the power off
immediately and install new batteries.
16
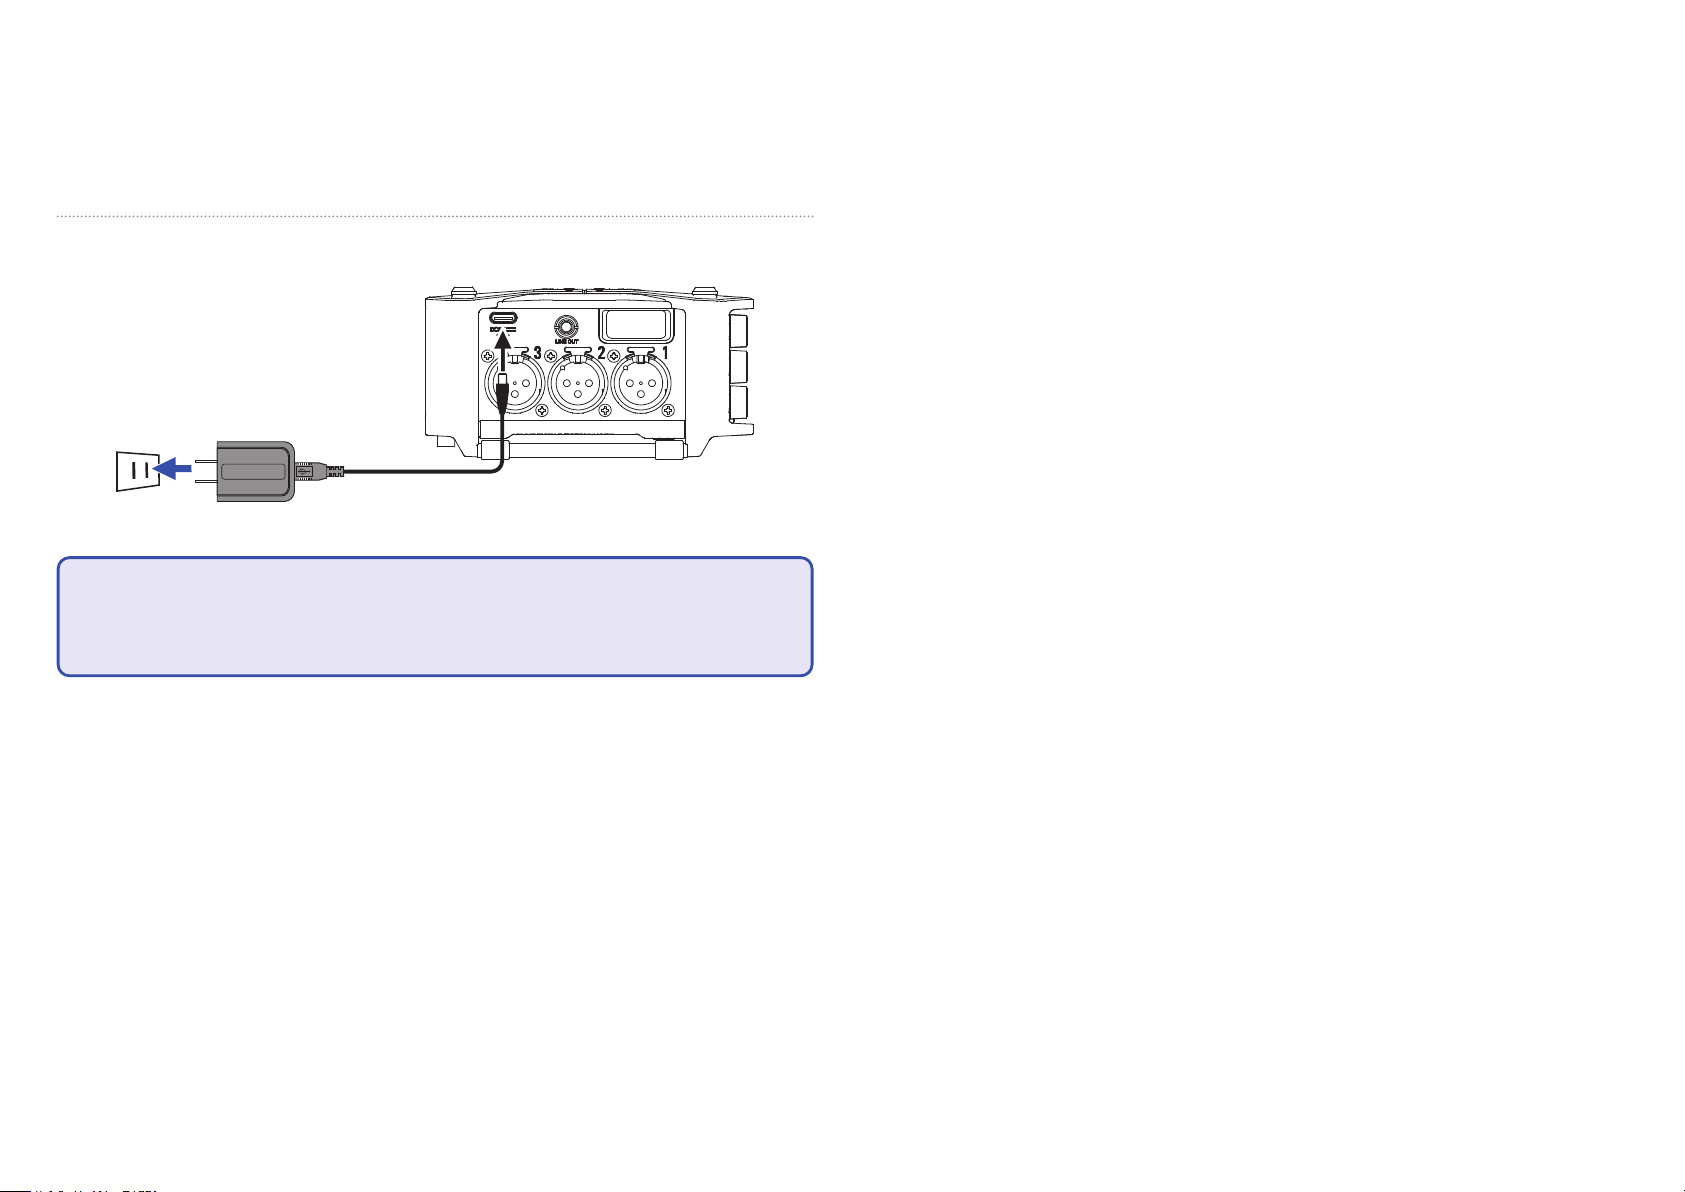
■ Using a USB Type-C cable
1. Connect the cable of the dedicated ZOOM AD-17 AC
adapter to the USB port.
2. Plug the dedicated AC adapter into an outlet.
NOTE
• A 5V mobile battery (commercially-available) can also be connected.
• When connected to a computer, power can be supplied by USB.
17
Loading SD cards
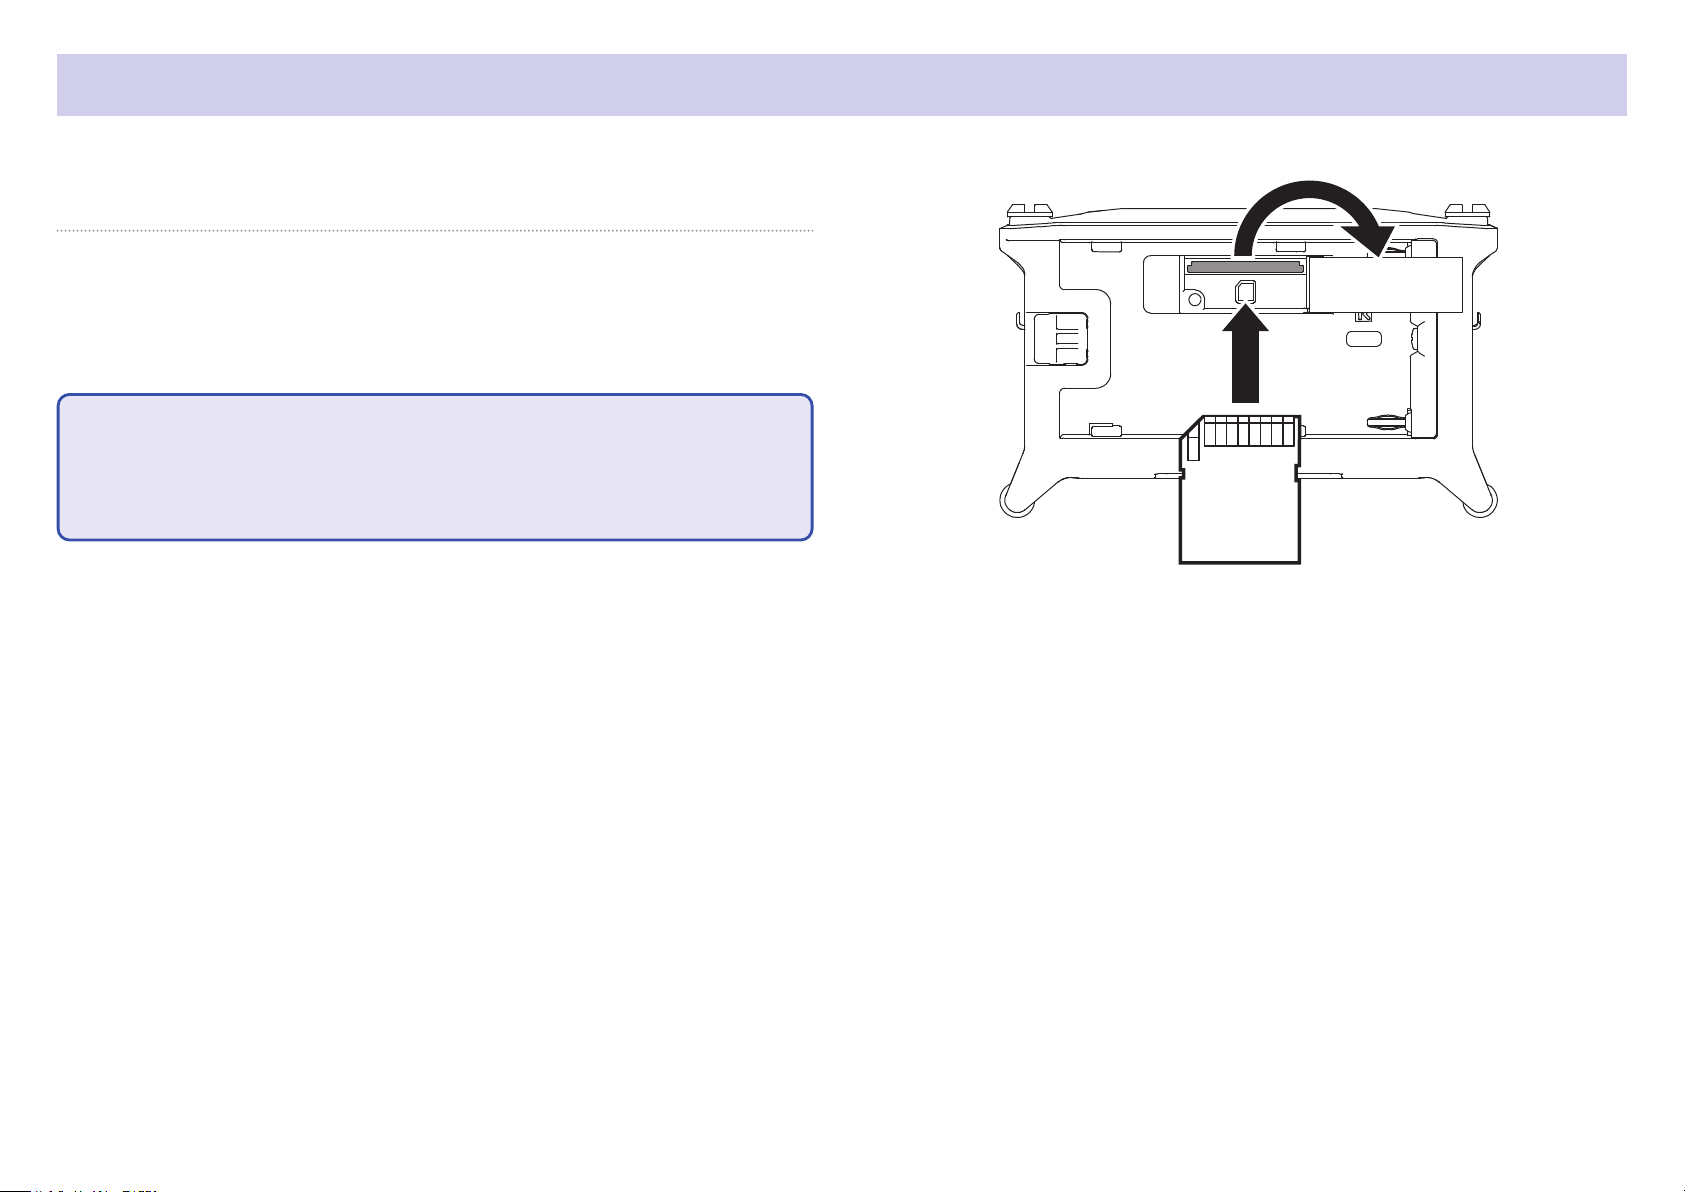
1. Open the SD card slot cover, and insert an SD card.
2. To remove the card: push it further into the slot and
then pull it out.
NOTE
Before using SD cards that have just been purchased or that have been formatted on a computer, they must be formatted. To format an SD card, use
Menu > SYSTEM > SD Card > Format.
18
Turning the power on and off
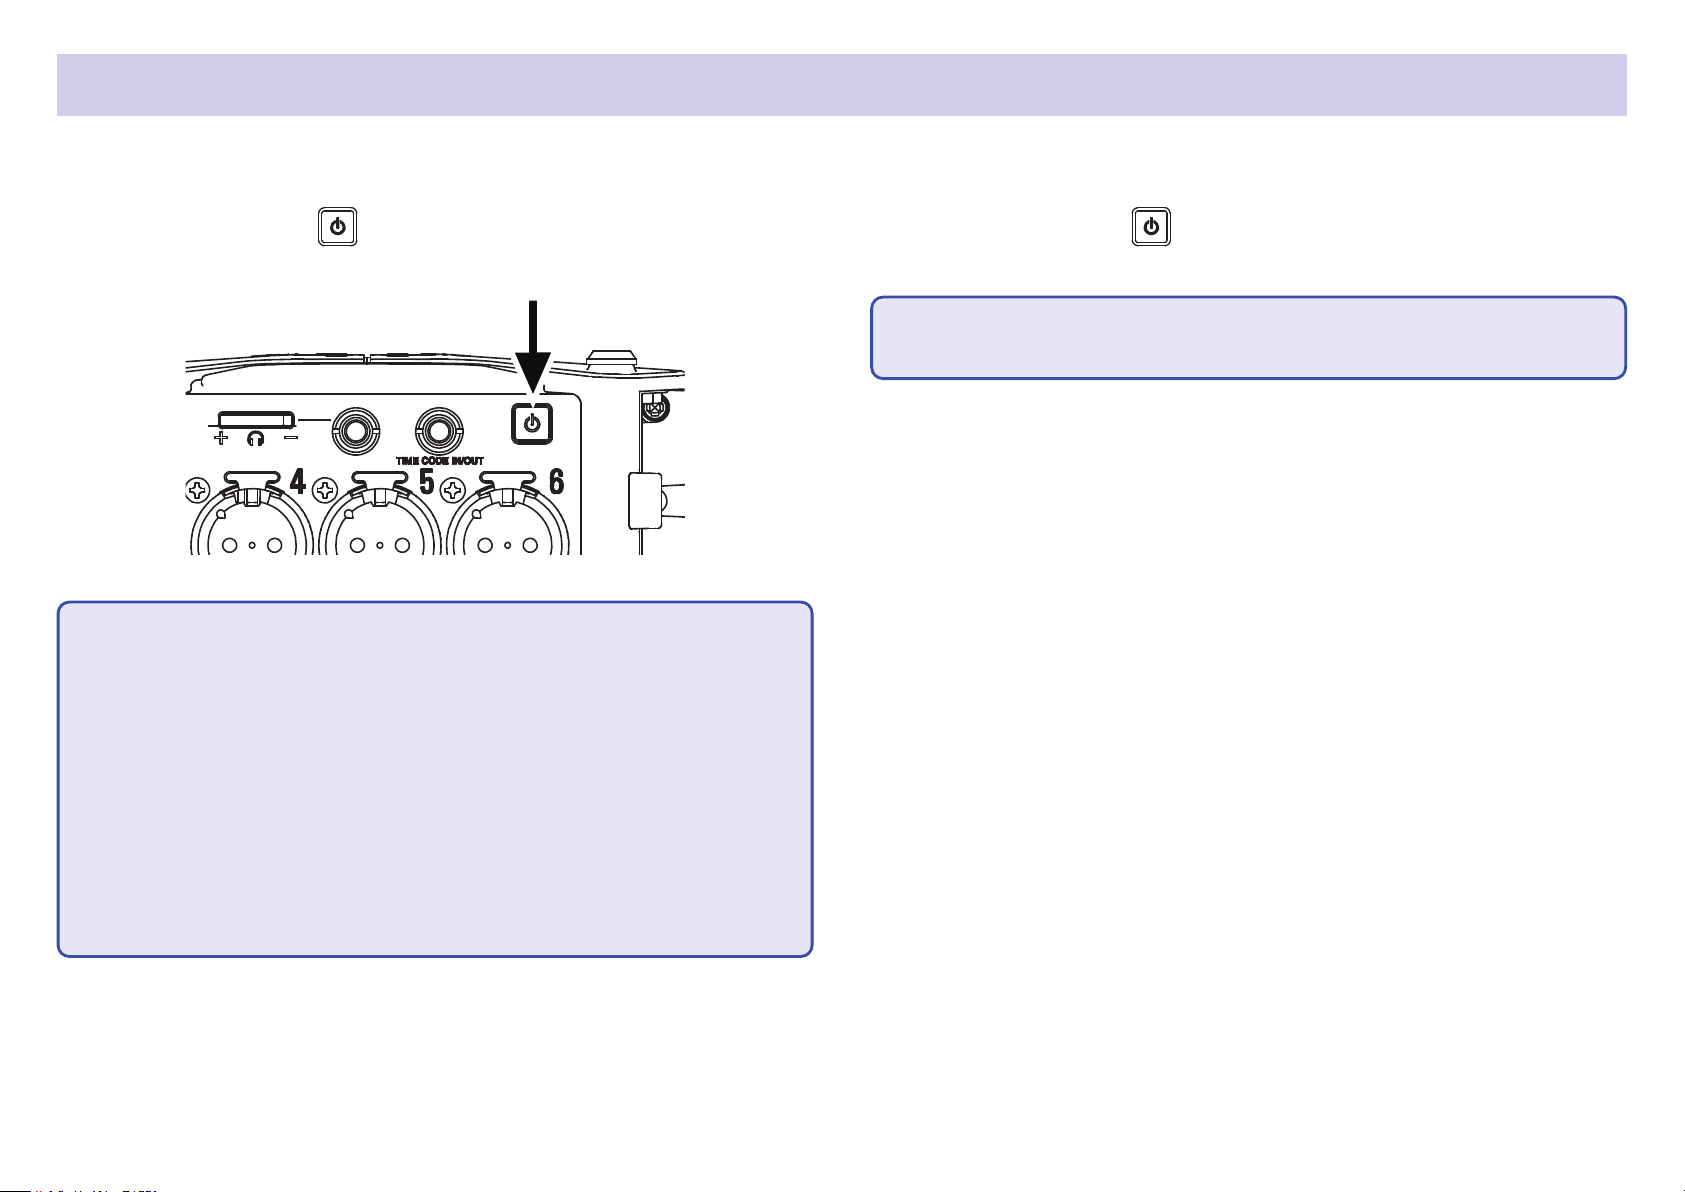
■ Turning the power on
1. Press and hold briey.
The ZOOM logo appears and the power turns on.
NOTE
• The rst time the power is turned on after purchase, the date/time must
be set ( →P.21). This setting can also be changed later.
• If “No Card!” appears on the display, conrm that an SD card is inserted
properly.
■ Turning the power off
1. Press and hold briey.
NOTE
Keep pressing it until the ZOOM logo appears on the LCD.
• If “Card Protected!” appears on the display, the SD card write-protection is
enabled. Slide the lock switch on the SD card to disable write-protection.
• If “Invalid Card!” appears on the display, the card is not formatted correctly. Format the card or use a different card. Formatting SD cards
( →P.178)
19

Setting the language
The menu display language can be changed.
1. Press .
2. Use and to select
SYSTEM, and press
.
3. Use and to select
Language, and press
4. Use and to select the
desired language, and press
NOTE
The rst time the power is turned on after purchase, the language must be
set.
.
.
20
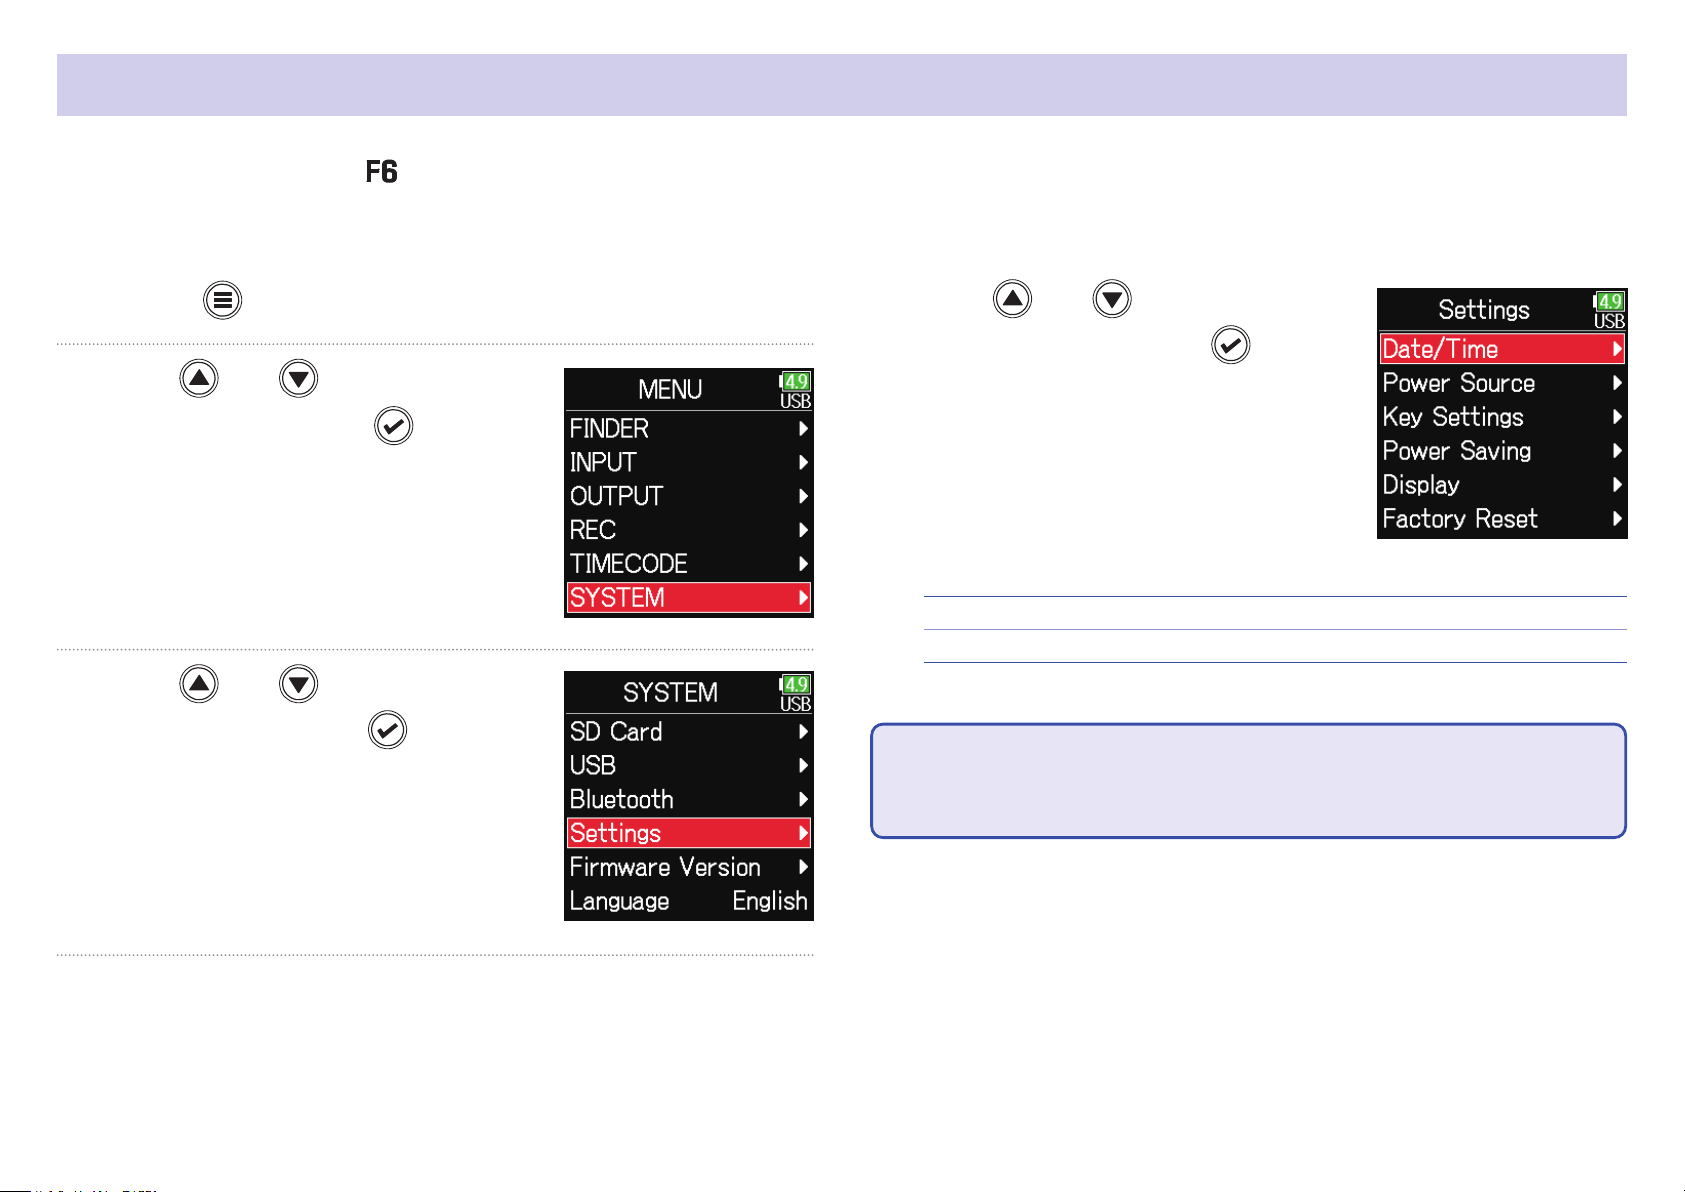
Setting the date and time
The date and time set on the are used when recording les, for example.
The date format (order of year, month and day) can also be set.
1. Press .
2. Use and to select
SYSTEM, and press
.
3. Use and to select
Settings, and press
.
4. Use and to select
Date/Time, and press
▶ Continue to one of the following procedures.
Setting the date and time ……………………………………………………… P.22
Setting the date format ………………………………………………………… P.22
NOTE
The rst time the power is turned on after purchase, the date/time must be
set.
.
21
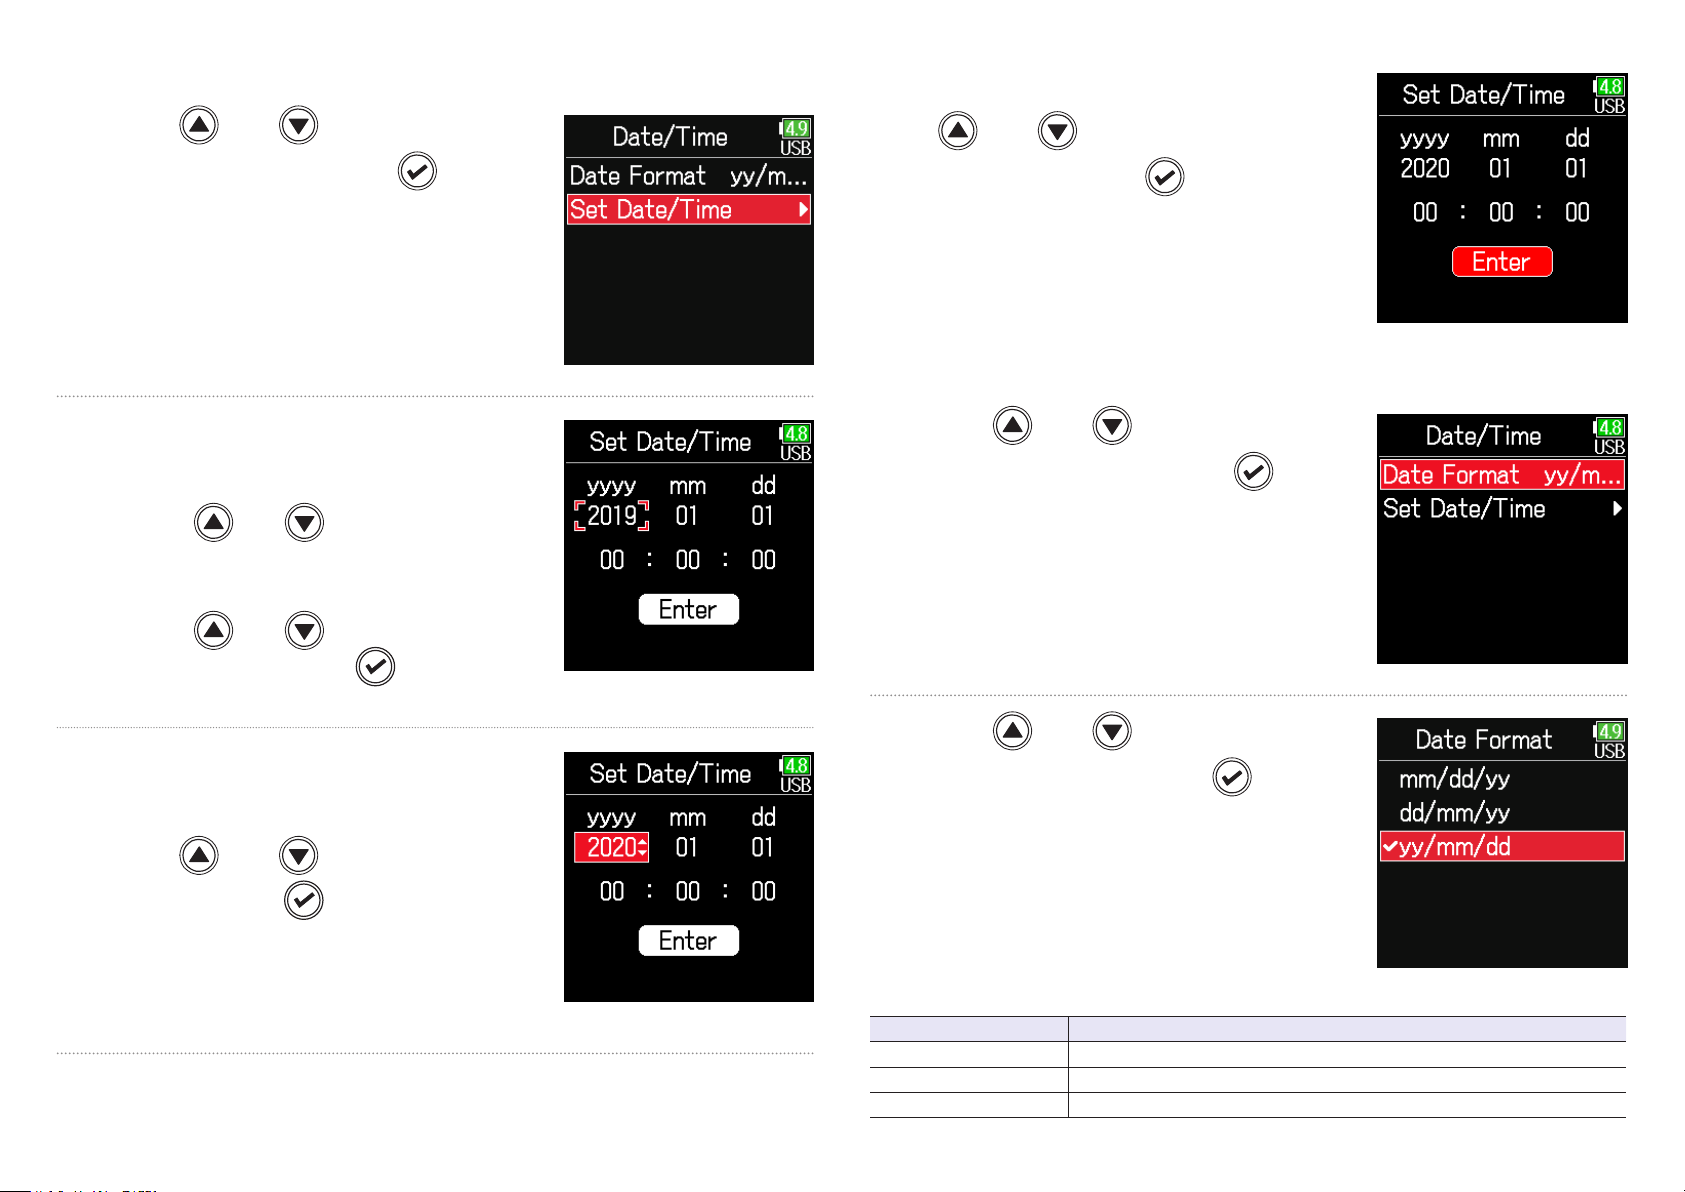
■ Setting the date and time
8. When done setting, use
5. Use and to select Set
Date/Time, and press
.
6. Set the date and time
Move cursor or change value:
Use
Change item value:
Use
the item, and press
and
and to select
.
and to select
Enter, and press
This completes setting the date and
time.
■ Setting the date format
.
5. Use and to select
Date Format, and press
.
7. The item selected to be
changed appears red.
Use
it, and press
and to change
.
6. Use and to select
the format, and press
Setting Explanation
mm/dd/yy Month, day, year order
dd/mm/yy Day, month, year order
yy/mm/dd Year, month, day order
22
.
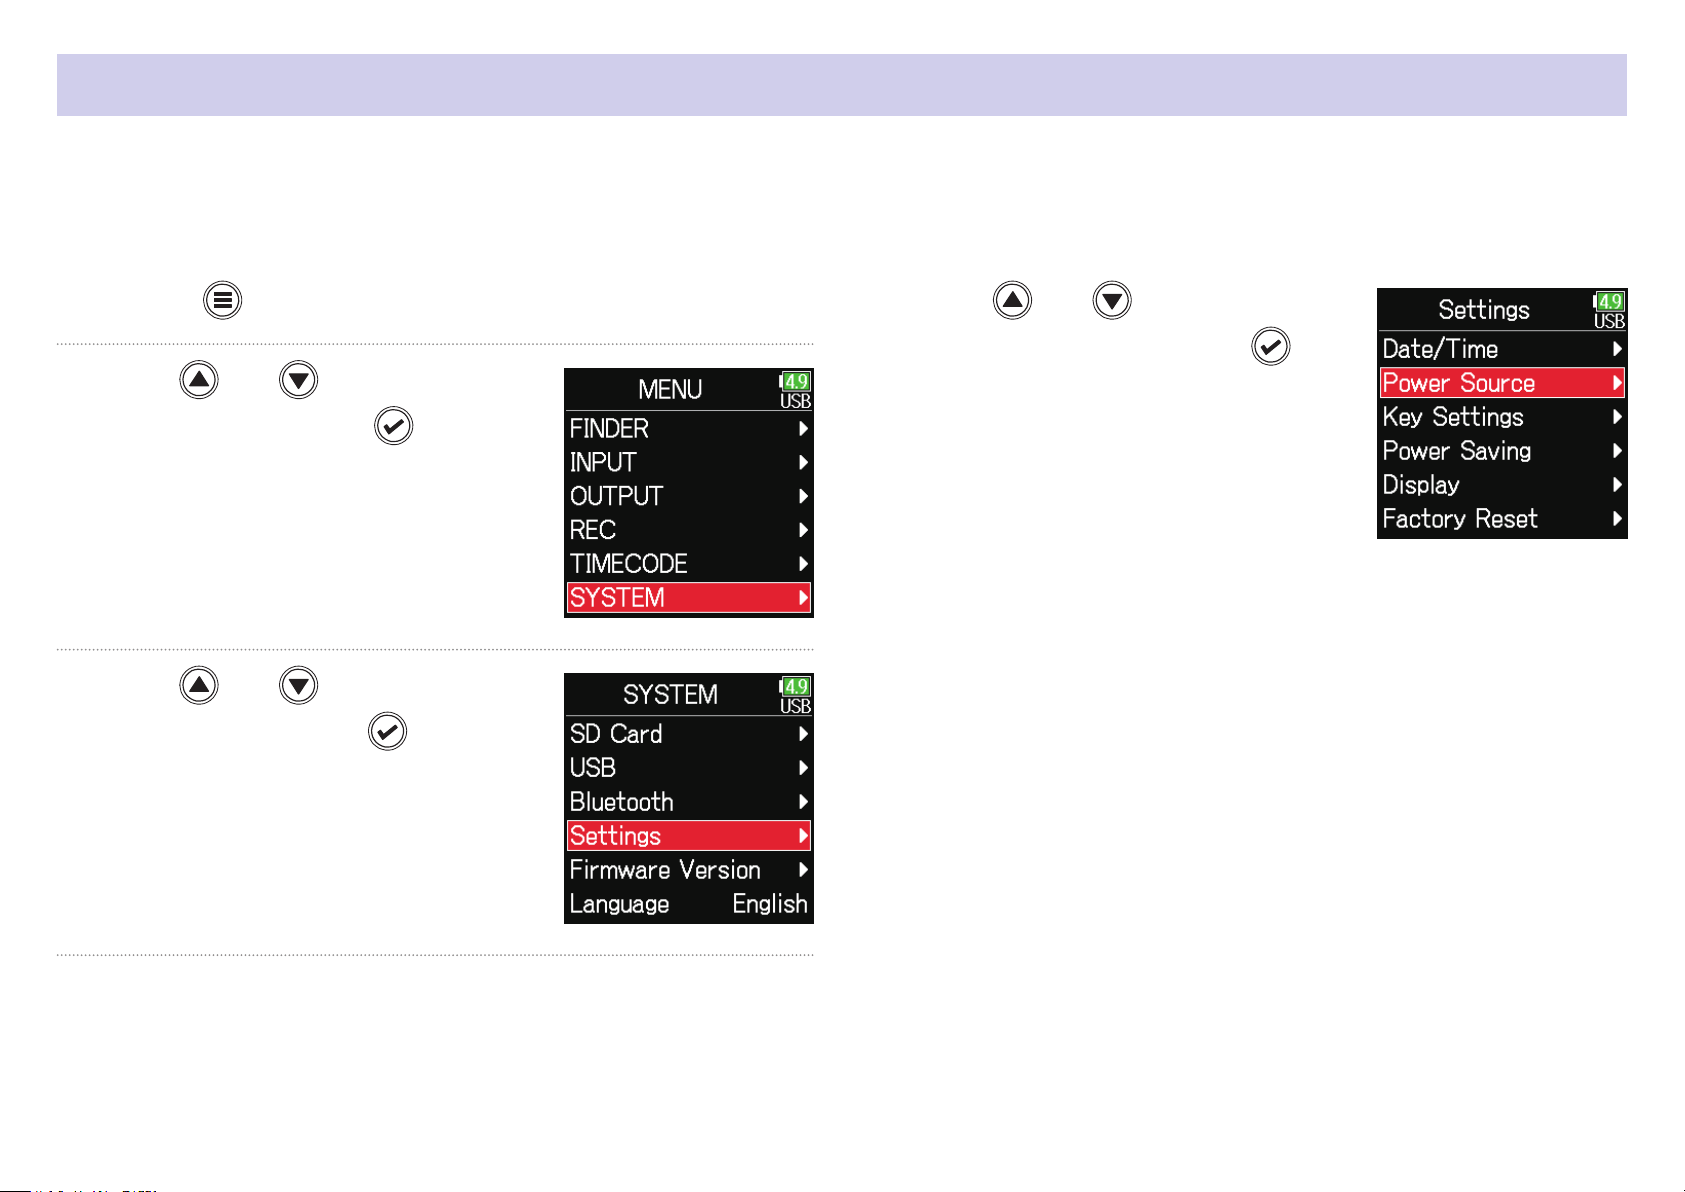
Setting the power supply used
When using AA batteries, set the battery type so that the amount of remaining power can be shown accurately.
The voltage of each power supply and the remaining battery charge can be checked on this menu page.
1. Press .
2. Use and to select
SYSTEM, and press
.
3. Use and to select
Settings, and press
.
4. Use and to select
Power Source, and press
.
23
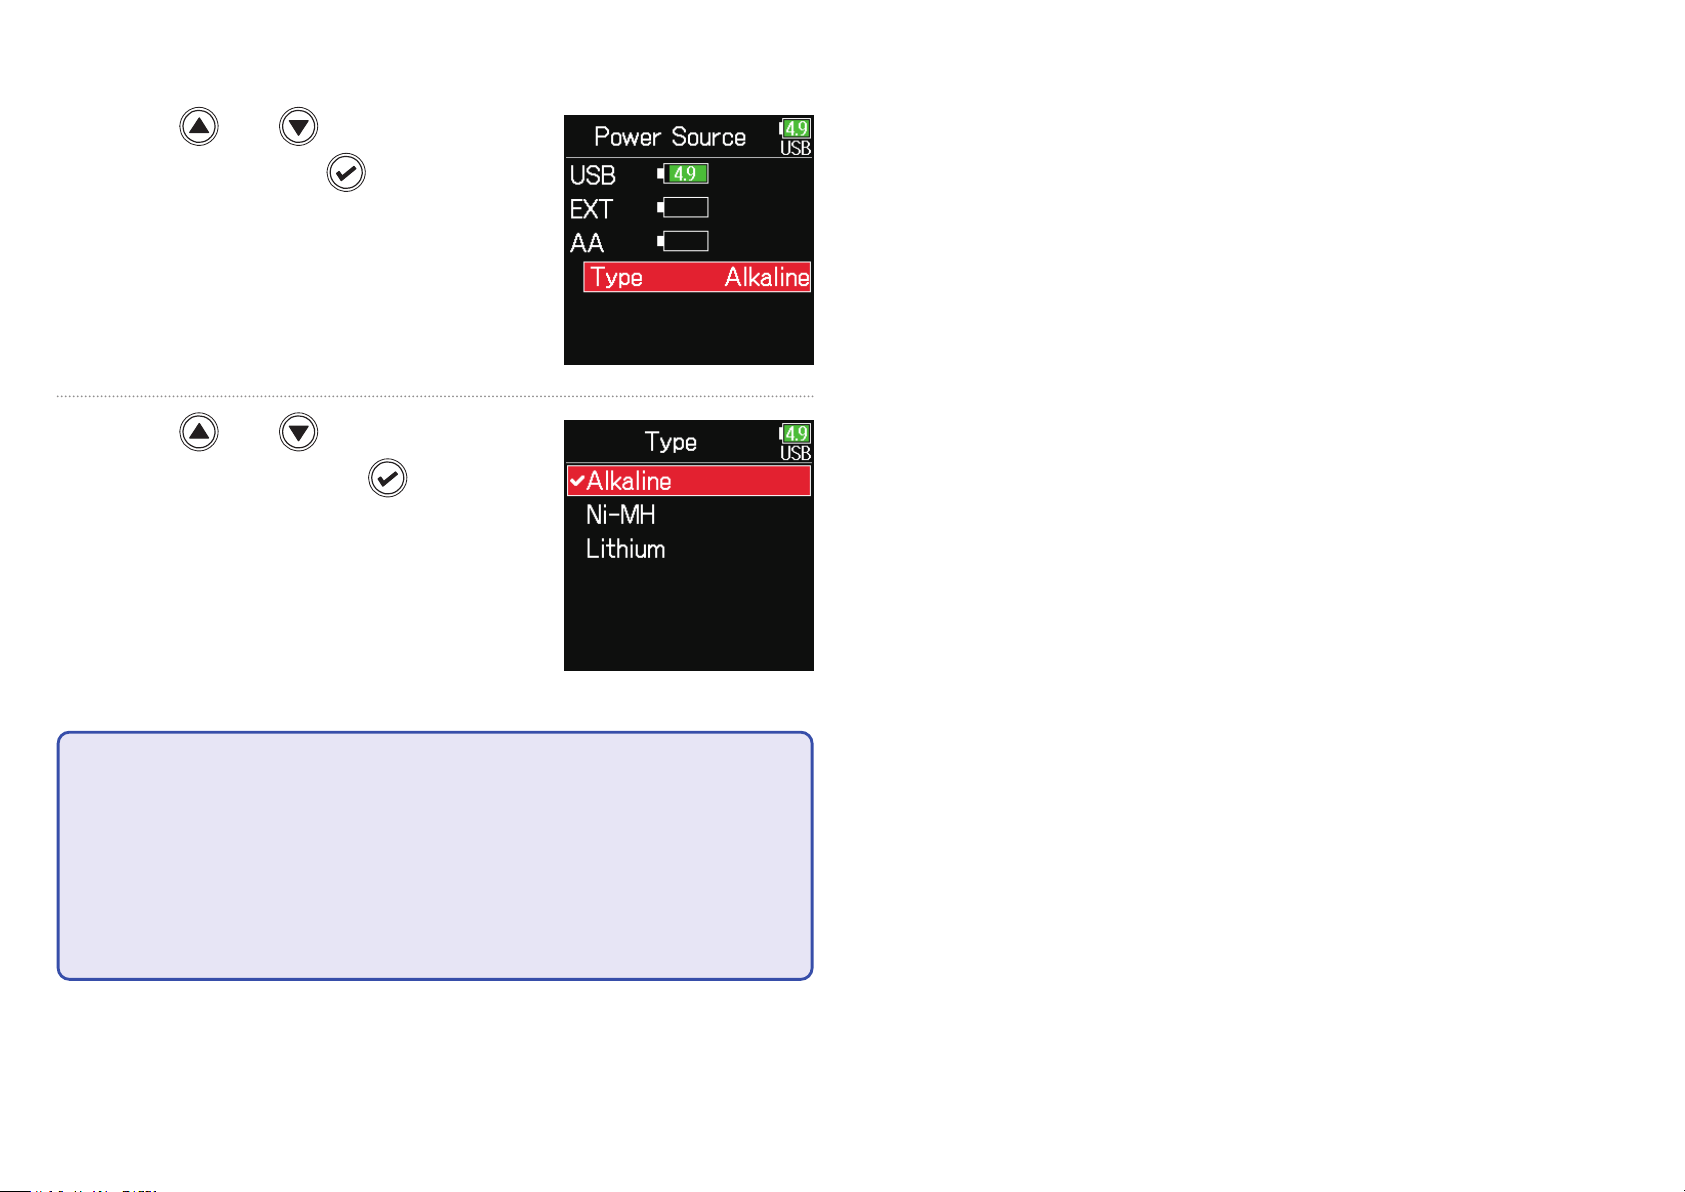
■ Setting the installed AA battery type
5. Use and to select
Type, and press
.
6. Use and to select
the type, and press
.
NOTE
• When multiple power supplies are connected, they will be used in the following order of priority.
1. USB (Power supply connected to USB port)
2. EXT (L battery)
3. AA (Installed AA batteries)
• The voltages of each power supply are shown on the display.
24
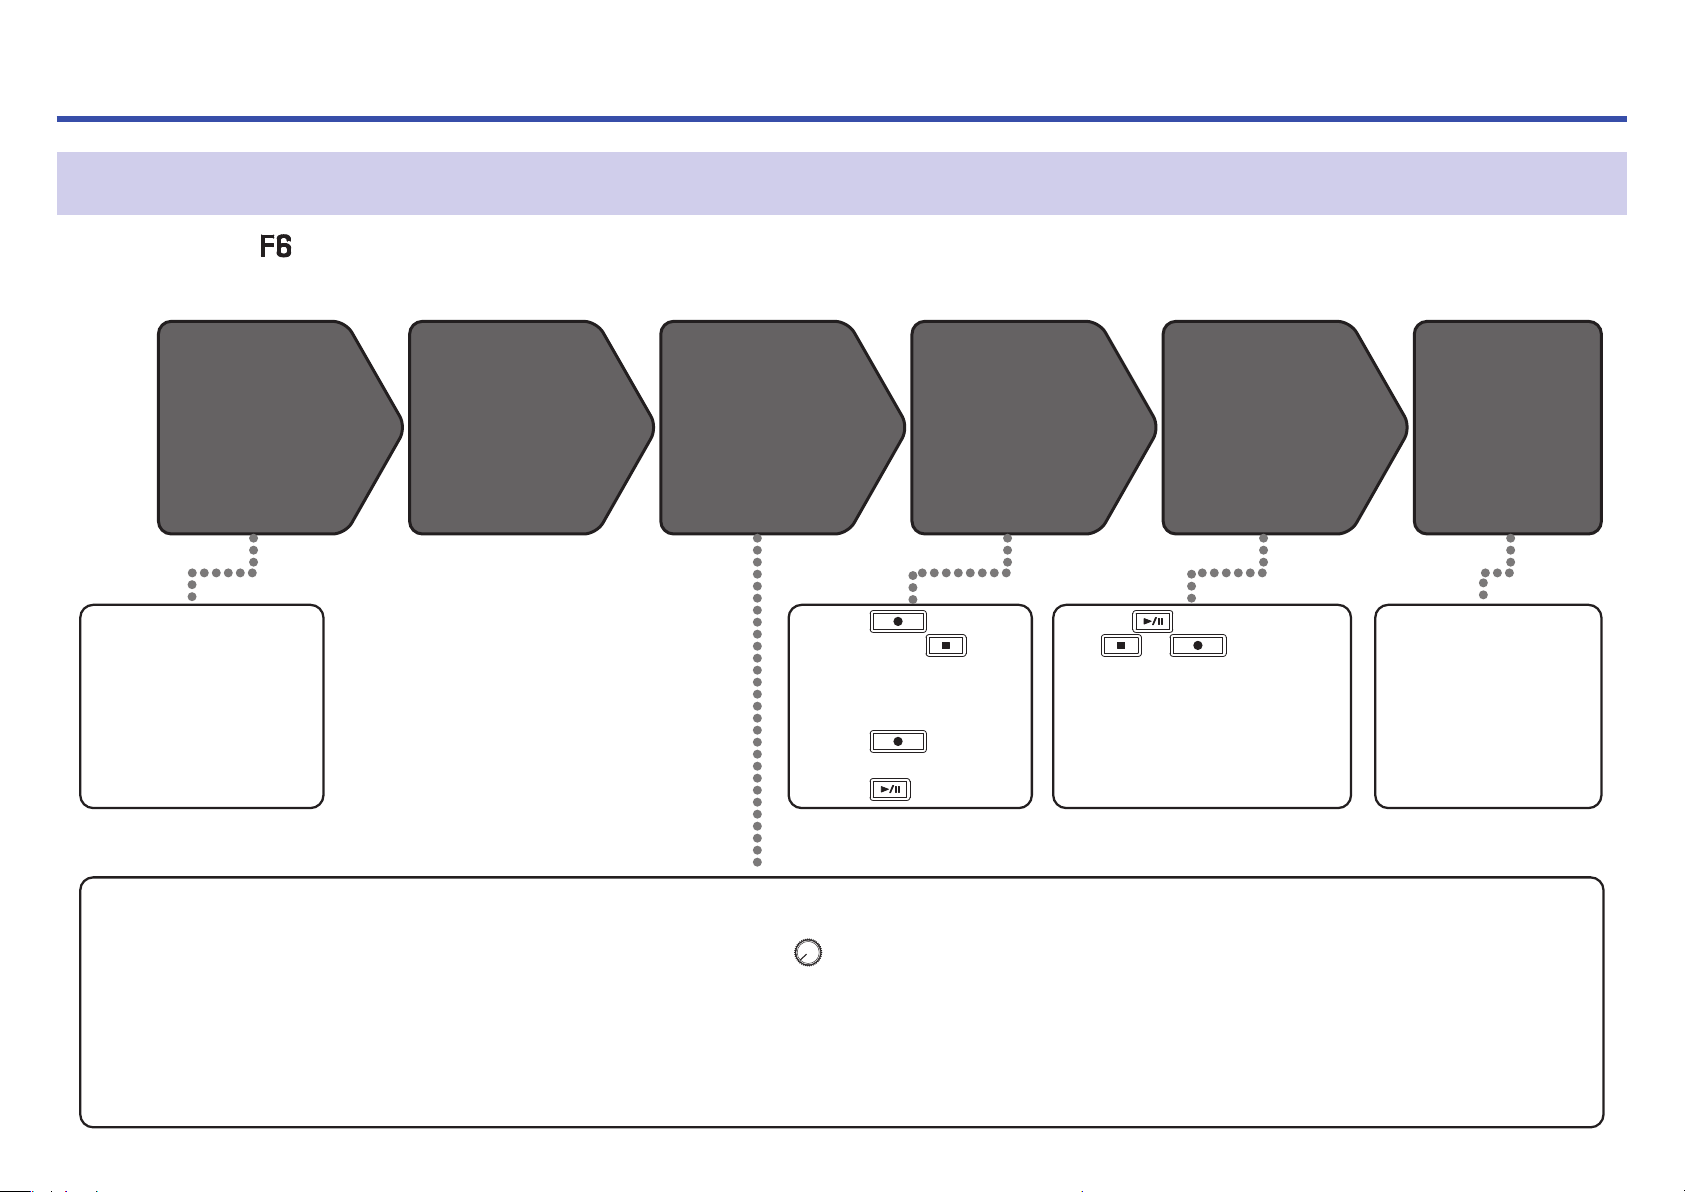
Recording
Recording process
Recording with the follows the process shown below.
The data created for each recording occurrence is called a "take".
Connecting
Connect mics, instruments, audiovisual
devices, and other equip-
ment to Inputs 1–6.
( →P.8)
1. Set the recording mode
(bit depth) ( →P.32).
• Select one of the recording
modes: 16/24-bit WAV, 32-bit
Float WAV, simultaneous
16/24-bit WAV and 32-bit WAV,
or MP3.
Turning the
power on
( →P.19)
2. Set the recording le
• Set the recording le format
( →P.26).
• Set the sampling rate
( →P.30).
Preparing to
record
・ Press to start
recording and
stop.
・ Marks (for cueing) can
also be set.
・ Press
recording the next take.
・ Press to pause.
3. Select tracks to record
( →P.51).
• Turn the left until it clicks
to disable the input. Input is
enabled at all other positions.
• This can be set to a stereo
track ( →P.99).
to start
Recording
( →P.29)
・ Press to start playback
to
and
・ Marks (for cueing), for exam-
ple, can also be set.
or to stop.
4. Make various input and
recording settings
• Settings, including metadata ( →P.67), pre-re-
cording ( →P.38), low-cut
lter ( →P.85) and limiter
( →P.87) can be made.
Playing and
checking
( →P.54)
Checking take
information
( →P.67)
・ Check and edit
metadata.
5. Adjust input levels
( →P.28).
• Setting input levels is necessary in some operation modes.
25
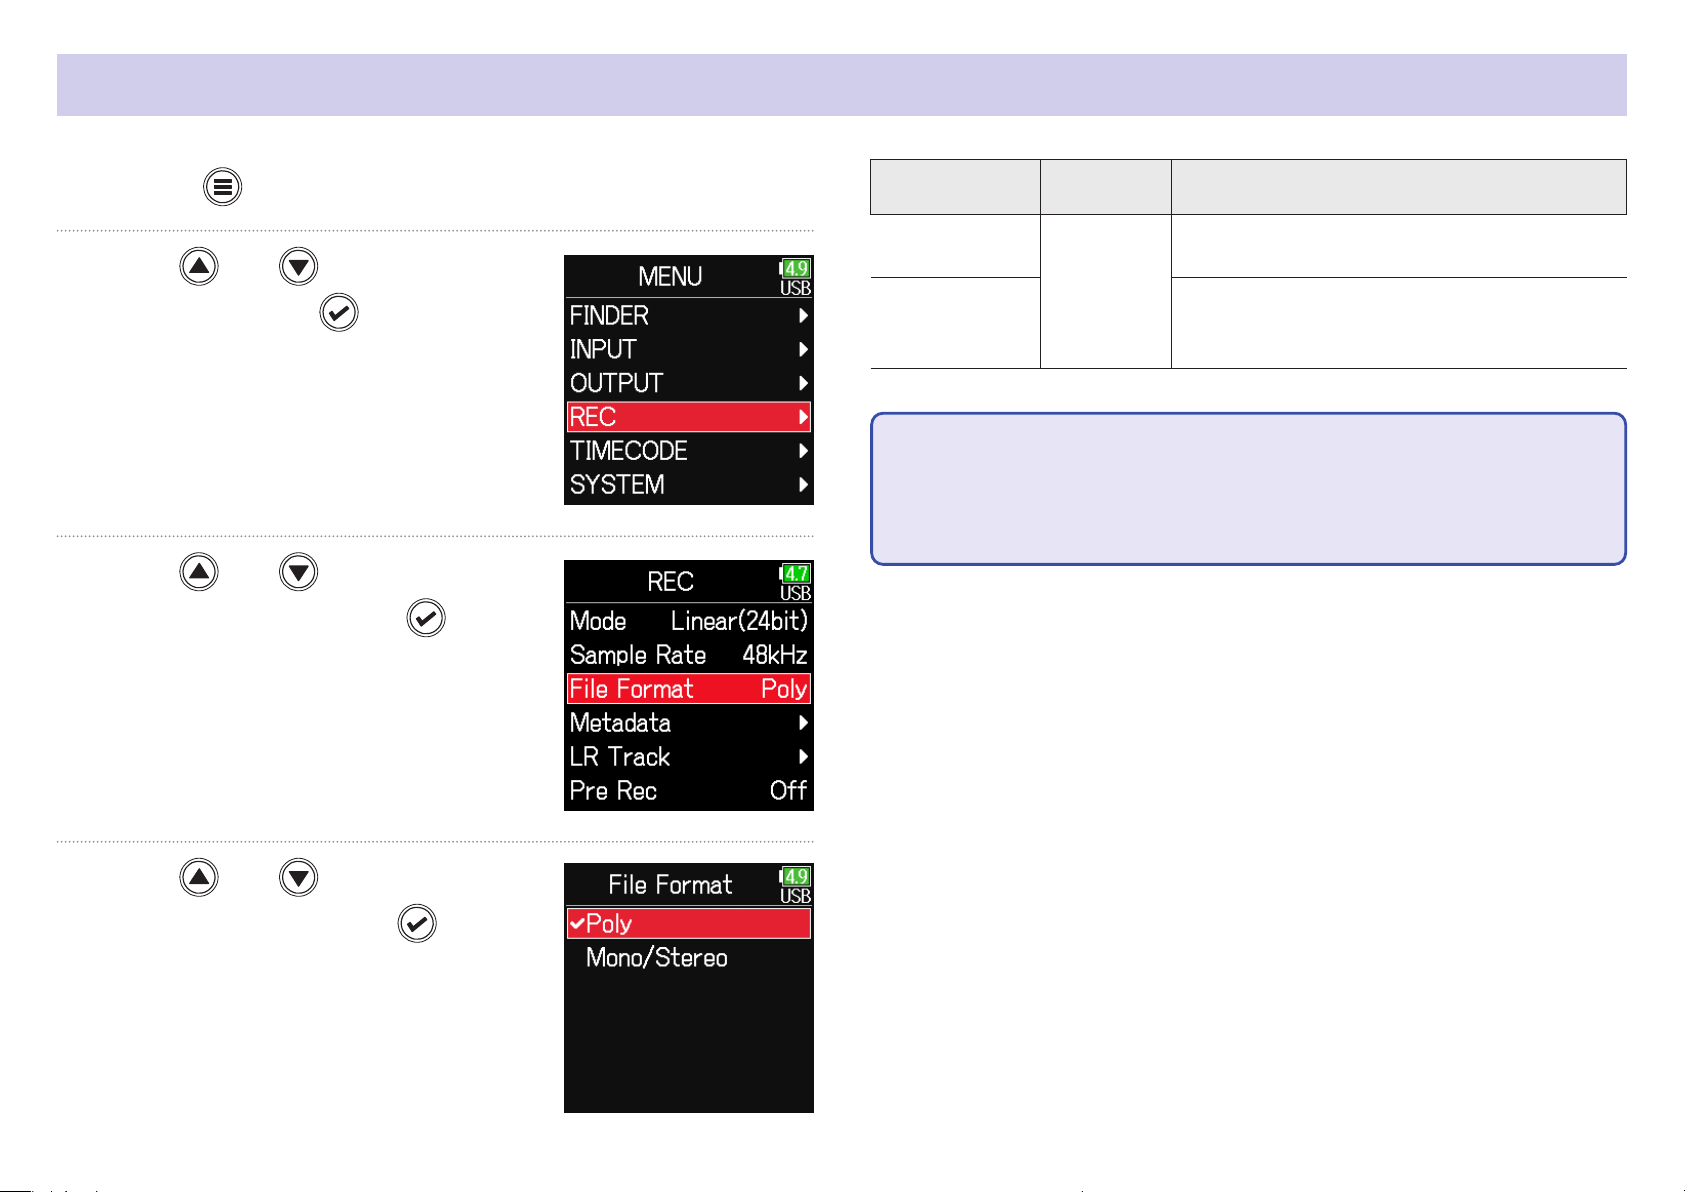
Setting the recording le format
1. Press .
2. Use and to select
REC, and press
.
3. Use and to select
File Format, and press
Setting
Poly
Mono/Stereo
NOTE
• When recording Mono/Stereo, audio les are saved in a folder that is cre-
ated. ( →P.43)
• This cannot be set when the mode is set to MP3.
Tracks
recorded
Selected
tracks 1-6
Explanation
A single poly le will be created that contains
audio for multiple tracks.
A single mono le is created for each mono
track and a single stereo le is created for
each stereo track.
.
4. Use and to select the
le format, and press
.
26
Selecting inputs and adjusting levels
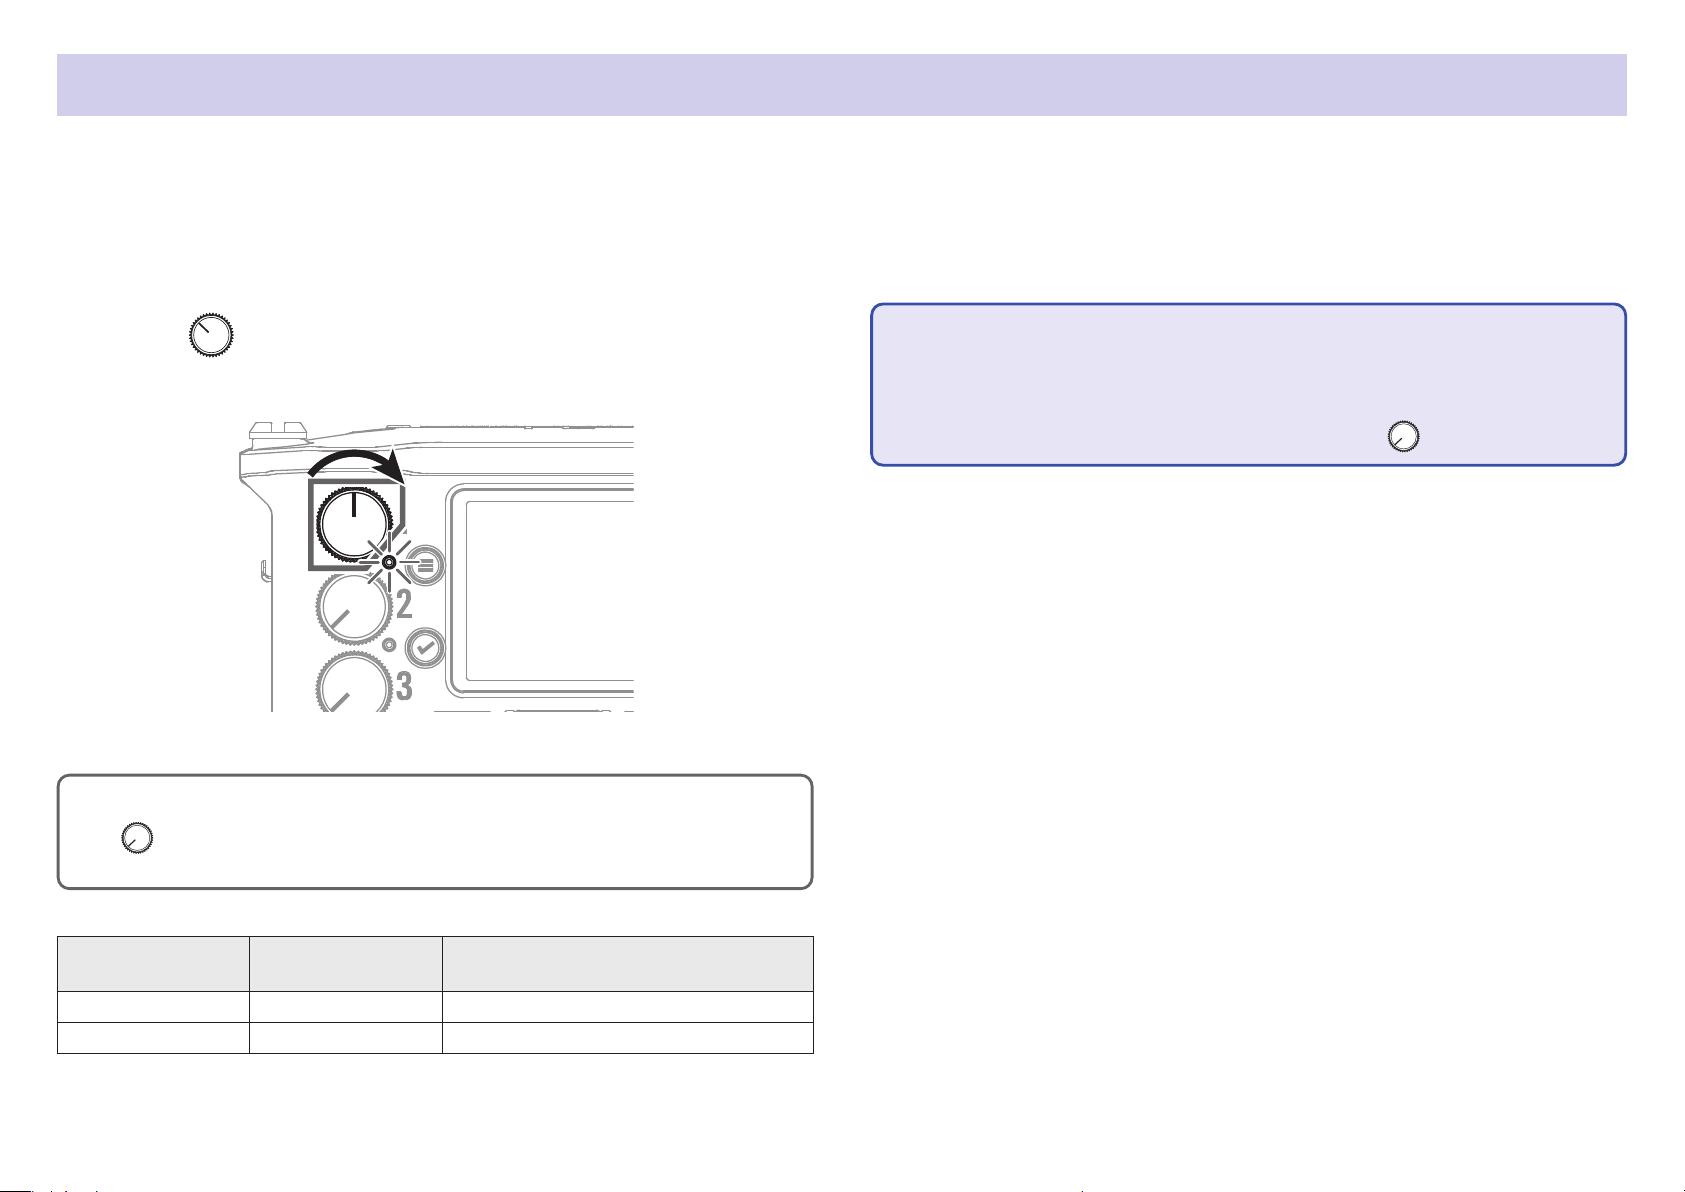
Select which among Inputs 1–6 to use.
Inputs will be recorded on tracks with the same numbers. For example, Input 1 will be recorded on track 1 and Input 2 will be recorded on track 2.
Selecting inputs
1. Turn right for the number of an input to record,
making the track status indicator light.
HINT
Turn left until it clicks to disable the input. Input is enabled at all other
positions.
NOTE
• The signals from the inputs selected this way will also be sent to the L/R
tracks.
•
The levels sent to the L/R tracks are adjusted with
.
Track indicator
Lit red Red The input is enabled.
Unlit Gray The input is disabled.
Track number
background color
Explanation
27
■ Adjusting input levels
5. Use and to select
1. Press .
2. Use and to select
INPUT, and press
.
3. Use and to select
PFL, and press
.
Trim, and press
NOTE
Trim cannot be used when the recording mode is set to Float. When set to
Float, the setting is shown as “--”.
.
6. Use and to adjust the
input level, and press
.
4. Use and to select the
desired track, and press
.
HINT
• This can be set in a range from +12 to +75 dB when the input source is
set to Mic, from –8 to +55 dB when set to Line, and from –35 to +30 dB
when set to USB.
• If the sound distorts even after lowering the input level, try changing mic
positions and adjusting the output levels of connected devices.
• Using the limiter ( →P.87)
• Using the high pass lter ( →P.85)
28
Recording
3. Press to pause.
NOTE
• Pausing occurs at whole second increments.
• When recording is paused, a mark is added at that point.
1. Press .
This starts recording.
HINT
If the timecode function is enabled, recording will start from frame 00 (00
or 02 when using drop frame) and the le length will always be a full second value. This makes synchronization easy when editing later.
2. Press to start a new take when recording.
This will end the current take and start a new take while con-
tinuing to record without interruption.
Press
• A maximum of 99 marks can be added to a take.
HINT
•
During playback,
have been added.
• Marks can be added without pausing. ( →P.170)
to resume recording.
and can be pressed to jump to places where marks
4. Press to stop.
NOTE
If the file size exceeds 2GB during recording, a new take will be created
automatically and recording will continue without interruption.
No gap in sound will occur between the two takes when this happens.
HINT
•
Press and hold
the next take recorded.
when the Home Screen is open to check the name of
NOTE
Pressing during recording is only possible after recording for at
least a second.
• Files are automatically saved at regular intervals during recording. If
the power is interrupted or another problem occurs during recording, an
affected le can be restored to normal by playing it with the
29
.
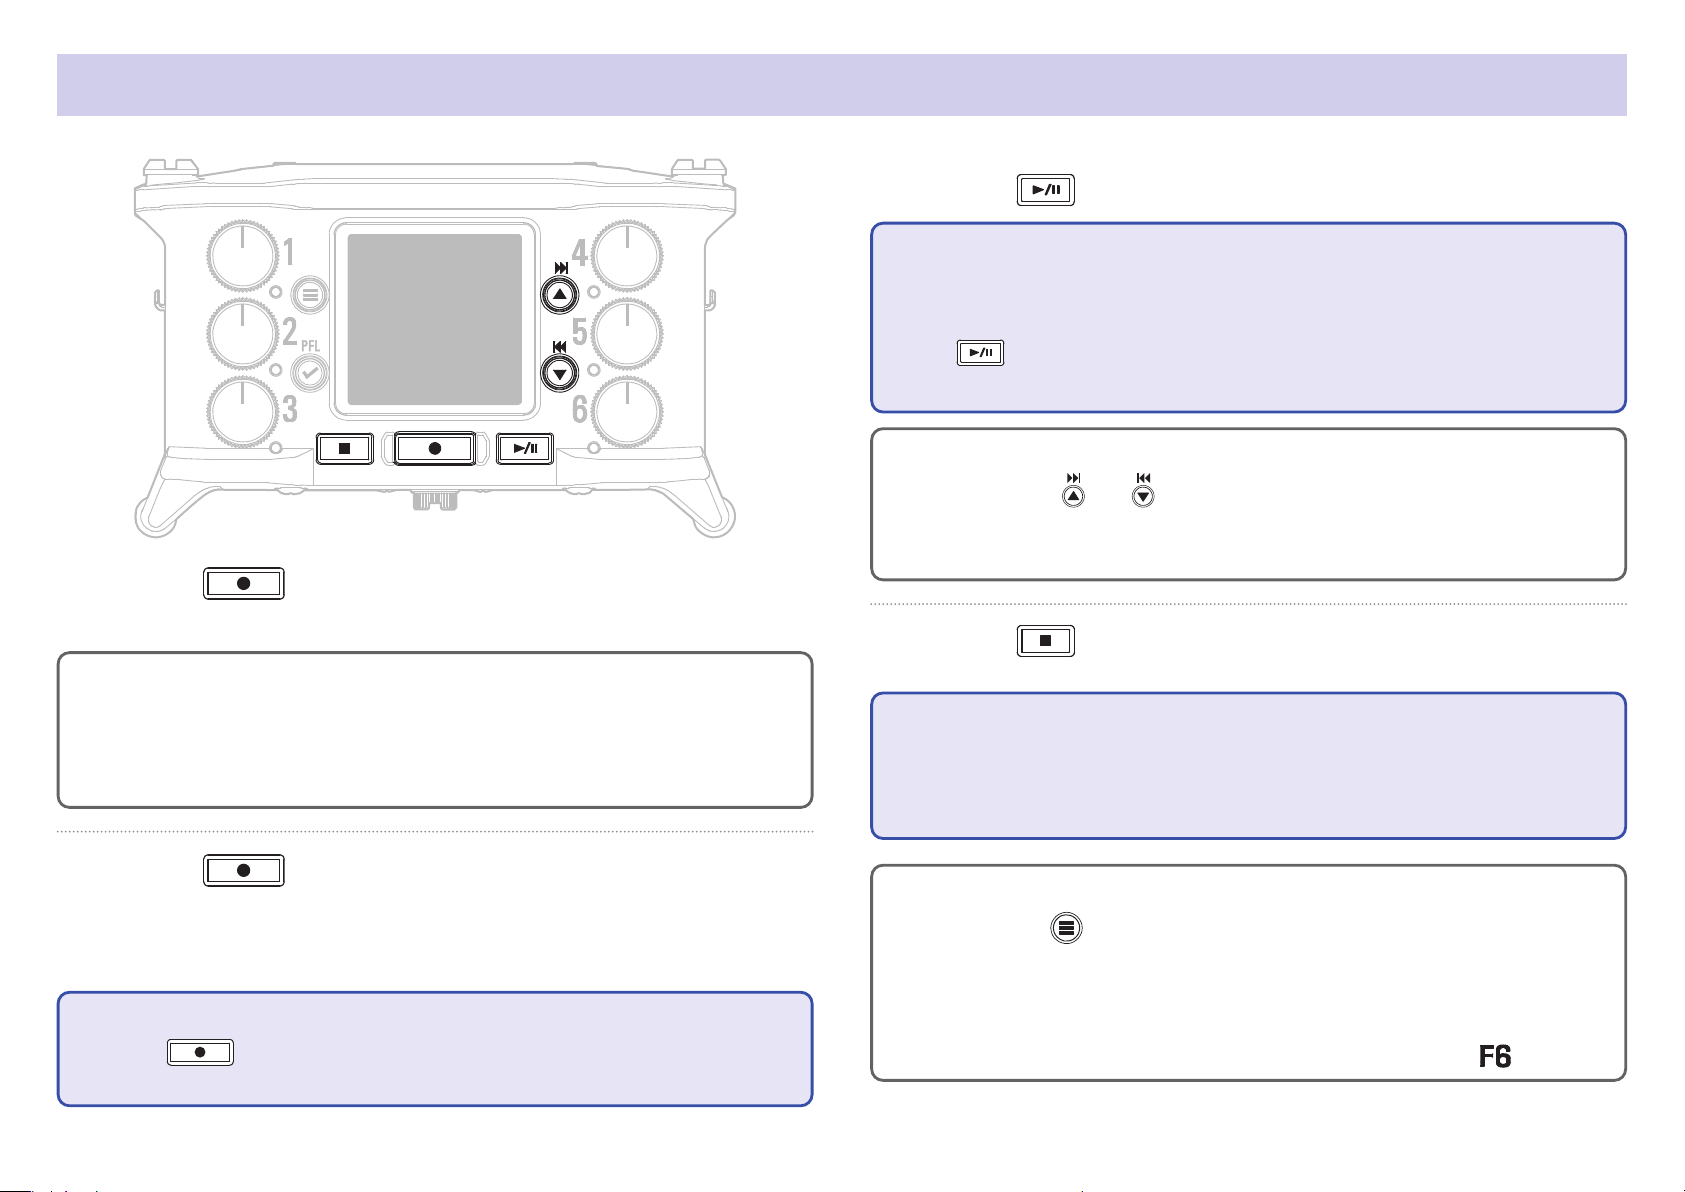
Setting the sampling rate
The sampling rate used to record les can be set.
1. Press .
2. Use and to select
REC, and press
.
3. Use and to select
Sample Rate, and press
4. Use and to select the
sampling rate, and press
Setting Explanation
44.1 kHz, 48 kHz, 88.2
kHz, 96 kHz, 192 kHz
.
47.952 kHz
48.048 kHz
47.952 kHz(F), 48.048
kHz(F)
These are standard sampling rates.
Select this when recording video at 23.976 frames
per second in order to edit later at 24 frames per
second.
Select this when recording video at 24 frames per
second in order to edit later at NTSC 29.97 or 23.98
HD.
These function the same as the two above, but the
sampling rate metadata will be recorded as 48 kHz
for <FILE_SAMPLE_RATE>.
This enables playback and editing with devices and
software that do not support 47.952 kHz and 48.048
kHz WAV les. Playback, however, will occur at the
±0.1% speed at which the le was recorded.
.
30
 Loading...