

Page 1
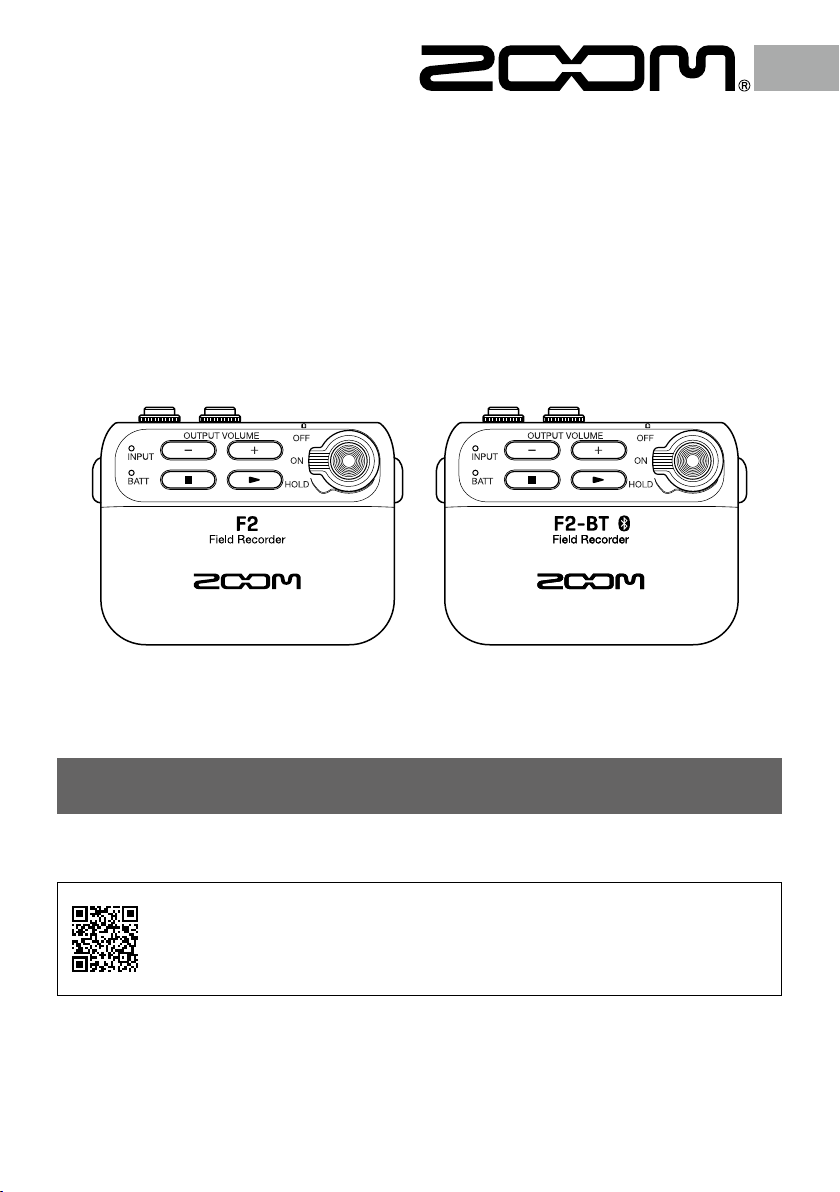
F2/F2-BT
Field Recorder
Operation Manual
You must read the Usage and Safety Precautions before use.
The Operation Manual can be downloaded from the ZOOM website (www.zoom.jp/docs/f2_f2-bt).
This page has les in PDF and ePub formats.
The PDF le format is suitable for printing on paper and reading on a computer.
The ePub format can be read with electronic document readers and is designed for reading on smart-
phones and tablets.
© 2020 ZOOM CORPORATION
Copying or reprinting this manual in part or in whole without permission is prohibited.
Product names, registered trademarks and company names in this document are the property of their respective companies.
All trademarks and registered trademarks in this document are for identification purposes only and are not intended to
infringe on the copyrights of their respective owners.
You might need this manual in the future. Always keep it in a place where you can access it easily.
The contents of this manual and the specifications of the product could be changed without notice.
Page 2

Introduction
Thank you very much for purchasing a ZOOM F2/F2-BT Field Recorder. With understanding
of the following features, we hope you will enjoy using it for a long time.
■ Light and compact
Since it is extremely compact, it can be hidden even in tight-fitting clothes and will not get
in the way even when filming with movement. Since the included lavalier mic can record to
it directly, there is no need to worry about interference as when using a wireless connection.
■ Gain adjustment unnecessary
Amazing dynamic range has been realized using a dual AD converter circuit and a 32-bit
float WAV file format, making gain adjustment before recording unnecessary. Whether
whispering or shouting, reliable recording is as easy as pressing the REC button.
■ High precision synchronization with video
With a ±0.5 ppm temperature-compensated crystal oscillator (TCXO), audio timing
discrepancies with simultaneously recorded video are almost imperceptible. By connecting
a Bluetooth timecode synchronization device, the F2-BT can be synchronized perfectly with
video that supports timecode.
■ Dedicated applications
Since achieving the compact size included eliminating the display, setting changes and file
management are handled by using the F2 Editor app on a computer connected by USB. The F2
Control smartphone/tablet app can also be used with the F2-BT, which supports Bluetooth, to
control recording, playback and other operations.
Contents
F2/F2-BT features …………………………………………………………………………………………………………………………………… 3
Use examples ………………………………………………………………………………………………………………………………………… 3
Functions of parts ………………………………………………………………………………………………………………………………… 4
Preparing for use …………………………………………………………………………………………………………………………………… 5
Turning the power on……………………………………………………………………………………………………………………………… 6
Connecting the lavalier mic …………………………………………………………………………………………………………………… 6
Recording ………………………………………………………………………………………………………………………………………………… 7
Playing recordings ………………………………………………………………………………………………………………………………… 7
Transferring files to computers …………………………………………………………………………………………………………… 8
Using a computer to change settings ………………………………………………………………………………………………… 9
Connecting to a smartphone/tablet and using F2 Control for remote control (F2-BT only) ……… 9
List of F2 Editor/F2 Control functions …………………………………………………………………………………………………10
Troubleshooting ………………………………………………………………………………………………………………………………………11
Specifications …………………………………………………………………………………………………………………………………………12
2
Page 3
F2/F2-BT features
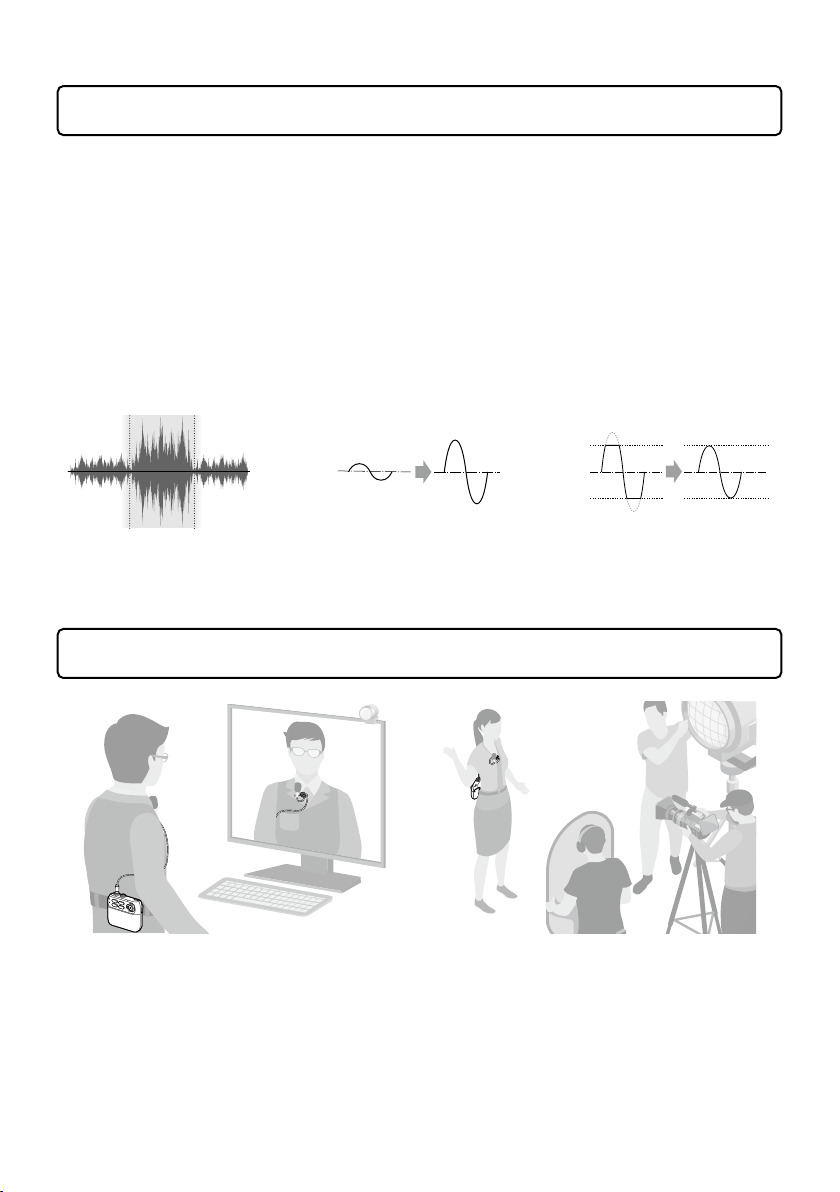
With a dual A/D converter circuit and support for 32-bit float WAV files, recording with the
highest audio quality is possible.
■ Dual A/D converter circuit
The input circuit has two A/D converters with different input gains. Recording with high
audio quality is possible without adjusting the gain whether the input sound is loud or quiet.
■ 32-bit oat WAV les
Recording with 32-bit float WAV file formats allows audio quality to be retained when
editing.
• Wide dynamic range
• Recording level always
optimal
• High resolution even
for quiet sounds
• Waveforms can be restored
to unclipped states
Use examples
Since input gain adjustment is unnecessary, recording can be started by pressing a single
button after putting the mic on.
3
Page 4
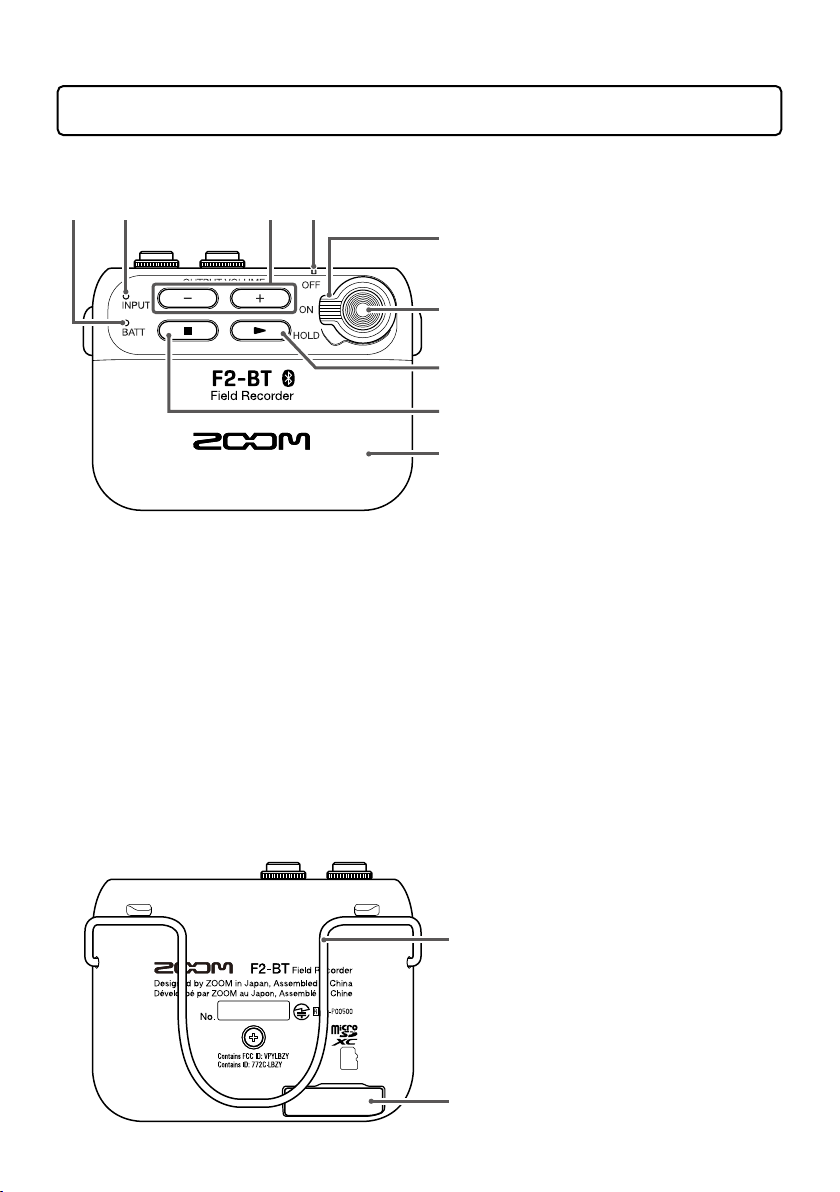
Functions of parts
■ Front
① ② ④
■ Back
③
⑤
⑥
⑦
⑧
⑨
⑩
BATT LED
①
The color of the light changes
according to the remaining battery
charge.
INPUT LED
②
This lights according to the input
level through the INPUT jack.
OUTPUT VOLUME −/+ buttons
③
Use these to adjust the output
volume. Raising the volume too
much could cause the monitored
sound to become distorted, but the
recorded data will not be distorted.
REC/PLAY LED
④
This lights during recording and
playback.
Power switch
⑤
Use this to turn the power ON/OFF
and to disable button operation.
REC button
⑥
Use this to start/stop recording.
Play button
⑦
Use to play recorded files.
Stop button
⑧
Press to stop playback of recorded
files.
Battery compartment cover
⑨
Remove when installing or removing
batteries.
Belt clip
⑩
microSD card slot
⑪
Insert a microSD card here.
⑪
4
Page 5

■ Top
HINT
An AD-17 AC adapter can also be used.
NOTE
• Use only one type of batteries (alkaline, NiMH or lithium) at a time.
• If the BATT LED does not light after the power is turned on, set the power to OFF and install
new batteries.
• After installing the batteries, set the battery type correctly. Use F2 Editor or F2 Control (F2-BT
only) to set this.
DC 5V (USB Type-C) connector
①
• A dedicated AC adapter (ZOOM AD-17) can
also be connected here to use AC power.
• This can also be connected to a computer
for use. Files can be moved, and F2/F2-BT
settings can be made using the F2 Editor
app.
OUTPUT jack
① ② ③
②
Connect headphones, for example, here.
INPUT jack
③
Connect a lavalier mic here.
Preparing for use
In order to use an F2/F2-BT, an application must be installed on a computer and initial
settings for it must be made. See page 9 for details about installing the application.
■ Turn the power on
After turning the power off, open the battery compartment cover
and install batteries. When the power is on, the remaining battery
charge can be checked with the BATT LED.
BATT LED
Lit green
Lit orange
Blinking orange
Blinking red
Remaining
battery charge
Full
Empty
5
AAA batteries
Page 6

■ Insert a microSD card
NOTE
• Always make certain that the power is off when inserting or removing a microSD card.
Inserting or removing a card while the power is on could result in data loss.
• When inserting a microSD card, be sure to insert the correct end with the top side up as
shown.
• Recording and playback are not possible when a microSD card is not loaded.
• Use F2 Editor to format microSD cards.
HINT
Setting to HOLD will disable button operations.
After turning the power off, open the microSD card slot cover and
insert a card.
To remove a microSD card, push it further into the slot and then
pull it out.
Turning the power on
Set to ON.
1.
To turn the power off, set to OFF.
2.
microSD card
Connecting the lavalier mic
Attach the windscreen and the clip to the lavalier mic.
1.
Connect the lavalier mic to the INPUT jack, and tighten the screw lock.
2.
Lavalier mic
Windscreen
Mic clip
Pass the cable through the
slot in the lavalier mic clip
before use.
6
INPUT jack
Page 7

HINT
• Mics without screw locks can also be connected.
• The INPUT LED lights green according to the input level. If the input level is too high, it will
blink red.
NOTE
• The INPUT jack always supplies plug-in power (2.5 V).
• Check the power specifications before using a mic made by a different company.
• Do not connect a device that does not support plug-in power.
Recording
NOTE
During recording, the REC/PLAY LED lights red.
HINT
• Use to adjust the output volume.
• During playback, the REC/PLAY LED lights green.
Press .
1.
Press again to stop recording.
2.
Playing recordings
Connect headphones, for example, to the
1.
OUTPUT jack.
Press .
2.
Press to stop playback.
3.
REC button
OUTPUT jack
Headphones
Play buttonStop button
7
Page 8

Transferring les to computers
Turn the F2/F2-BT power on.
1.
Use a USB cable to connect the F2/F2-BT and the computer.
2.
USB Type-C port
Use the computer to transfer the necessary les.
3.
When you want to disconnect, use the computer to end the USB connection with the
4.
F2/F2-BT.
■ F2/F2-BT folder and le structure
When recording with an F2/F2-BT, folders and files are created on microSD cards in the
following manner.
Root
200101_001.WAV
200101_010.WAV
200101_024.WAV
F2 Settings
F2SETTING.ZST (F2/F2-BT settings file)
8
Page 9

Using a computer to change settings
NOTE
Connection with a computer is not possible during recording or playback.
NOTE
Connection with F2 Control is not possible when connected to a computer.
Install F2 Editor on the computer.
1.
This can be downloaded from the ZOOM website (zoomcorp.com).
Turn the F2/F2-BT power on.
2.
Use a USB cable to connect the F2/F2-BT and the computer.
3.
USB Type-C port
Launch F2 Editor, and change the F2/F2-BT settings.
4.
Connecting to a smartphone/tablet and using F2 Control for remote control (F2-BT only)
Install the F2 Control app from the App Store or Google Play on the smartphone/
1.
tablet.
Turn the F2-BT power on.
2.
Launch F2 Control on the smartphone/tablet.
3.
When F2 Control launches, a Bluetooth device list will appear. Tap the device name/ID to connect
to the F2-BT.
The REC/PLAY LED will light orange on the F2-BT connected to F2 Control.
Use F2 Control to operate and set the F2-BT.
4.
9
Page 10

List of F2 Editor/F2 Control functions
Function Explanation F2 Editor F2 Control
Record/play/stop Control record, play, stop and other operations
Remaining battery charge
display
Recording/playback file
name display
Elapsed recording time
display
Recordable time display Check remaining recordable time
Level meter display Check input level (level meter)
Error message display Check error content
Lo Cut Set low-cut function
Output Volume Adjust output volume
Rec Format Select recording format
Rec File Name Set recording file name
User Defined Name Edit text used for file name
Rec File Note Edit note for recording file
Date/Time Set date and time added to recording files
Battery Type Select type of battery
Bluetooth Function Select function to use by Bluetooth
Forget Device End pairing with timecode synchronization device
Auto Power Off Set time until power turns off automatically
Factory Reset Reset to factory default settings
SD Card Format Format microSD card for use
Finder Check files on microSD card
Rename Change names of recorded files
Note Edit notes of recorded files
Version Check version
Check remaining battery charge
Check name of file being recorded/played
Check elapsed recording time
10
Page 11

Troubleshooting
■ Recording and playback
Recording is not possible
Confirm that the REC/PLAY LED is lit red.
Confirm that the microSD card has open space.
If the HOLD function is on, button operations will be disabled. Disable the HOLD function.
Recorded sound cannot be heard or is very quiet
Confirm that the REC/PLAY LED is lit green during playback.
There is no sound or output is very quiet
Confirm that the REC/PLAY LED is lit green during playback.
Check the connections to the monitoring system and its volume setting.
Confirm that the volume of the F2/F2-BT is not too low.
■ Other issues
The unit is not recognized by a computer connected using a USB cable
Confirm that the operating system is compatible.
Cannot connect with a Bluetooth device
Use F2 Editor to check the Bluetooth function setting.
Battery operation time is short
Making the following settings could increase the battery operation time.
• Use F2 Editor to set the power supply used correctly.
• Disconnect any unneeded plug from the OUTPUT jack, for example.
iPadOS is a trademark or registered trademark of Apple Inc.
App Store is a service mark of Apple Inc.
iOS is a trademark or registered trademark of Cisco Systems, Inc. in the USA and other countries and is used under license.
Android and Google Play are trademarks of Google LLC.
The Bluetooth
Zoom Corporation. Other trademarks and trade names are the property of their respective companies.
Recording from copyrighted sources, including CDs, records, tapes, live performances, video works and broadcasts, without
permission of the copyright holder for any purpose other than personal use is prohibited by law. Zoom Corporation will not
assume any responsibility related to infringements of copyrights.
®
word mark and logo are registered trademarks of Bluetooth SIG, Inc., and these marks are used under license by
11
Page 12

Specications
■ LMF-2
Lavalier mic Connector 3.5 mm stereo mini (with screw lock)
Directionality Omnidirectional
Sensitivity –32 dB/Pa at 1 kHz
Maximum sound pressure input 115 dB SPL
Cable length 160 cm
■ F2/F2-BT
Input Connector 3.5 mm stereo mini (with screw lock)
Input impedance 2 kΩ or more
Maximum input level -5.5 dBu
Output Connector 3.5 mm stereo mini (with screw lock)
Maximum output level 20 mW + 20 mW (into 32Ω load)
Recording media Cards compatible with microSD/microSDHC/microSDXC specications
(Class 4 or higher, 512 GB maximum)
Recording formats WAV 44.1kHz/32-bit oat, 48kHz/32-bit oat
USB USB Type-C
Note: Use a USB cable that supports data transfer. USB bus power is supported.
Mass storage operation USB 2.0 High Speed
PC app operation USB 2.0 High Speed
Power 2 AAA batteries (alkaline, lithium or rechargeable NiMH batteries)
AC adapter (ZOOM AD-17): DC 5 V/1 A
Bluetooth Bluetooth Ver4.2 (F2-BT only)
Continuous recording time F2: when LMF-2 lavalier mic connected (48 kHz/32-bit oat)
Alkaline batteries: about 15 hours
NiMH batteries (750 mAh): about 11 hours
Lithium batteries: about 21 hours
F2-BT: when LMF-2 lavalier mic connected (48 kHz/32-bit oat) and using F2 Control
Alkaline batteries: about 14 hours
NiMH batteries (750 mAh): about 10 hours
Lithium batteries: about 18 hours
• The above values are approximate.
• Continuous battery operation times were determined using in-house testing methods.
They will vary greatly according to use conditions.
External dimensions 57.5 mm (W) × 46.4 mm (D) × 22.4 mm (H)
Weight (main unit only) 32 g
Supports plug-in power (2.5 V)
Mono, BWF format supported
ZOOM CORPORATION
4-4-3 Kanda-surugadai, Chiyoda-ku, Tokyo 101-0062 Japan
zoomcorp.com
Z2I-4074-01
 Loading...