

Page 1

Zoom DualCam 300
User’s Manual
DualCam 300 de Zoom
Manual del Usuario
Page 2
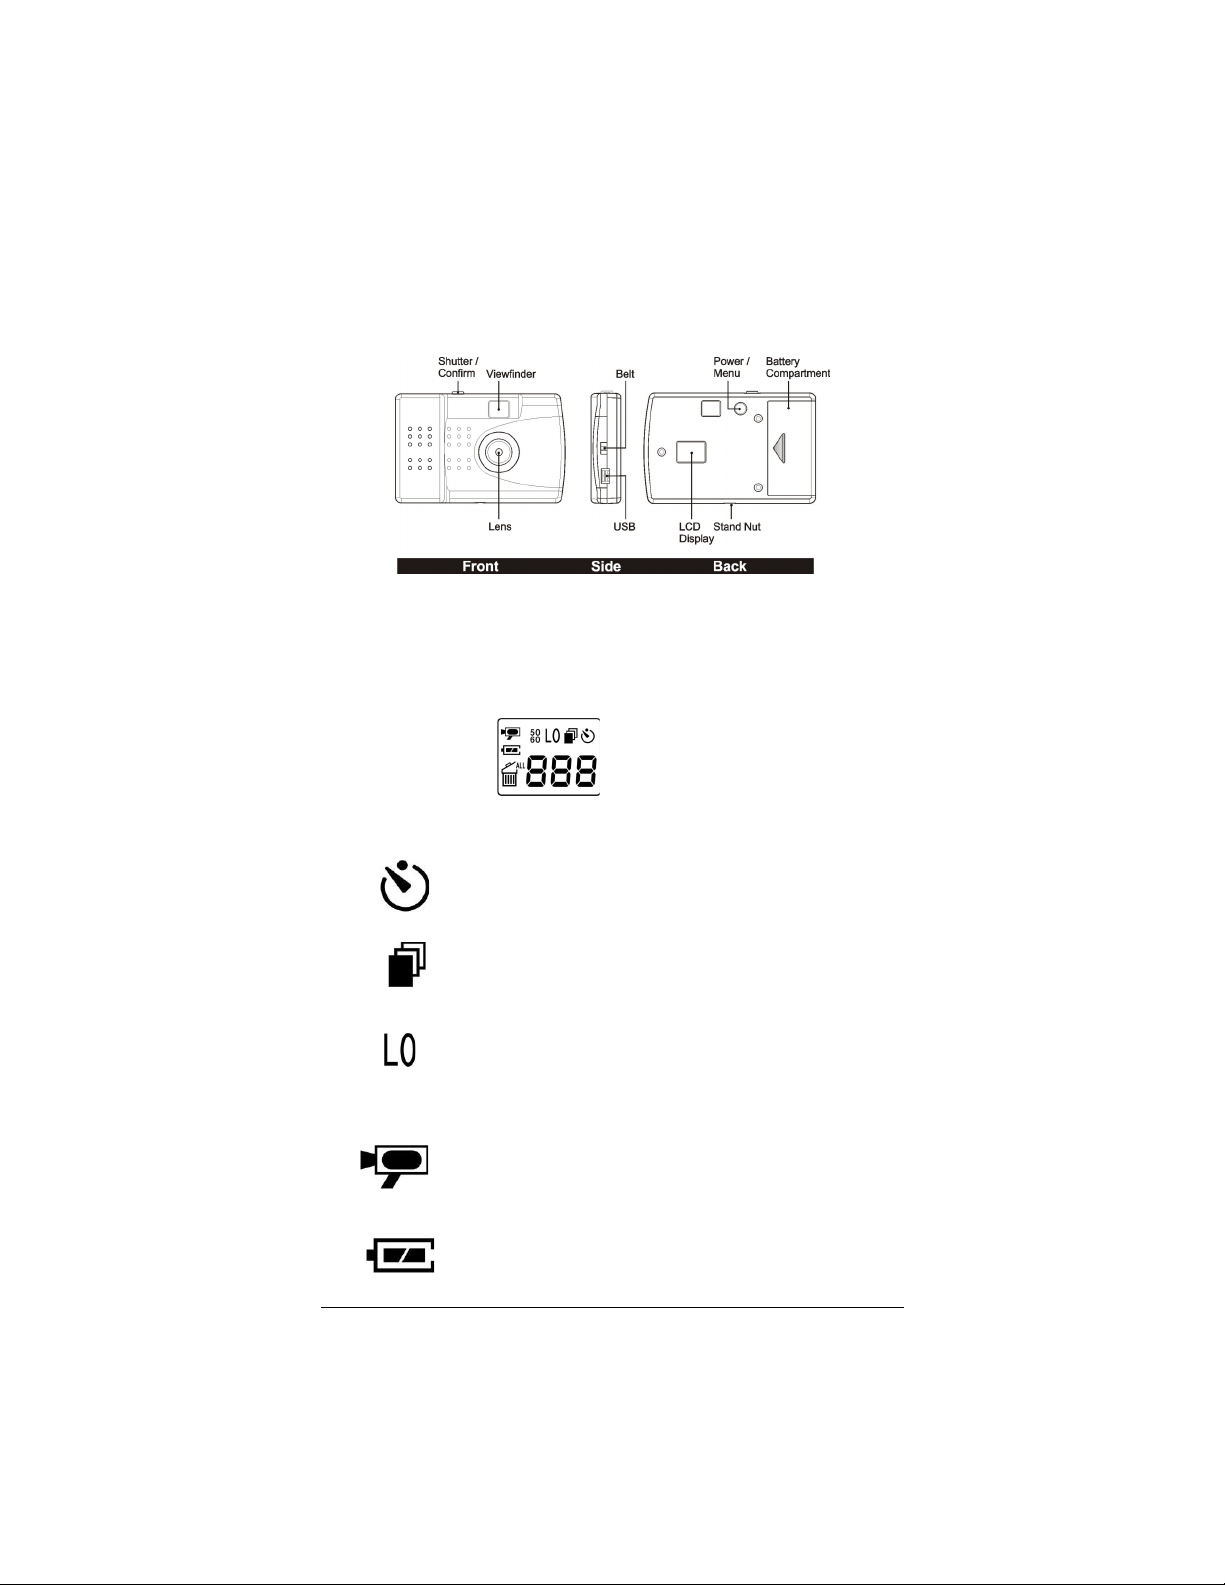
Zoom DualCam 300 Digital Camera
Congratulations on purchasing the Zoom DualCam 300. This manual introduces
you to the camera and tells you how to install its software.
To set up your camera or change a setting, depress the power button and hold it
down until the camera beeps indicating that the power is on. Pressing the
Menu/Power
display. When you want to change a setting, depress the
button while the appropriate icon is flashing. The menu options will cycle in a
loop starting with the Timer and working counter-clockwise.
LCD display:
Below is the description for each icon on the LCD panel.
Self-timer:
Continuous snapshot:
Hi/Lo:
AVI:
button again will cycle through the menu of icons on the LCD
Self-timer allows you to delay approximately 10 seconds
before the shot is taken.
A single click on the capture button will cause the camera to
take 3 pictures (one picture per second).
The LO icon indicates that the camera is in the lowresolution mode. If there is no icon, the camera is in highresolution (Hi) mode (VGA 640x480). Your camera must be
in high-resolution mode to utilize the 1.3 meg (1280x960)
resolution, which is achieved through software interpolation
Auto Video mode. The frame rate is about 9 frames per
second for all resolutions.
Shutter/Confirm
.
Battery status detection:
A 3-segment battery icon is displayed to indicate the
condition of the battery. Please see the
details.
2
Batteries
section for
Page 3
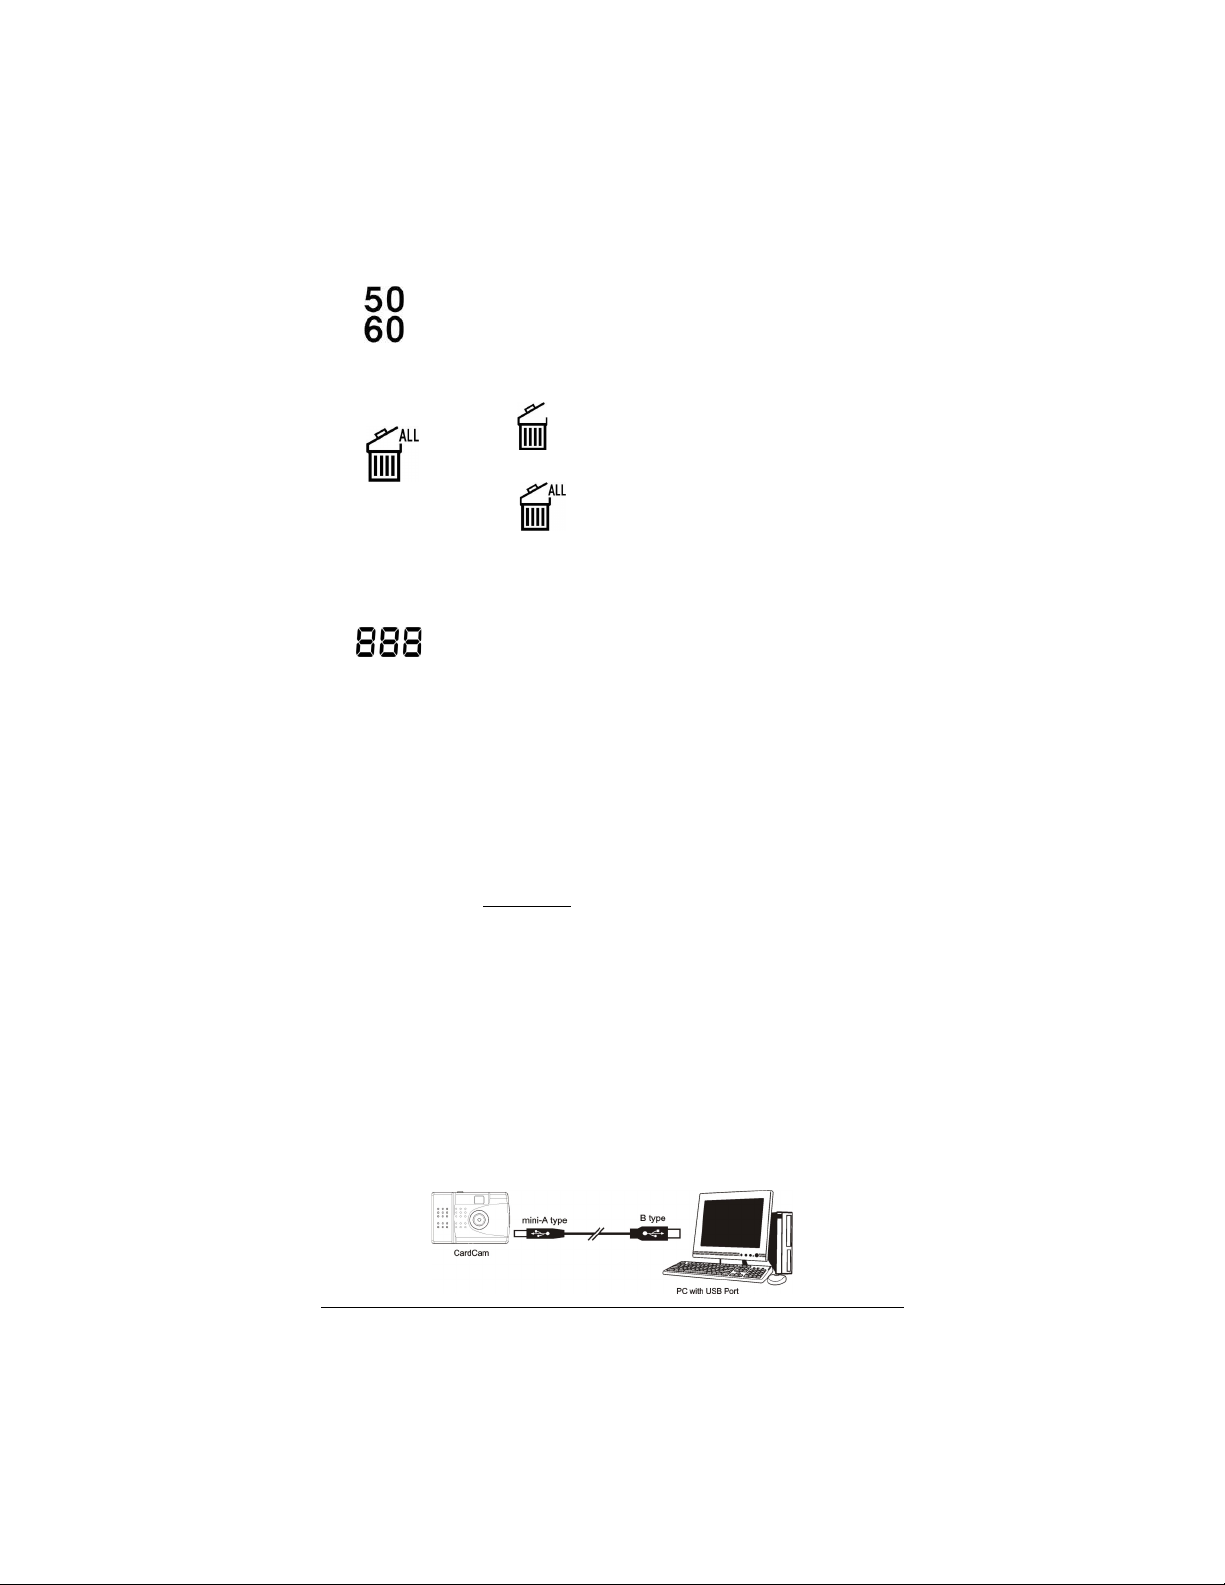
50/60:
50 for 50Hz electrical power frequency, 60 for 60Hz electrical
power frequency. Set this according to the country you are in
to eliminate flickering in your pictures when under
fluorescent lights.
Delete last/all:
If the icon is selected, the last picture taken will be
erased when the
If the icon is selected, all pictures stored in the
memory will be erased when the
pressed.
Shutter/Confirm
button is pressed.
Shutter/Confirm
button is
Picture number, PC, Memory_full:
When the camera is not attached to the computer, this will
indicate how many pictures you have taken. When the
camera is attached to the computer and in PC mode, the PC
icon displays instead. When the memory is full in detached
mode, the display reads
and the alarm sounds.
FUL
Software Installation
1. IMPORTANT Do not connect the camera to your computer before the
software is completely installed, because it may result in the PC not starting
correctly. If this problem occurs, power down the PC, unplug the camera,
and restart the PC.
2. Put the Zoom DualCam 300 CD into your CD-ROM drive. Your computer
will automatically run the software. Note: If the software does not set up
automatically, go to the Taskbar and click Start, then click on Run, select
Browse, choose SETUP.EXE on the software CD, then click OK to install.
3. Using the pull-down menu, select the language you want, then click
Follow the on-screen instructions to install the ArcSoft Software Suite.
4. After the application has been installed, the software automatically starts the
camera driver Installation program. Follow the on-screen instructions.
5. If you selected to install the
program prompts you to install DirectX. Follow the on-screen instructions.
6. Click the
installation of the application software, the camera driver, and DirectX.
(When you attach the camera to the computer, Windows will detect it and
complete the installation automatically.)
icon and restart your computer after completing the
Finish
VideoImpressions
software, the install
OK.
Connecting the DualCam 300 to the Computer’s USB port
1. Connect the USB cable to your computer’s USB port.
2. Connect the USB cable to your Zoom DualCam 300.
3
Page 4
Using Application Software
The
PhotoImpressions
files for the application software are contained within the
Help
program.
ArcSoft
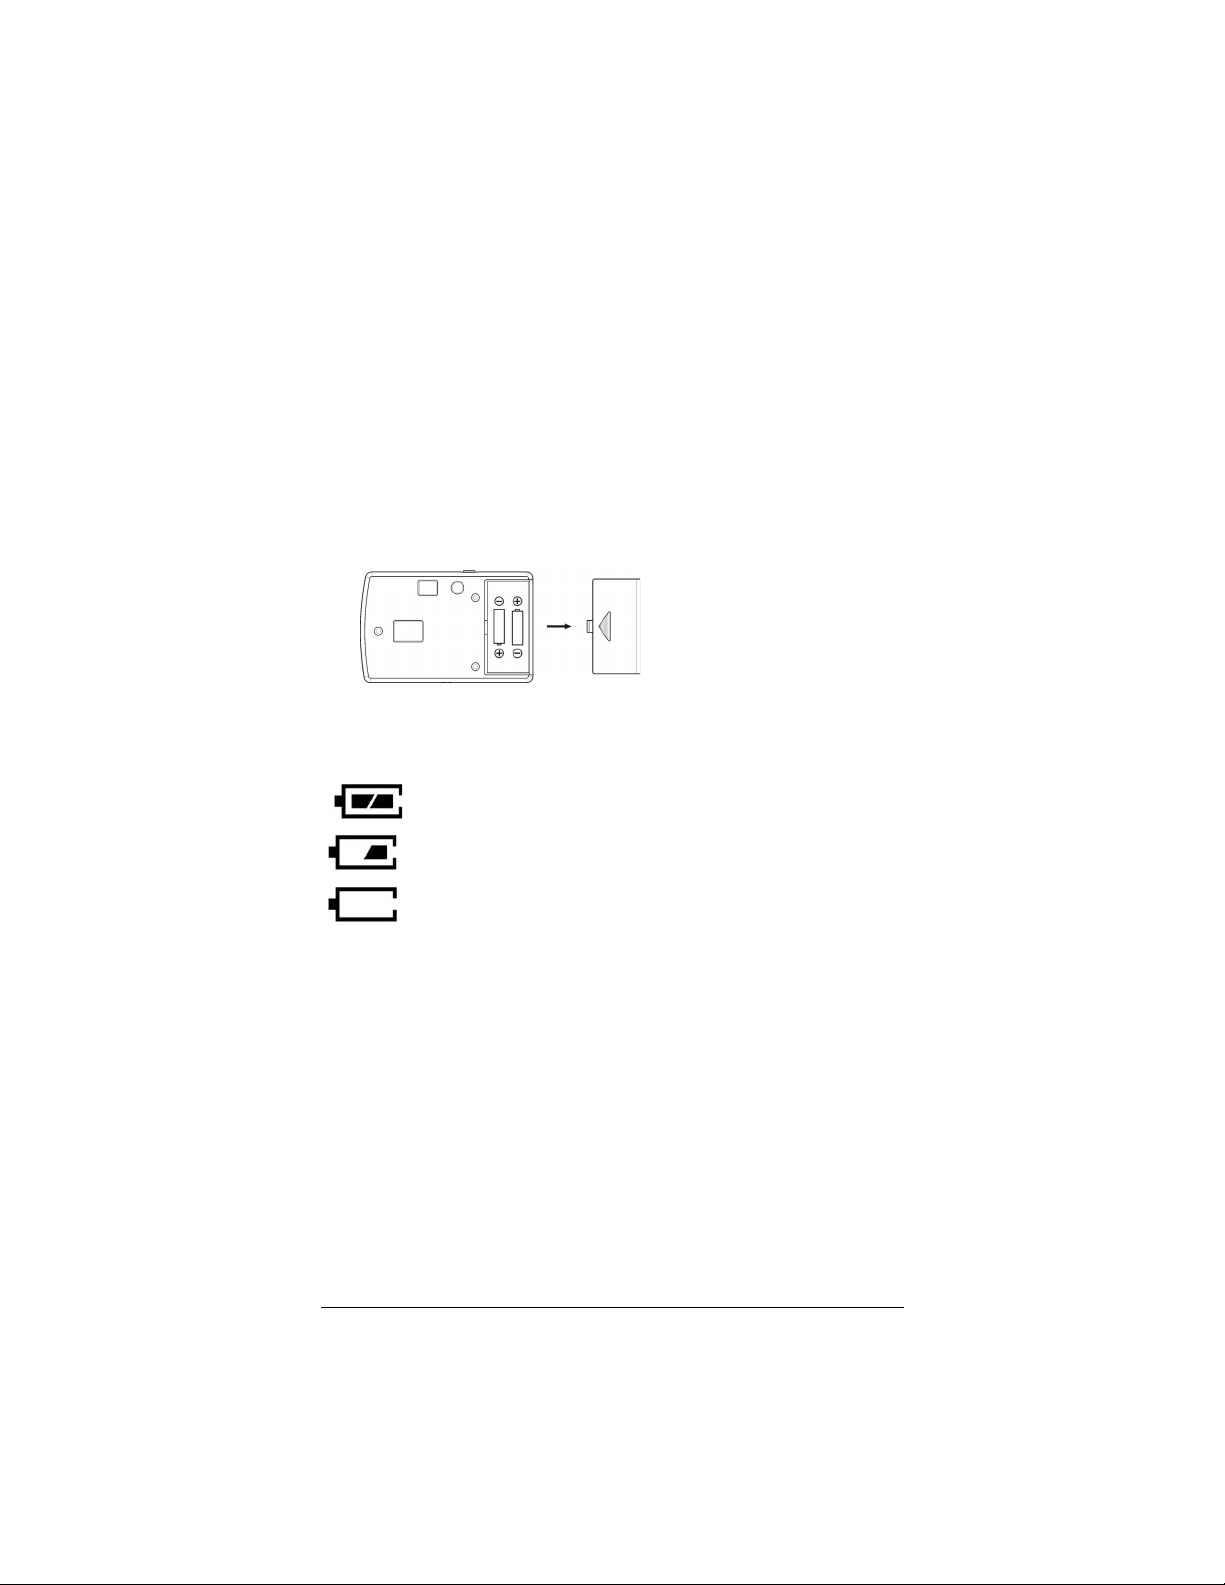
Batteries
Before operating your DualCam 300, you need to load the batteries as shown
below:
1. Push down with your thumb on the top of the battery compartment and slide
the cover off the camera.
2. Insert 2 AAA alkaline batteries into the camera, and make sure the batteries’
+ and – symbols match the symbols in the case.
3. Slide the battery cover back in place.
4. Press and hold down the
will beep indicating that it is ready to use (Default setting). If this does not
happen, replace the batteries with known good ones. If you are still unable
to get your camera to work, please contact Technical Support.
The camera will power down automatically if it is not used for 30-45
NOTE:
seconds to conserve battery life. It will beep to indicate that it is off.
Power/Mode
Battery Status Indicator
The battery status indicator is a three-segment indicator as defined below.
When the battery is full, three segments are shown. The voltage is
about 3 volts.
When the voltage drops down to 2.8 volts, the camera will sound a
warning tone and the left part of the battery icon will disappear.
When the battery is almost exhausted (lower than 2.5 volts), the
battery icon displays an empty battery for a short time, and the
camera powers off automatically.
button about 1 second. The Camera
NOTE:
Loss of battery charge may result in loss of stored pictures. The camera
constantly draws power from the batteries if the camera is not connected to the
PC. To ensure that the batteries stay fresh, remove them if you do not intend to
use the camera within the next few days. Make sure to transfer any pictures
stored in the camera to your PC prior to removing the batteries from your
camera, and prior to letting the batteries run down.
Always make sure to download pictures before your batteries run out.
Taking Photos
1. The Zoom DualCam 300 performs best under good lighting conditions and
at distances over 2 feet (60 cm).
2. Select your camera mode (Hi/Lo).
3. Center your subject in the viewfinder.
4. Press the
been taken. The LCD Picture counter increases by one.
5. Once the memory on the camera is full, the text
panel and an alarm sounds.
Shutter/Confirm
4
button. A beep confirms that the picture has
shows on the LCD
FUL
Page 5

Self-Timer
The self-timer allows you to snap a picture and have a 10-second delay before
the actual picture is taken.
1. Select the self-timer feature from the options menu.
2. Set up your shot, using the Zoom DualCam 300 tripod if necessary.
3. Press and release the
picture is taken (about 10 seconds).
4. To deactivate the self-timer function, press the
within 10 seconds to stop the self-timer countdown.
5. Re-select the mode to cancel the self-timer function.
Shutter/Confirm
button. The camera beeps until the
Shutter/Confirm
button
Continuous Snapshot
1. Select the continuous snap feature from the options menu.
2. Press
3. Re-select this mode to activate this function again.
Shutter/Confirm
button to take 3 continuous pictures (1fps).
Taking A Video
1. Select
2. Center the subject in the viewfinder.
3. Press the
9 frames per second and store them in the memory until the button is
released.
4. Continue shooting and hold the camera steady.
5. The picture is stored in AVI format and the picture number increases by only
one.
6. Re-select this mode to cancel this function.
mode to activate the function.
Video
Shutter/Confirm
button to capture images continuously at about
Erasing/Deleting Pictures
With the Zoom DualCam 300, you have the ability to erase all photos or just the
last picture or video taken. When the camera memory is full, the LCD displays
, and you cannot take any more pictures until you have downloaded your
FUL
pictures or erased them by using the
option.
Picture
EAL – Erase All, or E01 – Erase Last
Using the Camera as a PC Web Camera
If the camera is connected to a Windows PC’s USB port, the camera is in PC
mode. The digital still-camera mode is disabled, and the LCD display shows the
text PC. If the camera is unplugged from the USB port, the camera returns to
digital still-camera mode and automatically powers off. Use the included
VideoImpression application for video recording to create video email or video
presentations.
Microsoft Netmeeting® and other video conferencing software are compatible
with the Zoom DualCam 300. Your Windows PC may already have Netmeeting
installed; if it doesn’t, you should be able to get Netmeeting from the Microsoft
Web site at
select the
within NetMeeting.
www.microsoft.com/downloads
Zoom DualCam 300
as the video source and follow the instructions
. If you run Netmeeting, please
Using the Interpolation Software for Snapshots
1. Make sure you have the camera set to Hi resolution.
2. Connect your camera to the computer with the camera’s USB cable.
3. Select
4. Once
5. Pick
6. A window opens.
7. Select the
Arcsoft PhotoImpression
PhotoImpression
Zoom DualCam 300
click the
Camera and Scanner
Setting
is loaded, select
icon in the lower left corner.
from the program menu.
from the
Select Source
icon.
Camera/Scanner
pull-down menu and
.
5
Page 6

8. Select the
Expansion Mode
9. Click the icon of the camera pointing at a computer to move the pictures
stored in your camera to the PC.
10. Select the pictures you want to store on your computer by clicking the
Transfer
pictures in your camera after you have transferred them by clicking the
Erase All
The Zoom DualCam 300 is bundled with the Arcsoft Software Suite. Use the
PhotoImpressions
your photos. You can use this software to frame your pictures, and to make
calendars and greeting cards.
merging them into the included images that come with the software.
To download photos in lower resolution modes, follow steps 1,2,3,4,5,6,9 and 10
above. To download videos, click the icon of the roll of film instead of the camera
in step 9.
Resolution
or
Transfer All
button on the camera screen. Click
tab and select both the
boxes. Click OK to close the Setting window.
button on the camera screen. You can erase the
software to download, enhance, print, and add effects to
Funhouse
lets you have fun with your pictures,
352 x 288
Exit.
and the
DSC
Maintenance
Operating Environment: 41 to 104 deg F (5 to 40 deg C). 20-85% relative
humidity, non-condensing.
Never immerse the Zoom DualCam 300 in water or any liquid. Remove dust or
stains with a soft cloth dampened with water or neutral detergent. Keep the Zoom
DualCam 300 in a dry and cool dust-free environment or container when it is
NOT being used.
Remove the batteries when the Zoom DualCam 300 is NOT going to be used
over a long period.
Avoid dropping the Zoom DualCam 300 onto a hard surface. Do not disassemble
the Zoom DualCam 300.
Troubleshooting
Computer Display Resolution
your computer to 16 bit color or higher for optimum image display. Refer to the
video card manual or the procedure below:
1. Click the Windows
from the pop-up menus.
2. Double-click the
3. The
4. Restart your computer.
Camera Not Found Or Responding With Windows 98
update some of your Windows 98 files. Connect to the Internet and click
Windows Update
Critical Updates
Color Palette
Color (16 bit)
(If this option is not available to you, you may need to update your video
card driver. Please visit your video card manufacturer’s web site, download
the latest video driver available for your card, and install it per the
instructions provided by the card manufacturer. )
Display
pull-down menu displays the current setting. Select
or
True Color (24 bit)
and follow the on-screen instructions. Be sure to download all
.
6
– You must set the resolution of the display on
button followed by
Start
icon and click the
and then click OK.
and then
Setting
tab.
Setting
– You probably need to
Control Panel
High
Start
–
Page 7

Technical Support & Limited Warranty
Your first avenue of support should be through the organization that provided you with your Zoom Camera. If
you still desire to directly contact Zoom Technical Support, please feel free to do so. For your records, and to
facilitate Technical Support from either your equipment supplier or Zoom, please write down the following
information when you receive your Zoom Camera.
Product Name
Product Model N umber
Product Serial Number
The serial number is located on the back of the unit below the barcode. Please be sure to write it down. This
will greatly speed your service and ensure that the service representative is addressing the proper model.
Contacting Zoom by E-mail
You can e-mail Zoom with any tech support questions you have and one of our Technical Support Engineers
will respond by e-mail within 2 business days. To send an e-mail, go to:
When e-mailing Zoom, be sure to include the following:
Serial number(s)
Your full name and mailing address
A detailed description of your problem.
Contacting Zoom by Phone
In the U.S. Zoom Support phone lines are open Monday to Friday, 9:00 AM to 11:00 PM Eastern Time.
Please call:
In the United Kingdom, Zoom Support phone lines are open Monday to Friday, 9:00 AM to 5:00 PM
Greenwich Mean Time. Please call:
______________________________________
_______________________________
_______________________________
www.zoom.com/techmail
(561) 997-9683
+44 (0)1276 704440
Return of Defective Units
Please contact your local distributor or reseller for factory-authorized repair or replacement of your inwarranty defective product. If you are unable to reach your distributor, you can contact Zoom Factory
Customer Service in the United States by calling:
In the United Kingdom and Europe please call:
Please note that the customer is responsible for any charges (including brokerage or customs and duties)
associated with shipping the defective unit to Zoom for repair. During the first year Zoom will pay return
shipping to the customer by common carrier. After the first year the Customer may be required to pay a
nominal shipping and handling fee. Any applicable customs, duties and brokerage charges to import the
product are the responsibility of the customer. Zoom encourages all customers to return defective units to
their respective reseller whenever possible.
(561) 241-7712
+44 (0)1276 704440
Limited Warranty
Zoom Telephonics, Inc. (hereinafter “Zoom”) warrants this product against defects in material and
workmanship for a period two (2) years from the date of the original end-user purchase. This warranty
applies to the original end-user purchaser. For all Zoom products other than software, Zoom will, solely at its
option, repair or replace this product with a functionally equivalent new or factory-reconditioned product
during the warranty period. The consumer will deliver the product to Zoom. All transportation risks and costs
in connection with this warranty service are the responsibility of the consumer.
For Software Products supplied by Zoom
Zoom will replace software at no charge if there is a defect in materials or workmanship for a period of 30
days from date of original retail purchase, provided the defective software is returned to Zoom. Returned
shipment will be via U.S. Mail. Software products supplied by Zoom are sold “as is,” without warranty, either
expressed or implied, as to function, application, merchantability, performance, and quality. Zoom is not
responsible for incidental or consequential damages resulting from the breach of any expressed or implied
warranty, including any costs of recovering, reprogramming, or reproducing any programs or data stored or
used with the Zoom products, damage to property, and to the extent permitted by law, damages for personal
injury. This warranty is in lieu of all other warranties, expressed or implied. We do not assume or authorize
assumption for use of any other warranty expressed or implied. Some states and countries do not allow the
exclusion or limitation of incidental or consequential damages, so the above limitation or exclusions may not
apply to you. This warranty does not apply if the Zoom product has been damaged by accident, abuse,
lightning or other natural disasters, misuse or misapplication, or if it has been modified without the written
permission of Zoom, or if any serial number has been removed or defaced. This warranty shall not be
applicable to the extent that any provisions of this warranty are prohibited by any federal, state, or municipal
law that cannot be preempted. This warranty gives you specific legal rights, and you may also have other
rights that vary from state to state or country to country.
7
Page 8

Cámara digital DualCam 300 de Zoom
Felicitaciones por comprar la cámara DualCam 300 de Zoom. Este manual
presenta la cámara e indica cómo instalar el software.
Vista frontal Vista lateral Vista posterior
Shutter/Confirm=
Disparo/Confirmación
Battery Compartment=
Compartimento de la
pila
Para configurar la cámara o cambiar una de sus configuraciones, oprima el
botón de encendido sin soltarlo hasta que la cámara emita una señal sonora
para indicar que está encendida. Oprimir el botón de menú y encendido
(Menu/Power) nuevamente pasa cíclicamente el menú de iconos por la pantalla
LCD. Cuando desee cambiar una configuración, oprima el botón de disparo y
confirmación (Shutter/Confirm) mientras el icono correspondiente esté
destellando. Las opciones de menú pasarán por la pantalla cíclicamente en
sentido contrario a las manecillas del reloj empezando por el temporizador.
Viewfinder=
Visor
Stand Nut=
Tuerca del pedestal
Belt=
Correa
Lens=
Lente
Power/Menu=
Encendido/Menú
LCD Display=
Pantalla LCD
Pantalla LCD:
A continuación se presenta una descripción de cada uno de los iconos del panel
LCD.
Temporizador:
El temporizador permite retardar aproximadamente 10 segundos
la toma de la fotografía.
Instantáneas continuas:
Un solo clic en el botón de disparo y confirmación
(Shutter/Confirm)
por segundo)
hace que la cámara tome 3 fotos (una foto
Alto / bajo:
El icono bajo
baja resolución. Si no hay icono, la cámara está en modalidad de
alta resolución (Hi) (VGA 640x480). La cámara debe estar en
modalidad de alta resolución para usar la resolución de 1,3 meg
(1280x960), que se logra por medio de interpolación de software.
indica que la cámara está en modalidad de
(LO)
8
Page 9

Vídeo automático:
Modo de vídeo automático. La frecuencia es de 9 tomas por
segundo en todas las resoluciones.
Detección de la condición de la pila:
El icono de pila en tres partes indica la condición de la pila. Vea
los detalles en la sección
Pilas
50/60:
El 50 representa la frecuencia de 50 Hz del suministro eléctrico, el
60 representa la frecuencia de 60 Hz del suministro eléctrico. Fije
esta variable de acuerdo al país en que se encuentre para eliminar
el parpadeo de las fotos tomadas bajo luces fluorescentes.
Borrar la última / todas:
Si se selecciona el icono, apretar el botón de disparo y
confirmación
última foto que se tomó.
Si se selecciona el icono, apretar el botón de disparo
y confirmación
todas las fotos almacenadas en la
memoria.
Número de foto, PC, memoria llena:
Cuando la cámara no está conectada a un ordenador, este
contador indica la cantidad de fotos tomadas. Cuando la cámara
está conectada a un ordenador y está en modalidad PC, el icono
aparece en lugar del contador. Cuando la memoria se llena
PC
estando la cámara desconectada del ordenador, la pantalla dice
y suena la alarma.
FUL
.
(Shutter/Confirm)
borra la
(Shutter/Confirm)
borra
Instalación del software
1.
IMPORTANTE. No conecte la cámara al ordenador antes de que el
software esté completamente instalado, porque esto puede hacer que el PC
no se inicie correctamente. Si se produce este problema, apague el PC,
desenchufe la cámara y vuelva a iniciar el PC.
2.
Inserte el CD de la DualCam 300 de Zoom CD en la unidad de lectura de
CD-ROM. El ordenador ejecutará automáticamente el software.
Nota. Si el software no se instala automáticamente, vaya a la barra de
tareas y haga clic en Inicio, luego haga clic en Ejecutar, seleccione
Explorar, escoja SETUP.EXE en el CD de software y finalmente haga clic
en Aceptar para hacer la instalación.
3.
En el menú desplegable, seleccione el idioma que desea, luego haga clic
en
Aceptar (OK)
instalar el software ArcSoft Software Suite.
4.
Después de que la aplicación quede instalada, el software iniciará
automáticamente el programa de instalación del controlador de la cámara.
Siga las instrucciones que aparecen en la pantalla.
5.
Si seleccionó la instalación del software
instalación le indicará que instale DirectX. Siga las instrucciones que
aparecen en la pantalla.
. Siga las instrucciones que aparecen en la pantalla para
VideoImpression
, el programa de
9
Page 10

6.
Haga clic en el icono
después de completar la instalación del software de aplicación, del
controlador de la cámara y del software DirectX. (Cuando conecte la
cámara al ordenador, Windows la detectará y completará la instalación
automáticamente.)
Terminar (Finish)
y vuelva a iniciar su ordenador
Conexión de la DualCam 300 al puerto USB del ordenador
1. Conecte el cable USB al puerto USB del ordenador.
2. Conecte el cable USB a la DualCam 300 de Zoom.
CardCam=
Cámara tarjeta
mini-A type=
Tipo mini A
B type=
Tipo B
PC with USB Port=
PC con puerto USB
Uso del software de aplicación
Los ficheros de
ArcSoft PhotoImpression
Ayuda (Help)
del software de aplicación están en el programa
.
Pilas
Antes de operar la DualCam 300 de Zoom, usted tiene que colocarle las pilas
como se muestra a continuación:
1.
Presione hacia abajo con el pulgar la parte de arriba de la tapa del
compartimento de las pilas y retire la cubierta.
2.
Inserte 2 pilas alcalinas tamaño AAA en la cámara y asegúrese de que los
símbolos + y – de las pilas correspondan con los símbolos grabados en la
caja.
3.
Vuelva a colocar la cubierta del compartimento de las pilas en su lugar.
4.
Oprima el botón de encendido y modalidad
durante aproximadamente 1 segundo. La cámara emitirá una señal sonora
para indicar que está lista para usar (configuración predeterminada). Si esto
no ocurre, cambie las pilas por otras que usted sepa que están cargadas. Si
aun así la cámara no funciona, comuníquese con el departamento de
asistencia técnica.
Para conservar la carga de las pilas, la cámara se apaga
NOTA.
automáticamente si no se usa durante 30 a 45 segundos. La cámara emite
una señal sonora para indicar que se ha apagado.
(Power/Mode)
sin soltarlo
Indicador de condición de las pilas
El indicador de condición de las pilas es un indicador de tres partes que se
define a continuación.
Cuando las pilas están cargadas, aparecen tres partes. El voltaje es de
aproximadamente 3 voltios.
Cuando el voltaje baja a 2,8 voltios, la cámara emite una señal sonora
de advertencia y la parte izquierda del icono de la pila desaparece.
10
Page 11

Cuando las pilas están casi completamente agotadas (menos de 2,5
voltios) el icono de las pilas muestra un pila vacía durante un corto
período de tiempo y luego se apaga automáticamente.
NOTA.
pilas. La pérdida de la carga de las pilas puede hacer que se pierdan las
fotos almacenadas. La cámara consume constantemente energía de las pilas si
no está conectada a un PC. Para asegurar que las pilas se mantengan frescas,
quítelas si piensa guardar o no usar la cámara en los próximos días. Asegúrese
de transferir las fotos almacenadas en la cámara a su PC antes de quitarle las
pilas a la cámara y antes de que se agoten.
Asegúrese siempre de transferir las fotos antes de que se agoten las
Toma de fotos
1.
El mejor funcionamiento de la DualCam 300 de Zoom se obtiene en buenas
condiciones de iluminación y a distancias de más de 60 cm (2 pies).
2.
Seleccione la modalidad de la cámara
3.
Centre al sujeto de la fotografía en el visor.
4.
Oprima el botón de disparo y confirmación
sonora confirma que se ha tomado la foto. El contador de fotos LCD pasa al
número inmediatamente superior.
5.
Una vez que la memoria de la cámara está llena, el texto FUL aparece en
la pantalla LCD y suena una alarma.
Temporizador
El temporizador permite oprimir el botón de disparo y confirmación
(Shutter/Confirm)
foto.
1. Seleccione la función de temporización en el menú de opciones.
2. Cuadre la foto, con el trípode de la
3. Oprima y suelte el botón de disparo y confirmación
cámara emite una señal sonora hasta que toma la foto (aproximadamente
10 segundos después).
4. Para desactivar la función de temporización, oprima el botón de disparo y
confirmación
la cuenta regresiva.
5. Vuelva a seleccionar la modalidad para cancelar la función de
temporización.
y dejar pasar 10 segundos antes de que la cámara tome la
(Shutter/Confirm)
(Hi/Lo).
(Shutter/Confirm)
DualCam 300 de Zoom
(Shutter/Confirm)
antes de que pasen los diez segundos de
. Una señal
si es necesario.
. La
Instantáneas continuas
1.
Seleccione la función de instantáneas continuas en el menú de opciones.
2.
Oprima el botón de disparo y confirmación
fotos continuas (1 foto por segundo).
3.
Vuelva a seleccionar esta modalidad para activar esta función nuevamente.
(Shutter/Confirm)
para tomar 3
Filmación de un vídeo
1.
Seleccione la modalidad
2.
Centre al sujeto en el visor.
3.
Oprima el botón de disparo y confirmación
imágenes continuamente a aproximadamente 9 fotos por segundo y
almacenarlas en la memoria hasta que el botón se suelte.
4.
Continúe filmando y mantenga la cámara estable.
5.
La película se almacena en formato AVI y el número de fotos aumenta uno
por uno.
6.
Vuelva a seleccionar esta modalidad para cancelar esta función.
para activar la función.
Vídeo
(Shutter/Confirm)
para capturar
Borrar y eliminar fotos
Con la DualCam 300 de Zoom usted puede borrar todas las fotos o sólo la foto o
11
Page 12

vídeo más reciente. Cuando la memoria de la cámara está llena, la pantalla LCD
dice
PC o se borren todas con la opción
última con la opción
y no se pueden tomar más fotos hasta que las fotos se transfieran al
FUL
E01 – Borrar la última (Erase Last Picture).
EAL – Borrarlas todas (Erase All) ,
o la
Uso de la cámara como cámara Web de PC
Si la cámara está conectada al puerto USB de un PC que ejecuta Windows, la
cámara está en modalidad PC. La modalidad de cámara fotográfica digital está
desactivada y la pantalla LCD dice PC. Si se desenchufa del puerto USB, la
cámara volverá a la modalidad de cámara fotográfica digital y se apagará
automáticamente. Use la aplicación
vídeo y crear presentaciones de vídeo o mensajes de correo electrónico con
vídeo.
El software Microsoft Netmeeting® y otros softwares de videoconferencia son
compatibles con la DualCam 300 de Zoom. Su PC Windows puede tener
Netmeeting ya instalado; de no ser así, puede obtener Netmeeting en el sitio
Web de Microsoft en
seleccione la
instrucciones de NetMeeting.
www.microsoft.com/downloads
DualCam 300 de Zoom
VideoImpression
como fuente de vídeo y siga las
que se incluye para filmar
. Si ejecuta Netmeeting,
Uso del software de interpolación para las instantáneas:
1.
Asegúrese de que la cámara esté en alta resolución.
2.
Conecte la cámara al ordenador con el cable USB.
3.
Seleccione
4.
Una vez que
función de cámara y escáner
5.
Seleccione
fuente
(Cámara/Scanner)
6.
Se abre una ventana.
7.
Seleccione el icono de configuración
izquierda.
8.
Seleccione la ficha de resolución
x 288
ventana de configuración.
9.
Haga clic en el icono de la cámara que apunta a un ordenador para pasar
las fotos de la cámara al ordenador.
10.
Seleccione las fotos que desea guardar en el ordenador haciendo clic en el
botón de transferencia
(Transfer All)
fotos que hay en la cámara después de transferirlas haciendo clic en el
botón de borrado total
Haga clic en
Arcsoft PhotoImpression
Arcsoft PhotoImpression
DualCam 300 de Zoom
(Select Source)
y
DSC Expansion Mode.
que aparece en la pantalla de la cámara. Puede borrar las
Salir (Exit)
y haga clic en el icono de cámara y escáner
.
(Transfer)
(Erase All)
.
(Cámara/Scanner)
en el menú de programas.
haya sido cargado, seleccione la
en el menú desplegable de selección de
(Setting)
(Resolution)
Haga clic en
o en el botón de transferencia total
que aparece en la pantalla de la cámara.
.
en la esquina inferior
y seleccione las casillas
Aceptar (OK)
para cerrar la
352
La DualCam 300 de Zoom viene con el paquete Arcsoft Software Suite. Use el
software
sus fotos. Puede usar este software para enmarcar fotos y para crear
calendarios y tarjetas de felicitación. El software
con sus fotos, combinándolas con las imágenes que trae el software.
Para transferir fotos en modalidades de baja resolución, siga los pasos 1, 2, 3, 4,
5, 6, 9 y 10 que se indicaron anteriormente. Para transferir vídeos, en el paso 9
haga clic en el icono del carrete de película en vez del icono de la cámara.
PhotoImpression
para transferir, mejorar, imprimir y agregar efectos a
Funhouse
le permite divertirse
Mantenimiento
Ambiente de funcionamiento: 5 a 40 °C (41 a 104 °F ). 20 a 85% de humedad
relativa sin condensación.
12
Page 13

No sumerja nunca la DualCam 300 de Zoom en agua ni en ningún otro líquido.
Quítele el polvo y las manchas con un paño humedecido con agua o detergente
neutro. Guárdela en una caja o lugar fresco, seco y sin polvo cuando NO la esté
utilizando.
Quítele las pilas si NO la va a usar durante un período de tiempo prolongado.
No la deje caer sobre superficies duras. No la desarme.
Resolución de problemas
Resolución de la pantalla del ordenador.
ordenador se debe fijar en color de 16 bits o más para obtener una visualización
óptima de las imágenes. Consulte el manual de la tarjeta de vídeo o el
procedimiento que se presenta a continuación.
1. Haga clic en el botón
finalmente en
2. Haga doble clic en el icono
Configuración
3. El menú desplegable
Seleccione
luego haga clic en
(Si no tiene esta opción en su ordenador, necesitará actualizar el
controlador de la tarjeta de vídeo. Visite el sitio Web del fabricante de la
tarjeta de vídeo, transfiera el controlador de vídeo más reciente e instálelo
de acuerdo con las instrucciones del fabricante.)
4. Vuelva a iniciar el ordenador.
El sistema no encuentra la cámara o ésta no responde con Windows 98.
Probablemente necesita actualizar algunos de sus ficheros Windows 98.
Conéctese a la Internet, haga clic en
las instrucciones que aparecen en la pantalla. Asegúrese de transferir las
Actualizaciones Críticas (Critical Updates).
Panel de control
.
Color de alta densidad (16 bit)
Aceptar
de Windows, luego en
Inicio
Visualización
Paleta de colores
.
La resolución de la pantalla del
en los menús desplegables.
y luego haga clic en la ficha
muestra la configuración actual.
Inicio - Actualización de Windows
Configuración
o
Color verdadero (24 bit)
y
y
y siga
13
Page 14

Soporte Técnico Y Garantía
Su proveedor de soporte inicial debería ser la organización que le proporcionó la cámara Zoom. Si todavía
desea contactar directamente con el Soporte Técnico de Zoom, no dude en hacerlo. Para sus propios
archivos y para facilitar el servicio técnico bien sea de su proveedor de equipamiento o de Zoom, rellene la
siguiente información cuando reciba su cámara Zoom.
Nombre del producto
Número de modelo del producto
Número de serie del producto
El número de serie está situado bajo el código de barras. Una vez que haya localizado el número de serie no olvide escribirlo. Esto acelerará mucho la gestión y garantizará que el representante de servicio se centre en el modelo de cámara correcto.
Cómo contactar con Zoom por correo electrónico
Puede enviar un mensaje de correo electrónico a Zoom con cualquier pregunta de Soporte Técnico que
tenga y uno de nuestros técnicos de soporte le responderá por correo electrónico en el plazo de 2 días
laborables. Envíe sus preguntas a:
Cuando envíe un mensaje a Zoom, asegúrese de incluir lo siguiente: número(s) de serie; su nombre y
dirección postal completos; una descripción detallada de su problema.
Cómo contactar con Zoom por teléfono
En los EE.UU. las líneas de teléfono del soporte técnico de Zoom están abiertas de lunes a viernes de 9 de
la mañana a 11 de la noche, hora de la costa este. Llame al:
En el Reino Unido, las líneas de teléfono del soporte técnico de Zoom están abiertas de lunes a viernes de
9 de la mañana a 5 de la tarde hora británica (GMT). Llame al:
Devolución de unidades defectuosas
Tenga la bondad de ponerse en contacto con su distribuidor local para la reparación o recambio autorizado
por fábrica de su producto defectuoso en garantía. Si no puede ponerse en contacto con su distribuidor,
puede llamar al servicio en fábrica al cliente
Obsérvese que el cliente será responsable de todos los gastos (incluyendo corretaje o gastos y tasas de
aduana) asociados con el envío de la unidad defectuosa a Zoom para su reparación. Durante el primer año
Zoom pagará los gastos de envío de vuelta al cliente por transporte ordinario. Después del primer año se
podrá solicitar al cliente que pague una tasa nominal de transporte y manipulación. Todos los gastos
aplicables de aduanas, impuestos y corretaje para importar el producto son responsabilidad del cliente.
Zoom pide a todos sus clientes que devuelvan las unidades defectuosas a sus respectivos distribuidores
siempre que sea posible.
Garantía limitada
Zoom Telephonics, Inc. (de aquí en adelante “Zoom”) garantiza este producto contra defectos de materiales
y mano de obra durante un periodo de 2 años desde la fecha de la compra original por parte del usuario
final. Esta garantía es aplicable al comprador final original. Para todos los productos Zoom, excepto
software, Zoom, a su exclusiva discreción, reparará o sustituirá este producto por un producto nuevo o
reacondicionado en fábrica funcionalmente equivalente durante el periodo de garantía. El cliente será
responsable de entregar el producto a Zoom. Todos los gastos y riesgos de transporte en conexión con este
servicio de garantía son responsabilidad del cliente.
Para productos de software suministrados por Zoom
Zoom reemplazará el software gratuitamente si existe un defecto de materiales o mano de obra durante un
periodo de 30 días desde la fecha de la compra original en un establecimiento, a condición de que el
software defectuoso se devuelva a Zoom. El transporte de retorno será a través del servicio postal
estadounidense. Los productos de software suministrados por Zoom se venden “tal cual,” sin garantías, ya
sean explícitas o implícitas, en relación con su función, aplicación, comerciabilidad, rendimiento y calidad.
Zoom no se hace responsable de ningún daño indirecto o emergente resultante de la vulneración de
cualquier garantía expresa o implícita, incluyendo cualquier coste derivado de la recuperación,
reprogramación, o reproducción de cualquier programa o datos almacenados o utilizados con los productos
Zoom, daños a la propiedad y, hasta el punto permitido por la ley, daños por lesiones personales. Esta
garantía sustituye a todas las demás garantías, expresas o implícitas. No asumimos ni permitimos que se
asuma el uso de cualquier otra garantía expresa o implícita. Algunos estados y países no permiten la
exclusión o limitación de daños indirectos o emergentes, por lo que la limitación o exclusiones anteriores
pueden no ser aplicables a usted. Esta garantía no es aplicable si el producto Zoom ha sido dañado por
accidente, abusos, rayos u otros desastres naturales, uso indebido o mala aplicación, ni si ha sido
modificado sin el permiso por escrito de Zoom, ni si el número de serie ha sido eliminado o borrado.
Esta garantía no será aplicable en la medida en que cualquier provisión de la misma esté prohibida por
cualquier ley federal, estatal o municipal que no pueda excluirse. Esta garantía le proporciona derechos
legales específicos, sin perjuicio de otros derechos de que pueda disfrutar que pueden variar de estado a
estado o de país a país.
______________________________________
_____________________________
_______________________________
www.zoom.com/techmail
(561) 997-9683
+44 (0)1276 704440
(Zoom Factory Customer Service)
(561) 241-7712
en los EE.UU. en el:
14
Page 15

Regulatory Information
U.S. FCC Part 15 Emissions Statement
This equipment has been tested and found to comply with the limits for a Class B digital device, pursuant to
part 15 of the FCC Rules. These limits are designed to provide reasonable protection against harmful
interference in a residential installation. This equipment generates, uses and can radiate radio frequency
and, if not installed and used in accordance with the instructions, may cause harmful interference to radio
communications.
However, there is no guarantee that interference will not occur in a particular installation. If this equipment
does cause harmful interference to radio or television reception, which can be determined by turning the
equipment off and on, the user is encouraged to try to correct the interference by one or more of the
following measures:
Reorient or relocate the receiving antenna.
Increase the separation between the equipment and receiver.
Connect the equipment into an outlet on a circuit different from that to which the receiver is connected.
Consult the dealer or an experienced radio/TV technician for help.
Industry Canada Emissions Statement
This Class B digital apparatus meets all requirements of the Canadian Interference-Causing Equipment
Regulations.
Cet appareil numérique de la classe B respecte toutes les exigences du Règlement sur le matériel brouilleur
du Canada.
Electrostatic Discharge (ESD) Statement
This unit may require resetting after a severe ESD event.
Declaration of Conformity
The manufacturer declares under sole responsibility that this equipment is compliant to Directive 1999/5/EC
(R&TTE Directive) via the following. This product is CE Marked.
Directive Standard Test Report
89/336/EEC-EMC EN 55024: 1998
89/336/EEC-EMC EN 55022 : 1998
CE Compliance Statement
Hereby Zoom declares that this equipment is in compliance with the essential requirements and other
relevant provisions of Directive 1999/5/EC.
Zoom vakuuttaa täten että laite on direktiivin 1999/5/EY oleellisten vaatimusten ja sitä koskevien direktiivin
muiden ehtojen mukainen.
Hierbij verklaart Zoom dat het toestel in overeenstemming is met de essentiële eisen en de andere relevante
bepalingen van richtlijn 1999/5/EG.
Bij deze verklaart Zoom dat deze apparaat voldoet aan de essentiële eisen en aan de overige relevante
bepalingen van Richtlijn 1999/5/EC.
Par la présente Zoom déclare que cet appareil est conforme aux exigences essentielles et aux autres
dispositions pertinentes de la directive 1999/5/CE.
Par la présente, Zoom déclare que cet équipement est conforme aux exigences essentielles et aux autres
dispositions de la directive 1999/5/CE qui lui sont applicables.
Härmed intygar Zoom att denna produkt står I överensstämmelse med de väsentliga egenskapskrav och
övriga relevanta bestämmelser som framgår av direktiv 1999/5/EG.
Undertegnede Zoom erklærer herved, at følgende udstyr overholder de væsentlige krav og øvrige relevante
krav i direktiv 1999/5/EF.
Hiermit erklärt Zoom dass sich dieses Produkt in Übereinstimmung mit den grundlegenden Anforderungen
und den anderen relevanten Vorschriften der Richtlinie 1999/5/EG befindet. (BMWi)
Hiermit erklärt Zoom die Übereinstimmung des Gerätes mit den grundlegenden Anforderungen und den
anderen relevanten Festlegungen der Richtlinie 1999/5/EG. (Wien)
ΜΕ ΤΗΝ ΠΑΡΟΥSΑ ZOOM ΔΗΛOΝΕΙ ΟΤΙ SΥΜΜΟΡFOΝΕΤΑΙ ΠΡΟS ΤΙS ΟΥSΙOΔΕΙS ΑΠΑΙΤΗSΕΙS ΚΑΙ
ΤΙS ΛΟΙΠΕS SΧΕΤΙΚΕS ΔΙΑΤΑΞΕΙS ΤΗS ΟΔΗGΙΑS 1999/5/ΕK.
Con la presente Zoom dichiara che questo apparecchio è conforme ai requisiti essenziali ed alle altre
disposizioni pertinenti stabilite dalla direttiva 1999/5/CE.
Por medio de la presente Zoom declara que el equipo cumple con los requisitos esenciales y cualesquiera
otras disposiciones aplicables o exigibles de la Directiva 1999/5/CE.
Zoom declara que este equipamento está conforme com os requisitos essenciais e outras disposições da
Directiva 1999/5/CE.
ed
ed
EMC-immunity
EMC-emissions
15
Page 16

Declaración de conformidad
Nosotros los suscritos,
Compañía Zoom Telephonics, Inc.
Dirección,
Ciudad
País USA
Número de
teléfono
Número de fax 617 542 8276
certificamos y declaramos bajo nuestra exclusiva responsabilidad que el siguiente
equipo:
Descripción y proyección de uso del
producto
Estados de la Unión
Europea (UE) y de la
Asociación Europea de
Libre Comercio (AELC)
en que se proyecta usar
el producto
Estados con uso
restringido
Fabricante Zoom Telephonics, Inc.
Marca DualCam 300
Tipo 1540
ha sido sometido a prueba y cumple con los requisitos esenciales de protección
de la salud y la seguridad del usuario y de otras personas; tiene
compatibilidad electromagnética según lo especificado en las siguientes normas:
Norma Fecha de emisión
EN 55022 1998 +A1
Por lo tanto, este equipo cumple con los requisitos y disposiciones esenciales
de la Directriz 1999/5/EC del Parlamento Europeo y del consejo del 9 de marzo
de 1999 sobre equipos de radio, equipos de terminales de telecomunicaciones y
reconocimiento mutuo de su conformidad, y con las disposiciones del Anexo II
(procedimiento de evaluación de conformidad mencionado en el artículo 10(3)).
La documentación técnica requerida por el procedimiento de evaluación de
conformidad esta disponible en
Compañía Zoom Telephonics, Inc.
Dirección, Ciudad 430 Frimley Business Park, Frimley, Camberley, Surrey,
País United Kingdom
Número de teléfono 44 1276 70 4400
Número de fax 44 1276 70 4500
207 South Street, Boston, Massachusetts
02111
617 423 1072
UE: para la conexión a la red pública conmutada de
Alemania, Austria, Bélgica, Dinamarca, España,
Finlandia, Francia, Grecia, Irlanda, Italia,
Luxemburgo, Países Bajos, Portugal, Reino Unido,
Suecia,
AELC: Islandia, Liechtenstein, Noruega, Suiza
Ninguno
GU16 7SY
N°°°° de referencia TCF/TF
Redactado en Boston, MA,
Fecha May, 28, 2003
Nombre y cargo Director, Ingeniería de
apoyo
1540 TCF/TF
USA
Notice
The information in this document is subject to change without notice and does not represent a commitment
on the part of the vendor.
No warranty of representation, either expressed or implied, is made with respect to the quality, accuracy or
fitness for any particular purpose of this document. The manufacturer reserves the right to make changes to
the content of this document and/or the products associated with it at any time without obligation to notify
any person or organization of such changes.
In no event will the manufacturer be liable for direct, indirect, special, incidental or consequential damages
arising out of the use or inability to use this product or documentation, even if advised of the possibility of
such damages.
© 2003 Copyright. All rights reserved.
Aviso
Este documento contiene información de propiedad protegida por derechos de autor. Este manual y todo el
software, equipo y documentación que lo acompañan están protegidos por derechos de autor. Ninguna
parte de este documento puede ser fotocopiada o reproducida de forma alguna por medios mecánicos,
electrónicos o de otra índole.
El fabricante no garantiza que el equipo funcione correctamente en todos los entornos y aplicaciones, y no
da ninguna garantía ni hace ninguna representación, ni expresa ni implícita, en cuanto a la calidad, el
desempeño, la comerciabilidad o la idoneidad del software o la documentación para algún propósito en
particular. El fabricante se reserva el derecho de hacer cambios al equipo, al software y a la documentación
sin la obligación de notificar a ninguna persona u organización sobre tal modificación o cambio.
Todas las marcas y nombres de productos son marcas comerciales de sus respectivos dueños.
© Copyright 2003 Reservados todos los derechos.
1573-D 27285-1 ©2003
 Loading...