

Page 1

Aero RhythmTrak
A
Version 2.0 Quick Manual
The Operation Manual can be downloaded from the ZOOM website (www.zoom.co.jp)
© 2017 ZOOM CORPORATION
Copying or reprinting this manual in part or in whole without permission is prohibited.
Page 2

Contents
Explanation of terms ......................................3
Overview
Names of parts ..............................................4
Using the A .........................................7
Ring Controller overview ................................8
Connecting other devices ............................10
Switching modes ......................................... 11
Instrument overview .....................................12
Preparations
Turning the power on and o ....................... 14
Loading SD cards ........................................16
INST mode
INST mode overview ....................................17
Operation summary .....................................19
STEP mode
STEP mode overview ...................................21
Operation summary .....................................23
SONG mode
SONG mode overview .................................24
Operation summary .....................................25
Capturing audio (recording)
Capture overview .........................................26
Operation summary .....................................27
LOOPER mode
LOOPER mode overview .............................28
Operation summary .....................................29
Other functions
Editing sounds .............................................30
Eects .........................................................30
Mixer ...........................................................30
Arpeggiator ..................................................30
Product specications.................................. 31
Page 3
Explanation of terms
Pattern
This is a short music al part of se veral bars.
Patterns are made of sequences (performance
information) and kits (sound sets). You can also
save parameters controlled by the Ring Con-
troller, quantization and other settings for each
pattern separately.
The A has preset patterns that cover a
variety of musical genres.
Song
This is a combination of multiple patterns that
form a single musical piece.
Step
A step is the length of the shortest notes that
can be input to a sequence.
Steps are usually one 16th of a measure, so you
can set sounds to occur in 16th note intervals.
This length can be changed in the settings.
Sequence
A sequence is performance data that records
the timing when various sounds are played.
The A has a STEP mode that allows you
to record sequences one step at a time and an
INST mode that allows you to record playing the
pads in real time.
Kit
One pattern can use up to 33 instruments. This
collection of instruments is called a "kit".
A kit created in one pattern can be copied to
another pattern.
Explanation of terms
Instrument
These are the smallest elements of sounds. A
variety of sound sources, including drum sets,
percussion instruments, basses and synthesiz-
ers, are already prepared for use.
You can also use WAV les saved on an SD card
by a computer as instruments.
In addition to selecting sounds, various settings
are available in each instrument. These include
envelopes with attack and sustain times, lters
and eects.
3
Page 4
TEMPO button
CAPTURE button
Ring Controller charging connectorLCD screen
button
button
button
button
Overview
Overview
Names of parts
Names of parts
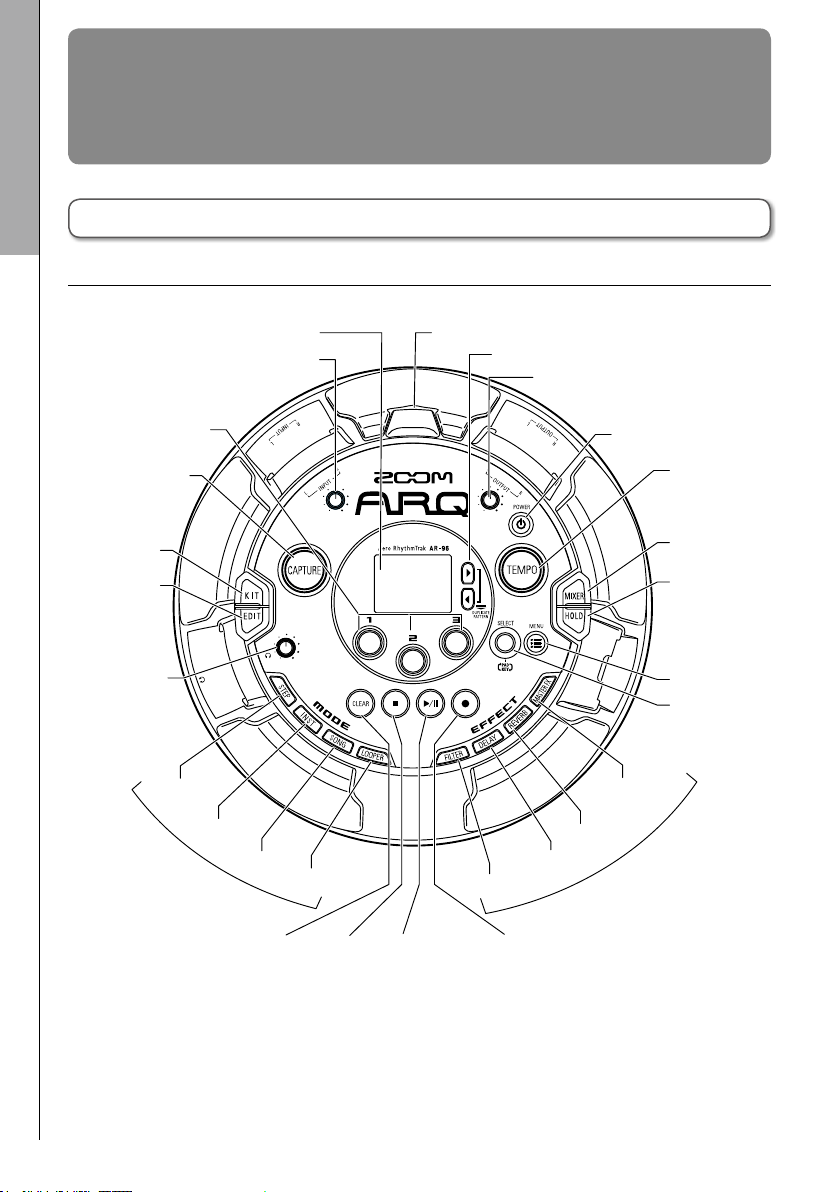
Base Station
■
Top
KIT button
EDIT button
Headphone
Parameter
knobs 1–3
volume
STEP
INPUT volume
INST
MODE
buttons
SONG
LOOPER
Right and left buttons
OUTPUT volume
POWER button
MASTER FX
REVERB
DELAY
FILTER
MIXER button
HOLD button
MENU button
SELECT knob
EFFECT
buttons
CLEAR
STOP
PLAY/PAUSE
4
REC
Page 5
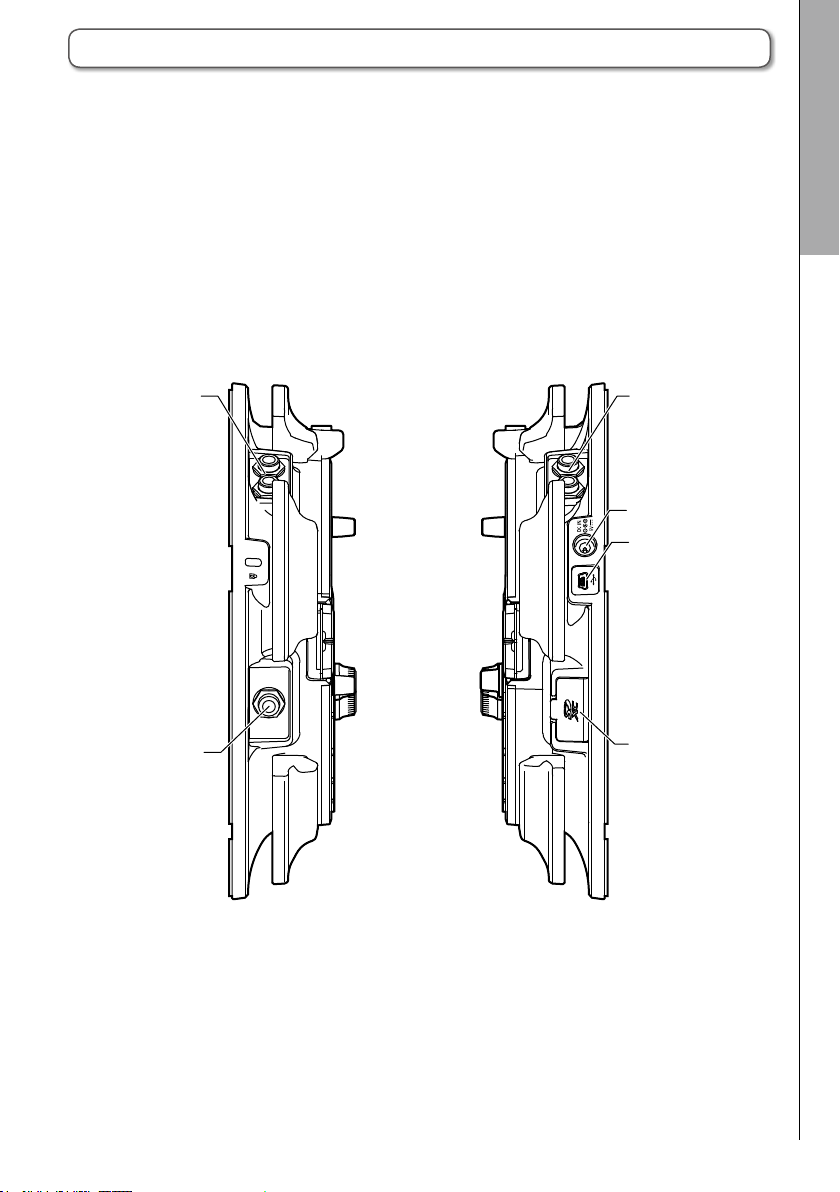
Names of parts (continued)
Overview
Names of parts
■
Left side
INPUT
jack
Headphone
jack
■
Right side
OUTPUT
jack
External
power jack
USB jack
SD card
slot
5
Page 6

Names of parts (continued)
Overview
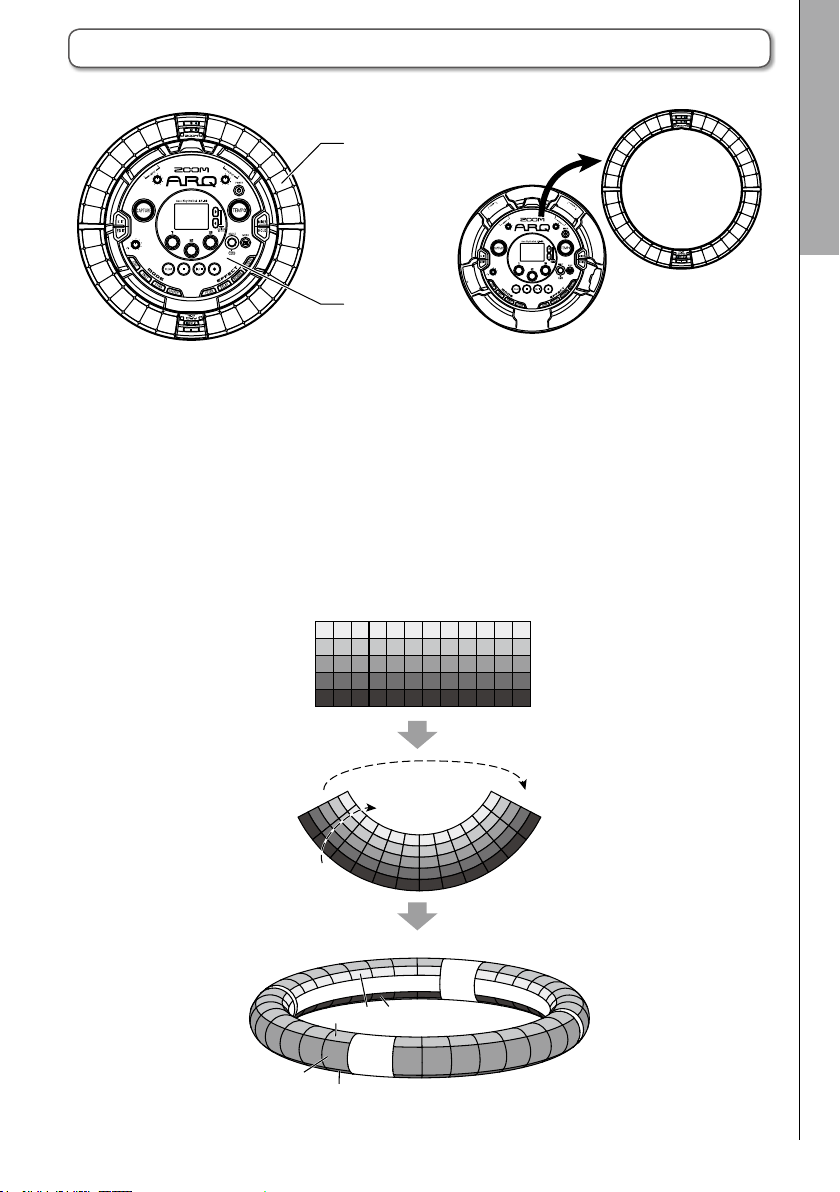
Ring Controller
Names of parts
SETUP button
DELAY button
FILTER button
MASTER FX button
REVERB button
Charging connector
(Bottom)
(Bottom)
(Side)
button
button
GRIP button
Pads
POWER button STOP button
(Side)
PLAY/PAUSE button
REC button
HINT
•You can use the Ring Controller buttons for the same operations as the Base Station buttons.
•The Ring Controller U corresponds to the Base Station u.
• Press p on the Ring Controller to show the remaining battery charge on the Base Station screen.
6
Page 7
Using the A
The A consists of a Base Station and a Ring Controller.
Ring Controller
Base Station
With the Base Station, you can edit tones, create songs and save them, for example. Use the Ring
Controller for input when creating songs.
Since the Ring Controller can be detached from the Base Station, you can hold it in your hand and
play it like an instrument. You can also connect it wirelessly to a Mac computer or iOS device and use
it as a MIDI controller.
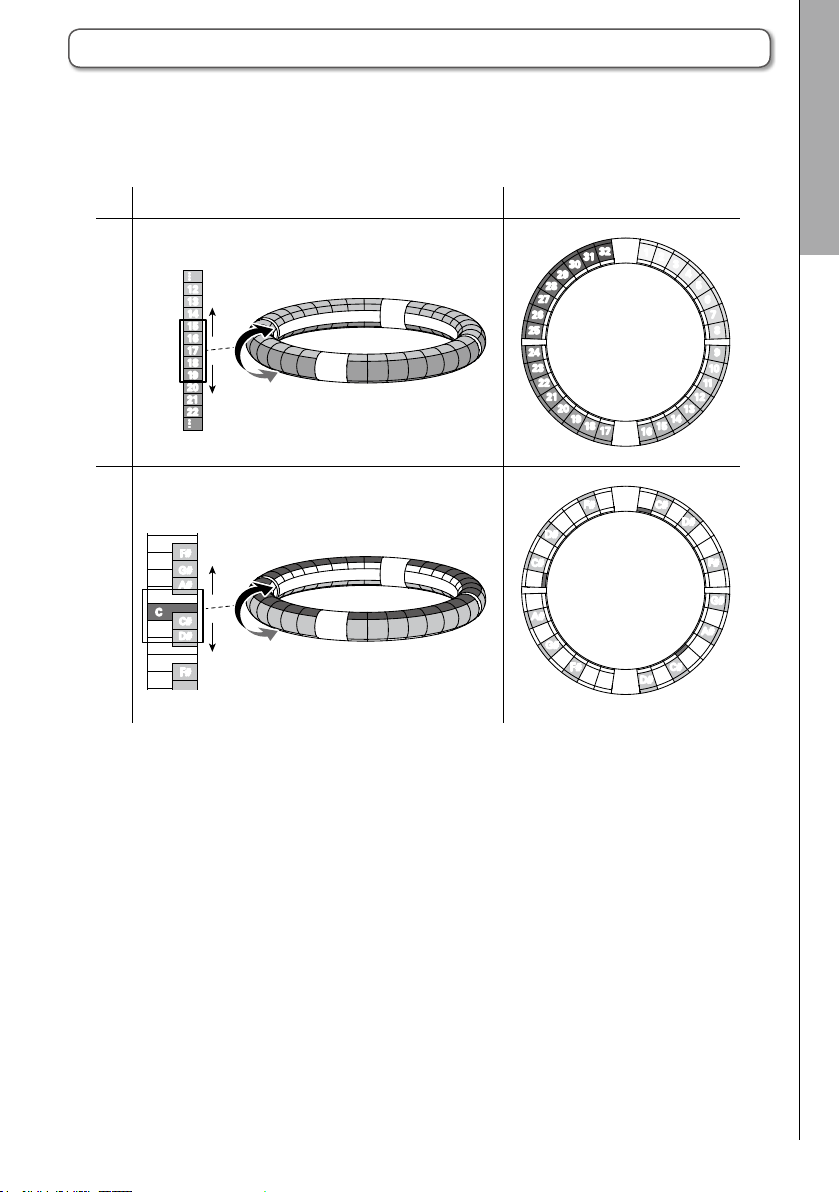
The Ring Controller includes an LED matrix with 5 rows of 32 blocks (3 rows with pads and 2 rows for
display only). Placing a two-dimensional matrix on the surface of a three-dimensional hoop enables
conrmation and operation of all steps in a compact form.
2313
1
…
A
B
C
D
E
303132
…
Overview
Using the A
32
…
B
E
A
C
D
1
2
3
…
7
Page 8

Top inner ring
pads for input
Step
Instrument
Instrument
Ring parameters
Ring Controller overview
Overview
The A Controller surface has 5 ring-shaped areas. The top, side and bottom rings each have 32
pressure-sensitive pads.
Using these pads, you can input and edit songs and perform in real-time, for example.
LED indicators
(no input)
Bottom inner ring
Ring Controller overview
LED indicators
(no input)
Bottom ring
Pressure-sensitive
Top ring
Pressure-sensitive
pads for input
Side ring
Pressure-sensitive
pads for input
Assignment of functions
Various functions are assigned to the Ring Controller rings and pads according to the operation status
and mode.
26
25
24
28
27
23
22
31
30
29
21
20
19
Pad locations
32
18
17
1
2
3
4
5
6
7
8
9
10
11
12
13
14
15
16
Example: In STEP mode PAD layout, the rings display 5 dierent instrument sequences (3 when set to
Guideline display), and each pad and indicator corresponds to a step between 1 and 32.
Example: In INST mode PAD layout, each pad controls 1 of 32 instruments with each ring assigned to
a dierent parameter setting.
HINT
Since input procedures differ for each mode, see the explanation pages for each operation for
details.
8
Page 9

Ring Controller overview (continued)
Playback position
During playback of a pattern or song, for exam-
ple, the LEDs of the top and bottom inner rings
light green at the step currently playing.
In addition, in INST mode and during other real-
time input, the LEDs light red.
Guideline
In STEP mode, the LEDs of the top and bottom
inner rings can be set to light for each beat to
assist in step recording.
S e e t h e O p e r a t i o n M a n u a l f o r s e t t i n g
instructions.
1
Lights
beat
For 16 beats
Grip area
You can set a grip area that does not respond
to touch in order to prevent pads from being
pressed unintentionally whe n using the Ring
Controller separately from the Base Station. The
grip area can be set automatically by holding the
Ring Controller after pressing g .
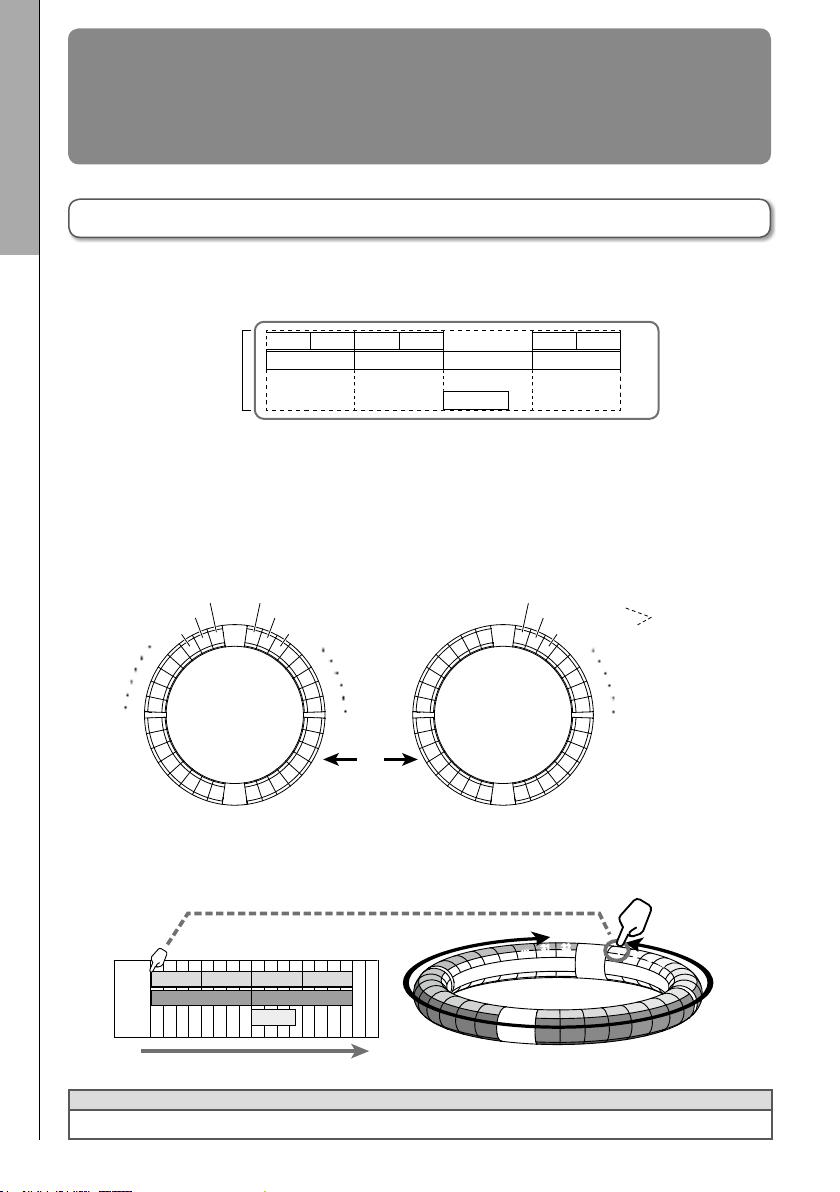
Turning the Ring Controller
over
If you turn the ring controller over and place it
so that the side with the power key and the side
with the eect keys are reversed, the functions
assigned to the rings and the display of LEDs
will be reversed top to bottom. Moreover, the
direction of movement will also be switched. As
a result, when the Ring Controller is viewed from
above, movement will always be clockwise and
the top ring will always be on top when you use
it.
TOP
TOP
32
1
Overview
Ring Controller overview
BOTTOM
BOTTOM
32
1
Use the same way even when turned over
NOTE
If the grip area has been set, turning the ring
controller over will not reverse assignments or
the direction.
9
Page 10

Overview
Connecting other devices
Connecting other devices
Audio source for
capturing recordings
Headphones
INPUT
A
Mixer, audio system or
other playback equipment
OUTPUT
AC adapter
Computer
(USB connection)
10
Page 11

Switching modes
With the A, you can create patterns and
combine multiple patterns to create songs.
Editing with the A mainly uses the follow-
ing four modes. By switching between these
modes, you can alternate between creating pat-
terns and creating songs.
The two modes for creating patterns are STEP
and INST.
· In STEP mode, you can record instrument
sounds one step at a time to create patterns.
· In INST mod e , a n d y o u c a n r e c o r d a
Pattern creation
Create and save patterns
performance as a pattern by playing the pads
in real-time.
Us e SONG and L OO PER m od es to c re ate
songs.
· In SONG mode, create songs by playing and
changing patterns in real-time and recording
the results.
· In LOOPER mode, use audio data captured
from the input of devices connected to the
INPUT jacks, patterns and songs, as well as
WAV les loaded from SD cards, for example,
as materia ls to buil d loo p sequences and
create songs.
Overview
Switching modes
STEP mode
Create patterns by
inputting one step
at a time
SONG mode
Combine patterns that
have already been
made to create songs
Song creation
Combine patterns and other sources to create songs
11
INST mode
Record patterns by
playing in real time
LOOPER mode
Create songs using loops
from other songs,
captured external input
and PCM audio files
Page 12
Instrument overview
Overview
The A can use up to 33 sound sources in a single kit. Each of these is called an instrument and
produces sound from waveform data, such as a drum hit, from a WAV le loaded from an SD card, or
from the built-in synthesizer. In addition to its sound (oscillator), each instrument has various settings.
These include envelopes with attack and sustain times, lters, eects and pad colors.
Instruments are assigned numbers from 1 to 33. In EDIT and STEP modes, you can edit the sound
and sequence for the instrument selected by number.
Instrument number 33 is the one used in KEY layout in A Version 1.00. It can only be edited in
Instrument overview
STEP mode.
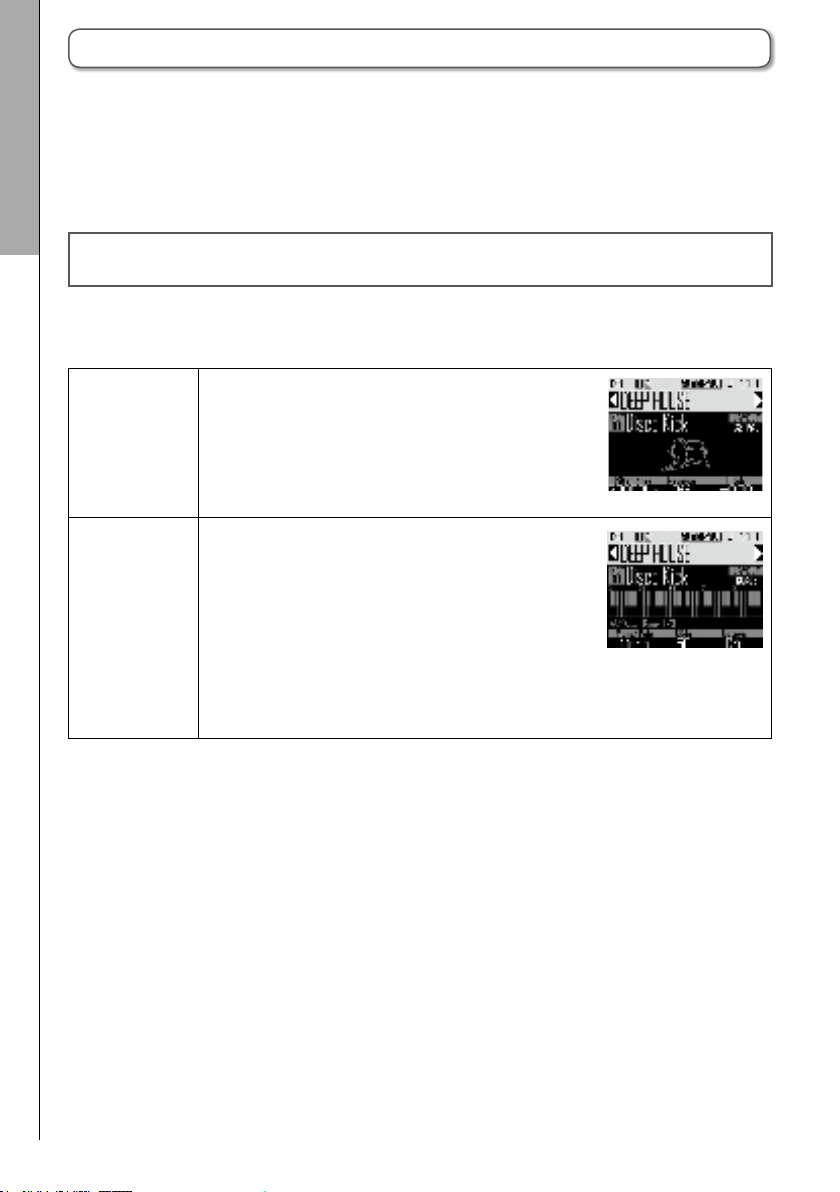
The A Ring Controller has the two following layouts. In STEP or INST mode, press E to switch
between them. Up to 16 sounds can be generated simultaneously in either layout.
PAD layout
SCALE layout This performance mode allows you to use a musical
In this performance mode, you can assign dierent instru-
ments to each of the 32 pads. Instruments 1–32 are
assigned individually to pads 1–32.
The selected instrument is shown on the display and the
corresponding pad lights white.
scale to play the instrument selected in PAD layout. The
pads become like a keyboard in a musical scale order.
The Ring Controller LEDs light with a pale color for white
keyboard keys and a dark color for black keyboard keys.
The scale can also be set to major or minor, for example.
Unlike in A Version 1.00, any of the 1–32 instruments can be switched to
SCALE layout.
The note (pitch) that sounds when a pad is played in PAD layout is C4.
12
Page 13
Instrument overview (continued)
Assignments of instruments to the Ring Controller are dierent for STEP and INST modes as well as
for PAD and SCALE layouts.
INST modeSTEP mode
Instrument No.
32
1
G
E
Note
2
3
4
5
6
7
8
9
10
11
12
13
14
15
16
C
C#
D
D#
E
F
F#
G
G#
A
A#
B
C
C#
D
D#
PAD layoutSCALE layout
Instrument
… …
12
13
14
15
16
17
18
19
20
21
22
Note
… …
F#
G
G#
A
A#
B
C
C#
D
D#
E
F
F#
No.
(Using chromatic scale)
31
30
29
28
27
26
25
24
23
22
21
20
19
18
17
F#
F
E
D#
D
C#
C
B
A#
A
G#
G
F#
F
(Same notes assigned
to side and bottom rings)
Overview
Instrument overview
13
Page 14

Preparations
Preparations
Turning the power on and o
Turning the power on and o
Base Station power
Connect the included AC adapter
1.
to the Base Station.
Press and hold p on the Base
2.
Station.
Ring Controller power
■
Charging the Ring Controller
Place the Ring Controller on the
1.
Base Station.
Press and hold p to turn the
3.
power OFF.
HINT
When the Ring Controller is asleep and con-
nected to the Base Station, turning the Base
Station power ON/OFF will also turn the Ring
Controller ON/OFF.
NOTE
Use the AC ada pter to p ower th e A
even when it is connected to a computer or
other device by USB.
Align their charging connectors before
placement.
Charging will start and the Ring Controller p LED will light.
Charging
(Power o or asleep)
Charging during use Orange
Using battery
(Remaining battery charge
at least 12%)
Using battery
(Remaining battery charge
less than 12%)
HINT
Even when the Base Station is OFF, if it is con-
nected to a power supply, it can recharge the
Ring Controller.
14
Red
Green
Blinking
green
Page 15

Turning the power on and o (continued)
■
Putting the Ring Controller to sleep
When the Ring Controller is charging, the power
will not turn OFF. Instead, it will go to sleep.
■
Turn the Ring Controller OFF
To turn the Ring Controller OFF, follow these
steps when it is not charging.
Preparations
1.
2.
HINT
Wh en a sleep, the Ri ng Controller p
LED will light red (charging) or blink red (not
charging).
CONTROLLER
p
CONTROLLER
p
.
to wake it from sleep.
Press and hold
Press and hold
1.
2.
NOTE
•W hen the power is OFF, the p LED
•Even if the power is OFF, the Ring Controller
CONTROLLER
p
when not charging.
CONTROLLER
p
becomes unlit.
will automatically enter sleep mode when
charging starts.
Press and hold
for at least 7 seconds
Press and hold
to turn the power on.
Turning the power on and o
15
Page 16
Preparations
■
1.
2.
Loading SD cards
3.
Loading SD cards
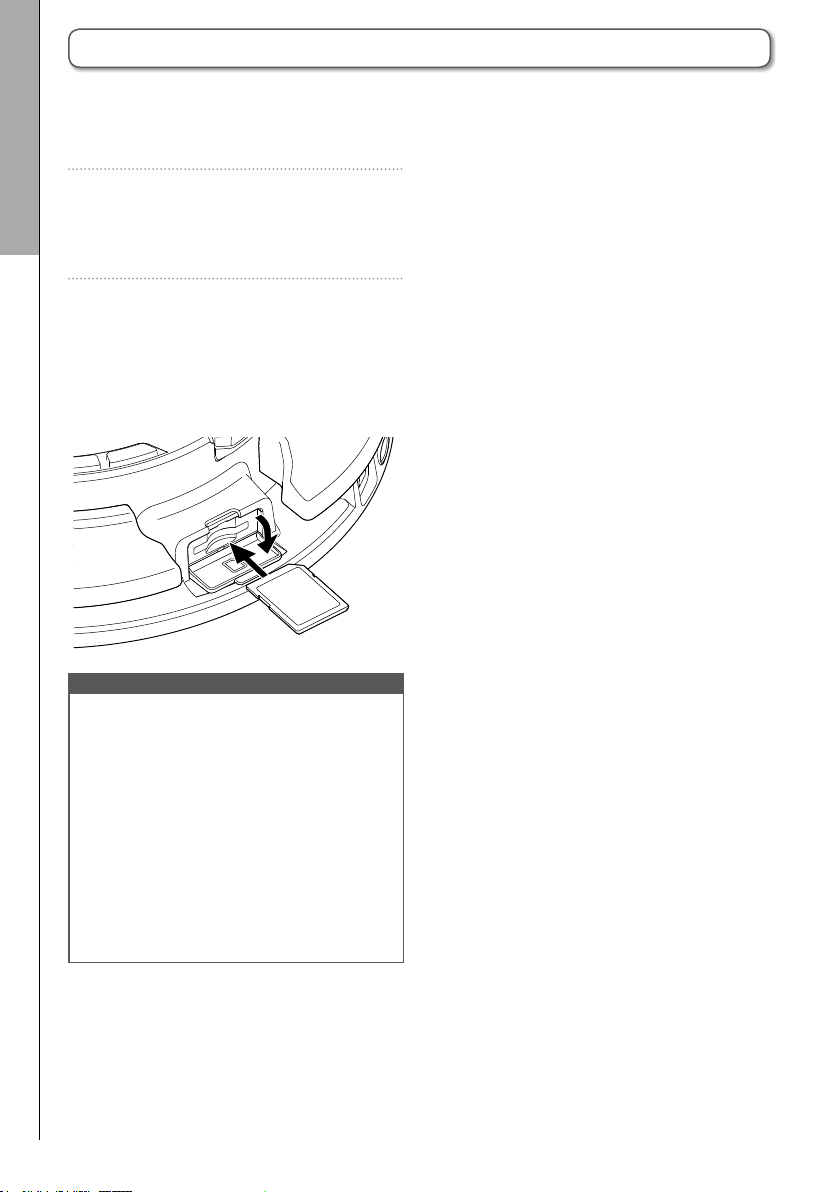
Loading and removing SD cards
Turnthepowero.
Open the SD card slot cover on the
Base Station.
Insert the SD card into the slot.
To eject an SD card:
Push the card further into the slot and
then pull it out.
NOTE
•If no SD card is loaded in the A, cap-
tured data cannot be saved and patterns and
songs that are created cannot be backed up.
•When inserting an SD card, be sure to insert
the correct end with the top side up as
shown.
•Before using SD cards that have just been
purchased or that have been formatted on
a computer, they must be formatted by the
A. See the Operation Manual for for-
matting procedures.
16
Page 17

INST (instrument) mode
INST (instrument) mode
INST mode overview
You can tap pads to perform as you like. You can also record performances in real-time to create
patterns.
In this mode, each pad around the Ring Controller corresponds to a single instrument (PAD layout) or
note (SCALE layout).
PAD layout
32
1
Selected
instrument
17
2
3
4
5
6
7
8
9
10
11
12
13
14
15
16
E
Change
31
30
29
28
27
26
25
Instrument Numbers
24
23
22
21
20
19
18
layout
HINT
In PAD layout, the note (pitch) C4 is output when a pad is played.
SCALE layout
G
F#
F
E
D#
D
C#
C
B
A#
A
G#
Notes
G
F#
F
E
The same notes are assigned
to the side and bottom rings
C
C#
D
C#
D
D#
C1
D#
E
C2
F
F#
C3
G
G#
A
C4
A#
B
C
C5
Selected
instrument
INST mode overview
Dierent parameter settings are assigned to the side and bottom rings, so they can be used for dier-
ent tones.
Same instrument
Different
parameters
17
Page 18

Real-time input (loop playback)
INST (instrument) mode
INST mode overview (continued)
Pattern creation in PAD layout
After starting real-time input, tap pads for an instrument to input it.
The pattern will start loop playback, and you can overdub as many times as you like.
INST mode overview
Instrument 1
Instrument 2
Instrument 3
Instrument 32
Pattern creation in SCALE layout
After starting real-time input, tap pads for notes to input them.
Scales can be used to input every instrument numbered 1–32.
B
C
D
E
F
Bar 1 Bar 2
…
Bar 1 Bar 2
C#
D#
Real-time input (loop playback)
1
2
C
Instrument
3
…
Notes
C#
D
…
32
31
G
F#
…
18
Page 19

Operation summary
Press X to enter INST mode.
INST (instrument) mode
Enter INST mode
Select a pattern
Use u to select a pattern number.
Check the instruments
Play the pads to hear the sounds of the input instruments.
When a pad is tapped, it becomes “selected” and lights white. The name and parameters of
the instrument are shown on the display.
To select an instrument without making a sound press and hold X while tapping the pad.
To use SCALE layout to input the selected instru-
ment, press E to change the layout.
You can also use e to check the
instruments.
Start input
Press R to enter standby,
and press P to start real-time
input.
Operation summary
19
Page 20
INST (instrument) mode
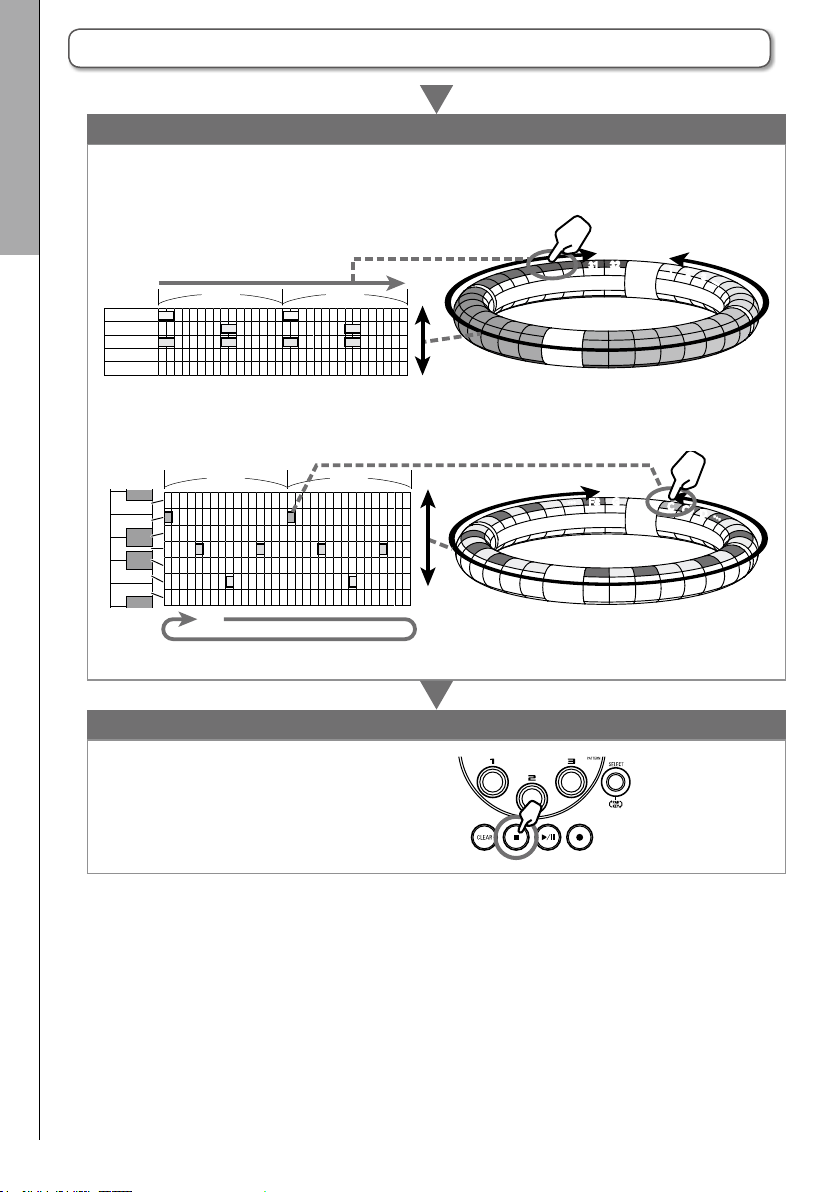
Operation summary (continued)
In PAD layout
Tap instrument pads to input them in time with the looping pattern that is playing back.
Operation summary
Instrument 1
Instrument 2
Instrument 3
Instrument 32
In SCALE layout
Tap the pads of notes to input them in time with the looping pattern that is playing back.
Start real-time input
Instrument
32
Input in real time
Bar 1 Bar 2
…
31
1
2
3
…
Bar 1Bar 2
B
C
C#
D
D#
E
F
Realtime input (loop playback)
Press S to end real-time input.
End input
G
F#
…
Notes
C
C#
D
…
20
Page 21

STEP mode
STEP mode overview
STEP mode
In STEP mode, you can create patterns by inputting them one step at a time.
In this mode, each pad around the Ring Controller corresponds to a single sequential step.
Step
1
32
2
Step
3
…
Bar 1 Bar 2
Instrument
……
1 2 3 …
……3030313132
Since the Ring Controller rings are divided into 32 steps, you can input up to two musical bars (1) at a
time (when the smallest step is a 16th note).
1 Input first instrument
Bar 2
1
…
Instrument
…
Bar 1
Bar 2
Bar 1
If the pattern is longer than two bars, the Ring Controller display will switch every two bars (in cases
when the smallest step is a 16th note).
STEP mode overview
Bar 1 Bar 2
…
Instrument
…
Ring Controller appearance
while playing bars 1 and 2
Bar 3 Bar 4
Ring Controller appearance
while playing bars 3 and 4
21
Page 22

STEP mode overview (continued)
STEP mode
In PAD layout
The 5 rings (3 when set to Guideline display) on the Ring Controller each show a dierent instrument.
You can use e to change which instruments are shown by which rings.
Since multiple instruments can be shown by the Ring Controller, you can check instruments that have
already been input as you input the next instrument.
STEP mode overview
Select the instrument shown
e
on the top ring
When instrument 2 is selected:
e
Top ring shows the sequence
for instrument 2
Side ring shows the sequence
for instrument 3
In SCALE layout
You can use e to select the note input.
22
Select the note shown on
e
the top ring
C1 C2 C3 C4 C5
When C#2 is selected:
e
Top ring shows C#2
sequence
Side ring shows D2
sequence
Page 23

Operation summary
Select a pattern
Use u to select a pattern number.
Enter STEP mode
Press W to enter STEP mode.
Select the instrument to input
Use e to select the instrument to use for input from the 32 instruments. That instrument
moves to the top ring of the Ring Controller.
STEP mode
Operation summary
1 Use e to select the input
2 The instrument color shown on the ring moves
To use SCALE layout for input, press e to change the mode.
Step input
Tap pads to input the sound at those points.
Bar 1
Instrument
Bar 2
23
instrument
After nishing, switch to a dierent instrument
Bar 2
Bar 1
Page 24

Playback order →
Song
SONG mode
SONG mode
SONG mode overview
In SONG mode, you can combine multiple patterns that you have created into one complete song.
SONG mode overview
…
Pattern A Pattern B Pattern C …
The pads on the Ring Controller are assigned 32 patterns.
The same patterns are assigned to the top, side and bottom rings.
You can change the patterns assigned to each pad.
SONG mode also has A–L pad banks.
By changing banks, you can assign 32 dierent patterns to the Ring Controller.
Pattern 32
Pattern 31
Pattern 30
Pattern 1
Pattern 2
Pattern 3
Pattern 64
Pattern 63
Pattern 62
Pattern 33
Pattern 100
Pattern 101
u
Switch pad bank
(A, B, C…L)
After completing preparation, start real-time input and tap pads to play their patterns.
32
31
Song
Pattern 1
Real-time input
24
The patterns
assigned to each
pad can be changed
Patterns
1
2
3
…
Page 25

Operation summary
Press Y to enter SONG mode.
SONG mode
Enter SONG mode
Select a song
Press M and use e to open the Song Sequence List.
Then, use e and E to select a song sequence.
Select a pattern to play
Use u to change the pad bank as necessary.
Start input
Press R to start real-time input.
Create a song
Tap pads for patterns to play them and add them to the song in real time.
Operation summary
Realtime recording
Song
Press S to end song input.
End input
25
Page 26

Capturing audio (recording)
Capturing audio (recording)
Capture overview
Capture overview
The A can capture (record) audio it is playing back and audio input through its INPUT jacks in
every mode.
You can use captured audio as instruments and in LOOPER mode.
WAV les saved on SD cards can also be used in the same way as captured audio.
Capture external input
Capture output audio
Add audio files
Patterns, songs,
looper sequences
HINT
•In LOOPER mode, up to 96 captured recordings can be assigned to pads and used to perform.
•The total time of captured audio that can be used for instruments is 6 minutes (or 12 minutes if
mono).
NOTE
Captured audio data is saved on the SD card. Be aware that you will not be able to use the captured
recordings if you remove the SD card or replace it with a dierent SD card.
26
Page 27

Operation summary
Play the material to capture
•Playapatternorsong,forexample,thatyouwanttouseasacapturedrecording.
•InputfromthesoundsourceconnectedtotheINPUTjacks.
External input
Capturing audio (recording)
Play patterns,
songs, etc.
Start capturing
Press c to start capturing.
Stop capturing
Press c again to stop capturing.
On the setting screen that appears after captur-
ing stops, you can assign it to pads and set the
rangethatissounded,forexample.
Save
You can select and save captured audio to use
as an instrument or in LOOPER mode.
Captured audio can also be saved to an SD
card without changing its name or using it as an
instrument or in LOOPER mode.
Operation summary
27
Page 28
LOOPER mode
Capture 1
Capture 32
Capture 30
Capture 33
Real time input
LOOPER mode
LOOPER mode overview
In LOOPER mode, you can combine patterns and songs that have already been created, input from
LOOPER mode overview
the INPUT jacks, WAV les and other captured audio into a single song as a looper sequence.
Playback order →Looper sequence
16 sounds
maximum
simultaneous
playback
(mono)
32 captured recordings are assigned to the Ring Controller pads.
The captured recordings assigned to the pads can be changed. The same captured recordings are
assigned to the top, side and bottom rings.
LOOPER mode has A, B and C pad banks. By changing banks, you can assign 32 dierent captured
recordings to the Ring Controller.
Capture 1 Capture 1 Capture 1 Capture 1 Capture 1 Capture 1
Capture 2 Capture 2 Capture 2 Capture 2
…
Capture 3
…
Capture 31
Capture 2
Capture 3
Capture 50
Capture 51
The captured
recordings
assigned to
each pad can
be changed
u
Switch pad bank
(A, B, C)
After completing preparation, start real-time input and tap pads to play their captured recordings. Up
to 16 captured mono recordings can be played back at the same time.
Looper
sequence
Capture 1 Capture 1
Capture 2 Capture 2
Capture 1 Capture 1
Capture 3
32
31
…
Captures
1
2
3
…
HINT
See "Captured recordings" (→ P. 26) for how to create captured recordings.
28
Page 29

Operation summary
t
Press Z to enter LOOPER mode.
Select the looper sequence
LOOPER mode
Enter LOOPER mode
Press M and use e to open the Looper Sequence List.
Use e and E to select a loop sequence from the list.
Select captured audio for playback
Tap a pad or use u to change the pad bank as necessary.
Start input
Press R to start real-time input.
Create a looper sequence
Tap pads for captured recordings to play them and add them to the sequence in real time.
Operation summary
Real-time recording
Looper
sequence
Capture 1 Capture 1
Capture 2 Capture 2
Capture 1 Capture 1
Capture 3
Press S to end looper sequence input.
End input
29
Page 30

Other functions
Other functions
Editing sounds
Editing sounds/Eects/Mixer/Arpeggiator
Press D to edit sounds by changing settings related to oscillator
and noise types, insert eects, level, pan, send eects, LFOs and
envelopes, for example.
You can also set Ring Controller display settings in SONG mode and
capture settings in LOOPER mode.
Eects
Press w, x, y or z to apply the fi lter, delay,
reverb or master eect to a pattern, song or looper sequence.
Mixer
Press m when creating or playing a pattern, song or loop to adjust
the mix of the instruments, as well as to mute, solo and use other
settings.
Arpeggiator
This function can be used to make an instru-ment play automatically
when triggered by a pad. Pressing multiple pads will trigger multiple
instruments in order.
By pressing chord tones in SCALE layout, the notes in the chord can
be played back one at a time.
HINT
See the Operation Manual for detailed information about all the functions.
30
Page 31

Product specications
Base Station
Inputs INPUT L/R
OUTPUT L/R
Outputs
Dynamic range
Recording media
MIDI IN/OUT USB MIDI or MIDI over Bluetooth LE
Power 5V 1A AC adapter
Power consumption
External dimensions 260.0 mm (D) × 260.0 mm (W) × 64.0 mm (H)
Weight (main unit only) 990 g
Display LCD 2.0" full-color LCD (320×240)
Interface
PHONES
USB 2.0
(standard USB MIDI)
MIDI over
Bluetooth LE
Connector type Standard mono phone jacks (unbalanced)
Input gain +10 to −65 dB
Input impedance 50 kΩ
Connector type Standard mono phone jacks (unbalanced)
Output impedance 200 Ω
Connector type
Output impedance 10 Ω
Supported operating
systems
Minimum specications
Transmission speed 31.25 kbps (±1%) maximum
Latency
(with Ring Controller)
Standard stereo phone jacks
20mW × 2 (into 32Ω load)
ANALOG IN (AD): 92 dB typ (IHF-A)
PHONE OUT (DA): 102 dB typ (IHF-A)
MAIN OUT (DA): 106 dB typ (IHF-A)
16MB–2GB SD cards, 4GB–32GB SDHC cards, 64GB–128GB
SDXC cards
Base Station: 1.25 W maximum
When powering Ring Controller: 4.5 W maximum
(including charging current)
Windows 7 (SP1 or later), Windows 8 (including 8.1) or later,
Windows 10
Mac OS X 10.8 or later
Chipset that includes USB 2.0 as standard,
Intel Core i3 or faster CPU
5–12.5 ms
Product specications
Ring Controller
MIDI IN/OUT MIDI over Bluetooth LE
Sensors PAD pressure sensors, 3-axis accelerometer
Power
Power consumption When using battery: 2 W maximum
Recharging time About 2.5 hours
Battery operation time
External dimensions 280.5 mm (D) × 280.5 mm (W) × 33.5 mm (H)
Weight (main unit only) 540 g
Trigger pads
Interface
MIDI over
Bluetooth LE
Number of pads 96
Velocity curves 4 types
Supported iOS devices iPad devices running iOS 8.0 or later
Supported Macs
Transmission speed 31.25 kbps (±1%) maximum
Latency
(with Base Station)
Latency (iOS and Mac OS) 16.25–20 ms
Lithium polymer rechargeable battery (DC4.2V maximum voltage,
3.7V nominal voltage, 450mAh 3.7V capacity), direct supply from
Base Station
About 4.5 hours when LED brightness is Low
About 2.5 hours when LED brightness is High
(diers according to use conditions)
Mac OS X 10.10.5 Yosemite or later
MacBook, iMac and Mac pro series computers that support BLE
transmission
5–12.5 ms
31
Page 32

ZOOM CORPORATION
4-4-3 Kandasurugadai, Chiyoda-ku, Tokyo 101-0062 Japan
http://www.zoom.co.jp
Z2I-2711-04
 Loading...