


Operation Manual
You must read the Usage and Safety Precautions before use.
©2022 ZOOM CORPORATION
Copying or reprinting this manual in part or in whole without permission is prohibited.
Product names, registered trademarks and company names in this document are the property of their respective companies. All trademarks and
registered trademarks in this document are for identification purposes only and are not intended to infringe on the copyrights of their respective owners.
Proper display is not possible on grayscale devices.

Notes about this Operation Manual
You might need this manual in the future. Always keep it in a place where you can access it easily.
The contents of this document and the specifications of the product could be changed without notice.
• Windows® is a trademark or registered trademark of Microsoft® Corporation.
• Mac is a trademark of Apple Inc.
• Recording from copyrighted sources, including CDs, records, tapes, live performances, video works
and broadcasts, without permission of the copyright holder for any purpose other than personal use
is prohibited by law. Zoom Corporation will not assume any responsibility related to infringements of
copyrights.
2

Contents
Notes about this Operation Manual........................................................................................................................ 2
Functions of parts....................................................................................................................................................... 4
Top..................................................................................................................................................................................4
Left and right sides..................................................................................................................................................... 5
Front and back............................................................................................................................................................. 6
Connecting to a computer......................................................................................................................................... 7
Installing the driver on Windows computers..........................................................................................................8
Connecting smartphones and tablets......................................................................................................................9
Supplying power........................................................................................................................................................ 10
Connecting instruments and mics..........................................................................................................................11
Connecting instruments........................................................................................................................................... 11
Connecting mics.........................................................................................................................................................12
Connecting stereo sound sources..........................................................................................................................13
Adjusting the input gain...........................................................................................................................................14
Using direct monitoring............................................................................................................................................15
Adjusting the volume................................................................................................................................................16
Enabling the loopback function.............................................................................................................................. 17
Use example: Making music....................................................................................................................................19
Use example: Web streaming using a computer.................................................................................................21
Use example: Web streaming using a smartphone/tablet................................................................................. 24
Mixer diagram............................................................................................................................................................27
Terms used in this manual......................................................................................................................................28
Troubleshooting.........................................................................................................................................................29
Cannot select or use the AMS-22 device...............................................................................................................29
The sound of the device connected to the input jack is distorted, too quiet or silent...................................29
Cannot play or record.............................................................................................................................................. 29
Playback sound cannot be heard or is quiet........................................................................................................30
Recorded audio is too loud, too quiet or silent................................................................................................... 30
A smartphone or tablet cannot be used...............................................................................................................30
Sound skips during playback or recording........................................................................................................... 30
Specifications..............................................................................................................................................................31
3

Functions of parts
Top
Gain knob
❶
Use this to adjust the input signal level from the MIC/GUITAR jack. (→ Adjusting the input gain)
Level indicator
❷
This indicator shows the signal level after gain knob adjustment.
The indicator color changes according to the signal level.
Lit green: Input signal is present. (−48 dBFS or higher)
Lit red: Input signal is clipping. (−1 dBFS or higher)
POWER indicator
❸
This lights when the power is on.
OUTPUT knob
❹
Use this to adjust the volume of signals output from the standard phone OUTPUT and headphone
jacks.
4
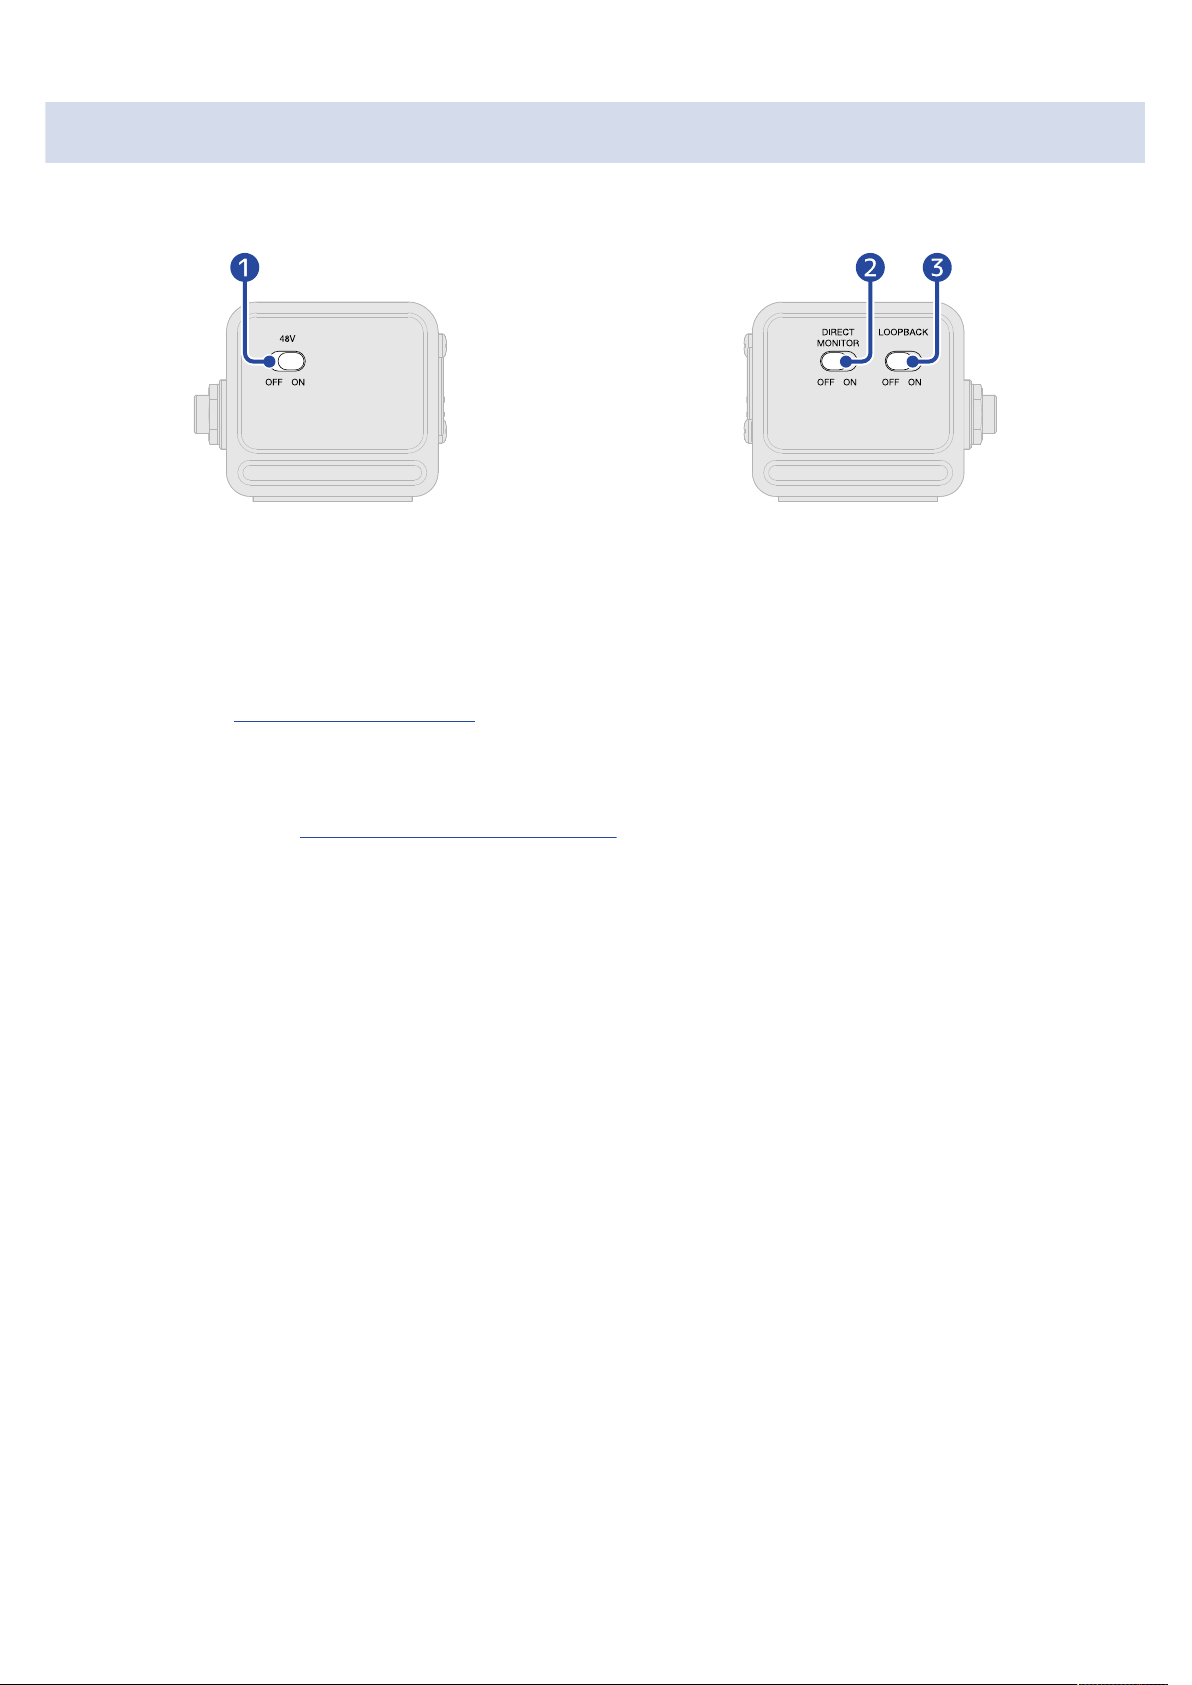
Left and right sides
■ Left side ■ Right side
48V switch
❶
This turns +48V phantom power ON/OFF. Set this to ON when connecting condenser mics.
DIRECT MONITOR switch
❷
Set this to ON to directly monitor sound from the MIC/GUITAR jack before it passes through the
computer. (→ Using direct monitoring)
LOOPBACK switch
❸
Set this to ON to send a mix of the sounds played by the computer and input through the AMS-22 back
to the computer. (→ Enabling the loopback function)
5

Front and back
XLR
1
2
3
■ Front ■ Back
MIC/GUITAR jack
❶
This input jack has a built-in mic preamp. Connect mics, keyboards, guitars and other audio sources
to this. This can be used with both XLR and standard phone (balanced or unbalanced) plugs. (→
Connecting instruments and mics)
1: GND
2: HOT
3: COLD
LINE IN jack
❷
Use this line jack to connect tablets and other devices with a stereo mini cable.
Headphone output jack
❸
This outputs a stereo signal. Connect headphones to this.
OUTPUT standard phone jacks
❹
These output the left (L) and right (R) channels of a stereo signal. Connect these to speakers with builtin amplifiers, for example.
USB port (Type-C)
❺
Use this USB port to connect computers, smartphones and tablets. (→ Connecting to a computer,
Connecting smartphones and tablets)
DC 5V port (Type-C)
❻
Use this power supply USB port to connect an AC adapter or mobile battery. (→ Supplying power)
6

Connecting to a computer
USB Type-C
The AMS-22 is compatible with USB bus power, so power can be supplied to it from a computer through a
USB cable. In addition to USB bus power, it can also be operated using an external power supply (dedicated
AC adapter or mobile battery). (→ Supplying power)
1. Install the dedicated driver before using an AMS-22 to record for the first time with a DAW application
on a Windows computer. (→ Installing the driver on Windows computers)
NOTE:
• A driver is not necessary when using a Mac.
2. Minimize the volume before connecting speakers, headphones or other output devices to the AMS-22.
(→ Adjusting the volume)
3. Use a USB cable to connect the AMS-22 USB port (Type-C) to a USB port on the computer.
NOTE:
Use a USB cable that supports data transfer.
4. Confirm that the POWER indicator is lit red.
7

Installing the driver on Windows computers
The dedicated driver must be installed on a Windows computer before using a DAW app on it to record.
1. Download the “ZOOM AMS-22 Driver” from zoomcorp.com to the computer.
NOTE:
The latest “ZOOM AMS-22 Driver” can be downloaded from the above website.
2. Launch the installer and follow the instructions to install the “ZOOM AMS-22 Driver”.
NOTE:
• Do not connect the AMS-22 to the computer during installation.
• See the Installation Guide included in the driver package for detailed installation procedures.
8

Connecting smartphones and tablets
USB Type-C
During use with a smartphone or tablet, an external power supply must be used.
1. Minimize the volume before connecting speakers, headphones or other output devices to the AMS-22.
(→ Adjusting the volume)
2. Connect an external power supply. (→ Supplying power)
NOTE:
Power must be provided before connecting a smartphone or tablet to the AMS-22.
3. Use a USB cable to connect the AMS-22 USB port (Type-C) to the smartphone/tablet.
To connect smartphones and tablets, prepare USB cables and adapters that match their connectors as
necessary.
Use a USB cable that supports data transfer.
Connector type Necessary USB cable/adapter
Lightning connector USB Type-A to Type-C cable, Lightning to USB 3 Camera
Adapter
Type-C connector USB Type-C to Type-C cable
9

Supplying power
A dedicated AC adapter (ZOOM AD-17) or a commercially-available USB mobile battery can be used.
1. Connect the USB connector of the dedicated AC adapter to the DC 5V port (Type-C), and plug the AC
adapter into an outlet.
HINT:
To use a USB mobile battery, connect its USB cable to the DC 5V port (Type-C).
2. Confirm that the POWER indicator is lit red.
10
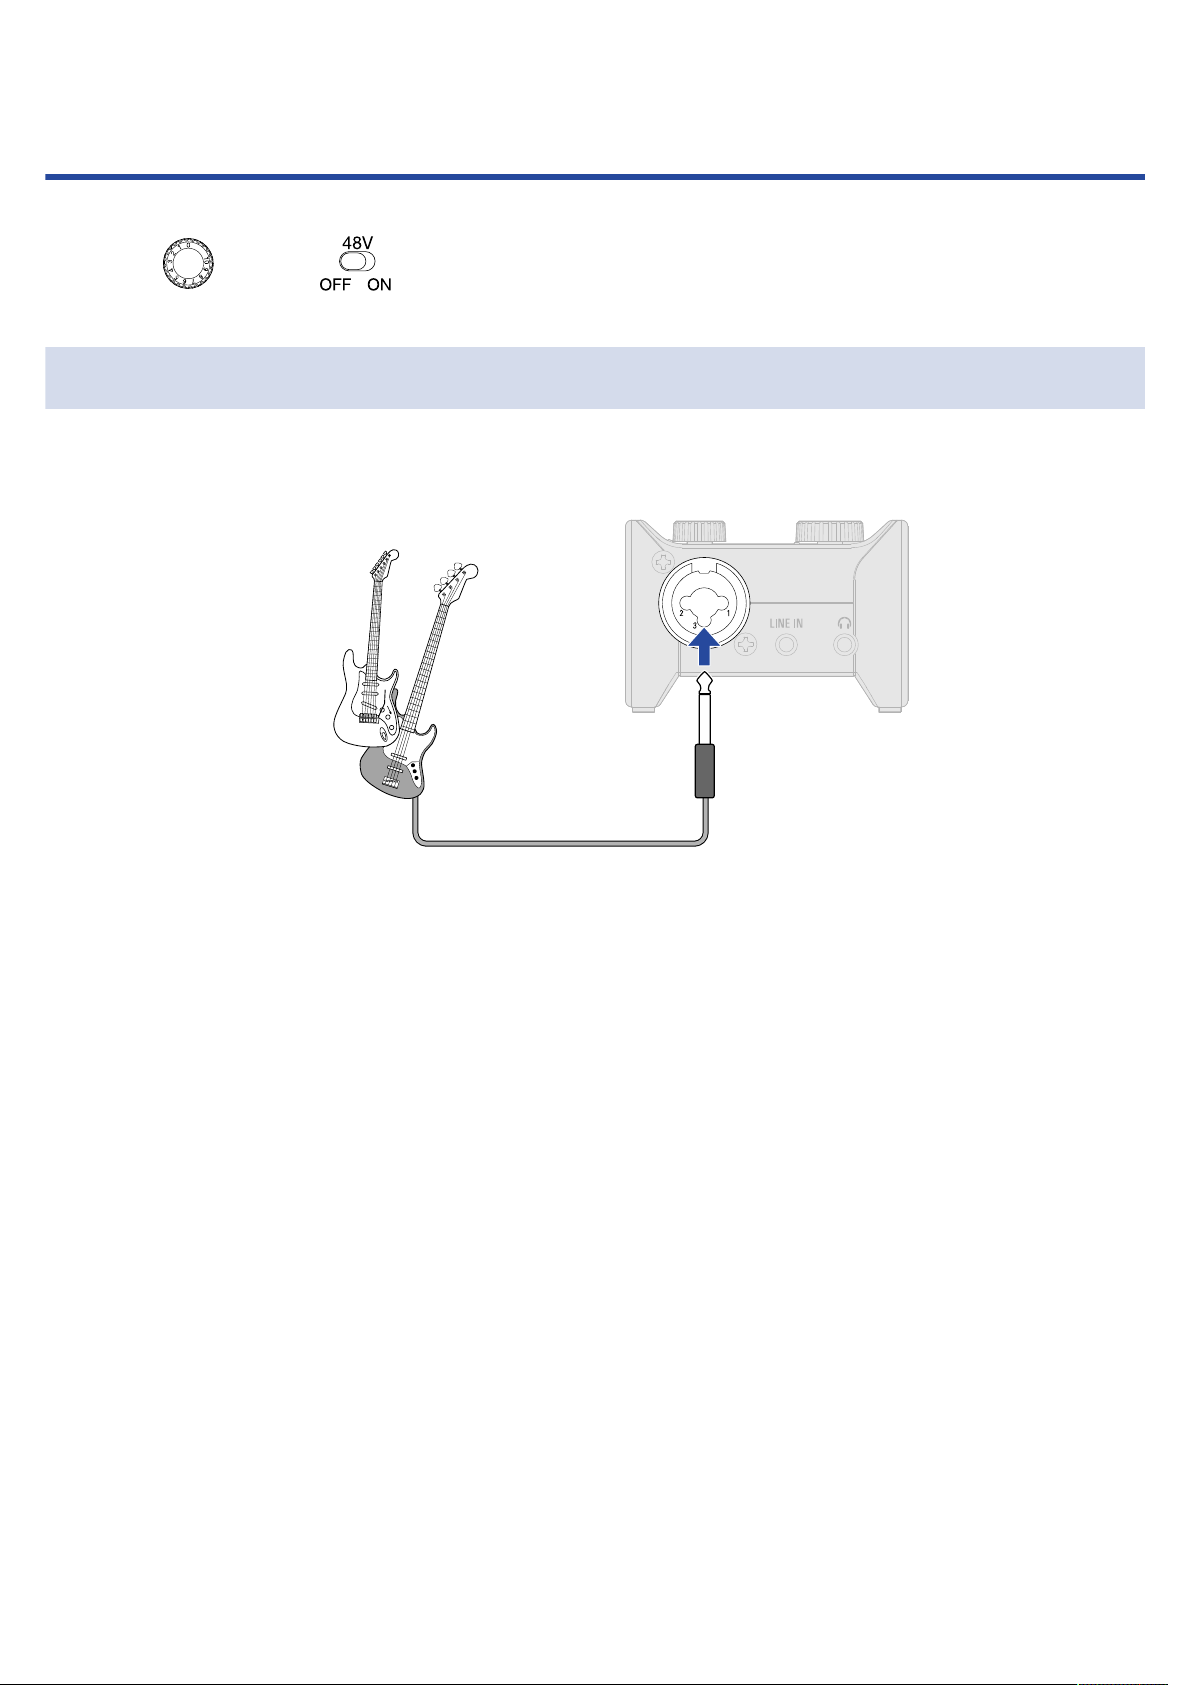
Connecting instruments and mics
Always set to 0 and to OFF before connecting instruments and mics.
Connecting instruments
1. Connect an instrument to the AMS-22.
Use an instrument cable to connect a guitar or bass, for example, to the MIC/GUITAR jack.
11

Connecting mics
1. Use a mic cable to connect a dynamic or condenser mic to the MIC/GUITAR jack.
2. Use to set phantom power.
Switch position Explanation
Use this to supply phantom power to condenser mics.
Use this when connecting dynamic mics.
NOTE:
• Do not set to ON when connecting equipment that is not compatible with phantom power.
Doing so could damage the equipment.
• Phantom power (48 V) is not supplied to the standard phone (TRS) connectors.
12

Connecting stereo sound sources
1. Connect a stereo sound source to the AMS-22.
Use a stereo mini cable to connect a tablet or other stereo sound source to the LINE IN jack.
NOTE:
• The gain is fixed for the LINE IN jack.
• Sounds input through the MIC/GUITAR and LINE IN jacks at the same time will be mixed.
13

Adjusting the input gain
Adjust the MIC/GUITAR jack input sensitivity.
1. Use to adjust the input signal while inputting sound from an instrument or mic.
Level indicator
: Input signal present. (−48 dBFS or higher)
: Input signal is clipping. (−1 dBFS or higher)
NOTE:
• Set this so that the level indicator does not light red.
14

Using direct monitoring
When the DIRECT MONITOR switch is ON, sound input to the AMS-22 can be directly monitored with
headphones, for example, before it passes through the computer. This enables monitoring without latency.
1. Set to ON.
15

Adjusting the volume
The volume output from speakers and headphones connected to the AMS-22 can be adjusted.
NOTE:
Set the AMS-22 volume to 0 before connecting speakers or headphones.
Failure to do so could result in unexpected loud sounds, causing harm to hearing, for example.
Turn to adjust the volume for the headphone output jack on the front of the unit and OUTPUT
standard phone jacks on the back of the unit.
16

Enabling the loopback function
BGM
ON AIR
WEB
LOOPBACKLOOPBACK
By turning the LOOPBACK function ON, sound input through the AMS-22 MIC/GUITAR jack and sound
output from the computer can be mixed and then input to the computer again (looped back).
This is convenient for mixing background music played on the computer with sound input through the
AMS-22 and streaming it live, for example.
The mic or instrument sound is input to the AMS-22.
❶
BGM from the computer is input to the AMS-22.
❷
The mic or instrument sound and the BGM from the computer are mixed and output to the
❸
computer.
1. Set to ON.
17

NOTE:
When is set to ON, disable AMS-22 monitoring in the DAW or streaming application.
If enabled, a feedback loop could be generated, which might cause loud noise to be output.
18

Use example: Making music
DAW
USB Type-C
USB Type-C
Use with a DAW app to record guitars and vocals, for example, and create music.
1. Supply power if using a smartphone or tablet. (→ Supplying power)
NOTE:
Power must be provided before connecting a smartphone or tablet to the AMS-22.
2. Connect the AMS-22 and the computer, smartphone or tablet. (→ Connecting to a computer,
Connecting smartphones and tablets)
19

3. Connect an instrument or mic. (→ Connecting instruments, Connecting mics)
4. Adjust the input gain. (→ Adjusting the input gain)
5. Adjust the output volume. (→ Adjusting the volume)
6. Launch the DAW app on the computer, smartphone or tablet, and select the AMS-22 as the audio
interface.
7. Create recording tracks in the DAW app, and start recording.
NOTE:
Refer to the DAW app manual for how to use it.
20

Use example: Web streaming using a
BGM
ON AIR
WEB
USB Type-C
computer
Connect to a computer and use for web streaming or podcast recording.
1. Connect the AMS-22 and the computer. (→ Connecting to a computer)
21

2. Connect an instrument or mic. (→ Connecting instruments, Connecting mics)
3. Adjust the input gain. (→ Adjusting the input gain)
4. Select the AMS-22 as the computer input and output device.
5. To enable the loopback function, set to ON. (→ Enabling the loopback function)
22

6. Adjust the output volume. (→ Adjusting the volume)
7. Launch the streaming app on the computer, smartphone or tablet, and select the AMS-22 as the
“audio” or “input/output” device.
8. Start streaming.
NOTE:
• Use BGM with permission from its creators.
• Refer to the streaming app manual for how to use it.
23

Use example: Web streaming using a
BGM
ON AIR
WEB
BGM
ON AIR
USB Type-C
smartphone/tablet
Connect to a smartphone or tablet and use for web streaming or podcast recording.
1. Supply power. (→ Supplying power)
NOTE:
Power must be provided before connecting a smartphone or tablet to the AMS-22.
2. Connect the AMS-22 and smartphone/tablet. (→ Connecting smartphones and tablets)
24

3. Connect an instrument or mic. (→ Connecting instruments, Connecting mics)
4. Adjust the input gain. (→ Adjusting the input gain)
5. To use BGM from another device, connect it to the LINE IN.
HINT:
BGM can also be played back on the smartphone/tablet and looped back by USB.
25

6. Adjust the output volume. (→ Adjusting the volume)
7. Launch the streaming app on the smartphone/tablet and start streaming.
NOTE:
Refer to the streaming app manual for how to use it.
26

Mixer diagram
27

Terms used in this manual
USB audio interface
This is a device that can input sound from mics and instruments, for example, to a computer, smartphone
or tablet as well as output sound from such a device to speakers and headphones.
Dynamic mic
These mics do not require phantom power and are tough and durable.
Condenser mic
These mics usually have high sensitivity and can capture sound with high quality. These require phantom
power supply for use.
Phantom power (48 V)
This is a function that supplies power to devices that require an external power supply, including some
condenser mics.
+48 V is standard.
28

Troubleshooting
Cannot select or use the AMS-22 device
• Confirm that the AMS-22 has been connected correctly on the computer. (→ Connecting to a computer)
• Quit all software that is using the AMS-22. Then, disconnect and reconnect the USB cable connected to
the AMS-22.
• Connect the AMS-22 directly to a USB port on the computer. Do not connect it using a USB hub.
• When connecting to a Windows computer, installing the dedicated driver can resolve problems with
applications other than DAWs. (→ Installing the driver on Windows computers)
• Reinstall the driver.
The sound of the device connected to the input jack is distorted, too quiet or silent
• When using a condenser mic, set to ON.
• Confirm that the level indicator is not lighting red. If it is lighting red, use the Gain knob to lower
the input gain.
• Use the Gain knob to adjust the signal level.
• Adjust the OUTPUT knob.
Cannot play or record
• Confirm that “ZOOM AMS-22” is selected in the “Sound” setting of the computer being used.
• Confirm that AMS-22 is set for input and output in the software being used.
• Quit all software that is using the AMS-22. Then, disconnect and reconnect the USB cable connected to
the AMS-22.
29

Playback sound cannot be heard or is quiet
• Check the connections and volume settings of the speakers.
• Adjust the OUTPUT knob.
Recorded audio is too loud, too quiet or silent
• Use the Gain knob to adjust the signal level.
A smartphone or tablet cannot be used
• Confirm that the external power supply is connected correctly. (→ Supplying power)
Sound skips during playback or recording
• If the audio buffer size of the software being used can be adjusted, increase it.
• Turn off the automatic sleep function and other computer power saving settings.
• If using a USB hub, stop using it. Connect the AMS-22 directly to a USB port on the computer.
30

Specifications
Input and output channels
Connectors
channels
Number of output
channels
MIC/GUITAR
OUTPUT
(standard phone jacks)
Mono (MIC/GUITAR) 1Number of input
Stereo (LINE IN) 1
Stereo (TRS) 1
Stereo (PHONES) 1
Type XLR/TRS combo jack
(XLR: 2 HOT, TRS: TIP HOT)
Input gain +8 - +54 dB (MIC) / +8 - +54 dB
(GUITAR)
Input impedance XLR: 2 kΩ (MIC)
TS: 1 MΩ (GUITAR)
Maximum input level XLR: +0.6 dBu (MIC)
TS: +11 dBu (GUITAR)
Phantom power +48 V
Type TRS phone jacks (impedance
balanced)
Maximum output
level
−2 dBu (at 0 dBFS)
Output impedance 100 Ω
OUTPUT
(headphone jack)
USB USB Type-C (audio interface
DC 5V USB Type-C (for power supply)
LINE IN
Frequency response 44.1 kHz: +0/−2 dB (20 Hz – 20 kHz)
Equivalent input noise –120 dBu or less (IHF-A) at
Type 3.5mm stereo mini jack
20 mW + 20 mW (32 Ω load)
Output impedance 10 Ω
function)
• Use a USB cable that supports
data transfer. USB bus power is
supported.
Type 3.5mm stereo mini jack
Input impedance 20 kΩ
Maximum input level +1.5 dBu
96 kHz: +0/−3 dB (20 Hz – 40 kHz)
+54dB/150Ω input
Audio interface Input and output
channels
Recording: 2 channels
Playback: 2 channels
31

Sampling frequencies 96 kHz, 88.2 kHz, 48 kHz, 44.1 kHz
Bit depth 24-bit
Interface USB 2.0
Class USB Audio Class 2.0
Power AC adapter (ZOOM AD-17): DC 5 V/1
A
• USB bus power is supported.
Rated current USB bus power / DC 5 V power
supply: 170 mA
Power consumption 1.8 W maximum
Dimensions 68.0 mm (W) × 57.7 mm (D) × 46.0
mm (H)
Weight (unit only) 85 g
Note: 0 dBu = 0.775 Vrms
32

ZOOM CORPORATION
4-4-3 Kanda-surugadai, Chiyoda-ku, Tokyo 101-0062 Japan
zoomcorp.com
Z2I-4395-01
 Loading...