

Page 1
Operation Manual
Thank you very much for purchasing a ZOOM (hereafter, “ ”).
Please read this manual carefully to fully understand the functions of the so that
you can make the most of it for many years.
Keep this manual in a convenient location and refer to it as necessary.
Contents
Usage and Safety Precautions ………… 2
Introduction………………………………… 3
Names of parts …………………………… 4
Connecting a guitar ……………………… 6
Connecting output devices …………… 6
Turning the unit on ……………………… 7
Setting the pickup type ………………… 8
Setting the volume ……………………… 8
Setting the source guitar type ………… 9
Setting the target guitar type ………… 10
Adjusting the tone ………………………… 11
Adjusting the reverb ……………………… 12
Using the compressor …………………… 12
Using the boost func tion ……………… 13
Using the anti-feedback f unction ……… 13
Adjusting the effects …………………… 14
Using the tuner …………………………… 16
Setting the type of bat teries used …… 16
Connecting audio equipment ………… 17
Updating the rmware …………………… 18
Troubleshooting ………………………… 19
Specications ……………………………… 19
© 2017 ZOOM CORPORATION
Copying or reprinting this manual in part or in whole without permission is prohibited.
Product names, registered trademarks and company names in this document are the property of their
respective companies. All trademarks and registered trademarks in this document are for identification
purposes only and are not intended to infringe on the copyrights of their respective owners.
Page 2
Usage and Safety Precautions
Warning
Caution
Safety Precautions
In this operation manual, symbols are used to highlight
warnings and cautions that you must read to prevent
accidents. The meanings of these symbols are as follows.
Something that could cause serious injury
or death.
Something that could cause injury or
damage to the equipment.
Other symbols used
An action that is mandatory.
An action that is prohibited.
Warnings
Operation using an AC adapter
Always use an AC adapter that is 9V DC 500mA center negative
(ZOOM AD-16).
Do not do anything that could exceed the ratings of outlet s and
other electrical wiring equipment.
Before using the equipment in a foreign country or other region
where the electrical voltage differs, always consult with a shop
that carries ZOOM products and use the appropriate AC adapter.
Operation with batteries
Use 2 commercially-available 1.5V AA batteries (alk aline or nick-
el metal hydride).
Carefully study the warning indications of the batteries before
use.
Always keep the battery cover closed during use.
Alterations
Do not open the case or modify the produc t.
Cautions
Product handling
Do not drop, bump or apply excessive force to the unit.
Be careful not to allow foreign objects or liquids to enter the
unit.
Operating environment
Do not use in extremely high or low temperature s.
Do not use near heaters, stoves and o ther heat sources.
Do not use in very high humidity or where it could be splashed
by water.
Do not use in places with frequent vibrations.
Do not use in places with much dust or sand.
AC adapter handling
When disconnecting the power plug from an outlet, always pull
on the plug itself.
Disconnect the power plug from the outlet when the unit will
not be used for a long time and whene ver there is lightning.
Battery handling
Install batteries with the correct +/− orientations.
Use the specied batteries.
Do not use new and old batteries together. Do not use batteries
of different brands or types together.
Remove the batteries when the unit will not be used for a long
time.
If a leak occurs, thoroughly wipe the battery case and battery
terminals to remove the leaked uid.
Connection cables and input/output jacks
Always turn the power OFF for all equipment before connecting
any cables .
Always disconnect all connection cables and the AC adapter
before moving the unit.
Volume
Do not use at a loud volume for a long time.
Usage Precautions
Interference with other electrical equipment
In consideration of safet y, the has been designed
to minimize its emissi on of electr omagnetic waves and to
suppress interference from external electromagneti c waves.
However, equipment that is very suscep tible to interference
or that emits power ful electromagnetic waves could result in
interference if placed nearby. If this occurs, place the
and the other device farther apart.
With any type of electronic device that uses digital control,
including the
cause malfunction, corrupt or destroy data and result in other
unexpected trouble. Always use caution.
, electromagnetic interference could
Cleaning
Use a soft cloth to clean the exterior of the unit if it becomes
dirty. If necessary, use a damp cloth that has been wrung out
well to wipe it.
Never use abrasive c leansers, wax or solven ts such as alcohol,
benzene or paint thinner.
Breakdown and malfunction
If the unit becomes broken or malfunctions, immediately turn
the power off, disconnect the AC adapter and disconnect other
cables. Contact the st ore where you bought the unit or ZOOM
service with the following information: product mod el, serial
number and specific symptoms of breakdown or malfunction,
along with your name, address and telephone number.
FCC regulation warning (for U.S.A.)
Note: This equipment has been tested and found to comply with
the limits for a Class B digital device, pursuant to Part 15 of the FCC
Rules. These limits are designed to provide reasonable protection
against harmful interference in a residential installation. This
equipment generates, uses and can radiate radio frequency energy
and, if not installed and used in accordance with the instructions,
may cause harmful interference to radio communications. However,
there is no guarantee that interference will not occur in a particular
installation. If this equipment does cause harmful interference to
radio or television reception, which can be determined by turning
the equipment off and on, the user is encouraged to try to correct
the interference by one or more of the following measures:
• Reorient or relocate the receiving antenna.
• Increase the separation between the equipment and receiver.
Connect the equipment into an outlet on a circuit different from
•
that to which the receiver is connected.
• Consult the dealer or an experienced radio/TV technician for help.
For EU Countries
Declaration of Conformity
2
Page 3

Introduction
Acoustic remodeling that restores body tone
The 16 source and 15 target guitar type presets simulate the sonic characteristics of a
variety of acoustic guitars with different body shapes and material properties. By choosing a source guitar and a target guitar according to the guitar you are using, you can
share the original rich and beautiful tones of acoustic guitars with audiences during live
performances.
High-quality preamp that can be used with many pickups
The preamp was designed especially for acoustic guitars and can be used with input
from piezoelectric, magnetic and passive pickups. This preamp designed for acoustic guitars provides excellent fundamental performance, including a 3-band EQ and super-low
noise design boasting a 120 dB signal-to-noise ratio and a −100 dBu noise oor.
9 effects for acoustic guitars
The nine types of effects, including choruses, delays and reverbs that make acoustic guitar sounds even more beautiful, have parameters that can be precisely adjusted.
Anti-feedback function with minimal effect on tone quality
The anti-feedback function can quickly and effectively eliminate feedback during a performance.
Clean boost of up to 9 dB
The boost function can reduce the volume differences of fingerpicking, strumming
chords and other guitar playing techniques, as well as increase amplication during solos.
Compressor that is easy to operate
Just turn the compressor knob to control the sound pressure. You can easily adjust it
from a natural effect to hard compression.
3
Page 4

Names of parts
Front Panel
Effect knob
Volume knob
Reverb knobs
Anti-feedback
switch
Tuner
Target guitar knob Equalizer knobs
Effect switchTuner switch
Parameter knobs
Source guitar knob
Compressor indicator
Boost switch
Boost indicatorEffect indicatorTuner indicator
Boost level knob
Clipping
indicator
Pick-up selection
switch
Compressor knob
Power indicator
4
Page 5
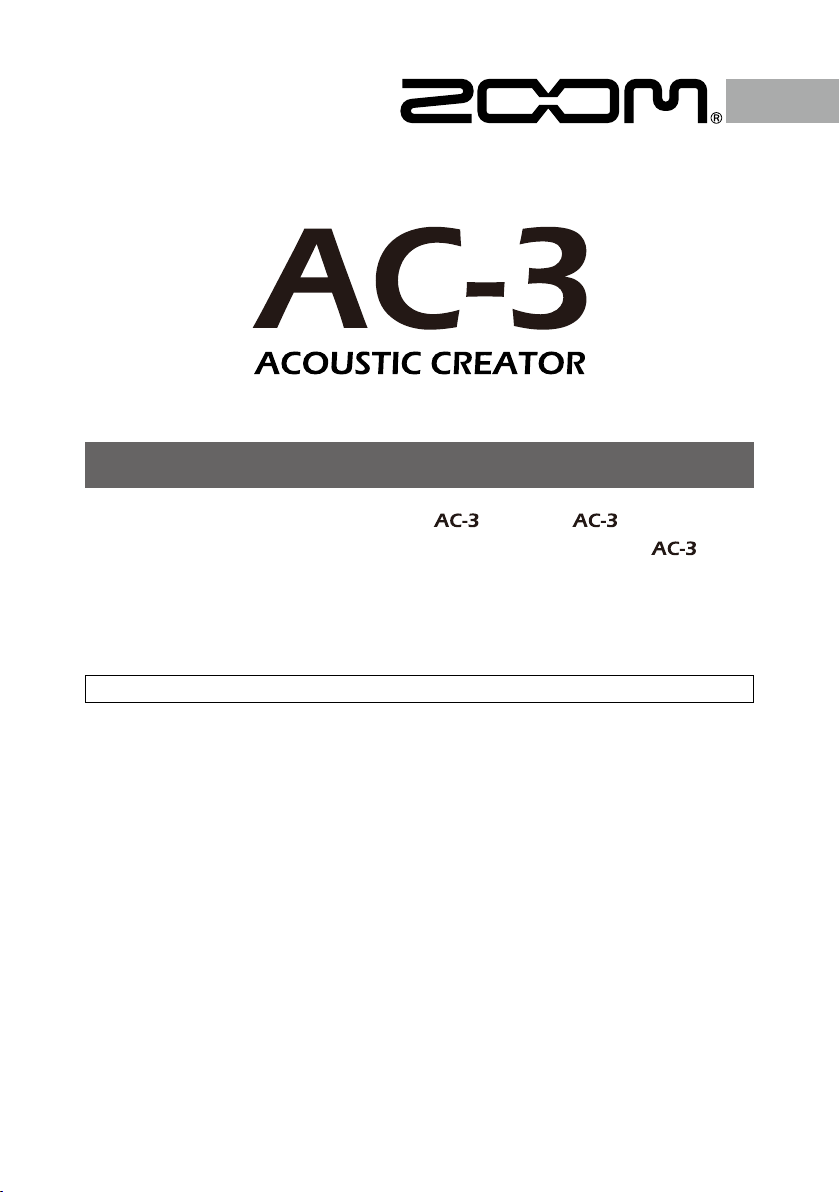
Names of parts
Rear Panel
BALANCED OUT
OUT-L PRE/POST
jacks
Footswitch
jack
switch
Left Panel
1:GND 2:HOT
3:COLD
POWER (eco)
switch
DC 9V AC adapter
connector
GROUND LIFT
switch
Right panel
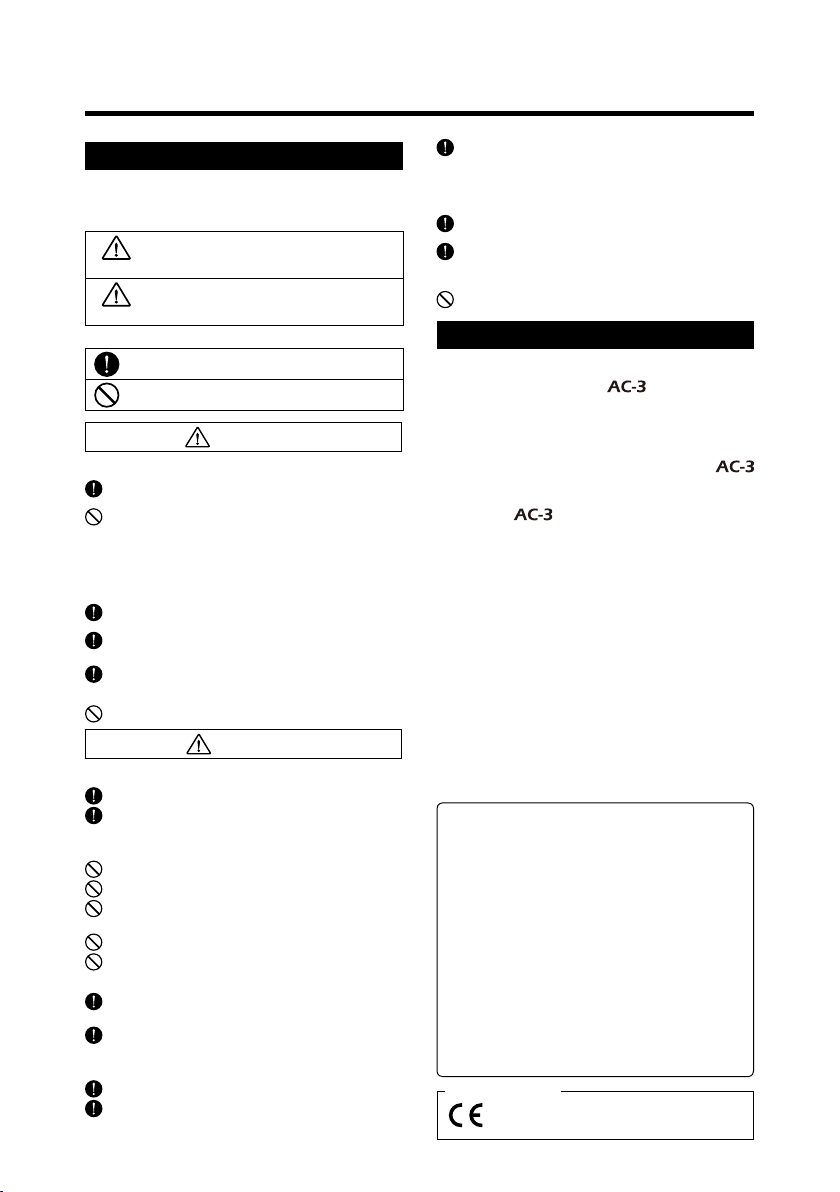
Output jacks
USB port Guitar input jack
5
Page 6
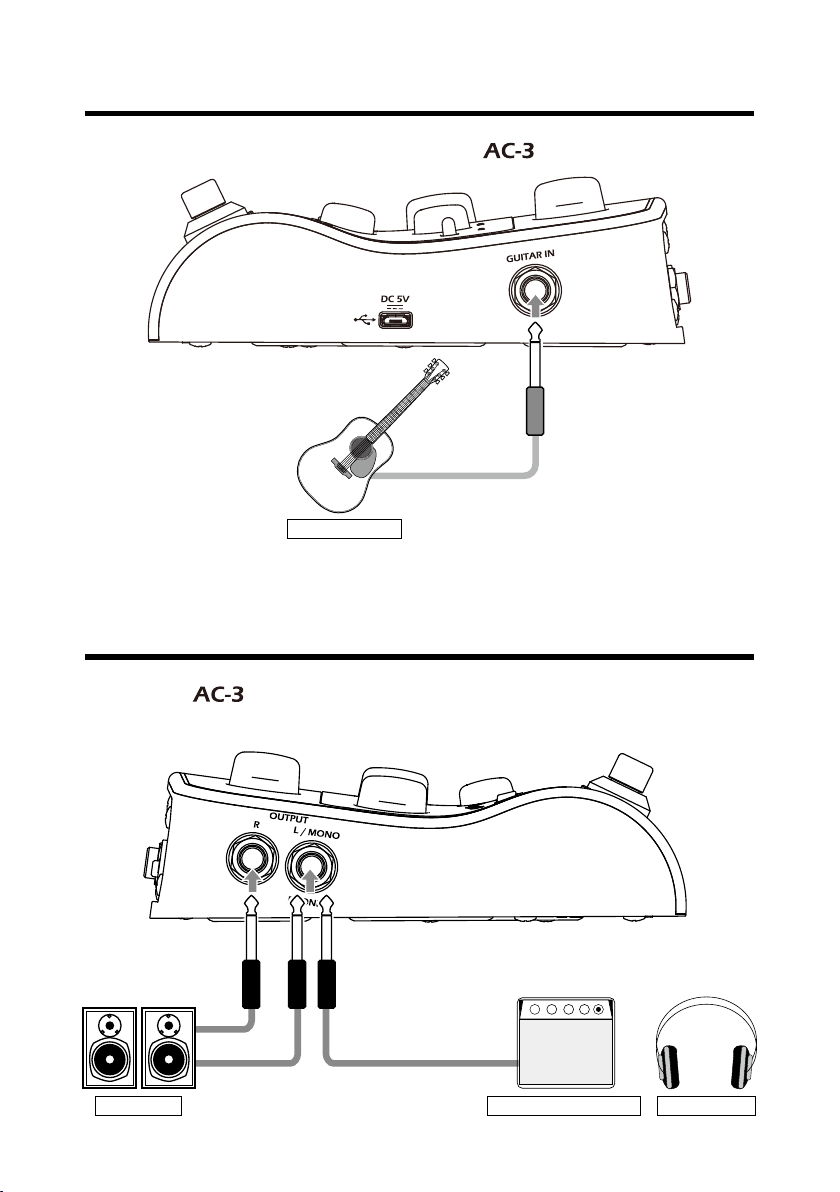
PA system
Headphones
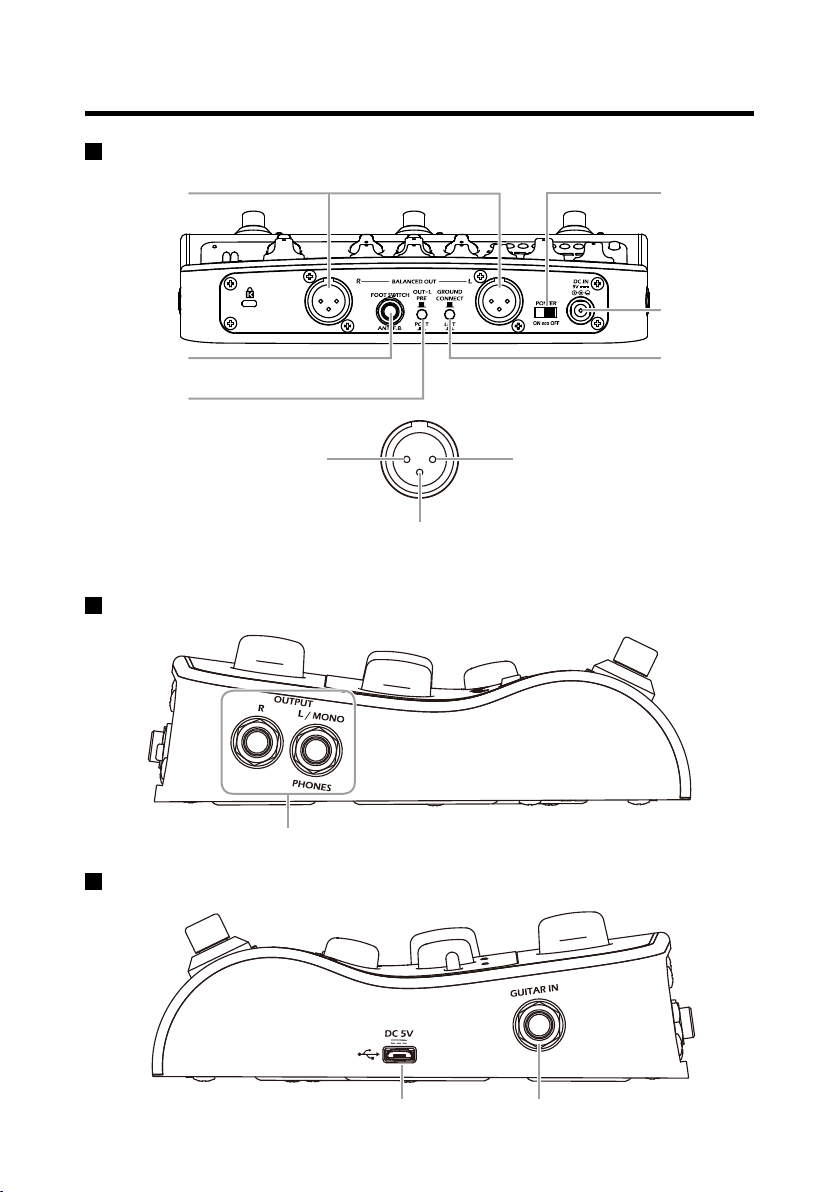
Connecting a guitar
Use a shielded cable to connect a guitar to the .
Acoustic guitar
Connecting output devices
Connect the
To use headphones, connect them to the L/MONO/PHONES jack.
to a PA system, acoustic guitar amp or other output device.
Acoustic guitar amp
6
Page 7

Turning the unit on
(front panel)
• Minimize the volume of the output device.
• Prepare the power source.
Using an AC adapter
Connect the AD-16 adapter to the .
• Set the power switch to "ON" or "eco".
Power indicator
Using batteries
Open the battery cover on the bottom of the unit and install batteries into the battery compartment.
Lit green: Remaining
battery power okay
Lit red: Remaining battery power low
NOTE
The power indicator lights red when the remaining battery power becomes low.
Replace the batteries with new ones.
• Turn the output device on, and raise its volume.
HINT
You can also use a USB cable to connect the to a computer and power it with USB bus power.
POWER switch "eco" setting
The power will automatically turn off if unused for 10 hours.
If you want the power to stay on always, set the POWER switch to "ON".
7
Page 8

Setting the pickup type
Adjust the operation of the according to the type of pickup used.
• PIEZO
This makes adjustments suitable for piezo pickups.
• MAGNETIC
This makes adjustments suitable for magnetic pickups.
• OFF
This turns off the pickup adjustment function.
Setting the volume
Turn the VOLUME knob to adjust the volume.
When using active pickups:
Set the VOLUME knob to the center position as the reference
level.
When using passive pickups:
Set the VOLUME knob to the 3 o'clock position as the reference
level.
NOTE
If the clipping indicator lights red, lower the output volume from the pickup.
8
Page 9

Setting the source guitar type
By choosing a source guitar according to the guitar that you are using, body
tone lost when using a pickup can be re-created, restoring the original rich and
beautiful tone of your acoustic guitar.
Round Shoulder Dreadnought
Best for guitars with round
shoulders, such as the Gibson J
series.
Square Shoulder Orchestra
Best for guitars with square
shoulders, such as the Gibson
Hummingbird.
Jumbo Triple 0
Best for jumbo body guitars,
such as the Gibson SJ series.
Best for dreadnought guitars,
such as the Martin D series.
Best for orchestra guitars, such
as the Martin OM series.
Best for 000 guitars, such as
the Martin 000 series.
Parlor Double 0
Best for parlor guitars, such as
the Gibson L series.
Single Cutaway YMH
Best for single cutaway guitars
like those made by Taylor.
Resonator Silent
Best for resonator guitars. Best for silent guitars that do
Upright Bass 12 Strings
Best for upright basses. Best for 12-string guitars.
Mold Nylon Strings
Best for molded resin guitars
like those made by Ovation.
9
Best for 00 guitars, such as the
Martin 00 series.
Best for special jumbo body
guitars, such as the YAMAHA
LL series.
not have resonant body cavities.
Best for classical guitars that
use nylon strings.
Page 10

Setting the target guitar type
In addition to selecting the source guitar, you can also select a target guitar
that is compatible with the guitar type used. This allows the body characteristics of that model to be re-created more distinctly.
Target guitar Character
J-Forty Five The body character of the Gibson J-45 features a dry sound ideal for strumming. Round Shoulder
Humming Bird
Dove
F-Fifty Five
Super Jumbo
00-Eighteen
00-Twenty One The Martin 00-21 body features the clear tone characteristic of Jacaranda.
LG-Two
000-Eighteen The character of the Martin 000-18 body features clear low frequencies.
000-Twenty Eight The character of the Martin 000-28 body features vivid high frequencies.
OM-Eighteen
OM-Twenty Eight
D-Forty Five
D-Twenty Eight The Martin D-28 has a fundamental st yle of acoustic body character.
This creates the body character of the Gibson Hummingbird, which is loved by
pop and rock artists.
The Gibson Dove body character features low-frequencies with a sense of weight
thanks to its maple sides and back.
Due to its large size, the Guild F-55 body has a character with both bell-like
high-frequencies and deep low-frequencies.
This re-creates the body character of the Gibson SJ-200, which is known as the
"King of the Flat-tops."
The Martin 00-18 body character features a balanced tone generated from a
small volume.
This provides the body character of the small Gibson LG-2, which is loved by
blues musicians.
The character of the Martin OM-18 body features a tone with fast response.
The character of the Martin OM-28 body features crisp high frequencies and a
moderate volume.
The character of the Martin D-45 body features rich harmonics and deep low frequencies.
Compatible
source guitar
Square Shoulder
Jumbo
Double 0
Parlor
Triple 0
Orchestra
DreadnoughtD-Eighteen The character of the Martin D-18 body features a crisp tone.
"OFF" function
When TARGET GUITAR is set to OFF, the recommended target guitar type for the se-
lected source guitar will automatically be used.
10
Page 11

Adjusting the tone
Turn the BASS, MIDDLE and TREBLE equalizer knobs to adjust the final output
sound.
Set each equalizer knob to its center position
for a flat response first before adjusting the
tone.
• BASS
Adjust to boost or cut low frequencies.
Boost to emphasize the body tone. Cut if low frequencies are too loud when
strumming.
• MIDDLE
Adjust to boost or cut middle frequencies.
Boost to add warmth to the tone. Cut to make the tone more powerful, em-
phasizing the attack.
• TREBLE
Adjust to boost or cut high frequencies.
Boost to emphasize the ringing of the strings. Cut if high frequencies are too
loud.
11
Page 12

Adjusting the reverb
Compressor indicator
Turn the REVERB MIX and TONE knobs to add a reverb effect to the sound of
the acoustic guitar, increasing its width and depth.
Keep the original tone of the acoustic guitar in mind as
you adjust the reverb volume.
• MIX
Use to adjust the strength of the reverb effect.
• TONE
Use to adjust the tone of the reverb effect.
NOTE
Turn the MIX knob all the way to the left to disable the reverb.
Using the compressor
Turn the compressor not to enable compression of input sounds that exceed a
set level, controlling performance dynamics.
Keep the balance of the entire performance in mind when
adjusting the compressor.
When the input sound is compressed, the compressor indicator will light as follows.
• Lit green
This setting is suitable for balancing the volume of
strumming and fingerpicking.
• Lit orange
This strong compression will maintain the output vol-
ume at an even level. This setting is suitable for increasing loudness when strumming.
NOTE
Turn the COMPRESSOR knob all the way to the left to disable compression.
12
Page 13

Using the boost function
Boost indicator (ON/OFF)
OFF Finding ON
Turn the BOOST LEVEL knob to amplify the volume during solos or to change
the volume when switching between strumming and fingerpicking. Use the
BOOST switch to turn the boost ON and OFF.
NOTE
• The volume can be amplied by up to +9 dB.
• If the sound distorts when BOOST is ON, turn the VOLUME knob to adjust the volume.
Using the anti-feedback function
Press the anti-feedback switch to find and cut the frequency band that is causing feedback to reduce it.
The feedback switch will blink while the feedback frequency band is
being found. When the frequency band has been found, it will light
and the anti-feedback function will become active.
NOTE
Press the anti-feedback switch again to turn the anti-feedback function off.
HINT
If an FS01 footswitch is connected, you can also turn the anti-feedback function on and off with your foot.
13
Page 14

Adjusting the effects
Turn the EFFECT knob to select the effect to use. Turn the parameter knobs to
adjust the parameters of that effect. Use the EFFECT switch to turn the effect
on and off.
Effect indicator
(ON/OFF)
Parameter
knob 1
Parameter
knob 2
Parameter
knob 3
14
Page 15

Adjusting the effects
TYPE NAME
CHORUS 1 Using three LFOs, this is a three-phase chorus with little modulation. Using a
CHORUS 2 By mixing the original sound with an effect sound that is just slightly pitch-shifted,
TAPE ECHO This effect simulates the sound of a tape echo. This can create rich delay effects
ANALOG DELAY This effect simulates the sound of an analog delay. This effect thickens the original
DELAY This delay has a clear tone. Using a stereo connection, this can create a ping-pong
HALL REVERB This high-density reverb simulates the sound of a concert hall.
MOD REVERB This reverb adds modulation to the echoes, making it expansive and thick.
TREMOLO This effect varies the volume cyclically.
PAD This effect creates an expansiveness and long sustain like a space that encloses
Parameter knob 1 Parameter knob 2 Parameter knob 3
stereo connection can create an expansive chorus effect.
RATE :
Adjusts the speed of the
modulation.
this effect generates a chorus with little modulation.
RATE :
Adjusts the speed of the
modulation.
with the sense of compression as well as the wow and utter of tape.
TIME :
Adjusts the delay time.
sound with a warm tone.
TIME :
Adjusts the delay time.
delay effect.
TIME :
Adjusts the delay time.
DECAY :
Adjusts the duration of the
reverberations.
DECAY :
Adjusts the duration of the
reverberations.
RATE :
Adjusts the speed of the
modulation.
everything.
DECAY :
Adjusts the duration of the
reverberations.
DEPTH :
Adjusts the depth of the
modulation.
TONE :
Adjusts the tone.
F.B. :
Adjusts the feedback
amount.
F.B. :
Adjusts the feedback
amount.
F.B. :
Adjusts the feedback
amount.
TONE :
Adjusts the tone of the
reverberations.
DEPTH :
Adjusts the depth of the
modulation.
DEPTH :
Adjusts the depth of the
modulation.
TONE :
Adjusts the tone of the
reverberations.
FX LEVEL :
Adjusts the amount of
effected sound.
FX LEVEL :
Adjusts the amount of
effected sound.
FX LEVEL :
Adjusts the amount of
effected sound.
FX LEVEL :
Adjusts the amount of
effected sound.
FX LEVEL :
Adjusts the amount of
effected sound.
FX LEVEL :
Adjusts the amount of
effected sound.
FX LEVEL :
Adjusts the amount of
effected sound.
FX LEVEL :
Adjusts the amount of
effected sound.
FX LEVEL :
Adjusts the amount of
effected sound.
15
Page 16

Using the tuner
Tuner indicator
←
Low pitch
(front panel)
Press the TUNER switch to turn the tuner on and off. Play the open string that
you want to tune and the closest pitch name LED will light. The LED meter will
show the pitch error.
(ON/OFF)
When the pitch is correct, the LED
at the center of the meter will light
green and LEDs to the left and right
will light red.
High pitch
→
NOTE
The output is muted when the tuner is on. The standard pitch is xed at A4 = 440 Hz.
Setting the type of batteries used
Set the type of battery used by the so that the remaining battery charge
can be indicated accurately.
• Turn the power ON while pressing .
(The boost indicator blinks.)
• Press to set the type of battery used.
Lit green: Alkaline batteries
Lit red: Nickel metal hydride batteries
Power indicator
• Press to conrm the setting. (The boost indicator stays lit.)
16
Page 17

Connecting audio equipment
Mixer
Recording device
The can be connected to a mixer, recording device or other audio equipment that adjusts the sound balance. When using in mono, connect the equipment only to the BALANCED OUT-L jack.
Set when the signal is output from the BALANCED OUT-L jack.
• PRE (button up): Output before processing by the
• POST (button down): Output after processing by the
.
.
The BALANCED OUT jack can be connected or disconnected
from the ground.
• CONNECT (button up): Connect to the ground pin.
• LIFT (button down): Disconnect the grounding pin from the
ground. This is effective if noise is caused by a ground loop.
17
Page 18

Updating the rmware
To download the latest firmware, visit the ZOOM website (http://www.zoom.
co.jp/).
• Use a USB cable to connect the
• While pressing both and , turn the POWER switch ON.
• Launch the rmware update application on the computer and start the update.
• The clipping indicator lights orange while the update is being executed.
NOTE
Do not disconnect the USB cable during a rmware update.
to a computer.
HINT
See the ZOOM website (http://www.zoom.co.jp/) for rmware update application instructions.
• The clipping indicator lights green when the update completes.
• Set the power switch to OFF.
18
Page 19

Troubleshooting
The unit will not power on
• Conrm that the POWER switch is set to
ON.
• If using batteries, confirm that they are
still charged.
There is no sound or output is very quiet
• Check the connections. (→ P6, P17)
• Sound will not be output in the tuner is on.
(→ P16)
There is a lot of noise
• Conrm that the shielded cable is not the
cause.
• Use a genuine ZOOM AC adapter.
The sound distorts strangely or has an odd timbre
• Adjust the amount of boost amplication.
(→ P13)
• Set the pickup selection correctly for the
type of pickup. (→ P8)
• Adjust the amount of compression. (→
P12)
Batteries lose their charge quickly
• Conrm that you are not using manganese
batteries. Alkaline batteries should provide
about 3 hours of continuous operation.
• Confirm that the battery type setting is
correct. (→ P16)
The effect is not working
• Adjust the parameter knobs. (→ P14)
Specications
Source guitars 16 types
Target guitars 15 types
Effect types 9 types
Sampling frequency 44.1 kHz
A/D conversion 24-bit 128 x oversampling
D/A conversion 24-bit 128 x oversampling
Signal processing 32-bit
Frequency characteristics 20 Hz–20 kHz (+1 dB/-3 dB) (10 kΩ load)
Input Standard mono phone jack
Outputs L/MONO/PHONES Standard stereo phone jack (combined line/headphone)
R Standard mono phone jack
BALANCED OUT-L XLR jack
BALANCED OUT-R XLR jack
S/N (equivalent input noise) 120 dBu
Noise oor (residual noise) -100 dBu
Control input FS01 Input
Power AC adapter: 9 V DC 500 mA center negative (ZOOM AD-16)
External dimensions 158 mm(D) X 237 mm(W) X 52 mm(H)
USB USB MIDI USB Micro-B
Weight 1150 g(Not including batteries)
Options FS01 foot switch
Note: 0 dBu = 0.775 V
Rated input level: -20 dBu
Input impedance: 10 MΩ
Maximum output level: Line +7 dBu (10 kΩ or more output impedance)
Headphones 8 mW + 8 mW (32 Ω load)
Maximum output level: Line +7 dBu (10 kΩ or more output impedance)
Output impedance: 100 Ω (HOT-GND, COLD-GND), 200 Ω (HOT-COLD)
PRE/POST (switchable)
GND LIFT (switchable)
Output impedance: 100 Ω (HOT-GND, COLD-GND), 200 Ω (HOT-COLD)
GND LIFT (switchable)
Batteries: 2 AA (about 3 hours continuous operation time using alkaline batteries)
19
Page 20

ZOOM CORPORATION
4-4-3 Kandasurugadai, Chiyoda-ku, Tokyo 101-0062 Japan
http://www.zoom.co.jp
Z2I-3000-01
 Loading...