


MODEL N0:
2-DIN NAVICEIVER 15.5cm/6.1" LCD DISPLAY
USER MANUAL
English

TABLE OF CONTENTS
TABLE OF CONTENTS.............................................................................................................................................. |
2 |
INTRODUCTION ........................................................................................................................................................ |
3 |
WARNINGS................................................................................................................................................................. |
4 |
PANEL CONTROLS ................................................................................................................................................... |
6 |
REMOTE CONTROLS................................................................................................................................................ |
7 |
BASIC OPERATION ................................................................................................................................................... |
9 |
DISC OPERATION .................................................................................................................................................... |
10 |
TUNER OPERATION................................................................................................................................................. |
14 |
USB/SD CARD OPERATION .................................................................................................................................... |
16 |
iPod OPERATION...................................................................................................................................................... |
17 |
BLUETOOTH OPERATION....................................................................................................................................... |
18 |
OTHER MODES ....................................................................................................................................................... |
20 |
SYSTEM SETUP ...................................................................................................................................................... |
21 |
DEVICE CONNECTIONS......................................................................................................................................... |
25 |
INSTALLATION......................................................................................................................................................... |
27 |
TROUBLESHOOTING.............................................................................................................................................. |
28 |
SPECIFICATIONS ..................................................................................................................................................... |
30 |
APPENDIX .................................................................................................................................................................. |
31 |
WARRANTY............................................................................................................................................................... |
34 |
2
ZE-NC524
INTRODUCTION
Dear customer,
thank you for purchasing the ZE-NC524 naviceiver. You acquired a multifunctional car multimedia center which is able to playback š les from a huge number of formats and disc structures. It can be extended with the DVB-T-receiver ZE-DVB 2000. You can directly connect an iPod and play all formats the handheld can, when it is connected. The navigation unit supports all up-to-date features like TMC and (with an additional license) TMC Pro as well.
SUPPORTED FORMATS AND DISC STRUCTURES:
The unit has been tested with, but is not limited to, the following encoding standards: DVD, DVD-R, DVD+R, DVD-RW, CD, CD-R, VCD, DVCD, CDDA, Picture-CD (JPG), MP3, WMA, XVID, DivX.
PLEASE NOTE:
Before installation remove the two screws on top of the device or the DVD drive will not work properly..
Remove two screws
Main Unit
Trim Frame
3

WARNINGS
1.Only connect this unit to a 12V DC power supply with negative grounding.
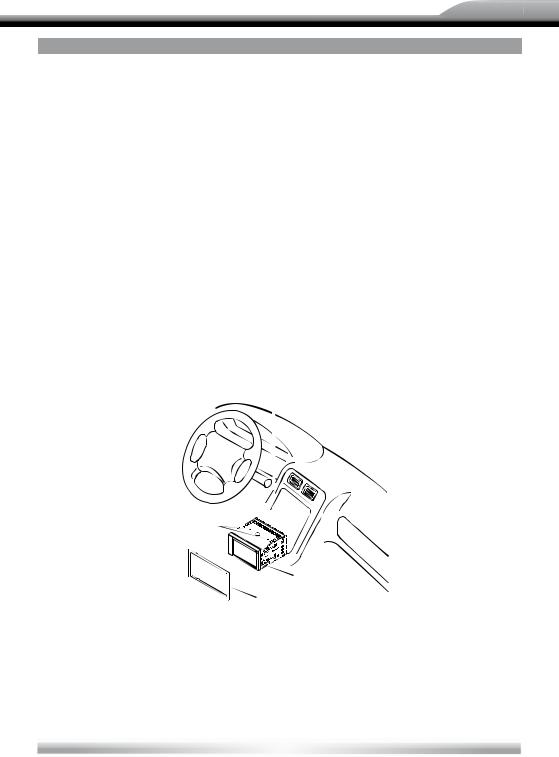
2.Never install this unit at a place where it could interfere with your overview during driving. It is designed for the center console.
3.Do not circumvent the security function which prevents you from watching a movie using the front display when you are driving. It' s a dangerous distraction and may also con¤ ict with your local law or even void your insurance.
4.Never expose this unit, the amplišer or the speakers to moisture or water to prevent electronic short-circuiting causing sparks or š re.
5.Please don‘t change the fuse in the power cord without professional guidance, improper fuse may cause damage to this unit or may even cause a š re.
6.Please power off this unit at once and send it back to the after-sales service center or the dealer/distributor you purchased it from if one of the following symptoms is found:
(a)Water or objects which got into the unit;
(b)Smoke;
(c)Peculiar smell.
7.To ensure secure driving, please adjust the volume to a safe level. It may be vital if an emergency situation occurs suddenly, cause you are expected to still hear the siren.
8.Class 1 Laser: Invisible Laser radiation is present when casing is open, avoid exposure of eyes to beam. Servicing of the unit only by authorised ZENEC technicians.
4

ZE-NC524
WARNINGS
PRECAUTIONS
1.Never disassemble or adjust the unit without any professional guide. For details, please consult an authorized ZENEC dealer.
2.lf the front panel or TFT monitor needs to be cleaned, please use a clean silicone cloth and a neutral detergent. Using a rough cloth and non-neutral detergent or all solvents (i.e. ethanol, benzene) for cleaning may result in damage or discoloration.
3.lf any abnormal behaviour of the unit is found, please refer to the trouble shooting guide. In case you can't determine the cause of the failure , you can always try to press the [RESET] key on the front panel to restore factory defaults. If that doesn't help either contact your local authorized ZENEC dealer.
4.lf you park the car for a longer time period under extreme temperatures (both extreme hot and cold), you should refrain from switching it on immediately. Rather wait until the cabin temperature has reached a range between minus š ve and plus forty degrees Centigrade.
5.Using in-car heater in low temperature environment may result in condensation inside the unit. DO NOT use the unit in this situation, eject the disc and wipe off the condensation on the disc. lf the unit still doesn't work after a few hours, please contact with after-sales service center.
6.To prevent damage to the screen, avoid touching it with sharp objects.
7.If the software version on your unit has been updated the icons used for this documentation may differ from the actual images displayed on the screen.
8.Operate the unit according to this information to prevent unnecessary problems or dangers. Be aware that you also risk your warranty if you don't use the unit in compliance with this manual.
DECLARATION
This product incorporates copyright protection technology that is protected by U.S patents and other intellectual property rights. Use of this copyright protection technology must be authorized by Macrovision, and is intended for home and other limited viewing uses only unless otherwise authorized by Macrovision.
Reverse engineering or disassembly is prohibited.
5
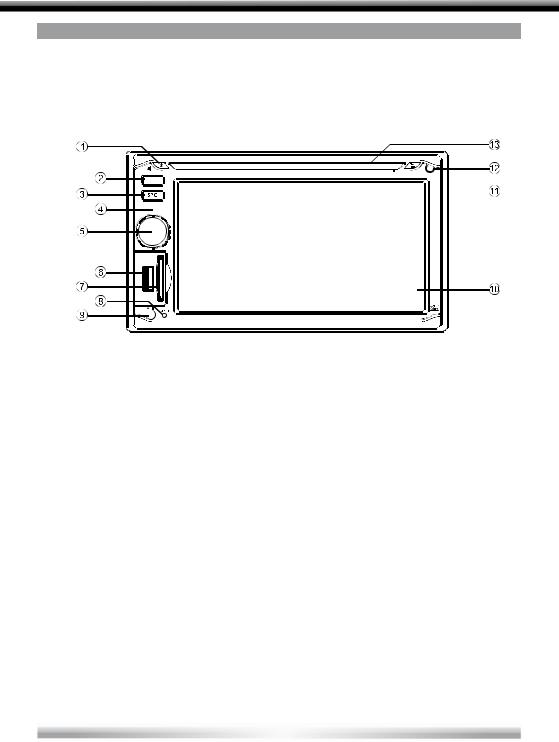
PANEL CONTROLS
START CODE: 012345 (Description: Page 9, 24)
FRONT PANEL
Press the ( ) button to turn on the unit.
NAV
1.Power on Mute
When on, long press to power off.
2.Screen ON/OFF. Keep pressed to toggle between Navigation and Play.
3.Keep pressed for Main Menu. Repeated short press: Select the following sources Radio
Disc (when a disc is inserted)
USB (when some USB data carrier is connected)
AV1 (rear A/V In) AV2 (front A/V In) Bluetooth
iPod
DVB-T (optional)
Navigation (long press)
4.Microphone
5.Rotate to adjust volume level.
Press to enter Equalizer setting menu. Press and hold it to enter setting mode.
6.USB slot
7.Map card slot
8.Reset
9.AV-In jack
10.Touch panel
11.Eject disc (when disc inserted) Reset the mechanism (long press)
12.Remote sensor
13.Disc slot
SAFETY NOTES:
The DVD video display of the center console unit will not operate while the vehicle is moving. This is a safety feature to prevent the driver from being dangerously distracted. The DVD video functions will only work on the front screen, when the vehicle has been stopped and the parking brake is engaged. It is illegal in most countries for the driver to view video while the vehicle is in motion. Optional headrest monitors for the back passengers will, however, always work.
6
ZE-NC524
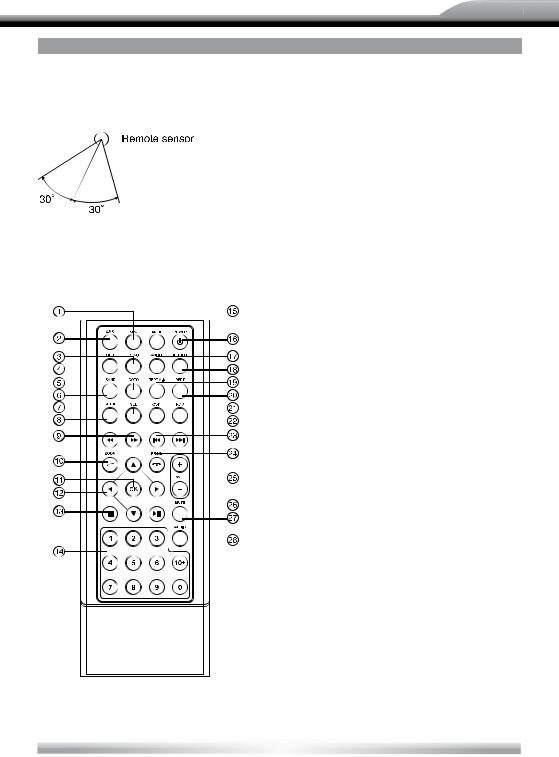
REMOTE CONTROLS
REMOTE CONTROL OPERATING RANGE
The remote control can operate within a distance of 3~5 m.
Press ( ) to turn on/off the unit.
1.Select the following sources: Radio
Disc (when a disc is inserted)
USB (when USB drive is connected) AV1 (rear A/V In)
AV2 (front A/V In) Bluetooth Navigation
iPod DVB-T
2.Radio preset scan Radio auto preset
3.Menu (DVD)
4.Title (DVD)
5.Go to search
6.Radio band
Video System PAL/NTSC/AUTO
7.Sound/display setting
8.System setup
9.Fast reverse/forward playback
10.Zoom (DVD/VCD) Dial/Receive call
11.Enter
12.Menu Cursor
13.Stop/Return
14.Digit area
15.Enter main menu
16.Power on/off
17.Angle (DVD)
18.DVD subtitle
19.A-B repeat
20.Repeat
21.On-screen display
22.Track random play
23.Radio tune Track skip/seek
24.Call off/cancel Program
25.Volume
26.Play/Pause
27.Mute
28.DVD audio
VCD audio L/R/ST
7
REMOTE CONTROLS (COnTinUED)
REPLACING THE LITHIUM BATTERY OF THE REMOTE CONTROL UNIT
When the operation range of the remote control deteriorates or it has no function at all, replace the lithium battery type 2025 with a new one.
1.Open the back cover of the remote control unit.
2.Insert the button-type battery with the stamped (+) mark facing upwards, directly under the small metal tongue. Close the back cover.
WARNING:
Store the battery where children cannot reach it. If a child accidentally swallows the battery, consult a doctor immediately.
Do never ever recharge, short-circuit, disassemble or heat up the battery nor dispose it in š re as this might cause it to explode. Lithium batteries, even more than other battery types, are prone to explode when they become excessively hot.
Do not expose or bring the battery into contact with any other metallic material as it will, most likely, short-circuit the battery.
For the very same reason, when throwing away or storing the battery, wrap it in tape or insulate it somehow.
8

ZE-NC524
BASIC OPERATION
PASSWORD
If you power-on the unit for the š rst time you need to enter a password. You will also need to re-enter it every time the unit has been disconnected from the power supply or when the battery has been removed or replaced.
Type "012345" (default), using the numeric
on-screen display. Touch |
to erase |
previous number. Touch  to conš rm.
TURN ON/OFF THE POWER
1. Press the ( ) button to switch on the unit.
The unit resumes with the status it had before it was powered off.
2.When on, press the ( ) button at least two seconds to switch off the unit.
MUTE
Press the PWR button very brie¤ y to toggle the sound off and on.
NOTE:
MUTE will be displayed on-screen during muting.
ADJUST THE VOLUME
Rotate the VOL knob to increase or decrease the volume level.
The adjustable range is 0 to 39.
PLAYING SOURCE SELECTION
Method 1:
Press SRC button on the panel or remote control to cycle through all the available sources.
Method 2:
Open the 'Main menu' by keeping SRC pressed at the top left corner of the TFT or press MODE button on remote control, and then touch the desired option or select the option by moving the cursor and then conš rm. Touch / on the TFT to show other options of the main menu.
NOTES:
Devices which are not ready or not connected cannot be chosen and the icons will be grayed out.
When entering DVD mode allow the DVD reader up to an entire minute to initialise. It will auto-enter the DVD-menu if a DVD is inserted.
PARKING BRAKE DETECTOR
1.The 'PRK SW' cable is connected to the hand brake switch in order to blank the DVD screen when the handbrake is not engaged.
2.If you try to watch a video with the handbrake released you will see ""WARNING!" Engage Parking Brake to View Video" on-screen. No video will be shown on the console screen. Optional headrest monitors for the backseat passengers will, however, function normally.
WHEN REVERSE DRIVING
If the rear view video camera is connected, the unit automatically switches to CAMERA source during reverse driving. The unit returns to it´s previous work after the reverse driving is done.
9
DISC OPERATION
INSERT A DISC
Insert a disc into the slot, and the unit will change automatically to disc mode.
NOTES:
Please check, if there is already a disc in the unit before you try to insert another one.
The unit will exit current playing source and enter DVD mode when a disc is inserted.
Some recorded discs, such as CD-R, CD-RW, DVD-R, DVD + R, DVD-RW, DVD+RW can only be played, when they are closed after recording (i.e. “close session and disc”).
EJECT THE DISC
Press  button to eject the disc.
NOTES:
After ejecting the disc, the unit reverts automatically to the previously used mode.
You can eject a disc even when the unit is switched off. The unit remains switched off after the disc is ejected.
If the disc is not removed from the unit within 10 seconds, it will be reloaded to prevent accidental damage.
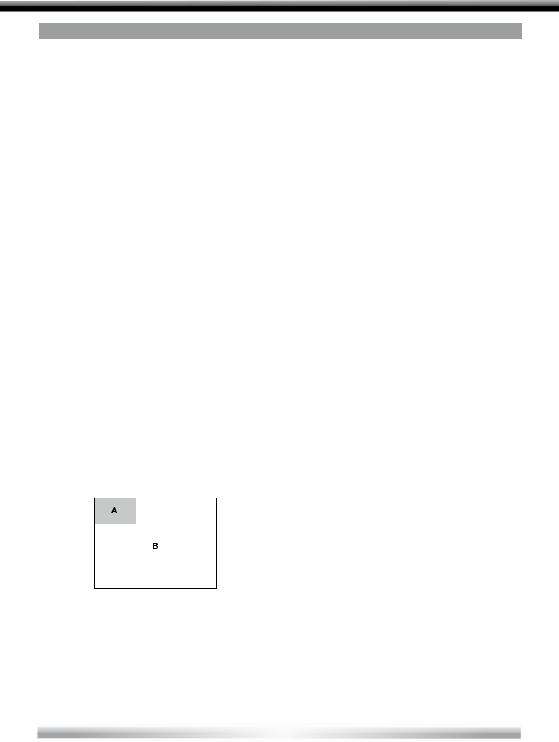
USING THE TOUCH SCREEN CONTROLS
The touch key areas for CD/VCD/DVD playback are outlined below:
A - Turn to main menu
B - Display on screen control menu
DISC PLAYBACK
1.After a disc is inserted, the display will show READ. For MP3 or discs with mixed šles, the initial reading time may even exceed one minute. Just give it a little time.
2.ERROR will be displayed if a disc read error occurs during disc operation.
3.The unit will auto-recognize the inserted medium (CD, VCD, DVD, etc.) and display the respective icon.
4.If you insert a DVD it advances to the title screen. Now you can easily start it by pressing [play].
FILE TYPES/SUPPORTED FORMATS
Audio š le: MP3(*.mp3), WMA(wma) Video š le:
XVID
DivX
MPEG 2 (*.vob)
MPEG 1 (*.dat)
Picture š le: JPEG (*.jpg) Picture CD
MP3 š le:
Supported sampling frequency for MP3 disc: 8KHz to 48KHz (44.1 KHz preferably). Supported bit-rates of MP3 disc are: 32 - 320 kbps (128 kbps preferably).
DISC AND FILE TYPES WHICH ARE NOT SUPPORTED
*.AAC, *.DLF, *.M3U, *.PLS, MP3 PRO š les and š les with DRM. Discs with left open sessions.
STOP PLAYBACK TEMPORARILY
During playback, press 
 to pause playback.
The sound will be muted and "PAUSE" is displayed.
Press 
 again to continue playback.
STOP PLAYBACK ENTIRELY
During DVD, VCD, CD, MP3 playback:
1.Press key on remote control once to stop the playback including saving of the
relevant location on the disc, press  to resume the playback from the saved disc location.
2.Press twice to cease the playback.
Press  to start the playback from the very beginning, the title page of the DVD or the š rst track of VCD / CD.
10
ZE-NC524
DISC OPERATION (COnTinUED)
SELECT DESIRED TRACK
Press or to skip to the next or the previous track.
Use 1-9 and 0, 10+ buttons on the remote control to select the desired track number.
FAST FORWARD/BACKWARD DURING PLAYBACK
Press or for more than 2 seconds once and repeat to select X2, X4, X8 or X20 speed of fast backward or forward playback.
During the fast forward or backward
operation, press 
 brie¤ y to playback again.
During the fast forward or backward operation, the volume will be muted.
into standby mode.
GOTO
Go directly to desired track/chapter or time point of DVD video.
Press GOTO button on the remote control, track or DVD title/chapter and time display on top of the screen. Current item is highlighted. Use / to select desired item. Use the digit buttons to select number. Press ENTER to conš rm.
RANDOM TRACK PLAYBACK (FOR CD/ VCD/MP3 ONLY)
You can play all the tracks in random order.
1.During playback, press  once or more to choose SHUFFLE, SHUFFLE DIR or SHUFFLE OFF.
2.Press  again to select normal playback.
REPEAT
During playback, press  once or more.
REP icon will appear on the display.
For VCD/CD: Display appears REP ONE
REP ALL REP OFF
For DVD: Display appears REP CHAPTER REP TITLE REP OFF
For File disc: Display appears REP ONE
REP DIR REP ALL REP OFF
NOTE:
If you do not select RPT on, when
the entire disc or TITLE playback has š nished, the system will stop. After idling more than š ve minutes the unit will go
11
 Loading...