


Z-E2050

INFOTAINER USER MANUAL
EN

Device user manual for ZENEC media system
We are delighted that you have chosen a product from ZENEC.
Please read this operating manual before you start your new ZENEC system. In this device user manual you will find important instructions and information for the safe operation of the ZENEC system, and to help you make the most of its technical advantages.
All the information in this manual corresponds to the state at the time of going to press, and applies only to ZENEC systems in original condition. On account of possible updates to device software, the illustrations and features shown in this operating manual may be different from your ZENEC system. Differences in the information, illustrations or features cannot form a basis for any claims.
If you sell your vehicle with the ZENEC system still fitted, please ensure that this operating manual stays with the vehicle, and that any personal data like a phonebook stored in the device is deleted.
CONTENTS |
|
SAFETY INSTRUCTIONS................................................................................................................... |
04 |
TURN DEVICE ON AND OFF ............................................................................................................. |
05 |
ANTI-THEFT PROTECTION................................................................................................................ |
05 |
MULTIFUNCTION STEERING WHEEL CONTROLS......................................................................... |
06 |
Z-E2050 (FRONT PANEL)................................................................................................................... |
07 |
MAIN MENU STRUCTURE .................................................................................................................... |
08 |
MAIN MENU ICONS................................................................................................................................ |
09 |
MEDIA AUDIO SOURCES ................................................................................................................. |
10 |
INPUT SOURCES................................................................................................................................ |
11 |
STATUS BAR....................................................................................................................................... |
12 |
SEARCH AND INPUT FUNCTION...................................................................................................... |
13 |
FM RADIO............................................................................................................................................ |
14 |
FM BAR GRAPH MODE...................................................................................................................... |
15 |
MANUAL FM STATION SEARCH....................................................................................................... |
16 |
UKW STATION PRESET..................................................................................................................... |
17 |
FM SETUP............................................................................................................................................ |
18 |
DAB+ RADIO SETUP....................................................................................................................... ... |
19 |
DAB+ ENSEMBLE AND STATION LIST........................................................................................... |
20 |
DAB+ SETUP....................................................................................................................................... |
21 |
DAB+ STATION-PRESETS................................................................................................................. |
22 |
USB / BT A2DP / IPOD / DVD / SD (AUDIO) MEDIA......................................................................... |
23 |
USB / BT A2DP / IPOD / DVD / SD (AUDIO) MEDIA CONTROL AND OPERATION BAR............. |
24 |
BT-MUSIC (A2DP) .............................................................................................................................. |
25 |
iPOD (AUDIO)...................................................................................................................................... |
26 |
PLAYLIST (AUDIO) ............................................................................................................................ |
27 |
VIDEO MEDIA: HARDDISK................................................................................................................ |
28 |
PLAYLIST (VIDEO).............................................................................................................................. |
29 |
HDMI / AV/IN........................................................................................................................................ |
30 |
CAMERA.............................................................................................................................................. |
31 |
SMARTLINK DIRECT.......................................................................................................................... |
32 |
SMARTLINK DIRECT CONTROL INTERFACE................................................................................. |
33 |
SMARTLINK DIRECT CONTROL BAR ICONS................................................................................. |
34 |
SMARTPHONE APP LINKING........................................................................................................... |
35 |
2 Rev.B

BLUETOOTH (HANDS-FREE SYSTEM)............................................................................................ |
36 |
CONTROL AND OPERATION BAR (RIGHT SIDE)........................................................................... |
37 |
DEVICE MANAGER............................................................................................................................ |
38 |
PAIRING............................................................................................................................................... |
39 |
BLUETOOTH SETUP.......................................................................................................................... |
40 |
BLUETOOTH STATUS BAR............................................................................................................... |
40 |
ACCEPTING/ENDING INCOMING CALLS (VIA DEVICE)................................................................ |
41 |
OUTGOING CALL VIA NUMERIC PAD.............................................................................................. |
41 |
OUTGOING CALL VIA PHONEBOOK............................................................................................... |
41 |
BLUETOOTH MENU............................................................................................................................ |
42 |
PHONEBOOK...................................................................................................................................... |
43 |
CALL LISTS......................................................................................................................................... |
44 |
FAVORITES.......................................................................................................................................... |
45 |
NAVIGATION....................................................................................................................................... |
46 |
NAVIGATION UPDATE........................................................................................................................ |
46 |
MAP VIEWS (EXAMPLES)................................................................................................................. |
47 |
SETUP OPERATIONS......................................................................................................................... |
48 |
DISPLAY ICON (BRIGHTNESS)......................................................................................................... |
49 |
SETUP OF SOURCES......................................................................................................................... |
50 |
MISC SETUP........................................................................................................................................ |
51 |
AUDIO SETUP..................................................................................................................................... |
52 |
VOLUME SETUP................................................................................................................................. |
53 |
QUICK AUDIO SETUP (BAL/FAD_SUBWOOFER_LOUDNESS).................................................... |
54 |
AUDIO SETUP: EXPERT MODE........................................................................................................ |
55 |
AUDIO VOLUME – BASE LEVEL SETUP.......................................................................................... |
56 |
BALANCE / FADER SETUP............................................................................................................... |
57 |
EQUALIZER SETUP............................................................................................................................ |
58 |
TIME ALIGNMENT SETUP................................................................................................................. |
59 |
SUBWOOFER SETUP......................................................................................................................... |
60 |
NAVI-MIXER SETUP........................................................................................................................... |
61 |
TFT DISPLAY CONFIGURATIONS.................................................................................................... |
62 |
CAR (VEHICLE) SETUP...................................................................................................................... |
63 |
AIR CONDITIONING (AC INFO) ........................................................................................................ |
64 |
CAR INFORMATION (VEHICLE STATUS)......................................................................................... |
65 |
SYSTEM SETUP.................................................................................................................................. |
66 |
DYNAMIC INDICATION OF THE SEAT HEATER......................................................................... |
67-68 |
SOFTWARE VERSION ....................................................................................................................... |
69 |
PASSWORD......................................................................................................................................... |
70 |
INSTALLATION NOTES...................................................................................................................... |
71 |
REMOVAL WORK AND PREPARATION........................................................................................... |
71 |
ABBREVIATIONS................................................................................................................................ |
72 |
OVERVIEW ACCESSORIES............................................................................................................... |
73 |
COMMISSIONING................................................................................................................................ |
73 |
CONNECTION DIAGRAM Z-E2050.................................................................................................... |
74 |
STATUTORY RIGHTS AND WARRANTY.......................................................................................... |
75 |
3 Rev.B

SAFETY INSTRUCTIONS
 CAUTION
If the driver of the vehicle is distracted, this may lead to an accident or injury. Operating the
ZENEC system can distract attention from the general traffic situation! Equally, connecting, changing or inserting data media can distract the driver from the general traffic situation.
 CAUTION
Always choose loudspeaker settings such that acoustic signals coming from outside can always be heard in the vehicle (e.g. signal horns or sirens).
 CAUTION
Incorrect installation or commissioning of the ZENEC system may cause damage to the ZENEC system or to the vehicle electronics. Only let qualified specialists authorized by ZENEC install the device.
 CAUTION
This ZENEC system is intended solely for operation at an on-board voltage of 12 V DC. Operating the ZENEC system at any other voltage can cause damage to the ZENEC system or to the vehicles electrical system.
 CAUTION
Taking apart or modifying the ZENEC system can result in damage to the device or the vehicle. Opening the device or modification by a person not authorized by ZENEC will render warranty claims null and void.
In the event of a malfunction or defect please contact an authorized ZENEC dealer. Unauthorized repairs will render warranty claims null and void.
 CAUTION
The connection and charging leads of external mobile devices can get in the way of the driver.
Please run these so that the driver's freedom of movement is not hindered.
 CAUTION
Route recommendations and displayed traffic signs on the ZENEC system may differ from the real situation. Traffic signs and traffic regulations have precedence over route recommendations and indications of the ZENEC systems.
Speed data displayed in the navigation system corresponds to the permitted speed limit. Please adjust your speed and driving behavior to the prevailing visibility, weather, road, and traffic conditions.
 NOTE
NOTE
The ZENEC system supports functions like multi-function steering wheel, display of air conditioning settings or optical parking system and multi-function display support. All of them are in dependence to the vehicle and can only be used, when they are provided by the vehicle.
4 Rev.B
TURN ON / OFF
Manual On / Off Z-E2050
 Press the knob (fig. S/7 ), to turn the ZENEC system on, press and hold the button to switch off the device.
Automatic On / Off
The device automatically switches on/off by CAN bus interface ignition signal.
Switching on the ignition will activate the ZENEC system. The boot process can take up to 30sec.
This may result in some delay until the system is ready. The ZENEC system is shut down by switching off the ignition, or removing the ignition key.
ANTI-THEFT PROTECTION
The ZENEC system is equipped with an anti-theft protection function. If this is active, on restarting the ZENEC system after interruption of the power supply you will be asked to enter your password.
To change the password:
Device User Manual → Setup → System Setup → Password
 NOTE
NOTE
Keep your password safe. If the password is lost the ZENEC system must be uninstalled, and sent back in to ZENEC Service to unblock the anti-theft protection. This service is not free!
5 Rev.B
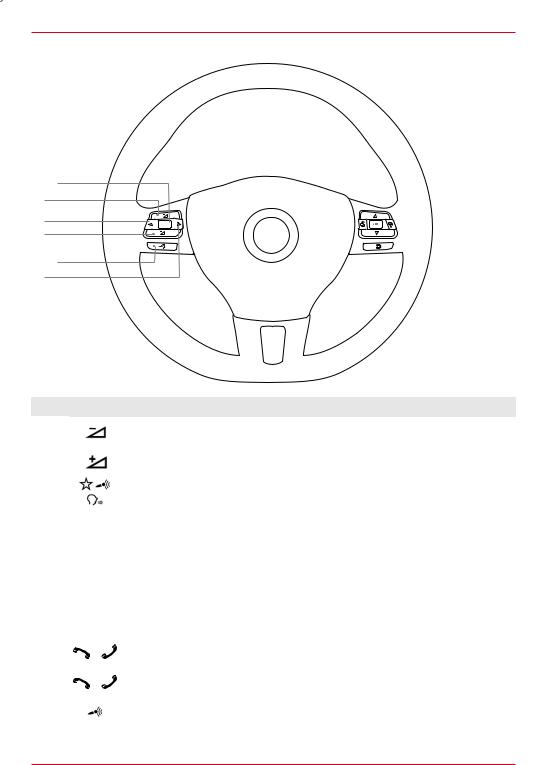
MULTIFUNCTION STEERING WHEEL


Item |
Icon |
Function |
|
1 |
|
Reduce volume |
|
|
|
|
|
2 |
|
Increase volume |
|
|
|
|
|
3 |
|
Mute |
|
|
|
|
|
|
| |
Radio source |
Press to choose the next radio station. |
4 |
|
|
|
Media |
Press to choose the next track/title. |
||
|
|
source |
Press and hold to fast forward. |
|
| |
Radio source |
Press to choose the previous radio station. |
5 |
|
|
|
Media |
Press to choose the previous next track/title. |
||
|
|
source |
Press and hold to fast rewind. |
|
|
|
|
6 |
|
Accept call |
|
|
|
|
|
7 |
|
Reject / End call |
|
|
|
|
|
8 |
|
Voice (not supported) |
|
|
|
|
|
6 Rev.B
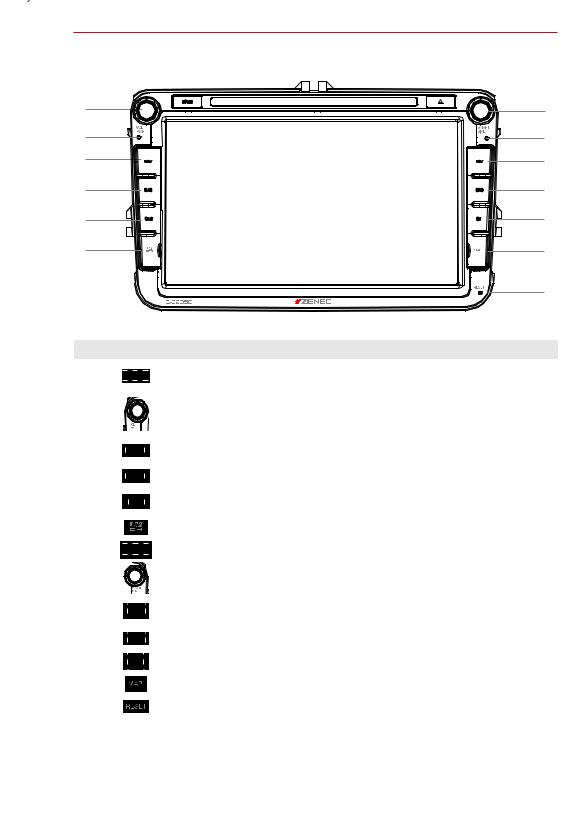
Z-E2050 (FRONT PANEL)
|
|
||
|
|
|
|
Device Front Panel Control Options
Item |
Icon Function |
|
1 |
Tap to jump back to main menu |
|
Press and hold jump to audio settings |
||
|
||
2 |
Turn to increase or decrease playback volume |
|
Press and hold to turn device ON or OFF |
||
|
Tap to mute/- unmute device |
|
3 |
Tap to jump to navigation |
|
Press and hold to open Quick Control Bar inside navigation source |
||
|
||
4 |
Tap to open DAB+ radio source |
|
5 |
Tap to jump to CAR |
|
Press and hold jump to special CAR Menu |
||
|
||
6 |
Slot for the microSD with Media Files (Audio & Video) |
|
7 |
Tap, to eject the DVD |
|
8 |
Turn for list scrolling |
|
9 |
Tap to select preferred content or execute a function |
|
Press and hold to jump to audio settings |
||
|
||
10 |
Tap to change the source |
|
11 |
Tap to open the Bluetooth hands-free page |
|
12 |
microSD card slot for GPS navigation software behind „MAP“ cover |
|
13 |
Hole in the panel for the reset pin |
14○ Internal microphone
15○ IR receiver for remote control
7 Rev.B
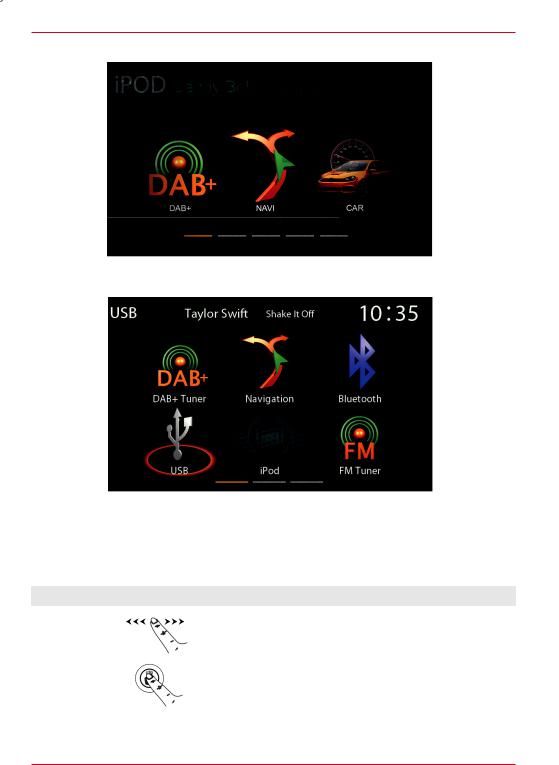
MAIN MENU STRUCTURE
Main menu with 3 Icons
Main menu with 6 Icons
The icon amount shown per main menu page can be adjusted in the setup (see page 51 „Main Menu
Style“).
Display – touch sensitive operation Bedienung
Function |
Icon |
Operation |
Sliden |
|
Swipe to navigate in the main menu by sliding to the left or right |
|
|
|
Move |
|
Press, hold and move the icon into the desired position |
|
|
|
8 Rev.B
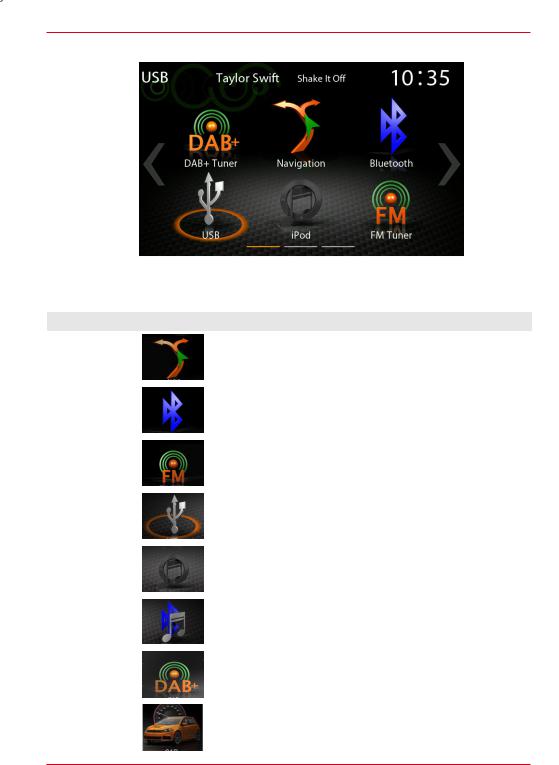
MAIN MENU ICONS
You can navigate through main menu pages by swiping or tapping on the orange page markers in the bottom area of each page.
Function |
Icon |
Operation |
Navi |
|
Tap to open navigation App |
|
|
|
Bluetooth |
|
Tap to open the Bluetooth hands-free page |
|
|
|
FM Tuner |
|
Tap to open FM radio source |
|
|
|
USB |
|
Tap to enter USB source |
|
|
|
iPod |
|
Tap to open audio playback source (Apple) |
|
|
|
BT-Music |
|
Tap to open BT-Music source |
|
|
|
DAB+ |
|
Tap to open DAB+ radio source |
|
|
|
CAR |
|
Tap to open CAR Infos |
|
|
|
9 Rev.B
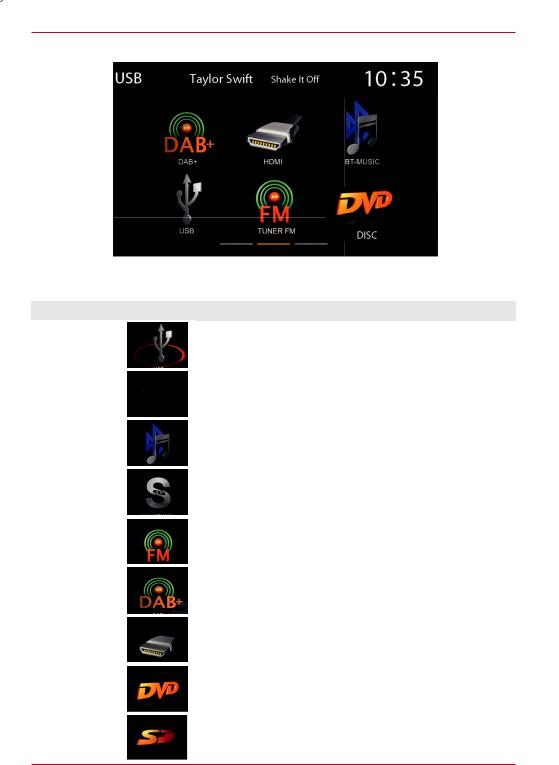
MEDIA AUDIO SOURCES
You can access / enter connected internal or external sources by tapping on the main icon according to the following list.
Function |
|
Icon |
Operation |
|
USB |
|
|
|
Tap to enter USB source |
|
|
|
||
|
|
|
|
|
|
|
|
|
|
iPod |
|
|
|
Tap to open audio playback source (Apple) |
|
|
|
|
|
|
|
|
|
|
BT-Music |
|
|
|
Tap to open BT-Music source |
|
|
|
||
|
|
|
|
|
|
|
|
|
|
Smartlink |
|
|
|
Tap to open Smartlink App |
|
|
|
|
|
|
|
|
|
|
FM Tuner |
|
|
|
Tap to open FM radio source |
|
|
|
|
|
|
|
|
|
|
DAB+ |
|
|
|
Tap to open DAB+ radio source (only for Z-N426) |
|
|
|
|
|
|
|
|
|
|
HDMI |
|
|
|
Tap to open HDMI source |
|
|
|
|
|
|
|
|
|
|
DVD |
|
|
|
Tap to open DVD source |
|
|
|
|
|
|
|
|
|
|
SD |
|
|
|
Tap to open SD source |
|
|
|
|
|
|
|
|
|
|
10 Rev.B
INPUT SOURCES
To select and open external sources like HDMI, Camera, AV-IN or Smartlink, they need to be paired or physically connected to the device.
Input Sources
Function |
Icon |
Operation |
HDMI |
|
Tap to open HDMI source |
|
|
|
Camera |
|
Tap to enter camera source |
|
|
|
Smartlink |
|
Tap to open Smartlink App |
|
|
|
AV-IN |
|
Tap to open AV-IN |
|
|
|
CAR |
|
Tap to open CAR Info page |
|
|
|
 NOTE
NOTE
Icons in the main menu remain greyed out for input source items not connected to device.
11 Rev.B
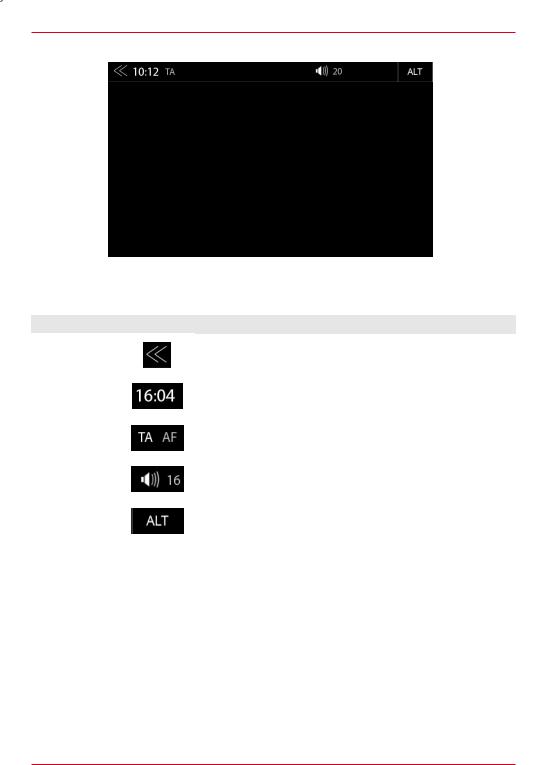
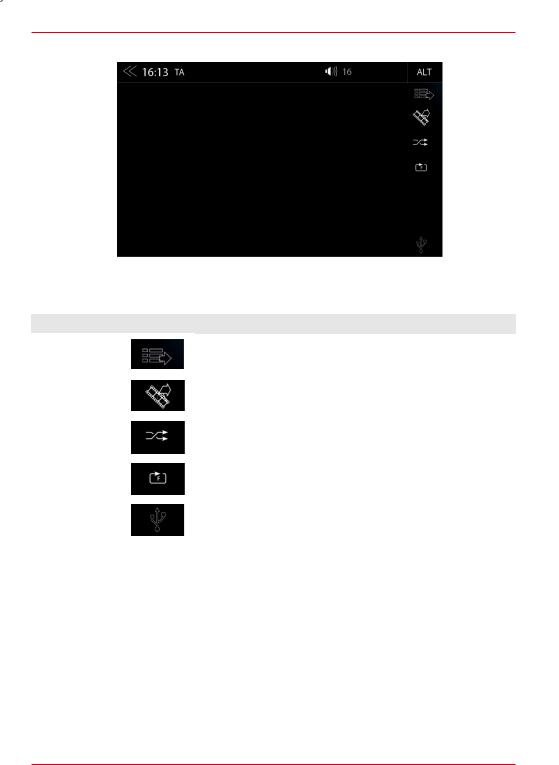
STATUS BAR (”INFO BAR”)
Screenshot fehlt
The „info bar in the upper hand screen area shows TA, volume and time but also contains two important controls for device operation: BACK (left side) and ALT (right side).
Function |
|
|
Icon |
Operation |
||
Back |
|
|
|
|
|
Tap to jump one level up or back |
|
|
|
|
|
||
|
|
|
|
|
|
|
|
|
|
|
|
|
|
Clock Time |
|
|
|
|
|
Display of time (no interaction possible) |
|
|
|
|
|
||
|
|
|
|
|
|
|
|
|
|
|
|
|
|
Traffic |
|
|
|
|
|
Traffic announcement (if function is set to active) |
|
|
|
|
|
||
Announcement |
|
|
|
|
|
|
|
|
|
|
|
|
|
|
|
|
|
|
|
|
Volume |
|
|
|
|
|
Shows the current playback volume |
|
|
|
|
|
||
|
|
|
|
|
|
|
|
|
|
|
|
|
|
ALT |
|
|
|
|
|
Tap to select / start a previously assigned function |
|
|
|
|
|
||
|
|
|
|
|
Settings → Misc → ALT software button |
|
|
|
|
|
|
|
|
|
|
|
|
|
|
|
12 Rev.B
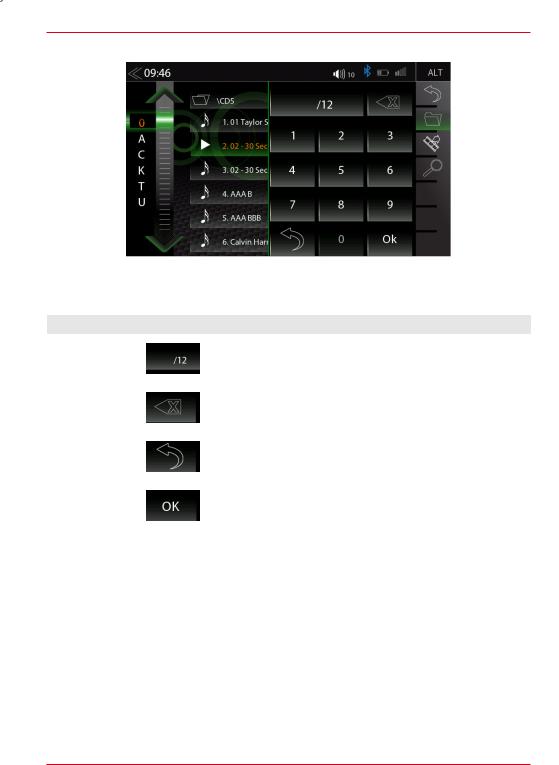
SEARCH AND INPUT FUNCTION
The input keyboard for search and input is a simple standard numeric layout.
Function |
Icon |
Operation |
Search & |
|
Input screen |
Input Field |
|
|
|
|
|
|
|
|
Delete |
|
Tap to delete a number |
|
|
|
|
Press and hold to delete the full string |
|
|
|
|
|
|
|
Back |
|
Tap to end the search or the input |
|
|
|
Enter |
|
Tap to confirm the input |
|
|
|
13 Rev.B
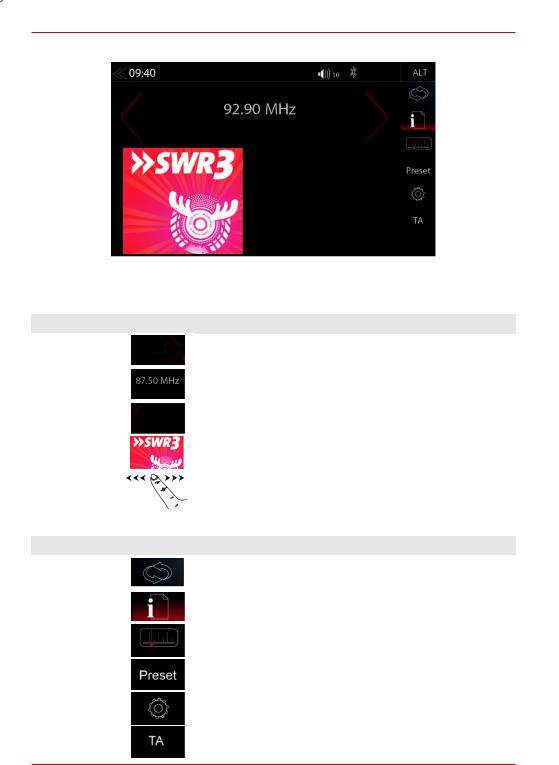
FM RADIO
The FM RDS source menu offers a control-/operating section on the right hand side, for fast and convenient adjustments during the FM radio playback.
Center Section of Display
Function |
|
Icon |
|
Operation |
|
Station forward |
|
|
|
|
Tap to start the auto FM station search, running up in the |
|
|
|
|
||
|
|
|
|
frequency band |
|
|
|
|
|
|
|
|
|
|
|
|
|
|
|
|
|
|
|
Station |
|
|
|
|
Station Name / Station Frequency |
|
|
|
|
|
|
|
|
|
|
|
|
Station back |
|
|
|
|
Tap to start auto FM station search, running down in the |
|
|
|
|
frequency band |
|
|
|
|
|
|
|
|
|
|
|
|
|
Cover |
|
|
|
|
Shows radio station graphics or cover picture of artist |
|
|
|
|
(Only with microSD card from Z-EMAP50 bundle) |
|
|
|
|
|
|
|
|
|
|
|
|
|
Info display |
|
|
|
|
Finger swiping left and right to access stored FM stations |
area |
|
|
|
|
previous / next |
|
|
|
|
|
|
Controland Operating Section |
|
||||
Function |
|
Icon |
|
Operation |
|
FM/DAB+ |
|
|
|
|
Tap to switch between FM/DAB+ |
|
|
|
|
||
Switch |
|
|
|
|
|
|
|
|
|
|
|
|
|
|
|
|
|
Info |
|
|
|
|
Tap to show station information |
|
|
|
|
||
|
|
|
|
|
|
|
|
|
|
|
|
Frequency |
|
|
|
|
Tap to open FM station frequency bar |
Scale |
|
|
|
|
|
|
|
|
|
|
|
|
|
|
|
|
|
|
|
|
|
|
|
Preset |
|
|
|
|
Tap to show the stored FM station list |
|
|
|
|
|
|
|
|
|
|
|
|
Tuner Setup |
|
|
|
|
Tuner settings |
|
|
|
|
|
|
TA |
|
|
|
|
Tap to activate or de-activate the auto switching of RDS based |
|
|
|
|
traffic announcements |
|
|
|
|
|
|
|
|
|
|
|
|
|
|
|
|
|
|
|
14 Rev.B
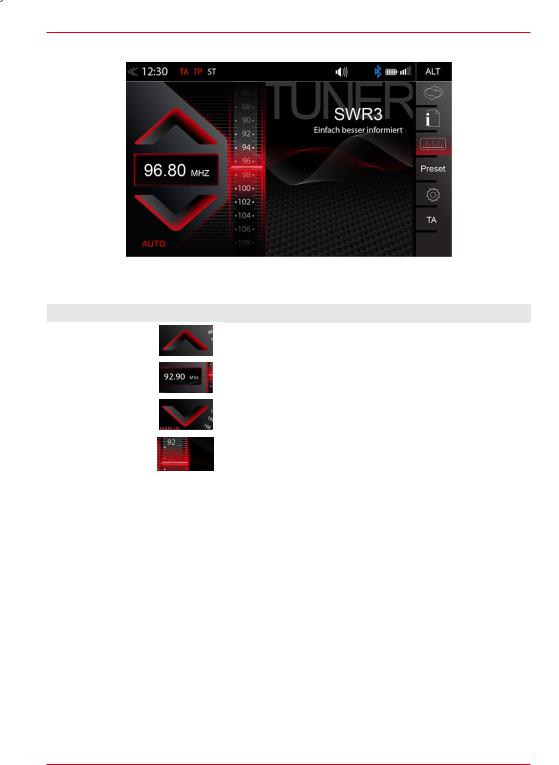
FM BAR GRAPH MODE
The FM setup mode (press gear icon) allows to assign two different operation modes to both station frequency arrows: manual steps in 100kHz, or auto scan (stopping at next station). See page 18.
Function |
|
|
Icon |
Operation |
|
Station Frequency |
|
|
|
|
Tap to start manual 100kHz jump, or FM station auto search |
|
|
|
|
||
UP |
|
|
|
|
up |
|
|
|
|
|
|
Station |
|
|
|
|
Tap to open the direct frequency input mode keyboard |
|
|
|
|
||
Frequency |
|
|
|
|
|
|
|
|
|
|
|
|
|
|
|
|
|
Station Frequency |
|
|
|
|
Tap to start manual 100kHz jump, or FM station auto search |
|
|
|
|
||
DOWN |
|
|
|
|
down |
|
|
|
|
|
|
Bar Graph Scale |
|
|
|
|
Press and hold to slide the frequency pointer of the bar graph |
|
|
|
|
||
|
|
|
|
into any position. Tap to set a desired frequency value on the |
|
|
|
|
|
|
scale |
|
|
|
|
|
|
15 Rev.B
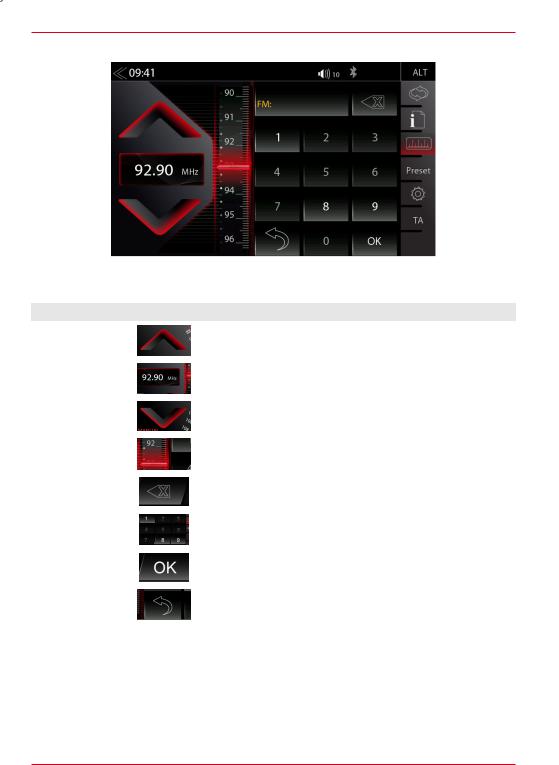
MANUAL FM STATION SEARCH
When you tap to the frequency display area, the numeric input keyboard opens for a direct input of the station frequency.
Function |
|
|
Icon |
Operation |
||
Station |
|
|
|
|
|
Tap to auto seek / manual seek up, depending on setting |
|
|
|
|
|
||
Frequency UP |
|
|
|
|
|
|
|
|
|
|
|
|
|
|
|
|
|
|
|
|
Station |
|
|
|
|
|
Tap to open and close direct station frequency input via keypad |
|
|
|
|
|
||
Frequency |
|
|
|
|
|
|
|
|
|
|
|
|
|
|
|
|
|
|
|
|
Station Frequency |
|
|
|
|
|
Tap to auto seek / manual seek down, depending on setting |
|
|
|
|
|
||
DOWN |
|
|
|
|
|
|
|
|
|
|
|
|
|
|
|
|
|
|
|
|
Scale |
|
|
|
|
|
Radio frequency scale display |
|
|
|
|
|
||
|
|
|
|
|
|
|
|
|
|
|
|
|
|
Delete |
|
|
|
|
|
Tap to delete a number |
|
|
|
|
|
||
|
|
|
|
|
Press and hold to delete the full number string |
|
|
|
|
|
|
|
|
|
|
|
|
|
|
|
Keypad |
|
|
|
|
|
Direct frequency input option |
|
|
|
|
|
||
|
|
|
|
|
|
|
|
|
|
|
|
|
|
OK |
|
|
|
|
|
Touch to confirm frequency |
|
|
|
|
|
||
|
|
|
|
|
|
|
|
|
|
|
|
|
|
Hide |
|
|
|
|
|
Hide Keyboard / Keypad |
|
|
|
|
|
||
|
|
|
|
|
|
|
|
|
|
|
|
|
|
16 Rev.B
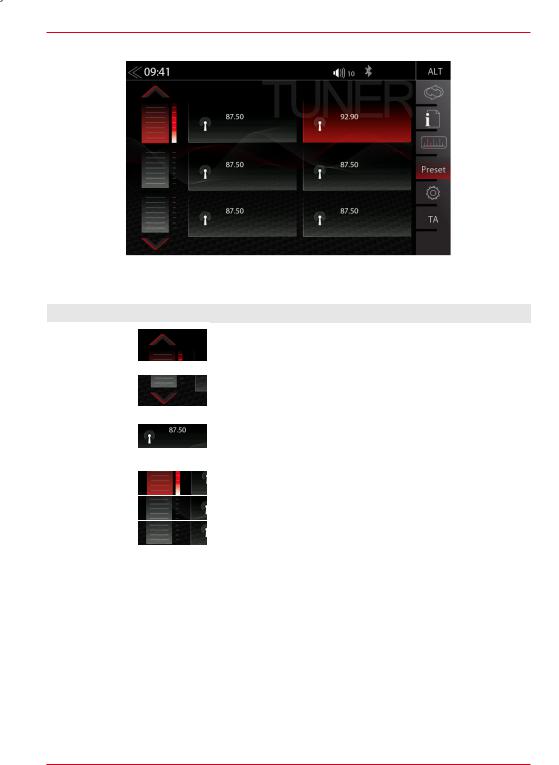
FM STATION-PRESET
Select a previously stored radio station by tapping on the station preset button.
Function |
|
Icon |
Operation |
|
Previous |
|
|
|
Tap to switch to previous preset page |
|
|
|
||
page |
|
|
|
|
|
|
|
|
|
|
|
|
|
|
Next |
|
|
|
Tap to switch to next preset page |
|
|
|
||
page |
|
|
|
|
|
|
|
|
|
|
|
|
|
|
|
|
|
|
|
Stores |
|
|
|
Tap to select a stored station. Press and hold the station to save |
|
|
|
||
|
|
|
the actual radio station on any of the station preset buttons |
|
|
|
|
|
|
|
|
|
|
|
|
|
|
|
|
Store |
|
|
|
Tap to goto another store register (3 register each with 6 stores) |
register |
|
|
|
|
|
|
|
|
|
|
|
|
|
|
17 Rev.B
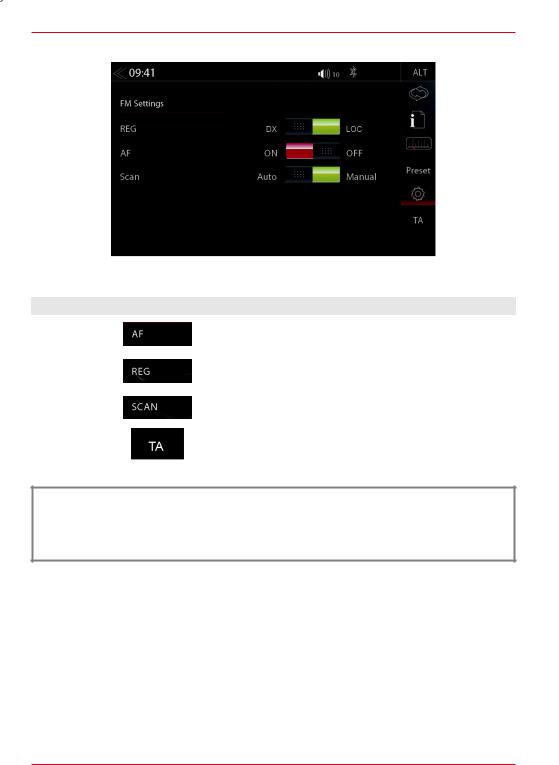
FM SETUP
Here you can set important FM RDS based settings such are AF and REG.
Function |
|
|
Icon |
Operation |
||
AF |
|
|
|
|
|
Alternative Frequency ON / OFF |
|
|
|
|
|
||
|
|
|
|
|
|
|
|
|
|
|
|
|
|
REG |
|
|
|
|
|
Setting for search function sensitivity of auto scan |
|
|
|
|
|
||
|
|
|
|
|
|
|
|
|
|
|
|
|
|
SCAN |
|
|
|
|
|
Setting to choose the automatic or manual station frequency |
|
|
|
|
|
||
|
|
|
|
|
search. |
|
|
|
|
|
|
|
|
|
|
|
|
|
|
|
TA |
|
|
|
|
|
Tap to activate or de-activate the auto switching of RDS traffic |
|
|
|
|
|
||
|
|
|
|
|
announcements |
|
|
|
|
|
|
|
|
|
|
|
|
|
|
|
 NOTE
NOTE
Select DX to increase the general sensitivity during auto scan to stop at weaker, usually more distant radio stations
Select LOC when you prefer to stop at local stations with a stronger signal level
18 Rev.B
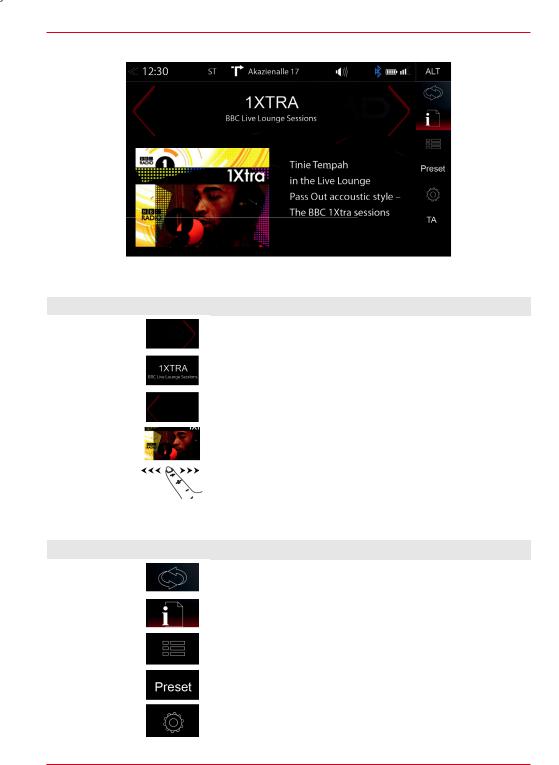
DAB+ RADIO SETUP
The DAB+ source menu offers a control- + operating section on the right side of the display, allowing for simple and convenient direct adjustments in the playback menu.
Function |
|
|
Icon |
|
Operation |
|
Station up |
|
|
|
|
|
Tap to jump to next station |
|
|
|
|
|
||
|
|
|
|
|
Press and hold to jump to next Ensemble |
|
|
|
|
|
|
|
|
|
|
|
|
|
|
|
Station |
|
|
|
|
|
Station Name / Ensemble Name |
|
|
|
|
|
||
|
|
|
|
|
|
|
|
|
|
|
|
|
|
Station down |
|
|
|
|
|
Tap to jump to previous station |
|
|
|
|
|
||
|
|
|
|
|
Press and hold to jump to previous Ensemble |
|
|
|
|
|
|
|
|
|
|
|
|
|
|
|
Slideshow |
|
|
|
|
|
Radio station artwork / artist display (”MOT Slideshow”) |
|
|
|
|
|
|
|
Info Display |
|
|
|
|
|
Finger swiping left and right to switch between Preset stations |
Area |
|
|
|
|
|
|
|
|
|
|
|
|
|
|
|
|
|
|
|
|
Controland Operating Section |
|
|||||
|
|
|
|
|
|
|
Function |
|
|
Icon |
|
Operation |
|
UKW / DAB+ |
|
|
|
|
|
Tap to switch between FM / DAB + |
|
|
|
|
|
||
Switch |
|
|
|
|
|
|
|
|
|
|
|
|
|
|
|
|
|
|
|
|
Info |
|
|
|
|
|
Tap to show station information - main display |
|
|
|
|
|
||
|
|
|
|
|
|
|
|
|
|
|
|
|
|
List |
|
|
|
|
|
Tap to open the station list (showing all currently receivable |
|
|
|
|
|
radio stations in the environment) |
|
|
|
|
|
|
|
|
|
|
|
|
|
|
|
|
|
|
|
|
|
|
Preset |
|
|
|
|
|
Tap to show the stored DAB station list |
|
|
|
|
|
||
|
|
|
|
|
|
|
|
|
|
|
|
|
|
Setup |
|
|
|
|
|
Tap to change settings for DAB+ functions |
|
|
|
|
|
|
|
|
|
|
|
|
|
|
19 Rev.B

DAB+ ENSEMBLE AND STATION LIST
Once the first DAB+ band scan has completed, device will show all DAB+ Ensembles and radio stations of sufficient signal strength. The Ensemble list and its content is auto updated periodically (by re-scaning).
Function |
|
|
Icon |
Operation |
||
|
|
|
|
|
|
|
Ensemble list |
|
|
|
|
Tap to open an Ensemble, showing the assigned DAB+ radio |
|
selection |
|
|
|
|
station list |
|
|
|
|
|
|
|
|
List scrolling |
|
|
|
|
Press and hold to move the slider of the Ensemble list up and |
|
|
|
|
|
down |
||
|
|
|
|
|
||
|
|
|
|
|
|
|
|
|
|
|
|
|
|
|
|
|
|
|
|
|
A tap on each Ensemble opens the related DAB+ station list of the respective Ensemble. The station list content follows exactly the original Ensemble display format and list sequence.
Function |
Icon |
Operation |
Radio station |
|
Tap to select one particular radio station out of the list |
selection |
|
|
|
|
|
List scrolling |
|
Press and hold to move the slider of the station list up and down |
|
|
|
Back |
|
Tap to jump back to Ensemble selection |
|
|
|
20 Rev.B
DAB+ SETUP
The setup page for the DAB+ tuner allows to define important functions such as DAB<>DAB and
FM<>DAB station following. Or to activate the phantom power supply voltage of the DAB antenna socket.
Function |
Icon |
Operation |
DAB-DAB |
|
Tap to turn DAB-DAB station following ON or OFF |
Following |
|
|
|
|
|
|
|
|
DAB |
|
Tap to turn the 12V phantom power supply of the DAB |
antenna socket |
|
|
|
antenna socket ON or OFF |
|
phantom power |
|
|
|
|
|
|
|
|
DAB Firmware |
|
Displays the current DAB+ Firmware version |
|
|
|
21 Rev.B
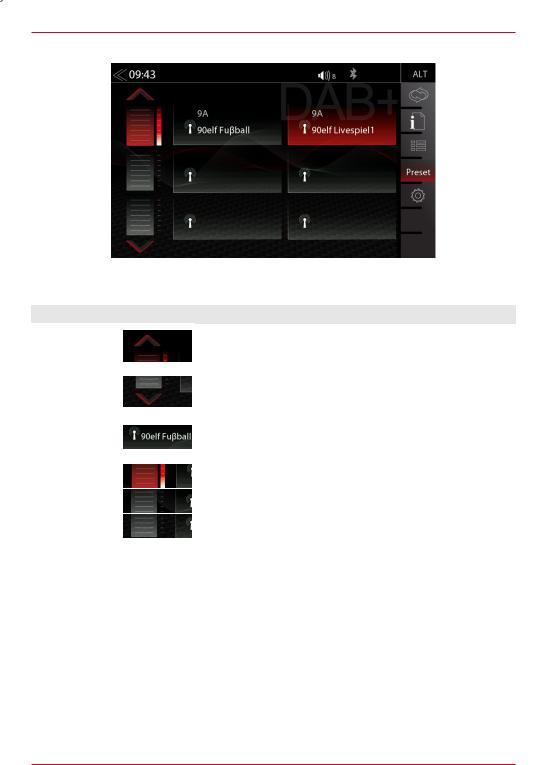
DAB+ STATIONS-PRESETS
Select a previously stored DAB+ radio station by tapping on the station preset button.
Function |
|
Icon |
Operation |
|
Previous |
|
|
|
Tap to switch to previous preset page |
|
|
|
||
page |
|
|
|
|
|
|
|
|
|
|
|
|
|
|
Next |
|
|
|
Tap to switch to next preset page |
|
|
|
||
page |
|
|
|
|
|
|
|
|
|
|
|
|
|
|
|
|
|
|
|
Stored |
|
|
|
Tap to select a stored DAB+ station. Press and hold the station |
|
|
|
||
|
|
|
to save the actual radio station on any of the station preset |
|
Station |
|
|
|
|
|
|
|
buttons |
|
|
|
|
|
|
|
|
|
|
|
Store |
|
|
|
Tap to goto another store register (3 registers with 6 stores each) |
|
|
|
||
|
|
|
||
|
|
|
||
register |
|
|
|
|
|
|
|
|
|
|
|
|
|
|
|
|
|
|
|
|
|
|
|
|
22 Rev.B
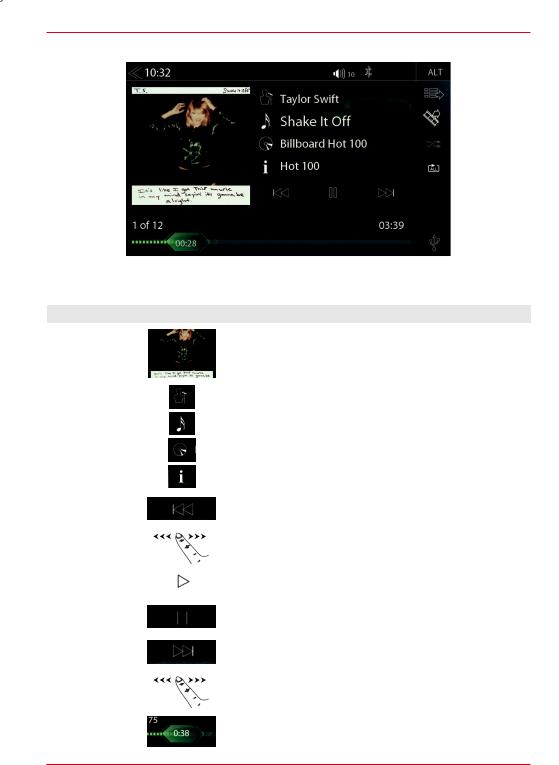
USB / BT A2DP / iPOD / SD (AUDIO) MEDIA
Various types of information shown in the source menu of the audio playback by (USB, BT A2DP, iPOD, etc.).
Function |
|
|
|
|
Icon |
Operation |
||||
Album, Art / |
|
|
|
|
|
|
|
|
|
If a cover is stored on the music media, it can be displayed. |
|
|
|
|
|
|
|
|
|
||
Cover |
|
|
|
|
|
|
|
|
|
This function is not supported for BT Audio playback. |
|
|
|
|
|
|
|
|
|
|
|
|
|
|
|
|
|
|
|
|
|
|
Interpret |
|
|
|
|
|
|
|
|
|
Information about the artist |
|
|
|
|
|
|
|
|
|
|
|
|
|
|
|
|
|
|
|
|
|
|
Track |
|
|
|
|
|
|
|
|
|
Information about the track |
|
|
|
|
|
|
|
|
|
|
|
Album |
|
|
|
|
|
|
|
|
|
Information about the album |
|
|
|
|
|
|
|
|
|
||
|
|
|
|
|
|
|
|
|
|
|
|
|
|
|
|
|
|
|
|
|
|
Genre |
|
|
|
|
|
|
|
|
|
Information about the genre or any other special infos |
|
|
|
|
|
|
|
|
|
|
|
|
|
|
|
|
|
|
|
|
|
|
|
|
|
|
|
|
|
|
|
|
Tap to skip to the previous track |
|
|
|
|
|
|
|
|
|
|
|
Back |
|
|
|
|
|
|
|
|
|
Press and hold to start fast reverse |
|
|
|
|
|
|
|
|
|
|
|
|
|
|
|
|
|
|
|
|
Swipe to the left to skip forwards to the next track |
|
|
|
|
|
|
|
|
|
|
|
|
|
|
|
|
|
|
|
|
|
|
|
Play |
|
|
|
|
|
|
|
|
|
Tap to play a track |
|
|
|
|
|
|
|
|
|
||
|
|
|
|
|
|
|
|
|
|
|
|
|
|
|
|
|
|
|
|
|
|
Pause |
|
|
|
|
|
|
|
|
|
Tap to pause at a track |
|
|
|
|
|
|
|
|
|
||
|
|
|
|
|
|
|
|
|
|
|
|
|
|
|
|
|
|
|
|
|
|
|
|
|
|
|
|
|
|
|
|
Tap to skip to the next track |
|
|
|
|
|
|
|
|
|
|
|
Forward |
|
|
|
|
|
|
|
|
|
Press and hold to start fast forward |
|
|
|
|
|
|
|
|
|
|
|
|
|
|
|
|
|
|
|
|
Swipe to the right to skip back to the previous track |
|
|
|
|
|
|
|
|
|
|
|
|
|
|
|
|
|
|
|
|
|
|
|
Playback Time |
|
|
|
|
|
|
|
|
|
Tap or slide to skip within a track |
|
|
|
|
|
|
|
|
|
||
Line |
|
|
|
|
|
|
|
|
|
|
|
|
|
|
|
|
|
|
|
|
|
|
|
|
|
|
|
|
|
|
|
|
|
|
|
|
|
|
|
|
|
|
|
23 Rev.B
USB / BT A2DP / iPOD / DVD / SD (AUDIO) MEDIA CONTROL AND OPERATION BAR
The control and operation bar on the right side of the audio playback media menu gives access to play lists favorites and external USB memory.
Function |
|
Icon |
Operation |
|
Playlist |
|
|
|
Tap to display the folder and list |
|
|
|
||
|
|
|
This function is not supported in BT Audio playback mode. |
|
|
|
|
|
|
|
|
|
|
|
Video <-> Audio |
|
|
|
Tap to switch between audio or video playback. This function is |
|
|
|
||
Source |
|
|
|
not supported in BT Audio and iPod mode |
|
|
|
|
|
Shuffle |
|
|
|
Tap to turn on the random play feature within the folder that is |
|
|
|
||
|
|
|
playing |
|
|
|
|
|
|
|
|
|
|
|
|
|
|
|
|
Repeat |
|
|
|
Tap to automatically repeat a track or a complete music |
|
|
|
||
|
|
|
collection |
|
|
|
|
|
|
|
|
|
|
|
|
|
|
|
|
Source |
|
|
|
Touch to jump to next available source |
|
|
|
||
|
|
|
(Available sources USB, iPod, DVD, BT-Music and SD) |
|
|
|
|
|
|
|
|
|
|
|
|
|
|
|
|
24 Rev.B
 Loading...