


ZE -NC5011D
CAR SPECIFIC NAVICEIVER FOR OPEL VEHICLES
USER MANUAL
BEDIENUNGSANLEITUNG

ABOUT THIS INSTRUCTION MANUAL
The instruction manual contains important information and warnings about the operation of this unit. Please store it inside your vehicle to have access to it any time. The contents of this document are provided "as is", as required by applicable law. No warranties of any kind, either expressed or implied, including, but not limited to, the implied warranties of merchantability and fitness for a particular purpose, are made in relation to the accuracy, reliability or contents of this document. ZENEC reserves the right to revise this document or withdraw it at any time without prior notice.
CONTENTS |
|
SAFETY INSTRUCTIONS ..................................................................................... |
3 |
FRONT PANEL BUTTONS................................................................................. |
4-5 |
BASIC OPERATION ........................................................................................... |
6-7 |
RADIO MODE ................................................................................................... |
8-11 |
PLAYBACK/PLAYLIST AUDIO/VIDEO .......................................................... |
12-17 |
BLUETOOTH MODE ...................................................................................... |
18-25 |
NAVIGATION MODE....................................................................................... |
26-27 |
SETUP............................................................................................................. |
28-37 |
REMOTE CONTROL MAIN ............................................................................ |
38-39 |
REMOTE CONTROL M-ZONE ....................................................................... |
40-41 |
EXTERNAL PLAYBACK SOURCES.............................................................. |
42-43 |
GLOSSAR............................................................................................................ |
44 |
TROUBLESHOOTING.................................................................................... |
45-46 |
SPECIFICATIONS................................................................................................ |
47 |
WARRANTY.................................................................................................... |
94-95 |
Navigation manual is separate.
2

ZE -NC5011D
SAFETY INSTRUCTIONS
1.Read these instructions entirely.
2.Keep these instructions. Whoever uses the unit should have access to this manual.
3.Heed all warnings. Follow all instructions.
4.This unit is designed to be used in a vehicle with 12V DC battery and negative ground.
5.Do not operate the unit in any other way than described in this manual. Failure to follow the instructions within this manual may void your warranty.
6.Do not disassemble or alter the unit in any way, because it will void your warranty. Do not attempt to repair or to service the unit yourself, but contact an authorized ZENEC dealer instead.
7.Use only original accessories which are designed and manufactured for the unit, otherwise you will risk damage. Install the unit according to the mounting manual by using the supplied mounting accessories. The forces of acceleration for accidents are sometimes huge. Incorrect mounted units are a big risk for the driver and the car passengers, during an accident.
8.Protect the unit from water and other liquids, which can enter the casing. A short circuit or even fire could be the result.
9.To prevent a short circuit, never insert or stick any metallic objects (such as coins or metal tools) into the unit.
10. Before you replace a defective fuse, try to find the cause for the short circuit. Please pay attention to the cables of the power supply! If the short circuit doesn't result from a failure of the power supply or wiring, you can replace the defective fuse with a new one (same values). If the short-circuit is still existing, please contact an authorized ZENEC dealer.
11.When connecting to any other device, read its user's guide for detailed safety instructions. Do not connect incompatible products.
12. Be careful not to drain the car battery while using the unit when the car engine is turned off. Because the unit uses a considerable amount of energy and the battery will be charged only while the engine is running, it might happen that the battery will discharge to a point where it's not longer possible to start the engine.
13. According to the law in different European countries, driving with monitors which are showing movies in the viewing range of the driver is not allowed, because the driver might be distracted from the traffic. Please respect the traffic regulations of your country, or you might face penalties in case of an accident or even loose your insurance coverage. Please pay attention to the volume inside your vehicle, because you are obliged to notice exterior sounds like police sirens etc.
14. Don't expose the unit to hard impacts. A mechanical or electrical malfunction of the unit could be the result.
15. Should any problems or questions occur during installation, please consult your ZENEC dealer/ importer.
16. This unit utilizes a laser class 1. Use of controls or adjustments or performance of procedures other than those specified herein may result in hazardous exposure to coherent light. Do not open covers and do not repair yourself. Refer servicing to qualified personnel.
3
FRONT PANEL BUTTONS
Front Panel
|
|
|
|
|
4

ZE -NC5011D
 FRONT PANEL BUTTONS
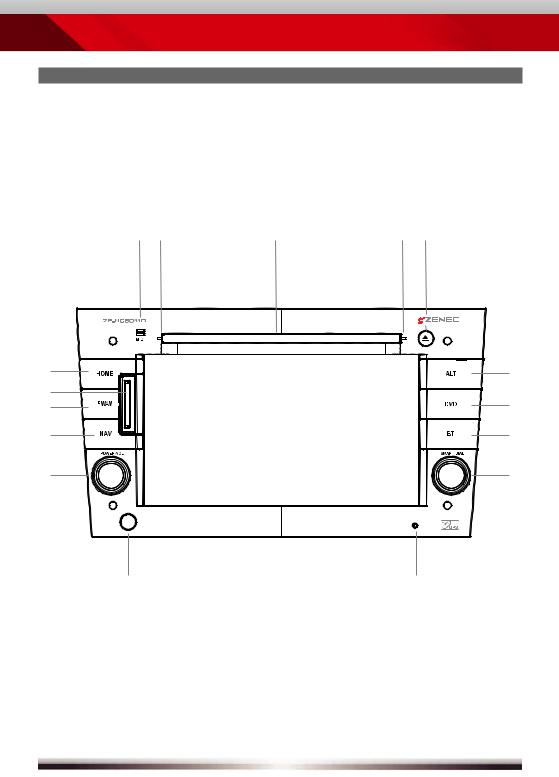
1.INTERNAL MICROPHONE
2.DISC INDICATOR
3.DISC SLOT
4.EJECT
Eject disc
5.HOME
Press to open Main Menu, hold to open EQ page
6.SD CARD SLOT
7.FM/AM
Press to switch to FM/AM source Press and hold to deand activate TA funktion
8.NAV
Press to switch between Navigation and playback page
Press and hold to fade in/out the infobars manually
9.PWR/VOL
Rotate to increase/decrease volume, press and hold to switch device ON/OFF
10.IR RECEIVER
11.RESET
Press to initiate a hardware reset
12.SMART DIAL
Rotate to move a cursor up and down
Press to confirm a selection
13.BT
Press to switch to BT source
14.DVD
Press to switch to DVD source
15.ALT
Funktion can be set in Setup Press and hold to open the OBC
5
BASIC OPERATION
POWER ON/OFF
Correctly installed, your device will power on together with the ignition. Ignition off: Device does not receive power. When the ignition is activated, you may also switch the device On and Off using the front panel power button.
SELECT A SOURCE
Enter main menu: - Via Touchscreen:
Touch the icon in the upper left corner of the screen. - Via "HOME" button:
Push "HOME" button to enter main menu. Operation at main menu:
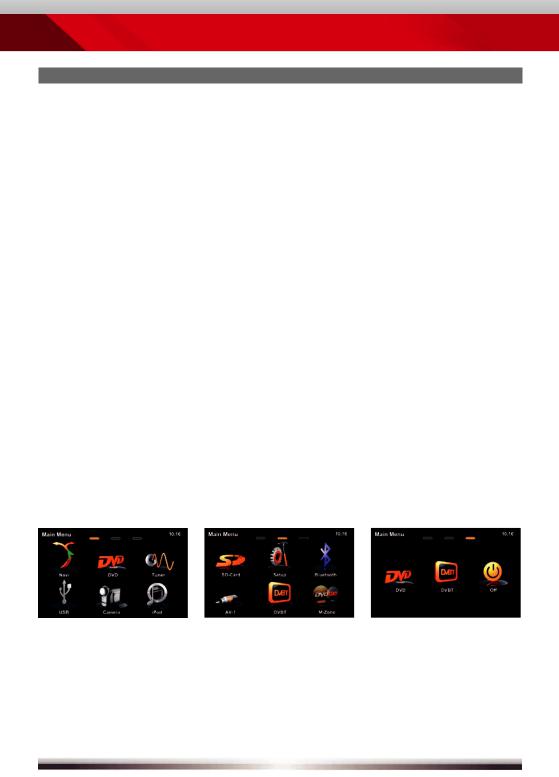
The main menu consists of three pages: 2 main pages and 1 M-Zone page. There are two basic ways to get there:
- Slide |
You can slide the two main pages back and forth. |
|
Just slide your fingertip onscreen in the respective direction. |
|
The M-Zone page (backseat area) cannot be accessed |
|
via sliding. |
- Bar |
Tap on any of the three oval markers on top of the screen to |
|
navigate through all three main menu pages. M-Zone included. |
Entering the main menu you have access to all playback sources and settings.
Main menu 1 |
Main menu 2 |
M-Zone page |
ADJUST LOCAL LANGUAGE
Tap center header button or slide to second main menu page. Choose SETUP > GENERAL > LANGUAGE and adjust to your likings. You might want to adjust some other basic settings. See chapter "Setup".
6

ZE -NC5011D
 BASIC OPERATION
Basic elements (all playback sources)
Display & control elements:
Indicates current source - Tap to enter main menu
Indicates when NAV infobar is available
-Tap to display NAV infobar
-Tap again to hide it
Connected cellphone battery status.
Cellphone GSM reception fi eld strength
Three infobar styles:
NAV infobar |
Playback infobar |
BT infobar |
NOTE:
Press and hold the NAV button to fade in/out the infobars manually. Touch the  icon to fade out the infobars manually.
NAV infobar is only available during active route guidance.
An incoming call or new playback information triggers the automatic pop-up of the other infobar types at NAV screen. They will fade out after
fi ve seconds.
7
RADIO MODE
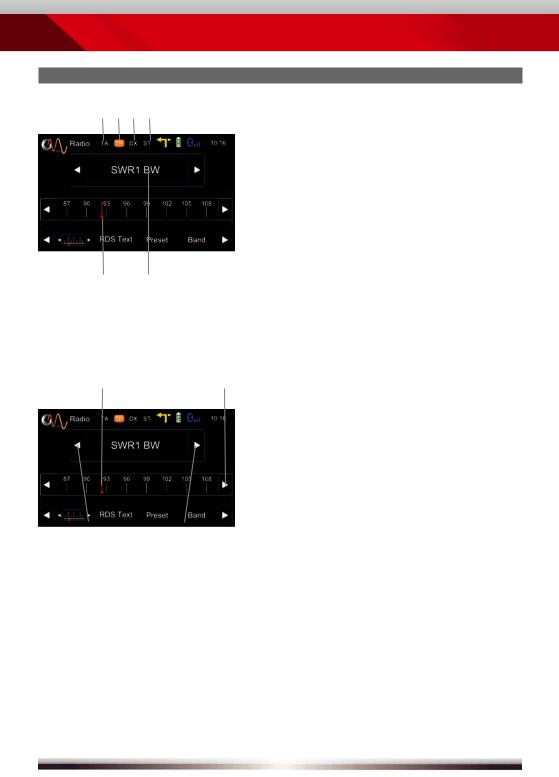
Display elements:
Red line marks current frequencyFrequency or station name
Traffi c announcement status
Traffi c announcements on carrier
LOC/DX status
Stereo reception status
|
|
|
|
|
|
|
|
|
|
Control elements: |
|
|
|
|
|
|
|
|
|
|
Scroll left |
|
|
|
|
|
|
|
|
|
|
Previous station |
|
|
|
|
|
|
|
|
|
|
Tap to select center display content |
|
|
|
|
|
|
|
|
|
|
|
|
|
|
|
|
|
|
|
|
|
Next station |
|
|
|
|
|
|
|
|
|
|
|
|
|
|
|
|
|
|
|
|
|
Scroll right |
|
|
|
|
|
|
|
|
|
|
|
|
|
|
|
|
|
|
|
|
|
100 kHz down |
|
|
|
|
|
Drag to adjust frequency |
|||||
|
|
|
|
|
|
|
|
|
|
|
100 kHz up
8
ZE -NC5011D
RADIO MODE
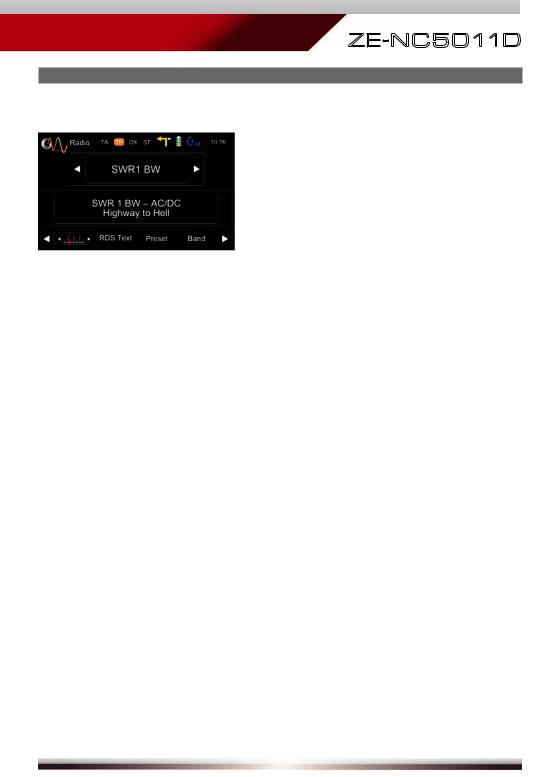
RDS text allows a radio station to transmit free-form textual information that can be either static e.g. station slogans or in sync with the programming such as the title and artist of the currently playing song or even short ads. Availability depends on region, reception quality and carrier.
9
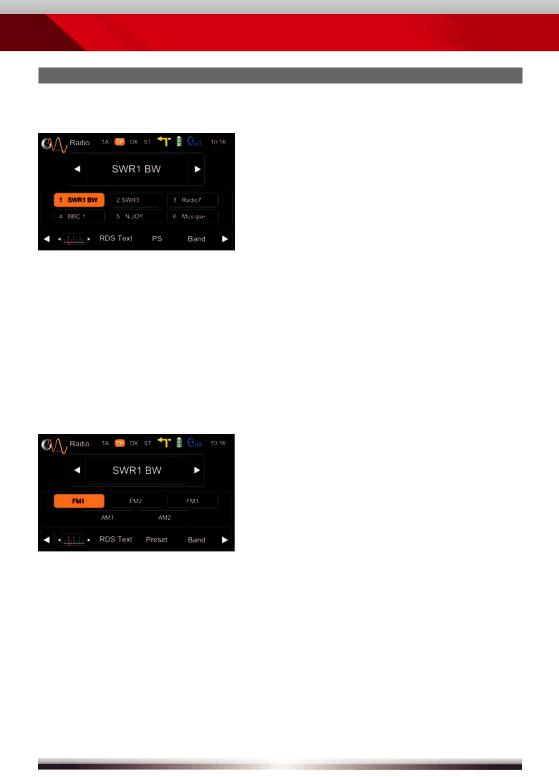
RADIO MODE
Select preset or save a preset. Press and hold a center button to set a new frequency as preset.
To select a radioband tap on a center button.
10
ZE -NC5011D
 RADIO MODE
Lower bar options:
The selected item is highlighted in orange onscreen:
AF ON/OFF: When activated, AF function automatically switches to an alternative frequency (AF) of your chosen station, in order to always offer the best possible reception quality.
TA ON/OFF: When activated, the radio temporarily switches, for the duration of the traffi c announcement, to tuner mode.
AS Searches for the six strongest stations and saves them as preset.
SCAN Intro-scan of all stations in reception range. You can hear each station for a short moment. Lock to the one you like by pressing scan again.
REG ON/OFF: At certain daytimes some stations divide their program into regional subprograms. The REG function prevents your receiver from switching to an alternative frequency with different content.
LOC Touch LOC/DX to omit or allow reception of stations with weak signals.
/DX If LOC is activated it will exclusively fi nd strong stations.
NOTE:
This unit features an RDS tuner. RDS is a system which transmits data on top of the FM radio signal. Availability and content of the RDS data depend on the respective broadcast station and its signal strength. RDS does, for example, transmit alternative frequencies, which allow for frequency changes without user interaction. AM band doesn´t support RDS functions.
You need to have the AF function activated in order to use the RDS feature. However, the AF function is deactivated ex factory. We recommend to activate it directly after mounting/installation of your device.
11
PLAYBACK |
IPOD/USB/SD/DISC |
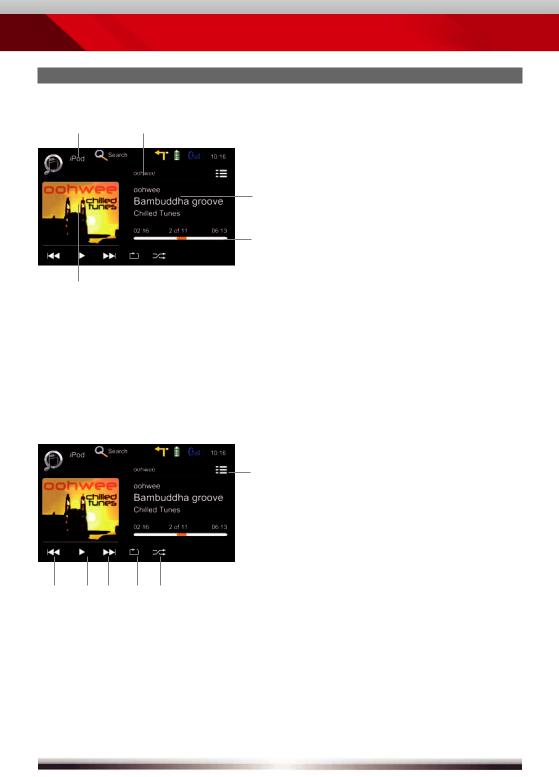
Playback page:
Display elements:
Source
Current folder/playlistID3 tag info
Progress barAlbum Art
Control elements:
Previous trackPlay/PauseNext track
Repeat
Shuffl e
Switch to playlist page
12
|
|
ZE-NC5011D |
PLAYBACK |
IPOD/USB/SD/DISC |
|
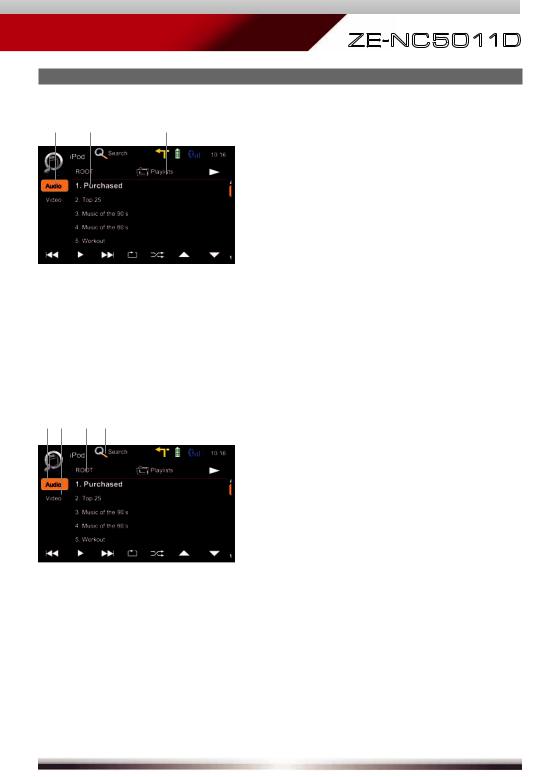
Playlist page iPod: |
|
|
|
|
|
|
|
Display elements: |
|
|
iPod mode |
|
|
Track/folder/playlist |
|
|
Current folder |
|
|
|
|
|
|
|
Control elements: |
||||||
|
|
|
|
|
|
|
|
|
|
|
|
||
|
|
|
|
|
|
|
|
|
|
|
|
Previous track |
|
|
|
|
|
|
|
|
|
|
|
|
|
||
|
|
|
|
|
|
|
|
|
|
|
|
||
|
|
|
|
|
|
|
|
|
|
|
|
|
|
|
|
|
|
|
|
|
|
|
|
|
|
|
Play/Pause |
|
|
|
|
|
|
|
|
|
|
|
|
|
Next track |
|
|
|
|
|
|
|
|
|
|
|
|
|
Repeat |
|
|
|
|
|
|
|
|
|
|
|
|
|
Shuffl e |
|
|
|
|
|
|
|
|
|
|
|
|
|
|
|
|
|
|
|
|
|
|
|
|
|
|
|
Cursor up |
|
|
|
|
|
|
|
|
|
|
|
|
|
Cursor down |
|
|
|
|||||||||||
|
|
|
|
|
|
|
|
|
|
|
|
|
Switch to playback page |
|
|
|
|
|
|
|
|
|
|
|
|
|
Switch to iPod audio mode |
|
|
|
|
|
|
|
|
|
|
|
|
|
Switch to iPod video mode |
|
|
|
|
|
|
|
|
|
|
|
|
|
Go to root directory |
Search
Folder/playlist up
13
PLAYBACK |
IPOD/USB/SD/DISC |
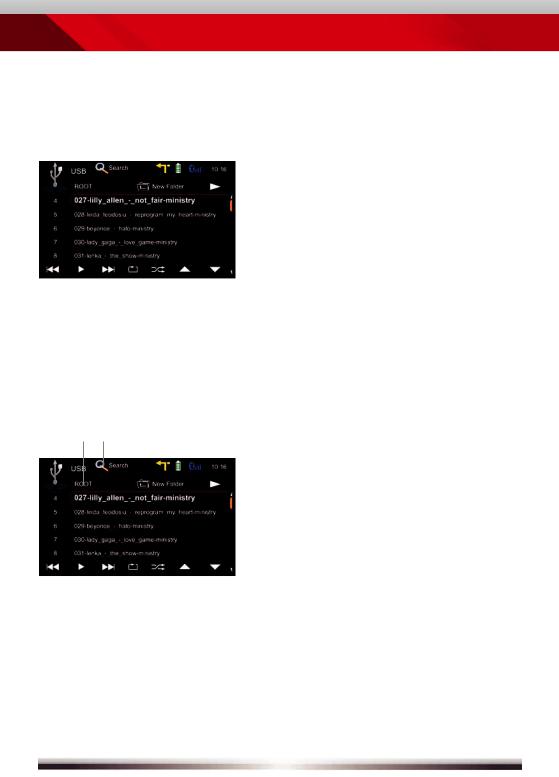
Playlist page USB/SD/Disc: |
|
|
|
|
|||
|
|
|
|
|
Display elements: |
|
|
|
|
|
Track index |
|
|
|
|
|
|
|
|
|
|
|
Track/folder |
|
|
|
|
|
Current folder |
|
|
|
|
|
|
|
|
|
Control elements: |
||||
|
|
|
|
|
|
|
|
|
|
|
|
||
|
|
|
|
|
|
|
|
|
|
|
|
Previous track |
|
|
|
|
|
|
|
|
|
|
|
|
|
||
|
|
|
|
|
|
|
|
|
|
|
|
||
|
|
|
|
|
|
|
|
|
|
|
|
|
|
|
|
|
|
|
|
|
|
|
|
|
|
|
Play/Pause |
|
|
|
|
|
|
|
|
|
|
|
|
|
Next track |
|
|
|
|
|
|
|
|
|
|
|
|
|
Repeat track |
|
|
|
|
|
|
|
|
|
|
|
|
|
Shuffl e |
|
|
|
|
|
|
|
|
|
|
|
|
|
|
|
|
|
|
|
|
|
|
|
|
|
|
|
Cursor up |
|
|
|
|
|
|
|
|
|
|
|
|
|
Cursor down |
|
|
|
|
||||||||||
|
|
|
|
|
|
|
|
|
|
|
|
|
Switch to playback page |
Go to root directorySearch
Folder up
14
ZE -NC5011D
PLAYBACK |
IPOD/USB/SD/DISC |
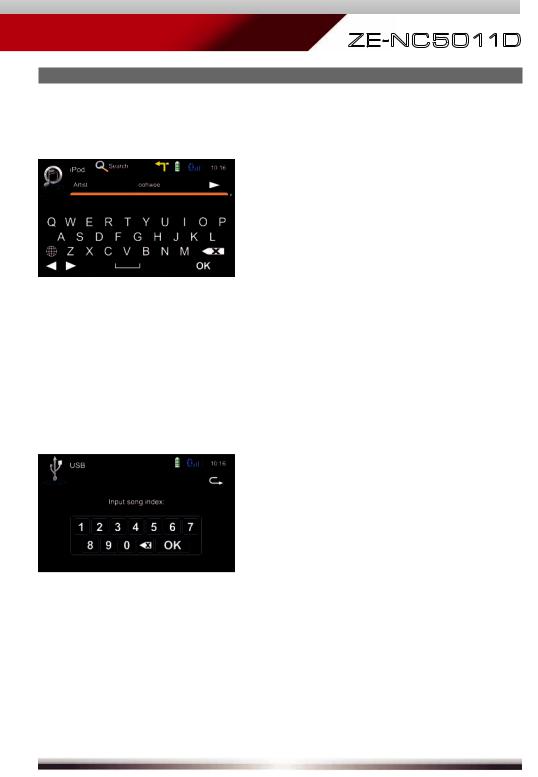
Search function:
iPod search:
Tapping on  Search pops up an alphabetic keyboard, allowing you to enter an initial letter. Alphabetic search is unique for iPod mode.
Tapping on  pops up the keyboard option allowing you to select your preferred keyboard language.
USB/SD/Disc modi search:
Tapping on  Search pops up an numeric keyboard, allowing you to enter track numbers. Numeric search is unique for USB/SD/Disc modi.
15
PLAYBACK |
IPOD/USB/SD/DISC |
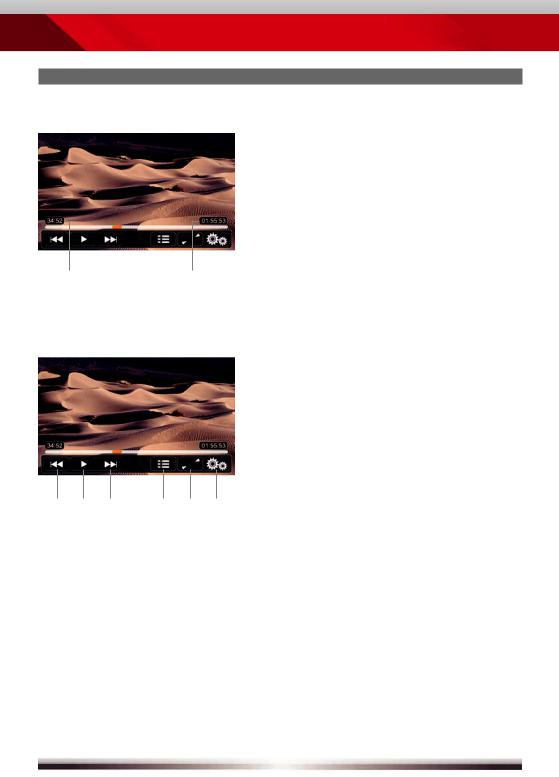
Elements to control playback of video fi les:
Display elements:
Current temporal position in trackTotal duration of track
Control elements:
Previous title/track/chapterPlay/Pause
Next title/track/chapter
To playlist/root menu of DVDFull screen mode
DVD settings
|
|
16

|
ZE-NC5011D |
PLAYBACK |
IPOD/USB/SD/DISC |
USB/SD/Disc mode:
Make sure your mass storage device is FAT32 formatted.
Depending on directory structure and contents the total number of available folders is limited.
Sorting and handling speed depends on speed and capacity of the mass storage used, as well as on the amount of stored data.
Connected USB hard disks have to be formatted with FAT32 and are only allowed to consume a maximum of 400mA (peak) current. Otherwise they must be considered incompatible and can´t be used with the device.
Only iPod mode supports album art.
iPod mode:
Depending on the size of the search list, results may be delayed during first search. That is due to the iPod, which takes a moment to setup and provide the search index.
iPods/iPhones display, depending on content and sorting, an extended set of information on the playlist page.
NOTE:
See www.zenec.com for:
Compatible fi le formats and their possible restrictions.
iPod/iPhone compatibility list.
17
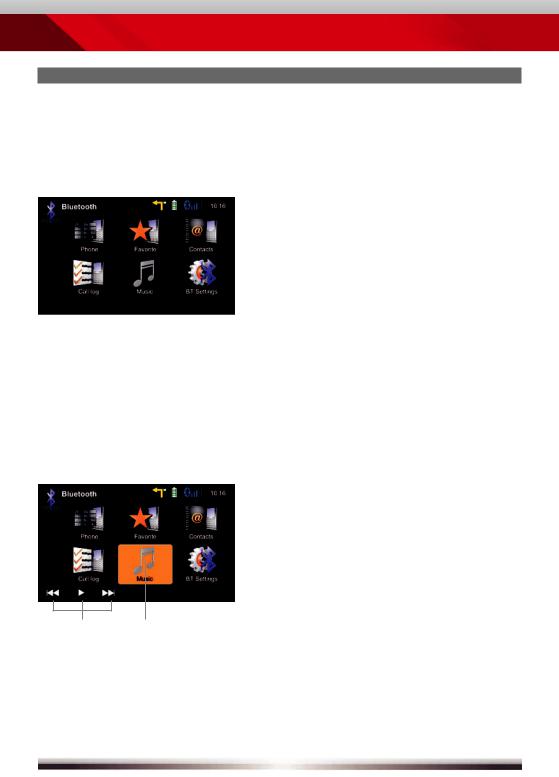
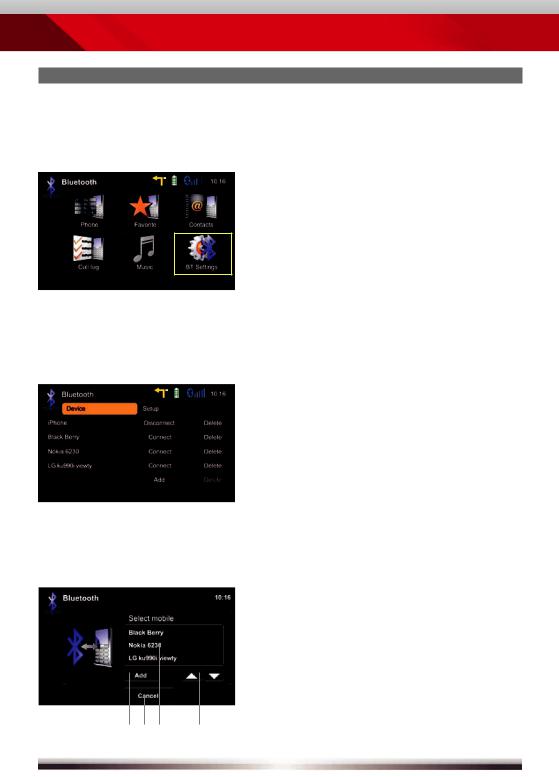
BLUETOOTH MODE
Bluetooth main menu:
Tap icon to enter
|
|
|
|
|
|
|
|
|
Control elements: |
|
|
|
|
|
|
|
|
|
|
Onscreen keypad |
|
|
|
|
|
|
|
|
|
|
||
|
|
|
|
|
|
|
|
|
Call Log |
|
|
|
|
|
|
|
|
|
|
Favourites |
|
|
|
|
|
|
|
|
|
|
||
|
|
|
|
|
|
|
|
|
Audiostreaming (A2DP) toggle |
|
|
|
|
|
|
|
|
|
|
Contacts |
|
|
|
|
|
|
|
|
|
|
Bluetooth settings |
|
|
|
|
||||||||
|
||||||||||
A2DP (de-)activation:
Control elements:
Control Playback
A2DP On/Off (highlighted=ON)
18
ZE -NC5011D
BLUETOOTH MODE
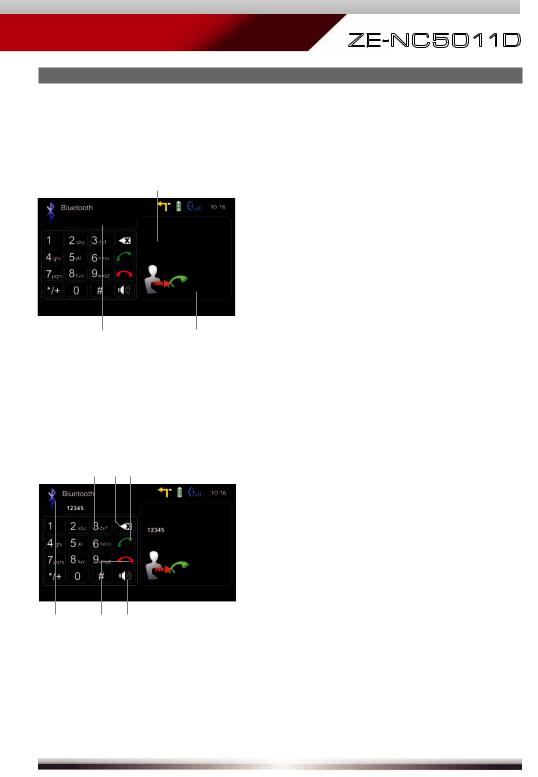
Accept call, dial, hang up, switch between calls:
Caller I
Caller II
Display elements:
First incoming callSecond incoming callDialled number
Control elements:
Keypad
Deletes last digit
Pick up call/Switch to second call
Toggle to shift call between handsfree and mobile phone (privacy mode)
Hang up active call/Back to fi rst call
Back to BT main menu
19
BLUETOOTH MODE
Pairing a mobile phone:
1 Enter BT settings > Device
2
3
Tap on "Add" to trigger a search for BT devices.
Choose your mobile phone from the list or retry searching. Press "Add".
Control elements:
Add a mobile phone and input PIN for pairing
Back to BT settings
Tap to select mobile phoneBrowse list (up/down)
20
ZE -NC5011D
BLUETOOTH MODE
4 Enter pin code and tap OK or retry.
Pin code
Deletes the last digit
Acknowledge pincode and continue
5 Upon request enter identical pin code on your mobile and acknowledge. You should now get a screen saying "Device successfully paired".
NOTE:
If you are trying to pair more than one cell phone:
Switch off the "auto connect" function while pairing additional mobile phones with the device.
Use different pin code twins for each paired cell phone.
21
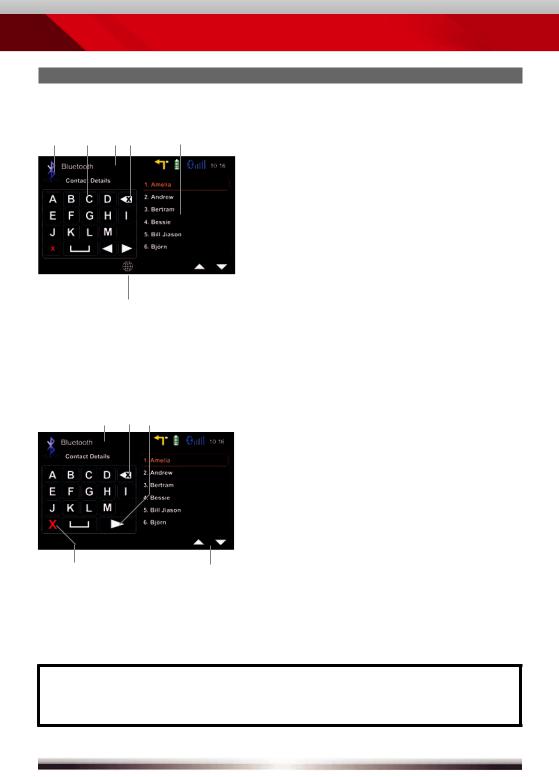
BLUETOOTH MODE
Contacts - Manage phonebook:
Search for an entry:
Control elements:
Back to BT main menu
Tap a contact number to start a callSearch
Tap on star to save as favouriteChoose contact name from list
Select your preferred keyboard language
No function, when keypad is activeQuit keypad
Display input
Tap to delete last characterSwitch to next page of keypad
NOTE:
You may search for up to 15 leading characters.
22
ZE -NC5011D
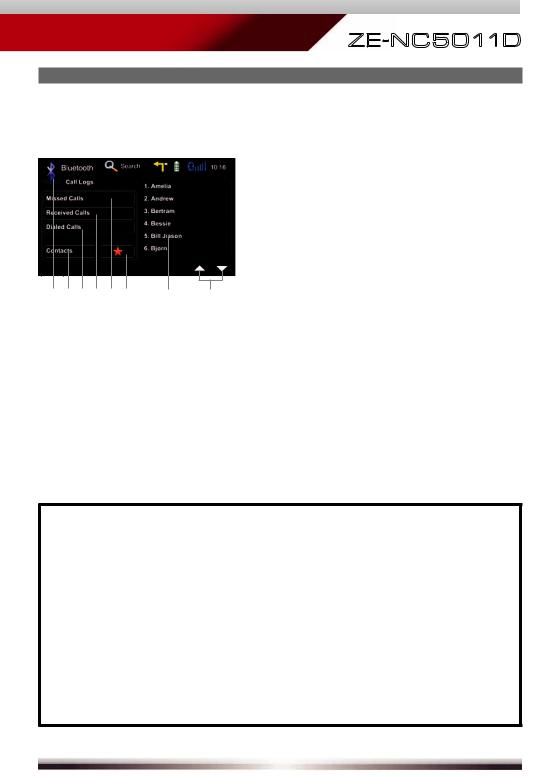
BLUETOOTH MODE
Manage phonebook:
Control elements:
Go back to BT main menuGo to contacts page
Tap to display outgoing call listTap to display incoming call listTap to display missed call listGo to favourites page
Tap on entry to callPage up/down
NOTE:
The synchronisation, the transferring, the sorting as well as the display of the phone book entries depend on the mobile phone brand and model. If the synchronisation doesn't work properly, disconnect the cell phone and repeat the pairing process.
If automatic phone book synchronisation does not work, consult the manual of your mobile phone. Some mobile phones require explicit activation of that function.
After entering the BT main menu press & hold either the Contacts or Call-Log icon in order to force a resync of the entire phone book (if you have experienced syncing problems).
23
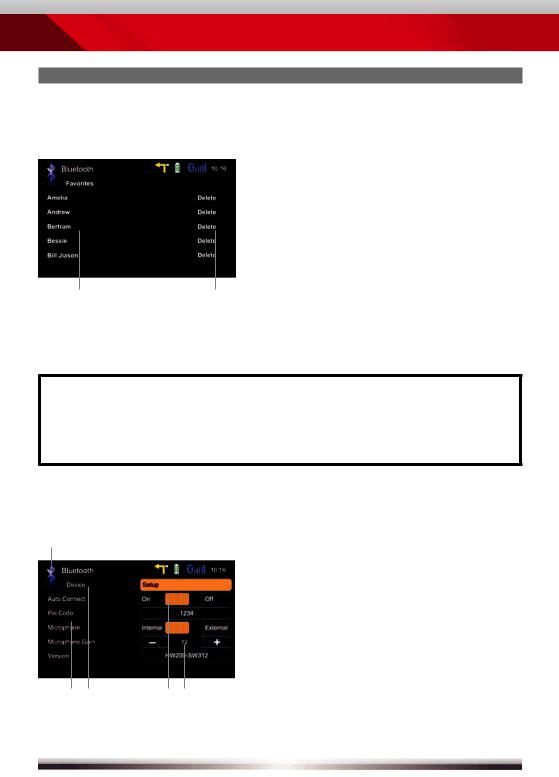
BLUETOOTH MODE
Manage favourites:
Control elements:
Tap on entry to call favouriteDelete favourite
NOTE:
Be aware that solely terminating the connection, or deleting a connected mobile phone, does not affect the list of favorites. Favourites have to
be explicitly deleted one by one.
Setup settings:
Back to BT main menuOptions
BT device settingsMicrophone selection
Tap +/- to adjust microphone gain
|
|
24

ZE -NC5011D
 BLUETOOTH MODE
NOTE:
If your mobile phone is compatible and still does not appear in the device list, make sure Bluetooth is turned on and set to "visible for all devices".
Bluetooth connections usually work within a range of approx. 8 m. Obstacles in the way may shorten the distance.
You can pair up to five cell phones, and synchronise up to a thousand phonebook contacts each.
In order to use the built-in handsfree device you need to pair your mobile phone first.
It cannot be guaranteed, that all mobile phones can be paired and that all functions will work.
For the "BT compatibility list" of tested and compatible mobile phones as well as the latest software updates look out on www.zenec.com.
25
NAVIGATION MODE
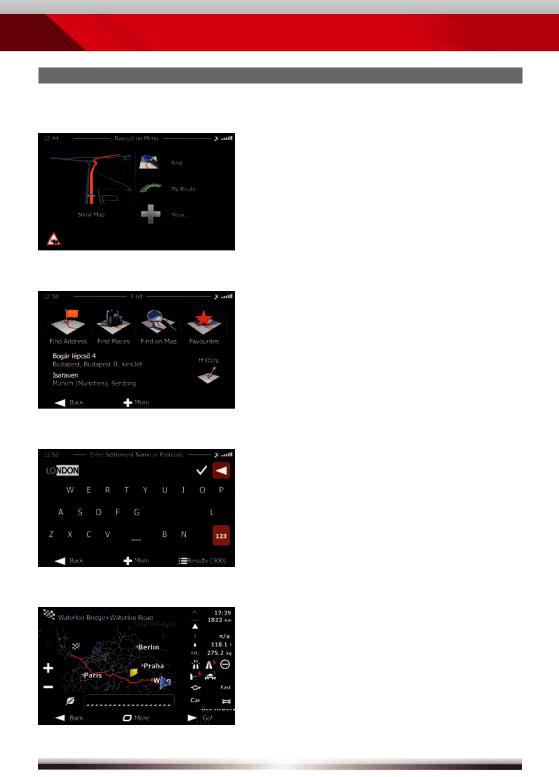
How to input a destination and start a route guidance:
Tap on "Find".
Choose your preferred destination search method. Here, in our example, choose "Find address".
Type in a city, street name, house number and confirm each step
by tapping  .
.
The program is now calculating the desired route. Once route calculation has completed just tap "GO!" to start route guidance.
26

ZE -NC5011D
 NAVIGATION MODE
NOTE:
For operation and detailed description of navigation features, please refer to the included, separate navigation manual.
You may listen to any playback source during navigating.
The navigation software automatically manages volume levels during voice guidance.
If you change the volume level during voice guidance, the chosen volume level gets stored for later route guidance.
Audio playback is, during voice guidance, capped to volume 10. If the preset audio volume is below 10, it will be muted.
27
SETUP: MAIN / FIRST SETTINGS
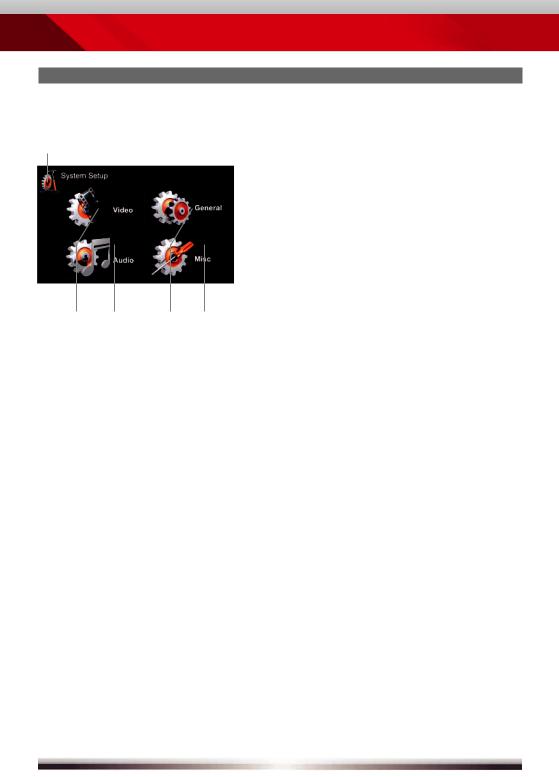
Main setup screen:
Control elements:
Return to the previous menu. Works with all four submenus.
See chapter Setup Video.See chapter Setup Audio.See chapter Setup General.See chapter Setup Misc.
Settings to be made directly after mounting and initial startup:
Set OSD language: |
Go to Setup>General>Language |
|
to choose your desired OSD |
|
language. Animated picture visualises |
|
your setting. |
Set Reverse Camera: |
Go to Setup>General>Driver Assist |
|
Needs to be enabled once in order to |
|
use the camera. Animated picture |
|
visualises your setting. |
28
ZE -NC5011D
 SETUP: IMPORT/EXPORT SYSTEM SETTINGS
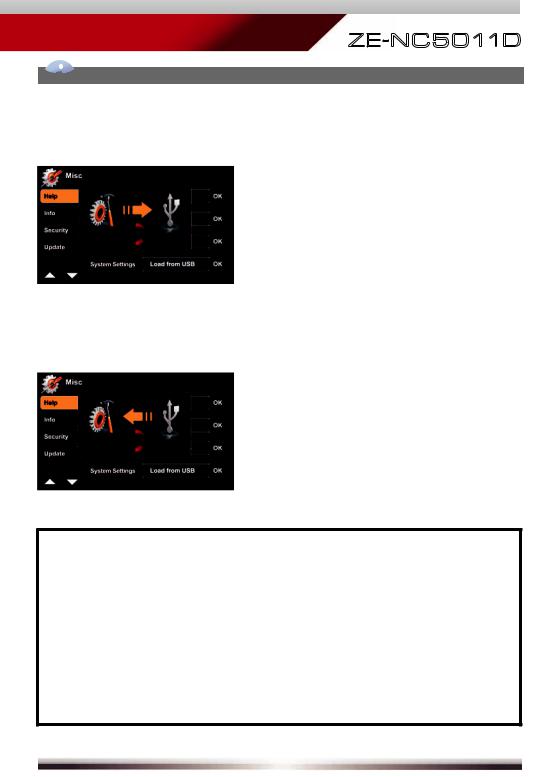
Go to Setup>Misc>Help Export system settings:
1.Format USB flash drive with FAT32.
2.Connect USB flash drive to device.
3.Tap "OK", at System Settings-Export option, to launch export.
Import system settings:
1.Connect USB flash drive to device.
2.Tap "OK", at System Settings-Import option, to launch import.
3.Restart device upon import completion.
NOTE:
Make sure the USB flash drive has been FAT32 formatted.
Refrain from manually modifying the generated export file. Re-import has to rely on proper file integrity.
After adding new functions, by means of a system update, they will always be intialised with standard default values. That compensates for lacking values from the import file content.
After a firmware update, check the update installation instructions for notes on system settings import and take them into consideration.
29
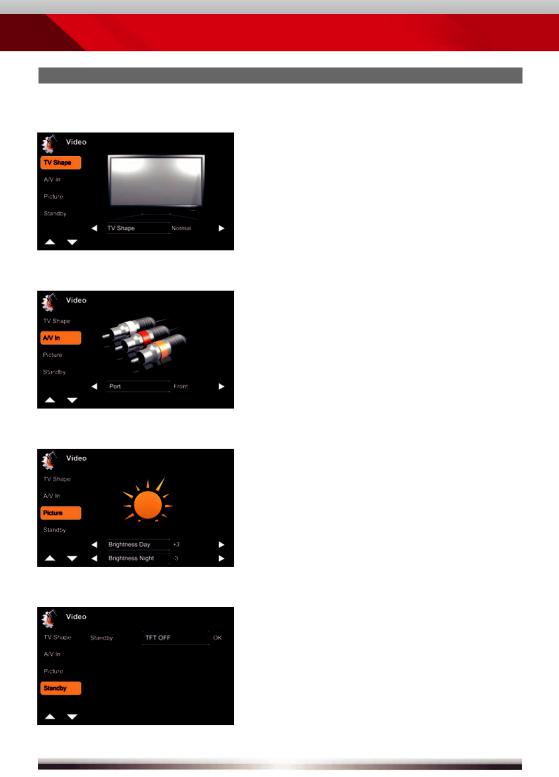
SETUP: VIDEO
Animated picture visualises TV shape settings.
Choose between front and rear
A/V In port. A/V In is equipped with a
PAL/NTSC auto switch.
Animated picture visualises your setting during adjusting TFT screen brightness.
Day-/Night TFT screen brightness is controlled by GPS time signal.
Standby activation turns screen OFF. Apart from that, the device operates in a normal manner.
Tap somewhere on screen to reactivate it.
30
 Loading...