

Page 1

User Guide
ZEISS Axiocam 208 color / 202 mono
Microscope Camera
Page 2

Page 3

Content ZEISS
Content
1 About this guide ................................................................................................... 5
1.1 Introduction ................................................................................................. 5
1.2 Explanation warning messages and additional information ........................... 5
1.3 Text formats and conventions....................................................................... 6
2 Safety .................................................................................................................... 7
2.1 Prevention of hazards ................................................................................... 7
2.2 Limitation of liability ..................................................................................... 8
2.3 Warranty ...................................................................................................... 8
2.4 Intended use ................................................................................................ 8
2.5 Warning labels ............................................................................................. 8
2.5.1 Position of the warning labels ............................................................ 9
2.5.2 Meaning of the warning labels........................................................... 9
3 Technical data....................................................................................................... 10
3.1 Axiocam 208 color ....................................................................................... 10
3.1.1 Specifications..................................................................................... 10
3.1.2 Spectral sensitivity.............................................................................. 12
3.2 Axiocam 202 mono...................................................................................... 12
3.2.1 Specifications..................................................................................... 12
3.2.2 Spectral sensitivity.............................................................................. 14
3.3 Applied standards and regulations ................................................................ 14
3.3.1 Symbols on the camera...................................................................... 15
3.3.2 Symbols on the adapter ..................................................................... 15
4 Shipment............................................................................................................... 19
4.1 Axiocam 208 color ....................................................................................... 19
4.2 Axiocam 202 mono...................................................................................... 20
5 Connecting the camera......................................................................................... 21
5.1 Camera layout and accessories ..................................................................... 21
5.1.1 Camera connections .......................................................................... 21
5.1.2 Camera controls ................................................................................ 21
5.1.3 Accessories ........................................................................................ 22
5.2 Mounting the camera to the microscope ...................................................... 24
5.3 Connecting the camera to the power supply................................................. 25
5.3.1 Powering the camera via microscope ................................................. 25
5.3.2 Powering the camera via mains supply ............................................... 25
5.4 Connecting the camera to a display (without PC) .......................................... 26
User Guide ZEISS Axiocam 208 color / 202 mono | en-US | Rev.1 | 426570-7011-001 3
Page 4

Content ZEISS
5.5 Connecting the camera to a network............................................................ 26
5.5.1 Connecting camera via Ethernet ........................................................ 27
5.5.2 Connecting camera via Wi-Fi adapter................................................. 27
5.6 Connecting the camera to a certified PC ....................................................... 28
5.7 Function indicator signals ............................................................................. 29
6 On Screen Display (OSD) menu............................................................................. 30
6.1 Opening the OSD menu................................................................................ 30
6.1.1 Opening menu via camera's operator panel ....................................... 30
6.1.2 Opening menu via microscope stand buttons..................................... 30
6.1.3 Opening menu via network browser .................................................. 31
6.2 Home menu ................................................................................................. 31
6.3 Settings menu .............................................................................................. 34
6.3.1 Image Settings menu ......................................................................... 35
6.3.2 Microscope System menu .................................................................. 36
6.3.3 Operating System menu..................................................................... 38
7 Installing software and drivers ............................................................................ 42
7.1 Installing software on PC .............................................................................. 42
7.2 Installing software on iPad............................................................................ 42
8 Acquiring images and videos ............................................................................... 43
8.1 Introduction ................................................................................................. 43
8.2 Basic procedure using operator panel ........................................................... 43
8.3 Basic procedure using OSD menu ................................................................. 43
8.4 Image acquisition with Labscope .................................................................. 44
9 Troubleshooting.................................................................................................... 45
9.1 ZEN software................................................................................................ 45
9.2 Camera ........................................................................................................ 46
9.3 Labscope...................................................................................................... 47
10 Maintenance plan................................................................................................. 48
10.1 Optical system .............................................................................................. 48
10.2 Cleaning the infrared filter or protective glass ............................................... 48
10.3 Updating the firmware ................................................................................. 49
11 Disposal and recycling.......................................................................................... 50
User Guide ZEISS Axiocam 208 color / 202 mono | en-US | Rev.1 | 426570-7011-001
4
Page 5

1 About this guide | 1.1 Introduction ZEISS
1 About this guide
1.1 Introduction
Welcome to the Axiocam 208 color / Axiocam 202 mono user guide.
These cameras are multi-functional digital CMOS cameras for use in light microscopy applications.
To make it easier for you to set up the camera, please follow the instructions in these chapters
step by step.
Content
Chapter Content
About this guide Introduction and overview of this manual.
Safety Important information on the safe handling of the camera.
Read this chapter before unpacking and operating the
camera.
Technical data Here you will find your camera's technical data.
Shipment The contents of delivery and optional attachments will be
described here.
Connecting the camera In this chapter, you will find detailed instructions on con-
necting and using the camera.
OSD menu This chapter lists the functions of the On Screen Display
(OSD) menu.
Installing software and drivers Here you will learn how to install the software and camera
drivers.
Acquiring images This chapter provides the basics of image acquisition.
Troubleshooting In this chapter, we have listed some solutions to various
problems. If you are still unable to solve your problem, contact ZEISS support.
Maintenance This chapter describes some measures for the maintenance
and care of your camera. In case of greater damage, always
contact ZEISS support.
Disposal and Recycling Important instructions for disposal and recycling.
1.2 Explanation warning messages and additional information
The safety notes in this document follow a system of risk levels, defined in the following manner:
CAUTION
Risk of personal injury
CAUTION indicates a potentially hazardous situation which, if not avoided, may result in minor
or moderate personal injury.
User Guide ZEISS Axiocam 208 color / 202 mono | en-US | Rev.1 | 426570-7011-001 5
Page 6

1 About this guide | 1.3 Text formats and conventions ZEISS
NOTICE
Risk of property damage
NOTICE indicates a property damage message. In addition, NOTICE is used for data loss or corrupt data.
Info
Indicates useful additional information. It helps you to make your daily work easier, but it is optional. There is no risk for personal injury or property damage involved.
1.3 Text formats and conventions
Bold texts
Bold is used for texts within the software like names of GUI elements (e.g. buttons, sections,
tools, menus), buttons on a device, and product names (e.g. MTB 2011).
Prerequisite
Font type "Courier"
Used for programming code, e.g. macro code as well as for anything that you would type literally when programming, including keywords, data types, constants, method names, variables,
class names, and interface names.
Shortcuts and key commands
Shortcuts are written like Crtl+C, meaning you should press Crtl-Key and C-Key simultaneously.
Procedures
The following formats are used for procedures (instructive sequences):
ü
stands for a condition which must be fulfilled before starting with the action.
1. stands for a single step the user is asked to perform.
Web-Links
Web links appear in blue text. To open the linked website, simply click on the link. Please make
sure you have an internet connection established before opening the web link.
User Guide ZEISS Axiocam 208 color / 202 mono | en-US | Rev.1 | 426570-7011-001
6
Page 7

2 Safety | 2.1 Prevention of hazards ZEISS
2 Safety
2.1 Prevention of hazards
The Axiocam 208 color and Axiocam 202 mono have been manufactured and tested by ZEISS according to the regulations specified in CE and has left the manufacturer’s premises in perfect
working order. In order to ensure that this condition is maintained and to avoid any risks when
operating the system, the user must comply with any notes and warnings contained in this manual. The manufacturer shall be exempt from statutory liability for accidents should the operator
fail to observe the safety regulations.
CAUTION
Personal Injury
To avoid personal injury, read and adhere to the safety notes below.
4 To avoid the risk of fire or explosion, do not use the camera near inflammable liquids or
gases.
4 Setup, expansions, re-adjustments, alterations, and repairs must be carried out only by
persons who have been authorized by ZEISS.
4 Do not allow any cables, particularly power cords, to trail across the floor, where they can
be snagged by people walking past.
4 Protect the cables from excessive heat (e.g. halogen lamps, microscope fluorescence illu-
mination).
4 To avoid injuries due to potentially high surface temperatures, do not touch the camera's
surface for a prolonged time.
4 Do not position the equipment in a way that makes it difficult to operate or disconnect the
device.
NOTICE
To avoid equipment damage, data loss, or corrupted data, read and adhere to the safety notes
below.
4 Protect the camera against mechanical impact. External damage may affect the operation
of inner components.
4 Keep chemicals and fluids away from the camera.
4 Make sure there is sufficient ventilation of the camera head. Avoid direct exposure to sun-
light and locations near heat sources (radiators, stoves). Overheating can cause noisy images.
4 Use the camera in a clean and dry location.
4 Attach all connectors firmly and securely.
4 Use only the accessories supplied by ZEISS, when applicable.
4 Use only normal microscope cleaning material to clean the camera housing.
4 Contact your local ZEISS service organization if a repair is necessary. Do not disassemble
the camera by yourself, otherwise the warranty will be lost.
4 Save all your data, such as images, measurement data, archives, reports, forms and docu-
ments, at regular intervals on an external storage medium. Otherwise it cannot be avoided
that access to this data may be lost as a result of operational errors or hardware defects.
ZEISS accepts no liability for consequential damage resulting from insufficient data protection.
User Guide ZEISS Axiocam 208 color / 202 mono | en-US | Rev.1 | 426570-7011-001 7
Page 8

2 Safety | 2.2 Limitation of liability ZEISS
2.2 Limitation of liability
No warranty shall be assumed by ZEISS during the warranty period if the equipment is operated
without observing the safety regulations. In any such case, ZEISS shall be exempt from statutory liability for accidents resulting from such operation.
2.3 Warranty
ZEISS shall be exempt from any warranty obligations should the user fail to observe the safety regulations. ZEISS only guarantees the safety, reliability, and performance of the system if the safety
notes are closely observed.
2.4 Intended use
The Axiocam 208 color and the Axiocam 202 mono are high definition cameras for color and
monochromatic imaging, respectively. They are suitable for use as accessories for educational and
routine microscopy in laboratory environments and for use by trained laboratory personnel. The
cameras have been designed to be used in the field of light microscopy for general observation,
routine work, and simple applications in which a sufficient amount of light is available.
Info
These cameras should only be used for training and research. The images / videos from these
cameras must not be used for the direct generation of diagnostic results.
2.5 Warning labels
All points that may pose special risks are additionally marked by warning labels (pictograms) on
the camera. These warning labels indicate possible dangers. They are part of this instruction manual. They are to be kept in a clean and legible state. Warning labels that are damaged or no
longer clearly legible must be replaced immediately. Always observe all warning labels on the
camera.
User Guide ZEISS Axiocam 208 color / 202 mono | en-US | Rev.1 | 426570-7011-001
8
Page 9

2 Safety | 2.5 Warning labels ZEISS
1
1
2.5.1 Position of the warning labels
Fig.1: Warning labels on the camera
2.5.2 Meaning of the warning labels
The meaning of each warning label is explained below.
No. Symbol Description
Tab.1: List of attached Warning Labels
Follow the notes in the instruction manual
and the supplied documents. For more information, see Prevention of hazards [}7].
User Guide ZEISS Axiocam 208 color / 202 mono | en-US | Rev.1 | 426570-7011-001 9
Page 10

3 Technical data | 3.1 Axiocam 208 color ZEISS
3 Technical data
3.1 Axiocam 208 color
3.1.1 Specifications
Features Values
Sensor type CMOS sensor with rolling shutter
Sensor Size Diagonal 8.1 mm (1/2.1")
Effective Sensor Pixel Count 8.3 Megapixels: 3840 (H) x 2160 (V)
Pixel size 1.85 μm
Spectral Sensitivity Approx. 400 nm – 700 nm, IR filter RGB
Bayer color mask
Selectable Resolution 3840 x 2160 (Ultra HD, 4K)
1920 x 1080 (Full HD, 1080p)
Gain (Signal Amplification) 1x – 22x adjustable
Digitization 3 x 8 bit / pixel
Exposure Time Range (Integration time) 0.06 ms - 1 s
Image enhancement functions Active denoising, active sharpening, auto
white balance, HDR
Automatic features Automatic exposure and gain regulation at
Ultra HD resolution (4K), fast live image under low light conditions
Status-LED for camera Color coded operation status
Interfaces HDMI for monitor
USB 3.0 Type-C for USB hub, flash drive, WiFi adapter or PC connection
Ethernet (RJ45) for LAN connection
Micro-D for power and communication with
dedicated stands
Wi-Fi compatibility Via USB Wi-Fi adapter and router
Optical Interface C-mount
Camera control buttons for stand-alone 1x Image capture
Stand-alone operation:
§ Image storage format
§ Video stream format
§ Live frame rate via HDMI
User Guide ZEISS Axiocam 208 color / 202 mono | en-US | Rev.1 | 426570-7011-001
1x OSD (On Screen Display menu)
1x Camera factory reset
§ tiff or jpg
§ mp4
§ 30 fps @ Ultra HD (4K)
10
Page 11

3 Technical data | 3.1 Axiocam 208 color ZEISS
Features Values
Maximum live frame rate at configuration:
§ HDMI
§ Ethernet
§ USB 3.0
Maximum live frame rate at configuration:
§ HDMI
§ Ethernet
§ USB 3.0
Max. file size per image .tiff up to: 24 MB (not content dependent)
Size/ Weight Approx. 135 x 97 x 54mm / 590 g
Housing Blue painted aluminum and cooling fins on
Registration CE, RoHS, CSA
Power supply via Micro-D interface
@ 4K (3840 x 2160)
§ 30fps
§ -
§ 15 fps
@ 1080p (1920 x 1080)
§ 30 fps
§ 30 fps
§ 27 fps
.jpg up to: approx. 0.5 MB – 3.3 MB (content
dependent)
the top plate
Power consumption Max. 9 W (24 V DC, 0.75 A)
Environmental conditions for storage and operation
Environmental conditions for transport in
packaging
Operating systems:
§ for ZEN
§ for Labscope
Supported Application Software ZEN blue v3.0 and higher (includes ZEN lite/
Order number 426570-9000-000
+10°C to +40°C, max. 75% relative air humidity at 35°C, no condensation, free air circulation required, indoor use
-40 °C to +70 °C, max. 75 % relative air humidity at 35 °C
§ Windows 10 x64 Prof./Ultimate and higher
§ Windows 7/10 x64 Prof./Ultimate and iOS
v12 and higher
pro/system)
Labscope v2.9 (win) and v2.8.3 (iOS) and
higher
Info
Computer hardware, operating system, and software may decrease the frame rates. All specifications are subject to change without notice.
User Guide ZEISS Axiocam 208 color / 202 mono | en-US | Rev.1 | 426570-7011-001 11
Page 12

3 Technical data | 3.2 Axiocam 202 mono ZEISS
3.1.2 Spectral sensitivity
Fig.2: Spectral sensitivity of Axiocam 208 color
3.2 Axiocam 202 mono
3.2.1 Specifications
Features Values
Sensor Type CMOS sensor with global shutter
Sensor Size Diagonal 13 mm (1/1.23")
Effective Sensor Pixel Count 2.1 Megapixels: 1920 (H) x 1080 (V)
Pixel size 5.86 μm
Spectral Sensitivity Approx. 350 nm – 850 nm, protection glass
Selectable Resolution 1920 x 1080 (Full HD, 1080p)
Gain (Signal Amplification) 1x – 16x adjustable
Digitization 12 or 8 bit / pixel
(coated)
Cooling Passive cooling
Exposure Time Range (Integration time) 0.3 ms - 2 s
Image enhancement functions Active denoising, active sharpening
User Guide ZEISS Axiocam 208 color / 202 mono | en-US | Rev.1 | 426570-7011-001
12
Page 13

3 Technical data | 3.2 Axiocam 202 mono ZEISS
Features Values
Automatic features Automatic exposure and gain regulation at
Full HD resolution (1080p), fast live image
under low light conditions
Status-LED for camera color coded operation status
Interfaces HDMI for monitor
USB 3.0 Type-C for USB hub, flash drive, WiFi adapter or PC connection
Ethernet (RJ45) for LAN connection
Micro-D for power and communication with
dedicated stands
Wi-Fi compatibility Via USB Wi-Fi adapter and router
Optical Interface C-mount
Camera control buttons for stand-alone 1x Image capture
1x OSD (On Screen Display menu)
1x Camera factory reset
Stand-alone operation:
§ Image storage format
§ Video stream format
§ Live frame rate via HDMI
Maximum live frame rate at configuration:
§ HDMI
§ Ethernet
§ USB 3.0
Max. file size per image 12bit .tiff: 4 MB (one channel, not content
Size/Weight Approx. 135 x 97 x 54mm / 590 g
§ tiff or jpg
§ mp4
§ 30 fps @ Full HD (1080p)
@ 1080p (1920 x 1080)
§ 30 fps
§ 30 fps
§ 27 fps
dependent)
8bit .tiff: 2 MB (one channel, not content dependent)
8 bit .jpg: approx. 0.1 MB – 1.3 MB (content
dependent)
Housing Blue painted aluminum and cooling fins on
the top plate
Registration CE, RoHS, CSA
Power supply via Micro-D interface
Power consumption Max. 9 W (24 V DC, 0.75 A)
Environmental conditions for storage and operation
User Guide ZEISS Axiocam 208 color / 202 mono | en-US | Rev.1 | 426570-7011-001 13
+10°C to +40°C, max. 75% relative air humidity at 35°C, no condensation, free air circulation required, indoor use
Page 14

3 Technical data | 3.3 Applied standards and regulations ZEISS
Features Values
Environmental conditions for transport in
packaging
Operating systems:
§ for ZEN
§ for Labscope
Supported Application Software ZEN blue v3.0 and higher (includes ZEN lite/
Order number 426570-9010-000
Info
Computer hardware, operating system, and software may decrease the frame rates. All specifications are subject to change without notice.
3.2.2 Spectral sensitivity
-40 °C to +70 °C, max. 75 % relative air humidity at 35 °C
§ Windows 10 x64 Prof./Ultimate and higher
§ Windows 7/10 x64 Prof./Ultimate and iOS
v12 and higher
pro/system)
Labscope v2.9 (win) and v2.8.3 (iOS) and
higher
Fig.3: Spectral sensitivity of Axiocam 202 mono
3.3 Applied standards and regulations
Observe the generally applicable local and national safety and accident prevention regulations, as
well as the applicable laws and regulations in your country. The camera and its accessories have
been designed, manufactured and tested to comply with the guidelines and specifications as
named in the following. The accordance to the relevant specification is indicated by a respective
symbol on the unit.
User Guide ZEISS Axiocam 208 color / 202 mono | en-US | Rev.1 | 426570-7011-001
14
Page 15

3 Technical data | 3.3 Applied standards and regulations ZEISS
3.3.1 Symbols on the camera
Symbol Description
Conforms to:
§ EU Directive 2014/34/EU (LVD)
§ 2014/30/EU (EMC)
§ 2011/65/EU (RoHS)
Complies with EU Directive 2012/19/EU
(WEEE)
CSA certificate mark, conforms to:
§ CAN/CSA-C22.2 No. 61010-1-12
§ UL Std. No. 61010-1 (3rd edition)
Tab.2: List of attached labels concerning standards and regulations
3.3.2 Symbols on the adapter
Symbol Description
Compliance of this power supply with FCC
Part 15, Class B has been demonstrated with
a standard output load. (The FCC law stipulates that system-level testing with the actual
system load is required to demonstrate compliance with the FCC emission limits.)
Japan: Voluntary Control Council for Interference (VCCI)
Australia and New Zealand: complies with
AN/NZS 60950.1:2011 Inc A1 EN
55032:2012
Book 60335 up to 36volts
Conforms to:
§ UL STD. 60950-1
§ UL STD. 1310
Certified to:
User Guide ZEISS Axiocam 208 color / 202 mono | en-US | Rev.1 | 426570-7011-001 15
Page 16

3 Technical data | 3.3 Applied standards and regulations ZEISS
Symbol Description
§ CSA STD C22.2 NO.60950-1
§ CSA STD.C22.2 NO.223
Conforms to AAMI STD. ES60601-1, IEC
60601-1-11
Certified to CAN/CSA STD.C22.2 NO.60601-1
Limited Power Source
Protected against:
§ access to hazardous parts with a wire
§ solid foreign objects of a diameter of
1.0mm and greater
§ vertically falling water drops when enclo-
sure tilted up to 15°
Complies to the specifications of directive
2011/65/EU Annex VI (ROHS-2) with amendment 2015/863-EU (ROHS-3)
Fuse inside: T 1.6A 250VAC
Semko S-Mark, certified to:
§ IEC 60601-1:2005+A1
§ EN 60601-1:2006+A1:2013+A12:2014
§ IEC 60601-1-11:2015IEC
60601-1-11:2015
§ EN 60601-1-11:2015
§ EN
60950-1:2006+A11:2009+A1:2010+A12:2
011+A2:2013
JAPAN TUV R-PSE, certified to:
User Guide ZEISS Axiocam 208 color / 202 mono | en-US | Rev.1 | 426570-7011-001
§ J60950-1(H26)
§ J55022(H22)
16
Page 17

3 Technical data | 3.3 Applied standards and regulations ZEISS
Symbol Description
Certified to:
§ GB4943.1-2011
§ GB9254-2008
§ GB17265.1-2012
Complies with:
§ Section 301 of Energy Independence and
Security Act (EISA)
§ Energy Star tier 2 (North America)
§ ECP tier 2 (China)
§ MEPS tier 2 (Australia)
§ Code of Conduct (Europe)
Complies with CHINA SJ/T 11364-2014 (with
a 30 years’ environmental protection use period)
Ukraine: UKRSepro
Complies with:
§ ТР ТС 004/2011
§ ТР ТС 020/2011
Construction of output connector
CE Mark, tested to comply with:
§ EN 55032.2012+AC.2013
§ EN 61000-3-2.2014
§ EN 61000-3-3.2013
§ EN 60601-1-2.2015
§ EN 55024.2010
Indoor use only
User Guide ZEISS Axiocam 208 color / 202 mono | en-US | Rev.1 | 426570-7011-001 17
Page 18

3 Technical data | 3.3 Applied standards and regulations ZEISS
Symbol Description
Equipment protected throughout by double
insulation or reinforced insulation
Complies with EU Directive 2012/19/EU
(WEEE)
Tab.3: List of attached labels concerning standards and regulations
User Guide ZEISS Axiocam 208 color / 202 mono | en-US | Rev.1 | 426570-7011-001
18
Page 19

4 Shipment | 4.1 Axiocam 208 color ZEISS
4 Shipment
4.1 Axiocam 208 color
Order No. 426570-9000-000
§ 1x Axiocam 208 color
§ 1x Power & signal cable, camera to microscope stand (compatible with Aixolab 5 and Axio-
scope 5/7/Vario)
§ 1x Power adapter with country-specific plug
§ 1x USB 3.0 cable, Type-C to Type-A
§ 1x USB 3.0 flash drive, Type-C and Type-A
§ 1x USB hub, Type-C
Accessories for Stand-Alone and for Usage with Labscope
Order Number Accessory
000000-0626-248 High-Speed-HDMI-Cable, Premium, Resolu-
tion 4K, 2m
000000-0626-246 Optical USB-Scroll Mouse
000000-0626-245 Keyboard, USB, Language DE
000000-0626-267 Keyboard, USB, Language US
426570-9110-000 Wi-Fi dongle package containing Wi-Fi Don-
gle and USB adaptor Type-C to Type-A
User Guide ZEISS Axiocam 208 color / 202 mono | en-US | Rev.1 | 426570-7011-001 19
Page 20

4 Shipment | 4.2 Axiocam 202 mono ZEISS
4.2 Axiocam 202 mono
Order No. 426570-9010-000
§ 1x Axiocam 202 mono
§ 1x Power & signal cable, camera to microscope stand (compatible with Aixolab 5 and Axio-
scope 5/7/Vario)
§ 1x Power adapter with country-specific plug
§ 1x USB 3.0 cable, Type-C to Type-A
§ 1x USB 3.0 flash drive, Type-C and Type-A
§ 1x USB hub, Type-C
Accessories for Stand-Alone and for Usage with Labscope
Order Number Accessory
000000-0626-248 High-Speed-HDMI-Cable, Premium, Resolu-
tion 4K, 2m
000000-0626-246 Optical USB-Scroll Mouse
000000-0626-245 Keyboard, USB, Language DE
000000-0626-267 Keyboard, USB, Language US
426570-9110-000 Wi-Fi dongle package containing Wi-Fi Don-
gle and USB adaptor Type-C to Type-A
User Guide ZEISS Axiocam 208 color / 202 mono | en-US | Rev.1 | 426570-7011-001
20
Page 21

5 Connecting the camera | 5.1 Camera layout and accessories ZEISS
1 2 3 4
1
2
3
4
1
2
3
4
5 Connecting the camera
5.1 Camera layout and accessories
5.1.1 Camera connections
Fig.4: Camera connector panel
No. Name Function
Micro-D port Power supply and communication
USB 3.0 Type-C Camera control and image data transfer
Ethernet port (RJ45) Communication and image data transfer
HDMI port Image data transfer to a certified monitor, TV or pro-
5.1.2 Camera controls
jector
Fig.5: Camera operator panel
User Guide ZEISS Axiocam 208 color / 202 mono | en-US | Rev.1 | 426570-7011-001 21
Page 22

5 Connecting the camera | 5.1 Camera layout and accessories ZEISS
1
2
3
4
No. Name Function
LED function indicator
Camera factory reset
button
Image / video capture
button
OSD menu button Press to open the OSD menu. Press again to close the
Please see section Function indicator signals [}29] for
detail.
Press to reset all parameters to default.
Press shortly for capturing an image.
Press for five seconds to start recording a video. Press
again shortly to stop the video recording.
OSD menu.
See also
2 Acquiring images and videos [}43]
5.1.3 Accessories
The following items are required for power supply and use of the ports:
Name Figure Remarks
Power & signal cable, camera to microscope stand
Connection between camera and
compatible microscopes (e.g.: Axioscope 5/7, ;Axiolab 5 power is supplied via microscope)
Power adapter with country-specific plug
USB 3.0 cable, Type-C to
Type-A
USB flash drive, Type C and
Type A
Power supply from external power
socket if the camera is used with microscopes other than Axioscope 5/7
or Axiolab 5.
Connection between camera and PC
Connection to camera (Type-C) or to
USB hub (Type-A) for immediate image and video storage
User Guide ZEISS Axiocam 208 color / 202 mono | en-US | Rev.1 | 426570-7011-001
22
Page 23

5 Connecting the camera | 5.1 Camera layout and accessories ZEISS
Name Figure Remarks
USB hub, Type-C Connection between camera and
multiple USB Type-A devices, such as
keyboard, mouse and flash drive
Ethernet cable
(not supplied in package)
HDMI cable
(not supplied in package,
please order seperately:
Order No.
000000-0626-248)
Mouse
(not supplied in package,
please order seperately:
Order No.
000000-0626-246)
Keyboard
(not supplied in package,
please order seperately:
Order No.
000000-0626-267 for US
layout,
Connection between camera and network or WLAN router
Connection between camera and
monitor, TV, or projector
For control and navigation in the OSD
menu
For typing in the OSD menu
Order No.
000000-0626-245 for DE
layout)
Wi-Fi Adapter package
(not supplied in package,
please order separately:
Order No.
426570-9110-000)
Monitor TFT 32" 4K
(not supplied in package,
please order seperately:
Order No.
410350-3201-000)
Wi-Fi Adapter package consisting of
Wi-Fi adapter and USB adapter TypeC to Type-A for wireless transmission
of camera images to PC or iPad with
Labscope
For display of camera image and operating the OSD menu
User Guide ZEISS Axiocam 208 color / 202 mono | en-US | Rev.1 | 426570-7011-001 23
Page 24

5 Connecting the camera | 5.2 Mounting the camera to the microscope ZEISS
2
1
3
4
1
2
3
4
5.2 Mounting the camera to the microscope
To mount the camera to your microscope’s camera port, use a C-mount camera adapter. The
adapter is not included in the scope of delivery. You will find some suitbale examples for adapters
in the list below:
Camera Port Adapter Order number
Axiocam 208
color
Axiocam 202
mono
60N Camera Adapter 60N-C 2/3" 0.5x 426112-0000-000
60N Camera Adapter 60N-C 2/3" 0.63x 426113-0000-000
NOTICE
Loss of warranty
The Axiocam 208 color is delivered with an integrated IR filter (infrared cut filter). The Axiocam
202 mono is delivered with a protective glass to shield the camera against dust and to reduce
optical interferences.
4 Do not remove the filter or the protective glass. Otherwise the warranty will be lost.
Fig.6: Mounting the camera to the microscope
Camera
C-mount camera adapter
Ring nut
60N port at microscope stand
1. Remove the dust cap from the camera's C-mount port.
2. Mount the C-mount camera adapter to the camera.
3. Attach the camera with the adapter to the microscope's 60N port.
4. Orient the camera to the stand and fix its position by tightening the ring nut.
User Guide ZEISS Axiocam 208 color / 202 mono | en-US | Rev.1 | 426570-7011-001
24
Page 25

5 Connecting the camera | 5.3 Connecting the camera to the power supply ZEISS
5.3 Connecting the camera to the power supply
When connected to Axioscope 5/7 or Axiolab 5, the Axiocam 208 color or the Axiocam 202
mono are powered by the microscope. Otherwise the cameras have to be connected to the supply mains via the plug-in power supply.
5.3.1 Powering the camera via microscope
NOTICE
Risk of damage to the microscope or the camera
4 Always switch off the microscope before you disconnect the power cable from the cam-
era!
Prerequisite
ü
The camera is mounted to Axioscope 5/7 or Axiolab 5.
1. Insert the Micro-D plug of the power cable into
the Micro-D port of the camera.
2. Insert the power cable's opposite connector
into the corresponding socket on your microscope.
Info
Refer to the instruction manual of your microscope for further information.
5.3.2 Powering the camera via mains supply
Prerequisite
User Guide ZEISS Axiocam 208 color / 202 mono | en-US | Rev.1 | 426570-7011-001 25
ü
The power supply has been adapted with the appropriate country-specific adapter.
ü
The camera is not already powered via a compatible microscope.
1. Insert the Micro-D plug of the plug-in power
supply into the Micro-D port of the camera.
Page 26

5 Connecting the camera | 5.4 Connecting the camera to a display (without PC) ZEISS
2. Insert the power plug of the plug-in power supply into a power outlet.
3. Turn on the camera via cable switch.
5.4 Connecting the camera to a display (without PC)
The camera can be connected to a certified monitor, TV, or projector for visualization of the live
image data and for operating the OSD menu functions. Certain HDMI functions (e.g. audio, commands from monitor to camera) are not supported.
Info
If you connect the Axiocam 208 color / 202 mono to a monitor, these are the minimal monitor
requirements:
§ HDMI 1.4 or HDMI 2.0 input port
§ 1920 x 1080 or higher resolution
§ 16:9 or 16:10 aspect ratio
§ Progressive scanning
§ HDMI cable with less than 3 m length (shorter cable enables better signal integrity)
Note that the maximum resolution of the Axiocam 202 mono is Full HD (1920 x 1080), while
the Axiocam 208 color supports resolutions up to Ultra HD (4K).
1. Insert the HDMI cable into the HDMI port of
the camera.
2. Insert the HDMI cable's opposite connector into the corresponding socket on your display
device.
3. Set the display device’s aspect ratio to 16:9 or Aspect.
For further camera settings using the OSD a mouse is required (e.g. Optical USB-Scroll Mouse, Order No. 000000-0626-246) . An additional keyboard is optional (Keyboard, USB, Design "Business
Slim", Language English US, Order No. 000000-0626-267 or Keyboard, USB, Design "Business
Slim", Language German, Order No. 000000-0626-245).
5.5 Connecting the camera to a network
If you want to connect the camera to a network, you can choose between several options, of
which all require network access and the ZEISS imaging software Labscope (available as windows
or iOS version). The camera identifies itself automatically to the network (DHCP) and is automatically recognized by Labscope, provided the device is on the same network.
User Guide ZEISS Axiocam 208 color / 202 mono | en-US | Rev.1 | 426570-7011-001
26
Page 27

5 Connecting the camera | 5.5 Connecting the camera to a network ZEISS
NOTICE
Display errors
In the event of an overloaded or slow WLAN, the live image of the camera may be delayed or
incorrectly displayed on the iPad.
4 If possible, use a high-performance 802.11n WLAN.
4 Provide a sufficient contingent of free bandwith for communication.
For an overview of all ZEISS Microscopy apps and further information on individual apps, visit
https://www.zeiss.com/microscopy/int/products/microscope-software/microscopy-apps.html?
vaURL=www.zeiss.com/micro-apps
5.5.1 Connecting camera via Ethernet
Prerequisite
ü
The camera is powered via mains supply or microscope.
1. Insert the Ethernet cable into the camera’s Ethernet port.
2. Insert the Ethernet cable's opposite connector into the corresponding socket on your
WLAN router.
5.5.2 Connecting camera via Wi-Fi adapter
Prerequisite
ü
The camera is powered via mains supply or microscope.
ü
An USB Wi-Fi adapter is available.
ü
An USB hub is connected to the camera.
ü
An USB mouse is connected to the USB hub to operate the OSD
ü
The camera is connected to a display via HDMI
1. Insert the USB Wi-Fi adapter into the camera's
USB Type-C port or into the USB hub.
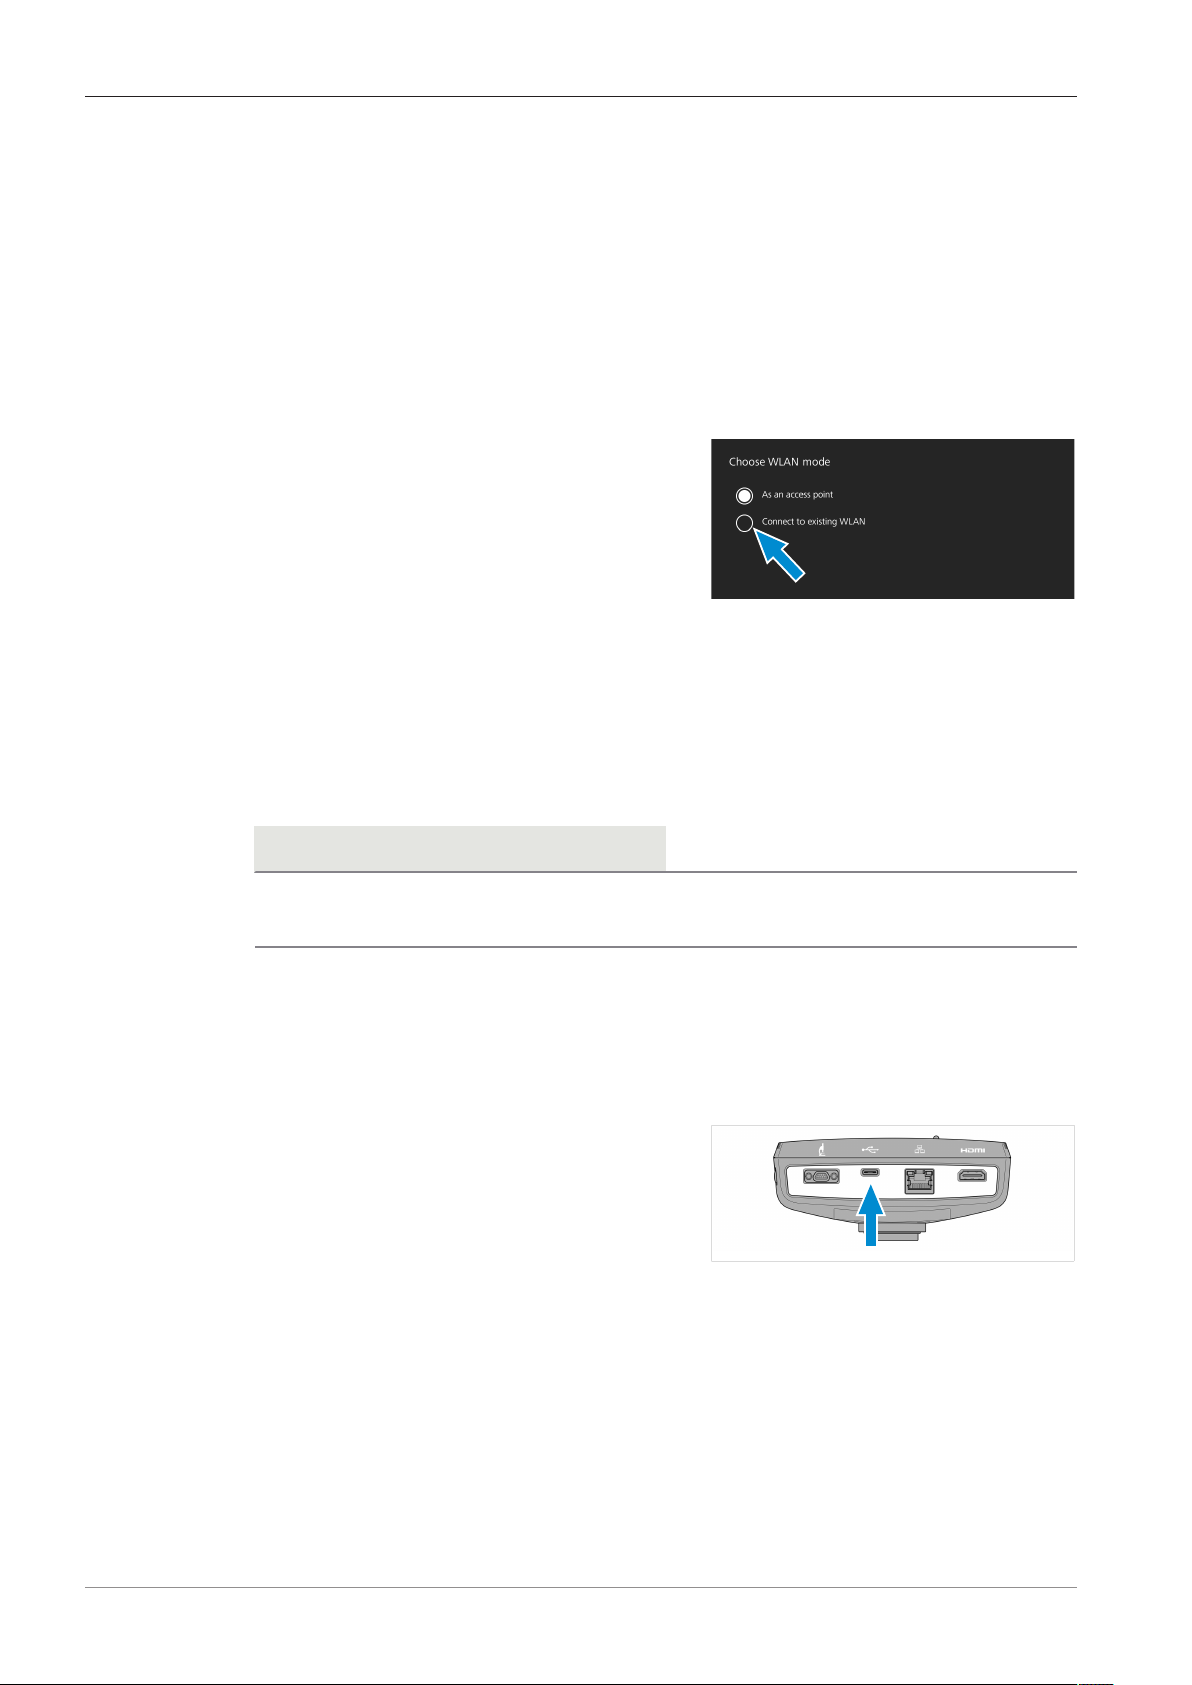
The Choose WLAN mode menu shows up. It offers two ways to connect the camera to a
Wi-Fi device (e.g. iPad or Laptop).
5.5.2.1 Using the camera as access point
Follow the subsequent instructions to directly connect your camera to the Wi-Fi device:
1. Select As an access point from the Choose
WLAN mode menu.
User Guide ZEISS Axiocam 208 color / 202 mono | en-US | Rev.1 | 426570-7011-001 27
Page 28
5 Connecting the camera | 5.6 Connecting the camera to a certified PC ZEISS
2. Click the Next button.
à
The subsequent screen appears.
3. Type in the network name and password into the respective input fields.
4. Click the Save button.
à
The camera can be found by other devices as access point: Other devices can connect to
the camera using the specified network name and password.
5.5.2.2 Connecting to existing WLAN
Follow the subsequent instructions to connect your camera to an existing WLAN:
1. Select Connect to existing WLAN from the
Choose WLAN mode menu.
2. Click the Next button.
à
The subsequent screen appears.
3. Select the network name from the respective selection field.
4. Type in the password into the respective input field.
5. Click the Save button.
à
The camera is connected to the WLAN.
à
If the Wi-Fi device is connected to the same router, the camera appears in Labscope.
5.6 Connecting the camera to a certified PC
Prerequisite
Info
If the WLAN list is empty or does not contain the one you want to connect to, wait for a few
seconds and click again to refresh.
The USB port can also be used for data transfer to the PC.
ü
The camera is powered via mains supply or microscope.
1. Insert the USB 3.0 cable's Type-C connector
into the corresponding socket on the camera.
2. Insert the USB 3.0 cable's Type-A connector into the corresponding socket on the PC.
User Guide ZEISS Axiocam 208 color / 202 mono | en-US | Rev.1 | 426570-7011-001
28
Page 29

5 Connecting the camera | 5.7 Function indicator signals ZEISS
5.7 Function indicator signals
For the definitions of the LED color signals, refer to the list below:
Signal Description
Pink Camera starting
Blue Power supplied and camera ready
Blue flash Snapping/recording in process, and saving data to USB flash drive
Red flash Firmware updating/factory resetting
Pink flash No USB flash drive or the drive is full
Off No power supplied
User Guide ZEISS Axiocam 208 color / 202 mono | en-US | Rev.1 | 426570-7011-001 29
Page 30

6 On Screen Display (OSD) menu | 6.1 Opening the OSD menu ZEISS
6 On Screen Display (OSD) menu
Info
Certain functions of the OSD menu are only available with compatible microscope stands i.e.
Axioscope 5/7 or Axiolab 5. For more information, please refer to the relevant microscope’s
manual.
6.1 Opening the OSD menu
When your camera is powered on and connected to a display device via HDMI, you can open or
close the OSD menu by pressing the Menu button on the camera.
To operate the OSD, plug the USB hub (included in the package) into the camera’s USB port. Then
you can connect your mouse/keyboard (not included in the package) and the USB flash drive (included in the package) via the hub.
Info
§ Certain functions are only available with compatible microscope stands i.e. Axioscope 5/7
or Axiolab 5. For more information, please refer to the relevant microscope’s manual.
§ The USB flash drive should be of FAT32 format and have enough free space for storing the
data.
6.1.1 Opening menu via camera's operator panel
Prerequisite
ü
The camera is connected to your display device via HDMI cable.
1. To open the OSD menu, press the Menu button on the camera's operator panel.
The OSD menu opens on your display device.
6.1.2 Opening menu via microscope stand buttons
Prerequisite
ü
The camera is connected to your display device via HDMI cable.
ü
The camera is mounted on a Axioscope 7 stand.
1. To open the OSD menu, press the microscope stand's Snap button and Stage control
button simultaneously.
The OSD menu opens on your display device.
Info
For more information, please refer to the Axioscope 5/7/Vario operating manual.
User Guide ZEISS Axiocam 208 color / 202 mono | en-US | Rev.1 | 426570-7011-001
30
Page 31
6 On Screen Display (OSD) menu | 6.2 Home menu ZEISS
1 8
2
6
4
3
14
5
9
11
13
10
12
7
1
2
3
6.1.3 Opening menu via network browser
Prerequisite
6.2 Home menu
ü
The camera is connected to the same network as your display device (i.e. iPad or PC).
1. On the display device, open the network browser.
2. Insert the camera's IP address into the browser window's address line and press Enter.
The OSD menu opens on your display device.
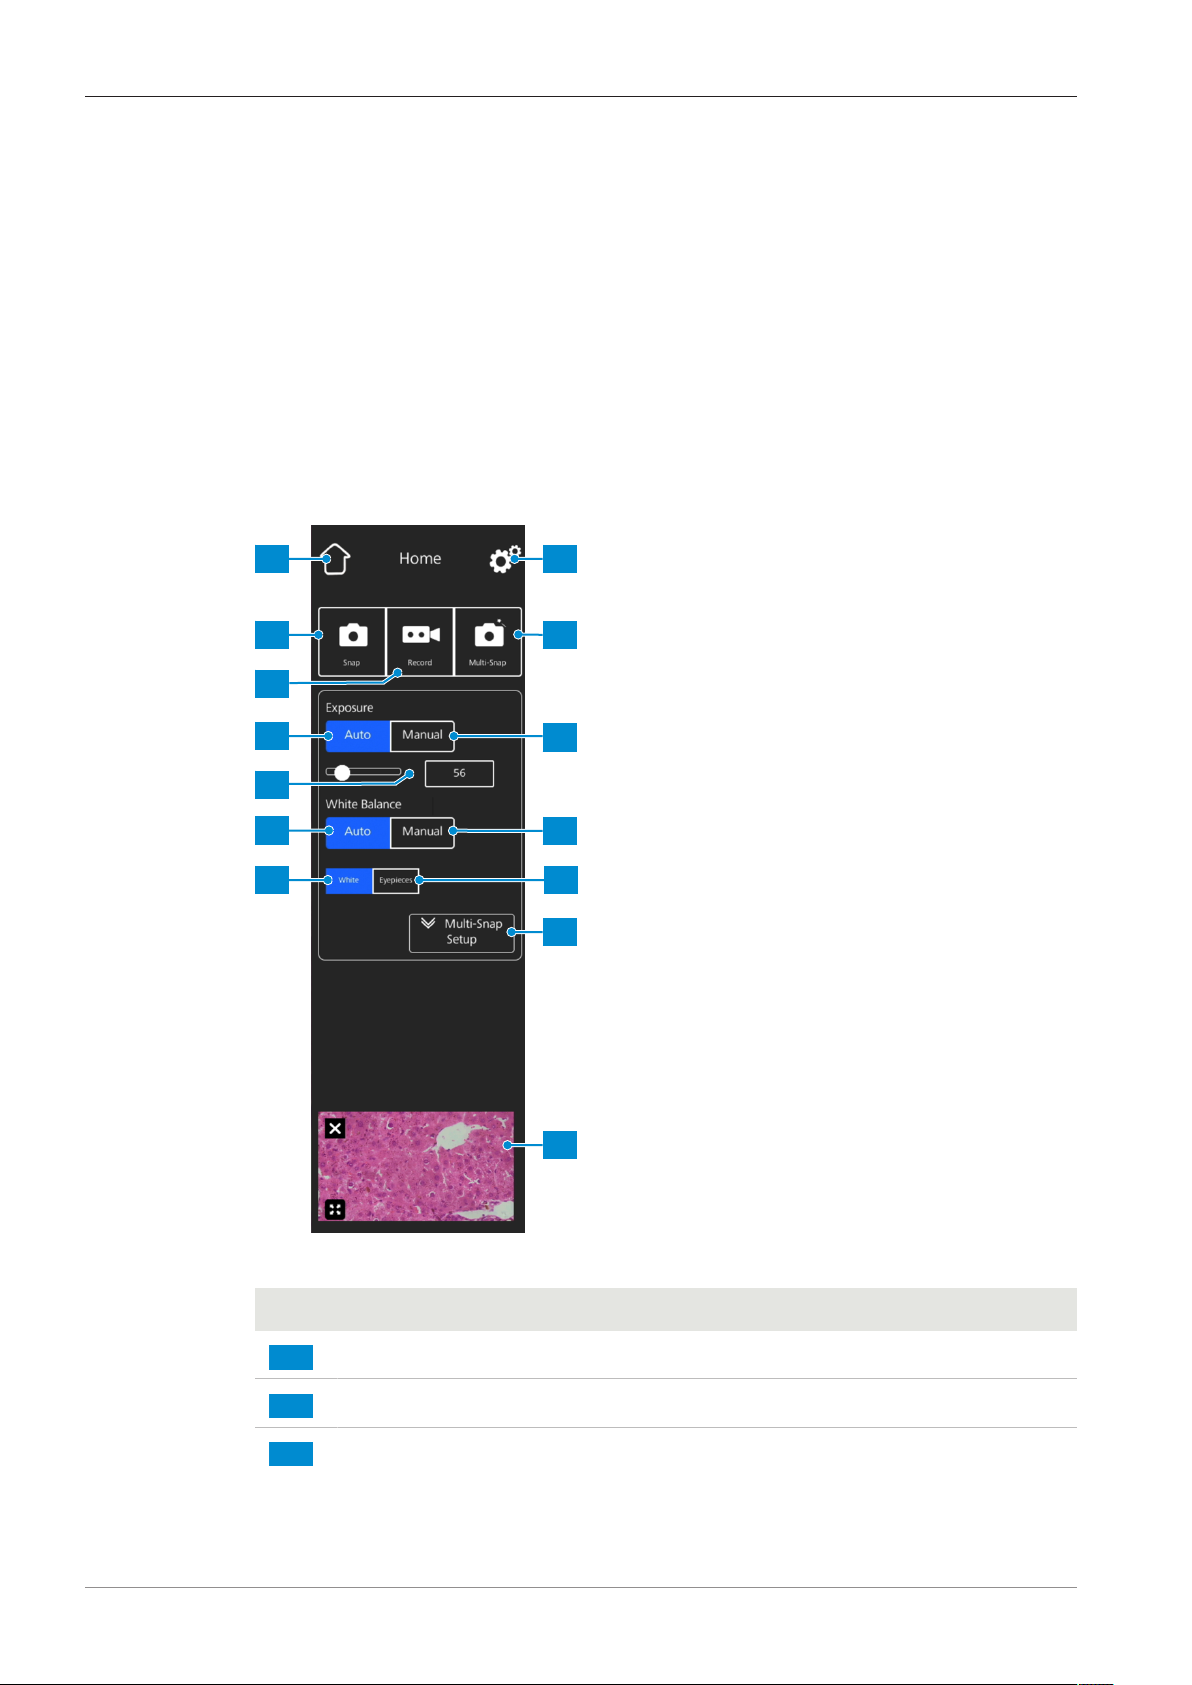
The Home menu gives you basic imaging controls to capture your images with minimum amount
of effort.
The controls for selected options are highlighted blue.
Fig.7: Home menu
No. Name Description
Home button Opens the Home menu.
Snap button Snaps a single image.
Record button Starts a video recording. A time counter is displayed.
User Guide ZEISS Axiocam 208 color / 202 mono | en-US | Rev.1 | 426570-7011-001 31
Page 32

6 On Screen Display (OSD) menu | 6.2 Home menu ZEISS
4
5
6
7
8
9
10
No. Name Description
When pushing the button the following controls expand:
§ The recording can be stopped by clicking the red
square symbol above the time display.
Auto Exposure button Ensures consistent brightness of the image by continu-
ously calculating the correct exposure time based on
the current light intensity.
Target Intensity controls In Auto Exposure mode, the light intensity can be fine-
tuned using the slider or the input field.
Auto White Balance
button (for Axiocam 208
color)
White button (for Axiocam 208 color)
Settings Opens the Settings menu.
Multi-Snap button (for
Axioscope5/7 and Axiolab5)
Manual Exposure button
Ensures a consistent color temperature of the image by
continuously calculating the white balance.
Please note:
A proper functioning of the Auto White Balance mode
requires enough empty area in the field of view.
If active, in the Auto White Balance mode the color
temperature is calculated based on the assumption
that the light source is white.
Performs a multi-channel acquisition.
Please note:
The Multi-Snap function requires that the camera is
connected to a compatible microscope stand (correct
light source and appropriate multi-band filter set). See
the corresponding microscope user manual for details.
Enables you to manually re-adjust the exposure time,
e.g. when the Auto Exposure mode doesn't deliver appropriate results.
When pushing the button, the following controls expand:
User Guide ZEISS Axiocam 208 color / 202 mono | en-US | Rev.1 | 426570-7011-001
32
Page 33

6 On Screen Display (OSD) menu | 6.2 Home menu ZEISS
11
12
13
14
No. Name Description
§ The exposure time can be fine-tuned using the up-
per slider or input field. For exposure time range, refer to Axiocam 208 color [}10] and Axiocam 202
mono [}12].
§ The gain value can be set using the lower slider or
input field.
Manual White Balance
button (for Axiocam 208
color)
Eyepieces button (for
Axiocam 208 color)
Multi-Snap Setup expander (for Axioscope 5/7
and Axiolab 5)
Enables you to manually re-adjust the color temperature, e.g. when the Auto White Balance mode doesn't
deliver appropriate results.
When pushing the button, the following controls expand:
§ The color temperature can be set warmer (more red)
or colder (more blue) using the slider.
§ The white balance can be calculated once by clicking
the Push button.
If active, in the Auto White Balance mode the color
temperature of the image is matched to the light
source's color temperature. The colors in the camera
image, thus, resemble the colors seen through the eyepieces.
Enables you to adjust the settings for the Multi-Snap
function.
When pushing the button, the following controls expand:
§ The fluorescence channels to be captured can be se-
lected and unselected by clicking the corresponding
buttons (UV, B, G, and R).
§ The expander can be closed by clicking the Hide
button.
Thumbnail area Shows a thumbnail of the last image taken, the first
frame of the last video captured, or the merged image
of the last multi-channel acquisition with overlaid
pseudo-colors.
§ The thumbnail can be closed by clicking the Close
symbol.
User Guide ZEISS Axiocam 208 color / 202 mono | en-US | Rev.1 | 426570-7011-001 33
Page 34
6 On Screen Display (OSD) menu | 6.3 Settings menu ZEISS
1
2
3
4
5
1
2
3
4
5
No. Name Description
§ The thumbnail can be maximized to the full display
by clicking the Expand symbol.
Tab.4: Home menu, control elements
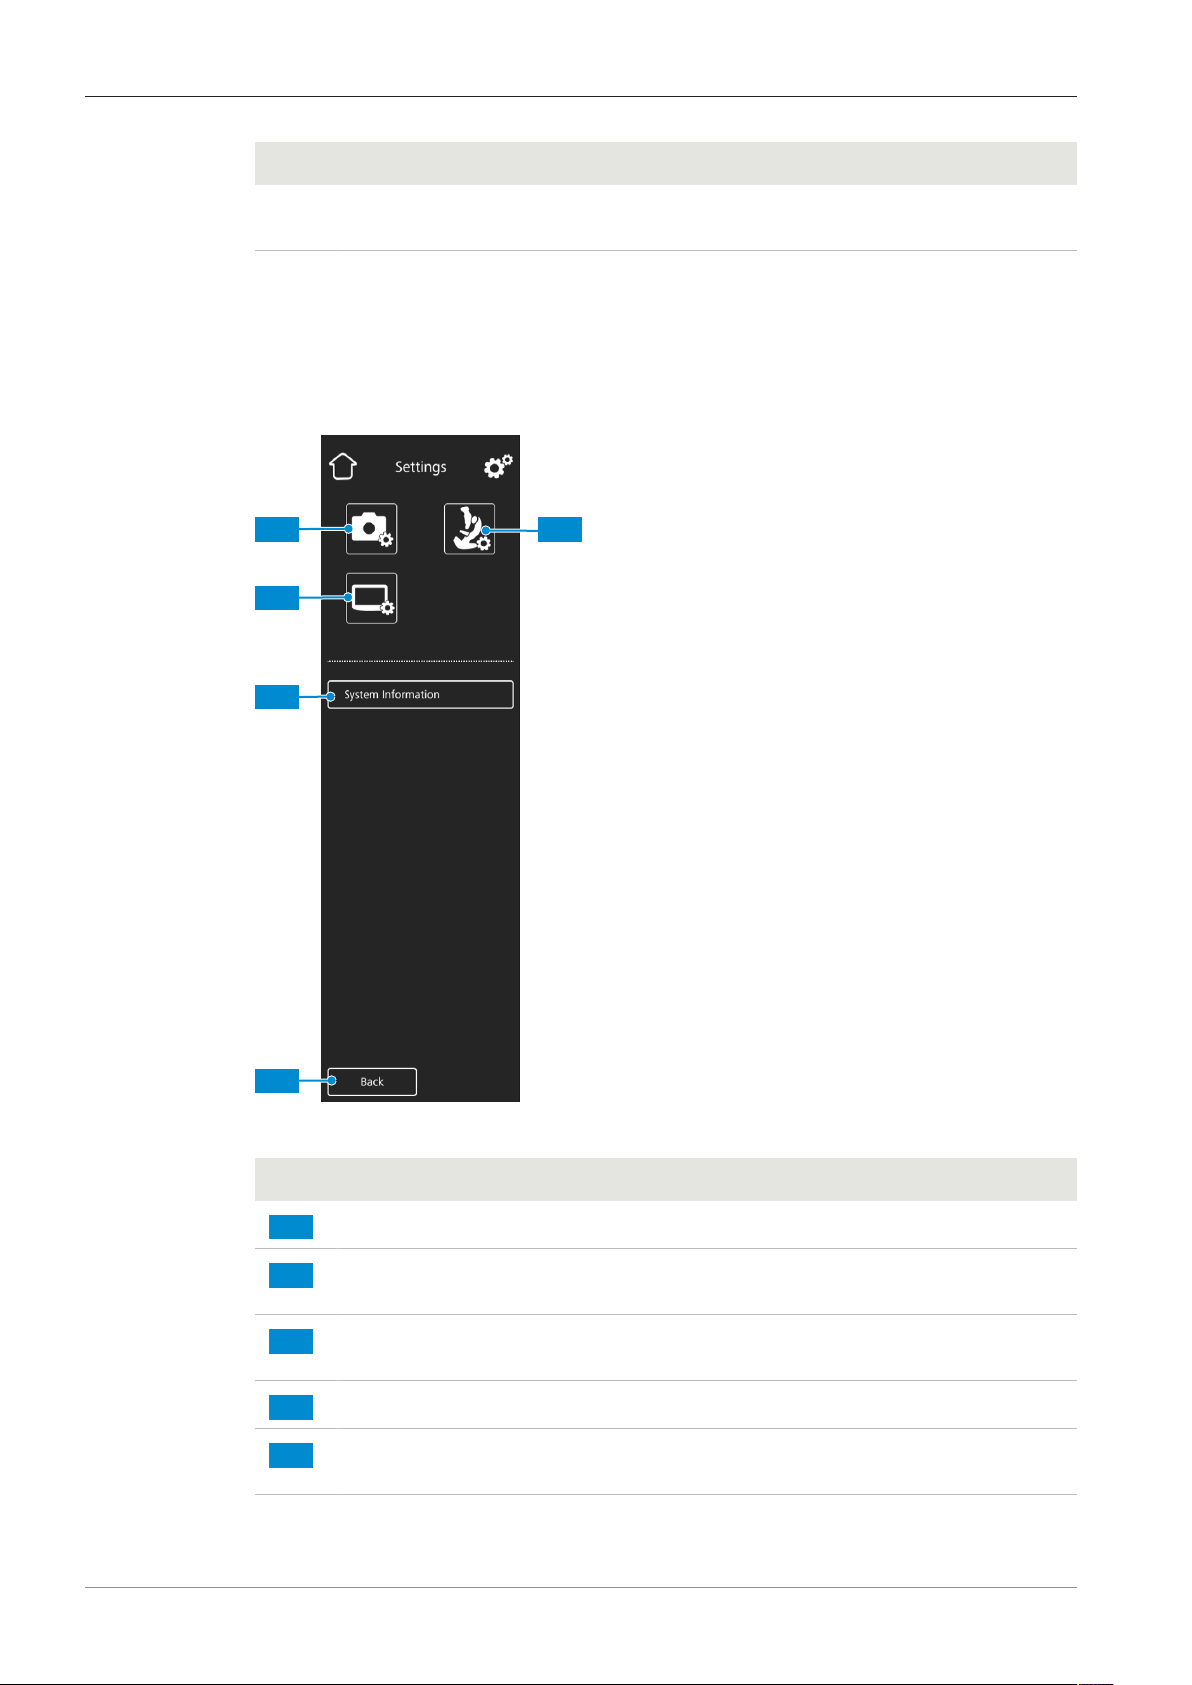
6.3 Settings menu
The Settings menu gives you more options for image settings, the opportunity to configure your
microscope, as well as to define some basic operating system settings.
User Guide ZEISS Axiocam 208 color / 202 mono | en-US | Rev.1 | 426570-7011-001
Fig.8: Settings menu
No. Name Description
Image Settings Opens the Image Settings menu
Operating System Settings
System lnformation Shows the status of the entire camera/microscope sys-
Back Opens the previous menu
Microscope System Settings
Opens the Operating System Settings menu
tem
Opens the Microscope System Settings menu
34
Page 35

6 On Screen Display (OSD) menu | 6.3 Settings menu ZEISS
1
2
3
4
5
9
6
7
8
1
2
3
6.3.1 Image Settings menu
The Image Settings menu gives you more advanced controls to optimize your image. It also
gives you some options to show different image information and how snapped images are
shown.
The controls for selected options are highlighted blue.
Fig.9: Image Settings menu
No. Name Description
Gamma controls Enable you to adjust the gamma value.
User Guide ZEISS Axiocam 208 color / 202 mono | en-US | Rev.1 | 426570-7011-001 35
Optimize Pixel Correction button
Optimize Denoise but-
ton
§ The gamma value can be fine-tuned using the slider
or the input field.
§ The gamma value can be reset to default by clicking
the Reset button.
Please note:
For Axiocam 208 color the default gamma value is
0.45. For Axiocam 202 mono the default gamma value
is 1.2.
Corrects dead and hot pixels in the image.
Reduces noise.
Page 36

6 On Screen Display (OSD) menu | 6.3 Settings menu ZEISS
4
5
6
7
8
9
1
2
3
4
5
No. Name Description
Image Orientation controls
Sets the image orientation.
§ 0°: original image orientation
§ Mirror vertical: image mirrored in vertical direction
§ Mirror horizontal: image mirrored in horizontal di-
rection
§ 180°: image rotated by 180°
Show Scale Bar button Shows a scale bar on the live display.
Please note:
The scale bar will also appear in the captured image.
Show Image after Snap
button
If activated, the image is shown on the full display for 5
seconds after being captured. The full display image
can be closed or minimized to a thumbnail, if required.
Smart Snap Mode button (for Axioscope 5/7
and Axiolab 5)
Activates the triggering of a multi-channel acquisition
by pushing the snap button on the camera or microscope stand.
Please note:
The Multi-Snap function requires that the camera is
connected to a compatible microscope stand (correct
light source and appropriate multi-band filter set). See
the corresponding microscope user manual for details.
Optimize HDR button
(for Axiocam 208 color)
Optimize Sharpen button
6.3.2 Microscope System menu
The Microscope System Settings menu provides access to some microscope configurations to
be adjusted for easier imaging. For example, the microscope information can be updated if a new
part is installed. If required, a configuration wizard guides through the entire configuration setup.
Converts several images with different exposure times
into a high contrast image or High Dynamic Range
(HDR) image in order to show large differences in
brightness (e.g. reflective samples) in detail.
Sharpens details.
Fig.10: Microscope System Settings menu
User Guide ZEISS Axiocam 208 color / 202 mono | en-US | Rev.1 | 426570-7011-001
36
Page 37

6 On Screen Display (OSD) menu | 6.3 Settings menu ZEISS
1
2
3
4
5
1
2
No. Name Description
Reflector / FL Modules
button (for Axiolab 5, Axioscope 5/7 and Axioscope 5/7)
Objectives button (for
Axiolab 5, Axioscope 5/7
and Axioscope 5/7)
Shading Correction button
Configuration Wizard
button (for Axiolab 5, Axioscope 5/7 and Axioscope 5/7)
Camera Adapter button
(for Axiolab 5, Axioscope
5/7 and Axioscope 5/7)
Opens a drop-down list to define the item installed at
the reflector turret's current position.
Opens a drop-down list to define the item installed at
the objective turret's current position.
Opens a menu to define the shading correction for
each combination of reflector, objective and light
source, see Applying Shading Correction [}37].
Opens a wizard to support you in setting up all microscope configurations listed above.
Opens a menu to define the camera adapter being currently used.
Please note:
For recommended adapters, see Mounting the camera
to the microscope [}24].
6.3.2.1 Applying Shading Correction
Follow the subsequent instructions to define the shading correction for a combination of reflector, objective and light source:
Fig.11: Shading correction menu
1. Move in the reflector module and the objective to be configured.
2. Turn on the light source to be configured.
User Guide ZEISS Axiocam 208 color / 202 mono | en-US | Rev.1 | 426570-7011-001 37
Page 38

6 On Screen Display (OSD) menu | 6.3 Settings menu ZEISS
1
2
1
2
3
4
5
6
7
1
2
3
4
à
The current position of the reflector turret is indicated by
à
The current position of the objective turret and the light source (RL: reflected light, TL:
transmitted light) are indicated by
3. Click the highlighted button to enter the shading correction menu for the current combination.
4. Follow the instructions on the display to perform the shading correction configurations.
.
.
Info
Shading correction may take a few seconds to take effect.
6.3.3 Operating System menu
The Operating System menu gives you options such as setting the language, defining the filename format or updating the system firmware.
Fig.12: Operating System menu
No. Name Description
Language button Opens a menu to set English, Chinese or German as
operating system language.
Date & Time button Opens a menu to set date and time.
File Options button Opens a menu to set the filename format and the file
type for captured images, see File Options menu
[}39].
HDMI Resolution button
(for Axiocam 208 color)
Opens a menu to set the desired HDMI resolution for
live view.
Please note:
§ Switching from 1080p to 4K must be confirmed by
pressing the Confirm button.
§ The camera restarts automatically for the new reso-
lution to take effect.
§ If the connected monitor does not support 4K it au-
tomatically switches back to 1080p after 20 seconds.
User Guide ZEISS Axiocam 208 color / 202 mono | en-US | Rev.1 | 426570-7011-001
38
Page 39

6 On Screen Display (OSD) menu | 6.3 Settings menu ZEISS
5
6
7
1
2
3
4
1
2
3
No. Name Description
Wi-Fi Settings button
(for USB Wi-Fi adapter)
Bright Pixel Correction
button
Firmware Update button
6.3.3.1 File Options menu
The File Options menu allows you to predefine a template for file naming.
The controls for selected options are highlighted blue.
Opens a workflow to set up a wireless connection, see
Connecting the camera to a network [}26].
Opens a workflow to perform Bright Pixel Correction,
see Bright Pixel Correction menu [}40].
Starts a firmware update when the update file is available via the USB interface, see Updating the firmware
[}49].
Fig.13: File Options menu
No. Name Description
Filename format example Shows the template of the filenames based on the cur-
rently selected components.
Filename format components
Set Filename after each
Snap
User Guide ZEISS Axiocam 208 color / 202 mono | en-US | Rev.1 | 426570-7011-001 39
Allows you to adjust the filename template.
§ Static text components (e.g. for sample names etc.)
can be added by typing text into the Custom fields.
Empty fields will be removed from the template.
§ The date and time format can be set.
§ A counter number is appended to each filename by
default.
Activates a prompt after each image capturing to manually set the filename.
Page 40

6 On Screen Display (OSD) menu | 6.3 Settings menu ZEISS
4
1
2
1
2
No. Name Description
File type selection Allows you to set the file type (JPEG or TIFF) for cap-
tured images. For Axiocam 202 mono, you can additionally choose to save a TIFF image as 8-bit or 12-bit.
6.3.3.2 Bright Pixel Correction menu
The Bright Pixel Correction menu allows you to apply the Bright Pixel Correction procedure.
This procedure corrects newly developed bright (or hot) pixels due to long exposure times, high
gain settings or cosmic events.
Fig.14: Bright Pixel Correction menu
No. Name Description
Correct Initiates Bright Pixel Correction.
Reset Restores the factory default Bright Pixel Correction con-
figuration.
User Guide ZEISS Axiocam 208 color / 202 mono | en-US | Rev.1 | 426570-7011-001
40
Page 41

6 On Screen Display (OSD) menu | 6.3 Settings menu ZEISS
Applying Bright Pixel Correction
Prerequisite
ü
The C-mount port is closed so that no light will reach the image sensor during the procedure.
You can close the C-mount port by either closing the light path of the microscope stand or
detaching the camera from the stand and protect sensor from light by screwing the protective
cap onto the camera's c-mount thread.
1. Tap the Correct button.
à
Do not operate the camera during the procedure.
à
If light reaches the sensor, the procedure fails.
Either cover the camera properly or reset the Bright Pixel configuration before restarting
the procedure.
The Bright Pixel Correction procedure is applied.
The camera reboots after a successful procedure.
User Guide ZEISS Axiocam 208 color / 202 mono | en-US | Rev.1 | 426570-7011-001 41
Page 42

7 Installing software and drivers | 7.1 Installing software on PC ZEISS
7 Installing software and drivers
7.1 Installing software on PC
To acquire images with the Axiocam 208 color or the Axiocam 202 mono via PC, you must install
ZEISS software (e.g. ZEN or Labscope ). You will find the installation files on the USB flash drive
delivered. The camera drivers are also installed during the software installation. The latest version
of ZEISS software products can be downloaded from our web page: http://www.zeiss.com/mi-
croscopy/int/downloads.html
Prerequisite
7.2 Installing software on iPad
ü
The camera is connected to the PC.
1. Install the software according to the installation guide delivered with the software.
2. To install the camera drivers, confirm the corresponding prompts that are displayed during
the software installation process.
3. When the installation is finished, restart your PC.
4. In the device manager of your PC, verify that the installation was successful.
Info
For information on how to acquire images with the specific software, please refer to the respective software manual.
1. From your iPad, go to the App Store and search for “Labscope” by ZEISS.
2. Follow the instructions on your iPad to install the app.
User Guide ZEISS Axiocam 208 color / 202 mono | en-US | Rev.1 | 426570-7011-001
42
Page 43

8 Acquiring images and videos | 8.1 Introduction ZEISS
8 Acquiring images and videos
Due to the fact that image acquisition is already covered in the ZEISS software manuals, image acquisition in ZEISS software is not a part of this guide. For more information on image acquisition
with these software products, please refer to the corresponding software manuals and online
help.
Info
These cameras should only be used for training and research. The images / videos from these
cameras must not be used for the direct generation of diagnostic results.
8.1 Introduction
The Axiocam 208 color and the Axiocam 202 mono are high definition cameras for color and
monochromatic imaging, respectively. They are suitable for use as accessories for educational and
routine microscopy in laboratory environments and for use by trained laboratory personnel. The
cameras have been designed to be used in the field of light microscopy for general observation,
routine work, and simple applications in which a sufficient amount of light is available.
8.2 Basic procedure using operator panel
Prerequisite
Due to the fact that image acquisition is already covered in the ZEISS software manuals, image acquisition in ZEISS software is not a part of this guide. For more information on image acquisition
with these software products, please refer to the corresponding software manuals and online
help.
Info
These cameras should only be used for training and research. The images / videos from these
cameras must not be used for the direct generation of diagnostic results.
ü
An USB flash drive has been inserted into the camera's USB port or into the USB hub connected to the camera.
1. Position your specimen on the microscope and adjust the microscope to see a focused image through the eyepieces.
2. Set the microscope light path to divert the image to the camera (e.g. adjust the microscope's tube slider to 50% camera and 50% eyepieces).
3. To take a single image, briefly press the Capture button on the camera.
à
The image is saved to the USB flash drive in either JPEG or TIFF format.
4. To start video recording, press the Capture button on the camera for about 5 seconds.
5. To finish video recording briefly press the Capture button on the camera once again.
à
The video is saved to the USB flash drive in MP4 format.
8.3 Basic procedure using OSD menu
Prerequisite
User Guide ZEISS Axiocam 208 color / 202 mono | en-US | Rev.1 | 426570-7011-001 43
ü
The USB flash drive and mouse/keyboard have been inserted into the USB hub connected to
the camera.
Page 44

8 Acquiring images and videos | 8.4 Image acquisition with Labscope ZEISS
ü
The camera is connected to a monitor via HDMI.
ü
The OSD menu has opend by pressing the menu button on the camera
1. Position your specimen on the microscope and adjust the microscope to see a focused image on the monitor.
2. To take a single image, click on the Snap button in the OSD menu.
à
The image is saved to the USB flash drive in either JPEG or TIFF format.
3. To start video recording, click on the Record button in the OSD menu.
4. To finish video recording click on the Stop button in the OSD menu.
à
The video is saved to the USB flash drive in MP4 format.
8.4 Image acquisition with Labscope
Upon first starting Labscope, each screen starts with an overlaying information screen explaining
the functions. Refer to the displayed information for using the software. Disable or re-enable the
information screens in the software`s Settings menu on your PC monitor iPad.
Info
For support in using Labscope, visit our Forum online http://forums.zeiss.com/microscopy/com-
munity/forumdisplay.php?f=38. Please check the Labscope threads for problem-solving notes.
User Guide ZEISS Axiocam 208 color / 202 mono | en-US | Rev.1 | 426570-7011-001
44
Page 45

9 Troubleshooting | 9.1 ZEN software ZEISS
9 Troubleshooting
9.1 ZEN software
Symptom Cause Measure
Camera does not appear in
the menu for selectable
cameras.
No camera image visible on
the screen.
The camera is not properly connected.
The software and the drivers are not
properly installed.
Incompatible accessories (e.g. USB
adapters, cables etc.) were used, so
the camera was brought into wrong
mode and failed to be recognized.
The PC's USB driver is outdated. Upgrade to the latest driver provided
The camera is not properly connected.
Check and adjust the camera connections to PC and power supply, if necessary.
Make sure you installed the software
and the drivers with administrative
rights and according to the instructions in this manual.
1. Connect the camera to the PC
with the accessories provided
in the delivery package.
2. Restart the camera.
by the PC manufacturer.
1. Make sure, the camera's status
LED constantly lights blue.
[}29]
2. If necessary, check and adjust
the camera connections to PC
and power supply.
3. Restart the camera.
The color of the displayed
image taken by Axiocam
208 color does not correspond to the image seen
through the eyepieces.
The illumination reaching through to
the camera is not sufficient.
Inappropriate display settings are
used.
The color matching is inappropriate. Set the color temperature.
1. Check the light path settings of
the microscope.
2. If necessary, check and adjust
the position of the beam splitter between the ocular and the
camera port.
3. If necessary, check and adjust
the setting of the aperture diaphragm of the microscope, if
necessary.
4. Execute an automatic exposure
measurement.
Check and adjust the display device's
settings for live imaging, if necessary.
Check the monitor's color temperature setting. If necessary, reduce the
color temperature to the lowest value
possible.
User Guide ZEISS Axiocam 208 color / 202 mono | en-US | Rev.1 | 426570-7011-001 45
Page 46

9 Troubleshooting | 9.2 Camera ZEISS
Symptom Cause Measure
The color of the displayed
image taken by Axiocam
202 mono does not correspond to the image seen
through the eyepieces.
Unsuitable overlay colors are used to
represent fluorescence dyes.
Select alternative overlay colors.
9.2 Camera
Symptom Cause Measure
The LED indicator is off. The camera is not powered on prop-
erly.
The LED indicator flashes
red.
The image / video cannot be
saved to the USB flash drive.
The camera is updating firmware or
being reset.
USB flash drive is not in correct format.
In case of Axioscope 5/7 and Axiolab
5, make sure the microscope is powered on and the camera is connected
to microscope via Micro-D power cable.
Alternatively, make sure the camera is
powered by the plug-in power supply.
NOTICE!Do not switch off the
power supply.
Format the USB flash drive to FAT32
format on a PC.
The firmware update does
not function.
The camera date and time is
not correct.
USB flash drive has not enough free
memory.
USB flash drive cannot be recognized. Restart the camera.
USB flash drive is not in correct format.
USB flash drive does not enough free
memory.
USB flash drive cannot be recognized. Restart the camera.
The firmware cannot be found. Make sure the latest firmware is
The firmware is not uploaded properly.
Date and time are not set correctly.
Make sure there is enough free memory on the flash drive.
Format the USB flash drive to FAT32
format on a PC.
Make sure there are at least 200MB
of free memory on the USB flash
drive.
stored to the root folder of the USB
flash drive.
Restart the firmware update process
and exactly follow the instructions in
the firmware update menu.
1. At the OSD menu, navigate to
Settings > OperatingSystem.
2. Tap the Date & Time button.
3. Set the camera date and time.
The buffer battery is empty. Please contact your local ZEISS service
User Guide ZEISS Axiocam 208 color / 202 mono | en-US | Rev.1 | 426570-7011-001
organization to change the battery.
The expected battery lifetime is approx. 4-5 years.
46
Page 47

9 Troubleshooting | 9.3 Labscope ZEISS
Symptom Cause Measure
The image has severe noise. The amplification (gain) is set too
high.
The exposure time is set too low. Manually adjust the exposure time.
The light intensity is set too low. Increase the light intensity. Activate
The image is too dark or too
bright.
The camera settings are not
saved after a camera
restart.
Monitor connected via
HDMI does not display an
image.
For Axiocam 208 color,
when switching to 4K, the
monitor becomes black and
then reverts to 1080p.
Automatic exposure time has not
been activated.
The camera has been powered off to
early after changing the settings.
The camera is not delivering a signal,
or signal is not compatible with the
monitor.
The monitor does not support 4K. Use a monitor supporting 4K resolu-
Manually reduce the gain value.
denoise function in Image setting
menu.
Activate the automatic exposure settings or manually adjust the exposure
settings to the current light situation.
For the settings to be automatically
stored, wait at least 5seconds after
changing the settings before you
power off the camera.
Ensure that the camera has been
switched on for at least 30 seconds
and the LED indicator is blue. Check
the plug connections on the camera
and monitor.
tion (e.g. Monitor TFT 32" HP Z32,
Order No. 410350-3201-000), listed
on ZEISS micro-shop website.
The image appears distorted
on full screen monitor.
The image is blurred on the
screen, but the sample is in
focus through the eyepieces.
Buttons do not react when
being pressed.
The Camera otherwise behaves abnormally.
9.3 Labscope
Info
For support in using Labscope, visit our Forum online http://forums.zeiss.com/microscopy/com-
munity/forumdisplay.php?f=38. Please check the Labscope threads for problem-solving notes.
The monitor's image aspect ratio is
not set to 16:9.
The focus plane of the camera is different from that of the eyepieces.
The buttons are temporarily locked,
as the camera is being accessed exclusively from the PC or network.
The camera may have been brought
into a non-intended state.
Set the monitor's aspect ratio to 16:9.
1. Focus the sample through the
eyepieces.
2. Calibrate the camera adaptor
until image is in focus on the
monitor.
Control the camera via PC software or
ZEISS app, or close the PC software or
ZEISS app.
Press the Camera factory reset button on the camera.
User Guide ZEISS Axiocam 208 color / 202 mono | en-US | Rev.1 | 426570-7011-001 47
Page 48

10 Maintenance plan | 10.1 Optical system ZEISS
10 Maintenance plan
To ensure the optimum performance of the device, preventive maintenance work should be performed at regular intervals.
Time interval Component Activity
As required Infrared filter or protective
glass
As required Firmware
Tab.5: Maintenance plan
10.1 Optical system
The internal optical components of the camera should always be protected. If no lens, or camera
adapter with optics, is screwed into the camera's C-Mount thread, the camera's sensor and protective glass must be protected by screwing the protective cap onto the camera's C-Mount
thread.
10.2 Cleaning the infrared filter or protective glass
NOTICE
Sensitive optical parts
An inadequate handling of optical components may damage the components or decrease the
device's imaging quality. The unauthorized handling of device components leads to the loss of
warranty.
4 Do not remove the filter or the protective glass.
4 Do not clean the sensor directly.
4 Do not use tap water to clean the IR filter.
Cleaning [}48]
Update [}49]
Tool / part Quantity
Soft brush 1
Cotton 1
Cleaning fluid for optics 1
Tab.6: Tools and parts
1. Use a soft brush or cotton to wipe away dry dust from the front side of the infrared filter or
the protective glass.
2. Use cotton and cleaning fluid for optics to wipe away more serious contamination from the
infrared filter.
User Guide ZEISS Axiocam 208 color / 202 mono | en-US | Rev.1 | 426570-7011-001
48
Page 49
10 Maintenance plan | 10.3 Updating the firmware ZEISS
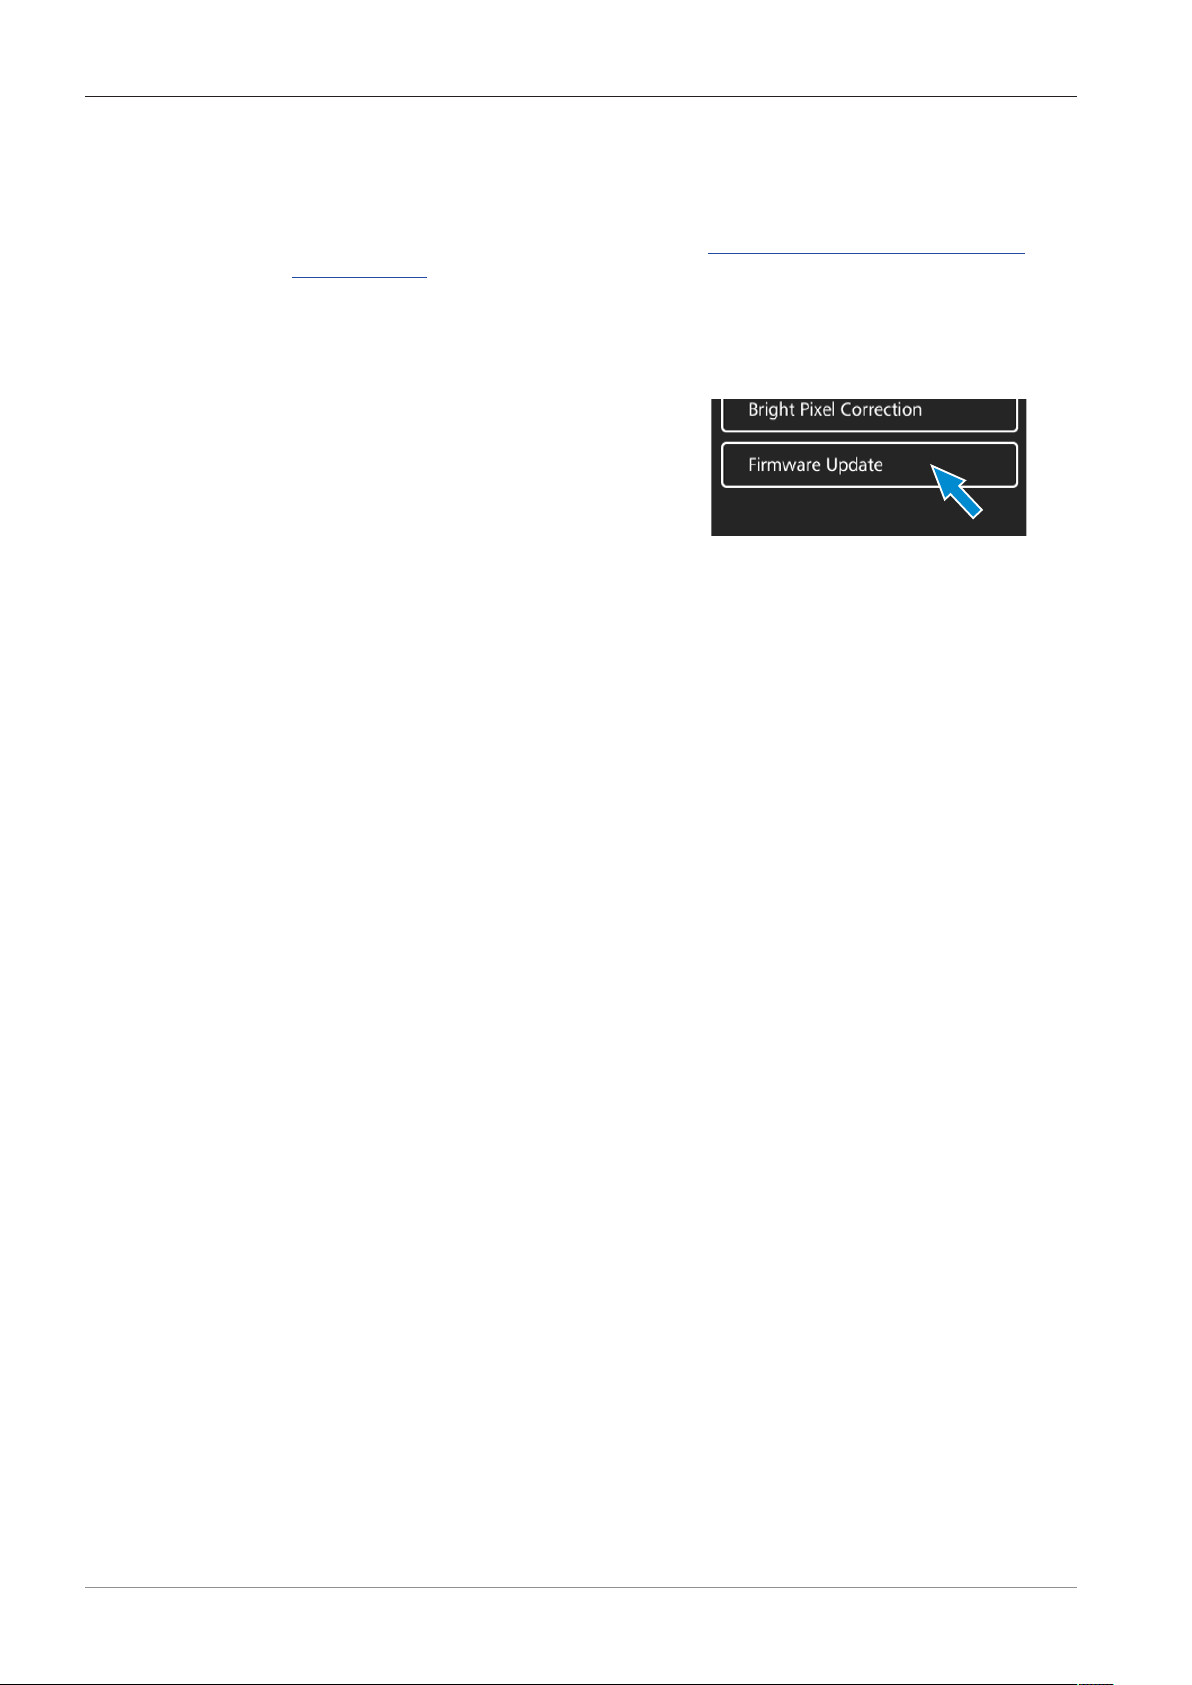
10.3 Updating the firmware
Follow the subsequent instructions to update the camera's firmware:
1. Download the latest firmware from the webpage http://www.zeiss.com/microscopy/int/
downloads.html.
2. Save the latest firmware update package (".tar" file) to the root folder of the USB flash drive
(contained in the scope of delivery).
3. Insert the flash drive into the connected USB hub.
4. At the OSD menu, navigate to Settings > Operating System.
5. Open the Firmware Update menu and press
the update button.
à
Note that the update procedure takes several minutes.
à
Do not operate the camera or unplug the USB flash drive during the update procedure.
The firmware is updated.
User Guide ZEISS Axiocam 208 color / 202 mono | en-US | Rev.1 | 426570-7011-001 49
Page 50

11 Disposal and recycling ZEISS
11 Disposal and recycling
This product has been developed, tested and manufactured in accordance with the applicable environmental provisions and directives of the European Union:
§ The product and its accessories comply with EU directives 2002/95/EC (RoHS) and 2002/96/EC
(WEEE), insofar as these apply to this product.
§ ZEISS has implemented a take-back and recycling process that ensures that proper recycling is
carried out in accordance with the aforementioned EU directives.
§ Please contact your ZEISS sales/service organization for details relating to disposal and recy-
cling.
§ This product must not be disposed of with domestic waste or using municipal waste disposal
services. In the event of resale, the seller must inform the buyer of the need to dispose of the
product appropriately.
User Guide ZEISS Axiocam 208 color / 202 mono | en-US | Rev.1 | 426570-7011-001
50
Page 51

Page 52

 Loading...