

Zebra HC100, ZebraNet RXi Series, S4M, 105SL, ZebraNet ZT200 Series Wireless Quick Start Manual
...Page 1

ZebraNet
®
Wireless Quick Start
Guide
for
Xi™ Series, RXi™ Series,
PAX4™ Series, Z Series®, RZ™ Series,
HC100™, S4M™, 105SL™,
ZT200™ Series, and ZE500™Series Printers
P1050133-002
Page 2

Copyright and Liability Disclaimer
2
© 2012 ZIH Corp. The copyrights in this manual and the software and/or firmware in the printer described
therein are owned by ZIH Corp. and Zebra’s licensors. Unauthorized reproduction of this manual or the software and/
or firmware in the printer may result in imprisonment of up to one year and fines of up to $10,000 (17 U.S.C.506).
Copyright violators may be subject to civil liability.
This product may contain ZPL
®
, ZPL II®, and ZebraLink™ programs; Element Energy Equalizer™ Circuit; E3™;
and Monotype Imaging fonts. Software © ZIH Corp. All rights reserved worldwide.
ZebraLink, and all product names and numbers are trademarks, and Zebra, the Zebra head graphic, ZPL and ZPL II
are registered trademarks of ZIH Corp. All rights reserved worldwide.
All other brand names, product names, or trademarks belong to their respective holders. For additional trademark
information, please see “Trademarks” on the product CD.
Proprietary Statement This manual contains proprietary information of Zebra Technologies Corporation and its
subsidiaries (“Zebra Technologies”). It is intended solely for the information and use of parties operating and
maintaining the equipment described herein. Such proprietary information may not be used, reproduced, or disclosed
to any other parties for any other purpose without the express, written permission of Zebra Technologies Corporation.
Product Improvements Continuous improvement of products is a policy of Zebra Technologies Corporation.
All specifications and designs are subject to change without notice.
Liability Disclaimer Zebra Technologies Corporation takes steps to ensure that its published Engineering
specifications and manuals are correct; however, errors do occur. Zebra Technologies Corporation reserves the right
to correct any such errors and disclaims liability resulting therefrom.
Limitation of Liability In no event shall Zebra Technologies Corporation or anyone else involved in the creation,
production, or delivery of the accompanying product (including hard ware and software) be liab le for any damages
whatsoever (including, without limitation, consequential damages including loss of busin ess profi ts, business
interruption, or loss of business information) arising out of the use of, the results of use of, or inability to use such
product, even if Zebra Technologies Corporation has been advised of the possibility of such damages. Some
jurisdictions do not allow the exclusion or limitation of incidental or consequential damages, so the above limitation
or exclusion may not apply to you.
Radio Approvals Zebra Wireless WLAN printers are only approved for use in certain countries. In no event
shall Zebra be liable for uses of Zebra Wireless WLAN printers that are contrary to local law. To determine
whether you are allowed to use your Zebra Wireless WLAN printer in a specific country, check to see if the radio type
number that is printed on the identification label of your device is listed on the radio approval list posted on the Zebra
support site at http://support.zebra.com/.
In countries other than the United States and Japan, verify that the Location setting from the Regional Options tab in
Regional and Language Options (from Zebra Toolset) has been set to the country in which you are using your Zebra
Wireless WLAN printer. This ensures compliance with local regulatory restrictions on transmit power and optimizes
network performance. Any deviation from the permissible power and frequency settings for the country of use could
be an infringement of local law and may be punished as such.
P1050133-002 05/31/2012
Page 3

Contents
1 • About This Document . . . . . . . . . . . . . . . . . . . . . . . . . . . . . . . . . . . . . . . . . . . . 9
Who Should Use This Document . . . . . . . . . . . . . . . . . . . . . . . . . . . . . . . . . . . . . . . . . . . 10
How This Document Is Organized . . . . . . . . . . . . . . . . . . . . . . . . . . . . . . . . . . . . . . . . . . 10
Document Conventions. . . . . . . . . . . . . . . . . . . . . . . . . . . . . . . . . . . . . . . . . . . . . . . . . . . .11
Contacts . . . . . . . . . . . . . . . . . . . . . . . . . . . . . . . . . . . . . . . . . . . . . . . . . . . . . . . . . . . . . . 12
2 • Printer Setup . . . . . . . . . . . . . . . . . . . . . . . . . . . . . . . . . . . . . . . . . . . . . . . . . . 13
Before You Begin . . . . . . . . . . . . . . . . . . . . . . . . . . . . . . . . . . . . . . . . . . . . . . . . . . . . . . . 14
Power Cord Specifications . . . . . . . . . . . . . . . . . . . . . . . . . . . . . . . . . . . . . . . . . . . . . . . . 15
Connect the Printer to a Power Source . . . . . . . . . . . . . . . . . . . . . . . . . . . . . . . . . . . . . . 16
Select a Wired Data Communication Interface. . . . . . . . . . . . . . . . . . . . . . . . . . . . . . . . . 17
Data Cables and Wireless Cards . . . . . . . . . . . . . . . . . . . . . . . . . . . . . . . . . . . . . . . . 18
3 • Wireless Configuration . . . . . . . . . . . . . . . . . . . . . . . . . . . . . . . . . . . . . . . . . . 19
Configure Using the Network Setup Wizard . . . . . . . . . . . . . . . . . . . . . . . . . . . . . . . . . . . 20
4 • Xi Series and RXi Series . . . . . . . . . . . . . . . . . . . . . . . . . . . . . . . . . . . . . . . . . 31
Select a Site for the Printer. . . . . . . . . . . . . . . . . . . . . . . . . . . . . . . . . . . . . . . . . . . . . . . . 32
Select a Surface . . . . . . . . . . . . . . . . . . . . . . . . . . . . . . . . . . . . . . . . . . . . . . . . . . . . . 32
Provide Proper Operating Conditions. . . . . . . . . . . . . . . . . . . . . . . . . . . . . . . . . . . . . 32
Allow Proper Space . . . . . . . . . . . . . . . . . . . . . . . . . . . . . . . . . . . . . . . . . . . . . . . . . . 32
Provide a Data Source . . . . . . . . . . . . . . . . . . . . . . . . . . . . . . . . . . . . . . . . . . . . . . . . 32
Provide a Power Source. . . . . . . . . . . . . . . . . . . . . . . . . . . . . . . . . . . . . . . . . . . . . . . 32
Xi4 and R110Xi4 General Specifications . . . . . . . . . . . . . . . . . . . . . . . . . . . . . . . . . . . . . 33
Physical Specifications . . . . . . . . . . . . . . . . . . . . . . . . . . . . . . . . . . . . . . . . . . . . . . . . 33
Electrical Specifications . . . . . . . . . . . . . . . . . . . . . . . . . . . . . . . . . . . . . . . . . . . . . . . 33
Environmental Conditions for Operation and Storage . . . . . . . . . . . . . . . . . . . . . . . . 33
5/31/12 P1050133-002
Page 4

Contents
4
Xi Series and RXi Series Compliance Information . . . . . . . . . . . . . . . . . . . . . . . . . . . . . . 34
FCC Compliance Statement. . . . . . . . . . . . . . . . . . . . . . . . . . . . . . . . . . . . . . . . . . . . 34
FCC Radiation Exposure Statement
(for printers with RFID encoders) . . . . . . . . . . . . . . . . . . . . . . . . . . . . . . . . . . . . . . . . 34
Canadian DOC Compliance Statement . . . . . . . . . . . . . . . . . . . . . . . . . . . . . . . . . . . 34
Brasil - Aviso da Anatel. . . . . . . . . . . . . . . . . . . . . . . . . . . . . . . . . . . . . . . . . . . . . . . . 34
Korean Compliance Statement. . . . . . . . . . . . . . . . . . . . . . . . . . . . . . . . . . . . . . . . . . 35
WLAN Radio Specification . . . . . . . . . . . . . . . . . . . . . . . . . . . . . . . . . . . . . . . . . . . . . 35
5 • PAX4 Series . . . . . . . . . . . . . . . . . . . . . . . . . . . . . . . . . . . . . . . . . . . . . . . . . . . 37
Print Engine Installation . . . . . . . . . . . . . . . . . . . . . . . . . . . . . . . . . . . . . . . . . . . . . . . . . . 38
Requirements . . . . . . . . . . . . . . . . . . . . . . . . . . . . . . . . . . . . . . . . . . . . . . . . . . . . . . . 38
Select a Site for the Printer. . . . . . . . . . . . . . . . . . . . . . . . . . . . . . . . . . . . . . . . . . . . . . . . 39
Stability . . . . . . . . . . . . . . . . . . . . . . . . . . . . . . . . . . . . . . . . . . . . . . . . . . . . . . . . . . . . 39
Provide Proper Operating Conditions. . . . . . . . . . . . . . . . . . . . . . . . . . . . . . . . . . . . . 39
Allow Proper Space . . . . . . . . . . . . . . . . . . . . . . . . . . . . . . . . . . . . . . . . . . . . . . . . . . 39
Provide a Data Source . . . . . . . . . . . . . . . . . . . . . . . . . . . . . . . . . . . . . . . . . . . . . . . . 39
Provide a Power Source. . . . . . . . . . . . . . . . . . . . . . . . . . . . . . . . . . . . . . . . . . . . . . . 40
110PAX4 and R110PAX4 General Specifications. . . . . . . . . . . . . . . . . . . . . . . . . . . . . . . 41
Physical . . . . . . . . . . . . . . . . . . . . . . . . . . . . . . . . . . . . . . . . . . . . . . . . . . . . . . . . . . . 41
Electrical Specifications . . . . . . . . . . . . . . . . . . . . . . . . . . . . . . . . . . . . . . . . . . . . . . . 41
Environmental Conditions. . . . . . . . . . . . . . . . . . . . . . . . . . . . . . . . . . . . . . . . . . . . . . 41
170PAX4 General Specifications . . . . . . . . . . . . . . . . . . . . . . . . . . . . . . . . . . . . . . . . . . . 42
Physical . . . . . . . . . . . . . . . . . . . . . . . . . . . . . . . . . . . . . . . . . . . . . . . . . . . . . . . . . . . 42
Electrical Specifications . . . . . . . . . . . . . . . . . . . . . . . . . . . . . . . . . . . . . . . . . . . . . . . 42
Environmental Conditions. . . . . . . . . . . . . . . . . . . . . . . . . . . . . . . . . . . . . . . . . . . . . . 42
PAX4 Compliance Information . . . . . . . . . . . . . . . . . . . . . . . . . . . . . . . . . . . . . . . . . . . . . 43
FCC Compliance Statement . . . . . . . . . . . . . . . . . . . . . . . . . . . . . . . . . . . . . . . . . . . 43
FCC Radiation Exposure Statement . . . . . . . . . . . . . . . . . . . . . . . . . . . . . . . . . . . . . 43
Canadian DOC Compliance Statement . . . . . . . . . . . . . . . . . . . . . . . . . . . . . . . . . . . 43
Brasil - Aviso da Anatel. . . . . . . . . . . . . . . . . . . . . . . . . . . . . . . . . . . . . . . . . . . . . . . . 43
Korean Compliance Statement. . . . . . . . . . . . . . . . . . . . . . . . . . . . . . . . . . . . . . . . . . 44
NCC . . . . . . . . . . . . . . . . . . . . . . . . . . . . . . . . . . . . . . . . . . . . . . . . . . . . . . . . . . . . . . 44
6 • Z Series and RZ Series . . . . . . . . . . . . . . . . . . . . . . . . . . . . . . . . . . . . . . . . . . 45
Select a Site for the Printer. . . . . . . . . . . . . . . . . . . . . . . . . . . . . . . . . . . . . . . . . . . . . . . . 46
Select a Surface . . . . . . . . . . . . . . . . . . . . . . . . . . . . . . . . . . . . . . . . . . . . . . . . . . . . . 46
Provide Proper Operating Conditions. . . . . . . . . . . . . . . . . . . . . . . . . . . . . . . . . . . . . 46
Allow Proper Space . . . . . . . . . . . . . . . . . . . . . . . . . . . . . . . . . . . . . . . . . . . . . . . . . . 46
Provide a Data Source . . . . . . . . . . . . . . . . . . . . . . . . . . . . . . . . . . . . . . . . . . . . . . . . 46
Provide a Power Source. . . . . . . . . . . . . . . . . . . . . . . . . . . . . . . . . . . . . . . . . . . . . . . 46
P1050133-002 5/31/12
Page 5

Contents
Z Series and RZ Series General Specifications . . . . . . . . . . . . . . . . . . . . . . . . . . . . . . . . 47
Physical Specifications . . . . . . . . . . . . . . . . . . . . . . . . . . . . . . . . . . . . . . . . . . . . . . . . 47
Electrical Specifications . . . . . . . . . . . . . . . . . . . . . . . . . . . . . . . . . . . . . . . . . . . . . . . 47
Environmental Conditions for Operation and Storage . . . . . . . . . . . . . . . . . . . . . . . . 47
Z Series and RZ Series Compliance Information . . . . . . . . . . . . . . . . . . . . . . . . . . . . . . . 48
FCC Compliance Statement. . . . . . . . . . . . . . . . . . . . . . . . . . . . . . . . . . . . . . . . . . . . 48
FCC Radiation Exposure Statement
(for printers with RFID encoders) . . . . . . . . . . . . . . . . . . . . . . . . . . . . . . . . . . . . . . . . 48
Canadian DOC Compliance Statement . . . . . . . . . . . . . . . . . . . . . . . . . . . . . . . . . . . 48
Brasil - Aviso da Anatel. . . . . . . . . . . . . . . . . . . . . . . . . . . . . . . . . . . . . . . . . . . . . . . . 48
Korean Compliance Statement. . . . . . . . . . . . . . . . . . . . . . . . . . . . . . . . . . . . . . . . . . 49
NCC . . . . . . . . . . . . . . . . . . . . . . . . . . . . . . . . . . . . . . . . . . . . . . . . . . . . . . . . . . . . . . 49
WLAN Radio Specification . . . . . . . . . . . . . . . . . . . . . . . . . . . . . . . . . . . . . . . . . . . . . 49
7 • HC100 . . . . . . . . . . . . . . . . . . . . . . . . . . . . . . . . . . . . . . . . . . . . . . . . . . . . . . . . 51
Select a Site for the Printer. . . . . . . . . . . . . . . . . . . . . . . . . . . . . . . . . . . . . . . . . . . . . . . . 52
Select a Surface . . . . . . . . . . . . . . . . . . . . . . . . . . . . . . . . . . . . . . . . . . . . . . . . . . . . . 52
Provide Proper Operating Conditions. . . . . . . . . . . . . . . . . . . . . . . . . . . . . . . . . . . . . 52
Allow Proper Space . . . . . . . . . . . . . . . . . . . . . . . . . . . . . . . . . . . . . . . . . . . . . . . . . . 52
Provide a Data Source . . . . . . . . . . . . . . . . . . . . . . . . . . . . . . . . . . . . . . . . . . . . . . . . 52
Provide a Power Source. . . . . . . . . . . . . . . . . . . . . . . . . . . . . . . . . . . . . . . . . . . . . . . 52
HC100 General Specifications . . . . . . . . . . . . . . . . . . . . . . . . . . . . . . . . . . . . . . . . . . . . . 53
Physical Specifications . . . . . . . . . . . . . . . . . . . . . . . . . . . . . . . . . . . . . . . . . . . . . . . . 53
Electrical Specifications . . . . . . . . . . . . . . . . . . . . . . . . . . . . . . . . . . . . . . . . . . . . . . . 53
Environmental Conditions for Operation and Storage . . . . . . . . . . . . . . . . . . . . . . . . 53
HC100 Compliance Information . . . . . . . . . . . . . . . . . . . . . . . . . . . . . . . . . . . . . . . . . . . . 54
FCC Compliance Statement. . . . . . . . . . . . . . . . . . . . . . . . . . . . . . . . . . . . . . . . . . . . 54
Canadian DOC Compliance Statement . . . . . . . . . . . . . . . . . . . . . . . . . . . . . . . . . . . 54
Brasil - Aviso da Anatel. . . . . . . . . . . . . . . . . . . . . . . . . . . . . . . . . . . . . . . . . . . . . . . . 54
Korean Compliance Statement. . . . . . . . . . . . . . . . . . . . . . . . . . . . . . . . . . . . . . . . . . 54
NCC . . . . . . . . . . . . . . . . . . . . . . . . . . . . . . . . . . . . . . . . . . . . . . . . . . . . . . . . . . . . . . 55
WLAN Radio Specification . . . . . . . . . . . . . . . . . . . . . . . . . . . . . . . . . . . . . . . . . . . . . 55
5
8 • S4M . . . . . . . . . . . . . . . . . . . . . . . . . . . . . . . . . . . . . . . . . . . . . . . . . . . . . . . . . . 57
Select a Site for the Printer. . . . . . . . . . . . . . . . . . . . . . . . . . . . . . . . . . . . . . . . . . . . . . . . 58
Select a Surface . . . . . . . . . . . . . . . . . . . . . . . . . . . . . . . . . . . . . . . . . . . . . . . . . . . . . 58
Provide Proper Operating Conditions. . . . . . . . . . . . . . . . . . . . . . . . . . . . . . . . . . . . . 58
Allow Proper Space . . . . . . . . . . . . . . . . . . . . . . . . . . . . . . . . . . . . . . . . . . . . . . . . . . 58
Provide a Data Source . . . . . . . . . . . . . . . . . . . . . . . . . . . . . . . . . . . . . . . . . . . . . . . . 58
Provide a Power Source. . . . . . . . . . . . . . . . . . . . . . . . . . . . . . . . . . . . . . . . . . . . . . . 58
5/31/12 P1050133-002
Page 6

Contents
6
S4M General Specifications . . . . . . . . . . . . . . . . . . . . . . . . . . . . . . . . . . . . . . . . . . . . . . . 59
Physical Specifications . . . . . . . . . . . . . . . . . . . . . . . . . . . . . . . . . . . . . . . . . . . . . . . . 59
Electrical Specifications . . . . . . . . . . . . . . . . . . . . . . . . . . . . . . . . . . . . . . . . . . . . . . . 59
Environmental Conditions for Operation and Storage . . . . . . . . . . . . . . . . . . . . . . . . 59
S4M Compliance Information . . . . . . . . . . . . . . . . . . . . . . . . . . . . . . . . . . . . . . . . . . . . . . 60
FCC Compliance Statement. . . . . . . . . . . . . . . . . . . . . . . . . . . . . . . . . . . . . . . . . . . . 60
Canadian DOC Compliance Statement . . . . . . . . . . . . . . . . . . . . . . . . . . . . . . . . . . . 60
Brasil - Aviso da Anatel. . . . . . . . . . . . . . . . . . . . . . . . . . . . . . . . . . . . . . . . . . . . . . . . 60
Korean Compliance Statement. . . . . . . . . . . . . . . . . . . . . . . . . . . . . . . . . . . . . . . . . . 60
NCC . . . . . . . . . . . . . . . . . . . . . . . . . . . . . . . . . . . . . . . . . . . . . . . . . . . . . . . . . . . . . . 61
9 • 105SL . . . . . . . . . . . . . . . . . . . . . . . . . . . . . . . . . . . . . . . . . . . . . . . . . . . . . . . . 63
Select a Site for the Printer. . . . . . . . . . . . . . . . . . . . . . . . . . . . . . . . . . . . . . . . . . . . . . . . 64
Select a Surface . . . . . . . . . . . . . . . . . . . . . . . . . . . . . . . . . . . . . . . . . . . . . . . . . . . . . 64
Provide Proper Operating Conditions. . . . . . . . . . . . . . . . . . . . . . . . . . . . . . . . . . . . . 64
Allow Proper Space . . . . . . . . . . . . . . . . . . . . . . . . . . . . . . . . . . . . . . . . . . . . . . . . . . 64
Provide a Data Source . . . . . . . . . . . . . . . . . . . . . . . . . . . . . . . . . . . . . . . . . . . . . . . . 64
Provide a Power Source. . . . . . . . . . . . . . . . . . . . . . . . . . . . . . . . . . . . . . . . . . . . . . . 64
105SL General Specifications. . . . . . . . . . . . . . . . . . . . . . . . . . . . . . . . . . . . . . . . . . . . . . 65
Physical Specifications . . . . . . . . . . . . . . . . . . . . . . . . . . . . . . . . . . . . . . . . . . . . . . . . 65
Electrical Specifications . . . . . . . . . . . . . . . . . . . . . . . . . . . . . . . . . . . . . . . . . . . . . . . 65
Environmental Conditions for Operation and Storage . . . . . . . . . . . . . . . . . . . . . . . . 65
105SL Compliance Information. . . . . . . . . . . . . . . . . . . . . . . . . . . . . . . . . . . . . . . . . . . . . 66
FCC Compliance Statement. . . . . . . . . . . . . . . . . . . . . . . . . . . . . . . . . . . . . . . . . . . . 66
Canadian DOC Compliance Statement . . . . . . . . . . . . . . . . . . . . . . . . . . . . . . . . . . . 66
Brasil - Aviso da Anatel. . . . . . . . . . . . . . . . . . . . . . . . . . . . . . . . . . . . . . . . . . . . . . . . 66
Korean Compliance Statement. . . . . . . . . . . . . . . . . . . . . . . . . . . . . . . . . . . . . . . . . . 66
NCC . . . . . . . . . . . . . . . . . . . . . . . . . . . . . . . . . . . . . . . . . . . . . . . . . . . . . . . . . . . . . . 67
WLAN Radio Specification . . . . . . . . . . . . . . . . . . . . . . . . . . . . . . . . . . . . . . . . . . . . . 67
10 • ZT200 Series . . . . . . . . . . . . . . . . . . . . . . . . . . . . . . . . . . . . . . . . . . . . . . . . . 69
Select a Site for the Printer. . . . . . . . . . . . . . . . . . . . . . . . . . . . . . . . . . . . . . . . . . . . . . . . 70
Select a Surface . . . . . . . . . . . . . . . . . . . . . . . . . . . . . . . . . . . . . . . . . . . . . . . . . . . . . 70
Provide Proper Operating Conditions. . . . . . . . . . . . . . . . . . . . . . . . . . . . . . . . . . . . . 70
Allow Proper Space . . . . . . . . . . . . . . . . . . . . . . . . . . . . . . . . . . . . . . . . . . . . . . . . . . 70
Provide a Data Source . . . . . . . . . . . . . . . . . . . . . . . . . . . . . . . . . . . . . . . . . . . . . . . . 70
Provide a Power Source. . . . . . . . . . . . . . . . . . . . . . . . . . . . . . . . . . . . . . . . . . . . . . . 70
ZT210, ZT220, and ZT230 General Specifications. . . . . . . . . . . . . . . . . . . . . . . . . . . . . . 71
Physical Specifications . . . . . . . . . . . . . . . . . . . . . . . . . . . . . . . . . . . . . . . . . . . . . . . . 71
Electrical Specifications . . . . . . . . . . . . . . . . . . . . . . . . . . . . . . . . . . . . . . . . . . . . . . . 71
Environmental Conditions for Operation and Storage . . . . . . . . . . . . . . . . . . . . . . . . 71
P1050133-002 5/31/12
Page 7

Contents
ZT210, ZT220, and ZT230 Compliance Information. . . . . . . . . . . . . . . . . . . . . . . . . . . . . 72
FCC Compliance Statement. . . . . . . . . . . . . . . . . . . . . . . . . . . . . . . . . . . . . . . . . . . . 72
Canadian DOC Compliance Statement . . . . . . . . . . . . . . . . . . . . . . . . . . . . . . . . . . . 72
Industry Canada (IC) Warning. . . . . . . . . . . . . . . . . . . . . . . . . . . . . . . . . . . . . . . . . . 72
Brasil - Aviso da Anatel. . . . . . . . . . . . . . . . . . . . . . . . . . . . . . . . . . . . . . . . . . . . . . . . 72
European Regulatory Information. . . . . . . . . . . . . . . . . . . . . . . . . . . . . . . . . . . . . . . . 73
Japan Restricted Frequencies . . . . . . . . . . . . . . . . . . . . . . . . . . . . . . . . . . . . . . . . . . 73
Taiwan Restricted Frequencies. . . . . . . . . . . . . . . . . . . . . . . . . . . . . . . . . . . . . . . . . . 73
Korean Compliance Statement. . . . . . . . . . . . . . . . . . . . . . . . . . . . . . . . . . . . . . . . . . 73
NCC . . . . . . . . . . . . . . . . . . . . . . . . . . . . . . . . . . . . . . . . . . . . . . . . . . . . . . . . . . . . . . 74
11 • ZE500 Series . . . . . . . . . . . . . . . . . . . . . . . . . . . . . . . . . . . . . . . . . . . . . . . . . 75
Print Engine Installation . . . . . . . . . . . . . . . . . . . . . . . . . . . . . . . . . . . . . . . . . . . . . . . . . . 76
Requirements . . . . . . . . . . . . . . . . . . . . . . . . . . . . . . . . . . . . . . . . . . . . . . . . . . . . . . . 76
Select a Site for the Printer. . . . . . . . . . . . . . . . . . . . . . . . . . . . . . . . . . . . . . . . . . . . . . . . 77
Stability . . . . . . . . . . . . . . . . . . . . . . . . . . . . . . . . . . . . . . . . . . . . . . . . . . . . . . . . . . . . 77
Provide Proper Operating Conditions. . . . . . . . . . . . . . . . . . . . . . . . . . . . . . . . . . . . . 77
Allow Proper Space . . . . . . . . . . . . . . . . . . . . . . . . . . . . . . . . . . . . . . . . . . . . . . . . . . 77
Provide a Data Source . . . . . . . . . . . . . . . . . . . . . . . . . . . . . . . . . . . . . . . . . . . . . . . . 77
Provide a Power Source. . . . . . . . . . . . . . . . . . . . . . . . . . . . . . . . . . . . . . . . . . . . . . . 78
ZE500 General Specifications. . . . . . . . . . . . . . . . . . . . . . . . . . . . . . . . . . . . . . . . . . . . . . 79
Physical . . . . . . . . . . . . . . . . . . . . . . . . . . . . . . . . . . . . . . . . . . . . . . . . . . . . . . . . . . . 79
Electrical Specifications . . . . . . . . . . . . . . . . . . . . . . . . . . . . . . . . . . . . . . . . . . . . . . . 79
Environmental Conditions. . . . . . . . . . . . . . . . . . . . . . . . . . . . . . . . . . . . . . . . . . . . . . 79
ZE500 Compliance Information . . . . . . . . . . . . . . . . . . . . . . . . . . . . . . . . . . . . . . . . . . . . 80
FCC Compliance Statement . . . . . . . . . . . . . . . . . . . . . . . . . . . . . . . . . . . . . . . . . . . 80
FCC Radiation Exposure Statement . . . . . . . . . . . . . . . . . . . . . . . . . . . . . . . . . . . . . 80
Canadian DOC Compliance Statement . . . . . . . . . . . . . . . . . . . . . . . . . . . . . . . . . . . 80
Brasil - Aviso da Anatel. . . . . . . . . . . . . . . . . . . . . . . . . . . . . . . . . . . . . . . . . . . . . . . . 80
Korean Compliance Statement. . . . . . . . . . . . . . . . . . . . . . . . . . . . . . . . . . . . . . . . . . 81
NCC . . . . . . . . . . . . . . . . . . . . . . . . . . . . . . . . . . . . . . . . . . . . . . . . . . . . . . . . . . . . . . 81
7
5/31/12 P1050133-002
Page 8

Contents
Notes • ___________________________________________________________________
__________________________________________________________________________
__________________________________________________________________________
__________________________________________________________________________
__________________________________________________________________________
__________________________________________________________________________
__________________________________________________________________________
__________________________________________________________________________
__________________________________________________________________________
__________________________________________________________________________
8
P1050133-002 5/31/12
Page 9

1
About This Document
This section provides you with contact information, documen t struc ture and organization, and
additional reference documents.
Contents
Who Should Use This Document. . . . . . . . . . . . . . . . . . . . . . . . . . . . . . . . . . . . . . . . . . . 10
How This Document Is Organized . . . . . . . . . . . . . . . . . . . . . . . . . . . . . . . . . . . . . . . . . . 10
Document Conventions . . . . . . . . . . . . . . . . . . . . . . . . . . . . . . . . . . . . . . . . . . . . . . . . . . 11
Contacts. . . . . . . . . . . . . . . . . . . . . . . . . . . . . . . . . . . . . . . . . . . . . . . . . . . . . . . . . . . . . . 12
5/31/12 P1050133-002
Page 10

About This Document
10
Who Should Use This Document
Who Should Use This Document
This guide is intended for use by someone who needs to configure and use a ZebraNet wireless
print server for use with a supported printer.
This guide supports the ZebraNet Wireless Print Server, the ZebraNet Wireless Plus Print
Server, the ZebraNet Internal Wireless Plus Print Server, and the ZebraNet b/g Print Server.
The firmware version required to operate your print server varies based on your printer. For
more information, refer to the ZebraNet Wired and Wireless Print Servers User Guide.
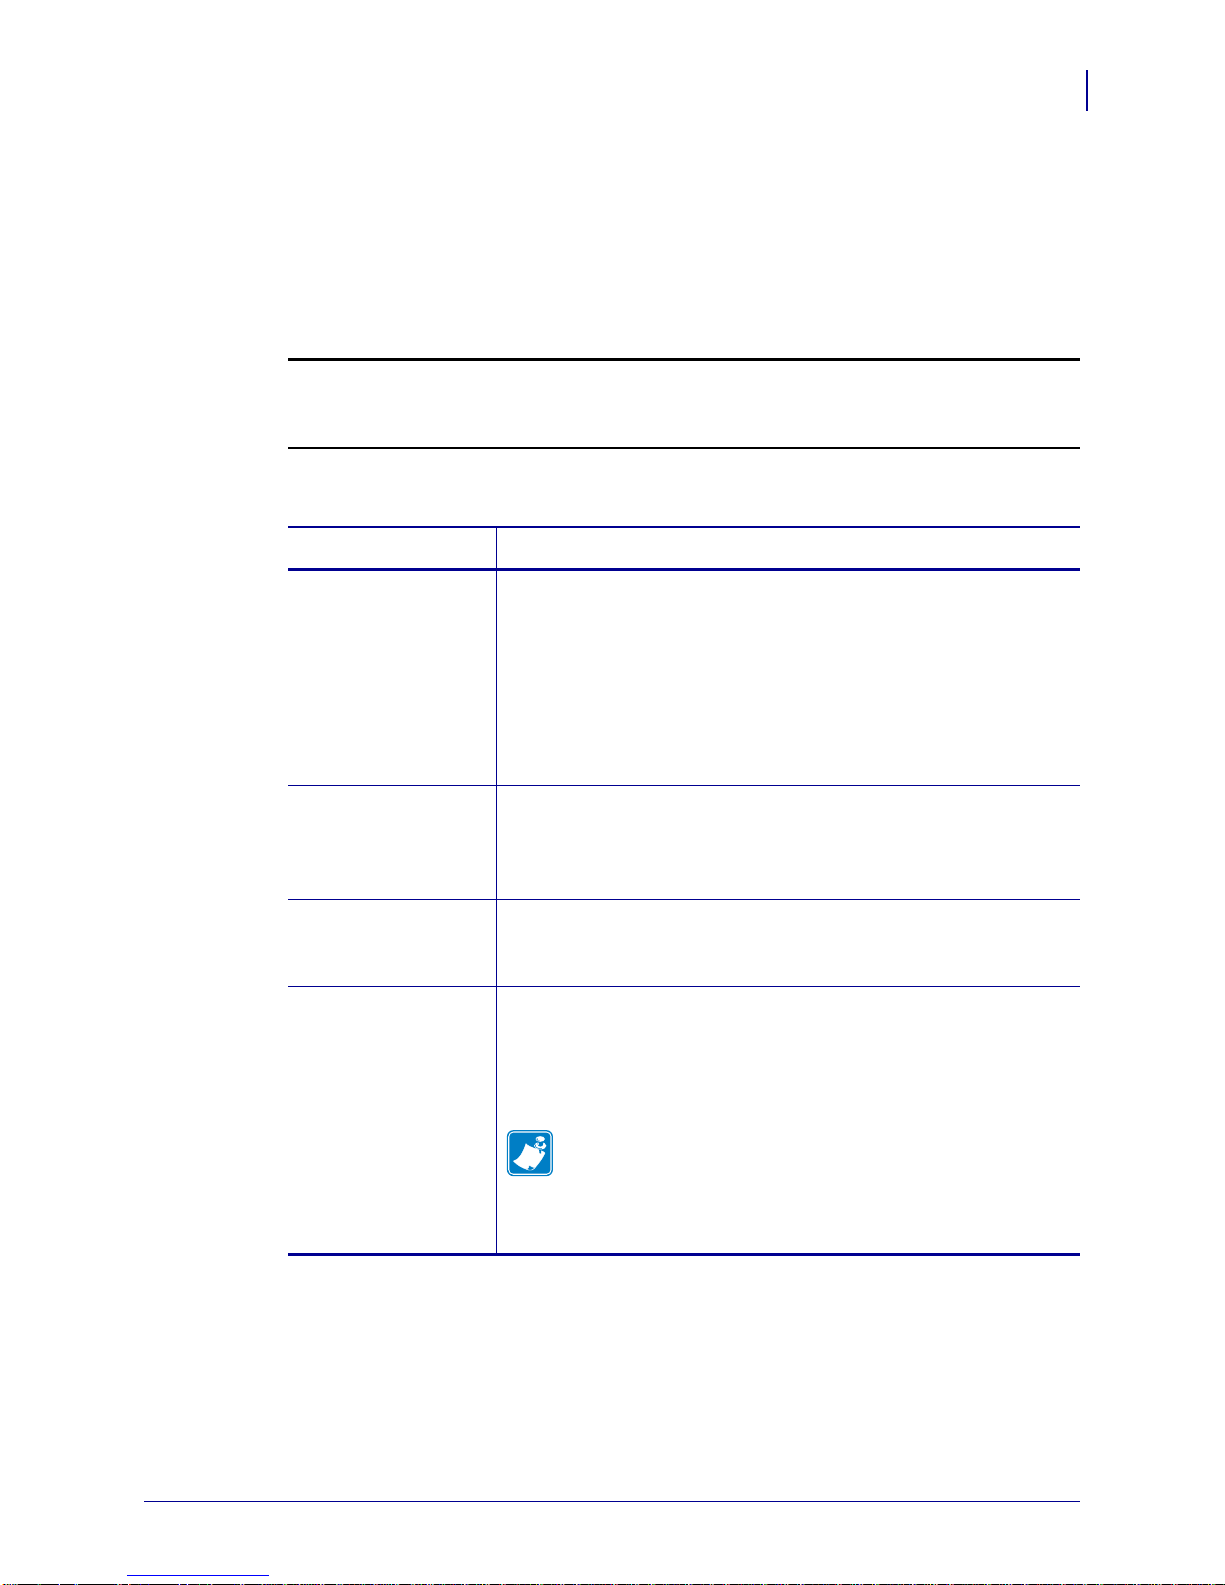
How This Document Is Organized
This guide is set up as follows:
Section Description
Printer Setup on page 13 This section provides the tasks that you must complete and the
issues that you must consider before you load and configure your
printer.
Wireless Configuration on page 19 Use this section to configure your ZebraNet wireless print server for
operation. For more detailed information, refer to the ZebraNet
Wired and Wireless Print Servers User Guide.
Xi Series and RXi Series on page 31
PAX4 Series on page 37
Z Series and RZ Series on page 45
HC100 on page 51
S4M on page 57
105SL on page 63
ZT200 Series on page 69
ZE500 Series on page 75
These sections contain information for specific printer and print
engine models.
P1050133-002 5/31/12
Page 11
Document Conventions
3
1
2
The following conventions are used throughout this document to convey certain information.
Printer/Print Engine The term “printer” will be used throughout this document to refer to
Zebra printers and print engines.
Alternate Color (online only) Cross-references contain hot links to other sections in this
guide. If you are viewing this guide online in .p df format, you can click the cross-reference
(blue text) to jump directly to its location.
Icons Used
Caution • Warns you of a potential electric shock situation.
Important • Advises you of informatio n that is essential to complete a task.
About This Document
Document Conventions
11
Note • Indicates neutral or positive information that emphasizes or supplements important
points of the main text.
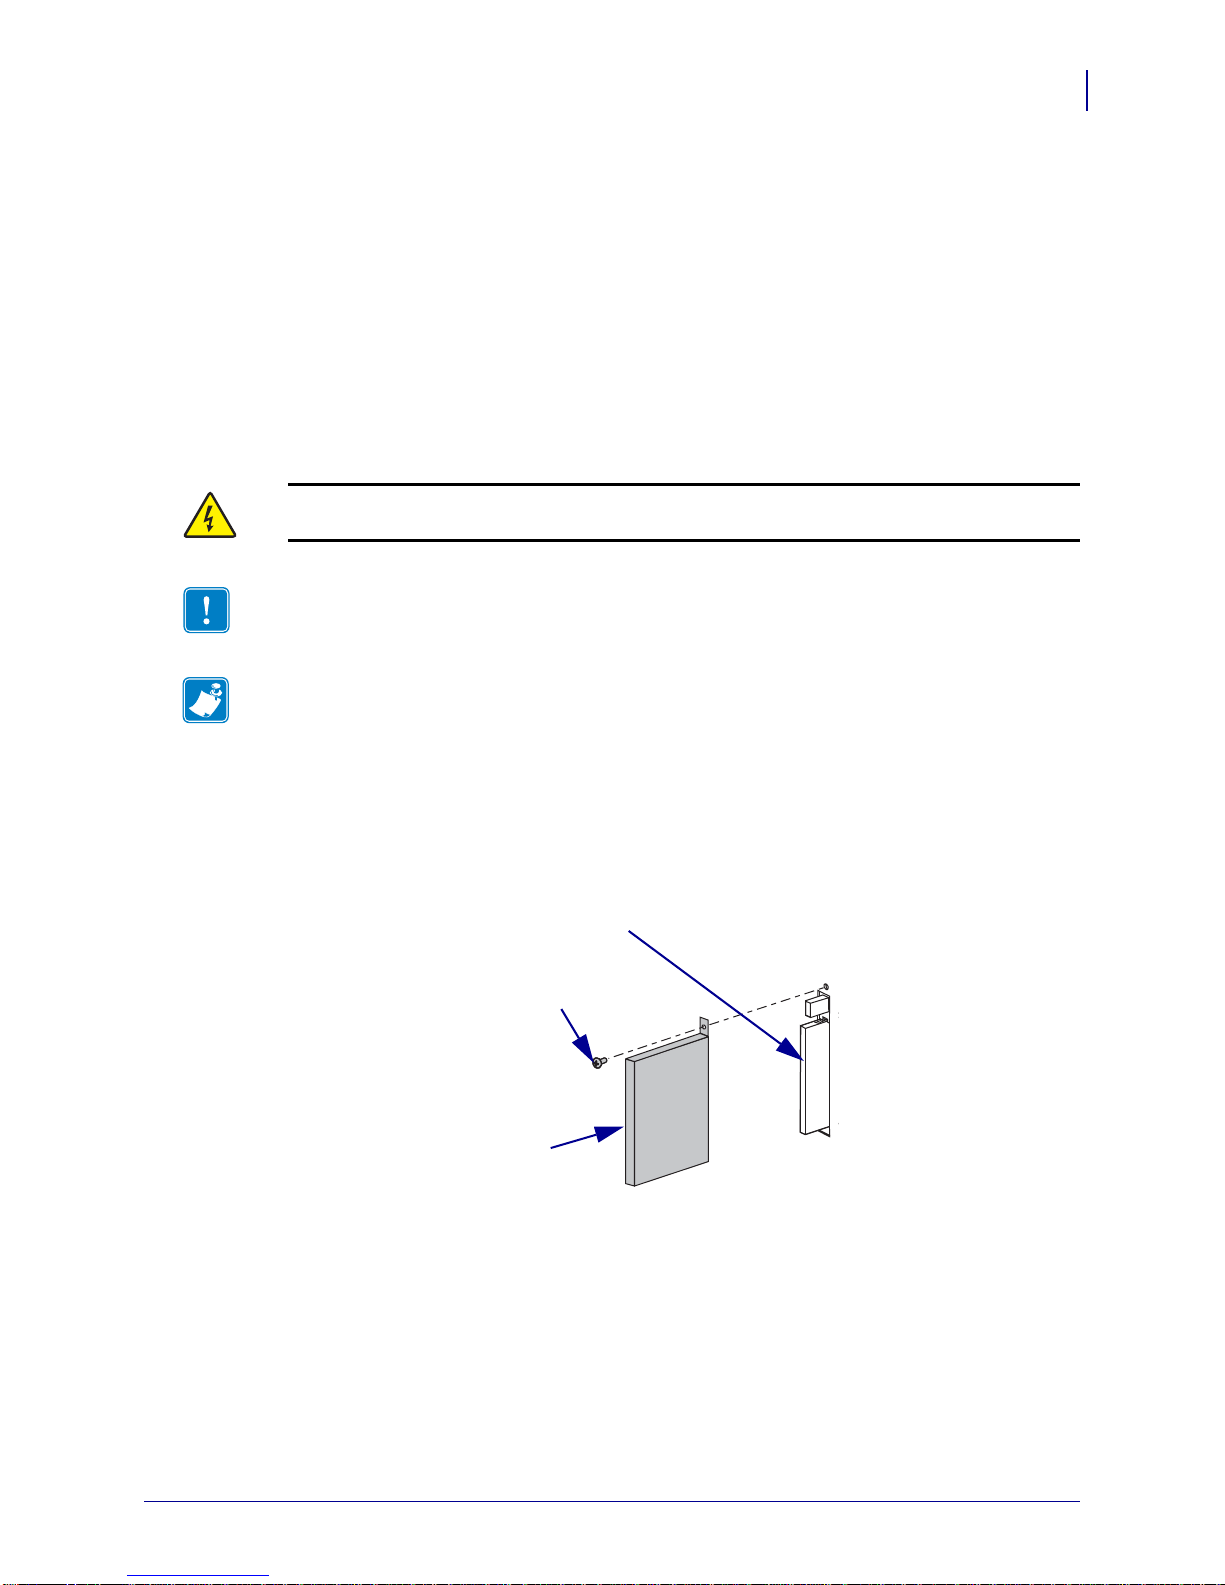
Illustration Callouts Callouts are used when an illustration contains information that needs
to be labeled and described. A table that contains the labels and descriptions follows the
graphic. Figure 1 provides an example.
Figure 1 • Sample Figure with Callouts
5/31/12 P1050133-002
Page 12

About This Document
12
Contacts
Contacts
Technical Support via the Internet is available 24 hours per day, 365 days per year.
Web Site: www.zebra.com
E-mail Back Technical Library:
E-mail address: emb@zebra.com
Subject line: Emaillist
Self Service Knowledge Base: www.zebra.com/knowledgebase
Online Case Registration: www.zebra.com/techrequest
Which Department
Do You Need?
Regional Headquarters Zebra Technologies Corporation
475 Half Day Road, Suite 500
Lincolnshire, IL 60069 USA
T: +1 847 634 6700
Toll-f ree +1 866 230 9494
F: +1 847 913 8766
Technical Support
For questions on the
operation of Zebra
equipment and software,
please call your distributor.
For additional assistance,
contact us.
Please have your model and
serial numbers available.
Repair Service
Department
For back-to-base service
and repair.
Technical Training
Department
For Zebra product training
courses.
Inquiry Department
For product literature and
distributor and dealer
information.
Customer Service
Department (US)
Internal Sales
Department (UK)
For printers, parts, media,
and ribbon, please call your
distributor or contact us.
Key:
T: Telephone
F: Facsimile
E: E-mail
T: +1 877 ASK ZEBRA (275 9327)
F: +1 847 913 2578
Hardware: ts1@zebra.com
Software: ts3@zebra.com
Kiosk printers:
T: +1 866 322 5202
E: kiosksupport@zebra.com
T: +1 877 ASK ZEBRA (275 9327)
F: +1 847 821 1797
E: repair@zebra.com
To request a repair in the U.S.,
go to www.zebra.com/repair
T: +1 847 793 6868
T: +1 847 793 6864
F: +1 847 913 2578
E: ttamerica@zebra.com
T: +1 877 ASK ZEBRA (275 9327)
E: inquiry4@zebra.com
T: +1 877 ASK ZEBRA (275 9327)
E: clientcare@zebra.com
The Americas
.
Europe, Middle East,
and Africa
Zebra Technologies Europe
Limited
Dukes Meadow
Millboard Road
Bourne End
Buckinghamshire, SL8 5XF
United Kingdom
T: +44 (0) 1628 556000
F: +44 (0) 1628 556001
T: +44 (0) 1628 556039
F: +44 (0) 1628 556003
E: Tseurope@zebra.com
T: +44 (0) 1772 693069
F: +44 (0) 1772 693046
New requests: ukrma@zebra.com
Status updates:
repairupdate@zebra.com
T: +44 (0) 1628 556000
F: +44 (0) 1628 556001
E: Eurtraining@zebra.com
T: +44 (0) 1628 556037
F: +44 (0) 1628 556005
E: mseurope@zebra.com
T: +44 (0) 1628 556032
F: +44 (0) 1628 556001
E: cseurope@zebra.com
Asia Pacific
and India
Zebra Technologies Asia Pacific
Pte. Ltd.
120 Robinson Road
#06-01 Parakou Building
Singapore 068913
T: + 65 6858 0722
F: +65 6885 0838
T: +65 6858 0722
F: +65 6885 0838
E: China: tschina@zebra.com
All other areas:
tsasiapacific@zebra.com
T: +65 6858 0722
F: +65 6885 0838
E: China: tschina@zebra.com
All other areas:
tsasiapacific@zebra.com
T: + 65 6858 0722
F: +65 6885 0838
E: China: tschina@zebra.com
All other areas:
tsasiapacific@zebra.com
E: China:
GCmarketing@zebra.com
All other areas:
APACChannelmarketing@zebra.co
m
T: +65 6858 0722
F: +65 6885 0836
E: China: order-csr@zebra.com
All other areas:
csasiapacific@zebra.com
P1050133-002 05/31/2012
Page 13

2
Printer Setup
This section provides the tasks that you must complete and the issues that you must consider
before you load and configure your printer.
Contents
Before You Begin. . . . . . . . . . . . . . . . . . . . . . . . . . . . . . . . . . . . . . . . . . . . . . . . . . . . . . . 14
Power Cord Specifications. . . . . . . . . . . . . . . . . . . . . . . . . . . . . . . . . . . . . . . . . . . . . . . . 15
Connect the Printer to a Power Source . . . . . . . . . . . . . . . . . . . . . . . . . . . . . . . . . . . . . . 16
Select a Wired Data Communication Interface . . . . . . . . . . . . . . . . . . . . . . . . . . . . . . . . 17
5/31/12 P1050133-002
Page 14

Printer Setup
14
Before You Begin
Before You Begin
Review this checklist, and resolve any issues before you set up or use your wireless printer.
Unpack and Inspect the Printer Have you unpacked the printer and inspected it for
damage?
When you receive the printer, immediately unpack it and inspect for shipping damage.
• Save all packing materials.
• Check all exterior surfaces for damage.
• Raise the media door, and inspect the media compartment for damage to components.
If you discover shipping damage upon inspection:
• Immediately notify the shipping company and file a damage report.
• Keep all packaging material for shipping company inspection.
• Notify your authorized Zebra reseller.
Important • Zebra Technologies Corporation is not responsible for any damage incurred
during the shipment of the equipment and will not repair this damage under warranty.
Install the Printer
• For all printers except PAX print engines: Have you selected an appropriate location
for the printer? If you have not, see Select a Site for the Printer on page 32.
• For PAX series print engines: Have you considered what factors will affect how the
print engines is installed into an applicator? Is the print engine mounted in an
applicator? For information, see Print Engine Installation on page 38.
Attach a Power Cord Do you have the correct power cord for your printer? If you are
unsure, see Connect the Printer to a Power Source on page 16. To attach the power cord
and connect the printer to a power source, see Connect the Printer to a Power Source
on page 16.
Select a Wired Data Communication Interface Have you connected your printer
to your computer or network using a wired data communication interface ? You must use a
wired connection first to configure your printer for wireless operation. If you have not, see
Select a Wire d Data Communication Interface on page 17.
P1050133-002 5/31/12
Page 15

Power Cord Specifications
3
1
2
4
Caution • For personnel and equipment safety, always use an approved three-conductor
power cord specific to the region or country intended for installation. This cord must use an
IEC 320 female connector and the appropriate region-specific, three-conductor grounded
plug configuration.
Depending on how your printer was ordered, a power cord may or may not be included. If one
is not included or if the one included is not suitable for your requirements, see Figure 2 an d
refer to the following guidelines:
• The overall cord length must be less than 9.8 ft. (3 m).
• The cord must be rated for at least 10 A, 250 V.
• The chassis ground (earth) must be connected to e nsure safety and redu ce electromagnetic
interference.
Figure 2 • Power Cord Specifications
Printer Setup
Power Cord Specifications
15
AC power plug for your country—This should bear
1
the certification mark of at least one of the known
international safety organizations (Figure 3).
3-conductor HAR cable or other cable approved for
2
your country.
IEC 320 connector—This should bear the
3
certification mark of at least one of the known
international safety organizations (Figure 3).
Length ≤ 9.8 ft. (3 m). Rating 10 Amp, 250 VAC.
4
Figure 3 • International Safety Organization Certifications
5/31/12 P1050133-002
Page 16

Printer Setup
16
Connect the Printer to a Power Source
Connect the Printer to a Power Source
For PAX4 print engines, the power supply in the prin t engi ne automat ically detec ts the ap plied
line voltage and works in the 90 to 264 VAC, 47 to 63 Hz range.
The AC power cord must have a three-prong female connector on one end that plugs into the
mating AC power connector at the rear of the printer. If a power cable was not included with
your printer, refer to Power Cord Specifications on page 15.
Caution • For personnel and equipment safety, always use an approved three-conductor
power cord specific to the region or country intended for installation. This cord must use an
IEC 320 female connector and the appropriate region-specific three-conductor grounded
plug configuration.
To connect the printer to a power source, complete these steps:
1. Toggle the printer power switch to the off (O) position.
2. Plug the power cord into the AC power connector on the rear of the printer.
3. Plug the other end of the power cord into a power outlet near the printer.
4. Turn on (I) the printer.
The control panel LCD and lights activate, indicating that the printer is booting up.
P1050133-002 5/31/12
Page 17
Select a Wired Data Communication Interface
Select a Wired Data Communication Interface
To configure your printer for wireless operation, you must first connect your printer using a
wired data communication interface. Table 1 provides basic information about wired data
communication interfaces. Not all interfaces may be available on your printer. Select an
interface that is supported by both your printe r and your computer or your Local Area Network
(LAN).
Caution • Ensure that the printer power is off (O) before connecting data communications
cables. Connecting a data communications cable while the power is on (
printer.
Table 1 • Wired Data Communication Interfaces
Interface Characteristics
RS-232 Serial • The baud rate, number of data and stop bits, the parity, and the
XON/XOFF or DTR control must match those of the host
computer.
• Maximum cable length of 50 ft (15.24 m).
• You may need to change printer parameters to match the host
computer.
• You need to use a null-modem adaptor to connect to the printer
if using a standard modem cable.
Printer Setup
I) may damage the
17
IEEE 1284
Bidirectional Parallel
USB
Internal wired
Ethernet print server
• Maximum cable length of 10 ft (3 m).
• Recommended cable length of 6 ft (1.83 m).
• No printer parameter changes required to match the host
computer.
• Maximum cable length of 16.4 ft (5 m).
• No printer parameter changes required to match the host
computer.
• Can print to the printer from any computer on your LAN.
• Can communicate with the printer through the printer’s web
pages.
• Computer must be equipped with an Ethernet board.
• The printer must be configured to use your LAN.
Note • Refer to the ZebraNet Wired and Wireless Print
Servers User Guide for configuration instructions. A copy
of this manual is available at
http://www.zebra.com/manuals or on the user CD that came
with your printer.
5/31/12 P1050133-002
Page 18

Printer Setup
18
Select a Wired Data Communication Interface
Data Cables and Wireless Cards
You must supply all data cables or removeable radio cards for your application. (Some
wireless print servers come with an integrated radio card.)
Data Cables Ethernet cables do not require sh ielding, but all o ther data cabl es must be fully
shielded and fitted with metal or metallized connector shells. Unshielded data cables may
increase radiated emissions above the regulated limits.
To minimize electrical noise pickup in the cable:
• Keep data cables as short as possible.
• Do not bundle the data cables tightly with the power cords.
• Do not tie the data cables to power wire conduits.
Wireless Cards For supported wireless cards, refer to the ZebraNet Wired and Wireless
Print Servers User Guide. A copy of the manual is available at http://www.zebra.com/manuals
or on the user CD that came with your printer.
P1050133-002 5/31/12
Page 19

3
Wireless Configuration
Use this section to configure your ZebraNet wireless print server for operation. For more
detailed information, refer to the ZebraNet Wired and Wireless Print Servers User Guide.
Important • A wireless option bo ard must be installed on your printer before you can
configure the printer to communicate using a wireless radio card.
You may configure your printer for wireless operation in the following ways. This Quick Start
Guide covers only the first option, the Network Setup Wizard.
• Through the Network Setup Wizard, which writes a ZPL script for you. On the last
screen of the utility, you may choose to send the command directly to your printer, or you
may choose to save the ZPL script to a file. The saved ZPL file has several purposes:
• The file can be sent to the printer through any available connection (serial, parallel,
USB, or wired print server).
• The file can be resent to the printer after the network settings have been restored to
factory defaults.
• The file can be sent to multiple printers that will use the same network settings.
• Through ZPL script that you write yourself. Use the ^WX command to set the basic
parameters for security type. You can send the command through any available connect ion
(serial, parallel, USB, or wired print server). Refer to the Zebra Programming Guide for
ZPL II, ZBI 2, Set-Get-Do, Mirror, and WML for more information on this option.
• Through Set/Get/Do (SGD) commands that you send to the printer. Begin with
wlan.security to set the wireless security type. Depending on which security type
that you select, other SGD commands will be necessary to specify other parameters. You
can send the commands through any available connection (serial, parallel, USB, or wired
print server). Refer to the Zebra Programming Guide for ZPL II, ZBI 2, Set-Get-Do,
Mirror, and WML for more information on this option.
5/31/12 P1050133-002
Page 20
Wireless Configuration
20
Configure Using the Network Setup Wizard
Configure Using the Network Setup Wizard
The ZebraNet Bridge Enterprise utility resides on the User CD for your printer an d is available
through http://www.zebra.com/software. ZebraNet Bridge Enterprise version 1.2.5 or lat er is
required to configure the printer correctly for use.
The Network Setup Wizard, which is part of this software, allows you to configure your printer
easily for wireless operation by writing the appropriate ZPL script for you. Use this utility
when you are first installing the wireless print server or after you set the network options back
to factory defaults.
Note • You can only set up one print server at a time with the Network Setup Wizard. To
configure multiple print servers (wired and wireless), run the program once for each print
server.
To use the Network Setup Wizard, complete these steps:
1. If it is not already installed, install ZebraNet Bridge Enterprise on your computer.
You can get the program from the user CD that came with your printer, or you can
download it at http://www.zebra.com/software.
2. Launch the ZebraNet Bridge Enterprise program.
If you are prompted for a serial number, you may click
Cancel. You will still be able to
use the Network Setup W izard.
3. From the Menu bar, select Tools > Network Setup Wizard.
The Network Setup Wizard opens.
P1050133-002 5/31/12
Page 21
Wireless Configuration
Configure Using the Network Setup Wizard
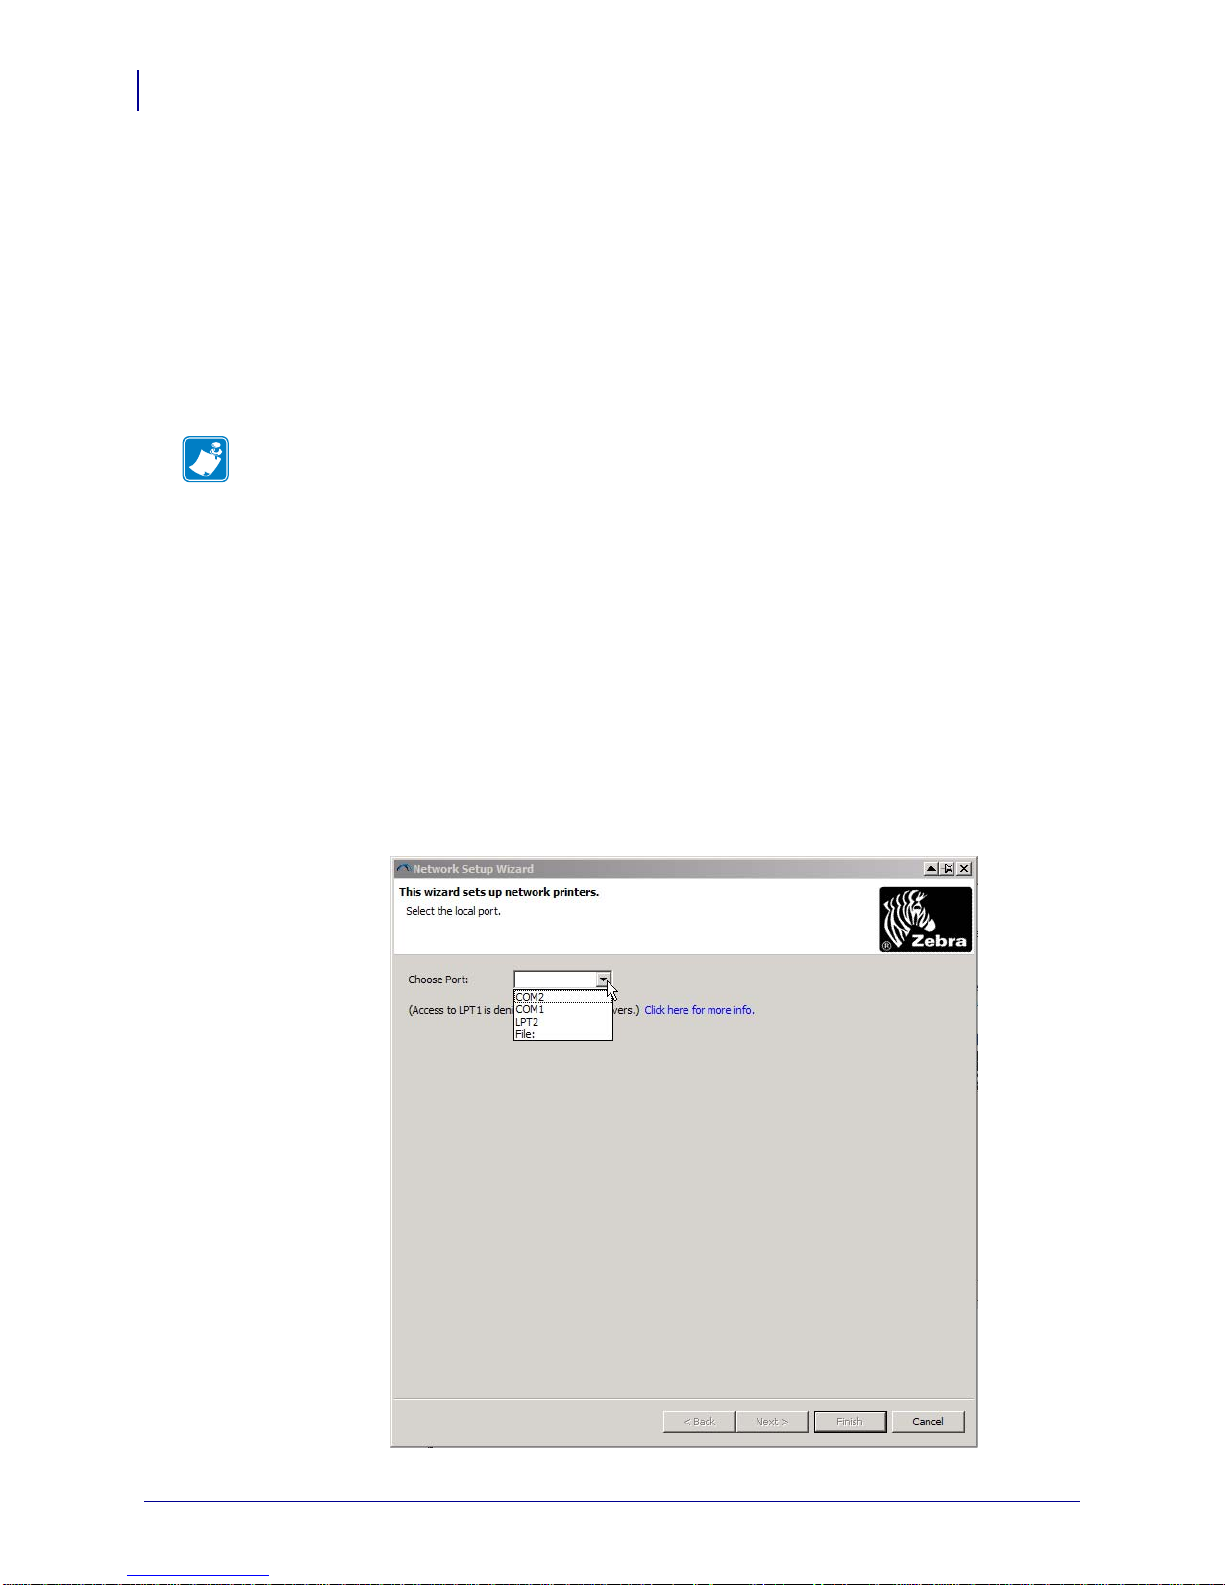
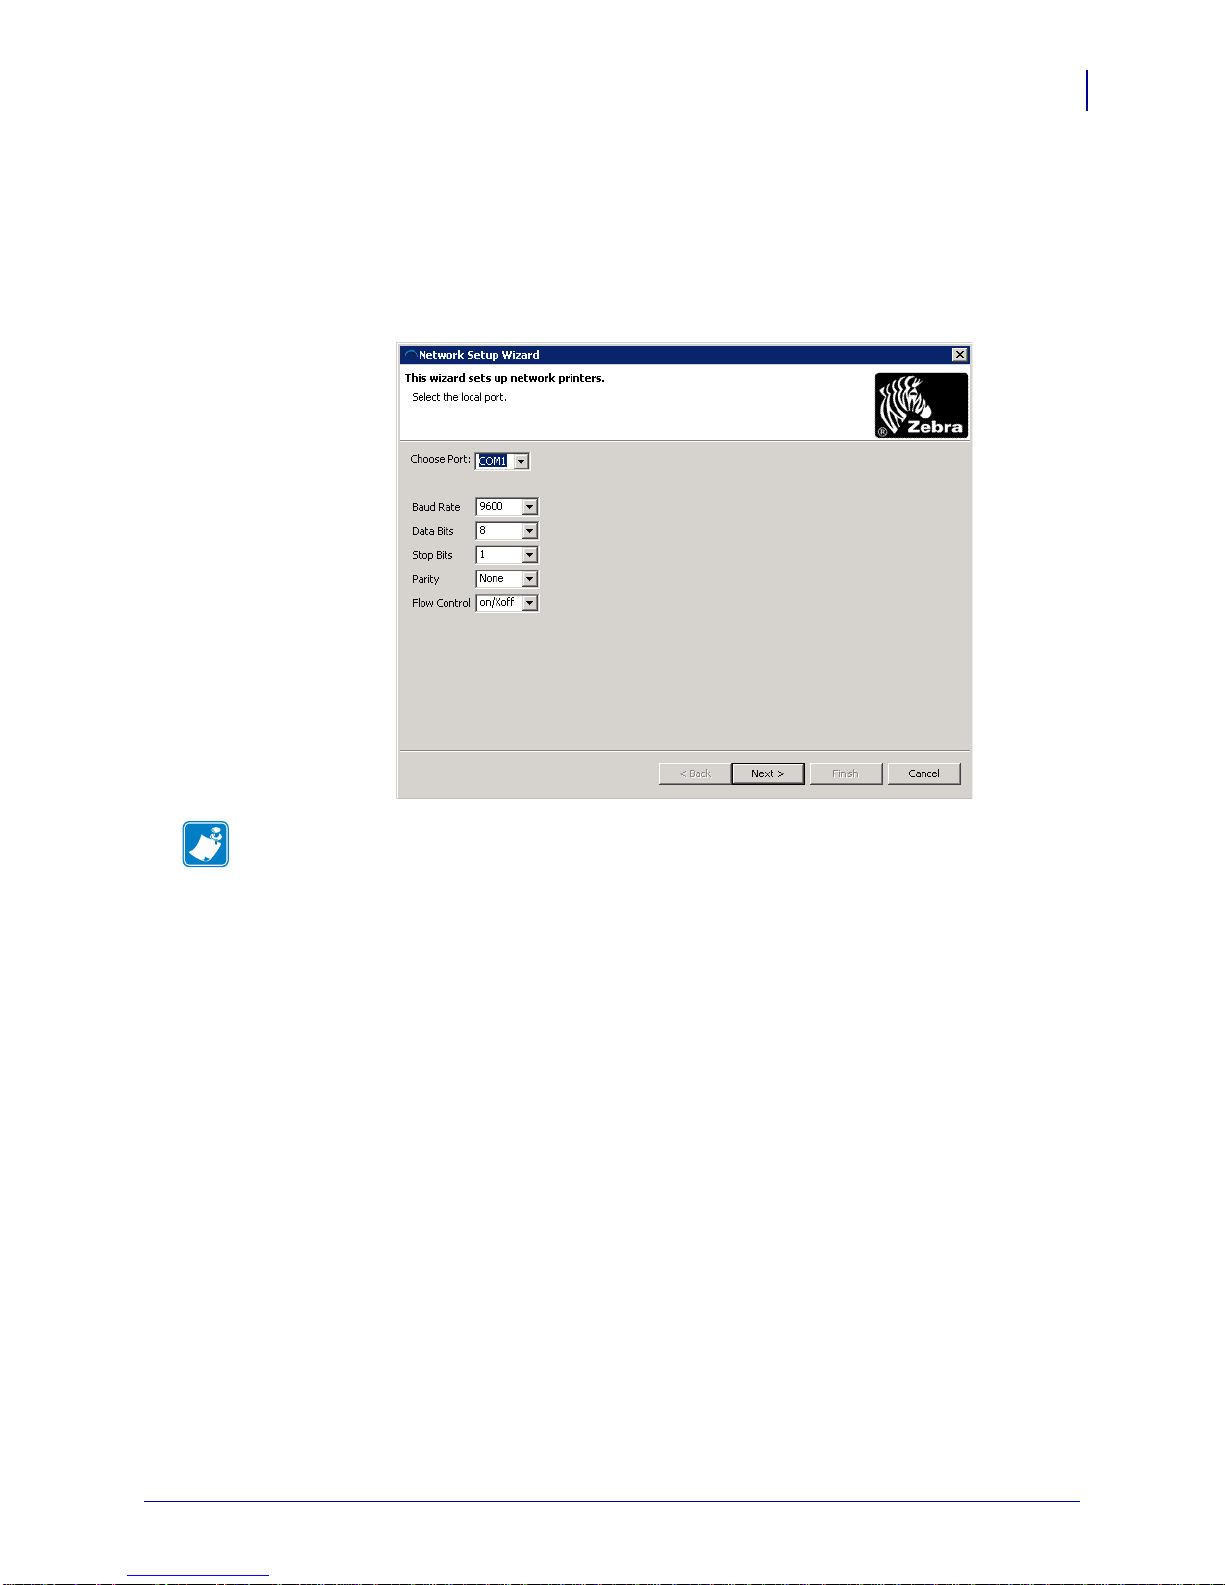
4. From the Choose Port list, select the port to which your printer is connected.
• If you will save the file without sending it to the pri nter, you may select any available
port.
• If you select a serial port, the serial configuration information appears below the
Choose Port list. If necessary, change the serial communication settings to match your
printer’s settings.
21
Note • If a port is in use by another device, it will not be included in the drop-down
list.
5/31/12 P1050133-002
Page 22
Wireless Configuration
22
Configure Using the Network Setup Wizard
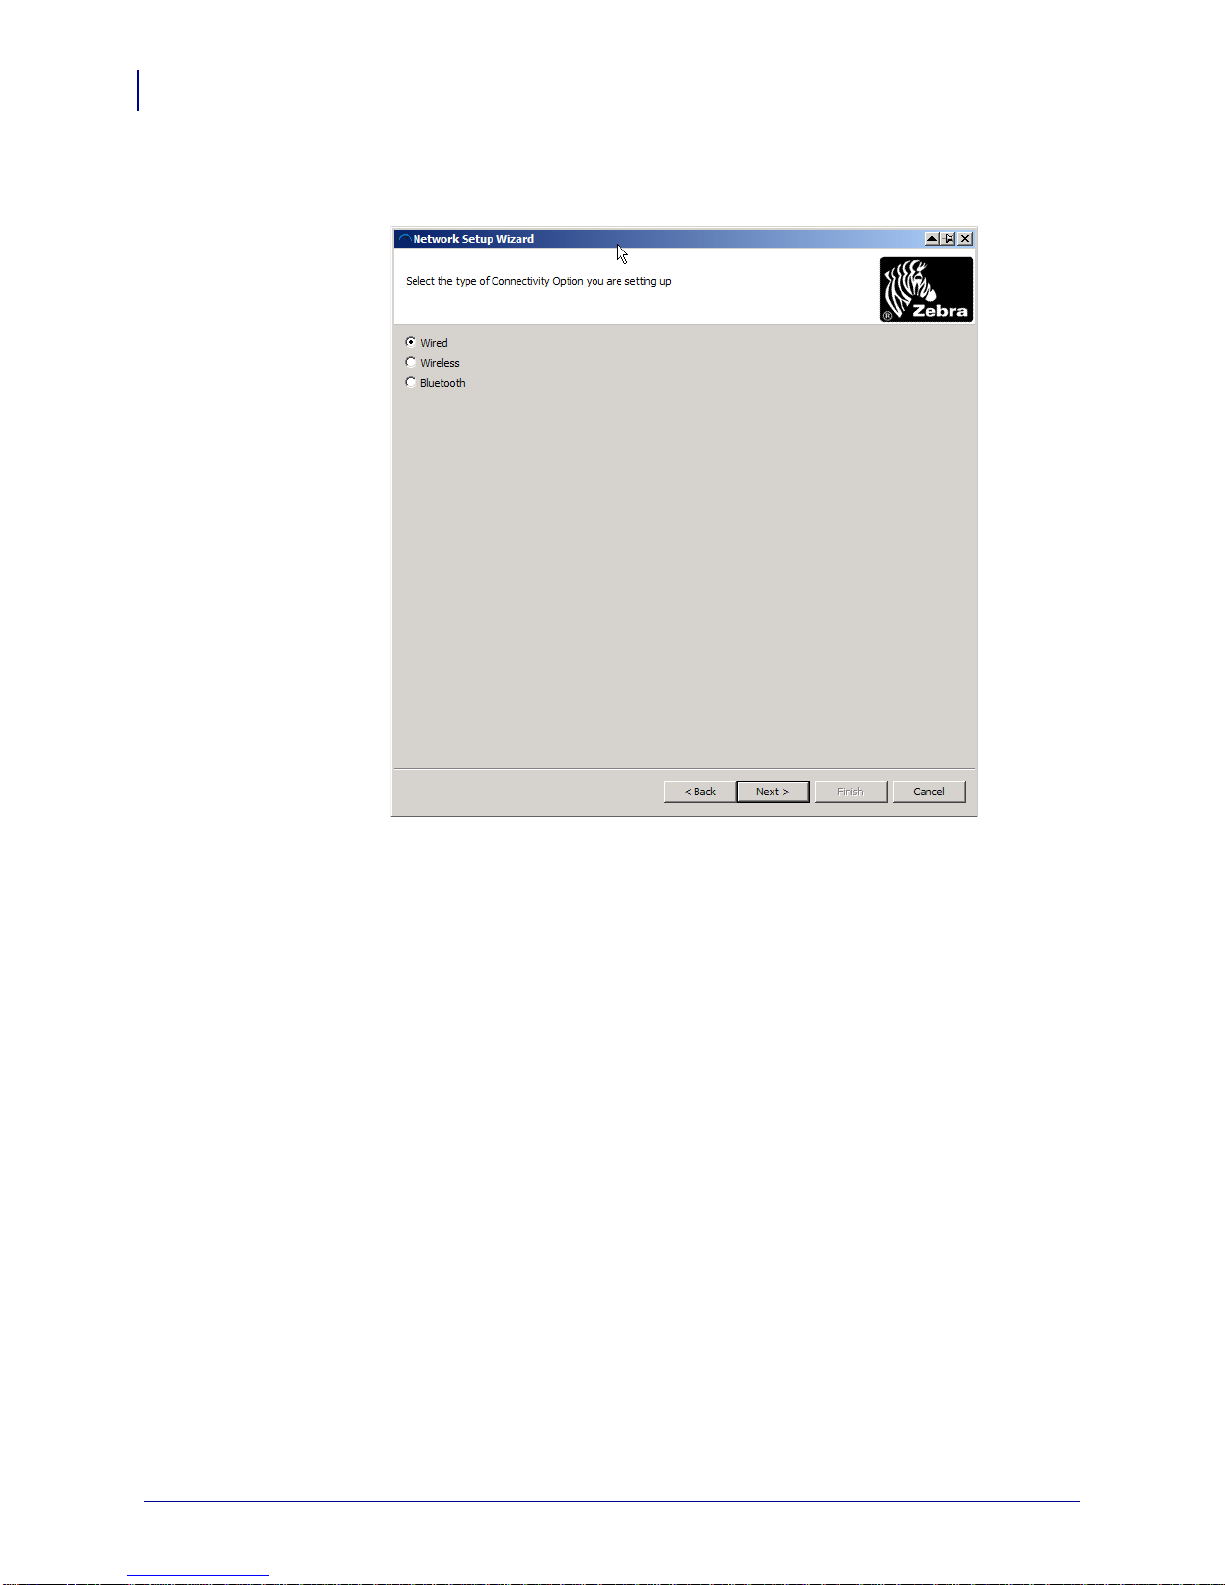
5. Click Next.
The wizard prompts for the print server device to configure.
6. Select Wireless and then click Next.
The wizard prompts you for the type of printer you are using.
P1050133-002 5/31/12
Page 23
Wireless Configuration
Configure Using the Network Setup Wizard
23
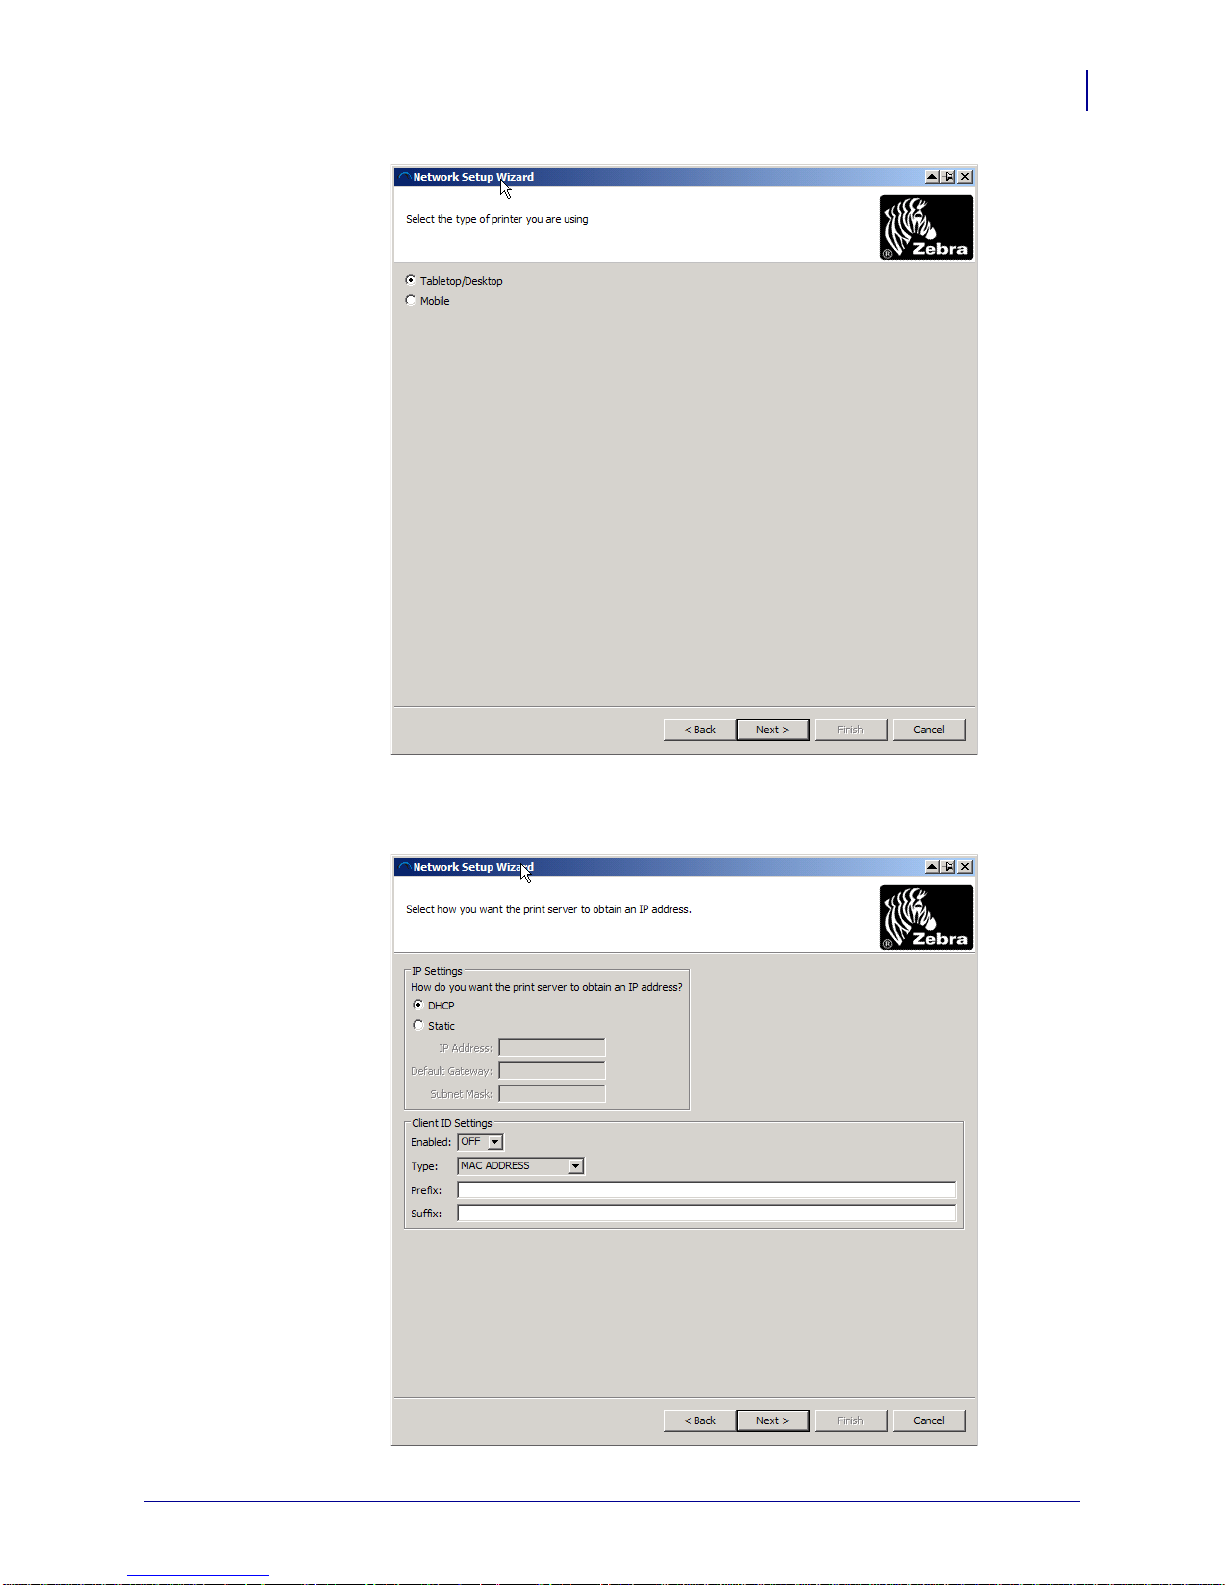
7. Select the type of printer you are using and then click Next.
The wizard prompts for the wireless IP information.
5/31/12 P1050133-002
Page 24
Wireless Configuration
24
Configure Using the Network Setup Wizard
8. Enable the DHCP (dynamic) or static IP option.
If you will be using... Complete the following steps...
DHCP a. Select DHCP and click Next.
Static
9. Click Next.
The Wireless Settings window opens.
b. Continue with step 9.
a. Select Static.
The IP settings fields are activated.
a. Enter the IP Address, Default Gateway, and Subnet
Mask for the wireless print server.
b. Continue with step 9.
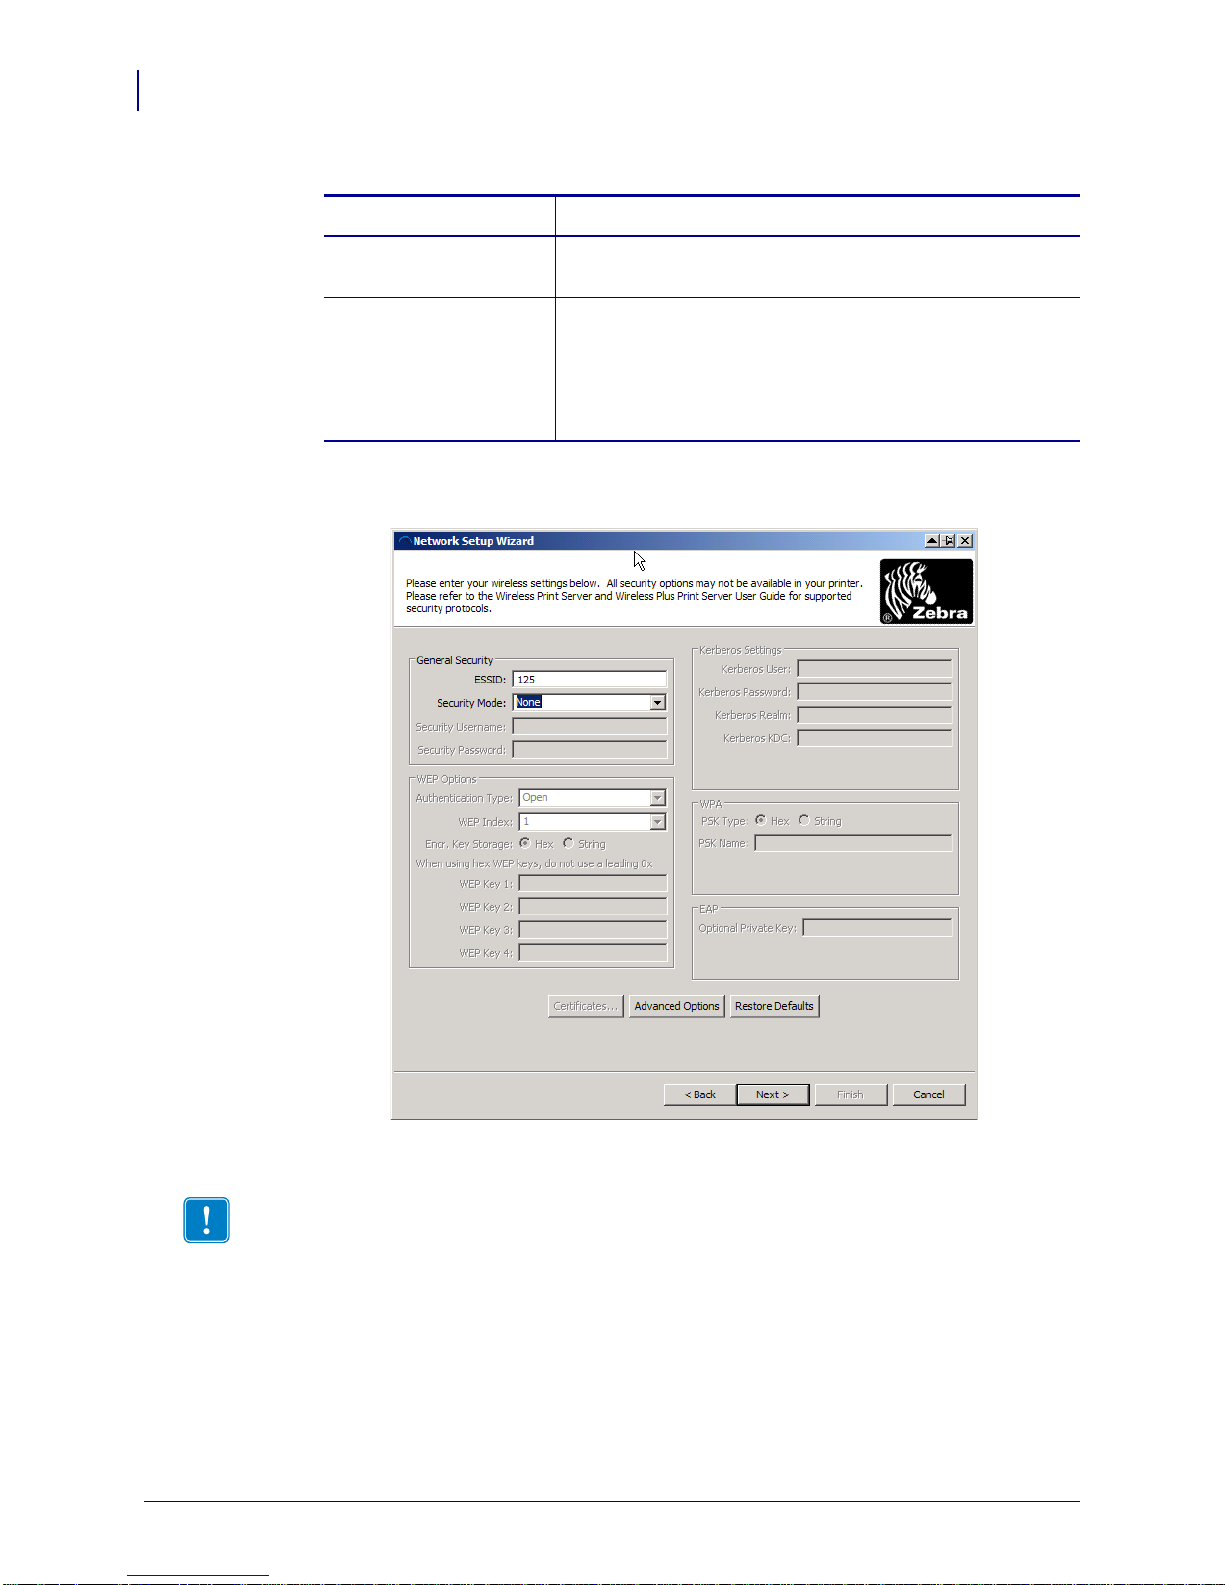
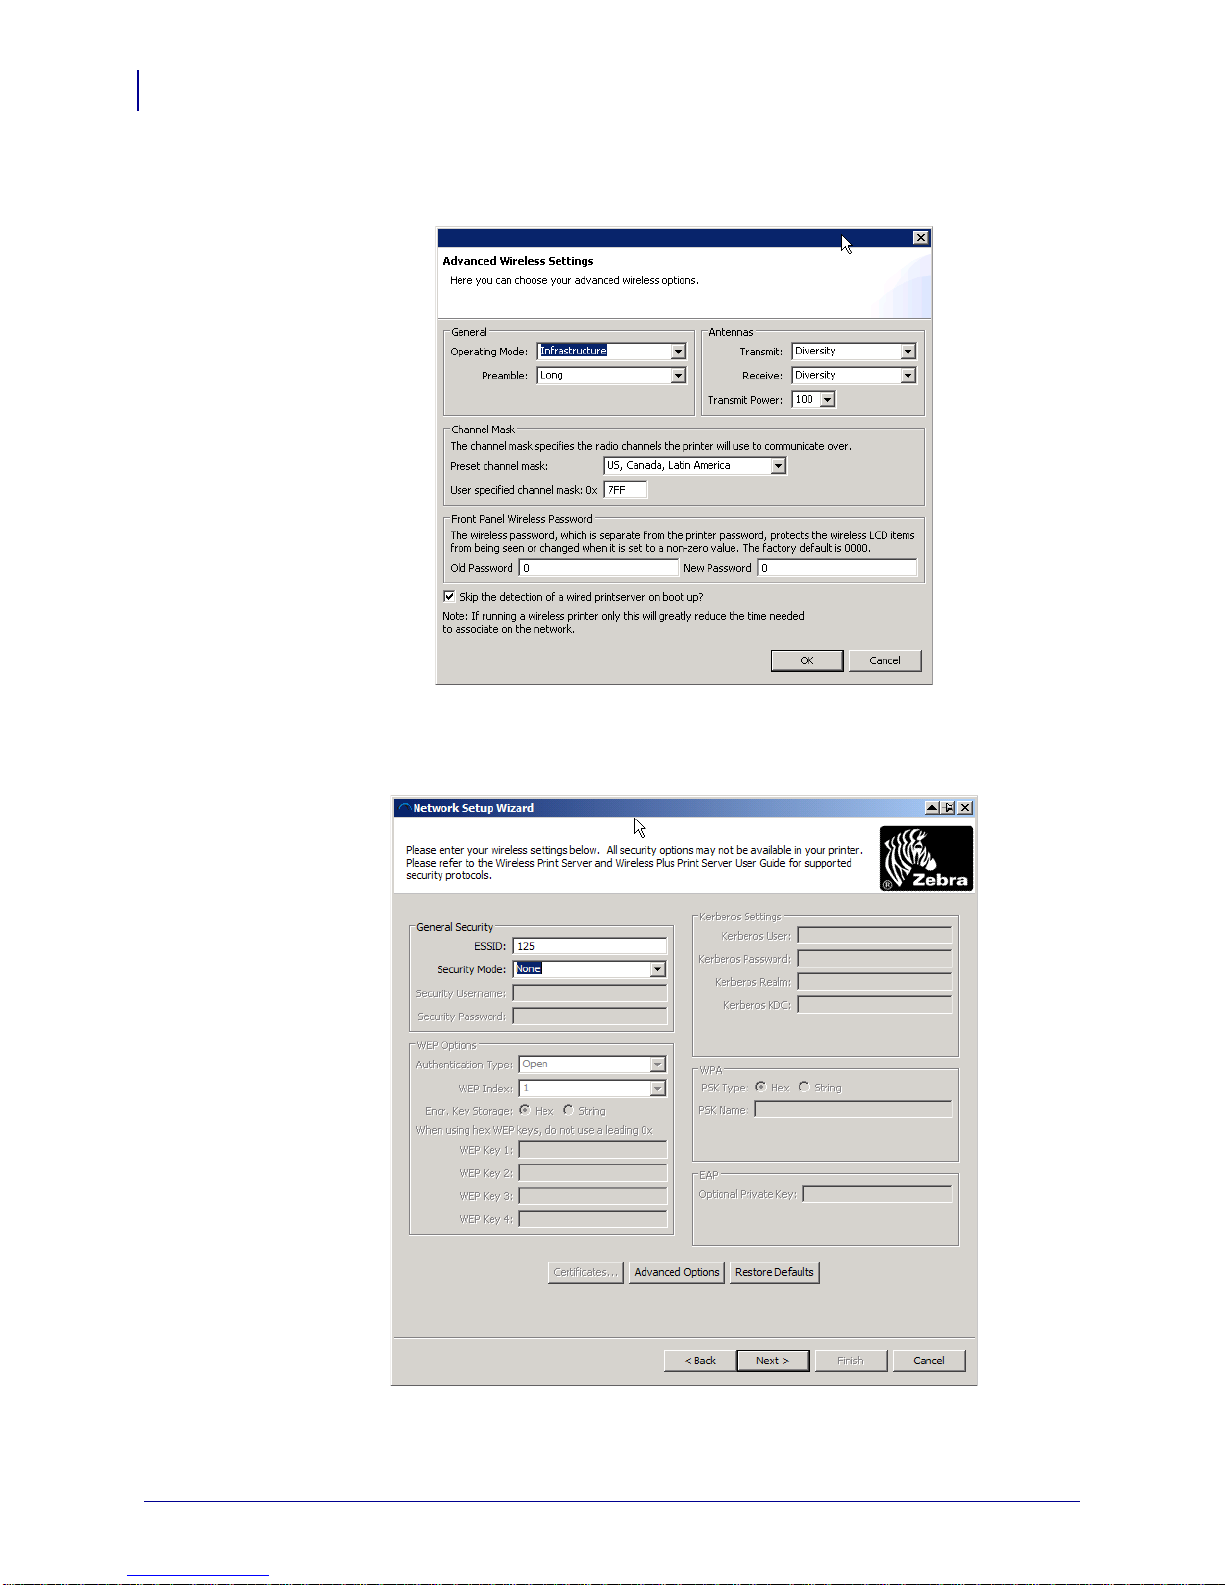
10. Enter the ESSID.
Important • The ESSID and pass phrase, if used, must be set at your access point before
completing these steps.
P1050133-002 5/31/12
Page 25
Configure Using the Network Setup Wizard
11. From the drop-down, select your Security Mode.
If you select… Then…
None Continue with step 12.
WEP 40-Bit
WEP 128-Bit
EAP-TLS
EAP-TTLS
EAP-FAST
WPA-EAP-TLS
PEAP
LEAP
WPA-EAP-TTLS
WPA-PEAP
a. In the WEP Options section of the window, enter the
following values:
• Authentication type
• WEP Index
• Encryptio n Ke y Storage
• WEP Keys
b. Continue with step 12.
In the EAP section of the window, if necessary:
a. Enter the Optional Private Key.
b. Continue with step 12.
In the General Security section of the window:
a. Enter the Security Username and Password.
b. Continue with step 12.
WPA-LEAP
WPA-PSK In the WPA section of the window:
a. Select the PSK Type.
b. Enter the PSK Name.
c. Continue with step 12.
WPA-EAP-FAST
a. In the General Security section of the window, enter the
Security Username and Password.
b. In the EAP section of the window, if necessary, enter the
Optional Private Key.
c. Continue with step 12.
KERBEROS
a. In the Kerberos Settings section of the window, enter the
following values:
• Kerberos User
• Kerberos Password
• Kerberos Realm
• Kerberos KDC
b. Continue with step 12.
Note • KERBEROS is not supported on Internal
Wireless Plus print servers or radio cards.
Wireless Configuration
25
5/31/12 P1050133-002
Page 26
Wireless Configuration
26
Configure Using the Network Setup Wizard
12. Click Advanced Options in the Wireless Settings window.
The Advanced Wireless Settings window open s.
13. Review the settings in the Advanced Wireless Settings window. Change the settings as
necessary, and then click
OK.
The Wireless Settings window returns.
P1050133-002 5/31/12
Page 27

Wireless Configuration
Configure Using the Network Setup Wizard
14. Click Next.
Based on your selections in the Wireless Setup Wi zard, the program writes the appropriate
ZPL commands and displays them for your review.
If you selected… Then this dialog box displays.
Tabletop/Desktop
27
Mobile
5/31/12 P1050133-002
Page 28

Wireless Configuration
28
Configure Using the Network Setup Wizard
15. Determine if you will send the script immediately, or save it for use at a later time.
To... Then...
Complete setup by sending
the ZPL script to the printer
through the port selected at
the beginning of this
procedure
Save the ZPL script to a file
for later use or for use on
other printers
a. Verify that the printer is connected to the computer
through the port you selected.
Note • For serial connections, use a serial n ull
modem cable.
b. If you have not already done so, turn on (I) the printer.
c. On the Review and Send ZPL for Wireless window,
Finish.
click
The printer sends the ZPL script to the print er through
the selected port. The Wireless Setup Wizard screen
closes.
d. Turn the printer off (O) and then back on (I).
Note • You can send the ZPL script file to
multiple printers that use the same configuration,
or you can send the file to a printer that had the
network settings restored to the factory defaults.
This saves you from having to go through the
Wireless Setup Wizard more than once.
a. On the Review and Send ZPL for Wireless window,
highlight the script, right-click, and select
b. Open a text editor, such as Notepad, and paste the
Copy.
script into the application.
c. Save the script.
d. In the Network Setup Wizard, click Cancel to exit
without sending the script at this time.
e. If you have not already done so, turn on (I) the printer.
f. Send the ZPL file to the printer through the connection
of your choice.
P1050133-002 5/31/12
Page 29

16. Observe t he wireless status on th e printer’ s control panel , and confirm that yo u have set up
your printer for wireless connectivity. Printers that have an LCD display text or symbols
(see Table 2 and Table 3). The HC100 printer does not have an LCD, so the wireless status
is indicated by the control panel lights (see Table 4).
LCD Link Status and Wireless Signal Indicators
This section applies to printers and print engines other than the HC100 printer.
• Link Status Indicator (Table 2)
The wireless link status indicator appears at the bottom left of the LCD, providing a
real-time display of the printer’s network status.
Table 2 • Link Status Indicators
Status Indicator Meaning
Wireless Configuration
Configure Using the Network Setup Wizard
29
cycling through characters
The wireless radio card is associated with the WLAN.
.oO
underscore
_
blank
• The wireless radio card is not associated with the WLAN. Verify that
your printer’s wireless settings match those of the WLAN.
• The firmware on the wireless radio card may need to be updated.
• The printer is checking for a wired print server.
• The printer is running a wired print server.
• The wireless print server board is not installed or not installed correctly.
• Wireless Signal Indicators (Table 3)
Depending on the printer model, press the right oval,
access and scroll through the wireless signal indicators on the LCD. For more
information on the control panel buttons on your printer, refer to your printer’s User
Guide.
Table 3 • Wireless Signal Indicators
Wireless Signal Indicator Description
SIGNAL STRENGTH and
SIGNAL QUALITY
When these indicators display percentages, the wireless radio card is
communicating with the network. The higher the number is, the better the
connection is between the printer and the network.
If your printer indicates a signal strength but you cannot communicate with
the printer from your computer, move the printer to a different location to
try to get a better signal strength or signal quality. This situation could also
indicate that the printer is associated with, but not authenticated with, your
access point.
Plus (+), or the up arrow to
NOISE LEVEL This number indicates any electrical interference with the wireless signal.
5/31/12 P1050133-002
If your printer cannot communicate with the network and the noise level is
high, move the printer to a location that is free of interference.
Page 30

Wireless Configuration
30
Configure Using the Network Setup Wizard
HC100 Wireless Status Indicator Lights
Table 4 • HC100 Wireless Status Indicator Lights
Wireless Status Indicator
Meaning
Steady Green The printer is associated with a wireless network. The
signal strength is strong.
Flashing Green The printer is NOT associated with a wireless network.
The signal strength is strong.
Steady Orange The printer is associated with a wireless network. The
signal strength is weak.
Flashing Orange The printer is NOT associated with a wireless network.
The signal strength is weak.
P1050133-002 5/31/12
Page 31

4
Xi Series and RXi Series
This section provides the features of and specifications for this printer.
Note • Printer specifications are subject to change without notice.
Contents
Select a Site for the Printer . . . . . . . . . . . . . . . . . . . . . . . . . . . . . . . . . . . . . . . . . . . . . . . 32
Xi4 and R110Xi4 General Specifications . . . . . . . . . . . . . . . . . . . . . . . . . . . . . . . . . . . . . 33
Xi Series and RXi Series Compliance Information. . . . . . . . . . . . . . . . . . . . . . . . . . . . . . 34
5/31/12 P1050133-002
Page 32

Xi Series and RXi Series
32
Select a Site for the Printer
Select a Site for the Printer
Consider the following when selecting an appropriate location for your printer.
Select a Surface
Select a solid, level surface of sufficient size and strength to accommodate the printer and
other equipment (such as a computer), if necessary. The choices include a table, countertop,
desk, or cart. For the printer’s weight and dimensions, see Xi4 and R110Xi4 General
Specifications on page 33.
Provide Proper Operating Conditions
This printer is designed to function in a wide range of envi ronmental and electri cal conditions,
including a warehouse or factory floor. For more information on the required conditions, see
Xi4 and R110Xi4 General Specifications on page 33 .
Table 2 shows the temperature and relative humidity requirements for the printer when it is
operating.
Mode Temperature Relative Humidity
Thermal Transfer 41° to 104° F
Direct Thermal 32° to 104° F
Allow Proper Space
The printer should have enough space around it for you to be able to open the media door. To
allow for proper ventilation and cooling, leave open space on all sides of the printer.
Caution • Do not place any padding or cushioning material behind or under the printer
because this restricts air flow and could cause the printer to overheat.
Provide a Data Source
If the printer will be located away from the data source (such as a computer), the selected site
must provide the appropriate connections to that data source. For more information on the
types of communication interfaces and their limitations, refer to your printer’s user guide.
Table 2 •
20 to 85% non-condensing.
5° to 40° C
20 to 85% non-condensing
0° to 40° C
Provide a Power Source
Place the printer within a short distance of a power outlet that is easily accessible.
P1050133-002 5/31/12
Page 33

Xi Series and RXi Series
Xi4 and R110Xi4 General Spe cifications
Xi4 and R110Xi4 General Specifications
Physical Specifications
110Xi4/R110Xi4 140Xi4 170Xi4 220Xi4
Dimensions
Height 15.5 in 393.7 mm 15.5 in 393.7 mm 15.5 in 393.7 mm 15.5 in 393.7 mm
Width 10.31 in. 261.9 mm 11.31 in. 287.3 mm 13.31 in. 338.1 mm 15.81 in. 401.6 mm
Depth 20.38 in. 517.5 mm 20.38 in. 517.5 mm 20.38 in. 517.5 mm 20.38 in. 517.5 mm
U.S.
Standard Metric
U.S.
Standard Metric
U.S.
Standard Metric
U.S.
Standard Metric
33
Weight
50 lb. 22.7 kg 55 lb. 25 kg 67 lb. 30.5 kg 72 lb. 32.7 kg
without
options
Electrical Specifications
Power 110Xi4/R110Xi4 140Xi4 170Xi4 220Xi4
General 100 to 240 VAC;
47 to 63 Hz
Power consumption printing
PAUSE test at slowest speed
121W 180W 220W 269W
100 to 240 VAC;
47 to 63 Hz
100 to 240 VAC;
47 to 63 Hz
100 to 240 VAC;
47 to 63 Hz
Printer idle 20 W 20 W 20 W 20 W
Environmental Conditions for Operation and Storage
Environment Mode Temperature Relative Humidity
Operation Thermal Transfer 41° to 104° F
5° to 40° C
20 to 85% non-condensing
Direct Thermal 32° to 104° F
Storage Thermal Transfer or
Direct Thermal
5/31/12 P1050133-002
0° to 40° C
–40° to 140° F
–40° to 60° C
5 to 85% non-condensing
Page 34

Xi Series and RXi Series
34
Xi Series and RXi Series Compliance Information
Xi Series and RXi Series Compliance Information
FCC Compliance Statement
This device complies with Part 15 rules. Operation is subject to the following two conditions:
1. This device may not cause harmful interference, and
2. This device must accept any interference received, including interference that may cause
undesired operation.
The user is cautioned that any changes or modifications not expressly approved by Zebra
Technologies Corporation could void the user’s authority to operate the equipment. To ensure
compliance, this printer must be used with Shielded Communication Cables.
FCC Radiation Exposure Statement
(for printers with RFID encoders)
This equipment complies with FCC radiation exposure limits set forth for an uncontrolled
environment.
Important •
1. The radio must be installed with a minimum 20cm separation between the user and the
antenna.
2. The radio must not be co-located or used in simultaneous transmitting condition with
another radio.
3. The host system shall have a label to indicate that the system contains a certified module.
An example is “Contains FCC ID : XXXXX , IC ID: YYYYY”.
Canadian DOC Compliance Statement
Cet appareil numérique de la classe B est conforme à la norme NMB-003 du Canada.
This Class B digital apparatus complies with Canadian ICES-003.
Brasil - Aviso da Anatel
Este equipamento opera em caráter secundário, isto é, não tem direito a proteção contra
interferência prejudicial, mesmo de estações do mesmo tipo, e não po de causar interferên cia a
sistemas operando em caráter primário.
P1050133-002 5/31/12
Page 35

Korean Compliance Statement
이 기기는 가정용 (B 급 ) 전자파 적합기기 로서 주로 가정에서 사용하는 것을 목적으로 하며 , 모든 지
역에서 사용할 수 있습니다 .
The equipment is for home use (Class B) and has acquired electromagnetic conformit y
registration, so it can be used not only in residential area but other areas as well.
This radio device is not allowed to be used for human safety since it has possibility of radio
interference during operation.
NCC
經型式認證合格之低功率射頻電機,非經許可,公司、商號或使用者均不得擅自變
更頻率、加大功率或變更原設計之特性及功能。低功率射頻電機之使用不得影響飛
航安全及干擾合法通信;經發現有干擾現象時,應立即停用,並改善至無干擾時方
得繼續使用。前項合法通信,指依電信法規定作業之無線電通信。低功率射頻電機
須忍受合法通信或工業、科學及醫療用電波輻射性電機設備之干擾。
Xi Series and RXi Series
Xi Series and RXi Series Compliance Information
35
According to "Administrative Regulations on Low Power Radio Waves Radiated Devices"
Without permission granted by the NCC, any company, enterprise, or user is not allowed to
change frequency, enhance transmitting power or alter original characteristic as well as
performance to an approved low power radio-frequency devices. The low power radiofrequency devices shall not influence aircraft security and interfere legal communications; If
found, the user shall cease operating immediately until no interference is achieved. The said
legal communications means radio communications is operated in compliance with the
Telecommunications Act.
The low power radio-frequency devices must be susceptible with the interference from legal
communications or ISM radio wave radiated devices.
WLAN Radio Specification
802.11 b
• 2.4GHz
• DSSS (DBPSK, DQPSK and CCK)
• RF power 10 mW (ZebraNet b/g Print Server)
802.11 g
• 2.4GHz
• OFDM (16-QAM and 64-QAM with BPSK and QPSK)
• RF power 10 mW (ZebraNet b/g Print Server)
5/31/12 P1050133-002
Page 36

Xi Series and RXi Series
Notes • ___________________________________________________________________
__________________________________________________________________________
__________________________________________________________________________
__________________________________________________________________________
__________________________________________________________________________
__________________________________________________________________________
__________________________________________________________________________
__________________________________________________________________________
__________________________________________________________________________
__________________________________________________________________________
36
Xi Series and RXi Series Compliance Information
P1050133-002 5/31/12
Page 37

5
PAX
This section provides the features of and specifications for this printer.
Note • Printer specifications are subject to change without notice.
Contents
Print Engine Installation . . . . . . . . . . . . . . . . . . . . . . . . . . . . . . . . . . . . . . . . . . . . . . . . . . 38
110PAX4 and R110PAX4 General Specifications . . . . . . . . . . . . . . . . . . . . . . . . . . . . . . 41
170PAX4 General Specifications. . . . . . . . . . . . . . . . . . . . . . . . . . . . . . . . . . . . . . . . . . . 42
PAX4 Compliance Information. . . . . . . . . . . . . . . . . . . . . . . . . . . . . . . . . . . . . . . . . . . . . 43
4 Series
5/31/12 P1050133-002
Page 38

PA X4 Series
38
Print Engine Installation
Print Engine Installation
This section provides basic information for mounting the print engine into an applicator. The
illustrations in this section show the print eng ine from dif ferent angles a nd include di mensions
and clearance needs.
Requirements
Stability When the print engine is mounted, the complete assembly must be physically
stable. When the print engine is loaded with ribbon and media, the equipment must not
become physically unstable.
Ventilation and Temperature Provide ventilation for the print engine mounting enclosure
to remove heat and ensure uninterrupted, trouble-free operation of the print engine. Ambient
air temperature surrounding the print engine must not exceed the following:
• Temperature: 32° to 104°F (0° to 40°C)
• Relative humidity: 20% to 95% non-co ndensing
Power Requirements Consider the current rating of the print engine during installation.
When power is applied to the print engine and th e enclosi ng equi pment, an overloa d condi tion
must not be created.
Grounding Requirements Maintain reliable g ro undi ng of the prin t en gin e. Pay particular
attention to the AC power supply connections so that earth ground is maintained through the
AC power input connector.
Clearance for Cables and Connectors Allow ample space at the rear of the print engine
for electronic connectors and dressing of the following cables: IEC power cord, serial and/or
parallel host communication cable, optional host communication cable (Ethernet), and the
discrete signal (applicator) interface cable.
Power Cord Requirements The IEC power cord does not have a strain relief on the print
engine. If the operating characteristics of the applicator include vibration or strain on the
power cord, provide an appropriate clamping mechanism to avoid unintentional disconnection
of the power cord from the print engine.
P1050133-002 5/31/12
Page 39

Select a Site for the Printer
Consider the following when selecting an appropriate location for your printer.
Stability
When the print engine is mounted, the complete assembly must be physically st able. When the
print engine is loaded with ribbon and media, the equipment must not become physically
unstable.
Provide Proper Operating Conditions
This printer is designed to function in a wide range of envi ronmental and electri cal conditions,
including a warehouse or factory floor. For more information on the required conditions, see
110PAX4 and R110PAX4 General Specifications on page 41 and 170PAX4 General
Specifications on page 42.
Table 3 shows the temperature and relative humidity requirements for the printer when it is
operating.
PAX4 Series
Select a Site for the Printer
39
Table 3 • Operating Temperature and Humidity
Mode Temperature Relative Humidity
Thermal Transfer 41° to 104° F
Direct Thermal 32° to 104° F
Allow Proper Space
The printer should have enough space around it for you to be able to open the media door. To
allow for proper ventilation and cooling, leave open space on all sides of the printer.
Caution • Do not place any padding or cushioning material behind or under the printer
because this restricts air flow and could cause the printer to overheat.
Provide a Data Source
If the printer will be located away from the data source (such as a computer), the selected site
must provide the appropriate connections to that data source. For more information on the
types of communication interfaces and their limitations, refer to the User Guide.
20 to 95% non-condensing.
5° to 40° C
20 to 95% non-condensing
0° to 40° C
5/31/12 P1050133-002
Page 40

PA X4 Series
40
Select a Site for the Printer
Provide a Power Source
Place the printer within a short distance of a power outlet that is easily accessible.
Power Requirements Consider the current rating of the print engine during installation.
When power is applied to the print engine and th e enclosi ng equi pment, an overloa d condi tion
must not be created.
Grounding Requirements Maintain reliable g ro undi ng of the prin t en gin e. Pay particular
attention to the AC power supply connections so that earth ground is maintained through the
AC power input connector.
Clearance for Cables and Connectors Allow ample space at the rear of the print engine
for electronic connectors and dressing of the following cables: IEC power cord, serial and/or
parallel host communication cable, optional host communication cable (Ethernet), and the
discrete signal (applicator) interface cable.
Power Cord Requirements The IEC power cord does not have a strain relief on the print
engine. If the operating characteristics of the applicator include vibration or strain on the
power cord, provide an appropriate clamping mechanism to avoid unintentional disconnection
of the power cord from the print engine.
P1050133-002 5/31/12
Page 41

110PAX4 and R110PAX4 General Specifications
110PAX4 and R110PAX4 General Specifications
Physical
110PAX4/R110PAX4
Dimensions
U.S. Standard Metric
Height 11.8 in 300 mm
Width 9.6 in. 245 mm
Depth 16.4 in. 417 mm
Weight 36 lb 16.3 kg
Electrical Specifications
PAX4 Series
41
Power
General 100 to 240 VAC;
47 to 63 Hz
Power Consumption
Idle
Printing
Fuses 5 Amp, 250 VAC, 5 × 20 mm IEC style, as supplied with the
19 W
375 W (maximum)
printer
Environmental Conditions
Environment Temperature Relative Humidity
Operation Thermal Transfer 41° to 104° F
Direct Thermal 32° to 104° F
Storage –40° to 160° F
20 to 95% non-condensing
5° to 40° C
0° to 40° C
5 to 95% non-condensing
–40° to 71° C
5/31/12 P1050133-002
Page 42

PA X4 Series
42
170PAX4 General Specifications
170PAX4 General Specifications
Physical
Dimensions
Height 11.8 in 300 mm
Width 9.6 in. 245 mm
Depth 18.3 in. 465 mm
We ight 35.5 lb 16.1 kg
Electrical Specifications
170PAX4
U.S. Standard Metric
Power
General 100 to 240 VAC;
47 to 63 Hz
Power Consumption
Idle
Printing
Fuses 5 Amp, 250 VAC, 5 × 20 mm IEC style, as supplied with the
19 W
375 W (maximum)
printer
Environmental Conditions
Environment Temperature Relative Humidity
Operation 32° to 105° F
Storage –40° to 160° F
20 to 95% non-condensing
0° to 40° C
5 to 95% non-condensing
–40° to 71° C
P1050133-002 5/31/12
Page 43

PAX4 Compliance Information
FCC Compliance Statement
This device complies with Part 15 rules. Operation is subject to the following two conditions:
1. This device may not cause harmful interference, and
2. This device must accept any interference received, including interference that may cause
undesired operation.
This equipment has been tested and found to comply with the limits for Class A Digital
Devices, pursuant to Part 15 of the FCC Rules. These limi ts are designed to provide reasona ble
protection against harmful interference when the equipment is operated in a commercial
environment. This equipment generates, uses, and can radiate radio frequency energy and, if
not installed and used in accordance with the product manuals, may cause harmful in terference
to radio communications. Operation of this equipment in a residential area is likely to cause
harmful interference, in which case the user will be required to correct the interference at his
own expense.
PAX4 Series
PAX4 Compliance Information
43
The user is cautioned that any changes or modifications not expressly approved by Zebra
Technologies could void the user’s authority to operate the equipment. To ensure compliance,
this printer must be used with Shielded Communication Cables.
FCC Radiation Exposure Statement
This equipment complies with FCC radiation exposure limits set forth for an uncontrolled
environment.
Important •
1. The radio must be installed with a minimum 20cm separation between the user and the
antenna.
2. The radio must not be co-located or used in simultaneous transmitting condition with
another radio.
3. The host system shall have a label to indicate that the system contains a certified module.
An example is “Contains FCC ID : XXXXX , IC ID: YYYYY”.
Canadian DOC Compliance Statement
Cet appareil numérique de la classe A est conforme à la norme NMB-003 du Canada.
This Class A digital apparatus complies with Canadian ICES-003.
Brasil - Aviso da Anatel
Este equipamento opera em caráter secundário, isto é, não tem direito a proteção contra
interferência prejudicial, mesmo de estações do mesmo tipo, e não po de causar interferên cia a
sistemas operando em caráter primário.
5/31/12 P1050133-002
Page 44

PA X4 Series
44
PAX4 Compliance Information
Korean Compliance Statement
NCC
The equipment is for business use (Class A), and has acquired electromagnetic conformity
registration. Sellers and users are required to take caution in this regard.
This radio device is not allowed to be used for human safety since it has possibility of radio
interference during operation.
經型式認證合格之低功率射頻電機,非經許可,公司、商號或使用者均不得擅自變
更頻率、加大功率或變更原設計之特性及功能。低功率射頻電機之使用不得影響飛
航安全及干擾合法通信;經發現有干擾現象時,應立即停用,並改善至無干擾時方
得繼續使用。前項合法通信,指依電信法規定作業之無線電通信。低功率射頻電機
須忍受合法通信或工業、科學及醫療用電波輻射性電機設備之干擾。
According to "Administrative Regulations on Low Power Radio Waves Radiated Devices"
Without permission granted by the NCC, any company, enterprise, or user is not allowed to
change frequency, enhance transmitting power or alter original characteristic as well as
performance to an approved low power radio-frequency devices. The low power radiofrequency devices shall not influence aircraft security and interfere legal communications; If
found, the user shall cease operating immediately until no interference is achieved. The said
legal communications means radio communications is operated in compliance with the
Telecommunications Act.
The low power radio-frequency devices must be susceptible with the interference from legal
communications or ISM radio wave radiated devices.
WLAN Radio Specification
802.11 b
• 2.4GHz
• DSSS (DBPSK, DQPSK and CCK)
• RF power 10 mW (ZebraNet b/g Print Server)
802.11 g
• 2.4GHz
• OFDM (16-QAM and 64-QAM with BPSK and QPSK)
• RF power 10 mW (ZebraNet b/g Print Server)
P1050133-002 5/31/12
Page 45

6
Z Series and RZ Series
This section provides the features of and specifications for this printer.
Note • Printer specifications are subject to change without notice.
Contents
Select a Site for the Printer . . . . . . . . . . . . . . . . . . . . . . . . . . . . . . . . . . . . . . . . . . . . . . . 46
Z Series and RZ Series General Specifications. . . . . . . . . . . . . . . . . . . . . . . . . . . . . . . . 47
Z Series and RZ Series Compliance Information. . . . . . . . . . . . . . . . . . . . . . . . . . . . . . . 48
5/31/12 P1050133-002
Page 46

Z Series and RZ Series
46
Select a Site for the Printer
Select a Site for the Printer
Consider the following when selecting an appropriate location for your printer.
Select a Surface
Select a solid, level surface of sufficient size and strength to accommodate the printer and
other equipment (such as a computer), if necessary. The choices include a table, countertop,
desk, or cart. For the printer’s weight and dimensions, see Z Series and RZ Series General
Specifications on page 47.
Provide Proper Operating Conditions
This printer is designed to function in a wide range of envi ronmental and electri cal conditions,
including a warehouse or factory floor. For more information on the required conditions, see Z
Series and RZ Series General Specifications on page 47.
Table 4 shows the temperature and relative humidity requirements for the printer when it is
operating.
Mode Temperature Relative Humidity
Thermal Transfer 41° to 104° F
Direct Thermal 32° to 104° F
Allow Proper Space
The printer should have enough space around it for you to be able to open the media door. To
allow for proper ventilation and cooling, leave open space on all sides of the printer.
Caution • Do not place any padding or cushioning material behind or under the printer
because this restricts air flow and could cause the printer to overheat.
Provide a Data Source
If the printer will be located away from the data source (such as a computer), the selected site
must provide the appropriate connections to that data source. For more information on the
types of communication interfaces and their limitations, refer to your printer’s user guide.
Table 4 •
20 to 85% non-condensing.
5° to 40° C
20 to 85% non-condensing
0° to 40°C
Provide a Power Source
Place the printer within a short distance of a power outlet that is easily accessible.
P1050133-002 5/31/12
Page 47

Z Series and RZ Series
Z Series and RZ Series General Specifications
Z Series and RZ Series General Specifications
Physical Specifications
ZM400/RZ400 ZM600/RZ600
Dimensions
U.S. Standard Metric U.S. Standard Metric
Height 13.3 in. 338 mm 13.3 in. 338 mm
Width 10.9 in. 278 mm 13.4 in. 341 mm
Depth 18.7 in. 475 mm 18.7 in. 475 mm
Weight (without options) 32.4 lbs. 15 kg 34.7 lbs. 16 kg
Electrical Specifications
Power ZM400/RZ400 ZM600/RZ600
47
Electrical 100 to 240 VAC;
47 to 63 Hz
5 Amps (fused)
Printer idle 15W 15W
100 to 240 VAC;
47 to 63 Hz
5 Amps (fused)
Environmental Conditions for Operation and Storage
ZM400/RZ400 and ZM600/RZ600
Environment
U.S. Standard Metric
Temperature Operating 41° to 104° F 5° to 40° C
Storage –40° to 140° F –40° to 60° C
Relative Humidity Operating 20% to 85%, non- condensing
Storage 5% to 85%, non-condensing
Environment Temperature Relative Humidity
Operation Thermal Transfer 41° to 104° F
5° to 40° C
20 to 85% non-condensing
Storage Thermal Transfer or
5/31/12 P1050133-002
Direct Thermal 32° to 104° F
0° to 40° C
–40° to 140° F
Direct Thermal
–40° to 60° C
5 to 85% non-condensing
Page 48

Z Series and RZ Series
48
Z Series and RZ Series Compliance Information
Z Series and RZ Series Compliance Information
FCC Compliance Statement
This device complies with Part 15 rules. Operation is subject to the following two conditions:
1. This device may not cause harmful interference, and
2. This device must accept any interference received, including interference that may cause
undesired operation.
The user is cautioned that any changes or modifications not expressly approved by Zebra
Technologies Corporation could void the user’s authority to operate the equipment. To ensure
compliance, this printer must be used with Shielded Communication Cables.
FCC Radiation Exposure Statement
(for printers with RFID encoders)
This equipment complies with FCC radiation exposure limits set forth for an uncontrolled
environment.
Important •
1. The radio must be installed with a minimum 20cm separation between the user and the
antenna.
2. The radio must not be co-located or used in simultaneous transmitting condition with
another radio.
3. The host system shall have a label to indicate that the system contains a certified module.
An example is “Contains FCC ID : XXXXX , IC ID: YYYYY”.
Canadian DOC Compliance Statement
Cet appareil numérique de la classe B est conforme à la norme NMB-003 du Canada.
This Class B digital apparatus complies with Canadian ICES-003.
Brasil - Aviso da Anatel
Este equipamento opera em caráter secundário, isto é, não tem direito a proteção contra
interferência prejudicial, mesmo de estações do mesmo tipo, e não po de causar interferên cia a
sistemas operando em caráter primário.
P1050133-002 5/31/12
Page 49

Korean Compliance Statement
이 기기는 가정용 (B 급 ) 전자파 적합기기 로서 주로 가정에서 사용하는 것을 목적으로 하며 , 모든 지
역에서 사용할 수 있습니다 .
The equipment is for home use (Class B) and has acquired electromagnetic conformit y
registration, so it can be used not only in residential area but other areas as well.
This radio device is not allowed to be used for human safety since it has possibility of radio
interference during operation.
NCC
經型式認證合格之低功率射頻電機,非經許可,公司、商號或使用者均不得擅自變
更頻率、加大功率或變更原設計之特性及功能。低功率射頻電機之使用不得影響飛
航安全及干擾合法通信;經發現有干擾現象時,應立即停用,並改善至無干擾時方
得繼續使用。前項合法通信,指依電信法規定作業之無線電通信。低功率射頻電機
須忍受合法通信或工業、科學及醫療用電波輻射性電機設備之干擾。
Z Series and RZ Series
Z Series and RZ Series Compliance Information
T
49
According to "Administrative Regulations on Low Power Radio Waves Radiated Devices"
Without permission granted by the NCC, any company, enterprise, or user is not allowed to
change frequency, enhance transmitting power or alter original characteristic as well as
performance to an approved low power radio-frequency devices. The low power radiofrequency devices shall not influence aircraft security and interfere legal communications; If
found, the user shall cease operating immediately until no interference is achieved. The said
legal communications means radio communications is operated in compliance with the
Telecommunications Act.
The low power radio-frequency devices must be susceptible with the interference from legal
communications or ISM radio wave radiated devices.
WLAN Radio Specification
802.11 b
• 2.4GHz
• DSSS (DBPSK, DQPSK and CCK)
• RF power 10 mW (ZebraNet b/g Print Server)
802.11 g
• 2.4GHz
• OFDM (16-QAM and 64-QAM with BPSK and QPSK)
• RF power 10 mW (ZebraNet b/g Print Server)
5/31/12 P1050133-002
Page 50

Z Series and RZ Series
Notes • ___________________________________________________________________
__________________________________________________________________________
__________________________________________________________________________
__________________________________________________________________________
__________________________________________________________________________
__________________________________________________________________________
__________________________________________________________________________
__________________________________________________________________________
__________________________________________________________________________
__________________________________________________________________________
50
Z Series and RZ Series Compliance Information
P1050133-002 5/31/12
Page 51

HC100
This section provides the features of and specifications for this printer.
Note • Printer specifications are subject to change without notice.
7
Contents
Select a Site for the Printer . . . . . . . . . . . . . . . . . . . . . . . . . . . . . . . . . . . . . . . . . . . . . . . 52
HC100 General Specifications. . . . . . . . . . . . . . . . . . . . . . . . . . . . . . . . . . . . . . . . . . . . . 53
HC100 Compliance Information. . . . . . . . . . . . . . . . . . . . . . . . . . . . . . . . . . . . . . . . . . . . 54
5/31/12 P1050133-002
Page 52

HC100
52
Select a Site for the Printer
Select a Site for the Printer
Consider the following when selecting an appropriate location for your printer.
Select a Surface
Select a solid, level surface of sufficient size and strength to accommodate the printer and
other equipment (such as a computer), if necessary. The choices include a table, countertop,
desk, or cart. For the printer’s weight and dimensions, see HC100 General Specifications
on page 53.
Provide Proper Operating Conditions
This printer is designed to function in a wide range of envi ronmental and electri cal conditions,
including a warehouse or factory floor. For more information on the required conditions, see
HC100 General Specifications on page 53.
Table 5 shows the temperature and relative humidity requirements for the printer when it is
operating.
Mode Temperature Relative Humidity
Thermal Transfer 41° to 104° F
Direct Thermal 32° to 104° F
Allow Proper Space
The printer should have enough space around it for you to be able to open the media door. To
allow for proper ventilation and cooling, leave open space on all sides of the printer.
Caution • Do not place any padding or cushioning material behind or under the printer
because this restricts air flow and could cause the printer to overheat.
Provide a Data Source
If the printer will be located away from the data source (such as a computer), the selected site
must provide the appropriate connections to that data source. For more information on the
types of communication interfaces and their limitations, refer to your printer’s user guide.
Table 5 •
20 to 85% non-condensing.
5° to 40° C
20 to 85% non-condensing
0° to 40° C
Provide a Power Source
Place the printer within a short distance of a power outlet that is easily accessible.
P1050133-002 5/31/12
Page 53

HC100 General Specifications
Physical Specifications
Dimensions U.S. Standard Metric
Height 7.0 in 178 mm
Width 5.0 in. 127 mm
Depth 9.5 in. 242 mm
HC100
HC100 General Specifications
53
Clearance - amount of space needed above the
printer to allow for loading a media cartridge
Weight without options 3.1 lb. 1.4 kg
6 in. 153 mm
Electrical Specifications
Power
General 100-240 VAC, 50-60 Hz external power supply
Printer idle 5W
Environmental Conditions for Operation and Storage
Environment
Operation Temperatures 41° to 104° F 5° to 40° C 20 to 85% non-condensing
Storage Temperatures –40° to 140° F –40° to 60° C 5 to 85% non-condensing
U.S. Standard Metric Relative Humidity
5/31/12 P1050133-002
Page 54

HC100
54
HC100 Compliance Information
HC100 Compliance Information
FCC Compliance Statement
This device complies with Part 15 rules. Operation is subject to the following two conditions:
1. This device may not cause harmful interference, and
2. This device must accept any interference received, including interference that may cause
undesired operation.
The user is cautioned that any changes or modifications not expressly approved by Zebra
Technologies Corporation could void the user’s authority to operate the equipment. To ensure
compliance, this printer must be used with Shielded Communication Cables.
Important •
1. The radio must be installed with a minimum 20cm separation between the user and the
antenna.
2. The radio must not be co-located or used in simultaneous transmitting condition with
another radio.
3. The host system shall have a label to indicate that the system contains a certified module.
An example is “Contains FCC ID : XXXXX , IC ID: YYYYY”.
Canadian DOC Compliance Statement
Cet appareil numérique de la classe B est conforme à la norme NMB-003 du Canada.
This Class B digital apparatus complies with Canadian ICES-003.
Brasil - Aviso da Anatel
Este equipamento opera em caráter secundário, isto é, não tem direito a proteção contra
interferência prejudicial, mesmo de estações do mesmo tipo, e não po de causar interferên cia a
sistemas operando em caráter primário.
Korean Compliance Statement
이 기기는 가정용 (B 급 ) 전자파 적합기기 로서 주로 가정에서 사용하는 것을 목적으로 하며 , 모든 지
역에서 사용할 수 있습니다 .
The equipment is for home use (Class B) and has acquired electromagnetic conformit y
registration, so it can be used not only in residential area but other areas as well.
This radio device is not allowed to be used for human safety since it has possibility of radio
interference during operation.
P1050133-002 5/31/12
Page 55

NCC
HC100
HC100 Compliance Information
經型式認證合格之低功率射頻電機,非經許可,公司、商號或使用者均不得擅自變
更頻率、加大功率或變更原設計之特性及功能。低功率射頻電機之使用不得影響飛
航安全及干擾合法通信;經發現有干擾現象時,應立即停用,並改善至無干擾時方
得繼續使用。前項合法通信,指依電信法規定作業之無線電通信。低功率射頻電機
須忍受合法通信或工業、科學及醫療用電波輻射性電機設備之干擾。
According to "Administrative Regulations on Low Power Radio Waves Radiated Devices"
Without permission granted by the NCC, any company, enterprise, or user is not allowed to
change frequency, enhance transmitting power or alter original characteristic as well as
performance to an approved low power radio-frequency devices. The low power radiofrequency devices shall not influence aircraft security and interfere legal communications; If
found, the user shall cease operating immediately until no interference is achieved. The said
legal communications means radio communications is operated in compliance with the
Telecommunications Act.
The low power radio-frequency devices must be susceptible with the interference from legal
communications or ISM radio wave radiated devices.
55
WLAN Radio Specification
802.11 b
• 2.4GHz
• DSSS (DBPSK, DQPSK and CCK)
• RF power < 0.002W/MHz
802.11 g
• 2.4GHz
• OFDM (16-QAM and 64-QAM with BPSK and QPSK)
• RF power < 0.001W/MHz
5/31/12 P1050133-002
Page 56

HC100
Notes • ___________________________________________________________________
__________________________________________________________________________
__________________________________________________________________________
__________________________________________________________________________
__________________________________________________________________________
__________________________________________________________________________
__________________________________________________________________________
__________________________________________________________________________
__________________________________________________________________________
__________________________________________________________________________
56
HC100 Compliance Information
P1050133-002 5/31/12
Page 57

This section provides the features of and specifications for this printer.
Note • Printer specifications are subject to change without notice.
8
S4M
Contents
Select a Site for the Printer . . . . . . . . . . . . . . . . . . . . . . . . . . . . . . . . . . . . . . . . . . . . . . . 58
S4M General Specifications. . . . . . . . . . . . . . . . . . . . . . . . . . . . . . . . . . . . . . . . . . . . . . . 59
S4M Compliance Information. . . . . . . . . . . . . . . . . . . . . . . . . . . . . . . . . . . . . . . . . . . . . . 60
5/31/12 P1050133-002
Page 58

S4M
58
Select a Site for the Printer
Select a Site for the Printer
Consider the following when selecting an appropriate location for your printer.
Select a Surface
Select a solid, level surface of sufficient size and strength to accommodate the printer and
other equipment (such as a computer), if necessary. The choices include a table, countertop,
desk, or cart. For the printer’s weight and dimensions, see S4M General Specifications
on page 59.
Provide Proper Operating Conditions
This printer is designed to function in a wide range of envi ronmental and electri cal conditions,
including a warehouse or factory floor. For more information on the required conditions, see
S4M General Specifications on page 59.
Table 6 shows the temperature and relative humidity requirements for the printer when it is
operating.
Mode Temperature Relative Humidity
Thermal Transfer 41° to 104° F
Direct Thermal 32° to 104° F
Allow Proper Space
The printer should have enough space around it for you to be able to open the media door. To
allow for proper ventilation and cooling, leave open space on all sides of the printer.
Caution • Do not place any padding or cushioning material behind or under the printer
because this restricts air flow and could cause the printer to overheat.
Provide a Data Source
If the printer will be located away from the data source (such as a computer), the selected site
must provide the appropriate connections to that data source. For more information on the
types of communication interfaces and their limitations, refer to your printer’s user guide.
Table 6 •
20 to 85% non-condensing.
5° to 40° C
20 to 85% non-condensing
0° to 40° C
Provide a Power Source
Place the printer within a short distance of a power outlet that is easily accessible.
P1050133-002 5/31/12
Page 59

S4M General Specifications
Physical Specifications
Dimensions U.S. Standard Metric
Height 11.6 in. 295 mm
Width 10.7 in. 272 mm
Depth 18.8 in. 477 mm
Weight without options 27.2 lb 12.4 kg
Electrical Specifications
Power
General 100 to 240 VAC;
47 to 63 Hz
5 Amps (fused)
S4M
S4M General Specifications
59
Printer idle 8.5W
Environmental Conditions for Operation and Storage
Environment Temperature Relative Humidity
Operation Thermal Transfer 41° to 104° F
5° to 40° C
Direct Thermal 32° to 104° F
0° to 40° C
Storage Thermal Transfer or
Direct Thermal
–40° to 140° F
–40° to 60° C
20 to 85% non-condensing
5 to 85% non-condensing
5/31/12 P1050133-002
Page 60

S4M
60
S4M Compliance Information
S4M Compliance Information
FCC Compliance Statement
This device complies with Part 15 rules. Operation is subject to the following two conditions:
1. This device may not cause harmful interference, and
2. This device must accept any interference received, including interference that may cause
undesired operation.
The user is cautioned that any changes or modifications not expressly approved by Zebra
Technologies Corporation could void the user’s authority to operate the equipment. To ensure
compliance, this printer must be used with Shielded Communication Cables.
Important •
1. The radio must be installed with a minimum 20cm separation between the user and the
antenna.
2. The radio must not be co-located or used in simultaneous transmitting condition with
another radio.
3. The host system shall have a label to indicate that the system contains a certified module.
An example is “Contains FCC ID : XXXXX , IC ID: YYYYY”.
Canadian DOC Compliance Statement
Cet appareil numérique de la classe B est conforme à la norme NMB-003 du Canada.
This Class B digital apparatus complies with Canadian ICES-003.
Brasil - Aviso da Anatel
Este equipamento opera em caráter secundário, isto é, não tem direito a proteção contra
interferência prejudicial, mesmo de estações do mesmo tipo, e não po de causar interferên cia a
sistemas operando em caráter primário.
Korean Compliance Statement
이 기기는 가정용 (B 급 ) 전자파 적합기기 로서 주로 가정에서 사용하는 것을 목적으로 하며 , 모든 지
역에서 사용할 수 있습니다 .
The equipment is for home use (Class B) and has acquired electromagnetic conformit y
registration, so it can be used not only in residential area but other areas as well.
This radio device is not allowed to be used for human safety since it has possibility of radio
interference during operation.
P1050133-002 5/31/12
Page 61

NCC
S4M
S4M Compliance Information
經型式認證合格之低功率射頻電機,非經許可,公司、商號或使用者均不得擅自變
更頻率、加大功率或變更原設計之特性及功能。低功率射頻電機之使用不得影響飛
航安全及干擾合法通信;經發現有干擾現象時,應立即停用,並改善至無干擾時方
得繼續使用。前項合法通信,指依電信法規定作業之無線電通信。低功率射頻電機
須忍受合法通信或工業、科學及醫療用電波輻射性電機設備之干擾。
According to "Administrative Regulations on Low Power Radio Waves Radiated Devices"
Without permission granted by the NCC, any company, enterprise, or user is not allowed to
change frequency, enhance transmitting power or alter original characteristic as well as
performance to an approved low power radio-frequency devices. The low power radiofrequency devices shall not influence aircraft security and interfere legal communications; If
found, the user shall cease operating immediately until no interference is achieved. The said
legal communications means radio communications is operated in compliance with the
Telecommunications Act.
The low power radio-frequency devices must be susceptible with the interference from legal
communications or ISM radio wave radiated devices.
61
WLAN Radio Specification
802.11 b
• 2.4GHz
• DSSS (DBPSK, DQPSK and CCK)
• RF power 10 mW (ZebraNet b/g Print Server)
802.11 g
• 2.4GHz
• OFDM (16-QAM and 64-QAM with BPSK and QPSK)
• RF power 10 mW (ZebraNet b/g Print Server)
5/31/12 P1050133-002
Page 62

S4M
Notes • ___________________________________________________________________
__________________________________________________________________________
__________________________________________________________________________
__________________________________________________________________________
__________________________________________________________________________
__________________________________________________________________________
__________________________________________________________________________
__________________________________________________________________________
__________________________________________________________________________
__________________________________________________________________________
62
S4M Compliance Information
P1050133-002 5/31/12
Page 63

9
105
This section provides the features of and specifications for this printer.
Note • Printer specifications are subject to change without notice.
Contents
Select a Site for the Printer . . . . . . . . . . . . . . . . . . . . . . . . . . . . . . . . . . . . . . . . . . . . . . . 64
105SL General Specifications . . . . . . . . . . . . . . . . . . . . . . . . . . . . . . . . . . . . . . . . . . . . . 65
105SL Compliance Information . . . . . . . . . . . . . . . . . . . . . . . . . . . . . . . . . . . . . . . . . . . . 66
SL
5/31/12 P1050133-002
Page 64

105SL
64
Select a Site for the Printer
Select a Site for the Printer
Consider the following when selecting an appropriate location for your printer.
Select a Surface
Select a solid, level surface of sufficient size and strength to accommodate the printer and
other equipment (such as a computer), if necessary. The choices include a table, countertop,
desk, or cart. For the printer’s weight and dimensions, see 105SL General Specifications
on page 65.
Provide Proper Operating Conditions
This printer is designed to function in a wide range of envi ronmental and electri cal conditions,
including a warehouse or factory floor. For more information on the required conditions, see
105SL General Specifications on page 65.
Table 7 shows the temperature and relative humidity requirements for the printer when it is
operating.
Mode Temperature Relative Humidity
Thermal Transfer 40° to 104° F
Direct Thermal 32° to 104° F
Allow Proper Space
The printer should have enough space around it for you to be able to open the media door. To
allow for proper ventilation and cooling, leave open space on all sides of the printer.
Caution • Do not place any padding or cushioning material behind or under the printer
because this restricts air flow and could cause the printer to overheat.
Provide a Data Source
If the printer will be located away from the data source (such as a computer), the selected site
must provide the appropriate connections to that data source. For more information on the
types of communication interfaces and their limitations, refer to your printer’s user guide.
Table 7 •
20 to 85% non-condensing.
5° to 40° C
20 to 85% non-condensing
0° to 40° C
Provide a Power Source
Place the printer within a short distance of a power outlet that is easily accessible.
P1050133-002 5/31/12
Page 65

105SL General Specifications
Physical Specifications
Dimensions Metric U.S. Standard
Height 394 mm 15.5 in
Width 284 mm 10.2 in.
Depth 480 mm 18.9 in.
Weight without options 25 kg 55 lb
Electrical Specifications
Power
General 100 to 240 VAC;
47 to 63 Hz
105SL
105SL General Specifications
65
Power Consumption Printing
Printer idle 19 W
Fuses 5 Amp, 250 VAC, 5×20 mm IEC style, as supplied with the printer
PAUSE test at slowest speed 180 W
Environmental Conditions for Operation and Storage
Environment Temperature Relative Humidity
Operation Thermal Transfer 40° to 104° F
5° to 40° C
Direct Thermal 32° to 104° F
0° to 40° C
Storage Thermal Transfer or
Direct Thermal
–40° to 140° F
–40° to 60° C
20 to 85% non-condensing
5 to 85% non-condensing
5/31/12 P1050133-002
Page 66

105SL
66
105SL Compliance Information
105SL Compliance Information
FCC Compliance Statement
This device complies with Part 15 rules. Operation is subject to the following two conditions:
1. This device may not cause harmful interference, and
2. This device must accept any interference received, including interference that may cause
undesired operation.
The user is cautioned that any changes or modifications not expressly approved by Zebra
Technologies Corporation could void the user’s authority to operate the equipment. To ensure
compliance, this printer must be used with Shielded Communication Cables.
Important •
1. The radio must be installed with a minimum 20cm separation between the user and the
antenna.
2. The radio must not be co-located or used in simultaneous transmitting condition with
another radio.
3. The host system shall have a label to indicate that the system contains a certified module.
An example is “Contains FCC ID : XXXXX , IC ID: YYYYY”.
Canadian DOC Compliance Statement
Cet appareil numérique de la classe B est conforme à la norme NMB-003 du Canada.
This Class B digital apparatus complies with Canadian ICES-003.
Brasil - Aviso da Anatel
Este equipamento opera em caráter secundário, isto é, não tem direito a proteção contra
interferência prejudicial, mesmo de estações do mesmo tipo, e não po de causar interferên cia a
sistemas operando em caráter primário.
Korean Compliance Statement
이 기기는 가정용 (B 급 ) 전자파 적합기기 로서 주로 가정에서 사용하는 것을 목적으로 하며 , 모든 지
역에서 사용할 수 있습니다 .
The equipment is for home use (Class B) and has acquired electromagnetic conformit y
registration, so it can be used not only in residential area but other areas as well.
This radio device is not allowed to be used for human safety since it has possibility of radio
interference during operation.
P1050133-002 5/31/12
Page 67

NCC
105SL
105SL Compliance Information
經型式認證合格之低功率射頻電機,非經許可,公司、商號或使用者均不得擅自變
更頻率、加大功率或變更原設計之特性及功能。低功率射頻電機之使用不得影響飛
航安全及干擾合法通信;經發現有干擾現象時,應立即停用,並改善至無干擾時方
得繼續使用。前項合法通信,指依電信法規定作業之無線電通信。低功率射頻電機
須忍受合法通信或工業、科學及醫療用電波輻射性電機設備之干擾。
According to "Administrative Regulations on Low Power Radio Waves Radiated Devices"
Without permission granted by the NCC, any company, enterprise, or user is not allowed to
change frequency, enhance transmitting power or alter original characteristic as well as
performance to an approved low power radio-frequency devices. The low power radiofrequency devices shall not influence aircraft security and interfere legal communications; If
found, the user shall cease operating immediately until no interference is achieved. The said
legal communications means radio communications is operated in compliance with the
Telecommunications Act.
The low power radio-frequency devices must be susceptible with the interference from legal
communications or ISM radio wave radiated devices.
67
WLAN Radio Specification
802.11 b
• 2.4GHz
• DSSS (DBPSK, DQPSK and CCK)
• RF power 10 mW (ZebraNet b/g Print Server)
802.11 g
• 2.4GHz
• OFDM (16-QAM and 64-QAM with BPSK and QPSK)
• RF power 10 mW (ZebraNet b/g Print Server)
5/31/12 P1050133-002
Page 68

105SL
Notes • ___________________________________________________________________
__________________________________________________________________________
__________________________________________________________________________
__________________________________________________________________________
__________________________________________________________________________
__________________________________________________________________________
__________________________________________________________________________
__________________________________________________________________________
__________________________________________________________________________
__________________________________________________________________________
68
105SL Compliance Information
P1050133-002 5/31/12
Page 69

ZT200 Series
This section provides the features of and specifications for these printers.
Note • Printer specifications are subject to change without notice.
10
Contents
Select a Site for the Printer . . . . . . . . . . . . . . . . . . . . . . . . . . . . . . . . . . . . . . . . . . . . . . . 70
ZT210, ZT220, and ZT230 General Specifications . . . . . . . . . . . . . . . . . . . . . . . . . . . . . 71
ZT210, ZT220, and ZT230 Compliance Information . . . . . . . . . . . . . . . . . . . . . . . . . . . . 72
5/31/12 P1050133-002
Page 70

ZT210 / ZT220 / ZT230
70
Select a Site for the Printer
Select a Site for the Printer
Consider the following when selecting an appropriate location for your printer.
Select a Surface
Select a solid, level surface of sufficient size and strength to accommodate the printer and
other equipment (such as a computer), if necessary. The choices include a table, countertop,
desk, or cart. For the printer’s weight and dimensions, see ZT210, ZT220, and ZT230 General
Specifications on page 71.
Provide Proper Operating Conditions
This printer is designed to function in a wide range of envi ronmental and electri cal conditions,
including a warehouse or factory floor. For more information on the required conditions, see
ZT210, ZT220, and ZT230 General Specifications on page 71.
Table 8 shows the temperature and relative humidity requirements for the printer when it is
operating.
Mode Temperature Relative Humidity
Thermal Transfer 40° to 105° F
Direct Thermal 32° to 105° F
Allow Proper Space
The printer should have enough space around it for you to be able to open the media door. To
allow for proper ventilation and cooling, leave open space on all sides of the printer.
Caution • Do not place any padding or cushioning material behind or under the printer
because this restricts air flow and could cause the printer to overheat.
Provide a Data Source
If the printer will be located away from the data source (such as a computer), the selected site
must provide the appropriate connections to that data source. For more information on the
types of communication interfaces and their limitations, refer to your printer’s user guide.
Table 8 •
20 to 85% non-condensing.
5° to 40° C
20 to 85% non-condensing
0° to 40° C
Provide a Power Source
Place the printer within a short distance of a power outlet that is easily accessible.
P1050133-002 5/31/12
Page 71

ZT210, ZT220, and ZT230 General Specifications
ZT210, ZT220, and ZT230 General Specifications
Physical Specifications
ZT210 ZT220 ZT230
ZT210 / ZT220 / ZT230
71
Dimensions
Height 11 in. 28 cm 11 in. 28 cm 11 in 28 cm
Width 9.5 in. 24 cm 9.5 in 24 cm 9.5 in 24 cm
Depth 17 in. 28 cm 17 in 43 cm 17 in 43 cm
Weight 20 lb 9 kg 17 lb 7.75 kg 20 lb 9 kg
U.S.
Standard Metric
U.S.
Standard Metric
Electrical Specifications
Power
General 100 to 240 VAC;
47 to 63 Hz
5 Amps (fused)
Printer idle 8.5W
Environmental Conditions for Operation and Storage
U.S.
Standard Metric
Environment Temperature Relative Humidity
Operation Thermal Transfer 40° to 105° F
5° to 40° C
Direct Thermal 32° to 105° F
0° to 40° C
Storage Thermal Transfer or
Direct Thermal
5/31/12 P1050133-002
–34° to 140° F
–30° to 60° C
20 to 85% non-condensing
5 to 85% non-condensing
Page 72

ZT210 / ZT220 / ZT230
72
ZT210, ZT220, and ZT230 Compliance Information
ZT210, ZT220, and ZT230 Compliance Information
FCC Compliance Statement
This device complies with Part 15 rules. Operation is subject to the following two conditions:
1. This device may not cause harmful interference, and
2. This device must accept any interference received, including interference that may cause
undesired operation.
The user is cautioned that any changes or modifications not expressly approved by Zebra
Technologies Corporation could void the user’s authority to operate the equipment. To ensure
compliance, this printer must be used with Shielded Communication Cables.
Important •
1. The radio must be installed with a minimum 20cm separation between the user and the
antenna.
2. The radio must not be co-located or used in simultaneous transmitting condition with
another radio.
3. The host system shall have a label to indicate that the system contains a certified module.
An example is “Contains FCC ID : XXXXX , IC ID: YYYYY”.
4. The radio is for indoor use only in the 5150-5250MHz frequency range.
Canadian DOC Compliance Statement
Cet appareil numérique de la classe B est conforme à la norme NMB-003 du Canada.
This Class B digital apparatus complies with Canadian ICES-003.
Industry Canada (IC) Warning
This device complies with Industry Canada license-exempt RSS standard(s). Operation is
subject to the following two conditions:
1) This device may not cause interference.
2) This device must accept any interference, including interference that may cause undesired
operation of the device.
Le présent appareil est conforme aux CNR d’Industrie Canada applicables aux appareils radio
exempts de licence. L’exploitation est autorisée aux deux conditions suivantes : (1) l’appareil
ne doit pas produire de brouillage, et (2) l’utilisateur de l’appareil doit accepter tout broui llage
radioélectrique subi, même si le brouillage est susceptible d’en compromettre le
fonctionnement.
Brasil - Aviso da Anatel
Este equipamento opera em caráter secundário, isto é, não tem direito a proteção contra
interferência prejudicial, mesmo de estações do mesmo tipo, e não po de causar interferên cia a
sistemas operando em caráter primário.
P1050133-002 5/31/12
Page 73

European Regulatory Information
Note • Member states in the EU with restrictive use for this device are crossed out. This
device is also authorized for use in all EFTA member states (CH, IS, LI, NO).
ZT210 / ZT220 / ZT230
ZT210, ZT220, and ZT230 Compliance Information
73
Japan Restricted Frequencies
For 5.725 - 5.825 GHz, this frequency band will not be available in Japan.
Taiwan Restricted Frequencies
For 5.15 - 5.25 GHz, this frequency band will not be available in Taiwan.
Korean Compliance Statement
이 기기는 가정용 (B 급 ) 전자파 적합기기 로서 주로 가정에서 사용하는 것을 목적으로 하며 , 모든 지
역에서 사용할 수 있습니다 .
The equipment is for home use (Class B) and has acquired electromagnetic conformit y
registration, so it can be used not only in residential area but other areas as well.
This radio device is not allowed to be used for human safety since it has possibility of radio
interference during operation.
5/31/12 P1050133-002
Page 74

ZT210 / ZT220 / ZT230
74
ZT210, ZT220, and ZT230 Compliance Information
NCC
經型式認證合格之低功率射頻電機,非經許可,公司、商號或使用者均不得擅自變
更頻率、加大功率或變更原設計之特性及功能。低功率射頻電機之使用不得影響飛
航安全及干擾合法通信;經發現有干擾現象時,應立即停用,並改善至無干擾時方
得繼續使用。前項合法通信,指依電信法規定作業之無線電通信。低功率射頻電機
須忍受合法通信或工業、科學及醫療用電波輻射性電機設備之干擾。
According to "Administrative Regulations on Low Power Radio Waves Radiated Devices"
Without permission granted by the NCC, any company, enterprise, or user is not allowed to
change frequency, enhance transmitting power or alter original characteristic as well as
performance to an approved low power radio-frequency devices. The low power radiofrequency devices shall not influence aircraft security and interfere legal communications; If
found, the user shall cease operating immediately until no interference is achieved. The said
legal communications means radio communications is operated in compliance with the
Telecommunications Act.
The low power radio-frequency devices must be susceptible with the interference from legal
communications or ISM radio wave radiated devices.
WLAN Radio Specification
802.11 b
• 2.4GHz
• DSSS (DBPSK, DQPSK and CCK)
• RF power 10 mW (ZebraNet b/g Print Server)
• RF power 63 mW (ZebraNet n Print Server)
802.11 g
• 2.4GHz
• OFDM (16-QAM and 64-QAM with BPSK and QPSK)
• RF power 10 mW (ZebraNet b/g Print Server)
• RF power 63 mW (ZebraNet n Print Server)
802.11 n
• 2.4GHz
• OFDM (16-QAM and 64-QAM with BPSK and QPSK)
• RF power 63 mW (ZebraNet n Print Server)
802.11 a/n
• 5.15-5.25 GHz, 5.25-5.35 GHz, 5.47-5.725 GHz, 5.725-5.825 GHz
• OFDM (16-QAM and 64-QAM with BPSK and QPSK)
• RF power 50 mW (ZebraNet n Print Server)
P1050133-002 5/31/12
Page 75

ZE500 Series
This section provides the features of and specifications for this printer.
Note • Printer specifications are subject to change without notice.
11
Contents
Print Engine Installation . . . . . . . . . . . . . . . . . . . . . . . . . . . . . . . . . . . . . . . . . . . . . . . . . . 76
ZE500 General Specifications . . . . . . . . . . . . . . . . . . . . . . . . . . . . . . . . . . . . . . . . . . . . . 79
ZE500 Compliance Information . . . . . . . . . . . . . . . . . . . . . . . . . . . . . . . . . . . . . . . . . . . . 80
5/31/12 P1050133-002
Page 76

ZE500 Series
76
Print Engine Installation
Print Engine Installation
This section provides basic information for mounting the print engine into an applicator. The
illustrations in this section show the print eng ine from dif ferent angles a nd include di mensions
and clearance needs.
Requirements
Stability When the print engine is mounted, the complete assembly must be physically
stable. When the print engine is loaded with ribbon and media, the equipment must not
become physically unstable.
Ventilation and Temperature Provide ventilation for the print engine mounting enclosure
to remove heat and ensure uninterrupted, trouble-free operation of the print engine. Ambient
air temperature surrounding the print engine must not exceed the following:
• Temperature: 32° to 104°F (0° to 40°C)
• Relative humidity: 20% to 85% non-co ndensing
Power Requirements Consider the current rating of the print engine during installation.
When power is applied to the print engine and th e enclosi ng equi pment, an overloa d condi tion
must not be created.
Grounding Requirements Maintain reliable g ro undi ng of the prin t en gin e. Pay particular
attention to the AC power supply connections so that earth ground is maintained through the
AC power input connector.
Clearance for Cables and Connectors Allow ample space at the rear of the print engine
for electronic connectors and dressing of the following cables: IEC power cord, serial and/or
parallel host communication cable, optional host communication cable (Ethernet), and the
discrete signal (applicator) interface cable.
Power Cord Requirements The IEC power cord does not have a strain relief on the print
engine. If the operating characteristics of the applicator include vibration or strain on the
power cord, provide an appropriate clamping mechanism to avoid unintentional disconnection
of the power cord from the print engine.
P1050133-002 5/31/12
Page 77

Select a Site for the Printer
Consider the following when selecting an appropriate location for your printer.
Stability
When the print engine is mounted, the complete assembly must be physically st able. When the
print engine is loaded with ribbon and media, the equipment must not become physically
unstable.
Provide Proper Operating Conditions
This printer is designed to function in a wide range of envi ronmental and electri cal conditions,
including a warehouse or factory floor. For more information on the required conditions, see
ZE500 General Specifications on page 79.
Table 9 shows the temperature and relative humidity requirements for the printer when it is
operating.
ZE500 Series
Select a Site for the Printer
77
Table 9 • Operating Temperature and Humidity
Mode Temperature Relative Humidity
Thermal Transfer 40° to 104° F (5° to 40° C) 20 to 85% non-condensing.
Direct Thermal 32° to 104° F (0° to 40° C) 20 to 85% non-condensing
Allow Proper Space
The printer should have enough space around it for you to be able to open the media door. To
allow for proper ventilation and cooling, leave open space on all sides of the printer.
Caution • Do not place any padding or cushioning material behind or under the printer
because this restricts air flow and could cause the printer to overheat.
Provide a Data Source
If the printer will be located away from the data source (such as a computer), the selected site
must provide the appropriate connections to that data source. For more information on the
types of communication interfaces and their limitations, refer to the User Guide.
5/31/12 P1050133-002
Page 78

ZE500 Series
78
Select a Site for the Printer
Provide a Power Source
Place the printer within a short distance of a power outlet that is easily accessible.
Power Requirements Consider the current rating of the print engine during installation.
When power is applied to the print engine and th e enclosi ng equi pment, an overloa d condi tion
must not be created.
Grounding Requirements Maintain reliable g ro undi ng of the prin t en gin e. Pay particular
attention to the AC power supply connections so that earth ground is maintained through the
AC power input connector.
Clearance for Cables and Connectors Allow ample space at the rear of the print engine
for electronic connectors and dressing of the following cables: IEC power cord, serial and/or
parallel host communication cable, optional host communication cable (Ethernet), and the
discrete signal (applicator) interface cable.
Power Cord Requirements The IEC power cord does not have a strain relief on the print
engine. If the operating characteristics of the applicator include vibration or strain on the
power cord, provide an appropriate clamping mechanism to avoid unintentional disconnection
of the power cord from the print engine.
P1050133-002 5/31/12
Page 79

ZE500 General Specifications
Physical
ZE500-4 ZE500-6
Dimensions
U.S. Standard Metric U.S. Standard Metric
Height 11.8 in 300 mm 11.8 in 300 mm
Width 9.6 in. 245 mm 9.6 in. 245 mm
Depth 14.95 in. 380 mm 17.23 in. 438 mm
Weight 34 lb 15.4 kg 38 lb 17.3 kg
Electrical Specifications
ZE500 Series
ZE500 General Specifications
79
Power
General 100 to 240 VAC;
47 to 63 Hz
Power Consumption
Idle
Printing
Fuses 5 Amp, 250 VAC, 5 × 20 mm IEC style, as supplied with the
20 W
375 W (maximum)
printer
Environmental Conditions
Environment Temperature Relative Humidity
Operation Thermal Transfer 40° to 104° F
Direct Thermal 32° to 104° F
Storage –40° to 160° F
20 to 85% non-condensing
5° to 40° C
0° to 40° C
5 to 95% non-condensing
–40° to 71° C
5/31/12 P1050133-002
Page 80

ZE500 Series
80
ZE500 Compliance Information
ZE500 Compliance Information
FCC Compliance Statement
This device complies with Part 15 rules. Operation is subject to the following two conditions:
1. This device may not cause harmful interference, and
2. This device must accept any interference received, including interference that may cause
undesired operation.
This equipment has been tested and found to comply with the limits for Class A Digital
Devices, pursuant to Part 15 of the FCC Rules. These limi ts are designed to provide reasona ble
protection against harmful interference when the equipment is operated in a commercial
environment. This equipment generates, uses, and can radiate radio frequency energy and, if
not installed and used in accordance with the product manuals, may cause harmful in terference
to radio communications. Operation of this equipment in a residential area is likely to cause
harmful interference, in which case the user will be required to correct the interference at his
own expense.
The user is cautioned that any changes or modifications not expressly approved by Zebra
Technologies could void the user’s authority to operate the equipment. To ensure compliance,
this printer must be used with Shielded Communication Cables.
FCC Radiation Exposure Statement
This equipment complies with FCC radiation exposure limits set forth for an uncontrolled
environment.
Important •
1. The radio must be installed with a minimum 20cm separation between the user and the
antenna.
2. The radio must not be co-located or used in simultaneous transmitting condition with
another radio.
3. The host system shall have a label to indicate that the system contains a certified module.
An example is “Contains FCC ID : XXXXX , IC ID: YYYYY”.
Canadian DOC Compliance Statement
Cet appareil numérique de la classe A est conforme à la norme NMB-003 du Canada.
This Class A digital apparatus complies with Canadian ICES-003.
Brasil - Aviso da Anatel
Este equipamento opera em caráter secundário, isto é, não tem direito a proteção contra
interferência prejudicial, mesmo de estações do mesmo tipo, e não po de causar interferên cia a
sistemas operando em caráter primário.
P1050133-002 5/31/12
Page 81

Korean Compliance Statement
The equipment is for business use (Class A), and has acquired electromagnetic conformity
registration. Sellers and users are required to take caution in this regard.
This radio device is not allowed to be used for human safety since it has possibility of radio
interference during operation.
NCC
經型式認證合格之低功率射頻電機,非經許可,公司、商號或使用者均不得擅自變
更頻率、加大功率或變更原設計之特性及功能。低功率射頻電機之使用不得影響飛
航安全及干擾合法通信;經發現有干擾現象時,應立即停用,並改善至無干擾時方
得繼續使用。前項合法通信,指依電信法規定作業之無線電通信。低功率射頻電機
須忍受合法通信或工業、科學及醫療用電波輻射性電機設備之干擾。
ZE500 Series
ZE500 Compliance Information
81
According to "Administrative Regulations on Low Power Radio Waves Radiated Devices"
Without permission granted by the NCC, any company, enterprise, or user is not allowed to
change frequency, enhance transmitting power or alter original characteristic as well as
performance to an approved low power radio-frequency devices. The low power radiofrequency devices shall not influence aircraft security and interfere legal communications; If
found, the user shall cease operating immediately until no interference is achieved. The said
legal communications means radio communications is operated in compliance with the
Telecommunications Act.
The low power radio-frequency devices must be susceptible with the interference from legal
communications or ISM radio wave radiated devices.
WLAN Radio Specification
802.11 b
• 2.4GHz
• DSSS (DBPSK, DQPSK and CCK)
• RF power 10 mW (ZebraNet b/g Print Server)
802.11 g
• 2.4GHz
• OFDM (16-QAM and 64-QAM with BPSK and QPSK)
• RF power 10 mW (ZebraNet b/g Print Server)
5/31/12 P1050133-002
Page 82

ZE500 Series
Notes • ___________________________________________________________________
__________________________________________________________________________
__________________________________________________________________________
__________________________________________________________________________
__________________________________________________________________________
__________________________________________________________________________
__________________________________________________________________________
__________________________________________________________________________
__________________________________________________________________________
__________________________________________________________________________
82
ZE500 Compliance Information
P1050133-002 5/31/12
Page 83

Page 84

Zebra Technologies Corporation
Zebra Technologies Corporation
475 Half Day Road, Suite 500
Lincolnshire, IL 60069 USA
T: +1 847 634 6700
Toll-free +1 866 230 9494
F: +1 847 913 8766
Zebra Technologies Europe Limited
Dukes Meadow
Millboard Road
Bourne End
Buckinghamshire, SL8 5XF, UK
T: +44 (0)1 62 8 55 60 00
F: +44 (0)1628 556001
Zebra Technologies Asia Pacific, LLC
120 Robinson Road
#06-01 Parakou Building
Singapore 068913
T: +65 685 8 07 22
F: +65 6885 0838
http://www.zebra.com
© 2012 ZIH Corp.
P1050133-002
 Loading...