


Line Mode
Programmer’s
Manual
Manual No. 980353-001 Rev. B
©2001 Zebra Technologies Corporation

2 980353-001 Rev.B
FOREWORD
This manual provides programming information for the Zebra Technologies printers, featuring
Line Mode and the EPL2 command language, which are manufactured by Zebra Technologies
Corporation, Camarillo, California.
The scope of the manual is Line Mode print operations and commands. For details concerning
non line mode printing and programming, see the printer's user's manual and the Page Mode
(EPL2) Programmer's manual.
COPYRIGHT NOTICE
This document contains information proprietary to Zebra Technologies Corporation. This document and the information contained within is copyrighted by Zebra Technologies Corporation
and may not be duplicated in full or in part by any person without written approval from Zebra.
While every effort has been made to keep the information contained within current and accurate
as of the date of publication, no guarantee is given or implied that the document is error-free or
that itisaccurate with regardto any specification. Zebrareserves the right tomake changes, forthe
purpose of product improvement, at any time.
TRADEMARKS
Zebra Technologies, EPL, EPL2, and Orion are trademarks of Zebra Technologies Corporation.
All other marks are trademarks or registered trademarks of their respective holders.
REVISION HISTORY
Rev.A - This manualversion coincideswith EPL firmware version4.06(or higher) and is available
from Zebra Technologies in electronic form. Line Mode firmware version trackingnumber is 0.12
(or higher) and is a subset of the EPL firmware.
Rev. B - See Above. Changed the R command length parameter from 99 to 25 mm max..
See the Zebra Technologies web site at: www.zebra.com
Technologies customer service.
980353-001 Rev.B
for an Adobe Acrobat file or call Zebra
iii

iv 980353-001 Rev.B
INTRODUCTION
Features . . . . . . . . . . . . . . . . . . . . . . . . 1-3
Limitations. . . . . . . . . . . . . . . . . . . . . . . 1-4
Configuration . . . . . . . . . . . . . . . . . . . . . 1-5
Manually Setting Line Mode . . . . . . . . . . . . . . . . 1-5
Printer Settings. . . . . . . . . . . . . . . . . . . . . 1-6
Printer Defaults . . . . . . . . . . . . . . . . . . . . 1-8
Basic Printing
Example of Default Font Character Dot Map . . . . . . . 2-2
Printing Example . . . . . . . . . . . . . . . . . . . . . 2-2
Printer Commands. . . . . . . . . . . . . . . . . . . 2-3
Command Conventions . . . . . . . . . . . . . . . . 2-4
Character Numbering . . . . . . . . . . . . . . . . . 2-5
Basic Command Syntax . . . . . . . . . . . . . . . . 2-5
Command Concatenation . . . . . . . . . . . . . . . 2-6
Basic Line Mode Guidelines . . . . . . . . . . . . . . 2-7
Contents
LINE MODE COMMAND REFERENCE
A . . . . . . . . . . . . . . . . . . . . . . . . . . 3-3
A0 . . . . . . . . . . . . . . . . . . . . . . . . . 3-6
B. . . . . . . . . . . . . . . . . . . . . . . . . . . 3-7
CR - Carriage Return . . . . . . . . . . . . . . . . 3-8
D . . . . . . . . . . . . . . . . . . . . . . . . . . 3-9
DATA - Text for Print . . . . . . . . . . . . . . . . 3-10
{DATA} . . . . . . . . . . . . . . . . . . . . . . 3-11
|DATA} . . . . . . . . . . . . . . . . . . . . . . 3-12
E . . . . . . . . . . . . . . . . . . . . . . . . . . 3-13
EPL? . . . . . . . . . . . . . . . . . . . . . . . . 3-14
EPL2 . . . . . . . . . . . . . . . . . . . . . . . . 3-15
FF - Form Feed . . . . . . . . . . . . . . . . . . . 3-16
G . . . . . . . . . . . . . . . . . . . . . . . . . . 3-17
g . . . . . . . . . . . . . . . . . . . . . . . . . . 3-18
H . . . . . . . . . . . . . . . . . . . . . . . . . . 3-19
I . . . . . . . . . . . . . . . . . . . . . . . . . . . 3-20
LF - Line Feed . . . . . . . . . . . . . . . . . . . 3-21
M . . . . . . . . . . . . . . . . . . . . . . . . . . 3-22
N . . . . . . . . . . . . . . . . . . . . . . . . . . 3-23
oR . . . . . . . . . . . . . . . . . . . . . . . . . 3-24
P . . . . . . . . . . . . . . . . . . . . . . . . . . 3-26
p . . . . . . . . . . . . . . . . . . . . . . . . . . 3-27
P00 . . . . . . . . . . . . . . . . . . . . . . . . . 3-28
980353-001 Rev.B v
Q? . . . . . . . . . . . . . . . . . . . . . . . . . 3-29
R . . . . . . . . . . . . . . . . . . . . . . . . . . 3-30
S . . . . . . . . . . . . . . . . . . . . . . . . . . 3-31
U . . . . . . . . . . . . . . . . . . . . . . . . . . 3-32
V . . . . . . . . . . . . . . . . . . . . . . . . . . 3-35
v . . . . . . . . . . . . . . . . . . . . . . . . . . 3-36
X . . . . . . . . . . . . . . . . . . . . . . . . . . 3-37
x . . . . . . . . . . . . . . . . . . . . . . . . . . 3-38
? . . . . . . . . . . . . . . . . . . . . . . . . . . 3-39
Appendix A - Character References
Appendix B
System Compatibility Features . . . . . . . . . . . . . . . . B-1
Changing Control Function Characters. . . . . . . . . . . . B-2
Resetting the Control Function Characters . . . . . . . . . . B-3
Checking Control Function Code Settings . . . . . . . . . . B-3
Appendix C
Modifying Your Printer For EPL1 Compatibility . . . . . . . C-1
Loading ELP1 Font Sets . . . . . . . . . . . . . . . . . . . C-2
Deactivating the EPL1 Fonts . . . . . . . . . . . . . . . . . C-3
EPL1 LP20XX Conversion to LN20XX Printer Models. . . . C-4
Resetting the LN20XX to LP20XX Printer Mode . . . . . . . C-4
vi
980353-001 Rev.B

INTRODUCTION
This section contains information about the
basic features, command syntax and
terminology of the Line Mode programming
language.
Line mode printing is ideal for basic retail (point
of sale - POS), shipping, inventory, work flow
control, and general labeling. EPL™ printers
with Line Mode, are versatile and are capable of
printing a wide range media and bar codes.
Line mode printing and programming is designed to support label and bar code printing
with little to no programming required.
980353-001 Rev.B 1-1

The Line Mode printer can print:
Receipts
❏
Labels
❏
Tags
❏
Support chemical and water proof media
❏
UPC (Universal Product Code) bar codes
❏
Postal bar codes
❏
Support for thecommon international indus
❏
try standard bar codes
The Line Mode printing language is designed to
be command compatible with EPL1 programming language used in LP2022 and LP2042
printers.
-
1-2 980353-001 Rev.B

Features Line Mode in flash based printers is similar in
operation to the early model LP Series printer
which used the EPL1 programming language.
Line mode only approximates EPL1 printed
data and commands.
Line Mode features include:
ASCII based command language.
❏
Immediate print and execution of a single
❏
line of text or command data.
Support for 10 standard bar codes.
❏
Two (2) resident fonts:
❏
Out of Box Font: 14 by 22 dots (CCSET1)
and 10 by 18 dots (CCSET3) bit mapped
fonts. These fonts are part of EPL1 emulation
soft font set (v,w,x,y,z) preloaded into the
printer at time of shipment.
Base Default Font: 14 by 24 dots (Font 4)
and 10 by 16 dot (Font 2) bit mapped fonts.
❏ Print and command buffering.
980353-001 Rev.B 1-3

Limitations Line Mode has limited support for the EPL1
command language set. See the Command
Reference table on page 3-1 for a list of com
mands.
The Line Mode printer has compatiable
❏
EPL1 softfonts preloaded into the printer. If
the EPL1 softfont sets are removed, then the
default ELP2™ fonts and character sets will
be used. The default font sets have differ
ences that may affect print results of legacy
EPL1 programmed data. . See Appendix C
for details on font set control.
Line Mode printing does not support black
❏
line (or mark) sensing.
❏ The printer does not support all character
code pages supported by Page mode (EPL2)
printing.
-
-
❏ The printer does not support all the bar code
formats supported by Page Mode (EPL2)
printing.
(See the Bar Code Select command (?) ).
1-4 980353-001 Rev.B

Configuration Zebra EPL flash based printers are, by default,
configured for Page (EPL2) mode operations.
The operator must convert the printer to Line
Mode prior to the initial use of Line Mode. This
is done via a hardware select procedure with the
Feed button during printer power-up.
Line Mode configuration settings are retained after
reset has been issued or power has been cycled.
Manually Setting
Line Mode
The printer utilizes the Feed button during
printer power-up to toggle between printer per
sonality modes, Line and Page (EPL2).
1. With printer power off, press and hold the
Feed button while turning the printer on, then
release the button when the LED starts blinking
red.
2. When the indicator LED starts flashing green,
immediately press and hold Feed button.
3. Release the Feed button when the LED turns
a steady Amber (orange).
4. Verify printer personality with Dump Mode
printout:. Line Mode or Page Mode (EPL2).
5. Press the Feed button to exit the Dump
Mode.
Printing on continuous media requires program
ming. Use the N command with no parameters to
disable Top of Form (label gap) sensing.
-
-
980353-001 Rev.B 1-5

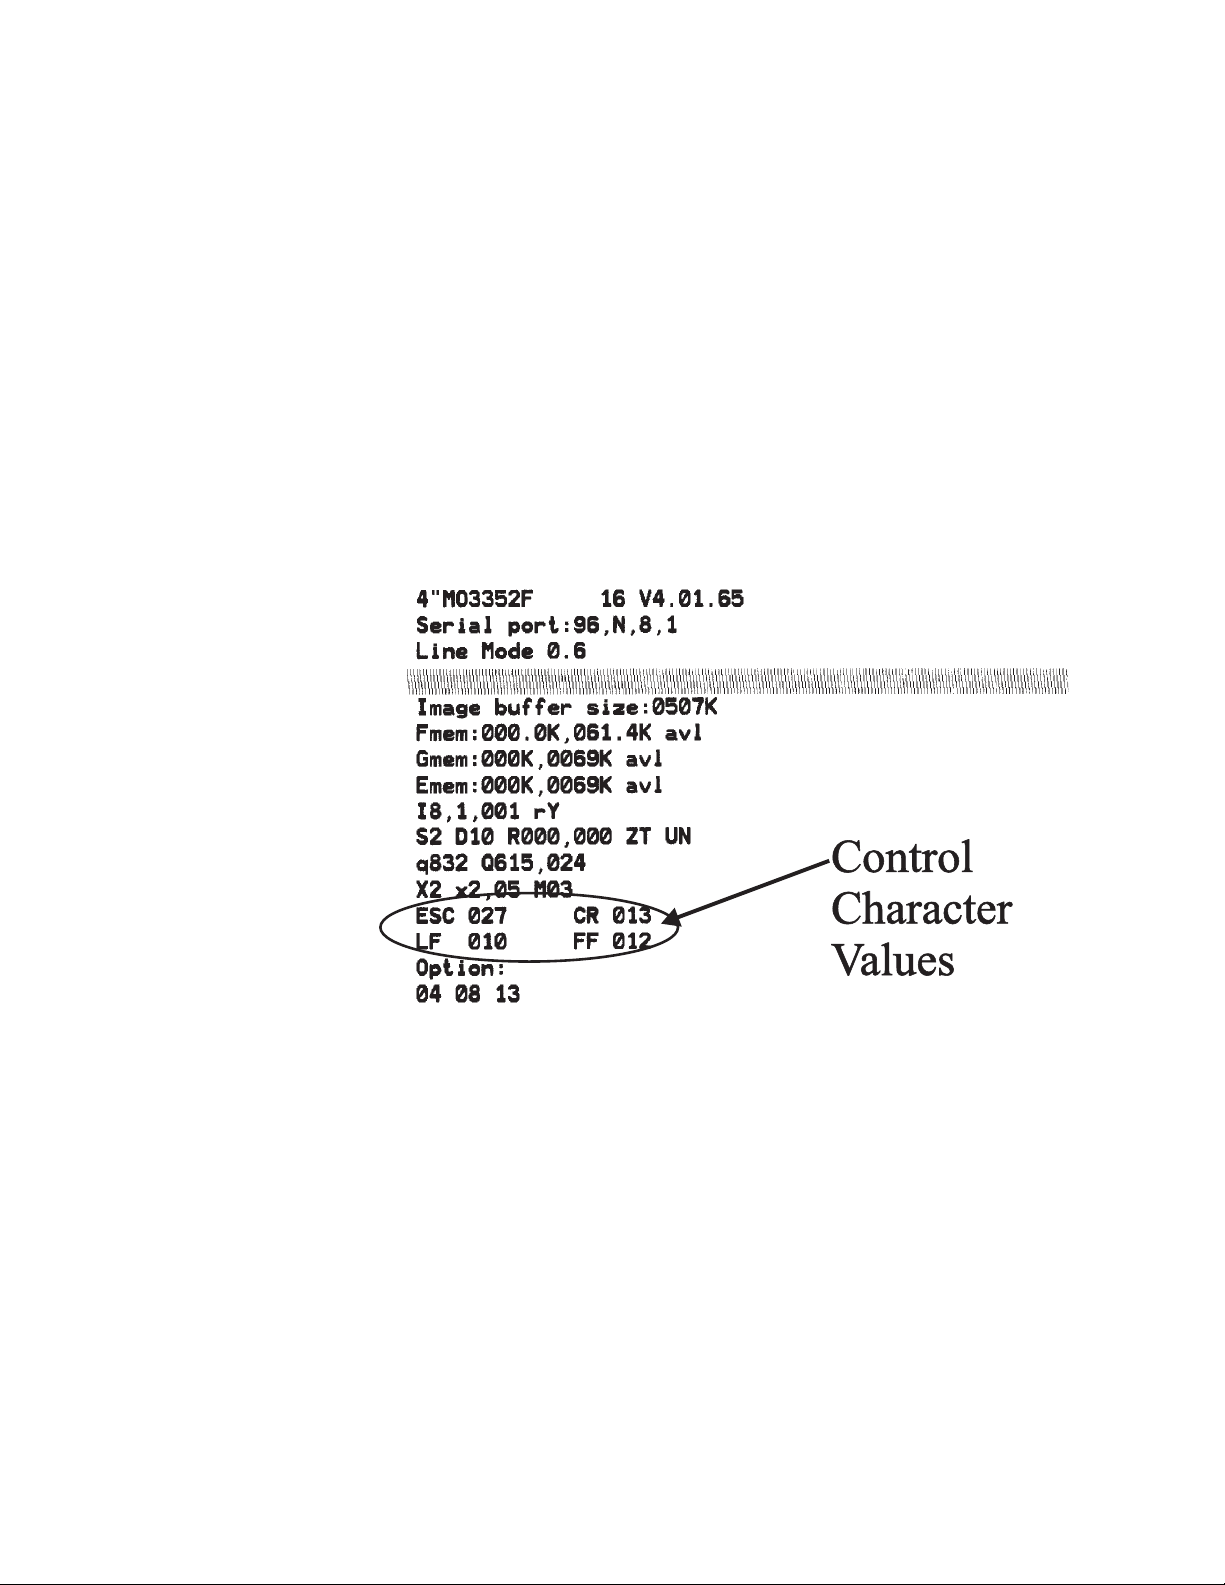
Printer Settings The Line Mode printer configuration and set
tings can be displayed by sending a Print Con
figuration Label (EPL?) command or by
preforming an AutoSense routine.
-
-
The printout produced by this command in
cludes some of the following information:
Printer Model Number Code
•
Firmware Version
•
Serial Port Settings
•
Print Head Test Pattern
•
Character Set Selection
•
Speed and Density
•
Label Size
•
Bar Code Settings
•
Basic Print Control Character Settings
•
Current Media Sensor Values
•
Status of Printer Specific Features and
•
Options:
Battery Life (Portable Printers)
ELP1 compatible fonts are loaded if oEv,w,
x,y,z is displayed on the Option line.
-
•
EPL2 Programming Parameters Not Used By
Line Mode
1-6
980353-001 Rev.B

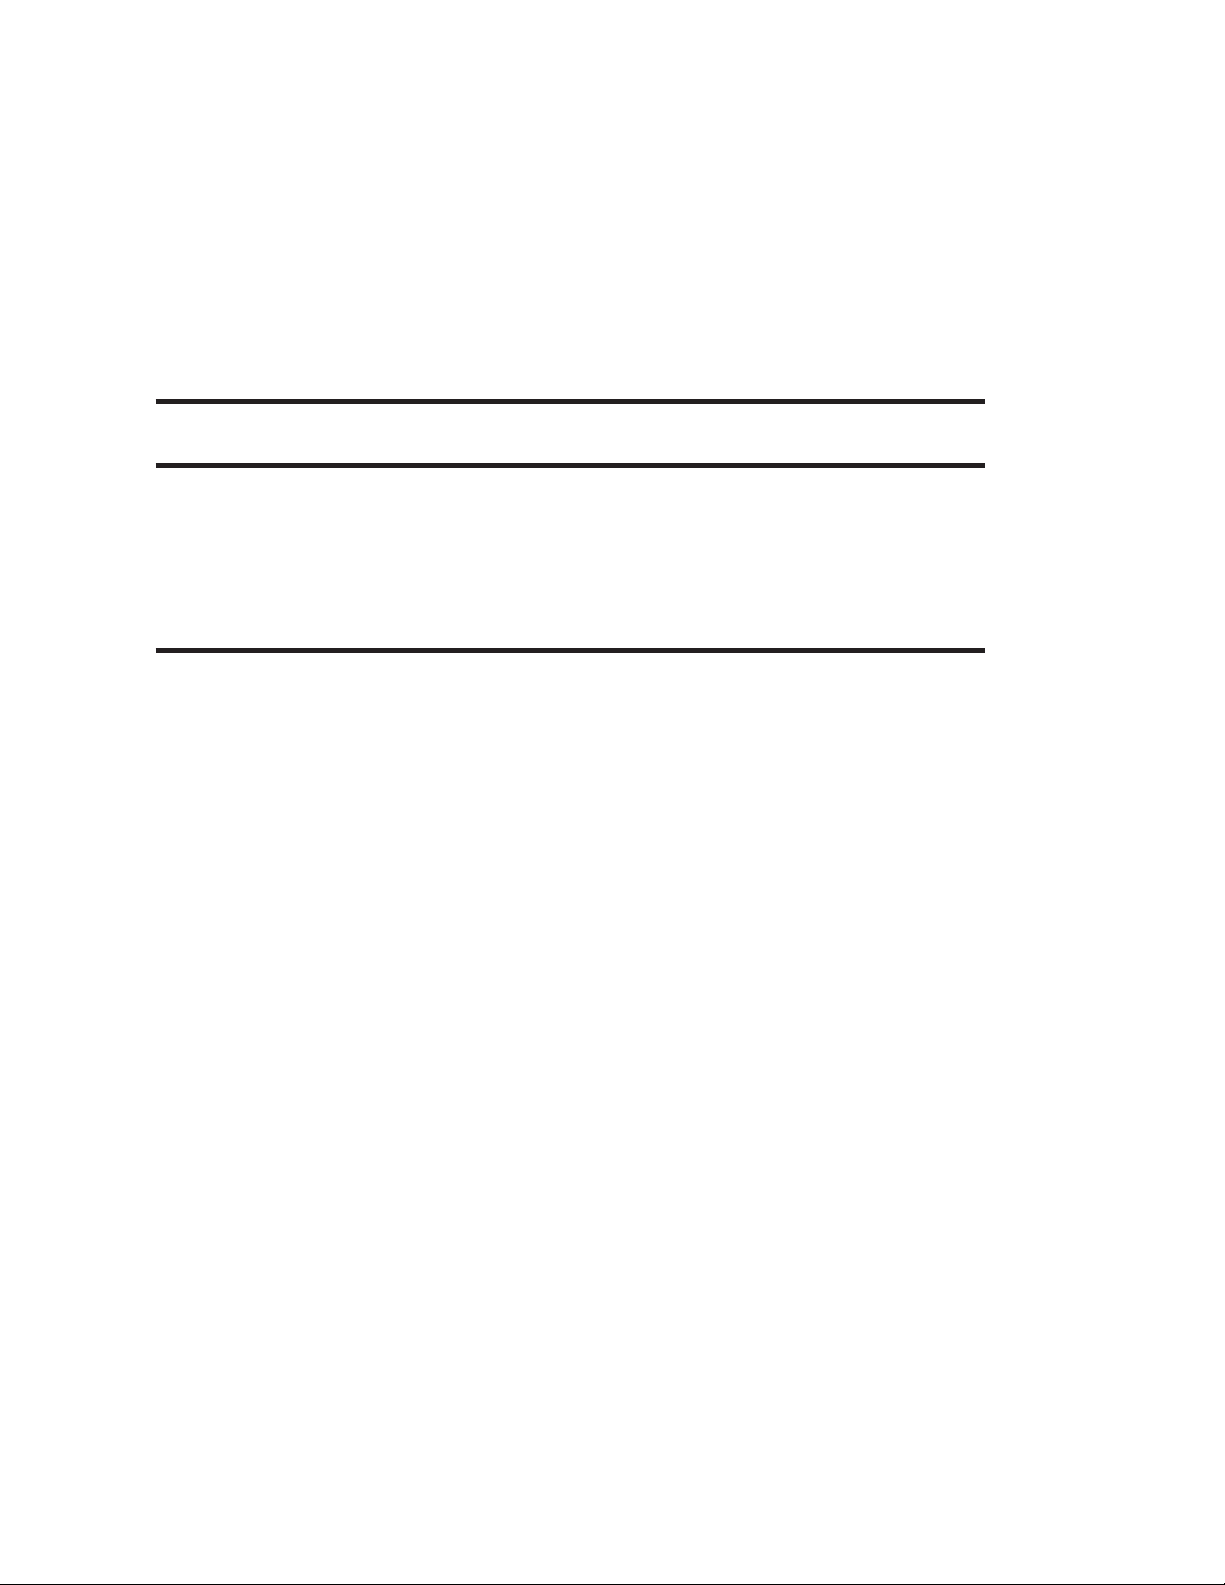
Sample of Dump Mode Printout
980353-001 Rev.B 1-7

Printer Defaults TheLine mode printer defaults into the configu
ration shown below. Some settings are printer
specific, such as default print width.
Font Characters - 14 by 24 dots
•
Command Equivalent - A11 (Text 1h x 1w)
(go to)
Character Set - Code Page 850 (Multilingual
•
code page)
Command Equivalent - I0 (go to)
Speed - 1.5 ips
•
Command Equivalent - S1 (go to)
Left Margin
•
Command Equivalent - M3 (go to)
Bar Code - I2 of 5 (Interleave 2 of 5)
•
Command Equivalent - ?2 (go to)
Bar Code -Narrow Bar Width is 2 Dots
•
Command Equivalent - X2 (go to)
-
• Bar Code - Narrow to Wide Bar Width Ratio is
2.5
Command Equivalent - x25 (go to)
•
Density - Printer Dependent.
See the D command. (go to)
1-8 980353-001 Rev.B

Basic Printing
Line Mode operation allows printing of simple
text (data) without using coded or programmed
data strings. The text that the user types can be
directly output to the printer for immediate
printing. This simple text may be sent to the
printer as simple text files (generated by most
ASCII editors) or from ASCII data sent by a terminal device or software program.
Data is sent to and processed by the printer on a
line by line basis. The printer will immediately
process a terminated line of data. Line termination is a line feed (LF), carriage return (CR), or a
combination (CR/LF).
Line and print heights are determined by multi
ples of the selected text character height. Bar
code height is also affected by the line height.
See the Bar Code Select (?) command for af
fected bar code.
980353-001 Rev.B 2-1
-
-
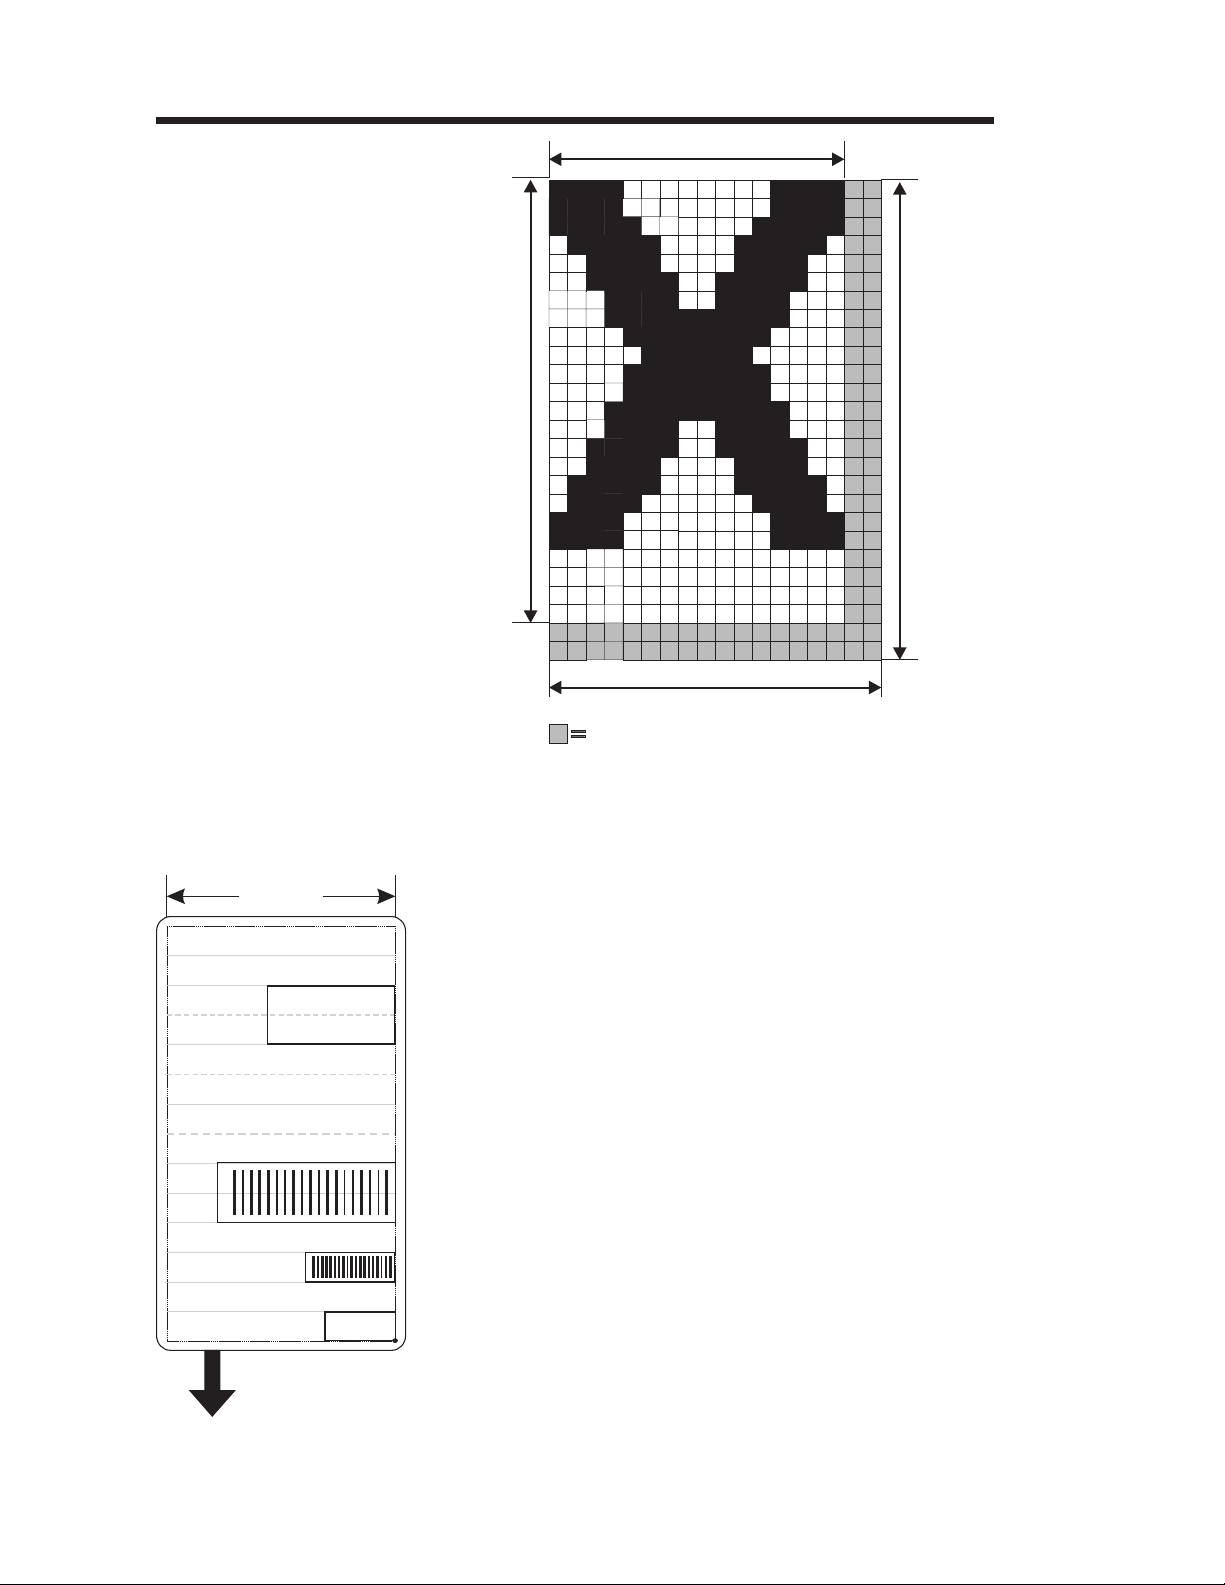
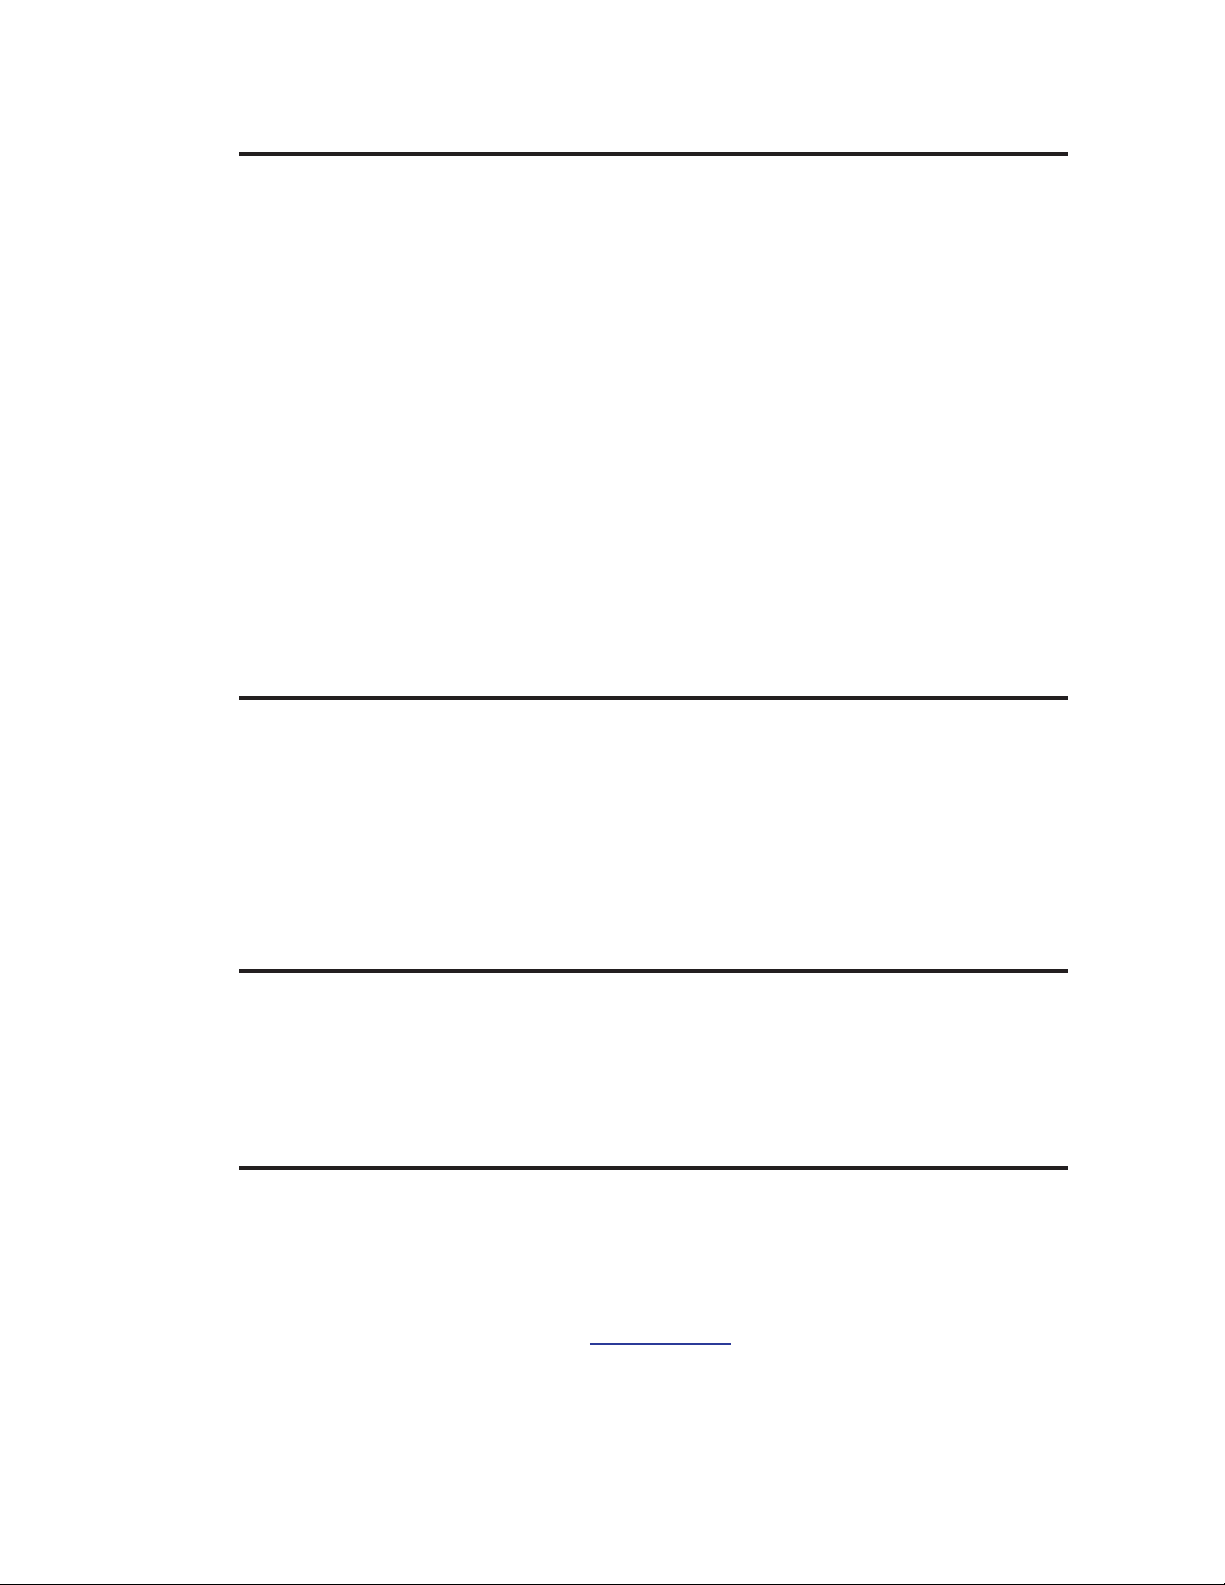
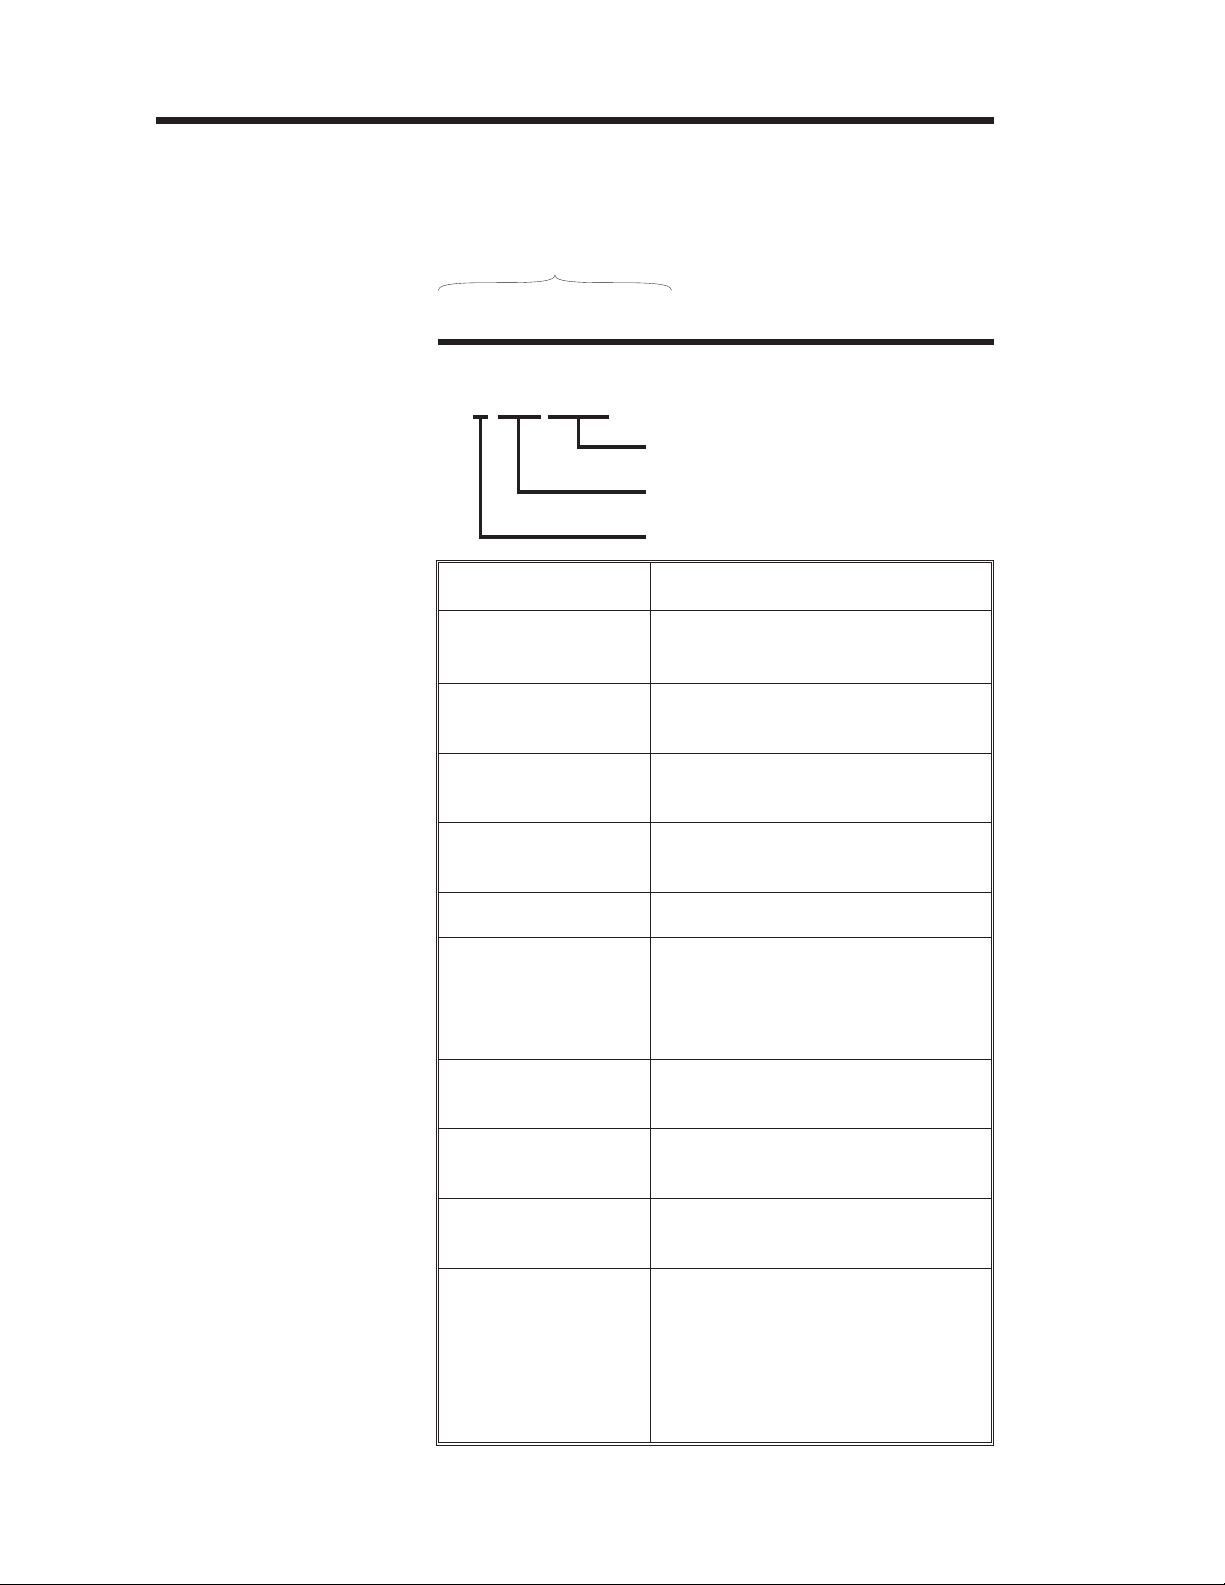
Example of Default
1
)
Font Character Dot
Map
4 Dots
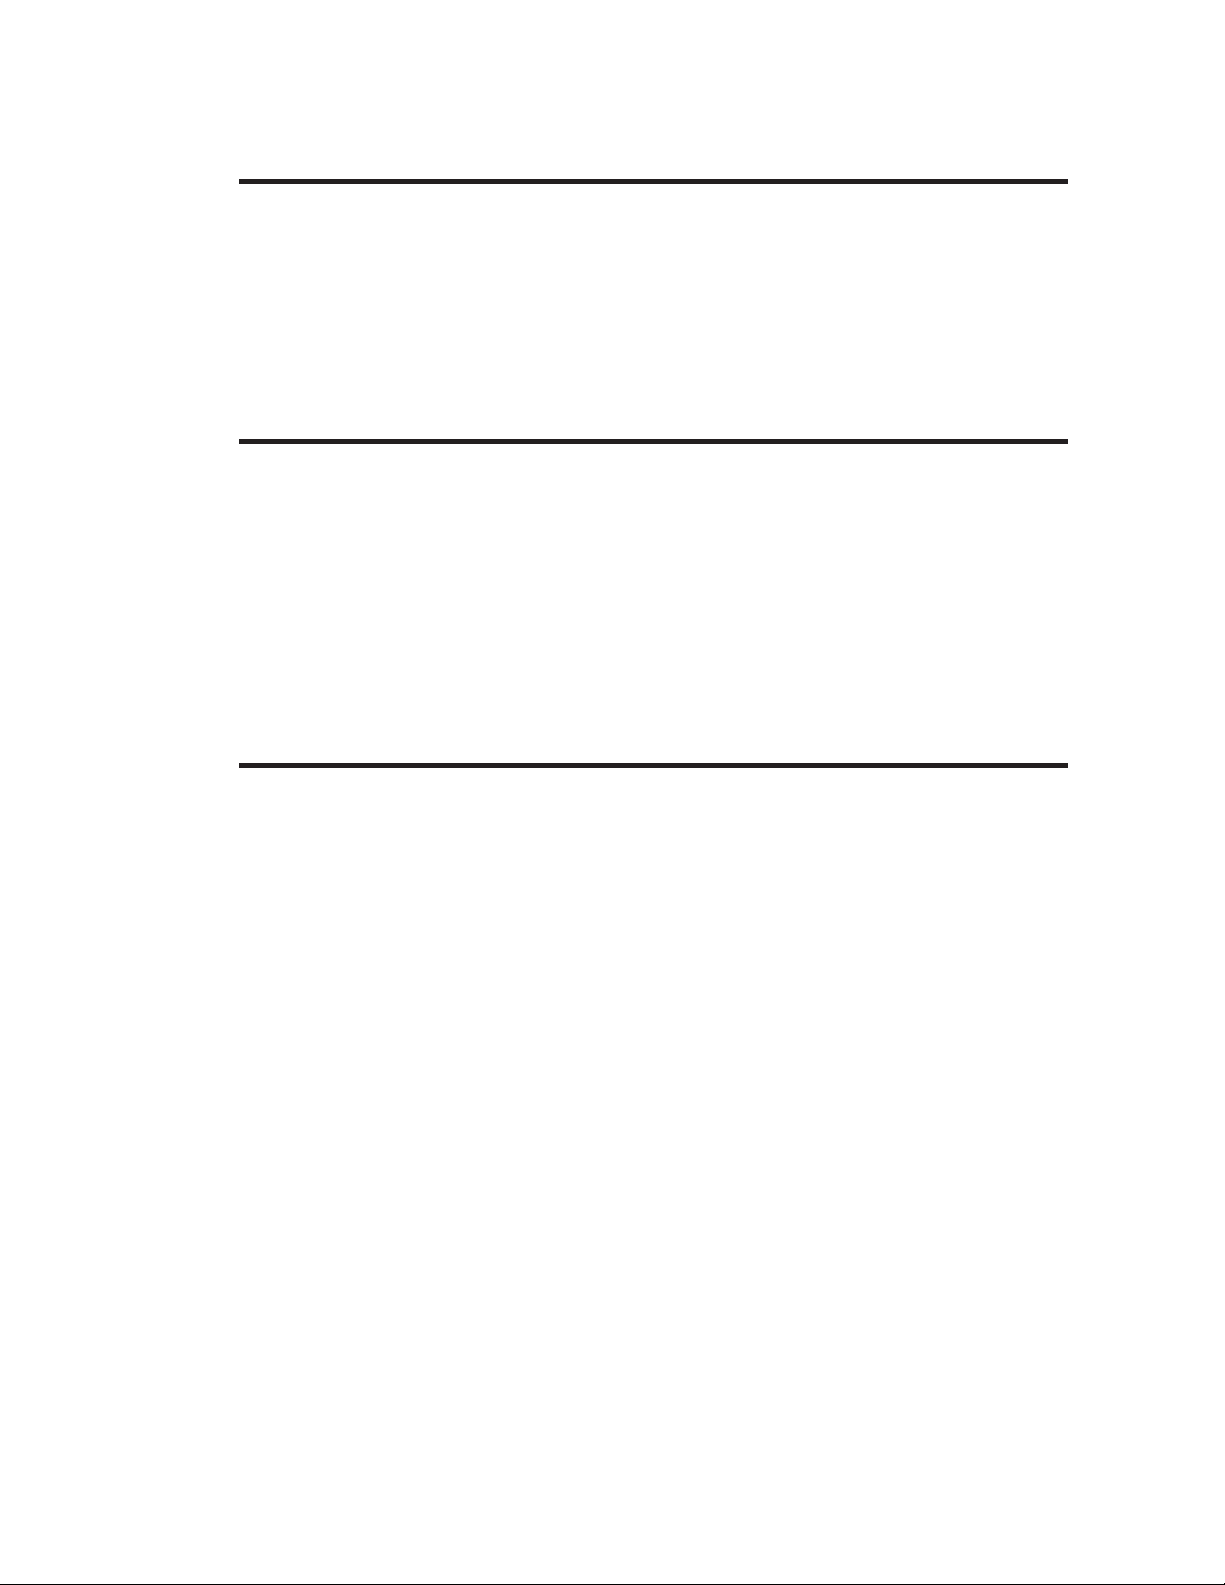
Printing Example
q
24
D
26
D
o
t
s
16 Dots (2mm)
Inter-character Space (actually white dots)
o
t
s
Text
Text Printed at 2x, Line Terminated with Form Feed (FF
Line Height Set to 2x, Single Line Feed Only
Line Height Set to 2x, Single Line Feed Only
Change Line Height (2x), Print Bar Code Data
Line Feed Only
Bar Code Data
Line Feed Only
Text
First Line of Text at Top of Form
Direction Of Feed
2-2 980353-001 Rev.B

Printer Commands The printer utilizes "Escape" sequence data to
notify the printer that the following data is a
command. Printer commands for Line Mode
are used to:
Change the line (and font) size
•
Print bar codes
•
Select and configure bar code parameters
•
Select Character Set
•
Control print margins, speed and density
•
Buffer Commands and Batch Print
•
980353-001 Rev.B 2-3
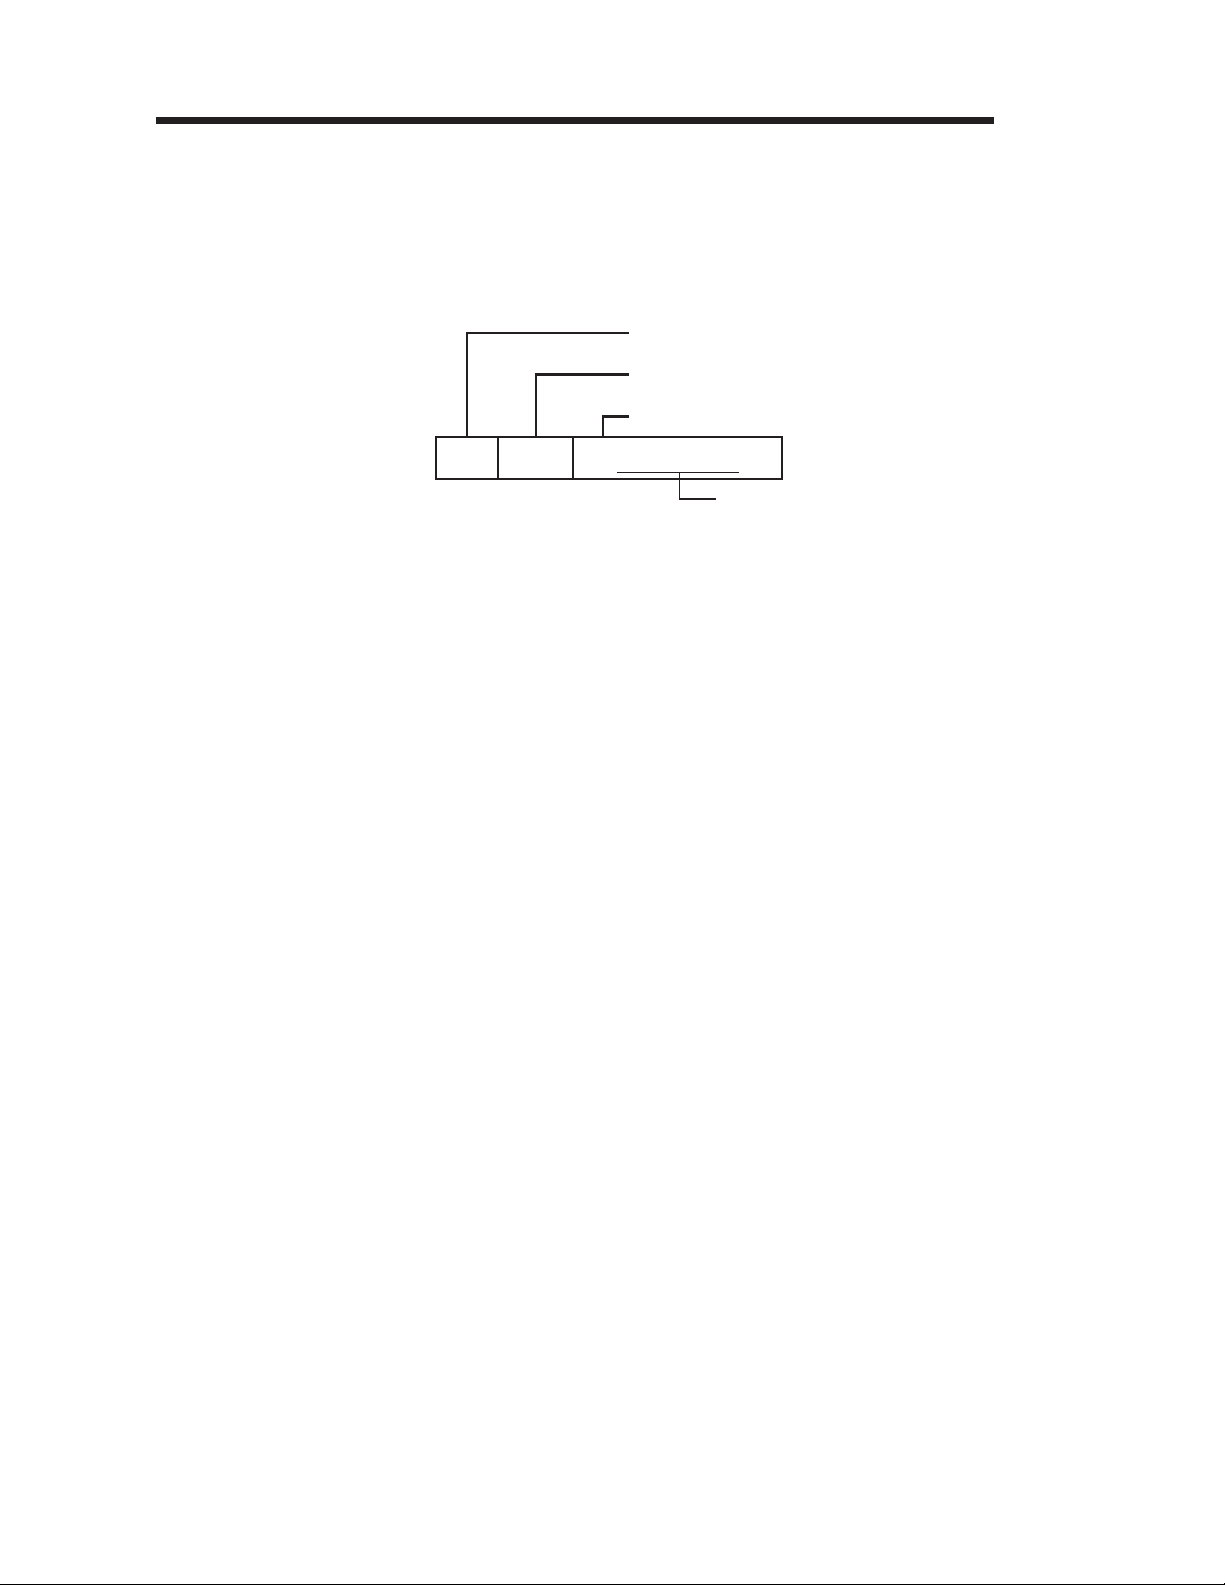
Command
Conventions
The manual uses the following typographic
conventions to describe commands.
Command Name
Text/Bar Code Size
←A p p DATA
12
Example
¬ or Esc
E or FF
or LF
e or CR
¿ or CR/LF
A
↵
Data
Parameters
Command
Description
Escape
ASCII value 27d (1Bh)
Form Feed Character,
ASCII value 12d (0Ch)
Line Feed Character,
ASCII value 10d (0Ah)
Carriage Return Character,
ASCII value 13d (0Dh)
Carriage Return & Line Feed
Command - Commands are
typically a single character.
Some commands contain up to
four (4) characters.
Character,
p1p2p
[p1p2p3]
This text should
®be on one line
3
DATA
Required parameters
(No delimiters)
Optional parameters
(No delimiters)
Text or bar code data to be
printed.
The line-continuation character
(®) indicates that code contin
ued from one line to the next in
the manual should be typed all
on one line. Note: This is not
used to program the printer.
-
2-4 980353-001 Rev.B

Character
Numbering
Character map positions are referred to by the
ASCII decimal numbers 0 - 255 and are desig
nated with a trailing d. The programmer will re
fer to these character locations using
hexadecimal numbering and are designated as
hexadecimal with a h. See the character map in
Appendix A
for reference.
-
-
Basic Command
Syntax
Each command consists of an ESCape (de
noted as ¬ or ESC) character followed by a sin
gle ASCII character to identify the specific
command desired. Some commands require
one or more additional parameters to complete
the command. Refer to Figure 1-1. for the basic
command syntax.
Each command line must be terminated with a
Line Feed (LF) character. As an alternate
method both the Carriage Return (CR) and Carriage Return Line Feed (CR/LF) combination
may be used. Most PC based systems send a
Carriage Return Line Feed (CR/LF) when the
Enter (Return) key is pressed.
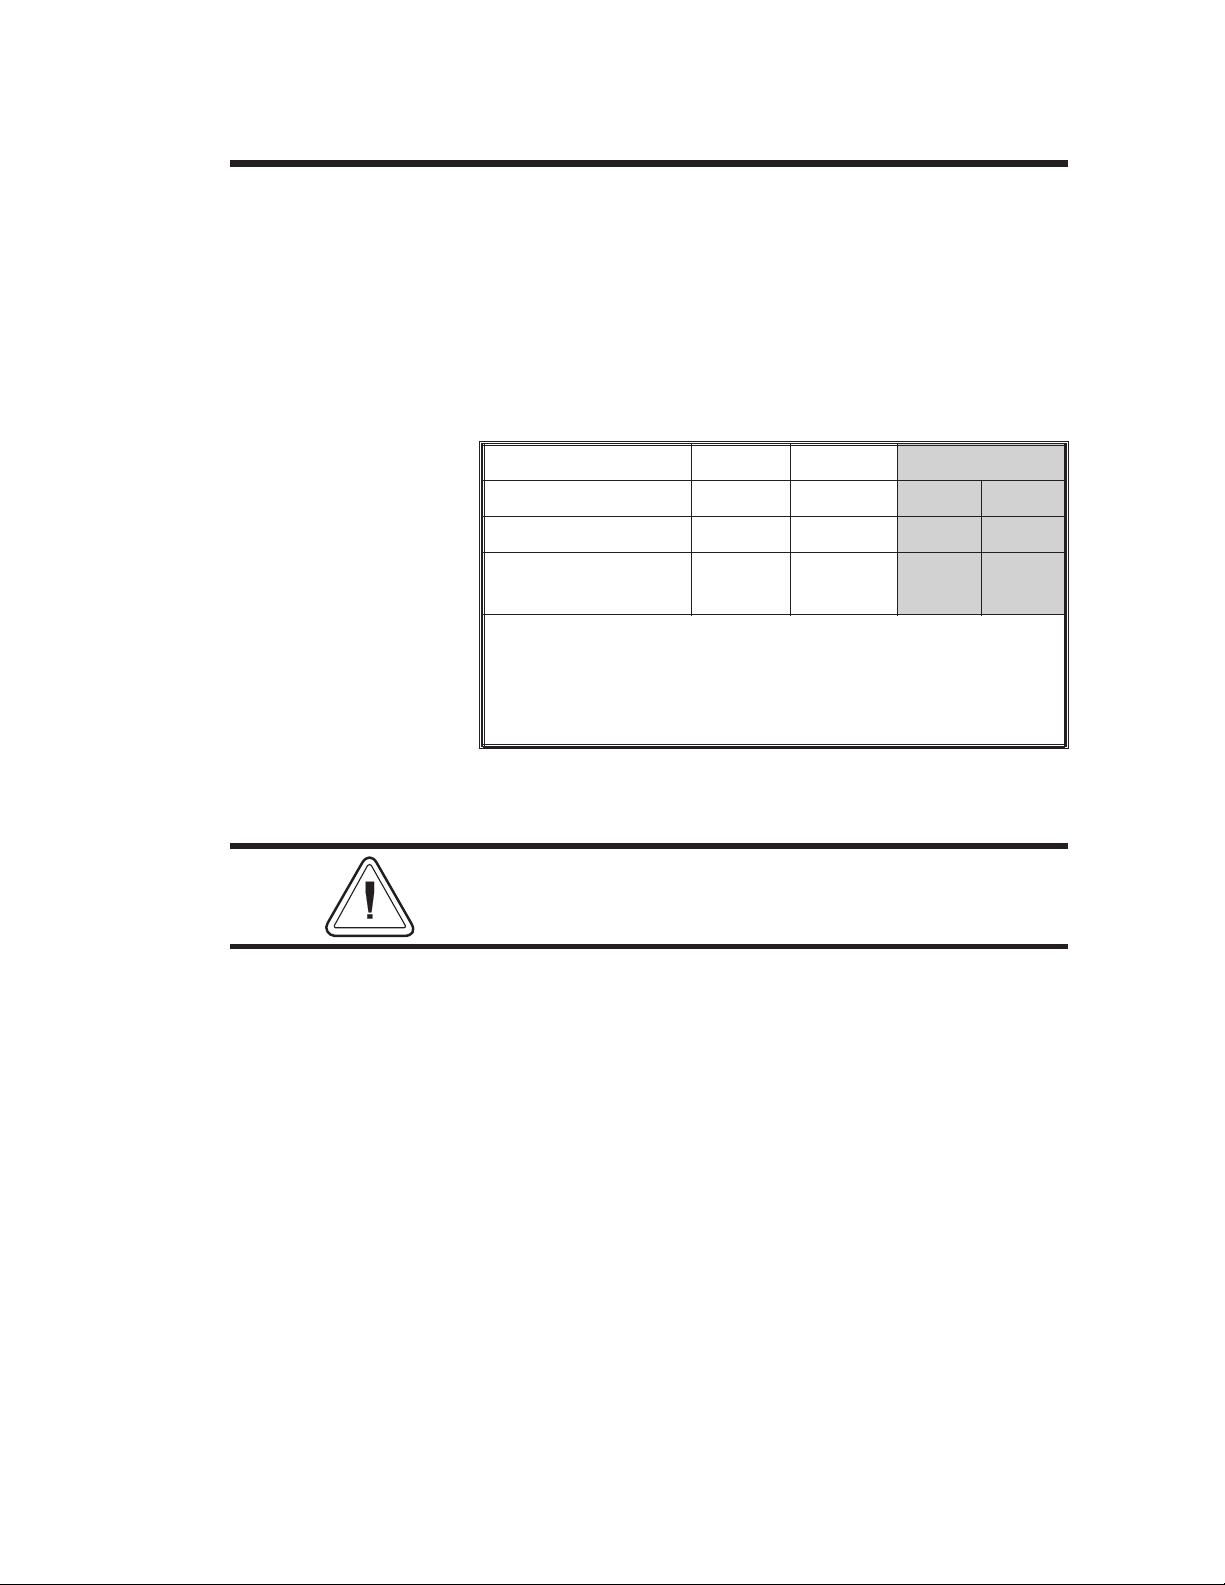
Default ASCII Values for the Basic Printer Control Functions
Pro-
Command Function
cessing
Order
Decimal Hexadecimal
-
-
CR Carriage Return 1 13 0D
LF Line Feed 2 10 0A
FF Form Feed 3 12 0C
ESC Escape 4 27 1B
980353-001 Rev.B 2-5
Command
Concatenation
Most commands can be concatenated together
to print several objects on the same line. Refer to
following for an example command concatena
tion.
-
Figure 6-1
Concatenated
Commands
Selects Bar Code 0 (Code 128)
Selects Character Set 1, width 1, height 3
Print Bar Code with Human Readable
ESC ESC ESC ↵?0 A13 {4014561780}
Bar Code Data
All objects on a line must be the same size
(height). An exception to this is the printer’s
ability to concatenate a line command that
changes line size after issuing one of the following commands: ESCA (Text), ESC{DATA}
(Bar Code) and the ESC |DATA} (Bar Code
with human readable text). While you can concatenate other commands on the same line as
the A command which sets line and bar code
height, you can not mix objects of different sizes
on the same line.
To over come this limitation, the R command
can be used to backup the label to print addi
tional objects on what seems to be the same
line.
-
2-6 980353-001 Rev.B

Basic Line Mode
Guidelines
The following are basic line mode programming
and operation guidelines.
Printing is from right to left and from top to
❏
bottom.
Sending a simple unformatted text (ASCII
❏
data) to the printer followed by a carriage re
turn (CR), line feed (LF) or both (CR/LF)
characters will result with printed text as
typed (or stored as a file) on the media.
A line consisting of only a carriage return
❏
(CR), line feed (LF) or both (CR/LF) charac
ters will produce a blank line.
❏ Once set to line mode, the printer will remain
in line mode until changed by the Line
Mode/Page Mode (EPL2) configuration subroutine (see page 1-5) or the EPL2 command
(see page 3-15).
-
-
❏ Printing graphics does not effect text or bar
code printing (line height) or parameters.
❏ The printer will accept data that exceeds the
right hand margin or media edge and will be
truncated. Note: Printing off the media and
onto the platen may reduce the printer’s op
erational life span.
-
980353-001 Rev.B 2-7

2-8 980353-001 Rev.B

LINE MODE COMMAND REFERENCE
This section contains a complete listing of all
commands in alphabetical order.
980353-001 Rev.B 3-1

Command Description Page
A
A0
B
CR
D
DATA
{DATA}
|DATA}
E
EPL?
EPL2
FF
G
g
H
I
LF
Text/Bar Code Size 3-3
Small Text 3-6
Begin Command Buffer 3-7
Carriage Return (e)
Density 3-9
Text Data 3-10
Print Bar Code with human readable 3-11
Print Bar Code without human readable 3-12
End Command Buffer 3-13
Print Configuration Label 3-14
Switch To Page Mode 3-15
Form Feed (E)
Draw Graphics 3-17
Draw Graphics 3-18
Graphic Line Height 3-19
Country Code 3-20
Line Feed ()
3-8
3-16
3-21
M
N
oR
P
p
P00
Q?
R
S
U
V
v
X
x
?
Left Margin 3-22
Form Length 3-23
Enable Euro Character 3-24
Print 1 - 99 Labels 3-26
Print 1 - 999 Labels 3-27
Reprint Buffer 3-28
Auto Detect Label Parameters 3-29
Top Margin 3-30
Print Speed 3-31
MaxiCode - 2D Bar Code 3-32
Start Reverse Printing 3-35
Stop Reverse Printing 3-36
Bar Width 3-37
Bar Width 3-38
Bar Code Select 3-39
3-2 980353-001 Rev.B

A Command - Text/Bar Code Size
Description Use this command to set character and bar code
height, as well as, character width. This com
mand controls the default font for the printer.
Out of Box Font: 14 by 22 dots (CCSET1)
and 10 by 18 dots (CCSET3) bit mapped fonts.
These fonts are part of EPL1 emulationsoft font
set (v,w,x,y,z) preloaded into the printer at time
of shipment.
Base Default Font: 14 by 24 dots (Font 4)
and 10 by 16 dot (Font 2) bit mapped fonts.
The base default fonts will be used if the soft
fonts are deleted or inactivated with EPL2 pro
gramming (in EPL2, page mode).
See Appendix C for information on controlling
line mode font sets.
-
-
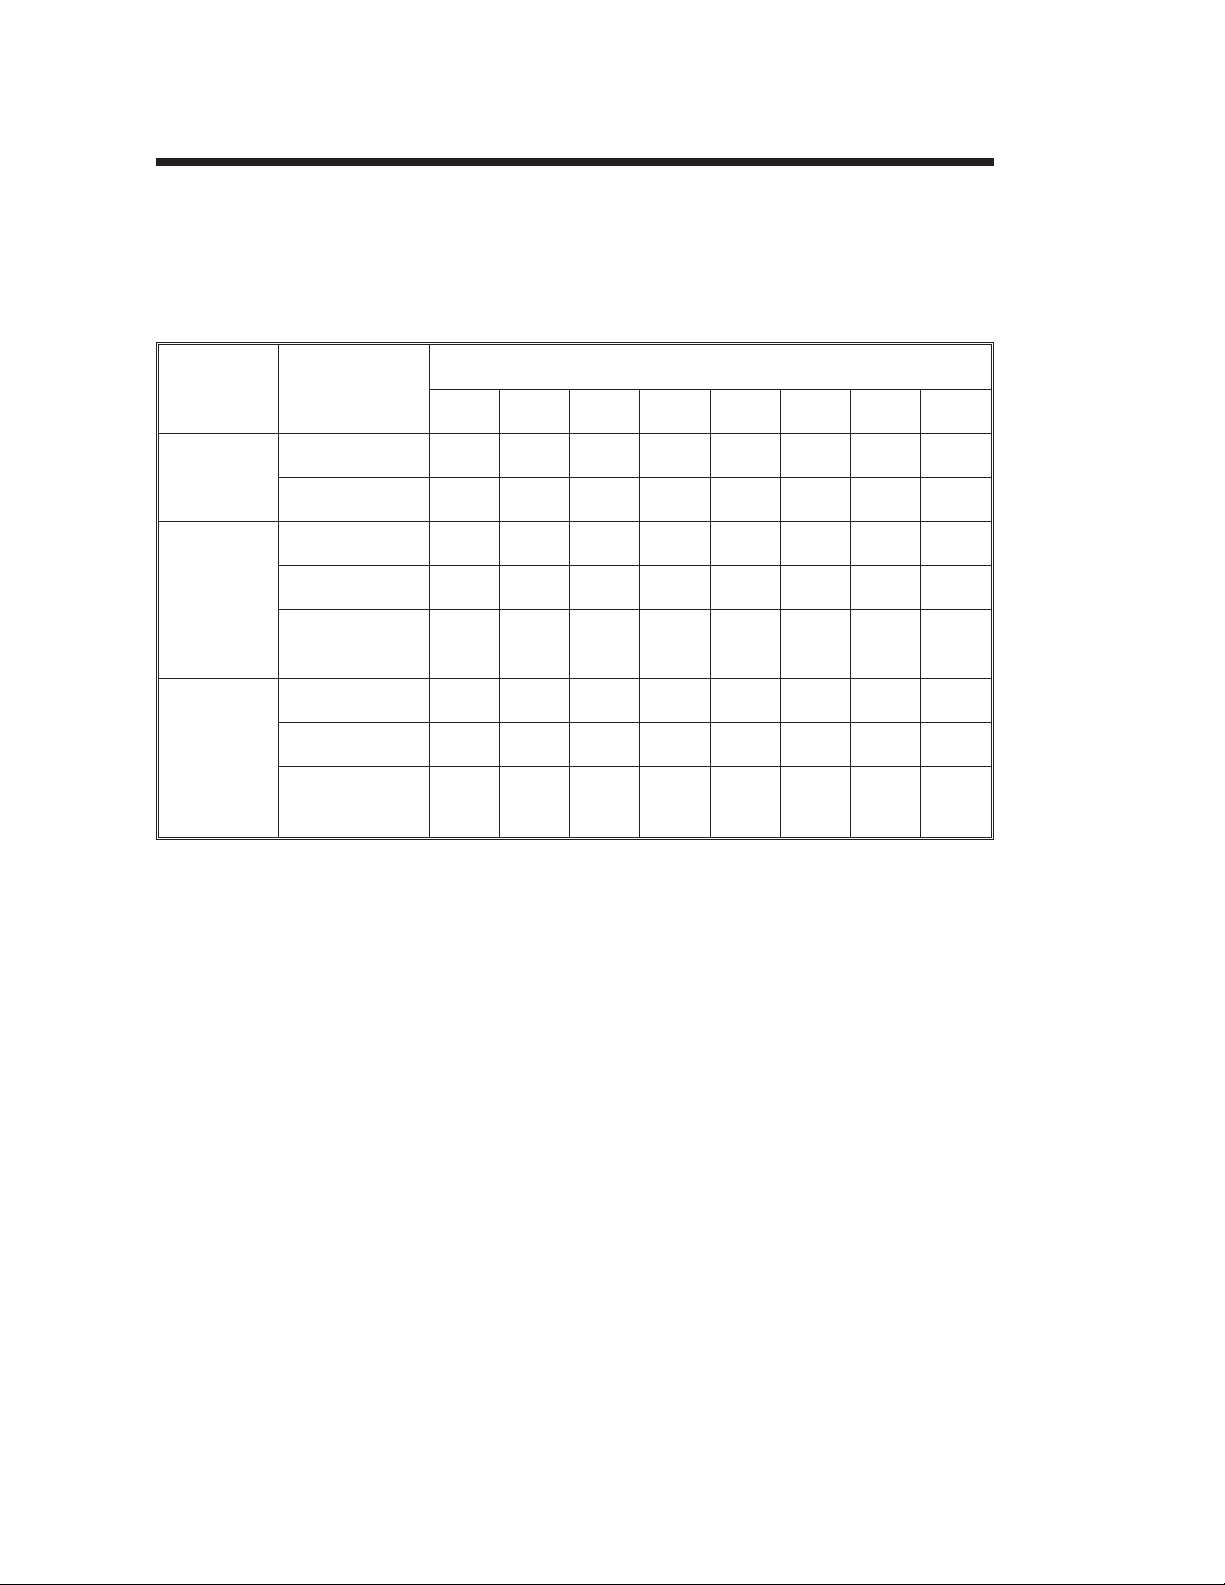
Parameters p1= Horizontal size control and font set se-
Model Font
CCSET1
2443
2844
2722
2824
& Font 4 *
CCSET3
& Font 2 *
CCSET1
& Font 4*
CCSET3
& Font 2 *
Syntax
¬Ap
1p2
lection.
Sets the width of Text character, only.
Values: 1, 2, 3, 4, 5, 6, & 7
Default: 1
Characters
Per
Inch (cpi) 7 3.5 2.25 1.75
Line 52 26 17 13
Inch (cpi)
Line 69 34 23
Inch (cpi) 7 3.5 2.25 1.75
Line 28 14 9 7
Inch (cpi) 16.9 8.46 5.65
Line 37 18 12
1
(x1)2(x2)3(x3)4(x4)5(x1)6(x2)7(x3)
p1(width multiplier)
16.9 8.46 5.64
N/A
N/A
980326-001 Rev.A 3-3
A Command - Text/Bar Code Size
p2= Vertical size (multiplier).
Sets Text and Bar Code height.
Values: 1, 2, 3, 4, 5, 6, 7 & 8
Default: 1
Font
CCSET1
& Font 4*
CCSET3
Font 2*
Per
Character
Dots
Millimeters
Dots
Millimeters
Lines Per
Inch
Dots
Millimeters
Lines Per
Inch
Line Height as Set by p
12345678
26 52 78 104 130 156 182 208
3.25 6.5 9.75 13 16.25 19.5 22.75 26
24 48 72 96 120 144 168 192
3 6 9 12 15 18 21 24
8.4 4.2 2.8 2.1 1.6 1.4 1.2 1
26 52 78 104 130 156 182 208
3.25 6.5 9.75 13 16.25 19.5 22.75 26
7.8 3.9 2.6 1.9 1.5 1.3 1.1 0.97
2
❏ All text and bar codes will be printed at the
size selected by this command until a new
size is selected.
❏
The printer only supports a single line height
setting per line.
3-4 980326-001 Rev.A
A Command - Text/Bar Code Size
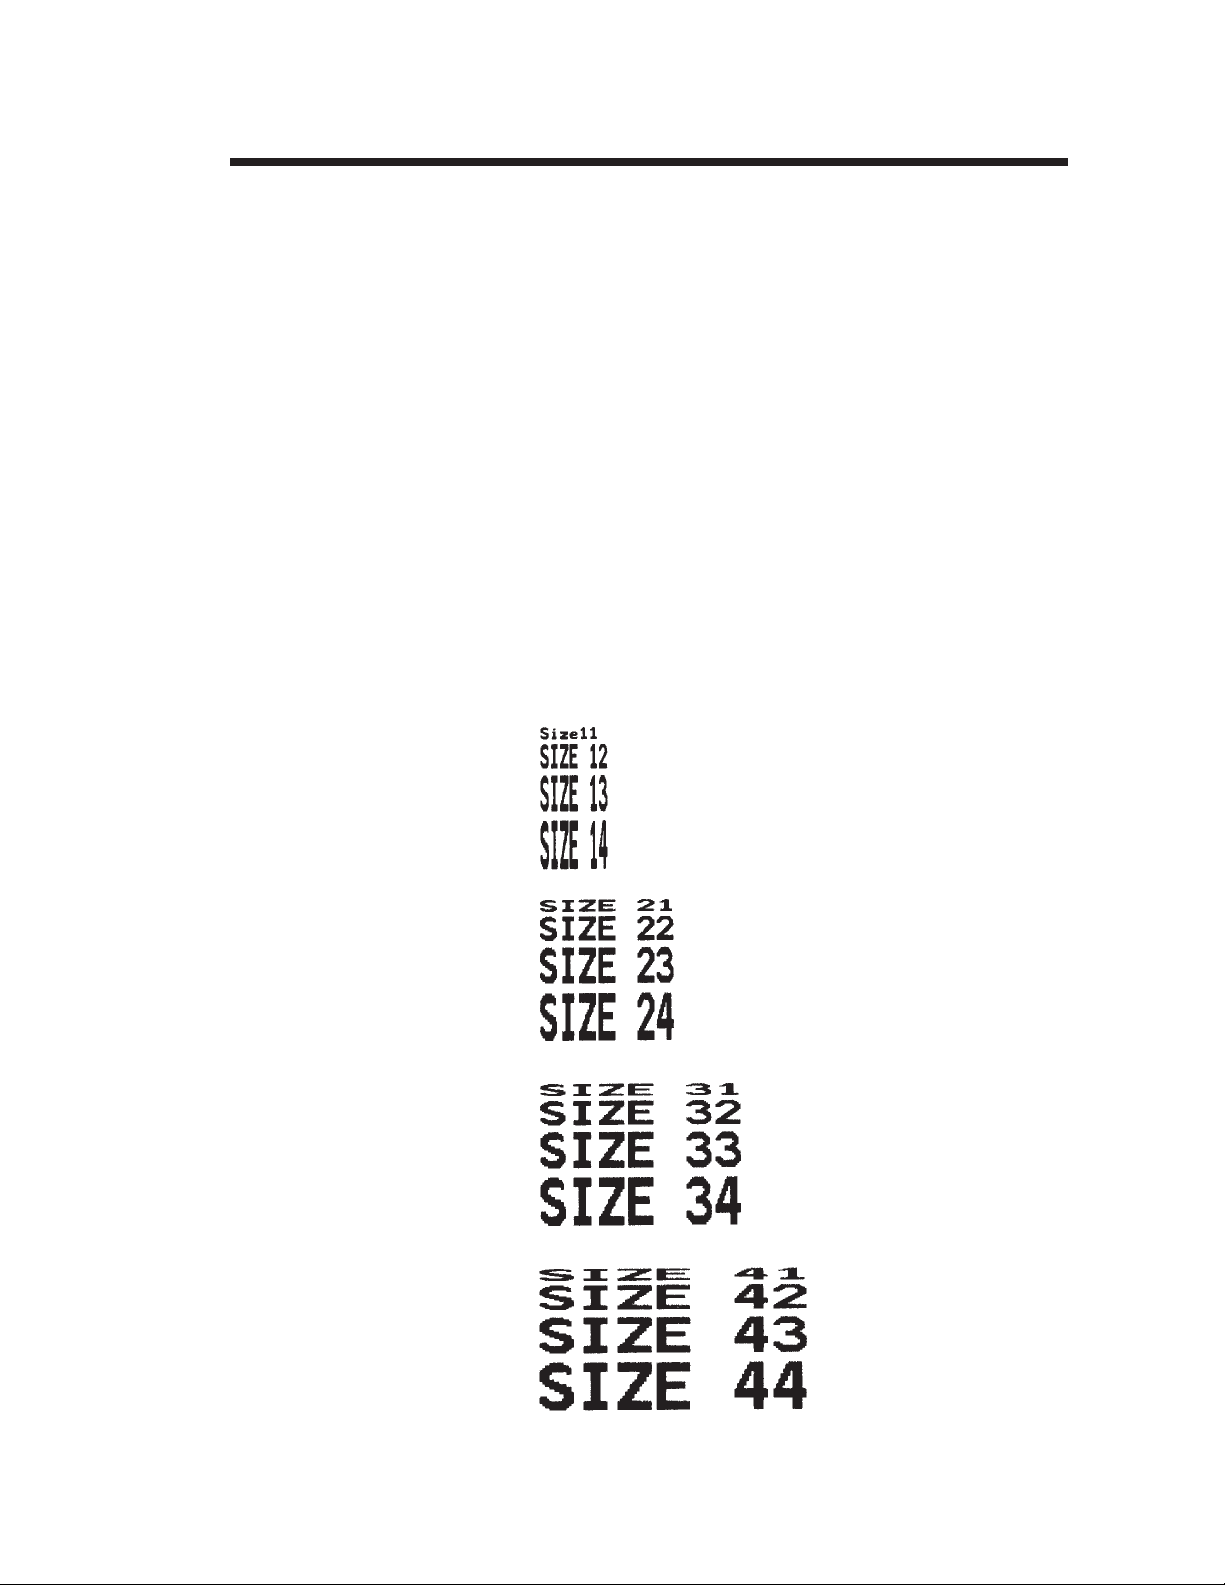
Example:
Will Produce:
(Not to scale)
¬A11SIZE 11¿
¬A12SIZE 12¿
¬A13SIZE 13¿
¬A14SIZE 14¿
¬A21SIZE 21¿
¬A22SIZE 22¿
¬A23SIZE 23¿
¬A24SIZE 24¿
¬A31SIZE 31¿
¬A32SIZE 32¿
¬A33SIZE 33¿
¬A34SIZE 34¿
¬A41SIZE 41¿
¬A42SIZE 42¿
¬A43SIZE 43¿
¬A44SIZE 44¿
980353-001 Rev.B 3-5

A0 Command - Small Text
Description Use this command to set the small font charac
ter height and width. This command does not
affect bar code height.
Out of Box Font: 5 by 7 dots (bit mapped
font) (CCSET4). This font is part of EPL1 emu
lation soft font set (w,x,y,z) preloaded into the
printer at time of shipment.
Base Default Font: 8 by 12 dots (bit mapped
font) (Font 1).
The base default fonts will be used if the soft
fonts are deleted or inactivated with EPL2 pro
gramming (in EPL2, page mode).
See Appendix C for information on controlling
line mode font sets.
Base Small Font size: 8 by 12 dots (bit mapped
font). See Appendix C for alternate font sets.
Syntax
¬A0p
1
-
-
-
Parameters p1= Sets vertical and horizontal character
height multipliers.
Sets Small Text width.
p Width Multiplier Height Multiplier
0 11
1 11*
2
3
4
* - EPL1 fonts were bold versions for these settings
❏
All text will be printed at the size selected by this
12*
13*
22
command until a new size is selected. Bar code
size will remain unaffected by this command.
❏
The printer only supports a single line height
setting per line.
3-6 980353-001 Rev.B

B Command - Begin Command Buffer
Description Use this command to batch print labels or mini
Syntax
Parameters
Command Buffering
Rules
mize the affects of host system delays.
Command buffering allows:
Assembly of a series of line print commands
•
(text, bar codes, etc.) for print.
Buffered printing treats the print operation as
•
a single print routine. and will print without
starting and stopping between line print oper
ations.
¬B
None
Default: Command Buffering Off
Use the command with the E command, End
Command Buffer.
❏ Do not use printer configuration and control
commands (speed, mode changes, density,
etc.) within command buffer data strings.
-
-
❏ Line, text and bar code control commands
are allowed within the command buffer data
strings.
❏
Printing with the buffer mode will automati
cally assert a form feed at the end of buffer.
To disable this feature, use the N command,
Form Feed control, without any parameters.
❏
The printer will automatically backup to top
of form (label) when buffer printing a label.
The R command can not be used in buffered
print operations.
-
980353-001 Rev.B 3-7

CR - Carriage Return
Description Use this command to print a line of data (text
and bar codes) and move to the next line.
This command may be used in conjunction with the
Line Feed (LF) and will react as if a single Line Feed
(LF) or a single Carriage Return (CR) has been is
sued.
-
Syntax
e : ASCII value 13d (0Dh)
e :Abbreviation = CR/LF
Parameters None
: Abbreviation = CR
:Treated as a single Line Feed (LF)
3-8 980353-001 Rev.B
D Command - Density
Description Use this command to set print density. This
command controls the amount of heat applied
to the media by the print head.
Syntax
¬Dp
1
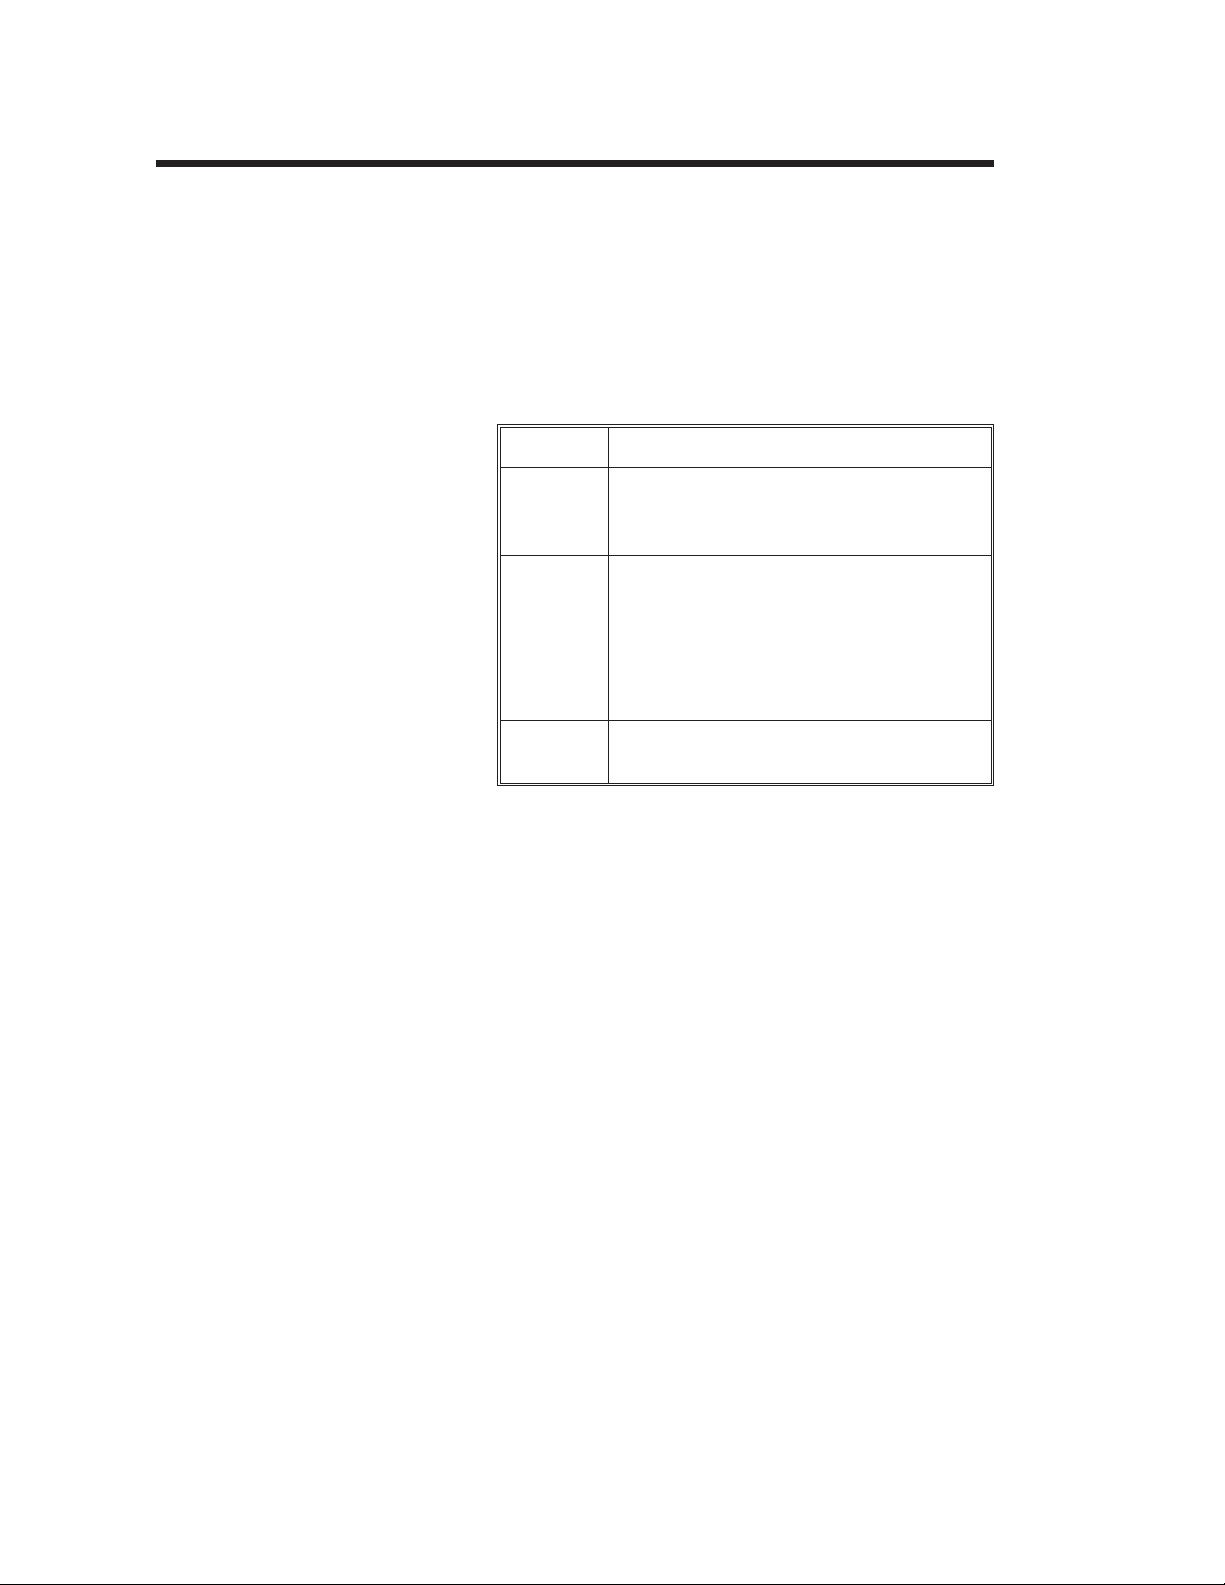
Parameters p1= Density setting - Line Mode Printing
only!
Model Values1Default
2443 / 2844 0-7 5 0-15 10
2722 / 2824 0-7 5 0-15 7
LP Models
(Reference Only)
Note 1: 0 is the lightest print and 7 is the darkest.
Note 2: The printer saves and shares density settings between
Line Mode and Page (EPL2) mode.
Note 3: Range and default density for EPL2 (Page Mode) operation is listed for reference to the AutoSense Dump Mode printout.
0-7 5
2
EPL2
The selected density will remain in effect until
changed or power is removed.
The speed and densitycommands can dramatically affect print quality. Changes to thespeed setting typically
require a change to the print density.
3
980353-001 Rev.B 3-9

DATA - Text for Print
Description Data is standard ASCII text characters. Text
(DATA) does not require special commands or
identifiers (i.e. Esc) to print. A simple Line Feed
(LF) character, a Carriage Return (CR), a Car
riage Return and Line Feed combination
(CR/LF)orFF (Form Feed) will cause the
printer to print a line of DATA (text) and ad
vance to the start of the next line (or form if a
Form Feed is used to terminate a line).
Parameters DATA = ASCII Characters
Range: 32 to 254 decimal
(20-FE Hexadecimal) and
include 20-21 decimal
(14-15 hexadecimal).
See the Line Mode Character Map (Code
Page 850) in Appendix A
.
-
-
Example: Data Entered:
ABC 123 EFGe : Text terminated with CR - Carriage
ABC 123 EFG : Text terminated with LF - Line Feed
ABC 123 EFG¿ : Text terminated with CR/LF
Will Print:
ABC 123 EFG
ABC 123 EFG
ABC 123 EFG
: Return
: combination
3-10
980353-001 Rev.B

{DATA} Command - Print Bar Code (with Human Readable)
Description Use this command to write the bar code data
field with human readable code.
Example:
¬{DATA}
Parameters DATA = bar code data to be encoded.
Description
1. Starts bar code data field
{
DATA
}
2. Identifies bar code to include hu
man readable text
1. Bar code data
2. Must comply with bar code specifi
cations, i.e. type of character (num
ber only or alpha-numeric),
supported characters, data field size,
etc.
1. Terminates the data to be entered
into the bar code.
-
-
-
Example:
¬{1234567890}¿
980353-001 Rev.B 3-11
|DATA} Command - Print Bar Code (w/o Human Readable)
Description Use this command to write the bar code data
field as a bar code without human readable text.
Syntax
¬|DATA}
Parameters DATA = Bar code data to be encoded.
Description
1. Starts bar code data field
Example:
|
DATA
}
¬|1234567890}¿
2. Identifies bar code to be without
the human readable text
1. Bar code data
2. Must comply with bar code specifi
cations, i.e. type of character (num
ber only or alpha-numeric),
supported characters, data field size,
etc.
1. Terminates the data to be entered
into the bar code.
-
-
3-12
980353-001 Rev.B

E Command - End Command Buffer
Description Use this command to finish (terminate) com
mand buffering.
Syntax
Parameters
¬E
None
Default: Command Buffering Off
Always use the E command in conjunction with
the B command, Begin Command Buffer.
See the P and p commands to print buffered
commands.
-
980353-001 Rev.B 3-13

EPL? Command - Print Configuration Label
Description This command is used to print the current
printer configuration. This is the same Dump
Mode status printout that is printed by the
AutoSense alignment and configuration rou
tine.
-
Syntax
¬EPL?
3-14
980353-001 Rev.B

EPL2 Command - Switch To Page Mode
Description This command is used to switch the printer from
Line Mode to Page Mode (EPL2).
This command can not be concatenated with
other commands on a single line.
Syntax
Example:
This command is not intended to be used dur
ing normal print operations.
¬EPL2
¬EPL2 :switch to Page Mode
The EPL2 command OEPL1 (followed by a LF, CR
or CR/LF) can be sent to the printer to return the
printer to Line Mode operation.
-
980353-001 Rev.B 3-15

FF - Form Feed
Description Use this command to feed to the top of the next
form (label).
When in continuous media mode, the printer
will advance the printer to the next line unless
set to a different value by the N command.
Syntax
E
Parameters None
Default - Label (Gap Sense) Mode:
By Default, Continuous Media Mode:
Continuous Media Mode with N set:
: ASCII value 12d (0Ch)
: Abbreviation = FF
Go to Top Of (Next) Form.
Go to next line when a Form Feed (FF)
is issued. Line height is set as per the A
command setting.
Move the print position from 0 to 99
mm (N00 to N99) for each Form Feed
(FF) issued to the printer. See the N
command for details.
3-16 980353-001 Rev.B
G Command - Draw Graphics
Description Use this command to draw single line of a bit
mapped graphic. The bit map data pattern can
be repeated automatically, in sequence, up to
eight times. The line height is set by the H com
mand. The bit map image is assembled on a line
by line basis.
-
Syntax
¬Gp
Parameters p
DATA = Data bytes representing the bit
Each additional line of graphics must start with
the G command and include the complete command parameter and data string
(¬Gp
DO NOT add carriage returns (CR) or Line Feeds
(LF)orCR/LF to the end of a Draw Graphics command line.
Sending a CR or LF or CR/LF will advance the print
position by full text line as defined by the default or
previously issued A command.
DATA
1
= Number of bytes to follow.
1
Values : 01 to 99
mapped graphic. Each bit represents
one dot (1=black, 0=white).
DATA).
1
980353-001 Rev.B 3-17

g Command - Draw Graphics
Description Use this command to draw single line of a bit
mapped graphic. The bit map data pattern can
be repeated automatically, in sequence, up to
eight times. The line height is set by the H com
mand. The bit map image is assembled on a line
by line basis.
-
Syntax
¬gp
Parameters p
DATA = Data bytes representing the bit
Each additional line of graphics must start with
the G command and include the complete command parameter and data string
(¬gp
DO NOT add carriage returns (CR) or Line Feeds
(LF)orCR/LF to the end of a Draw Graphics command line.
Sending the CR or LF or CR/LF will advance the
print position by full text line as defined by the de
fault or previously issued A command.
DATA
1
= Number of bytes to follow.
1
Values : 001 to 199
mapped graphic. Each bit represents
one dot (1=black, 0=white).
DATA).
1
-
3-18
980353-001 Rev.B

H Command - Graphic Line Height
Description Use this command to set the number of times
(up to eight)that a graphic(line) of bitmap data
will be repeated when printing. The G or g
commands are used to send the bit map data.
Syntax
¬Hp
1
Parameters p1= Line height of graphic (bit map data
pattern) measured in dots.
Range: 1- 8 Default: 1
(8 dots = 1mm)
980353-001 Rev.B 3-19

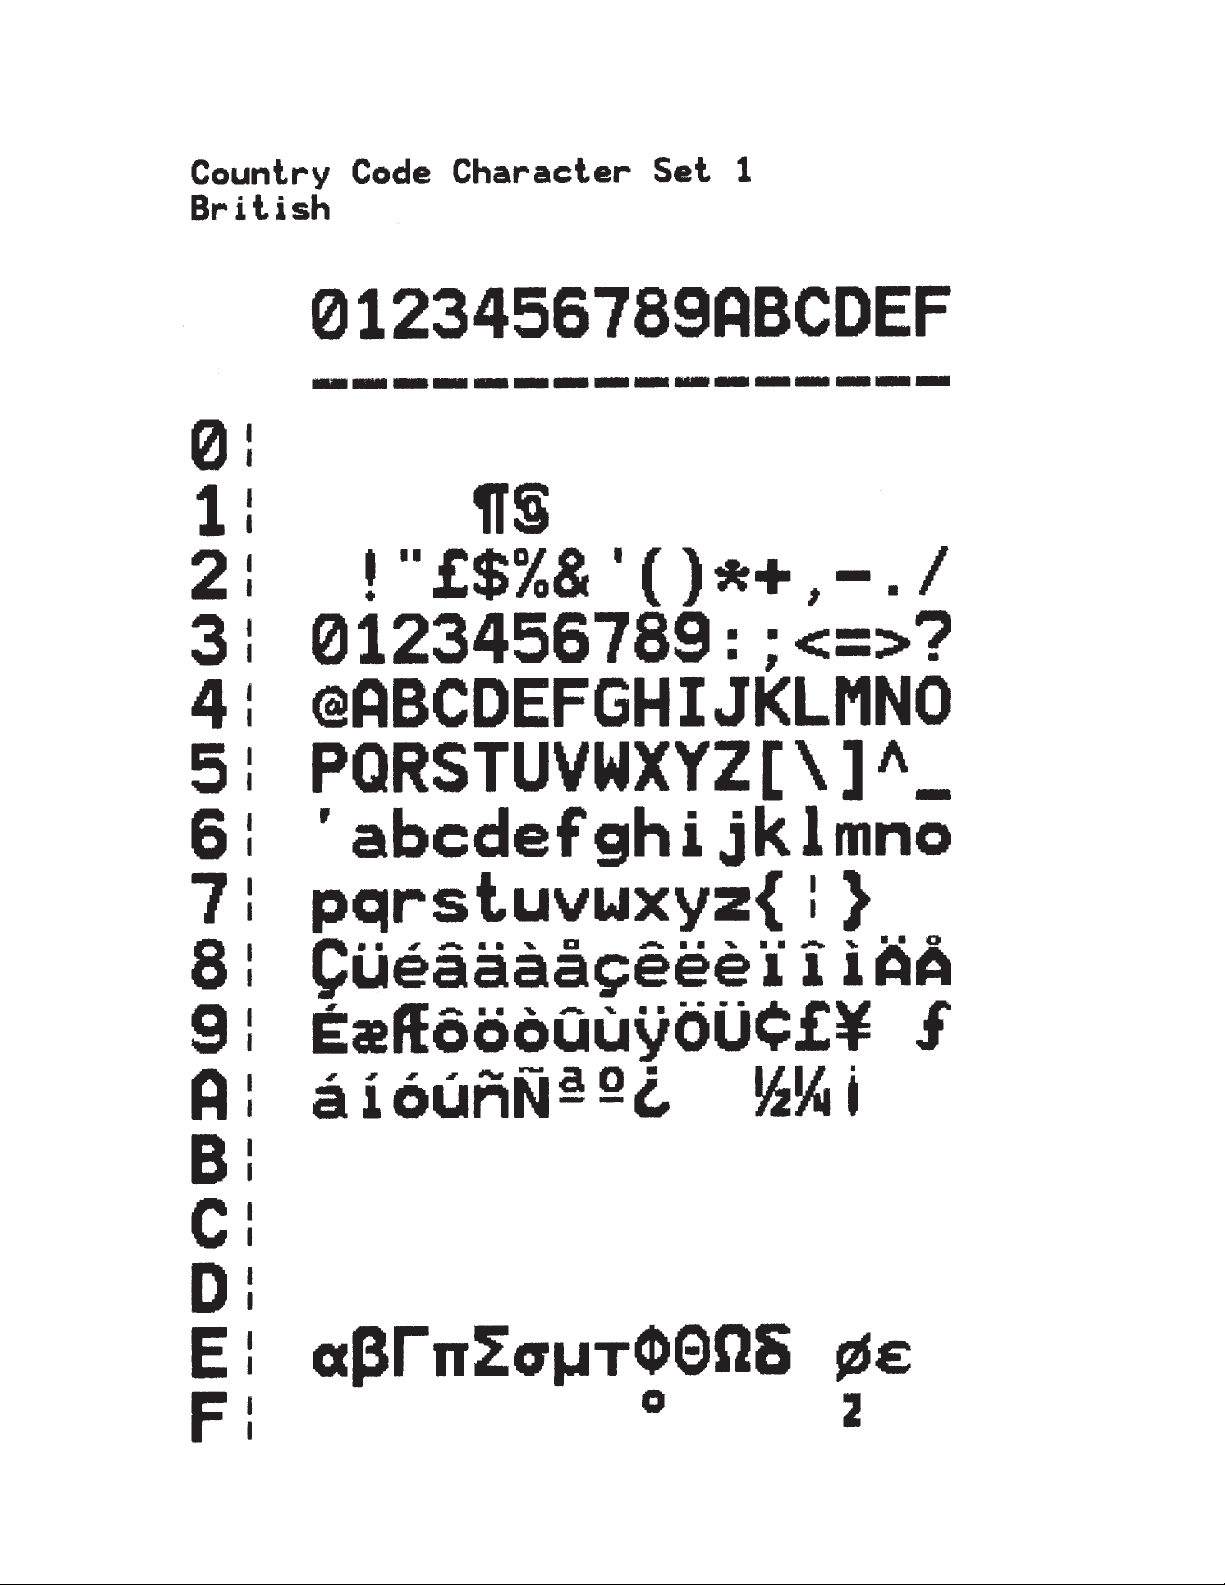
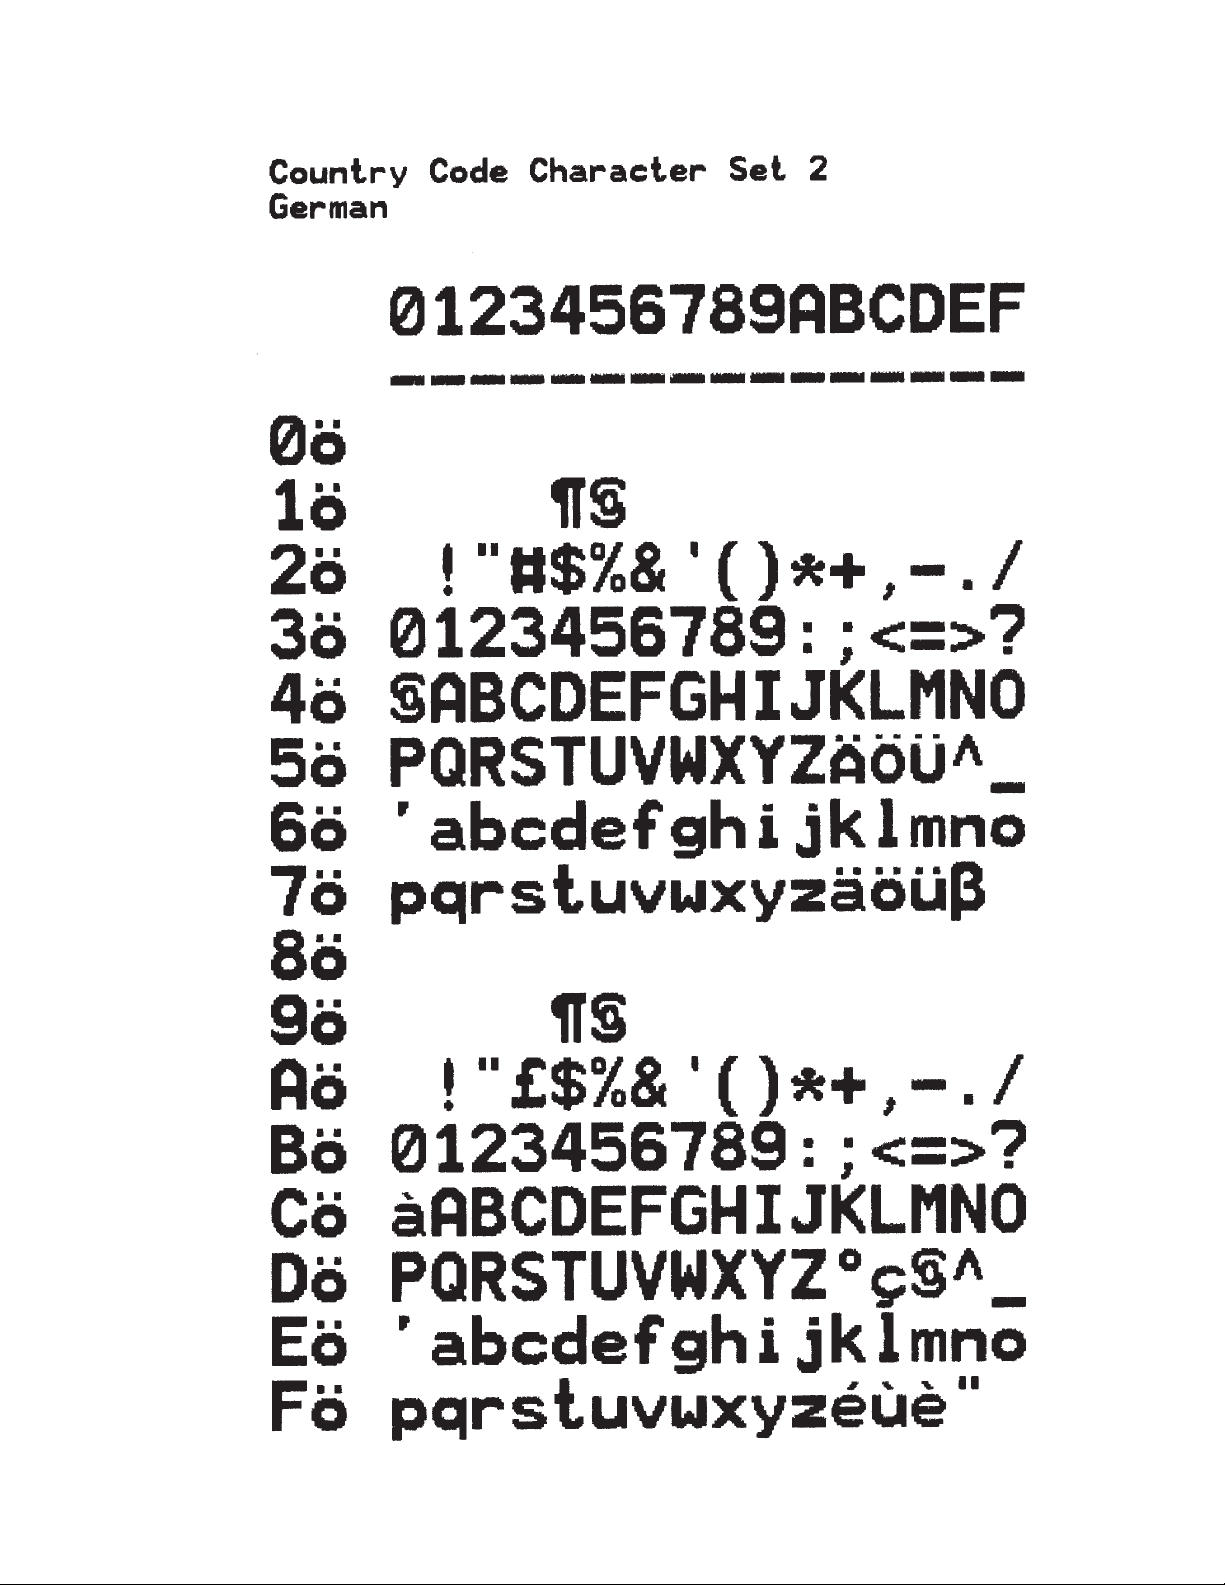
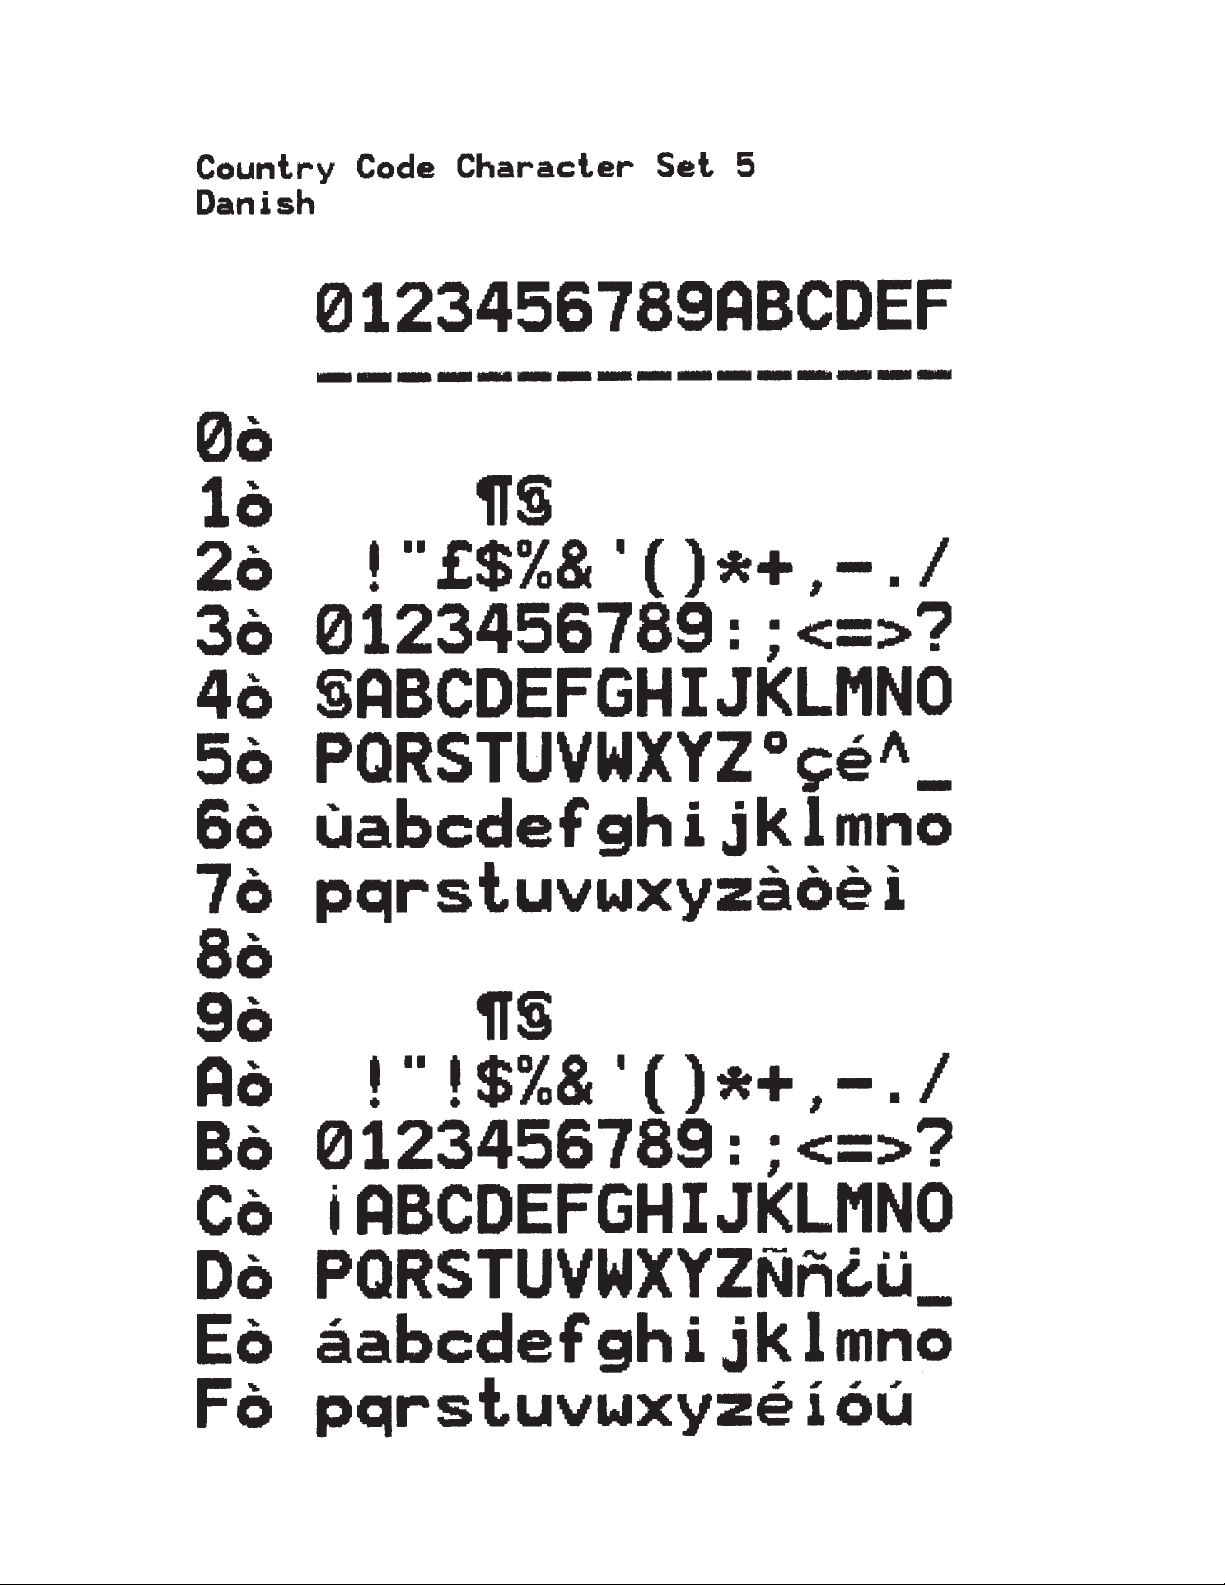
I Command - Country Code Character Set
Description Use this command to select the appropriate
character set for printing.
Syntax Ip
1
Parameters p1= Select 0- 8 Default = 0
Character Set Selection
p
1
0 8 USA
1
2 German
3 French
4 Danish
5 Italian
6 Spanish
7 Swedish
8 Swiss
Data Bits Country
British
7
Dump Mode
Status Printout
I8,1
I7,1
I7,2
I7,3
I7,4
I7,5
I7,6
I7,7
I7,8
3-20 980353-001 Rev.B
LF - Line Feed
Description Use this command to print a line of data (text
and bar codes) and move to the next line.
This command may be used in conjunction with the
Carriage Return (CR)and will react as if a single Line
Feed (LF) or a single Carriage Return (CR) has been
issued.
Syntax
Parameters
: ASCII value 10d (0Ah)
: Abbreviation = LF
e : Abbreviation = CR/LF
:Treated as a single Line Feed (LF)
None
980353-001 Rev.B 3-21

M Command - Left Margin
Description Use this command to adjust the Left Margin.
By default, the Line Mode printer's outsidemar
gins are set to match the maximum printable
area for the largest typical label media sup
ported by that printer.
Syntax
¬Mp
1
Parameters p1= Additional margin in millimeters.
Range: 00 - 99
Default: 03 (3mm)
1 millimeter = 0.040" = 8 dots
Do not set 2 inch printers to have margin values of greater than 49mm.
The margin command can not be applied to a
line of print after print data (text, bar codes, or
graphics) has proceeded it in a line.
The left margin parameter(M) is displayed on
the Dump Mode Printout and has a range of
M00 to M99.
-
-
Printable Area = 1-2 mm margin on all sides.
Printing outside of the "printable" area may
damage or shorten the print head's life.
Example:
3-22 980353-001 Rev.B
¬M05¿:set a 5mm left margin

N Command - Form Feed Control
Description Use this command to disable automatic form
feed (N) or set the form feed length (Nxx) when
using continuous media.
Syntax
¬N[p1]
Parameters None = Disables auto form feed in buffer
mode.
= Sets length of the form in millimeters.
p
1
Feed a specified distance (p
) when a
1
Form Feed (FF) is issued.
Range: 00 - 25 (1 = 1 millimeter)
980353-001 Rev.B 3-23

oR Command - Enable Euro Character
Description This command allows the advanced program
mer to substitute the Euro currency character
for any ASCII character in printer.
The original character can be restored by send
ing the oR command without a parameter. Ex
ample of Euro Currency Symbol is shown
below.
Syntax
¬oR[p1, p2]
Parameters p1= E
If the p
parameter is not provided,
2
then the Euro character will map to
code page position 213 decimal (D5
hexadecimal) for all code pages.
= Decimal number, Range 0 to 255
p
2
The active code page’s ASCII character
map position to be replaced by the Euro
character. The Euro character will be active in this map position for all code
pages.
See the I command for details on code
page selection.
-
-
-
None = No Parameters (p
) resets to all
1/p2
code pages to original default character
mapping.
The oR command is a global printer command.
❏
It must be issued prior to issuing a text com
mand (and printing).
❏
Effects a single character on a single code
page. Changing the character position will
restore the original character.
❏
The character substitution is saved like
printer configuration parameters (Density,
Serial Port Data Rate, Options, etc.). The pa
rameter data is preserved until it is changed
by the oR command or reprogramming of
the printer.
3-24 980353-001 Rev.B
-
-

oR Command - Enable Euro Character
Example:
¬oRE¿ : Places the Euro character into character
: map position 213 decimal
: (D5 hexadecimal)
¬oRE,128¿ : Places the Euro into character map
: position 128 decimal (80 hexadecimal)
¬oR¿ : Clears Character Substitution,
: Restores default character maps
980353-001 Rev.B 3-25

P Command - Print Buffer 1-99 times
Description Use this command to print 1 to 99 batch forms
or labels from commands and data previously
stored in the printer's command buffer.
The printer can print one or more forms or la
bels that have been stored in the printer's com
mand buffer as a single "batch". The "batch" of
forms or labels are then printed 1 to 99 times as
parameter of this command.
1
Syntax
set per p
¬Pp
1
Parameters p1= Sets the number of batch forms or labels
to print.
Range: 00 - 99
The P command does not need to be terminated with a Line Feed (LF) character or alternately the Carriage Return (CR) or Carriage
Return Line Feed (CR/LF) combination. If the
print (P) command string is terminated immediately following the command, the top of form
will be move down one line on the next label following the completion of the batch print routine.
-
-
3-26 980353-001 Rev.B

p Command - Print Buffer 1-999 times
Description Use this command to print 1 to 999 batch forms
or labels from commands and data previously
stored in the printer's command buffer.
The printer can print one or more forms or la
bels that have been stored in the printer's com
mand buffer as a single "batch". The "batch" of
forms or labels are then printed 1 to 999 times
parameter of this command.
1
Syntax
as set per p
¬pp
¿
1
Parameters p1= Sets the number of batch forms or labels
to print.
Range: 001 - 999
The p command must be terminated with a
Line Feed (LF) character. As an alternate
method, both the Carriage Return (CR) or Carriage Return Line Feed (CR/LF) combination
may be used.
-
-
Line Mode Operational Command Difference
- The equivalent ELP1 p command automatically
prints a 100 labels when the p
001 through 099.
parameter is set to
1
980353-001 Rev.B 3-27

P00 Command - Reprint Buffer
Description Use this command to print and repeat print a
batch form or label programmed from
commands and data previously stored in the
printer's command buffer.
Each time the FEED button is pressed, the
❏
form (or label) stored in the image buffer will
print.
The printer will accept no more commands
❏
or data once this command has been issued.
To cancel the feed to reprint the buffer, reset
❏
the printer by cycling the printer power.
Syntax
¬P00
3-28
980353-001 Rev.B

Q? Command - Auto Detect Label Parameters
Description Use this command to printer automatically de
tect the label and gap length and set the sensor
levels similar to the AutoSense routine.
This command will
not enter the printer into the
Dump mode or print the printer configuration
label.
Syntax
Parameters
¬Q?
None
-
980353-001 Rev.B 3-29

R Command - Backup
escription Use this command to control the print position
ing. This command's positioning functions can:
Reposition the print position back towards the
•
Top of Form after printing a line (or lines).
Disable the reposition to Top of Form before
•
printing (R00).
Move the print position to the physical Top of
•
form. Issuing the Rnn (nn = 01 -25) com
mand in the first command line following a
form feed (FF), a print buffer command (p or
P), a reset condition(power-up, etc.) or as the
first command in a group of buffered com
mands will cause the printer to reposition to
the physical Top of Form.
Syntax
¬Rp
1
Parameters p1= Distance in millimeters to backup.
Range: 01 - 25 (1 = 1 millimeter)
00 = Disables automatic
backup to top of form.
-
-
-
Example:
❏ The printer will reset to the default position
for Top of Form after a print command (p or
P) has been sent to the printer.
❏
The default Top of Form position (or margin)
is approximately 1mm below the top edge of
the media (label).
❏
The R command cannot be used inside a
Buffered Label or to print a buffered label
(see the B, E, P, and p commands).
¬R05 :moves the first print line 5mm
:toward the top edge of the label
3-30
980353-001 Rev.B

S Command - Speed Select
Description Usethis command to select media print speed.
Syntax
¬Sp
1
Parameters p1= Speed select value.
Model Value Speed
1.0 ips (25 mmps)
0
2722
2443
2844
2824
1.5 ips (37 mmps)
1
2.0 ips (50 mmps)
2
1.0ips (25 mm/s)
0
1.5 ips (37 mm/s)
1
2.0ips (50 mm/s)
2
2.5 ips (63 mm/s)
3
The selected speed will remain in effect until
changed or power is removed.
The speed and density commands can dramatically
affect print quality.Changes to the speed setting typically require a change to the print density.
980353-001 Rev.B 3-31

U Command - MaxiCode - 2D Bar Code
Description Use this command to print a MaxiCode bar
code symbol. The printer will automatically in
terpret and encode data into MaxiCode sym
bols for data modes 2, 3, 4, and 6. Up to eight
symbols can be linked.
-
-
Syntax
¬Up
Parameters p
Range = 00 to 99 (millimeters)
Note - The vertical start position is set by line
p
1. If p2(mX) is not used, the printer will use the
following rules to automatically format the
“DATA” parameter. If the postal code (third
parameter, PC) in the “DATA” is:
,[p2,],“DATA”
1
= Horizontal start position from the left
1
margin in millimeters.
position.
= Mode Selection
2
Value Description
Not Used Automatic Selection Mode 2 or 3
m2 Mode 2
m3 Mode 3
m4 Mode 4
m6 Mode 6
•
All numeric characters, the printer will auto
matically select Mode 2.
-
3-32
•
Alpha only or alpha-numeric character com
binations will set the printer to Mode 3.
•
Not used, the printer automatically selects
Mode 3.
980353-001 Rev.B
-

U Command - MaxiCode - 2D Bar Code
2. If p2value is “m2 or m3”, the printer will use
the following rules to format the “Data” param
eter:
In Mode 2 - If a non-numeric character is en
•
tered in the Postal Code “Data” parameter
field, then the MaxiCode bar code will not
print.
In Mode 3 – If the Postal Code “Data” field
•
exceed 6 characters, thenthe additional char
acters will be truncated from the bar code
field.
Mode Data Format
2 & 3 “cl,co,pc,lpm”
4 & 6 “lpm”
cl = Class Code (3 digits re-
quired)
co = Country Code
Mode 2 = Numeric Characters
Mode 3 = International
Characters (up to 6 characters)
pc = Postal Code
Mode 2 = 5 or 9 characters
(All Numeric, including USA
Postal ZIP 5 or 9 char.)
For less than 9 characters, the
printer will pad the field with 0’s.
Mode 3 (International)= Any
alphanumeric character
(up to 6 characters)
lpm = Low priority message (data)
ASCII printable characters (up
to 84 characters per symbol),
any 256 character map.
The programmer should rely on the
symbology’s specification to insure format com
pliance and proper implementation. See the
AIM web site for specifications at:
http://www.aimi.org/
-
-
-
(3 digits required)
-
980353-001 Rev.B 3-33

U Command - MaxiCode - 2D Bar Code
Using AIM Specified
MaxiCode Data
Formatting
The line mode printer can use and automati
cally decode the AIM ITS (International Techni
cal Standards) MaxiCode data format. The
printer detects the message/start header
([)>R
message marker (R
), field separator (GS), and the end of
S
SEOT
) data control strings.
The hexadecimal (ASCII) data control strings
are in the following table. See the EPL2 dump
mode character map in Appendix A.
Control String Hexadecimal Code
Message/Start Header
[ ) > R
Field Separator
G
S
End Of Message Marker
RSE
S
OT
5B 29 3E 1E
1D
1E 04
-
-
Syntax bp1,p2“[AIM MaxiCode Data]”
Example
¬U20,m2,"001,840,93065,1692,[)>RS01GS9
6XXXZZFDAAFG
MARILLOG
Notes:
1) This programming example represents actual data used to
format a single AIM compliant MaxiCode symbol as pro
grammed by a major international and domestic shipping com
pany.
2) The shipper has explicitly set the MaxiCode symbol for Mode
2. This can be omitted by the programmer and the printer will
auto-select the mode per parameter p
3) The shipper has used the “!” character to pad the symbol’s
data. A scanner reads back all the "Data" within the quotation
marks, including the “!” characters following the End Of Mes
sage Marker (E
4) All of the data fields in the Low Priority Message are not
used in the example. Some are left empty with the field delim
iting G
character used as a format field holder.
S
SHIPGS309GSGS1/1GS10GSNGSGSCA
S
CAGSRSEOT!!!!!!!!!!!!!!!!!!!!!!!"¿
S
rules.
2
).
OT
-
-
-
-
3-34 980353-001 Rev.B

V Command - Enable Reverse Print
Description This command is used to enable reversed
(white on black) printing.
Syntax
¬V
Parameters Default Condition - Disabled
The reversed print condition will be cleared
when:
The line has been printed, ie a line termina
❏
tion comand (LF, CR or CR/LF or a combination there of).
❏ A Disable Reverse Print command (v) is sent
to the printer.
❏ A print command (Porp) is sent to the
printer.
❏ The print has power cycled and returns to the
default condition, which is disabled.
-
980353-001 Rev.B 3-35

v Command - Disable Reverse Print
Description Usethis command to disable reversed printing.
Syntax
¬v
3-36
980353-001 Rev.B

X Command - Bar Width
Description
Use this command to set the "X" dimension (or
narrow bar width) of a bar code.
Syntax
¬Xp
1
Parameters p1= Width in dots.
Each dot is 0.125mm or 0.005" wide.
Values: 2, 3 or 4
Default: 2 (.25mm or .010")
The selected value will remain in effect until:
The setting is changed,
❏
❏ An error condition occurs or
❏ The print has power cycled and returns to the
default setting.
Example:
¬X2¿ :sets the bar width to 10 mils.
980353-001 Rev.B 3-37

x Command - Bar Width Ratio
Description Use this command to set ratio of the narrow bar
width to the wide bar width for applicable bar
code types.
Supported bar codes that have adjustable bar
with ratios are:
Code 39
•
Interleaved 2 of 5
•
CodaBar
•
Syntax
¬xp1p
2
Parameters p1= Narrow bar width in dots.
Values: 2, 3 or 4
Default: 2 (.250 mm or .010 inch)
= Wide bar width in dots.
p
2
Values: 04 to 12
Default: 05 (.625 mm or .025 inch)
The selected value will remain in effect until
changed, an error condition occurs, or power is
removed.
Example:
¬x205¿ :sets the narrow bar to 2, and the
:wide bar to 5.
3-38
980353-001 Rev.B

? Command - Bar Code Select
Description Use this command to select the bar code type.
Syntax
¬?p
1
Parameters p1= Bar Code type.
Default = 2 (I 2 of 5).
Value Description
0
1
2 Interleaved 2 of 5 (default)
3 Code 39 (w/extended)
9 Code 93
U UPC-A and UPC-E
E EAN8 and EAN13
P Postnet 5, 9,11 & 13 digit
K CodaBar
M
L MSI-3 with mod. 10 check digit
Code 128B/C
Serial Shipping Container Code
Code 128
(Auto-selects mode A, B or C)
Plessey (MSI-1)
with mod. 10 check digit
Example:
The selected Bar code will remain in effect until
changed or power is removed.
¬?2¿ :selects Interleaved 2 of 5 bar codes
980353-001 Rev.B 3-39

3-40 980353-001 Rev.B
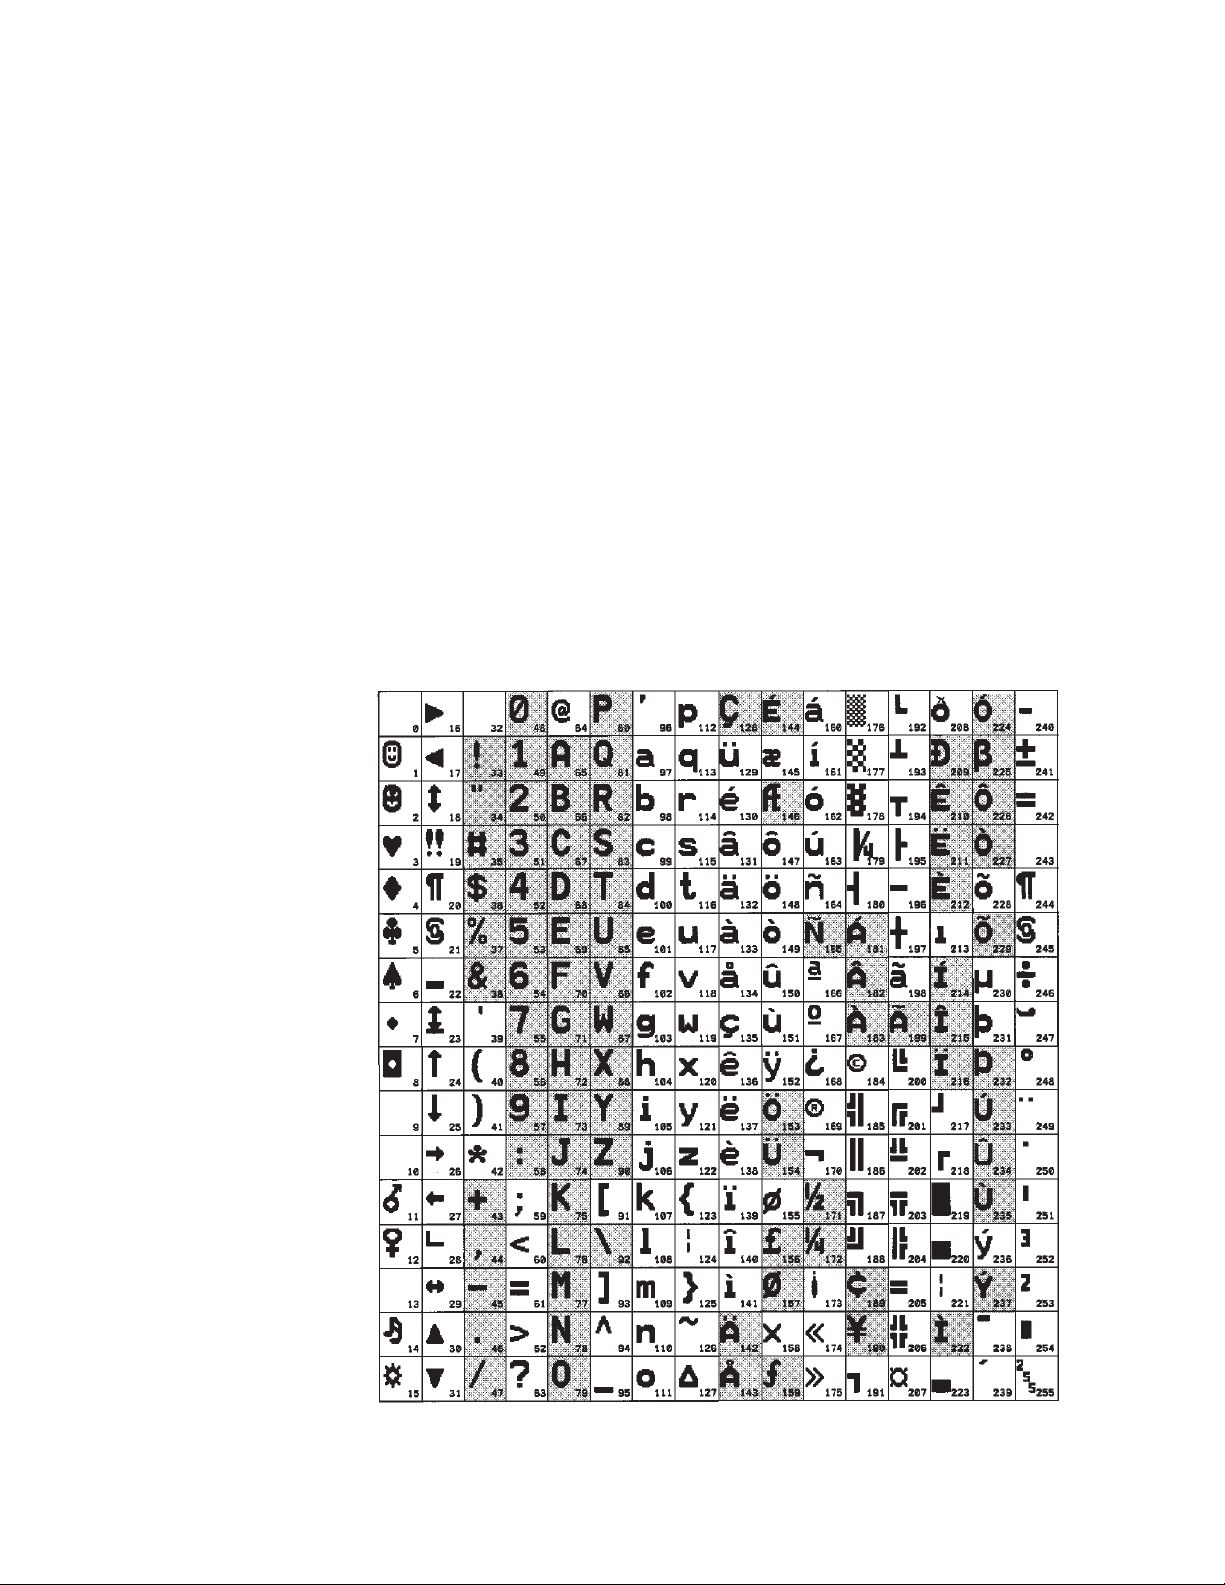
Appendix A - Character References
This section has character reference.
Default Character Map
Code Page - 850
980353-001 Rev.B A-1

Dump Mode Character Map
Hexidecimal - Most Significant Digit
0123456789ABCDEF
00
0
016
J
1
2
3
4
5
6
7
8
9
A
B
C
Hexidecimal - Least Significant Digit
D
E
F
117
o
218
♥
!!
319
♦
¶
420
♣ §
521
♠
622
o
723
h
824
i
925
g
10 26
G
f
11 27
E
12 28
e
13 29
¬
n
14 30
C
15 31
0
32 48
!1
33 49
"2
34 50
#3
35 51
$4
36 52
%5
37 53
&6
38 54
'7
39 55
(8
40 56
)9
41 57
*:
42 58
+;
43 59
,<
44 60
-=
45 61
.>
46 62
/?
47 63
@P
64 80
AQ
65 81
BR
66 82
CS
67 83
DT
68 84
EU
69 85
FV
70 86
GW
71 87
HX
72 88
IY
73 89
JZ
74 90
K[
75 91
L\
76 92
M]
77 93
N^
78 94
O_
79 95
`p
96 112
aq
97 113
br
98 114
cs
99 115
dt
100 116
eu
101 117
fv
102 118
gw
103 119
hx
104 120
iy
105 121
jz
106 122
k{
107 123
l|
108 124
m}
109 125
n~
110 126
o
111 127
128 144
129 145
130 146
131 147
132 148
133 149
134 150
135 151
136 152
137 153
138 154
139 155
140 156
141 157
142 158
143 159
°
160 176
¡±
161 177
¢²
162 178
£³
163 179
¤´
164 180
¥µ
165 181
¦¶
166 182
§·
167 183
¨¸
168 184
©¹
169 185
ªº
170 186
«»
171 187
¬¼
172 188
½
173 189
®¾
174 190
¯¿
175 191
ÀÐ
192 208
ÁÑ
193 209
ÂÒ
194 210
ÃÓ
195 211
ÄÔ
196 212
ÅÕ
197 213
ÆÖ
198 214
Ç×
199 215
ÈØ
200 216
ÉÙ
201 217
ÊÚ
202 218
ËÛ
203 219
ÌÜ
204 220
ÍÝ
205 221
ÎÞ
206 222
Ïß
207 223
àð
224 240
áñ
225 241
âò
226 242
ãó
227 243
äô
228 244
åõ
229 245
æö
230 246
ç÷
231 247
èø
232 248
éù
233 249
êú
234 250
ëû
235 251
ìü
236 252
íý
237 253
îþ
238 254
256
ï
239 255
A-2 980353-001 Rev.B

980353-001 Rev.B A-3
A-4 980353-001 Rev.B
980353-001 Rev.B A-5

A-6 980353-001 Rev.B

980353-001 Rev.B A-7
A-8 980353-001 Rev.B

980353-001 Rev.B A-9

A-10 980353-001 Rev.B

980353-001 Rev.B A-11

A-12 980353-001 Rev.B
Appendix B
System Compatibility
Features
Many computer operatingsystems have unique
character values assigned to the basic printer
control functions of escape, line feed, carriage
return and form feed. The line mode printer
programming allows for any one or all of these
functions to be reassigned as a new one or two
character (hexadecimal) data string.
Default ASCII Values for the Basic Printer Control Functions
Pro-
Command Function
CR Carriage Return 1 13 0D
LF Line Feed 2 10 0A
FF Form Feed 3 12 0C
ESC Escape 4 27 1B
cessing
Order
Decimal Hexadecimal
980353-001 Rev.B B-1

The table below describes the unique,
non-printing data characters that are used by
the line mode printer to reprogram these basic
printer control functions.
Command
<STX> Start Transmission 02 02
<ETX> End Transmission 03 03
<EOT> End of Text 04 04
<CAN> Cancel 24 18
Changing Control
Function Characters
Standard Character
Name
Use this command string to change the basic
command code functions.
Syntax:
<STX>p1<EOT>p2<ETX>
Decimal Hexadecimal
Parameters p1= Character to be substituted for: Escape
(ESC), line feed (LF), carriage return
(CR) or a form feed (FF).
= One to two character string to be substi-
p
2
tuted. Each individual control character
can be substituted with a one or two
ASCII characters.
Example:
<STX>LF<EOT>?-<ETX>:The printer will treat a ?-
as a line feed (LF) .
If control function code substitution is such
that a higher priority code is a subset of
a lower priority code, the lower priority
code will not be executed. For instance,
if the carriage return is replaced with ?
and the line feed is replaced with ?- and
the user sends the line feed sequence to
the printer the ? will be interpreted as a
carriage return and the – will be printed
as data.
B-2 980353-001 Rev.B
Resetting the Control
Function Characters
Use this command string to reset (or return)
the basic printer control function charac
ter codes to their default values.
-
Syntax:
Checking Control
Function Code
Settings
<STX><CAN><ETX>
The AutoSense routine’s Dump Mode Print
out has the decimal values for the basic
printer control function displayed near
the bottom of the printout.
-
980353-001 Rev.B B-3

B-4 980353-001 Rev.B

Appendix C
Modifying Your
Printer For EPL1
Compatibility
The Line Mode printing language is designed to
be command compatible with EPL1 programming language. The printer character sets used
for printing are the basic differences between
the ELP flash based Line Mode printer and the
EPL1 LP series printer (i.e. LP2022, LP2042,
etc.).
ELP1 printers had a character sets for font 1
(CCSET 1) of 14 by22 dots and font 2 (CCSET
4) that was 5 by 7 dots. See the A command
(page 3-3) for the default Line Mode fonts. The
EPL1 character sets can be installed in the
printer prior to switching to Line Mode and us
ing the printer Font Downloader utility.
The printer automatically performs the func
tions of the Top-of-form (Qnnn) command for
labels less than 2 inches long and the Extra Feed
(On) command for label taken sensing.
-
-
The printer does not support the Print Line
Command (L). Lines can be printed with the G,
g and H graphic print commands.
980353-001 Rev.B C-1

Loading ELP1 Font
Sets
1. Set the reconfigure the printer for Page
(EPL2) Mode. Send a EPL2 command to the
printer.
2. Send the EPL2 U command to the printer.
The printer will print a Dump Mode status re
port. If it prints a U, then the print is still in Line
Mode and steps 1 and 2 need to be repeated.
3. Download the EPL1 Font file
(LMFONT.BIN) with the Firmware
Downloader program. Change the file type pull
down menu to *.BIN files and load the font (and
the embedded command that activate the
EPL1 fonts).
4. Send the EPL2 OEPL1 (Set Line Mode)
command to the printer. Send a Line Mode
EPL? command to the printer to print a Dump
Mode printout. Verify that the printer is in Line
Mode and that the status line immediately below the “Option:” line has, at minimum, the
following: oEw, x, y, z
-
Cycle the printer power and repeat steps3&4if
the printer is not in Line Mode or the fonts (as
represented by oEw, x, y, z ) are not active and
loaded.
C-2 980353-001 Rev.B

Deactivating the
EPL1 Fonts
1. 1. Set the reconfigure the printer for Page
(EPL2) Mode. Send a EPL2 command to the
printer.
2. Send the EPL2 U command to the printer.
The printer will print a Dump Mode status re
port. If it prints a U, then the print is still in Line
Mode and steps 1 and 2 need to be repeated.
-
3. Send the EPL2 o (Clear Special Mode Op
tions) command to the printer.
4. Send the EPL2 OEPL1 (Set Line Mode)
command to the printer. Send a Line Mode
EPL? command to the printer to print a Dump
Mode printout. Verify that the printer is in Line
Mode and that the status line immediately be
low the “Option:” line has been cleared of the
following: oEw, x, y, z
Typically the last two lines will read:
Options:
04 07 10 << label sensor readings
Cycle the printer power and repeat steps3&4if
the printer is not in Line Mode or the fonts have
not been cleared.
-
-
980353-001 Rev.B C-3

EPL1 LP20XX
Conversion to
LN20XX Printer
Models
The LN20XX EPL1 printer had unique Control
Function Characters (see Appendix B) prepro
grammed into the printer.
1. 3. Download the EPL1 LN printer conversion
file (EPL1 Chr Substitution LN.bin) with the
Firmware Downloader program. Change the
file type pull down menu to *.BIN files and load
the conversion file.
-
Resetting the LN20XX
to LP20XX Printer
Mode
The printer will print a Dump Mode Printout au
tomatically if the conversion is correct. Thecon
trol function character should be as follows:
ESC 063 CR 063,044
LF 063,044 FF 063,046
See the “Resetting the Control Function Characters” in Appendix B, page B-3.
-
-
C-4 980353-001 Rev.B
 Loading...