


Print Servers
Wired/Wireless
User Guide
P1043301-006

© 2017 ZIH Corp. The copyrights in this manual and the software and/or firmware in the label printer described
therein are owned by ZIH Corp. Unauthorized reproduction of this manual or the software and/or firmware in the
label printer may result in imprisonment of up to one year and fines of up to $10,000 (17
violators may be subject to civil liability.
This product may contain ZPL®, ZPL II®, and ZebraLink™ programs; Element Energy Equalizer® Circuit; E3®; and
Monotype Imaging fonts. Software © ZIH Corp. All rights reserved worldwide.
U.S.C.506). Copyright
ZebraLink and all product names and numbers are trademarks, and Zebra, the Zebra logo, ZPL, ZPL II, Element
Energy Equalizer Circuit, and E
All other brand names, product names, or trademarks belong to their respective holders. For additional trademark
information, please see “Trademarks” on the product CD.
3
Circuit are registered trademarks of ZIH Corp. All rights reserved worldwide.
Proprietary Statement This manual contains proprietary information of Zebra Technologies Corporation and its
subsidiaries (“Zebra Technologies”). It is intended solely for the information and use of parties operat ing and
maintaining the equipment described herein. Such proprietary information may not be used, reproduced, or disclosed
to any other parties for any other purpose without the express, written permission of Zebra Technologies Corporation.
Product Improvements Continuous improvement of products is a policy of Zebra Technologies Corporation.
All specifications and designs are subject to change without notice.
Liability Disclaimer Zebra Technologies Corporation takes steps to ensure that its published Engineering
specifications and manuals are correct; however, errors do occur. Zebra Technologies Corporation reserves the right
to correct any such errors and disclaims liability resulting therefrom.
Limitation of Liability In no event shall Zebra Technologies Corporation or anyone else involved in the creation,
production, or delivery of the accompanying product (including hard ware and software) be liab le for any damages
whatsoever (including, without limitation, consequential damages including loss of busin ess profi ts, business
interruption, or loss of business information) arising out of the use of, the results of use of, or inability to use such
product, even if Zebra Technologies Corporation has been advised of the possibility of such damages. Some
jurisdictions do not allow the exclusion or limitation of incidental or consequential damages, so the above limitation
or exclusion may not apply to you.
Part Number: P1043301-006

Contents
Introduction . . . . . . . . . . . . . . . . . . . . . . . . . . . . . . . . . . . . . . . . . . . . . . . 7
Overview . . . . . . . . . . . . . . . . . . . . . . . . . . . . . . . . . . . . . . . . . . . . . . . . . . . . . .8
Support . . . . . . . . . . . . . . . . . . . . . . . . . . . . . . . . . . . . . . . . . . . . . . . . . . . . . . .8
Browser Requirements . . . . . . . . . . . . . . . . . . . . . . . . . . . . . . . . . . . . . . . .8
Supported Services . . . . . . . . . . . . . . . . . . . . . . . . . . . . . . . . . . . . . . . . . . .8
Address Administration Protocols . . . . . . . . . . . . . . . . . . . . . . . . . . . . . . . .8
Supported Wireless Radio Cards . . . . . . . . . . . . . . . . . . . . . . . . . . . . . . . .9
Supported Security Types . . . . . . . . . . . . . . . . . . . . . . . . . . . . . . . . . . . . .10
Printer Requirements . . . . . . . . . . . . . . . . . . . . . . . . . . . . . . . . . . . . . . . . . . .14
Hardware—Wired Print Servers . . . . . . . . . . . . . . . . . . . . . . . . . . . . . . . .14
Hardware—Wireless Print Servers . . . . . . . . . . . . . . . . . . . . . . . . . . . . . .15
Memory Requirements . . . . . . . . . . . . . . . . . . . . . . . . . . . . . . . . . . . . . . .16
Firmware—10/100 Print Server . . . . . . . . . . . . . . . . . . . . . . . . . . . . . . . . .17
Firmware—Wireless . . . . . . . . . . . . . . . . . . . . . . . . . . . . . . . . . . . . . . . . .18
Compatibility . . . . . . . . . . . . . . . . . . . . . . . . . . . . . . . . . . . . . . . . . . . . . . . . . .19
Specifications . . . . . . . . . . . . . . . . . . . . . . . . . . . . . . . . . . . . . . . . . . . . . . . . .19
External 10/100 Print Server Specifications . . . . . . . . . . . . . . . . . . . . . . .19
Internal Print Server Specifications . . . . . . . . . . . . . . . . . . . . . . . . . . . . . .20
Wireless Print Server Specifications . . . . . . . . . . . . . . . . . . . . . . . . . . . . .21
Installation . . . . . . . . . . . . . . . . . . . . . . . . . . . . . . . . . . . . . . . . . . . . . . . 23
External 10/100 Print Server . . . . . . . . . . . . . . . . . . . . . . . . . . . . . . . . . . . . . .24
Before You Begin . . . . . . . . . . . . . . . . . . . . . . . . . . . . . . . . . . . . . . . . . . .24
Illustration . . . . . . . . . . . . . . . . . . . . . . . . . . . . . . . . . . . . . . . . . . . . . . . . .25
Installation Instructions . . . . . . . . . . . . . . . . . . . . . . . . . . . . . . . . . . . . . . .26
Internal 10/100 Print Server . . . . . . . . . . . . . . . . . . . . . . . . . . . . . . . . . . . . . .27
Wireless Print Servers . . . . . . . . . . . . . . . . . . . . . . . . . . . . . . . . . . . . . . . . . . .27
10/12/17 P1043301-006

4
Contents
Install a Radio Card in a Wireless Print Server . . . . . . . . . . . . . . . . . . . . . . . .27
Wireless Radio Card . . . . . . . . . . . . . . . . . . . . . . . . . . . . . . . . . . . . . . . . .27
Compact Flash Wireless Radio Card . . . . . . . . . . . . . . . . . . . . . . . . . . . .29
Getting Started . . . . . . . . . . . . . . . . . . . . . . . . . . . . . . . . . . . . . . . . . . . 31
Before You Begin . . . . . . . . . . . . . . . . . . . . . . . . . . . . . . . . . . . . . . . . . . . . . .33
Default User ID and Password . . . . . . . . . . . . . . . . . . . . . . . . . . . . . . . . .33
Printing a Configuration Label— External 10/100 Print Server . . . . . . . . . . . .34
Printing a Network Configuration Label . . . . . . . . . . . . . . . . . . . . . . . . . . . . . .36
Configuration of Wireless Securities . . . . . . . . . . . . . . . . . . . . . . . . . . . . . . . .40
View Wireless Status through the Control Panel . . . . . . . . . . . . . . . . . . . . . . .41
LCD Link Status and Wireless Signal Indicators (Other Printers) . . . . . . .42
HC100 Wireless Status Indicator Lights . . . . . . . . . . . . . . . . . . . . . . . . . .43
Network Status Indicator Lights . . . . . . . . . . . . . . . . . . . . . . . . . . . . . . . .44
Determining the Active Print Server . . . . . . . . . . . . . . . . . . . . . . . . . . . . . . . .45
Viewing IP Addresses and the Active Print Server . . . . . . . . . . . . . . . . . .45
Active Device Selection . . . . . . . . . . . . . . . . . . . . . . . . . . . . . . . . . . . . . . .46
Assigning an IP Address on any Print Server . . . . . . . . . . . . . . . . . . . . . . . . .48
With Dynamic Host Configuration Protocol (DHCP) . . . . . . . . . . . . . . . . .48
Assigning an IP Address Without DHCP via ZebraNet Bridge . . . . . . . . .48
Assigning an IP address Without DHCP from the Control Panel . . . . . . .48
Assigning an IP Address Without DHCP via a Telnet Session . . . . . . . . .49
Setting and Monitoring Alerts on Any Print Server . . . . . . . . . . . . . . . . . . . . .51
Using ZebraNet Bridge . . . . . . . . . . . . . . . . . . . . . . . . . . . . . . . . . . . . . . .51
ZebraLink Alerts . . . . . . . . . . . . . . . . . . . . . . . . . . . . . . . . . . . . . . . . . . . .51
Using WebView . . . . . . . . . . . . . . . . . . . . . . . . . . . . . . . . . . . . . . . . . . . . .53
Checking Print Server Configuration Settings . . . . . . . . . . . . . . . . . . . . . . . . .56
Using ZebraNet Bridge . . . . . . . . . . . . . . . . . . . . . . . . . . . . . . . . . . . . . . .56
Using WebView . . . . . . . . . . . . . . . . . . . . . . . . . . . . . . . . . . . . . . . . . . . . .56
Enabling Protocols . . . . . . . . . . . . . . . . . . . . . . . . . . . . . . . . . . . . . . . . . . . . .59
Using WebView . . . . . . . . . . . . . . . . . . . . . . . . . . . . . . . . . . . . . . . . . . . . .59
Defaulting ALL Print Servers . . . . . . . . . . . . . . . . . . . . . . . . . . . . . . . . . . . . . .61
Using WebView . . . . . . . . . . . . . . . . . . . . . . . . . . . . . . . . . . . . . . . . . . . . .61
Using ZebraNet Bridge . . . . . . . . . . . . . . . . . . . . . . . . . . . . . . . . . . . . . . .63
Using a ZPL Command . . . . . . . . . . . . . . . . . . . . . . . . . . . . . . . . . . . . . . .63
Defaulting a 10/100 Print Server . . . . . . . . . . . . . . . . . . . . . . . . . . . . . . . .63
Defaulting the Print Servers on the LP/TLP 2824 Plus and G-Series Printers
64
Defaulting the Print Servers on the HC100 Printers . . . . . . . . . . . . . . . . .64
Defaulting the Print Servers on the ZM400 and ZM600 Printers . . . . . . .64
Defaulting the Print Servers on 105SL, PAX4, Xi4, ZE500, and 105SLPlus
Printers . . . . . . . . . . . . . . . . . . . . . . . . . . . . . . . . . . . . . . . . . . . . . . . . . . .65
Defaulting the Print Servers on the ZD400, ZD500R, and ZTxxx Printers 65
P1043301-006 10/12/17

Contents
Printing Queues . . . . . . . . . . . . . . . . . . . . . . . . . . . . . . . . . . . . . . . . . . . 67
Berkeley Software Distribution (BSD)-Style Print Queue . . . . . . . . . . . . . . . .68
Configuring the Print Queue . . . . . . . . . . . . . . . . . . . . . . . . . . . . . . . . . . .68
System V Queue Installation . . . . . . . . . . . . . . . . . . . . . . . . . . . . . . . . . . . . . .69
Configuring Operating System V Queue for Printing . . . . . . . . . . . . . . . .69
Prerequisites . . . . . . . . . . . . . . . . . . . . . . . . . . . . . . . . . . . . . . . . . . . . . . .69
UNIX Configuration . . . . . . . . . . . . . . . . . . . . . . . . . . . . . . . . . . . . . . . . . .69
Using Printing Protocols . . . . . . . . . . . . . . . . . . . . . . . . . . . . . . . . . . . 71
IPP . . . . . . . . . . . . . . . . . . . . . . . . . . . . . . . . . . . . . . . . . . . . . . . . . . . . . . . . . .72
FTP . . . . . . . . . . . . . . . . . . . . . . . . . . . . . . . . . . . . . . . . . . . . . . . . . . . . . . . . .73
ZebraLink WebView . . . . . . . . . . . . . . . . . . . . . . . . . . . . . . . . . . . . . . . 75
WebView . . . . . . . . . . . . . . . . . . . . . . . . . . . . . . . . . . . . . . . . . . . . . . . . . . . . .76
Home Page . . . . . . . . . . . . . . . . . . . . . . . . . . . . . . . . . . . . . . . . . . . . . . . .76
View Printer Configuration . . . . . . . . . . . . . . . . . . . . . . . . . . . . . . . . . . . .78
View and Modify Printer Settings . . . . . . . . . . . . . . . . . . . . . . . . . . . . . . .80
Network Communications Screens . . . . . . . . . . . . . . . . . . . . . . . . . . . . . . . . .86
Directory Listing . . . . . . . . . . . . . . . . . . . . . . . . . . . . . . . . . . . . . . . . . . . .93
Printer Controls . . . . . . . . . . . . . . . . . . . . . . . . . . . . . . . . . . . . . . . . . . . . .97
5
Print Server Web Pages . . . . . . . . . . . . . . . . . . . . . . . . . . . . . . . . . . . . 99
Status and Configuration . . . . . . . . . . . . . . . . . . . . . . . . . . . . . . . . . . . . .100
Print Server Status . . . . . . . . . . . . . . . . . . . . . . . . . . . . . . . . . . . . . . . . .107
View Port Status . . . . . . . . . . . . . . . . . . . . . . . . . . . . . . . . . . . . . . . . . . .109
Reset . . . . . . . . . . . . . . . . . . . . . . . . . . . . . . . . . . . . . . . . . . . . . . . . . . . .110
Restore . . . . . . . . . . . . . . . . . . . . . . . . . . . . . . . . . . . . . . . . . . . . . . . . . .111
Control Panel . . . . . . . . . . . . . . . . . . . . . . . . . . . . . . . . . . . . . . . . . . . . 113
Control Panel Menu Options . . . . . . . . . . . . . . . . . . . . . . . . . . . . . . . . . . . . .114
Wired Network Parameters on the Printer Display . . . . . . . . . . . . . . . . .114
Wireless Network Parameters on the Printer Display . . . . . . . . . . . . . . .116
Hardware T roubleshooting . . . . . . . . . . . . . . . . . . . . . . . . . . . . . . . . . 119
Troubleshooting the External 10/100 Print Server . . . . . . . . . . . . . . . . . . . .120
Resetting to Factory Defaults . . . . . . . . . . . . . . . . . . . . . . . . . . . . . . . . .120
External 10/100 Print Server Network Status and Status Indicators . . . . 120
Troubleshooting the External 10/100 Print Server . . . . . . . . . . . . . . . . .121
Troubleshooting the Internal Print Server . . . . . . . . . . . . . . . . . . . . . . . . . . .123
Resetting the Internal Print Server to Factory Defaults . . . . . . . . . . . . . .123
Internal Print Server Network Status and Activity Indicators . . . . . . . . . .123
Troubleshooting the Wireless Print Server . . . . . . . . . . . . . . . . . . . . . . . . . .125
Print Server Will Not Operate on the 5Ghz Band . . . . . . . . . . . . . . . . . .125
Resetting the Wireless Print Server to Factory Defaults . . . . . . . . . . . . .125
10/12/17 P1043301-006

6
Contents
ZebraNet Bridge Discovery or Configuration Problems . . . . . . . . . . . . . . . .126
Unable to Print . . . . . . . . . . . . . . . . . . . . . . . . . . . . . . . . . . . . . . . . . . . . . . .126
Ping the Printer . . . . . . . . . . . . . . . . . . . . . . . . . . . . . . . . . . . . . . . . . . . .127
Telnet . . . . . . . . . . . . . . . . . . . . . . . . . . . . . . . . . . . . . . . . . . . . . . . . . . . .127
Unable to Configure Device . . . . . . . . . . . . . . . . . . . . . . . . . . . . . . . . . . . . .128
HP JetAdmin or HP Web JetAdmin . . . . . . . . . . . . . . . . . . . . . . . . . . . . . . . .128
Wireless Error Messages . . . . . . . . . . . . . . . . . . . . . . . . . . . . . . . . . . . . . . .128
General Wireless Issues . . . . . . . . . . . . . . . . . . . . . . . . . . . . . . . . . . . . . . . .129
Encryption and Authentication Issues . . . . . . . . . . . . . . . . . . . . . . . . . . . . . .131
IP Issues . . . . . . . . . . . . . . . . . . . . . . . . . . . . . . . . . . . . . . . . . . . . . . . . . . . .132
Frequently Asked Questions . . . . . . . . . . . . . . . . . . . . . . . . . . . . . . . 133
FAQs . . . . . . . . . . . . . . . . . . . . . . . . . . . . . . . . . . . . . . . . . . . . . . . . . . . . . . .133
Glossary . . . . . . . . . . . . . . . . . . . . . . . . . . . . . . . . . . . . . . . . . . . . . . . . 137
Index . . . . . . . . . . . . . . . . . . . . . . . . . . . . . . . . . . . . . . . . . . . . . . . . . . . 143
P1043301-006 10/12/17

1
Introduction
This chapter provides a high-level overview of Zebra’s wired and wireless print servers,
installation types, standard network configurations, and how to work with the print servers.
Contents
Overview . . . . . . . . . . . . . . . . . . . . . . . . . . . . . . . . . . . . . . . . . . . . . . . . . . . . . . . . . . . . . . 8
Support. . . . . . . . . . . . . . . . . . . . . . . . . . . . . . . . . . . . . . . . . . . . . . . . . . . . . . . . . . . . . . . . 8
Browser Requirements . . . . . . . . . . . . . . . . . . . . . . . . . . . . . . . . . . . . . . . . . . . . . . . . . 8
Supported Services . . . . . . . . . . . . . . . . . . . . . . . . . . . . . . . . . . . . . . . . . . . . . . . . . . . . 8
Address Administration Protocols . . . . . . . . . . . . . . . . . . . . . . . . . . . . . . . . . . . . . . . . . 8
Supported Wireless Radio Cards. . . . . . . . . . . . . . . . . . . . . . . . . . . . . . . . . . . . . . . . . . 9
Supported Security Types . . . . . . . . . . . . . . . . . . . . . . . . . . . . . . . . . . . . . . . . . . . . . . 10
Printer Requirements. . . . . . . . . . . . . . . . . . . . . . . . . . . . . . . . . . . . . . . . . . . . . . . . . . . . 14
Hardware—Wired Print Servers. . . . . . . . . . . . . . . . . . . . . . . . . . . . . . . . . . . . . . . . . . 14
Hardware—Wireless Print Servers . . . . . . . . . . . . . . . . . . . . . . . . . . . . . . . . . . . . . . . 15
Memory Requirements. . . . . . . . . . . . . . . . . . . . . . . . . . . . . . . . . . . . . . . . . . . . . . . . . 16
Firmware—10/100 Print Server . . . . . . . . . . . . . . . . . . . . . . . . . . . . . . . . . . . . . . . . . . 17
Firmware—Wireless. . . . . . . . . . . . . . . . . . . . . . . . . . . . . . . . . . . . . . . . . . . . . . . . . . . 18
Compatibility. . . . . . . . . . . . . . . . . . . . . . . . . . . . . . . . . . . . . . . . . . . . . . . . . . . . . . . . . . . 19
External 10/100 Print Server Specifications. . . . . . . . . . . . . . . . . . . . . . . . . . . . . . . . . . . 19
External 10/100 Print Server Specifications. . . . . . . . . . . . . . . . . . . . . . . . . . . . . . . . . 19
Internal Print Server Specifications . . . . . . . . . . . . . . . . . . . . . . . . . . . . . . . . . . . . . . . 20
Wireless Print Server Specifications . . . . . . . . . . . . . . . . . . . . . . . . . . . . . . . . . . . . . . 21
10/12/17 P1043301-006

Introduction
8
Overview
Overview
Support
Browser Requirements
The print server is an optional factory- or field-installed device that connects the network and
your ZebraLink-enabled printer. The print server provides you with a web browser as a user
interface for printer and print server settings. If you use ZebraNet Bridge Enterprise, you can
easily access the specialized features of a ZebraLink-ena bl ed prin ter. For details, see the
ZebraNet Bridge Enterprise User Guide.
Note • You can download the most recent version of ZebraNet Bridge Enterprise from
www.zebra.com/utilities.
This section lists the minimum requirem ents for print servers, which include browsers,
supported services, address administration protocols, hardware, and firmware.
• HTML v3.2 or higher
• Internet Explorer
Supported Services
• Raw TCP • FTP
• HTTP • UDP
• LPR/LPD • Telnet
• SNMPv1 • SMTP
• POP3 • WINS
• IPP v1.0 * † • ARP
* Supported only on the external 10/100 Print Server.
† Supported only on the internal 10/100 Print Server for PAX4 and 105SL printers/print engines.
Address Administration Protocols
•DHCP
•BootP
•RARP
•Gleaning
•Permanent
P1043301-006 10/12/17

Supported Wireless Radio Cards
Note • This section applies only to the Wireless Print Server and the Wireless Plu s Print
Server. All other wireless print servers supported by this manual have a built-in radio.
A supported third-party PCMCIA, Compact Flash™, or CardBus wireless radio card is
required for the printer to connect to the WLAN. After the wireless option board is installed in
the printer, the wireless radio card inserts into a slot on this board. A wireless radio card is
NOT provided with the Wireless Print Server or the Wireless Plus Print Server.
Note •
• Some wireless radio cards listed here may not support all wireless print server features.
• See Table 1 on page 11 or check with the card manufacturer to ensure that the card that
you wish to use supports the wireless security type used on your WLAN.
• Some wireless radio cards may require specific firmware versions to support certain
features. You may be able to download new firmware to your wireless radio card. Check
with the card manufacturer for more information.
• Check the operating conditions (such as temperature and humidity) for th e w irel ess rad io
card that you choose. If the card has more restrictions than the printer, this may limit the
conditions under which you can operate the printer with a wireless connection.
Introduction
Support
9
The following wireless radio cards are supported at the time of this release:
Symbol® Technologies
•Spectrum24® Compact Flash wireless radio card LA-4137-1020-WW (the card uses an
adapter and must have firmware version F3.91-69 or later)
For instructions on how to install t his card and the adapter, see Install a Radio Card in a
Wireless Print Server on page 27.
• 802.11b Spectrum24 High Rate Direct Sequence PN:LA-4121-1000-US (card must have
firmware version V2.90-58 or later)
• 802.11b Spectrum24 High Rate Direct Sequence PN:LA-4121-1020-US (card must have
firmware version V2.90-58 or later)
• 802.11b Spectrum24 High Rate Direct Sequence PN:LA-4121-1120-US (card must have
firmware version V2.90-58 or later)
10/12/17 P1043301-006

10
Introduction
Support
Cisco® Systems
All Aironet® cards must have card firmware version 5.60.21 or later.
• 802.11g Aironet CB21AG CardBus wireless radio card (for the Wireless Plus Print Sever
only)
• 802.11b Aironet AIR-PCMC340
• 802.11b Aironet AIR-PCMC341
• 802.11b Aironet AIR-PCMC342
• 802.11b Aironet PCMC350
• 802.11b Aironet PCMC351
• 802.11b Aironet PCMC352
Supported Security Types
Your WLAN can use any of a number of different types of security and encryption, or it can
use none at all. This section shows which sec urit y types you can use with the various wireless
print servers.
Note • Configuring a printer for WPA also allows the printer to be used in WPA2
environments.
P1043301-006 10/12/17

Wireless Plus Print Server
Table 1 lists the security types that are supported by the Wireless Plus Print Server. Support
varies by the card manufacturer and the card type. Select a wireless radio card that is supported
by your wireless print server and that supports the security type being used on your WLAN.
Table 1 • Security Types Supported on the Wireless Plus Print Server
Card Manufacturer
Introduction
Support
11
Security Type
Cisco CB21 Cisco 350
Cisco Symbol
LA-4121
(PCMCIA)
Compact Flash
LA-4137
Open Yes Yes Yes Yes
EAP-FAST Yes Not Supported Yes Yes
EAP-TLS Yes Not Supported Not Supported Yes
EAP-TTLS Yes Not Supported Not Supported Yes
Kerberos Not Supported Not Supported Yes Yes
LEAP Yes Yes Yes Yes
PEAP Yes Not Supported Yes Yes
WEP (40 bit and 128 bit) Yes Yes Yes Yes
WPA - LEAP Yes Yes Yes Yes
WPA - PSK Yes Yes Yes Yes
WPA- EAP-FAST Yes Yes Yes Yes
WPA- EAP-TLS Yes Yes Yes Yes
WPA- EAP-TTLS Yes Yes Yes Yes
WPA- PEAP Yes Yes Yes Yes
WPA2 - LEAP Yes Not Supported Not Supported Not Supported
WPA2 - PSK* Yes* Not Supported Not Supported Not Supported
WPA2- EAP-FAST Yes Not Supported Not Supported Not Supported
WPA2- EAP-TLS Yes Not Supported Not Supported Not Supported
WPA2- EAP-TTLS Yes Not Supported Not Supported Not Supported
WPA2- PEAP Yes Not Supported Not Supported Not Supported
* Key rotation for WPA2 PSK is supported in firmware version V60.15.8Z or later, V53.15.8Z or later., and RX.15.8Z or later.
10/12/17 P1043301-006

12
Introduction
Support
Internal Wireless Plus Print Server and Other a/b/g/n/ac Print Servers
Table 2 lists the security types that are supported by the Internal Wireless Plus Print Server and
other print servers that include a/b/g/n/ac.
Table 2 • Security Types Supported on the
Internal Wireless Plus Print Server and all a/b/g/n/ac Print Servers
Security Type Supported?
Open Yes
EAP-FAST Yes
EAP-PEAPv2 Yes *
EAP-TLS Yes
EAP-TTLS Yes
Kerberos Not Supported
Key Management Yes *
LEAP Yes
MIC Yes *
PEAP Yes
WEP (40 bit and 128 bit) Yes
WPA - LEAP Yes
WPA - PSK Yes
WPA - EAP-FAST Yes
WPA - EAP-TLS Yes
WPA - EAP-TTLS Yes
WPA - PEAP Yes
WPA - TKIP Yes *
WPA2 - 802.1x + AES Yes *
WPA2 - LEAP Yes
WPA2 - PSK Yes
WPA2 - EAP-FAST Yes
WPA2 - EAP-TLS Yes
WPA2 - EAP-TTLS Yes
WPA2 - PEAP Yes
*Note: Supported on the n Print Server only
P1043301-006 10/12/17

Wireless Print Server
Table 3 lists the security types that are supported by the Wireless Print Server. Support varies
by the card manufacturer and the card type. Select a wireless radio card that is supported by
your wireless print server and that supports the security type being used on your WLAN. The
Wireless Print Server does not support the Cisco CB21 radio card.
Table 3 • Security Types Supported on the Wireless Print Server
Card Manufacturer
Introduction
Support
13
Security Type
Cisco Symbol
Cisco 350
LA-4121
(PCMCIA)
LA-4137
Compact Flash
Open Yes Yes Yes
EAP-FAST Not Supported Not Supported Yes
EAP-TLS Not Supported Not Supported Yes
EAP-TTLS Not Supported Yes Yes
Kerberos Not Supported Yes Yes
LEAP Yes Yes Yes
PEAP Not Supported Yes Yes
WEP (40 bit and 128 bit) Yes Yes Yes
WPA - LEAP Yes Yes Yes
WPA - PSK Yes Yes Yes
WPA- EAP-FAST Yes Yes Yes
WPA- EAP-TLS Yes Yes Yes
WPA- EAP-TTLS Yes Yes Yes
WPA- PEAP Yes Yes Yes
10/12/17 P1043301-006

Introduction
14
Printer Requirements
Printer Requirements
Hardware—Wired Print Servers
Table 4 indicates which printers are compatible with wired print server options.
Table 4 • Wired Print Servers Available by Printer
Printers External *
Internal
Field Upgrade
Internal
Factory
105SL XXX
105SLPlus XXX
GK420 X — X
GX420/GX430 X — X
HC100 — — X
LP/TLP 2824 Plus — — X
PAX4 seriesXXX
R110PAX4 XXX
R110Xi4 XXX
RZ400 XXX
RZ600 XXX
Xi4 XXX
ZD400 Series — — X
ZD500R X X
ZE500 XXX
ZM400 XXX
ZM600 XXX
ZT200 Series X X X
ZT400 Series X — X
ZT510 X — X
ZT600 Series X — X
* For additional information on print server firmware versions, see Firmware—10/100 Print Server on
page 17.
P1043301-006 10/12/17

Hardware—Wireless Print Servers
Table 5 indicates which printers are compatible with wireless print server options.
Table 5 • Wireless Print Servers Available by Printer
Introduction
Printer Requirements
15
Printers a/b/g/n/ac a/b/g/n b/g
Internal
Wireless Plus
Wireless
Plus
Wireless
105SL —— — X XX
105SLPlus —— X — ——
GK420 — — X — — —
GX420/430 — — X — — —
HC100 — — X — — —
LP/TLP 2824 Plus — — — — — —
PAX4 series — — X X X X
R110PAX4———XXX
R110Xi4 — — X X X X
RZ400 — — X X X X
RZ600 — — X X X X
Xi4 — — X X X
ZD400 Series X — — — — —
ZD500R — X — — — —
ZE500 — — X — — —
ZM400 — — X X X —
ZM600 — — X X X —
ZT200 Series — X — — — —
ZT400 Series — X — — — —
ZT510 X — — — — —
ZT600 Series X — — — — —
10/12/17 P1043301-006
Introduction
16
Printer Requirements
Memory Requirements
PCMCIA and Compact Flash Memory Cards PCMCIA memory or Compact Flash
memory cards will not work and are not supported on the Wireless Plus Print Server. The
Internal Wireless Plus Print Server and the a/b/g/n/ac Print Servers do not include a slot for
these card types.
Wireless Card Socket Option The wireless print server options replace the Wireless Card
Socket Option (WCSO) in 105SL printers with a serial number of 6400357 or greater. Do not
install a wireless option board on a 105SL printer with a serial number that is less than
6400357.
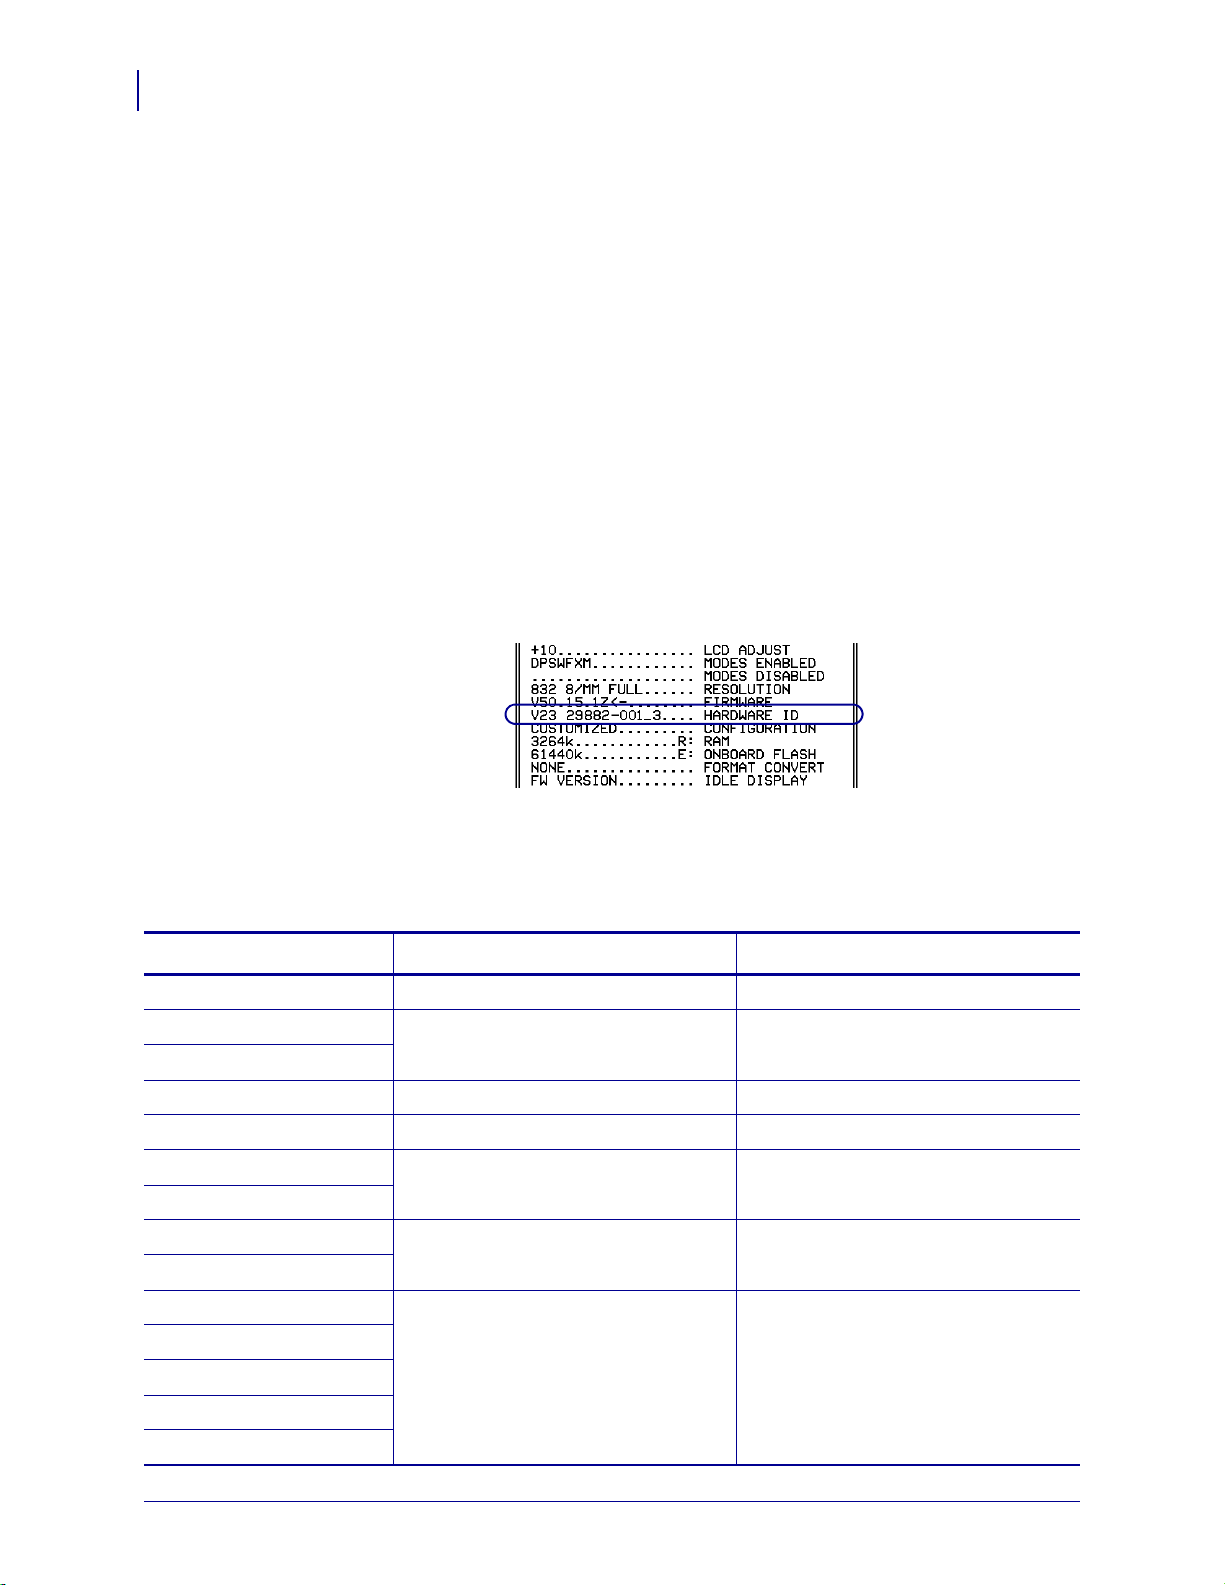
Wireless Option Board A special wireless option board must be installed in your
printer/print engine. To determine if you have a wireless option board installed, use a printer
configuration label (refer to the printing instructions in your printer User Guide). To purchase
a wireless option, contact your authorized Zebra reseller for more information.
The wireless option boards are identified by the HARDWARE ID line on the printer
configuration label.
The part numbers shown on the HARDWARE ID line indicate the wireless print se rvers as
shown in Table 6.
Table 6 • Zebra Part Numbers for Wireless Print Server Boards
Part Number Corresponds to the Following Radio Included?
P1033782-0xx n Print Server Yes
P1033557-0xx b/g Print Server Yes
P1033605-001
PCBA P1033782-03x a/b/g/n Print Server Yes
PCBA P1077918-01x a/b/g/n/ac Print Server Yes
29652-0xx Internal Wireless Plus Print Server Yes
29883-001
29651-0xx Wireless Plus Print Server No. Requires a third-party radio card.
29882-001
29881-009 Wireless Print Server No. Requires a third-party radio card.
79077
79078
79079
79100
P1043301-006 10/12/17
Firmware—10/100 Print Server
EN: ZZ:ZZ:ZZ:ZZ:ZZ:ZZ
UID #
SN YYYYYYY
PN XXXXX
FOR HOME, OFFICE,
COMMERCIAL, OR
INDUSTRIAL USE
Tested to Comply
With FCC Standards
This Class B digital apparatus
complies with Canadian ICES-003
V2
1
All external print servers are available with several versions of print server firmware. PAX4
and 105SL printers use print server firmware version 1.01.x.
To determine the proper firmware version, first determine your hardware version.
To locate your hardware version, perform the following:
1. Which type of printer and print server do you have?
If you have… Then…
Introduction
Printer Requirements
17
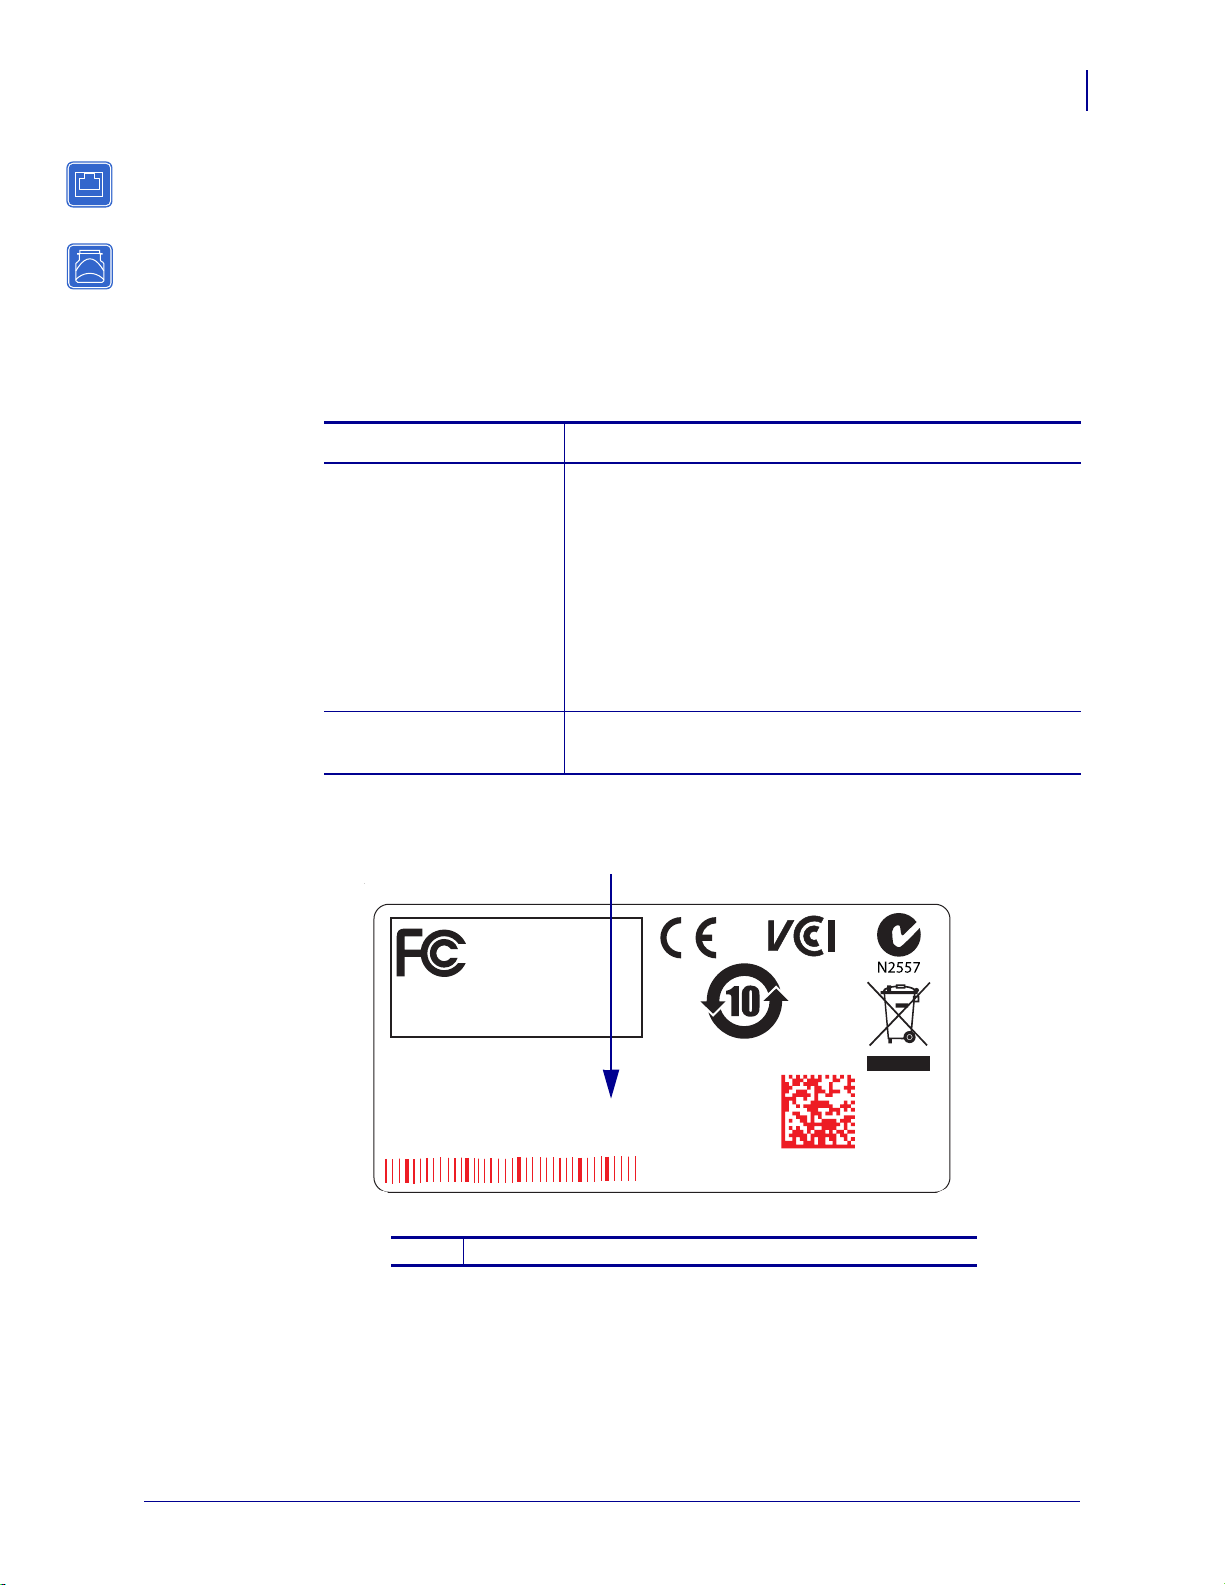
A printer with an external
print server
a. Look at the side of the print server.
b. See Figure 1. Your hardware version is listed on the
Compliance label.
c. Your hardware version number is either blank or V2.
• If your hardware version is blank, assume this
means V1 (version 1). You will need firmware
version 1.01.x.
• If your hardware version is V2, you will need
firmware version 2.01.x.
A printer with an internal
print server
a. Your hardware version will be V1.
b. You will need firmwa re versio n 1.0 1. x.
Figure 1 • External 10/100 Print Server Sample Compliance Label
10/12/17 P1043301-006
Location of hardware version
1

Introduction
18
Printer Requirements
Firmware—Wireless
After a wireless option board is installed, your printer must be running a supported firmware
version to access the features in this manual. Table 7 shows the minimum firmware version
required.
You may download the latest firmware appropriate for your printer to access the latest
encryption features. Go to http://www.zebra.com/firmware for firmware download options.
Table 7 • Supported Firmware Versions
Printer a/b/g/n/ac Internal a/b/g/n Internal b/g
105SL — — — V60.16.X V60.15.X V60.15.X
105SLPlus — — V53.17.16Z — — —
HC100 — — — V54.16.X — —
110PAX 4
170PAX 4
R110PAX 4 — — — R62.16.X
R110Xi4 — — V53.17.11Z V.53.17.7 V.53.17.7 —
RZ400
RZ600
Xi4 — — V53.17.11Z V53.17.X V53.17.X —
ZD400
Series
ZD500 — V74.19.6Z — — — —
ZM400
ZM600
ZE500 — — V53.17.15Z — — —
ZT200
Series
ZT400
Series
ZT510 V80.20.4Z — — — — —
ZT600
Series
— — V60.17.11Z V60.16.X V60.15.X V60.15.X
— — V53.17.11Z R53.16.X R53.16.X R53.16.X
P77.19.14Z — — — — —
— — V53.17.11Z V53.16.X V53.15.X —
— V72.18.X — — — —
— V75.19.7Z — — — —
V80.20.4Z — — — — —
Internal
Wireless Plus
R63.16.X
Wireless Plus Wireless
R62.15.X
R63.15.X
R62.15.X
R63.15.X
P1043301-006 10/12/17

Compatibility
This section identifies the various components that are compatible with all print servers.
Introduction
Compatibility
19
Software IBM
®
: Tivoli® v7.1.3, HP®: Web JetAdmin™ v7.0, OpenView™ v6.4, and any
SNMP management application via Zebra Management Information Base (MIB) all work with
both the wired and wireless print serv ers.
Specifications
External 10/100 Print Server Specifications
General Specifications
Network Connection Ethernet 10BASE-T and 100BASE-T UTP RJ-45
connection Half and Full Duplex Communications
Printer Connection Bi-directional, IEEE-1284 Centronics parallel port
(Compatibility, Nibble, and ECP)
User Interface LED activity indicators:
• bi-color display of operational status
• bi-color display of speed and network activity
Height (external dimensions) 1.2 in. 30.48 mm
Width (external dimensions) 2.8 in. 71.12 mm
Length (external dimensions) 3.2 in. 81.28 mm
Weight 2.7 oz 77 g
Electrical Maximum 450mA at 5.25VDC Power provided by
the printer (Centronics pin 18, 5VDC at 450mA)
Temperature Operating 32° to 104°F 0° to 40°C
Storage –40° to 140°F –40° to 60°C
Relative Humidity Operating 20% to 85%, non-condensing
Storage 5% to 85%, non-condensing
Agency Approvals Agency Approvals
• IEC 60950
• EN 55032, class B
• EN 55024
Agency Marks
• FCC - B
• ICES-003
• VCCI
• RCM
10/12/17 P1043301-006
20
Introduction
Specifications
Internal Print Server Specifications
General Specifications
Network Connection Ethernet 10BaseT and 100BaseT UTP RJ-45
connection Half and Full Duplex Communications
User Interface A single (two element) LED activity indicator:
• bi-color display of operational status (solid
green or solid amber)
• bi-color display of speed and network activity
(flashing green or flashing amber)
Temperature Operating 32° to 140°F 0° to 60°C
Storage –40° to 140°F –40° to 60°C
Relative Humidity Operating 20% to 80%, non-condensing
Storage 5% to 85%, non-condensing
P1043301-006 10/12/17
Wireless Print Server Specifications
General Specifications
Network Connection • IEEE 802.11b/g, 802.11a/b/g/n,
• Data Rates up to 300 Mb per second
• Wireless Medium DSSS and OFDM
• Frequency Band: 2.4G or 2.4G/5G
802.11a/b/g/n/ac
Introduction
Specifications
21
User Interface
• Link Status Indicator—real-time display of
network status
• Wireless Signal Indicators
Electrical Power provided by the printer
Temperature Operating 32° to 140°F 0° to 60°C
Storage –40° to 140°F –40° to 60°C
Relative Humidity Operating 20% to 80%, non-condensing
Storage 5% to 85%, non-condensing
10/12/17 P1043301-006

Introduction
Notes • ___________________________________________________________________
__________________________________________________________________________
__________________________________________________________________________
__________________________________________________________________________
__________________________________________________________________________
__________________________________________________________________________
__________________________________________________________________________
__________________________________________________________________________
__________________________________________________________________________
__________________________________________________________________________
22
Specifications
P1043301-006 10/12/17

2
Installation
This chapter provides information on how to install the Zebra’s wired and wireless print
servers.
Contents
External 10/100 Print Server . . . . . . . . . . . . . . . . . . . . . . . . . . . . . . . . . . . . . . . . . . . . . . 24
Before You Begin . . . . . . . . . . . . . . . . . . . . . . . . . . . . . . . . . . . . . . . . . . . . . . . . . . . . . 24
Illustration. . . . . . . . . . . . . . . . . . . . . . . . . . . . . . . . . . . . . . . . . . . . . . . . . . . . . . . . . . . 25
Installation Instructions . . . . . . . . . . . . . . . . . . . . . . . . . . . . . . . . . . . . . . . . . . . . . . . . 26
Internal 10/100 Print Server. . . . . . . . . . . . . . . . . . . . . . . . . . . . . . . . . . . . . . . . . . . . . . . 27
Wireless Print Servers . . . . . . . . . . . . . . . . . . . . . . . . . . . . . . . . . . . . . . . . . . . . . . . . . . . 27
Install a Radio Card in a Wireless Print Server . . . . . . . . . . . . . . . . . . . . . . . . . . . . . . . . 27
Wireless Radio Card . . . . . . . . . . . . . . . . . . . . . . . . . . . . . . . . . . . . . . . . . . . . . . . . . . 27
Compact Flash Wireless Radio Card. . . . . . . . . . . . . . . . . . . . . . . . . . . . . . . . . . . . . . 29
10/12/17 P1043301-006
Installation
24
External 10/100 Print Server
External 10/100 Print Server
This section provides you with an illustration of the externa l 10/100 Print Server and t he step s
required for its installation. For a list of compatible printers, see Hardware—Wired Print
Servers on page 14.
Before You Begin
Important • In order to take advantage of all features described in this manual, you must
download firmware X.14 or later.
Note • Not all printers support firmware X.14 or later. On those printers, the features
for this print server will be limited.
To upgrade you printer firmware, complete these steps:
1. If your printer has firmware x.12 firmware, you must upgrade your printer firmware to
version x.14.x or higher.
2. To upgrade your firmware, visit the Zebra Web site, and down load th e lat est firmw are fo r
your printer:
www.zebra.com/firmware
3. Confirm that the upgrade was successful:
If... Then...
Your printer has an LCD Look at the lower right-hand corner and confirm the
version of firmware that is on your printer.
Your printer does not have
an LCD
Print out a configuration label to see the version of
firmware that is on your printer.
P1043301-006 10/12/17
Illustration
1
5
4
3
2
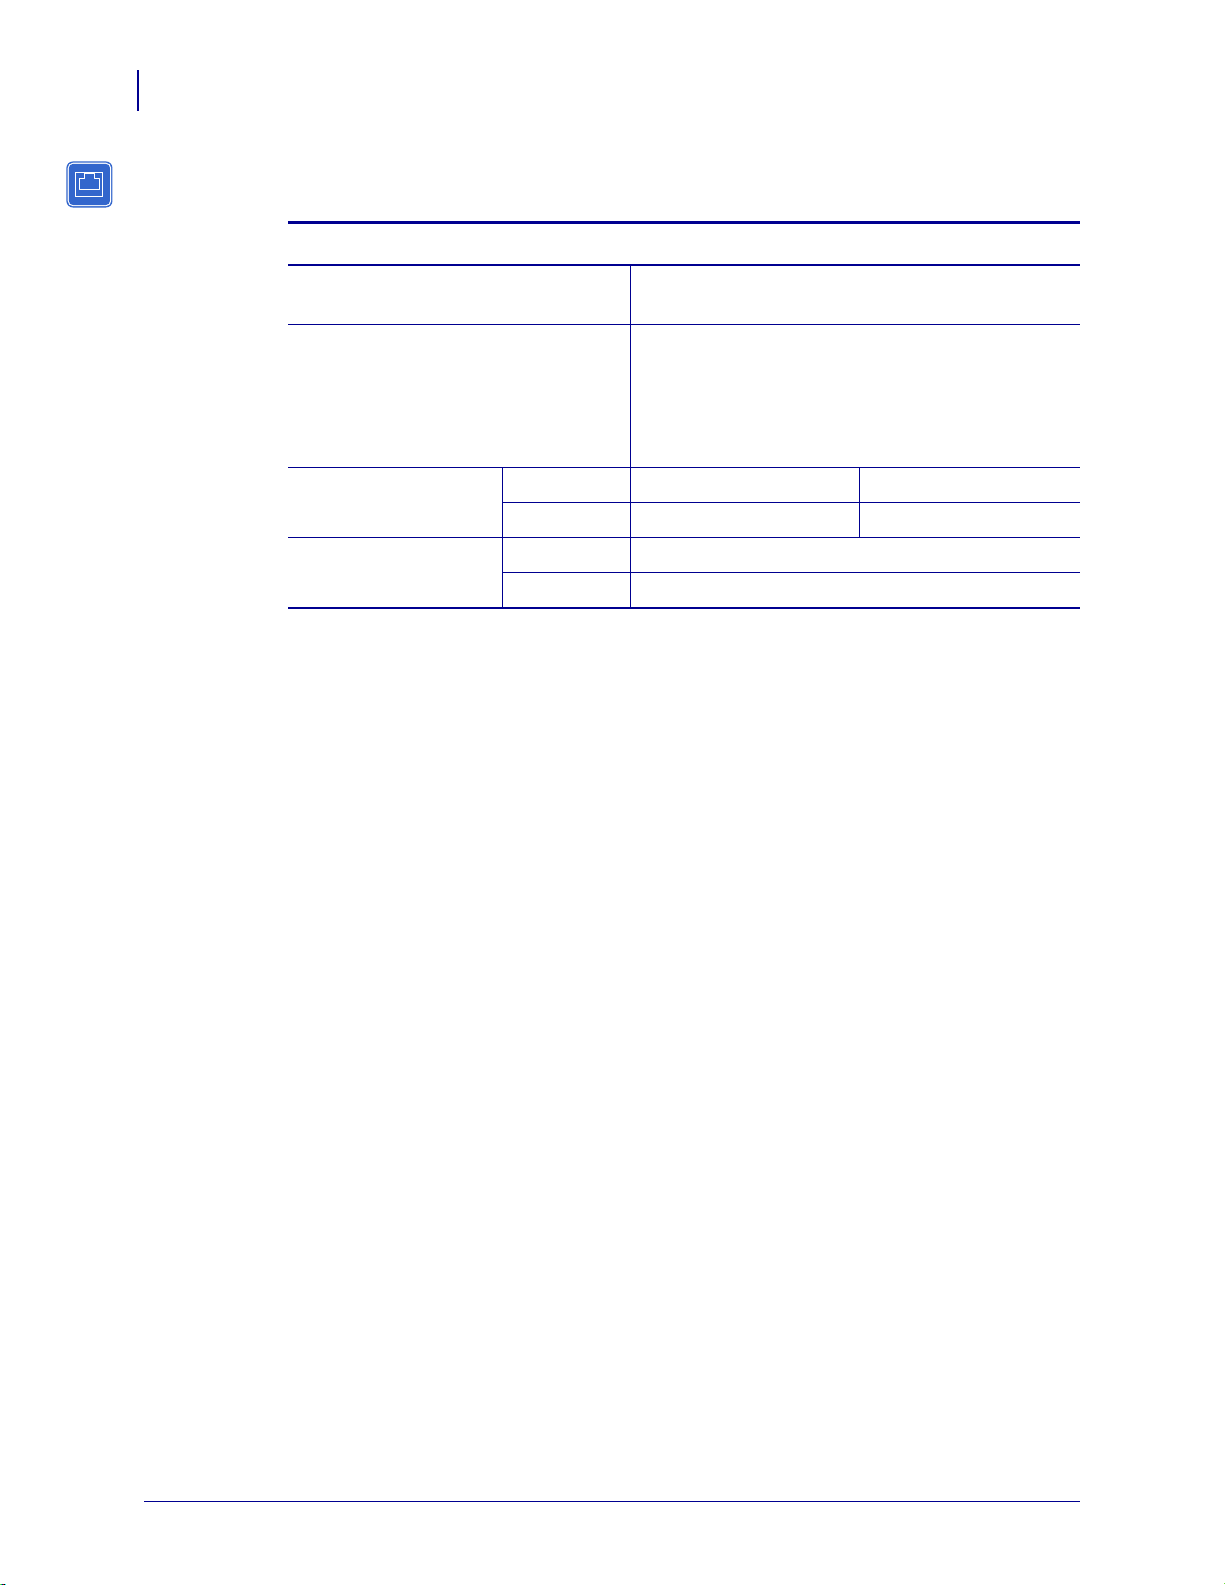
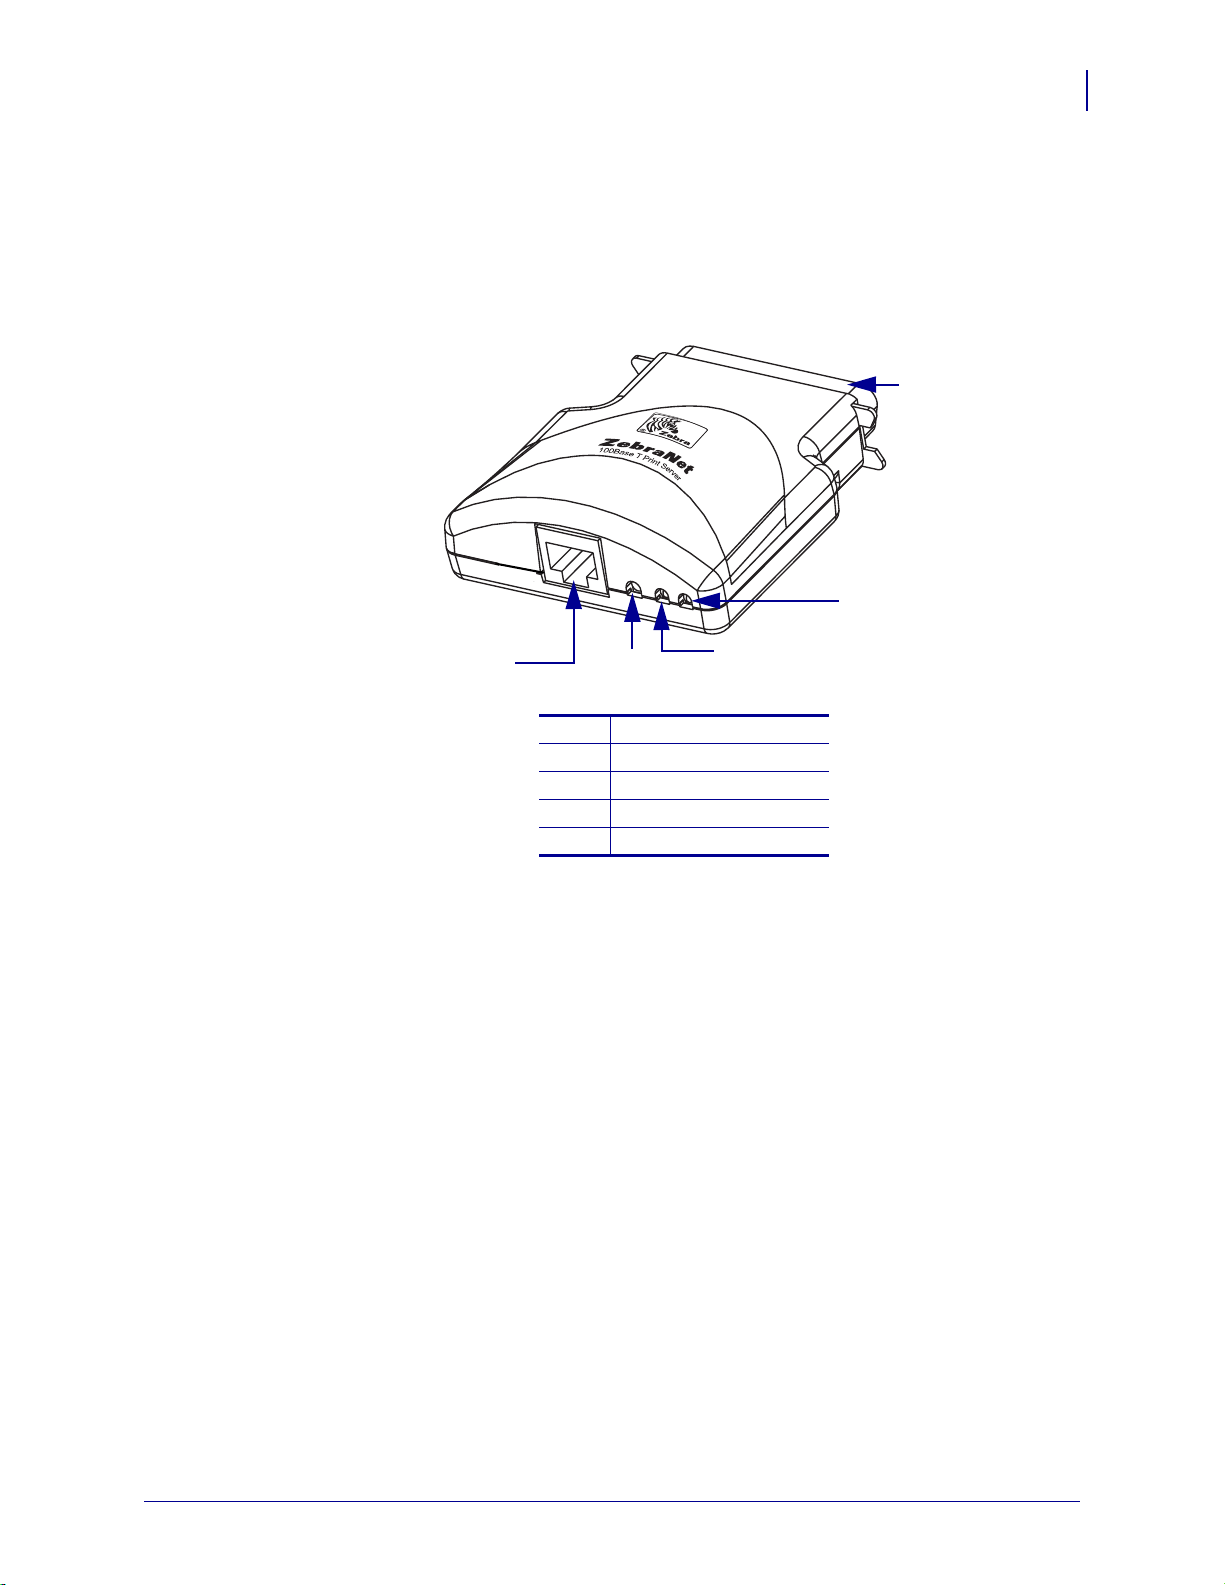
Figure 2 shows an external 10/100 Print Server. When necessary, refer back to this illustration
during the installation steps.
External 10/100 Print Server
Figure 2 • External 10/100 Print Server
Installation
25
Parallel connector
1
Network status LED
2
Status LED
3
Test button
4
Ethernet connector
5
For more details on status indicators, see External 10/100 Print Server Network Status and
Status Indicators on page 120.
10/12/17 P1043301-006

Installation
Parallel
Port
Connector
Printer Back
26
External 10/100 Print Server
Installation Instructions
To install an external 10/100 Print Server, complete these steps:
1. Turn off (O) the printer.
2. On the back of the printer, connect the external 10/100 Print Server device to the parallel
port.
3. Secure the wire locks.
4. On the back of the external 10/100 Print Server, connect an active Ethernet cable to the
RJ-45 connector Ethernet conne ctor.
5. Turn on (I) the printer.
The external 10/100 Print Server performs a Power On Self-Test (POST). This takes about
45 seconds. During the POST, the external 10/100 Print Server Status LED (just below the
TEST button) turns red and flashes on and off. Once the POST is successfully completed
and the external 10/100 Print Server is fully initialized, the Status LED tu rns green.
For more details on status indicators, see External 10/100 Print Server Network Status and
Status Indicators on page 120.
Note • If there is not an active Ethernet cable attached to the external 10/100 Print Server,
the Status LED turns red and slowly flashes on and off.
6. To check the status of the external 10/100 Print Server, press the Test button located on the
back of the external 10/100 Print Server.
This prints out a configuration label of the external 10/100 Print Server. To see a sample
label, see Figure 4 on page 35.
P1043301-006 10/12/17

Internal 10/100 Print Server
To install an internal 10/100 print server, see the installation instructions that came with the
print server.
Wireless Print Servers
To install a wireless print server, see the installation instructions that came with the print
server.
Install a Radio Card in a Wireless Print Server
Note • This section applies only to the Wireless Print Server and the Wireless Plu s Print
Server. All other wireless print servers covered by this manual have a built-in radio.
Printers that have the wireless option board installed can use any of th e wireless rad io cards or
Compact Flash wireless radio cards listed in Supported Wireless Radio Cards on page 9. This
section provides instructions for installing either type of card. Most printers use a clear plastic
RF cover over the wireless radio card or compact Flash wireless radio card.
Installation
Internal 10/100 Print Server
27
Wireless Radio Card
This section applies to PCMCIA or CardBus wireless radio cards.
Note • Z4Mplus, R4Mplus, and Z6Mplus printers do not support CardBus wireless radio
cards.
To install a wireless radio card, complete these steps:
1. Turn off (O) the printer.
2. Remove and discard the metal cover that was shipped in place over the wireless option
card slot on the back of the printer.
10/12/17 P1043301-006
Installation
4
2
1
3
3
1
2
28
Install a Radio Card in a Wireless Print Server
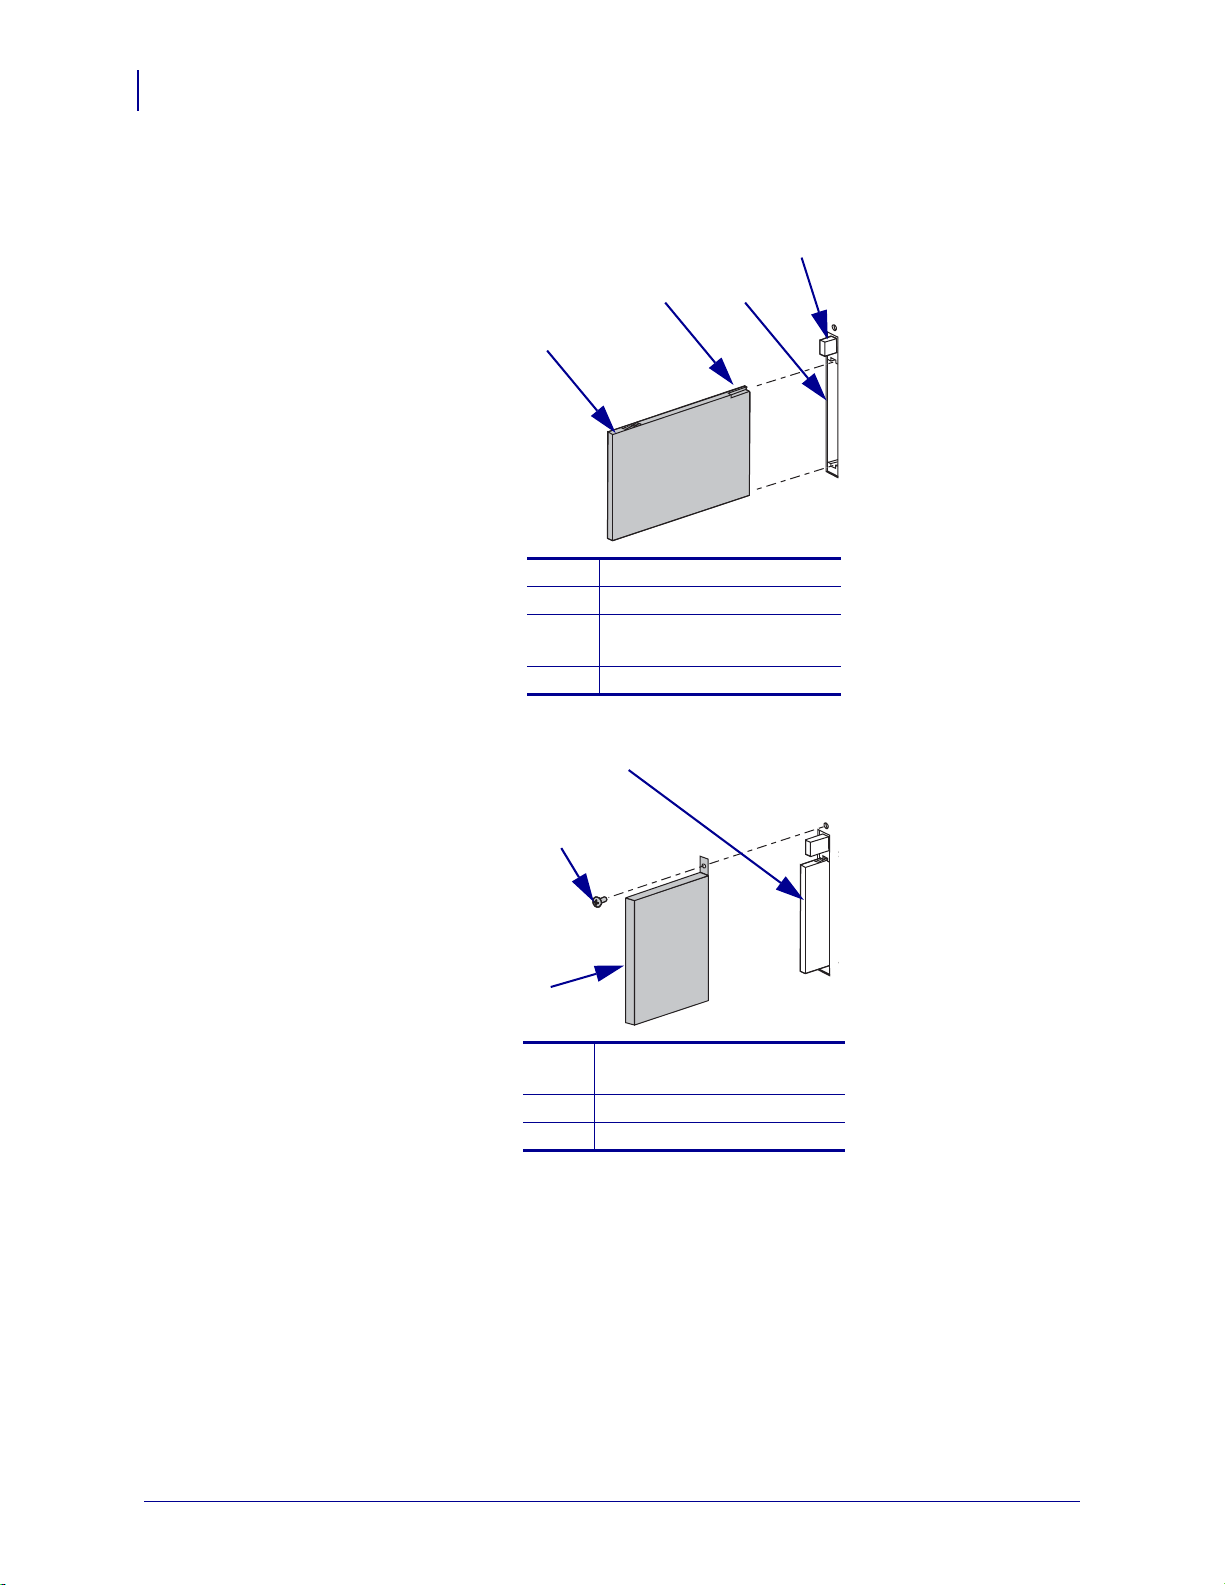
3. Position the notch on the wireless radio card on the top, leading edge. Insert the wireless
radio card into the wireless option card slot on the back of the printer until the card-eject
button pops out.
Wireless radio card
1
Notch
2
Wireless option card slot
3
on back of printer
Card-eject button
4
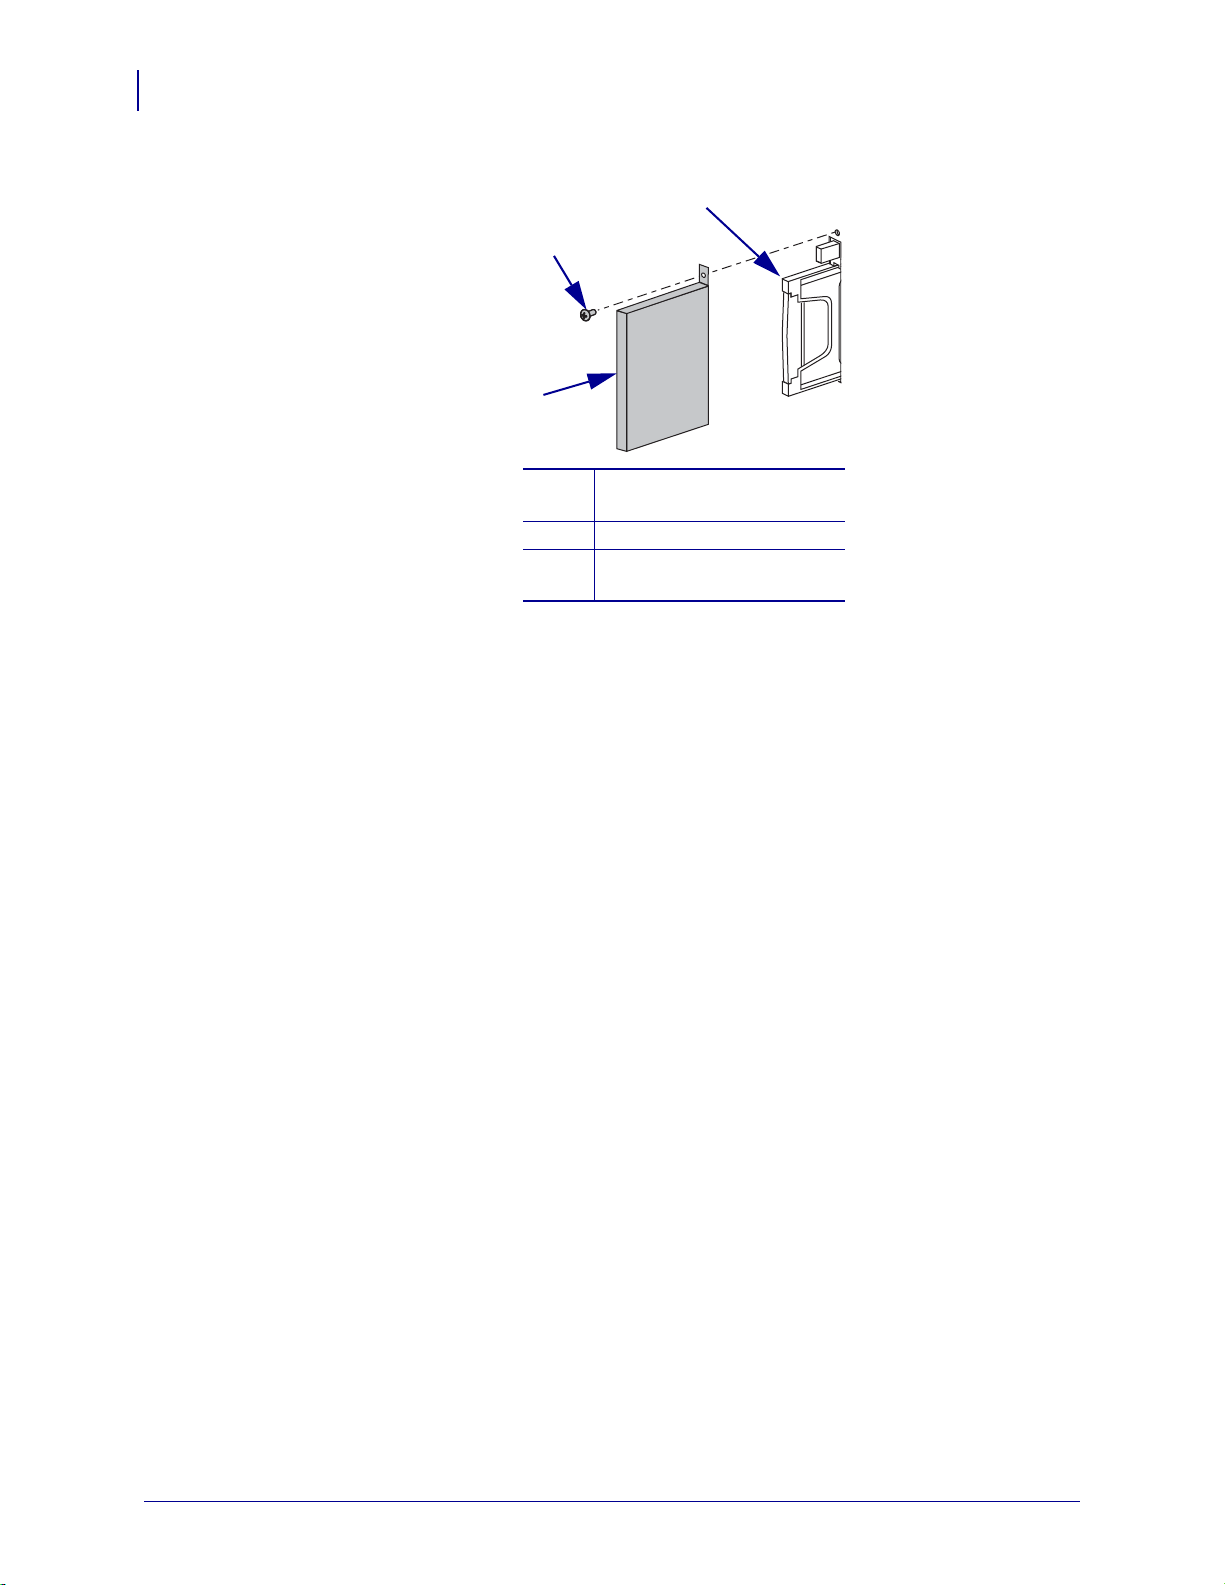
4. Place the RF card cover over the wireless radio card, and secure it with a small screw.
Clear plastic RF card cover
1
(not used on all printers)
Screw
2
Wireless radio card
3
5. Turn on (I) the printer.
The printer restarts and uses the wireless radio card to communicate with your WLAN.
Allow several minutes for the printer to connect to the network. For more information
about wireless status, refer to View Wireless Status through the Control Panel on page 41
or Troubleshooting the Wireless Print Server on page 125.
P1043301-006 10/12/17
Compact Flash Wireless Radio Card
4
2
1
3
This section applies to Compact Flash wireless radio cards, which require an adapter before
they can be used in the wireless option card slot.
To install a Compact Flash wireless radio card and adapter, complete these
steps:
1. If you have not already done so, turn off (O) the printer.
2. Remove and discard the metal cover that was shipped in place over the wireless option
slot on the back of the printer.
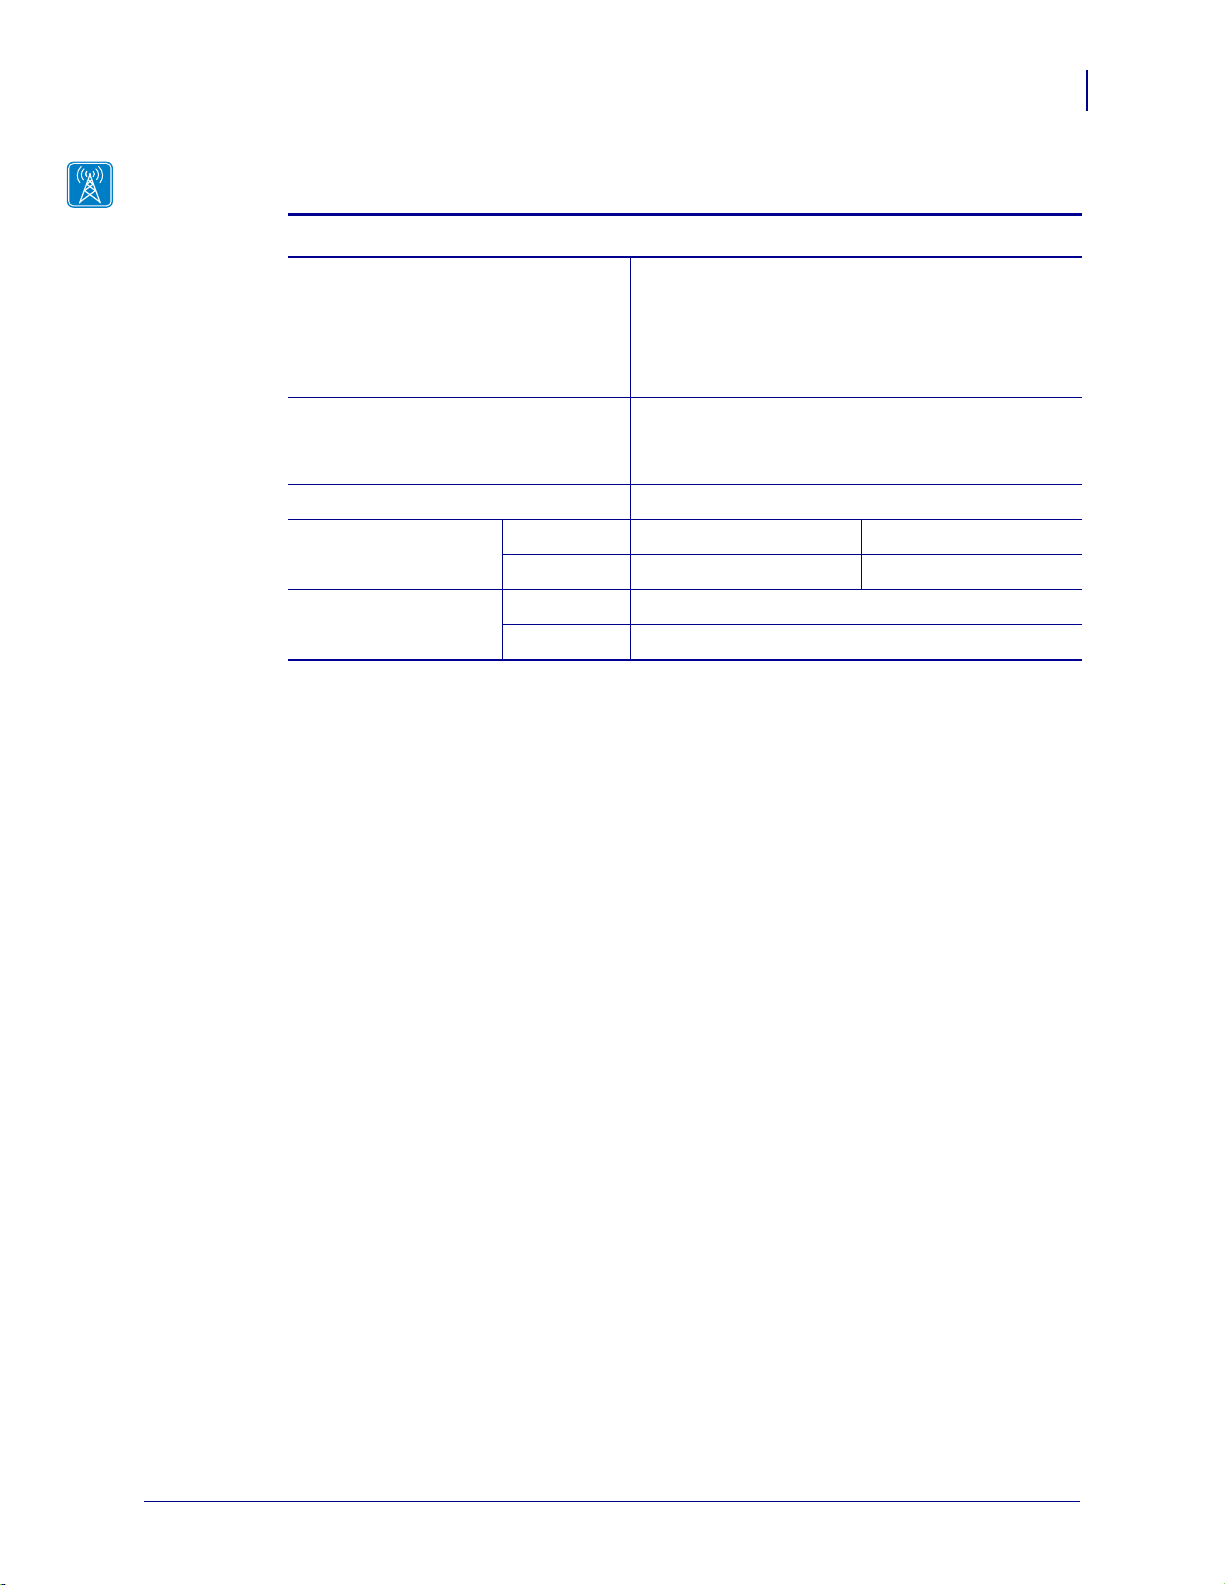
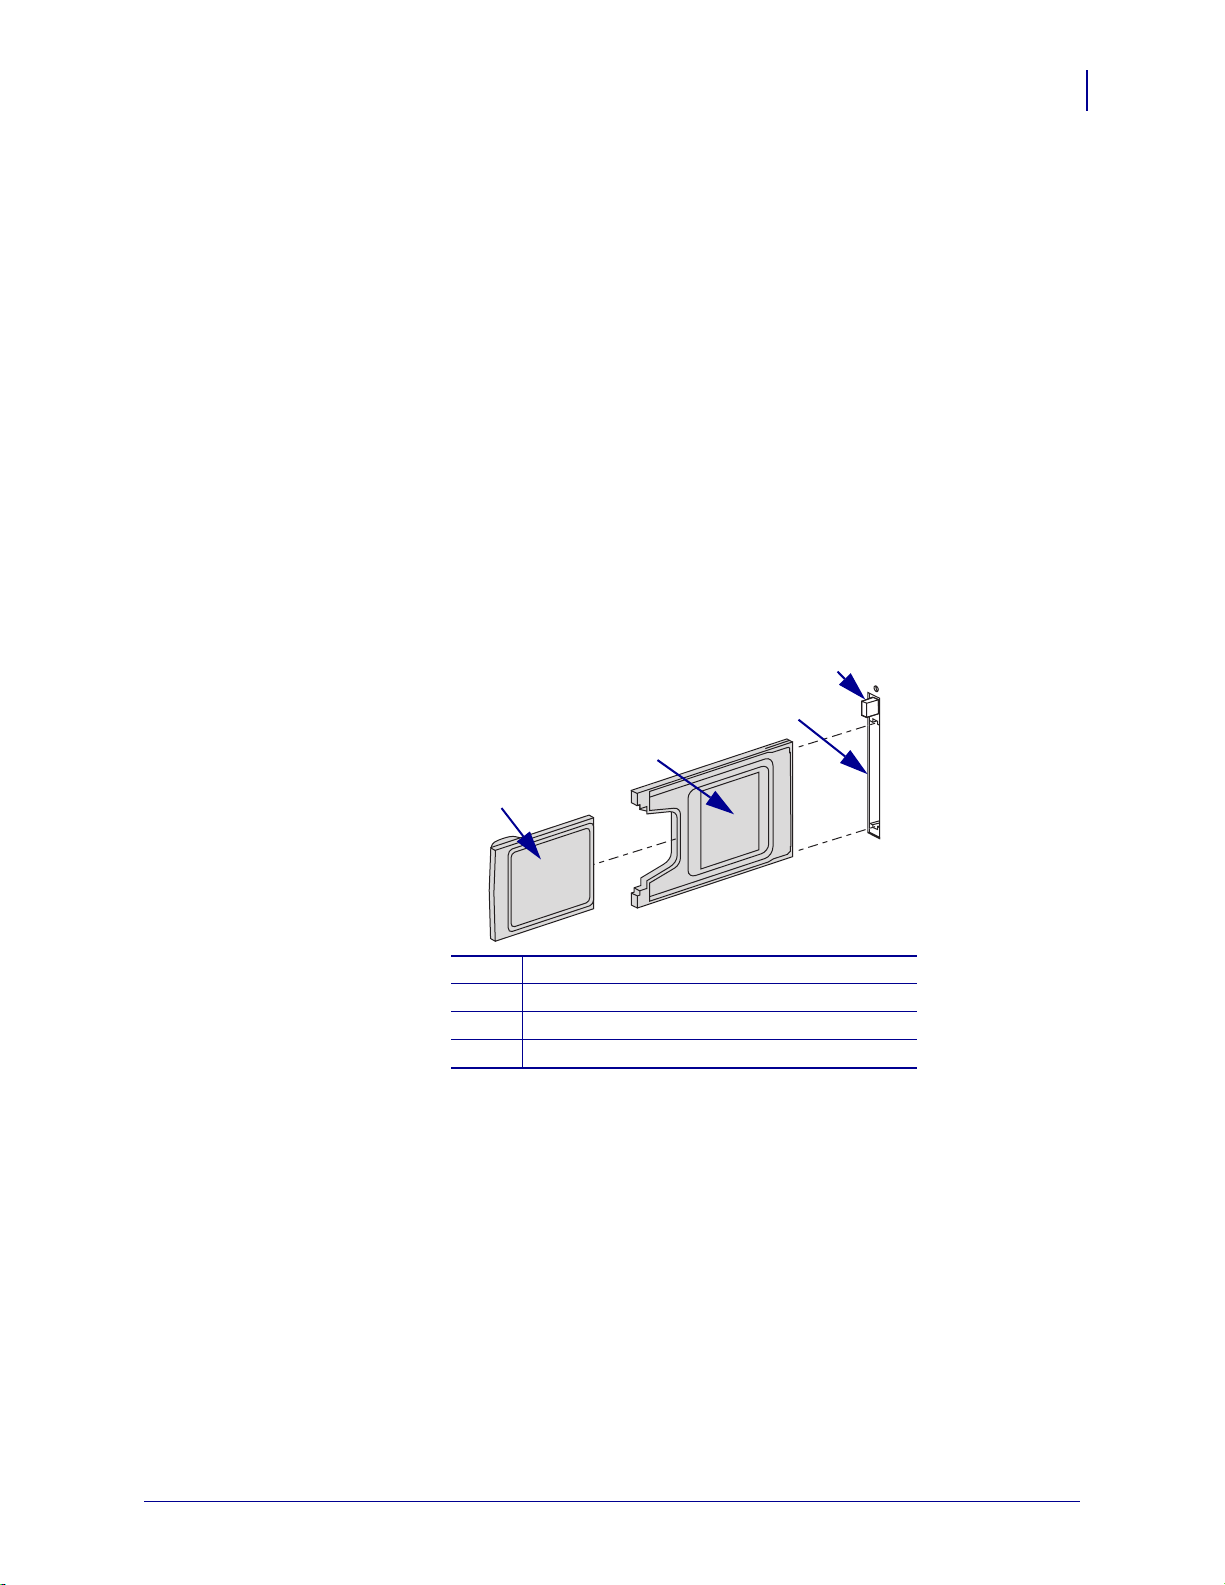
3. See Figure 3. Position the adapter with the back facing as shown. Insert the adapter into
the wireless option card slot on the back of the printer until the card-eject button pops out.
4. See Figure 3. Insert the Compact Flash wireless radio card into the adapter.
Figure 3 • Installing a Compact Flash Wireless Radio Card
Installation
Install a Radio Card in a Wireless Print Server
29
Back of Compact Flash wireless radio card
1
Back of adapter
2
Wireless option card slot on back of printer
3
Card-eject button
4
10/12/17 P1043301-006
Installation
3
1
2
30
Install a Radio Card in a Wireless Print Server
5. Place the RF card cover over the wireless radio card, and secure it with a small screw.
6. Turn on (I) the printer.
The printer restarts and uses the wireless radio card to communicate with your WLAN.
Allow several minutes for the printer to connect to the network. For more information
about wireless status, refer to View Wireless Status through the Control Panel on page 41
or Troubleshooting the Wireless Print Server on page 125.
Clear plastic RF card cover
1
(not used on all printers)
Screw
2
Compact Flash wireless
3
radio card and adapter
P1043301-006 10/12/17
 Loading...