

Page 1
Grilling Function
Information Sheet
This leaflet is designed to provide useful key information for the
usage of the Grill of your oven. Please use this leaflet in
conjunction with your instruction book.
• Always keep the door of the appliance
and cooking.
• The Grill should be cleaned at regular intervals to remove
any build up of fats and other foodstuffs. Refer to the
cleaning and maintenance instructions in your user manual.
• Never leave the appliance unattended whilst grilling.
• Use the correct grilling Function / Setting for the food types
being cooked.
• When using the grill function select the appropriate
temperature setting.
Please refer to your appliance user manual for further information.
closed whilst grilling
NO YES
Page 2

User
Manual
Informacje
dla
użytkownika
Built-in
Oven
Piekarnik do
zabudowy
ZOB 580
1
Page 3

Thank you for selecting our appliance
We wish you lots of enjoyment with your new appliance and we hope that you will consider our brand
again when purchasing household appliances.
Please read this user manual carefully and keep it throughout the product life cycle as a reference
document. The user manual should be passed on to any future owner of the appliance.
2
Page 4

Contents
Important safety information ........................................................................................................... 4
Description of the oven .................................................................................................................. 6
Controls ....................................................................................................................................... 7
Before the first use ........................................................................................................................ 9
Electronic programmer ............................................................................................................... 10
Using the oven ........................................................................................................................... 15
Cooking chart- Conventional and Fan oven ................................................................................ 21
Cooking chart- Grilling ................................................................................................................ 22
Cooking chart- Thermal grilling ................................................................................................... 22
Cleaning and Maintenance ......................................................................................................... 23
Care of catalytic liners ................................................................................................................. 24
Something not working ............................................................................................................... 29
Technical data ............................................................................................................................ 30
Electrical connection ................................................................................................................... 31
Instructions for building in ............................................................................................................ 32
Guarantee/Customer Service (for the United Kingdom only) ....................................................... 33
Technical assistance and spare parts .......................................................................................... 34
European guarantee .................................................................................................................. 35
Guide to using the user instructions
Safety instructions
Step by step instructions
)
Hints and Tips
This appliance conforms with the following ECC Directives:
- 2006/95 (Low Voltage Directive);
- 89/336 (EMC Directive);
- 93/68 (General Directive);
and subsequent modifications.
3
Page 5

English
Important Safety Information
These warnings are provided for the safety of the users and those living with them. So read
them carefully before installing and using the appliance.
This will allow you to obtain best performance, avoid improper actions, use the appliance in
complete safety and also respect the environment.
If you need assistance, contact our Customer Care Department on 08705 727 727.
Installation
· This oven must be installed by qualified
personnel to the relevant British Standards.
· This oven is heavy. Take care when mov-
ing it.
· Remove all packaging, both inside and out-
side the oven, before using the oven.
· Do not attempt to modify the oven in any
way.
During Use
· This oven is intended for domestic cooking
only. It is not designed for commercial or
industrial purposes.
· Always stand back from the oven when
opening the oven door during cooking
or at the end of it to allow any build up of
steam or heat to release.
· Appliances become very hot with use, and
retain their heat for long periods after use.
Care should be taken to avoid touching
heating elements inside the oven.
· Never line any part of the oven with alu-
minium foil.
· Do not allow heatproof cooking material, e.g.
roasting bags, to come into contact with oven
elements.
· Never place plastic or any other material
which may melt in or on the oven.
· Do not place sealed cans or aerosols in-
side the oven. They may explode if they
are heated.
· Do not hang towels, dishcloths or clothes
from the oven or its handle.
· Do not use this oven if it is in contact with
water and never operate it with wet hands.
· Take great care when heating fats and oils
as they will ignite if they become too hot.
· Always use oven gloves to remove and re-
place food in the oven.
· Before cleaning the oven, either turn the
power off or pull the mains plug out.
· Ensure that all controls are in the OFF posi-
tion when not in use.
· Do not leave cookware containing foodstuffs,
e.g. fat or oil in or on the oven in case it is
inadvertently switched ON.
· When using other electrical appliances, en-
sure the cable does not come into contact with
the hot surfaces of the oven.
4
Page 6

People Safety
· This oven is designed to be operated by adults.
Do not allow children to play near or with the
oven.
· The oven gets hot when it is in use. Children
should be kept away until it has cooled.
· This appliance is not intended for use by chil-
dren or other persons whose physical, sensory or mental capabilities or lack of experience and knowledge prevents them from using the appliance safely without supervision
or instruction by a responsible person to ensure that they can use the appliance safely.
Maintenance and Cleaning
· Only clean this oven in accordance with the
instructions.
· Always allow the oven to cool down and switch
off the electrical supply before carrying out any
cleaning or maintenance work.
· The oven should be kept clean at all times. A
build-up of fats or other foodstuffs could result
in a fire, especially in the grill pan.
· Never use steam or high pressure steam
cleaners to clean the appliance.
· Do not use abrasive cleaners or sharp metal
scrapers. These can scratch the glass in the
oven door, which may result in the shattering
of the glass.
Service
· This oven should only be repaired or ser-
viced by an authorised Service Engineer and
only genuine approved spare parts should
be used.
Environmental Information
· After installation, please dispose of the packaging
with due regard to safety and the environment.
· When disposing of an old appliance, make it
unusable, by cutting off the cable. Remove
any door catches, to prevent small children
being trapped inside.
The symbol on the product or on its packaging
indicates that this product may not be treated as
household waste. Instead it shall be handed over
to the applicable collection point for the recycling of
electrical and electronic equipment. By ensuring
this product is disposed of correctly, you will help
prevent potential negative consequences for the
environment and human health, which could
otherwise be caused by inappropriate waste
handling of this product.
For more detailed information about recycling of this
product, please contact your local city office, your
household waste disposal service or the shop
where you purchased the product.
Always keep these user instructions with the
appliance. Should the appliance be passed
on to third persons or sold, or if you leave
this appliance behind when you move house,
it is very important that the new user has
access to these user instructions and the
accompanying information.
5
Page 7
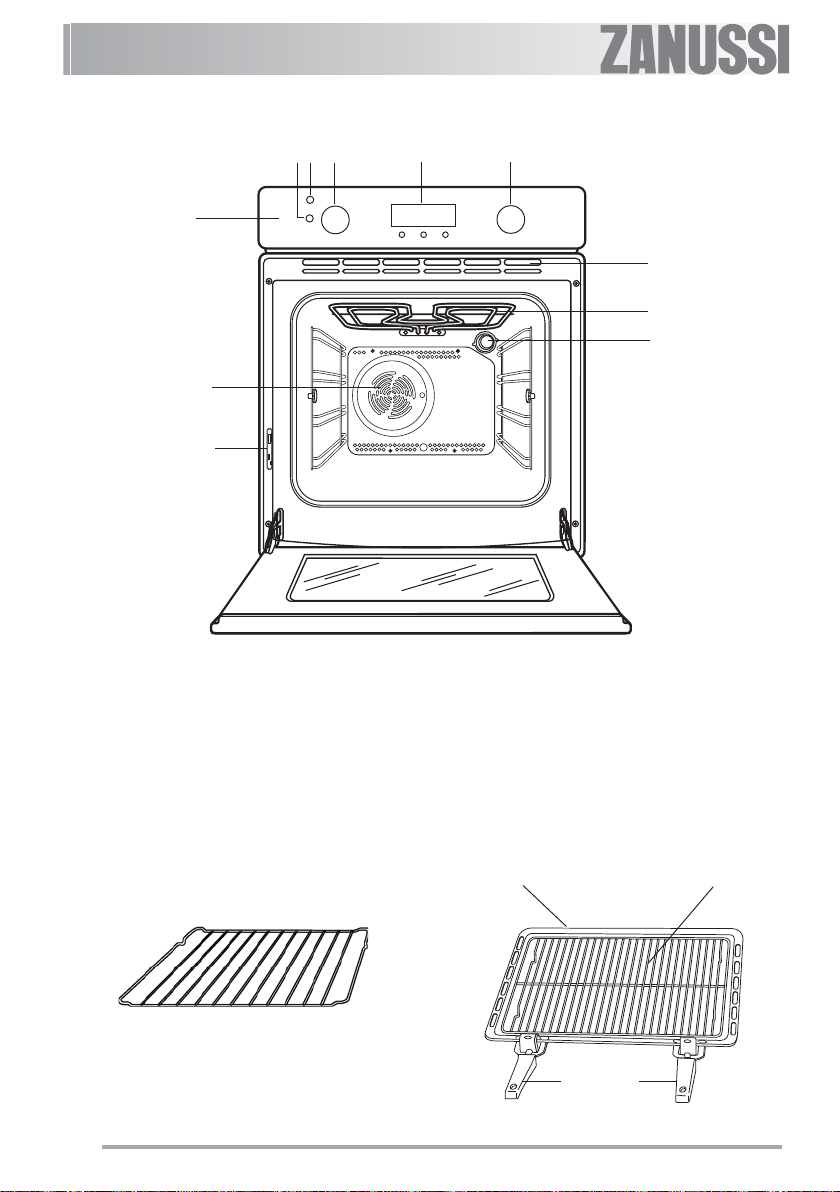
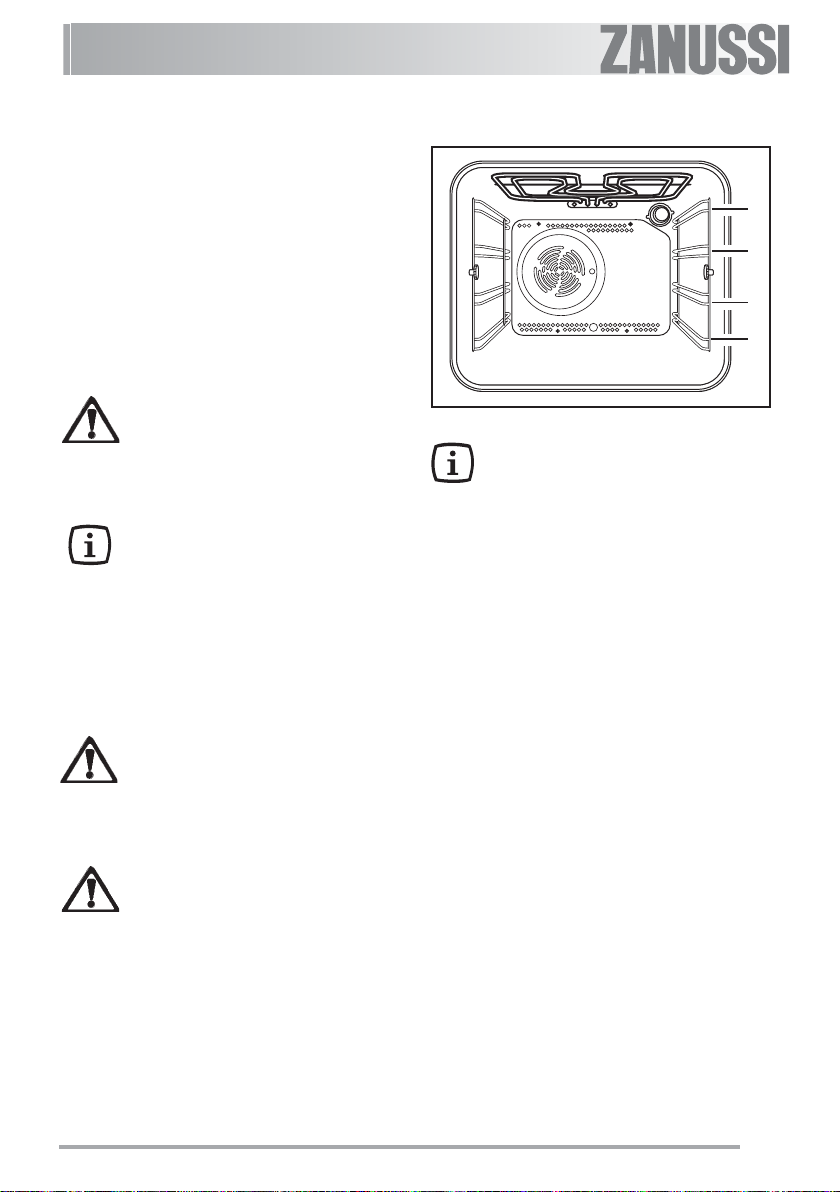
Description of the oven
524
6
1
10
11
3
7
8
9
1. Control Panel
2. Oven Function Control Knob
3. Electronic Programmer
4. Thermostat Control Knob
5. Thermostat Control Light
Oven accessories
Anti-tip shelf
6
6. Mains On Light
7. Air Vents for Cooling Fan
8. Grill
9. Oven Light
10. Oven Fan
11. Rating Plate
Grill/roasting
pan
Removable
handles
Grill trivet
Page 8
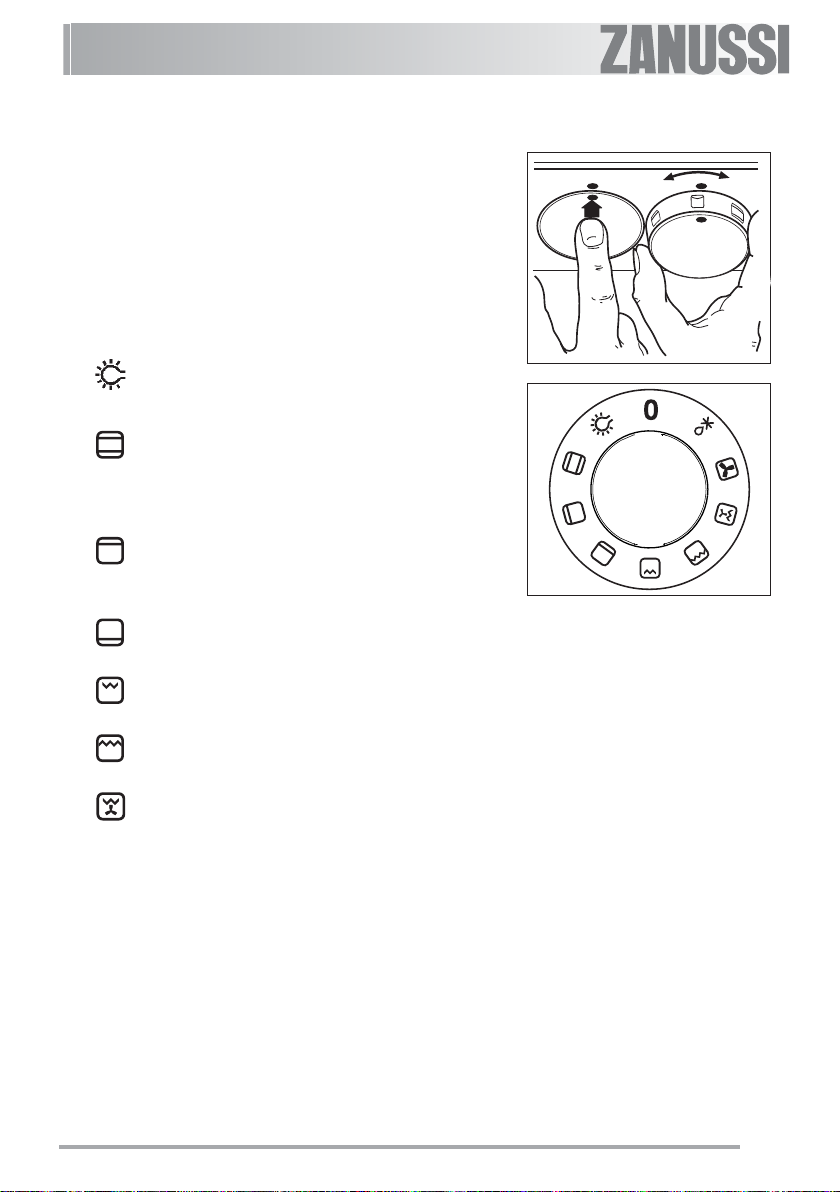
Controls
Push-Pull control knobs
This model is provided with push-pull control knobs.
These knobs can be completely sunken inside the
control panel when the oven is not working.
Oven Function Control Knob
0 The oven is off.
Oven light - The oven light will be on
without any cooking function.
Conventional cooking - The heat
comes from both the top and bottom
element, ensuring even heating inside
the oven.
Top heating element - The heat
comes from the top element only (outer
section).
Bottom heating element - The heat
comes from the bottom of the oven only.
Inner grill element only - Can be
used for grilling small quantities.
Full Grill - The full grill element will be
on.
Thermal Grilling - This function offers
an alternative method of cooking food
items, normally associated with
conventional grilling. The grill element
and the oven fan operate alternately,
circulating hot air around the food.
When using the thermal grill
cooking function, select a
maximum temperature of 200°C.
7
Page 9
Fan cooking - This allows you to
roast or roast and bake
simoultaneously using any shelf,
without flavour transference.
Defrost Setting - This setting is
intended to assist in thawing of frozen
food.
Mains on Light
The mains on light will come on when the oven
function control knob is set.
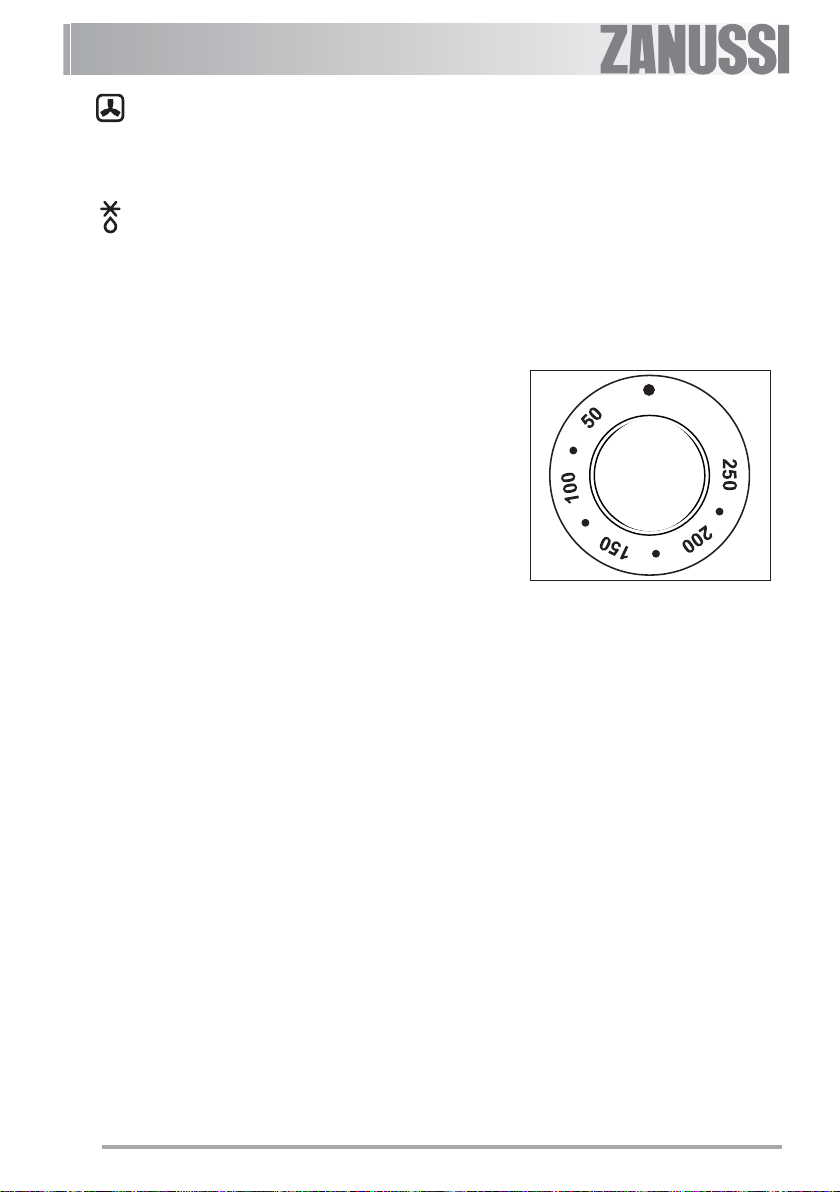
Thermostat Control Knob
Turn the thermostat control knob clockwise to select
temperatures between 50°C and 250°C.
Thermostat Control Light
The thermostat control indicator will come on when
the thermostat control knob is turned. The indicator
will remain on until the correct temperature is
reached.
It will then cycle on and off to show the temperature
is being maintained.
Safety Thermostat
To prevent dangerous overheating (through
incorrect use of the appliance or defective
components), the oven is fitted with a safety
thermostat, which interrupts the power supply. The
oven switches back on again automatically, when
the temperature drops.
Should the safety thermostat trigger due to incorrect
use of the appliance, it is enough to remedy the error
after the oven has cooled down; if on the other hand,
the thermostat triggers because of a defective
component, please contact Customer Service.
8
Page 10
The cooling fan
The cooling fan is designed to cool the oven and
the control panel. The fan switches on automatically
after a few minutes of cooking. Warm air is blown
out through the aperture near the oven door
handle. When the oven is switched off, the fan will
remain on in order to cool the oven and kitchen
cabinets properly, after which it switches off
automatically.
Before the first use
Remove all packaging, both inside and
outside the oven, before using the oven.
Before using for the first time, the oven should be
heated up without food.
During this time, an unpleasant odour may be
emitted. This is absolutely normal. It is caused by
manufacturing residues.
Ensure the room is well ventilated.
1. Switch the oven function control knob
)
This procedure should be repeated with the full
grill function and coventional cooking function
to fan cooking .
2. Set the thermostat control knob to
250°C.
3. Open a window for ventilation.
4. Allow the oven to run empty for approximately 45 minutes.
for approximately 5-10 minutes.
Then let the oven cool down. Then
dampen a soft cloth with warm water and
a little mild washing-up liquid and use this
to clean the oven cavity.
Before using for the first time, carefully
wash the oven accessories as well.
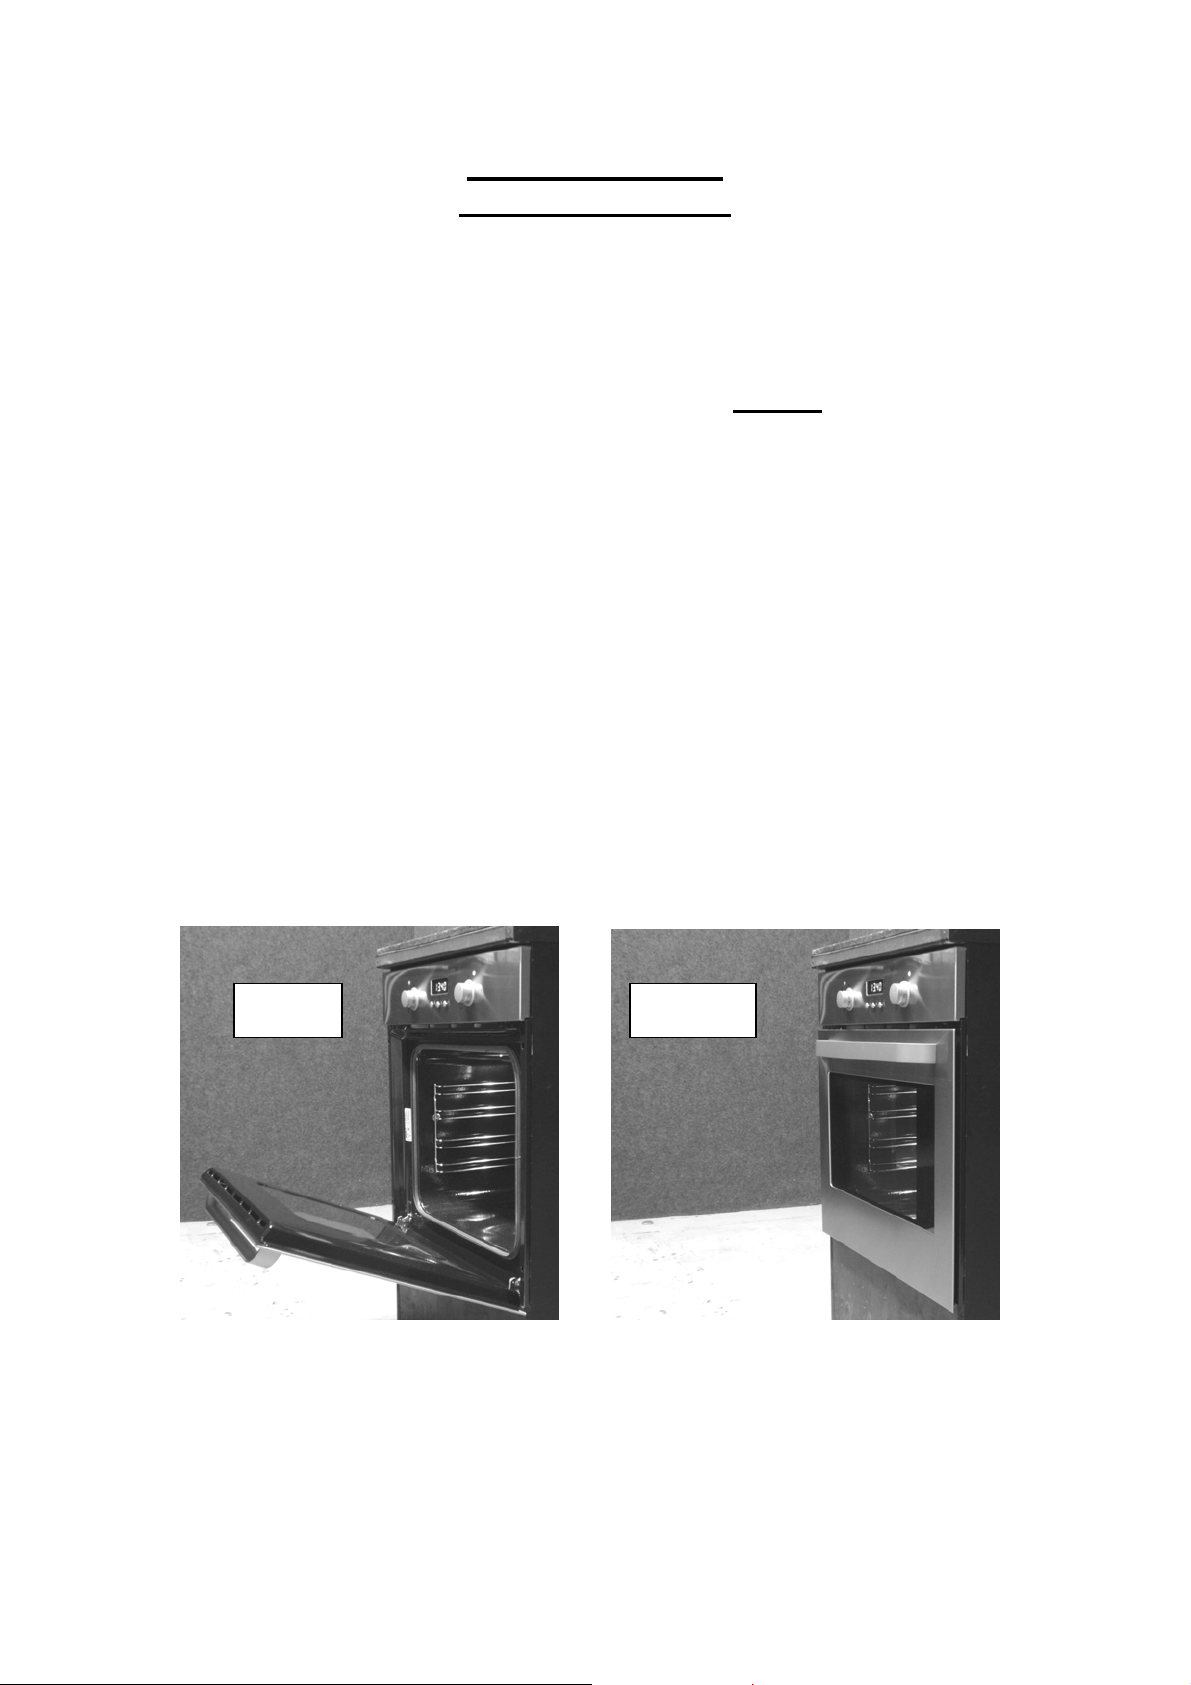
To open the oven door, always hold the
handle in the centre.
9
Page 11
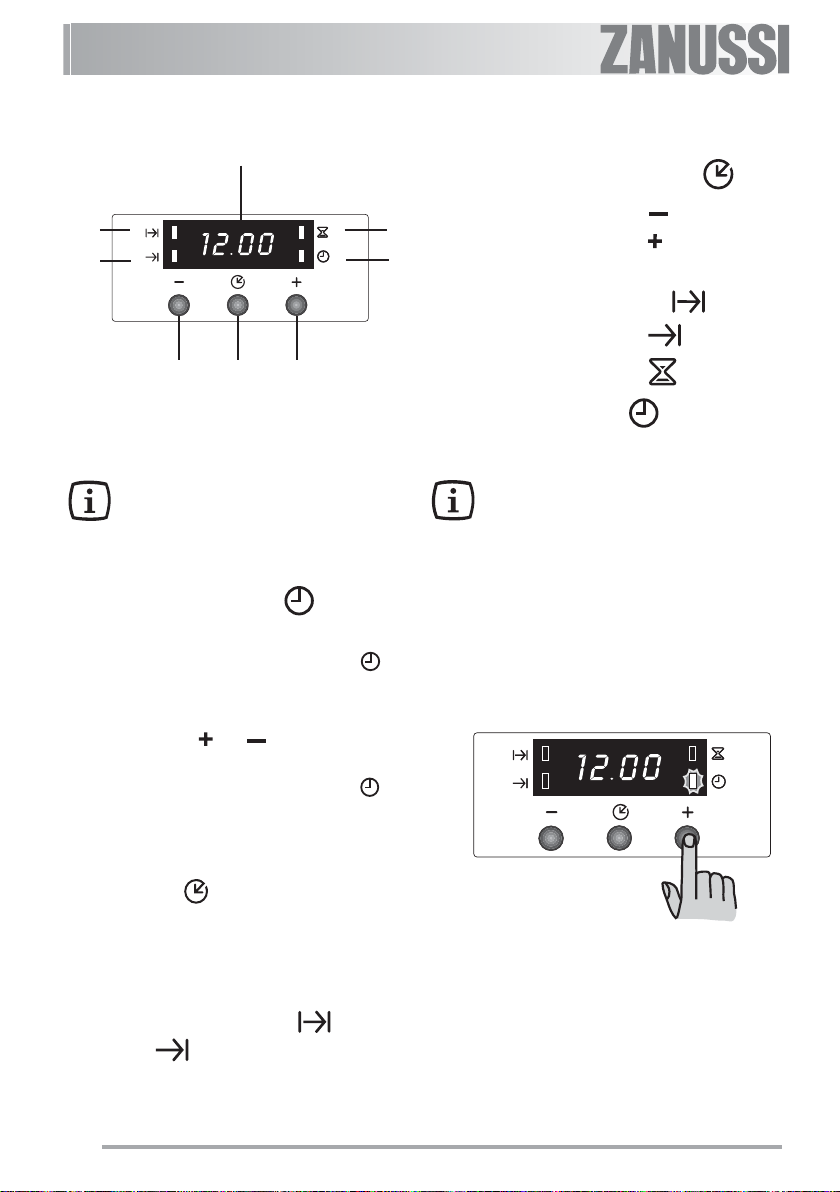
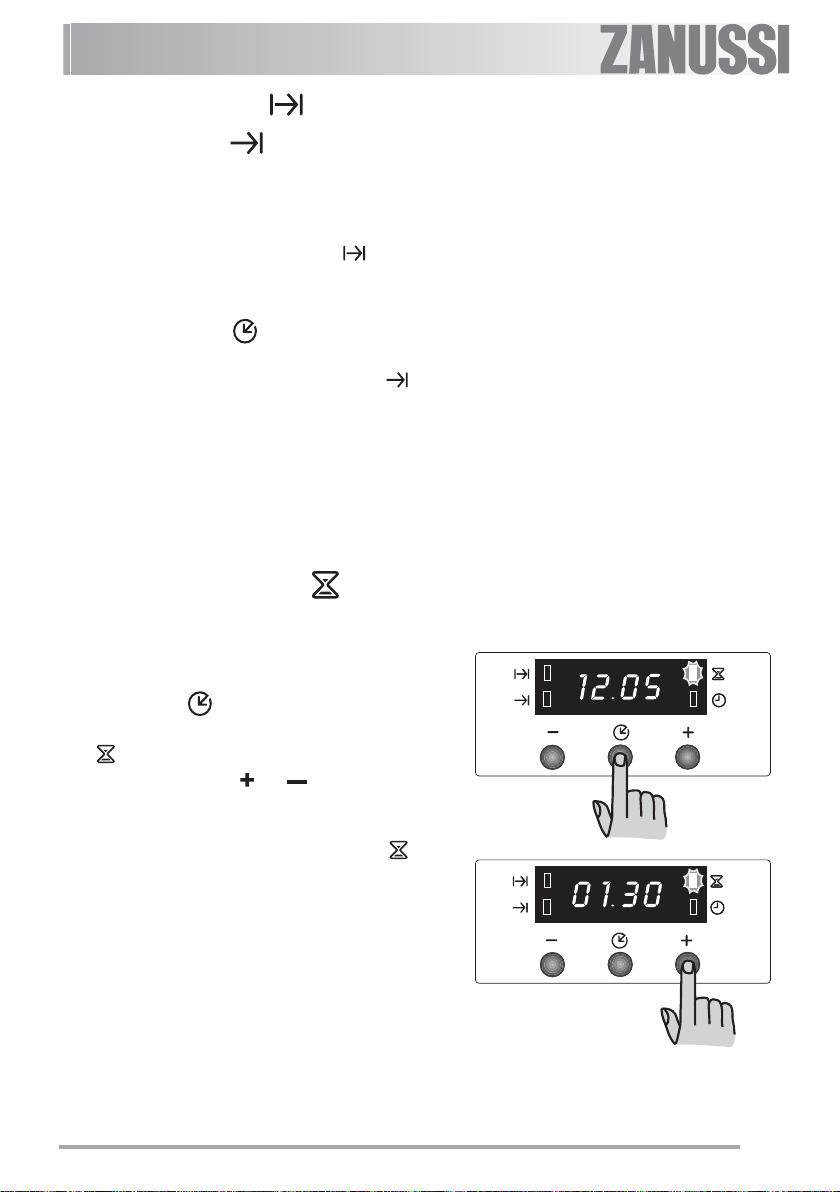
Electronic programmer
4
5
6
123
The oven will only work if the time of
day has been set.
However, the oven can also be operated
without any programme.
Setting the time of day
When the power supply is switched on, or after a
power failure, the “Time of day” pilot lamp will
flash on the display.
To set the correct time of day:
1. Press button “ ” or “ ”.
2. After the setting is carried out, wait for 5
seconds: the “Time of day” pilot lamp will
go out and the display will show the set time.
The appliance is ready for use.
To reset the correct time of day:
7
1. Push button for selecting a function
2. Decreasing control button “ ”
3. Increasing control button “ ”
8
4. Display
5. “Cooking Duration” pilot lamp
6. “End of cooking” pilot lamp
7. “Minute minder” pilot lamp
8. “Time of day” pilot lamp
In the event of a power failure, all the
settings (time of day, programme setting or
programme in operation) will be cancelled.
When the power is restored, the numbers
in the display will flash, and the clock/timer
has to be reset.
1. Press button repeatedly to select the “Time
of day” function. The relevant pilot lamp will
start flashing. Then proceed as described
above.
The time of day can only be reset if no automatic
function (cooking duration or end of
cooking ) has been set.
10
Page 12
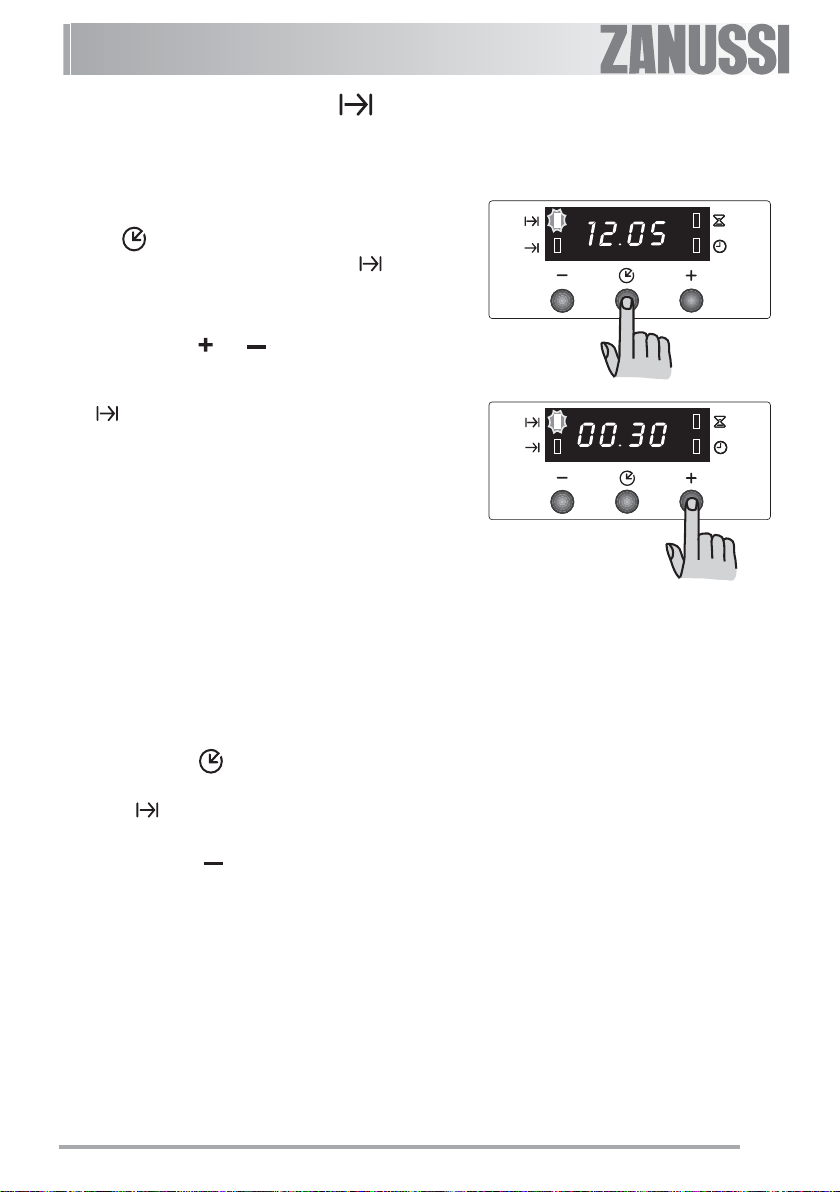
“Cooking Duration” function
This function allows the oven to automatically switch
off at the end of a programmed cooking duration
time. Place food in the oven, select a cooking
function and adjust the cooking temperature. Press
button repeatedly to select the “Cooking
Duration” function. The relevant pilot lamp will
start flashing. Then, proceed as follows:
To set the duration time:
1. Press button “ ” or “ ”.
2. After the setting is carried out, wait for 5
seconds: the "Cooking Duration" pilot lamp
will come on and the display will revert to
the time of day.
3. When cooking time is over, the oven will be
switched off automatically and an acoustic alarm
will be heard, while the pilot lamp will start
flashing. Turn the oven function and the
thermostat control knob to zero.
To switch off the acoustic alarm, press any
button.
NOTE: turning the acoustic alarm off will reset
the oven to manual, and if the oven function
and the thermostat knobs are not set to zero
the oven will start to heat again.
To cancel the duration time:
1. Press button repeatedly to select the
“Cooking Duration” function. The relevant pilot
lamp will flash and the display will show
the remaining cooking time.
2. Press button “ ” until the display shows
“0:00”. After 5 seconds the pilot lamp will go
out and the display will revert to the time of
day.
11
Page 13
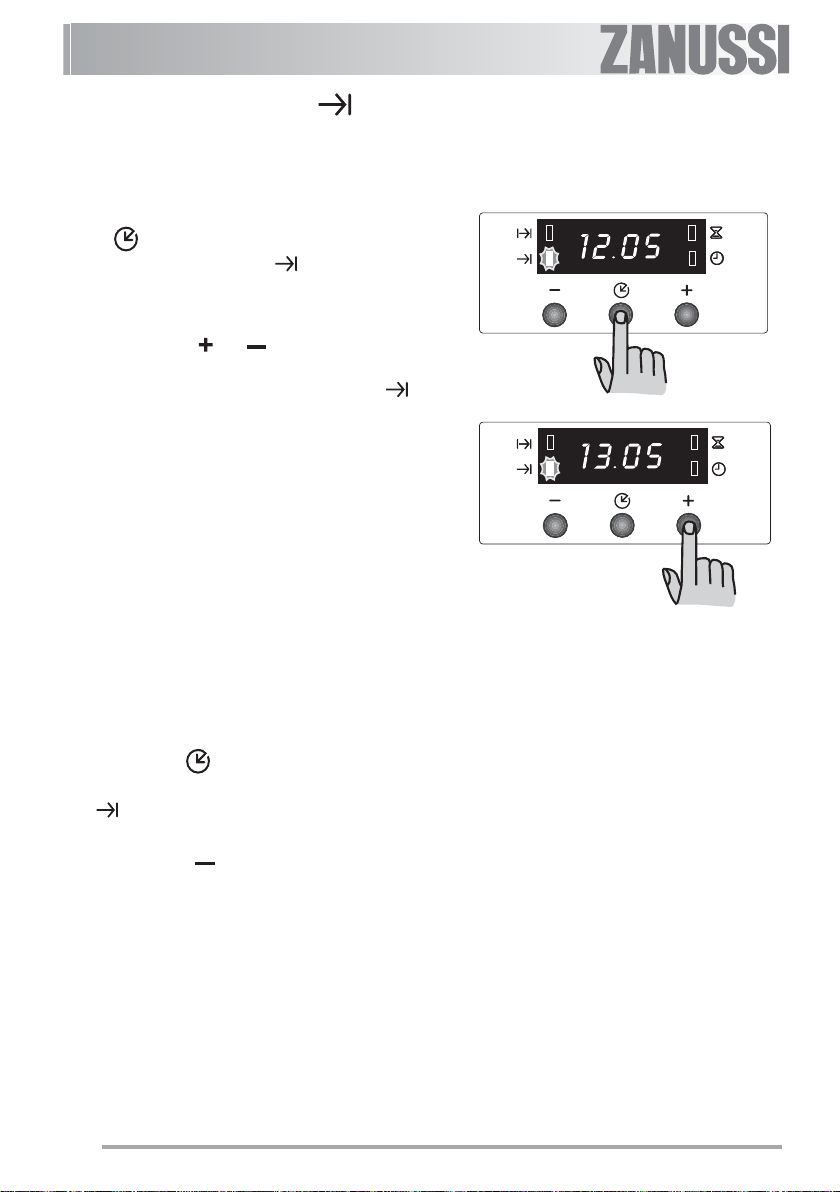
“End of cooking” function
With this function, you can set the oven to switch off
automatically when a programmed end of cooking
time is over. Place food in the oven, select a cooking
function and adjust the cooking temperature. Press
button repeatedly to select the “End of cooking”
function. The relevant pilot lamp will start flashing.
Then, proceed as follows:
To set the End of cooking time:
1. Press button “ ” or “ ”.
2. After the setting is carried out, wait for 5
seconds: the “End of cooking” pilot lamp
will come on and the display will revert to the
time of day.
3. When cooking time is over, the oven will be
switched off automatically and an acoustic alarm
will be heard, and the pilot lamp will start
flashing. Turn the oven function and the
thermostat control knob to zero.
To switch off the acoustic alarm, press any
button.
NOTE: turning the acoustic alarm off will reset
the oven to manual, and if the oven function
and the thermostat knobs are not set to zero
the oven will start to heat again.
To cancel the End of cooking time:
1. Press button repeatedly to select the “End
of cooking” function. The relevant pilot lamp
will flash and the display will show the
programmed End of cooking time.
2. Press button “ ” until the display shows the
current time of day. The programmer will beep
and the pilot lamp will go out.
12
Page 14
“Cooking duration” and “End
of cooking time” combined
The functions “Cooking duration” and “End of
cooking time” can be used simultaneously to set the
oven to switch on and off automatically at a later time.
1. With the “Cooking duration” function (carry
out the cooking duration setting as described
in the relevant chapter) set the duration time.
Then, press button : the display will show
the programmed setting.
2. With the “End of cooking time” function
(carry out the End of cooking setting as
described in the relevant chapter) set the end
of cooking time.
The relevant pilot lamps will come on and the
display will show the time of day. The oven
will switch on and off according to the set
programmes.
“Minute minder” function
The minute minder alarm will sound at the end of a
timed period, but the oven will remain on, if it is in use.
To set the minute minder:
1. Press button repeatedly to select the “Mi-
nute minder” function. The relevant pilot lamp
will start flashing.
2. Then, press button “ ” or “ ” (maximum: 2
hours, 30 minutes).
3. After the setting is carried out, wait for 5
seconds: the “Minute minder” pilot lamp
will come on.
4. At the end of the timed period, the pilot lamp
will start flashing and an acoustic alarm will be
heard. To switch off the acoustic alarm, press
any button.
13
Page 15
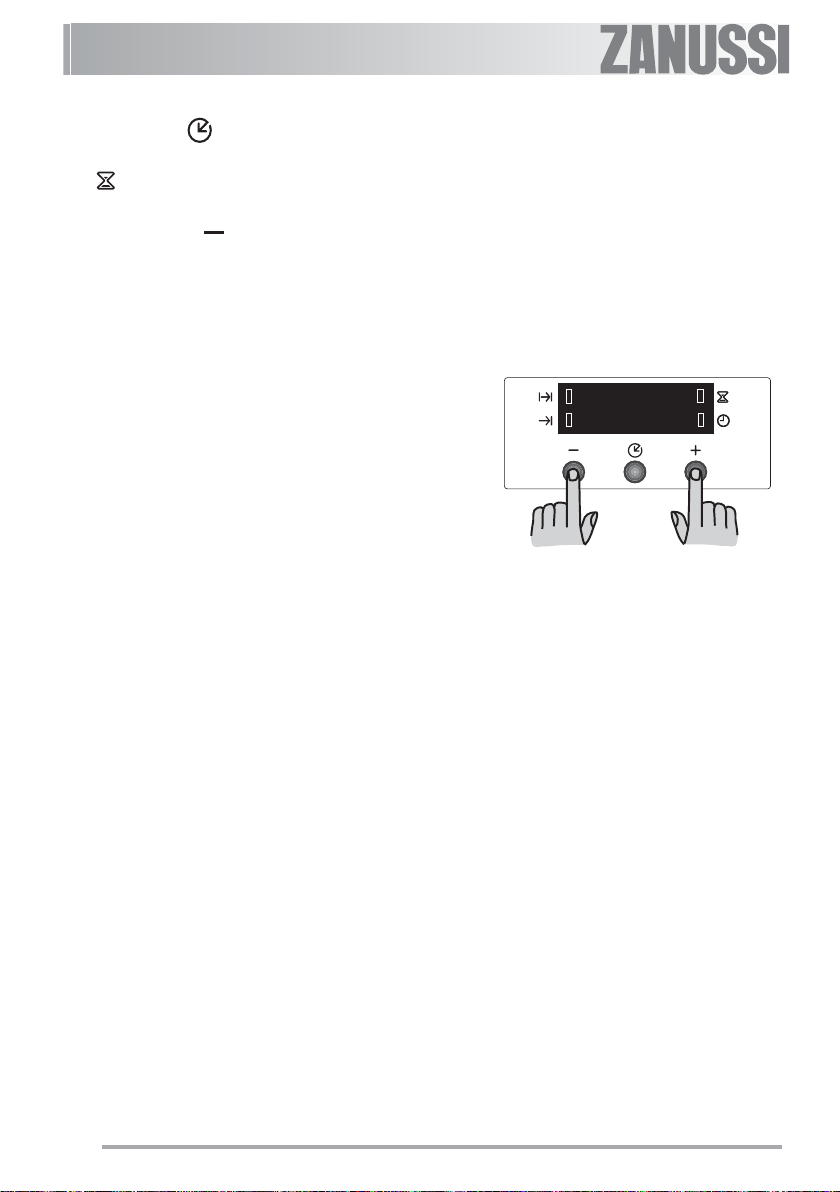
To cancel the minute minder:
1. Press button repeatedly to select the “Mi-
nute minder” function. The relevant pilot lamp
will flash and the display will show the
remaining time.
2. Press button “ ” until the display shows
“0:00”. After 5 seconds the pilot lamp will go
out and the display will revert to the time of
day.
How to switch off the display
1. Press two programmer push buttons
simoultaneously and keep them pressed for
about 5 seconds. The display will switch off.
2. To switch on the display, press any button.
The display can be switched off only if
no other functions have been set.
14
Page 16
Using the oven
The oven is supplied with an exclusive system
which produces a natural circulation of air and the
constant recycling of steam.
This system makes it possible to cook in a steamy
environment and keep the dishes soft inside and
crusty outside. Moreover, the cooking time and
energy consumption are reduced to a minimum.
During cooking steam may be produced which
can be released when opening the oven door.
This is absolutely normal.
However, always stand back from the
oven when opening the oven door
during cooking or at the end of it to
allow any build up of steam or heat to
release.
When food is heated, steam is created, like
in a kettle. When the steam comes into
contact with the glass in the oven door, it
condenses and creates water droplets.
To reduce condensation, always preheat the
empty oven for 10 minutes.
We recommend you wipe the water droplets away
after every cooking process.
Always cook with the oven door
closed. Stand clear when opening the
drop down oven door. Do not allow it to
fall open - support the door using the door
handle, until it is fully open.
4
3
2
1
The oven has four shelf levels.
The shelf positions are counted from the
bottom of the oven as shown in the
diagram.
It is important that these shelves are
correctly positioned as shown in the
diagram.
Do not place cookware directly on the oven
base.
Attention! - Do not place objects on the
oven base and do not cover any part of
the oven with aluminium foil while cooking,
as this could cause a heat build-up which
would affect the baking results and damage
the oven enamel. Always place pans,
heat-resisting pans and aluminium trays
on the shelf which has been inserted in the
shelf runners.
15
Page 17

How to Use the Conventional Oven
When using this setting, heat comes from both the
top and bottom elements. This allows you to cook
on a single level and is particularly suitable for
dishes which require extra base browning such
as pizzas, quiches and flans.
Gratins, lasagnes and hotpots which require extra
top browning also cook well in the conventional
oven. This form of cooking gives you the
opportunity to cook without the fan in operation.
1. Turn the oven function control knob to the
required cooking function ( ).
2. Turn the thermostat control to the required temperature.
THINGS TO NOTE
z
The oven light will come on when the oven
function control knob is set.
z
The thermostat control light will remain on until
the correct temperature is reached. It will then
cycle on and off to show that temperature is
being maintained.
The Cooling Fan
• The cooling fan will operate continually during
cooking. It may run on after the oven is
switched off to keep the controls cool. This is
quite normal.
Top oven element only
This function is suitable for finishing cooked dishes,
e.g. lasagne, shepherds pie, cauliflower cheese etc.
Bottom oven element only
Hints and Tips
- The middle shelf position allows for the best heat
distribution. To increase base browning simply
lower the shelf position. To increase top
browning, raise the shelf position.
- The material and finish of the baking trays and
dishes used will affect base browning.
Enamelware, dark, heavy or non-stick utensils
increase base browning, while oven glassware,
shiny aluminium or polished steel trays reflect
the heat away and give less base browning.
- Always place dishes centrally on the shelf to
ensure even browning.
- Stand dishes on suitably sized baking trays to
prevent spillage onto the base of the oven and
make cleaning easier.
- Do not place dishes, tins or baking trays directly
on the oven base as it becomes very hot and
damage will occur.
- For faster preheating use the fan oven function
to preheat the oven until the oven indicator neon
goes out, then swich the selector to the
conventional oven setting.
- Single level cooking gives best results. If you
require more than one level cooking use the fan
oven function.
NOTE
The action of the cooling fan will depend on how
long the oven has been used and at what temperature. It may not switch in at all at lower temperature settings nor run on where the oven has only
been used for a short time.
This function is particularly useful when blindbaking pastry or cooking pizza. It may also be
used to finish off quiches or flans to ensure the
base pastry is cooked through.
16
Page 18

Fan Cooking
The air inside the oven is heated by the element
around the fan situated behind the back panel.
The fan circulates hot air to maintain an even
temperature inside the oven.
The advantage of cooking with this function
is energy saving through:
z Faster Preheating
As the fan oven quickly reaches temperature,
it is not usually necessary to preheat the oven
although you may find that you need to allow
an extra 5-7 minutes on cooking times. For
recipes which require higher temperatures,
best results are achieved if the oven is
preheated first, e.g. bread, pastries, scones,
souffles, etc.
z Lower Temperatures
Fan oven cooking generally requires lower
temperatures than conventional cooking.
Follow the temperatures recommended in the
cooking chart. Remember to reduce
temperatures by about 20-25°C for your own
recipes which use conventional cooking.
z Even Heating for Baking
The fan oven has uniform heating on all shelf
positions. This means that batches of the same
food can be cooked in the oven at the same
time. However, the top shelf may brown slightly
quicker than the lower one. This is quite usual.
There is no mixing of flavours between dishes.
- Shelf positions are not critical, but make sure
the shelves are evenly spaced.
- When cooking more than one dish in the fan
oven, place dishes centrally on the shelves
rather than several dishes on one shelf.
- When the oven is full, you may need to allow
slightly longer cooking time.
- When the oven is full of the same food, e.g.
equal trays of small cakes or equal size victoria
sandwich cakes, then they will be cooked in
the same time and removed from the oven
together. When different sizes of trays or types
of food, e.g. biscuits and cakes are cooked,
they will not necessarily be ready together.
- The fan oven can be used to heat foods
through without thawing first, e.g. fruit tarts,
mince pies, sausage rolls, and other small
pastry items. Use a temperature of 190-200°C
and allow 20-40 minutes (depending on the
quantity of food in the oven).
- The use of too high temperatures can cause
uneven browning. Check with the
recommendations for oven temperatures given
in the cooking charts, but be prepared to adjust
the temperature, if necessary. Remember to
reduce temperatures by about 20-25°C for
your own conventional recipes.
- When roasting do use the trivet in the meat tin.
Fat and meat juices will drain into the meat tin
below and can be used to make gravy. The
trivet also prevents splashes of fat from soiling
the oven interior.
- The meat tin should not be placed on a heated
hotplate as this may cause the enamel to crack.
How to use the Fan Oven
1. Turn the oven function control knob to .
2. Turn the thermostat control to the required
temperature.
Things to note
• The oven light will come on when the oven
function control knob is set.
• The oven fan will operate continually during
cooking.
• The thermostat control light will remain on until
the correct temperature is reached. It will then
cycle on and off to show the temperature is
being maintained.
17
Page 19

The cooling fan
During cooking the cooling fan will operate
continually.
It may run on after the oven is switched off to keep
the controls cool. This is quite normal.
The action of the cooling fan will depend
on how long the oven has been used and
at what temperature. It may not switch in at
all at lower temperature settings nor run
on where the oven has only been used
for a short time.
Grilling -
- Most foods should be placed on the grid in the
grill pan to allow maximum circulation of air
and to lift the food out of the fats and juices.
Food such as fish, liver and kidneys may be
placed directly on the grill pan, if preferred.
- Food should be thoroughly dried before grilling
to minimise splashing. Brush lean meats and
fish lightly with a little oil or melted butter to
keep them moist during cooking.
- Accompaniments such as tomatoes and
mushrooms may be placed underneath the
grid when grilling meats
- When toasting bread, we suggest that the top
runner position is used.
- The food should be turned over during
cooking, as required.
How to use the Full Grill
1. Turn the oven control function knob on .
2. Turn the thermostat control knob on the
required temperature.
3. Adjust the grid and grill pan runner position to
allow for different thicknesses of food. Position
the food close to the element for faster cooking
and further away for more gentle cooking.
Preheat the grill on a full setting for a few minutes
before sealing steaks or toasting. Adjust the heat
setting and the shelf as necessary, during cooking.
During cooking, the cooling fan and the thermostat
control light will operate in the same way as
described for the fan oven function.
How to use the Inner Grill Element
The inner grill provides quick direct heat to the
central area of the grill pan. By using the inner grill
element for cooking small quantities, it can help to
save energy.
1. Turn the oven control function knob on .
2. Turn the thermostat control knob on the
required temperature.
3. Adjust the grid and grill pan runner position to
allow for different thicknesses of food and follow
the instructions for grilling.
The grill element is controlled by the thermostat.
During cooking, the grill cycles on and off to prevent
overheating.
How to Use the Thermal Grill
Thermal grilling offers an alternative method of
cooking food items normally associated with
conventional grilling. The grill element and the
oven fan operate alternately, circulating hot air
around the food. The need to check and turn the
food is reduced. Thermal grilling helps to minimize
cooking smells in the kitchen.
With the exception of toast and rare steaks, you
can thermally grill all the foods you would normally
cook under a conventional grill. Cooking is more
gentle, therefore food generally takes a little longer
to cook with thermal grilling compared with
conventional grilling. One of the advantages is that
larger quantities can be cooked at the same time.
1. Turn the oven control function knob on
2. Turn the thermostat control knob on the
required temperature. Select a maximum
temperature of 200°C.
3. Adjust the grid and grill pan runner position to
allow for different thicknesses of food and follow
the instructions for grilling.
18
Page 20

Hints and Tips
Prepare foods in the same way as for conventional
grilling. Brush lean meats and fish lightly with a little
oil or butter to keep them moist during cooking.
How to Use Defrosting
The oven fan operates without heat and circulates
the air, at room temperature, inside the oven. This
increases the speed of defrosting. However,
please note that the temperature of the kitchen will
influence the speed of defrosting.
This function is particularly suitable for delicate food
which could be damaged by heat, e.g. cream filled
gateaux, iced cakes, pastries, bread and other
yeast products.
1. Turn the oven function control knob to .
2. Ensure the thermostat control knob is in the
OFF position.
Hints and Tips
• Cover food with a lid, aluminium foil or plastic film
to prevent drying out during defrosting.
• ALWAYS COOK THOROUGHLY
IMMEDIATELY AFTER THAWING.
• Frozen food should be placed in a single layer
when ever possible and turned over half way
through the defrosting process.
• Only joints of meat and poultry up to 2 kg. (4 lb.)
are suitable for defrosting in this way.
19
Page 21

Hints and Tips
On baking:
Cakes and pastries usually require a medium
temperature (150°C-200°C) and therefore it is
necessary to preheat the oven for about 10
minutes.
Do not open the oven door before 3/4 of the baking
time has elapsed.
Shortcrust pastry is baked in a springform tin or
on a tray for up to 2/3 of the baking time and then
garnished before being fully baked. This further
baking time depends on the type and amount of
topping or filling. Sponge mixtures must separate
with difficulty from the spoon. The baking time would
be unnecessarily extended by too much liquid.
If two baking trays with pastries or biscuits are
inserted into the oven at the same time, a shelf
level must be left free between the trays.
If two baking trays with pastries or biscuits are
inserted into the oven at the same time, the trays
must be swapped and turned around after about
2/3 of the baking time.
On Roasting:
Do not roast joints smaller than 1 kg. Smaller pieces
could dry out when roasting. Dark meat, which is
to be well done on the outside but remain medium
or rare inside, must be roasted at a higher temperature (200°C-250°C).
White meat, poultry and fish, on the other hand,
require a lower temperature (150°C-175°C). The
ingredients for a sauce or gravy should only be
added to the roasting pan right at the beginning if
the cooking time is short. Otherwise add them in
the last half hour.
You can use a spoon to test whether the meat is
cooked: if it cannot be depressed, it is cooked
through. Roast beef and fillet, which is to remain
pink inside, must be roasted at a higher temperature in a shorter time.
If cooking meat directly on the oven shelf, insert
the roasting pan in the shelf level below to catch
the juices.
Leave the joint to stand for at least 15 minutes, so
that the meat juices do not run out.
To reduce the build up of smoke in the oven, it is
recommended to pour a little water in the roasting
pan. To prevent condensation forming, add water
several times. The plates can be kept warm in the
oven at minimum temperature until serving.
Caution!
Do not line the oven with aluminium
foil and do not place a roasting pan
or baking tray on the floor, as otherwise the oven enamel will be damaged by the heat build-up.
Cooking times
Cooking times can vary according to the different
composition, ingredients and amounts of liquid in
the individual dishes.
Note the settings of your first cooking or roasting
experiments to gain experience for later preparation of the same dishes.
Based upon your own experiences you will be
able to alter the values given in the tables.
20
Page 22
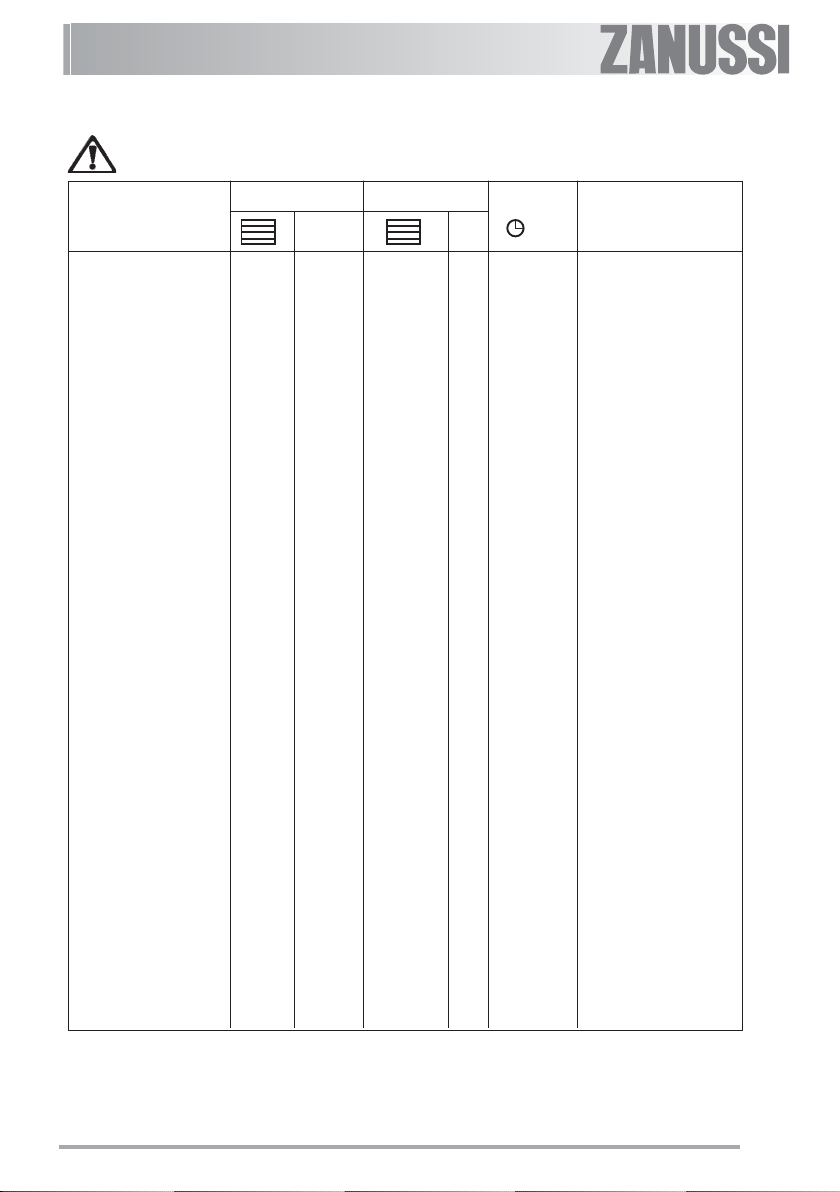
Cooking chart- Conventional and fan oven
Cooking times in the table do not include pre-heating. We recommend to pre-heat
the oven for about 10 minutes before cooking.
TYPE OF DISH
CAKES
Whisked recipies 2 170 2 (1and3)* 160 45-60 In cake mould
Shortbread dough 2 170 2 (1and3)* 160 20-30 In cake mould
Butter-milk cheese cake 1 175 2 165 60-80 In cake mould
Apple cake (Apple pie) 1 170 2left+right. 160 90-120 In cake mould
Strudel 2 180 2 160 60-80 In baking tray
Jam- tart 2 190 2(1and3)* 180 40-45 In cake mould
Fruit cake 2 170 2 150 60-70 In cake mould
Sponge cake 1 170 2(1and3)* 165 30-40 In cake mould
Christmas cake 1 150 2 150 120-150 In cake mould
Plum cake 1 175 2 160 50-60 In bread tin
Small cake 3 170 2 160 20-35 In baking tray
Biscuits 2 160 2(1and3)* 150 20-30 In baking tray
Meringues 2 135 2(1and3)* 150 60-90 In baking tray
Buns 2 200 2 190 12~20 In baking tray
Pastry: Choux 2or 3 210 2(1and3)* 170 25-35 In braking tray
Plate tarts 2 180 2 170 45-70 In cake mould
BREAD AND PIZZA
White bread 1 195 2 185 60-70
Rye bread 1 190 1 180 30-45 In bread tin
Bread rolls 2 200 2(1and3)* 175 25-40 In baking tray
Pizza 2 200 2 200 20-30 In baking tray
FLANS
Pasta flan 2 200 2(1and3)* 175 40-50 In mould
Vegetable flan 2 200 2(1and3)* 175 45-60 In mould
Quiches 1 210 1 190 30-40 In mould
Lasagne 2 200 2 200 25-35 In mould
Cannelloni 2 200 2 200 25-35 In mould
MEAT
Beef 2 190 2 175 50-70 On grid
Pork 2 180 2 175 100-130 On grid
Veal 2 190 2 175 90-120 On grid
English roast beef
rare 2 210 2 200 50-60 On grid
medium 2 210 2 200 60-70 On grid
well done 2 210 2 200 70-80 On grid
Shoulder of pork 2 180 2 170 120-150 With rind
Shin of pork 2 180 2 160 100-120 2 pieces
Lamb 2 190 2 175 110-130 Leg
Chicken 2 190 2 200 70-85 Whole
Turkey 2 180 2 160 210-240 Whole
Duck 2 175 2 220 120-150 Whole
Goose 2 175 1 160 150-200 Whole
Rabbit 2 190 2 175 60-80 Cut in pieces
Hare 2 190 2 175 150-200 Cut in pieces
Pheasant 2 190 2 175 90-120 Whole
Meat loaf 2 180 2 170 tot.150 in bread pan
FISH
Trout/Sea bream 2 190 2(1and3)* 175 40-55 3-4 fishes
Tuna fish/Salmon 2 190 2(1and3)* 175 35-60 4-6 fillets
Conventional Cooking Fan Cooking
4
3
2
1
temp °C
4
3
2
1
If you wish to cook more than one dish at the same time, we suggest that you change the cooking levels of your dishes during the last
5-10 minutes in order to obtain a more uniform colour of your dishes.
(*) If you need to cook more than one dish at the same time, we recommend you to place them on the levels quoted
between brackets. Shelf positions are counted from bottom of the oven.
Cooking times
in minutes
temp
°C
NOTES
21
Page 23

Cooking times in the tables do not include pre-heating. We recommend to pre-heat the oven
for about 10 minutes before cooking.
Cooking chart- Grilling -
Quantity
TYPE OF DISH
4
3
2
1
Grilling
temp.°CPieces g.
Fillet steaks 4 800 3 250 12~15 12~14
Beef-steaks 4 600 3 250 10~12 6~8
Sausages 8 / 3 250 12~15 10~12
Pork chops 4 600 3 250 12~16 12~14
Chicken (cut in two) 2 1000 3 250 30~35 25~30
Kebabs 4 / 3 250 10~15 10~12
Chicken (breast) 4 400 3 250 12~15 12~14
Hamburger* 6 600 2 250 20-30
*
Preheat 5’00'’
Fish (fillets) 4 400 3 250 12~14 10~12
Sandwiches 4~6 / 3 250 5~7 /
Toast 4~6 / 3 250 2~4 2~3
Cooking time in
minutes
1st side
2nd side
Cooking chart- Thermal grilling
With thermal grilling select a maximum temperature of 200°C.
TYPE OF DISH Quantity Shelf Temp. Cooking time (minutes)
(gr.) level lower upper
Rolled joints
Chicken (cut in two) 1000 3 200 25 ~ 30 20 ~ 30
Chicken legs — 3 200 15 ~ 20 15 ~ 18
Quail
Vegetable gratin — 3 200 20 ~ 25 —
St. Jacques shells — 3 200 15 ~ 20 —
Mackerel — 3 200 15 ~ 20 10 ~ 15
Fish slices 800 3 200 12 ~ 15 8 ~ 10
(turkey) 1000 3 200 30 ~ 40 20 ~ 30
500 3 200 25 ~ 30 20 ~ 25
°C
side side
These charts are intended as a guide only. It may be necessary to increase or decrease the
temperature to suit your individual requirements. Only experience will enable you to determine
the correct setting for your personal requirements.
22
Page 24

Cleaning and Maintenance
Before cleaning always allow the
cooling fan to cool the oven down
before switching off at the electricity
supply.
This appliance cannot be cleaned with
steam or with a steam cleaning
machine.
The oven should be kept clean at all
times. A build-up of fats or other
foodstuffs could result in a fire,
especially in the grill pan.
Important: Before carrying out any cleaning
operation, the appliance must be disconnected from
the power supply.
External cleaning
Regularly wipe over the control panel, oven door
and door seal using a soft cloth well wrung out in
warm water to which a little mild washing-up liquid
has been added.
To prevent damaging or weakening the door glass
panels avoid the use of the following:
• Household detergent and bleaches
• Impregnated pads unsuitable for non-stick
saucepans
• Brillo/Ajax pads or steel wool pads
• Chemical oven pads or aerosols
• Rust removers
• Bath/Sink stain removers
Clean the outer and inner door glass using warm
soapy water. Should the inner door glass become
heavily soiled it is recommended that a cleaning
product such as Hob Brite is used. Do not use
paint scrapers to remove soilage.
Cleaning materials
Before using any cleaning materials on your oven,
check that they are suitable and that their use is
recommended by the manufacturer.
Cleaners that contain bleach should NOT be used
as they may dull the surface finishes. Harsh
abrasives should also be avoided.
Oven Cavity
The enamelled base of the oven cavity is best
cleaned whilst the oven is still warm.
Wipe the oven over with a soft cloth soaked in
warm soapy water after each use. From time to
time it will be necessary to do a more thorough
cleaning, using a proprietary oven cleaner.
DO NOT attempt to clean catalytic liners.
23
Page 25

Care of catalytic liners
As cooking produces oil, fats, splashes of food,
etc., catalytic enamel destroys them. To aid this
process it is a good idea to run the oven for an hour
or two per week, without food, to ensure continued
good performance from the Catalytic liners.
To clean the oven cavity, proceed as follows:
1. remove the oven accessories, if present (e.g.
pans, grids, baking tray, dripping pan, etc.).
Do not leave anything inside the oven.
2. Turn the oven function control knob to the
coventional cooking function .
3. Turn the thermostat control to 250°C.
4. Allow the oven to run empty for approximately
45 minutes.
5. Open a window for ventilation.
This procedure should be repeated with the full
grill cooking function for approximately 5
minutes.
If the oven cavity is cold, let the oven run for 60
minutes.
Do not attempt to clean catalytic
enamel.
Hints and Tips
Cooking to reduce soilage
Cook at the recommended temperatures. Higher
temperatures during roasting will increase soilage.
Try cooking to lower temperatures for an increased
length of time, you will save energy and often the
joint is more tender.
Use minimal, if any, extra oil or fat when roasting
meat; potatoes only require brushing with fat before
cooking. Extra fat in the oven during roasting will
increase splashing and soilage. It is NOT necessary
to add water to the meat tin when roasting. The
water and the fat juices from the joint create excessive
splattering during cooking, even at normal
temperatures, as well as causing condensation.
Covering joints during cooking will also prevent
splashing onto the interior surfaces; removing the
covering for the last 20-30 minutes will allow extra
browning, if required. Some large joints and turkeys
especially benefit by this method of cooking, allowing
the joint to cook through before the outside is
overbrowned.
Do use the roasting tin. During roasting, the fat from
the joint will be contained beneath the trivet and
therefore prevent it from splattering onto the 'Catalytic'
liner.
• Manual cleaning of the Catalytic liner is not
recommended. Damage will occur if soap
impregnated steel wool pads, aerosol cleaners
and any other abrasives are used.
• Slight discolouration and polishing of the Catalytic
surface may occur in time. This does not affect
the Catalytic properties in any way.
• Follow the recommendations in “Cooking to
reduce soilage”.
24
Page 26

Shelf Supports and Catalytic Panels
The shelf supports and the catalytic panels can
be removed for easy cleaning.
Make sure the appliance is
completely cooled before carrying out
this operation.
Proceed as follows:
)
1. remove the front screw while keeping the shelf
support and the catalytic panel in position with
the other hand (see diagram 1);
2. keep the shelf support and the catalytic panel
in position and lift them with a hand while
disengaging the rear hook. Take off the shelf
support and the catalytic panel (see diagram
2);
3. once the cleaning is carried out, fit the shelf
support and the catalytic panel together and
mount them following the procedure in reverse.
Please, ensure the retaining nuts are secure when
refitting the shelf support and the catalytic panel.
1
2
25
Page 27

Cleaning the Oven Door
Before cleaning the oven door, we recommend
you to remove it from the oven.
)
Proceed as follows:
1. open the oven door completely;
2. find the hinges linking the door to the oven
(Fig. A);
3. unlock and turn the small levers located on the
two hinges (Fig. B);
4. handle the door by its left- and right-hand sides,
then slowly turn it towards the oven until it is
half-closed (Fig. C);
5. gently pull the oven door off its site (Fig. C);
6. place it on a steady plan.
Clean the oven door glass with warm soapy water
and a softh cloth only. Never use harsh abrasives.
Once the cleaning is carried out, refit the oven
door, following the procedure in reverse.
Stainless steel or aluminium appliances:
We recommend that the oven door is only cleaned
using a wet sponge and dried after cleaning with a
soft cloth.
Never use steel wool, acids or abrasive products
as they can damage the oven surface. Clean the
oven control panel following the same precautions.
DO NOT clean the oven door while
the glass panels are warm. If this
precaution is not observed the glass
panel may shatter.
If the door glass panel becomes chipped or has
deep scratches, the glass will be weakened and
must be replaced to prevent the possibility of the
panel shattering. Contact your local Service Centre
who will be pleased to advise further.
Fig. A
Fig. B
Fig. C
26
Page 28

Replacing The Oven Light
Disconnect the appliance
If the oven bulb needs replacing, it must comply
with the following specifications:
- Electric power: 15 W/25 W,
- Electric rate: 230 V (50 Hz),
- Resistant to temperatures of 300°C,
- Connection type: E14.
These bulbs are available from your local Service
Force Centre.
To replace the faulty bulb:
)
1. Ensure the oven is isolated from the electrical
supply.
2. Push in and turn the glass cover anticlockwise.
3. Remove the faulty bulb and replace with the
new one.
4. Refit the glass cover and restore the electrical
supply.
27
Page 29

Grill heating element
This model has been fitted with a hinged grill element to make the roof of the oven especially easy
to clean.
Before proceeding ensure the oven
is cool and disconnected from the
electricity supply.
Proceed as follows:
)
1. Undo the screw fastening the grill element.
When carrying out this operation for the first
time, we recommend using a screwdriver.
2. Then gently pull the grill downwards to allow
access to the oven roof.
3. Clean the oven roof with a suitable cleaner
and wipe dry before returning the hinged grill
element to its original position.
4. Gently push up the grill element into place and
firmly screw into place the holding nut.
Ensure the holding nut on the grill
element is properly tightened so that
it does not fall down when in use.
28
Page 30

Something not working
If the oven is not working correctly, please carry out the following checks, before contacting your local
Service Centre.
IMPORTANT: If you call out an engineer to a fault listed below, or to repair a fault caused by incorrect
use or installation, a charge will be made even if the appliance is under guarantee.
PROBLEM
SOLUTION
The oven does not come on.
The oven temperature light does not
come on.
The oven light does not come on.
It takes too long to cook the dishes or
they cook too quickly.
Steam and condensation settle on the
food and in the oven cavity.
Check that the current time of day has been set on
the programmer (see chapter "Setting the time of
day").
Check that both a cooking function and temperature
have been selected.
Check the oven is wired in properly, and the socket
switch or the switch from the mains supply to the
oven are ON.
Select a temperature with the thermostat control knob.
or
Select a function with the oven function control knob.
Select a cooking function with the oven function control knob.
or
Check the light bulb, and replace it if necessary
(see "Cleaning the oven").
The temperature may need adjusting.
or
Following the advice contained in these instruc-
tions, especially the section “Using the oven“.
When the cooking process is completed, do not
leave the dishes standing in the oven for longer than
15-20 minutes.
The oven fan is noisy.
The display shows "12.00".
Check that shelves and bakeware are not vi
brating in contact with the oven back panel.
Set the time of day (see chapter "Setting the time of
day").
29
Page 31

Technical Data
The oven must be installed according
to the instructions supplied.
This oven must be installed by
qualified personnel to the relevant
British Standards.
Heating element ratings
Oven elements 1,800 W
Top element 800 W
Bottom element 1,000 W
Thermal Grilling 2,475 W
Convection element 2,000 W
Inner Grill element 1,650 W
Double Grill element 2,450 W
Oven Light 25 W
Cooling Fan 25 W
Convection Fan 25 W
Total Rating 2,500 W
Supply voltage (50 Hz) 230 V
Dimensions of the recess
Height under top mm 593
in column mm 580
Width mm 5 60
Depth mm 550
Oven
Height mm 335
Width mm 3 95
Depth mm 400
Oven capacity 53 l
30
Page 32

Electrical Connection
The oven is designed to be connected to 230 V (50 Hz)
electricity supply.
The oven has an easily accessible terminal block
which is marked as follows:
Letter L - Live terminal
Letter N - Neutral terminal
or E - Earth terminal
THIS OVEN MUST BE EARTHED
The cable used to connect the oven to the electrical
supply must comply to the specifications given
below.
For UK use only
Connection Min. size Cable / flex Fuse
via Cable/flex type
2
13 A socket 2.5 mm
outlet butyl
13 A spur box
Oven 2.5 mm
Control twin and 20 A max.
Circuit earth
3 core 13 A min.
insulated
2
PVC/PVC 15 A min.
It is necessary that you install a double pole switch
between the oven and the electricity supply (mains),
with a minimum gap of 3mm between the switch
contacts and of a type suitable for the required load
in compliance with the current rules.
The switch must not break the yellow and green
earth cable at any point.
the yellow and green earth cable should be 2-3 cm
longer than the other cables.
Important
After installation and connecting, the cable must be
placed so that it cannot at any point reach a
temperature of more than 50°C above the ambient
temperature.
Before the oven is connected, check that the main
fuse and the domestic installation can support the
load and that the power supply is properly earthed.
The manufacturer declines any responsibility
should these safety measures not be carried
out.
For Europe use only
Min. size Cable/ Cable / flex type Fuse
flex
2
2.5 mm
H07 RN-F, H05 RN-F,
H05 RR-F, H05 VV-F,
H05 V2V2-F (T90),
H05 BB-F
15 A
31
Page 33

Instructions for building in
Please ensure that when the oven is installed
it is easily accessible for the engineer in the
event of a breakdown.
Building In
The surround or cabinet into which the oven will be
built must comply with these specifications:
z the dimensions must be as shown in the relevant
diagrams;
z the materials must withstand a temperature
increase of at least 60°C above ambient;
z proper arrangements must be made of a
continuous supply of air to the oven to prevent
the oven overheating.
Dimensions of the oven and recess required are
given in the relevant diagrams.
Securing the Appliance to the Cabinet
1. Open the oven door.
2. Fasten the oven to the cabinet placing the four
distance holders (letter A) which fit exactly into
the holes in the frame and then fit the four
wood screws (letter B) provided.
32
550 MIN
560 - 570
593
0
0
1
÷
0
8
Page 34

Guarantee/Customer service (for the United Kingdom only)
Standard guarantee conditions
We, Zanussi-Electrolux, undertake that if within 12 months of the date of the purchase this ZanussiElectrolux appliance or any part thereof is proved to be defective by reason only of faulty
workmanship or materials, we will, at our option repair or replace the same FREE OF CHARGE for
labour, materials or carriage on condition that:
· The appliance has been correctly installed and used only on the electricity supply stated on the
rating plate.
· The appliance has been used for normal domestic purposes only, and in accordance with the
manufacturer’s instructions.
· The appliance has not been serviced, maintained, repaired, taken apart or tampered with by any
person not authorised by us.
· Electrolux Service Force Centre must undertake all service work under this guarantee
· Any appliance or defective part replaced shall become the Company’s property.
· This guarantee is in addition to your statutory and other legal rights.
Exclusions
· Damage or calls resulting from transportation, improper use or neglect, the replacement of any
light bulbs or removable parts of glass or plastic.
· Costs incurred for calls to put right an appliance which is improperly installed or calls to
appliances outside the United Kingdom.
· Appliances found to be in use within a commercial environment, plus those which are subject to
rental agreements.
· Products of Electrolux manufacturer that are not marketed by Electrolux.
Service and Spare Parts
In the event of your appliance requiring service, or if you wish to purchase spare parts, please contact
your local Service Force Centre by telephoning
0870 5 929 929
Your telephone call will be automatically routed to the Service Force Centre covering your postcode
area.
For the address of your local Service Force Centre and further information about Service Force,
please visit the website at www.serviceforce.co.uk
Before calling out an engineer, please ensure you have read the details under the heading “Something
not working”.
33
Page 35

When you contact the Service Force Centre you will need to give the following details:
1.Your name, address and postcode.
2.Your telephone number.
3. Clear concise details of the fault.
4. The model and Serial number of the appliance (found on the rating plate).
5.The purchase date.
Please note a valid purchase receipt or guarantee documentation is required for in guarantee service calls.
Customer Care
For general enquiries concerning your Electrolux appliance, or for further information on Electrolux
products please contact our Customer Care Department by letter or telephone at the address below or
visit our website at www.electrolux.co.uk
Customer Care Department
Electrolux Major Appliances
Addington Way
Luton
Bedfordshire, LU4 9QQ
Tel: 08705 727 727 (*)
(*) Calls may be recorded for training purposes
Technical assistance and spare parts
If the checks suggested in the previous section are
not useful for solving the problem, contact the
nearest authorised Technical Assistance Centre,
specifying the type of fault, appliance model
(Mod.), product number (Prod. no.) and serial
number (Ser. No.) given on the oven dataplate.
The dataplate is located on the outside of the oven
and is visible, opening the door, in the place
shown in the Figure.
Original spare parts, certified by the product
manufacturer, and identified by this mark, are only
available at our Technical
Assistance Centres and
Authorised Spare Parts
Shops.
34
Page 36

European guarantee
This appliance is guaranteed by Electrolux in each of the countries listed at the back of this user
manual, for the period specified in the appliance guarantee or otherwise by law. If you move from one
of these countries to another of the countries listed below the appliance guarantee will move with you
subject to the following qualifications:
• The appliance guarantee starts from the date you first purchased the appliance which will be
evidenced by production of a valid purchase document issued by the seller of the appliance.
• The appliance guarantee is for the same period and to the same extent for labour and parts as
exists in your new country of residence for this particular model or range of appliances.
• The appliance guarantee is personal to the original purchaser of the appliance and cannot be
transferred to another user.
• The appliance is installed and used in accordance with instructions issued by Electrolux and is only
used within the home, i.e. is not used for commercial purposes.
• The appliance is installed in accordance with all relevant regulations in force within your new country
of residence.
The provisions of this European Guarantee do not affect any of the rights granted to you by law.
35
Page 37

36
Page 38

electrolux
Dziękujemy za zakup produktu naszej firmy
Ż
yczymy Państwu wiele satysfakcji z dokonanego wyboru. Wierzymy, że
dzięki korzyściom plynącym z użytkowania tego sprzętu dołączą Państwo do stale
powiększającego się grona zadowolonych klientów, a podczas następnych
zakupów wybiorą Państwo również produkty z naszej oferty.
Prosimy o uważne zapoznanie się z instrukcją obsługi. Zalecamy
przechowywanie jej przez cały okres eksploatacji urządzenia oraz przekazanie
podczas ewentualnej zmiany właściciela.
37
Page 39

electrolux
Spis treści
Ostrzeżenia i ważne informacje bezpieczeństwa............................................. 39
Opis urządzenia ............................................................................................... 41
Pokrętła sterowania .......................................................................................... 42
Przed pierwszym użyciem piekarnika .............................................................. 44
Programator elektryczny .................................................................................. 45
Korzystanie z piekarnika .................................................................................. 50
Tabela pieczenia .............................................................................................. 54
Konserwacja i czyszczenie .............................................................................. 56
Pielęgnacja powłok katalitycznych .................................................................. 58
Co zrobić, jeśli urządzenie nie działa prawidłowo............................................. 63
Dane techniczne ..............................................................................................64
Instrukcje dla instalatora.................................................................................. 65
Instrukcja zabudowy ........................................................................................ 67
Gwarancja/Serwis ............................................................................................ 68
Serwis i części zamienne ................................................................................ 69
Gwarancja Europejska ..................................................................................... 69
Wskazówki dot. korzystania z niniejszej instrukcji
Wskazówki dot. bezpieczeństwa
Kolejność wykonywania czynności
)
Porady i wskazówki
Urządzenie spełnia następujące normy europejskie:
- 2006/95 (dyrektywa niskonapięciowa);
- 89/336 (dyrektywa dot. kompatybilności elektromagnetycznej EMC);
- 93/68 (dyrektywa ogólna); wraz z późniejszymi zmianami.
38
Page 40

electrolux
Polski
Ostrzeżenia i ważne informacje
bezpieczeństwa
Zawsze przechowywać niniejsze instrukcje z urządzeniem. W razie
sprzedaży lub przekazania urządzenia innemu użytkownikowi bądź w razie
przeprowadzki i pozostawienia go na miejscu, należy pamiętać o przekazaniu
nowemu użytkownikowi niniejszej instrukcji, aby umożliwić mu zapoznanie się
z funkcjonowaniem urządzenia i ewentualnymi ostrzeżeniami.
Niniejsze ostrzeżenia mają na celu zapewnienie bezpieczeństwa
użytkownikowi i jego domownikom. Należy je uważnie przeczytać przed
instalacją lub użyciem urządzenia.
Instalacja
• Wszystkie czynności związane z
instalacją muszą być wykonywane
przez wykwalifikowaną osobę zgodnie
z obowiązującymi przepisami i
normami. Poniżej podano opis
poszczególnych czynności, jakie
należy wykonać podczas
instalowania urządzenia.
• Instalację i podłączenie urządzenia
zlecić wykwalifikowanej osobie,
posiadającej odpowiednią wiedzę,
która wykona wszystkie czynności
zgodnie z przepisami.
• Przeróbki domowej instalacji
zasilającej wymagane w celu
instalacji urządzenia mogą być
wykonywane wyłącznie przez
wykwalifikowanych elektryków.
Eksploatacja
• Piekarnik służy wyłącznie do
przygotowywania potraw. Nie należy
go używać do innych celów.
• Podczas otwierania drzwi
piekarnika, w trakcie lub pod
koniec przygotowywania potrawy,
należy zawsze cofnąć się tak, aby
para i ciepłe powietrze mogły
swobodnie wydostać się na
zewnątrz.
• Zachować ostrożność podczas
obsługi kuchenki. Bardzo gorące
grzałki powodują nagrzanie się półek
oraz innych części urządzenia.
• Jeśli, z jakichkolwiek przyczyn, w
piekarniku przygotowuje się potrawy
w folii aluminiowej, nie wolno
dopuścić, aby bezpośrednio stykała
się ona z dnem piekarnika.
• Czyszcząc piekarnik, należy
pamiętać o następujących zasadach:
nie wolno rozpryskiwać żadnych
środków na filtr tłuszczu (jeśli jest
zainstalowany), grzałki ani czujnik
termostatu.
• Zmiany lub modyfikacje parametrów
urządzenia stwarzają zagrożenie dla
użytkownika.
• Podczas pieczenia czy grillowania,
okno piekarnika oraz inne jego części
mocno się rozgrzewają. Dzieci nie
powinny znajdować się w pobliżu
piekarnika. Jeśli urządzenia
elektryczne będą podłączane do
gniazdka obok piekarnika, należy
zapewnić, aby ich przewody nie
stykały się z gorącymi częściami
piekarnika ani nie zaczepiały o drzwi
piekarnika.
• Zawsze korzystać z rękawic do
pieczenia wkładając i wyjmując
naczynia z piekarnika.
• Regularne czyszczenie zapobiega
pogorszeniu jakości powierzchni.
39
Page 41

electrolux
• Przed rozpoczęciem czyszczenia
piekarnika, wyłączyć zasilanie lub
wyjąć wtyczkę piekarnika z gniazdka.
• Sprawdzić, czy piekarnik jest
wyłączony “WYŁ”, jeśli już
zakończono pieczenie.
• Piekarnik może być używany jako
urządzenie niezależne lub w
połączeniu z elektryczną płytą
kuchenną, w zależności od modelu,
jednofazową pracującą z napięciem
230 V.
• Do czyszczenia urządzenia nie
należy stosować pary ani parowych
urządzeń czyszczących.
• Nie stosować ściernych środków
czyszczących ani metalowych
skrobaków o ostrych krawędziach.
Mogą one porysować powierzchnię
drzwi piekarnika, co może
spowodować pęknięcie szkła w tych
drzwiach.
Bezpieczeństwo dzieci
• Urządzenie jest przeznaczone do
obsługi przez osoby dorosłe.
Korzystanie z urządzenia przez dzieci
lub zabawa dzieci z urządzeniem są
niebezpieczne.
• Dzieci nie powinny zbliżać się do
pracującego piekarnika. Należy
pamiętać również, że piekarnik
pozostaje przez dłuższy czas gorący
jeszcze po wyłączeniu.
• Niniejsze urządzenie nie jest
przeznaczone do obsługi przez dzieci
ani inne osoby, których zdolności
fizyczne, sensoryczne lub mentalne,
bądź brak doświadczenia i wiedzy, nie
pozwalają na bezpieczne z niego
korzystanie bez nadzoru lub
przeszkolenia osoby odpowiedzialnej.
Serwis
• Wszystkie przeglądy lub naprawy
należy wykonywać w zakładach
serwisowych producenta lub
zakładach autoryzowanych przez
producenta. Nalegać na stosowanie
wyłącznie oryginalnych części
zamiennych.
• Nie próbować samodzielnie
naprawiać urządzenia w razie awarii
lub uszkodzenia. Naprawy
wykonywane przez osoby
niedoświadczone mogą spowodować
urazy cielesne lub uszkodzenie
urządzenia.
Informacje dot.
środowiska naturalnego
• Po zainstalowaniu urządzenia należy
pozbyć się opakowania zgodnie z zasadami bezpieczeństwa i ochrony
środowiska.
• W czasie złomowania urządzenia
należy odciąć kabel zasilający tak,
aby nie można było ponownie
wykorzystać kuchenki.
Symbol na produkcie lub na
opakowaniu oznacza, że produktu tego
nie wolno traktować tak, jak innych
odpadów domowych. Należy oddać go do
właściwego punktu skupu surowców
wtórnych zajmującego się złomowanym
sprzętem elektrycznym i elektronicznym.
Właściwa utylizacja i złomowanie
pomaga w eliminacji niekorzystnego
wpływu złomowanych produktów na
środowisko naturalne oraz zdrowie.
Nieprawidłowa utylizacja stwarza
zagrożenie dla środowiska naturalnego
oraz zdrowia. Aby uzyskać szczegółowe
dane dotyczące możliwości recyklingu
niniejszego urządzenia, należy
skontaktować się z lokalnym urzędem
miasta, służbami oczyszczania miasta
lub sklepem, w którym produkt został
zakupiony.
40
Page 42

Opis urządzenia
1
electrolux
624
5
3
7
8
9
10
11
1. Panel sterowania
2. Pokrętło wyboru funkcji piekarnika
3. Programator elektroniczny
4. Pokrętło termostatu
5. Kontrolka zasilania WŁKontrolka
termostatu
Akcesoria piekarnika
11
6. Kontrolka zasilania WŁ
7. Otwory wentylacyjne powietrza dla
wentylatora chłodzenia
8. Ruszt do grilla
9. Oświetlenie piekarnika
10.Wentylator piekarnika
11.Tabliczka znamionowa
Ociekacz do
tłuszczu
Ruszt do
grilla
Ruszt z zabezpieczeniem
przed wypadnięciem
Zdejmowane
uchwyty
41
Page 43

electrolux
Pokrętła sterowania
Wysuwane pokrętła
Niektóre modele są wyposażone w
wysuwane pokrętła sterujące. Pokrętła
znajdują się na panelu sterowania,
całkowicie wsunięte, gdy piekarnik nie
pracuje.
Pokrętło wyboru funkcji
piekarnika
0 Piekarnik wyłączony
Oświetlenie piekarnika
Pieczenie tradycyjne
Górna grzałka
Dolna grzałka
Wewnętrzna grzałka grilla
Pełny Grill rożnie
Grillowanie termiczne
Pieczenie konwekcyjne
Rozmrażanie
Kontrolka zasilania WŁ
Kontrolka zasilania włącza się, gdy
ustawione jest pokrętło wyboru funkcji
piekarnika.
Pokrętło termostatu
Obrócić pokrętło termostatu
piekarnika w kierunku przeciwnym do
ruchu wskazówek zegara, aby wybrać
temperaturę pomiędzy 50°C a 250°C.
Kontrolka termostatu
Kontrolka termostatu zapala się w
momencie przekręcenia pokrętła
termostatu. Kontrola świeci się do
42
Page 44

momentu osiągnięcia odpowiedniej
temperatury. Następnie cyklicznie zapala
się i gaśnie symbolizując utrzymywanie
temperatury.
Termostat bezpieczeństwa
Dla zapobieżenia nadmiernemu
przegrzaniu spowodowanemu
nieprawidłowym użyciem urządzenia lub
wadliwym komponentem, piekarnik został
wyposażony w termostat
bezpieczeństwa, który w razie potrzeby
wyłącza zasilanie. Piekarnik włącza się
ponownie automatycznie po obniżeniu
temperatury.
Jeśli termostat bezpieczeństwa
włączy się z powodu nieprawidłowej
eksploatacji urządzenia, wystarczy
odczekać, aby piekarnik ostygł; jeśli zaś
termostat włącza się z powodu
wadliwego komponentu, należy
skontaktować się z Serwisem.
Wentylator chłodzący
Wentylator chłodzenia służy do
chłodzenia piekarnika i panelu
sterowania. Wentylator włącza się
automatycznie po kilku minutach
pieczenia. Ciepłe powietrze jest
wydmuchiwane przez otwór w pobliżu
drzwi piekarnika. Gdy piekarnik jest
wyłączony, wentylator może działać
jeszcze przez jakiś czas, aby chłodzić
pokrętła sterowania. To całkowicie
normalne.
Działanie wentylatora chłodzenia
zależy od tego, jak długo piekarnik
pracował oraz w jakiej
temperaturze. Może się on w ogóle
nie włączyć przy niskiej
temperaturze lub wtedy, gdy
piekarnik pracował tylko przez
krótki czas.
electrolux
43
Page 45

electrolux
Przed pierwszym użyciem piekarnika
Przed przystąpieniem do
eksploatacji piekarnika zdjąć całe
opakowanie oraz wszystkie
osłony, zarówno te znajdujące się
wewnątrz, jak i na zewnątrz
urządzenia.
Przed pierwszym użyciem, piekarnik
należy wygrzać bez wkładania do środka
żadnych potraw.
W tym czasie może być wyczuwalny
nieprzyjemny zapach. Jest to zjawisko
normalne. Zapach powodują resztki z
procesu produkcyjnego.
Sprawdzić, czy pomieszczenie
posiada prawidłową wentylację.
Piekarnik będzie działał tylko pod
warunkiem ustawienia godziny
(patrz rozdział “Programator
elektroniczny” - paragraf
“Ustawianie godziny”).
1. Ustawić pokrętło wyboru funkcji
)
Wyżej opisaną procedurę należy
piekarnika na pieczenie
konwekcyjne .
2. Ustawić pokrętło termostatu w
położeniu 250.
3. Otworzyć okno w celu
zapewnienia odpowiedniej
wentylacji pomieszczenia.
4. Odczekać ok. 45 minut bez
wkładania potraw do piekarnika.
powtórzyć przy funkcji “Pełny grill”
funkcji "Pieczenie tradycyjne" przez
około 5-10 minut.
Następnie odczekać, aż piekarnik
ostygnie. Zwilżyć miękką
ściereczkę ciepłą wodą z
dodatkiem łagodnego płynu do
mycia naczyń i wyczyścić komorę
piekarnika.
Przed pierwszym użyciem
dokładnie umyć akcesoria.
44
i
Aby otworzyć drzwiczki piekarnika,
należy zawsze chwytać za
środkową część uchwytu.
Page 46

Programator elektroniczny
electrolux
4
5
6
23
1
Kuchenka jest gotowa do pracy
tylko po ustawieniu godziny.
Używanie piekarnika nie wymaga
wybrania żadnego programu.
Ustawianie godziny
Po włączeniu zasilania lub po zaniku
prądu w sieci, na wyświetlaczu pojawi się
i będzie migać.
Ustawianie godziny:
1. Naciskać przycisk “ ” lub “ ”.
2. Po ustawieniu godziny, należy
poczekać 5 sekund: kontrolka
“Godzina” zgaśnie, a na
wyświetlaczu pojawi się aktualny
czas. Urządzenie jest gotowe do
pracy.
Zmiana ustawień godziny:
1. Naciskać przycisk aż pojawi się
funkcja “Godzina”. Zacznie migać
odpowiednia kontrolka. Następnie
postępować jak opisano powyżej.
Godzinę można zmienić jedynie, gdy
nie ustawiono funkcji automatycznej
(czas pieczenia lub koniec
pieczenia ).
7
8
1. Wcisnąć przycisk, aby wybrać
funkcję
2. Przycisk do zmniejszania wartości
“ ”
3. Przycisk do podwyższania wartości
“ ”
4. Wyświetlacz
5. Kontrolka “Czas pieczenia”
6. Kontrolka “Koniec pieczenia”
7. Kontrolka “Minutnika”
8. Kontrolka “Godzina”
W przypadku przerwy w zasilaniu
wszystkie ustawienia (czas,
ustawienia programu lub program w
trakcie używania) zostaną
anulowane. Po przywróceniu
zasilania liczby na wyświetlaczu
będą migać, a zegar będzie
wymagał ponownego nastawienia.
45
Page 47

electrolux
Funkcja “Czas pieczenia”
Funkcja ta umożliwia automatyczne
wyłącznie piekarnika po zakończeniu
zaprogramowanego czasu pieczenia.
Włożyć potrawę do piekarnika, wybrać
funkcję pieczenia i ustawić temperaturę
pieczenia. Naciskać przycisk aż
pojawi się funkcja “Czas pieczenia” .
Zacznie migać odpowiednia kontrolka.
Następnie, wykonać następujące
czynności:
Ustawianie czasu pieczenia:
1. Naciskać przycisk “ “ lub “ “.
2. Po ustawieniu godziny, należy
poczekać 5 sekund: kontrolka “Czas
pieczenia” zapali się, a na
wyświetlaczu ponownie pojawi się
godzina.
3. Po upływie czasu pieczenia, piekarnik
automatycznie wyłączy się, słyszalny
będzie alarm akustyczny, a kontrolka
zacznie migać. Ustawić pokrętło
wyboru funkcji piekarnika i pokrętło
termostatu w położenie zero.
Wyłączyć sygnał dźwiękowy
wciskając dowolny przycisk.
UWAGA: wyłączenie alarmu
dźwiękowego powoduje przejście
piekarnika w tryb ręczny. Brak
ustawienia pokręteł wyboru funkcji
piekarnika i termostatu w położeniu
zero spowoduje ponowne włączenie
się piekarnika.
Kasowanie ustawionego
czasu pieczenia:
1. Naciskać przycisk aż pojawi się
funkcja “Czas pieczenia” . Zacznie
migać odpowiednia kontrolka, a na
wyświetlaczu zostanie pokazany
pozostały czas pieczenia.
2. Naciskać przycisk “ “ aż na
wyświetlaczu pojawi się “0:00”. Po 5
sekundach, kontrolka zgaśnie, a na
wyświetlaczu ponownie pojawi się
godzina.
46
Page 48

Funkcja “Koniec pieczenia”
Funkcja ta pozwala na ustawienie
automatycznego wyłączenia piekarnika
po upłynięciu zaprogramowanego czasu
zakończenia pieczenia. Włożyć potrawę
do piekarnika, wybrać funkcję pieczenia i
ustawić temperaturę pieczenia. Naciskać
przycisk aż pojawi się wybrana
zostanie funkcja “Zakończenie
pieczenia” . Zacznie migać
odpowiednia kontrolka. Następnie,
wykonać następujące czynności:
Ustawianie czasu zakończenia
pieczenia:
1. Naciskać przycisk “ ” lub “ ”.
2. Po ustawieniu godziny, należy
poczekać 5 sekund: zapali się
kontrolka “Zakończenie pieczenia”
zapali się, a na wyświetlaczu
ponownie pojawi się godzina.
3. Po upływie czasu pieczenia, piekarnik
automatycznie wyłączy się, słyszalny
będzie alarm dźwiękowy, a kontrolka
zacznie migać. Ustawić pokrętło
wyboru funkcji piekarnika i pokrętło
termostatu w położenie zero.
Wyłączyć sygnał dźwiękowy
wciskając dowolny przycisk. UWAGA:
wyłączenie alarmu dźwiękowego
powoduje przejście piekarnika w tryb
ręczny. Brak ustawienia pokręteł
wyboru funkcji piekarnika i termostatu
w położeniu zero spowoduje ponowne
włączenie się piekarnika.
Kasowanie ustawionego czasu
zakończenia pieczenia:
1. Naciskać przycisk aż pojawi się
wybrana zostanie funkcja
“Zakończenie pieczenia” . Zacznie
migać odpowiednia kontrolka, a na
wyświetlaczu pojawi się
zaprogramowany czas zakończenia
pieczenia.
2. Naciskać przycisk “ ” aż na
wyświetlaczu pojawi się aktualny
czas. Programator będzie wydawał
dźwięk, a kontrolka zgaśnie.
electrolux
47
Page 49

electrolux
“Czas pieczenia” oraz
“Zakończenie pieczenia”
połączone
Funkcje “Czas pieczenia” i
“Zakończenia pieczenia” można
stosować jednocześnie tak, aby ustawić
piekarnik, aby automatycznie włączył i
wyłączył się w późniejszym czasie.
1. W przypadku funkcji “Czas pieczenia”
po wybraniu funkcji “Czas
pieczenia” (czas pieczenia należy
ustawić jak to opisano w odpowiednim
rozdziale). Następnie nacisnąć
przycisk
pokazane zostaną zaprogramowane
ustawienia.
2. W przypadku funkcji “Zakończenie
pieczenia” po wybraniu funkcji
“Zakończenie pieczenia” (czas
zakończenia pieczenia należy
ustawić jak to opisano w odpowiednim
rozdziale).
Zapali się odpowiednia kontrolka, a na
wyświetlaczu pojawi się aktualna
godzina. Piekarnik będzie się włączał
i wyłączał zgodnie z ustawionymi
programami.
: na wyświetlaczu
Kasowanie minutnika:
1. Naciskać przycisk aż pojawi się
funkcja “Minutnik”. Zacznie migać
odpowiednia kontrolka i na
wyświetlaczu pojawi się pozostały
czas.
2. Naciskać przycisk “ ” aż na
wyświetlaczu pojawi się “0:00”. Po 5
sekundach, kontrolka zgaśnie, a na
wyświetlaczu ponownie pojawi się
godzina.
Funkcja “Minutnik”
Po zakończeniu ustawionego okresu,
rozlegnie się alarm minutnika,
aleuruchomiony piekarnik pozostanie
włączony.
Ustawianie minutnika:
1. Naciskać przycisk aż pojawi się
funkcja “Minutnik”. Zacznie migać
odpowiednia kontrolka.
2. Następnie nacisnąć przycisk “ ” lub
“ ” (maksymalnie: 2 godziny, 30
minut).
3. Po ustawieniu godziny, należy
poczekać 5 sekund: zapali się
kontrolka “Minutnik” .
4. Po zakończeniu ustawionego czasu,
kontrolka zacznie migać i rozlegnie
się alarm akustyczny. Wyłączyć
sygnał dźwiękowy wciskając dowolny
przycisk.
48
Page 50

Wyłączanie wyświetlacza
1. Jednocześnie wcisnąć dwa
przyciski programatora i przytrzymać
je przez ok. 5 sekund. Wyświetlacz
wyłączy się.
2. W celu ponownego włączenia
wyświetlacza, wystarczy wcisnąć
dowolny przycisk.
Wyświetlacz można wyłączyć tylko
pod warunkiem, że nie zostały
ustawione żadne funkcje kuchenki.
electrolux
49
Page 51

electrolux
Korzystanie z piekarnika
Kuchenka posiada unikalny system,
który powoduje naturalną cyrkulację
powietrza oraz stały obieg pary.
System ten umożliwia gotowanie na
parze oraz zapewnia delikatność potraw w
środku z jednoczesną ich chrupkością na
zewnątrz. Dodatkowo, do minimum
ograniczony zostaje czas pieczenia oraz
zużycie energii. W czasie pieczenia
może powstawać para, która może się
wydostawać na zewnątrz po otwarciu
drzwiczek piekarnika. Jest to zjawisko
normalne.
Należy jednak odsunąć się od
piekarnika w momencie otwierania
jego drzwiczek w czasie pieczenia
lub po jego zakończeniu tak, aby
para lub ciepło mogły się swobodnie
wydostać.
Uwaga! - Podczas pieczenia nie
wolno stawiać na dnie piekarnika
żadnych przedmiotów ani
przykrywać żadnych części
piekarnika folia aluminiową. Może to
prowadzić do nadmiernego wzrostu
temperatury, co może negatywnie
wpływać na wyniki pieczenia i
uszkodzić emaliowaną powłokę
piekarnika. Naczynia, naczynia
żaroodporne oraz tace aluminiowe
należy ustawiać na półkach
zamocowanych w prowadnicach.
Gdy potrawa jest gotowana, tworzy
się para, jak w czajniku. Gdy para
wchodzi w styczność ze szkłem
na drzwiach piekarnika, następuje
kondensacja i powstają krople
wody.
W celu redukcji kondensacji,
należy zawsze rozgrzewać pusty
piekarnik przez 10 minut.
Zalecamy wycieranie kropel wody po
każdym pieczeniu.
4
3
2
1
Podczas pieczenia drzwi
piekarnika muszą być zawsze
zamknięte. Podczas otwierania
drzwiczek należy stać w
bezpiecznej odległości. Nie
dopuszczać do swobodnego
opadania drzwi - podtrzymywać je,
dopóki nie będą całkowicie otwarte.
W piekarniku znajdują się cztery
poziomy półek i dwie półki. Poziom
wsunięcia półek liczy się od dołu
piekarnika zgodnie z opisem na
schemacie.
Półki należy wsuwać prawidłowo i
zgodnie z opisem na schemacie.
Naczyń do pieczenia nie należy
stawiać bezpośrednio na dnie
piekarnika.
50
Page 52

electrolux
Pieczenie konwekcyjne
- Żywność pieczona jest przy użyciu
podgrzanego powietrza
rozprowadzanego równo wewnątrz
piekarnika za pomocą wentylatora
położonego na tylnej ścianie
piekarnika.
- W ten sposób ciepło dociera szybko i
równomiernie do wszystkich części
piekarnika, co oznacza, że można
jednocześnie piec różne rodzaje
potraw na różnych poziomach.
Pieczenie konwekcyjne zapewnia
szybką eliminację wilgoci, zaś
bardziej suche wnętrze piekarnika
uniemożliwia przenikanie różnych
smaków i aromatów z jednej potrawy
do drugiej.
- Możliwość pieczenia na różnych
półkach oznacza, że można
jednocześnie piec kilka różnych
potraw oraz do trzech blach ciastek i
mini-pizz, do natychmiastowego
zjedzenia lub zamrożenia.
- W piekarniku można oczywiście piec
tylko na jednej półce. W takim
przypadku, należy używać najniżej
położonych półek, w celu
łatwiejszego śledzenia przebiegu
pieczenia.
- Ponadto, piekarnik może być użyty
do przygotowywania przetworów
(sterylizacja), pieczenia owoców w
syropie oraz do suszenia grzybów lub
owoców.
Grillowanie -
- Większość potraw można
umieszczać na ruszcie patelni do
grillowania, aby zapewnić
maksymalną cyrkulację powietrza
oraz zapewnić ściekanie tłuszczu i
soków. Takie potrawy jak ryby,
wątróbki i nerki można umieszczać
bezpośrednio na patelni do
grillowania, wg smaku.
- Potrawy powinny być całkowicie
wysuszone przed grillowaniem, aby
zminimalizować rozpryskiwanie.
Lekko nasmarować pędzelkiem
chude mięso i ryby olejem lub
roztopionym masłem, aby zapewnić,
że będą miękkie podczas pieczenia.
- Dodatki, np. pomidory i grzyby,
można umieścić pod rusztem
podczas grillowania mięs.
- Do tostowania chleba zalecamy
korzystanie z najwyższej półki.
- Potrawy należy obracać podczas
pieczenia, wg smaku.
Obsługa Pełnego Grilla
1. Ustawić pokrętło wyboru funkcji
piekarnika na .
2. Ustawić pokrętło termostatu na
żądaną temperaturę.
3. Wyregulować pozycję rusztu i
patelni do grillowania odpowiednio
do grubości potrawy. Aby zapewnić
szybsze pieczenie, umieścić
potrawę bliżej grzałki, aby zapewnić
łagodniejsze pieczenie - dalej.
Rozgrzewać grill z pełną mocą przez
kilka minut przed włożeniem steków lub
tostów. Ewentualnie wyregulować
ustawienie ciepła oraz półkę podczas
pieczenia.
Podczas pieczenia, wentylator
chłodzenia i kontrolka termostatu będą
działać w taki sam sposób, jak przy
funkcji pieczenia konwekcyjnego.
Obsługa Wewnętrznej Grzałki
Grilla
Wewnętrzny grill zapewnia szybkie i
bezpośrednie ciepło w środkowej
części patelni do grillowania.
Korzystając z wewnętrznej grzałki grilla
do przygotowywania małych ilości
potraw można zaoszczędzić energię.
1. Ustawić pokrętło wyboru funkcji
piekarnika na .
2. Ustawić pokrętło termostatu na
żądaną temperaturę.
51
Page 53

electrolux
3. Wyregulować pozycję rusztu i patelni
do grillowania odpowiednio do
grubości potrawy oraz zgodnie z
instrukcjami grillowania.
Grzałka grilla jest sterowana przez
termostat. Podczas pieczenia, grill
włącza się i wyłącza cyklicznie, aby
zapobiec przegrzaniu.
Tylko górna grzałka
Funkcja ta jest odpowiednia do
kończenia pieczenia dań, np. lasagne,
zapiekanka, zapiekanka serowokalafiorowa, itp.
Tylko grzałka dolna
Funkcja ta jest szczególnie
przydatna do ciast do nadzień. Może
być również wykorzystywana do
przyrumieniania rożków lub tart.
Kontrolka termostatu świeci się do
momentu osiągnięcia
odpowiedniej temperatury.
Następnie cyklicznie zapala się i
gaśnie symbolizując
utrzymywanie temperatury.
Pieczenie konwencjonalne
- Półka środkowa pozwala na
optymalne rozprowadzenie ciepła.
Aby zwiększyć przyrumienienie od
spodu, korzystać z niższej półki.
Aby zwiększyć przyrumienienie od
góry, korzystać z wyższej półki.
- Materiał blach/formy oraz ich
wykończenie mają wpływ na stopień
podpieczenia i zarumienienia
potrawy. Emalia, ciemne, ciężkie i
nieprzylepne naczynia zwiększają
przyrumienienie od spodu, natomiast
szklane naczynia do piekarnika,
błyszczące blachy z aluminium lub
polerowanej stali odbijają ciepło i
powodują mniejsze przyrumienienie
od dołu.
- Zawsze umieszczać naczynia
centralnie na półce, aby zapewnić
równomierne przyrumienienie.
- Potrawy umieszczać w formach/
blachach o wystarczających
wymiarach, tak aby nie dochodziło
do wyrastania ciasta i
zanieczyszczania wnętrza
piekarnika. Ułatwi to czyszczenie.
- Nie wkładać naczyń, blach ani form
bezpośrednio na spód piekarnika,
ponieważ nagrzewa się on bardzo
mocno i może dojść do uszkodzenia.
W tym ustawieniu ciepło dochodzi
zarówno z grzałki dolnej jak i górnej.
Pozwala to na pieczenie na jednym
poziomie i jest szczególnie polecane
do dań, które nie wymagają
szczególnego przyrumienienia od
spodu, np. rożków lub tart.
Zapiekanki, lasagne oraz duszone
mięsa, które wymagają ekstra
przyrumienienia od góry, również dobrze
pieką się w piekarniku
konwencjonalnym.
Obsługa piekarnika
konwencjonalnego
1. Ustawić pokrętło wyboru funkcji
piekarnika na żądaną funkcję .
2. Ustawić pokrętło termostatu na
żądaną temperaturę.
Grillowanie termiczne
Ustawić pokrętło wyboru funkcji
piekarnika oraz ustawić termostat
na wymaganą temperaturę.
Ta funkcja oferuje możliwość
alternatywnego pieczenia potraw
zwyczajowo przygotowywanych na
konwencjonalnym grillu. Grzałka grilla
i wentylator pracują naprzemiennie,
stwarzając obieg gorącego powietrza
wokół potraw.
Przy używaniu tej funkcji należy
nastawić temperaturę maksymalną na
200°C.
52
Page 54

electrolux
Rozmrażanie
Wentylator piekarnika pracuje bez
ciepła i powoduje cyrkulację powietrza w
temperaturze pokojowej wewnątrz
piekarnika.
Sprawdzić, czy pokrętło termostatu
jest wyłączone.
Porady i wskazówki
Pieczenie ciast:
Ciasta zazwyczaj piecze się w
średniej temperaturze (między 150 i
200°C) i dlatego konieczne jest
rozgrzanie piekarnika przez ok. 10 min.
Drzwiczek piekarnika nie należy
otwierać przed upływem co najmniej 3/4
ustawionego czasu pieczenia.
Ciasto kruche powinno być pieczone
w formie lub w blasze przez 2/3 całego
wymaganego czasu pieczenia, a
następnie odpowiednio przybrane przed
całkowitym upieczeniem. Dalszy czas
pieczenia zależy od rodzaju przybrania
lub nadzienia. Ciasta biszkoptowe muszą
z trudem oddzielać się od łyżki. Czas
pieczenia byłby za bardzo wydłużony,
jeśli byłoby za bardzo wodniste.
Jeśli do piekarnika wkłada się dwie
blachy z ciastem lub herbatnikami
jednocześnie, należy zostawić jedną
półkę wolną między blachami.
Jeśli do piekarnika wkłada się dwie
blachy z ciastem lub herbatnikami
jednocześnie, należy zamienić półki
blach, a także odwrócić blachy, po
upływie ok. 2/3 czasu pieczenia.
Pieczenie:
Nie piec mięs mniejszych niż 1 kg.
Mniejsze mięsa mogą wyschnąć
podczas pieczenia. Ciemne mięso, które
musi być dobrze wypieczone z zewnątrz,
a średnio lub lekko wypieczone wewnątrz,
powinno być pieczone w wyższej
temperaturze (200°C-250°C).
Białe mięso, drób i ryby, z drugiej
strony, wymagają niższej temperatury
(150°C-175°C). Składniki sosów powinny
być dodawane do brytfanny na początku,
jeśli czas pieczenia jest krótki. W
przeciwnym razie należy dodać je w
ostatniej półgodzinie.
Można przeprowadzić test łyżką, aby
sprawdzić, czy mięso się upiekło: jeśli
nie można go wgnieść, mięso jest
upieczone. Rostbefy i filety, które mają
pozostać różowe w środku, muszą być
pieczone w wyższej temperaturze przez
krótszy czas.
Jeśli mięso jest pieczone
bezpośrednio na półce piekarnika, na
półkę poniżej włożyć tacę na skapujący
sos.
Pozostawić mięso, aby doszło przez
ostatnie 15 minut, tak, aby soki nie
wyciekły.
Aby zmniejszyć ilość dymu w
piekarniku, zaleca się dodanie niewielkiej
ilości wody do brytfanki. Aby zapobiec
tworzeniu się kondensacji, dodawać
wodę kilka razy. Przed podaniem,
przygotowane potrawy można
utrzymywać ciepłe w piekarniku.
Uwaga!
Podczas pieczenia nie wolno
stawiać na spodzie piekarnika
żadnych przedmiotów ani
przykrywać żadnych części
piekarnika folia aluminiową.
Może to prowadzić do
nadmiernego wzrostu
temperatury, co może
uszkodzić emaliowaną
powłokę piekarnika.
Czasy pieczenia
Czas pieczenia zależy od
składników, konsystencji produktu oraz
ilości płynów w poszczególnych daniach.
Zaleca się zapamiętanie wyników
eksperymentów z pieczeniem w
piekarniku, ponieważ późniejsze
pieczenie potraw w tych samych
warunkach pozwoli uzyskać podobne
rezultaty.
W oparciu o własne doświadczenie
będzie można zmieniać wartości podane
w tabelach.
53
Page 55

electrolux
Tabela pieczenia
Pieczenie konwencjonalne -
Podane czasy nie obejmują czasu wstępnego nagrzania piekarnika.
Pusty piekarnik należy zawsze rozgrzewać przez 10 minut.
TYP
POTRAWY
CIASTA
Ciasta ubijane 2 170 2 (1 i 3)* 160 45-60 w foremce na ciasto
Kruche ciasto 2 170 2 (1 i 3)* 160 20-30 w foremce na ciasto
Sernik 165 60 1 2 80 ~ 175 w foremce na ciasto
Jabłecznik 1 170 2lew+pr. 160 90-120 w foremce na ciasto
Strudel 2 180 2 160 60-80 w tacy do pieczenia
Tarta z dżemem 2 190 2(1 i 3)* 180 40-45 w foremce na ciasto
Ciasto owocowe 2 170 2 150 60-70 w foremce na ciasto
Biszkopt 1 170 2(1 i 3)* 165 30-40 w foremce na ciasto
Keks 1 150 2 150 120-150 w foremce na ciasto
Ciasto ze śliwkami 1 175 2 160 50-60 w dużej formie
Małe ciasto 3 170 2 160 20-35 w tacy do pieczenia
Herbatniki 2 160 2(1 i 3)* 150 20-30 w tacy do pieczenia
Bezy 2 135 2(1 i 3)* 150 60-90 w tacy do pieczenia
Bułeczki 2 200 2 190 12~20 w tacy do pieczenia
Ciasta: Choux 2 lub 3 210 2(1 i 3)* 170 25-35 w tacy do pieczenia
Tarty płaskie 2 180 2 170 45-70 w foremce na ciasto
CHLEB I PIZZA
Biały chleb 1 195 2 185 60-70
Chleb żytni 1 190 1 180 30-45 w formie do chleba
Bułeczki 2 200 2(1 i 3)* 175 25-40 w tacy do pieczenia
Pizza 2 200 2 200 20-30 w tacy do pieczenia
ZAPIEKANKI
Zapiekanka makaronowa 2 200 2 (1 i 3)* 175 40 ~ 50 w foremce
Zapiekanka warzywna 2 200 2 (1 i 3)* 175 45 ~ 60 w foremce
Quiches 1 210 1 190 30-40 w blasze
Lasagne 200 25 2 2 200 ~ 35 w foremce
Cannelloni 200 25 2 2 200 ~ 35 w foremce
Mięso
Wołowina 2 190 2 175 50 ~ 70 na ruszcie
Wieprzowina 2 180 2 175 100 ~ 130 na ruszcie
Cielęcina 2 190 2 175 90 ~ 120 na ruszcie
Rostbef
lekko wypieczony 2 210 2 200 50-60 na ruszcie
średnio wypieczony 2 210 2 200 60-70 na ruszcie
dobrze wypieczony 2 210 2 200 70 ~ 80 na ruszcie
Łopatka wieprzowa 2 180 2 170 120-150 ze skórą
Gicz wieprzowa 2 180 2 160 100-120 2 szt.
Jagnięcina 2 190 2 175 110 ~ 130 Gicz
Kurczak 2 190 2 200 70 ~ 85 cały
Indyk 2 180 2 160 210 ~ 240 cały
Kaczka 2 175 2 220 120 ~ 150 cała
Gęś 2 175 1 160 150 ~ 200 cała
Królik 2 190 2 175 60-80 w kawałkach
Zając 2 190 2 175 150-200 w kawałkach
Bażant 2 190 2 175 90-120 w całości
Klopsy 2 180 2 170 og.150 w dużej formie
RYBY
Pstrąg/Leszcz morski 2 190 2(1 i 3)* 175 40-55 3-4 ryby
Tuńczyk/Łosoś 2 190 2(1 i 3)* 175 35-60 4-6 filety
(*)
Chcąc przygotować jednocześnie więcej niż jedną potrawę, zaleca się
4
3
2
1
temp °C
umieszczenie potraw na poziomach podanych w nawiasach.
Pieczenie tradycyjne
Pieczenie
konwekcyjne
4
temp
3
2
1
°C
Czas
pieczenia w
minutach
UWAGI
54
Page 56

electrolux
Grillowanie
-
Podane czasy nie obejmują czasu wstępnego nagrzania piekarnika
Pusty piekarnik należy zawsze rozgrzewać przez 10 minut.
Czas pieczenia
w minutach
1-sza strona
2-ga strona
TYP POTRAWY
Ilość
Grillowanie
4
3
temp.°CKawałki g.
2
1
Steki (filety) 4 800 3 250 12~15 12~14
Befsztyki 4 600 3 250 10~12 6~8
Kiełbasy 8 / 3 250 12~15 10~12
Kotlety wieprzowe 4 600 3 250 12~16 12~14
Kurczak (połówki) 2 1000 3 250 30~35 25~30
Kebaby 4 / 3 250 10~15 10~12
Kurczak (pierś) 4 400 3 250 12~15 12~14
Hamburger* 6 600 2 250 20-30
*
Wstępne rozgrzanie 5’00'’
Ryby (filety) 4 400 3 250 12~14 10~12
Kanapki 4~6 / 3 250 5~7 /
Tosty 4~6 / 3 250 2~4 2~3
Grillowanie termiczne
W przypadku korzystania z pieczenia konwekcyjnego, należy ustawić
maksymalną temperaturę na 200°C.
Ilość Czas pieczenia
TYP POTRAWY
Kawałki g.
Panier. piecze
Kurczak (połówki) 2 1000 3 200 25~30 20~30
Udka kurze 6 — 3 200 15~20 15~18
Przepiórka 4 500 3 200 25~30 20~25
Zapiekanka warzywna — — 3 200 20~25 —
Małże — — 3 200 15~20 —
Makrela 2-4 — 3 200 15~20 10~15
Filety rybne 4-6 800 3 200 12~15 8~10
ń (indyk) 1 1000 3 200 30~40 20~30
Grillowanie termiczne
4
temperatu-
3
2
1
ra w °C
w minutach
1-sza
strona
2-ga
strona
Podane wartości temperatur są jedynie orientacyjne. Temperatury można dopasować do
indywidualnych wymagań.
55
Page 57

electrolux
Konserwacja i czyszczenie
Przed rozpoczęciem czyszczenia,
należy wyłączyć piekarnik i
poczekać, aż ostygnie.
Do czyszczenia urządzenia nie
należy stosować pary ani
parowych urządzeń czyszczących.
WAŻNE: Przed rozpoczęciem prac
konserwacyjnych lub czyszczenia, należy
odłączyć piekarnik od zasilania
elektrycznego.
Aby zapewnić trwałość urządzenia
konieczne jest regularne wykonywanie
następujących czynności czyszczących:
- Wykonywać dopiero po ostygnięciu
piekarnika.
- Części emaliowane należy myć w wodzie
z dodatkiem mydła.
- Nie należy stosować środków ściernych.
- Osuszyć części ze stali nierdzewnej
miękką ściereczką.
- W przypadku uporczywych plam, można
zastosować detergenty niepowodujące
ścierania lub dostępne na rynku produkty
przeznaczone do czyszczenia stali
nierdzewnej lub ciepły ocet.
Emalia piekarnika jest bardzo trwała i
nieprzepuszczalna. Gorące kwasy z owoców
(np. cytryny, gotowane śliwki, itd.)
pozostawiają trudne do usunięcia plamy na
powierzchniach emaliowanych. Jednakże,
takie plamy na dobrze wypolerowanej
powierzchni emaliowej nie mają wpływu na
pracę piekarnika. Po każdym użyciu, należy
dokładnie przemyć piekarnik. To jest
najłatwiejszy sposób czyszczenia
zabrudzeń. Zapobiega on przypalaniu
zabrudzeń.
Środki czyszczące
Przed zastosowaniem środków
czyszczących należy sprawdzić, czy nadają
się one do czyszczenia kuchenki i czy są
zalecane przez producenta.
56
Page 58

NIE należy stosować środków
czyszczących zawierających wybielacz,
ponieważ mogą one zmatowić powierzchnie.
Nie należy również stosować ściernych
środków czyszczących.
Czyszczenie zewnętrznych
powierzchni kuchenki
Należy regularnie przecierać panel
sterowania, drzwiczki piekarnika oraz
uszczelkę drzwiową stosując do tego celu
delikatną szmatkę zwilżoną ciepłą wodą z
dodatkiem detergentu w płynie.
Aby nie uszkodzić lub osłabić szyby w
drzwiczkach piekarnika nie należy
stosować:
• detergentów i wybielaczy
• impregnowanych myjek nienadających
się do mycia rondli z materiału
zapobiegającemu przyleganiu potraw
• myjek Brillo/Ajax lub myjek metalowych
• myjek do piekarników nasączonych
środkami chemicznymi lub aerozoli
• zmywaczy rdzy
• odrdzewiaczy do wanien/umywalek
Wyczyścić zewnętrzną i wewnętrzną
powierzchnię szyby piekarnika ciepłą wodą
z mydłem. W przypadku mocnego
zabrudzenia wewnętrznej powierzchni
drzwiczek zaleca się stosowanie środków
czyszczących takich jak Hob Brite. Nie
stosować skrobaków do farb do usuwania
pozostałości potraw z piekarnika.
Komora piekarnika
Emaliowany spód komory piekarnika
najlepiej czyści się, gdy piekarnik jest
jeszcze ciepły.
Po każdym użyciu przetrzeć piekarnik
przy pomocy miękkiej szmatki zamoczonej
w ciepłej wodzie z mydłem. Okresowo
należy wykonać bardziej dokładne
czyszczenie stosując do tego celu markowy
środek do czyszczenia.
Nie próbować czyścić emalii
katalitycznej.
electrolux
57
Page 59

electrolux
Pielęgnacja powłok katalitycznych
Podczas przyrządzania potraw wytapia
się z nich tłuszcz, wycieka olej i
pryskają fragmenty potraw, ale emalia
katalityczna usuwa te zabrudzenia.
Aby wspomóc ten proces, zaleca się
włączanie pustego piekarnika raz w
tygodniu na jedną lub dwie godziny, aby
zapewnić maksymalną wydajność
powłoki katalitycznej.
Aby wyczyścić piekarnik, proszę
wykonać następujące czynności:
1. Wyjąć z piekarnika ewentualne
akcesoria (brytfanny, kratki, formy
do pieczenia, tackę na ściekający
tłuszcz itp.) Nie zostawiać niczego
w piekarniku.
2. Ustawić pokrętło wyboru funkcji
piekarnika na funkcję "Pieczenie
tradycyjne"
3. Ustawić pokrętło termostatu na
temp. 250°C.
4. Odczekać ok. 45 minut bez
wkładania potraw do piekarnika.
5. Otworzyć okno w celu zapewnienia
odpowiedniej wentylacji
pomieszczenia.
Procedurę tę należy powtórzyć
ustawiając pokrętło wyboru funkcji
piekarnika
minut.
Jeżeli piekarnik jest zimny, należy go
pozostawić włączonym na 60 minut.
Nie próbować czyścić emalii
katalitycznej.
.
na pozycję grill na ok. 5
Porady i wskazówki
• Nie zaleca się czyszczenia
ręcznego powłoki katalitycznej.
Stosowanie stalowych myjek
zwilżonych mydłem w płynie,
środków czyszczących w aerozolu
lub innych środków o działaniu
ściernym powoduje uszkodzenie
powłoki.
58
Page 60

electrolux
• W miarę upływu czasu może dojść
do lekkiego odbarwienia i
polerowania powłoki katalitycznej.
Nie wpływa to w żaden sposób na
jej właściwości.
• Przestrzegać zaleceń podanych w
rozdziale "Jak przyrządzać
potrawy, aby zmniejszyć
powstawanie zabrudzeń".
Jak przyrządzać potrawy, aby
zmniejszyć powstawanie
zabrudzeń
Proszę przyrządzać potrawy w
zalecanych temperaturach. Pieczenie
w zbyt wysokich temperaturach
powoduje zwiększenie zabrudzeń.
Proszę spróbować przyrządzać
potrawy w niższych temperaturach,
pozostawiając je w piekarniku przez
nieco dłuższy czas - w ten sposób
oszczędza się energię, a pieczeń jest
często delikatniejsza w smaku.
Podczas pieczenia mięsa należy
używać minimalnej ilości oleju lub
całkowicie z niego zrezygnować;
Ziemniaki wystarczy lekko
nasmarować olejem za pomocą
pędzla przed włożeniem ich do
piekarnika. Nadmierna ilość tłuszczu
w piekarniku podczas pieczenia
powoduje jego pryskanie, a tym
samym zabrudzenie piekarnika.
Podczas pieczenia NIE trzeba
dodawać wody do mięsa. Woda i
płynny tłuszcz wypływający z
pieczeni powodują nadmierne
rozpryskiwanie podczas
przyrządzania potrawy nawet w
normalnych temperaturach, jak
również powodują kondensację.
Przykrycie pieczeni podczas
gotowania zapobiega pryskaniu
tłuszczu na dolne powierzchnie;
Jeżeli chce się przyrumienić pieczeń
lub inną potrawę, należy ją odkryć na
ostatnich 20-30 minut pieczenia. Jest
to szczególnie korzystne w
przypadku przyrządzania dużych
pieczeni czy indyków, gdyż umożliwia
upieczenie mięsa w środku, zanim
zewnętrzna część zbytnio się
przyrumieni.
Nie używać brytfanny. Podczas
pieczenia tłuszcz wyciekający z
pieczeni pozostanie za trójnogiem i
nie będzie pryskać na powłokę
katalityczną,
59
Page 61

electrolux
Wsporniki półek i panele
katalityczne
Wsporniki półek i panele katalityczne
można zdemontować w celu
oczyszczenia.
Przed przystąpieniem do tej
operacji proszę się upewnić, że
piekarnik całkowicie ostygł.
Należy postępować w
)
następujący sposób:
1. odkręcić przednią śrubę
jednocześnie przytrzymując
wspornik półki i panel katalityczny
drugą ręką (patrz diagram 1).
2. Przytrzymać wspornik półki i panel
katalityczny i podnieść je,
równocześnie odczepiając tylny hak.
Zdjąć wspornik półki i panel
katalityczny (patrz panel 2).
Oczyścić z zewnątrz wsporniki
półek, używając w tym celu
detergentów dostępnych w handlu.
3. Po zakończeniu czyszczenia
założyć ponownie wspornik półki i
panel katalityczny i zamontować je,
wykonując tę samą procedurę w
odwrotnej kolejności.
Podczas montowania wspornika półki i
panelu katalitycznego należy się
upewnić, że śruby mocujące są
poprawnie dokręcone.
1
2
Czyszczenie piekarnika
Przed czyszczeniem drzwiczek
piekarnika należy je zdemontować z
piekarnika.
Należy postępować w następujący
sposób:
1. całkowicie otworzyć drzwiczki
piekarnika;
2. odnaleźć zawiasy, na których
drzwiczki są zawieszone na
piekarniku (Rys. A);
60
Rys. A
Page 62

3. odkręcić i obrócić małe dźwignie
znajdujące się na obu zawiasach (Rys.
B);
4. drzwi należy trzymać po prawej lub
lewej stronie, a następnie powoli
obrócić w kierunku piekarnika do
położenia w połowie zamkniętego
(Rys. C);
5. delikatnie wyjąć drzwiczki (Rys. C);
6. położyć je na stabilnej podstawie.
Drzwiczki należy wyczyścić przy
pomocy delikatnej szmatki zwilżonej w
ciepłej wodzie z mydłem. Nie należy
korzystać ze ściemych środków
czyszczących. Po wyczyszczeniu, z
powrotem nałożyć drzwiczki piekarnika,
wykonując wyżej opisaną procedurę w
odwrotnej kolejności.
Modele wykonane ze stali
nierdzewnej lub aluminium:
Zaleca się czyszczenie drzwiczek
piekarnika przy pomocy wilgotnej gąbki.
Po wyczyszczeniu, wytrzeć miękką
szmatką.
Nie należy używać myjek stalowych,
kwasów ani produktów ściernych,
ponieważ mogą one uszkodzić
powierzchnię piekarnika. Panel sterowania
należy myć stosując się do tych samych
zaleceń.
NIE CZYŚCIĆ drzwi piekarnika,
gdy panele szklane są jeszcze
ciepłe. Niezastosowanie się do
tego zalecenia może
spowodować stłuczenie szyby.
Wyszczerbiona lub głęboko zadrapana
szyba ma mniejszą wytrzymałość i, aby
uniknąć ryzyka rozbicia szyby, należy ją
wymienić. W przypadku wątpliwości
prosimy o kontakt z lokalnym punktem
serwisowym.
electrolux
Rys. B
Rys. C
61
Page 63

electrolux
Wymiana oświetlenia piekarnika
Odłączenie urządzenia
Jeśli to konieczne, wymienić żarówkę.
Żarówka musi mieć następujące parametry:
- Moc: 15 W/25 W,
- Napięcie: 230 V (50 Hz),
- Żaroodporność do temperatury 300°C,
- Typ gwintu: E14.
Żarówki można nabyć w lokalnym punkcie
serwisowym.
Wymiana spalonej żarówki:
1. Sprawdzić, czy piekarnik jest odłączony
od zasilania.
2. Wcisnąć szklaną oprawkę i obrócić w
kierunku przeciwnym do ruchu
wskazówek zegara.
3. Wyjąć spaloną żarówkę i wymienić ją na
nową.
4. Z powrotem nałożyć szklany klosz i
podłączyć zasilanie.
Grzałka grilla
Ten model jest wyposażony w grzałkę grilla na
zawiasach, dzięki czemu można niezwykle łatwo
oczyścić górę wnęki piekarnika.
Przed rozpoczęciem czyszczenia, należy
sprawdzić, czy piekarnik jest chłodny
oraz czy jest odłączony od zasilania
elektrycznego.
1. Odkręcić śrubę mocującą grzałkę grilla (patrz
Rys.). Wykonując tę czynność po raz pierwszy
należy posłużyć się śrubokrętem.
2. Następnie delikatnie pociągnąć grill do dołu, aby
uzyskać dostęp do górnej części komory
piekarnika (patrz Rys.).
3. Oczyścić górę komory piekarnika przy pomocy
odpowiedniego środka czyszczącego i wytrzeć
do sucha przed ponownym zamocowaniem
grzałki grilla na jej miejscu.
4. Ostrożnie wcisnąć grzałkę grilla na miejsce i
dokręcić nakrętkę.
Sprawdzić, czy nakrętka grzałki grilla jest
właściwie dokręcona, aby grzałka nie
spadła podczas pracy urządzenia.
62
Page 64

electrolux
Co zrobić, jeśli urządzenie nie działa prawidłowo
Jeśli urządzenie nie działa prawidłowo, przed skontaktowaniem się z lokalnym
punktem serwisowym Electrolux, należy wykonać następujące kontrole.
PROBLEM
Piekarnik się nie włącza.
Nie działa kontrolka
temperatury piekarnika.
Nie działa oświetlenie
piekarnika.
ROZWIĄZANIE
Sprawdzić, czy wybrana została funkcja
pieczenia i temperatura.
lub
Sprawdzić, czy urządzenie jest właściwie
podłączone, a wyłącznik urządzenia lub
wyłącznik główny piekarnika są włączone.
Wybrać temperaturę pokrętłem
termostatu.
lub
Za pomocą pokrętła wyboru funkcji
piekarnika wybrać żądaną funkcję.
Wybrać żądaną funkcję pokrętłem wyboru
funkcji piekarnika.
lub
Sprawdzić żarówkę i, w razie potrzeby,
wymienić (patrz “Konserwacja i
czyszczenie”).
Dania pieką się za długo lub za
szybko.
Na potrawach i w komorze
piekarnika osiadają para i
skropliny.
Głośna praca wentylatora
piekarnika.
Wyświetlacz pokazuje
“12.00”.
Konieczna może być regulacja
temperatury.
lub
Zgodnie z radami w niniejszej instrukcji, w
szczególności w rozdziale “Korzystanie z
piekarnika”.
Gdy proces gotowania jest zakończony
nie pozostawiać naczyń w piekarniku na
dłużej niż 15-20 minut.
Sprawdzić, czy tace i naczynie do
pieczenia nie wibrują w momencie
stykania się z tylną płytą piekarnika.
Ustawić godzinę (patrz rozdział
“Ustawianie godziny”).
63
Page 65

electrolux
Dane techniczne
Wartości znamionowe grzałek
Dolna grzałka 1000 W
Górna grzałka 800 W
Pełna moc
(górna+dolna grzałka) 1800 W
Pieczenie konwekcyjne 2000 W
Grill 1650 W
Pełny Grill 2450 W
Grillowanie termiczne 2475 W
Oświetlenie piekarnika 25 W
Silnik wentylatora gorącego
powietrza 25 W
Silnik wentylatora chłodzenia 25 W
Razem moc znamionowa 2500 W
Napięcie robocze (50 Hz)
230 V
Wymiary wnęki
Wysokość pod blatem 593 mm
w meblu 580 mm
Szerokość 560 mm
Głębokość 550 mm
Piekarnik
Wysokość 335 mm
Szerokość 395 mm
Głębokość 400
Pojemność piekarnika 53 l
64
mm
Page 66

Instrukcje dla instalatora
Podłączenie trzeba wykonać
zgodnie z obowiązującymi
przepisami prawa. Wszelkie
prace wykonywać po
wyłączeniu urządzenia. Prace
przy urządzeniu wykonywać
mogą jedynie upoważnieni
serwisanci.
Producent nie ponosi żadnej
odpowiedzialności za
niezastosowanie się do
niniejszych wskazówek
dotyczących bezpieczeństwa.
Podłączenie do zasilania
elektrycznego
Przed podłączeniem do zasilania
elektrycznego należy pamiętać:
- Bezpieczniki oraz domowa instalacja
elektryczna muszą być odpowiednie
do maks. obciążenia elektrycznego
urządzenia (patrz tabliczka
znamionowa).
- Domowe urządzenia elektryczne
muszą być właściwie uziemione
zgodne z przepisami prawa.
- Gniazdko lub przełącznik
wielobiegunowy muszą być łatwo
dostępne po zakończeniu instalacji
urządzenia.
Urządzenie nie zostało wyposażone
w elektryczny przewód zasilania, w
związku z czym należy go podłączyć do
przewodu zasilania ze standardową
wtyczką, odpowiedniego do obciążenia
elektrycznego przedstawionego na
tabliczce znamionowej. Wtyczkę należy
włożyć do odpowiedniego gniazdka
zasilającego w ścianie.
Jeżeli chcą Państwo bezpośredniego
podłączenia do sieci elektrycznej
(zasilającej), należy umieścić pomiędzy
urządzeniem a siecią zasilającą
przełącznik wielobiegunowy, o
minimalnym odstępie 3 mm pomiędzy
stykami, odpowiedni do wymaganego
obciążenia, zgodnie z obowiązującymi
electrolux
65
Page 67

electrolux
przepisami. Zielono-żółty przewód
uziemienia nie może być przerwany
przez przełącznik i powinien być o 2-3 cm
dłuższy od przewodów fazy i zera.
Dostarczony przewód zasilający oraz
wtyczka muszą być podłączone do
całkowicie izolowanego gniazdka (230
V~, 50 Hz). Całkowicie izolowane
gniazdko powinno być prawidłowo
zamontowane zgodnie z przepisami.
Mogą być stosowane następujące
rodzaje przewodów zasilających,
uwzględniając odpowiedni przekrój
znamionowy przewodu: H07 RN-F, H05
RN-F, H05 RR-F, H05 VV-F, H05 V2V2-F
(T90), H05 BB-F.
Przewód zasilający musi być tak
ułożony, aby nie osiągał on w żadnym
swoim punkcie temperatury wyższej o 50
°C od temperatury otoczenia.
Po wykonaniu przyłączenia, należy
włączyć grzałki i przez 3 minuty
kontrolować, czy pracują prawidłowo.
Listwa zaciskowa
Piekarnik jest wyposażony w łatwo
dostępną listwę zaciskową
przystosowaną do jednofazowego
napięcia 230 V.
Litera L - Faza
Litera N - Zero
lub E - Uziemienie
66
Page 68

Instrukcje zabudowy
Aby zapewnić prawidłowe działanie
urządzenia do zabudowy, szafka
kuchenna lub wnęka na urządzenie
powinny mieć odpowiednie wymiary.
Zgodnie z obowiązującymi
przepisami, wszystkie części powinny
zapewniać izolację elektryczną przed
porażeniem, a części izolowane powinny
być zamocowane w taki sposób, aby nie
można było ich zdemontować bez
narzędzi.
Dotyczy to również zamocowania na
ścianach końcowych na początku lub
końcu linii zabudowy.
Podczas zabudowy należy zapewnić
zabezpieczenie przed porażeniem.
Urządzenie należy umieścić tyłem lub
bokiem do wysokich mebli kuchennych,
urządzeń lub ścian. Jednakże, jedynie
inne urządzenia lub meble o takiej samej
wysokości co urządzenie mogą być
umieszczone z drugiej strony.
electrolux
Rys. A
Rys. B
Wymiary piekarnika (Rys. A)
Instrukcje zabudowy
Aby zapewnić prawidłowe działanie
urządzenia do zabudowy, szafka
kuchenna lub wnęka na urządzenie
powinny mieć odpowiednie wymiary
(Rys. B-C).
Mocowanie urządzenia do
kredensu
1. Otworzyć drzwi piekarnika;
2. Przymocować piekarnik do szafki
umieszczając cztery przekładki (Rys.
D - A), które wpasowują się dokładnie
do otworów w ramie, a następnie
włożyć cztery śruby do drewna (Rys.
D - B) dostarczone w komplecie.
Rys. C
Rys. D
550 M
560 - 570
IN
593
80÷100
67
Page 69

electrolux
Gwarancja/Serwis
Warunki gwarancji
1. Electrolux Poland Sp. z o.o. gwarantuje, że zakupione urządzenie jest wolne od wad
fizycznych zobowiązując się jednocześnie – w razie ujawnienia takich wad w okresie
gwarancyjnym i w zakresie określonym niniejszym dokumentem – do ich usunięcia w
sposób uzależniony od właściwości wady.
2. Ujawniona wada zostanie usunięta na koszt gwaranta w ciągu 14 dni od daty zgłoszenia
uszkodzenia do autoryzowanego punktu serwisowego Electrolux Poland.
3. W wyjątkowych przypadkach konieczności sprowadzenia części zamiennych od
producenta termin naprawy może zostać wydłużony do 30 dni.
4. Okres gwarancji dla użytkownika wynosi 24 miesiące od daty zakupu.
5. Sprzęt przeznaczony jest do używania wyłącznie w warunkach indywidualnego
gospodarstwa domowego.
6. Gwarancja nie obejmuje:
z a. uszkodzeń powstałych na skutek używania urządzenia niezgodnie z instrukcją
obsługi,
z b. uszkodzeń mechanicznych, chemicznych lub termicznych,
z c. uszkodzeń spowodowanych działaniem siły zewnętrznej np. przepięcia w sieci
elektrycznej, wyładowania atmosferycznego,
z d. napraw i modyfikacji dokonanych przez firmy lub osoby nieposiadające
autoryzacji Electrolux Poland,
z e. części z natury łatwo zużywalnych takich jak: żarówki, bezpieczniki, filtry,
pokrętła.
7. Klientowi przysługuje wymiana sprzętu na nowy jeżeli po wykonaniu w okresie gwarancji
czterech napraw nadal występują w nim wady. Przez naprawę rozumie się wykonanie
czynności o charakterze specjalistycznym właściwym dla usunięcia wady. Pojęcie
naprawy nie obejmuje: instalacji, instruktażu, konserwacji sprzętu, poprawy połączeń
mechanicznych lub elektrycznych.
8. Wymiany sprzętu dokonuje autoryzowany punkt serwisowy Electrolux Poland lub jeśli
jest to niemożliwe placówka sprzedaży detalicznej, w której sprzęt został zakupiony.
Sprzęt zwracany po wymianie musi być kompletny, bez uszkodzeń mechanicznych.
Niespełnienie tych warunków może spowodować nie uznanie gwarancji.
9. Montaż sprzętu wymagającego specjalistycznego podłączenia do sieci gazowej lub
elektrycznej może być wykonany wyłącznie przez osoby posiadające odpowiednie
uprawnienia pod rygorem utraty gwarancji.
10. Electrolux Poland nie ponosi żadnej odpowiedzialności za uszkodzenia powstałe na
skutek niewłaściwego zainstalowania sprzętu lub napraw wykonanych przez osoby
nieupoważnione.
11. Koszty nieuzasadnionego wezwania serwisu pokrywa klient.
12. Powyższa gwarancja nie wyłącza, nie ogranicza ani nie zawiesza uprawnień
kupującego wynikających z tytułu niezgodności towaru z umową.
13. Niniejsza gwarancja obowiązuje na terytorium Polski.
14. Warunkiem dokonania naprawy lub wymiany urządzenia w ramach gwarancji jest
przedstawienie dowodu zakupu z wpisaną czytelnie datą sprzedaży, potwierdzoną
pieczęcią i podpisem sprzedawcy.
Uwaga: uszkodzenie lub usunięcie tabliczki znamionowej z urządzenia może
spowodować nieuznanie gwarancji.
Electrolux Poland Sp. z o.o.ul. Kolejowa 5/701-217 Warszawa tel. 22 434 73 00
e-mail: reklamacje@electrolux.pl
www.electrolux.pl
68
Page 70

Serwis i części zamienne
Jeżeli kuchenka nie działa prawidłowo
mimo wykonania wszystkich kontroli
wymienionych w poprzednim rozdziale,
należy skontaktować się z lokalnym
punktem serwisowym i określić typ usterki,
model urządzenia (Mod.), jego numer
produktu (Nr prod.) i numer seryjny (nr na
tabliczce identyfikacyjnej). Tabliczka ta
umieszczona jest na przedniej zewnętrznej
krawędzi komory piekarnika.
Oryginalne części zamienne, dopuszczone
przez producenta i posiadające ten symbol,
są dostępne wyłącznie w
naszych punktach
serwisowych i w
autoryzowanych
sklepach z częściami
zamiennymi.
electrolux
Gwarancja europejska
Niniejsze urządzenie jest objęte gwarancją firmy Electrolux w każdym z niżej
wymienionych krajów przez okres podany w gwarancji urządzenia lub określony
ustawowo. W przypadku przeprowadzki właściciela urządzenia z jednego z
poniższych krajów do innego, gwarancja zachowuje swoją ważność z następującymi
zastrzeżeniami:
z Gwarancja na urządzenie obowiązuje od dnia zakupu. Datę zakupu należy
potwierdzić przez okazanie dokumentu zakupu wydanego przez sprzedawcę
urządzenia.
z Okres gwarancji na urządzenie oraz zakres gwarancji (wykonawstwo oraz części)
są takie same, jak okres i zakres obowiązujące dla danego modelu lub serii
urządzenia w nowym kraju zamieszkania.
z Gwarancja na urządzenie jest wydawana osobiście na pierwszego kupującego i
nie można jej przekazać na innego użytkownika.
z Urządzenie zostało zainstalowane i jest eksploatowane wyłącznie do celów
domowych zgodnie z instrukcjami firmy Electrolux. Użytkowanie do celów
zawodowych jest wykluczone.
z Urządzenie zostało zainstalowane zgodnie ze wszystkimi obowiązującymi
przepisami nowego kraju zamieszkania.
Postanowienia niniejszej Gwarancji Europejskiej w żaden sposób nie ograniczają
nabytych praw ustawowych.
69
Page 71

electrolux
70
Page 72

electrolux
ZOB 580
0.79 kWh
0.78 kWh
53
43 min.
41 min.
1130 cm²
HR SI PL CZ SK RO
-
Proizvoðaè
1
Model
2
Klasa energetske
3
djelotvornosti
*
-Konvencionalno
4
-Konvekcija s
5
ventilatorom
Potronja elektriène
energije (kWh)
Funkcija grijanja:
-Konvencionalno
6
-Konvekcija s
7
ventilatorom
-Para
8
Neto zapremina (litara)
9
Velièina:
-Mala
-Srednja
-Velika
Vrijeme peèenja
normalno punog:
-Konvencionalno
10
-Konvekcija s
11
ventilatorom
Povrina najveæeg
pladnja za peèenje
12
Buka (db (A) re 1 pw)
13
Veæa djelotvornost
Veèja uèinkovitost
*
Wiêksza sprawnoæ
Hatékonyabb
Úsporné
Viac úsporná
Mai eficient
Proizvajalec
Model
Razred energijske
uèinkovitosti
-Konvencionalno
-Z dodatno ogretim
zrakom
Poraba elektriène energije
(kWh)
Ogrevanje:
-Konvencionalno
-Z dodatno ogretim
zrakom
-Para
Neto prostornina (v litrih)
Velikost:
-Mala
-Srednja
-Velika
Èas kuhanja pri
standardni obremenitvi:
-Konvencionalno
-Z dodatno ogretim
zrakom
Velikost najveèjega
pekaèa
Hrup (db (A) re 1 pw)
Producent
Model
Klasa energooszczêdnoci
-Tradycyjne
-Konwekcja wymuszona
Zu¿ycie energii (kWh)
Funkcja podgrzewania:
-Tradycyjne
-Konwekcja wymuszona
-Para
Pojemnoæ u¿yteczna
(w litrach)
Wielkoæ:
-Ma³a
-rednia
-Du¿a
Czas gotowania
standardowej wielkoci
potrawy:
-Tradycyjne
-Konwekcja wymuszona
Powierzchnia najwiêkszej
tacy do pieczenia
Poziom ha³asu (db (A)
re 1 pw)
Manja djelotvornost
Manja uèinkovitost
Mniejsza sprawnoæ
Kevésbé hatékony
Ménì úsporné
Menej úsporná
Mai puþin eficient
HU
Gyártó
Modell
Energiahatékonysági
osztály
-Hagyományos
-Levegõkeringetéses
konvekciós
Energiafogyasztás (kWh)
Melegítés funkció:
-Hagyományos
-Levegõkeringetéses
konvekciós
-Gõz
Hasznos térfogat (liter)
Méret:
-Kicsi
-Közepes
-Nagy
Normál mennyiség
sütéséhez szükséges idõ:
-Hagyományos
-Levegõkeringetéses
konvekciós
A legnagyobb sütõlap
területe
Zaj (db (A) re 1 pw)
Výrobce
Model
Tøída energetické úèinnosti
-Konvenèní
-Konvenèní s
ventilátorem
Spotøeba energie (kWh)
Funkce ohøevu:
-Konvenèní
-Konvenèní s ventilátorem
-Pára
Uitný objem (litry)
Velikost:
-Malá
-Støední
-Velká
Èas peèení standardního
mnoství:
-Konvenèní
-Konvenèní s ventilátorem
Plocha nejvìtího
peèícího plechu
Hluènost dB(A) re 1pW
12 l £
35 l £
65 l £
Výrobca
Model
Trieda energetickej
hospodárnosti
-Konvenèné
-Vnútené prúdenie
vzduchu
Spotreba energie (kWh)
Funkcia peèenie:
-Konvenèné
-Vnútené prúdenie
vzduchu
-Para
Vyuite¾ný objem (litre)
Ve¾kos:
-Malá
-Stredná
-Ve¾ká
Èas na upeèenie pri
tandardnej záai:
-Konvenèné
-Vnútené prúdenie
vzduchu
Plocha najväèieho
plechu na peèenie
Hluènos (db (A) re 1 pw)
Neto zapremina/Neto prostornina/Pojemnoæ u¿yteczna/Hasznos térfogat/
Uitný objem/Vyuite¾ný objem/Volum util
Neto zapremina/Neto prostornina/Pojemnoæ u¿yteczna/Hasznos térfogat/
Uitný objem/Vyuite¾ný objem/Volum util
Neto zapremina/Neto prostornina/Pojemnoæ u¿yteczna/Hasznos térfogat/
Uitný objem/Vyuite¾ný objem/Volum util
Producãtor
Model
Clasa de eficienþã
energeticã
-Convenþional
-Convecþie forþatã
Consum de energie (kWh)
Funcþia de încãlzire:
-Convenþional
-Convecþie forþatã
-Vapori
Volum util (litri)
Dimensiuni:
-Mic
-Mediu
-Mare
Durata de coacere pentru
încãrcãturã normalã:
-Convenþional
-Convecþie forþatã
Suprafaþa tãvii de copt
celei mai mari
Zgomot (db (A) re 1 pw)
ZOB 580
0.79 kWh
0.78 kWh
53
43 min.
41 min.
1130 cm²
< 35 l
< 65 l
2002/40/EC
71
Page 73

electrolux
www.electrolux.co.uk
www.electrolux.pl
72
35699-1601 01/08 R.A
 Loading...