

Page 1

User’s
Manual
IM 04L51B01-02EN
8th Edition
Model GX10/GX20/GP10/GP20
Paperless Recorder
First Step Guide
Contents
Introduction ................................................................................. 1
Handling Precautions of the GX/GP ............................................ 5
SD Memory Card Handling Precautions ...................................... 5
Checking the Package Contents ................................................. 5
Standard Accessories ................................................................. 8
Conventions Used in This Manual ............................................... 9
Protection of Environment ..........................................................10
Functional Overview ...................................................... 11
Overview ................................................................................... 11
A Variety of Source Signals ........................................................ 11
Expandable Module Construction ............................................... 11
GX60 Connection and Multichannel Measurement ..................... 11
High-speed Measurement, Dual Interval Measurement (Measurement
mode) ....................................................................................12
Loop Control and Program Control Function (/PG Option)..........12
Data Storage .............................................................................12
A Variety of Display Functions ....................................................12
Touch Screen ............................................................................13
Freehand Messages ..................................................................13
Versatile Network Functions and Software .................................13
Other Functions ........................................................................ 14
System Conguration ................................................................15
Component Names ........................................................16
GX20/GX10 ...............................................................................16
GP20/GP10 ...............................................................................17
GX60/GX90EX ..........................................................................17
GX90XA/GX90XD/GX90YD/GX90WD/GX90XP/GX90YA/GX90UT
..............................................................................................18
Operating Procedure ...................................................... 20
Installation and Wiring ....................................................22
Installation Location ................................................................... 22
Installation Procedure ................................................................ 23
External Dimensions and Panel Cut Dimensions........................ 23
Connect an GX60
..................................................................... 25
Installing and Removing I/O Modules ......................................... 26
Wiring ....................................................................................... 28
Basic Operation ..............................................................37
Turning the Power On and Off ................................................... 37
Setting and Removing SD Memory Cards ................................. 38
Viewing the Operation Screen (Trend) ....................................... 38
Displaying the Menu Screen ...................................................... 39
Setting the Date and Time* ........................................................ 39
Conguring the Inputs ............................................................... 40
Starting Measurement and Recording ....................................... 40
Switching between Operation Screens ...................................... 40
Saving Data to USB Memory .................................................... 41
Switching the Quick Settings (GP only) ...................................... 41
Advanced Operation (Various settings and operation) 42
Setting Measurement and Recording Conditions ....................... 42
Setting Alarms .......................................................................... 42
Alarm DO output ....................................................................... 43
Using the Scaling Function (Measuring a ow meter) ................. 43
Using the Scaling Function (Measuring a temperature) .............. 44
Registering and Deleting Favorite Screens ................................ 44
Setting the Measurement Mode .....................................45
Setting the Measurement Mode ................................................ 45
Limitations................................................................................. 45
Reconguring the GX/GP (Module identication) .........46
Reconguring the GX/GP .......................................................... 46
Initializing the GX/GP
(Initializing all settings) ........................................................... 46
Saving and Loading Setting Parameters .......................47
Saving Setting Parameters........................................................ 47
Loading Setup Parameters ....................................................... 47
Web Application .............................................................48
Starting the Web Application ..................................................... 48
Closing the Web Application ...................................................... 48
Application Software ......................................................49
PC System Requirements ......................................................... 49
Installation ................................................................................. 49
Starting and Closing Universal Viewer
....................................... 50
Starting and Closing Hardware Congurator .............................. 50
Setup Menu Map .............................................................51
Power Specialties, Inc. | www.powerspecialties.com | (816) 353-6550
Page 2

Power Specialties, Inc. | www.powerspecialties.com | (816) 353-6550
Page 3

PRS 108-02E
User Registration
Thank you for purchasing YOKOGAWA products.
We invite you to register your products in order to receive the most up to date product
information. To register, visit the following URL.
http://www.yokogawa.com/ns/reg/
Power Specialties, Inc. | www.powerspecialties.com | (816) 353-6550
Page 4

Power Specialties, Inc. | www.powerspecialties.com | (816) 353-6550
Page 5

1
IM 04L51B01-02EN
Introduction
Thank you for purchasing the SMARTDAC+ GX/GP
Series Paperless Recorder (hereafter referred to as the
GX/GP). This manual explains the basic operation,
installation, and wiring of the GX/GP.
For details on configuring and operating the GX/GP, see
the “ Paperless Recorder User’s Manual (IM 04L51B0101EN) “ provided in electronic format.
For details on the settings and operation of the PID
control module and program control (/PG option), see the
Loop Control Function, Program Control Function (/PG
Option) User’s Manual (IM 04L51B01-31EN), provided as
an electronic manual.
This manual supports the following products.
Model Product Name
GX10/GX20 Paperless Recorder (panel mount type)
GP10/GP20 Paperless recorder (portable type)
GX60 I/O Base Unit (Expandable I/O)
Although the display of GX20 is used in this guide,
GX10/GP10/GP20 can be operated similarly.
This manual denotes devices with their product names or
model (e.g. GX60).
To ensure correct use, please read this manual and the
following manuals thoroughly before beginning operation.
For a detailed description of the product, see the
electronic manual.
For specifications, refer to General Specifications.
Paper Manuals
Manual Title Manual No.
Models GX10/GX20/GP10/GP20
Paperless Recorder First Step Guide
IM 04L51B01-02EN
(This manual)
Precaution on the use of SMARTDAC+
(Only delivered with each module or GX60)
IM 04L51B01-91EN
Electronic Manuals
You can download these manuals from the following web
page:
www.smartdacplus.com/manual/en/
Manual Title Manual No.
Model GX10/GX20/GP10/GP20
Paperless Recorder First Step Guide
IM 04L51B01-02EN
Model GX10/GX20/GP10/GP20
Paperless Recorder User’s Manual
IM 04L51B01-01EN
Model GX10/GX20/GP10/GP20/GM10
Communication Command User’s Manual
IM 04L51B01-17EN
SMARTDAC+ STANDARD Universal Viewer
User’s Manual
IM 04L61B01-01EN
SMARTDAC+ STANDARD Hardware Configurator
User’s Manual
IM 04L61B01-02EN
Model GX10/GX20/GP10/GP20/GM10
Multi-batch Function (/BT) User’s Manual
IM 04L51B01-03EN
Model GX10/GX20/GP10/GP20
Advanced Security Function (/AS) User’s Manual
IM 04L51B01-05EN
Model GX10/GX20/GP10/GP20/GM10
EtherNet/IP Communication (/E1) User’s Manual
IM 04L51B01-18EN
Model GX10/GX20/GP10/GP20/GM10
WT Communication (/E2) User’s Manual
IM 04L51B01-19EN
Model GX10/GX20/GP10/GP20/GM10
OPC-UA Server (/E3) User’s Manual
IM 04L51B01-20EN
Model GX10/GX20/GP10/GP20/GM10
SLMP Communication (/E4) User’s Manual
IM 04L51B01-21EN
Model GX10/GX20/GP10/GP20/GM10
LOG scale (/LG) User’s Manual
IM 04L51B01-06EN
Model GX10/GX20/GP10/GP20/GM10
Loop Control Function, Program Control Function (/PG
Option) User’s Manual
IM 04L51B01-31EN
DXA170 DAQStudio User’s Manual IM 04L41B01-62EN
Precaution on the use of SMARTDAC+ IM 04L51B01-91EN
General Specifications
Title General
specifications No.
GX10/GX20 Paperless Recorder (panel mount type)
GS 04L51B01-01EN
GP10/GP20 Paperless Recorder (portable type)
GS 04L52B01-01EN
GX60 I/O Base Unit (Expandable I/O) / GX90EX Expansion
Module
GS 04L53B00-01EN
GX90XA/GX90XD/GX90YD/GX90WD/GX90XP/GX90YA
I/O modules
GS 04L53B01-01EN
GX90UT PID Control Module
GX10/GX20/GP10/GP20 Paperless Recorder
Data Acquisition System GM
Loop Control Function, Program Control Function (/PG
Option)
GS 04L53B01-31EN
* The last two characters of the manual number and
general specification number indicate the language in
which the manual is written.
Installing the Java Runtime Environment (JRE)
Download JRE from the following site, and install it.
<http://www.smartdacplus.com/software/en/>
Notes
• The contents of this manual are subject to change
without prior notice as a result of continuing
improvements to the instrument’s performance and
functions.
• Every effort has been made in the preparation of
this manual to ensure the accuracy of its contents.
However, should you have any questions or find any
errors, please contact your nearest Yokogawa dealer.
• Copying or reproducing all or any part of the contents
of this manual without the permission of Yokogawa is
strictly prohibited.
Authorised Representative in the EEA
The Authorised Representative for this product in the EEA is:
Yokogawa Europe B.V.
Euroweg 2, 3825 HD Amersfoort,The Netherlands
Revisions
December 2012 1st Edition December 2014 5th Edition
February 2013 2nd Edition December 2015 6th Edition
May 2013 3rd Edition June 2017 7th Edition
May 2014 4th Edition November 2017 8th Edition
Trademarks
• SMARTDAC+ and SMARTDACPLUS are registered
trademark of Yokogawa Electric Corporation.
•
Microsoft and Windows are registered trademarks or
trademarks of Microsoft Corporation in the United States
and/or other countries.
• Pentium is a trademark of Intel Corporation in the
United States and/or other countries.
•
Adobe and Acrobat are registered trademarks or
trademarks of Adobe Systems Incorporated.
• Kerberos is a trademark of Massachusetts Institute of
Technology (MIT).
• The SD logo is a registered trademark of the SD
association.
• Company and product names that appear in this
manual are registered trademarks or trademarks of
their respective holders.
•
The company and product names used in this manual
are not accompanied by the registered trademark or
trademark symbols (® and ™).
Power Specialties, Inc. | www.powerspecialties.com | (816) 353-6550
Page 6

2
IM 04L51B01-02EN
Manual guide for various items and functions
Imtem, Function Main manual
Document name
No.
Related manuals
User’s Manual
IM 04L51B01-01EN
Communication
Command User’s
Manual
IM 04L51B01-17EN
Paperless Recorder
First Step Guide
IM 04L51B01-02EN
Standard
settings,operation
Communication comand Installation and Wiring
Safety Precautions,
Installation and Wiring,
Basic operation of the
GX/GP
First Step Guide
IM 04L51B01-02EN
basic operation and
setting of the GX/GP.
User’s Manual
IM 04L51B01-01EN
Math function (/MT) User’s Manual
IM 04L51B01-01EN
Report function (/MT) User’s Manual
IM 04L51B01-01EN
Report Template Function
(/MT)
User’s Manual
IM 04L51B01-01EN
Batch Function User’s Manual
IM 04L51B01-01EN
Modbus Function User’s Manual
IM 04L51B01-01EN
DARWIN compatible
communication function
User’s Manual
IM 04L51B01-01EN
Communication channel
function (/MC)
User’s Manual
IM 04L51B01-01EN
Serial communication
function (/C2, /C3)
User’s Manual
IM 04L51B01-01EN
Advanced security
function (Part 11)
Advanced Security
Function (/AS)
User’s Manual
IM 04L51B01-05EN
EtherNet/IP
Communication (/E1)
EtherNet/IP
Communication (/E1)
User’s Manual
IM 04L51B01-18EN
WT Communication (/E2) WT Communication (/E2)
User’s Manual
IM 04L51B01-19EN
Aerospace heat treatment
(/AH)
User’s Manual
IM 04L51B01-01EN
Multi Batch Function (/BT) Multi Batch Function (/BT)
User’s Manual
IM 04L51B01-03EN
OPC-UA Server (/E3) OPC-UA Server (/E3)
User’s Manual
IM 04L51B01-20EN
SLMP Communication (/
E4)
SLMP Communication (/
E4)
User’s Manual
IM 04L51B01-21EN
Custom Display (/CG
option)
DXA170 DAQStudio
IM 04L41B01-62EN
Log Scale (/LG) Log Scale (/LG)
User’s Manual
IM 04L51B01-06EN
Loop Control Function,
Program Control Function
(/PG)
Loop Control Function,
Program Control Function
(/PG Option)
User’s Manual
IM 04L51B01-31EN
Power Specialties, Inc. | www.powerspecialties.com | (816) 353-6550
Page 7
3
IM 04L51B01-02EN
Safety Precautions
• This instrument conforms to IEC safety class I
(provided with terminal for protective grounding),
Installation Category II, and EN61326-1 (EMC
standard), Measurement Category II (CAT II).*
* Measurement Category II (CAT II) are for the analog
input modules (GX90XA) and PID control mopdule
(GX90UT).
Measurement category II (CAT II) applies to
measuring circuits connected to low voltage
installation, and electrical instruments supplied
with power from fixed equipment such as electric
switchboards.
• This instrument is an EN61326-1 (EMC standard)
class A instrument (for use in commercial, industrial, or
business environments). The influence rate (judgment
condition A) in the immunity test environment is within ±
10 % of the range.
• The general safety precautions described here must
be observed during all phases of operation. If the
SMARTDAC+ is used in a manner not described in
this manual, the SMARTDAC+ safety features may be
impaired. Yokogawa Electric Corporation assumes no
liability for the customer’s failure to comply with these
requirements.
• The SMARTDAC+ is designed for indoor use.
■ About This Manual
• Please pass this manual to the end user. We also ask
you to store this manual in a safe place.
• This guide is intended for the following personnel:
Engineers responsible for installation, wiring, and
maintenance of the equipment.
Personnel responsible for normal daily operation of the
equipment.
• Read this manual thoroughly and have a clear
understanding of the product before operation.
• This manual explains the functions of the product. It
does not guarantee that the product will suit a particular
purpose of the user.
■ Precautions Related to the Protection, Safety,
and Alteration of the Product
The following safety symbols are used on the product
and in this manual.
“Handle with care.” To avoid injury and damage to the instrument,
the operator must refer to the explanation in the manual.
Protective ground terminal
Functional ground terminal
(do not use this terminal as a protective ground terminal.)
Alternating current
Direct current
ON (power)
OFF (power)
• For the protection and safe use of the product and the
system in which this product is incorporated, be sure
to follow the instructions and precautions on safety
that are stated in this manual whenever you handle the
product.
Take special note that if you handle the product in a
manner that violates these instructions, the protection
functionality of the product may be damaged or
impaired. In such cases, Yokogawa does not guarantee
the quality, performance, function, and safety of
product.
• When installing protection and/or safety circuits such
as lightning protection devices and equipment for the
product and control system or designing or installing
separate protection and/or safety circuits for fool-proof
design and fail-safe design of the processes and lines
that use the product and the control system, the user
should implement these using additional devices and
equipment.
• If you are replacing parts or consumable items of
the product, make sure to use parts specified by
Yokogawa.
• This product is not designed or manufactured to
be used in critical applications that directly affect
or threaten human lives. Such applications include
nuclear power equipment, devices using radioactivity,
railway facilities, aviation equipment, air navigation
facilities, aviation facilities, and medical equipment. If
so used, it is the user’s responsibility to include in the
system additional equipment and devices that ensure
personnel safety.
• Do not modify this product.
● Use the Correct Power Supply
Ensure that the source voltage match-
es the voltage of the power supply before turning ON the power. In the case
of portable type and the GX60 (power
inlet type), ensure that it is within the
maximum rated voltage range of the
provided power cord before connecting the power cord.
● Use the Correct Power Cord and Plug
(Portable Type, GX60 (power inlet
type))
To prevent electric shock or re, be
sure to use the power cord supplied
by Yokogawa. The main power plug
must be plugged into an outlet with a
protective earth terminal. Do not disable this protection by using an extension cord without protective earth
grounding.
The power cord is designed for use
with this instrument. Do not use the
power cord with other instruments.
● Connect the Protective Grounding
Terminal
Make sure to connect the protective
grounding to prevent electric shock
before turning ON the power.
The power cord that comes with the
portable type and the GX60 (power
inlet type) are three prong type power
cord. Connect the power cord to a
properly grounded three-prong outlet.
● Do Not Impair the Protective Grounding
Never cut off the internal or external
protective grounding wire or dis-
Power Specialties, Inc. | www.powerspecialties.com | (816) 353-6550
Page 8

4
IM 04L51B01-02EN
■ Exemption from Responsibility
• Yokogawa makes no warranties regarding the product
except those stated in the WARRANTY that is provided
separately.
• Yokogawa assumes no liability to any party for any loss
or damage, direct or indirect, caused by the user or any
unpredictable defect of the product.
■ Software Handling Precautions
• Yokogawa makes no warranties, either expressed or
implied, with respect to the software’s merchantability
or suitability for any particular purpose, except as
specified in the terms of the separately provided
warranty.
• All reverse-engineering operations, such as reverse
compilation or the reverse assembly of the product are
strictly prohibited.
• No part of the product’s software may be transferred,
converted, or sublet for use by any third party, without
prior written consent from Yokogawa.
About the Usage of Open Source Software
关于开放源代码软件的使用
This products uses open source software.
For details on using open source software, see Regarding
the Downloading and Installing
for the Software, Manuals and Labels (IM 04L61B01-
11EN).
connect the wiring of the protective
grounding terminal. Doing so invalidates the protective functions of the
instrument and poses a potential
shock hazard.
●
Do Not Operate with Defective Protec-
tive Grounding
Do not operate the instrument if the
protective grounding might be defective. Also, make sure to check them
before operation.
● Do Not Operate in an Explosive Atmosphere
Do not operate the instrument in the
presence of ammable gas, vapors, or
combustible dust. Operation in such
an environment constitutes a safety
hazard. Prolonged use in a highly
dense corrosive gas (H
2
S, SOx, etc.)
will cause a malfunction.
●
Do Not Remove Covers
The cover should be removed by
Yokogawa’s qualied personnel only.
Opening the cover is dangerous,
because some areas inside the instrument have high voltages.
● Ground the Instrument before Making
External Connections
Connect the protective grounding
before connecting to the item under
measurement or control unit.
● Damage to the Protection
Operating the instrument in a man-
ner not described in this manual may
damage the instrument’s protection.
● Wiring
To prevent shock, attach the included
terminal cover after wiring. Make sure
to use appropriate wires and crimp-on
lugs.
If hazardous external voltage (30 V
AC or 60 V DC or more) is applied to
the I/O terminals, provide adequate
protection to prevent users or service
engineers from suddenly touching
the terminals or tools or the like from
coming in contact with the terminals.
This instrument is a Class A product.
Operation of this instrument in a
residential area may cause radio
interference, in which case the user is
required to take appropriate measures to
correct the interference.
Power Specialties, Inc. | www.powerspecialties.com | (816) 353-6550
Page 9
5
IM 04L51B01-02EN
Handling Precautions of the GX/GP
• Use care when cleaning this instrument, especially
its plastic parts. Use a soft dry cloth. Do not use
organic solvents, such as benzene or thinner, or
other cleansers. They may cause discoloring and
deformation.
• Keep electrically charged objects away from the signal
terminals. Failure to do so may damage the GX/GP.
• Do not apply volatile chemicals to the display, panel
keys, etc. Do not allow rubber and vinyl products to
remain in contact with the GX/GP for long periods of
time. Doing so may damage the GX/GP.
• When not in use, make sure to turn off the power
switch.
• If there are any symptoms of trouble such as strange
odors or smoke coming from the GX/GP, immediately
turn off the power switch and the power supply source.
Then, contact your nearest Yokogawa dealer.
SD Memory Card Handling Precautions
• SD memory cards are delicate and should be handled
with caution.
• Yokogawa provides no warranty for damage to, or loss
of data recorded on the SD memory card, regardless
of the cause of such damage or loss. Please always
make backup copies of your data.
• Do not store or use the SD memory card in places with
static electricity, near electrically charged objects, or
where electrical noise is present. Doing so can result in
electric shock or damage.
• Do not disassemble or modify the SD memory card.
Doing so can result in damage.
• Do not physically shock, bend, or pinch the SD memory
card. Doing so can lead to malfunction.
• During reading/writing of data, do not turn OFF the
power, apply vibration or shock, or pull out the card.
Data can become corrupt or permanently lost.
• Only use Yokogawa SD memory cards. Operation
cannot be guaranteed with other brands of card.
• When inserting the SD memory card into the
instrument, make sure you orient the card correctly
(face up or down) and that you insert it securely. If not
inserted correctly, the card will not be recognized by
the instrument.
• Never touch the SD memory card with wet hands.
Doing so can lead to electric shock or malfunction.
• Never use the SD memory card if it is dusty or dirty.
Doing so can lead to electric shock or malfunction.
• The SD memory card comes formatted.
SD cards must be formatted according to the standard
established by the SD Association (https://www.sdcard.
org/home). If you want format the SD memory card,
use the instrument’s Format function. If using a PC
to perform the formatting, use the SD card formatter
software available from the above SD Association.
• You can use SD/SDHC cards (up to 32 GB) on the GX/
G P.
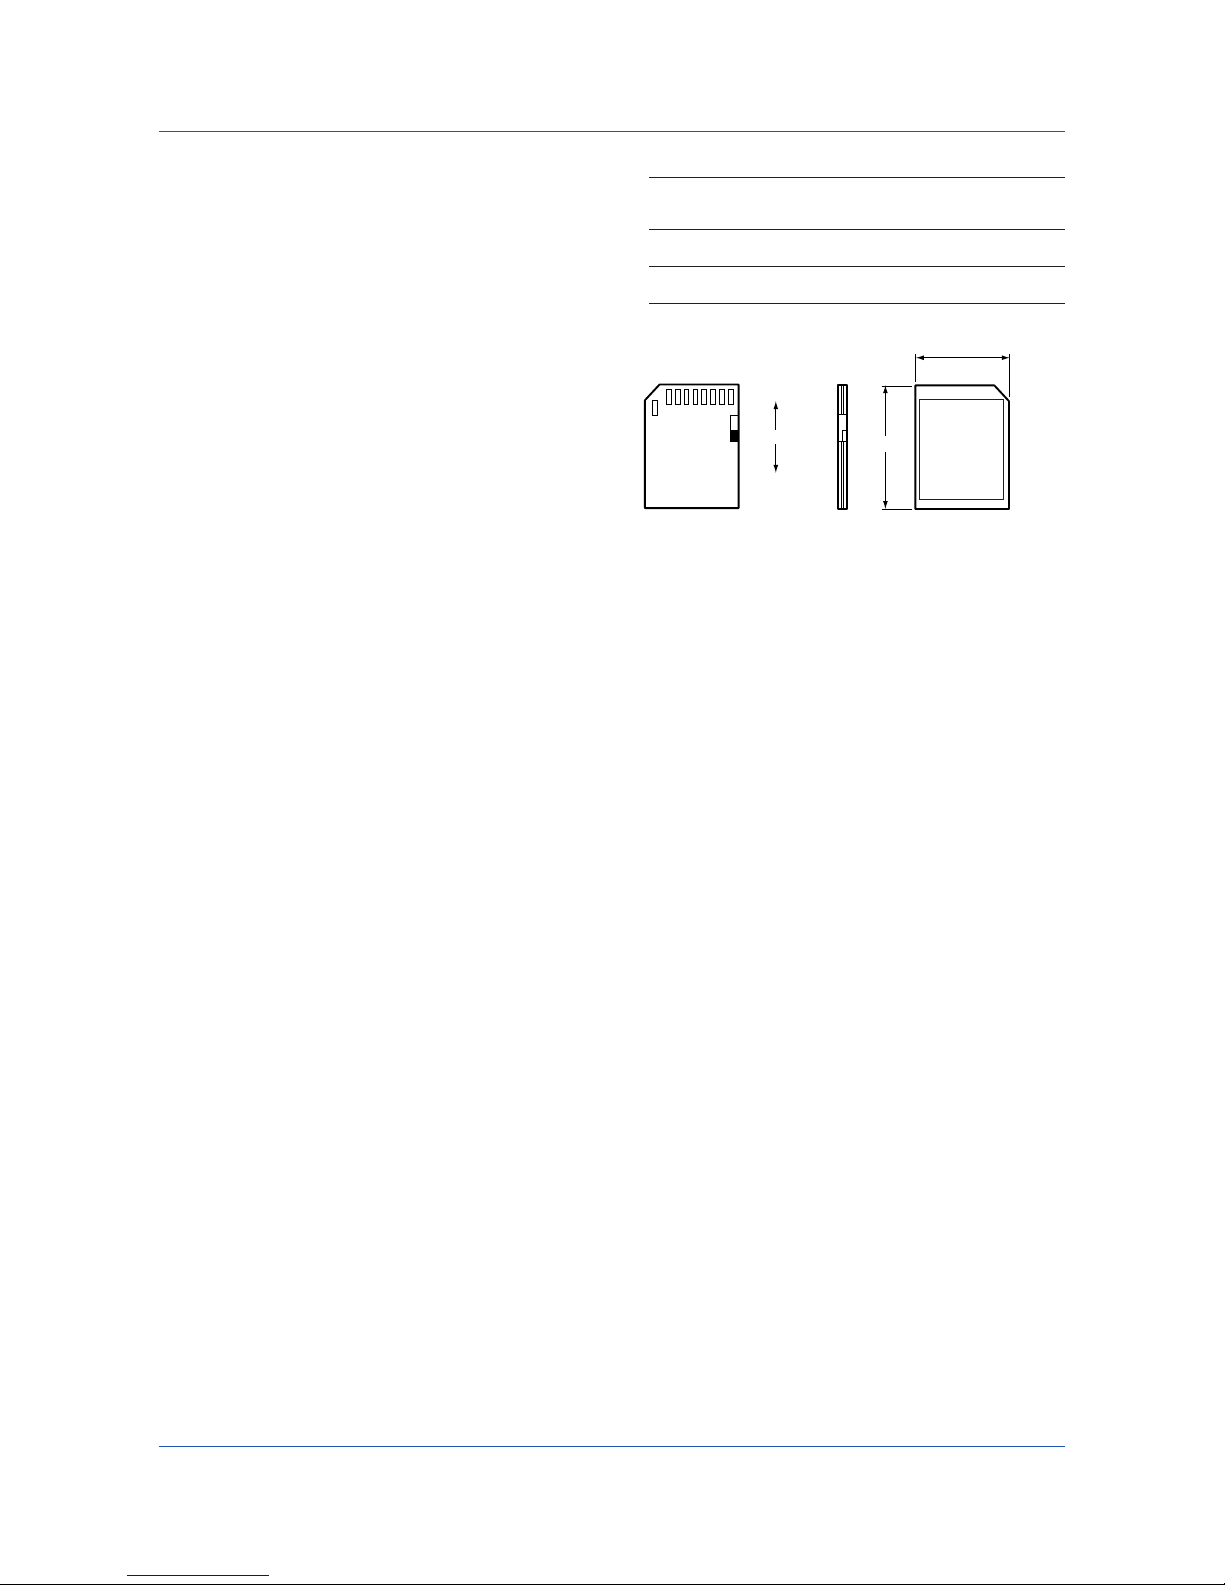
SD Memory Card Specifications and Characteristics
Electrical specifications Operating voltage: 2.7 V to 3.6 V (memory
operation)
Operating temperature /
humidity conditions
–25 to 85°C / 20 to 85% RH, no condensation
Storage temperature /
humidity conditions
–40 to 85°C / 5 to 95% RH, no condensation
Unit: mm
32 ± 0.1
24 ± 0.1
WP
SD
Writable
Write-protected
Checking the Package Contents
After receiving the product and opening the package,
check the items described below. If the wrong items
have been delivered, if items are missing, or if there is a
problem with the appearance of the items, contact your
nearest Yokogawa dealer.
Check that the product that you received is what you
ordered by referring to the model name and suffix code
given on the name plate on the GX/GP.
NO. (Instrument Number)
When contacting the dealer from which you purchased the
instrument, please give them the instrument number.
Power Specialties, Inc. | www.powerspecialties.com | (816) 353-6550
Page 10
6
IM 04L51B01-02EN
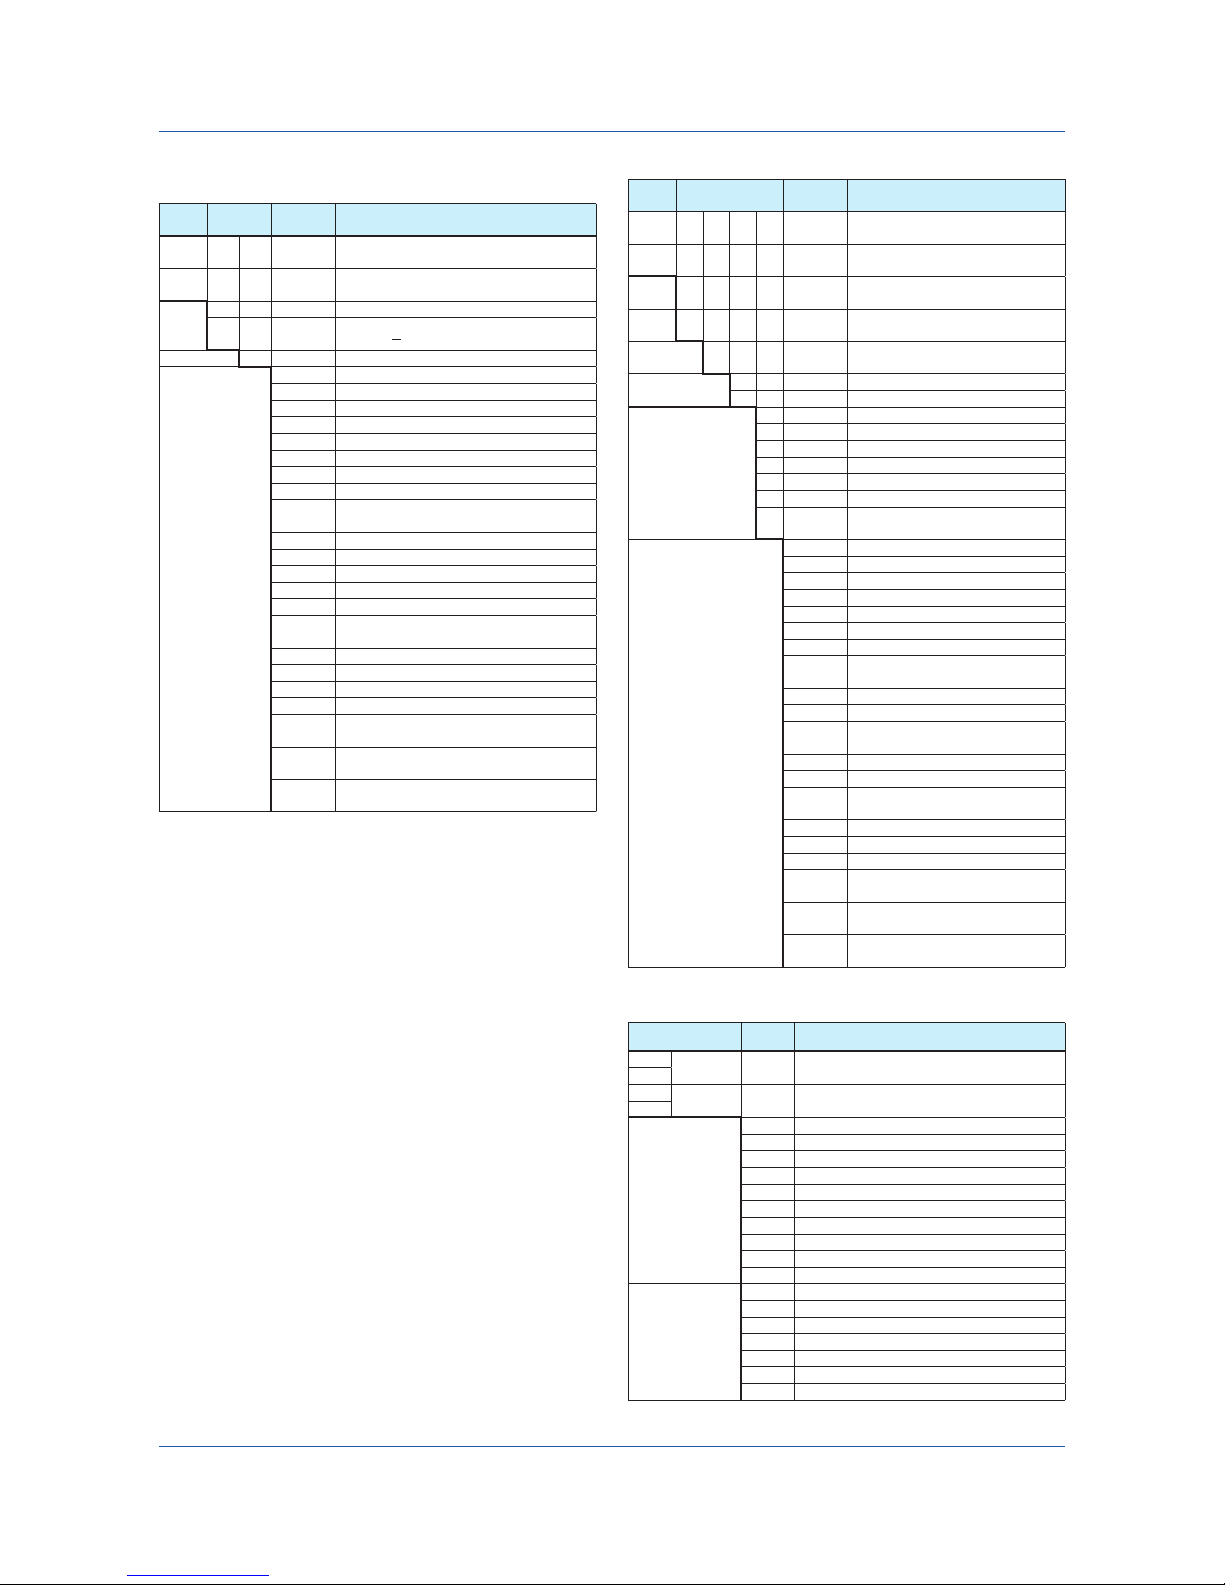
GP10/GP20
13
Model Suffix Code Optional
Code
Description
GP10 Paperless recorder (Portable type,
Small display)
GP20 Paperless recorder (Portable type,
Large display)
Type -1 Standa rd (max. no. of measurement
ch : 100)
-2 Large Memory (max. no. of
measurement ch : 500)
12
Language E English, degF, DST (summer/winter
time)
10
Power supply 1 100 VAC, 240 VAC
16
2 12V DC
17
Power cord D Power cord UL/CSA standard
F Power cord VDE standard
R Power cord AS standard
Q Power cord BS standard
H Power cord GB standard
N Power cord NBR standard
W Screw terminal, power cord not
included
Options /AH Aerospace heat treatment
/AS Advanced security function
/BT Multi-batch function
/C2 RS-232
1
/C3 RS-422/485
1
/CG Custom display function
/D5 VGA output
2
/E1 EtherNet/IP communication
(PLC communication protocol)
19
/E2 WT communication
14
/E3 OPC-UA server
/E4 SLMP communication (Mitsubishi
PLC)
20
/FL Fail output, 1 point
/LG LOG scale
/MT Mathematical function (with report
function)
15 18
/MC Communication channel function
21
/PG Program control function
22
/UH USB interface (host 2 ports)
/UC[ ]0 Analog (universal) input module
preinstalled (clamp terminal)
3
/US[ ]0 Analog (universal) input module
preinstalled (M3 screw terminal)
3
/CR[ ][ ] Digital output module, digital input
module preinstalled
5
Models in Which I/O Modules Are Preinstalled
Model Suffix Code Optional
Code
Description
GX10 -□E/[ ][ ] Paperless recorder (panel mount type)
GX20
GP10 -□E1[ ]/[ ][ ] Paperless recorder (portable type)
GP20
Options
(analog Input)
3 11
/UC10 With analog input module, 10ch (Clamp terminal)
/UC20 With analog input module, 20ch (Clamp terminal)
7
/UC30 With analog input module, 30ch (Clamp terminal)
8
/UC40 With analog input module, 40ch (Clamp terminal)
5
/UC50 With analog input module, 50ch (Clamp terminal)
5
/US10 With 10ch analog input module (M3 screw terminal)
/US20 With 20ch analog input module (M3 screw terminal)
7
/US30 With 30ch analog input module (M3 screw terminal)
8
/US40 With 40ch analog input module (M3 screw terminal)
5
/US50 With 50ch analog input module (M3 screw terminal)
5
Options
(digital I/O)
4
/CR01 With digital I/O module (output: 0, input: 16)
8, 9, 15
/CR10 With digital I/O module (output: 6, input: 0)
8
/CR11 With digital I/O module (output: 6, input: 16)
7, 8, 9, 15
/CR20 With digital I/O module (output: 12, input: 0)
6
/CR21 With digital I/O module (output: 12, input: 16)
6, 9, 15
/CR40 With digital I/O module (output: 24, input: 0)
6
/CR41 With digital I/O module (output: 24, input: 16)
6, 9, 15
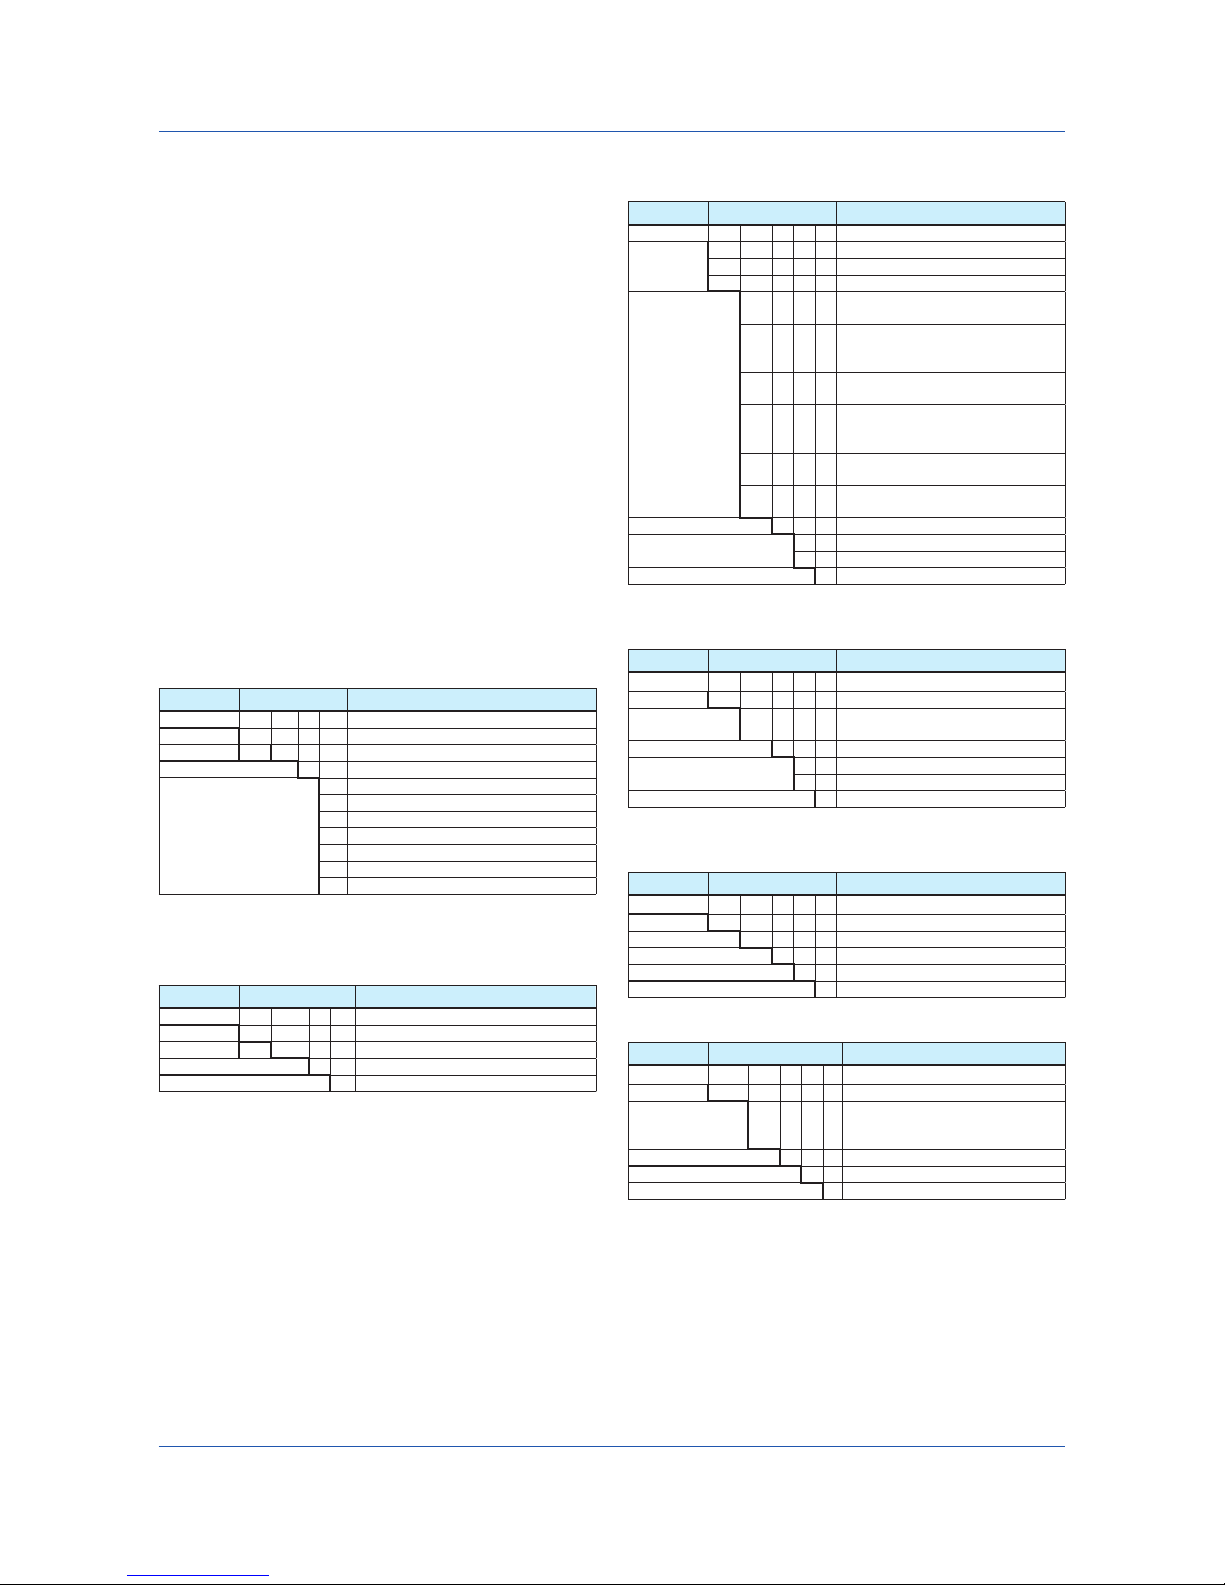
MODEL and SUFFIX Codes
GX10/GX20
13
Model Suffix
Code
Optional
Code
Description
GX10 Paperless recorder (Panel mount type,
Small display)
GX20 Paperless recorder (Panel mount type,
Large display)
Type -1 Standard (max. no. of measurement ch : 100)
-2 Large Memory (max. no. of measurement
ch : 500)
1112
Language E English, degF, DST (summer/winter time)
10
Options /AH Aerospace heat treatment
/AS Advanced security function
/BC Black cover
/BT Multi-batch function
/C2 RS-232
1
/C3 RS-422/485
1
/CG Custom display function
/D5 VGA output
2
/E1 EtherNet/IP communication
(PLC communication protocol)
19
/E2 WT communication
14
/E3 OPC-UA server
/E4 SLMP communication (Mitsubishi PLC)
20
/FL Fail output, 1 point
/LG LOG scale
/MT Mathematical function (with report
function)
15 18
/MC Communication channel function
21
/P1 24 VDC/AC power supply
4
/PG Program control function
22
/UH USB Interface (host 2 ports)
/UC[ ]0 Analog (universal) input module preinstalled
(clamp terminal)
3
/US[ ]0 Analog (universal) input module preinstalled
(M3 screw terminal)
3
/CR[ ][ ] Digital output module, digital input module
preinstalled
5
Power Specialties, Inc. | www.powerspecialties.com | (816) 353-6550
Page 11
7
IM 04L51B01-02EN
1 /C2 and /C3 cannot be specified together.
2 /D5 can be specified only for the GX20/GP20.
3 Only one option can be specified.
4 Only one option can be specified.
5 /UC40, /UC50, /US40, and /US50 cannot be specified for the GX10/GP10.
6 /CR20, /CR21, /CR40, and /CR41 cannot be specified for the GX10/GP10.
7 If /UC20 or /US20 is specified for the GX10/GP10, /CR11 cannot be specified.
8 If /UC30 or /US30 is specified for the GX10/GP10, /CR01, /CR10, and /CR11
cannot be specified.
9 A digital input module has M3 screw terminals.
10 The Display language is selectable from English, German, French, Russian,
Korean, Chinese, Japanese.
To confirm the current available languages, please visit the following website.
URL: www.yokogawa.com/ns/language/
11 Solid state relay type (Type Suffix Code: -U2).
12 Can be specified only for the GX20/GP20.
13 To connect an I/O base unit, you will need one I/O expansion module for the
GX/GP.
14 /MC option must be separately specified when the WT communication is
selected.
15 Optional code /MT (MATH) required if using the GX90XD’s or GX90WD’s pulse
input.
16 Selectable only when the power cord suffix code is D or F or R or Q or H or N.
17 Selectable only for the GP10 when the power cord suffix code is W.
18 The /MT option (computation) is required to perform pulse integration on
GX90XP pulse input modules.
19 If you want to write from a PLC to the GX/GP via EtherNet/IP communication, a
separate communication channel (/MC) is required.
20 If you want the GX/GP to load data from SLMP servers via SLMP
communication, a separate communication channel (/MC) is required.
21 If you want to load data from other devices into the GX/GP using Modbus client,
a communication channel (/MC) is required.
22 This is applicable only when a GX90UT PID Control Module is installed.
I/O Base Unit (Expandable I/O)
1
Model Suffix Code Description
GX60 I/O base unit
Type -EX I/O Expansion
Area N General
Power supply 1 100 VAC, 240 VAC
Power cord D Power cord UL/CSA standard
F Power cord VDE standard
R Power cord AS standard
Q Power cord BS standard
H Power cord GB standard
N Power cord NBR standard
W Screw terminal, power cord not included
2
1 Include GX90EX (Expansion module), Stopper (antiskid rubber)
2 Intended use for panel or rack mounting only.
I/O Expansion Module (Expansion Module)
Model Suffix Code Description
GX90EX I/O Expansion Module
Port -02 2 ports
Type -TP1 Twisted pair cable
- N Always N
Area -N General
I/O Modules
GX90XA
Model Suffix Code Description
GX90XA Analog Input Module
Channels
-04 4 channels (Type -H0 only)
-06 6 channels (Type -R1 only)
-10 10 channels (Type -C1, -L1, -U2, -T1 )
Type
-C1
Current, Scanner type
(isolated between channels)
-L1
DCV/TC/DI (400 VAC, 1 min),
Scanner type
(isolated between channels)
-U2
Universal, Solid state relay scanner
type (3-wire RTD b-terminal common)
-T1
DCV/TC/DI, Electromagnetic relay
scanner type (Isolated between
channels)
-H0
High-speed universal, individual A/D
type (isolated between channels)
-R1
4-wire RTD/resistance, scanner type
(isolated between channels)
- N Always N
Terminal type
-3 Screw terminal (M3)
-C Clamp terminal
Area N General
GX90XD
Model Suffix Code Description
GX90XD Digital Input Module
1
Channels -16 16 channels
Type -11
Open collector/Non-voltage, contact
(shared common), Rated 5 VDC
- N Always N
Terminal type
-3 Screw terminal (M3)
-C Clamp terminal
Area N General
1 Optional code /MT (MATH) required if using the pulse input.
GX90YD
Model Suffix Code Description
GX90YD Digital Output Module
Channels -06 6 channels
Type -11 Relay, SPDT(NO-C-NC)
- N Always N
Terminal type -3 Screw terminal (M3)
Area N General
GX90WD
Model Suffix Code Description
GX90WD Digital Input/Output Module
1
Channels -0806 Input 8 channels, Output 6 channels
Type -01
Open collector/non-voltage contact
(shared common), rated 5 VDC;
Relay, SPDT (NO-C-NC)
- N Always N
Terminal type -3 Screw terminal (M3)
Area N General
1 Optional code /MT (MATH) required if using the pulse input.
Power Specialties, Inc. | www.powerspecialties.com | (816) 353-6550
Page 12
8
IM 04L51B01-02EN
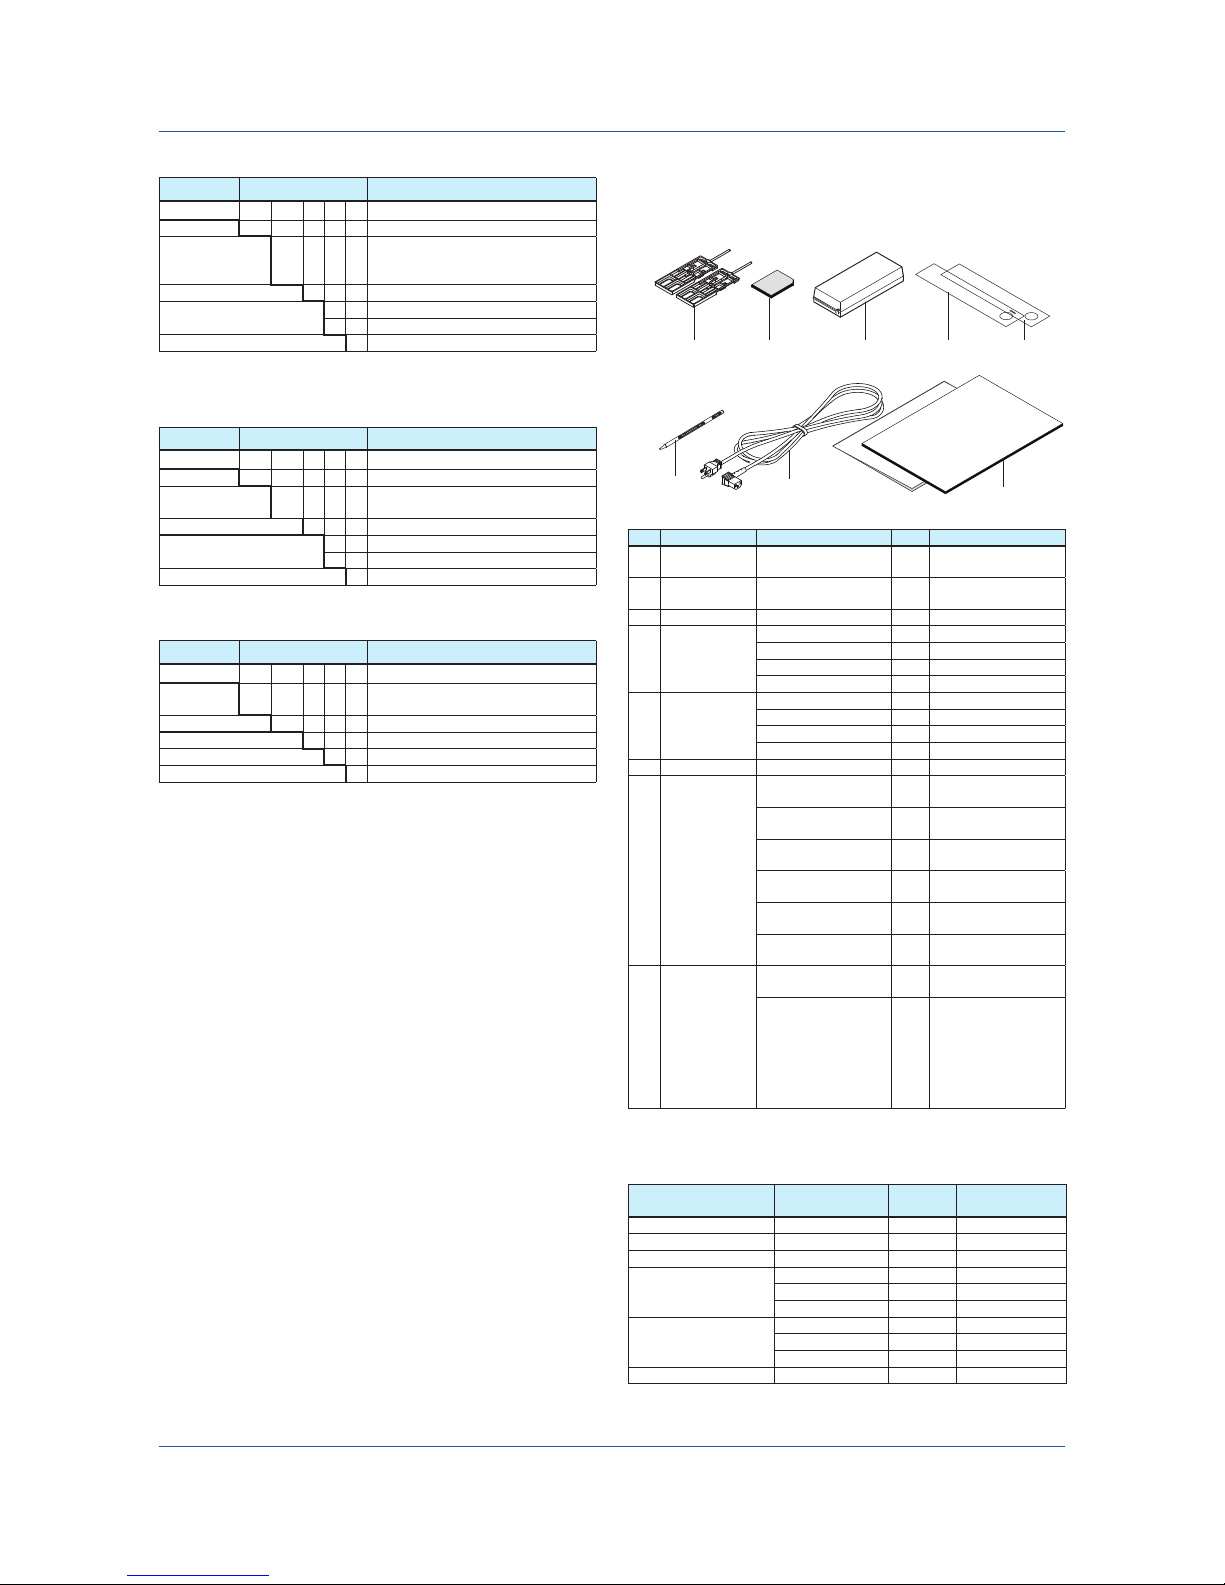
Standard Accessories
The instrument is shipped with the following accessories.
Make sure that all accessories are present and
undamaged.
7
8
1 2 3 4 5
6
No. Name Part Number/Model Qty. Notes
1 Mounting
bracket
B8740DY 2 GX10/GX20 only
2 SD memory
card
773001 1 1GB
3 Dummy cover B8740CZ For empty slots
4 Tag plate B8740FE 1 GX20
B8740ME 1 GP20
B8741FE 1 GX10
B8741ME GP10
5 Sheet B8740FF 1 GX20
B8740MF 1 GP20
B8741FF 1 GX10
B8741MF 1 GP10
6 Stylus B8740BZ 1
7 Power cord A1006WD 1 D: Power cord UL,
CSA st’d
1
A1009WD 1 F: Power cord VDE
st’d
1
A1024WD 1 R: Power cord AS
st’d
1
A1054WD 1 Q: Power cord BS
st’d
1
A1064WD 1 H: Power cord GB
st’d
1
A1088WD 1 N: Power cord NBR
st'd
1
8 Manual IM 04L51B01-02EN 1 First Step Guide (This
manual)
IM 04L61B01-11EN 1 Regarding the
Downloading and
Installing for the
Software, Manuals
and Labels/About
the Usage of Open
Source Software
1 Except GP10 power supply suffix code: 2
Optional Accessories (Sold separately)
Name Part Number/
Model
Minimum.
Q’ty
Notes
Mounting bracket B8740DY 2 GX10/GX20 only
SD memory card 773001 1 1GB
Stylus B8740BZ 1
Shunt resistor
(for M3 screw terminal)
415940 1 250 Ω ± 0.1%
415941 1 100 Ω ± 0.1%
415942 1 10 Ω ± 0.1%
Shunt resistor
(for clamp terminal)
438920 1 250 Ω ± 0.1%
438921 1 100 Ω ± 0.1%
438922 1 10 Ω ± 0.1%
Dummy cover B8740CZ 1 For module slot
GX90XP
Model Suffix Code Description
GX90XP Pulse Input Module
1
Channels -10 10 channels
Type -11
DC voltage/Open collector/Nonvoltage, contact (shared common),
Rated 5 VDC
- N Always N
Terminal type
-3 Screw terminal (M3)
-C Clamp terminal
Area N General
1 The /MT option (computation) is required to perform pulse integration.
GX90YA
Model Suffix Code Description
GX90YA Analog Output Module
Channels -04 4 channels
Type -C1
Current output (isolated between
channels)
- N Always N
Terminal type
-3 Screw terminal (M3)
-C Clamp terminal
Area N General
GX90UT
Model Suffix Code Description
GX90UT PID Control Module
Number
of loops
-02 2 loops
Function - 11 DI 8 points, DO 8 points
- N Always N
Terminal type -3 Screw terminal (M3)
Area N General
■ Customized Product
For customized product, the product is identified by the
option code of /S# (where ‘#’ is a number).
Contact your supplier in case your instrument has option
/S#, and you are not in the possession of IM [Model code]-
-S# (where [Model code] means, for example, GX90XA).
Power Specialties, Inc. | www.powerspecialties.com | (816) 353-6550
Page 13
9
IM 04L51B01-02EN
GX/GP Style Number, Release Number, and
Firmware Version Number
Style number: The GX/GP hardware ID number. This
number is written on the name plate (H
column).
Release number: The GX/GP firmware ID number. This
number is written on the name plate
(S column). This number matches with
the integer part of the firmware version
number.
Example: If the firmware version number is 1.01, the
release number is 1.
Firmware version number:
This number appears on the system
information screen of the GX/GP.
To view the number, see section
2.3, “Displaying Various Types of
Information” in the User’s Manual, IM
04L51B01-01EN.
Conventions Used in This Manual
• This manual covers information regarding GX/GPs
whose display language is English.
•
For details on the language setting, see the Paperless
Recorder User’s Manual, IM04L51B01-01EN.
Unit
K: Denotes 1024. Example: 768K (file size)
k: Denotes 1000.
The notes and cautions in this manual are indicated using
the following symbols.
Improper handling or use can lead to injury to the user or
damage to the instrument. This symbol appears on the
instrument to indicate that the user must refer to the user’s
manual for special instructions. The same symbol appears
in the corresponding place in the user’s manual to identify
those instructions. In the manual, the symbol is used in
conjunction with the word “WARNING” or “CAUTION.”
WARNING
Calls attention to actions or conditions that could cause
serious or fatal injury to the user, and precautions that can
be taken to prevent such occurrences.
CAUTION
Calls attentions to actions or conditions that could cause
light injury to the user or damage to the instrument or
user’s data, and precautions that can be taken to prevent
such occurrences.
Note
Calls attention to information that is important for proper
operation of the instrument.
Module Notation
When necessary, the following notations are used to
distinguish the GX90XA analog input modules by type.
Type Suffix Code Notation
-U2 Universal
-C1 Current (mA)
-L1 Low withstand voltage relay
-T1 Electromagnetic relay
-H0 High-speed universal or High speed AI
-R1 4-wire RTD/resistance
Power Specialties, Inc. | www.powerspecialties.com | (816) 353-6550
Page 14
10
IM 04L51B01-02EN
Protection of Environment
Control of Pollution Caused by the Product
This is an explanation for the product based on “Control of pollution caused by Electronic Information Products” in the
People’s Republic of China.
产品中有毒有害物质或元素的名称及含量
部件名称
有毒有害物质或元素
铅(Pb) 汞(Hg) 镉(Cd)
六价铬
(Cr6+)
多溴联苯
(PBB)
多溴二苯醚
(PBDB)
印制电路板 N/A N/A N/A
内部接线材料 N/A N/A N/A
外壳/ 机箱 塑料 N/A N/A N/A
金属 N/A N/A N/A
I/O 模块外壳 塑料 N/A N/A N/A
电源 N/A N/A N/A
正面边框 N/A N/A N/A
显示器 (LCD) N/A N/A N/A
标准附件/ 可选附件 安装支架 N/A N/A N/A
电源线(GP10/GP20/GX60 (
的插口型))
N/A N/A N/A
SD 存储卡 N/A N/A N/A
分流电阻 N/A N/A N/A
:表示该部件的所有均质材料中的有毒有害物质或元素的含量均低于GB/T 26572 标准所规定的限量要求。
N/A:表示该部件中至少有一种均质材料中的有毒有害物质或元素的含量超过GB/T 26572 标准所规定的限量要求。
本产品的部分部件包含RoHS指令中的限用物质,但是其使用方法不受该指令限制。
Some parts of this product include the restricted substances of RoHS Directive, but their applications are under the exemption of the directive.
该标志为环境保护使用期限,根据SJ/T11364,适用于在中国(台湾、香港、澳门除外)销售的电子电气产
品。只要遵守该产品的安全及使用注意事项,从产品生产之日起至该标志所示年限内,不会因为产品中的
有害物质外泄或突变而导致环境污染或对人身财产产生重大影响。
注释) 该标志所示年限为“环境保护使用期限”,并非产品的保质期。另外,关于更换部件的推荐更换周
期,请参阅使用说明书。
Waste Electrical and Electronic Equipment (WEEE), Directive
This is an explanation of how to dispose of this product based on Waste Electrical and Electronic
Equipment (WEEE), Directive. This directive is only valid in the EU.
• Marking
This product complies with the WEEE Directive marking requirement. This marking indicates that you
must not discard this electrical/electronic product in domestic household waste.
• Product Category
With reference to the equipment types in the WEEE directive, this product is classified as a “Monitoring
and Control instrumentation” product.
Do not dispose in domestic household waste.
When disposing products in the EU, contact your local Yokogawa Europe B.V. office.
How to Dispose the Batteries
This is an explanation about the EU Battery Directive This directive is only valid in the EU.
Batteries are included in this product. Batteries incorporated into this product cannot be removed by
yourself. Dispose them together with this product. When you dispose this product in the EU, contact your
local Yokogawa Europe B.V.office. Do not dispose them as domestic household waste.
Battery type: Lithium battery
Notice: The symbol (see above) means they shall be sorted out and collected as ordained in ANNEX II in
DIRECTIVE 2006/66/EC.
Power Specialties, Inc. | www.powerspecialties.com | (816) 353-6550
Page 15

11
IM 04L51B01-02EN
Functional Overview
Overview
The GX/GP is a paperless recorder that can display
measured data in real time on its touch screen and save
the data in an SD memory card.
A variety of
signal inputs
GX/GP configuration
and real-time monitoring
on a Web browser
Displaying data on
Universal Viewer
GX/GP
Ethernet
Redundant measured data
on internal memory and external media
SD memory card
A Variety of Source Signals
The GX/GP can connect to DC voltage, TC, RTD, ON/
OFF, DC current (mA) and pulse inputs and measure
temperature, flow rate, and other parameters. The GX/GP
acquires data by sampling input signals at the set scan
interval. The shortest scan interval is 1 ms (High-speed AI
module). Up to four alarm conditions can be specified on
each measurement channel.
Expandable Module Construction
The I/O section is modular, so you can configure your
system according to the input types and number of
measurement points.
Modules
Model Name Channels
GX90XA Analog input module 4/6/10
GX90XD Digital input module 16
GX90YD Digital output module 6
GX90WD Digital Input/Output Module Input : 8 ,
Output : 6
GX90XP Pulse Input Module 10
GX90YA Analog output module 4
GX90UT PID Control Module 26
• Up to 10 modules can be installed in the GX20/GP20.
• Up to 3 modules can be installed in the GX10/GP10.
• Different modules can coexist.
* Up to nine modules for the GX20/GP20 and two
modules for the GX10/GP10 when an GX60 is
connected.
Detachable module
terminal block
Maintenance is easy!
GX60 Connection and Multichannel
Measurement
An GX60 I/O can be connected to the GX20/GP20 to
measure up to 450 channels. On the standard type,
you can connect the GX60 to allocate input sections at
different locations.
GX/GP
GX60
•
•
•
Max6
GX90EX
Rear
GX/GP configuration
Item GX/GP
Standard Type Large Memory Type
Maximum number of
connectable GX60
6 6
Maximum number of
I/O modules (main
unit + GX60)
10
1
45
2
Maximum number of
I/O channels
100 500
1 2 on the rear of the GX10/GP10, 9 on the rear of the
GX20/GP20.
2 9 on the rear of the GX20/GP20.
Power Specialties, Inc. | www.powerspecialties.com | (816) 353-6550
Page 16
12
IM 04L51B01-02EN
High-speed Measurement, Dual
Interval Measurement (Measurement
mode)
The GX/GP has measurement modes to allow high-speed
measurement and simultaneous measurement of slow
and fast signals.
In high-speed measurement, a high-speed AI module
can be installed to achieve measurement at the shortest
interval of 1 ms.
In dual interval measurement, measurement can be
performed by two measurement groups with different scan
intervals.
Various measurements can be performed by changing the
measurement mode according to the measurement target
and measurement conditions.
Loop Control and Program Control
Function (/PG Option)
By installing a PID Control Module (GX90UT), you can
perform PID control of up to 20 loops (up to 6 loops for
the GX10/GP10). In addition to control loop monitoring
and the control group screen for convenient operation,
adjustment using the tuning screen is available.
Adding the /PG option to the GX/GP main unit allows
99 patterns and 99 segments of program patterns to be
stored in the main unit. Further, 32 time events can be set.
Data Storage
There are two ways to store data. One way is to record
measured data at all times (display data and event data).
The other way is to record only when events, such as
alarms, occur (event data). Measured data is saved to
the internal memory at the specified interval. Data in
the internal memory can be saved to the SD memory
card automatically or manually. Measured data can
be transferred automatically to an FTP server over an
Ethernet connection.
GX/GP
Signal input
Ethernet
Auto data transfer to FTP server
SD Memory
card
FTP server
Internal memory
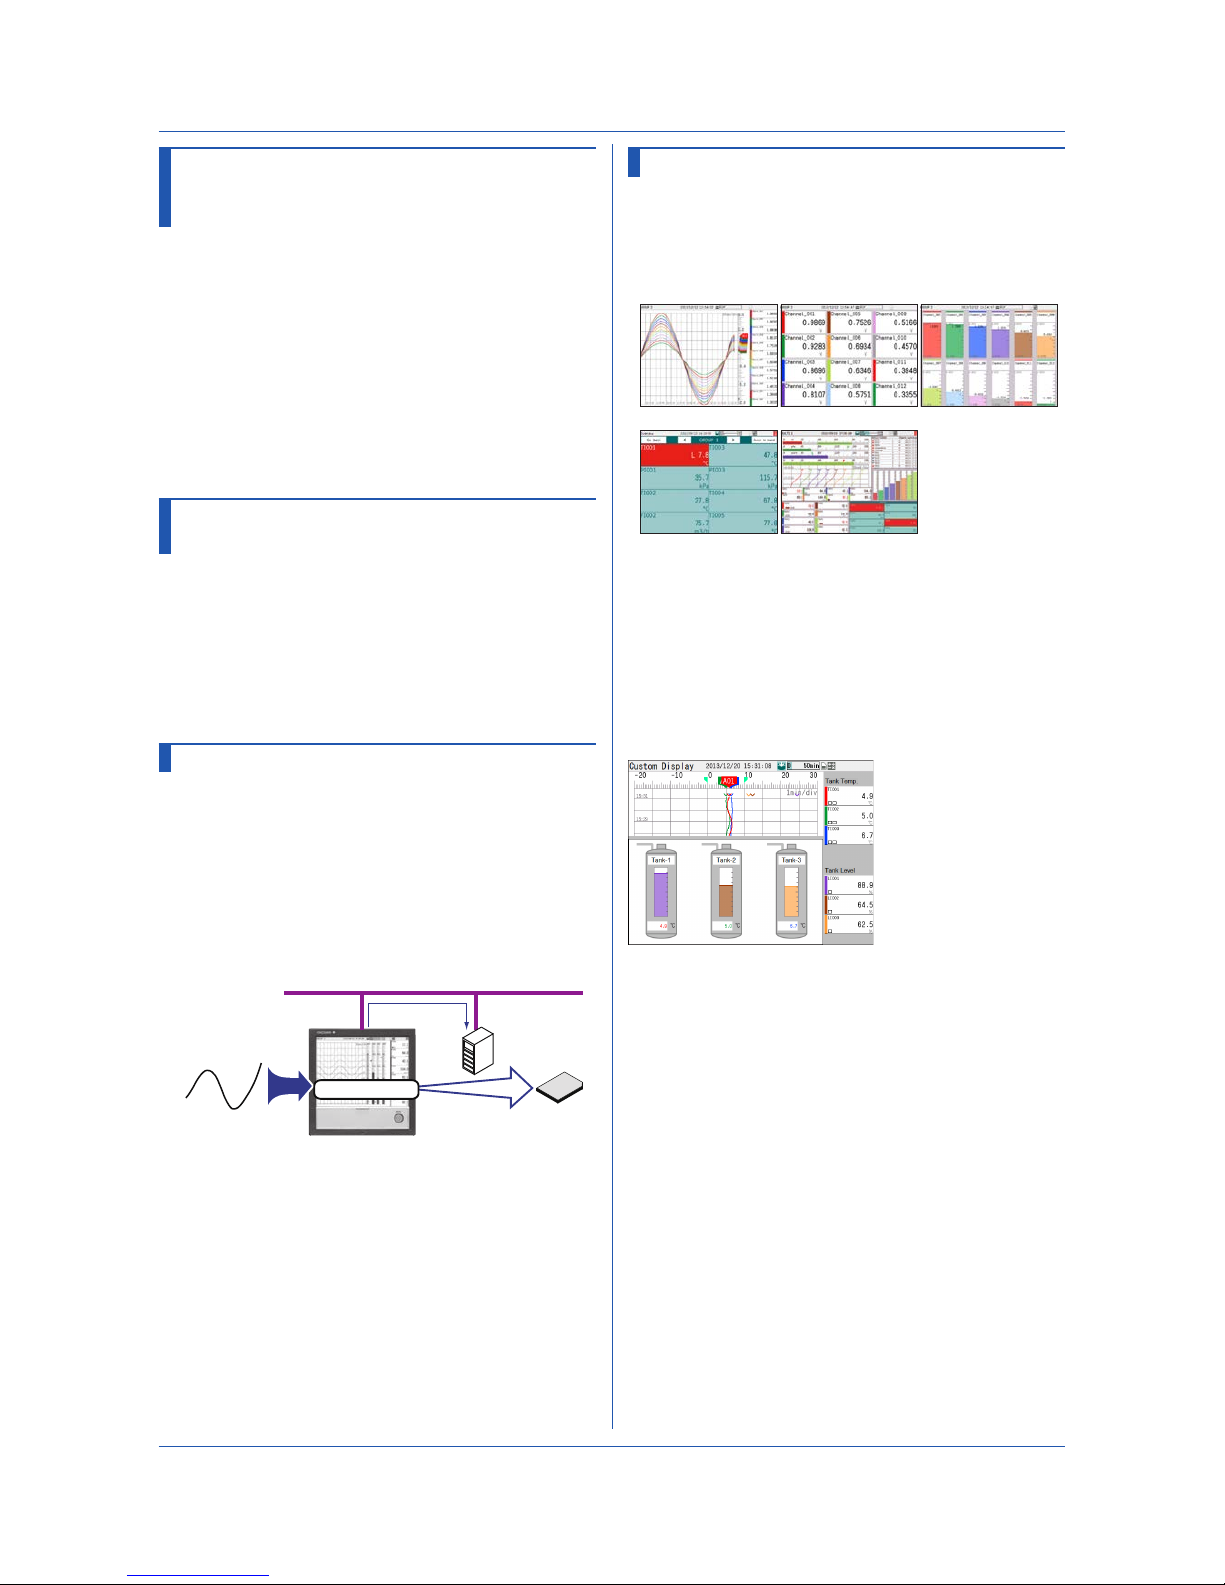
A Variety of Display Functions
Measured data can be displayed in groups as trend
waveforms, values, and bar graphs. There is also an
overview display that you can monitor all channels on a
single screen.
Trend Digital Bar graph
Overview Multi panel
Custom Display (Option, /CG)
You can control and monitor on a custom display
consisting of digital, trend, bar graph, and other
components and images can that are laid out freely.
Custom displays are created using DAQStudio (DXA170),
a software application sold separately.
Displays that you create are loaded into the GX/GP from
DAQStudio or from an external storage medium.
Custom Display
Functional Overview
Power Specialties, Inc. | www.powerspecialties.com | (816) 353-6550
Page 17
13
IM 04L51B01-02EN
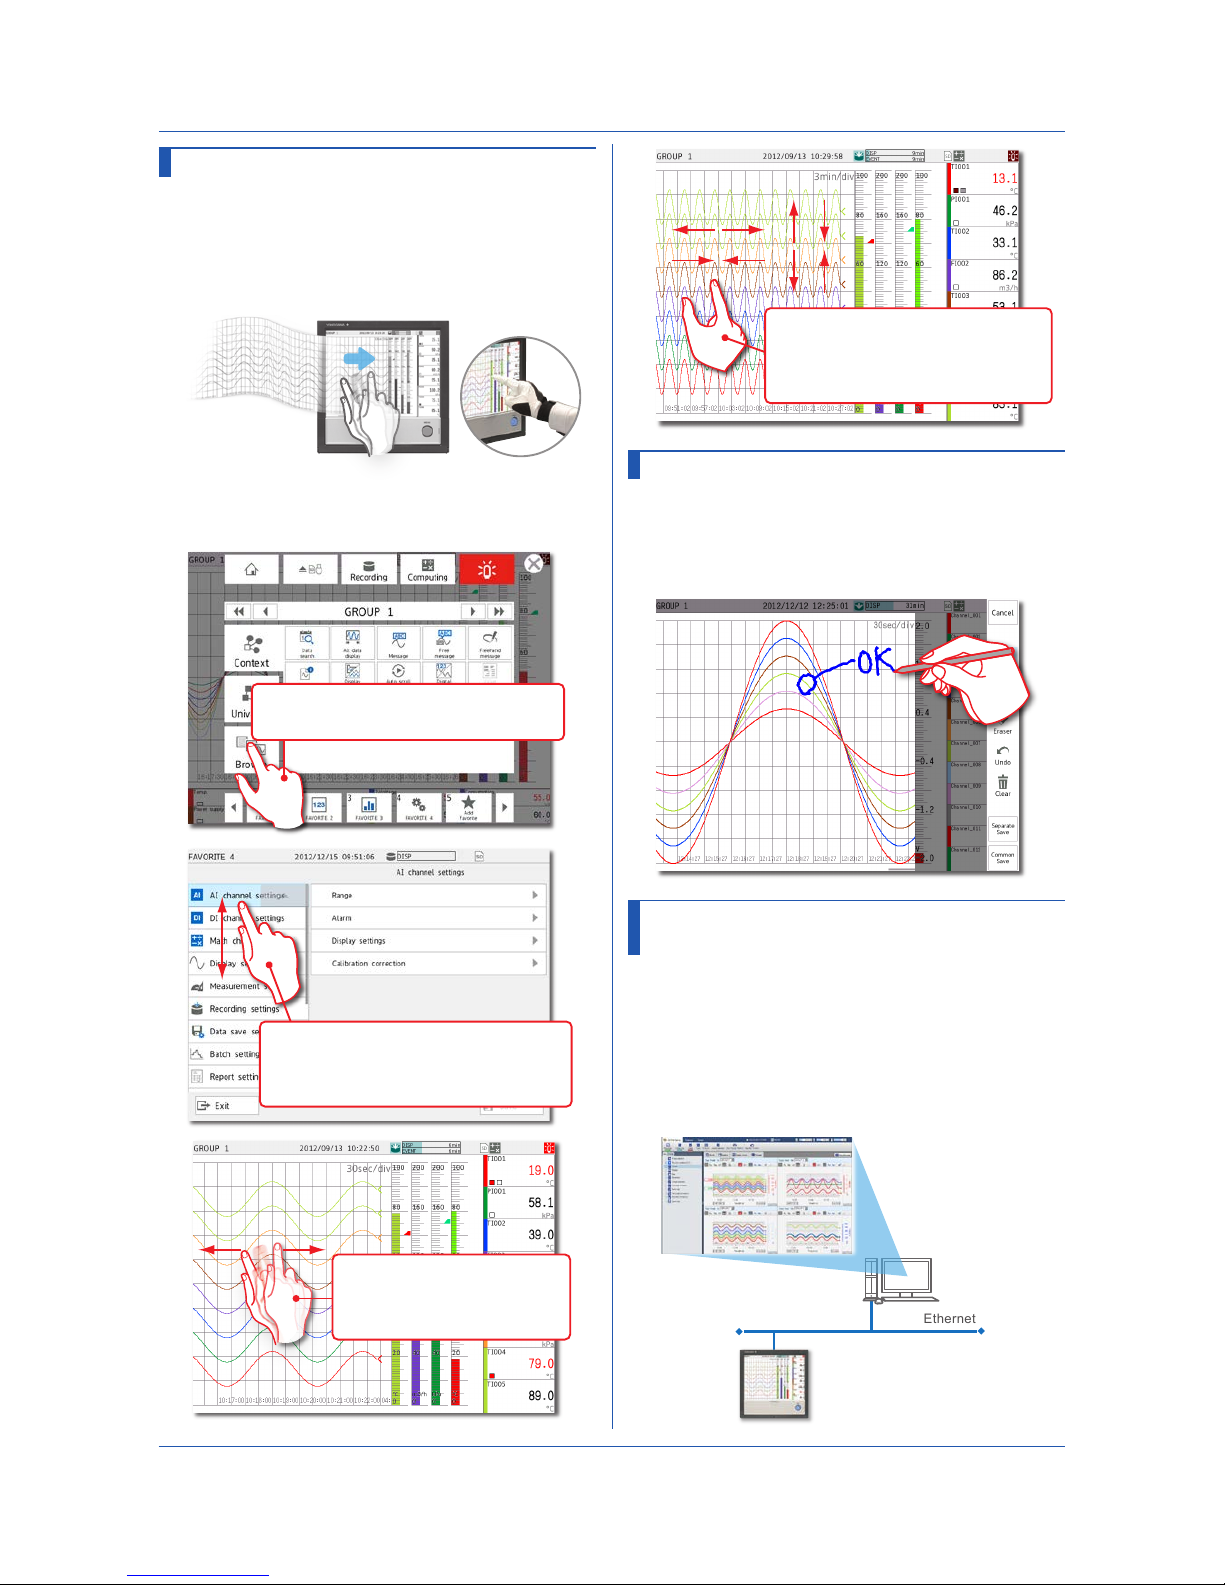
Touch Screen
The GX/GP touch screen enables intuitive operation. You
can tap the icons of setup and operation items as well as
scroll and zoom in on and out of waveforms by directly
touching the screen. In addition, when you are working
on-site, you can operate the GX/GP with your gloves on.
Touch Operations
Tap
Touch the screen with a pen or finger.
Drag
Drag
Touch the screen with a pen or finger
and move.
Drag
Flick
Wipe a pen or finger across
the screen.
Functional Overview
Pinch apart/together
Touch the screen with two fingers
and move them apart or together.
Freehand Messages
You can use the touch pen or your finger to write text and
draw marks freely in the waveform area. The messages
that you write can easily be displayed from information
displays such as the message summary and memory
summary.
Versatile Network Functions and
Software
The Ethernet interface enables you to monitor the GX/
GP from a Web browser. E-mails can be sent through this
interface when alarms and other events occur.
In addition, you can use the Modbus protocol to read
data from other devices on the network and display it.
As for the software, Universal Viewer can be used to
view measured data and convert the data into other data
formats.
Ethernet
Internet Explorer
Seamless remote monitoring
on a Web browser
Power Specialties, Inc. | www.powerspecialties.com | (816) 353-6550
Page 18

14
IM 04L51B01-02EN
Other Functions
Math function
(/MT option)
Expressions can be assigned to
math channels to perform various
computations.
Logic math can output calculated
results as 0 or 1 to DOs or internal
switches. Computation is performed
regardless of the math start/stop
condition.
FAIL output
(/FL option)
This function transmits alarms when
the GX/GP fails.
Security function You can allow only registered users
to use the GX/GP. In addition, certain
operations can be prohibited.
Remote control This function executes specified
operations by combining input modules
and the event action function.
Advanced
security function
(/AS option)
A security function that complies with
US FDA 21CFR Part11. Electronic
signatures can be added to measured
data.
EtherNet/IP
communication (/
E1 option)
This function is equipped with a server
function that enables communication
with EtherNet/IP devices.
WT
communication
(/E2 option)
This function acquires measured and
calculated data from a power meter
and displays and records it along with
the measured values of the GX/GP.
LOG scale (/LG
option)
This function measures logarithmic
voltage that has been converted from a
physical value, scales the voltage, and
displays the resultant data.
Aerospace heat
treatment (/AH
option)
Supports aerospace heat treatment
measurements and NADCAP
AMS2750E compliant recording and
reporting.
Manage user-defined schedules for
periodical execution.
Multi batch (/BT
option)
Start and stop recording separately for
each batch and create data files for
each batch.
OPC-UA server
(/E3 option)
Equipped with an OPC-UA server
function. GX/GP measurement data
can be retrieved directly from a host
system, such as SCADA and MES.
SLMP
communication (/
E4 option)
Equipped with a client function for the
MC protocol. Connection to Mitsubishi
Electric PLCs can be established
easily.
Functional Overview
Power Specialties, Inc. | www.powerspecialties.com | (816) 353-6550
Page 19
15
IM 04L51B01-02EN
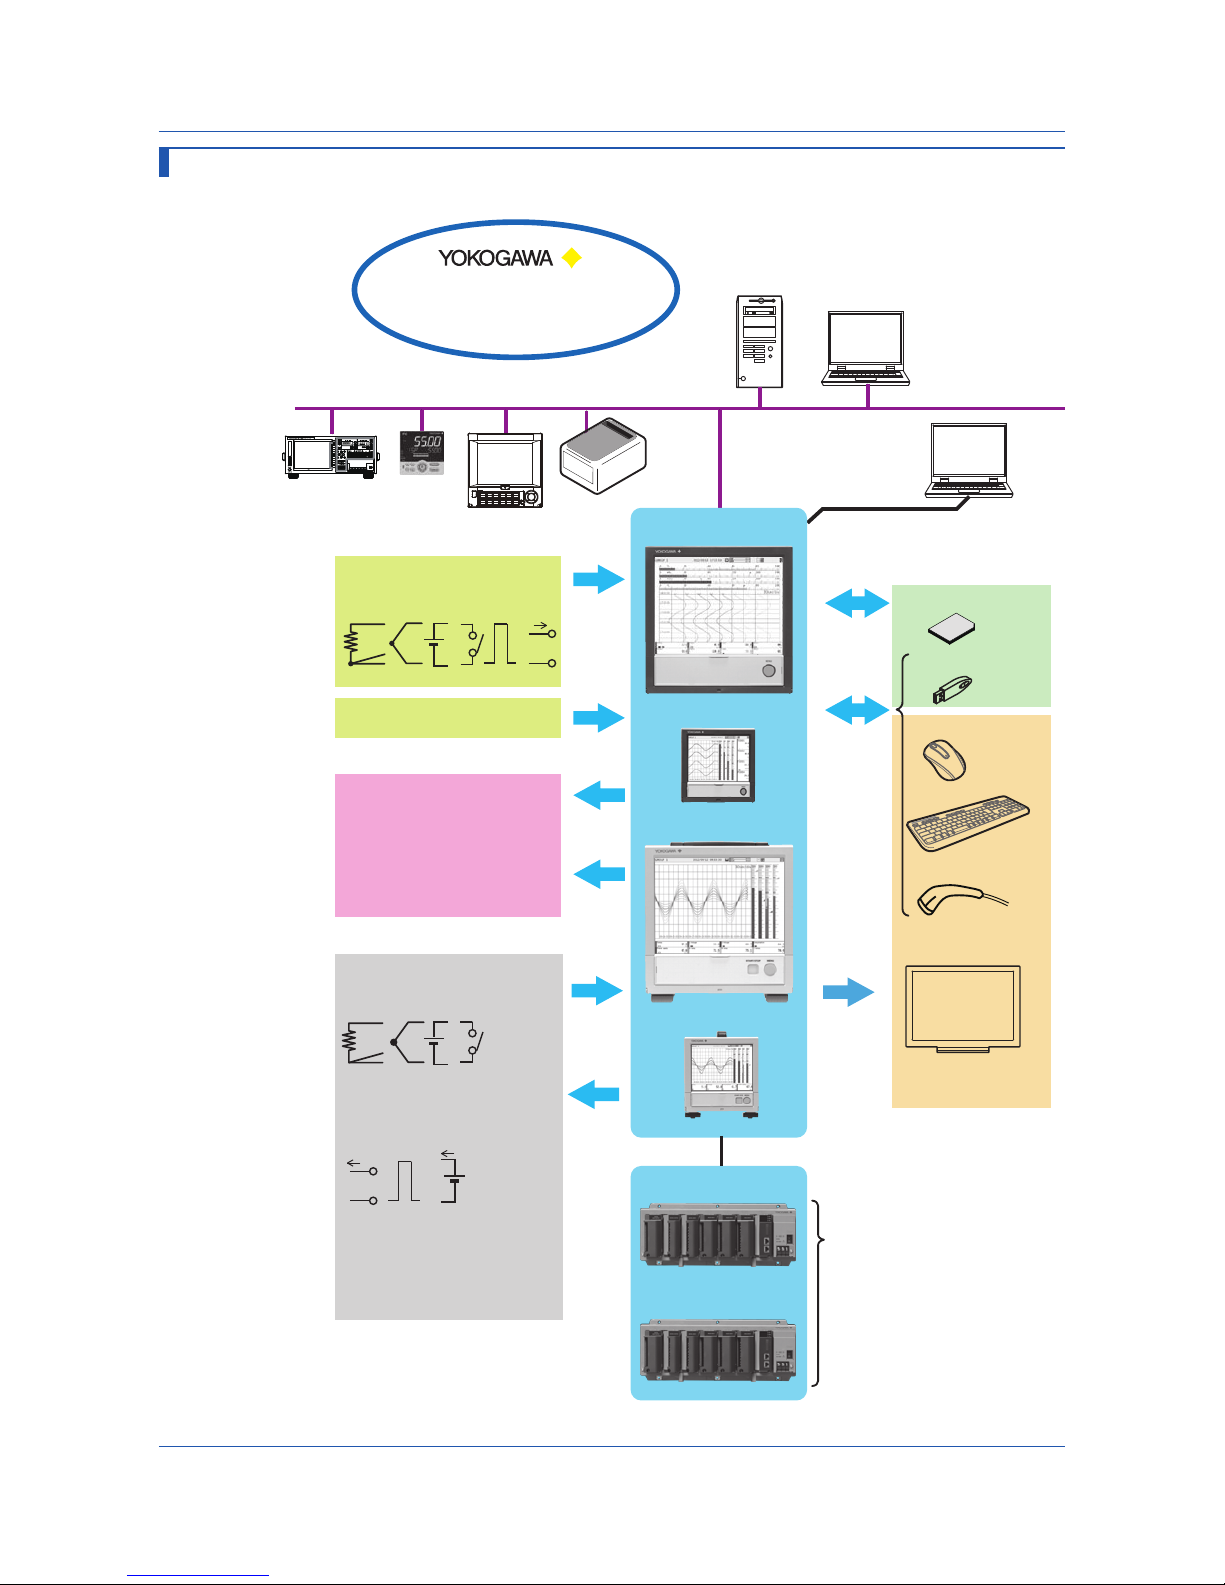
System Configuration
You can configure a GX/GP system as shown below.
PC
PC
Recorder
Network
printer
Temperature
Controller
Monitor*
Ethernet
USB port*
Alarm output
Serial communication*
RS-232, RS-422/485
FAIL/status output*
keyboard
Mouse
SD memory card
Bar code reader
(GX20/GP20 only)
USB memory
* Option
Manual DO output
Power meter
(WT)
Analog output
DO out
DI input
Alarm out
Control input
DI
RTD
TC/DCV
Control output
A
mA
Pulse
DC loop power
supply
Digital input/output
Signal output
Signal input
DI
RTD
TC/DCV
mA
•
•
•
GX60
Max 6 unit
Pulse
Remote input
GX10
GP20
GP10
• Download PC software
• Download user’s manuals
Web site
GX20
A
3-wire/4-wire
Functional Overview
Power Specialties, Inc. | www.powerspecialties.com | (816) 353-6550
Page 20
16
IM 04L51B01-02EN
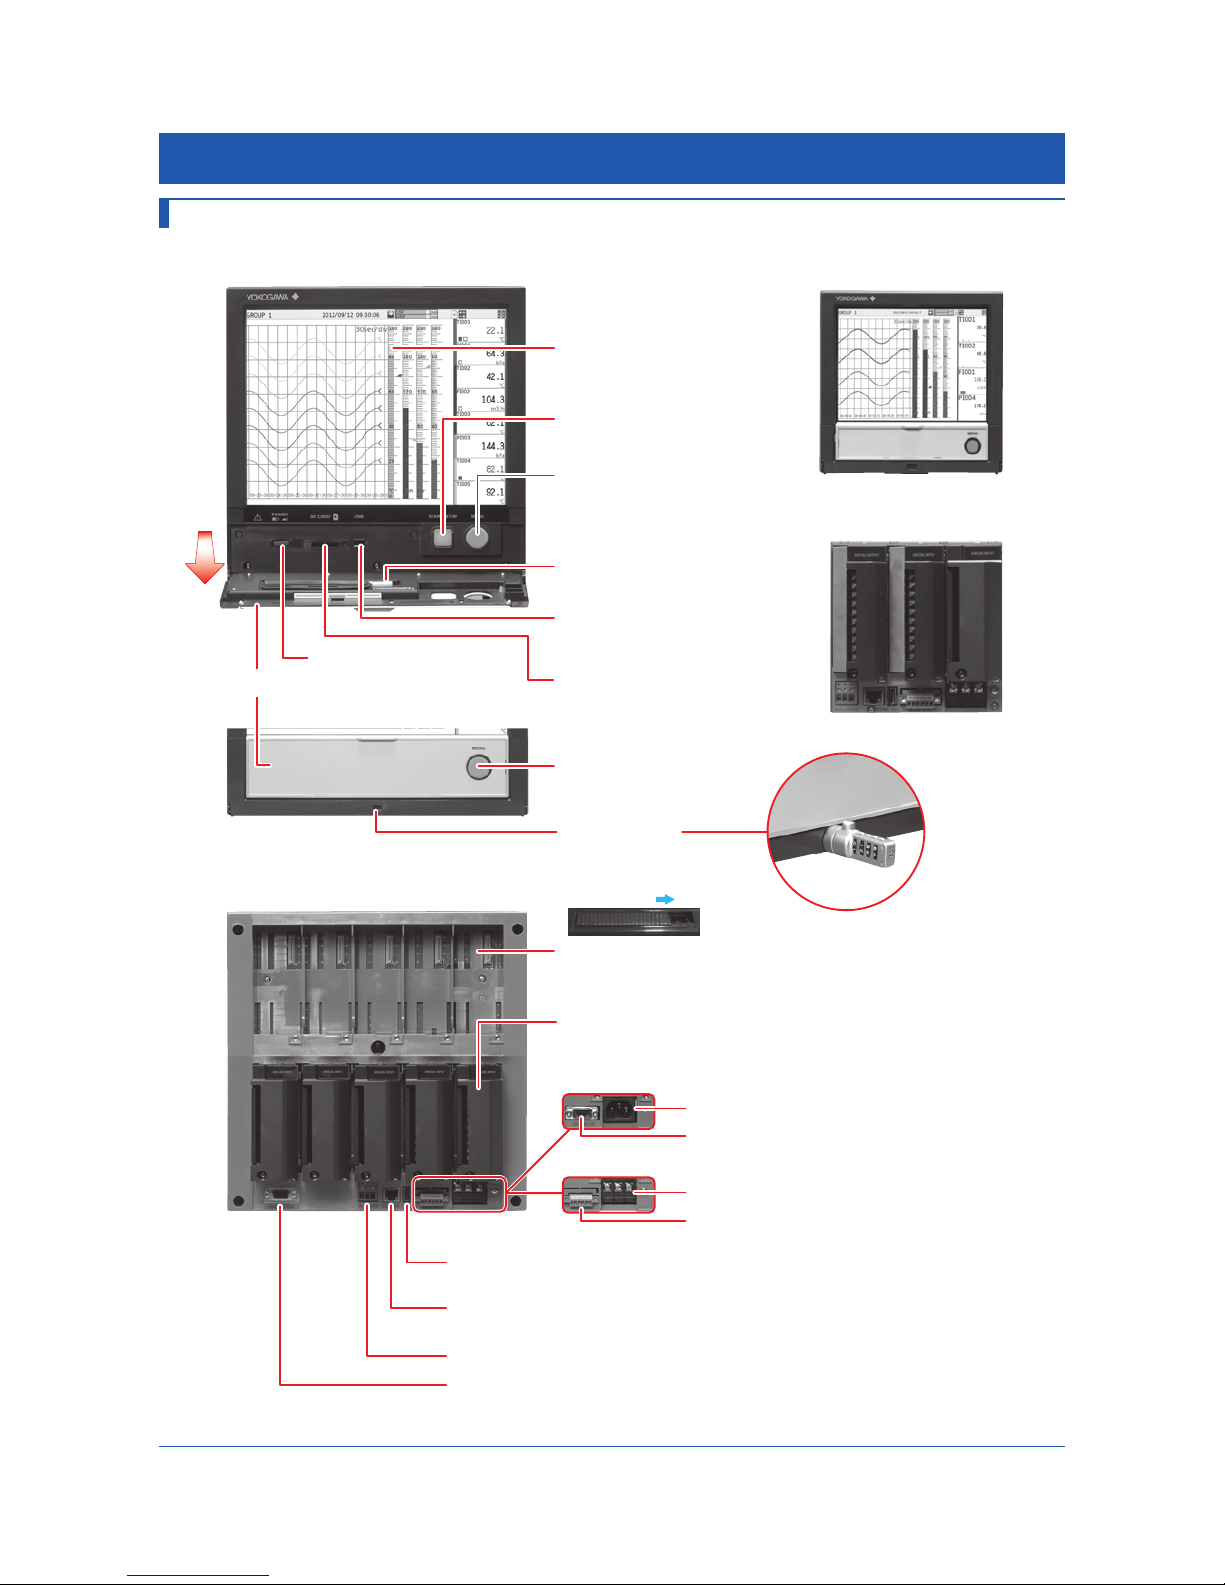
Component Names
GX20/GX10
RS-232 terminal
Power inlet (GP10/GP20)
Serial port (/C2 option)
Shows the trend display and other
displays and the setup screen
Starts and stops recording
Press this once to show a menu
for accessing various screens.
USB2.0 compliant. Connect a USB
memory device, mouse, keyboard, etc.
SD memory card (up to 32 GB)
Format: FAT32 or FAT16
A 1 GB card is included.
Use an off-the-shelf door lock key.
GX20 front panel GX10 front panel
GX10 rear panel
GX20 rear panel
LCD
MENU key
MENU key
Stylus pen (touch pen)
Power switch
SD memory card slot
USB port (/UH option)
USB 2.0 compliant. Connect a USB memory device, mouse, keyboard, etc.
USB port (/UH option)
Connect I/O signals.
GX10, GP10: 3 slots (0 to 2)
GX20, GP20: 10 slots (0 to 9)
RS-422/485 terminal
I/O module
Power supply terminal and protective
ground terminal (GX10/GX20)
Serial port (/C3 option)
10BASE-T/100BASE-TX port
Ethernet port
FAIL output terminal (/FL option)
Connects to an external monitor
VGA output connector (/D5 option)
Front door lock
mechanism
I/O module slot
START/STOP key
Front door
A front door is locked/unlocked
by a slide at the bottom.
Lock
Alarms are indicated with a red
LED.
Power Specialties, Inc. | www.powerspecialties.com | (816) 353-6550
Page 21
17
IM 04L51B01-02EN
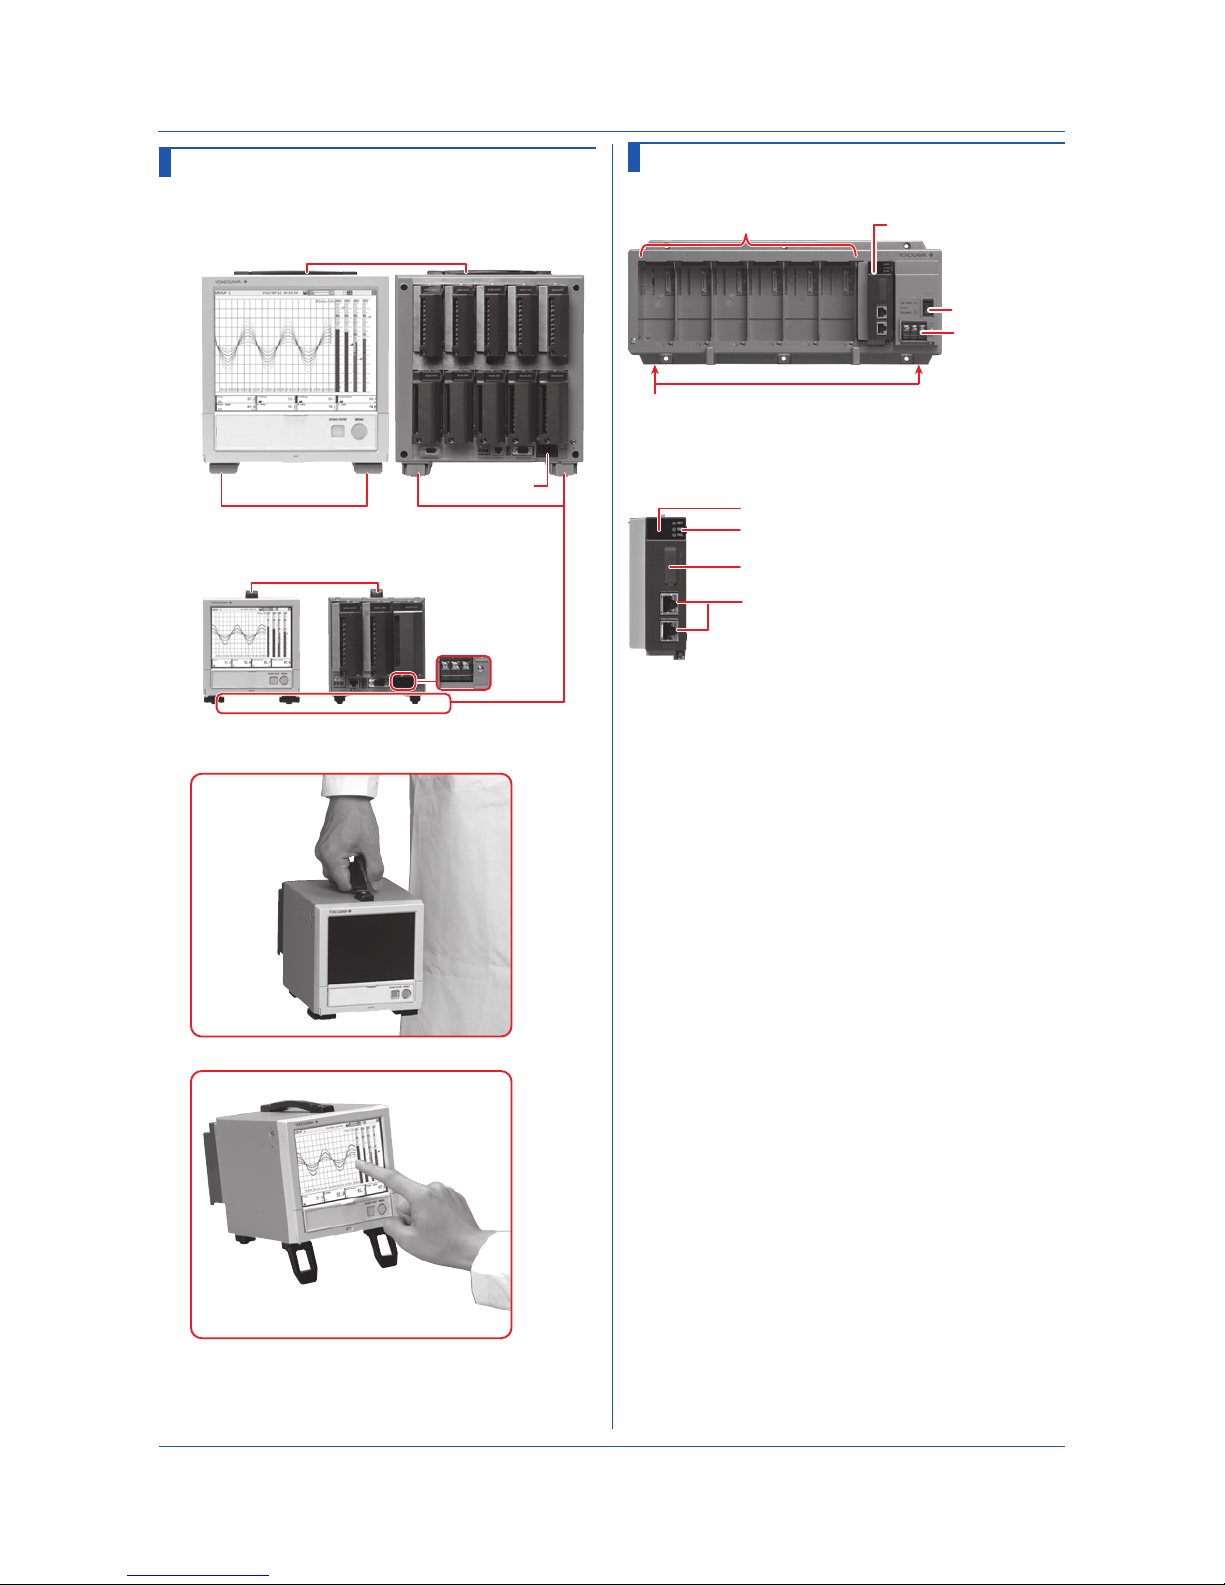
GP20/GP10
GP20 front GP20 rear
GP10 front GP10 rear
Handle
Handle
Feet
Power inlet
Power supply terminal
(Power supply suffix
code: 2)
GX60/GX90EX
GX60 I/O Base Unit (Expandable I/O)
I/O Module Slot
GX90EX
Power Switch
Power supply
terminal and
protective ground
terminal or
Power inlet
Stopper (antiskid rubber)
Affix the included antiskid rubber
to the location indicated in the figure .
GX90EX Expansion Module
Connecting port
Setting switch
(DIP switch
)
System status
LED
EXBus status LED
7
segment
LED
Component Names
Power Specialties, Inc. | www.powerspecialties.com | (816) 353-6550
Page 22
18
IM 04L51B01-02EN
GX90WD Digital Input/Output Module
M3 screw terminal
Terminal block release levers
GX90XP Pulse Input Module
Terminal block attachment screws
M3 screw terminal Clamp terminal
GX90YA Analog Output Module
Terminal block attachment screws
M3 screw terminal Clamp terminal
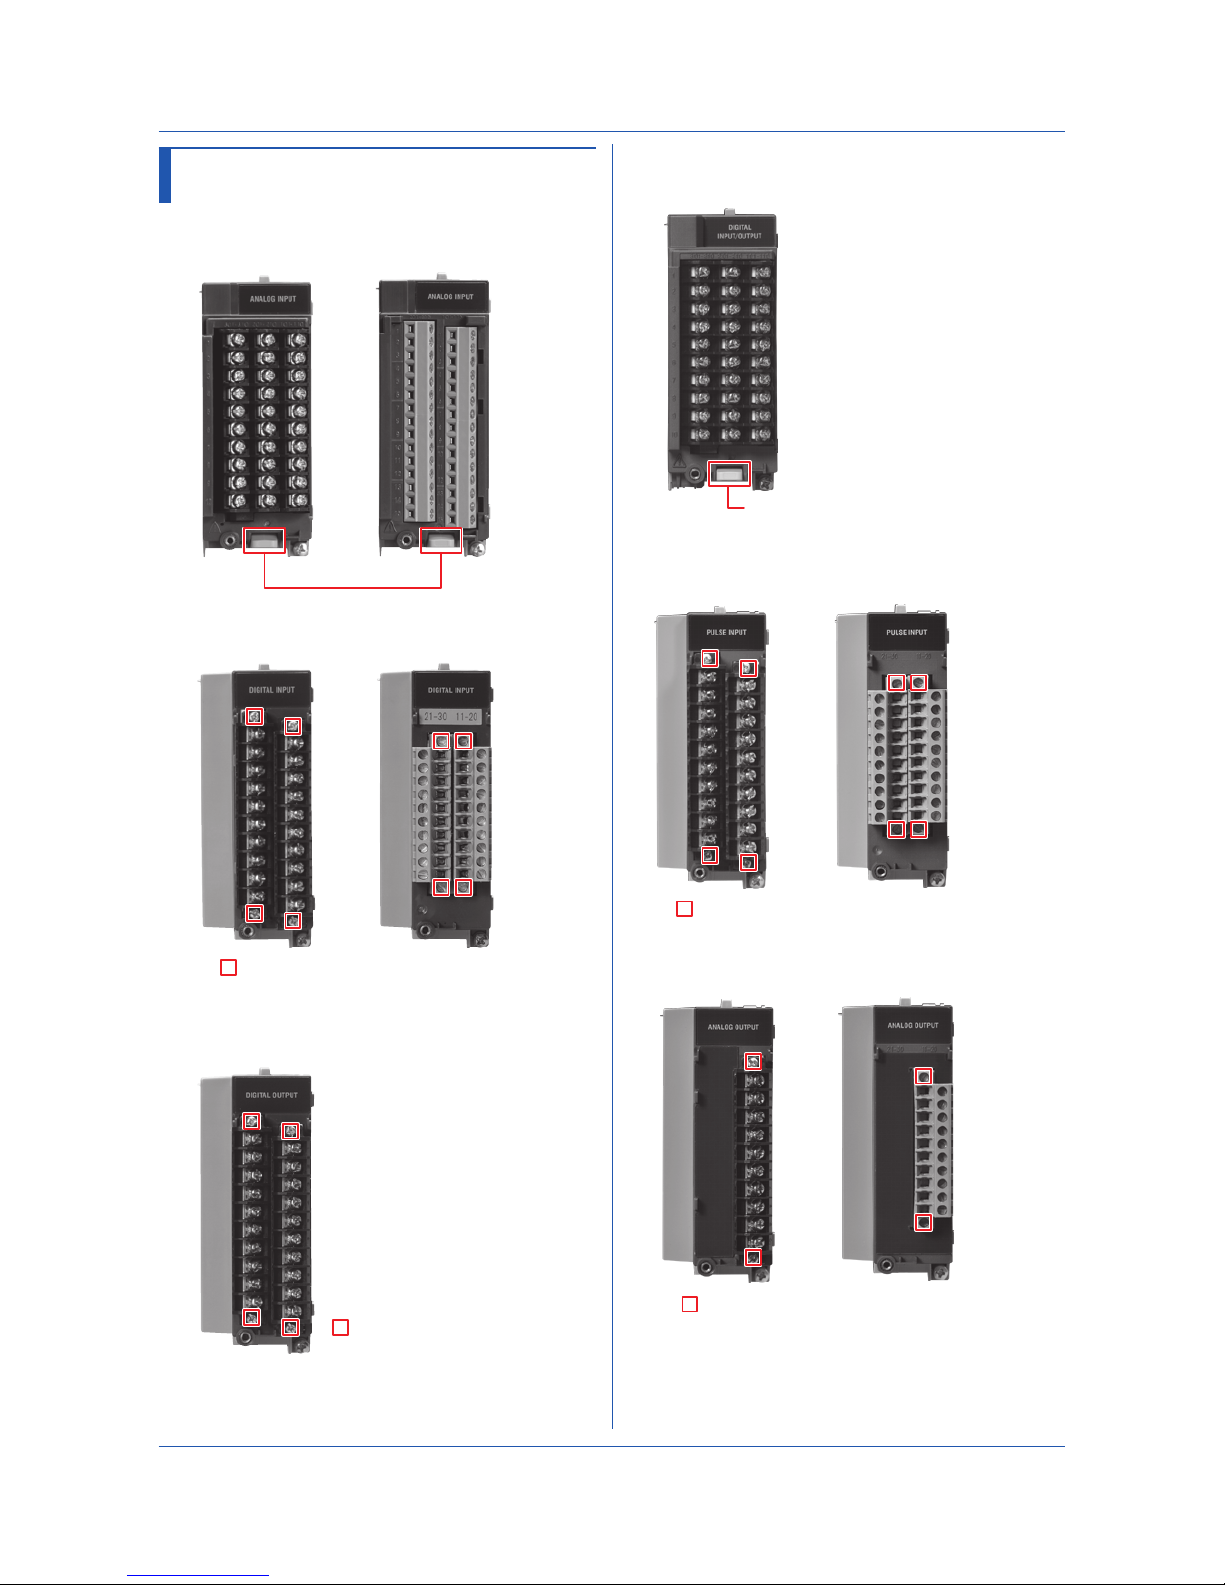
GX90XA/GX90XD/GX90YD/GX90WD/
GX90XP/GX90YA/GX90UT
GX90XA Analog Input Module
M3 screw terminal Clamp terminal
Terminal block release levers
GX90XD Digital Input Module
Terminal block attachment screws
M3 screw terminal Clamp terminal
GX90YD Digital Output Module
M3 screw terminal
Terminal block attachment screws
Component Names
Power Specialties, Inc. | www.powerspecialties.com | (816) 353-6550
Page 23

19
IM 04L51B01-02EN
GX90UT PID Control Module
M3 screw terminal
Terminal block release levers
To prevent electric shock when you
attach or remove terminal covers or
terminal blocks, be sure that the power
supply is turned off.
Removing and Attaching a Terminal Cover
Removing the Terminal Cover
Loosen the screw at the bottom section of the terminal
cover, and remove the cover.
Attaching the Terminal Cover
1. Insert the two hooks at the top section on the inside of
the terminal cover into A, and push the bottom section
of the terminal cover.
2. Fasten the screw at the bottom section of the terminal
cover to fix the cover in place.
Recommended tightening torque: 0.6 N•m
A
The shape of the cover varies depending on the
module, but the procedure is the same.
Removing and Attaching a Terminal Block
Removing the GX90XA Terminal Block
Push down on the lever at the bottom section of the
module, and pull the terminal block out.
Attaching the GX90XA Terminal Block
Insert the terminal block into the module, and push
the lever firmly against the module (at the position
indicated by the arrow in the figure).
Terminal block release lever
Side view of module
For modules other than the GX90XA, you can use the
attachment screw to remove and attach them.
Terminal block attachment screws
Recommended torque for tightening the terminal block
attachment screws: 0.1 N•m
Component Names
Power Specialties, Inc. | www.powerspecialties.com | (816) 353-6550
Page 24

20
IM 04L51B01-02EN
Operating Procedure
Make the GX/GP recognize the
modules (GX/GP reconfiguration).
Configure functions as
necessary.
Turn on the power.
Configure signal inputs.
Install modules.
Not required if preinstalled
To connect an GX60,
install the modules in the GX60.
Set the date and time.*
Connect I/O signals and power.
Manuals for reference
First Step Guide (This manual)
(IM 04L51B01-02EN)
“Installation and Wiring”
Wiring
First Step Guide (This manual)
(IM 04L51B01-02EN)
“Installation and Wiring”
Installing and Removing
I/O Modules
First Step Guide (This manual)
(IM 04L51B01-02EN)
“Basic Operations”
Turning the Power On
and Off
First Step Guide (This manual)
(IM 04L51B01-02EN)
“Reconfiguring the
GX/GP”
First Step Guide (This manual)
(IM 04L51B01-02EN)
“Basic Operations”
Setting the Date and Time
First Step Guide (This manual)
(IM 04L51B01-02EN)
“Basic Operations”
Configuring the Inputs
First Step Guide (This manual)
(IM 04L51B01-02EN)
“Basic Operations”
Starting Measurement
and Recording
Start measuring/recording.
URL: www.smartdacplus.com/manual/en/
Product user’s manuals can be downloaded or viewed at the
following URL;
Paperless Recorder
User’ s Manual (Electronic Manual)
(IM 04L51B01-01EN)
Connect an GX60
To connect an GX60.
Setting the Measurement Mode
If preinstalled, modules are preconfigured.
If you rearrange the modules, connect an
GX60 or change the measurement mode,
reconfigure.
First Step Guide (This manual)
(IM 04L51B01-02EN)
“Setting the Measurement Mode”
Setting the Measurement Mode
First Step Guide (This manual)
(IM 04L51B01-02EN)
“Installation and Wiring”
Connect an GX60
When performing high-speed or dual interval
measurement according to measurement
conditions, change the measurement mode from
Normal to High speed or Dual interval.
For details on various settings, see the Paperless
Recorder User’ s Manual (IM 04L51B01-01EN),
provided as an electronic manual.
1
2
3
4
5
6
7
* If you need to set the time zone or
DST (Daylight Saving Time) or both, do
so before setting the date and time.
When you are using the GX/GP for the first time, following the procedure below to quickly start measuring and recording.
Power Specialties, Inc. | www.powerspecialties.com | (816) 353-6550
Page 25

21
IM 04L51B01-02EN
Lit in red
Alarm activated
Off: Power off
Lit in blue
Running
(No alarm)
Alternates
Power inlet on the GP10/
GP20/GX60 (Power inret
type)
Power switch
Recording stopped
Recording in
progress
Browse tab
Set the date and time*.
Start measuring/recording.
Configure input and functions.
MENU key
Common menu tab
To open, push the front door down and pull it toward you.
or
Insert until a click is heard
and fasten with screws.*
2
Modules installed
(10 modules)
3
GX60 address setting
2
Connect the LAN cable bteween GX/GP
and GX60.
3
GX10/GP10 : Slot 2
GX20/GP20 : Slot 9
Setting switch
(DIP switch
)
GX90EX
9
Ex GX/GP
GX60
GX90EX
GX60
Set the measurement
mode
Reconfiguration
(Initialize)
1
2
3 4
5
6
7
Dummy covers are
attached to empty slots
(with screws).
Modules not installed
* Recommended tightening
torque: 0.6 N•m
Ex GX/GP
1
Install an expansion module
(GX90EX) into the GX/GP.
1
To prevent electric shock when
wiring, make sure that the power
supply is turned off.
Operating Procedure
Power Specialties, Inc. | www.powerspecialties.com | (816) 353-6550
Page 26

22
IM 04L51B01-02EN
• Minimal mechanical vibrations
Install the GX/GP in a location that has minimal
mechanical vibrations. Installing the GX/GP
in a location that is subject to large levels of
mechanical vibration will not only put added stress
on its components, it may also impede ordinary
measurement.
• Level Location
Install the GX/GP in a level location so that it is not
slanted to the left or the right (however, the GX/GP
can be inclined up to 30 degrees backward for panel
mounting).
Note
Condensation may form when moving the GX/GP from
a low temperature or humidity environment to a high
temperature or humidity environment, or when there is a
sudden change in temperature. Temperature or humidity
changes may also result in thermocouple measurement
errors. In these kinds of circumstances, wait for at least
an hour before using the GX/GP, to acclimate it to the
surrounding environment.
The GP20 may tip over if it is tilted more than 10
degrees, front and back.
Do Not Install the Instrument in the Following Places
• Outdoors
• In direct sunlight or near heat sources
Install the GX/GP in a place that is near room
temperature (23°C) and that is not subject to large
temperature fluctuations. Placing the GX/GP in direct
sunlight or near heat sources can cause adverse
effects on the internal circuitry.
• Where an excessive amount of soot, steam, moisture,
dust, or corrosive gases are present
Soot, steam, moisture, dust, and corrosive gases will
adversely affect the GX/GP. Avoid installing the GX/GP
in such locations.
• Near strong magnetic field sources
Do not bring magnets or instruments that produce
electromagnetic fields close to the GX/GP. Operating
the GX/GP near strong magnetic fields can cause
measurement errors.
• Where the display Is difficult to see
The GX/GP uses an LCD screen, so it is difficult to
view the display from an extreme angle. Install the GX/
GP so that the user can view the display directly from
the front.
Installation and Wiring
Installation Location
Install the GX/GP indoors in an environment that
meets the following conditions:
• If hazardous external voltage (30 V AC or 60 V DC or
more) is applied to the output terminals of the GP10/
GP20/GX60, be sure to install it in a location where
people cannot touch the terminals carelessly or in a
panel.
• The GX10/GX20 is designed to be installed in an
instrumentation panel.
• This product is designed as open equipment under the
CSA/UL/EN 61010-2-201 standards. In order to comply
with these standards, install it as follows:
• The GX10/GX20 is designed to be installed in an
instrumentation panel.
Install it in a location where people cannot touch the
terminals carelessly.
• To make the GP10/GP20 comply with the relevant
standard, support the parts of the device other than
the front-panel control area with an instrumentation
panel or the like, and install it in a location where
people cannot touch the terminals carelessly or in a
panel.
• Install the GX60/GM unit in a panel with a door.
• The instrumentation panel or panel used for support
must comply with CSA/UL/EN 61010-2-201 or must
be at least IP1X (degrees of protection) and at least
IK09.
To make panel door lock for GX10/GX20
or install the GP/GX60 systems in a
panel with a door or in a location where
operator or any third person can not
operate the power switch carelessly.
When the power switch of GX/GP
systems under operation be turned on or
off carelessly , it may result the system
down or injury.
Careless operations can be avoided by
applying the slide lock.
• Well-ventilated location
To prevent overheating, install the GX/GP in a well-
ventilated location. For the panel cut dimensions when
arranging multiple GXs, see the next page. When
other instruments are installed next to the GX, follow
the panel cut dimensions to provide adequate space
around the GX. In the case of the portable type, we
recommend that you provide at least 50 mm of space
from the left, right, and top panels.
Power Specialties, Inc. | www.powerspecialties.com | (816) 353-6550
Page 27

23
IM 04L51B01-02EN
Installation Procedure
• Using more than the appropriate
torque to tighten the screws can deform the case or damage the brackets.
• Be sure not to insert foreign objects
or tools into the case through the
mounting bracket holes.
• When you attach the rubber packing, be sure that no portion of it gets
wedged between the GX and the
panel. If the rubber packing is not
attached properly, you will not be able
to achieve sufcient dust proong or
waterproong.
Installation Procedure for the GX10/GX20
Use a steel panel that is 2 mm to 26 mm thick.
1
Insert the GX through the front of the panel.
2
Mount the GX to the panel using the included
mounting brackets as described below.
• Use two mounting brackets to support the top and
bottom or the left and right sides of the case (remove
the stickers that are covering the holes before you
attach the brackets).
• The recommended tightening torque for the mounting
screws is 0.7 to 0.9 N•m.
• Follow the procedure below to mount the GX to the
panel.
• First, attach the two mounting brackets and
temporarily tighten the mounting screws.
• Next, fix the GX in place by tightening the mounting
screws with the appropriate torque. When the GX is
approximately perpendicular to the panel, press the
mounting brackets so that they are in contact with
the case, and fully tighten the mounting screws.
Note
To achieve sufficient dust proofing and waterproofing,
mount the GX in the middle of the panel cut out.
Installation Procedure for the GX60
Use a steel panel that is at least 2 mm thick.
1
Make 6 holes in the panel for the six M4 screws.
2
Fix the unit in place by fastening M4 screws to
the six mounting screw holes. The recommended
tightening torque for the screws is 0.7 to 0.9N•m.
External Dimensions and Panel Cut
Dimensions
GX20 External Dimensions
Panel cut dimensions
Unit: mm (approx. inch)
Unless otherwise specified,
tolerance is ±3% (however,
tolerance is ±0.3 mm when
below 10 mm).
*1: With modules
*2: Without modules
(*1)
(*2)
(Dimensions after attaching
the mounting bracket)
(Dimensions before attaching
the mounting bracket)
(Allowable
panel thickness)
7.5 (0.30) 9.4 (0.37)280.2 (11.03)
247.4 (9.74)
32.3 (1.27)
219.2 max. (8.63)
168.8 (6.65)
152.6 (6.01)
2 to 26
28.2
(1.11)
295.2 (11.62)
288 (11.34)
148 (5.83)
295.2 (11.62)
288 (11.34)
144 (5.67)
280.2 (11.03)
360 min.
(14.17)
281
(11.06)
+2
0
281
(11.06)
+2
0
361 min. (14.21)
Installation and Wiring
Power Specialties, Inc. | www.powerspecialties.com | (816) 353-6550
Page 28

24
IM 04L51B01-02EN
GP20 External Dimensions
Unit: mm (approx. inch)
Unless otherwise specified,
tolerance is ±3% (however,
tolerance is ±0.3 mm when
below 10 mm).
*1: With modules
*2: Without modules
(*1)
(*2)
288 (11.34)
196.8 (7.75)
287 (11.30)
( 8 (0.31))
23
(0.91)
MAX 247.2 (9.73)
288 (11.34)
288 (11.34)
( 8 (0.31))
22
(0.87)
GP10 External Dimensions
Unit: mm (approx. inch)
Unless otherwise specified,
tolerance is ±3% (however,
tolerance is ±0.3 mm when
below 10 mm).
*1: With modules
*2: Without modules
(*1)
(*2)
196.8 (7.75)
Max 247.2 (9.73)
144 (5.67)
(8
(0.31)
)
144.9
(5.70)
15
(0.59)
143.6 (5.65)
When using the stand, the GP10 will face 12 degrees
upward.
Installation and Wiring
GX10 External Dimensions
Panel cut dimensions
137
(5.39)
+2
0
175 min.
(6.89)
L
+2
0
L
+2
0
137
(5.39)
+2
0
2
3
4
5
6
7
8
9
10
n
282 (11.10)
426 (16.77)
570 (22.44)
714 (28.11)
858 (33.78)
1002 (39.45)
1146 (45.12)
1290 (50.79)
1434 (56.46)
(144×n)-6
Side-by side mounting
(vertically; max. 3 units)
Side-by-side mounting
(horizontally)
Single-unit
mounting
Units
Unit: mm (approx. inch)
Unless otherwise specified,
tolerance is ±3% (however,
tolerance is ±0.3 mm when
below 10 mm).
137
(5.39)
+2
0
137
(5.39)
+2
0
175 min. (6.89)
L
+2
0
*1: With modules
*2: Without modules
(*1)
(*2)
Panel thickness
(Dimensions before attaching
the mounting bracket)
(Dimensions after attaching
the mounting bracket)
26.6 (1.05)
22.8 (0.90)
2 to 26
157.7 (6.21)
173.1 (6.81)
Max
224.4 (8.83)
136.5
(5.37)
7.5
(0.30)
9.4 (0.37)
136.5
(5.37)
151.5 (5.96)
144 (5.67)
40.9 (1.61)
40.9 (1.61)
103.3
(4.07)
103.3 (4.07)
144 (5.67)
151.5 (5.96)
Power Specialties, Inc. | www.powerspecialties.com | (816) 353-6550
Page 29

25
IM 04L51B01-02EN
GX60 Dimensions
Power supply terminal type
127.8 (5.03)
148 (5.83)
412.5 (16.2)
162 (6.38)48 156 (6.14)
164.7 (6.48)
6-Φ5 hole
(1.89)
8.7
(0.34)
(6-Φ0.2) hole
Power inlet type
127.8 (5.03)
148±0.4
162±0.2
156±0.2
6-Φ4.5 hole or M4
(6.14±0.0078)
(6.38±0.0078)
(5.83±0.0157)
(6-Φ0.18) hole or M4
148 (5.83)
412.5 (16.2)
162 (6.38)48 156 (6.14)
8.7
(0.34)
164.7 (6.48)
6-Φ5 hole
Mounting hole dimensions
(1.89)
(6-Φ0.2) hole
With modules
147 (5.79)
48
(1.89)
412.5 (16.2)
162 (6.38)156 (6.14)
6-Φ5 hole
(6-Φ0.2) hole
148 (5.83)
164.7 (6.48)
8.7
(0.34)
Unit: mm (approx. inch)
Unless otherwise specified, tolerance is ±3% (however,
tolerance is ±0.3 mm when below 10 mm).
Connect an GX60
Installing an Expansion Module into the GX/GP
When installing an expansion module into the GX/GP or
setting dipswitches, turn off the GX/GP and the GX60.
1
Install an expansion module into slot 9 or 2 of the
GX/GP.
2
Set dipswitch 8 of the expansion module to “ON”
(master).
Set the unit number to 0.
(Default: 0)
1
2
3
4
5
6
7
8
ON
Setting the Unit Number of the GX60
The factory default unit number of the expansion module
is 0. Use dipswitches 1 to 4 to set the unit number (1 to 6).
1
2
3
4
5
6
7
8
ON
Unit number and dipswitch setting
Unit number
Dipswitch
1 2 3 4
6 OFF ON ON OFF
5 ON OFF ON OFF
4 OFF OFF ON OFF
3 ON ON OFF OFF
2 OFF ON OFF OFF
1 ON OFF OFF OFF
0
1
OFF OFF OFF OFF
1 The factory default setting. Unit number “0” is
reserved for the expansion module that is installed
into the GX/GP.
Fixing the Data Rate to 10 Mbps
To fix the data rate to 10 Mbps, set dipswitch 7 to “ON”.
1
2
3
4
5
6
7
8
ON
7-segment LED for
10 Mbps fixed mode
Dot indication
Installation and Wiring
Power Specialties, Inc. | www.powerspecialties.com | (816) 353-6550
Page 30

26
IM 04L51B01-02EN
Installation and Wiring
Setting Switches (Dipswitches)
Use the dipswitches to set the unit number of the GX60,
10 Mbps fixed mode, and operation mode.
Dipswitch settings
Dipswitch Description
8 Switches between master I/O expansion and slave
I/O expansion mode
7 10 Mbps/100Mbps
6 Always OFF (cannot be changed)
5 Always OFF (cannot be changed)
4 For unit number
3
2
1
Port
The port is used to connect the GX60 to the GP/GX. Only
cascaded connection is supported.
Installing and Removing I/O Modules
Installing a Module
1. As shown below, insert the module into the GX/GP slot
and the GX60 slot.
2. Push the module in until you hear a click. Then, fasten
the screw at the bottom section of the module.*
Module
Latch
Ex. GX/GP
* Recommended torque for tightening the screws: 0.6 N•m
Removing a Module
1. Loosen the screw at the bottom section of the module.
2. While pressing down on the latch at the top of the
module, pull the module out.
Connect an GX60
Connect the expansion module installed in the GX/GP
to the expansion modules of each expansion unit using
Ethernet STP (shielded ) cables.
Only cascaded connection is supported.
Maximum communication distance is 100 m. Distance
extension through HUB connection or LAN repeaters is
not possible.
GX/GP
GX60
GX90EX
Functions of Expansion Module Components
Connecting port
Setting switch
(DIP switch
)
System status
LED
EXBus status LED
7
segment
LED
7 segment LED
Displays the unit number and operation errors of the GX/
GP and GX60
• Unit number indication
Displays the unit number (00 to 06).
• Operation error indication
Displays error codes. Ex (where x is a one digit number
or an alphabet letter) will blink. For details on error
codes, see “Expansion Module Error Codes” in section
5.2.1, “Messages” of the User’s Manual (IM 04L51B0101EN).
* If an “Fx” indication is displayed, servicing is
necessary. Contact your nearest YOKOGAWA
dealer for repairs.
System Status Display LED
Three LEDs indicate the operating status of the expansion
module.
Status display LED Color Description
RDY Green Illuminates during normal
operation. Turns off when during
a failure.
MAIN Green Illuminates during master I/O
expansion operation.
FAIL RED Illuminates during an error.
Power Specialties, Inc. | www.powerspecialties.com | (816) 353-6550
Page 31

27
IM 04L51B01-02EN
Installation and Wiring
Limit to the Number of GX/GP Main Unit Modules
• When GX90XA-04-H0 and GX90YA are included
GX10 GP10 GX20-1 GP20-1 GX20-2 GP20-2
No limit No limit* 9 9 9 9
* Up to two modules for 12 V DC models (power supply
suffix code: 2)
• When GX90UT is included
GX10 GP10 GX20-1 GP20-1 GX20-2 GP20-2
No limit No limit* 8 8 8 8
* Up to two modules for 12 V DC models (power supply
suffix code: 2)
Limit on Modules
• Up to 10 modules consisting of GX90YD, GX90WD,
and GX90UT can be installed into the system.
• One GX90WD module can be installed in a GX. One
module can be installed in a GX60 (expandable I/O)
and each GM sub unit.
• One GX90YA module can be installed in a GX10. Two
modules can be installed in each of the GX20, GX60
(expandable I/O) and GM sub unit.
• Up to 10 GX90YA modules can be installed in a GX10/
GX20-1 system and up to 12 in a GX20-2 system.
• If the measurement mode is High speed, only
GX90XA-04-H0 (high-speed AI), GX90XD (DI), and
GX90WD (DIO) are detected. DI and DIO are fixed
to remote mode. Measurement and recording are not
possible.
• If the measurement mode is Dual interval, GX90UT is
not detected.
Notes on Module Installation
• When the reference junction compensation of this
product is used with the thermocouple input of a
GX90XA-10-U2, GX90XA-10-L1, GX90XA-10-T1 or
GX90XA-04-H0, if the following module is installed to
the right (slot with the smaller number) of the GX90XA
module as seen from the GX rear panel, the reference
junction compensation accuracy of that module may
deviate from the guaranteed range (except when
GX90XA-04-H0 is installed to adjacent slots).
GX90XA-10-C1, GX90XA-04-H0, GX90WD, GX90YA,
GX90UT
• On the GX20, when the reference junction
compensation of this product is used with the
thermocouple input of a GX90XA-10-U2, GX90XA10-L1, GX90XA-10-T1, or GX90XA-04-H0, if the
following module is installed above, below, to the
right, or to the left (slot with the smaller number) of
the GX90XA module as seen from the GX rear panel,
the reference junction compensation accuracy of that
module may deviate from the guaranteed range.
GX90YA, GX90UT
Channel Names
A channel name consists of a unit number, slot number,
and channel number.
GX10/GP10
Channel name
0
1234
5
6789
Rear
GX20/GP20
Unit number
GX/GP: (Fixed)
GX60: 1 to 6
Slot number
Channel number
I/O modules
0
12
GX60
012345
Power Specialties, Inc. | www.powerspecialties.com | (816) 353-6550
Page 32

28
IM 04L51B01-02EN
Installation and Wiring
Precautions to Be Taken While Wiring
Take the following precautions when wiring the input/
output signal cables.
• With a screw terminal, we recommend that you use a
crimp-on lug with an insulation sleeve (M4 for power
supply wiring, M3 for signal wiring).
Crimp-on lug with an insulation sleeve
Recommended signal
wiring crimp-on lug
N1.25-MS3
(JST Mfg. Co., Ltd.)
• With a clamp terminal, we recommend the following
wire.
GX90XA
Cross-sectional area 0.05 mm
2
to 1.5 mm2 (AWG30 to 16)
Stripped wire length 5 to 6 mm
GX90XD, GX90XP, GX90YA
Cross-sectional area 0.2 mm
2
to 1.5 mm2 (AWG24 to 16)
Stripped wire length 9 to 10 mm
RS-422/485 (/C3 option)
Cross-sectional area 0.2 mm
2
to 1.5 mm2 (AWG24 to 16)
Stripped wire length 6 to 7 mm
FAIL output/status output (/FL option)
Cross-sectional area 0.33 mm
2
to 2.0 mm2 (AWG22 to 14)
Stripped wire length 10 to 11 mm
• Take measures to prevent noise from entering the
measurement circuit.
• Move the measurement circuit away from the power
cable (power circuit) and ground circuit.
• Ideally, the object being measured should not
generate noise. However, if this is unavoidable,
isolate the measurement circuit from the object.
Also, ground the object being measured.
• Shielded wires should be used to minimize the noise
caused by electrostatic induction. Connect the shield
to the ground terminal of the GX/GP as necessary
(make sure you are not grounding at two points).
• To minimize noise caused by electromagnetic
induction, twist the measurement circuit wires at
short, equal intervals.
• Make sure to earth ground the protective ground
terminal through minimum resistance.
• When wiring input/output signal cables, observe the
minimum bend radius of the cables. For the minimum
bend radius, use the specifications indicated by
the input signal cable manufacture or six times the
conductor diameter of the input/output signal cable,
whichever is larger.
• When using internal reference junction compensation
on the thermocouple input, take measures to stabilize
the temperature at the input terminal.
• Always use the terminal cover.
• Do not use thick wires which may cause large heat
dissipation (we recommend a cross sectional area of
0.5 mm2 or less).
• Make sure that the ambient temperature remains
reasonably stable. Large temperature fluctuations
can occur if a nearby fan turns on or off.
Wiring
• To prevent electric shock while wiring,
make sure that the power supply is
turned off.
• If a voltage of more than 30 VAC or
60 VDC is to be applied to the output
terminals, use ring-tongue crimp-on
lugs with insulation sleeves on all
terminals to prevent the signal cables
from slipping out when the screws become loose. Furthermore, use doubleinsulated cables (dielectric strength
of 2300 VAC or more) for the signal
cables on which a voltage of 30 VAC
or 60 VDC or more is to be applied.
For all other signal cables, use basic
insulated cables (dielectric strength of
1390 VAC). To prevent electric shock,
attach the terminal cover after wiring
and make sure not to touch the terminals.
• Applying a strong tension to the input
and output signal cables connected to
the GX/GP may damage the cables or
the GX/GP terminals. To avoid applying tension directly to the terminals,
x all cables to the rear of the mounting panel.
• To prevent re, use signal cables with
a temperature rating of 70°C or more.
• To avoid damage to the GX/GP, do not
apply voltages that exceed the following values to the input terminals.
GX90XA
• Allowable input voltage: ±10 V DC
for TC/DC voltage (1 V range or less)/
RTD/DI (Contact), DC mA
±60 V DC for DC voltage (2 V to 50
V range), DI (voltage) input (except
High-speed AI)
±120 V DC for DC voltage (2 to 100
V range ) input , DI (voltage) (High-
speed AI)
• Common mode voltage: ±60 VDC (under measurement category II conditions)
±300 VAC rms (under measurement
category II conditions (High-speed AI)
GX90XD, GX90WD
• Allowable input voltage: +10 VDC
GX90XP
• Allowable input voltage: ±10 VDC
GX90UT
• Allowable input voltage: ±10 V DC
for TC/DC voltage (1 V range or less)/
RTD/DI (Contact), DC mA
±60 V DC for DC voltage (2 V range or
more), DI (voltage)
• Common mode voltage: ±60 VDC (under measurement category II conditions)
The GX/GP is an installation category II
product.
Power Specialties, Inc. | www.powerspecialties.com | (816) 353-6550
Page 33

29
IM 04L51B01-02EN
Installation and Wiring
• Connecting the input wires in parallel with other
devices can cause signal degradation, affecting all
connected devices. If you need to make a parallel
connection, then
• Turn the burnout detection function off.
• Ground the instruments to the same point.
• Do not turn ON or OFF another instrument during
operation. This can have adverse effects on the
other instruments.
• RTDs cannot be wired in parallel.
Wiring Procedure
A terminal cover is screwed in place on the I/O terminal
block. A label indicating the terminal arrangement is
affixed to the cover.
1. Turn off the GX/GP/GX60, and remove the terminal cover.
2. Connect the signal cables to the terminals.
Recommended
torque for
tightening the
screws
Screw terminal
(M3)
0.5 to 0.6 N•m
Clamp terminal GX90XA: 0.4 N•m
GX90XD: 0.5 N•m
GX90XP: 0.5 N•m
3. Attach the terminal cover and fasten it with screws. The
appropriate tightening torque for the screws is 0.6 N•m.
Inside dimension of M3 screw terminal block
approx. 6 (0.23) mm
Unit: mm (approx. inch)
Wiring Clamped Terminals
Connection
port
Screw
terminal
Flat-blade screwdriver
Wire
(Stripped wire)
First, loosen the screw at the front using a flat-blade
screwdriver. Insert the input signal wire into the slit on the
left side of the terminal block, and fasten the screw at the
front.
Note
With a clamp terminal, if you use a single wire whose
diameter is 0.3 mm or less, you may not be able to clamp
the wire securely to the terminal. Take measures to
securely clamp the wire such as by folding the conductor
section that will be connected to the clamp terminal in half.
Wiring to a GX90XA Analog Input Module
Universal/Low withstand voltage relay/
Electromagnetic relay/Current (mA) type
Terminal Diagram
CH1
301/201/101
101
102
103
113
114
115
310/210/110
M3 screw terminal Clamp terminal
Wiring direction
CH10
201
202
203
213
214
215
CH1
CH3
CH5
CH7
CH9
CH2
CH4
CH6
CH8
CH10
Wiring direction
Wiring Diagram
DC voltage input/DI (level) DI (contact)
+−
−
+
TC input RTD input
+−
−
+
B
b
A
ABb
DC current input
(with an external shunt
resistor)
current input
+−
−
+
+−
−
+
Type Input type Wiring
-U2 DC voltage, thermocouple
(TC), resistance temperature
detector (RTD), DI (voltage,
contact), and DC current (by
adding an external shunt
resistor)
1, 2, 3, 4, 5
-C1 DC current (mA) 6
-L1 DC voltage, thermocouple
(TC), DI (voltage, contact),
and DC current (by adding
an external shunt resistor)
1, 2, 3, 5
-T1
Terminal Arrangement
M3 screw terminal
CH
No.
Term.
No.
Symbol Term.
No.
Symbol Term.
No.
Symbol
CH1 301 b
1
201 -/B 101 +/A
CH2 302 b
1
202 -/B 102 +/A
CH3 303 b
1
203 -/B 103 +/A
CH4 304 b
1
204 -/B 104 +/A
CH5 305 b
1
205 -/B 105 +/A
CH6 306 b
1
206 -/B 106 +/A
CH7 307 b
1
207 -/B 107 +/A
CH8 308 b
1
208 -/B 108 +/A
CH9 309 b
1
209 -/B 109 +/A
CH10 310 b
1
210 -/B 11 0 +/A
Power Specialties, Inc. | www.powerspecialties.com | (816) 353-6550
Page 34

30
IM 04L51B01-02EN
Terminal Arrangement
M3 screw terminal
CH
No.
Term.
No.
Symbol Term.
No.
Symbol Term.
No.
Symbol
CH1 301 /A 201 -/b 101 +/B
CH2 304 /A 204 -/b 104 +/B
CH3 307 /A 207 -/b 107 +/B
CH4 310 /A 210 -/b 110 +/B
Clamp terminal
CH No. Term.No. Symbol Term.No. Symbol
CH1
201 +/B 101 Not Used
202 -/b 102 Not Used
203 /A 103 Not Used
204 Not Used 104 Not Used
CH2
205 +/B 105 Not Used
206 -/b 106 Not Used
207 /A 107 Not Used
208 Not Used 108 Not Used
CH3
209 +/B 109 Not Used
210 -/b 110 Not Used
211 /A 111 Not Used
212 Not Used 11 2 Not Used
CH4
213 +/B 11 3 Not Used
214 -/b 114 Not Used
215 /A 115 Not Used
* Empty terminals may not be used.
4-wire RTD/resistance
Terminal Diagram
CH1
301/201/101
302
101
102
103
104
111
112
113
114
108
309/209/109
M3 screw terminal Clamp terminal
CH6
201
202
203
204
211
212
213
214
CH1
CH3
CH5
CH2
CH4
CH6
Wiring direction Wiring direction
Wiring
CH1、CH3、CH5 CH2、CH4、CH6
IAB
C
IAB
C
I
A
B
C
Installation and Wiring
Clamp terminal
CH No. Term.No. Symbol CH No. Term.No. Symbol
201 +/A 101 +/A
CH2 202 -/B CH1 102 -/B
203 b
1
103 b
1
204 +/A 104 +/A
CH4 205 -/B CH3 105 -/B
206 b
1
106 b
1
207 +/A 107 +/A
CH6 208 -/B CH5 108 -/B
209 b
1
109 b
1
210 +/A 110 +/A
CH8 2 11 -/B CH7 111 -/B
212 b
1
112 b
1
213 +/A 113 +/A
CH10 214 -/B CH9 11 4 -/B
215 b
1
115 b
1
1 There are no symbol indications for the
electromagnetic relay, current (mA), or low withstand
voltage relay type.
・ The RTD b terminal is connected internally.
High-speed universal
Terminal Diagram
CH1
301/201/101
310/210/110
M3 screw terminal Clamp terminal
CH
4
CH1
CH2
CH3
CH4
CH
2
304/204/104
CH
3
307/207/107
201
202
203
213
214
215
Wiring direction Wiring direction
DC voltage input/DI (level) DI (contact)
+−
−
+
TC input RTD input
+−
−
+
b
A
B
BbA
DC current input
(with an external shunt resistor)
+−
−
+
* Be careful because the DI wiring is different between
level and contact.
Power Specialties, Inc. | www.powerspecialties.com | (816) 353-6550
Page 35

31
IM 04L51B01-02EN
Terminal Arrangement
M3 screw terminal
CH
No.
Term.
No.
Symbol Term.
No.
Symbol Term.
No.
Symbol
CH1
301 B 201 A 101 I
302 C 202 Not
Used
102 C
CH2 303 B 203 A 103 I
CH3
304 B 204 A 104 I
305 C 205 Not
Used
105 C
CH4 306 B 206 A 106 I
CH5
307 B 207 A 107 I
308 C 208 Not
Used
108 C
CH6 309 B 209 A 109 I
310 Not
Used
210 Not
Used
110 Not
Used
Clamp terminal
CH No. Term.No. Symbol CH No. Term.No. Symbol
CH2
201 I
CH1
101 I
202 A 102 A
203 B 103 B
204 C 104 C
205 Not Used 105 Not Used
CH4
206 I
CH3
106 I
207 A 107 A
208 B 108 B
209 C 109 C
210 Not Used 110 Not Used
CH6
211 I
CH5
111 I
212 A 112 A
213 B 113 B
214 C 114 C
215 Not Used 115 Not Used
* Empty terminals may not be used
Wiring to a GX90XD Digital Input Module
Terminal Diagram
DI1
M3 screw terminal Clamp terminal
DI8
COM
COM
DI9
DI16
COM
DI9
DI16
DI1
DI8
COM
Wiring direction Wiring direction
Terminal Arrangement
Term. No. Symbol Term. No. Symbol
21 DI9 11 DI1
22 DI10 12 DI2
23 DI11 13 DI3
24 DI12 14 DI4
25 DI13 15 DI5
26 DI14 16 DI6
27 DI15 17 DI7
28 DI16 18 DI8
29 COM2 19 COM1
30 - 20 -
DI1 to
DI16
COM1,2
Input type:
Photocoupler isolation
DI1 to DI8: COM1
DI9 to DI16: COM2
Shared common (COM)
Allowable input voltage range:
0 to 10V
Internal circuit
Note: Do not apply voltage outside the allowable input
voltage range across input terminals. Doing so can cause
a malfunction.
Wiring to a GX90YD Digital Output Module
Terminal Diagram
M3 screw terminal
Wiring direction
DO1
N.C.
COM
N.O.
N.C.
COM
N.O.
N.C.
COM
N.O.
N.C.
COM
N.O.
N.C.
COM
N.O.
N.C.
COM
N.O.
DO2
DO3
DO4
DO5
DO6
11
12
13
14
15
16
17
18
19
21
22
23
24
25
26
27
28
29
Terminal Arrangement
DO No. Term. No. Symbol DO No. Term. No. Symbol
21 NC 11 NC
DO4 22 COM DO1 12 COM
23 NO 13 NO
24 NC 14 NC
DO5 25 COM DO2 15 COM
26 NO 16 NO
27 NC 17 NC
DO6 28 COM DO3 18 COM
29 NO 19 NO
30 - 20 -
Installation and Wiring
Power Specialties, Inc. | www.powerspecialties.com | (816) 353-6550
Page 36

32
IM 04L51B01-02EN
Terminal Arrangement
Term. No. Symbol Term. No. Symbol
21 CH6 + 11 CH1 +
22 − 12 −
23 CH7 + 13 CH2 +
24 − 14 −
25 CH8 + 15 CH3 +
26 − 16 −
27 CH9 + 17 CH4 +
28 − 18 −
29 CH10 + 19 CH5 +
30 − 20 −
Negative terminal (common) potential shared
+
−
5V DC
approx.5kΩ
Internal circuit
Input type:
Photocoupler isolation
Negative terminal (common)
potential shared
Allowable input voltage:±10V
Note: Do not apply voltage outside the allowable input
voltage range across input terminals. Doing so can cause
a malfunction.
Wiring to a GX90YA Analog Output Module
Terminal Diagram
CH1+
CH4+
(11)
CH1–
(12)
(17)
CH4–
(18)
CH1+
CH4+
(11)
CH1–
(12)
(17)
CH4–
(18)
M3 screw terminal Clamp terminal
Wiring direction
Wiring direction
Terminal Arrangement
Term. No. Symbol
11 CH1 +
12 13 CH2 +
14 15 CH3 +
16 17 CH4 +
18 19 Not Used
20 Not Used
Installation and Wiring
Wiring to a GX90WD Digital Input /Output Module
Terminal Diagram
M3 screw terminal
Wiring direction
DI
301/201/101
302/202/102
303/203/103
310/210/110
DO
305/205/105
Terminal Arrangement
CH
No.
Term.
No.
Symbol Term.
No.
Symbol Term.
No.
Symbol
DI1 to
DI8
301 DI3 201 DI2 101 DI1
302 DI6 202 DI5 102 DI4
303 DICOM 203 DI8 103 DI7
-
304 - 204 - 104 -
DO1 305 DO1NO 205 DO1COM 105 DO1NC
DO2 306 DO2NO 206 DO2COM 106 DO2NC
DO3 307 DO3NO 207 DO3COM 107 DO3NC
DO4 308 DO4NO 208 DO4COM 108 DO4NC
DO5 309 DO5NO 209 DO5COM 109 DO5NC
DO6 310 DO6NO 210 DO6COM 11 0 DO6NC
DI1 to
DI18
DICOM
Input type:
Photocoupler isolation
Shared common (DICOM)
Allowable input voltage range:
0 to 10V
Internal circuit
Note: Do not apply voltage outside the allowable input
voltage range across input terminals. Doing so can cause
a malfunction.
Wiring to a GX90XP Pulse Input Module
Terminal Diagram
M3 screw terminal
Wiring direction
Clamp terminal
Wiring direction
CH1 +
CH5 +
CH5 –
CH6 +
CH10 +
(11)
(19)
(21)
(30)
CH6 –
(22)
(29)
CH10 −
CH1 –
(20)
CH10 −
CH6 +
CH10 +
CH1 +
CH5 +
CH5 −
(11)
(20)
(21)
(30)
(29)
CH6 −
(22)
(12)
(19)
CH1 −
(12)
Power Specialties, Inc. | www.powerspecialties.com | (816) 353-6550
Page 37

33
IM 04L51B01-02EN
Wiring to a GX90UT PID Control Module
Terminal Diagram
M3 screw terminal
Wiring direction
DI
AI
AO
DO
301/201/101
302/202/102
303/203/103
304/204/104
305/205/105
306/206/106
307/207/107
308/208/108
209/109
210/110
Analog Input
DC voltage input/DI (level) DI (contact)
+−
TC input RTD input
+−
BbA
DC current input
(with an external shunt
resistor)
+−
* Be careful because the DI wiring is different between
level and contact.
Analog Output
DC current output, voltage pulse, 15 V DC loop power
supply
+−
Terminal Diagram
Term.
No.
Symbol Term.
No.
Symbol Term.
No.
Symbol
301 DI3 201 DI2 101 DI1
302 DI6 202 DI5 102 DI4
303 DICOM 203 DI8 103 DI7
304 DO3 204 DO2 104 DO1
305 DO6 205 DO5 105 DO4
306 DO-COM 206 DO8 106 DO7
307 AI1(/A) 207 AI1(-/b) 107 AI1(+/B)
308 AI2(/A) 208 AI2(-/b) 108 AI2(+/B)
309 Not Used 209 AO1(-) 109 AO1(+)
310 Not Used 210 AO12-) 110 AO2(+)
* Empty terminals may not be used
DI1 to
DI18
DI-COM
Input type:
Photocoupler isolation
Shared common (DI-COM)
Allowable input voltage range:
0 to 10V
Internal circuit
Note: Do not apply voltage outside the allowable input
voltage range across input terminals. Doing so can cause
a malfunction.
Connecting to the FAIL Output/Status Output (/
FL option)
NCCNO
During normal
operation
When a failure
occurs
When power is
turned off
NO C NC
During normal
operation
NO C NC
When the specified
status occurs
NO C NC
NO C NC NO C NC NO C NC
When power is
turned off
FAIL
output
Status
output
Recommended torque for tightening the screws: 0.5N•m
Connecting to the Serial Communication
Interface (/C2 option)
54321
9876
DSUB 9-pin male
Screw: M26 X 0.45
2 RD (Received Data)
3 SD (Send Data)
5 SG (Signal Ground)
7 RS (Request to Send)
8 CS (Clear to Send)
Pins 1, 4, 6, and 9 are not used.
Connecting to the RS-422/485 Connector (/C3 option)
Two-wire systemFour-wire system
FG SG SDB+ SDA– RDB+ RDA–
FG SG SDB+ SDA– RDB+ RDA–
Electric potential
of the shield
Shield
FG SDB+
SG SDA−
Electric potential
of the shield
Shield
FG SDB+
SG SDA−
RDB+
RDA−
FG (Frame Ground) Case ground of the GX/GP
SG (Signal Ground) Signal ground
SDB+ (Send Data B+) Send data B (+)
SDA− (Send Data A−) Send data A (–)
RDB+ (Received Data B+) Receive data B (+)
RDA− (Received Data A−) Receive data A (–)
Recommended torque for tightening the screws: 0.2N•m
Installation and Wiring
Power Specialties, Inc. | www.powerspecialties.com | (816) 353-6550
Page 38

34
IM 04L51B01-02EN
Connecting to the Ethernet Port
Checking the Connection and Communication Status
You can use the indicators that are located above the
Ethernet port to check the connection status of the
Ethernet interface.
Indicators
Yellow green Orange
Indicator Connection Status of the Ethernet
Interface
Lit (yellow-green) The Ethernet link is established.
Off (yellow-green) The Ethernet link is not established.
Blinking (yellow-green) Receiving data
Lit (orange) Connected at 100 Mbps
Off (orange) Connected at 10 Mbps
Wiring the Power Supply
Use a power supply that meets the following conditions:
Item Condition (Not /P1) Condition (/P1)
Rated supply voltage 100 to 240 VAC 24 VDC/AC
Allowable power
supply voltage range
GX/GP:
90 to 132 VAC,180
to 264 VAC
GX60:
90 to 132 VAC,180
to 240 VAC
21.6 V to 26.4
VDC/AC
Rated power supply
frequency
50/60 Hz 50/60 Hz (for AC)
Permitted power
supply
frequency range
50/60 Hz ± 2% 50/60 Hz ± 2%
(for AC)
Maximum power
consumption
GX10/GP10: 48 VA
GX20/GP20: 90 VA
GX60: 40VA
GX10: 24 VA
GX20: 48 VA
100 VAC (/P1: 24 VDC)
Maximum power
consumption
GX10/GP10: 60 VA
GX20/GP20: 110 VA
GX60: 55VA
GX10: 42 VA
GX20: 76 VA
240 VAC (/P1: 24 VAC)
Note
Do not use a supply voltage of 132 to 180 VAC, as this
may have adverse effects on the measurement accuracy.
GP10 Power Supply Suffix Code: 2
Item Condition
Rated supply voltage 12 VDC
Allowable power
supply voltage range
10 V to 20 VDC
Maximum power
consumption
26 VA
Installation and Wiring
Connecting to the VGA Connector (/D5 option)
15
610
15 11
D-Sub 15-pin (Female)
Pin No. Signal Name Specifications
1 Red 0.7 Vp-p
2 Green 0.7 Vp-p
3 Blue 0.7 Vp-p
4 ―
5 ―
6 GND
7 GND
8 GND
9 ―
10 GND
11 ―
12 ―
13 Horizontal
sync signal
Approx. 39.1 kHz, TTL negative logic
14 Vertical sync
signal
Approx. 60 Hz, TTL negative logic
15
• Only connect the GX/GP to a monitor
after turning both the GX/GP and the
monitor off.
• Do not short the VIDEO OUT connector or apply external voltage to it.
Doing so may damage the GX/GP.
Connecting to a Monitor
1. Turn off the GX/GP and the monitor.
2. Connect the GX/GP and the monitor using an RGB
cable.
3. Turn on the GX/GP and the monitor. The GX/GP
screen appears on the monitor.
Note
• When the GX/GP is turned on, the VIDEO OUT
connector constantly transmits VGA signals.
• The monitor display may flicker if you place the GX/
GP or some other device close to it.
• Depending on the type of monitor, parts of the GX/GP
display may be cut off.
Connecting to the USB Port (/UH option)
A USB2.0 compliant port (see “Component Names”)
Power Specialties, Inc. | www.powerspecialties.com | (816) 353-6550
Page 39

35
IM 04L51B01-02EN
Precautions to Be Taken When Wiring the Power
Supply (GX10/GX20/GX60)
Make sure to follow the warnings below when wiring the
power supply. Failure to do so may cause electric shock
or damage to the instrument.
• To prevent electric shock, ensure that
the power supply is turned off.
• To prevent re, use 600 V PVC insulated wires (AWG20 to AWG16;
JISC3307) or wires or cables with
equivalent or better performance.
• Make sure to earth ground the protective ground terminal through minimum resistance before you turn on
the power.
• Use crimp-on lugs (designed for 4
mm screws) with insulation sleeves to
connect both the power cord and the
protective ground.
• To prevent electric shock, be sure to
close the transparent cover for the
power supply wires.
• Provide a power switch (double-pole
type) on the power supply line to
separate the GX/GP from the main
power supply. Use labels to indicate
that this switch is for cutting off the
power supply to the GX/GP and to
indicate ON and OFF.
Switch specifications
Steady-state
current rating
1 A or higher (Not /P1),
3 A or higher (/P1)
Inrush
current rating
60 A or higher (Not /P1),
70 A or higher (/P1)
Must comply with IEC60947-1 and
IEC60947-3.
• Do not add a switch or fuse to the
ground line.
Wiring Procedure (GX10/GX20/GX60)
1. Turn off the GX power supply, and then remove the
transparent power supply terminal cover.
2. Connect the power cord and the protective ground cord
to the power supply terminal. Use ring-tongue crimpon lugs (for M4 screws) with insulation sleeves. The
appropriate tightening torque for the screws is 1.4 to
1.5 N•m.
Protective ground
L(+) N(-)
3. Attach the transparent power supply terminal cover,
and fasten it with screws.
Precautions to Be Taken When Connecting the
Power Supply (GP10/GP20/GX60)
Make sure to follow the warnings below when connecting
the power supply. Failure to do so may cause electric
shock or damage to the instrument.
• Before connecting the power cord,
ensure that the source voltage
matches the rated supply voltage of
the instrument and that it is within the
maximum rated voltage range of the
provided power cord.
• Connect the power cord after checking that the power switch of the instrument is turned OFF.
• To prevent electric shock and re, be
sure to use a power cord purchased
from Yokogawa Electric Corporation.
• Make sure to connect protective earth
grounding to prevent electric shock.
Insert the power cord into a grounded
three-prong outlet.
• Do not use an extension cord without
protective earth ground. If you do, the
instrument will not be grounded.
Connection Procedure
1. Check that the GP’s power switch is off.
2. Connect the supplied power cord plug to the power
inlet on the rear panel of the GP or front panel of the
GX60.
3. Ensure that the source voltage is within the maximum
rated voltage range of the provided power cord. Then,
connect the other end of the cord to the outlet. Use a
grounded three-prong outlet.
Installation and Wiring
Power Specialties, Inc. | www.powerspecialties.com | (816) 353-6550
Page 40

36
IM 04L51B01-02EN
Precautions to Be Taken When Connecting the
Power Supply (GP10 Power supply Suffix Code: 2)
Make sure to follow the warnings below when connecting
the power supply. Failure to do so may cause damage to
the instrument.
• Wire the power cable to the power
supply terminal, making sure that the
polarity is correct.
• Connect the power cables after
checking that the power switch of the
instrument is turned OFF.
• Using other wires may cause abnormal heating or re.
Wiring Procedure (GP10 Power supply Suffix Code: 2)
1. Turn off the GP power supply, and then remove the
transparent power supply terminal cover.
2. Wire the power cable to the power supply terminal,
making sure that the polarity is correct.
Use ring-tongue crimp-on lugs (for M4 screws) with
insulation sleeves. The appropriate tightening torque
for the screws is 1.4 to 1.5 N•m.
Use 600 V PVC insulated wires (AWG20 to AWG16;
JISC3307) or wires or cables with equivalent or better
performance.
(+) (-)
3. Attach the transparent power supply terminal cover,
and fasten it with screws.
Installation and Wiring
Power Specialties, Inc. | www.powerspecialties.com | (816) 353-6550
Page 41

37
IM 04L51B01-02EN
Basic Operation
Turning the Power On and Off
To make panel door lock for GX10/GX20
or install the GP/GX60 systems in a
panel with a door or in a location where
operator or any third person can not
operate the power switch carelessly.
When the power switch of GX/GP
systems under operation (control in
progress) be turned on or off carelessly
, it may result the system down or injury.
Be careful to operate the power switch
on or off.
Careless operations can be avoided by
applying the slide lock.
Turning the Power On
Check the following points before
turning on the power switch.
• The power cord or wires are connected properly to the GX/GP and GX60.
• The GX/GP is connected to the correct
power supply.
If the input wiring is connected in
parallel with another instrument, do not
turn on or off the GX/GP/GX60 or other
instrument during operation. If you do,
measured values may be affected.
GX/GP
1
Open the front door.
2
Turn on the power switch.
A self-test takes place for a few seconds, and then
the operation screen appears.
Power switch
3
Close the front door.
GX60
Turn on the power switch.
Power switch
• If nothing appears on the display even
when you turn on the power switch,
turn off the power switch, and check
the wiring and supply voltage. If, after
checking these items, the GX/GP still
fails to start when you turn on the
power switch, it may be malfunctioning. Contact your nearest Yokogawa
dealer for repairs.
• If an error message appears on the
screen, take measures according to
the information in chapter 5, “Troubleshooting” in the GX/GP User’s Manual.
• After you turn on the power switch, allow the GX/GP to warm up for at least
30 minutes before starting a measurement.
Turning the Power Off
Check the following points before
turning off the power switch.
• The external storage medium is not
being accessed (the yellow-green LED
is not blinking).
GX/GP
1
Open the front door.
2
Turn off the power switch.
3
Close the front door.
GX60
Turn off the power switch.
This section explains the details indicated as “Basic Operation” in the operating procedure on pages 20 and 21.
Power Specialties, Inc. | www.powerspecialties.com | (816) 353-6550
Page 42

38
IM 04L51B01-02EN
Viewing the Operation Screen (Trend)
Waveform
display
Data display section
Scale
Status display section
Shows the display name, date/time,
data recording, alarm icons, etc.
Shows measured data and function
setup screens
Numeric display section
Status Display Section
Recording stopped
Recording in progress
Date and time
When using the batch function
When using the login function
Data type
DISP: Display data
EVENT: Event data
Recording progress
Internal memory error
Recording status icon
Display name or group name
When using the login and batch functions
Displays the progress using a green bar graph.
The frame indicates the saving interval (display
data) or data length (event data).
Control status icon
Control in
progress
Control
stopped
Basic Operation
Setting and Removing SD Memory
Cards
Setting a SD Memory Card
1
Open the front door.
2
Insert an SD memory card into the card slot.
Removing the SD Memory Card
1
Press MENU.
2
Tap the media eject icon.
3
On the screen for selecting the type of media, tap
SD.
4
Remove the SD memory card.
Operation complete
Power Specialties, Inc. | www.powerspecialties.com | (816) 353-6550
Page 43

39
IM 04L51B01-02EN
Alarm icon
E-mail transmission is enabled.
Operation lock is enabled.
Math icon (/MT option)
SD memory card icon
Status icon
The condition assigned to instrument information
output is occurring.
Displayed when any alarm is activated.
Alarm activated.
Gray icon: Computation started
Yellow icon: Computation data dropout occurred
Remaining memory space 50% or less
Remaining memory space 10% or less
Remaining memory space 50% or more
External medium error
Lit in red
Blinking in red
Blinking in gray
Alarm indication set to hold. Alarms are
currently activated, and some alarms have not
been acknowledged.
Alarm indication set to hold. All alarms have
been cleared after alarms have occurred, but
some alarms have not been acknowledged.
Displaying the Menu Screen
To change the display between various setup screens and
operation screens, display the menu screen.
1
Press MENU.
The menu screen appears.
MENU key
Tabs
Recording icon
Icons
Scrolls the menu in the tab
(These appear when the number of icons exceeds
the maximum number that can be displayed.)
Setting the Date and Time*
* If you need to set the time zone or DST (Daylight Saving
Time) or both, do so before setting the date and time.
Path MENU key > Browse tab > Setting > Setting
menu > System settings > Time basic
settings
Set the date using the calendar and the time.
Path MENU key > Universal tab > Date/Time
settings
1
Tap the Date tab.
2
Set the month and day with the switch icons.
Switches the year
Switches the month
Time tab
Date tab
Basic Operation
Power Specialties, Inc. | www.powerspecialties.com | (816) 353-6550
Page 44

40
IM 04L51B01-02EN
Starting Measurement and Recording
1
Press MENU.
The menu screen appears.
2
Tap the Recording icon.
The record start screen appears.
3
Tap Record.
Recording starts. The recording status icon in the
status display section changes to recording in progress.
Operation complete
You can also start recording with the START/
STOP key.
You can stop recording in the same way that you
start recording.
Switching between Operation Screens
1
Press MENU.
The menu screen appears.
Trend
Digital
Bar graph
Overview
2
Tap the Browse tab.
3
Tap the icon of the display that you want to change
to.
Operation complete
3
Tap the Time tab.
4
Enter the time using the keyboard, and tap OK.
The time is set.
Operation complete
Configuring the Inputs
For channel 1 (0001) of slot 0, set thermocouple type T, 0
to 200°C.
Path MENU key > Browse tab > Setting >
Setting menu > AI channel settings > Range
1
2
3
4
5
6
7
1
Tap First-CH > 0001.
2
Check that Last-CH is 0001.
3
Tap Type > TC.
4
Tap Range > T.
5
Tap Span Lower, and enter 0.0.
6
Tap Span Upper, and enter 200.0.
7
Tap Save.
Operation complete
Basic Operation
Power Specialties, Inc. | www.powerspecialties.com | (816) 353-6550
Page 45

41
IM 04L51B01-02EN
Saving Data to USB Memory
1
Set the USB memory.
The Media operation screen appears.
2
Tap the Memory save Data save icon.
The Memory summary / Save screen appears.
3
Press MENU.
The menu screen appears.
4
Tap the Context tab.
Each data save icon appears.
Data save icon
5
Tap data save icon to save.
The data save screen appears.
6
Select the USB, and tap OK.
The data is save to USB memory.
Operation complete
Switching the Quick Settings (GP
only)
A minimal setup menu for data collection is displayed.
Path MENU key > Browse tab > Setting >
1
1
Tap the Quick setting tab.
Setting menu of the quick setting is displayed.
Operation complete
Basic Operation
Power Specialties, Inc. | www.powerspecialties.com | (816) 353-6550
Page 46

42
IM 04L51B01-02EN
Setting the Trend Interval
Path MENU key > Browse tab > Setting >
Setting menu > Display settings > Trend
interval
1
2
1
Tap Trend interval [/div] > 1 min.
2
Tap Save.
Operation complete
Setting Alarms
On channel 1 of slot 0, set the high limit alarm at the alarm
value of 150°C.
Path MENU key > Browse tab > Setting >
Setting menu > AI channel settings > Alarm
1
2
3
4
5
6
1
Tap First-CH > 0001.
2
Check that Last-CH is 0001.
3
Tap Level1 > On.
4
Tap Type > H.
5
Tap Value, and enter 150.0.
6
Tap Save.
Operation complete
Advanced Operation (Various settings and operation)
Setting Measurement and Recording
Conditions
Configuring the type of data to record to display data, the
scan interval to 2 s, and the trend interval to 1 min.
Setting the Type of Data to Record
Path MENU key > Browse tab > Setting >
Setting menu > Recording Settings >
Basic settings
1
2
1
Tap File type > Display.
2
Tap Save.
You can set the file type to record only the data that
suits your purpose. For example, you can record
detailed data or record data only when alarms occur.
For details, see the User’s Manual (IM 04L51B0101EN).
Setting the Scan Interval
Path MENU key > Browse tab > Setting >
Setting menu > Measurement settings >
Scan interval
1
2
1
Tap Scan interval > 2s.
2
Tap Save.
Operation complete
This section explains how to change various settings.
Before you change settings, stop recording and computation.
Power Specialties, Inc. | www.powerspecialties.com | (816) 353-6550
Page 47

43
IM 04L51B01-02EN
Alarm DO output
Alarms are transmitted via DO output to DO channel 1 of
slot 1. (A DO output module is required.)
Configure the following settings in the alarm settings (see
“Setting Alarms”).
1
2
1
Tap Output type > Relay.
2
Tap the Output No., and enter 0101.
Path MENU key > Browse tab > Setting >
Setting menu > DO channel settings > Range
1
2
3
4
1
Tap First-CH > 0101.
2
Check that Last-CH is 0101.
3
Tap Range Type > Alarm.
4
Tap Save.
Operation complete
Using the Scaling Function
(Measuring a flow meter)
On channel 1 of slot 1 (0101), measure the input signal
ranging from 1 to 5 VDC as 0.0 to 100.0 m3/h.
Path MENU key > Browse tab > Setting >
Setting menu > AI channel settings > Range
1
2
3
4
5
7
8
9
10
11
6
1
Tap First-CH > 0101.
2
Check that Last-CH is 0101.
3
Tap Type > GS.
4
Tap Range > 1-5V.
5
Tap Calculation > Linear scaling.
6
Drag the screen up.
Show the setting parameters off the screen at the
bottom.
7
Tap Decimal place > 1.
8
Tap Scale Lower, and enter 0.0.
9
Tap Scale Upper, and enter 100.0.
10
Tap Unit, and enter m3/h.
11
Tap Save.
Operation complete
Advanced Operation (Various settings and operation)
Power Specialties, Inc. | www.powerspecialties.com | (816) 353-6550
Page 48

44
IM 04L51B01-02EN
Registering and Deleting Favorite
Screens
You can register displays that you use frequently as
favorite screens and display them with easy operation.
You can register up to 20 displays.
Registering a Favorite Screen
1
Show the display that you want to register as a
favorite screen.
2
Press MENU.
The menu screen appears.
Add a favorite screen
Scroll
Close button
Favorite screen list
3
Tap Add favorite.
A conrmation screen appears.
4
Tap Favorite name, and enter the name.
5
Tap OK.
The display is registered.
6
Tap the Close icon.
The screen closes.
Operation complete
Deleting a Favorite Screen
1
Press MENU.
2
Tap Universal tab > Remove favorite.
3
Select the screen to delete, and tap OK.
4
Tap the Close icon.
The screen closes.
Operation complete
Using the Scaling Function
(Measuring a temperature)
On channel 1 of slot 0 (0001), measure the input signal
ranging from 0 to 5 VDC as 0.0 to 600.0 °C.
Path MENU key > Browse tab > Setting >
Setting menu > AI channel settings > Range
1
2
3
4
5
7
8
9
10
13
6
11
12
1
Tap First-CH > 0001.
2
Check that Last-CH is 0001.
3
Tap Type > Volt.
4
Tap Range > 6V.
5
Tap Span Lower, and enter 0.000.
6
Tap Span Upper, and enter 5.000.
7
Tap Calculation > Linear scaling.
8
Drag the screen up.
Show the setting parameters off the screen at the
bottom.
9
Tap Decimal place > 1.
10
Tap Scale Lower, and enter 0.0.
11
Tap Scale Upper, and enter 600.0.
12
Tap Unit > , and enter °C.
13
Tap Save.
Operation complete
Advanced Operation (Various settings and operation)
Power Specialties, Inc. | www.powerspecialties.com | (816) 353-6550
Page 49

45
IM 04L51B01-02EN
Setting the Measurement Mode
Setting the Measurement Mode
The measurement mode determines how the entire
GX/GP system operates. The GX/GP measurement
characteristics change depending on the measurement
mode. The measurement mode must be set before
reconfiguration and before specifying various settings.
By factory default, the measurement mode is set to
Normal. When performing high-speed or dual interval
measurement according to measurement conditions, you
need to set the measurement mode to High speed or Dual
interval.
1
Press MENU.
2
Tap the Browse tab.
3
Tap Initialize Calibration.
4
Tap Measuremet mode.
5
Setting the Measurement Mode.
6
Tap Execute.
A conrmation screen is displayed.
7
Tap OK
Operation complete
Note
• When the measurement mode is changed, the system
restarts, and the following data is initialized. Set the
measurement mode before reconfiguration and before
specifying various settings.
Data subject to initialization
All internal data
All setting parameters including security settings but
excluding communication settings
System configuration data
• You cannot set the measurement mode when
recording, computation, or control execution is in
progress.
• The measurement mode is not initialized during
initialization.
• If the advanced security function (/AS) or multi-batch
function (/BT) is enabled (On), the measurement
mode is fixed to Normal.
When changing the measurement mode, disable the
functions beforehand.
Limitations
Depending on the measurement mode, there is a limit
to the number of measurement channels, the number of
recording channels, and the supported modules.
For the specific limitations, see the limitations provided in
the following general specifications.
• GX/10/GX20 Paperless Recorder (panel mount type)
General Specifications GS 04L51B01-01EN
• GP10/GP20 Paperless Recorder (portable type)
General Specifications GS 04L52B01-01EN
This section explains the measurement mode, which needs to be set properly according to the measurement conditions.
Power Specialties, Inc. | www.powerspecialties.com | (816) 353-6550
Page 50

46
IM 04L51B01-02EN
Initializing the GX/GP
(Initializing all settings)
Initialize the GX/GP after reconfiguring the GX/GP when
channels are not assigned to display groups. Channels
are automatically assigned during initialization.
For details, see the User’s Manual (IM 04L51B01-01EN).
Note
• This procedure is not necessary if you purchased an
I/O module preinstalled model and do not need to
change the configuration.
• If you initialize, setting parameters are reset to their
factory defaults. We recommend that you back up
setting parameters before initialization.
1
Press MENU.
2
Tap the Browse tab.
3
Tap Initialize Calibration > Initialize > Settings/
Inter data.
4
Tap Initialize all > On.
4
5
5
Tap Execute.
A conrmation screen is displayed.
6
Tap OK.
The settings are initialized.
Operation complete
Reconfiguring the GX/GP (Module identification)
Reconfiguring the GX/GP
When you reconfigure the GX/GP and the GX60, the
installed I/O modules are detected, and the settings are
changed accordingly.
Reconfiguration is necessary in the following situations.
• If you specify modules separately
• If you change the modules (change to different modules)
• If you add or remove modules
• If you connect the GX60
• When the measurement mode is changed
• When the advanced security function on/off state is
changed
If you purchased a model with preinstalled modules (/U[]
[]0 or /CR[][] option), you can start using the GX/GP right
away without any reconfiguration. However, if you connect
the GX60, change modules, add modules, or delete
modules, you will need to reconfigure.
Note
You cannot reconfigure GX/GP while recording start
,math start, controled.
1
Press MENU.
2
Tap the Browse tab.
3
Tap Initialize Calibration.
4
Tap Reconfiguration.
5
Tap Execute.
The system information appears.
XX-XX-XX-XX-XX-XX
RX.XX.XX
XXXXXXXXX
6
RX.XX.XX
6
Tap Reconfigure.
7
Tap OK.
Operation complete
Note
Do not carry out the following operations while the GX/
GP is reconfiguring.
• Turn the power off and on
• Insert or remove modules
This procedure is not necessary if you purchased an I/O
module preinstalled model and do not need to change the
configuration.
This section explains what you need to do when you change the module configuration (by installing or removing modules).
Power Specialties, Inc. | www.powerspecialties.com | (816) 353-6550
Page 51

47
IM 04L51B01-02EN
Saving and Loading Setting Parameters
Saving Setting Parameters
Save setting parameters to the SD memory card with the
file name “SF1.”
Path MENU key > Browse tab > Save load
> Menu Save settings > Setting parameters
1
2
3
4
1
Tap Media kind > SD.
2
Tap File name, and enter SF1.
3
Tap Execute.
4
Tap Exit.
Operation complete
This section explains how to back up setting parameters.
Before you change the module configuration or settings, we recommend that you back up the setting parameters.
Loading Setup Parameters
Load the setup parameter file “SF1.GNL” from the SD
memory card.
Path MENU key > Browse tab > Save load
> Menu Load settings > Setting parameters
1
2
3
4
1
Tap Media kind > SD.
2
Tap File name > SF1.GNL.
3
Tap Execute.
4
Tap Exit.
Operation complete
Power Specialties, Inc. | www.powerspecialties.com | (816) 353-6550
Page 52

48
IM 04L51B01-02EN
Web Application
You can open the Web application simply by starting a Web browser (IE11), and specifying
the GX/GP IP address. You do not have to install any software. You can do the following on
the Web application.
• Operate the GX/GP
• Monitor data
• Changing setting parameters
For details on configuring the environment settings to connect the GX/GP to an Ethernet
network and how to use the software, see the User’s Manual (IM 04L51B01-01EN).
Starting the Web Application
1
Start the Web browser.
2
In the Address box, enter “http://” followed by the GX/GP IP address.
If DNS is available, you can specify the host name in place of the IP address.
Example: When the IP address is “192.168.1.1,” enter
http://192.168.1.1
in the Address box.
The Web application starts, and the screen appears.
Operation complete
Closing the Web Application
When close the Web browser, the Web application also closes.
Power Specialties, Inc. | www.powerspecialties.com | (816) 353-6550
Page 53

49
IM 04L51B01-02EN
Application Software
The following software applications are available for the
GX/GP.
• SMARTDAC+ STANDARD Universal Viewer
• SMARTDAC+ STANDARD Hardware Configurator
(Included program pattern setting)
You can use SMARTDAC+ STANDARD Universal Viewer
to display on screen and print the following types of data
that is generated by recorders.
• Display data files
• Event data files
• Report data files (including hourly, daily, monthly, batch,
and daily-custom, and free reports)
• Manual sampled data files
Two different recording data files can be displayed
superimposed.
You can attach also convert measured data to ASCII or
Excel formats.
You can use SMARTDAC+ STANDARD Hardware
Configurator to create and edit setup data for the GX/GP
recorder.
In addition, program patterns can be created and sent to
the GX/GP.
You can download the latest software and labels from the
following URL.
URL: www.smartdacplus.com/software/en/
You can the labels on the front door of the GX/GP.
Enter or print tag names on them for use. You can use
Microsoft Office Excel 2003 or later to edit the labels.
You can download the product user’s manuals from the
following URL.
URL: www.smartdacplus.com/manual/en/
PC System Requirements
OS
OS Type
Windows 7 Home Premium SP1 (32- or 64-bit edition)
Professional SP1 (32- or 64-bit edition)
Windows 8.1 Update
Pro Update
Windows 10 Home (32- or 64-bit edition)
Pro (32- or 64-bit edition)
CPU and main memory
OS CPU and main memory
Windows 7
Windows 8.1
Windows 10
32-bit edition: Intel Pentium 4, 3 GHz or faster
x64 or x86 processor. At least 2 GB of memory.
64-bit edition: Intel Pentium 4, 3 GHz or faster
x64 processor. At least 2 GB of memory.
Web Browser
Compatible Browser Version
Windows Internet Explorer
Java Runtime Environment
1.8.0_xx (Version 8 Update
xx) xx is 121 or more
Explorer 11
Hard disk
Free space of at least 100 MB (depending on the amount
of data, you may need more memory).
Display
A video card that is recommended for the OS and a
display that is supported by the OS, has a resolution of
1024×768 or higher, and that can show 65,536 colors (16bit, high color) or more.
Other Operating Conditions
To view the user’s manuals, you need to use Adobe
Reader 7 or later by Adobe Systems (the latest version
recommended).
Installation
To install Universal Viewer or Hardware Configurator,
download the installer from the Yokogawa website.
1
Turn on the PC, and start Windows.
Log onto Windows as an administrator.
2
Double click the installer (**.exe).
The installer starts. Follow the instructions on the
screen to install the software.
Note
• Close all other software applications before installing
this software.
• To reinstall the software, uninstall the current software
first.
Hardware Configurator
• The “Countries/regions except Japan” selection dialog
box appears during installation. Select the country that
you will use the software in.
• The HTTP port for using the Web browser is set
to 34443. If this port is already in use by another
application, you will not be able to start Hardware
Configurator even if you install it. In such a case,
perform the corrective action on section 1.4 in
SMARTDAC+ STANDARD Hardware Configurator
User’s Manual (IM 04L61B01-02EN).
Power Specialties, Inc. | www.powerspecialties.com | (816) 353-6550
Page 54

50
IM 04L51B01-02EN
Starting and Closing Hardware
Configurator
Starting Hardware Configurator
1
From the Start menu, select All Programs
- SMARTDAC+ STANDARD - Hardware
Configurator.
The rst time Hardware Congurator starts after
installation, the Windows Security Alert dialog box
appears. Click Unblock.
Hardware Congurator starts, and the following
window appears.
Note
• Hardware Configurator will not start if Internet Explorer
is not installed.
• The default settings are the system configuration of
the GX10.
Closing Hardware Configurator
Close Internet Explorer.
1
Click the Close button; or on the File menu, click
Exit.
Note
If you change the setup data, the changes are stored and
will appear the next time you start the software.
About the User’s Manuals
The user’s manual is installed with the software. To view
the manual, on the Help menu, click Instruction Manual.
You can also access it from Start > All Programs.
Use Adobe Reader 7.0 or later to view the manual.
The software and manual are installed for the following
languages.
Universal Viewer
Language Software User’s manual
Japanese Japanese Japanese
English English English
Chinese Chinese Chinese
French French English
German German
Russian Russian
Korean Korean
Hardware Configurator
Country Selected at
Installation
Software User’s manual
Japanese Display language
selectable:
Japanese/English/
German/French/
Russian/Chinese/
Korean
Japanese,
English, Chinese
Regions except Japan
Starting and Closing Universal Viewer
Starting Universal Viewer
1
From the Start menu, click All Programs -
SMARTDAC+ STANDARD - Viewer.
Universal Viewer starts.
Closing Universal Viewer
1
On the File menu, click Exit. Or, click the × button.
Specifying a File Name and Opening the Data
File
1
On the File menu, click Open. Or, click Open on the
toolbar.
The Open dialog box appears.
2
Select the data file you want to open, and click
Open. Or, double-click the file.
The data appears in the window.
Using the Application Software
Power Specialties, Inc. | www.powerspecialties.com | (816) 353-6550
Page 55

51
IM 04L51B01-02EN
Setup Menu Map
Depending on setting parameter values, some items may be hidden. For details, see the User’s Manual (IM 04L51B01-01EN).
AI channel settings, AI (mA) channel settings
Range
First-CH
Last-CH
Range
Type
Range
Span Lower
Span Upper
Calculation
Reference channel
Scale
Decimal place
Scale Lower
Scale Upper
Unit
Low-cut
On/Off
Low-cut value
Low-cut output
Moving average
On/Off
Count
First-oder lag filter
2 3
On/Off
Filter coefficient
RJC
1 3
Mode
Temperature
Burnout set
3
Mode
Bias
Value
Alarm
First-CH
Last-CH
Level 1
On/Off
Type
Value
Hysteresis
Logging
Output type
Output No.
Level 2
On/Off
Level 3
On/Off
Level 4
On/Off
Alarm delay
Hour
Minute
Second
Display settings
First-CH
Last-CH
Tag
Characters
No.
Color
Color
Zone
Lower
Upper
Scale
Position
Division
Bar graph
Base position
Division
Partial
On/Off
Expand
Boundary
Color scale band
Band area
Color
Display position Lower
Display position Upper
Alarm point mark
Indicate on Scale
Mark kind
Alarm 1 color
Alarm 2 color
Alarm 3 color
Alarm 4 color
Display characters of
each value
0
1
Calibration correction
First-CH
Last-CH
Mode
Mode
Number of set points
1
Linearizer input
Linearizer output
Execution of input
measurement
:
12
Linearizer input
Linearizer output
Execution of input
measurement
Power Specialties, Inc. | www.powerspecialties.com | (816) 353-6550
Page 56

52
IM 04L51B01-02EN
DI channel settings
Range
First-CH
Last-CH
Range
Type
Span Lower
Span Upper
Calculation
Reference channel
Scale
Decimal place
Scale Lower
Scale Upper
Unit
Alarm
First-CH
Last-CH
Level 1
On/Off
Type
Value
Hysteresis
Logging
Output type
Output No.
Level 2
On/Off
Level 3
On/Off
Level 4
On/Off
Alarm delay
Hour
Minute
Second
Display settings
First-CH
Last-CH
Tag
Characters
No.
Color
Color
Zone
Lower
Upper
Scale
Position
Division*
Bar graph
Base position
Division*
Alarm point mark
Indicate on Scale
Mark kind
Alarm 1 color
Alarm 2 color
Alarm 3 color
Alarm 4 color
Display characters of
each value
0
1
* When the range type is set to Pulse.
Setup Menu Map
Setting when the mode is set to Correction Coefficient on
a module with an /AH option
1
Uncorrected value
Instrument correction
factor
Sensor correction
factor
Execution of input
measurement
:
12
Uncorrected value
Instrument correction
factor
Sensor correction
factor
Execution of input
measurement
1 Not displayed for AI (mA) channel setting.
2 Appears for channels of high-speed AI modules
3 Not displayed for 4-wire RTD/resistance type.
Power Specialties, Inc. | www.powerspecialties.com | (816) 353-6550
Page 57

53
IM 04L51B01-02EN
Pulse input channel settings
Range
First-CH
Last-CH
Range
Type
Range
Chatterring filter
Span Lower
Span Upper
Calculation
Reference channel
Scale
Decimal place
Scale Lower
Scale Upper
Unit
Moving average
On/Off
Count
Alarm
First-CH
Last-CH
Level 1
On/Off
Type
Value
Hysteresis
Logging
Output type
Output No.
Level 2
On/Off
Level 3
On/Off
Level 4
On/Off
Alarm delay
Hour
Minute
Second
Display settings
First-CH
Last-CH
Tag
Characters
No.
Color
Color
Zone
Lower
Upper
Scale
Position
Division
Bar graph
Base position
Division
Color scale band
Band area
Color
Display position Lower
Display position Upper
Alarm point mark
Indicate on Scale
Mark kind
Alarm 1 color
Alarm 2 color
Alarm 3 color
Alarm 4 color
AO channel settings
Range
First-CH
Last-CH
Range
Type
Range
Span Lower
Span Upper
Reference channel
Channel type
Channel no
Preset value
Preset value
Preset action
At power on
On error
During stop conditions
Display settings
First-CH
Last-CH
Tag
Characters
No.
Color
Color
Zone
Lower
Upper
Scale
Position
Division
Bar graph
Base position
Division
DO channel settings
Range
First-CH
Last-CH
Range
Type
Span Lower
Span Upper
Unit
Action
Energize/De-energize
Action
Hold
Relay Action on ACK
Relay deactivated
interval
Display settings
First-CH
Last-CH
Tag
Characters
No.
Color
Color
Zone
Lower
Upper
Scale
Position
Bar graph
Base position
Display characters of
each value
0
1
Setup Menu Map
Power Specialties, Inc. | www.powerspecialties.com | (816) 353-6550
Page 58

54
IM 04L51B01-02EN
Math channel settings
Calculation expression
First-CH
Last-CH
Math range
On/Off
Calculation expression
Decimal place
Span Lower
Span Upper
Unit
TLOG
Timer type
Timer No.
Sum scale
Reset
Rolling average
On/Off
Interval
Number of samples
Alarm
First-CH
Last-CH
Level 1
On/Off
Type
Value
Hysteresis
Logging
Output type
Output No.
Level 2
On/Off
Level 3
On/Off
Level 4
On/Off
Alarm delay
Hour
Minute
Second
Display settings
First-CH
Last-CH
Tag
Characters
No.
Color
Color
Zone
Lower
Upper
Scale
Position
Division
Bar graph
Base position
Division
Partial
On/Off
Expand
Boundary
Color scale band
Band area
Color
Display position Lower
Display position Upper
Alarm point mark
Indicate on Scale
Mark kind
Alarm 1 color
Alarm 2 color
Alarm 3 color
Alarm 4 color
Constant
Number of constant
Constant
K001
:
K100
Variable constant
Constant number
Constant
W001
:
W100
Math action settings
Value on Error
START/STOP key
action
Value on Overflow
SUM, AVE
MAX, MIN, P-P
Operation when PSUM
arithmetic overflows
OVER/ROTATE
Logic math settings
Logic math number
Output
Output type
Output No.
Calculation expression
Calculation expression
Setup Menu Map
Power Specialties, Inc. | www.powerspecialties.com | (816) 353-6550
Page 59

55
IM 04L51B01-02EN
Display settings
Trend interval
Trend interval [/div]
Trend rate switching
Second interval [/div]
Group settings
Group number
Group settings
On/Off
Group name
Channel set
Scale image
On/Off
Trip line 1
On/Off
Position
Color
Line width
Trip line 2
On/Off
Trip line 3
On/Off
Trip line 4
On/Off
Message settings
Message number
Message
Message 1
:
Trend settings
Direction
Trend clear
Trend line
Grid
Scale
Digit
Value indicator
Digit of mark
Partial
On/Off
Message
Write group
Power-fail message
Change message
Screen display settings
Bar graph
Direction
LCD
Brightness
View angle
1
Backlight saver
Mode
Saver time
Restore
Monitor
Display background
Scroll time
Jump default display
Calendar display
1st weekday
Changing each value
from monitoring
On/Off
1 GX10/GP10 only.
2
Does not appear when the measurement mode is
High speed.
3 Does not appear when the measurement mode is
Duall interval.
Measurement settings
Scan interval
1
Scan interval
1
Over-range
Value on over-range
Select unit
Main unit, Unit 1 to 6
Module 0 - 9
5
Operation mode
Operation mode
A/D integrate
3
A/D integrate
3
Noise rejection
2
Noise rejection
2
General signal
Lower limit of burnout
set
Upper limit of burnout
set
Chattering filter for
pulse input
4
On/Off
1 Does not appear when the measurement mode is
Duall interval.
2 Appears when the GX90XA type is -H0 and with PID
control modules.
3 Does not appear with high-speed AI or PID control
modules.
4 Pulse input module only
5 Does not appear with AO or DO modules.
When the measurement mode is set to dual interval
Dual interval settings
Scan interval
Scan interval
Measurment group 1
Measurment group 2
Master scan interval
Measurment group
number
Module scan interval
Main Unit, Unit 1 to 6
Module 0 to 9
Measurment group
number
Module 1
Measurment group
number
:
Module 9
Measurment group
number
Recording settings
Recording mode
File type
Event
data(Measurment
group 1)
Recording interval
Recording mode
Data length
Pre-trigger
Trigger source
operation
Event
data(Measurment
group 2)
Recording interval
Recording mode
Data length
Pre-trigger
Trigger source
operation
Continued on the next page
Setup Menu Map
Power Specialties, Inc. | www.powerspecialties.com | (816) 353-6550
Page 60

56
IM 04L51B01-02EN
Record confirmation
action
Confirmation screen
Recording channel
settings
Measurment group 1
Event data
Measurment group 2
Event data
Manual sample
Manual sample
Recording settings*
Basic settings
Recording mode
File type
Display data, Trend
waveform
Saving interval
Event data
Recording interval
Recording mode
Data length
Pre-trigger
Trigger source
operation
Record confirmation
action
Confirmation screen
Recording channel
settings
Display data, Trend
waveform
Event data
Manual sample
* Does not appear when the measurement mode is
Dual interval.
Data save settings
Save directory
Directory name
File header
Characters
Data file name
Structure
Identified strings
Media save
Auto save
Media FIFO
File format
Display / Event data
Batch settings
Batch function
On/Off
Lot-No. digit
Auto increment
Batch text
Batch text
Text field number
Text field
Title of field
Characters
On a GX/GP with the multi-batch function (/BT option) with
the function enabled
Batch settings
Batch function
On/Off
Lot-No. digit
Auto increment
Batch-specific settings
Batch text
Batch group number
Text field number
Text field
Title of field
Characters
Group text
Batch group number
Group number
Group settings
On/Off
Group name
Channel set
Scale image
On/off
Trip line 1
On/off
Position
Color
Line width
:
Trip line 4
On/Off
Position
Color
Line width
Data save settings
Batch group number
File header
Characters
Data file name
Structure
Identified strings
Recording start screen
Recording start screen
Report settings
Basic settings
Type
Type
Creation time
Day
Day of week
Hour
Minute
Save interval
File creation interval
Data type
Report 1
Report 2
Report 3
Report 4
Report 5
File type
File type
Report template output
Excel file
PDF file
Printer
Continued on the next page
Setup Menu Map
Power Specialties, Inc. | www.powerspecialties.com | (816) 353-6550
Page 61

57
IM 04L51B01-02EN
Electronic signature
PDF electronic
signature
Text file
Batch information
output
Report channel settings
Report channel number
Report channel
Channel type
Channel no
Sum scale
Timer settings
Timer
Timer 1
Type
Type
Interval
Day
Hour
Minute
Interval
Action on Math Start
Reset
Reference time
Hour
Minute
Timer 2
:
Timer 12
Match time timer
Match time timer 1
Type
Type
Timer match condition
Month
Day
Day of week
Hour
Minute
Timer action
Timer action
Match time timer 2
:
Match time timer 12
Event action
Event action number
Event action
On/Off
Event
Type
Number
Event details
Operation mode
Action
Type
Number
Detail
Group number
Batch group number
When a PID control module is installed
Control event action
Control event action
number
DI/DO/Internal switch
registration
Type
Number
Operation/Status
output
Content
Detail 1
Number
Detail 2
Number
Only on GX/GPs with the /AH Aerospace heat treatment
Calibration remineder settings
Schedule number
Reminder function
On/Off
Due date
Due date
Daily reminder
Re-notification cycle
Notification contents
Title
Notification message1
Notification message2
Buzzer
Display settings for
date setting
Calibration correction
setting
Communication
channel settings
On/Off, Span
First-CH
Last-CH
On/Off, Span
On/Off
Decimal place
Span Lower
Span Upper
Unit
At power on
Value at power on
Preset value
Preset value
Watchdog timer
On/Off
Timer
Value at timer-expired
Alarm
First-CH
Last-CH
Level 1
On/Off
Type
Value
Hysteresis
Logging
Output type
Output No.
Level 2
On/Off
Level 3
On/Off
Continued on the next page
Setup Menu Map
Power Specialties, Inc. | www.powerspecialties.com | (816) 353-6550
Page 62

58
IM 04L51B01-02EN
Level 4
On/Off
Alarm delay
Hour
Minute
Second
Display settings
First-CH
Last-CH
Tag
Characters
No.
Color
Color
Zone
Lower
Upper
Scale
Position
Division
Bar graph
Base position
Division
Partial
On/Off
Expand
Boundary
Color scale band
Band area
Color
Display position Lower
Display position Upper
Alarm point mark
Indicate on Scale
Mark kind
Alarm 1 color
Alarm 2 color
Alarm 3 color
Alarm 4 color
Communication (Ethernet)
settings
Basic settings
Automatic IP settings
Obtain IP address automatically
IP Address
IP Address
Subnet mask
Default gateway
Automatically DNS settings
Obtain DNS address automatically
DNS settings
Primary DNS server
Secondary DNS server
Domain suffix
Primary domain suffix
Secondary domain suffix
Host settings
Host name
Domain name
Host name registration
Host name registration
FTP client settings
FTP client function
On/Off
Transfer file
Display & Event data
Report
Manual sampled data
Alarm summary
Snap shot
Setting file
1
Transfer wait time
Display & Event data
Report
Encryption
Encryption
Verification of certificate
FTP connection Primary
FTP server name
Port number
User name
Password
Directory
PASV mode
FTP connection Secondary
FTP server name
Port number
User name
Password
Directory
PASV mode
SMTP client settings
SMTP client function
On/Off
Authentication
Authentication
Encryption
Encryption
Verification of certificate
SMTP server
SMTP server name
Port number
User name
Password
POP3 server
POP3 server name
Port number
User name
Password
Continued on the next page
Setup Menu Map
Power Specialties, Inc. | www.powerspecialties.com | (816) 353-6550
Page 63

59
IM 04L51B01-02EN
E-mail settings
Mail header
Recipient 1
Recipient 2
Sender
Subject
E-mail contents
Header
Include source URL
Alarm settings
Alarm notification
Detection
Channel set
Alarm level 1
:
Alarm level 4
Attach instantaneous data
Send alarm action
Include tag/ch in Subject
Report settings
Report notification
Scheduled settings
Scheduled notification
Attach instantaneous data
Interval (Recipient 1)
Ref. time hour (Recipient 1)
Ref. time minute (Recipient 1)
Interval (Recipient 2)
Ref. time hour (Recipient 2)
Ref. time minute (Recipient 2)
System settings
Memory full notification
Power failure notification
System error notification
Notification of user lockout
1
SNTP client settings
SNTP client function
On/Off
SNTP server
SNTP server name
Port number
Query action
Ref. time (Hour)
Ref. time (Minute)
Interval
Timeout
Time adjust on Start action
Modbus client settings
Basic settings
Modbus client function
On/Off
Communication
Interval
Recovery action
Wait time
Connection
Keep connection
Connection timeout
Modbus server settings
Server number
Modbus server settings
Server name
Port number
Continued on the next page
Command settings
Client command number
Command settings
Type
Server
Unit No.
Data type
Register
Channel type
First-CH
Last-CH
WT connection client settings
Basic settings
WT connection client function
On/Off
Communication
Interval
Recovery action
Wait time
WT server settings
Server number
WT server settings
On/Off
Server name
Model name
WT data allocation settings
Allocation No
WT data allocation setting
On/Off
Server No
Data group name
Data name
Exponential scaling
Communication channel
SLMP client settings
4
Basic settings
SLMP client function
On/Off
Data code
Data code
Communication
Interval
Connection
Communication timeout
Recovery action
Recovery time
SLMP server settings
Server number
SLMP server settings
Server name
Port number
Command settings
Client commnad number
Commnad settings
Type
Server
Request destination network No.
Request destination station No.
Request destination unit IO number
Request destination multidrop
station No.
Device code
First device number
Data type
Channel type
First-CH
Last-CH
KDC client settings
1
KDC connection Primary
Server name
Port number
KDC access point Secondary
Server name
Port number
Continued on the next page
Setup Menu Map
Power Specialties, Inc. | www.powerspecialties.com | (816) 353-6550
Page 64

60
IM 04L51B01-02EN
Certification key
Host principal
Realm name
Password
Encryption
Server settings
Sever function
Keep alive function
On/Off
Timeout function
On/Off
Timeout (minute)
FTP server
Output Directory Format
Modbus server
Modbus delay response
Allowed Modbus clients
Modbus client connect limits function
On/Off
1
On/Off
IP Address
:
10
On/Off
IP Address
Server list
FTP
On/Off
Encryption
Port number
HTTP
On/Off
Encryption
Port number
SNTP
On/Off
Port number
MODBUS
On/Off
Port number
GENE
On/Off
Port number
EtherNet/IP
3
On/Off
DARWIN
On/Off
Channel conversion
OPC-UA
5
On/Off
Port number
Web content selection
User level: User
DO channel status/COMM status, etc.
Log
System information/Network information
File
User level: Monitor
DO channel status/COMM status, etc.
Log
System information/Network information
File
1 On a GX/GP with the advanced security function (/AS
option) with the function enabled
2 Only on GX/GPs with the /E2 WT communication
option.
3 Only on GX/GPs with the /E1 EtherNet/IP
communiction option.
4
Only on GX/GPs with the /E4 SLMP communication
5 Only on GX/GPs with the /E3 OPC-UA server.
Communication(Serial)
settings
Basic settings
Receiver
Function
Address
Data transfer
Baud rate
Parity bit
Stop bit
Data length
Handshake
Logout
Auto logout
DARWIN
Channel conversion
Modbus master
Basic setting
Master function
On/Off
Communication
Interval
Communication timeout
Gap between messages
Recovery action
Retransmission
Wait time
Command settings
Master command number
Command settings
Type
Slave
Data type
Register
Channel type
First-CH
Last-CH
Setup Menu Map
Power Specialties, Inc. | www.powerspecialties.com | (816) 353-6550
Page 65

61
IM 04L51B01-02EN
System settings
Environment
(Language) settings
Language
Temperature
Decimal Point Type
Date format
Date format
Delimiter
Month indicator
Alarm basic settings
Rate of change
Decrease
Increase
Indicator
Hold/Nonhold
Alarm ACK
Individual alarm ACK
Time basic settings
Time zone
Hour
Minute
Gradually adjusting
the time
Time deviation limit
Time adjustment
beyond limit
Daylight Saving Time
Use/Not
Start time
Month
Day order
Day of the week
Hour of the day
End time
Month
Day order
Day of the week
Hour of the day
Internal switch settings
First number
Last number
Internal switch
Type
And/Or
Preset action
At power on
Status relay
Fail relay
Memory/Media status
Measurement error
Communication error
Record stop
Alarm
Printer settings
IP Address
Paper size
Page orientation
Resolution (dpi)
Number of copies
Snapshot
Paper size indicator
Sound, LED
Sound
Touch
Warning
LED
MENU key LED
Instruments tag
Instruments tag
Instrument tag No.
Setting file
Setting file comment
Configuration change
comment
1
Input comment
USB input device
USB input device
1 On a GX/GP with the advanced security function (/AS
option) with the function enabled.
Security settings
Basic settings
Security function
Touch operation
Communication
Logout
Auto logout
Operation without
Login
Password management
1
On/Off
Root user password
Password retry
1
Password retry
User ID
1
On/Off
User settings
User number
User settings
User level
Mode
User name
User ID
1
Initialize password
Password expiration
1
User property
Authority number
Sign in property
1
Authority of signature
1
Authority of user
Authority number
Authority of user
Record
Math
Data save
Message
Batch
Alarm ACK
Communication
Touch operation
Time set
Setting operation
Calibration correction
1
External media
System operation
Output operation
Remote/Local
operation
2
Control operation
2
Tuning operation
2
SP operation
2
Program operation
2
Continued on the next
page
Setup Menu Map
Power Specialties, Inc. | www.powerspecialties.com | (816) 353-6550
Page 66

62
IM 04L51B01-02EN
Operation Lock
Operation Lock function
Password
Limitations
Record
Math
Data save
Message
Batch
Alarm ACK
Communication
Touch operation
Time set
Setting operation
Calibration settings
1
External media
System operation
Output operation
Remote/Local
operation
2
Control operation
2
Tuning operation
2
SP operation
2
Program operation
3
Sign in settings
1
Sign in type
Type
Recording stop action
Sign in
Data file transfer
FTP transfer timing
Sign in title
Sign in 1
Sign in 2
Sign in 3
Sign in property
1
Authority of signature
Sign in property
Sign in 1
Sign in 2
Sign in 3
1 On a GX/GP with the advanced security function (/AS
option) with the function enabled.
2 When a PID control module is installed.
3 When a PID control module and program control (/PG
option) is installed.
Control settings
Setup parameters
Basic control settings
Control period
Control period
Control basic operation
Unit Number
Slot Number
Basic action
Control mode
Input switching action
Restart mode
Control loop settings
Loop number
Basic action
Control type
PID initial value
PID selection
EXPV function
RSP function
PID control mode
Number of SP groups
Number of PID groups
Number of Alarms
Alarm mode
Action settings
Unit Number
Slot Number
Action
AUTO/MAN Switch
(Loop1)
AUTO/MAN Switch
(Loop2)
REMOTE/LOCAL
Switch (Loop1)
REMOTE/LOCAL
Switch (Loop2)
STOP/RUN Switch
(Loop1)
STOP/RUN Switch
(Loop2)
Switch to Cascade
Switch to AUTO
(Loop1)
Switch to AUTO
(Loop2)
Switch to MAN (Loop1)
Switch to MAN (Loop2)
Switch to REMOTE
(Loop1)
Switch to REMOTE
(Loop2)
Switch to LOCAL
(Loop1)
Switch to LOCAL
(Loop2)
Auto-tuning START/
STOP Switch (Loop1)
Auto-tuning START/
STOP Switch (Loop2)
PV Switch
Alarm ACK (Loop1)
Alarm ACK (Loop2)
Bit-0 of SP Number
(Loop1)
Bit-1 of SP Number
(Loop1)
Bit-2 of SP Number
(Loop1)
Continued on the next
page
Setup Menu Map
Power Specialties, Inc. | www.powerspecialties.com | (816) 353-6550
Page 67

63
IM 04L51B01-02EN
Bit-3 of SP Number
(Loop1)
Bit-0 of SP Number
(Loop2)
Bit-1 of SP Number
(Loop2)
Bit-2 of SP Number
(Loop2)
Bit-3 of SP Number
(Loop2)
Bit-0 of PID Number
(Loop1)
Bit-1 of PID Number
(Loop1)
Bit-2 of PID Number
(Loop1)
Bit-3 of PID Number
(Loop1)
Bit-0 of PID Number
(Loop2)
Bit-1 of PID Number
(Loop2)
Bit-2 of PID Number
(Loop2)
Bit-3 of PID Number
(Loop2)
DO settings
Unit Number
Slot Number
DO number
Range
Type
DO function selection
Type
Output
Action
Energize/De-energize
Action
Hold
Relay Action on ACK
Relay deactivated
interval
Input/Output settings
Input settings
Measurment input range
Unit Number
Slot Number
AI number
Range
Type
Range
Span Lower
Span Upper
Calculation
Scale
Decimal place
Scale Lower
Scale Upper
Unit
Low-cut
On/Off
Low-cut value
Low-cut output
RJC
Mode
Temperature
Burnout set
Mode
Bias
Value
Input filter
On/Off
Filter
Calibration correction
Unit Number
Slot Number
AI number
Mode
Mode
Number of set points
1
Linearizer input
Linearizer output
:
12
Linearizer input
Linearizer output
Setting when the mode is set to Correction Coefficient on a
module with an /AH option
1
Uncorrected value
Instrument correction
factor
Sensor correction
factor
Execution of the input
measurement
:
12
Uncorrected value
Instrument correction
factor
Sensor correction
factor
Execution of the input
measurement
Output settings
Re-Trans
Unit Number
Slot Number
AO number
Re-Trans
On/Off
Type
Minimum value of input
scale
Maximum value of
input scale
Split computation
Unit Number
Slot Number
AO number
Mode
On/Off
Output 0% segmental
point
Output 100%
segmental point
Output type
Unit Number
Slot Number
AO number
Output type
Type
Cycle time
Current output range
Continued on the next
page
Setup Menu Map
Power Specialties, Inc. | www.powerspecialties.com | (816) 353-6550
Page 68

64
IM 04L51B01-02EN
PV,RSP settings
Control PV input range
Loop number
Control PV input range
Decimal point
Minimum value of input
range
Maximum value of
input range
Unit
Input switching PV
range
Input switching PV
low limit
Input switching PV
high limit
EXPV function
Loop number
EXPV
Type
Channel number
EXPV2
Type
Channel number
RSP function
Loop number
RSP
Type
Channel number
AI terminal number
Remote input
Input filter
Filter
Input ratio
Ratio
Input bias
Bias
Output settings
Loop number
Preset output
Input error preset output
Output limiter switch
On/Off
Operation parameters
Control alarm
Loop number
Level 1
On/Off
Type
Stand-by action
Hysteresis
On-delay timer (minutes)
On-delay timer
(seconds)
Off-delay timer (minutes)
Off-delay timer
(seconds)
Relay action/behavior
PV velocity alarm time
setpoint (minutes)
PV velocity alarm time
setpoint (seconds)
:
Level 4
On/Off
Value
SP number
Alarm level 1 setpoint
:
Alarm level 4 setpoint
Target setpoint
Loop number
SP ramp-rate settings
Ramp-down rate
Ramp-rate
Ramp-up rate
Ramp-rate
SP number 1
Target setpoint
:
SP number 8
Target setpoint
PID number/Reference
point
Loop number
SP number 1
PID number
:
SP number 8
PID number
Reference point
Point 1
:
Point 8
Zone PID switching
hysteresis
Reference deviation
On/Off
Reference deviation
PID settings
Loop number
PID number
Proportional band
Integral time
Derivative time
Control output low limit
Control output high limit
Tight shut function
Manual reset
Upper-side hysteresis
Lower-side hysteresis
Direct/Reverse action
switch
Preset output
PID settings(Reference
PID)
Loop number
Proportional band
Integral time
Derivative time
Control output low limit
Control output high limit
Tight shut function
Manual reset
Upper-side hysteresis
Lower-side hysteresis
Direct/Reverse action
switch
Preset output
Control detail settings
Loop number
Tracking
SP tracking
PV tracking
SP limit
Low limit
High limit
SP ramp-rate time unit
Unit
Continued on the next page
Setup Menu Map
Power Specialties, Inc. | www.powerspecialties.com | (816) 353-6550
Page 69

65
IM 04L51B01-02EN
Output velocity limiter
On/Off
Value
Auto-tuning
Type
Output low limit
Output high limit
SP bias
Anti-reset windup
Type
Value
Overshoot suppressing
function
Super function
Control display
Control group settings
Group number
Group settings
Group On/Off
Group name
Division
1
On/Off
Loop number
:
8
On/Off
Loop number
Loop display settings
Loop number
Tag
Characters
No.
Color
Pattern Color
Deviation display band
Deviation display band
PID channel settings
Channel no
Tag
Characters
No.
Color
Color
Zone
Lower
Upper
Scale
Position
Division
Bar graph
Base position
Division
Partial
On/Off
Expand
Boundary
Display characters of
each value
0
1
Screen display settings
Display background
Manual output operation
type
Program pattern
settings
Program Run/Reset
message
Automatic switch to
program operation
display
Program RUN detail
settings
Editing Prgram Pattern
Program pattern EDIT menu
Initial settings
Pattern initial settings
Pattern name
Number of loops used
Action loop
Loop 1
:
Loop 20
Program starting
conditions
Starting target setpoint
Loop 1
:
Loop 20
Start code
Reference loop number
Wait function settings
Zone number
Loop 1
Wait function
Lower-side wait zone
Upper-side wait zone
:
Loop 20
Wait function
Lower-side wait zone
Upper-side wait zone
Setup Menu Map
Power Specialties, Inc. | www.powerspecialties.com | (816) 353-6550
Page 70

66
IM 04L51B01-02EN
Segment settings
Program pattern setting
Segment number
Target setpoint
Loop 1
:
Loop 20
Segment time
Time
Segment PID number
selection
Junction code
Time Event settings
Segment number
Time Event 1
Starting condition
On time
Off time
:
Time Event 32
Starting condition
On time
Off time
PV Event settings
Segment number
PV Event 1
Loop number
Type
Value
:
PV Event 32
Loop number
Type
Value
PV Event hysteresis
Hysteresis
PV Event 1
:
PV Event 32
Insert/Delete segment
Segment number
Insert/Delete segment
Execute
Repeat function
settings
Repeat function
settings
Repeat function
Number of repeat
cycles
Repeat cycle start
segment number
Repeat cycle end
segment number
Event display group
Event display 1
Display
Event type
Event number
:
Event display 10
Display
Event type
Event number
Setup Menu Map
Power Specialties, Inc. | www.powerspecialties.com | (816) 353-6550
Page 71

Power Specialties, Inc. | www.powerspecialties.com | (816) 353-6550
Page 72

Power Specialties, Inc. | www.powerspecialties.com | (816) 353-6550
 Loading...