

Page 1
Yealink Network Technology CO., LTD
Yealink VC500 Full HD Video Conferencing Endpoint Quick Start Guide
V31.10
Applies to firmware version 63.31.0.10 or later
Page 2

Page 3
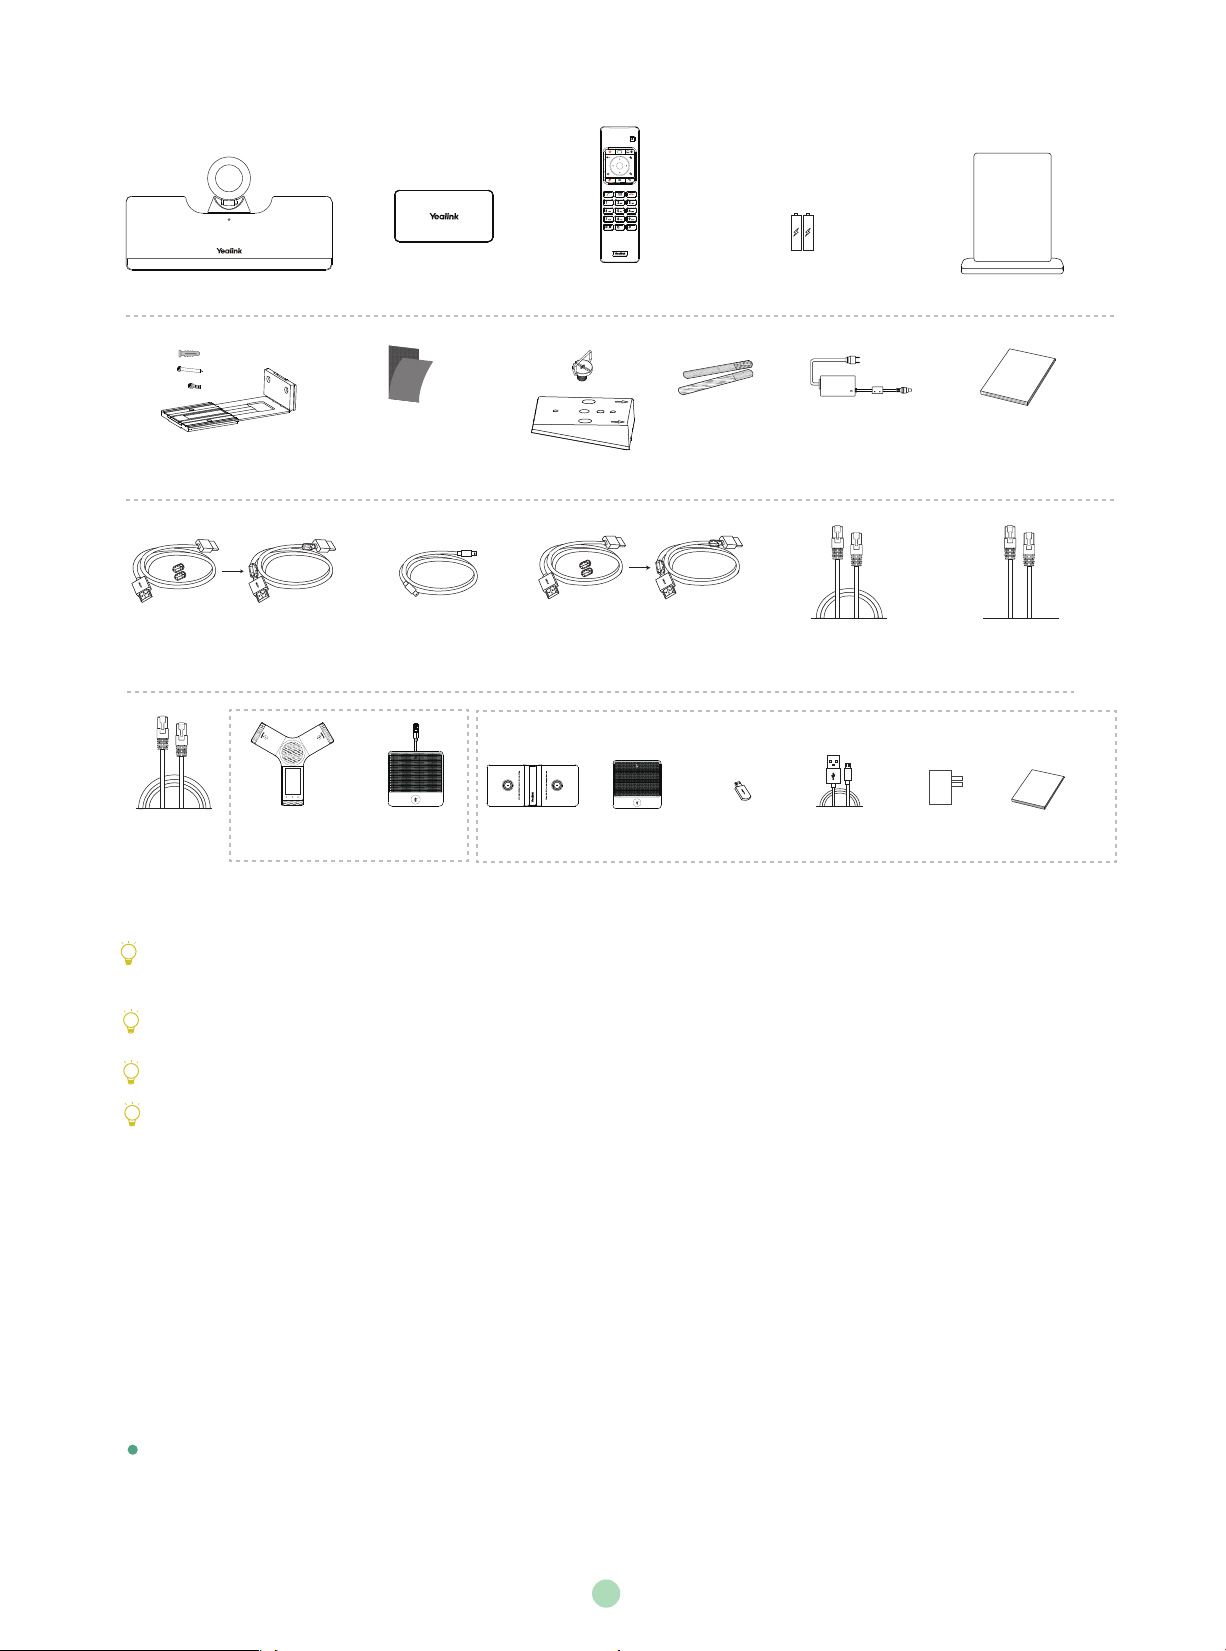
Packaging Contents
OK
VC500 Codec
Mounting Bracket
and Accessories
1.2m
HDMI Cable
(for content sharing)
7.5m
Ethernet Cable
+
2
+
2
+
2
CP960
Conference Phone
VCH50 Video
Conferencing Hub
Velcro×2
(One Velcro is on the bracket)
1.2m
Mini-DP Cable
CPE90 Wired
Expansion Mic×2
A Package
Charger Cradle
VCR11
Remote Control
+
1
VESA Accessory
1.8m
HDMI Cable
(for the display device)
CPW90 Wireless
Mic×2
AAA Batteries×2
Cable Ties×5
DD10
USB Dongle
Power Adapter
3m
Ethernet Cable
Micro USB Cable
B Package
1.8m
Acrylic board
VC500
Quick Start Guide
0.8m
Ethernet Cable
Power Adapter
Quick Start Guide
We recommend that you use the accessories provided or approved by Yealink. The use of unapproved third-party accessories may
result in reduced performance.
VC500 codec can work with A package or B package.
Use the power adapter provided by Yealink to charge the CPW90 wireless microphones only.
Before using the HDMI cable, put the magnet rings on it to prevent electromagnetic interference.
VC500 Codec Installation
Select one of the following installation method based on your site requirements:
.
Put on a Flat Surface
.
Mount on top of a TV
.
Mount on a wall
.
Mount on a ceiling
.
Mount onto a TV stand or a tripod
Put on a Flat Surface
You can put the VC500 codec on a conference room table, and make sure that the slope is not more than 5 degrees so that the VC500
can operate correctly.
1
Page 4
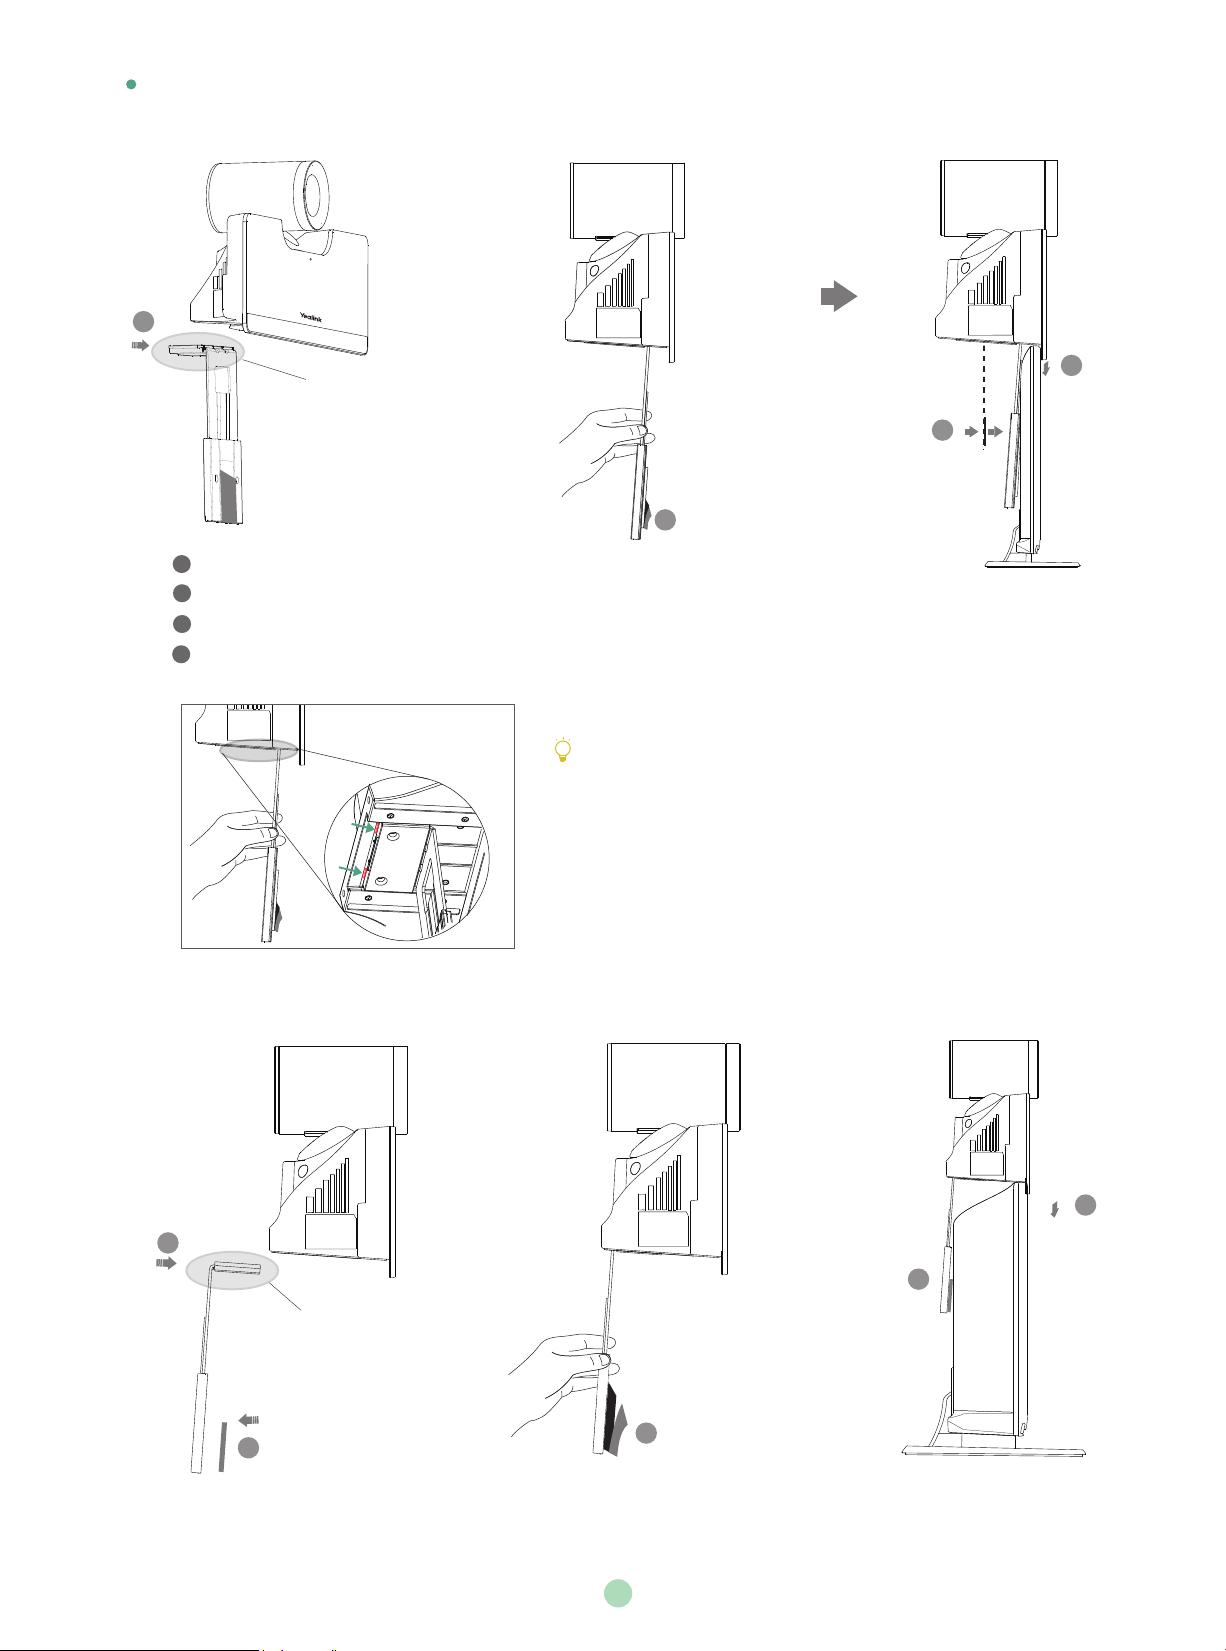
Mount on top of a TV
Please choose the following installation method when the thickness of the TV is between 1mm and 36mm.
1
Notice the direction of the bracket
3
3
2
Steps:
Please choose the following installation method when the thickness of the TV is between 37mm and 77mm.
Push the bracket along the track of the V500 codec to an appropriate location.
1
2
Remove one Velcro.
Put the bracket on the top of the TV.
3
Stick a Velcro onto the back of the TV, and make sure that the bracket and the back of the TV are tightly positioned against
4
each other.
If your VC500 codec cannot be mounted on the top of a TV when the
bracket has reached the given location, you should remove the bracket,
and then convert its direction. Refer to the following section for more
information.
4
TV
4
1
5
Notice the direction of the bracket
2
3
TV
2
Page 5

3
Steps:
Push the bracket along the track of the V500 codec to an appropriate location.
1
2
Stick a Velcro onto the bracket.
3
Remove one Velcro.
4
Put the bracket on the top of the TV.
Stick a Velcro onto the back of the TV, and make sure that the bracket and the back of the TV are tightly positioned against
5
each other.
X
If your VC500 codec cannot be mounted on the top
of a TV when the bracket has reached the edge of
the VC500 codec, choose other installation methods.
The VC500 codec may fall down when the thickness
of the TV is more than 77 mm. In this situation, do
not mount the VC500 on the top of a TV.
Do not pick up the bracket which connects with
a VC500 codec, the VC500 codec may fall down
in this situation.
Mount on a Wall
The recommended height for VC500 codec positioning is 1.5m-1.8m above the ground.
1
48mm
Screw specification: T4×30
2
Hole depth: 30mm
Hole diameter: 6mm
3
Page 6

Reset
3
Reset
4
Screw specification: M3×8
Reset
Steps:
Punch holes into the wall and then insert the expansion bolts.
1
Secure the bracket using the T4×30 screws.
2
3
Push the VC500 codec along the track of the bracket.
4
Secure the VC500 codec onto the bracket using the M3×8 screws.
Mount on a Ceiling
If you choose the ceiling-mounted installation, you need to purchase a bracket separately. The bracket must meet the following
requirements:
.
Able to bear a weight of at least 10.5kg (23.15 lb.) and has a thickness between 2mm (0.08 in.) and 3 mm (0.12 in.).
.
Comes with a location pillar, which can be inserted into the location hole of the VESA accessory.
.
The distance between the screw on the bracket and the location pillar must be 14 mm (0.55 in.).
45.97mm
(1.81in)
14.0mm
(0.55in)
Screw hole
6.0 mm(0.24 in.) in depth
4
Location hole
5.0 mm(0.20 in.) in diameter
Page 7

Screw specification: M3×8
1
2
Screw specification:
1/4”-20 UNC
MAC
SN
Reset
Steps:
1
Push the VESA accessory along the track of the VC500 codec.
2
Secure the VESA accessory to the VC500 codec using the M3×8 screws.
3
Align the location pillar at the location hole, and then secure the bracket to the VESA accessory using the 1/4”-20 UNC screw.
MAC
SN
Reset
MAC
SN
Reset
3
MAC
SN
Reset
Mount onto a TV Stand or a Tripod
You need to purchase a TV stand or a tripod separately. The TV stand or tripod has the same requirements as the bracket used in the
ceiling-mounted installation method.
The installation steps are the same as the ceiling-mounted installation steps.
Screw specification: M3×8
1
2
MAC
SN
Reset
MAC
SN
Reset
Remote Control and Cable Ties Installation
Install batteries
Reset
SN
MAC
3
Screw specification:
1/4”-20 UNC
Reset
SN
MAC
TV Stand
Fasten the cables with the cable tie
5
Page 8

Connections
If you purchase A package, do the following:
Display×2
CP960
1.8m
HDMI Cable
HDMI 1
HDMI 2
Internet
3m
Ethernet Cable
0.8m
Ethernet Cable
VC Hub/Phone
Reset
DC48V
7.5m
Ethernet Cable
Power Adapter
SN
MAC
VCH50
Audio
1.2m
Mini-DP Cable
MINI DP HDMI
or
PC
1.2m
HDMI Cable
Codec
If you do not need to share content, you can connect the VC Hub/Phone port on the VC500 codec to the Internet port on the
CP960 conference phone directly.
When CP960 conference phone works with the VC500 codec, the 3.5mm Audio-out port and Micro USB port on the CP960
conference phone are unavailable.
The VC500 endpoint should be used with Yealink original power adapter (48V/0.7A) only. The use of the third-party power adapter
may cause the damage to the endpoint. The cable should be replaced at once if its skin is broken.
If you purchase B package, do the following:
Display×2
1.8m
HDMI Cable
HDMI 1
HDMI 2
Internet
1.2m
Mini-DP Cable
VCH50
MINI DP HDMI
or
1.2m
HDMI Cable
Codec
DD10 USB dongle
7.5m
Ethernet Cable
Reset
VC Hub/Phone
DC48V
SN
MAC
3m
Power Adapter
PC
Ethernet Cable
The CPW90 wireless microphones and DD10 USB dongle are automatically paired from the factory.
To use the CPW90 wireless microphones, connect the DD10 USB dongle to one of the USB ports on the VC500 codec, then the
CPW90 wireless microphones can work as audio input devices.
6
Page 9

Network Deployment
VC500 supports two network deployment methods: Cloud deployment and traditional deployment. You can choose the deployment
method according to your need.
Cloud Deployment
With Cloud service, organizations can communicate using the Cloud platform, so that complex network settings are unnecessary. You
can log into Yealink VC Cloud Management Service/Yealink Meeting Server/StarLeaf/Zoom/Pexip/BlueJeans/Mind platform using VC500
video conferencing endpoint. Get account information from your administrator.
Do the following to log into your VC500 via remote control:
.
Select More->Setting->Advanced (Default Admin Password:0000)->Video Conference Platform.
.
In the Cloud Account field, check the Enabled checkbox.
.
Select the desired platform from the pull-down list of Platform Type.
.
Configure the desired platform and log in.
Traditional Deployment
If you do not log into the Cloud platform, you can choose traditional deployment method to deploy your VC500, and dial the IP address
of other device to make a call.
In order to ensure that the VC500 can work properly, please configure it according to the actual situation.
If it is in the head office, please make sure that it is reachable from public network. If it is in the branch office, please use intelligent
traversal to deploy it or just follow the same steps as for the head office.
Head Office
If you deploy VC500 in the head office, at least one static public IP address is required in the head office to allow branch offices to
connect.
Do one of the following to deploy VC500:
Option1: To deploy the VC500 on a public network, at least one static public IP address is required, you need to assign a static public IP
address to the VC500.
Option2: To deploy the VC500 in an Intranet (behind the firewall), you must assign a static private IP address to the VC500. In the
meantime, do port mapping on the firewall for VC500.
Configure a Static IP
The following introduces how to configure a static IP address for the VC500.
For example: use the remote control to configure a static IPv4 address to your VC500.
.
Select More->Setting->Advanced (Default Admin Password:0000)->Internet Configuration.
.
Select IPv4 from the pull-down list of IP Mode.
.
Press or to select IPv4, and then press .
.
Uncheck the DHCP checkbox.
.
Enter the IP address, subnet mask, gateway and DNS information in corresponding fields.
.
Press or to select Save, and then press to save the configuration.
.
The screen prompts [Reboot now?].
Select OK to reboot the
endpoint
.
7
Page 10

Configure Port Mapping
If the VC500 is deployed in an Intranet, and you want to solve the interconnection problem by port mapping, you must forward the
following ports to the public network on the firewall.
Protocol Type
UDP/TCP
TCP/UDP
TCP
TCP/UDP
H.323 signal port
Audio & Video media stream port
Web management port( optional )
SIP( optional )
PortFunction
1719-1720
50000-50499
443
5060
Branch Office
If you deploy VC500 in the branch office, do one of the following to deploy it:
Option1: Deploy the VC500 following the same steps as for the head office. In this way, both inbound and outbound calls are
available.
Option2: Deploy the VC500 using intelligent traversal, which means that plug and play is possible without any further firewall
configuration, but only outbound calls are available.
Please note that when the VC500 is deployed with intelligent traversal, you have to open ports (as shown below) if they are
restricted.
It is recommended that you forward the web management port(443/TCP) to the public network, so that the head office can
remotely manage the branch office.
Protocol Type
UDP/TCP
TCP/UDP
TCP/UDP
H.323 signal port
Audio & Video media stream port
SIP( optional )
PortFunction
1719-1720
50000-50499
5060-5061
Bandwidth Requirements
To ensure the performance of video conference, the recommended bandwidth for VC500 is as below:
Video Resolution Recommended Bandwidth
Full HD 1080P 1.3Mb
People 1080P+Content 1080P 2.6Mb
For more information of the configurations, contact your system administrator.
The bandwidth mentioned above is based on two-way conference. Bandwidth in head office should be increased along with the
growing number of connected branch offices.
Troubleshooting
After installation and deployment, you can test the VC500 by dialing the Yealink Demo Room. If you can’t dial out successfully, please
contact your IT administrator to check the internal network configuration.
8
Page 11

If you do not use Cloud platform and deploy your VC500 in an Intranet, you have configured port mapping on the firewall or gateway,
but you find that local endpoint appears black screen and you cannot hear sound when you call Yealink Demo or other endpoints. The
most likely reason is that the firewall or gateway in your environment does not support the ALG feature. In this situation, please take the
following actions so that the static NAT feature on the VC500 can solve this problem.
To configure static NAT via the remote control:
.
Select More->Setting->Advanced (Default Admin Password:0000)->NAT/Firewall.
.
Select Auto from the pull-down list of Type, the endpoint will obtain public IP address automatically.
.
If the endpoint does not obtain a public IP address automatically, select Manual Settings from the pull-down list of Type, and then
enter the public IP address in the Public IP Address field.
Yealink Test Room IP:
117.28.251.50, 117.28.234.45
Page 12

About Yealink
Yealink (Stock Code: 300628) is a global leading unified communication (UC) terminal solution provider that primarily offers video
conferencing systems and voice communication solutions. Founded in 2001, Yealink leverages its independent research and
development and innovation to pursue its core mission: “Easy collaboration, high productivity.” The company’s high-quality UC terminal
solutions enhance the work efficiency and competitive advantages of its customers in over 100 countries. Yealink is the world’s
second-largest SIP phone provider and is number one in the China market.
Technical Support
Visit Yealink WIKI (http://support.yealink.com/) for the latest firmware, guides, FAQ, Product documents, and more. For better service, we
sincerely recommend you to use Yealink Ticketing system (https://ticket.yealink.com) to submit all your technical issues.
VC500 - EN
YEALINK(XIAMEN) NETWORK TECHNOLOGY CO.,LTD.
Web: www.yealink.com | Addr: 309, 3th Floor, No.16, Yun Ding North Road, Huli District, Xiamen City, Fujian, P.R. China
Copyright
©2018YEALINK(XIAMEN) NETWORK TECHNOLOGY CO.,LTD. All rights reserved.
 Loading...