

Page 1
LEGEND Digital Torque Amplifier
SGDG User’s Manual
Upon receipt of the product and prior to initial operation, read these instructions
thoroughly, and retain for future reference.
Page 2
Safety-Related Symbols
G
The followi ng sy mbo l s are used in this man ual acco r d ing to the s afe ty-r el ated co nte n t.
Be sure to observe text annotated with these safety symbols as their content is important.
WARNIN
CAUTION
YASKAWA manufactures compon ent parts that can be used in a wide variety
of industrial applications. The selection and application of YASKAWA products remain the responsibility of the equipment designer or end user.
YASKAWA accepts no responsibility for the way its products are incorporated
into the final syst em desi g n.
Under no circumstances should any YASKA WA product be incorporated into
any product or design as the exclusive or sole safety control. Without exception, all controls should be designed to detect faults dynamically under all circumstances. All products designed to incorporate a component part
manufactured by YASKAW A must be supplied to the end user with appropriate
warnings and instructions as to that part’s safe use and operation. Any warnings provided by YASKAWA must be promptly provided to the end user.
Mis-operation may result in a hazardous condition with the possibility of death or
serious injury.
Mis-operation may result in a hazardous condition with the possibility of serious or
light injury as well as material damage.
Furthermore, the items annotated with a may result in serious
consequences depending on the situation. Be sure to observe these as they highlight
important content.
CAUTION
WARNING
YASKAWA offers an express warranty only as to the quality of its products in
conforming to standards and specifications published in YASKAW A’ s manual.
NO OTHER W ARRA NTY, EXPRESS OR IMPL IED, I S O FFERED. YASKAWA
assumes no liability for any personal injury, property damage, losses, or
claims arising from misapplication of its products.
i
Page 3

Icon Display
The following icons were designe d so as to aid in understanding the type of descriptive
content. The icons are displayed where needed to aid in comprehension.
Major items which should be memorized. In addi tion 、 this can be a minor item which does
Important
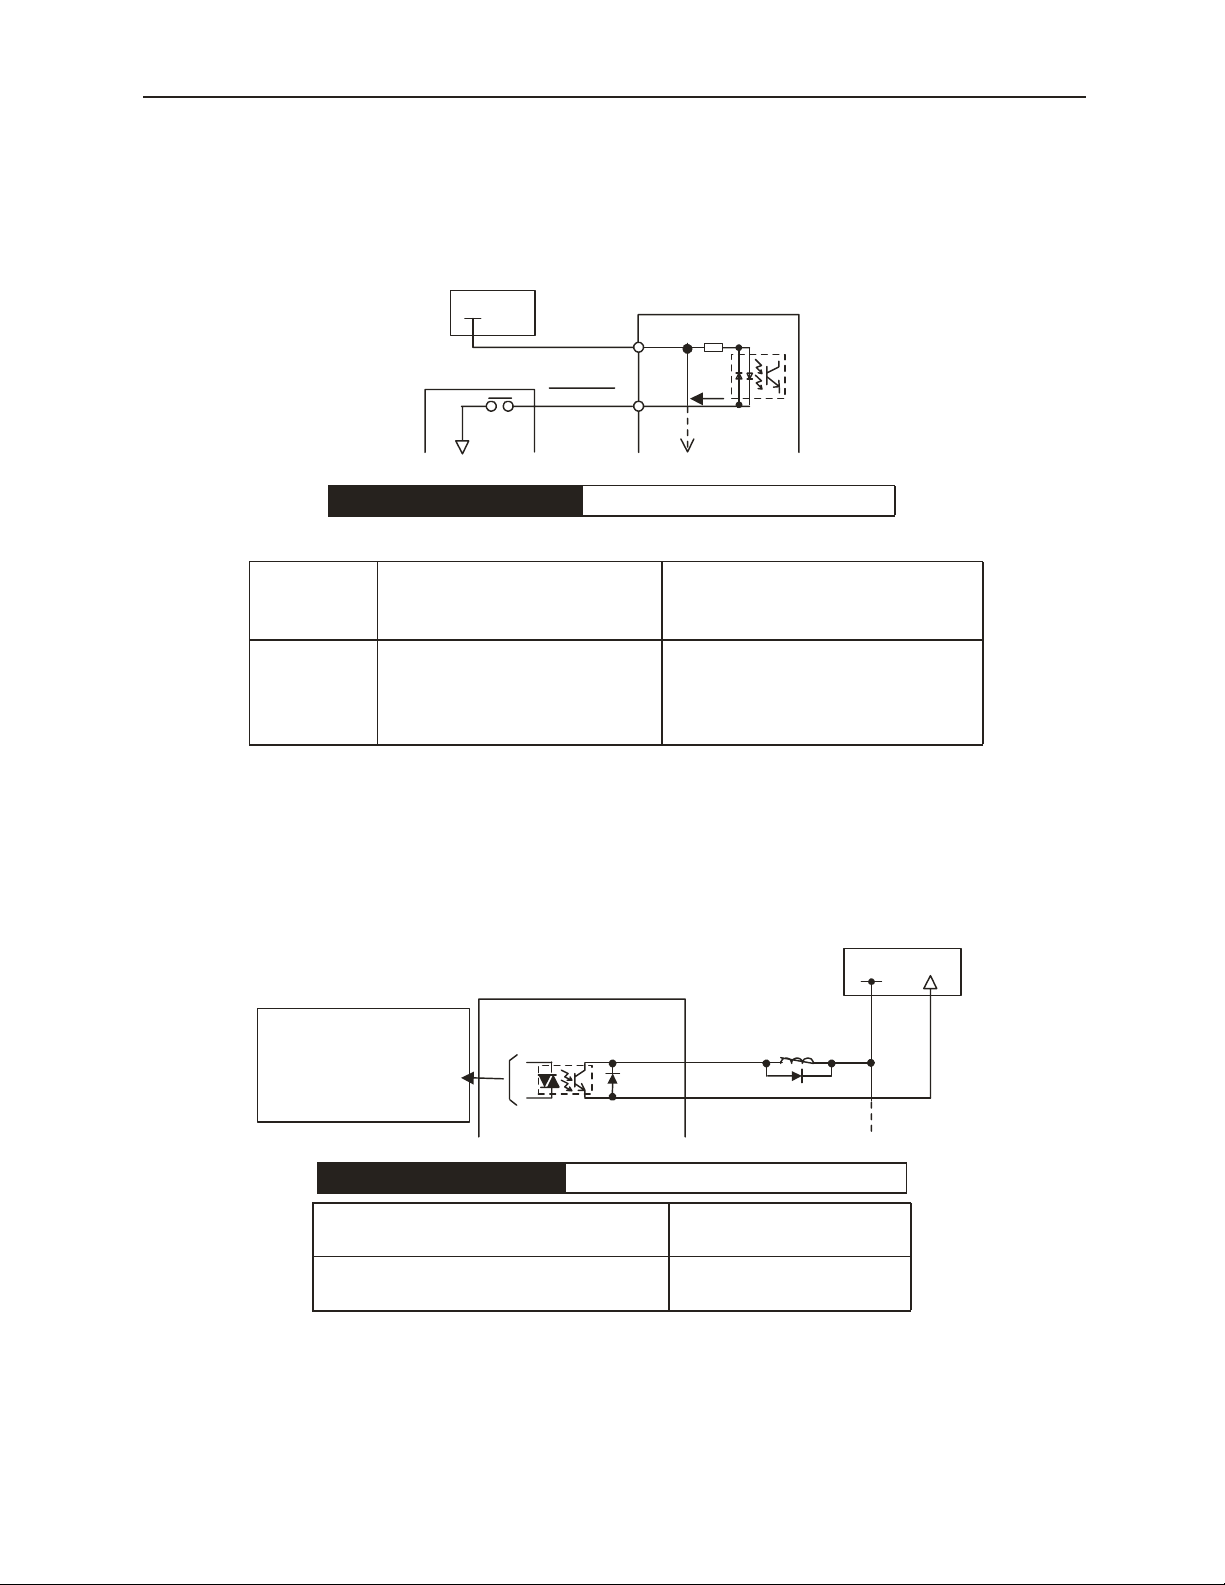
Exp.
Supp.
Terminology?? This explains difficult- to-understand technical terminology and technical terms which
not reach the level of damage to the machine, such as the genera tion of an alarm display.
This shows programming, operation examples, etc.
This shows supplemental informat ion and convenient functions to remember.
have not been previously explain ed.
ii
Page 4

Outline of Manual
Thank you for purchasing the LEGEND Digital torque amplifier.
Use this product with a full understa nding of conditions such as product specific a tions, usage
limits, etc.
This manual explains the following areas for users of the LEGEND Digital torque amplifier.
• Methods for mounting and wiring servomotor an d amplif iers
• How to use the various functions
• Ratings and specificati ons for standard device types
• Maintenance and Inspection
For additional infor mation on Sigma II servomotor,please refer to the following documents:
• Sigma II Servo System Product Catalog Supplement
(Doc.# G-MI#99001x-Sigma II)
• Sigma II Series Servo System User’s Manual
(Doc.# YEA-S800-32.2x)
• Linear Servomotor Product Catalog
(Doc.#KAE-S800-39.10)
iii
Page 5

G
Safety Notes
In this manual, we will describe important cautionary items which should always be
observed regarding usa ge, inspection upon receipt of product, mounting, wiring,
operation, and maintenance/inspection.
■ Inspection Upon Receipt of Product
• Use the ser vomotors and am plifiers in the designated combinations. (See “3.5
Combinations” on page 39.)
Failure to do so may result in fire or unit failure.
■ Mounting
• Never use this produc t in an area where w ater may splash, in a corrosive or flammable
atmosphere, or next to flammable items.
Doing so may res u lt in electric shock or fire.
CAUTION
CAUTION
■ Wiring
WARNIN
• Be sure to connect the ground terminal of the digital torque amplifier to a grounding
electrode (100Ω or less).
Failure to do so may result in electric shock or fire.
CAUTION
Wiring Precautions
• Do not bundl e or run power and sig n al lines together in the same duct.
Keep power and signal lin e s at least 1 1.81” (30cm) apart.
• Use twisted pair or shielded multi-core twisted pair wires for signal and encoder (PG)
feedback lines.
• The maxim um lengths for signal lines are as follows :
• Maximum of 9.84ft (300cm) for reference input lines.
• Maximum of 65.6ft (20m ) for PG feedback lines.
• Use a cable type UL20276-SB for distanc es over 65.6ft (20m ).
iv
Page 6
CAUTION
G
G
• Do not connect a three-phase power supply to the digital torque amplifier output terminals
U, V, and W.
Doing so may result in in jury or fire.
• Securely fasten the screws for the power terminals and mo tor terminals.
Failure to do say may result in fire.
■ Operation
WARNIN
• To prevent unexpected accidents, test the motor with the motor shaft not conn ected to a
machine or load.
• T o prev ent une xp ected acc ident s , run w ith l imi t swit c hes or st op pe rs att ac hed to bot h end s
of the magne t track.
Failur e to do so may result in injury.
• Set parameters before operating the motor in connection with a machine..
Operatin g w ithout making these settings m ay result in mac hine runaway and damage.
• After mounting on the machine, prior to the star t of operation, make sure th e em ergency
stop can be applied at any time.
Failur e to do so may result in injury.
• Do not touch the heat sink while the unit is running.
The high tempe rature may result in burns.
■ Maintenance/Inspection
WARNIN
• Never touch the inside of the digital torque amplifier.
Doing so may result in electrical shock.
• Be sure no wir ing is exposed when power is turned ON.
Failure to do so may re su lt in el ectrical sh oc k .
• Do not touch the terminals for five minutes following power OFF .
Electrical shock may result due to residual voltage.
CAUTION
• Do not change the wiring while power is ON.
Doing so may result in electrical shock or injury.
v
Page 7
f
■ General Cautionary Items
Cautionary Items Regarding Usage
• The fig ures contai ned in this manua l may, for purposes of detailed explanation, be drawn with covers and
safety sh ields removed. When operating this product, be sure to return all standard covers and shields to
their original locations, and operate the product in accordanc e w ith this manual.
• The fig ures contain ed in this manual are representative examples, and may diff er from the produ ct
recieved.
• Appropr iate modifications may be made to this manual due to improvement s or specification changes in
the product, or to imp rove the ease of use of th e m anual itself. In the event of such changes, the document
number of the ma nual will be upda ted, and issued as a revision.
• To order additional copies of this manual, contact your Yasakwa representative, or the nearest Yaskawa
sales office printed on the back of this manual with the document number written on the cover.
• Yask a w a assumes no responsibil ity for products modified by the custo m er as they fall outside th e
warranty.
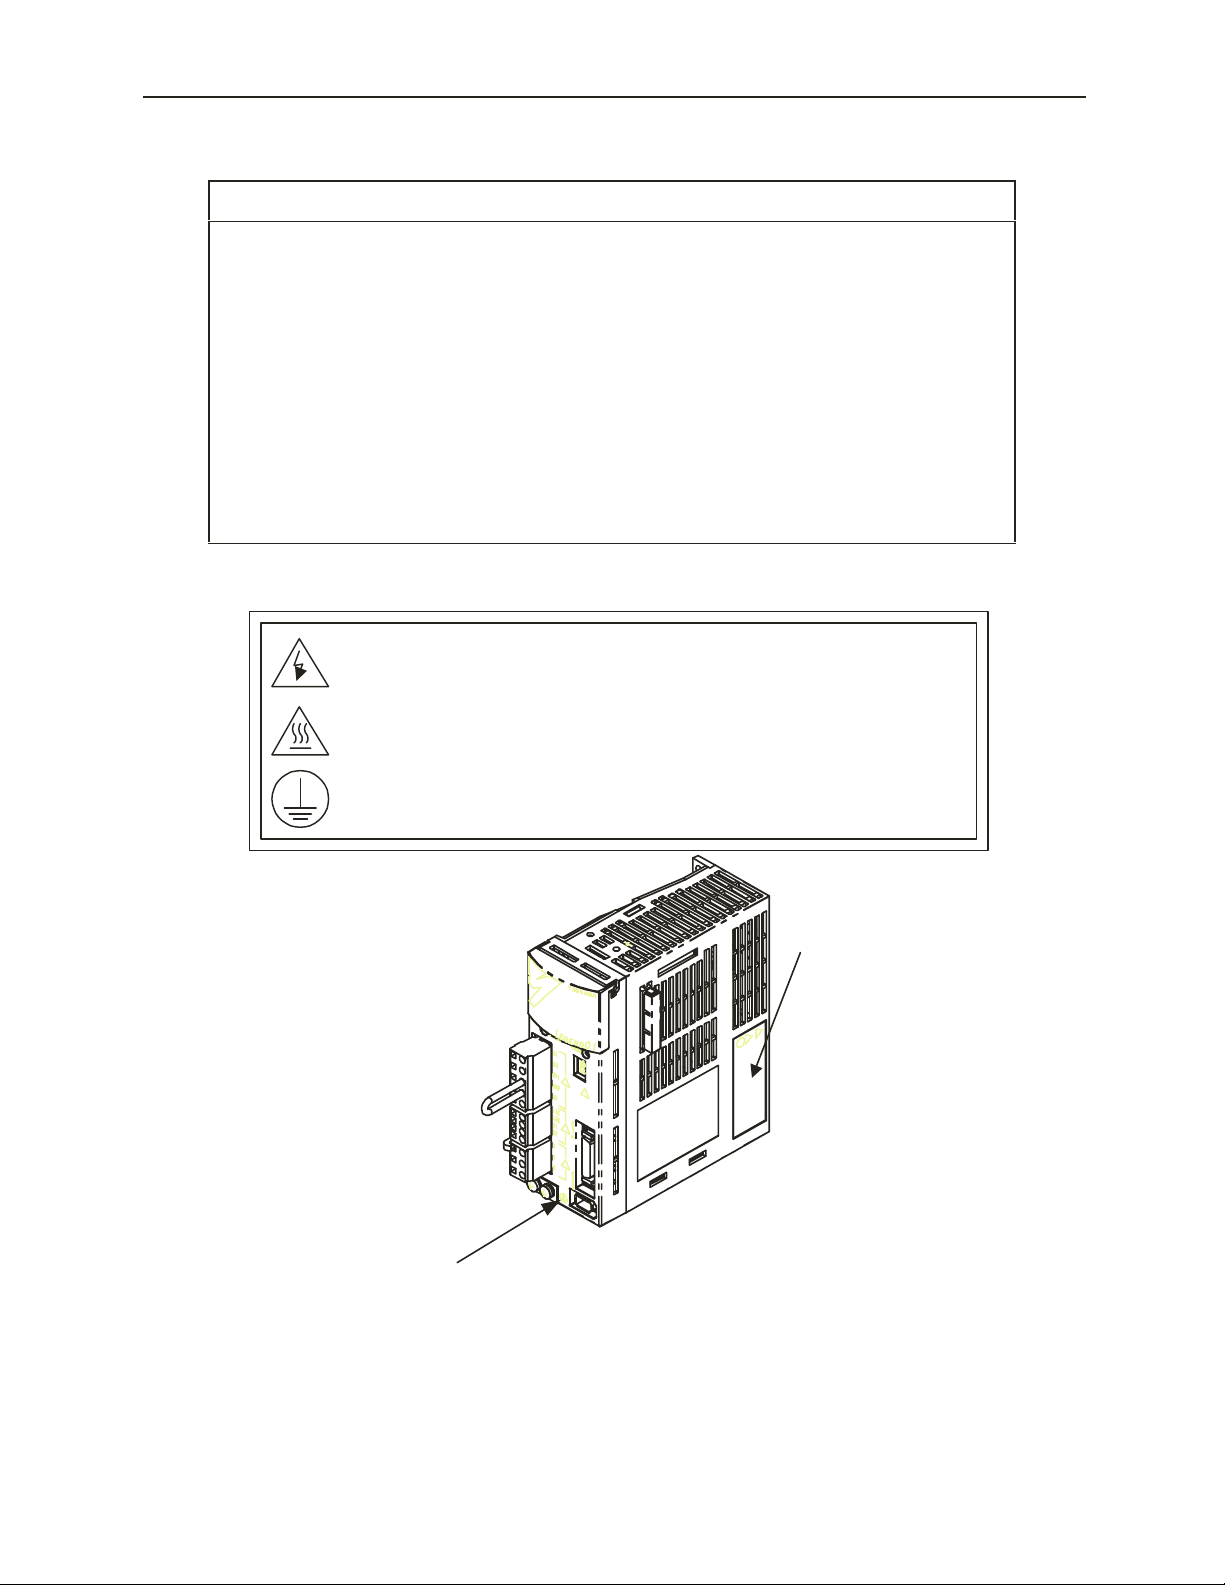
■ Warning Label
危険
WARNING
注意
CAUTION
必ずアース線を接続せよ
Use proper grounding techniques.
通電中および電源オフ後,5分間端子部にさわるな!感電のおそれあり
Disc onnect al l power and wait 5 m in.
before servicing. May cause electric shock.
通電中はヒートシンクにさわるな!火傷のおそれ あり
Do not touch heat sink when power is ON.
May cause burn.
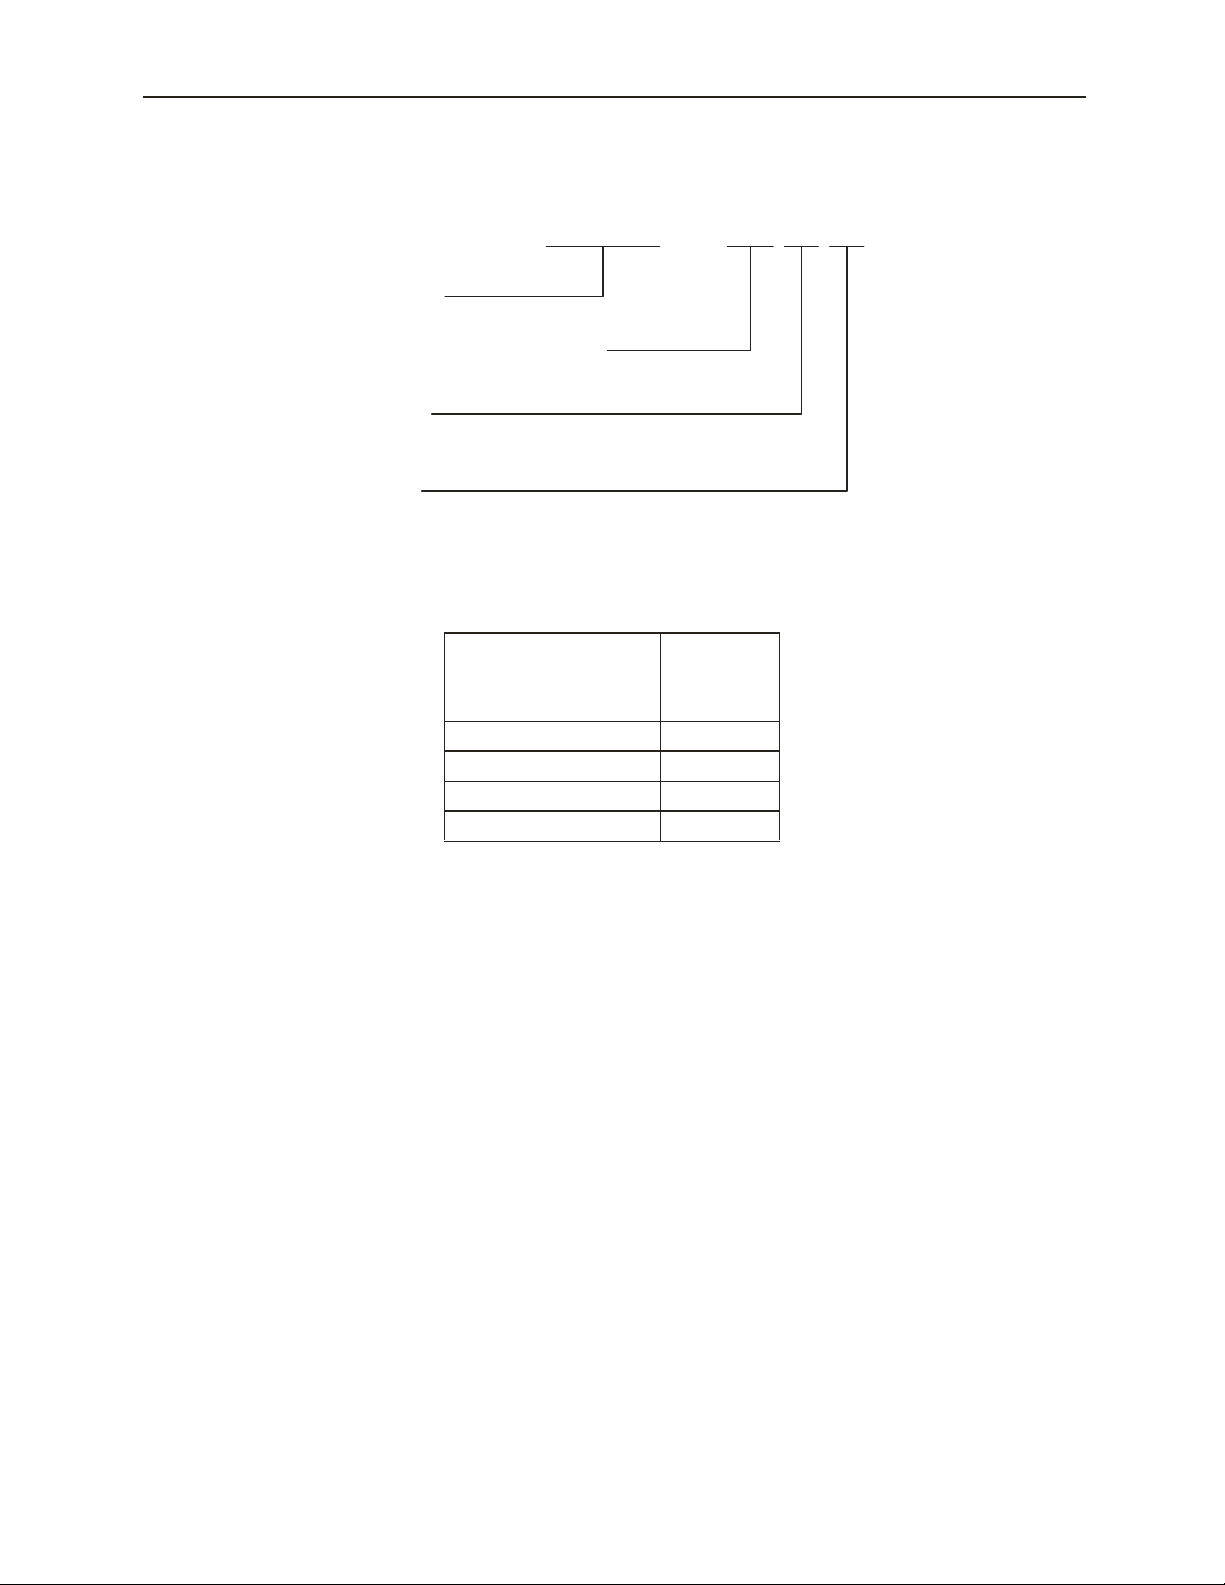
Mounting Position o
Warning Label
Ground Mark
Figure A: Attachment Position of Warning Label and Ground Mark
vi
Page 8

Table of Contents
Safety-Related Symbols .......................................................................................... i
Icon Display ............................................................................................................. ii
Outline of Manual ................................................................................................... iii
Safety Notes............................................................................................................ iv
Inspection Upon Receipt of Product........................................................iv
Mounting .................................................................................................iv
Wiring......................................................................................................iv
Operation .................................................................................................v
Maintenance/Inspection ...........................................................................v
General Cautionary Items .......................................................................vi
Warning Label.........................................................................................vi
Chapter 1: Interpretation of Model Number ......................................................... 1
1.1 Rotary Motor Type ..................................................................................... 1
1.2 Linear Motor Type...................................................................................... 2
Motor Coils.............................................................................................. 2
1.3 Core-less Type .......................................................................................... 2
Motor Coil................................................................................................ 2
1.4 T-Type Iron Core ....................................................................................... 3
Motor Coil................................................................................................ 3
1.5 F-Type Iron Core ....................................................................................... 4
Motor Coil................................................................................................ 4
1.6 Digital Torque Amplifier ............................................................................. 5
1.7 Serial Converter Unit ................................................................................. 6
Chapter 2: Wiring ................................................................................................... 9
2.1 Main Circuit Wiring..................................................................................... 9
Main Circuit Terminal Names and Functions .......................................... 9
Example of Typical Main Circuit Wiring................................................. 12
Power ON Sequence Design ................................................................ 13
Power Line Size and Peripheral Devices .............................................. 13
Digital Torque Amplifier Power Loss ..................................................... 13
Main Circuit Terminal Block Wiring Method .......................................... 13
Power Terminal Processing .................................................................. 14
Peripheral Device Types and Capacities .............................................. 15
2.2 Input Signals ............................................................................................ 16
Page 9

Table of Contents
Example of I/O Signal Connection ........................................................ 16
Connector (CN1) Terminal Array List.................................................... 17
CN1 Specifications................................................................................ 17
I/O Signal Names and Their Functions ................................................. 18
Command Input Circuit and Interface ................................................... 20
Sequence Input Circuit and Interface.................................................... 20
Output Circuits and Interfaces............................................................... 21
2.3 Wiring to the Encoder .............................................................................. 22
2.4 Cable Specifications and Peripheral Devices.......................................... 24
2.5 Standard Connection Examples .............................................................. 26
Single-phase Power Specification (SGDG-01GT, SGDG-04GT).......... 26
3-Phase Power Specification (SGDG-10GT, SGDG-15GT) ................. 27
Chapter 3: Setup................................................................................................... 29
3.1 Linear Motor Mounting............................................................................. 29
3.2 Rotary Motor Mounting ............................................................................ 29
Storage Temperature............................................................................ 30
Mounting Location................................................................................. 30
Alignment .............................................................................................. 31
Mounting Direction ................................................................................ 31
Shaft Tolerance Ranges ....................................................................... 31
Oil and Water Countermeasures........................................................... 32
Cable Stress.......................................................................................... 32
Vibration Resistance ............................................................................. 33
3.3 Digital Torque Amplifier Installation ......................................................... 34
Storage Conditions................................................................................ 34
Mounting Conditions ............................................................................. 34
3.4 Switch Settings ........................................................................................ 37
SW1 Function Selection Switch (dip switches) ..................................... 37
SW2 Linear Scale Pitch Setting (rotary switch)..................................... 37
SW3 PG Divider Setting (rotary switch) ................................................ 38
3.5 Combinations........................................................................................... 39
Combinations with Rotary Motors ......................................................... 39
Linear Motor Combinations ................................................................... 40
Serial Conversion Unit and Applicable Motors...................................... 40
Chapter 4: Description of Functions .................................................................. 41
4.1 Torque/Force Control............................................................................... 41
4.2 Protection Sequence Design ................................................................... 41
Servo ON Input ..................................................................................... 42
DB OFF Input........................................................................................ 43
RUN Signal Output................................................................................ 43
4.3 Encoder Signal Output............................................................................. 44
I/O Signals............................................................................................ 45
Page 10

Table of Contents
Output Phase Form............................................................................... 45
PG Divider Setting................................................................................. 46
4.4 Analog Monitor......................................................................................... 47
4.5 Regenerative Resistor Selection ............................................................. 47
External Regen Resistors ..................................................................... 48
For Digital Torque Amplifiers of 400W Capacity or Less ...................... 48
For Digital Torque Amplifiers of 500W Capacity or More...................... 51
Calculating Regen Energy .................................................................... 51
Chapter 5: Servo System Maintenance/Inspection........................................... 53
5.1 Motor Inspection ...................................................................................... 53
5.2 Digital Torque Amplifier Inspection .......................................................... 54
Component Replacement Timeline....................................................... 54
Use Conditions...................................................................................... 54
5.3 Alarms...................................................................................................... 55
7-Segment LED..................................................................................... 55
Alarm List .............................................................................................. 55
Appendix A: Host Controller Connection Examples ........................................ 57
A.1 Connecting the Galil IMC-1900/2900 ...................................................... 57
A.2 Connecting the Delta Tau PMAC2 .......................................................... 58
A.3 Connecting the MEI PCX/DSP ................................................................ 59
A.4 Connecting the Acroloop ACR-8010 ....................................................... 60
Appendix B: Installation Conditions for EMC Directives ............................... 61
EMC Installation Conditions.................................................................. 61
The Cable Core..................................................................................... 64
Cable Clamp ......................................................................................... 64
Page 11

Page 12
1.1 Rotary Motor Type
SGMPH - 01 A A A 2 S D
1. Interpretation of Model Number
1.1 Rotar y Moto r Type
Σ-II Series
Servo Motor
Series Name
SGMAH
SGMPH
SGMGH
SGMSH
② Voltage
1500
r / min
A 200V
B
100V
3000
r / min
*1
① Motor Capacity (kW)
SGMAH SGMPH SGMGH SGMSH
No.
3000
r / min
A3 0.03
A5 0.05
01 0.1 0.1
02 0.2 0.2
03
04 0.4 0.4
05 0.45
06
08 0.75 0.75
09 0.85
10 1.0
12
13 1.3
15 1.5 1.5
3000
r / min
SGMPH only
⑧ Brake/Oil S eal Specifications
w/o brake or oil seal
1
S w/ oil seal
C w/ 24V brake
E S+C
⑦ Shaft Specif ic a tio n
2 Straight, no key
4 Sra ight , w/ ke y
6 Straight, w/ key and ta p
8 Straight, w/ tap
④ Design Revision Order
SGMAH
A
SGMPH
SGMGH(1500 r/min)
SGMSH
SGMGH(1500 r/min)
C
For high-preci sion machine tool s
E SGMPH (Waterproof Spec. IP67)
③ Serial Encoder Specifications
No. SGMAH SGMPH SGMGH SGMSH
A
13-bit
Incremental
C
17-bit
Incremental
◎ ◎
◎
: Standard
◎
○
: Opt i on
◎
*1. 10 0V is only for us e with SGMA H , SG M PH
servo motors of 0.2kW or less.
1
Page 13
1.2 Linear Motor Type
1.2 Linear Motor Type
■ Motor Coils
SGL G W - 40 A 140 A
Linear Σ Series Motor
Motor Type
G: Core-less
T: T-type iron core
F: F-type iron core
Type
W: Motor Coil
Height of Magnets
1.3 Core-less Type
■ Motor Coil
16
30
L1
W
Option Specifications
P: w/ Hall sensor only.
W: w/ Hall se nsor and
Serial Converter. Th e
Serial Converter is
required f or operation with
LEGEND Digital Torque
Amplifiers.
Design Revision Orde r
Magnet Track Length
Voltage
A: 200V
25.4
15
H
Hall
Sensor
Model
SGLGW-
40A140A(P)
40A253A(P)
40A365A(P)
60A140A(P) 220 73 140 125 83 0.47
60A253A(P)
60A365A(P)
2
Max.
Thrust
(N)
140 47 140 125 63 0.39
280 93 252.5 237.5 63 0.65
420 140 365 350 63 0.91
440 147 252.5 237.5 83 0.80
660 220 365 350 83 1.13
Cont.
Thrust
(N)
L2
External Dimensions (mm)
L1 L2 H
Mass
(kg)
Page 14
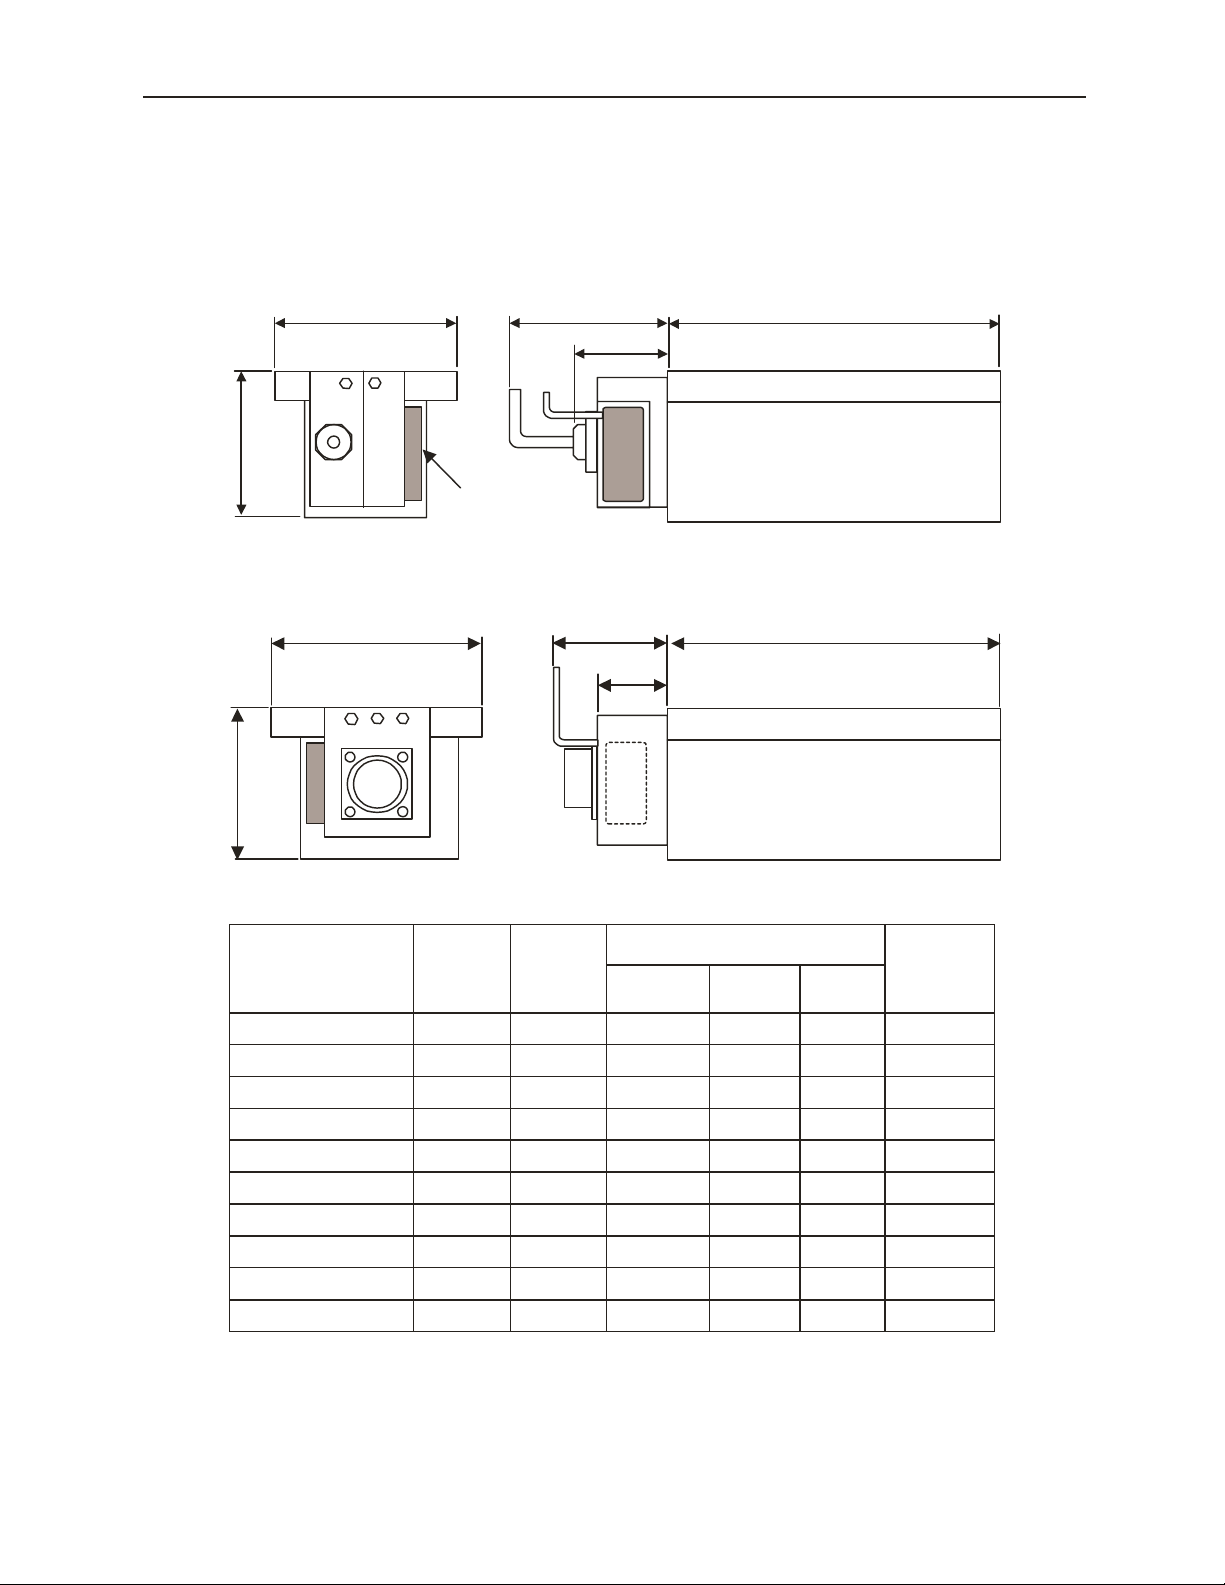
1.4 T-Type Iron Core
■ Motor Coil
Type: SGLTW-20A □□□ A(P), SGLTW -35A □□□ A(P)
1.4 T-Type Iron Core
W
50
H
Hall
Sensor
Type: SGLTW-40A □□□ A(P), SGLTW -80A □□□ A(P)
W
H
Min. 64
40
LMin. 100
L
Model
SGLTW-
20A170A(P)
20A320A(P)
20A460A(P)
35A170A(P)
35A320A(P)
35A460A(P)
40A400A(P)
40A600A(P)
80A400A(P)
80A600A(P)
Max.
Thrust
(N)
380 130 170 100 51 2.6
760 250 315 100 51 4.8
1140 380 460 100 51
660 220 170 100 66 3.7
1320 440 315 100 66 6.8
2000 670 460 100 66 10
2000 670 395 150 78 20
3000 1000 585 150 78 30
4000 1300 395 150 115 30
6000 2000 585 150 115 43
Cont.
Thrust
(N)
External Dimensions (mm)
L W H
Mass
(kg)
7
3
Page 15
1.5 F-Type Iron Core
1.5 F-Type Iron Core
■ Motor Coil
Min. 50
L
Hall Sensor
Model
SGLFW-
20A090A(P) 86 25 91 40 34 0.7
20A120A(P)
35A120A(P)
35A230A(P) 440 160 235 55 34 2.3
50A200A(P)
50A380A(P)
1ZA200A(P) 1200 400 215 119 43 6.4
1ZA380A(P)
Max.
Thrust
(N)
125 40 127 40 34 0.9
220 80 127 55 34 1.3
600 200 215 71.5 43 3.7
1200 400 395 71.5 43 6.9
2400 800 395 119 43 12.2
Cont.
Thrust
(N)
External Dimensions (mm)
L W H
W
H
Mass
(kg)
4
Page 16
1.6 Digital Torque Amplifier
T
1.6 Digital Torque Amplifier
SGDG
LEGEND
SGDG Servo Amplifier
Maximum a pplied motor capacity
(see table below)
Voltage
G: 90V~253V
Model
@T: Torqu e/Force Con trol
10 G
-
Maximum Capacity of Applied Motor
Applied Motor
Maximum Ca pacity
Symbol
01 0.1
04 0.4
10 1.0
15 1.5
Capacity
(kW)
Note: Keep th e following in mind in SGDG digital to rque amplifier and SGDG/SGL□W
servomotor combinations:
The SGDG-01GT can drive motors of 30~200W rated output.
The SGDG-04GT can drive motors of 100~750W rated output.
The SGDG-10GT can drive motors of 300W~2kW rated output.
The SGDG-15GT can drive motors of 750W~3kW rated output.
Since LEGEND servo drives are applicable to a wider range motor and driver combinations,
the output power of the drive will dictate the available maximum motor power even if the
maximum output power of the motor is larger than that of the connected drive.
Specific speed/torque performance will vary depending on such power supply conditions as
voltage, number of available phases, etc.
5
Page 17
1.7 S erial Convert er Uni t
1.7 Serial Converter Unit
JZDP
Conversion unit type
(see ta bl e below)
Compatible Motor Numbers
Varies according to compatible motors
(see ta bl e below)
A○○○ △△△
-
-
Serial Converter Unit Type Model Classifications
Model Model Usage Scale Hall Sensor (Y/N?)
JZDPA003
JZDPA004
(Note)
US Marketdedicated
By Haidenhain
N
By Renishaw
Y
JZDPA005
JZDPA006
JZDPA008
By Renishaw
N
By Haidenhain
Y
By Renishaw
Y
6
Page 18

Serial Converter Units and Applied Motors
1.7 Serial Converter Unit
Serial Conver te r Unit Mode l
JZDP-A00 □ - □□□
001 SGLGW-40A140A(P) 013 SGLTW-20A460A(P)
002 SGLGW-40A253A(P) 014 SGLTW-35A170A(P)
003 SGLGW-40A365A(P) 015 SGLTW-35A320A(P)
004 SGLGW-60A140A(P) 016 SGLTW-35A460A(P)
005 SGLGW-60A253A(P) 017 SGLFW-20A090A(P)
006 SGLGW-60A365A(P) 018 SGLFW-20A120A(P)
007 SGLTW-40A400A(P) 019 SGLFW-35A120A(P)
008 SGLTW-40A600A(P) 020 SGLFW-35A230A(P)
009 SGLTW-80A400A(P) 021 SGLFW-50A200A(P)
010 SGLTW-80A600A(P) 022 SGLFW-50A380A(P)
011 SGLTW-20A170A(P) 023 SGLFW-1ZA200A(P)
012 SGLTW-20A320A(P) 024 SGLFW-1ZA380A(P)
Applied Motor
Serial Converter Unit Model
JZDP-A00 □ - □□□
Applied Motor
7
Page 19

Notes:
8
Page 20
2.1 Main Circuit Wiring
2. Wiring
2.1 Main Circuit Wiring
Here we will show representative examples of main circuit wiring, the functions of the main
circuit terminals, as well as the power input sequence, etc. Observe the following cautionary
items when wiring.
CAUTION
• Do not pass the power line and signal lines through the same duct or bundle them together. Keep the
power line and signal lines at least 30cm apart when wiring.
• Use a twist pair wire or multi-core twisted-pair bundled shield wire for the signal and encoder lines.
The maximum wiring length is 3m for the command input line, and 20m for the encoder feedback line.
• Do not touch the power terminal for 5 min. after power OFF as a high voltage may remain even after
power OFF.
Perform inspection work after checking that the CHARGE lamp has gone out.
• Do not turn the power ON/OFF frequently. Limit ON/OFF repetition to one time per minute.
Because the digital torque amplifier has a capacitor in its power unit, a large charging current (charging
time: 0.2sec.) will be fed at power ON. For this reason, frequent power ON/OFF switching degrades the
main circuit element within the digital torque amplifier.
• Suitable for use on a circuit capable of delivering not more than 5000 A
(symmetrical)
rms
■ Main Circuit Terminal Names and Functions
Table 2.1: Main Circuit Terminal Names and their Functions
Terminal
Code
L1, L2 or L1,
L2, L3
U, V, W
L1C, L2C
(2 places) Ground Terminal
Name Function
100W/400W
Main Circuit Power
Input Terminal
Motor Connection
Terminal
Control Power Input
Terminal
Single Phase 90~253 V
1.0kW~1.5kW
Three Phase 90~253 V
Connected to motor.
Single Phase 90~253 V
Perform “Ground Processing “ by connecting with the power
grounding terminal and the motor grounding terminal.
9
Page 21
2.1 Main Circuit Wiring
Table 2.1: Main Circuit Terminal Names and their Functions (Continued)
Terminal
Code
B1, B2 or
B1, B2, B3
⊕1,⊕2
Name Function
Connection not normally needed.
Connect an external regen resistor (provided by
External Rege n
Resistor Connection
Terminal
High-Frequency
Harmonic
Suppressing DC
100W/400W
1.0kW/1.5kW
This is normally sh orted between ⊕1-⊕2. If harmonic
frequency suppression is needed, connect a DC reactor
between ⊕1-⊕2.
customer) between B1-B2 if regen capability is
insufficient.
(Note)There is no B3 terminal.
B2-B3 is no rmally shorted (using the in te g rated
regen resistor)
If the capacity of the internal regen resistor is
insuf ficient, connect an external regen resistor
(provided by customer) between B1-B2 with B2B3 open (wiring removed).
Reactor Connection
Terminal
Main Circuit Load
Connection is normally not needed.
Terminal
10
Page 22
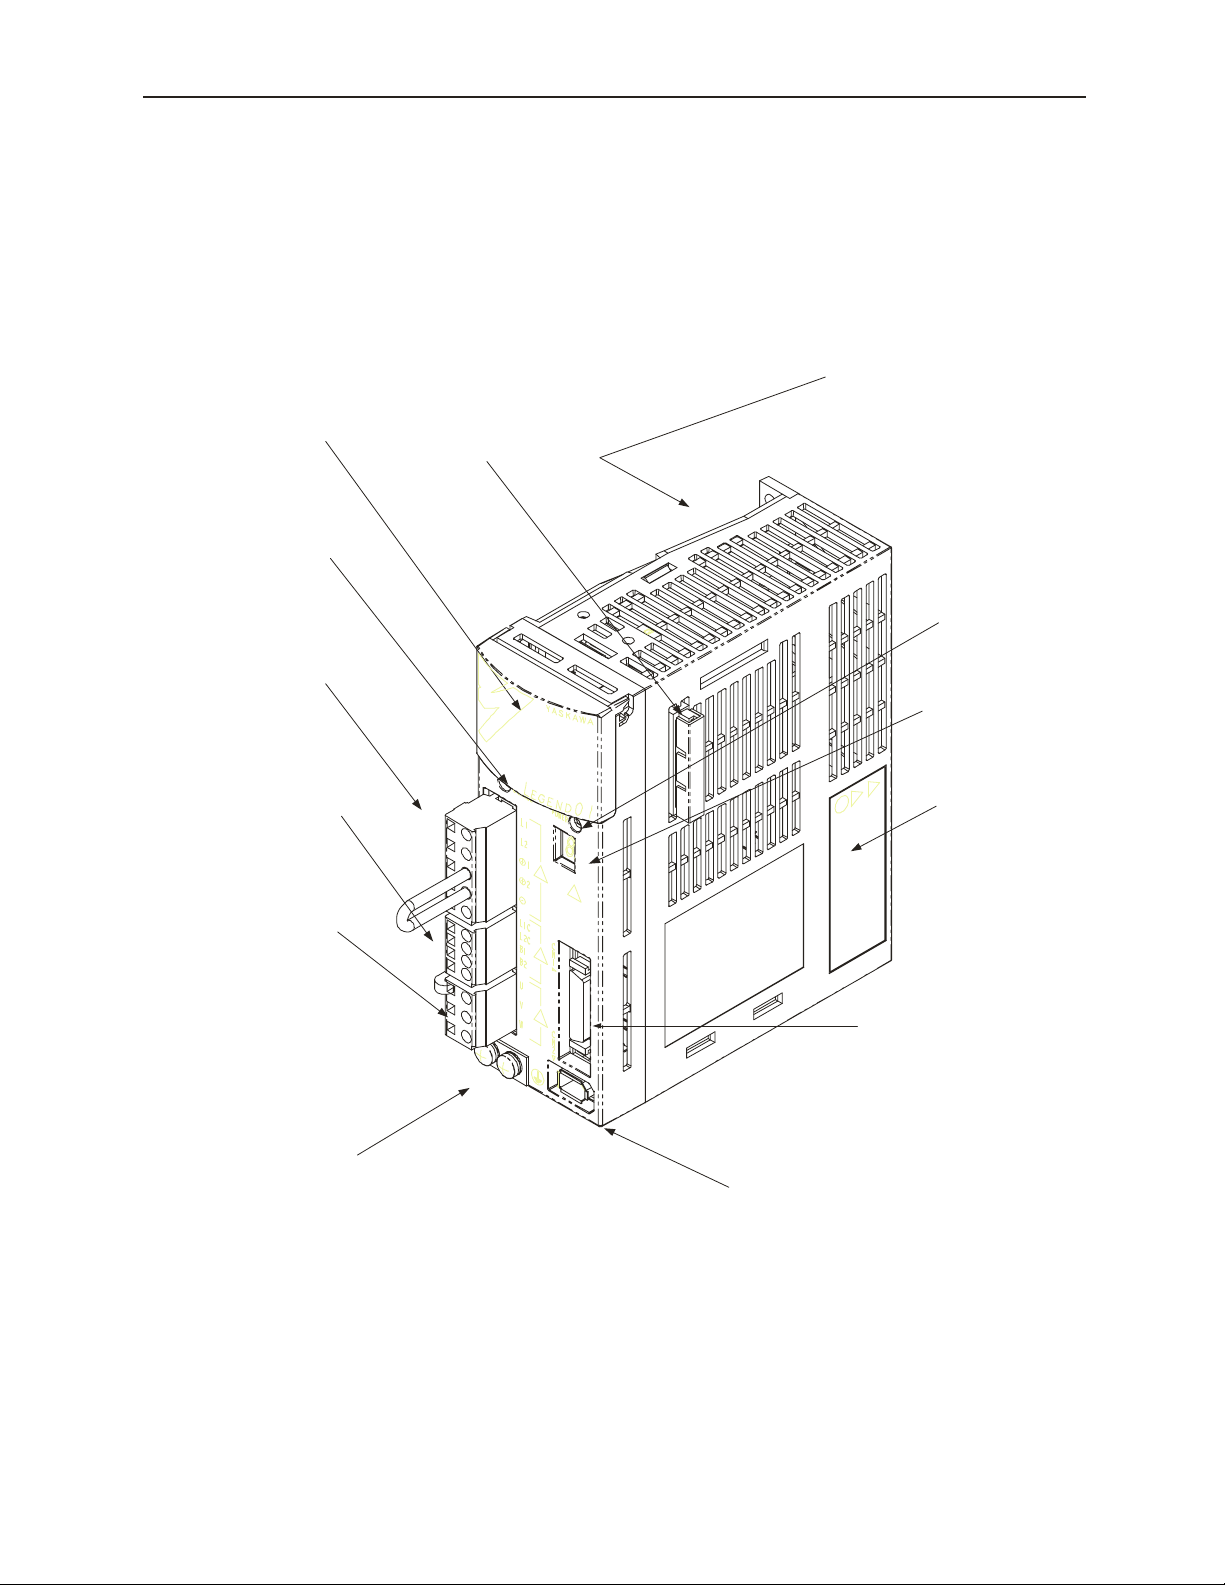
2.1 Main Circuit Wiring
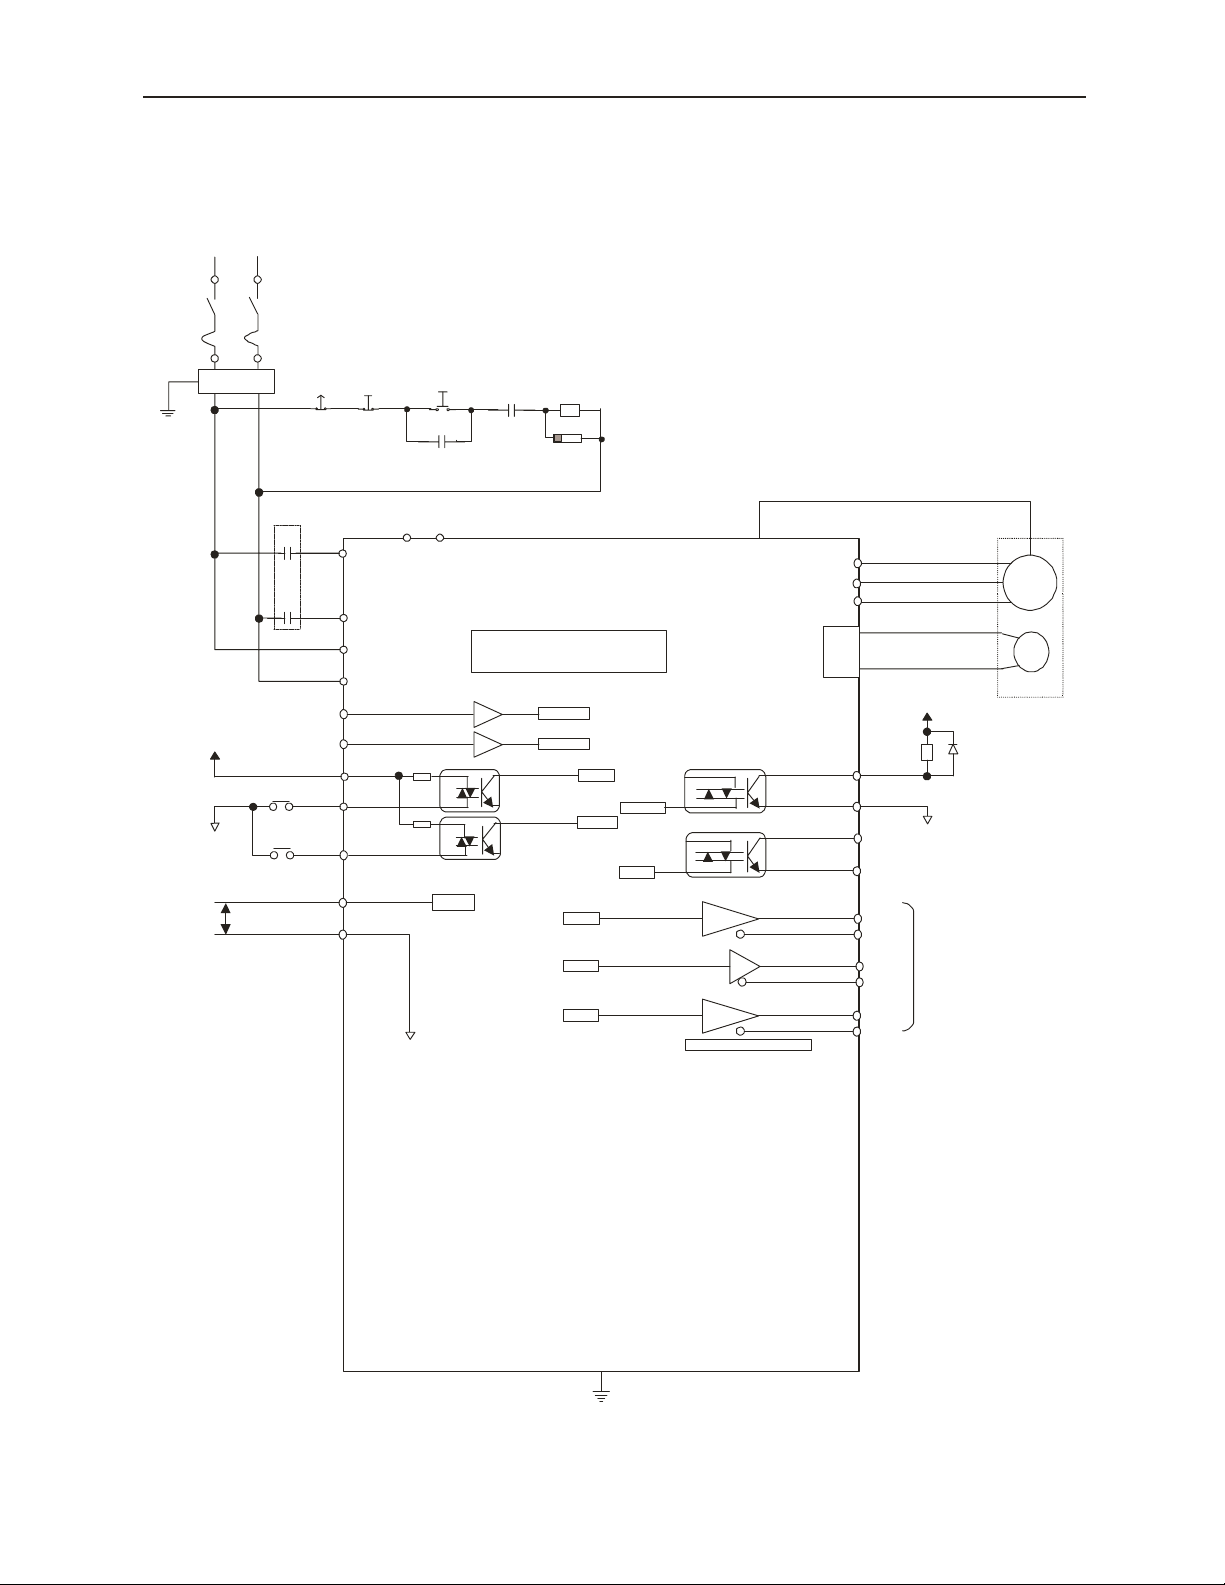
SYSTEM
SWITCHES
(Under the cover)
MAIN
POWER
INDICATOR
MAIN
POWER
TERMINAL
CONTROL
POWER
TERMINAL
MOTOR
CONNECTION
TERMINAL
HEAT SINK
(Side)
OPTION BOARD
CONNECTOR
CONTROL
POWER
INDICATOR
STATUS
INDICATOR
WARNING
LABEL
GROUNDING
TERMINAL
I/O SIGNAL
CONNECTOR CN1
ENCODER CONNECTOR
CN2
11
Page 23

2.1 Main Circuit Wiring
■ Example of Typical Main Circuit Wiring
A typical wiring example is shown in the figur e below.
Power 90V~253V
Noise Filter
Emergency
MC1
Stop
Power
L1
L2
L3
L1C
L2C
OFF
Power
ON
MC1
Digital Torque Amplifier
SGDG-□□GT
RY10
MC1
Surge
Supressor
FG
U
V
W
A
B
M
C
D
PG
12
ALM
ALM-SG
Figure A Main Circuit Wiring Example
CN1
31
32
Ry10
1D
0
+24V
24V
Page 24
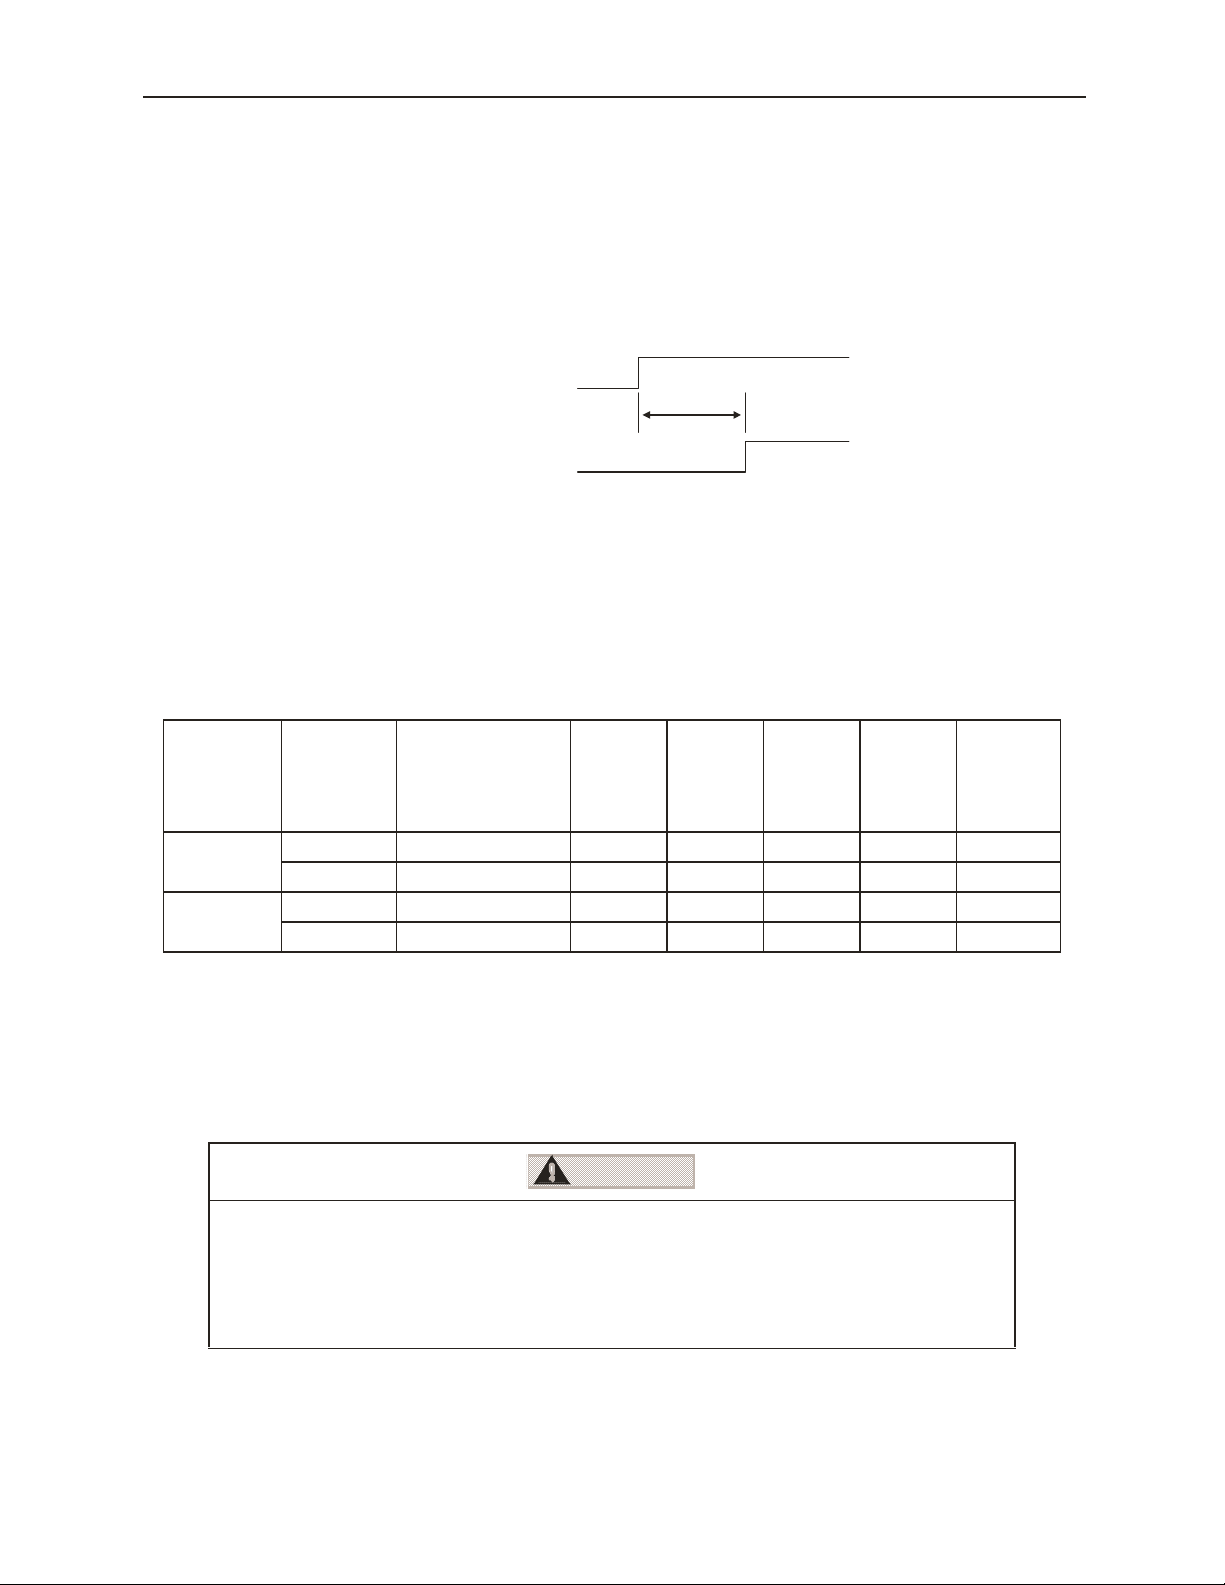
■ Power ON Sequence Design
S
Keep the following in mind when designing a Power ON Sequence.
• Design the power feed sequence so that the power goes OFF if a “Servo Alarm” is
output. See “Figure A Main Circuit Wir ing Example” on page 12.
• Hold down the power ON button for at least two seconds. The digital tor que
amplifier will output a “Servo Alar m” signal for at most two seconds at power ON.
This is necessary for digital torqu e amplifier initial setting.
2.1 Main Circuit Wiring
Power
ervo Alarm (ALM) Output Signal
2.0s Max.
■ Power Line Size and Peripheral Devices
See the Sigma II Series Servo System User's Manual: Servo Selection and Data Sheet
edition. (Document Number: YEA-SIA-S800-32.2x)
■ Digital Torque Amplifier Power Loss
The digital torque amplifie r power loss at continuous output is shown in Table 2.2 below.
Table 2.2: Digital Torque Amplifier Power Loss at Continuous Output
Main
Circuit
Single-phase
200V
3-phase
200V
Max.
Applied
Motor
Capacity
0.10 SGDG–01GT 0.91 6.7 – 13 19.7
0.40 SGDG–04GT 2.8 20 – 13 33
1.0 SGDG–10GT 7.6 55 12 15 82
1.5 SGDG–15GT 11.6 123 14 15 152
Digital Torque
Amplifier Model
Output
Current
(actual)
A
Main
Circuit
Power
Loss W
Regen
Resistor
Power
Loss W
Control
Circuit
Power
Loss W
Total
Power
Loss W
Note: The regen res is tor power loss is the allowable power loss. Take the following measures if this
value is exceeded. Remove the lead wire of the digital torque amplifier' s integrated regen
resistor and install an external regen resistor. Furthermore, the external re gen re si stor is an
option. For details on regen resistors, see “
4.5 Regenerative Resistor Selection”.
■ Main Circuit Terminal Block Wiring Method
Observe the following cautionary items when wiring.
CAUTION
• Perform wiring after removing the terminal block from the digital tor que amplifier unit.
• Insert one wir e into each po wer line in sertion aperture in the termin al block.
• When inserting the pow er lines, be sure that they do not short against the surrounding material due to
exposed wir e cores.
• Power lines that have been mist akenly pulled out by excessive force should be re-stripped then connected .
Servo amplifiers with capacities of 1.5kW or less consist of a connector-type terminal
block for the main circuit. Wire the terminal block by the following procedure.
13
Page 25
2.1 Main Circuit Wiring
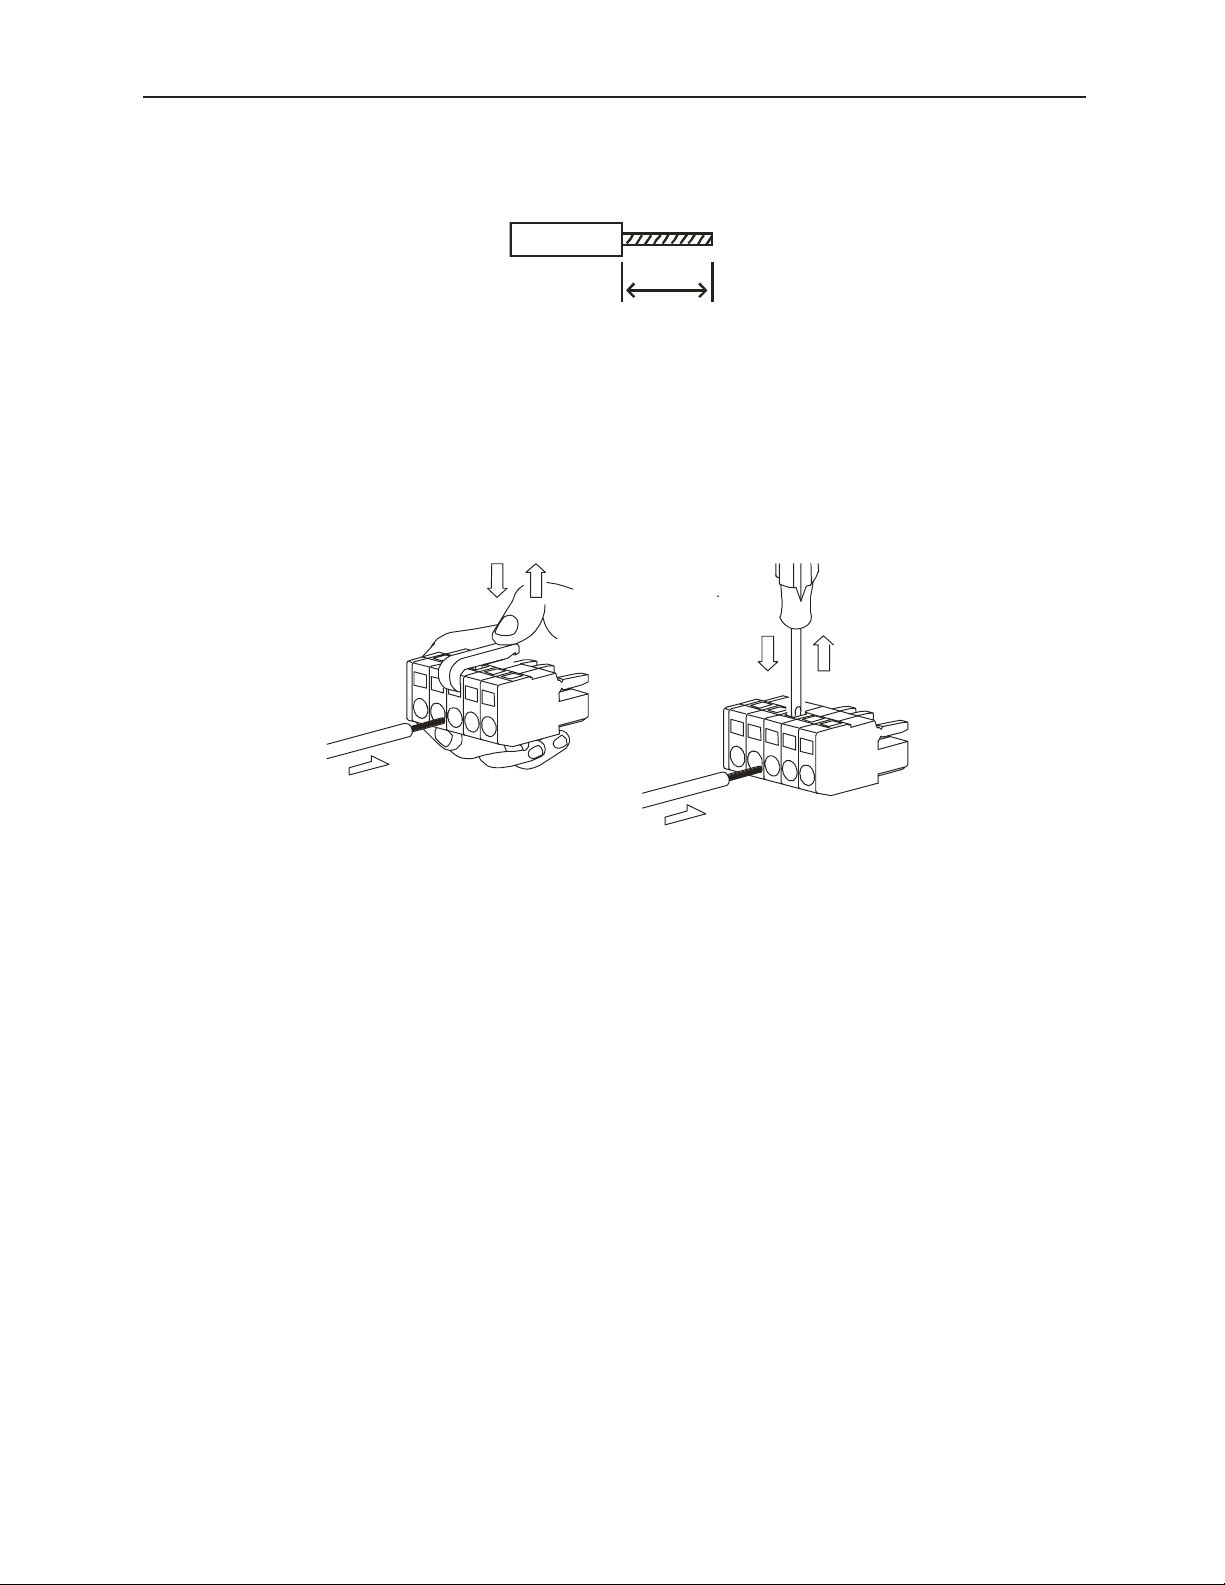
.)
Connec tio n Me th od
1. Strip the insulation of the power lines used.
2. Open the terminal block wiring insertion area with a tool. There are two opening
methods as shown in figures A and B.
• Figure A shows opening by prying with an accessory lever.
• Figure B shows opening by forcibly pressi ng the driver insertion aperture with
8
9mm
~
(.315~.35 in
either a flathead screwdriver head width 3.0~3.5mm (.118~.138 in.) or a 210-120Jtype driver from Wago, Inc. The work can be done using either of the methods in
Figure A: or Figure B:.
Figure A :
Figure B:
3. Insert the core of the power line int o the opening. Release the lever or the pressure on
the driver after insertion.
■ Power Terminal Processing
Strip the insulation on the power line. The useable line sizes are as follows:
• Solid Conductor.. φ0.5~φ1.6mm
• Stranded Conductor ..AWG28~AWG12
14
Page 26

■ Peripheral Device Types and Capacities
Table 2.3 Shows Servopack device Types and capacities.
Table 2.3: Peripheral Device Types and Capacities
2.1 Main Circuit Wiring
Main
Circuit
Power
Supply
Single-Phase
200V
Three-Phase
200V
Model
Power Su ppl y
Capacity Per
Capacity
(kW)
0.1 01GT 0.40 4
0.4 04GT 1.2 8
1.0 10GT 2.3 7
1.5 15GT 3.2 10
* The FN □□□□ noise filter is manufactured by Schaffner Corp.
SGDG- Model
Amplifier
(KV A)
MCCB or
Fuse
Capacity
(Arms)
Recommended
Noise Filter*
Single-
FN2070-
6/07
Phase
250VAC
6A
Single-
FN2070-
10/07
Phase
250VAC
10A
Three-
FN258L-
16/07
Phase
480V
16A
Specifi-
cations
Magnetic
Contactor
10A or
Equivalent
20A or
Equivalent
20A or
Equivalent
15
Page 27

2.2 Input Signals
2.2 Input Signals
■ Example of I/O Signal Connection
• A typical example of I/O signal connecti on is shown below.
Power 90V~253V AC
24V~12V
Torque/
Force
Reference
Noise F ilter
Emergency
MC1
Stop
Power
OFF
L1
Power
ON
RY10
MC1
B2
B1
MC1
Surge
Supressor
FG
L2
L1C
L2C
CN1-26
CN1-27
3.3KΩ
CN1-13 CN1-34
RY1
/S-ON CN1-14 CN1-35
RY2
/DBOFF CN1-15
CMD-IN CN1-3
GND CN1-4 CN1-21
3.3KΩ
A/D
SGDG-□□GT
Digital Torque Am pl ifier
SV ON 5
DB_OFF
SV ON
ALM
DB OFF
RUN
PA
PB
PA
PC
PA
SN75ALS174 or similar product
CN1-7
CN1-10
CN1-20
CN1-22
CN1-23
CN1-24
CN1-25
W
CN
U
V
2
24V~12V
RY10
Motor
PG
ALM+
ALMRUN+
RUN-
PAO
/PAO
Encoder
PBO
Divided
/PBO
PCO
/PCO
Output
16
FG
Page 28

■ Connector (CN1) Terminal Array List
The CN1 terminal array and its specif ications are shown below.
CN1 Terminal Layout
2.2 Input Signals
1--- --- 19GND GND
Torque/
CMD
3
-IN
5 --- --- 23 *PB0
RUN+RUN Signal
7
9 --- --- 27
11 --- ---
13 +24V
DB
15
OFF
17 --- --- 35 ALM -
Force
Reference
Input
Output
External
Power Input
DB OFF
Signal Input
2 GND GND
4 GND GND 22 PBO
6 GND GND 24 PCO
8 --- --- 26 /S-ON5
10 RUN -
12 --- --- 30 --- ---
14 /S-ON
16 --- --- 34
18 --- --- 36 --- ---
RUN Signal
Output
Servo ON
Signal Input
21 *PAO
25 *PCO
DB
OFF5
Torque
29
Mon
31 --- ---
33 GND GND
Encoder
Divided
Output A
phaseEncoder
Divided
Output B
phase-
Encoder
Divided
Output C
phase-
DB OFF
Sign a l Input
Torque
Monitor
5V/Max.
Torque
Servo
Alarm
Output
Encoder
20 PAO
SPD-
28
MON
32 --- ---
ALM +Servo Alarm
Divided
Output A
phase+
Encoder
Divided
Output B
phase+
Encoder
Divided
Output C
phase+
Servo ON
Input
Speed
Monitor
1V/1000
RPM
Output
Note 1 Do not use empty terminals for relays.
Note 2 Connect the I/O signal cable shield wire to the connector shell. This is connected to the
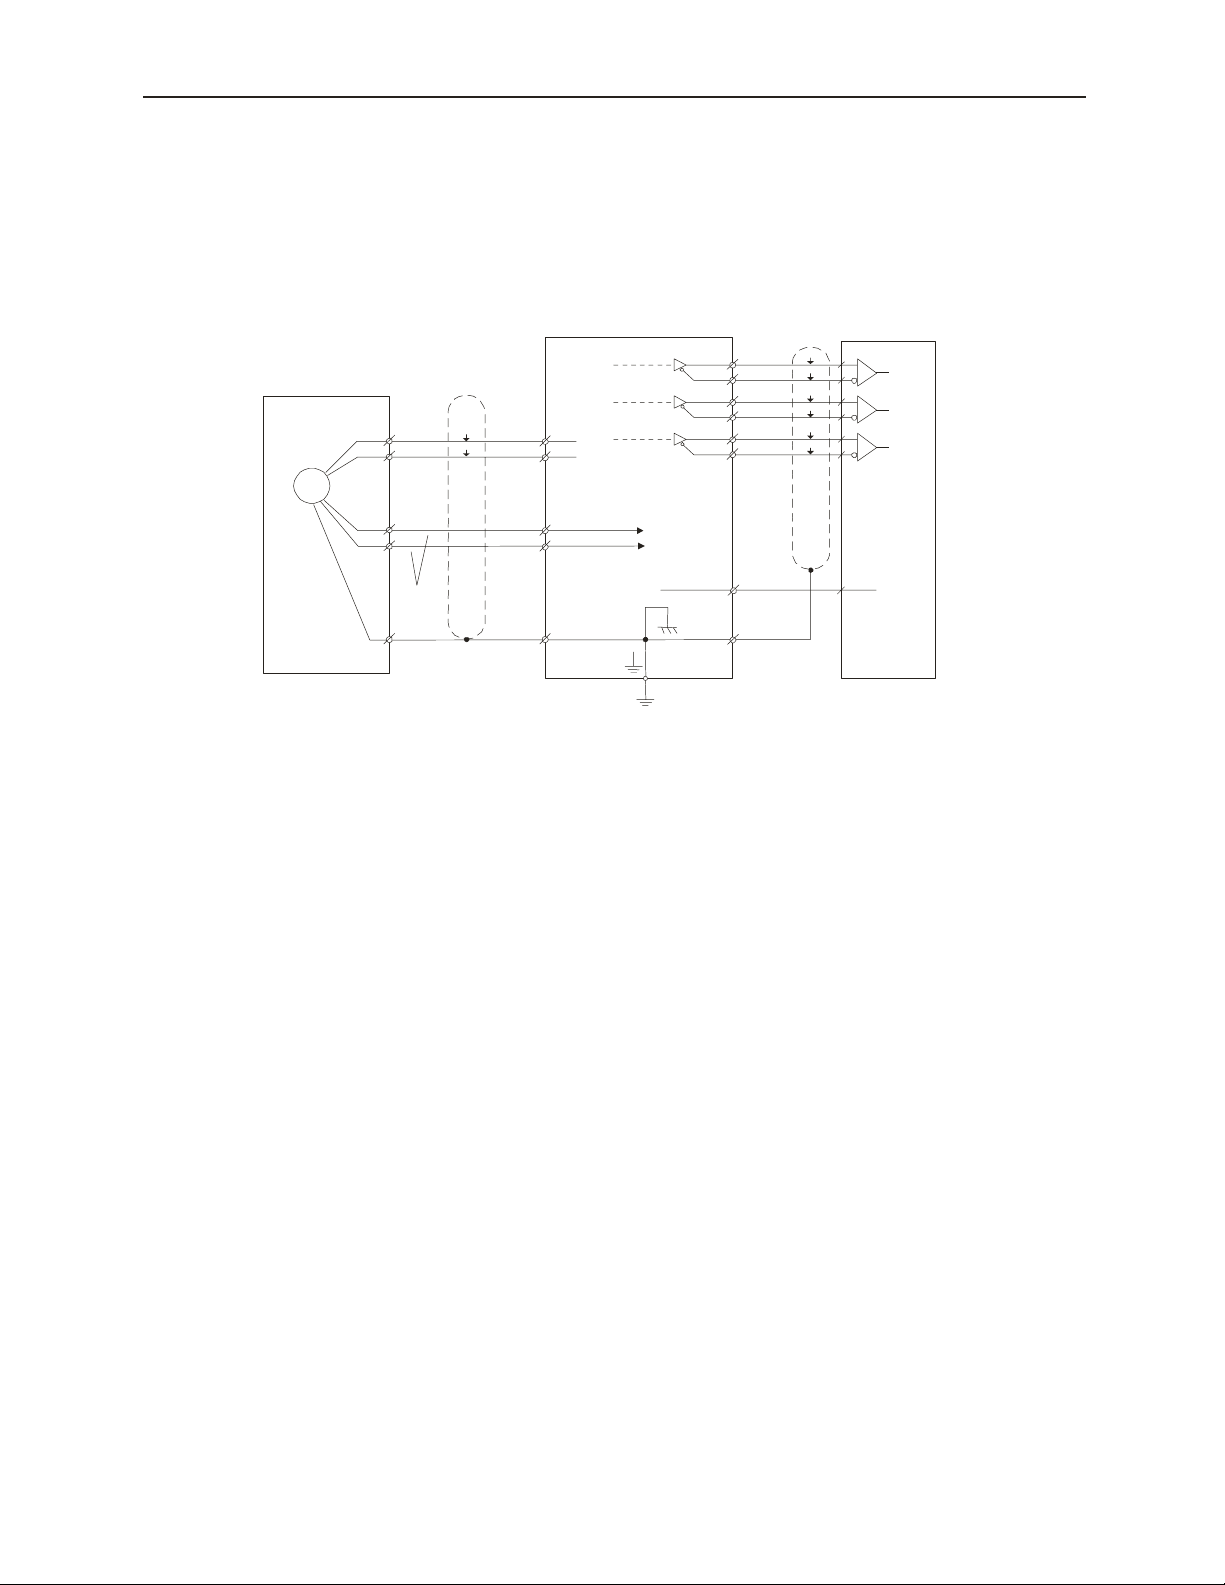
frame ground on the digital torque amplifier side connector.
■ CN1 Specifications
Specification for
Connector Used in
Digital Torque
Amplifier
10236-52A2JL-type
Right Angle 36P
Soldering
Type
10136-3000VE 10336-52A0-008 Sumitomo 3M, Inc.
Applied Receptacle Model
Case Manufacturer Name
17
Page 29

2.2 Input Signals
■ I/O Signal Names and Their Functions
The names and functions of the digita l torque amplifier I/O signals are shown below.
Input Signals
Common
Torque
Common
Signal Name
/S-ON
DB - OFF
+24VIN
CMD-IN
Pin
No.
14
26
15
13
3
Function
Servo ON
• The inverter out put is enabled to provide power to the motor.
DB Release
• A free run st ate has resul ted by releasing the DB.
Sequence si gnal control pow er input
• +24V power supply provided by customer.
Torque/Force Reference Input
• -10~+10VDC 10V= Peak Motor Torque
Output Signals
Signal Name Pin No. Function
ALM+
ALM -
PAO 20
*PAO
PBO
*PBO 23
PCO
*PCO
RUN+
RUN - 10
SPD-MON 28 Speed Monitor (1V/1000rpm) , Linear Scale 1V/1000mm/sec
TORQUE-MON 29 5V/Max Torque
FG Shell
34
35
21
22
24
25
7
Servo Alarm
: Turns OFF due to error detection.
A-phase Signal
2-phase pu lse (A-phase, B-phase)
B-phase Signal
C-phase Signal
Base Block Release Signal
: Output du ring base block release
The frame ground in connected upon connection of the I/O signal cable
shield wire to the connector shell.
Conversion Encoder Output S ignal
and origin pulse (C-phase) signal
18
Page 30

Reserved
Output Signals (Continued)
Signal Name Pin No. Function
1
5
8
9
11
12
16
17
18
30
31
32
36
Open Te rmi nal
(Note) Do not use empty ter m inals for relays, etc.
2.2 Input Signals
19
Page 31

2.2 Input Signals
■ Interface Circuit
An example is given below of connection of the digi tal torque amplifier I/O signals to an
upper level device.
■ Command Input Circuit and Interface
Analog Input Circuit
The analog signal is the torque ref erence signal. The input impedance is as follows.
• Command Input (CMD-IN): Approx. 14kΩ
The maximum allowable voltage for the input signal is
• 10V= Peak Motor Torque
Amplifier
(1/2W)
1.8kΩ
12V
25HP-10B
2kΩ
or more
3
1
2
1000:1
CMD-IN
SG
Approx.14kΩ
0V
±12V
■ Sequence Input Circuit and Interface
+24VIN
/S-ON etc.
Amplifier
3.3k Ω
Amplifier
DC
DC24V
50mA or more
+24VIN
/S-ON etc.
3.3kΩ
24V
50mAor more
Amplifier
DC24V
50mA or more
+24VIN
/S-ONetc.
3.3kΩ
This is connected by a relay or open collector transistor circuit. Select a low current type
when connecting by relay. If low curre nt relay is not used, this may cause a connection
fault.
20
Page 32
2.2 Input Signals
■ Output Circuits and Interfaces
The output signal circuits of the digital torque amplifier are of the three types shown
below. Configure the input circuit on the upper-level device to match each of these output
circuits.
• Connection with Line Driver Output Circuits
The output signals (PAO, *PAO, PBO, *PBO) where the encoder serial data was
converter to a 2-phase (A-phase, B-phase) pulse, and the origin pulse signal (PCO,
*PCO) are output by the line driver circui t. The upper- level device receives these
through the line receiver circuit. See “2.3 Wiring to the Encoder” for an example of
the connect io n circuit .
• Connection with Photocoupler Output Circuit
Servo alarms and other output signals f or sequence use are configured in the
photocoupler output circ uit. They are connected through the relay and line driver
circuits.
Digital Torque
Amplifier Side
DC5V~24V
0V
Relay
Digital Torque
Amplifier Side
P
DC5V~12V
0V
Note: The maximum allowable voltage and current capacity of the photocoupler output circuit are as
follows:
• Voltage: DC30V(Max.)
• Current: DC50mA(Max.)
21
Page 33
2.3 Wiring to the Encoder
2.3 Wiring to the Encoder
The wiring of the digital torqu e amplifier to the encoder is described here.
■ Connection to Encoder (CN2) and Output Signal Processing from Digital Torque
Amplifier (CN1)
Incremental *
Encoder
D(6)
PG
H(1)
G(2)
0.33mm
(Shell)
* S G M AH , SGMGH, S G M S H O n ly.
J
2
*
P
Shield
Wire
Digital Torque Amplifier
CN1
PG5V
PG0V
ov
Connector
Shell
1- 33
1-34
1-35
1-36
1-19
1-20
1-1
CN2
2-5
2-6
Output Line Driver
TI SN75ALS194
2-1
2-2
Connector
Shell
A-phase
B-phase
C-phaseC(5)
or equivalent
SG
PAO
*PAO
PBO
*PBO
PCO
*PCO
*
P
P
P
Applied Line
Receiver
TI SN75175
or equivalent
ov
(provided by customer)
22
Page 34
■ Encoder Connector (CN2) Terminal Array and Models
The CN2 terminal arrays and models are shown below.
CN2 Terminal Array
2.3 Wiring to the Encoder
1 PG5V
5 PS
Encoder Power
+5V
Encoder Serial Signa l
Input
2
PG0V
6
*PS
Encoder Power
0V
Encoder Serial Signal
Input
CN2 Connectors
CN2 Connectors
Model of
Connector Us ed
in Digital
Torque
Amplifier
53460-0611 55100-0600 54280-0600 Japan Molex, Inc.
Note: The plug and socket on the digital torque amplifier side are a set product FA1394 from Japan
Molex, Inc.
Note: The motor-side socket is connected to the connector for the SGMAH, SGMPH servomotor
encoder.
Note: The SGMGH and SGMSH servomotor enc oder connectors are shown belo w.
• Plug L-type: MS3108B20-29S or
• Straight: MS3106B20-29S
• Cable Clamp: MS3057-12A
Plug, soldered
type (digital
torque amplifier-
side connector)
Applied Plug (or socket) Model
Socket, soldered
type, (motor-side
connector)
Manufacturer
Name
Supp.
Yaskawa pro vi de s a dedi cat ed cab le fo r the en cod e r. Fo r det ai ls, see the fo llow i ng do cu me nt.
• Sigma II Servo System Product Catalog Supplement
(Doc.# G-MI#99001x-Sigma II)
23
Page 35

2.4 Cable Specifications and Peripheral Devices
2.4 Cable Specifications and Peripheral Devices
Ratings and specifications for peripheral devices, as well as cable specifications for digital
torque amplifiers are summarized in the tables below.
CAUTION
Wiring Precautions
• Do not bundle or run power and signal l ines together in the same duct.
Keep power and signal line s at le ast 11.81” (30cm) apart.
• Use twisted pa ir or shielded multi-core t wi s t e d pa ir wires for signal and
encoder (PG) feedback lines.
• The maximum length s for signal lines are as follows:
• Maximum of 9.84ft (300cm) for reference input lines.
• Maximum of 65.6ft (20m) for PG feedback lines.
• Use a cable with 164 ft (50m) specifications for distances over 65.6ft (20m).
■ Cable Specifications
SGDG
External Terminal Name
Terminal
Symbol
Main circuit power input terminals
Servomotor connection terminals U, V, W
Control power supply term inals L1C, L2C
Control I\O signal connector CN1 Twisted pair or shielded twisted pair wires
PG signal connector CN2
Ground terminal 14 AWG [HIV 0.003 (2.0)]
L1, L2
(Single Phase)
16 AWG [HIV 0.002
Core wire at least 28 AWG [0.0002
annealed copper t wis ted wires
Finished cable dimensions:
maximum
(6.8mm) for CN2.
Wire Size AWG [in
01GT 04GT
(1.25)]
16 AWG [HIV 0.002 (1.25)]
Φ0.63in (16mm) for CN1 and Φ0.27in
2
(mm2)]
14 AWG [0.003 (2.0)]
(0.12)], tinned,
Main circuit power input terminals L1, L2, L3
(Three-phase)
14 AWG [HI V 0 .003 (2.0)]
Servomotor connection terminals U, V, W
Control power supply terminals L1C, L2C
16 AWG [HIV 0.002 (1.25)]
Control I\O signal connector CN1 Twisted pair or shielded twisted pair wires
PG signal connector CN2
Core wire at least 28 AWG [0.0002
(0.12)], tinned,
annealed copper twisted wires
Finished cable dimensions: maximum Φ0.63in
(16mm) for CN1 and Φ0.27in (6.8mm) for CN2.
Ground terminal 14 AWG [HIV 0.003 (2.0)]
Notes: 1. Wire sizes were selected for three cables per bundle at 40°C ambient temperature with the rated current.
2. Use cables with a minim um withstand vol tage of 600V for main circuits.
3. If cables are bundled in PVC or metal ducts, consider the reduction ratio of the allowa ble current.
4. Use hea t-resistant cable under high ambient or panel temperat ures where normal vinyl cable will rapidly
deteriorate.
24
Page 36
2.4 Cable Specifications and Peripheral Devices
The following table shows types of cables. It is used in conjunction with the preceding
tables.
Cable Type
Temperature Rating of Conductor
Name Composition
PVC
IV
HIV
Standard polyvinyl chloride cable
600V PVC cable
Temperature-resistant vinyl cable
The following table specifies the appropriate cables for CN1 and CN2 digital torque amplif ier
connectors . Wire siz es we re s elect ed with the exp ec ta tio n of th ree ca bles per b und le, at an
ambient temperature of 40°C, at the rated current level.
Connector Name Signal Description Specification
Cable Use twisted pair or shielded twist e d pair wire.
Control I/O Signal
Connector
PG Signal
Connector
CN1
CN2
Applicable wire (AWG): 24, 26, 28, 30
Finished cable
Dimension
Cable Use Yaskawa cable, or shielded twisted pair wire.
Applicable wire
Finished cable
Dimension
Φ 0.63 (Φ16.0) maximum
(AWG): 24, 26, 28, 30
Use 22 AWG [0.000 5in
AWG [0.0002 in
wiring di stances up to 65.6ft (20m).
Φ 0.27 (Φ6.8) maximum
2
(0.34mm2)] for the encoder power supply and 26
2
(0.14mm2)] for other signals. These conditio ns permit
°C
—
60
75
25
Page 37
2.5 Standard Connection Examples
2.5 Standard Connection Examples
■ Single-phase Power Specification (SGDG-01GT, SGDG-04GT)
Power 90V~253V AC
24V~12V
Torque/
Force
Reference
Noise Filter
Emergency
Stop
MC1
Power
OFF
L1
Power
ON
RY10
MC1
B2
B1
MC1
Surge
Supressor
FG
L2
L1C
L2C
CN1-26
CN1-27
3.3KΩ
CN1-13 CN1-34
RY1
/S-ON CN1-14 CN1-35 ALM-
RY2
/DBOFF
CMD-IN CN1-3
GND CN1-4 CN1-21
3.3KΩ
CN1-15
A/D
SGDG-□□GT
Servo amplifier
SV ON 5
DB_OFF
SV ON
DB OFF
PA
PB
PC
ALM
RUN
SN75ALS174 or similar product
CN1-24
CN1-25
CN1-7
CN1-10
CN1-20
CN1-22
CN1-23
U
V
W
CN2
RY10
ALM+
RUN+
RUN-
PAO
/PAO
PBO
/PBO
PCO
/PCO
Motor
PG
24V~12V
Encoder
Divided
Output
26
FG
Page 38
■ 3-Phase Power Specification (SGDG-10GT, SGDG-15GT)
Power 90V~253V Ac
Emergency
Noise Filter
Stop
Power
OFF
Power
ON
RY10
2.5 Standard Connection Examples
MC1
Torque/
Force
Reference
24V~12V
Surge
Supressor
FG
MC1
MC1
L1
B1
B3
B2
L2
L3
*
L1C
L2C
CN1-26
CN1-27
3.3KΩ
CN1-13
RY1
RY2
CN1-14
/S-ON
/DBOFF
CN1-3
CMD-IN
GND CN1-4 CN1-21
3.3KΩ
CN1-15
SGDG-□□GT Digital
Torque Amplifier
DB_OFF
A/D
SV ON 3
PA
PB
PC
SV ON
DB OFF
ALM
run
SN75ALS174 or similar product
CN1-34
CN1-35
CN1-7
CN1-10
CN1-20
CN1-22
CN1-23
CN1-24
CN1-25
U
W
CN2
V
RY10
ALM+
ALM-
RUN+
RUN-
PAO
/PAO
PBO
/PBO
PCO
/PCO
Motor
PG
24V~12V
Encoder
Divided
Output
* For single-phase
applications, use terminals
L1 + L3 for the main
power connection.
FG
27
Page 39

Notes:
28
Page 40
3. Setup
3.1 Linear Motor Mounting
CAUTION
• In the case of linear motors, various changes c an occur according to the direct ion of the motor mounting
and the dir ection of the en coder mounti ng. Therefor e, perform set up carefull y.
Careless setup may result in injury.
■ Motor Mounting and Encoder Mounting
Mount so that the motor forward direction matches the encoder forward direction.
■ Setting the Linear Encoder Scale Pitch
Upon completing mounting and wiring, feed control power only, input (SW2) the correct
linear scale pitch use d by each applic ation. Alarm 0 (SW setting error) is output at the initial
power ON because the initial value is assumed to be “0”. This ceases occurring if the correct
value is set in SW2 and the power cycled.
3.1 Linear Motor Mounting
3.2 Rotar y Moto r Mounting
The SGM□H servomotor can be mounted in both the horizontal or vertical direction.
However, mistaking the mounting direction or mounting in an inappropriate location may
shorten motor life or lead to unexpected accidents. Correctly mount the motor according to
the following caution ary items.
CAUTION
• Do not connect the servomotor directly to a
commercial power source. This will damage the
motor.
The servo mo tor will not run without a dedicated
digital to rq u e am pl if ie r.
29
Page 41

3.2 Rotary Motor Mounting
Before Mounting
Important
The shaft end is treated with a rust-preventative agent. Before mounting the motor, wipe
off this rust-preventative agent with a cloth soaked in thinner.
When removing the rust-preventative agent, be sure that the thinner does not contact any
other parts of the servomotor .
■ Storage Temperature
Store the servomotor withi n the temper ature range below when storing without electric al
feed.
-20 ~ +60°C Temperature Range
Rustpreventative
A gent
■ Mounting Location
The SGM□H servomotor is intended fo r use indoors. Use in an environment meeting the
following conditi ons.
• Indoors, in a location free from corro sive or explosive gas.
• A location with good ventilation, with little dust, grime, or steam
• A location with an ambient temperature between 0~40°C
• A location with a relative humidity of 20%~80%, no condensation
• A location easy to inspect and clean
30
Page 42

Important
3.2 Rotary Motor Mounting
■ Alignment
Upon mating to the machi n e, make sure the motor shaft core and the machine shaft cor e
are coupled in a straight line. Mount the servomotor so that it falls within the alignment
accuracy in th e figure below.
The maximum deviation at all four sides cannot
exceed 0.03mm (rotated with the coupling)
The maxi mum deviation at all four sides cann ot
exceed 0.03mm (rotated with the coupling)
(1) Improper alignment can lead to vibration, which risks damaging the shaft coupling.
(2) When mo unting the coupling, do not apply shock directly to the shaft. This may damage th e encoder mounted
on the shaft end opposite t h e load.
■ Mounting Direction
The SGM□H servomotor can be mounted in either the horizontal or vertical direc tions.
■ Shaft Tolerance Ranges
Design machine systems so that the thrust loads and radial loads1 applied to the
servomotor shaft during ope ration fall within the tolerances in Table 3.1.
The allowable radial loa ds shown in the table are the maximum loads that can be applied
to the end of the output shaft.
1. Thrust Load, Radial Load:
Thrust Load (Fs): The shaft load applied parrallel to the shaft core.
Radial Load (Fr): Shaft load ap p l ied at a right angle to th e shaft core.
Motor
Fr
Fs
Shaft
31
Page 43

3.2 Rotary Motor Mounting
Table 3.1: Allowable Radial Load/Allowable Thrust Load for Servomotors
Motor Model
SGMAH-
SGMPH-
SGMGH-
SGMSH-
Allowable
Radial Load Fr
[N(kgf)]
A3 68(7) 54(5.5)
01 78(8) 54(5.5)
02 245(25) 74(7.5)
04 245(25) 74(7.5)
08 392(40) 147(7.5) 35
01 78(8) 49(5) 20
02 245(25) 68(7)
04 245(25) 68(7)
08 392(40) 147(15)
15 490(50) 147(15)
05A □ A 490(50) 98(10)
13A □ A 686 (70) 343(35)
10A 686(70) 196(20)
15A 686(70) 196(20)
Allowable
Thrust Load Fs
[N(kgf)]
LR
[mm]
20A5 68(7) 54(5.5)
25
25
35
5809A □ A 490(50) 98(10)
45
Reference Diagram
LR
Fr
Fs
■ Oil and Water Countermeasures
It is possible to take protective measures for motor operation in areas where water or oil
may drip. However, use a motor with an oil seal atta ched when needed to set through to
1
the shaft section
. In addition, mount the motor with the connector s facing downward.
Through
Shaft Section
■ Cable Stress
Do not bend or stretch the power line.
In particula r, be care fu l to wire the signal cable so that they are n ot subj ec t to str ess
because its core is very thin (0.2, 0.3mm).
1. Through Shaft Section
This refers to the gap where the shaft protrudes from the end of the motor.
32
Page 44

3.2 Rotary Motor Mounting
■ Vibration Resistance
Mount the servomotor with the shaft positioned horizontally. The servomotor will
withstand the following le vels of vibration on all three axes: front-to- back (X),
vertical (Y), and side-to-side (Z).
2
• SGMAH, SGMPH: 49m/s
• SGMSH, SGMGH, SGMDH, and SGMUH: 24.5m/s
(5G)
2
(2.5G)
Side-to-side
3.2.1 Vibration Clas s
The vibration class for SGMH servomotors operating at rated speed is 15µm
(maximum).
Position for measuring vibration
Vertical
Front-to-back
Hor izontal shaft
Impact applied to the servomotor
33
Page 45

3.3 Digital Torque Amplifier Installation
3.3 Digital Torque Amplifier Installation
The SGDG digital torque amplifier is a base-mo unted digital torque amplifier. Mount it
properly according to the following cautionary items as mistakes in the mounting method can
lead to failure of the unit.
■ Storage Conditions
Store the digital torq ue amplifier within the temperature range bel ow when storing
without electrica l feed.
Temperature Range: -20~ +85°C
LEGEND SGDG Digital Torque Amplifier
■ Mounting Conditions
Location
The following points shoul d be kept in mind with regard to the mounting location.
Installation
Conditions
Mounted in a Control
Panel
Mounted Near a HeatGenerating Object
Mounted Near a
Vibration Source
Design the control panel size, digital torque amplifier
installati on, and cooling method so that the ambient
temper atu re of t he dig ita l torq ue amp li fie r does not exc eed
55
°C.
Suppress the temperature rise due to radiated heat and
convection from the heat-generating object so that the
ambient temperature of the digital torque amplifier does
not exceed 55
Attach vibrat ion- prevent ative bracket s to the dig it al torque
amplifier mount ing surface so that the vibrations are not
communicated to the digital tor que amplifier.
Cautions on Mounting
°C.
34
Page 46

3.3 Digital Torque Amplifier Installation
Installation
Conditions
Mounted in a Location
Exposed to Corrosive
Gas
Others
Take measures to prevent the influx of corrosive gas. The
gas will have no immedi ate effect, but will lead to device
failures in the electronic components and contact-related
devices.
Do not install in areas with high temperature or hum idity,
or where the atmosphere contains dust or iron particles.
Cautions on Mounting
Control Panel Environmental Conditions
• Digital Torque Amplifier Ambient Temperature: 0~55°C
• Humidity: 90% RH or less
2
• Vi bration: 0.5G (4.9m/s
)
• Do not allow freezing or condensation to occur.
• Use an am bient te mperature of 45°C or less to maintain long-term reliability.
Mounting Direction
Mount in a vertical direction on a wall as shown in the figure below. Cool the digital
torque amplifier eit her with natural convection or a fan. Be sure to maintain this
direction. Securely fix the digital torque amplifier to the mounting surface by using the
mounting holes at 2~4 locations (the number of holes will differ depending on capacity).
Surface
Mounting
Ventilation
Cooling
Mount the amplifier with suffic ient peripheral space around the digi tal torque amplifier
consideration of the above figure so as to achieve sufficient cooling by either a fan or
natural convecti on.
35
Page 47

3.3 Digital Torque Amplifier Installation
r
Digital Torque Amplifier Mounting Standards
Observe the standards for mount ing into a control panel shown in the figure below,
including those cases where multiple digital torque amplifiers are installed in parallel
within a control panel (hereafter referred to as a “parallel platform”).
FanFan
30mm or more 10mm or more
50mm o
more
50mm or
more
Mount the digital torque amplif ier so that the front side faces the operator .
Side-by-side Installation
When installing digital torque amplifier side by side as shown in the figure above, allow
at least 0.39in (10mm) between and at least 1.97in (50mm) above and below each digital
torque amplifier. Install cooling fans above the digital torque amplifie rs to avoid
excessive te mperature rise and to maintai n even tem perature inside the cont ro l panel .
36
Page 48

3.4 Switch Settings
3.4 Switch Settings
■ SW1 Function Selection Switch (dip switches)
Switch No. Function At OFF At ON Default Setting
1
2 Torque Reference Filter No Yes ON
3 Input Power Selection
4
5
6
7
8 Not used ON
Status After DB Stop
During Base Block
Linear Scale Polarity
Reversal
Regen Overload Alarm or
Warning
Feedback Pulse
B-phase Reversal
Command Direction
Reversal
Release DB after
motor stop
DC-Power Input
Compatible
B-phase progression:
U, V , W direction
No Yes ON
Reversed Not reversed ON
Reversed Not reversed ON
Continue DB af ter
motor stop
AC-Power Input
Compatible
A-phase progressio n:
U, V , W direction
ON
ON
ON
(enabled only when
linear motor is used)
■ SW2 Linear Scale Pitch Setting (rotary switch)
Setting Linear Scale Pitch Setting Setting Linear Scale Pitch Setting
0*
1
2
3
4
5
6
7 Not used F Not used
0μm
2μm
4μm
20μm
40μm
800μm
1000μm
8 Not used
9 Not used
A Not used
B Not used
C Not used
D Not used
E Not used
* The defaul t se tting is 0 (0μm).
37
Page 49

3.4 Switch Settings
■ SW3 PG Divider Setting (rotary switch)
Setting PG Divider Setting** Setting PG Divider Setting**
0* 8192 P/R 8 3000 P/R
1 8000 P/R 9 2500 P/R
2 7200 P/R A 2048 P/R
3 6000 P/R B 2000 P/R
4 5000 P/R C 1800 P/R
5 4096 P/R D 1600 P/R
6 4000 P/R E 1000 P/R
7 3600 P/R F Not used
* The default se tt in g is 0 (20 4 8 ×4). ** 4× at host controller
For a 13-bit Rotary Motor
For a 17-bit Rotary Motor
Setting PG Divider Setting** Setting PG Divider Setting**
0* 65,536 P/R 8 30000 P/R
1 64,000 P/R 9 24000 P/R
2 60,000 P/R A 16000 P/R
3 50,000 P/R B 131,072 P/R***
4 40,000 P/R C 120,000 P/R***
5 36,000 P/R D 100,000 P/R***
6 32,768 P/R E 80,000 P/R***
7 32,000 P/R F Not used
* The default setting is 0 (16384×4). ** 4× at host controller
*** Overspeed alar m will activate at motor speeds o f 2500rpm or higher.
For Linear Motors
Setting PG Divider Setting Setting PG Divider Setting
0* 1/20 8 1/32
1 1/256 9 1/16
2 1/250 A 1/10
3 1/200 B 1/8
4 1/128 C 1/5
5 1/100 D 1/4
6 1/64 E 1/2
7 1/40 F Not used
* The default setting is 0 (1/20).
38
Page 50
3.5 Combinations
Digital Torque amplifi er and motor combinations are shown below.
■ Combinations with Rotary Motors
3.5 Combinations
SGMAH
Digital Torque
Amplifier Model
SGDG-01GT SGMAH-A3B
SGDG-04GT SGMAH-01B
SGDG-10GT SGMAH-08A
Compatible Motor Models
SGMAH-A5B
SGMAH-A3A
SGMAH-A5A
SGMAH-01A
SGMAH-02B
SGMAH-02A
SGMAH-04A
SGMPH
Digital Torque
Amplifier Model
SGDG-01GT SGMPH-01A
SGDG-04GT SGMPH-01B
SGDG-10GT SGMPH-08A
SGDG-15GT SGMPH-15A
Compatible Motor Models
SGMPH-02B
SGMPH-02A
SGMPH-04A
Digital Torque
Amplifier Model
SGDG-10GT
SGDG-15GT
SGMGH
Compatible Motor Models
SGMGH-05 □ A
SGMGH-09 □ A
SGMGH-13 □ A
39
Page 51
3.5 Combinations
SGMSH
Digital Torque
Amplifier Model
SGDG-10GT
SGDG-15GT
■ Linear Motor Combinations
Digital Torque
Amplifier Model
SGDG-01GT
SGDG-04GT SGLGW-40A253A
SGDG-10GT SGLTW-20A320A
SGDG-15GT SGLFW-50A380A
Compatible Motor Models
SGMSH-10 □ A
SGMSH-15 □ A
Linear Motor Models
SGLGW-40A140A
SGLGW-40A365A
SGLGW-60A140A
SGLGW-60A253A
SGLFW-20A090A
SGLFW-20A120A
SGLFW-35A120A
SGLTW-35A170A
SGLTW-35A320A
SGLFW-35A230A
SGLFW-50A200A
SGLGW-60A365A
SGLTW-20A170A
SGLFW-1ZA200A
■ Serial Conversion Unit and Applicable Motors
Serial Conversion Unit Model
JZDP-A00 □ - □□□
001 SGLGW-40A140A(P) 013 SGLTW-20A460A(P)
002 SGLGW-40A253A(P) 014 SGLTW-35A170A(P)
003 SGLGW-40A365A(P) 015 SGLTW-35A320A(P)
004 SGLGW-60A140A(P) 016 SGLTW-35A460A(P)
005 SGLGW-60A253A(P) 017 SGLFW-20A090A(P)
006 SGLGW-60A365A(P) 018 SGLFW-20A120A(P)
007 SGLTW-40A400A(P) 019 SGLFW-35A120A(P)
008 SGLTW-40A600A(P) 020 SGLFW-35A230A(P)
009 SGLTW-80A400A(P) 021 SGLFW-50A200A(P)
010 SGLTW-80A600A(P) 022 SGLFW-50A380A(P)
011 SGLTW-20A170A(P) 023 SGLFW-1ZA200A(P)
012 SGLTW-20A320A(P) 024 SGLFW-1ZA380A(P)
40
Applicable Motors
Serial Conversion Unit Model
JZDP-A00 □ - □□□
Applicable Motors
Page 52

4. Description of Functions
CN1-3
CN1-4
4.1 Torque/Force Control
This is the torque/force control-dedicated mode.
This control mode inputs the torque/force reference from CMD-IN (CN1-3 & CN1-4).
Amplifier
CMD-IN
CMD-IN
SG
4.2 Protection Sequence Design
This section describes the methods for integrating a protective sequence for safety purposes
using I/O signals from the digital torque amplifier.
SG
CN1-3
CN1-4
4.1 Torque/Force Control
Servo Alarm Output
Digital Torque Amplifier
Digital T orque A m plifier
Photocoupler O utput pe r
Output
Max. Usage voltage: DC30V
Max. Usage Current: :DC50mA
Photocoupler
CN1-34
MAX 50mA
CN1-35
ALM+
ALM-
The basic method for continuin g alar m-related “output signals” is shown below.
Prepare an ext ernal 24V usage power source . No 24V powe r source is integrated in the digital
torque amplifier. The photocoupler output signal is handled as follows:
Output → ALM+ CN1-34
Output → ALM- CN1-35
Servo Alarm Output
Signal ground for servo alarm
output
24V P ow er
+24V
0V
The output is “ON” when the digital torque amplif ier detects an error.
41
Page 53

4.2 Protection Sequence Design
r
Be sure to configure the external circuit so that the main power to the digital torque ampli fier
goes OFF at alarm output.
ON State
OFF State
CN1–34, 35 is “closed”,
CN1–34 is level “Low”
CN1–34, 35 is “open”,
CN1–34 is level “High”
Normal State
Alarm State
■ Servo ON Input
Serial Input Signal: The basic connection method and for Servo ON (/S-ON) is displayed
below. This is used to forcibly stop the servomotor in a “non-powered” state.
24V
Power
+24V
Upper-Level
Device
0
V
+24VIN
S-ON
→ Input/S-ON CN1-14 Servo ON
Switches the motor between a powered and a non-powered state.
When ON
CN1-14 is
“L” level
When OFF
CN1-14 is
“H” level
Sends po w er to th e m o to r. This is
the normal RUN state. (this is called
the 4sta te )
Sets the motor to a “non-powered”
state. O peration is not possible (this
is the Servo OFF state). Do not
perform Se rvo O FF while th e mot or
is running except during an
emergency stop.
Amplifier
CN1-13 3.3kΩ
CN1-14
5mA
Servo ON
Servo OFF
Photocouple
Motor “Powered”
State
The motor runs
according to the
input signals
Motor Non- P o w ered
State
Operation is not
possible
Important
42
Do not start/stop the motor by using the (/S -ON) signal. Always start/stop the motor with an
input command.
Page 54
4.2 Protection Sequence Design
r
■ DB OFF Input
Sequence Input Signal: The basic connection and handling method for the (DB OFF)
signal is shown below. This is used to forcibly release the “DB stop state” during Servo
OFF from the upper-level device .
24VPower
+24V
Upper-Level
Device
0V
+24VIN
DB-OFF
Amplifier
CN1-13 3.3kΩ
CN1-15
5mA
Photocouple
→ Input DB OFF CN1-15 DB OFF
Switches the motor between a powered and a non-powered state.
When
ONCN1-15
is “L” level
When
OFFCN1-15
is “H” level
DB stop at Servo OFF DB ON
Releases the DB stop and goes to
free run at Servo OFF
DB OFF
DB Sto p State
DB stop at Servo OFF
DB Stop Release
Release DB stop
according to an input
signal
■ RUN Signal Output
Photocoupler Output Signa l: The basic connection method and handling method for the
“RUN” signal is shown below. This output signal indicates that the base block on the
output inverter is rel eased, and power is being applied to the motor.
Photocoupler Ou tput per
Output
Max. Use Voltage: DC30V
Max. Output Current :
DC50mA
Output → RUN CN1-7
ON State
OFF State
Digital Torque Amplifier
CN1-7
C N 1-10
RUN Signal Output
CN1–7, 10 is “clos ed”
CN1–7 is le ve l “ L”
CN1–7, 10 is “open” CN1–
7 is level “H”
+
RUN
RUN-
Base Block
Base Block Releas ed
24V Pow er
+24V 0V
43
Page 55

4.3 Encoder Signal Output
l
e
4.3 Encoder Signal Output
The output signa l following division within the digital torque amplifier of the enc oder output1
can be output to an external device.
Upper-Leve
Devic
Encoder
Serial Data
PG
Digital Torque
Amplifier
CN2 CN1
Division
Circuit
A-Phase
B-Phase
C-Phase
The output circuit is a line driver output. Connect in consideration of the following
circuit.
Digital Torque
A-Phase
B-Phase
C-Phase
Amplifier
OV
Connector Shell
CN1-20
CN1-21
CN1-22
CN1-23
CN1-24
CN1-25
CN1-1
PAO
*PAO
PBO
*PBO
PCO
*PCO
‚o
‚o
‚o
Shield Wire
Upper-Level Device
Line Receiv er
R
R
R
2
1
6
7
10
9
8‚bOV16
3
5
11
Choke
Coil
+5
V
+
-
Smoothing
Capacitor
A-Phase
B-Phase
C-Phase
+5
V
0V
‚o: Shows a twisted pair wire.
Applied Line Receiver: TI SN75175 or MC3486equivalent
R (Termination Resistance): 220~470Ħ
‚b (Decoupling Capa citor) : 0.1ƒÊF
1. After Division: This means the output conve rted to the set pulse ratio based on the pulse data from the
encoder mounted on the motor. The unit here is “No. of Pulses/Rotat ion”.
44
Page 56
■ I/O Signals
In Reverse OperationIn Reverse Operation
In Forward Operation
The details on the output signal are as follows:
4.3 Encoder Signal Output
Output → PAO CN1-20
Output → *PAO CN1-21
Output → PBO CN1-22
Output → *PBO CN1-23
Output → PCO CN1-24
Output → *PCO CN1–25
Encoder Output A-phase
Encoder Output /A-phase
Encoder Output B-phase
Encoder Output /B-phase
Encoder Output C-phase
Encoder Output /C-phase
The divided encoder signal is output.
The division ratio is set in the fol lowing switches.
Encoder Di vision Ratio
Setting
SW3
■ Output Phase Form
In Forward Operation In Reverse Operation
A-Phase
B-Phase
C-Phase
90
K
A-Phase
B-Phase
C-Phase
tt
90
K
Output → SG CN1–2
Signal Ground
Signal Ground: Connect to “0V” on the upper- level device.
45
Page 57

4.3 Encoder Signal Output
■ PG Divider Setting
Set the pulse division rat io by the following switches.
Delivery
Setting
SW3
PG Divider
Setting
Unit
P/R
Setting Range
16,000~131,072 (Rotary 17-bit) 65,536
1000~8192 (Rotary 13-bit) 8192
1/256~1/2 (Linear Motor) 1/20
Set the number of output pulses output by the encoder output signals (PAO, *PAO, PBO,
*PBO).
Output Terminals
PAO(CN1-20)
Servo Motor
Encoder
PG
Serial Data
Amplifier
Divider
*PAO(CN1-21)
PBO(CN1-22)
*PBO(CN1-23)
A-Phase
Output
B-Phase
This divides the pulses from the motor en coder (PG) by the number of pulses set there,
then outputs it. The setting value is the number of output pulses per motor rotation. Set
this to match the command unit of the machine controller. The setting range differs
according to the encoder used.
46
Page 58

4.4 Analog Monitor
The following signals can be monitor ed in the analog voltage form.
1CN Pin No. Signal Name Content
4.4 Analog Monitor
28
29 Analog Monitor 2 Torque = 5V/Max. Torque
Analog Monitor 1 Motor speed
: 1V/1000r/min or 1V/1000mm/sec
The analog monitor output volta ge is 8VDC (Max.). The output voltage will invert if it
exceeds 8VDC.
4.5 Regenerative Resistor Selection
When the servomotor is operated in electrical generator mode, the servo amplfier will absorb
electrical power . This is c alled regenerative power. Although the regenerative power is
absorbed by charging the smoo thing capacitor of the digital torque amplifier, the regenerative
power will be further consumed by the regen resistor if the chargeable energy limit of the
capacitor is exceeded. The servomotor is operated in the regen (electrical generator) mode in
the following situations:
• Deceleration to stop time during acceleration/deceleration operation
• Vertical axis load
• Continuous operation where the servomotor continues rotating from the load side
(overhauling load)
The capacity of the regenerative resistor integrated within the digital torque amplifier is
designed for short-term operation only, such as the deceleration to stop period. Operation is
not possible with an overhauling load. Install an external regen resi stor if the regen power
exceeds the processin g capab ility of the digital torque amplifier. The specifications of regen
resistors inte grated in digital torque amplifiers and the regen power the y can process
(average) are shown below.
Integrated Regen Resistor
Applied Digital T o rque
Amplifier
Resistance (Ω) Capacity (W)
SGDG-01GT/-04GT - - -
SGDG-10GT 50 60 12 40
SGDG-15GT 30 70 14 20
* The regen capa city (avera ge) which can be proc essed is a 20% rat ing of the regene rative resistor capacity
integrated within the digita l to rq u e amplifier.
Specifications
Regen Power
Processed by
Integrated
Resistor (W)
Minimum
Total
Resistance
(Ω)
40
When installing an external regen resistor, make the resistance the same as that of the resistor
integrated withi n the digital torque amplifier. When using several resistors with small
resistance co m bined in a gr oup t o inc rea se the capacity (W) of the regen resis tor , se lect
resistors so that the value including the resistance error is equal to or greater than the
“minimum allowable resista nce” in the above table.
47
Page 59

4.5 Regenerative Resistor Selection
■ External Regen Resistors
(1) If the power resistor is used at the rated load rate, resistor temperatures will reach 200°C~300°C. Be sure to
Important
derate be fore using. Check with the manufacturer for the lo ad characteristics of the resistor. Use at a load rating
of 20% or less when using natural cooling (natural convection cooling) , and at 50% or less when forced air
cooling is used.
(2) For safety reason s , w e re co m m e n d th e use of resi st ors with the rmostatic sw it ch es.
■ For Digital Torque Amplifiers of 400W Capacity or Less
SGDG-01GT
The SGDG-01GT does not have the regen transist or built-in even though there are
terminals for connecting an external regen resistor. Therefore, for external regen
requirement, the JUSP-RG08D external regen unit must be used. This unit connects
directly across the DC bus. It is a self-contained unit consisting of bus sensing circuitry,
switching IGBT, 50 ohm power resistor, and alarm relay contacts. The regen capacity of
this unit is 60W before derating. The convection cool capacity is 12W. Capacity
increases to 30W with forced-air cooling.
When this external regen unit is used, #5 of SW1 in the SGDG-01GT should be turned
OFF to avoid erroneous alarms.
The following is the dimension and spec ifications of the JUSP-RG08D:
Dimensional Drawings
48
Page 60

Regenerative Unit Specifications
4.5 Regenerative Resistor Selection
Type
Applicable Servopack SGDG Servopack
Regenera tive Working Voltage 3 80V dc
Regenerative Proce ssing Current 8Adc Regenerative res istance:50
Regenerative resistance
Error Detection Function
Alarm Output
Dimensions in mm
(inches)
discon nection, regenerative
transistor fault, overvoltage
Normally closed contact (open
when prote ctive funct ion
operates)
55W x 160H x 130D
(2.17W x 6.30H x 5.31D)
JUSP-RG08
JUSP-RG08D
200V operation ok
Remarks
Ω 60W
SGDG-04GT
The SGDG-04GT has terminals for connecting an external regen resistor of higher
capacity. However, the SGDG-04GT does not aut omatically recognize this external reg en
resistor and it doesn’t activate the regen IGBT. Thus, when an external resistor is
connected, the regen energy is still processed by internal regen capacity. The alarm #4
(overvoltage) will occur if the regen energy is too high. To add external regen capability
to the SGDG-04GT, one of the following methods may be used:
1. Use external regen unit JUSP-RG08D. Refer to the information in the
table above for more de tails. When this exte rnal regen unit is used, #5
of SW1 in the SGDG-04GT should be turned OFF to avoid erroneous
alarms.
or
2. Use SGDG-04GTY22P for external regen application only. If the user knows that the
application requires extra regen capacity, the Y-mod unit must be ordered. With
Y22P-mod, two (2) external regen resistors, RH500N25_ohmK, wired in series must
be connected to the SGDH-04GT at all times. These resistors should be connected
across terminals B1 and B2. The convection cool capacity of these two resistors in
series is 120W. The capacity increases to 300W with forced-air cooling. Therefore,
the items required are:
1 x SGDG-04GTY22P
2 x RH500N25_ohmK
49
Page 61

4.5 Regenerative Resistor Selection
Connecting the JUSP-RG08D to the SGDG-01GT/SGDG-04GT
D
a) A regenerative unit has the fol lowing fault detection functions:
• Detecting disconnecti on in a regene rative resistor
• Detecting faults in a regenerative resistor
• Detecting overvoltage
b) When one of these fault detection functions operates, the internal alarm relay is
actuated. Then the circuit between output terminals C1 and C2 is opened.
c) When an external resistor is use d, r emove the shorting jumper between Y4 and Y5.
Then, connect the resistor between P/Y3 and Y4.
d) The resistance value of the ext erna l resistor should be 50
Ω min.
SGDG-04GTY22P
Connect the regen resistor between terminals B1-B2 on the SGDG-04GTY22P digital
torque amplifier.
Amplifier
SGDG04GTY22P
B1
Regen R esistor
50
B2
* The regen resistor is provided
by the customer.
Page 62

4.5 Regenerative Resistor Selection
■ For Digital Torque Amplifiers of 500W Capacity or More
Open terminals B2-B3 on the digital torque amplifier (remove the wire), and connect the
regen resistor betwe en ter minals B1-B2.
Amplifier
Important
B1
Regen R esistor
B2
B3
Be sure to remove the lead wire
between B 2-B3.
* The re gen reistor is supplie d
by the customer
The regen resistor reaches high temperatures. Use wires with high-temperature insulation,
and make sure the wires do not come into contact with the regen resistor.
When an external resistor is connected, turn OFF #5 of SW1. Be sure the energy
capacity of the res i sto r is ad eq uate to dissipate the reg en en erg y of the loa d.
■ Calculating Regen Energy
For the procedure to calculate regen resistor capacity, please refer to Chapter 5 of the
Sigma II Series Servo System User’s Manual (Doc. # YEA-SIA-S800-32.2x).
51
Page 63

Notes:
52
Page 64

5. Servo System Maintenance/ Inspection
5.1 Motor Inspection
The procedures for simple daily maintenance of the servomotor are shown in Table 5.1.
Because AC servomotors are brushless, simple daily inspection is sufficient. The inspection
periods in the table are standard scales. Determine the usage conditions and environment, and
then decide an appropriate inspection period.
Do not disassemble the servomot or for maintenance/inspection. Contact your Yaskawa
Important
representative or sales office if the servomotor is to be disassembled.
Table 5.1: Servomotor Inspection
5.1 Motor Inspection
Inspection
Item
Check fo r
vibration or noise
External
Inspection
Changing the oil
seal
Comprehensive
Inspection
Inspection
Period
Daily Inspect by touch or hearing.
According to soiling
conditions
Once every 5,000
hours mini m um
Every 20,000 hours
or 5 years,
minimum
Inspection/Work
Content
Clean w it h cloth or air.
Remove from m achine and
replace.
Cont ac t yo u r Yaskaw a
service department.
Notes
The level should not be
greate r than normal.
-
Only for motors with oil
seals.
The customer should not
disassemble/clean the
servomotor.
53
Page 65

5.2 Digital Torque Amplifier Inspection
5.2 Digital Torque Amplifier Inspection
Digital torque amplifier inspection is summarized in the table below. Although there is no
need for daily inspection, perform inspections at least once per year.
Table 5.2: Digital Torque Amplifier Inspection
Inspection
Item
Unit, Board
Cleaning
Loose Screws
Component Fault
in Unit or Board
Inspection
Period
Once per year
minimum
Once per year
minimum
Once per year
minimum
Inspection Content
There shou ld be no grime,
dust, or oil on the unit.
There shou ld be no
loosene ss in the terminal
block and connector
mounting screws.
There should be no cha nges
in coloration due to heat,
damage, or wi re breakage.
Measures Taken at
Error
Clean with air or cloth.
Tighten
Consu lt Yaskawa.
■ Component Replacement Timeline
The components in the table below are subje ct to mechanical wear or degradation over
time. Inspect these periodically for purposes of preventat ive maintenance.
Digital torque amplif iers overhauled by Yaskawa are shipped with their system switches
returned to their factory default settings. Be sure to verify these switches before
operating.
Table 5.3: Periodic Inspection of Components
54
Standard
Component Name
Replacement
Replacement Metho d, Other
Period
Cooling Fan 4 ~ 5 Years R e p l ace with a new item.
Smoothing Capacitor 7 ~ 8 Years
Relays
Fuses 10 years Rep l ac e w i t h a ne w i te m .
Dischar ge Capacito r on
Printed Circuit Board
―
5 years
Replace with a new item. (determine by
inspection)
Determ ine by inspection
Replace with a new bo a rd . (determin e
by inspection)
■ Use Conditions
• Ambient T emperature: Yearly average 30°C
• Load Ratio: 80% or less
• Operation Rate: 20 hours or less per day
Page 66

5.3 Alarms
POWER ON: Green LED turns ON at control power ON.
CHARGE LED: Red LED turns ON at main circuit power ON.
■ 7-Segment LED
Normal
Status
■ Alarm List
5.3 Alarms
Base B lock
Servo ON
Alarm
Display
Alarm Name Content
Switch Setting Error
Overcurrent Overcurrent flowed to IGBT
Regen Circuit Error
Overvoltage The main circuit vo ltage exceeds 420V*.
Overspeed
SW2, SW3 are not set during line ar motor
combination
・Regen resistor disconnection
・Regen transistor short
The regen energy exceeds the capacity of
the regen resistor*#.
Detected when the motor speed exceeds the
maximum speed*.
Undervoltage The main ci rc uit volta ge i s be low 70V*.
Operati on for several seconds or tens of
secon ds at a t or qu e/f or ce grea t ly in exc e ss of
Overload
the rating*#.
Continuous operation above the rated
torque/force*.
55
Page 67

5.3 Alarms
Alarm
Display
Alarm Name Content
Communication error between encoder and
Encoder
Communicati on Error
Runaway Detection Motor ru n awa y*.
Encoder Failure
Main Circuit Power
Error
digital to rq u e am pl if ie r.
Communication between the encoder and
digital torque amplifier failed three times in
succession.
Checksum error in EEPROM wit hin
encoder
Error in the number of pulses in encoder
rotation
Error in EEPROM within encod e r
Error in communication data between
encoder and digital torque amplifier.
DC input with AC input settings for main
circuit power or AC input with DC input
settings.
Main circ uit power was fre quently tuned
ON/OFF*.
Improper combination of motor and digital
torque amplifier capacities.
Combination Error
Digital Torque
Amplifier Fault
Linear Motor Scale
Polarity Error
* Reset at S–ON signal ON.
# LED will blink at warni ng before alarm.
Improper motor combination.
Failure of A/D converter used in command
input
Servo amplifier system error
Polarity setting of the linear motor scale A,
B-phase s is reversed.
56
Page 68

Appendix A: Host Controller Connection Examples
Appendix A:Host Controller Connection Examp les
This appendix provides example s of SGDG digital torque amplifier connection to typic al host
controllers. Please refer to the manuals of the host controllers f or more details before actually
connecting to them.
A.1 Connecting the Galil IMC-1900/2900
LEGEND - Galil, Minimum Servo Interface
SGDG, CN1
3
4
20
21
22
23
24
25
26
33
CMD-IN
GND
PAO
PAO
PBO
PBO
PCO
PCO
SV ON5
GND
CASE
P*
P*
P*
P*
P*
IMC-1900 / 2900
MOCMDn
GND
+MAn
-MAn
+MBn
-MBn
+INn
-INn
AMPENn
GND
P* = Twisted Pair
n = Ax i s Des ignat i on, X, Y, Z or W
Caution:
Galil motion cont rol lers all ow to reverse the loop and encoder polari ty with t he M T and
CE commands. Check applicable Galil produc t manual s for the appropriate procedure
on proper loop and encoder phasing. Incorrect phasing may cause the motor to
"run away!"
57
Page 69
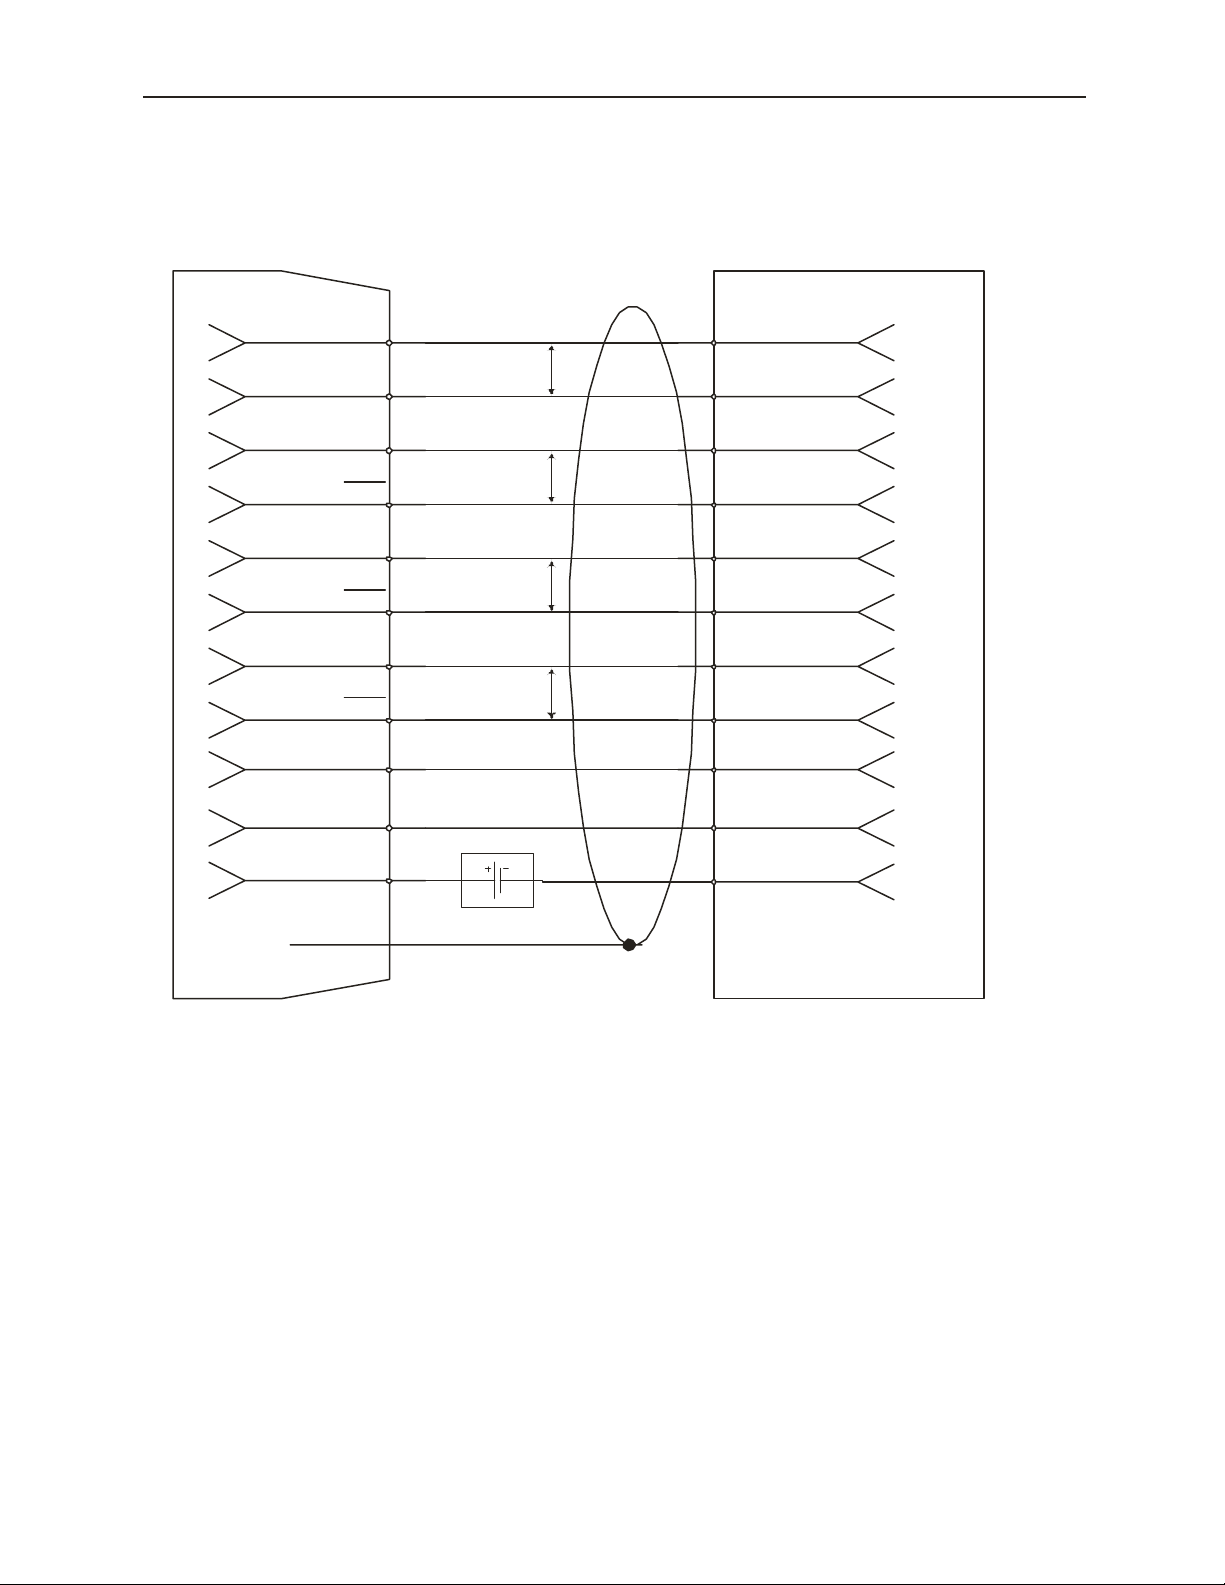
Appendix A: Host Controller Connection Examples
A.2 Connecting the Delta Tau PMAC2
LEGEND - Delta T au PMAC2, M inimum Servo Interf ace
SGDG, CN1
3
4
20
21
22
23
24
25
33
14
13
CMD-IN
GND
PAO
PAO
PBO
PBO
PCO
PCO
GND
/S-ON
+24V
P*
P*
P*
P*
ACC - 8E
DACnA+
AGND
CHAn+
CHAn-
CHBn+
CHBn-
CHCn+
CHCn-
GND
AMP_ENAn+
AMP_ENAn-
TB x - 1
TB x - 3
TB y - 1
TB y - 2
TB y - 3
TB y - 4
TB y - 5
TB y - 6
TB y - 8
TB x - 7
TB x - 8
CASE
Note:
Jumper pin 1 to 2 on E1 to power ACC-8E digital 5V circuitry from PM A C2
through flat cable on JM ACH port.
Jumper pin1 to 2 on E4 (axis n=1) and on E7 (axis n=2) for normally open relay
contact between A MP_ENA n + an A MP_ENAn-.
58
24V Power Supply
P* = Twisted Pair
n = Axi s Designation: 1 or 2
when n=1, x=5 and y= 2
when n=2, x=7 and y= 3
Page 70
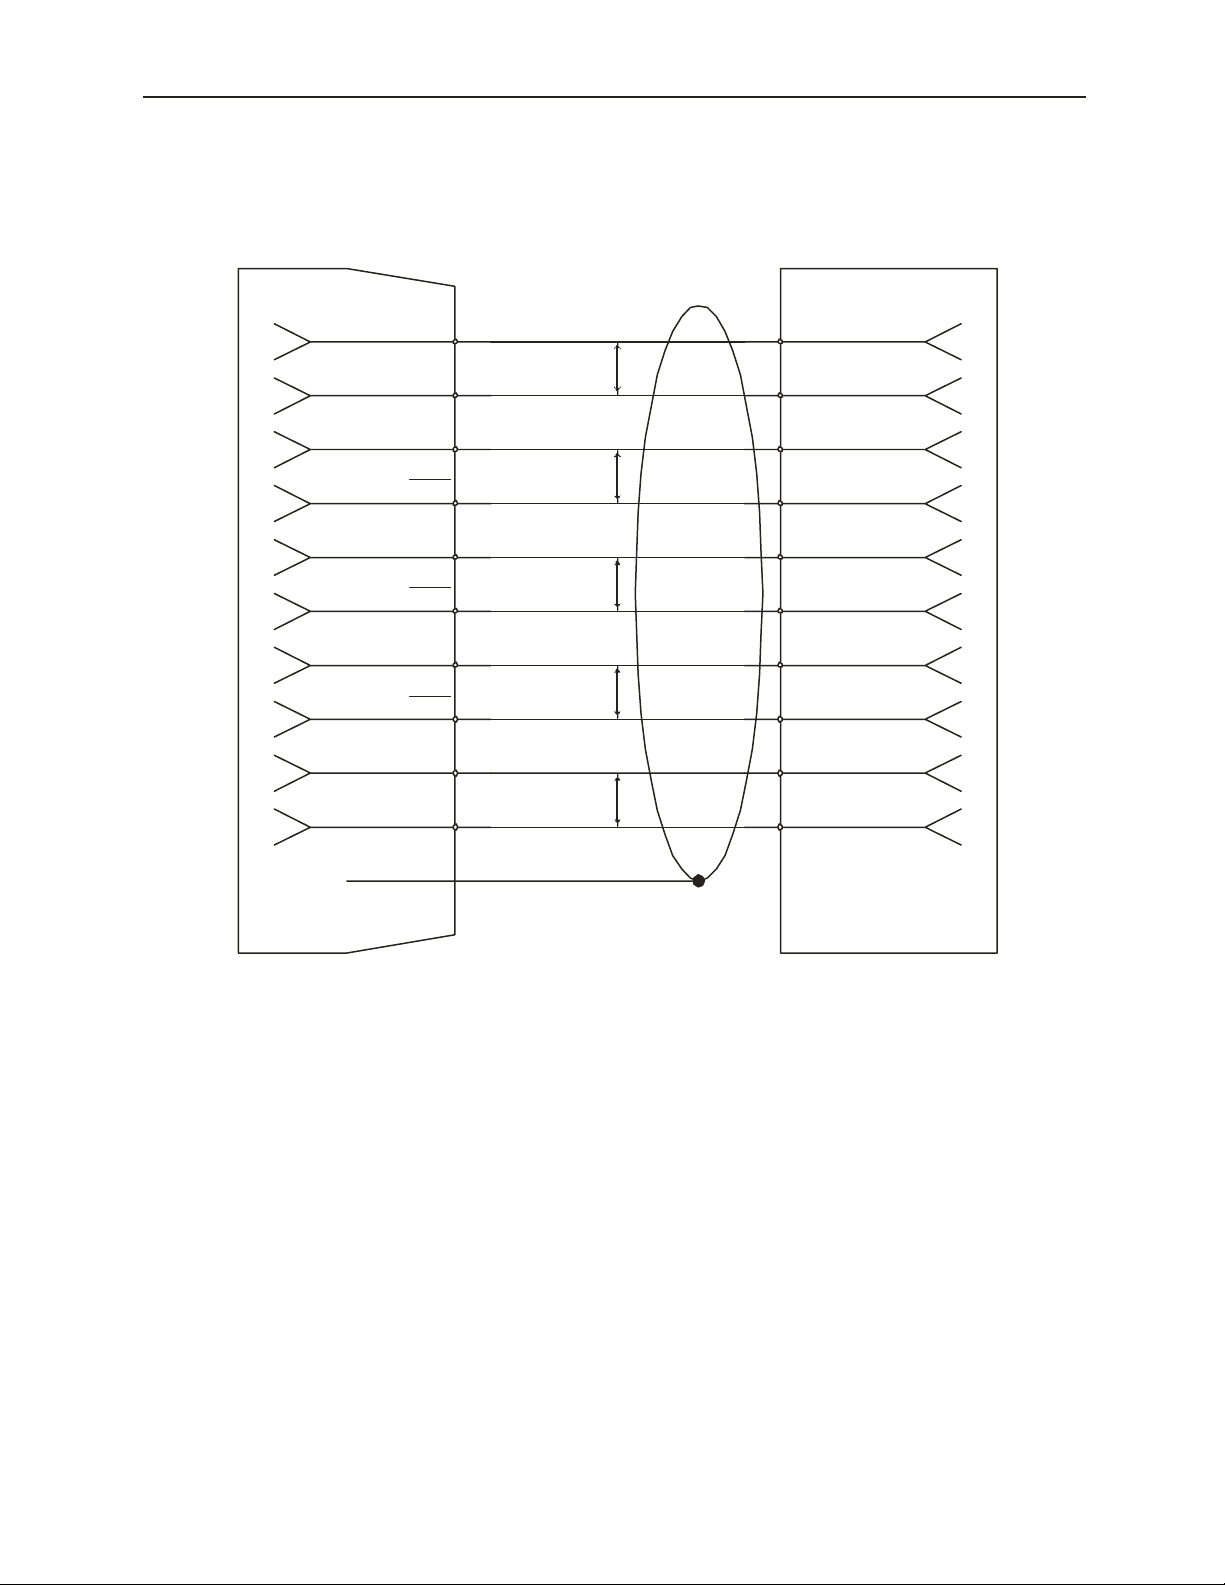
A.3 Connecting the MEI PCX/DSP
LEGEND - MEI PCX/DSP, Minimum Servo Interface
SGDG, CN1
Appendix A: Host Controller Connection Examples
20
21
22
23
24
25
26
33
3
4
CMD-IN
GND
PAO
PAO
PBO
PBO
PCO
PCO
SV ON5
GND
CASE
P*
P*
P*
P*
P*
+/ -10V Anal og
Out n
AGND n
Enc oder A+ n
Enc oder A- n
Enc oder B+ n
Enc oder B- n
Enc I ndex+ n
Enc I ndex- n
Am p Enab le
Out n
GND n
P* = Twisted Pair
n = Ax i s Des ignat i on, 0, 1, 2. . .
Signals may be f r om diff e rent c onnectors on MEI cont r oller .
Consult ME I DSP S eri es Motion Cont r oller Installat ion G ui de for details.
59
Page 71
Appendix A: Host Controller Connection Examples
e
A.4 Connecting the Acroloop ACR-8010
LEGEND - Acroloop (ACR-8010), Minimum Servo Interface
SGDG, CN1
3
4
CMD-IN
GND
P*
ASIG-x
AGND-x
Torque Reference should b
mapped to one of these
analog out p uts
20
21
22
23
24
25
26
33
PAO
PAO
PBO
PBO
PCO
PCO
SV ON5
GND
P*
P*
P*
P*
CHAn
CHAn'
CHBn
CHBn'
MRKn
MRKn'
OUT-y
AGND
CASE
P* = Twisted Pair
n = Axis Designation, 0, 1, 2...
x = A nalog output number
y = Digital output number
Encoder type is Differential Line Driver (+5 Volt Outputs) so Pullups should be rem oved
Encoders 0-3 are on P1A co nnector
Encoders 4-7 are on P1B co nnector
ASIG-0 and AGND-0 through ASIG -7 and GND-7 are on P2 conn ector
AGND is on P2 connector
OUT-32 through OUT-63 are on P3 connector
Servo on should be
mapped to one of these
digital outputs
60
Page 72

Appendix B: Installation Conditions for EMC Directives
Appendix B: Installation Conditions for EMC Directives
The following conditions mus t be satisfied to adapt a combination SGM□H servomotor and an
SGDG digital torque amplifie r to EMC directives (EN55011-2 and EN61000-6-2).
■ EMC Installation Conditions
This section describes the installation conditions that satisfy EMC guidelines for each
model of the SGDG digital torque amplifier. Also, it describes the EMC installation
conditions satis fied under test conditions prepared by Yaskawa . The act ual EMC level
may differ depending on actual syste m configuration, wiring, and other conditions.
61
Page 73
Appendix B: Installation Conditions for EMC Directives
Shield cable (2m)
Motor
Encoder
Core
5m
②
Clamp
Core
Earth Plate/Shield Box
U,V,W
③
Clamp
Core
CN2
CN1
SGDG -04GT
L1C,L2C
L1,L2
PE
Controller cable
①
② Motor cable Shield cable (5m)
③ Encoder cabl e Sh ield cable (5m)
④ AC Line cable Shield cabl e ( 2m)
Symbol Name Specification
①
Core
Clamp
Controller
62
Filter
Noise
Clamp
④
SGDG-04GT
SGDG-01GT
AC200V
Power supply
Single phase
2m
FG
Clamps : Fix and ground the cable shield using a piece of conductive metal.
Page 74

Appendix B: Installation Conditions for EMC Directives
Controller cable
Motor
Encoder
① Shield cable (2m)
② Motor cable Shield cable (5m)
③ Encoder cable Shield cable (5m)
④ AC Line cable Shield cable (2m)
Symbol Name Specification
Core
5m
Clamp
Core
③
CN2
CN1
①
Controller
②
Clamp
Core
Earth Plate/Shield Box
U,V,W
SGDG-15GT
L1C,L2C
L1,L2,L3
PE
SGDG-10GT
SGDG-15GT
Noise
Clamp
AC200V
Power supply
Filter
④
3 phase
FG
2m
Clamps : Fix and ground the cable shield using a piece of conductive metal.
63
Page 75

Appendix B: Installation Conditions for EMC Directives
■ Cable Core and Cable Clamp
■ The Cable Core
Attach the core on the cable as shown below:
Cable Model
Quantity
ESD-SR-25
1
Note: The diagram shows two turns of the cable
Turn 2
Manufacturer
Tokin Corp.
The table below shows the cable and position where the core is attached.
Cable Name Mounting Position of the Core
Controller Cable
Servomotor Cable
Encoder Cable
Near the controller and digital torque ampl ifier.
Near the digita l torque amplifier and the servomotor.
Near the digita l torque amplifier and the servomotor.
■ Cable Clamp
The figure below shows the cable shiel d using a piec e of conductive metal.
<Example of Cable Clamp>
Cable
Core
64
Clamp
Cable
Shield (Cable sheath stripped)
Fix and ground the cable shield
using a piece of conductive metal
Remove paint on mounting surface
of ground plate
Page 76

■ Noise Filter for Brake Power Supply
FN2070-6/07 (Made by Schaffner) for servomotors of 0.4kW or less.
■ Cable Specifications
Shielded cables shoul d be used for the following cables:
AC power input line cable (between the power supply and the noise filter)
Servomotor cable (betwee n the digi tal torque amplifier and the servomotor)
Encoder cable (between the digital torque amplifier and the servomotor)
Controller cable (betwe e n the digital torque amplifier and the controlle r)
■ Recommended Ferrite Cores
Cable N am e Ferrite Core s Manufa ctu rer
Appendix B: Installation Conditions for EMC Directives
Controller Cable
Encoder Cable
Servomotor Cable
■ Shielded Bo x
A shielded box, a closed metallic encl osure, should be used for shielding elect roma gnetic
interference. The structure of the box should allow the main body, door, cooling unit, etc., to
be attached to the ground. The box opening should be as small as possible.
ESD-SR-25 Tokin
400W or lower ESD-SR-25 Tokin
1kW or higher PC40T90×13.5 ×74 TDK
65
Page 77

Notes:
66
Page 78

INDEX
A
Acroloop ACR-8010 ................................ 60
Alarms
7-Segment LED
Analog Monitor
................................ 55
....................................... 47
B
Brake Power
Noise Filter
...................................... 65
C
Cable ................................................... 65
Ferrite Cores
Cable Clamp
Cable Core
Attachment
Cables
Specifications
Capacity
SGDG-04GT
SGDG-10GT
SGDG-15GT
Combination
Linear Motor
Serial Conversion Unit
SGMSH
Combination Error
Combinations
SGMAH
SGMGH
SGMPH
Connection
Examples
3-Phase Power .................................. 27
Single Phase ..................................... 26
Connector
Encoder
Terminal Array ................................... 23
Specification
Terminal Array
Control Panel
Environment
Cooling Fan
.................................... 65
.......................................... 64
...................................... 64
................................... 24
...................................... 5
...................................... 5
...................................... 5
..................................... 40
........................ 40
........................................... 40
................................... 56
........................................... 39
.......................................... 39
........................................... 39
..................................... 17
.................................. 17
..................................... 35
Replacement
Core-less Type
Magnet Track
.................................... 54
..................................... 2
D
Delta Tau PMAC2 ................................... 58
Digital Torque Amplifier
Amplifier Fault
Component Replacement
Cooling
Inspection
Cleaning ............................................. 54
Component Fault................................ 54
Screws ............................................... 54
Installation
Model Number
Mounting Direction
Mounting Location
Mounting Standards
Power Loss
Storage
Use Conditions
Discharge Capacitor
Replacement
.................................. 56
.................... 54
........................................... 35
........................................ 54
....................................... 34
.................................... 5
............................. 35
............................. 34
........................... 36
...................................... 13
........................................... 34
................................. 54
.................................... 54
E
EMC Directives ...................................... 61
SGDG-01GT, 04GT
SGDG-10GT, 15GT
Encoder Communication Error
Encoder Failure
Encoder Signal
Output
Encoder Signals
I/O Signals
Output Phase Form
PG Divider
...................................... 56
............................................. 44
....................................... 45
....................................... 46
........................... 62
........................... 63
................... 56
........................... 45
F
F-Type Iron Core
Magnet Track
Fuses
Replacement
..................................... 4
.................................... 54
Page 79

G
Galil IMC-1900/2900 ............................... 57
I
Input Circuits
Command
Sequence
Input Signals
Connection
DB OFF
Functions
Names
Servo ON
........................................ 20
........................................ 20
...................................... 16
........................................... 43
......................................... 18
............................................ 18
........................................ 42
L
Linear Motor Model
Core-less Type
F-Type Iron Core
Magnet Track
T-Type Iron Core
Linear Motors
Encoder
Scale Pitch......................................... 29
Mounting
Encoder ............................................. 29
Motor ................................................. 29
................................... 2
................................. 4
..................................... 2
................................. 3
......................................... 29
M
Main Circuit
Functions
Terminal Names
Main Circuit Power Error
MEI PCX/DSP
Model
Serial Converter Unit
Model Number
Linear Motor
Rotary Motor
........................................... 9
.................................. 9
.......................... 56
........................................ 59
............................ 6
......................................... 1
....................................... 2
...................................... 1
O
Oil Seals............................................... 32
Output Circuits
Output Signals
RUN
Overcurrent
Overload
Overspeed
Overvoltage
....................................... 21
............................................... 43
........................................... 55
............................................... 55
............................................ 55
........................................... 55
P
Peripherals ............................................ 24
Power Line
Size
................................................ 13
Stripping
Terminal Processing
Power ON Sequence
Protection Sequence
Design
.......................................... 14
.......................... 14
............................... 13
............................................ 41
R
Regen Circuit Error ................................. 55
Regenerative Resistor Selection
Regenerative Resistors
-500W Capacity Amps
500W+ Capacity Amps
Energy Calculation
External
Relays
Replacement
Rotary Motor
Mounting
Rotary Motors
Alignment
Mounting
Shaft Tolerance
Vibration Class
Vibration Resistance
Runaway
........................................... 48
......................................... 29
Direction ............................................. 31
Location.............................................. 30
SGMAH .............................................. 33
SGMDH.............................................. 33
SGMGH.............................................. 33
SGMPH .............................................. 33
SGMSH .............................................. 33
SGMUH.............................................. 33
............................................... 56
........................................ 31
............................ 51
.................................... 54
................................ 31
................................. 33
.......................... 33
................ 47
........................ 48
....................... 51
S
Scale Polarity Error ................................. 56
Serial Converter
Applied Motor
JZDP-A003
JZDP-A004
JZDP-A005
JZDP-A006
JZDP-A008
Servo Alarm
Output
............................................. 41
..................................... 7
........................................ 6
........................................ 6
........................................ 6
........................................ 6
........................................ 6
Page 80

Servomotor
Inspection
Maximum Capacity
Vibration Resistance and Class
SGDG-01GT
SGLTW -35A
SGLTW -80A
SGLTW-20A
SGLTW-40A
Smoothing Capacitor
Replacement
Specifications
Storage Temperature
Switch Setting
Function Selection
Linear Scale Pitch
PG Divider
PG Divider Setting
Switch Setting Error
Switch Settings
........................................ 53
Comprehensive ................................. 53
External ............................................. 53
Noise ................................................. 53
Oil Seal .............................................. 53
Vibration ............................................ 53
.............................. 5
............................................ 5
........................................... 3
........................................... 3
............................................ 3
............................................ 3
.................................... 54
........................................ 65
.............................. 30
............................. 37
............................. 37
13-bit Rotary ...................................... 38
17-bit Rotary ...................................... 38
Linear Motor ...................................... 38
............................. 38
................................ 55
...................................... 37
............ 33
T
Terminal Block
Connection
Torque Control
Description
T-Type Iron Core
Magnet Track
...................................... 14
....................................... 41
..................................... 3
U
Undervoltage ......................................... 55
W
Wiring .................................................... 9
Encoder
Main Circuit
.......................................... 22
........................................ 9
Example............................................. 12
Terminal Block ................................... 13
Page 81

Y
ASKAWA ELECTRIC AMERICA, INC.
Y
A
Y
Y
Y
Y
Y
Y
Y
A
Y
2121 Norman Drive South, Waukegan, IL 60085, U.S.A.
Phone: (847) 887-7000 Fax: (847) 887-7310 Internet: http://www.yaskawa.com
MOTOMAN INC.
805 Liberty Lane, West Carrollton, OH 45449, U.S.A.
Phone: (937) 847-6200 Fax: (937) 847-6277 Internet: http://www.motoman.com
ASKAWA ELETRICO DO BRASIL COMERCIO LTDA.
venida Fagundes Filho, 620 Bairro Saude Sao Paolo-SP, Brasil CEP: 04304-000
Phone: 55-11-5071-2552 Fax: 55-11-5581-8795 Internet: http://www.yaskawa.com.br
ASKAWA ELECTRIC CORPORATION
New Pier Takeshiba South Tower, 1-16-1, Kaigan, Minatoku, Tokyo, 105-6891, Japan
Phone: 81-3-5402-4511 Fax: 81-3-5402-4580 Internet: http://www.yaskawa.co.jp
ASKAWA ELECTRIC (SHANGHAI) CO., LTD.
4F No. 18 Aona Road, Waigaoqiao Free Trade Zone, Pudong New Area, Shanghai 200131, China
Phone: 86-21-5866-3470 Fax: 86-21-5866-3869
BEIJING OFFICE
Room No. 301 Office Building of Beijing International Club,
21 Jianguomanwai Avenue, Beijing 100020, China
Phone: 86-10-6532-1850 Fax: 86-10-6532-1851
SHANGHAI OFFICE
27 Hui He Road Shanghai 200437 China
Phone: 86-21-6553-6600 Fax: 86-21-6531-4242
SHANGHAI YASKAWA-TONJI M & E CO., LTD.
27 Hui He Road Shanghai 200437 China
Phone: 86-21-6533-2828 Fax: 86-21-6553-6677
BEIJING YASKAWA BEIKE AUTOMATION ENGINEERING CO., LTD.
30 Xue Yuan Road, Haidian, Beijing 100083 P.R. China
Phone: 86-10-6232-9943 Fax: 86-10-6234-5002
SHOUGANG MOTOMAN ROBOT CO., LTD.
7, Yongchang-North Street, Beijing Economic Technological Investment & Development Area,
Beijing 100076 P.R. China
Phone: 86-10-6788-0551 Fax: 86-10-6788-2878
ASKAWA ELECTRIC (HK) COMPANY LIMITED
Rm. 2909-10, Hong Kong Plaza, 186-191 Connaught Road West, Hong Kong
Phone: 852-2803-2385 Fax: 852-2547-5773
ASKAWA ELECTRIC KOREA CORPORATION
Kfpa Bldg #1201, 35-4 Youido-dong, Yeongdungpo-Ku, Seoul 150-010, Korea
Phone: 82-2-784-7844 Fax: 82-2-784-8495
ASKAWA ELECTRIC (SINGAPORE) PTE. LTD.
151 Lorong Chuan, #04-01, New Tech Park Singapore 556741, Singapore
Phone: 65-282-3003 Fax: 65-289-3003
TAIPEI OFFICE (AND YATEC ENGINEERING CORPORATION)
Shen Hsiang Tang Sung Chiang Building
10F 146 Sung Chiang Road, Taipei, Taiwan
Phone: 886-2-2563-0010 Fax: 886-2-2567-4677
ASKAWA ELECTRIC TAIWAN CORPORATION
Shen Hsiang Tang Sung Chiang Building
10F 146 Sung Chiang Road, Taipei, Taiwan
Phone: 886-2-2563-0010 Fax: 886-2-2567-4677
ASKAWA ELECTRIC EUROPE GmbH
m Kronberger Hang 2, 65824 Schwalbach, Germany
Phone: 49-6196-569-300 Fax: 49-6196-888-301 Internet: http://www.yaskawa.de
MOTOMAN ROBOTEC GmbH
Kammerfeldstrabe 1, 85391 Allershausen, Germany
Phone: 49-8166-900 Fax: 49-8166-9039
ASKAWA ELECTRIC UK LTD.
1 Hunt Hill Orchardton Woods Cumbernauld, G68 9LF, United Kingdom
Phone: 44-12-3673-5000 Fax: 44-12-3645-8182
MOTOMAN ROBOTICS EUROPE AB
Box 504 S38525, Torsas, Sweden
Phone: 46-486-48800 Fax: 46-486-41410
Yaskawa Electric America, Inc., July 2009 YEA-SIA-LGD-1.2F Printed in U.S.A.
 Loading...