


Yard-Man 24A-020D401 User Manual
OPERATOR’S MANUAL
Chipper Shredder
Vacuum
Model Number
24A-020D401
IMPORTANT: READ SAFETY RULES AND INSTRUCTIONS CAREFULLY
Warning: This unit is equipped with an internal combustion engine and should not be used on or near any unimproved forest-
covered, brush-covered or grass-covered land unless the engine’s exhaust system is equipped with a spark arrester meeting
applicable local or state laws (if any). If a spark arrester is used, it should be maintained in effective working order by the operator.
In the State of California the above is required by law (Section 4442 of the California Public Resources Code). Other states may have
similar laws. Federal laws apply on federal lands. A spark arrester for the muffler is available through your nearest engine authorized
service dealer or contact the service department, P.O. Box 368022 Cleveland, Ohio 44136-9722.
MTD PRODUCTS INC. P.O. BOX 368022 CLEVELAND, OHIO 44136-9722
PRINTED IN U.S.A.
FORM NO.
770-10197C.fm
(8/01)

TABLE OF CONTENTS
Content Page
Important Safe Operation Practices...................................................................3
Assembling Your Chipper Shredder Vacuum ....................................................5
Know Your Chipper Shredder Vacuum..............................................................7
Operating Your Chipper Shredder Vacuum .......................................................8
Maintaining Your Chipper Shredder Vacuum.....................................................9
Troubleshooting.................................................................................................12
Parts List............................................................................................................14
FINDING MODEL NUMBER
This Operator’s Manual is an important part of your new chipper shredder vacuum. It will help you
assemble, prepare and maintain the unit for best performance. Please read and understand what it says.
Before you start assembling your new equipment, please locate the model plate on the
equipment and copy the information from it in the space provided below. The information on
the model plate is very important if you need help from our Customer Support Department or
an authorized dealer.
• You can locate the model number by looking down at the rear of the chipper shredder vacuum. A
sample model plate is explained below. For future reference, please copy the model number and the
serial number of the equipment in the space below.
(Model Number)
(Serial Number)
MTD PRODUCTS IN C
CLEVELAND, OHIO 44136
Copy the model number here:
Copy the serial number here:
CALLING CUSTOMER SUPPORT
If you have difficulty assembling this product or have any questions regarding the controls, operation or
maintenance of this unit, please call the Customer Support Department.
Call 1- (330) 220-4MTD (4683) or 1- (800)-800-7310 to reach a Customer Support
representative. Please have your unit’s model number and serial number ready when you
call. See previous section to locate this information. You will be asked to enter the serial
number in order to process your call.
For more details about your unit, visit our website at www.yardman.com
2

SECTION 1: IMPORTANT SAFE OPERATION PRACTICES
WARNING: This symbol points out important safety instructions which, if not followed, could
endanger the personal safety and/or property of yourself and others. Read and follow all instructions in
this manual before attempting to operate this machine. Failure to comply with these instructions may
result in personal injury. When you see this symbol - heed its warning.
WARNING: Engine Exhaust, some of its constituents, and certain vehicle
components contain or emit chemicals known to State of California to cause cancer
and birth defects or other reproductiv e harm.
DANGER
manual. As with any type of power equipment, carelessness or error on the part of the operator can
result in serious injury. This machine is capable of amputating hands and feet and throwing objects.
Failure to observe the following safety instructions could result in serious injury or death.
: This machine was built to be operated according to the rules for safe operation in this
TRAINING
1. Read, understand, and follow all instructions on the
machine and in the manual(s) before attempting to
assemble and operate. Keep this manual in a safe
place for future and regular reference and for
ordering replacement parts.
2. Be familiar with all controls and their proper
operation. Know how to stop the machine and
disengage them quickly.
3. Never allow children under 16 years old to operate
this machine. Children 16 years old and over
should read and understand the operation
instructions and safety rules in this manual and
should be trained and supervised by a parent.
4. Never allow adults to operate this machine without
proper instruction.
5. Keep bystanders, helpers, pets, and children at
least 75 feet from the machine while it is in
operation. Stop machine if anyone enters the area.
6. Never run an engine indoors or in a poorly
ventilated area. Engine exhaust contains carbon
monoxide, an odorless and deadly gas.
7. Do not put hands and feet near rotating parts or in
the feeding chambers and discharge opening.
Contact with the rotating impeller can amputate
fingers, hands, and feet.
8. Never attempt to unclog either the feed intake or
discharge opening, remove or empty vacuum bag,
or inspect and repair the machine while the engine
is running. Shut the engine off and wait until all
moving parts have come to a complete stop.
Disconnect the spark plug wire and ground it
against the engine.
PREPARA TION
1. Thoroughly inspect the area where the equipment
is to be used. Remove all rocks, bottles, cans, or
other foreign objects which could be picked up or
thrown and cause personal injury or damage to the
machine.
2. Always wear safety glasses or safety goggles
during operation or while performing an adjustment
or repair, to protect eyes. Thrown objects which
ricochet can cause serious injury to the eyes.
3. Wear sturdy, rough-soled work shoes and closefitting slacks and shirts. Loose fitting clothes or
jewelry can be caught in movable parts. Never
operate this machine in bare feet or sandals. Wear
leather work gloves when feeding material in the
chipper chute.
4. Before starting, check all bolts and screws for
proper tightness to be sure the machine is in safe
working condition. Also, visually inspect machine
for any damage at frequent intervals.
5. Maintain or replace safety and instructions labels,
as necessary.
6. To avoid personal injury or property damage use
extreme care in handling gasoline. Gasoline is
extremely flammable and the vapors are explosive.
Serious personal injury can occur when gasoline is
spilled on yourself or your clothes which can ignite.
Wash your skin and change clothes immediately.
a. Use only an approved gasoline container.
b. Extinguish all cigarettes, cigars, pipes, and
other source s of i gnitio n.
c. Never fuel machine indoors.
d. Never remove gas cap or add fuel while the
engine is hot or running.
e. Allow engine to cool at least two minutes
before refueling.
f. Never over fill fuel tank. Fill tank to no more
than 1/2 inch below bottom of filler neck to
provide space for fuel expansion.
g. Replace gasoline cap and tighten securely.
h. If gasoline is spilled, wipe it off the engine
and equipment. Move machine to another
area. Wait 5 minutes before starting the
engine.
3

i. Never store the machine or fuel container
inside where there is an open flame, spark,
or pilot light (e.g. furnace, water heater,
space heater, clothes dryer, etc.)
j. To reduce a fire hazard, keep machine free
of grass, leaves, or other debris build-up.
Clean up oil or fuel spillage and remove any
fuel soaked debris.
k. Allow machine to cool at least 5 minutes
before storing.
OPERATION
1. Do not put hands and feet near rotating parts or in
the feeding chambers and discharge opening.
Contact with the rotating impeller can amputate
fingers, hands, and feet.
2. Before starting the machine, make sure the chipper
chute, feed intake, and cutting chamber are empty
and free of all debris.
3. Thoroughly inspect all material to be shredded and
remove any metal, rocks, bottles, cans, or other
foreign objects which could cause personal injury
or damage to the machine.
4. If the impeller s trik es a fo reig n obj ect or if yo ur
machine should start making an unusual noise or
vibration, immediately shut the engine off. Allow the
impeller to come to a complete stop. Disconnect
the spark plug wire, ground it against the engine
and perform the following steps:
a. Inspect for damage.
b. Repair or replace any damaged parts.
c. Check for any loose parts and tighten to
assure continued safe operation.
5. Do not allow an accumulation of processed
material to build up in the discharge area. This can
prevent proper discharge and result in kickback of
material through the feed opening.
6. Do not attempt to shred or chip material larger than
specified on the machine or in this manual.
Personal injury or machine damage could result.
7. Never attempt to unclog either the feed intake or
discharge opening while the engine is running.
Shut the engine off, wait until all moving parts have
stopped, disconnect the spark plug wire and
ground it against the engine before clearing debris.
8. Never operate without vacuum bag and discharge
chute properly attached to the machine. Never
empty or change vacuum bag while the engine is
running. Zippered end of vacuum bag must be kept
closed at all times during operation.
9. Never operate without either the inlet nozzle or
optional hose attachment properly attached to the
machine. Never attempt to attach or change either
attachment while the engine is running.
10. Keep all guards, deflectors and safety devices in
place and operating properly.
11. Keep your face and body back and to the side of
the chipper chute while feeding material into the
machine to avoi d acci dent al kick back i njur ies.
12. Never operate this machine without good visibility
or light. Always be sure of your footing and keep a
firm hold on the handles.
13. Do not operate this machine on a gravel surface.
14. Do not operate this machine while under the
influence of alcohol or drugs.
15. Muffler and engine become hot and can cause a
burn. Do not touch.
16. Never pick up or carry machine while the engine is
running.
MAINTENANCE AND STORAGE
1. Never tamper with safety devices. Check t heir
proper operation regularly.
2. Check bolts and screws for proper tightness at
frequent intervals to keep the machine in safe
working condition. Also, visually inspect machine
for any damage and repair, if needed.
3. Before cleaning, repairing, or inspecting, stop the
engine and make certain the impeller and all
moving parts have stopped. Disconnect the spark
plug wire and ground it against the engine to
prevent unintended starting.
4. Do not change the engine governor settings or
overspeed the engine. The governor controls the
maximum safe operating speed of the engine.
5. Maintain or replace safety and instruction labels, as
necessary.
6. Follow this manual for safe loading, unloading,
transporting, and storage of this machine.
7. Never store the machine or fuel container inside
where there is an open flame, spark or pilot light
such as a water heater, furnace, clothes dryer, etc.
8. Always refer to the operator’s manual for proper
instructions on off-season storage.
9. If the fuel tank has to be drained, do this outdoors.
10. Observe proper disposal laws and regulations for
gas, oil, etc. to protect the environment.
4

WARNING - YOUR RESPONSIBILITY: Restrict the use of th is power mac hine to p ersons wh o read,
understand and fo llow th e warnings and ins tructions in this manual a nd on the mach ine.
NOTE: Not all safety labels shown may apply to your chipper shredder vacuum.
SECTION 2: ASSEMBLING YOUR CHIPPER SHREDDER VACUUM
IMPORT ANT :
in the engine. Be certain to service engine with gasoline
and oil as instructed in the separate engine manual
before operating your machine.
NOTE: Reference to right or left hand side of the
chipper shredder vacuum is observed from the
operating position.
This unit is shipped without gasoline or oil
Removing Unit From Carton
• Remove staples, break glue on top flaps, or cut
tape at carton end and peel along top flap to open
carton.
• Remove loose parts if included with unit (i.e.,
operator’s manual, etc.)
• Cut along corners, lay carton down flat, and remove
packing material.
• Roll or slide unit out of carton and check carton
thoroughly for loose parts.
Loose Parts In Carton (See Figure 1)
• Handle Assembly
• Bag
• Blower Chute (If Equipped)
Upper
Handle
Blower Chute
Wing
Nuts
Bag
Lower
Handle
Disconnecting Spark Pl ug Wire
Before setting up your chipper shredder vacuum,
disconnect the spark plug wire from the spark plug and
ground to a stud on the engine.
Wing
Nuts
Carriage
Screw
Figure 1
5
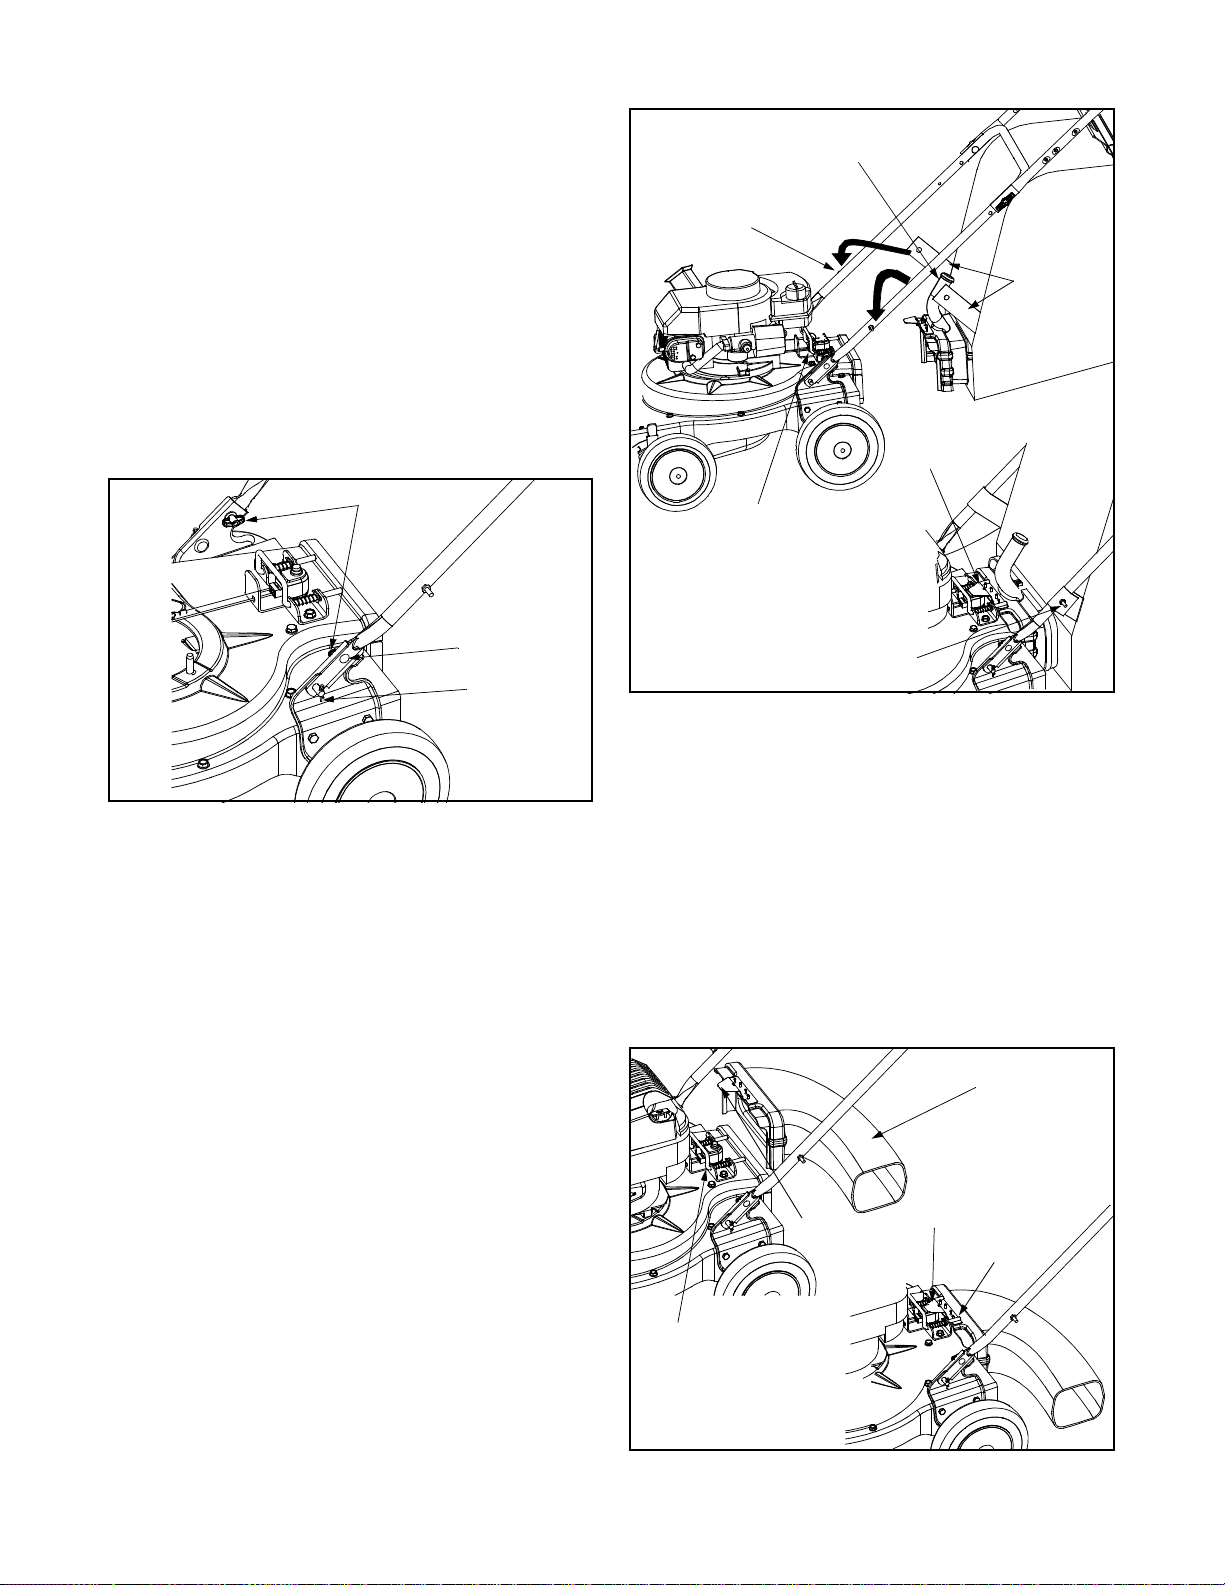
Attaching The Handle
• Unfold the upper handle until it aligns with the lower
handle.
• Secure the two handles by tightening the wing nuts
(carriage bolts must be seated properly into the
handle). See Figure 1.
• Remove the hairpin clips from the handle brackets
on the chipper shredder vacuum and remove the
carriage bolts and wing nuts from the lower handle.
See Figure 2.
• Place each bottom hole in lower handle over pins
on handle brackets and secure with hairpin clips.
• Insert carriage bolts thru upper hole in lower handle
from the outside and secure with wing nuts.
Bag Handle
Stud
Straps
Front Tab
Wing Nuts
Carriage Bolt
Hairpin Clip
Figure 2
Attaching The Bag
• Grasp bag handle with one hand and slide locking
rod on mounting bracket with other hand toward
engine. Use the end of mounting bracket as
leverage when sliding the locking rod.
See Figure 3.
• Slip bag over the rim of the discharge opening and
release locking rod to secure bag in place.
• Place the straps on the bag over the lower handle,
hooking them on the studs.
• Snap bag clip to the top of the lower handle.
Locking Rod
Stud
Figure 3
Attaching The Blower Chute (If E quippe d)
• Grasp blower chute with one hand and slide locking
rod on mounting bracket with other hand toward
engine. Use the end of mounting bracket as
leverage when sliding the locking rod. See Figure 4.
• Slip blower chute over rim of the discharge opening
and release locking rod to secure chute in place.
Make sure the safety switch button is fully
depressed by the front tab on the blower chute.
• Raise the nozzle height to the highest setting when
using the blower chute. Refer to nozzle height
adjustment in the OPERATION section.
Blower
Chute
NOTE: The safety switch button attached to the
mounting bracket mu st be fully dep ressed by the fr ont
tab on the bag handle when securing the bag or the
engine will not start.
6
Locking
Rod
Front
Tab
Figure 4
Front
Tab
Locking
Rod
 Loading...