


IMPORTANT: Read safety rules and instructions
carefully before operating equipment.
MTD Products Ltd., P. O. BOX 1386, KITCHENER, ONTARIO N2G 4J1
600 series
Snowthrowers
Printed in U.S.A.
FORM NO
772C0710
.
(7/2004)
TABLE OF CONTENTS
Content Page
Customer Support 2
Important Safe Operation Practices 3
Setting Up Your SnowtThrower 5
Knowing Your Snow Thrower 8
Operation 10
Content Page
Ajustments 13
Maintenance & Service 15
Off Season Storage 19
Trouble Shooting 19
Warranty 21
Illustrated Parts List 22
FINDING MODEL NUMBER
This Operator’s Manual is an important part of your new snow thrower. It will help you to assemble, prepare and
maintain the unit for best performance. Please read and understand what it says.
Before you start assembling your new snow thrower, please locate the model plate on the
equipment and copy the information from it in the space provided below. The information on the
model plate is very important if you need help from our Customer Support Department or an
authorized dealer.
• You can locate the model number by standing behind the unit in the operating position and looking down at
the dash panel . A sample model plate is explained below. For future reference, please copy the model
number and the serial number of the equipment in the space below.
Model Number
Numéro de modèle
XXXXXXXXXX
Serial Number
Numéro de série
XXXXXXXXXXX
Copy the model number here:
www.mtdcanada.com
MTD PRODUCTS LIMITED
KITCHENER, ON N2G 4J1
1-800-668-1238
Copy the serial number here:
ENGINE INFORMATION
The engine manufacturer is responsible for all engine-related issues with regards to performance, power-rating,
specifications, warranty and service. Please refer to the engine manufacturer’s Owner’s/Operator’s Manual packed
separately with your unit for more information.
CALLING CUSTOMER SUPPORT
Please do NOT return the unit to the retailer from which it was purchased, without first contacting Customer Support.
If you have difficulty assembling this product or have any questions regarding the controls, operation or
maintenance of this unit, please call a Customer Support Representataive. 1-800-668-1238
Please have your unit’s model number and serial number ready when you call. See previous section to
locate this information. You will be asked to enter the serial number in order to process your call.
2

SECTION 1: IMPORTANT SAFE OPERATION PRACTICES
WARNING: This symbol points out important safety instructions which, if not followed, could endanger the
personal safety and/or property of yourself and others. Read and follow all instructions in this manual before
attempting to operate this machine. Failure to comply with these instructions may result in perso nal injury. When you
see this symbol—heed its warning.
WARNING: Engine Exhaust, some of its constituents, and certain vehicle components contain or emit chemicals
known to State of California to cause cancer and birth defects or other reproductive harm.
DANGER: This machine was built to be operated according to the rules for safe operation in this manual. As with
any type of power equipment, carelessness or error on the part of the operator can result in serious injury. This
machine is capable of amputating hands and feet and throwing objects. Failure to observe the following safety
instructions could result in serious injury or death.
Training
1. Read, understand, and follow all instructions on the
machine and in the manual(s) before attempting to
assemble and operate. Keep this manual in a safe place
for future and regular reference and for ordering
replacement parts.
2. Be familiar with all controls and their proper operation.
Know how to stop the machine and disengage them
quickly.
3. Never allow children under 14 years old to operate this
machine. Children 14 years old and over should read and
understand the operation instructions and safety rules in
this manual and should be trained and supervised by a
parent.
4. Never allow adults to operate this machine without
proper instruction.
5. Thrown objects can cause serious personal injury. Plan
your snow throwing pattern to avoid discharge of material
toward roads, bystanders and the like.
6. Keep bystanders, helpers, pets and children at least 75
feet from the machine while it is in operation. Stop
machine if anyone enters the area.
7. Exercise caution to avoid slipping or falling, especially
when operating in reverse.
Preparation
1. Thoroughly inspect the area where the equipment is to
be used. Remove all door mats, newspapers, sleds,
boards, wires and other foreign objects which could be
tripped over or thrown by the auger/impeller.
2. Always wear safety glasses or eye shields during
operation and while performing an adjustment or repair to
protect your eyes. Throw n objects wh ich ricochet c an
cause serious injury to the eyes.
3. Do not operate without wearing adequate winter outer
garments. Do not wear jewelry, long scarves or other
loose clothing which could become entangled in moving
parts. Wear footwear which will improve footing on
slippery surfaces.
4. Use a grounded extension cord and receptacle for all
units with electric start engines.
5. Adjust collector housing height to clear gravel or crushed
rock surfaces.
6. Disengage the control handle before starting the engine.
7. Never attempt to make any adjustments while engine is
running, except where specifically recommended in the
operator’s manual.
8. Let engine and machine adjust to outdoor temperature
before starting to clear snow.
9. To avoid personal injury or property damage use extreme
care in handling gasoline. Gasoline is extremely
flammable and the vapors are explosive. Serious
personal injury can occur when gasoline is spilled on
yourself or your clothes which can ignite. Wash your skin
and change clothes immediately.
a. Use only an approved gasoline container.
b. Extinguish all cigarettes, cigars, pipes and other
sources of ignition.
c. Never fuel machine indoors.
d. Never remove gas cap or add fuel while the
engine is hot or running.
e. Allow engine to cool at least two minutes before
refueling.
f. Never over fill fuel tank. Fill tank to no more than
½ inch below bottom of filler neck to provide space
for fuel expansion.
g. Replace gasoline cap and tighten securely.
h. If gasoline is spilled, wipe it off the engine and
equipment. Move machine to another area. Wait 5
minutes before starting the engine.
i. Never store the machine or fuel container inside
where there is an open flame, spark or pilot light
(e.g. furnace, water heater, space heater, clothes
dryer etc.).
j. Allow machine to cool at least 5 minutes before
storing.
Operation
1. Do not put hands or feet near rotating parts, in the auger
housing or discharge chute. Contact with the rotating
parts can amputate hands and feet.
2. The auger control handle is a safety device. Never
bypass its operation. Doing so, makes the machine
unsafe and may cause personal injury.
3. The control handle must operate easily in both directions
and automatically return to the disengaged position when
released.
4. Never operate with a missing or damaged discharge
chute. Keep all safety devices in place and working.
5. Never run an engine indoors or in a poorly ventilated
area. Engine exhaust contains carbon monoxide, an
odorless and deadly gas.
6. Do not operate machine while under the influence of
alcohol or drugs.
3

7. Muffler and engine become hot and can cause a burn. Do
G R A P H IC S S H E E T
not touch.
8. Exercise extreme caution when operating on or crossing
gravel surfaces. Stay alert for hidden hazards or traffic.
9. Exercise caution when changing direction and while
operating on slopes.
10. Plan your snow throwing pattern to avoid discharge
towards windows, walls, cars etc. To avoid property
damage or personal injury caused by a ricochet.
11. Never direct discharge at children, bystanders and pets
or allow anyone in front of the machine.
12. Do not overload machine capacity by attempting to clear
snow at too fast of a rate.
13. Never operate this machine without good visibility or
light. Always be sure of your footing and keep a firm hold
on the handles. Walk, never run.
14. Disengage power to the auger/impeller when
transporting or not in use.
15. Never operate machine at high transport speeds on
slippery surfaces. Look down and behind and use care
when in reverse.
16. If the machine should start t o vibrate abnormally, stop the
engine, disconnect the spark plug and ground it against
the engine. Inspect thoroughly for damage. Repair any
damage before starting and operating.
17. Disengage the control handle and stop engine before you
leave the operating position (behind the handles). Wait
until the auger comes to a complete stop before
unclogging the discharge chute, making any
adjustments, or inspections.
18. Never put your hand in the discharge or collector
openings. Always use a clearing tool to unclog the
discharge opening.
19. Use only attachments and accessories approved by the
manufacturer.
20. If situations occur which are not covered in this manual,
use care and good judgment. Call customer assistance
for the name of your nearest servicing dealer.
Maintenance And Storage
1. Never tamper with safety devices. Check their proper
operation regularly.
2. Disengage the control handle and stop engine. Wait until
the auger/impeller come to a complete stop. Disconnect
the spark plug wire and ground against the engine to
prevent unintended starting before cleaning, repairing, or
inspecting.
3. Check bolts, and screws for proper tightness at frequent
intervals to keep the machine in safe working condition.
Also, visually inspect machine for any damage.
4. Do not change the engine governor setting or over-speed
the engine. The governor controls the maximum safe
operating speed of the engine.
5. Snow thrower shave plates and skid shoes are subject to
wear and damage. For your safety protection, frequently
check all components and replace with original
equipment manufacturer’s (O.E.M.) parts only. “Use of
parts which do not meet the original equipment
specifications may lead to improper performance and
compromise safety!”
6. Check controls periodically to verify they engage and
disengage properly and adjust, if necessary. Refer to the
adjustment section in this operator’s manual for
instructions.
7. Maintain or replace safety and instruction labels, as
necessary.
8. Observe proper disposal laws and regulations for gas,
oil, etc. to protect the environment.
9. Prior to storing, run machine a few minutes to clear snow
from machine and prevent freeze up of auger/impeller.
10. Never store the machine or fuel container inside where
there is an open flame, spark or pilot light such as a water
heater, furnace, clothes dryer etc.
11. Always refer to the operator’s manual for proper
instructions on off-season storage.
Your Responsibility:
• Restrict the use of this power machine to persons who
read, understand and follow the warnings and
instructions in this manual and on the machine.
4
SECTION 2: SETTING UP YOUR SNOW THROWER
NOTE: The snow thrower is shipped with oil and
WITHOUT GASOLINE. After assembly, refer to
separate engine manual for proper fuel and engine oil
recommendations.
Unpacking
• Cut along corners of the carto n and lay it down flat.
Remove packing material.
• Remove any loose parts included with unit (i.e.,
operator’s manual, etc.).
• Roll unit out of carton. Check carton th oroughly for
any remaining loose part.
Loose Parts
Your snow thrower has been assembled at the factory
except the parts shipped loose in the carton. These are
listed below.
a. Electric Start Cord (optional)
b. Shear Pins and Cotter Pins
Before Assembly
Disconnect spark p lug wire and ground it against the
engine to prevent unintended starting.
NOTE: All references in this manual to the left or right
side of the snow thrower is from the operating position
only. Exceptions, if any, will be specified.
NOTE: If the connector is not properly assembled, the
shift rod will pivot and changing speed or direction of
the snow thrower will not be possible.
1
Panel varies
by model
e
dl
n
ha
e
y
s
a
i
a
w
R
s
hi
t
Figure 1
2
NOTE: This Operator’s Manual covers several models,
handle panels, lights and chute cranks are some
features that may vary by model. Not all features
referenced in this manual are applicable to all
snowthrower models.
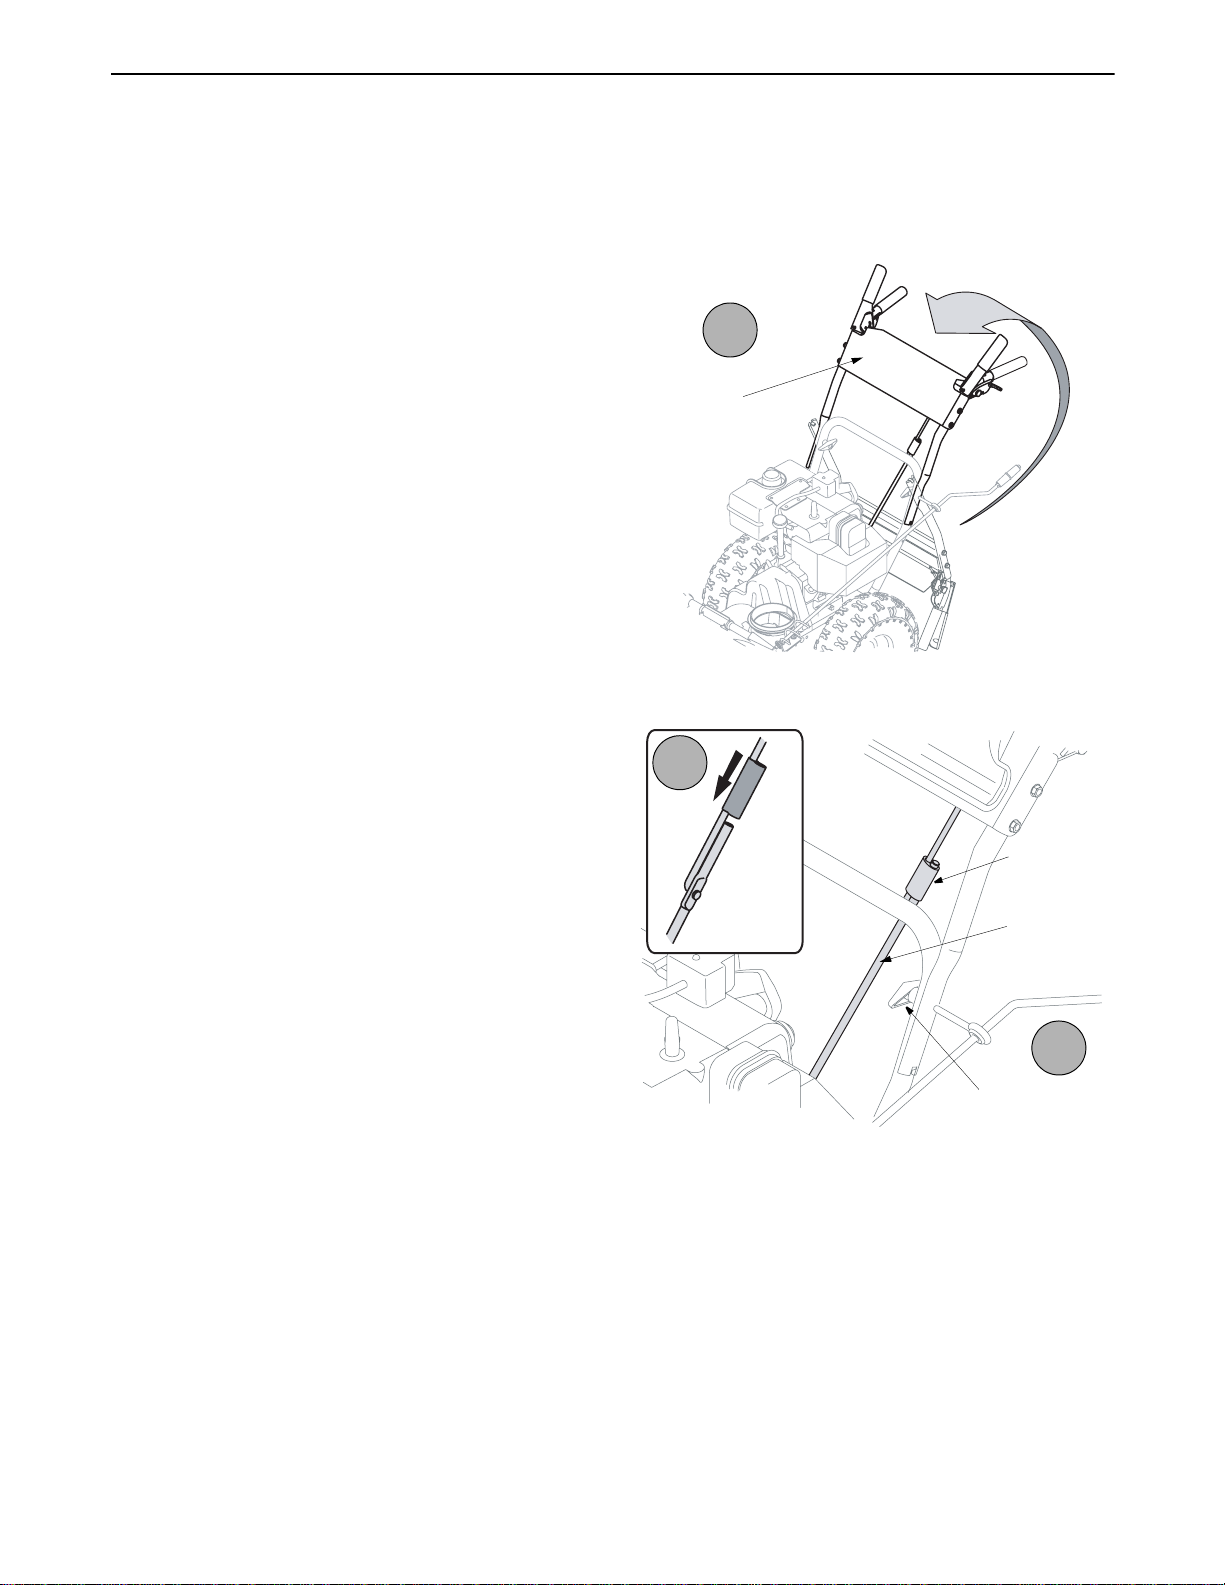
Setting up the Snow Thrower
Handle
1. Observe the lower rear area of the snow thrower to
be sure both cables are aligned with r oller guides
before pivoting the handle upward until it clicks into
the place. See Figure 1.
2. Slide the shift rod connector down over the end of
the lower shift rod. Tap the connector until it locks
over the lower shift rod. See Figure 2.
3. Tighten two handle knobs firmly to secure the
upper handle to the lower handles. See Figure 1.
Connector
Shift Rod
3
Handle Knob
Figure 2
5

Chute Assembly (all models)
1. Apply a light lubricant (i.e. 3-in-1 oil) to the base of
the chute assembly.
2. Place the chute assembly on the lip of the chute
adapter. See Figure 3
3. One end of each chute ke eper is already attached
to the chute flange. Pivot the free end of t he chute
keeper to align it with the chute flange and push it
till it snaps into position. See Figure 4. Repeat with
remaining chute keepers.
Chute
Assembly
2
1
Figure 3
Chute
Assembly
3
Cables
Short
Tube
Chute Support
Tube
Figure 6
2. Position the chute assembly so the chute opening
is facing the front of the unit.
3. Place the chute control box on the short tube of the
chute assembly and the chute support tube of the
chute assembly as shown in Figure 6, cables
should be towards the operator.
4. Insert the clevis pin, earlier removed, through the
holes on the chute control box and chute support
tube. Secure with the hairpin clip. See Figure 5.
For Models with 2Way Chute Control
1. Slip the cables, running from the chute to the
handle panel into the cable guide located on top of
the engine. See Figure 7 .
Cable Guide
Chute Keeper
Figure 4
For Models with 4 Way Chute Control Box
1. Pull the hairpin clip out of the clevis pin on the chute
support tube. Save this hardware.
Hairpin Clip
Chute Support
Tube
4 Way
Chute
Control
Box
Clevis
Pin
Figure 5
Figure 7
Models with a Chute Directional Control
1. Remove the flat washer and hairpin clip from the
end of the chute directional control. Insert the end
of the chute directional control into the lower
bracket and secure with the flat washer and hairpin
clip just removed. See Figure 8.
NOTE: If necessary, the lower bracket can be
adjusted. Refer to Chute Bracket Adjustment. in the
Adjustment Section.
6

Figure 8
Lamp Wire (optional)
1. Make sure the lamp wire is wrapped down the right
handle as shown in Figure 9 .
2. Make sure the lamp wire is plugged into the
alternator lead wire under the fuel tank. See Figu re
9 inset.
Alternator Lead
Alternator
Lead
Lamp Wire
Chute Clean-out Tool
1. The chute clean-out tool is fastened with a cable tie
to the rear of the auger housing for shipping
purposes. Cut the cable tie and remove the
extension cord (if equipped) before oper ating the
snow thrower.
Final Adjustments
After setting up your snow thrower, check the
adjustments as instructed below and make any final
adjustments necessary before operating the unit .
CAUTION: Failure to comply with these adjustment
instructions may cause damage to the u nit.
CAUTION: Prior to ope rating your snow
thrower, refer to Auger Control Test on page 12.
Read and follow all instructions carefully and
perform all adjustments to verify your snow
thrower is operating safely and properly.
Tire Pressure
• Before operating, check tire pressure and reduce
pressure in both tires to between 15 psi and 20 psi.
NOTE: If the tire pressure is not equal in both tires,
the unit may not travel in a straight path and the shave
plate may wear unevenly.
Skid Shoe
Locate the shave plate and the skid shoes in Figure
10. The space between this shave plate and the
ground can be adjusted, refer to the Adjustment
section of this manual.
IMPORTANT:
this snow thrower on gravel as loose gravel can be
easily picked up and thrown by the auger causing
personal injury or damage to the snow thrower.
It is not recommended that you operate
NOTE
: Wheels are omitted from illustration for clarity.
Figure 9
If for some reason, you have to operate the sno w
thrower on gravel, keep the skid sh oe in the highest
position for maximum clearance between the ground
and the shave plate.
7

SECTION 3: KNOWING YOUR SNOW THROWER
Electric Starter Button
Oil Fill
Chute Assembly
Clean-out
Tool
Shave Plate
Augers
Drive Control
Gas Cap
Shift Lever
Auger Control
Engine Controls
Recoil Starter
Handle
Electric Starter Outlet
Primer
Ignition
Key
Chute Directional
Control
Choke
Control
Throttle
Control
Skid Shoe
Figure 10
WARNING: Read, understand, and follow
all instructions and warnings on the machine
and in this manual before operating.
NOTE: For detailed starting instructions and more
information on all engine controls, refer to the separate
engine manual packed with your unit
Shift Lever
The shift lever is located in the center of the handle
panel and is used to determine gorund speed and
direction of travel.
Forward
There are six forward (F) speeds. Position one (1) is the
slowest and position five (6) is the fastest.
Reverse
There are two reverse (R) speeds. One (1) is the sl ower
and two (2) is the faster.
Choke Control
the choke control closes the choke plate on the
carburetor and aids in starting the engine.
Throttle Control
The throttle control is located on the
engine. It regulates the speed of the
engine and will shut off the engine
when pushed down completely.
Primer
Depressing the primer forces fuel
directly into the engine’s carburetor to
aid in cold-weather starting.
Oil Fill
Engine oil level can be checked and
oil added through the oil fill.
Ignition Key
The ignition key is a safety devise. It must be fully
inserted in order for the engine will start. Remove the
ignition key when the snow thrower is not in use.
The choke control is found on t he rear of the engine and
is activated by rotating the knob clockwise. Activating
IMPORTANT:
8
Do not attempt to turn the key.
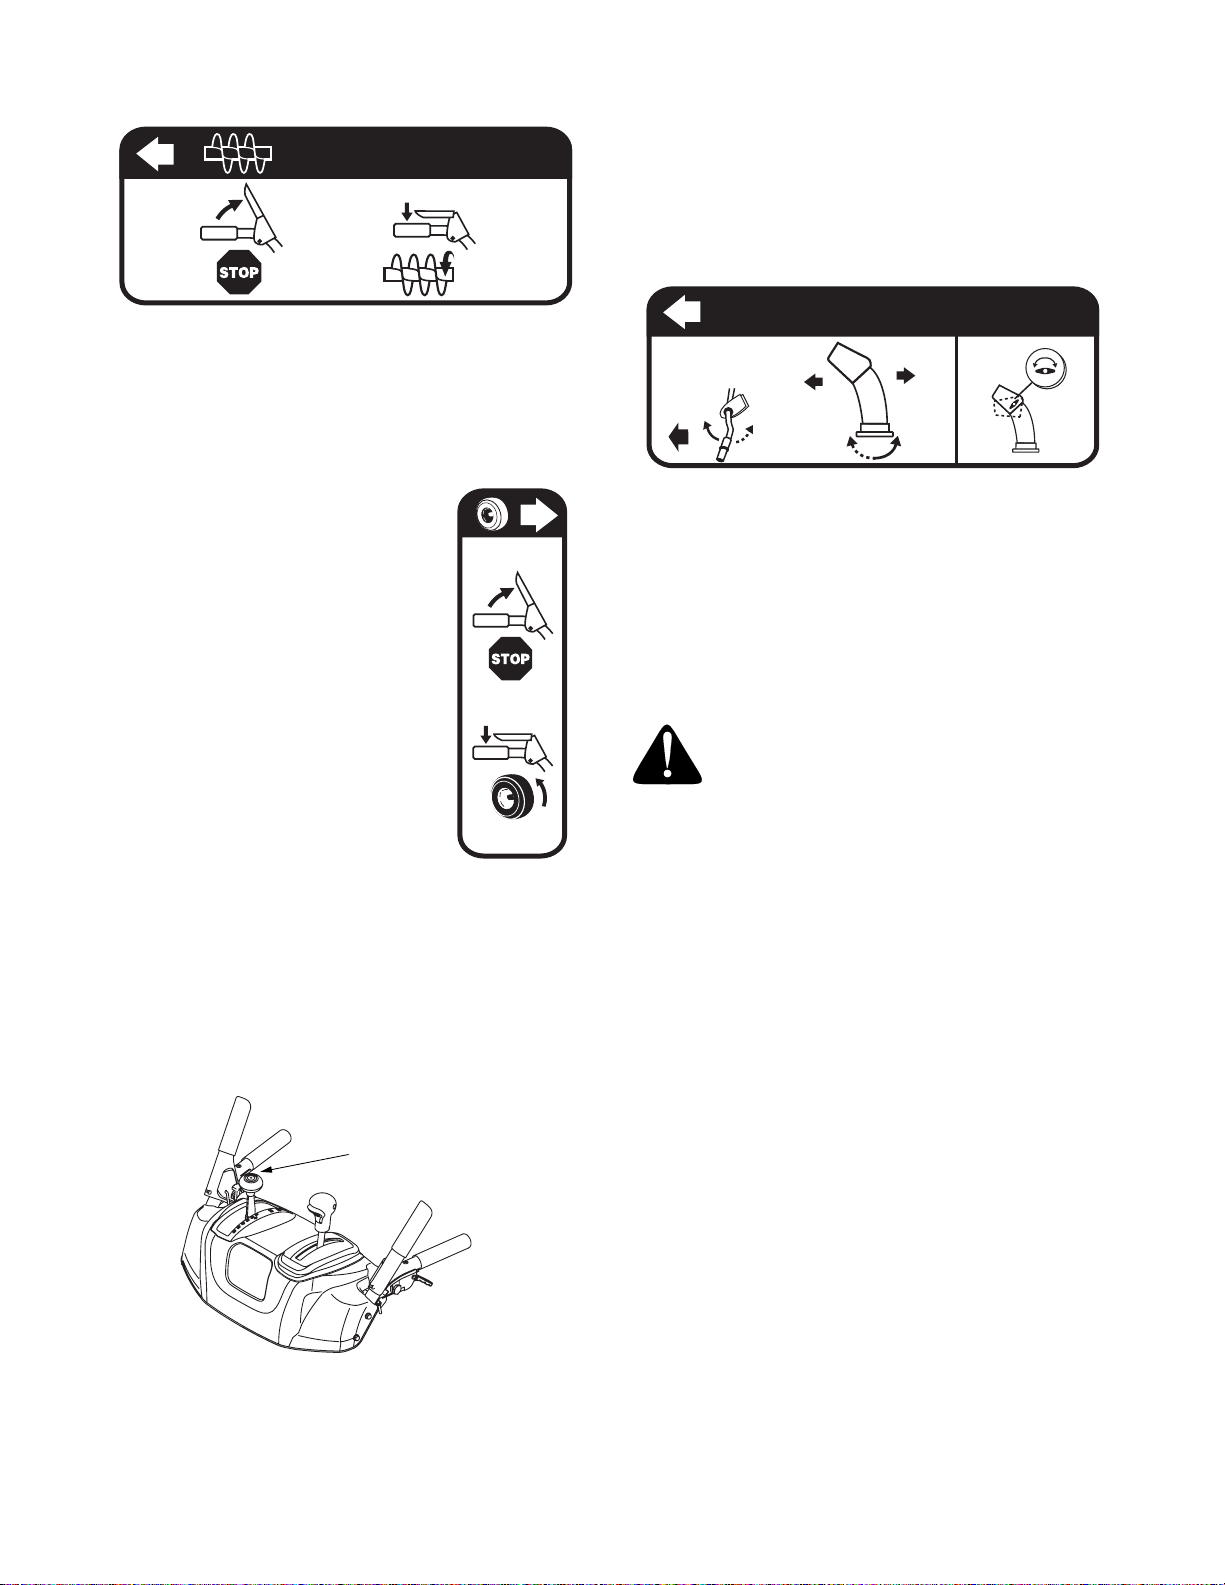
Auger Control
CHUTE DIRECTIONAL CONTROL
COMMANDE D'ORIENTATION DE LA GOULOTTE
The auger control is located on the left handle.
Squeeze the auger control against the handle to
engage the augers and start snow throwing action.
Release to stop.
Drive Control
The drive control is located on the
right handle. Squeeze the drive
control against the handle to
engage the wheel drive. Release
to stop.
2 Way Chute Control (optional)
This two-way control lever is meant to control the
distance of snow discharge from the chute. Tilt the lever
forward or rearward to adjust the distance snow will be
thrown.
Chute Directional Control (optional)
The chute directional control is located on left side of
the snow thrower.
To change the direction in which snow is thrown, turn
chute directional control as follows:
• Crank clockwise to dischar ge to the left.
• Crank counterclockwise to discharge to the right.
4 Way Chute Control
(optional)
This four-way control lever is meant to control the
direction and distance of snow discharge fr om the
chute. Press the button on the knob and pivot it left or
right to rotate the chute to the direction that snow will be
thrown. Tilt the lever forward or rearward to adjust the
distance snow will be thrown.
Chute
Control Lever
Clean-Out Tool
WARNING: Never use yo ur hands to clear
a clogged chute assembly. Shut off engine
and remain behind handles until all moving
The tool is designed to clear a clogged chute assemb ly.
Refer to Operating Your Snow Thrower section for more
detailed information regarding the chut e clean-out tool.
Skid Shoes
The space between the shave plate and th e ground can
be adjusted by moving the skid shoes.
For close snow removal and hard packed snow, place
skid shoes in the lowest position. Use middle or high
position when area to be cleared is uneven or gravel
surface.
Make certain the entire bottom surface of the skid shoe
is against the ground to avoid uneven wear on the slide
shoes.
Recoil Starter Handle
The recoil starter handle is used to manually start the
engine.
Electric Starter Button (If so equipped)
Pressing the electric starter button engages the
engine’s electric starter when plugged into a 120V
power source.
9

Electric Starter Outlet (If so equipped)
Requires use of a three-prong outd oor extension cord
(packed with the snow thrower) and a 120V po wer
source/wall outlet.
Augers
When engaged, the augers rotate and draw snow into
the housing.
Chute Assembly
Snow drawn into the auger housing i s discharged out
the chute assembly.
SECTION 4: OPERATING YOUR SNOW THROWER
Before Starting
WARNING: Read, understand, and follow
all instructions and warnings on the machine
and in this manual before operating.
Gas & Oil Fill-Up
Service the engine with gasoline and oil as instr ucted in
the separate engine manual packed with your snow
thrower. Read instructions carefully.
WARNING: Use extreme care when
handling gasoline. Gasoline is extremely
flammable and the vapors are explosive.
Never fuel the machine indoors or while the
engine is hot or running. Extinguish cigarettes,
cigars, pipes and other sources of ignition.
Starting The Engine
• Attach spark plug wire to spar k plug. Make certain
the metal loop on the end of the spark plug wire
(inside the boot) is fastened securely over the metal
tip on the spark plug.
• Make certain both t he auger control and drive
control are in the disengaged (released) position.
• Move throttle control up to FAST position. Insert
ignition key into slot. Make sure it snaps into place.
Do not attempt to turn the key
NOTE:
inserted into ignition switch.
The engine cannot start unless the key is
Electric Starter (on models so quipped)
• Determine that your home’s wirin g is a three-wire
grounded system. Ask a licensed electrician if you
are not certain.
CAUTION: If your home’ s wiring system
is not a three-wire grounded system, do
not use this electric starter under any
conditions.
.
WARNING: The optiona l electric starter is
equipped with a grounded three-wi re power
cord and plug, and is designed to operate on
120 volt AC household current. It must be
used with a properly ground ed three-pron g
receptacle at all times to avoid the possibility
of electric shock. Follow all instructions
carefully prior to operating the electric starter.
WARNING: If your home electrical
system is grounded, but a three-hole
receptacle is not available, do not use your
snow thrower’s electric starter.
If you have a grounded three-prong receptacle,
proceed as follows:
• Plug the extension cord into the out let located on
the engine’s surface. Plug the other end of
extension cord into a three-prong 120-volt,
grounded, AC outlet in a well-vent ilated area.
• Rotate choke control to FULL choke position (cold
engine start).
NOTE: If the engine is already warm, place choke
control in the OFF position instead of FULL.
• Push the primer two or three times for cold engine
start, making sure to cover vent hole in the center of
the primer when pushing.
NOTE: DO NOT use primer to restart a warm engine
after a short shutdown.
• Push starter button to start engine.
• Once the engine starts, immediately release start er
button.
• As the engine warms, slowly rotate the choke
control to the OFF position. If the engine falters,
quickly rotate the choke control back to FULL and
then slowly into the OFF position again.
• When disconnecting the exten sion cord, always
unplug the end at the three-prong wall o utlet before
unplugging the opposite end from the snow
thrower.
Recoil Starter
• Rotate choke control to FULL choke position (cold
engine start).
10

NOTE: If the engine is already warm, place choke
control in the OFF position instead of FULL.
• Push the primer two or three t imes for cold engine
start, making sure to cover vent hole in the center of
the primer when pushing.
NOTE: DO NOT use primer to restart a warm engine
after a short shutdown.
NOTE: Additional priming may be necessary if the
temperature is below 15° F(9° C).
• Grasp the recoil starter handle and slowly pull the
rope out. At the point where it becomes slightly
harder to pull the rope, slowly allow the rope to
recoil.
• Pull the starter handle with a fi rm, rapid stroke.
IMPORTANT:
snap back. Keep a firm hold on the starter handle and
allow it to slowly recoil.
• As the engine warms, slowly rotate the choke
control to the OFF position. If the engine falters,
quickly rotate the choke control back to the FULL
position and then slowly into the OFF position
again.
Do not release the handle and allow it to
Stopping The Engine
• Run engine for a few minutes before stopping to
help dry off any moisture on the engine.
• To help prevent possible starter freeze-up, proceed
as follows:
Electric Starter (on models so equipped)
1. Connect extension cord to the ele ctric starter outlet
on the engine, then to 120 volt AC outlet.
2. With the engine running, push the starter button
and allow the starter for spin for several seconds.
The noise made by the starter is normal. The
engine’s starter is not being harmed.
3. When disconnecting the e xtension cord, always
unplug the end at the three-prong wall outlet before
unplugging the opposite end from the snow
thrower.
4. Move throttle control to STOP position.
5. Remove the ignition key.
6. Wipe all snow and moisture from the carburetor
cover in the area of the drive control and auger
control. Also, engage and release the controls
several times.
NOTE: Keep the key in a safe place. The engine
cannot start without the ignition key.
Recoil Starter
1. With engine running, pull starter rope with a rapid,
continuous full arm stroke three or four times.
Pulling the starter rope will produce a loud
clattering sound, which is not harmful to engine.
2. Move throttle control to STOP position.
3. Remove the ignition key.
NOTE: Keep the key in a safe place. The engine
cannot start without the ignition key.
4. Wipe all snow and moisture from the carburetor
cover in the area of the drive control and auger
control. Also, engage and release the controls
several times.
To Engage Drive
• With the throttle control in the Fast (rabbit) position,
move shift lever into one of the six forward (F)
positions or two reverse (R) positions. Select a
speed appropriate for the snow condit ions and a
pace you’re comfortable with.
IMPORTANT:
comfortable and familiar with the operation of the snow
thrower.
• Squeeze the auger control against the handle and
the augers will turn. Release it and the
augers will stop.
• Squeeze the drive contr ol against the
handle the snow thrower will move.
Release it and drive motion will stop.
IMPORTANT:
speeds or direction of travel) without first releasing the
drive control and bringing the snow thrower to a
complete stop. Doing so will result in premature wear to
the snow thrower’s drive system.
Use the slower speeds until you are
NEVER reposition the shift lever (change
To Engage Augers
1. To engage augers and start snow throwin g,
squeeze the left hand auger clutch grip against the
left handle. Release to stop augers.
For models with optional interlock mechanism only:
2. While the auger control is engaged, sque eze the
drive control to move, release to stop. Do not shift
speeds while the drive is engaged.
NOTE: This same lever also locks auger control so you
can turn the chute crank without interrupting the snow
throwing process.
3. Release the auger control; the interlock mechanism
should keep the auger control engaged until the
drive control is released.
4. Release the drive control to stop both the augers
and the wheel drive. To stop the auger, both lever s
must be released.
11

Auger Control Test
IMPORTANT:
operating your snow thrower for the first time and at the
start of each winter season.
Check the adjustment of the auger control as follows:
• When the auger cont rol is released and in the
disengaged “up” position, the cable should have
very little slack. It should NOT be tight.
• In a well-ventilated area, start the snow thrower
engine as instructed earlier in this section un der the
heading Starting the Engine. Make sure the throttle is
set in the FAST position.
• While standing in the opera tor’s position (behind
the snow thrower), engage the auger.
• Allow the auger to remain engaged for
approximately ten (10) seconds be fore releasing
the auger control. Repeat this several times.
• With the throttle control in t he FAST (rabbit)
position and the auger control in the disengage d
“up” position, walk to the front of the machine.
• Confirm that th e auger has completely stopp ed
rotating and shows NO signs of motion.
IMPORTANT:
immediately return to the operator’s position and shut
off the engine. Wait for ALL moving parts to stop before
re-adjusting the auger control.
Perform the following test before
If the auger shows ANY signs of rotating,
Z Fitting
Hex Nut
Cable Should
Be Straight
Figure 11
5. The interlock feature will allow you to remove your
left hand from the auger control lever.
6. When clearing the first pass through th e snow,
control speed of snow thrower according to the
depth and condition of snow.
7. On each succeeding pass, readjust the chute to the
desired positon and slightly overlap previous path.
8. After the area is cleared, stop t he snow thrower
following instructions given below.
• To readjust the cont rol cable, loosen the hex jam
nut on the auger control cable “Z” fitting.
• Rotate the coupling end of the cable (without
turning the cable) counterclockwise to provide
more slack.
• Retighten the hex jam nut. See Figu re 11.
• Repeat Auger Control Test to verify proper
adjustment has been achieved.
To Throw Snow
CAUTION: Check the area to be cleared for foreign
objects. Remove, if any.
1. Start the engine following starting instructions.
2. Rotate the discharge chute to the desired position,
(away from bystanders and/or buildings) by movin g
the chute control.
3. Select the speed according to snow condition.
CAUTION: Never move the shift lever without first
releasing the drive clutch.
4. Engage the auger control and drive control levers
as previously stated.
Operating Tips
NOTE: Allow the engine to warm up for a few minutes
as the engine will not develop full power until it reaches
operating temperature.
WARNING: The temperat ure of muffler and
o
surrounding areas may exceed 150
these areas.
• For most efficient snow remova l, remove snow
immediately after it falls.
• Discharge snow downwind whenever possible.
Slightly overlap each previous swath.
• Set the skid shoes 1/4" belo w the scraper bar for
normal usage. The skid shoes may be adjusted
upward for hard-packed snow.
NOTE: It is not recommended that you operate this
snow thrower on gravel as loose gravel can be easily
picked up and thrown by the auger causing an injury or
damage to the snow thrower.
• If for some reason, you have to operate the snow
thrower on gravel, keep the skid shoe in the highest
position for maximum clearance between ground
and shave plate.
• Clean the snow thrower thorough ly after each use.
F. Avoid
12

Chute Clean-Out Tool
The chute clean-out tool is conveniently fastened to the
rear of the auger housing with a mo unting clip. Should
snow and ice become lodged in the chute assembly
during operation, proceed as follows to safe ly clean the
chute assembly and chute opening:
• Release both the Auger Control and the
Control
• Stop the engine by removing the ignit ion key.
• Remove the clean-out tool from the clip which
secures it to the rear of the auger housing.
• Use the shovel-shaped end of the clean-out tool to
dislodge and scoop any snow and ice which has
formed in and near the ch ute assembly.
.
Drive
WARNING: Never use your hands to clean
snow and ice from the chute assembly or
auger housing
• Refasten the clean-ou t tool to the mounting clip on
the rear of the auger housing, r einsert the ignition
key and start the snow thrower’s engine.
• While standing in the opera tor’s position (behind
the snow thrower), engage the auger control for a
few seconds to clear any remaining snow and ice
from the chute assembly.
Drift Cutters (o n models so equipped)
Drift cutters should be used when operating the snow
thrower in heavy drift conditions.
On models so equipped, drift cutters are assembled to
the auger housing inverted. Remove the ca rriage bolts
by unthreading the hex nuts which secure them, and
reinstall the drift cutters in their proper position before
operating the snow thrower. See Figure 12 .
If your unit is not equipped with drift cutters, contact
Customer Support as instructed on page 2 for
information regarding price and availability.
Snow Thrower Model Drift Cutter Kit
All models OEM-390-679
.
Drift
Cutter
Carriage Screws /
Hex Nuts
Figure 12
Tire Chains (on models so equipped)
Tire chains should be used whenever extra traction is
needed. If your unit is not equipped with tire chains,
contact Customer Support for informa tion regarding
price and availability.
Operating Tips
NOTE: Allow the engine to warm up for a few minutes.
The engine will not develop full power until it reaches
operating temperature.
WARNING: The temperat ure of the muffler
and the surrounding areas may exceed
°
F(65° C). Avoid these areas.
150
• If possible, remove snow immediatel y after it falls.
• Discharge snow downwind whenever possible.
• Slightly overlap each previou s path.
• Set the skid shoes 1/4" belo w the shave plate for
normal usage. Adjust it upward for hard-packed
snow and downward when using on gravel or
crushed rock.
• Avoid possible starter freeze -up. Clean the snow
thrower thoroughly after each use.
13

SECTION 5: MAKING ADJUSTMENTS
WARNING: Never attempt to make any
adjustments while the engine is running,
except where specified in operator’s ma nual.
Shift Rod Adjustment
If the full range of speeds (forward and reverse) cannot
be achieved, refer to the figures to the right and adjust
the shift rod as follows:
Place the shift lever in the fastest forward
speed position. Remove the hairpin clip which
1
secures the ferrule to the shift lever.
1
Thread the ferrule up or down the shift rod until
it aligns with the hole in the shift lever behind
3
the handle panel. Resecure the ferrule with the
hairpin clip removed earlier.
Chute Assembly
The distance snow is thrown can be adjusted by
changing the angle of the chute assembly. To do so,
stop the engine by removing the ignition key and loo sen
the plastic wing knob found on the left side of the chute
assembly. Pivot the chute upward or downward before
re-tightening the wing knob. See Figure 16 .
3
Figure 13
Rotate the shift arm clockwise as far as it will
go.
2
2
Figure 14
Figure 15
Figure 16
Chute Bracket Adjustment
If the spiral at the bottom of the chut e directional control
is not fully engaging with the chute assembly, the ch ute
bracket can be adjusted. To do so, loosen the two nuts
which secure the chute bracket and reposition it sligh tly
before retightening the nuts. See Figure 17 .
14

.
Figure 17
Drive Control
When the drive control is released a nd in the
disengaged “up” position, the cable should have very
little slack. It should NOT be tight.
Check the adjustment of the drive control as follows:
1. With the drive control disengaged,
push the snow thrower gently
forward. The unit should roll freely.
2. Engage the drive control and gently
attempt to push the snow thrower
forward. The wheels should not turn.
The unit should not roll freely.
3. With the drive control disengaged, move the shift
lever back and forth between the R2 position and
the F6 position several times. There should be no
resistance in the shift lever.
If any of the above tests failed, th e drive cable is in need
of adjustment. refer to Figure 18 and procee d as
follows:
• Loosen the hex jam nut on the aug er control cable
“Z” fitting and rotate the coupling end (without
turning the cable) of the cable downward to
provide more slack or upward to take up slack. See
Figure 18 .
Disengaged
Figure 18
Skid Shoes
NOTE: The space between the skid shoes and the
ground can be adjusted. See Figure 19. For close snow
removal, place skid shoe in the low position. Use
middle or high position when area to be cleared is
uneven.
NOTE: Some models are equipped with reversible skid
shoes and may be turned over to increase their
lifespan. See Figure 19.
CAUTION: Loose gravel can be picked up
and thrown by the auger, causing injury to the
operator and bystanders and/or damage to
the snow thrower and surrounding property.
• Adjust skid shoes by loosening the four he x nuts
(two on each side) and carriage bolts. Move skid
shoes to desired position.
• Make certain the e ntire bottom surface of skid shoe
is against the ground to avoid uneven wear on the
skid shoes. Retighten nuts and bolts secu rely.
• Retighten the hex jam nut and repeat all three tests
to verify proper adjustment has been achieved.
Auger Control
Refer to Auger Control Test on Page 12 to adjust the auger
control.
15
Standard
Figure 19- Skid Shoes
Reversible
SECTION 6: MAINTAINING AND SERVICING YOUR SNOW THROWER
WARNING: Before lubricating, repairing, or
inspecting, disengage all controls and stop
engine. Wait until all moving parts have come
to a complete stop.
Engine
Refer to the separate engine manual packed with your
unit for all engine maintenance.
Lubrication
Engine
Refer to the separate engine manua l packed with your
unit.
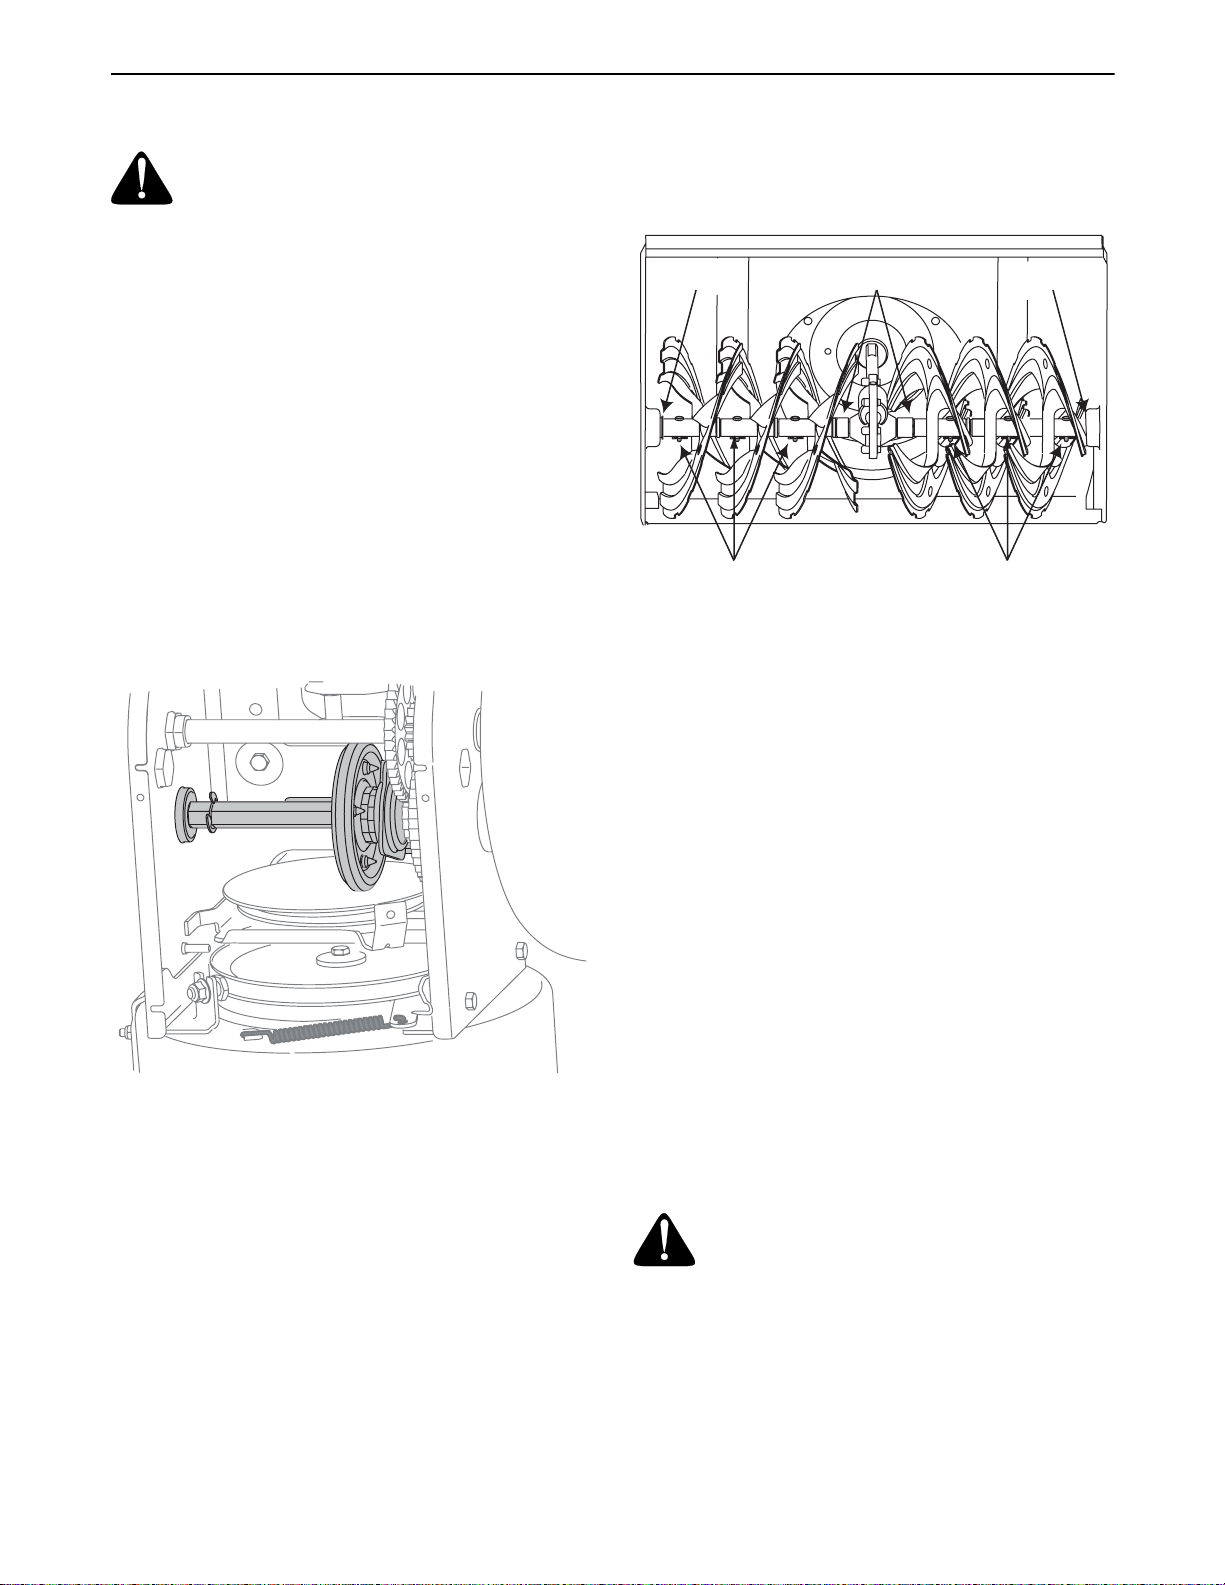
Gear Shaft
The gear (hex) shaft should be lubricated at least once
a season or after every 25 hours of operation.
• Remove the lower f rame cover by removing the two
screws which secure it.
• Apply a light coating of an all-weather multipurpose grease to the hex shaft. Se e Figure 20.
the spacers. Also lubricate the flange bearings
found at either end of the shaft. See Figure 21.
Bearing
Shear Pins
Spacers
Figure 21- 30” Auger Shown
Bearing
Shear Pins
Augers
The augers are secured to the spiral shaft with shear
pins and cotter pins. See Figure 21. If you hit a foreign
object or ice jam, the snowthrower is designed so that
the shear pins will shear.
If the augers will not turn, check to see if the shear pins
have sheared. Replacements have been provided with
the snowthrower. When replacing pins, spray an oil
lubricant into shaft before ireassembling.
IMPORTANT:
anything other than OEM Part No.
shear pins
components as a result of failing to do so will NOT be
covered by your snow thrower’s warranty.
NEVER replace the auger shear pins with
738-04124 replacement
. Any damage to the auger gearbox or other
Figure 20
IMPORTANT:
drive plate.
Keep lubricant off the friction wheel and
Wheels
Oil or spray lubricant into bearings at wheels at least
once a season. Remove wheels, clean and coat axles
with a multi-purpose automotive grease.
Chute Directional Control
• Once a season, the spiral end on the chute
directional control should be greased with
multipurpose automotive grease.
Auger Shaft
• At least once a season, remove the shear pins on
auger shaft. Spray lubricant inside shaft, around
Gear Case
The auger gear case has been filled with grease at the
factory. If disassembled for any reason, lubricate with
two ounces of grease (Part Number 737-0168 ).
IMPORTANT:
the seals could result. Be sure the vent plug is free of
grease in order to relieve pressure.
Do not overfill the gear case. Damage to
WARNING: Before servicing, repairing, or
inspecting, disengage all controls and stop
engine. Wait until all moving parts have come
to a complete stop.
Shave Plate and Skid Shoes
• The shave plate and skid shoes o n the bottom of
the snow thrower are subject to wear. They should
be checked periodically and replaced when
necessary.
16

• To remove skid shoes, remove the four carriage
bolts and hex flange nuts which secure them to the
snow thrower. Reassemble new skid shoes with the
four carriage bolts (two on each side) and hex
flange nuts. Refer to Figures 19 and 21 .
• To remove shave plate, remove the carriage bolts,
cupped washers and hex nuts which attach it to the
snow thrower housing. Reassemble new shave
plate, making sure heads of carriage bolts are to
the inside of housing. Tighten secure ly.
Replacing Belts
Check the condition of both auger belt and drive belt
every 25 hours of snow thrower operation. Replace if
either shows signs of wear and tear.
Auger Belt
• Remove belt cover by removing the two self tapping screws that secure it to the snow thrower
housing. See Figure 22.
• •Drain the gasoline fr om the snow thrower, or place
a piece of plastic under the gas cap.
Self-tapping Screws
• Tip the snow thrower up and fo rward, so that it rests
on the housing. Remove two self-tapping screws
from the frame cover underneath t he snow thrower
and move the frame cover away. See F igure 24.
Frame Cover
Figure 24
• Half turn shoulder screw and slid e it out of the
mounting bracket. See Figure 25.
• Unhook spring to re lease tension on the auger belt.
Remove old belt and replace with new belt installing
it on the groove. See Figure 25.
• Wrap auger belt ar ound the auger pulley. See
Figure 25.
• Re-insert shoulder screw into the mounting bracket
and tighten to secure.
• Wrap auger belt behind the idler. Reattach the
spring to the bolt where it was earlier secured.
• Re-install frame cover an d flip the snow thrower
back to the operating position.
• Wrap auger belt ar ound the engine pulley.
• Re-install belt cover with self-tapping screws
removed before.
Figure 22
• Take auger belt off the pulley as shown in Fig ure 23
Engine
Pulley
Auger
Belt
Figure 23
Shoulder
Screw
Mounting Bracket
Spring
Figure 25
Drive Belt
• Remove belt cover by removing th e two selftapping screws that secure it to the snow thrower
frame. See Figure 22.
• Drain the gasoline from the snow thro wer, or place
a piece of plastic under the gas cap.
• Take auger belt off the pulley as shown in F igure 23
17
Auger
Pulley

• Push idler away from the chute and insert a Philips
head screwdriver in the hole on the idler as shown
in Figure 26. This will release tension on drive belt.
Auger Belt
Drive Belt
Idler
Engine
Pulley
Figure 26
• Pull drive belt out and away from the engine pulley
to remove. See Figure 26.
• Tip the snow thrower up and forward, so that it rests
on the housing. Remove two self-tapping screws
from frame cover underneath th e snow thrower and
move the frame cover away. Refer to Figure 24.
• Back out the stop bolt to create sufficient gap
between the friction wheel disc and the drive pul ley.
Pull the drive belt from around the drive pulley and
clear it off the friction wheel disc. See Figure 27.
Drive
Belt
Friction
Wheel
Drive Pulley
• Re-install auger belt on the engine pulley.
• Re-attach fram e cover and put the equipment ba ck
to operating position. Re-attach belt cover with two
self-tapping screws removed earlier.
Friction Wheel Rubber
• Check the rubber on th e friction wheel after 25
hours of operation, and periodically thereafter.
Replace the rubber if any signs of wear or cracking
are found.
• Drain the gasoline from the snow thro wer, or place
a piece of plastic under the gas cap.
• Move shift lever to the R2 position.
• Tip the snow thrower so that it rests on the housing.
• Remove two self-tapping screws from fr ame cover
underneath the snow thrower a nd move the frame
cover away. See Figure 24.
• Remove the right-hand wheel by removing the
screw and bell washer which secure it to the axle.
• Locate the hex shaft and snap ring on the right side
of the snow thrower frame, about two inches from
the wheel axle.
• Using a suitable t ool, carefully r emove the outer Ering which secures the hex shaft to the snow
thrower frame and lightly tap the shaft’s end to
dislodge the ball bearing from the right side of the
frame.
• Slide the hex shaft downward and to the left while
carefully un-meshing the lower gear s on the hex
shaft from the upper gears on the wheel axle . See
Figure 28.
• Set the hex shaft’s gears aside.
• Carefully remove the inner E-ring from the hex
shaft and slide the friction wheel assembly off the
hex shaft.
Stop
Bolt
Figure 27
• Now moving to the other side of the snow thrower ,
slide the belt off the crankshaft.
• Replace with new belt, first sliding it through the
crank shaft, then working it around the groove of
the drive pulley and finally wrapping it around the
engine pulley from where the old belt was removed.
Once the belt is firmly placed on the pulleys, make
sure to remove the screwdriver from the idler.
NOTE: If you’re replacing the friction wheel assembly
as a whole, discard the worn part and slide the new part
onto the hex shaft. Follow the steps above in reverse
order to reassemble components. If you’re
disassembling the friction wheel and replacing only the
rubber ring, proceed as follows:
• Remove the four scre ws from the friction wh eel
assembly and remove the bonded friction wh eel.
• Reassemble new bonded friction wheel ru bber to
the friction wheel assembly, turn each screw
approximately 2 turns in order shown in Figure 29
until screws are tight. It is important for the rubber to
be assembled symmetrically.
• Slide the friction wh eel assembly back onto the hex
shaft and follow the steps above in revers order to
reassemble components.
18

Friction
Wheel
3
2
Plate
Screw
Figure 28
SECTION 7: OFF-SEASON STORAGE
If unit is to be stored over 30 days, prepare for storage
as instructed in the separate engine manual pa cked
with your unit.
WARNING: Never store snow thrower wit h
fuel in tank indoors or in poorly ventilated
areas, where fuel fumes may reach an open
flame, spark or pilot light as on a furnace, water
heater, clothes dryer or gas applia nce.
• Clean snow thrower thorou ghly.
Rubber
• Lubricate as instructed in the Mainta ining Your
Snow Thrower section of this manual.
• Store the snow thrower in a clean, dry are a.
• Refer to the eng ine manual for correct engin e
storage instructions.
NOTE: When storing any type of power equipment in a
poorly ventilated or metal storage shed, care should be
taken to rustproof the equipment, especially springs,
cables and all moving parts.
1
Figure 29
4
19

SECTION 8: TROUBLE SHOOTING
Problem Cause Remedy
Engine fails to start.
Engine runs erratic.
Loss of power.
Engine overheats.
Excessive vibration.
Unit fails
to propel itself.
1. Fuel tank empty, or stale fuel.
2. Blocked fuel line.
3. Choke not in ON position
4. Faulty spark plug.
5. Safety key not in ignition switch on engine.
6. Spark plug wire disconnected.
7. Primer button not being used properly.
1. Unit running on CHOKE.
2. Blocked fuel line or stale fuel.
3. Water or dirt in fuel system.
4. Carburetor out of adjustment.
1. Spark plug wire loose.
2. Gas cap vent hole plugged.
3. Exhaust port plugged.
1. Carburetor not adjusted properly. 1. Contact service center.
1. Loose parts or damaged auger. 1. Stop engine immediately and
1. Drive control cable in need of adjustment.
2. Drive belt loose or damaged.
1. Fill tank with fresh gasoline.
2. Clean the fuel line.
3. Move switch to ON po sition
4. Clean, adjust gap or replace.
5. Insert the key fully into the switch.
6. Connect spark plug wire.
7. Contact service center.
1. Move choke lever to OFF position.
2. Clean fuel line and fill tank with clean,
fresh gasoline.
3. Drain fuel tank and carburetor. Refill
with fresh fuel.
4. Contact service center.
1. Connect and tighten spark plug wire.
2. Remove ice and snow from gas cap. Be
certain vent hole is clear.
3. Contact service center.
disconnect spark plug wire. Tighten all
bolts and nuts. If vibration continue s,
have unit serviced by an authorized
service center.
1. Adjust drivecontrol cable. Refer t o
Adjustments.
2. Replace drive belt.
Unit fails
to discharge snow.
1. Discharge chute clogged.
1. Stop engine immediately and
disconnect spark plug wire. Clean
discharge chute and inside of auger
housing.
2. Foreign object lodged in auger.
2. Stop engine immediately and
disconnect spark plug wire. Remove
object from auger.
3. Auger control cable in need of adjustment.
4. Auger belt loose or damaged.
5. Shear bolt(s) sheared.
3. Refer to Final Adjustments on page 7 .
4. Refer to page 16.
5. Replace with new shear bolt(s).
NOTE: For repairs beyond the minor adjustments above, contact your local authorized service dealer.
20

SECTION 9: TWO YEAR YARD-MAN SUPREME WARRANTY
For two years from date of retail purchase within Canada, MTD PRODUCTS LIMITED will, at its
option, repair or replace, for the original purchaser, free of charge, any part or parts found to be
defective in material or workmanship. This warranty covers units which have been operated and
maintained in accordance with the owner’s instructions furnished with the unit, and which have
not been subject to misuse, abuse, commercial use, neglect, accident improper maintenance or
alteration. Normal wear parts or components thereof are subject to special terms as noted
below in the NO FAULT Ninety Day Consumer Warranty clause.
The engine, starter motor or component parts thereof carry separate warranties from their
manufacturers. Please refer to the applicable manufacturer’s warranty policy for these items.
NO FAULT Ninety Day Consumer Warranty on Normal Wear Parts: All normal wear part
failures will be covered on this product for a period of 90 days regardless of cause. After 90 days
but within the two year warranty period, normal wear part failures will be covered if caused by
defects in material or workmanship of other component parts. Normal wear parts are defined as
batteries, belts, blades, blade adaptors, grass bags, rider deck wheels, seats, tires and clutch
parts (friction wheels).
Full Ninety Day Warranty on Battery: For ninety (90) days from the date of retail purchase, if
any battery included with this unit proves defective in material or workmanship and our testing
determines the battery will not hold a charge, MTD PRODUCTS LIMITED will replace the battery
at no charge to the original purchaser.
Additional Limited Thirty Day Warranty on Battery: After ninety (90) days but within one
hundred twenty (120) days from the date of purchase, MTD PRODUCTS LIMITED will replace
the defective battery, for the original purchaser, for a cost of one-half (½) of the current retail
price of the battery in effect at the date of return.
How to Obtain Service: Warranty service is available, with proof of purchase, through your
local MTD Authorized Service Dealer. If you do not know the dealer in your area, please write to
the Service Department of MTD PRODUCTS LIMITED, P.O. BOX 1386, KITCHENER,
ONTARIO N2G 4J1. The return of a complete unit will not be accepted by the factory unless
prior written permission has been extended by MTD PRODUCTS LIMITED.
Other Warranties: All other warranties, express or implied, including any implied warranty of
merchantability is limited in its duration to that set forth in this express limited warranty. The
provisions as set forth in this warranty provide the sole and exclusive remedy of MTD
PRODUCTS LIMITED obligations arising from the sale of its products. MTD PRODUCTS
LIMITED will not be liable for incidental or consequential loss or damage.
21

50
46
45
28
62
54
58
47
27
33
29
20
32
30
31
34
49
53
57
48
55
52
59
60
56
7
35
40
2
26
8
6
5
21
23
12
7
15
18
24
61
14
22
3
9
65
6
51
66
43
42
4
1
16
44
7
4
7
9
17
13
39
40
4
36
37
7
41
38
4
7
7
AUGER HOUSING COM PO NENTS/COMPOSANTS DU LOGEMENT DES TARIÈRES
SIZE
TAILLE
AUGER
HOUSING/
LOGEMENT DES
AUGER AXLE/
ESSIEU DES
TARIÈRES
TARIÈRES
22
24
26
26
28
684-04067 Ø 711-04286 790-00117 618-04170 N/A
684-04069 Ø 711-04285 790-00120 618-04171 731-04870 (1)
684-04071 Ø 711-04284 790-00121 618-04172 731-04870 (2)
684-04072 ¿ 711-04284 790-00121 618-04172 731-04870 (2)
684-04073 Ø 711-04283 790-00118 618-04173 731-04870 (3)
SHAVE PLATE
LAME
PLATE
GEARBOX ASS’Y/
EN SEM BLE DE LA
VIS SANS FIN
SPACERS/
ENTRETOISE
28
30
30
684-04074 ¿ 711-04283 790-00118 618-04173 731-04870 (3)
684-04063 Ø 711-04282 790-00119 618-04165 731-04871 (3)
684-04075 ¿ 711-04282 790-00119 618-04165 731-04871 (3)
¿ Plain/Ordianire
Ø Serrated/Dentelée
N/A = Not avail able
22
N/D = Non disponible

REF PART
NO. NO.
N° DE N° DE
RÉF PIÈCE DE SCRIP TION DE SCRIP TION
1 731-2643 Clean-Out Tool Outil de dégagement de la goulotte
2 684-04057 Im pel ler Ass'y 12 po Ventilateur
3 710-0347 Hex Screw 3/8-16 X 1.75 Vis à tête hex 3/8-16 x 1,75
4 710-0451 Car riage Bolt 5/16-18 x .75 Gr. 1 Boulon ordi naire 5/16-18 x 0,75 Qual. 1
5 710-0703 Car riage Screw 1/4-20 x .75 Gr. 5 Boulon ordi naire 1/4-20 x 0,75 Qual. 5
6 710-0726 Hex Wash HD AB Tap Scr 5/16 X .75 Vis taraudée 5/16 x 0,75
7 712-04063 Flange Locknut 5/16-18 Gr. F Ny lon Contre-écrou à embase 5/16-18 Qual. F ny lon
8 712-04064 Hex L-Flanged Nut 1/4-20 Gr. F Ny lon Contre-écrou a embase 1/4-20 Qual. F ny lon
9 712-04065 Hex L-Flanged Nut 3/8-16 Gr. F Ny lon Contre-ecrou a embase 3/8-16 Qual. F ny lon
10 714-0149B In ter nal Cot ter Pin Goupille fendue interne
12 726-04012 Push-on Nut .25 dia. Écrou pousser 0,25 diam.
13 731-04705 Chute Adapter Adaptateur de goulotte d'éjection
14 732-0611 Ex ten sion Spring Ressort d’extension
15 736-0174 Wave Washer .660 ID X .88 OD X .010 Rondelle ondulée 0,660 DI x 0,88 DE x 0,010
16 731-02625 Cleanout Tool Mount Mon tage de la outil de dégagement de la goulotte
17 738-0143 Shld. Scr. .500 Dia. X .335" Lg. Vis à épaulement dia. 0,500 po x 0,335 po de lg.
18 738-0281 Shoul der Scr .625 Dia X .170 Vis à épaulement dia 0,625 x 0,170 po
19 738-04124 Shear Pin .25 x 1.5 Gr. 2 Boulon de cisaillement 0,25 x 1,5 Qual 2.
20 741-0245 Hex. Flange Brg. .751" I.D. Roulement 0,75 DI
21 741-0309 Self-align ing bear ing Roulement auto-aligneur
22 756-0981A Flat Idler Pul ley 2.75" OD Poulie tendeur 2,75 DE
23 790-00075 Bear ing Hous ing 1.85 ID Carter de la roulement 1,85 DI
24 790-00080 Au ger Idler Brake Bracket Sup port
25 See chart on pre vi ous page. Voir la tab leau sur la page precedante.
26 See chart on pre vi ous page. Voir la tab leau sur la page precedante.
27 684-04107 Spi ral Ass'y LH Tarière CG
28 684-04108 Spi ral Ass'y RH Tarière CD
29 714-0507 Cot ter Pin 3/32 X .75 Goupille fendue 3/32 x 0,75
30 See chart be low. Voir la tab leau plus bas.
31 736-0188 Flat Washer .760 ID X 1.49 OD Rondelle plate 0,760 DI X 1,49 DE
32 738-04124 Shear Pin .25 x 1.5 Gr. 2 Goupille de cisaillement 0,25 x 1,5 po de lg
33 741-0493A Flange Bush ing Col let à bride
34 790-00087 Bush ing Hous ing Carter de la col let
35 See chart be low. Voir la tab leau plus bas.
36 710-04071 Car riage Bolt 5/16-18 x 1.0 Boulon ordi naire 5/16-18 x 1,0
37 720-0284 Han dle Knob As sem bly Bou ton
38 731-04354A Up per Chute Goulotte supérieur
39 731-04869 Chute Flange Keeper Garde-bride de la goulotte
40 731-04912 Lower Chute Goulotte inférieur
41 736-0159 Flat Washer .349 ID x .879 OD x .063 Rondelle plate 0,349 DI x 0,879 DE x 0,063
42 741-0475 Plas tic Bush ing .380 ID Manchon en plastique de 0,38 po de D.I.
43 784-5647 Chute Crank Brkt. Sup port du bras de goulotte d’ejection
44 784-5580 Slide Shoe Sobat coulissant
45 719-0319 RH Re duced Au ger Hous ing Carter de l'engrenage CD
46 719-0320 LH Re duced Au ger Hous ing Carter de l'engrenage CG
47 721-0179 Oil Seal 3/4 ID Joint d’etancheite d’huile 3/4 DI
48 741-0662 Flange Bear ing .75 ID x 1.00 OD x .50 Roulement 0,75 DI x 1,00 DE x 0,50
49 710-0642 Thd Form ing Scr. 1/4-20 X .75 Vis taraudee 1/4-20 x 0,75
50 See chart on pre vi ous page. Voir la tab leau a page precedante.
51 714-0161 Hi Pro Key 3/16 x 5/8 Clé 3/16 x 5/8
52 715-04021 Dowel Pin .25 OD x 1.2 Goupille 0,25 x 1,2
53 717-04126 Worm Shaft .75 OD Arbre 0,75 DE
54 717-0528A Worm Gear 20T Arbre 20 dents
55 718-04071 Thrust Col lar Col let
56 721-0325 Plug, 1/4 x .437 Bouchon 1/4 x 0,437
57 721-0327 Oil Seal .75 x 1 x .131 Joint d'huile 0,75 DI x 1 x 0,131
58 736-0351 Flat Washer .76 ID X 1.5 OD X .03 Rondelle plate 0,76 DI x 1,5 DE x 0,03
59 736-3084 Fl. Washer .510 x 1.120 x .060 Rondelle frein 0,510 x 1,120 x 0,060
60 741-0663 Flange Bear ing .75 ID x 1.0 OD x .925 Roulement 0,75 DI x 1,0 DE x 0,925
61 746-0897 Au ger Clutch Ca ble (w/"Z" fit ting) Ca ble de tariere (avec extremite en «Z»)
62 741-0661A Flange Bear ing.75 ID x 1.0 OD x .975 Roulement 0,75 DI x 1,0 DE x 0,975
64 737-3000 Grease Fit ting Raccord de graissage
65 790-00091 Re vers ible Slide Shoe Pat in réversible
66 05139A Drift Cut ter - Op tional Virole de reglage - en op tion
23
31A-6002
9.7.04

39
46
56
52
57
57
54
40
59
49
4
45
4
51
48
58
43
5
44
32
17
10
55
47
31
11
42
15
14
13
5
38
21
18
9
11
12
7
2
11
41
62
6
26
18
70
34
61
33
25
5
50
27
16
18
35
22
69
8
3
18
1
65
20
4
71
23
60
72
30
25
37
5
1
63
64
36
2
66
5
24
68
67
24

REF PART
NO. NO.
N° DE N° DE
RÉF PIÈCE DE SCRIP TION DE SCRIP TION
1 656-0012A Friction Wheel Disc Assembly Disque de roue du friction
2 684-04066 Friction Wheel Ass’y, Bearing 4.9 OD Roue du friction, roulement 4,9 DE
3 684-04045 Friction Wheel Support Brkt Ass’y Support de la roue du friction
4 710-0627 Hex L-Bolt 5/16-24 x .75 Gr. 5 Boulon hex 5/16-24 x 0,75 Qual. 5
5 710-1652 Hex Wash Hd TT Scr. 1/4-20 x .625 Vis taraudée 1/4-20 x 0,625
6 710-0788 Hex Bolt 1/4-20 x 1.00 Vis à tête hex 1/4-20 x 1,00
7 711-04246A Hex Drive Shaft .75 Arbre d’entraînement 0,75
8 712-0711 Hex Nut 3/8-24 Écrou hexagonal 3/8-24
9 714-0161 Woodruff Key 3/16 x 5/8 HT Clavette Woodruff 3/16 x 5/8
10 716-0231 “E” Ring Bague en «E»
11 716-0136 E-Ring .875 dia. Bague en E 0,875 diam.
12 617-04025 Complete Gear, 16/44T Engrenage 16/44
13 717-04129A Pinion, 16T Pignon, 16 dents
14 717-04137A Gear, 44T Engrenage 44 dents
15 617-04026 Complete Gear, 16/44T Engrenage 16/44
16 726-0221 Cap Speed Nut 1/4 Rod Chapeau à enfoncer
17 732-0264 Extension Spring 3/8 OD x 2.5 Ressort d’extension 3/8 DE x 2,5
18 736-0287 Flat Washer .79 ID x 1.25 OD x .06 Rondelle frein 0,79 DI x 1,25 DE x 0,06
19 736-04157 Wave Washer 1.56 x 1.875 x .018 Rondelle ondulée 1,56 x 1,875 x 0,018
20 736-0242 Bell. Washer .345 ID x .88 OD x .06 Rondelle Bell.0,345 DI x 0,88 DE x 0,060
21 736-04161 Flat Washer .75 x 1.0 x .06 Rondelle plate 0,75 x 1,0 x 0,06
22 736-0300 Flat Washer .385 ID x .87 OD x .06 Rondelle plate 0,385 DI x 0,87 DE x 0,06
23 790-00010 Friction Plate 12 Pt 4.6 Dia. Plaque du friction 12 x 4,6 diam.
24 790-00011 Friction plate exteriors 12 x 4.6 dia. Plaque du friction ext. 12 x 4,6 diam.
25 738-0924 Hex Shld.Scr.1/4-28 x .375 Vis à épaulement 1/4-28 x .375
26 684-04139 Shift Rod Tige de changement de la vitesses
27 741-0563 Ball Bearing w/snap ring Roulement à billes avec bague
30 746-0897 Auger Clutch Cable (w/"Z" fitting) Câble de tarière (avec extremite en «Z»)
31 746-04086 Drive Clutch Cable 41.75" Lg. Câble d’entraînement 41,75 po de lg.
32 748-0190 Spacer .513 ID x 1.0 Entretoise 0,513 DI x 1,0
33 756-0625 Cable Guide Roller Guide du câble
34 784-5687A Auger Clutch Cable Guide Bracket Support
35 790-00072 Frame Bâti
36 790-00096 Guide Bracket, Auger Cable Support
37 790-00054 Frame Cover Couvercle
38 790-00055 Roller Bracket, Drive Cable Support
39 710-0191 Hex Screw 3/8-24 x 1.25 Vis à tête hexagonale 3/8-24 x 1,25
40 710-0597 Hex Screw 1/4-20 x 1.00 Vis à tête hexagonale 1/4-20 x 1,00
41 710-0654A Hex Wash HD Tap Scr 3/8-16 x .88 Vis autotaraudee 3/8-16 x 0,88
42 710-1245B Hex Lock Scr. 5/16-24 x .875 Vis a tete hex. 5/16-24 x 0,875
43 712-04064 Hex L-Flanged Nut 1/4-20 Gr. F Nylon Contre-écrou à embase 1/4-20 Qual. F nylon
44 731-04792 Belt Cover Couvercle de la courroie
45 732-0710 Extension Spring .38 OD x 2.68" Lg. Ressort d’extension 0,38 DE x 2,68 po de lg
46 736-0247 Flat Washer .40 ID x 1.25 OD x .160 Rondelle plate 0,40 DI x 1,25 DE x 0,160
47 736-0505 Flat Washer .34 ID x 1.50 OD x .150 Rondelle plate 0,34 DI x 1,5 DE x 0,150
48 741-0919 Ball Bearing .787 ID x 1.85 OD x .56 Roulement à billes 0,787 DI x 1,85 DE x 0,56
49 748-0234 Shoulder Spacer .25 THK Entretoise épaulée
50 748-04053 Adapter Pulley, .75 diam. Poulie 0,75 diam.
51 750-04230 Flg. Spacer .777 OD x .260 ID x .550 Entretoise 0,777 DE x 0,260 DI x 0,550
52 750-04303 Spacer .875 ID x 1.185 Entretoise 0,875 DI x 1,185 DE
53 754-04050 V-Belt, 1/2 Courroie trapezoïdale, 1/2
54 754-0456 V-belt, 3/8 Courroie trapezoïdale, 3/8
55 756-04109 Pulley, Auger, 8.1 x .5 Poulie, tarière, 8,1 x 0,5
56 756-04113 Pulley, Half, 2.6 OD Poulie, demi 2,6 DE
57 756-04114 Pulley, Half 2.2 OD Poulie, demi 2,2 DE
58 790-00062 Bearing Washer 2.12 OD x .255 ID Rondelle de roulement 2,12 DE x 0,255 DI
59 790-00082 Drive Idler Bracket Support
60 See chart below. Voir tableau de la page prochaîne.
Continued on next page/Suite à la page prochaîne
25

NO. NO.
N° DE N° DE
RÉF PIÈCE
RÉF PIÈCE DE SCRIP TION DE SCRIP TION
61 731-04873 Spacer .75 ID x 1.25 OD x 3.0 Entretoise 0,75 DI x 1,25 DE x 3,0
* 731-04877 Spacer .75 ID x 1.25 OD x 1.50 (22" only) Entretoise 0,75 DI x 1,25 DE x 1,5 (22 po seulement)
62 738-04095A Axle .75 x 22 Essieu 0,75 x 22,0
* 738-04109 Axle .75 x 19 (22" only) Essieu 0,75 x 19,0 (22 po seulement)
63 756-0648A Friction Wheel Disc .375 x 6.0 Disque 0,375 x 6,0
64 738-0865 Friction Disque Bearing Pin Goupille
65 741-0600 Ball Bearing 17 x 40 x 12 Roulement à billes 17 x 40 x 12
66 618-04169 Friction Wheel Bearing Ass'y Roulement
67 718-04070 Friction Wheel Hub Moyeu du roue du friction
68 735-0243B Friction Wheel Rubber Roue du friction en caoutchouc
69 736-0105 Cupped Washer .400 ID x .88 OD x .06 Rondelle creuse 0,400 DI x 0,88 DE x 0,06
70 741-0245 Hex Flange Bearing. .751" I.D. Roulement 0,75 DI
71 710-0896 Hex B-Tap Scr 1/4-28 x .25" Lg Vis taraudée à tête hexagonale 1/4-28 x 0,25
*For models with 22" auger housings.
31A-6003
7.6.04
Model Wheel As sem bly De scrip tion Tire Rim
Modèle En sem ble de roue De scrip tion Roue Jante
31AE5GLF 634-04145 16 x 4.8 x 8 LH X-Trac 734-2038 634-04140
31AE5GLG 634-04146 16 x 4.8 x 8 RH X-Trac 734-2038 634-04140
31AH5KLG
31AE5KLH
31AE6GLN
31AE6LHG
31AE6LHH
31AE6MKH
31AE6MKP
31AE5HQ 634-04136 16 x 6.5 x 8 LH X-Trac 734-2031 634-0069
31AE5LLH 634-04137 16 x 6.5 x 8 RH X-Trac 734-2031 634-0069
31AH5MLH
31AE5MLP
31AE5NQ
31AE5SQ5
31AH6MLH
31AE6MLO
31A-6AED 634-04144 13 x 4 Snow Hog 734-1732 634-04151
31AA6AHE
31A-6LEF 634-04141 16 x 4.8 Snow Hog 734-1530 634-04140
31AE6GKF
31AE6GKO
31AE6LKG
31AA6AKE 634-04142 15 X 5 Snow Hog 734-1859 634-04151
31AE6FEE
31AE6FHF 634-04141 16 x 4.8 Snow Hog 734-1530 634-04140
31AE6FKF
31AS6LCG
31AH6KLG 634-04135 16 X 6.5 Snow Hog 734-1525 634-0069
26

8
27
27
15
25
13
21
16
5
10
6
13
17
1
35
24
7
2 Way Chute Control/
Commande de la goulotte à 2 fonctions
3
34
33
34
13
28
6
26
19
18
30
31
27
29
17
Manual Chute Control/
Commande de la goulotte manuel
23
27
13
15
36
25
13
21
16
5
10
6
13
2
24
7
17
14
4 Way Chute Control/
4
35
34
32
12
20
*37
22
11
9
Commande de la goulotte à 4 fonctions
* Optional - Replacement Hardware for Snow Thrower Chain Clearance/
* En Option - Quincaillerie de remplacement pour le dégagement de chaîne de la souffleuse
REF.
NO.
N°. DE
RÉF.
1 731-04912 Lower Chute (2 Way) Goulotte inférieur (2 fonctions)
2 731-04861 Lower Chute (4 Way) Goulotte inférieur (4 fonctions)
3 753-04862 Replacement Knob-2 Way Chute Control Lever Bouton de rechange pour levier de la comm. de la goulotte à 2 fonctions
4 753-04866 Replacement Joystick Lever-4 Way Chute Control Levier de rechange pour commande de la goulotte à 4 fonctions
5 710-0262 Carriage Bolt 5/16-18 x 1.50 Gr. 2 Boulon ordinaire 5/16-18 x 1,50 Qual. 2
6 710-04071 Carriage Screw 5/16-18 x 1.0 Vis ordinaire 5/16-18 x 1,0
7 710-04187 Hi-Lo Screw 1/4-15 x .50 Vis 1/4-15 x 0,50
8 710-0276 Carriage Bolt 5/16-18 x 1.00" Lg Boulon ordinaire de 5/16-18 x 1,00 po de lg.
9 710-0726 Hex Wash HD AB Tap Scr 5/16 x .75 Vis taraudée 5/16 x 0,75
10 710-0895 Hex Tapp Scr 1/4 x .75" Lg. Vis taraudée à tête hex. de 1/4 x 0,75 po de lg.
11 710-0909A Hex Wash TT-Tap Scr 5/16-18 x 1.75 Lg. Vis taraudée 5/16-18 x 1,75 po de lg.
12 711-0415 Clevis Pin 3/8 Dia Axe de chape 3/8 Dia.
13 712-04063 Flange Locknut 5/16-18 Gr. F Nylon Contre-écrou à embase 5/16-18 Qual. F nylon
14 714-0104 Int. Cotter Pin .072 x 1.13" Lg. Goupille fendue int. 0,072 x 1,13 po de lg.
15 731-04425A Upper Chute w/Export Label, Remote Goulotte supérieur, étiquette d'export, commande à distance
16 731-1313C Cable Guide Guide de la câble
17 731-04869 Chute Flange Keeper Garde-bride de la goulotte
18 738-04135 Shoulder Screw .25 x .50:10-24 Vis à épaulement 0,25 x 0,50:10-24
19 741-0475 Plastic Bushing .380 ID Manchon en plastique de 0,38 po de D.I.
20 749-04155 Chute Support Tube Tuyau de support de la goulotte
21 784-5594 Cable Bracket Chute Tilt Support de câble
22 784-5599 Handle Tab Taquet du guidon
23 784-5647 Chute Crank Brkt. Support du bras de goulotte d'éjection
24 790-00131 Bracket: Chute Control Support: Commande de la goulotte
25 737-0318 Grease:Arctic:EP NLGI 1-58F Graisse
26 737-04085 Grease Pack Paquet de graisse
27 736-0159 Flat Washer .349 ID x .879 OD x .063 Rondelle plate 0,349 DI x 0,879 DE x 0,063
28 710-0451 Carriage Bolt 5/16-18 x .75 Boulon ordinaire 5/16-18 x 0,75
29 720-0284 Handle Knob Assembly Bouton
30 731-04354A Upper Chute Goulotte supérieur
31 731-04912 Lower Chute (2 Way/Manual) Goulotte inférieur (2 fonctions et manuel)
32 736-0463 Flat Washer .25 x .630 x .0515 (4 pcs. w/631-04124) Rondelle plate 0,25 x 0,630 x 0,0515 (4 pcs. avec 631-04124)
33 710-04352 Screw #6, .375 Plastite (Item of Part #3) Vis N°. 6, 0,375 Plastite (article de pièce N°. 3)
34 710-04353 Screw #8, 1.00 Plastite (Item of Parts #3, #4 and #35) Vis N°. 8, 1,0 Plastite (article des pièces N°. 3, N°. 4 et N°. 35)
35 753-04864 Joystick Control Housing w/Hardware Boîtier du levier et quincaillerie
36 753-04875 Replacement Chute Rotation Pulley/Cable Assembly Poulie de rotation de la goulotte (incl. les câbles)
37 753-04876 Replacement Hardware for Snow Thrower Chain
38 710-0805 Hex Bolt 5/16-18 x 1.50 Gr. 5 Boulon hex. 5/16-18 x 1,50 po de lg. Qual. 5
39 736-0451 Saddle Washer .320 ID x .93 OD Rondelle selle 0,320 DI x 0,93 DE
PAR T
NO.
N° DE
PIÈCE DESCRIPTION DESCRIPTION
Clearance
Quincaillerie de remplacement pour le dégagement de chaîne de la
souffleuse
39
38
35A-6004
10.01.04

Styles H, K & L
19
13
17
33
21
24
9
1
20
42
25
32
12
38
14
37
29
15
7
5
27
40
41
36
34
16
54
53
26
54
35
3
31
52
43
26
11
56
1
37
23
15
48
22
9
4
7
44
28
51
47
25
8
2
30
6
35
45
46
10
18
10
10
35
35
18
2
25
2
50
55
49
28

REF.
NO.
N°. DE
RÉF.
1 631-04124 Handle Panel Ass'y - Yellow Panneau - jaune
2 631-04133 LH Clutch Lock Handle Ass'y Poignée d'embrayage CG
3 631-04134 RH Clutch Lock Handle Ass'y Poignée d'embrayage CD
4 684-04105 Engagement Handle Assembly LH Poignée d'entraînement CG
5 684-04106 Engagement Handle Assembly RH Poignée d'entraînement CD
6 710-04326 Screw #8-16 x .50 Vis no. 8-16 x 0,50
7 710-04354 Screw 1/4-20 x .375 Vis 1/4-20 x 0,375
8 710-0837 Oval HD C-Sunk Scr #10 x 5/8 Vis à tête goutte de suif no 10 x 5/8
9 710-1026 Hex TT-Tap Scr 1/4-20 x 1.75 Vis taraudée 1/4-20 x 1,75
10 710-1233 Oval C-Sunk Hd Screw 10-24 x 1.375 Vis 10-24 x 1,375
11 711-04287 Pivot Rod Tige de pivot
12 711-0677 Adjustment Ferrule Virole de réglage
13 712-0693 Hex Nut Écrou à six pans
14 712-04064 Hex L-Flanged Nut 1/4-20 Gr. F Nylon Contre-écrou à embase 1/4-20 Qual. F nylon
15 712-04081A Hex Shoulder Nut 1/4-20 Écrou 1/4-20
16 714-0104 Int. Cotter Pin .072 x 1.13" Lg. Goupille fendue int. 0,072 x 1,13 po de lg.
17 716-0398 Lock Ring - Toggle Switch Bague - commutateur à culbuteur
18 720-0274 Grip Poignée
19 720-04039 Shift Knob Bouton
19 720-04045 Shift Knob - Yellow Bouton - jaune
20 725-04213 Lamp #1295 Ampoulle no. 1295
21 725-04214 Wire Harness Faisceau de fil
22 725-04216A Heated Grip Wire Harness Faisceau de fil - poignée chauffée
23 725-1649 Socket Douille
24 725-1756 Toggle Switch - Single Throw Commutateur à culbuteur
25 725-1757 Heated Grip Poignée chauffée
26 726-0470 Cable Tie 19 x 8.39" Attache-câble 19 x 8,39 po
27 731-04894 Lock Plate Palastre de serrure
28 731-04896 Clutch Lock Cam Came
29 732-0193 Compression Spring .38 ID x .88 Lg Ressort de compression 0,38 DI x 0,88 po de lg.
30 732-04219 Spring: Clutch Lock Ressort: Verrou d'embrayage
31 732-04238 Torsion Spring .8156 x .3038 Ressort de torsion 0,8156 x 0,3038
32 735-0199A Rubber Bumper Pare - chocs en caoutchouc
33 736-0226 Flat Washer .469 ID x .88 OD x .063 Rondelle plate 0,469 DI x 0,88 DE x 0,063
34 736-0262 Flat Washer .38 ID x .87 OD x .09 Rondelle plate 0,38 DI x 0,87 DE x 0,09
35 738-04122 Shoulder Screw 1/4-20 x 1.345 Vis à épaulement 1/4-20 x 1,345
36 738-04125 Shoulder Screw .374 Dia. x 1.05 Lg. Vis à épaulement 0,374 dia. x 1,05 po de lg.
37 746-0778 "Z" Fitting Extrémité en «Z»
38 747-04284 Upper Shift Rod Tige de commande supérieur
39 750-04314 Shift Rod Connector Raccord - Tige de commande
40 790-00130 Shift Lever Levier de changement de la vitesse
41 790-00140 Panel Support Support de panneau de bord
42 747-04257 Shift Rod Tige de changement de la vitesse
44 747-04263 Chute Crank Eye Bolt Special Boulon à oeil spécial
45 720-0201A Knob 1.0 x 3.2 Bouton 1,0 x 3,20
46 726-0100 Push Nut 3/8" Rod Écrou pour tige de 3/8 po
47 735-0234 Grommet Grummet
48 684-04104 Chute Crank Assembly Manivelle de la goulotte
49 736-0185 Flat Washer .406" I.D. x .75" O.D. Rondelle plate 0,406 DI x 0,75 DE
50 714-0104 Int. Cotter Pin .072 x 1.13" Lg. Goupille fendue int. 0,072 x 1,13 po de lg.
51 749-04142 Upper Handle LH Goulotte supérieur CG
52 749-04141 Upper Handle RH Guidon supérieur CD
53 720-0284 Handle Knob Assembly Bouton
54 736-0451 Saddle Wash. .320 ID x .937 OD Rondelle selle 0,320 DI x 0,937 DE
55 710-0726 Hex Wash HD AB Tap Scr 5/16 x .75 Vis taraudée 5/16 x 0,75
56 749-04138 Lower Handle Guidon inférieur
PART
NO.
N° DE
PIÈCE DESCRIPTION DESCRIPTION
631-04125 Handle Panel Ass'y - Black Panneau - noir
631-04128 Handle Panel Ass'y-Black w/Chute Control Panneau - noir avec commande de la goulotte
31a-6006
07.30.04
29

23
pas responsable de toute perte ni de tout dommage indirect ou accidentel.
PRODUCTS LIMITED découlant de la vente de ses produits. MTD PRODUCTS LIMITED n’est
Les conditions stipulées dans cette garantie représentent les seules obligations de MTD
tacites de qualité marchande, se limitent à la durée stipulée dans la garantie limitée exprimée.
Autres garanties: Toutes les autres garanties, exprimées ou tacites, y compris les garanties
autorisation écrite préalable de MTD PRODUCTS LIMITED.
machine complète ne peut être retournée à l’usine que si elle est accompagnée d’une
après-vente, MTD PRODUCTS LIMITED, C. P. 1386, KITCHENER (ONTARIO) N2G 4J1. Une
connaissez pas le concessionnaire-réparateur de votre localité, adressez-vous au service
mesure d’assurer tout service sous garantie sur présentation d’une preuve d’achat. Si vous ne
Pour obtenir le service sous garantie: Tout concessionnaire-réparateur agréé par MTD est en
moitié (1/2) du prix de détail en vigueur de la batterie à la date du retour de celle-ci.
à compter de la date d’achat, à remplacer la batterie défectueuse à l’acheteur initial, pour la
de la période de quatre-vingt-dix (90) jours et avant la fin d’une période de cent vingt (120) jours
Garantie limitée supplémentaire de trente jours sur la batterie: MTD s’engage, à l’expiration
confirmé qu’elle ne peut maintenir une charge.
défectueuse en raison d’un vice de matière ou de fabrication et après que nos tests aient
gratuitement à l’acheteur initial toute batterie fournie avec cette machine qui s’avère
Garantie complète de quatre-vingt-dix jours sur la batterie: MTD s’engage à remplacer
sièges, les pneus et les pièces de l’embrayage (roues de frottement).
courroies, les lames, les adaptateurs de lames, les sacs à herbe, les roues des tondeuses, les
matière ou de fabrication d’une autre pièce. Par pièces courantes, on entend les batteries, les
garantie de deux ans, les pièces courantes sont protégées si leur défaillance résulte du vice de
cause de leur défaillance. À l’expiration du délai de 90 jours, mais avant la fin de la période de
courantes: Toutes les pièces courantes sont protégées pendant 90 jours, quelle que soit la
«Garantie sans défaut de quatre-vingt-dix jours au consommateur» des pièces
en ce qui concerne ces pièces.
séparée de leurs fabricants respectifs. Veuillez consulter les conditions de garantie du fabricant
Le moteur, le moteur de démarrage ainsi que ses composants font l’objet d’une garantie
«Garantie sans défaut de quatre-vingt-dix jours au consommateur».
Les pièces courantes font l’objet de conditions spéciales énumérées ci-dessous dans la clause
modification, qui n’ont pas été accidentées et qui n’ont pas été utilisées à des fins commerciales.
l’objet d’un emploi incorrect ou abusif, de négligence, d’un entretien inadéquat ou de
instructions publiées dans la notice d’utilisation accompagnant la machine, qui n’ont pas fait
s’applique seulement aux machines qui ont été utilisées et entretenues conformément aux
fabrication dans les deux ans qui suivent la date d’achat au détail au Canada. Cette garantie
l’acheteur initial, la ou les pièces qui s’avèrent défectueuses en raison d’un vice de matière ou de
MTD PRODUCTS LIMITED s’engage à réparer ou à remplacer gratuitement, à son choix, à
CHAPITRE 9: GARANTIE YARD-MAN SUPRÈME DE DEUX ANS

22
vous à une station technique agéée.
REMARQUE: Ce chapitre concerne des problèmes d’entretien mineurs. Pour plus de détails, adressez-
5. Remplacez la goupille de cisaillement.
4. Voir la page 18.
3. Voir Derniers réglages à la page 8.
corps étranger de la tarière.
débranchez le fil de la bougie. Dégagez le
2. Arrêter immédiatement le moteur et
logement de la tarière.
goulotte d’évacuation et l’intérieur du
débranchez le fil de la bougie. Nettoyez la
1. Arrêtez immédiatement le moteur et
2. Remplacez la courroie d’entraî nement.
Réglages.
1. Réglez le câble d’entraî nement. Voir le
station technique agréée.
persistent, faites vérifier la machine par une
les boulons et écrous. Si les vibrations
débranchez le fil de la bougie. Serrez tous
1. Arrêtez immédiatement le moteur et
3. Adressez-vous à une station technique.
d’aération.
Assurez-vous de la propret du trou
2. Dégagez la glace et la neige du chapeau.
1. Branchez et serrez le fil de la bougie.
4. Adressez-vous à une station technique.
fraîche.
d’essence. Faites le plein avec une essence
carburateur pour vider le réservoir
3. Débranchez la canalisation d’essence au
une essence propre.
2. Nettoyez la canalisation; faites le plein avec
1. Ouvrez le volet de départ.
7. Adressez-vous à un station technique.
6. Branchez le fil de la bougie.
5. Mettez la clé.
la bougie.
4. Nettoyez, réglez l’écartement ou remplacez
3. Ouvrez le volet de départ.
2. La nettoyer.
fraîche.
1. Faite le plein avec une essence propre et
ayant du jeu.
jeu.
endommagée.
bouché.
éventée.
fermé.
correctement.
5. Goupille de cisaillement est cisaillé.
4. Courroie d’entraînement de la tarière abîmée ou
3. Câble d’entraînement de la tarière mal réglé.
2. Présence de corps étranger dans la tarière.
pas la neige
1. Goulotte d’évacuation bouchée.
2. Courroie d’entraînement abîmée ou ayant du
1. Câble d’entraînement mal réglé.
3. Le port déchappement est bouché.
2. Chapeau d’échappement du trou d’aération
4. Carburateur est mal réglé.
3. Eau ou saleté dans le système d’essence.
2. Canalisation de carburant bouchée ou essence
1. Machine fonctionnant avec le volet de départ
7. Bouton de l’amorceur n’étant pas employé
6. Fil de la bougie débranché.
5. La clé de contact du moteur n’est pas mise.
4. Bougie défectueuse.
3. Volet de départ fermé.
2. Canalisation de carburant bouchée.
1. Réservoir vide ou essence éventée.
La souffleuse n’évacue
pas
La souffleuse n’avance
Vibration excessives 1. Pièces desserrées ou vis sans fin
Moteur surchauffe 1. Carburateur est mal réglé. 1. Adressez-vous à une station technique.
Perte de puissance 1. Fil de la bougie desserré.
irrégulier
Fonctionnement
pas
Le moteur ne démarre
Problème Cause(s) Solution
CHAPITRE 8: GUIDE DE DÉPANNAGE

21
de silicone.
roulements et câbles, d’une couche d’huile légère ou
machine en particulier les chaînes, ressorts,
de bien la protéger contre la rouille. Enduisez la
machine à moteur dans un abri métallique ou mal aéré,
REMARQUE: Prenez soin, avant de remiser une
propre.
• Entreposez la souffleuse dans un endroit sec et
d’utilisation.
chapitre Régime d’utilisation de cette notice
• Suivez les renseignements de lubrification dans le
• Nettoyez à fond la souffleuse.
gaz.
fourneau, un sêche-linge ou autre appareil à
veilleuse d’un chauffe-eau, un radiateur, un
contact avec une flamme ou une étincelle ou
vapeurs de carburant peuvent venir en
ventilation n’est pas adéquate et si les
à l’intérieur ou dans des endroits fermés si la
le moteur avec du carburant dans le réservoir
AVERTISSEMENT: N’entreposez jamais
accompagne votre souffleuse.
fournies dans la notice d’utilisation du moteur qui
jours, préparez-le de la façon selon les instructions
Si le moteur doit être entreposé pendant plus de 30
CHAPITRE 7: REMISAGE HORS SAISON

20
Figure 28
Vis
Plaque
Figure 29
4
1
2
3
Caoutchouc
frottement
Roue de
inverse, pour installer tous les composants.
et procédez comme ci-dessus, mais dans l’ordre
• Glissez la roue de frottement sur l’arbre hexagonal
bien montée de façon symétrique.
très important que la bague de caoutchouc soit
illustré à la Figure 30 , et serrez-les à fond. Il est
chaque vis approximativement 2 tours dans l’ordre
frottement sur la roue de frottement, tournez
• Installez le nouveau caoutchouc de la roue de
frottement.
frottement et retirez le caoutchouc de la roue de
• Enlevez les quatre vis de l’ensemble de la roue de
caoutchouc, procédez comme suit.
frottement pour ne remplacer que la bague en
les composants. Si vous démontez la roue de
dessus, mais dans l’ordre inverse, pour installer tous
frottement neuve sur l’arbre hex. Procédez comme siau complet, jetez la roue usée et glisser la roue de
REMARQUE: Si vous remplacez la roue de frottement
faissant glisser de l’arbre hex.
de l’arbre hex. et retirez la roue de frotteme nt en la
• Dégagez soigneusement la bague intérieure en E
• Mettez de côté les engrenages de l’arbre hex.
sur l’essieu de la roue. Voir la Figure 28 .
engrenages inférieurs des engrenages supé rieurs
gauche tout en dégageant len tement les
• Faites ensuite glisser l’arbre hex. vers le bas et la
à billes de la droite du châssis.
sur l’extrémité de l’arbre pour déloger le roulement
le châssis de la souffleuse, puis frappez doucement
bague extérieure en E qui maintient l’arbre hex. sur
• Avec un outil adéquat, dégagez soigneusement la
pouces de l’essieu de la roue.
droite du châssis da la souffleuse, à environ 2
• Localisez l’arbre hex. et la bague élastique sur la
rondelle creuse qui la maintinnent sur l’essieu.
• Démontez la roue droite en retirant la vis et la
taraudeuses du couvre-châssis, sous la souffleuse.
reposer sur l’habitacle. Enlevez les deux vis-auto-
• Basculez la souffleuse vers l’avant pour la faire
position R2.
• Placez le levier de changement de vitesse à la
morceau de plastique sous le bouchon d’essence.
• Videz l’essence de la souffleuse ou placez un
vous apercevez des fendillements.
frottement dès l’apparition de signes d’usure ou si
Remplacez la bague en caoutchouc de la roue de
fonctionnement, et, par la suit, de façon périodique.
devrait être vérifiée après 25 heures de
• La bague de caoutchouc de la roue de frottement
de la roue de frottement
Changement de la bague en caoutchouc

19
26 .
Figure 27
la de la poulie motrice pour la retirer. Voir la Figure
• Dégagez la courroie de la transmission et éloigneztransmission.
d’arrêt
Boulon
éliminera la tension sur la courroie de la
sur la tendeur, comme à la Figure 26 . Ceci
enfoncez un tournevis à tête Phillips dans le trou
• Poussez la poulie de tension loin de la goulotte et
comme à la Figure 23.
• Dégagez la courroie de la tarière de la poulie,
transmission
de la
Poulie
fuites.
de plastique sous le capuchon pour empêcher les
• Videz l’essence du réservoir ou placez un morceau
châssis de la souffleuse. Voir la Figure 22 .
frottement
Roue de
transmission
Courroie de la
vis auto-taraudeuse qui le maintiennent sur le
• Démontez le couvre-courroie en retirant les deux
Remplacement de la courroie de la transmission
tôt.
avec les deux vis auto-taraudeuses retirées plus
l’équipement en marche. Fixer le couvre-courroie
• Replacez le couvre-châssis et remettez
motrice.
• Replacez la courroie de la tarière sur la poulie
poulie de tension.
poulies, n’oubliez pas de retirer le tournevis de la
de retirer. Quand la courroie est bien assise sur les
de la même façon que la courroie que vous venez
d’abord sur le vilebrequin, puis sur la poulie motrice
• Installez la courroie neuve, en la glissant tout
dégagez la courroie du vilebrequin.
Ressort
Figure 25
taraudeuses enlevées précédemment.
• Replacez le couvre-courroie avec les vis auto-
motrice.
• Faites passer la courroie de la tarière sur la poulie
souffleuse en position normale.
• Replacez le couvre-châssis et remettez la
boulon comme précédemment.
poulie de tension. Accrochez le ressort sur le
• Faites passer la courroie de la tarière derrière la
Support de montage
• Placez-vous de l’autre côté de la souffleuse et
la roue de frottement. Voir la Figure 27 .
la poulie de la transmission ainsi que du disque de
la poulie de la transmission. Dégagez la courroie de
suffisant entre le disque de la roue de frott ement et
• Dévisez le boulon d’arrêt pour créer un espace
Figure 26
tarière
de la
Poulie
épaulement
Vis à
tarière
de la
Courroie
Figure 24
Tendeur
motrice
Poulie
..
transmission
de la
Courroie
et écartez-le. Voir la Figure 24
Couvre-châssis
taraudeuses du couvre-châssis sous la souffle use
reposer sur l’habitacle. Enlevez les deux vis auto-
• Basculez la souffleuse vers l’avant pour la faire
.

18
montage et serrez à fond.
• Replacez la vis à épaulement dans le support de
tarière. Voir la Figure 27 .
• Enroulez la courroie de la tarière sur la poulie de la
dans la rainure. Voir la Figure 27 .
remplacez-la par une courroie neuve bien installée
courroie de la tarière. Enlevez la courroie usagée et
• Décrochez le ressort pour éliminer la tension sur la
support de montage. Voir la Figure 24 .
demi-tour à la vis à épaulement et dégagez-la du
et écartez celui-ci. Voir la Figure 24 Faites faire un
taraudeuses du couvre-châssis sous la souffleuse
reposer sur l’habitacle. Enlevez les deux vis auto-
• Basculez la souffleuse vers l’avant pour la faire
Figure 23
l’habitacle de la souffleuse. Voir la Figure 22 .
vis auto-taraudeuse qui le maintiennent sur
• Démontez le couvre-courroie en retirant les deux
Remplacement de la courroie de la tarière
les si elles présentent des signes d’usure.
toutes les 25 heures de fonctionnement. RemplacezVérifiez les courroies de la tarière et de l’entraînement
Remplacement de les courroies
l’habitacle. Serrez à fond.
des boulons ordinaires se trouve à l’intérieur de
Installez la lame plate neuve en vérifiant que la têt e
maintiennent ainsi que les patins sur la souffleuse.
ordinaires et le contre-écrous à embase qui la
• Pour démonter la lame plate, enlevez les boulons
Voir la Figure 19.
sur chaque côté) et les contre-écrous à embase.
nouveaux patins avec les boulons ordinaires (deux
maintiennent sur la souffleuse. Remontez les
ordinaires et les contre-écrous à embase qui les
• Pour retirer les patins, enlevez les quatre boulons
régulièrement et remplacez-les au besoin.
souffleuse et ils risquent de s’user. Vérifiez-les
• La lame plate et les patins sont installés sous la
Lame plate et patins
la tarière
Courroie de
motrice
Poulie
comme à la Figure 23..
• Dégagez la courroie de la tarière de la poulie,
Figure 22
soient immobilisées.
souffleuse. Attendez que toutes les pièces se
lubrifier, de réparer ou d’inspecter la
commandes et arrêtez le moteur avant de
AVERTISSEMENT: Débrayez toutes les
Figure 21- Tarière de 30 po illustrée.
Goupilles de cisaillement
Vis auto-taraudeuses
Roulement
fuites.
de plastique sous le capuchon pour empêcher les
• Videz l’essence du réservoir ou placez un morceau
Entretoise
Goupilles de cisaillement
Roulement

17
graisse pour pouvoir dégager la pression.
Vérifiez que le bouchon de l’évent n e contient pas de
l’engrenage car les joints pourraient être end ommagés.
Ne remplissez pas trop la boîte de
IMPORTANT:
graisse (Numéro de pièce 737-0168).
quelconque, lubrifiez-la à nouveau avec 2,0 oz. de
graisse à l’usine. Si elle est démontée pour une raison
La boîte de l’engrenage à vis sans fin a été remplie de
Figure 20
Évitez de répandre de l’huile sur la roue de
d’entraînement en aluminium.
frottement en caoutchouc et sur la plaque
IMPORTANT:
Boîte de l’engrenage
souffleuse.
homologuées ne sera pas couvert par la garantie de la
pièce de la tarière par l’emploi de goupilles non
dégât causé à la boîte de vitesses ou à toute autre
les goupilles de remplacement OEM-738-04124. Tout
cisaillement de la tarière par des goupilles autres que
Ne remplacez JAMAIS les goupilles de
IMPORTANT:
neufs.
goupilles neufs et de fixer avec les goupilles-épingles
lubrifiant à base d’huile sur l’arbre avant d’installer les
épingles de rechange sont fournis. Vaporisez un
Deux goupilles de cisaillement et deux goupillese sont cisaillés. Remplacez les goupilles si besoin est.
Si les tarières ne tournent pas, vérifiez si les goupilles
glace.
cisailler si la souffleuse heurte un objet ou un bloc de
tarière. Voir la Figure 19. Les goupilles sont sensés se
épingles mainteiennent les tarières sur l’arbre de la
Deux goupilles de cisaillement et deux goupille-
Tarières
Voir la Figure 21.
trouvés à chaque extrémité de l’arbre de la tarière.
entretoises. Lubrifiez aussi les roulements à bride
un lubrifiant à l’intérieur de l’arbre et autour des
la tarière, au moins une fois par saison. Vaporisez
• Enlevez les goupilles de cisaillement sur l’arbre de
Arbre de la tarière
graisse automobile à usages multiples.
sans fin de la manivelle de la goulotte avec une
• Il est recommandé de graisser l’engrenage à vis
Commande de direction de la goulotte
automobile à usages multiples.
roues, nettoyez et enduisez les essieux d’u ne graisse
roues au moins une fois par saison. Démontez les
Huilez ou vaporisez du lubrifiant sur les roulements des
toutes saison sur l’arbre hex. Voir la Figure 20.
• Appliquez une légère couche d’huile polyvalente
auto-taraudeuses qui le maintient.
• Enlevez le couvre-châssis en enlevant les deux vis
fois par saison ou toutes les 25 heures d’utilisation.
Lubrifiez l’arbre de transmission (hex.) au moins une
Arbre de transmission
avec la souffleuse.
Consultez la notice d’utilisation du moteur, fournie
Moteur
Lubrification
moteur.
la souffleuse quant sux instructions d’entretien du
Consultez la notice d’utilisation du moteur fournie avec
Moteur
soient immobilisées.
souffleuse. Attendez que toutes les pièces se
lubrifier, de réparer ou d’inspecter la
commandes et arrêtez le moteur avant de
AVERTISSEMENT: Débrayez toutes les
Roues
CHAPITRE 6: RÉGIME D’UTILISATION ET ENTRETIEN
leur usure inégale. Serrez les boulo ns à fond.
est de niveau et en contact avec le sol pour évite r
• Vérifiez que toute la surface inférieure des patins
ordinaires. Déplacez les patins à la posit ion voulue.
écrous à embase (deux de chaque côté) et boulons
• Adjustez les patins en desserrant les quatre contre-

Réversible
16
Figure 19 - Patins
obtenir moins de jeu. Voir la Figure 18 .
bas pour obtenir plus de jeu ou ver s le haut pour
Ordinaire
et des dégats matériels.
tarière, peut causer des blessures corporelles
recouverte de gravier qui, s’il est projeté par la
d’utiliser la souffleuse sur une surface
Débrayée
AVERTISSEMENT: Il est déconseillé
leur durée de vie.
réversibles et peuvent être retournés pour accroître
REMARQUE: Certains modèles sont équipés de patins
lorsque la surface à déblayer est irrégulière.
basse. Utilisez les positions intermédiaire ou haute
complètement la neige, placez les patins à la position
ajustant les patins. Voir la Figure 1 9. Pour déblayer
L’espace entre la lame plate et le sol peut être ajusté en
de la tarière. Faites tourner la virole du câble vers le
«Z» du câble (sans tordre le câble) de comman de
• Desserrez le contre-écrou à six pans du raccord en
comme suit:
la transmission. Consultez la Figure 18 et continuez
Si l’un des tests ci-dessus échoue, ajustez le câble de
vitesses.
devez sentir aucune résistance dans le levier de
en arrière entre les positions R2 et F6. Vous ne
déplacez plusieurs fois le levier de vitesses d’avant
3. Débrayée la commande de la transmission,
bouger facilement.
roues ne doivent pas tourner. La machine doit PAS
vers l’avant. Vous devez sentir une résistance. Les
et essayez de déplacer la souffleuse
2. Embrayez la commande de traction
facilement.
puis tirez-la. La machine doit bouger
débrayée, poussez la souffleuse,
1. La commande de transmission
transmission comme suit:
Vérifiez l’ajustement de la commande de la
position «relevée». Le câble ne doit PAS être tendu.
commande de la transmission est débrayée et en
Le câble doit présenter très peu de jeu quand la
Commande de la transmission
Patins
Figure 17
page13, pour ajuster la tarière.
Reportez-vous au test de la commande de la tarière,
Commande de la tarière
Figure 18
puis resserrez les écrous. Voir la Figure 17 .
retiennent le support de la goulotte, repositionez-le,
goulotte. Pour cela, desserrez les deux écrous qui
goulotte, il est possible d’ajuster le support de la
direction de la goulotte ne s’encl enche pas bien avec la
Si la vis hélicoïdale à la base de la commande de
les trois tests pour vous assurer du bon ajustement.
Resserrez ensuite le contre-écrou à six pans et répétez
Réglage du support de la goulotte

15
Figure 16
bouton. Voir la Figure 16 .
pivoter la goulotte à la position voulue et resserr ez le
gauche de la goulotte d’éjection pour la régler. Faites
retirez la clé de contact. Desserrez le bouton sur le côté
changeant l’angle de la goulotte. Arrêtez le moteur et
La distance de projection peut être modifiée en
Goulotte
goupille-épingle.
vitesses. Maintenez le tout en place avec la
alignée avec le trou du haut du levier de
3
selon le besoin, jusqu’à ce que la virole soit
Filetez la virole sur la tige du levier de vitesses
Figure 13
Figure 15
1
3
2
Figure 14
des aiguilles d’une montre le plus loin possible.
Tournez le bras de commande dans le sens
vitesses.
vitesses, qui fixe la virole sur le levier de
goupille-épingle de la poignée du levier de
1
marche avant la plus rapide. Enlevez la
Placez le levier de vitesses à la position
comme suit:
figures à la droite et régler la tige du levier de vitesses
l’arrière) ne peut pas être réalisée, réfé rez-vous aux
Si la gamme complète des vitesses (vers l'avant et
Tige du levier de vitesses
d’utilisation.
d’instructions spéciales dans la notice
2
que le moteur tourne, sauf en cas
d’effectuer un réglage q uelconque penda nt
AVERTISSEMENT: N’essayez jamais
CHAPITRE 5: RÉGLAGES

14
souffleuse complètement après chaque utilisation.
• Pour empêcher le démarreur de geler. Nettoyez la
Abaissez-les sur les allées recouvertes de gravier.
relever les patins en cas de neige tassée.
lame plate pour un déblaiement normal. On peut
• Réglez les patins à 1/4 de po en dessous de la
• Chevauchez légèrement les passages successifs.
le sens du vent.
• Dans la mesure du possible, projetez la neige dans
de temps après une chute de neige.
• Le déblaiement sera plus facile s’il est effectué peu
150ºF (65ºC). Évitez de les toucher.
silencieux et des zones voisines peut dépasser
AVERTISSEMENT: La tem pérature du
fonctionnement normale.
puissance que lorsqu’il atteint sa température de
quelques minutes, car il ne développe toute sa
REMARQUE: Laissez le moteur tourner pendant
souffleuse. Voir la Figure 12 .
coupe à la position correcte avant de vous servir de la
pans qui les retiennent, puis assemblez les barres de
les boulons ordinaires en dévissant les écrous à six
l’habitacle de la tarière sur certains modèles. Enlevez
Les barres de coupe sont assemblées à l’envers sur
travaille dans de gros amoncellements de neige.
Utilisez les barres de coupe quand la souffleuse
Barres de coupe (sur certains modèles)
Conseils d’utilisation
renseigner quant à leur prix et leur disponibilité.
chaînes pour pneu, le service après-vente peut vous
nécessaire. Si votre souffleuse n’est pas équipée de s
chaque fois que la traction supplémentaire est
Les chaînes pour pneu devraient être employées
Chaînes pour pneu (sur certains modèles)
Tous les modèles OEM-390-679
Modèle de souffleuse Barres de coupe
renseigner quant à leur prix et leur disponibilité.
coupe, le service après-vente (voir page 2) peut vous
Si votre souffleuse n’est pas équipée de barre s de
Figure 12
Écrous à six pans
Boulons ordinaires/
coupe
Barre de
reste de neige ou de glace de la goulotte d’éjection.
pendant quelques secondes pour dégager t out
souffleuse) et embrayez la commande de la tarière
• Tenez-vous au poste de conduite (derrière la
de contact et faites démarrer la souffleuse.
l’arrière de l’habitacle de la tarière. Remettez la clé
• Replacez l’outil de dégagement sur l’attache à
la goulotte à la main.
la neige ou la glace près de la tarière ou dans
AVERTISSEMENT: Ne dégagez jamais
dans la goulotte.
et retirer la neige ou la glace qui s’est accumulée
• Utilisez l’extrémité en forme de pelle pour déloger
sa position sur l’arrière de l’habitacle de la tarière.
• Détachez l’outil de dégagement de la goulotte de
• Arrêtez le moteur et retirez la clé de contact.
la manette de blocage de la traction/tarière.
• Débrayez la manette de commande de la tarière et
et l’ouverture de la goulotte:
goulotte, procédez comme suit pour nettoyer la goulotte
éliminer les accumulations de neige et de glace dans la
tarière par une attache. Servez- vous de cet outil p our
Cet outil est maintenu sur l’arrière de l’habitacle de la
Outil de dégagement de la goulotte
selon les instructions ci-dessus.
8. Lorsque la neige est déblayée, arrêtez la souffleuse
passage précédent.
la position voulue et chevauchez légèrement le
7. Lors des passages successifs, ajustez la goulotte à

13
de la neige.
la vitesse adaptée à la profondeur et aux cond itions
6. Lors du premier passage dans la n eige, choisissez
gauche de la commande de la tarière.
5. Le mécanisme de blocage permet de retirer la main
précédement.
transmission selon les instructions indiqué
4. Embrayez les commandes de la tarière et de la
transmission.
d’abord débrayé la commande de la
le levier de changement de vitesse sans avoir
AVERTISSEMENT: Ne déplacez jamais
présentes.
3. Choisissez la vitesse adaptée aux conditions
bâtiments) avec la commande de la goulotte.
voulue (jamais vers des spectateurs et/ou
2. Orientez la goulotte d’éjection dans la direction
instructions.
1. Faites démarrer le moteur en suivant les
dégagée et retirez les débris le cas échéant.
ATTENTION: Vérifiez que la zone de travail est bien
Pour projeter la neige
Figure 11
Be Straight
Cable Should
Hex Nut
Z Fitting
commande de la tarière.
• Répétez le test pour vérifier l’ajustement de la
la Figure 11.
• Resserrez ensuite le contre-écrou à six pans. Voir
aiguilles d’une montre pour obtenir plus de jeu.
tourner la virole du câble dans le sens contraire aux
«Z» du câble de commande de la tar ière. Faites
desserrez le contre-écrou à six pans du raccord en
• Pour ajuster à nouveau le câble de commande,
nouveau le câble de la tarière.
les pièces se soient immobilisées avant d’ajuster à
conduite et arrêtez le moteur . Attendez que TOUTES
immobile, retournez immédiatement à la position de
Si la tarière n’est pas complètement
IMPORTANT:
Faites ce test avant d’utiliser la souffleuse
qu’aucune pièce ne bouge.
• Vérifiez que la tarière est totalement immobilisée et
machine.
débrayée et « relevée ». Placez-vous devant la
la manette de commande de la tarière à la position
• Laissez tourner le moteur à plein régime et gardez
la tarière. Répétez cette opération plusieurs fois.
• Attendez environ dix secondes avant de débrayer
souffleuse) et enclenchez la tarière.
• Tenez-vous à la position de conduite (derrière la
rapide.
Vérifiez que l’obturateur est réglé à la position
paragraphe «pour faire déma rrer le moteur ».
la souffleuse selon les instructions dans le
• Choisissez un endroit bien aéré et faites démarrer
SANS toutefois être tendu.
«relevée». Le câble doit présenter très peu de jeu
• Débrayez la commande et placez-la en position
suivante :
Vérifiez le réglage de cette commande de la façon
d’hiver.
pour la première fois et au début de chaque saison
IMPORTANT:
Test de la commande de la tarière
les deux poignées doivent être débrayées.
arrêter la tarière et les roues. Pour arrêter la tarière
4. Lâchez la commande de la transmission pour
transmission soit débrayée.
engagée jusqu’à ce que la commande de la
mécanisme de blocage maintient la tarièr e
3. Débrayez la commande de la tarière ; le
projeter la neige.
conducteur puisse orienter la goulotte sans cesser de
la commande de la tarière pour permettre au
REMARQUE: Cette même poignée permet de bloquer
est embrayée.
de vitesse quand la commande de la transmission
avancer. Lâcher-la pour arrêter. Ne changez pas
pressez la commande de la transmission pour
2. Alors que la commande de la tarière est embrayée,
seulement :
Pour modèles avec le mécanisme de blocage en option
Lâchez la poignée pour arrêter la tarière.
gauche de la tarière contre le guidon gauche.
projeter la neige, pressez la poignée d’embrayage
1. Pour embrayer la tarière et pour commencer à
Pour embrayer la tarière
la transmission de la souffleuse.
souffleuse. Ceci pourrait causer l’usure p rématurée de
transmission et avoir complètement arrêté la
sans avoir au préalable débrayé la commande de la
(pour changer de vitesse ou de sens de déplacement)

12
Ne déplacez JAMAIS le levier de vitesses
Utilisez une vitesse lente jusqu’à ce que
IMPORTANT:
arrêter.
guidon pour avancer la souffleuse; lâchez-la pour
• Pressez la commande de la transmission contre le
tarières.
et les tarières tourneront; lâchez-la pour arrêter les
• Pressez la commande de la tarière contre le guidon
vous soyez habitué.
IMPORTANT:
aux conditions présentes.
marche arrière (R). Choisissez la vitesse adaptée
marche avant (F) ou à l’une des deux positions de
de vitesse à l’une des six po sitions de
(lapin), placez le levier de changement
• Avec l’obturateur à la position Fast
Ne laissez pas la poignée revenir
Pour embrayer la transmission
Déplacez celle-ci plusieurs fois.
carburateur et près des manettes de commande.
4. Enlevez toute la neige et l’humidité du couvercle du
clé.
n’est pas possible de faire démarrer le moteur sans la
REMARQUE: Rangez la clé dans un endroit sùr. Il
3. Retirez la clé de contact.
STOP.
2. Placez la manette de l’obturateur à la position
ne risque pas d’endommager le moteur .
quatre reprises. Vous entendrez un cla quement qui
fermement sur la corde du démarreur à trois ou
1. Quand le moteur tourne, tirez rapidemen t et
Démarreur à lanceur
clé.
n’est pas possible de faire démarrer le moteur sans la
REMARQUE: Rangez la clé dans un endroit sùr. Il
Déplacez celle-ci plusieurs fois.
carburateur et près des manettes de commande.
6. Enlevez toute la neige et l’humidité du couvercle du
5. Retirez la clé de contact.
STOP.
4. Placez la manette de l’obturateur à la position
souffleuse.
courant avant de débrancher l’autre extrémit é de la
3. Débranchez d’abord le fil élect rique de la prise d e
démarreur du moteur.
démarreur ne risque pas d’endommager le
quelques secondes. le bruit particulier émis par le
démarreur et faites tourner le déma rreur pendant
2. Quand le moteur tourne, appuyez sur le bout on du
volts C.A.
extrémité du fil dans une prise de courant de 120
électrique, sur le moteur. Branchez l’autre
1. Branchez le fil électrique dans le démarreur
Démarreur électrique (sur certains modèles)
comme suit avant d’arrêt er le moteur:
• Pour empêcher le démarreur de geler, procédez
s’y accumuler.
minutes pour sécher toute l’humidité qui aurait pu
• Laissez tourner le moteur pendant quelques
Arrêt du moteur
position SANS VOLET.
VOLET PLEIN, puis revenez lentement à la
à nouveau le bouton du volet de départ à la position
position SANS VOLET. Si le moteur hésite, tournez
lentement le bouton du volet de départ vers la
• Au fur et à mesure que le moteur chauffe, tournez
s’enrouler lentement tout en le retenant .
brusquement contre le moteur, m ais laissez-la
IMPORTANT:
• Tirez à nouveau, mais rapidement.
résistance. Laissez la corde s’enrouler lentement.
lanceur jusqu’à ce que vous sentiez une légère
• Tirez lentement sur la poignée du démarreur à
9ºC).
nécessaire si la température est inférieure à 15ºF (-
REMARQUE: Un amorçage supplémentaire peut être
après un arrêt bref.
REMARQUE: N’AMORCEZ PAS un moteur chaud
appuyant.
toujours l’évent du bouton de l’amorceur en
l’amorceur pour le démarrage à froid. Couvrez
• Appuyez deux ou trois fois sur le bouton de
PLEIN.
de départ à la position SANS VOLET au lieu de VOLET
REMARQUE: Si le moteur est chaud, tournez le volet
VOLET PLEIN (démarrage à froid).
• Tournez le bouton du volet de départ à la position
Démarreur à lanceur
souffleuse.
courant avant de débrancher l’autre extrémité de la
• Débranchez d’abord le fil électrique de la prise de
position SANS VOLET.
VOLET PLEIN, puis revenez lentement à la
à nouveau le bouton du volet de départ à la position
position SANS VOLET. Si le moteur hésite, tournez
lentement le bouton du volet de départ vers la
• Au fur et à mesure que le moteur chauffe, tournez
démarreur immédiatement.
• Quand le moteur démarre, lâchez le bouton du
que le moteur se mette en route.
• Appuyez sur le bouton du démarreur jusqu’à ce
après un arrêt bref.
REMARQUE: N’AMORCEZ PAS un moteur chaud
appuyant.
toujours l’évent du bouton de l’amorceur en

11
l’amorceur pour le démarrage à froid. Couvrez
• Appuyez deux ou trois fois sur le bouton de
PLEIN.
de départ à la position SANS VOLET au lieu de VOLET
REMARQUE: Si le moteur est chaud, tournez le volet
VOLET PLEIN (démarrage à froid).
• Tournez le bouton du volet de départ à la position
à la terre dans un endroit bien-aéré.
prise de courant de 120 volts C.A. à trois trous mise
moteur. Branchez l’autre extrémité du fil dans une
• Branchez le fil électrique dans le démarreur, sur le
à la terre, procédez comme suit:
Si vous avez une prise de courant à trois trous relié
Démarreur électrique (sur certains modèles)
que la clé soit insérée dans le commutateur d’allumage.
REMARQUE: Le moteur ne peut pas démarrer à moins
pas la clé.
vous qu’elle se met bien en position. Ne tournez
RAPIDE .Enfoncez la clé dans la fente. Assurez-
• Placez la manette de l’obturateur à la position
de l’entraînement sont débrayées (re lâchées).
• Assurez-vous que les commandes de la tarière et
attachée à l’embout métallique de la bougie.
la bougie (dans la gaine en caoutchouc), est bien
Vérifiez que la boucle métallique, au bout du fil de
• Branchez le fil de la bougie sur cette dernière.
Pour faire démarrer le moteur
cas ce démarreur électrique.
normalement être utilisé, n’utilisez en aucun
à trois trous à l’endroit où le déma rreur doit
est relié à la terre, mais s’il n’y a pas de prise
AVERTISSEMENT: Si votr e système
d’utiliser le démarreur électrique.
soigneusement toutes les instructions avant
pourrait blesser le conducteur. Suivez
la possibilité d’une décharge électrique qui
Il doit toujours être relié à la terre pour éviter
fonctionner sur un courant de 120 volts, C.A.
électrique à trois fils et il est conçu pour
option) est équipé d’un fil et d’une prise
AVERTISSEMENT: Ce démarreur (en
source incandescente.
cigarettes ou pipe, tout cigare ou toute autre
quand le moteur est chaud. Éteignez t oute
l’intérieur, pendant que le moteur tourne ou
explosif. Ne faites jamais le plein d’essence à
extrêmement inflammable et les vapeurs sont
en manipulant de l'essence. L'essence est
AVERTISSEMENT: Faites très atte ntion
Veuillez lire ces instructions attentivemen t.
d’utilisation du moteur qui accompagne la souffleuse.
besoin. Suivez les instructions fournies dans la notice
Vérifiez le niveau d’huile et d’essence et ajouter au
Pleins d’essence et d’huile
ce démarreur électrique.
fils reliés à la terre, n’utilisez en aucun cas
votre maison n’est pas un système à trois
AVERTISSEMENT: Si le câblage de
renseignez-vous auprès d’un électricien.
trois fils reliés à la terre. Si vous n’êtes pas ce rtain,
• Vérifiez que le câblage de votre maison comporte
fonctionnement.
sur la machine et dans ce notice avant le
suivez toutes les instructions et les consignes
AVERTISSEMENT: Lisez, comprenez, et
Avant le démarrage
evacuée par la goulotte.
La neige dirigée dans l’habitacle de la tarière est
Goulotte
dirigent la neige vers l’habitacle.
Lorsque les tarières sont embrayées, elles tournent et
Tarière s
souffleuse) et d’une prise de courant de 120 volts.
l’extérieur à fiche à 3 broches (fournie avec la
Il exige l’emploi d’une rallonge électrique pour
CHAPITRE 4: FONCTIONNEMENT
échéant)
Fiche du démarreur électrique (le cas
est branché à une prise de courant de 120 volts.
enclencher le démarreur électrique du moteur quand il
Appuyez sur le bouton du démarreur électrique pour
échéant)
Bouton de démarreur électrique (le cas
mettre en marche le moteur manuellemen t.
La poignée du démarreur à lanceur est utilisée pour
Poignée de démarreur à lanceur

10
CHUTE DIRECTIONAL CONTROL
COMMANDE D'ORIENTATION DE LA GOULOTTE
contacte avec le sol pour éviter l eur usure inégale.
Vérifiez que toute la surface inférieure des pati ns est en
ou haute lorsque la surface à déblayer est irrégulière.
à la position basse. Utilisez les positions intermédiaire
Pour déblayer complètement la neige, placez les p atins
ajustant les patins.
L’espace entre la lame plate et le sol peut être ajusté en
Patins
ajuster la distance de projection.
Inclinez la manette vers l’avant ou vers l’arrière pour
distance de projection de la neige par la go ulotte.
Cette manette à 2 fonctions permet de contrôler la
(en option)
Commande de la goulotte à 2 fonctions
CHUTE TILT
ADJUSTABLE
RIGHT
DISCHARGE
avant d’essayer de dégager la goulotte .
que toutes les pièces se soient immobilisées
moteur et restez derrière le guidon jusqu’à ce
une goulotte bouchée à la main. Arrêtez le
AVERTISSEMENT: Ne dégagez jama is
LEFT
renseignement concernant cet outil.
le chapitre Fonctionnement pour plus de
L’outil sert à dégager une goulotte bouchée. Consultez
L’outil de dégagement de la goulotte
décharger la neige à droite.
• Tournez la manivelle en sens inverse pour
d’une montre pour décharger la neige à ga uche.
• Tournez la manivelle dans le sens des aiguilles
direction de la goulotte comme suit:
projetée, tournez la manivelle de la commande de
Pour changer la direction dans laquelle la neige est
le côté gauche de la souffleuse.
La commande de direction de la gou lotte est placé sur
DISCHARGE
N’essayez pas de tourner la clé.
projection.
vers l’avant ou vers l’arrière pour ajuster la distance de
direction de projection de la neige. Inclinez la manette
droite ou à gauche pour orienter la goulotte dans la
goulotte. Appuyez sur le bouton et pivotez la manette à
direction et la distance de projection de la neige par la
Cette manette à 4 fonctions permet de contrôler la
(en option)
Commande de la goulotte à 4 fonctions
IMPORTANT:
n’est pas utilisée.
Retirez la clé quand la souffleuse
mettre le moteur en marche.
complètement enfoncée pour
de sécurité. Il doit êtr e
La clé de contact est un dispositif
Clé de contact
pour les arrêter.
embrayer les roues. Lâchez-la
commande contre le guidon pour
guidon droite. Serrez la
Cette commande se trouve sur le
l’entraînement
Commande de
CHUTE DIRECTIONAL CONTROL
(en option)
Commande de direction de la goulotte
la goulotte
Commande de
arrêter.
la tarière et pour déblayer la neige. Lâchez-la pour
commande de la tarière contre le guidon pour embrayer
Elle se trouve sur le guidon gauche. Serrez la
Commande de la tarière

9
par le goulot de remplissage.
d’huile à moteur et de faire le plein
Il est possible de vérifier le niveau
Plein d’huile
Volet de départ
de
moteur en temps froid.
moteur pour aider à faire démarrer le
directement dans le carburateur du
d’amorcage force le carburant
L’enfoncement du bouton
Amorceur
plus lente des deux.
La souffleuse a deux marches arrière (R2), R1 étant la
Marche arrière
la plus lente et la position 6 la plus rap ide.
La souffleuse a six marches avant (F). La posit ion 1 est
Marche avant
complètement.
moteur quand il est abaissé
le régime du moteur et coupera le
trouvée sur le moteur. Il sert a régler
La commande de l’obturateur est
Commande de l’obturateur
démarrage du moteur.
ferme la plaque sur le carburateur et facilite le
aiguilles d’une montre. Le bouton du volet de dépar t
est activé en tournant le bouton dans le sens des
Le volet de départ est trouvé sur l’arriè re du moteur et
Figure 10
l’obturateur
Commande
Patin
avant le fonctionnement.
consignes sur la machine et dans ce notice
suivez toutes les instructions et les
AVERTISSEMENT: Lisez, comprenez et
la vitesse et la direction de déplacem ent.
Il se trouve au milieu du tableau de bord et sert à choisir
Levier de vitesses
démarrage et les commandes du moteur.
pour avoir plus de renseignements concernant le
moteur emballée séparément avec votre souffleuse
REMARQUE: Consultez la notice d’utilisation du
T arières
démarreur
Poignée de
départ
Volet de
contact
Clé de
Amorceur
Boîte d’interrupteur
Commandes de moteur
Commande de la taière
la goulotte
Commande de
de la goulotte
dégagement
Outil de
Goulotte
Goulot de remplissage
de carburant
Capuchon
Bouton de démarrage électrique
Levier de vitesses
Commande de l’entraînenment
SECTION 3: COMMANDES DE LA SOUFFLEUSE

8
un dégagement maximal entre le sol et la lame plate.
réglez les patins à la position la plus haute pour assurer
souffleuse sur une surface recouverte de gravier,
Si pour une raison quelconque, vous devez utiliser la
des dégats matériels.
par la tarière, peut causer des blessures corporelles et
une surface recouverte de gravier qui, s’il est projeté
15 et 20 lb/po2.
réduisez la pression dans les deux pneus à entre
IMPORTANT:
«Réglage» de cette notice d’utilsation.
entre la lame plate et le sol, consultez le chapitre
patins à la Figure 10. Il est possible d’ajuster l’espace
Déterminez l’emplacement de la lame plate et des
Patins
de l’autre.
les pneus, la machine risque de tirer d’un côté plus que
REMARQUE: Si la pression n’est pas égale dans tous
• Avant l’utilisation, vérifiez la pression des pneus et
l’alternateur
Fil de
Fil de l’alternateur
Il est déconseillé d’utiliser la souffleuse sur
Pression des pneus
et correctement.
que votre souffleuse fonctionne sans risque
effectuez tous les ajustements pour vérifier
et suivez soigneusement les instructions et
commande de la tarière» à la page 13. Lisez
souffleuse, référez-vous à «Test de la
Figure 9
plus de clarté.
: Les roues ne sont pas représentées pour
REMARQUE
Fil du phare
l’encadré de la Figure 9 .
l’alternateur sous le réservoir d’essence. Voir
2. Vérifiez que le fil du phare est branché dans le fil de
guidon droit, comme à la F igure 9 .
1. Vérifiez que le fil du phare est enroulé autour du
Fil du phare (en option)
Figure 8
AVERTISSEMENT: Avant d’utiliser votre
endommager la souffleuse.
ATTENTION: Le non-respect de ces instructions peut
souffleuse en marche.
derniers réglages nécesaires avant de mettre la
réglages selon les instructions ci-dessous et faites les
Après avoir assemblé la souffleuse, vérifiez les
Derniers réglages
démarrer la souffleuse.
rallonge électrique (si équipée) avant de faire
l’expédition. Coupez l’attache-fil et retirez la
sur l’arrière de l’habitacle de la tarière pour
1. L’outil de dégagement de la goulotte est attaché
Outil de dégagement de la neige

7
goulotte» dans le chapitre «Réglage».
besoin est. Référez-vous à «Réglage du support de la
REMARQUE: Le support inférieur peut être ajusté, si
goupille-épingle retiré plus tôt. Voir la Figure 8.
Figure 5
et maintenez-la en place avec la rondelle plate et la
l’extrémité de la manivelle dans le support inférieur
l’extrémité de la manivelle de la goulotte. Enfoncez
1. Retirez la rondelle plate et la goupille-épingle de
Modèles avec la manivelle de la goulotte
goulotte
support de la
Tube de
Figure 7
chape
Axe de
4 fonctions
la goulotte à
commande de
Boîtier de
Goupille-épingle
boulonnerie.
le tube de support de la goulotte. Ne jetez pas la
1. Dégagez la goupille-épingle de l’axe de chape sur
Guide
Voir la Figure 7.
goulotte dans le guide qui se trouve sur le moteur.
Figure 4
Pour modèles avec commande de la goulotte à 4 fonctions
• Glissez les câbles allant du tableau de bord à la
Pour modèles avec commande de la goulotte à 2 fonctions
goupille-épingle. Voir la Figure 5.
de la goulotte
Garde-bride
soutien de la goulotte. Maintenez en place avec la
les trous du boîtier de commande et dans la tige de
4. Faites passer l’axe de chape retiré plus haut, dans
l’utilisateur.
goulotte, comme à la Figure 6, avec les câbles vers
3
Assembly
Chute
extrémité du boîtier dans le tube de support de la
le tube court de la goulotte. Insérez l’autre
3. Insérez le boîtier de commande de la goulotte sur
goulotte face à l’avant de la machine.
2. Positionnez la goulotte pour que l’o uverture de la
Figure 3
Figure 6
1
support
Tube de
court
Tube
Câbles
2
Goulotte

on
e
6
Figure 1.
installer les autres guides.
Voir la Figure 4. Répétez le processus pour
goulotte et poussez pour le bloquer en position.
l’autre extrémité pour l’aligner avec le collet de la
déja fixée sur le collet de la goulotte. Faites pivoter
3. L’une des extrémités du guide de la goulotte est
Voir la Figure 3.
2. Positionez la goulotte sur le rebord de l’a daptateur.
base de la goulotte.
1. Appliquez un lubrifiant léger (ex. huile 3-en-1 ) à la
Goulotte (tous les modèles)
Figure 2
guidon
Bouton du
3
commande
Tige de
Raccord
2
Figure 1
c
e
t
t
gu
e
f
i
a
d
ç
d
e
z
l
R
o
e
n
dr
e
s
s
e
modèle
par le
varie
Panneau
1
guidon supérieur sur le guidon inférieur. Voir la
3. Serrez les deux boutons pour bien maintenir le
inférieur. Voir la Figure 2.
raccord pour le bloquer sur la tige de commande
commande inférieur. Frappez doucement sur le
changement de vitesse sur l’extrémité de la tige de
2. Glissez le raccord de la tige de commande du
inférieur. Voir laFigure 1.
supérieur jusqu’à ce qu’il s’emboîte sur le guidon
l’arrière de la souffleuse, avant de rele ver le guidon
rainures des galets de guidage qui se trouvent à
1. Vérifiez que tous les câbles sont enfoncés dans les
Guidon
Assemblage de la souffleuse
modèles de souffleuse.
discutées dans ce notice sont applicables à tous les
peuvent changer par le modèle. Pas toutes les traits
manivelles de la goulotte sont quelques dispositifs qui
plusieurs modèles, les panneaux, phares et les
REMARQUE: Cette notice d’utilisation couvre
seront indiquées.
derrière la souffleuse. Des exceptions, le cas échéant,
souffleuse sont déterminés du poste de conduite,
REMARQUE: Les côtés droit et gauche de la
accidentel.
contre le moteur, pour empêcher tout dé marrage
Débranchez le fil de la bougie et mettez le à la masse
Avant l’assemblage
fendues
b. Goupilles de cisaillement et goupilles
a. Cordon électrique du démarrage (en option)
des pièces ci-dessous, placez en vrac dans la caisse.
Cette souffleuse a été assemblée à l’usin e à l’exception
Pièces détachées
machine.
plus de pièces ni de documentation dans la
• Sortez la machine du carton. Vérifiez qu’il ne reste
d’utilisation).
accompagnent la souffleuse (par ex. l a notice
• Sortez toutes les pièces détachées qui
étalez-le. Sortez les garnitures.
• Découpez le carton en suivant les coins, puis
Déballage du carton
souffleuse.
changer la vitesse ou la direction de déplacement de la
vitesse risque de pivoter et il ne sera pas possible de
correctement, la tige de commande du changement de
REMARQUE: Si le raccord n’est pas installé
employer.
du moteur quant au carburant et à l’huile à moteur à
l’assemblage, veuillez consulter la notice d’utilisation
plein d’huile mais SANS ESSENCE. Après
REMARQUE: La souffleuse a été expédiée avec le
CHAPITRE 2: MONTAGE

5
figurent dans cette notice et sur la machine.
respecter les avertissements et instructions qui
personnes qui peuvent lire, compren dre et
• Cette machine ne doit être utilisée que par des
Votre responsabilité
instructions de remisage hors-saison.
11. Consultez toujours la notice d’utilisation quant aux
appareil à gaz).
radiateur, un fourneau, un sèche-linge ou autre
étincelle ou une veilleuse (d’un chauffe-eau, un
d’essence à l’intérieur s’il y a une flamme, une
10. Ne remisez jamais la machine ou les bidons
avant de remiser la souffleuse.
que l’ensemble de la tarière et de la t urbine ne gèle
minutes pour éliminer la neige de la tarière et é viter
9. Laissez la machine fonctionner pendant quelques
nature et à l’environnement.
des déchets et liquides qui risquent de nuire à la
8. Respectez les règlements concernant l’élimination
d’instructions et remplacez-les au besoin.
7. Prenez soin des étiquettes de sécurité et
dans la notice d’utilisation de la machine.
nécessaires. Consultez le chapitre «Réglages»
fonctionnent bien et faites les réglages
6. Vérifiez fréquemment que les commandes
l’utilisateur.
performances et compromettre la sécurité de
d’origine peuvent donner lieu à de mauvaises
conformes aux spécifications de l’équipement
seulement. L’utilisation de pièces qui ne sont pas
remplacez-les par des pièces authentiques
sécurité, vérifiez souvent tous les composants et
souffleuse s’usent avec l’usage. Par mesure de
5. Les plaques de raclage et les patins de la
dangereux.
laissez pas le moteur s’emballer, ce qui peut être
4. Ne modifiez pas le réglage du régulate ur et ne
vous assurer qu’elle n’est pas endommagée.
marche. Examinez soigneusement la machine pour

4
bien serrés et maintenez la machine en bo n état de
3. Vérifiez régulièrement que les boulons et vis sont
quelconque ou d’examiner la machine.
goulotte d’éjection, de faire un ajustement
complètement immobilisée avant de déboucher la
Attendez que la tarière/turbine se soit
moteur avant de quitter le poste de conduite.
2. Débrayez toutes les commandes et arrêtez le
Vérifiez souvent qu’ils fonctionnent correctement.
1. Ne modifiez jamais les dispositifs de sécurité.
ENTRETIEN ET REMISAGE
concessionnaire le plus proche de chez vous.
après-vente pour obtenir le nom du
notice d’utilisation. Adressez-vous au service
situations qui n’ont pas été abordées par cette
20. Faites toujours preuve de bon sens dans des
avec les accessoires homologués.
bien comprendre et suivre les instructions fournies
fabricant de la machine. Veuillez lire attentivement,
19. N’utilisez que des accessoires homologués par le
un outil pour déboucher l’ouverture de la goulotte.
d’éjection ou près de l’admission. Utilisez toujours
18. Ne placez jamais vos mains dans la goulotte
quelconque ou d’examiner la machine.
goulotte d’éjection, de faire un ajustement
complètement immobilisée avant de déboucher la
Attendez que la tarière/turbine se soit
moteur avant de quitter le poste de conduite.
17. Débrayez toutes les commandes et arrêtez le
marche.
tout dégât éventuel avant de la remettre en
que la machine n’est pas endommagée. Réparez
commence à vibrer de façon anormal e. Vérifiez
mettez-le à la terre contre le moteur si la machine
16. Arrêtez le moteur, débranchez le fil de la bougie et
reculant.
des surfaces glissantes. Soyez prudent en
15. Ne déplacez jamais rapidement la souffleuse sur
lorsqu’elle n’est pas utilisée.
et de la turbine pour transport er la machine et
14. Débrayez la commande de l’ensemble de la tarière
guidon.
toujours un bon équilibre et tenez fermement le
mauvaise ou si la lumière est insuffisante. Gardez
13. N’utilisez pas la machine si la visibilité est
déblayer la neige trop rapidement.
12. Ne fatiquez pas la machine en essayant de
machine.
permettez jamais à quiconque de se tenir devant la
spectateurs et des animaux de compagnie et ne
11. Ne dirigez jamais la neige vers des enfants, des
graves ou des dégâts matériels.
débris peuvent ricocher et causer des blessures
neige vers des fenêtres, murs, voitures, etc. car les
10. Prévoyez de travailler en évitant de projeter la
en travaillant sur une pente.
9. Faites très attention en changeant de direction et
circulation. Ne transportez pas de passage rs.
attention aux dangers non évidents et à la
routes, allées ou chemins en gravier. Faites
8. Soyez extrêmement prudent à proximité des
pas.
et peuvent causer des brûlures. Ne les touchez
7. Le silencieux et le moteur deviennent très ch auds
médicaments.
des boissons alcoolisées ou après avoir pris des
6. Ne vous servez pas de la machine après avoir bu
un gaz inodore très dangereux.
du moteur contiennent du monoxyde de carbone,
local clos ou mal aéré car les gaz d’échappement
5. Ne faites jamais fonctionner la machine dans un
bon état.
de sécurité en place et assurez-vous qu’ils sont en
elle est endommagée. Laissez tous les dispositifs
4. Ne travaillez jamais sans la goulotte d’éjection ou si
débrayage lorsqu’elles sont relâchées.
revenir automatiquement à la position de
fonctionner facilement dans les deux directions et
3. Toutes les manettes de commande doivent
causer des blessures corporelles.
dangereux l’emploi de la machine et pour rait
Ne contournez jamais son rôle ce qui rendrait
tarière et de la turbine est un dispositif de sécurité.
2. La manette de commande de l’ensemble de la
amputer mains et pieds.
d’éjection. Les pièces en mouvement peuven t
tarière ou de la turbine ou dans la goulotte
d’une pièce en mouvement, dans l’habit acle de la
1. Ne placez jamais vos mains ou vos pieds près
UTILISATION
moins 5 minutes avant de la remiser.
j. Laissez la machine refroidir pendant au
linge ou autre appareil à gaz).
eau, un radiateur, un fourneau, un sècheune étincelle ou une veilleuse (d’un chauffed’essence à l’intérieur s’il y a une flamme,
i. Ne remisez jamais la machine ou les bidons
avant de la remettre en marche.
Déplacez la machine et attendez 5 minutes
éclaboussure sur le moteur et la machine.
h. En cas de débordement, essuyez toute
g. Resserrez bien le capuchon d’essence.
pour permettre l’expansion du carburant.
Laissez un espace d’un demi-pouce environ
f. Ne faites jamais déborder le réservoir.
deux minutes avant de faire le plein.
e. Laissez le moteur refroidir pendant a u moins
moteur tourne.
n’ajoutez pas d’essence pendant que le
d. N’enlevez jamais le capuchon d’essence et

3
projetés par la tarière/turbine.
vous pourriez trébucher ou qui risquent d’être
c. Ne faites jamais le plein à l’intérieur.
ou toute autre source incandescente.
b. Éteignez toute cigarette ou pipe, tout cigare
homologués seulement.
a. Remisez le carburant dans des bidons
vêtements.
votre peau et changez immédiatement de
peau ou sur vos vêtements s’enflammaient. Rincez
grièvement blessé si des éclaboussures sur votre
vapeurs risquent d’exploser. Vous pouvez être
d’un produit extrêmement inflammable et les
très attention en manipulant de l’essence. Il s’agit
9. Pour éliminer tout risque de blessure g rave, faites
déblayer.
température extérieure avant de commencer à
8. Laissez le moteur et la machine s’habituer à la
du fabricant).
tourne (à moins d’indications contraires de la part
7. N’essayez jamais de régler le moteur pendant qu’il
moteur en marche.
6. Débrayez toutes les commandes avant de mettre le
concassée.
contact avec les surfaces en gravier ou en pierre
5. Réglez la hauteur de la tarière pour éviter tout
d’un moteur à démarreur électrique.
mises à la terre avec toutes les machines équipées
4. Utilisez une rallonge à 3 fils et une prise de courant
surfaces glissantes.
chaussures qui améliorent votre stabilité sur des
prendre dans les pièces en mouvement. Portez des
longues ou de vêtements amples qui risque nt de se
adéquats. Ne portez pas de bijoux, d’écharpes
3. Ne travaillez pas sans porter des vêtements d’hiver
ricocher et vous blesser aux yeux.
réparation. Un objet peut en effet être projeté,
la machine ou en effectuant un réglage ou une
2. Portez toujours des lunettes de sécurité en utilisant
de bois, fils de fer et autres objets sur lesquels
enlevez tous les paillassons, traîneaux, morceaux
1. Examinez soigneusement la zone à déblayer et
Préparation
tomber, surtout en reculant.
7. Soyez toujours prudent pour ne pas glisser ou
machine si quelqu’un s’approche.
de la machine quand elle est en marche . Arrêtez la
et les enfants à une distance d’au moins 75 pieds
6. Gardez les spectateurs, les animaux de compagnie
spectateurs, etc.
évitant de projeter la neige vers la route, des
des blessures graves. Prévoyez de travailler en
5. Les objets projetés par la machine peuvent causer
servir.
pas bien le fonctionnement de la machine de s’en
4. Ne permettez jamais à des adultes ne connaissant
la surveillance étroite d’un adulte.
apprendre à utiliser la machine et s’en servir sous
respecter les consignes de sécurité. Ils doivent
comprendre le fonctionnement de la machine et
plus âgés doivent lire la notice d’utilisation, bien
ans de se servir de la machine. Des adolescents
3. Ne permettez jamais à des enfants de moins de 14
rapidement les commandes.
servir. Apprenez à arrêter la machine et à débraye r
utilisation de cette machine avant de vous en
2. Familiarisez-vous avec les commandes et la bonne
commander des pièces de rechange.
pour toute consultation ultérieure et pour
Conservez cette notice d’utilisation à un endroit sûr
la notice d’utilisation avant de la mettre en marche.
les instructions qui figurent sur la machine et dans
1. Assurez-vous de lire et de bien comprendre toutes
Formation
graves et même mortelles.
des débris. Par conséquent, le non-respect de ces consignes peut causer des blessures corporelles
l’utilisateur peut entraîner des blessures graves. Cette machine peut amputer mains et pieds et projeter
notice d’utilisation. Comme avec tout appareil motorisé, une négligence ou une erreur de la part de
DANGER: Cette machine doit être utilisée conformément aux consignes de sécurité qui figurent dans la
problèmes liés à la reproduction.
reconnus dans l’État de Californie comme causant le cancer, des anomalies congénitales ou d’autres
AVERTISSEMENT: Les gaz d’échappement de ce produit contiennent des produits chimiques
blessures corporelles. Respectez l’avertissement qui accompagn e ce symbole.
d’essayer de vous servir de cette machine. Le non-respect de ces instructions peut entraîner des
mais aussi ceux d’autrui. Prière de lire toutes les instructions figurant dans cette notice d’utilisation avant
si elles ne sont pas respectées, peuvent mettre en danger non seulement votre personne et vos biens,
AVERTISSEMENT: Ce symbole attire votre attention sur des consignes de sécurité importantes qui,
CHAPITRE 1: IMPORTANT CONSIGNES DE SÉCURITÉ

2
consultation.
importants, vous ne devrez enregistrer qu e le numéro de série avan t de pouvoir poursuivre votre
Préparez vos numéros de modèle et de série avant de téléphoner. Bien que les deux numé ros soient
668-1238.
commandes, le fonctionnement ou l’entret ien de la machine, appelez le service ap rès-vente au 1-800-
Si l’assemblage de cette machine vous pose des problèmes ou pour toute question concernant les
Veuillez retourner la machine au détaillant qui vous l’a vendue, sans vous adresser d’abord au service après-vente.
SERVICE APRÈS-VENTE
moteur empaqueté séparément avec votr e souffleuse.
puissance, caractéristique, garantie et service. Pour plus de renseignements, consultez votre notice d’utilisation du
Le fabricant du moteur est responsable pour tout questions relié au mot eur en ce qui concerne la perfomance,
INFORMATION DE MOTEUR
1-800-668-1238
Recopiez ici le numéro de série:
Recopiez ici le numéro de modèle:
KITCHENER, ON N2G 4J1
MTD PRODUCTS LIMITED
XXXXXXXXXXX
Numéro de série
Serial Number
www.mtdcanada.com
XXXXXXXXXX
Numéro de modèle
Model Number
web du fabricant et/ou vous devez vous addresser au service après-vente ou concessiona ire local.
l’arrière de le châssis de la souffleuse. Ces renseignements s’avèront très importants si vous utilisez le site
• Pour localiser la plaque signalétique, placez-vous derrière la souffleuse à la poste de conduite et regardez à
dessous. La plaque signalétique apparait comme ci-dessous.
sur la souffleuse et recopier le numéro de modèle et la numéro de série aux endroits prévus ci-
ARRÊT
Avant de procéder à l’assemblage de votre nouvelle souffleuse, localiser la plaque signalétique
lire attentivement et vous assurer de bien comprendre toutes les instructions.
renseignements nécessaires à l’assemblage, à la préparation et à l’entretien de votre machine. Veuillez donc la
Cette notice d’utilisation est une pièce importante de votre nouvelle souffleuse. Elle vous fournit les
POUR TROUVER LE NUMÉRO DE MODÈLE
Garantie 23
d’utilisation
version anglaise de cette notice
Pièces détachées (voir la page 22 de la
Guide de dépannage 22
Remisage hors saison 21
Chapitre Page
Régime d’utilisation et entretien 15
Fonctionnement 11
Commandes de la souffleuse 9
Montage 6
Importantes consignes de sécurité 3
Service après-vente 2
Chapitre Page
TABLE DES MATIÈRES

(7/2004)
.
772C0710
FORM NO
séries 600
IMPRIMÉ AUX ÉTATS-UNIS
MTD Products Ltd., P. O. BOX 1386, KITCHENER, ONTARIO N2G 4J1
et les instructions avant de mettre en marche la machine.
IMPORTANT: Lisez attentivement les règles de sécurité
Modèle 6FE illustré
Souffleuses
 Loading...