

Page 1
HOME THEATER SOUND SYSTEM
SYSTEME HOME CINEMA
TSS-15
(Amplifier x 1, Front/Center speaker x 3, Surround speaker x 2, Subwoofer x 1)
A
OWNER’S MANUAL
MODE D’EMPLOI
Page 2

1
2
3
4
5
6
7
8
9
10
11
12
13
14
15
16
17
18
19
20
■
■
CAUTION: READ THIS BEFORE OPERATING YOUR SYSTEM.
To assure the finest performance, please read this manual
carefully. Keep it in a safe place for future reference.
Install this sound system in a well ventilated, cool, dry, clean
place with at least 20 cm on top, 10 cm on the left and right,
and 10 cm at the back of the amplifier unit — and away from
direct sunlight, heat sources, vibration, dust, moisture, and/or
cold.
Locate this system away from other electrical appliances,
motors, or transformers to avoid humming sounds. To prevent
fire or electrical shock, do not place this system where it may
be exposed to dripping or splashing, and never put any objects
filled with liquids, such as vases, on top of the system.
Do not expose this system to sudden temperature changes from
cold to hot. Do not locate this system in an environment with
high humidity (i.e., a room with a humidifier) to prevent
condensation inside this system, which may cause electrical
shock, fire, damage to this system, and/or personal injury.
Avoid installing this system in a place where foreign objects
or liquid might fall. Otherwise, fire, damage to the system,
and/or personal injury may result. Do not place the following
objects on this system:
– Other components, as they may cause damage and/or
discoloration of the surface of the system.
– Burning objects (i.e., candles) as they may cause fire,
damage to the system, and/or personal injury.
– Containers of liquid, as they may leak or spill and cause
electrical shock to the user and/or damage to this system.
Do not cover this system with a newspaper, tablecloth,
curtain, etc. in order not to obstruct heat radiation. If the
temperature inside this system rises, it may result in fire,
damage to the system, and/or personal injury.
Do not plug this system into a wall outlet until all
connections are complete.
Do not operate this system upside-down. It may overheat,
possibly causing damage.
Do not use excessive force on switches, knobs, and/or cables.
When disconnecting the power cable from a wall outlet,
grasp the plug; do not pull the cable.
Do not clean this system with chemical solvents; they might
damage the finish. Use a clean, dry cloth.
Only the voltage specified on this system may be used. Using
this system with a voltage higher than specified is dangerous
and may cause fire, damage to the system, and/or personal
injury. YAMAHA will not be held responsible for any
damage resulting from use of this system with a voltage other
than specified.
To prevent damage by lightning, disconnect the power cable
from the wall outlet during an electrical storm.
Take care of this system to prevent foreign objects and/or
liquid drops from entering the system.
When using a humidifier, avoid condensation inside the
system by allowing sufficient space around the system. Avoid
excess humidification. Condensation might cause a fire,
damage to the system, and/or electric shock.
Do not attempt to modify or fix this system. Contact qualified
YAMAHA service personnel when any service is needed.
The cabinet should never be opened for any reason.
When not planning to use this system for a long period of
time (i.e., vacation), disconnect the AC power plug from the
wall outlet.
Be sure to read the “Troubleshooting” section for
information on common operating errors before concluding
that this system is faulty.
Before moving this system, press STANDBY/ON to place
the system in standby mode, and disconnect the AC power
plug from the wall outlet.
Be sure to only use the AC adaptor (LSE9802B1540)
included with this system. Otherwise, you might cause a fire
or damage to this system.
• This system is not fully disconnected from the AC power
source as long as it is connected to a wall outlet, even if the
system is turned off. This state is called Standby mode. In
Standby mode, the system consumes a very small amount
of power.
• Do not install the system in a horizontal orientation as this
may cause damage or malfunction.
• This system is designed for use in a home. Do not attempt
to install it in an automobile. Doing so may cause damage
or malfunction.
WARNING
TO REDUCE THE RISK OF FIRE OR ELECTRIC SHOCK,
DO NOT EXPOSE THIS APPLIANCE TO RAIN OR
MOISTURE.
For U.K. customers
If the socket outlets in the home are not suitable for the plug
supplied with this appliance, the plug should be removed and an
appropriate 3-pin plug fitted. For details, refer to the instructions
below.
Note
A plug severed from the mains lead must be destroyed, as a plug
with bared flexible cord is hazardous if engaged in a live socket
outlet.
Special Instructions for U.K. Model
IMPORTANT
THE WIRES IN MAINS LEAD ARE COLOURED IN
ACCORDANCE WITH THE FOLLOWING CODE:
Blue: NEUTRAL
Brown: LIVE
As the colours of the wires in the mains lead of this apparatus
may not correspond with the coloured markings identifying
the terminals in your plug, proceed as follows:
The wire that is coloured BLUE must be connected to the
terminal that is marked with the letter N or coloured BLACK.
The wire that is coloured BROWN must be connected to the
terminal that is marked with the letter L or coloured RED.
Making sure that neither core is connected to the earth
terminal of the three-pin plug.
CAUTION
Danger of explosion if battery is incorrectly replaced.
Replace only with the same or equivalent type.
Page 3

●
●
●
●
●
●
●
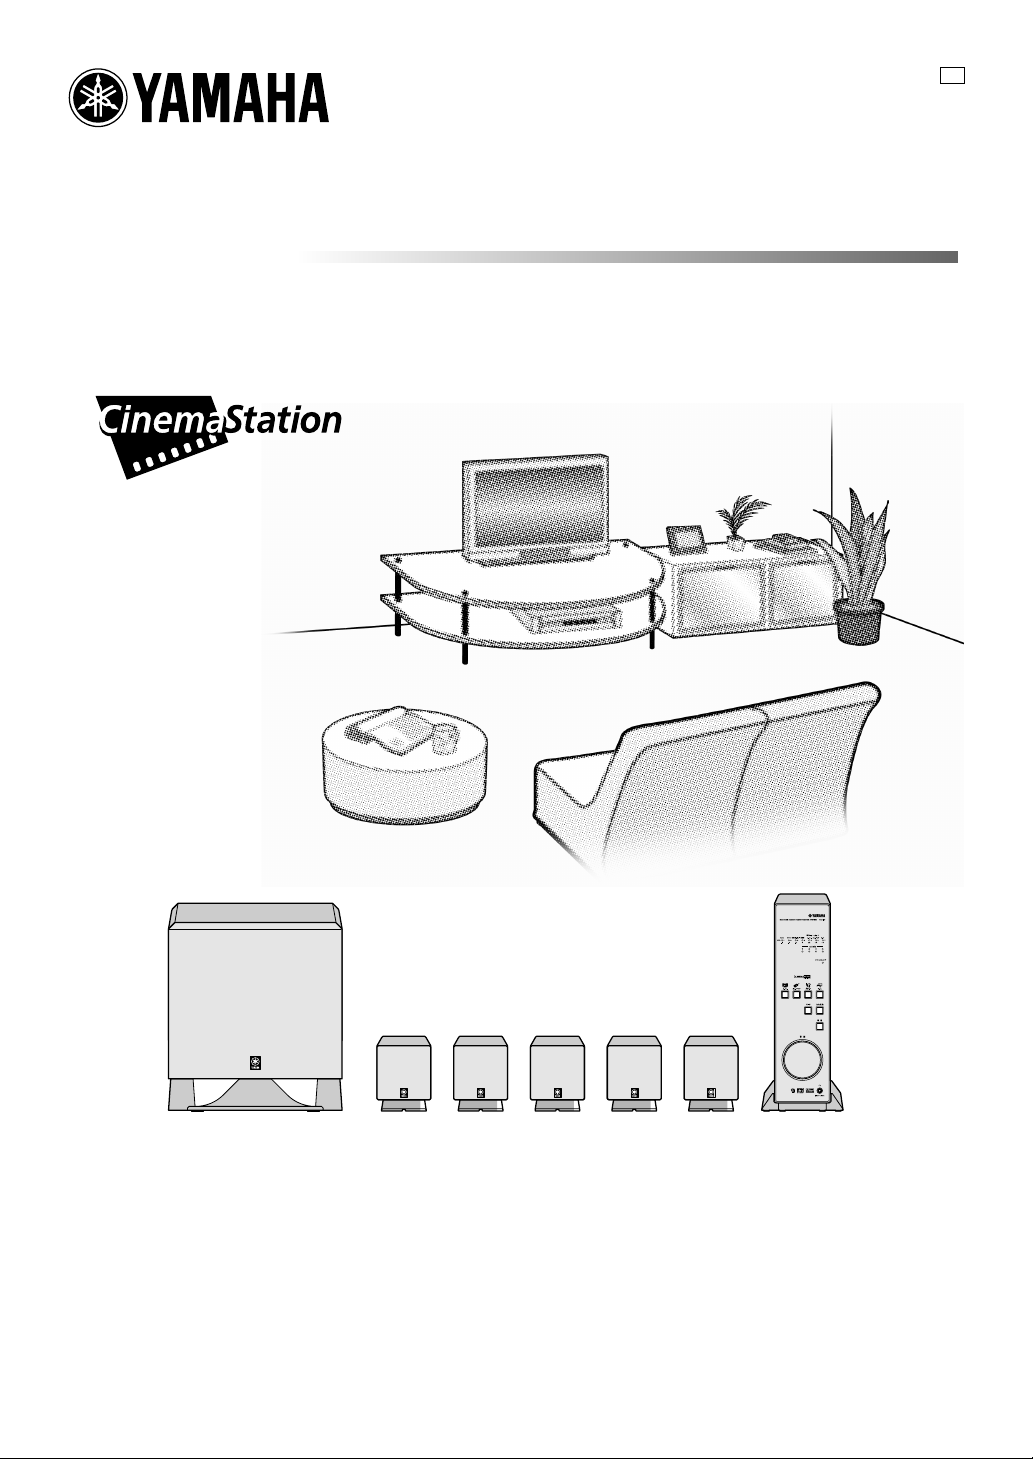
Features
Home Theater Sound System
With the Yamaha TSS-15 Home Theater Sound System, you can enjoy 5.1-channel surround sound at
home—just like being at the movies.
Dolby Digital, Pro Logic II, DTS & AAC
With Dolby Digital and DTS, you can enjoy the surround sound of DVD movies. With Dolby Pro Logic II,
you can enjoy 5.1-channel surround from legacy Dolby
Surround sources and normal stereo sources. The general model also supports AAC (Advanced Audio Coding).
Cinema DSP
Yamaha’s Cinema DSP technology offers Movie,
Music, Sports, and Game listening modes for an
enhanced listening experience.
Silent Cinema
With Yamaha’s Silent Cinema technology, you can
enjoy multichannel surround sound even when using
headphones.
Virtual Surround
With the Virtual Surround function, you can enjoy
5.1-channel surround sound even when not using the
surround left and right speakers. The surround speakers
can then be used with the front speakers to provide
extra power.
Active Servo Technology
The subwoofer uses Yamaha’s Active
Servo technology to deliver incredible
bass from its compact cabinet.
Contents
Features ................................................. 1
Contents ................................................. 1
Package Contents ......................................2
Preparing the Remote Control ....................... 2
Fitting the Stand........................................ 2
Getting to Know the TSS-15 ..........................3
Installing the Speakers................................ 6
Hooking Up the System ............................... 8
Connecting the Speakers.........................................9
Connecting Your Other Components....................10
Connecting the Power Cable.................................11
Basic Operation ...................................... 12
Adjusting Speaker Levels with the Test Tone ... 13
Using the Cinema DSP Listening Modes ......... 14
Other Listening Modes .............................. 15
Troubleshooting...................................... 17
Glossary ............................................... 19
Specifications ........................................ 20
English
QD-Bass Technology
The subwoofer employs Yamaha’s
QD-Bass (Quatre Dispersion Bass)
technology, which uses a down-firing driver with a
square, pyramid-shaped reflective plate to radiate the
sound in four horizontal directions, providing extraordinary power and performance.
Manufactured under license from Dolby Laboratories.
“Dolby”, “Pro Logic”, and the double-D symbol are
trademarks of Dolby Laboratories.
“DTS” and “DTS Digital Surround” are registered trademarks
of Digital Theater Systems, Inc.
Silent Cinema is a registered trademark of Yamaha
Corporation.
The “AAC” logo is a trademark of Dolby Laboratories.
These are AAC patent numbers.
08/937,950 5,633,981 5,227,788 5,299,239
5848391 5 297 236 5,285,498 5,299,240
5,291,557 4,914,701 5,481,614 5,197,087
5,451,954 5,235,671 5,592,584 5,490,170
5 400 433 07/640,550 5,781,888 5,264,846
5,222,189 5,579,430 08/039,478 5,268,685
5,357,594 08/678,666 08/211,547 5,375,189
5 752 225 98/03037 5,703,999 5,581,654
5,394,473 97/02875 08/557,046 05-183,988
5,583,962 97/02874 08/894,844 5,548,574
5,274,740 98/03036 5,299,238 08/506,729
1
Page 4
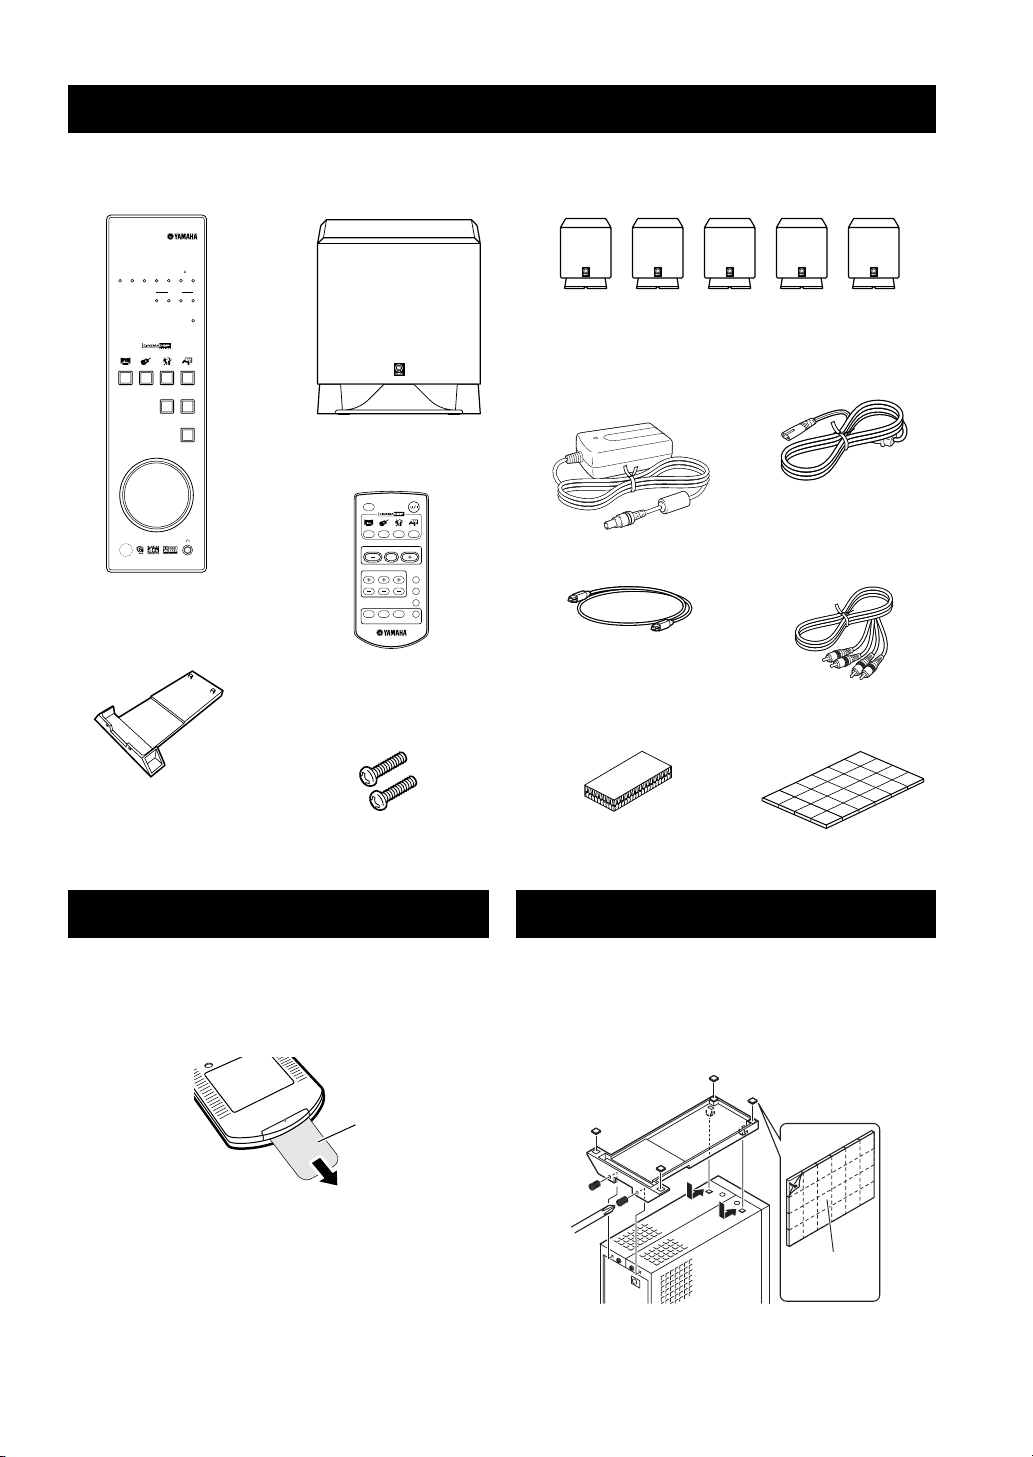
Package Contents
Make sure that you have all the items shown here.
NATURAL SOUND HOME THEATER SYSTEM TSS-15
Pro Logic
q
MAIN
/SUB
AAC
DTS
AUTOq Digital
MOVIE MUSIC
1
234567
-6 -4 -2 0 +2 +4 +6
INPUT
1234
NIGHT
Satellite speakersTSS-15 amplifier Subwoofer
(Front L/R and center speakers have 3 meter cords,
surround L/R speakers have 10 meter cords.)
MOVIE MUSIC SPORTS GAME
MODE INPUT
STANDBY/ON
VOLUME
Remote control
STANDBY/ON
MODE
MOVIE MUSIC SPORTS
GAME
VOLUME
SILENT CINEMA
Stand
SP LEVEL
SW CENTER SURR
1
23 4
INPUT
TSS-15 WD76700
MUTE
NIGHT
TEST
DUAL MONO
Screws
Preparing the Remote Control
AC adaptor
Power cable
(LSE9802B1540)
Optical cable Audio pin cable
Fastener
Non-skid pads
Fitting the Stand
The remote control comes with the battery already
installed. Before using the remote control for the very first
time, pull out the plastic tab, as shown.
Plastic tab
For information on replacing the battery, see page 18.
2
Before using the TSS-15 amplifier for the very first time,
you must fit the stand for stability. Do not use the amplifier
horizontally. Put the stand onto the base of the amplifier,
and with a Phillips screwdriver, screw it to the amplifier
with the two screws provided, as shown.
non-skid
pads
Affix four non-skid pads onto the base of the stand to prevent it from slipping.
Page 5
Getting to Know the TSS-15
■
Front Panel
NATURAL SOUND HOME THEATER SYSTEM TSS-15
q
Pro Logic
MAIN
AAC
-6 -4 -2 0 +2 +4 +6
MOVIE MUSIC SPORTS GAME
Status, volume & level indicators
1
DTS
AAC
1
-6 -4 -2 0 +2 +4 +6
Volume and level indicators
These are multipurpose indicators. Normally, they
work as status indicators, indicating input signal format
(Dolby Digital, DTS, etc) or Pro Logic II listening
mode. When the VOLUME control is adjusted, they
indicate the volume level setting from 1 through 7.
After several seconds, they revert to status indicators,
/SUB
DTS
1
234567
1234
VOLUME
(general model)
Status indicators
Digital
234 56 7
MOVIE MUSIC
INPUT
MODE INPUT
STANDBY/ON
SILENT CINEMA
MAIN
/SUB
AUTOq Digital
NIGHT
Pro Logic
q
MOVIE MUSIC AUTOq
1
2
3
4
5
6
7
8
9
0
and work as explained below. They’re also used when
adjusting individual speaker levels with the test tone
(–6, –4, –2, 0, +2, +4, +6).
• AAC indicator (general model only)
This indicator lights up when an AAC signal is input.
• DTS indicator
This indicator lights up when a DTS signal is input.
• Dolby Digital indicator
This indicator lights up when a Dolby Digital signal
is input.
• MAIN/SUB indicator
When listening to a multilingual TV program, this
indicator lights up green when the main language is
selected, and lights up red when the sub-language is
selected. Main and sub are selected by using the
remote control’s [DUAL MONO] button.
• MOVIE indicator
This indicator lights up when the Dolby Pro Logic II
Movie listening mode is selected.
• MUSIC indicator
This indicator lights up when the Dolby Pro Logic II
Music listening mode is selected.
• AUTO indicator
This indicator lights up when the Auto listening mode
is selected.
2
INPUT 1–4 indicators
These indicators show which input is currently
selected.
NIGHT indicator
3
This indicator lights up when the Night listening mode
is selected (see page 15).
4
MOVIE, MUSIC, SPORTS & GAME buttons
These buttons are used to select the Movie, Music,
Sports, and Game Cinema DSP listening modes. The
button for the selected mode lights up (see page 14).
MODE button
5
This button is used to select the following listening
modes: Dolby Pro Logic II Movie, Dolby Pro Logic II
Music, or Auto (see page 15). It can also be used to
cancel the Cinema DSP listening modes.
INPUT button
6
This button is used to select inputs 1 through 4 (see
page 12).
7
STANDBY/ON button
This button is used to set the TSS-15 to On or Standby
(see page 12).
Note:
While on Standby, the TSS-15 consumes a small
amount of power so that it’s able to receive commands
from the remote control.
English
3
Page 6
4
8
VOLUME control
This control is used to adjust the volume.
9
Remote control sensor
This sensor receives infrared signals from remote control.
■ Remote Control
2
6
0
MODE
MOVIE MUSIC SPORTS
VOLUME
MUTE
SP LEVEL
SW CENTER SURR
1
23 4
INPUT
SILENT CINEMA headphones jack
A pair of headphones can be connected to this mini
jack for private listening. With Yamaha’s Silent Cinema
technology, you can enjoy multichannel surround
sound even when using headphones. No sound is output by the speakers while a plug is inserted in this jack.
STANDBY/ON
1
GAME
3
4
5
NIGHT
7
TEST
DUAL MONO
8
9
0
1
STANDBY/ON [ ] button
This button is used to set the TSS-15 to On or Standby.
Note:
While on Standby, the TSS-15 consumes a small
amount of power so that it’s able to receive commands
from the remote control.
2 MODE button
This button is used to select the following listening
modes: Dolby Pro Logic II Movie, Dolby Pro Logic II
Music, or Auto (see page 15). It can also be used to
cancel the Cinema DSP listening modes.
3 MOVIE, MUSIC, SPORTS & GAME buttons
These buttons are used to select the Movie, Music,
Sports, and Game Cinema DSP listening modes. The
button for the selected mode lights up (see page 14).
4 VOLUME [–] & [+] buttons
These buttons are used to adjust the volume. The Down
[–] button reduces the volume, the Up [+] button
increases it.
5 MUTE button
This button is used to mute the TSS-15. While the
TSS-15 is muted, the volume level indicators flash.
Press is again to unmute the TSS-15.
6 SP LEVEL buttons
These buttons are used to adjust the levels of the subwoofer (SW), center speaker (CENTER), and surround
speakers (SURR) (see page 12).
7 NIGHT button
This button is used to set the Night listening mode (see
page 15).
8 TEST button
This button is used to turn the test tone on or off (see
page 13).
9 DUAL MONO button
When listening to a multilingual TV program, this button can be used to select the main, sub, or both languages.
0 INPUT buttons 1–4
These buttons are used to select inputs 1 through 4 (see
page 12).
Page 7
■ Using the Remote Control
NATURAL SOUND HOME THEATER SYSTEM TSS-15
Pro Logic
q
MAIN
/SUB
MOVIE MUSIC
DTS
AUTOq Digital
AAC
1
234567
-6 -4 -2 0 +2 +4 +6
INPUT
1234
NIGHT
MOVIE MUSIC SPORTS GAME
MODE INPUT
STANDBY/ON
VOLUME
SILENT CINEMA
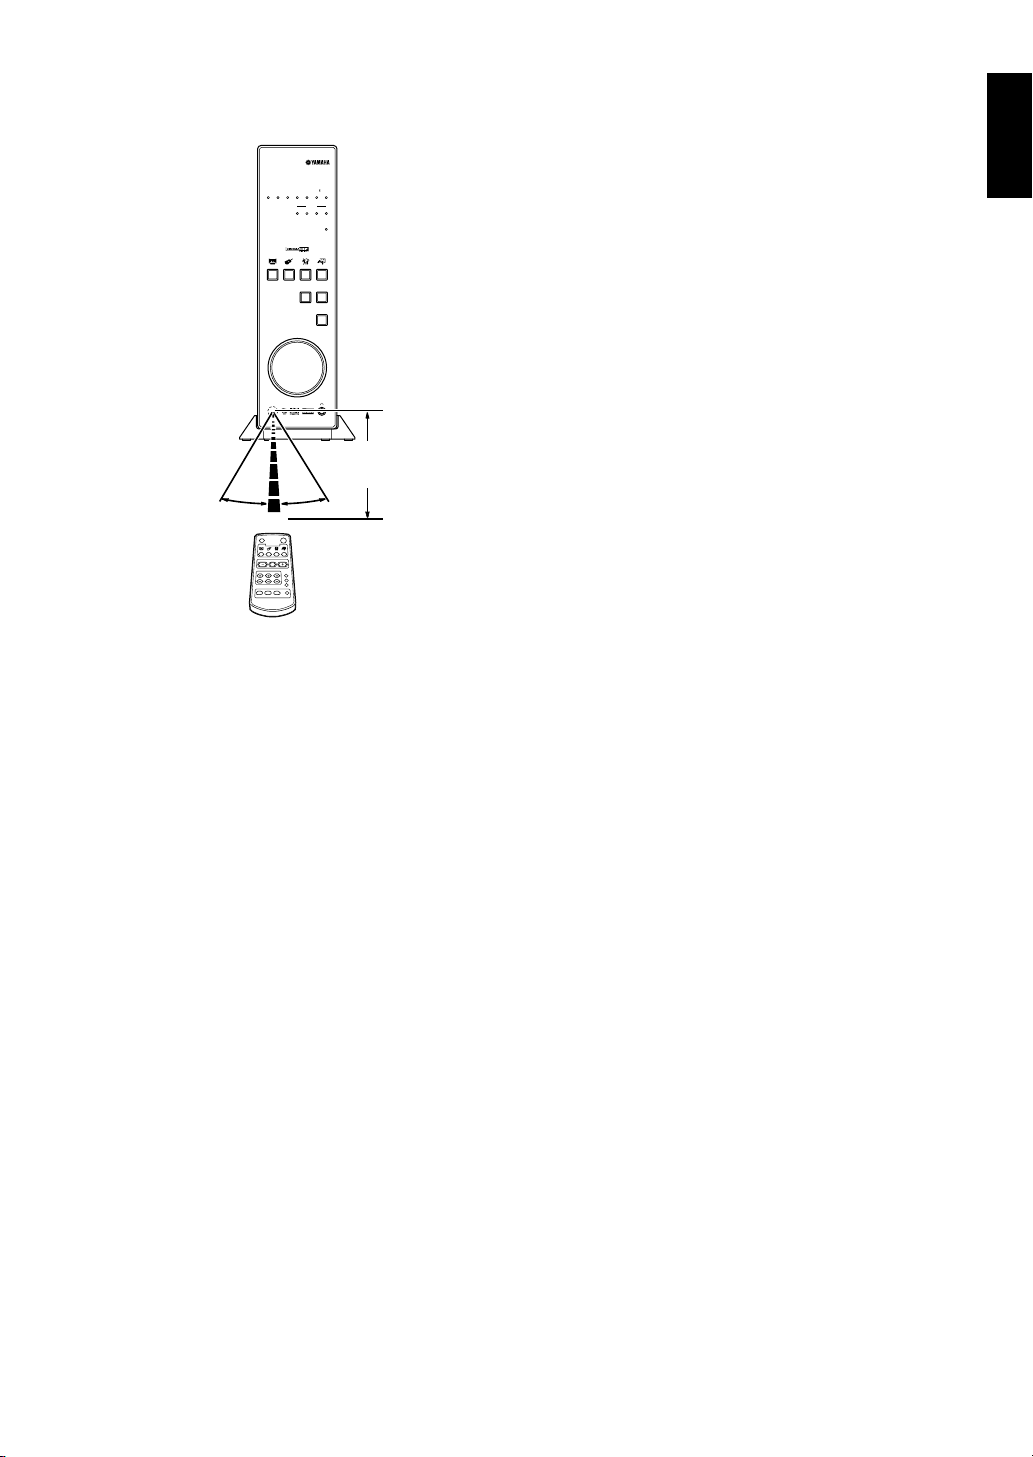
Up to 6 meters
30° 30°
Point the remote control
toward the TSS-15’s
remote control sensor.
English
Remote Control Precautions
• Do not spill water or other liquids on the remote control.
• Do not drop the remote control.
• Do not subject the remote control to the following:
— high humidity, such as near a shower or bath
— high temperatures, such as near a heater or stove
— extremely low temperatures
— dusty environments
5
Page 8

Installing the Speakers
Before you connect the speakers to the TSS-15 amplifier,
you need to decide where to install them. To get the best
results from the TSS-15, use all five satellite speakers and
the subwoofer.
The three satellite speakers with 3-meter cords are the front
left, front right, and center speakers. The two satellite
speakers with 10-meter cords are the surround left and surround right speakers.
The following illustration shows the ideal position for each
speaker relative to the TV and listening position.
Center speaker
Amplifier
Front left
speaker
Front right
speaker
Subwoofer
Surround right
speaker
Surround left
speaker
Note:
The TSS-15 amplifier is designed to be used vertically. If
it’s used horizontally, heat may build up inside the case,
causing damage or malfunction.
■ Preparing the Satellite Speakers
To prevent the satellite speakers from slipping, or vibrating
when mounting on the wall, affix four non-skid pads to the
base of each speaker stand, as shown.
To adjust the angle of a speaker, using a Phillips screwdriver, loosen the screw at the back of the stand, adjust the
angle, and then tighten the screw.
non-skid
pads
■ Front Speakers
The front speakers output the main sound. Place them
either side of your TV, an equal distance from the listening
position.
■ Center Speaker
With movies, the center speaker is used mainly for dialog.
Position it centrally between the front speakers, preferably
on top of your TV.
■ Surround Speakers
The surround left and right speakers output surround
effects and ambience. They should be positioned behind
the listening position, equidistant from the listener.
■ Subwoofer
The subwoofer outputs the bass sounds of the LFE (LowFrequency Effects) channel. Since bass sounds are nondirectional, the position of the subwoofer is not as important
as for the other speakers. In general, a good bass sound can
be achieved by putting the subwoofer in a corner at the
front of the room. To prevent sound reflections from nearby
walls, turn it inward so that it faces the listening position.
6
Note:
Do not put the speakers on uneven surfaces.
■ Wall-Mounting the Satellite Speakers
The satellite speakers can be wall-mounted by using two #8
wood screws (sold separately).
1 Using a Phillips screwdriver, loosen the screw
at the back of the speaker stand, set the angle
of the speaker as you want it, and then tighten
the screw.
0–90˚
Page 9

2 Position the speaker on the wall where you
want to hang it, and use a pencil to mark the
two hole positions.
4 mm
40 mm
20 mm
minimum
diameter
5 mm gap
3 Screw two #8 screws into the wall, leaving a
5 mm gap to accept the keyhole slots.
4 Thread the speaker cord around the strain-
relief guide and out through the slot at the
front of the speaker stand, as shown.
• Do not use nails or double-sided tape to mount the
speakers.
• Use cord clips to secure the speaker cords to the wall.
■ Securing the Center Speaker to Your TV
To prevent the center speaker from slipping, you can secure
it to your TV by using the fastener provided. You must
remove its stand first.
Notes:
• Do not put the center speaker on top of your TV if it
overhangs (i.e., the top of the TV is not deep enough).
• Do not put the center speaker on top of your TV if the top
is not level.
• Do not touch the adhesive side of the fastener after peeling off the backing.
•Wipe the top of your TV before attaching the fastener.
1 To remove the center speaker’s stand, using a
Phillips screwdriver, remove the screw and
washer at the back of the stand.
Keep the screw and washer for future use.
English
or
5 Fit the speaker stand onto the screws and
push it down so that the screw heads sit
correctly in the keyhole slots.
40 mm
Cautions:
• Each satellite speaker weighs 0.4 kg. Heed the following
cautions to ensure that the speakers do not fall and cause
damage or injury.
• Once the satellite speakers have been mounted on the
wall, check each speaker to ensure that there’s no possibility of it falling. Yamaha cannot be held responsible for
any damage or injury caused by falling speakers.
• If you have hollow walls, make sure that the screws go
into the studs. If there are no studs, or the walls are solid,
use suitable wall anchors.
• Use 1-inch #8 screws (4 mm shank diameter) with a head
diameter of 8 mm or less.
2 Peel the backing off one side of the fastener,
and affix it to the top of your TV.
3 Peel the backing off the other side of the
fastener, and affix the center speaker on top.
Peel off the
backing
Bottom of speaker
Note:
Although the speakers are magnetically shielded to prevent
interference, if the TV picture is distorted, try moving the
speakers away from your TV.
7
Page 10

Hooking Up the System
You can connect up to four audio components to the
TSS-15. This could be a DVD player, CD player, games
console, TV, VCR, DVR (digital video recorder), set-top
box (digital satellite, cable, over the air), camcorder, and so
on. The following diagram shows a typical setup.
Caution:
Before making any connections, disconnect each component’s power cable from the wall outlet.
VCR
TSS-15
NATURAL SOUND HOME THEATE
R SYSTE
M TSS-15
q
P
r
o
L
ogi
c
AIN
M
/SU
B
T
S
MOVIE
MUSIC
AUT
O
q
D
igital
D
AA
C
234567
1
-6-4-
20+2+4 +6
I
NPU
T
1234
NIGHT
MOVIE
MUSICSPORTSGAM
E
MODEI
NPU
To wall outlet
AC adaptor
T
STANDBY/O
N
VOLUME
Notes:
• Connect the white plug of the audio cable to the left “L”
(white) jack. Connect the red plug to the right “R” (red)
jack.
• Push each plug firmly into its jack. Lose connections can
cause noise or malfunction.
• Before connecting your other components to the
TSS-15, refer to their instruction manuals.
• Do not connect video signals to any of the TSS-15’s
jacks. The TSS-15 only supports audio signals.
DVD player
Games console
TV, set-top box, etc
* Since it has no video inputs or outputs, only audio
signals can be connected to the TSS-15.
8
Surround
left speaker
Front left
speaker
Center
speaker
SILENT CINEMA
Surround
right speaker
Front right
speaker
Subwoofer
Page 11

Connecting the Speakers
English
The diagram below shows how to connect the speakers to
the TSS-15.
The three satellite speakers with 3-meter cords are the front
left, front right, and center speakers. The two satellite
speakers with 10-meter cords are the surround left and surround right speakers.
Front left
speaker
Surround left
speaker
Center
speaker
Front
right
speaker
Surround
right
speaker
Cautions:
• Connect only the included speakers to the TSS-15.
Speakers from other manufacturers are not designed to
work with the TSS-15 and may use different connectors.
•Never connect the speaker outputs to another amplifier,
as this may cause a malfunction, seriously damage the
TSS-15 or amplifier, or cause a fire.
•To prevent people from tripping over or damaging the
speaker cables, tidy and secure them once they’re connected.
TSS-15 rear panel
Speaker outputs
SPEAKER
OUTPUTS
FRONT
L
R
SURROUND
L
R
SUBWOOFER
DC IN 15V
CENTER
1
2
3
3
4
2
1
ANALOG
INPUT
DIGITAL
VIRTUAL
L
R
TSS-15
NATURAL SOUND HOME THEATER SYSTEM TSS-15
q
Pro Logic
MAIN
/SUB
MOVIE MUSIC
AUTOq Digital
DTS
AAC
234567
1
-6 -4 -2 0 +2 +4 +6
INPUT
ON
OFF
1234
MOVIE MUSIC SPORTS GAME
MODE INPUT
VOLUME
NIGHT
STANDBY/ON
Subwoofer
■ Speaker Outputs
1
FRONT L/R
Connect the front left and right speakers.
2 SURROUND L/R
Connect the surround left and right speakers.
SILENT CINEMA
3 CENTER
Connect the center speaker.
4 SUBWOOFER
Connect the subwoofer.
9
Page 12

Connecting Your Other Components
The following diagram shows how to connect your components to the TSS-15.
Dust cap
Before connecting an optical digital cable, remove
the dust cap, as shown.
Keep the cap for future
use. To keep out dust, refit
the cap when the jack is
not being used.
NATURAL SOUND HOME THEATER SYSTEM TSS-15
q
Pro Logic
MAIN
/SUB
MOVIE MUSIC
DTS
AUTOq Digital
AAC
234567
1
-6 -4 -2 0 +2 +4 +6
INPUT
1234
NIGHT
MOVIE MUSIC SPORTS GAME
MODE INPUT
STANDBY/ON
VOLUME
SILENT CINEMA
TSS-15
Rear panel
SPEAKER
OUTPUTS
FRONT
L
R
SURROUND
L
4
R
CENTER
3
SUBWOOFER
2
1
DC IN 15V
3
2
1
ANALOG
INPUT
DIGITAL
VIRTUAL
Input jacks
L
R
ON
OFF
Audio cable
Coaxial cable
OUTPUT
(sold separately)
COAXIAL DIGITAL
OUTPUT
Optical cable (sold separately)
OPTICAL
DIGITAL
OUTPUT
Optical cable
OPTICAL
DIGITAL
OUTPUT
L
R
VCR, etc
CD player, etc
TV, set-top box
(digital satellite,
cable, over the air),
etc
DVD player,
games console,
etc
■ Audio Inputs
The TSS-15 has four audio inputs. Inputs 1, 2, and 3 accept
digital audio signals. Input 4 accepts analog audio signals.
1 DIGITAL INPUT 1
Use the supplied optical digital audio cable to connect
the digital audio output of a DVD player, etc., to this
optical digital input.
2 DIGITAL INPUT 2
Use an optical digital audio cable (sold separately) to
connect the digital audio output of a TV, etc., to this
optical digital input.
3 DIGITAL INPUT 3
Use a coaxial digital audio cable (sold separately) to
connect the digital audio output of a CD player, etc., to
this optical digital input.
4 ANALOG INPUT 4
Use the audio cable to connect the analog audio output
of a VCR, etc., to this analog input.
10
Notes:
•You can connect your computer to ANALOG INPUT 4
by using a mini plug to RCA conversion cable, or an
adaptor.
• Since the TSS-15 doesn’t have any video inputs and outputs, connect the video output from your DVD player or
VCR directly to your TV.
Page 13

Connecting the Power Cable
Do not connect the power cable until you have completed and double-checked all audio connections.
SURROUND
TSS-15 rear panel
1
AC adaptor
L
R
CENTER
SUBWOOFER
DC IN 15V
3
2
1
ANALOG
INPUT
DIGITAL
VIRTUAL
L
R
ON
OFF
2
power cable
TSS-15
NATURAL SOUND HOME THEATER SYSTEM TSS-15
q
Pro Logic
MAIN
/SUB
DTS
MOVIE MUSIC
AAC
234567
1
-6 -4 -2 0 +2 +4 +6
INPUT
1234
MOVIE MUSIC SPORTS GAME
MODE INPUT
VOLUME
AUTOq Digital
NIGHT
STANDBY/ON
SILENT CINEMA
3
To wall outlet
English
1 Connect the AC adaptor to the DC IN 15V jack
on the TSS-15’s rear panel.
2 Connect the power cable to the AC adaptor.
3 Plug the power cable into a suitable wall
outlet.
Cautions:
• Unplug the power cable from the wall outlet if you plan
not to use the TSS-15 for an extended period.
• If you put the AC adaptor on a shelf or rack, position it
so that it’s unlikely to fall, as it may cause injury or damage to another component or itself.
• Use only the included AC adaptor with the TSS-15
amplifier. Using another adaptor may cause a malfunction or fire.
• Do not use the AC adaptor with any device other than the
TSS-15.
11
Page 14

Basic Operation
This section explains the basic operation.
TSS-15 Remote control
NATURAL SOUND HOME THEATER SYSTEM TSS-15
q
Pro Logic
MAIN
/SUB
MOVIE MUSIC
DTS
AAC
234567
1
-6 -4 -2 0 +2 +4 +6
INPUT
1234
MOVIE MUSIC SPORTS GAME
MODE INPUT
STANDBY/ON
VOLUME
SILENT CINEMA
AUTOq Digital
NIGHT
VOLUME
STANDBY/ON
SP LEVEL
INPUT
MODE
MOVIE MUSIC SPORTS
VOLUME
MUTE
SP LEVEL
SW CENTER SURR
1
23 4
INPUT
TSS-15 WD76700
■ Listening to a Sound Source
1 To turn on the TSS-15, press the
[STANDBY/ON] button.
The STANDBY/ON button on the TSS-15 lights up.
STANDBY/ON
GAME
NIGHT
TEST
DUAL MONO
■ Adjusting the Level of the Subwoofer,
Center, or Surround Speakers
While listening to a sound source, use the SP LEVEL Up
[+] and Down [–] buttons to adjust the level of the subwoofer (SW), center speaker (CENTER), or surround
speakers (SURR).
Notes:
• The TSS-15 supports Dolby Digital, DTS, and AAC
(general model only) digital audio with a sampling rate
of 48 kHz or less, and PCM audio up to 96 kHz.
• The Cinema DSP and Dolby Pro Logic II listening
modes cannot be used with 96 kHz PCM audio.
• The subwoofer, center, and surround speaker levels can-
not be adjusted while a pair of headphones is connected.
■ Muting the TSS-15
To temporarily mute the TSS-15, press the remote control’s
[MUTE] button. The volume level indicators flash on the
TSS-15. To unmute the TSS-15, press the [MUTE] button
again. If you adjust the volume while the TSS-15 is muted,
or press any other button, it will be unmuted automatically.
MODE
MOVIE MUSIC SPORTS
STANDBY/ON
GAME
2 Turn on the source component.
3 Use the remote control’s INPUT buttons, or
the TSS-15’s [INPUT] button to select the
input to which the component is connected.
The INPUT indicator for the selected input lights up.
4 Start playback on the component.
See the component’s instruction manual for details.
5 Use the remote control’s VOLUME Up [+] and
Down [–] buttons, or the TSS-15’s VOLUME
control to adjust the volume.
While it’s being adjusted, the volume level is shown by
the TSS-15’s volume indicators for several seconds.
VOLUME
MUTE
SP LEVEL
SW CENTER SURR
NIGHT
TEST
Press the [MUTE]
button to mute the
TSS-15
■ Turning Off the TSS-15
To turn off the TSS-15, press the [STANBY/ON] button on
the remote control or TSS-15 to set it to Standby.
While on Standby, the TSS-15 consumes a small amount of
power so that it’s able to receive commands from the
remote control.
Note:
The next time you turn on the TSS-15, the previously
selected input (1–4) and listening mode will be selected
automatically.
12
Page 15

Adjusting Speaker Levels with the Test Tone
English
It’s important that all speakers can be heard equally at the
listening position. The TSS-15 has a built-in test tone for
adjusting the level of each speaker.
Notes:
• The test tone cannot be used while a pair of headphones
is connected.
• The Night listening mode cannot be used while the test
tone is being output.
• The test tone can be used with the Virtual Surround function (see page 16).
MODE
MOVIE MUSIC SPORTS
SP LEVEL
SW CENTER SURR
1
STANDBY/ON
GAME
VOLUME
MUTE
NIGHT
TEST
DUAL MONO
23 4
INPUT
STANDBY/ON [ ]
VOLUME +/–
TEST
3 Press the [TEST] button.
The test tone is output by each speaker for 2.5 seconds
in the following order: front left, center, front right, surround right, surround left, subwoofer.
The TSS-15’s CINEMA DSP buttons indicate which
speaker is currently outputting the test tone, as shown
below.
MOVIE MUSIC SPORTS GAME
MOVIE MUSIC SPORTS GAME
Front left
speaker
Subwoofer
MOVIE MUSIC SPORTS GAME
Surround left
speaker
MOVIE MUSIC SPORTS GAME
MOVIE MUSIC SPORTS GAME
Front right
speaker
Center
speaker
Listening
position
Surround right
speaker
MOVIE MUSIC SPORTS GAME
TSS-15 WD76700
This procedure should be performed from the listening
position.
1 To turn on the TSS-15, press the
[STANDBY/ON] button.
The STANDBY/ON button on the TSS-15 lights up.
2 Set the volume to about 4.
Note:
If the test tone is too quiet, turn up the TSS-15 amplifier’s
VOLUME control. If it’s too loud, turn it down.
4 While the test tone is being output by a
speaker, use the VOLUME Up [+] and Down [–]
buttons to adjust its level.
While the level is being adjusted, the test tone will continue to be output by the same speaker. When you stop
adjusting the level, the test tone will be output by the
next speaker in the order stated above.
Notes:
• The level of each speaker is shown by the volume level
indicators on the TSS-15 (–6, –4, –2, 0, +2, +4, +6).
• The front left and right speaker levels cannot be set
above 0.
•To reset all speakers to their default levels, while the test
tone is being output, press the TSS-15 amplifier’s
[MODE] button for two seconds.
5 When you’ve finished adjusting the level of
each speaker, press the [TEST] button again
to turn off the test tone.
13
Page 16

Using the Cinema DSP Listening Modes
Yamaha’s Cinema DSP technology offers Movie, Music,
Sports, and Game listening modes for an enhanced listening experience. In addition, you can use all five speakers
even with stereo music sources, including CDs, videos,
games, and so on.
To select the Cinema DSP listening modes, use the
[MOVIE], [MUSIC], [SPORTS], and [GAME] buttons.
The corresponding button lights up. To turn the mode off,
press the button again, or press the [MODE] button.
Notes:
• The Cinema DSP listening modes cannot be used with
mono or multilingual (main/sub) audio sources.
• The TSS-15 remembers which listening mode you previously used with each input so the next time you select an
input, the listening mode is selected automatically.
• Feel free to chose a listening mode based on your listening preference, and not purely on the name of the mode
itself.
■ About the Cinema DSP Listening Modes
Listening mode Description
TSS-15 Remote control
VOLUME
MUTE
SP LEVEL
23 4
INPUT
TSS-15 WD76700
STANDBY/ON
NATURAL SOUND HOME THEATER SYSTEM TSS-15
Pro Logic
q
MAIN
/SUB
DTS
MOVIE MUSIC
AAC
234567
1
-6 -4 -2 0 +2 +4 +6
INPUT
1234
MOVIE MUSIC SPORTS GAME
MODE INPUT
STANDBY/ON
VOLUME
SILENT CINEMA
AUTOq Digital
MODE
NIGHT
CINEMA
DSP
MODE
MOVIE MUSIC SPORTS
SW CENTER SURR
1
GAME
NIGHT
TEST
DUAL MONO
With this mode, you can enjoy a movie theater-like experience in your own home
Movie
theater.
The TSS-15’s [MOVIE] button lights up when this mode is selected.
With this mode you can experience the excitement of a live concert hall.
Music
The TSS-15’s [MUSIC] button lights up when this mode is selected.
With this mode, you can enjoy watching sports surrounded by the sounds of the
Sports
crowd, the stadium, and the game.
The TSS-15’s [SPORTS] button lights up when this mode is selected.
With this mode, you can enjoy the dynamics and thrills of three-dimensional sur-
Game
round sound effects.
The TSS-15’s [GAME] button lights up when this mode is selected.
Notes:
• The Cinema DSP listening modes can be used with
Dolby Digital, DTS, AAC (general model only), PCM,
or analog audio sources.
• When used with a Dolby Digital, DTS, or AAC (general
model only) source, the DIGITAL, DTS, or AAC
indicator lights up.
• When used with a stereo (2-channel) source, Dolby Pro
Logic II Movie mode is used to create 5.1-channels, and
the MOVIE indicator lights up.
MOVIE MUSIC SPORTS GAME
MOVIE MUSIC SPORTS GAME
MOVIE MUSIC SPORTS GAME
MOVIE MUSIC SPORTS GAME
14
Page 17

Other Listening Modes
English
■ Using Dolby Pro Logic II
With Dolby Pro Logic II, you can enjoy 5.1-channel surround from legacy Dolby Surround sources (video, laser
etc
disc,
) or normal stereo sources (CDs, etc). There are
two modes: Movie mode for watching movies, and Music
mode for listening to music.
To select Dolby Pro Logic II, use the [MODE] button to
select Movie mode or Music mode. The Pro Logic II
MOVIE or MUSIC indicator lights up.
■ Listening with No Processing
With Auto mode, you can listen to music and other sources
with no Cinema DSP processing. Analog and PCM sources
will be heard through the front left and right speakers and
subwoofer. Dolby Digital, DTS, and AAC (general model
only) will be decoded and output by the appropriate speakers.
To select Auto mode, press the [MODE] button repeatedly
until the AUTO indicator lights up.
■ Night Listening Mode
In Night Listening mode, the audio dynamic range is
reduced so that you can hear quiet dialog even when listening at low volume levels—useful when you don’t want to
disturb anyone else.
Note:
The Cinema DSP listening modes can be used with Night
listening mode.
1 To select Night listening mode, press the
[NIGHT] button.
The NIGHT indicator lights up.
■ Using Headphones & Silent Cinema
With the Silent Cinema function, you can enjoy multichannel surround sound, including Dolby Digital and DTS,
even when using headphones.
To use Silent Cinema, simply connect your headphones to
the SILENT CINEMA headphones jack.
Front panel
NATURAL SOUND HOME THEATER SYSTEM TSS-15
Pro Logic
q
MAIN
/SUB
DTS
AUTOq Digital
MOVIE MUSIC
AAC
234567
1
-6 -4 -2 0 +2 +4 +6
INPUT
1234
NIGHT
MOVIE MUSIC SPORTS GAME
MODE INPUT
STANDBY/ON
VOLUME
SILENT CINEMA
SILENT CINEMA
Notes:
• No sound is output by the speakers while a plug is
inserted in the SILENT CINEMA headphones jack.
• Silent Cinema can be used with the Cinema DSP listening modes.
•To listen to stereo (2-channel) sources (CDs, etc) without
Silent Cinema, turn off the Cinema DSP listening
modes, and use the [MODE] button to select Auto mode.
2 To cancel Night listening mode, press the
[NIGHT] button again.
Remote control
VOLUME
MUTE
SP LEVEL
23 4
INPUT
TSS-15 WD76700
STANDBY/ON
GAME
NIGHT
TEST
DUAL MONO
NIGHT
MODE
MOVIE MUSIC SPORTS
SW CENTER SURR
1
15
Page 18

■ Virtual Surround
With the Virtual Surround function, you can enjoy
5.1-channel surround sound even when the surround left
and right speakers are not used. The surround speakers can
then be used as front speakers to provide extra power.
To turn on the Virtual Surround function, set the TSS-15 to
Standby, and then set the VIRTUAL switch on the rear
panel to ON.
Note:
The Virtual Surround function can be turned on or off only
when the TSS-15 is on Standby. Setting the VIRTUAL
switch while the TSS-15 is on will have no effect.
Rear panel
SPEAKER
OUTPUTS
FRONT
L
R
SURROUND
L
R
CENTER
SUBWOOFER
DC IN 15V
L
R
ANALOG
INPUT
DIGITAL
3
2
1
ON
OFF
VIRTUAL
VIRTUAL switch
Boosting the Front Speaker Volume
In Virtual Surround mode, the surround left and right
speakers can be used in addition to the front left and right
speakers to provide extra power. In this mode, the front left
and surround left speakers output the same sound. Likewise, the front right and surround right speakers output the
same sound.
TSS-15
Front left &
surround left
speakers
Front right &
surround right
speakers
Subwoofer
When using the surround speakers as front speakers, you
can adjust their positions to optimize the sound dispersion.
Note:
The test tone can be used with the Virtual Surround function to adjust the level of each speaker (see page 13). The
level of the surround speakers cannot be adjusted independently of the front speakers.
16
■ Energy Saving Function
The TSS-15 has an energy saving function. If it’s left on
and no controls are operated for 24 hours, it will automatically switch to Standby mode.
Page 19

Troubleshooting
If the TSS-15 Home Theater Sound System does not work properly, refer to the table below. If the problem is not listed,
or if the suggested remedy fails to resolve the problem, set the TSS-15 to Standby, disconnect the power cable from the
wall outlet, and contact your Yamaha dealer.
English
Problem Possible cause Remedy
The TSS-15 turns itself off
as soon as it’s turned on.
No sound can be heard.
One speaker outputs no
sound.
Only the front speakers
output sound.
The center speaker outputs
no sound.
The surround speakers
output no sound.
The subwoofer outputs no
sound.
Refer to
page
The power cable is not connected
properly.
A speaker cord has a short circuit so
the amplifier protection system has
turned the TSS-15 off automatically.
The TSS-15 amplifier was exposed to
a strong external electrical shock,
such as lightning or excessive static
electricity.
The TSS-15 has been used at high
volume levels and the amplifier
protection system has turned the
TSS-15 off automatically.
The TSS-15 amplifier is excessively
hot and the protection system has
turned it off automatically.
Connections are incomplete.
The wrong input is selected.
The volume is set too low. Turn up the volume. 12
The TSS-15 has been muted.
The speaker is not connected
properly.
The Auto listening mode is selected
and the audio source is stereo.
The Dolby Surround, Dolby Digital,
or DTS source does not include
surround channel information.
Digital audio signals with a sampling
rate above 48 kHz are output by only
the front speakers.
The center speaker’s volume level is
set to minimum.
Some multichannel sources do not
include center channel information.
The surround speakers’ volume level
is set to minimum.
The subwoofer’s volume level is set to
minimum.
Some source material does not
include sub-bass sounds.
Make sure that the power cable is properly
connected to a suitable wall outlet.
Make sure that all speaker cords are
properly connected and check for any
shorts.
Set the TSS-15 to Standby, and then
disconnect the power cable from the wall
outlet. Wait about 30 seconds, plug the
power cable in again, and then turn on the
TSS-15.
Use the TSS-15 at a lower volume. 12
Wait a few minutes for the amplifier to cool
down.
Make sure that the speakers and other
components are properly connected.
Select the appropriate input.
If the DTS indicator is flashing, select
another input, then select the previous
input.
Press the [MUTE] button to unmute the
TSS-15.
Check the speaker connections. 9
To use all speakers, select a Cinema DSP or
Dolby Pro Logic II listening mode.
——
Use the remote control’s SP LEVEL
CENTER Up [+] button to increase the
level.
——
Use the remote control’s SP LEVEL SURR
Up [+] button to increase the level.
Use the remote control’s SP LEVEL SW
Up [+] button to increase the level.
——
9–10
14–15
11
9
—
—
12
12
12
12
12
17
Page 20

Problem Possible cause Remedy
The source is Dolby Digital
and the Auto listening
mode is selected, but the
center and surround
speakers output no sound.
The source is Dolby Digital
or DTS, but the Dolby
Digital or DTS indicator
doesn’t light up.
A humming noise can be
heard.
Noise can be heard.
The sound is distorted.
The TSS-15 doesn’t work
properly.
Noise can be heard when
the TSS-15 amplifier is
situated close to another
electronic device.
The Dolby Digital signal contains
only two channels.
The DVD player is not set correctly.
An audio cable is not connected
properly.
The level of the input signal is too
low.
An audio cable is not connected
properly.
The level of the input signal is too
high.
The internal microprocessor has
locked up due to external electrical
shock (lightning or excessive static
electricity) or a drop in the power
supply voltage.
The electronic device’s highfrequency circuits are causing
interference on the TSS-15 amplifier.
The battery is depleted.
If the DVD being played has a 5.1-channel
soundtrack, select it on the DVD player.
If not, you can still use all speakers by
selecting the Dolby Pro Logic II Movie or
Music listening mode.
Make sure that the DVD player is
configured to output Dolby Digital and
DTS (bitstream) signals from its digital
output. Refer to its manual for details.
Check all audio connections and correct as
necessary.
Increase the output level on the source
component.
Check all audio connections and correct as
necessary.
Reduce the output level on the source
component.
Disconnect the power cable from the wall
outlet, wait for about 30 seconds, then plug
it back in again.
Move the TSS-15 amplifier and electronic
device away from each other.
Replace with a new CR2025 battery.
1. Using a small screwdriver, carefully
slide out the battery holder.
2. Remove the expired battery, and place
the new battery onto the battery holder
with the + side facing up.
3. Slide the battery holder into the remote
control, and push it so that it clicks shut.
+ side up
Refer to
page
15
—
10
—
10
—
—
—
—
The remote control doesn’t
work.
18
You’re too far away from the TSS-15.
Direct sunlight or lighting (invertertype fluorescent light, etc) is shining
on the TSS-15’s remote control
sensor.
2
3
1
• Do not attempt to recharge the old battery.
• Dispose of the old battery in accordance
with local regulations.
The remote control has a maximum
working range of 6 meters (20 feet), and a
working angle of 30 degrees.
Reposition the TSS-15 amplifier. —
5
Page 21

Glossary
English
5.1-channel
Refers to a six-channel surround sound format. The 5 refers
to the five full-range audio channels (left, right, center, surround left, and surround right), and the .1 refers to the frequency-limited LFE (Low Frequency Effects) channel,
which is used for sub-bass effects between 20 Hz and
120 Hz.
AAC
AAC, which stands for Advanced Audio Coding, is a new
audio encoding format that uses more efficient compression than the MP3 format, yet offers audio quality on par
with that of CD. AAC was developed by the MPEG group
and is used in the new MPEG-4 video format.
Dolby Digital
This is the designated digital surround sound format for
DVD-Video, HDTV, and select digital broadcasts (cable,
satellite, over the air). A Dolby Digital bitstream may contain mono, stereo, Dolby Surround, or 5.1-channel audio
information. Dolby Digital uses lossy compression to
squeeze six channels of information into a single digital
bitstream. Unlike Dolby Surround and Dolby Pro Logic
that use matrix encoding, Dolby Digital uses discrete channels.
Dolby Pro Logic
The matrix decoder used in home theater equipment to
decode Dolby Surround material.
Dolby Pro Logic II
The second generation Dolby Pro Logic matrix decoder
can create quasi 5.1-channel surround (left, right, center,
surround left, and surround right) from legacy Dolby Surround sources and normal stereo sources. It offers Movie
and Music listening modes.
Dolby Surround
The home version of the original Dolby Stereo surround
system used in movie theaters. It uses matrix encoding to
deliver four channels (left, right, center, and surround) of
information via two audio channels. It’s commonly used
for video, laser disc, analog TV, and other stereo analog
systems.
DTS
Developed by Digital Theater Systems, DTS is a 5.1-channel digital surround format similar to Dolby Digital, except
it uses less compression for a more faithful sound. It’s commonly used with DVD-Video and DTS CDs.
PCM
PCM signals are linear, noncompressed digital audio signals. Normal CDs contain 16-bit/44.1 kHz PCM. A DVD
may contain 16-bit/48 kHz through 24-bit/96 kHz PCM.
Silent Cinema
Yamaha’s Silent Cinema technology allows you to enjoy
multichannel surround sound even when using headphones.
Yamaha Cinema DSP
Since Dolby Surround and DTS were originally developed
for use in movie theaters, it’s inevitable that sounds will not
be heard exactly how the original sound designer intended
when listened to in a typical home environment, with the
smaller room size, wall construction, and number of speakers. Using a wealth of measured data, Yamaha’s Cinema
DSP technology uses Yamaha’s own sound-field technology to combine Dolby Pro Logic, Dolby Digital, and DTS
to supplement the scale, depth and volume of sounds,
thereby recreating the audio experience of a movie theater
in the home theater environment.
Yamaha Virtual Surround
Yamaha’s Virtual Surround technology allows you to enjoy
5.1-channel surround sound even when not using the surround left and right speakers. The surround speakers can
then be used with the front speakers to provide extra power.
19
Page 22

Specifications
• Amplifier unit
Output Power per Channel
. Front/center/surround: 6W x 5 (1 kHz, 4 Ω, 10 % THD)
Subwoofer: 18W (100 Hz, 4 Ω, 10 % THD)
Input Sensitivity .................................................200 mV
H. P. Output Level/Output Impedance
........................................ 450 mV/30 Ω (1 kHz, 200 mV)
Frequency Response ............................... 40 Hz–20 kHz
Dimensions (W x H x D)
........................................... 102 mm x 260 mm x 196 mm
Weight ....................................................................1.3 kg
Power Consumption .............................................. 40 W
Standby Power Consumption
............................ 0.8 W (100–120V), 1.1 W (220–240V)
• Satellite speakers
Type ........Full range speaker system acoustic suspension
Driver ................................................5 cm (2") cone type
Magnetic shielding type
Impedance .................................................................4 Ω
Dimensions (W x H x D)
...................... 70 mm x 91 mm x 110 mm (include stand)
Weight ....................................................................0.4 kg
• Subwoofer
Type ...........Active Servo Processing Subwoofer System
Driver ......................................... 13 cm (5") cone woofer
Magnetic shielding type
Impedance ................................................................. 4 Ω
Dimensions (W x H x D)
............................................220 mm x 239 mm x 220 mm
Weight ................................................................... 3.4 kg
* Please note that all specifications are subject to change without notice.
20
Page 23

Caracteristiques techniques
• Unité d’amplification
Puissance de sortie par canal
Avant/centrale/surround: 6W x 5 (1 kHz, 4 Ω, 10 % THD)
Caisson de graves: 18W (100 Hz, 4 Ω, 10 % THD)
Sensibilité d’entrée ............................................. 200 mV
Niveau de sortie des enceintes/
Impédance de sortie de la prise casque
.........................................450 mV/30 Ω (1 kHz, 200 mV)
Sensibilité d’entrée ................................... 40 Hz–20 kHz
Dimensions (L x H x P) ....102 mm x 260 mm x 196 mm
Poids ....................................................................... 1,3 kg
Consommation électrique ......................................40 W
Consommation en veille
.............................0,8 W (100–120V), 1,1 W (220–240V)
• Enceintes satellites
Type ...................................... Enceinte à gamme intégrale
Acoustic suspension
Entraînement
...........................................................Type à cône de 5 cm
Blindage magnétique
Impédance ................................................................. 4 Ω
Dimensions (L x H x P)
................ 70 mm x 91 mm x 110 mm (y compris le pied)
Poids ....................................................................... 0,4 kg
• Caisson de graves
Type ....de système de subwoofer à traitement servo actif
Entraînement
..............................................13 cm de type cône à woofer
Blindage magnétique
Impédance .................................................................. 4 Ω
Dimensions (L x H x P)
............................................ 220 mm x 239 mm x 220 mm
Poids .......................................................................3,4 kg
* Noter que toutes les caractéristiques techniques sont modifiables sans préavis.
YAMAHA ELECTRONICS CORPORATION, USA
YAMAHA CANADA MUSIC LTD.
YAMAHA ELECTRONIK EUROPA G.m.b.H.
YAMAHA ELECTRONIQUE FRANCE S.A.
YAMAHA ELECTRONICS (UK) LTD.
YAMAHA SCANDINAVIA A.B.
YAMAHA MUSIC AUSTRALIA PTY, LTD.
135 MILNER AVE., SCARBOROUGH, ONTARIO M1S 3R1, CANADA
J A WETTERGRENS GATA 1, BOX 30053, 400 43 VÄSTRA FRÖLUNDA, SWEDEN
6660 ORANGETHORPE AVE., BUENA PARK, CALIF. 90620, U.S.A.
SIEMENSSTR. 22-34, 25462 RELLINGEN BEI HAMBURG, F.R. OF GERMANY
RUE AMBROISE CROIZAT BP70 CROISSY-BEAUBOURG 77312 MARNE-LA-VALLEE CEDEX02, FRANCE
YAMAHA HOUSE, 200 RICKMANSWORTH ROAD WATFORD, HERTS WD18 7GQ, ENGLAND
17-33 MARKET ST., SOUTH MELBOURNE, 3205 VIC., AUSTRALIA
20
2004 All rights reserved.
©
Printed in China WD66140
IP
 Loading...