

Page 1
CHROMATIC TUNER
TD-12
TD-12
OWNER’S MANUAL
Thank you for purchasing the YAMAHA
CHROMA TIC TUNER TD-12.
■ Precautions
Location
Using the unit in the following locations can result in a malfunction.
• In direct sunlight
• Locations of extreme temperature or humidity
• Excessively dusty or dirty locations
• Locations of excessive vibration
• Close to magnetic fields
Power supply
To power the tuner, use only two AAA (R03, LR03, L30) 3V dry cell batteries.
Be sure to turn the power switch OFF when the unit is not in use. Remove the batteries
in order to prevent it from leaking when the units is not in use for extended periods.
Interference with other electrical devices
This product contains a microcomputer. Radios and televisions placed nearby may
experience reception interference. Operate this unit at a suitable distance from radios
and televisions.
Handling
To avoid breakage, do not apply excessive force to the switches or controls.
Cleaning
If the exterior becomes dirty, wipe it with a clean, dry cloth. Do not use liquid cleaners
such as benzene or thinner, or cleaning compounds or flammable polishes.
Keep this manual
After reading this manual, please keep it for later reference.
Keeping foreign matter out of your equipment
Never set any container with liquid in it near this equipment. If liquid gets into the
equipment, it could cause a breakdown, fire, or electrical shock. Be careful not to let
metal objects get into the equipment.
1. IMPORTANT NOTICE: DO NOT MODIFY THIS UNIT!
This product, when installed as indicated in the instructions contained in this manual, meets FCC requirements. Modifications not expressly approved by Yamaha may void your authority, granted by the FCC, to
use the product.
2. IMPORTANT: When connecting this product to accessories and/or another product use only high quality
shielded cables. Cable/s supplied with this product MUST be used. Follow all installation instructions. Failure to follow instructions could void your FCC authorization to use this product in the USA.
3. NOTE: This product has been tested and found to comply with the requirements listed in FCC Regula-
tions, Part 15 for Class ”B” digital devices. Compliance with these requirements provides a reasonable level
of assurance that your use of this product in a residential environment will not result in harmful interference
with other electronic devices. This equipment generates/uses radio frequencies and, if not installed and
used according to the instructions found in the users manual, may cause interference harmful to the operation of other electronic devices. Compliance with FCC regulations does not guarantee that interference will
not occur in all installations. If this product is found to be the source of interference, which can be determined by turning the unit ”OFF” and ”ON”, please try to eliminate the problem by using one of the following
measures:
Relocate either this product or the device that is being affected by the interference.
Utilize power outlets that are on different branch (circuit breaker or fuse) circuits or install AC line filter/s.
In the case of radio or TV interference, relocate/reorient the antenna. If the antenna lead-in is 300 ohm
ribbon lead, change the lead-in to co-axial type cable.
If these corrective measures do not produce satisfactory results, please contact the local retailer authorized to distribute this type of product. If you can not locate the appropriate, please contact Yamaha Corporation of America, Electronic Service Division, 6600 Orangethorpe Ave, Buena Park, CA 90620
The above statements apply ONLY to those products distributed by Yamaha Corporations of
America or its subsidiaries.
THIS DIGITAL APPARATUS DOES NOT EXCEED THE “CLASS B” LIMITS FOR RADIO
NOISE EMISSIONS FROM DIGITAL APPARATUS SET OUT IN THE RADIO INTERFERENCE REGULATION OF THE CANADIAN DEPARTMENT OF COMMUNICATIONS.
FCC INFORMATION (U.S.A.)
■ Specifications
Tuning: 12 note equal-tempered
Detection range: C1 (32.70Hz)–C8 (4186.01Hz): Sine wave
Reference tone: C4 (261.63Hz)–C5 (523.25Hz): one octave
Tuning modes: METER (AUTO), SOUND (MANUAL)
Calibration function: 410–480 Hz (1 Hz steps)
Detection accuracy: ±1 cent
Sound accuracy: ±1.5 cent
Connection jack: INPUT jack (1/4" mono)
Power supply: two AAA batteries 3V
Battery life: Approximately 100 hours (Conventional batteries,
Dimensions (W×D×H): 4.1" × 2.52" × 0.6" (104 × 64 × 15 mm)
Weight: 2.86 oz (81g) : including the battery
Included items: Owner’s Manual, two AAA batteries
* The Calibration and Sound mode settings are remembered even when the power is
turned off. However, these settings will be initialized if the batteries are replaced.
Default settings: CALIB= 440Hz, SOUND= A: ABb
* Specifications and appearance are subject to change without notice for improvement.
Meter mode, A4 continuous input)
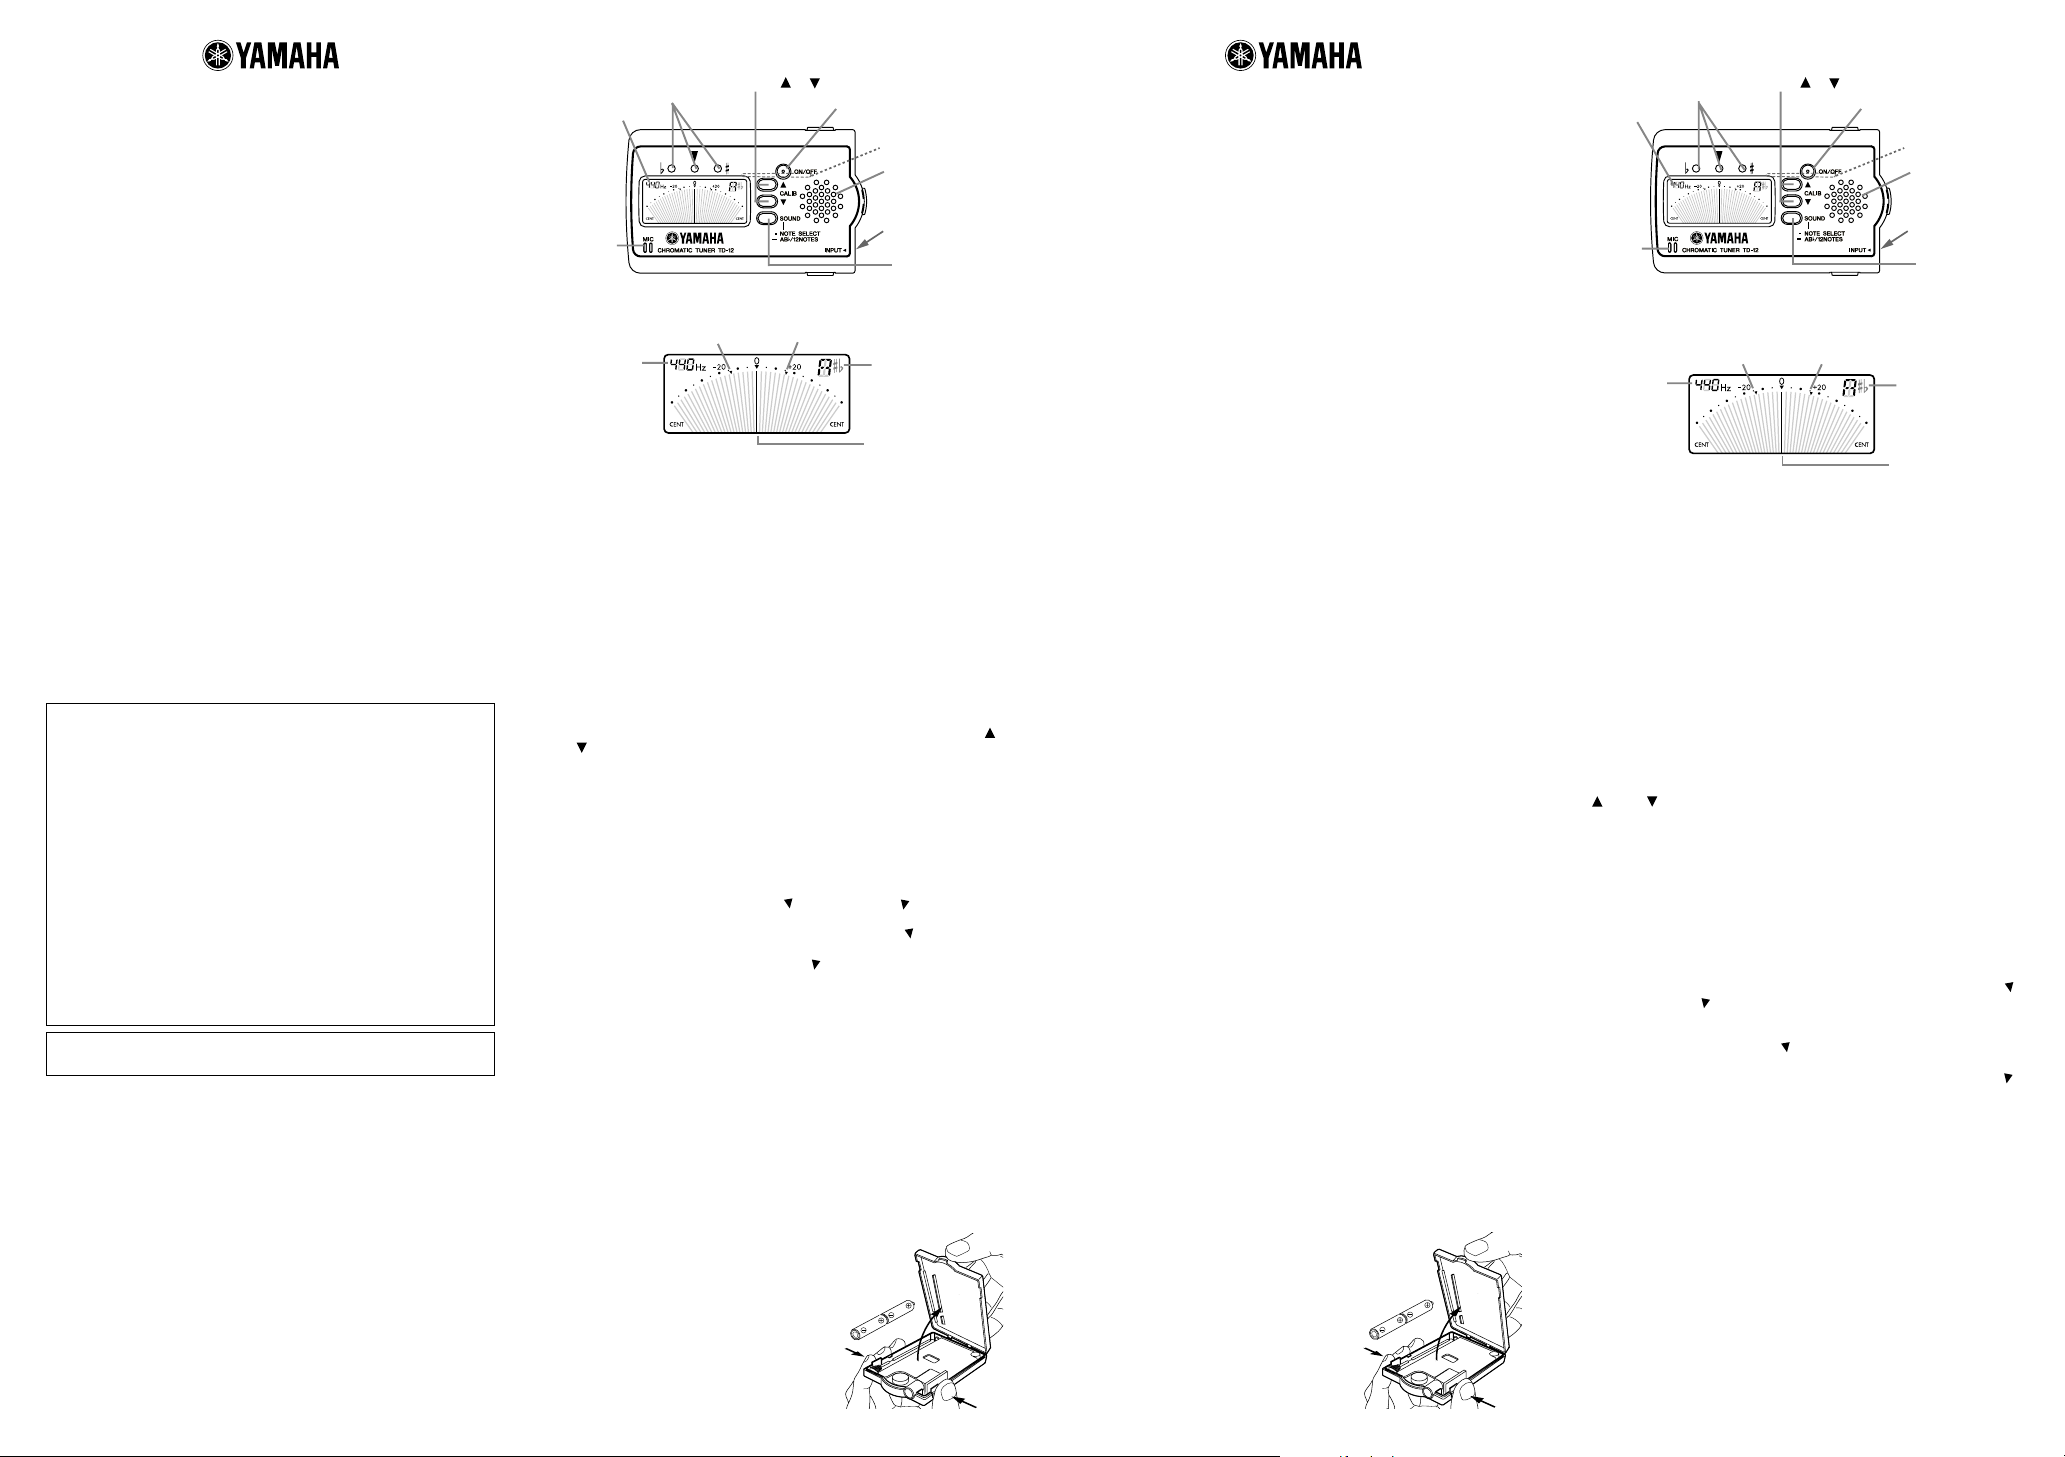
■ Controls and functions
Tuning guide LEDs
Display
Internal mic
* The tuner can be tilted back by using the slit in the rear panel.
Insert a coin or similar flat object into the slit and tilt back.
Pure major third
Calibration
CALIB [
], [ ] switches
Power switch
Tilt slit*
Speaker
INPUT jack
[SOUND] switch
Pure minor third
Note name
Meter
■ Tuning pr ocedure
● Meter mode
In this mode the VU style meter shown in the display is used to tune y our instr ument.
1. If you are using an instrument with a pickup or contact mic, connect the
INPUT jack of the TD-12 to the cable (plug) from your instrument or mic.
If you wish to tune your instrument using the built-in mic, do not connect a
plug to the INPUT jack. In steps 4 and 5, place your instrument as close as
possible to the built-in mic.
* If a plug is connected to the INPUT jack, the built-in mic cannot be used. The INPUT
jack is for mono use only. Stereo plugs cannot be used.
2. Press the power [ON/OFF] switch.
When the power is turned on, the reference pitch defaults to A 440 Hz.
When the power is on for 20 minutes without use the tuner will automatically
turn off to conserve battery life.
3. If you wish to change the reference pitch (calibration), press the CALIB [ ]
] switch. This can be adjusted in 1 Hz steps over a range of 410 Hz–480
or [
Hz.
4. Play a single note on your instrument, and the name of the nearest note will
appear in the display. Tune your instrument so that the correct note name is
shown in the display.
5. Tune your instrument so that the VU style meter moves to the 0 position
(center) and the center pitch guide LED is lit.
The left indicator of the tuning guide will light if your instrument is flat, and
the right indicator will light if your instrument is sharp.
If you want to tune a pure major third above or a pure minor third above a
certain note, make the meter indicate "
For example if you want to tune a major third above the A (0 cents) note, set
the note name display to C#, and make the meter indicate "
Or if you want to tune a minor third above A (0 cents), set the note name
display to C, and make the meter indicate "
* While tuning with the onboard mic a quiet environment is recommended for precise
tuning.
" (-13.7 cents) or " " (+15.6 cents).
" (-13.7 cents).
" (+15.6 cents).
● Sound mode
In this mode you can tune while listening to a reference pitch.
1. Make the settings described in steps 2–3 of “Meter mode.”
2. Press the [SOUND] switch to enter Sound mode.
3. Press the [SOUND] switch to select the note name you want to tune (NOTE
SELECT). The pitch you hear will be one octave higher than the actual pitch
of your instrument. If you press and hold the [SOUND] switch for approximately one second, A4/Bb4 and 12NOTE will alternate, and the note names
that are selected when you press this switch will change.
ABb: A ➝ Bb ➝ Meter mode (default setting)
12NOTE: C(4) ➝ C# ➝ D ➝ Eb ➝ E ➝ F ➝ F# ➝ G ➝ G# ➝ A ➝ Bb ➝
4. Tune your instrument to the reference pitch that is out-
put by the TD-12.
B ➝ C(5) ➝ Meter mode
■ Installing the battery
While pressing on the tabs marked PUSH on both
sides, open the case, and insert the batteries being careful to observe the correct polarity. Battery
life may differ according to the conditions of use. If
the unit malfunctions, and turning the power OFF
and then ON does not resolve the problem, remove
and then reinstall the batteries.
CHROMATIC TUNER
TD-12
TD-12
BEDIENUNGSANLEITUNG
Herzlichen Dank für den Kauf des YAMAHA
CHROMATIC TUNER TD-12.
■ Vor sichtsmaßnahmen
Aufstellung
Betreiben Sie das Gerät nicht in folgenden Umgebungen, da dies zu Fehlfunktionen führen könnte:
• in direktem Sonnenlicht
• bei extremer Temperatur oder Luftfeuchtigkeit
• in extrem staubigen oder schmutzigen Umgebungen
• unter dem Einfluß starker Vibrationen
• in der Nähe eines Magnetfeldes
Stromversorgung
Benutzen Sie für die Stromversorgung des Tuner ausschließlich zw ei Mikrozellen
(R03, LR03, L30) (3V Trockenbatterien).
Stellen Sie den Netzschalter auf OFF, wenn das Gerät nicht benutzt wird. Wenn
Sie das Gerät über einen längeren Zeitraum nicht benutzen, nehmen Sie die
Batterien heraus, damit sie nicht auslaufen.
Interferenzen bei anderen Elektrogeräten
Dieses Produkt ist mit einem Mikrocomputer ausgerüstet. Bei der Aufstellung in
direkter Nähe von Rundfunk- und Fernsehgeräten kann deren Empfang durch
Interferenzen gestört werden. Betreiben Sie dieses Gerät deshalb in ausreichender Entfernung von Rundfunk- und Fernsehempfängern.
Handhabung
Bedienen Sie die Schalter und Regler nicht mit übermäßiger Kraft, um Beschädigungen zu vermeiden.
Reinigung
Wenn das Gehäuse verschmutzt ist, reinigen Sie es mit einem trockenen, weichen Tuch. Verw enden Sie k eine flüssigen Reinigungsmittel, zum Beispiel Leichtbenzin, Verdünner, Lösungsmittel oder brennbare Polituren.
Bedienungsanleitung
Nachdem Sie die Bedienungsanleitung gelesen haben, sollten Sie sie für den
späteren Gebrauch gut aufbewahren.
Fremdgegenstände
• Stellen Sie keine Behälter mit Flüssigkeit in die Nähe dieses Geräts. Wenn
Flüssigkeiten in das Gerät gelangen, könnte dies einen Systemausfall, Brand
oder Stromschlag zur Folge haben.
• Achten Sie darauf, daß keine Metallgegenstände in das Gerät gelangen. Sollte
dies dennoch geschehen, ziehen Sie den Wechselstromadapter aus der Netzsteckdose. S etz en Sie sich anschließend mit dem nächstgelegenen YAMAHAFachhändler oder dem Geschäft in Verbindung, in dem Sie das Gerät gekauft
haben.
■ T ec hnisc he Daten
Stimmung: 12 gleichschwebende Töne
Erkennungsbereich: C1 (32,70Hz)–C8 (4186,01Hz): Sinuswelle
Referenznoten: C4 (261,63Hz)–C5 (523,25Hz): eine Oktave
Stimmodi: METER (AUTO), SOUND (MANUAL)
Kalibrierungsfunktion: 410–480 Hz (1 Hz-Schritte)
Erkennungsgenauigkeit: ±1 Cent
Referenzton-Genauigkeit: ±1,5 Cent
Anschlußbuchse: INPUT-Buchse (1/4" mono)
Stromversorgung: 2 Mikrozellen 3V
Lebensdauer der Batterien: Etwa 100 Stunden (herkömmliche Batterien,
Abmessungen (B×T×H): 104 × 64 × 15 mm
Gewicht: 81 g inklusive Batterien
Beiliegendes Zubehör: Bedienungsanleitung, 2 Mikrozellen
* Die Einstellungen der Kalibrierung (CALIB) und des Tonausgabe-Modus’ (SOUND
OUT) bleiben erhalten, auch wenn das Gerät ausgeschaltet wird. Diese Einstellungen
gehen jedoch verloren, wenn die Batterien ersetzt werden.
Voreinstellungen: CALIB= 440Hz, SOUND= A: ABb
* Änderungen, die dem technischen Fortschritt dienen, können jederzeit ohne
Ankündigung vorgenommen werden.
Meßmodus, kontinuierliche Eingabe der Note A4)
■ Batterie einbauen
Drücken Sie auf beiden Seiten auf den mit PUSH
markierten Bereich, öffnen Sie das Gehäuse und
legen Sie die Batterien ein.Achten Sie auf die korrekte Polarität. Abhängig von den Einsatzbedingungen des Geräts, kann die Lebensdauer
der Batterien unterschiedlich lang sein.
Falls Fehlfunktionen auftreten, die sich durch A usund Einschalten des Geräts nicht beheben lassen, nehmen Sie die Batterien heraus und bauen
Sie sie nochmals ein.
■ Regler und Funktionen
Abstimm-LEDs
Display
Internes
Mikrofon
* Das Stimmgerät weist einen Schlitz auf der Rückseite auf, mit dem es
nach hinten geneigt aufgestellt werden kann. Stecken Sie hierzu eine
Münze o. ä. in den Schlitz, und kippen Sie das Gerät nach hinten.
Reine Dur-Terz
Kalibrierung
CALIB [
], [ ] Schalter
Netzschalter
Neigeschlitz*
Lautsprecher
INPUT-Buchse
[SOUND]-Taste
Reine Moll-Terz
Notenname
VU-Skala
■ Arbeitsweise für das Stimmen
● Metermodus
In diesem Modus wird die VU-Skala im Display benutzt, um Ihr Instrument zu
stimmen.
1. Wenn Sie ein Instrument mit Spulenelement oder Kontaktmikrof on v erw en-
den, müssen Sie die INPUT-Buchse des TD-12 über ein geeignetes Kabel
mit dem Ausgang des Instrumentes oder Mikrofons verbinden.
Wenn Sie das interne Mikrofon des TD-12 verwenden, müssen Sie nichts
an der INPUT-Buchse anschließen.
* Bedenken Sie, daß durch Anschließen eines Klinkensteckers an der INPUT-Buchse
das interne Mikrofon deaktiviert wird. Die Buchsen INPUT und OUTPUT sind
monaural. Es können keine Stereo- Klinkenstecker angeschlossen werden.
2. Drücken Sie den Netzschalter [ON/OFF].
Nach dem Einschalten wird die zuletzt gewählte Referenzfrequenz (Vorgabe: A4= 440Hz) gewählt.
Wenn kein Signal eingespeist wird, schaltet sich das Gerät nach 20 Minuten aus.
3. Wenn Sie die Referenzfrequenz ändern möchten, müssen Sie die CALIB
[
] oder [ ] Taste drücken. Die Referenzfrequenz kann in Schritten von 1
Hz im Bereich von 410–480 Hz eingestellt werden.
4. Spielen Sie eine Einzelnote auf dem Instrument.
Das Display zeigt den Namen der erkannten Note sowie die Oktave, in der
sie gespielt wird, an.
Stimmen Sie Ihr Instrument so weit, dass schon einmal der richtige Notenname angezeigt wird.
5. Stimmen Sie Ihr Instrument so, daß die VU-Skala in der P osition 0 steht (Mit-
te) und die Abstimm-LEDs leuchten.
Die linke der Abstimm-LEDs leuchtet, wenn der Ton zu tief gestimmt ist, und
die rechte leuchtet, wenn der Ton zu hoch gestimmt ist.
Wenn Sie eine reine Dur-Terz oder eine reine Moll-Terz über einer bestimmten Note stimmen möchten, achten Sie darauf, daß die Anzeige "
(-13,7 Cents) oder "
Wenn Sie zum Beispiel eine reine Dur-Terz über dem Ton A (0 Cents) stimmen möchten, stellen Sie den Notennamen C# ein, und stimmen Sie das
Instrument so, daß die Anzeige "
reine Moll-Terz über dem Ton A (0 Cents) stimmen möchten, stellen Sie den
Notennamen C, und stimmen Sie das Instrument so, daß die Anzeige "
(+15,6 Cents) leuchtet.
* Beim Stimmen mit dem eingebauten Mikrofon ist für ein genaues Ergebnis eine ruhi-
ge Umgebung notwendig.
● Sound-Modus
In diesem Modus können Sie Ihr Instrument nach einem Referenzton stimmen.
1. Führen Sie die Schritte 2 und 3 des obigen Abschnitts “Meßmodus” aus.
2. Drücken Sie die [SOUND]-Taste, um den Sound-Modus aufzurufen.
3. Drücken Sie die Taste [SOUND] und wählen Sie den Namen der Note, die
Sie stimmen möchten (NOTE SELECT). Die zu hörende Tonhöhe liegt eine
Oktave höher als die tatsächliche Tonhöhe Ihres Instruments. Wenn Sie
die Taste [SOUND] etwa eine Sekunde lang gedrückt halten, erscheint abwechselnd A4/Bb 4 und 12NOTE, und die mit dieser Taste ausgewählten
Notennamen ändern sich. Anm. d. Ü.: Die englische Notenbezeichnung “B”
entspricht dem deutschen “H”, und engl. “Bb” ist deutsch “B”.
ABb: A ➝ Bb ➝ Meßmodus (Voreinstellung)
12NOTE: C(4) ➝ C# ➝ D ➝ Eb ➝ E ➝ F ➝ F# ➝ G ➝ G# ➝ A ➝ Bb ➝
4. Stimmen Sie Ihr Instrument zur vom TD-12 ausgegebenen Referenznote.
" (+15,6 Cents) leuchtet.
" (-13,7 Cents) leuchtet. Wenn Sie eine
B ➝ C(5) ➝ Meßmodus
"
"
 Loading...