

Yamaha RXV577B Connection Guide
WIRELESS
WIRELESS
WIRELESS
Screw in
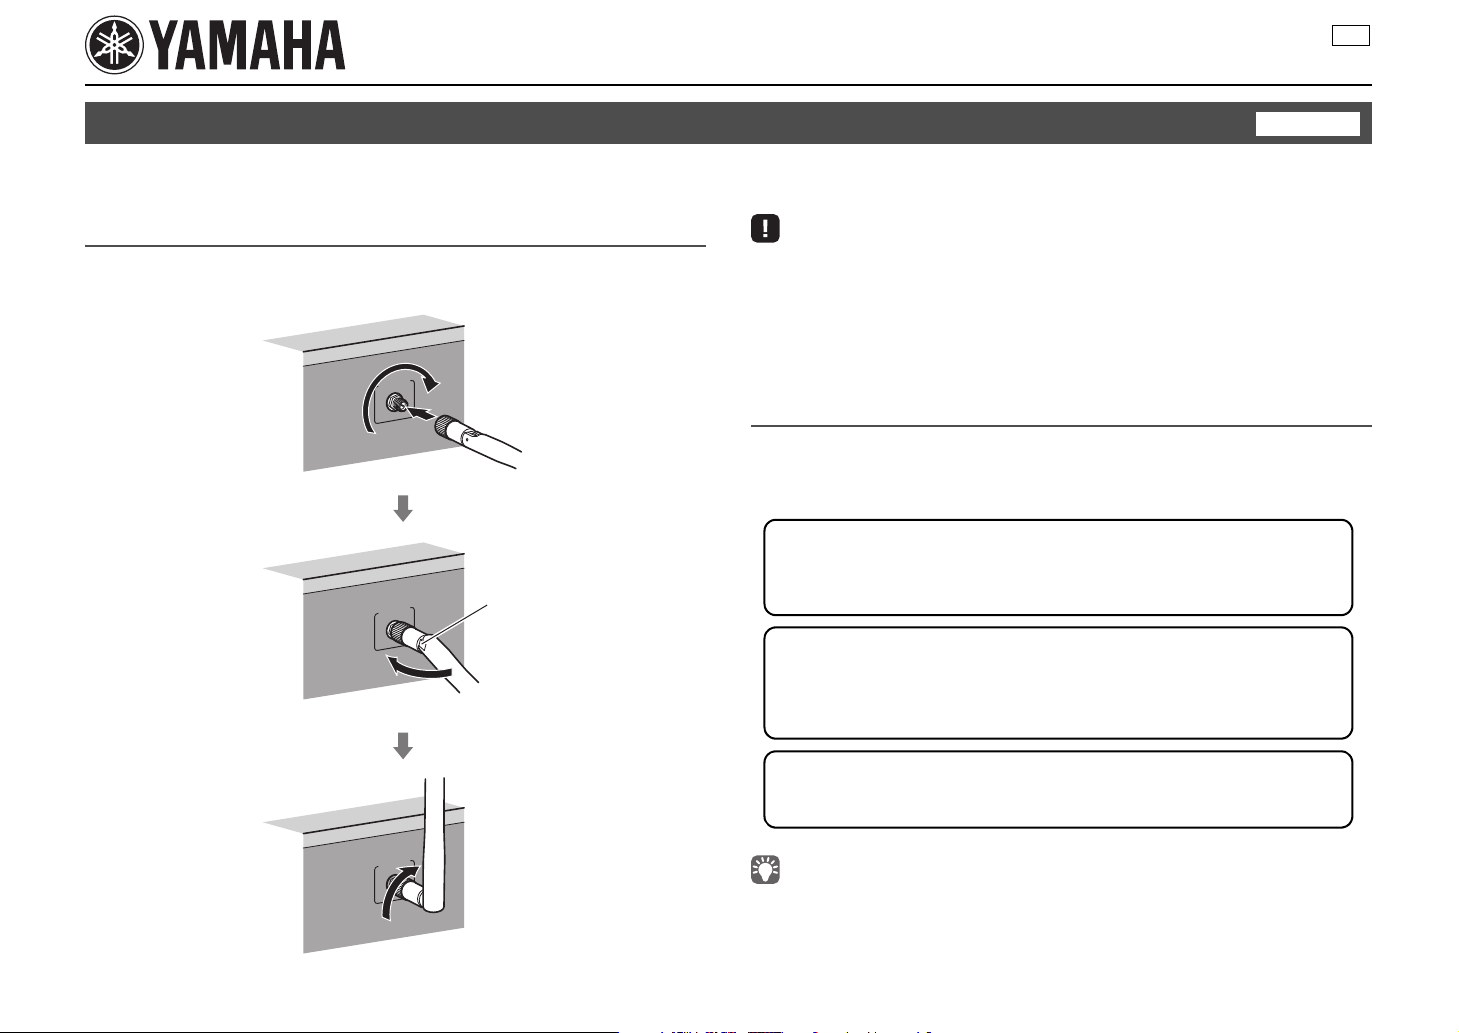
Bend
Turn clockwise to the vertical position
Joint
A: Using the WPS button configuration
Set up a wireless connection with the WPS button on the wireless router
(access point).
C: Searching for an access point
Set up a wireless connection by searching available access points.
B: Sharing the iOS device setting
Set up a wireless connection by applying the connection settings on iOS
devices (iPhone/iPod touch*).
* You need iOS devices with iOS 5.0 or later.
UCAB
Wireless network connection guide
This document explains how to connect the unit to a wireless network.
Attaching the wireless antenna
Attach the supplied wireless antenna to the unit.
Be sure to turn off the unit before attaching the antenna.
English
• Do not apply excessive force on the antenna. Doing so may damage the antenna.
• When attaching the antenna, hold the root of the antenna and screw it into the WIRELESS jack tightly.
• The antenna can be bent in only one direction. Check the orientation of the joint and bend the antenna in
the proper direction.
• Do not connect the antenna other than the supplied one.
• When packing the unit, remove the antenna to prevent damage.
Connecting the unit to a wireless network
Connect the unit to a wireless router (access point).
There are several methods to connect the unit to a wireless network. This section
describes the following three methods.
• Manual configuration is also available. For details, see “Connecting to a network wirelessly” on the Owner’s
Manual.
En 1
1234
5 6
FM
INFO
MEMORY
AM
PRESET
TUNING
SCENE
RETURN
TOP
MENU
POP-UP
MENU
VOLUME
BD
DVD
TV
NET
RADIO
MUTE
DISPLAY
ENTER
TRANSMIT
RECEIVER
HDMI
AV
SLEEP
AUX USB
5 6
NET
ZONE B
ZONE A
MOVIE MUSIC
SUR. DECODE STRAIGHT
ENHANCER
BASS DIRECT
MODE
SETUP
OPTION
2341
1
234
5
6
Y
PRESET
TU
G
S
E
RETURN
TO
MENU
POP-U
MENU
D
O
MUTE
DISPLAY
T
S
P
AUXUSB
5
6
ZO
B
ZO
A
C
S
E
BASS
MODE
N
234
1
ENTER
RECEIVER z RECEIVER z
SETUP
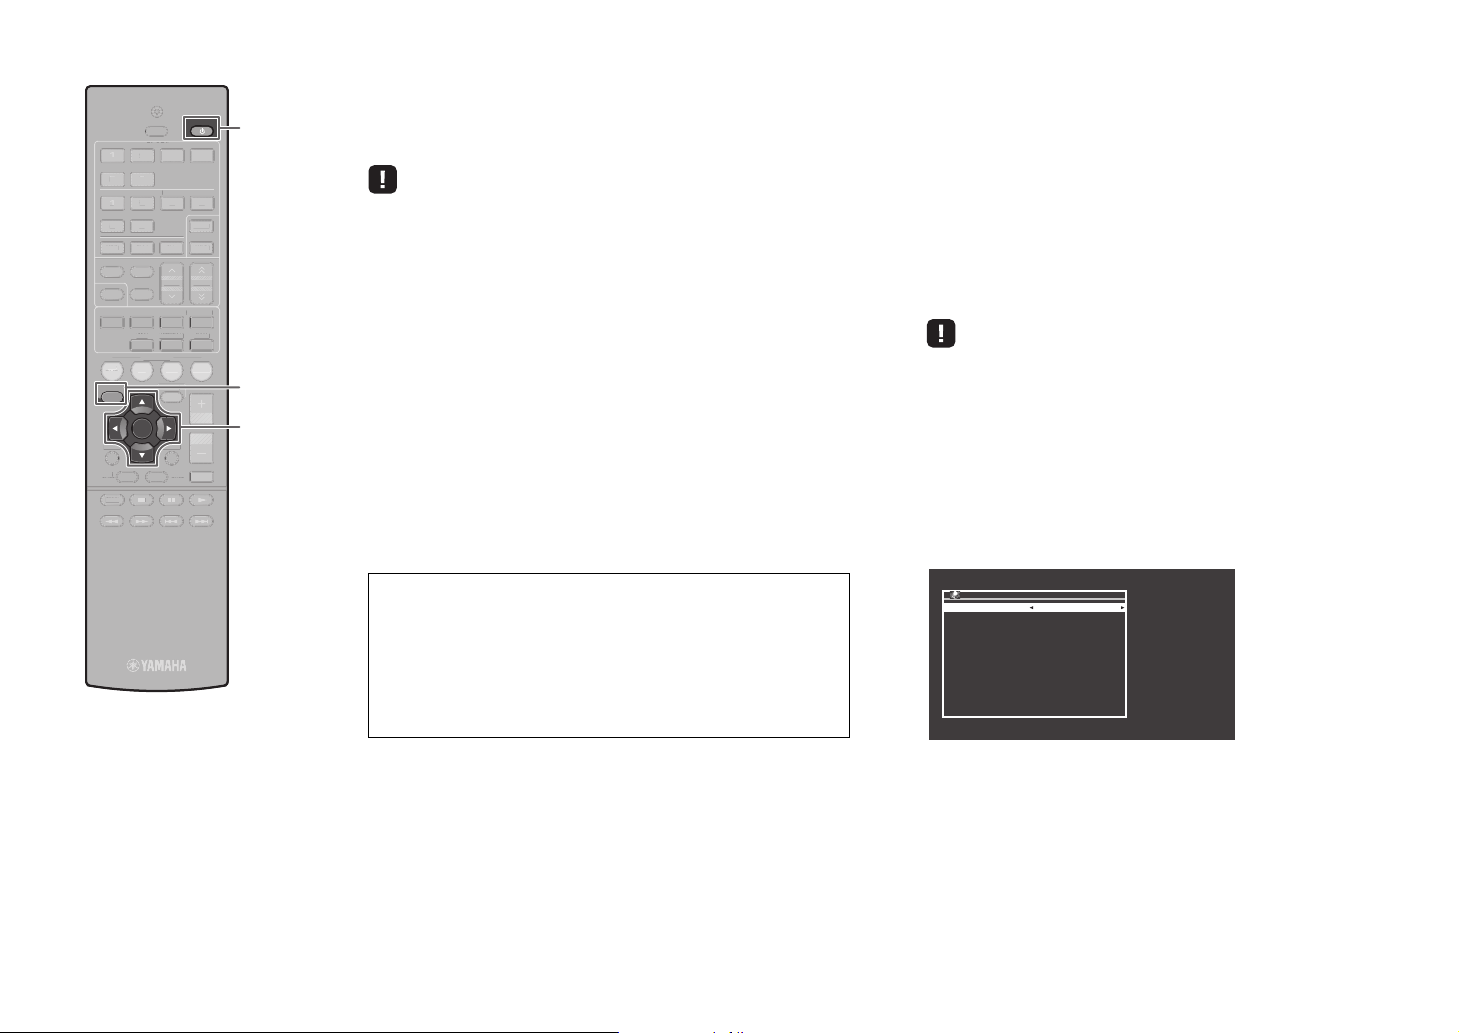
Network Connection
Connection Wireless (Wi-Fi)
: ENTEROK
: RETURNBack
INFO
MOVIEMUSI
B
P
TRANSMI
LEE
MEMOR
UR. DECODESTRAIGHT
NHANCER
CEN
OPTIO
P
DIRECT
RADI
VOLUME
NE
NE
NIN
Cursor keys
A: Using the WPS button configuration
You can easily set up a wireless connection with one push of the
WPS button.
• The unit cannot connect to the wireless router (access point) of which security
type is WEP. In this case, try another connection method.
Press RECEIVER z to turn on the unit.
1
Hold down INFO (WPS) on the front panel for 3
2
seconds.
“Press WPS button on Access Point” appears on the front
display.
Push the WPS button on the wireless router (access
3
point).
When the connection process finishes, “Completed”
appears on the front display.
If “Not connected” appears, repeat from step 1 or try
another connection method.
About WPS
WPS (Wi-Fi Protected Setup) is a standard established by the
Wi-Fi Alliance, which allows easy establishment of a wireless
home network.
Ubiquitous WPS2.0
Copyright © 2013 Ubiquitous Corp.
B: Sharing the iOS device setting
You can easily setup a wireless connection by applying the
connection settings on iOS devices (iPhone/iPod touch).
Before proceeding, confirm that your iOS device is connected to a
wireless router.
Press RECEIVER z to turn on the unit.
1
Turn on the TV and switch the TV input to display
2
video from the unit (HDMI OUT jack).
• Operations with TV screen are available only when your TV is connected to
the unit via HDMI.
Press SETUP.
3
Use the cursor keys and ENTER to select
4
“Network”, then “Network Connection”.
Use the cursor keys (e/r) to select “Wireless
5
(Wi-Fi)” and press ENTER.
2 En
1234
5 6
FM
INFO
MEMORY
AM
PRESET
TUNING
SCENE
RETURN
TOP
MENU
POP-UP
MENU
VOLUME
BD
DVD
TV
NET
RADIO
MUTE
DISPLAY
ENTER
TRANSMIT
RECEIVER
HDMI
AV
SLEEP
AUX USB
5 6
NET
ZONE B
ZONE A
MOVIE MUSIC
SUR. DECODE STRAIGHT
ENHANCER
BASS DIRECT
MODE
SETUP
OPTION
2341
S
E
RETURN
TO
MENU
POP-U
MENU
D
O
MUTE
DISPLAY
Y
PRESET
TU
G
1
234
5
6
T
R
S
P
AUXUSB
5
6
ZO
B
ZO
A
C
S
E
BASS
MODE
N
234
1
ENTER
SETUP
INFO
MOVIEMUSI
B
P
MEMOR
TRANSMI
LEE
UR. DECODESTRAIGHT
NHANCER
CEN
OPTIO
P
ECEIVER
DIRECT
RADI
VOLUME
NE
NE
NIN
Cursor keys
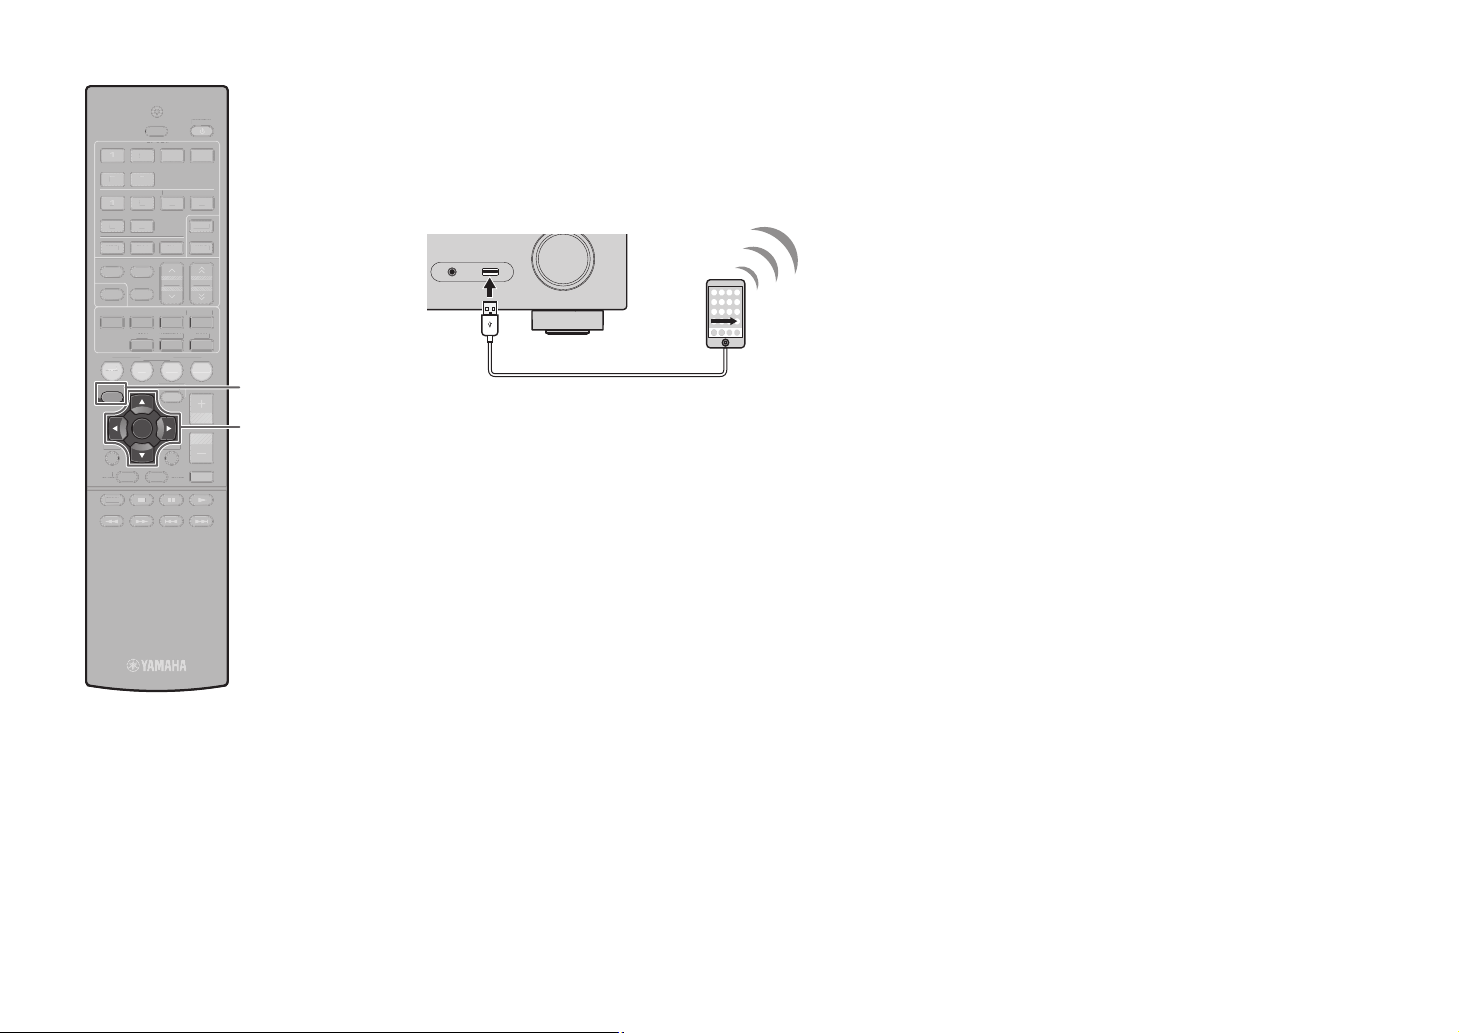
Use the cursor keys (q/w) to select “Share Wi-Fi
6
Settings(iOS)” and press ENTER.
Connect the iOS device to the USB jack, and disable
7
the screen lock on the iOS device.
AUX
5V 1A
AUDIO
Press ENTER on the remote control.
8
Tap “Allow” in the message appeared on the iOS
9
device.
When the connection process finishes, “Completed”
appears on the TV screen.
To exit from the menu, press SETUP.
10
C: Searching for an access point
Set up a wireless connection by searching available access points.
Perform steps 1 to 5 of “B: Sharing the iOS device
1
setting”.
Use the cursor keys (q/w) to select “Access Point
2
Scan” and press ENTER.
Use the cursor keys (q/w) to select the desired
3
access point and press ENTER.
The wireless connection setting screen appears on the TV.
Press ENTER.
4
Use the cursor keys and ENTER to enter the
5
security key.
Button functions
[←]/[→]: Moves the cursor left and right.
[Aa]: Switches the letter cases (upper/lower).
[BKSP]: Deletes the character to the left of the selected one.
[Space]: Enters a space.
[DEL]: Deletes the selected character.
When finished entering the key, select “OK” to return to the
previous screen.
Use the cursor keys (q/w) to select “Connect” and
6
press ENTER to start the connection process.
When the connection process finishes, “Completed” appears
on the TV screen.
If “Not connected” appears, repeat from step 1 or try another
connection method.
To exit from the menu, press SETUP.
7
En 3
 Loading...