

Page 1

AV Receiver
User Guide
EN
Page 2

CONTENTS
CONTENTS
BEFORE USING THE UNIT 9
Read me first............................................................................................9
How to use this guide...............................................................................................................................................................9
Glossary.. ..................................................................................................................................................................................10
Checking the accessories..........................................................................11
Checking the accessories.........................................................................................................................................................11
Using the remote control..........................................................................13
Insert the batteries in the remote control.. ............................................................................................................................13
Operating range of the remote control...................................................................................................................................14
FEATURES 15
What you can do with the unit...................................................................15
Useful applications..................................................................................22
AV SETUP GUIDE.......................................................................................................................................................................22
MusicCast CONTROLLER..........................................................................................................................................................23
PART NAMES AND FUNCTIONS 24
Unit body...............................................................................................24
Part names and functions of the front panel..........................................................................................................................24
Front display.............................................................................................................................................................................26
Part names and functions of the rear panel.. .........................................................................................................................31
Remote control.......................................................................................33
Part names and functions of the remote control.. .................................................................................................................33
PREPARATIONS 36
Before starting........................................................................................36
Names and functions of speakers.. .........................................................................................................................................36
Flow of preparations.. ..............................................................................................................................................................38
How to place speakers (speaker systems)...................................................40
Speaker systems recommended to the unit (basic setup).....................................................................................................40
Other speaker systems (basic setup).. ....................................................................................................................................42
Speaker systems using the unit’s internal amplifier (advanced setup).. ..............................................................................57
2
Page 3

CONTENTS
Connecting speakers................................................................................64
Speaker requirements.. ...........................................................................................................................................................64
Cable requirements..................................................................................................................................................................65
How to connect speakers.. ......................................................................................................................................................66
Connecting a TV.. ....................................................................................69
HDMI connection with a TV......................................................................................................................................................69
Connecting playback devices....................................................................71
HDMI connection with a video device such as a BD/DVD player............................................................................................71
Connection other than HDMI with a playback device.. ..........................................................................................................72
Connecting the radio antennas..................................................................73
Connecting the FM antenna.....................................................................................................................................................73
Connecting the AM antenna.. ..................................................................................................................................................74
Connecting the DAB/FM antenna.. ..........................................................................................................................................76
Preparing for connecting to a network.......................................................77
Network connection of the unit.. ............................................................................................................................................77
Connecting a network cable (wired connection).. .................................................................................................................78
Preparing wireless antennas (wireless connection)...............................................................................................................79
Connecting other devices......................................................................... 80
Connecting an external power amplifier.. ..............................................................................................................................80
Connecting a device compatible with the trigger function.. .................................................................................................81
Operating the unit from another room (remote connection)................................................................................................82
Turning on the power of the unit.. ............................................................. 84
Plugging in the power cable.. ..................................................................................................................................................84
Setting the power to on/standby (Main zone).. ......................................................................................................................85
Selecting the menu language.................................................................... 86
Selecting the menu language.. ................................................................................................................................................86
Setting MusicCast....................................................................................87
What is MusicCast.....................................................................................................................................................................87
Using MusicCast CONTROLLER................................................................................................................................................88
Adding the unit to the MusicCast network..............................................................................................................................89
Using the MusicCast Surround function...................................................... 90
Configuring wireless speakers.................................................................................................................................................90
Configuring the speaker settings...............................................................92
Flow of the speaker configurations.........................................................................................................................................92
Assigning speaker configuration.. ...........................................................................................................................................95
Optional measurement of YPAO..............................................................................................................................................96
Configuring the speaker settings automatically based on the YPAO measurement results................................................97
Error messages from YPAO.. ..................................................................................................................................................101
Warning messages from YPAO...............................................................................................................................................102
3
Page 4

CONTENTS
ENJOYING SOUND 103
Enjoying sound field effects.. .................................................................. 103
Selecting your favorite sound mode.. ...................................................................................................................................103
Enjoying 3-dimentional sound fields.. ..................................................................................................................................104
Enjoying sound field effects optimized for the type of content...........................................................................................105
Enjoying sound field effects without surround speakers (Virtual CINEMA DSP).................................................................107
Enjoying surround sound with 5 speakers placed in front (Virtual CINEMA FRONT).......................................................... 108
Enjoying surround sound with headphones (SILENT CINEMA).. .........................................................................................109
Enjoying unprocessed playback...............................................................110
Enjoying original sound (straight decode)............................................................................................................................110
Enjoying multichannel playback without sound field effects (surround decoder).. ..........................................................111
Enjoying higher quality playback (Pure Direct).. ..................................................................................................................112
Enjoying 3-dimensional sound.................................................................113
Enjoying Dolby Atmos® and DTS:X™...................................................................................................................................... 113
Enjoying favorite sound..........................................................................114
Enjoying more powerful sound to the audio source (Compressed Music Enhancer).........................................................114
Enhancing the low-frequency range from the subwoofer.. .................................................................................................115
Enjoying powerful sound at low volume.. ............................................................................................................................116
Making easy to hear the dialogue sounds.............................................................................................................................117
Enjoying bass sound with small speakers (Extra Bass).. ......................................................................................................118
Enjoying sound better............................................................................................................................................................119
PLAYBACK 120
Basic playback procedure.......................................................................120
Basic procedure for playing back video and music.............................................................................................................. 120
Item names and functions of the playback screen...............................................................................................................121
Item names and functions of the browse screen.. ...............................................................................................................122
Playing back TV audio.. ..........................................................................124
Playback of TV audio with eARC/ARC.................................................................................................................................... 124
Playback of TV audio with a digital optical cable.. ...............................................................................................................125
Listening to the radio.............................................................................126
Preparing to listen to the radio.. ...........................................................................................................................................126
Listening to the radio.. ...........................................................................................................................................................129
Displaying the Radio Data System information....................................................................................................................130
Displaying the DAB information.. ..........................................................................................................................................131
Registering a radio station manually.. ..................................................................................................................................132
Registering FM radio stations automatically (Auto Preset).. ...............................................................................................133
Clearing preset stations.. .......................................................................................................................................................134
4
Page 5

CONTENTS
Playing back music with the Bluetooth® connection.. ................................. 135
Playback of Bluetooth® device music on the unit.. ..............................................................................................................135
Playback of music using Bluetooth® speakers/headphones.. .............................................................................................136
Playing back music with AirPlay.. ............................................................ 137
Playback of music with AirPlay..............................................................................................................................................137
Playing back music stored on a USB flash drive..........................................138
Playback of USB flash drive content.. ...................................................................................................................................138
Playing back music stored on media servers (PCs/NAS)...............................140
Playback of music media servers (PCs/NAS).. ......................................................................................................................140
Listening to Internet radio......................................................................141
Selecting an Internet radio station........................................................................................................................................141
Listening to music streaming services.. .................................................... 142
Listening to a music streaming service.. ...............................................................................................................................142
USEFUL FUNCTIONS 143
Sleep timer function.. ............................................................................143
Setting the time of the sleep timer........................................................................................................................................143
SCENE function.. ...................................................................................144
Selecting the input source and favorite settings with one touch (SCENE).. .......................................................................144
Selecting a registered scene..................................................................................................................................................145
Registering a scene.. ..............................................................................................................................................................147
Shortcut function..................................................................................148
Registering a favorite content as shortcut............................................................................................................................148
Recalling a registered content as shortcut.. .........................................................................................................................149
ENJOYING IN MULTIPLE ROOMS (ZONES) 150
Preparing zones.. ..................................................................................150
Playback in multiple rooms (multi zone function).. .............................................................................................................150
Multi-zone configuration examples.. ....................................................................................................................................151
Connecting zone speakers.....................................................................................................................................................152
Operating zones....................................................................................154
Turning on/off the power of zones........................................................................................................................................ 154
Basic procedure in zone.........................................................................................................................................................155
Other procedure in zone.. ......................................................................................................................................................156
Enjoying the same source in multiple rooms (party mode).................................................................................................157
5
Page 6

CONTENTS
CONFIGURATIONS 158
Configuring the unit...............................................................................158
Using the menu.. ....................................................................................................................................................................158
Configuring playback settings for different playback sources (Option menu)..159
Basic operation of the Option menu.. ...................................................................................................................................159
Option menu items.. ..............................................................................................................................................................161
Configuring the volume automatically based on the YPAO measurement results.............................................................162
Configuring DSP/Surround.. ..................................................................................................................................................164
Correcting volume differences during playback.. ................................................................................................................166
Enabling Lipsync adjustment.. ..............................................................................................................................................168
Checking the audio signal information................................................................................................................................. 169
Checking the video signal information.. ...............................................................................................................................170
Combining an audio input jack with a HDMI input jack.. .....................................................................................................171
Selecting a video source to be displayed with the selected audio source..........................................................................172
Setting the use of Auto Play function.................................................................................................................................... 173
Configuring the shuffle setting.. ............................................................................................................................................174
Configuring the repeat setting.. ............................................................................................................................................175
Setting the use of volume control via AirPlay/Bluetooth.....................................................................................................176
Adding a “NET RADIO” radio station to the “Favorites” folder.. ..........................................................................................177
Removing a radio station from the “Favorites” folder.. .......................................................................................................178
Configuring various functions (Setup menu)..............................................179
Basic operation of the Setup menu.......................................................................................................................................179
Setup menu items.. ................................................................................................................................................................181
Configuring the speaker settings.. ........................................................................................................................................190
Configuring the HDMI settings...............................................................................................................................................203
Configuring the sound settings.. ...........................................................................................................................................211
Configuring the scene settings.. ............................................................................................................................................232
Configuring the multi zone settings.. ....................................................................................................................................234
Configuring the function settings..........................................................................................................................................246
Configuring the network settings.......................................................................................................................................... 269
Configuring the Bluetooth® settings.. ...................................................................................................................................277
Configuring the language settings.. ......................................................................................................................................282
6
Page 7

CONTENTS
Configuring the unit’s settings by operation of the body front panel (Front
Display menu).......................................................................................283
Basic operation of the Front Display menu.. ........................................................................................................................283
Front Display menu items......................................................................................................................................................284
Adjusting the brightness of the front display.. .....................................................................................................................285
Setting the power of each zone to on/standby.. ..................................................................................................................286
Setting the use of the volume on the front panel................................................................................................................. 287
Setting the use of the input selector on the front panel.. ....................................................................................................288
Setting the use of the scene key on the front panel.. ...........................................................................................................289
Setting the use of the operation sound.. ..............................................................................................................................290
Setting the use of the remote control.. .................................................................................................................................291
Selecting the remote control ID.. ..........................................................................................................................................292
Setting information items to be skipped when operating SELECT/ENTER.........................................................................293
Restoring the default settings.. .............................................................................................................................................294
Backing up and restoring all the settings.. ...........................................................................................................................295
Updating the firmware...........................................................................................................................................................297
Setting the use of Retail Demo Mode.. ..................................................................................................................................298
UPDATE 299
Updating the unit’s firmware..................................................................299
Firmware updates.. ................................................................................................................................................................299
Updating the unit’s firmware via the network......................................................................................................................300
Updating the unit’s firmware using a USB flash drive..........................................................................................................302
TROUBLESHOOTING 303
When any problem appears.....................................................................303
If trouble occurs, first check the following:...........................................................................................................................303
Power, system, or remote control trouble............................................................................................................................304
Audio trouble..........................................................................................................................................................................314
Video trouble.. ........................................................................................................................................................................325
FM/AM radio trouble.. ............................................................................................................................................................329
DAB radio trouble................................................................................................................................................................... 334
USB trouble.. ..........................................................................................................................................................................339
Network trouble.. ...................................................................................................................................................................343
Bluetooth® trouble.. ...............................................................................................................................................................354
Error indications on the front display.......................................................356
Error indications on the front display.. .................................................................................................................................356
7
Page 8

CONTENTS
APPENDIX 357
Care and cleaning.................................................................................. 357
Care for the front panel..........................................................................................................................................................357
Connecting to a network wirelessly..........................................................358
Selecting a wireless network connection method.. .............................................................................................................358
Setting up a wireless connection using the WPS button.. ...................................................................................................359
Setting up a wireless connection using an iPhone............................................................................................................... 360
Setting up a wireless connection by selecting from the list of available access points.. ...................................................361
Setting up a wireless connection manually.......................................................................................................................... 362
Setting up a wireless connection using the WPS PIN code.. ................................................................................................363
Using front presence speakers.................................................................364
Front presence speaker layout.............................................................................................................................................. 364
Installing the front presence speakers in Front Height position.. .......................................................................................365
Installing the front presence speakers in Overhead position.. ............................................................................................366
Using Dolby Enabled speakers as the front presence speakers.. ........................................................................................367
Supported devices and file formats..........................................................368
Supported Bluetooth® devices.. ............................................................................................................................................368
Supported USB devices.. .......................................................................................................................................................369
Supported file formats...........................................................................................................................................................370
Zone output..........................................................................................371
Multi-zone output...................................................................................................................................................................371
Trademarks..........................................................................................372
Trademarks.. ..........................................................................................................................................................................372
Specifications.. ..................................................................................... 374
Specifications.. .......................................................................................................................................................................374
Default settings.....................................................................................381
Default settings of the Option menu.....................................................................................................................................381
Default settings of the Setup menu.......................................................................................................................................382
Default settings of the Front Display menu.. ........................................................................................................................387
8
Page 9

BEFORE USING THE UNIT > Read me first
BEFORE USING THE UNIT
Read me first
How to use this guide
Thank you very much for purchasing a Yamaha product.
(
This unit is a product for enjoying video and music at home.
(
This guide explains preparations and operations for everyday users of the unit.
(
To use the unit safely and correctly, be sure to read this guide carefully before using it.
When reading this guide, mind the following items.
(
The illustrations of the main unit used in this guide are of the U.S.A. model, unless otherwise specified.
(
This guide mainly explains operations using the menu displayed on the TV.
(
This guide explains operations using the supplied remote control.
(
This guide describes all the “iPod touch”, “iPhone” and “iPad” as the “iPhone”. “iPhone” refers to “iPod
touch”, “iPhone” and “iPad”, unless otherwise specified.
(
Symbols and signal words in this guide
CAUTION:
Indicates precautions for the possibility of minor or moderate injury.
NOTICE:
Indicates precautions for use to avoid the possibility of malfunction/damage to the unit and unit’s data
loss.
NOTE:
Indicates instructions and supplementary explanations for optimum use.
[Search tag]:
Indicates a keyword used in searches. This serves as a link from “Quick Start Guide” to “User Guide”.
NOTE
Read “Safety Brochure” and “Quick Start Guide” first.
9
Page 10

BEFORE USING THE UNIT > Read me first
Glossary
For a glossary of terms used in this guide, refer to the site below. There are explanations of terms and
technologies for this product and also for Yamaha AV products in general.
https://manual.yamaha.com/av/cm/glossary/
10
Page 11

BEFORE USING THE UNIT > Checking the accessories
Checking the accessories
Checking the accessories
Check that the following accessories are supplied with the product.
£ AM antenna (Except for U.K., Europe, Russia and Australia models)
£ FM antenna (Except for U.K., Europe, Russia and Australia models)
* One of the above is supplied depending on the region of purchase.
£ DAB/FM antenna (U.K., Europe, Russia and Australia models)
£Power cable
* The supplied power cable varies depending on the region of purchase.
£ YPAO microphone
£ Remote control
£ Batteries (AAA, R03, UM-4) (x2)
£ Quick Start Guide
£ Safety Brochure
11
Page 12

BEFORE USING THE UNIT > Checking the accessories
NOTE
Access the Yamaha Downloads site to download the latest Quick Start Guide.
http://download.yamaha.com/
12
Page 13

BEFORE USING THE UNIT > Using the remote control
Using the remote control
Insert the batteries in the remote control
Insert the batteries the right way round.
13
Page 14
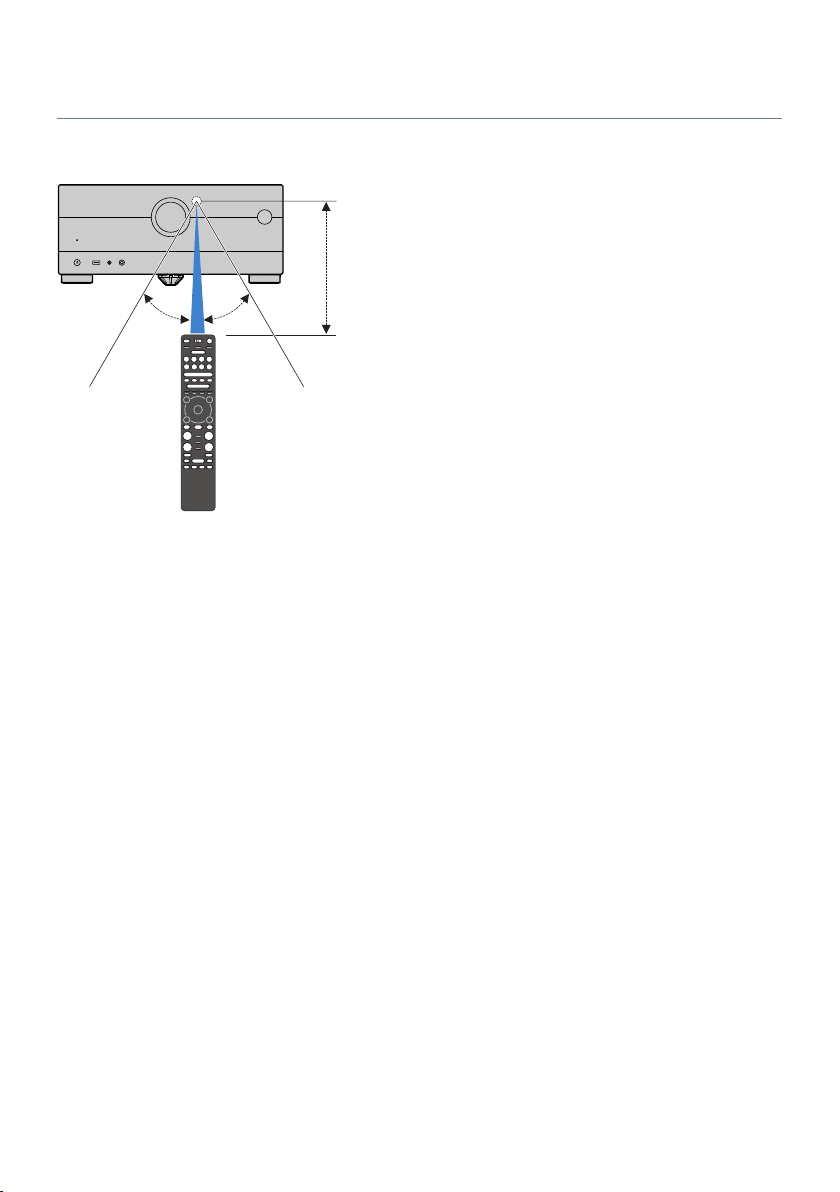
Within 6 m (20 ft)
30° 30°
BEFORE USING THE UNIT > Using the remote control
Operating range of the remote control
The operating range of the remote control is shown in the following figure.
Point the remote control at the remote control sensor on the unit.
14
Page 15

FEATURES > What you can do with the unit
FEATURES
What you can do with the unit
Supporting various speaker system
According to the number of speakers that you are using, you can enjoy your favorite acoustic spaces in
various styles.
(
7.1/5.1.2-channel system
(
5.1.2-channel system
(
7.1-channel system
(
5.1-channel system
(
3.1.2-channel system
(
3.1-channel system
(
2.1-channel system
(
Virtual CINEMA FRONT
(
Multi zone function
(
Bi-amp connection
Related links
(
“Speaker systems recommended to the unit (basic setup)”(p.40)
(
“Other speaker systems (basic setup)”(p.42)
(
“Speaker systems using the unit’s internal amplifier (advanced setup)”(p.57)
15
Page 16

FEATURES > What you can do with the unit
Automatically optimizing the speaker settings
YPAO function detects speaker connections, measures the distances from them to your listening positions
(measuring positions) by using YPAO microphone measurement, and then automatically optimizes the
speaker settings, such as volume balance and acoustic parameters, to suit your room (YPAO: Yamaha
Parametric room Acoustic Optimizer).
(
“Flow of the speaker configurations”(p.92)
16
Page 17

FEATURES > What you can do with the unit
Enjoying sound field effects with much presence
The unit is equipped with a variety of sound programs and surround decoders that allow you to enjoy
playback sources with your favorite sound mode (such as sound field effect or stereo playback).
(
“Enjoying 3-dimentional sound fields”(p.104)
(
“Enjoying sound field effects optimized for the type of content”(p.105)
(
“Enjoying sound field effects without surround speakers (Virtual CINEMA DSP)”(p.107)
(
“Enjoying surround sound with headphones (SILENT CINEMA)”(p.109)
(
“Enjoying original sound (straight decode)”(p.110)
(
“Enjoying multichannel playback without sound field effects (surround decoder)”(p.111)
(
“Enjoying higher quality playback (Pure Direct)”(p.112)
(
“Enjoying bass sound with small speakers (Extra Bass)”(p.118)
(
“Enjoying more powerful sound to the audio source (Compressed Music Enhancer)”(p.114)
(
“Enjoying Dolby Atmos® and DTS:X™”(p.113)
17
Page 18

FEATURES > What you can do with the unit
Wide variety of supported content via network
When the unit is connected to a network, you can enjoy the various kinds of content via network on the unit.
(
“Playback of music with AirPlay”(p.137)
(
“Playback of music media servers (PCs/NAS)”(p.140)
(
“Selecting an Internet radio station”(p.141)
(
“Listening to a music streaming service”(p.142)
18
Page 19

FEATURES > What you can do with the unit
Playing back content of various devices
A number of HDMI jacks and various input/output jacks on the unit allow you to connect video devices (such
as BD/DVD players), audio devices (such as CD players), Bluetooth devices (such as smartphones), game
consoles, USB flash drives, and other devices. You can play back content of them or tune in to a radio station.
(
“Listening to the radio”(p.129)
(
“Playback of Bluetooth® device music on the unit”(p.135)
(
“Playback of USB flash drive content”(p.138)
19
Page 20

FEATURES > What you can do with the unit
Useful functions
The unit is equipped with the various useful functions. The SCENE function allows you to select the input
source and settings registered to the corresponding scene, such as sound program and Compressed Music
Enhancer on/off, with just one touch. You can recall the registered content (such as music stored on media
servers and Internet radio stations) by selecting the shortcut number. When the unit is connected to an HDMI
Control-compatible TV with an HDMI cable, you can control the unit (such as power and volume) with TV
remote control operations.
(
“Selecting the input source and favorite settings with one touch (SCENE)”(p.144)
(
“Registering a favorite content as shortcut”(p.148)
(
“Playback of TV audio with eARC/ARC”(p.124)
20
Page 21

FEATURES > What you can do with the unit
Supporting wireless speakers
The unit is equipped with the function connected with speakers wirelessly. You can enjoy audio played back
on the unit using Bluetooth speakers/headphones. Also, using devices that support the MusicCast Surround
function, the surround speakers and subwoofer can be wireless.
(
“Playback of music using Bluetooth® speakers/headphones”(p.136)
(
“Configuring wireless speakers”(p.90)
21
Page 22

FEATURES > Useful applications
Useful applications
AV SETUP GUIDE
AV SETUP GUIDE is an application that assists you with cable connections between AV Receiver
and playback devices as well as AV Receiver setup. This app guides you through the various
settings such as speaker connections, TV and playback device connections and selecting the
speaker system.
For details, search for “AV SETUP GUIDE” on the App Store or Google Play.
22
Page 23

FEATURES > Useful applications
MusicCast CONTROLLER
MusicCast CONTROLLER is an application that allows you to link a MusicCast compatible device to
other MusicCast compatible devices in other rooms and play them back simultaneously. This app
lets you use your smartphone or other mobile device instead of the remote control to easily select
music to play back as well as configure the unit and MusicCast compatible devices.
For details, search for “MusicCast CONTROLLER” on the App Store or Google Play.
23
Page 24
PHONES
1 2 3 4
SELECT/ENTER
SCENE
ZONE
PURE DIRECT
USB YPAO
5V 1A
MENU
(CONNECT)
RETURN
b
h
gc ed
f
a
i j k
PART NAMES AND FUNCTIONS > Unit body
PART NAMES AND FUNCTIONS
Unit body
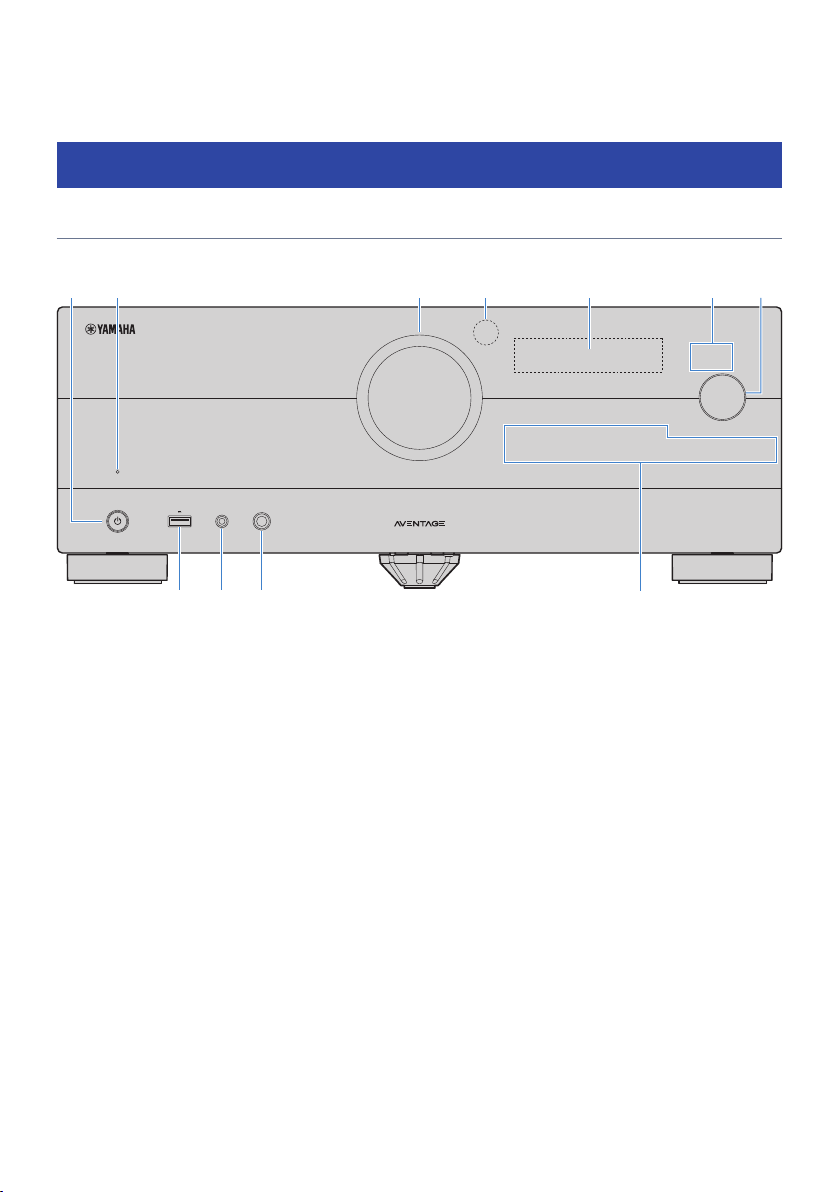
Part names and functions of the front panel
The part names and functions of the front panel are as follows.
a
z (power)
Turns on/off (standby) the Main zone (p.85).
b
Standby indicator
Lights up when the unit is in standby mode under any of the following conditions.
(
HDMI Control is enabled (p.203)
(
Standby Through is enabled (p.205)
(
Network Standby is enabled (p.274)
(
Bluetooth Standby is enabled (p.279)
c
VOLUME
Adjusts the volume.
d
Remote control sensor
Receives remote control signals (infrared) (p.14).
e
Front display
Displays information and menu (p.26).
NOTE
Under the high or low temperature, the visibility of the character is sometimes deteriorated by the LCD characteristics. It is not
a malfunction.
24
Page 25

PART NAMES AND FUNCTIONS > Unit body
f
Indicator
Lights up under the following condition.
PURE DIRECT
Lights up when PURE DIRECT is working (p.112).
ZONE
Lights up when the zone is turned on (p.154).
g
SELECT/ENTER
Selects the input source and operates the front display.
h
USB jack
For connecting a USB flash device (p.138).
i
YPAO jack
For connecting the supplied YPAO microphone (p.92).
j
PHONES jack
For connecting headphones.
k
Touch panel
For operation by a touch. The operation sound rings.
SCENE
Switches with one touch between multiple settings set using the SCENE function. Also, turns on the unit when it is in
standby mode (p.144).
RETURN
Operates the “Front Display” menu.
MENU (CONNECT)
Operates the “Front Display” menu.
Enters the MusicCast network addition and the wireless LAN setup by holding down for 5 seconds.
Related links
“Care for the front panel”(p.357)
25
Page 26

a
g h
fb d
c
e
PART NAMES AND FUNCTIONS > Unit body
Front display
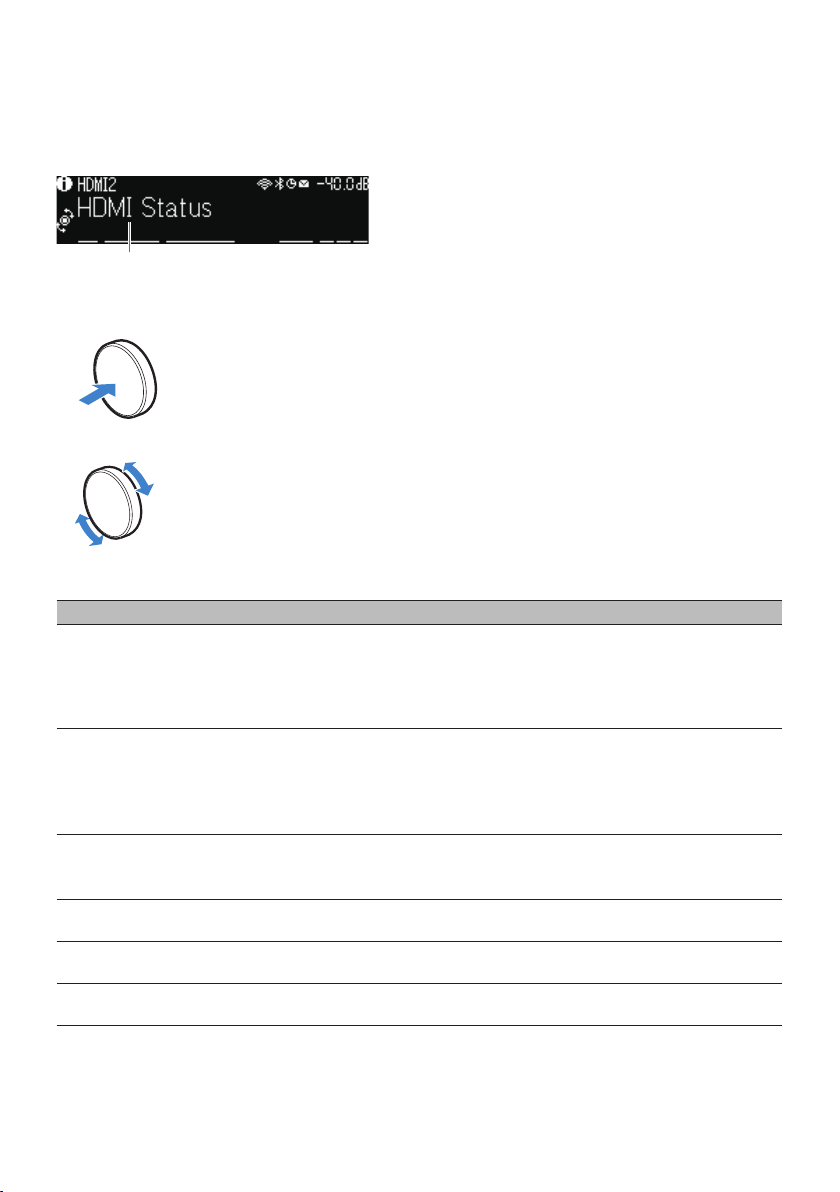
Part names and functions of the front display
The part names and functions of the front display are as follows.
a
Operation mode icon
Indicates the current mode of the front display (the input select mode or the info select mode).
b
Input default name
Displays the default name when you have renamed the input source name.
c
Main information
Displays information, such as the current input name, input information item, according to the mode of the front
display.
d
e
Play status icon
Shuffle
Lights up when the shuffle setting is turned on (p.174).
Repeat
Lights up when the repeat setting is turned on (p.175).
Playback/Pause/Stop
Lights up while the unit plays back a song, pauses or stops.
Status icon
Wireless LAN
Lights up while the unit is connected to a wireless network (p.358).
Bluetooth
Lights up while the unit is connected to a Bluetooth device (p.135).
Sleep timer
Lights up when the sleep timer is on (p.143).
Firmware update
Lights up when a firmware update is available via the network (p.299).
26
Page 27

PART NAMES AND FUNCTIONS > Unit body
f
Volume
Indicates the current volume.
g
SELECT/ENTER indicator
Indicates the available SELECT/ENTER status (push or rotate) for the right display area.
h
Additional information
Displays the additional information of the current input such as Reception, DSP Program.
NOTE
(
Depending on the content of playback, the unit may not get its playback status correctly. For details on the playback status, refer
to the MusicCast CONTROLLER app or your playback software.
(
If the unit is the slave device of the MusicCast network, the playback status is displayed as follows, depending on the master
device.
(
Playback icon is lit up on the front display of the unit when the content of audio playback is selected as the input source of the
master device, and the master device pauses.
(
Playback icon is always lit up on the front display of the unit when “HDMI”, “AUDIO”, “PHONO”, “TV” or “TUNER” is selected as
the input source of the master device.
27
Page 28
Item
aa
bb
PART NAMES AND FUNCTIONS > Unit body
Selecting the input information displayed on the front display
The front display in the info select mode displays additional information related to the input source on the
front display.
Push SELECT/ENTER on the front panel to switch the front display to the info select mode. And rotate
SELECT/ENTER to select between the various items. The additional information is displayed under the item.
Displayed items vary depending on the input source.
Currently input source Displayed item
HDMI
AUDIO
PHONO
TV
TUNER (FM/AM)
TUNER (DAB)
SERVER
NET RADIO
Deezer
DSP Program, Audio Decoder, Output Channel, HDMI Status, System Status
Reception, DSP Program, Audio Decoder, Output Channel, HDMI Status, System Status
(U.K., Europe and Russia models only)
Radio Data System data is also available when the unit is tuned into a Radio Data System
broadcasting station. For details, see the following:
(
“Displaying the Radio Data System information”(p.130)
(U.K., Europe, Russia and Australia models only)
For details, see the following:
(
“Displaying the DAB information”(p.131)
Song, Artist, Album, IP Address, Ethernet MAC Address, Wi-Fi MAC Address, DSP Program,
Audio Decoder, Output Channel, HDMI Status, System Status
Station, IP Address, Ethernet MAC Address, Wi-Fi MAC Address, DSP Program, Audio
Decoder, Output Channel, HDMI Status, System Status, Song, Album
Track, Artist, Album, IP Address, Ethernet MAC Address, Wi-Fi MAC Address, DSP
Program, Audio Decoder, Output Channel, HDMI Status, System Status
28
Page 29
Indicators
PART NAMES AND FUNCTIONS > Unit body
Currently input source Displayed item
music streaming services
(with playback
information)
Song, Artist, Album, IP Address, Ethernet MAC Address, Wi-Fi MAC Address, DSP Program,
Audio Decoder, Output Channel, HDMI Status, System Status
AirPlay
music streaming services
(without playback
information)
Alexa
DSP Program, Audio Decoder, Output Channel, HDMI Status, System Status, IP Address,
Ethernet MAC Address, Wi-Fi MAC Address
MusicCast Link
Bluetooth
USB
Song, Artist, Album, DSP Program, Audio Decoder, Output Channel, HDMI Status, System
Status
NOTE
(
You can set “Information Skip” in the “Front Display” menu to skip information items on the front display.
(
When you have not operated SELECT/ENTER for a few seconds, the front display turns to the input select mode automatically.
Related links
“Setting information items to be skipped when operating SELECT/ENTER”(p.293)
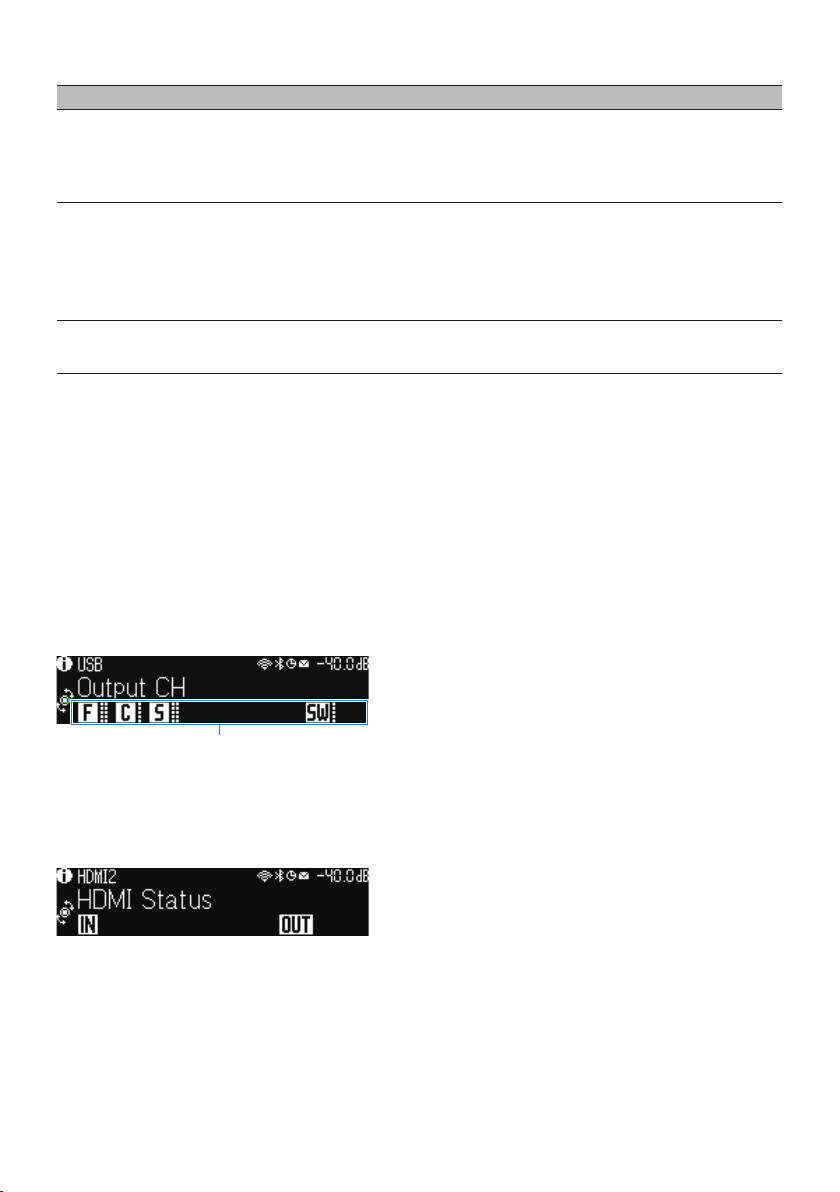
Output Channel
n
Information about speaker terminals that are currently outputting sound is displayed. No output is indicated
by an underscore.
HDMI Status
n
Information about the HDMI input jacks (connection) and the HDMI out jack (connection) is displayed. No
connection is indicated by an underscore.
System Status
n
The following system information is displayed. An underscore is indicated when it is disabled.
(
ECO: the eco mode is enabled.
(
PARTY: the party mode is enabled.
(
MASTER: the unit is the master device of the MusicCast network.
29
Page 30

PART NAMES AND FUNCTIONS > Unit body
30
Page 31

ANTENNA
FMAM
AUDIO 5AUDIO 4
OPTICAL
IN
OUT
REMOTE
COAXIAL
CENTER FRONT
SURROUND BACK
EXTRA SP2
/ZONE 2/BI-AMP
SPEAKERS
PHONO
ZONE OUT
ZONE 2
GND
AUDIO 2
(3 MUSIC)
AUDIO 1
(7 TV)
AUDIO 3
F. PRESENCE
EXTRA SP1
/ZONE 2
SURROUND
NETWORK
HDMI OUT
eARC/ARC
( 2 RADIO )
(4 NET RADIO) (8 SERVER)
1 2 3 4 5 6 7
(1 MOVIE) (5 STB) (6 GAME)
TRIGGER OUT
PRE OUT
FRONT SUBWOOFER
1
2
75
12V 0.1A
HDMI
j
dba
f ge h i k
c c
ml
PART NAMES AND FUNCTIONS > Unit body
Part names and functions of the rear panel
The part names and functions of the rear panel are as follows.
(
The area around the video/audio output jacks is marked in white on the actual product to prevent improper connections.
a
REMOTE IN/OUT jacks
For connecting to an infrared signal receiver/emitter that allows you to operate the unit and other devices from
another room (p.82).
(U.S.A. model)
b
TRIGGER OUT jack
For connecting to a device that supports the trigger function (p.81).
c
Wireless antennas
For a wireless (Wi-Fi) connection to a network (p.77) and a Bluetooth connection (p.135).
d
HDMI OUT jack
For connecting to HDMI-compatible TV and outputting video/audio signals (p.69). When using eARC/ARC, TV audio
signals are also input.
e
PHONO jacks
For connecting to a turntable (p.72).
f
HDMI 1–7 jacks
For connecting to HDMI-compatible playback devices and inputting video/audio signals (p.71).
g
ZONE OUT jacks
For connecting to the external amplifier used in another room (Zone2) and for outputting audio (p.153).
31
Page 32

PART NAMES AND FUNCTIONS > Unit body
h
PRE OUT jacks
For connecting to a subwoofer with built-in amplifier (p.68) or an external power amplifier (p.80).
i
NETWORK jack
For a wired connection to a network (p.78).
j
ANTENNA jacks
For connecting to the radio antennas (p.73).
k
AC IN jack
For connecting the supplied power cable (p.84).
l
AUDIO 1-5 jacks
For connecting to audio playback devices and inputting audio signals (p.72).
m
SPEAKERS terminals
For connecting to speakers (p.36).
32
Page 33

PRES ET
BAND TUNINGTUNING
MEMORY
RED GREEN
YELLOW
BLUE
POP-UP
/MENU
HOME
TOP
MENU
ENTER
DISPLAYRETURN
OPTIONSETUP
MUTE
VOLUME
BLUETOOTH
NET USBTUNER
INPU T
PROG RAM
SUR. DECODE
BASS
ENHANCER
PURE DIRECT
STRAIGHT
SCENE
4321
8765
HDMI OUT
PARTY
SLEEP
MAIN
ZONE 2
PRES ET
BAND
TUNING
TUNING
MEMORY
GREEN
YELLOW
BLUE
POP-UP
/MENU
/MENU
HOME
TOP
MENU
MUTE
VOLUME
BLUETOOTH
USB
TUNER
INPU T
PROG RAM
SUR. DECODE
BASS
ENHANCER
PURE DIRECT
STRAIGHT
SCENE
432
PRES ET
BANDMODE BAND TUNINGTUNING TUNINGTUNING MODE
MEMORYMEMORY
RED GREEN
YELLOW
BLUE
POP-UP
/MENU
HOME
TOP
MENU
ENTER
DISPLAYRETURN
OPTIONSETUP
MUTE
VOLUME
BLUETOOTH
NET USBTUNER
INPU T
PROG RAM
SUR. DECODE
BASS
ENHANCER
PURE DIRECT
STRAIGHT
SCENE
4321
8765
HDMI OUT
PARTY
SLEEP
MAIN
ZONE 2
q
r
s
o
p
c
b
d
e
h
f
i
l
j
g
m
a
n
k
PART NAMES AND FUNCTIONS > Remote control
Remote control
Part names and functions of the remote control
The part names and functions of the supplied remote control are as follows.
33
Page 34

PART NAMES AND FUNCTIONS > Remote control
a
Remote control signal transmitter
Transmits remote control signals (infrared).
b
z (power) key
Turns on/off the zone selected by zone switch (p.154).
c
Zone switch
Changes the zone that is controlled by the remote control (p.155).
d
SLEEP key
Sets the time of the sleep timer (p.143).
e
PARTY key
Turns on/off the party mode (p.157).
f
SCENE keys
Switches with one touch between multiple settings set using the SCENE function. Also, turn on the unit when it is in
standby mode (p.144).
g
Input selection keys
Selects an input source for playback.
NOTE
Presses NET repeatedly to select a desired network source.
hknqrs External device operation keys
Controls playback of the HDMI Control-compatible playback device. And performs playback operations for the USB
flash drive or music media server (PCs/NAS).
NOTE
The playback devices must support HDMI Control. Some HDMI Control-compatible devices cannot be used.
h
PRESET keys
Selects a preset radio station (p.129).
Recalls Bluetooth, USB, or network content that is registered as a shortcut (p.149).
i
OPTION key
Displays the Option menu operated on the TV (p.159).
j
SETUP key
Displays the Setup menu operated on the TV (p.179).
k
ENTER/Cursor, RETURN keys
Operates the menu on the TV.
l
DISPLAY key
Turns on/off the browse screen, playback screen, etc.
m
Sound mode keys
Selects a sound program or a surround decoder (p.103).
34
Page 35

PART NAMES AND FUNCTIONS > Remote control
n
Playback operation keys
Controls playback of the USB flash drive, music media server (PCs/NAS) or radio.
o
HDMI OUT key
Turns on/off the HDMI output (p.120).
p
PURE DIRECT key
Enables/disables the Pure Direct (p.112).
r
VOLUME keys
Adjusts the volume.
s
MUTE key
Mutes the audio output.
35
Page 36

4
1
2
9 9
E R
5
6 7
3
10° to 30° 10° to 30°
0.5 to 1 m (1.6
to 3.3 ft)
0.5 to 1 m (1.6
to 3.3 ft)
1.8 m (5.9 ft) 1.8 m (5.9 ft)
0.3 m (1 ft) or more
PREPARATIONS > Before starting
PREPARATIONS
Before starting
Names and functions of speakers
The names and functions of speakers connected to the unit are as follows.
Speaker type Abbr. Function
Front 1/2 Produces front channel sounds (stereo sounds).
Center 3 Produces center channel sounds (such as movie dialogue and vocals).
Surround 4/5 Produces surround channel sounds.
Surround back 6/7 Produces surround back channel sounds.
Front presence E/R
Subwoofer 9
NOTE
(
Use this diagram as a reference for the ideal speaker layout for the unit. However, your speaker layout does not need to match the
diagram exactly. The automatic speaker setting (YPAO) can be used to automatically optimize the speaker settings (such as
distances) to suit the actual speaker layout.
(
The unit provides three layout patterns for front presence speakers. You can choose a layout pattern that suits your listening
environment. You can enjoy Dolby Atmos, DTS:X or CINEMA DSP 3D with any layout pattern.
Produces CINEMA DSP 3D effect sounds or heights channel sounds of
Dolby Atmos and DTS:X content.
Produces LFE (low-frequency effect) channel sounds and reinforces the
bass parts of other channels.
36
Page 37

PREPARATIONS > Before starting
Related links
(
“Flow of preparations (with surround speakers connected by speaker cables)”(p.38)
(
“Flow of preparations (with surround speakers wirelessly connected)”(p.39)
(
“Front presence speaker layout”(p.364)
37
Page 38

PREPARATIONS > Before starting
Flow of preparations
Flow of preparations (with surround speakers connected by speaker cables)
Basic flow of preparations for using the unit is as follows.
1 Place speakers.
2 Connect speakers.
3 Connect a TV.
4 Connect playback devices.
5 Connect the radio antennas.
6 Prepare for connecting to a network.
7 Set MusicCast network.
8 Assign speaker configuration.
9 Configure the speaker settings.
Related links
“How to place speakers (speaker systems)”(p.40)
38
Page 39

PREPARATIONS > Before starting
Flow of preparations (with surround speakers wirelessly connected)
Basic flow of preparations for using the unit with surround speakers wirelessly connected is as follows.
1 Place speakers.
2 Connect speakers.
3 Connect a TV.
4 Connect playback devices.
5 Connect the radio antennas.
6 Prepare for connecting to a network.
7 Set MusicCast network.
8 Connect wireless speakers.
9 Assign speaker configuration.
10 Configure the speaker settings.
Related links
“How to place speakers (speaker systems)”(p.40)
39
Page 40

4
1
2
9 9
5
3
76
R
10° to 30°
10° to 30°
0.5 to 1 m (1.6
to 3.3 ft)
0.5 to 1 m (1.6
to 3.3 ft)
1.8 m (5.9 ft)
1.8 m (5.9 ft)
0.3 m (1 ft) or more
PREPARATIONS > How to place speakers (speaker systems)
How to place speakers (speaker systems)
Speaker systems recommended to the unit (basic setup)
This speaker system brings out the full performance of the unit.
You can enjoy a highly-natural 3-dimensional sound field with any content. We recommend this speaker
system for Dolby Atmos or DTS:X content.
[Search tag]#Q01 Speaker systems
7.1/5.1.2-channel system
n
40
Page 41

AUDIO 5AUDIO 4
OPTICAL
COAXIAL
CENTER FRONT
SURROUND BACK
EXTRA SP2
/ZONE 2/BI-AMP
SPEAKERS
PHONO
ZONE OUT
ZONE 2
GND
AUDIO 2
(3 MUSIC)
AUDIO 1
(7 TV)
AUDIO 3
F. PRESENCE
EXTRA SP1
/ZONE 2
SURROUND
PRE OUT
FRONT SUBWOOFER
1
2
3
76
12
5994 RE
PREPARATIONS > How to place speakers (speaker systems)
NOTE
(
The surround back speakers and front presence speakers do not produce sounds simultaneously. The unit automatically changes
the speakers to be used, depending on the input signal and CINEMA DSP 3D.
(
When installing the front presence speakers on the ceiling above the listening position, or when using Dolby Enabled speakers as
the front presence speakers, the front presence speaker layout settings must be changed.
(
You can also connect up to 2 subwoofers (with built-in amplifier) to the unit. Two subwoofers connected to the unit output the
same sounds.
(
When using only one subwoofer, you can place it either in the left or right side.
Related links
(
“Speaker requirements”(p.64)
(
“Setting the layout of the front presence speakers”(p.193)
41
Page 42

4
1
2
9 9
E R
5
3
10° to 30° 10° to 30°
0.5 to 1 m (1.6
to 3.3 ft)
0.5 to 1 m (1.6
to 3.3 ft)
1.8 m (5.9 ft) 1.8 m (5.9 ft)
PREPARATIONS > How to place speakers (speaker systems)
Other speaker systems (basic setup)
5.1.2-channel system
To have a full effect of Dolby Atmos or DTS:X content, we recommend this speaker system. The front
presence speakers produce a natural 3-dimensional surround field including overhead.
[Search tag]#Q01 Speaker systems
For layout with front presence speakers in Front Height position
n
42
Page 43

4
1
2
9 9
5
3
E R
10° to 30°
10° to 30°
AUDIO 5AUDIO 4
OPTICAL
COAXIAL
CENTER FRONT
SURROUND BACK
EXTRA SP2
/ZONE 2/BI-AMP
SPEAKERS
PHONO
ZONE OUT
ZONE 2
GND
AUDIO 2
(3 MUSIC)
AUDIO 1
(7 TV)
AUDIO 3
F. PRESENCE
EXTRA SP1
/ZONE 2
SURROUND
PRE OUT
FRONT SUBWOOFER
1
2
3
12
5994 RE
PREPARATIONS > How to place speakers (speaker systems)
For layout with front presence speakers in Overhead position
n
43
Page 44

PREPARATIONS > How to place speakers (speaker systems)
NOTE
(
When installing the front presence speakers on the ceiling above the listening position, or when using Dolby Enabled speakers as
the front presence speakers, the front presence speaker layout settings must be changed.
(
You can also connect up to 2 subwoofers (with built-in amplifier) to the unit. Two subwoofers connected to the unit output the
same sounds.
(
When using only one subwoofer, you can place it either in the left or right side.
Related links
(
“Speaker requirements”(p.64)
(
“Setting the layout of the front presence speakers”(p.193)
44
Page 45

4
1
2
9 9
5
6 7
3
10° to 30° 10° to 30°
0.3 m (1 ft) or more
PREPARATIONS > How to place speakers (speaker systems)
7.1-channel system
This speaker system allows you to enjoy extended surround sound using the surround back speakers.
[Search tag]#Q01 Speaker systems
45
Page 46

AUDIO 5AUDIO 4
OPTICAL
COAXIAL
CENTER FRONT
SURROUND BACK
EXTRA SP2
/ZONE 2/BI-AMP
SPEAKERS
PHONO
ZONE OUT
ZONE 2
GND
AUDIO 2
(3 MUSIC)
AUDIO 1
(7 TV)
AUDIO 3
F. PRESENCE
EXTRA SP1
/ZONE 2
SURROUND
PRE OUT
FRONT SUBWOOFER
1
2
3
76
12
5994
PREPARATIONS > How to place speakers (speaker systems)
NOTE
(
You can also connect up to 2 subwoofers (with built-in amplifier) to the unit. Two subwoofers connected to the unit output the
same sounds.
(
When using only one subwoofer, you can place it either in the left or right side.
Related links
“Speaker requirements”(p.64)
46
Page 47

4
1
2
9
5
3
9
10° to 30° 10° to 30°
PREPARATIONS > How to place speakers (speaker systems)
5.1-channel system
This is a basic speaker layout recommended for enjoying surround sound.
[Search tag]#Q01 Speaker systems
47
Page 48

AUDIO 5AUDIO 4
OPTICAL
COAXIAL
CENTER FRONT
SURROUND BACK
EXTRA SP2
/ZONE 2/BI-AMP
SPEAKERS
PHONO
ZONE OUT
ZONE 2
GND
AUDIO 2
(3 MUSIC)
AUDIO 1
(7 TV)
AUDIO 3
F. PRESENCE
EXTRA SP1
/ZONE 2
SURROUND
PRE OUT
FRONT SUBWOOFER
1
2
3
12
5994
PREPARATIONS > How to place speakers (speaker systems)
NOTE
(
You can also connect up to 2 subwoofers (with built-in amplifier) to the unit. Two subwoofers connected to the unit output the
same sounds.
(
When using only one subwoofer, you can place it either in the left or right side.
Related links
“Speaker requirements”(p.64)
48
Page 49

1
2
9
E R
3
0.5 to 1 m (1.6
to 3.3 ft)
0.5 to 1 m (1.6
to 3.3 ft)
1.8 m (5.9 ft) 1.8 m (5.9 ft)
PREPARATIONS > How to place speakers (speaker systems)
3.1.2-channel system
We recommend this speaker layout when you cannot place speakers in the back of the room. You can also
enjoy Dolby Atmos or DTS:X content with this speaker system.
[Search tag]#Q01 Speaker systems
49
Page 50

AUDIO 5AUDIO 4
OPTICAL
COAXIAL
CENTER FRONT
SURROUND BACK
EXTRA SP2
/ZONE 2/BI-AMP
SPEAKERS
PHONO
ZONE OUT
ZONE 2
GND
AUDIO 2
(3 MUSIC)
AUDIO 1
(7 TV)
AUDIO 3
F. PRESENCE
EXTRA SP1
/ZONE 2
SURROUND
PRE OUT
FRONT SUBWOOFER
1
2
3
12
9
RE
PREPARATIONS > How to place speakers (speaker systems)
NOTE
(
When installing the front presence speakers to the ceiling above the listening position or using the Dolby Enabled speakers as the
front presence speakers, configure your front presence speaker layout.
(
You can also connect up to 2 subwoofers (with built-in amplifier) to the unit. Two subwoofers connected to the unit output the
same sounds.
(
When using only one subwoofer, you can place it either in the left or right side.
Related links
(
“Speaker requirements”(p.64)
(
“Setting the layout of the front presence speakers”(p.193)
50
Page 51

1
2
9
3
PREPARATIONS > How to place speakers (speaker systems)
3.1-channel system
This is a speaker layout recommended for enjoying stereo sound with a center speaker. Center channel
sound such as movie dialogue and vocals can be clearly obtained.
[Search tag]#Q01 Speaker systems
51
Page 52

AUDIO 5AUDIO 4
OPTICAL COAXIAL
CENTER FRONT
SURROUND BACK
EXTRA SP2
/ZONE 2/BI-AMP
SPEAKERS
PHONO
ZONE OUT
ZONE 2
GND
AUDIO 2
(3 MUSIC)
AUDIO 1
(7 TV)
AUDIO 3
F. PRESENCE
EXTRA SP1
/ZONE 2
SURROUND
PRE OUT
FRONT SUBWOOFER
1
2
3
2
1
9
PREPARATIONS > How to place speakers (speaker systems)
NOTE
(
You can also connect up to 2 subwoofers (with built-in amplifier) to the unit. Two subwoofers connected to the unit output the
same sounds.
(
When using only one subwoofer, you can place it either in the left or right side.
Related links
“Speaker requirements”(p.64)
52
Page 53

1
2
9
PREPARATIONS > How to place speakers (speaker systems)
2.1-channel system
This is a speaker layout recommended for enjoying stereo sound.
[Search tag]#Q01 Speaker systems
53
Page 54

AUDIO 5AUDIO 4
OPTICAL COAXIAL
CENTER FRONT
SURROUND BACK
EXTRA SP2
/ZONE 2/BI-AMP
SPEAKERS
PHONO
ZONE OUT
ZONE 2
GND
AUDIO 2
(3 MUSIC)
AUDIO 1
(7 TV)
AUDIO 3
F. PRESENCE
EXTRA SP1
/ZONE 2
SURROUND
PRE OUT
FRONT SUBWOOFER
1
2
21
9
PREPARATIONS > How to place speakers (speaker systems)
NOTE
(
You can also connect up to 2 subwoofers (with built-in amplifier) to the unit. Two subwoofers connected to the unit output the
same sounds.
(
When using only one subwoofer, you can place it either in the left or right side.
Related links
“Speaker requirements”(p.64)
54
Page 55

1
2
9
3
54
PREPARATIONS > How to place speakers (speaker systems)
Virtual CINEMA FRONT
This speaker layout is recommended if you cannot place speakers in the back of the room.
[Search tag]#Q01 Speaker systems
55
Page 56

AUDIO 5AUDIO 4
OPTICAL
COAXIAL
CENTER FRONT
SURROUND BACK
EXTRA SP2
/ZONE 2/BI-AMP
SPEAKERS
PHONO
ZONE OUT
ZONE 2
GND
AUDIO 2
(3 MUSIC)
AUDIO 1
(7 TV)
AUDIO 3
F. PRESENCE
EXTRA SP1
/ZONE 2
SURROUND
PRE OUT
FRONT SUBWOOFER
1
2
3
12
5
9
4
PREPARATIONS > How to place speakers (speaker systems)
NOTE
(
To use Virtual CINEMA FRONT, the speaker configuration settings must be changed.
(
You can also connect up to 2 subwoofers (with built-in amplifier) to the unit. Two subwoofers connected to the unit output the
same sounds.
(
When using only one subwoofer, you can place it either in the left or right side.
Related links
(
“Setting your speaker system”(p.190)
(
“Setting the use of Virtual CINEMA FRONT”(p.197)
(
“Speaker requirements”(p.64)
56
Page 57

PREPARATIONS > How to place speakers (speaker systems)
Speaker systems using the unit’s internal amplifier (advanced setup)
List of speaker systems using the unit’s internal amplifier
In addition to the basic speaker systems, the unit also allows you to apply the following speaker
configurations.
To enjoy following systems, configure the necessary speaker settings in “Power Amp Assign” in the “Setup”
menu.
[Search tag]#Q01 Speaker systems
Main zone
Output
channel
(max)
Bi-amp Surround back/Presence
7 Surround back +1 room 7.1 +1Zone p.58
7 Front presence +1 room 5.1.2 +1Zone p.60
5 ) BI-AMP p.62
Related links
(
“Speaker requirements”(p.64)
(
“Setting your speaker system”(p.190)
(
“Multi-zone configuration examples”(p.151)
Multi-
zone
Power Amp Assign Page
57
Page 58

2
1
76
4
1
2
9 9
5
3
Main zone
Zone2
AUDIO 5AUDIO 4
OPTICAL
COAXIAL
CENTER FRONT
SURROUND BACK
EXTRA SP2
/ZONE 2/BI-AMP
SPEAKERS
PHONO
ZONE OUT
ZONE 2
GND
AUDIO 2
(3 MUSIC)
AUDIO 1
(7 TV)
AUDIO 3
F. PRESENCE
EXTRA SP1
/ZONE 2
SURROUND
PRE OUT
FRONT SUBWOOFER
1
2
3
76
12
5
99
12
4
Zone 2
PREPARATIONS > How to place speakers (speaker systems)
7.1 +1Zone
The Zone function allows you to play back an input source in the room where the unit is installed and in
another room.
[Search tag]#Q01 Speaker systems
58
Page 59

PREPARATIONS > How to place speakers (speaker systems)
NOTE
(
To use the Zone speaker system, the speaker configuration settings must be changed.
(
You can also connect up to 2 subwoofers (with built-in amplifier) to the unit. Two subwoofers connected to the unit output the
same sounds.
(
When using only one subwoofer, you can place it either in the left or right side.
(
When Zone2 output is enabled, the surround back speakers in the Main zone do not output sound.
Related links
(
“Speaker requirements”(p.64)
(
“Setting your speaker system”(p.190)
(
“Playback in multiple rooms (multi zone function)”(p.150)
59
Page 60

4
1
2
9 9
5
3
E R
2
1
Main zone
Zone2
AUDIO 5AUDIO 4
OPTICAL
COAXIAL
CENTER FRONT
SURROUND BACK
EXTRA SP2
/ZONE 2/BI-AMP
SPEAKERS
PHONO
ZONE OUT
ZONE 2
GND
AUDIO 2
(3 MUSIC)
AUDIO 1
(7 TV)
AUDIO 3
F. PRESENCE
EXTRA SP1
/ZONE 2
SURROUND
PRE OUT
FRONT SUBWOOFER
1
2
3
12
5994 R12E
Zone 2
PREPARATIONS > How to place speakers (speaker systems)
5.1.2 +1Zone
The Zone function allows you to play back an input source in the room where the unit is installed and in
another room.
[Search tag]#Q01 Speaker systems
60
Page 61

PREPARATIONS > How to place speakers (speaker systems)
NOTE
(
To use the Zone speaker system, the speaker configuration settings must be changed.
(
You can also connect up to 2 subwoofers (with built-in amplifier) to the unit. Two subwoofers connected to the unit output the
same sounds.
(
When using only one subwoofer, you can place it either in the left or right side.
(
When Zone2 output is enabled, the front presence speakers in the Main zone do not output sound.
Related links
(
“Speaker requirements”(p.64)
(
“Setting your speaker system”(p.190)
(
“Playback in multiple rooms (multi zone function)”(p.150)
61
Page 62

9 9
3
2
1
4
5
Bi-amp
AUDIO 5AUDIO 4
OPTICAL
COAXIAL
CENTER FRONT
SURROUND BACK
EXTRA SP2
/ZONE 2/BI-AMP
SPEAKERS
PHONO
ZONE OUT
ZONE 2
GND
AUDIO 2
(3 MUSIC)
AUDIO 1
(7 TV)
AUDIO 3
F. PRESENCE
EXTRA SP1
/ZONE 2
SURROUND
PRE OUT
FRONT SUBWOOFER
1
2
3
5994
1 2
PREPARATIONS > How to place speakers (speaker systems)
BI-AMP
You can connect the front speakers that support bi-amp connections.
To enable the bi-amp function, configure the necessary speaker settings.
[Search tag]#Q01 Speaker systems
62
Page 63

PREPARATIONS > How to place speakers (speaker systems)
NOTICE
(
Before making bi-amp connections, remove any brackets or cables that connect a woofer with a tweeter. If you are not making
bi-amp connections, make sure that the brackets or cables are connected before connecting the speaker cables. Refer to the
instruction manual of the speakers for details.
NOTE
(
The following speakers cannot be connected simultaneously.
(
Surround back speakers
(
Bi-amp speakers
(
You can also connect up to 2 subwoofers (with built-in amplifier) to the unit. Two subwoofers connected to the unit output the
same sounds.
(
When using only one subwoofer, you can place it either in the left or right side.
Related links
(
“Setting your speaker system”(p.190)
(
“Speaker requirements”(p.64)
63
Page 64

PREPARATIONS > Connecting speakers
Connecting speakers
Speaker requirements
Speakers and subwoofers to be connected to the unit must meet the following requirements:
(
Use following speakers.
(
the front speakers: with an impedance of at least 4-ohm
(
other speakers: with an impedance of at least 6-ohm
(
Use a subwoofer with built-in amplifier.
[Search tag]#Q01 Speaker systems
NOTE
(
Prepare the number of speakers according to your speaker system.
(
Be sure to connect the front left and right speakers.
(
When using surround back speakers, be sure to connect the surround back left and right speakers. Using only one surround back
speaker was discontinued.
(
Under its default settings, the unit is configured for 8-ohm speakers. When connecting 6-ohm speakers, set the unit’s speaker
impedance to “6 Ω MIN”.
(
When connecting the front speakers with an impedance of 4-ohm, set the unit’s speaker impedance to “6 Ω MIN”.
Related links
(
“Setting the speaker impedance”(p.201)
(
“Cable requirements”(p.65)
64
Page 65

–
+
–
+
PREPARATIONS > Connecting speakers
Cable requirements
Use the following types of commercially-available cables to connect speakers to the unit:
(
Speaker cables (for connecting the speakers)
(
Audio pin cable (for connecting a subwoofer)
Related links
“Connecting the speaker”(p.66)
65
Page 66

F
RONT
SPEAKERS
aa
b
d
c
+ (red)
- (black)
PREPARATIONS > Connecting speakers
How to connect speakers
Connecting the speaker
Connect a speaker cable between the negative (–) terminal of the unit and the negative (–) terminal of the
speaker, and between the positive (+) terminal of the unit and the positive (+) unit of the speaker.
Remove the unit’s power cable from an AC wall outlet before connecting the speaker.
NOTICE
(
Prepare speaker cables in a place away from the unit, to avoid accidentally dropping wire strands into the unit's interior which
could result in a short circuit or malfunction of the unit.
(
Improper connecting of the speaker cables may cause a short circuit and also damage the unit or the speakers.
(
Do not let the bare wires of the speaker cable touch one another.
(
Do not let the bare wires of the speaker cable come into contact with the unit’s metal parts (rear panel and screws).
1 Remove approximately 10 mm (3/8”) of insulation from the ends of the speaker
cable, and twist the bare wires of the cable firmly together.
2 Loosen the speaker terminal.
3 Insert the bare wires of the cable into the gap on the side of the terminal.
4 Tighten the terminal.
This completes the connection.
66
Page 67

F
RONT
a
b
SPEAKERS
Banana plug
PREPARATIONS > Connecting speakers
NOTE
(
If “Check SP Wires” appears on the front display when the unit is turned on, turn off the unit, and then confirm that the speaker
cables are not short circuited.
(
(U.S.A., Canada, China, Taiwan, Brazil, Central and South America and General models only)
When using a banana plug, tighten the speaker terminal and insert a banana plug into the end of the terminal.
Related links
“Connecting the subwoofer”(p.68)
67
Page 68

PRE OUT
FRONT SUBWOOFER
1
2
ZONE OUT
ZONE 2
Audio pin cable
PREPARATIONS > Connecting speakers
Connecting the subwoofer
Use an audio pin cable to connect the subwoofer.
Unplug the power cables of the unit and subwoofer from the AC wall outlets before connecting the
subwoofer.
Related links
“HDMI connection with a TV”(p.69)
68
Page 69

AUDIO 5AUDIO 4
OPTICAL
IN
OUT
REMOTE
COAXIAL
CENTER FRONT
SURROUND BACK
/ZONE 2/BI-AMP
SPEAKERS
GND
AUDIO 2
(3 MUSIC)
AUDIO 1
(7 TV)
AUDIO 3
SURROUND
HDMI OUT
eARC/ARC
1 2
(1 MOVIE) (5 STB)
TRIGGER OUT
12V 0.1A
HDMIOUT
eARC/ARC
HDMI
HDMI
HDMI
HDMI
HDMI
HDMI
(eARC/ARC)
The unit (rear) HDMI OUT jack
HDMI input
TV
PREPARATIONS > Connecting a TV
Connecting a TV
HDMI connection with a TV
Connect a TV to the unit with an HDMI cable. When the TV audio is played back on the unit, use eARC/ARC
function or use a digital optical cable to input TV audio to the unit.
[Search tag]#Q02 Connect TV
NOTE
(
Use a 19-pin HDMI cable with the HDMI logo. We recommend using a cable as short as possible to prevent signal quality
degradation.
(
Use a Premium High Speed HDMI Cable or Premium High Speed HDMI Cable with Ethernet to enjoy 3D or 4K Ultra HD videos.
(
When using eARC/ARC, connect a TV with an HDMI cable that supports eARC/ARC (such as a High Speed HDMI Cable with Ethernet).
(
You may need setting on the TV. Refer to the instruction manual for the TV.
Using eARC/ARC function
n
If your TV supports eARC/ARC, the TV audio is played back on the unit with only one HDMI cable. When using
ARC, set the HDMI Control function to “On”.
NOTE
(
“ARC” is an abbreviation of Audio Return Channel. “ARC” allows that the TV audio is played back on AV products (such as AV
receiver, sound bar), by connecting the HDMI input jack that supports ARC of your TV to the HDMI OUT jack that supports ARC of
your AV products with only an HDMI cable, without a digital optical cable.
(
“eARC” is an abbreviation of enhanced Audio Return Channel. “eARC”, enhanced the function of ARC, supports uncompressed 5.1channel and 7.1-channel audio formats, and object-based surround (such as Dolby Atmos and DTS:X) via compatible TV with the
HDMI cable.
Related links
(
“Playback of TV audio with eARC/ARC”(p.124)
(
“HDMI connection with a video device such as a BD/DVD player”(p.71)
69
Page 70

AUDIO 5AUDIO 4
OPTICAL
IN
OUT
REMOTE
COAXIAL
CENTER FRONT
SURROUND BACK
/ZONE 2/BI-AMP
SPEAKERS
GND
AUDIO 2
(3 MUSIC)
AUDIO 1
(7 TV)
AUDIO 3
SURROUND
HDMI OUT
eARC/ARC
1 2
(1 MOVIE) (5 STB)
TRIGGER OUT
12V 0.1A
HDMIOUT
eARC/ARC
HDMI
HDMI
HDMI
HDMI
HDMI
HDMI
OPTICAL
O
O
OPTICAL
AUDIO1
(7TV)
The unit (rear) HDMI OUT jack
HDMI input
TV
AUDIO 1 jack
Audio output
(digital optical)
PREPARATIONS > Connecting a TV
Connecting a digital optical cable
n
If your TV does not support eARC/ARC, connect your TV to the unit with a digital optical cable.
NOTE
According to the audio output jacks of your TV, you can connect your TV to the unit with an audio cable (digital coaxial or stereo pin
cable) other than a digital optical cable. In this case, set “TV Audio Input” in the “Setup” menu.
Related links
(
“Playback of TV audio with a digital optical cable”(p.125)
(
“HDMI connection with a video device such as a BD/DVD player”(p.71)
(
“Setting the audio input jack used for TV audio”(p.249)
70
Page 71

AUDIO 5AUDIO 4
OPTICAL
IN
OUT
REMOTE
COAXIAL
CENTER FRONT
SURROUND BACK
EXTRA SP2
/ZONE 2/BI-AMP
SPEAKERS
PHONO
ZONE OUT
ZONE 2
GND
AUDIO 2
(3 MUSIC)
AUDIO 1
(7 TV)
AUDIO 3
F. PRESENCE
EXTRA SP1
/ZONE 2
SURROUND
HDMI OUT
eARC/ARC
1 2 3 4 5 6 7
(1 MOVIE) (5 STB) (6 GAME)
TRIGGER OUT
PRE OUT
FRONT SUBWOOFER
1
2
12V 0.1A
HDMI
HDMI
HDMI
HDMI
HDMI
1 2 3 4 5 6 7
(1 MOVIE) (5 STB) (6 GAME)
The unit (rear)
HDMI OUT jack
HDMI 1–7 jacks
Video device
PREPARATIONS > Connecting playback devices
Connecting playback devices
HDMI connection with a video device such as a BD/DVD player
Connect a video device to the unit with an HDMI cable.
Related links
“AUDIO connection with an audio device such as a CD player”(p.72)
71
Page 72

AUDIO 5AUDIO 4
OPTICAL
IN
OUT
REMOTE
COAXIAL
CENTER FRONT
SURROUND BACK
EXTRA SP2
/ZONE 2/BI-AMP
SPEAKERS
PHONO
GND
AUDIO 2
(3 MUSIC)
AUDIO 1
(7 TV)
AUDIO 3
SURROUND
HDMI OUT
eARC/ARC
1 2 3
(1 MOVIE) (5 STB) (6 GAME)
TRIGGER OUT
12V 0.1A
HDM
R
L
COAXIAL
OPTICAL
R
L
PHONO
GND
PHONO
GND
OPTICAL COAXIAL
R
L L
R
L
R
L
R
C
C
O O
The unit
(rear)
PHONO jacks
Audio output
(either digital optical, digital coaxial, or
analog stereo)
Audio device
AUDIO 1-5 jacks
Ground lead
Audio output (PHONO)
Turntable
PREPARATIONS > Connecting playback devices
Connection other than HDMI with a playback device
AUDIO connection with an audio device such as a CD player
Connect audio devices such as CD players to the unit.
Depending on the audio output jacks available on your audio device, choose one of the following
connections.
Audio output jacks on audio device Audio input jacks on the unit
Digital coaxial AUDIO2 (COAXIAL)
Digital optical AUDIO1 (OPTICAL)
Analog stereo (RCA) AUDIO 3-5 (AUDIO [RCA])
Turntable (PHONO) PHONO
NOTE
(
The PHONO jack of the unit is compatible with an MM cartridge. To connect a turntable with a low-output MC cartridge, use a
boosting transformer.
(
Connecting the turntable to the GND terminal of the unit may reduce noise in the signal. (This GND terminal is not a safety ground.)
Related links
(
“Part names and functions of the rear panel”(p.31)
(
“Connecting the FM antenna”(p.73)
(
“Connecting the DAB/FM antenna”(p.76)
72
Page 73

ANTENNA
FMAM
AUDIO 5AUDIO 4
COAXIAL
CENTER FRONT
SURROUND BACK
EXTRA SP2
/ZONE 2/BI-AMP
SPEAKERS
PHONO
ZONE OUT
ZONE 2
GND
AUDIO 2
(3 MUSIC)
AUDIO 3
F. PRESENCE
EXTRA SP1
/ZONE 2
NETWORK
HDMI OUT
eARC/ARC
( 2 RADIO )
(4 NET RADIO) (8 SERVER)
1 2 3 4 5 6 7
(1 MOVIE) (5 STB) (6 GAME)
PRE OUT
FRONT SUBWOOFER
1
2
75
HDMI
The unit (rear)
FM antenna
PREPARATIONS > Connecting the radio antennas
Connecting the radio antennas
Connecting the FM antenna
Model For
U.S.A., Canada, Asia, Korea, China, Taiwan, Brazil, General, and Central and South America
Connect the supplied FM antenna to the unit.
Fix the end of the FM antenna to a wall.
Related links
“Connecting the AM antenna”(p.74)
73
Page 74

ANTENNA
FMAM
AUDIO 5AUDIO 4
COAXIAL
CENTER FRONT
SURROUND BACK
EXTRA SP2
/ZONE 2/BI-AMP
SPEAKERS
PHONO
ZONE OUT
ZONE 2
GND
AUDIO 2
(3 MUSIC)
AUDIO 3
F. PRESENCE
EXTRA SP1
/ZONE 2
NETWORK
HDMI OUT
eARC/ARC
( 2 RADIO )
(4 NET RADIO) (8 SERVER)
1 2 3 4 5 6 7
(1 MOVIE) (5 STB) (6 GAME)
PRE OUT
FRONT SUBWOOFER
1
2
75
HDMI
AM antenna
The unit (rear)
ReleaseHold down Insert
PREPARATIONS > Connecting the radio antennas
Connecting the AM antenna
Model For
U.S.A., Canada, Asia, Korea, China, Taiwan, Brazil, General, and Central and South America
Connect the supplied AM antenna to the unit.
Place the AM antenna on a flat surface.
Assembling and connecting the AM antenna
NOTE
(
Unwind only the length of cable needed from the AM antenna unit.
(
The wires of the AM antenna have no polarity.
74
Page 75

PREPARATIONS > Connecting the radio antennas
Related links
“Network connection of the unit”(p.77)
75
Page 76

HDMI
PHONO
ZONE OUT
ZONE 2
F. PRESENCE
EXTRA SP1
/ZONE 2
NETWORK
(4 NET RADIO) (8 SERVER)
3 4 5 6 7
(6 GAME)
PRE OUT
FRONT SUBWOOFER
1
2
ANTENNA
( 2 RADIO )
DAB/FM
75
The unit (rear)
DAB/FM antenna
PREPARATIONS > Connecting the radio antennas
Connecting the DAB/FM antenna
Model For
U.K., Europe, Russia and Australia
Connect the supplied DAB/FM antenna to the unit.
Fix the antenna ends to a wall.
NOTE
(
The antenna should be stretched out horizontally.
(
If you cannot obtain good reception on the radio, adjust the height, direction or placement of the DAB/FM antenna.
Related links
“Network connection of the unit”(p.77)
76
Page 77

PREPARATIONS > Preparing for connecting to a network
Preparing for connecting to a network
Network connection of the unit
The unit supports wired and wireless connections.
Select a connection method according to your network environment.
You can enjoy Internet radio or music files stored on media servers, such as PCs and Network Attached
Storage (NAS), on the unit.
NOTICE
(
Do not connect this product to public Wi-Fi and/or Internet directly. Only connect this product to the Internet through a router
with strong password-protections. Consult your router manufacturer for information on security best practices.
Related links
(
“Connecting a network cable (wired connection)”(p.78)
(
“Preparing wireless antennas (wireless connection)”(p.79)
77
Page 78

ANTENNA
FMAM
AUDIO 5AUDIO 4
PHONO
ZONE OUT
ZONE 2
GND
AUDIO 2
(3 MUSIC)
AUDIO 3
NETWORK
HDMI OUT
eARC/ARC
( 2 RADIO )
(4 NET RADIO) (8 SERVER)
1 2 3 4 5 6 7
(1 MOVIE) (5 STB) (6 GAME)
PRE OUT
FRONT SUBWOOFER
1
2
75
HDMI
LAN
WAN
Network Attached Storage (NAS)
Internet
Modem
Wireless router
PC
Network cable
The unit (rear)
PREPARATIONS > Preparing for connecting to a network
Connecting a network cable (wired connection)
Connect the unit to your router with a commercially-available STP network cable (CAT-5 or higher straight
cable).
When using a router that supports DHCP, you do not need to configure any network settings for the unit.
NOTE
You need to configure the network settings if your router does not support DHCP or if you want to configure the network parameters
manually.
Related links
(
“Setting the network parameters manually”(p.272)
(
“Checking the network information of the unit”(p.269)
(
“Connecting an external power amplifier”(p.80)
78
Page 79

PREPARATIONS > Preparing for connecting to a network
Preparing wireless antennas (wireless connection)
Stand the wireless antennas upright for connecting to the wireless network or a Bluetooth device wirelessly.
NOTICE
(
Do not apply excessive force on the wireless antenna. Doing so may damage the antenna.
Related links
(
“Adding the unit to the MusicCast network”(p.89)
(
“Selecting a wireless network connection method”(p.358)
(
“Connecting an external power amplifier”(p.80)
79
Page 80

ANTENNA
FMAM
AUDIO 5AUDIO 4
FRONT
SURROUND BACK
EXTRA SP2
/ZONE 2/BI-AMP
SPEAKERS
PHONO
ZONE OUT
ZONE 2
GND
F. PRESENCE
EXTRA SP1
/ZONE 2
NETWORK
( 2 RADIO )
(4 NET RADIO) (8 SERVER)
1 2 3 4 5 6 7
(1 MOVIE) (5 STB) (6 GAME)
PRE OUT
FRONT SUBWOOFER
1
2
75
HDMI
a
The unit (rear)
PREPARATIONS > Connecting other devices
Connecting other devices
Connecting an external power amplifier
When connecting an external power amplifier (pre-main amplifier) to enhance speaker output, connect the
input jacks of the power amplifier to the PRE OUT jacks of the unit.
The same channel signals are output from the PRE OUT jacks as from their corresponding SPEAKERS
terminals.
NOTICE
To prevent the generation of loud noises or abnormal sounds, make sure the followings before making connections.
(
Unplug the power cable of the unit and turn off the external power amplifier before connecting them.
(
When using the PRE OUT jacks, do not connect speakers to the corresponding SPEAKERS terminals.
(
When using a pre-main amplifier that does not have the volume control bypass, turn up the volume of the pre-main amplifier
enough and fix it. In this case, do not connect other devices (except the unit) to the pre-main amplifier.
a
FRONT jacks
Outputs front left and right channel sounds.
Related links
“Connecting a device compatible with the trigger function”(p.81)
80
Page 81

AUDIO 5AUDIO 4
OPTICAL
IN
OUT
REMOTE
COAXIAL
CENTER FRONT
SPEAKERS
AUDIO 2
(3 MUSIC)
AUDIO 1
(7 TV)
AUDIO 3
SURROUND
HDMI OUT
eARC/ARC
1 2
(1 MOVIE) (5 STB)
TRIGGER OUT
12V 0.1A
TRIGGER OUT
12V
0.1A
The unit (rear)
TRIGGER OUT jack
System connector
jack
Yamaha subwoofer that
supports a system connection
PREPARATIONS > Connecting other devices
Connecting a device compatible with the trigger function
The trigger function can control an external device in conjunction with operating the unit (such as powering
on/off and input selection). If you have a Yamaha subwoofer that supports a system connection or a device
with a trigger input jack, you can use the trigger function by connecting the external device to the TRIGGER
OUT jack with a monaural mini-jack cable.
Related links
(
“Operating the unit from another room (remote connection)”(p.82)
(
“Specifying the zone with which the TRIGGER OUT jack functions are synchronized”(p.254)
81
Page 82

AUDIO 5AUDIO 4
OPTICAL
IN
OUT
REMOTE
COAXIAL
CENTER FRONT
SPEAKERS
AUDIO 2
(3 MUSIC)
AUDIO 1
(7 TV)
AUDIO 3
SURROUND
HDMI OUT
eARC/ARC
1 2
(1 MOVIE) (5 STB)
TRIGGER OUT
12V 0.1A
REMOTE
IN
OUT
The unit (rear)
Main zone
Zone2
External device
(such as a CD player)
REMOTE IN/OUT jacks
Infrared signal
transmitter
Infrared signal
receiver
Remote control (supplied
with each device)
PREPARATIONS > Connecting other devices
Operating the unit from another room (remote connection)
You can operate the unit or external devices from another room (a zone) using the remote control supplied
with each device if you connect an infrared signal receiver/emitter to the unit’s REMOTE IN/OUT jacks.
An infrared signal transmitter is not required if you are using Yamaha products that support remote
connections, as the unit does. You can transmit remote control signals by connecting the REMOTE IN/OUT
jacks with monaural mini-jack cables and an infrared signal receiver.
82
Page 83

REMOTE
IN
OUT
REMOTE
IN
OUT
Remote control
Zone2
REMOTE IN/OUT jacks
Infrared signal receiver
Yamaha products (up to
six, including the unit)
REMOTE IN/OUT jacks
PREPARATIONS > Connecting other devices
Related links
“Plugging in the power cable”(p.84)
83
Page 84
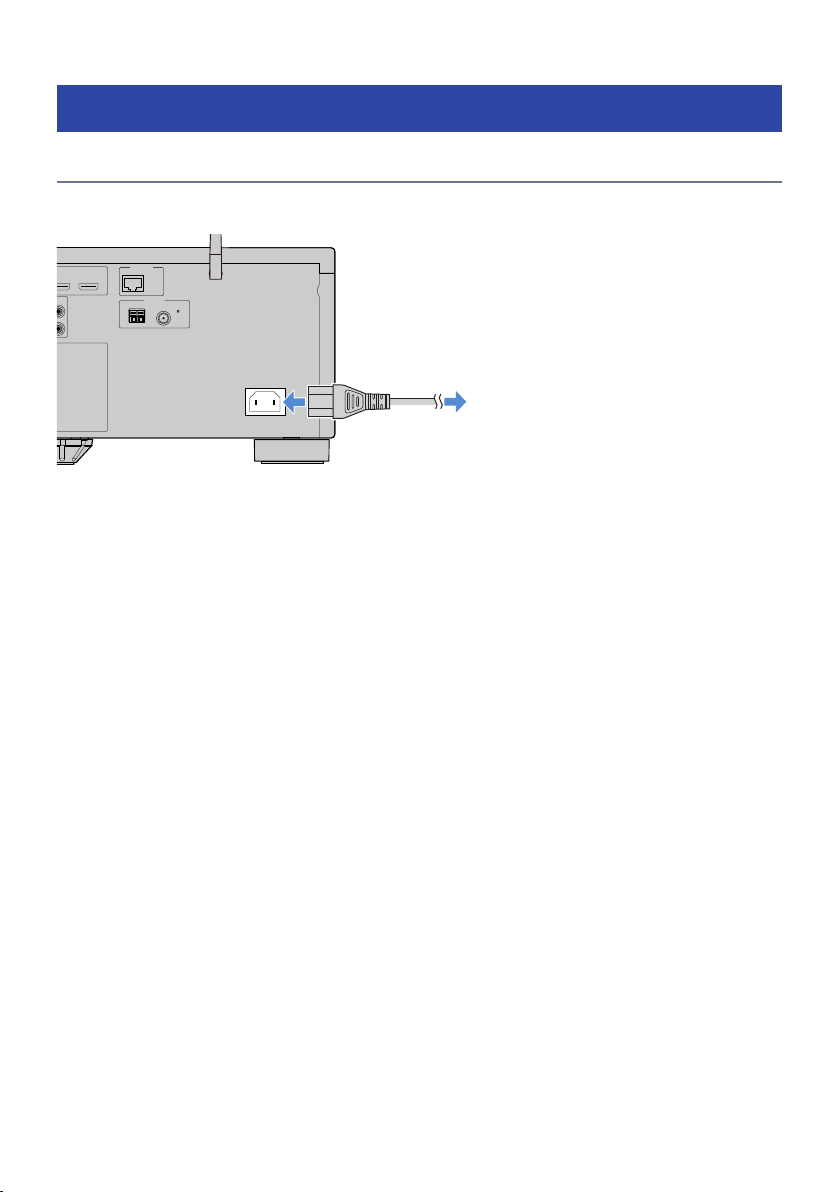
ANTENNA
FMAM
NETWORK
( 2 RADIO )
(4 NET RADIO) (8 SERVER)
6 7
75
The unit (rear)
To an AC wall outlet
PREPARATIONS > Turning on the power of the unit
Turning on the power of the unit
Plugging in the power cable
After all the connections are complete, plug in the power cable.
Related links
“Setting the power to on/standby (Main zone)”(p.85)
84
Page 85

PREPARATIONS > Turning on the power of the unit
Setting the power to on/standby (Main zone)
Switch the power of Main zone between on and standby.
NOTE
Main zone is the room where the unit is installed.
1 Set the zone switch to “MAIN”.
2 Press z.
Each time you press the key, you can switch the power of Main zone between on and standby.
NOTE
When you turn on the unit for the first time, the message regarding the network setup appears on the TV. If you use an iPhone, you can
set up a wireless connection by following the on-screen instructions. Here, press RETURN on the remote control to proceed to the next
procedure.
Related links
(
“Part names and functions of the remote control”(p.33)
(
“Selecting the menu language”(p.86)
85
Page 86

PREPARATIONS > Selecting the menu language
Selecting the menu language
Selecting the menu language
To set the desired menu language, switch the input of the TV to display video from the unit and press SETUP.
And then, select “Language” in the “SETUP” menu.
Related links
(
“Setting the menu language”(p.282)
(
“Basic operation of the Setup menu”(p.179)
(
“What is MusicCast”(p.87)
86
Page 87

PREPARATIONS > Setting MusicCast
Setting MusicCast
What is MusicCast
MusicCast is a wireless musical solution from Yamaha, allowing you to share music among all of your rooms
with a variety of devices. You can enjoy music from your smartphone, PC, NAS drive, Internet radio station
and music streaming service anywhere in your house with one easy-to-use dedicated application “MusicCast
CONTROLLER”.
For more details and a lineup of MusicCast compatible products, visit the Yamaha website.
Related links
“Using MusicCast CONTROLLER”(p.88)
87
Page 88

PREPARATIONS > Setting MusicCast
Using MusicCast CONTROLLER
To use the network features on the MusicCast compatible device, you need the dedicated application
“MusicCast CONTROLLER” for the operation. Search for the free application “MusicCast CONTROLLER” on
the App Store or Google Play and install it to your device.
Related links
“Adding the unit to the MusicCast network”(p.89)
88
Page 89

MENU [CONNECT]
Indicator
PREPARATIONS > Setting MusicCast
Adding the unit to the MusicCast network
Perform the following procedure to add the unit to the MusicCast network. You can also configure the unit’s
wireless network settings at once.
1 Launch the “MusicCast CONTROLLER” application on your mobile device and tap
“Setup”.
2 Operate the “MusicCast CONTROLLER” application following the on-screen
instructions.
NOTE
(
If you configure the unit's wireless network settings with this method, the SSID and security key for your wireless LAN router
(access point) will be needed.
(
If you add the second or later MusicCast compatible device, tap “Settings” and then “Add New Device” in the “MusicCast
CONTROLLER” application.
(
When you add the unit to the MusicCast network, the wireless LAN indicator sometimes lights up on the front display even if a
wired connection is used.
Related links
(
“Setting the power interlock from the unit to MusicCast compatible devices”(p.276)
(
“Configuring wireless speakers”(p.90)
(
“Flow of the speaker configurations”(p.92)
89
Page 90

As of April 1, 2020
MusicCast 50 MusicCast 20 MusicCast SUB 100
Wireless Streaming Speaker Network Subwoofer
4
1
2
9
5
3
E R
PREPARATIONS > Using the MusicCast Surround function
Using the MusicCast Surround function
Configuring wireless speakers
Using devices that support the MusicCast Surround function, you can enjoy a 5.1.2-channel or 5.1-channel
system with wireless surround speakers and subwoofer.
NOTE
Refer to the instruction manual of the devices that support the MusicCast Surround function for details on settings and operations.
Devices supporting MusicCast Surround
n
Sample speaker layout
n
The following is a 5.1.2-channel system using two MusicCast 20 speakers as the surround speakers and one
MusicCast SUB 100 as the subwoofer.
90
Page 91

PREPARATIONS > Using the MusicCast Surround function
NOTE
(
In a 5.1.2-channel or 5.1-channel system, the surround speakers and subwoofer can be wireless. With other systems, only the
subwoofer can be wireless.
(
With wireless surround speakers
(
Sound will not be output from the speaker terminals (SURROUND) on the unit.
(
Surround back speakers cannot be used.
(
With a wireless subwoofer
(
One subwoofer can be wireless.
(
Sound will not be output from the pre-out jacks (SUBWOOFER 1 and 2) on the unit. Therefore, another subwoofer cannot be used
by connecting it with an audio cable.
(
The following audio cannot be output from the wireless surround speakers and subwoofer.
(
DSD audio
(
DVD-Audio and Super Audio CD (SACD) from HDMI input
1 The unit and the devices supporting MusicCast Surround must be registered with
the same location on the MusicCast CONTROLLER app.
2 Follow the app’s on-screen instructions to complete setup of the MusicCast
Surround function.
For detailed setup instructions, refer to the following.
https://download.yamaha.com/files/tcm:39-1212383
Related links
“Flow of the speaker configurations”(p.92)
91
Page 92

VOLUME HIGH CUT
CRO
SSOVER/
MIN MAXMIN
MAX
9
PREPARATIONS > Configuring the speaker settings
Configuring the speaker settings
Flow of the speaker configurations
Before using the unit, adjust the speaker settings such as volume balance and acoustic parameters. With the
supplied YPAO microphone, the unit detects speaker connections and measures the distances from them to
your listening position(s) that is measuring position(s). And then, the unit automatically optimizes the
speaker settings such as volume balance and acoustic parameters. (YPAO: Yamaha Parametric room Acoustic
Optimizer)
NOTE
(
During the measuring process, test tones are output at high volume. You cannot adjust the volume.
(
During the measuring process, stay in a back corner of the room and note the following for accurate measurement.
(
Keep the room as quiet as possible.
(
Do not block sound between the speakers and the YPAO microphone.
(
Do not connect headphones.
1 Select the unit’s speaker impedance settings as necessary.
2 Configure the corresponding speaker settings.
3 Set the volume of the subwoofer to half. If the crossover frequency is adjustable,
set it to maximum.
4 Place the YPAO microphone at your listening position (same height as your ears).
We recommend the use of a tripod as a microphone stand and adjust your listening position
(same height as your ears). You can use the tripod screws to stabilize the microphone.
92
Page 93

1 2
3
9
4 5
The unit (front)
Ear height
b
a
PREPARATIONS > Configuring the speaker settings
5 Connect the YPAO microphone to the YPAO jack.
The following screen appears on the TV.
a
Setting of “Power Amp Assign” in the “Setup” menu
b
Setting of “Speaker Impedance” in the “Setup” menu
93
Page 94

1
3
4
2
PREPARATIONS > Configuring the speaker settings
6 According to the guidance displayed on the screen, start the measurement.
If you want to enable an item under “Measuring option”, select the item.
The following screen appears on the TV when the measurement finishes.
After confirming the measurement results, press ENTER.
a
The number of speakers (front side/rear side/subwoofer)
b
Speaker distance (nearest/farthest)
c
Adjustment range of speaker output level
d
Warning message (if available)
7 Select “Save” to apply the measurement results to the speaker settings.
8 Disconnect the YPAO microphone from the unit.
This completes optimization of the speaker settings.
NOTICE
(
The YPAO microphone is sensitive to heat, so should not be placed anywhere it could be exposed to direct sunlight or high
temperatures (such as on top of AV equipment).
NOTE
(
“YPAO Volume” in the “Option” menu is automatically enabled after the YPAO measurement. Then, the high- and low-frequency
levels are automatically adjusted according to the volume so that you can enjoy natural sounds even at low volume.
(
An error message may appear during the measurement.
(
To cancel the operation, disconnect the YPAO microphone before starting the measurement.
(
YPAO multi measurement option cannot be enabled with wireless speakers.
Related links
(
“Setting the speaker impedance”(p.201)
(
“Assigning speaker configuration”(p.95)
(
“Error messages from YPAO”(p.101)
(
“Warning messages from YPAO”(p.102)
(
“Configuring the speaker settings automatically based on the YPAO measurement results”(p.97)
(
“Adjusting the high- and low-frequency levels automatically according to the volume”(p.162)
94
Page 95

PREPARATIONS > Configuring the speaker settings
Assigning speaker configuration
If you use any of the following speaker configurations, configure the corresponding speaker settings
manually.
When using the surround back speakers
(
When using bi-amp connections or zone connections
(
When using the surround speakers placed in front (Virtual CINEMA FRONT)
(
When using the front presence speakers for Dolby Atmos or DTS:X playback
(
Related links
(
“Setting your speaker system”(p.190)
(
“Setting the use of Virtual CINEMA FRONT”(p.197)
(
“Front presence speaker layout”(p.364)
95
Page 96

a b
a
a
b
cde
c
d
d e
bac
Single measure
Multi measure (5 listening
positions)
Multi measure (1 listening
position + front/back/left/right)
Multi measure (2 listening
positions + front/back)
PREPARATIONS > Configuring the speaker settings
Optional measurement of YPAO
YPAO measuring at multiple listening positions (multi measure)
Select “Multi Measure” option if you will have several listening positions or if you want others to enjoy
surround sound. You can take measurements at up to 8 different positions in the room. The speaker settings
will be optimized to suit the area defined by those positions.
NOTE
(
First place the YPAO microphone at the listening position you will be seated most frequently.
(
YPAO multi measurement option cannot be enabled with wireless speakers.
Related links
“Configuring the speaker settings automatically based on the YPAO multi measurement results”(p.97)
96
Page 97

VOLUME HIGH CUT
CRO
SSOVER/
MIN MAXMIN
MAX
9
PREPARATIONS > Configuring the speaker settings
Configuring the speaker settings automatically based on the YPAO measurement results
Configuring the speaker settings automatically based on the YPAO multi measurement results
Perform the following procedure to take a measurement when the “Multi Measure” option is selected. It
takes about 15 minutes to measure 8 listening positions.
NOTE
(
During the measuring process, test tones are output at high volume. You cannot adjust the volume.
(
During the measuring process, stay in a back corner of the room and note the following for accurate measurement.
(
Keep the room as quiet as possible.
(
Do not block sound between the speakers and the YPAO microphone.
(
Do not connect headphones.
(
YPAO multi measurement option cannot be enabled with wireless speakers.
1 Select the unit’s speaker impedance settings as necessary.
2 Configure the corresponding speaker settings.
3 Set the volume of the subwoofer to half. If the crossover frequency is adjustable,
set it to maximum.
4 Place the YPAO microphone at your listening position (same height as your ears).
We recommend the use of a tripod as a microphone stand and adjust your listening position
(same height as your ears). You can use the tripod screws to stabilize the microphone.
97
Page 98

1 2
3
9
4 5
The unit (front)
Ear height
b
a
PREPARATIONS > Configuring the speaker settings
5 Connect the YPAO microphone to the YPAO jack.
6 Select “Multiple” for measuring option on the entry screen.
a
Setting of “Power Amp Assign” in the “Setup” menu
b
Setting of “Speaker Impedance” in the “Setup” menu
98
Page 99

PREPARATIONS > Configuring the speaker settings
7 According to the guidance displayed on the screen, start the measurement.
The following screen appears on the TV when the measurement at the first position finishes.
8 Move the YPAO microphone to the next listening position and select “OK”.
Repeat it until measurements at all listening positions (up to 8) have been taken.
9 When the measurements at the positions you want to measure are completed,
select “Skip”.
When you have taken measurements at 8 listening positions, the following screen appears
automatically.
After confirming the measurement results, press ENTER.
10 Select “Save” to save the measurement result.
The adjusted speaker settings are applied.
11 Disconnect the YPAO microphone from the unit.
Thicompletes optimization of the speaker settings.
99
Page 100

PREPARATIONS > Configuring the speaker settings
NOTICE
(
The YPAO microphone is sensitive to heat, so should not be placed anywhere where it could be exposed to direct sunlight or
high temperatures (such as on top of AV equipment).
100
 Loading...