

Page 1
Page 2
Page 3
MUSIC SEQUENCER
OW NER’S MA NUA L
Page 4

Contents
The QY22: What It Is &
Z
What It Can Do....................... 7
What It Is .................................... 8
Voice Mode............................ 9
Song Mode ............................ 9
Pattern Mode ....................... 11
What It Can Do ........................ 12
About General MIDI ................. 14
Setting Up: Power &
X
Connections ......................... 15
Power Supply ........................... 16
Using Batteries .................... 16
When to Replace the Batteries .
Using a Power Adaptor ....... 18
Setting Up Your System........... 19
The Connectors ................... 19
Audio Connections .............. 21
MIDI Connections ................ 22
Getting to Know the QY22:
C
How the Controls Work..... 23
The Controls............................. 24
Play the Demo.......................... 34
17
The VOICE Mode: Selecting,
V
Playing, & Assigning the
QY22 Voices & Drums ....... 35
Try Out the Voices ................... 37
Making Voice-to-Track
Assignments............................. 38
The Mute Buttons..................... 38
The Pan Pots ........................... 39
The Faders............................... 40
Easy Accompaniment for
B
Other Instruments............... 41
Selecting & Playing the Preset
Patterns .................................... 42
Changing Chords................. 47
Muting Tracks ...................... 51
Record a Complete
Accompaniment........................ 52
Realtime Accompaniment
Recording ............................ 52
Step Accompaniment
Recording ............................ 59
Using the QY22 As a Drum
Machine.................................... 75
Creating Original Patterns
N
Recording an Original
ABC Pattern ............................. 78
Realtime Pattern Recording...
Step Pattern Recording ....... 86
Playback In the Pattern Mode.. 94
Accompaniment Without the
Limitations of ABC.................... 95
The Pattern Jobs...................... 96
1: Copy Pattern.................... 98
2: Quantize .......................... 99
3: Transpose...................... 100
4: Modify Velocity .............. 101
5: Modify Gate Time .......... 102
6: Pattern Name ................ 103
7: Clear Track .................... 104
8: Clear Pattern ................. 105
Creating a Complete Song
M
........................................... 107
Recording the Sequencer
Tracks..................................... 108
Preparing to Record —
Voice Assignments ............ 108
.. 77
78
Page 5
Contents
Realtime Sequencer Track
Recording .......................... 109
Step Sequencer Track
Recording .......................... 115
The Song Jobs ....................... 122
1: Mix Track ....................... 124
2: Copy Measure ............... 125
3: Create Measure............. 126
4: Quantize ........................ 127
5: Delete Measure ............. 128
6: Erase Measure .............. 129
7: Transpose...................... 130
8: Move Clock.................... 131
9: Remove Event ............... 132
10: Modify Velocity ............ 133
11: Modify Gate Time ........ 134
12: Song Name.................. 135
13: Clear Track .................. 136
14: Clear Song................... 137
Editing Songs & Patterns
<
Engaging the Edit Mode......... 140
Change Mode Editing ............ 143
Insert Mode Editing ................ 146
. 139
Utility Functions................ 157
>
Accessing the Utility Mode..... 158
System Parameters................ 160
Bulk Dump.............................. 163
ABC Zone............................... 165
Memory Initialize .................... 166
The QY22 As A Tone
?
Generator/ABC Expander
As a Tone generator Module . 168
As an ABC Expander ............. 170
Appendix ............................. 171
[
Voice List................................ 172
Drum Kit List........................... 176
Preset Pattern List.................. 180
ABC Fingering Chart .............. 182
Troubleshooting...................... 184
Error Messages...................... 186
Specifications ......................... 188
Index..................................... 190
. 167
Z
X
C
V
B
N
M
<
>
?
[
.........
.........
.........
.........
.........
.........
.........
.........
.........
.........
.........
Index
......
Page 6

Page 7

Precautions
Your QY22 will give you years of reliable service if you follow the simple rules given below:
■ Location
Do not expose the instrument to the following
conditions to avoid deformation, discoloration,
or more serious damage.
• Direct sunlight (e.g. near a window).
• High temperatures (e.g. near a heat source,
outside, or in a car during the daytime).
• Excessive humidity.
• Excessive dust.
• Strong vibration.
■ Power Supply
• Turn the power switch OFF when the instrument is not in use.
• If you use an AC power adaptor, unplug the
adaptor from the AC outlet if the instrument is
not to be used for an extended period of time.
• Unplug the AC power adaptor during electric
storms.
4
• • • • • • • • • • • • • • • • • • • • • • • • • • • • • • • • • • • • • • • • • • • • • • • • • • • • • • • • • • • • • • • • • • • • • • • • • • • • • • • • • • • • • • • • • • • • • • • • • • • • • • • • • • • • • • • • • • • • • • • • • • • • • • • • • • • •
• Avoid plugging an AC power adaptor used with
the QY22 into the same AC outlet as appliances with high power consumption, such as
electric heaters or ovens. Also avoid using
multi-plug adaptors since these can result in
reduced sound quality and possibly damage.
■ Turn Power OFF When Making Connections
• To avoid damage to the instrument and other
devices to which it is connected (a sound system, for example), turn the power switches of all
related devices OFF prior to connecting or disconnecting audio and MIDI cables.
■ Handling and Transport
• Never apply excessive force to the controls,
connectors or other parts of the instrument.
• Always unplug cables by gripping the plug
firmly, not by pulling on the cable.
• Disconnect all cables before moving the instrument.
Page 8
Precautions
• Physical shocks caused by dropping, bumping,
or placing heavy objects on the instrument can
result in scratches and more serious damage.
■ Cleaning
• Clean the cabinet and panel with a dry soft
cloth.
• A slightly damp cloth may be used to remove
stubborn grime and dirt.
• Never use cleaners such as alcohol or thinner.
• Avoid placing vinyl objects on top of the instrument (vinyl can stick to and discolor the surface).
■ Electrical Interference
• This instrument contains digital circuitry and
may cause interference if placed too close to
radio or television receivers. If this occurs,
move the instrument further away from the affected equipment.
■ Data Backup
• The QY22 contains a special long-life battery
that retains the contents of its internal RAM
memory even when the power is turned OFF.
The backup battery should last for several
years. When the backup battery needs to be
replaced “Backup Batt. Low!” will appear on the
display when the power is turned on. When this
happens, have the backup battery replaced by
qualified Yamaha service personnel. DO NOT
ATTEMPT TO REPLACE THE BACKUP BATTERY YOURSELF!
• Internal memory data can be corrupted due to
incorrect operation. We recommend that you
use the QY22 MIDI bulk dump utility (see page
163 for details) to transfer important data to a
MIDI data recorder such as the Yamaha MDF2
for safe long-term storage. Yamaha cannot be
held responsible for data loss caused by battery
failure or improper operation of the QY22!
■ Service and Modification
• The QY22 contains no user serviceable parts.
Opening it or tampering with it in anyway can
lead to irreparable damage and possibly electric
shock. Refer all servicing to qualified YAMAHA
personnel.
YAMAHA is not responsible for damage caused by
improper handling or operation.
• • • • • • • • • • • • • • • • • • • • • • • • • • • • • • • • • • • • • • • • • • • • • • • • • • • • • • • • • • • • • • • • • • • • • • • • • • • • • • • • • • • • • • • • • • • • • • • • • • • • • • • • • • • • • • • • • • • • • • • • • • • • • • • • • • • •
5
Page 9
About This Manual
The following simple icons are used throughout this manual to draw attention to important
points and information where necessary. The icons also make it easier to differentiate between information that you should read immediately and information that can be skipped
until later, hopefully helping you to become familiar with the QY22 in the quickest, most efficient manner possible.
6
CAUTION
This icon warns of possible hardware
damage, software malfunction, or any other
serious problem that may occur due to im-
MUSICAL
NOTE
Suggestions as to how a feature or function can be applied musically are identified
by this icon.
proper operation or set up.
IMPORTANT
This icon marks information that you
must read — i.e. important steps or procedures that are essential for proper, efficient,
or easy operation.
HINT
Hints or ideas that are not specifically
musical but may make operation easier or
more interesting are marked by the lightbulb icon.
The magnifying-glass icon indicates in-
formation that may not be essential for gen-
DETAIL
eral operation, but is a more detailed explanation of a feature, a description of the
principle involved, etc. You can skip this
information if full details are not required
immediately.
• • • • • • • • • • • • • • • • • • • • • • • • • • • • • • • • • • • • • • • • • • • • • • • • • • • • • • • • • • • • • • • • • • • • • • • • • • • • • • • • • • • • • • • • • • • • • • • • • • • • • • • • • • • • • • • • • • • • • • • • • • • • • • • • • • • •
Page 10
The QY22:
What It Is & What It Can Do
What It Is .....................................................................8
Voice Mode .............................................................. 9
Song Mode...............................................................9
Pattern Mode ......................................................... 11
What It Can Do......................................................... 12
1
• • • • • • • • • • • • • • • • • • • • • • • • • • • • • • • • • • • • • • • • • • • • • • • • • • • • • • • • • • • • • • • • • • • • • • • • • • • • • • • • • • • • • • • • • • • • • • • • • • • • • • • • • • • • • • • • • • • • • • • • • • • • • • • • • • • •
7
Page 11

1
The QY22: What It Is & What It Can Do
What It Is …
The QY22 is a complete music production system with tone generator, sequencer, and autoaccompaniment capability all integrated with a sophisticated control interface. It has 3
modes that provide access to its 3 main functional blocks: the VOICE mode, the SONG
mode, and the PATTERN mode.
QY22 Modes
SONG MODE
8 tracks: 4 sequencer tracks
+ 4 accompaniment tracks.
VOICE MODE
AWM tone generator with
128 voices & 8 drum kits.
PATTERN MODE
Patterns for SONG mode
accompaniment tracks +
ABC auto-accompaniment.
8
• • • • • • • • • • • • • • • • • • • • • • • • • • • • • • • • • • • • • • • • • • • • • • • • • • • • • • • • • • • • • • • • • • • • • • • • • • • • • • • • • • • • • • • • • • • • • • • • • • • • • • • • • • • • • • • • • • • • • • • • • • • • • • • • • • • •
SOUND
OUTPUT
Page 12
1
The QY22: What It Is & What It Can Do
VOICE Mode ————————————————————————————
The QY22’s internal AWM tone generator provides full General
MIDI Level 1 compatibility with 128 top-quality General MIDI
voices plus 8 complete drum kits with different drum and percussion
instruments assigned to different notes. You can assign any of these
voices to the internal sequencer tracks (➪ page 38), or play them directly from an external keyboard or other MIDI controller via the
MIDI interface (➪ page 168).
See the Appendix (page 172) for a complete list of the QY22 voices.
DETAIL
SONG Mode ————————————————————————————
Think of the QY22 SONG mode as an 8-track tape recorder or 8part score that lets you record different parts of a musical composition
one at a time, and then play them back all together. You can even edit
certain parts after they’ve been recorded to correct mistakes and finetune the overall sound. The QY22 has an internal memory that will
hold up to 20 complete songs. For extra storage capacity you can use
the MIDI bulk dump utility to transmit the song data to a MIDI data
recorder such as the Yamaha MDF2 (➪ page 163).
The SONG mode’s 8 tracks are actually divided into 2 4-track
groups: tracks 1 through 4 are the sequencer tracks, while the remaining 4 tracks are the accompaniment tracks. The difference is
described below.
• • • • • • • • • • • • • • • • • • • • • • • • • • • • • • • • • • • • • • • • • • • • • • • • • • • • • • • • • • • • • • • • • • • • • • • • • • • • • • • • • • • • • • • • • • • • • • • • • • • • • • • • • • • • • • • • • • • • • • • • • • • • • • • • • • • •
9
Page 13

1
The QY22: What It Is & What It Can Do
● The Sequencer Tracks
SONG Mode Tracks
Sequencer track 1 (“TR1”)
Sequencer
tracks.
Accomp.
tracks
Sequencer track 2 (“TR2”)
Sequencer track 3 (“TR3”)
Sequencer track 4 (“TR4”)
Accompaniment chord 1 (“C1”)
Accompaniment chord 2 (“C2”)
Accompaniment bass (“Ba”)
Accompaniment drums (“Dr”)
● The Accompaniment
Tracks
The QY22 sequencer has 4 “normal” sequencer tracks to
which you can individually assign any of the 128 internal
voices (or 8 drum kits if desired), and record just about anything you like either via the QY22’s own micro keyboard or
an external keyboard connected to the QY22 MIDI IN connector. You can use the real-time record mode (➪ page 109) so
that the QY22 records exactly what you play as you play it, or
the step record mode (➪ page 115) in which notes can be entered one at a time. The step record mode lets you record extremely fast or complex passages that would be impossible to
play in real time.
The remaining four tracks are dedicated to producing accompani-
ment: the chord 1 and chord 2 tracks, a bass track, and a drum
track. The accompaniment tracks differ from the sequencer tracks in
2 ways:
1. Accompaniments are produced by specifying a sequence of pat-
terns to be played rather than by recording individual notes or
chords (➪ page 52). The QY22 has 100 preset patterns that you
can simply select and use, and can store up to 100 original patterns you create in the PATTERN mode (➪ page 78).
10
• • • • • • • • • • • • • • • • • • • • • • • • • • • • • • • • • • • • • • • • • • • • • • • • • • • • • • • • • • • • • • • • • • • • • • • • • • • • • • • • • • • • • • • • • • • • • • • • • • • • • • • • • • • • • • • • • • • • • • • • • • • • • • • • • • • •
Page 14

1
The QY22: What It Is & What It Can Do
2. The accompaniment tracks feature Yamaha’s advanced ABC
(Auto Bass Chord) auto-accompaniment system (➪ page 47).
Of course, you can create accompaniments without using ABC
if you like.
PATTERN Mode ——————————————————————————
The QY22 PATTERN mode produces the accompaniment patterns
that are used by the SONG mode accompaniment tracks. The best of
the QY20’s preset patterns have been incorporated into the QY22’s
preset patterns as well as some powerfully new patterns created especially for the QY22. 100 preset patterns are provided (each with 6
variations: Intro, Normal, Variation, Fill-in 1, Fill-in 2, and Ending)
that you can simply select and use to create accompaniments in a
wide variety of styles (➪ page 42). In the PATTERN mode you can
also record entirely original patterns that you’ll later string together in
the SONG mode to create a complete accompaniment track (➪ page
52). The ABC auto-accompaniment feature can be applied to your
own patterns. The QY22 can store up to 100 original patterns, and
you can use the MIDI bulk dump utility to transmit pattern data to a
MIDI data recorder such as the Yamaha MDF2 if you want extra storage capacity (➪ page 163).
See the Appendix (page 180) for a complete list of the preset patterns.
DETAIL
• • • • • • • • • • • • • • • • • • • • • • • • • • • • • • • • • • • • • • • • • • • • • • • • • • • • • • • • • • • • • • • • • • • • • • • • • • • • • • • • • • • • • • • • • • • • • • • • • • • • • • • • • • • • • • • • • • • • • • • • • • • • • • • • • • • •
11
Page 15
1
The QY22: What It Is & What It Can Do
What It Can Do …
Here are a few ideas on how you can use the QY22. There’s no way we can cover all possibilities, but the ideas presented might help to spark some new and interesting applications.
● A Super Practice Tool
● Use It As A Drum Machine
12
• • • • • • • • • • • • • • • • • • • • • • • • • • • • • • • • • • • • • • • • • • • • • • • • • • • • • • • • • • • • • • • • • • • • • • • • • • • • • • • • • • • • • • • • • • • • • • • • • • • • • • • • • • • • • • • • • • • • • • • • • • • • • • • • • • • •
Create accompaniments that you can practice with on your guitar,
keyboard, or any other instrument (vocals too, of course). That way
you have the advantage of practicing with a bass line and chords instead of just a metronome or drum machine (➪ page 52).
Use the drum kit voices to record on the sequencer tracks, or record
drum-only patterns in the PATTERN mode that you can later string
together in the SONG mode. You can also use the drum tracks from
the preset patterns (➪ page 75).
Page 16

1
The QY22: What It Is & What It Can Do
● Compose & Arrange
● Serious Music Production
● Use It As a Tone Generator
● Add ABC Capability to Your
MIDI Keyboard
The QY22’s outstanding voices, versatile sequencing capability,
and in-depth editing features make it a perfect tool for trying out musical ideas and arrangements. It’s also a great way to present your
ideas to others (➪ page 108).
Use the QY22 as an adjunct to serious music recording and pro-
duction. It can, for example, be MIDI-clock synchronized to other
MIDI equipment in order to add extra tracks to an arrangement (➪
page 160).
The QY22’s AWM tone generator is in no way a compromise. You
get outstanding AWM sound quality that’s on a par with some of the
finest full-size synthesizers. You can select and play the QY22 voices
remotely from just about any MIDI keyboard, computer, or other controller (➪ page 168).
Use the QY22 as an “ABC expander” for your MIDI keyboard.
Auto-accompaniment can make playing at home more fun, and it can
be a tremendous sound-booster at 1-performer live gigs (➪ page 170).
• • • • • • • • • • • • • • • • • • • • • • • • • • • • • • • • • • • • • • • • • • • • • • • • • • • • • • • • • • • • • • • • • • • • • • • • • • • • • • • • • • • • • • • • • • • • • • • • • • • • • • • • • • • • • • • • • • • • • • • • • • • • • • • • • • • •
13
Page 17
1
The QY22: What It Is & What It Can Do
About General MIDI
The QY22 is fully compatible with the General MIDI System Level 1 Standard.
As you probably know, MIDI (Musical Instrument Digital Interface) makes it possible for various electronic musical instruments and other devices to “communicate” with
each other. For example, by connecting a sequencer to a synthesizer, you can play back
a songs data on the sequencer using the voices of the synthesizer.
But until General MIDI came along, the problem has been that voice assignments
had never been standardized. So, if you were to create a song using tone generator A’s
piano voice and then play it back on tone generator B, it might be played back as an
organ voice. This is because each company has used it’s own voice assignments in it’s
products.
The General MIDI Level 1 Standard was developed to solve this problem. The most
important feature of General MIDI is the standardization of voices. This means that a
song recorded in the General MIDI format can be played back on any General MIDI
compatible tone generator and sound just as the composer had intended.
GENERAL
14
• • • • • • • • • • • • • • • • • • • • • • • • • • • • • • • • • • • • • • • • • • • • • • • • • • • • • • • • • • • • • • • • • • • • • • • • • • • • • • • • • • • • • • • • • • • • • • • • • • • • • • • • • • • • • • • • • • • • • • • • • • • • • • • • • • • •
Page 18

Setting Up:
Power & Connections
Power Supply..........................................................16
Using Batteries......................................................16
2
When to Replace the Batteries .....................................
Using a Power Adaptor......................................... 18
Setting Up Your System....................................... 19
The Connectors .................................................... 19
Audio Connections................................................ 21
MIDI Connections ................................................. 22
• • • • • • • • • • • • • • • • • • • • • • • • • • • • • • • • • • • • • • • • • • • • • • • • • • • • • • • • • • • • • • • • • • • • • • • • • • • • • • • • • • • • • • • • • • • • • • • • • • • • • • • • • • • • • • • • • • • • • • • • • • • • • • • • • • • •
17
15
Page 19
2
Setting Up: Power & Connections
Power Supply
Your QY22 will run either from batteries or an optional AC adaptor. Follow the instructions
below according to the power source you intend to use.
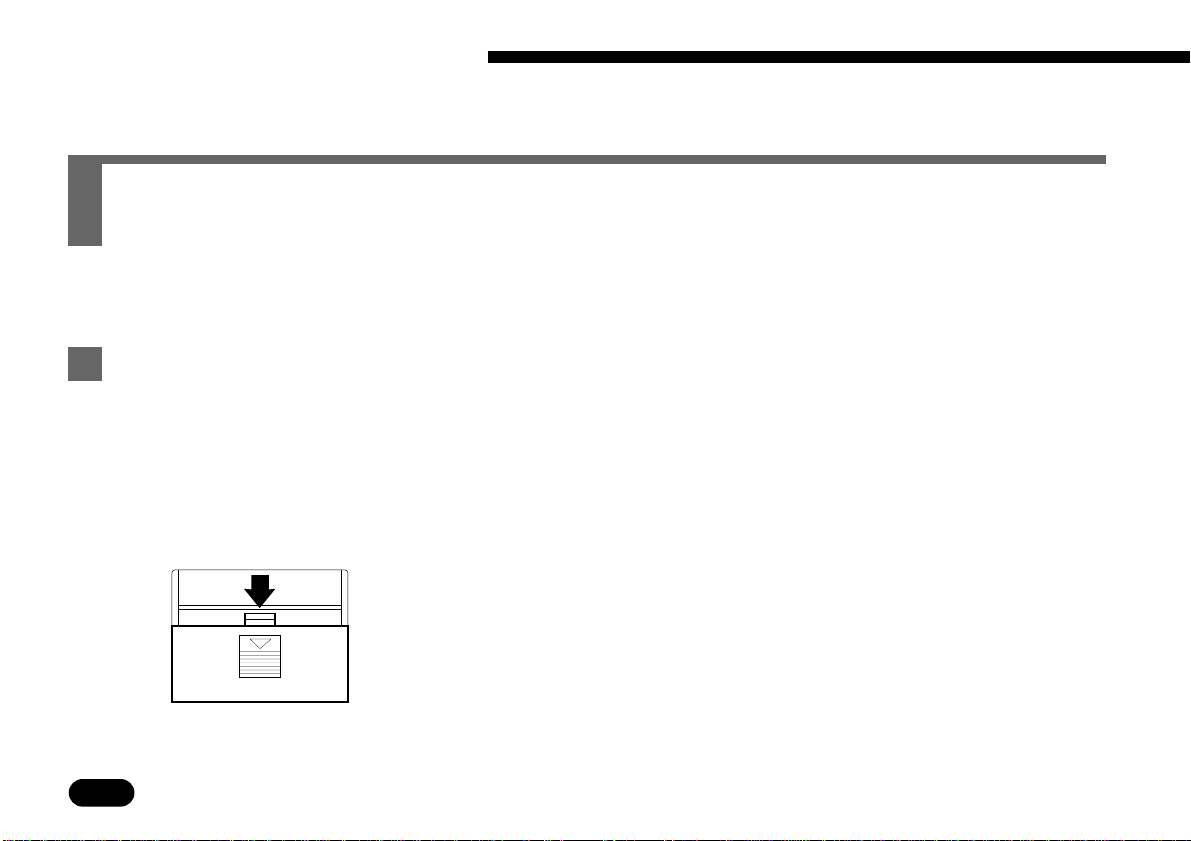
Using Batteries ——————————————————————————
Six 1.5V AA size (SUM-3 or R6P) or equivalent alkaline batteries
must first be installed in the battery compartment.
16
Open Battery
Z
Compartment Cover
• • • • • • • • • • • • • • • • • • • • • • • • • • • • • • • • • • • • • • • • • • • • • • • • • • • • • • • • • • • • • • • • • • • • • • • • • • • • • • • • • • • • • • • • • • • • • • • • • • • • • • • • • • • • • • • • • • • • • • • • • • • • • • • • • • • •
Open the battery compartment cover — located on the instrument’s
bottom panel — by pressing down on the grooved section of the cover
and sliding in the direction of the arrow, as shown in the illustration.
Page 20

2
Setting Up: Power & Connections
Insert Batteries
X
Insert the six batteries, being careful to follow the polar-
ity markings on the bottom panel.
Replace Cover
C
Replace the compartment cover, making sure that it locks firmly in
place.
When to Replace the Batteries————————————————————
When the batteries run down and are no longer able to operate the
QY22, the sound may become distorted and the display shown to the
left will appear.
When this display appears, replace the batteries with a complete set
of six new batteries. NEVER mix old and new, or different types of
batteries (e.g. alkaline and manganese)!
To prevent possible damage due to battery leakage, remove the batteries
from the instrument if it is not to be used for an extended period of time.
CAUTION
• • • • • • • • • • • • • • • • • • • • • • • • • • • • • • • • • • • • • • • • • • • • • • • • • • • • • • • • • • • • • • • • • • • • • • • • • • • • • • • • • • • • • • • • • • • • • • • • • • • • • • • • • • • • • • • • • • • • • • • • • • • • • • • • • • • •
17
Page 21
2
Setting Up: Power & Connections
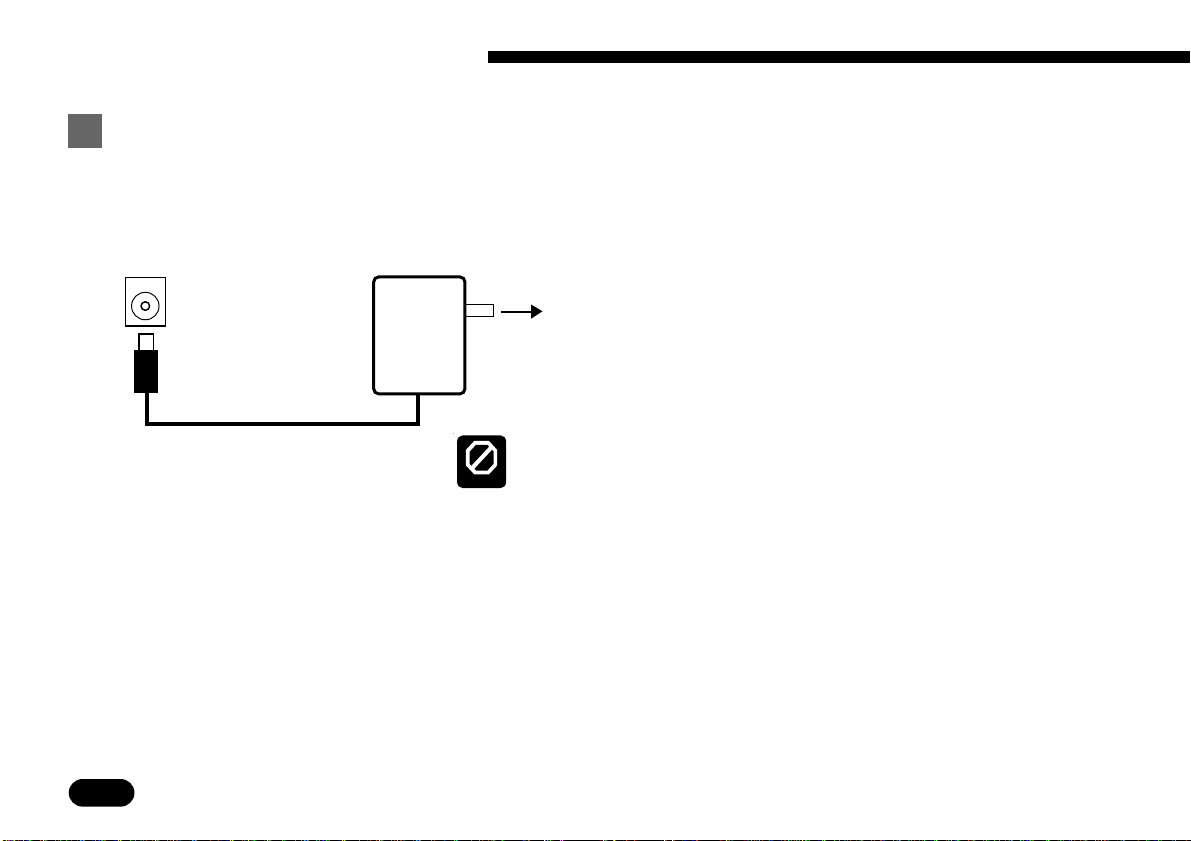
Using a Po wer Adaptor ———————————————————————
Plug the DC output cable from a Yamaha PA-3, PA-4, or PA-40
AC Adaptor (available from your Yamaha dealer) into the DC IN jack
on the rear panel, then plug the adaptor into a convenient wall AC
DC IN
power socket.
18
PA-3
PA-4
PA-40
CAUTION
• • • • • • • • • • • • • • • • • • • • • • • • • • • • • • • • • • • • • • • • • • • • • • • • • • • • • • • • • • • • • • • • • • • • • • • • • • • • • • • • • • • • • • • • • • • • • • • • • • • • • • • • • • • • • • • • • • • • • • • • • • • • • • • • • • • •
AC power socket.
Do not attempt to use an AC adaptor other than the specified unit or an
appropriate replacement provided by your Yamaha dealer to power the
QY22. The use of an incompatible adaptor may cause irreparable damage to the QY22, and might pose a serious shock hazard!
Be sure to unplug the AC adaptor from the AC mains socket when the
QY22 is not in use.
Page 22

VOLUMEMIN MAX PHONES
2
Setting Up: Power & Connections
Setting Up Your System
What you will connect the QY22 to, and what you will connect to the QY22, will depend entirely on your individual requirements, and it would be impossible to cover all possibilities
here. A few examples are provided below to help you get started.
The Connectors ——————————————————————————
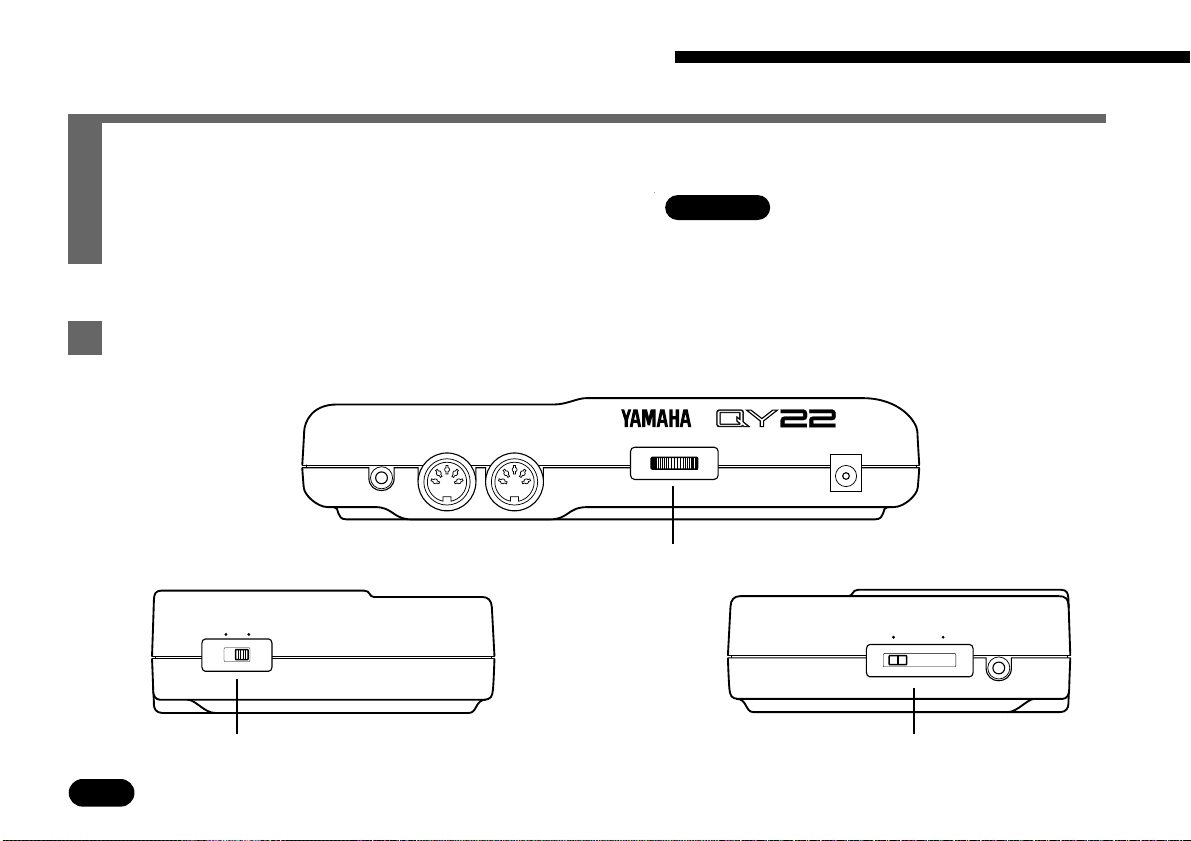
Rear Panel
CONTRAST DC INOUT —— MIDI —— INLINE OUT
3
• • • • • • • • • • • • • • • • • • • • • • • • • • • • • • • • • • • • • • • • • • • • • • • • • • • • • • • • • • • • • • • • • • • • • • • • • • • • • • • • • • • • • • • • • • • • • • • • • • • • • • • • • • • • • • • • • • • • • • • • • • • • • • • • • • • •
21
Right Side Panel
4
19
Page 23
2
Setting Up: Power & Connections
1 DC IN Jack
2 MIDI IN & OUT Connectors
3 LINE OUT Jack
4 PHONES Jack
This jack is only used when you are powering the QY22 from an
optional AC adaptor instead of batteries. The DC output cable from
an optional Yamaha PA-3, PA-4, or PA-40 AC Power Adaptor is
plugged in here.
The batteries are automatically disconnected when a plug is inserted into
the DC IN jack.
DETAIL
If you plan to use a MIDI keyboard or other instrument to play and
program the QY22, it should be connected to QY22 MIDI IN connector (see “MIDI Connections,” below). The MIDI OUT connector can
be connected to an external tone generator if you want to drive external voices from the QY22 sequencer, or a MIDI data recorder such as
the Yamaha MDF2 if you want to store your songs and patterns to
floppy disk (➪ page 163).
This miniature stereo phone plug delivers a line-level stereo output
signal from the QY22 for connection to a stereo sound system (see
“Audio Connections,” below). The output level is adjusted via the
VOLUME control on the right side panel.
Any pair of stereo headphones with the miniature stereo phone plug
can be plugged in here for convenient monitoring. The PHONES output level is adjusted via the VOLUME control on the right side panel.
20
• • • • • • • • • • • • • • • • • • • • • • • • • • • • • • • • • • • • • • • • • • • • • • • • • • • • • • • • • • • • • • • • • • • • • • • • • • • • • • • • • • • • • • • • • • • • • • • • • • • • • • • • • • • • • • • • • • • • • • • • • • • • • • • • • • • •
Page 24
2
Setting Up: Power & Connections
Audio Connections —————————————————————————
LINE OUT
LR
Stereo sound system
The simplest way to monitor the QY22 sound is via a pair of stereo
headphones (miniature stereo phone plug type) plugged into the
PHONES jack. If you want to use an external stereo sound system,
however, use the LINE OUT jack and the supplied “Y” cable (miniature stereo phone plug to dual RCA pin plugs). The white RCA pin
plug goes to the left-channel input of your stereo sound system and
the red plug goes to the right-channel input.
Make sure that both the QY22 and your sound system are turned OFF
when making connections.
CAUTION
• • • • • • • • • • • • • • • • • • • • • • • • • • • • • • • • • • • • • • • • • • • • • • • • • • • • • • • • • • • • • • • • • • • • • • • • • • • • • • • • • • • • • • • • • • • • • • • • • • • • • • • • • • • • • • • • • • • • • • • • • • • • • • • • • • • •
21
Page 25
2
Setting Up: Power & Connections
MIDI Connections —————————————————————————
OUT —— MIDI —— IN
MIDI OUT
OUT —— MIDI —— IN
Although the QY22 can be played and programmed from the built-in micro
keyboard, it can also be connected to an external keyboard or computer for added
benefits. An external MIDI keyboard connected to the MIDI IN connector provides the added advantages of standard keyboard size and key velocity sensitivity
(if your keyboard has a velocity-sensitive keyboard). Connected to a computer
with sequencing software, the QY22’s high quality Voices and Multi-timbral
capabilities can easily expand your home studio setup. Connect the MIDI OUT
connector of the keyboard, or other control device, to the MIDI IN connector of
the QY22, and make sure that your keyboard is set to transmit on the appropriate
MIDI channel. The QY22 MIDI assignments are as follows:
MIDI Channel Voice
1 ........................ Sequencer track TR1
2 ........................ Sequencer track TR2
3 ........................ Sequencer track TR3
4 ........................ Sequencer track TR4
5 ........................ Accompaniment track C1 (Chord 1)
6 ........................ Accompaniment track C2 (Chord 2)
7 ........................ Accompaniment track Ba (Bass)
10 ...................... Accompaniment track Dr (Drums)
This simply means that if your keyboard transmits on MIDI channel 1, it will control the QY22 voice that is currently assigned to sequencer track 1, and so on. See
page 38 for instructions on how to assign different voices to the SONG mode tracks.
22
with
MIDI Interface
• • • • • • • • • • • • • • • • • • • • • • • • • • • • • • • • • • • • • • • • • • • • • • • • • • • • • • • • • • • • • • • • • • • • • • • • • • • • • • • • • • • • • • • • • • • • • • • • • • • • • • • • • • • • • • • • • • • • • • • • • • • • • • • • • • • •
Data received on MIDI channels other than those listed above also produce sound,
according to the received MIDI program change messages (see the “MIDI Data
DETAIL
Format” booklet). Also, if the QY22 is to be used as a General MIDI tone generator,
the MIDI Ctl (MIDI Control) parameter should be set to “Off” (See page 160)
Page 26
Getting to Know the QY22:
How the Controls W ork
The Controls ............................................................... 24
Play the Demo ............................................................ 34
3
• • • • • • • • • • • • • • • • • • • • • • • • • • • • • • • • • • • • • • • • • • • • • • • • • • • • • • • • • • • • • • • • • • • • • • • • • • • • • • • • • • • • • • • • • • • • • • • • • • • • • • • • • • • • • • • • • • • • • • • • • • • • • • • • • • • •
23
Page 27
3
Getting to Know the QY22: How the Controls Work
The QY22 has fairly simple, consistent control interface that, once understood, makes operation fast and easy, no matter what operation you are perfor ming. If you read through this
section carefully, and try out the procedures in the
Try This:
sections, you should have no
problem accessing and operating the QY22’s many advanced features.
The Controls————————————————————————————
Rear Panel
CONTRAST DC INOUT —— MIDI —— INLINE OUT
24
Left Side Panel
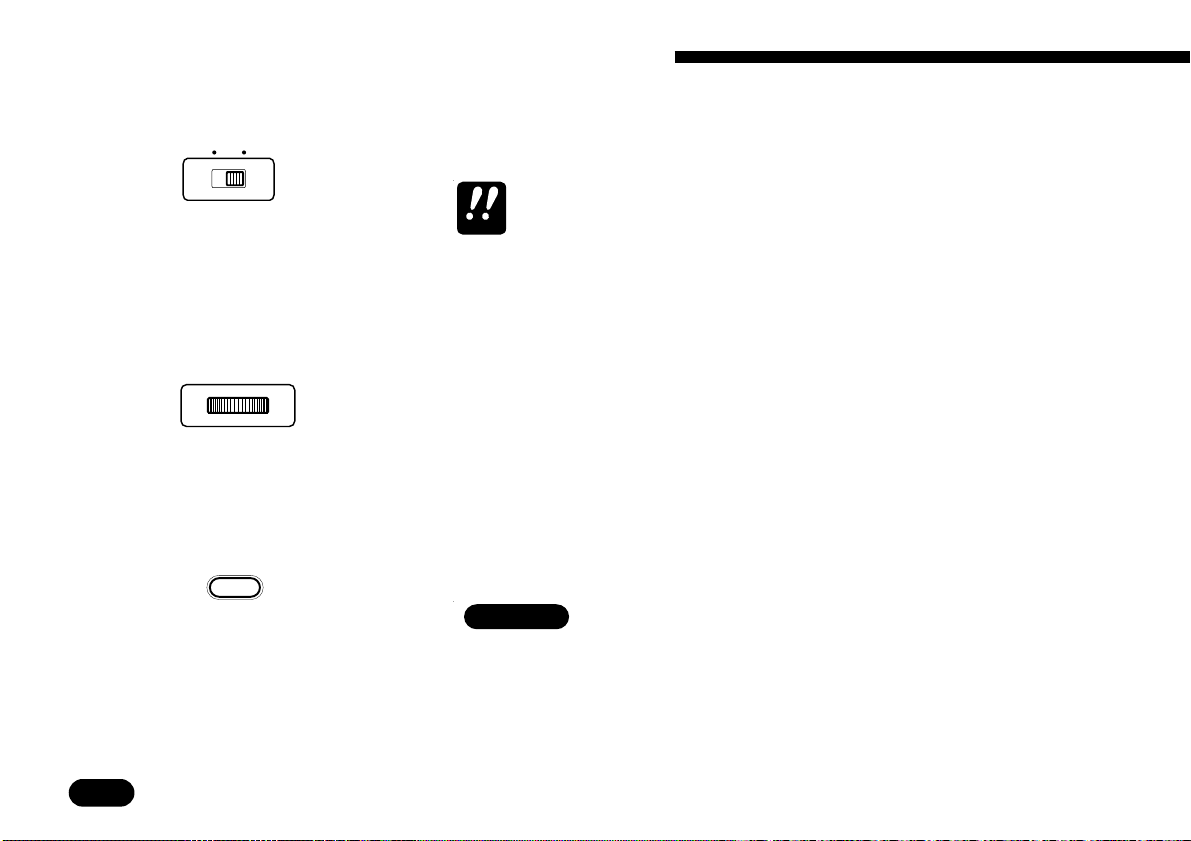
ON OFF POWER
2
Right Side Panel
VOLUMEMIN MAX PHONES
1 !
• • • • • • • • • • • • • • • • • • • • • • • • • • • • • • • • • • • • • • • • • • • • • • • • • • • • • • • • • • • • • • • • • • • • • • • • • • • • • • • • • • • • • • • • • • • • • • • • • • • • • • • • • • • • • • • • • • • • • • • • • • • • • • • • • • • •
Page 28

3
Getting to Know the QY22: How the Controls Work
0
Front Panel
OCT
DOWN
BASS
E FGABCD
INTRO NORMAL VARI. FILL1 FILL2 ENDING
OCT
UP
–
1
NO YES
( 11)
7
( 5)
7
add9
736
ENTER
+
1
7sus4
– – –
dim
sus4
CC
2
MUSIC SEQUENCER
A
G
F
G
B
A7
GENERAL
D
C
E
D
add9
MM76 7 m7m6m
MODE
MENU
( 13)
(#9)
7
7
( 13 )
(b9)
7
M9 aug 9 m9 mM7
4
5
8
9
(11)
m7
(b5)m7(b5)
m7
• • • • • • • • • • • • • • • • • • • • • • • • • • • • • • • • • • • • • • • • • • • • • • • • • • • • • • • • • • • • • • • • • • • • • • • • • • • • • • • • • • • • • • • • • • • • • • • • • • • • • • • • • • • • • • • • • • • • • • • • • • • • • • • • • • • •
25
Page 29
3
Getting to Know the QY22: How the Controls Work
1 POWER Switch
ON OFF POWER
2 LCD Display &
CONTRAST Control
CONTRAST
3 [MODE] Key
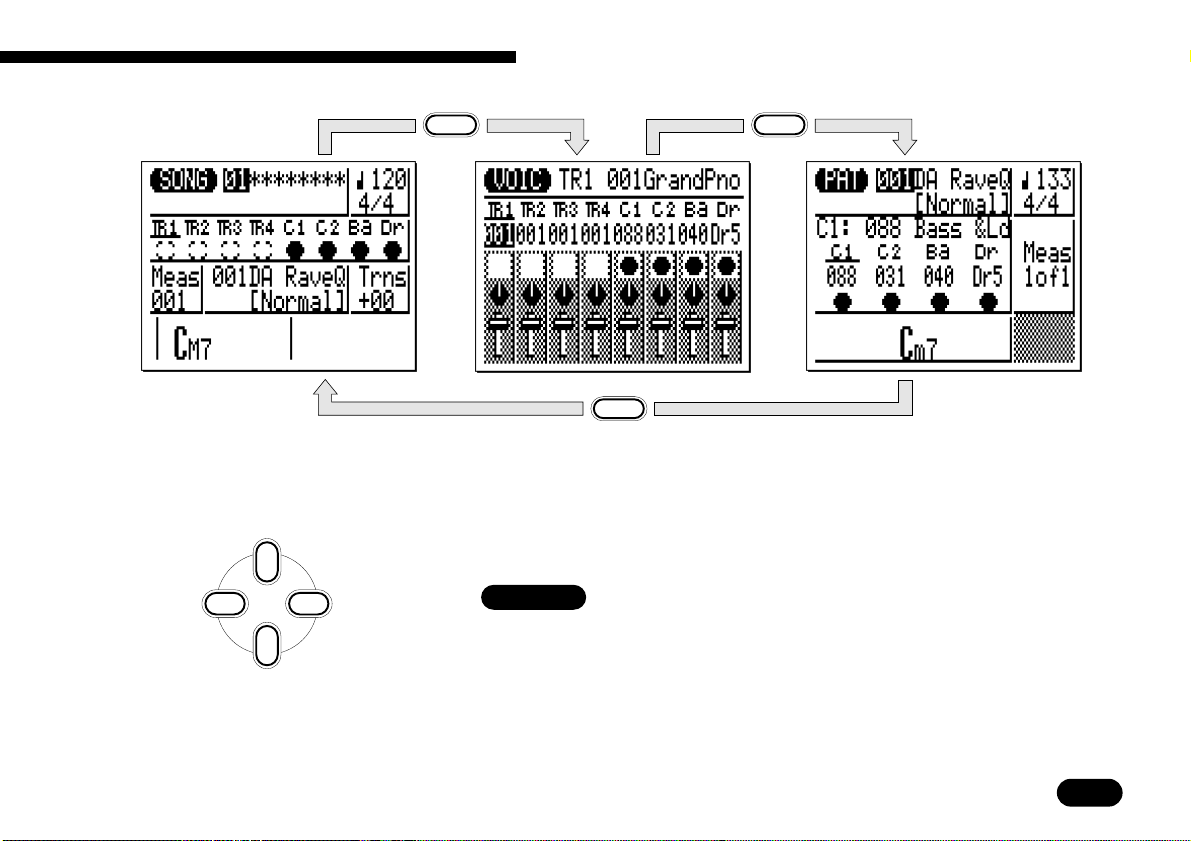
MODE
Slide to the “ON” position to turn the QY22 on, and to the “OFF”
position to turn it off.
Always turn the power switch off when not using your QY22.
IMPORTANT
This large multi-function liquid crystal display panel shows all parameters and prompts you need to operate the QY22 with optimum
ease and efficiency.
Use the CONTRAST control on the rear panel to achieve the best
display visibility (LCD visibility varies greatly with viewing angle
and lighting).
Use this key to switch between the QY22’s SONG, VOICE, and
PATTERN modes.
Try This:
Turn your QY22 on (the power switch is on the left
side), then press the [MODE] key a few times and
watch how the display changes. The [MODE] key calls
the SONG, VOICE, and PATTERN mode displays in
sequence.
26
• • • • • • • • • • • • • • • • • • • • • • • • • • • • • • • • • • • • • • • • • • • • • • • • • • • • • • • • • • • • • • • • • • • • • • • • • • • • • • • • • • • • • • • • • • • • • • • • • • • • • • • • • • • • • • • • • • • • • • • • • • • • • • • • • • • •
Page 30
3
Getting to Know the QY22: How the Controls Work
4 Cursor Keys
Up
Left Right
Down
MODE
MODE
MODE
These 4 keys move the “cursor” around the display screen, highlighting the various parameters that are available for editing (the
QY22 cursor appears as a dark block with inverse characters).
Try This:
Select the SONG mode display (use the [MODE] key,
as described above), then try using the cursor keys to
move the cursor around the screen.
• • • • • • • • • • • • • • • • • • • • • • • • • • • • • • • • • • • • • • • • • • • • • • • • • • • • • • • • • • • • • • • • • • • • • • • • • • • • • • • • • • • • • • • • • • • • • • • • • • • • • • • • • • • • • • • • • • • • • • • • • • • • • • • • • • • •
27
Page 31

3
Getting to Know the QY22: How the Controls Work
[
5
−1/NO] and [+1/YES
Keys
–
1
NO YES
]
These keys are used to edit (change the value of) the parameter at
which the cursor is currently located. The [−1/NO] key decrements
(decreases stepwise) the value of the selected parameter, while the
+
1
[
+1/YES] key increments (increases stepwise) the parameter. Press
either key briefly to decrement or increment the parameter by one, or
hold the key for continuous decrementing of incrementing in the
specified direction.
The [−1/NO] and [+1/YES] keys are also used to respond to “Are
you sure?” prompts when they appear. Press [+1/YES] to go ahead
with the operation, or [−1/NO] to cancel.
For even faster decrementing or incrementing, press the opposite increment/decrement key while holding the key corresponding to the direction
HINT
you want to increment/decrement in.
Try This:
Select the SONG mode display (use the [MODE] key,
as described above), use the cursor keys to select the
transpose parameter (“Trns” on the display), then try
using the [−1/NO] and [+1/YES] keys to change its
value. Set it back to “+00” before continuing.
m
This is the transpose
parameter.
28
Use
• • • • • • • • • • • • • • • • • • • • • • • • • • • • • • • • • • • • • • • • • • • • • • • • • • • • • • • • • • • • • • • • • • • • • • • • • • • • • • • • • • • • • • • • • • • • • • • • • • • • • • • • • • • • • • • • • • • • • • • • • • • • • • • • • • • •
–
NO YES
+
1
1
to set.
Page 32

[
6
MENU] and Function
Keys
MENU
3
Getting to Know the QY22: How the Controls Work
The [MENU] key calls a menu of functions or sub-modes that can
be accessed from the current QY22 mode, and the function keys (the
small round yellow keys) select the corresponding item from the
menu that appears on the display.
Try This:
Select the SONG mode display (use the [MODE] key,
as described above), then press the [MENU] key. You
should see the menu shown to the left.
m
Press to see
job list.
Next press the top function key (the one immediately
to the right of “Job” on the menu) to call the SONG
mode Job List:
Move cursor up.
m
You can now use the cursor keys (up and down only)
to select the various items in the Job List. Leave the
display as it is for now, and read about the [ENTER
key, below.
m
Move cursor down.
• • • • • • • • • • • • • • • • • • • • • • • • • • • • • • • • • • • • • • • • • • • • • • • • • • • • • • • • • • • • • • • • • • • • • • • • • • • • • • • • • • • • • • • • • • • • • • • • • • • • • • • • • • • • • • • • • • • • • • • • • • • • • • • • • • • •
]
29
Page 33

3
Getting to Know the QY22: How the Controls Work
7 [ENTER] Key
ENTER
8 Sequencer Keys
In addition to “entering” chords in SONG and PATTERN modes
(which we’ll learn about later), the [ENTER] key is used to “enter” a
selected menu function.
Try This:
Assuming that you’ve gone through the “Try this:”
procedure for the [MENU] and Function keys, above,
you should now have the SONG mode Job List on your
QY22 screen. Use the cursor keys (up and down only)
to select job number 2 “Copy Meas”. Now press the
[
ENTER] key to actually engage the copy measure job
— the display should appear as shown to the left.
Since we don’t really want to use the copy measure
job, press the [MODE] key to go back to the SONG
mode. You could also press the top function key (next
to “Exit >” on the display) to first move back to the
Job List, and then again to return to the SONG mode.
The sequencer keys control recording and playback in the SONG
and PATTERN modes, and allow you to locate a specific measure
within a song or pattern. Their layout and functions are similar to the
transport controls on a tape recorder.
30
• • • • • • • • • • • • • • • • • • • • • • • • • • • • • • • • • • • • • • • • • • • • • • • • • • • • • • • • • • • • • • • • • • • • • • • • • • • • • • • • • • • • • • • • • • • • • • • • • • • • • • • • • • • • • • • • • • • • • • • • • • • • • • • • • • • •
Page 34

3
Getting to Know the QY22: How the Controls Work
RECORD READY
Press this key to engage the
record ready mode. You have to
press START/STOP to actually
start recording.
GO TO TOP
This key takes you straight to the
first measure ("top") of the current
song or pattern.
9 Micro Keyboard
A
G
F
G
E FGABCD
INTRO NORMAL VARI. FILL1 FILL2 ENDING
B
A7
C
D
MOVE BACK
Press briefly to move back one measure,
or hold for continuous scrolling.
MOVE FORWARD
Press briefly to move forward
one measure, or hold for
continuous scrolling.
START/STOP
Press to start or stop recording
or playback.
This tiny 2-octave keyboard makes it possible to program the QY22
anywhere, anytime, without having to connect an external MIDI keyboard. It’s even polyphonic, so you can directly enter chords as well
as single notes. The only thing it lacks is velocity sensitivity. The
QY22 does, however, accept velocity information from an external
MIDI keyboard.
( 9)
D
E
7
( 9)
7
7
7
( 5)
( 13 )
7
7sus4
– – –
dim
sus4
CC
( 11)
( 13)
When programming the
accompaniment tracks the
micro-keyboard is also used
(11)
add9
M9 aug 9 m9 mM7
MM76 7 m7m6m
add9
m7
m7
to specify the chord roots and
( 5)
types to be entered.
• • • • • • • • • • • • • • • • • • • • • • • • • • • • • • • • • • • • • • • • • • • • • • • • • • • • • • • • • • • • • • • • • • • • • • • • • • • • • • • • • • • • • • • • • • • • • • • • • • • • • • • • • • • • • • • • • • • • • • • • • • • • • • • • • • • •
31
Page 35

3
Getting to Know the QY22: How the Controls Work
Sequencer
track 1.
m
0 Octave Keys
OCT
OCT
DOWN
UP
BASS
Try This:
In the SONG mode, use the cursor keys to place the
cursor at the sequencer track 1 position (“TR1” on the
display).
Now play the micro keyboard. You should hear the
voice that is currently assigned to sequencer track 1.
Also try moving the cursor to the accompaniment bass
(“Ba”) and drum (“Dr”) tracks and playing the currently assigned bass and drum voices. In the SONG
mode, the micro keyboard plays the voice assigned to
the currently selected track (unless you’re recording the
accompaniment chord tracks, in which case it is used to
specify chords).
Since the 2-octave range of the micro-keyboard is not enough for
serious music programming, the [OCT DOWN] and [OCT UP] keys
allow the pitch of the keyboard to be shifted up or down in octave
steps, over a range of 8 octaves. Each time the [OCT DOWN] key is
pressed the pitch of the keyboard is shifted down by one octave, until
the lower limit is reached. The [OCT UP] key shifts the pitch of the
keyboard up in the same way.
32
• • • • • • • • • • • • • • • • • • • • • • • • • • • • • • • • • • • • • • • • • • • • • • • • • • • • • • • • • • • • • • • • • • • • • • • • • • • • • • • • • • • • • • • • • • • • • • • • • • • • • • • • • • • • • • • • • • • • • • • • • • • • • • • • • • • •
Page 36

3
Getting to Know the QY22: How the Controls Work
When recording the accompaniment chord tracks in the step mode,
the [OCT DOWN] key is used to specify the bass note for chords,
while the [OCT UP] key is used to enter syncopated chords.
! VOLUME Control
VOLUMEMIN MAX
The VOLUME control adjusts the volume of the sound delivered
via both the LINE OUT and PHONES jacks. Slide the control toward
“MAX.” to increase the volume or toward “MIN.” to decrease the
volume.
Set the VOLUME control to “MIN.” when connecting the QY22 to a sound
system for the first time, then gradually raise the volume level until the
CAUTION
required listening level is reached. This simple precaution can prevent
unexpectedly high volume levels from damaging your speaker system
(and maybe even your ears!).
• • • • • • • • • • • • • • • • • • • • • • • • • • • • • • • • • • • • • • • • • • • • • • • • • • • • • • • • • • • • • • • • • • • • • • • • • • • • • • • • • • • • • • • • • • • • • • • • • • • • • • • • • • • • • • • • • • • • • • • • • • • • • • • • • • • •
33
Page 37

3
Getting to Know the QY22: How the Controls Work
Play the Demo ———————————————————————————
Once you’ve set up your QY22 and become familiar with the controls, you might like to play back the pre-programmed demonstration
to hear what the QY22 can do.
34
MENU
• • • • • • • • • • • • • • • • • • • • • • • • • • • • • • • • • • • • • • • • • • • • • • • • • • • • • • • • • • • • • • • • • • • • • • • • • • • • • • • • • • • • • • • • • • • • • • • • • • • • • • • • • • • • • • • • • • • • • • • • • • • • • • • • • • • •
From the SONG or VOICE mode display (use the [MODE] key
Z
to select) press the [MENU] key.
Press the function key
X
immediately next to
“DEMO” on the display.
The initial demo display
should appear.
[
Press the
C
repeatedly until stopped.
Press the
V
key to return to the mode from which the demo was engaged.
]
key to start demo playback. The demo will play
[
]
key to stop the demo, then press the [MODE
]
Page 38

The VOICE Mode:
Selecting, Playing, & Assigning
the QY22 Voices & Drums
Try Out the Voices ...................................................... 37
Making Voice-to-Track Assignments .......................... 38
The Mute Buttons........................................................38
The Pan Pots ..............................................................39
The Faders.................................................................. 40
4
• • • • • • • • • • • • • • • • • • • • • • • • • • • • • • • • • • • • • • • • • • • • • • • • • • • • • • • • • • • • • • • • • • • • • • • • • • • • • • • • • • • • • • • • • • • • • • • • • • • • • • • • • • • • • • • • • • • • • • • • • • • • • • • • • • • •
35
Page 39

4
The VOICE Mode: Selecting, Playing, & Assigning the QY22 Voices & Drums
The QY22 has 128 voices and 8 drum kits that can be selected, played, and assigned to the
SONG mode tracks in the VOICE mode. The voice mode also features a graphic on-screen
“mixer” that has mute buttons, pan pots, and faders for each track.
Use the [MODE] key to select the VOICE mode display.
MODE
36
Current track.
m
Voice assigned to current track.
m
m
SONG mode tracks.
Voice numbers.
Pan pots.
• • • • • • • • • • • • • • • • • • • • • • • • • • • • • • • • • • • • • • • • • • • • • • • • • • • • • • • • • • • • • • • • • • • • • • • • • • • • • • • • • • • • • • • • • • • • • • • • • • • • • • • • • • • • • • • • • • • • • • • • • • • • • • • • • • • •
m
m
m
Mute buttons.
m
Faders.
Page 40

4
The VOICE Mode: Selecting, Playing, & Assigning the QY22 Voices & Drums
Try Out the Voices —————————————————————————
Move the cursor to the voice number immediately below “TR1” on
the display (as in the display shown to the left). Note that the name of
the voice currently assigned to TR1 appears in the upper right corner
of the display. Play the micro keyboard and you’ll hear that voice.
In any QY22 mode, the micro keyboard plays the voice assigned to the
currently selected track. A MIDI keyboard connected to the MIDI IN con-
DETAIL
nector, however, will only play the voice assigned to the track that receives on the MIDI channel that the external keyboard is transmitting on:
MIDI channel 1 plays TR1, channel 2 plays TR2, channel 3 plays TR3,
channel 4 plays TR4, channel 5 plays C1, channel 6 plays C2, channel 7
plays Ba, and channel 10 plays Dr. Channel 10 also plays any other track
Use
–
NO YES
voice numbers.
+
1
1
to select
to which a drum voice (“Dr1” through “Dr8”) is assigned.
Use the [+1/YES] key to step through the QY22’s 128 voices (you
can use the [−1/NO] key to step backward, too), trying out each voice
on the keyboard.
Keep incrementing past voice number 128 and you’ll select drum
kits 1 through 8 (“Dr1” through “Dr8” on the display). Try these out
on the keyboard, too.
See the Appendix (page 176) for a complete list of note assignments (i.e.
which drum instruments are assigned to which notes) for all 8 drum kits.
DETAIL
If you’re playing the micro keyboard, use the octave keys to access the
full range of instruments in each drum kit.
HINT
• • • • • • • • • • • • • • • • • • • • • • • • • • • • • • • • • • • • • • • • • • • • • • • • • • • • • • • • • • • • • • • • • • • • • • • • • • • • • • • • • • • • • • • • • • • • • • • • • • • • • • • • • • • • • • • • • • • • • • • • • • • • • • • • • • • •
37
Page 41

4
The VOICE Mode: Selecting, Playing, & Assigning the QY22 Voices & Drums
Making Voice-to-T rac k Assignments —————————————————
When you record accompaniments (➪ page 52) or complete songs (➪
page 108) in the SONG mode, you’ll need to specify which voices are to be
played by which tracks. These assignments are made in the VOICE mode.
To assign voices to the sequencer and accompaniment tracks, simply move
the cursor to the voice number of the desired track, then use the [−1/NO
and [+1/YES] keys to select the voice (or drum kit) for that track.
When a different pattern is selected in the SONG mode, the voice assignments
for that pattern are automatically recalled, overriding any voice assignments
DETAIL
made in the VOICE mode (the pan and volume settings are not changed).
In the VOICE mode, any of the Normal voices (001...128) or Drum voices
(Dr1...Dr8) can be assigned to any of the sequence tracks. However, in the
SONG EDIT mode, only the Normal voices (001...128) can be assigned to
sequencer tracks using the Program Change function. If you want to use a
Drum voice in a sequencer track, use the VOICE mode to assign a Drum voice
to the desired track.
The Mute Buttons —————————————————————————
The mute “buttons” below the voice number for each track can be used to
mute (turn off) the corresponding track. Move the cursor to the appropriate
mute button, then press [+1/YES] to mute that track, or press [−1/NO] to
turn a muted track back on.
The letter “M” appears in the mute buttons of tracks that are muted.
Tracks that do not contain data cannot be muted, and their mute buttons
appear as white rather than dark blocks. In the display to the left, for example, TR1 through TR4 contain no data and are therefore white. The Ba track
has been muted, and the cursor is currently over the C2 track mute button.
]
38
• • • • • • • • • • • • • • • • • • • • • • • • • • • • • • • • • • • • • • • • • • • • • • • • • • • • • • • • • • • • • • • • • • • • • • • • • • • • • • • • • • • • • • • • • • • • • • • • • • • • • • • • • • • • • • • • • • • • • • • • • • • • • • • • • • • •
Page 42

4
The VOICE Mode: Selecting, Playing, & Assigning the QY22 Voices & Drums
–
NO YES
1
m
Mute on.Mute off.
+
1
m
also indicated in the upper right corner of the display (in this example,
“Mute = off” for the C2 track).
The mute buttons are a handy way to simply turn tracks that you don’t
want to hear off. When recording songs or patterns, they also make it
MUSICAL
NOTE
possible to mute a “busy” track that might make it difficult to hear an important accompaniment track.
The Pan Pots ———————————————————————————
Like the pan pots on a mixing console, the VOICE mode pan pots
can be used to position the sound of the corresponding track anywhere from left to right in the stereo sound field. Position the cursor
at the pan pot, then use the [−1/NO] and [+1/YES] keys to set the pan
position. The graphic pan pot will rotate to the corresponding position. The pan positions also have numeric values (1 through 7) that
appear in the upper right corner of the display: “Left 7” is full left and
“Right 7” is full right. In the display to the left, TR3 is panned about
half way to the left (“Left 4”).
Note that the status of the mute button over which the cursor is located is
–
NO YES
1
m
Pan right.Pan left.
+
1
m
• • • • • • • • • • • • • • • • • • • • • • • • • • • • • • • • • • • • • • • • • • • • • • • • • • • • • • • • • • • • • • • • • • • • • • • • • • • • • • • • • • • • • • • • • • • • • • • • • • • • • • • • • • • • • • • • • • • • • • • • • • • • • • • • • • • •
39
Page 43

4
The VOICE Mode: Selecting, Playing, & Assigning the QY22 Voices & Drums
The Faders ————————————————————————————
Each track has a graphic “fader” that can be set to produce the best
“mix” (balance) between the various voices. Position the cursor at a
fader, then use the [−1/NO] and [+1/YES] keys to set the fader level.
The graphic fader will move to the corresponding position (higher for
higher volume, and lower for lower volume). The fader positions also
have numeric values (000 through 127) that appear in the upper right
corner of the display: “000” is minimum volume (no sound) and
“127” is maximum volume. The default setting is “100” for all tracks.
In the display to the left, the TR2 fader has been set to a quiet “50.”
Lower volume.
40
–
NO YES
• • • • • • • • • • • • • • • • • • • • • • • • • • • • • • • • • • • • • • • • • • • • • • • • • • • • • • • • • • • • • • • • • • • • • • • • • • • • • • • • • • • • • • • • • • • • • • • • • • • • • • • • • • • • • • • • • • • • • • • • • • • • • • • • • • • •
1
m
Raise volume.
+
1
m
You can switch back and forth between the SONG and VOICE modes
even while a song is playing, so you can adjust all VOICE mode param-
HINT
eters (change voices, mute tracks, pan, and change volume settings)
while listening to the results in real time!
Page 44

Easy Accompaniment for
Other Instruments
Selecting & Playing the Preset Patterns.......... 42
Changing Chords .................................................. 47
Muting Tracks .......................................................51
Record a Complete Accompaniment................52
Realtime Accompaniment Recording ................... 52
Step Accompaniment Recording ..........................59
Using the QY22 As a Drum Machine ................ 75
5
• • • • • • • • • • • • • • • • • • • • • • • • • • • • • • • • • • • • • • • • • • • • • • • • • • • • • • • • • • • • • • • • • • • • • • • • • • • • • • • • • • • • • • • • • • • • • • • • • • • • • • • • • • • • • • • • • • • • • • • • • • • • • • • • • • • •
41
Page 45

5
Easy Accompaniment for Other Instruments
Selecting & Playing the Preset Patterns
Using the QY22 preset patterns you can easily create accompaniments that you can play or
sing along with.
The QY22 has 100 preset accompaniment patterns covering a wide variety of musical
styles. Here’s how you can select and play the patter ns while in the SONG mode.
Select the SONG mode
Z
and an “empty” song.
Song number (1 … 20).
–
Use
42
1
NO YES
• • • • • • • • • • • • • • • • • • • • • • • • • • • • • • • • • • • • • • • • • • • • • • • • • • • • • • • • • • • • • • • • • • • • • • • • • • • • • • • • • • • • • • • • • • • • • • • • • • • • • • • • • • • • • • • • • • • • • • • • • • • • • • • • • • • •
+
1
to set.
m
Asterisks (*) indicate an
empty song.
m
In order to select and play the patterns as described in this section you must select an empty song
(i.e. one in which nothing has been recorded). Empty
songs are indicated by a row of asterisks
(“********”) following the song number. Different
song numbers (1 through 20) are selected simply by
moving the cursor to the song number and using the
[−1]
and [+1] keys.
Page 46

5
Easy Accompaniment for Other Instruments
Select a pattern number.
X
Start playback.
C
Play indicator.
Measure number.
m
m
Use the cursor keys to move the cursor to the accompaniment pattern number, then use the [−1] and [+1] buttons to select the pattern
you want to play. The preset patterns are numbers 001 through 100.
Place the cursor here (this is the
accompaniment pattern number).
[
Press the
]
key to start playback of the selected accompani-
ment pattern. The play indicator will appear in the display and the
]
[
green LED above the
key will flash at the current playback
tempo.
Note that the “Meas” (measure) number
on the display advances as each meas-
DETAIL
ure is played. In this mode playback will
continue up to measure “999” and then
repeat from measure “001”.
• • • • • • • • • • • • • • • • • • • • • • • • • • • • • • • • • • • • • • • • • • • • • • • • • • • • • • • • • • • • • • • • • • • • • • • • • • • • • • • • • • • • • • • • • • • • • • • • • • • • • • • • • • • • • • • • • • • • • • • • • • • • • • • • • • • •
43
Page 47

5
Easy Accompaniment for Other Instruments
Listen to the pattern’s
V
variations.
Each preset pattern has 6 variations or “sections” — INTRO, NOR-
MAL, VARI., FILL1, FILL2, and ENDING.
INTRO ........ introduction
NORMAL.... normal pattern, used for the “verse” of a song.
VARI. .......... variation, normally used as a chorus or bridge.
FILL1 .......... fill-in 1, transition from normal to variation.
FILL2 .......... fill-in 2, transition from variation to normal.
ENDING...... ending pattern.
When the INTRO, FILL1, and FILL2 sections are selected while playing a
pattern in the SONG mode, the section plays through once and is auto-
IMPORTANT
matically followed by either the NORMAL or VARI. pattern. INTRO is
followed by NORMAL, FILL1 is followed by VARI. and FILL2 is followed
by NORM. The FILL1 and FILL2 patterns automatically provide smooth,
“musical” transitions between the NORMAL and VARI. sections. Playback
stops automatically after the ENDING section.
The currently selected section is shown between square brackets
below the pattern number and name.
44
The “Normal” selection
is currently playing.
• • • • • • • • • • • • • • • • • • • • • • • • • • • • • • • • • • • • • • • • • • • • • • • • • • • • • • • • • • • • • • • • • • • • • • • • • • • • • • • • • • • • • • • • • • • • • • • • • • • • • • • • • • • • • • • • • • • • • • • • • • • • • • • • • • • •
Page 48

5
Easy Accompaniment for Other Instruments
E FGABC
INTRO NORMAL VARI. FILL1 FILL2 ENDING
You can change patterns directly by pressing the appropriate key on
the micro-keyboard while the cursor is located at either the pattern
number or the section name on the display.
The micro-keyboard section keys do not produce any sound when used to
switch sections.
DETAIL
The newly selected section will begin playing from the top of the
next measure. “next” will appear below the pattern number until the
new section actually begins playing.
“Fill1” has been selected and will begin
playing from the top of the next measure.
You can also change sections by placing the cursor over the section
name and using the [
DETAIL
−
1] and [+1] keys.
–
+
1
NO YES
• • • • • • • • • • • • • • • • • • • • • • • • • • • • • • • • • • • • • • • • • • • • • • • • • • • • • • • • • • • • • • • • • • • • • • • • • • • • • • • • • • • • • • • • • • • • • • • • • • • • • • • • • • • • • • • • • • • • • • • • • • • • • • • • • • • •
1
to select sections.
45
Page 49

5
Easy Accompaniment for Other Instruments
Select different patterns &
B
sections.
Stop playback when done.
N
With the cursor positioned over the pattern number you can use the
[−1]
and [+1] keys to select different patterns, and use the micro-key-
board section keys to select different sections during playback. In all
cases the newly selected pattern or section will begin playing from the
top of the next measure. “next” will appear below the pattern number
until the new pattern or section actually begins playing.
If you move the cursor to the tempo parameter (indicated by a note symbol and a number in the upper right corner of the display), you can use
HINT
the [−1] and [+1] buttons to set the playback tempo to anywhere from 30
to 250 beats per minute. Please note, however, that if you play a pattern
that has a slow default tempo at a fast tempo, some notes may be unnaturally cut off.
–
NO YES
Stop playback at any time by pressing the
+
1
1
to set tempo from 30 to 250 beats per minute.
[
]
key. For a more
musical ending, select the ENDING section. Playback will stop automatically after the ENDING section.
Depending on the selected pattern, some voices may not sound if a pattern is started from a point in the middle of the pattern rather than at the
DETAIL
beginning.
46
• • • • • • • • • • • • • • • • • • • • • • • • • • • • • • • • • • • • • • • • • • • • • • • • • • • • • • • • • • • • • • • • • • • • • • • • • • • • • • • • • • • • • • • • • • • • • • • • • • • • • • • • • • • • • • • • • • • • • • • • • • • • • • • • • • • •
Page 50

5
Easy Accompaniment for Other Instruments
Changing Chords —————————————————————————
The QY22 features a sophisticated ABC (Auto Bass Chord) system that automatically re-harmonizes
the chord and bass tracks to match chords you specify. This makes creating complete accompaniment
tracks fast and easy … just select a pattern, then specify the required chord changes (details in the next
section). Here’s how you use the micro-keyboard to specify chord changes.
Play a pattern.
Z
Move the cursor to the
X
chord symbol.
Select and play one of the preset patterns, as described in the pre-
ceding section.
The micro-keyboard can be used to enter chords only when the cursor is located over the chord symbol on the display. Use the cursor
keys to move the cursor to the chord symbol at the bottom of the display.
m
Chord symbol.
• • • • • • • • • • • • • • • • • • • • • • • • • • • • • • • • • • • • • • • • • • • • • • • • • • • • • • • • • • • • • • • • • • • • • • • • • • • • • • • • • • • • • • • • • • • • • • • • • • • • • • • • • • • • • • • • • • • • • • • • • • • • • • • • • • • •
47
Page 51

5
Easy Accompaniment for Other Instruments
Enter a chord.
C
A
G
F
G
E FGABCD
INTRO NORMAL VARI. FILL1 FILL2 ENDING
B
A7
Example: Enter a G7 chord.
G
9
7
ENTER
Note that the lower octave of the micro-keyboard has chord root
names “E” through “D” marked on the keys, and the upper octave
keys are marked with a variety of chord types.
( 9)
D
C
E
D
add9
MM76 7 m7m6m
7
( 9)
7
M9 aug 9 m9 mM7
7
7
( 5)
( 13 )
7
add9
7sus4
– – –
dim
sus4
CC
(11)
m7
( 5)
m7
( 11)
( 13)
To enter a chord, press the key corresponding to the desired chord
root, then the key corresponding to the desired chord type (the chord
type keys alternately select the lower and upper chord types marked
… watch the display), and finally the [ENTER] key.
The chord is actually entered only when the [ENTER] key is
pressed. Until the [ENTER] key is pressed, the newly specified chord
root and type will flash on the display.
Actually, you can press the chord type key and then the root key, the
order doesn’t matter.
DETAIL
48
• • • • • • • • • • • • • • • • • • • • • • • • • • • • • • • • • • • • • • • • • • • • • • • • • • • • • • • • • • • • • • • • • • • • • • • • • • • • • • • • • • • • • • • • • • • • • • • • • • • • • • • • • • • • • • • • • • • • • • • • • • • • • • • • • • • •
Page 52

5
Easy Accompaniment for Other Instruments
The Chord Types
add9...... major added ninth.
M........... major.
M9......... major ninth.
M7......... major seventh.
aug........ augmented.
6............ sixth.
9............ ninth.
7............ seventh.
add9...... minor added ninth.
m........... minor
m9......... minor ninth.
m7......... minor seventh.
mM7...... minor major seventh.
m7(11) .. minor seven eleven.
m7(b5) .. minor seven flat five.
7(#9) ..... seventh sharp nine.
7(b9) ..... seventh flat nine.
7(b13) ... seventh flat thirteen.
7(13) ..... seventh thirteen.
7(#11) ... seventh sharp eleven.
7(#5) ..... seventh sharp five.
7sus4 .... seventh suspended four.
sus4 ...... suspended four.
- - - ........ non-ABC (see “DETAIL”
below).
dim........ diminished.
m6......... minor sixth.
The “- - -” chord type marking is a special “non-ABC” type that can be
used to create accompaniment patterns without the harmonic limitations
DETAIL
of the ABC system. See page 95 for details.
If you enter only the chord root without a chord type, the result will be a
major chord.
HINT
• • • • • • • • • • • • • • • • • • • • • • • • • • • • • • • • • • • • • • • • • • • • • • • • • • • • • • • • • • • • • • • • • • • • • • • • • • • • • • • • • • • • • • • • • • • • • • • • • • • • • • • • • • • • • • • • • • • • • • • • • • • • • • • • • • • •
49
Page 53
5
Easy Accompaniment for Other Instruments
Try out the various chords
V
with different patterns.
Stop playback when done.
B
During playback you can move the cursor up to the pattern number,
select a different pattern, then move the cursor back to the chord symbol and try different chords with the new pattern.
If you move the cursor to the “Trns” (transpose) parameter, you can use
then [
−
HINT
Stop playback by pressing the
1] and [+1] buttons to transpose the pitch of the entire pattern up
or down in semitone increments over a range of two octaves. A transpose
setting of “+00” produces normal pitch.
[
]
key. You can also stop playback after an appropriate ending by selecting the ENDING section
(the cursor must be on the pattern number or section name to do this).
50
• • • • • • • • • • • • • • • • • • • • • • • • • • • • • • • • • • • • • • • • • • • • • • • • • • • • • • • • • • • • • • • • • • • • • • • • • • • • • • • • • • • • • • • • • • • • • • • • • • • • • • • • • • • • • • • • • • • • • • • • • • • • • • • • • • • •
Page 54

5
Easy Accompaniment for Other Instruments
Muting Tracks ———————————————————————————
The mute “buttons” below each track name can be used to mute
(turn off) the corresponding track, either while playback is stopped or
running. Move the cursor to the appropriate mute button, then press
[
+1/YES] to mute that track, or press [−1/NO] to turn a muted track
back on.
–
+
1
NO YES
1
Mute off. Mute on.
m
m
The letter “M” appears in the mute buttons of tracks that are muted.
Tracks that do not contain data cannot be muted, and their mute buttons appear as white rather than dark blocks. Please note that a dark
mute button will appear reversed when the cursor is placed over it
(white against the dark cursor). In the display to the left, for example,
TR1 through TR4 contain no data and are therefore white. The C1
and C2 tracks have been muted, and the cursor is currently over the
C2 track mute button.
The mute buttons are a handy way to turn tracks that you don’t want to
hear off. In the example above, for example, the C1 and C2 tracks have
MUSICAL
NOTE
been turned off, leaving only the bass and drum accompaniment. You
could also mute the bass track if you just want drums.
• • • • • • • • • • • • • • • • • • • • • • • • • • • • • • • • • • • • • • • • • • • • • • • • • • • • • • • • • • • • • • • • • • • • • • • • • • • • • • • • • • • • • • • • • • • • • • • • • • • • • • • • • • • • • • • • • • • • • • • • • • • • • • • • • • • •
51
Page 55

5
Easy Accompaniment for Other Instruments
Record a Complete Accompaniment
The QY22 provides two ways to record an accompaniment by specifying patterns and
chords: “realtime” and “step” recording. The realtime method is the fastest and easiest, let-
ting you record pattern and chord changes “on the fly.” The step method gives you more
detailed control, and is an excellent way to add the finishing touches to an accompaniment
recorded in real time.
Realtime Accompaniment Recording—————————————————
Once you know how to select patterns, sections, and enter chords
in the SONG mode (see the preceding sections), recording a basic
accompaniment in real time is easy. Repeats and tempo changes can
be added later using the step record method (page 59).
52
Select the SONG mode &
Z
an empty song.
• • • • • • • • • • • • • • • • • • • • • • • • • • • • • • • • • • • • • • • • • • • • • • • • • • • • • • • • • • • • • • • • • • • • • • • • • • • • • • • • • • • • • • • • • • • • • • • • • • • • • • • • • • • • • • • • • • • • • • • • • • • • • • • • • • • •
Use the [MODE] key to select the SONG mode and, with the cur-
sor located over the song number at the top of the display, use the
[−1]
and [+1] keys to select an empty song number if necessary.
Empty songs are indicated by a row of asterisks (“********”) following the song number.
Page 56

MODE
5
Easy Accompaniment for Other Instruments
Asterisks (*) indicate an empty song.Song number (1 … 20).
If for some reason all 20 songs contain data, use the
“Clear Song” function described on page 137 to clear a
DETAIL
song for recording.
Engage the record ready
X
mode.
“REC” appears when the
record mode is engaged.
• • • • • • • • • • • • • • • • • • • • • • • • • • • • • • • • • • • • • • • • • • • • • • • • • • • • • • • • • • • • • • • • • • • • • • • • • • • • • • • • • • • • • • • • • • • • • • • • • • • • • • • • • • • • • • • • • • • • • • • • • • • • • • • • • • • •
Press the [●] key to engage the record ready mode. The red LED
above the [●] key will light.
53
Page 57

5
Easy Accompaniment for Other Instruments
Select the realtime
C
record mode.
Place cursor here to select
the realtime record mode.
V
m
Select the starting pattern, section, chord, &
tempo.
Move the cursor to the “REC REAL STEP” area of the display,
then press the left cursor key to select the “REAL” mode (if it isn’t
already selected). The selected record mode is indicated by a pair of
arrows on either side of the mode name — i.e. “>REAL<”. Once
selected, move the cursor vertically to move to other areas of the
screen. The arrows will remain positioned at the selected mode no
matter where you move the cursor.
Move the cursor to the pattern number, section, chord, and tempo
parameters, and set as required.
It’s sometimes easier to set a slow tempo for realtime recording, so you
have plenty of time to enter pattern and chord changes.
HINT
54
• • • • • • • • • • • • • • • • • • • • • • • • • • • • • • • • • • • • • • • • • • • • • • • • • • • • • • • • • • • • • • • • • • • • • • • • • • • • • • • • • • • • • • • • • • • • • • • • • • • • • • • • • • • • • • • • • • • • • • • • • • • • • • • • • • • •
Page 58

5
Easy Accompaniment for Other Instruments
Select the “Pat” track to
B
record pattern & section
changes.
Record.
N
Realtime recording in progress.
Minus measure numbers during
count-in.
Move the cursor to the track area of the display, and then shift the
cursor sideways to select “Pat.” Once selected, move the cursor vertically to move to other areas of the screen. An underline will remain
below the selected track no matter where you move the cursor.
Select “Pat” to record pattern changes.
[
Press the
ronome will sound and you’ll be given a two-measure count-in prior
to the first measure actually recorded. The count-in is also indicated
]
key to begin recording pattern changes. The met-
by negative numbers in the “Meas”
parameter. If a 4/4 pattern is selected, for example, the count-in will
run from measure “−08” to “−01”,
then recording will begin from
measure “001”.
m
• • • • • • • • • • • • • • • • • • • • • • • • • • • • • • • • • • • • • • • • • • • • • • • • • • • • • • • • • • • • • • • • • • • • • • • • • • • • • • • • • • • • • • • • • • • • • • • • • • • • • • • • • • • • • • • • • • • • • • • • • • • • • • • • • • • •
55
Page 59

5
Easy Accompaniment for Other Instruments
Since you selected “Pat” recording, the cursor will automatically
move to the pattern number when you start recording. All you have to
do to record pattern and section changes is to select the required pattern numbers via the [−1] and [+1] keys, and section changes via the
appropriate micro-keyboard keys. Remember that all pattern and section changes occur from the top of the
is entered. Also keep in mind that the INTRO will automatically
switch to the NORMAL pattern, FILL1 will automatically switch to
the VARI. pattern, and FILL2 will automatically switch to the NORMAL pattern.
DETAIL
Stop recording.
M
Stop recording either by pressing the
ENDING section. The normal SONG play mode is automatically reselected when you stop recording.
next measure after the change
The sequencer tracks (TR1 through TR4) will not sound during accompaniment track recording even if they contain data.
[
]
key or by selecting the
56
• • • • • • • • • • • • • • • • • • • • • • • • • • • • • • • • • • • • • • • • • • • • • • • • • • • • • • • • • • • • • • • • • • • • • • • • • • • • • • • • • • • • • • • • • • • • • • • • • • • • • • • • • • • • • • • • • • • • • • • • • • • • • • • • • • • •
Page 60

5
Easy Accompaniment for Other Instruments
Engage record ready
<
again and select “Chd”.
Asterisks have disappeared
because the song now contains data. Use the “Song
Name” job (page 135) to enter
an original name.
Record.
>
Press the [●] key to engage the record ready mode again (the
“REAL” mode will still be selected), then move the cursor to the
track section of the display and select “Chd” in order to record chord
changes.
Select “Chd” to record
chord changes.
[
Press the
]
key to begin recording chord changes. The metro-
nome will sound and you’ll be given a two-measure count-in.
Since you selected “Chd” recording, the cursor will automatically
move to the chord when you start recording. All you have to do to
record chord changes is to enter the required chords as described in
the “Changing Chords” section (page 47).
Chord changes actually occur on quarter-note divisions, so try to press
the [ENTER] key to enter each chord either exactly on the beat or a frac-
HINT
tion of a section before the beat on which you want the chord change to
occur.
• • • • • • • • • • • • • • • • • • • • • • • • • • • • • • • • • • • • • • • • • • • • • • • • • • • • • • • • • • • • • • • • • • • • • • • • • • • • • • • • • • • • • • • • • • • • • • • • • • • • • • • • • • • • • • • • • • • • • • • • • • • • • • • • • • • •
57
Page 61

5
Easy Accompaniment for Other Instruments
Stop recording.
?
Listen to the results.
[
“Am7” currently
playing.
m
The next chord is
“G7”.
m
[
Press the
]
key to stop recording when all the required chord
changes have been entered. The normal SONG play mode is automatically re-selected when you stop recording.
]
[
Press the
key to play back and check out the accompaniment
you’ve just recorded.
Note that the chord currently playing is shown in the normal chord symbol
location on the display, while the next chord is shown to its right. If the
DETAIL
same chord continues for more than 2 measures, however, the next chord
is not shown.
Don’t worry if you’ve made a few mistakes. Simple slip-ups made in the
realtime record mode can usually be corrected in the step record mode …
HINT
described next.
58
• • • • • • • • • • • • • • • • • • • • • • • • • • • • • • • • • • • • • • • • • • • • • • • • • • • • • • • • • • • • • • • • • • • • • • • • • • • • • • • • • • • • • • • • • • • • • • • • • • • • • • • • • • • • • • • • • • • • • • • • • • • • • • • • • • • •
Page 62

5
Easy Accompaniment for Other Instruments
Step Accompaniment Recording———————————————————
The STEP record mode provides four different accompanimenttrack data-entry displays: “Pat” (pattern changes), “Chd” (chord
changes), “Rpt” (repeats), and “Tmp” (tempo changes). In each of
these you can individually enter or delete pattern, chord, repeat, and
tempo changes at precisely the required locations.
Select a song to record.
Z
Engage the record ready
X
mode.
• • • • • • • • • • • • • • • • • • • • • • • • • • • • • • • • • • • • • • • • • • • • • • • • • • • • • • • • • • • • • • • • • • • • • • • • • • • • • • • • • • • • • • • • • • • • • • • • • • • • • • • • • • • • • • • • • • • • • • • • • • • • • • • • • • • •
Select an empty song if you want to record a new song in the step
record mode, or select a song that already contains data if you want to
make changes or additions.
Press the [●] key to engage the record ready mode. The red LED
above the [●] key will light.
59
Page 63

5
Easy Accompaniment for Other Instruments
Select the step record
C
mode.
Cursor here to select the step
record mode.
Select “Pat”, “Chd”,
V
“Rpt”, or “Tmp”.
Move the cursor to the “REC REAL STEP” area of the display,
then press the right cursor key to select the “STEP” mode (if it isn’t
already selected). The selected record mode is indicated by a pair of
arrows on either side of the mode name — i.e. “>STEP<”. Once
selected, move the cursor vertically to move to other areas of the
screen. The arrows will remain positioned at the selected mode no
matter where you move the cursor.
Move the cursor to the track area of the display, and then shift the
cursor sideways to select “Pat”, “Chd”, “Rpt”, or “Tmp”. Once selected, move the cursor vertically if you want to move to other areas
of the screen. An underline will remain below the selected track no
matter where you move the cursor.
Select “Pat” to record pattern changes, “Chd” to
record chord changes, “Rpt” to record repeats,
or “Tmp” to record tempo changes.
60
• • • • • • • • • • • • • • • • • • • • • • • • • • • • • • • • • • • • • • • • • • • • • • • • • • • • • • • • • • • • • • • • • • • • • • • • • • • • • • • • • • • • • • • • • • • • • • • • • • • • • • • • • • • • • • • • • • • • • • • • • • • • • • • • • • • •
Page 64

5
Easy Accompaniment for Other Instruments
Start recording.
B
Enter the required pat-
N
tern, chord, repeat, and
tempo data.
Stop recording.
M
[
Press the
Refer to the following sections for details on how to use each of the
step-record mode data-entry displays.
m
Go to “Pat” screen.
m
Go to “Chd” screen.
m
Go to “Rpt” screen.
m
Go to “Tmp” screen.
Press the
the normal SONG play mode.
]
key to call the selected step record display.
You can switch directly between the
pattern, chord, repeat, and tempo
HINT
data-entry displays while the record
mode is engaged by simply pressing
the [MENU] key to call the menu
shown here, and then the function
key corresponding to the display you
want to go to.
[
]
key to exit from the step record mode and return to
• • • • • • • • • • • • • • • • • • • • • • • • • • • • • • • • • • • • • • • • • • • • • • • • • • • • • • • • • • • • • • • • • • • • • • • • • • • • • • • • • • • • • • • • • • • • • • • • • • • • • • • • • • • • • • • • • • • • • • • • • • • • • • • • • • • •
61
Page 65

5
Easy Accompaniment for Other Instruments
“Pat” — Step Record Pattern Changes
Here’s how the STEP record pattern display will look if you’ve selected an empty song (the appro-
priate pattern data will appear if the selected song contains data).
62
Measure number.
Time signature.
• • • • • • • • • • • • • • • • • • • • • • • • • • • • • • • • • • • • • • • • • • • • • • • • • • • • • • • • • • • • • • • • • • • • • • • • • • • • • • • • • • • • • • • • • • • • • • • • • • • • • • • • • • • • • • • • • • • • • • • • • • • • • • • • • • • •
m
m
Cursor here to set
pattern number.
Cursor here to
set section.
1st measure.
2nd measure.
m
Subsequent measures follow.
Page 66

5
Easy Accompaniment for Other Instruments
Moving Around &
●
Entering Data
Scroll up (see lower
measure numbers).
m
m
Scroll down (see higher
measure numbers).
Scroll up (see lower
measure numbers).
Go to first measure. Scroll down (see higher
m
m
m
measure numbers).
tion at which you want to enter data, and the [−1] and [+1] keys are
used to actually enter or change data.
song: moving the cursor past the bottom of the screen accesses subsequent measures, while moving it above the top of the screen accesses
the preceding measures (if there are any). In the pattern display moving sideways takes you to the time signature, pattern number, and
section parameters.
used to move forward or backward through the song. The [p] key
takes you directly to the first measure.
As usual, the cursor keys are used to move the cursor to the loca-
The cursor keys also move you forward or backward through the
In all of the STEP record displays the sequencer keys can also be
• • • • • • • • • • • • • • • • • • • • • • • • • • • • • • • • • • • • • • • • • • • • • • • • • • • • • • • • • • • • • • • • • • • • • • • • • • • • • • • • • • • • • • • • • • • • • • • • • • • • • • • • • • • • • • • • • • • • • • • • • • • • • • • • • • • •
63
Page 67

5
Easy Accompaniment for Other Instruments
Pattern Number and
●
Section
Time Signature
●
Any pattern number from 001 through 200 (presets and user patterns) can be entered for each measure. Only the preset patterns, however, have sections. The pattern name appears to the right of the pattern number. Only one pattern & section can be entered per measure,
and that pattern will begin playing from the beginning of the measure
at which it is entered.
A pattern entered once will continue to play until a different pattern
is entered. If you want to change sections without changing the pattern number, only the section need be entered.
In the example display to the left the intro section of pattern 006
plays for the first measure, the normal section of the same pattern is
selected in measure 2.
Although the default time signature for the selected pattern is automatically selected, the time signature value for each measure can be
changed as required. The available time signatures are:
1/16....... 16/16
1/8......... 16/8
1/4......... 8/4
64
• • • • • • • • • • • • • • • • • • • • • • • • • • • • • • • • • • • • • • • • • • • • • • • • • • • • • • • • • • • • • • • • • • • • • • • • • • • • • • • • • • • • • • • • • • • • • • • • • • • • • • • • • • • • • • • • • • • • • • • • • • • • • • • • • • • •
Page 68

5
Easy Accompaniment for Other Instruments
If a time signature is selected that results in shorter measures than
the pattern default, the pattern will be truncated (cut short) accordingly. If the selected time signature results in longer measures than
the pattern default, the pattern will be repeated to fill the specified
measure length.
Erasing Pattern Changes
●
The function key immediately to the right of “ers” on the display
can be used to erase the time signature, pattern number, or section
data at which the cursor is located. If you erase a time signature
change, the default time signature value for the current pattern will be
automatically re-selected.
m
Press to erase pattern, section, or time
signature change at cursor location.
• • • • • • • • • • • • • • • • • • • • • • • • • • • • • • • • • • • • • • • • • • • • • • • • • • • • • • • • • • • • • • • • • • • • • • • • • • • • • • • • • • • • • • • • • • • • • • • • • • • • • • • • • • • • • • • • • • • • • • • • • • • • • • • • • • • •
65
Page 69

5
Easy Accompaniment for Other Instruments
“Chd” — Step Record Chord Changes
Here’s how the STEP record chord display will look if you’ve selected an empty song (the appropri-
ate chord data will appear if the selected song contains data).
66
Measure number.
Time signature.
• • • • • • • • • • • • • • • • • • • • • • • • • • • • • • • • • • • • • • • • • • • • • • • • • • • • • • • • • • • • • • • • • • • • • • • • • • • • • • • • • • • • • • • • • • • • • • • • • • • • • • • • • • • • • • • • • • • • • • • • • • • • • • • • • • • •
m
m
on which chord is to
be entered.
1st measure.
2nd measure.
m
One beat.Place cursor at beat
Subsequent measures follow.
Page 70

5
Easy Accompaniment for Other Instruments
Chords
●
Specifying the Bass Note
●
For a Chord
Example: Enter a Bm7 chord with
E in the bass.
B
m9
m7
DOWN
BASS
OCT
One chord can be entered per quarter note. Place the cursor at the
required quarter-note division on the display and enter the chord via
the micro-keyboard in the normal way (see page 48). In the example
display to the left, an A major chord is entered on the first beat of the
first measure, a B minor seventh on the third beat of the first measure,
and a D major on the first beat of the second measure.
You can specify the bass note to be used with any chord by using
the [OCT DOWN] key (note the “BASS” marking below the key).
Enter the chord in the normal way, press the [OCT DOWN/BASS
]
key (a slash will appear below the chord name), then press the key on
E
the micro-keyboard corresponding to the desired bass note (the bass
note will appear to the right of the slash).
You can add bass notes to existing chords without having to re-enter the
entire chord by simply moving the cursor to the chord and using the [OCT
HINT
DOWN/BASS] key to specify the bass note. A bass note can be removed
from a chord by placing the cursor at the chord and either re-entering the
chord or pressing the [OCT DOWN/BASS] key twice.
• • • • • • • • • • • • • • • • • • • • • • • • • • • • • • • • • • • • • • • • • • • • • • • • • • • • • • • • • • • • • • • • • • • • • • • • • • • • • • • • • • • • • • • • • • • • • • • • • • • • • • • • • • • • • • • • • • • • • • • • • • • • • • • • • • • •
67
Page 71

5
Easy Accompaniment for Other Instruments
Syncopated Chords
●
Example: Enter a syncopated
D chord.
D
Erasing Chords
●
OCT
UP
Chords can be syncopated (i.e. the chord actually begins an eighthnote before the beat on which it is entered) by using the [OCT UP
key (note the “e
c
” marking below the key). Enter the chord in the
]
normal way, then press the [OCT UP] key (a syncopation symbol will
appear below the chord name).
You can add syncopation to existing chords without having to re-enter the
entire chord by simply moving the cursor to the chord and pressing the
HINT
[OCT UP] key. Syncopation can be removed from a chord by placing the
cursor at the chord and pressing the [OCT UP] key.
The function key immediately to the right of “ers” on the display
can be used to erase the chord at which the cursor is located.
Press to erase chord at
cursor location.
68
• • • • • • • • • • • • • • • • • • • • • • • • • • • • • • • • • • • • • • • • • • • • • • • • • • • • • • • • • • • • • • • • • • • • • • • • • • • • • • • • • • • • • • • • • • • • • • • • • • • • • • • • • • • • • • • • • • • • • • • • • • • • • • • • • • • •
Page 72

5
Easy Accompaniment for Other Instruments
The Chord Display
●
During Playback
Half-note indicates
length of chord.
Syncopation mark.
Chord actually begins 1/8-note earlier.
m
m
Chord bass notes and syncopation marks appear on the display as
shown in the SONG playback mode.
m
“/E” indicates that Bm7
is played with E bass.
• • • • • • • • • • • • • • • • • • • • • • • • • • • • • • • • • • • • • • • • • • • • • • • • • • • • • • • • • • • • • • • • • • • • • • • • • • • • • • • • • • • • • • • • • • • • • • • • • • • • • • • • • • • • • • • • • • • • • • • • • • • • • • • • • • • •
69
Page 73

5
Easy Accompaniment for Other Instruments
“Rpt” — Step Record Repeats
The STEP record “Rpt” display allows three different types of repeats to be entered at appropriate
points during the song: start repeat, end/number of repeats, and end song.
70
Cursor here to enter repeat
at top of measure.
Repeats
●
End
m
Start
m
repeat.
m
End of song.
• • • • • • • • • • • • • • • • • • • • • • • • • • • • • • • • • • • • • • • • • • • • • • • • • • • • • • • • • • • • • • • • • • • • • • • • • • • • • • • • • • • • • • • • • • • • • • • • • • • • • • • • • • • • • • • • • • • • • • • • • • • • • • • • • • • •
repeat.
m
Number of
repeats.
The start repeat
be selected via the [−1] and [+1] keys when the cursor is located at the top of the measure, and the end
repeat mark
placed at the end of the measure. When the end of
repeat mark is selected the [−1] and [+1] keys are
also used to select any number of repeats from 02 to
99. When “X02” is selected, for example, the sec-
Cursor here to enter repeat
at end of measure.
)
(
or end of song mark
)
(
can be selected when the cursor is
( )
can
Page 74

5
Easy Accompaniment for Other Instruments
tion of the song between the “ ” and “ ” marks is played twice (repeated once), then the song continues until the next repeat section or
the end of the song.
You can even enter repeats within repeats (this is known as “nesting”
repeats). Up to 10 repeats can be nested.
HINT
Erasing Repeats
●
The function key immediately to the right of “ers” on the
display can be used to erase the repeat at which the cursor is
located.
Press to erase repeat at
cursor location.
Any material recorded to the accompaniment tracks in the
realtime record mode
DETAIL
fected by those repeats.
• • • • • • • • • • • • • • • • • • • • • • • • • • • • • • • • • • • • • • • • • • • • • • • • • • • • • • • • • • • • • • • • • • • • • • • • • • • • • • • • • • • • • • • • • • • • • • • • • • • • • • • • • • • • • • • • • • • • • • • • • • • • • • • • • • • •
after insertion of repeats will not be af-
71
Page 75

5
Easy Accompaniment for Other Instruments
“Tmp” — Step Record Tempo Changes
The STEP record mode “Tmp” display can be used to enter instantaneous tempo changes as well as
gradual ritardando and accelerando tempo changes.
72
Measure number.
Time signature.
• • • • • • • • • • • • • • • • • • • • • • • • • • • • • • • • • • • • • • • • • • • • • • • • • • • • • • • • • • • • • • • • • • • • • • • • • • • • • • • • • • • • • • • • • • • • • • • • • • • • • • • • • • • • • • • • • • • • • • • • • • • • • • • • • • • •
m
m
Place cursor at beat at
which tempo change is
to occur or begin.
One beat.
1st measure.
2nd measure.
m
Subsequent measures follow.
Page 76

5
Easy Accompaniment for Other Instruments
Tempo Changes
●
Place the cursor in the center of the
measure/beat at which you want the tempo
change to begin, then use the [−1] key to
enter a “rit” (tempo decrease) value or the
“accel” or “rit”.
Amount of tempo change.
Number of beats over which
tempo change occurs.
[+1]
key to enter an “accel” (tempo increase) value. The amount of tempo
change is specified in beats per minute, so
if the starting tempo is 120 and you enter
an “accel” value of 10, the tempo will increase by 10 beats per minute to 130. The
only limitation is that you can’t enter
tempo changes that result in a tempo
slower than 30 or higher than 250.
To enter gradual accelerando or ritardando changes, first set the
amount of “accel” or “rit” change required, as described above, then
move the cursor to the lower number and use the [−1] and [+1] keys
to enter the number of beats over which you want the tempo change
to occur. In the sample display to the left, the tempo will increase by
12 over two beats (the wiggly arrow extends for the specified number
of beats).
• • • • • • • • • • • • • • • • • • • • • • • • • • • • • • • • • • • • • • • • • • • • • • • • • • • • • • • • • • • • • • • • • • • • • • • • • • • • • • • • • • • • • • • • • • • • • • • • • • • • • • • • • • • • • • • • • • • • • • • • • • • • • • • • • • • •
73
Page 77

5
Easy Accompaniment for Other Instruments
In the next sample display a ritardando of 25 beats per minute is set
to occur over six beats.
DETAIL
The wiggly arrow that represents the duration of the tempo change only
appears within the two measures shown on the display. You can enter
much longer tempo change lengths (up to a maximum of 99 measures),
but the arrow will not appear when you scroll the screen to see subsequent measures.
74
Erasing Tempo Changes
●
The function key immediately to the right of “ers” on the display
can be used to erase the tempo change at which the cursor is located.
m
Press to erase tempo
change at cursor location.
• • • • • • • • • • • • • • • • • • • • • • • • • • • • • • • • • • • • • • • • • • • • • • • • • • • • • • • • • • • • • • • • • • • • • • • • • • • • • • • • • • • • • • • • • • • • • • • • • • • • • • • • • • • • • • • • • • • • • • • • • • • • • • • • • • • •
Page 78

5
Easy Accompaniment for Other Instruments
Using the QY22 As a Drum Machine
Although you can create complete accompaniments using the preset patterns as described
in the preceding section, you can also mute the C1, C2, and Ba tracks, leaving only the Dr
track, so the QY22 functions as a drum machine. You can create drum-only accompaniments using the drum tracks from the preset patterns, or record original drum tracks for your
own patterns, as described in the following chapter.
It’s also possible to record dr um voices to the sequencer tracks as described in the “Cre-
ating a Complete Song” chapter (page 108).
• • • • • • • • • • • • • • • • • • • • • • • • • • • • • • • • • • • • • • • • • • • • • • • • • • • • • • • • • • • • • • • • • • • • • • • • • • • • • • • • • • • • • • • • • • • • • • • • • • • • • • • • • • • • • • • • • • • • • • • • • • • • • • • • • • • •
75
Page 79

76
• • • • • • • • • • • • • • • • • • • • • • • • • • • • • • • • • • • • • • • • • • • • • • • • • • • • • • • • • • • • • • • • • • • • • • • • • • • • • • • • • • • • • • • • • • • • • • • • • • • • • • • • • • • • • • • • • • • • • • • • • • • • • • • • • • • •
Page 80

Creating Original Patterns
6
Recording an Original
ABC Pattern
Realtime Pattern Recording......... 78
Step Pattern Recording ............... 86
Playback In the Pattern Mode.... 94
Accompaniment Without the
Limitations of ABC
• • • • • • • • • • • • • • • • • • • • • • • • • • • • • • • • • • • • • • • • • • • • • • • • • • • • • • • • • • • • • • • • • • • • • • • • • • • • • • • • • • • • • • • • • • • • • • • • • • • • • • • • • • • • • • • • • • • • • • • • • • • • • • • • • • • •
.................................... 78
....................... 95
The Pattern Jobs........................... 96
1: Copy Pattern............................ 98
2: Quantize................................... 99
3: Transpose .............................. 100
4: Modify Velocity....................... 101
5: Modify Gate Time .................. 102
6: Pattern Name......................... 103
7: Clear Track ............................ 104
8: Clear Pattern.......................... 105
77
Page 81

6
Creating Original Patterns
Recording an Original ABC Pattern
The QY22 makes it easy to create original accompaniment patterns. In addition to the preset patterns residing in pattern memory locations 001 through 100, the QY22 has 100 more
pattern memory locations (101 through 200) which can be used to store your own creations.
Like the SONG mode, the PATTERN mode provides two ways to create original patterns:
realtime and step recording.
Realtime Pattern Recording —————————————————————
In the realtime record mode you select the track you want to
record (C1, C2, Ba, or Dr), and then play the part on the micro-keyboard or an external MIDI keyboard in real time.
78
Select the PATTERN
Z
mode & an empty user
pattern.
• • • • • • • • • • • • • • • • • • • • • • • • • • • • • • • • • • • • • • • • • • • • • • • • • • • • • • • • • • • • • • • • • • • • • • • • • • • • • • • • • • • • • • • • • • • • • • • • • • • • • • • • • • • • • • • • • • • • • • • • • • • • • • • • • • • •
Use the [MODE] key to select the PAT (pattern) mode and, with
the cursor located over the pattern number at the top of the display,
use the [−1] and [+1] keys to select an empty user pattern number (the
programmable user patterns are numbered 101 through 200). Empty
patterns are indicated by a row of asterisks (“********”) following
the pattern number.
Page 82

6
Creating Original Patterns
MODE
Engage the record ready
X
mode.
–
NO YES
Select user pattern
number (101 … 200).
+
1
1
Asterisks (*) indicate
an empty pattern.
If for some reason all 100 user patterns contain data, use the “Clear Pat-
tern” function described on page 105 to clear a pattern for recording.
DETAIL
Press the [●] key to engage the record ready mode. The red LED
above the [●] key will light.
• • • • • • • • • • • • • • • • • • • • • • • • • • • • • • • • • • • • • • • • • • • • • • • • • • • • • • • • • • • • • • • • • • • • • • • • • • • • • • • • • • • • • • • • • • • • • • • • • • • • • • • • • • • • • • • • • • • • • • • • • • • • • • • • • • • •
79
Page 83

6
Creating Original Patterns
“REC” appears when the
record mode is engaged.
Select the realtime
C
record mode.
Place cursor here to select
the realtime record mode.
m
m
Move the cursor to the “REC REAL STEP” area of the display,
then press the left cursor key to select the “REAL” mode (if it isn’t
already selected). The selected record mode is indicated by a pair of
arrows on either side of the mode name — i.e. “>REAL<”. Once
selected, move the cursor vertically to move to other areas of the
screen. The arrows will remain positioned at the selected mode.
80
• • • • • • • • • • • • • • • • • • • • • • • • • • • • • • • • • • • • • • • • • • • • • • • • • • • • • • • • • • • • • • • • • • • • • • • • • • • • • • • • • • • • • • • • • • • • • • • • • • • • • • • • • • • • • • • • • • • • • • • • • • • • • • • • • • • •
Page 84

6
Creating Original Patterns
Select the record tempo,
V
time signature, and
pattern length.
Select the track to
B
record and the voice for
that track.
Move the cursor to the tempo, time signature, and pattern length
parameters and set as required using the [−1] and [+1] keys.
m
Record tempo.
m
Time signature: 1/16 … 16/16,
1/8 … 16/8,
m
Length of pattern: “1of1” … “1 of 8”
(max. length 8 measures).
It’s sometimes easier to set a slow tempo for realtime recording, so you
have plenty of time to enter the data.
HINT
Move the cursor to the track area of the display, and then shift the
cursor sideways to select the track you want to record: “C1” = chord
1, “C2” = chord 2, “Ba” = bass, “Dr” = drums. Once the track has
been selected use the [−1] and [+1] keys to select the voice you want
to use for that track. If you don’t intend to use a track, set the voice
number to “OFF.”
Move the cursor vertically to move to other areas of the screen. An
underline will remain below the selected track.
1/4 … 8/4.
• • • • • • • • • • • • • • • • • • • • • • • • • • • • • • • • • • • • • • • • • • • • • • • • • • • • • • • • • • • • • • • • • • • • • • • • • • • • • • • • • • • • • • • • • • • • • • • • • • • • • • • • • • • • • • • • • • • • • • • • • • • • • • • • • • • •
81
Page 85

6
Creating Original Patterns
Cursor here to select the C1 (Chord 1) track.
–
+
1
NO YES
128, Dr1 … Dr8, OFF). The same applies to
the C2, Ba, and Dr tracks, except that only
the Dr1 … Dr8 voices and “OFF” can be
assigned to the Dr track.
Record.
N
1
to select C1 voice (001 …
Number & name of voice
assigned to current track
shown here.
m
In the PATTERN PLAY or PATTERN RECORD modes, with the exception of the Drum Track, it is possible to assign any of the Normal voices
DETAIL
(001 ... 128) or Drum voices (Dr1 ... Dr8) to any of the sequencer tracks.
However, in the PATTERN EDIT mode, with the exception of the DRUM
track, only Normal voices (001 ... 128) can be assigned to the other tracks
using the Program Change function. Use the PATTERN PLAY or PATTERN RECORD modes to assign Drum voices to sequencer tracks.
You can also change the voice assignments later in the same way.
HINT
[
Press the
and you’ll be given a two-measure count-in prior to the first measure
actually recorded. The count-in is also indicated by negative numbers
in the “Meas” parameter. If a 4/4 time signature is selected, for example, the count-in will run from measure “−08” to “−01”, then recording will begin from measure “001”.
]
key to begin recording. The metronome will sound
82
• • • • • • • • • • • • • • • • • • • • • • • • • • • • • • • • • • • • • • • • • • • • • • • • • • • • • • • • • • • • • • • • • • • • • • • • • • • • • • • • • • • • • • • • • • • • • • • • • • • • • • • • • • • • • • • • • • • • • • • • • • • • • • • • • • • •
Page 86

6
Creating Original Patterns
Realtime recording
in progress.
m
m
Minus measure numbers
-
during count
in.
Patterns can only be recorded in the key of C. Play the required
part either on the micro-keyboard or via an external MIDI keyboard
transmitting on the appropriate MIDI channel:
MIDI Channel Track
5 ....................... C1 (Chord 1)
6 ....................... C2 (Chord 2)
7 ....................... Ba (Bass)
10 ....................... Dr (Drums)
The pattern will continue to repeat from the first to last measure, so
you can continue to add notes until the current part is complete.
• • • • • • • • • • • • • • • • • • • • • • • • • • • • • • • • • • • • • • • • • • • • • • • • • • • • • • • • • • • • • • • • • • • • • • • • • • • • • • • • • • • • • • • • • • • • • • • • • • • • • • • • • • • • • • • • • • • • • • • • • • • • • • • • • • • •
83
Page 87

6
Creating Original Patterns
Since your original ABC pattern will be automatically re-harmonized as
required by the QY22 ABC system, there are a few rules you should fol-
MUSICAL
NOTE
low to ensure the best results:
1: You’re recording in C, so think in C.
2: Use primarily the root, 3rd, 5th, and major 7th.
3: Keep it rhythmic … avoid melodic lines.
84
Delete mistakes as
M
required.
To delete mistakes, simply play the note to be deleted on the microkeyboard while holding the function key next to “Del” on the display.
All corresponding notes that occur while the micro-keyboard key is
held will be deleted.
Press while holding a note on the microkeyboard to delete all occurrences of that
m
note for as long as the note is held.
[
Stop recording.
<
Press the
]
key to stop recording. The normal PAT play mode
is automatically re-selected when you stop recording.
• • • • • • • • • • • • • • • • • • • • • • • • • • • • • • • • • • • • • • • • • • • • • • • • • • • • • • • • • • • • • • • • • • • • • • • • • • • • • • • • • • • • • • • • • • • • • • • • • • • • • • • • • • • • • • • • • • • • • • • • • • • • • • • • • • • •
Page 88

6
Creating Original Patterns
Note that when you return to the PAT play mode the block below
each track that contains data will be filled (dark) while the blocks
below empty tracks are empty (outline only).
Track empty.
Track contains data.
Record the remaining
>
tracks.
Complete the pattern by selecting the remaining tracks, assigning
the required voices, and recording as described in steps 5 through 8,
above.
MENU
Hold
The pitch of the lowest
micro-keyboard key
(changes when the
octave keys are used).
Micro-keyboard.
Drum instruments
currently played by
the corresponding
micro-keyboard keys.
• • • • • • • • • • • • • • • • • • • • • • • • • • • • • • • • • • • • • • • • • • • • • • • • • • • • • • • • • • • • • • • • • • • • • • • • • • • • • • • • • • • • • • • • • • • • • • • • • • • • • • • • • • • • • • • • • • • • • • • • • • • • • • • • • • • •
m
m
m
and press
MODE
As long as the record mode is not engaged you
can press the [MODE] key while holding the
HINT
[MENU] key to see the current pitch of the micro-
keyboard as determined by the [OCT DOWN] and
[OCT UP] keys, and a list of the drum instruments
currently played by the micro-keyboard keys.
See the “Editing Songs & Patterns” section , page
140, for information on how to edit recorded pat-
DETAIL
tern data.
85
Page 89

6
Creating Original Patterns
Step Pattern Recording ———————————————————————
The step pattern record mode lets you enter each track note-bynote, with precise control over the timing, length, and loudness of
each note. You can record entire tracks using the step mode, or use it
to brush-up and add data to an existing track.
Select the PATTERN
Z
mode & a user pattern.
–
1
NO YES
Select user pattern
number (101 … 200).
86
• • • • • • • • • • • • • • • • • • • • • • • • • • • • • • • • • • • • • • • • • • • • • • • • • • • • • • • • • • • • • • • • • • • • • • • • • • • • • • • • • • • • • • • • • • • • • • • • • • • • • • • • • • • • • • • • • • • • • • • • • • • • • • • • • • • •
Use the [MODE] key to select the PAT (pattern) mode
and, with the cursor located over the pattern number at the
MODE
top of the display, use the [−1] and [+1] keys to select the
pattern you want to record (the programmable user patterns
+
1
are numbered 101 through 200). You can select an empty
pattern if you want to record a new pattern using the STEP
m
Asterisks (*) indicate
an empty pattern.
m
mode, or a pattern that already contains data if you want to
edit or add new data to the pattern.
Page 90

6
Creating Original Patterns
Engage the record ready
X
mode.
Select the step record
C
mode.
Place cursor here to select the step
record mode.
Press the [●] key to engage the record ready mode. The red LED
above the [●] key will light.
“REC” appears when the
record mode is engaged.
Move the cursor to the “REC REAL STEP” area of the display,
then press the right cursor key to select the “STEP” mode (if it isn’t
already selected). The selected record mode is indicated by a pair of
arrows on either side of the mode name — i.e. “>STEP<”. Once
selected, move the cursor vertically to move to other areas of the
screen. The arrows will remain positioned at the selected mode.
m
• • • • • • • • • • • • • • • • • • • • • • • • • • • • • • • • • • • • • • • • • • • • • • • • • • • • • • • • • • • • • • • • • • • • • • • • • • • • • • • • • • • • • • • • • • • • • • • • • • • • • • • • • • • • • • • • • • • • • • • • • • • • • • • • • • • •
87
Page 91

6
Creating Original Patterns
Set time signature and
V
pattern length (new
patterns only).
Select the track to
B
record and the voice for
that track.
If you are recording a new pattern, move the cursor to the time sig-
nature and pattern length parameters and set as required.
m
Time signature: 1/16 … 16/16,
1/8 … 16/8,
m
Length of pattern: “1of1” … “1 of 8”
(max. length 8 measures).
1/4 … 8/4.
The time signature and pattern
length parameters can not be
DETAIL
changed if the selected pattern
already contains data.
Move the cursor to the track area of the display, and then shift the
cursor sideways to select the track you want to record: “C1” = chord
1, “C2” = chord 2, “Ba” = bass, “Dr” = drums. If you are recording a
new pattern or track, use the [−1] and [+1] keys to select the voice
you want to use for that track once the track has been selected. If you
don’t intend to use a track, set the voice number to “OFF.”
Move the cursor vertically to move to other areas of the screen. An
underline will remain below the selected track.
88
• • • • • • • • • • • • • • • • • • • • • • • • • • • • • • • • • • • • • • • • • • • • • • • • • • • • • • • • • • • • • • • • • • • • • • • • • • • • • • • • • • • • • • • • • • • • • • • • • • • • • • • • • • • • • • • • • • • • • • • • • • • • • • • • • • • •
Page 92

Cursor here to select the C1
(Chord 1) track.
–
NO YES
(001 … 128, Dr1 … Dr8, OFF).
The same applies to the C2, Ba,
and Dr tracks, except that only the
Dr1 … Dr8 voices and “OFF” can
be assigned to the Dr track.
N
+
1
1
to select C1 voice
Record.
Measure/beat/clock display.
Note parameters.
m
m
m
[
Press the
]
key to begin recording. The step record display
shown below will appear.
6
Creating Original Patterns
Number & name of voice assigned
to current track shown here.
You can also change the voice assignments later in the same way.
HINT
Time signature.
Note display.
• • • • • • • • • • • • • • • • • • • • • • • • • • • • • • • • • • • • • • • • • • • • • • • • • • • • • • • • • • • • • • • • • • • • • • • • • • • • • • • • • • • • • • • • • • • • • • • • • • • • • • • • • • • • • • • • • • • • • • • • • • • • • • • • • • • •
m
89
Page 93

6
Creating Original Patterns
Set the note parameters
M
as required.
Note (32nd, 16th triplet,
16th, 8th triplet, 8th,
1/4 triplet, 1/4,
1/2 triplet, 1/2).
Enter a note.
<
m
Velocity
(p = soft,
mf = medium,
f = loud).
Move the cursor to the note, velocity, and gate time parameters and
set as required using the [−1] and [+1] keys for the first (or next) note
to be entered.
The velocity and gate time settings in the step record
display correspond to the following numeric values in
DETAIL
the edit displays (to be described later):
Gate time
(Staccato,
Normal, Slur).
Velocity “p” =56
“mf” =88
“f” = 120
Gate Time “Staccato” = 50% normal note length.
“Normal” = 90% normal note length.
“Slur” = 99% normal note length.
Once the note parameter have been specified, the note can be entered simply by playing the appropriate key on the micro-keyboard
(or on your external MIDI keyboard). A note symbol appears on the
note display and the note pointer advances to the next note position.
The note symbol always appears as a 1/4-note, regardless of the actual
note entered (chords are also indicated by the 1/4-note symbol).
Here’s how the display will look after two 8th notes have been entered.
90
• • • • • • • • • • • • • • • • • • • • • • • • • • • • • • • • • • • • • • • • • • • • • • • • • • • • • • • • • • • • • • • • • • • • • • • • • • • • • • • • • • • • • • • • • • • • • • • • • • • • • • • • • • • • • • • • • • • • • • • • • • • • • • • • • • • •
Page 94

6
Creating Original Patterns
1st beat.
Note
pointer.
Cursor moved to note pointer (pointer filled).
Note that the pointer points up to notes in the
upper row and down to notes in the lower row.
2nd beat.
Each dash
represents a
32nd note
(12 clocks).
4th beat.3rd beat.
The Note Display
The note display shows up to four 1/4-notes worth
of data at once (that’s one measure in 4/4 time). If the
selected time signature results in more than four 1/4
notes per measure, then the display will scroll to show
the extra notes. On the other hand, if the time signature is 3/4, then the 4th beat is not used and appears as
double dashes on the display (“========”).
Moving Around In the Note Display
You can move the cursor down to the note display
(the note pointer will appear filled) and move the note
pointer to any position at which you want to enter a
note, or to any note that you want to delete. You will
actually hear the appropriate note or chord when the
note pointer is moved to an existing note symbol.
When you move the note pointer past the end of the
note display, the next measure will appear. If you
move past the last measure in the pattern, the first
measure of the pattern will appear.
• • • • • • • • • • • • • • • • • • • • • • • • • • • • • • • • • • • • • • • • • • • • • • • • • • • • • • • • • • • • • • • • • • • • • • • • • • • • • • • • • • • • • • • • • • • • • • • • • • • • • • • • • • • • • • • • • • • • • • • • • • • • • • • • • • • •
91
Page 95

6
Creating Original Patterns
Measure (1 of 4,
2 of 4, 3 of 4, 4
of 4 if 4/4 time).
1/4-note beat
(01, 02, 03, 04
if 4/4 time).
m
Clock (96
clocks per
1/4 note).
The Step Mode Function Keys
The four function keys immediately to the right of the display provide access to a number of handy functions in the step
record mode. The “del” key deletes the note or chord at the
note pointer. The “Bdl” key moves
m
Delete note at note
pointer.
m
Step back by current
note length and delete.
m
Enter rest of current
note length.
m
Enter a note of the same
length as the last note,
tied to the last note (this
effectively lengthens the
last note).
The Measure/Beat/Clock Display
The “Meas” area of the step record display shows the current position of the note pointer in measures, 1/4-note beats,
and clocks (there are 96 clocks per 1/4 note). If you’re not sure
what measure you’re seeing on the note display while recording, check the measure/beat/clock display.
the note pointer backward by the
currently selected note length and
deletes any notes that exist at that
location. The “rst” key enters a rest
of the currently selected note length
at the note pointer position. And the
“tie” key lengthens the previously
entered note by “tying” another note
of the same length and pitch to it
(the “tie” key only works immediately after entering a note).
92
• • • • • • • • • • • • • • • • • • • • • • • • • • • • • • • • • • • • • • • • • • • • • • • • • • • • • • • • • • • • • • • • • • • • • • • • • • • • • • • • • • • • • • • • • • • • • • • • • • • • • • • • • • • • • • • • • • • • • • • • • • • • • • • • • • • •
Page 96

6
Creating Original Patterns
Complete the pattern.
>
Repeat steps 7 and 8 until the current track of the pattern is com-
[
plete, then press
]
to stop recording and go back to step 5 to
record the next track, as necessary.
See the “Editing Songs & Patterns” section , page 140, for information on
how to edit recorded pattern data.
DETAIL
• • • • • • • • • • • • • • • • • • • • • • • • • • • • • • • • • • • • • • • • • • • • • • • • • • • • • • • • • • • • • • • • • • • • • • • • • • • • • • • • • • • • • • • • • • • • • • • • • • • • • • • • • • • • • • • • • • • • • • • • • • • • • • • • • • • •
93
Page 97

6
Creating Original Patterns
Playback In the Pattern Mode
Patterns can be played in the PATTERN mode in much the same way as they are in the
SONG mode.
Pattern number. Sections can be
changed via micro-keyboard when
cursor here or on section name.*
Section name.*
Voice numbers.
Mute buttons. Operation is the
same as in the SONG mode.
Chords can be changed via microkeyboard when cursor here.
94
• • • • • • • • • • • • • • • • • • • • • • • • • • • • • • • • • • • • • • • • • • • • • • • • • • • • • • • • • • • • • • • • • • • • • • • • • • • • • • • • • • • • • • • • • • • • • • • • • • • • • • • • • • • • • • • • • • • • • • • • • • • • • • • • • • • •
Pattern name.
Tempo
* Only preset patterns have sections. No
section name appears when a user pattern is selected.
[
Use the
]
key to start and stop playback. The main different
between playback in the PATTERN mode and playback in the SONG
mode is that in the PATTERN mode the sections don’t switch automatically. If you select “Fill1”, for example, “Fill1” will play repeatedly until a different section is selected (in the SONG mode “Vari.” is
automatically selected after “Fill1” plays through once). Also, only
the accompaniment tracks are available for playback in the PATTERN mode.
Page 98

6
Creating Original Patterns
Accompaniment Without the Limitations of ABC
If you want total harmonic freedom in your accompaniment tracks, unrestrained by the limits
of the ABC system, simply record the accompaniment for your song in sections, recording
the required chord/harmonic changes directly into as many patterns as your song requires
(remember, patterns can be up to 8 measures long). Then, when recording the accompaniment tracks in the SONG mode, use the “- - - ” chord type so that the pattern data is played
back unmodified. You might need to record several patterns containing the various chord
changes you need for your song, but you don’t have to worry about how the ABC system
might alter your accompaniment when it is played back.
• • • • • • • • • • • • • • • • • • • • • • • • • • • • • • • • • • • • • • • • • • • • • • • • • • • • • • • • • • • • • • • • • • • • • • • • • • • • • • • • • • • • • • • • • • • • • • • • • • • • • • • • • • • • • • • • • • • • • • • • • • • • • • • • • • • •
95
Page 99

6
Creating Original Patterns
The Pattern Jobs
The pattern mode includes 8 pattern “jobs” that perform a variety of important functions. To
access and use the pattern jobs, press the [MENU] key while in the normal PATTERN play
mode, and then press the function key next to “Job” on the display.
96
MENU
This calls the pattern job list. You can select any job on the list
simply by moving the cursor to the required job and pressing
[
ENTER].
m
Press for
pattern
job list.
• • • • • • • • • • • • • • • • • • • • • • • • • • • • • • • • • • • • • • • • • • • • • • • • • • • • • • • • • • • • • • • • • • • • • • • • • • • • • • • • • • • • • • • • • • • • • • • • • • • • • • • • • • • • • • • • • • • • • • • • • • • • • • • • • • • •
Pattern jobs 1 … 6
(cursor at top of list).
Pattern jobs 3 … 8
(cursor at bottom of list).
Page 100

6
Creating Original Patterns
User Patterns Only!
Since all of the pattern jobs modify the pattern data in some way,
they can only be used on user patterns (numbers 101 through 200). If
you attempt to use a pattern job while a preset pattern is selected, the
error display shown to the left will appear. Press any key (except the
micro-keyboard) to return to the job list.
Returning to the Pattern Play Mode
The function button next to “Exit” on the display can be used to
exit from any pattern job, and then from the job list thereby returning
you to the normal pattern play mode.
m
Press to exit
to job list.
• • • • • • • • • • • • • • • • • • • • • • • • • • • • • • • • • • • • • • • • • • • • • • • • • • • • • • • • • • • • • • • • • • • • • • • • • • • • • • • • • • • • • • • • • • • • • • • • • • • • • • • • • • • • • • • • • • • • • • • • • • • • • • • • • • • •
m
Press to exit to pattern
play mode.
97
 Loading...