

Page 1
®
YAMAHA
AUTHORIZED
PRODUCT MANUAL
Page 2
YAMAHA
Page 3

INTRODUCTION
Congratulations on your purchase of the Yamaha PortaSound PSS-680!
You now own one of the most sophisticated portable electronic keyboards available.
Controlled by an advanced microcomputer, the PortaSound PSS-680 offers far more
musical enjoyment and versatility than any other instrument in its class. In fact, it gives
you the fun and functions of a who/e host of digital music machines, namely ...
l An electronic keyboard offering 100 high-quality preset
voices using the famous Yamaha FM sound source.
l A digital synthesizer that lets you alter any of the preset
voices to taste and save up to five of these edited versions.
l A versatile rhythm machine using 32 percussion instru-
ments, PCM recorded for breath-taking realism. With 100
basic rhythm patterns featuring three intros/fill-ins and
one ending each, you have an amazing 400 rhythm variations at your disposal. What’s more, you can even play
percussion by hand like a drummer and record you own
original Custom Drummer pattern.
l
A sophisticated
you Single Finger Chords, automatic bass, chords and
orchestra, automatic Duet and orchestration capabilities.
automatic accompaniment system
giving
ABOUT THIS MANUAL
One look at your new PortaSound PSS-680 tells you:
this is an advanced instrument with a great variety of functions. Though this is true, don’t let the large number of
buttons fool you — the PSS-680 is actually very easy to use.
As you can see from the INDEX ILLUSTRATION on p.6, the
controls are all organized in easy-to-understand functional
groups. Once you get to know them, you will have no trouble
operating your PortaSound, making it do exactly what you
want it to.
To get acquainted with your new keyboard and have fun
with it from the start, please read PART
use the INDEX ILLUSTRATION to look up information on
buttons or functional groups you are especially interested
in right away. Otherwise, continue with PART
This manual is structured into three main parts. The shortest
and simplest one, PART I
PSS-680, gives you all the information you need to play your
new instrument, making use of its most basic features. It also
shows you how you can listen to the pre-programmed DE-
MONSTRATION
The functions mentioned shortly in the QUICK GUIDE illustration of PART I are explained in greater detail in PART II.
Particularly if you already have some experience with digital
song.
— GETTING TO KNOW THE
I first. You can then
II.
l A simple but very useful sequencer offering unique mu-
sical possibilities: You can digitally record up to five
melodies and chord progressions each and play them back
any time at the touch of a button.
l A highly advanced MIDI controller and multi-timbral
MIDI sound source. Used as a controller, the PortaSound
can play a number of external MIDI instruments simultaneously on various channels. As a sound source, it will
perform several voices as well as percussion independently
at the same time.
Read this manual carefully while playing your new PortaSound, and you will be able to make full use of its many
fantastic features in no time.
keyboards, the QUICK GUIDE will enable you to use these
functions immediately. On the other hand, if you are a total
newcomer, reading the next part will make operations clearer
to you.
PART II— BASIC FEATURES contains a systematic overall
introduction of WHAT YOUR PortaSound CAN DO, followed
by detailed explanations of most PortaSound functions. It tells
you all about voice and style selection, effects, Hand Percussion, the Auto Accompaniment features and the Song
Memory.
Each section starts out with a short Overview giving you a
general idea of the respective functions. You can then try
them out right away by following the steps described under
Operation. Note that in the text, bold print indicates basic
operational steps, while the regular print below it gives all
the necessary explanations. Therefore, you can simply follow
the instructions in bold print when you want to get to know
a feature, and read the details and
Finally, PART III shows you how to use those ADVANCED
FEATURES that require a bit of specialized know-how — the
Digital Synthesizer section to create your own FM sounds,
and the MIDI functions for communication with other MIDI
instruments, sequencers and computers.
Points to Remember
later.
Page 4
CONTENS
PRECAUTIONS-TAKINGCAREOFYOURPORTASOUND..
CONTROLPANEL..
PARTI
QUICKGUIDE.....................................................................................................................
INDEXILLUSTRATION.....................................................................................................
GETTING TO KNOW THE PSS-680
POWER
PLAYING................................................................................................................4
DEMONSTRATION
PART II BASIC FEATURES
WHATYOURPortaSoundCANDO............................................................................
Voices,RhythmandAutoAccompaniment........................................................
Headphones...........................................................................................................
ConnectingthePSS-680toYourStereo
VOICE/MELODYSECTION.............................................................................................
SELECTING
EFFECTS..
PITCH BEND Wheel
PARAMETERCHANGESettings.........................................................................10
TRANSPOSE
TUNING ...........................................................................................................
MELODYVOLUME
RHYTHM MACHINE FUNCTIONS
STYLE
RHYTHM CONTROL............................................................................................
TEMPO.................................................................................................................... 14
BEAT
ChangingtheRhythmStyleDuringPerformance..
HANDPERCUSSION..
CUSTOM DRUMMER
AUTO ACCOMPANIMENT FEATURES
MODE.....................................................................................................................
ORCHESTRATION
A)SingleFingerChords......................................................................................19
B) Single Finger Auto Accompaniment
C) Fingered Auto Accompaniment
DUET..
SONG
MEMORY
MELODY Memory.................................................................................................22
CHORD Memory
. . . . . . . . . . . . . . . . . . . . . . . . . . . . . . . . . . . . . . . . . . . . . . . . . . . . . . . . . . . . . . . . . . . . . . . . . . . . . . . . . . . . . . . . . . . . . . . . . . . . . . ..
. . . . . . . . . . . . . . . . . . . . . . . . . . . . . . . . . . . . . . . . . . . . . . . . . . . .
................................................................................................................... 4
...............................................................................................
......................................................................................
...........................................................
AVOICE
...............................................................................................................
SELECT-ChoosingtheRhythm.............................................................13
Display..
.....................................................................................................................
.......................................................................................................
................................................................................................................ 22
. . . . . . . . . . . . . . . . . . . . . . . . . . . . . . . . . . . . . . . . . . . . . . . . . . . . . . . . . . .
...............................................................................................
.......................
........................................................................................
..........................................................................................
..........................................................................................
................................................................................................
....................................................................................................
.
...........................................................................
...............................................................................13
...........................................
.......................................................................
............................................................20
....................................................................
. . . . . . . . . . . . . . . . . . . . . . . . . . . . . . .
. . . . . . . . . . . . . . . ... . . . . . . . . . . . . . . .
1
2
4
4
5
6
7
7
7
8
8
8
8
9
10
11
11
11
13
14
14
15
16
18
18
18
20
21
24
PART III ADVANCED FUNCTIONS
DIGITALSYNTHESIZER...................................................................................................
SYNTHESISBASIC
FM
1)
Voice
2)ABitofFMTheory..
3)CreatingSounds..............................................................................................27
SYNTHESIZERPARAMETERS............................................................................29
.......................................................................................................................................
MIDI
What is MIDI?
MIDIMODE ....................................................................................................
Parametersand
.........................................................................................................
COURSE..
Values.........................................................................26
.......................................................................................
.....................................................................
.....................................................................26
26
26
26
30
30
31
Page 5
Keyboard
AssignMODE
. . . . . . . . . . . . . . . . . . . . . . . . . . . . . . . . . . . . . . . . . . . . . . . . . . . . . . . . . . . . . . . . . . . . . . . . . ..
TransmittedData..................................................................................................
MemoryBulkDump..............................................................................................
ReceivedData
Sound
SourceMode ...............................................................................................
Transmitted
Received Data
MIDI
RECEIVE
TRANSMITCHANNEL Selection
CONNECTIONEXAMPLES..................................................................................
MIDI
ADDITIONAL
INFORMATION.........................................................................................
........................................................................................................34
Data..
..................................................................................................
........................................................................................................35
CHANNEL
FILTER
. . . . . . . . . . . . . . . . . . . . . . . . . . . . . . . . . . . . . . . . . . . . . . . . . . . . . . . . . . . . . .
........................................................36
ALLRESET ............................................................................................................
SPECIFICATIONS
EXCLUSIVE DATA FORMAT
ImplementationChart
MIDI
............................................................................................................. 40
..........................................................................................
. . .. . . . . . . . . . . . . . . . . . . . . . . . . . . . . . . . . . . . . . . . . . . . . . . . . . . . . . . . . . . . . . . . . . . . . . . . . . .
32
32
33
35
35
36
37
39
39
41
45
PRECAUTIONS — TAKING CARE OF YOUR PORTASOUND
Your new PortaSound is a fine musical instrument — and should be treated as such.
Handle it with care and common sense, and it will give you years of enjoyment.
• Location
Avoid exposure to direct sunlight or other sources of heat.
Never leave it inside a car where it can get very hot. Vibration, excessive dust, cold, low or high humidity can
also cause malfunction.
• Handling
Avoid rough handling. Don’t drop or jolt the PortaSound
as this can damage the internal circuitry. Pressing too
hard on keys or controls may lead to malfunctions. When
cords are plugged into the rear panel jacks, pay particular
attention not to apply excessive force to them since this
may damage the terminals.
• Adaptors
Use only the power adaptor described in the POWER
section.Disconnect the AC adaptor when not using your
PortaSound.
• Batteries
• When not using your PortaSound for long periods, be
sure to remove the batteries to avoid damage through
battery leakage.
•
Replace weak batteries before they run down com-
pletely.
• Always replace all batteries with new ones.
• Do not use different kinds of batteries at the same time,
• In case electrolyte has leaked into the battery compartment, wipe it off completely before installing new
batteries.
• Never disassemble, heat or throw discarded batteries
into a fire. Dispose of them properly.
• Cleaning
Clean the exterior with a soft, dry cloth. Using chemical
solvents will damage the finish.
• Interference Through Electromagnetic Fields
Do not use your PortaSound close to television sets or
other equipment receiving electromagnetic signals as this
could cause interference noise in the other appliance.
• Service and Modifications
Your PortaSound contains no user serviceable parts.
Opening it or tampering with it in any way can lead to
electrical shock as well as damage. Of course, any resulting
damage will no longer be repaired free of charge. Refer
all servicing to qualified YAMAHA personnel.
1
Page 6
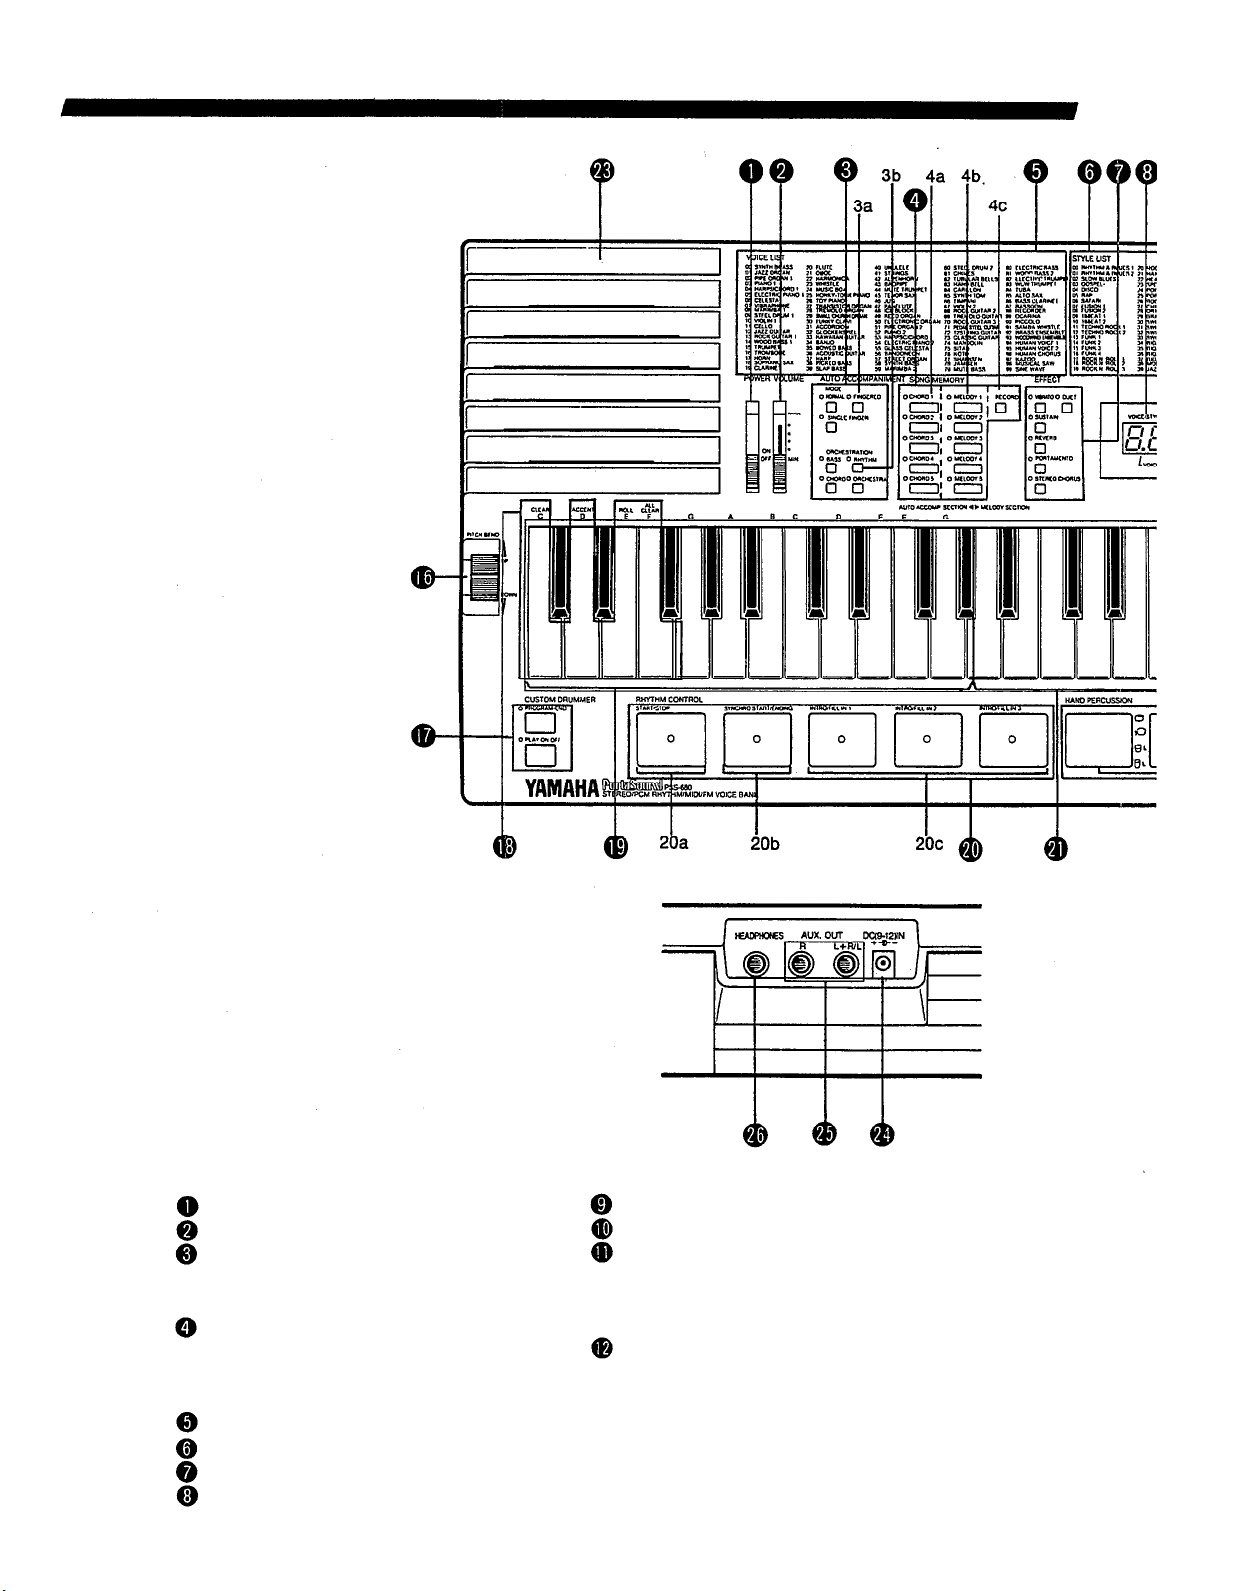
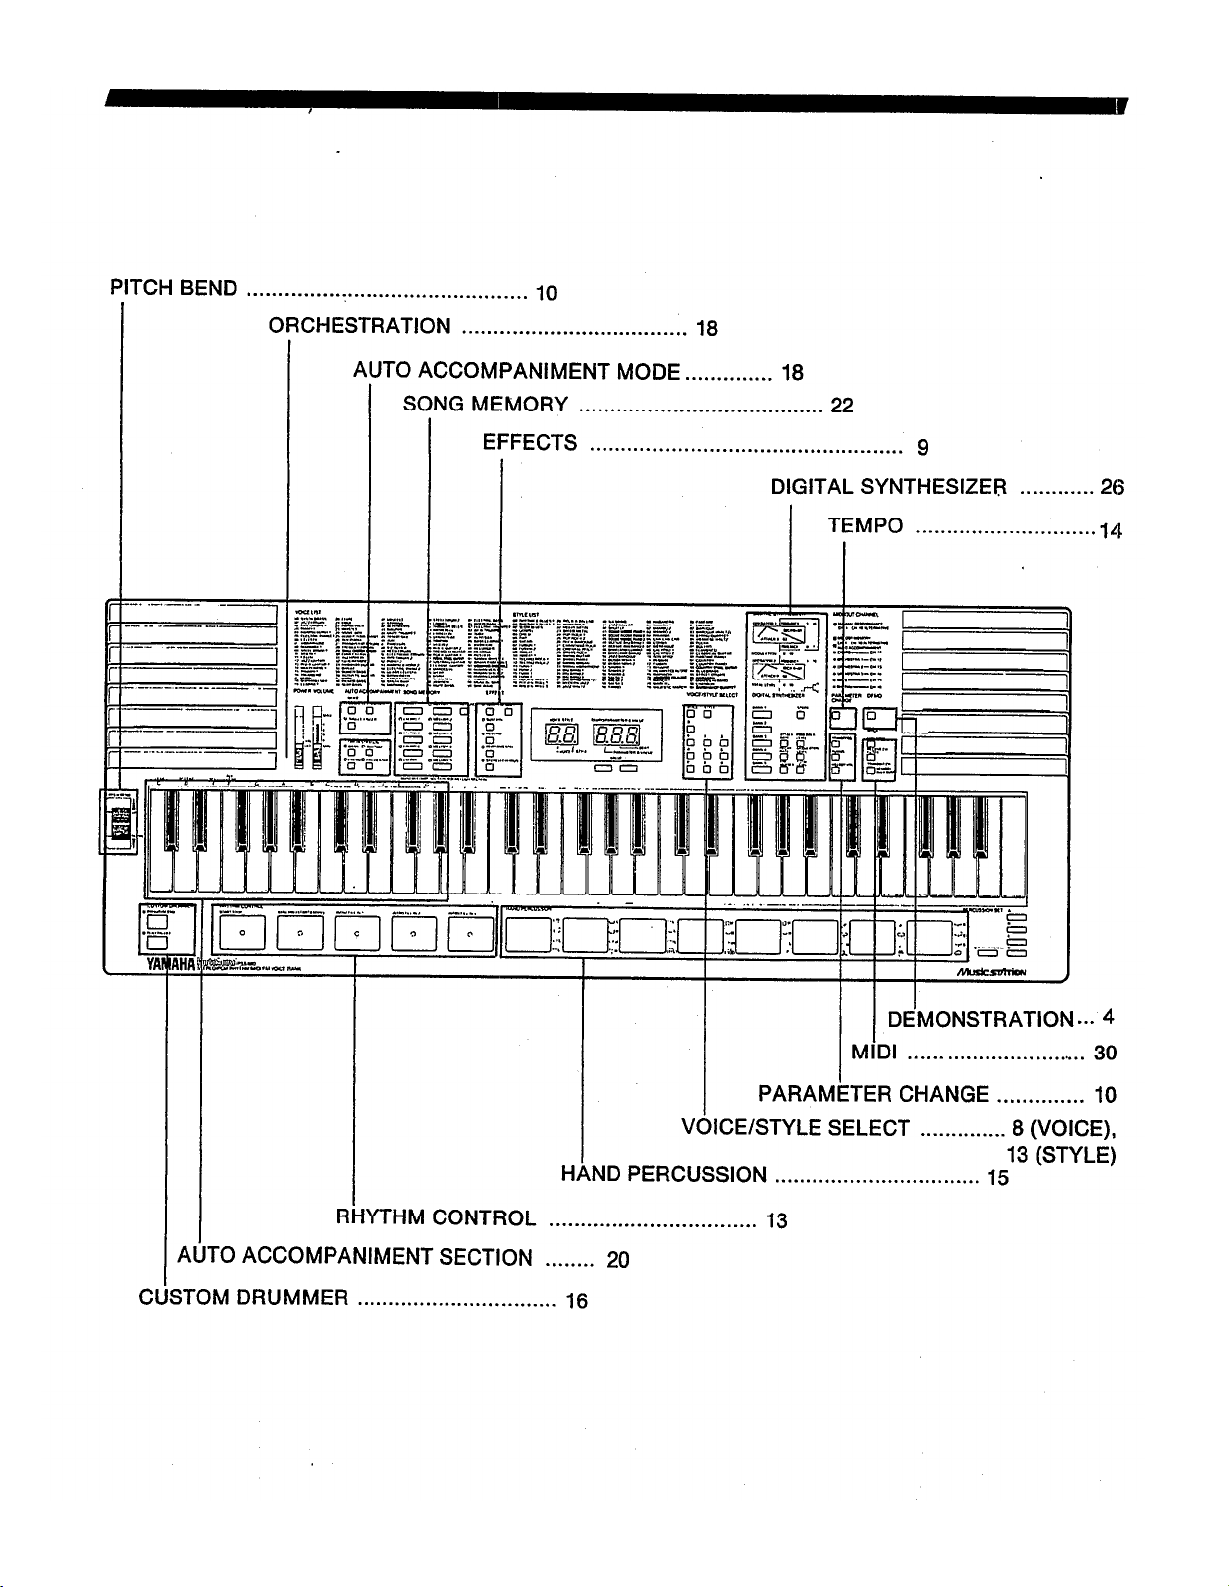
CONTROL PANEL
POWER switch
VOLUME slider
AUTO ACCOMPANIMENT group
3a MODE selectors
3b ORCHESTRATION buttons
SONG MEMORY
4a CHORD bank selectors
4b MELODY bank selectors
4c RECORD button
VOICE LIST
STYLE LIST
EFFECT selectors
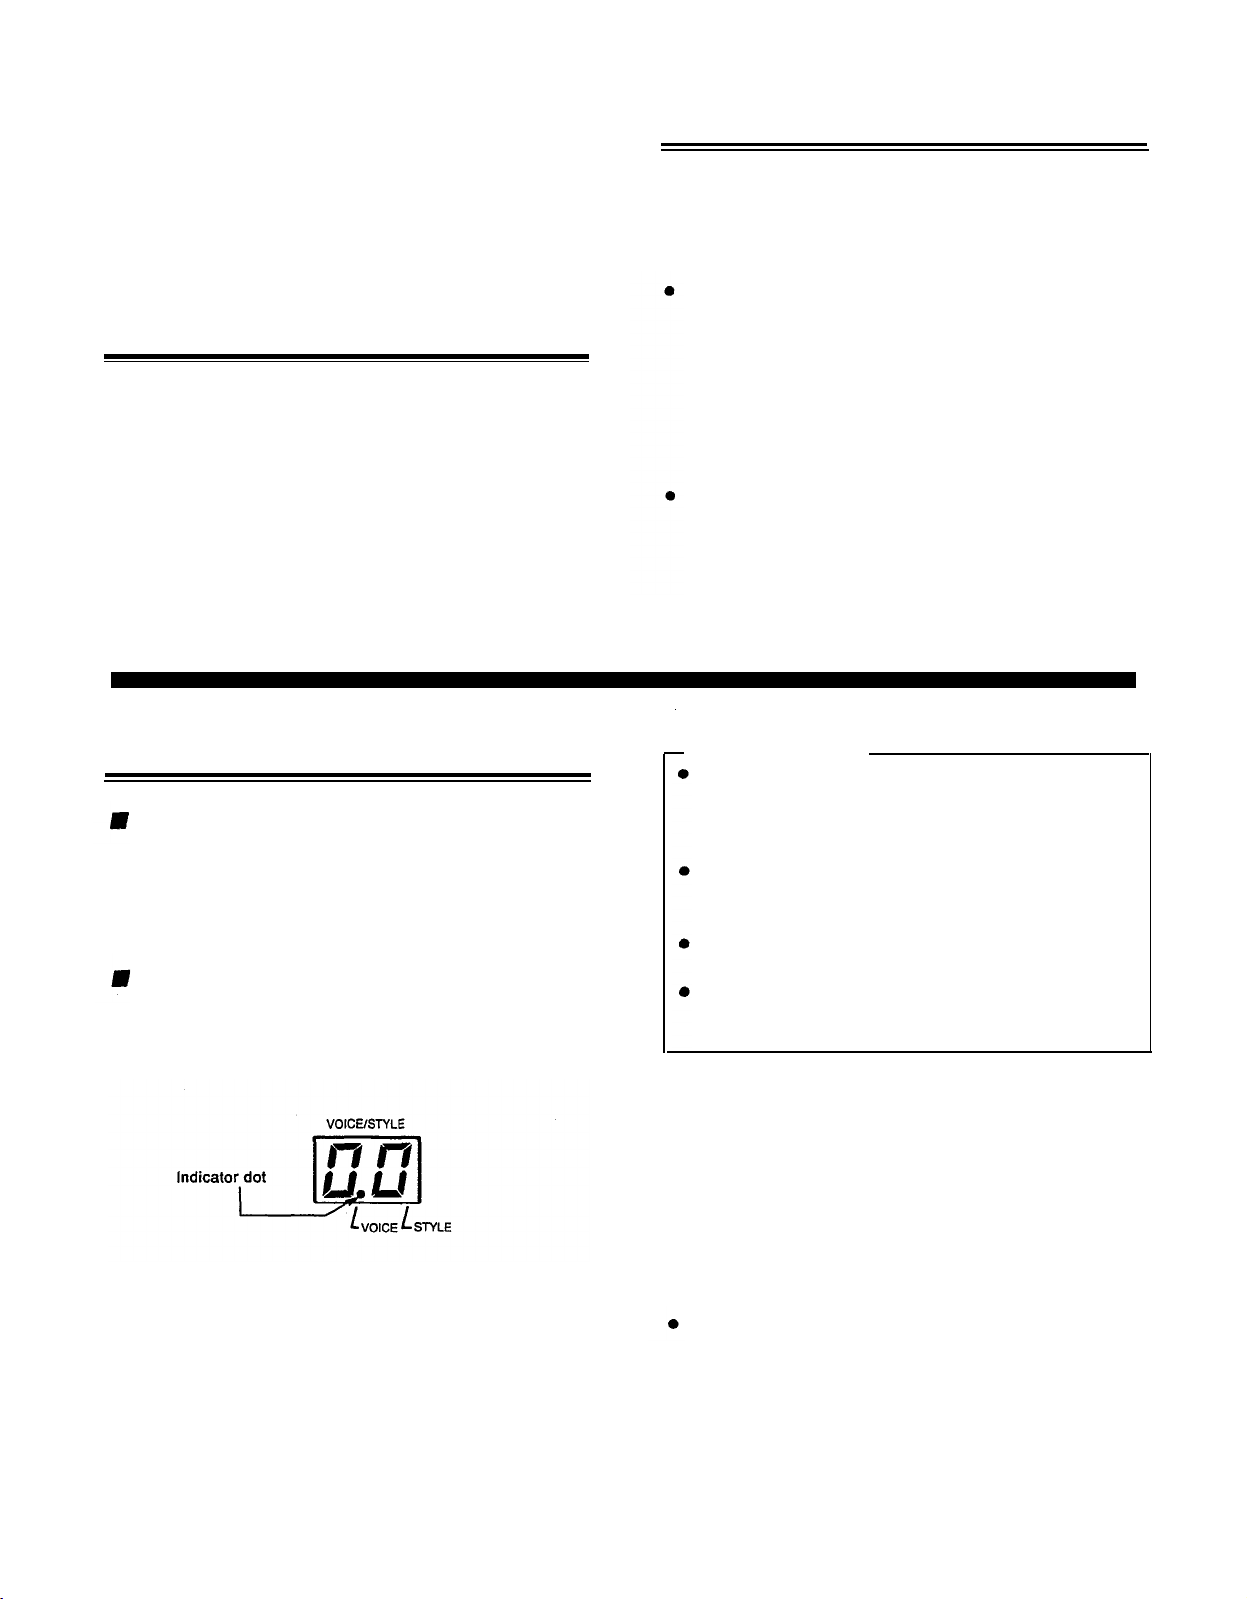
VOICE/STYLE number display
TEMPO/PARAMETER & VALUE display
VALUE buttons
VOICE/STYLE SELECT group
11a VOICE switch
11b STYLE switch
11c Number buttons
DIGITAL SYNTHESIZER group
12a Voice BANK selectors
12b STORE button
12c Synthesizer Parameter selectors
12d DIGITAL SYNTHESIZER flowchart
2
Page 7
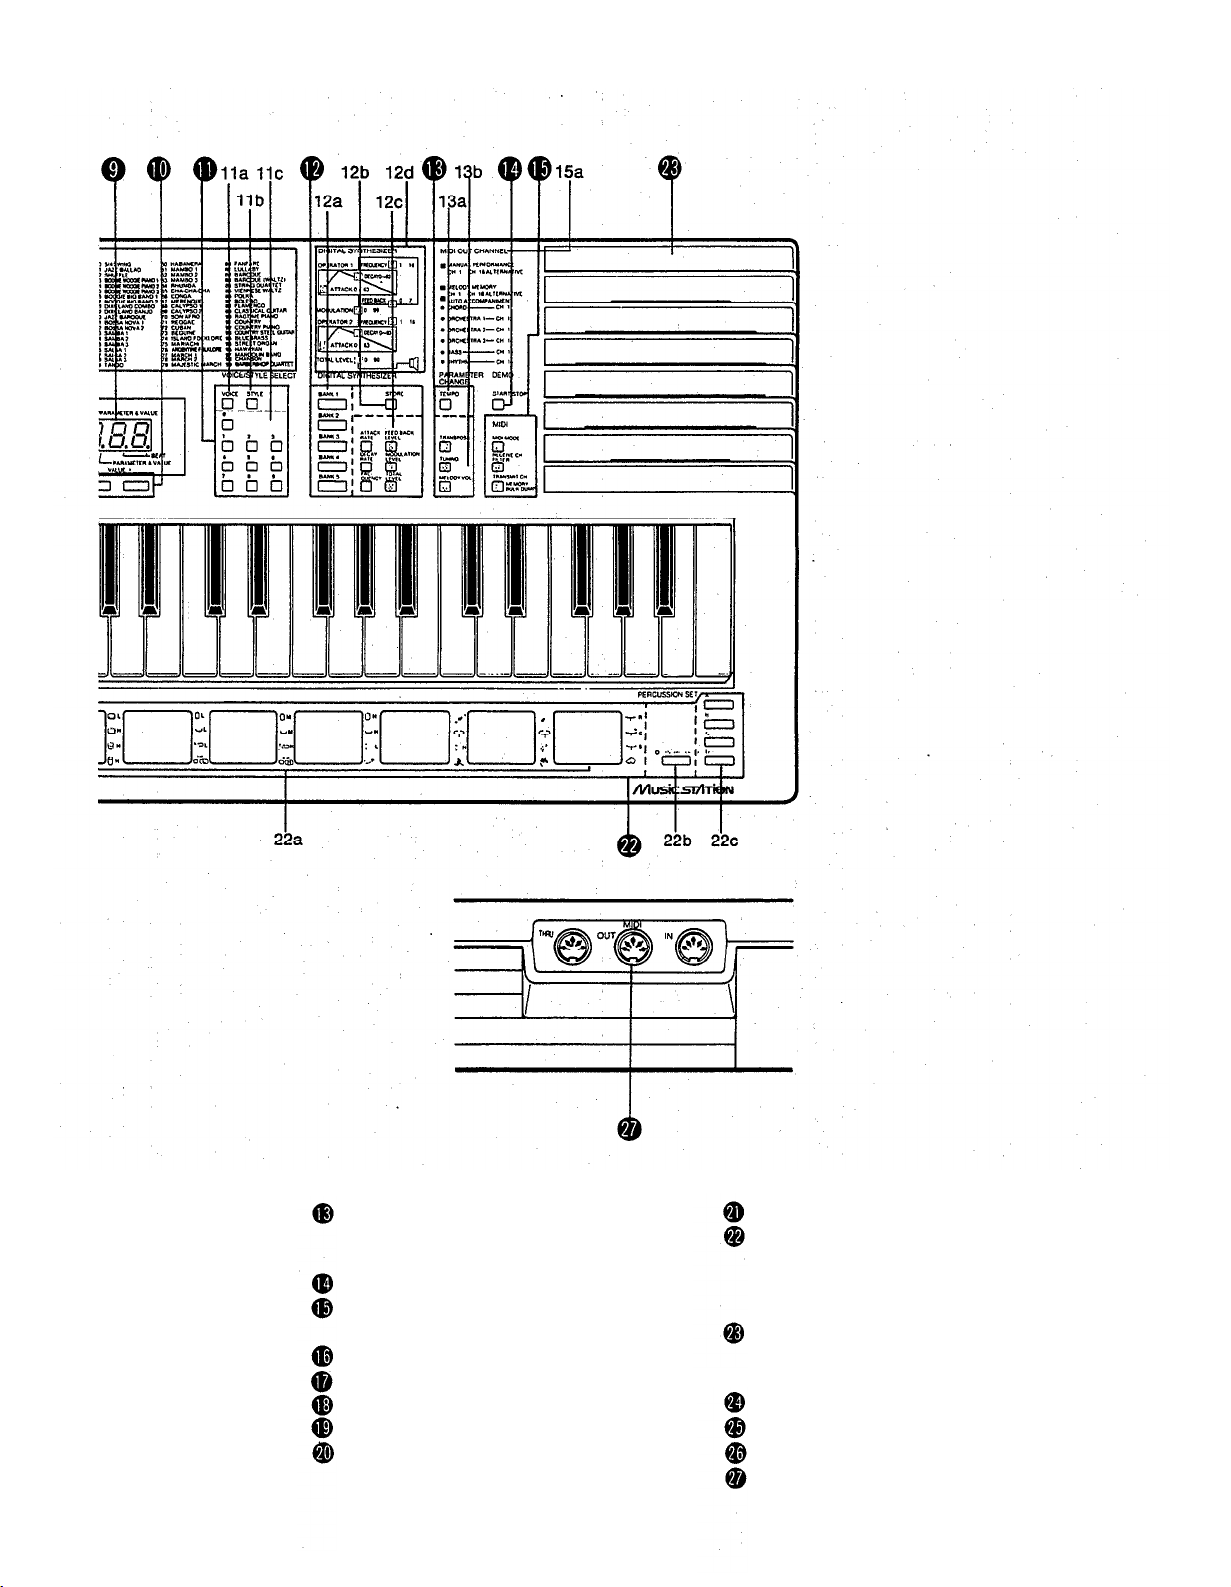
PARAMETER CHANGE group
13a TEMPO button
13b Parameter selectors
DEMO START/STOP switch
MIDI group
15a MIDI OUT CHANNEL list
PITCH BEND wheel
CUSTOM DRUMMER controls
Percussion control keys
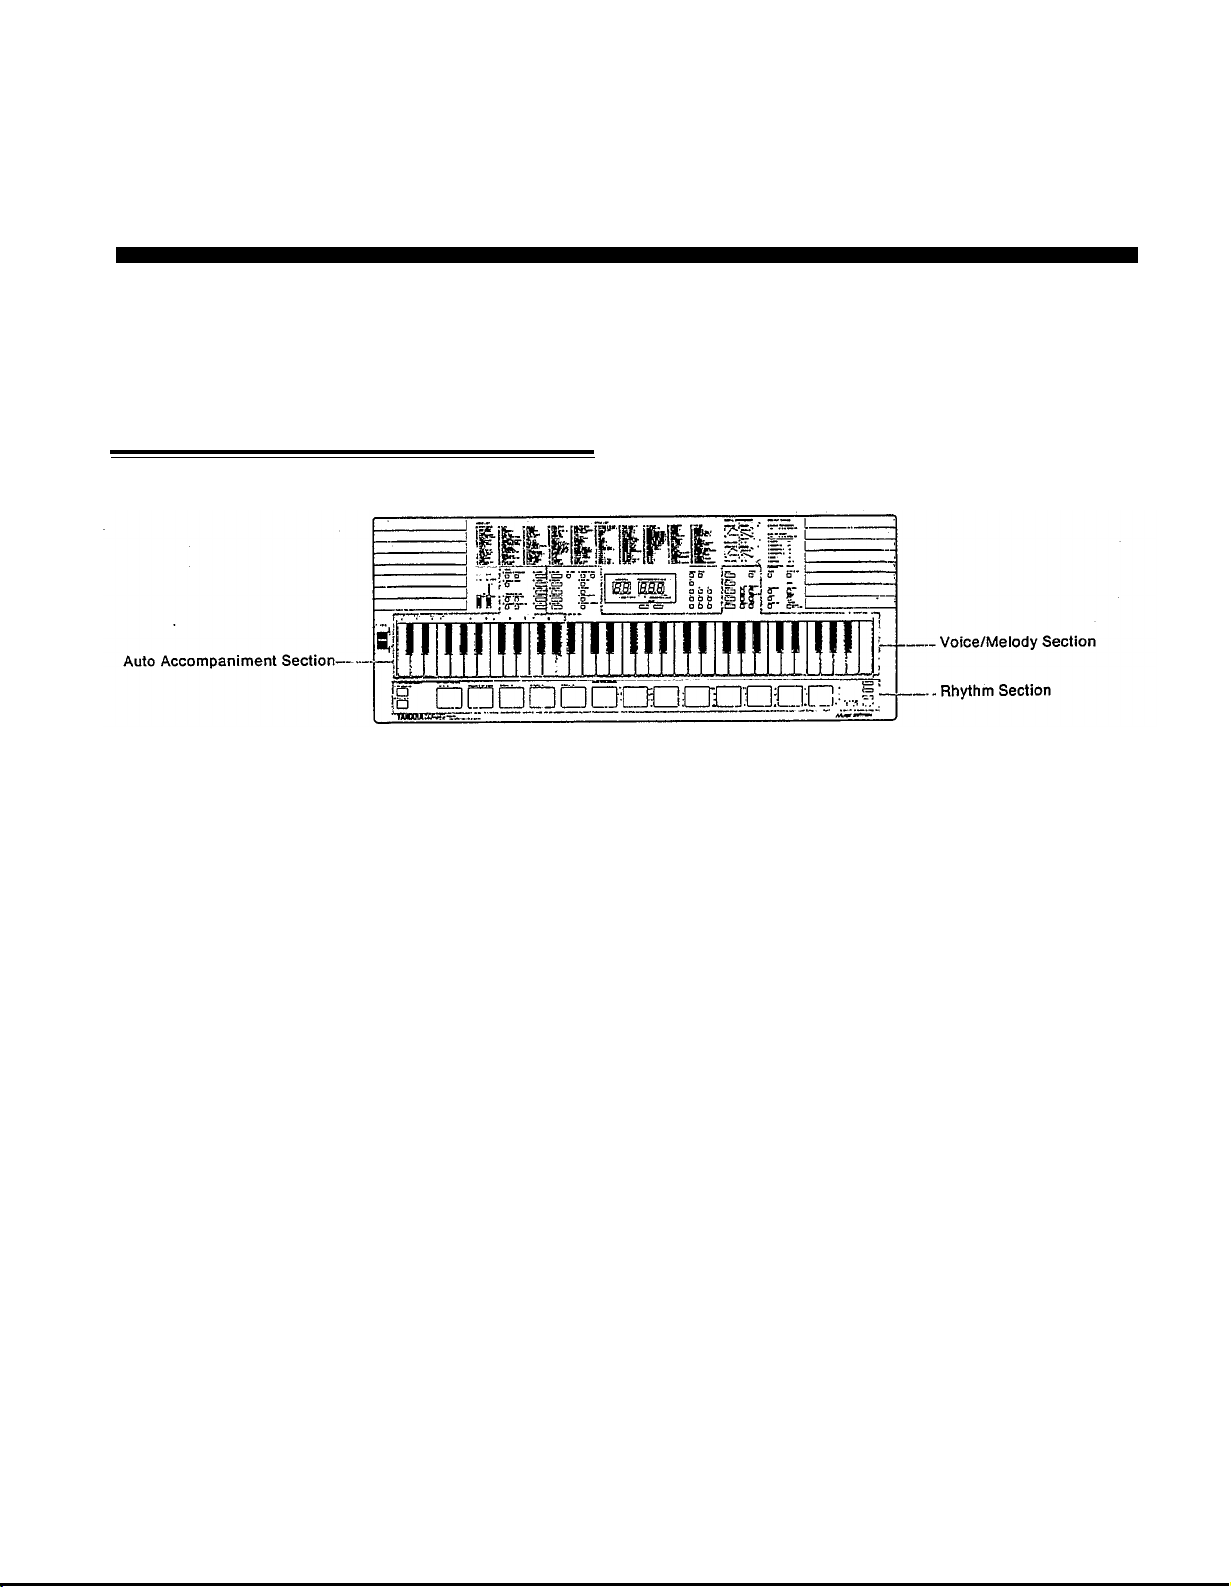
AUTO ACCOMPANIMENT SECTION
RHYTHM CONTROL pads
20a START/STOP switch
20b SYNCHRO START/ENDING control
20c INTRO/FILL IN controls
MELODY SECTION
HAND PERCUSSION section
22a HAND PERCUSSION pads
22b SYNCHRO BREAK switch
22c PERCUSSION SET selectors
Built-in speakers
REAR PANEL
DC(9-12V)IN AC power adaptor terminal
AUX. OUT jacks
HEADPHONES jack
MIDI terminals
3
Page 8
PART
GETTING TO KNOW THE PSS-680
This part of the manual first shows you how to provide the PSS-680 with POWER, using batteries or an
AC adaptor. You can then turn it on and start PLAYING it right away.
Next, listen to a DEMONSTRATlON of what the PortaSound PSS-680 can do. Reading PART II will then
enable to perform this kind of professional-sounding music all by yourself.
The QUICK GUIDE briefly introduces the most basic features without going into detail so you can enjoy
yourself experimenting and discovering.
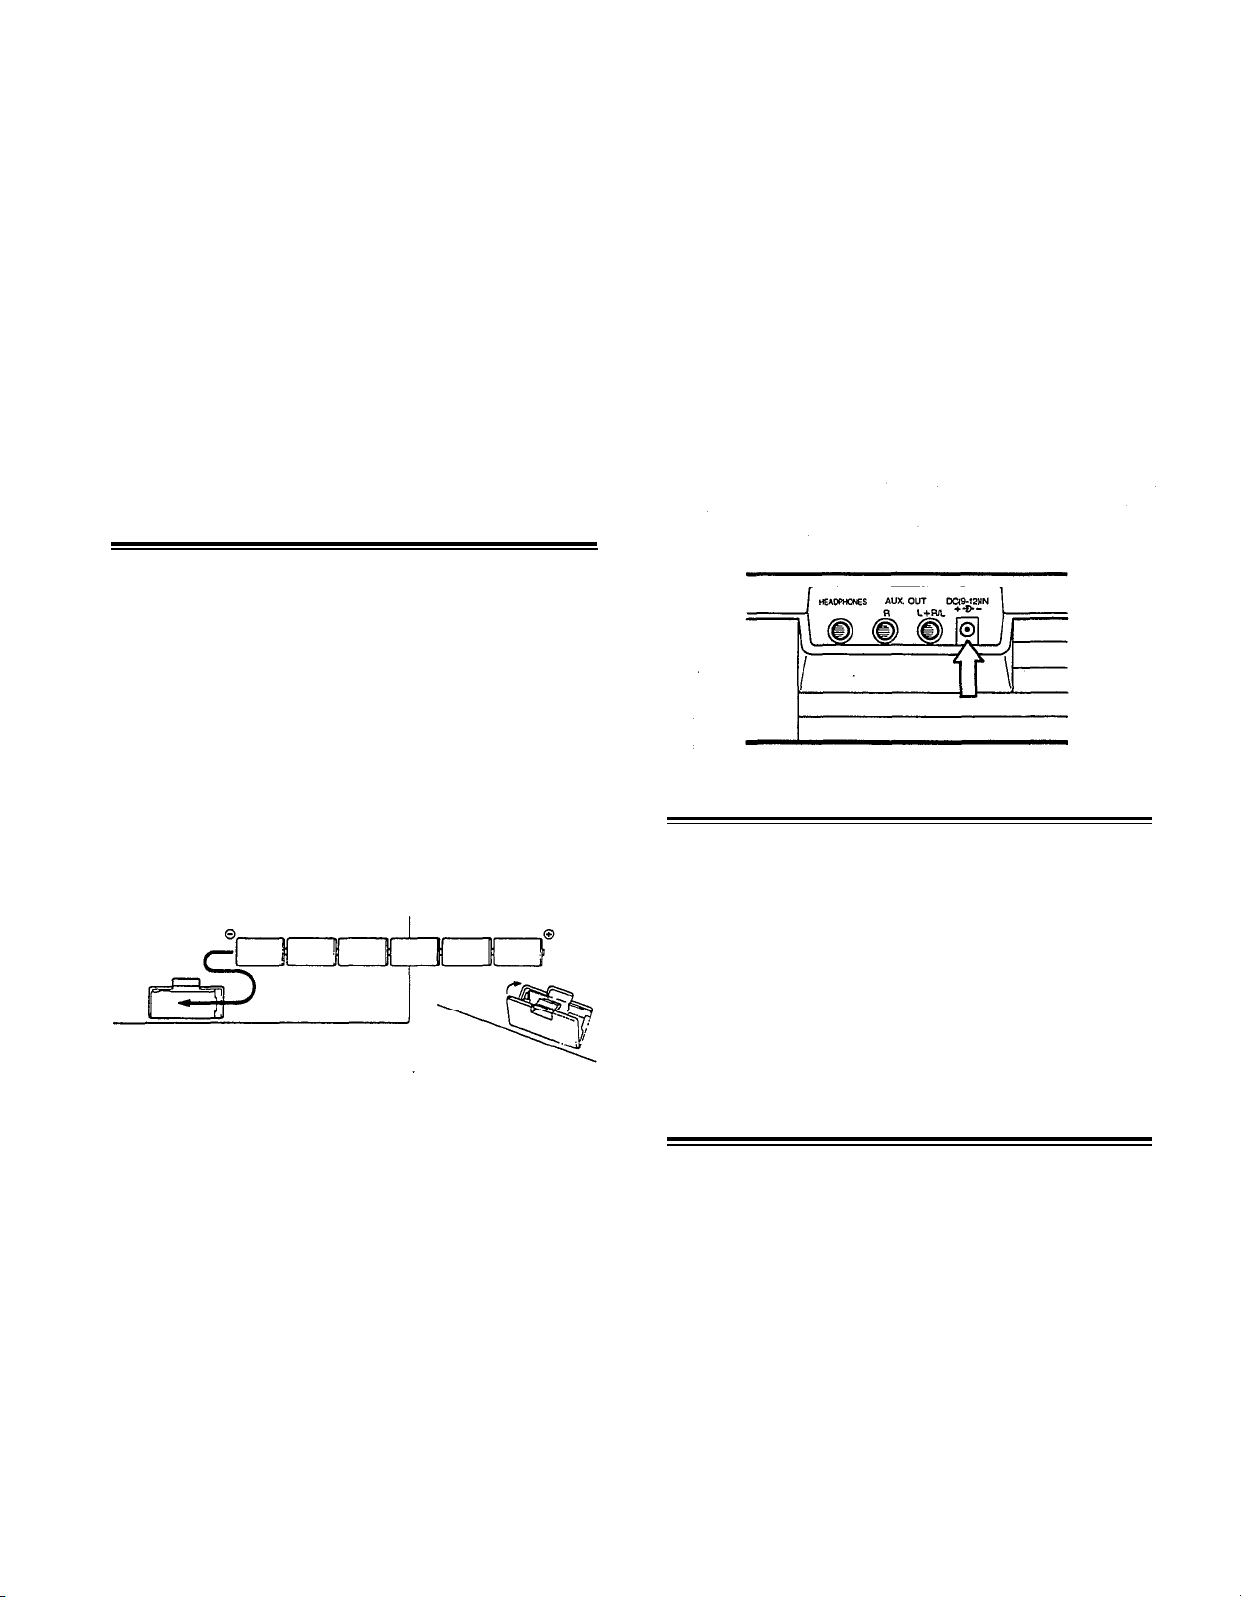
POWER
Your PortaSound PSS-680 works on batteries or household
current.Since batteries are also needed to support the internal
RAM memory, buy six 1.5V SUM-2 alkaline batteries. (Be
sure to read the precautions concerning batteries on p. 1).
To save battery power, you can also use a Yamaha PA-3,
PA-4 or PA-40 AC adaptor.
I
Inserting Batteries
Turn the instrument upside-down and remove the battery
compartment lid by pushing its tab in the direction of the
arrow embossed on the lid. Insert the six batteries, making
sure that their poles are aligned as shown in the illustration
below.
Low Battery Warning
When the battery voltage drops below a certain level, the
LED displays will start to blink. As soon as this happens,
replace all six batteries with new ones. If you allow the batteries to become spent completely, any data you have stored
in the internal memories will be lost.
Using an AC Power Adaptor
When you want to connect your PortaSound to a wall socket,
buy a Yamaha PA-3, PA-4 or PA-40 Power Adaptor. No
other adaptor can be used, so be sure to ask for the right
kind.
Plug the adaptor into a convenient wall socket and its connector into the DC(9-12V)IN terminal (24) on the back of
your PortaSound as shown. (Even when power is turned
off, the AC adaptor back up the PortaSound RAM memory.)
Replace the lid. It should lock in place with a click.
PLAYING
Slide the POWER switch (1) upward to the ON position.
The LED displays and various indicators will light up to
confirm that the PortaSound is turned on.
You can now play the keyboard. Adjust the sound level with
the VOLUME slider (2), pushing it up toward MAX to increase volume and down to lower it.
• Be sure to turn your PortaSound off again by sliding the
POWER switch (1) back to OFF after you have finished
playing. This will save battery power.
DEMONSTRATION
To get an idea of the music your new PortaSound is capable
of playing, listen to the factory-programmed demonstration
song. Start it by pressing the yellow DEMO START/STOP
button (14).
l The song will continue until you press DEMO
START/STOP again, or the START/STOP pad (20a).
You will soon be playing music in this kind of professional
style by yourself — PART II will teach you all the necessary
operations. Most of these steps can also be carried while
the PortaSound is performing the demonstration song,
allowing you to alter this song according to your taste.
4
Page 9

QUICK GUIDE
Selecting Voices
To choose any instrument sound you like, simply look
up its name in the VOICE LIST (5) and input the corresponding number with the number buttons (11c). (It may
be necessary to press the blue VOICE switch (11a) first.)
Effects
Add special effects to the instrument sounds by pressing
these selectors.
Pitch Bend Wheel
Bend the pitch of melody notes upward or downward
with this wheel.
Single Finger Chords
You can play entire chords automatically with just a
finger or two — press the SINGLE FINGER selector (3a),
then play keys in the AUTO ACCOMPANIMENT SECTION.
Automatic
With SINGLE FINGER mode on, hit the START/STOP pad
(20a) to start the rhythm. Play the AUTO ACCOMPANIMENT SECTION and enjoy automatic bass, chord and
orchestra accompaniment. To stop it, press SYNCHRO
START/ENDING (20b).
Accompaniment
Selecting Styles
The STYLE LIST (6) shows you which rhythm and accompaniment styles you can choose from. Press the blue
STYLE (11 b) switch, then enter the desired style number
with the number buttons (11c).
Tempo
To adjust the speed of the rhythm/accompaniment, press
TEMPO (13a), then use the VALUE buttons (10) to make
it faster or slower.
Rhythm Control
START/STOP (20a) starts or stops the selected rhythm.
Hit the INTRO/FILL IN pads (20c) instead for a different
beginning or for variations while the drum sounds are
playing. (Works for Auto Accompaniment too.)
SYNCHRO START/ENDING (20b) lets the rhythm begin
automatically when you play the AUTO ACCOMPANI-
MENT SECTION (19), or ends it with a special pattern.
Orchestration
These switches (3b) turn the four components of the Auto
Accompaniment —
orchestra parts —on and off to suit your music.
Hand Percussion
Hit these 8 pads (22a) any time to play your own drums.
Use the PERCUSSION SET selectors (22c) to choose one
of four different drum sets.
bass, rhythm (drums), chords and
5
Page 10
INDEX ILLUSTRATION
6
Page 11
PART
BASIC FEATURES
WHAT YOUR PortaSound CAN DO
Using the QUICK GUIDE and listening to the DEMO song has already given you a first impression of your
new PortaSound’s capabilities. This chapter tells you more about them.
Voices, Rhythm and Auto Accompaniment
To better understand the PortaSound’s functional structure,
think of it as comprising the following three sections:
II
As the names say, the Voice/Melody Section controls all
features concerning the voices you play, usually in the form
of a melody, while the Auto Accompaniment Section helps
you perform the accompaniment to these melodies. The
Rhythm Section can be used separately like a drum machine.
or in combination with Auto Accompaniment.
l This is not a strict division. These sections are closely
interconnected — for instance, RHYTHM CONTROL
influences both the Rhythm and the Auto Accompaniment
Sections, and the SONG MEMORY MELODY banks
are just as much part of Voice/Melody as they are of Auto
Accompaniment. Keeping this division in mind, though,
makes it easier to understand the PortaSound features.
Voice/Melody Section
In the tradition of Yamaha’s famous DX7 synthesizers, the
preset instrument sounds available on the PortaSound
PSS-680 are referred to as “voices”. With the Digital Synthesizer functions explained in PART III (p.26), you can alter
them to create your own original sounds, then save up to five
of these for
For more expressiveness and realism, you can add various
EFFECTS (p.9) to the voices. PORTAMENTO and PITCH
BEND (p.10), for instance, can greatly enhance strings, brass
or bass sounds.
Easy Play Functions
If the melody you want to play is in a difficult key, you can
TRANSPOSE the entire keyboard (p.11) to an easier one.
Melodies (or parts of them) you find particularly hard to
instant access at the push of a button.
perform can be memorized in the MELODY banks of the
SONG MEMORY (p.22). For example, if a phrase is too
fast for you. record it at a comfortable slow tempo and then
play it back any time at the correct speed by simply pressing
the corresponding MELODY button.
Rhythm and Auto Accompaniment Sections
Since these sections are so closely interrelated, many of their
functions are treated together in this manual.
The Rhythm and Auto Accompaniment features can enhance
your performances in four basic ways: The PortaSound
PSS-680 is capable of
1. playing a rhythm accompaniment to your music with realistic percussion sound patterns in a hundred different
musical styles, functioning like a high-quality drum machine. Many variations of these basic patterns are possible
with RHYTHM CONTROL.
2. letting you play complete chords by using only a single
finger of your left hand (SINGLE FINGER chords).
3. performing an entire accompaniment arrangement, complete with drums, bass, chords and orchestra, easily controlled by your left hand. Again, RHYTHM CONTROL
can be used to add a great number of variations. You can
even change the ORCHESTRATION, deleting or adding
parts to the accompaniment at the touch of a button.
4. digitally recording whole melodies or various melody
sections as well as entire chord progressions in the SONG
MEMORY. These can be played back at the touch of a
button. The PSS-680 thus also does the job of a simple
but particularly flexible sequencer — you can use it either
7
Page 12
for totally automatic performances, or to enhance any
music you are playing live.
Connecting the PSS-680 to Your Stereo
In addition, you can play four different sets of 8 percussion
instruments by hand like a drummer with the easy-to-use
HAND PERCUSSION pads, further enhancing the Rhythm
and Auto Accompaniment with your own solos, and record
your own original CUSTOM DRUMMER pattern.
Headphones
For private practicing and playing without disturbing others,
connect headphones to the rear panel HEADPHONES jack
(26). The built-in speakers (23) are automatically cut off when
you insert a headphone plug into this jack.
VOICE/MELODY SECTION
SELECTING A VOICE
Overview
100 preset FM voices are yours for the choosing. Each voice
has its own number, indicated in blue next to its name in the
VOICE LIST (5), for instant access.
Selecting a voice is very easy, requiring only one or two steps:
Operation
1. Make sure the VOICE indicator is lit.
Check to see that the dot in the VOICE/STYLE number
display (8) is located above “VOICE”.
For a truly powerful sound, connect the AUXILIARY
(AUX.) jacks (25) on the rear panel of the PortaSound to
your stereo system with optional cables. Both jacks must be
used for a stereo effect.
Be sure to turn the PortaSound’s power off when making
theses connections.
Reduce the VOLUME (2) on the PortaSound and adjust
the sound level with your stereo’s volume control.
If you want to connect the PortaSound to a mono amplification system such as a keyboard amp, use only the
L + R/L jack. This will then output a mix of the left and
right channel signals.
Only the PCM percussion sounds have distinct left or right
positions in the stereo field, while the FM voices are all
centered. STEREO CHORUS, however, gives a
three-dimensional stereo effect with all FM sounds.
Points to Remember
Notice that all voice numbers have two digits. Both
must be entered for the instrument sound to change.
(The first ten voice numbers start with a “0”, which
you also have to input.)
You can always check the currently selected voice by
looking at the VOICE/STYLE display (making sure
the VOICE indicator is lit).
When POWER is turned on, the voice chosen before
the PSS-680 was turned off is selected automatically.
With each voice, up to twelve keys can be played at
the same time — in other words, the PSS-680 is 12-voice
polyphonic.
To appreciate the amazing variety of realistic FM instrument
sounds now at your disposal, try out as many voices as you
like right now.
This shows that your PortaSound is ready for voice selection. If it is not, simply press the blue VOICE switch
(11a), making sure that the VOICE indicator dot lights
up.
2. Enter the voice number.
Use the VOICE/STYLE SELECT number buttons (11c)
to input the number of the desired voice.
8
Playing Along with the Demo Song
If you want, you can even play along with the demonstration
song using any instrument of your choice. To do so, select
a voice, press the yellow DEMO START/STOP switch and
play. You can change to other voices any time.
When playing along like this, you can only play single
notes at a time (= “monophonic” performance).
A TIP: Using the Digital Synthesizer Memory Banks for
One-Touch Voice Selection.
Sometimes you will want to change voices while playing —
but you may not have enough time to look up a voice number
and input its two digits during a performance.
Page 13
For instant access at the touch of a button, you can store
up to five selected voices in the Digital Synthesizer Memory
BANKS 1 thru 5 (12a).
Operation
1. Select the voice you want to store.
2.
Hold down the red STORE button (12b) and simultaneously
press the desired BANK button (12a),
1. The VOICE/STYLE display will indicate “b.1”. The
selected voice is now stored in BANK 1 and can be recalled
any time by pressing that button.
Stored voices are retained in their banks even when
POWER is turned off.
Saving voice data to a bank deletes any previous settings
already stored there.
for example BANK
EFFECTS
short explanation of what each effect does, and how to adjust
PORTAMENTO:
VIBRATO
Vibrato regularly (cyclically) raises and lowers the pitch of
a sound. It occurs naturally in the human voice, and many
acoustic instruments, for example strings, make use of it.
Usually, this effect does not start right away when a note is
sung or played, but after a certain delay time.
The PSS-680 VIBRATO also simulates this natural delay.
For an even more realistic effect, each voice has the vibrato
delay that suits it best.
SUSTAIN
Sustain lengthens the release rate of a voice, causing the sound
to linger even after the keys have been released. It works
rather like the damper pedal of a piano. The sustain effect
is also different (longer or shorter) for each voice.
Overview
The PSS-680 offers six different kinds of effects, described
below, which can be added to the FM instrument voices for
even greater tonal variation. They do not affect the PCM
percussion sounds.
Operation
1. To obtain the effect you want, simply press the corresponding button in the EFFECT group.
The little red indicator next to it will light up, showing
that an effect has been selected. You can use several or
all effects at the same time.
Points to Remember
DUET and PORTAMENTO depend on other settings
as well —
Some preset voices are already programmed with effects
— for instance, VIOLIN 1 (10) and STRINGS (41) use
vibrato, HARP (37) sustain, and so on. In such cases,
the corresponding EFFECT indicator will light up
whenever that instrument is selected. For these instruments, you can of course turn OFF that effect by
pressing its selector.
With the exception of STEREO CHORUS, all effects
influence only the notes you are playing in the MELODY SECTION (21) of the keyboard.
Effects can be stored independently for each SONG
MEMORY MELODY bank (see p.22.). During bank
playback, these individual effect settings are used automatically and cannot be canceled with the EFFECT
selectors.
Try out all six effects to understand how they work and how
they influence each instrument sound differently. Here is a
see below for details.
REVERB
Reverb, short for reverberation, gives a spacious effect similar
to an instrument being played in a large hall. It can add atmosphere to almost any voice. Try it with SMALL CHURCH
ORGAN (29) or HUMAN VOICES/CHORUS (94 to 96).
PORTAMENTO
Portamento is the smooth pitch glide effect that occurs be-
tween notes played consecutively on some instruments, such
as the violin and trombone, or sung by the human voice. The
speed with which the pitch changes between the keys you
play can be adjusted over a 5-step range (values from 1 =
slow to 5 = fast). Fast settings provide a less extreme effect
which can make string instrument voices etc., sound very
realistic.
Operation
1. Hold down the PORTAMENTO button.
The TEMPO/PARAMETER & VALUE display will now
show the current portamento speed setting. To change this
value,
2. keep holding down the PORTAMENTO button and use
the VALUE buttons.
Pressing + increases portamento speed, SHORTENING
the portamento time for a LESS pronounced effect. –
lowers the speed, so it takes longer for the pitch to change
between notes, making the effect more noticeable.
Be sure to hold down the PORTAMENTO button while
changing this setting, otherwise it will not work. Pressing
both VALUE buttons + and – simultaneously returns
the setting to the default value of 3.
The PORTAMENTO setting is retained even when power
is turned off.
Range: 1 to 5
9
Page 14
STEREO CHORUS
Stereo Chorus creates the
“spacy” impression of several
instruments being played at the same time for a warm, threedimensional “symphonic” sound. It is the only effect that
influences not only the melodies you play, but also all accompaniment sounds (except PCM percussion).
•The pitch bend range setting is retained even when power
is turned off.
Points to Remember
Is a VALUE button pressed for more then a second,
the value will begin to change rapidly.
There is no setting with VALUE = 0.
Pitch bend data can be saved with the SONG MEM-
DUET
ORY MELODY function.
Duet differs from the other effects in that it can only be used
in combination with the AUTO ACCOMPANIMENT
functions. A detailed explanation of this feature, which automatically adds a second solo instrument to the one you
are playing, is given on p.21.
l Note that the Duet effect will not work in the NORMAL
AUTO ACCOMPANIMENT mode, even if the DUET
button is pressed and its indicator lit.
Overview
The PARAMETER CHANGE group of buttons (13) consists
of the TEMPO button (13a), explained elsewhere (p.14), and
the three parameter selectors (13b) TRANSPOSE, TUNING
and MELODY VOLUME. Though their functions are not
PITCH BEND Wheel
Range: +/-12
connected, the setting method is the same for the latter three,
which is why they are grouped together.
It is a good idea to memorize this basic setting method, since
Overview
This control lets you bend the pitch of notes played in the
MELODY SECTION upward or downward. The effect is
similar to a guitar being choked by bending the strings, and
is often heard during synthesizer solos.
The range of the pitch bend is adjustable. On delivery, it is
set to 1 (the default value): Moving the wheel fully in the
UP direction raises pitch by a semitone, while moving it fully
DOWN lowers the pitch by the same interval. The available
range is from one half-tone (semitone, VALUE = 1) to one
octave (VALUE = 12). To adjust it —
you will be using it for the Digital Synthesizer and MIDI
functions as well.
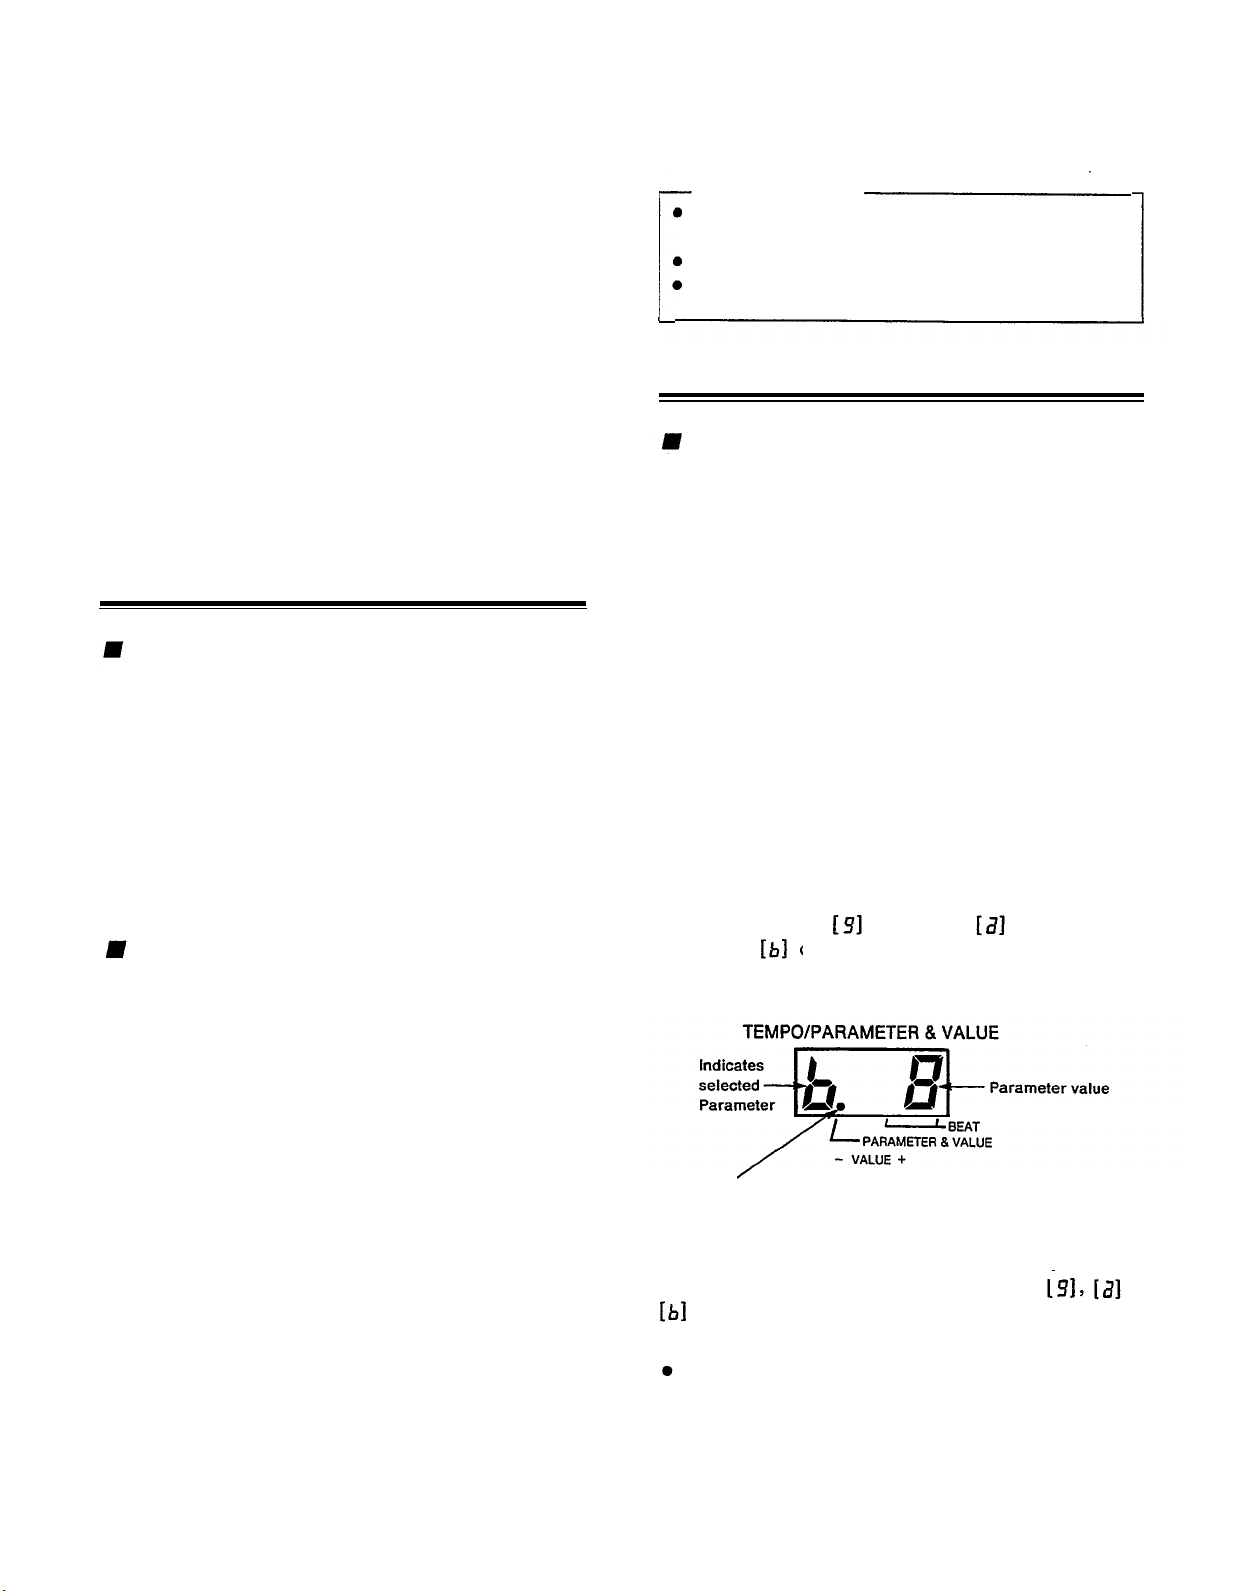
Parameters and Values
A parameter is simply a setting whose value can be changed.
The three parameter selectors (13b) have an orange number
or letter printed on them, as do the Digital Synthesizer and
MIDI buttons to their left and right. This is the parameter
identification symbol that appears on the TEMPO/PARA-
METER & VALUE display, telling you which parameter is
currently selected.
Press TRANSPOSE TUNING and MELODY
Operation
1. Hold the PITCH BEND wheel in either the UP or DOWN
position.
VOLUME one after the other. This calls up each pa-
rameter and its current value on the TEMPO/PARAMETER
& VALUE display (9).
The current pitch bend range appears on the
TEMPO/PARAMETER & VALUE display.
PARAMETER CHANGE Settings
2. Use the VALUE + or –buttons to set the bend range
value.
While doing so, the PITCH BEND wheel must still be
held in the UP or DOWN position. Pressing + increases
the setting,– decreases it. A value of 1 on the
TEMPO/PARAMETER & VALUE display indicates a
bend range of one semitone, a value of 2 one whole tone,
and so on. A setting of 12 (= 12 semitones) equals one
octave.
With positive settings, the pitch bend direction will correspond to the PITCH BEND wheel’s UP or DOWN
movement. Setting a negative value (indicated by a “-”
on the display) reverses the pitch bend — moving the
PITCH BEND wheel UP will then decrease the pitch and
vice versa.
The setting can be returned to 1 instantly by pressing both
VALUE buttons at the same time.
10
This dot keeps the parameter symbol on its left apart from the
value digits on its right.
The single digit left of the dot on the display is the symbol
indicating the selected PARAMETER (the symbol also
printed on the button just pressed), in our case or
. The one- or two-digit number to the right of the period
is the current VALUE of that parameter.
If there is not dot on the TEMPO/PARAMETER &
VALUE display, this means
that the display is currently
indicating the TEMPO.
Once a parameter is called up on the display, you can
change its value with the –
and + VALUE buttons (10).
Pressing – decreases the value, + increases it. For a more
Page 15
rapid change, hold down either button. Pressing both
– and + simultaneously resets the original value (i.e. the
value before you started to make changes).
TRANSPOSE
Overview
Range: +/– 12 semitones
Points to Remember
The TRANSPOSE value is memorized when power is
turned off.
The TRANSPOSE value influences the pitch of tran-
smitted MIDI note data and received data in the 00
mode. However, received data is not affected in the
99 mode. (See MIDI section.)
With the exception of the PCM percussion sounds, all Por-
taSound voices can be transposed over a range of two octaves.
In other words, you can use the TRANSPOSE function to
raise or lower the pitch of both the MELODY SECTION
and the AUTO ACCOMPANIMENT SECTION in semitone
steps.
This feature has mainly two applications. First, it lets you
set the pitch of the entire keyboard to the easiest key for you
to play in. For example, if a song is in B major and you find
it difficult to perform in that key, all you have to do is lower
the keyboard pitch by a half-tone with TRANSPOSE. Now,
if you play the same song in the easy key of C major on the
PortaSound keyboard, its pitch will automatically be trans-
posed downward (lowered) by a semitone, so that in effect
you will hear it in B major. This is sometimes handy when
playing along with other instruments, too.
TRANSPOSE can also be used to raise or lower the pitch
of the PortaSound by an octave in order to change the mood
of the music or adapt the note range to the character of the
instrument voice — e.g. transposing it downward for a deeper
and more powerful electric bass sound.
Note, however, that octave transposition is only effective for
melody voices — the auto accompaniment section returns to
original pitch when a TRANSPOSE value of + or –12 is
entered.
Operation
1.
Press TRANSPOSE .
The TEMPO/PARAMETER &VALUE display will show
TRANSPOSE Value Display
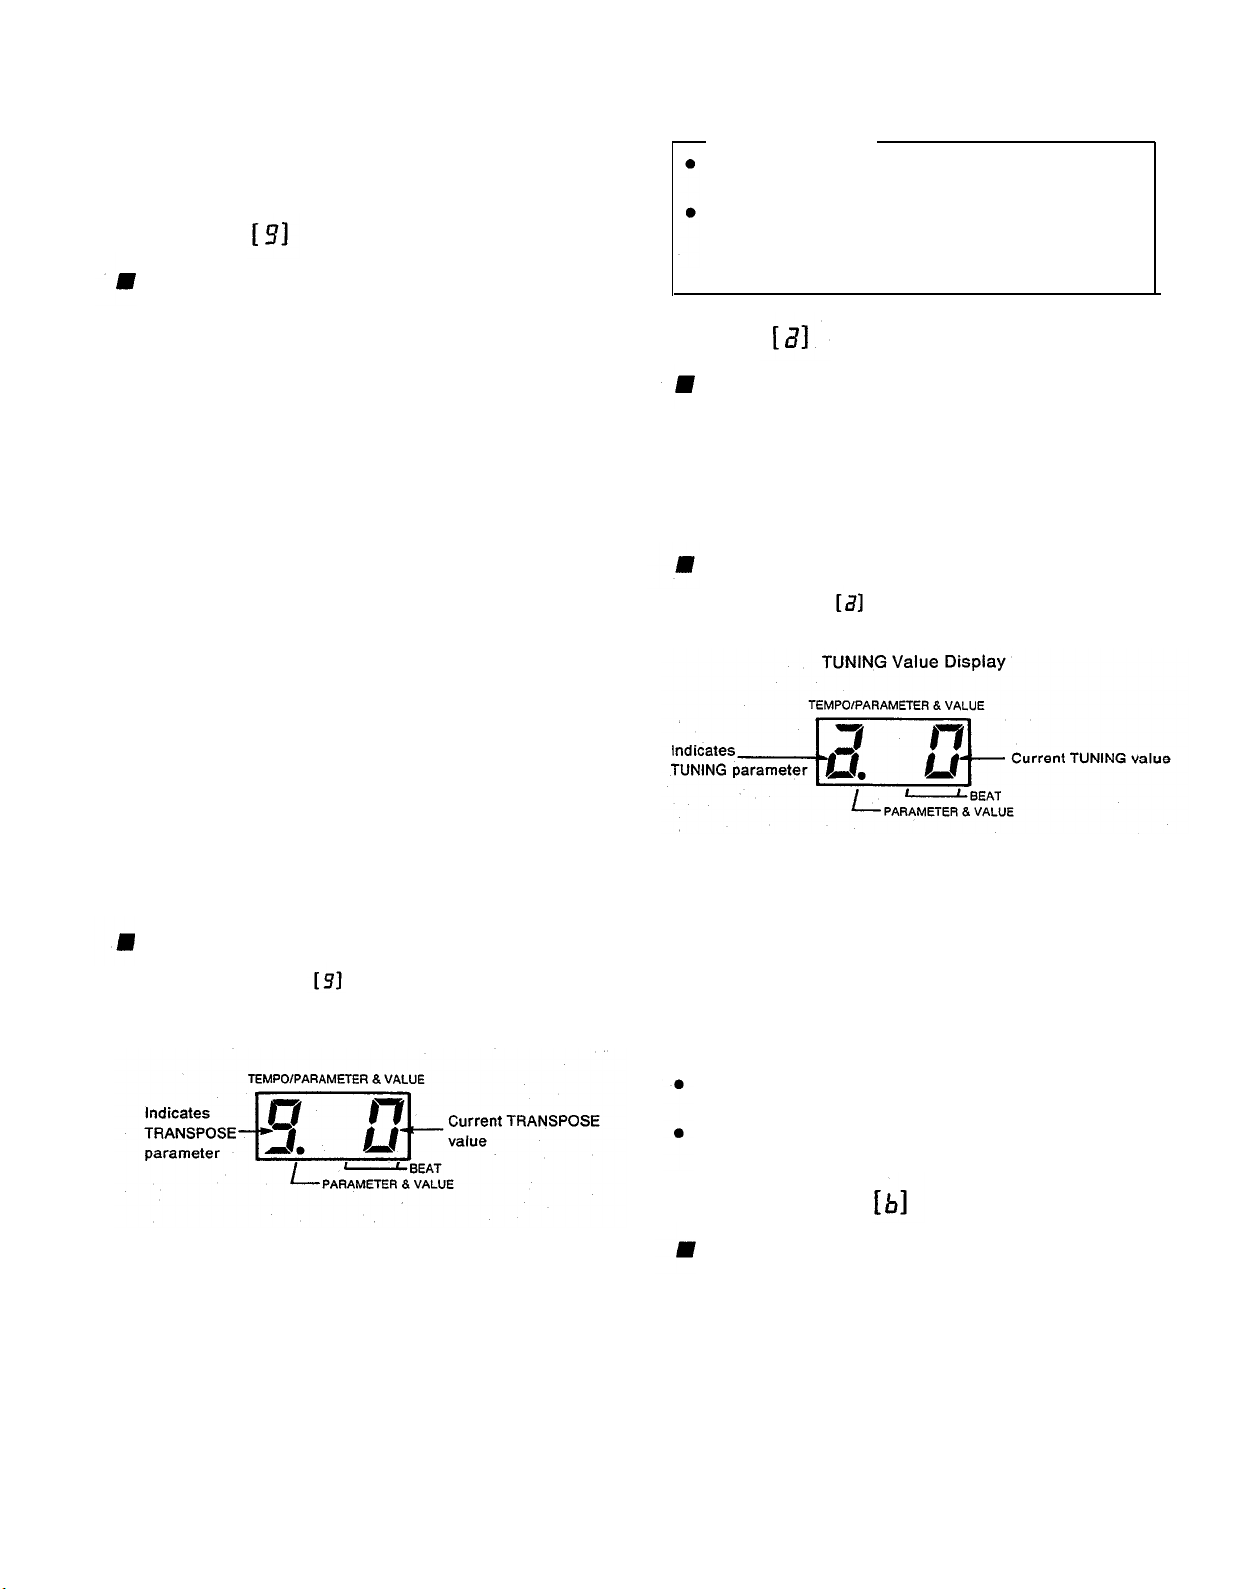
TUNING
Overview
The overall pitch of your PortaSound is normally set so that
A3 = 440 Hz (standard concert pitch). When playing together
with other instruments which have a different tuning, you
can raise or lower this pitch in steps of approximately 3.13
cents over a +/– 16 step range.
Operation
1. Press TUNING .
The TEMPO/PARAMETER VALUE display will show
This display tells you that the TUNING value is now 0,
meaning that A3 corresponds to 440 Hz.
2. Adjust the pitch with the VALUE buttons.
To raise the pitch, use +. Each value increase by 1 raises
the pitch by about 3.13 cents.
– lowers the pitch. A minus symbol “–” in front of the
value indicates that the current pitch is lower than the
regular setting.
Range: +/– 16
This display tells you that the TRANSPOSE value is now
0, meaning that the keyboard is in its regular key.
2. Adjust the key with the VALUE buttons.
To raise the key, use +. Each value increase by 1 means
an upward transposition by 1 semitone.
– lowers the key. A minus symbol ”–” in front of the
value indicates that the current key is lower than the regular setting of 0.
• Press both VALUE buttons simultaneously to instantly
return to the regular key (TRANSPOSE value 0).
Press both VALUE buttons simultaneously to instantly
return to the regular pitch (TUNING value 0).
The TUNING value is memorized when power is turned
off.
MELODY VOLUME
Overview
This parameter lets you adjust the volume of the keyboard’s
MELODY SECTION and the SONG MEMORY MELODY
banks in relation to the AUTO ACCOMPANIMENT sounds.
(For information on AUTO ACCOMPANIMENT, see below.) Minimum value is 1 for the quietest, maximum is 9 for
the loudest sound.
Occasionally, chords will sound distorted if melody volume
is set to maximum and the voice has a TOTAL LEVEL (see
Digital Synthesizer section) of 90 or more. In such cases, lower
the melody volume or the total level.
Range: 1–9
11
Page 16
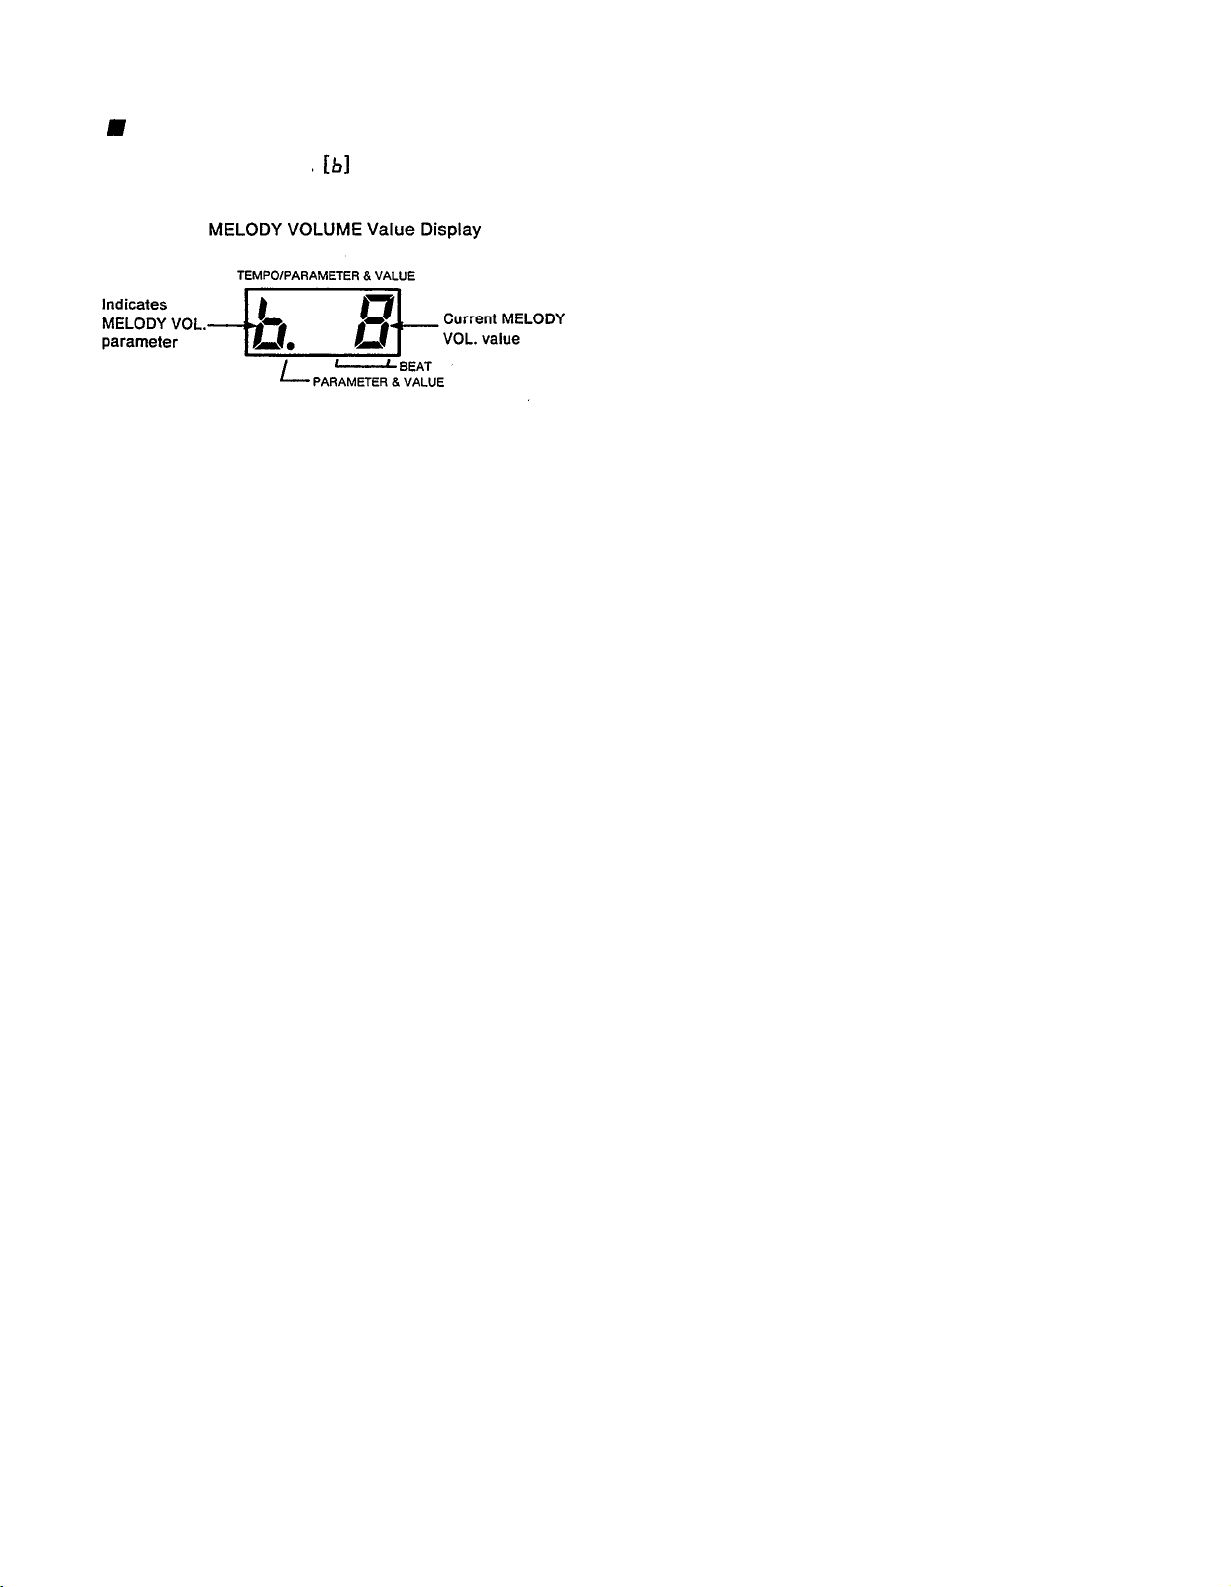
Operation
1. Press MELODY VOL. .
The TEMPO/PARAMETER &VALUE display will show
This display tells you that the MELODY VOL. value is
now 8 (the normal setting).
2. Adjust the melody volume with the VALUE buttons.
+ raises the volume, – lowers it.
l To instantly return to MELODY VOLUME to value 8,
press both VALUE buttons simultaneously.
l MELODY VOLUME setting is retained when power is
turned off.
12
Page 17

RHYTHM MACHINE FUNCTIONS
A rhythm (or drum) machine provides a background of rhythm patterns played by various percussion
instruments. This not only makes most popular music sound better, it also helps you keep perfect time,
just like a metronome.
This section introduces the PortaSound’s rhythm machine functions. Most of the following operations
can be applied in exactly the same way for the AUTO ACCOMPANIMENT features explained further below,
so it is a good idea to memorize them well.
STYLE SELECT – Choosing the Rhythm
Overview
The STYLE LIST (6) shows the 100 basic rhythm styles at
your disposal. Choosing one that suits your music is practically identical with selecting a voice — except that the STYLE
indicator on the VOICE/STYLE display must be lit instead
of the VOICE indicator.
Operation
1. Check whether the dot in the VOICE/STYLE number
display (8) is located above “STYLE”. If it is not, press
the blue STYLE selector (11b).
2. Enter the style number.
Use the VOICE/STYLE SELECT number buttons (11c)
to input the number of the desired style.
As with voice numbers, all style numbers have two digits,
so be sure to input enter both.
Points to Remember
Which style is currently selected can be checked on the
VOICE/STYLE display by pressing the STYLE selector. (This is not necessary if the indicator dot is al-
ready above STYLE.)
When power is turned on, the style last selected is
automatically chosen.
The number of beats per rhythm pattern depends on
the selected style. ‘Many patterns consist of two measures with a slightly differing structure (see paragraph
on BEAT Display below).
If you wish, you can set the AUTO ACCOMPANIMENT MODE to NORMAL by pushing that button
(3a) when using the PSS-680 like a rhythm machine.
This will allow you to play the selected voice over the
entire keyboard. (For details on AUTO ACCOMPANIMENT MODE, see p.18.)
RHYTHM CONTROL
Overview
Now that you have selected a rhythm style, the RHYTHM
CONTROL section (20) lets you start, change and stop the
percussion in a variety of ways. This gives you incredibly
flexible and realistic live control over the drum patterns. The
rubber pads are large and easy to hit so you can operate them
quickly without interrupting your keyboard playing.
With a bit of practice, you will be able to control the rhythm
(and Auto Accompaniment) with these pads as naturally as
if you were a drummer — simply by hitting them at the right
time.
Operation
Starting the Rhythm
a) START/STOP (20a)
Hitting this pad starts the rhythm right away.
b) SYNCHRO START/ENDING (20b)
When this pad is pressed, both BEAT indicator dots in
the TEMPO/PARAMETER & VALUE display start to
blink simultaneously, indicating the tempo, but the
rhythm does not start yet.
In NORMAL mode, the rhythm will start as soon as
you play any key(s) on the keyboard. In SINGLE
FINGER and FINGERED, you can start the rhythm
by pressing keys in the AUTO ACCOMPANIMENT
SECTION.
Points to Remember
The Synchro Start function can be canceled prior to
rhythm start by pressing SYNCHRO START/ENDING again.
When using Synchro Start, you can watch the blinking
indicator dots to get a feel for the beat until you are
ready to start performing.
Instead of playing a key, you can also start the rhythm
by pressing START/STOP (20a).
c) INTRO/FILL IN 1, 2, 3 (20c)
These three pads in the right part of the RHYTHM
CONTROL section start the rhythm right away with a
special “INTRO” (introduction) pattern. (No other Auto
Accompaniment instrument sounds are heard during the
intro even if an AUTO ACCOMPANIMENT SECTION
key is being pressed.) When the intro is finished (after
13
Page 18

one measure), the PortaSound continues with the basic
rhythm.
The three intros available for each pattern are all different. However, with some of the simplest styles, the
difference is not as pronounced as with the more complex
ones.
Stopping the Rhythm
a) START/STOP (20a)
Hitting this pad again stops the rhythm immediately.
b) SYNCHRO START/ENDING (20b)
Press this pad when you want the rhythm to end naturally
on a special “ending pattern”.
Points to Remember
• Unless SYNCHRO START/ENDING is pressed
within the first quarter beat of a measure, this ending
pattern will begin only after the current measure has
been played to the end.
• If an INTRO/FILL IN pad is hit during an ending,
the ending rhythm pattern is replaced by a fill in per-
cussion, and the Auto Accompaniment then continues
with the basic pattern from the beginning of the next
measure. In other words, the ending no longer ends
the accompaniment. This can be very effective as a
“break” within a song to add tension.
Rhythm Variation
a)
INTRO/FILL IN 1, 2, 3 (20c)
When pressed while a rhythm is playing, the three
INTRO/FILL IN pads start a special “fill in” pattern
that livens up the rhythm by adding variation. Fill ins
are particularly effective at the end of a phrase or during
a musical climax.
As soon as the till in is over, the PortaSound continues
with the basic rhythm. Regardless of when an
INTRO/FILL IN pad is hit, the fill in always “fits in”
perfectly with the rhythm.
You can therefore get even more variation out of the
rhythm by hitting INTRO/FILL IN pads with different
timings for different till in effects.
The three fill ins available for each pattern are the same
as the respective intros.
Points to Remember
• You can press another INTRO/FILL IN pad while
one till in is playing to alter the till in pattern. By
continuing to hit INTRO/FILL IN pads alternately
before the fill in is over, you can create complex drum
solos over several measures.
• Holding down the same INTRO/FILL IN pad causes
that fill in to be repeated until the pad is released.
• The intros/fill ins of all patterns, including those with
a length of two measures, always have a length of one
measure.
TEMPO
As the name says, the TEMPO/PARAMETER & VALUE
display not only indicates parameters and values (as explained
in the PARAMETER CHANGE paragraph above), but also
the tempo (i.e. the speed of the rhythm). The PARAMETER
& VALUE indicator dot always tells you which of these two
display types is currently set — if this dot is not lit, the display
is showing the present tempo.
To switch to TEMPO display from any other kind of parameter indication, simply press the TEMPO button (13a).
Each rhythm has a “standard tempo” most suitable for its
style. If you select a style while the rhythm is stopped, the
PortaSound will automatically switch to this respective
standard tempo (and display it if the TEMPO display is on).
However, if you change styles while the rhythm accompaniment is playing, the PortaSound will continue in the present
tempo. You can still instantly switch to the current style’s
standard tempo any time during a performance by pressing
the VALUE –and + buttons (10) simultaneously.
Of course, you can easily adjust the tempo to your individual
performance needs. Simply lower or raise the tempo with the
VALUE – and + buttons during TEMPO display. (Pressing
them at the same time returns you to the original tempo.)
The TEMPO control range is from 10 to 220 (i.e. 10
to 220 quarter notes /beats per minute). When power is turned
on, the value of the last tempo adjustment made is automatically selected.
BEAT Display
The two dot indicators of the BEAT display give you important information on the current rhythm pattern.
When both are blinking simultaneously while no sound is
heard, this shows you are currently in SYNCHRO START
standby (see above). Otherwise, the BEAT indicators light
up only when a rhythm is playing.
a)
To indicate the beginning of a pattern, the left BEAT
indicator dot lights up together with the right dot.
b)
Most of the patterns consist of two measures. To indicate
the beginning of the second measure, the left BEAT
indicator 1ights up alone.
c)
The right BEAT dot lights up alone to show the second,
third, etc. beat of each measure. (Only at the beginning
of a pattern does it light together with the left dot.)
Range: 10 — 220
Changing the Rhythm Style During a Performance
When you want to switch to a different rhythm style while
playing, simply enter the desired style -number with the
VOICE/STYLE SELECT buttons.
14
Page 19

Points to Remember
l The PortaSound will switch to the new rhythm style
at the beginning of the next measure, retaining the
current tempo. However, if the style number is altered
within the first quarter of a beat, the PortaSound will
switch styles during the same beat. (See the paragraph
on Single Finger Auto Accompaniment, p.18, for a
more detailed explanation.)
l In the case of rhythm patterns consisting of two mea-
sures, the order of these measures is maintained when
styles are switched. In other words, changing the style
Pad
1
2
3
4
5
6
7
8
after the first measure of a two-measure pattern has
been played causes the PortaSound to continue with
the second measure of the new style.
l No style change is possible during an ending.
HAND PERCUSSION
The PortaSound PSS-680 features a set of 8 drum pads, labeled HAND PERCUSSION (22), which can be used to play
your own rhythm patterns live or record an original pattern
with the CUSTOM DRUMMER function. Four different
Pad
1
2
3
4
5
6
7
8
sets of 8 percussion instruments can be assigned to these pads
with the PERCUSSION SET buttons (22c) A, B, C and D
on the extreme right for a total of 32 types of drums, cymbals,
latin percussion, etc.
Sets A and B are ideal for various styles of rock, pop and
jazz, while C and D offer latin percussion.
The eight HAND PERCUSSION pads can be played any
The four drum sets available are as follows:
time, even during the demonstration song. This allows you
to add your own variations to the the current rhythm pattern
or perform your own drum solos. Depending on the
SET A
Pad
1
2
3
4
5
6
7
8
Symbol
Name
Rim shot
Snare low
Tom low
Tom mid
Tom hi
Brush
Brush hit
Ride cymbal
SYNCHRO BREAK setting, you can either play “on top
of" the present rhythm or have that rhythm stop automatically
while you are hitting the drum pads.
Damping the Open Hi-Hat
Drummers can damp the sound of the open hi-hat by stepping
on the hi-hat pedal. With the PSS-680, you can achieve a
similar effect by hitting the closed hi-hat pad soon after
pressing the open hi-hat pad in PERCUSSION SET B. As
soon as the closed hi-hat pad is hit, the open hi-hat sound
is damped.
SET C
Symbol
Bongo low
Bongo hi
Agogo low
Agogo hi
Cuica low
Cuica hi
Tambourine
Splash cymbal
SET D
Symbol
Conga low
Conga hi
Timbale low
Timbale hi
Cowbell
Cabasa
Hand clap
Whistle
Name
Name
Pad
1
2
3
4
5
6
7
8
SET B
Symbol
Bass drum
Snare hi
Synth tom low
Synth tom mid
Synth tom hi
Hi-hat closed
Hi-hat open
Crash cymbal
Name
SYNCHRO BREAK
When the red indicator of this switch (22b) is lit, the
SYNCHRO BREAK function is on. In this mode, the regular
rhythm accompaniment (basic pattern, intro, fill in or ending)
will stop as soon as you hit one or more of the HAND
PERCUSSION pads. You can thus add your own fill in
patterns, solos, etc.
The BEAT indicator dots still show the beat for visual confirmation of the tempo. The regular rhythm will continue
automatically from the beginning of the following measure
after you have completed your hand percussion part.
15
Page 20

Note:
If you hit a pad at the beginning of a measure while the
rhythm is playing, Synchro Break will become effective.
However, in order to enable a more natural fill in, it will
not work when a pad is hit at the beginning of the measure
following such a Synchro Break measure.
To turn off SYNCHRO BREAK, press its button, making
sure the indicator goes out. With SYNCHRO BREAK off,
you can play your own percussion “over” the regular rhythm,
adding variety to the usual patterns.
The maximum number of percussion sounds the Porta-
Sound PSS-680 can produce at the same time is 8, including
both regular rhythm and hand percussion. If more than
8 percussion instruments are played simultaneously, the
PortaSound automatically gives priority to certain in-
struments while ignoring others.
CUSTOM DRUMMER
Overview
With the CUSTOM DRUMMER (17) function, you can alter
any basic rhythm pattern (but not till ins or endings) to suit
your music and memorize it for instant recall. Or else, you
can create you own unique pattern from scratch and save it.
The four white keys furthest on the left (18) are labeled
CLEAR, ACCENT, ROLL and ALL CLEAR. The first three
are used together with the HAND PERCUSSION pads to
erase (clear) certain instrument sounds from a pattern, add
an accent to a sound (increasing its volume) or create rapid
drum rolls. ALL CLEAR instantly erases the entire pattern
so you can program an entirely new one.
To program your custom pattern, first select the style that
will form its basis. Even if you want to create a totally new
pattern, select the corresponding type of style — i.e., a one-
or two- measure pattern, one in common time or three-four
time, and so on. It is important to choose the right type. If
you select a pattern consisting of a single measure as basis,
you cannot create a two-measure pattern. If you choose a
three-four time style, you will not be able to create a four-four
time custom pattern.
Also note that some swing patterns, such as style 30. “Swing
guitar”, give the impression of using triplets, while actually
they do not. To create a swing triplet rhythm, therefore be
sure to use styles such as “Big Band 3”.
Operation
Recording a Custom Pattern
1. Press PROGRAM/END.
This blue button’s indicator lights and the selected rhythm
starts. (It is not possible to use PROGRAM/END while
a rhythm is already playing or in synchro standby mode.)
2. Alter the rhythm as desired.
You can now make any changes you want (explained
below) while the selected rhythm is repeated again and
again. It is not necessary to play your entire pattern at
once — take your time adding single notes and accents
or deleting certain instruments as the pattern repeats, until
you finally arrive at the complete pattern you intended.
If you want to create a custom pattern from scratch, it
may be easier to first erase all percussion sounds by
pressing ALL CLEAR. As soon as you do, a muted closed
hi-hat will automatically sound on every beat, in addition
to a rim shot at the beginning of each measure.
dicates the tempo and helps you keep time. (These muted
hi-hat and rim shot sounds are NOT recorded.)
The following procedures let you program your own
rhythm pattern:
Erasing Percussion Sounds
a)
This is done by holding down the CLEAR key (Cl)
while hitting the pad of the instrument to be erased.
This deletes that instrument from the pattern completely. (It is not possible to erase single notes while
retaining others.)
You may have to switch between PERCUSSION
SETS (22c) to be able to erase certain instruments.
Erasing Entire Patterns
b)
Simply press ALL CLEAR.
c)
Adding Percussion Sounds
Every note you play by hitting a pad is recorded.
When the pattern is repeated, you will hear the notes
you added during the previous cycle.
All 32 percussion instrumentscan be used if you switch
between PERCUSSION SETS while recording.
d)
Adding Accents
To enter an accented note, hold down the ACCENT
key (D1) and hit the desired drum pad. Accents can
also be added later to existing notes by holding the
ACCENT key down and hitting the respective drum
pad at the precise timing of the note you want to sound
louder. (You can delete accents in the same way
without holding the ACCENT key down.)
This in-
16
e)
Playing Drum Rolls
On actual percussion instruments, rolls are played
by hitting the drum very fast with both sticks or letting
one stick rebound. Since this is practically impossible
with the HAND PERCUSSION pads, the ROLL
feature allows you to add such rolls by holding down
the ROLL key (El) while hitting drum pad.
Page 21

feature allows you to add such rolls by holding down
the ROLL key (El) while hitting drum pad.
By pressing ROLL and ACCENT at the same time,
you can create loud rolls.
f)
Damping the Open Hi-Hat
When programming the custom pattern, you can’
damp the sound of open hi-hat notes by hitting the
closed hi-hat pad with the appropriate timing (slightly
after the open hi-hat notes).
3. Press PROGRAM/END again to memorize the rhythm.
As soon as you have completed your custom rhythm
pattern, press PROGRAM/END. This stops the rhythm
and stores the pattern in the CUSTOM DRUMMER
memory. (You can do the same by pressing START/STOP,
DEMO, or turning off the PortaSound.)
Points to Remember
Custom patterns can consist of up to 16 “tracks” (including the original sounds, if any). Each instrument,
roll and accent is counted as one track. Any additional
tracks are ignored.
If you want to continue editing (changing) the custom
pattern you have already stored, press PLAY ON/OFF
and then PROGRAM/END (both indicators must be
lit). You can now alter the custom pattern.
Switching to a different style while programming a
custom pattern is not possible.
Custom data is retained when power is turned off.
While programming, none of the keys works (except
the four for CLEAR, ACCENT, ROLL and ALL
CLEAR). Only the drum pads, PERCUSSION SET
selectors, and VALUE (tempo) buttons are operative.
Playing the Custom Pattern
To be able to play the custom pattern, the gray PLAY
ON/OFF button must be set to on, i.e. its red indicator must
be lit. You can then start the custom pattern as you would
a regular rhythm, by hitting START/STOP, SYNCHRO
START or an INTRO. Remember, though, that intros, fill
ins and endings will be those of the regular rhythm that formed
the basis of your custom pattern.
Points to Remember
• The custom pattern will be repeated as long as the
PLAY ON/OFF indicator is lit. This means that selecting a different style will NOT automatically switch
to that rhythm as is the case with regular rhythm
patterns.
ON/OFF button again, turning off its indicator.
Instead, you have to press the PLAY
• Pressing PLAY ON/OFF to light its indicator while
any regular pattern (not including fill ins or endings)
is playing immediately starts the custom pattern, while
pressing this button again immediately stops it and
causes the selected style to continue. The tempo remains
the same throughout. You can thus create and use a
custom pattern as a special kind of fill in as well.
If PLAY ON/OFF is pressed while a till in is playing,
the custom pattern will start after the fill in is over.
• When a custom pattern is played during a regular
rhythm that is longer or shorter (has more or fewer
beats) than the custom pattern, it is either cut short
(in case of shorter patterns) or repeated (in case of
longer ones) to fit in.
17
Page 22

AUTO ACCOMPANIMENT FEATURES
There are several basic types of AUTO ACCOMPANIMENT features available on the PSS-660. An outline
of their functions is given here, along with an explanation of the MODE (3a) and ORCHESTRATION (3b)
controls. A detailed operation guide for features A) through E) follows below.
The Single Finger Chord function lets you play entire
A)
chords with just one finger.
If you start a rhythm, the PortaSound will then also
B)
play percussion, bass, chords and orchestra parts that
match each other perfectly, giving you truly Automatic
Single Finger Accompaniment.
For even more control over the harmonic structure
C)
of the AUTO ACCOMPANIMENT, you can play your
own complex chords with
paniment.
keyboardists with a basic knowledge of harmony.
In addition to the above accompaniments, Duet lets
D)
the PortaSound automatically perform a second solo
voice that harmonizes with the one you are playing in
the MELODY SECTION.
Difficult chord progressions or melody phrases can be
E)
stored in the Song Memory banks for instant recall.
The CHORD memories make Auto Accompaniment
completely automatic.
Except for Song Memory, these features are selected
and/or started with the MODE (3a) and RHYTHM
CONTROL (20) buttons, and controlled live by the AUTO
ACCOMPANIMENT SECTION (19). This part of the
keyboard has a different sound than the MELODY
SECTION (21) to its right when AUTO ACCOMPANIMENT is turned on: The MELODY SECTION plays the
selected VOICE, while the instruments sounds of the
AUTO ACCOMPANIMENT SECTION (bass, chords
and orchestra) depend on the selected STYLE.
Three different AUTO ACCOMPANIMENT modes can be
chosen with these selector switches. A red indictor shows
which one is currently selected.
NORMAL: No Auto Accompaniment at all — the entire
keyboard may be used to play the selected voice (12 voice
polyphonic). All Rhythm Machine functions work in
this mode.
SINGLE FINGER: When SINGLE FINGER MODE is se-
lected, one, two or three fingers enable you to play
complete chords or accompaniments in the AUTO
ACCOMPANIMENT SECTION (19). You have the
option of performing Single Finger Chords (no rhythm
accompaniment) or Single Finger Auto Accompaniment
(with automatic bass, rhythm, chord and orchestra instruments), depending on whether you switch on the
rhythm or not.
This feature is recommended for experienced
Fingered Automatic Accom-
MODE
FINGERED:
that you must press at least three keys in the AUTO
ACCOMPANIMENT SECTION to get any sound at
all.
These four switches determine the orchestration of the accompaniment, i.e. which instruments are used to play along
with your melody (either as Single Finger Chords or Auto
Accompaniment). Note that each style has its own basic
orchestration with different kinds of instruments.
1) RHYTHM
Turns the percussion sounds on and off. Allows you to
play Auto Accompaniment without any rhythm for music
that sounds better without drums.
2)
BASS
Switches the bass sound on and off. Various kinds of bass
instruments are used for different styles - wood bass, tuba,
electric bass, slap bass, etc.
3) CHORD
Each style uses different instruments for the CHORD part
of the accompaniment — such as organ, piano, guitar, etc.
which can be turned on an off with this button.
Chords consist of up to three notes sounding at the same
time.
4) ORCHESTRA
A wide variety of instruments (up to three different ones
for each style) is used for the ORCHESTRA accompa-
niment. This button turns it on or off. The orchestra
accompaniment consists of three parts.
Points to Remember
The total number of notes you can play on the Porta-
Sound PSS-680 at the same time is 12. Since the AUTO
ACCOMPANIMENT features use up from 1 to 7
notes, (1 for bass, 3 for chords and 3 for orchestra),
depending on the ORCHESTRATION setting, they
limit the number of notes that may played in the melody
section to between 5 and 11.
Single Finger and Fingered Chords consist only of
BASS and CHORD sounds. Therefore, only the BASS
and CHORD settings are relevant for these functions.
If all ORCHESTRATION buttons are off, no sound
will be heard when playing the AUTO ACCOMPANIMENT section of the keyboard, but chord assignment is still operative for DUET and SONG MEMORY (see below).
This mode is similar to the preceding one, except
ORCHESTRATION
18
Page 23

A) Single Finger Chords
Press the AUTO ACCOMPANIMENT SINGLE FINGER
MODE selector (3a) to turn on the Single Finger mode. (The
rhythm must be off.) Now play single keys in the AUTO
ACCOMPANIMENT SECTION (19) of the keyboard with
one finger and notice how the PortaSound produces complete
major chords instead of just single notes.
In the Single Finger mode, the PortaSound PSS-680 can play
the following four different types of chords, depending on
the key combinations you press in the AUTO ACCOMPANIMENT SECTION (19).
MAJOR CHORDS:
To obtain a certain major chord. all you
have to do is press the key corresponding to its basic
note. For example, if you want to hear a C major chord,
press C.
MINOR CHORDS:
Minor chords are produced by pressing
the basic note together with any black key to the left
of it. The illustration below shows how to play a C minor
chord.
MINOR SEVENTH CHORDS: Minor seventh chords are
produced by pressing the basic note together with any
black key AND white key to the left of it.
Note:
In general, you should release the keys completely, lifting
you fingers off the keyboard, to change to a different chord
with the Single Finger Chord function. Otherwise, you
may not be able to obtain the intended type of chord.
For example, if you want to change from G major to A
major and do not release the G key completely before
pressing A, you will get an A seventh chord instead of the
A major chord you wanted.
On the other hand, you can for example change from a
major to a minor chord while pressing the basic note by
additionally playing any black key to the left. This gives
a different effect than you would achieve by releasing the
basic key. (Of course, this way of altering chords will not
work when switching to chords using fewer keys than the
current chord, say from C minor seventh to C seventh.)
TIP: The PortaSound PSS-680 plays Single Finger Chords
with a large variety of different instruments, depending
on the currently selected style. This allows you to choose
the best kind of accompaniment voices for the music
you want to play.
SEVENTH CHORDS: To obtain a seventh chord, press the
basic note along with any white key to its left.
To see how important it is to choose the right kind of voice
and accompaniment sounds, try playing Mendelssohn’s famous “Wedding March”, following the score below.
First, select a suitable voice, e.g. number 29 (SMALL
CHURCH organ) or 16 (TROMBONE), then a style that
fits in with it. For example, style 03 (GOSPEL) gives an organ
accompaniment, while MARCH 1 and 2 (77, 78) provide brass
sections.
Next, turn on the Single Finger Chord function by pressing
SINGLE FINGER. You can now perform the “Wedding
March” by playing the melody with your right hand and the
chords indicated above the score with your left.
(Remember: “Am” means an A minor chord, “B7” a B seventh
chord, and so on.)
19
Page 24

Other interesting voices you may want to try for this march
are numbers 28 (TREMOLO ORGAN), 11 (CELLO) and
95 (HUMAN VOICE 2). In any case, you will notice that
the selection of a suitable voice and style is very important
to bring out the atmosphere of a piece.
Note:
Basically, all of the steps explained for the Rhythm Section
further above — concerning style selection, RHYTHM
CONTROL, Hand Percussion etc. — can also be used to
operate the AUTO ACCOMPANIMENT features introduced here.
B) Single finger Auto Accompaniment
Using the same simple key combinations as explained above
— for major, minor, seventh and minor seventh chords —
you can have the PortaSound play complex accompaniment
combinations complete with bass and orchestra. All you have
to do is start the selected rhythm in either of the following
ways, making sure that SINGLE FINGER MODE is selected:
About the Auto Accompaniment Patterns
To create the desired chord progression with the accompaniment, all you have to do is play different keys in the AUTO
ACCOMPANIMENT SECTION. As a rule, the structure
of the accompaniment pattern will always change on the
following beat AFTER you play different keys — regardless
of the precise timing with which they were played. Musically,
this gives the most natural effect.
However, to make sure that the chord progression is per-
formed as intended even if you are slightly late playing the
new keys, the PortaSound will switch the pattern structure
during the same beat if you change the chord soon enough.
When you press a different Single Finger or Fingered Chord
during a pattern, the PortaSound does not simply go on
playing the accompaniment as if nothing had happened, as
this would sound unnatural. Instead, the PSS-680 automatically alters the accompaniment pattern somewhat, adding
variety and giving a very natural, musical effect.
Once you get to know the various styles and their pattern
arrangements, you can make use of this computer-controlled
feature for an even more varied accompaniment.
Starting the Accompaniment
a)
Press SYNCHRO START/ENDING.
The BEAT indicators will flash in the selected tempo,
and you can now start the entire single finger chord
accompaniment at once by playing any key(s) in the
AUTO ACCOMPANIMENT SECTION.
b)
Start the rhythm with START/STOP or an INTRO/FILL
IN pad.
Any key now pressed in the AUTO ACCOMPANIMENT SECTION starts the other accompaniment parts
— bass, chords and orchestra.
You can begin playing any time you want, either after
a few beats or measures of percussion sounds, or right
from the start (except during an intro), depending on
the musical effect you want.
Points to Remember
• Auto accompaniment will continue automatically even
if you lift your fingers off the keyboard. The key and
the pattern of the arrangement (bass line, chord
structure, orchestra part) is determined by the keys
played in the AUTO ACCOMPANIMENT SECTION.
Just as you changed chords with the Single Finger
Chord function, you can now alter the entire accompaniment by playing different keys or or key combinations. Further variations can be added by pressing
the INTRO/FILL IN or ENDING buttons as explained
under RHYTHM CONTROL (p.13).
• Since the accompaniment arrangements are based on
the respective rhythm pattern, their length (number
of beats/measures) depends on the style.
Stopping the Accompaniment
To stop the accompaniment, you have two options:
a) Press START/STOP.
This will stop the entire auto accompaniment immediately.
b)
Press SYNCHRO START/ENDING.
The PortaSound will play the ending arrangement for
the selected style, and the accompaniment will stop in
a very natural way.
Changing Tempo and Style
As explained for the rhythm functions on p.13, you can alter
the tempo and switch the style while an auto accompaniment
is playing as well.
C) Fingered Auto Accompaniment
This mode works practically the same way as Single Finger
Auto Accompaniment. except that it requires you to play the
AUTO ACCOMPANIMENT SECTION of the keyboard
in a different manner, closer to the actual chord structure
used for the automatic accompaniment.
In the FINGERED Auto Accompaniment mode, you have
to play three- or four-note chords for the PortaSound to be
able to accompany you. The PSS-680 recognizes the following
chord types:
20
Page 25

Major:
Minor:
Seventh:
Minor seventh:
Major seventh:
Minor seventh flatted fifth:
Seventh sustained fourth:
DUET
Overview
By using the Duet feature, you can have the PortaSound
automatically perform a second voice that harmonizes perfectly with any solo part you play in the MELODY SECTION
of the keyboard. This gives the impression of a duet (a performance with two instrument parts), even though you are
playing only one part yourself.
To be able to use Duet, the PortaSound must be set to one
of the AUTO ACCOMPANIMENT modes (Single Finger
or Fingered).
Augmented:
Diminished:
Minor major seventh:
Sixth:
Minor sixth:
Seventh flatted fifth:
Points to Remember
The inverted forms of chords (in the case of a major
chord for instance 3—5—l and 5—l—3, etc.) are also
recognized.
Any combination of notes other than those listed above
is ignored.
In the case of augmented and diminished chords, the
lowest note played on the keyboard is considered to
be the root of the chord.
Sixth chords are distinguished from minor sevenths
as follows:
If the lowest key played is the root of the
sixth, the PortaSound considers the chord to be a sixth
chord, while all other key combinations produce minor
sevenths.
In a similar manner, seventh flat-five chords are distinguished from minor sixths according to whether the
lowest note played is the root of the sixth (in which
case the chord is considered a minor sixth) or not.
With seventh flat-five chords, the lowest key played
is treated either as the root or the seventh.
Operation
1.
Select SINGLE FINGER or FINGERED mode (3a).
2. Press the DUET button (7).
Its red indicator will light up. The PortaSound is now ready
to perform an automatic Duet.
3. Start Auto Accompaniment or play Single Finger Chords.
Once an Auto Accompaniment is playing (or a Single
Finger Chord is pressed), any melody lines you perform
with your right hand will automatically be accompanied
by a second voice in harmony with the accompaniment.
(The sound of this second voice is that of the currently
selected instrument.).
Points to Remember
With the Duet function on, the MELODY SECTION
is monophonic — only one note can be played at a time.
If more than one key is pressed simultaneously, only
the highest one will sound.
Pitch bends and portamento can be used with Duet.
Duet has no effect on SONG MEMORY MELODY
playback.
The Duet sound data is all output on the same MIDI
OUT channel.
Duet works even if the entire Auto Accompaniment
ORCHESTRATION is turned off. This lets you play
a duet without any accompaniment sounds.
Duet is canceled if a melody memory is turned on for
recording.
21
Page 26

SONG MEMORY
The SONG MEMORY section (4) comprises ten memory banks in which you can digitally record melodies
and chord progressions for instant automatic playback. Difficult (fast) or complicated passages can be
memorized at a comfortable low speed and played any time with the correct tempo at the touch of a button,
making perfect performances easier than ever.
The SONG MEMORY consists of five MELODY (4b) and five CHORD (4a) banks, which are treated here
separately.
• The MELODY and CHORD memory functions can be used to record simultaneously when you want
to memorize melodies complete with accompaniment. (The CHORD memory will thereby store the
timing with which MELODY banks were turned on or off.)
MELODY Memory
The five MELODY banks are all monophonic. This means
you can only store melodies where one note is played at a
time (i.e. melodies not containing chords) in any of these
memories. However, you can use several MELODY banks
together to
of five voices. Each bank can store up to about 250 melody
notes.
Memorized Data
The MELODY SONG MEMORY not only memorizes note
data, but also voice numbers, effects (except stereo chorus
and Duet) and pitch bends. In other words, you can change
voices during a recorded performance, use the PITCH BEND
wheel and switch VIBRATO, SUSTAIN, REVERB and/or
PORTAMENTO on or off — and the PortaSound will remember all of this. When you play back the melody, the voices
will change with the correct timing, and all other alterations
will be made automatically, just as you intended.
In addition, the current values for melody volume, pitch bend
range and portamento speed, along with the present MIDI
transmission channel number, are automatically stored for
each bank at the beginning of a recording. During playback,
the PortaSound operates according to these settings.
You can use the entire keyboard for melody recording if
the AUTO ACCOMPANIMENT MODE is set to
NORMAL (3a). Otherwise, only the MELODY SEC-
TION may be played.
During MELODY MEMORY playback, you can use any
of the Auto Accompaniment functions as usual and, in
addition, play along “live”.
How many notes you can play live depends on the number
of voices being reproduced by the MELODY MEMORY
and the orchestration of the AUTO ACCOMPANIMENT. If a full bass, chord and orchestra accompaniment
is playing (= 7 voices) and you are reproducing all five
MELODY MEMORY banks, this leaves no additional
live voice as the PortaSound can play a maximum of 12
notes simultaneously. (See the paragraph on ORCHESTRATION.)
memorize polyphonic passages with a maximum
How to Memorize a Melody
• When you begin, the rhythm must be stopped (off) to be
able to use the MELODY memory. Once you start recording, though, the currently selected rhythm will start
by itself, helping you to keep time. Therefore, be sure to
select the right style for the melody you wish to memorize,
and adjust the tempo before starting to record.
Operation
1.
While holding down the red RECORD button (4c), press
the MELODY bank selector for the memory you want to
store your melody in.
Should you wish to memorize a polyphonic melody, press
as many MELODY selectors as you need to accommodate
all the voices. For example, if the melody contains triads
(three-note chords), you have to select three memory banks
while holding down RECORD.
The red LED indicator(s) of the MEMORY selector(s)
you pressed will start to flash with alternating long/short
intervals, showing that the selected memory is on standby,
ready for recording. To turn off a memory if you decide
to use a different one instead, simply press its selector
again.
Also note that the BEAT indicators in the TEMPO/
PARAMETER & VALUE display begin to blink, indi-
cating the tempo.
2. Start playing the melody.
This automatically starts the rhythm and recording.
During the recording, the LED(s) of the respective bank(s)
will blink rapidly.
Instead of beginning to play right away, you can press the
RHYTHM CONTROL START/STOP button or use a
FILL IN if you want the melody to start with a pause.
(The interval between starting the rhythm and playing the
first note on the keyboard is memorized.)
3. Press START/STOP to end the recording.
As soon as you do, the melody performance is stored and
remains so even if power is turned off. The number
indicator(s) of the bank(s) in which the data is stored will
go out.
22
Page 27

Points to Remember
If several MELODY banks have been recorded sim-
ultaneously, they are treated as one “set”. In other
words, they can only be played back together. As soon
as any of the memory selectors of such a set is pressed
for playback, the LED indicators of the other selectors
in this set will also light up, showing that they belong
together.
Starting to record will erase any data currently stored
in the selected MELODY bank(s). If the selected bank
belongs to a “set” as mentioned above, this entire set
is deleted.
Any of the five DIGITAL SYNTHESIZER banks can
also be used as a voice source during MELODY recording. Note, however, that later editing (alteration)
of the digital synthesizer voice will of course change
the corresponding voice as played by the MELODY
bank.
The current effect settings (vibrato, sustain, reverb and
portamento) are memorized at the beginning of a recording and can be changed any time while you record.
After a recording has been completed, you can alter
the melody volume, pitch bend range, portamento speed
and MIDI transmission channel by entering record
standby (step 1. above), changing the setting, then
exiting record standby ‘by pressing the respective
MELODY button again.
Melody Playback
Starting melody playback is slightly different according to
whether the rhythm is currently playing or not.
If no rhythm is playing —
1. Press the desired MELODY bank selector(s).
The selector’s indicator will start to blink slowly, and the
BEAT indicators will flash in the selected tempo. This
shows that the PortaSound is now on standby for synchronized melody playback.
2. Play a key to begin playback.
If the PortaSound is set to NORMAL Auto Accompaniment mode, pressing any key will start playback. Otherwise, play keys in the AUTO ACCOMPANIMENT
SECTION. Playback may also be started with
START/STOP or an INTRO/FILL IN pad.
As soon as playback begins, the respective MELODY
indicator(s) will stop flashing and remain lit.
Points to Remember
Even while a MELODY bank is playing, you can start
any other MELODY bank by pressing its selector.
(Again, playback of such banks will begin from the
following measure.)
If identical melodies are recorded with identical voices
in different banks and played back simultaneously, a
phase cancellation effect may occur, causing the melody
sound to decrease. Therefore, avoid such unison recordings.
Playback continues until the end of the melody, where
it will stop and the selector’s indicator go out. Playback
can be stopped any time by pressing the respective
MELODY bank selector again.
Pressing the MELODY selector of a bank containing
no recorded data will have no effect.
Simultaneous Recording and Playback
It is possible to record one or several MELODY banks while
playing back (and thus listening to) others you have previously
recorded. This is very helpful when you want to perform one
melody part "on top of" another one, making sure they fit
together.
Operation is a simple combination of the recording and
playback steps described above:
1. While holding down the RECORD button, press the
MELODY bank selector(s) for the memory you want to
store the new melody in.
The red LED indicator(s) of the MEMORY selector(s)
you pressed will start to flash with alternating long/short
intervals, showing they are ready for recording. The BEAT
indicators in the TEMPO/PARAMETER & VALUE
display begin to blink.
2. Press the selector(s) of the MELODY bank(s) you wish to
play back.
The selector’s indicator will start to blink slowly.
3. Start playing the new melody.
This automatically starts recording. As soon as the re-
cording begins, the LED(s) of the recording MELODY
bank(s) will blink rapidly, while those of the playback
banks will stop flashing and instead remain lit.
4. Press START/STOP to end the recording.
You can stop playback of any bank(s) during the recording
by pressing the respective selector(s).
If a rhythm is playing —
1.
Simply press the desired MELODY bank selector(s).
The selector’s indicator will start to blink slowly. Playback
will commence from the beginning of the next measure
following the one during which you pressed the selector.
As soon as playback begins, the MELODY indicator(s)
will stop flashing and remain lit.
23
Page 28

CHORD Memory
The CHORD memory is a highly sophisticated automatic
performance feature that not only lets the PortaSound play
programmed chord progressions and rhythm arrangements,
but also memorized melodies and custom drum patterns with
the desired timing.
The following kind of data can be stored in each CHORD
memory bank. Note that the resolution differs according to
the type of data. (“Resolution” means the maximum number
of data changes the PortaSound will accept within a certain
time. For example, a resolution of one beat for chords indicates that the PSS-680 reacts to one chord change per beat
at most— more frequent changes are ignored.)
CHORD Memory Data
Auto Accompaniment Chords and chord change timing
— resolution 1 beat
INTRO/FILL IN number and start timing — resolution
1 beat
ENDING start timing — resolution 1 measure
On/off timing of MELODY MEMORY banks — resolution 1 measure (on), 1 beat (off)
Timing of ORCHESTRATION changes — resolution 1
beat
Style number and change timing — resolution 1 measure
Custom drummer PLAY ON/OFF — resolution 1 beat
1 initial TEMPO setting per bank (any tempo changes
made during a recording are not stored)
How to Record with the CHORD Memory
When recording a melody at the same time (i.e. when
one or more MELODY banks are also selected), you
can start to record by playing any key on the keyboard.
All data listed above is now recorded with the correct
timing. For instance, you can turn MELODY memory playback on and off during the performance,
and the PortaSound will memorize when you did. If
you start recording a melody simultaneously with the
chords, this melody will also be played when you later
start CHORD memory playback.
3. Press START/STOP or ENDING to end the recording.
As soon as you do, the CHORD selector indicator goes
out and the entire performance is stored. It remains so
even if power is turned off.
If the performance (chord progression) was stopped
by pressing START/STOP, the entire progression
will be played repeatedly during playback. On the
other hand, if you stopped recording with an ENDING, it is played back only once. (Of course, if you
pressed START/STOP or a FILL IN button before
the ending was over, playback will repeat.)
Starting to record will erase any data currently stored
in the selected CHORD bank.
A CHORD bank’s tempo setting can be altered after
a recording. Simply enter record standby (step 1.
above), alter the tempo value, then press the respective
CHORD memory bank button again.
Since each CHORD bank can store a different tempo,
you can use this feature to liven up your music by
switching between slower and faster banks during a
performance.
1.
While holding down the red RECORD button (4c), press
the CHORD selector (4a) for the memory you want to store
your data in.
The red LED indicator of the CHORD selector you
pressed will start to flash with alternating long/short in-
tervals, showing that the selected memory is standing by
for recording. To turn off a memory, simply press its selector again.
The BEAT indicators in the TEMPO/PARAMETER &
VALUE display begin to blink, indicating the tempo.
Since no chords can be memorized in the NORMAL
AUTO ACCOMPANIMENT MODE, the PortaSound
automatically selects the FINGERED MODE (its indicator lights). You can switch to SINGLE FINGER MODE
(3a) instead if you prefer.
2.
Start playing the AUTO ACCOMPANIMENT SECTION
of the keyboard.
This automatically starts recording. The CHORD selector
indicator flashes rapidly.
You can press the RHYTHM CONTROL START/STOP
button or use a FILL IN instead if you want the chord
progression to start with a pause. (The interval between
starting the rhythm and playing the first chord is also
memorized.)
CHORD Memory PIayback
CHORD bank playback can be started any time, regardless
of whether the rhythm is currently playing or not.
If no rhythm is playing —
1.
Press the desired CHORD bank selector.
The selector’s indicator will start to blink slowly, and the
BEAT indicators flash in the currently selected tempo.
The PortaSound is now on standby for synchronized
playback. If you wish, you can also select a MELODY
bank.
2. Press START/STOP.
Playback of the selected CHORD memory bank and any
selected MELODY bank will commence.
The
TEMPO/PARAMETER & VALUE display will switch
to the TEMPO memorized in the CHORD bank now
playing (the tempo of the original performance).
Playback may also be started by playing keys — any key
in NORMAL mode, and AUTO ACCOMPANIMENT
SECTION keys in the other modes.
As soon as playback begins, the CHORD indicator will
stop flashing and remain lit.
24
Page 29

If a rhythm is playing —
1.
Press the desired CHORD bank selector.
The selector’s indicator will start to blink slowly.
Playback will commence from the beginning of the next
measure following the one during which you pressed the
selector.
As soon as playback begins, the CHORD indicator will
stop flashing and remain lit.
The TEMPO will switch from the currently selected value
to the tempo memorized in the CHORD bank.
You can switch between CHORD memory banks
during playback by pressing another CHORD selector. The chord progression and the tempo will change
from the beginning of the following measure.
For CHORD banks whose recording was ended with
the START/STOP button, playback is repeated until
you stop it with START/STOP or SYNCHRO
START/ENDING and the selector’s indicator goes
out.
Unlike the MELODY function, pressing the selector
of a CHORD bank being played back does NOT stop
playback. Instead, that bank will begin playing again
from the start.
To stop CHORD bank playback any time, press
START/STOP.
Points to Remember
If you change the tempo during CHORD bank record
standby, this new value will be recorded for that bank.
Similar to the way you can make changes during the
demonstration song, you can use the controls for the
CHORD memory data listed above to alter a SONG
MEMORY CHORD performance while it is being
played back. For instance, you may use the INTRO/
FILL IN pads (20c) or SYNCHRO START/ENDING
pad (20b). (It is not possible to switch to a different
style during CHORD MEMORY playback.) However,
such operations are not memorized.
25
Page 30

PART
ADVANCED FUNCTIONS
DIGITAL SYNTHESIZER
Like a Yamaha DX synthesizer, the PortaSound PSS-680 uses an FM sound source — and like a digital
synthesizer, it lets you, adjust various voice settings (parameters) in order to create your own original
sounds. Five of these
The following short basic course on "FM Synthesis" which will help you understand this process, making
it easier for you to achieve the kind of sound you have in mind.
While this paragraph explains in detail how the voice parameters work together, their functions are
summed up in the next section, SYNTHESIZER PARAMETERS, for easy reference. You may want to read
that section first for a quick overview.
FM SYNTHESIS BASIC COURSE
1)
Voice Parameters and Values
custom voices can be stored in special memory banks.
III
2)
A Bit of FM Theory
The preset voices are edited (altered) by changing the values
of nine voice parameters (selectors 12c). These settings determine what a voice sounds like by each adjusting a different
aspect of the tone. The controls for the DIGITAL SYNTHESIZER section (12) are located under an illustration
(12d) that shows how these parameters are interrelated, giving
their names and numbers. It is reproduced further below for
your convenience. (The small numbers next to the parameter
numbers in the illustration are the respective value ranges
of the parameters.)
How to alter parameter values has already been explained
on p.10 in the PARAMETER CHANGE paragraph. Pressing
the parameter selectors (12c) calls up the value of each pa-
rameter on the TEMPO/PARAMETER & VALUE display
(9). The single digit left of the dot on the display indicates
the PARAMETER number/symbol. The two digit number
to the right of the dot is the current VALUE of that parameter.
The only difference to note here is that the parameter
selectors in the left row access two parameters each. This
is indicated by their having two numbers (e.g.[0/1]) printed
on them, Repeatedly pressing any of these three selectors
switches between the two parameters shown on the selector
you pushed. The parameter number on the display will
alternate accordingly.
Once a parameter is called up on the display, you can change
its value with the –
The following explains how the parameters influence the
instrument sound. While reading this information, you will
be making various settings so you can actually hear how a
voice is created step by step.
and + VALUE buttons (10).
a) Modulation
Select voice 99, the SINE WAVE. Play the keyboard and listen
to the tone. Press a single note, and it sounds like an electronic
signal. Play a chord, and it is more similar to a cheap electric
organ.
As the voice name says, this is the sound of a pure sine wave.
It is the shape of such waves that determines the character
of a sound —
they produce a different wave shape. A sine wave looks like
this:
All FM sounds are based on such sine waves — one sine wave
is used to modulate, or interact with, a second one, thus
changing the sound quality. In fact, FM is short for “Frequency Modulation”,which is the sine wave interaction
method your PortaSound uses to produce all the realistic
sounds you have already tried out.
Depending on the frequency ratio of the FM sine waves, the
resulting wave form will differ. The following two examples.
show what happens when a sine wave with a frequency of
250 Hz modulates another sine wave of the same frequency
(ratio 1:1), and when it modulates a 750 Hz sine wave (ratio
1:3).
a violin and clarinet sound different because
26
Page 31

As you can see, the different ratios produce totally different
wave forms —
table for strings and brass, while square waves sound milder
and “simpler”, having fewer harmonics (overtones), and are
good for woodwinds like clarinet and oboe.
To generate the basic sine waves, the PSS-680 uses digital
oscillators called “operators” in FM synthesis. The basic
configuration of theses operators is shown on the front panel
illustration reproduced here.
The two “boxes” (with the triangles in them) represent the
two oscillators, marked in blue as OPERATOR 1 and
OPERATOR 2. The output from OPERATOR 1 is fed to
the input of OPERATOR 2, thus modulating the second
oscillator. As you have just seen, this causes it to oscillate
in a different way, producing a different sound than the simple
sine wave tone.
You can try out the effect of such modulation right away.
At the moment, with the SINE WAVE voice, OPERATOR
1 is NOT modulating OPERATOR 2 at all — that is why
you hear nothing by a sine wave in the first place. Check this
by pressing the MOD. LEVEL button in the DIGITAL
SYNTHESIZER section. The TEMPO/PARAMETER &
VALUE display will change to
saw-tooth waves give a bright tone color sui-
Set MOD. LEVEL back to 80, then save this new voice to
memory BANK 1. This makes it easier to compare the new
voice with the original SINE WAVE sound.
• How to save voices to any of the five BANKS was ex-
plained on p.8 ATIP. Simply hold down the red STORE
button (12b) and simultaneously press the desired BANK
selector (12a),
display will indicate The voice you are currently
working on is now stored in BANK 1 and can be recalled
any time by pressing that button.
You can select SINE WAVE by entering “99” with the VOICE
SELECT buttons, and the altered voice with BANK 1. When
you switch between them, the TEMPO/PARAMETER &
VALUE display shows their different MOD. LEVEL value.
b) Modulators, Carriers, Envelopes
Before you can use the rest of the parameters to create sounds,
it is necessary to understand a bit more about FM Synthesis
theory. Once you have got to know the concepts of
“modulator”,“carrier” and “envelope”, you will hear how
they actually determine the characteristics of each voice.
The left row of buttons — ATTACK RATE, DECAY RATE
and FREQUENCY — accesses identical parameters for operators 1 and 2. However, due to their different roles in FM
synthesis, the settings affecting operator 1 have a very different influence on the sound than those for operator 2.
Since OPERATOR 1 modulates OPERATOR 2, it is called
a “modulator”. It is responsible for the tonal quality of a
sound. OPERATOR 2 is referred to as a “carrier” because
it “carries” the sound, determining its volume.
Within the two OPERATOR boxes is a white triangle called
an “envelope” —
output level over time. It consists of two parameters, ATTACK RATE and DECAY RATE. “Attack” is the time it
takes for the level to rise from 0 to peak value, while “decay”
is the opposite — how long it takes for the level to drop from
its peak back to zero.
You can now listen to how all of this relates to actual sound
synthesis while continuing to alter the sound you have stored
in BANK 1.
for example BANK 1. The VOICE/STYLE
a representation of the change in operator
As you can see, the MODULATION LEVEL parameter
, which determines how strongly operator 1 modulates
operator 2, is set to 00. This means there is no modulation
in this voice — but you can change that. Raise MOD. LEVEL
by holding down the + VALUE button while playing the
keyboard. Notice how the sound becomes brighter and
sharper, particularly over a value of 50.
Finally, set MOD. LEVEL to 80. Compare this sound to the
original SINE WAVE voice by pressing – and + at the same
time to revert to the original modulation level value of 00.
Unless you store them in the memory banks BANK 1 –
5 (12a), your original sounds will be lost as soon as you
switch to a different voice.
3) Creating Sounds
ATTACK RATES
To see how the attack works, call up parameter i.e. the
ATTACK RATE for OPERATOR 2, the carrier. The
TEMPO/PARAMETER & VALUE display should show
27
Page 32

The attack rate for the carrier envelope is set to its maximum
value, 63. This means that the carrier level peaks immediately
when a key is pressed. Now set the value to 01 and press any
key, holding it down for several seconds. Notice how long
it takes the volume to reach its peak.
The two things you can learn from this are:
a)
The higher the ATTACK RATE value, the faster the
attack.
b)
The carrier (OPERATOR 2) level determines the volume
of a sound.
Reset parameter to the original value of 63 and switch
to parameter the ATTACK RATE for the modulator.
Again, set it to 01 and press a key for several seconds. This
time, the volume remains more or less the same, but the
brightness of the sound increases with time. Lesson three
therefore says:
c)
The modulator level influences the tonal quality of a
sound.
If you set the modulator attack rate to around 22, you can
achieve a kind of “wah” effect - try it. Store this new voice
in BANK 2.
To verify that the modulator (OPERATOR 1) is responsible
for the tonal quality, set MOD. LEVEL back to 00. The
sound is the same as the original SINE WAVE voice — even
though operator 2 attack is set to 22, there is no longer any
wah effect since there is no modulation.
DECAY RATES
Recall the voice in BANK 1 by pressing that button. We
will experiment with the DECAY RATES, starting with the
one for the carrier — so call up parameter on the display.
Raise the value to around 25 and play some keys. What
sounded like an organ until now has begun to sound like a
clavinette, because
d)
the higher the DECAY RATE value, the faster the decay.
In the case of the carrier, this means the sound will die out
faster if you raise the decay rate. While a voice with a carrier
decay rate of 00 will continue “for ever” (as long as you press
a key), high values just produce a short click noise — the
sound dies out so quickly that you do not perceive it as musical
any longer. Try and see, then set the value back to around
25.
Now change the modulator decay, parameter as well.
As was to be expected, this alters-the tone over time. Raise
the value to around 30, and you will get an effect similar to
plucked strings or a percussive instrument being hit by a
mallet. Save this new voice to BANK 3.
By now, you will probably realize the great potential the
PortaSound PSS-680 gives you for creating a wealth of instrument or fantasy sounds, using the voice parameters and
your own imagination.
FREQUENCIES
Operator 2 Frequency - Parameter
To understand the next parameters, FREQUENCY, again
switch to the SINE WAVE voice 99 and call up parameter
Its value is 1. With the PSS-680, this means the keyboard
is set to the standard pitch where the frequency of A3 is 440Hz.
Raising the value to 2 doubles the frequency, so all keys play
an octave higher.
Since doubling the frequency of the carrier is the same as
raising pitch by one octave, you have to increase the FREQUENCY value to 4 (NOT 3) when you want the sound to
be higher by 2 octaves, to 8 for 3 octaves. By the same token,
a value of 6 produces a pitch an octave above that of value
3, and an octave below that of 12. The only exception to this
rule is the value 00, which gives a pitch one octave below the
standard.
Operator 1 Frequency - Parameter
Though parameter alters the frequency in exactly the
same way, only for the modulator, the effect is very different.
Remember that altering the ratio between the two sine waves
of OPERATOR 1 and OPERATOR 2 results in different
wave forms (p.26). This allows you to create various complex
harmonic structures (and thus characteristic tones), which
depend on the wave form.
Press BANK 3 and access parameter 4. Raise the value to
7. The sound takes on a new quality, becoming “glassy”. Store
this voice in BANK 4.
Using the same method, you can also alter the BANK 1 sound.
Call it up and raise its modulator frequency value (parameter
4) to 3. Save this voice to BANK 5.
FEEDBACK LEVEL
There is one more parameter that influences the character-
istics of a sound: FEED BACK LEVEL. As you can see in
the front panel illustration, OPERATOR 1 is half surrounded
by a line that leads from its output to its input, marked FEED
BACK . This is a “feedback loop” where part of the
operator 1 output is returned to the input, producing
“self-modulation”.
The effect is similar to, though often more extreme than what
would happen if operator 1 were being modulated by another
operator. In other words, increasing this feedback = selfmodulation makes the sound brighter, sharper, etc., just like
modulation of operator 2 through operator 1 does.
Call up the BANK 1 voice and raise its FEED BACK LEVEL.
A setting of 6 produces a distortion or “fuzz” effect, a lower
one of about 4 gives a harmonium-like quality to the original
sound. Choose the setting you like and store the new voice
in BANK 1 again, thus erasing the previous one.
TOTAL LEVEL
Since MOD. LEVEL was explained at the beginning, this
leaves the simplest parameter of them all — TOTAL LEVEL.
It determines how loud voices will sound, allowing you to
adjust the basic volume individually for each voice you create.
28
Page 33

Some voices will sound distorted if the TOTAL LEVEL
is raised to over 90 especially when they are used with
melody volume level 69’.If this happens, lower the TOTAL
LEVEL for that voice.
This completes the explanation of the DIGITAL SYNTHESIZER section. You will still need a bit of practice to
be able to use it the way you want.
In the meantime, compare the five new voices in banks 1 to
5 with the original SINE WAVE sound. Notice how even the
simple, basic settings you made have dramatically transformed the simple sound of voice 99 into something far more
interesting. Also be sure to try out various EFFECTS — for
example, BANK 4 and 5 sound nice with SUSTAIN and
REVERB, BANK 1 with VIBRATO.
When saving edited sounds to the five BANKS, the current
sustain and vibrato settings are also memorized.
The best way to learn more about sound creation is to have
a look at the parameter settings used for the preset instrument
voices. Calling up a certain parameter on the display and
then switching between various voices lets you compare their
specific values, giving you a better idea of how different
settings influence the sound.
• Since the preset voices use other internal parameters be-
sides the ones explained above (whose values cannot be
altered) the results of your sound editing will depend on
the voice you originally start out with. Even if the parameter settings you made are exactly the same, the final
voice will have somewhat different characteristics ac-
cording to the original voice you edited.
SYNTHESIZER PARAMETERS
Like the preceding explanations, this summary contains some
oversimplifications. Though technically not always completely “correct”, it will give you an overall picture of each
voice parameter’s functions.
The range of possible settings is given for each parameter,
showing the minimum and maximum values.
ATTACK RATE
Range: 0 — 63
DECAY RATE
The OPERATOR 2 DECAY RATE sets the time it takes
for the volume of the sound to drop from peak level back
to zero. A high value causes a fast decay, so the sound will
fade away quickly when a key is pressed — plucked instru-
ments like harp, koto or harpsichord have such fast decays.
Low values mean the sound will continue even if the keys
are pressed for a long time, like that of an organ or violin.
The OPERATOR 1 DECAY RATE influences the change
in tonal quality over time.
FREQUENCY
The basic pitch of a sound is determined by the OPERATOR
2 FREQUENCY value. In principle, doubling the value
raises the pitch by one octave.
The FREQUENCY of OPERATOR 1 also influences
the pitch as well as the tonal quality of the sound. It is the
ratio between the two FREQUENCY values (for example
1:1, or 1:3 = 2:6, etc.) that results in different wave forms
and thus different sound characteristics.
FEED BACK LEVEL Range: 0 — 7
This parameter regulates the self-modulation of OPERATOR
1. The effect is similar to that of the following parameter,
and the settings of both strongly influence each other.
MODULATlON LEVEL
In general, raising the MODULATION LEVEL makes the
sound sharper, while decreasing this parameter gives a milder
sound.
This is the most fundamental voice parameter, literally
forming the heart of FM (frequency modulation). If it is set
to 00, the parameter settings for OPERATOR 1
and will have no effect whatsoever.
TOTAL LEVEL Range: 0 — 99
The final parameter simply adjusts the output level of OPERATOR 2. In other words, it determines the overall volume
of a voice.
Range: 0 — 63
Range: 0 — 15
Range: 0 — 99
The OPERATOR 2 ATTACK RATE determines the
time it takes for the volume of the sound to rise from zero
to peak level. A low value represents a slow rate, so the attack
will take time, with the initial volume increasing gradually
like that of a violin or human voice. On the other hand, high
values mean a fast attack, similar to that of an organ or piano,
where the sound volume reaches its peak level almost as soon
as keys are pressed.
OPERATOR 1 ATTACK RATE influences the change
in tonal quality over time, for instance creating a “wah” effect.
29
Page 34

MIDI
What is MIDI?
MIDI stands for “Musical Instrument Digital Interface”.
It is an international standard interface system that allows
musical instruments such as your PortaSound PSS-680,
synthesizers, drum machines, sequence recorders, computers
and other equipment to “communicate”.
The most basic MIDI functions are something like a highly
advanced remote control
— they let you play other instruments from the PortaSound, using its keyboard, the Hand
Percussion drum pads and the SONG MEMORY, or control
the PSS-680 FM and PCM sound sources from external MIDI
equipment.
MIDI IN, OUT, THRU Connections
On the rear panel of the PSS-680, you will find three MIDI
DIN connectors labeled IN, THRU and OUT (27).
IN is for the reception of MIDI data, which are re-transmitted
as they are from THRU. This allows you to control both the
PortaSound and any equipment hooked up to THRU, such,
as a DX synthesizer or a TX tone generator, via MIDI signals
received at the IN terminal. These signals might be produced
“live” by you yourself playing another keyboard, or in recorded form by a sequencer for an automated performance.
If too much MIDI data is received at once, the message
will appear, indicating that the “buffer is full”.
The MIDI OUT terminal is for transmission of MIDI data
from the PortaSound itself. Again, this may be real-time
(“live”) information from, say, the keyboard, pitch bend
wheel or a VOICE SELECT button for program selection,
or data recorded in the SONG MEMORY.
In the above simple hook-up, the PSS-680 is used to play the TX81Z
FM tone generator.
This setup uses the DX7S synthesizer to program the QX5 sequence
recorder and play the PortaSound plus the TX81Z FM tone generator.
The PSS-880 and TX81Z can also be controlled by QX5 sequences.
Whenever MIDI data is received, the VOICE indicator
dot (in Style Select mode) or STYLE indicator dot (in
VOICE select mode) will blink. This allows you to confirm
visually whether MIDI reception is working properly.
Use special MIDI cables for the above type of connections.
Some more examples for practical MIDI hook-ups are
given at the end of this chapter.
16 Channel Control
MIDI is capable of handling up to 16 totally independent
channels simultaneously on a single cable. This is made
possible by coding each individual MIDI message (data
group) with a channel number from 1 to 16. Most MIDI
equipment can be set to transmit or receive data on channels
which can be freely specified by the user.
30
Page 35

When a MIDI instrument receives information coded with
its “own” channel number (the one specified for reception
on that unit), it will execute the command. If the data is coded
with a different MIDI channel number, the command will
simply be ignored and the instrument will wait for the next
message. Hooking up various kinds of MIDI equipment such
as synthesizers and tone generators to the
terminal therefore can provide totally individual simultaneous
control over up to 16 different instruments.
As far as individual channel control is concerned, the Por-
taSound PSS-680 itself works like several synthesizers (tone
generators) and a drum machine at once. Using the RE-
CEIVE CH. FILTER functions explained below, it can accept
a variety of data on different channels at the same time, thus
playing several individual FM voices plus PCM percussion
simultaneously.
MIDI MODE
same MIDI OUT
Overview
The PortaSound PSS-680 has two MIDI modes with very
different applications. Generally speaking, you should choose
Keyboard Assign mode to play other MIDI equipment from
the PortaSound, and Sound Source mode when you want to
use the PSS-680 as a multi- timbral (multi-voice/multichannel) sound source controlled by external MIDI sequencers or keyboards.
The types of MIDI data transmitted and received by the
PSS-680 in these two modes are detailed below.
2. press +.
The display will show indicating Sound Source
mode.
You can switch back and forth between MIDI MODES
with the VALUE + and – buttons.
In Sound Source mode, no sound is produced when playing
the keyboard, the DEMONSTRATION cannot be started,
and most buttons do not work.
Operation
To switch between these two MIDI modes,
1.
press the button labeled MIDI MODE [c] in the MIDI
section (15).
The TEMPO/PARAMETER & VALUE display will indicate
Keyboard Assign Mode
The display shows that the PSS-580 is set to
Keyboard Assign mode (the default setting). To switch
to Sound Source Mode,
31
Page 36

Keyboard Assign Mode
Transmitted Data
In this mode, Timing Clock, Start/Stop and note on/off data
are transmitted. The 16 MIDI channels are used to send the
following information:
Channel
1 to 16
(assignable)
11
12 to 14
15
16
MANUAL
Data
Any of the 16 channels can be
assigned for transmission of normal keyboard performance data,
i.e. the melody and accompaniment you play all by yourself.
If an AUTO ACCOMPANIMENT feature is being used, only
key data from the MELODY
SECTION will be transmitted.
Default channel is 1.
MELODY MEMORY Data
The performance data from
MELODY banks 1 to 5 is transmitted on the MIDI TRANSMIT
channel that was selected when
the bank was recorded. It is pos-
sible to change this stored channel
number during record standby
while the MELODY bank indi-
cator is blinking with alternating
long/short intervals (see p.22).
Simply select the new channel
with TRANSMIT CH. [e], then
press the MELODY bank button
again so that its indicator goes
out.
The TRANSMIT channel se-
lected during recording is also
chosen for transmission when
several banks have been used as
a “set” for a polyphonic MELODY.
CHORD key note data
Key note data for ORCHESTRA
parts 1 (ch 12) thru 3 (ch 14).
BASS key note data
RHYTHM key note data in-
cluding those for HAND PER-
CUSSION. (See the table on this
page (and the next).)
Information
PERFORMANCE
Points To Remember
•If the TRANSPOSE function is being used, it will affect
all transmitted key note data except the rhythm part.
• The MELODY VOL. setting determines the trans-
mitted key on velocity data (i.e. how loud the basic
sound of the controlled external instruments will be).
• In the case of the Auto Accompaniment sounds, the
velocity data is preset for each style and each of its
parts.
MIDI Key Numbers and Percussion Sounds
KEY
NAME
C1
C#1
D1
D#1
E1
F1
F#1
G1
G#1
A1
A#1
B1
C2
C#2
D2
MIDI
KEY#
36 (24H)
37 (25H)
38 (26H)
39 (27H)
40 (28H)
41 (29H)
42 (2AH)
43 (2BH)
44 (2CH)
45 (2DH)
46 (2EH)
47 (2FH)
48 (30H)
49 (31H)
50 (32H)
TRANSMITTED AS... ACCEPTED AS...
X X
X
X
X X
X
SYNTH TOM LOW
SYNTH TOM MID
SYNTH TOM HI
X
BASS DRUM
X
X
LOW TOM
SNARE HI
MID TOM MID TOM
X
SNARE HI
SYNTH TOM LOW
SYNTH TOM LOW
SYNTH TOM MID
SYNTH TOM HI
BASS DRUM
BASS DRUM
RIM SHOT
LOW TOM
LOW TOM
SNARE HI
•A MIDI OUT CHANNEL list (15a) is printed on the front
panel of the PortaSound for easy reference.
32
Page 37

D#2
E2
F2
F#2
G2
G#2 56
A2
A#2
B2
C3
C#3
D3
D#3
E3 64
F3
F#3
G3
G#3
A3
A#3
B3
C4
C#4
D4
D#4
E4
F4
F#4
G4
G#4
A4
A#4
B4
C5 84
59
70
71
72
74
76
78
83
RIM SHOT
51
52
SNARE LOW
HI TOM
53
HAND CLAP
54
COWBELL
55
CABASA
57
HI-HAT CLOSED
58
BRUSH HIT
HI-HAT OPEN
60
CRASH CYMBAL
61
SPLASH CYMBAL
62
RIDE CYMBAL
63
CONGA LOW CONGA LOW
65
CONGA HI CONGA HI
66
BONGO LOW
67
68
BONGO HI BONGO HI
69
TIMBALE LOW TIMBALE LOW
TIMBALE HI
TAMBOURINE
73
AGOGO LOW
AGOGO HI
75
CUICA LOW
CUICA HI
77
WHISTLE
79 BRUSH
80
81
82
RIM SHOT
SNARE LOW
HI TOM
HAND CLAP
COWBELL
CABASA
HI-HAT CLOSED
BRUSH HIT
HI-HAT OPEN
CRASH CYMBAL
SPLASH CYMBAL
X
X
X
X
X X
X
X
X X
X
RIDE CYMBAL
RIDE CYMBAL
CONGA HI
BONGO LOW
TIMBALE HI
TAMBOURINE
COWBELL
AGOGO LOW
AGOGO HI
CUICA LOW
CUICA HI
WHISTLE
BRUSH
Program Change Data
is transmitted
a)
on the manual performance transmission channel whenever a program change (voice selection) is carried out,
b)
on all channels when the style is switched (because this
changes the various Auto Accompaniment voices), with
the style number itself being output on channel 16, and
c)
whenever the rhythm is started.
If a MELODY memory bank is selected while the rhythm
is playing, the corresponding program change data is
also transmitted.
Control Change Data
Vibrato, Sustain and Portamento ON/OFF information is
transmitted as part of the manual performance and MELODY
memory data. In other words, any changes you make (or have
recorded) concerning these settings, such as turning Sustain
on or off, are transmitted to the connected MIDI equipment.
Pitch Bend Change Data
This is transmitted for every channel. The data value is calculated for each channel according to that channel’s bend
range and the bender position, under the assumption that the
bend range of the receiving equipment is set to +/–1 octave.
Memory Bulk Dump
X
X
X
X
Overview
All data stored in the PortaSound’s internal RAM — the five
DIGITAL SYNTHESIZER voice banks, the SONG MEMORY banks and the CUSTOM DRUMMER pattern —
can be dumped to an external MIDI memory device (or
another PSS-680 or PS-480) as system exclusive data.
System exclusive messages are reserved for use by individual
manufacturers for communication between specific devices.
Only certain YAMAHA equipment or computers etc. that
recognize the YAMAHA ID can accept or transmit such data.
When the PortaSound PSS-680 receives system exclusive
messages with the corresponding ID code, this data is stored
in the internal memories so that their settings become the
same as on the transmitting equipment. During this process,
the PortaSound is not operative.
Though Digital Synthesizer, Melody Memory Chord Memory
and Custom Drummer data all form independent parts of
the system exclusive data, they are always transmitted to-
gether as explained below.
For details on the exclusive data format, see p.41.
Before carrying out the following steps, make sure the receiving equipment is set for MIDI data reception. (No
channel specification is necessary.)
33
Page 38

Operation
1. Press TRANSMIT CH/MEMORY BULK DUMP
twice.
• If the PortaSound is already in TRANSMIT CHANNEL
select mode (indicated by an on the TEMPO/ PARAMETER & VALUE display), press this button only
once.
The TEMPO/PARAMETER & VALUE display will start
to blink, showing that the PortaSound is ready for memory
bulk dump.
2. Press the VALUE + button.
This starts the bulk dump. (The TEMPO/PARAMETER
& VALUE display goes out during transmission.)
Completion of the bulk data dump is indicated by the
display lighting up again. The PortaSound then enters
TRANSMIT CH. select mode.
• To exit Memory Bulk Dump mode without carrying out
the data dump, press TRANSMIT CH/MEMORY BULK
DUMP again instead of the VALUE + button.
Reception
The PSS-680 will accept exclusive messages in ANY condition
— no particular setting is necessary. During reception, the
Portasound is totally inoperative, but one indicator dot will
blink to indicate MIDI communication. After a bulk dump,
the RAM contents of the receiving equipment will correspond
to that of the transmitting unit.
If reception of the bulk dump was not successful, the error
message
• As the default setting, all channels 1 to 16 are on for re-
ception. Any channel can be turned on or off with the
RECEIVE CH. FILTER button (see below).
Channel 16
Note data received on channel 16 functions as if the corresponding drum pads were being hit. See the table on page
32.
Program Change Data
Program change data received on channels 1 to 15 switches
the selected voice, while program changes on channel 16
switch the style.
On channels 1 thru 15, program change values from 00 to
99 select voices from 00 to 99, while values from 100 to 104
access the DIGITAL SYNTHESIZER voice banks 1 to 5.
Values from 105 to 127 select the voices from 00 to 22.
On channel 16, program change values from 00 to 99 select
styles from 00 to 99. Values from 100 to 127 select styles from
00 to 27.
Pitch Bend Change Data
is accepted. The bend range depends on the panel data setting.
Control Change Data
Portamento ON/OFF and modulation (vibrato) ON/OFF
and sustain ON/OFF data are received.
System Real Time Messages
will appear on the display. In this case, repeat the bulk dump.
Note:
Only that part of the data where the error occurred is reset.
All other system exclusive data is received correctly. In
other words, if an error for instance occurred during
transmission of the digital synthesizer bank 1, only this
data will be reset while all other system exclusive data is
received as intended.
Received Data
With the exception of channel 16, all note ON/OFF data is
used to play the selected voice. Only MIDI note numbers
corresponding to the keyboard’s five octave range are accepted. Velocity data is NOT accepted in this mode, but can
be received in Sound Source mode 99.
Start, Stop and Timing Clock data are accepted. However,
if no external clock data is received, the PortaSound uses
its internal clock.
The external clock can be turned on and off as explained
on p.36, “MIDI RECEIVE CHANNEL FILTER”.
All panel settings remain valid during data reception, only
the tempo control will not work if external clock data is
being received.
34
Page 39

Sound Source Mode 99
Transmitted Data
All normal (manual) keyboard performance data is transmitted, but no corresponding sound is produced by the
PortaSound ("local off"). This means that you can control
external MIDI sound sources from the PSS-680 keyboard
even while the PortaSound is “muted”.
Channel settings are the same as for Keyboard Assign mode.
Bulk dumps can also be performed in this mode.
Pitch Bend Change Data
Under the assumption that the bend range of the receiving
equipment is set to +/–1 octave, the PortaSound sends pitch
bend change data according to its own range setting and
bender position.
Hand Percussion
Note data is sent on channel 16 whenever a drum pad is hit.
(See the tables on page 32.)
Received Data
Points to Remember
• The default value is voice number 00 for all channels.
Once this is changed through reception of program
change data on individual channels, the new voice
numbers are stored when Sound Source mode 99 is
exited or power to the PortaSound is turned off.
When power is turned off, then on again, or when
MIDI mode is switched to 99 after having been set to
00, the currently selected voice number becomes the
default voice number for all channels.
• The PSS-680 of course remains 12-voice polyphonic
in this mode too. If the received data would necessitate
the playing of more than 12 notes simultaneously, the
oldest data is ignored and only the last 12 notes received
are played.
When this happens, the message
During data reception in the Sound Source mode, all front
panel functions are inoperative except MIDI RECEIVE
CHannel, TRANSMIT CH, and MODE selection, MELODY VOLume, master volume, Transpose, and the effects
reverb and stereo chorus.
Note on/off and velocity data is accepted on all channels
specified with the RECEIVE CHANNEL FILTER. In other
words, you can play the PortaSound PSS-680 from an external
keyboard or sequencer as a velocity sensitive (dynamic volume) sound source.
MIDI note numbers from 24 to 108 are accepted in this mode,
meaning you can play the PortaSound over a full 7 octave
range not limited by the instruments keyboard.
The data received on channel 16 is treated as rhythm data
(see the tables on page 32). Program changes on channel
16 are ignored. Since Note On Velocity is accepted, you can
play the PortaSound's percussion instruments as a dynamic
drum tone generator.
Dynamic Allocation
The note on/off data received on channels 1 thru 15 is “dynamically allocated” to the respective sound sources (voices).
Program changes are accepted independently for each
channel, and the note on/off data received on these channels
always plays the corresponding voice. In other words, the
PSS-680 functions as a multi-timbral sound source, able to
play a number of individual timbres in up to 12-voice polyphony, each on different MIDI channels.
meaning “channel full”, appears on the display.
• In mode 99, Start, Stop and Timing Clock data are
ignored. Pitch bend change data is received on each
channel. Pitch bend range is automatically set to &
1 octave. Sustain on/off and modulation (vibrato)
on/off is also accepted. Remember, though, that each
voice has its own default setting for sustain and vibrato,
which is automatically chosen whenever that voice
selected via program change. This default setting may
of course be changed by transmitting the appropriate
control change data to the PortaSound.
Program Change Data
As in the keyboard assign mode, program change values from
00 to 99 select voices from 00 to 99, while values from 100
to 104 access the DIGITAL SYNTHESIZER voice banks
1 to 5. Values from 105 to 127 select voices from 00 to 22.
35
Page 40

MIDI RECEIVE CHANNEL FILTER
Overview
This function allows you to choose on which of the 16 MIDI
channels the PortaSound will receive data in either MIDI
RECEIVE MODE, Keyboard Assign 00 or Sound Source
99. It also lets you determine whether the PSS-680 will be
controlled by external or internal clock data.
To select these reception channels individually for the two
modes, the corresponding RECEIVE MODE (00 or 99) must
be chosen before performing the following settings.
Operation
1. Press RECEIVE CH.
The TEMPO/PARAMETER & VALUE display will
change to
At delivery, all channels are on for reception (corresponds to OMNI mode). In mode 00, the external
clock is off.
TRANSMIT CHANNEL Selection
Overview
This function allows you to select one MIDI channel for
transmission of “live” data (= the data of your current
manual performance) to external MIDI equipment.
Operation
1. Press TRANSMIT CH .
This display shows that channel 1 is selected for MIDI
transmission.
This display shows that channel 1 is selected for MIDI
reception.
A minus sign
“–” in front of the displayed MIDI channel
number indicates that this channel is set to receive MIDI
data.
2. Turn this channel on or off with the VALUE buttons.
Pressing –causes the minus sign to disappear, meaning
that MIDI data will not be received on the displayed,
channel. Press + to turn it on again.
3. Use RECEIVE CH.
to call up the other channels.
Each time you press RECEIVE CH . the display will
switch to the next MIDI channel, starting again from
channel 1 after channel 16 (or when in “00” mode)
has been displayed.
As explained in step 2., you can turn the displayed channel
on or off with the VALUE buttons.
After channel 16 has been called up, pressing RECEIVE CH. again displays a for “clock”
(in 00 mode only). This parameter turns the external
clock reception on (indicated by a minus sign) or off
as shown in step 2., allowing you to switch between
internal and external clock control.
The PortaSound remembers these MIDI RECEIVE
CHANNEL SETTINGS even when power is turned
off.
The displayed MIDI channel number is the one currently
set to transmit MIDI data.
2. Set the MIDI channel with the VALUE buttons.
Pressing + raises the channel number while – lowers it.
(The display continues to change when 16 or 1 is reached.)
The TRANSMIT CH. number is memorized even
when power is turned off. The default value is 1.
Pressing TRANSMIT CH. again enters Memory
Bulk Dump mode, explained above. If you mistakenly
entered this mode, press TRANSMIT CH. once
more to be able to select the transmission channel.
36
Page 41

The following hook-ups are suggestions that will help you make the most of your PortaSound’s sophisticated MIDI functions. The first three examples show how you can play the PSS-680 via external MIDI
equipment, while example four gives you ideas for controlling other sound sources from the PortaSound.
Example 5 shows connection to a simple MIDI recorder. Finally, hooking the PSS-680 to a sequencer
allows mutual control that even lets you edit the SONG MEMORY data.
1
PortaSound – Standard Keyboard
MIDI CONNECTION EXAMPLES
3
PortaSound – External Drum Pads
If you find the PortaSound’s mini keys somewhat difficult
to use and would prefer to play the PSS-680 from a
standard-sized keyboard, simply make the following
connections:
Set the PSS-680 to MIDI MODE 00, and make sure that
the receive and transmit channels correspond on both
instruments. You can now play the PortaSound from the
external keyboard. Besides, you can use the front panel
controls of the PSS-680 to change any settings as desired.
If you have a touch sensitive standard keyboard and want
to play the PortaSound with velocity data for more expression, select MIDI MODE 99 instead. Note, however,
that you will not be able to use the front panel controls
in this mode.
2
PortaSound – Portable Remote Keyboard
This simple connection allows you to play the PortaSound
from a remote keyboard.
For a particularly authentic percussion feeling, we recommend connection of external drum pads such as the
Yamaha Electronic Percussion Set DD-5.
Set the DD-5 MIDI output channel to 16 and the PortaSound MIDI MODE to 99, then play the excellent PSS-680
percussion sounds from the DD-5 — complete with dynamics for the breathtaking realism of an actual drum set!
4 PortaSound – Tone Generators
An even richer sound and more complex performance
capabilities for both voices and rhythm can be achieved
by connecting the PortaSound PSS-680 to one or more
external tone generators and rhythm machines — particularly if they have multi-timbral capabilities such as
Yamaha TX81Z or TX802 and the RX7 rhythm composer.
the
Set MIDI MODE to 99, especially when using a shoulder
keyboard such as the SHS-10 or SHS-200. You can now
play the superior sounds of the PSS-680 from the remote
keyboard.
37
Page 42

Set the PSS-680 MIDI MODE to 00, and make sure the
PortaSound transmission channels and the tone generator/
rhythm machine reception channels correspond. It is also
a good idea to adjust the tone generator voice numbers
(e.g. setting P.Change to “individual” on the TXS1Z) so
that choosing a PortaSound voice will automatically select
a corresponding external voice.
Don’t forget to make use of the PSS-680’s MIDI OUT
channel assignment possiblities. For instance, you can let
each MELODY memory bank and Auto Accompaniment
part play a different tone generator voice.
5 PortaSound – MIDI Recorder
To greatly expand the scope of the SONG MEMORY,
you can connect your PortaSound to a MIDI recorder
such as the EMQ-1.
Now, all you have to do is use the SONG MEMORY as
usual, then play back your recording in 00 mode while
transmitting it to the sequence recorder. (Of course, you
can also record “live” with the QX5 without using the
PortaSound SONG MEMORY at all). The QX5 then
allows you to edit (change) this data any way you want,
adding, deleting and repeating parts or making your music
more expressive with velocity dynamics. (When controlling
the PortaSound from the QX5, set the MIDI mode to 99.)
With this hookup, you can also use the sequencer to store
system exclusive data (such as the Digital Synthesizer
settings) and load them back to the PSS-680. You thus
have a limitless number of banks for SONG MEMORY,
DIGITAL SYNTHESIZER, etc. at your disposal.
The EMQ-1 now allows you to record and overdub on
several channels. If you set the PSS-680 to “00” mode,
you can record in real time. Set the PortaSound to “99”
mode when receiving data from the EMQ-1.
All performances can be saved on disks, so you can create
your own music library. Besides, you can use the EMQ-1
for data tiling (bulk dumps), thus storing your digital
synthesizer settings, SONG MEMORY contents and
custom drum patterns on disks. When transmitting data
to, or receiving data from the EMQ-1, either mode will
do, but you should set the PSS-680 to “00” mode for
EMQ-1 playback.
6 PortaSound – Sequencer
The SONG MEMORY functions of the PortaSound
PSS-680 are flexible and very easy – but they do not let
you edit any of the memorized note data. This becomes
possible when you connect the PortaSound to a sequencer
as follows.
38
Page 43

ADDITIONAL INFORMATlON
ALL RESET
Overview
Static electricity and other factors can very rarely cause the
Portasound’s internal microcomputer to “lock up” so that
it is no longer possible to use the instrument’s controls. When
this happens, you can reset all internal settings to their default
values.
The contents of the RAM is erased by this procedure,
canceling all settings and memorized data. Therefore, be
sure to reset the PortaSound only when absolutely necessary, or when you wish to clear all stored data at once.
Operation
1. Turn off the PortaSouod.
2. While simultaneously pressing the NORMAL and FINGERED buttons, turn on the POWER again.
This resets the PortaSound to the following default settings:
thru
Voices
Digital
Song Memories
Custom Drummer
MIDI Mode
MIDI
MIDI Transmit Ch
Auto Accompaniment NORMAL, full ORCHESTRATION
Voice/Style
TEMPO/PARAMETER & VALUE
DISPLAY
Effects
Transpose
Tuning
Melody
Pitch
Portamento
Custom
Precussion Set
Synchro Break
Synthesizer
ReceiveCh.
. . . . . . . . . . . . . . . . . . . . . . . . .
. . . . . . . . . . . . . . . . . . . . . . . . . . . . . . . . . . . . . . . . . . .
. . . . . . . . . . . . . . . . . . . . . . . . . . . . . . . . . . . . . . . .
. . . . . . . . . . . . . . . . . . . . . . . . . . . . . . . . . . . . . . . . . . . . . . . . . . . . . . . . . . . . . . . . . . . . . . . . . .
. . . . . . . . . . . . . . . . . . . . . . . . . . . . . . . . . . . . . . . . . . . . . . . . . . . . . . . . . . . . . . . . . . . . . . . . . . . . . .
Volume
Range
Bend
Speed
Drummer
. . . . . . . . . . . . . . . . . . . . . . . . . . . . . . . . . .
in BANKS 1 thru 5
. . . . . . . . . . . . . . . . . . . . . . . . . . . . . . . . . . . . . . . . . . . . . . . . . . .
. . . . . . . . . . . . . . . . . . . . . . .
. . . . . . . . . . . . . . . . . . . . . . . . . . . . . . . . . . . . . . . . . . . . . . . . . . . . . . . . . . . . . . . . . . . .
. . . . . . . . . . . . . . . . . . .
. . . . . . . . . . . . . . . . . . . . . . . . . . . . . . . . . . . . . . . . . . . . . . . . . . . . . . . . . . .
.
. . . . . . . . . . . . . . . . . . . . . . . . . . . . . . . . . . . . . . . . . . . . . . . . . . . . . . . . . . . . . . . . .
. . . . . . . . . . . . . . . . . . . . . . . . . . . . . . . . . . . . . . . . . . . . . . . . . . . . . . . . . . . . . .
. . . . . . . . . . . . . . . . . . . . . . . . . . . . . . . . . . . . . . . . . . . . . . . . . . . . . . . . . . . . .
. . . . . . . . . . . .
. . . . . . . . . . . . . . . . . . . . . . . . . . . . . . . . . . . . . . . . . . . . . . . . . . . . . . . . . . . . . . . . . .
. . . . . . . . . . . . . . . . . . . . . . . . . . . . . . . . . . . . . . . . . . . . . . . . . . . . . . . . . . . . . . .
PROGRAM OFF, PLAY OFF
Rhythm part of style 00
All on, clock off (mode 00)
Both 00; set for Voice selection
indicatesTempo
Vibrato on, all others off
00
04
All empty
00
120
ON
1
0
0
8
1
3
A
39
Page 44

SPECIFICATIONS
Key board
61 keys (C1 ~ C6)
Voice ("00 ~ 99”)
Synth Brass, Jazz Organ, Pipe Organ 1, Piano 1,
Harpsichord 1, Electric Piano 1, Celesta, Vibraphone,
Marimba 1, Steel Drum 1, Violin 1, Cello, Jazz Guitar,
Rock Guitar 1, Wood Bass 1, Trumpet, Trombone, Horn,
Soprano Sax, Clarinet, Flute, Oboe, Harmonica, Whistle,
Music Box, Honky-Tonk piano, Toy Piano, Transistor
Organ, Tremolo Organ, Small Church Organ, Funky Clavi,
Accordion, Giockenspiel, Hawaiian Guitar, Banjo,
Bowed Bass, Acoustic Guitar, Harp, Picked Bass,
Slap Bass, Ukulele, Strings, Alpenhorn, Bagpipe,
Mute Trumpet, Tenor Sax, Jug, Panflute, Ice Block,
Reed Organ, Electronic Organ, Pipe Organ 2, Piano 2,
Harpscichord 2, Electric Piano 2, Glass Celesta,
Bandoneon, Street Organ, Synth Bass, Marimba 2,
Steel Drum 2, Chimes, Tubular Bells, Hand Bell,
Carillon, Synth Tom, Timpani, Violin 2, Rock Guitar 2,
Tremolo Guitar, Rock Guitar 3, Pedal Steel Guitar,
12String Guitar, Classic Guitar, Mandolin, Sitar,
Koto, Shamisen, Jamisen, Mute Bass, Electric Bass,
Wood Bass 2, Electric Trumpet, Wow Trumpet, Tuba,
Alto Sax, Bass Clarinet, Bassoon, Recorder, Ocarina,
Piccolo, Samba Whistle, Brass Ensemble,
Woodwind Ensemble, Human Voice 1, Human Voice 2,
Human Chorus, Kazoo, Musical Saw, Sine Wave
Style (“00 ~ 99”)
Rhythm & Blues 1, Rhythm & Blues 2, Slow Blues, Gospel,
Disco, Rap, Safari, Fusion 1, Fusion 2, 16Beat 1, 16Beat 2,
Techno Rock 1, Techno Rock 2, Funk 1, Funk 2, Funk 3,
Funk 4, Rock’n’ Roll 1, Rock’n’ Roll 2, Rock’n' Roll 3,
Rock-a-Ballad, Hard Rock, Heavy Metal, Speed Metal,
Pop Rock 1, Pop Rock 2, Rock Baroque, Christmas Rock,
Oriental Rock, Brass Rock, Swing Guitar, Swing Piano,
Swing Organ, Swing Vibraphone, Big Band 1, Big Band 2,
Big Band 3, Big Band (Waltz), Modern Jazz, Jazz Waltz,
5/4 Swing, Jazz Ballad, Shuffle, Boogie Woogie Piano 1,
Boogie Woogie Piano 2, Boogie Woogie Piano 3,
Boogie Big Band 1, Boogie Big Band 2, Dixieland Combo,
Dixieland Banjo, Jazz Baroque, Bossa Nova 1,
Bossa Nova 2, Samba 1, Samba 2, Samba 3, Salsa 1,
Salsa 2, Salsa 3, Tango, Habanera, Mambo 1, Mambo 2,
Mambo 3, Rhumba, Cha-Cha-cha, Conga, Merengue,
Calypso 1, Calypso 2, Son Afro, Reggae, Cuban,
Beguine, Island Folklore, Mariachi, Argentine Folklore,
March 1, March 2, Majestic March, Fanfare, Lullaby,
Baroque, Baroque (Waltz), String Quartet, Viennese Waltz,
Polka, Bolero, Flamenco, Classical Guitar, Ragtime Piano,
Country, Country Piano,Country Steel Guitar, Bluegrass,
Street Organ, Hawaiian, Mandolin Band, Chanson,
Barbershop Quartet
Other Controls
AUTO ACCOMPANIMENT
MODE: NORMAL, FINGERED, SINGLE FINGER
ORCHESTRATION: BASS, RHYTHM, CHORD,
ORCHESTRA
SONG MEMORY
CHORD 1 ~ 5, MELODY 1 ~ 5, RECORD
EFFECT
VIBRATO, SUSTAIN, REVERB, PORTAMENTO,
STEREO CHORUS, DUET
DIGITAL SYNTHESIZER
BANK 1 ~ 5, STORE, ATTACK RATE,
DECAY RATE, FREQUENCY, FEED BACK LEVEL,
MODULATION LEVEL, TOTAL LEVEL
PARAMETER CHANGE
TEMPO, TRANSPOSE, TUNING, MELODY VOL.
DEMO
START/STOP
MIDI
MIDI MODE, RECEIVE CH. FILTER, TRANSMIT CH.,
MEMORY BULK DUMP
Auxlliary Jacks
Headphones/Aux Out
Main Amplifiers
Stereo 2W x 2
Speakers
12 cm x 2 (4.7” x 2)
Dimensions (W/D/H)
776
mm x 300 mm x 93 mm
(30-1/2” x 11-3/4” x 3-5/8”)
Weight
3.7 kg (8.1 lbs.) excluding batteries
OPTION
AC Adaptors: PA-3, PA-4 or PA-40
Stand: Portatone Stand L-2
Specifications subject to change without notice.
40
Page 45

EXCLUSIVE DATA FORMAT
1. FORMAT NO. =
HEADER & EOX
DATA CONTENTS
(00H), FORMAT NAME = (FM 2OPERATOR VOICE DATA)
STATUS =F0H
INST. CLASS =76H
FORMAT NO. =(00H)
(DESCRIBED BELOW)
CHECK SUM DATA = TWO'S COMPLEMENT OF 7BITS SUM OF ALL DATA BYTES.
NOTICE FOLLOWING DATA: BYTES ARE TO BE DIVIDED INTO 4BIT DATA AND SENT AS LESS SIGNIFICANT
4BITS OF DATA PART. SIGNIFICANT 4BITS ARE SENT FIRST.
M: MODULAR C: CARRIER
BANK NUMBER:
X: DOES NOT MATTER.
DT1:
FINE DETUNE ( THE 4TH BIT IS SIGN BIT. OTHER 3BITS STAND FOR ABSOLUTE VALUE.)
DT2:
COARSE DETUNE (1: + 600CENTS, 0: DISABLE)
MULTIPLE NUMBER OF FREQUENCY
MUL:
TL: TOTAL LEVEL
LKS (HI): LEVEL KEY SCALING (SEE BELOW)
LKS(LO): LEVEL SCALING (SEE BELOW)
ID =43H
DATA
EOX =F7H
INDICATES THE NUMBER OF BANK TO WHICH FOLLOWING DATA HAVE TO BE SENT.
0~4 MEANS BANK #1~5. ANY DATA OVER 4 IS ACCEPTED AS 0.
0000000 = 99 OF
0000001 = 98 OF
1100011 = 00 OF
1111111 = 00 OF
PANEL DATA
PANEL DATA
PANEL DATA
PANEL DATA
RKS: RATE KEY SCALING
AR, D1R, D1L, RR, SRR: ENVELOPE GENERATOR PARAMETERS (SEE BELOW)
AMEN: AMPLITUDE MODULATION ENABLE
D1L, DECAY 1 LEVEL RR: RELEASE RATE
SIN TBL: SINE TABLE FORM
FB: FEED BACK LEVEL
PMS: PITCH MODULATION (VIBRATO) SENSITIVITY
AMS: AMPLITUDE MODULATION SENSITIVITY
V: VIBRATO ENABLE
S: SUSTAIN ENABLE
VDT: VIBRATO DELAY TIME
1: ON, 0: OFF
0: SINE WAVE
1: SQUARED SINE WAVE
2: SINE HALF WAVE
3: SQUARED SINE HALF WAVE
1: ON, 0: OFF
1: ON, 0: OFF
41
Page 46

2. FORMAT NO. =
HEADER & EOX
(01H). FORMAT NAME = (MELODY MEMORY 5BANKS)
STATUS =F0H
ID =43H
INST. CLASS = 76H
FORMAT NO. =01H
DATA
(DESCRIBED BELOW)
DATA CONTENTS
CHECK SUM DATA = TWO'S COMPLEMENT OF 7BITS SUM OF ALL DATA BYTES.
NOTICE: FOLLOWING DATA BYTES ARE TO BE DIVIDED INTO 4BIT DATA AND SENT AS LESS-SIGNIFICANT
4BITS OF DATA PART. SIGNIFICANT 4BITS ARE SENT FIRST.
XXXXXXXX: DOES NOT MATTER
EOX = F7H
MELODY DATA FORMAT
DURATION
KEY ON
KEY OFF
VOICE
CHANGE
PITCH BEND
EFFECT
SWITCH
STATUS
DDDDDD = TIME LENGTH
(DDDDDD) DECIMAL = 24 * BEAT – 1
-EXAMPLES000000 = 1/24BEAT
010111 = 1BEAT
111111 = 8/3BEAT
NNNNNN = KEY NUMBER (0~60)
000000 = C1 (MIN KEY NOTE)
111100 = C6 (MAX KEY NOTE)
NNNNNN = KEY NUMBER (0~60)
000000 = C1 (MIN KEY NOTE)
111100 = C6 (MAX KEY NOTE)
TTTTTT = VOICE NUMBER (0~104)
0~99: VOICE#00~99
100~104: SYNTH BANK 1~5
BBBBB = LESS SIGNIFICANT 7BIT OF
THE SUM OF THIS DATA WILL BE
CURRENT PITCH BEND VALUE.
40H = CENTER 7FH = MAX 00H=MIN
DEFAULT VALUE IS 40H
POSITIVE DATA = 00001~01111
NEGATIVE DATA = 11111~10000
(2'S COMPLEMENT)
P: PORTAMENTO
R: REVERB
S: SUSTAIN
V: VIBRATO 1: ON 0: OFF
42
END OF
SONG
OTHERS
GD: GROUPING
DATA
IF SEVERAL BANKS ARE TOGETHER, ALL APPROPRIATE BITS OF EACH BANK SHOULD BE 1.
CONNECTION WITH ITSELF ENABLES PLAYBACK OF THE BANK.
PBR: PITCH BEND RANGE
MVOL: MELODY VOLUME 1~9: MELODY VOLUME VALUE 1~9
MTC: MIDI TRANSMIT CHANNEL 0~15: CHANNEL 1~16
PS: PORTAMENTO SPEED 1~5: 1~5 OF PANEL DATA.
NOTICE: ANY DATA WHICH EXCEEDS THE LIMITS SHOWN ABOVE MAY CAUSE UNEXPECTED TROUBLE ON SLAVE INSTRUMENT.
POSITIVE DATA = 00000001~00001100
NEGATIVE DATA = 11111111~11110100
a=CONNECTION WITH BANK#1
b=CONNECTION WITH BANK#2
e=CONNECTION WITH BANK#5
1: TOGETHER, 0: SEPERATED
(2'S COMPLEMENT)
Page 47

3. FORMAT NO. =
HEADER & EOX
(02H), FORMAT NAME =
STATUS =F0H
INST. CLASS =76H
FORMAT N. =02H
(DESCRIBED BELOW)
(CHORD MEMORY DATA)
ID =43H
DATA
DATA CONTENTS
XXXXXXXX: DOES NOT MATTER.
CHECK SUM DATA = TWO'S COMPLEMENT OF 7BIT SUM ALL DATA BYTES.
NOTICE: FOLLOWING DATA BYTES ARE TO BE DIVIDED INTO 4BIT DATA AND SENT AS LESS SIGNIFICANT
4BITS OF DATA PART. SIGNIFICANT 4BITS ARE SENT FIRST.
EOX = F7H
BANK NUMBER
UUUUUUUU = BANK #, TO WHICH FOLLOWING DATA WILL BE SENT.
0~4 MEANS BANK#1 ~5. ANY DATA OVER 5 IS ACCEPTED AS 0.
CHORD SEQUENCE DATA FORMAT
MMMM: MEASURE COUNT
0000 = SAME MEASURE
0001 = NEXT MEASURE
1111 = 15 MEASURES AFTER
(FOR THE VERY FIRST OF
CHORD SEQUENCE DATA THIS
MUST BE 0001)
BBB: BEAT COUNT
000 = 1ST BEAT
001 = SECOND BEAT
111 = 8TH BEAT
(THIS NUMBER CANNOT EXCEED
THE BEAT NUMBER OF EACH
STYLE.)
CHORD
NAME
RRRR: ROOT NOTE OF CHORD
0000 =C, 0001 = C#, 0010 = D,
0011 = D#, 0100 = E, 0101 = F,
0110 = F#, 0111 = G, 1000 = G#,
1001 = A, 1010 = A#, 1011 = B,
RHYTHM
CONTROL
SWITCHES
V = FILL IN 1, W = FILL IN 2,
X = FILL IN 3, Y = ENDING, Z = STOP
ONLY ONE OF THESE BITS IS
ALLOWED TO BE 1.
CCCC: CHORD TYPE
0000 = M, 0001 = m, 0010 = 7th
0011 = m7th,
0110 = m7th-5 0111 = 7SUS4, 1000 = AUG.
1001 = DIM, 1010 = 6th, 1011 = M6th,
1100 = 7th-5
0100 = M7th, 0101 = mM7th,
MELODY
MEMORY
SWITCHES
bbbb: BANK#
0000 = 1, 0001 = 2, 0010 = 3, 0011 = 4, 0100 =5
a: ON/OFF 1 = ON, 0 = OFF (WHEN A = 1, BBB MUST BE 000)
ORCHES-
TRATION
SWITCHES
A = BASS, O = ORCHESTRA,
H = CHORD, T = RHYTHM,
D = CUSTOM DRUMER PLAY 1: ON, 0: OFF
STYLE
NUMBER
CHANGE
SSSSSS = STYLE # MUST BE 0 ~99 (BBB: BEAT COUNT MUST BE 000)
TEMPO
TTTTTTTTT = TEMPO MUST BE 10~220
NOTICE: ANY DATA WHICH EXCEEDS THE LIMITS SHOWN ABOVE MAY CAUSE UNEXPECTED TROUBLE ON SLAVE INSTRUMENT.
43
Page 48

4. FORMAT NO. =
HEADER & EOX
(03H), FORMAT NAME
STATUS = F0H
INST. CLASS = 76H
FORMAT NO. = 03H
DATA
(DESCRIBED BELOW)
= (RHYTHM PATTERN DATA)
ID = 43H
DATA CONTENTS
CHECK SUM DATA = TWO'S COMPLEMENT OF 7BITS SUM OF ALL DATA BYTES.
NOTICE: FOLLOWING DATA BYTES ARE TO BE DIVIDED INTO 4BIT DATA AND SENT AS LESS SIGNIFICANT
4BITS OF DATA PART, SIGNIFICANT 4BITS ARE SENT FIRST.
BANK#: BANK# TO WHICH FOLLOWING DATA MUST BE SENT.
XXXX = DOES NOT MATTER
Q: QUANTIZE FOR CUSTOM DRUMER INPUT.0: 1/4, 1:1/3
BEAT: BEAT LENGTH OF THIS PATTERN
INSTRUMENT SELECT
QUANTIZE DATA
EOX = F7H
THIS DATA IS IGNORED.
000 = 1BEAT
001 = 2BEATS
111 = 8BEATS
I I I I I I: INSTRUMENT NUMBER
A: ACCENT1 FLAG 1: ACCENT1, 0: NORMAL
R: ROLL FLAG 1: ROLL, 0: NORMAL
A: QUANTIZE OF 1ST BEAT.
B: QUANTIZE OF 2ND BEAT.
H: QUANTIZE OF 8TH BEAT.
ON TIMING DATA
a: 1ST TIMING OF BEAT.
b: 2ND TIMING OF A BEAT.
h: 8TH TIMING OF BEAT.
VOLUME DATA (NORMAL, ACCENT1, NORMAL ACCENT1 ROLL)
VVVVV: VOLUME 0 ~ 31.0: MAX, 31 : MIN
ACC2: ACCENT2 FLAG 1:ON, 0:OFF
ACC2 STANDS FOR AN INSTANT ACCENT (3 POINTS UP) FOR EACH TRACK ACCENT2 WORKS
PRIOR TO ACCENT1.
NOTICE: ANY DATA WHICH EXCEEDS THE LIMITS SHOWN ABOVE MAY CAUSE UNEXSPECTED TROUBLE ON SLAVE INSTRUMENT.
0: 1/8, 1:1/6
1:ON, 0:NO ACTION
44
Page 49

[PORTABLE KEYBOARD]
Model
PSS-680
Mode 00
MIDI Implementation Chart Version: 1.0
Function
Basic
Channel
Mode
Note
Number:
Velocity
Default
Changed
Default
Messages
Altered
True voice
Note ON
Note OFF
Manual/
Melody Memory Orchestra
Play
Chord
1-16 (*1) 11
1-16
3
********************
*******************
Transmitted Recognized
1 2 3 Base
12 13 14 15
x
3
444 4
x x
Rhythm
16
3
1-16 (*2)
1-16
1 (*2)
x
24-108 (*3) 36-96
36-96 (*4)
x 9nH, v = 1-127 (*5) x 9nH
x 9nH, v = 0 x 9nH, v = 0
/8nH
After
Touch
Key’s
Ch’s
X
X X
X
Pitch Bender
1
64
Control
65
Change
Remarks
7 bit reso.
VIBRATO
SW
SUSTAIN
SW
PORTAMENT
SW
Prog
Change :
True
********************
System Exclusive
System : Song Pos
: Song Sel
Common
System
Real Time
Aux
: Tune
: Clock
: Commands
: Local ON/OFF
x
x
x
Alternative
: All Notes OFF
Messages
: Active Sense
: Reset
Note: (*1)When the power is turned OFF, the data is stored.
(*2)
All channels from 1 to 16 can be turned ON/OFF selectively, and the data is stored when the power
is turned off.
(*3)
Including the effective key area after transposing.
(*4)
Ch16 is reserved for the rhythm section.
(*5)
Velocity value is obtained by varying the melody volume, rather than key-on speed.
(*6)
0-99 are transmitted corresponding to the voices #00-99. 100-104 corresponds to the DIGITAL
SYNTH BANK 1-5.
(*7)
Transmistted corresponding to Style #00-99.
Start, Stop
45
Page 50

[PORTABLE KEYBOARD]
Model
PSS-680
Mode 99
MIDI Implementation Chart Version: 1.0
Function
Basic
Channel
Default
Changed
Transmitted
1-16 (*1) 1-16 (*2)
1-16
Default
Mode
Messages
Altered ***********
Note
Number:
Velocity
True voice
Note ON
Note OFF
24-108(*3)
***********
X 9nH, v = 1-127 (*5)
X 9nH, v = 0
3
x x
Recognized Remarks
1-16
3 (*9)
x
24-108
24-108(*4)
9nH, v = 1-127
X 9nH, v = 0
/8nH
After Key’s
Touch
Ch’s
x
x
x
x
Pitch Bender
1
64
Control
65
Change
7bit Resolution
VIBRATO SW
SUSTAIN SW
PORTAMENT SW
Prog
Change :
True
***********
System Exclusive
System
: Song Pos
: Song Sel
Common
System
: Tune
: Clock
Real Time : Commands
Aux
: Local ON/OFF
: All Notes OFF x x
Mes- : Active Sense
sages
Note:
: Reset
(*8)
For the channels from 1 to 15, 0-99, 100-104 and 105-127 are recognized corresponding to the voices
#00-99, the DEGITAL SYNTH BANK 1-5 and voices 00-22 respectively. For the 16th, 0-99 and 100-127
correspond to Style #00-99 and Style #00-27 respectively.
(*9)
Multi timbre, Dynamic allocation. Refer to page 35.
(*10) For transmission, 00-99 and 100-104 correspond to voices #00-99 and the DEGITAL SYNTH BANK 1-5
respectively in the VOICE SELECTION. In the STYLE SELECTION, 00-99 are transmitted via Ch16
corresponding to #00-99.
(*11) Channels 1 through 15 recognize 0-99, 100-104 and 105-127 as voices #00-99, the DEGITAL SYNTH
BANK 1-5 and voices #00-22. Ch16 does not recognize any signals.
(*10)
0-127 (*11)
0-99
x
x
x
x
x
x
x
x
x
x
x
x
x
x
46
Page 51

•
This applies only to products distributed by Yamaha Music Corp.
Attention users in the U.S.A.
PortaSound PSS-680 prepared in
accordance with FCC rules.
The PortaSound PSS-630 uses frequencies that appear in
the radio frequency range, and if installed in the immediate
proximity (within three meters) of some types of audio or
video devices Interference may occur.
The PortaSound PSS-680 has been type tested and
found to comply with the specificatlons set for a Class B
computing device in accordance with those specifications
listed in Subpart J of Part 15 of the FCC rules.
are designed to provide a reasonable measure of protection against such interference. However, this does not
guarantee that Interference will not occur.
These rules
if your Portasound PSS-680 should be suspected of causing
interference with other electronic devices, veriflcation can
be made by turning your PortaSound PSS-630 off and on.
If the interference continues when your PortaSound
PSS-680 is off, the PortaSound PSS-680 is not the source
of the interference. If your PortaSound PSS-680 does appear to be the source of the interference, you should try
to correct the situatlon by uslng one or more of the following
measures:
Relocate either the PortaSound PSS-680 the electronic
device that Is being affected by the Interference.
Utilize power outlets for the PortaSound PSS-680 and
the device being effected that are on different branch
(circuit breaker or fuse) circuits. or Install A/C line filters.
in the case of radio-TV interference, relocate the antenna or, if the antenna lead-in is a 300 ohm ribbon lead,
change the lead-in to a co-axial type cable.
The serial number of this product may be found on the bottom of the unit. You
should note this serial number in the space provided below and retain this
manual as permanent record of your purchase to aid identification in the
event of theft.
Model No.
Serial No.
If these corrective measures do not produce satis-
factory results, please contact your Authorized Yamaha
Consumer Products dealer for suggestions and/or corrective measures.
If you cannot locate an Authorized Yamaha Consumer
Products dealer in your general area, contact the Consumer Products Service Center, Yamaha Music Corporation, 6600 Orangethorpe Ave, Buena Park, CA 90620.
If for any reason you should need-additional
information relating to radio or TV interference, you may
find a booklet prepared by the Federal Communications
Commission helpful: “How to Identify and Resolve Radio-TV Interference Problems”. This booklet is avaliable
from the U.S. Government Printing Office. Washington D.C.
20402—
Stock * 004-000-345-4.
Concerning Warranty This product was made for international distribution, and
since the warranty for this type of products varies from marketing area to
marketing area, please contact the selling agency for information concerning
the applicable warranty and/or service policies.
Page 52

YAMAHA
YAMAHA CORPORATION
P.O. Box 1, Hamamatsu, Japan
Page 53

PSS680 OM
9/10/98 29645
YAMAHA
Yamaha Corporation of America
6600 OrangeThorpe Avenue, P.O. Box 6600, Buena Park, CA 90622-6600
PSS680 OM
 Loading...