

Page 1

Page 2

PRECAUTIONS
PLEASE READ CAREFULLY BEFORE PROCEEDING
* Please keep this manual in a safe place for future reference.
WARNING
Always follow the basic precautions listed below to avoid the possibility of serious injury or even death from electrical
shock, short-circuiting, damages, fire or other hazards. These precautions include, but are not limited to, the following:
Power supply/Power cord
• Only use the voltage specified as correct for the instrument. The required
voltage is printed on the name plate of the instrument.
• Check the electric plug periodically and remove any dirt or dust which may have
accumulated on it.
• Use only the supplied power cord/plug.
• Do not place the power cord near heat sources such as heaters or radiators, and
do not excessively bend or otherwise damage the cord, place heavy objects on
it, or place it in a position where anyone could walk on, trip over, or roll anything
over it.
Do not open
• Do not open the instrument or attempt to disassemble the internal parts or
modify them in any way. The instrument contains no user-serviceable parts. If it
should appear to be malfunctioning, discontinue use immediately and have it
inspected by qualified Yamaha service personnel.
Water warning
• Do not expose the instrument to rain, use it near water or in damp or wet
conditions, or place containers on it containing liquids which might spill into
any openings.
• Never insert or remove an electric plug with wet hands.
Fire warning
• Do not put burning items, such as candles, on the unit.
A burning item may fall over and cause a fire.
If you notice any abnormality
• If the power cord or plug becomes frayed or damaged, or if there is a sudden
loss of sound during use of the instrument, or if any unusual smells or smoke
should appear to be caused by it, immediately turn off the power switch,
disconnect the electric plug from the outlet, and have the instrument inspected
by qualified Yamaha service personnel.
CAUTION
Always follow the basic precautions listed below to avoid the possibility of physical injury to you or others, or damage
to the instrument or other property. These precautions include, but are not limited to, the following:
Power supply/Power cord Location
• When removing the electric plug from the instrument or an outlet, always hold
the plug itself and not the cord. Pulling by the cord can damage it.
• Remove the electric plug from the outlet when the instrument is not to be used
for extended periods of time, or during electrical storms.
• Do not connect the instrument to an electrical outlet using a multiple-connector.
Doing so can result in lower sound quality, or possibly cause overheating in the
outlet.
DDK-7 Owner’s Manual
2
(1)B-11 1/2
• Do not expose the instrument to excessive dust or vibrations, or extreme cold or
heat (such as in direct sunlight, near a heater, or in a car during the day) to
prevent the possibility of panel disfiguration or damage to the internal
components.
• Do not use the instrument in the vicinity of a TV, radio, stereo equipment,
mobile phone, or other electric devices. Otherwise, the instrument, TV, or radio
may generate noise.
• Do not place the instrument in an unstable position where it might accidentally
fall over.
• Before moving the instrument, remove all connected cables.
• When setting up the product, make sure that the AC outlet you are using is
easily accessible. If some trouble or malfunction occurs, immediately turn off
the power switch and disconnect the plug from the outlet. Even when the power
switch is turned off, electricity is still flowing to the product at the minimum
level. When you are not using the product for a long time, make sure to unplug
the power cord from the wall AC outlet.
Page 3

• Do not place the instrument against a wall (allow at least 3 cm/one-inch from
the wall), since this can cause inadequate air circulation, and possibly result in
the instrument overheating.
Connections
• Before connecting the instrument to other electronic components, turn off the
power for all components. Before turning the power on or off for all
components, set all volume levels to minimum. Also, be sure to set the volumes
of all components at their minimum levels and gradually raise the volume
controls while playing the instrument to set the desired listening level.
Maintenance
• When cleaning the instrument, use a soft, dry cloth. Do not use paint thinners,
solvents, cleaning fluids, or chemical-impregnated wiping cloths.
Handling caution
• Do not insert a finger or hand in any gaps on the instrument.
• Never insert or drop paper, metallic, or other objects into the gaps on the panel
or keyboard. If this happens, turn off the power immediately and unplug the
power cord from the AC outlet. Then have the instrument inspected by qualified
Yamaha service personnel.
• Do not place vinyl, plastic or rubber objects on the instrument, since this might
discolor the panel or keyboard.
• Do not rest your weight on, or place heavy objects on the instrument, and do not
use excessive force on the buttons, switches or connectors.
• Do not use the instrument/device or headphones for a long period of time at a
high or uncomfortable volume level, since this can cause permanent hearing
loss. If you experience any hearing loss or ringing in the ears, consult a
physician.
Saving data
Saving and backing up your data
• Always save data to a USB flash memory or other external media, in order to
help prevent the loss of important data due to a malfunction or user operating
error.
Backing up the external media
•To protect against data loss through media damage, we recommend that you
save your important data onto two external media.
Yamaha cannot be held responsible for damage caused by improper use or
modifications to the instrument, or data that is lost or destroyed.
Always turn the power off when the instrument is not in use.
The serial number of this product may be found on the bottom
of the unit. You should note this serial number in the space
provided below and retain this manual as a permanent record
of your purchase to aid identification in the event of theft.
Model No. DDK-7
Serial No.
(1)B-11 2/2
DDK-7 Owner’s Manual
(bottom)
3
Page 4

Congratulations!
You are the proud owner of a fine electronic keyboard, the DDK-7.
The Yamaha DDK-7 combines the most advanced tone generation technology with state-of-the-art
digital electronics and features to give you stunning sound quality with maximum musical
versatility.
In order to make the most of your DDK-7 and its extensive performance potential, we urge you to
read the manual thoroughly while trying out the various features described.
Keep the manual in a safe place for later reference.
Accessories
• Owner’s Manual
•Power cord
DDK-7 Owner’s Manual
4
Page 5
Main Features
Wide Variety of Registration Menus page 20
The Registration Menu buttons feature a total of 288 Registrations, allowing you to instantly set up the
DDK-7 for playing your favorite type of music. The Registrations in Registration Menu are divided into six
basic categories for ease of selection. Moreover, you can edit any of the Registrations and customize them to fit
your own performance needs.
Richly textured, four-layer AWM Voices and High Quality Digital
Effects
The DDK-7 contains a huge amount of exceptionally high-quality Voices – 415 altogether – created with the
AWM (Advanced Wave Memory) tone generation system. The authentic touch response keyboard lets you
play these Voices with all the expressiveness and control of an actual acoustic instrument. What’s more, there
are 183 different effect types in 15 categories that you can apply to each Voice section —letting you enhance
and even completely change the character of the Voices, without having to use the Voice Edit features.
pages 24
and 52
Dynamic, Contemporary Rhythms and Auto Accompaniment page 60
The exceptionally of wide selection of 274 rhythms lets you choose exactly the rhythm you need in your
performance. Each rhythm contains 15 variations (sections) – such as Main, Fill In, Intro, Ending, and Break
– that you can easily switch while you play, to make your performance even more dynamic and professional.
Each rhythm has its own matching accompaniment divided into five instrument parts, providing basic
backing as well as embellishments.
Comprehensive input and output connectors ideal for live
page 223
performance
Since the DDK-7 is equipped with two types of AUX OUT jacks: MAIN and SUB, you can select outputs for
each part. This lets you add an external effect to a specific part, or adjust the volume balance among the parts
with an external mixer—allowing you to build up your own system and create just the sound you want.
Large, 6.5-inch TFT-LCD with Intuitive Touch Panel Operation page 13
This large LCD display not only lets you clearly see a wide selection of settings and parameters at almost any
angle, it also serves as a touch control panel — letting you intuitively make selections and adjust settings
simply by touching the screen! Once you touch a setting, you can even adjust it in finer detail if necessary with
the Data Control dial.
DDK-7 Owner’s Manual
5
Page 6

The DDK-7 is compatible with the following formats.
“GM (General MIDI)” is one of the most common Voice allocation formats. “GM System
Level 2” is a standard specification that enhances the original “GM” and improves Song data
compatibility. It provides for increased polyphony, greater Voice selection, expanded Voice
parameters, and integrated effect processing.
XG is a major enhancement of the GM System Level 1 format, and was developed by Yamaha
specifically to provide more Voices and variations, as well as greater expressive control over
Voices and effects, and to ensure compatibility of data well into the future.
GS was developed by the Roland Corporation. In the same way as Yamaha XG, GS is a major
enhancement of the GM specifically to provide more Voices and Drum kits and their variations,
as well as greater expressive control over Voices and effects.
The Style File Format combines all of Yamaha’s auto accompaniment know-how into a single
unified format.
This product utilizes NF, an embedded Internet browser from ACCESS Co., Ltd. NF is used with
the patented LZW, licensed from Unisys Co., Ltd. NF may not be separated from this product,
nor may it be sold, lent or transferred in any way. Also, NF may not be reverse-engineered,
reverse-compiled, reverse-assembled or copied.
This software includes a module developed by the Independent JPEG Group.
• The bitmap fonts used in this instrument have been provided by and are the property of Ricoh Co., Ltd.
• This product incorporates and bundles computer programs and contents in which Yamaha owns copyrights or
with respect to which it has license to use others’ copyrights. Such copyrighted materials include, without
limitation, all computer software, styles files, MIDI files, WAVE data and sound recordings. Any unauthorized
use of such programs and contents outside of personal use is not permitted under relevant laws. Any violation of
copyright has legal consequences. DON’T MAKE, DISTRIBUTE OR USE ILLEGAL COPIES.
• Copying of the commercially available music sequence data and/or digital audio files is strictly prohibited except
for your personal use.
•Electone and STAGEA are the trademarks of Yamaha Corporation.
• The company names and product names in this Owner’s Manual are the trademarks or registered trademarks of
their respective companies.
• The illustrations and LCD screens as shown in this owner’s manual are for instructional purposes only, and may
appear somewhat different from those on your instrument.
• The pan flute and sitar, shown in the displays of the DDK-7, are on display at the Hamamatsu Museum of
Musical Instruments.
• This device is capable of using various types/formats of music data by optimizing them to the proper format
music data for use with the device in advance. As a result, this device may not play them back precisely as their
producers or composers originally intended.
DDK-7 Owner’s Manual
6
Page 7
Contents
Quick Introductory
Guide
1
Accessories ..............................................................4
Main Features ...........................................................5
Panel Layout . . . . . . . . . . . . . . . . . . . . . . . 8
Front Panel ................................................................8
LCD Display/Display Select ....................................10
Overview .................................................................10
1 Quick Introductory Guide . . . . . . . . . . 11
Getting Started........................................................11
Using the LCD Display............................................13
LCD Display Settings ..............................................16
Voice Display ..........................................................18
Registration Menu ...................................................20
Confirming the Version of Your DDK-7....................23
Factory Set (Initializing the DDK-7).........................23
2 Voices . . . . . . . . . . . . . . . . . . . . . . . . . . 24
Voices for each keyboard .......................................24
Selecting Voices with the Voice buttons .................26
Voice List.................................................................32
3 Organ Flutes. . . . . . . . . . . . . . . . . . . . . 37
4 Voice Controls and Effects . . . . . . . . . 40
Selecting from the Voice Condition display ............41
Selecting from the panel .........................................46
Effect List ................................................................52
8 Voice Edit. . . . . . . . . . . . . . . . . . . . . . 137
Voice Structure......................................................137
Editing a Voice ......................................................138
Saving the edited Voice ........................................145
Quitting Voice Edit.................................................146
Recalling an Edited Voice .....................................146
9 Rhythm Program . . . . . . . . . . . . . . . . 147
Outline of the Rhythm Programming Operation ....147
Rhythm Pattern Program .......................................148
Rhythm Sequence Program ..................................183
Saving Rhythm Pattern and Rhythm Sequence Data
to external media...................................................192
10 Controllers . . . . . . . . . . . . . . . . . . . . 193
Footswitches .........................................................193
Foot Pedal .............................................................196
Expression Pedals.................................................205
11 Transpose and Pitch Controls . . . . 208
12 Internet Direct Connection . . . . . . . 209
Connecting the Instrument to the Internet.............209
Accessing the Website from the DDK-7 ...............210
About the Internet Settings Display.......................218
Exiting from the Internet Display ...........................221
Initializing Internet Settings ...................................221
Glossary of Internet Terms ....................................222
Voices
2
Organ Flutes
3
Voice Controls
and Effects
4
Rhythm/
Keyboard Percussion
5
Registration Memory
6
Music Data Recorder
(MDR)
7
5 Rhythm/Keyboard Percussion . . . . . . 60
Selecting rhythms with the Rhythm button..............60
Rhythm List .............................................................68
Accompaniment......................................................70
Automatic Accompaniment – Auto Bass Chord
(A.B.C.) ...................................................................71
Melody On Chord (M.O.C.).....................................73
Keyboard Percussion..............................................74
6 Registration Memory . . . . . . . . . . . . . . 89
Storing Registrations...............................................89
Selecting Registrations ...........................................91
Saving the Registration data to USB flash memory ....92
Initializing Registration Memory ..............................93
Registration Shift .....................................................94
Unifying a specific parameter.................................99
7 Music Data Recorder (MDR) . . . . . . . 102
Calling Up the M.D.R. Display ..............................103
Formatting External Media ....................................103
Selecting a Song...................................................104
Recording .............................................................110
Changing the Song Name ....................................113
Saving Registrations as Registration Data (File)...116
Recalling Recorded Registrations ........................121
Playing Back a Song.............................................122
Other Functions (Tools).........................................128
13 Connections. . . . . . . . . . . . . . . . . . . 223
Accessory Jacks and Controls .............................223
Connecting Headphones or External System .......225
Connecting a Pedal Unit .......................................229
Connecting a Foot Pedal.......................................229
Connection with Computer....................................230
Connecting External Devices................................231
MIDI.......................................................................235
MIDI Control ..........................................................238
14 Appendix . . . . . . . . . . . . . . . . . . . . . 240
XG Voice & Drum List............................................240
XG Drum Map .......................................................245
MIDI Data Format ..................................................248
Troubleshooting ....................................................263
Specifications........................................................266
Index .....................................................................268
8
9
10
11
12
13
Voice Edit
Rhythm Program
Controllers
Transpose
and Pitch Controls
Internet Direct
Connection
Connections
14
Appendix
Page 8

Panel Layout
Front Panel
UPPER 1, 2
(page 24)
PEDAL 1, 2
(page 25)
LOWER 1, 2
(page 25)
LEAD 1, 2
(page 24)
LCD display/
DISPLAY SELECT
(page 10)
REGIST MENU
(page 20)
RHYTHM/
KEYBOARD PERCUSSION
(page 60)
USB TO DEVICE terminal
(page 224)
SUSTAIN button
(page 49)
REVERB button
(page 46)
13 14 15 16
[M.] (Memory) button
(page 89)
123
Registration memory
(page 89)
DDK-7 Owner’s Manual
8
Page 9
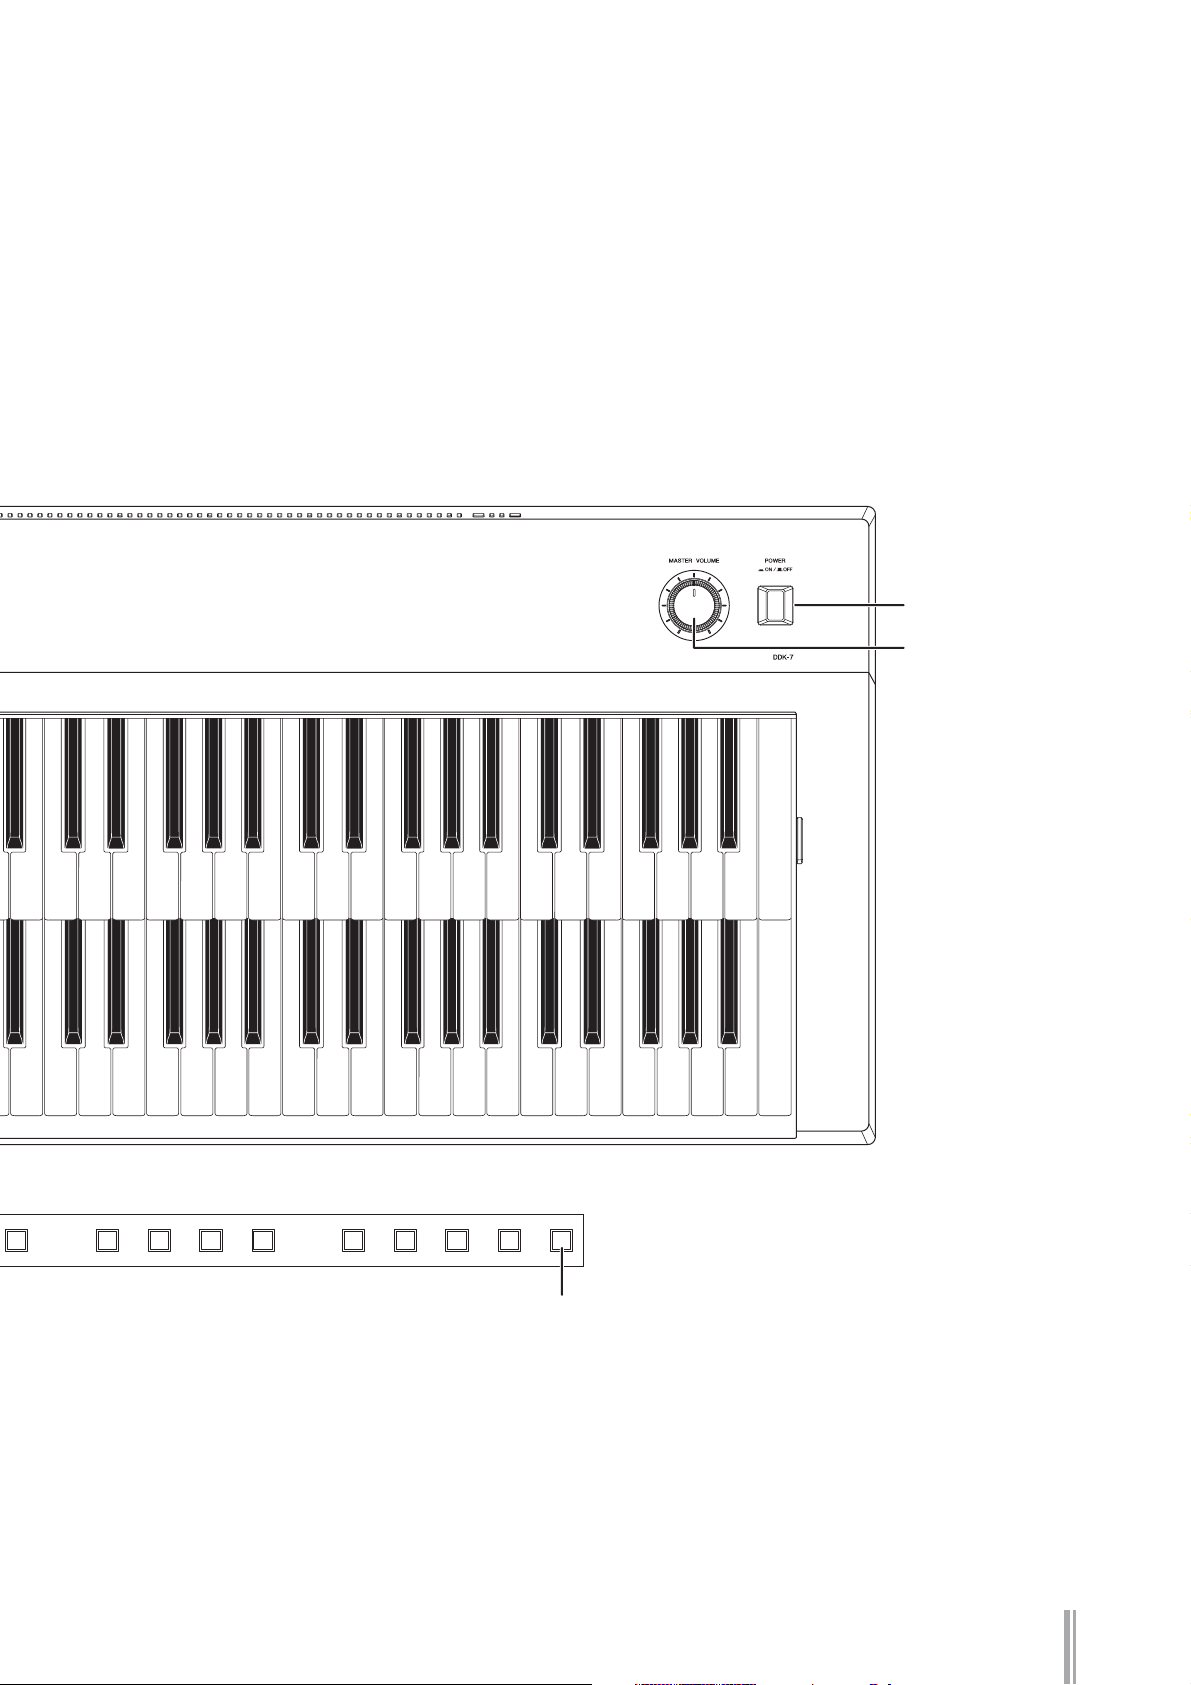
POWER switch
(page 12)
MASTER VOLUME
dial (page 12)
45678910 12
11
[D.] (Disable) button
D.
(page 91)
DDK-7 Owner’s Manual
9
Page 10

LCD Display/Display Select
345 678 9)! @#$
1
2
1 LCD display (touch-panel) . . . . . . . . . . . . page 13
2 DATA CONTROL dial . . . . . . . . . . . . . . . . page 15
3 [VOICE DISPLAY] button . . . . . . . . . . . . . page 18
4 [REGIST MENU] button . . . . . . . . . . . . . . page 20
5 [FOOT SWITCH] button . . . . . . . . . . pages 94, 193
6 [MDR] button. . . . . . . . . . . . . . . . . . . . page 102
7 [INTERNET] button . . . . . . . . . . . . . . . . page 210
8 [UTILITY] button . . . . . . pages 16, 205, 208, 238
Overview
FOOT PEDAL jacks (page 224)
USB/MIDI terminals (page 224)
TO PEDAL connector (page 225)
I/O connectors (page 225)
Front Panel
(page 8)
9 [PROGRAM] button . . . . . . . . . . . . . . . page 138
) [SUSTAIN] button . . . . . . . . . . . . . . . . . page 49
! [REVERB] button . . . . . . . . . . . . . . . . . . page 46
@ [U. ORGAN FLUTES] button. . . . . . . . . . . page 37
# [L. ORGAN FLUTES] button . . . . . . . . . . . page 37
$ [ROTARY SP SPEED] button . . . . . . . . . . page 50
AC INLET jack (page 223)
Upper keyboard
Lower keyboard
DDK-7 Owner’s Manual
10
PHONES jack (page 223)
USB TO DEVICE terminal (page 224)
MIC jack (page 223)
Page 11

1
Quick Introductory Guide
Whether you are an advanced performer or have never touched an electronic keyboard in your life, we
recommend that you take the time to go through this basic section. It shows you in the simplest
possible manner how to start playing your DDK-7.
Contents
1 Getting Started . . . . . . . . . . . . . . . . . . . . . . . . . . .11
2 Using the LCD Display . . . . . . . . . . . . . . . . . . . . .13
• Changing the Display Page . . . . . . . . . . . . . . . . .13
• Pressing Buttons on the Display . . . . . . . . . . . . .14
• Adjusting Parameter Values by Using the Display
Sliders . . . . . . . . . . . . . . . . . . . . . . . . . . . . . . . . . .15
3 LCD Display Settings . . . . . . . . . . . . . . . . . . . . . .16
• Selecting the Display Language . . . . . . . . . . . . .16
• Muting the Touch Panel Sound. . . . . . . . . . . . . . .17
• Adjusting the Display Brightness . . . . . . . . . . . . .17
Getting Started
1
Connect the power cord.
1
First insert the plug of the power cable into the AC INLET on the DDK-7, then
plug the other end of the cable into the proper AC outlet on the wall.
AC INLET jack
4Voice Display . . . . . . . . . . . . . . . . . . . . . . . . . . . . . 18
5 Registration Menu. . . . . . . . . . . . . . . . . . . . . . . . . 20
• Selecting Registrations . . . . . . . . . . . . . . . . . . . .20
• Registration Menu List . . . . . . . . . . . . . . . . . . . . .22
6 Confirming the Version of Your DDK-7 . . . . . . . .23
7Factory Set (Initializing the DDK-7) . . . . . . . . . . .23
Only use the voltage specified as correct for the DDK-7. The required voltage
is printed on the name plate of the DDK-7. Yamaha products are
manufactured specifically for the supply voltage in the area where they are to
be sold. If you intend to use the instrument in another location, or if any
doubt exists about the supply voltage, please consult with a qualified
technician.
Connect the speakers or headphones.
2
Since the DDK-7 has no built-in speakers, you will need to monitor the sound
of the instrument by using external equipment. Connect a set of headphones,
powered speakers, or other playback equipment as required.
Reference Page
Using Headphones
(page 225)
Playing the Sounds of the
DDK-7 Through an External
Audio System (page 226)
Using a mixer for live
performance (page 226)
DDK-7 Owner’s Manual
11
Page 12

1
Quick Introductory Guide
Do not use the instrument/
device or headphones for a
long period of time at a
high or uncomfortable
volume level, since this can
cause permanent hearing
loss.
Even when the power
switch is turned off,
electricity is still flowing to
the product at the minimum
level.
Speaker (Left)
OUTPUT R
L/L+R
PHONES
Speaker (Right)
Turn the power on.
3
Make sure the volume settings of the DDK-7 and external devices are turned
down to the minimum.
NOTE
when you connect an
external audio device to the
AUX OUT jacks, the output
level is fixed and cannot be
controlled.
Turn the power on by pressing the [POWER] switch on the DDK-7 front panel,
then turn the power on the amplifiers.
For turning the power on or off.
When powering down the setup, make sure to switch off the power of the
external device (or lower its volume) before switching off the DDK-7.
Set the MASTER VOLUME control.
4
The MASTER VOLUME control is an overall control that affects the volume of
the entire instrument.
Decreasing
the volume
Increasing
the volume
DDK-7 Owner’s Manual
12
Now that you've set up the DDK-7 properly, you're ready to begin playing it.
The Expression Pedal on the DDKU-P7 Pedal Unit can be used to control the
volume with your foot as you play.
Page 13

Using the LCD Display
2
1
This instrument features a special touch panel that allows you to change the parameters
by simply touching the ‘virtual’ buttons or sliders on the display. (Please note that two
or more parameters cannot be operated simultaneously.)
You can also use the Data Control dial to make fine changes to the parameter value
shown in the display.
Changing the Display Page
There are some oval-shaped numbered buttons at the top right of the display. Pressing
these buttons changes the “page” of the display. The selected page’s button turns
orange.
Page 1
Page 2
NOTE
When cleaning the display,
use a soft, dry cloth.
Do not use any sharp or
hard tools to operate the
touch panel. Doing so may
damage the display.
Quick Introductory Guide
Press this button to select Page 1
Press this button to select Page 2
DDK-7 Owner’s Manual
13
Page 14

1
Pressing Buttons on the Display
Quick Introductory Guide
There are three types of buttons: those that select a function, those that switch a
function on/off, and those that open a list or menu of parameters. To select the desired
function, simply press the button in the display directly.
For switching on/off or opening a parameter list, see the instructions below.
To switch the function on or off:
Off, or mute (button is grayed out) On
You can independently mute each Voice section in the Voice Display, each
accompaniment part in Rhythm Menu display, and each Element in the Voice Edit
display.
To open the parameter list:
When you press the button, a parameter list will appear in which you can select the
desired parameter.
DDK-7 Owner’s Manual
14
Page 15
Adjusting Parameter Values by Using the Display
Sliders
You can adjust some parameters such as Volume, Reverb, Pan and so on, by using the
‘virtual’ sliders in the display. There are two ways to move the slider in the display:
touching it directly, and using the Data Control dial. We suggest that you touch the
display slider when making coarse adjustments and use the Data Control dial for fine
adjustment.
Touching the display slider directly:
Press a point in the slider to which you want to adjust the parameter value. The slider
will move to the point you pressed. Also, by sliding your finger up or down while
holding down the display slider, you can change the parameter value.
or
1
Quick Introductory Guide
Slider will move to the point you touch
Slider will follow your finger
Using the Data Control dial:
Touch on/above the slider in the display to enable the parameter and set a rough value,
then turn the Data Control dial.
Touch here to enable the parameter
DATA CONTROL
Blue mark
To control Pan, you can move the horizontal slider in the same way as vertical sliders.
DATA CONTROL
DDK-7 Owner’s Manual
15
Page 16
1
Quick Introductory Guide
LCD Display Settings
3
Here you can change the display settings: displayed language (English or Japanese),
touch panel sound, and display brightness.
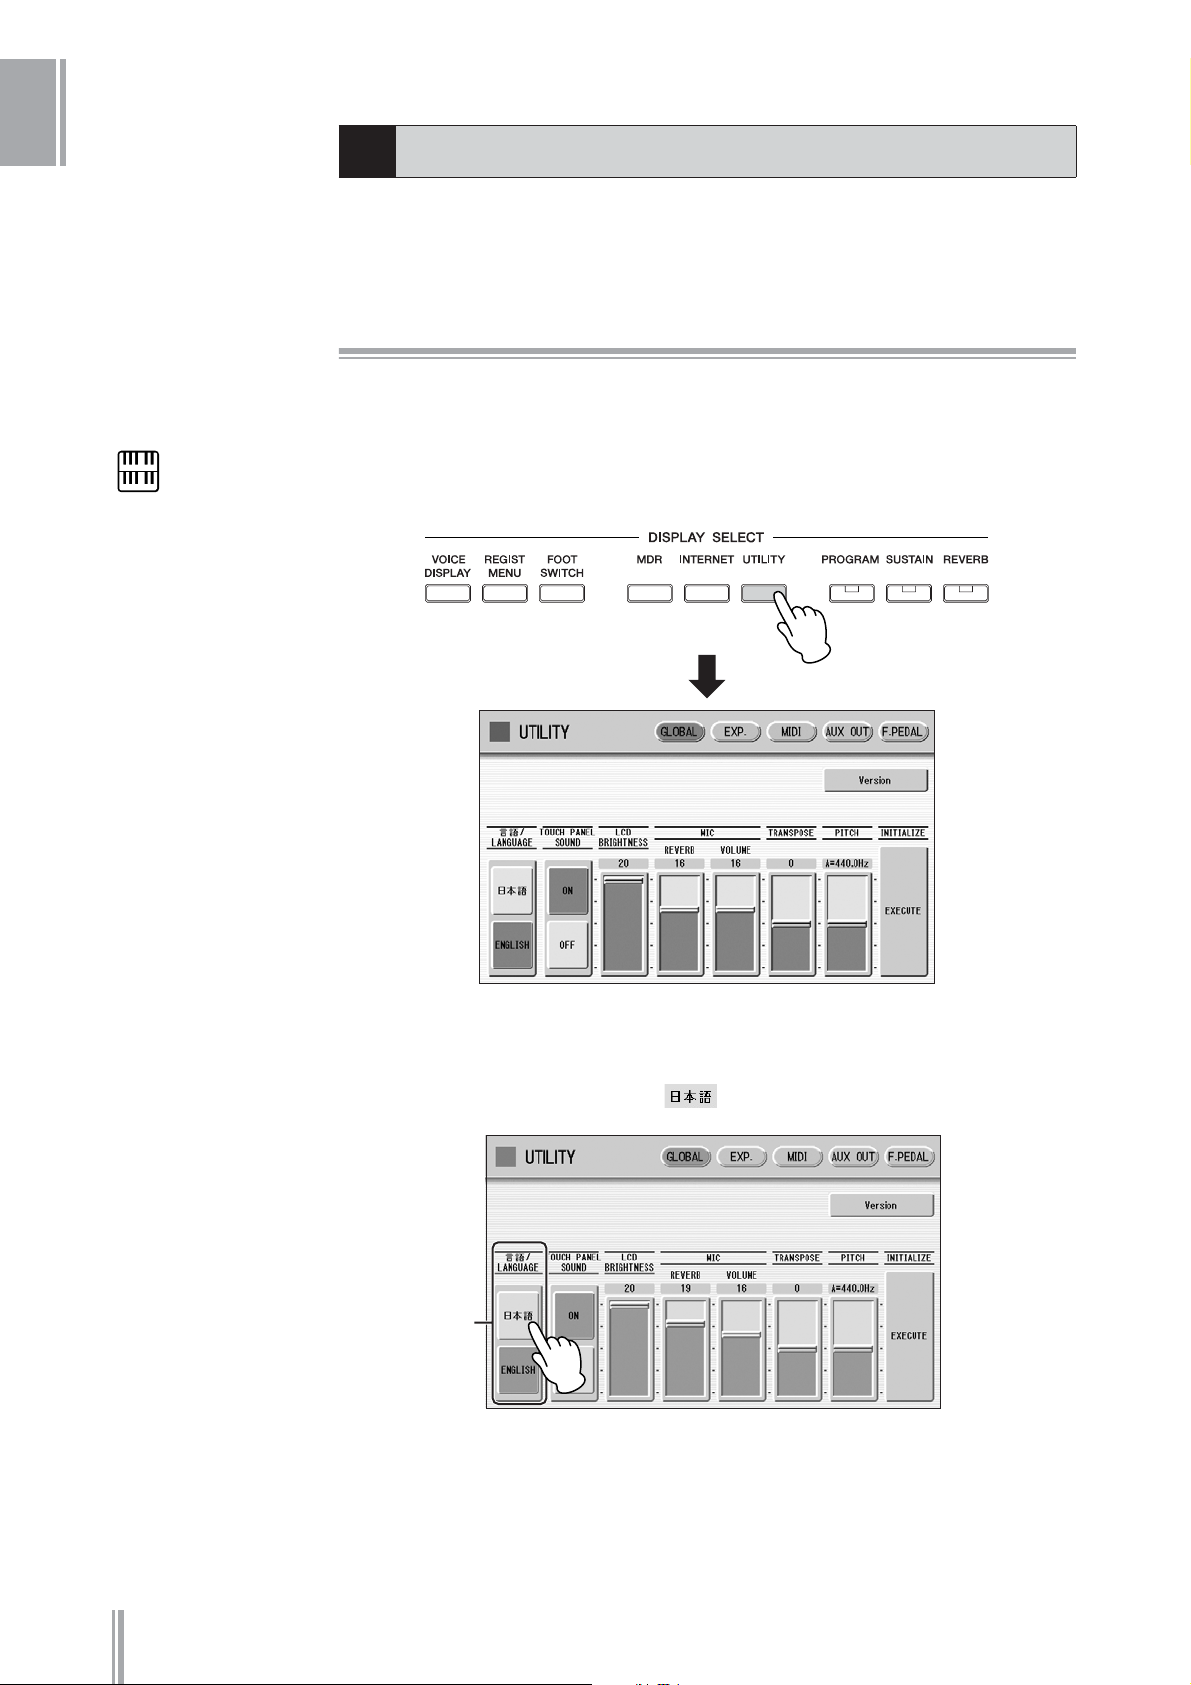
Selecting the Display Language
The LCD display can be shown in two languages, English and Japanese. The default
setting is English.
NOTE
The settings in the Utility
Display are automatically
saved when another display
is called up.
Press the [UTILITY] button to call up the GLOBAL Page of the
1
Utility Display.
DDK-7 Owner’s Manual
16
Press the desired button, (Japanese) or [English].
2
LANGUAGE
Page 17

Muting the Touch Panel Sound
The DDK-7 is set by default with the touch panel sound turned on, giving you audio
feedback when you press a button or control. If you want to mute the touch panel
sound, follow the procedure below.
Press [UTILITY] button to call up GLOBAL Page of the Utility
1
Display.
Press the [OFF] button of the TOUCH PANEL SOUND to mute the
2
sound.
TOUCH PANEL SOUND
1
Quick Introductory Guide
To turn the sound on again, select [ON] in Step #2.
Adjusting the Display Brightness
You can adjust the display brightness to a comfortable, easy-to-read level.
Press the [UTILITY] button to call up the GLOBAL Page of the
1
Utility Display.
Move the LCD BRIGHTNESS slider by touching it directly or
2
using the Data Control dial.
Higher settings make the display brighter and lower settings make it darker.
DATA CONTROL
LCD BRIGHTNESS
DDK-7 Owner’s Manual
17
Page 18

1
Quick Introductory Guide
Voice Display
4
You can visually confirm the currently assigned Voices to each keyboard, currently
selected rhythm, Registration Shift, and so on, in the Voice Display.
How to call up the Voice Display:
The Voice Display always appears when the DDK-7 is turned on. To call up the Voice
Display from any other display, press the [VOICE DISPLAY] button.
The Voice Display consists of three different pages that can be switched by pressing the
[1], [2] or [3] button at the top right of the display.
Voice Display [Page 1]
Switching the Display Pages
1
3
2
564
DDK-7 Owner’s Manual
18
Page 19

1 Voice Sections
Shows the Voices currently assigned to each Voice section. You can also mute specific
Voice section by pressing its button (the button is grayed-out).
Reference Page
Selecting a Voice (page 26)
1
2 RHYTHM
Shows the currently selected rhythm.
3 A.B.C. MODE
Shows the mode of the Auto Bass Chord.
4 TEMPO
Shows the current rhythm tempo.
5 BAR/BEAT
Shows the bar/beat when the rhythm is playing.
6 REGISTRATION
Shows the current position of the Registration Shift.
Voice Display [Page 2]
Reference Page
Selecting a rhythm (page 60)
Quick Introductory Guide
Reference Page
Auto Bass Chord (page 71)
Reference Page
Adjusting the tempo
(page 66)
Reference Page
Registration Shift (page 94)
You can confirm the parameter values (for example, Reverb, Volume, Pan) for each
Registration Memory simultaneously. Moreover, you can unify a specific parameter
used in various Registration Memories at one time. See page 99 for the details.
Voice Display [Page 3]
Determines the Melody On Chord modes. See page 73 for details.
DDK-7 Owner’s Manual
19
Page 20

1
Quick Introductory Guide
Registration Menu
5
NOTE
Additional basic
Registrations are preset on
the Registration Memory
locations from 1 to 16. See
page 89 for details.
A “Registration” consists of panel settings including the selected Upper Keyboard
Voices, Lower Keyboard Voices, Pedal Voices, rhythm and so on. The Registration
Menu button includes 288 Registrations, specially suited for playing in a different
music style.
Selecting Registrations
Press the [REGIST MENU] button to call up the Registration
1
Menu display.
Select the desired registration category with the category
2
buttons in the display.
Each button has different Registrations for different music genres. For example,
if you want to play Jazz, press the [JAZZ & LATIN] button. For details on the
Registration Menu, see page 22.
1 23
456
Live Performance
1
Basic
2
Pops & Rock
3
Dance & Ballad
4
Jazz & Latin
5
Symphony & World
6
DDK-7 Owner’s Manual
20
Page 21

Select the desired Registration by pressing the appropriate
3
button on the display.
One display page contains 12 Registration buttons. Pressing the numbered
buttons in the display changes the display pages, letting you select up to 48
Registrations from one Registration category button.
Change the display pages here.
1
Quick Introductory Guide
The color of the selected Registration name changes to orange, indicating that it
has been selected, and the Auto Bass Chord mode is shown at the bottom of the
display.
Play your favorite song with the selected Registration.
4
Reference Page
Auto Bass Chord (page 71)
DDK-7 Owner’s Manual
21
Page 22

1
Registration Menu List
Quick Introductory Guide
Page
1
2
3
4
LIVE PERFORMANCE
Bell Pop Piano Simple 8 Beat 1 Dynamic 8 Beat Organ Ballad Blow On Sax Fanfare
AOR Piano Simple 8 Beat 2 NY Ballad Dramatic Ballad Sax Ensemble String Orchestra
Ballad Stack Light Step British Pop Love Ballad Moonlight Romantic Violin
Rockin’on Piano Sunny Pop 8 Beat Modern Smooth Lead Big Band Baroque
Ballad Piano Kids March 1 Rock Band Pop Ballad Clarinet Swing Flute&Harp
LA Fusion Kids March 2 Detroit Pop Guitar Ballad Jazz Combo Serenade
70’s Pops Kids March 3 Techno Pop Acoustic Ballad Medium Jazz Fast March
Pop E.Piano Synth. Rock Sheriff Reggae Healing Guitar Organ Session Wild West
Prism E.Piano Symphonic March 1 Rock&Roll Chillout Guitar Combo Vienna Waltz
Kool E.Piano Symphonic March 2 Power Rock Sweetheart 1 Tender Ballad Polka
Spacey E.Piano Bluegrass 60’s Guitar Rock Sweetheart 2 Jazz Waltz Chanson Club
Smooth E.Piano Sea Carnival Unplugged Slow & Easy Five-Four Theatre Organ
60’s Soul Basic Waltz Motor City Euro Trance Big Band Samba Flamenco
Classic Jazz Org Brass Ensemble Lovely Shuffle 6/8 Trance Mambo Brass Pop Flamenco
Organ Band Pure Waltz Gospel Shuffle Cool Hip Hop Mambo Tenor Mexican Dance
Bump Organ Rococo Ensemble Joyful Gospel Latin House Montuno Mariachi
Kool Dist. Organ Pop Cha Cha Frankly Soul Dance Beat Bossa Nova Celtic Dance
Rock Dist. Organ Comical Rumba Soul Euro Dance Pop Pop Bossa Folk Step
Organ Funk Comical Samba Gospel UK Pop Sweet Rumba Italiano
Progressive Rock Toy Orchestra 6/8 Soul Jive Beguine Musette
Lounge Organ Charleston Hit Pop Disco Queen Cha Cha Cha Country
60’s Cheap Organ Winter Swing New Country Disco Soul Mellow Groove Hawaiian
Sunset Reggae Snow Waltz 1 Eternal Pop Pop Disco Modern R&B Chinese Nocturne
Hard Rock Organ Snow Waltz 2 Ground Beat Hot Disco Dixieland Jazz Japanese Sound
70’s Crossover Alpine Polka *A Bounce Pop *A Ibiza *A Jungle Drum *A Orchestra March*A
East Coast Brass Alpine Polka *B Bounce Pop *B Ibiza *B Jungle Drum *B Orchestra March*B
Fat Analog Synth Alpine Polka *C Bounce Pop *C Ibiza *C Jungle Drum *C Orchestra March*C
Club Jazz Alpine Polka *D Bounce Pop *D Ibiza *D Jungle Drum *D Orchestra March*D
Distor. Guitar Dream Ballad *A Blues Jam *A Power House *A Jazz Club *A Pasodoble *A
Tricky Guitar Dream Ballad *B Blues Jam *B Power House *B Jazz Club *B Pasodoble *B
Wow Guitar Dream Ballad *C Blues Jam *C Power House *C Jazz Club *C Pasodoble *C
Flange Clavi. Dream Ballad *D Blues Jam *D Power House *D Jazz Club *D Pasodoble *D
Pop Fusion Lead Pops Orchestra*A Evergreen Waltz*A Dance Latino *A Afro Session *A Tango *A
AOR Lead Pops Orchestra*B Evergreen Waltz*B Dance Latino *B Afro Session *B Tango *B
Sweet Fusion Pops Orchestra*C Evergreen Waltz*C Dance Latino *C Afro Session *C Tango *C
Retro Pop Pops Orchestra*D Evergreen Waltz*D Dance Latino *D Afro Session *D Tango *D
Sweep Pad Kids On Stage *A 16 Beat Pop *A Twilight Disco*A ChaCha Grandee*A Show Time *A
Pop Ballad Kids On Stage *B 16 Beat Pop *B Twilight Disco*B ChaCha Grandee*B Show Time *B
Fat Pad Kids On Stage *C 16 Beat Pop *C Twilight Disco*C ChaCha Grandee*C Show Time *C
Deep Pad Kids On Stage *D 16 Beat Pop *D Twilight Disco*D ChaCha Grandee*D Show Time *D
Oriental Pad Galaxy March *A Top Gear Rock *A Love Song *A 3/4 Fast Jazz *A Majestic Sound*A
Spacious Piano Galaxy March *B Top Gear Rock *B Love Song *B 3/4 Fast Jazz *B Majestic Sound*B
70’s Flute Pad Galaxy March *C Top Gear Rock *C Love Song *C 3/4 Fast Jazz *C Majestic Sound*C
Screen Ballad Galaxy March *D Top Gear Rock *D Love Song *D 3/4 Fast Jazz *D Majestic Sound*D
Brass Pad SE *A Southern Pop *A Movie Ballad *A Twilight Sax *A Orchestra Swing*A
Pop Rock Brass SE *B Southern Pop *B Movie Ballad *B Twilight Sax *B Orchestra Swing*B
Dance Brass SE *C Southern Pop *C Movie Ballad *C Twilight Sax *C Orchestra Swing*C
World Strings SE *D Southern Pop *D Movie Ballad *D Twilight Sax *D Orchestra Swing*D
BASIC POPS & ROCK DANCE & BALLAD JAZZ & LATIN
SYMPHONY & WORLD
DDK-7 Owner’s Manual
22
Page 23

Confirming the Version of Your DDK-7
6
You can confirm the version of your DDK-7 by the following procedure.
Press the [UTILITY] button to call up the GLOBAL Page of the
1
Utility Display.
Press the [Version] button in the display.
2
The Version dialog appears in the display. Pressing [OK] closes the dialog.
Factory Set (Initializing the DDK-7)
7
1
Quick Introductory Guide
All current settings including Registration Memory, User Voices, User Rhythms, and
LCD Display settings can be deleted at once by the following procedure. Be careful
when executing Factory Set, since it erases all your existing data. Always save your
important data to external media, such as USB flash memory.
Factory Set does not reset the Internet Direct Connection settings. If you want to reset
the Internet Direct Connection settings, see page 221.
Turn off the power.
1
While holding down the ENDING [1] button, turn the power back
2
on.
Reference Page
Saving Registrations
(page 116)
Reference Page
Initializing Internet Settings
(page 221)
Release the ENDING [1] button after Voice Display appears.
3
If you don’t want to reset the LCD Display settings, you can initialize only Registration
settings. See page 93 for more information.
Reference Page
Initializing Registration
Memory (page 93)
DDK-7 Owner’s Manual
23
Page 24

2
Voices
2
Voices
The DDK-7 features hundreds of high quality Voices. Any of these Voices can be used on the
Upper Keyboard and Lower Keyboard. If you connect the Pedal Unit to the DDK-7, you can
use any of these voices also on the Pedalboard. Up to four Voice sections are available on
the Upper Keyboard for playing together in a layer, while the Lower Keyboard and
Pedalboard each have two Voice sections.
Voices for the Upper Keyboard
Voices for Pedalboard
Voices for
the Lower Keyboard
Contents
1Voices for each keyboard . . . . . . . . . . . . . . . . . . .24
2 Selecting Voices with the Voice buttons . . . . . . .26
• Selecting a Voice . . . . . . . . . . . . . . . . . . . . . . . . .26
• Changing the Voice volume . . . . . . . . . . . . . . . . .27
Voices for each keyboard
1
A total of 415 voices can be selected on the display which you can call up by pressing
the Voice section buttons on the front panel.
Voices for the Upper Keyboard
Up to four different Voice sections are available on the Upper Keyboard for playing
together: Upper Keyboard Voice 1, Upper Keyboard Voice 2, Lead Voice 1, and Lead
Voice 2. Voices for each section can be selected from the panel.
3Voice List . . . . . . . . . . . . . . . . . . . . . . . . . . . . . . . . 32
Upper Keyboard Voice 1
Upper Keyboard Voice 2
Lead Voice 1
Lead Voice 2
DDK-7 Owner’s Manual
24
Page 25

Lead Voice 1 and 2 sound only the highest note (or last note played) if two or more
keys are played together. This makes the Lead Voices ideal for “lead” or solo
instruments such as Trumpet and Saxophone.
Voices for the Lower Keyboard
2
Up to two different Voice sections are available on the Lower Keyboard for playing
together: Lower Keyboard Voice 1 and Lower Keyboard Voice 2. Voices for each section
can be selected from the panel.
Lower Keyboard Voice 1
Lower Keyboard Voice 2
Voices for Pedalboard
Up to two different Voice sections are available on the Pedalboard for playing together:
Pedal Voice 1 and Pedal Voice 2. Voices for each section can be selected from the panel.
Pedal Voices 1 and 2 sound only the highest note if two or more pedals are played, by
default.
Voices
Reference Page
POLY (page 42)
Pedal Voice 1
Pedal Voice 2
DDK-7 Owner’s Manual
25
Page 26

2
Voices
Selecting Voices with the Voice buttons
2
Since selection of Voices follows the same procedure throughout all Voice sections,
instructions for only the Upper Keyboard Voice 1 (UPPER 1) are given here.
Selecting a Voice
Press the [UPPER 1] button.
1
Reference Page
Voice Edit (page 137)
The voice menu of the currently selected category is shown in the display.
Voice menu
Select the desired instrument category with the category
2
buttons in the display.
You can also choose the “User” category to select a User voice you have created.
DDK-7 Owner’s Manual
26
Page 27

For example, to call up Piano 1, select the Piano category.
The name of the selected category (Piano) is displayed on the upper left. The
Voice name shown under the category name is that of the currently assigned
Voice and is irrelevant to the Voice menu below.
2
Voices
Select the desired Voice name (Piano 1, for example) from the
3
Voice menu.
The Voice menu contains many Piano Voices, more than can fit on one display
page. To change the display pages, press the appropriate number buttons in the
display.
The color of the selected Voice name changes to orange, indicating that it has
been selected.
Reference Page
Voice List (page 32)
Changing the Voice volume
There are two ways to set the Voice volume: using the VOLUME buttons on the panel
and using the volume slider in the display. The VOLUME buttons let you make coarse
adjustments to the volume while the slider gives you fine control.
DDK-7 Owner’s Manual
27
Page 28

2
Voices
Using the VOLUME buttons on the panel (coarse)
Press one of the VOLUME buttons of each Voice section on the panel to set the desired
level for each Voice.
The buttons have seven volume settings, from a minimum of 0, or no sound, to a
maximum of full volume.
Using VOLUME slider in the display (fine)
NOTE
Depending on the volume
value (set by the slider), two
adjacent VOLUME lamps
may be lit at the same time,
indicating an intermediate
position.
Pressing the same Voice button on the panel again (or pressing the Voice name of the
selected Voice in the display) calls up the Voice Condition Display.
DATA CONTROL
Volume slider
To set the volume, touch the VOLUME slider in the display or use the Data Control
Dial. The control range is from 0 (no sound) to 24 (full volume).
DDK-7 Owner’s Manual
28
Page 29

Pressing a Voice button once calls up the Voice Menu display. Pressing it a second
time calls up the Voice Condition display. Successive presses alternate between the
two displays.
When the Voice Condition display is shown, pressing [VOICE MENU] button on
the display also calls up the Voice Menu.
From the Voice Condition display, you can control Voice-related parameters such as
Pan, Effect, Volume, and so on. For more information on the Voice Condition
display, see page 41.
About the To Lower function
Voices selected for the Lead Voice 1, Pedal Voice 1, and Pedal Voice 2 sections can
also be played on the Lower Keyboard when the [TO LOWER] button in each
section is on. When [TO LOWER] is on, the Lead Voice and Pedal Voice cannot be
played on the Upper Keyboard and Pedalboard, respectively.
The To Lower function is not available in the Lead Voice 2 section.
2
Voices
CAUTION
Turning the DDK-7 off
erases all panel settings
you have made.
If you wish to keep the
panel settings you have
made, save them to a USB
flash memory or other
external media before
turning the DDK-7 off
(page 92).
DDK-7 Owner’s Manual
29
Page 30

2
Voices
Reference Page
Foot Pedal (page 196)
About the Solo function
The Lead Voice 2 section features an exclusive Solo function. Solo lets you
instantly switch to a solo Lead Voice in the middle of your performance, muting
all other Upper Keyboard Voices. If you connect an optional Foot Pedal to the
DDK-7, you can control the solo function without taking your hands from the
keyboards.
Select the Voice that you wish to play solo in the Lead Voice
1
2 section.
In this condition, all the Voices for Upper Keyboard (Upper Keyboard
Voice 1 and 2, and Lead Voice 1 and 2) can be played.
Press the [SOLO] button in the Lead Voice 2 section.
2
This sets Solo to standby status.
Press the [UTILITY] button to call up the Utility Display.
3
DDK-7 Owner’s Manual
30
Press the [F. PEDAL] button at the top right of the display to call up the
FOOT PEDAL Page.
Page 31

Press the [SOLO] button in the display.
4
Select the [SOLO] button in the left side of the display if you are using the
(1 VOLUME) of the FOOT PEDAL jacks, or select in the right side if you
are using (2 SUSTAIN).
The Solo function is assigned to the Foot Pedal, and the polarity is
selected automatically.
In this condition (Solo on), all Voices set to the Upper Keyboard except
for Lead Voice 2 are playable on the Upper Keyboard.
To temporarily turn Solo on as you play, press the Foot
5
Pedal and hold down.
In this condition, only the Lead Voice 2 is playable on the Upper Keyboard.
(All other voices are muted.) Each time you press the Foot Pedal (Solo on)
you can play only Lead Voice 2, and each time you release it (Solo off) you
can play all Voices except Lead Voice 2 on the Upper Keyboard.
2
Voices
Notes on using Solo
•Some Registration Menu settings reverse the polarity of the Foot Pedal for the
Solo function. In this condition, the situation described above is reversed. In
other words, each time you press the Foot Pedal you can play all Voices except
Lead Voice 2, and each time you release it you can play only Lead Voice 2 on the
Upper Keyboard. To return the polarity to its original setting, press the [-]
button in the display.
•Pressing the Foot Pedal while holding down a key will not turn Solo on for
that key. Solo will active when the next key is played after pressing the Foot
Pedal.
• Lead Voices 1 and 2 sound only the highest note if two or more keys are
played. However, in the Solo mode, Lead Voice 2 sounds for the last key
played.
DDK-7 Owner’s Manual
31
Page 32

2
Voices
Voice List
3
This list shows all available Voices on the DDK-7. Numbers written at the left side of each column in this list
indicate the numbered buttons displayed in the Voice Menu.
Category/
Voice Name
STRINGS/VIOLIN
1 Strings 1 8’ THRU THRU
Strings 2 8’ THRU THRU
Strings 3 8’ AMBIENCE THRU
Strings 4 8’ THRU THRU
Strings 5 8’ THRU THRU
Strings 6 8’ THRU THRU
Strings 7 8’ DELAY LR THRU
Strings 8 8’ THRU THRU
Strings 9 8’ HM ENHANCER THRU
Chamber Strs 1 8’ AMBIENCE THRU
Chamber Strs 2 8’ THRU THRU
Chamber Strs 3 8’ THRU THRU
Chamber Strs 4 8’ HM ENHANCER THRU
2 Pizzicato Strs 1 8’ THRU ROOM S
Pizzicato Strs 2 8’ AMBIENCE ROOM S
Pizzicato Strs 3 8’ AMBIENCE ROOM S
Pizzicato Strs 4 8’ BASEMENT ROOM S
Tremolo Strings 8’ AMBIENCE THRU
3 Strings1&7 8’ THRU THRU
Strings2&Viola 8’ THRU THRU
Strings3&4 8’ AMBIENCE THRU
Strings7&Violin5 8’ THRU THRU
Violin5&Cello 8’ HM ENHANCER THRU
Octave Strings 1 8’ THRU THRU
Octave Strings 2 8’ THRU THRU
4Violin 1 8’ THRU THRU
Violin 2 8’ AMBIENCE THRU
Violin 3 8’ THRU THRU
Violin 4 8’ THRU THRU
Violin 5 8’ AMBIENCE THRU
Violin 6 8’ AMBIENCE THRU
Viola 8’ AMBIENCE THRU
Cello 1 8’ RESONATOR THRU
Cello 2 8’ THRU THRU
Pizzicato Violin 8’ AMBIENCE ROOM S
CONTRABASS
1 Contrabass 1 8’ THRU THRU
Contrabass 2 8’ THRU THRU
Contrabass 3 16’/8’ THRU THRU
Contrabass 4 8’ THRU THRU
Contrabass 5 8’ AMBIENCE THRU
Acoustic Bass 1 8’ AMBIENCE THRU
Acoustic Bass 2 8’ HM ENHANCER THRU
Pizzicato Bass 1 8’ THRU THRU
Pizzicato Bass 2 8’ THRU THRU
Preset
Feet
Preset
Effect 1
Preset
Effect 2
Category/
Voice Name
BRASS/TRUMPET
1 Brass Section 1 8’ THRU THRU
Brass Section 2 8’ THRU THRU
Brass Section 3 8’ THRU THRU
Brass Section 4 8’ HM ENHANCER THRU
Brass Section 5 8’ HM ENHANCER THRU
Brass Section 6 8’ THRU THRU
Trombone Sec 1 16’/8’ HM ENHANCER THRU
Trombone Sec 2 16’/8’ THRU THRU
Trombone Sec 3 16’/8’ THRU THRU
Trombone Sec 4 16’/8’ AMBIENCE THRU
Trombone Sec 5 16’/8’ THRU HALL 1
2 Brass1&Trp6 8’ THRU THRU
Brass2&Trp6 8’ ST 2BAND EQ THRU
Horn 1&4 8’ ST 2BAND EQ HALL 1
Octave Brass 1 8’ AMBIENCE THRU
Octave Brass 2 8’ DELAY LR THRU
Octave Brass 3 8’ THRU THRU
Octave Brass 4 8’ THRU THRU
Octave Brass 5 8’ THRU THRU
Octave Brass 6 8’ THRU THRU
Octave Brass 7 8’ ECHO THRU
3Trumpet 1 8’ THRU THRU
Trumpet 2 8’ THRU THRU
Trumpet 3 8’ THRU THRU
Trumpet 4 8’ THRU THRU
Trumpet 5 8’ HM ENHANCER THRU
Trumpet 6 8’ THRU THRU
Trumpet 7 8’ AMBIENCE THRU
Muted Trumpet 1 8’ THRU THRU
Muted Trumpet 2 8’ THRU THRU
Muted Trumpet 3 8’ PHASER 1 THRU
Flugel Horn 1 8’ THRU THRU
Flugel Horn 2 8’ THRU THRU
4Trombone 1 16’/8’ ST 2BAND EQ THRU
Trombone 2 16’/8’ THRU THRU
Trombone 3 16’/8’ THRU THRU
Trombone 4 16’/8’ THRU THRU
Muted Trombone 1 16’/8’ THRU THRU
Muted Trombone 2 16’/8’ ST 3BAND EQ PHASER 1
Preset
Feet
Preset
Effect 1
Preset
Effect 2
DDK-7 Owner’s Manual
32
Page 33

Category/
Voice Name
5 Horn 1 8’ THRU THRU
Horn 2 8’ THRU THRU
Horn 3 8’ THRU THRU
Horn 4 8’ THRU THRU
Horn 5 8’ THRU THRU
Horn 6 8’ THRU THRU
Muted Horn 8’ THRU THRU
6Tuba 1 16’ ST 2BAND EQ THRU
Tuba 2 16’/8’ THRU THRU
Euphonium 16’/8’ THRU THRU
Brass Bass 1 16’ THRU THRU
Brass Bass 2 8’ THRU THRU
Brass Bass 3 8’ THRU THRU
WOODWIND/FLUTE
1 Flute 1 8’ THRU THRU
Flute 2 8’ THRU THRU
Flute 3 8’ THRU THRU
Flute 4 8’ THRU THRU
Piccolo 4’ THRU THRU
Recorder 1 4’ THRU THRU
Recorder 2 4’ THRU THRU
Ocarina 4’ THRU THRU
Whistle 4’ ST 2BAND EQ AMBIENCE
2 Clarinet 1 8’ THRU THRU
Clarinet 2 8’ THRU THRU
Clarinet 3 8’ THRU THRU
Clarinet 4 8’ THRU THRU
Bass Clarinet 16’/8’ THRU THRU
3 Oboe 1 8’ THRU THRU
Oboe 2 8’ THRU THRU
Oboe 3 8’ THRU THRU
Oboe 4 8’ THRU THRU
Oboe 5 8’ HM ENHANCER THRU
English Horn 1 8’ THRU THRU
English Horn 2 8’ THRU THRU
Bassoon 1 16’/8’ THRU THRU
Bassoon 2 16’/8’ THRU THRU
Bassoon 3 16’/8’ THRU THRU
4 Alto Sax 1 16’/8’ HM ENHANCER THRU
Alto Sax 2 16’/8’ THRU THRU
Tenor Sax 1 16’/8’ THRU THRU
Tenor Sax 2 16’/8’ THRU THRU
Tenor Sax 3 16’/8’ THRU THRU
Soprano Sax 1 8’ THRU THRU
Soprano Sax 2 8’ THRU THRU
Baritone Sax 16’/8’ THRU THRU
Preset
Feet
Preset
Effect 1
Preset
Effect 2
Category/
Voice Name
5 Sax Ens 1 16’/8’ THRU THRU
Sax Ens 2 16’/8’ THRU THRU
Sax Ens 3 16’/8’ THRU THRU
Woodwind Ens 1 8’ THRU THRU
Woodwind Ens 2 8’ THRU THRU
Woodwind Ens 3 8’ THRU THRU
Woodwind Ens 4 8’ THRU THRU
TUTTI
1 Strings&Winds 8’ THRU THRU
Strings&Brass 1 8’ THRU THRU
Strings&Brass 2 8’ XG HM ENHNCE THRU
Strings&Horn 8’ THRU THRU
Brass&Sax 1 8’ THRU THRU
Brass&Sax 2 8’ THRU THRU
Brass&Sax 3 8’ THRU THRU
Brass&Winds 8’ THRU THRU
2Orchestra Hit 8’ THRU THRU
CHOIR
1 Choir 1 8’ THRU THRU
Choir 2 8’ THRU THRU
Choir 3 8’ THRU THRU
Choir 4 8’ THRU THRU
Choir 5 8’ THRU THRU
Choir 6 8’ THRU THRU
Choir 7 8’ THRU THRU
Choir 8 8’ THRU THRU
Choir 9 8’ THRU THRU
2Vocal 8’ XG HM ENHNCE THRU
PA D
1 Smooth Pad 1 8’ THRU THRU
Smooth Pad 2 4’ THRU THRU
Smooth Pad 3 8’ THRU THRU
Smooth Pad 4 8’ DELAY LR THRU
Smooth Pad 5 8’ DELAY LR THRU
Smooth Pad 6 8’ THRU THRU
Smooth Pad 7 4’ XG CHORUS 1 CROSS DELAY
Smooth Pad 8 8’ XG CHORUS 1 XG HM ENHNCE
2 Resonance Pad 1 8’ ENS DETUNE TEMPO CROSS
Resonance Pad 2 8’ XG FLANGER 3 CROSS DELAY
Resonance Pad 3 8’ ENS DETUNE CROSS DELAY
Resonance Pad 4 4’ CELESTE 2 DELAY LR
Resonance Pad 5 8’ SYMPHONIC DELAY LR
Resonance Pad 6 8’ XG PCH CHG 1 CROSS DELAY
Resonance Pad 7 8’ DELAY LR PHASER 1
Resonance Pad 8 8’ DELAY LR TEMPO CROSS
Resonance Pad 9 8’ V_FLANGER ECHO
Resonance Pad 10 8’ DELAY LR XG CHORUS 1
Resonance Pad 11 8’ COMPRESSOR DELAY LR
Preset
Feet
Preset
Effect 1
Preset
Effect 2
2
Voices
DDK-7 Owner’s Manual
33
Page 34

2
Voices
Category/
Voice Name
3 Bell Pad 1 8’ CELESTE 1 DELAY LR
Bell Pad 2 8’ XG CHORUS 3 CROSS DELAY
Bell Pad 3 8’ XG CHORUS 3 DELAY LR
Bell Pad 4 8’ XG CHORUS 4 DELAY LR
Bell Pad 5 8’ CHORUS 1 XG DLY LCR
Bell Pad 6 8’ XG CHORUS 2 DELAY LR
Bell Pad 7 8’ XG CHORUS 2 DELAY LR
Bell Pad 8 8’ XG AT PAN 1 DELAY LR
Bell Pad 9 4’ XG 3BAND EQ DELAY LR
4 Space Pad 1 8’ ENS DETUNE DELAY LR
Space Pad 2 8’ XG FLANGER 1 DELAY LR
Space Pad 3 8’ DELAY LR XG FLANGER 1
Space Pad 4 16’ PITCH CHANGE DELAY LR
Space Pad 5 8’ XG CHORUS 1 DELAY LR
Space Pad 6 8’ V_FLANGER TALKING MOD
5 Noisy Pad 1 8’ ENS DETUNE DELAY LR
Noisy Pad 2 8’ ENS DETUNE TALKING MOD
Noisy Pad 3 8’ XG FLANGER 2 DELAY LR
Noisy Pad 4 8’ ECHO XG FLANGER 2
Noisy Pad 5 8’ EQ DISCO CANYON
SYNTH
1 Synth Lead 1 8’ CELESTE 1 TEMPO DELAY
Synth Lead 2 8’ ODRV+DELAY PHASER 1
Synth Lead 3 8’ ER 1 DELAY LR
Synth Lead 4 8’ XG CHORUS 4 THRU
Synth Lead 5 8’ XG CHORUS 3 TEMPO CROSS
Synth Lead 6 8’ XG CHORUS 4 XG DLY LCR
Synth Lead 7 8’ GM CHORUS 3 DELAY LR
Synth Lead 8 8’ V_DIST SOFT DELAY LR
2 Pop Lead 1 8’ ST 2BAND EQ TEMPO DELAY
Pop Lead 2 8’ XG HM ENHNCE TEMPO CROSS
Pop Lead 3 8’ CMP+OD+TDLY ENS DETUNE
Pop Lead 4 8’ PITCH CHANGE TEMPO DELAY
Pop Lead 5 8’ DELAY LR THRU
Pop Lead 6 8’ XG HM ENHNCE ECHO
Pop Lead 7 16’/8’ DELAY LCR THRU
3 Synth Cla 1 8’ ST 2BAND EQ TEMPO DELAY
Synth Cla 2 8’ ENS DETUNE DELAY LR
Synth Cla 3 8’ XG 3BAND EQ DELAY LR
Synth Cla 4 8’ DELAY LR ENS DETUNE
Synth Cla 5 8’ ENS DETUNE XG DLY LCR
Synth Cla 6 8’ XG FLANGER 3 DELAY LR
Synth Sax 8’ ST 2BAND EQ DELAY LR
Synth Trumpet 8’ ST 2BAND EQ DELAY LR
Synth Violin 8’ ST 2BAND EQ DELAY LCR
Preset
Feet
Preset
Effect 1
Preset
Effect 2
Category/
Voice Name
4 Synth Brass 1 8’ PITCH CHANGE THRU
Synth Brass 2 8’ THRU THRU
Synth Brass 3 8’ THRU THRU
Synth Brass 4 8’ ST 3BAND EQ THRU
Synth Brass 5 8’ XG 3BAND EQ THRU
Synth Brass 6 8’ XG 3BAND EQ XG CHORUS 4
Synth Brass 7 8’ COMPRESSOR THRU
Synth Brass 8 8’ ST 2BAND EQ DELAY LR
Synth Brass 9 8’ CROSS DELAY THRU
Synth Brass 10 8’ ENS DETUNE CROSS DELAY
Synth Brass 11 8’ REVERS GATE DELAY LR
Synth Brass 12 8’ ST 3BAND EQ TEMPO CROSS
Synth Brass 13 8’ ST 2BAND EQ ENS DETUNE
5 Synth Strs 1 8’ ST 2BAND EQ XG CHORUS 1
Synth Strs 2 8’ ST 3BAND EQ XG CHORUS 1
Synth Strs 3 8’ XG CHORUS 1 CROSS DELAY
Synth Strs 4 8’ XG 3BAND EQ XG CHORUS 1
Synth Strs 5 8’ XG CHORUS 1 CROSS DELAY
Synth Strs 6 8’ PHASER 1 ER 1
Synth Strs 7 8’ XG CHORUS 1 CROSS DELAY
6 Synth Bell 1 8’ XG CHORUS 1 TEMPO DELAY
Synth Bell 2 8’ XG PCH CHG 1 THRU
Synth Bell 3 8’ ST 3BAND EQ TEMPO DELAY
Synth Bell 4 8’ XG HM ENHNCE XG SYMPHONIC
Synth Bell 5 8’ CROSS DELAY TUNNEL
Synth Bell 6 8’ XG HM ENHNCE XG SYMPHONIC
Synth Bell 7 8’ CROSS DELAY TUNNEL
Synth Decay 1 8’ ST 2BAND EQ TEMPO CROSS
Synth Decay 2 8’ ST 2BAND EQ ENS DETUNE
Synth Decay 3 8’ AMBIENCE REVERS GATE
Synth Decay 4 8’ HM ENHANCER AMP SIM
ORGAN
1 Pipe Organ 1 8’ AMBIENCE THRU
Pipe Organ 2 8’ THRU THRU
Pipe Organ 3 8’ THRU THRU
Pipe Organ 4 8’ THRU THRU
Pipe Organ 5 8’ THRU THRU
Harmonica 1 8’ THRU THRU
Harmonica 2 8’ ST 3BAND EQ THRU
Harmonica 3 8’ DELAY LR THRU
Preset
Feet
Preset
Effect 1
Preset
Effect 2
DDK-7 Owner’s Manual
34
Page 35

Category/
Voice Name
2 Theatre Organ 1 8’ TREMOLO 2 HM ENHANCER
Theatre Organ 2 8’ HM ENHANCER THRU
Theatre Organ 3 8’ GT TREMOLO 1 HM ENHANCER
Theatre Organ 4 8’ TREMOLO 2 HM ENHANCER
Theatre Organ 5 8’ TREMOLO 2 XG HM ENHNCE
Theatre Organ 6 8’ THRU THRU
Theatre Organ 7 8’ TREMOLO 2 THRU
Theatre Organ 8 8’ THRU XG HM ENHNCE
Accordion 1 8’ ST 3BAND EQ THRU
Accordion 2 8’ THRU THRU
Accordion 3 8’ THRU THRU
Accordion 4 8’ ST 3BAND EQ THRU
Bandoneon 8’ THRU THRU
Reed Organ 8’ THRU THRU
3 Jazz Organ 1 16’ 2WAY ROT SP THRU
Jazz Organ 2 16’ ROTARY SP 1 THRU
Jazz Organ 3 16’ TREMOLO 1 XG ROTARY SP
Jazz Organ 4 16’ TREMOLO 1 ROTARY SP 1
Jazz Organ 5 16’ ST 3BAND EQ BASEMENT
Jazz Organ 6 16’ ST 3BAND EQ XG ROTARY SP
Jazz Organ 7 16’ ST 2BAND EQ ROTARY SP 1
Jazz Organ 8 16’ ST 2BAND EQ XG ROTARY SP
Jazz Organ 9 16’ ST 3BAND EQ DUAL ROTSP 2
4 Pop Organ 1 8’ ST 2BAND EQ TREMOLO 1
Pop Organ 2 8’ ST 3BAND EQ DUAL ROTSP 1
Pop Organ 3 8’ XG 3BAND EQ DUAL ROTSP 1
Pop Organ 4 8’ ST 2BAND EQ DIST+2ROT SP
Pop Organ 5 8’ XG PCH CHG 1 DIST+2ROT SP
Rock Organ 1 8’ ST 2BAND EQ ODRV+ROT SP
Rock Organ 2 8’ V_DIST SOFT DUAL ROTSP 2
Rock Organ 3 8’ COMP+DIST ROTARY SP 1
5 Organ Bass 1 8’ THRU THRU
Organ Bass 2 16’ THRU THRU
Organ Bass 3 16’ THRU THRU
Organ Bass 4 16’ THRU THRU
PIANO
1 Piano 1 8’ THRU THRU
Piano 2 8’ XG HM ENHNCE THRU
Piano 3 8’ AMBIENCE THRU
Honkytonk Piano 8’ LO-FI ST 3BAND EQ
Harpsichord 1 8’ THRU THRU
Harpsichord 2 8’ THRU THRU
Clavichord 8’ AMBIENCE THRU
Preset
Feet
Preset
Effect 1
Preset
Effect 2
Category/
Voice Name
2 DX E.Piano 1 8’ CHORUS 2 THRU
DX E.Piano 2 8’ ENS DETUNE THRU
DX E.Piano 3 8’ ST 2BAND EQ CELESTE 4
DX E.Piano 4 8’ ST 2BAND EQ TEMPO CROSS
Stage E.Piano 1 8’ THRU THRU
Stage E.Piano 2 8’ ST 3BAND EQ CHORUS 1
Stage E.Piano 3 8’ ST 2BAND EQ EP AUTO PAN
Stage E.Piano 4 8’ ST 2BAND EQ PITCH CHANGE
Stage E.Piano 5 8’ XG TREMOLO XG CMP+DIST
Stage E.Piano 6 8’ ST 2BAND EQ EP PHASER 3
3 Stack E.Piano 1 8’ ST 2BAND EQ XG SYMPHONIC
Stack E.Piano 2 8’ HM ENHANCER ENS DETUNE
Clavi 1 16’ THRU THRU
Clavi 2 16’ ST 2BAND EQ TOUCH WAH 2
GUITAR
1 Nylon Guitar 1 16’/8’ THRU THRU
Nylon Guitar 2 16’/8’ ST 3BAND EQ THRU
Steel Guitar 1 16’/8’ ST 2BAND EQ HM ENHANCER
Steel Guitar 2 16’/8’ THRU THRU
12Str Guitar 16’/8’ ST 2BAND EQ XG HM ENHNCE
Jazz Guitar 1 16’/8’ THRU THRU
Jazz Guitar 2 16’/8’ THRU THRU
Harp 1 8’ THRU THRU
Harp 2 8’ THRU THRU
Harp 3 8’ ER 1 THRU
2 Elec Guitar 1 16’/8’ ST 2BAND EQ SYMPHONIC
Elec Guitar 2 16’/8’ ST 2BAND EQ V_DIST SOFT
Elec Guitar 3 16’/8’ ST 2BAND EQ ST OVERDRIVE
Elec Guitar 4 16’/8’ ODRV+T DLY THRU
Elec Guitar 5 16’/8’ ST 2BAND EQ V_DIST SOFT
Muted Guitar 16’/8’ ST 2BAND EQ TEMPO DELAY
Distortion Gtr 1 16’/8’ ST 2BAND EQ WAH+OD+T DLY
Distortion Gtr 2 16’/8’ ST 3BAND EQ V_DST H+TDLY
Distortion Gtr 3 16’/8’ ST 3BAND EQ DIST+T DLY
3 Banjo 8’ THRU THRU
Mandolin 8’ THRU THRU
Pedal Steel Gtr 8’ THRU THRU
PERCUSSION
1Vibraphone 1 8’ THRU THRU
Vibraphone 2 8’ HM ENHANCER AUTO PAN
Marimba 1 8’ THRU THRU
Marimba 2 8’ THRU THRU
Xylophone 4’ THRU THRU
Glockenspiel 1 4’ THRU THRU
Glockenspiel 2 4’ THRU THRU
Preset
Feet
Preset
Effect 1
Preset
Effect 2
2
Voices
DDK-7 Owner’s Manual
35
Page 36

2
Voices
Category/
Voice Name
2 Celesta 1 4’ HM ENHANCER THRU
Celesta 2 4’ HM ENHANCER THRU
Music Box 1 4’ THRU THRU
Music Box 2 4’ HM ENHANCER STAGE 2
Chime 1 4’ AMBIENCE THRU
Chime 2 8’ AMBIENCE HALL L
Chime 3 8’ ST 2BAND EQ PLATE 2
TIMPANI
1 Timpani 1 8’ ST 2BAND EQ ER 1
Timpani 2 8’ ST 2BAND EQ ER 2
Timpani Roll 1 8’ ST 2BAND EQ ER 1
Timpani Roll 2 8’ ST 2BAND EQ ER 2
Timpani Roll 3 8’ ST 2BAND EQ ER 1
ELECTRIC BASS
1 Fingered Bass 1 16’ THRU THRU
Fingered Bass 2 8’ THRU THRU
Fingered Bass 3 16’ THRU THRU
Fingered Bass 4 16’ THRU THRU
Fingered Bass 5 16’ THRU THRU
Slap Bass 1 16’ THRU THRU
Slap Bass 2 16’ THRU THRU
Slap Bass 3 16’ ST 2BAND EQ XG PCH CHG 1
Slap Bass 4 16’ M BAND COMP THRU
2 Picked Bass 1 16’ THRU THRU
Picked Bass 2 16’ ST 2BAND EQ PITCH CHANGE
Picked Bass 3 16’ THRU THRU
Picked Bass 4 16’ THRU THRU
Fretless Bass 1 16’ THRU THRU
Fretless Bass 2 16’ ST 2BAND EQ PITCH CHANGE
SYNTH BASS
1 Funk Bass 1 16’ THRU THRU
Funk Bass 2 16’ THRU THRU
Funk Bass 3 16’ THRU THRU
Funk Bass 4 16’ ENS DETUNE THRU
Funk Bass 5 16’ ST 2BAND EQ XG FLANGER 1
Funk Bass 6 16’ ST 2BAND EQ ENS DETUNE
Funk Bass 7 16’ ST 2BAND EQ XG HM ENHNCE
Funk Bass 8 16’ THRU THRU
Funk Bass 9 16’ ST 2BAND EQ ENS DETUNE
Funk Bass 10 16’ ST 2BAND EQ PITCH CHANGE
2 Dance Bass 1 16’ THRU THRU
Dance Bass 2 16’ THRU THRU
Dance Bass 3 16’ THRU THRU
Dance Bass 4 16’ ST 2BAND EQ HM ENHANCER
Dance Bass 5 16’ ST 2BAND EQ ENS DETUNE
Dance Bass 6 16’ ST 2BAND EQ ENS DETUNE
Dance Bass 7 16’ THRU THRU
Dance Bass 8 16’ HM ENHANCER FLANGER 1
Preset
Feet
Preset
Effect 1
Preset
Effect 2
Category/
Voice Name
3 Smooth Bass 1 16’ ST 2BAND EQ PITCH CHANGE
Smooth Bass 2 16’ THRU THRU
Smooth Bass 3 16’ ST 2BAND EQ FLANGER 1
Smooth Bass 4 16’ ST 2BAND EQ PITCH CHANGE
Smooth Bass 5 16’ ST 2BAND EQ ENS DETUNE
Smooth Bass 6 16’ THRU THRU
Smooth Bass 7 16’ ST 2BAND EQ PITCH CHANGE
WORLD
1 Pan Flute 1 8’ THRU THRU
Pan Flute 2 8’ THRU THRU
Bagpipe 8’ THRU THRU
Dulcimer 8’ THRU THRU
Shakuhachi 8’ THRU THRU
Yokobue 4’ THRU THRU
Shamisen 8’ THRU THRU
Koto 8’ THRU THRU
Taishokoto 4’ THRU THRU
2 Erhu 1 8’ HM ENHANCER THRU
Erhu 2 8’ THRU THRU
Sheng 8’ THRU THRU
Zheng 8’ THRU THRU
Pipa 8’ THRU THRU
Nay 8’ THRU THRU
Surnay 8’ THRU THRU
Oud 8’ THRU THRU
Sitar 8’ THRU THRU
Kamanche 8’ THRU THRU
3 Steel Drum 8’ THRU THRU
Log Drum 8’ THRU THRU
Kalimba 8’ THRU THRU
Preset
Feet
Preset
Effect 1
Preset
Effect 2
DDK-7 Owner’s Manual
36
Page 37

3
Organ Flutes
The DDK-7 has an Organ Flutes feature that allows you to create your own organ Voices,
giving you access to an unlimited combination of organ sounds. With this function, you can
recreate all of the classic organ sounds by adjusting the flute footage levels and the
percussive sounds, just like on conventional organs. There are nine flute footage settings,
with three additional footage settings for the attack sound.
Press one of the Organ Flutes buttons (UPPER or LOWER).
1
The Flute Footage Levers appear on the display.
FOOTAGE Page
3
Organ Flutes
Press the ON/OFF button in the display to turn the Organ Flutes
2
function on by selecting “ON”.
To turn off the Organ Flutes function, press the same button a second time to
select “OFF”. The lamp of the [U. ORGAN FLUTES] or [L. ORGAN
FLUTES] button on the panel lights up when the Organ Flutes function is on.
The lamp turns off when the function is off.
Select the wave type for the Organ Flute Voice.
3
Selecting [SINE] button produces a clean, clear sound and selecting
[VINTAGE] produces a gritty, slightly distorted sound.
DDK-7 Owner’s Manual
37
Page 38

Adjust flute footage settings (over a range of 0 – 8).
4
The Flute footage levers can be adjusted by directly touching the display.
The Data Control dial cannot be used. Play the keyboard and listen to the
changes in the sound as you adjust the footage levels.
Press the [ATTACK/VOLUME] button in the upper right on the
5
display to adjust the volume and attack settings.
3
Organ Flutes
ATTACK/VOLUME Page
1
1 ATTAC K
Determines the level of each volume in the percussive portion of the Voice. Footage
settings are 4', 2-2/3' and 2'. The LENGTH lever determines the duration of the
attack sound.
23
4 5
Reference Page
Reverb (page 46)
2 RESP. (Response)
Determines the overall speed of the keyboard response. Moving the lever downward
makes the keyboard response slower, creating a pipe organ effect.
3 MODE
Determines which notes in a held group of notes are given an attack sound.
This parameter is common to both Upper and Lower Organ Flute Voices.
FIRST: Only the first note played will have attack. All other notes played while
the first is held have no attack.
EACH: All notes played have an attack sound.
4 REVERB
Determines the amount of reverb applied to the Organ Flute Voice. When the reverb
depth in the REVERB Page 1 control is set to the minimum, the setting here will have
no effect.
5 VOLUME
Determines the overall volume of the Organ Flute Voice. The volume balance of the
individual footages is maintained. A minimum setting here produces no Organ Flute
sound.
DDK-7 Owner’s Manual
38
Page 39

Press the [EFFECT] button in the upper right on the display to
6
adjust the Rotary Speaker settings.
EFFECT Page
1
2
1 EFFECT TYPE
Select the Rotary Speaker (tremolo) effect type. Pressing the button for which the effect
type (or “OFF”) is displayed calls up a list of the effect types. Select the desired type
from among the list.
3
Organ Flutes
Reference Pages
Effect List (page 52)
Rotary Speaker (page 50)
2 EFFECT Parameters
Effect parameters are displayed corresponding to the selected effect type.
Select the desired effect type
DDK-7 Owner’s Manual
39
Page 40

4
Voice Controls and Effects
The DDK-7 is equipped with two general kinds of functions that can be used to change the
sound of the Voices: Voice Controls and Effects.
Each Voice has been given certain factory-preset effect settings to best enhance its sound.
However, if you wish, you can change the sound to suit your preferences by using the
controls and effects described in this section. All built-in effects are digital.
The chart below shows the various Voice controls and effects for the individual Voice
sections. Available functions are indicated by circles. The controls and effects are applied
differently according to the different types: independently for each Voice section,
independently for each keyboard or globally for the entire system.
4
Voice Controls and Effects
Controls and Effects Reference
Selecting from the Voice Condition display
Voice sections to which the controls/effects are applied
page
for
changing
the settings
Pan page 41 O—OO—O
Touch Tone page 41 O—O O—O
Pitch page 42 O—O O—O
Feet page 42 O—O O—O
Reverb (send level) page 42 OOOOOO
Brilliance page 42 O—O O—O
Volume page 42 OOOOOO
Priority* page 42 ——O*———
Poly (Pedal
polyphonic mode)
Vibrato page 43 O—O O—O
Touch Vibrato page 44 O—O O—O
Lead Slide page 44 O—O———
Transpose page 44 O—O O—O
Tune page 44 O—O O—O
Effect (1, 2) page 45 O—OO—O
page 42
Upper Keyboard Lead Voice Lower Keyboard Pedalboard
Upper
Keyboard
Voice 1, 2
—————O
Organ Flute
Voice
Lead Voice 1, 2
Lower
Keyboard
Voice 1, 2
Organ Flute
Voice
Pedalboard
Voice 1, 2
Reverb page 46 O
Sustain page 49 OOOOOO
the panel
Rotary Speaker page 50
Selecting from
Contents
1 Selecting from the Voice Condition display . . . . . . . . . . . . . . . 41
2 Selecting from the panel . . . . . . . . . . . . . . . . . . . . . . . . . . . . . . . 46
3 Effect List . . . . . . . . . . . . . . . . . . . . . . . . . . . . . . . . . . . . . . . . . . . 52
DDK-7 Owner’s Manual
40
O
* Priority is applied only for Lead Voice 2.
Page 41

Selecting from the Voice Condition display
1
Choose a Voice on the panel, then press the same button on the panel again (or press
the name of the selected Voice in the display). The Voice Condition display appears.
Voice Condition Display for each Voice has four pages that can be switched by pressing
[1] – [4] buttons at the top right of the display.
Voice Condition [Page 1]
1
2
2 -1 2-2 3
45
76 8 2 -1 2 -2 345 76 9
1
2
In this display, you can adjust the basic Voice controls, including panning, touch tone
and volume. The displays of the various Voice sections have slight differences in their
functions.
1 PAN
Determines the position of the Voice in the stereo image. Seven pan positions are
available.
2 TOUCH TONE
The Touch Tone function gives you expressive control over the volume and timbre of a
Voice. All Voices are provided with this expressive function, making it possible to
perfectly reproduce the subtle dynamic and tonal changes of actual instruments.
Two types of keyboard touch affect this function: Initial Touch and After Touch.
4
Voice Controls and Effects
2 -1 INITIAL touch
Controls volume and timbre according to the velocity at which you play the
keys. The harder you play the keys, the greater the volume and the brighter the
timbre will become.
Higher settings make the change wider. Minimum setting produces no effect.
Range: 0 – 14
2 -2 AFTER touch
Controls volume and timbre according to the pressure you apply to the keys
after playing them.
The harder you press down on the keys, the greater the volume and the brighter
the timbre will become.
Higher settings make the change wider. Minimum setting produces no effect.
Range: 0 – 14
NOTE
Initial Touch may not be
effective on some organ
Voices.
NOTE
After Touch is not applied to
the Pedal Voices.
NOTE
After Touch has no effect on
percussive Voices (such as
piano or vibraphone),
percussion sounds, or some
organ Voices.
DDK-7 Owner’s Manual
41
Page 42

3 PITCH
Controls pitch according to the play style of After Touch.
AFTER touch
Controls the pitch according to the pressure you apply to the keys after playing
them.
The minimum setting produces no effect at all. Higher (positive) settings make
the pitch higher according to the pressure and lower (negative) settings make the
pitch lower. The setting of +14 or -14 results in the widest pitch change.
Range: -14 – +14
4 FEET
4
Voice Controls and Effects
Determines the octave setting of the Voice, letting you use the Voice over a wide
register. There are three settings: 4', 8' and 16' (4' is highest and 16' is lowest). A 2'
setting is added to the Pedal Voice sections. PRESET is the original (factory) setting.
5 REVERB
Determines the amount of reverb applied to each Voice section. When the REVERB
control in the Reverb Page 1 is set to the minimum, the setting here will have no effect.
See page 46 for details.
6 BRILLIANCE
Adjustment of the Voice tone, brighter or mellower. Range is from -3 to +3. Higher
settings makes the voice tone brighter.
7 VOLUME
Fine adjustment of the Voice volume. See page 28 for more information.
8 PRIORITY (only for the Lead Voice 2)
Determines the mode of Lead Voice 2, Last or Top.
LAST: Only the last played key is sounded when two or more keys are played
simultaneously.
Reference Page
Solo function (page 30)
DDK-7 Owner’s Manual
42
TOP: Only the highest note is sounded when two or more keys are played
simultaneously. When the Solo mode is on, Lead Voice 2 sounds according to
Last mode, regardless of the setting made here.
9 POLY (only for Pedal Voices)
Allows you to switch the pedal polyphonic mode on or off. Setting POLY to on
switches the normally monophonic pedal Voices to polyphonic play. This makes it
possible to play the Pedalboard in various expressive ways, such as playing legato or
playing intervals and chords.
Keep in mind that you cannot exceed the total maximum polyphony: 14 notes for all
sections, Upper, Lower and Pedal.
Page 43

Voice Condition [Page 2]
1
1 -1
3
1 -2 1-3 1-4 3 -1 3 -2
2
4 5
The items included in this page differ between the Lead Voice sections and the other
sections. SLIDE (
1 VIBRATO
3) only applies to Lead Voice 1 and 2.
The Vibrato function wavers the level of the Voices, making them sound warmer and
more animated. This effect is applied independently to each Voice section. For some
Voices, vibrato may not be effective at all or the effect may not sound as expected.
4
Voice Controls and Effects
1 - 1 PRESET/USER
Selecting PRESET calls up the original
Vibrato Control
Delay
Speed
(factory) vibrato settings for the Voice.
When PRESET is selected, DELAY,
DEPTH and SPEED parameters cannot
be edited.
Selecting USER lets you adjust the vibrato
settings for yourself.
1 - 2 DELAY
Determines the amount of time that elapses between the playing of a key and
the start of the vibrato effect. Higher settings increase the delay of the vibrato
onset.
Range: 0 – 14
1 - 3 DEPTH
Determines the intensity of the vibrato effect. Higher settings result in a more
pronounced vibrato. The minimum setting cancels the vibrato effect.
Range: 0 – 14
1 - 4 SPEED
Determines the speed of the vibrato effect. Higher settings increase the speed of
the vibrato.
Range: 0 – 14
Depth
DDK-7 Owner’s Manual
43
Page 44

NOTE
Touch Vibrato is not applied
to the Pedal Voices.
2 TOUCH VIBRATO
Turns the Touch Vibrato function on or off. Setting Touch Vibrato to on lets you apply
vibrato to individual notes as you play them by after touch. The harder you press down
the key, the greater the vibrato will be. When Touch Vibrato is off, vibrato depth
cannot be controlled, no matter how hard you press the keys.
3 SLIDE (only for Lead Voices)
Controlling Lead Slide (with
Foot Pedal); (page 199)
4
Voice Controls and Effects
Transpose (for entire
instrument); (page 208)
Pitch (for entire instrument);
(page 208)
Reference Page
Reference Page
Reference Page
Applies a portamento effect to notes played in legato. The Slide function is effective
within a one-octave range for Lead Voices. Slide has no effect when playing notes
beyond a one-octave range. By connecting an optional Foot Pedal to the DDK-7, you
can use it to control the slide function.
3 - 1 ON/OFF
On/Off switch the Slide effect.
3 - 2 TIME
Determines the speed of the slide or portamento effect. Higher settings makes
the slide speed slower.
Range: 0 – 14
4 TRANSPOSE
Changes the pitch in semitones for each Voice section. Range is from -6 to +6.
5 TUNE
Determines the fine pitch settings (detune) for each Voice section, producing a richer
sound. Each step represents a 1-cent change in pitch.
Range: -64 – +63
DDK-7 Owner’s Manual
44
Page 45

Voice Condition [Page 3, 4]
2
1
3
You can edit the effect parameters from these two displays. Both displays have the same
contents. You can select two effects for each Voice section with these displays (Voice
Condition Pages 3 and 4).
1 EFFECT 1 (Page 3)/EFFECT 2 (Page 4)
Selects the effect category. Pressing the effect button on the display calls up the effect
category list. Select the desired effect category in the list.
Reference Page
Effect List (page 52)
4
Voice Controls and Effects
By selecting [PRESET] in the list, the original (factory) effect category for the selected
Voice is automatically set. Selecting [THRU] bypasses the effect (no effect is added to
the selected Voice).
2 TYPE 1 (Page 3)/ TYPE 2 (Page 4)
Determines the type of the effect. Pressing the TYPE button on the display calls up the
effect type list, corresponding to the selected effect category. Select the desired effect
type in the list.
If you have selected the [PRESET] category, the effect type cannot be edited.
After changing the effect type, the effect parameter below is automatically changed
corresponding to the selected effect type.
3 Effect Parameters
Effect parameters are displayed corresponding to the selected effect type.
DDK-7 Owner’s Manual
45
Page 46

4
Voice Controls and Effects
Selecting from the panel
2
The Reverb, Sustain and Rotary Speaker displays are called up by pressing the
respective buttons on the panel.
Reverb
Reverb adds an echo-like effect to the sound, giving the impression of a performance in
a large room or concert hall. You can adjust the reverb volume for each Voice sections,
or adjust the reverb volume for rhythm and accompaniment separately.
To adjust the reverb effect and call up the Reverb pages:
Press the REVERB button, located to the left of the panel, to set the Reverb effect. The
Reverb display appears.
The Reverb display consists of four pages.
REVERB [Page 1]
DEPTH:
Fine adjustment of the depth of reverberation or the level of the reflected sounds.
When this parameter is set to the minimum, the settings in the pages that follow have
no effect.
Range: 0 – 24
DDK-7 Owner’s Manual
46
Page 47

REVERB [Page 2]
4
321
1 TYPE
Determines the reverb type for each of the Voice sections and the Organ Flute Voice.
Several types can be selected: Room, Hall, Stage, and so on.
Pressing the TYPE button on the display calls up the Reverb Type list.
Press the number buttons to change the display pages.
The list contains many reverb types, more than can fit on one display page. To change
the display pages, press the appropriate number buttons [1] or [2] in the display. Select
the desired reverb type in the list. After changing the reverb type, the TIME parameter
below is automatically changed corresponding to the selected reverb type.
Reference Page
Effect List (page 52)
Voice Controls and Effects
2 TIME
Determines the reverb length for each of the Voice sections and the Organ Flute Voice.
Higher settings increase the reverberance.
Range: 0.3s – 30.0s
3 ORGAN
Determines the amount of reverb applied to the Organ Flute Voice. This parameter
corresponds to the REVERB slider contained in the ATTACK/VOLUME Page of the
Organ Flute display.
Range: 0 – 24
Reference Page
Organ Flutes (page 37)
DDK-7 Owner’s Manual
47
Page 48

4
REVERB [Page 3]
Voice Controls and Effects
Reference Page
Connecting a Microphone
(page 232)
Determines the amount of reverb effect applied to each Voice section.
Each slider corresponds to the REVERB slider in Voice Condition Page 1 of the
respective Voices.
Range: 0 – 24
REVERB [Page 4]
32 41
1 TYPE
Determines the reverb type for rhythm, accompaniment, keyboard percussion, and
microphone signal.
Reference Pages
Changing the rhythm reverb
(page 67)
Keyboard Percussion
(page 74)
DDK-7 Owner’s Manual
48
2 TIME
Determines the length of reverb applied to the rhythm, accompaniment, keyboard
percussion, and microphone signal.
Range: 0.3s – 30.0s
3 RHYTHM
Determines the amount of reverb applied to the rhythm (with PERCUSSION slider)
and accompaniment (with ACCOMPANI. slider). Each slider corresponds to the
REVERB slider in the Rhythm Condition display.
Range: 0 – 24
4 KEYBOARD PERCUSSION
Determines the amount of reverb applied to the Keyboard Percussion.
Range: 0 – 24
Page 49

Sustain
The sustain effect, selectable for the each Voice section, causes Voices to gradually fade
out when the keys are released. The sustain on/off and sustain length settings are
independent for each Voice section, providing maximum expressive control.
The optional Foot Pedal can also be used to switch sustain on/off for voice sections
other than Pedal Voice 1 and 2.
To add sustain to the Voices and call up the Sustain page:
Press the SUSTAIN button, located to the left of the panel, to set the sustain. The
Sustain display appears.
The Sustain display consists of two pages.
SUSTAIN Display
Switches the sustain function on/off
Reference Page
Foot Pedal (page 196)
4
Voice Controls and Effects
Sustain length value
The display shows the on/off status and the current sustain length values for each Voice
section. The values here must be set high enough for the sustain effect to be noticeable.
Press the ON/OFF button in the display to select “ON” above the Voice section name
for which you want to apply sustain. To turn sustain off, press the same button a
second time to select “OFF”.
To adjust the sustain length value, use the display sliders. If you set the highest value
(HOLD), some Voices such as organ or synth will sound continuously even when the
keys are released.
The lamp of the [SUSTAIN] button lights up when you turn on the Sustain effect for
one of the Voice sections in the Sustain display. When you turn off the Sustain effect
for all Voice sections in the Sustain display, the lamp turns off. Remember to check
whether the sustain effects are on or off in the Sustain display before you start to play.
Range: 0 – 12, HOLD
DDK-7 Owner’s Manual
49
Page 50

4
Voice Controls and Effects
Rotary Speaker
Rotary Speaker recreates the rich, swirling sound of the popular rotating speaker effect.
The Rotary Speaker effect can be switched in real time as you play, with either the front
panel button. The Rotary Speaker effect CANNOT be turned on only by turning on
the [ROTARY SP SPEED] button. The following procedure is needed to use the
Rotary Speaker effect.
Select the Rotary Speaker effect from the desired Voice.
1
When you want to set Rotary Speaker to one of the Voice section, you can select the
effect category of Rotary Speaker in the Voice Condition Display Page 3 or 4.
See page 45 for details.
Select “Rotary Speaker” here.
When you want to set Rotary Speaker for the Organ Flute Voice, select the effect
type in the EFFECT Page. See page 39 for details.
Select an effect type other than [OFF].
DDK-7 Owner’s Manual
50
Page 51

Adjust the rotating speed and mode of the Rotary Speaker.
2
Press the [ROTARY SP SPEED] button on the panel.
The ROTARY SPEAKER display appears. The settings in this display are
common to all Voice sections.
ROTARY SPEAKER Display
21
4
Voice Controls and Effects
1 SPEED
Determines the speed of the speaker rotation.
Range: 2.69Hz – 39.7Hz
2 MODE
Determines the slow/stop mode when [ROTARY SP SPEED] button is off. If [SLOW]
is selected, a slow chorus effect is applied when you turn off the button on the panel.
If [STOP] is selected, the Rotary Speaker effect turns off when you turn off the button
on the panel.
Once the Rotary Speaker effect has been turned on and set, you can control the effect
in real time from the panel.
Control the Rotary Speaker effect from the panel.
3
You can control Rotary Speaker on/off from the panel. An optional Foot Pedal,
or the Footswitch on the Pedal Unit can also be used to switch the effect on/off.
See page 196 for details.
Reference Page
Footswitches (page 193)
Foot Pedal (page 196)
DDK-7 Owner’s Manual
51
Page 52

Effect List
3
REVERB
Produces a gentle “wash” of aftertones in the sound,
recreating the subtle ambience and depth of actual
performance spaces and rooms.
Effect Type Effect Type
HALL 1 PLATE 2
HALL 2 WHITE ROOM
4
Voice Controls and Effects
HALL 3 TUNNEL
HALL M CANYON
HALL L BASEMENT
ROOM 1 XG HALL 1
ROOM 2 XG HALL 2
ROOM 3 XG ROOM 1
ROOM 4 XG ROOM 2
ROOM S XG ROOM 3
ROOM M XG STAGE 1
ROOM L XG STAGE 2
STAGE 1 XG PLATE
STAGE 2 GM PLATE
PLATE 1
Parameter
Time 0.3 - 30.0 s Determines the decay time of
Dry/Wet D63>W - D<W63 Determines the balance of
DELAY
Produces delayed distinct repeats of the sound, or
echoes. This is also useful for creating rhythmic
repeats in the sound.
Effect Type
DELAY LCR
XG DLY LCR
DELAY LR
ECHO
CROSS DELAY
TEMPO DELAY
TEMPO ECHO
TEMPO CROSS
Value Description
the reverb.
the original sound (dry) and
the effect sound (wet).
Parameter Value Description
L DelayTime 0.1 - 1486.0 msec
R DelayTime 0.1 - 1486.0 msec
C DelayTime 0.1 - 1486.0 msec
L>R
Delay Time
R>L
Delay Time
DelayTime 32th - 4th When using Tempo Delay,
InputSelect L, R, L&R Determines the input
Feedback
Delay Time
Feedback
Delay 1
Feedback
Delay 2
Feedback
Level
L Feedback -63 - +63 Determines the feedback
R Feedback -63 - +63 Determines the feedback
Dry/Wet D63>W - D<W63 Determines the balance of
Echo: 0.1 - 371.5
msec
Echo: 0.1 - 371.5
msec
Echo: 0.1 - 371.5
msec
0.1 - 743.0 msec Determines the time for the
0.1 - 743.0 msec Determines the time for the
0.1 - 1486.0 msec Determines the feedback
0.1 - 1486.0 msec Determines the first feedback
0.1 - 1486.0 msec Determines the second
-63 - +63 Determines the amount of
Determines the time that
elapses between the original
sound and the delayed
repeat in the left channel.
Determines the time that
elapses between the original
sound and the delayed
repeat in the right channel.
Determines the time that
elapses between the original
sound and the delayed
repeat in the center of the
stereo image.
sound to move from left to
right (when using Cross
Delay).
sound to move from right to
left (when using Cross
Delay).
this sets the time between
delayed repeats to match the
tempo of the rhythm/song.
configuration.
time of the delayed repeats.
The larger the value, the
longer the time between
delayed repeats. (For Delay
LR, the left and right
channels can be set
independently.)
delay time of the L/R delay.
feedback delay time of the
L/R delay.
delayed repeats in the
sound. When this is set to
0%, the delayed repeat from
the second time will not
sound.
level in the left channel.
level in the right channel.
original sound and the effect
sound.
DDK-7 Owner’s Manual
52
Page 53

ER/KARAOKE
Produces early reflections without the subsequent
reverb, or a deep echo effect like that used in Karaoke
sing-along applications.
Effect Type
ER 1
ER 2
GATE REVERB
REVERS GATE
KARAOKE 1
KARAOKE 2
KARAOKE 3
Parameter Value Description
Type S-H, L-H, Rdm,
Room Size 0.1 - 7.0 Determines the room size.
Type Type A, Type B Determines the reverse gate
DelayTime 0.1 - 400 msec Determines the time that
Feedback
Level
Dry/Wet D63>W - D<W63 Determines the balance of
Rvs, Plt, Spr
-63 - +63 Determines the amount of
Determines the early
reflection type. The response
of the early reflections varies
depending on the type.
The higher the value the
longer the ER.
type.
elapses between the original
sound and the delayed
repeat.
delayed repeats in the
sound. When this is set to
0%, the delayed repeat from
the second time will not
sound.
the original sound and effect
sound.
CHORUS
Creates a warm effect as if several of the same sound
were playing at once. Makes the overall sound richer,
“fatter” and more animated.
Effect Type Effect Type
CHORUS 1 GM CHORUS 4
CHORUS 2 FB CHORUS
XG CHORUS 1 CELESTE 1
XG CHORUS 2 CELESTE 2
XG CHORUS 3 CELESTE 3
XG CHORUS 4 CELESTE 4
GM CHORUS 1 SYMPHONIC
GM CHORUS 2 XG SYMPHONIC
GM CHORUS 3 ENS DETUNE
Parameter Value Description
LFO Freq. 0.00 - 39.7 Hz Determines the frequency of
LFO Depth 0 - 127 Determines the depth of
Input Mode Mono, Stereo Determines the input
Detune -50 - +50 cent Determines the amount of
L DelayTime 0.0 - 50.0 msec Determines the time that
R DelayTime 0.0 - 50.0 msec Determines the time that
Dry/Wet D63>W - D<W63 Determines the balance of
oscillation, or the speed of
the wavering effect.
oscillation, or the amount of
the wavering effect.
configuration.
detuning (or pitch shifting) is
applied to the delayed
repeats.
elapses between the original
sound and the delayed
repeat in the left channel.
elapses between the original
sound and the delayed
repeat in the right channel.
the original sound and the
effect sound.
FLANGER
This creates a metallic periodic “sweeping” effect,
similar to Chorus but with a brighter more resonant
sound.
Effect Type
FLANGER 1
FLANGER 2
XG FLANGER 1
XG FLANGER 2
XG FLANGER 3
GM FLANGER
V_FLANGER
TEMP FLANGER
DYNA FLANGER
Parameter Value Description
LFO Freq. 0.00 - 39.7 Hz Determines the frequency of
LFO Depth 0 - 127 Determines the depth of
FEEDBACK
LEVEL
LFO Wave Triangle, Sine,
-63 - +63 Determines the amount of
Random
oscillation, or the speed of
the wavering effect.
oscillation, or the amount of
the wavering effect.
output sound (with the
flanging effect) that is
returned to the input. The
larger the value, the more
complex and pronounced the
flanging effect becomes.
Determines the waveform:
triangular wave, sine wave or
random.
4
Voice Controls and Effects
DDK-7 Owner’s Manual
53
Page 54

Parameter Value Description
Sensitivity 0 - 127 Determines the sensitivity.
Threshold 0 - 127 Determines the input level at
Dry/Wet D63>W - D<W63 Determines the original
PHASER
Similar to Flanger, this produces rolling timbre
4
Voice Controls and Effects
changes and a pronounced up/down filter sweep
effect.
Effect Type
PHASER 1
PHASER 2
EP PHASER 1
EP PHASER 2
EP PHASER 3
TEMPO PHASER
DYNA PHASER
Parameter Value Description
LFO Freq. 0.00 - 39.7 Hz Determines the frequency of
LFO Depth 0 - 127 Determines the depth of
Phase Shift 0 - 127 Determines the phase
Feedback
Level
Sensitivity 0 - 127 Determines the sensitivity.
Threshold 0 - 127 Determines the input level at
Dry/Wet D63>W - D<W63 Determines the balance of
The higher the value the
greater the change.
which effect begins to be
applied.
sound and the effect sound.
oscillation, or the speed of
the wavering effect.
oscillation, or the amount of
the wavering effect.
relationship between the
processed signal and the
original. This changes the
sound characteristics of the
Phaser effect.
-63 - +63 Determines the amount of
output sound (with the
phasing effect) that is
returned to the input. The
larger the value, the more
complex and pronounced the
phasing effect becomes.
The higher the value the
greater the change.
which effect begins to be
applied.
the original sound and the
effect sound.
TREMOLO/AUTO PAN
This periodically changes the volume and has the
effect of moving the sound image both front and
back, and left and right.
Effect Type Effect Type
TREMOLO 1 ORGAN TREMOLO
TREMOLO 2 AUTO PAN
XG TREMOLO XG AT PAN 1
EP TREMOLO XG AT PAN 2
GT TREMOLO 1 EP AUTO PAN
GT TREMOLO 2
Parameter Value Description
LFO Freq. 0.00 - 39.7 Hz Determines the tremolo
speed.
LFO Depth 0 - 127 Determines the depth of the
AM Depth 0 - 127 Determines the amount of
PM Depth 0 - 127 Determines the amount of
Input Mode Mono, Stereo Determines the input
L/R Depth 0 - 127 Determines the depth of
F/R Depth 0 - 127 Front/rear. Determines the
Pan L<->R, L->R, L<-R,
Lturn, Rturn, L/R
Dry/Wet D63>W - D<W63 Determines the balance of
Tremolo effect.
volume change.
pitch change in the sound.
configuration.
panning between the left and
right channels.
depth of the front and rear
panning effect. This controls
both level and pitch at the
same time.
Determines the Auto Pan
type. (“L<->R” is a sine wave
and “L/R” is a sawtooth
wave.)
original sound and the effect
sound.
DDK-7 Owner’s Manual
54
Page 55

ROTARY SPEAKER
DISTORTION
This popular effect (used mainly for electronic organ
sounds) recreates the rich, animated pulsing sound of
a rotating speaker horn.
Effect Type Effect Type
XG ROTARY SP DUAL ROTSP 2
ROTARY SP 1 DIST+ROT SP
ROTARY SP 2 ODRV+ROT SP
ROTARY SP 3 AMP+ROT SP
ROTARY SP 4 DIST+2ROT SP
ROTARY SP 5 ODRV+2ROT SP
2WAY ROT SP AMP+2ROT SP
DUAL ROTSP 1
Parameter Value Description
EQ Low Freq. 32 - 2.0k Hz Determines the central
EQ Low Gain -12 - +12 dB Determines the amount over
EQ Middle
Freq.
EQ Middle
Gain
EQ Hi.Freq. 500 - 16k Hz Determines the central
EQ Hi.Gain -12 - +12 dB Determines the amount over
Low/High
Balance
MIC L-R Angle 0 - 180deg Determines the L/R angle of
Dist. Drive 0 - 127 Determines the depth of
Amp. Type Off, Stack, Combo,
Drive 0 - 127 Determines the amount of
100 - 16k Hz Determines the central
-12 - +12 dB Determines the amount over
L63>H - L<H63 Determines the volume
Tube
frequency of the low
frequency range that is
boosted or cut.
which the low frequency
range is boosted or cut.
frequency of the middle
frequency range that is
boosted or cut.
which the middle frequency
range is boosted or cut.
frequency of the high
frequency range that is
boosted or cut.
which the high frequency
range is boosted or cut.
balance between low and
high speakers.
the apparent microphone.
distortion. The higher the
value the greater the amount
of distortion.
Determines the amplifier type
simulated.
distortion.
This effect adds distortion to the sound.
Effect Type Effect Type
DIST HARD 1 V_DIST HARD
DIST HARD 2 V_DIST SOFT
DIST SOFT 1 COMP+DIST
DIST SOFT 2 XG CMP+DIST
ST DIST HARD AMP SIM
ST DIST SOFT XG AMP SIM
OVERDRIVE ST AMP SIM 1
ST OVERDRIVE ST AMP SIM 2
XG DIST XG ST AMP
XG ST DIST
Parameter Value Description
Drive 0 - 127 Determines the amount or
Amp. Type Off, Stack, Combo,
LPF Cutoff 1.0 - 18kHz, Thru Determines the cutoff
OutputLevel 0 - 127 Determines the level or
EQ Low Gain -12 - +12 dB Determines the amount of EQ
EQ Middle
Gain
Overdrive 0 - 100 % Determines the depth of
Device Transistor, Vintage,
Speaker Flat, Stack, Combo,
Presence 0 - 20 Values in the higher range
Comp.
Threshold
Dry/Wet D63>W - D<W63 Determines the balance of
Tube
-12 - +12 dB Determines the amount of EQ
Dist 1, Dist 2, Fuzz
Twin, Radio,
Megaphone
-48 - -6 db Determines the input level at
degree of distortion in the
sound.
Determines the type of
amplifier that is simulated.
frequency of the low pass
filter. Frequencies above this
value are cut or filtered out.
volume of the processed
sound.
boost or cut in the low
frequency range.
boost or cut in the mid
frequency range.
overdrive. The higher the
value the greater the amount
of distortion.
Determines the device that
will create distortion:
Transistor, VintageTube,
Distortion, Fuzz and so on.
Determines the simulated
speaker type: Flat, Stack,
Combo, Twin, Radio,
Megaphone and so on.
can give vocals more
presence.
which compression begins to
be applied.
the original sound and the
effect sound.
4
Voice Controls and Effects
DDK-7 Owner’s Manual
55
Page 56

DISTORTION+
WAH
A combination of Distortion and Delay.
Effect Type Effect Type
DIST+DELAY V_DIST H+DLY
ODRV+DELAY V_DIST S+DLY
XG DIST+DLY DIST+T DLY
XG ODRV+DLY ODRV+T DLY
CMP+DIST+DLY CMP+DST+TDLY
CMP+ODRV+DLY CMP+OD+TDLY
XG CMP+DT+DL V_DST H+TDLY
XG CMP+OD+DL V_DST S+TDLY
4
Voice Controls and Effects
Parameter Value Description
Dist. Drive 0 - 127 Determines the depth of
Dist. Out Level 0 - 127 Determines the output level
L DelayTime 0.1 - 1486.0 msec Determines the time that
R DelayTime 0.1 - 1486.0 msec Determines the time that
Delay
Feedback
Comp.
Threshold
DelayTime 0.1 - 1486.0 msec Determines the time that
Overdrive 0 - 100 % Determines the depth of
Device Transistor, Vintage,
Speaker Flat, Stack, Combo,
Presence 0 - 20 Values in the higher range
Dry/Wet D63>W - D<W63 Determines the balance of
distortion. The higher the
value the greater the amount
of distortion.
of the distorted sound.
elapses between the original
sound and the delayed
repeat in the left channel.
elapses between the original
sound and the delayed
repeat in the right channel.
-63 - +63 Determines the amount of
-48 - -6db Determines the input level at
Dist 1, Dist 2, Fuzz
Twin, Radio,
Megaphone
delayed repeats in the
sound.
which compression begins to
be applied.
elapses between the original
sound and the delayed
repeat.
overdrive. The higher the
value the greater the amount
of distortion.
Determines the device that
will create distortion:
Transistor, VintageTube,
Distortion, Fuzz and so on.
Determines the simulated
speaker type: Flat, Stack,
Combo, Twin, Radio,
Megaphone and so on.
can give vocals more
presence.
original sound and the effect
sound.
This uses an automatic up/down filter sweep to
change the timbre of the sound, producing a
“wahwah” sound.
Effect Type Effect Type
AUTO WAH TC WAH+ODRV
XG AUTO WAH XG TC WAH+OD
TOUCH WAH 1 CLAVI TC WAH
TOUCH WAH 2 EP TOUCH WAH
AT WAH+DIST WAH+DST+TDLY
XG AT WH+DST WAH+OD+T DLY
AT WAH+ODRV WAH+DIST+DLY
XG AT WAH+OD XG WH+DST+DL
TC WAH+DIST WAH+ODRV+DLY
XG TC WH+DST XG WH+OD+DLY
Parameter Value Description
LFO Freq. 0.00 - 39.7 Hz Determines the speed of the
LFO Depth 0 - 127 Determines the depth of the
Cutoff 0 - 127 Determines the central
Resonance 1.0 - 12.0 Determines the frequency
Drive 0 - 127 Higher values result in a more
Sensitivity 0 - 127 Determines the degree to
DelayTime 0.1 - 1486.0 msec Determines the time that
Delay
Feedback
Comp.
Threshold
Dist. Out Level 0 - 127 Determines the output level
Dry/Wet D63>W - D<W63 Determines the balance of
-63 - +63 Determines the amount of
-48 - -6db Determines the input level at
Wah effect.
Wah effect.
frequency that the wah filter
acts upon.
bandwidth (around the
central frequency set in
Cutoff above) that the wah
filter affects.
distorted sound.
which the wah filter is
affected by your playing
touch.
elapses between the original
sound and the delayed
repeat.
delayed repeats in the
sound.
which compression begins to
be applied.
of the distorted sound.
the original sound and the
effect sound.
DDK-7 Owner’s Manual
56
Page 57

DYNAMIC
EQ/ENHANCER
This effect (also called compression) “squeezes” the
overall dynamic range of the sound, and has a gain
control–letting you make soft sounds louder, and thus
give more “punch” to the sound.
Effect Type
M BAND COMP
COMPRESSOR
NOISE GATE
Parameter Value Description
Type Normal, Low, Mid,
EQ Low Gain -63 - +63 Determines the amount of
EQ Middle
Gain
EQ Hi.Gain -63 - +63
Attack 1 - 40 msec Determines how soon the
Release 10 - 680 msec Determines how soon the
Threshold multi-band
Ratio 1.0 - 20.0 Determines the amount of
OutputLevel 0 - 127 Determines the overall output
High, Low/High,
Low/Mid, Mid/High,
FullBit, Wild, Attacky,
LowEnd, Hard, Basic
-63 - +63 Determines the amount of
compressor:
-32 - +32
compressor:
-48 - -6 dB
Noise Gate:
-72 - -30 dB
Determines the compressor
type.
low-frequency gain (boost or
cut).
mid-frequency gain (boost or
cut).
Determines the amount of
high-frequency gain (boost or
cut).
compression effect is
applied, once the
compressor has been
triggered (as a result of
Threshold below).
compressor returns to its
normal gain, once the trigger
signal drops below the
Threshold point.
Determines the level of the
input signal required to
trigger the compressor.
Signals at a level below the
Threshold pass through
unaffected; signals at and
above the Threshold are
compressed.
compression of the sound
(for signals passing the
Threshold). This is expressed
as a ratio
–
output signal relative to the
change in input. The range
here is 1/1 (no change in
output signal, hence no
compression) to 20/1. Higher
ratios result in greater
compression.
of the compressed signal.
Use this to bring up the
overall level after you've
reduced the dynamic range
with compression.
the change in
This effect boosts or cuts specific frequency bands,
allowing you to shape the tone of the sound as
required by the mix.
Effect Type
ST 2BAND EQ
ST 3BAND EQ
XG 3BAND EQ
EQ DISCO
EQ TEL
HM ENHANCER
XG HM ENHNCE
Parameter Value Description
EQ LowFreq. 50 - 2.0k Hz
EQ Low Gain -12 - +12 dB Determines the amount over
EQ Middle
Freq.
EQ Middle
Gain
EQ M Width 0.1 - 12.0 Determines the bandwidth or
EQ Hi.Freq. 500Hz - 16 kHz Determines the central
EQ Hi.Gain -12 - +12 dB Determines how much
HPF Cutoff 500Hz - 16 k Hz Determines the cutoff
Drive 0 - 127 Determines the amount or
Mix Level 0 - 127 Determines how much of the
ST2BandEQ:
32 - 2.0k Hz
100 - 16k Hz Determines the central
-12 - +12 dB Determines the amount over
Determines the central
frequency of the low
frequency range that is to be
boosted or cut.
which the low frequency
range is boosted or cut.
frequency of the middle
frequency range that is to be
boosted or cut.
which the middle frequency
range is boosted or cut.
the range of frequencies
around the specific middle
frequency that is to be
boosted or cut. Lower values
let you narrow in on a specific
frequency, while higher
values select a broader
range of frequencies to be
affected.
frequency of the high
frequency range that is to be
boosted or cut.
increase/ decrease the wave
frequency point of EQ high
frequency.
frequency of the low pass
filter. Frequencies above this
value are cut or filtered out.
depth of the Enhancer effect.
processed enhanced sound
is mixed together with the
original sound.
4
Voice Controls and Effects
DDK-7 Owner’s Manual
57
Page 58

PITCH CHANGE
This effect changes the pitch.
Effect Type
PITCH CHANGE
XG PCH CHG 1
XG PCH CHG 2
Parameter Value Description
Pitch -24 - +24 Determines the amount of
Pitch Fine 1 -50 - +50 Fine pitch adjustment to
4
Voice Controls and Effects
Pitch Fine 2 -50 - +50 Fine pitch adjustment to
Initial Delay 0.1 - 400 msec Determines the time that
Feedback
Level
Dry/Wet D63>W - D<W63 Determines the balance of
pitch change in semitones.
detune the sound and create
a chorus effect.
detune the sound and create
a chorus effect.
elapses between the original
sound and the early
reflections.
-63 - +63 Determines the amount of
delayed repeats in the
sound. When this is set to
0%, the delayed repeat from
the second time will not
sound.
original sound and the effect
sound.
IMPULSE EXP
Parameter Value Description
Density 0.159 - 22.61 msec Determines the density.
Dispersion 4.028 msec - 4.000
sec
Wet Level 0 - 127 Determines the level of the
RESONATOR
Parameter Value Description
Type Type1 - 6 Determines the type.
Decay Time 4.028 msec -
4.000 sec
LPF Cutoff 28.5Hz -
21.6 kHz (Thru)
Dispersion 0 - 16 Determines the resonance
Wet Level 0 - 127 Determines the level of the
VOICE CANCEL
Parameter Value Description
Low Adjust 0 - 26 Determines the frequencies
High Adjust 0 - 26 Determines the frequencies
Determines the resonance
time.
effected sound.
Determines the length of
reverberation.
Determines the cutoff
frequency of the Low Pass
Filter. The portion of the
signal above the specified
frequency is cut.
time.
effected sound.
in the lower portion of the
middle range that are
attenuated.
in the upper portion of the
middle range that are
attenuated.
MISCELLANEOUS
Creates special effects.
Effect Type
AMBIENCE
IMPULSE EXP
RESONATOR
VOICE CANCEL
TALKING MOD
LO-FI
DYNA FILTER
DYNA RINGMOD
RING MOD
ISOLATOR
AMBIENCE
Parameter Value Description
DelayTime 0.0 - 50.0 msec Determines the delay time.
Output Phase Normal, Invers Determines the phase of the
effect sound.
Dry/Wet D63>W - D<W63 Determines the balance of
original sound and the effect
sound.
TALKING MOD
Parameter Value Description
Vowel a, i, u, e, o Determines the specific
Drive 0 - 127 Determines the effect depth.
OutputLevel 0 - 127 Determines the output level
LO-FI
Parameter Value Description
Sampling
Control
Word Length 0 - 127 Determines the resolution or
Filter Type Thru, PwrBass,
Dry/Wet D63>W - D<W63 Determines the balance of
DYNA FILTER
Parameter Value Description
Sensitivity 0 - 127 Determines the sensitivity.
44.1 kHz - 345.0 Hz Determines the sampling
Radio, Tel, Clean,
Low
vowel used for the “talking”
effect.
of the effect-processed
sound.
frequency.
roughness of the sound.
Determines the filter type.
original sound and the effect
sound.
The higher the value the
greater the change.
DDK-7 Owner’s Manual
58
Page 59

Parameter Value Description
Level Offset 0 - 127 Determines the offset values
Filter Type LPF (12 dB),
LPF (18 dB),
LPF (24 dB),
HPF, BPF, BEF
Resonance -16 - +111 The higher the value, the
Dry/Wet D63>W - D<W63 Determines the balance of
DYNA RINGMOD
Parameter Value Description
Sensitivity 0 - 127 Determines the modulation
Threshold 0 - 127 Determines the input level at
Dry/Wet D63>W - D<W63 Determines the balance of
of the filter frequency. The
offset value affects the filter
frequency when no control
signals are received.
Determines the filter type.
more sharp the frequency
response curve is.
original sound and the effect
sound.
sensitivity for the input
change.
which effect begins to be
applied.
original sound and the effect
sound.
THRU
Bypass control. This cancels the effect processing.
Effect Type
Thru
4
Voice Controls and Effects
RING MOD
Parameter Value Description
Frequency 0.7 - 5002.6 Hz Determines the frequency for
Frequency
Fine
LFO Wave Triangle, Sine Selects a triangular wave or
LFO Depth 0 - 127 Determines the wave depth.
Dry/Wet D63>W - D<W63 Determines the balance of
ISOLATOR
Parameter Value Description
On/Off Off, On Determines the on/off status
Low Mute Off, On Mute switch for the low
Middle Mute Off, On Mute switch for the mid
High Mute Off, On Mute switch for the high
Low Level 0 - 127 Determines the level of the
Middle Level 0 - 127 Determines the level of the
High Level 0 - 127 Determines the level of the
0 - 127 Determines detailed
the Amplitude Modulation.
adjustment of the Amplitude
Modulation.
sine wave as the wave for
modulation.
The higher the value, the
greater the effect.
original sound and the effect
sound.
for the effect.
frequency range.
frequency range.
frequency range.
low frequencies.
mid frequencies.
high frequencies.
DDK-7 Owner’s Manual
59
Page 60

5
Rhythm/Keyboard Percussion
This DDK-7 features 274 different real rhythms featuring actual
drum and percussion sampled sounds. Automatic Accompaniment
functions are used with the rhythms, providing appropriate and
completely automatic accompaniment to match the style of the
selected rhythm. Moreover, the DDK-7 has a Keyboard Percussion
feature that allows you to play drum and percussion sounds from
the Upper, Lower keyboard and Pedalboard.
5
Rhythm/Keyboard Percussion
Contents
1 Selecting rhythms with the Rhythm button . . . .60
• Selecting a rhythm . . . . . . . . . . . . . . . . . . . . . . . .60
• Operating the rhythm from the panel . . . . . . . . . .63
• Changing the rhythm volume . . . . . . . . . . . . . . . .65
• Adjusting the tempo . . . . . . . . . . . . . . . . . . . . . . .66
• Changing the rhythm reverb. . . . . . . . . . . . . . . . .67
2Rhythm List . . . . . . . . . . . . . . . . . . . . . . . . . . . . . .68
3 Accompaniment . . . . . . . . . . . . . . . . . . . . . . . . . .70
4Automatic Accompaniment – Auto Bass Chord
(A.B.C.) . . . . . . . . . . . . . . . . . . . . . . . . . . . . . . . . . .71
Rhythm/Keyboard Percussion
1
A total of 274 rhythms can be instantly selected from the Rhythm Menu Display
which is called up by pressing the RHYTHM button.
Selecting a rhythm
5 Melody On Chord (M.O.C.) . . . . . . . . . . . . . . . . . .73
6 Keyboard Percussion . . . . . . . . . . . . . . . . . . . . . .74
• Using the Preset Keyboard Percussion . . . . . . . . 74
• Preset Keyboard Percussion List. . . . . . . . . . . . .76
• Assigning sounds to the User Keyboard Percussion
. . . . . . . . . . . . . . . . . . . . . . . . . . . . . . . . . . . . . . . 79
• Copying the Keyboard Percussion settings
• Detailed settings for each percussion instrument
. . . . . . . . . . . . . . . . . . . . . . . . . . . . . . . . . . . . . . . 83
• Kit Assign List . . . . . . . . . . . . . . . . . . . . . . . . . . .85
. . . . . . 81
Selecting rhythms with the Rhythm button
DDK-7 Owner’s Manual
60
In the explanation below, 16Beat 1 in the POPS category is selected as an example.
Press the Rhythm button in the RHYTHM section on the front
1
panel.
Rhythm button
The Rhythm Menu is displayed.
Page 61

Select the desired Rhythm category with the category buttons in
2
the display.
You can also choose the “User” category to select a User rhythm you have created
in the Rhythm Pattern Program.
For example, to call up 16Beat 1, select the POPS category.
Rhythm category
5
The name of the selected category (Pops) is displayed on the upper left. The
Rhythm name shown under the category name is that of the currently assigned
Rhythm and is irrelevant to the Rhythm menu below.
Select the desired rhythm name from the Rhythm menu.
3
The Rhythm menu contains many Pops rhythms, more than can fit on the
display page. To change the display pages, press the appropriate number buttons
in the display.
Rhythm/Keyboard Percussion
Reference Page
Rhythm Pattern Program
(page 148)
The color of the selected rhythm name changes to orange, indicating that it has
been selected.
DDK-7 Owner’s Manual
61
Page 62

Rhythm Structure
Each rhythm is made up of “sections.” Since each section is a rhythmic variation of
the basic rhythm, you can use them to add “spice” to your performance and mix up
the beats while you are playing. You can freely change the section while the rhythm
is played back.
INTRO
This is used for the beginning of the song. There are three Intro sections that can be
selected with INTRO [1] – [3] buttons. When the Intro finishes playing, the
rhythm automatically shifts to the Main section.
5
Rhythm/Keyboard Percussion
Selected Intro section’s lamp is lit
MAIN
This is used for playing the main part of the song. There are four Main sections that
can be selected with MAIN/FILL IN [A] – [D] buttons. The rhythm pattern of
several measures repeats indefinitely.
Selected Main section’s lamp is lit
FILL IN
This is designed for use as a temporary and regular rhythmic pattern to spice up a
repeating rhythm. There are four Fill In sections that can be played by pressing the
selected (lit) MAIN/FILL IN [A] – [D] buttons as desired. When one measure
pattern of Fill In finishes playing, the rhythm is automatically shifts to the Main
section.
DDK-7 Owner’s Manual
62
Selected Fill In section’s lamp flashes
Page 63

BREAK
This lets you add dynamic variations and breaks in the rhythm pattern. The Break
section is selected by pressing the [BREAK] button. When the one-measure Break
pattern finishes playing, the rhythm automatically shifts to the Main section.
The lamp is lit when the Break section is selected
ENDING
This is used for the ending of the song. There are three Ending sections that can be
selected with the ENDING [1] – [3] buttons. When the ending is finished, the
rhythm automatically stops.
Selected Ending section’s lamp is lit
5
Operating the rhythm from the panel
You can turn the rhythm on/off and switch the sections as desired by pressing the
buttons on the panel. Using the Fill Ins and Break patterns let you add dynamic
interest and “spice” to your performance.
To start/stop the rhythm:
START
The rhythm begins as soon as the [START] button is pressed.
To stop the rhythm, press the button again.
SYNCHRO START
The [SYNCHRO START] button puts the rhythm in “standby.”
The rhythm starts when you press a note on the Lower keyboard or
Pedalboard.
When you start the rhythm with the [SYNCHRO START] button,
pressing this button again stops the rhythm.
Rhythm/Keyboard Percussion
DDK-7 Owner’s Manual
63
Page 64

NOTE
When an Intro or Ending
pattern is playing, the Lower
Keyboard cannot be played.
5
Rhythm/Keyboard Percussion
NOTE
Pressing the ENDING [1]
button during playback of
the Main section will first call
up the fill in pattern, then the
Ending 1 pattern.
INTRO
Pressing one of the INTRO [1] – [3] buttons automatically adds
a short introduction before starting the actual (Main) rhythm.
First press one of the INTRO [1] – [3] buttons, then press the
[START] or [SYNCHRO START] button to actually start
the rhythm.
While the introduction is playing, the BAR/BEAT display
shows the countdown to the first measure of the pattern.
For example, if there is a four-measure lead-in for a pattern
in 4/4 time, the display at right appears:
ENDING
Pressing one of the ENDING [1] – [3] buttons automatically
adds an ending phrase before stopping the rhythm.
When you press the Ending button while rhythm is
playing back, the rhythm will automatically stop after the
ending phrase is played. You can have the ending gradually
slow down (ritardando) by pressing the ENDING button once again, while the ending
is playing.
To switch the rhythm sections:
You can change the rhythm section of the Main phrase by pressing the desired MAIN/
FILL IN [A] – [D] button. The selected section’s lamp (above the button) is lit.
To use the Fill In patterns:
As you play the DDK-7 along with the rhythm, occasionally press the selected MAIN/
FILL button as desired. The Fill In pattern (one measure) will be played and the
selected Fill In section’s lamp (above the button) flashes.
When you use the Auto Fill In function, Fill Ins will be played automatically. The Auto
Fill In function is set in the Rhythm Condition display.
Pressing the Rhythm button on the panel again (or pressing the rhythm name of the
selected rhythm in the display again) calls up the Rhythm Condition Display.
DDK-7 Owner’s Manual
64
Page 65

When Auto Fill is set to ON in the left side of the display, the Fill In pattern is
automatically played whenever you switch the Main sections.
To use the Break patterns:
As you play the DDK-7 along with the rhythm, occasionally press the [BREAK]
button.
Moreover, you can start/stop the rhythm and switch the sections by using the
Footswitch or optional footpedal. See page 194 for details.
Changing the rhythm volume
There are two ways to set the rhythm volume: using the VOLUME buttons on the
panel and using the volume slider in the display. The volume buttons let you make
coarse adjustments to the volume while the slider gives you fine control.
Using VOLUME buttons on the panel
(coarse):
Press the VOLUME buttons of the rhythm on the panel to
set the desired level. The buttons have seven volume
settings, from a minimum of 0, or no sound, to a
maximum of full volume.
Using VOLUME slider in the display (fine):
Pressing the rhythm button on the panel again (or pressing the rhythm name of the
selected rhythm in the display again) calls up the Rhythm Condition Display.
5
Rhythm/Keyboard Percussion
DATA CONTROL
To set the volume, touch the PERCUSSION VOLUME slider in the display or use the
Data Control Dial. The control range is from 0 (no sound) to 24 (full volume).
NOTE
Depending on the volume
value (set by the slider), two
adjacent VOLUME lamps
may be lit at the same time,
indicating an intermediate
position.
DDK-7 Owner’s Manual
65
Page 66

Adjusting the tempo
5
Rhythm/Keyboard Percussion
You can adjust the rhythm tempo by pressing
TEMPO Indicator
the TEMPO buttons. Pressing the right
button increases the tempo and pressing the
left button decreases it. Each rhythm has its
original (preset) tempo. Press the TEMPO
buttons simultaneously to restore the tempo
to the original setting.
Decreasing
the tempo
Increasing
the tempo
TEMPO display shows the current tempo. Displayed values are given in beats per
minute.
The tempo range is 40 to 240 beats per minute.
Each rhythm has its original (preset) tempo. Press [PRESET TEMPO] button in the
display to restore the tempo to the original setting.
When the rhythm begins playing, the TEMPO indicator changes function to a BAR/
BEAT indicator.
BAR/BEAT Indicator
Bar (measure)
Beat
On the BAR/BEAT indicator, the number on the left indicates the current bar or
measure and the one on the right indicates the number of the beat in each bar.
DDK-7 Owner’s Manual
66
Page 67

You can also see the Tempo and Bar/Beat indications in the Voice Display. In the Voice
Display, both Tempo and Bar/Beat can be seen in one display.
Reference Page
Voice Display (page 18)
5
Changing the rhythm reverb
You can adjust the amount of reverb applied to the rhythms and the percussion sounds
used in the rhythms in the Rhythm Condition display.
DATA CONTROL
When the Reverb depth for the entire instrument in Reverb Display Page 1
is set to the minimum, the setting here will have no effect.
Range: 0 – 24
Reference Page
Reverb (page 46)
Rhythm/Keyboard Percussion
DDK-7 Owner’s Manual
67
Page 68

Rhythm List
2
This list shows all available rhythms on the DDK-7. Numbers written at the left side of each column in this list
indicate the numbered buttons displayed in the Rhythm Menu.
MARCH
Marching Band 1
Marching Band 2
Marching Band 3
Alpine March
6/8 March 1
6/8 March 2
1
6/8 Kids
6/8 Organ March
Broadway
SF March
5
Rhythm/Keyboard Percussion
Wild West
Baroque
WALTZ
Vienna Waltz
Orchestra Waltz
Simple Waltz
Gentle Waltz
Guitar Serenade
1
Snow Waltz
Classic Waltz
Mariachi
Alpine Waltz
Musette
Jazz Waltz 1
Jazz Waltz 2
Jazz Waltz 3
2
Jazz Waltz 4
Modern Waltz
Pop Waltz
Country Waltz
SWING&JAZZ
Big Band 1
Big Band 2
Big Band 3
Big Band 4
Big Band 5
Big Band 6
1
Big Band 7
Big Band Bop
Orch. Big Band
Orchestra Swing
Movie Panther
Jungle Drum
Jazz Club
Simple Swing
2
Acoustic Jazz
Medium Jazz
Fast Jazz
Combo Swing
Cool Combo
Light Swing
2
Afro Cuban 1
Afro Cuban 2
Bebop
Five-Four
Jazz Ballad 1
Jazz Ballad 2
Movie Swing
Piano Trio
Midnight Swing
3
Slow Jazz
Moonlight 1
Moonlight 2
Winter Song 1
Winter Song 2
Foxtrot
Slowfox
Quickstep
Dixieland 1
4
Dixieland 2
Dixieland Jazz
Ragtime
Charleston
Guitar Swing
POPS
8Beat Light 1
8Beat Light 2
8Beat Light 3
8Beat Light 4
Folk Rock 1
Folk Rock 2
1
60’s 8Beat
Asian Pops
Unplugged 1
Unplugged 2
Unplugged 3
8Beat Adria
Bubblegum Pop
70’s 8Beat
Tijuana
SingerSongWriter
2
Surfin’ 8Beat
Finger Pickin’
Heart Beat
Guitar Pop
2 British 16Beat
16Beat 1
16Beat 2
16Beat 3
16Beat 4
3
Fusion Shuffle 1
Fusion Shuffle 2
Jazz Pop
16Beat Shuffle 1
16Beat Shuffle 2
Pop Shuffle
Eurovision Pop
British Pop
4
Sing Along
Simple Shuffle 1
Simple Shuffle 2
Simple Shuffle 3
R&B
Blues Rock
Motor City
Soul 1
Soul 2
16Beat Soul
Frankly Soul
1
Gospel Funk
Jazz Funk
Funk Beat 1
Funk Beat 2
Detroit Pop 1
Detroit Pop 2
New R&B
Modern R&B
New Gospel
Cool Blues
Gospel Shuffle
2
Gospel Sisters
Amazing Gospel
6/8 Blues
Slow Blues
6/8 Soul
Blues Shuffle
LATIN
Samba
Big Band Samba
Light Samba 1
1
Light Samba 2
Pop Samba 1
Pop Samba 2
Bossa Nova 1
Bossa Nova 2
1
Bossa Nova 3
Pop Bossa
Mambo 1
Mambo 2
Salsa 1
Salsa 2
2
Montuno
Calypso
Cha Cha Cha
Big Band Cha Cha
Pop Cha Cha
Rumba
Pop Rumba
Fast Rumba
Guitar Rumba
Beguine 1
3
Beguine 2
Cuban Bolero
Tango 1
Tango 2
Tango Orchestra
Tango Milonga
WORLD MUSIC
Bolero
Flamenco
Pop Flamenco
Pasodoble
Polka 1
1
Polka 2
Banda Polka
Irish Dance
Tarantella
Sirtaki
Enka
Reggae
Happy Reggae
Sheriff Reggae
Shuffle Reggae
Bluegrass 1
Bluegrass 2
2
Hoedown
Country 2/4
Country Shuffle
Country Band
Hawaiian
Mexican Dance
DDK-7 Owner’s Manual
68
Page 69

BALLAD
Power Ballad
Dramatic Ballad
Movie Ballad 1
Movie Ballad 2
Secret Service
Carpenters Pop
1
Romantic Ballad
Love Song
16Beat Ballad 1
16Beat Ballad 2
16Beat Ballad 3
Easy Ballad
Guitar Ballad 1
Guitar Ballad 2
Guitar Ballad 3
Organ Ballad
Chart Ballad
2
Analog Ballad
Pop Ballad
8Beat Modern
Chillout
Slow&Easy
6/8 Slow Rock 1
6/8 Slow Rock 2
6/8 Orchestra 1
3
6/8 Orchestra 2
6/8 Ballad
Acoustic Ballad
ROCK
Power Rock
Southern Rock
60’s Rock 1
60’s Rock 2
Hard Rock 1
Hard Rock 2
1
Rock Shuffle 1
Rock Shuffle 2
Tears Rock 1
Tears Rock 2
Soft Rock
British Rock
Country Rock 1
Country Rock 2
New Country
Cowboy Rock
Rock&Roll 1
2
Rock&Roll 2
Skiffle
Caribbean Rock
R&R Shuffle
Jive
Boogie Woogie
DANCE
Ibiza 1
Ibiza 2
Euro Trance
Disco Teens
Techno Party
1
Club Dance
Dream Dance
Club House
UK Pop
US Disco
Swing House
US Pop
US Hip Hop
Classic Hip Hop
Trip Hop
Chart Pop
2
Ground Beat
Hip Hop Groove
Hip Hop Pop
Hip Hop Light
Euro Hip Hop
Latin DJ’s
Club Latin
Latin Disco 1
Latin Disco 2
Garage
3
6/8 Trance
80’s Dance
Pop Beat 1
Pop Beat 2
Funky Dance
Disco Philly 1
Disco Philly 2
70’s Disco 1
4
70’s Disco 2
Disco Funk
Disco Chocolate
Dance Pop
Certain rhythms created for use with slow, soft
Songs or for Songs that do not use a bass part at the
Table 1:
beginning, may not have drum sections. To use
these rhythms, refer to the following information.
Some sections of the following nine rhythms are
configured with accompaniment only; they do not
contain any drum or percussion.
•
Category Rhythm Section
MARCH
WALTZ
WORLD
MUSIC
BALLAD Dramatic Ballad Main A
ROCK R&R Shuffle Ending 1
6/8 Organ March Main A, Main B
Baroque All sections except Intro 1
Simple Waltz Ending 1
Guitar Serenade All sections except Intro 1
Banda Polka Main A, Fill In A
Hoedown Ending 1
Mexican Dance Main A, Fill In A
Some sections of the following five rhythms do not
contain an Auto Bass part. This means that even
though the Auto Bass Chord is turned on, the bass
part will not sound.
•Guitar Serenade in the WALTZ category
•Folk Rock 1 in the POPS category
•Unplugged 1 in the POPS category
•Pop Flamenco in WORLD MUSIC category
•New Country in the ROCK category
5
Rhythm/Keyboard Percussion
DDK-7 Owner’s Manual
69
Page 70

5
Rhythm/Keyboard Percussion
Accompaniment
3
The Accompaniment function provides arpeggiated chords and other instrumental
embellishments when rhythms are used.
Accompaniment controls are selected from the Rhythm Menu and Rhythm Condition
display.
Select the desired rhythm name in the display.
1
Accompaniment parts
At the bottom of the display, there are seven part buttons, such as Chord 1,
Chord 2, Pad, and so on. These parts, with the exception of Main Drum and
Add Drum, are Accompaniment parts.
Turn the desired parts on.
2
The Accompaniment consists of five parts, Chord 1, Chord 2, Pad, Phrase 1,
and Phrase 2, and each of them can be set to on or off by pressing corresponding
button in the display.
If you turn all the parts off, the Accompaniment does not sound.
CHORD 1/CHORD 2:
These are the rhythmic chord backing parts.
PAD:
This part features sustained chords and commonly uses lush sounds such as
strings and organ.
PHRASE 1/PHRASE 2:
These parts are used for various embellishments and riffs that enhance the song,
such as brass section accents and chord arpeggios.
Not all parts contain accompaniment data. Some parts may be empty depending
on the selected rhythm and rhythm section.
Main Drum and Add Drum contains the drum and percussion rhythm patterns.
When you turn both Main Drum and Add Drum off, the drum and percussion do
not sound. Generally, Main Drum contains the main part of the rhythm and Add
drum has additional percussion sounds, such as tambourine.
DDK-7 Owner’s Manual
70
Page 71

Adjust the volume and amount of reverb applied to the
3
Accompaniment.
Pressing the rhythm button on the panel again calls up the Rhythm Condition
display.
The two sliders at the right side of the display can control the Accompaniment
volume and reverb. Touch the slider in the display or use the Data Control dial
to adjust the volume/reverb.
DATA CONTROL
5
Automatic Accompaniment
4
– Auto Bass Chord (A.B.C.)
The Auto Bass Chord (A.B.C.) function works with the Rhythm section of the DDK-7
to automatically produce bass accompaniment as you play. It adds an entirely new
dimension to your performance by effectively putting a full backing band at your
disposal. There are three modes used for producing Automatic Accompaniment
patterns.
Before using the A.B.C. function, turn Pedal Poly off. If Pedal Poly is set to on, the bass
pattern of the A.B.C. will not sound.
To set the A.B.C. function:
Rhythm Condition Display
Reference Page
POLY (page 42)
Rhythm/Keyboard Percussion
Select the A.B.C. modes in the Rhythm Condition Display.
12
DDK-7 Owner’s Manual
71
Page 72

1 A.B.C. MODE
OFF:
Cancels the Auto Bass Chord function.
SINGLE FINGER:
The Single Finger mode provides the fastest and easiest means to obtain many different
chord/bass combinations. You can produce major, minor, 7th, and minor 7th chords by
simply using one, or at most, two or three fingers to play the chords. The chord
produced will sound in the same octave regardless of where it is played on the Lower
keyboard.
5
Rhythm/Keyboard Percussion
C
Key of C
Major chords:
Press the root of the chord (the note that corresponds to the chord’s
Cm
name).
Minor chords:
C7
Simultaneously press the root and any one black key to the left of it.
7th chords:
Simultaneously press the root and any one white key to the left of it.
Cm7
Playing single finger chords without the use of the rhythm lets you add full continuous
chords to your performance.
Minor 7th chords:
Simultaneously press the root as well as any black key and any white
key to the left of it.
FINGERED CHORD:
The Fingered Chord mode automatically produces bass accompaniment for chords
played in the Lower keyboard. It allows you to use a wider range of chord types than in
the Single Finger mode. In the Fingered Chord mode, you play full chords while the
Auto Bass Chord function automatically selects the appropriate bass pattern. If you play
only one or two notes in the Lower keyboard, the appropriate chord will sound on the
basis of the previously played chord.
NOTE
When playing certain chords
(aug, dim7, sus4, 6, and
m6), make sure to play the
root of the chord as the
lowest note in that chord.
Key of C
C Cm C7 Cm7 Cmaj7
CaugCm maj7 Cdim Cdim7 Csus4
Cm7-5C7sus4 C6 Cm6 Cadd9
Playing fingered chords without the use of the rhythm lets you add full continuous
chords to your performance.
CUSTOM A.B.C.:
The Custom A.B.C. mode is a slight variation on the Fingered Chord mode. It allows
you to determine what bass notes will be played in the accompaniment by playing a note
on the Pedalboard along with the chords you play in the Lower keyboard.
DDK-7 Owner’s Manual
72
Page 73

2 MEMORY
LOWER:
When this is set to on, the Lower keyboard Voices and chord accompaniment keep
playing even after you release your fingers from the Lower keyboard, while the rhythm
plays.
PEDAL:
When this is set to on, the Pedalboard Voices and bass accompaniment keep playing
even after you release your foot from the Pedalboard, while the rhythm plays.
(In the Single Finger and Fingered modes:) When this is set to on, the bass
accompaniment of the Pedalboard Voices keeps playing even after you release your
fingers from the Lower keyboard.
When you start the rhythm with [SYNCHRO START] button, set the Lower/Pedal
Memory to on. When Memory is off, releasing your fingers from Lower keyboard stops
the rhythm.
5
Melody On Chord (M.O.C.)
The Melody On Chord (M.O.C.) feature automatically adds a harmony part to the
melodies you play on the Upper keyboard. The harmony is derived from the chords
you play on the Lower keyboard – or from the chords that are played for you, if you use
Automatic Accompaniment. Melody On Chord has three different modes, each
providing a different set of harmonics to accompany the melody played. Melody On
Chord can also be controlled with the Footpedal.
5
Rhythm/Keyboard Percussion
To set the M.O.C. function:
Press the [VOICE DISPLAY] button, then call up the Page 3 by using the Page
buttons.
Voice Display [Page 3]
The Melody On Chord display appears.
DDK-7 Owner’s Manual
73
Page 74

Reference Page
Controlling Melody On Chord
(with Footpedal); (page 200)
1 M.O.C. MODE
OFF:
Cancels the Melody On Chord function.
Mode 1:
Produces harmonies of up to two notes in a range close to the melody played.
Mode 2:
Produces harmonies of up to three notes in a range close to the melody played.
Mode 3:
Produces harmonies of up to four notes in a range relatively distant from the melody
played.
Melody On Chord can be heard only when the Upper Keyboard Voice section’s volume
is set to the appropriate value. Melody On Chord does not apply to the Lead Voices.
5
Rhythm/Keyboard Percussion
NOTE
In the Voice Display, each
Voice section can be muted
(page 19).
Keyboard Percussion
6
The Keyboard Percussion function features many types of drum and percussion
sounds, playable from the keyboards and Pedalboard.
Keyboard Percussion has two different modes, Preset and User. Preset Keyboard
Percussion lets you play the preset drum kit sounds from the keyboards (assigned
beforehand to the keys), while the User Keyboard Percussion lets you freely assign the
drum sounds to any key or pedal you wish.
Using the Preset Keyboard Percussion
Turn off the Upper, Lower and/or Pedal Voices by setting each
1
Voice’s volume to MIN.
Turn on the Keyboard Percussion function by pressing the
2
[K.B.P.1] or [K.B.P.2] button.
The Keyboard Percussion (K.B.P.) Display appears.
NOTE
Two Keyboard Percussion
sets, [K.B.P.1] and [K.B.P.2],
can be played at the same
time by setting both buttons
to on.
Reference Page
Connecting a Pedal Unit
(page 229)
DDK-7 Owner’s Manual
74
Pressing the [K.B.P.1] button calls up the Preset 1 kit on the Upper/Lower
keyboards, and pressing [K.B.P.2] button calls up the Preset 2 kit on the
Pedalboard.
Page 75

Select the desired percussion kit.
3
As a default, Multi Kit is assigned to the keyboards but you can change the kit
from a total of 16 different kits. Pressing the Kit button on the display calls up
the Percussion Kit List. Choose the desired Kit within the list.
For details of percussion assignments for each kit, see the Preset Keyboard
Percussion List on page 76.
The message “Are you sure you want to clear all assignments and setup data?” may
appear when you change the kit. Select [CLEAR] to clear all assignments (made in
the ASSIGN Page) and detailed settings (made in the SETUP Page) and call up the
selected kit on the panel. Select [CANCEL] to call up the selected kit without
erasing the assignments and detailed settings.
5
Adjust the volume and amount of reverb applied to the Keyboard
4
Percussion.
Two sliders in the K.B.P. display determine the reverb and volume settings.
DATA CONTROL
The settings here determine the reverb/volume for the entire Keyboard
Percussion setup, not for each percussion instrument. You can, however, adjust
each percussion instrument’s reverb/volume (page 83).
Rhythm/Keyboard Percussion
Play some notes on the keyboards.
5
DDK-7 Owner’s Manual
75
Page 76

Preset Keyboard Percussion List
C1
C1
D1
D1
E1
F1
F1
G1
G1
A1
A1
B1
C2
C2
5
Rhythm/Keyboard Percussion
D2
E2
F2
G2
A2
B2
C3
D3
E3
F3
G3
A3
B3
C4
D4
E4
F4
G4
A4
B4
C5
D5
E5
F5
G5
A5
B5
C6
D2
F2
G2
A2
C3
D3
F3
G3
A3
C4
D4
F4
G4
A4
C5
D5
F5
G5
A5
Multi Kit Standard Kit 1 - Symphony Kit
Preset 2(PK) Preset 1(LK) Preset 1(UK) Preset 2(PK) Preset 1(LK) Preset 1(UK)
Bass Drum Heavy - Kick -
SD Brush Roll - Side Stick Surdo Mute
Snare Drum Heavy - Snare Surdo Open
SD Brush Shot 1 Claves Hand Clap Hi Q
SD Reverb 1 - Snare Tight Whip Slap
Snare Drum Light - Floor Tom L Scratch H
Tom 3 Synth Tom 3 Hi-Hat Closed Scratch L
Snare Drum Rim 1 Concert BD Floor Tom H Finger Snap
Tom 2 Synth Tom 2 Hi-Hat Pedal Click Noise
Hi-Hat Close Bass Drum Heavy Low Tom Metronome Click
Tom 1 Synth Tom 1 Hi-Hat Open Metronome Bell
Hi-Hat Open Bass Drum Light Mid Tom L Seq Click L
Ride Cymbal 1 Snare Drum Heavy - Mid Tom H Seq Click H -
Synth Tom 3 SD Brush Roll - Crash Cymbal 1 Br ush Tap -
Crash Cymbal 1 Snare Dr um Heavy - High Tom Brush Swirl -
Synth Tom 2 SD Brush Shot 1 - Ride Cymbal 1 Brush Slap -
Orchestra Cymbal SD Reverb 1 - Chinese Cymbal Brush Tap Swirl -
- Snare Drum Light - Ride Cymbal Cup Snare Roll -
Synth Tom 1 Tom 3 - Ta mbourine Castanet -
- Snare Drum Rim 1 - Splash Cymbal Snare Soft -
Tom 2 - Sticks -
Hi-Hat Close - Kick Soft -
Tom 1 - Open Rim Shot -
Hi-Hat Open - Kick Tight -
Ride Cymbal 1 - Kick Bongo H
Orch Snare Drum - Side Stick Bongo L
Crash Cymbal 1 - Snare Conga H Mute
Snare Drum Roll - Hand Clap Conga H Open
Orchestra Cymbal - Snare Tight Conga L
Orch Cymbal Roll - Floor Tom L Timbale H
Tr iangle Mute - Hi-Hat Closed Timbale L
Tambourine - Floor Tom H Agogo H
Tr iangle Open - Hi-Hat Pedal Agogo L
Castanet - Low Tom Cabasa
Cowbell 1 - Hi-Hat Open Maracas
Timbale 1 Low - Mid Tom L Samba Whistle H
Timbale 1 High - Mid Tom H Samba Whistle L
Wood Block Low - Crash Cymbal 1 Guiro Short
Conga Low - High Tom Guiro Long
Wood Block High - Ride Cymbal 1 Claves
Conga High - Chinese Cymbal Wood Block H
Bongo Low - Ride Cymbal Cup Wood Block L
Agogo Low - Tambour ine Cuica Mute
Bongo High - Splash Cymbal Cuica Open
Agogo High - Cowbell Tr iangle Mute
Cuica Low - Crash Cymbal 2 Tr iangle Open
Hand Claps - Vibraslap Shaker
Cuica High - Ride Cymbal 2 Jingle Bells
Shaker - - Bell Tree
- -
- -
- -
- -
- -
- -
- -
- -
- -
- -
- -
- -
: Indicates the keys of the DDK-7 keyboard and DDKU-P7.
*The 10 kits, Standard Kit 2 – Symphony Kit, have the same sound assignments as Standard Kit 1.
DDK-7 Owner’s Manual
76
Page 77

C1
D1
E1
F1
G1
A1
B1
C2
D2
E2
F2
G2
A2
B2
C3
D3
E3
F3
G3
A3
B3
C4
D4
E4
F4
G4
A4
B4
C5
D5
E5
F5
G5
A5
B5
C6
SFX Kit 1 SFX Kit 2
Preset 2(PK) Preset 1(LK) Preset 1(UK) Preset 2(PK) Preset 1(LK) Preset 1(UK)
Cutting Noise 1 - Phone Call -
Cutting Noise 2 - Door Squeak -
C1
- - Door Slam -
String Slap - Scratch Cut -
D1
- - Scratch H 3 -
- - Wind Chime -
- - Telephone Ring -
F1
- - - -
- - - -
G1
- - - -
- - - -
A1
- - - -
- - - - - -
- - - - - -
C2
- - - - - -
- - - - - -
D2
Flute Key Click - - CarEngnIgnition - -
- - - Car Tires Squeal - -
- - - Car Passing - -
F2
- - - Car Crash - -
G2
A2
C3
D3
F3
G3
A3
C4
D4
F4
G4
A4
C5
D5
F5
G5
A5
- - - -
- - - -
- - - -
- - - -
Cutting Noise 1 - Phone Call Burst
Cutting Noise 2 - Door Squeak Roller Coaster
- - Door Slam Submarine
String Slap - Scratch Cut -
- - Scratch H 3 -
- - Wind Chime -
- - Telephone Ring -
- - - -
- Shower - Laugh
- Thunder - Scream
- Wind - Punch
- Stream - Heart Beat
- Bubble - Foot Steps
- Feed - -
- - - -
- - - -
Flute Key Click - CarEngnIgnition -
- - Car Tires Squeal -
- - Car Passing -
- - Car Crash -
- - Siren -
- - Tr ain -
- - Jet Plane -
- - Starship -
- Dog - Machine Gun
Horse Laser Gun
Bird Tweet Explosion
- Firework
- -
- -
Ghost -
Maou -
- -
- -
- -
- -
- -
5
Rhythm/Keyboard Percussion
DDK-7 Owner’s Manual
77
Page 78

C1
C1
D1
D1
E1
F1
F1
G1
G1
A1
A1
B1
C2
C2
D2
D2
E2
5
Rhythm/Keyboard Percussion
F2
G2
A2
B2
C3
D3
E3
F3
G3
A3
B3
C4
D4
E4
F4
G4
A4
B4
C5
D5
E5
F5
G5
A5
B5
C6
F2
G2
A2
C3
D3
F3
G3
A3
C4
D4
F4
G4
A4
C5
D5
F5
G5
A5
Arabic Kit Pop Latin Kit
Preset 2(PK) Preset 1(LK) Preset 1(UK) Preset 2(PK) Preset 1(LK) Preset 1(UK)
Kick Soft - Bongo H Open 1 f -
Side Stick - Bongo H Open 3 f -
Snare Soft - Bongo H Rim -
Arabic Hand Clap - Bongo H Tip -
Snare Drum - Bongo H Heel -
Floor Tom L - Bongo H Slap -
Hi-Hat Closed - Bongo L Open 1 f Hand Clap
Floor Tom H - Bongo L Open 3 f -
Hi-Hat Pedal - Bongo L Rim -
Low Tom - Bongo L Tip -
Hi-Hat Open - Bongo L Heel Conga H Tip
Mid Tom L - Bongo L Slap Conga H Heel
Mid Tom H Nakarazan Dom - Timbale L Open Conga H Open -
Crash Cymbal 1 Cabasa - - Conga H Mute -
High Tom Nakarazan Edge - - Conga H SlapOpen -
Ride Cymbal 1 Hager Dom - - Conga H Slap -
Crash Cymbal 2 Hager Edge - - Conga H SlapMute -
Duhulla Dom Bongo H - Paila L Conga L Tip -
Tambourine Bongo L - Timbale H Open Conga L Heel -
Duhulla Tak Conga H Mute - - Conga L Open -
Conga H Open - Conga L Mute -
Conga L - Conga L SlapOpen -
Zagrouda H - Conga L Slap -
Zagrouda L - Conga L Slide -
Kick Soft Katem Dom Bongo H Open 1 f Cowbell Top
Side Stick Katem Tak Bongo H Open 3 f -
Snare Soft Katem Sak Bongo H Rim -
Arabic Hand Clap Katem Tak Bongo H Tip -
Snare Drum Doff Tak Bongo H Heel Guiro Short
Floor Tom L Tab la Dom Bongo H Slap Guiro Long
Hi-Hat Closed Ta bla Tak 1 Bongo L Open 1 f -
Floor Tom H Ta b la Tik Bongo L Open 3 f -
Hi-Hat Pedal Ta bla Tak 2 Bongo L Rim Tambourine
Low Tom Tab la Sak Bongo L Tip -
Hi-Hat Open Ta bla Roll Edge Bongo L Heel -
Mid Tom L Ta bla Flam Bongo L Slap -
Mid Tom H Sagat 1 Timbale L Open Maracas
Crash Cymbal 1 Tabel Dom - Shaker
High Tom Sagat 3 - Cabasa
Ride Cymbal 1 Tabel Tak - Cuica Mute
Crash Cymbal 2 Sagat 2 - Cuica Open
Duhulla Dom Rik Dom Paila L -
Tambourine Rik Tak 2 Timbale H Open -
Duhulla Tak Rik Finger 1 - -
Cowbell Rik Tak 1 - -
Duhulla Sak Rik Finger 2 - Tr iangle Mute
Claves Rik BrassTremolo - Tr iangle Open
Doff Dom Rik Sak Paila H -
- Rik Tik - Wind Chime
- -
- -
- -
- -
- -
- -
- -
- -
- -
- -
- -
- -
DDK-7 Owner’s Manual
78
Page 79

Assigning sounds to the User Keyboard Percussion
You can assign any desired drum and percussion sound to any key or pedal, and your
original setups can be saved to eight memory locations: User 1 through User 8. The
User setting saved in User memory location can be called up by using the [K.B.P.1] or
[K.B.P.2] buttons.
In the instructions below, drum sounds are assigned to User 1 and called up with
[K.B.P.1] button.
Turn on the Keyboard Percussion function by pressing the
1
[K.B.P.1] button.
The K.B.P. display appears.
Press [USER 1] on the display.
2
This procedure assigns User 1 to the [K.B.P.1] button. You can call up the User 1
setting the next time you press the [K.B.P.1] button.
Select the desired percussion kit.
3
See page 75 for selecting the kit.
Press the [ASSIGN] button at the top right of the display to call
4
up the ASSIGN Page.
In the ASSIGN Page, you can assign specific drum sounds to any of the keys.
5
Select the desired drum instrument that you wish to assign to
5
a key.
Select the desired drum instrument category with the category buttons in the
display. The drum instrument menu of the selected category appears.
Drum Instrument Category
Rhythm/Keyboard Percussion
Reference Page
Kit Assign List (page 85)
Drum Instrument Menu
DDK-7 Owner’s Manual
79
Page 80

NOTE
Though eight User Keyboard
Percussion setups can be
created, they cannot be
memorized to Registration
Memory. Only on/off data and
the Keyboard Percussion
Menu are memorized to
Registration Memory.
Assign an instrument to a particular key or pedal by
6
simultaneously holding down the desired instrument name in the
display and pressing the key (or pedal) to which the instrument is
to be assigned.
The key to which the instrument is to be assigned
Instrument Name
5
Rhythm/Keyboard Percussion
Press the key.
Hold down the Instrument name…
When the assignment is complete, the key name and instrument name is
displayed at the top of the display. The assignments are saved to the User
memory selected in Step 2 (in this example, User 1).
Repeat the operation steps above as necessary to construct your
7
own User Keyboard Percussion set.
To erase one instrument:
Simultaneously hold down the [CLEAR] button in the display (ASSIGN Page) and
press the key (or pedal) corresponding to the instrument you wish to erase.
DDK-7 Owner’s Manual
80
The Keyboard Percussion setting you have created is automatically saved
when you switch to another display. While data is being saved, the square at
the top left of the display turns light blue for a few seconds. Do not turn the
power off while the Keyboard Percussion settings are being saved.
Page 81

To erase all instruments:
You can clear all assignments using the [CLEAR] button in the display (ASSIGN Page).
Press, then release the [CLEAR] button. The following display
1
appears, prompting confirmation of the operation.
Press [CLEAR] in the display to erase all data. When [CLEAR] is
2
selected, a “Completed” message momentarily appears on the
display.
Press [CANCEL] in the display to abort the operation.
5
Copying the Keyboard Percussion settings
You can copy the Preset Keyboard Percussion to one of the User locations, or copy from
one User location to another. In the instructions below, Preset 1 is copied to User 1.
Press the [K.B.P.1] button to copy Preset 1.
1
To copy Preset 1, select the [K.B.P.1] button; to copy Preset 2, select the
[K.B.P.2] button. To copy either User location, select button [K.B.P.1] or
[K.B.P.2].
Press the [MENU] button at the top right of the display to call up
2
the MENU Page.
Rhythm/Keyboard Percussion
DDK-7 Owner’s Manual
81
Page 82

5
Rhythm/Keyboard Percussion
Within the Menu buttons, select the User location as the
3
destination — for example, User 1.
Press the COPY [FROM] button in the display. A list appears,
4
letting you select the copy source location.
Select the copy source (Preset 1 here) from the list.
5
A message appears, prompting confirmation of the operation.
Press the [COPY] button in the display to copy Preset 1. When
6
[COPY] is selected, a “Completed” message momentarily
appears in the display.
Press the [CANCEL] button in the display to abort the operation.
DDK-7 Owner’s Manual
82
Page 83

Detailed settings for each percussion instrument
You can independently adjust the settings of pan, pitch, reverb and volume for each
instrument. The settings here are system settings that cannot be memorized to
Registration memory.
Turn off the volume of the relevant keyboard (the keyboard to
1
which the instrument to be changed is assigned).
Press the [SETUP] button at the top right of the K.B.P. display to
2
call up the SETUP Page.
Press the appropriate key (the key to which the instrument to be
3
changed is assigned).
The selected instrument’s name is shown on the display and you can change its
settings.
The name of the
selected instrument
5
1
2345 6
1 PAN
Determines the position of the currently selected instrument in the stereo image. Seven
pan positions are available.
2 PITCH COARSE
Adjusts the pitch of the currently selected instrument by 100 cents.
Range: -64 – +63
3 PITCH FINE
Adjusts the pitch of the currently selected instrument by one cent, allowing more
detailed tuning of the instrument than PITCH COARSE (
Range: -64 – +63
2).
Rhythm/Keyboard Percussion
4 REVERB
Determines the amount of reverb applied to the currently selected instrument.
Range: 0 – 24
5 VOLUME
Determines the volume of the currently selected instrument.
Range: 0 – 24
DDK-7 Owner’s Manual
83
Page 84

6 RESET
Initializes settings such as pan, pitch, and reverb to their default values.
Pressing the [EXECUTE] button calls up the following display, prompting
confirmation of the operation.
5
Rhythm/Keyboard Percussion
Press the [EXECUTE] button in the display to restore (initialize) the default settings.
When [EXECUTE] is selected, a “Complete” message momentarily appears on the
display.
Press the [CANCEL] button in the display to abort the operation.
DDK-7 Owner’s Manual
84
Page 85

Kit Assign List
Multi Kit
CYMBAL
Crash Cymbal 1
Crash Cymbal 2
Crash Cym Mute
Ride Cymbal 1
Ride Cymbal 2
Ride Cymbal Cup
Orchestra Cymbal
Orch Cymbal Roll
Orch Cymbal Mute
Cymbal March
Cym Brush Shot
Tam - Tam
HI-HAT
Hi-Hat Open
Hi-Hat Close
Hi-Hat Pedal 1
Hi-Hat Pedal 2
Analog HH Open
Analog HH Close
SNARE DRUM
Snare Drum Light
Snare Drum Heavy
Snare Drum Rim 1
Snare Drum Rim 2
SD Accent 1
SD Accent 2
SD Reverb 1
SD Reverb 2
Synth Snare Drum
Orch Snare Drum
Snare Drum Roll
Analog SD
SNARE BRUSH
SD Brush Shot 1
SD Brush Shot 2
SD Brush Roll
TOM
Tom 1
Tom 2
Tom 3
Tom 4
Tom Brush Shot 1
Tom Brush Shot 2
Tom Brush Shot 3
Tom Brush Shot 4
Synth Tom 1
Synth Tom 2
Synth Tom 3
BASS DRUM
Bass Drum Light
Bass Drum Heavy
Bass Drum Attack
Synth Bass Drum
Bass Drum March
Concert BD
Analog BD Short
Analog BD Long
CONGA/BONGO
Conga High
Conga Low
Conga Slap
Conga Muff
Conga Slide
Bongo High
Bongo Low
Bongo Slap
Bongo Mute
CUICA/SURDO
Cuica High
Cuica Middle
Cuica Low
Tamborim Open
Tamborim Mute
Surdo Open
Surdo Mute
Surdo Rim
Surdo Muff
TIMBALES/COWBELL
Timbale 1 High
Timbale 1 Low
Timbale 2 High
Timbale 2 Low
Timbale 3 High
Timbale 3 Low
Timbale 4 High
Timbale 4 Low
Cowbell 1
Cowbell 2
Cowbell 3
Cowbell 4
PERCUSSION 1
Cabasa
Shaker
Maracas High
Maracas Low
Guiro Short
Guiro Long
Wood Block High
Wood Block Mid
Wood Block Low
Claves
Castanet
Vibraslap
PERCUSSION 2
Agogo High
Agogo Low
Triangle Open
Triangle Mute
Windbell Down
Windbell Up
Tambourine
Pandeiro
Bells
Hand Claps
Finger Snap
Scratch
Noise Percussion
PERCUSSION 3
Kotsuzumi 1
Kotsuzumi 2
Kotsuzumi 3
Kotsuzumi 4
Ohtsuzumi 1
Ohtsuzumi 2
Taiko 1
Taiko 2
Ohdaiko 1
Ohdaiko 2
Kakegoe 1
Kakegoe 2
Kakegoe 3
Standard Kit 1
CYMBAL
Crash Cymbal 1
Crash Cymbal 2
Splash Cymbal
Chinese Cymbal
Ride Cymbal 1
Ride Cymbal 2
Ride Cymbal Cup
Hi-Hat Open
Hi-Hat Closed
Hi-Hat Pedal
SNARE DRUM
Snare
Snare Tight
Snare Soft
Snare Roll
Side Stick
Open Rim Shot
Brush Tap
Brush Slap
Brush Swirl
Brush Tap Swirl
TOM
Floor Tom L
Floor Tom H
Low Tom
Mid Tom L
Mid Tom H
High Tom
BASS DRUM
Kick
Kick Tight
Kick Soft
PERCUSSION 1
Conga H Open
Conga L
Conga H Mute
Bongo H
Bongo L
Timbale H
Timbale L
Cowbell
Claves
Guiro Long
Guiro Short
Maracas
Vibraslap
PERCUSSION 2
Surdo Mute
Surdo Open
Cuica Mute
Cuica Open
Cabasa
Shaker
Agogo H
Agogo L
Samba Whistle H
Samba Whistle L
PERCUSSION 3
Tambourine
Castanet
Jingle Bells
Bell Tree
Triangle Open
Triangle Mute
Wood Block H
Wood Block L
Sticks
Whip Slap
Finger Snap
Hand Clap
PERCUSSION 4
Hi Q
Click Noise
Scratch H
Scratch L
Seq Click L
Seq Click H
Metronome Click
Metronome Bell
Standard Kit 2
CYMBAL
Crash Cymbal 1
Crash Cymbal 2
Splash Cymbal
Chinese Cymbal
Ride Cymbal 1
Ride Cymbal 2
Ride Cymbal Cup
Hi-Hat Open
Hi-Hat Closed
Hi-Hat Pedal
SNARE DRUM
Snare Short
Snare Tight H
Snare Soft 2
Snare Roll
Side Stick Light
Open Rim Shot H
Brush Tap
Brush Slap
Brush Swirl
Brush Tap Swirl
TOM
Floor Tom L
Floor Tom H
Low Tom
Mid Tom L
Mid Tom H
High Tom
BASS DRUM
Kick Short
Kick Tight
Kick Soft
PERCUSSION 1
Conga H Open
Conga L
Conga H Mute
Bongo H
Bongo L
Timbale H
Timbale L
Cowbell
Claves
Guiro Long
Guiro Short
Maracas
Vibraslap
PERCUSSION 2
Surdo Mute
Surdo Open
Cuica Mute
Cuica Open
Cabasa
Shaker
Agogo H
Agogo L
Samba Whistle H
Samba Whistle L
PERCUSSION 3
Tambourine
Castanet
Jingle Bells
Bell Tree
Triangle Open
Triangle Mute
Wood Block H
Wood Block L
Sticks
Whip Slap
Finger Snap
Hand Clap
PERCUSSION 4
Hi Q
Click Noise
Scratch H
Scratch L
Seq Click L
Seq Click H
Metronome Click
Metronome Bell
Hit Kit
CYMBAL
Crash Cymbal 1
Crash Cymbal 2
Splash Cymbal
Chinese Cymbal
Ride Cymbal 1
Ride Cymbal 2
Ride Cymbal Cup
Hi-Hat Open 2
Hi-Hat Closed 2
Hi-Hat Pedal 2
SNARE DRUM
Snare Ambient
Snare Tight 2
Snare Electro
Snare Roll
Stick Ambient
Snare Pitched
Brush Tap
Brush Slap
Brush Swirl
Brush Tap Swirl
TOM
Hybrid Tom 1
Hybrid Tom 2
5
Rhythm/Keyboard Percussion
DDK-7 Owner’s Manual
85
Page 86

Hybrid Tom 3
Hybrid Tom 4
Hybrid Tom 5
Hybrid Tom 6
BASS DRUM
Kick Tight H
Kick Wet
Kick Tight L
PERCUSSION 1
Conga H Open
Conga L
Conga H Mute
Bongo H
Bongo L
Timbale H
Timbale L
Cowbell
Claves
Guiro Long
Guiro Short
Maracas
Vibraslap
PERCUSSION 2
Surdo Mute
Surdo Open
Cuica Mute
5
Rhythm/Keyboard Percussion
Cuica Open
Cabasa
Shaker
Agogo H
Agogo L
Samba Whistle H
Samba Whistle L
PERCUSSION 3
Tambourine Light
Castanet
Jingle Bells
Bell Tree
Triangle Open
Triangle Mute
Wood Block H
Wood Block L
Sticks
Whip Slap
Finger Snap
Hand Clap
PERCUSSION 4
Hi Q
Click Noise
Scratch H
Scratch L
Seq Click L
Seq Click H
Metronome Click
Metronome Bell
Room Kit
CYMBAL
Crash Cymbal 1
Crash Cymbal 2
Splash Cymbal
Chinese Cymbal
Ride Cymbal 1
Ride Cymbal 2
Ride Cymbal Cup
Hi-Hat Open
Hi-Hat Closed
Hi-Hat Pedal
SNARE DRUM
Snare Snappy
Snare Tight Snap
Snare Soft
Snare Roll
Side Stick
Open Rim Shot
Brush Tap
Brush Slap
Brush Swirl
Brush Tap Swirl
TOM
Tom Room 1
Tom Room 2
Tom Room 3
Tom Room 4
Tom Room 5
Tom Room 6
BASS DRUM
Kick
Kick Tight
Kick Soft
PERCUSSION 1
Conga H Open
Conga L
Conga H Mute
Bongo H
Bongo L
Timbale H
Timbale L
Cowbell
Claves
Guiro Long
Guiro Short
Maracas
Vibraslap
PERCUSSION 2
Surdo Mute
Surdo Open
Cuica Mute
Cuica Open
Cabasa
Shaker
Agogo H
Agogo L
Samba Whistle H
Samba Whistle L
PERCUSSION 3
Tambourine
Castanet
Jingle Bells
Bell Tree
Triangle Open
Triangle Mute
Wood Block H
Wood Block L
Sticks
Whip Slap
Finger Snap
Hand Clap
PERCUSSION 4
Hi Q
Click Noise
Scratch H
Scratch L
Seq Click L
Seq Click H
Metronome Click
Metronome Bell
Rock Kit
CYMBAL
Crash Cymbal 1
Crash Cymbal 2
Splash Cymbal
Chinese Cymbal
Ride Cymbal 1
Ride Cymbal 2
Ride Cymbal Cup
Hi-Hat Open
Hi-Hat Closed
Hi-Hat Pedal
SNARE DRUM
Snare Rock
Snare Rock Tight
Snare Noisy
Snare Roll
Side Stick
Open Rim Shot
Brush Tap
Brush Slap
Brush Swirl
Brush Tap Swirl
TOM
Tom Rock 1
Tom Rock 2
Tom Rock 3
Tom Rock 4
Tom Rock 5
Tom Rock 6
BASS DRUM
Kick Gate
Kick 2
Kick Soft
PERCUSSION 1
Conga H Open
Conga L
Conga H Mute
Bongo H
Bongo L
Timbale H
Timbale L
Cowbell
Claves
Guiro Long
Guiro Short
Maracas
Vibraslap
PERCUSSION 2
Surdo Mute
Surdo Open
Cuica Mute
Cuica Open
Cabasa
Shaker
Agogo H
Agogo L
Samba Whistle H
Samba Whistle L
PERCUSSION 3
Tambourine
Castanet
Jingle Bells
Bell Tree
Triangle Open
Triangle Mute
Wood Block H
Wood Block L
Sticks
Whip Slap
Finger Snap
Hand Clap
PERCUSSION 4
Hi Q
Click Noise
Scratch H
Scratch L
Seq Click L
Seq Click H
Metronome Click
Metronome Bell
Electro Kit
CYMBAL
Crash Cymbal 1
Crash Cymbal 2
Splash Cymbal
Chinese Cymbal
Ride Cymbal 1
Ride Cymbal 2
Ride Cymbal Cup
Hi-Hat Open
Hi-Hat Closed
Hi-Hat Pedal
SNARE DRUM
Snare Noisy 2
Snare Noisy 3
Snare Snap Elec
Snare Roll
Side Stick
Open Rim Shot
Brush Tap
Brush Slap
Brush Swirl
Reverse Cymbal
TOM
Tom Electro 1
Tom Electro 2
Tom Electro 3
Tom Electro 4
Tom Electro 5
Tom Electro 6
BASS DRUM
Kick Gate Heavy
Kick Gate
Kick 3
PERCUSSION 1
Conga H Open
Conga L
Conga H Mute
Bongo H
Bongo L
Timbale H
Timbale L
Cowbell
Claves
Guiro Long
Guiro Short
Maracas
Vibraslap
PERCUSSION 2
Surdo Mute
Surdo Open
Scratch H 2
Scratch L 2
Cabasa
Shaker
Agogo H
Agogo L
Samba Whistle H
Samba Whistle L
PERCUSSION 3
Tambourine
Hi Q 2
Jingle Bells
Bell Tree
Triangle Open
Triangle Mute
Wood Block H
Wood Block L
Sticks
Whip Slap
Finger Snap
Hand Clap
PERCUSSION 4
Hi Q
Click Noise
Scratch H
Scratch L
Seq Click L
Seq Click H
Metronome Click
Metronome Bell
Analog Kit
CYMBAL
Crash Analog
Crash Cymbal 2
Splash Cymbal
Chinese Cymbal
Ride Cymbal 1
Ride Cymbal 2
Ride Cymbal Cup
Hat Open Analog
Hat Close Analog
Hat Close Anlg 2
SNARE DRUM
Snare Analog
Snare Analog 2
Snare Noisy 4
Snare Roll
Side Stick Anlg
Open Rim Shot
Brush Tap
Brush Slap
Brush Swirl
Reverse Cymbal
TOM
Tom Analog 1
Tom Analog 2
Tom Analog 3
Tom Analog 4
Tom Analog 5
Tom Analog 6
BASS DRUM
Kick Analog
Kick Anlg Short
Kick 3
PERCUSSION 1
Conga Analog M
Conga Analog L
DDK-7 Owner’s Manual
86
Page 87

Conga Analog H
Bongo H
Bongo L
Timbale H
Timbale L
Cowbell Analog
Claves 2
Guiro Long
Guiro Short
Maracas 2
Vibraslap
PERCUSSION 2
Surdo Mute
Surdo Open
Scratch H 2
Scratch L 2
Cabasa
Shaker
Agogo H
Agogo L
Samba Whistle H
Samba Whistle L
PERCUSSION 3
Tambourine
Hi Q 2
Jingle Bells
Bell Tree
Triangle Open
Triangle Mute
Wood Block H
Wood Block L
Sticks
Whip Slap
Finger Snap
Hand Clap
PERCUSSION 4
Hi Q
Click Noise
Scratch H
Scratch L
Seq Click L
Seq Click H
Metronome Click
Metronome Bell
Dance Kit
CYMBAL
Crash Analog
Crash Cymbal 2
Splash Cymbal
Chinese Cymbal
Ride Cymbal 1
Ride Analog
Ride Cymbal Cup
Hi-Hat Open 3
Hi-Hat Closed 3
Hat Close Anlg 3
SNARE DRUM
Snare Clap
Snare Dry
Snare Techno
Reverse Dance 2
Side Stick Anlg
Rim Gate
Snare Analog 3
Snare Analog 4
Vinyl Noise
Reverse Cymbal
TOM
Tom Dance 1
Tom Dance 2
Tom Dance 3
Tom Dance 4
Tom Dance 5
Tom Dance 6
BASS DRUM
Kick Techno
Kick Techno L
Kick Techno Q
PERCUSSION 1
Conga Analog M
Conga Analog L
Conga Analog H
Bongo Analog H
Bongo Analog L
Timbale H
Timbale L
Cowbell Dance
Claves 2
Guiro Long
Guiro Short
Maracas 2
Vibraslap Analog
PERCUSSION 2
Kick Dance 1
Kick Dance 2
Dance Breath 1
Dance Breath 2
Cabasa
Shaker
Agogo H
Agogo L
Samba Whistle H
Samba Whistle L
PERCUSSION 3
Tambourine Anlg
Hi Q 2
Jingle Bells
Bell Tree
Triangle Open
Triangle Mute
Dance Perc 3
Dance Perc 4
Snare Dance 1
Whip Slap
Finger Snap
Dance Clap
PERCUSSION 4
Hi Q
Click Noise
Scratch Dance 1
Scratch Dance 2
Dance Perc 2
Hi Q Dance 1
Dance Perc 1
Reverse Dance 1
Jazz Kit
CYMBAL
Crash Cymbal 1
Crash Cymbal 2
Splash Cymbal
Chinese Cymbal
Ride Cymbal 1
Ride Cymbal 2
Ride Cymbal Cup
Hi-Hat Open
Hi-Hat Closed
Hi-Hat Pedal
SNARE DRUM
Snare Jazz L
Snare Jazz M
Snare Jazz H
Snare Roll
Side Stick Light
Open Rim Shot
Brush Tap
Brush Slap
Brush Swirl
Brush Tap Swirl
TOM
Floor Tom L
Floor Tom H
Low Tom
Mid Tom L
Mid Tom H
High Tom
BASS DRUM
Kick Jazz
Kick Tight
Kick Soft
PERCUSSION 1
Conga H Open
Conga L
Conga H Mute
Bongo H
Bongo L
Timbale H
Timbale L
Cowbell
Claves
Guiro Long
Guiro Short
Maracas
Vibraslap
PERCUSSION 2
Surdo Mute
Surdo Open
Cuica Mute
Cuica Open
Cabasa
Shaker
Agogo H
Agogo L
Samba Whistle H
Samba Whistle L
PERCUSSION 3
Tambourine
Castanet
Jingle Bells
Bell Tree
Triangle Open
Triangle Mute
Wood Block H
Wood Block L
Sticks
Whip Slap
Finger Snap
Hand Clap
PERCUSSION 4
Hi Q
Click Noise
Scratch H
Scratch L
Seq Click L
Seq Click H
Metronome Click
Metronome Bell
Brush Kit
CYMBAL
Crash Cymbal 1
Crash Cymbal 2
Splash Cymbal
Chinese Cymbal
Ride Cymbal 1
Ride Cymbal 2
Ride Cymbal Cup
Hi-Hat Open
Hi-Hat Closed
Hi-Hat Pedal
SNARE DRUM
Brush Slap 3
Brush Tap 2
Brush Slap 2
Snare Roll
Side Stick Light
Open Rim Shot
Brush Tap
Brush Slap
Brush Swirl
Brush Tap Swirl
TOM
Tom Brush 1
Tom Brush 2
Tom Brush 3
Tom Brush 4
Tom Brush 5
Tom Brush 6
BASS DRUM
Kick Jazz
Kick Tight
Kick Soft
PERCUSSION 1
Conga H Open
Conga L
Conga H Mute
Bongo H
Bongo L
Timbale H
Timbale L
Cowbell
Claves
Guiro Long
Guiro Short
Maracas
Vibraslap
PERCUSSION 2
Surdo Mute
Surdo Open
Cuica Mute
Cuica Open
Cabasa
Shaker
Agogo H
Agogo L
Samba Whistle H
Samba Whistle L
PERCUSSION 3
Tambourine
Castanet
Jingle Bells
Bell Tree
Triangle Open
Triangle Mute
Wood Block H
Wood Block L
Sticks
Whip Slap
Finger Snap
Hand Clap
PERCUSSION 4
Hi Q
Click Noise
Scratch H
Scratch L
Seq Click L
Seq Click H
Metronome Click
Metronome Bell
Symphony Kit
CYMBAL
Hand Cymbal
Hand Cymbal 2
Splash Cymbal
Chinese Cymbal
Hand Cymbal S
Hand Cymbal 2 S
Ride Cymbal Cup
Hi-Hat Open
Hi-Hat Closed
Hi-Hat Pedal
SNARE DRUM
Band Snare
Band Snare 2
Snare Soft
Snare Roll
Side Stick
Open Rim Shot
Brush Tap
Brush Slap
Brush Swirl
Brush Tap Swirl
TOM
Floor Tom L
Floor Tom H
Low Tom
Mid Tom L
Mid Tom H
High Tom
BASS DRUM
Gran Cassa Mute
Gran Cassa
Kick Soft 2
PERCUSSION 1
Conga H Open
Conga L
Conga H Mute
Bongo H
Bongo L
Timbale H
Timbale L
Cowbell
Claves
Guiro Long
Guiro Short
Maracas
Vibraslap
5
Rhythm/Keyboard Percussion
DDK-7 Owner’s Manual
87
Page 88

PERCUSSION 2
Surdo Mute
Surdo Open
Cuica Mute
Cuica Open
Cabasa
Shaker
Agogo H
Agogo L
Samba Whistle H
Samba Whistle L
PERCUSSION 3
Tambourine
Castanet
Jingle Bells
Bell Tree
Triangle Open
Triangle Mute
Wood Block H
Wood Block L
Sticks
Whip Slap
Finger Snap
Hand Clap
PERCUSSION 4
Hi Q
5
Rhythm/Keyboard Percussion
Click Noise
Scratch H
Scratch L
Seq Click L
Seq Click H
Metronome Click
Metronome Bell
SFX Kit 1
SFX
Cutting Noise 1
Cutting Noise 2
String Slap
Flute Key Click
Shower
Thunder
Wind
Stream
Bubble
Feed
Ghost
Maou
Dog
Horse
Bird Tweet
SFX Kit 2
SFX 1
Phone Call
Telephone Ring
Wind Chime
Door Squeak
Door Slam
Scratch Cut
Scratch H 3
Laugh
Scream
Punch
Heart Beat
Foot Steps
SFX 2
CarEngnIgnition
Car Tires Squeal
Car Passing
Car Crash
Siren
Train
Jet Plane
Starship
Burst
Roller Coaster
Submarine
Machine Gun
Laser Gun
Explosion
Firework
Arabic Kit
ARABIC 1
Nakarazan Dom
Nakarazan Edge
Hager Dom
Hager Edge
Zagrouda H
Zagrouda L
Arabic Hand Clap
Duhulla Dom
Duhulla Tak
Duhulla Sak
Doff Dom
Doff Tak
ARABIC 2
Katem Dom
Katem Tak
Katem Sak
Tabla Dom
Tabla Tak 1
Tabla Tak 2
Tabla Sak
Tabla Tik
Tabla Roll Edge
Tabla Flam
Tabel Dom
Tabel Tak
ARABIC 3
Sagat 1
Sagat 2
Sagat 3
Rik Dom
Rik Tak 1
Rik Tak 2
Rik Sak
Rik Tik
Rik Finger 1
Rik Finger 2
Rik BrassTremolo
CYMBAL/SNARE DRUM
Crash Cymbal 1
Crash Cymbal 2
Ride Cymbal 1
Hi-Hat Open
Hi-Hat Closed
Hi-Hat Pedal
Snare Drum
Snare Soft
Side Stick
TOM/BASS DRUM
Floor Tom L
Floor Tom H
Low Tom
Mid Tom L
Mid Tom H
High Tom
Kick Soft
PERCUSSION
Conga H Open
Conga L
Conga H Mute
Bongo H
Bongo L
Cowbell
Claves
Cabasa
Tambourine
Pop Latin Kit
CONGA
Conga H Tip
Conga H Heel
Conga H Open
Conga H Mute
Conga H SlapOpen
Conga H Slap
Conga H SlapMute
Conga L Tip
Conga L Heel
Conga L Open
Conga L Mute
Conga L SlapOpen
Conga L Slap
Conga L Slide
BONGO
Bongo H Open 1 f
Bongo H Open 3 f
Bongo H Rim
Bongo H Tip
Bongo H Heel
Bongo H Slap
Bongo L Open 1 f
Bongo L Open 3 f
Bongo L Rim
Bongo L Tip
Bongo L Heel
Bongo L Slap
PERCUSSION 1
Timbale H Open
Timbale L Open
Paila H
Paila L
Cowbell Top
Tambourine
Guiro Long
Guiro Short
Maracas
Cuica Open
Cuica Mute
Cabasa
Shaker
PERCUSSION 2
Triangle Open
Triangle Mute
Wind Chime
Hand Clap
DDK-7 Owner’s Manual
88
Page 89

6
Registration Memory
Registration Memory allows you to store virtually all the settings you make on the panel and
LCD, providing a convenient way to instantly change all Voice settings and rhythms while
you’re playing, with the simple touch of a single button on the Registration Memory panel.
The buttons are conveniently located between the Upper and Lower keyboards for easy
access while playing. Moreover, you can also recall the settings using the right footswitch
on the Pedal Unit, or optional Foot Pedal. All Registrations in Registration Memory can also
be saved to a USB flash memory or other external media.
13 14 15 16 1 2 3 4 5 6 7 8 9 10 11 12 D
Various types of basic Registrations have been programmed to the numbered Registration
Memory buttons, 1 – 16. When you record your own Registration settings to a numbered
button, the preset Registration for that button will be overwritten and erased as a result.
When you initialize the Registration Memory (page 93), the preset settings will be recalled
and your own Registration setting(s) will be erased and replaced with the factory defaults.
Contents
1 Storing Registrations . . . . . . . . . . . . . . . . . . . . . .89
2 Selecting Registrations . . . . . . . . . . . . . . . . . . . .91
3Saving the Registration data to USB flash memory
. . . . . . . . . . . . . . . . . . . . . . . . . . . . . . . . . . . . . . . .92
4 Initializing Registration Memory . . . . . . . . . . . . .93
1
Storing Registrations
Newly created Registrations you make can be stored to the Registration Memory panel
buttons. All Registrations in Registration Memory can also be saved to a USB flash
memory or other external media for future recall.
Create your original Registration.
1
While holding down the [M.] (Memory) button in the Registration
2
Memory section, press the numbered button to which you wish
to save your Registration.
5 Registration Shift . . . . . . . . . . . . . . . . . . . . . . . . . 94
• Setting the Registration Shift mode in the Regist Shift
display . . . . . . . . . . . . . . . . . . . . . . . . . . . . . . . . . 94
• Confirming the Registration Shift setting in the Voice
Display . . . . . . . . . . . . . . . . . . . . . . . . . . . . . . . . .97
6 Unifying a specific parameter . . . . . . . . . . . . . . . 99
6
REGISTRATION MEMORY
Reference Pages
Selecting a Voice (page 26)
Selecting a Rhythm
(page 60)
Voice Controls and Effects
(page 40)
1. While holding down [M.] button...
13 14 15 16 1 2 3 4 5 6 7 8 9 10 11 12 D.
When the Registration is stored, the numbered button flashes momentarily.
When recording Registration settings, the square at the top left of the
display turns light blue for a few seconds, indicating that the Registration is
currently being saved. Do not turn the power off while the Registration is
being saved.
2. Press desired numbered button.
DDK-7 Owner’s Manual
89
Page 90

Functions and settings that cannot be memorized:
The following settings cannot be stored to a Registration Memory number.
• Pitch (page 208)
• MIDI Control settings (fpage 238)
• Mic. Volume (page 233)
• AUX OUT settings (page 228)
• Mic. Reverb (page 233)
• LCD related settings (page 16)
• Internet Direct Connection settings (page 218)
Saving Registrations as
Registration Data (File)
(page 116)
6
REGISTRATION MEMORY
Reference Page
The following settings common to all Registration Memory numbers 1 – 16 and
cannot be stored individually for each number.
• Transpose (page 208)
• Attack mode in Organ Flute Voices (page 38)
• Registration Shift (page 94)
• Auto Fill setting (page 64)
• Reverb type (page 47)
• User Voices (page 145)
• User rhythms (page 172)
• User Keyboard Percussion (page 79)
• Rhythm Sequences (page 183)
• Disable setting (page 91)
DDK-7 Owner’s Manual
90
Page 91

2
Selecting Registrations
Simply press the numbered button that corresponds to the Registration you wish to
select.
•You can also recall Registrations by using the Foot Contollers. This function is called
“Registration Shift” (page 94).
•You can also program the Registrations to change automatically at specific points
within the Rhythm Sequence. This function is called “Registration Sequence” (page
188).
Using the [D.] (Disable) button:
Rhythm and automatic accompaniment patterns also change when you select
different Registration Memory buttons. Pressing the [D.] (Disable) button allows
you to keep the same rhythm, accompaniment patterns, tempo, and so on
throughout all your Registration changes, or make your own rhythm selections if
you want to.
Disable Button
7 8 9 10 11 12 D.
When the [D.] button is on, the following functions will not change, even when
you change the Registration Memory number.
• Rhythm menu, Rhythm section, Rhythm tempo, Rhythm volume, Rhythm
reverb
• Rhythm reverb time
•Accompaniment volume, Accompaniment reverb, On/Off status of
Accompaniment parts
• A.B.C. mode, A.B.C. memory
• M.O.C. mode
•Second expression pedal control for rhythm tempo
Reference Page
Controlling the Registration
Shift (page 203)
6
REGISTRATION MEMORY
DDK-7 Owner’s Manual
91
Page 92

Saving the Registration data to USB flash
3
memory
Saving Registrations as
Registration Data (File);
(page 116)
6
REGISTRATION MEMORY
Reference Page
You can save your Registration Memory settings to an external storage device, such as
USB flash memory, with sixteen Registrations comprising a single file.
The instructions below explain how to save the Registration data to a USB flash
memory. For details about using other external storage devices, see chapter 7, Music
Data Recorder (M.D.R.).
Insert a USB flash memory into the USB TO DEVICE terminal on
1
the left side of the DDK-7.
Press the [MDR] button on the panel to call up the M.D.R. display.
2
Reference Page
Recalling Recorded
Registrations (page 121)
Reference Page
Changing the Song Name
(page 113)
DDK-7 Owner’s Manual
92
Select the song to which you want to save the Registration data
3
(page 104).
Press [REGIST EDIT] button in the display to call up the
4
Registration Edit display.
Press the [SAVE] button in the display.
5
A message appears, indicating the Registration data is currently being saved.
When the operation is completed, the message closes.
Page 93

Initializing Registration Memory
4
Deleting all Registration data in Registration Memory initializes the Registration
Memory. Be careful when using this operation, since it erases all your existing data.
In order to avoid inadvertently losing your important data, save it to an external storage
device.
Press the [UTILITY] button on the panel to call up the GLOBAL
1
Page in the Utility display.
Reference Page
Factory Set (Initializing the
DDK-7); (page 23)
6
Press the INITIALIZE [EXECUTE] button on the right side in the
2
display.
The message “Are you sure you want to initialize Registration data?” appears.
Press [INITIALIZE] to actually initialize the data. When the operation is
complete, the DDK-7 will be restarted.
Press [CANCEL] to cancel the operation.
REGISTRATION MEMORY
DDK-7 Owner’s Manual
93
Page 94

Reference Page
5
Registration Shift
The Registration Shift function allows you to change Registrations without taking your
hands from the keyboards. By using the Right Footswitch on the expression pedal, or
optional Foot Pedal, you can “jump” to a specified Registration or step through the
panel Registrations in sequence, either in numeric order or in any order you specify.
Registration Shift has three modes: Shift, Jump and User. These are set in the Regist
Shift display. You can also view and check the Registration Shift mode in the Voice
Display.
Setting the Registration Shift mode in the Regist Shift
display
Footswitches (page 193)
Foot Pedal (page 196)
6
REGISTRATION MEMORY
Connect the Pedal Unit (DDKU-P7) or optional Foot Pedal (FC4/FC5) to the
instrument.
DDKU-P7 FC4 FC5
If you want to use the Foot Pedal, set the desired parameters in the Regist Shift display
explained in this section, then assign the Regist Shift function to the Foot Pedal. Refer
to the section “Controlling Registration Shift” on page 203.
Setting the Registration Shift mode in the Regist Shift display
Press the [FOOT SWITCH] button on the panel.
1
DDK-7 Owner’s Manual
94
Press the [RIGHT] button at the top right of the display to call up
2
the RIGHT Page (Regist Shift display).
Page 95

REGIST SHIFT Display
2
3
4
1
1 OFF
Turns off the Registration Shift assignment. When you select OFF, you cannot change
Registrations by using the Right Footswitch, or with an optional Foot Pedal.
2 SHIFT
In the Shift mode, each press of the Right Footswitch, or with an optional Foot Pedal
selects the Registration Memory presets in their numerical order. After the last
Registration is reached, the function ‘wraps around’ to select the first preset again. The
numbered buttons light up as they are selected.
3 JUMP
Pressing the Right Footswitch, or with an optional Foot Pedal jumps to select the
designated panel Registration.
You can set the Jump “destination” with buttons in the display or the Data
Control dial.
6
REGISTRATION MEMORY
Registration number of the destination
4 USER
In the User mode, each press of the Right Footswitch, or with an optional Foot Pedal
selects Registrations according to the order you’ve specified.
To set the User Registration order:
1 Press the desired numbered button in the Registration Memory
section.
2 Press the [SET] button in the display.
The Registration number appears in the display, indicating that the Registration is
entered.
DDK-7 Owner’s Manual
95
Page 96

NOTE
When the cursor is
positioned at “-”, Footswitch,
or an optional Foot Pedal
does not work.
3 Repeat the above procedure #1 through #2 to set the Registration
order.
Registration row
3
6
REGISTRATION MEMORY
1
1 POSITION
These are cursor controls used to move the cursor (colored orange) along the Registration
row in the display. Entered Registration numbers are shown in boxes, while the numbers in
the row above indicate the position in the sequence (in other words, the number of
successive presses of the Right Footswitch). Up to 80 steps (Registrations) can be
memorized.
Moves the cursor to the first position.
Moves the cursor one step to the left.
Moves the cursor one step to the right.
Moves the cursor five steps to the right.
2 DATA
These are data controls used to enter and delete Registration numbers in the Registration
row.
SET: For initially entering a Registration number to a blank space in the Registration row,
or for replacing a number at the current cursor position.
To enter a number, press the desired Registration Memory button (the selected button will
light), then press [SET] in the display. The entered Registration number will appear in the
Registration row. After using SET to enter Registrations, the cursor can be moved among
the numbers.
2
INSERT: For inserting a Registration number just before the current cursor position.
To perform the operation, first move the cursor to a numbered position. Then, press the
desired Registration Memory button (the selected button will light), and press [INSERT]
in the display. The new Registration number is inserted at the cursor position and all other
numbers to the right of the cursor are moved to accommodate the new numbers.
Registration numbers cannot be entered beyond the Registration Shift function’s capacity of
80. If the insert operation exceeds this capacity, a “Data Full” message appears and the
operation cannot be executed.
DELETE: For deleting a Registration number at the current cursor position. To delete the
unnecessary number, move the cursor to a numbered position and press [DELETE] in the
display.
CLEAR: For erasing all current user Registration Shift settings.
After selecting [CLEAR], a message appears prompting confirmation of the operation.
Select [CLEAR] to clear all data. The message “Clear all data” momentarily appears in the
display and returns to the previous display.
Select [CANCEL] to abort the operation.
DDK-7 Owner’s Manual
96
Page 97

3 SHIFT END
Determines how to end the Registration shift function.
STOP: Selects the last Registration and quits the operation.
TOP: After the last preset is reached, the first preset is called up again, starting the sequence
over again from the beginning.
NEXT REGIST: After the last preset is reached, the next Registration data in the Song is
called up. This function is available only when two or more Registration data sets are saved
in one Song. This function is handy when you need to play a song with more than sixteen
Registrations.
The Shift End mark ( ) will automatically be put at the end of the Registrations you
entered when Top or Next Regist is selected as the Shift End.
Reference Page
Saving Two or More
Registration Banks to One
Song (page 117)
NOTE
When you play the song
using Next Regist. function,
always press the [F] (Play)
button in the M.D.R. display
to start the song and activate
these functions.
The [CUSTOM] (Custom
Play) button will not activate
the Next Regist. function.
NOTE
If the next Registration data
contains User voices, the
DDK-7 may produce no
sound for a few seconds
while loading the
Registration.
6
Confirming the Registration Shift setting in the Voice
Display
You can confirm the Registration Shift mode in the Voice Display, Page 1.
Press the [VOICE DISPLAY] button on the panel to call up the Voice
Display.
The Registration Shift mode is shown at the bottom right of the display.
REGISTRATION MEMORY
DDK-7 Owner’s Manual
97
Page 98

Registration Shift, OFF:
The current Registration number is displayed.
Registration Shift, in “SHIFT” mode:
6
REGISTRATION MEMORY
Current Registration
The current Registration number (left) and the next number (right) are
displayed.
Next Registration
Registration Shift, in “JUMP” mode:
Destination number
can be changed.
The current Registration number (left) and the destination number (right) will
be displayed. You can change the destination number even in the middle of the
performance by using the buttons in the display or the Data Control
dial.
Registration Shift, in “USER” mode:
DDK-7 Owner’s Manual
98
Indicates the current position of the Registration Shift. You can change the
Registration by moving the cursor (in orange) right/left, using the displayed
buttons or the Data Control dial. This is handy if you’ve inadvertently advanced
the shift setting in the middle of your performance. The user Registration
settings cannot be edited here.
Moves the cursor to the first position.
Moves the cursor one step to the left and selects the next Registration.
Moves the cursor one step to the right and selects the previous Registration.
Moves the cursor five step to the right and selects the Registration.
Page 99

6
Unifying a specific parameter
In the Voice Display, Page 2, you can conveniently “unify” a specific parameter used in
different Voice groups at one time. This is useful when you are changing, for example,
the Voice Brilliance setting for the Upper Keyboard and want the same setting to be
applied to the entire instrument.
Available parameters
• Reverb • Rhythm Reverb • Volume
• Panning • Brilliance • Sustain
Press the [VOICE DISPLAY] button on the panel.
1
Press the [2] button at the top right of the display to select
2
Page 2.
6
Press the PARAMETER button (indicates the currently selected
3
parameter) in the display to select the desired parameter for
changing.
The Parameter Select pop-up menu appears, letting you select the desired
parameter.
REGISTRATION MEMORY
Parameter
Part
DDK-7 Owner’s Manual
99
Page 100

6
Select the parameter and part in the Parameter Select pop-up
menu. After selecting the desired parameter, the pop-up menu
automatically closes.
The amount of the selected parameter for each Registration is shown in the
display.
Parameter value
for each
Registration
Selected
parameter
Select the targeted Registration numbers and turn them on.
4
Parameters in Registrations set to ON will be changed.
REGISTRATION MEMORY
Press the targeted Registration in the display and turn it on with the SETTINGS
buttons: ALL ON, ALL OFF, ON, OFF, and SELECT.
ALL ON: Selects all Registration memory numbers.
ALL OFF: Cancels all Registration memory numbers.
ON: Sets the currently selected Registration memory number to “ON.”
OFF: Sets the currently selected Registration memory number to “OFF.”
SELECT: Turns on the Registration memory numbers that contain the same Voice as
the one which is currently set in the Registration at the cursor position. The targeted
Registration numbers are underlined.
100
DDK-7 Owner’s Manual
 Loading...