

Page 1
DlGrTAL PERÇU
Owner's Guide
Bedienungsanleitung
Manuel d'instructions
Manual del propietario
YAMAHA
Page 2

Contents
1. Before Playing............................................................................... 2
2. Nomenclature..................................................................................4
3. Listen to the Demonstration
4. Enjoying Manual Percussion
5. How To Use The Auto Rhythm Section
6. Percussion Ensemble..................................................................11
7. External Jacks...............................................................................12
8. Optional Accessories
9. Taking Care Of Your Digital Percussion
10. Specifications................................................................................14
11. Troubleshooting............................................................................16
...................................................................
.........................................................
........................................................
........................................
....................................
12
13
Table des matières
1. Avant l'exécution ............................................................................2
2. Nomenclature
5
6
9
3. Ecoute de la Séquence de Démonstration
4. Le plaisir de la Percussion Manuelle
5. Utilisation de la Section de Rythmes Automatiques
6. Utilisation des Ensembles de Percussion
7. Prises Externes
8. Accessoires en Option .................................................................12
9. Entretien de la Boîte à Percussion Numérique
10. Spécifications................................................................................14
11. Dépistage des Pannes .................................................................16
..................................................................................
...................................
............................................
...................
.................................
.............................................................................
.........................
4
5
6
9
11
12
13
Inhalt
1. Vor der Inbetriebnahme.................................................................2
2. Bezeichnimg der Funktionselemente ..............................................4
3. Demo-Spiel ....................................................................................5
4. Manuelles Percussionsspiel
5. Rh3dhmus-Automatik....................................................................9
6. Percussion-Ensemble-Spiel
7. Anschluß an externe Geräte..........................................................12
8. Sonderzubehör
............................................................................
9. Pflege des Digital-Schlagzeugs ......................................................13
10. Technische Daten..........................................................................14
11. Fehlersuche...................................................................................16
.............................................................
..........................................................
11
12
Indice
1. Antes de tocar.................................................................................2
2. Nomenclatura.................................................................................4
3. Escucha de la Demostración
6
4. Disfrutando de la Percusión Manual
5. Cómo Usar la Sección de Ritmo Automático
6. Ventajas del Conjunto de Percusión..............................................11
7. Tomas Externas ........................................................................... 12
8. Accesorios Opcionales...................................................................12
9. Cuidados de su Percusión Digital
10. Especificaciones ............................................................................14
11. Localización de Averias.................................................................16
...........................................................
..............................................
..................................
.................................................
5
6
9
13
Page 3
Before Playing
Vor der
Avant l'exécution
Antes de tocar
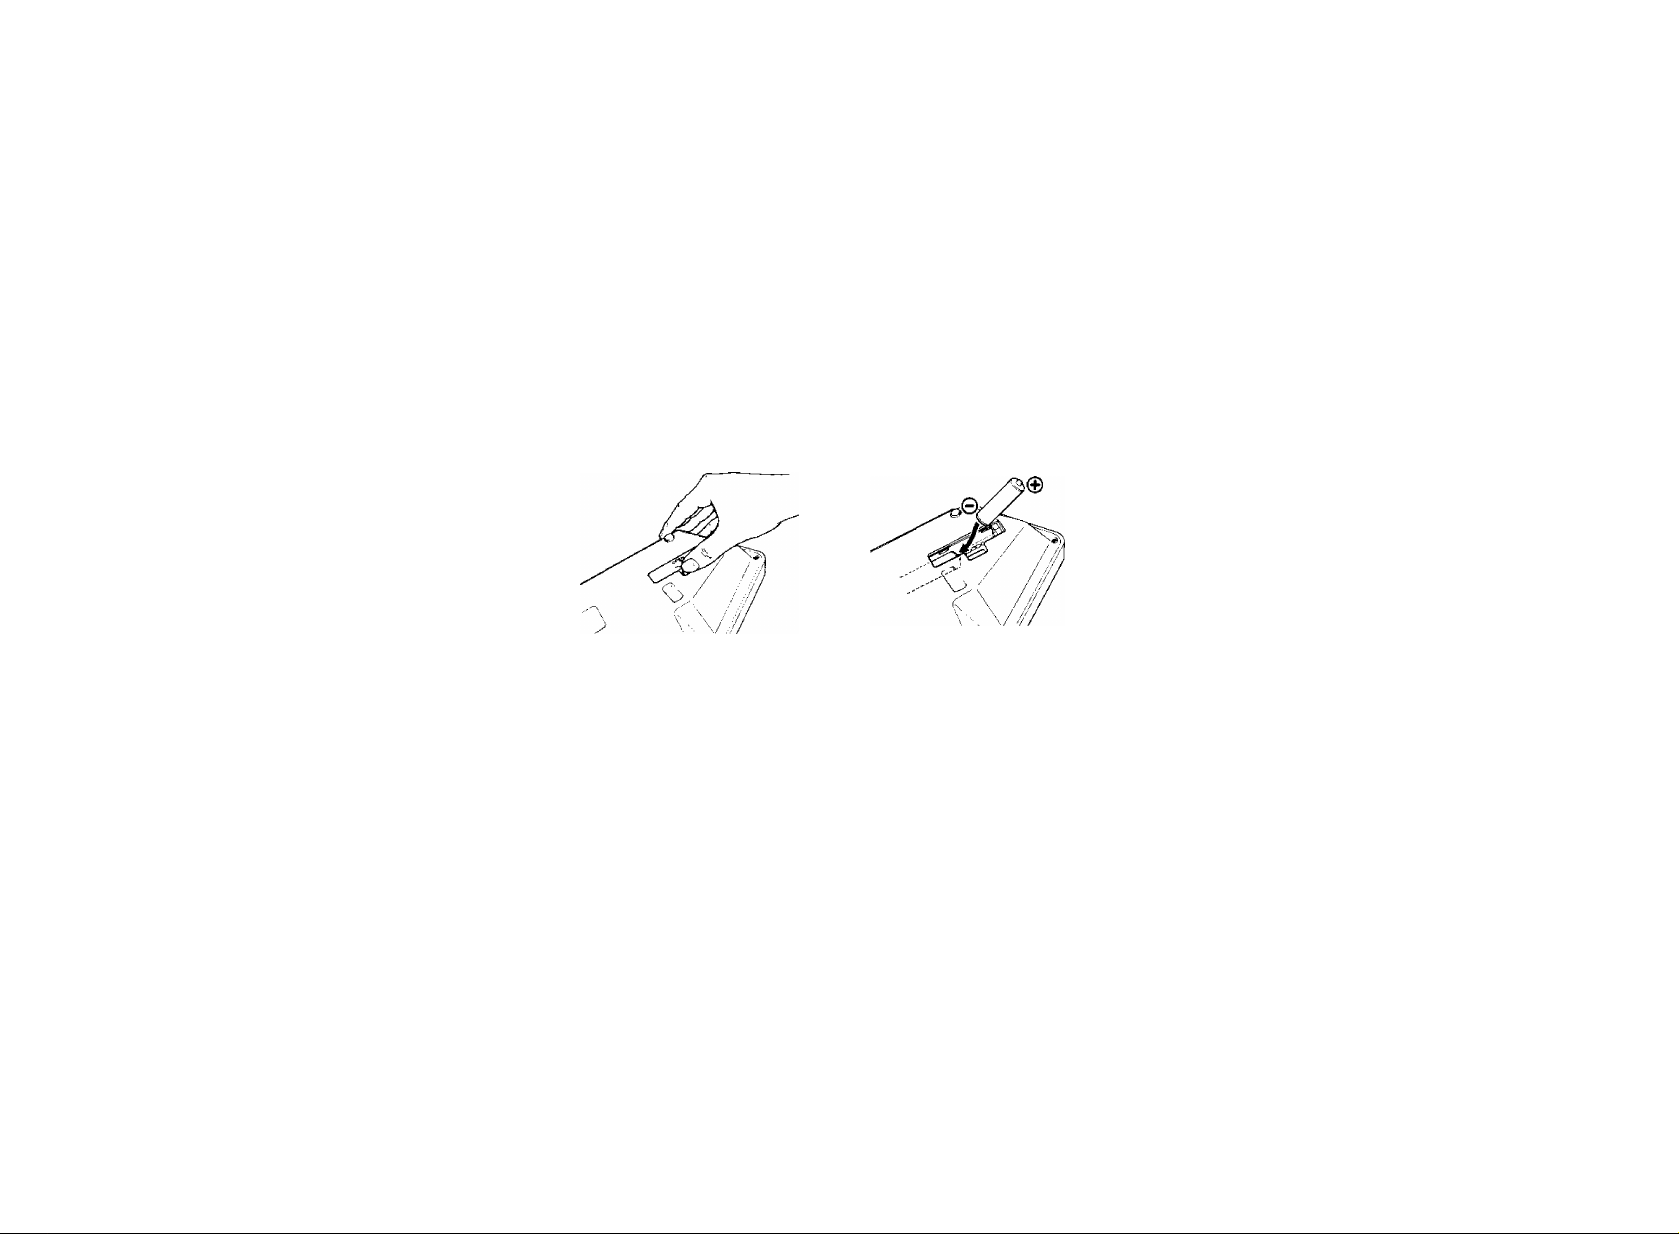
Inserting Batteries
Remove the battery compartment cover on
the bottom of the instrument and insert six
1.5V SUM-3, R-6, "AA" size or equivalent
batteries (sold separately), making sure
that the polarities are placed as directed in
the compartment.
Replace the cover, ensuring that it locks
securely in place.
• As the battery voltage drops below the
required operating level, the following
changes will occur in the operation of the
DD-6:
1. Tom, conga and other drum-type
sounds will become distorted. This
distortion increases the louder you
play.
2. The STYLE/BEAT/TEMPO display
0 will dim, and its brightness will
vary when you play the pads.
Caution:
• When the batteries run down, replace
them with a complete set of six new
batteries.
NEVER mix old and new batteries.
• To prevent possible damage due to
battery leakage, remove the batteries
from the instrument if it is not to be used
for an extended period of time.
Inbetriebnahme
Einlegen der Batterien
Entfernen Sie den Batteriefach deckel
am Boden des Instruments, und legen
Sie sechs 1,5-V-Batterien (nicht
mitgeliefert) des Typs SUM-3, R-6,
Größe "AA" oder gleichwertige
Batterien, wie im Batteriefach
dargestellt, mit korrekt ausgerichteten
Minus- und Pluspolen ein.
Bringen Sie den Batteriefachdeckel
danach wieder so an, daß er sicher
einrastet.
* Wenn die Batteriespannung bis unter
die erforderliche Betriebsspannung
abfällt, macht sich dies wie folgt
bemerkbar:
1. Tom, Conga und andere
Schlagzeugklänge klingen verzerrt.
Der Verzerrungsgrad nimmt bei
höherer Lautstärke zu.
2. Die Rhythmus ! Taktf Tempo-
Anzeige 0 wird zunehmend
schwächer, wobei sich die Helligkeit
beim Spielen auf den Pads
(Schlagflächen) ändert.
Wichtiger Hinweis:
* Verbrauchte Batterien müssen durch
sechs neue Batterien desselben T^ps
ersetzt werden. NIEMALS alte und
neue Batterien zusammen verwenden!
* Zur Verhütung von Beschädigungen
durch auslaufende Batterien sollten
diese entnommen werden, wenn das
Instrument voraussichtlich längere Zeit
nicht gebraucht wird.
Mise en place des piles
Enlever le couvercle du compartiment des
piles situé à la partie inférieure de
l’instrument et introduire six piles "AA",
SUM-3, R-6 de 1,5 V ou des piles
équivalentes (vendues séparément), en
prenant soin de les placer de la manière
indiquée dans le compartiment.
Replacer le couvercle en s'assurant qu'il
est correctement bloqué en place.
* Lorsque la tension des piles chute au-
dessous du niveau normal de
fonctionnement, il se produit les
changements suivants dans le
fonctionnement de la boîte DD-6.
1. Les Тот, Conga et autres sonorités
du type batterie subiront une
distorsion. Plus Ibn joue fort et plus
cette distorsion augmente.
2. L'affhhage STYLE/BEAT/TEMPO
0 s'assombrit et sa luminosité varie
lorsque l'on joue des pads.
Attention:
* Lorsque les piles se vident, les
remplacer par un jeu complet de six
piles neuves. NE JAMAIS utiliser
ensemble des piles neuves et des piles
ayant déjà servies.
* Pour prévenir tout endommagement
que pourrait provoquer une fuite des
piles, retirer les piles de l'instrument
lorsqu'il ne doit pas être utilisé pendæt
une période prolongée.
Inserción de las pilas
Extraiga la cubierta del compartimiento
de las pilas que se encuentra en la parte
inferior del instrumento e inserte seis
pilas SUM-3, R-6 de 1,5 V del tamaño
"AA" o equivalentes (vendidas por
separado), asegurándose de que las
polaridades se colocan como se indica en
el compartimiento.
Vuelva a colocar la cubierta,
asegurándose de que se cierra bien.
* Si la tensión de las pilas cae por debajo
del nivel de operación necesario,
ocurrirán los siguiente cambios en la
operación del DD-6:
1. Tbm, conga y otros sonidos de tipo
de tambores se distorsionarán. Esta
distorsión aumentará el sonido que
toque.
2. El visualizador STYLEf BEATi
TEMPO 0 se oscurecerá, y el
brillo variará cuando toque los
accionadores.
Precaución:
* Cuando las pilas se gasten,
reemplácelas con un juego completo de
seis pilas nuevas. NUNCA mezcle pilas
nuevas y viejas.
* Para evitar posibles daños debidos a
fugas de las pilas, extráigalos del
instrumento si no se va a utilizar
durante largo tiempo.
Page 4

Optional Power Adaptors
Power Adaptor PA-1/ PA-1 B/ PA-3 is
available for household current. No other
adaptor is usable, so when you purchase
a power adaptor please ensure that it is
model PA-1/ PA-1B/ PA-3.
Als Option erhältlicher
Netzadapter
Zum Betrieb mit gewöhnlichem
Netzstrom können Sie den Adapter
PA-1, PA-IB bzw. PA-3 verwenden.
Andere Adapter eignen sich nicht für
den Anschluß. Achten Sie beim Kauf
daher darauf, eines dieser drei Modelle
zu erwerben.
Adaptateurs secteur en
option
Seul un adaptateur secteur PA-1/ PA-1 B/
PA-3 convient dans le cas de courant
secteur. Aucun autre adaptateur n’est
utilisable et il est donc nécessaire, avant
d'effectuer son achat, de vérifier qu’il s’agit
bien d’un modèle PA-1/ PA-1 B/ PA-3.
Adaptadores de
alimentación opcionales
Los adaptadores de alimentación РА-1/
РА-1В/ PA-3 están disponibles para
corriente casera. No se puede utilizar
otro adaptador, por eso, cuando compre
un adaptador de alimentación, por favor
asegúrese de que sea de estos modelos.
For An Even Bigger Sound
Although you’ll be happy with the sound
from the built-in speaker, you can enhance
and create an even more satisfying sound
if you connect the DD-6 to a bigger
speaker system. Try using your home
stereo or other PA system.
Für noch größere
Klangfülle
Obwohl der vom eingebauten
Lautsprecher produzierte Klang vollauf
zufriedenstellend ist, können Sie mit
größeren Lautsprechern die Klangfülle
weiter steigern. Schließen Sie das DD-6
hierfür an Ihre Stereoanlage oder ein
PA-System an.
Un son encore plus puissant
Bien qu’il soit certain que le son produit
par le haut-parleur incorporé donnera
entière satisfaction, il est possible
d'obtenir un son encore plus agréable en
connectant la boîte DD-6 à des enceintes
plus puissantes. Essayer d’utiliser une
chaîne stéréo ou autre système
d’amplification.
Para un sonido aún mayor
Aunque estará contento con el sonido del
altavoz incorporado, puede crear todavía
un sonido más satisfactorio si conecta el
DD-6 a un sistema de altavoces más
grande. Pruebe utilizando su aparato
estereofónico casero u otro sistema PA
Page 5
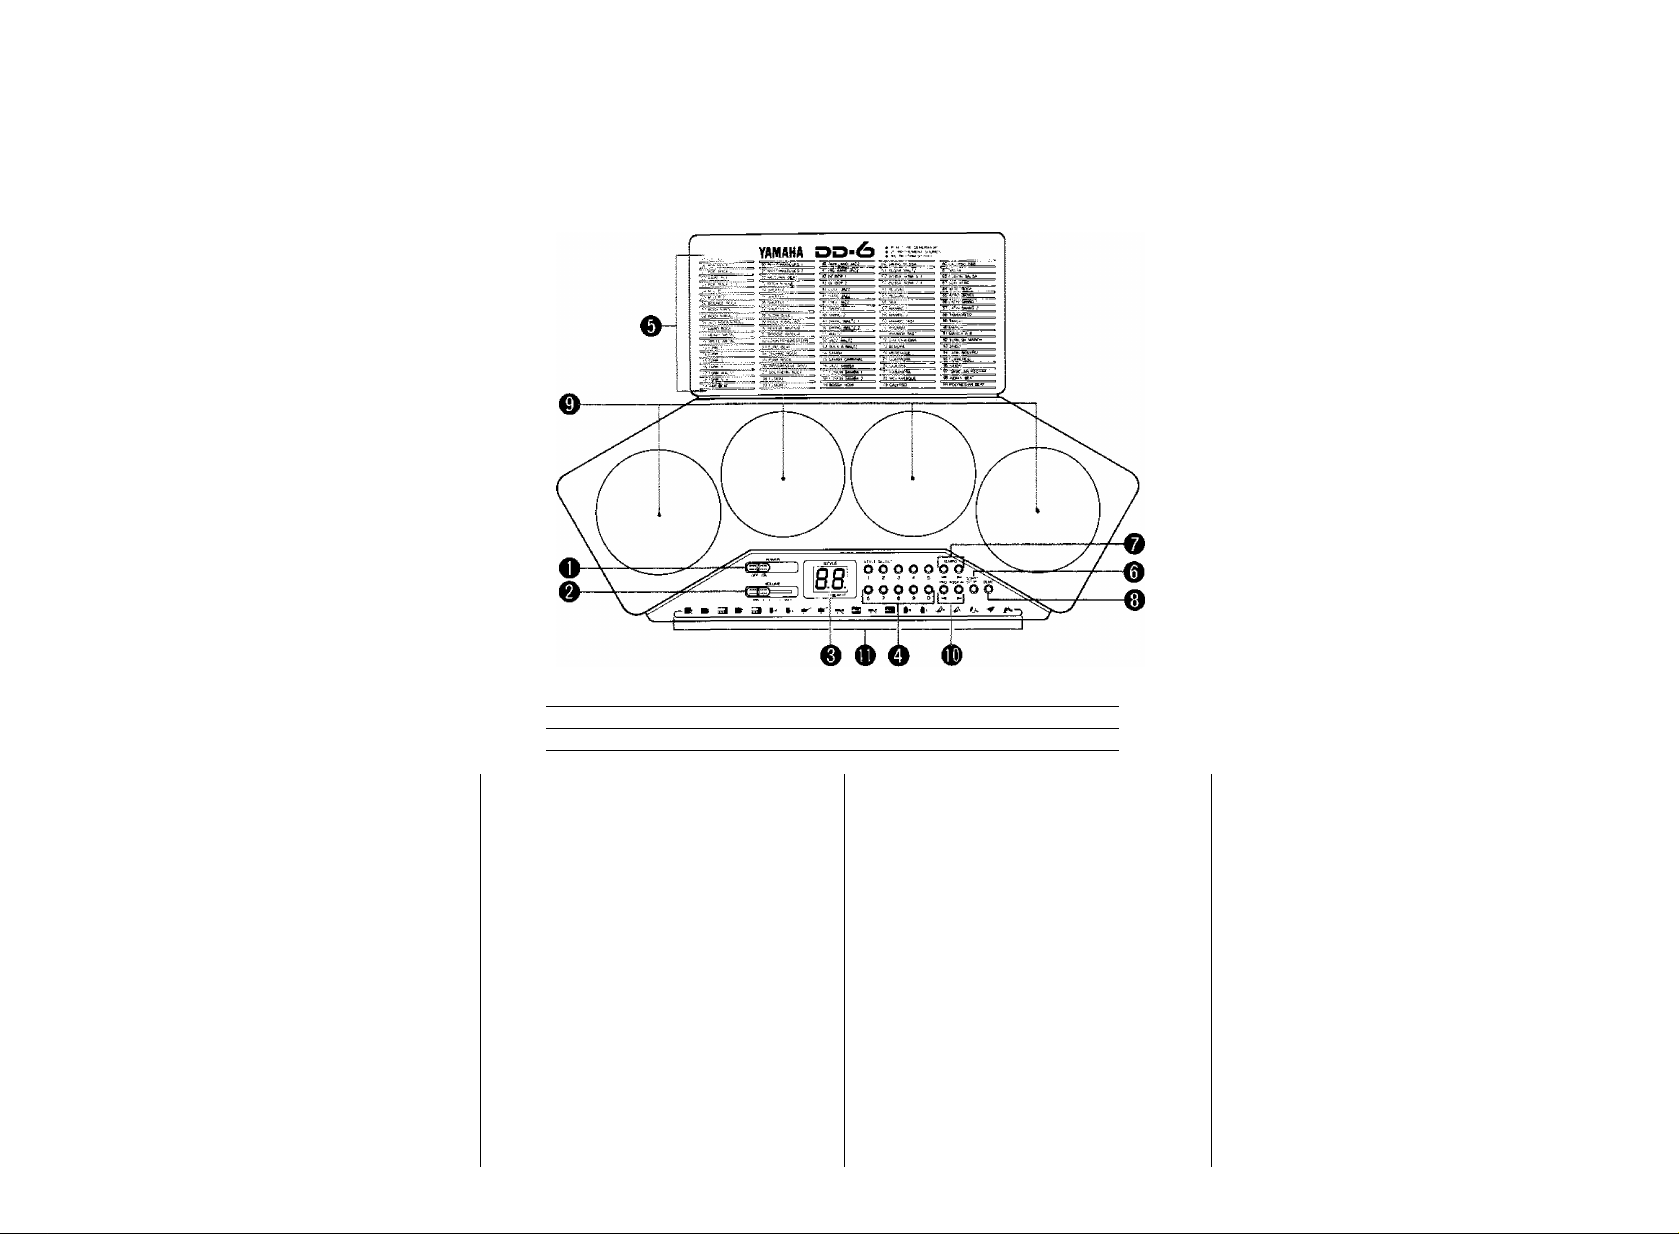
Nomenclature
Bezeichnung der Funktionselemente
Nomenclature
Nomenclatura
0 POWER Switch
©VOLUME Control
©STYLE/ BEAT/ TEMPO Display
©STYLE SELECT Buttons
©STYLE LIST
©START/ STOP Button
©TEMPO Controls
©DEMO Button
©Percussion Pads
©PAD ASSIGN Buttons
©Instrument Symbols
©Percussion Sticks
O—:
crr—
©Netz schal ter
©Lautstärkeregler
©Rhythmus/ Takt/ Ibmpo-Anzeige
© Rhythmus wähl tasten
©Rhythmus-Li ste
©Start/ Stop-Taste
©Tempo-Ihsten
©Demo-Taste
©Schlagflächen (Pads)
©Pad-Zuweisungstasten
© Instrumentstimmensymbole
©Schlagstöcke
------------------------------------------
©Interrupteur d'alimentation (POWER)
©Commande de réglage du volume
(VOLUME)
©Affichage de style/temps/tempo
(STYLE/ BEAT/TEMPO)
©Touches de sélection des styles
(STYLE SELECT)
©Liste des styles
©Touche de départ/ arrêt
(START/ STOP)
©Commandes de tempo (TEMPO)
©Touche de démonstration (DEMO)
©Pads de percussion
©Touche d'affectation des pads
(PAD ASSIGN)
©Symboles des instruments
©Baguettes de percussion
)
i—^
)
©Interruptor de alimentación
(POWER)
©Control del volumen (VOLUME)
©Visualizador de estilo/ tiempo/ tempo
(STYLE/ BEAT/ TEMPO)
©Botones de selección de estilo
(STYLE SELECT)
©LISTA DE ESTILOS
©Botón de inido/ parada
(START/STOP)
©Controles de tempo (TEMPO)
©Botón de demostradón (DEMO)
©Acdonadores de percusión
©Botones de asignadón de accionador
(PAD ASSIGN)
©Símbolos de instrumentos
©Palillos de percusión
Page 6
The Yamaha DD-6 Digital Percussion unit
is supplied with a pair of Percussion
Stici^. These sticks have been designed
specifically for use with the DD-6, and
should not be used to play acoustic drums
or to strike any surface other than the
DD-6 percussion pads.
Das Digital-Schlagzeug DD-6 von
Yamaha wird mit einem Paar
Schlagstöcken geliefert. Diese
Schlagstöcke sind nur für das DD-6
gedacht und sollten daher nicht zum
Spielen auf akustischen Schlagzeugen
oder anderen Flächen als den Pads des
DD-6 verwendet werden.
La boîte à percussion numérique DD-6
Yamaha est fournie avec une paire de
baguettes de percussion. Ces baguettes
ont été spécialement conçues pour être
utilisées avec la boîte DD^ et elles ne
doivent pas être utilisées avec une batterie
acoustique ou pour battre tout autre
surface que tes pads de percussion de la
boîte DD-6.
La unidad de percusión di DD-6
Yamaha se suministra cor^ un par de
palillos de percusión. Esfc^ palillos se
han diseñado especifícam<®ute para el
uso con el DD-6, y no se ^eben usar para
tocar baterías acústicas o golpear
ninguna otra superficie no sean los
accionadores de percusiór» del DD-6,
Listen to the Demonstration
The DD-6 is programmed with a
demonstration that allows you to hear
many of the built-in rhythm styles in
sequence. The number of each style is
shown on the STYLE/ BEAT/ TEMPO
display 0 as it plays.
1. Slide the POWER switch Q to the ON
position.
2. Set the VOLUME control 0 to a position
about half way between the MIN smd
MAX settings. You can make further
volume adjustments once playback
begins.
Demo-Spiel
Im DD-6 ist ein Demo-Programm
vorgespeichert, das einige der
vorpri^rammierten Rhythmen
nacheinander spielt. Die Nummer des
jeweiligen Rhythmus erscheint hierbei
in der Rhythmus/ Thkt/ Tfempo-Anzeige
0
1. Stellen Sie den POWER-Schalter O
auf "ON".
POWER
OFF ON
2.Bringen Sie den Lautstärkeregler 0
imgefähr in Mittelstellung zwischen
MIN und MAX. Nach Einsetzen der
Wiedergabe können Sie die Lautstärke
dann wunschgemäß einregeln.
VOLUME
Ecoute de la
Séquence de
Démonstration
La boîte DD-6 a été programmée avec
une séquence de démonstration vous
permettant d'écouter un grand nombre des
styles rythmiques incorporés les uns après
les autres. Pendant la reproduction d'un
style, son numéro est indiqué sur
l'affichage STYLE/ BEAT/ TEMPO 0.
1. Faire coulisser l'interrupteur POWER O
sur la position ON.
_________
2. Régler la commande VOLUME 0 sur
J
une position à mi-chemin entre les
réglages MIN et MAX. Un réglage plus
minutieux pourra être effectué après le
début de la séquence de démonstratbn.
Escucha de la
Demostrad ón
El DD-6 está programadc? una
demostración que le permit escuchar
muchos de los estilos rítrr^í^as
incorporados en secuencia El número
de cada estilo se muestra
visualizador STYLE/ BEA^/ TEMPO 0
cuando se reproduce,
1. Deslice el interruptor pOWER 0 en
la posición ON.
2. Ajuste el control VOLUME 0 a la
mitad, entre los ajustes MIN y MAX.
Puede realizar ajustes sidicionales del
volumen una vez se inicie la
reproducción.
MIN I I I I MAX
Page 7

3. Press the DEMO button O to begin
demonstration playback. You can play
along with the demonstration by tapping
on the DD-6 percussion pads.
3, Drücken Sie die DEMO-llaste ®, um
das Demo-Programm zu starten. Sie
können hierbei auf den Pads des DD-6
zum Rhythmus spielen.
3. Appuyer sur la touche DEMO © pour
lancer la reproduction de la séquence de
démonstratbn. Il est possible de jouer
au fur et à mesure en battant les pads de
percussion de la boîte DD-6.
DEMO
3. Presione el botón DEMO © para
empezar la reproducción de
demostración. Puede tocar junto con la
demostración presionando los
accionadores de percusión del DD-6.
4. The demonstration can be stopped at
any time by pressing either the DEMO or
START/ STOP button ©©
Enjoying Manual Percussion
This is the main function of the Digital
Percussion DD-6. When the POWER
switch O is "ON", it is possible to hear
percussion sounds when tapping the
Percussion Pads © with the Percussion
Sticks © or your hands. You can have tun
playing the DD-6 just like an acoustic
percussion set. Also, the Pads are
equipped with a touch-level sensor, which
means you can obtain different volume
levels depending on how hard you tap the
pad.
1. Set the POWER switch © to the "ON"
position.
4. Das DEMO-Programm kann mit der
Demo-Taste © bzw. der START/
STOP-Taste © jederzeit gestoppt
werden.
START/
STOP DEMO
Manuelles
Percussionsspiel
Dies ist die Hauptfunktion des DigitalSchlagzeugs DD-6, Nach Einschalten
des DD-6 mit dem POWER-Schalter ©
wird beim Anschlägen eines Pads ©
mit den Schlagstöcken © der
zugewiesene Schlagzeugklai^
produziert. Das DD-6 kann auf diese
Weise wie ein gewöhnliches Schlagzeug
gespielt werden. Darüber hinaus sind
die Pads mit Schlagstärke-Sensoren
ausgestattet, so daß je nach
Schlagstärke der entsprechende
Lautstärkegrad erzielt wird.
1. Stellen Sie den POWER-Schalter ©
auf"ON".
4. La démonstration peut être arrêtée à tout
moment en appuyant soit sur la touche
DEMO ©, soit sur la touche START/
STOP ©.
Le plaisir de ia
Percussion
Manuelie
C'est la fonction principale de la boîte à
percussion numérique DD-6. Lorsque
l'interrupteur POWER © est mis sur la
position "ON", il est possible d'entendre un
son de percussion en battant les pads de
percussion © avec les baguettes de
percussion © ou les mains. On peut
ainsi utiliser la boîte DD-6 exactement
comme un ensemble de percussion
acoustique. De plus, les pads sont
équipés d'un capteur de force d'impact, ce
qui signifie que le son obtenu sera
différent suivant la force avec laquelle on
bat les pads.
1. Mettre l'interrupteur POWER © sur la
position "ON".
4. La demostración se puede detener en
cualquier momento, presionando el
botón DEMO o START/ STOP ©, ©.
Disfrutando de la Percusión Manual
Esta es la función principal del DD-6 de
percusión digital. Cuando el interruptor
POWER © está en ON, es posible
escuchar sonidos de percusión cuando
presione los accionadores de percusión
© , con los palillos de percusión © o
con las manos. Puede disfrutar tocando
el DD—6 como un coryunto de percusión
acústica. También, los accionadores
están equipados con un sensor de nivel
de pulsación, lo que signífíca que puede
obtener niveles diferentes de volumen
dependiendo de cómo de fuerte presione
el accionador.
1. Ajuste el interruptor POWER © en la
posición ON.
Page 8

2. Tap any of the Percussion Pads O to
hear percussion sounds.
* The percussion sounds are preset as
foltows.
2.Schlagen Sie die einzelnen Pads (
um sich die zugewiesenen
Schlagzeugklänge anzuhören.
* Folgende Schlagzeugklänge sind
voreingestellt:
an»
2. Battre les pads de percussion 0 pour
obtenir des sons de percussion.
* Les sons de percussion sont préréglés
de ia manière suivante.
2. Presione cualquiera de los accionadores
de percusión O para escuchar sonidos
de percusión.
* Los sonidos de percusión se presentan
como sigue.
Once the maximum volume is reached,
it is not possible to create higher
volume by striking the percussion pads
any harder. The use of unnecessary
force in playing the percussion pads
can cause mechanical damage to the
instrument as well as spurious
triggering of unwanted sounds.
Pad Assign
This function allows you to assign any of
the 20 percussion sounds indicated by the
Instrument Symbols 0 at the bottom of
the DD-6 control panel to any of the
percussion pads.
Es ist eine Höchstlautstärke
vorgegeben, die auch durch noch
härteres Anschlägen nicht
überschritten werden kann. Zu viel
Kraftaufwand beim TVommeln auf
den Pads kann zu Beschädigung des
Instruments und zur Auslösung nicht
gewünschter Neber^eräusche fihren.
Schlagflächenzuweisung
Mit dieser Funktion können Sie jeder
Schlagfläche einen beliebigen der 20
durch die Instrumentstimmensymbole
0 unten am Bedienfeld des DIT-6
gekennzeichneten Percussionklänge
zuweisen.
^Wt\
S] ^3 ÍE
Une fois que le volume maximal est
atteint, il n'est pas possible d'obtenir un
volume plus élevé en bafianf les pads
de percussbn avec plus de force. Le
fait d'appliquer une force excessive sur
les pads de percussion risque de
provoquer des dommages mécaniques
et de produire des sons parasites non
souhaitables.
Affectation des Pads
Cette fonction permet d'affecter à
n'importe que) pad de percussion une des
20 sonorités de percussion représentées
par les symboles d'instrument
la partie inférieure du panneau de
commande do la boîte DD-6.
lE
Ш 'Æ Ш m Ш
0
situés à
Una vez se ha alcanzado el volumen
máximo, no es posible crear un
volumen más alto tocando más fuerte
los accionadores de percusión. El uso
de fuerza innecesaria al tocar los
accionadores de percusión puede
causar daños mecánicos en el
instrumento, así como disparos falsos
de sonidos no deseados.
Asignación de Accionador
Esta función le permite asignar
cualquiera de los 20 sonidos de
percusión indicados mediante los
símbolos de instrumentos 0 en la parte
inferior del panel de control del DD-6 en
cualquiera de los accionadores de
percusión.
D
Page 9

1. Press and hold either the or ► PAD
ASSIGN button depending on the
direction you want to move through the
instrument "list." If the instrument you
want to assign to a pad can be
accessed most quickly by moving
backward from the current instrument,
for example, press and hold the M PAD
ASSIGN button.
1. Halten Sie je nach Position der
gewünschten Instrumentsstimme in
der Liste die PAD ASSIGN-Taste
bzw, ► (El gedrückt. Wenn die
gewünschte Instrumentstimme
beispielsweise von der gegenwärtig
zugewiesenen aus rückwärts schneller
zu erreichen ist, drücken Sie die -
Thste.
1 .Appuyer sur la touche PAD ASSIGN M
PAD ASSIGN
ou ^ selon le sens dans lequel il
est préférable de se déplacer dans ta
"liste" d'instruments. Si l'instrument
souhaité peut être atteint plus
rapidement en se déplaçant vers
l'atrière, par exemple, appuyer sur la
touche PAD ASSIGN
1. Presione y mantenga presionado el
botón PAD ASSIGN ◄ o ► (El
dependiendo de la dirección en la que
quiera moverse a través de la lista de
instrumentos. Si el instrumento que
quiere asignar a un acdonador puede
accederse más rápidamente moviendo
hacia atrás desde el instrumento
actual, por ejemplo, presione y
mantenga presionado el botón
PAD ASSIGN,
2. While holding the appropriate PAD
ASSIGN button, tap the pad to which
you want to assign a new instrument.
Each time the pad is tapped, the next
instrument in the specified direction (M
or ^ ) will be heard.
3. Release the or ► PAD ASSIGN
button immediately after you hear the
instrument you want to assign to the
pad. The newly assigned instrument will
now be heard whenever that pad is
played — until a new instrument is
assigned.
* The preset pad assignments (see
previous page) are restored whenever
the POWER switch is turned ON.
* Some of the instruments are reverse
sounds. This is similar to the effect of
recording the sound on f^pe emd
playing it backwards.
* H is possible to return to the first bass
drum sound (at the far left of the
instrument list) at any time by holding
both the ◄ and ► PAD ASSIGN
buttons simultaneously and striking a
pad.
*
2. Schlagen Sie dann bei gedrückt
gehaltener PAD ASSIGN-Taste das
Pad an, dem eine neue
Instrumentstimme zugewiesen
werden soll. Bei jedem Schlag wird zur
jeweils nächsten Instrumentstimme in
der vorgegebenen Richtung { ^ bzw.
► ) gewechselt.
3. Lassen Sie die gedrückte PAD
ASSIGN-Taste M bzw. ► los, sobald
die gewünschte Instrumentstimme zu
hören ist. Beim Spielen auf diesem
Pad ist nun die neue
Instrumentstimme zu hören, bis Sie
wieder eine andere zuweisen.
* Beim Einschalten des Instruments
wird stets die werkseitige Zuweisung
(siehe vorangehende Seite)
vorgegeben.
* Manche der Instrumentstimmen sind
umgekehrte Klänge, vergleichbar
mit dem Effekt, der beim Ahspielen
einer Bandaufnahme in
Rückwärtsrichtung erzielt wird.
* Sie können jederzeit schnell zum
ersten Baßtrommel-Klang
(Instrumentstimmensymbol ganz
links) zurückspringen, indem Sie
beim Schlagen auf eines der Pads
beide PAD ASSIGN-Tasten (und
gleichzeitig gedrückt halten.
2. Tout en maintenant enfoncée la touche
PAD ASSIGN, battre le pad auquel un
nouvel instrument doit être affecté. A
chaque battement le son de l'instrument
suivant dans le sens spécifié ( ou
^ ) sera entendu.
3. Relâcher la touche PAO ASSIGN ou
^ dès que le son de l'instrument
devant être affecté au pad est entendu.
Le son du nouvel instrument sera
désormais entendu en battant le pad
concerné.
* Les affectations de pad programmées
(voir page précédente) sont rétablies à
chaque mise sous tension de
Hnstrument
* Certaines sorюrítés d'instruments sont
inversées. Ced est similaire à l'effet
produit torsqu'un enregistrement du son
est reproduit en passant la bande à
l'envers.
* Il est possible de revenir à tout moment
à la sonorité de grosse caisse (à
l'extrémité gauche de la liste
d'instruments) en maintenant
simultanément enfoncées les deux
touches PAD ASSIGN М et ^ et en
battant un pad.
2. Mientras mantiene presionado el
botón PAD ASSIGN apropiado,
presione el acdonador en el que quiere
asignar el nuevo instrumento. Cada
vez que se presione el acdonador, se
escuchará el siguiente instrumento en
la direcdón espedñcada ( o ► ).
3. Libere el botón PAD ASSIGN o ►
inmediatamente después de escuchar
el instrumento que quiere asignar al
acdonador. El instrumento asignado
se podrá escuchar siempre que se
toque el acdonador - hasta que se
asigne instrumento nuevo.
* Las asignaciones de accionadores
preajustadas (vea la página previa) se
reponen siempre que se coloca el
interruptor POWER en ON,
* Agunos de los instrumentos tienen
sonidos invertidos. Esto es similar al
efecto de grabación de sonidos en una
cinta y reproducirla al revés.
* Es posible retornar al primer sonido
de tambor grave (al extremo izquierdo
de la lista de instrumentos) en
cualquier momento, manteniendo
presionados los botones PAD ASSIGN
y ^ sumultáneamente y
presionando un acdonador.
в
Page 10

How to Use the
Rhythmus-
Utilisation de la
Cómo Usar la
Auto Rhythm
Section
This section offers you an extraordinary
total of 100 different programmed rhythms,
all of which are listed on the panel. PCM
digital technology ensure lifelike
reproduction.
Automatik
Im DD-6 sind insgesamt 100
verschiedene Rhythmen
vorprogrammiert. Eine Liste der
Rhythmen finden Sie an der Prontplatte.
PCM-Digitaltechnik sorgt für
"lebensechte" Klangreproduktion.
00 POP ftOCK 1
Ö1 POP ROCK 2
02 HARD POP
03 POP ROCK 5/^
05 M 0. R 2
06 BOUNCE ROCK
07 ROCK N ROLL 1
Oe ROCK N ROLL 2
09 50'S ROCK N ROLL
10 HARD ROCK
11 HEAVY METAL
12 SPEED METAL
17 FUNK WALTZ
________
YAMAHA DD-â
20 RHYTHM&BLUES 1
21 RHYTHM&BLUES 2
22 MOTOWN BEAT
23 ROCK N SOUL
24 SHUFFLE 1
25 shuffle 2
26 SHUFFLE 3
28 SLOW BLUES
29 ROCK-A-BALLAD
30 BOOGIE WQOGIE 1
31 BOOGIE WOOGIE 2
32 COUNTRY&WESTERN
33 EURO SEAT
34 TECHNO ROCK
35 PUNK ROCK___________
36 PROGRESSIVE ROCK
37 SOUTHERN ROCK
38 FUSION T
___________
_____________
40 DIXIELAND JAZZ
41 aiG BAND JAZZ
44 COOL JAZZ
45 HÄRD7ÄZZ
46 FREE JAZZ
49 SWJNC WALTZ 1
50 SWING WALTZ 2
52 JAZZ WALTZ
53 BOCK-A-WALTZ
55 SAMBA CARNI VAL
56 JAZZ SAMBA
57 FUSIQN SAMBA 1
58 FUSIQN SAMBA 2
59 BOSSA NOVA
Section de Rythmes
Automatiques
Cette section offre un total extraordinaire
de 100 rythmes programmés différents,
dont la liste est donnée sur la face avant.
La technologie numérique de modulation
par codage d’impulsion (PCM) assure une
reproduction absolument fidèle.
• PCM TONE GENERATOR
• 20 INSTRUMENT SOUNDS
• 100 RHYTHM STYLES
60 SWING BOSSA
61 BOSSA WALTZ
62 BOSSA NOVA 5/4
63 BOSSA NOVA 7/4
65 REGGAE 2
68 MAMBO 2
' 69 MAM SO FAST
71 RHUMBA FAST
72 CHA-CHA^HA
74 MERENGUE
75 GUARACHA
77 HABANERA
78 MOZAMBIQUE
8Q CALYPSO R&B
82 FUSION SALSA
84 AFRO ROCK
65 afro dance
86 LATIN SWING 1
87 latin SWING 2
88 TAMBÒRiTq
91 MARCH 6/8
’ 92 TURKISH f^RCH
94 LATIN BOLERO
95 FLAMENCO
97 GAMELAN KECHAK
"WlNDiÂrTBÈÂT
99 POLYNESIAN BEAT
Sección de Ritmo
Automático
Esta sección le ofrece un total
extraordinario de 100 ritmos
programados diferentes, que están
listados en el panel. La tecnología
digital PCM asegura una reproducción
viva.
1. Switch on
If the power is not already on, slide the
POWER switch Q to the "ON" position.
The STYLE/ BEAT/ TEMPO display 0
will then illuminate.
2. Adjust the volume
Set the VOLUME control 0 to an
af^ropriate volume level — start with a
setting about half way between MIN and
MAX.
L Einschalten
Wenn das Instrument noch nicht
eingeschaltet ist, stellen Sie zunächst
den POWER-Schalter O auf "ON".
Zur Bestätigung leuchtet dann die
Rhythmus/ Ihkt/ Tfempo-Anzeige 0
auf.
2.Lautstärke
Stellen Sie den Lautstärkeregler
wunschgemäß ein - anfänglich eignet
sich die Mittelstellung zwischen MIN
und MAX am besten.
0
1. Mettre sous tension
Si l'instrument n'est pas déjà sous
tension, faire coulisser l'interrupteur
POWER O sur la position "ON".
L'affichage STYLE/ BEAT/ TEMPO 0
s'allume alors.
2. Régler le volume
Régler le volume à l'aide de la
commande VOLUME
0
, la mettre
d'abord sur une position à mi-chemin
entre les réglages MIN et MAX.
L Conexión
Si la alimentación todavía no está
conectada, deslice el interruptor
POWER O la posición ON. El
visualizador STYLE/ BEAT/ TEMPO
0
se iluminará.
2.Ajuste el volumen
Ajuste el control VOLUME O en un
nivel de volumen apropiado - inicie con
un ajuste a la mitad de MIN y MAX.
Page 11

3. Select a Rhythm Style
Use the number buttons to enter the
number of the desired rhythm style. The
various rhythm styles and their numbers
are shown in the STYLE LIST 0 above
the percussion pads. Always enter two
digits to select a rhythm style. For
example, to select style 47 (SWING 1),
first press the "4" button and then the "7"
button. The numbers are shown on the
STYLE/ BEAT/ TEMPO display 0 as
they are entered. The new style is
selected as soon as the second digit of
its number is entered.
3. Rhythmus-Wahl
Geben Sie die Nummer des
gewünschten Rhythmus über die
Zehnertasten ein. Die RhythmusListe 0 gibt eine Übersicht über die
verschiedenen Rhythmen und ihre '
Nummern. Bei der Wahl eines
Rhythmus muß immer die
vollständige (zweistellige) Nummer
eingegeben werden. Um
beispielsweise Rhythmus Nr. 47 zu
wählen, geben Sie zunächst "4" und
danach "7" ein. Die eingegebene
Nummer wird auf der Rhythmus/
Takt/ Tfempo-Anzeige 0 angezeigt.
Nach Eingabe der zweiten Stelle ist
der neue Rhythmus dann aktiviert.
3. Sélectionner un style de rythma
Utiliser les touches numériques pour
introduire le numéro du style de rythme
désiré. Les divers styles de rythme et
leur numéro sont indiqués dans la liste
des styles
percussion.
Toujours introduire deux chiffres pour
sélectionner un style de rythme. Par
exemple, pour sélectionner le style 47
(SWING 1 ), appuyer d'abord sur la
touche "4" et ensuite sur la touche "7".
Les chiffres apparaissent sur l'affichage
STYLe BEAT/ TEMPO 0 au fur et à
mesure de leur introduction, Le
nouveau style est sélectionné dès que le
deuxième chiffre de son numéro est
introduit.
STYLE SELECT
0
au-dessus des pads de
8
3. Seleccione un estilo rítmico
Use los botones numéricos para
introducir el número del estilo rítmico
deseado. Los diferentes estilos
rítmicos y sus números se muestran
en la STYLE LIST 0 encima de los
accionadores de percusión. Introduzca
siempre dos dígitos para seleccionar
un estilo rítmico. Por ejemplo, para
seleccionar el estilo 47 (SWING 1),
presione primero el botón "4" y luego
el botón "7". Los números se muestran
en el visualizador STYLE/ BEAT/
TEMPO 0 cuando se introducen. El
estilo nuevo es seleccionado tan pronto
se introduce el número del segundo
dígito.
4. Start the Rhythm
Press the START/ STOP button to begin
playback of the selected rhythm.
* The two dots at the bottom of the
STYLE/ BEAT/ TEMPO display flash in
time with rhythm playback. Both dots
flash simultaneously on the first beat of
the two-measure pattern, the left dot
alone flashes on the first beat of the
second measure, and the right dot
flashes on the remaining beats of both
measures.
*
4, Rhythmus-Start
Drücken Sie zum Starten des
gewählten Rhythmus die START/
STOP-Tkste.
* Die beiden Punkte unten in der
Rhythmus/ Takt/ Tfempo-Anzeige
geben den Thkt des spielenden
Rhythmus an. Zum ersten Taktschlag
des aus zwei Takten bestehenden
Musters blinken beide Punkte
gleichzeitig auf, während der linke
Punkt den ersten Taktschlag des
zweiten Taktes und der rechte Punkt
alle übrigen Taktschläge angibt.
4. Lancer le rythme
Appuyer sur la touche START/ STOP
pour lancer le rythme sélectionné.
* Les deux points à la partie inférieure de
l'affichage STYLE/ BEAT/ TEMPO se
mettent à clignoter en mesure. Les
deux points clignotent simultanément
sur le premier temps d'un motif à deux
mesures, le point gauche clignotant seul
sur le premier temps de la deuxième
mesure, alors que le point droit clignote
sur les temps restants des deux
mesures.
4. Inicie el ritmo
Presione el botón START/ STOP para
empezar la reproducción del ritmo
seleccionado.
* Los dos puntos de la parte inferior del
visualizador STYLE/ BEAT/ TEMPO
parpadearán cuando se reproduzca el
ritmo- Ambos puntos parpadean
simultáneamente en el primer tiempo
del patrón de dos compases, y el pimto
izquierdo parpadea en el primer
tiempo del segundo compás, y el punto
derecho parpadea en los tiempos
restantes de ambos compases.
70
Page 12

5. Set The Tempo
Adjust the tempo as you like by using
the TEMPO controls ©. ► is for
increasing the tempo and M is for
decreasing the tempo.
* The tempo can be set from -8 (J = 40)
—+7 (J -230).
* To set the preset tempo 0 (J = 114),
press both controls at the same time.
* The preset tempo 0 (J - 114) is restored
whenever the POWER switch is turned
ON.
5. Tempo-Einstellung
E>as kann mit den TEMPO-
Tbsten © wunschgemäß eingestellt
werden. ► hebt das Tfempo an, und
verlangsamt das Tempo.
* Das Tfempo kann im Bereich von -8 (J
= 40) bis +7 (J = 230) verändert
werden.
* Zur Rücksetzung zum Vorgabe-Tfempo
(J = 114) drücken Sie beide TEMPO-
Tfesten gleichzeitig.
* Beim Einschalten wird das
Instrument zum Vorgabe-Tfempo (J =
114) rückgesetzt.
TEMPO
5. Régler )8 tempo
Régler le tempo selon ses propres goûts
en utilisant les commandes TEMPO ©
. La touche ^ permet d'accélérer le
tempo, alors que la touche M permet
de le ralentir.
* Le tempo peut être réglé entre -8 (J =
32) et +7 (J = 230).
* Pour rétablir le tempo préréglé 0 ( j -
114), appuyer sur les deux touches en
même temps.
* Le tempo préréglé 0 ( J = 114) est
rétabli à chaque mise sous tension de
l'appareil.
S.Ajuste del tempo
^uste el tempo como quiera usando
los controles TEMPO © . ► es para
aumentar el tempo, y es para
disminuirlo.
* El tempo se puede sg ostar desde -8 (J
= 40) —+7 (J =230).
* Para ajustar el tempo actual 0 (J =
114), presione ambos controles al
mismo tiempo.
* El tempo preajustado 0 (J = 114) se
repone siempre que el interruptor
POWER se coloca en ON.
6. Stop The Rhythm
Press the START/ STOP button ©
again and the rhythm will stop.
* Style 00 (POP ROCK 1) is automatically
selected whenever the POWER switch
is turned ON.
Percussion
Ensemble
It is possible to combine manual
percussion with auto rhythm patterns.
Ensemble with auto Ahythm
To enjoy a percussion ensemble of your
own, simply tap the Percussbn Pads ©
while an auto rhythm pattern is playing.
11
6. Stoppen des Rhythmus
Der Rhythmus wird durch erneutes
Drücken der START/ STOP-Taste ©
wieder gestoppt.
* Beim Einschalten des Instruments
wird automatisch Rhythmus Nr. 00
(POP ROCK 1) vorgegeben.
PercussionEnsemble-Spiel
Sie können sich beim Spielen auf den
Pads von einem automatischen
Rhythmus begleiten lassen.
Ensemble mit Automatischem
Rhythmus
Zum Spielen mit Ihrem eigenen
"Percussion-Ensemble" starten Sie
einfach einen Rhythmus und spielen
dann auf den Pads.
G.Arrèter le rythme
Appuyer à nouveau sur la touche
START/ STOP © pour arrêter le
rythme.
* Le style 00 (POP ROCK 1 ) est
automatiquement sélectionné à chaque
mise sous tension de l'instrument.
Utilisation des Ensembles de Percussion
II est possible de combiner la percussion
manuelle avec les rythmes automatiques.
Ensemble avec Rythme Automatique
Pour créer un ensemble de percussion
personnel, battre simplement les pads de
percussion © pendant la reproduction
d'un rythme automatique.
6.Pare el ritmo
Presione el botón START/ STOP ©
de nuevo y el ritmo se detendrá.
* El estilo 00 (POP ROCK 1) se
selecciona automáticamente siempre
que el interruptor POWER se coloca
en ON.
Ventajas del
Conjunto de
Percusión
Es posible combinar la percusión
manual con los patrones rítmicos
automáticos.
Conjunto con Ritmo Automático
Para disfrutar de su propio conjunto de
percusión, presione simplemente los
accionadores de percusión © mientras
se reproduce el patrón ritmico
automático.
Page 13

External Jacks
Anschluß an exteme Geräte
Prises Externes
Tomas Extemas
You will find two jacks on the side of the
instrument. These jacks are for connecting
optional accessories and other equipment.
1. External Power Source
(DC9 —12V IN)
Connect the optional AC power adaptor
PA-1 / PA-1 B/ PA-3 to the DC9 — 12V
IN jack.
2. HEADPHONES/ AUX OUT Jack
Connect a set of headphones to this
jack and you can enjoy playing without
disturbing others. Also for connecting to
a stereo system or other equipment.
An der Seite des Instruments befinden
sich zwei Buchsen, die zum Anschluß
des DD-6 an Sonderzubehör bzw. andere
Geräte verwendet werden können.
1. Netzadapter*Buchse
(DC9—12VIN)
Diese Buchse dient zum Anschluß des
als Sonderzubehör erhältlichen
Netzadapters PA-1, PA-lB bzw. PA-3.
2. Kopfhörer/ AUX>Buchse
(HEADPHONES/ AUX OUT)
Hier können Sie zum "stillen” Üben
Kopfhörer anschließen. Die Buchse
eignet sich auch zum Anschluß des
DD-6 an eine Stereoanlage oder ein
anderes Verstärkersystem.
L'instrument est équipé de deux pnses
situées sur le côté. Ces prises permettent
de connecter les accessoires en option ou
d'autres appareils.
1. Prise d'alimentation externe
(DC9-12VIN)
Brancher un adaptateur secteur PA-1/
PA-1 B/ PA-3 en option à la prise
d'entrée DC9 —12 V IN.
2. Prise de sortie casque/ aux
(HEADPHONES/ AUX OUT)
Brancher un casque d'écoute à cette
prise afin de pouvoir jouer sans gêner
personne. Elle sert paiement à
connecter l'instrument à une chaîne
stéréo ou autre appareil.
Encontrará dos tomas en el lado del
instrumento. Estas tomas sirven para
conectar accesorios opcionales y otros
equipos.
L Alimentación externa
(DC9-12VIN)
Conecte el adaptador de alimentación
de CA opcional PA-1/ PA- IB/ PA-3 en
latomaDC9 —12VIN.
2.Tbma HEADPHONES/ AUX OUT
Conecte un juego de auriculares en
esta toma y podrá disíhitar tocando
sin molestar a los demás. También
para conectar a un sistema
estereofónico u otro equipo.
Optional
Accessories
• AC Power Adaptor
(PA-1/PA-1 B/PA-3)
Transforms AC voltage to DC voltage.
Headphones (HPE-3/ HPE-5)
Specially designed lightweight dynamic
headphones with extra-soft ear pads.
Availability of some optional accessories
will vary from country to country.
Sonderzubehör
• Netzadapter
(PA^l/PA-lB/PA-^)
Wandelt die Haushalt-Netzspannung
in Gleichspannung um.
• Kopfhörer (HPE-3/ HPE-5)
EHes sind speziell für DigitalSchlagzeuge entwickelte dynamische
Kopfhörer mit extraweichen
Ohrpolstem. In manchen Ländern
sind die Sonderzubehör-Artikel unter
Umständen nicht überall erhältlich.
Accessoires en
Option
• Adaptateur secteur
(PA-1/PA-1 B/PA-3)
Transforme ta tension secteur en
tension CC.
• Casque d'écoute (HPE-3/ HPE-5)
Casque d'écoute dynamique et léger,
pourvu de garnitures d'oreille
extrêmement douces.
La disponibilité des accessoires en
option peut varier de pays à pays.
Accesorios
Opcionales
Adaptador de alimentación de CA
(PA^l/PA-lB/PA-3)
IVansforma la tensión de CA en
tensión de CC.
Auriculares (HPE-3/ HPE-5)
Auriculares dinámicos de poco peso,
especialmente diseñados con
almohadillas para los oídos extra
suaves.
La disponibilidad de algunos
accesorios opcionEdes puede variar en
cada país. 12
Page 14

Taking Care Of
Pflege des
Entretien de la
Cuidados de su
Your Digital
Percussion
Your Digital Percussion DD-6 Will remain
in excellent playing condition if care is
taken concerning the following.
1 .When you use AC power, be sure to use
the optional PA-1/PA-1 B/PA-3. Before
use, read the adaptor instructions
carefully.
2. Oo not subject the unit to physical
shock, and avoid placing an;^hing heavy
on it.
3. Do not place the instrument near any
heating appliance, or leave it inside a
car in direct sunlight for any length of
time. Direct sunshine can raise the
interior temperature of a car with closed
doors and windows to as high as 80*C
(176®F). Temperatures in excess of
60®C (140®F) can cause physical and/or
electrical damage, as well as physical
deformation or discoloration.
4. Use a dry damp cloth for cleaning.
Never use solvents such as benzine or
thinner.
Digital-
Schlagzeugs
Beachten Sie bitte folgende Punkte,
damit das Digital-Schlagzeug DD-6
stets in gutem Zustand und spielbereit
bleibt.
1. Beim Anschluß an eine Steckdose nur
den als Sonderzubehör erhältlichen
Netzadapter PA-1, PA-IB bzw, PA-3
verwenden. Vor dem Anschluß auch
die dem Adapter beiliegenden
Anweisungen durchlesen!
2. Das Instrument vor Stößen bzw.
Erschütterungen schützen und auch
keine schweren Gegenstände auf das
Gerät stellen.
S.Das Instrument nicht in der Nähe
eines Heizkörpers aufstellen oder
längere Zeit in einem in der prallen
Sonne abgestellten Fahrzeug liegen
lassen. Insbesondere im Sommer
kann die Tiemperatur im
Fahrzeuginnem bei geschlossenen
Fenstern bis zu Werten um 80°C
ansteigen. Temperaturen über 60°C
können die Schaltungen im
Instrument beschädigen und das
Gehäuse verformen bzw. verfärben.
4. Das Instrument mit einem weichen,
ggf. leicht angefeuchteten Tüch
reinigen. Niemals Lösungsmittel wie
Benzin oder Verdünner verwenden!
Boîte à Percussion
Numérique
La boîte à percussion numérique DD-6
restera en excellente condition
de fonctionnement en prenant les
précautions suivantes:
1. En cas de fonctionnement sur secteur,
veiller à toujours utiliser un adaptateur
secteur PA-1 / PA-1 B/ PA-3. Avant
d'utiliser l'adaptateur, lire attentivement
les instructions de son mode d'emploi.
2. Ne pas soumettre l'instrument à des
chocs physiques, et éviter d'y placer un
objet lourd.
3. Ne pas placer l'instrument près d'un
appareil de chauffage, et ne pas le
laisser pendant une période prolongée
dans un véhicule stationné en plein
soleil. La température interne d'un
véhicule stationné en plein soleil avec
les vitres fermées peut atteindre 80°C.
Une température supérieure à 60°C
peut provoquer des dommages
physiques et/ou électriques de même
que la déformation ou décoloration de
l'instrument.
4. Utiliser un chiffon très légèrement
humide pour nettoyer l'instrument.
Ne jamais utiliser de solvants tels que
de la benzine ou un diluant.
Percusión Digital
Su DD-6 de percusión digital
permanecerá en excelentes condiciones
si se toma en cuenta lo siguiente.
1. Cuando utilice alimentación de CA,
asegúrese de utilizar los adaptadores
opcionales PA-1/PA-lB/PA-3. Antes
del uso, lea cuidadosamente las
instrucciones.
2. No exponga la unidad a golpes, y evite
colocar objetos pesados encima.
3. No coloque el instrumento cerca de
aparatos que generan calor, ni dejarlo
dentro del automóvil bajo la luz
directa del sol ni durante poco tiempo.
La luz directa del sol puede elevar la
temperatura interior del automóvil
con las puertas y ventanillas cerradas
hasta 80° C. Las temperaturas más
altas de 60° C pueden causar daños
físicos y/o eléctricos, así como
deformación física o decoloración.
4. Utilice un paño seco para la limpieza.
Nunca utilice solventes tales bencina o
disolvente.
13
Page 15

Specifications
Technische Daten
Spécifications
Especificaciones
Percussion Pads
4 pads
Auto Rhythm Patterns (100 styles)
Pop Rock 1, Pop Rock 2, Hard Pop, Pop
Rock 5/4, M.O.R. 1, M.O.R. 2, Bounce
Rock, Rock'n' Roll 1, Rock’n' Roll 2, 50's
Rock’n' Roll, Hard Rock, Heavy Metal,
Speed Metal, Funk 1, Funk 2, Funk 3,
Funk 4, Funk Waltz, Funk 5/4, Rap Beat,
Rhythm & Blues 1, Rhythm & Bluse 2,
Motown Beat, Rock'n' Soul, Shuffle 1,
Shuffle 2, Shuffle 3, Shuffle 4, Slow Blues,
Rock-A-Ballad, Boogie Woogie 1, Boogie
Woogie 2, Country & Western, Euro Beat,
Techno Rock, Punk Rock, Progressive
Rock, Southern Rock, Fusion 1, Fusion 2,
Dixieland Jazz, Big Band Jazz, Be-Bop 1,
Be-Bop 2, Cool Jazz, Hard Jazz, Free
Jazz, Swing 1, Swing 2, Swing Waltz 1,
Swing Waltz 2, Wattz, Jazz Waltz, Rock-AWaltz, Samba, Samba Carnival, Jazz
Samba, Fusion Samba 1, Fusion Samba
2, Bossa Nova, Swing Bossa, Bossa
Waltz, Bossa Nova 5/4, Bossa Nova 7/4,
Reggae 1, Reggae 2, Ska, Mambo 1,
Mambo 2, Mambo Fast, Rhumba, Rhumba
Fast, Cha-Cha-Cha, Beguine, Merengue,
Guaracha, Guajira, Habanera,
Mozambique, Calypso, Calypso R&B,
Salsa, Fusion Salsa, Son Afro, Afro Rock,
Afro Dance, Latin Swing 1, Latin Swing 2,
Tamborito, Tango, March, March 6/8,
Turkish March, Jingo, Latin Bolero,
Flamenco, Baion, Gamelan Kechak,
Indian Beat, Polynesian Beat
Schlagflachen
4 Pads
Automatische Rhythmen (100 Muster)
Pop Rock 1, Pop Rock 2, Hard Pop, Pop
Rock 5/4, M.O.R. 1, M.O.R. 2, Bounce
Rock, Rock'n' Roll 1, Rock'n’ Roll 2, 50's
Rock'n' Roll, Hard Rock, Heavy Metal,
Speed Metal, Funk 1, Funk 2, Funk 3,
Funk 4, Funk Waltz, Funk 5/4, Rap
Beat, Rhythm & Blues 1, Rhythm &
Bluse 2, Motown Beat, Rock'n' Soul,
Shuffle 1, Shuffle 2, Shuffle 3, Shuffle 4,
Slow Blues, Rock-A-Ballad, Boogie
Woogie 1, Boogie Woogie 2, Country &
Western, Euro Beat, Ifechno Rock, Punk
Rock, Progressive Rock, Southern Rock,
Fusion 1, Fusion 2, EHxieland Jazz, Big
Band Jazz, Be-Bop 1, Be-Bop 2, Cool
Jazz, Hard Jazz, FVee Jazz, Swing 1,
Swing 2, Swing Waltz 1, Swing Waltz 2,
Waltz, Jazz Waltz, Rock-A-Waltz,
Samba, Samba Carnival, Jazz Samba,
Fusion.Samba 1, Fusion Samba 2, Bossa
Nova, Swing Bossa, Bossa Waltz, Bossa
Nova 5/4, Bossa Nova 7/4, Reggae 1,
Reggae 2, Ska, Mambo 1, Mambo 2,
Mambo Fast, Rhumba, Rhumba Fast,
Cha-Cha-Cha, Beguine, Merengue,
Guaracha, Guajira, Habanera,
Mozambique, Calypso, Calypso R&B,
Salsa, Fusion Salsa, Son Afro, Afro
Rock, Afro Dance, Latin Swing 1, Latin
Swing 2, Tamborito, Tango, March,
March 6/8, Turkish March, Jingo, Latin
Bolero, Flamenco, Baion, Gamelan
Kechak, Indian Beat, Polynesian Beat
Pads de percussion
4 pads
Rythmes automatiques (100 styles)
Pop Rock 1, Pop Rock 2, Hard Pop, Pop
Rock 5/4, M.O.R. 1, M.O.R. 2, Bounce
Rock, Rock'n' Roll 1, Rock’n' Roll 2, 50's
Rock'n' Roll, Hard Rock, Heavy Metal,
Speed Metal, Funk 1, Funk 2, Funk 3,
Funk 4, Funk Waltz, Funk 5/4, Rap Beat,
Rhythm & Blues 1, Rhythm & Bluse 2,
Motown Beat, Rock'n* Soul, Shuffle 1,
Shuffle 2, Shuffle 3, Shuffle 4, Slow Blues,
Rock-A-Ballad, Boogie Woogie 1, Boogie
Woogie 2, Country & Western, Euro Beat,
Techno Rock, Punk Rc»ck, Progressive
Rock, Southern Rock, Fusion 1, Fusion 2,
Dixieland Jazz, Big Band Jazz, Be-Bop 1,
Be-Bop 2, Cool Jazz, Hard Jazz, Free
Jazz, Swing 1, Swing 2, Swing Waltz 1,
Swing Waltz 2, Waltz, Jazz Waltz, Rock-AWaltz, Samba, Samba Carnival, Jazz
Samba, Fusion Samba 1, Fusion Samba
2, Bossa Nova, Swing Bossa, Bossa
Waltz, Bossa Nova 5/4, Bossa Nova 7/4,
Reggae 1, Reggae 2, Ska, Mambo 1,
Mambo 2, Mambo Fast, Rhumba, Rhumba
Fast, Cha-Cha-Cha, Beguine, Merengue,
Guaracha, Guajira, Habanera,
Mozambique, Calypso, Calypso R&B,
Salsa, Fusion Salsa, Son Afro, Afro Rock,
Afro Dance, Latin Swing 1, Latin Swing 2,
Tamborito, Tango, March, March 6/8,
Turkish March, Jingo, Latin Bolero,
Piamene», Baion, Gamelan Kechak,
Indian Beat, Polynesian Beat
Pulsadores de percusión
4 pulsadores
Patrones rítmicos automáticos (100 estilos)
Pop Rock 1, Pop Rock 2, Hard Pop, Pop
Rock 5/4, M.O.R. 1, M.O.R. 2, Bounce
Rock, Rock'n' Roll 1, Rock'n' Roll 2, 50's
Rock'n' Roll, Hard Rock, Heavy Metal,
Speed Metal, Funk 1, Funk 2, Funk 3,
Funk 4, Funk Waltz, Funk 5/4, Rap
Beat, Rhythm & Blues 1, Rhythm &
Bluse 2, Motown Beat, Rock'n' Soul,
Shuffle 1, Shuffle 2, Shuffle 3, Shuffle 4,
Slow Blues, Rock-A-Ballad, Boogie
Wo<^e 1, Boogie Woogie 2, Country &
Western, Euro Beat, Tfechno Rock, Punk
Rock, Progressive Rock, Southern Rock,
Fusion 1, Fusion 2, Dixieland Jazz, Big
Band Jazz, Be-Bop 1, Be-Bop 2, Cool
Jazz, Hard Jazz, FVee Jazz, Swing 1,
Swing 2, Swing Waltz 1, Swing Waltz 2,
Waltz, Jazz Waltz, Rock-A-Waltz,
Samba, Samba Carnival, Jazz Samba,
Fusion Samba 1, Fusion Samba 2, Bossa
Nova, Swing Bossa, Bossa Waltz, Bossa
Nova 5/4, Bossa Nova 7/4, Reggae 1,
Reggae 2, Ska, Mambo 1, Mambo 2,
Mambo Fast, Rhumba, Rhumba Fast,
Cha-Cha-Cha, Beguine, Merengue,
Guaracha, Guajira, Habanera,
Mozambique, Calypso, Calypso R&B,
Salsa, Fusion Salsa, Son Afro, Afro
Rock, Afro Dance, Latin Swing 1, Latin
Swing 2, Tamborito, Tango, March,
March 6/8, Turkish March, Jingo, Latin
Bolero, Flamenco, Baion, Gamelan
Kechak, Indian Beat, Polynesian Beat
Instrument Voices
Bass Drum, Snare Drum,Reverse Snare,
Rim Shot, Reverse Rim, Tom Hi, Tom Low,
Hi-Hat Close, Hi-Hat Open, Ride Cymbal,
Reverse Ryde Cymbal, Crash Cymbal,
Reverse Crash Cymbal, Conga Hi, Conga
Low, Agogo Hi, Agogo Low, Shaker,
Cowbell, Hand Clap
Instrmnentstimmen
Bass Drum, Snare Drum,Reverse Snare,
Rim Shot, Reverse Rim, Тэт Hi, Тэт
Low, Hi-Hat Close, Hi-Hat Open, Ride
Cymbal, Reverse Ryde Cymiral, Crash
C^bal, Reverse Crash Cymbal, Conga
Hi, Conga Low, Agc^o Hi, Agogo Low,
Shaker, Cowbell, Hand Clap
Vofx d'instrument
Bass Drum, Snare Drum,Reverse Snare,
Rim Shot, Reverse Rim, Tom Hi, Tom Low,
Hi-Hat Close, Hi-Hat Open, Ride Cymbal,
Reverse Ryde Cymbal, Crash Cymbal,
Reverse Crash Cymbal, Conga Hi, Conga
Low, Agogo Hi, Agogo Low, Shaker,
Cowbell, Hand Clap
Voces instrumentales
Bass Drum, Snare Drum,Reverse Snare,
Rim Shot, Reverse Rim, Ibm Hi, Torn
Low, Hi-Hat Close, Hi-Hat Open, Ride
Cymbal, Reverse Ryde Cymbal, Crash
Cymbal, Reverse Crash Cymbal, Conga
Hj, Conga Low, Agogo Hi, Agogo Low,
Shaker, Cowbell, Hand Clap
14
Page 16

Controls and Display
Power Switch, Volume Control, Style/
Beat/Tempo Display, Style Select Buttons,
Style List, Start/ Stop Button, Tempo
Controls, Demo Button, Pad Assign
Buttons, Instrument Symbols
Bedienelemente/ Anzeige
Netzschalter, Lautstärkeregler,
Rhythmus/ Täkt/ Tfempo* Anzeige,
Rhythmus-Wahltasten, Rhythmus-Liste,
Start/ Stop-Taste, Tempo-lhsten, DemoTaste, Pad-Zu weisungstasten,
Instrumentstimmensymbole
Commandes et Affichage
Interrupteur d'alimentation. Volume,
Affichage Style/ Temps/ Tempo,
Touches de Sélection des Styles, Liste des
Styles, Touche de Début/Arrêt,
Commandes de Tempo, Touche
Démonstration, Touches d'affectation des
Pads, Symboles des instruments
Controles y visualizador
Interruptor de alimentación, control del
volumen, visualizador de
estilo/ tiempo/ tempo, botones de
selección de estilo, lista de estilos,
botón de inido/ parada, controles de
tempo, botón de demostradón,
botones de asignación de acdonador,
símbolos de instrumentos.
Other Functions
Auto Rhythm Demonstration, Touch-Level
Sensitive Pads
Auxiliary Jacks
DC9-12V In, Phones/ Aux Out
Main Amplifier
2.5W (RMS), 8 ohms
Speaker
10 cm, 8 ohms
Rated Voltage
DC 9v:
• six 1.5v SUM-^, R-6, "AA” size or
equivalent batteries
• AC Power adaptor (PA-1, PA-1 B, PA-3)
Dimensions (W x D x H)
420mm x 216mm x 113 mm)
(16-1/2"x 10-1/4"x4-1/2")
Weight
1.3 kg (2.9 lbs.) excluding batteries
Andere Funktionen
Demo-Programm mit automatischen
Rhythmen, anschlagdynamische Pads
Anschlußbuchsen
Netzadapter-Buchse, Kopfhörer/
AUX-Buchse
Verstärkerleistung
2,5 W (RMS) an 8 Ohm
Lautsprecher
10 cm, 8 Ohm
Betriebsspannung
9-V-Gleichspannung:
• sechs 1,5-V-Batterien des Typs SUM-3,
R-6, Größe "AA" oder gleichwertige
Batterien.
• Netzadapter (PA-1, PA—IB oder PA-3)
Abmessungen (B x T X H)
420 mm X 216 mm X 113 mm
(16-1/2" X 10-1/4" X 4-1/2")
Gewicht
1,3 kg ohne Batterien
Autres fonctions
Démonstration des rythmes automatiques.
Pads sensible à la force de battement
Prises auxiliaires
DC 9-12 V IN, PHONES/ AUX OUT
Amplificateur principal
2,0W(eff.), Sohms
Haut-parleur
10 cm, 8 ohms
Tension nominale
9 V cc:
• six piles "AA" SUM-3, R-6 de 1,5 V ou
des piles équivalentes
■ Adaptateur secteur (PA-1, PA-1 B,
PA-3)
Dimensions (L x P x H)
420 mm x 216 mm x 113 mm
(16-1/2"x 10-1/4"x4-1/2")
Poids
1,3 kg les piles non comprises
Otras funciones
Demostradón de ritmos automáticos,
acdonadores sensitivos de nivel de
pulsadón
Tomas auxiliares
Entrada de 9-2 V CC, auriculares/
salida auxiliar
Amplificador principal
2,5 W (RMS), 8 ohmios
Altavoz
10 cm, 8 ohmios
Tensión nominal
9 VCC:
■ Seis pilas SUM-3, R-6 de 1,5 V del
tamaño "AA" o equivalentes
• Adaptador de alimentadón de CA
(PA-1, PA-IB, PA-3)
Dimensiones (An x Prf x Al)
420 mm x 216 mm X 113 mm
(16-1/2" X 10-1/4" X 4-1/2")
Peso
1,3 kg excluyendo las pilas
Original Accessory .
Percussion Sticks
* Specificatbns subject to change without
notice.
15
Mitgeliefertes Zubehör
Schlagstöcke
* Änderungen der technischen Daten
ohne Vorankündigung Vorbehalten.
Accessoires d'origine
Baguettes de percussion
* Les spécifications sont susceptibles
d'être modifiées sans avis préalable.
Accesorios originales
Palillos de percusión
* Especificaciones sujetas a cambios sin
previo aviso.
Page 17

n
Troubleshooting
In many cases, what appear to be
malfunctions can be traced to simple
causes. Please check the following
symptoms, causes and remedies before
assuming that your DD-6 is faulty.
Fehlersuche
In vielen Fällen können Fehlfunktionen
auf einfache Ursachen zurückgeführt
werden. Versuchen Sie zunächst, die
Störungen anhand der folgenden Liste
zu beseitigen. Falls das nicht klappt,
wenden Sie sich bitte an Ihren Yamaha
Kundendienst.
SVmptqm Sÿmptôipe
á^ü^Qiiia
A buzz or dick occurs momentarily when the DD-6 is turned ON or OFF.
Beim Ein- oder Ausschalten des DD-6 ist ein lechtón oder Klicken
hörbar.
Un bourdonnement ou un dédie se produit momentanément lorsque la
DD-6 est mise sous ou hors tension.
Se escucha un zumbido o semido seco momentáneamente cuando el
DD-6 se conecta/desconecta.
The STYLE/ BEAT/ TEMPO display is dim or completely dark.
Die STYLE/ BEAT/ TEMPO-Anzeige ist dunkel oder leeuhtet nur
schwach.
L’affichage STYLE/ BEAT/ TEMPO est plus ou moins sombre. 1. Les piles se vident.
El visualizador STYLE/ BEAT/ TEMPO está oscurecido o
completamente oscuro.
No sound from the DO-6 spe^ers.
Die Lautsprecher dee DD-6 bleiben stumm.
Aucun son ne parvient des haut-parleurs de la DD-6.
No se escucha sonido de los altavoces del DD-6
The wrong instrument plays when you strike a pad.
Das falsche Instrument ertönt, wenn Sie auf ein Pad schlagen.
Ce n'est pas le bon instrument qui joue lorsque vous battez un pad.
Cuando pulsa una tecla, se reproduce el instrumento incorrecto.
.. . . ■■■ ,Causa "Cause. ::
.. ■“ Ux«i№he CauSa "',
This is a result of the transient power surge that occurs when the POWER
switch is operated, and is normal.
Dies wird beim Betätigen des POWER-Schalters durch den
anfänglichen Spannungsanstieg verursacht und ist normal.
Ced est dû à la suríntensíté se produisant lorsque l’interrupteur POWER
est sollicité. C'est un phértomène normal.
Esto es el resultado del flujo de alintentación, y es normal cuando se
opera el interruptor POWER.
1. The batteries are running low.
2. The voltage may drop temporarily when the volume is turned up - this is
normal.
1. Die Batterien sind schwach.
2. Die Spannung fällt kurzzeitig ab, wenn die Lautstärke erhöht wird.
Das ist normal.
2. Il est possible que la tension chute provisoirement à l'augmentation du
niveau du volume. C'est un phénomène normal.
1. Las pilas se están gastando. Si el problema es causado por las pilas gastadas, deben reemplazarse
2. La tensión cae temporalmente cuando se sube el volumen-esto es
normal.
1. The volume is turned down too low.
2. A plug is inserted into the HEADPHONES/ AUX. OUT jack - this
automatically shuts off the sound from the speakers.
1. Die Lautstärke ist zu niedrig eingestellt.
2. Ein Steckerist in der HEADPHONES/AUX. OUT-Buchse. Dies
schaltet automatisch die Lautsprecher stumm.
1. Le réglage du volume est trop bas.
2. Quelque chose est branché à la prise HEADPHONES/ AUX.OUT - ced
coupe automatiquement le son (tes haut-parleurs.
1. £1 volumen está demasiado bajo.
2. Se ha insertado una clavija en la toma HEADPHONES/ AUX. OUT -
esto desactiva autcmiá ticamente el sonido de los altavoces.
1. The desired instrument has not been properly assigned to the pad.
2. The POWER switch has been turned OFF and ON.
1. Das gewünschte Instrument ist dem Pad nicht richtig zugewiesrai.
2. Das Gerät wurde aus- und wieder eingeschaltet.
1. L'instrument voulu n'a pas été correctement affecté au pad.
2. L'appareil a été mis hors tension puis à nouveau sous tension.
1. El instrumento deseado no se ha asignado correctamente a la tecla.
2. El interruptor POWER se ha colocado en OFF o en ON.
Depistage des Pannes
Dans de nombreux cas, ce qui semble
être une anomalie de fonctionnement est
en fait dû à une cause très simple.
Effectuer d'abord ies contrôles suivants
pour déterminer si le DD-6 est
effectivement en panne.
This is not a malfunction.
Es li^ keine Fehlfunktion vor.
Il ne s'agit pas d'une anomalie de fonction nmnent.
Esto no es nii^n mal funcionamiento.
If the problem is caused by low batteries, the batteries should be reF^aced
immediately.
Falls die Batterien schwach sind sollten Sie diese auswechseln.
Si les piles sont vides, elles doivent être remplacées immédiatement.
in media ta mente.
1. Turn the volume up to an appropriate level.
2. Remove the plug from the HEADPHONES/AUX. OUT jack.
1. Erhiteen Sie die Lautstärke.
2. Ziehen Sie den Stocker aus der HEADPHONE/AUX-OUT-Buchse.
1. Augmenter le volume jusqu’à un niveau approprié.
2. Déatincher la prise HEADPHONES/AUX. OUT.
1. Suba el volumen al nivel apropiada
2. Extraiga la clavija de la toma HEADPHONES/ AUX. OUT.
1. Assign the desired instrument to the pad(s).
2. The preset pad assignments are restored whenever the DD-6 is turned
ON, so this is not a malfunction.
1. Weisen Sie das gewünschte Instrument dem Pad zu.
2. Dìe ursprünglichen Zuweisungen werden beim Einschalten des
DD-6 wieder hergestellt Das ist keine Fehlfunktion.
1. Affecter l'instrument voulu au pad oonc»mé.
2. Les affectations de pad programmées sont rétablies chaque fois que la
DD-6 est mise sous tension et il ne s'agit donc pas d'une anoméitie de
fonctionnement.
1. Asigne el instrumento deseado a la tecla.
2. Las asignaciones de teclas preajustadas se reponen cuando el DD-6
se coloca en ON, esto no es un mal funcionamiento.
Localización de Averías
En muchos casos, lo que puede parecer
un mal funcionamiento puede ser una
causa simple. Por favor compruebe los
siguientes síntomas, causas y remedios
antes de afirmar que su DD-6 esta
defectuoso.
Berrpdy Remede
AiMrílfe "■ ■“ _ Remedia "
16
Page 18

FCC INFORMATION
IMPORTANT NOTICE :
DO NOT MODIFY THIS UNITI This product, when installed, as
indicated in the instructions contained in this manual, meets FCC
requirements. Modifications not expressly approved by Yamaha may
void your authority, granted by the FCC, to use the product,
IMPORTANT :
When connecting this product to accessories and/or other equipment
utilize only high quality, shielded cable/s, Failure to use the
appropriate cable/s, (maximum length 1,5 meter/s) could void your
FCC authorization to use this product.
NOTE:
This product has been tested and found to comply with the
requirements listed in FCC Regulations, Part 15 for Class "B" digital
devices. Compliance with these requirements provides a reasonable
level of assurance that your use of this product in a residential
environment will not result in harmful interference with other
electronic devices. This equipment generates/uses radio frequencies
and, if not installed and used according to the instructions found in
the users manual, may cause interference harmful to the operation
This applies only to products distributed by Yamaha Corporation of America.
Dies bodehc sich nur auf die von der Yamaha Corporation of America vetriebenen Produkte.
Ceci ne s'applique qu'aux produits distribués par Yamaha Corporation of America.
Esto se aplica solamente a pioductos distiibuidos por Yamaha Coporadon of America.
of other electronic devices. Compliance with FCC regulations does
not guarantee that interference will not occur in all installations. If this
product is found to be the source of interference, which can be
determined by turning the unit "OFF" and "ON", please try to
eliminate the problem by using one of the foilowing measures:
Relocate either this product or the device that is being affected by
the interference.
Utilize power outlets that are on different breinch (circuit breaker or
fuse) circuits or install AC line filters.
In the case of radio of TV interference, relocate/reorient the antenna.
If the antenna lead-in is 300 ohm ribbon lead, change the lead-in to
co-axial type cable.
If these corrective measures do not produce satisfactory results,
please contact the local retailer authorized to distribute this type of
product. If you can not locate the appropriate retailer, please contact:
Yamaha Corporation of America, Electronic Service Division, 6600
Orangethorpe Ave, Buena Park CA,90620
Wichitiger Hinweis flir die Benutzung in der BundesrepubKk Deutschland.
Bescheinl^nÿ des Importeurs
Hiermit wird bescheinigt, daß der/die/das
Musi/dnsirument Typ DD~6
(Gerät, Typ, Bezeichnung)
in Übereinstimmung mit den Bestimmungen der
VERFÜGUNG 10^^
_____________
(A mtsbl att Verfügung)
funk-entstört ist.
Der Deutschen Bundespost wurde das Inverkehrbringen dieses Gerätes
angezeigt und die Berechtigung zur Überprüfung der Serie auf Einhal-tung
i der Bestimmungen eingeräumt,
I
Yamaha Europa GmbH
I
Name des Importeurs
* This applies only to products distributed by Y^aha Europa GmbH.
* Dies bezieht sich nur auf die von der Yamaha Europa GmbH vertriebenen Produkte.
* Ced ne s'applique qu'aux produits distribués par Yamaha Europa GmbH.
* Esto se aplica solamente a productos distribuidos por Yamaha Europa GmbH.
THIS DIGITAL APPARATUS DOES NOT EXCEED THE "CLASS B" UMTS FOR RADIO
NOSE EMISSIONS FROM DIGITAL APPARATUS SET OUT IN THE RADIO
INTERFERENCE REGULATION OF THE CANADIAN DEPARTMENT OF COMMI^IICATIONS.
LE PRESENT APPAREIL NUMERIQUE N'EMET PAS DE BRUITS RADIOÉLECTRIQUES
DEPASSANT LES LIMITES APPLICABLES AUX APPAREILS NUMERIQUES DE LA
•TiLASSE B" PRESCRITES DANS LE REGLEMENT SUR LE BROUILLAGE
RADIOELECTRIQUE EDICTE PAR LE MINISTERE DES COMMUNICATIONS DU CANADA.
This applies only to products distributed by Yamaha Canada Music Ltd.
Dies bezieht sich nur auf die von der Yamaha Canada Music Ltd. vertriebenen
Produkte.
Ceci ne s'applique qu'aux produits distribués par Yamaha Canada Music Ltd.
Esto se aplica solamente a productos distribuidos por Yamaha Canada Music Ltd.
The serial number of this product may be found on
the bottom of the unit. You should note this serial
number in the space provided below and retain this
manual as a permanent record of your purchase to
aid identification in the event of theft.
Model No. DO-6
Serial No.
Concerning the Warranty
This product was made for international distribution,
and since the warranty for this type of product varies
from marketing area to marketing area, please
contact the selling agency for information
concerning the applicable warranty and/or service
policies.
17
Die Seriennummer befindet sich an der
Unterseite des Instruments. Wir empfehlen, diese
Nummer sicherheitshalber an der unten
vorgesehenen Stelle einzutr^en, um sie auch im
Falle eines Diebstahls jederzeit zur Hand zu
haben.
Model-Nr. DD-6
Serien-Nr.
Hinweis zur Garantie
Dieses Produkt wird international vertrieben,
und die Garantiebedingungen sind von
Vertriebsland zu Vetriebsland verschieden. Ihr
Händler gibt Ihnen gerne genauere
Informationen zu den in Ihrem Land gültigen
Garantie und/oder Servicebedingungen..
Le numéro de série de ce produit figure sur le socle
de rappareil, il conviendra de noter ce numéro de
série dans l'espace réservé ci-dessous et de
conserver ce manuel: celui-ci constitue le document
permanent de votre achat et permet l'identification
en cas de voi.
Modèle No. DD-6
No. de série:
Remarque relative è ta garantie
Ce modèle est destiné à être distribué à l'échelle
internationale. Etant donné que les conditions de
garantie pour ce type de produit varient en fonction
des zones de commercialisation, prière de prendre
contact avec l'agence chargée des ventes pour tous
renseignements relatifs aux conditions de garantie
et de service après-vente.
E1 número de serie de este producto se encuentra
en la parte inferior de la unidad. Strvaae anotar
este número de serie en el espacio proporcionado
debaiü y guarde este manual como comprobante
de compra para ayudar a la identiñcación en caso
de robo.
№ de modelo DD-6
N"de serie
Concerniente a la garantía
Este producto ha sido fabricado para ser
distribuido internacionalmente y, como la
garantía para este tipo de producto varía en
relación a su área de comercialización, sírvase
consultar con el agente de ventas sobre la
información en tomo a la garantía aplicable y/o
políticas de servido.
Page 19

YAM AH A
YAMAHA CORPORATION
P.O.Box 1, Hamamatsu, Japan
9003 VJ07600 Printed in Japan @
 Loading...