

Page 1

3/23/10
(Rev A)
FTDX5000 Software Update and Version
Identification
There are four different Software installations. Each one must be followed carefully. Installing the
wrong type software may cause difficulties. Check your radio before installing software to be sure
which updates are needed.
If multiple software installations are required the MAIN Software should be installed last, as it is the
only one that requires a hard reset (FAST+LOCK).
The latest versions are listed below.
• MAIN Software Version 0106.
• EDSP Software Version 0515.
• OEL (OLED) Software Version 0110.
• SM-5000 Software Version 0107.
• DMU-2000 Software Version (Option): Please refer to the DMU-2000 update information on our
website.
Implements improvements
• Ver. 0106, V0110 and V0107 are engineering issues.
• Ver. 0515 corrects a popping noise in the speech processor.
The software versions can be displayed on the radio
While holding the three buttons [GEN]+[50]+[ENT] turn the radio on. The software version will be
displayed See Fig. 1 and 2.
Fig. 1
Page 2
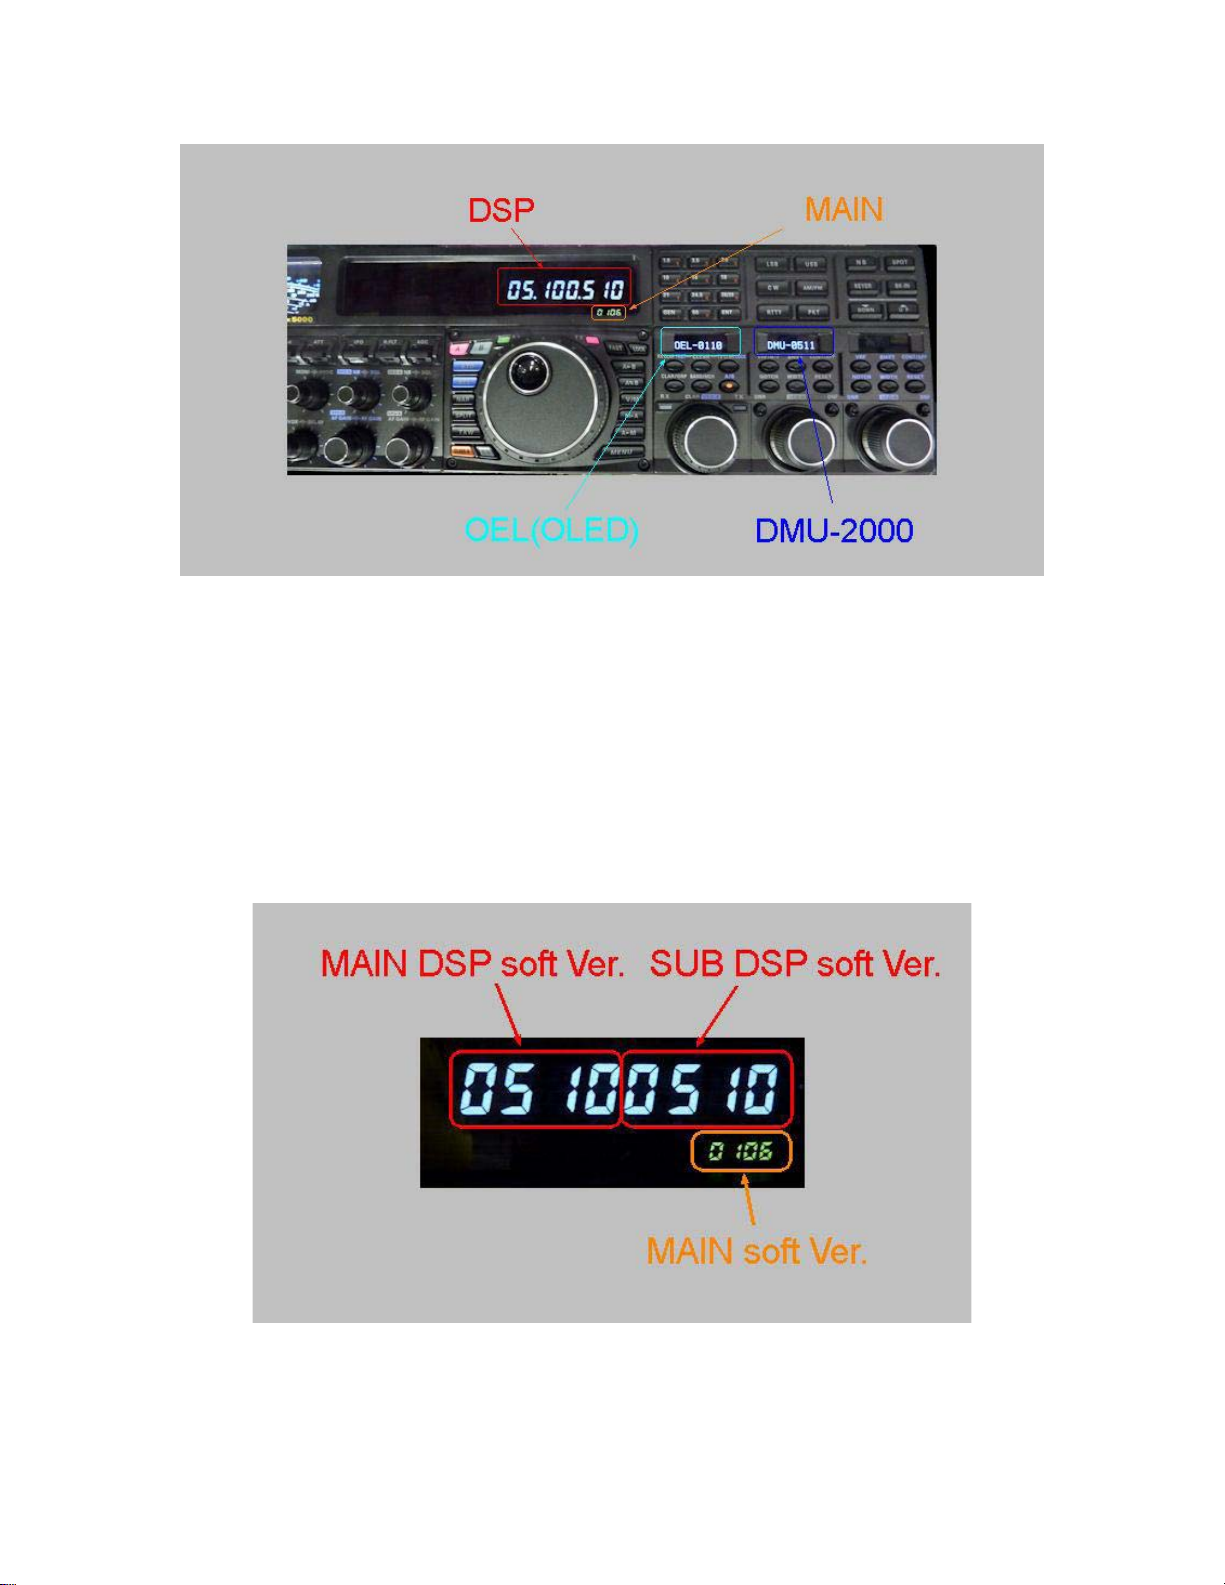
Fig. 2
・MAIN Software Version
The version number will be shown on the VFD CLAR (Clarifier) display. See Fig. 2 and 3 (example
MAIN software version V0106).
・DSP Software Version
The version number will be shown on the VFD MAIN Frequency display.
See Fig. 2 and 3 (example DSP software version MAIN: V0510 and SUB V0510).
Fig. 3
Page 3
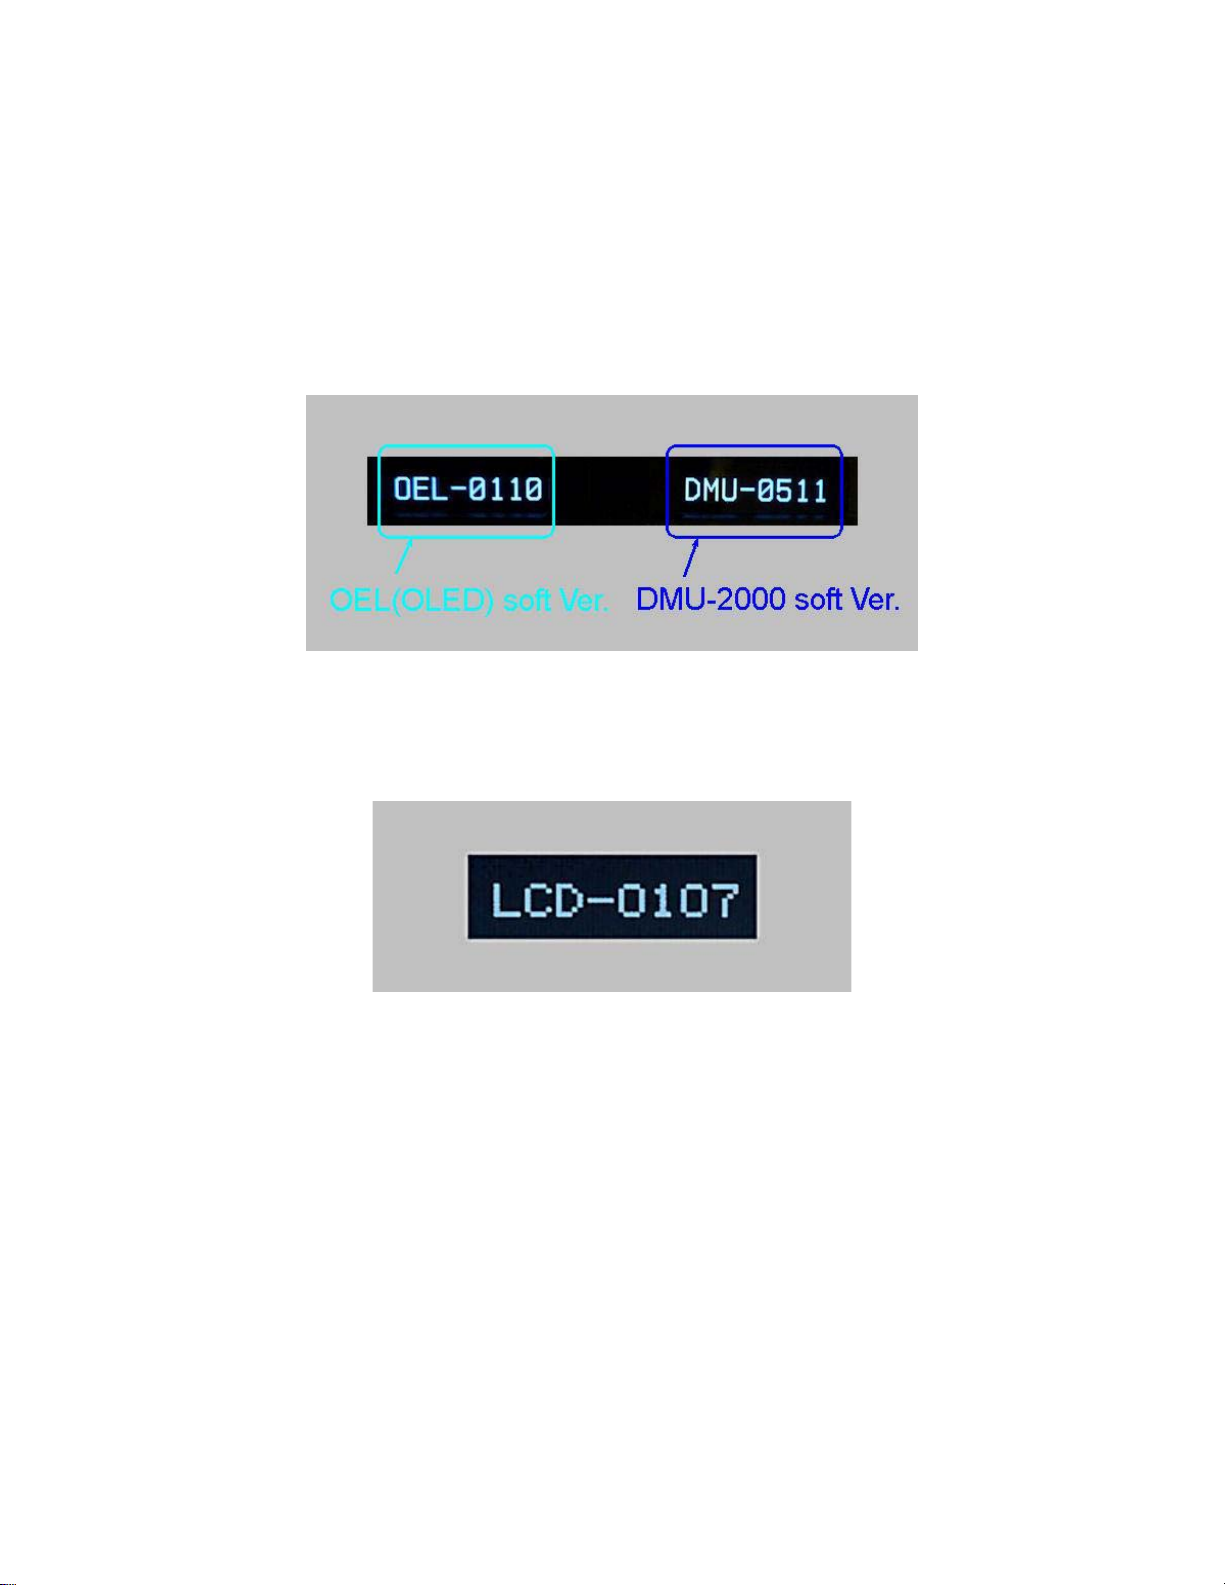
・OEL (OLED) Software Version
The version number will be shown on the CLAR/VFO-B DIAL display (Left side). See Fig. 2 and 4
(example OEL software version V0110).
・DMU-2000 Software Version
The version number will be shown on the VFO-A SELECT DIAL display (Center). See Fig. 2 and 4
(example DMU software version V0511). This will not be displayed unless the DMU-2000 is attached
and turned on.
Fig. 4
・SM-5000 Software Version
The version number will be shown on the SM-5000 LCD display, right side lower corner. See Fig. 5
(example LCD software version V0107).
Fig. 5
Page 4

Install the data file to PC
[The following procedures are provided to update the data file from the Yaesu website]
1. Down load the FT
http://www.yaesu.com/indexVS.cfm?cmd=DisplayProducts&ProdCatID=102&encProdID=12FF
98B9C73C8988F2398C979793E2E1&DivisionID=65&isArchived=0
2. Save the FT
3. Unzip and Extract the contents of [FTdx5000 3-23-10.zip] to the desktop of your computer.
4. You will find the FTdx5000 MAIN, EDSP, OLED and SM-5000 LCD folders on your desktop.
The programmers and software are now stored on your computer on the desktop. The files designated
in the last step above are ready to update your FT
・MAIN CPU Software Version
*Don't forget to write down (or save to a CF Card) any personal menu settings you have changed from
the default before you start. Please see the DMU-2000 Data Management Operation Manual for the
procedure to save your settings to a CF card.
1. Turn the FT
rear panel).
2. Locate the program switch thru the access hole on the back at the rear right corner of the radio.
Carefully move the PGM-SW to the WRITE (program position). See Fig. 6.
NOTE: always move the program switch before connecting the AC cable or turning the rear
panel Power switch on, or the programming will not start.
DX5000 data file [FTdx5000 3-23-10.zip] from the following website:
DX5000 data file [FTdx5000 3-23-10.zip] to the desktop on your computer.
DX5000 Transceiver.
MAIN Software Update
DX5000 OFF and disconnect the power cable (or turn OFF the MAIN power switch
Fig. 6
Carefully move the PGM-SW to
the WRITE (program position).
Page 5

3. Connect the serial straight through programming cable (DB9F to DB9F) to the serial port COM1
in the back of your computer. Plug the DB9F connector to the CAT connector on the FT
DX5000.
If you use a USB to serial adapter, you might need to change the COM Port number.
4. Leave the FT
DX5000 Front On/Off switch turned OFF and connect the power cable (or turn ON
the rear panel MAIN power switch).
5. Now go to the desktop open FTdx5000 MAIN folder and find the FSW008 icon as shown below.
Double-click the FSW008 icon, displayed on the Program Screen.
NOTE: If you receive a
“communications error”
message on your screen, click
on the Configure box and
choose a different COM port
from the drop down menu.
Then click the WRITE button
again.
6. When the program opens, confirm that the file AH036_V0106.SFL is highlighted; if not, click on
it to highlight it.
7. Click "Configure" if necessary, to change the COM Port.
8. Click WRITE. The onscreen progress bar will indicate programming activity.
9. When programming has completed, an [OK?] box will appear. Click [OK?].
10. Disconnect the AC power cable (or turn OFF the rear MAIN power switch for FT
DX5000 and
wait a minute, until the capacitors discharge) and then remove the DB9 serial programming cable.
Thru the access hole on the back of the radio, move the PGM-SW to the NORMAL position.
See Fig. 6.
11. Reconnect the AC power cable (or turn ON the rear MAIN power switch for FT
DX5000).
12. Press and hold in the [FAST] and [LOCK] keys while turning the radio back on. This resets the
radio and locks in the new software.
13. Turn the radio off. The main CPU updating process is now complete.
14. Confirm the new update software by holding the three buttons [GEN]+[50]+[ENT] and turn the
radio on. The new software version will be displayed See Fig. 2.
Page 6

EDSP, OLED and SM-5000 Software Update
See below, how to access the programming mode for each different EDSP, OLED and SM-5000
software. It is very important to install the correct software. The incorrect installation may make the
radio inoperable and the version number will not be displayed .
Fig. 7
NOTE: The below instructions are for installing each software individually. If you are sequentially
installing more than one software EDSP, OLED and SM-5000 LCD type, it is not necessary to turn off
the rear panel Main power switch or disconnect the AC and programming cables until all of the
software is installed. However, turn the front power switch off after each program is installed.
Page 7

・ EDSP Software Version
This procedure is used for uploading new EDSP Software to the FT
DX5000 Amateur Transceiver
from your personal computer, using the RS-232C (DB9F to DB9F) straight cable.
1. Turn the FT
DX5000 OFF and disconnect the power cable (or turn OFF the MAIN power switch
rear panel).
2. Connect a serial RS-232C, DB9F to DB9F straight cable to the COM1 connector of your
computer and the 9-pin CAT connector on the rear of the transceiver. If you use a USB to serial
adapter, you might need to change the COM Port setting.
3. Reconnect the AC power cable (or turn ON the rear panel MAIN power switch).
4. While holding the [DNR]+[DNF] buttons at VFO-A (center), press the front power switch to
turn the radio on. See Fig. 7. You will see [dSP Prg] on the radio display.
5. On your computer desk top open FTdx5000 EDSP folder and find the EDSP-5000 icon as shown
below. Double-click the EDSP-5000 icon, displayed on the Program Screen.
6. Click the Update button. You will see AH036H_V0515 out file displayed. If you do not see
AH036H_V0515 (as in the screen below), then open the “Look in:” window and go to the desktop
and find FTdx5000 EDSP. Open the folder and AH036H_V0515 will be displayed in the
window. Click AH036H_V0515 out file to highlight it. Then click the Open button and wait until
the program is loaded, and 100% is indicated on the bar graph, [completion!!] will be displayed.
NOTE: If you receive a “communications
error” message on your screen you should
check the COM port number and speed under
Device Manager. The writing speed
38.4kbps is fixed in the download algorithm
of the EDSP board so you may need to set
the port speed close to 38.4kbps. Click on the
COM Select box arrow and choose a
different COM port from the drop down
menu in the EDSP-5000 writer.
7. Turn OFF the front Power Switch and disconnect the AC power cable (or turn OFF the rear panel
MAIN power switch for FT
DX5000 and wait a minute, until the capacitors discharge). This resets
the radio and locks in the new software. Remove the DB9F to DB9F cable. The updating process
is now complete.
8. Confirm the new update software by holding the three buttons [GEN]+[50]+[ENT] and turn the
radio on. The new software version will be displayed See Fig. 2.
Page 8
・OEL (OLED) Software Version
This procedure is used for uploading new OEL (OLED) Software into the FT
Transceivers, from your personal computer, using the RS-232C, DB9F to DB9F straight cable.
1. Turn the FT
power switch).
2. Connect a serial RS-232C, DB9F to DB9F straight cable to the COM1 connector of your
computer and the 9-pin CAT connector on the rear of the transceiver. If you use a USB to serial
adapter, you might need to change the COM Port number.
3. Reconnect the AC power cable (or turn ON the rear panel MAIN power switch).
4. While holding the [DNR] + [DNF] buttons at VFO-B (right side), press the front power switch to
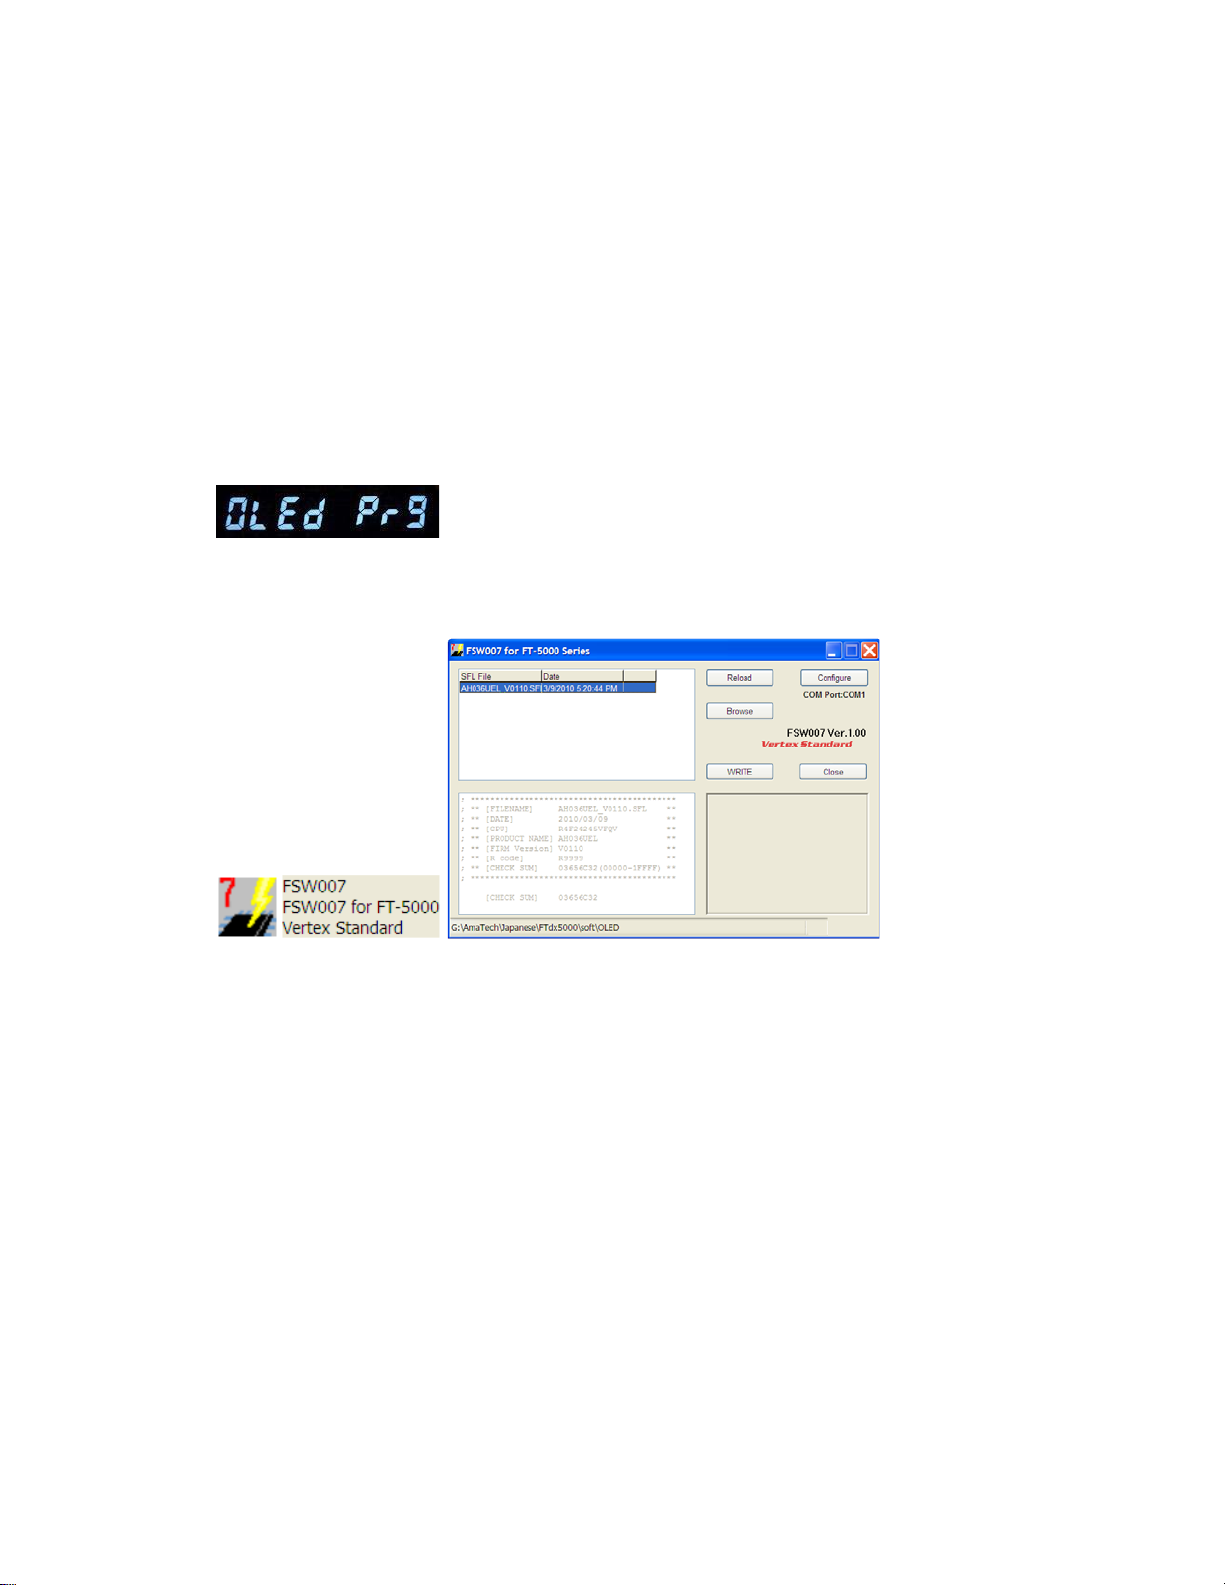
turn the radio on. See Fig. 7. You will see [OLEd Prg] on the radio display.
DX5000 OFF and disconnect the power cable (or turn OFF the rear panel MAIN
DX5000 Amateur
5. On your computer desk top open FTdx5000 OLED folder and find the FSW007 icon as shown
below. Double-click the FSW007 icon, displayed on the Program Screen.
6. When the program opens, confirm that the file AH036UEL_V0110.SFL is highlighted; if not,
click on it to highlight it.
7. Click "Configure" if necessary, to change the COM Port.
8. Click WRITE. The onscreen progress bar will indicate programming activity.
9. When programming has completed, an [OK?] box will appear. Click [OK?].
10. Disconnect the AC power cable (or turn OFF the rear panel MAIN power switch for FT
and wait a minute, until the capacitors discharge) and then remove the DB9 serial programming
cable.
11. Reconnect the AC power cable (or turn ON the rear panel MAIN power switch). The OEL
(OLED) updating process is now complete.
12. Confirm the new update software by holding the three buttons [GEN]+[50]+[ENT] and turn the
radio on. The new software version will be displayed See Fig. 2.
DX5000
Page 9

・ SM-5000 Software Version
1. Turn the FT
DX5000 OFF and disconnect the power cable (or turn OFF the rear panel MAIN
power switch).
2. Locate the program switch thru the access hole on the back at the rear center of the SM-5000.
Carefully move the PGM-SW to the WRITE (program position). See Fig 10.
Carefully move the PGM-SW to
the WRITE (program position).
Fig 10
3. Connect the serial straight through programming cable (DB9F to DB9F) to the serial port COM1
in the back of your computer. Plug the DB9F connector to the CAT connector on the FT
DX5000.
If you use a USB to serial adapter, you might need to change the COM Port setting.
4. Reconnect the AC power cable (or turn ON the rear panel MAIN power switch).
5. While holding the [NOTCH] + [RESET] buttons at VFO-B (right side), press the front main
power switch to turn the radio on. See Fig. 7. You will see [LCd Prg] on the radio display.
6. On your computer desk top open SM-5000 LCD folder and find the FSW010 icon as shown
below. Double-click the FSW010 icon, displayed on the Program Screen.
7. When the program opens, confirm that the file AH036LCD_V0107.SFL is highlighted; if not,
click on it to highlight it.
8. Click "Configure" if necessary, to change the COM Port.
9. Click WRITE. The onscreen progress bar will indicate programming activity.
10. When programming has completed, an [OK?] box will appear. Click [OK?].
11. Disconnect the AC power cable (or turn OFF the rear panel MAIN power switch for FT
and wait a minute, until the capacitors discharge) and then remove the DB9 serial programming
cable.
Thru the access hole on the back of the radio, move the PGM-SW to the NORMAL position. See
Fig 10
12. Reconnect the AC power cable (or turn ON the rear panel MAIN power switch for FT
13. Turn the radio off. The SM-5000 updating process is now complete.
14. Confirm the new update software by holding the three buttons [GEN]+[50]+[ENT] and turn the
radio on. The new software version will be displayed See Fig. 2.
DX5000
DX5000).
Page 10

We hope this new software will increase your enjoyment of your FTDX5000. Thank you for choosing
Yaesu radios. If you have any problems or questions please contact Vertex Standard, Amateur Tech
Support. amateurtech@vxstdusa.com
Best regards,
Mikio Maruya, WA6F
Executive Vice President
Engineering & Customer Service
Vertex Standard USA, Inc.
Vertex Standard USA, Inc. | 10900 Walker St. | Cypress, CA 90630 | 714.827-7600 | FAX: 714.827-8100
www.vertexstandard.com
 Loading...