

Page 1

FT-920
OPERATING
MANUAL
YAESU MUSEN CO., LTD.
1-20-2 Shimomaruko, Ota-Ku, Tokyo 146-8649, Japan
YAESU U.S.A.
17210 Edwards Rd., Cerritos, CA 90703, U.S.A.
YAESU EUROPE B.V.
Snipweg 3, 1118DN Schiphol, The Netherlands
YAESU UK LTD.
Unit 12, Sun Valley Business Park, Winnall Trading Estate
Winchester, Hampshire, SO23 0LB, U.K.
YAESU GERMANY GmbH
Am Kronberger Hang 2, D-65824 Schwalbach, Germany
YAESU HK LTD.
11th Floor Tsim Sha Tsui Centre, 66 Mody Rd.,
Tsim Sha Tsui East, Kowloon, Hong Kong
Page 2

Table of Contents
General Description ......................................................... 1
Specifications ................................................................... 2
Accessories & Options ................................................... 4
Plug Pinout ...................................................................... 5
Installation ........................................................................ 6
Preliminary Inspection ................................................. 6
DC Power Connections ............................................... 6
Transceiver Location ................................................... 8
Grounding .................................................................... 8
Antenna Considerations .............................................. 9
Memory Backup .......................................................... 9
Adjusting the Front Feet ................................................10
Safety Precautions............................................................ 11
1. Power Connections ................................................ 11
2. Ground Connections .............................................. 11
3. Electrical Shock Prevention ................................... 11
4. Antenna Precautions ................................................11
5. RF Field Exposure Advisory
and Electromagnetic Compatibility .................. 12
Accessory Installation ..................................................... 13
1. Lineae Amplifier Interfacing ................................... 13
2. Digital Modem Interfacing (TNC, WeatherFax, etc.)...16
3. Other Digital/Recording Device Interfacing ...............17
4. CW Key/Paddle and Computer Keying
Interface Suggestions .................................... 18
Front Panel Controls, Switches, & Jacks ..................... 20
Display Panel Indicators and Icons ............................... 28
Rear Panel Connectors and Switches ........................... 32
Bottom Panel ................................................................... 34
Operation .......................................................................... 35
Before You Start ......................................................... 35
Receiving ..................................................................... 35
Antenna Selection ................................................. 35
Bandwidth Selection .............................................. 37
Amateur Band Selection ....................................... 37
Direct Keypad Frequency Entry ............................ 38
Stacked VFO System ........................................... 38
Frequency Navigation ............................................ 38
VFO Tuning Dial ............................................. 39
Shuttle Jog (VFO-A) ....................................... 39
Front Panel Up/Down Switches ...................... 39
MH-31B8 Hand MicUP/DWN/FST Switches ...... 39
MD-100A8X Desk Microphone
Rotary Scanning Switch ............................ 39
LOCK Switches ................................................. 39
Operating Convenience Features ...........................40
Display Brightness Control .............................. 40
Keypad Beep Frequency/Level ....................... 40
Receiver Accessories ............................................ 41
Clarifier (Offset Tuning) ................................... 41
CW Center Tuning (Enhanced Tuning Scale) ...41
CW SPOT ......................................................... 41
RF Preamplifier Selections ............................. 41
AGC Selection ................................................ 42
Squelch ........................................................... 42
General Coverage Reception .......................... 42
Dealing with Interference ...................................... 43
SHIFT Control ................................................... 43
HIGH CUT/LOW CUT Controls (DSP) .................. 43
NOTCH Filter (DSP) .......................................... 44
RF GAIN Control .............................................. 44
IF Noise Blanker (NB) .................................... 44
DSP Noise Reduction (NR) ............................ 44
Tools for Strong-Signal
andLow-Frequency Operation .................. 45
IPO (Intercept Point Optimization) .................. 45
ATT (Front End Attenuator) ............................ 46
Digital Voice Recorder Operation (DVR) ........ 46
Transmitting ................................................................. 47
Automatic Antenna Matching ................................ 47
SSB Transmission ................................................. 49
Basic Operation ............................................... 49
VOX Operation ................................................ 49
Digital Speech Processor Operation ............... 49
DSP Voice Pattern Contours ......................... 50
Voice Monitor Operation ................................. 50
Digital Voice Recorder Operation (Transmit) .. 50
Linear Amplifier Tuning ............................................... 51
CW Transmission .................................................. 51
Straight Key Operation .................................... 51
Electronic Keyer Operation ............................. 52
Memory Keyer Operation ................................ 52
Tips for Successful CW Memory Keyer Operation ..... 53
Split Frequency Operation .................................... 54
TX CLARifier Operation .................................... 53
Split VFO Operation ........................................ 54
Quick Split Feature ......................................... 54
Mode K Satellite Operation ............................. 55
Digital Mode Operation ......................................... 55
AFSK RTTY or Packet Operation .................. 56
FSK RTTY Operation ...................................... 56
AM Transmission .................................................. 57
Basic Operation ............................................... 57
FM Operation ........................................................ 58
Simplex (Non-Repeater) Operation ................. 58
Repeater Operation ......................................... 58
Memory Operation ........................................................... 59
QMB Channel Programming/Recall ............................. 59
Memory Operation on “Regular” Memory Channels
(Channel #1-01 to 1-99) ........................................ 60
Memory Operation on Split-Frequency Channels
(Channel #d-01 to d-10) ........................................ 62
Memory Operation on “CALL” Channels
(Channel #C-01 to C-11) ...................................... 63
Adding Alpha-Numeric Labels to Memory Channels .. 64
Memory Mode Accessories ......................................... 65
Moving Memory Data to VFO-A ........................... 65
Deleting Data from a Memory Channel ................ 65
Scanning Operation ......................................................... 66
Scanning Operation ..................................................... 66
Scan Skip Programming (Memory Mode Only) .......... 66
Programmable Memory Scan (PMS) Operation ......... 66
Scan-Resume Choices ................................................ 67
Dual Watch Operation ..................................................... 68
Menu Operation ............................................................... 69
Normal Menu Operation .............................................. 69
Panel Menu Operation ................................................ 70
Quick Menu Operation ................................................ 70
Menu Mode Selections and Settings .......................... 73
VHF/UHF Transverter Operation ..................................... 84
Phone Pacth Operation ................................................... 85
Computer-Aided Transceiver
(
CAT
Memory Backup ............................................................... 91
Microprocessor Resetting ............................................... 92
Installation of Optional Accessories .............................. 93
Data Protocol .................................................... 88
CAT
Constructing Sending CAT Commands ...................... 88
Downloading FT-920 Data ........................................... 89
14-Byte Frequency Data Record Structure ................. 90
Bottom Case Removal ................................................ 93
Installation of Optional Filters YF-116C/YF-116A ....... 94
Installation of High-Stability Oscillator TCXO-7 ........... 94
Installation of FM Unit FM-1 ....................................... 94
) System Protocol ......... 86
Page 3

General Description
Congratulations on the purchase of your Yaesu FT-920! Whether this is your first rig, or if Yaesu equipment is
already the backbone of your amateur radio station, it is our sincere hope that you will derive many years of
operating enjoyment from your new transceiver.
The FT-920 is a state-of-the-art amateur transceiver incorporating a multitude of advanced features to give you
the competitive edge in a wide variety of operating applications. The FT-920 offers up to 100 Watts of adjustable
power output on all amateur bands between 160 meters and 6 meters (25 Watts carrier in the AM mode),
utilizing rugged, low-distortion MOS FET final amplifier transistors. Operation in the SSB, CW, AM, AFSK, and
FSK modes is built in, and an FM module is available as an option.
Yaesu’ s renowned Omni-Glow™ LCD display provides a wealth of information regarding transceiver status, and
it includes enhanced tuning aids for many operating applications.
The built-in high-speed automatic antenna tuner may be utilized both on receive and transmit, providing improved impedance matching for the transmitter and protection from out-of-band signals on receive. A built-in
Digital Voice Recorder allows storage and playback of incoming signals, and also allows you to store up to four
repetitive messages (such as “CQ Contest. . .”) of up to 16 seconds each. And the Electronic Memory Keyer
also provides storage of CW messages, including incremented, imbedded contest numbers, to reduce operator
fatigue in contests. Independent KEY jacks on the front and rear panels allow connection of keyer paddles to one
jack and a computer or straight key to the other, for optimum contest work. A CW Pitch control and Spot tone
provide efficiency in operating, and both full QSK and semi-break-in CW (VOX switching) are provided.
The receiver section is highlighted by the high-performance Digital Signal Processing filters, which provide
razor-sharp selectivity, an automatic seeking Notch filter, and Noise Reduction. The high-intercept front end
circuitry includes ten input bandpass filters with PIN diode switching, optimized RF preamplifiers for both high
and low bands, and Intercept Point Optimization (IPO) for high-signal, high-noise environments. A separate
receive-only antenna jack is provided, in addition to the two main TX/RX jacks, for connection of a Beverage or
other low-noise receiving antenna.
Yaesu’s exclusive Shuttle Jog tuning dial provides simple yet quick frequency excursions around the band.
Independent tuning knobs for the two VFOs join direct keyboard frequency entry, one-touch band change, and
extensive scanning capabilities to make the FT-920 a joy to use. And the FT-920’s extensive memory system,
sporting 99 regular memories, ten split-frequency memories, five QMB (Quick Memory Bank) channels, and an
easy-access “CALL” channel for each band, provides the utmost in operating ease. Each of the memories (except the QMB channels) can be assigned an alpha-numeric label of up to seven characters, to aid in memory
channel identification.
A host of convenience features is provided, including a Digital Speech Processor, SSB monitor circuit, all-mode
Squelch, VOX, and a continuously-variable RF power control. Yaesu’s CAT System for external computer control includes a built-in RS-232C level converter and DB-9 serial port on the rear panel, for easy connection to
your home computer. And the extensive Menu system allow the owner to configure literally dozens of transceiver
performance characteristics, such as voice audio response patterns, keyer weight, tuning steps, and power
output to be applied to each antenna jack. The FT-920 clearly is the cost-performance leader in the Amateur
Radio industry today!
Please take some time to familiarize yourself with the many features available in the FT-920, as described in the
pages to follow. At Yaesu, we appreciate your investment in this fine transceiver, and we hope that you will take
the time to read this manual thoroughly so as to get the most out of your new FT-920!
FT-920 Operating Manual
1
Page 4

Specifications
General
Receiving Frequency Range: 100 kHz ~ 30 MHz, 48 ~ 56 MHz
Transmitting Frequency Range: 160 ~ 6 Meter Amateur Bands
Operating Temperature Range: -10º ~ +50º C
Frequency Stability: ±10 ppm; ±2 ppm w/TCXO-7
Frequency Accuracy: < ±7 ppm (FM within ± 500 Hz)
w/TCXO-7: < ±3.5 ppm (FM within ± 460 Hz)
Emission Modes: USB/LSB, CW, AM, FM, FSK, AFSK
Frequency Steps: 1 Hz/10 Hz/100 Hz for SSB/CW/FSK/AFSK
10 Hz/100 Hz/1000 Hz for AM/FM
Antenna Impedance: 50 Ω, unbalanced
Antenna Tuner Matching Range: 16.5 Ω ~ 150 Ω
Power Consumption: Input Rx (no signal) Rx (Signal present) Tx (100W)
13.5 VDC 2.0A 2.5A 22A
Supply Voltage: 13.5 VDC (±10%), negative ground
Dimensions: 410(W) x 135(H) x 316(D) mm
Transmitter
Power Output: 160 m ~ 10 m amateur bands
Adjustable up to 100 Watts (25 Watts AM carrier)
6 m amateur band
Adjustable up to 100/10 Watts (25/2.5 Watts AM carrier)
Modulation Types: SSB: J3E Balanced, filtered carrier
AM: A3E Low-level (early stage), (w/optional YF-116A AM Filter)
FM: F3E Variable reactance PM
FSK: J1D/J2D Audio-Frequency-Shifted Keying
Maximum FM Deviation: ±2.5 kHz (narrow), ±5.0 kHz (wide)
FSK Shift Frequencies: 170, 425, and 850 Hz
Packet Shift Frequency: 200 Hz
Harmonic Radiation: At least 50 dB below peak output (HF)
At least 60 dB below peak output (VHF)
SSB Carrier Suppression: At least 40 dB below peak output
Undesired Sideband Suppression: At least 50 dB below peak output
Audio Response (SSB, DSP Off): Not more than -6 dB from 400 to 2600 Hz
SSB 3rd-order IMD: -31 dB or better @ 100 Watts PEP (14 MHz)
Microphone Impedance: 500 Ω ~ 600 Ω
2
FT-920 Operating Manual
Page 5

Specifications
Receiver
Circuit Type: Double-conversion Superheterodyne (FM: Triple-conversion)
Intermediate Frequencies: 68.985 MHz
8.215 MHz
455 kHz (FM)
Sensitivity: Frequency
150 ~ 250 kHz 5 µV 40 µV —
250 ~ 500 kHz 4 µV 32 µV —
0.5 ~ 1.8 MHz 2 µV 16 µV —
1.8 ~ 24.5 MHz 0.20 µV 2 µV 0.5 µV
24.5 ~ 54 MHz 0.13 µV 1.3 µV 0.25 µV
IF Selectivity (-6/-60 dB): SSB, CW, FSK, AFSK 2.4 kHz/5.0 kHz
CW 500 Hz/1.8 kHz (w/optional YF-116C CW Filter)
AM 6 kHz/14 kHz (w/optional YF-116A AM Filter)
FM 12 kHz/25 kHz (w/optional FM-1 FM Unit)
Squelch Sensitivity (IPO Off): SSB/CW/Digital/AM: <2.0 µV
FM (28-56 MHz): <0.32 µV
IF Rejection: >70 dB (HF)
>50 dB (VHF)
Image Rejection: >70 dB (1.8 ~ 56 MHz)
IF Shift Range: ±1.2 kHz
DSP Notch Depth: >35 dB
Audio Output: 1.5 W into 4 Ω with <10% THD (Speaker)
100 mV @ 600 Ω (Digital, fixed level)
Audio Output Impedance (SPKR): 4 Ω ~ 8 Ω
SSB/CW/Dig.(2.4 kHz) AM (6 kHz) FM (28 MHz +)
(With Preamp On, for 10 dB S+N/N or 12 dB FM SINAD)
Automatic Antenna Tuner
Impedance Range: 16.7 Ω ~ 150 Ω (1.8 ~ 30 MHz)
25.0 Ω ~ 100 Ω (50 ~ 54 MHz)
Frequency Range: 160 m ~ 6 m amateur bands
Matching Time: <30 seconds
Matched SWR: <1.4:1
Specifications are subject to change, in the interest of technical improvement, without notice or obligation. Specifications
are guaranteed only within Amateur bands.
FT-920 Operating Manual
3
Page 6

Accessories & Options
Supplied Accessories
Item Quantity
MH-31B8 Hand Microphone.................................. 1
DC Cable fused for 25 Amps................................ 1
Spare 25 Amp Fuse.............................................. 1
Available Options
MD-100
FM-1 FM Unit
YF-116C 500 Hz CW Filter
YF-116A 6 kHz AM Filter
TCXO-7 High-Stability Reference Oscillator Unit (2 ppm)
FP-1025A AC Power Supply, Switching Regulator Type (25A) (USA only)
FP-1030A AC Power Supply, Linear Type (25A)
YH-77STA Stereo Headphones
SP-8 External Speaker w/Audio Filters
FL-7000 500 Watt Solid State HF Linear Amplifier
VL-1000 1000 Watt Solid State HF+50 MHz Linear Amplifier
E-767 Band Data + T/R Switching Cable for FL-7000
RCA Connector (P/N P0090544)
2 Pin Miniature Plug (P/N P0090034)
3 Pin Phone Plug (P/N P0090008)
5 Pin DIN Plug (P/N P0091006)
A8X
Desk-Top Microphone
4
FT-920 Operating Manual
Page 7

Plug Pinout
FT-920 Operating Manual
5
Page 8

Installation
Preliminary Inspection
Inspect the transceiver upon opening the packing
carton. Check that all controls and switches work
freely , and inspect the cabinet for any cosmetic damage. Ensure that the accessory cable and fuses are
included.
If any damage is found, document it completely, and
contact the shipping company (or Dealer, if you purchased it over-the-counter) right away . Save the packing materials in case you need to return the set for
service.
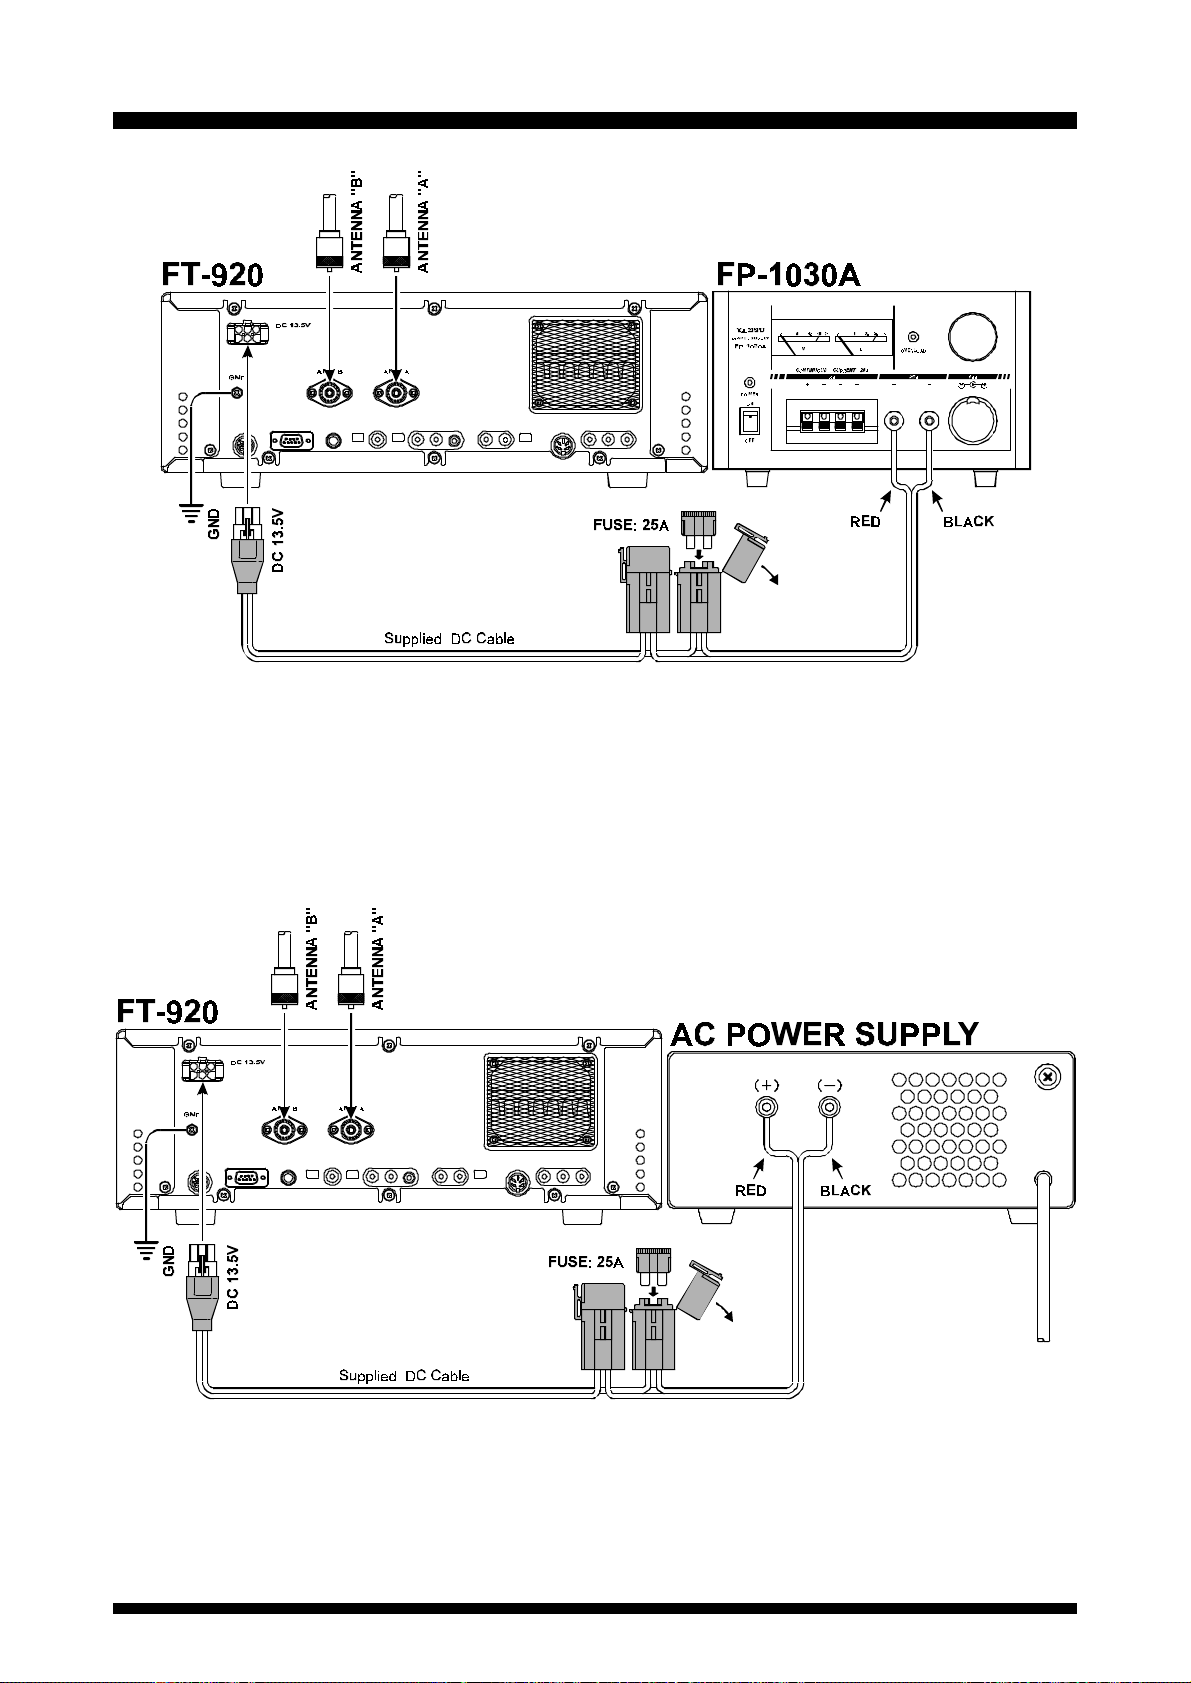
DC Power Connections
The FT-920 Transceiver is designed for operation
from 13.5 Volts DC, negative ground, with the DC
source being capable of providing 20 Amperes of
continuous current. For base station installations, we
recommend the matching Y aesu FP-1030A AC power
supply, which was specifically designed for compatibility with your FT-920. You can, of course, use another DC source, so long as it is well regulated and
meets the above voltage/current specifications. In any
case, be extremely careful to avoid reversed polarity
connections when installing your FT-920. See the
Caution
box below.
If you are connecting the FP-1030A to the FT-920,
before connecting power, check the label on the rear
of the power supply which indicates the AC line voltage range for which the power supply is currently set.
If your AC line voltage is outside this range, the input
voltage range will need to be re-configured. If you
have any questions about the voltage setting for your
power supply, consult with your dealer before proceeding, as improper connections could cause serious damage not covered by your warranty. See the
documentation accompanying your power supply for
details on the exact procedure required for power
supply AC voltage re-configuration.
Connection of the DC line must be made according
to the instructions below:
The RED DC power lead connects to the Positive
(+) DC terminal; and The BLACK DC power lead
connects to the Negative (-) DC terminal.
Make sure the FT-920’s POWER switch is off, and plug
the DC cable into the 6-pin Molex jack on the rear
panel of the transceiver.
6
Caution
Serious damage can result if improper supply voltage is applied to this transceiver. Your Limited Warranty
does not cover damage caused by the application of AC, reversed polarity DC, or DC outside the specified range of 13.5 V ±10%.
If you wish to use a power supply other than one of Yaesu manufacture, you must make certain that any
DC supply connector to the transceiver matches the FT-920 requirements. See the DC connector pinout
on the previous page. Other manufacturers have power supplies with a physically matched con-
nector that is wired differently; this may cause serious damage to the FT-920.
FT-920 Operating Manual
Page 9
Installation
FT-920 Operating Manual
7
Page 10

Installation
Transceiver Location
To ensure long life of the transceiver’s components,
be certain to provide adequate ventilation around the
cabinet of the FT-920. The cooling system of the
transceiver must be free to draw cool air in from the
side of the transceiver and expel warm air from the
rear exhaust port.
Do not install this transceiver on top of another heatgenerating device (such as a linear amplifier), and
do not place equipment, books, or papers on top of
the transceiver. Place the radio on a hard, flat, stable
surface. Avoid heating vents and window locations
that could expose the transceiver to excessive direct
sunlight, especially in hot climates.
Grounding
The FT-920 HF transceiver, like any other HF communications apparatus, requires an effective ground
system for maximum electrical safety and best communications effectiveness. A good ground system can
contribute to station efficiency in a number of ways:
r It can minimize the possibility of electrical shock
to the operator.
r It can minimize RF currents flowing on the
shield of the coaxial cable and the chassis of
the transceiver; such currents may lead to radiation which can cause interference to home
entertainment devices or laboratory test equipment.
r It can minimize the possibility of erratic trans-
ceiver/accessory operation caused by RF feedback and/or improper current flow through logic
devices.
An effective earth ground system make take several
forms; for a more complete discussion, see an appropriate RF engineering text. The information below is intended only as a guideline.
Typically, the ground connection consists of one or
more copper-clad steel rods, driven into the ground.
If multiple ground rods are used, they should be positioned in a “V” configuration, and bonded together
at the apex of the “V” which is nearest the station
location. Use a heavy, braided cable (such as the
discarded shield from type RG-213 coaxial cable) and
strong cable clamps to secure the braided cable(s)
to the ground rods. Be sure to weatherproof the con-
nections to ensure many years of reliable service.
Use the same type of heavy, braided cable for the
connections to the station ground bus (described
below).
Inside the station, a common ground bus consisting
of a copper pipe of at least 25 mm (1”) diameter
should be used. An alternative station ground bus
may consist of a wide copper plate (single-sided circuit board material is ideal) secured to the bottom of
the operating desk. Grounding connections from individual devices such as transceivers, power supplies,
and data communications devices (TNCs, etc.)
should be made directly to the ground bus using a
heavy, braided cable.
Please note that some types of external power supplies (not of Yaesu manufacture), while otherwise
being suitable for use with the FT-920, may be designed such that the Negative (black) DC output terminal is “floating” (not connected directly to ground).
This may cause erratic operation, especially when
transmitting, due to the potential for ground loops to
form between your antenna system, your station
ground, and your power supply. This potential susceptibility is not unique to the FT-920, and the problem can usually be solved by directly grounding the
Negative DC terminal to the power supply chassis,
which can then be bonded to earth ground; check
first with the power supply manufacturer, though, to
be certain that this grounding technique is acceptable to them.
Do not make ground connections from one electrical
device to another, and thence to the ground bus. This
so-called “Daisy-Chain” grounding technique may
nullify any attempt at effective radio frequency grounding.
Inspect the ground system — inside the station as
well as outside — on a regular basis so as to ensure
maximum performance and safety.
8
FT-920 Operating Manual
Page 11

Installation
Antenna Considerations
The FT-920 is designed for use with any antenna
system providing a 50 Ω resistive impedance at the
desired operating frequency . While minor excursions
from the 50 Ω specification are of no consequence,
the transceiver’s Automatic Antenna Tuner may not
be able to reduce the impedance mismatch to an
acceptable value if the Standing Wave Ratio (SWR)
present at the Antenna jack is greater than 3:1.
Among the undesirable consequences that high SWR
may produce are:
r The transceiver’s power amplifier protection
circuitry will reduce power if the Automatic
Antenna Tuner is unsuccessful in reducing the
SWR.
r Even if the Automatic Antenna Tuner success-
fully normalizes the impedance presented to
the radio, feedline losses will escalate rapidly
with high SWR at the higher operating frequencies, especially 28 MHz and 50 MHz.
r Although high SWR itself does not cause
feedline radiation, the sudden onset of high
SWR may well indicate a mechanical failure in
a matching device, leading to an electrical condition which
diation, which can cause interference to nearby
home-entertainment devices.
Every effort should, therefore, be made to ensure that
the impedance of the antenna system utilized with
the FT-920 be as close as possible to the specified
50 Ω value.
may
cause excessive feedline ra-
Any antenna to be used with the FT-920 must, ultimately, be fed with 50 Ω coaxial cable. Therefore,
when using a “balanced” antenna such as a dipole,
remember that a balun or other matching/balancing
device must be used so as to ensure proper antenna
performance.
Use high-quality 50 Ω coaxial cable for the lead-in to
your FT-920 transceiver. All efforts at providing an
efficient antenna system will be wasted if poor quality , lossy coaxial cable is used. Losses in coaxial lines
increase as the frequency increases, so a coaxial
line with only 0.5 dB of loss at 7 MHz may have 2 dB
of loss at 28 MHz. For reference, the chart below
shows approximate loss figures for typically-available
coaxial cables frequently used in amateur radio installations.
Memory Backup
The lithium memory BACKUP switch on the rear panel
is turned on at the factory, allowing VFO, memory,
and menu data to be retained while power is off.
Backup current is minuscule, so it is not necessary
to turn the BACKUP switch off unless the transceiver is
to be stored for an extended period.
After five or more years of operation, the transceiver
may fail to retain memories. At this point, the lithium
battery should be replaced. Contact your dealer for
procurement of the battery, and follow the instructions on page 91 for replacement of the battery.
Before completing installation of your FT-920 transceiver, please take the time to review the following
safety guidelines.
Loss in dB per 30m (100 feet) for
Selected 50
(Assumes 50 Ω Input/Output Terminations)
Cable Ty pe Loss: 2 MHz Loss: 15 MHz Loss: 28 MHz
RG-58A a
RG- 58 Foama
RG-8Xa
RG-8A, RG-213a
RG-8 Foama
Belden® 991 3a
RG-17Aa
Loss figures are approximate; consult cable manufacturers’ catalogs for complete specifications.
Loss figures can increase significantly if high SWR is present on
the transmission line.
ΩΩ
Ω Coaxial Cables
ΩΩ
0.55 1.75 2.60
0.54 1.50 2.00
0.39 1.07 1.85
0.27 0.85 1.25
0.22 0.65 0.88
0.18 0.50 0.69
0.08 0.30 0.46
FT-920 Operating Manual
9
Page 12

Installation
Adjusting the Front Feet
The two front feet of the FT-920 can be set in either
of two positions. By turning the knurled ring around a
(retracted) foot clockwise, the middle of the foot will
extend about one centimeter. Turn the ring as far as
it will go (about ¼ turn) to lock the extended foot in
place. To retract an extended foot, turn the knurled
ring counter-clockwise ¼ turn while pressing on the
center of the foot.
10
FT-920 Operating Manual
Page 13

Safety Precautions
1. Power Connections
Be certain to follow the guidelines on page 6 carefully so as to ensure that your AC power supply is
configured for the AC line voltage used in your area.
When making DC connections, be absolutely certain
to observe proper polarity in your wiring. Note that
other manufacturers may use the same type of DC
power connector as does Yaesu, but the wiring configuration of the other manufacturer’s plug may be
different from that specified for your transceiver. Accordingly, you should verify the pin configuration of
the plug before attempting to use a non-Yaesu DC
cable of any kind.
2. Ground Connections
Besides following the guidelines presented on page
8 carefully, note that household or industrial gas lines
must
never
be used in an attempt to establish an
electrical ground. Cold water pipes may, in some instances, help in the grounding effort, but gas lines
represent a significant explosion hazard, and should
never be used.
3. Electrical Shock Prevention
Be certain that all station wiring is properly insulated
so as to prevent short-circuits which could damage
this transceiver and/or accessories connected to it.
Be sure to protect power cables from damage due to
abrasion by ensuring that they cannot be walked upon
nor crushed under rolling chairs, etc. Never route
power cables near sharp metallic edges which might
cut through protective insulation.
Never spill liquids into this transceiver, and do not
drop sharp metallic objects into the transceiver enclosure. Electrical shock may result when you attempt
to remove the object.
4. Antenna Precautions
Always install antennas such that they can
come in contact with outdoor power lines in the event
of a catastrophic antenna support or power line support structure failure. An adequate safety margin is
usually
antenna and its support structure [1.5 times the height
of the support]
wires attached to the support]
power line support pole].
Ground the antenna support structure adequately , so
as to dissipate energy absorbed during a lightning
strike. Install appropriate lightning arrestors in the
antenna lead-in and rotator cable (if used) according
to the arrestor’s instructions.
In the event of an approaching electrical storm, disconnect all antenna lead-in, rotator control, and power
cables
storm is not immediately in your area. Do not allow disconnected cables to touch the case of your
FT-920 transceiver or accessories, as lightning can
easily jump from the cable to the circuitry of your transceiver via the case, causing irreparable damage. If a
lightning storm is in progress in your immediate area,
do not
be killed instantly should lightning strike your antenna
structure or a nearby power line.
If a vertical antenna is used, be certain that humans
and/or pets or farm animals are kept away both from
the radiating element (to prevent electrical shock and
RF exposure danger)
event of an electrical storm). The buried radials of a
ground-mounted vertical antenna can carry lethal
voltages outward from the center of the antenna in
the event of a direct lightning strike.
provided by separating power lines from the
plus
[the length of any antenna or guy
plus
[the height of the
completely
attempt to disconnect the cables, as you could
from the station, but only if the
and
the ground system (in the
never
Unsupervised children should be kept away from any
electrical apparatus such as the FT-920 transceiver
and its accessories.
FT-920 Operating Manual
11
Page 14

Safety Precautions
5. RF Field Exposure Advisory and
Electromagnetic Compatibility
This transceiver is capable of power output in excess of 50 Watts, so customers in the United States
may be required to demonstrate compliance with
Federal Communications Commission (FCC) regulations concerning maximum permissible exposure
to radio frequency energy. Compliance is based on
the actual power output used, feedline loss, antenna
type and height, and other factors which can only be
evaluated as a system. Information regarding these
regulations may be available from your Dealer, your
local radio club, from the FCC directly (press releases
and other information can be found on the FCC’s site
on the World Wide Web at < http://www.fcc.gov >),
or from the American Radio Relay League, Inc. (225
Main St., Newington CT 06111 or < http://
www.arrl.org>).
Remember to re-evaluate your station’ s compliance
with these regulations during portable operations such
as Field Day or special-event stations. Note, also,
that power output may be programmed to 50 Watts
(maximum) via Menu Items U-49 and U-50; see page
79 for details.
Regarding electromagnetic compatibility: if this transceiver is used with, or in the vicinity of, a computer or
computer-driven accessories, you may need to experiment with grounding and/or Radio Frequency Interference (RFI) suppression devices (such as ferrite cores) to minimize interference to
nications caused by energy from the computer . Computer-generated RFI is usually a result of inadequate
shielding of the computer’s cabinet or I/O and peripheral connections. While computer equipment may
“comply” with RF emission standards, this does
ensure that sensitive amateur radio receivers will not
experience interference from the device!
Be certain to use only shielded cables for TNC-toTransceiver connections. You may need to install AC
line filters on the power cord(s) of the suspected
equipment, and decoupling ferrite toroidal chokes may
be required on interconnecting patch/data cables. As
a last resort, you can try installing additional shielding within the computer’s case, using appropriate
conductive mesh or conductive shielding tape. Especially check “RF holes” where plastic is used for
cabinet front panels.
For further information, consult amateur radio reference guides and publications relating to RFI suppression techniques.
your
commu-
not
12
FT-920 Operating Manual
Page 15

Accessory Installation
1. Linear Amplifier Interfacing
The FT-920 can be used with the (optional) Yaesu
FL-7000 Linear Amplifier, which provides automatic
band switching through the use of digital data sent
via the BAND jack on the rear panel of the transceiver .
Most other commonly-used linear amplifiers may also
be used with the FT-920, so long as the Tx/Rx switching voltages and timing (sequencing) for the
amplifier’s control relay(s) are not extraordinary.
Tx/Rx Control Devices
for Linear Amplifier Switching
Two control devices are provided in the FT-920 for
Tx/Rx control of an linear amplifier’s relay(s).
An open-collector transistor switch provides a
solid-state, fast-acting closure to ground for
low-voltage/low-current situations; maximum
ratings are +50 V DC at 500 mA (maximum
dissipation of 25W), and relays using negative
DC voltages or AC of any kind must not be
used with the transistor switch.
The transistor switch’s “hot” lead is identified
as TX GND (since it closes to “GND” on “TX”),
and is provided on Pin 2 of the BAND (DIN) connector on the rear panel of the FT-920. It is
also provided via the rear-panel TX GND jack
when the TR-RY switch is set to the TR position.
A mechanical relay is provided for high volt-
age/high-current applications, although the
relay will not be fast enough for QSK (full breakin) CW operation; maximum ratings for the relay contacts are 220 V DC (maximum) at 270
mA, 30V DC at 2 A, or 125 V AC (maximum
AC voltage) at 500 mA (60 Watts total maximum dissipation).
The relay’s contacts may be accessed by connecting a shielded cable to the rear-panel TX
GND jack.
If the relay is being used, the TR-RY switch adjacent to the TX GND RCA jack must be set to
the RY position; conversely, if you are using
the transistor switch, leave the TR-RY switch in
the TR position, so as to eliminate the clicking
of the relay.
The relay provides a mechanical closure to Ground
on Transmit, while the (NPN) transistor switch sinks
its (open) collector to Ground on Transmit. Check
with the
vice) to confirm the amplifier switching voltage and
current, if they are not clearly stipulated in the documentation for your equipment.
þ Be absolutely certain to check the position of the
manufacturer
TR-RY switch prior to connecting any external device to the TX GND jack. Never connect an AC
voltage, or a negative DC voltage, to the TX GND
jack if the TR-RY switch is set to TR. The Limited
Warranty on this product does not cover damage
caused by improper connections (excessive or improper voltage) to the rear panel jacks of the FT-
920.
of your amplifier (or other de-
About ALC
The FT-920 provides an external ALC jack on the
rear panel (RCA-type jack) for input of Automatic
Level Control voltage from a linear amplifier.
ALC voltage is used to provide dynamic control of
the output of the transceiver, so as not to provide
more drive than is needed for full amplifier output.
The ALC control voltage range is 0 to -4 V DC, with
the voltage going more negative as the amplifier’s
drive requirements are approaching fulfillment.
The FT-920’s ALC system is very typical of designs
in the amateur radio industry, and consequently is
compatible with many manufactured and home-built
amplifiers. However, ALC voltage may be generated
by an amplifier in a manner incompatible with efficient ALC operation in the FT-920, and it is important
that you recognize the differences in amplifier ALC
circuits before proceeding with ALC line connection.
r ALC circuits which detect
the amplifier, and generate negative-going ALC
control voltage when maximum output power
has been realized, will generally work properly
with the FT-920. The exact amount of ALC voltage fed to the FT-920 can usually be adjusted
via a potentiometer on the rear panel of the
amplifier.
r ALC circuits which detect
Current
cessive grid current is present, may not work
well with the FT-920 and other similar trans-
, and generate ALC voltage when ex-
Power Output
Amplifier Tube Grid
from
FT-920 Operating Manual
13
Page 16

Accessory Installation
ceivers, as the ALC voltage may be generated
because of amplifier mis-tuning not related to
an excessive-drive condition. With amplifiers
deriving their ALC voltage in this manner, we
recommend that you
and rather let the amplifier’s protection circuitry
manage its ALC requirements internally.
One useful alternative to ALC interconnection may
be considered: by entering Menu Item(s) U-49 and/
or U-50, you may define the maximum power output
for the FT-920. So if your amplifier never requires
more than 50 Watts of drive, just set the maximum
power output to “50” via the menu system, and you
will not have to worry about over-driving your amplifier. And since the power output may be set independently for each antenna port (use Menu Item U-49
for Antenna A, and U-50 for Antenna B), you may
lower the power output on a port connected to your
amplifier while retaining the full 100 Watts on the other
antenna port.
not
connect the ALC line,
Interconnection with QSK Amplifiers
If using a Yaesu FL-7000 amplifier, connect the (optional) cable CT-11 from the transceiver BAND jack to
the amplifier’s ACC-2 jack. This provides automatic
band selection for the linear, as well as QSK Tx/Rx
switching control and sequencing. Also connect an
RCA-to-RCA patch cord (Yaesu Part #T9101296 -
supplied with the FL-7000) from the amplifier’s ALC
jack to the transceiver’s EXT ALC jack, and connect
an RF coaxial jumper (Yaesu Part #T9100980 - also
supplied with the FL-7000) from the transceiver’s
antenna jack (A or B ) to the amplifier’s RF INPUT jack.
If using another manufacturer’s QSK amplifier, and if
it meets the 15 VDC/100 mA limitation for transistor
switching described previously, connect the Tx/Rx
switching line for the linear to Pin 2 of the BAND jack,
and use Pin 3 for the shield of the cable. If the amplifier provides a closure to ground to confirm that its
relays are properly seated, this “exciter-enable” line
may be connected to Pin 8 of the BAND jack.
The BAND jack is a specialized, interlocked 8-pin DIN
connector. When a suitable plug (Yaesu Part
#P0090160) is inserted into the BAND jack, it opens
the interlock which, in the case of the FT-920, grounds
Pin 8. If no exciter-enable line is provided by your
amplifier, connect a jumper between Pin 8 and Pin 3
(Ground); if you do not, the FT-920 will not allow itself to transmit.
If your QSK amplifier requires the exciter’s control
circuits to switch more than 100 mA, or uses more
than 15 VDC for Tx/Rx relay switching, you will have
to provide a suitable external interface transistor, controlled by Pin 2 of the BAND jack.
14
FT-920 Operating Manual
Page 17

Accessory Installation
Interconnection with non-QSK Amplifiers
(Yaesu FL-2100 Series or others)
The TX GND jack on the rear panel of the transceiver
provides for Tx/Rx switching of non-QSK amplifiers.
A schematic diagram of the FT-920’s internal relay
circuit is shown below.
As the FT-920 is supplied from the factory, the internal relay is disabled, and a high-dissipation NPN
transistor’s (open) collector is connected to the TX
GND jack. To enable the relay for use with amplifiers
requiring it, move the rear panel TR-RY switch, located in the hole near the center of the rear panel, to
the RY position. Use a thin, insulated object like a
toothpick to move the switch. Then connect the cen-
ter contact of the TX GND RCA jack to the amplifier’s
relay control line, using the outer contact of the TX
GND jack for the shield. Connect the RF coaxial cable
and, if compatible, the ALC cable as described in the
QSK amplifier interconnection section above. Refer
to the drawing below for details.
With the relay enabled, the FT-920 can support
QSK
linear Tx/Rx switching voltages of up to 220 VDC
(maximum permissible DC voltage) at 270 mA, 30
VDC at 2 A, or 125 VAC (maximum permissible AC
voltage) at 500 mA.
non-
Caution!
Do not exceed the maximum ratings of the
switching circuitry (transistor or relay) of the
FT-920 made available via the BAND or TX GND
jacks. Your warranty does not cover damage
caused by improper interconnections to linear
amplifiers. When in doubt, it is always safest
to utilize the TX GND jack with the TR-RY switch
set to TR, as this configuration should handle
the switching requirements of most all commonly-available amplifiers.
FT-920 Operating Manual
15
Page 18

Accessory Installation
2. Digital Modem Interfacing
(TNC, WeatherFax, etc.)
The FT-920 provides several convenient interconnection points, as well as dedicated operating modes,
for digital operation. While interfacing to commonlyavailable modems is simple and straightforward, it is
important that you read the instructions below so as
to understand the facilities that are provided on the
FT-920.
DATA Jack
This five-pin DIN connector is the primary interface
port for most digital-mode operation. It provides the
following connection points which may be required in
your installation:
Pin 1 (AFSK Input):
Connect this pin to your TNC’s “AFSK Out” or “Mic
Audio” output line. The optimum input level is 30
mV rms, and the input impedance is 3 kΩ. Your
TNC’s audio output level potentiometer will allow
you to set the level to the optimum value. This pin
may be used either for 300 baud SSB-mode digital operation or for 1200-baud FM packet. The
bandwidth and frequency response are not, however, suitable for 9600 baud operation. Be sure
the AFSK-FSK switch on the rear panel is in the
AFSK position.
For FSK operation (whereby the TNC closes a
line to ground to accomplish teletype keying), set
the AFSK-FSK switch to FSK, and connect your
TNC’s FSK keying line to Pin 1.
Pin 2 (Ground):
Connect this to the shield(s) of the cable(s) used
for connections between the TNC and the FT-920.
Pin 3 (PTT):
Connect this pin to the PTT line from the TNC.
This pin, when grounded by the TNC, places the
FT-920 into the Transmit condition.
Pin 4 (Audio Out):
Connect this pin to your TNC’s “RX Audio” input
line. This is a constant-level (100 mV rms @ 600
Ω) audio output line which is
position of the front-panel AF GAIN control.
Pin 5 (BUSY):
This is a “Squelch Status” pin not generally required for digital mode operation. This pin is held
at +5V when the squelch is open, and is grounded
when the receiver is muted by the squelch (“nosignal” condition).
not
affected by the
KEY Jack (Rear Panel)
If you wish to send CW using your TNC and computer keyboard, the CW Key output line from your
TNC may be connected to the rear-panel KEY jack,
according to the connection information provided on
page 5.
Since a TNC’s keying output is electrically similar to
that of a Straight Key, set the rear panel’s PDL-KEY
switch to the PDL (Manual Key) position, and connect
the TNC’s key line there. You can still connect your
keyer paddle to the
FT-920’s built-in electronic keyer , for those situations
where you wish to send using the paddle; there is no
need to switch the internal keyer on and off.
front panel
KEY jack, and use the
16
FT-920 Operating Manual
Page 19

Accessory Installation
3. Other Digital/Recording
Device Interfacing
AF OUT Jack
This is a 3.5 mm miniature phone jack which provides constant-level (100 mV @ 600 Ω) for connection to a WeatherFax decoder, tape recorder, or other
accessory. The audio output level is not affected by
the setting of the front panel AF GAIN control, so you
can turn the volume down, if you like, without affecting the audio level being presented to your decoding
device.
The connection to the AF OUT jack is at the same
level as the connection to Pin 4 of the DATA jack. However, the two output ports use independent output
buffer amplifiers, so you can freely connect and disconnect devices to/from these ports without concern
over the impedances and levels.
PTT Jack
This RCA jack is wired in parallel with the DAT A jack’s
Pin 3, and may be used in conjunction with a computer or TNC’s PTT line, if desired.
P
ATCH
Jack
For transmit audio input for SSTV (Slow-Scan Television) operation, you may connect the SSTV
terminal’s TX AUDIO line to the PATCH jack. You will
need to disconnect the microphone, however , during
transmission, as the PATCH jack is connected in a “Y”
configuration along with the microphone input (from
pin 8 of the MIC jack).
FT-920 Operating Manual
17
Page 20

Accessory Installation
4. CW Key/Paddle and Computer
Keying Interface Suggestions
Features
The FT-920 includes a host of features for the CW
operator, the functions of which will be detailed in the
“Operation” section later. These include:
A built-in electronic keyer with message
memory;
A front-panel KEY jack for connection of a keyer
paddle; and
A rear-panel KEY jack which may be connected
to another keyer paddle or a straight key , TNC,
or computer CW keying interface (for use with
contest software, etc.).
Both KEY jacks on the FT-920 utilize “positive” keying voltage. Key-up voltage is approximately +5V DC,
and key-down current is approximately 0.5 mA. When
connecting a key or other device to the KEY jacks,
use
only
a 3-pin (“stereo”) ¼” phone plug; a 2-pin
plug will place a short between the ring and
(grounded) shaft of the plug, resulting in a constant
“key-down” condition in some circumstances.
Configuration Suggestions
For everyday operation using the internal elec-
tronic memory keyer, connect your paddle to the
front panel
KEYER switch. If you wish to keep the keyer
paddle’s cable out of the way, connect the plug,
instead, to the rear panel K EY jack, and set the
rear-panel PDL-KEY switch to PDL.
If two operators are using the FT-920 simulta-
neously (for a contest, Field Day, etc.), a second
keyer paddle may be connected to the
KEY jack. Be sure that the rear panel’s PDL-KEY
switch is set to PDL so that both operators have
access to the internal electronic memory keyer,
and switch the front panel KEYER switch on.
If two operators are using the FT-920 simulta-
neously, but both wish to use a straight key, “bug,”
or an outboard electronic keyer, the key plugs may
be inserted into the front and rear panel KEY jacks;
now turn the front panel’s KEYER switch off. Irrespective of the setting of the PDL-KEY switch, the
tip connections on both Key plugs will serve as
“Straight Key” lines for accommodating this application.
If you are using a computer-driven CW keying in-
terface (with contest software), but want to be able
to send occasional “repeat” messages quickly
using the FT-920’s
keyer paddle
keying interface
key) to the
tion, set the rear panel’s PDL-KEY switch to the
KEY position, which re-configures
panel’s KEY jack to accept a “Manual” keying line.
KEY jack, and activate the front panel
rear panel
internal
to the
rear panel
front panel
line (which emulates a straight
keyer, connect your
KEY jack, and the
KEY jack. In this configura-
only
the rear
18
Note that the rear-panel KEY jack carries the capability to support an external PTT line, if provided by your
external keyer, TNC, or computer keying interface.
FT-920 Operating Manual
Page 21

Accessory Installation
5. Antenna Connections
The FT-920’s three antenna connectors, plus innovative microprocessor-based memory and switching
circuits, provide excellent flexibility in setting up your
antenna connections.
Typical antenna configurations are shown below . Remember that Antenna A and Antenna B (which are
“SO-239” or “M” connectors) may be used for transmission and reception, while the RX Antenna port
(which is an “RCA” type connector) may only be used
for reception.
Note
Regarding Large Receive Antennas
Although surge suppression is provided on all
antenna ports, you may wish to consider building a simple external circuit which will disconnect, on TX, any antenna connected to the RX
ANT IN jack, particularly if you are using a very
long wire antenna such as a Beverage. Very
long antennas can build up very high RF and
static voltages on them, and the circuit below
may provide better protection for your
receiver’s input circuitry .
6. Personal Computer Interfacing
for Contest Software, etc.
The FT-920 features a built-in level converter, allowing direct connection from the rear-panel CAT jack to
the serial port of your computer, without the need for
any external converter box.
When your software requests serial port configuration information, set it for “4800,N,8,2” (4800 baud,
No Parity , 8 Data Bits, and 2 Stop Bits). Be certain to
configure and activate any required “TSR” (T erminateand-Stay-Resident) utilities before beginning computer-controlled transceiver operation (your software’s
instruction manual will describe any such requirement).
FT-920 Operating Manual
19
Page 22

Front Panel Controls, Switches, & Jacks
(1) POWER Switch
This latching-type switch turns the FT-920 on and
off. Push it once to turn the transceiver on, and press
it again to turn the power off.
(2) MOX Switch
This also is a latching-type switch, used to switch the
FT-920 manually into the transmit mode (instead of
using the microphone Push-T o-Talk (PTT) switch, for
example). Press [MOX] once to activate the transmit
mode, and press it again to release the FT-920 back
into the receive mode.
Be sure to have an antenna or dummy
load connected to the transceiver when
this switch is pushed. Failure to do so may
cause damage to the transmitter’s final amplifier
stage.
(3) VOX Switch
This switch enables automatic voice-actuated transmitter switching in the SSB, AM, and FM modes, as
well as “semi-break-in” CW. Press the [VOX] switch
once to activate VOX, and again to disable VOX (and
return to PTT operation).
(4) PHONES Jack
This ¼” 3-pin jack is used for connection of headphones. When a plug is inserted into this jack, the
internal/external speaker will be cut off. This jack is
optimized for use with 16 Ω to 32 Ω headphones,
and will accept either monaural or stereo headphone
types.
(5) KEY Jack
This ¼” 3-pin jack is used for connection of a CW
keyer paddle or a straight key. Use only a 3-pin ( “stereo”) plug in this jack; if you attempt to use a 2-pin
plug, a constant CW carrier will be sent out. The
pinout is shown on page 5.
(6) MIC Jack
This 8-pin connector accepts microphone input, as
well as providing PTT, ground, and scanning control
access. Proper microphone impedance is 500 ~ 600
Ω.
20
FT-920 Operating Manual
Page 23

Front Panel Controls, Switches, & Jacks
(7) METER SELECT Switch
This switch is used to select the display function of
the transmission multimeter, with the selections being provided in the following sequence:
ALC: ALC Voltage.
SWR: SWR as observed by the transmitter P A.
COMP: Speech Processor Compression level.
VOLT: Final amplifier transistor supply voltag
(also displayed on receive).
AMP: Final amplifier transistor drain current.
ALC: ALC Voltage
(return to beginning of loop).
(8) IPO Switch
The Intercept Point Optimization button switches the
receiver RF preamplifier on and off. When the switch
is pressed, the “IPO” icon appears on the display
panel, and the receiver RF preamplifier is bypassed.
When this switch is pressed again, “IPO” will disappear, and the RF preamplifier returns to operation.
Best receiver sensitivity occurs when “IPO” is off.
However, the RF preamplifier may not be necessary
in noisy locations or on the lower frequencies, in which
case the IPO feature will provide improved immunity
from intermodulation.
(9) ATT Switch
This switch may be used to reduce the input receive
signal in one S-Unit steps, starting at 0 dB (no attenuation), and sequencing through [6 dB] Þ [12 dB]
Þ [18 dB] Þ [0 dB]. . .
The attenuation level is shown on the display panel.
Best sensitivity will, of course, occur when no attenuation is used.
(10) AGC Switch
This switch selects the recovery time for the receiver
AGC (Automatic Gain Control) system. The selections available are, in order:
AGC FAST: Fast receiver recovery time.
AGC SLOW: Slow receiver recovery time.
AGC OFF: AGC system disabled.
AGC FAST: Fast receiver recovery time
(return to beginning of loop).
The current receiver recovery time constant is shown
on the display panel.
? If “AGC OFF” is selected, the S-meter (which moni-
tors AGC voltage) will cease to function.
(11) MIC GAIN Control
This control adjusts the microphone input level in the
SSB and AM modes. Clockwise rotation increases
the microphone gain level.
(12) RF PWR Control
This control adjusts the transmitter’s power output,
with a range of 10 ~ 100 Watts, and adjustment is
available in all modes. Clockwise rotation increases
the power output.
(13) AF GAIN Control
This control adjusts the receiver volume level presented to the speaker or headphones. Clockwise rotation increases the volume level.
? Note that this control does not affect the audio
level presented to the rear-panel AF OUT and DATA
jacks.
(14) RF GAIN Control
This control adjusts the gain of the receiver’s RF and
IF stages. Clockwise rotation increases the RF Gain
level for best sensitivity, and the normal operating
position for this control is fully clockwise.
? Counter-clockwise rotation of the RF GAIN con-
trol, besides lowering the receiver gain level, will
cause the S-meter to deflect upward, as though a
strong signal were present.
(15) NARROW Switch
This switch is used to activate optional narrow filters,
for improved interference rejection. Press this switch
to select the narrow filter; the “NAR” indicator will appear on the display panel.
(16) MODE Switches
Pressing one of these switches selects the operating
mode. Per the chart below, repeated presses of a
particular switch may cause the precise mode to be
selected from within a mode group (for example,
pressing [SSB] repeatedly toggles between [USB]
and [LSB].
Mode
Sw itch
SSB
CW
AM
FM
DATA
LSB Ö USB
CW (LS B) Ö CW (USB)
AM
FM
DATA L SB Õ DATA USB Õ DATA FM
(RTTY/FSK) (PKT/AFSK) (PK T/AFSK) (RTTY/FSK)
Available Mode Selections
Õ
DATA LSB
Õ
FT-920 Operating Manual
21
Page 24

Front Panel Controls, Switches, & Jacks
(17), (18) Antenna Switches (A/B, RX)
These switches allow selection of antennas, per the
information and illustration below.
(17) A/B Press this switch to toggle between antennas connected to the “A” and “B” connectors
on the rear panel. The indicator “ ANT[A] ” or
“ANT[B]” will appear on the display panel to indi-
cate which antenna is in use. The antenna selection will be maintained in the VFO or Memory register in use.
(18) RX When this switch is pressed, the
receiver’s input is connected to the receive-only
“RX IN” RCA connector on the rear panel of the
FT-920. This feature allows connection of a lownoise receiving antenna or a VHF/UHF receive
converter. When the RX button is pushed, the “RX
ANT” indicator will appear on the display panel.See
the drawing on the next page for details.
(19) SQL (Squelch) Control
This control, active in all modes, may be used to silence background noise when no signal is present.
Most frequently used during FM operation, this control must be rotated fully counter-clockwise for most
SSB, CW, or AM operation.
(20) PROC COMPression Level Control
This control is used to adjust the compression level
of the digital speech processor during SSB operation. Clockwise rotation increases the compression
level.
(21) PROC Switch
Pressing this switch activates the digital SSB speech
processor, for enhanced “talk power” under difficult
conditions. The “PROC” indicator will appear on the
display panel when the speech processor is activated.
Press this switch again to turn the speech processor
off.
(22) MONI GAIN Control
This control is used to adjust the audio level of the
voice monitor. Clockwise rotation increases the audio level.
(23) MONI Switch
Pressing this switch activates the voice monitor , which
allows the operator to monitor voice characteristics
during adjustments. When the monitor is activated,
the “MONI” indicator appears on the display panel.
Press this switch again to turn off the monitor.
22
FT-920 Operating Manual
Page 25

Front Panel Controls, Switches, & Jacks
(24) NB LEVEL Control
This control adjusts the blanking level for the IF Noise
Blanker. Clockwise rotation increases the degree of
blanking.
(25) NB Switch
Pressing this switch activates the IF Noise Blanker.
When the Noise Blanker is activated, the ‘NB” indicator will appear in the display panel. Press this switch
again to switch the Noise Blanker off.
? The IF Noise Blanker may be used or alone or in
conjunction with the DSP Noise Reduction feature.
(26) RX - (VFO-A) Indicator/Switch
This combination LED/Switch indicates the operating status of VFO-A in the receive mode. The LED
appears green when the receiver is set up for the
use of VFO-A.
This LED is also a switch; when the receiver is using
VFO-A, pressing the green LED will cause the receiver to be muted (the LED will now blink). Press
the LED again to cancel the mute function.
(27) TX - (VFO-A) Indicator/Switch
This combination LED/Switch indicates whether or
not VFO-A is being used to determine the transmit
frequency. The LED appears orange when the transmitter is being controlled by VFO-A (this is the
situation for transceive operation using VFO-A).
When the corresponding LED near the tuning dial for
VFO-B is pushed, the VFO-A [TX] LED will go out,
showing that VFO-A has relinquished transmit frequency control. Pushing the VFO-A [TX] LED again
will restore transmit frequency control to VFO-A.
typical
If this LED is pushed while it is already illuminated,
the FT-920 will be placed in the (reduced-power:
Approx. 10 W) “TX MUTE” mode. In this mode, the
Orange LED will
(28) VFO-A Tuning Dial
This large knob is the main tuning dial for the transceiver, controlling the frequency of the (main) VFOA. Clockwise rotation of the knob increases the frequency, while counter-clockwise rotation decreases
the frequency . The tuning steps of the rotary encoder
coupled to the VFO-A Tuning Dial are shown below.
Operating
Mode
SSB, CW, DATA(SS B)
AM, FM, DATA(FM)
(29) STEP Switch
Use the [STEP] switch to enable fine or coarse tuning
when using the VFO-A or VFO-B tuning dials, as well
as the [UPs] or [Downt] switches. The [step] switch
toggles the tuning steps through the following sequence:
Fast Õ Fine Õ Normal Õ Fast Õ . . .
The current setting will be indicated on the display
panel.
(30) Shuttle Jog Control
The outer, concentric “Shuttle Jog” control behind the
VFO-A Tuning Dial allows fine or rapid frequency excursions with just a slight turn of your hand. Rotating
the Jog ring slightly to the left or right initiates slow
tuning in a downward or upward direction, respectively . The more you rotate the spring-loaded Jog dial,
the faster the VFO will tune. The tuning rate of the
Shuttle Jog may be programmed via the Menu system.
blink
.
STEP
No rmal Fast Fine
10Hz 100Hz 1Hz
100Hz 1kHz 10 H z
FT-920 Operating Manual
23
Page 26

Front Panel Controls, Switches, & Jacks
(31) LOCK Switch (A)
The [LOCK] switch locks the settings of the VFO-A
Tuning Dial and/or the Shuttle Jog. Press this switch
momentarily to lock the Tuning Dial; press and hold it
in for ½ second to lock the Shuttle Jog.
When either control is locked, the “LOCK” indicator
below the “ VFO-A” indicator on the display panel will
be illuminated.
(32) DISPLAY Switch
This switch changes the function of the VFO-B readout area of the display panel. In the normal mode,
the VFO-B frequency is displayed. When this button
is pushed, and you are operating in the MR (Memory
Recall) mode, any alphanumeric memos (“AlphaTags”) you have programmed will be substituted in
place of the frequency display on the VFO-B side.
Press this switch again to return to the frequency display mode.
(33) (VFO) A u B Switch
Pressing and holding this switch in for ½ second
causes the contents of VFO-A to be copied into VFOB, so that the two VFOs’ contents will be identical.
(34) (VFO) A B Switch
Pressing this switch momentarily to swap the contents of VFO-A with those of VFO-B.
(35) VFO/MEM Switch
Pressing this switch changes frequency control between the VFO and Memory systems.
Repeatedly pushing this switch causes frequency
control to toggle between the two systems.
(36) RPT Switch
Pressing this switch, while on 28 MHz in the FM operating mode, causes a standard repeater shift (default: 100 kHz) to be applied to the operating frequency during transmission; additionally, a
(subaudible) CTCSS encode tone (default: 88.5 Hz)
will be superimposed on your transmitted signal, for
accessing repeaters requiring it.
Both the CTCSS tone frequency and repeater shift
may be changed via the Menu system.
(37) DW Switch
Pressing this switch activates the Dual Watch feature.
24
FT-920 Operating Manual
Page 27

Front Panel Controls, Switches, & Jacks
(38) V u M Switch
Pressing this switch for ½ second transfers the contents of VFO-A into a memory register.
(39) V u M Switch
Pressing this switch for ½ second transfers the contents of the currently-selected memory channel into
VFO-A.
(40) Keypad
The keypad is used for one-touch band selection, as
well as direct frequency entry, during VFO operation.
During FM transmission, the Keypad also serves as
a DTMF Encoding Keypad for Autopatch operation.
(41) QMB RCL Switch
This switch is used for one-touch recall of Quick
Memory Bank memories. Pressing this switch causes
the QMB memories to be recalled sequentially.
(42) QMB STO Switch
This switch is used for storing VFO-A frequencies
into the QMB memory registers.
(43) REC Switch
Pressing this switch causes the built-in Digital Recorder to start recording the contents of the receiver’s
incoming audio. Pressing the REC switch for ½ second, followed by the [1], [2], [3], or [4] key on the Keypad, causes the Digital Voice Message recorder to
start recording.
(44) PLAY Switch
Pressing this switch initiates playback of the receiver’s
Digital Recorder.
(45) UP (p ) / DOWN (q ) Keys
Pressing these keys allows quick frequency jumps
(during VFO operation) or memory channel selection (during Memory Recall operation). Pressing either of these switches once (momentarily) causes
the frequency or memory channel number to move
upward or downward by one increment; pressing and
holding a switch in causes continuous frequency or
channel number change.
The increments for frequency change during VFO
operation, using these switches, are shown below.
STEP SWITCH POSI TION
NORM AL FAST FINE
100k H z 1MHz 10k H z
(46) RX - (VFO-B) Indicator/Switch
This combination LED/Switch indicates the operating status of VFO-B in the receive mode. The LED
appears green when the receiver is set up for the
use of VFO-B.
This LED is also a switch; when the receiver is using
VFO-B, pressing the green LED will cause the receiver to be muted (the LED will now blink). Press
the LED again to cancel the mute function.
(47) TX - (VFO-B) Indicator/Switch
This combination LED/Switch indicates whether or
not VFO-B is being used to determine the transmit
frequency. The LED appears orange when the transmitter is being controlled by VFO-B (this is a typical
situation for “Split” operation using VFO-B for transmission while receiving on VFO-A).
When the corresponding LED near the tuning dial for
VFO-A is pushed, the VFO-B [TX] LED will go out,
showing that VFO-B has relinquished transmit frequency control. Pushing the VFO-B [TX] LED again
will restore transmit frequency control to VFO-B.
If this LED is pushed while it is already illuminated,
the FT-920 will be placed in the (reduced-power:
Approx. 10W) “TX MUTE” mode. In this mode, the
Orange LED will
(48) VFO-B Tuning Dial
This knob is the tuning dial controlling the frequency
of the (Sub) VFO-B. Clockwise rotation of the knob
increases the frequency , while counter-clockwise rotation decreases the frequency. The tuning steps of
the rotary encoder coupled to the VFO-B Tuning Dial
are shown below.
Operating
Mode
SSB, CW, DATA(SS B)
AM, FM, DATA(FM)
(49) MEM CH Switch
Pressing this switch changes the operating configuration for the VFO-B Tuning Dial.
If this switch is pressed, the VFO-B Tuning Dial will
switch from VFO operation to Memory Channel selection. Press the switch again to return to VFO operation.
blink
.
STEP
No rmal Fast Fine
10Hz 100Hz 1Hz
100Hz 1kHz 10 H z
FT-920 Operating Manual
25
Page 28

Front Panel Controls, Switches, & Jacks
(50) LOCK Switch (B)
This switch locks the settings of the VFO-B knob and/
or the front panel keys.
Pressing this switch momentarily locks the settings
of the VFO-B Tuning Dial. Pressing and holding in
this switch for ½ second causes all the keys on the
front panel of the transceiver (except for the [LOCK]
switches!) to be locked. When the LOCK function is
engaged, the “LOCK” indicator will be shown on the
display panel.
(51) MENU Switch
Pressing this switch momentarily activates the “Menu”
mode, which allows customization of many aspects
of transceiver configuration.
(52) RX CLAR Switch
Pressing this switch activates the RX Clarifier (Offset T uning from VFO-A frequency) feature. When this
feature is activated, the VFO-B Tuning Knob is used
for Clarifier tuning up to an offset of ±9.99 kHz.
(53) TX CLAR Switch
Pressing this switch activates the TX Clarifier feature, allowing the transmit frequency to be offset from
the VFO-A frequency up to ±9.99 kHz. The TX Clarifier may be used in conjunction with the RX Clarifier,
or the chosen offset may be applied either to the RX
or TX frequency singly.
(54) CLEAR CLAR Switch
Pressing this switch clears any offset that has been
established for the Clarifier, returning it to a “Zero
Offset” condition. Pressing this switch only cancels
the
offset
; it does
(55) SPOT Switch
In the CW mode, this switch activates a spotting tone,
used for precise zeroing in onto an incoming (RX)
signal. By matching the pitch of the incoming signal
exactly to the pitch of the Spot tone, your transmitter’s
signal will be precisely aligned to a “Zero Beat” position relative to the other station’s signal.
not
turn the Clarifier itself off.
26
FT-920 Operating Manual
Page 29

Front Panel Controls, Switches, & Jacks
(56) BK-IN Switch
Pressing this switch, in the CW mode, places the
transceiver in the “Full Break-In” (“QSK”) mode.
(57) KEYER Switch
This is the On/Off switch for the built-in Electronic
Keyer.
(58) SPEED Control
This is the Speed control for the built-in Electronic
Keyer. Clockwise rotation increased the sending
speed.
(59) PITCH Control
This control adjusts the pitch of (A) the SPOT tone,
(B) the corresponding pitch of your FT-920’s transmitted carrier, and (C) the center frequency of the
receive passband. The available range of frequencies is 300 ~ 1050 Hz, in 50 Hz steps.
(60) SIDE TONE Control
This control adjusts the level of the CW monitor
sidetone. Clockwise rotation increases the monitor
level.
(61) MEM GROUP Switch
This switch is used to select the “Memory Group
Recall” mode of Memory operation. In this mode, only
those memory channels within the designated group
will be available for recall; this is useful in reducing
channel selection time if you only are interested in
watching a few particular channels.
(62) TUNER Switch
This is the On/Off switch for the FT-920’s Automatic
Antenna Tuner.
(63) SHIFT Control
This control adjusts the receiver’s IF Shift feature,
which adjusts the 8.2 MHz IF position relative to the
center frequency of the selected IF filter (in all modes
except FM). The default position for this control is at
12 o’clock, and an adjustment range of ±1.26 kHz is
provided (the pitch of the incoming signals will not
change).
(64) NR Control
This control adjusts the level of the DSP-based Noise
Reduction feature. Clockwise rotation of this control
increased the degree of noise reduction.
(65) DSP Switch
This is the On/Off switch for the Digital Signal Pro-
cessing circuitry.
(66) LOW CUT/HIGH CUT Controls
These controls adjust the passband cutoff frequencies of the receiver’s High-Cut and Low-Cut DSP filters. The inner control adjusts the Low-Cut characteristics, with a physical adjustment range over the
left hemisphere. The outer control adjusts the HighCut characteristics, and its adjustment range is over
the right hemisphere.
Do not attempt to adjust either of these controls past
the 12 o’clock position.
(67) NOTCH Switch
This is the On/Off switch for the beat-canceling DSP
Notch filter.
Pressing this switch
Tuner in line.
Pressing and holding in this switch for ½ second activates the Automatic Matching mode, in which a carrier is generated and the tuner ’s microprocessorbased circuitry selects values of inductance and capacitance so as to present a low SWR to the
transmitter’s output port.
þ Be certain to have an antenna or dummy load con-
nected to the antenna jack on the rear of the transceiver before initiating Automatic Antenna Tuner
matching procedures.
momentarily
places the Antenna
FT-920 Operating Manual
27
Page 30

Display Panel Indicators and Icons
(1) S/PO Meter
This meter scale indicates signal strength on receive,
and power output on transmit. The characteristics
may be changed between Instantaneous and PeakHold by making the appropriate selection via Menu
Item U-07.
(2) Transmit Multimeter
In accordance with the corresponding setting of the
Meter Select switch, these meter scales provide display of the following transmitter performance parameters:
ALC: ALC Voltage.
SWR: SWR as observed by the transmitter PA.
COMP: Speech Processor Compression level.
VOLT: Final amplifier transistor supply voltage
(also displayed on receive).
AMP: Final amplifier transistor drain current.
(3) [PROC]
This icon indicates that the Digital Speech Processor is On.
(4) [IPO]
This icon indicates that the Intercept Point Optimization condition for the receiver is active, with the input
preamplifier being bypassed.
(5) [ATT 6 12 18]
This icon is illuminated when the receiver input preamplifier is On, and it displays the number of dB of attenuation.
(6) [AGC F S] [AGC OFF]
These icons indicate the current operating mode for
the Automatic Gain C ontrol circuitry.
(7) [TRANSMIT]
This icon becomes illuminated during transmission.
If you attempt to transmit outside of an authorized
transmit range, this icon will disappear, and “ERROR”
will appear on the main frequency display area.
(8) [BUSY]
This icon is illuminated during reception so long as
the receiver is unsquelched. By keeping the SQUELCH
control fully counter-clockwise, receiver audio will always be present and the [BUSY] icon will stay lit.
(9) [SPLIT]
This icon is illuminated during “Split” operation using
VFO-A for reception and VFO-B for transmission, or
vice-versa.
(10) [FAST]
This icon is illuminated when “Fast” synthesizer steps
have been selected, for more rapid frequency navigation using the VFO-A and VFO-B Tuning Knobs,
or the U P(p)/(q)DOWN switches. In the “Fast” mode,
the frequency change is multiplied by a factor of 10.
(11) [NAR]
This icon is illuminated when a Narrow filter (in those
modes where one is available) has been selected.
28
FT-920 Operating Manual
Page 31

Display Panel Indicators and Icons
(12) [GEN]
This icon is illuminated when the transceiver is tuned
to a frequency outside one of the 500 kHz segments
containing an Amateur band. Transmission will be
inhibited when the [GEN] icon is lit.
(13) [FINE]
This icon is illuminated when “Fine” synthesizer steps
have been selected, for fine tuning using the VFO-A
and VFO-B Tuning Knobs, or the UP(p)/(q)DOWN
switches. The tuning rate, in the “Fine” mode, is 1/
10th the “Normal” rate.
(14) [NB]
This icon is illuminated when the IF Noise Blanker is
turned on.
(15) VFO-A Mode
These icons display the operating mode in use on
VFO-A.
(16) [MONI]
This icon is illuminated when the voice monitor is activated.
(17) Enhanced Tuning Scale
This meter scale provides a wide variety of information regarding the operation of the transceiver, depending on its configuration (via Menu Item U-10).
(18) VFO-A Frequency Display
This is the main frequency display for the transceiver’s
primary (A) VFO. Display resolution to 10 Hz is provided.
(19) [LOCK]
This icon is illuminated when the VFO-A “ Lock” function is activated so as to prevent inadvertent frequency
changes.
(20) [QMB]
This icon is illuminated when frequency data is recalled from the Quick Memory Bank.
(21) [VFO]
This icon is illuminated when frequency data is provided by the VFO system.
(22) [MEM]
This icon is illuminated when frequency data is recalled from the Memory system.
(23) [MEM TUNE]
This icon is illuminated when transceiver frequency
control is in a pseudo-VFO mode known as “Memory
Tune,” whereby a memory channel is used as a starting point for tuning using the VFO-A Tuning Dial.
At the factory, the Enhanced Tuning Scale is set up
so as to provide a visual representation of the DSP
system’s bandwidth. Other configurations allow depiction of the Clarifier offset direction and magnitude,
as well as tuning accuracy. See the discussion on
page 74 for details.
FT-920 Operating Manual
29
Page 32

Display Panel Indicators and Icons
(24) [ANT] [A] [B] [RX ANT]
These icons indicate which antenna is currently in
use.
(25) [TX] [CLAR] [RX]
These icons indicate the operating status of the Clar ifier function. When the Receive Clarifier is on, [CLAR]
[RX] will be displayed; when the Transmit Clarifier is
on, [TX] [CLAR] will be displayed.
(26) Multi-Panel
This panel of the display area provides quantitative
data regarding transceiver operating status.
At the factory , this panel is set up to display the amount
of Clarifier system frequency offset from the main
VFO frequency . Other available functions include display of CW Pitch and VFO-A/VFO-B Offset, utilizing
Menu Item U-09. See page 74 for details.
(27) [-] [RPT] [+]
These icons are illuminated during “Repeater” F M
operation, typically on 29 MHz. When the repeater
shift direction is negative, the [-] [RPT] icons are illuminated; when the repeater shift direction is positive,
the [RPT] [+] icons are lit.
(28) [T]
This icon is illuminated when the CTCSS Tone Encoder is activated during FM Repeater operation.
(29) [SQL]
This icon is illuminated when the CTCSS Tone Decoder is activate during FM repeater operation.
(30) [WAIT]
This icon will be briefly illuminated during antenna
tuning, before a satisfactory match has been achieved
by the Automatic Antenna Tuner.
(31) [HI SWR]
If the Automatic Antenna Tuner is unable to achieve
a satisfactory match, this icon will become illuminated.
Transmitter power output will be significantly reduced
when the [HI SWR] icon is lit. You should check your
antenna system, connectors, and cables to determine
and repair the cause of the fault.
(32) [M CK]
This icon is illuminated when the “scratchpad”
Memory Check mode is activated. In this mode, you
may inspect and select the memory channel to be
used
if and when
lected.
(33) [GROUP]
This icon is illuminated when the Memory system is
restricted to the Memory Group mode. See page 61
for details.
the Memory Recall mode is se-
30
FT-920 Operating Manual
Page 33

Display Panel Indicators and Icons
(34) Memory Channel Display Field
This area of the display indicates the Memory Channel number.
(35) [OFFSET]
This icon is illuminated when the Multi-Display Panel
is displaying the frequency offset of the Clarifier.
(36) VFO-B Mode
These icons display the operating mode in use on
VFO-B.
(37) [SCAN]
This icon will be illuminated, during Memory operation, when the currently-selected Memory Channel
has been tagged for inclusion among the channels
to be scanned.
(38) [RX] [TUNER] [TX]
These icons light up to indicate whether the Automatic Antenna Tuner is connected to the Receiver or
Transmitter stage, respectively.
(39) [CAT]
This icon will be illuminated when data is being passed
to or from the transceiver’s (serial) DATA port. During operation using software which “polls” the radio’s
status frequently, this icon may appear to be blinking.
(40) VFO-B Frequency Display
This is the main frequency display for the transceiver’s
secondary (B) VFO. Display resolution to 10 Hz is
provided.
(41) [LOCK]
This icon is illuminated when the VFO-B “ Lock” function is activated so as to prevent inadvertent frequency
changes.
(42) [BK-IN]
During CW operation, this icon will be illuminated if
Full Break-In (QSK) operation is selected.
(43) [KEYER]
This icon is illuminated, in the CW mode, when the
built-in Electronic Keyer is turned on.
(44) [TRACK]
This icon will be illuminated during “VFO Tracking”
operation, whereby VFO-A and VFO-B are “slaved”
under control by the VFO-A Tuning Knob (press and
hold in the VFO-A [LOCK] key while rotating the tuning dial to engage VFO Tracking).
(45) [NR]
This icon is illuminated when the DSP Noise Reduc-
tion circuitry is active.
FT-920 Operating Manual
31
Page 34

Rear Panel Connectors and Switches
(1) BAND Connector
This 8-pin interlocked DIN connector includes Tx/Rx
switching and bandswitching control lines for use with
the Yaesu Model FL-7000 Linear Amplifier.
(2) CAT Port
This DB-9 connector is used for interconnection to a
personal computer’s serial port to enable computerassisted operation. Use a standard (not “null modem”)
RS-232C serial data cable.
(3) KEY Jack
This jack may be used for connection to a straight
key, an external electronic keyer, a computer-driven
CW keying interface, or a keyer paddle.
(4) PDL-KEY Switch
This switch changes the function of the
rear-panel
KEY jack.
When the “PDL-KEY” switch is set to the “PDL” posi-
tion, the rear-panel KEY jack will be connected in parallel with the front-panel KEY jack; when the “ PDL-KEY”
switch is set to “KEY,” the
rear-panel
Key jack will be
changed so as to accept a straight key , external electronic keyer , or computer-driven keying interface
while
simultaneously allowing the front panel KEY jack to
be connected to a keyer paddle for utilization of the
built-in Electronic Keyer.
See page 18 for configura-
tion details and operating tips.
(5) PTT jack
This “RCA” female connector is used for connection
of a footswitch or other external switch for Tx/Rx command control of the FT-920. This jack is wired in parallel with the front-panel MOX switch; shorting the
PTT jack to ground causes the FT-920 to be placed
in the Transmit mode, while opening the connection
to the PTT jack returns the radio to the Receive mode.
Open-circuit voltage is 13.5V DC, and short-circuit
current is 15 mA.
(6) TR-RY switch
This switch selects the switching device to be connected to the (adjacent) TX GND jack, used for Tx/Rx
control of peripheral devices such as linear amplifiers, etc. With the switch set to the RY position, the TX
GND jack is connected to a mechanical relay; if the
switch is set to TR, the TX GND jack is connected to a
switching transistor. The specifications for these devices are shown in the next section.
(7) TX GND Jack
This RCA connector is connected to the switching
device described above, for control of external devices. Please note the specifications for the two devices available via this jack:
The relay provides a mechanical closure to
Ground on Transmit,
while the (NPN) transistor switch sinks its (open)
collector to ground on
(AC 125V max. at 500 mA,
DC 220V max. at 270 mA)
(
Positive DC Voltage Only
RY
60 Wa tt s max im um
TR
25 Wa tt s max im um
, 50 V
max. at 500 mA)
32
FT-920 Operating Manual
Page 35

Rear Panel Connectors and Switches
transmit. Check with the
fier (or other device) to confirm the switching voltage
and current, if it is not clearly stipulated in the documentation for your equipment.
þ Be absolutely certain to check the position of the
TR-RY switch prior to connecting any external device to the TX GND jack. Never connect an AC
voltage, or a negative DC voltage, to the TX GND
jack if the TR-RY switch is set to TR. The Limited
Warranty on this product does not cover damage
caused by improper connections (excessive or improper voltage) to the rear panel jacks of the FT-
920.
(8) 13.5V Jack
This jack provides +13.5V DC at up to 200 mA for
use with low-power peripheral devices. The jack is
fused, and the current is limited by the size of the
copper foil on the internal circuit boards; do not exceed the 200 mA current limitation.
(9) EXT SP Jack
This 3.5 mm, 2-pin jack provides speaker audio output for an external speaker. The audio output impedance at this jack is 4 Ω ~ 16 Ω, and the level
varies according to the setting of the front panel’s AF
GAIN control.
(10) AF OUT Jack
This is a fixed-level audio output jack for connection
to a peripheral device such as a TNC, Morse code
reader, or WeatherFax decoder. The audio output
level provided is 100 mV at 600 Ω, and the front-panel
AF GAIN control has no effect upon the audio level
present at the AF OUT jack.
(11) PATCH Jack
This RCA jack is wired in parallel with the front panel’s
microphone input jack, providing a convenient input
port for connection of a phone patch or other audio
input. The audio input impedance is 600 Ω, and the
signal applied to the PATCH jack is affected by the
setting of the front panel’s MIC GAIN control.
(12) AFSK-FSK Switch
This switch determines the method of (transmit) Data
input to Pin 1 of the DATA jack (described below). If
AFSK is selected, then Pin 1 should be connected to
the “TX Audio” line from the TNC. If FSK is selected,
then Pin 1 should be connected to the “FSK Out” line
from the TNC or TU.
manufacturer
of your ampli-
FT-920 Operating Manual
(13) DATA Jack
This five-pin DIN jack accepts AFSK input or FSK
(closure to ground) input from a Terminal Node Controller (TNC) or Terminal Unit (TU); it also provides
fixed-level Audio Output, PTT, and Ground lines. The
optimum AFSK Input level is 30 mV at 3 kΩ, while
the Audio Output level provided is fixed at 100 mV at
600 Ω .
(14) EXT ALC Jack
This RCA type connector may be used for connection to a linear amplifier’s ALC cable. The specified
control voltage range is 0V ~ -4V DC, with -4V corresponding to the maximum degree of power reduction being applied to the FT-920.
(15) RX ANT Jacks
These RCA connectors provide convenient access
to the receiver input line for a number of applications.
They are active only when the front-panel [RX ANT]
key is pressed.
The OUT jack is connected to the “RX” lead from the
main T/R relay for the transceiver.
The IN jack is connected to the input port of the FT920 receiver section.
Accordingly, a separate receive-only antenna, or a
VHF receive converter’s 28 MHz output, may be connected to the IN jack. Alternatively, a receive
preamplifier’s Input jack may be connected to the OUT
jack, and the preamp’s Output jack may be connected
to the IN jack. See page 35 for interface instructions
and ideas.
(16) ANT Jacks (A - B)
These SO-239 (“M”) jacks should be connected to
an appropriate coaxial connector for the antenna or
a 50 Ω dummy load. Antenna selection is made via
the front-panel [ANTENNA A/B] switch.
(17) DC 13.5V Jack
This is the main DC input jack for the transceiver.
The specified voltage is 13.5V DC (negative ground)
at 20 Amps.
(18) GND Lug
For best performance and safety, this Ground Lug
should be connected to a good earth ground, using a
short, heavy, braided cable.
33
Page 36

Bottom Panel
The small adjustment hole, shown in the drawing, is
used for adjustment of the “Beep” tone associated
with front panel keystrokes.
34
FT-920 Operating Manual
Page 37

Operation
Before You Start
Before you begin operation for the first time, preset
the front panel controls and switches to the following
positions:
POWER, VOX, MOX: all off
MIC GAIN: 9 o’clock
AF GAIN: 9 o’clock
RF POWER: fully clockwise
RF GAIN: fully clockwise
SHIFT: 12 o’clock
NR: 12 o’clock
LOW CUT: fully counter-clockwise
(approximately 7 o’clock)
HIGH CUT: fully clockwise
(approximately 5 o’clock)
SQL: fully counter-clockwise
PROC LEVEL: fully counter-clockwise
MONI LEVEL: fully counter-clockwise
NB LEVEL: fully counter-clockwise
SPEED: 12 o’clock
PITCH: 12 o’clock
SIDE TONE: 12 o’clock
These represent typical starting points for operation;
optimum setting procedures will be discussed later.
Note that a wide variety of transceiver characteristics may be optimized or adjusted using the Menu
System, discussed in detail beginning on page 69.
Connect your microphone and CW key/paddle to the
appropriate jacks, then turn on your 13.5 Volt DC
power supply.
Receiving
Press the POWER switch to
turn the transceiver on. Assuming that this is the first
time you have used the FT920, the display should look
like this:
Inspection of the display will show you that both VFOA and VFO-B are set to 7.000.00 MHz in the LSB
mode. The (Green) [RX] and (Orange) [TX] LEDs
associated with VFO-A should both be illuminated,
indicating that all frequency control is being exercised
by that VFO.
You should now be hearing background noise. Adjust the AF GAIN control for a comfortable listening
level on the incoming background noise.
We will now discuss antenna selection, frequency
navigation, and other aspects of FT-920 operation.
Antenna Selection
Two main antenna jacks
are provided on the rear
panel of the FT-920, allowing you to connect, for example, a triband Y agi to one
jack and a multiband dipole
or vertical to the other.
These “SO-239” or “M” type jacks, labeled A and B,
may be selected by pressing the ANTENNA A/B switch
on the left side of the transceiver’s front panel. This
switch toggles between the two available main antenna ports.
FT-920 Operating Manual
Note that the maximum power output for each antenna jack may be set independently via Menu Items
U-49 (Antenna A) and U-50 (Antenna B). See page
79 for details.
An additional receive-only antenna jack (RCA type)
may also be found on the rear panel of the transceiver, labeled RX IN. This jack may be connected to
a specialized antenna, such as a loop or Beverage,
for use in the receive mode; transmission will remain
on the previously-selected A or B antenna if a receive-only antenna is used.
35
Page 38

Operation
To engage the receive-only antenna, press the RX
ANTENNA switch, located immediately under the A/B
switch just described. Press the RX ANTENNA switch a
second time to return receive operation to the main
(transmit) antenna (A or B).
þ The antenna selection (A, B, and/or R X) will be
maintained in the VFO or memory register in use.
Therefore, once you have set the transceiver up
on each band of interest, you will not have to select the antenna manually (unless you
change it) when you change bands or memories;
the most recent setting will be retained.
want
to
Mode Selection
Press one of the Mode
switches, located immediately to the left of the VFOA Tuning Dial, to select the
operating mode. The available choices are SSB, CW,
AM, FM, and DATA.
The SSB switch is a toggle
function which allows the operator to choose between
USB (used, by convention,
above 10 MHz) and LSB
(used below 10 MHz). Press the SSB switch, as necessary, to choose the appropriate SSB mode as we
proceed with exploration of different bands.
The CW switch uses a toggle function to select between USB- and LSB-side injection (a.k.a. “CW-Reverse”). Although the default USB-side injection is
typically used, you may wish to elect LSB-side injection below 10 MHz, particularly if you anticipate switching between LSB (voice) and CW frequently.
Special Note for CW Mode
Reverse CW Sideband
When you switch modes between CW and USB,
you will observe that the frequency of the received signal stays the same (even though the
displayed
will also observe that the pitch of the received
signal decreases as you increase the frequency
by rotating the Tuning Dial.
However, switching from CW to
retuning the desired station. This can be particularly inconvenient when working a station in
the 75-meter voice band (LSB) and you ask him
to move to CW on the same frequency.
To eliminate the need for retuning in this situation, you may switch the receiver CW carrier
injection point to the “reverse” (LSB) side. When
you press [CW ], you should notice that the “USB”
indicator (just above “ CW” on the main display)
will blink for a couple of seconds, while the “CW”
indicator glows steadily . This indicates that USBside injection is currently in use. If you press[CW ]
once more, the “LSB” indicator will now blink,
informing you that LSB-side injection is now in
use.
When using LSB-side injection, you can freely
switch between CW and LSB without having to
retune the other station. Note that, in the LSB
and CW/LSB modes, the received signal pitch
now
you increase the
VFO frequency.
To return the receiver to the (default) USB-side injection method, just
push [CW] again.
frequency may change slightly).You
LSB
increases
as
requires
36
Operating Hint
ture is the potential to eliminate interference. If
you are experiencing QRM from a CW station
that the IF Shift and/or DSP are unable to eliminate, you should try switching to the reverse CW
sideband, retuning the desired CW signal, and
adjust the IF Shift and/or DSP again.
- An added benefit of this fea-
FT-920 Operating Manual
Page 39

Operation
Bandwidth Selection
Optional filters are available from your Yaesu dealer
for providing selectable IF bandwidths in the CW and
AM modes. For CW, the optional YF-116C 500 Hz
filter provides the narrow selectivity needed for today’s
crowded bands, while on AM, the YF-116A filter provides a 6 kHz bandwidth for improved listening fidelity.
Pressing the [NARROW] key on the front panel causes
the narrower filter appropriate for that operating mode
to be switched into the circuit. See the chart below
for the bandwidths available in each mode:
NARROW
Switch
OFF
ON
r CW “Narrow” and AM “6 kHz bandwidth” opera-
tion requires installation of an optional filter.
r
In the AM mode,
installed, the default bandwidth will be 6 kHz;
pressing the [NARROW] key engages the (SSB) 2.4
kHz filter.
r
In the FM mode,
affects only the
work
, be sure to press the [NARROW] switch so as
to set a maximum deviation of ±2.5 kHz, the statutory deviation limit on the 10-meter band.
MHz
, however, you will probably want to use the
“Wide” configuration, which provides ±5 kHz deviation.
CW (RX ) AM (TX) FM
2.4kHz
0.5kHz
Through
or
¦
6. 0kH z
¦
2.4kHz
WIDE FM
(± 2.5 k Hz)
NARROW FM
(± 5 kHz)
when the optional AM filter is
the action of the [NARROW] switch
transmitter. For 29 MHz NBFM
For 50
Amateur Band Selection
VFO-A Band Selection
One-touch Amateur band selection is provided via
the Keypad, located between the VFO-A and VFO-B
Tuning Knobs.
Press the [14] key to change VFO-A to the 14 MHz
band. Initially, the operating frequency will be
14.000.00 MHz; rotate the VFO-A Tuning Knob to
move around in the band. Press the [CW] key to set
the operating mode to CW. Now press the [10] key;
observe that the frequency is set to 10.000.00 MHz,
and the mode is set to AM. Now press the [7] key,
and observe that the mode has changed to LSB, the
mode originally chosen on the 7 MHz band.. Press
the [14] key , and observe that the mode has similarly
reverted to CW, the last mode used on the 14 MHz
band.
VFO-B Band Selection
By pressing
key for ½ second, frequency command control will
be shifted from the VFO-A register to the VFO-B register.
For example, to set VFO-B to the 21 MHz band, press
and hold in the [GEN/CE] key for ½ second; you will
observe that the VFO-B frequency display area will
blink
. Within five seconds, press the Keypad’s [21]
key. After pressing the [GEN/CE] key for ½ second,
you may also change the mode of operation and/or
the antenna to be used, if you like.
? Note that pressing the [GEN/CE] key for ½ second
does not, itself,
ing (or transmitting) VFO register. This action acts
as a “scratchpad” function which allows VFO-B to
be set on the frequency , mode, and antenna
used when VFO-B is next activated
and holding in
choose
the Keypad’s [GEN/CE]
VFO-B to be the receiv-
to be
.
FT-920 Operating Manual
37
Page 40

Operation
Direct Keypad Frequency Entry
VFO-A Direct Frequency Entry
A starting point on a band may also be established
using direct entry via the Keypad. This is accomplished using the[ENT] key as well as the individual
numeric keys on the Keypad. For the purposes of
direct frequency entry, use the numerals located on
the lower right-hand side of a particular key.
For example, to set 24.905.33 MHz on VFO-A, press:
[ENT]Þ[2]Þ[4]Þ[9]Þ[0]Þ[5]Þ[3]Þ[3]Þ[E NT].
Trailing digits which are identical (or acceptable for
the new setting) need not be entered. Therefore in
the above example (which began with the initial 12meter band setting of 24.500 MHz), to set 24.900
MHz on the VFO-A register, one can simply press:
[ENT]Þ[2]Þ[4]Þ[9]Þ[ENT].
You can set the operating mode at the same time
that you enter the frequency , if you need to make that
change. To set VFO-A to 14.011.52 MHz CW, press:
[ENT]Þ[1]Þ[4]Þ[0]Þ[1]Þ
[1]Þ[5]Þ[2]Þ[CW]Þ[ENT].
Stacked VFO System
The FT-920 provides two VFO registers on each band
for each Tuning Dial (“A” and “B”). These dual registers are most often use to establish “favorite frequency” presets in each Amateur band.
In the previous VFO-A example of direct frequency
entry, for example, we set up VFO-A on 7.255 MHz.
Now press the [7] key momentarily. You will observe
that “7.255.00” has disappeared, and another 7 MHz
frequency (probably 7.000.00 MHz) is now displayed.
You may now retune this VFO register to any desired
frequency. It may be desirable, for example, to set
the new VFO register to 7.025 MHz CW, so you have
one CW frequency and one SSB frequency in each
band.
All settings of the frequency, mode, bandwidth, antenna selection, and antenna tuner adjustment are
totally independent between the two registers on each
band, so changing one VFO register’s bandwidth, for
example, will have no effect on the alternate register’s
settings.
? When entering a frequency below 10.000.0 MHz,
you must enter the leading Zero of the desired
frequency. That is, to enter 7.255.00 MHz, press:
[ENT]Þ[0]Þ[7]Þ[2]Þ[5]Þ[5]Þ[0]Þ[0]Þ[ENT].
VFO-B Direct Frequency Entry
Direct VFO-B frequency entry using the Keypad again
requires that the [GEN/CE] key be pressed and held
in for ½ second, as described previously. Then enter
the desired frequency while the VFO-B display area
is blinking.
For example, to set VFO-B to 18.095.20 MHz, CW
mode, press:
[GEN/CE](
[1]Þ[8]Þ[0]Þ[9]Þ [5]Þ[2]Þ[0]Þ[CW]Þ[ENT].
? If you attempt to enter a frequency outside the
operating range of the transceiver, the attempt will
be ignored, and the transceiver will revert to the
last frequency you were on before the attempted
frequency entry.
hold for ½ sec.)
Þ[ENT]Þ
Two VFO registers per band are also provided for
VFO-B. Just remember to push and hold in the [GEN/
CE] key for ½ second before pushing the [7] key to
inspect and/or adjust the settings for the alternate 7
MHz register for VFO-B.
Frequency Navigation
Once you have made an initial setting on a band (using the one-touch band keys or direct frequency entry), you may tune around the band in search of signals.
Several tuning methods are available, depending on
which VFO is in use.
r For VFO-A frequencies:
- VFO-A Tuning Dial
- Shuttle Jog
- Front Panel [UP/DOWN] Switches
- Microphone [UP/DOWN] Switches
r For VFO-B frequencies:
- VFO-B Tuning Dial
38
FT-920 Operating Manual
Page 41

Operation
VFO Tuning Dial
Rotating either VFO Tuning Dial tunes the transceiver
according to the selected tuning step size. Due to the
extremely fine steps synthesized by the Direct Digital
Synthesis (DDS) circuitry, the tuning action is as
smooth as though an analog tuning VFO were being
used.
By pushing the [STEP] key, the tuning rate may be
modified. The [STEP] key toggles between three settings: FINEÞ NORMALÞFASTÞ FINE. . .
The steps available in each mode are shown below.
MODE
SSB, CW, DATA(SSB)
AM, FM, DATA(FM)
NORMAL FA ST FINE
100Hz 1kHz 10Hz
ST EP Switch
10Hz 100Hz 1Hz
? The [STEP] switch affects the action of the VFO-A
and VFO-B tuning dials, as well as the front panel
and microphone [UP] and [DOWN] switches.
Finally, the number of tuning steps per revolution of
the tuning dials may be changed via Menu Item U01; see page 73 for details.
Shuttle Jog (VFO-A)
The Shuttle Jog is an efficient way to achieve large
frequency excursions, avoiding the need to spin the
VFO-A tuning dial to move quickly from one frequency
to another.
Basically , the Shuttle Jog is a spring-loaded ring used
for frequency change. Rotating the Shuttle Jog ring
away from its center detent in either direction will initiate tuning. The farther the Shuttle Jog ring is moved
from the center, the larger and faster the amount of
frequency change which results (minimum steps with
slight rotation of the Shuttle Jog ring are 10 Hz).
Front Panel UP/D
OWN
Switches
These switches may also be used for quick frequency
excursions from one end of a band to another. In the
“Normal” position of the [STEP] switch, for example,
one touch of the [UP] switch will cause the frequency
to jump upward by 100 kHz.
The frequency
jumps available are
shown at the right.
STEP SW ITCH POSI TION
NORMAL FAST FINE
100k H z 1MH z 10kH z
MH-31B8 Hand Mic UP/DWN/FST Switches
Pushing the MH-31B8’s UP or D WN switch will initiate
tuning in an upward or downward direction, in frequency steps set in accordance with the selection
made via the [STEP] switch. Pushing the [FST] key will
switch tuning into the “Fast” mode, as though the front
panel [STEP] switch had been set to “Fast.” See the
table below for a summary of the steps available in
these modes of operation.
MODE UP DWN
SSB, CW,
DATA(SSB)
AM , FM,
DATA(FM)
{
10Hz
{
100Hz|100Hz{1kHz
FST
+
UP
|
10Hz{100Hz|100Hz
FST
+
DWN
|
1kHz
MD-100A8X Desk Microphone Rotary Scanning Switch
The (optional) MD-100A8X Desk Microphone features a Rotary Scanning Switch at the base of the
microphone support stand. Rotating this switch to the
left causes the frequency to scan lower, and rotating
the switch to the right causes the frequency to scan
higher. Rotating this switch
fully
to the left or right
causes the scanning speed to switch to the “Fast”
mode, as though you had pushed the [FST] switch on
the MH-31B 8.
See the table below for a summary of the steps available in these modes of operation.
MODE Right Left
SSB, CW,
DATA(SSB)
AM , FM,
DATA(FM)
L
OCK
Switches
{
10Hz
{
100Hz|100Hz{1kHz
Fully
Right
|
10Hz{100Hz|100Hz
Fully
Left
|
1kHz
To guard against accidental changes in the settings
of the Tuning Dials and/or the Shuttle Jog dial, use
the Lock functions provided on the front panel.
The LOCK switches to the lower right of the VFO-A
and VFO-B Tuning Dials have slightly different effects, depending on how each switch is pressed.
These switches may be used in combination to provide the desired locking control, as shown below.
L
< 0.5 sec
> 0.5 sec
(A) Sw itch L
OCK
VF O-A Tuning Dial
and Shuttle Jog
None
exp. POW ER, MOX, V OX
(B) Sw itch
OCK
VF O-B Tuning Dial
Al l Switc h es
Switches
FT-920 Operating Manual
39
Page 42

Operation
Operating Convenience Features
Display Brightness Control
The FT-920 is shipped from the factory with the display illumination set to its maximum level. Should you
wish to reduce the illumination level of the display,
use the following procedure.
Press the [MENU] key to enter the Menu mode
of operation.
Rotate the VFO-B Tuning Dial to select Menu
Item U-08 (“DIMMER”).
Press the [ENT] key to enter the “Menu Com-
mand” mode.
Rotate the VFO-B Tuning Dial to change the
setting indicated in the main display window
from “OFF” to “ON.”
Press the [MENU] key once more to exit the
Menu mode and resume normal transceiver
operation.
Keypad Beep Frequency/Level
The “Beep” tone which is heard when you press a
key on the front panel may be adjusted, if you like.
To adjust the Beep Frequency:
Press the [MENU] key to enter the Menu mode
of operation.
Rotate the VFO-B Tuning Dial to select Menu
Item U-06 (“BEEP-F”).
Press the [ENT] key to enter the “Menu Com-
mand” mode. At this point, the current beep
tone frequency will be heard.
Rotate the VFO-B Tuning Dial to set the tone
that you prefer. Just for your information, the
exact tone frequency will be shown on the main
display window.
Once you have found a satisfactory tone, press
[ENT] to exit the Menu mode and resume nor-
mal operation.
T o set the Beep Level, you may adjust the Beep level
potentiometer, which is accessible through a small
adjustment hole on the bottom of the transceiver. Use
a small insulated flat-blade alignment tool to set the
level to the best amplitude for your operating needs.
40
FT-920 Operating Manual
Page 43

Operation
Receiver Accessories
Noise, interference, changing signal characteristics,
and changing propagation can all present difficult
challenges to today’s operator . The FT-920, however ,
provides a wealth of features designed to enhance
reception on our crowded bands. These features are
described below.
Clarifier (Offset Tuning)
The Clarifier feature allows offset tuning from the
current VFO frequency. The Clarifier provides several important capabilities:
r If the incoming signal begins to drift, the [RX
CLAR] may be activated so as to allow you to
continue receiving the other station
requiring you to adjust both your transmit and
receive frequencies (possibly causing interference to other nearby operators).
r For DX pileup operation, the [TX CLAR] may
be used to establish a split TX/RX frequency
relationship, and the [RX CLAR] may be used
to establish an optimum calling frequency.
r If you frequently need to move a fixed amount
of frequency excursion (such as “five up”), the
[TX/RX CLAR] control allows you to program
this amount for instant recall and QSY to that
frequency.
Press the [RX CLAR] key to activate the Receive Clarifier. The RX CLAR indicator will appear on the display,
and the VFO-B Tuning Dial may now be used to move
your receive frequency up to ±9.99 kHz. If you want
the transmit
programmed offset, also push the [TX CLAR] key.
The amount of offset from the VFO frequency will be
displayed in the Multi-Function Window of the display, and a graphical representation of the magnitude and direction of the offset can be provided in the
Enhanced Tuning Scale, with proper setup of Menu
Item U-10 (see page 74).
To turn the Clarifier off, push the [RX CLAR] (and/or
[TX CLAR]) again. The transceiver will revert to the
original VFO frequency; however, the offset will not
be wiped clean, but rather maintained at the current
value on the assumption that you may want to hop
back to the offset frequency again.
and
receive frequencies to follow the
without
CW Center Tuning (Enhanced Tuning Scale)
The Enhanced Tuning Scale may be used to provide
a visual indication of precise frequency adjustment
in the CW mode. Configuration of the Enhanced Tuning Scale is performed via Menu Item U-10 (page
74).
When CW Center Tuning has been selected, the CW
passband center frequency (as determined by the
setting of the PITCH control) becomes the center point
of the Enhanced Tuning Scale. Per the illustration
below , when proper alignment of the incoming signal’s
pitch is accomplished, your
cisely aligned in a “zero beat” with the frequency of
the incoming signal.
CW S
POT
The CW Spot feature provides an
aligning your FT-920’s transmitter to the frequency
of an incoming signal (as opposed to the
method provided by the Enhanced Tuning Scale).
By pressing the SPOT key , you will activate a constant
audio “sidetone” which is set to the pitch which
matches (precisely) the pitch of your transmitted signal. The sidetone pitch frequency also corresponds
to the center frequency of the receiver filter passband (with the IF SHIFT control centered in its default
position). By aligning the CW Spot tone to match the
pitch of an
your signal and the other station’s signal to be exactly on the same frequency.
The Spot tone’s center frequency may be adjusted
to any value between 300 Hz and 1050 Hz (in 50 Hz
steps) by rotation of the PITCH control.
RF Preamplifier Selections
Two RF preamplifier circuits are provided on the FT920, each yielding particular benefits for the varying
requirements throughout the operational range of this
transceiver:
r A Junction FET (JFET) preamplifier includes
r A Dual-Gate MOSFET preamplifier provides
incoming
high-Q selectivity for excellent protection from
out-of-band energy.
high gain and low noise figure, particular ben-
eficial on the higher bands.
transmitter
station’s signal, you will cause
signal will pre-
audible
method of
visual
To set the Clarifier offset to
CLEAR] key .
FT-920 Operating Manual
Zero
, press the [CLAR
Via Menu Item U-47, you may assign these preamplifiers on a band-by-band basis; the default selec-
41
Page 44

Operation
tions are the JFET preamp on the 1.8 ~ 21 MHz
bands, and the MOSFET preamp on the 24 ~ 50 MHz
bands. We recommend that you use these settings
initially , and only change them later if you have a particular need to do so.
? Although the MOSFET preamplifier provides
higher gain, the JFET preamplifier yields higher
dynamic range with respect to out-of-band signals.
Switching to the MOSFET preamp on 40 meters
will, undoubtedly, provide a higher S-meter reading. However, the
not change. On the other hand, when using a
Beverage or small loop antenna for receiving on
the low bands, the MOSFET preamp may be the
better choice.
Remember: if you can hear background “band
noise” appear when you connect your antenna,
you already have adequate sensitivity. Any increase in front end gain beyond this point will not
improve the signal-to-noise ratio on the incoming
signal.
The preamplifier chosen will always be on, unless
the [IPO] key is pushed. See the discussion of IPO
operation below in the section regarding “
Strong-Signal and Low-Frequency Operation
AGC (Automatic Gain Control) Selection
The AGC system of the FT-920’s receiver prevents
potential ear damage and/or overload of receiver
components by establishing an “AGC Threshold” of
signal input. Once the AGC Threshold is reached,
further increase in signal strength does not result in
an increase in audio output.
The recovery time of the AGC system (the time required for the receiver to recover to full sensitivity) is
variable, and you may select the AGC recovery time
which provides the most operator comfort.
To select the AGC recovery time, press the front
panel’s [AGC] switch repeatedly. Y ou will observe the
display icons cycling through the available selections:
AGC FAST Þ AGC SLOW Þ AGC OFF Þ AGC FAST Þ . . .
The AGC FAST position is usually preferable for CW
and SSB contest work, while you may prefer AGC
SLOW for more casual voice work. AGC OFF is most
often used for precise measurement of signals (when
evaluating antenna patterns, etc.), but strong signals
useful
sensitivity will probably
Tools for
.”
will sound very distorted with the AGC turned off.
Rotating the RF GAIN control counter-clockwise will
help reduce the distortion.
Squelch
If you wish to mute the FT-920’s receiver during nosignal conditions, rotate the SQL (Squelch) control
clockwise until the background noise just disappears.
This threshold point is the setting which produces the
best sensitivity of the squelch to weak incoming signals.
When a signal is received which exceeds the threshold set by the SQL control the muting function will be
disabled and normal receiver audio will flow. When
the signal disappears, the receiver will again be
muted.
The Squelch circuitry is most often used during FM
operation, but the FT-920’s Squelch system is operational in all modes. It may be particularly useful
while monitoring a 6-meter calling frequency (such
as 50.125 MHz), or when waiting for a Mode-A (29
MHz downlink) satellite to come within range.
To disable the Squelch system ’s muting capability,
rotate the SQL control fully counter-clockwise.
General Coverage Reception
You may have noticed that, if you tune outside of one
of the 500 kHz segments which contains an Amateur
band, the [GEN] icon on the display becomes illuminated. This indicates that the transceiver is now receiving in the “General Coverage” mode. On such
frequencies, the transmitter is disabled. If you try to
transmit, “ERROR” will appear on the display.
Since the FT-920 is chiefly an Amateur transceiver,
the one-touch band keys do not recognize non-Amateur bands. However, you may use direct frequency
entry to establish a starting point in, for example, a
shortwave broadcast band; you may then use the
tuning dial(s) and/or the UP/DWN switches to move
around the band. You may also program a “favorite
frequency” in each broadcast band into memory, then
recall it quickly as a starting point for memory tuning.
See the section on Memory operation, beginning on
page 59, for details.
Otherwise, the FT-920’s receiver facilities completely
support General Coverage reception, and you will
42
FT-920 Operating Manual
Page 45

Operation
enjoy the many interesting aspects of shortwave listening. Among the transmission often encountered
are:
International Shortwave Broadcasts
(see table below)
Maritime and Aeronautical Communications
(transoceanic airliners, etc.)
News Services and Diplomatic/Embassy Traffic
Military Communications
WeatherFax Transmissions
(satellite images, charts, and forecasts)
Popular Shotwave Broadcast Bands
Meter
Band
LW 0.150~0.285 31 9.35~9.90
MW 0.520~1.625 25 11.55~12.05
120 2.30~2.50 22 13.60~13.90
90 3.20 ~3.40 19 15. 10~15.70
75 3.90 ~4.00 16 17. 55~17.90
60 4.75 ~5.20 - 18.90~19.30
49 5.85 ~6.20 13 21. 45~21.85
41 7.10 ~7.50 11 25. 67~26.10
Frequency Range
(MHz)
Meter
Band
Frequency Range
(MHz)
Dealing with Interference
S
HIFT
Control
The front panel’s SHIFT control tunes the position of
the IF passband relative to the frequency of the incoming signal in all modes except FM. This allows
the operator to sweep (in effect) the current IF filter
back and forth across the desired signal, eliminating
interference in the process, without changing the pitch
of the incoming signal.
The control is detented in the center (12 o’clock) position, which represents the “normal” passband center frequency. The SHIFT control is dedicated to the
receive mode, and does not affect your transmitted
signal characteristics (such adjustment of the transmitted signal is, however, provided via Menu Items
U-59, U-60, U-62, and U-63).
Rotate the SHIFT control to the left or right to eliminate
the interference. Careful adjustment of the SHIFT con-
trol may also be useful in improving the recovered
audio on excessively bassy SSB signals. Return the
SHIFT control to the center detented position to return
to the normal default passband setting.
H
IGH CUT/LOW CUT
Controls (DSP)
The DSP system’s chief interference-fighting circuitry
is the passband tuning feature, which features the
HIGH CUT and LOW CUT controls. These controls may
be used to optimize the audio bandwidth so as to
reduce interference and noise, and maximize signalto-noise ratio.
To activate the DSP passband filter, press the [ DSP]
key (located just below the SHIFT control). The [DSP]
key contains an LED, which will glow green when the
DSP is on. Now rotate the HIGH CUT and LOW CUT to
roll off interference and/or noise, or to enhance the
sound of the incoming signal. A graphical representation of the relative width of the DSP passband can
be displayed on the Enhanced Tuning Scale by making the appropriate configuration of Menu Item U-10.
See page 74 for details.
Press the [DSP] switch again to turn the DSP passband filter off.
FT-920 Operating Manual
Note: Since the DSP passband filter operates in the
audio section, after the AGC detector, very strong
signals inside the IF passband but outside the DSP
43
Page 46

Operation
passband may cause interference to reception by
“pumping” the AGC, causing the desired signal to fade
in and out rapidly. Engage the Narrow CW filter, if
installed, or use the SHIFT control, to roll off the offending signal before it reaches the DSP stage.
N
OTCH
Filter (DSP)
Unwanted beat notes inside the RX filter passband
can be effectively removed by utilization of the DSP
Notch function. The DSP system will detect the beat
note, then automatically center a sharp notch filter to
eliminate the beat note. If multiple beat notes are
present the DSP will create multiple notch filters to
eliminate them!
To activate the DSP Notch Filter, press the [NOTCH]
key. To turn the filter off, press the [NOTCH] key once
more.
Note: The DSP Notch filter should not be used in the
CW mode! The DSP system will interpret a CW carrier as being “interference,” and will notch out the incoming signal. Therefore, as you tune the band with
the Notch Filter on, CW signals will appear for a moment, then disappear as they are notched out.
RF G
AIN
Control
The RF GAIN control is a highly useful interferencefighting control that is often overlooked.
When interference or background noise are severe,
rotating the RF GAIN control counter-clockwise may,
in some instances, improve reception. Counter-clockwise rotation of the RF GAIN control reduces the gain
in the RF and IF stages by applying an increasing
amount of AGC voltage; this causes the background
noise and signal levels to decrease, and it also causes
the “no-signal” indication of the S-meter to rise. Signals
weaker
may still be plainly audible, but they will no longer be
affecting the AGC system.
This may be exploited by the skillful operator, particularly with regard to the DSP system. Because the
DSP operates in the audio section of the receiver,
after AGC detection is accomplished, rotating the RF
GAIN control counter-clockwise may reduce the detrimental effects of strong noise and interfering signals,
and may render the DSP more effective at eliminating beat notes, adjacent-frequency interference, or
noise. To do this, reduce the setting of the RF GAIN
than the minimum S-meter indication
control until the S-meter hangs up approximately at
the peak signal level of the interfering signal; this
places the incoming signals
old (described on page 42). Now engage or adjust
the necessary DSP features, and you will, in many
circumstances, find that interference rejection is improved.
For maximum sensitivity, the RF GAIN control should
be set fully clockwise.
below
the AGC Thresh-
IF Noise Blanker (NB)
When automotive ignition noise, power-line noise, or
other impulse-type noise is present, the IF Noise
Blanker feature may be engaged so as to minimize
or eliminate the noise.
Press the [NB] switch so as to illuminate the NB icon
on the display, then rotate the NB LEVEL control to
the point of maximum noise elimination consistent
with the maintenance of good signal quality. Press
the [NB] switch again to turn off the IF Noise Blanker.
Note: Under extremely strong signal conditions on a
crowded band, such as during a DX contest, etc.,
excessive advancement of the NB LEVEL control may
cause somewhat degraded immunity from “splatter”
from very strong nearby stations. This general tendency is typical of all IF noise blanker circuits, and
the FT-920’s circuitry is carefully designed to minimize this characteristic. Try reducing the setting of
the NB LEVEL control if this is observed, and try to
utilize the DSP Noise Reduction to compensate (see
below).
DSP Noise Reduction (NR)
The DSP system of your FT-920 includes a highlyeffective Noise Reduction circuit. The DSP Noise
Reduction is particularly helpful in enhancing signalto-noise ratio by lowering the overall level of background noise. The DSP Noise Reduction works to
improve on the action of the IF Noise Blanker by eliminating lower-level, non-impulse-type noises that are
difficult for the IF Noise Blanker to detect.
To activate the DSP Noise Reduction, rotate the NR
control clockwise from its default position, which is
fully to the left. Adjust the setting of the NR control
until the best signal-to-noise ratio is achieved. Also
try adjusting the setting of the RF GAIN, per the dis-
cussion previously, to see if reducing the RF/IF gain
44
FT-920 Operating Manual
Page 47

Operation
level will enhance the performance of the DSP Noise
Reduction.
To turn the DSP Noise Reduction off, rotate the NR
control fully counter-clockwise.
? As you tune around the band while using the NR
circuit, you may discover that the apparent “pitch ”
of the background noise changes somewhat after you encounter signals. The NR circuit is an
adaptive filter which “form fits” around a signal,
so this observation is completely normal.
Tools for Strong-Signal and
Low-Frequency Operation
Operation on the lower HF Amateur bands (160
through 30 meters) presents special challenges, including high atmospheric noise levels, strong local
signals, and a lack of antenna directivity (compared
with higher-frequency multielement beam antennas).
The FT-920 is particularly well equipped to assist the
operator in maintaining reliable communications under these difficult conditions.
The receiver section front end includes a high-intercept doubly-balanced mixer, which provides excellent immunity from intermodulation. For protection
against the ingress of out-of-band signals which can
cause intermodulation, the receiver front end is protected by a bank of bandpass filters, including special high-Q filters for the 7, 14, 21, and 50 MHz bands.
And the built-in Automatic Antenna Tuner may be
engaged on receive, as well as transmit, providing
extra protection against strong signals outside the
current band of interest.
Other features of interest to the operator in strongsignal environments include:
IPO (Intercept Point Optimization)
The IPO feature reduces the receiver front-end gain
by bypassing the RF preamplifier. When the extra
gain of the preamp is not needed (typically below
about 10 MHz), engaging the IPO feature will reduce
the background noise level and improve the receiver’s
immunity by reducing the signal level presented to
the first mixer. So long as background “band noise”
is still audible, the
will not have been reduced by activating the IPO.
To turn this feature on, press the [IPO] key, located
just to the right of the [METER SELECT] key on the left
side of the front panel. The IPO icon on the display
will become illuminated, and the background noise
level should drop. If you have reduced the setting of
the RF GAIN control previously, you may need to rotate it clockwise somewhat after turning on the IPO
feature.
useful
sensitivity of the receiver
FT-920 Operating Manual
To re-activate the receiver front end’s preamplifier
again, press the [IPO] key again.
45
Page 48

Operation
ATT (Front End Attenuator)
Under conditions of extremely high signal levels, the
front end attenuator may be engaged, either singly
or in conjunction with the IPO feature, to reduce receiver sensitivity.
Pressing the front panel’s [ATT ] key repeatedly
causes the attenuator to cycle through the various
levels of attenuation provided (in 1 S-Unit steps of 6
dB each):
6 dB Þ 12 dB Þ 18 dB Þ 0 dB Þ 6 dB Þ . . .
The “0 dB” position, of course, represents the “Attenuator Off” configuration.
Digital Voice Recorder Operation (DVR)
The FT-920 includes a built-in Digital Voice Recorder
which you can use to record and then replay the incoming signal (from the VFO-A path) for a period of
up to 16 seconds. In addition, the DVR may be used
for storage and replay of repetitive (“CQ” type) messages in
sion” (page 50) for details of the latter feature.
your
voice. See the section on ‘Transmis-
Recording and playback of incoming signals is
straightforward.
While receiving, press the [REC] switch, then [0]
(50 MHz), to start recording. The recording level
is set automatically, so you may leave the listening volume at a level which is comfortable for you.
During recording, the
Channel display field will blink.
T o stop recording, press the [R EC] switch momen-
tarily again. The last 16 seconds of incoming audio will now be stored. In this way , you can quickly
confirm, for example, if a DX station correctly copied your callsign through a pile-up.
To play back the stored audio, press [PLAY] then
[0] (50 MHz). For playback, the front panel’s [AF
GAIN] control sets the volume level. Incoming signals, however, will be cut off for the duration of
the audio memory playback.
hyphen
in the Memory
46
FT-920 Operating Manual
Page 49

Operation
Transmitting
Now that you are familiar with receiver operation, we
shall explore the FT-920’s capabilities in the transmit
mode.
Important Note!
Whenever you transmit, be certain to have a
suitable antenna or 50 Ω dummy load connected to the antenna jack in use. Although
the FT-920’s final amplifier protection circuitry
will drastically reduce power if no load is
present, there still is a slight chance of damage to your equipment in the unlikely event of
a catastrophic protection-circuitry failure.
The transmitter can be activated within an amateur
bands. When tuned to any other frequency , the transmitter will be disabled. You, as the station control
operator, are responsible to restrict your transmissions to those frequencies on which you are authorized to operate.
Attempting to transmit outside of an amateur band
segment will cause the “ERROR” diagnostic message
to appear on the display.
Whenever the transmitter is activated, the FT-920’s
built-in directional coupler detects any reflected power
which appears at the final amplifier’s output port (due
to antenna system impedance mismatch), and disables the transmitter if too much reflected power is
found (in which case the [HI SWR] icon will become
illuminated). You should cease transmission immediately, and determine the cause of the antenna system fault.
? The upper limit of the transmitter’s power output
can be set via Menu Items U-49 (for Antenna A)
and U-50 (for Antenna B) separately for each antenna port. See page 79 for details.
Automatic Antenna Matching
The built-in automatic antenna tuner unit is capable
of matching antenna systems presenting impedances
within the range 16.5~150 Ω, which corresponds to a
maximum SWR or approximately 3:1. If the
antenna(s) you re using exceed this SWR as configured, you must make adjustments (electrical and/or
mechanical) so as to present an impedance closer
to 50 Ω to the FT-920’s ANTENNA jack(s). Remember
that the net SWR as detected by the FT-920 may be
different than the SWR at the antenna feedpoint,
depending on the degree of impedance transformation which may occur in your feedline (if the feedpoint
impedance is not very close to the coaxial cable’s 50
Ω impedance).
Note that the FT-920’s automatic antenna tuner is
not designed to cope with the wide variations in impedance presented by a random-length long wire
antenna, unless you take specific steps to match the
impedance at all frequencies of interest.
To use the FT-920’s automatic antenna tuner:
Turn the RF PWR control fully clockwise (the
transceiver will automatically reduce its power
to a maximum of 50 Watts during antenna tuning).
Check to be certain that the frequency is clear
before initiating antenna tuning.
Press and hold in the TUNER switch for ½ sec-
ond to activate the tuner. The RX TUNER TX
indicator will appear on the display.
A carrier will now be transmitted by the FT-
920. The automatic antenna tuner will now
adjust itself so as to present a low SWR to the
final amplifier stage. The “WAIT” indicator will
appear on the display during tuning.
When tuning is completed, the “WAIT” indica-
tor will disappear, and the FT-920 will revert to
the receive mode. At this point, if the tuner
achieved an SWR of less than 1.5:1, the tuner
settings will be stored by the tuner’s memory
system; these settings will be used the next
time operation takes place on this frequency.
If the tuner was not able to achieve an SWR of
1.5:1 or lower (typically only when the “TunerOff” SWR is above 3:1), the tuner’s memory
system will ignore these settings, and the tuning procedure should be repeated the next time
FT-920 Operating Manual
47
Page 50

Operation
you operate on this frequency; this feature prevents you from storing an undesirable setting
(such as that produced when you accidentally
select the wrong antenna on a particular band).
Should you wish to take the antenna tuner out
of line, press the TUNER switch momentarily.
The RX TUNER TX indication will disappear from
the display.
How the Automatic Antenna Tuner Works
When the TUNER switch is pressed and the RX TUNER TX indicator is displayed, the following operations
take place:
A. The tuner’s microprocessor reviews the current the tuning conditions (if any) stored in memory, and
applies the settings for the frequency closest to the current frequency as a starting point for operation.
Note that a change in tuning conditions is produced for every change in operating frequency of approximately 10 kHz.
B. If transmission occurs (without the operator pressing the TUNER key), the tuner will begin adjustments
if the SWR is found to be 3:1 or greater. Tuner settings will not be recorded in this instance. If, however ,
the T UNER key is pushed and held in for ½ second, the tuner settings
memory system.
C. If tuning is successfully accomplished, and the tuner settings stored into memory, the antenna system
characteristics as seen from the transmitter’ s perspective resemble curve (1) in the graph below. If
you QSY to frequency (2) in the chart (where the SWR is above 3:1), the tuner will be automatically
activated when you begin to transmit.
D. The automatic antenna tuner has 100 dedicated tuner memory registers, of which eleven are allocated
(one each) to the amateur bands covered by the FT-920. The other 89 record the most recent tuner
settings, irrespective of the band in use, on a first-in, first-out basis.
E. The automatic antenna tuner is configured at the factory to be engaged both on receive
It is possible, however, to configure it so that the tuner is only active on transmit. See Menu Item U-48,
described on page 79.
F. The automatic antenna tuner only adjusts the
adjustments made by the tuner can, of course, affect the SWR present on the coaxial feedline. Therefore, every effort should be made to minimize SWR so as to ensure efficient power transfer to the
antenna feedpoint (since feedline losses may escalate rapidly as SWR increases).
G. Because the impedance of such antennas varies widely depending on the band in use, please note
that random-length long-wire and center-fed
flat-top antenna systems generally will not be
satisfactorily tuned by the FT-920’s automatic
antenna tuner unless you make design provisions for ensuring that the impedance stays
within the specified range of 16.5 ~ 150 Ω.
apparent
SWR as presented to the transceiver. No
will
be stored in the tuner’s
and
transmit.
48
FT-920 Operating Manual
Page 51

SSB Transmission
Basic Operation
Connect your microphone to the front panel MIC
jack.
Preset the front panel controls as follows:
MODE; LSB or USB (depending on band;
use USB on 14 MHz & higher bands)
METER SELECT; ALC
MIC GAIN; 9 o’clock position
RF PWR; Fully clockwise
Press the microphone’s PTT switch, and speak
into the microphone at a normal voice level. The
TRANSMIT indicator in the display will be illuminated,
and the ALC meter will deflect according to the
peaks in your speech. Adjust the MIC GAIN control
so that the ALC meter peak reading is along (but
not beyond) the right edge of the ALC range on
the meter.
Release the PTT switch to return to the receive
mode.
For operation at lower power levels, rotate the RF
PWR control counterclockwise while watching the
PO scale on the meter so as to set the desired
power level.
? Counterclockwise rotation of the RF PWR control,
or operation using an antenna with an impedance
greatly different from 50 Ω, may result in a higher
reading on the ALC meter. Therefore, it is helpful
to make initial adjustment of the MIC GAIN control
into a 50 Ω dummy load or carefully-matched antenna, and with the RF PWR control fully clockwise.
VOX Operation
When operating in the SSB, AM, or FM modes, you
may use the VOX system to provide hands-free automatic change-over from receive to transmit. When
the speech input from the microphone is detected by
the VOX circuitry, an internal “PTT” switch will be
activated to begin transmission; when speech input
ceases, the VOX circuitry will release the transceiver
back to the receive mode. Operation is quite simple:
Press the VOX switch.
Without pressing the PTT switch on the micro-
Operation
phone
, speak into the microphone at a normal
voice level. The FT-920 should automatically
switch into the transmit mode, and should return
to receive when you quit talking.
T o cancel VOX and return to PTT operation, press
the VOX switch once more.
The VOX system may require minor adjustment to
optimize its parameters for your particular voice characteristics. These parameters are set via the Menu
system as follows:
r If speaking in your normal voice level does not
activate the transmitter, or if background noise
in the operating room trips the VOX, the VOX
sensitivity (VOX GAIN) may be adjusted via Menu
Item U-65, as described on page 81.
r If the delay in returning to the receive mode is
not suitable for your operating habits (too quick
or too slow), the delay interval (VOX DELAY) may
be adjusted via Menu Item U-64, as described
on page 81.
r To prevent the speaker audio from activating
the VOX circuitry, you may need to adjust the
VOX Antitrip setting. Use Menu Item U-66,
described on page 82, to do this.
Digital Speech Processor Operation
The Digital Speech Processor provides two chief
methods of enhancing your SSB “talk power:”
r Using digital audio compression methods, the
Digital Speech Processor increases your
transceiver ’s
r Using specially-designed digital equalization
techniques, you may choose a DSP voice pattern contour which most closely matches your
voice’s characteristics, so as to focus more of
the
available transmitter power
sion of the most useful frequency components
of your speech. Four different voice pattern
contours are available.
Once you have correctly set the MIC GAIN control’s
level, you may set up the Digital Speech Processor
as follows:
Press the METER SELECT switch so that the trans-
mitter selection is set to COMP.
Press the PROC switch once so that the PROC indi-
cator on the display becomes illuminated.
Press the PTT switch, and speak into the micro-
phone in a normal voice level. You will observe
average power output
into transmis-
; and
FT-920 Operating Manual
49
Page 52

Operation
the COMP meter indication fluctuating according
to your speech input. Now adjust the front panel ’s
PROC L EVEL control so that the reading on the COMP
scale peaks at or below 10 dB.
T o deactivate the Digital Speech Processor, press
the PROC switch once more. The PROC indicator
on the display will disappear.
? Raising the compression level generally raises talk
power; however, excessive advancement of the
PROC LEVEL control will cause the signal-to-noise
ratio on your speech signal to deteriorate, thus
reducing the effectiveness of the speech processor. Keeping the compression level below 10 dB
will ensure that this does not occur.
DSP Voice Pattern Contours
If you wish to enhance the effectiveness of your
speech processing system, you may choose from one
of four voice pattern contours which are provided via
Menu Item U-51. See page 80.
OFF: DSP microphone equalization is disable.
1: Mid- and high-frequency components are
enhanced .
2: A high-emphasis response is produced,
ideal for pile-up or contest work.
3: Both low- ang high-emphasis response are
produced.
4: A wide bandpass response is produced,
emulating a “Broadcast” microphone audio
characteristic.
Once you have selected the desired voice pattern
contour, press the DSP switch to activate the Digital
Signal Processing (DSP) system. No further adjustment should be necessary.
? The Voice Pattern Contour feature may be used
alone, or in conjunction with the Digital Speech
Processor. Experiment with these systems singly
and in combination to determine which setting
provides the best talk power and audio quality in
relation to your voice’s characteristics.
Voice Monitor Operation
The Monitor function allows you to observe the characteristics of your speech signal so as to make adjustments of the DSP, AM or FM modulation characteristics, etc.
Press the MONI switch to activate the Voice Moni-
tor; the MONI indicator on the display will become
illuminated. Now , when you speak, your voice will
be audible from the speaker or headphones.
Adjust the Monitor’s volume by rotating the MONI
LEVEL control. Clockwise rotation increases the
volume level from the Monitor.
Press the MONI switch again to turn the Monitor
off.
Digital Voice Recorder Operation (Transmit)
The FT-920’s Digital Voice Recorder can be used to
store as many as four messages, in your own voice,
of up to 16 seconds in length. Such messages may
be used for repetitive “CQ” calling for contest work;
you might also use the Digital Voice Recorder to store
your callsign phonetically, then send it automatically
in a pile-up situation late at night when you don’t wish
to awaken other family members (you can also store
“Roger, roger, five nine, fifty-nine” plus your callsign
to complete the contact).
Operation is similar to that described for receive-mode
recording (see page 46), except that the [REC] and
[PLAY] keys are pressed
accomplish the desired action (on receive, these
switches are pressed
The four message locations are designated by the
[1] ~ [4] BAND keys.
Press and hold in the [REC] key for ½ second, then
press the [1] key on the keypad to begin recording in DVR memory #1.
Speak into the microphone in a steady voice level.
The recording volume level is set automatically,
so the MIC GAIN control has no ef fect during DVR
recording.
Press the [1] key again to stop recording, if you
elect not to use the full 16 seconds available.
Repeat this process for any of message locations
[2] ~ [4] into which you wish to store a message.
To review the message without transmitting it,
press and hold in the [MONI] key for ½ second.
The replay volume may be adjusted using the AF
GAIN control.
T o transmit the stored message over the air , press
and hold in the [PLAY] key for ½ second, followed
immediately by the appropriate BAND key . The PTT
circuitry will automatically engage, switching the
FT-920 into the transmit mode, and the transceiver
will return to receive at the completion of the message.
and held in for ½ second
momentarily
).
to
50
FT-920 Operating Manual
Page 53

Operation
The input level of your voice signal to the Digital Voice
Recorder may be adjusted by using the MIC GAIN control. The optimum settings for the Recorder may, however, be slightly different from those used in normal
operation; this is normal.
CW Transmission
The FT-920’s versatile design allows the CW operator unparalleled flexibility for operation using the internal electronic keyer, an external keyer , a computerdriven keying interface, or a straight key.
The best selections for interconnections and switch
positioning will depend critically on your application.
See the configuration details beginning on page 18
for suggestions.
Straight Key Operation
Insert your key’s plug into either K EY jack. Set the
other controls as follows:
MODE; CW
KEYER; Off (No icon should appear on display).
RF POWER; Fully clockwise.
SIDE TONE; 12 o’clock position.
VOX; Off
BK-IN; Off
PDL-KEY; Confirm that
this rear panel switch is set to KEY.
FT-920 Operating Manual
If you close the key at this point, you will hear the
CW side tone in the background, but you will not
be transmitting. This mode allows you to adjust
the S IDE TONE control for a comfortable volume
level, and it is also useful if you wish to practice
sending.
For “Semi-Break-In” operation, press the VOX
switch. Now , when you press on the key , the transmitter will automatically activated, and after you
quit sending the FT-920 will return to the receive
mode. The “Hang Time” for the CW “VOX” circuitry is adjustable (separately for the CW mode
as opposed to SSB) via Menu Item U-24. See page
76.
For “Full Break-In” (“QSK”) operation, turn the
VOX off and press the BK-IN switch. Now, press-
ing and releasing the key will cause instantaneous
TX/RX switching in tandem with your keying, allowing you to hear any incoming signals in the
spaces between dots, dashes, and letters in your
sending. This may be particularly helpful for message handling or contest operation.
? When the VOX is on, pressing the BK-IN switch
does
not
cause QSK operation to be activated,
as the
VOX
command will
In
command. When both switches are pressed
so these features are both on, the FT-920 will
override
the
Break-
51
Page 54

Operation
remain in the Semi-Break-In mode.
For low-power operation, rotate the RF PWR con-
trol counter-clockwise until the desired power output is observed on the transmitter meter.
Electronic Keyer Operation
The built-in Electronic Keyer may be used alone, or
in combination with an external keying device such
as a computer-driven keying interface.
Connect your keyer paddle’s cable to the front
panel’s KEY jack. If you wish to use the
KEY jack, connect the paddle’s cable to that jack,
and set the rear panel’ s PDL-KEY switch to P DL.
Confirm that the controls and switches are set up
as they were originally for Straight Key operation
on the previous page.
Press the KEYER switch to turn the electronic keyer
on. The KEYER indicator will appear on the display.
Close the “Dot” contact on the paddle, and rotate
the KEYER SPEED control to set the electronic
keyer’s speed to the desired level. Clockwise rotation increases the sending speed.
Adjust the sidetone to a comfortable level by ro-
tating the SIDE TONE control.
Select Semi-Break-In or Full Break-In, as desired,
as you did during Straight Key operation.
The weight (proportion of dots to dashes) may be
adjusted (each parameter individually) in the event
you wish to modify the relationship from the default 1:1:3 Dot:Space:Dash ratio. Use Menu Items
U-21 and U-22 (see pages 75 and 76).
rear panel
A programmable delay in the keyer transmission
may be added, when using an amplifier, so as to
allow the amplifier’s relays a few extra milliseconds in order to become properly seated. This
delay shifts the entire stream of dots and dashes
without changing the weight. Use Menu Item U23 (see page 76).
The function of the electronic keyer may be
changed from “Keyer Without Space ” to “Keyer
With Auto-Space” to “Bug Keying” via Menu Item
U-20 (see page 75).
Memory Keyer Operation
The FT-920 includes an easy-to-use CW Message
memory system, which allows automated CW sending of repetitive messages (such as “CQ TEST” or
“CQ DX” etc.). The following functions are available
through the CW Message Memory system:
r Up to six messages may be stored (four may
contain up to 50 characters, while the other
two may contain up to 20 characters).
r A sequential contest number (001, 002, . . .)
may be imbedded in a message, if desired.
r The stored messages may be reviewed
out transmission
checked for accuracy.
r The message(s) may be transmitted so as to
reduce operator fatigue during long operating
sessions, such as in a contest.
Message Memory Storage
Press the [REC] switch, then one of the keypad
keys numbered [1] ~ [4], [8], or [9] to store a message in one of those slots. Memories [1] ~ [4] will
accommodate messages of up to 50 characters
in length, while Memories [8] and [9] will accommodate messages of up to 20 characters in length.
Additionally, Memory [9] can accommodate a message within which a sequential contest number
may be imbedded.
After pressing one of the numbered keys, start
sending the desired message (e.g. “CQ TEST
JA1YOE JA1YOE K”). The storage process will
be terminated automatically.
To imbed a contest serial number in a message,
send three
a message assigned to the [9] key. For example,
to send “599001,” “599002,” and so forth, store
“5NN???” into the special “Contest Number
Question Marks
so the contents may be
at the desired point in
with-
52
FT-920 Operating Manual
Page 55

Operation
Memory Register (Key #[9]). If the number gets
out of sequence during the contest, you may set
the number to an arbitrary value via Menu Item U-
25.
Review of Stored Messages
To review messages previously stored
ing them over the air
switch for ½ second, then press the desired number
key on the keypad. You will hear the message via the
Sidetone circuit, so as to check it for accuracy.
Transmission of Stored Messages
Press the [PLAY] switch momentarily, then one of the
number keys [1] ~ [4], [8], or [9] to play the message
stored in that memory register. The transmitter will
automatically be activated for message generation,
after which the transceiver will automatically revert
to the receive mode.
? The CW Message Memory, and electronic keyer,
only function in the CW mode. If you wish to practice sending, or check message memory contents,
be certain to select the CW mode of operation.
, press
and hold in
without send-
the [PLAY]
Split Frequency Operation
DX operators frequently have need for split frequency
operation, whereby a DX-pedition station may transmit on one frequency while listening over a segment
of the same band. The FT-920 provides several
means of efficient split frequency operations for DX
operation and even certain satellite operating situations.
TX C
LAR
ifier Operation
For splits of up to ±9.99 kHz, the TX Clarifier provides a simple means of split operation.
Example:
DX1DX is transmitting on 14.024.0 MHz, listening
“Up 5” kHz:
With the Clarifier set to zero offset, tune in
DX1DX on 14.024.00 MHz using the Main VFO
Tuning Dial.
Press the TX CLAR button, and rotate the Sub
VFO Tuning Dial so as to set up a Clarifier of fset of -5.00 kHz.
Push the RX CLAR button, and you will now be
listening in the area of 14.029.0 MHz. You may
hear a number of stations calling, and you
hear this station currently being worked by
DX1DX.
If you can hear the station being worked by
DX1DX, press the SPOT key, and adjust the
VFO-B Tuning Dial so as to align the pitch of
the station being worked by DX1DX with the
pitch of your radio’s SPOT tone; this action will
place you exactly on the frequency currently
being received by DX1DX.
Now press the RX CLAR key again to turn off
the Receive Clarifier. You will now be back on
14.024.00 MHz, listening for DX1DX to send
“QRZ?” When you transmit, you will be approximately on 14.029 MHz, depending on how far
you adjusted the offset so as to zero in on the
station being worked by DX1DX.
If you don’t work DX1DX after one or two calls,
again press the RX CLAR key and look around
for the station being worked by DX1DX; then
press RX CLAR again to return to 14.024.00
MHz for receiving DX1DX.
may
FT-920 Operating Manual
53
Page 56

Operation
Split VFO Operation
Some pile-ups (especially on SSB) involve a split
greater than ±9.99 kHz. In these cases, use the two
VFOs on the FT-920 for split frequency operation.
Example:
DX1DX is on 7.095.0 MHz, listening “210 to 220 ”
(7.210 ~ 7.220
With the Clarifier(s) off, and TX/RX control on
the Main Tuning Dial, tune in DX1DX on
7.095.0 MHz.
Press and hold in the [A B] key for ½ sec-
ond, then rotate the VFO-B Tuning Dial to set
VFO-B somewhere between 7.210 and 7.220
MHz (pressing [A B] ensures that both VFOs
are on the same operating mode).
Press the VFO-B [TX] indicator, which will glow
Orange after you press it. This indicates that
VFO-A is in charge of the receive frequency,
while VFO-B is controlling the transmit frequency.
In the same manner as you did in the TX CLAR
example previously, you may press the VFOB [RX] indicator so as to listen to the pile-up. If
you find the station being worked by DX1DX,
tune quickly onto that station’s frequency , then
press the VFO-A [RX] indicator to return receive frequency control to VFO-A, so you can
listen for DX1DX to say “QRZ?”
? When operating Split via any means, in pile-up
situations be absolutely certain not to press the
VFO-A [TX] indicator accidentally, as this will make
you transmit on the DX station’s frequency, causing interference to others trying to work the DX.
Quick Split Feature
A user-programmed “Quick Split” may be utilized to
provide a starting point for split operation. For example, if many of your DX pile-up operating situations require you to transmit 5 kHz higher than you
are receiving, this feature may be useful to you. Here
is the procedure for activating Quick Split:
Press the [MENU] key to enter the Menu mode.
Rotate the VFO-B Tuning Dial so as to select
Menu Item U-04.
Press the [ENT] key to enter the Menu Com-
mand mode.
Now rotate the VFO-B Tuning Dial to select
“5.0” (kHz) or whatever TX/RX split you desire.
MHz) for replies:
Press the [MENU] key once more to exit the
Menu mode.
While operating with both TX and RX control
from VFO-A, press the [AuB] key. You will
observe that TX control has been shifted to
VFO-B, and that VFO-B’s frequency is 5 kHz
higher than VFO-A’s.
To
cancel
Quick Split, repeat the first four steps
above; in step , rotate the VFO-B Tuning Dial
to “OFF” then press [MENU] to exit the Menu
mode and resume normal operation.
Mode K Satellite Operation
Although the FT-920 is not designed for full duplex
satellite operation, Mode K satellite operation (uplink
on 21.2 MHz, downlink on 29.4 MHz) is nonetheless
possible, particularly on CW. Here is a generalized
example of such an operating scenario; consult one
of the many satellite operating journals for precise
frequency information:
Set VFO-A to 29.430 MHz, CW mode, and dis-
able (temporarily, at least) the Narrow filter, if
currently on. Be sure that the VFO-A [RX] indicator is illuminated.
Set VFO-B to 21.230 kHz, CW mode. Press
the VFO-B [TX] key so that the switch/LED
glows Orange.
If you are using a typical triband or log-peri-
odic antenna which covers both 15 and 10
meters, set up the two VFOs for operation on
the same antenna. If you are using separate
antennas on the two bands, connect the 15
meter antenna to antenna port B, and select
Antenna B for VFO-B; now connect the 10
meter antenna to antenna port A, and select
antenna A for VFO-A.
Press the [BK-IN] switch to activate full CW
break-in operation.
If the appropriate satellite is above the hori-
zon, and the frequency is clear, you may now
send a string of dots to allow you to find your
downlink signal through the satellite. Because
the break-in system allows you to listen between dots, the propagation delay through the
satellite should allow you to hear traces of your
signal, and you may adjust the appropriate
VFO for the exact pitch desired, a well as to
follow Doppler shift.
Make a note of the TX/RX frequency differ-
54
FT-920 Operating Manual
Page 57

Operation
ence by pressing the [ DSPL Y ] key. Y ou may use
this display option to use the current offset as
a starting point for setting the VFO-A/VFO-B
relationship when tuning around the satellite
transponder downlink segment. Remember,
though, that Doppler shift will change during
an operating session, so the initial offset will
not be maintained indefinitely.
? The function of the [DSPLY] key must be set
to [OFFSET], via Menu Item U-09, for this
function to work. See page 74.
For SSB operation, be certain that each VFO
is set to the correct sideband. Initially during a
pass, it may be easier to establish the Uplink/
Downlink frequency offset on CW , then switch
both VFOs back to SSB.
N When operating on Mode K, take particular care
to check your uplink frequency before transmitting, as your signal may be propagated over a long
distance on the 21 MHz band, possibly causing
harmful interference to other operators.
Digital Mode Operation
The FT-920 provides outstanding capabilities for digital mode operation, such as RTTY, packet, etc.
It is important that you understand the differences
between the two keying methods provided on the FT920 for digital mode operation, so that the controls
and switches may be set correctly.
r Most operation is accomplished using
Frequency-Shifted Keying
the T erminal Node Controller (TNC) generates
audio
tones to be transmitted as data by the
FT-920. T o activate this mode of operation, the
front panel Mode selection must be set to
DATA-USB (even though “USB” may not be
the actual sideband utilized in operation), and
the rear panel AFSK-FSK switch must be set
to AFSK.
r The FT-920 can also accept input from a TNC
or T erminal Unit (TU) operating in the FSK (
quency-Shifted Keying)
sure to ground
the transmitted carrier to be shifted in frequency; no audio tones are produced by the
TNC or TU.
of the FSK keying line causes
(AFSK), whereby
mode, whereby a
Audio
Fre-
clo-
AFSK RTTY or Packet Operation
The AFSK configuration environment may be the
easiest for you to use, as the TNC then has total control of the tone frequencies, Mark/Space relationship
(normal/inverted), and other aspects of digital operation which are critical to successful operation.
Connect your TNC to the FT-920’s DATA jack per
the instructions on page 16. Pin 1 of the DAT A jack
should be connected to the TNC’s “MIC AUDIO” or
“TX AUDIO” line. Be sure to set the AFSK-FSK
switch to AFSK.
For AFSK RTTY (Baudot) or 300 bps HF Packet
operation, press the [DATA] mode key until “DATA”
and “USB” appear on the display. Now enter the
Menu system, and select Menu # U-46; set this
Menu Item for the frequency appropriate for your
operating mode:
r For typical RTTY operation, select
sets the carrier injection up for an offset of
2.125 kHz in a pseudo-LSB mode, so that the
transceiver actually is operating in the “LSB”
mode (even though the display still indicates
DATA-USB.
2125-L
; this
FT-920 Operating Manual
55
Page 58

Operation
r For Packet operation, you may leave Menu #
U-46 in its default
mode), or set it to
as required by the configuration of your TNC.
See the documentation provided with your
TNC’s communication software for details regarding defining the transmitted tones.
The packet frequency display (offset) may also be
modified via Menu # U-45, allowing you to have the
radio’s display indicate either Mark or Space frequency , or the center frequency of the two tones.
At this point, you are ready to utilize your TNC’s
software to begin operation. After loading the software, tune in an RTTY station so that it is properly
decoded on your computer screen. When solid
copy is obtained, you may press the appropriate
key on your computer’s keyboard to activate the
transmitter, and begin typing. See your TNC’s instruction manual for further details regarding actual operation.
The DSP High- and Low-Cut filter are particularly
beneficial in reducing interference in RTTY pileup situations. A typical setting of the HIGH CUT control is at approximately 1 o’clock, while the LOW
CUT control may be set approximately to 11 o’clock.
The CW Narrow filter may also be used for AFSK
operation. Just press the [NARROW] switch, then
rotate the SHIFT control to peak the signal in the
narrowed IF passband.
Via Menu # U-10, the Enhanced T uning Scale may
be engaged so as to allow a visual representation
of precise tuning pursuant to the tone frequency
selected via Menu # U-46. However, since your
TNC may also have such a facility, and because
the TNC is ultimately in control of the tone generation and decoding, you may wish to rely on the
TNC’s tuning indicator, and use the Enhanced
Tuning Scale of your FT-920 for other purposes.
For 1200 bps FM packet, press the DATA key until
DATA and FM appear on the display.
FSK RTTY Operation
This mode utilizes the tone generator in the FT-920
for production of the required Mark and Space tones
used for RTTY operation.
Follow the interconnection guidelines on page 17
for details on how to hook up your terminal equipment to the transceiver. Be certain to set the
AFSK-FSK switch on the rear panel of the trans-
2125-U
1700-U
(pseudo-USB
or some other value
ceiver to FSK. In this mode of operation, closing
Pin 1 of the DATA jack to ground causes the carrier to shift; the magnitude of the shift (170/425/
850 Hz) is set via Menu # U-43, while the carrier’s
offset from zero beat and its sideband (USB/LSB)
can be set via Menu # U-42. Do not connect Pin 1
of the DATA jack to any TNC/TU line which carries
“MIC AUDIO” or “TX AUDIO” as these lines are used
for AFSK operation (see previous section).
Press the front panel [DATA] key to select the [DATA]
[LSB] mode, which corresponds to “FSK” operation (remember, “DATA USB” is used for “AFSK”
operation).
At this point, you are ready to utilize your TNC/
TU’s software to begin operation. After loading the
software, tune in an RTTY station so that it is properly decoded on your computer screen or TU display. When solid copy is obtained, you may press
the appropriate key on your computer’s keyboard
to activate the transmitter, and begin typing. See
your TNC/TU instruction manual for further details regarding actual operation.
As with AFSK operation, the CW filter may be
engaged in the FSK mode by pressing the [NAR-
ROW] key, and the DSP filters may also be used to
reduce interference in crowded digital operating
situations.
Operating Tips
r If you are hearing and decoding stations success-
fully in an AFSK environment, but stations cannot
understand you, check to be certain that your
TNC’s software has not set a shift other than 170
Hz, and be sure that the tones have not been “inverted” in the software configuration.
r If you are getting no shift (only a steady carrier) in
RTTY FSK operation, be sure that you have not
connected Pin 1 of the DATA jack to an AFSK output line from your TNC (use only the “FSK” line
provided by your TNC). If the FSK line has been
properly connected, check to be sure that you have
the “FSK” mode properly enabled on your TNC, if
the software requires you to do so.
r If you are having trouble decoding HF packet sta-
tions, be sure that you have set Menu # U-46 to
one of the settings which ends with “U” (instead
of “L”), and that you have chosen a tone frequency
compatible with the tones for which your TNC is
configured.
56
FT-920 Operating Manual
Page 59

Operation
AM Transmission
(Optional YF-116A AM Filter Required)
The FT-920 utilizes low-level modulation on AM, and
the DSP system may be used to enhance your transmitted audio quality.
Remember that AM consists of the carrier signal plus
two sidebands. Because the available power output
is 100 Watts (total), the
ited to 25 Watts so as to have power available for the
modulation sidebands, which carry your voice signal.
Basic Operation
Connect your microphone to the MIC jack.
Set the following controls as described below:
MODE: AM
METER SELECT: ALC
(The ALC indicator will appear on the display)
MIC GAIN: Fully Counter-clockwise
RF PWR: Fully Clockwise
Press the microphone’s PTT switch. The TRANS-
MIT indicator on the display will become illuminated.
Rotate the MIC GAIN control clockwise while speak-
ing into the microphone. When you reach the setting of the MIC GAIN control which causes the power
output indication to increase slightly on voice
peaks, reduce the setting of the MIC GAIN control
slightly; this will be the point of best audio quality.
? The PO meter will fluctuate significantly for an
instant at the start of a transmission; this is not
abnormal. However, if the ALC meter fluctuates significantly on voice peaks, the MIC GAIN
control may be set too high, and your transmitted signal quality may be degraded. Reduce
the setting of the MIC GAIN control if this is ob-
served.
The DSP, VOX, and Monitor features are opera-
tional during AM transmission. See page 50 for a
description of the DSP Voice Pattern Contours,
and page 49 for details regarding VOX operation.
Monitor operation is discussed on page 50.
For low-power operation, reduce the setting of the
RF PWR control.
carrier
power should be lim-
FM Operation
(Optional FM-1 Unit Required)
FM operation is permitted only in the 29 and 50 MHz
bands, due to bandwidth limitations. Be careful while
operating in the 29 MHz band to operate only in the
FM sub-band above 29.5 MHz, so as to avoid harmful interference to satellite operations below 29.5 MHz.
Simplex (Non-Repeater) Operation
Connect the microphone to the MIC jack. Set the
MODE switch to FM, and the RF PWR control fully
clockwise.
Close the microphone’s PTT switch to activate the
transmitter. Speak into the microphone in a normal voice level. The microphone gain level is set
automatically in the FM mode, and is not affected
by the MIC GAIN control’s setting.
Release the PTT switch to return to the receive
mode.
The VOX, and Monitor features are operational
during FM transmission. See page 49 for details
regarding VOX operation. Monitor operation is discussed on page 50.
Repeater Operation
The FT-920 may also be used, in the FM mode, for
repeater operation. Several convenient features make
FM repeater operation simple and efficient.
While operating in the FM mode on the 29 or 50
MHz bands, press the front panel [RPT] key to activate repeater operation. Pressing the [RPT] key
causes two important functions to become activated:
r The transmitter frequency will be shifted by a
default value (100 kHz on 29 MHz, 500 kHz
on 50 MHz) so as to access the repeater input
frequency;
r A repeater access tone will be superimposed
on your signal, as many repeaters on these
bands use CTCSS to prevent false activation
of the repeater by random noise. Both
Subaudible (CTCSS) and Burst (1750 Hz)
tones are available.
If the above repeater shifts and/or access tone are
not appropriate for your area, they may be set independently for each band. The Menu items which
pertain to these functions are shown below .
r T o set the 29 MHz CTCSS T one Mode (CTCSS/
Burst), use Menu Item U-35 (see page 77).
FT-920 Operating Manual
57
Page 60

Operation
r T o set the 50 MHz CTCSS Tone Mode (CTCSS/
Burst), use Menu Item U-36 (see page 77).
r T o set your FT-920’ s transmitted CTCSS tone
(Menu Item U-35/36 must be set to CONTI), use
Menu Item U-37 (see page 78).
r T o set your FT-920’s CTCSS Decoder CTCSS
tone, use Menu Item U-38. The default value
is “Off,” which means that Tone Squelch
(CTCSS Decode) operation is not engaged.
Set this Menu item to the appropriate tone so
as to keep your receiver quiet until the matching tone is received from the repeater.
r To set the 29 MHz repeater shift, use Menu
Item U-39 (see page 78).
r To set the 50 MHz repeater shift, use Menu
Item U-40 (see page 78).
One press of the [RPT] key will have set the FT-
920 for “Minus Shift” operation. In this situation,
you will observe both the “-” and “RPT” indicators
on the display . If your repeater uses a
(instead of negative), press the [RPT] key again;
the “+” indicator will replace the “-” indicator on
the display, while “RPT” will remain illuminated.
? The majority of repeaters on the 29 and 50
MHz bands use “-” shift.
Set the FT-920’s receiver to the repeater output
(downlink) frequency.
Close the [PTT] switch and speak into the micro-
phone. You will observe that the transmitted frequency has shifted according to the setting of the
[RPT] key .
Release the [PTT] switch to return to the receive
mode.
Since FM is a continuous-duty mode, we recom-
mend you rotate the RF PWR control counter-clockwise so as to use the minimum power necessary
to gain access to the repeater. This will significantly reduce the amount of heat generated by
the transmitter section.
? Since repeaters do not all use the same access
tone, we recommend that you load your favorite
repeater frequencies into memory, to avoid the
inconvenience of always having to reset the
CTCSS tone frequency. When a repeater frequency is stored into memory, the receive frequency, shift direction, shift magnitude, and tone
information are all stored into the memory register. See page 59 for details of memory operation.
positive
shift
Linear Amplifier Tuning
A special feature of the FT-920 allows you to do lowduty-cycle tune-up of your linear amplifier by transmitting a high-speed pulse, instead of a continuous
carrier.
Here is how to do this:
Press [MENU] to enter the Menu mode.
Select Menu Item U-55 by rotating the VFO-B
Tuning Dial, then press [ENT] and rotate the VFO-
B Tuning Dial to select the amount of time you
want the pulser to be active (the default time period is 10 seconds). Now press [ENT] again.
Rotate the VFO-B Tuning Dial to select Menu Item
U-52 (“LI-TU-S”). When you press [ENT], the pulser
will commence transmission. The number of seconds remaining in the transmission will appear on
the main frequency display area.
Once the countdown is complete, the Menu dis-
play will say “OFF , ” and you may either repeat the
tune-up pulse transmission by pressing [ENT ]
again, or exit to normal operation by pressing
[MENU].
The duration of the tune-up time may be adjusted via
Menu Item U-55. The length of the transmitted pulses
is adjusted via Menu Item U-57 (default: 100 ms.),
while the interval
via Menu Item U-56 (default: 100 ms.). Y ou therefore
can adjust the duty cycle to your requirements. You
may wish to reduce the interval time (via U-56) to a
very low value, such as 10 ms., so as to make the
transmitted pulses resemble a continuous carrier.
The power output used during this tune-up procedure can also be set independently for the AntennaA port and the Antenna-B port. The power output used
during this tune-up procedure (not during regular
operation) may be set via Menu Item U-53 (AntennaA) or U-54 (Antenna-B).
The FT-920 provides a wide variety of memory system resources. These include:
r 99 “standard” memory channels, numbered
“01” through “99.”
between
pulses may be adjusted
58
FT-920 Operating Manual
Page 61

Memory Operation
r Five QMB (Quick Memory Bank) channels,
providing one-touch storage and recall of prime
operating frequencies. The QMB channels are
labeled “C-1” through “C-5.”
r Ten Split Frequency memory channels, used
for storing frequency settings when the transmitter and receiver frequency are different. The
Split channels are labeled “d-01” through “ d -
10.”
r Eleven Call channels, for storage and quick
recall of one prime frequency on each amateur band. These channels are labeled “S-01”
through “S-1 1.”
r One set of band-edge memories, also known
as “Programmable Memory Scan” channels,
labeled “LO” and “HI.”
These memories do not just store away the operating frequency; thanks to the enhanced memory space
provided in the FT-920, the following data will be
stored into each memory channel:
r Operating frequency
r Operating mode (LSB, USB, CW, etc.)
r Receiving filter bandwidth
r Clarifier information (offset direction and mag-
nitude) except on PMS and CALL channels
r Antenna jack selection
r Automatic Antenna Tuner status (On/Off) ex-
cept on QMB and CALL channels
r Repeater Shift information (except on QMB
and PMS channels)
r Repeater CTCSS tone information (except on
QMB channels)
r Alphanumeric Labels (except on QMB chan-
nels)
r LOCK switch status (except on QMB channels)
simple storage and recall procedures are desired.
QMB Channel Storage
While using VFO-A, tune in the desired frequency
on the Main Tuning Dial.
Press and hold in for ½ second the [QMB STO]
key until the double beep is heard. The double
beep provides audible confirmation that the
memory storage was successful.
As you dial up other frequencies in the VFO mode,
repeating the procedure in‚ above causes the QMB
memory system to cycle through the QMB channels in the following sequence:
C-1 Þ C-2 Þ C-3 Þ C-4 Þ C-5 Þ C-1 Þ C-2 Þ ....
Frequency data will be stored and purged on a
first-in, first-out basis.
QMB Channel Recall
Press the [QMB RCL] key to recall the currently-
active QMB channel. The “QMB” indicator on the
display will become illuminated.
Press the [QMB RCL] key repeatedly to cycle
ough the QMB channels, in the same sequence
as shown for QMB Channel Storage.
While operating in the QMB Channel Recall mode,
you are not “fixed” on the QMB channel; you may
tune away from the QMB channel frequency, using the Main Tuning Dial, as though you were in
the VFO mode. In this situation, the “QMB” indicator will be replaced by one which indicates “M
TUNE.” To return to the originally-stored QMB
channel, press the [QMB RCL] key once.M
Memory Operation on
“Regular” Memory Channels
Storage and recall of memory channels in the various memory systems is quite straightforward, thanks
to the advanced ergonomic design of the FT-920.
These procedures are detailed below.
QMB Channel Programming/Recall
The QMB (Quick Memory Bank) memories are designed for urgent operating situations where very
FT-920 Operating Manual
59
Page 62

Memory Operation
(Channel #1-01 to 1-99)
Memory Channel Storage
While using VFO-A, tune in the desired frequency
on the Main Tuning Dial. Set the operating mode,
bandwidth, Clarifier mode and offset, and Antenna
(A or B) as desired. If using the Automatic Antenna Tuner, you may wish to touch up its alignment by pushing and holding in the [TUNER] key
for ½ second.
Press the [V u M] switch momentarily to enter
the “Memory Check” mode, which is used to find
an unused memory channel. The “M CK” indicator on the display panel will blink, and the frequency
stored (if any) on the current memory channel will
be shown in the VFO-B display area.
Note: The VFO-B Tuning Dial may also be used
for the “M CK” mode. See “Memory Channel Selection using VFO-B Tuning Dial” at the right.
Use the [UPp ] or [DOWNq] key to increment
through the main channel bank. Frequency data
stored previously in memory channels will be displayed in the VFO-B display area. If you have restricted memory operation to one channel group
(by pressing the [MEM GROUP] key), memory storage will similarly be limited to the currently-selected
memory group; just press [MEM GROUP] again to
allow unrestricted access to all memory channels
for storage of your frequency data.
When you have selected the channel location into
which to store the frequency information, press
and hold in the [V u M] key for ½ second, until
you hear a double beep, which confirms that the
frequency information was successfully stored.
Note: If information was previously stored on the
channel into which you stored data in step
above, the previous data will be overwritten and
lost!
Memory Channel Recall
If you currently are in the VFO tuning mode, press
the[VFO/MEM] key once to enter the “Memory ”
mode (the “MEM” icon will appear below the main
frequency display).
To select another memory channel, press either
the [UPp] or [DOWNq] key. Repeated pressing of
one of these keys allows you to step through the
memory channels one at a time, or you may hold
in the [UPp] or [DOWNq ] key to step through the
channels in a “manual scan” mode.
Note: The VFO-B Tuning Dial may also be used
for Memory Channel selection. See “Memory
Channel Selection using VFO-B Tuning Dial” below.
To restrict your memory channel selection just to
one memory group, press the [MEM GROUP] key
once (the “G ROUP” icon will appear above the chan-
Memory Channel Selection
Using VFO-B Tuning Dial
You may find it more convenient to use the
VFO-B Tuning Dial, instead of the [UPp] and
[DOWNq] keys, for memory channel selection.
Here’s how to do this:
Press the [MEM CH] key (located below and
to the left of the VFO-B Tuning Dial) momentarily. The brackets surrounding the
memory channel number display will start
to blink.
Now rotate the VFO-B Tuning Dial. Y ou will
observe the channel numbers changing,
and you may select the desired memory
channel quickly in this manner.
To revert to normal operation of the VFO-B
Tuning Dial, press the [M EM CH] key once
more.
60
FT-920 Operating Manual
Page 63

Memory Operation
nel number). Now, only those channels within the
current memory group (designated by the digit
preceding the hyphen in the memory channel number) will be available for recall via step ‚ above.
To change memory groups, press the [MEM GROUP]
key again (so that the “GROUP” icon disappears),
then use the [UPp] or [DOWNq] key to step
through the channels until you enter another group.
You may now press the [GROUP] key again to restrict memory channel access to the newly-selected group.
Once you are operating on a memory channel,
you may tune off of the original frequency (as
though you were in the VFO mode). Just rotate
the Main Tuning Dial; the “MEM” icon will be replaced by one which indicates “MEM TUNE,” indicating that you have now shifted into the “Memory
Tu n e” mode.
When operating in the Memory Tune mode, if you
find another frequency you wish to store into another memory channel, just press the [V u M] key
momentarily (the channel number will blink), select a new memory channel via the [UPp ] or
[DOWNq] key , then press and hold in the [V u M]
key for ½ second (until you hear the double beep).
To exit the Memory Tune mode, press the
[VFO/M EM] key as follows:
r One touch of [VFO/MEM] returns you to the
original
indicator will be replaced by “MEM.”
memory frequency. The “MEM TUNE”
r A second touch of [VFO/MEM] will cause you
to exit the Memory mode and return to the VFO
mode (the “MEM” indicator will be replaced by
“VFO”).
Note that repeater offsets (used on 29 MHz and
50 MHz FM)
channels; there is no need to utilize the “Split ”
memories described later for repeater operation.
Moreover, Clarifier data is also stored into “regular” memory locations, so small (<9.99 kHz) Tx/
Rx splits can be accommodated using the Clarifier.
can
be stored into “regular” memory
Memory Operation on
Split-Frequency Channels
Memory Group Information
The FT-920’s main memory area may be divided into as many as four groups. These groups may, in
some instances, provide more efficient or intuitive memory operation; for example you might wish to
segregate memories according to operating objectives, such as:
r AM Broadcast Stations
r Shortwave Broadcast Stations
r HF Amateur Stations
r 50 MHz Amateur Stations
Once you have determined how many memories are to be designated in each group (see Menu Items U11 ~ U-14), you may restrict memory operation just to one group, or you may allow the memory channels
to be selected without regard to memory group boundaries.
The complete memory channel number is composed of two sets of numbers, separated by a hyphen. The
single digit before the hyphen is the memory group number (1, 2, 3, or 4). The second, two digit number
is the channel number itself (1 to 99). Therefore, if channel #34 is assigned to group #1, its channel
number is “1-34.” If you have created four channel banks of 24~25 channels each, channel #34 would be
designated “2-34” since it falls within channel group #2.
FT-920 Operating Manual
61
Page 64

Memory Operation
(Channel #d-01 to d-10)
Some operating circumstances require the receive
and transmit frequencies to be separated by a frequency range in excess of that provided by the Clarifier feature (>9.99 kHz). For example, international
SSB operation on the 7 MHz band may require one
station to transmit in the frequency range 7.040 ~
7.100 MHz, while the other station must transmit in
the 7.150 ~ 7.300 MHz range. The FT-920 provides
ten special memories for such operating instances.
Storage and recall are similar to that described previously.
Split Frequency Memory Channel Storage
Set VFO-A to the required receive frequency and
mode, and set VFO-B to the required transmit frequency and mode.
Press the (Orange) VFO-B “TX” LED/Switch to
activate the Split mode, previously discussed on
page 54.
Note: It is also acceptable to store the transmit
frequency on VFO-A and the receive frequency
on VFO-B, if you prefer . In this case, in step‚ above,
press the VFO-B “RX” LED/Switch to set up the
appropriate Tx/Rx relationship between the two
VFOs.
Press the [V u M] switch momentarily to enter
the Memory Check mode (the “M CK” indicator
will blink), then use the [UPp] or [DOWNq] key to
select the memory channel you wish to use (from
the special “Split” memories numbered “d-01 ”
through “d-10”).
When you have chosen the desired memory chan-
nel, press and hold in the [V u M] key for ½ second to lock the split frequency data into the chosen memory location. As usual, a double beep
will indicate when you have held in the [V u M]
key long enough.
“MEM” indicator will appear on the display, replacing the “VFO” indicator . It does not matter whether
or not you are operating in the “Split” mode at this
time.
Next, press either the [UPp] or [ DOWNq] key to
select the desired channel from within the d-01 ~
d-10 Split Memory bank. The (differing) transmit
and receive frequencies will be indicated on the
left and right sides of the frequency display, and
the VFO-A and VFO-B Tx and Rx LED/Switches
will be illuminated according to the relationship you
programmed.
Particularly during 7 MHz pile-up situations, it may
be necessary to adjust your transmit frequency
(which
Memory Tune function is active with respect to
either
may adjust either dial freely , as desired, if you need
to retune. The “M TUNE” indicator will appear, and
you may, as described earlier, store the retuned
frequency into another memory, if desired. Alternatively, press the [VFO/MEM] key once to return
to the original split frequency pair, and press it
once more to exit the memory and return to VFO
operation.
As a convenience during Memory operation, once
you have recalled a channel within the Split
Memory Bank (channel #d-10 ~ d-10), you may
press the [MEM GROUP] key to restrict memory
access
[MEM GROUP] key again to restore free memory
channel access.
usually
the VFO-A or VFO-B Tuning Dial, so you
only
will be stored in VFO-B). The
to the Split Memory Bank. Press the
Memory Operation on
“C
ALL
” Channels
62
Split Frequency Memory Channel Recall
While operating in the VFO mode, press the [VFO/
MEM] key once to enter the Memory mode. The
FT-920 Operating Manual
Page 65

(Channel #C-01 to C-11)
The “CALL” channels are easy-access memories
which may serve as convenient starting points for
operation. Many operators use them for quick recall
of favorite frequencies in each band.
There is no
quency per band. However, the CALL Channel feature includes a simple method of recalling these special memories (described later) which involves the
pressing of one of the [BAND] keys. Therefore, the
procedure for storing memories band-by-band will be
described below for illustrative purposes.
Storing Data in C
While operating on VFO-A, select the “favorite fre-
quency” you wish to have stored as your “CALL”
frequency on the current band.
Press the [V u M] key once momentarily; the
“M CK” indicator will blink, and the frequency store
in the current memory channel will be shown in
the VFO-B display area.
Now press either the [U Pp] or [DOWNq] key (or
use the VFO-B Tuning Dial by pressing the
[MEM CH] key first) to select the CALL Channel
memory assigned to the band currently in use.
See the table below for a listing of the bands and
their assigned memory locations for the CALL
Channel function. The CALL Channels are assigned memory locations “C-01” through “C-11.”
Next, press and hold in the [V u M] key for ½
second (until you hear the double beep) to lock
the frequency into the chosen memory location.
You may now repeat this process for the other
CALL Channels, preferably assigning one such
channel per band.
Note: Channel “C-10” already is programmed (at
the factory) with the following frequency:
requirement
ALL
C-10: 51.000.00MHz (FM)
that you assign one fre-
Channels
Memory Operation
in
the [STEP] key (below and to the left of the VFOA Tuning Dial) and press the [BAND] key (on the
keypad) corresponding to the desired band.
For example
nel, press and hold in [STEP], then press the
[7 MHz] key while you are holding in [STEP]. To
recall the 12-meter CALL Channel, press and hold
in [STEP] and press [24.5 MHz].
Note: If you are operating in the “Memory Tune”
mode, activating the C
cancel the Memory Tune function, and place the
transceiver directly into the Memory mode.
Since the CALL Channels are not segregated into
an isolated memory band, like the QMB memories, you also may access these memories via the
[UPp] and [DOWNq] keys, or via the VFO-B Tuning Dial, as with “regular” memories.
When operating on a CALL Channel, it is possible
to utilize the Memory Tune mode in a manner similar to that used on “regular” memories. Just rotate the VFO-A Tuning Dial, as desired, to tune
off of the pre-programmed CALL Channel frequency. The new frequency may be stored in another memory, if desired, as described on page
60.
To cancel Memory Tune operation, press the
[VFO/MEM] key once (or press and hold in [STEP]
and press another [BAND] key for another CALL
Channel).
Adding Alpha-Numeric Labels to
Each of the memory channels in the FT-920, except
, to recall the 40-meter CALL Chan-
ALL
Channel system will
Memory Channels
Recall of C
Whether in VFO or Memory operation, recall of
CALL Channels is very easy. Just press
ALL
Channel Memories
and hold
FT-920 Operating Manual
63
Page 66

Memory Operation
for the QMB channels, may be appended with a
seven-digit Alpha-Numeric Label which may aid in
memory channel recognition. Such Labels can be
particularly useful for identifying Shortwave Broadcast stations stored in memory, especially because
identification can be difficult if they are broadcasting
in a foreign language you do not understand. AlphaNumeric Label programming is simple to accomplish
using the front panel knobs and/or the keys.
First recall the memory channel to which the La-
bel is to be appended.
Press the [DISPLAY] key (located immediately to
the right of the VFO-A [TX] LED/Switch); any previously-stored Label will be displayed in place of
the VFO-B frequency display.
Now press the [ENT] key on the keypad. The first
“dash” in the VFO-B display area will now blink,
signaling you that Alpha-Numeric entry may begin.
Rotate the VFO-B Tuning Dial to select the letter
or number you wish to enter into the first Label
slot. You may also use the [BAND] keys by pressing repeatedly on a particular key until one of the
letters or the number stamped on the key appears
(for example, repeatedly pressing the [7 MHz] key
toggles between D Þ E Þ F Þ 3). Rotating the
VFO-B Tuning Dial is usually faster, however.
After you have chosen the first letter/digit for the
Label, press the [UPp] key . A blinking “dash” will
appear to the right of the first digit. Choose the
next letter/digit as in the previous step. Press the
[UPp] key to advance the entry position as you fill
up the Label register, up to a maximum of seven
characters.
When entry is complete, press the [ENT] key. You
will hear a double beep, which confirms that the
Label storage process was successful.
If you make a mistake during entry , you may use
the [DOWNq] key to step backward through the
Label field. If you wish to leave a blank space,
just press the [UPp] key without choosing a letter. To create a space where a letter/digit exists
from a previous entry, the character one increment counterclockwise from the “A” on the VFOB Tuning Dial will inject a space; you may also
use the third selection on the [50 MHz] key (“_”), if
you prefer keyboard entry.
Press the [DISPLAY] key to revert to display of the
operating frequency , instead of the Alpha-Numeric
Label. Press [DISPLAY] once more to return to display of the Label.
Labels generally are not appended to Split Fre-
quency channels, as they are usually stored for 7
MHz SSB applications where one or both frequencies may change often. If you
on a Split channel, the Label will, of course, obscure the display of the VFO-B frequency (usually the Tx frequency). However, if you move the
VFO-B Tuning Dial (thus entering the Memory
Tune mode) so as to adjust your Tx frequency,
the display will
frequency , and will stay in that condition for about
four seconds after tuning has stopped. Then the
Label will return.
instantly
must
store a Label
revert to indication of the
Memory Mode Accessories
Moving Memory Data to VFO-A
Data stored on memory channels can easily be
moved to VFO-A, if you like.
64
FT-920 Operating Manual
Page 67

Memory Operation
First use the [UPp] or [DOWNq] key (or the VFO-
B Tuning Dial, after pressing [MEM CH]) to select
the memory channel containing the frequency data
to be moved to VFO-A.
Next, press and hold in the [M u V] key for ½
second until you hear a double beep. The data
will now have been copied to VFO-A, although
the original memory contents will remain intact on
the previously-stored channel.
If a Split Frequency Memory Channel was trans-
ferred, the Rx/Tx frequency relationship will not
be changed by the action in the previous step.
That is, if the Tx frequency was originally stored
via VFO-A and the Rx frequency stored via VFOB, that relationship will remain unchanged after
the Memory-to-VFOtransfer process.
Deleting Data from a Memory Channel
Frequency data stored on a memory channel can be
deleted from a memory channel, if desired. The de-
letion process is not a “hard” erasure, so if you erase
a channel by mistake using this procedure, the
memory channel contents can be recovered.
First use the [UPp] or [DOWNq] key (or the VFO-
B Tuning Dial), from the Memory mode, to select
the memory channel containing the data to be
deleted.
Next, press and hold in the [V u M] key for ½
second until you hear the double beep. At this
point, the memorized frequency and other data
will disappear. The data is now “masked” and will
not be available for operation.
To restore the masked frequency data, repeat
steps and above. However, if you store new
frequency information on a channel containing
masked data, the masked data will be over-written and lost.
The FT-920 contains a wide variety of scanning capabilities. Whether you are in the VFO mode or one
of the Memory modes, scanning operation is funda-
FT-920 Operating Manual
65
Page 68

Scanning Operation
mentally identical in all modes of operation, but with
the following differences:
r In the VFO mode, scanning causes the trans-
ceiver to sweep up or down the band, pausing
or halting on any signal encountered;
r In the QMB mode, the scanner will scan
the QMB memory bank;
r In the “regular” Memory mode, the scanner will
scan the
instructed to
scanning;
r In the “regular” Memory mode, with “Group”
Memory activated, the scanner will scan
the memories within the
r In the Programmable Memory Scan (PMS)
mode, the scanner will scan the band
user-programmed frequency limits
Scanning operation is easy to perform:
Set the [SQL] (Squelch) control to the point where
background noise is silenced. A typical setting,
for effective scanning operation, will be at 12
o’clock or slightly clockwise from this position.
Set the transceiver into the operating configura-
tion in which you wish to scan (VFO, Memory,
QMB, etc.).
Press and hold in either the [UP] or [DOWN] switch
on the microphone to initiate scanning. On the MD100A8X, rotate the scanning ring to the left for
downward scan, or to the right for upward scan.
Note: If you are scanning in the VFO mode, note
that complete rotation of the
end of its travel will place the radio in a “fast scan”
mode
across a band.
The scanner will now cause the transceiver to in-
crement in the chosen direction until a signal is
detected. When a signal is encountered which
opens the Squelch, the scanner will pause until
the signal disappears (at the end of the other
station’s transmission), at which point the scanner will resume. While the radio is in the “Pause”
condition, the decimal points in the Main VFO-A
frequency display area will blink. See “Scan-Resume Choices” below for details of how to customize the resumption of scanning.
Press the [PTT] switch on the microphone to can-
cel scanning and return to normal Tuning Dial
operation.
programmed memories
skip
certain memories during
current group
scanning ring to the
which may aid you in navigating quickly
, and can be
only
only
; and
within
.
Scan Skip Programming (Memory Mode Only)
Among the memories you have programmed, there
may be some stations which you do not wish to scan.
For example, standard time stations like WWV, JJY,
CHU, LOL, RWM, or VNG transmit a continuous carrier which might always stop the scanner (thus preventing you from encountering a different station).
Therefore, you may designate certain memory channels to be
left intact for manual channel selection.
Here’s how to remove a channel from the scanning
loop:
Recall the memory channel to be skipped.
Press and hold in the [MEM GROUP] key for ½ sec-
ond, until the “SCAN” indicator on the display panel
goes off; this shows that this channel is now not
eligible for scanning.
Repeat steps and as many times as neces-
sary to skip all the channels you do not wish to
scan.
Initiate memory scanning (as described previ-
ously), and you will observe that the channels you
marked to be skipped are not included in the scanning loop. Press the [PTT] switch to stop the scan;
now use the front panel or microphone [UP] or
[DOWN] key to step through the channels manu-
ally - one at a time - and you will observe that the
“skipped” channels are, nonetheless, available for
recall by manual means.
You may restore a previously-skipped channel to
the scanning loop by selecting the channel manually; then press the [MEM GROUP] switch for ½ second until the “SCAN” indicator is restored to the
frequency display panel.
Programmable Memory Scan (PMS) Operation
The PMS scanning mode allows you to set up band
limits within which to scan. For example, you might
elect to scan 50.0 to 50.4 MHz in USB mode, watching for activity. The procedure for establishing such
band limits is quite easy:
First, store the lower frequency limit in the “P-Lo”
memory channel, and the upper frequency limit in
the “P-Hi” memory channel. In the above example,
you would store 50.000 MHz in “P-Lo,” and 50.400
MHz in “P-Hi.”
Next, switch from the VFO mode to the Memory
mode by pressing [VFO/MEM].
skipped
during
scanning
, but otherwise
66
FT-920 Operating Manual
Page 69

Scanning Operation
Now activate the “Memory Tune” mode by rotat-
ing the VFO-A Tuning Dial slightly either direction. You will observe the [M T UNE] indicator on
the display.
Rotate the [SQL] control until the background
noise is silenced, then press the microphone [UP]
or [DOWN] switch (or rotate the scanning ring, if
using the MD-100A8X Desk Microphone) to initiate scanning. The transceiver will now scan within
the range 50.000 to 50.400 MHz, halting on any
signals received, then resuming its scan based
on the setting of Menu Item U-15 (see below).
Note that these band limits do not apply just to
scanning; they are also applied to the operation
of the VFO-A Tuning Dial, so the PMS feature
makes it easy to stay within a particular band of
operation whether tuning manually or scanning!
Scan-Resume Choices
Scanning operation requires that you have the FT920’s audio squelched. The transceiver then assumes
that the opening of the squelch corresponds to the
discovery of a signal you may wish to listen to.
Once the scan has been halted, one of three things
may happen:
r The
r Another option is that the scanner will halt,
r The scanner can also be programmed to stop
default
pauses on the signal and stays locked on its
frequency until the other station’s transmission
ceases (at which point the squelch will close).
One second after the squelch closes, scanning resumes automatically. The resumption
interval is adjustable from 0 to 10 seconds via
Menu Item U-17 (see page 75).
when the squelch opens, for a fixed time period (default = 5 seconds). Thereafter, scanning will resume whether or not the other
station’s transmission has ended. The “hold”
time is adjustable from 1 to 60 seconds via
Menu Item U-16 (see page 75).
when it finds a signal, and lock on that frequency without resuming the scan at some
point.
action is that the transceiver
Scanning is chiefly useful in the FM mode, when you
are monitoring a number of repeater or simplex channels. When operating on the 50 MHz band, the number of channels per second may be adjusted via Menu
Item U-19; the default value is 10 channels per second.
When scanning in a narrow-band mode such as SSB
or CW, a signal may occupy a number of synthesizer
steps over its entire bandwidth. Tuning across a CW
signal in, for example, 2.5 Hz steps, will take a considerable amount of time at 1 step per second, especially if the signal is strong. But until the signal is fully
passed, the squelch will stay open, thinking that it is
finding a new station every 2.5 Hz! Therefore, when
scanning a band in anticipation of a band opening,
you may wish to press the [FAST] key, and reduce
the Pause Time (Menu U-16) to about 1 second, so
as to reduce the holding time on a signal which is
encountered.
Dual Watch is similar , in some respects, to scanning.
In Dual Watch, however, the transceiver monitors
(squelched) on the Main RX frequency (typically VFO-
The scan-resume choices may be selected via Menu
Item U-15 (SCN-STP); see page 75 for details.
FT-920 Operating Manual
67
Page 70

Dual Watch Operation
A) while periodically checking the Sub VFO (typically
VFO-B) for activity. A typical example might be for
you to set VFO-A to 50.110 MHz, watching for DX
stations who might call CQ on that frequency, while
periodically checking 28.885 MHz for stations reporting band openings on 6 meters.
To activate Dual Watch:
Set up transmit and receive operation on VFO-A,
establishing your primary monitoring frequency.
Set up the frequency to be checked periodically
on VFO-B.
V erify that the correct antenna (A or B) has been
selected for VFOs A and B, if they are on dif ferent
bands. The Dual Watch feature will automatically
switch antennas for you during the VFO-A/B
switching process.
Rotate the [SQL] control until the background
noise is silenced.
Press the [DW] key. The decimal points in both
frequency displays will blink, and you will observe
that, every few seconds, the green “RX’ indicator
for VFO-B will become illuminated for an instant.
This shows you when VFO-B is being checked
for activity.
If a station is detected on the VFO-B frequency,
the FT-920 will pause on the VFO-B frequency,
and stay there according to the Menu selections
you made per the “Scan-Resume Choices” earlier.
Press [DW] again to cancel Dual Watch. Note that
pressing the [PTT] switch on the microphone does
not
cancel Dual Watch operation.
The time interval between Dual Watch excursions to
VFO-B may be adjusted, via Menu Item U-18, to any
value between 3 and 15 seconds. The default setting
is 10 seconds.
The VFO-A register need not be in the “VFO” mode;
it may also be set to a Memory Channel or a QMB
channel, if you like.
Note also that the active RX VFO at the time that [DW]
is pushed will be the one on which the transceiver
will hold, checking the opposite VFO periodically.
Therefore, if the green “RX” LED for
nated when you push [DW], the FT-920 will hold on
VFO-B, then check
Remember that the squelch must be engaged in order for Dual Watch to function. During Dual Watch,
transmitting remains enabled, and the VFO frequencies may be changed.
The FT-920’s Menu System allows you, the owner,
to customize a wide variety of transceiver performance aspects and operating characteristics. Such
VFO-A
periodically for activity.
VFO-B
is illumi-
68
FT-920 Operating Manual
Page 71

Menu Operation
a large number of adjustments would ordinarily require dozens of additional knobs on the front panel
of the transceiver, thus complicating operation hopelessly. The Ergonomics Design Team at Y aesu Musen
Co., Ltd. therefore created the Menu System such
that virtually all Menu items are of the “set and forget” variety, not requiring revision during day-to-day
operation.
Three Menu operating modes are provided, allowing
different avenues of access to the Menu System.
These are:
r Normal Menu operation (73 selections), ac-
cessed by pressing the [MENU] key.
r Panel Menu operation (5 fixed selections), ac-
cessed by holding in the [STEP] key plus one
additional key , providing instant access to critical Menu items.
r Quick Menu operation (5 user-selected items),
accessed by pressing the [MENU] key after activation via Menu Item U-67. When Quick Menu
has been activated, Normal Menu operation is
activated by pressing and holding in the [MENU ]
key for ½ second.
Item number will start blinking, and a brief title for
the Memory Item will appear at the far right side
of the display.
Rotate the
Item you wish to work on.
When you have chosen the desired Menu Item
number, press [ENT] on the keypad momentarily.
The current value or condition for the Menu Item
chosen will be shown in the main frequency display area.
Again rotate the
front panel [UPp] or [DOWNq] keys, to change the
value or condition for the Menu Item.
When you have made your selection, press [ENT]
to lock in your setting. You may now select another Menu Item number to work on (by rotating
the VFO-B Tuning Dial) or press [MENU] to exit
and resume normal operation.
VFO-B Tuning Dial
VFO-B Tuning Dial
to select the Menu
, or press the
Panel Menu Operation
Five more-frequently-used Menu Items have been
Here are operating procedure summaries for each
Menu mode.
Normal Menu Operation
Press the [MENU] key once momentarily . The Menu
FT-920 Operating Manual
69
Page 72

Menu Operation
stored in a special Menu Bank which allows you to
recall them quickly by pressing
[STEP] key while pressing
another
and holding in
the
key. These Menu
Items are shown below:
For example, here is how to use the Panel Menu fea-
Menu # Function Description
U-08
U-09
U-10
U-24
U-37
Di spl a y Di m m e r On /Off [
Multi Panel Disp lay Choice [
Enhanced Tuning Sca le
Display
"VOX" Hang Time i n CW
Mode
(TX) CTCSS Ton e
Freq u enc y
P re ss th is ke y wh i l e
Ho ldin g in [S
METER SELEC T
[
D ISPLA Y
A B
BK-I
[
R PT
[
] key
] Key
N
] Key
TEP] ke y
] Key
] Key
ture to activate the Display Dimmer:
Press and hold in the [STEP] key.
While you are holding in the [STEP] key, press the
[DISPLAY] key. Menu U-08 will appear just to the
left of the “DIMMER” title, and “oFF” will blink in
the main display area. This means that the current condition of the Dimmer is
Off
.
Rotate the VFO-B Tuning Dial to select “on;” you
will note that the display just got darker.
Press the [ENT] key on the keypad. You may now
rotate the VFO-B Tuning Dial if you want to change
some other Menu Item, or just press [MENU] to
exit the Menu System and resume normal operation.
Quick Menu Operation
The Quick Menu feature allows
Menu Items you feel the need to change more frequently . These are assembled into Quick Menu bank
which operates almost identically to the “Normal”
Menu mode. However, access is very slightly different:
r When you have created a Quick Menu, you
activate it by pressing [MENU]
described above in the “Normal Menu Operation” section). You now
the Quick menu Items.
r To gain access to the other “Normal” Menu
Items, press [MENU] and hold it in for ½ second (instead of pressing it momentarily).
you
to select certain
momentarily
only
have access to
(as
the [MENU] key, operation is identical to that described
in the “Normal Menu Operation” section.
The Quick Menu bank is set up by first accessing
Menu Item U-67 via Normal Menu operation. For illustrative purposes, we shall create a Quick Menu
bank consisting of Menu Items U-01, U-02, and U03:
Press the [MENU] key momentarily to enter the
Menu mode.
Rotate the VFO-B Tuning Dial to select Menu Item
U-67. The Title for this item is “Q MENU,” and
the default value is “U-01 oFF.”
Press the [ENT] key to enter the Menu Item Com-
mand mode. The “U-01 oFF” display will blink.
Now press the [UPp] key to change the “oFF” to
“on” relative to U-01.
Rotate the VFO-B Tuning Dial to select Menu Item
U-02 . Again press [UPp] to change the “oFF” to
“on.”
Rotate the VFO-B Tuning Dial to select Menu Item
U-03. Again press [UPp] to change “oFF” to “on.”
Press the [ENT] key to lock in the new settings for
U-67, then press [MENU] to exit.
Now press [MENU] momentarily, and rotate the
VFO-B Tuning Dial. You will see that you have
access only to Menu Items U-01, U-02, and U-03.
Press [MENU] to exit.
Press and hold in the [MENU] key for ½ second,
then rotate the VFO-B Tuning Dial. You will see
that you now have access to
all
Menu Items. Press
[MENU ] to exit.
We will now provide a summary chart showing the
Menu Items available, followed by a more comprehensive description of each Menu Item and the
choices available.
Menu Mode Summary Chart
70
After you have done one of the above actions with
FT-920 Operating Manual
Page 73

Menu Operation
Menu Mode Selections and Settings
Me nu # F unction of M enu I tem Ava ilabl e C ho ices D efault
U-0 1
U-0 2
U-0 3
U-0 4
U-05
U-06
U-0 7
U-0 8
U-0 9
U-1 0
U-11
U-12
U-1 3
U-1 4
U-1 5
U-1 6
VFO Dial Spee d X2, X4 X 4
Up /D o w n Switch Steps 0.5 kH z ~ 100 0 k Hz /Step 1 00 kHz
Step Switch Function Toggle/Momentary Toggle
Q ui c k S p l i t O ffs e t O ff/ - 100 kHz ~ + 1 00 kH z O ff
TX W he n Sp o t is Pre sse d On /O ff O ff
Be ep Fr equency Off/22 0 H z ~ 7040 H z 880 H z
"P eak H o ld" M eterin g 0(O ff) ~ 2000 ms. Off
Display Dimmer Con trol On/O ff Off
Multi-Panel Display Ite m C lar ifie r/P itch/Offset Clar ifier
Enha nc ed Tuning Scale C lar./D S P /Tun ing/Fine Tu nin g DS P
Memory Channel Group 1 1 ~ 9 9 99
Mem ory C ha n nel Group 2 {( L a s t # in Grp. 1)+1} ~ 9 9 O ff
Mem ory C ha n nel Group 3 {( L a s t # in Grp. 2)+1} ~ 9 9 O ff
Mem ory C ha n nel Group 4 {( L a s t # in Grp. 3)+1} ~ 9 9 O ff
Scan ning Mod e C arrier Dro p/D elay/ Halt Carrie r Dro p
Hol d T ime for "Delay" S ca n 1 ~ 60 Seconds 5 Seconds
U-1 7
U-18
U-1 9
U-2 0
U-2 1
U-2 2
U-2 3
U-2 4
U-25
U-2 6
U-2 7
U-2 8
U-2 9
U-3 0
U-3 1
U-3 2
Resume Time after Carrier Drop 0 ~ 10 Seconds 1 Second
Du al Watc h P olling Inte rval 3 ~ 15 Seconds 10 Seconds
Scannin g S pee d 1 ~ 100 ms ./Step 10 ms.
E lec t ron ic K ey e r M o de Key er 1/K e y er 2/B u g Keyer 1
K eyer Dot :Space Ra t io 0 (0: 1) ~ 127 (1 2.7:1 ) 1 0 (1 :1 )
K eye r Da s h :Sp a c e R a t io 0 (0: 1 ) ~ 12 7 (12.7 :1 ) 30 (3:1)
Ke y er E nvelope De lay 0 ~ 30 ms. 5 ms.
Semi-Break-in PTT Hold Time 0 ~ 51 00 ms. (5 .1 secon ds) 0 ms.
Contest Num ber 0 000 ~ 999 9 000 0
C ontest Num b er "0" Format 0 (Zero)/T/O (Oh) 0 (Zero )
C ontest Numb er "1" Form at 1/A A
C ontest Numb er "2" Form at 2/U 2
C ontest Numb er "3" Form at 3/V 3
C ontest Numb er "5" Form at 5/E 5
C ontest Numb er "7" Form at 7/B 7
C ontest Numb er "8" Form at 8/D 8
U-3 3
U-3 4
U-3 5
U-3 6
C ontest Numb er "9" Form at 9/N 9
C ontest Numb er Size/Fo rmat N o Lead ing 0/nnn /n nnn/Off N o Leading 0
HF Repeater Tone Type CTCSS/Burst CTCSS
VHF Repeater Ton e Type CTCS S/Bur st CTCS S
FT-920 Operating Manual
71
Page 74

Menu Operation
Menu Mode Summary Chart
Me nu # F unction of M enu I tem Ava ilabl e C ho ices D efault
U-3 7
U-38
U-39
U-4 0
U-4 1
U-42
U-4 3
U-44
U-4 5
U-4 6
U-4 7
U-48
U-49
U-5 0
U-5 1
U-5 2
(TX) Tone Frequ ency Off/67.0 ~ 250.3 H z/1750 H z O ff
(RX) To ne Frequency O ff/67.0 ~ 25 0.3 Hz O ff
H F R epeater Sh ift 0 ~ 5 M H z 100 kH z
VHF Re peat er Sh ift 0 ~ 5 MH z 5 00 kH z
A u to m a ti c A n t en n a S e le c ti o n A u t o /M a n u a l/O ff A u t o
RTT Y G en era to r Ton e Pa i r 212 5/ 12 75 U S B/2 125 /1 27 5 LS B 2 12 5 LSB
RTTY Shift 170 /4 25/850 Hz 170 Hz
Shif t P o lari ty N or mal /Rever s e N orm al
Pa cket Fre q. D isp la y Offset -3.0 ~ + 3 .0 kHz +2.125 kH z
Pac k e t S u bc a r ri er Fre qu ency 11 7 0/ 17 00 /2 125/2210 U SB / LS B 2125 US B
RF Preamp (Band-by-Band) JFET/MO SFET JFET(160-15m)
ATU E n ab ling on RX On /O ff O ff
Max . PO: Antenna- A 10 0/50/10 W 100 W
Max . PO: Antenna- B 10 0/50/10 W 100 W
DS P Voice Equalize r Hi/Mid/Low/Ba ndpass /Off O ff
Linear Tun ing St a rt B egins w he n [E nt] i s pressed
U-5 3
U-5 4
U-5 5
U-5 6
U-5 7
U-5 8
U-59
U-6 0
U-6 1
U-62
U-63
U-6 4
U-6 5
U-6 6
U-6 7
U-6 8
Linear Tun in g PO : A nt. A 100/5 0/ 10 W 1 00 W
Linear Tun in g PO : A nt. B 100/5 0/ 10 W 1 00 W
Linea r Tuning Tim e 3 ~ 60 Seconds 10 Seconds
Line ar Tuning Spa ce T ime 0 ~ 30 00 m s. 100 ms.
Linear Tu ning Pulse Time 0 ~ 30 00 ms. 100 ms.
Rx LSB Carrier Offset - 300 ~ +500 Hz 0
Tx LSB C arrier Offset -300 ~ +500 H z 0
Pr ocess or LSB Offset - 300 ~ +50 0 Hz 0
Rx USB Carrier Offset -300 ~ +500 Hz 0
Tx USB Carrier Offset -300 ~ +500 Hz 0
Process or U SB O ffset - 300 ~ +500 H z 0
VO X H ang T ime 0 ~ 3 Seconds 1 S econd
V OX G a in 0 ~ 15 (A rb itr ar y sc ale ) 15
VO X Anti-Trip 0 ~ 15 (A rb itrary s cale ) 5
Q uick Menu A ll Me n u It e m s Off
FM S ca nn in g S t eps O ff/0 .5 ~ 50 kH z 10 kH z
72
U-69
U-7 0
U-71
U-7 2
U-73
CW F ilter O n/O ff Off
AM Filter On/Off Off
ATU Auto- Retuning On/O ff O n
ATU F a s t T u n i n g On/O ff O ff
RX Ant. Jack Circuit Path Op en/Conn ected o n Tx Ope n
FT-920 Operating Manual
Page 75

Menu Operation
U-01 ( DIAL-S )
Function: VFO-A/VFO-B Tuning Dial Speed
Available V alues: 4/ 2
Default: 4
You may choose between two speeds for the tuning
dials. Selecting “2” cuts the tuning rate in half compared to the default value.
U-02 ( UP/DN-S )
Function: UP/DOWN Switch Steps (front panel)
Available V alues: 0.5 ~ 1000 (kHz/Step)
Default: 100 kHz/Step
The default value is ideal for quick navigation from
one end of a band to the other. For quick tuning
around within a band segment, a value like 1 kHz
may be preferable.
U-03 ( STEPSET )
Function: STEP Switch Function
Available V alues: LoC/no-LoC
Default: LoC
The LoC(Lock) position allows toggling of the Fast
Þ Fine Þ Normal tuning rate. If no-LoC is chosen,
you must hold the [STEP] key in while the “Fast” or
“Fine” indicator is illuminated in order for those tuning rates to be chosen. After releasing the [STEP] key ,
the tuning rate will return to “Normal.”
U-04 ( QCK SPL )
Function: Activation/Setting of Magnitude of Quick Split
Available V alues: oFF or -100 ~ 100 kHz
Default: oFF
If the Quick Split Menu Item is set to anything other
than Off, pressing the [A u B] key will put the transceiver in the “Split” mode, with TX on VFO-B and RX
on VFO-A. Additionally , a frequency offset (referenced
to the RX frequency) will be applied, per your setting
of this Menu Item.
Function: Activation/De-activation of TX when the
[SPOT] key is pushed
A vailable Values: on/off
Default: off
Normally , pressing the [S POT] key only causes you to
hear an audible tone corresponding to the pitch of
your own transmitted signal (in the CW mode). By
setting this Menu Item to On, however, you can also
cause the FT-920 to
pressed.
transmit
when the [\SPOT] key is
U-06 ( BEEP-F )
Function: Setting of Key Beeper Frequency
A vailable Values: oFF or 220 ~ 7040 Hz
Default: 880 Hz
The Menu Item allows you to set the tone of the front
panel key Beep tone generator to whatever value is
comfortable. It also allows you to disable the Beep
tone, if desired.
U-07 ( MTR-PH )
Function: Enabling/Disabling of the “Peak-Hold”
function of the S/PO meter.
A vailable Values: 0(off) ~ 2000 ms.
Default: 0(off)
U-08 ( DIMMER )
Function: Adjustment of illumination level for front
panel display
A vailable Values: on/oFF
Default: oFF
In low-light situations, activating the Dimmer may reduce excess brightness in the display. For normal
room lighting, however, this Menu Item should be set
to Off for best visibility.
U-05 ( SPOT-TX )
FT-920 Operating Manual
73
Page 76

Menu Operation
U-09 ( DISPLAY )
Function: Selection of display Multi-Panel characteristics
Available Values: CLAr/ PitTCh/ oFFSEt
Default: CLAr
This Menu Item allows you to choose which selection will be displayed in the small Multi Panel, located
immediately to the right of the VFO-A frequency display. The choices are:
CLAr Display of the Clarifier offset (in kHz)
from the VFO-A frequency.
PitTCh Display of the CW Pitch (in Hz)
oFFSEt Display of the amount of frequency dif-
ference between VFO-A and VFO-B.
U-10 ( E-DISPL )
Function: Selection of Enhanced Tuning Scale
choices
Available Values: CLAr/ dSP/ tUnE/ FInE
Default: dSP
The Enhanced Tuning Scale, located immediately
above the VFO-A frequency display, may be used to
provide a visual indication of several transceiver operating characteristics:
CLAr When the Clarifier is active, a small dot
below the horizontal Enhanced Tuning
Scale shows the relative offset of the
Clarifier from the displayed VFO-A frequency . Note that this small dot will be
observed on Receive when the RX
Clarifier is on, but only on transmit
when the TX Clarifier is on.
dSP When the DSP is On, this scale pro-
vides a relative indication of the bandwidth currently set via the High-Cut and
Low-Cut knobs.
tUnE In this mode, an arrow indicates which
direction you should tune on CW in
order to center an incoming tone on
the “zero beat” point with your own signal.
FInE When tuning in steps less than 10 Hz,
this scale will expand rapidly as you
tune quickly , but as you tune slowly you
will be able to measure frequency
steps as fine as 1 Hz, thanks to the 1
Hz calibration dots on the Enhanced
Tuning Scale. This feature will be dis-
abled when tuning steps are 10 Hz or
larger.
U-11 ( GROUP1 )
Function: Select the number of Memory Channels
in Group 1
Available Values: 01 ~ 99
Default: 99 (All Memory Channels are in Group 1 by
default)
Memory Group 1 may be left at 99 channels, in which
case there will be no partitioning of the Memory System. Otherwise, you may set any number less than
99 for inclusion in Group 1 if you wish to partition the
memories.
U-12 ( GROUP2 )
Function: Select the number of memories in Group 2
Available Values: The last digit in Group 1
the bottom end of Group 2; 99 maximum
Default: oFF
If, for example, there are 25 memories in Group 1,
Group 2 starts at Memory #26.
plus 1
is
U-13 ( GROUP3 )
Function: Select the number of memories in Group 3
Available Values: The last digit in Group 2
the bottom end of Group 3; 99 maximum
Default: oFF
If, for example, Group 2 contains Memory Channels
26 through 40, Group 3 begins with
Memory #41.
plus 1
is
U-14 ( GROUP4 )
Function: Select the number of memories in Group 4
Available Values: The last digit in Group 3
the bottom end of Group 4; 99 maximum
Default: oFF
You do not have to use all 99 memories. Just set the
upper limit of this Menu Item to some value less than
99.
plus 1
is
74
FT-920 Operating Manual
Page 77

Menu Operation
U-15 ( SCN-STP )
Function: Select the desired Scan-Resume mode.
Available V alues: PAUS/ 5SEC/ StoP
Default: PAUS
This Menu Item allows you to select your favorite
method of scan-restart after the scanner has stopped
on an incoming signal (when the Squelch opens). The
choices are:
PAUS The scanner will hold until the signal
disappears, then will resume after a
delay set via Menu Item U-17.
5SEC The scanner will hold for a fixed length
of time, set via Menu Item U-16, then
resume whether or not the other station is still transmitting.
StoP The scanner will stop when a signal is
received, and will not restart.
U-16 ( PAUSE-T )
Function: Set the delay time for scan resumption in
the “5SEC” scan condition described in Menu Item
U-15.
Available V alues: 1 ~ 60 Seconds
Default: 5 Seconds
This Menu Item defines the length of time the scanner will dwell on a frequency when in the “5 Second”
mode, so named after its default value. After the time
period set via this Menu Item, the scanner will resume irrespective of the presence or absence of a
signal on the current frequency.
U-17 ( SCN-RES )
Function: Set the delay time for scan resumption in
the “PAUS” scan condition described in Menu Item
U-15.
Available V alues: 0.0 ~ 10.0 Seconds
Default: 1.0 Second
You will generally want to set a fairly short value for
this Menu Item, so as not to delay the resumption of
scanning after a signal disappears.
U-18 ( DW-TIME )
Function: Set the polling interval for the Dual Watch
system
A vailable Values: 3 ~ 15 Seconds
Default: 10 Seconds
This Menu Item defines the amount of time the Dual
Watch system will dwell on VFO-A before checking
VFO-B for activity.
U-19 ( SCNSP-V )
Function: Set the amount of time per synthesizer
step in the VFO/PMS Scan modes
A vailable Values: 1 ~ 100 ms (in 1 ms. steps)
Default: 10 ms.
Use this Menu item to select the amount of time each
step of the synthesizer will be allocated during VFO
Scan or PMS operation.
U-20 ( EL-SET )
Function: Select the keyer paddle operating mode
A vailable Values: EL1/ bUG/ EL2
Default: EL1
This menu Item allows selection of the preferred keying action of your paddle. The choices available are:
EL1 Iambic keying with Automatic Character
Spacing disabled.
bUG Mechanical “Bug” key emulation. The “dot”
paddle contact produces automatically-generated dots, while the “dash” contact produces dashes of a length produced manually .
EL2 Iambic keying with Automatic Character
Spacing enabled. This selection is best
when programming message memories.
U-21 ( DOTSIZE )
Function: Set the Dot:Space ratio for the built-in electronic keyer
A vailable Values: 0 ~ 127 (0:1 ~ 12.7:1 Dot:Space
ratio)
Default: 10 (corresponds to 1:1 Dot:Space ratio)
Use this Menu item to set the Dot weighting for the
internal keyer. It is not recommended that you exceed a value of “ 20 ” for this setting.
FT-920 Operating Manual
75
Page 78

Menu Operation
U-22 ( DSHSIZE )
Function: Set the Dash:Space ratio for the built-in
electronic keyer
Available V alues: 0 ~ 127 (0:1 ~ 12.7:1 Dash:Space
ratio)
Default: 30 (corresponding to 3:1 Dash:Space ratio)
Note that the Dot:Space:Dash ratio, using the default
values, is a perfect 1:1:3.
U-23 ( QSK-DLY )
Function: Provide an envelope delay when using the
internal keyer
A vailable Values: 0 ~ 30 ms.
Default: 5 ms.
This Menu Item allows shifting of the entire CW transmission string in time, so as to avoid sequencing difficulties with external linear amplifiers, etc. The delay is applied to the entire keyed signal (no truncation
on either “make” or “break”) to preserve the full values of weighting set via Menu Items U-21 and U-22.
U-24 ( KYR-DLY )
Function: Set the pseudo-VOX hang time for transmission during semi-break-in CW
A vailable Values: 0.00 ~ 5.10 Seconds
Default: 0
Increasing this value somewhat above its default will
allow the FT-920 to stay in the “transmit” mode between word spaces. This function is analogous to the
“VOX Delay” function on voice modes.
U-25 ( QSO-NO )
Function: Set the starting value for the Contest Number used by the message memory
A vailable Values: 0000 ~ 9999
Default: 0000
If you should get out of sync with the automatic contest number incrementation of the message memory ,
you may reset the number via this Menu Item. In a
contest, this may be a good candidate for assignment to an exclusive “Quick Menu” position.
U-26 ( 0-FORM )
Function: Define the desired truncation for the Ø figure used in contest numbers
Available Values: 0 (0: )
o (o: )
t (T: )
Default: 0(0: )
Use this Menu Item to shorten the number “zero” in a
contest number.
U-27 ( 1-FORM )
Function: Define the desired truncation for the 1 figure used in contest numbers
)
)
)
)
)
)
)
)
)
Available V alues: 1 (1:
A (A:
Default: 1 (
Use this Menu Item to shorten the number “one” i n a
contest number.
U-28 ( 2-FORM )
Function: Define the desired truncation for the 2 figure used in contest numbers
Available V alues: 2 (2:
U (U:
Default: 2 (
Use this Menu Item to shorten the number “two” in a
contest number.
U-29 ( 3-FORM )
Function: Define the desired truncation for the 3 figure used in contest numbers
Available V alues: 3 (3:
u (V:
Default: 3 (
This truncation is seldom used in contest numbers,
as it may cause confusion with the number 4.
76
FT-920 Operating Manual
Page 79

Menu Operation
U-30 ( 5-FORM )
Function: Define the desired truncation for the 5 figure used in contest numbers
Available V alues: 5 (5: )
E (E: )
Default: 5 ( )
This truncation is seldom used in incremented contest numbers, although it frequently is used in the
truncated form of the “599” signal report, which may
be shortened to “ENN” (
ahead of the incremented contest number (001, 002,
. . . ).
U-31 ( 7-FORM )
Function: Define the desired truncation for the 7 figure used in contest numbers
Available V alues: 7 (7:
Default: 7 (
This truncation is seldom used in contest numbers,
as it may cause confusion with the number 6.
b (B:
)
U-32 ( 8-FORM )
Function: Define the desired truncation for the 8 figure used in contest numbers
Available V alues: 8 (8:
Default: 8 (
Use this Menu Item to shorten the number “eight” in
a contest number.
d (D:
)
)
)
)
)
)
U-34 ( NR-SIZE )
Function: Set the number of digits in a contest number
A vailable Values: non/ 999/ 9999/ oFF
Default: non
The default value places a contest number
leading zeroes
memory location (at the point where “??? ” is inserted).
The other choices are:
in the contest number message
without
999 A full three-digit contest number, including
zeroes. This will switch automatically to four
digits after QSO number 999.
9999 A full four-digit contest number, including
zeroes. If you reach 9999 QSOs, you probably already won the contest, and can now
quit!
oFF In this mode, the contest number genera-
tor is disabled.
U-35 ( HF-TONE )
Function: Define the type of repeater-access tone
to be transmitted on 28 MHz during FM “RPT ” operation.
A vailable Values: CtCSS/ bUrSt
Default: CtCSS
The default value causes a tone (set via Menu Item
U-37) to be transmitted continuously when the “ RPT”
FM mode is in use. The BURST option transmits the
selected tone for an interval of only 500 milliseconds,
and typically only the 1750 Hz tone selection would
be applicable for BURST operation.
U-33 ( 9-FORM )
Function: Define the desired truncation for the 9 figure used in contest numbers
Available V alues: 9 (9:
Default: 9 (
This is perhaps the most-commonly-truncated number used in CW contests.
n(N:
)
)
)
FT-920 Operating Manual
U-36 ( VHF-TONE )
Function: Define the type of repeater-access tone
to be transmitted on 50 MHz during FM “RPT ” operation.
A vailable Values: CtCSS/ bUrSt
Default: CtCSS
The default value causes a tone (set via Menu Item
U-37) to be transmitted continuously when the “ RPT”
FM mode is in use. The BURST option transmits the
selected tone for an interval of only 500 milliseconds,
and typically only the 1750 Hz tone selection would
be applicable for BURST operation.
77
Page 80

Menu Operation
U-37 ( TX-T-F )
Function: Set the desired repeater access (TX) tone.
Available Values: OFF/V alues per chart below/1750
Hz
Default: OFF
Use this Menu Item to set the frequency of your encoding tone, used for repeater access in the FM “RPT”
mode.
U-38 ( RX-T-F )
Function: Set the desired Tone Decoder frequency
for your receiver
A vailable Values: OFF/Values per chart below
Default: OFF
Use this Menu Item to set the frequency of your
transceiver’s CTCSS Decoder, if used. The Decoder
is activated by setting this Menu Item to any value
other than OFF, and your receiver will be silent on
FM/RPT until a matching tone is received (superimposed on the carrier of an incoming signal).
U-39 ( HF-RPT )
Function: Set the desired repeater shift magnitude
for 29 MHz operation
A vailable Values: 0.0 ~ 5000.0 kHz
Default: 100.0 kHz
This Menu Item sets the 29 MHz shift separately from
the 50 MHz shift.
U-40 ( VHF-RPT )
Function: Set the desired repeater shift magnitude
for 50 MHz operation
A vailable Values: 0.0 ~ 5000.0 kHz
Default: 500.0 kHz
The default shift represents the standard value used
in most of the United States.
U-41 ( ANT-SEL )
Function: Define the operating function for the [AN-
TENNA A/B/RX] switch
Available Values: Auto/ on/ oFF
Default: Auto
The available choices are:
Auto The selection of Antenna-A, Antenna-B,
or RX is stored in VFO or Memory registers, so no operator intervention is needed
when changing bands or memories insofar as antenna selection is concerned.
on The [ANTENNA A/B/RX] switch is functional,
but the settings are not stored in VFO or
Memory registers. You must manually
choose the antenna selection yourself.
oFF Only Antenna-A is available. There is no
path provided to Antenna-B nor the RXOnly antenna.
U-42 ( RTTY-TN )
Function: Select the offset frequency and injection
sideband for the “Mark” tone produced by the internal RTTY generator
Available V alues: Hi 2125U/ Lo 1275U/
Hi 2125L/ Lo 1275L
Default: Hi 2125L
The available choices include:
Hi 2125U The Mark tone is offset 2.125 kHz,
USB injection
Lo 1275U The Mark tone is offset 1.275 kHz,
USB injection
Hi 2125L The Mark tone is offset 2.125 kHz,
LSB injection
Lo 1275L The Mark tone is offset 1.275 kHz,
LSB injection
The Shift tone’s frequency is offset from the Mark
tone by an amount determined by the next Menu Item,
U-43 (RTTY Shift).
78
CTCSS Tone Freq uenc y (Hz)
67.0 79.7 94.8 110.9 131.8 156.7 186.2 225.7
69.3 82.5 97.4 114.8 136.5 162.2 192.8 233.6
7 1. 9 8 5. 4 100. 0 118. 8 14 1.3 16 7.9 20 3. 5 24 1. 8
7 4. 4 8 8. 5 103. 5 123. 0 14 6.2 17 3.8 21 0. 7 25 0.3
7 7. 0 9 1. 5 107. 2 127. 3 15 1.4 17 9.9 21 8. 1
U-43 ( RTTY-SH )
Function: Set the desired RTTY Mark-Space frequency shift
Available V alues: SFt 170/ SFt 425/ SFt 850
Default: SFt 170
This Menu Item determines the amount of shift to be
applied from the Mark tone frequency , which was programmed via Menu Item U-42 (RTTY Tones).
FT-920 Operating Manual
Page 81

Menu Operation
U-44 ( SFT-POL )
Function: Define whether Mark or Space shall be
the idling (key up) tone
Available V alues: noAL/ rES
Default: noAL
The above abbreviations are defined as:
noAL (Normal) The idling tone is Space.
rES (Reverse) The idling tone is Mark.
U-45 ( PK-DISP )
Function: Define the Packet displayed frequency
offset
Available V alues: -3.000 ~ 3.000 kHz
Default: -2.125 kHz
You can have the display show the (suppressed) carrier frequency or the center frequency between the
two Packet tones, for example.
U-46 ( PKT-FRQ )
Function: Align the transceiver to the frequency of
the tone pair defined by the TNC.
Available V alues: 1170-U/1700-U/ 2125-U/
2210-U/1170-L/1700-L/
2125-L/ 2210-L
Default: 2125-U
The above designations of the available values represent the center frequency of the Packet tone pairs,
plus their injection sideband (L =LSB, U=USB).
U-47 ( RF AMP )
Function: Determine which receiver input preampli-
fier is to be used on each band
Available Values: A1/ A2
Defaults: A1 (1.8 ~ 24.49 MHz), A2 (24.5 ~ 54 MHz)
These preamplifier choices allow the user to customize the preamplifier choice for each amateur band.
Preamplifier A1 is a Junction FET type, providing
superior strong-signal-handling capability, while
preamplifier A2 is a Dual-Gate MOS FET, providing
best Noise Figure. Note that the total gain of the JFET amplifier is somewhat lower than for the MOS
FET preamp, but on the lower frequency bands the
additional gain is not needed.
The gain of the J-FET amplifier rolls off above 30
MHz, as does the gain of the MOS FET amplifier
below about 7 MHz; accordingly, we do not recommend these amplifiers be used outside of the recommended frequencies.
U-48 ( ATU-RX )
Function: Enable/Disable the use of the Automatic
Antenna Tuner in the Receive mode
A vailable Values: on/ oFF
Default: oFF
Engaging the Antenna Tuner in the Receive mode
helps protect the receiver circuitry from strong outof-band signals; it acts as an additional bandpass filter ahead of the fixed bandpass networks already
protecting the receiver. There is a very slight reduction in sensitivity when this feature is ON, which should
prove insignificant in everyday operation.
U-49 ( A-MAXPO )
Function: Set the maximum power level for the “A”
antenna terminal
A vailable Values:100/ 50/10
Default:100
This convenience feature allows you to limit the power
applied to the “A” antenna port, in case you wish to
excite a low-drive linear amplifier, for example. You
may use the other antenna port for full-power operation, of course.
U-50 ( B-MAXPO )
Function: Set the maximum power level for the “B”
antenna terminal
A vailable Values:100/ 50/10
Default:100
This convenience feature allows you to limit the power
applied to the “B” antenna port, in case you wish to
excite a low-drive linear amplifier, for example. You
may use the other antenna port for full-power operation, of course.
FT-920 Operating Manual
79
Page 82

Menu Operation
U-51 (MIC-EQ)
Function: Set the DSP microphone equalization pattern, if desired
A vailable Values: oFF/1/ 2/ 3/ 4
Default: oFF
This Menu Item allows you to tailor, via the DSP, the
audio response of the transceiver to match your voice
characteristics. This focuses the
the transceiver into the frequency spectrum occupied
by your voice, thus increasing
The choices are:
available power
useful
power output.
of
oFF This function is disabled.
1 Mid- and high-frequency components are
enhanced with this setting.
2 A high-emphasis response is produced,
ideal for pile-up or contest work.
3 Both low- and high-emphasis responses
are produced.
4 A wide bandpass response is produced,
emulating a “broadcast” microphone audio
characteristic.
The [DSP] key on the front panel does
on for this feature to work, as On/Off control is implicit in the menu selections provided. Use the “M onitor” feature to select the audio response most suited
for your voice.
U-52 ( LI-TU-S )
Function: Activate the Linear Amplifier Tuning pulser
A vailable Values: N/A
Default: oFF
After selecting this Menu Item, pressing the [ENT] key
activates the pulser for a time duration established
via Menu Item U-55, and the time remaining will count
down on the U-52 status screen. The characteristics
of the pulser are set via Menu Items U-53 ~ U-57.
This feature may be ideal for inclusion as a “Quick
Menu” item.
U-53 ( LI-A-PO )
Function: Set the power output for the Linear Amplifier Tuning pulser via Antenna-A
A vailable Values:100/ 50/10
Default:100
If you have different amplifiers for different bands,
each with unique drive requirements, you may use
this setting to define the tune-up power level via the
A antenna port.
not
have to be
U-54 ( LI-B-PO )
Function: Set the power output for the Linear Amplifier Tuning pulser via Antenna-B
Available V alues: 100/ 50/10
Default:100
If you have different amplifiers for different bands,
each with unique drive requirements, you may use
this setting to define the tune-up power level via the
B antenna port.
U-55 ( LI-TIME )
Function: Define the duration of the Linear Amplifier
Tuning pulser’s tune-up period
Available Values: 3 ~ 60 Seconds
Default:10 Seconds
When the [ENT] key is pressed while in Menu Item
U-52, a pulsed signal will be transmitted for a number of seconds, after which the transceiver will return
to the Receive mode. The tuning time period is set
via this Menu Item.
U-56 ( LI-SPAC )
Function: Set the length of the spaces between the
TX pulses defined in Menu Item U-57
Available V alues: 0 ~ 3000 ms.
Default:100 ms.
A lower value set in this Menu Item makes the pulser’s
action more closely appear to resemble a continuous “key-down” tone. The duty cycle is lower , though,
depending on the pulse length set via Menu Item U-
57.
U-57 ( LI-MARK )
Function: Set the length of the TX pulse for the Lin-
ear Amplifier Tuning pulser
Available V alues: 0 ~ 3000 ms.
Default:100 ms.
A lower value set in this Menu Item reduces the duty
cycle of the transceiver/amplifier during linear amplifier tune-up.
80
FT-920 Operating Manual
Page 83

Menu Operation
U-58 ( RLSBCAR )
Function: Set the RX Carrier Point for LSB
Available V alues: - 0.300 ~ 0.500 kHz
Dafault: 0.000
Changing this value is analogous to rotating the IF
SHIFT control, allowing you to preset the frequency
response of the receiver during LSB operation. The
effect of the adjustment can be heard if you turn the
volume up while rotating the VFO-B Tuning Dial to
adjust the setting.
U-59 ( TLSBCAR )
Function: Set the TX Carrier Point for LSB
Available V alues: - 0.300 ~ 0.500 kHz
Dafault: 0.000
This is the same function as that of Menu Item U-58,
as applied to your voice response on LSB (TX). The
effect may be difficult to discern, however, depending on the settings of the TX Equalizer via Menu Item
U-51.
U-60 ( PROCLSB )
Function: Set the TX Carrier Point for LSB when the
Speech Processor is on
Available V alues: - 0.300 ~ 0.500 kHz
Dafault: 0.000
This is the same function as that of Menu Item U-59,
but is applied to your voice response on LSB (T X)
when the Speech Processor is on. Therefore, it is
possible to set two different response characteristics
for your voice, one for “Processor-On” and one for
“Processor Off.”
U-61 ( RUSBCAR )
Function: Set the RX Carrier Point for USB
Available V alues: - 0.300 ~ 0.500 kHz
Dafault: 0.000
Changing this value is analogous to rotating the IF
SHIFT control, allowing you to preset the frequency
response of the receiver during USB operation. The
effect of the adjustment can be heard if you turn the
volume up while rotating the VFO-B Tuning Dial to
adjust the setting.
U-62 ( TUSBCAR )
Function: Set the TX Carrier Point for USB
A vailable Values: - 0.300 ~ 0.500 kHz
Dafault: 0.000
This is the same function as that of Menu Item U-58,
as applied to your voice response on USB (T X). The
effect may be difficult to discern, however, depending on the settings of the TX Equalizer via Menu Item
U-51.
U-63 ( PROCUSB )
Function: Set the TX Carrier Point for USB when the
Speech Processor is on
A vailable Values: - 0.300 ~ 0.500 kHz
Dafault: 0.000
This is the same function as that of Menu Item U-59,
but is applied to your voice response on USB (TX)
when the Speech Processor is on. Therefore, it is
possible to set two different response characteristics
for your voice, one for “Processor-On” and one for
“Processor Off.”
U-64 ( VOX-DLY )
Function: Set the “hang time” for the VOX circuitry
A vailable Values: 0 ~15
Default: 5 (Corresponding to 1 second)
The above scale of 1 ~ 15 is in 0.2 second increments, allowing precise setting of the desired VOX
recovery time.
U-65 ( VX-GAIN )
Function: Set the gain of the VOX circuitry’s input
audio detector
A vailable Values: 0 ~15
Default:15
The adjustment values are an arbitrary scale. Set the
VOX Gain to the level which quickly activates the
transmitter, yet does not pick up extraneous noises
in your operating room.
FT-920 Operating Manual
81
Page 84

U-66 ( VX-ANTR )
Function: Set the level of the “Anti-Trip” circuitry of
the VOX system
A vailable Values: 0 ~15
Default:15
This adjustment scale is also arbitrary. This Menu
Item should be set to the point where loud speaker
volume does not activate the VOX.
U-67 ( Q MENU )
Function: Define which items are to be included in
the “Quick Menu” bank
A vailable Values: All Menu Items
Default: OFF
After pressing [ENT] while using this Menu Item, rotate the VFO-B Tuning Dial to select the Menu Item
to be included/excluded from Quick Menu, then use
the front panel [UPp] or [DOWNq] key to change the
setting for that Menu Item to ON or OFF.
The default setting for this Menu Item is OFF, which
means that there is no Quick Menu feature active.
When this is the case, a momentary press of the
[MENU] key activates “Normal Menu” operation. When
one or more items have been designated for “Quick
Menu” use, however, a momentary press of [MENU]
activates the Quick Menu; pressing and holding
[MENU] in for ½ seconds activates “Normal menu”
operation in this case.
U-68 ( FM STEP )
Function: Set scanning steps/ to be used during FM
operation
A vailable Values: OFF/ 0.5 ~ 50kHz
Default: 10 kHz
This Menu Item sets the scanning steps for FM work
when the “F AST ” synthesizer-step mode is selected.
It allows the radio to be used in a “channelized” mode
according to the channel spacing utilized in your country .
U-69 ( CW-NAR )
Function: Enable/Disable the signal path through the
optional YF-116C CW filter
Available Values: on/oFF
Default: oFF
When the CW filter is installed, the signal path must
be enabled (or the FT-920 will not “know” that the
filter is there). Conversely, if the filter is not installed,
erroneously setting this Menu Item to “ on ” will result in a “dead” receiver if the [NARROW ] key is pressed
during CW operation.
U-70 ( AM-WIDE )
Function: Enable/Disable the signal path through the
optional YF-116A AM filter
Available Values: on/oFF
Default: oFF
When the AM filter is installed, the signal path must
be enabled (or the FT-920 will not “know” that the
filter is there). Set this Menu Item to “ on” to enable
the signal path to the Wide filter. The stock 2.4 kHz
(SSB) filter then becomes the “Narrow” filter during
AM operation.
U-71 ( AUTOTUN )
Function: Enable/Disable automatic retuning of A TU
settings when SWR increases
Available Values: on/oFF
Default: on
This feature instructs the Automatic Antenna Tuner
to re-adjust its settings, without operator intervention,
should the SWR present at the antenna jack increase
above a value of 3:1.
U-72 ( FASTTUN )
Function: Enable/Disable high-speed antenna tuning
Available Values: on/oFF
Default: oFF
The higher-speed tuning option reduces the tuning
time slightly for the ATU. The SWR obtained at the
completion of “Fast” tuning may be slightly higher than
in the “Normal” mode, but this should present no problems in typical operation.
82
FT-920 Operating Manual
Page 85

U-73 ( T-RXANT )
Function: Enable/Disable protection relay in line from
“RX ANTENNA” jack
Available V alues: on/oFF
Default: on
When the [RX ANTENNA ] key is pressed, activating
the Receive-only antenna port, protection for the receiver circuits from high RF voltage is afforded by a
small relay which, in the default condition, opens the
RX Antenna line during transmission. If only very low
RF voltage is present in your installation during transmission, this Menu Item may be turned OFF.
Menu Operation
FT-920 Operating Manual
83
Page 86

VHF/UHF Transverter Operation
Although the FT-920 does not have a dedicated
“Transverter” jack
the multiple antenna ports and the Menu system will
generally provide easy interfacing to VHF and UHF
transverters.
The recommended interconnection points are described below:
r For transceive converters (where both trans-
mit and receive converter circuits use a common RF input/output line), connect the coaxial
cable from the transverter to the [B] antenna
jack.
r For separate receive and transmit converter
units, connect the transmit converter’s coaxial
cable to the [B] antenna jack, and the receive
converter’s coaxial cable to the [RX ANT IN] RCA
jack on the rear panel of the FT-920.
per se
, the flexibility provided by
r Select Antenna-B by pressing the [ANTENNA A/
B] switch, if needed.
r Press VFO-A’ s Orange “TX” LED/Switch for ½
second to activate the “TX Mute” mode, which
provides a maximum power output of 10 Watts.
r Now rotate the RF PWR control fully counter-
clockwise. At this setting, power output will be
essentially zero, and you may then adjust the
RF PWR control slightly clockwise so as to
Important Note:
takenly assign a different band to Antenna B,
or forget to turn the RF P WR control fully
counter-clockwise, the maximum power which
will appear at the Antenna B port will be 10
watts. If you design an input protection attenuator network correctly, you should easily be
able to provide “fail-safe” protection for your
VHF/UHF transverter.
Even though you might mis-
84
FT-920 Operating Manual
Page 87

Overview
Phone patch operation allows linking your FT-920 to
the public telephone system to provide two-way simplex communications on behalf of third parties. The
FT-920 may be used with the LL-7 phone patch unit
installed in the optional SP-8 external loudspeaker,
or with phone patch units from other manufacturers.
The diagram at the bottom of the page shows interconnection for the SP-8/LL-7 combination; be sure
to consult the documentation provided with units of
non-Yaesu manufacture for installation instructions.
Operation
Phone patch Tx/Rx switching may be done manually
using the PTT method, or automatically using the
VOX circuitry of the transceiver. While the manual
(“PTT”) method does not require careful balancing
of the LL-7’s bridge circuit, it
by the operator (you must manually switch the PTT
or MOX switch every time someone in the patched
conversation says “Over”). Therefore, most operators prefer to use the VOX method whenever the
telephone signal-to-noise ratio permits. If the telephone line noise level is high, however, the PTT
method may still be necessary, so you should become familiar with both methods.
does
require more work
Phone Patch Operation
Note
You may need to contact your telephone company for permission to connect an external device, such as a phone patch, to the telephone
system’s lines. Also, you should procure and
use a suitable 600 Ω, three-way transformer if
connecting the LL-7
to the same telephone line.
Regardless of which patch Tx/Rx control method is
used, you may need to instruct the person on the
telephone to speak slowly in a clear, steady voice
level, and to say “Over” when a response is expected
from the other party . This will serve as a notice to you
(if you are using PTT control) to switch to receive
while signaling the other station to go ahead and transmit, so as to avoid “doubling” with the other station.
During all phone patch operation, you should monitor both sides of the conversation at all times (this
may be required by law); this will, of course, require
a telephone at the operating position.
and
a telephone handset
FT-920 Operating Manual
85
Page 88

CAT
(
Computer-Aided Transceiver
) System Protocol
The CAT System in the FT-920 provides control of
frequency , VFO, memory, and other settings through
the use of command codes sent from an external
personal computer. This allows multiple control operations to be fully automated as a single mouse click,
or it allows a third-party software package (such as
contest logging software) to communicate with the
FT-920 without operator intervention.
The FT-920 has a built-in level converter, allowing
direct connection from the rear panel CAT jack to
the serial port of your computer, without the need for
an external RS-232C level converter box.
Y ou will need a serial cable for connection to the (RS232C) COM port of your computer. Purchase or construct a standard serial cable (not the so-called “null
modem” type), ensuring it has the correct gender and
number of pins for connection to your system.
Yaesu Musen does not produce CAT System oper-
ating software, due to the wide variety of personal
computers, operating systems, and applications in
use today. However, the FT-920 (and other Yaesu
products) are widely supported by third-party software
packages, and we recommend that you contact your
dealer for advice, or check advertisements in amateur radio journals. Most software vendors also have
Home Pages on the World Wide Web containing a
wealth of information on the features and radio support for their software packages.
The information presented in this section will allow
the programmer to understand the command structure and opcodes used in the FT-920’s CAT Sys-
tem.
Opcode Command Chart
# Com mand Title O pcode Para meter Com ments
1
SP LIT On /O ff 01 H P 1 xx x x x x P1= 00 : Off, P 1 = 0 1: O n
2
Re call Memory 02H P1 xx xx xx See N ote 1
3
Memory Operations 03H P1 P2 xx xx See Note 2
4
Recal l VFO 05H P 1 xx x x x x P1= 00: VFO -A, P1=01: VFO-B
5
Copy Memory Data to VFO-A 06H P1 xx x x xx See Note 3
6
Clarifier Operations 09H P1 P2 P3 P4 See Note 4
7
Set VFO-A Frequency 0AH P1 P2 P3 P4 See Note 5
8
Mode Setting 0CH P1 xx xx xx See Note 6
9
Update IntervalPacing 0EH P1 xx xx xx
10
Status Update 10H P1 xx xx P4 See Note 7
11
Keyer Commands 70H 1B 01 P3 xx See Note 8
12
T une r On /O ff 81H P1 xx xx x x P1=00 : Of f, P1=01: On
13
Tuner Start 82H xx xx xx xx
14
Repeater Shift 84H P 1 xx x x xx P1=00: SIMPLEX, P1=01: M inus Shift, P1=02: Pl us Shift
15
Set VFO-B Frequency 8AH P1 P2 P3 P4 See Note 9
16
Bandwidth 8CH P1 xx xx P4 See Note 10
17
Tone Fr equ ency 9 0H P1 P2 xx xx S ee Note 11
18
Read Meter F7H P1 xx xx xx See Note 12
19
Read Status Flags FAH 01 xx xx xx
P=00~FF(H) in 1 m s. steps. Adds delay between each
by te o f al l do wnl o aded d ata f r om t he F T - 92 0
86
FT-920 Operating Manual
Page 89

(
CAT
Computer-Aided Transceiver
Notes to Opcode Command Chart
Note 1:
P1 = 01~7A: Memory Channel Number (Hex)
01~63: Memory Channels 1-01~1-99
64~6D: Memory Channels d-01~d-10
6E~78: Memory Channels C-01~C-11
79~7A: Memory Channels P-Lo~P-Hi
Note 2:
P1 = 01~7A: Memory Channel Number (Hex)
01~63: Memory Channels 1-01~1-99
64~6D: Memory Channels d-01~d-10
6E~78: Memory Channels C-01~C-11
79~7A: Memory Channels P-Lo~P-Hi
P2 = 00: Memory Store
P2 = 01: Memory Clear
P2 = 02: Memory Recall
Note 3:
P1 = 01~7A: Memory Channel Number (Hex)
01~63: Memory Channels 1-01~1-99
64~6D: Memory Channels d-01~d-10
6E~78: Memory Channels C-01~C-11
79~7A: Memory Channels P-Lo~P-Hi
Note 4:
P1 = 00: RX Clarifier Off P2 = 00: Clarifier Offset (+)
P1 = 01: RX Clarifier On P2 = FF: Clarifier Offset (-)
P1 = 80: TX Clarifier Off
P1 = 81: TX Clarifier On P3 = 00~09 (kHz)
P1 = FF: Set Clarifier P4 = 00~00 (100/10 Hz)
Note 5:
The frequency is converted to its BCD-coded components.
For example: to convert 14.256.78 MHz
P1 P2 P3 P4
¯¯¯¯
5 Byte Block = 0A, 01, 42, 56, 78
Opcode
Note 6:
VFO-A Mode Parameters VFO-B Mode Parameters
P1 = 00: LS B P1 = 80: LSB
P1 = 01: USB P1 = 81: USB
P1 = 02: CW-USB P1 = 82: CW-USB
P1 = 03: CW-LSB P1 = 83: CW-LSB
P1 = 04: AM P1 = 84: AM
P1 = 05: AM P1 = 85: AM
P1 = 06: FM P1 = 86: FM
P1 = 07: FM-N P1 = 87: FM-N
P1 = 08: DATA-LSB P1 = 88: DATA-LSB
P1 = 09: DATA-LSB P1 = 89: DATA-LSB
P1 = 0A: DATA-USB P 1 = 8 A: DATA-USB
P1 = 0B: DATA-FM P1 = 8B: DATA-FM
Note 7:
Status Update Data
P1 = 01: Memory Channel Number (1 byte)
P1 = 02: Current Operating Data for VFO/Memory (28 bytes)
P1 = 03: VFO-A and VFO-B Data (28 bytes)
P1 = 04: Memory Channel Data: (14 bytes)
P4 = 01~89 Memory Channel Number (used when P1 = 04)
01~63: Memory Channels 1-01~1-99
64~6D: Memory Channels d-01~d-10 (VFO-A)
6E~78: Memory Channels C-01~C-11
79~7A: Memory Channels P-Lo~P-Hi
7B~84: Memory Channels d-01~d-10 (VFO-B)
85~89: QMB Memories S-01~S-05
)
System Protocol
Note 8:
P3 = 00: Keyer Memory 0
P3 = 01: Keyer Memory 1
P3 = 02: Keyer Memory 2
P3 = 03: Keyer Memory 3
P3 = 04: “ID” Memory
P3 = 05: “Contest Number” Memory
P3 = 06: Keyer Memory Down
P3 = 07: Keyer Memory Up
P3 = 08: Keyer Memory Playback (no Tx)
P3 = 09: Write Memory
Note 9:
The frequency is converted to its BCD-coded components.
For example: to convert 14.256.78 MHz
P1 P2 P3 P4
¯¯¯¯
5 Byte Block = 8A, 01, 42, 56, 78
Opcode
Note 10:
VFO-A Mode Parameters VFO-B Mode Parameters
P1 = 00: Wide P1 = 80: Wide
P1 = 01: Wide P1 = 81: Wide
P1 = 02: Narrow P1 = 82: Narrow
P1 = 03: Narrow P1 = 83: Narrow
P1 = 04: Wide P1 = 84: Wide
Note 11:
P1 = 00~28: Tone Encoder Frequency (Hex)
P2 = 00~27: Tone Decoder Frequency (Hex)
Note 12:
A digitized meter deflection indication is returned, with value between 0 and FFH; four sets of this data are sent, plus one padding byte (0F7H), as follows:
Meter Byte Meter Byte Meter Byte Meter Byte F7H
P1 = 00: S/PO, ALC, VOLT, AMP
P1 = 01: FWD, REV, SHIFT, PITCH
P1 = 02: Dummy byte, SQL, HPF, LPF
P1 = 03: NR, PROC, DISC, RMC
CTCSS Tone Data
P1P2Freq .
(Hz)P1P2
00h OFF 0Bh 94.8 16h 136.5 21h 203.5
01h 67.0 0Ch 97.4 17h 141.3 22h 210.7
02h 69.3 0Dh 100.0 18h 146.2 23h 218.1
03h 71.9 0Eh 103.5 19h 151.4 24h 225.7
04h 74.4 0Fh 107.2 1Ah 156.7 25h 233.6
05h 77.0 10h 110.9 1Bh 162.2 26h 241.8
06h 79.7 11h 114.8 1Ch 167.9 27h 250.3
07h 82.5 12h 118.8 1Dh 173.8 28h* 1750
08h 85.4 13h 123.0 1Eh 179.9
09h 88.5 14h 127.3 1Fh 186.2
0Ah 9 1. 5 15 h 131. 8 20 h 192. 8 * 28h = P1 onl y
Freq .
(Hz)P1P2
Freq .
(Hz)P1P2
Freq .
(Hz)
FT-920 Operating Manual
87
Page 90

CAT
(
Computer-Aided Transceiver
) System Protocol
CAT
Serial data is passed via the
Data Protocol
jack on the rear
CAT
panel of the transceiver at 4800 bps. When data is
being transferred, the
indicator on the front
CAT
panel display is illuminated momentarily, disappearing when the data flow is terminated. All commands
sent from the computer to the transceiver consist of
five-byte blocs, with up to 200 ms between each byte.
The last byte in each block is the
instruction opcode
while the first four bytes of each block are arguments
(either parameters for that instruction, or dummy values required to pad the block out to five bytes).
B yt e 1 B yt e 2 B yt e 3 Byt e 4 B yt e 5
A rgu me nt Ar gu me nt A r gum ent A rgu m ent
CAT 5-BYTE COMM AND STRUCTIURE
Instruction
OPC O DE
Each byte sent consists of one start bit, 8 data bits,
no parity bit, and two stop bits:
Start
01234567
Bit
CAT DATA BYTE FORM AT
Stop
Bit
Stop
Bit
There are nineteen instruction opcodes for the FT920, listed in the chart on page 86. Most of these
duplicate front panel operations, while some replicate
Menu functions. Note that most commands require
one or more parameters to be set; however, regardless of the number of parameters present, every
Command Block sent
must
consist of five bytes.
Constructing and Sending
CAT
Commands
Example #1:
Set VFO-A to 14.250.00 MHz
r Per the CA T Command Table, the opcode for “Set
VFO-A Frequency” is “0AH. ” Note that the “ H”
following each byte value indicate hexadecimal
(base 16) values. Placing the opcode into the fifth
data bit position, we then enter the frequency into
,
the first four data bit positions:
10'sHz100'sHz1's
00052410
00 50 42 01
Byte 1Byte 2Byte 3Byte 4
kHz
10's
kHz
100's
kHz
1's
MHz
10's
MHz
100's
MHz
The four argument byte values are constructed
from the decimal value by breaking the frequency
into 2-digit blocks (in BCD “packed decimal” format). Leading zeroes
are required
in the hundreds-of-MHz place as well as the tens-of-MHz
place (when below 10 MHz).
r We now insert the four-byte BCD-coded frequency
(00, 50, 42, 01) into the five-byte block along with
the parameter byte, resulting in a complete command string in hex format:
Byte 1Byte 2Byte 3Byte 4Byte 5
00 50 42 01 0AH
Da ta /Arg u ment Byt es O pcod e
Send these five bytes to the transceiver, in the
order shown in the table above, left to right: 00
50 42 01 0AH
88
Accordingly, any CAT control program must con-
struct the five-byte block by selecting the appropriate
instruction opcode, organizing the parameters, if any ,
and providing unused “dummy” argument bytes to
pad the block to its required five-byte length (the
dummy bytes can contain any value). The resulting
five bytes are then sent,
opcode last
, from the computer to the FT-920 CPU via the computer’s serial
port and the transceiver’s CAT jack.
Example #2:
Store the above frequency (14.250 MHz) into Memory
Channel #1-48
r Memory operation is exercised by Opcode 03H.
In base 16 (hexadecimal), Memory Channel #48
is channel 30. And, pursuant to Note #2 associated with Opcode 03H, parameter P2 (Memory
Set) must be set to value “00.” Therefore, the corresponding five-byte command/parameter block
would be 00 00 00 30 03H.
Byte 1Byte 2Byte 3Byte 4Byte 5
00 00 00 30 03H
Da ta /Arg u ment Byt es O pcod e
In sum, commands are sent in the following general
format:
Byte 1Byte 2Byte 3Byte 4Byte 5
P4 P3 P2 P1 Opcode
FT-920 Operating Manual
Page 91

CAT
(
Computer-Aided Transceiver
)
System Protocol
Downloading FT-920 Data
On command, the FT-920 will download some or all
of its operational data. By regular polling of the transceiver, your software can be kept continuously updated on the status of the FT-920 operating environment.
The following commands cause the FT-920 to download various components of its operational status:
Status Update
transceiver to download frequency and memory
channel data, per the parameter data supplied in
the Status Update request (parameters P1 & P4).
Status Flags Request
structs the transceiver to download eight status
flag bytes.
Read Meter
ceiver to download meter deflection data in packs,
pursuant to Note 12 following the “Opcode Command Chart on page 86.
Pacing
(0EH): this Opcode sets the delay between
bytes of data when you request a download of
data. This delay is set to zero initially, but resetting it to a higher value will allow slower computers to read and process data returned by the radio. However, the download time will be significantly increased if a high value is used in this
command’s “P1” argument.
(10H): this Opcode causes the
(FAH): this Opcode in-
(F7H): this Opcode causes the trans-
These Opcodes are detailed below.
Status Update
(10H)
Depending on the value of parameter P1, this command will return:
• One byte containing the current Memory
Channel Number (P1=01);
• Two 14-byte records of the current operating
frequency (VFO or Memory; P1-02);
• One each 14-byte record for VFO-A and VFOB (P1=03); or
• One 14-byte record of Memory Channel data
(P1=04).
When P1 is set to value 04, parameter P4 may be
set to a hexadecimal value between 00 and 89 to
prompt the transceiver to download frequency information on any of the memories, as shown in Note 7
on previous page. So P1=04 instructs the radio to
download memory data, and P4’s value defines which
memory channel’s data is to be downloaded.
The format for the 14-byte frequency data records is
shown at the end of this sub-section.
Status Flags Request
(FAH)
The format for the eight Status Flags is shown below:
8-Byte Status Flags Record Table
Bit O ffset S tat us Flag Byte #0 Con te nt s
0 Split Operation active with VF O-B on TX
1 Split Operatio n active with VFO-B on RX
2 Antenna Tuner On/tuning
3 CAT Sys tem ope ration in prog res s
4 VFO-B In Us e (both TX and RX on V FO-B)
5 Dir ec t Keypa d E nt r y i n progress
6VFO-A is Muted
7 Tran sm issio n in progr e ss (PTT li n e g roun ded )
Bit O ffset S tat us Flag Byte #3 Con te nt s
0 Not Used
1 Alpha-Nume ric Memory Lav el selecte d
2 Not Used
3 Lin e ar Amplifier Tuni ng Pulser act ive
4 PTT grounded via CAT command
5 Transmit "Inh ibit" is active
6 Key R e leas e Timer actve
7PTT inhibit
Bit O ffset S tat us Flag Byte #6 Con te nt s
0 Dua l Watch acti ve
1 Not Used
2 Qu ic k Menu Mode act iv e
3 BUSY lamp is on
4 Fi ne Tuning act iv e
5 Not Used
6 V FO -B Tx Mu te a c t i v e
7 V FO -A Tx Mu te a c t i v e
Bit O ffset S tat us Flag Byte #1 Con te nt s
0 5-sec ond "M e mory Ch ec k" countdown in prog ress
1 M em or y C he cking in progres s
2 Dual VFO Tracking active
3 Quick Memory Bank (QMB) s elected
4 Mem ory Tuni ng in progress
5 VFO Operatio n selec ted
6 Memory Mode selected
7 Gener al Cov era ge Re cepti on activ e
Bit O ffset S tat us Flag Byte #4 Con te nt s
0 RTTY space (TX Idle)
1 Not Used
2 All Front Panel Controls locked
3 Group Memory Mode active
4 Ante n na B sel e cte d
5 Rx Antenna selected
6 Not Used
7 Not Used
Bit O ffset S tat us Flag Byte #7 Con te nt s
0 Not Used
1 M enu Setting in prog r es s
2 CTCSS/Tone Burst active
3 Not Used
4 Not Used
5 Linear Am p li f ier Tuning Pulse being tr ansmitte d
6 DTM F Tone are being transmit ted
7 VOX is active
Bit O ffset S tat us Flag Byte #2 Con te nt s
0 Fast Tuning is acti ve
1 Antenna Tuner is in-line
2 VFO-B is loc ked
3 VFO-A is loc ked
4 Squelch is closed
5 Up s canning is active
6 Scanning is paused
7 Scan ning is act ive
Bit O ffset S tat us Flag Byte #5 Con te nt s
0VFO-A is muted
1VFO-B is muted
2 Not Used
3 Tx activated via Spot switch command
4 Not Used
5 Not Used
6 Antenna Tuner's Wait light is on
7 High SWR detected
FT-920 Operating Manual
89
Page 92

CAT
(
Computer-Aided Transceiver
) System Protocol
Read Meter
(F7H)
Sending this command with the parameters shown
below causes a variety of transceiver metering data
to be downloaded. The values are within the range 0
and FFH, and the data is returned in the following
format:
Parameter
P1 = 00 S/PO ALC VOLT AMP F7H
P1 = 0 1 FWD RE V SHIFT P ITCH F 7H
P1 = 0 2 Du mmy SQ L HPF LPF F7H
P1 = 03 NR PROC D ISC RMC F7H
Meter
Byte
Meter
Byte
Meter
Byte
Meter
Byte
Pad
The “dummy” data above is meaningless, and may
be ignored.
1-Byte Memory Channel Number
Data Structure (For Opcode 10H, etc.)
Mem ory Channel Data (H ex Codes)
Ch. He x Ch. He x Ch. He x Ch. He x
5EH
1-9 4
3FH
1-6 3
20H
1-3 2
01H
1-0 1
1-0 2
1-0 3
1-0 4
1-0 5
1-0 6
1-0 7
1-0 8
1-0 9
1-1 0
1-11
1-1 2
1-1 3
1-1 4
1-1 5
1-1 6
1-1 7
1-1 8
1-1 9
1-2 0
1-2 1
1-2 2
1-2 3
1-2 4
1-2 5
1-2 6
1-2 7
1-2 8
1-2 9
1-3 0
1-3 1
02H
03H
04H
05H
06H
07H
08H
09H
0AH
0BH
0C H
0D H
0EH
0FH
10H
11H
12H
13H
14H
15H
16H
17H
18H
19H
1AH
1BH
1C H
1D H
1EH
1FH
1-3 3
1-3 4
1-3 5
1-3 6
1-3 7
1-3 8
1-3 9
1-4 0
1-4 1
1-4 2
1-4 3
1-4 4
1-4 5
1-4 6
1-4 7
1-4 8
1-4 9
1-5 0
1-5 1
1-5 2
1-5 3
1-5 4
1-5 5
1-5 6
1-5 7
1-5 8
1-5 9
1-6 0
1-6 1
1-6 2
21H
22H
23H
24H
25H
26H
27H
28H
29H
2AH
2BH
2C H
2D H
2EH
2FH
30H
31H
32H
33H
34H
35H
36H
37H
38H
39H
3AH
3BH
3C H
3D H
3EH
1-6 4
1-6 5
1-6 6
1-6 7
1-6 8
1-6 9
1-7 0
1-7 1
1-7 2
1-7 3
1-7 4
1-7 5
1-7 6
1-7 7
1-7 8
1-7 9
1-8 0
1-8 1
1-8 2
1-8 3
1-8 4
1-8 5
1-8 6
1-8 7
1-8 8
1-8 9
1-9 0
1-9 1
1-9 2
1-9 3
40H
41H
42H
43H
44H
45H
46H
47H
48H
49H
4AH
4BH
4C H
4D H
4EH
4FH
50H
51H
52H
53H
54H
55H
56H
57H
58H
59H
5AH
5BH
5C H
5D H
1-9 5
1-9 6
1-9 7
1-9 8
1-9 9
d-0 1
d-0 2
d-0 3
d-0 4
d-0 5
d-0 6
d-0 7
d-0 8
d-0 9
d-1 0
C-0 1
C-0 2
C-0 3
C-0 4
C-0 5
C-0 6
C-0 7
C-0 8
C-0 9
C-1 0
C-11
P-Lo
P-Hi
5FH
60H
61H
62H
63H
64H
65H
66H
67H
68H
69H
6AH
6BH
6C H
6D H
6EH
6FH
70H
71H
72H
73H
74H
75H
76H
77H
78H
79H
7AH
14-Byte Frequency Data
Record Structure
The following tables outline the 14-byte data record
structures used for the Operating Data, VFO-A, VFOB, and Memory Frequency data records.
Byte 1 4-Byte Data Rec ord Assignme nt
1 Ban d Selectio n
2
3
4
5
6
7
8Mode Data
9Flag
AFilter Data 1
BFilter Data 2
C C TC SS Enc oder D at a
D CTCSS Decoder Data
E M emo ry Recall Flag
O per at ing Fr equ enc y
Cla rifier Offset
(2 Bytes, see below)
90
Tone Frequency Codes
P1P2Freq .
(Hz)P1P2
00h OFF 09 h 8 8.5 12 h 118.8 1Bh 16 2. 2 24 h 22 5.7
01h 67.0 0Ah 91.5 13h 123.0 1Ch 167.9 25h 233.6
02h 69.3 0Bh 94.8 14h 127.3 1Dh 173.8 26h 241.8
03h 7 1. 9 0C h 97. 4 15 h 13 1. 8 1E h 17 9. 9 27 h 25 0.3
04h 7 4. 4 0D h 100.0 16 h 136. 5 1F h 186. 2 2 8h* 175 0
05h 7 7. 0 0Eh 10 3. 5 17 h 141. 3 20h 192. 8
06h 7 9. 7 0F h 107.2 18 h 146. 2 21 h 203. 5
07h 8 2. 5 10 h 110.9 19h 151.4 22 h 210. 7
08h 8 5.4 11h 114.8 1Ah 15 6. 7 23 h 21 8. 1 * 28h = P1 only
Freq .
(Hz)P1P2
Freq .
(Hz)P1P2
Freq .
(Hz)P1P2
Freq .
(Hz)
FT-920 Operating Manual
Page 93

Memory Backup
The FT-920’s memory data is maintained, even when
DC power it turned off, via a lithium backup battery
with an estimated lifetime of approximately five years.
No data essential to the fundamental operation of the
radio is stored in “volatile” memory, so when the
battery’s voltage ultimately is exhausted the transceiver will not be disabled; you will just observe that
your memories have disappeared.
In some cases of erratic operation, it may be advisable to reset the microprocessor to its factory default
condition, so as to determine whether or not a part
failure has caused improper action, as opposed to
some operational error.
This section describes the procedures to be used for
these situations.
Backup Battery Replacement
The backup battery is a standard Sony™ CR2032
(or equivalent), which is installed in a socket on the
bottom side of the transceiver. Replacement of the
battery is easy to accomplish:
Remove the bottom cover of the transceiver (see
page 93).
Locate the backup battery, per the illustration, lo-
cated near the front panel in the vicinity of the bright
silver enclosure on the left side. Remove the original backup battery , and replace it with a fresh one
(be sure the replacement battery shows at least 3
Volts on a Voltmeter).
Before closing the case, be certain to check that
you have not accidentally changed the position of
the BACKUP switch, located near the backup battery but immediately adjacent to the above-referenced silver enclosure. This switch must be in the
ON position for the backup system to work.
Close up the case, replacing the six screws on
the bottom, then tightening the four screws on the
side panels. Be careful not to pinch any wires while
re-assembling the radio.
FT-920 Operating Manual
91
Page 94

Microprocessor Resetting
Microprocessor Reset Procedures
Three levels of microprocessor resetting are available, only two of which are typically used. These are:
r A reset of all memories, antenna tuner data, and
VFO frequencies to their factory defaults. Menu
settings are
this, turn the transceiver off, then press and hold
in the [GEN] and [ENT] keys on the keyboard
hold them in while you turn the
on
. The VFO-B frequency display area will indicate “INITIAL” and a series of “Dashes” will slowly
disappear across the middle of the VFO-A frequency display area. When the initialization procedure is complete, the frequency displays, newly
reset to 7.000 MHz in the LSB mode, will reappear.
r A reset of just the Menu settings is also possible.
This will not wipe out any other memories, but will
allow you to clear all Menu settings to their original factory default values. T o do this, turn the trans-
not
affected by this procedure. To do
[POWER]
switch back
and
ceiver off., then press and hold in the [MENU] and
[CLEAR CLAR] keys
the
[POWER]
r If the transceiver’s microprocessor still is behav-
ing erratically, you may need to perform a complete, “hard” reset of the CPU. To do this, remove
the bottom cover of the transceiver as described
previously. Now set the BACKUP switch to the OFF
position. Wait about 30 seconds, then plug the
DC cable back into the rear panel DC jack. Turn
the transceiver on, then carefully turn the BACKUP
switch on using a non-conducting alignment tool
or a toothpick. The transceiver may now be turned
off, the DC cable removed, and the bottom cover
replaced.
Important Note!
Be extremely careful not to come in contact with any
transceiver internal circuitry while the bottom case is
removed, as possibly dangerous voltages may exist
inside the case.
and hold them in while you turn
switch back on.
92
FT-920 Operating Manual
Page 95

Installation of Optional Accessories
Bottom Case Removal
Turn the transceiver off, and remove all cables
connected to it.
Turn the transceiver upside down, and remove
the six screws affixing the bottom panel of the
radio. Loosen the four screws on the sides of the
upper case, but do not remove them.
Now fold the rear of the bottom panel slightly away
from the chassis, and remove the bottom panel
by sliding it rearward.
To close up the case, replace the six screws on
the bottom, then tighten the four screws on the
side panels. Be careful not to pinch any wires while
re-assembling the radio.
Figure 1
FT-920 Operating Manual
Figure 2
93
Page 96

Installation of Optional Accessories
Installation of
Optional Filters YF-116C/YF-116A
Remove the bottom case of the transceiver (see
previous page).
Refer to Figure 2 on the previous page, and lo-
cate the mounting positions for the CW (YF-1 16C)
and/or AM (YF-116A) filters on the MAIN Unit.
Refer to Figure 3, and push the optional filter board
onto the pins corresponding to its assigned mounting location on the radio. Gently press the board
down until it is firmly seated in its connectors.
Replace the bottom case of the transceiver.
Turn the transceiver on, and enter the Menu mode.
Per the chart below, change the setting of Menu
Item U-69 to “ON” if installing the YF-116C CW
filter, and/or change the setting of Menu Item U70 to “ON” if installing the YF-116A AM filter.
Filter installation is now complete.
94
Installation of
High-Stability Oscillator TCXO-7
Remove the bottom case of the transceiver (see
previous page).
Refer to Figure 2 on the previous page, and lo-
cate the mounting position for the TCXO-7, which
currently is occupied by the “REF OSC UNIT.”
Refer to Figure 4, and remove the REF OSC UNIT,
replacing it with the TCXO-7.
Installation is now complete, as the TCXO-7 has
been carefully aligned at the factory and should
require no adjustment after installation. Replace
the bottom case of the transceiver.
Installation of FM Unit FM-1
Remove the bottom case of the transceiver (see
previous page).
Refer to Figure 2 on the previous page, and lo-
cate the mounting positions for the FM-1 on the
MAIN Unit.
Refer to Figure 5, and push the optional FM-1
board onto the pins corresponding to its assigned
mounting location on the radio. Gently press the
board down until it is firmly seated in its connectors.
Installation is now complete, as the FM-1 has been
carefully aligned at the factory and should require
no adjustment after installation. Replace the bottom case of the transceiver.
FT-920 Operating Manual
Page 97

CAUTION !
Changes or modifications to this device not expressly approved by Yaesu
Musen could void the user’s authorization to operate this device.
1. This device complies with part 15 of the FCC Rules. Operation is subject
to the following two conditions; (1) this device may not cause harmful
interference, and (2) this device must accept any interference including
interference that may cause undesired operation.
2. The scanning receiver in this equipment is incapable of tuning, or readily
being altered, by the User to operate within the frequency bands allocated
to the Domestic public Cellular Telecommunications Service in Part 22.
This device complies with RSS-210 of Industry Canada. Operation is subject
to the following two condition; (1) this device not cause interference, and (2)
this device must accept any interference, including interference that may
cause undesirable operation of the device.
Page 98

Copyright 1997
Yaesu Musen Co., Ltd.
All rights reserved.
.... leading the way.
SM
No portion of this manual
may be reproduced without
the permission of
Yaesu Musen Co., Ltd.
 Loading...