

Xerox WorkCentre 7525, WorkCentre 7530, WorkCentre 7535, WorkCentre 7545, WorkCentre 7556 Quick Use Guide [fr]
EN
More Information
FR
Informations supplémentaires
www.xerox.com/office/WC75xxsupport
www.xerox.com/msds (U.S./Canada)
www.xerox.com/environment_europe
www.xerox.com/office/businessresourcecenter
www.xerox.com/security
Xerox® WorkCentre® 7500 Series
Multifunction Printer
www.xerox.com/office/WC75xxsupport
EN
• Print drivers and utilities
• User manuals and instructions
• Online Support Assistant
• Safety specifications (in User Guide)
FR
• Pilotes d'imprimante et utilitaires
• Manuels d'utilisation et instructions
• Assistant de support en ligne
• Spécifications de sécurité
(dans le Guide d'utilisation)
www.xerox.com/msds (U.S./Canada)
www.xerox.com/environment_europe
EN
Material Safety Data Sheets
FR
Fiches de données de sécurité
www.xerox.com/office/
businessresourcecenter
EN
Templates, tips, and tutorials
FR
Modèles, conseils et didacticiels
www.xerox.com/security
EN
Security news and information
FR
Informations de sécurité
®
Xerox
WorkCentre® 7500 Series
Quick Use Guide
Petit guide d’utilisation
604E55311 Rev A © 2011 Xerox Corporation. All rights reserved.
Xerox® and the sphere of connectivity design are trademarks of Xerox Corporation
in the United States and/or other countries.

2
www.xerox.com/office/WC75xxsupport
EN
FR
Contents
Sommaire
EN
Printer Tour........................................................................................................................................................3
FR
Découverte de l'imprimante
EN
Control Panel ....................................................................................................................................................3
FR
Panneau de commande
EN
Machine Status Menu...................................................................................................................................5
FR
Menu État machine
EN
Billing and Usage Information..................................................................................................................6
FR
Informations de facturation et d'utilisation
EN
CentreWare Internet Services....................................................................................................................7
FR
Services Internet CentreWare
EN
Configuration Report.....................................................................................................................................7
FR
Relevé de configuration
Printer Basics ................................................................................................................3
Généralités
EN
FR
EN
Print Drivers.......................................................................................................................................................8
FR
Pilotes d'imprimante
EN
Installing Drivers.............................................................................................................................................8
FR
Installation des pilotes
EN
Supported Media.........................................................................................................................................10
FR
Supports pris en charge
EN
Printing from USB........................................................................................................................................12
FR
Impression depuis un lecteur USB
Printing............................................................................................................................8
Impression
EN
FR
EN
Basic Copying................................................................................................................................................14
FR
Copie de base
Copying........................................................................................................................ 14
Copie
EN
FR
EN
Scan to Email.................................................................................................................................................16
FR
Numérisation courrier électronique
Scanning...................................................................................................................... 16
Numérisation
EN
FR
EN
Basic Faxing...................................................................................................................................................18
FR
Télécopie de base
Faxing ........................................................................................................................... 18
Télécopie
EN
FR
EN
Loading Media..............................................................................................................................................11
FR
Chargement du papier
EN
Troubleshooting .......................................................................................................20
FR
Résolution des incidents
EN
Paper Jams.....................................................................................................................................................20
FR
Incidents papier
EN
Printer Tour
FR
Découverte de l'imprimante
EN
EN
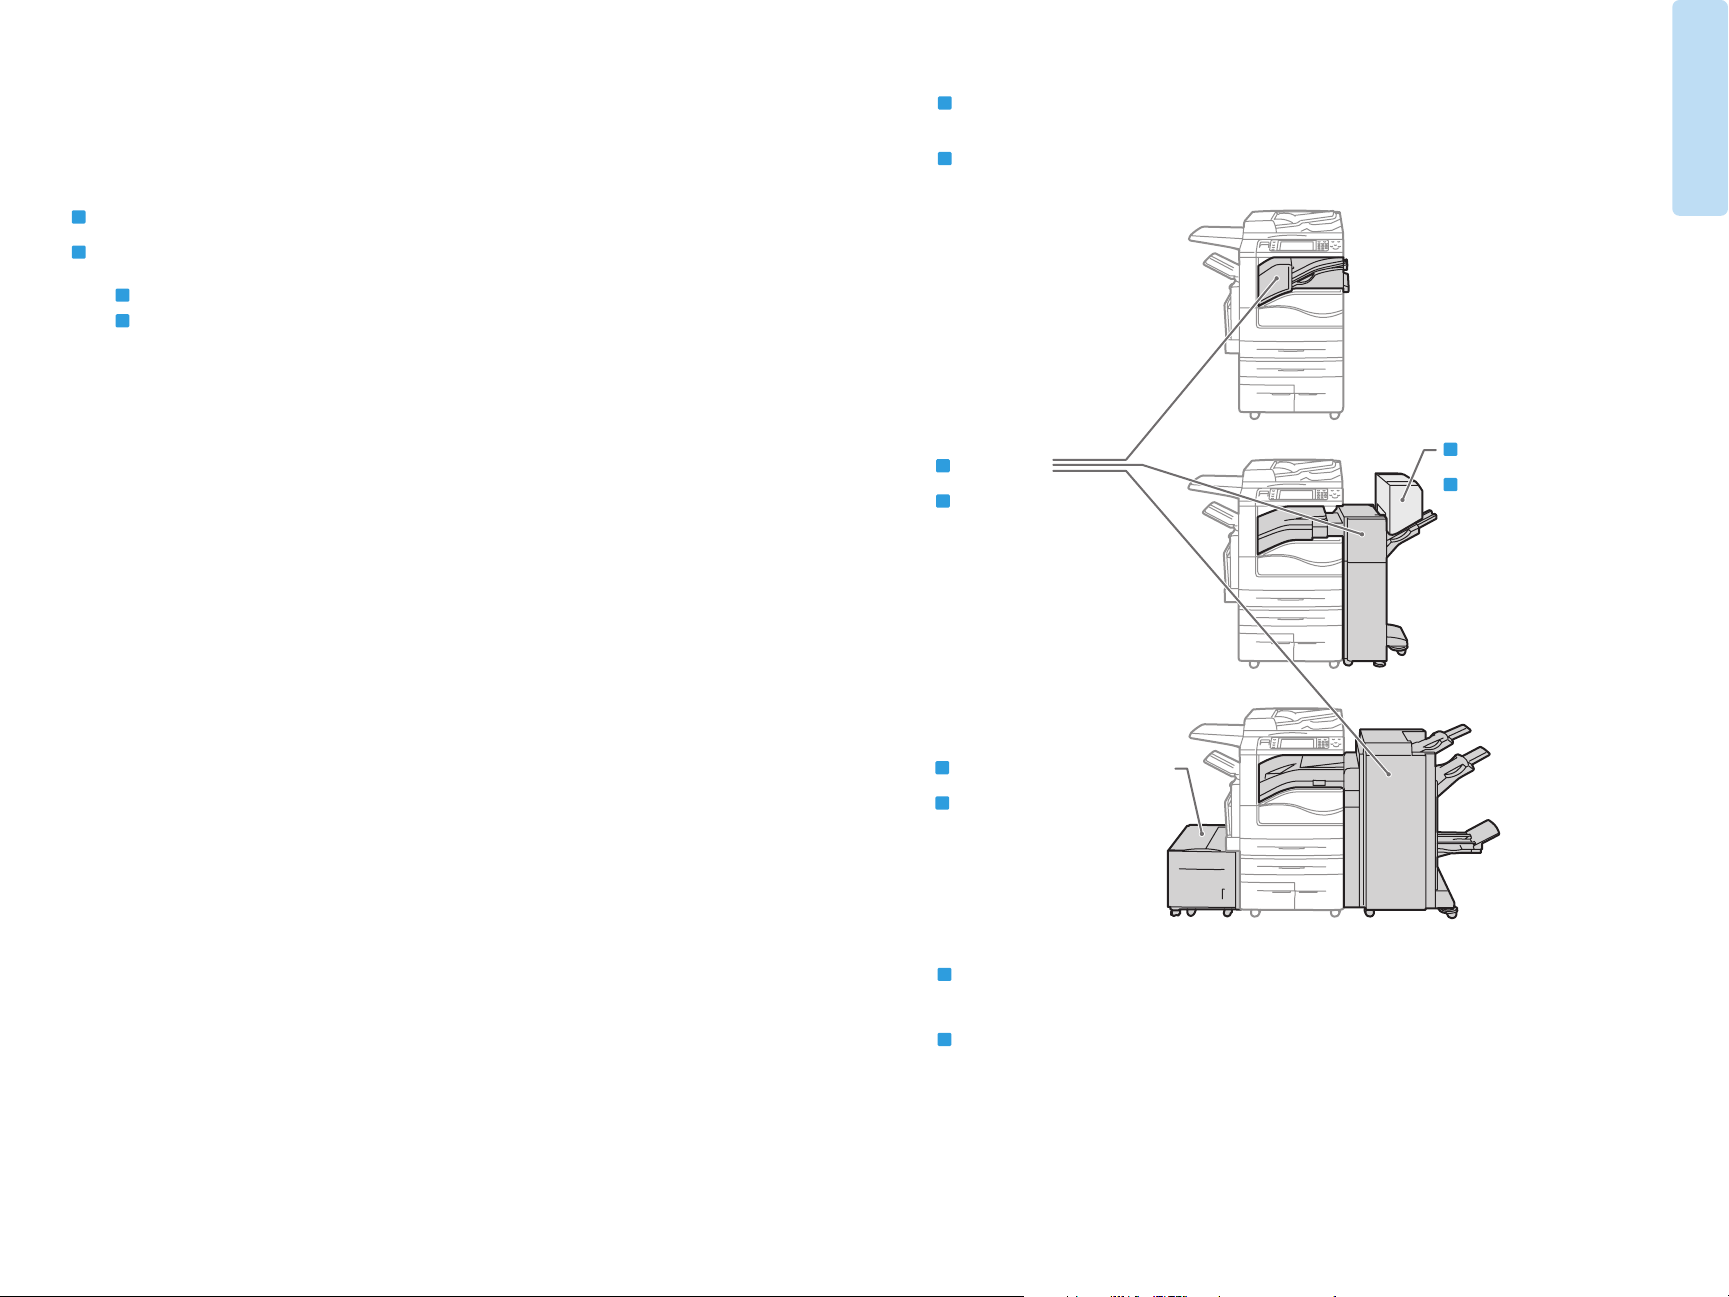
Finishers
FR
Modules
Booklet Maker
FR
Plieuse/brocheuse
de finition
Printer Basics
Généralités
www.xerox.com/office/WC75xxsupport
EN
High-Capacity Feeder
FR
Magasin grande
capacité
EN
Optional accessories may be part of your printer setup.
See the User Guide for more information.
FR
Votre imprimante peut être configurée avec des accessoires en option.
Consultez le Guide de l'utilisateur pour plus d'informations.
3
Printer Basics
Généralités
EN
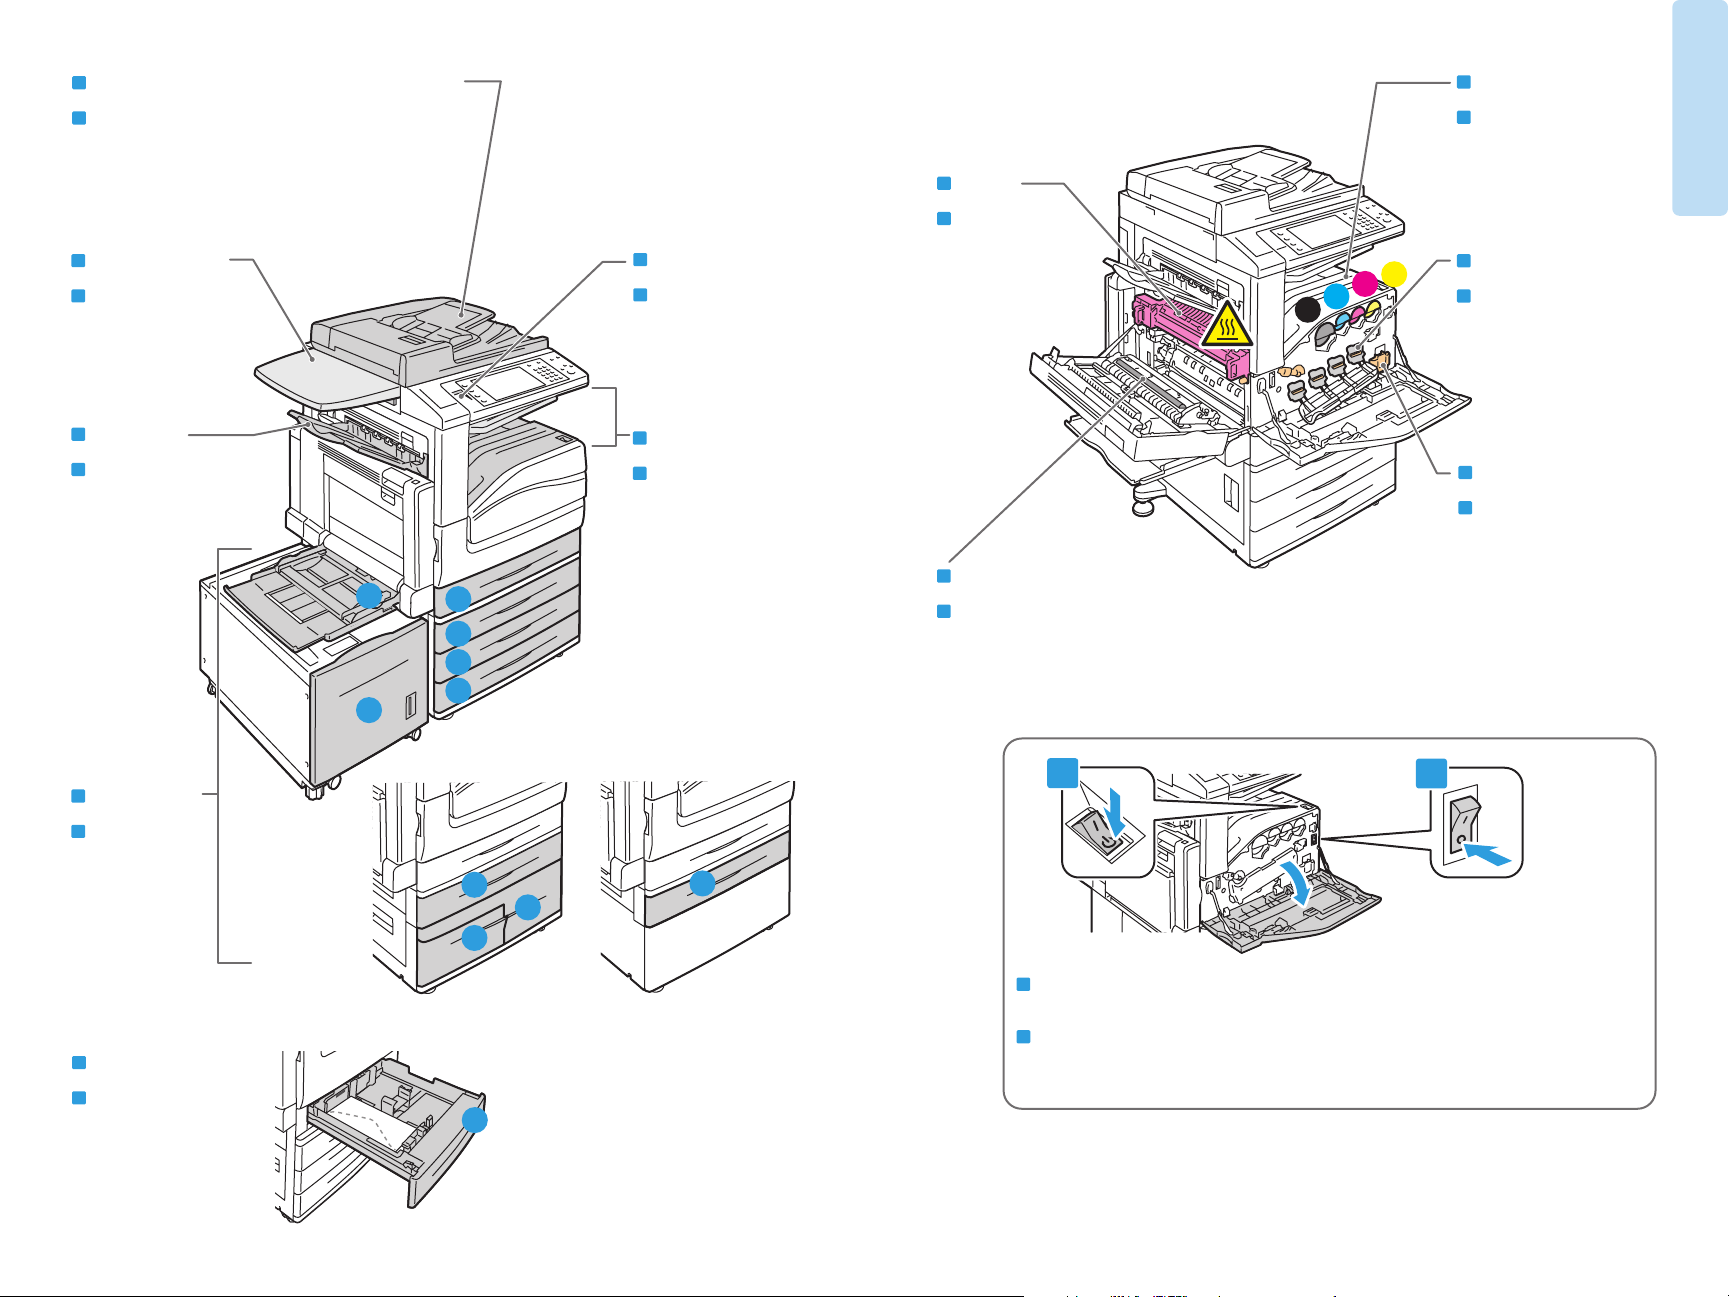
Duplex Automatic Document Feeder
FR
Chargeur automatique de
documents recto verso
EN
Work Surface
FR
Tablette
de travail
EN
Left Tray
FR
Magasin
gauche
5
6
EN
Toner Cartridges
FR
Cartouches
de toner
EN
Fuser
FR
Module
EN
USB Port
FR
Port USB
EN
Output Trays
FR
Bacs de
sortie
four
EN
Y
M
C
K
Drum Cartridges
FR
Modules
photorécepteurs
EN
Waste Cartridge
FR
Bac de
récupération
EN
Second Bias Transfer Roll
1
2
3
4
FR
Rouleau de deuxième
transfert
EN
Trays 1–6
FR
Magasins
1 à 6
EN
Envelope Tray
FR
Magasin à
enveloppes
www.xerox.com/office/WC75xxsupport
1
2
2
2
4
3
EN
To restart printer, use power switch on top of printer. For full shut down
turn off power switch, then turn off main power switch behind front cover.
FR
Pour redémarrer l'imprimante, utilisez l'interrupteur sur le dessus de la machine.
Pour mettre l'imprimante hors tension, éteignez-la à l'aide de l'interrupteur,
puis à l'aide de l'interrupteur principal, derrière le panneau avant.
1
4
EN
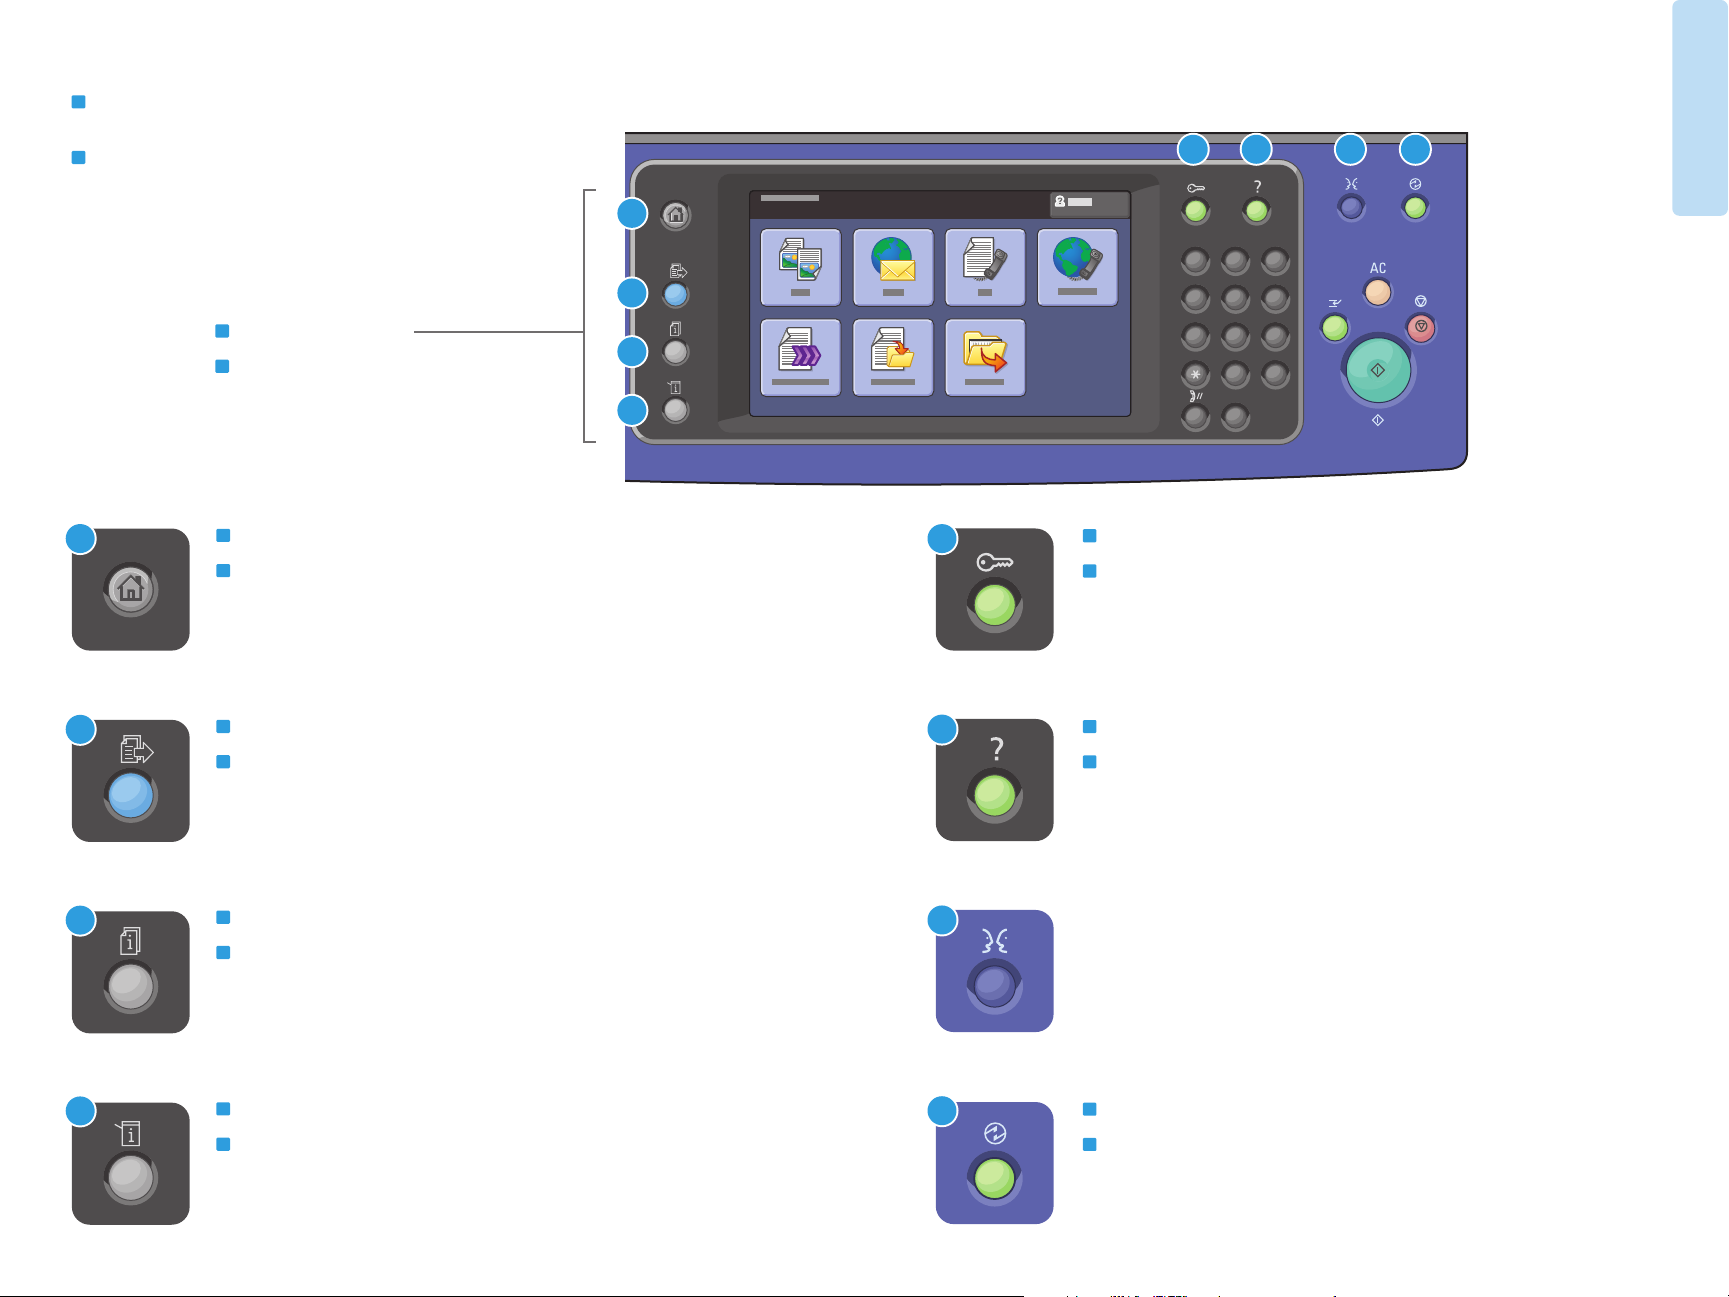
Control Panel
Printer Basics
Généralités
FR
Panneau de
commande
EN
Menu navigation
FR
Navigation dans
les menus
EN
1
2
Services Home: main services screen
FR
Accueil Services : écran principal des services
EN
Services: Services Home or last used screen
FR
Services : Accueil Services ou le dernier
écran utilisé
5 76 8
1
ABC3DEF
1
2
GHI
PQRS
4
7
JKL6MNO
5
TUV9WXYZ
8
2
3
0
#
4
EN
5
Log In/Out: access to password protected features
FR
Connexion/Déconnexion : accès aux fonctions
–
C
protégées par mot de passe
EN
6
Help: information about the current selection or service
FR
Aide : informations sur l'option ou le service
actuellement sélectionné
EN
3
4
Job Status: active and completed jobs
FR
État travail : travaux actifs et terminés
EN
Machine Status: settings and information
FR
État machine : paramètres et informations
www.xerox.com/office/WC75xxsupport
7
8
English (default language)
Català
Čeština
Dansk
Deutsch
Español
EN
Energy Saver: enter or exit low power mode
FR
Économie d'énergie : permet d'entrer en mode
Français
Italiano
Magyar
Nederlands
Norsk
Polski
Português
Română
Suomi
Svenska
Türkçe
Ελληνικά
Русский
d'alimentation réduite et d'en sortir
5
Printer Basics
Généralités
EN
Machine Status Menu
FR
Menu État machine
EN
Billing and Usage Information
FR
Informations de facturation
et d'utilisation
EN
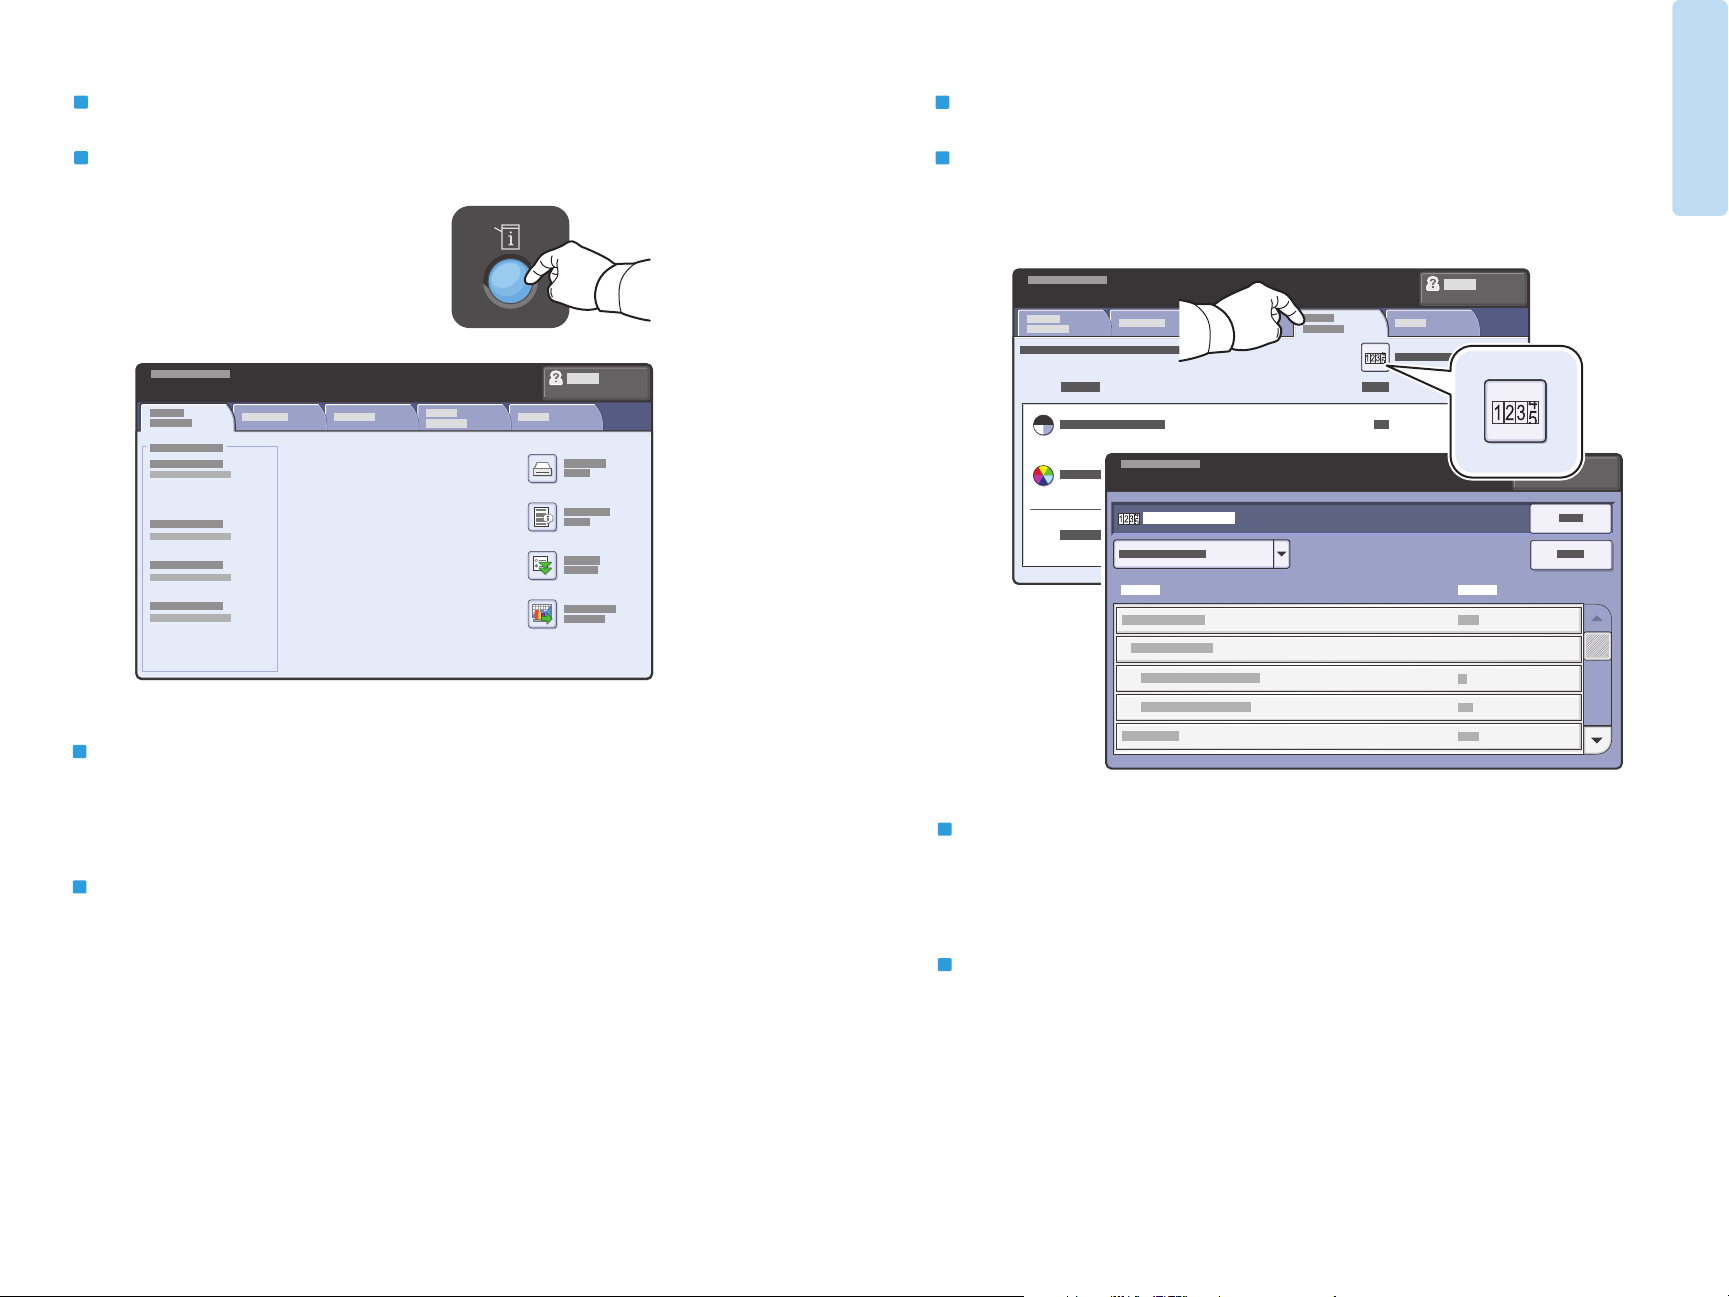
The Machine Status menu provides access to supplies status,
printer information, and settings. To access all menus and settings,
log in using the administrator name and password.
FR
Le menu État machine permet d'accéder à l'état des consommables,
aux informations relatives à l'imprimante et aux paramètres.
Pour accéder à tous les menus et paramètres, connectez-vous
en utilisant le nom et le mot de passe de l'administrateur.
www.xerox.com/office/WC75xxsupport
EN
In the Machine Status menu, touch the Billing Information tab
for basic impression counts. Touch the Usage Counters button
for detailed usage counts.
FR
Dans le menu État machine, sélectionnez l'onglet Informations
de facturation pour afficher les totaux d'impression de base.
Appuyez sur le bouton Compteurs d'utilisation pour afficher
les totaux d'utilisation détaillés.
6
Printer Basics
http://xxx.xxx.xxx.xxx
Généralités
EN
CentreWare Internet Services
FR
Services Internet CentreWare
English
Dansk
Deutsch
Español
Français
Italiano
EN
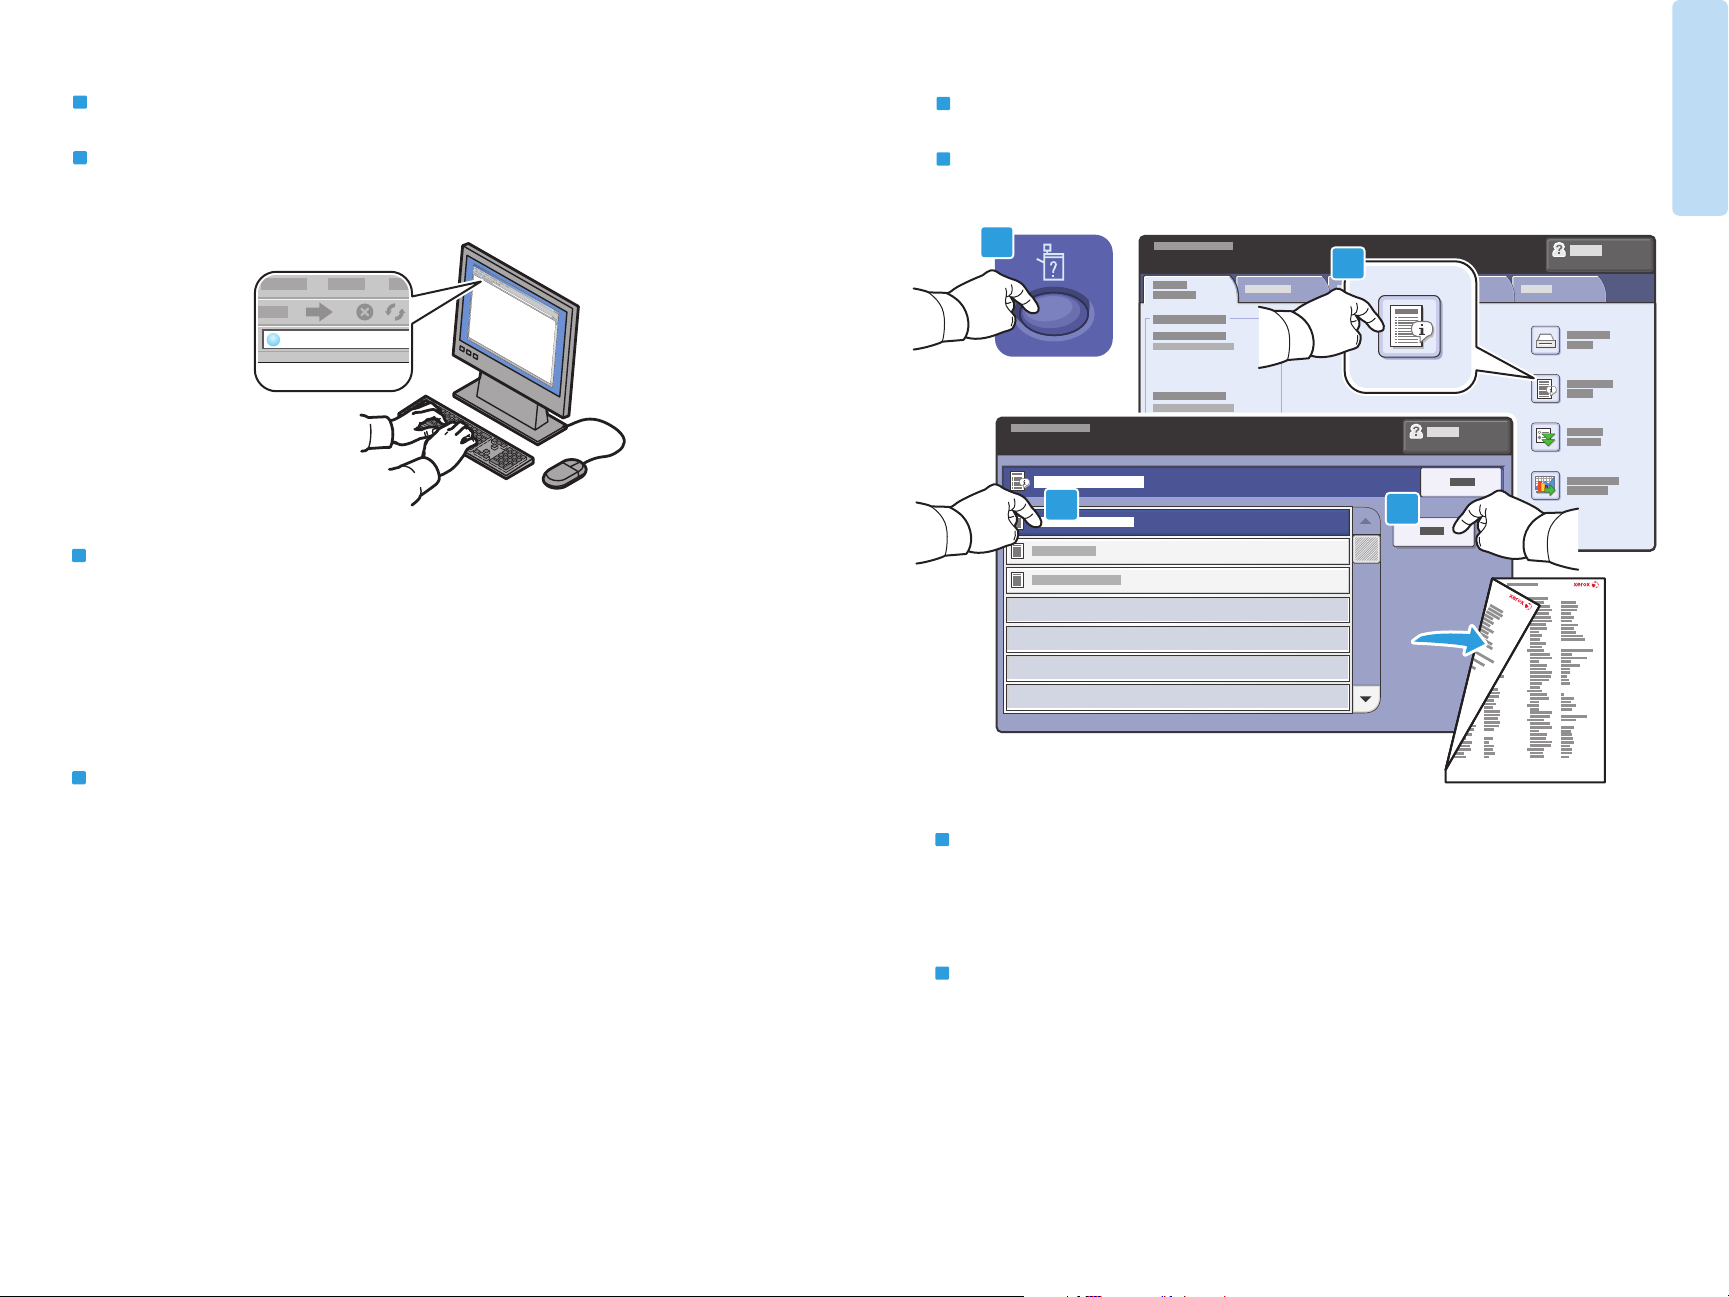
CentreWare Internet Services enables you to access printer
Nederlands
Norsk
Português
Suomi
Svenska
configuration, security settings and diagnostic functions, and to
manage address books and scanning over a TCP/IP network.
To connect, type the printer's IP address in your computer's Web
browser. The IP address is available on the Configuration Report
information page.
EN
Configuration Report
FR
Relevé de configuration
1
2
3
4
FR
Les Services Internet CentreWare permettent d'accéder aux
paramètres de configuration et de sécurité et aux fonctions de
diagnostic de l'imprimante. Ils permettent également de gérer
des carnets d'adresses et des numérisations via un réseau TCP/IP.
Pour vous connecter, entrez l'adresse IP de l'imprimante dans le
navigateur Web de votre ordinateur. Cette adresse est indiquée
sur le relevé de configuration de l'imprimante.
www.xerox.com/office/WC75xxsupport
EN
The Configuration Report lists the printer’s IP address and other
detailed information. In the Machine Status menu, touch the
Information Pages button, touch Configuration Report, then Print.
FR
Le relevé de configuration répertorie l'adresse IP de l'imprimante
ainsi que des informations détaillées. Dans le menu État machine,
sélectionnez le bouton Pages d'information, puis Relevé de
configuration et Imprimer
.
7

Printer Basics
http://www.xerox.com
Généralités
EN
Print Drivers
FR
Pilotes d'imprimante
www.xerox.com/office/WC75xxdrivers
EN
To access all of the features of the printer you must install the Xerox®
print driver. Current drivers are available online. The Web-based
®
Xerox
installer provides the easiest installation for your printer.
EN
Installing Drivers
FR
Installation des pilotes
1
1.1
www.xerox.com/office/WC75xxdrivers
1.2
1.3
FR
Pour accéder à toutes les fonctions de l'imprimante, il est nécessaire
d'installer le pilote d'imprimante Xerox
sont disponibles en ligne. Le programme d'installation à partir du site
®
Web Xerox
www.xerox.com/office/WC75xxsupport
représente le moyen le plus simple.
®
. Les pilotes les plus récents
EN
Type the drivers address in your web browser. Verify your operating
system and language, then click the driver installer and follow prompts.
FR
Saisissez l'adresse des pilotes dans le navigateur Web. Vérifiez la
version et la langue de votre système d'exploitation, puis cliquez
sur le programme d'installation du pilote et suivez les instructions.
8

www.xerox.com/office/WC75xxsupport
Printer Basics
Généralités
xxx.xxx.xxx.xxx
2
2.1
2.1
2.2
If your printer is not discovered, click the network printer icon,
enter your printer’s IP address, then continue setup.
The IP address is available on the Configuration Report.
To print a Configuration Report, see page 7.
Si votre imprimante n'est pas détectée, cliquez sur l'icône de
l'imprimante réseau, entrez l'adresse IP de l'imprimante, puis
continuez la configuration. L’adresse IP est indiquée dans le relevé
de configuration. Pour savoir comment imprimer le relevé de
configuration, consultez la page 7.
EN
FR
If your printer is in the list of discovered printers,
click on it then continue setup
Si votre imprimante se trouve dans la liste des imprimantes
détectées, sélectionnez-la et continuez la configuration
EN
FR
To connect to your printer...
Pour vous connecter à l'imprimante...
EN
FR

EN
Supported Media
FR
Supports pris
en charge
1
2
1 2 3 4
60–256 g/m
(16 lb. Bond–140 lb. Index)
Letter............................8.5 x 11 in.
Legal.............................8.5 x 14 in.
Tabloid........................... 11 x 17 in.
Statement...................5.5 x 8.5 in.
Executive.....................7.25 x 10.5 in.
8.5 x 13 ........................8.5 x 13 in.
A4 ..................................210 x 297 mm
A3 ..................................297 x 420 mm
A5 ..................................148 x 210 mm
B5 JIS ...........................182 x 257 mm
B4 JIS ...........................257 x 364 mm
2
2 3 4
Oversized Tabloid.......12 x 18 in.
SRA3 .............................320 x 450 mm
3 4
60–256 g/m
(16 lb. Bond–140 lb. Index)
Letter............................8.5 x 11 in.
Executive.....................7.25 x 10.5 in.
A4 ..................................210 x 297 mm
B5 JIS ...........................182 x 257 mm
2
3
4
2
3
4
2
4
3
5
55–300 g/m
(16 lb. Bond–110 lb. Cover)
Letter............................8.5 x 11 in.
Legal.............................8.5 x 14 in.
Tabloid........................... 11 x 17 in.
Postcard 4 x 6.............4 x 6 in.
5 x 7 ..............................5 x 7 in.
Statement...................5.5 x 8.5 in.
Executive.....................7.25 x 10.5 in.
8 x 10............................8 x 10 in.
8.5 x 13 ........................8.5 x 13 in.
9 x 11............................9 x 11 in.
Oversized Tabloid.......12 x 18 in.
12 x 19 ...........................
A4 ..................................210 x 297 mm
A3 ..................................297 x 420 mm
A5 ..................................148 x 210 mm
A6 ..................................105 x 148 mm
B6 JIS ...........................128 x 182 mm
B5 JIS ...........................182 x 257 mm
A4
Oversized................223 x 297 mm
Postcard 100 x 148...100 x 148 mm
Postcard 148 x 200...148 x 200 mm
215 x 315 mm .............215 x 315 mm
B4 JIS ...........................257 x 364 mm
SRA3 .............................320 x 450 mm
Monarch ......................3.9 x 7.5 in.
Commercial #10........4.1 x 9.5 in.
6 x 9 ..............................6 x 9 in.
9 x 12............................9 x 12 in.
DL ..................................110 x 220 mm
C5 ..................................162 x 229 mm
C4 ..................................229 x 324 mm
2
5
12 x 19 in.
6
6
55–256 g/m
(16 lb. Bond–140 lb. Index)
Letter....................... 8.5 x 11 in.
Executive................ 7.25 x 10.5 in.
A4............................. 210 x 297 mm
B5 JIS...................... 182 x 257 mm
2
WW
LL
EN
Custom
FR
Personnalisé
5
LL
WW
5
W: 89–320 mm (3.5–12.6 in.)
L: 98–483 mm (3.9–19 in.)
1
2
3
4
LL
WW
1
W: 140–297 mm (5.5–11.7 in.)
L: 182–432 mm (7.2–17 in.)
2 3 4
W: 140–320 mm (5.5–12.6 in.)
L: 182–457 mm (7.2–18 in.)
www.xerox.com/paper (U.S./Canada)
www.xerox.com/europaper
6
5
EN
Lightweight
FR
Fin
55–59 g/m
(14–16 lb. Bond)
2
1 2 3 4 5 6
EN
Plain
FR
Standard
60–80 g/m
(16–20 lb. Bond)
EN
Bond
FR
Bond
80–105 g/m
(20–28 lb. Bond)
EN
Heavyweight (HW)
FR
Épais
106–169 g/m
(28 lb. Bond–60 lb. Cover)
EN
Extra HW (X-HW)
FR
Très épais
170–256 g/m
(65 Cover–140 lb. Index)
2
2
2
2
5
EN
X-HW Plus
FR
X-HW Plus
256–300 g/m
(140 lb. Index–110 lb. Cover)
2
Printing
Impression
www.xerox.com/office/WC75xxsupport
10
EN
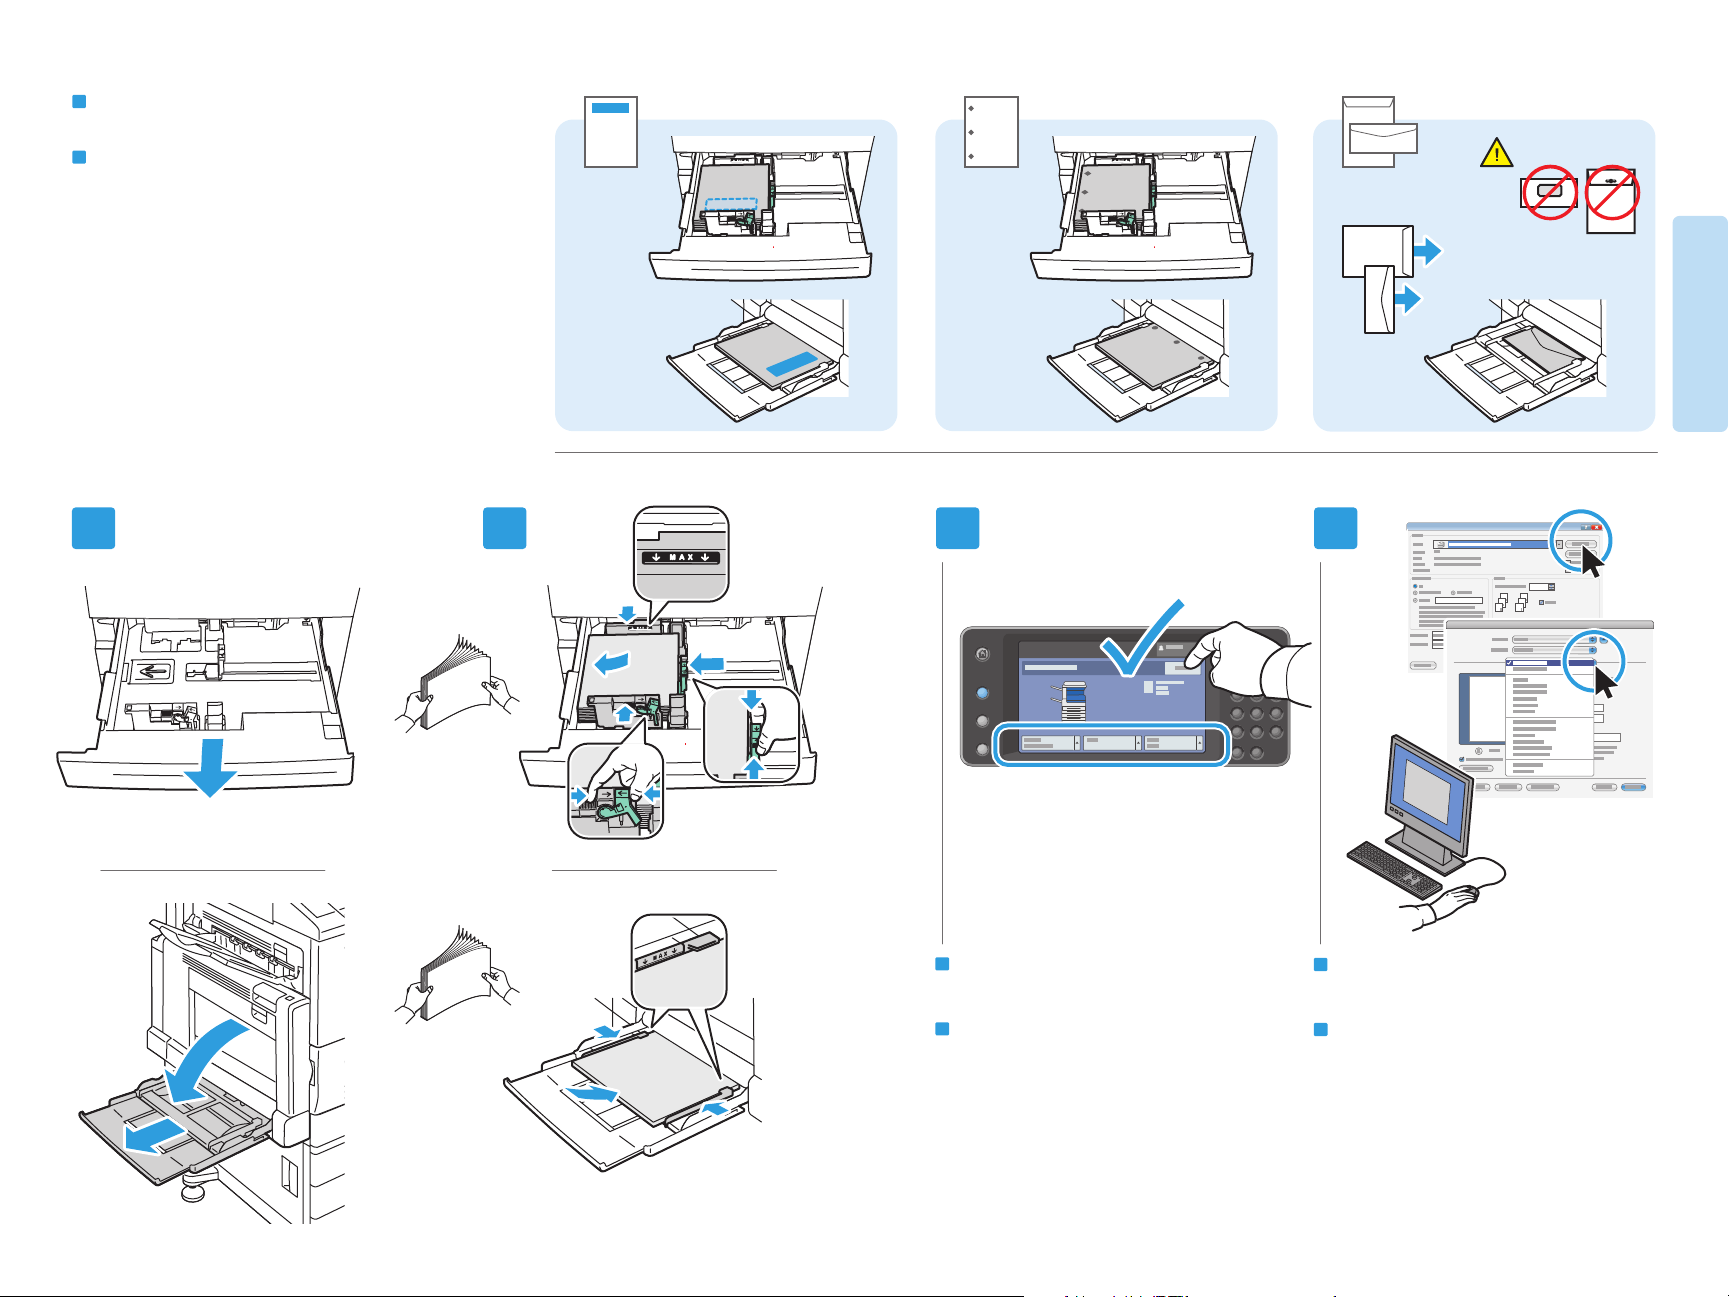
Loading Paper
FR
Chargement
du papier
1 2
3 4
PC
Mac
Printing
Impres sion
www.xerox.com/office/WC75xxsupport
EN
Confirm or change
size and type settings
FR
Confirmez ou modifiez les
paramètres de format et de
type de support
EN
When printing, select printing
options in the print driver
FR
Pour effectuer une impression,
sélectionnez les options requises
dans le pilote d'imprimante
11

EN
Printing from USB
FR
Impression depuis un
lecteur USB
1
EN
Insert USB Flash Drive in the USB port
FR
Insérez votre lecteur USB dans le port USB
2
EN
Press Services Home, then touch Print Files
FR
Appuyez sur Accueil Services, puis sur Imprimer fichiers
2.1
2.2
3
Printing
Impression
EN
FR
www.xerox.com/office/WC75xxsupport
Do not remove USB Flash Drive during reading.
Files may be damaged.
Laissez le lecteur USB connecté pendant la lecture
de données, sous peine d'endommager les fichiers.
3.1
3.2
EN
Touch USB Drive, then select a file or folder
FR
Sélectionnez le lecteur USB, puis sélectionnez un fichier ou un dossier
12

4
5
Printing
Impression
1
4.1
GHI
PQRS
1
4
7
–
ABC3DEF
2
JKL6MNO
5
TUV9WXYZ
8
0
C
#
4.2
EN
Once the desired file is selected, adjust the job quantity
using the alphanumberic keypad
FR
Une fois le fichier requis sélectionné, définissez la quantité pour
le travail à l'aide du pavé alphanumérique
EN
Press Start
FR
Appuyez sur Démarrer
EN
Stop: Pause or cancel job
FR
Arrêt / Pause : permet de mettre
en pause ou d'annuler un travail
EN
Interrupt: Interrupt printing jobs
FR
Interruption : permet d'interrompre
les travaux d'impression
www.xerox.com/office/WC75xxsupport
13

EN
Copying
EN
Basic Copying
FR
Copie
www.xerox.com/office/WC75xxdocs
EN
For more information, see the Copying chapter in the User Guide
located on your Software and Documentation disc or online.
FR
Pour plus d'informations, consultez le chapitre Copie dans le Guide
d'utilisation figurant sur le CD-ROM Software and Documentation
(Logiciel et documentation) ou accessible en ligne.
FR
Copie de base
1
EN
Load original
FR
Chargez le document
38–128 g/m
(26 lb. Text–34 lb. Bond)
50–128 g/m
(20 lb.–34 lb. Bond)
X: 85–432 mm (5.5–17 in.)
Y
X
Y: 125–297 mm (8.26–11.69 in.)
≤110 (80 g/m
2
2
2
)
X: 430 mm (17 in.)
Y
X
Y: 310 mm (12.25 in.)
Copying
Copie
www.xerox.com/office/WC75xxsupport
2
2.1
EN
Press Services Home,
then touch Copy
FR
Appuyez sur Accueil Services,
puis sur Copie
2.2
EN
Clear All: clears previous settings
FR
Annuler tout : annule tous
les paramètres précédemment
sélectionnés
14
3
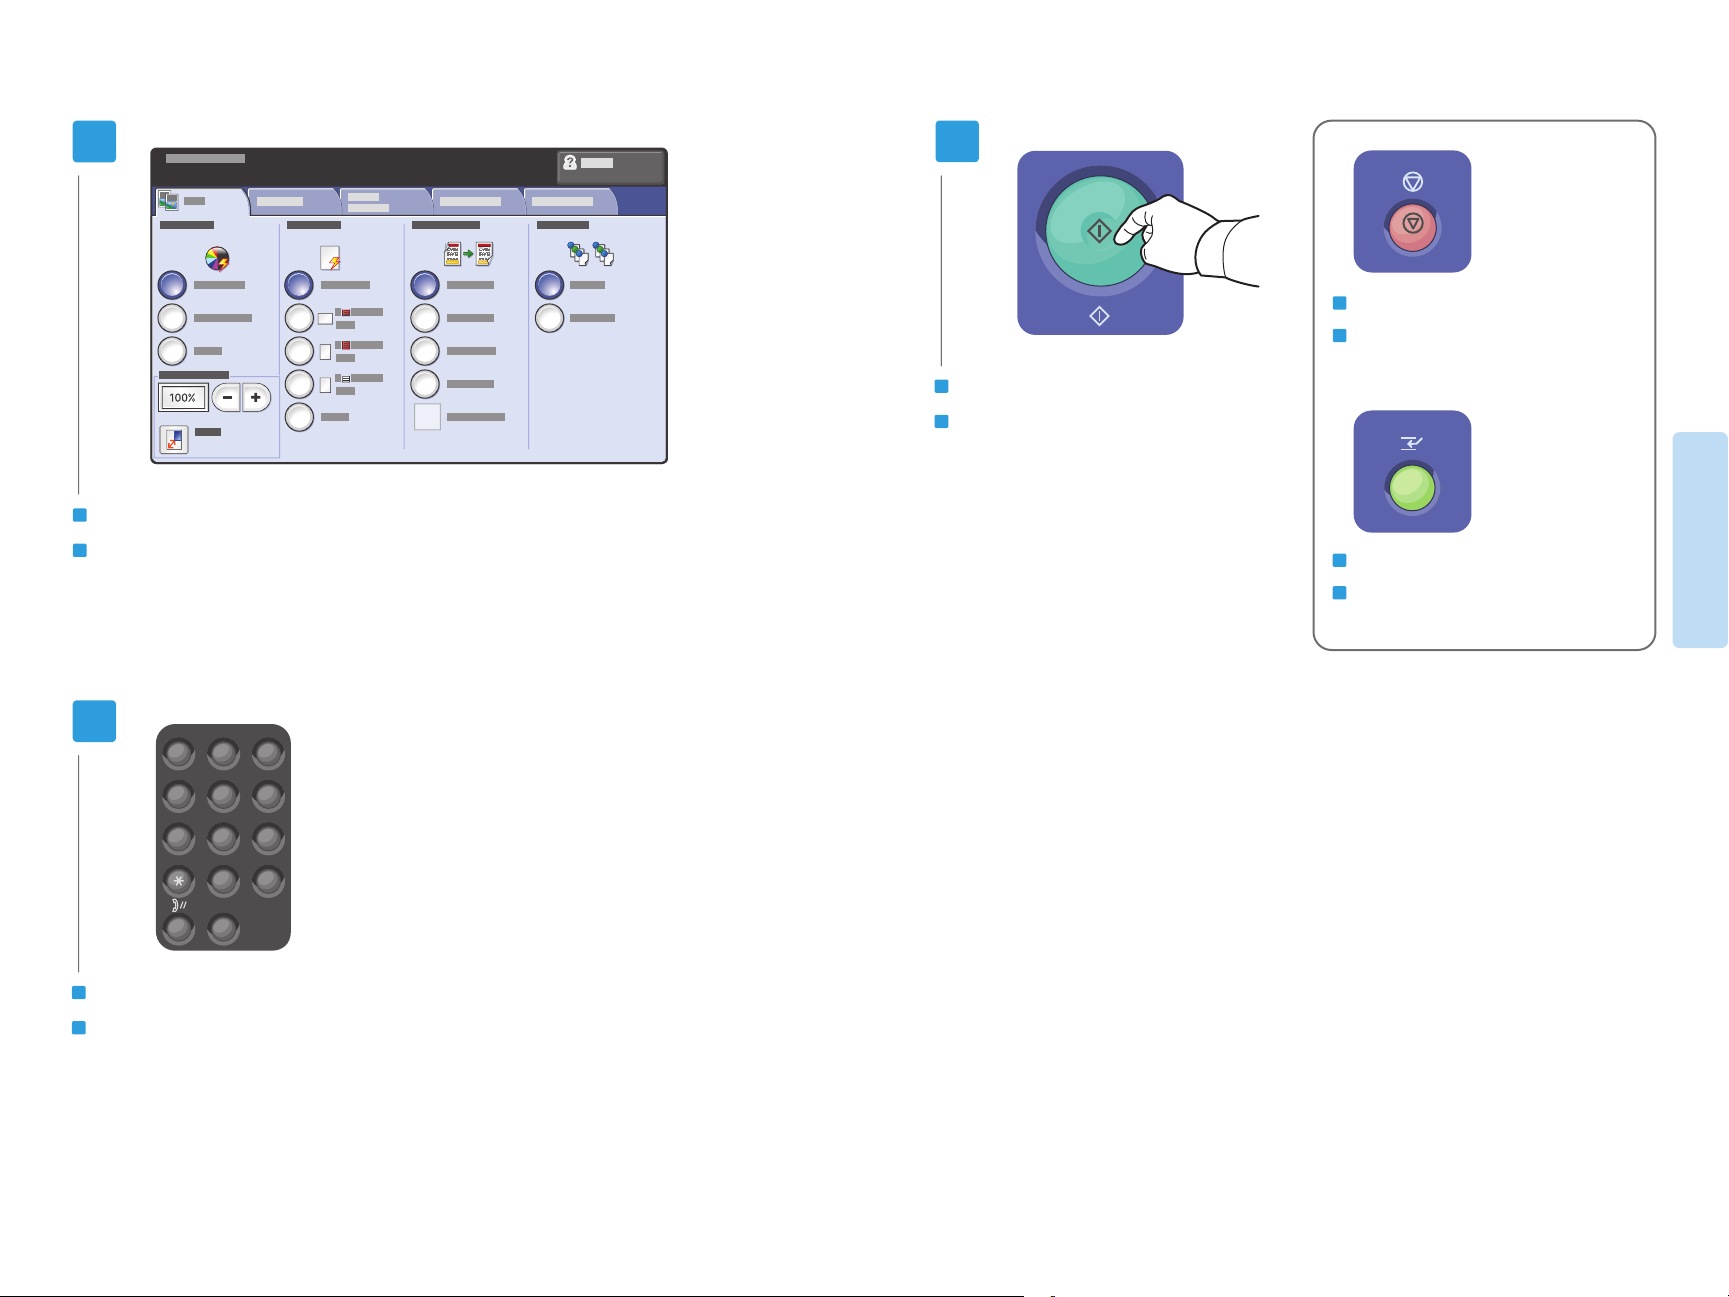
EN
Select settings
FR
Sélectionnez les paramètres
5
3
3
2
2
1
1
EN
Stop: Pause or cancel job
FR
Arrêt / Pause : permet de mettre
en pause ou d'annuler un travail
EN
Press Start
FR
Appuyez sur Démarrer
EN
Interrupt: Interrupt printing jobs
FR
Interruption : permet d'interrompre
les travaux d'impression
Copying
Copie
4
EN
Select number of copies
FR
Sélectionnez le nombre de copies
GHI
PQRS
1
4
7
–
ABC3DEF
2
JKL6MNO
5
TUV9WXYZ
8
0
C
#
www.xerox.com/office/WC75xxsupport
15

EN
Scanning
EN
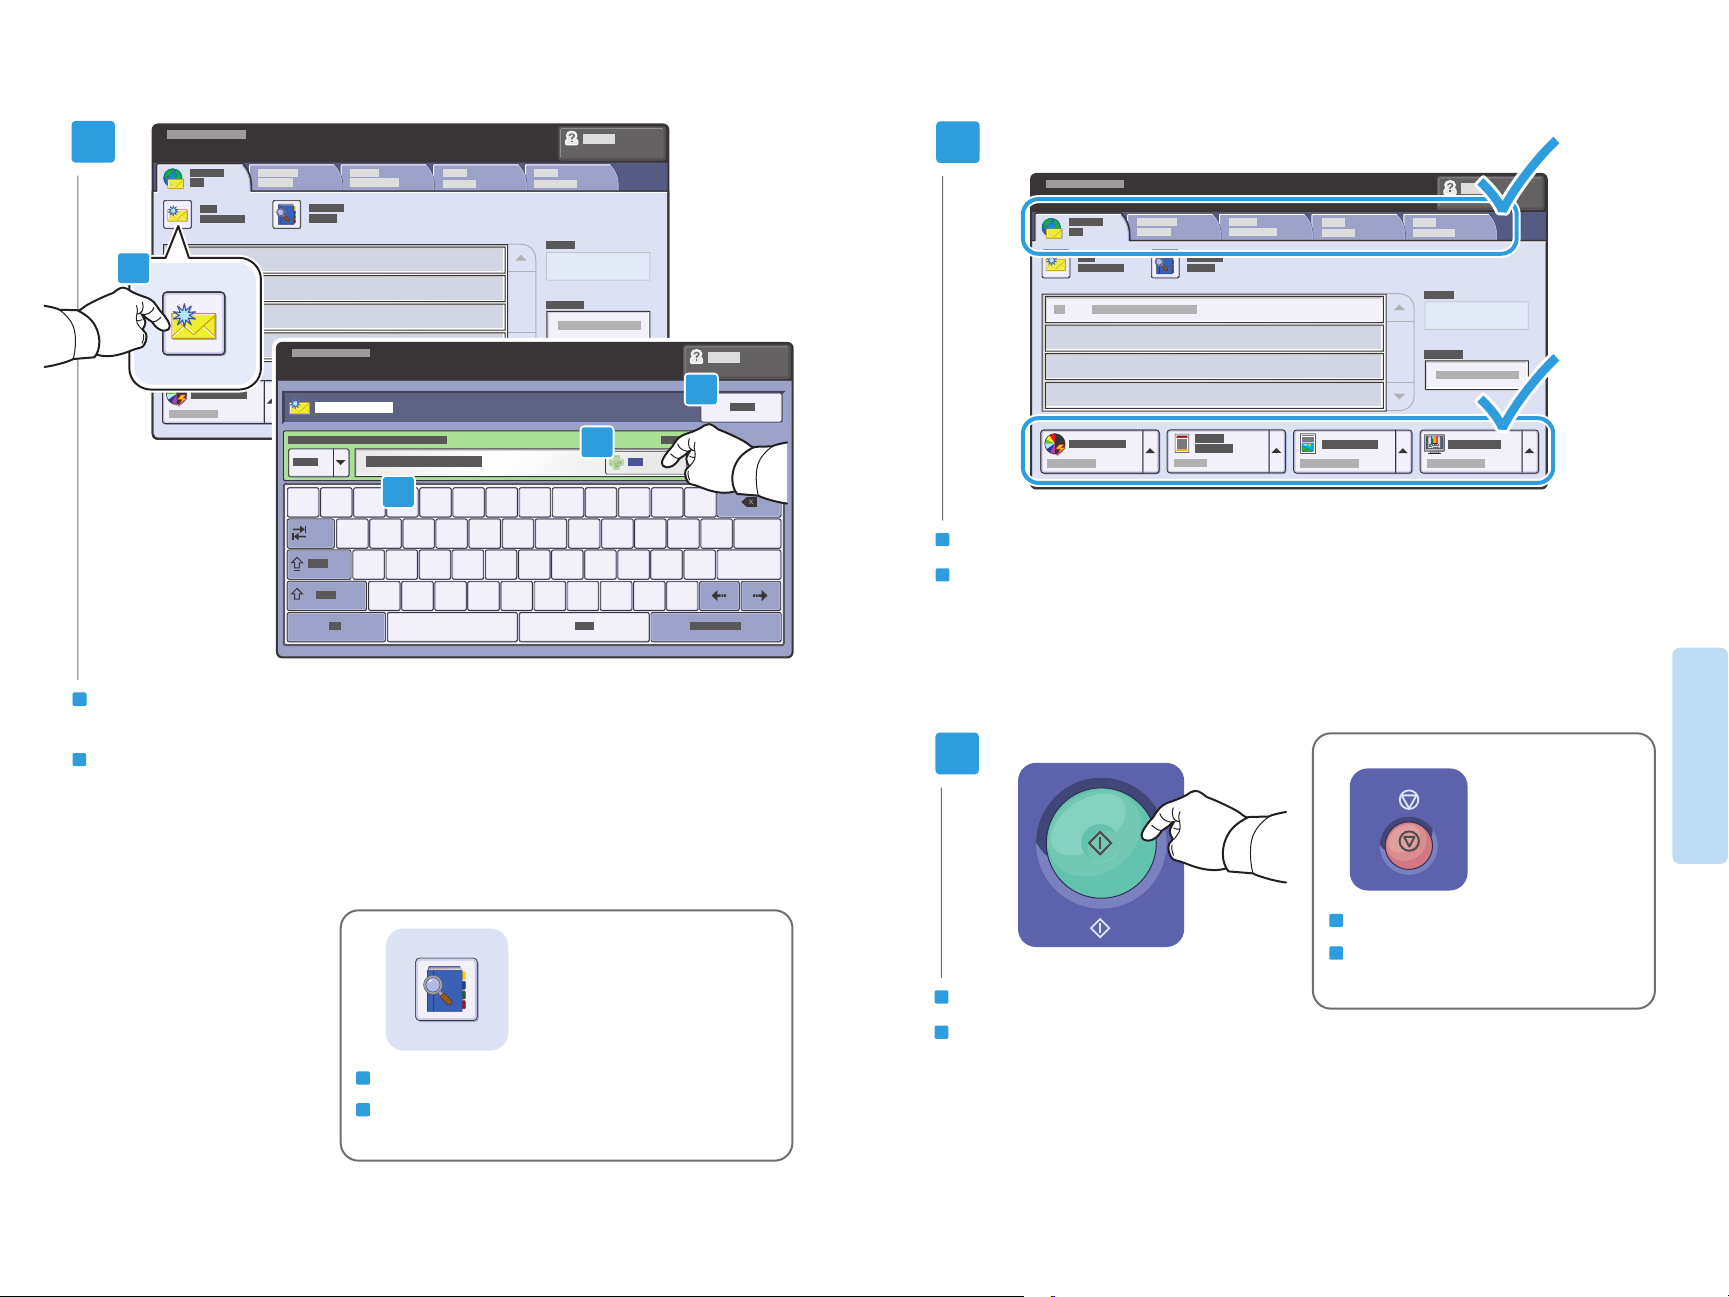
Scan to Email
FR
Numérisation
www.xerox.com/office/WC75xxdocs
EN
For more information, see the Scanning chapter in the User Guide.
Also see the System Administrator Guide to set up scan workflows.
EN
Pour plus d'informations, consultez le chapitre Numérisation dans
le Guide d'utilisation.
Consultez également le Guide de l'administrateur système pour
savoir comment configurer les flux de travail de numérisation.
FR
Numérisation courrier
électronique
1
EN
Load original
FR
Chargez le document
38–128 g/m
(26 lb. Text–34 lb. Bond)
50–128 g/m
(20 lb.–34 lb. Bond)
X: 85–432 mm (5.5–17 in.)
Y
X
Y: 125–297 mm (8.26–11.69 in.)
≤110 (80 g/m
2
2
2
)
X: 430 mm (17 in.)
Y
X
Y: 310 mm (12.25 in.)
Scanning
Numérisation
www.xerox.com/office/WC75xxsupport
2
2.1
EN
Press Services Home,
then touch E-mail
FR
Sélectionnez Accueil Services,
puis Courrier électronique
2.2
EN
Clear All: clears previous settings
FR
Annuler tout : annule tous
les paramètres précédemment
sélectionnés
16
3
3.1
3.4
3.3
3.2
~
`
EN
EN
To type new addresses, touch New Recipient,
To type new addresses, touch New Recipient,
then touch +Add for each recipient, then Close
then touch +Add for each recipient, then Close
FR
Pour entrer de nouvelles adresses, sélectionnez Nouveau destinataire,
puis +Ajouter (pour chaque destinataire) et Fermer
@
1!2
qwertyuio
asdfgh j
$
#
3
zxcvbnm
%
4
^
5
7&8
6
*
)
(
0
9
kl
,<.
>
-_=
p
:
+
[{]
‘“;
?
/
|
}
\
4
EN
Select settings
@
FR
Sélectionnez les paramètres
Scanning
Numérisation
5
EN
Use the Address Book to enter stored addresses.
FR
Utilisez le carnet d'adresses pour entrer des adresses
mémorisées.
www.xerox.com/office/WC75xxsupport
EN
Press Start
FR
Appuyez sur Démarrer
EN
Stop: Pause or cancel job
FR
Arrêt / Pause : permet de mettre
en pause ou d'annuler un travail
17

EN
Faxing
EN
Basic Faxing
FR
Télécopie
www.xerox.com/office/WC75xxdocs
EN
For more information, see the Faxing chapter in the User Guide.
Also see the System Administrator Guide for information about fax
setups and advanced settings.
FR
Pour plus d'informations, consultez le chapitre Télécopie dans
le Guide d'utilisation.
Consultez également le Guide de l'administrateur système pour savoir
comment configurer le service de télécopie et les paramètres avancés.
FR
Télécopie de base
1
EN
Load original
FR
Chargez le document
38–128 g/m
(26 lb. Text–34 lb. Bond)
50–128 g/m
(20 lb.–34 lb. Bond)
X: 85–432 mm (5.5–17 in.)
Y
X
Y: 125–297 mm (8.26–11.69 in.)
≤110 (80 g/m
2
2
2
)
X: 430 mm (17 in.)
Y
X
Y: 310 mm (12.25 in.)
www.xerox.com/office/WC75xxsupport
2
2.1
EN
Press Services Home,
then touch Fax
FR
Appuyez sur Accueil Services,
puis sur Fax
2.2
EN
Clear All: clears previous settings
FR
Annuler tout : annule tous
les paramètres précédemment
sélectionnés
18
Faxing
Télécopie

3
EN
Use the Address Book to enter stored fax numbers.
FR
Utilisez le carnet d'adresses pour ajouter des numéros de
fax mémorisés.
EN
To uch Dialing Characters to use
ABC3DEF
1
2
GHI
JKL6MNO
4
5
TUV9WXYZ
PQRS
7
8
0
#
–
C
EN
Clear the Speed Dial check box to enter a new fax number,
special characters and see descriptions.
FR
Sélectionnez Caractères de
composition pour utiliser des
caractères spéciaux et afficher
des descriptions.
or select it to enter the speed dial number or choose it from the list
FR
Désactivez la case à cocher Numérotation abrégée pour saisir un
nouveau numéro de fax ou activez la case à cocher pour indiquer
un numéro abrégé ou le sélectionner dans la liste
EN
To add more fax or speed dial numbers, touch +Add.
FR
Pour ajouter des numéros de fax ou des numéros abrégés,
sélectionnez +Ajouter.
4
EN
Select settings
FR
Sélectionnez les paramètres
5
EN
Press Start
FR
Appuyez sur Démarrer
EN
Stop: Pause or cancel job
FR
Arrêt / Pause : permet de mettre
en pause ou d'annuler un travail
Faxing
Télécopie
www.xerox.com/office/WC75xxsupport
19
EN
Paper Jams
FR
Incidents papier
EN
When a jam occurs, the control panel touch screen displays
an animated graphic showing how to clear the jam.
www.xerox.com/office/WC75xxdocs
EN
CAUTION: To avoid damage, remove misfed media gently and avoid
tearing it. Try to remove the media in the direction that it would
normally feed. Any pieces left in the printer can cause further
misfeeds. Do not reload media that has misfed.
The printed side may smudge, and toner may stick to your hands.
Avoid spills, and wash off any toner with cool water and soap.
Do not use hot water.
FR
ATTENTION : pour éviter tout endommagement, dégagez le support
délicatement, sans le déchirer. Essayez de tirer le support dans le sens
d'alimentation normale. Tout résidu de support dans l'imprimante
pourrait entraîner d'autres faux départs. Ne rechargez pas un support
qui a subi un faux départ.
Also see Jams in the User Guide for more information.
FR
Lorsqu'un incident papier survient, l'écran tactile du panneau de
commande affiche un graphique animé indiquant comment
résoudre l'incident.
Vous pouvez également consulter la section Incidents papier dans
le Guide d’utilisation pour plus d'informations.
L'encre de la face imprimée peut couler et le toner peut tacher les
mains. Veillez à ne pas de répandre le toner. Si cela se produit,
nettoyez-le avec de l'eau froide et du savon. N'utilisez pas d'eau
chaude.
Résolution des incidents
Troubleshooting
www.xerox.com/office/WC75xxsupport
20
 Loading...