

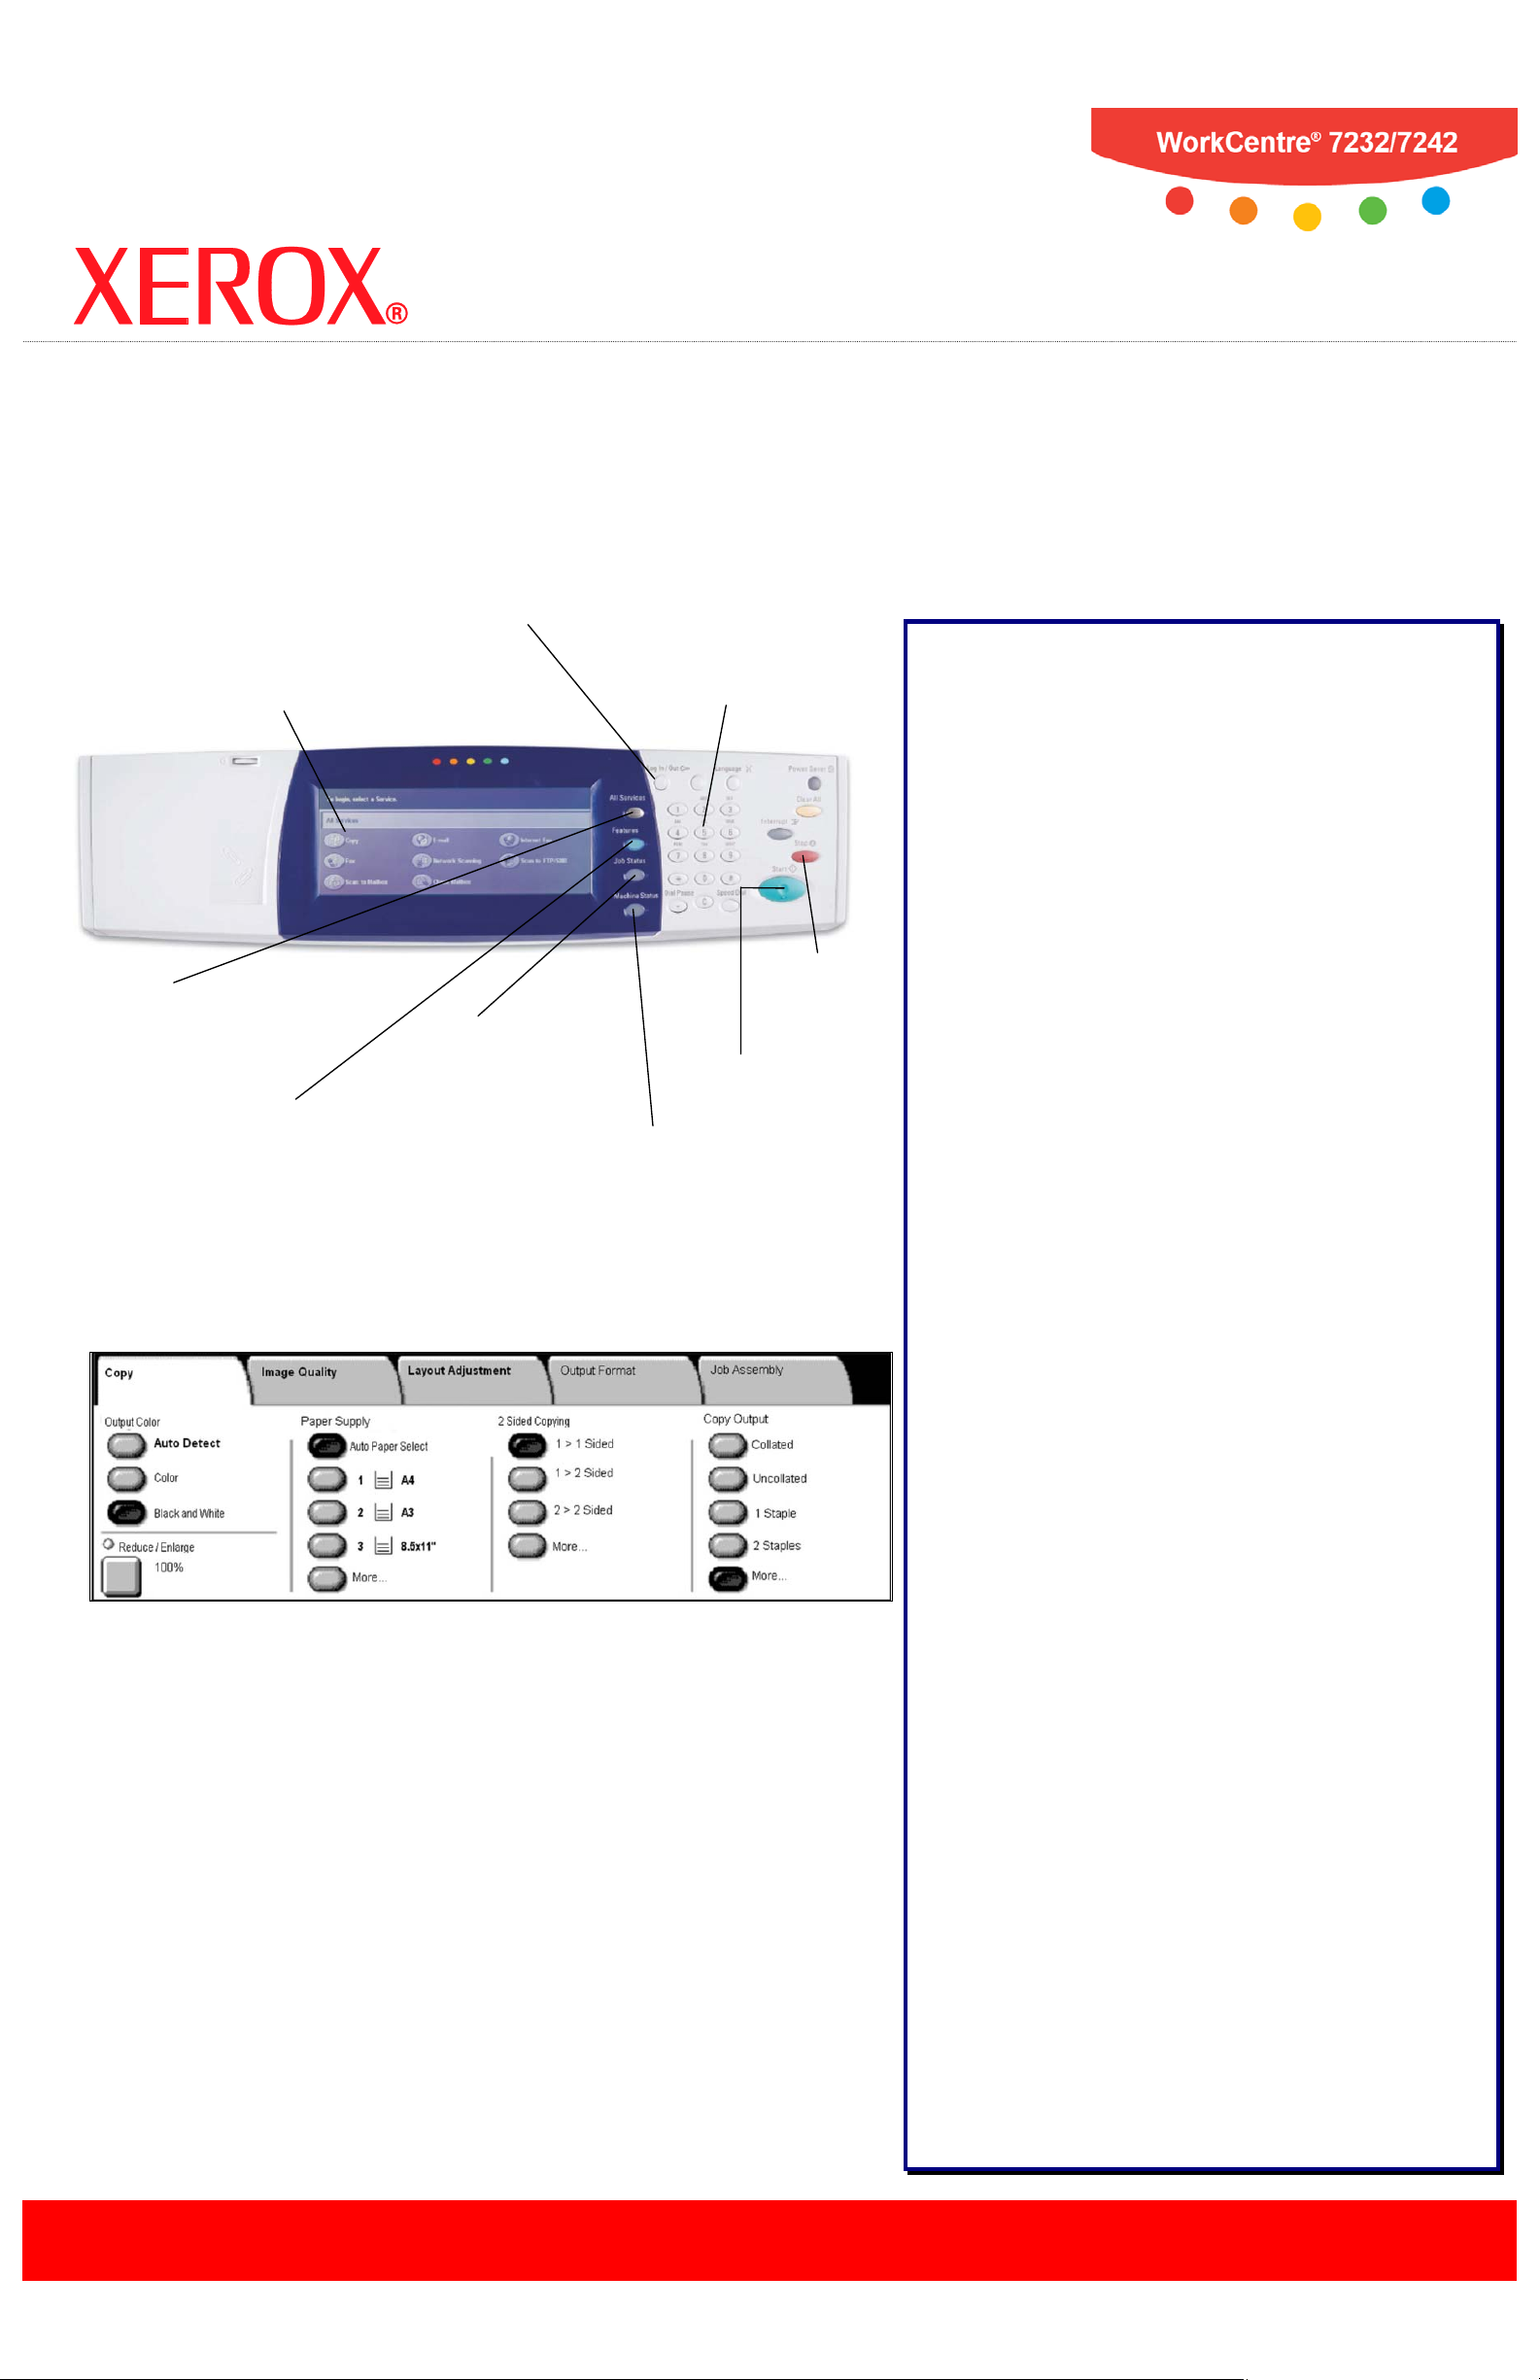
All Services Button
Services screen on the
Touch Screen
Job Status Button
Machine Status Button
Displays the current status
Stop Button
Log In/O
ut Button
Number Keypad
Start Button
Features Button
Copying
at the WorkCentre® 7232/7242
Allows you to select
all programming
features.
Provides password-
protected access to the
System Administrator
Menu.
Allows you to enter the
quantity of copies you require.
Copying Options:
Output Color
The Auto Detect option allows the machine to determine
the color content of your document. The Color option
enables the machine to use all four toner colors. The
Black & White option enables the machine to use only
black toner.
Displays the All
touch screen.
Displays job features
on the touch screen.
Displays job progress
information on the
Simple Copying:
touch screen.
of the machine on the
Starts the copy job.
touch screen.
Stops the
copy job.
Reduce/Enlarge
Select the 100% option to produce copies that match the
size of your original document. Select More… to view a
list of commonly used Reduce/Enlarge settings.
Paper Sup ply
The Paper Supply options allow you to specify any one of
five standard paper trays to use as a source for your copy
job. You can also choose the Auto Paper Select option to
allow the machine to automatically choose the best Paper
Tray for your copy job.
2 Sided Copying
Depending on your original documents and you r requ ir ed
output, you can select 1→1 Sided, 1→2 Sided,
2→2 Sided, or 2→1 Sided.
Copy Output
The Copy Output options differ depending on your
machine’s Finisher configuration. The most robust
Finisher configuration allo ws you to choose from Collated,
1 Staple, 2 St aples , Folded, and Hole Punched.
1. Load the document into the Document Handler.
2. Touch the
All Services
button on the Co ntrol Panel.
3. Touch the Copy icon on the Touch Scre en.
4. Select the appropriat e
5. Enter the
6. Press the
Quantity
Start
button on th e Cont r ol P an e l.
Settings
on the Touch Screen.
using t he Number Keypad.
Image Quality
The Image Quality tab options allow you to access the
Original Type, Image Options, Image Enhancement, Color
Effects, Color Balance, and Color Shift settings.
Layout Adjustm ent
The Layout Adjustment tab options allow you to access
the Book Copying, Original Size, Edge Erase, Image Shift,
Image Rotation, Invert Image, a nd Original Orientation
settings.
Output Format
The Output Format tab options allow you to access the
Booklet Creation, Covers, Transparency Options, Page
Layout, Poster, Annotations, Watermark, and ID Card
Copying settings.
Job Assembly
The Job Assembly tab options allow you to access the
Build Job, Sample Job, Combine Original Sets, Delete
Outside/Delete Inside, Save Current Settings, and
Retrieve Saved Settings options.
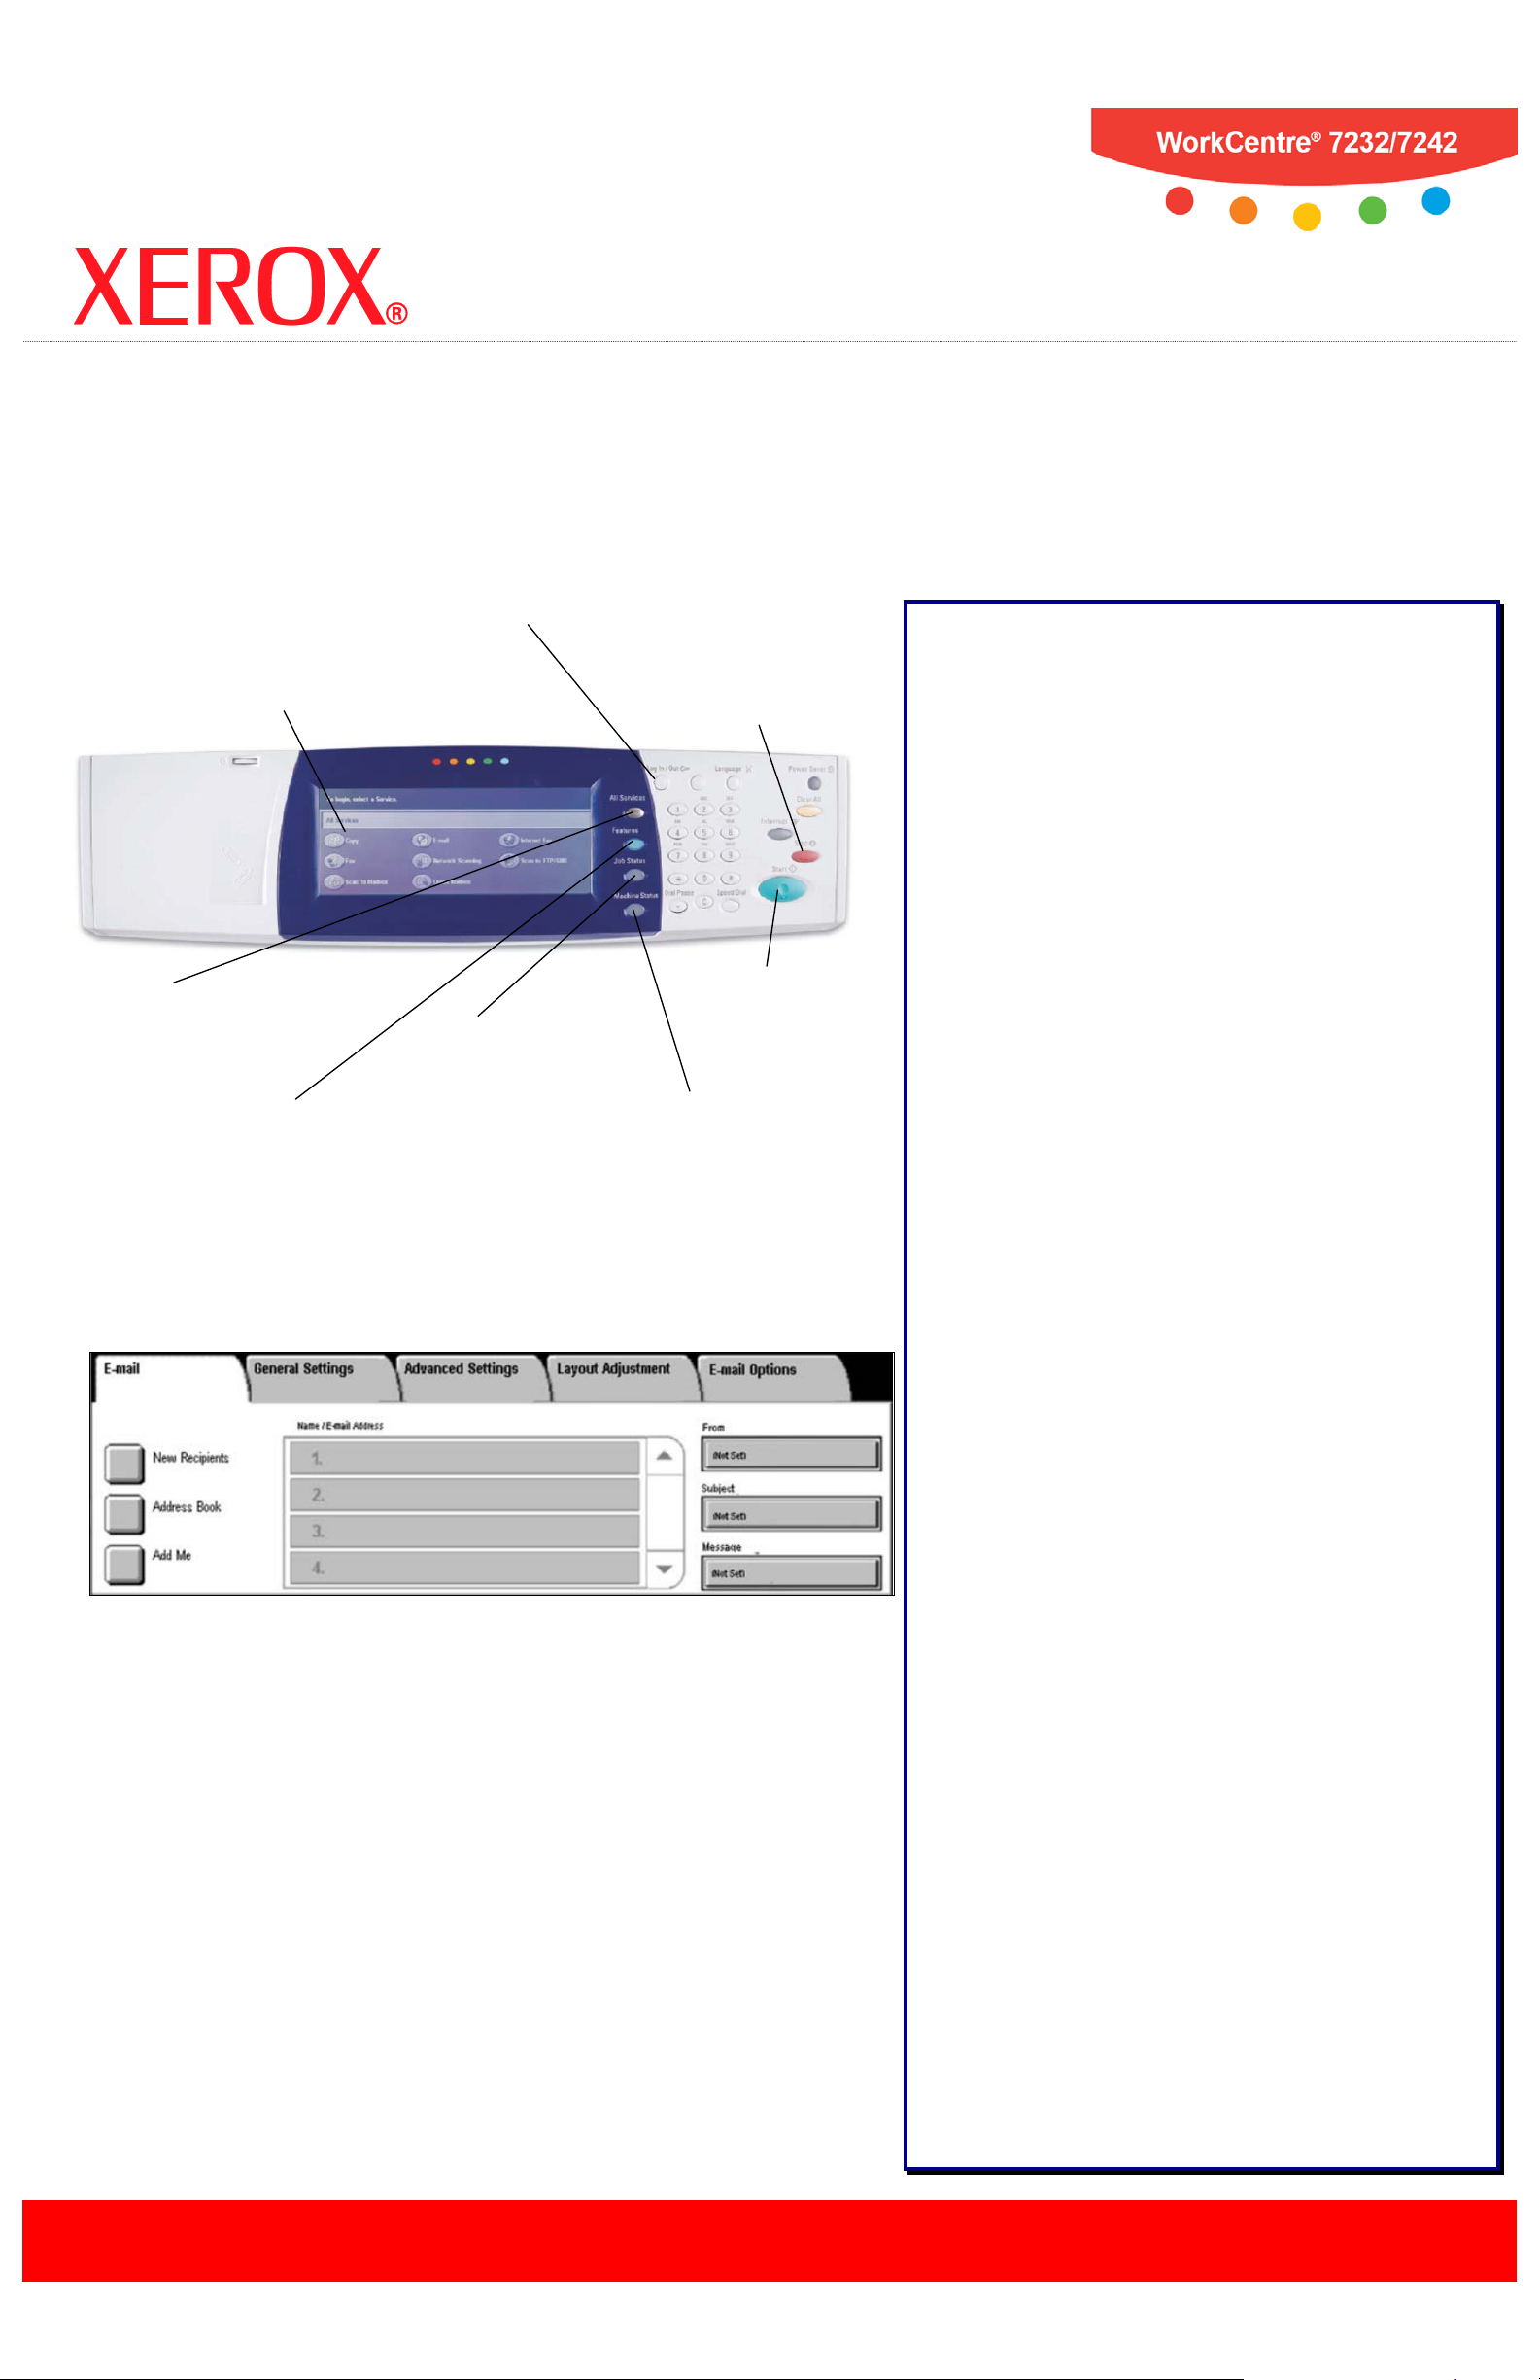
All Services Button
Services screen on the
Touch Screen
Job Status B
utton
Machine Status Button
Displays the current status
Log In/Out Button
Start Button
Features Button
E-mailing
at the WorkCentre® 7232/7242
Allows you to select
all programming
features.
Provides password-
protected access to the
System Administrator
Menu.
Stop Button
Stops the E-
mail job.
E-mailing Options:
General Set t in gs - Color Sca n ni ng
The Auto Detect option allows the machine to determine
the color content of your document. The Color option
enables the machine to use all four toner colors. The
Grayscale option enables the machi ne to print only black
and gray tones. The Black & White option enables the
machine to use only black toner.
Displays the All
touch screen.
Displays job features
on the touch screen.
Displays job progress
information on the
touch screen.
of the machine on the
Starts the
E-mail job.
touch screen.
Simple E-mailing:
Load
1.
2. Touch the All Services button on the Contr ol Panel.
3. Touch the
4. Specify the Recipient on the E-mail tab.
5. Select the appropriat e
6. Press the
the document into the Document Handler.
E-mail
Start
icon on the Touch Sc r e en.
Settings
on the Touch Screen.
button on th e Cont r ol P an e l.
You can specify your original documents as 1 Sided, 2
Sided, or 2 Sided(Rotate Side 2).
General Se t ti n gs - Orig in al T yp e
General Settings - 2 Sided Scanning
You can specify your original documents as Photo & Text,
Text, or Photo.
General Settings - Scan Presets
You can specify your scanning presets for Sharing &
Printing, for Archival record, for OCR, for High Quality
Printing, Simple Scan, or Custom.
Advanced Settings
The Advanced Setti ngs tab options allow you to access
the Photographs, Image Options, Image Enhancement,
and Shadow Suppression settings.
Layout Adjustm ent
The Layout Adjustment tab options allow you to access
the Resolution, Original Orientation, Original Size, Edge
Erase, Book Scanning, and Reduce/Enlarge settings.
E-mail Options
The E-mail Options tab options allow you to access the
Quality/File Size, File Name, File Format, Reply To, and
Split Send settings.
Entering E-mail Recipient Information
You can enter Recipient Information using one of the
following methods:
- Touch the New Recipients button.
Touch the New Recipients button, then use the
touch screen keypad to enter the E-mail address of
your intended recipient. After entering the address,
touch the Add button to add your recipient to the
recipient list.
- Touch the Address Book but to n.
Touch the Address Book button, then use the
touch screen keypad to search for your intended
recipient. After finding your recipi e nt, touc h the
button to add your recipient to the recipient list.
- Touch the Add Me button.
Touch the
person sending the e-mail to the list of recipient(s)
intended to receive the e-mail.
Add Me
button to automatically add the
Add

All Services Button
Services screen on the
Touch Screen
Job Status Button
Machine Status Button
Displays the current status
Stop Button
Log In/Out Button
Number Keypad
Start Button
Features Button
Faxing
at the WorkCentre® 7232/7242
Allows you to select
all programming
features.
Provides password-
protected access to the
System Administrator
Menu.
Allows you to enter the
Recipient Fax Number.
Faxing Options:
General Se tt i n gs - Light en /Darken
Use the arrow b u ttons on the Fax tab to lighten or darken
the faxed image.
Displays the All
touch screen.
Displays job features
on the touch screen.
Displays job progress
information on the
touch screen.
of the machine on the
touch screen.
Simple Faxing:
1. Load the document into the Document Handler.
2. Touch the
All Services
3. Touch the Fax icon on the Touch Screen.
4. Enter the Recipient Fax Number.
5. Select the appropriate Settings on the Touch Screen.
6. Press the Start button on the Control Panel.
button on the Control Panel.
Stops the
Fax job.
Starts the Fax job.
General Settings - 2 Sided Scanning
Specify your original documents as 1 Sided, 2 Sided, or 2
Sided(Rotate Side 2). When you choose a 2 Sided option,
you can also select the First Page 1 Sided option, if
required.
General Se t ti n gs - Orig in al T yp e
Specify your original documents as Photo & Text,
Text, or Photo.
General Settings - Resolution
Specify your scanned resolution as Standard, Fine,
Superfine(400dpi), or Superfine(600dpi).
Layout Adjustm ent
The Layout Adjustment tab options allow you to access
the Original Size, Book Faxing, and Reduce/Enlarge
settings.
Fax Options
The Fax Opt ions tab options allow you to access the
Confirmation Options, Starting Rate, Priority Send/Delay
Start, Transmission Header Text, Recipient Print Sets,
Multiple-Up, Remote Mailbox, and F Code settings.
More Fax Options
The More Fax Options tab options allow you to access the
Remote Polling, Store for Polling, and On-hook (Manual
Send/Receive) settings.
Entering Fax Recipient Information
You can enter Recipient Information using one of the
following methods:
- Use the Number Keypad.
Simply press the buttons on the Number Keypad to
enter the Fax Number of your intended recipient.
- Touch the New Recipients button.
Touch the New Recipients button, then use the
touch screen keyboard to enter the fax number for
your intended recipient. After entering the fax
number, touch the Add button to add yo ur recipi ent
to the recipient list.
- Touch the Address Book but to n.
Touch the Address Book button, then use the
touch screen keyboard to find your intended
recipient. After finding your recipi e nt, touc h the
button to add your recipient to the recipient list.
Add

All Services Button
Services screen on the
Touch Screen
Job Status Button
Machine Status Button
Displays the current status
Stop Button
Log In/Out B
utton
Number Keypad
Features Button
Scanning
at the WorkCentre® 7232/7242
Allows you to select
all programming
features.
Displays the All
touch screen.
Displays job features
on the touch screen.
Simple Scanning:
DEFAULT
@Template A
1. Load the document into the Document Handler.
2. Touch the
3. Touch the Network Scanning icon.
4. Select the appropriat e
5. Select the appropriat e
6. Press the Start butt on o n t he Control Panel.
All Services
Provides password-
protected access to the
System Administrator
Menu.
Displays job progress
information on the
touch screen.
button on the Co ntrol Panel.
Template
Settings
Allows you to enter the
required Template Number.
Stops the
Scan job.
Start Button
Starts the
Scan job.
of the machine on the
touch screen.
on the Touch Screen.
on the Touch Screen.
Scanning Options:
General Settings – Color Scanning
The Auto Detect option allows the machine to determine
the color content of your document. The Color option
enables the machine to use all four toner colors. The
Grayscale option enables the machi ne to print only black
and gray tones. The Black & White option enables the
machine to use only black toner.
General Settings - 2 Sided Scanning
You can specify your original documents as 1 Sided, 2
Sided, or 2 Sided(Rotate Side 2).
General Se t ti n gs - Orig in al T yp e
You can specify your original documents as Photo & Text,
Text, or Photo.
General Settings - Scan Presets
You can specify your scanning presets for Sharing &
Printing, for Archival Record, for OCR, for High Quality
Printing, Simple Scan, or Custom.
Advanced Settings
The Advanced Setti ngs tab options allow you to access
the Photographs, Image Options, Image Enhancement,
and Shadow Suppression settings.
Layout Adjustm ent
The Layout Adjustment tab options allow you to access
the Resolution, Original Orientation, Original Size, Edge
Erase, Book Scanning, and Reduce/Enlarge settings.
Filing Options
The Filing Options tab options allow you to access the
Quality/File Size, File Name, File Format, Meta Data, File
Name Conflict, Password, and Login Name settings.
About Templates…
To successfully complete a network scanning job you
must select a template from the list. Templates are used
for scanning jobs at the machine - they define the
parameters of each scan job. Information such as the
final destination of the job (the repository) and the image
quality settings are defined within the template, along with
the template name. Template names are displayed on the
Network Scanning tab.
You can select an existing template “as is” or use Internet
Services to create a brand new template.
 Loading...