

Page 1

WorkCentre® 4150
Getting Started Guide
Page 2

Page 3
WorkCentre
Getting Started Guide
®
4150
Page 4

Page 5

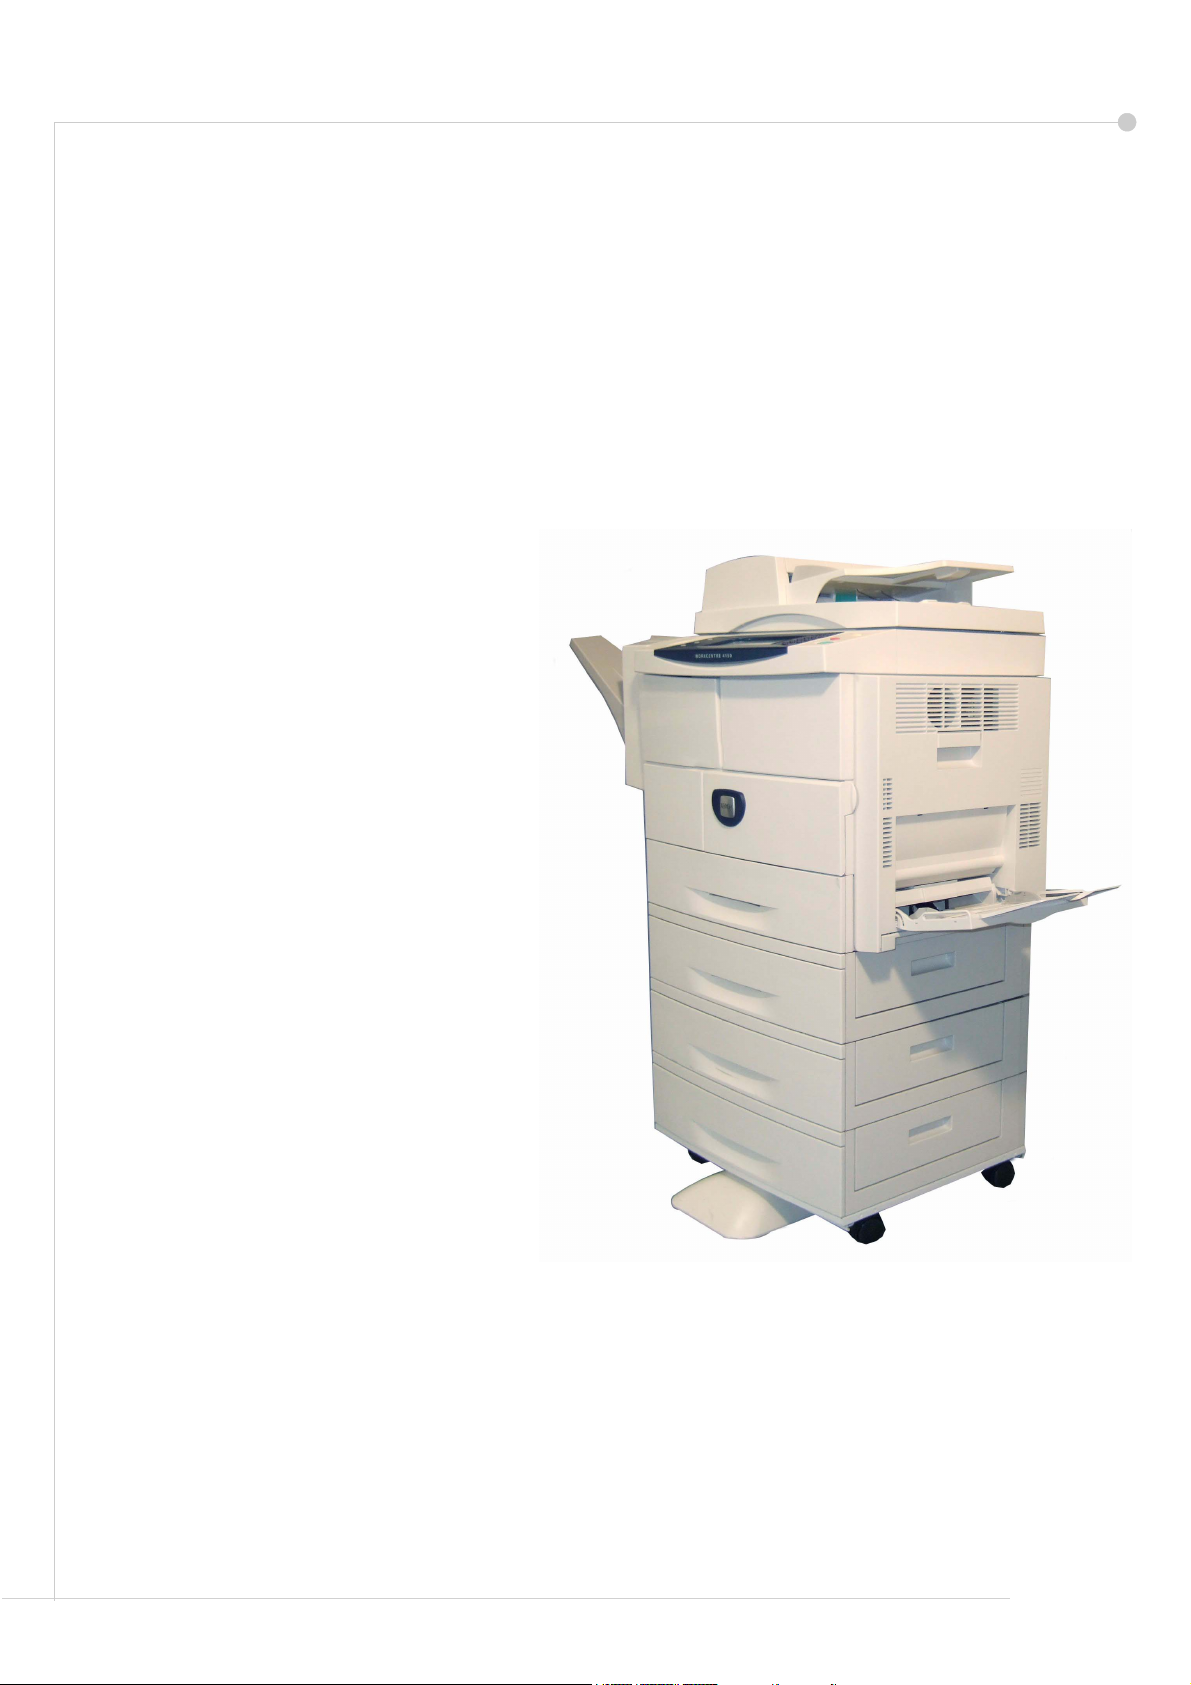
Xerox WorkCentre 4150
Getting Started Guide
Thank you for choosing the WorkCentre 4150. If you work through the procedures in this
book in the order they are presented you will successfully:
Connect the WorkCentre
Set-up the WorkCentre
Install optional features
Operate the WorkCentre
Contents
Install the WorkCentre ........................................................................ 3
Switch On the WorkCentre ................................................................. 4
Your WorkCentre................................................................................ 6
Connecting to the Network ................................................................. 9
Install Print Drivers ........................................................................... 11
E-mail Setup ..................................................................................... 12
Fax Setup ......................................................................................... 14
Installing Option Kits......................................................................... 15
Making Copies.................................................................................. 17
Printing a Document ......................................................................... 19
Sending a Fax .................................................................................. 21
Network Scanning ............................................................................ 23
Sending an E-mail ............................................................................ 25
LAN Fax............................................................................................ 27
Enhance your WorkCentre’s productivity ......................................... 29
Troubleshooting................................................................................ 31
Help .................................................................................................. 33
getting started guide 1
Page 6

For information about Safety, Regulatory Information, Environmental Compliance, Illegal
Copies, and Product Recycling and Disposal, please refer to the relevant sections in the
User Guide.
If you require more detailed information about any of the features available on your
WorkCentre, please refer to the User Guide and the System Administration CD.
For product support and information about ordering consumables and print media go to the
Xerox website www.xerox.com/support.
Prepared by:
Xerox
GKLS European Operations
Bessemer Road
Welwyn Garden City
Hertfordshire
AL7 1BU
ENGLAND
©2006 by Xerox Corporation. All rights reserved.
Copyright protection claimed includes all forms and matters of copyrighted material and
information now allowed by statutory or judicial law or hereinafter granted, including without
limitations, material generated from the software programs which are displayed on the
screen, such as icons, screen displays, looks etc.
All Xerox products mentioned in this publication are trademarks of Xerox Corporation.
Product names and trademarks of other companies are hereby acknowledged. The
information in this document is correct at the time of publication. Xerox reserves the right at
any time to change the information without notice. Changes and technical updates will be
added in subsequent editions of the documentation.
For the latest information go to www.xerox.com/support.
2 getting started guide
Page 7
Install the WorkCentre
1 Unpack the WorkCentre and any hardware options and locate the Installation Instructions.
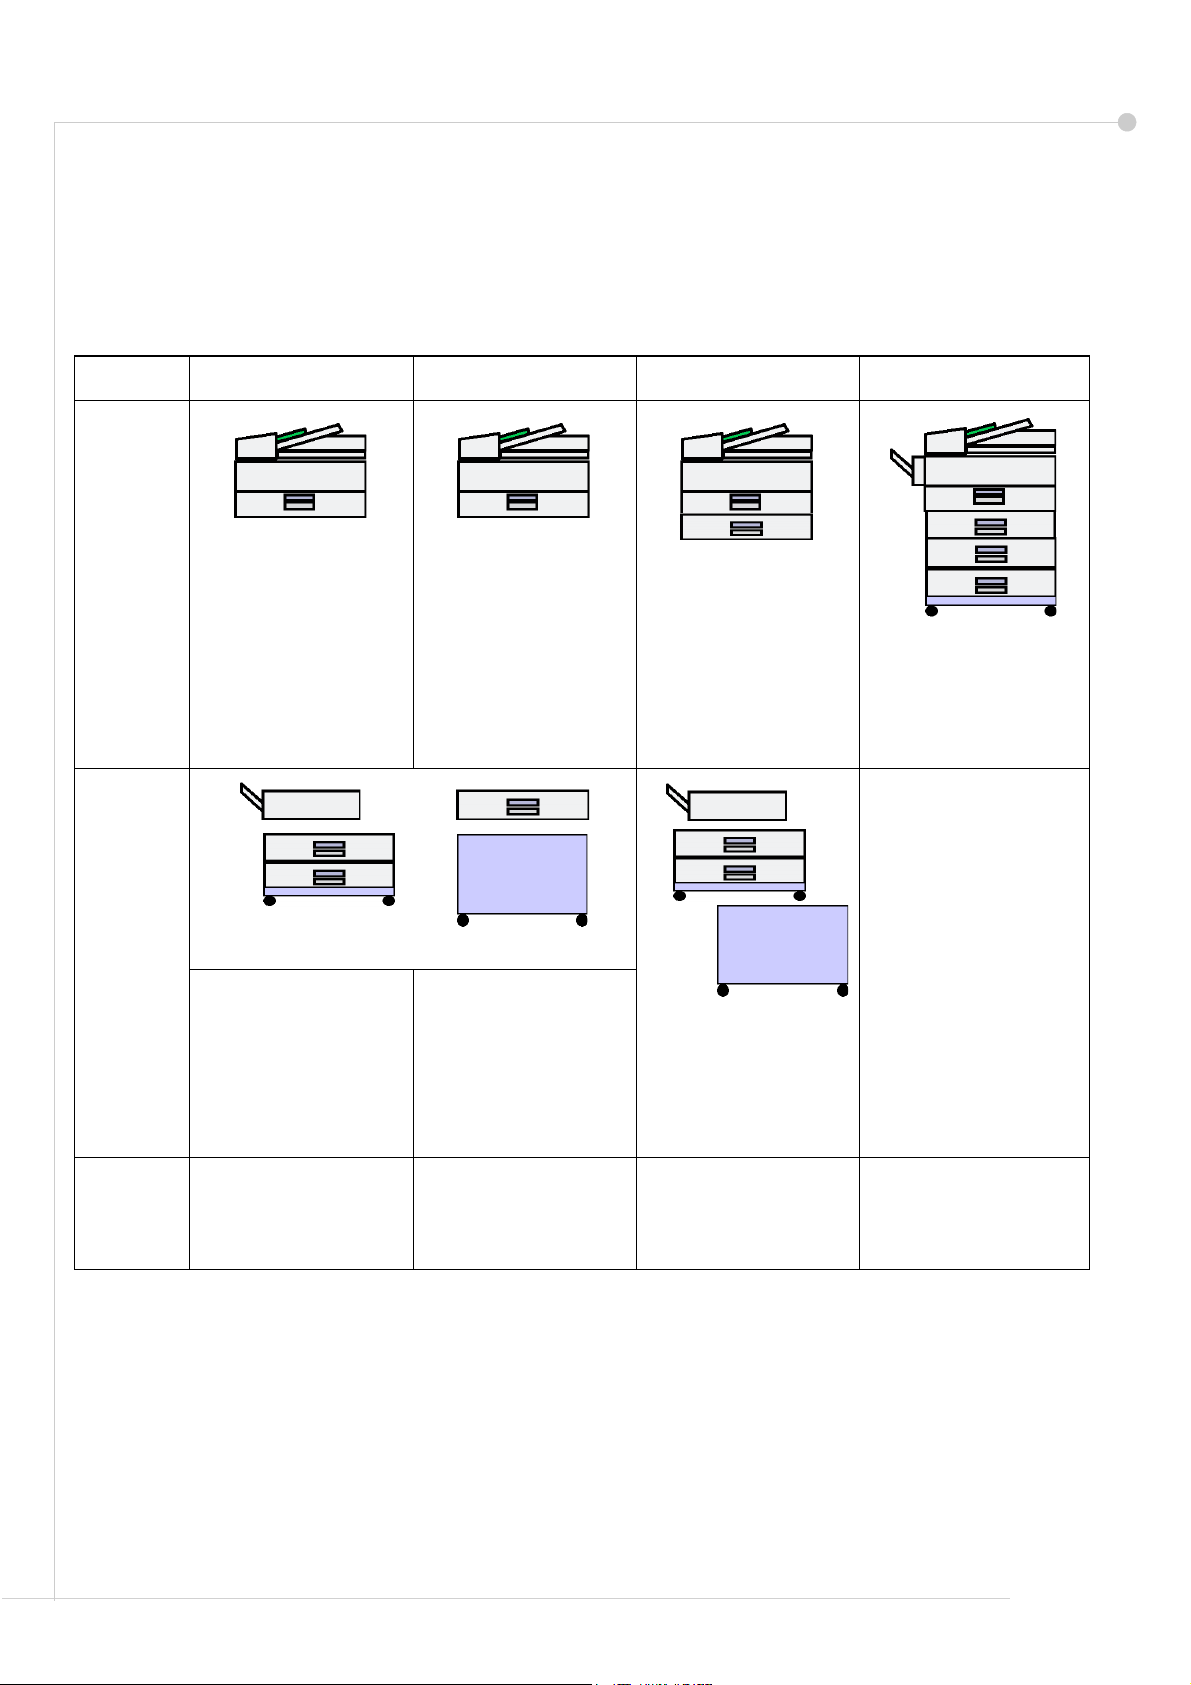
2 Follow the Installation Instructions to assemble the WorkCentre and hardware options. The
result will be one of these four configurations.
WorkCentre 4150 WorkCentre 4150s WorkCentre 4150x WorkCentre 4150xf
Standard
Features
Optional
Hardware
Copy
Tray 1 and Bypass
Tray
Tray 2 and Stand
Tray 3/4, Short Stand
Finisher
Fax
Foreign Device Interface.
Copy, Print and E-mail
Tray 1 and Bypass
Tray
Tray 2 and Stand
Tray 3/4, Short Stand
Finisher
Fax
Foreign Device Interface.
256 Mb Memory
Copy, Print, E-mail
and Fax
Trays 1 and 2 and
Bypass Tray
Copy, Print, E-mail,
Fax
Trays 1, 2, 3, 4 and
Bypass Tray
Finisher
Foreign Device Interface
256 Mb Memory
Stand
Tray 3/4, Short Stand
Finisher
Foreign Device Interface
256 Mb Memory
Optional
Features
Image Overwrite
Network Scanning
Network Accounting
Server Fax
Image Overwrite
Network Scanning
Network Accounting
Server Fax
Image Overwrite
Network Scanning
Network Accounting
Server Fax
In addition you will have:
Power Cord, User Documentation CD, Print Driver CD (WorkCentre 4150s, 4150x and 4150
xf configurations only), Getting Started Guide (this book) and a Telephone Cable (Fax
Option only).
getting started guide 3
Page 8
Switch On the WorkCentre
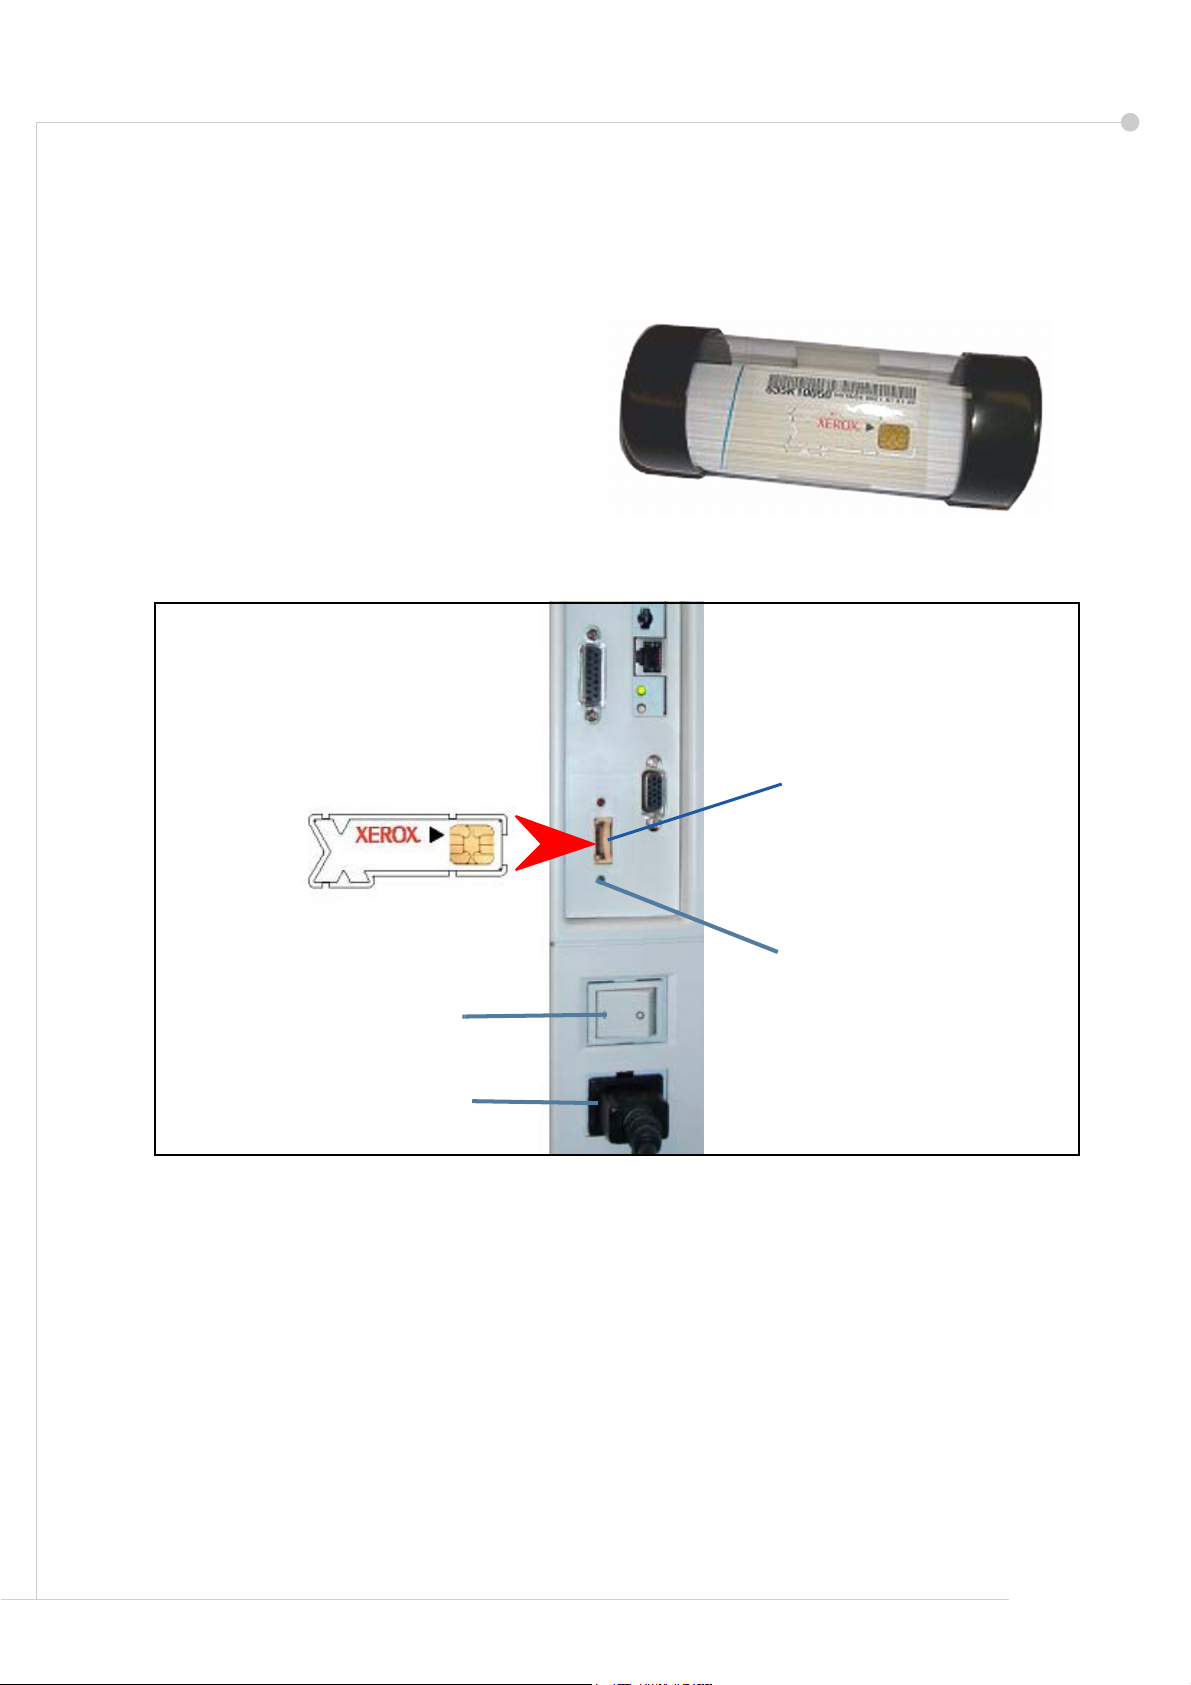
Once the WorkCentre has been assembled it must be configured. This is done using the
Product Enablement Key when the machine is switched on for the first time.
The Product Enablement Key is delivered
in a plastic tube inside the box with the
machine. The procedure to configure the
machine is as follows:
1 Locate the tube containing the Product
Enablement Key. Remove the plastic
card and carefully press out the key.
2 Install the Product Enablement Key into
the Card Reader Slot on the left side of
the machine.
Product Enablement
Key
Card Reader
slot
Green LED
On/Off Switch
Power Cord
3 Connect the Power Cord to the machine and a suitable power supply outlet.
4 Switch on the machine.
5 The Language Default screen will be displayed. Select your chosen language and then
select Save.
6 The Installation Wizard screen will be displayed. Select Next.
7 The Product Enablement Settings screen will be displayed. Follow the instructions on the
screen.
NOTE: When the Green LED light stops blinking and remains on continuously (about 10
seconds), the configuration is successful.
Remove the Product Enablement Key and select Next on the display
4 getting started guide
Page 9

8 The Machine Configuration screen asks you to confirm that the WorkCentre has correctly
recognized the Configuration that you ordered. If there are any errors, follow the
instructions on the screen. If the configuration is correct, select Next.
9 The Default Paper Size screen is displayed. Select either A4 or 8.5 x 11 inches and Next.
10 The Customer Support and Supplies Numbers screen is displayed. Enter the Customer
Support Telephone Number and the Supplies Telephone Number and select Next.
NOTE: This is for reference only. You may leave these fields blank if you do not have the
information.
11 The next 4 screens will allow you to set the Date Format, Date, Clock Format and Time.
Follow the instructions to enter the appropriate information and select Next on each
screen.
12 The Set Greenwich Meantime Offset screen will be displayed.
Greenwich Mean Time (GMT) is World Time and is the basis for every world time zone. A
table of GMT Offset is included at the end of this book. Either locate the GMT Offset for
your location from the table, or access http://wwp.greenwichmeantime.com/ for additional time zones.
When you have input the GMT Offset select Next.
13 The Congratulations screen will be displayed. This indicates that you have successfully
completed the System Settings portion of the Xerox Installation Wizard. Select Finish to
continue.
NOTE: In some locations a popup screen will appear asking for the Page Pack Passcode.
If this occurs, contact your Customer Support Representative for the passcode.
14 The machine will display a Machine self test in progress screen while the machine applies
the configuration settings. When this is complete the machine will display the Basic
Copying screen. Your WorkCentre is now ready for you to use.
getting started guide 5
Page 10
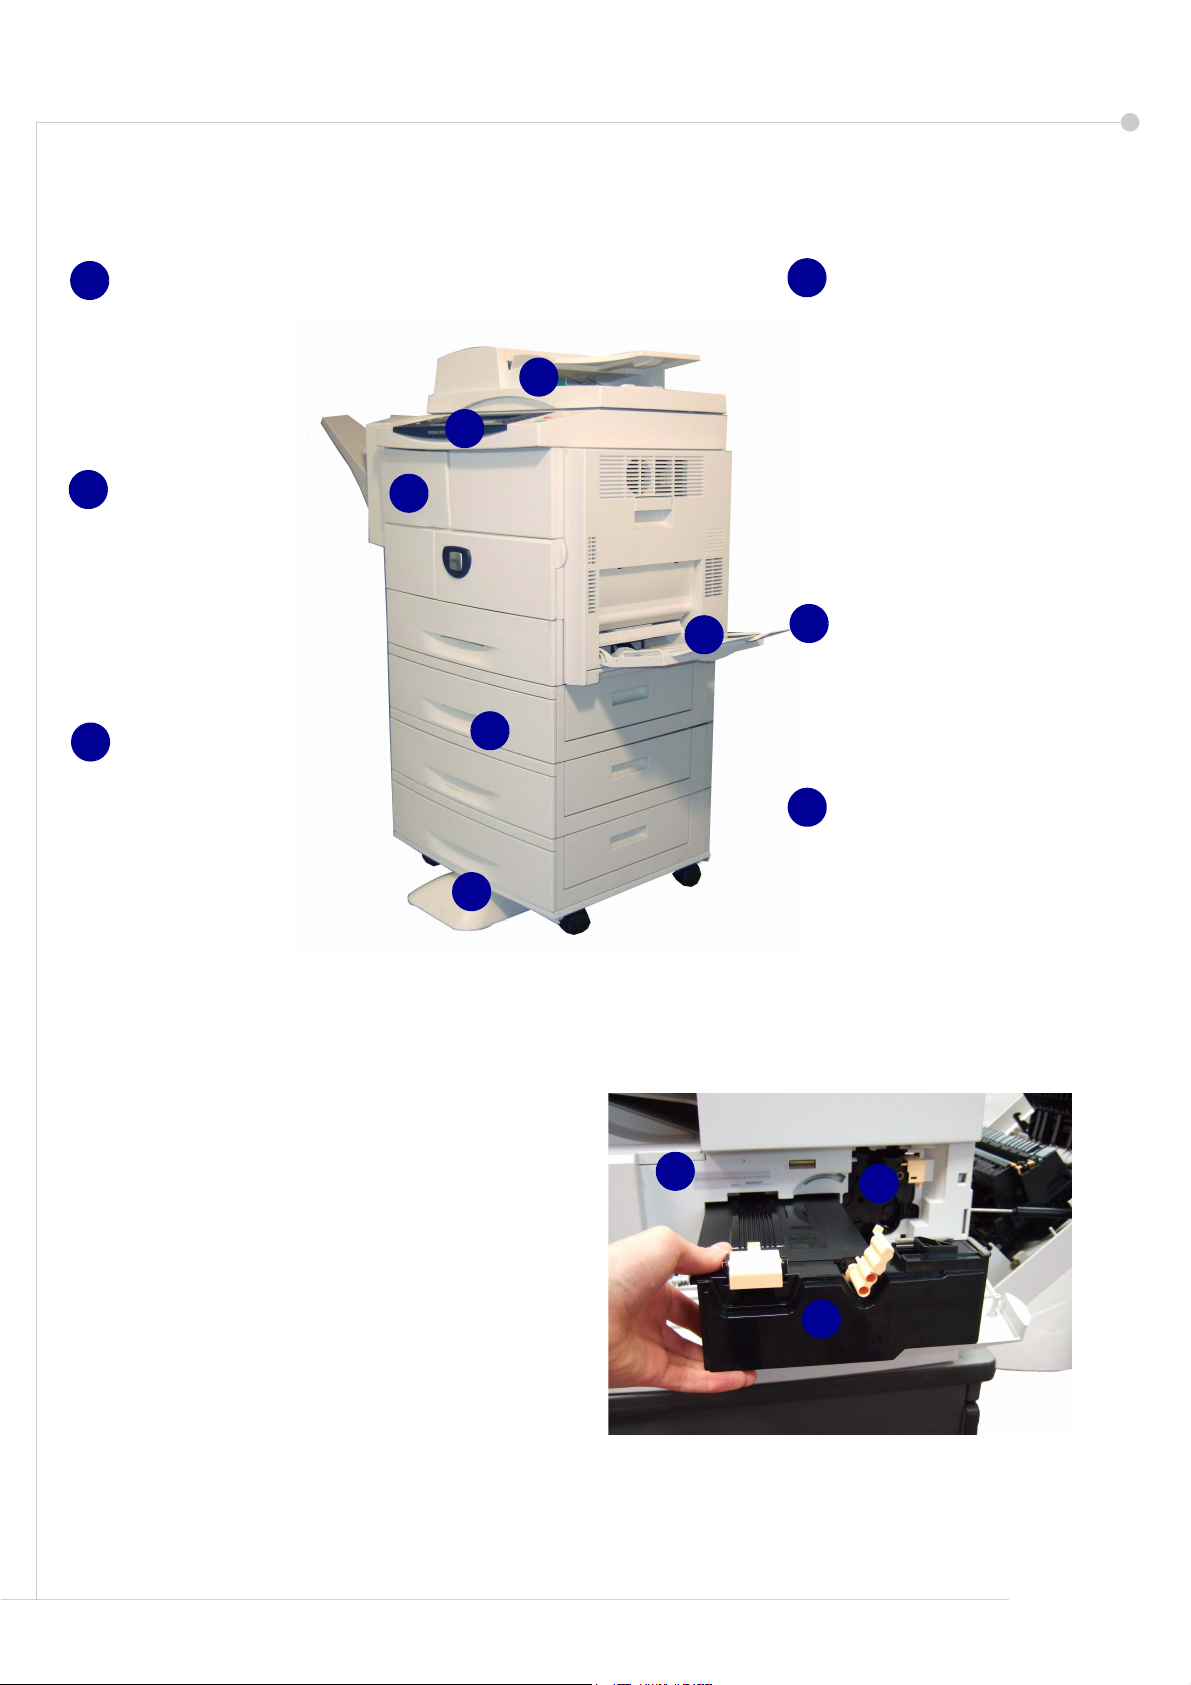
Your WorkCentre
1
Control Panel:
Touch Screen and
Numeric Keypad.
3
Finisher:
Optional Finisher
collates and staples
output.
4
Paper Trays:
Tray 1 is standard, Trays
2, 3 and 4 are optional.
All the trays are
functionally the same.
Trays 2, 3 and 4 are
interchangeable.
2
Document Feeder:
Used for scanning multiple
2
1
3
1
2
4
3
4
6
5
documents. The
Document Glass
underneath is used for
scanning single
documents, bound
documents etc.
5
Bypass Tray:
Used for non-standard
printing media.
6
Stand:
Note that a cabinet is
available when trays 3 and
4 are not installed.
Inside the WorkCentre
There are 2 Customer Replaceable Units in
the WorkCentre, the SMart Kit Drum
Cartridge (7) and the Toner Cartridge (8).
If the Finisher option is installed there is also
a replacement Staple Cartridge.
The Serial Number (9) is also located here.
If the machine display is on, the Serial
Number can also be seen by pressing the
Machine Status button.
6 getting started guide
9
7
8
Page 11

Control Panel Overview
Job Status
Access
Energy Saver
Services
Machine
Status
Item Description
Services Displays the Services screen to enable selection of features.
Display and
Touch Screen
Numeric Keypad
Language
Help
Cancel Entry
Interrupt Printing
Clear All
Start
Stop
Job Status Use to view the current job status and other job queues.
Machine Status Use to access machine information, status, Serial Number
and to print reports.
Display and Touch
Screen
Help Displays help messages for features and error messages.
Language Used to select the language shown on the display.
Access Provides access to machine setups for the Administrator.
Numeric Keypad Use to enter alphanumeric characters.
Cancel entry Cancels the entry made on the Numeric Keypad.
Energy Saver Indicator Indicates when the machine is in energy saving mode.
Clear/Clear All (AC) Press once to clear a current entry. Press twice to return to
Interrupt Printing Use to interrupt the current job to run a more urgent job.
Stop Stops the current job or the job in progress.
Displays the current WorkCentre status and screens to select
machine features.
default settings.
Start Use to activate a job.
getting started guide 7
Page 12
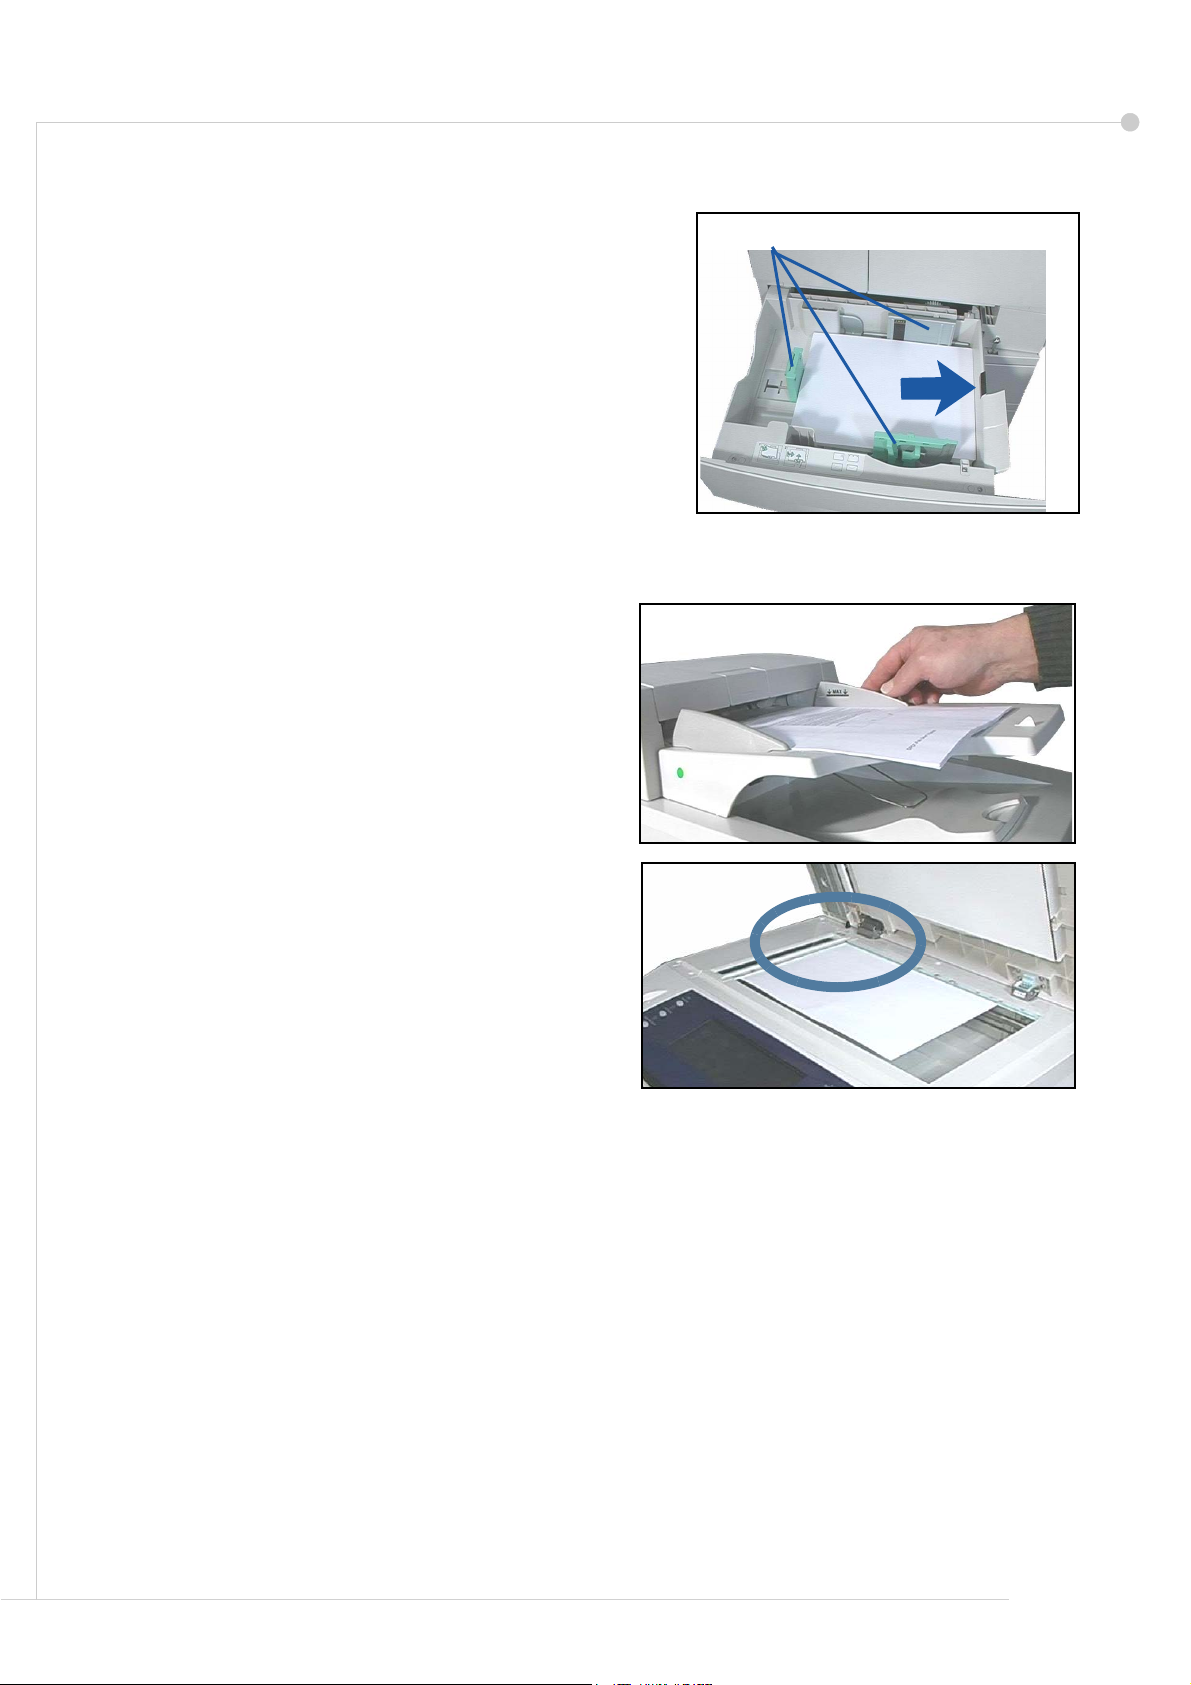
Load Paper into the Paper Trays
Open the paper tray and load paper into the tray. Do
1
NOT fill above the Max line.
Guides
2 Adjust the guides to hold the paper against the right
side of the tray.
3 When you close the tray, the Tray Information screen
will display. Input the size, type and color of the paper
you have loaded and press Confirm.
Loading Documents
Documents can be loaded either into the Document Feeder or onto the Document Glass.
1 Load documents to be copied face up in the
input tray of the Document Feeder with the top
of the document to the left or rear of the tray.
2 Move the Document Guide to just touch both
sides of the document.
Or...........
3 ........open the Document Feeder and place
single documents face down on the Document
Glass aligned with the rear left corner.
NOTE: Documents are only scanned once
even when several copies are selected.
8 getting started guide
Page 13

Connecting to the Network
If your WorkCentre is a 4150s, 4150x or 4150xf, follow these instructions to connect the
WorkCentre to an Ethernet TCP/IP network.
If you are connecting your WorkCentre to a different type of network, or you wish to use
other protocols, refer to the System Administration CD.
Test the WorkCentre
Before connecting the WorkCentre to your network, make sure that it is operating correctly
as a copier.
1 Place a document in the Document Feeder and make 3 copies.
2 If the copies are made successfully, install the network connection as described in the next
steps. If copying is not successful, refer to Troubleshooting on page 31.
Network Connection using TCP/IP
You can set up the TCP/IP network connection using either of the following methods:
• DHCP: Use this method to allow a DHCP server to automatically assign an IP address.
This is the factory default setting.
• Static IP address: Use this method to manually assign an IP address provided by the
network administrator.
When the WorkCentre is powered on, it automatically uses DHCP to obtain its network
configuration. To use a static IP address, DHCP must be turned off and the IP address,
gateway address, subnet mask, and DNS Server address must be entered manually.
1 Connect the Ethernet cable to the RJ45 connector
on the WorkCentre.
NOTE: The Ethernet cable is not supplied by Xerox.
2 Continue on to the next step to setup the address
using DHCP. If you want to set a static IP address,
skip to Network Setup Using a Static IP Address on
page 10.
Connector
RJ45
Network
Network Setup Using DHCP
After the WorkCentre starts, it negotiates with the DHCP server for an IP address. Wait two
1
minutes for the network setup to complete and then check the allocated IP address as
follows:
• On the Control Panel, select the Access button and then enter the Administrator
passcode [1111] and select Enter.
• Select Go to Tools > Connectivity and Network Setup > Network Setup > TCP/
IP Options > TCP/IP Settings.
• The allocated TCP/IP address is in the Name/Address field.
getting started guide 9
Page 14

2 Confirm that an IP address has been allocated and that it is an appropriate IP address for
your network.
NOTE: If the IP address starts with 169.xxx.xxx.xxx, the DHCP server has not properly
allocated an address or DHCP is not enabled on your network. Contact your network
administrator for assistance.
Network Setup Using a Static IP Address
Before you begin, obtain the following information from your network administrator:
• IP Address
• Gateway Address
• Subnet Mask
• DNS Server Address
1 Press the Access button on the Control Panel, enter the
Administrator’s passcode [1111] and select Enter.
2 On the screen select Go to Tools > Connectivity and
Network Setup > Network Setup > TCP/IP Options.
3 Select HTTP and Enable. Select Save.
4 Select TCP/IP Settings.
5 Touch the Dynamic Addressing button. By default, DHCP
will be selected. Select Disabled to disable DHCP and
touch Save.
6 Select Name/Address. Enter the Host Name, by touching the Keyboard symbol. Enter the
IP Address by touching each box and entering the number using the Numeric Keypad.
Select Save.
7 Select Subnet and Gateway. Enter the Subnet Mask and IP Gateway. Select Save.
8 If you do not wish to configure DNS settings proceed to the next step. If you wish to
configure DNS settings select the DNS Configuration button. Enter the Domain Name and
the Preferred DNS Server address. Select Save.
9 The static IP address is now set. Select Exit Tools.
10 getting started guide
Page 15

Install Print Drivers
This procedure describes how to install Print Drivers using the Print Driver CD.
NOTE: If you wish to install different print drivers or are using a different operating system
refer to the System Administration CD for full details.
The Print Drivers are on the Print Driver CD that was delivered with your WorkCentre.
You can use the CentreWare Print and Fax Drivers CD to install multiple components such
as printer drivers, user documentation and PPDs (PostScript® Printer Description) at the
same time. To use the installer, load the CentreWare Print and Fax Drivers CD-ROM
delivered with your WorkCentre.
NOTE: CentreWare is a group of applications, internet services and printer drivers which
provide assistance to customers configuring and installing the device.
1 At the client workstation insert the Driver CD into the CD drive.
2 If the CD does not start automatically, go to the Start menu, select Run and browse to the
CD drive. Select Setup and click OK. Click OK to start the installation procedure.
3 Select the language for the installation and select Continue. The driver screen is
displayed.
4 Select Install Drivers.
5 Select Install Print Drivers.
NOTE: The Adobe
®
PostScript® 3 ™ Driver is installed by default.
6 To install the PCL 5 or PCL 6 Print Drivers, select Option and check the boxes for the
drivers required.
7 Enter the Printer’s IP address, DNS name or UNC path for the WorkCentre.
8 Select Install.
9 Follow the on screen messages to complete the installation.
10 When the Print Driver is successfully installed, either send a test print from the print driver
or submit a job to the WorkCentre.
11 If the printing operation is successful, continue on to the next setup procedure in this
document. If the print operation failed, refer to Troubleshooting on page 31.
For a full explanation refer to the System Administration CD that accompanied your
WorkCentre.
getting started guide 11
Page 16

E-mail Setup
If you wish to setup the E-mail service follow this procedure. If you do not want to setup this
service at this time continue on to Fax Setup.
If your WorkCentre is a network connected configuration, it will arrive with the E-mail service
enabled.
NOTE: If you do not see the E-mail button on the All Services screen, enable E-mail in the
Tools Pathway. (Select Access > Passcode [1111] > Enter > Go to Tools > More >
Optional Services > E-mail.)
Before starting the setup procedure, please ensure the following items are available or have
been performed.
• Ensure the WorkCentre is fully functioning on the network and that the E-mail
service is available on the All Services screen.
• Ensure that the TCP/IP and HTTP protocols are configured on the device and fully
functional. Refer to Network Setup Using a Static IP Address on page 10.
• Obtain the IP Address of a functional SMTP mail server that accepts inbound mail
traffic.
• Ensure the DNS settings are configured correctly and obtain the Domain Name
address, if applicable.
• Create an E-mail account which the WorkCentre will use as the default From
address.
• Test the E-mail account by sending an E-mail to the Xerox device account. This
task should be completed at a mail client on your network that supports SMTP
(Simple Mail Transfer Protocol) and POP3 (Post Office Protocol 3).
You will use Internet Services to configure E-mail settings and this is accessed through your
web browser.
1 Open your Web browser and enter the TCP/IP address of the WorkCentre in the Address
bar. Press Enter.
2 Select Properties > Connectivity > Protocols > TCP/IP.
3 Enter the domain name in the Domain Name box (for example: abc.xyz.company.com). It is
only necessary to configure the DNS settings if Host Names are to be used.
NOTE: If Dynamic Addressing has been set on the WorkCentre (DHCP or BootP) the
Domain Name will not be accessible. If you need to change it, select Static from the IP
Address Resolution menu list.
4 Scroll to the bottom of the screen and click the Apply button to implement any changes.
Enter the current administrator tools User Name and Password. The default is [admin]
which is case sensitive, and [1111].
5 From the Protocols menu select SMTP Server.
6 Select either IP Address or Host Name and enter the Host Name or the IP Address and
Port Number (1-65535) of the SMTP Server. The default Port is 25.
7 Check the box if your Server Requires SMTP Authentication.
8 Enter the Login Name and Password.
12 getting started guide
Page 17

9 If your server requires POP3 authentication before SMTP select Enable and either Login
with User Credentials or Login with Device Credentials.
10 If you selected Login with Device Credentials, enter the SMTP Server Login Name and
Password.
11 Select Apply to confirm your settings.
12 From the Properties menu, Select Services > E-mail Settings > E-mail Setup.
13 On the E-mail Setup screen you can select the following options:
• Scan Resolution
• Attachment Type
• Output color
• Date/Time stamp on Pdf documents
• “From” and “To” Security Options
• Auto send to self
• Specify default Subject field text
• Specify default Message Body text
• Specify default Signature text
• Programmable SmartKeys
• Choose E-mail/Fax Forwarding rules
• Choose Confirmation Sheet rules
14 When you have made your selections select Apply.
NOTE: For more information on all of the E-mail features including setting up address
books, please refer to the System Administration CD.
getting started guide 13
Page 18

Fax Setup
The WorkCentre 4150 and 4150s can have Fax installed as a optional feature. The Fax Kit
will require both installation and setup. Fax on the WorkCentre 4150x and 4150xf is a
standard feature but will require setup when the WorkCentre is installed.
Installing the Fax Kit (4150 and 4150s only)
Install the Fax Kit using the instructions in the Kit.
1
Connecting
Connect the telephone line to the Line
2
connector on the WorkCentre.
3 If you wish to attach a handset to the
WorkCentre, connect the handset to the
Ext. connector.
Setting up
Handset
(Ext.)
connector
Line
connector
Press the Access button to enter the
4
Tools pathway.
5 On the numeric keypad enter [1111] or the current passcode and touch Enter.
6 Select Go to Tools > More > Optional Services > Embedded Fax. The Fax Install
Screen will appear.
7 Select the required (or nearest) country location by touching the entry in the Country Setup
list and select Next.
8 Select the required dialing method. For a tone line select Tone. For a 10 pulse per second
line select Pulse. If in doubt, select Tone.
9 Touch the keypad symbol for Fax Number and enter the fax telephone number for the
WorkCentre.
10 Touch the keypad symbol for Machine Name and enter the friendly name for the
WorkCentre.
11 Select Save and Close and Exit Tools. The WorkCentre will now send and receive fax
transmissions using default settings. If you wish to change the Fax Setup enter the Tools
Pathway as described in steps 4 and 5 and select Go to Tools > More > More > Fax
Setup. The various Fax options can be selected and changed.
14 getting started guide
Page 19

Installing Option Kits
This section provides instructions on how to install and configure optional features:
• Network Scanning
• Hard Disk Overwrite
• Server Fax
• Network Accounting
NOTE: For instructions on installing and configuring Server Fax and Network Accounting,
refer to the System Administration CD.
Installing Option Kits
All the Option Kits are installed in the same way. Each kit will contain a Feature Enablement
Key and instructions.
1 With the WorkCentre switched on, insert
the Feature Enablement Key into the Card
Reader slot just above the On/Off switch on
the left hand side of the machine.
2 When the feature is successfully installed a
pop-up message will tell you that the
feature is configured and ask you to
remove the Feature Enablement Key.
Card Reader
slot
Network Scanning
Network Scanning is an optional feature, available for the WorkCentre 4150s, 4150x and
4150xf, and can be purchased from your Xerox Sales Representative.
Network Scanning enables you to convert your hard copy documents to electronic files and
retrieve them from a server or workstation on the network.
There are two ways to configure Network Scanning:
• Use Internet Services, the WorkCentre's embedded web server, to set up the
Network Scanning feature. Installation and setup of this feature is described below.
• FreeFlow™ SMARTsend™ is an optional application that will scan to a variety of
destinations. Installation and setup of this feature is described in the FreeFlow™
SMARTsend™ System Administrators CD that comes with the application.
NOTE: Scanning services should be enabled on your network before you enable the
Network Scanning option.
Install Internet Services Network Scanning
1 Configure the option. Refer to Installing Option Kits on page 15
Create a Network Scanning Repository
2 At your PC, open your web browser and enter the Host Name or IP address of the
WorkCentre.
3 Select Properties > Services > Network Scanning > File Repository Setup.
getting started guide 15
Page 20

4 In the Default File Destination box select Add and enter a name to describe the filing
destination.
5 Select the correct protocol for the repository in the Protocol menu.
6 Select and enter either the IP Address or Host Name of the server you want to send your
scanned images to.
7 In Document Path enter the path to the location of the folder on the server where you want
to store your images. Enter the full path to the folder, starting from the root of FTP services.
8 Enter the Login Name and Password of the Server to enable the WorkCentre to access the
default repository.
9 Click Apply.
10 A default template can now be used on the WorkCentre. You can modify the template or
create new templates from Internet Services.
For more detailed information on Network Scanning, repositories and templates, refer to the
System Administration CD.
Image Overwrite
The Image Overwrite Security Kit is an option kit available for purchase from your Xerox
Sales Representative for all connected WorkCentres.
When a job is processed it is stored on the hard drive. For security, you can delete the
processed jobs from the hard drive using either Immediate Image Overwrite or On Demand
Image Overwrite. On Demand Image Overwrite is initiated as required by the WorkCentre
administrator whereas Immediate Image Overwrite clears the memory on a job by job basis
immediately after each job has been processed.
NOTE: Copy jobs are not sent across the network or stored in the same way as other types
of jobs, so they do not need to be overwritten.
Installing the kit
1 Install the kit. Refer to Installing Option Kits on page 15.
Enable Immediate Image Overwrite
2 Press the Access button to access the Tools pathway.
3 On the keypad enter [1111] or the current passcode. Touch Enter.
4 Select Go to Tools > More > Optional Services > Immediate Image Overwrite.
5 Select Enable, Save and Exit Tools. The feature becomes immediately operational and
requires no further configuration by the System Administrator.
16 getting started guide
Page 21

Making Copies
1 Load the documents to be copied either face up in the Document Feeder or face down to
the rear left corner of the Document Glass.
2 Select the Services button. If the Basic Copying screen is not displayed, touch the All
Services button and then Copy. The Basic Copying screen will be displayed.
3 Select the required features using
the Touch Screen.
The features are shown in the table
below.
.
Basic Copying Image Adjustment Output Format
Reduce/Enlarge - reduce
or enlarge the image 25%
to 400%
Paper Supply - Select the
tray/size of paper
2 Sided Copy - 1 or 2
sided copy options
Output - collated and stapled options
Image Quality - adjust settings to improve image
quality
Edge Erase - deletes the
edges of the image
Book Copying - copy
bound documents
Image Shift - moves the
image on the page
Original Size - Set size of
original
Booklet Creation - automatically print document as
a booklet
Multi -Up - prints several
images on 1 page
Covers - insert covers
Transparency Separators - insert dividers
between each transparency
4 Enter the number of copies required, using the numeric keypad and then press Start.
NOTE: To confirm the Copy job, press the Job Status button on the Control Panel to
display the Job Status screen. The queued copy job will be displayed in the queue.
getting started guide 17
Page 22

Additional Copy Features
Reduce / Enlarge
Originals can be reduced or enlarged between 25% and 400%. To use
this option, select the Basic Copying tab. Select any one of the preset
reduce/enlarge ratios or touch More to access custom settings.
Image quality adjustment
You can enhance the copy quality of the output based on the type and
quality of the original being scanned. To use this option, select the Image
Adjustment tab and select Image Quality.
Original Type: Select the type of document to be copied, either Text,
Text and Photo or Photo.
Lighten / Darken: Adjusts the lightness or darkness of the output.
Background Suppression: Use to automatically reduce or eliminate the
dark background resulting from copying colored paper or newspaper
originals.
Creating booklets
A sequential set of either 1-sided or 2-sided originals can be copied to
create handy booklets. The WorkCentre produces 2-sided prints
automatically, which when folded, produces a booklet with all the pages
in the correct sequence. The WorkCentre will also reduce and correctly
position each image to fit on the selected paper.
To use this option, load the originals in the Document Feeder and select
the Output Format tab and Booklet Creation.
Multiple images
This feature is used to copy two or more documents, in a reduced size,
onto one sheet of paper. It is ideal for creating handouts, storyboards or
documents used for archival purposes. To use this option, load the
originals in the Document Feeder and select the Output Format tab
and choose Multiple Up. You can copy one, two or four separate
originals onto one sheet of paper.
18 getting started guide
Page 23

Printing a Document
1 Ensure that the correct Xerox WorkCentre 4150 printer driver has been installed on your
PC. To install the print drivers refer to Install Print Drivers on page 11.
You can also access the Print Drivers by referring to the CentreWare Print and Fax Services
CD or you can download the latest versions from the Xerox website at www.xerox.com/
support.
2 Open the document to be printed. Select File > Print and select the Xerox WorkCentre
4150 from the list of printers displayed.
3 To change the default printing properties select Properties.
The print driver has various tabs that
contain options and properties.
• The Advanced tab contains various
font and printing options.
• Use the Paper/Output tab to choose
the type of media, size and color and
output choices like Staple and 2 Sided
Prints.
• Image Options enables you to adjust
the look of your prints. You can reduce
and enlarge the image size, save toner
and set the resolution.
• The Layout/Watermark tab has various
options to add watermarks to pages,
change image orientation (landscape
or portrait) and enable booklet and
multi-up printing.
Choose the options for your printing job and click OK to print the document.
4 The print job will be sent to the WorkCentre and will appear in the Incomplete Jobs queue.
To view the queue at the WorkCentre, select the Job Status button.
getting started guide 19
Page 24

Additional Print Features
Rotate image
This feature enables you to rotate the page through 180 degrees. To use
this option, select the Advanced tab and click on Image Options.
Select On to rotate page images 180 degrees from their current
orientation. Select Off to disable the feature.
Saved settings
Frequently (or rarely) used features of a print job can be saved with
the Saved Settings option. This enables you to name, save, and recall
almost all selectable features of a print job. You can store up to 50
different job settings. To use this option, select the Paper/Output tab,
click on Save to save current settings. Click on Load to load
previously saved settings.
Toner Saver
If you are printing draft documents you can reduce the toner (dry ink)
used by selecting the Toner Saver feature. The image will be lighter
than normal but will be legible and ideal for checking or proofreading a
document. Select the Image Options tab and click on the Conserve
Dry Ink checkbox to use this feature.
Add watermark
The Watermark feature lets you create and print background text or
bitmaps, across the pages of your documents. You can create your own
watermarks or edit existing ones. You can also specify watermarks to be
printed in the foreground or background or printed only on the first page.
To use this option, select the Layout/Watermark tab and select the
appropriate choices from the Watermark section.
20 getting started guide
Page 25

Sending a Fax
1 Load the documents to be faxed either face down on the Document Glass or face up into
the Document Feeder.
2 Press the Services button on
the Control Panel. Select the
All Services button and
choose the Fax option. This
displays the Basic Fax
screen.
3 Enter the recipient’s fax
number by:
• Keypad Dial - enter the
number on the numeric keypad.
• Manual Dial - if a telephone handset is attached to the WorkCentre, select Manual Dial
and dial the number on the handset.
• Speed Dial - Select Speed Dial and enter a pre-set speed dial number.
• Send List - Add several recipients to the Send List to send the same fax to several
recipients. This button provides access to the dial directory for individuals and groups.
4 Select the required features for your fax job. They are shown in the following table:
Basic Faxing Image Adjustment
Sides Scanned - 1-sided or 2-sided
originals
Resolution - sets the quality of image Color Mode - mono or color
Image Quality - adjust settings to
improve image quality
Original Size - set size of original
NOTE: The Added Fax Features tab provides access to fax setup features such as
creating mailboxes, adding names to a dial directory and other useful options.
5 Press Start to transmit your fax.
NOTE: To confirm the Fax job, press the Job Status button on the Control Panel to display
the Job Status screen. The queued job will be displayed.
getting started guide 21
Page 26

Additional Fax Features
Delayed send
This feature enables you to specify the time the fax is transmitted. This
option can be used to delay transmission of a fax job to an off-peak
period to reduce the cost of the call. To use this option, select the
Added Fax Features tab. Select Fax Sending Features > Delay
Send.
Change the resolution
The Resolution effects the appearance of the fax at the receiving fax
terminal. To use this option, select the Basic Faxing tab and choose from
the available options under Resolution. You can select Standard for most
text documents, Fine for line art and photos and SuperFine for photos
and halftones or images that have gray tones.
Set up a dial directory
Use this feature to store destination names, fax numbers and
transmission settings in your WorkCentre. Entries stored here will be
available for selection within the Send List feature on the Basic Faxing
tab. Select the Added Fax Features tab and then Dial Directory Setup.
Enter Individual fax details. Dialing Groups can also be set up comprising
several Individual entries.
Fax Reports
Numerous fax reports can be printed by selecting the Added Fax
Features tab and Fax Reports. Select the report you require and then
touch the Print Report button.
22 getting started guide
Page 27

Network Scanning
Network Scanning enables you to scan your hard copy documents and store them as
electronic files. You can retrieve the files from the server using your workstation.
1 Load the documents to be scanned either face down on the Document Glass or face up
into the Document Feeder.
2 Press the Services button on
the Control Panel. Touch the
All Services button and
choose the Network
Scanning option. This
displays the Network
Scanning screen.
3 Select the Scanning
Template you require from
the Template Destinations list.
4 If required, modify the template settings from the options on the Basic and Advanced
Settings tabs
Basic Settings Advanced Settings
Color - Black and white or color scan Image Options - Lighten or darken the
image
2-Sided - Original can be 1 or 2 sided Scan to Edge - Scan the complete page
Original Type - Text or photo Original Size - Set size of original
Scan Presets - Sets the scan settings to suit
how the scanned image will be used
File format - PDF, TIF or JPEG
Resolution - from 72x72 to 600x600 dpi
Quality/File Size - optimum quality versus
file size
NOTE: The Option tab enables Document Management options. The Refresh
Destinations tab will refresh the Template Destinations list if new templates have been
created.
5 Press Start to scan your documents.
NOTE: To confirm the scan job, press the Job Status button on the Control Panel to
display the Job Status screen. The queued job will be displayed.
getting started guide 23
Page 28
Additional Network Scanning Features
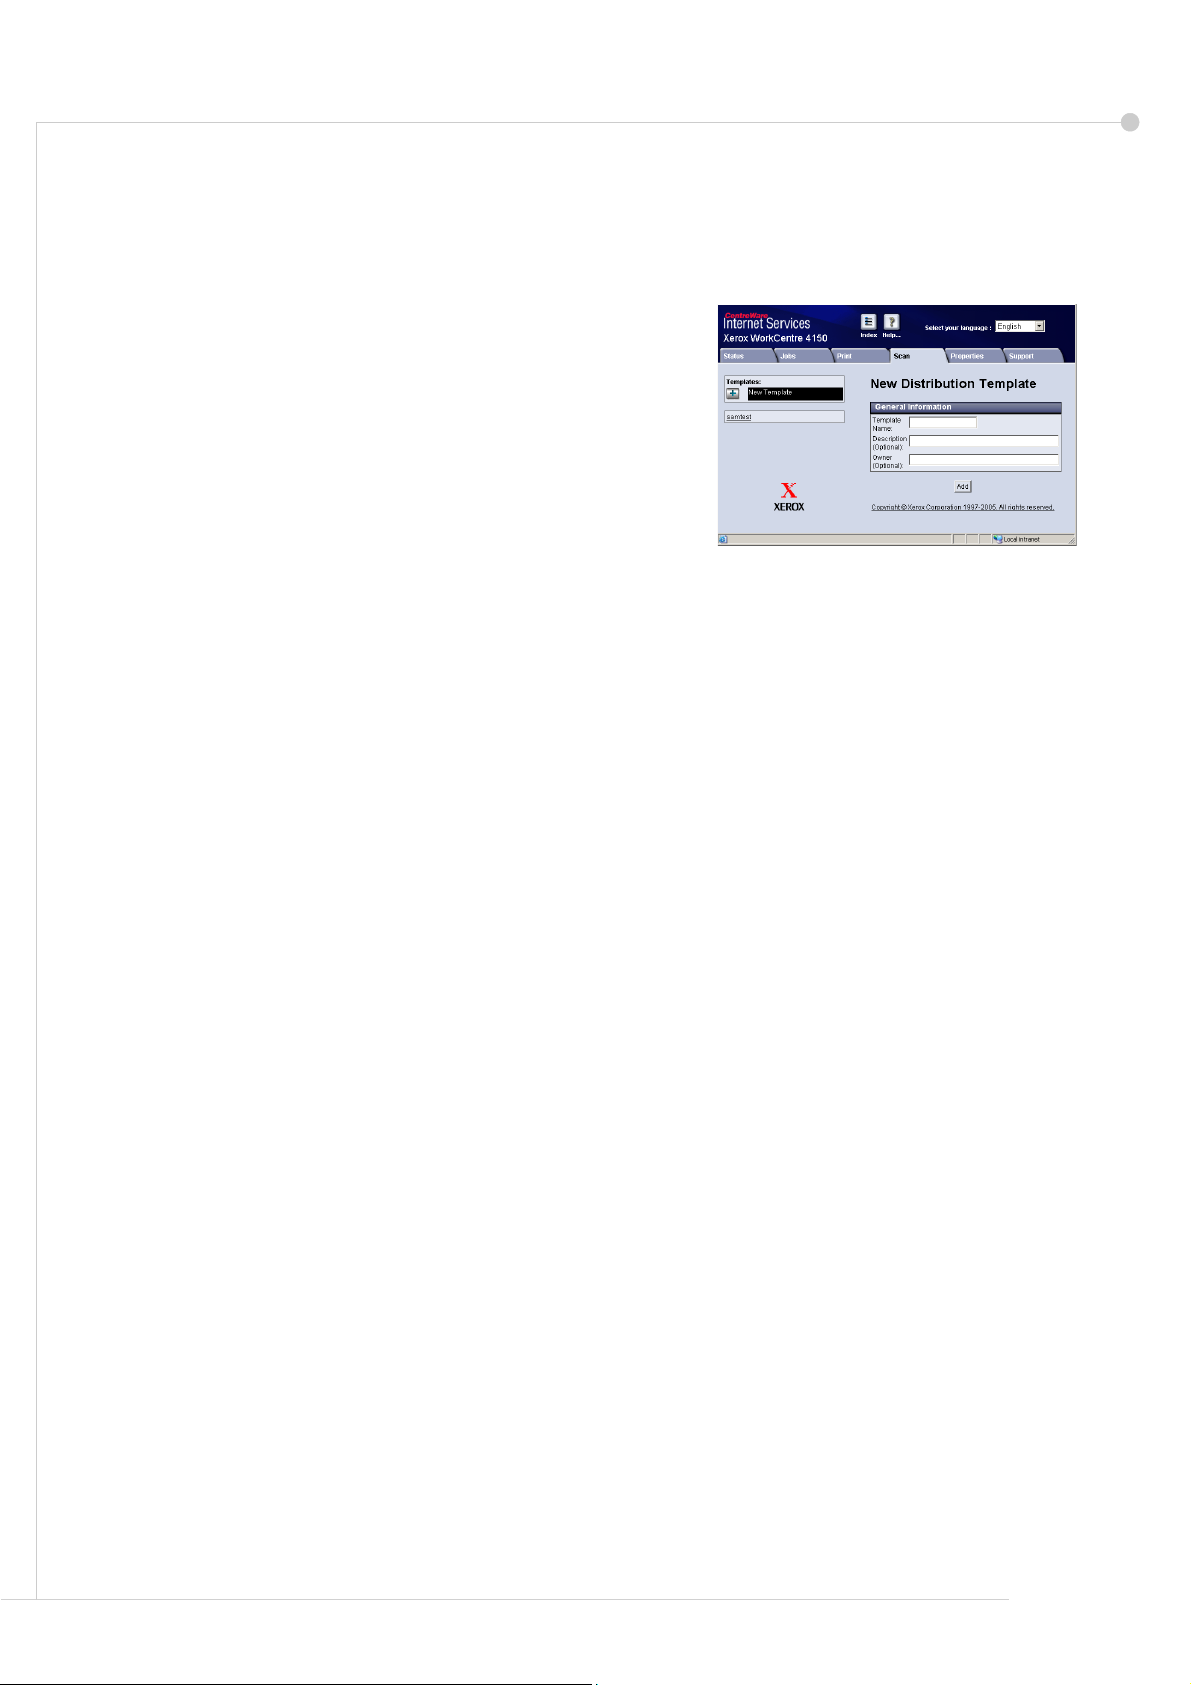
Creating a Scanning Templates
Templates are used in network scanning to define the
destination and scan settings for your scan job. Your
workflow will be more efficient if you create specific
templates for your most frequent scanning jobs.
New templates are based on the settings configured for
the Default Template or you can copy and modify
existing templates. Up to 250 templates can be created.
1 Open your Web browser and enter the TCP/IP address
of the machine in the Address bar. Press Enter and
click the Scan tab.
2 In the General Information window, enter a name for your template in the Template Name
box. Optionally you can add a description and the name of the owner.
3 Select Add to create the new template. Input the Administrator’s user name and passcode
[admin/1111]. The template will appear in the Templates list on the left hand side.
Name / Format
4 To select the name and the format of the scanned document, select Edit. Enter a name for
the scanned document and choose the format from: PDF, Multi-Page TIFF, TIFF or JPEGJIF. Select Apply.
Destination Services
5 The scan can be sent to a file repository setup by the System Administrator or transmitted
as a fax if Fax Server is enable on the WorkCentre. Select File and/or Fax as appropriate.
If you select File, select the file repository to which your scanned images will be sent.
Document Management Fields
6 If you wish to add data to assist document management of your scanned images, select
Add and complete the appropriate information.
Scan Options
7 To change the scanning options select Edit. You will be able to set 2-Sided, Original Type
and advanced scanning settings such as Lighten/Darken, Contrast, Original Input and
Resolution. You may also choose to print a confirmation report and job log.
8 When you have made your selections, select Apply. Your new template will appear in the
Template Destinations list on the WorkCentre.
24 getting started guide
Page 29

Sending an E-mail
1 Load the documents to be E-mailed either face down on the Document Glass or face up
into the Document Feeder.
2 Press the Services button on
the Control Panel. Touch the
All Services button and
choose the E-mail option.
This displays the E-mail
screen.
3 Touch From and enter the
address you want to appear
in the From field of the fax .
NOTE: This field may have been preset by the Administrator and may not be editable.
4 Touch To and enter the E-mail address of the recipient. If an address book has been set up
you can just enter the name of the recipient and press Enter. The address book will be
searched and the recipient can be selected from the resulting list of names. Multiple
recipients can be added to the Address List in this way.
5 Touch CC... and/or BCC... to copy the E-mail to other recipients.
6 Select Edit Subject and enter the Subject of the E-mail.
7 Select any setting appropriate for your document from either the Basic Settings tab or the
Advanced Settings tab.
Basic Settings Advanced Settings
Color - Black and White or Color Image Options - Lighten or darken the
image
2-Sided - Original can be 1 or 2 sided Scan to Edge - Scan the complete page
Original Type - Text or photo Original Size - Set size of original
Scan Presets - Sets the scan settings to suit
how the scanned image will be used
File format - PDF, TIF or JPEG
Resolution - from 72x72 to 600x600 dpi
Quality/File Size - optimum quality versus
file size
8 Press Start to scan your document and send it as an attachment to an E-mail.
NOTE: To confirm the job, press the Job Status button on the Control Panel. The job will
be displayed in the job queue.
getting started guide 25
Page 30

Additional E-mail Features
Scan Presets
Preset Output
Sharing and Printing A medium quality scan and file size
High Quality Use to produce a high quality image on photos and
Archival Record Produces small file size for electronic storage
OCR High image quality to enable the use of Optical
Simple Scan A low quality scan for a smaller file size
Custom Individual options selected by the user. This is the
Scanned images are a compromise between image quality (resolution)
and file size. This feature enables you to select the optimum settings
according to how the scanned image will be used with just one button
press.
The options are:
halftones
Character Recognition applications
default.
Color Scanning
While the WorkCentre is a mono printer you can scan in color to both Email and fax. When the Color scan option is selected you will also be able
to save the image as a JPEG-JIF format which is a better compression
format for color bitmaps.
To enable Color scan to E-mail select the Basic Settings tab and choose
the Color option. Select Color.
NOTE: When color scanning is selected, the maximum image resolution
is 300x300 dpi.
26 getting started guide
Page 31

LAN Fax
The optional LAN Fax feature enables you to send a fax to any fax machine over the
telephone network from your PC or workstation. The document does not have to be printed
first, and you can send it to the required destination without leaving your workstation.
NOTE: LAN Fax is only available on WorkCentres that have Embedded Fax and are
network connected. LAN Fax is NOT available on the PCL 5e print driver.
1 Enable LAN Fax on your Print Driver as follows:
2 From the Properties screen for the WorkCentre 4150 print driver select Configuration >
Installable Options and set LAN fax to Installed.
3 To send a LAN Fax, simply select Print from your application. Select the WorkCentre 4150
as the printer.
4 Select Properties to display the Print Driver options.
5 On the Paper/Output tab, select
Fax as your Job Type and select
OK.
6 When you select OK on the Print
window, the LAN Fax Setup
window will be displayed. Enter
the fax recipient as follows:
• Select Add Fax Recipient and
enter the fax number of the
recipient or recipients.
• If phonebooks have been
setup, select Add From
Phonebook and select the
recipients.
7 Select OK and the fax will be sent
to the WorkCentre which will send
it to the Fax recipients.
getting started guide 27
Page 32

Additional LAN Fax Features
Fax Options
Select Job Type as Fax and then press Setup.
From the LAN Fax Setup screen select the Fax
Options tab. Use this tab to select the options
required for your fax job. A Confirmation Sheet
can be printed to confirm the fax has been
sent. A Cover Sheet with personalized notes
can be sent with your fax.
Use Send Speed to select a specific rate at
which to send your fax, and use Fax
Resolution to adjust the quality.
A Send Time can be entered to send the fax at
a specified time. Use the Fax Dialing Options
to add a dialing prefix or credit card number.
Preferences
Use the Preferences tab to setup your
phonebooks, settings and preferences.
Personal phonebooks can be created, edited
and saved using the Phonebook Preferences
options. Shared phonebooks can also be
selected using these options.
28 getting started guide
Page 33

Enhance your WorkCentre’s productivity
The WorkCentre 4150 is a powerful multi function device with many digital functions
integrated into one sleek system. It is designed to support large workgroups in different
production environments. You can do more with less and streamline your workflow with
these productivity enhancing features.
Customize your WorkCentre
The WorkCentre can be setup to reflect your office’s workflow. For
example, the initial screen you see when you walk up to the WorkCentre
can be either the Machine Status, Job Status or one of the Services. Default
settings for each of the Services can be set to your own requirements such
as the default paper tray, customized reduction ratios and 2-sided copying
to save on paper.
To explore the options, access Tools and explore the Screen Defaults and
System Settings.
On-line Address Book
The Address Book comes in handy when you have built up a list of frequent
fax or mail recipients. Use this feature to program the Address Book with
recipients’ details like E-mail address or fax numbers. Address Numbers
registered for the Address Book can also be used as speed dial codes.
If configured, your machine is able to support both company (LDAP) and
Local Address books. Local address books can be imported from a .csv file
in Internet Services > Properties > Services > E-mail Settings.
Remote Administration
Your multi function machine contains its own Internet Services site. The site
is accessed from your web browser. As a user, you can obtain information
about the machine, and any jobs sent to the machine, from the comfort of your
own desktop.
The various tabs on the web page contain different options to assess the
status of the machine, media it contains, jobs in queue and Administrator
setups. You can even send a print-ready job over the Internet with this feature.
Simply open your web browser and enter the IP address of the WorkCentre.
getting started guide 29
Page 34

Send paper documents as E-mail
Scanned documents can be sent as E-mail attachments to a specified E-mail
recipient or recipients. Access to the E-mail features is gained using the
Services button on the Control Panel and the All Services button on the display.
This is an excellent feature for scanning documents for your own use. Simply
select the E-mail feature, enter your own E-mail address and scan the document.
Moments later it will be in your E-mail Inbox.
Easy Consumable Management
Consumables are items on the WorkCentre that need replenishing or replacing,
such as paper, staples, and customer replaceable units. Units like the SMart
Kit Drum Cartridge, Toner Cartridge and Staple Cartridge are customer
replaceable, meaning you can replace the consumable without having to call
out a Xerox service representative. This enables you to reduce down time.
Powerful Documents
The WorkCentre is not just any ordinary printer, you can use your machine to
print and create documents tailored to your needs, be it for a presentation, as
handouts or as meeting notes.
For example, the Booklet Creation feature enables the production of booklets or
multi-page copies from 1 or 2-sided originals. Bound Originals can be scanned
in color and sent to yourself using E-mail for inclusion in your electronic
documents. Presentation packs can be created using the Multi-up feature, and
many more. You are only limited by your imagination.
30 getting started guide
Page 35

Troubleshooting
A variety of situations can effect the quality of your output. For optimal performance, ensure
the guidelines in the User Guide are followed. The documentation and the fault messages
on the WorkCentre help you to locate and resolve a problem easily.
Some problems can be resolved by switching off and switching on your WorkCentre. Wait
approximately 20 seconds before switching the WorkCentre ON. If after rebooting your
WorkCentre the problem has not been resolved, have a look at some of the areas below to
identify solutions.
Problem Solution
The WorkCentre will not
power on
Documents will not feed
through the Document
Feeder
The WorkCentre will not
print from a workstation.
Cannot send an E-mail • Check if the WorkCentre is connected on the network as a
• Check to see that the WorkCentre is not in Low Power Mode
as indicated by the green light on the Control Panel. Touch
the User Interface screen to re-activate.
• Check to see that the power cord is correctly installed.
• Press the ON/OFF button to ON (I).
• Ensure that all staples or paper clips have been removed from
the originals.
• Ensure the document feeder is not overloaded. Max. 50 documents.
• Ensure that the edge guides are adjusted to touch the sides of
the originals.
• Make sure that an active network cable is connected to the
WorkCentre.
• Check that the Network Setup is correct. Refer to Connecting
to the Network on page 9.
printer.
• Check that E-mail is enabled. Refer to E-mail Setup on
page 12.
Paper jams • Load the paper in the paper trays with the seam side of the
paper up.
• Load the paper in the Bypass Tray with the seam side down.
• If the paper curls excessively, flip the paper over in the applicable paper tray.
• Use paper from a fresh package.
Cannot fax a document • Ensure your WorkCentre is connected to a working telephone
line and check for a dial tone.
• Check that Fax is enabled. Refer to Fax Setup on page 14.
NOTE: More detailed troubleshooting information can be found in the Troubleshooting
section of the User Guide.
getting started guide 31
Page 36

Paper jams
The screen will indicate the location of the jam.
• Follow the instructions on the display to clear the paper from the paper path.
• Ensure that all jam clearance doors and covers are returned to their correct positions.
NOTE: Jam Clearance areas may vary depending on your WorkCentre model and
configuration.
p
Output and Finisher
jam clearance areas.
Document jams
The display will indicate when a document jam has occurred.
• Follow the instructions on the display and
remove all the documents from the
document feeder and document glass as
instructed.
• When instructed to do so, re-order the
documents as at the start of the job and
reload into the document feeder. The
documents will be recycled automatically to
recover the job integrity.
Right side cover and
duplex areas.
Paper Trays 2, 3 and 4
jam clearance areas.
32 getting started guide
Page 37

Help
When using your WorkCentre, detailed and timely help is available at your fingertips. You
can access Help information and tips from a variety of sources.
On the WorkCentre
Press Help at any time to access the on-line help
screens. Messages, screen instructions and graphics
provide additional information.
Documentation
Most answers to your questions will be provided by the documentation that is supplied on
CDs with the WorkCentre. Alternatively you can access the documents from
www.xerox.com/support.
• User Guide - contains instructions and information about all the features on the
WorkCentre.
• System Administration CD - provides detailed instructions and information about
connecting your WorkCentre to the network and installing optional features.
On the Print Driver
Select Help on the printer driver screen or [F1] on the PC
keyboard for information on the displayed printer driver
screen.
On Internet Services
Select Index to view the contents of the Internet
Services site.
Select Help to take you to the Xerox on-line support web
site.
getting started guide 33
Page 38

Greenwich Mean Time Offset
http://wwp.greenwichmeantime.com/.
City/Region/
Country
International Date Line
West
Midway Island -11.0 Luxembourg +1.0 Kolkata +5.5
Samoa -11.0 Austria +1.0 Mumbai +5.5
Hawaii -10.0 Croatia +1.0 New Delhi +5.5
Alaska -9.0 Czech Republic +1.0 Almaty +6.0
Pacific Time
(US, Canada)
Tijuana -8.0 Denmark +1.0 Astana, +6.0
Mountain Time
(US, Canada)
Central America -6.0 Poland +1.0 Sri Jayawardenenpura +6.0
Central Time
(US, Canada)
Guadalajara -6.0 Italy +1.0 Bangkoc +7.0
Bogota -5.0 Greece +2.0 Hanoi +7.0
Lima -5.0 Turkey +2.0 Jakarta +7.0
Quito -5.0 Bulgaria +2.0 Krasnoyarsk +7.0
Eastern Time
(US, Canada)
Atlantic Time (Canada) -4.0 Isreal +2.0 Chongqing +8.0
Caracas -4.0 South Africa +2.0 Hong Kong +8.0
La Paz -4.0 Jordan +2.0 Urunqi +8.0
Newfoundland -3.0 Syria +2.0 Irkutsk +8.0
Brazilia -3.0 Finland +2.0 Ulaan Bataar +8.0
Buenos Aires -3.0 Moscow +3.0 Kuala Lumpur +8.0
Greenland -3.0 St. Petersburg +3.0 Singapore +8.0
Azores -1.0 Volgograd +3.0 Taipei +8.0
Cape Verde Islands -1.0 Kuwait +3.0 Seoul +9.0
Casablanca 0.0 Tehran +3.5 Yakutsk +9.0
Monrovia 0.0 Abu Dhabi +4.0 Guam +10.0
UK 0.0 Muscat +4.0 Port Moresby +10.0
Eire 0.0 Baku +4.0 Vladivostok +10.0
Portugal 0.0 Yerevan +4.0 Magadan +11.0
East Africa 0.0 Tbilisi +4.0 Soloman Islands +11.0
Holland +1.0 Kabul +4.5 New Caledonia +11.0
Belgium +1.0 Ekaterinburg +5.0 Fiji +12.0
France +1.0 Islamabad +5.0 Kamchatka +12.0
Spain +1.0 Karachi +5.0 Marshall Islands +12.0
Germany +1.0 Tashkent +5.0 Nuku’alofa +13.0
GMT
Offset
-12.0 Switzerland +1.0 Chennai +5.5
-8.0 Finland +1.0 Novosibirsk +6.0
-7.0 Sweden +1.0 Dhaka +6.0
-6.0 Norway +1.0 Rangoon +6.5
-5.0 Egypt +2.0 Beijing +8.0
City/Region/
Country
GMT
Offset
City/Region/
Country
GMT
Offset
34 getting started guide
 Loading...