

Page 1

Ax
DocuPrint P8e
Personal Laser Printer
User Guide
Final Draft
Page 2

Page 3

Table of Contents
g
g
g
g
g
g
g
g
g
g
g
g
g
g
g
g
g
g
Introduction................................................................................i
What This Manual Contains......................................................ii
Manual Conventions................................................................ iii
Safety Notes ............................................................................iv
Chapter 1: Setting Up Your Printer. . . . . . . . . . . . . . . . . . . . . . . . 1
Selecting a Location..................................................................2
Unpackin
Control Locations and Functions ..............................................4
Settin
Chapter 2: Printing . . . . . . . . . . . . . . . . . . . . . . . . . . . . . . . . . . . . 15
Selecting Print Media..............................................................16
Loadin
Usin
Usin
.................................................................................3
Front View.......................................... ..... ...........................4
Rear View..........................................................................5
Inside.................................................................................5
Operator Panel ..................................................................6
Up Your Printer.............................................................8
Installin
Attachin
Connectin
Installin
Installin
Settin
Media Selection...............................................................16
Media Guidelines.............................................................16
Usin
Usin
Usin
Loadin
the Status Monitor.........................................................23
Accessin
Status Monitor Messa
the Windows Remote Control Panel (RCP)..................25
Accessin
the Image Cartridge............................................8
the Power Cord................................................10
the Printer to Your Computer........................10
the Printer Driver ..............................................11
the RCP and SM Programs..............................13
the DocuPrint P8e as the Default Printer.............14
Print Media................................................................17
the Multipurpose Paper Feeder (MPF)..................17
the Manual Feeder................................................20
the Face-up Stacker..............................................21
Envelopes..........................................................22
the Status Monitor..........................................23
es................................................24
Windows RCP................................................25
Page 4

Using the Buttons on the RCP.........................................26
g
g
g
g
g
g
Usin
the Tabs on the RCP.............................................27
Usin
RCP for DOS.........................................................28
Chapter 3: Troubleshooting . . . . . . . . . . . . . . . . . . . . . . . . . . . . 29
Clearing Paper Jams .......................... ....................................30
Printer Problems.....................................................................33
Print Quality Problems............................................................36
Chapter 4: Maintenance. . . . . . . . . . . . . . . . . . . . . . . . . . . . . . . . 39
Cleaning the Printer................................................................40
Cleanin
Cleanin
Replacin
the Outside.......................................................40
the Inside..........................................................40
the Image Cartridge............................................. ..41
Chapter 5: Adding Memory . . . . . . . . . . . . . . . . . . . . . . . . . . . . . 45
Installing a SIMM ....................................................................46
Removin
a SIMM ..................................................................48
Appendix A: Specifications . . . . . . . . . . . . . . . . . . . . . . . . . . . . . . 51
Appendix B: CE Declaration . . . . . . . . . . . . . . . . . . . . . . . . . . . . . . 55
Index . . . . . . . . . . . . . . . . . . . . . . . . . . . . . . . . . . . . . . 59
Page 5

Introduction
g
g
g
g
g
Thank you for purchasing this laser printer.
The Xerox DocuPrin t P8e i s a des ktop la ser pr inte r specia lly d esi
small office and home office users. It provides all the performance and
power you need for your business and personal printin
In this manual you will find all the information essential for the operation
and care of your laser printer. So, keep it handy should you experience any
difficulties with the printer.
.
ned for
Energy Star
This printer contains advanced ener
conservation technolo
consumption when it is not in active use.
When the printer does not receive data for an
extended period of time, power consumption is
automatically lowered.
The ener
EPA endorsement of any product or service.
y star emblem does not represent
y which reduces power
Xerox Corporation
y
i
Page 6

What This Manual Contains
g
g
g
g
g
This manual consists of the following safety precautions, four chapters,
and two appendices and warranty information:
Safety Notes
Describes the precautions required to prevent personal injury and
equipment dama
Chapter 1 Setting Up Your Printer
Covers the setup and basic operations of the printer. Read this chapter
before attemptin
Chapter 2 Printing
Gives you guidelines f or selecting and handling/storing media products as
well as detailed specifications for print materials. Also, this chapter
instructs you on how to load print media.
Chapter 3 Troubleshooting
Describes procedures to help isolate and solve print quality and printer
problems. Read this chapter when a problem occurs, before callin
service.
e. Read this chapter before installing the printer.
to print.
for
Chapter 4 Maintenance
Discusses how to handle and use the printer supplies and maintain the
printer. Read this chapter before attemptin
performin
any maintenance.
to use the supplies or
Chapter 5 Adding Memory
Describes how to install (and remove) a memory SIMM to increase printer
memory.
Appendix A
Printer Specifications
Appendix B
CE Declaration
ii
Page 7

Manual Conventions
The following conventions are used throughout this manual:
Provides information required to successfully complete an operation or
procedure.
Cautions you not to overlook the mentioned points.
iii
Page 8

Safety Notes
g
g
g
g
g
g
g
g
g
The Xerox DocuPrint P8e and its supplies are designed and tested to meet
strict safety requirements. This chapter contains information to ensure the
continued safe operation of your Xerox DocuPrint P8e.
Laser Safety
The Xerox DocuPrint P8e complies with safety standards, and is certified
as a Class 1 Laser product under the US Department of Health and Human
Services (DHHS) Radiation Performance Standard accordin
Radiation Control for Health and Safety Act of 1968. The printer does not
emit hazardous laser radiation.
CAUTION The use of controls, adjustments, or procedures other
Since radiation emitted inside the printer is completely confined within the
protective housin
from the machine durin
to the
than those specified in the documentation might result in
hazardous exposure to laser light.
s and external covers, the laser beam cannot escape
any phase of user operation.
iv
The Center for Devices and Radiolo
and Dru
Au
United States. The label on the machine indicates compliance with the
CDRH re
United States.
The Xerox DocuPrint P8e contains laser dan
intended for use by Xerox Service Representatives, and are placed on or
near panels or shields that require special tools for removal. Do not
remove any of these panels. There are no operator serviceable areas
inside these covers.
Administration implemented regulations for laser products of
ust 1, 1976. These regulations apply to laser products marketed in the
ulations and must be attached to laser products marketed in the
ical Health (CDRH) of the US Food
er labels. These labels are
Ozone Safety
During normal operation, the Xerox DocuPrint P8e produces ozone. The
ozone produced does not present a hazard to the operator. However, it is
advisable that the machine be operated in a well ventilated area.
If you need additional information about ozone, please request the Xerox
publication Ozone (part number 600E74140) by callin
the United States and Canada.
1-800-828-6571 in
Page 9

Electrical Safety
g
g
g
g
g
g
g
g
g
Always
1. Use only the power cord supplied with your Xerox DocuPrint P8e.
2. Do not use a
3. Plu
follow a code of safe habits starting with the following:
round adapter plug to connect the Xerox DocuPrint P8e
to a power source receptacle that lacks a
the power cable directly into a properly grounded electrical outlet.
Do not use an extension cord. If you are not sure whether or not an
outlet is properly
rounded, consult an electrician.
round connection terminal.
WARNING You might receive a severe ele ctrical shock if you do
not connect the grounding conductors properly.
4. Do not place the Xerox DocuPrint P8e where people might step or trip
on the power cable.
5. Do not place objects on the power cable.
6. Do not override or disable electrical or mechanical interlocks.
7. Do not obstruct ventilation openin
prevent overheatin
of the machine.
s. These openings are provided to
WARNING Do not push objects into slots and openings on the
Xerox DocuPrint P8e. Contacting a voltage point or
shorting out a part might result in electrical shock or
fire.
8. If any of the following conditions occur, turn off the Xerox DocuPrint
P8e power immediately. Disconnect the power cable from the
electrical outlet. Contact an authorized Xerox Service Representative
to correct the problem:
- The Xerox DocuPrint P8e emits unusual odors, or makes unusual
noises.
- The power cable is dama
- Liquid is spilled into the Xerox DocuPrint P8e.
- Any part of the Xerox DocuPrint P8e is dama
- The Xerox DocuPrint P8e is exposed to water.
ed or frayed.
ed.
Disconnect Device
The power cord is the disconnect device for the Xerox DocuPrint P8e. It is
attached to the back of the machine as a plu
electrical power from the Xerox DocuPrint P8e, disconnect the power cord
from the power receptacle.
-in device. To remove all
v
Page 10

Radio Frequency Emissions
g
g
g
g
g
g
g
g
g
g
g
USA
Note: This equipment has been tested and found to comply with the limits
for a Class B di
limits are desi
interference in a residential installation. This equipment
and can radiate radio frequency ener
accordance with the instructions, may cause harmful interference to radio
communications. However, there is no
occur in a particular installation. If this equipment does cause harmful
interference to radio or television reception, which can be determined by
turnin
the interference by one or more of the followin
the equipment off and on, the user is encouraged to try to correct
ital device, pursuant to Part 15 of the FCC Rules. These
ned to provide reasonable protection against harmful
enerates, uses
y and, if not installed and used in
uarantee that interference will not
measures:
- Reorient or relocate the receivin
- Increase the separation between the equipment and receiver.
- Connect the equipment into an outlet on a circuit different from that
to which the receiver is connected.
- Consult the dealer or an experienced radio/TV technician for help.
Chan
es or modifications to this equipment not specifically approved by
the Xerox Corporation may void the authority
operate this equipment.
Shielded cables must be used with this equipment to maintain compliance
with FCC re
ulations.
antenna.
ranted by the FCC to
WARNING In order to allow this equipment to operate in proximity
to Industrial, Scientific and Medical (ISM) equipment,
the external radiation from ISM equipment may have to
be limited or special mitigation measures taken.
vi
Page 11

Operational Safety
g
g
g
g
g
g
g
g
g
g
g
The Xerox DocuPrint P8e and its supplies were designed and tested to
meet strict safety requirements. These include safety a
approval, and compliance with established environmental standards.
To ensure the continued safe operation of your Xerox DocuPrint P8e,
follow these safety
uidelines at all times.
ency examination,
• Improper connection of the
shock.
• Follow warnin
equipment.
• Locate the Xerox DocuPr int P8e on a solid support surface (not on
plush carpet) that has adequat e str en
unit.
• Locate the Xerox DocuPrint P8e in an area that has adequate
ventilation and room for servicin
• Do not locate the Xer ox DocuPrint P8 e near a radiator or a ny other
heat source.
• Do not obstruct ventilation openin
overheatin
• Do not place or push objects of any kind into the ventilation openin
• Do not attempt any maintenance function that is not specifically
described in the Xerox DocuPrint P8e documentation.
• Use materials and supplies specifically desi
DocuPrint P8e. The use of unsuitable materials may result in poor
performance and possibly a hazardous situation.
• Do not remove the covers or
• Do not operate the Xerox D oc uPri nt P 8e if y ou noti ce un us ual no is es
or odors. Disconnect the power cord from the power source
receptacle, and contact your Xerox Service Representative
immediately.
s and instructions marked on or supplied with the
.
rounding conductor can result in electrical
th to support the weight of the
.
s. They are provided to prevent
s.
ned for your Xerox
uards that are fastened with screws.
vii
Page 12

viii
Page 13

1
1Setting Up Your Printer
Setting Up Your Printer • 1
Page 14

1-1 Selecting a Location
Place your printer on a flat, hard, stable surface near your computer. Leave
enough space around the printer, so that you can easily:
• Open the printer cover.
• Load the paper.
• Retrieve the paper.
• Open the front single sheet output tray and retrieve the paper in the
front output tray.
Be sure to allow air circulation around the vents to prevent the printer from
overheating.
Do not place the printer:
• In direct sunlight.
• Near heat sources or air condition ers.
• In dusty or dirty environments.
2 • Chapter 1
Page 15
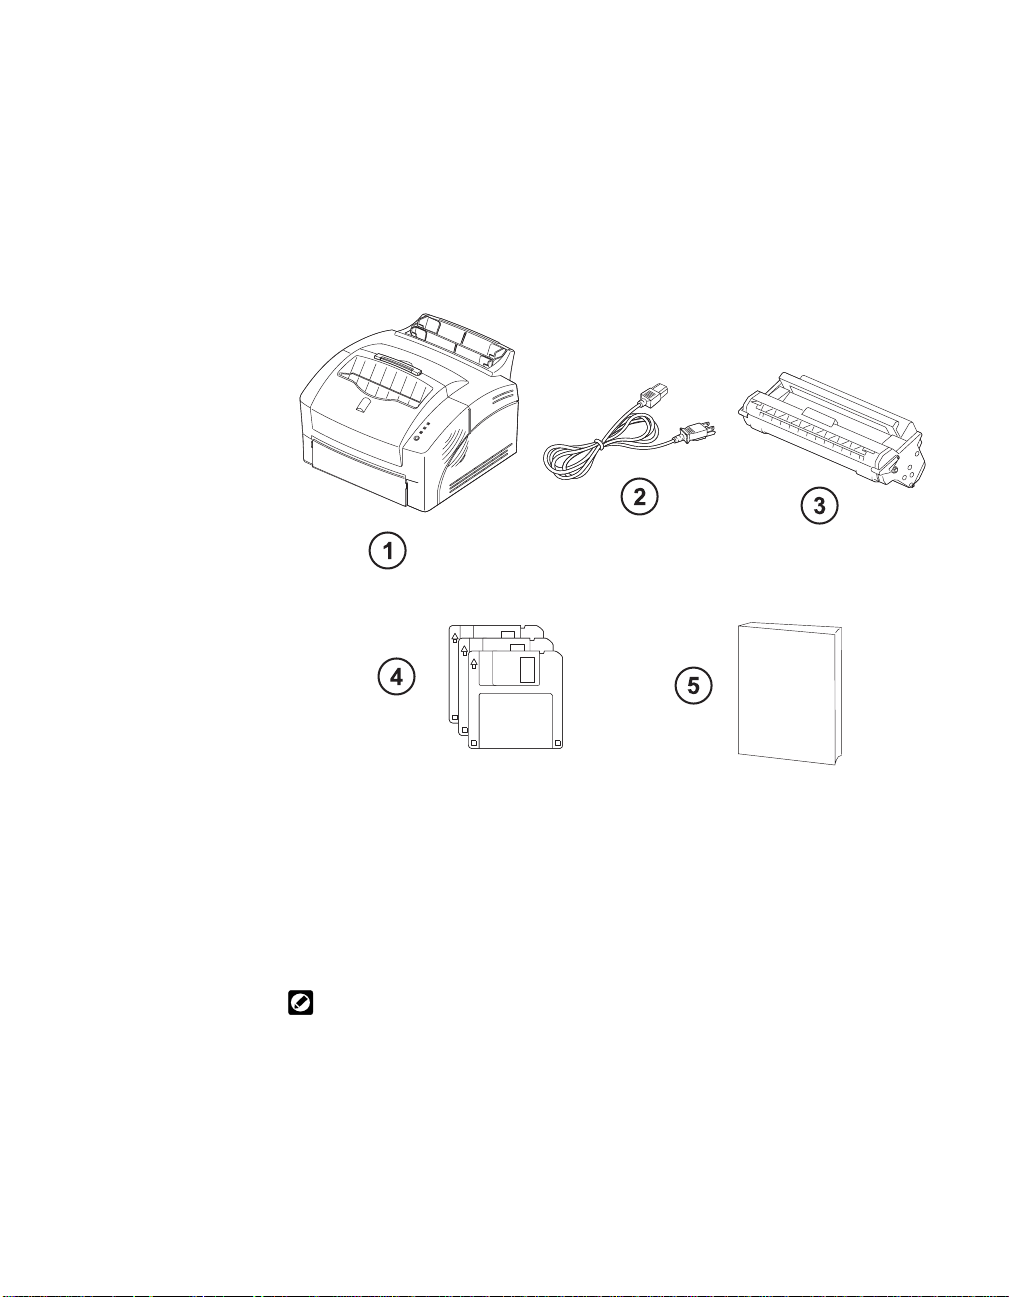
1-2 Unpacking
Remove the printer and all accessories from the packing carton. Save the
carton and packing materials in case you need to repack the printer.
Make sure you have the following items:
1Printer
2Power Cord
3 Starter Image Cartridge
4 Setup Diskettes
5 Documentation (User Guide and Quick Reference Card)
You need a centronic s-compatible para llel printer cable. Th e printer cable may
not ship with your printer, in which case you can purchase this cable from your
dealer or retailer. Make sure the cable is IEEE 1284-compliant.
Setting Up Your Printer • 3
Page 16
1-3 Control Locations and
Functions
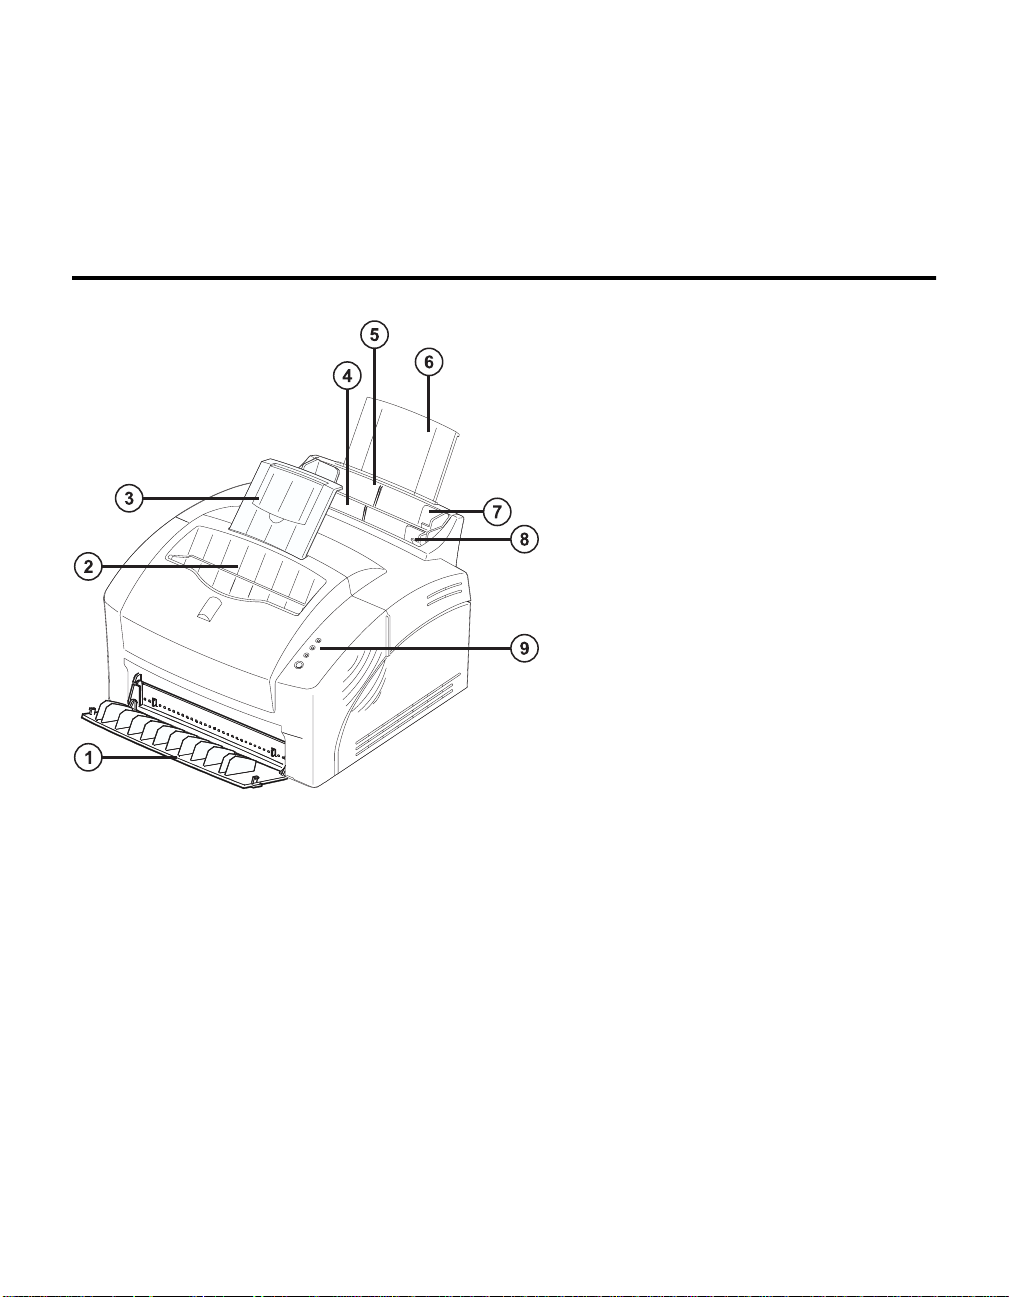
1-3-1 Front View
1 Face-up Stacker
Holds a single sheet of special
print media (transparency, label,
envelope, and heavy weight
paper) with print side facing up.
2 Face-down Stacker
Holds printed documents. If
printed on plain paper , a
maximum of 100 sheets can be
held.
3 Stacker Extender
Supports paper stacked in the
paper output bin.
4 Manual Feeder
Used to feed a single sheet of
paper.
4 • Chapter 1
5 Multipurpose Paper Feeder
Holds 150 sheets of plain paper.
6 Tray Extender
Supports paper stacked in the
multipurpose paper feeder.
7 Paper Guides
Adjusts to the width of paper in
the multipurpose paper feeder.
8 Paper Guides
Supports paper for the manual
feeder.
9 Operator Panel
Page 17
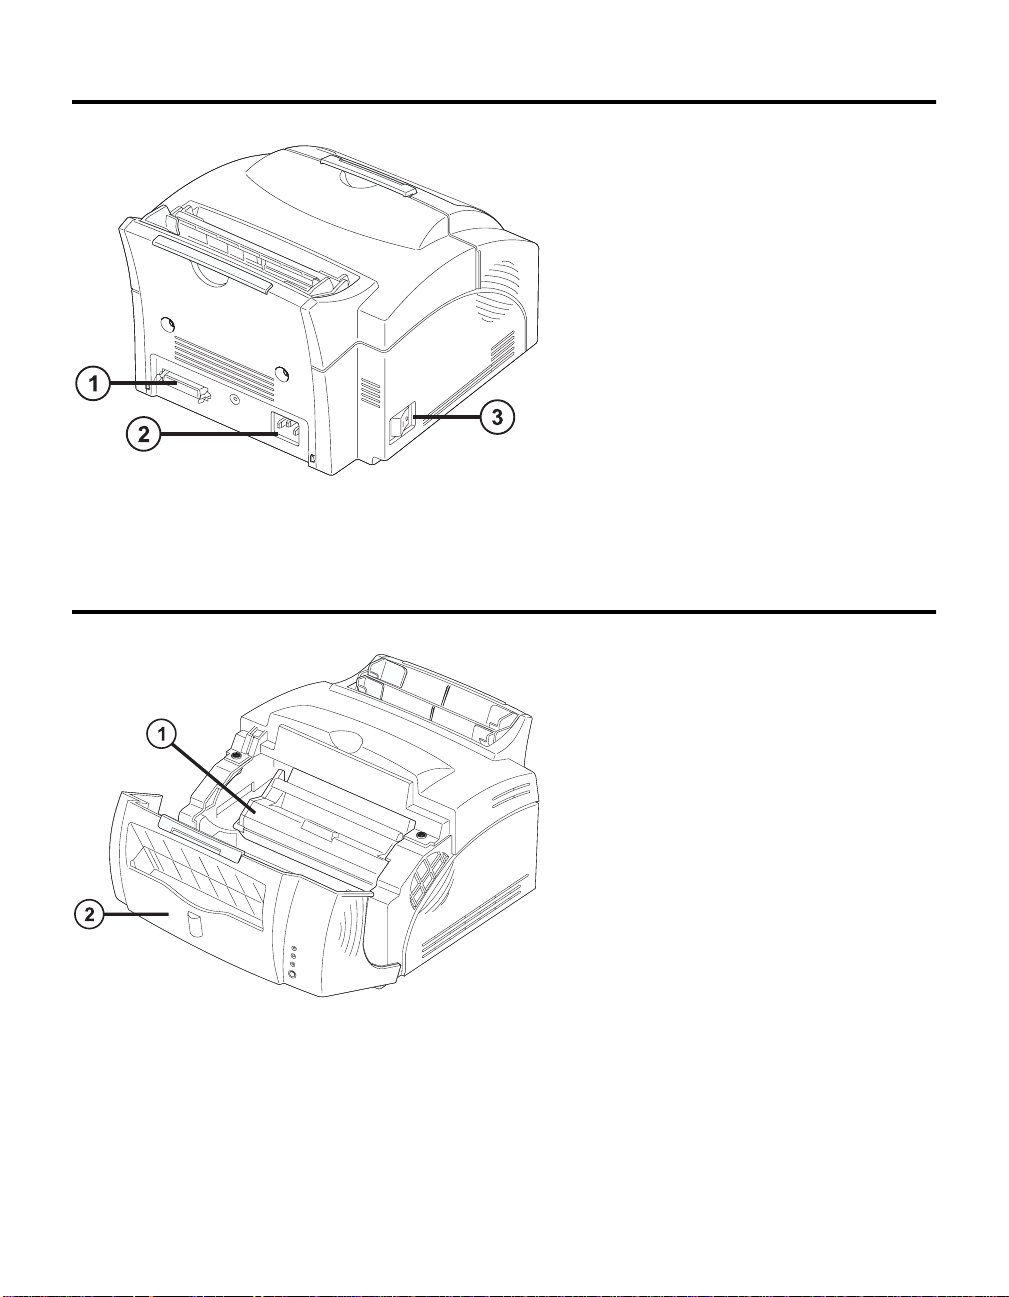
1-3-2 Rear View
1-3-3 Inside
1 Printer Cable Connector
2 Power Cord Connector
3 Power Switch
1 Image Cartridge
2 Front Cover
Setting Up Your Printer • 5
Page 18
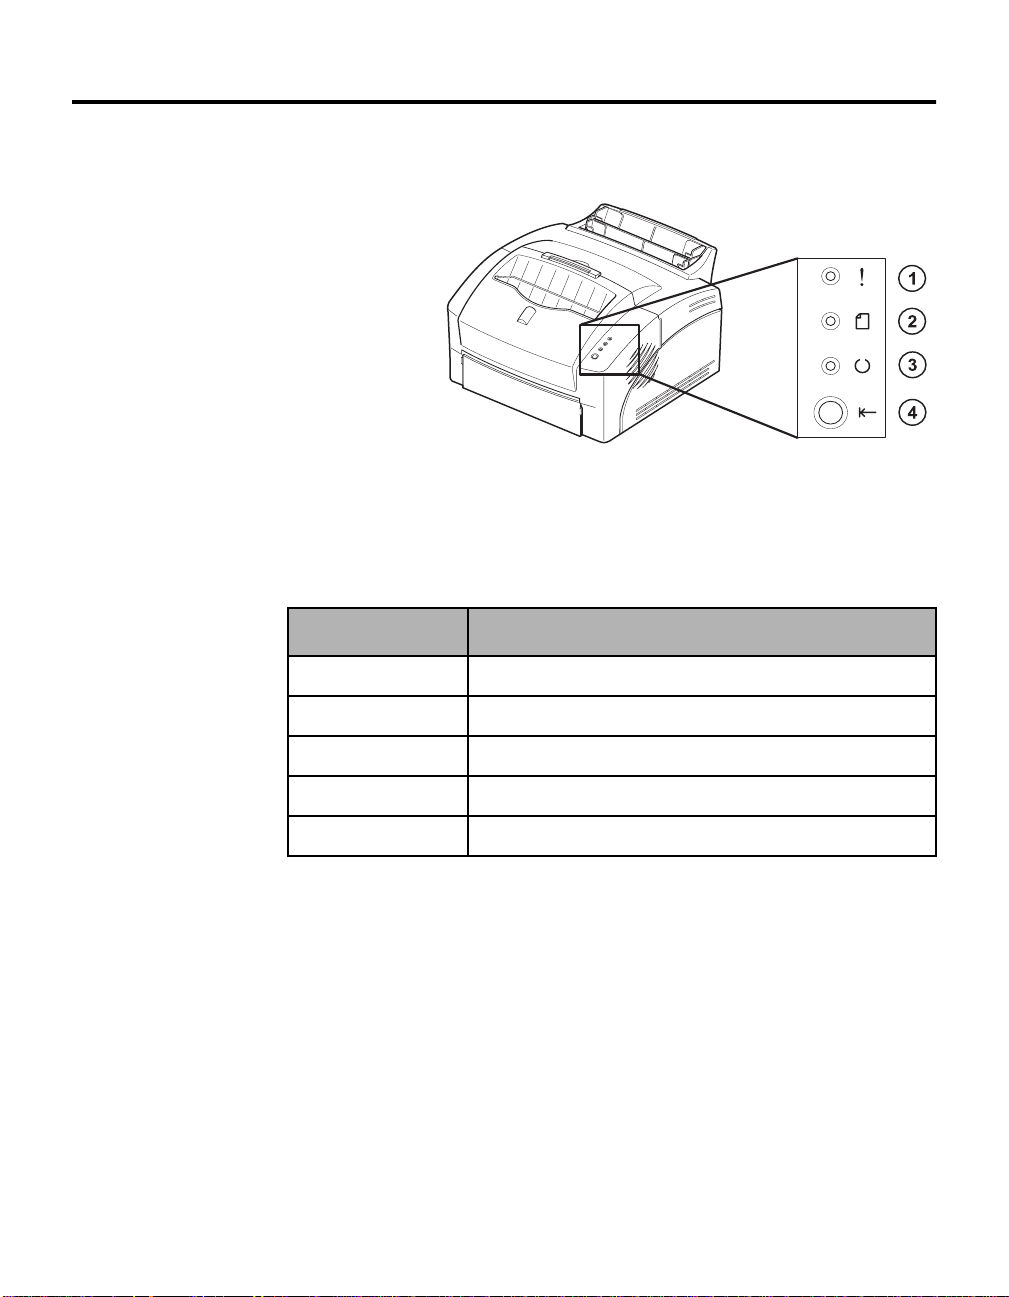
1-3-4 Operator Panel
The operator panel has three indicator lights and 1 button.
1 ERROR light
2 PAPER light
3 READY light
4 On/Off-line button
Indicator Lights:
Indicator Light Description
6 • Chapter 1
READY (on) The printer is ready to receive and process data.
READY (blink) The printer is receiving or processing data.
READY (off) The printer is off-line.
ERROR (on) A print error has occurred.
PAPER (on) The paper tray is empty.
Page 19

On/Off-line Button Function:
Function Usage
On-line/Off-line Pressing the button toggles the printer between
Reset Press the button to turn the printer off-line. Hold
Self Test When the printer is on-line and the other LEDs are
OPC Cleaning Remove excess toner from OPC drum.
on-line and off-line status.
down the button for four seconds (until all LEDs
are blinking). User default reset causes the printer
to clear all data from the printer’s memory except
permanent fonts and macros, and then restore the
user default settings.
off, hold down the button for four seconds (until all
LEDs are blinking).
When the printer is on-line, press and hold down
the button until all three LEDs remain lit (not
blinking) and the printer begins to cycle up (starts
feeding paper), then release the button.
One sheet will be printed.
Setting Up Your Printer • 7
Page 20
1-4 Setting Up Your Printer
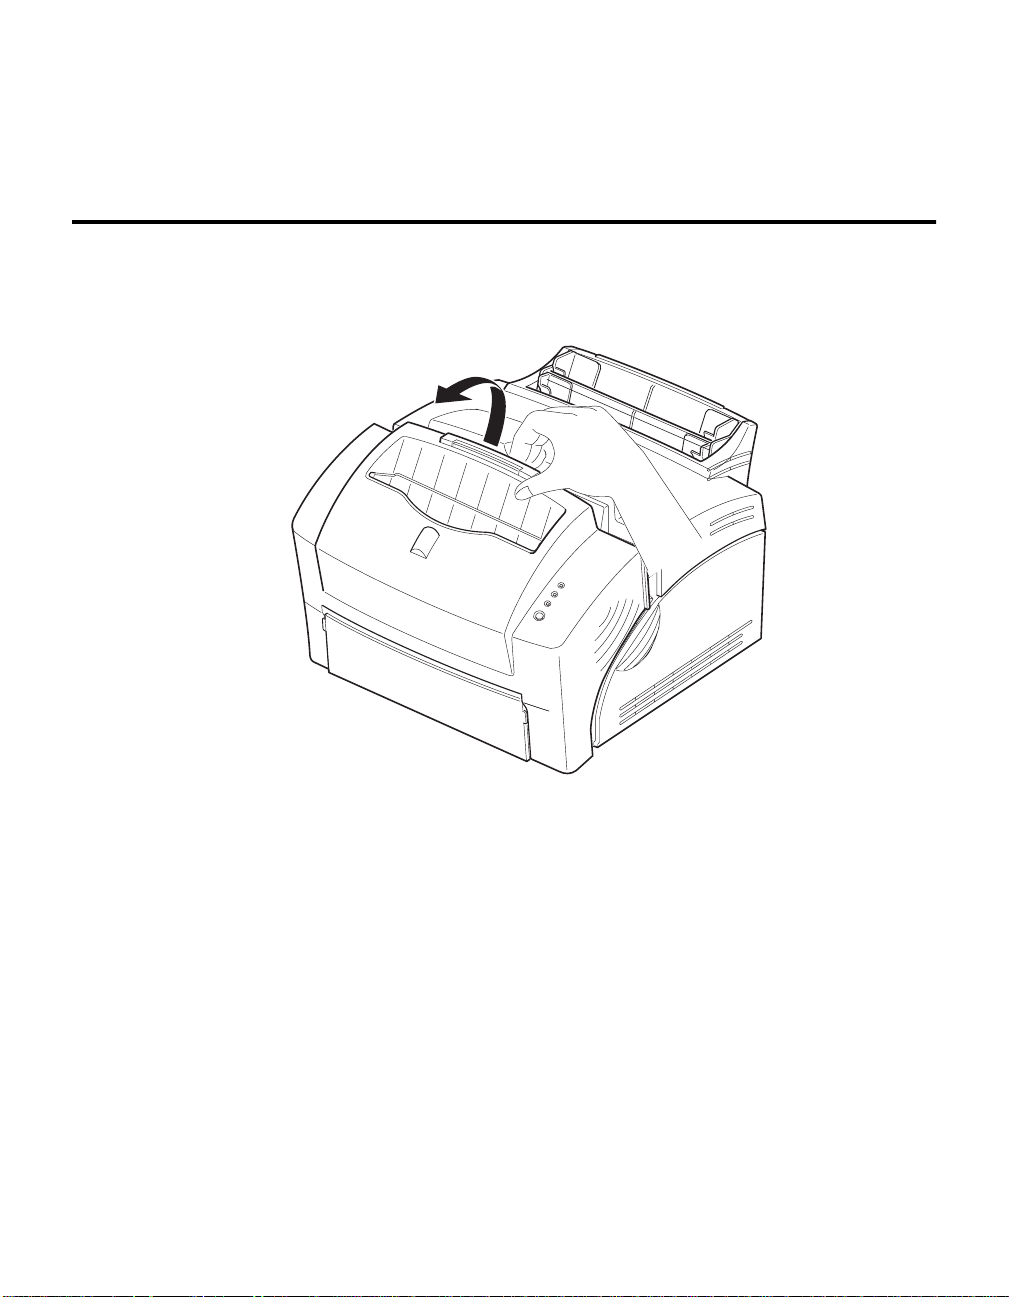
1-4-1 Installing the Image Cartridge
1
2
To open the front cover, place your fingers on top of the cover and
pull it down.
Unpack the image cartridge.
8 • Chapter 1
3
4
Shake the cartridge from side-to-side 5 or 6 times to distribute the
toner.
Carefully remove the seal ing tape by pulli ng on the sealing tape tab.
Page 21
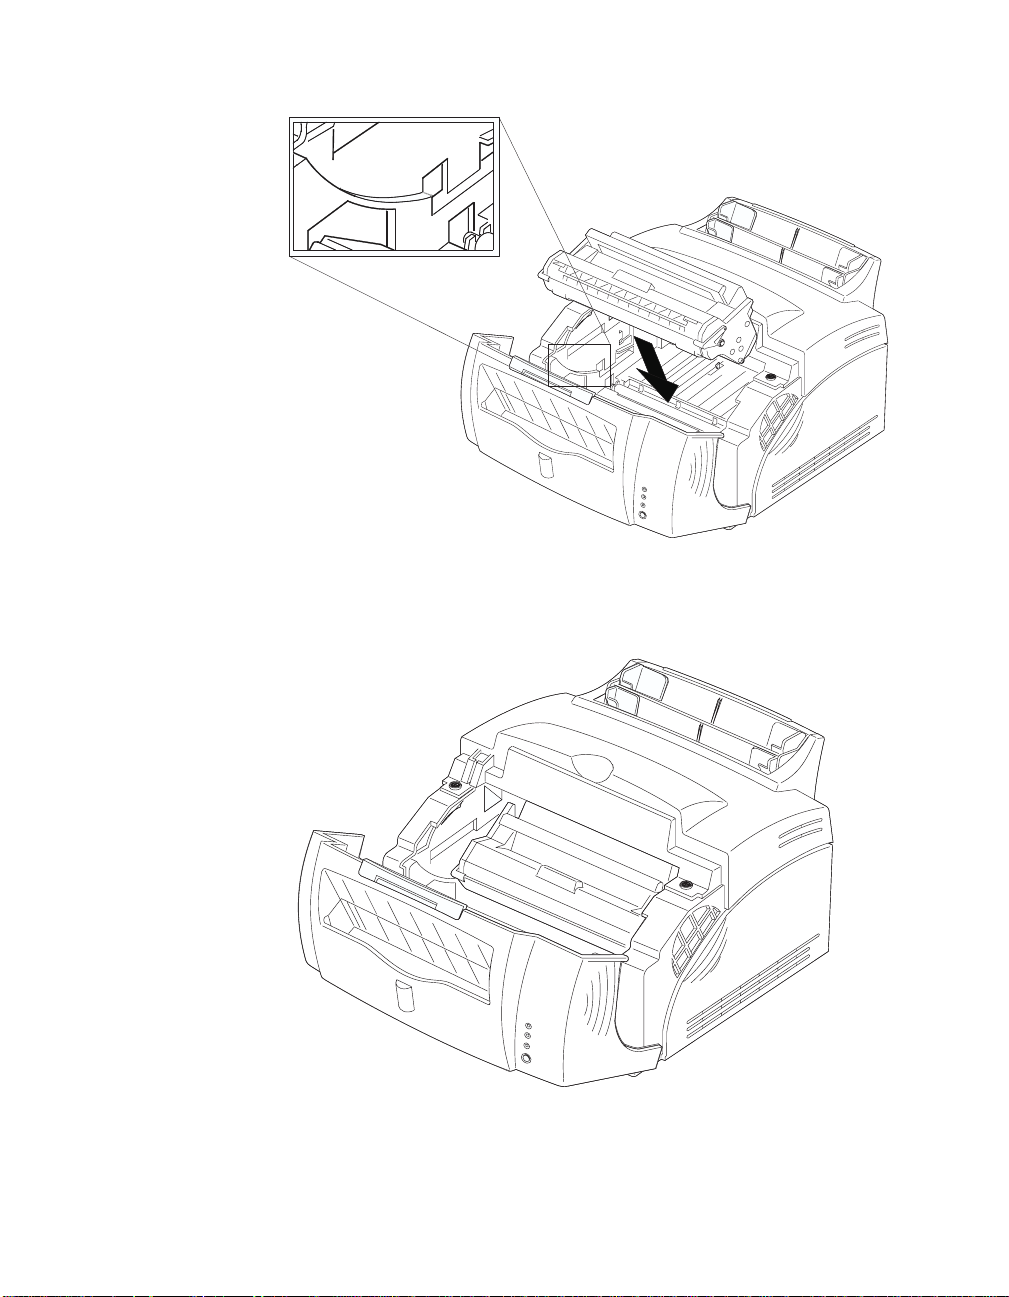
5
Find the cartridge slots inside the printer, one on each side.
6
7
Push the image cartridge into place by pressing down on the
handle.
Close the front cover gently. Do not force the cover closed in case
the image cartridge is not seated properly.
Setting Up Your Printer • 9
Page 22
1-4-2 Attaching the Power Cord
1
2
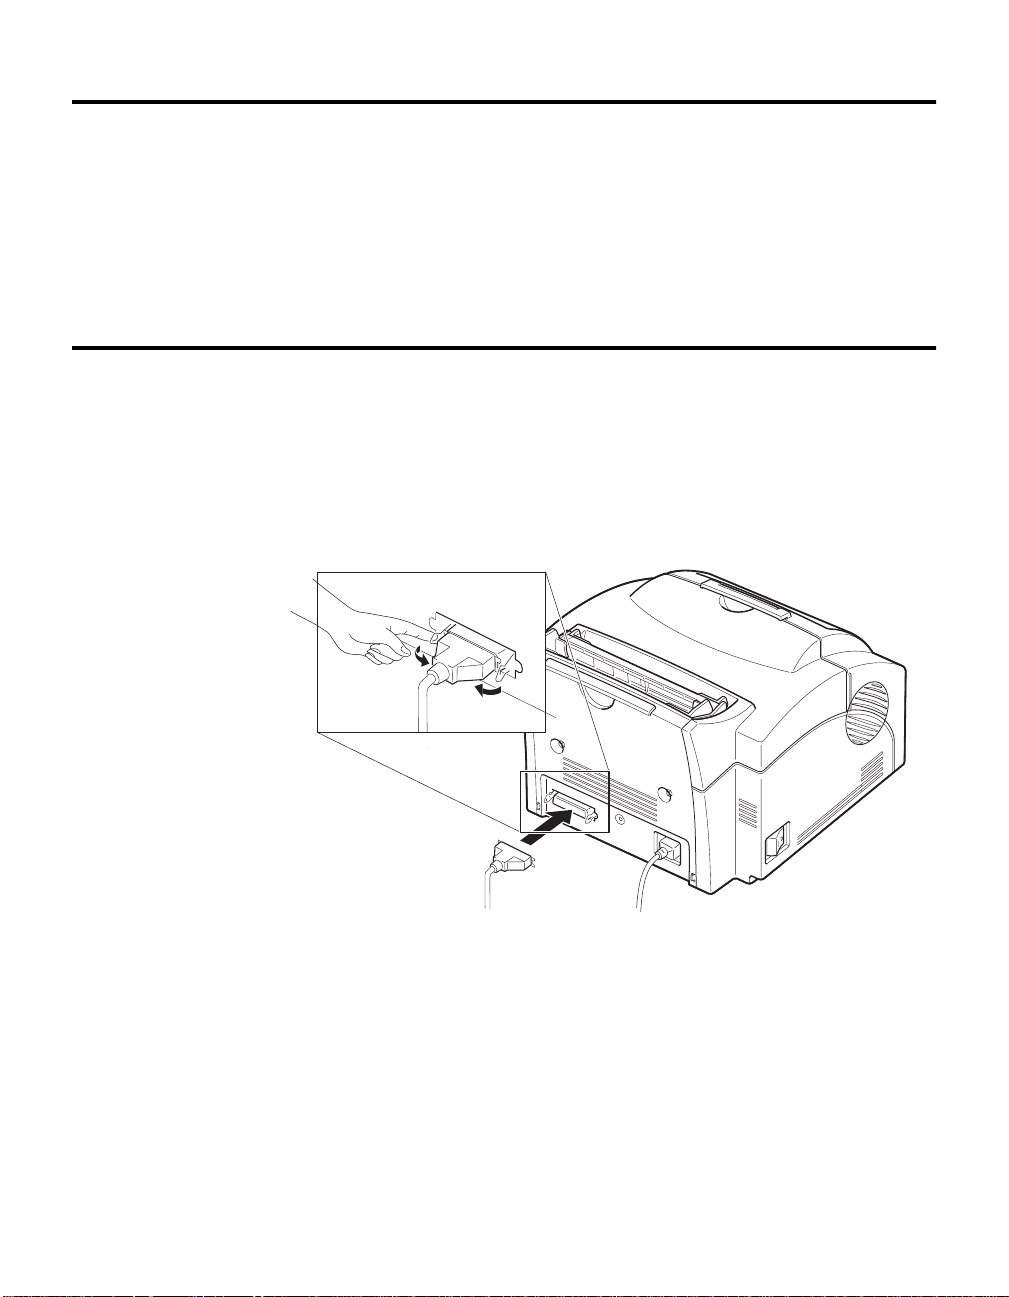
1-4-3 Connecting the Printer to Your Computer
1
2
Make sure the printer’s power switch is in the OFF position.
Plug one end of the power cord into the connector at the back of the
printer and the other end into a wall outlet.
Power OFF your computer.
Plug the parallel interface cable into the connector on the back of
the printer. Push the clips at each end of the connector into the
notches on the printer cable to secure the cable. The clips snap
when pushed into the notches in the printer cable connector.
10 • Chapter 1
3
4
Attach the other end of the parallel cable to your computer.
Turn on your printer and then your computer.
Page 23

1-4-4 Installing the Printer Driver
Windows 95/98 PCL 5e Driver:
1
2
3
4
5
6
7
Windows 3.1x PCL 5e Driver:
1
Start Windows. If Windows detects new hardware, click
Insert the Setup Diskette (Xerox DocuPrint P8e PCL-5e Driver) into
your computer’s floppy drive.
From the
In the Run dialog box, type
Follow the on-screen instructions to complete the installation.
Remove the diskette before restarting Windows.
Restart Windows, as prompted, when the installation is complete.
Start Windows.
Start
menu, select
.
Run
a:\setup
(or
b:\setup
Cancel
) and click OK.
.
2
3
4
5
6
7
Insert Setup Diskette (Xerox DocuPrint P8e PCL-5e Driver) into
floppy drive.
From the
In Run dialog box, type
Follow on-screen instructions to complete the installation.
Remove the diskette before restarting Windows.
Restart Windows, as prompted, when the installation is complete.
Program Manager
, select
a:\setup
(or
from the
Run
b:\setup
) and click OK.
Setting Up Your Printer • 11
File
menu.
Page 24

Windows NT 4.0 PCL 5e Driver:
1
2
3
4
5
6
Start Windows.
From the Windows NT
Double-click on the
Click
Have Disk
Insert the Setup Diskette for Wind ows NT 4.0 into your computer’s
floppy drive.
Follow the on-screen instructions to complete the installation.
You also have the option of installing the Windows Remote Control Panel
(RCP) program from the Setup Diskette. If you wish to do so, see the
procedure on the next page.
Add Printer
.
menu, select
Start
icon.
Printers
.
12 • Chapter 1
Page 25

1-4-5 Installing the RCP and SM Programs
The Windows Remote Control Panel (RCP) program allows you to view
and change print settings for DOS applications from the Windows screen.
The Status Monitor is a program that runs in the background and
automatically displays messages on your computer screen whenever the
printer status changes. It is not available for Windows NT.
Windows 3.1x/95/98 (RCP&SM):
1
2
Windows NT 4.0 (RCP):
1
2
DOS (RCP&SM):
1
2
Insert the Setup Diskette for RCP&SM into your computer’s floppy
drive.
Run Setup.exe from the diskette and follow the on-screen
instructions to complete the installation.
Insert the Setup Diskette for Wind ows NT 4.0 into your computer’s
floppy drive.
Run Setup.exe in the diskette’s NTRCP folder and follow the onscreen instructions to complete the installation.
Turn on your computer.
Insert the Setup Diskette for RCP&SM into your computer’s floppy
drive.
3
At the DOS prompt, enter the following commands:
md dosrcp
cd dosrcp
copy a:\dosutil\*.*
dosp8e.bat
(creates a dosrcp directory)
(changes to the dosrcp directory)
(copies files from the diskette)
(installs RCP&SM)
Setting Up Your Printer • 13
Page 26

1-4-6 Setting the DocuPrint P8e as the Default Printer
To use your printer, you must set it to be the default printer. Follow the
instructions below.
Windows 95/98 and NT 4.0:
Windows 3.1x:
1
2
3
1
2
Click
Double-click the
Select
selection next time you open the printer menu.
Double-click the
dialog box will appear.
Click the
the Printer menu, and then close the dialog box.
, select
Start
Printer
Xerox DocuPrint P8e
Settings
Xerox DocuPrint P8e
menu,
Set As Default
Printer
, then select
icon in the Control Panel. The Printers
printer, select
Printers
icon.
. A check mark will confirm the
Set as Default
.
from
14 • Chapter 1
Page 27

2
g
2Printin
Printing • 15
Page 28

2-1 Selecting Print Media
2-1-1 Media Selection
Media Sizes Weights Input Sheet Capacity
Paper Letter (8.5 x 11”)
Legal (8.5 x 14”)
Executive (7.25 x 10.5”)
A4 (210 x 297 mm)
A5 (148 x 210 mm)
B5 (182 x 257 mm)
Envelope COM-10
Monarch
C5
DL
Transparency Letter
A4
Labels Letter
A4
*
Multi-Purpose Paper Feeder
2-1-2 Media Guidelines
When selecting or loading paper, please remember the following:
16-24 lb (60-90 g/m
24-43 lb (90-107 g/m
24-43 lb (90-107 g/m
24-43 lb (90-107 g/m
2
)
2
)MPF*: Up to 10
2
)MPF*: Up to 10
2
)MPF*: Up to 10
*
MPF
: 150 (20 lb)
Manual Feeder: 1
Manual: 1
Manual: 1
Manual: 1
16 • Chapter 2
• Attempting to print on damp, curled, wrinkled, or torn paper can cause
paper jams and poor print quality.
• Use cut-sheet paper only. You cannot use multi-part paper.
• Always use paper and other media that conform with those listed in the
Media Selection table, above.
• Do not use envelopes with thick or crook ed edges, or envelopes tha t
are damaged, curled, wrinkled, or irregularly shaped.
Page 29

2-2 Loading Print Media
pap
2-2-1 Using the Multipurpose Paper Feeder (MPF)
For best results, use high quality Xerox brand xerographic copier paper.
1
Pull the extender on the MPF up until it stops.
2
Before loading the paper, flex the sheets back and forth to loosen
them, then fan them. Tap the edges on a table top to straighten
them. Doing this before you load paper helps prevent paper jams.
Do not load too much. This feeder holds up to 150 sheets of plain
er (and the Face-down Stacker holds up to 100 sheets.
Printing • 17
Page 30

3
Insert the paper in the paper feeder.
If the paper has a preferred print side, place the print side facing you. If you
use letterhead paper, load the paper with the letterhead edge pointing
down and the front facing toward you.
4
Adjust the paper guides to the width of the paper.
18 • Chapter 2
Page 31

5
Pull up the extender on the face-down stacker until it stop s. The
face-down stacker can hold up to 100 printed pages.
6
Select the paper size from your software application and st art your
print job.
Printing • 19
Page 32

2-2-2 Using the Manual Feeder
Use the front manual feeder in order to feed paper one sheet at a time into
your printer.
1
2
Place the paper in the manual feeder and adjust the paper guides
to the width of the paper.
Make sure the paper is as far down as it will go.
20 • Chapter 2
3
Be sure that before starting your print job, you select the manual
feeding source and the correct paper size from your software
application.
Page 33

2-2-3 Using the Face-up Stacker
The Face-up Stacker is recommended for envelopes, transparencies and
thick stock paper.
1
2
Place your fingers on either side of the face-up stacker , press tabs
toward center of the printer, and pull the face-up stacker down.
If you use the face-up stacker, a single pri nted page is placed with
the printed side facing up.
Printing • 21
Page 34

2-2-4 Loading Envelopes
Depending on the thickness of your envelopes, the multipurpose paper
feeder can hold up to 10 envelopes. If you experience envelope feeding
problems, try placing envelopes one at a time into the manual feeder.
1
2
Insert the envelopes in the multipurpose p aper feeder. The
envelopes should be loaded vertically
toward the front
Adjust the paper guides to the width of the envelopes.
.
with the face to be printed
22 • Chapter 2
3
Select the correct envel ope size from your software application and
start your print job.
Page 35

2-3 Using the Status Monitor
The Status Monitor is a program that runs in the background and
automatically displays messages on your computer screen whenever the
printer status changes.
2-3-1 Accessing the Status Monitor
1
2
To access the Status Monitor from DOS:
1
2
For Windows 95, select
Xerox DocuPrint P8e RCP&SM
For Windows 3.1x, click the
in the Program Manager.
Select
At the DOS prompt, type
Type
Status Monitor
dosp8e.exe
. The Status Monitor appears.
and press Return.
Program
cd\dosrcp
from the Start menu. Then select
from the Program drop down list.
Xerox DocuPrint P8e RCP&SM
and press Return.
icon
Printing • 23
Page 36

2-3-2 Status Monitor Messages
Message Description
ON-LINE The printer is online and ready to receive data.
OFF-LINE The printer is offline. To switch the printer to online status,
press the key on the operator panel.
Cover Open or Missing Cartridge The printer cover is open, or not closed securely. This
message also appears when the image cartridge is not
installed or installed completely.
Paper Tray Open or Empty The printer has run out of paper. Load the paper.
Paper JAM There is paper jammed inside the printer. Remove the
jammed paper (see Chapter 3, “Troubleshooting.”)
Memory Full The printer memory is full because it has received too
many documents or too complex or detailed a document.
Divide the document into two or three jobs and send again.
Band Error Text was too dense or vector graphics sent it the printer
were too complex. Decrease page complexity. Change the
resolution to 300 dpi through the Print setting in your
software. Or add printer memory (see Chapter 5,
“Additional Memory”).
24 • Chapter 2
Page 37

2-4 Using the Windows Remote
Control Panel (RCP)
The Windows Remote Control Panel (RCP) program allows you to view
and change print settings for DOS applications from the Windows screen.
2-4-1 Accessing Windows RCP
1
2
3
Start Windows, if not already started.
For Windows 95, select Program from the Start menu. Then select
Xerox DocuPrint P8e RCP&SM
For Windows 3.1x, click the
in the Program Manager.
Select
box appears.
Remote Control Panel
from the Program drop down list.
Xerox DocuPrint P8e RCP&SM
. The Remote Control Panel dialog
icon
Printing • 25
Page 38

2-4-2 Using the Buttons on the RCP
Button Description
Send Initiates selected changes to printer parameters.
Default Resets all printer parameters to the factory default
values.
Reset Resets all printer parameters to user preference
default values.
Form Feed If any data exists in the printer, the printer
formfeeds the current page. If not, this button is
ignored.
Status Monitor Shows the current printer status (see page 23).
Exit Closes the RCP.
26 • Chapter 2
Page 39

2-4-3 Using the Tabs on the RCP
Tab Parameters Description
Total View
(Shows all
the printer
parameters
available in
the RCP.)
Printer Emulation Shows current emulation. It is always PCL 5e.
Page Setup Paper Size Sets the default size of the image that will print on
(See individual
Printer, Page Setup,
Font Setup, Quality
and Test tabs, below)
Printer Timeout Tells the printer how long to wait after data is printed
Power Save Puts the printer into Power Save mode when it is
Paper Jam Recovery If this box is checked, the printer will recover pages
Lines Per Page Sets the number of lines on the page.
(See below)
before accepting data via the other interface. The
default value is 15 seconds.
powered ON but is idle for a length of time. Select your
desired time length. The default value is 30 minutes. In
Power Save mode, the power consumption is under
18 watts.
from the print job when paper is jammed in the printer.
paper and envelope.
Copies Sets the number of copies.
Orientation Determines the orientation of the image on the page.
Font Setup Symbol Set Symbol set is a unique grouping of all available
characters in a font.
Pitch This menu is available only when you select a fixed
pitch outline font. It is ignored for other fonts.
Typeface It shows the typeface of the current font.
Point Size This menu is available only when you select a
proportionally spaced outline font. It is ignored for
other font.
Printing • 27
Page 40

Tab Parameters Description
Quality Density Determines the overall density of the printed image.
Econo Mode Determines the toner quantity to use when printing. If
this mode is set to ON, the printer conserves toner
when printing. The default value is OFF, which
provides 100% usage.
Test Configuration List Prints the current printer configuration.
Demo List Prints a demonstration page showing the main
features of the printer.
2-4-4 Using RCP for DOS
To start the Remote Control Panel for DOS, type dosrcp at the DOS
prompt, then press Enter.
The Remote Control Panel for DOS is somewhat different than that for
Windows. If you change any item in the Remote Control Panel for DOS,
you must send it to the printer by selecting the Send settings to printer
item in the File menu.
28 • Chapter 2
Page 41

3
g
3Troubleshootin
Troubleshooting • 29
Page 42

3-1 Clearing Paper Jams
If the paper has just started to feed from the feeder when the jam occurs:
1
2
Pull the jammed paper back out of the feeder toward you.
Open and close the front cover to resume printing.
30 • Chapter 3
Page 43
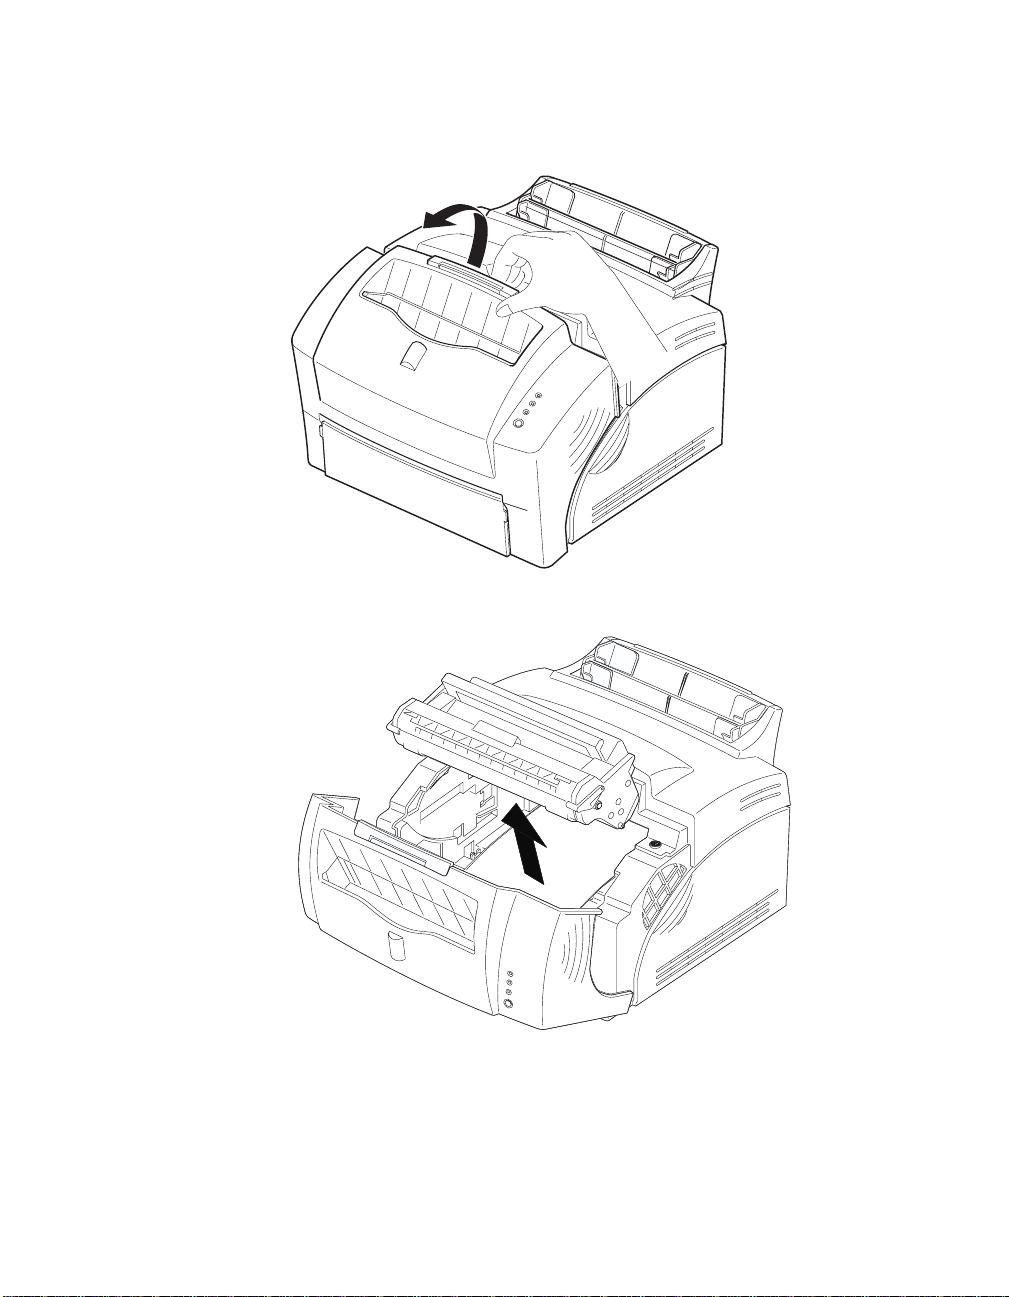
If the jam occurs inside the printer:
1
2
Open the front cover.
Remove the image cartridge.
Troubleshooting • 31
Page 44

3
Grasp the paper on both sides and gently pull the paper out toward
you.
4
5
6
Check that there is no other paper in the printer.
Reinstall the image cartridge.
Close the front cover. The printer will continue prin ting.
32 • Chapter 3
Page 45

3-2 Printer Problems
If you have any problems with the operation of your DocuPrint P8e printer,
refer to the table below and on the following pages.
If the problem cannot be solved by carrying out the instructions given below,
call an authorized service representative.
Problem Possible Cause Remedy
The printer does not
print.
The interface cable is not
connected properly.
The interface cable is defective. Swap the cable with one known to
The port setting is incorrect. Check the Windows printer
The image cartridge is not
installed properly.
A paper jam has occurred. Clear the paper jam (refer to
The printer may be configured
incorrectly.
The printer driver may be
incorrectly installed.
Check the interface cable
connection.
work. If printing is still not
possible, replace the interface
cable.
settings to make sure that the
print job is being sent to the
correct port (for example, LPT1).
Remove and reinsert the image
cartridge.
“Clearing Paper Jams” on
page 30).
Check the application to make
sure that all print settings are
correct.
Delete the Xerox DocuPrint P8e
icon and reinstall the printer
driver. Try printing a test page.
The paper is not fed
into the printer.
Paper has not been inserted
correctly.
There is too much paper in the
multipurpose paper feeder.
Remove and reinsert the paper
correctly (refer to “Loading Print
Media” on page 17).
Remove some of the paper from
the multipurpose paper feeder.
Troubleshooting • 33
Page 46

Problem Possible Cause Remedy
The printer ejects
blank pages.
Half of the page is
blank.
The image cartridge is not
installed properly.
The image cartridge is empty. Replace the image cartridge
The page layout is too complex. Simplify the page layout and
The page orientation setting may
be incorrect.
The paper size and the software
paper size settings do not match.
Scaling may be set to less than
100%.
The interface cable specifications
may be incorrect.
Remove and reinsert the image
cartridge.
(refer to “Replacing the Image
Cartridge” on page 41).
remove any unnecessary
graphics from the document if
possible.
Install more memory (refer to
“Installing a SIMM” on page 46).
Change the page orientation in
the Printer Setup dialog box.
Insert the correct paper into the
printer or change the software
paper size settings.
Change the Scaling setting in the
Printer Setup dialog box.
Use the interface cable supplied
with the printer or replace the
cable with an IEEE-1284 rated
cable.
The printer prints the
wrong data, or it
prints incorrect
characters.
34 • Chapter 3
The interface cable might not be
connected properly.
There may be a problem with the
printer driver software.
The interface cable specifications
may be incorrect.
Check the interface cable
connection.
Exit Windows and reboot the
computer. Turn the printer off and
then back on again.
Use the interface cable supplied
with the printer or replace the
cable with an IEEE-1284 rated
cable.
Page 47

Problem Possible Cause Remedy
The paper keeps
jamming.
Printing is too slow. If using Windows 3.1x, Print
There is too much paper in the
multipurpose paper feeder.
An incorrect type of paper is being
used.
An incorrect output method is
being used.
The paper setting method may be
incorrect.
Manager may be disabled.
Remove some of the paper from
the multipurpose paper feeder. (If
printing onto envelopes,
transparencies or labels, insert
them one at a time in the manual
feeder.
Use only paper that meets the
specifications required by the
printer (refer to “Selecting Print
Media” on page 16).
Items such as thick paper should
not be printed using the facedown stacker. Use the face-up
stacker instead.
If printing onto envelopes, insert
the envelopes so that there is a
gap of approximately 1 mm (1/
32”) between the left edge of the
envelopes at the paper guide.
From the Control Panel Printers
menu, check the Use Print
Manager box.
If using Windows 3.1x, the
Background Printing item in the
Option menu of Print Manager
may be set incorrectly.
If using Windows 95, the Spooling
Setting may be set incorrectly.
The computer may have
insufficient random-access
memory (RAM).
Select Background Printing from
the Option menu in the Print
Manager.
From the Start menu, select
Settings and Printers. Click the
DocuPrint P8e icon with the right
mouse button, select Properties,
click the Details tab, and then
click the Spool Settings button.
Select the desired spool setting
from the available choices.
Install more random-access
memory (RAM) in your computer.
Troubleshooting • 35
Page 48

3-3 Print Quality Problems
The causes listed in the table below are probable causes only, and may not
represent all of the possible cases which may occur under actual operating
conditions. If you exp erience a pr oblem which do es not seem to fall under any
of the cases liste d in this table , or if you are co ncerned about a ny other aspe ct
of printer operation, contact an authorized service representative.
Problem Possible Cause Remedy
Irregular faded
patches of print
Black staining There is a paper quality problem. Use only paper that meets printer
Character voids The paper may be too dry. Try printing with a different batch
Background scatter The paper may be too damp. Try printing with a different batch
There is a paper quality problem. Use only paper that meets the
specifications required by the
printer.
Toner may be unevenly
distributed.
An image cartridge from another
Xerox printer has been installed.
Remove the image cartridge and
shake it gently to evenly distribute
the toner. Then replace the image
cartridge.
specifications (refer to “Selecting
Print Media” on page 16).
Always use the same image
cartridge with the same printer.
Using a cartridge that has already
been used in another printer may
not give satisfactory results.
of paper.
of paper. Do not open packages
of paper until necessary so that
the paper does not absorb too
much moisture from the air.
36 • Chapter 3
Printing over uneven surfaces. If printing onto envelopes, change
your printing layout to avoid
printing over areas that have
overlapping seams on the reverse
side.
Page 49

Problem Possible Cause Remedy
Missing characters The paper may be too damp. Try printing with a different batch
of paper. Do not open packages
of paper until necessary so that
the paper does not absorb too
much moisture from the air.
Back of printout dirty The transfer roller may be dirty. Print a few blank pages to clean
the transfer roller.
Incorrect fonts TrueType fonts may be disabled
(Windows 3.1x).
Faded graphics Toner may be low. Remove the image cartridge and
Use the Fonts dialog box in the
Control Panel to enable TrueT ype
fonts.
shake it gently to evenly distribute
the toner. Then replace the image
cartridge. Have a spare image
cartridge in preparation for the
toner running out.
Troubleshooting • 37
Page 50

38 • Chapter 3
Page 51

4
4Maintenance
Maintenance • 39
Page 52

4-1 Cleaning the Printer
Do not use ammonia-based sprays or volatile solvents such as thinner to
clean the printer, as these can damage the printer surface.
Always unplug the power cord before cleaning any part of the
printer.
4-1-1 Cleaning the Outside
Clean the outside surfaces of the printer by wiping them with a soft, clean,
lint-free cloth.
Keep the front cover closed when cleaning the outside of the printer.
You can dampen the cloth slightly with water, but be careful not to let a ny water
drip onto the printer or inside it.
4-1-2 Cleaning the Inside
40 • Chapter 4
1
2
3
4
When paper jams oc cur, unfu sed toner on the pape r can fal l off the paper and
build up inside the prin ter.
Unplug the power cord.
Remove the image cartridge (refer to “Replacing th e Ima ge
Cartridge” on page 41).
Use a soft cloth to wipe away any dust and spilled toner from the
image cartridge.
You can dampen the cloth slightly with water, but be careful not to let a ny water
drip onto the printer or inside it.
Reinsert the image cartridge.
Page 53

4-2 Replacing the Image
Cartridge
1
2
3
Make sure the printer is turned OFF.
To open the front cover, place your fingers on top of the cover and
pull it down.
Lift the image cartridge handle to disengage the c artridge, the n pull
the image cartridge out of the printer.
Maintenance • 41
Page 54

Follow the instructions on the cartridge box to recycle the used cartridge.
4
5
6
7
Unpack the new image cartridge.
Shake the cartridge from side to side five or six times to distr ibute
the toner.
Carefully remove the seal ing tape by pulli ng on the sealing tape tab.
Find the cartridge slots inside the printer, one on each side.
42 • Chapter 4
Page 55

8
Grasp the handle and slide the cartridge down between the image
cartridge slots.
9
10
Gently push the image cart ridge into place by pressing down on t he
handle.
Close the front cover.
Maintenance • 43
Page 56

44 • Chapter 4
Page 57

5
y
5Adding Memor
Adding Memory • 45
Page 58

5-1 Installing a SIMM
Follow this procedure for installing a memory SIMM to increase
printer memory.
1
2
3
4
5
Turn the printer power OFF and unplug the printer power cord.
Disconnect all cables from the back of the printer.
Open the front cover and remove the image cartridge. Refer to
“Replacing the Image Cartridge” on page 41).
Push down on the tray and stacker extenders until both are
recessed into the printer body.
Turn the printer upside down, remove the screws where shown
below, and remove that half of the bottom panel (1).
46 • Chapter 5
The printer’s control board and the SIMM are sensitive to static
electricity. Before installing the SIMM, discharge static electricity
from your body by touching something metal, such as the metal
back plate on any device plugged into a grounded power source.
If you walk around before completing the installation, again
discharge any static electricity.
Page 59

6
Hold the SIMM (1) with the connection points pointing toward the
control board, and insert the SI MM all the way into the connector at
o
a 90
angle.
7
8
9
10
Rotate it down until it snaps into place.
Make sure both metal clips (1) on the connector are fastened and the two
pins on the connector are pushed through the holes on the SIMM.
Replace the bottom panel and secure with screws.
Turn the printer back over and replace the image cartri dge.
Pull out the tray and stacker extenders.
11
Reconnect the printer cab le and power cord a nd turn the pri nter o n.
Adding Memory • 47
Page 60

5-2 Removing a SIMM
Follow this procedure should you need to remove the memory SIMM.
1
2
3
4
5
Turn the printer power OFF and unplug the printer power cord.
Disconnect all cables from the back of the printer.
Open the front cover and remove the image cartridge. Refer to
“Replacing the Image Cartridge” on page 41).
Push down on the tray and stacker extenders until both are
recessed into the printer body.
Turn the printer upside down, remove the screws where shown
below, and remove that half of the bottom panel (1).
48 • Chapter 5
The printer’s control board and the SIMM are sensitive to static
electricity. Before installing the SIMM, discharge static electricity
from your body by touching something metal, such as the metal
back plate on any device plugged into a grounded power source.
If you walk around before completing the installation, again
discharge any static electricity.
Page 61

6
Gently push out on the metal clips (1) at each end of the SIMM
connector and rotate the SIMM to the vertical posi tion. Then pull out
the SIMM.
7
8
9
10
Replace the bottom panel and secure with screws.
Turn the printer back over and replace the image cartri dge.
Pull out the tray and stacker extenders.
Reconnect the printer cab le and power cord a nd turn the pri nter o n.
Adding Memory • 49
Page 62

50 • Chapter 5
Page 63

A
6Specifications
Specifications • 51
Page 64

Speed 8 ppm
Resolution 600 x 600 dpi
Image cartridge life 5,000 @ 5% coverage (A4)
Media types Paper, OHP, card stock, labels, envelopes
Media sizes Letter, Legal, Executive, Monarch, COM-10, DL, A4, A5, B5, C5, D5
2
Media weight Paper: 16 - 24 lb. (60 - 90 g/m
Other: up to 32 lb. (120 g/m
)
2
)
Input capacity
Paper: Up to 150 sheets (75 g/m
Other media (OHP, envelopes, labels, etc.): Up to 10
Output capacity Face-down: 100 sheets
Face-up: 1 sheet (thick paper)
Dimensions W x D x H:
13.5” (345 mm) x 14.3” (14.3 mm) x 8.8” (224 mm) tray closed
Weight 15.4 lbs. (7 Kg)
Duty cycle Up to 6,000 pages per month
Safety USA - UL 1950
Europe - TUV(GS), CB, DEMKO
China - CCIB
Russia - GOST
India - ISI
EMC FCC Class B (no immunity)
CE (CISPR 22, No harmonics, Flicker)
o
Operating condition s 10
C / 32.5o C
20% / 80% relative humidity
Storage conditions -20
o
C / 40o C
20% / 90% relative humidity
2
)
Noise level Power Saving Mode: < Background (35 dBA)
Operation: < 47dBA
Power rating 90 - 137 VAC, 60 Hz
189 - 259 VAC, 50 Hz
Power consumption < 450 watts
Memory 4 MB standard, expandable to 36 MB
1 SIMM socket
SIMM type: EDO, 72 pin, 60 ns, 32 bit (no parity)
SIMM size: 4, 8, 16, 32 MB
52 • Appendix A
Page 65

Interface Bi-directional parallel port (ECP, Byte, Nibble)
Printer Description
Language (PDL)
Fonts 45 interal scalable fonts, 1 bitmap font
Host environments Windows 3.1x, Windows 95/98, Windows NT 4.0, DOS
Host drivers PCL 5e (Windows 3.1x, 95/98, NT 4.0)
PCL 5e
RCP/SM for Windows 3.1x, 95/98
RCP/SM for DOS
RCP for Windows NT 4.0
Install program (Windows 3.1x, 95/98)
Specifications • 53
Page 66

54 • Appendix A
Page 67

B
7CE Declaration
This Appendix contains the “CE Declaration” which only applies to
European Countries.
CE Declaration • 55
Page 68

56 • Appendix B
Page 69

CE Declaration • 57
Page 70

58 • Appendix B
Page 71

8Index
B
Button functions 7
Online/offline 7
OPC cleaning 7
Reset 7
Self test 7
C
Cleaning the printer 40
D
Default printer setting
Windows 3.1x
Windows 95/98 14
Windows NT 4.0 14
DocuPrint P8e
Cleaning
Selecting a location for 2
Setting up 8–14
Specifications 52–53
Unpacking 3
Driver installation
Windows 3.1x
Windows 95/98 11
Windows NT 4.0 12
14
40
11
E
Envelopes 16
Loading 22
F
Face-down stacker
Location on printer
Face-up stacker
Location on printer
Using 21
Front cover
Location on printer
4
4
5
I
Image cartridge
Initial installation
Location in printer 5
Replacing 41–43
Indicator lights 6
Installation and setup 8–14
8–9
L
Labels 16
Location for printer 2
M
Manual feeder
Location on printer
Using 20
Media guidelines 16
Media selection 16
Memory
Adding
46–47
4
Index • 59
Page 72

Multipurpose paper feeder
Location on printer
Using 17–19
4
O
Online/offline button function 7
OPC cleaning 7
Operator panel
Location on printer
Using 6–7
4
P
Paper 16
Paper guides
Location on printer
Using 18
Paper jams 30–32
Paper selection 16
Parallel interface cable 10
Power cord
Attaching to printer
Power cord connector
Location on printer
Power switch
Location on printer
Printer cable connector
Location on printer
4
10
5
5
5
T
Transparencies 16
Tray extender
Location on printer
Troubleshooting 33–37
U
Unpacking the printer 3
W
Windows 3.1x
Setting default printer
Windows 95/98
Driver installation
Setting default printer 14
Windows NT 4.0
Driver installation
Setting default printer 14
Windows3.1x
Driver installation
11
12
11
4
14
R
Remote Control Panel
Installing
Using 25–28
Reset button function 7
13
S
Self test button function 7
SIMM
Installation
Removal 48–49
Stacker extender
Location on printer
Status Monitor
Installing
Using 23–24
60 • Index
46–47
4
13
 Loading...