

Page 1

The Xerox
DocuPrint N24, N32, and
N40 Network Laser
Printers
System Administrator Guide
Version 1.8
Page 2

Copyright © 1998, 1999, Xerox Corporation. All Rights Reserved.
Copyright protection claimed includes all forms of matters of
copyrightable materials and information now allowed by statutory or
judicial law or hereinafter granted, including without limitation, material
generated from the software p rograms w hich are displayed on the s creen
such as styles, templates, icons, screen displays, looks, etc.
XEROX®, The Document Company®, the stylized X, DocuPrint, and
N24, N32, and N40 are trademarks of Xerox Corporation or its
subsidiaries.
Adobe® and PostScript® are trademarks of Adobe Systems
Incorporated. This product includes an implementation of LZW licensed
under U.S. Patent 4.558.302.
PCL, HP, and LaserJet are trademarks of Hewlett-Packard Company.
IBM is a trademark of International Business Machines Corporation.
Microsoft, Microsoft Windows, Microsoft Word, MS, and MS-DOS are
trademarks of Microsoft Corpor a tion. U nive r s is a tra dem ar k of L inotyp e
AG or its subsidiaries. WordPerfect is a trademark of Corel Corporation.
Centronics is a trademark of Centronics Corporation. Macintosh and
TrueType are trademarks of Apple Compu t er, Incorporated. OnPage is a
trademark of COMPUTER:ap plications , In c. A ll othe r pro duc t na me s are
trademarks/tradenames of their respective owners.
PCL, PCL5e, and PCL6 are tr ademarks of Hewlett Packard Company.
This printer contains an emulation of the Hewlett Packard PCL
command language, recogniz es HP PCL comma nds, and proces ses these
commands in a manner comparable with Hewlett Packard LaserJet
printer products.
Notice
Specifications described in this publi cation are subject to change withou t
notice. Use of some features may be limited by your hardware or
software configuration. Contact your dealer, Xerox, or Xerox Limited for
details.
Page 3

Table of Contentsi
Chapter 1
Getting Started
Introduction .....................................................................1-3
How Much of This Book Must I Read? ..........................1-4
Printer Components .......................................................1-6
Special Features .............................................................. 1-8
Connectivity ................................................................1-8
Power Saver ................................................................1-9
High Resolution Printing ............................................1-9
Edge to Edge Printing .................................................1-9
Automatic Tray Sequencing .....................................1-10
Automatic Language Sensing and Switching .........1-10
Automatic Font/Macro Saving .................................1-11
Secure Printing .......................................................... 1-11
Proof Printing ............................................................ 1-11
Printer Generated Reports .......................................1-12
PostScript ...................................................................1-13
Optional Duplex Printing .........................................1-13
.....................................................................
1-1
DocuPrint N24, N32, and N40 System Administrator Guide ❖ i
Page 4

Increased Paper Handling .........................................1-13
Multiple Output Options ... ...... ....... ...... ....... ...... ....... 1-14
Memory Expansion ............................... ....... ...... ....... 1-14
Flash Memory SIMMs ...............................................1-15
Hard Disk Drive Option ............................................1-15
Finisher ......................................................................1-15
Intelligent Rasterizing ..............................................1-16
Memory Considerations .................... ...... ....... ...... ....... 1-1 7
Installing the Printer .................................................... 1-19
Before You Begin ......................................................1-19
Space Requirements .................................................1-19
Precautions ................................................................ 1-21
Lifting and Carrying the Printer ............................... 1-23
Installation Steps ......................................................1-24
Maintaining the Printer ...............................................1-32
Cleaning the Printer .................................................. 1-32
Replacing the Toner Cartridge .................................1-32
Recycling the Toner Cartridge ..................................1-33
Installing the Maintenance Kit .................................1-33
Moving the Printer .......................................................1-35
Transporting the Printer .............................................. 1-36
Technical Support .........................................................1-37
Before Calling for Service ......................................... 1-37
Accessing Xerox Via the Internet .............................1-37
Chapter 2
Paper Handling
......................................................................
Selecting Paper ...............................................................2-2
Storing Paper ..................................................................2-5
ii ❖ DocuPrint N24, N32, and N40 System A dministr ator Gu ide
2-1
Page 5

Loading Paper ..................................... ...... ....... ...... .........2-6
Using Trays 1, 2 and 3 (if installed) ...........................2-7
Using Trays 4 and 5 in the 2,500 Sheet Feeder .......2-11
Using the 50 Sheet Bypass Feeder ...........................2-14
Using the 100 Envelope Feeder ...............................2-19
Automatic Tray Switching ........................................... 2-20
Tray Sequence Settings ............................................2-21
Paper Handling Exception Conditions .....................2-22
Tray Sequence Rules .................................................2-24
Tray Sequence Examples ..........................................2-25
Paper Size/Type Mismatch ........................................2-26
Offsetting Output ........................................................ 2-27
Using the 10-bin Mailbox/Collator ..............................2-28
Printing to the Mailbox/Collator ..............................2-28
Duplex (Two-Sided) Printing ....................................... 2-29
Print Orientation and Control Panel Settings .........2-30
Chapter 3
Using the Control Panel
......................................................
Control Panel Features ...................................................3-3
The Display .................................................................. 3-4
The Indicator Lights ....................................................3-4
The Keys ...................................................................... 3-6
Navigating the Menu System ......................................3-10
Menu Indicators ........................................................ 3-11
Control Panel Locks ...................................................3-11
Setting a Menu Option ............................................. 3-13
Main Menu ................................................................... 3-15
Job Menu ......................................................................3-16
Password Menu ............................................................3-18
Tray Menu ..................................................................... 3-21
PCL Menu ......................................................................3-28
PostScript Menu ...........................................................3-33
DocuPrint N24, N3 2, and N40 Syst em Administrator Guide ❖ iii
3-1
Page 6

System Menu ................................................................3-35
Parallel Menu ................................................................ 3-44
Serial Menu .................................. ................................. 3-47
Ethernet Menu ............................................................. 3-50
Token Ring Menu ......................................................... 3-63
Novell Menu .................................................................3-77
Test Menu .....................................................................3-84
Reset Menu ...................................................................3-89
Chapter 4
Chapter 5
Chapter 6
Printer Management Software and Drivers
...................
Using CentreWare DP with the DocuPrint N40 ............4-2
DocuPrint N40 PCL Emulation Printer Driver ................4-4
DocuPrint N40 PostScript Printer Driver .......................4-5
Driver Features ...............................................................4-6
Using the Hard Disk Drive /
Downloading Fonts and J obs ...................................... 5-1
Hard Drive Considerations ............................................5-2
Disk Initialization ........................................................ 5-2
Downloading Fonts and Macros ...................................5-3
FSDOWNLOAD Command ..........................................5-4
FSDELETE Command ...................................................5-7
Using the Hard Disk Drive for Secure and Proof Jobs .5-8
Creating Secure Jobs ...................................................5-8
Creating Proof Jobs ...................................................5-10
Printing or Deleting Secure or Proof Jobs ...............5-12
Troubleshooting
.................................. .......................... ........
4-1
6-1
Printer Operation Problems ...........................................6-2
Control Panel Messages .................................................6-5
Diagnostic LED Flash Sequences .................................6-26
Paper Jams .................................................................... 6-28
What Causes a Paper Jam? .......................................6-28
iv ❖ DocuPrint N24, N32, and N40 System Administrator Guide
Page 7

Clearing Paper Jams .................................................. 6-28
Clearing Area A (No Duplex Module) ......................6-32
Clearing Area A (With Duplex Module) ..................6-35
Clearing Area B .........................................................6-38
Clearing Area C .........................................................6-38
Clearing Area D .........................................................6-39
Clearing Tray 5 .......................................................... 6-40
Clearing the Duplex Module ....................................6-41
Print Quality Problems .................................................6-42
Appendix A
Appendix B
Appendix C
DocuPrint N40 Ordering Information
Maintaining the Printer
.................................. .....................
..............................
Replacing the Toner Cartridge ......................................B-2
Standard Configuration ..............................................B-3
Duplex Configuration .................................................B-7
Installing the Maintenance Kit ....................................B-11
Replacing the Fuser Cartridge and BTR ...................B-12
Replacing the Feedrolls ............................................B-17
Resetting the Counter ..............................................B-22
Cleaning the Printer .....................................................B-23
Exterior Cleaning ......................................................B-23
Interior Cleaning ... ....................................................B-24
Installing and Removing Printer Options
........................
Precautions ...................................................... ...... ....... ..C-3
2,500 Sheet Feeder .........................................................C-4
Installing ......................................................................C-4
Removing .....................................................................C-8
Duplex Module .............................................................C-11
A-1
B-1
C-1
Installing ....................................................................C-11
Removing ...................................................................C-17
10-bin Mailbox/Collator ...............................................C-21
DocuPrint N24, N32 , and N40 Syste m Administrat or Guide ❖ v
Page 8

Installing(Console Configuration) ............................C-21
Removing (Console Configuration) .........................C-26
Installing (Tabletop Configuration) .........................C-29
Removing (Tabletop Configuration) ........................C-33
100 Envelope Feeder ....................................................C-37
Installing ....................................................................C-37
Removing ...................................................................C-38
Hard Disk Drive ............................................................C-40
Installing ....................................................................C-41
Removing ...................................................................C-44
Memory SIMM .... ...... ....... ...... ...... .................................C-4 6
Installing ................................... ....... ...... ....... ...... .......C-47
Removing ............................................... ....... ...... .......C-49
Xerox Network Interface Card (XNIC) .........................C-51
Installing the XNIC ....................................................C-51
Removing the XNIC ...................................................C-56
Appendix D
Printer Resident Fonts
........................................................
Base Printer Fonts ......................................................... D-2
Printing a PCL Font List ......................... ....... ...... ....... . D-4
PostScript Fonts ............................................................. D-5
Printing a PostScript Font List ................................... D-6
Appendix E
Appendix F
Printer Specifications
DocuPrint N40 Unique Printer Commands
...................................... .................... .
Overview ........................................................................ F-2
Paper Size Selection ....................................................... F-3
Paper Type Selection ...................................................... F-4
Input Tray Selection ....................................................... F-5
Output Selection ............................................................ F-6
PJL Commands ................................................................ F-7
vi ❖ DocuPrint N24, N32, and N40 System Administrator Guide
......................
D-1
E-1
F-1
Page 9

Appendix G
Environmental Specifications
The Xerox Commitment to Environmental Quality . G-2
Acoustic Noise Figures ............................................... G-2
FCC Compliance Statement for United States Users G-3
Compliance Statement for International Users ....... G-4
Operational Safety ..................................................... G-5
Laser Safety .............................. ....... ...... ....... ...... ........ G-7
Laser Safety Warning for Finland and Sweden ....... G-7
...........................................
G-1
Index ..................................................................................................
IX-i
DocuPrint N24, N3 2, and N40 Syst em Administrat or Guide ❖ vii
Page 10

viii ❖ DocuPrint N24, N32, and N40 System Administrator Guide
Page 11

Getting Started
Introduction ......................................... ........................... 1-3
How Much of This Book Must I Read? .................. ........ 1-4
Printer Components ............................................... ........ 1-6
Special Features ................ ............ ............. ............. ....... . 1-8
Connectivity ..................... ...................................... ........ 1-8
Power Saver ................................................................... 1-9
High Resolution Printing ......... ...... ....... ...... ....... ...... ....... . 1-9
Edge to Edge Printing .................................................... 1-9
Automatic Tray Sequencing ......................................... 1-10
Automatic Language Sensing and Switching ................ 1-10
Automatic Font/Macro Saving ...................................... 1-11
Secure Printing ............................................................. 1-11
Proof Printing ............................................................... 1-11
Printer Generated Reports ............................................ 1-12
PostScript ......................... ...... ...................................... 1-13
Optional Duplex Printing .............................................. 1-13
Chapter1
Increased Paper Handling ............................................. 1-13
Multiple Output Options .............................................. 1-14
Memory Expansion ...................................................... 1-14
Flash Memory SIMMs ................................................... 1-15
Chapter 1: Getting Started ❖ 1-1
Page 12

Getting Started
Hard Disk Drive Option ................................................ 1-15
Finisher ..................... ................................................... 1-15
Intelligent Rasterizing ............. ...... ....... ......................... 1-16
Memory Considerations .............................................. 1-17
Installing the Printer .................................................... 1-19
Before You Begin ......................................................... 1-19
Space Requirements ..................................................... 1-19
Precautions ...................... ............................................ 1-21
Lifting and Carrying the Printer .................................... 1-23
Installation Steps .......................................................... 1-24
Maintaining the Printer ............................................... 1-32
Cleaning the Printer ..................................................... 1-32
Replacing the Toner Cartridge ...................................... 1-32
Recycling the Toner Cartridge ...................................... 1-33
Installing the Maintenance Kit .......................... ...... ...... 1-33
Moving the Printer ................................................. ...... 1-35
Transporting the Printer .................................. ............ 1-36
Technical Support ...................................... ............. ...... 1-37
Before Calling for Service ............................................. 1-37
Accessing Xerox Via the Internet .................................. 1-37
1-2 ❖ DocuPrint N24, N32, and N40 Syste m Administra tor Guide
Page 13

Introduction
Introduction
This guide is for use with the Xerox DocuPrint N24, N32,
and N40 printers.
Because most of the printer’s features and functionality
are shared by all three, this guide uses the generic name
DocuPrint N40 when referring to these printers. And it
refers to all features not found on the base printer as
options.
This guide also identifies two different configurations for
the DocuPrint N40:
• The tabletop configuration
• The console configuration (sitting on top of the
optional 2,500 Sheet Feeder).
Samples of each configuration are shown later in this
chapter, however the figures throughout this guide may
show either configuration when illustrating a feature or
procedure.
Chapter 1: Getting Started ❖ 1-3
Page 14

How Much of Thi s Book Must I Read?
How Much of
This Book Must I
Read?
Because of the customer installable nature of the
DocuPrint N40, your printer should be operational
following the brief instructions in the Quick Installation
Guide. (The installation instructions are also present ed
later in this chapter).
Use this book as a reference for:
• Learning about special printer features [“Special
Features” (page 1-8)]
• Printer memory issues [“Memory Considerations”
(page 1-17)]
• Instructions for installing the printer [“Installing the
Printer” (page 1-19)]
• Tips on taking care of the printer [“Maintaining the
Printer” (page 1-32)]
• Tips on transporting the printer [“Tr ansporting the
Printer” (page 1-36)]
• Contacting Xerox for technical support [“Technical
Support” (page 1-37)]
• Paper specifications, loading paper, and duplex
printing (Chapter 2:Paper Handling)
• Instructions on using the Control Panel
(Chapter 3: Using the Control Panel)
• Information about CentreWare DP and installing
printer drivers (Chapter 4: Printer Management
Software and Drivers)
1-4 ❖ DocuPrint N24, N32, and N40 Syste m Administra tor Guide
Page 15

How Much of This Book Must I Read ?
• Downloading fonts (Chapter 5: Using the Hard
Disk Drive / Downloading Fonts and Jobs)
• Troubleshooting printing problems if they occur
(Chapter 6: Troubleshooting)
• Ordering printer options (Appendix A: DocuPrint N40
Ordering Information)
• Replacing consumables and cleaning the printer
(Appendix B: Maintaining the Printer)
• Installing and removing printer options (Appendix
C: Installing and Removing Printer Options)
• List of fonts resident on the printer (Appendix
D: Printer Resident Fonts)
• Printer Specifications (Appendix E: Printer
Specifications)
• DocuPrint N40 printer command differences for PCL
and PostScript (Appendix F:DocuPrint N40 Unique
Printer Commands)
Chapter 1: Getting Started ❖ 1-5
Page 16
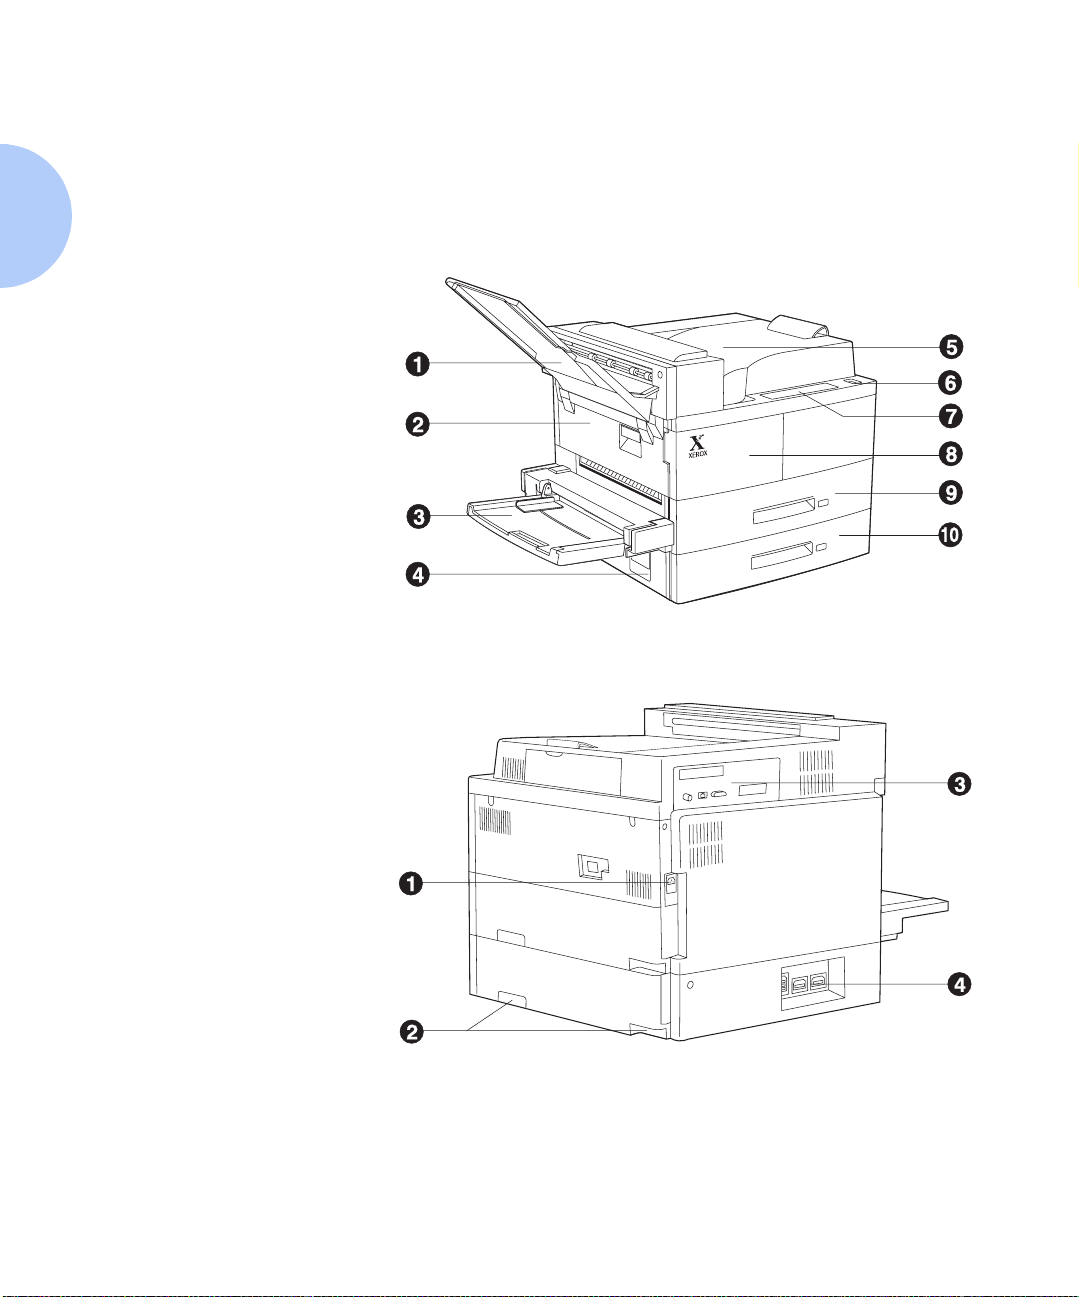
Printer Components
Components
Front View
1
Face-up Output Bin
2
Door A
3
50 Sheet Bypass Feeder
4
Door B
5
Face-down Output Bin
6
Power switch
7
Control Panel
8
Front cover
9
Paper Tray 1
10
Paper Tray 2
Printer
The major components of the DocuPrint N40 are
indicated in Figure 1.1 below.
Figure 1.1 Base printer components
Rear View
1
Power receptacle
2
Hand grips
3
Controller Board with host/
network interface ports.
4
Connectors for optional
2,500 Sheet Feeder, 10-bin
Mailbox/Collator, Finisher,
and Duplex Module
1-6 ❖ DocuPrint N24, N32, and N40 Syste m Administra tor Guide
Page 17
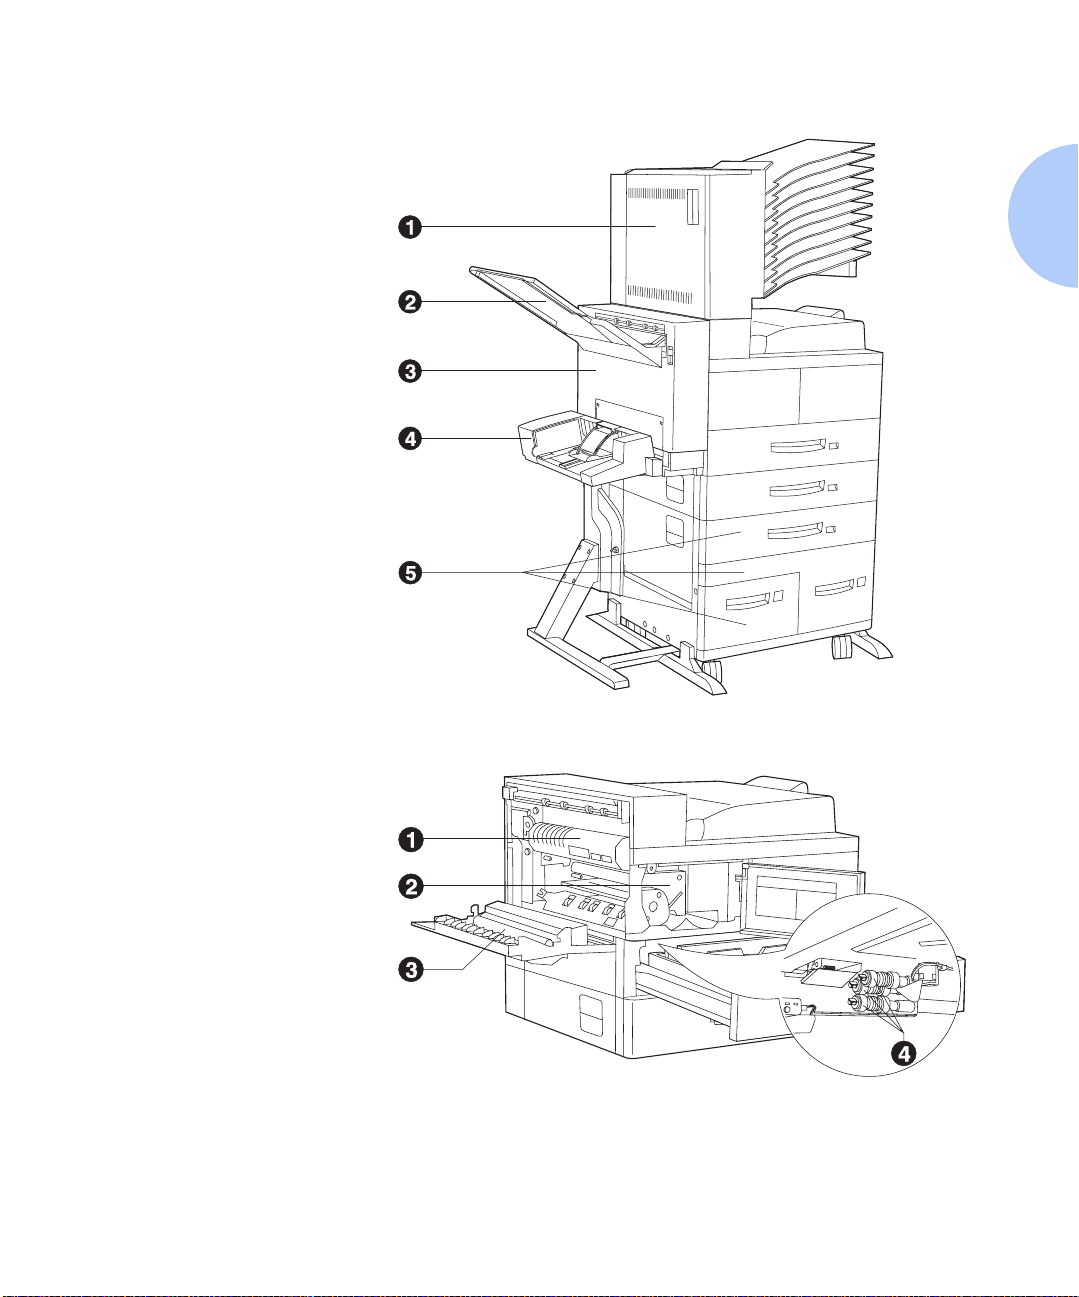
Front View
1
10-bin Mailbox/Collator
2
Face-up Output Bin
3
Duplex Module
4
100 Envelope Feeder
5
2,500 Sheet Feeder with
Paper Trays 3, 4, and 5
Printer Components
Figure 1.2 Console configuration with options
Front View, Covers Open
1
Fuser
2
Toner Cartridge
3
Bias Transfer Roll (BTR)
4
Feedrolls
Figure 1.3 Customer replaceable components
Chapter 1: Getting Started ❖ 1-7
Page 18

Special Features
Special Features
Connectivity
Several features have been designed into the DocuPrint
N40 to enhance your printing environment. Using the
printer's Control Panel menu system, you can tailor
printer settings to match your printing requirements.
See Chapter 3:Using the Control Panel for more
information about the Control Panel and its menu system.
The N40 includes the following physical connectivity
interfaces on board:
• IEEE 1284 Bi-directional parallel
• RS232C Serial Interface with a DB9 Connector
• Ethernet (10 Mbit)
Two additional interfaces are available as options.
• Ethernet (100 Mbit)
• Token Ring
Installing either optional network interface disables the
on board 10 Mbit Ethernet interface. Removing either
optional interface enables the on board 10 Mbit Ethernet
functionality again .
1-8 ❖ DocuPrint N24, N32, and N40 Syste m Administra tor Guide
Page 19

Special Features
Power Saver
High Resolution
Printing
Edge to Edge Printing
After 60 minutes of inactivity, the printer automatically
turns off internal components to reduce the amount of
electricity used. The printer automatically turns those
parts back on when it receives a print job.
Using the printer's Control Panel menu system, you can
send the printer into Power Saver mode after your choice
of Off, 15, 30, 60, 90, 120 or 180 minutes of inactivity.
See the section “System Menu” (page 3-35) in
Chapter 3: Using the Control Panel.
The DocuPrint N40 is set to print at 600 x 600 dpi (dots
per inch). You can also print draft-quality jobs by using
the System Menu to set Draft Mode to On. The printer
automatically reduces the amount of toner by two-thirds
(and prints a draft-quality output). Draft Mode can be
selected on a per job basis from the Xerox printer drivers.
See Chapter 3: Using the Control Panel for in structio ns on
changing Control Panel settings.
You can print PostScript LanguageLevel 3 (hereafter
referred to as PostScript) and PCL 6 Emulatio n (hereafter
referred to as PCL) jobs all the way to the edge of the
page. (However, there is a 4 mm border on all edges, with
all paper sizes, where print quality cannot be
guaranteed.) This feature may be selected via the Control
Panel for PCL jobs or via print drivers for both PCL and
PostScript jobs. Note that selecting this feature will cause
PCL job printing to be shifted up to the top of the page
and left to the edge of the page.
Chapter 1: Getting Started ❖ 1-9
Page 20

Special Features
Automatic Tray
Sequencing
Automatic Language
Sensing and
Switching
The DocuPrint N40 allows you to set automatic tray
sequencing for both PCL and PostScript jobs. When a
paper tray runs out of paper, the printer automatically
switches to another paper tray (if anot her tray is loaded
with the same size and type paper). That means you don't
have to load paper as often. You can also install the
optional 2,500 Sheet Feeder (with one 500 sheet tray and
two 1,000 sheet trays) to extend your printing capacity.
For more information on tray switching, see the section
“Automatic Tray Switching” (page 2-20) in
Chapter 2: Paper Handling.
The printer can process both PCL and PostScript jobs.
When the printer's Language Sensing option is on, the
DocuPrint N40 samples the incoming data stream to
determine which language the print job requires. The
DocuPrint N40 then switches to the proper interpreter for
that job.
Language Sensing can be set individually for each port,
or protocol within a port, from the Parallel Menu and from
the Ethernet and Novell Menus by setting the a ppropriate
PDL setting to Auto.
With the Language Sensing option on, the printer
automatically samples each print job and switches to the
appropriate processing language.
For more information about language sensing and
switching, see Chapter 3: Using the Control Panel.
1-10 ❖ DocuPrint N24, N32, and N40 System Administrator Guide
Page 21

Special Features
Automatic Font/
Macro Saving
Secure Printing
Proof Printing
When you are printing both PostScript and PCL jobs, the
printer will automaticall y save downloaded fonts, macros,
and the entire PostScript environment when it switches
PDLs (Printer Description Language ). This saves yo u from
having to download fonts, macros, and headers every
time the program switches between PostScript and PCL.
The DocuPrint N40 allows users to define and control
what are called “secure jobs.” When a secure job is sent
to the printer, printing is delayed until the password
associated with that job is entered at the printer’s Control
Panel. Secure jobs are defined and enabled either via
DocuPrint N40 printer drivers or via a sequence of PJL
commands (see Chapter 5: Using the Hard Disk Drive /
Downloading Fonts and Jobs, page 5-8, for an example).
This feature requires the Hard Disk Drive option.
The DocuPrint N40 allows you to view and proofread the
first set of a multiple set job before printing the remaining
sets. This is called “proof printing”. When you send a
proof job to the printer, only the first set is printed
immediately. You can then go to the printer and proof the
first set. Depending on the outcome of the proofing, you
can then decide either to co ntinu e pri ntin g the rema ining
sets or to delete the job by entering the Password Menu
via the Printer Control Panel. Proof printing jobs are
defined and enabled either via the DocuPrint N40 prin ter
drivers or via a sequence of PJL commands (see
“Creating Proof Jobs” page 5-10, for an example). This
feature requires the Hard Disk Drive option.
Chapter 1: Getting Started ❖ 1-11
Page 22

Special Features
Printer Generated
Reports
Using the printer's Control Panel, you can print seven
separate reports.
• The Demo Page provides a sample of the printer's
capabilities and lists the printer's key features.
• The Configuration Sheet lists printer name, software
revision level, communication parameters settings,
options installed, current option setting in the Control
Panel's menu system and print counts.
• The PCL Font List shows which PCL fonts are
currently available. The list includes resident fonts,
fonts stored on the hard disk and permanent fonts
downloaded to system memory.
• The PostScript Font List shows which PostScript fonts
are currently available. The list includes resident fonts,
fonts stored on the hard disk or downloaded to system
memory.
• The Test Prin t is used by service and repair technicians
if problems occur with the printer.
• The Disk Directory lists disk statistics and the directory
of the disk file system, including fonts, forms, and
macros.
• The Menu Map option in the Test Menu lets you print
a page showing the structure of the control panel
menu tree.
See Chapter 3:Using the Control Panel for more
information about these reports.
1-12 ❖ DocuPrint N24, N32, and N40 System Administrator Guide
Page 23

Special Features
PostScript
Optional Duplex
Printing
Increased Paper
Handling
The DocuPrint N40 includes PostScript LanguageLevel 3.
Click for Updated Information.
You can print two-sided documents when you install the
Duplex Module option.
See Appendix A: DocuPrint N40 Ordering Information to
order a Duplex Module.
Two adjustable 500 sheet input trays and a 50 Sheet
Bypass Feeder are standard. To this, you can add an
optional 2,500 Sheet Feeder consisting of one 500 sheet
tray and two 1000 sheet trays, increasing the total input
capacity to 3,500 sheets. Additional benefits can be
derived by replacing the 50 Sheet Bypass Feeder with the
optional 100 Envelope Feeder. It has a capacity of 100
envelopes.
See Appendix A: DocuPrint N40 Ordering Information to
order the 2,500 Sheet Feeder and 100 Envelope Feeder.
Chapter 1: Getting Started ❖ 1-13
Page 24

Special Features
Multiple Output
Options
Memory Expansion
The 200 Sheet Face-up Bin and the 50 0 She et Fa ce-dow n
Bin with offset capability come standard on the DocuPrint
N40. The Face-up Bin holds up to 200 sheets of Letter/A4
paper . The Face-down Bi n with offset capabili ty holds up
to 500 sheets of paper and can offset print jobs.
An optional 10-bin Mailbox/Collator, which sits on top of
the Face-down Bin, is also available. Output can be
directed to any one of its 10 bins, and each bin has a
capacity of 100 sheets of 20 lb. paper. All capacities are
based on 20 lb. paper.
Click for Updated Information.
See Appendix A: DocuPrint N40 Ordering Information to
order the 10-bin Mailbox/Collator.
The DocuPrint N40 base printer has 24 MB of RAM
installed as standard, and five SIMM slots for memory
expansion. The five SIMM slots can be populated with
combinations of 8, 16, or 32 MB memory SIMMs up to a
total of 128 MB. A combination of five 32 MB SIMMs
would exceed the 128 MB maximum and is NOT allowed.
1-14 ❖ DocuPrint N24, N32, and N40 System Administrator Guide
Page 25

Special Features
Flash Memory SIMMs
Hard Disk Drive
Option
Finisher
An additional Flash SIMM of 8 MB is available. You can
essentially increase the resident fonts of the printer or
create resident macros by installing Flash SIMMs and
downloading resources permanently to this memory.
Flash Memory SIMMs are installed in the same way as
RAM SIMMs and in the same slots. See Appendix
C: Installing and Removing Printer Options.
An optional Hard Disk Drive is also available, and is used
for storing fonts, forms and macros, enabling secure and
proof job printing and automatic collation o f mul tipl e sets
of a document. See Chapter 5: Using the Hard Disk Drive
/ Downloading Fonts and Jobs for more information about
the Hard Disk Drive. See Appendix A: DocuPrint N40
Ordering Information to order more printer memory or
the Hard Disk Drive.
The finisher option can be installe d only on consol e
versions of the DocuPrint N40 (i.e., versions which have
the 2,500 Sheet Feeder). It has three output bins with a
total maximum capacity of 2,000 unstapled sheets, up to
667 unstapled sheets per bin. There is stapling capability
for all three bins. Stapled output is delivered face down.
The stapler can staple sets of up to 50 sheets. It has three
stapling positions (Front for portrait, Back for landscape,
and Dual for booklet mode). The customer-replaceable
stapling cartridge contains 5,000 staples.
The finisher documentation is provided as a separate
document on your CD.
Chapter 1: Getting Started ❖ 1-15
Page 26

Special Features
Intelligent
Rasterizing
The DocuPrint 40 driver sends data to the printer only
once, regardless of the number of copies specified. This
conserves valuable network resources and allo ws users to
resume their applications quickly.
Once the data reaches the N40, it analyzes the job to
determine the amount of memory the rasterized data will
require. If there is sufficient memory, it will perform
Raster Image Processing (RIP) only once and hold the
rasterized pages in memory for use in printing each
successive copy.
Rasterizing is a time consuming part of the printing
process. On many small group laser printers, raster
processing is repeated for each successive copy. The
ability of the N40’s printer intelligence to determine that
particu lar jobs need to be rasterized once allows multiple
sets to be produced at rated printer speeds. This
enhances job performance.
Intelligent rasterizing is performed automatically by the
N40.
1-16 ❖ DocuPrint N24, N32, and N40 System Administrator Guide
Page 27

Memory Consi derations
Memory
Considerations
In today's printing environments, technologies have
advanced greatly. Corresponding memory requirements
have increased too. If you plan to print highly complex
jobs, you may need to add printer memory
Click for Updated Information.
The DocuPrint N40 accepts memory SIMMs with the
following specifications:
•8 MB SIMM
— 72 pins
— 70 nanosecond access time
—No parity
— 2M x 32 bits
• 16 MB SIM M
— 72 pins
— 70 nanosecond access time
—No parity
— 4M x 32 bits
• 32 MB SIM M
— 72 pins
— 70 nanosecond access time
—No parity
— 8M x 32 bits
Chapter 1: Getting Started ❖ 1-17
Page 28

Memory Consideratio ns
Additional memory will provide the following enhanced
DocuPrint N40 capabilities:
• Additional font cache
• Additional download space for fonts, macros and
images
• Increased throughput for complex pages, duplex
pages and larger paper sizes (A3/Ledger)
• Incr eased Post Scrip t VM
• Collated sets without the Hard Disk Drive
1-18 ❖ DocuPrint N24, N32, and N40 System Administrator Guide
Page 29
Installing the Printer
Installing the
Printer
Before You Begin
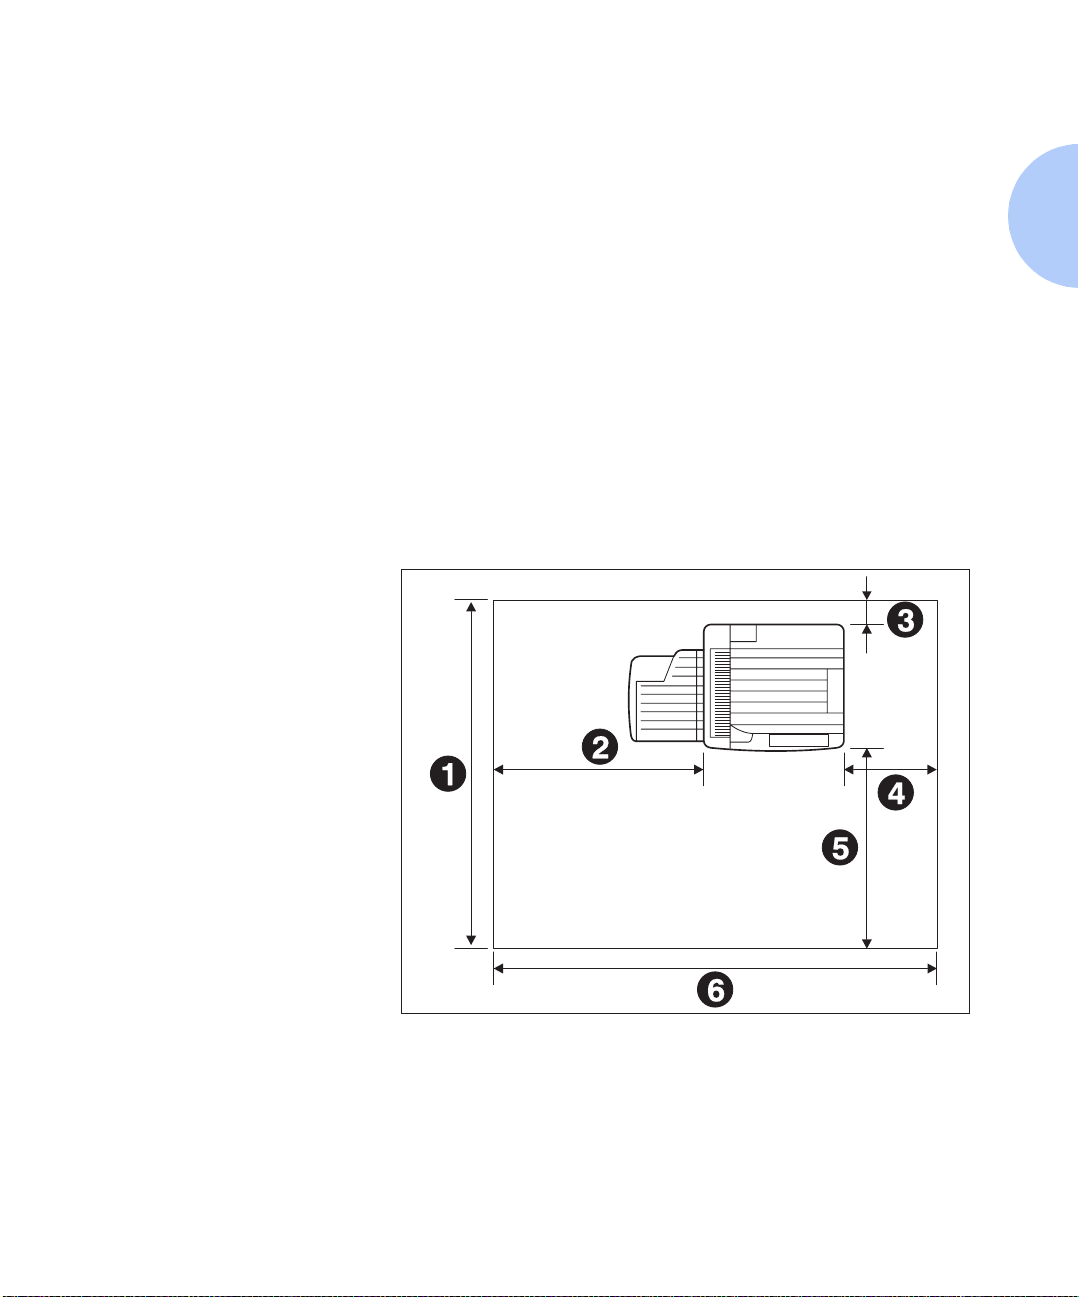
Space Requirements
Top View
1
60.5 inches (1540 mm)
2
36 inches (920 mm)
3
4 inches (100 mm)
4
12 inches (305 mm)
5
36.5 inches (925 mm)
6
72 inches (1830 mm)
This section describes the procedures for unpacking and
setting up the printer in its base c onfiguration. If you have
additional options to install, refer to Appendix
C: Installing and Removing Printer Options for specific
instructions for each option.
Be sure to read this entire section before continuing on to
the installation steps. This section contains important
information concerning your safety and the safety of the
printer.
For easy operation, maintenance and replacing of
consumables, you should select a location for the printer
that leaves the minimum clearan ces around th e printer as
shown in Figure 1.4 for a base configuration, and in
Figure 1.5 on page 1-20 when options are installed.
Figure 1.4 Space requirements for a base configuration
Chapter 1: Getting Started ❖ 1-19
Page 30

Installing the Printer
Top View
1
60 inches (1525 mm)
2
32 inches (815 mm)
3
4 inches (100 mm)
4
12 inches (305 mm)
5
36 inches (915 mm)
6
72 inches (1830 mm)
Figure 1.5 Space requirements when options are installed
1-20 ❖ DocuPrint N24, N32, and N40 System Administrator Guide
Page 31

Installing the Printer
Precautions
Please observe the following precautions for installing
and using your DocuPrint N40 printer. Please leave a
minimum of 30 inches above the printer when the
Mailbox is installed.
To avoid fire hazard:
• Do not place the printer in a location with high
temperature and humidity, poor ventilation, or a high
level of dust.
• Do not place the printer near heaters or similar objects.
• Never block the printer’s ventilation openings. Be sure to
leave ample space between the ventilation openings and
the nearest wall or other surface. (Refer to Figures 1.4
and 1.5 for space requirements.)
• Do not place the printer near alcohol, benzene, or other
volatile and flammable materials.
To avoid electric shock or fire hazard:
• Do not connect the printer to any power source until you
are instructed to do so.
• Do not plug the printer into an AC outlet with incorrect
voltage.
• The printer must be properly grounded. Do not bypa ss the
ground plug. Use a three-prong connection.
• Do not use a multi-extension cord connector.
• If using an extension cord, do not use one with rated
current less than 125V 15A (250V 13A in Europe). Do not
damage or modify the extension cord. Do not bend, pull
or place heavy objects on the extension cord.
• Never touch the GFI (Ground Fault Interrupt) or plug with
wet hands.
• If you do not use the GFI, Xerox does not guarantee the
successful operation of your machine.
Chapter 1: Getting Started ❖ 1-21
Page 32

Installing the Printer
To avoid printer malfunction or damage:
• Position the printer on a horizontal, sturdy and stable
surface.
• Operate the printer under temperature conditions of
10 to 35° C (50 to 95° F), with humidity 15 to 85%. Be sure
to keep the temperature below 28º C (82° F) if the
humidity is 85%.
If the temperature changes significantly, condensation
may develop inside the printer and cause printing
problems. Therefore, be sur e to let the printer stabilize for
some time to adjust to the new temperature.
• Do not subject the printer to direct sunlight.
1-22 ❖ DocuPrint N24, N32, and N40 System Administrator Guide
Page 33

Installing the Printer
Lifting and Carrying
the Printer
THIS PRINTER IS HEAVY. The weight of the main unit
without paper cassette, consumables, and paper is about
105 lbs. (48kg). Never attempt to lift the printer by
yourself. THE PRINTER SHOULD ALWAYS BE
CARRIED BY TWO PEOPLE.
To carry the printer , grasp the bottom corners on the right
side (as shown in Figure 1.6), not from the front (where
the control panel is located) and back sides. On the left
side, hold both corners of the 50 Sheet Bypass Feeder to
avoid injury to fingers when setting the printer down.
Figure 1.6 Carrying the printer
Also, when lifting the printer , cor rect posture is important
to avoid hip injuries.
Chapter 1: Getting Started ❖ 1-23
Page 34

Installing the Printer
Installation Steps
Follow these steps to set up your N40 printer.
to use two people when lifting and carrying the printer
You should have:
•Printer
• GFI (Ground Fault Interrupt)
(110V or 220V) +
Power Cord (220V)
• Toner Cartridge (in a box)
• Face-up Bin Kit (in a box)
• Documentation Kit and CD-ROM
(Some parts may be inside a paper tray. )
Remember
Cut the shipping straps off the shipping
1
carton, lift the carton away from the
printer and unpack the printer .
Save the carton and packing
materials for later use in case you
ever need to ship the printer.
Remove the plastic bag and piec es of tape
2
from the printer.
Complete the registration card.
3
(See Step on page 1-25 for the location of
the serial number.)
If you are setting up the printer in its
4
console configuration, refer to
C: Installing and Removing Printer
Options
2,500 Sheet Feeder, then return to this
procedure.
With two people, lift up the printer as
5
shown on page 1-23 and place it on either
the 2,500 S heet Feeder (for console
configuration) or on a flat, sturdy surface
that meets the space and environment
requirements discussed in the sections
“Space Requirements”
“Precautions”
for instructions on installing the
(page 1-19) and
(page 1-21).
Appendix
.
DocuPrint N40 options should be
6
installed in the following order:
2,500 Sheet Feeder, Printer, Duplex
Module, 10-bin Mailbox/Collator or
Finisher and 100 Envelope Feeder.
1-24 ❖ DocuPrint N24, N32, and N40 System Administrator Guide
Page 35

Installing the Printer
Remove the Toner Cartridge from its
7
package and pull out the pr otective paper
sheet from the drum shutter.
Hold the Toner Cartridge horizontally
8
and gently shake it 5 to 6 times to evenly
distribute the toner inside.
Print quality may be degraded if the
toner is not evenly distributed. If
the toner is not freed by shaking
the cartridge, you may hear a noise
when powering ON the printe r, and
the cartridge may be damaged.
Open Door A.
9
Open the front cover.
10
This reveals the serial number (1)
and toner install instructions (2).
Chapter 1: Getting Started ❖ 1-25
Page 36

Installing the Printer
Hold the amber handle with one hand
11
and gently push the Toner Cartridge all
the way into the printer.
The printer’s front cover is spring
loaded and will not stay open. You
must hold it open or else it will shut.
Do not touch any parts inside the
printer. Make sure the cartridge is
firmly seated in the printer.
Gently pull the sealing tape straight out
12
in the direction of the arrow.
If the tape is pulled out at an angle,
it may break.
Close Door A and the front cover.
13
When closing Door A, do not use
the latch on the cover. Instead,
follow the instruction label on the
cover for the correct location to
push the cover closed.
If you are installing the optional Duplex
14
Module, skip to Step on page 1-28,
complete the remaining steps, then refer
Appendix C: Installing and Removing
to
Printer Options
installing the Duplex Module (and other
options).
for instructions on
1-26 ❖ DocuPrint N24, N32, and N40 System Administrator Guide
Page 37

Installing the Printer
Unpack the Face-up Output Bin.
15
There are parts for simp lex operation (1)
and duplex operation (2). Note also that
there are two sets of sc rews, a longer pair
(3) and a shorter pair (4).
SAVE ALL OF THESE PARTS. Some
are used with the Duplex Module.
Attach the bin to the connecting plate
17
with the supplied shorter screws.
Attach the bracket to the printer with the
16
supplied longer screws. Tighten by hand.
Hook the bin and connecting p late on the
18
bracket. Make sure they are firmly
seated.
Chapter 1: Getting Started ❖ 1-27
Page 38

Installing the Printer
Pull out Paper Tray 1 (shown above) or
19
Tray 2 until it stops.
Gently lift up the width guide and slide it
21
all the way until it stops.
Prepare a stack of paper, making sure the
20
tops of the sheets are aligned.
Press down the gray handle and slide the
22
side guide all the way until it stops.
1-28 ❖ DocuPrint N24, N32, and N40 System Administrator Guide
Page 39

Installing the Printer
Place the paper in the tray, between the
23
guides.
Do not stack paper above the
indicated mark.
Align the edges of the paper stack.
25
Adjust the side guide to the paper length.
24
Adjust the width guide to the paper
26
width.
To avoid paper jams, make sure the
guide stopper is loc ked firmly i n the
guide hole on the bottom of the
tray, and that both the side and
length guides are set correctly for
the size of paper you are using.
Chapter 1: Getting Started ❖ 1-29
Page 40

Installing the Printer
A Paper Size Label card can be found in
27
each tray. Insert the correct paper size
label into the paper size slot on the front
of the tray, then push the tray all the way
back into the printer until it latches.
For complete paper size and
loading information, refer to
Chapter 2: Paper Handling.
Repeat the paper loading steps for the
28
other paper tray(s).
If you have other options to install, refer
29
30
31
Appendix C: Installing and Removing
to
Printer Options
Otherwise, you can proceed to the next
step and complete the installation.
Attach the interface cable from your host
computer or network.
For 110 V installation, go to Step 32.
For 220 V installation, go to Step 33.
for instructions.
1-30 ❖ DocuPrint N24, N32, and N40 System Administrator Guide
Page 41

Installing the Printer
Plug one end of the 110V GFI (Ground
32
Fault Interrupt) power cord into the
receptacle and the other end into the wall
outlet.
If you do not use the GFI power
cord, Xerox does not guarantee the
successful operation of your
machine.
Go to Step 34.
Attach the 220V GFI (Ground Fault
33
Interrupt) and power cord and plug into
AC outlet.
If you do not use the GFI power
cord, Xerox doe s no t g uaran t ee the
successful operation of your
machine.
Power ON the printer.
34
Save all remaining parts, as you may
need them at some later time.
Chapter 1: Getting Started ❖ 1-31
Page 42

Maintaining the Printer
Maintaining
the Printer
Cleaning the
Printer
Replacing the
Toner Cartrid ge
Maintaining the printer in good operating condition is
essential to having a reliable, well-running machine.
For optimum performance, do not place the printer near vents
or dust-producing equipment. Particles in the air may ente r
the printer and cause failures in internal mechanisms.
For best results, clean the outside of the printer with a damp
cloth. For stubborn stains, soak the cloth in a mild detergent
before cleaning. Do not use strong detergents. Wipe the
printer with a soft dry cloth when finished. Always power the
printer off before cleaning. See Appendix B: Maintaining the
Printer for more details.
The Toner Cartridge will print approximately 23,000
impressions of A4 or 8.5 x 11 paper under average operating
conditions (5% image area coverage). The number of prints
per cartridge will decrease if you routinely print dense text
and graphics.
Replace the Toner Cartridge as soon as you see the following
message at the printer's Control Panel display:
Low Toner
See Appendix A: DocuPrint N40 Ordering Information for
ordering a new toner cartridge and Appendix B: Maintaining
the Printer for removal and installation instructions.
1-32 ❖ DocuPrint N24, N32, and N40 System Administrator Guide
Page 43

Maintaining the Print er
Recycling the Toner
Cartridge
Installing the
Maintenance Kit
The DocuPrint N40 Toner Cartridge can be recycled free
of charge to you. Follow the instructions packaged with
your new Toner Cartridge to recycle the old one.
The Maintenance Kit is comprised of a Fuser Cart ridge , a
Bias Transfer Roll (BTR) and Feedrolls (three for each
paper input tray). (In order to support all possible
configurations, fifteen feedrolls are shipped in each kit.)
The Fuser Cartridge, feedrolls and BTR have avera ge
useful lives of 300,000 impressions. At 285,000
impressions, this message will be displayed at the
printer’s Control Panel display:
Maintenance Kit
Required
At 300,000 impressions, this message will be displayed at
the printer’s Control Panel display:
Maintenance Kit
Replace
At that point or sometime in between the occurrence of
the two messages, install the Maintenance Kit.
Chapter 1: Getting Started ❖ 1-33
Page 44

Maintaining the Printer
Ideally, all three items of the Maintenance Kit should be
replaced at the same time to maintain a consistent
maintenance cycle. It is your responsibility to install the
Maintenance Kit to keep the machine in optimal condition. It
is also your responsibility to determine when this kit
installation is required.
All instructions necessary for replacing the Fuser, BTR
and feedrolls are contained in the Maintenance Kit. All
these components are designed to be user installable,
however a Xerox Service Representative can be called to
install the Maintenance Kit for a fee.
See Appendix A: DocuPrint N40 Ordering Information for
ordering information, and Appendix B: Maintaining the
Printer for instructions on replacing the Maintenance Kit
items.
1-34 ❖ DocuPrint N24, N32, and N40 System Administrator Guide
Page 45

Moving the Printer
Moving the
Printer
When moving the printer a short distance, you do not have to
disassemble it. Simply power it OFF and disconnect all cords
before moving it (and be sure to notify all users that it will be
offline during the move).
If in the tabletop configuration, be sure to use two people as
shown in the section “Lifting and Carrying the Printer”
(page 1-23).
If in the console configuration, unlock the caste rs to roll the
printer. To avoid tipping the printer over, be sure not to tilt it
more than 10° as shown in Figure 1.7.
Figure 1.7 Maximum tilt angles
Chapter 1: Getting St arted ❖ 1-35
Page 46

Transporting the Printer
Transporting
the Printer
When transporting the printer more than a short distance, use
the original shipping box and packaging materials. If the
original shipping box or materials are not available, use a
sturdy packing box and generous amount of cushioning or
packing materials.
To prepare your printer for transportation, follow the
instructions below.
1. Power off the printer and disconnect the GFI power cord
and all interface cables.
2. Remove any paper handling options and repack each in
its original packaging.
3. Remove the Toner Cartridge and pack it in its original
packaging.
4. Pack the printer with the Toner Cartridge (sealed in a
plastic bag) and GFI power cord in the original printe r
box.
1-36 ❖ DocuPrint N24, N32, and N40 System Administrator Guide
Page 47

Technical Support
Te chnical
Support
Before Calling for
Service
Accessing Xerox
Via the Internet
If you are unable to resolve a printing problem using the
instructions in Chapt er6: Troubleshooting, contact the dealer
from which you bought your printer or contact Xerox.
Before contacting your dealer or Xerox, please have the
following infor m at io n avail abl e:
• Printer Serial No. (located inside the front cover)
• A Configuration Sheet (described on page 3-85)
• Any error code or message displayed on the Control Panel
• A description of the problem
• Type of network (if problem is network related)
The Xerox Web Page can be reached at www.xerox.com and
will contain the latest versions of drivers and documentation.
Chapter 1: Getting St arted ❖ 1-37
Page 48

Technical Support
1-38 ❖ DocuPrint N24, N32, and N40 System Administrator Guide
Page 49

Paper Handling
Selecting Paper .......... ....................................... .............. 2-2
Storing Paper .................... ............................................. . 2-5
Loading Paper ................... ...... ............. ............. ............. . 2-6
Using Trays 1, 2 and 3 (if installed) ................................. 2-7
Using Trays 4 and 5 in the 2,500 Sheet Feeder ............. 2-11
Using the 50 Sheet Bypass Feeder ................................ 2-14
Using the 100 Envelope Feeder .................................... 2-19
Automatic Tray Switching ..... ...................................... 2-20
Tray Sequence Settings ................................................ 2-21
Paper Handling Exception Conditions ........................... 2-22
Tray Sequence Rules .................................................... 2-24
Tray Sequence Examples .............................................. 2-25
Paper Size/Type Mismatch ............................................ 2-26
Offsetting Output ........................................................ 2-27
Using the 10-bin Mailbox/Collator .............................. 2-28
Printing to the Mailbox/Collator ................................... 2-28
Chapter2
Duplex (Two-Sided) Printing ................................. ...... 2-29
Print Orientation and Control Panel Settings ................. 2-30
Chapter 2: Pap er Handli ng ❖ 2-1
Page 50

Selecting Paper
Selecting Paper
Table 2.1 on page 2-4 lists the size paper, envelopes, and
other print media you can use with all DocuPrint N40
input and output bins.
The DocuPrint N40 supports paper weights as follows:
• 17-28 lbs. (64-105 g/m
• 17-57 lbs. (64-190 g/m
2
) via paper trays
2
) A6 via the 50 Sheet Bypass
Feeder
2
• 17-24 lbs. (64-90 g/m
• The optional 2,500 Sheet Feeder supports 18-24 lbs.
(68-90 g/m
2
)
) with duplex
Using sizes other than those listed in Table 2.1, or paper
not recommended for laser printers, may result in paper
jams and print quality problems. The following media are
unacceptable for use in the DocuPrint N40:
• Excessively thick or thin paper
• Paper that has already been printed on (preprinted
letterhead is allowed)
• Wrinkled, torn or bent paper
• Moist or wet paper
• Curled paper
• Paper with an electrostatic charge
• Glued paper
2-2 ❖ DocuPrint N24, N32, and N40 Syste m Administra tor Guide
Page 51

Selecting Paper
• Paper with special coating
• Paper unable to withstand a temperature of 150º C
(302º F)
• Thermal paper
• C a rb on paper
• Paper with paper fasteners, ribbons, tape, etc.
attached
• Heavily textured paper
• Label stock with exposed backing sheets.
Chapter 2: Pap er Handli ng ❖ 2-3
Page 52

Selecting Paper
Table 2.1 Acceptable media sizes and capacities for all DocuPrint N40 media trays
Input Output
Media Size
297x420 mm
A3
210x297 mm
A4
148x210 mm
A5
105x148 mm
A6
Statement
Executive
Letter
Folio
Legal
Ledger
Envelopes
COM-10
Monarch
4.33x8.66” 110x220 mm
DL
6.38x9.01” 162x229 mm
C5
5.5x8.5” 140x216 mm
7.25x10.5” 184x2 67 mm
8.5x11” 216x279 mm
8.5x13” 216x330 mm
8.5x14” 216x356 mm
11x17” 279x432 mm
4.125x9.5” 105x241mm
3.87x7.5” 98x191mm
Tray 1 Tray 2
Tray 3
Tray 4
Tray 5
50
Sheet
Bypass
Feeder
100
Enve-
lope
Feeder
Face-
down
Bin
Face-
up
Bin
10-bin
Mail-
box/
Collator
•• • •••
•••• •••
•••••
•••
•••••
•••• •••
•••• •••
•• • •••
•• • •••
•• • •••
•
•
•
•
•
•
•
•
•
•
•
•
•
•
•
•
Transparencies
210x297 mm
A4
8.5x11” 216x279mm
Letter
•
•
Tr ay 2
Tr ay 2
•
•
Labels
210x297 mm
A4
8.5x11” 216x279mm
Letter
Capacity
1
Maximum capacity using 20 lb (80 g/m2) stock.
1
500 500/tray
1000/tray
•
•
50 100 500 200 100/bin
For acceptable media sizes for use with the Duplex
Module, see Table 2.5 on page 2-29.
2-4 ❖ DocuPrint N24, N32, and N40 Syste m Administra tor Guide
•
•
•
•
•
•
•
•
Page 53

Storing Paper
Storing Paper
The DocuPrint N40’s print quality is optimized when
paper and other print media are properly stored. Proper
storage ensures optimum print quality and trouble-free
printer options.
• Store the paper on a flat surface, in a relatively low
humidity environment.
• Avoid storing paper in such a way as to cause
wrinkling, bending, curling, etc.
• Do not unwrap paper until you are ready to use it, and
rewrap any paper you are not using.
• Do not expose paper to direct sunlight or high
humidity.
Chapter 2: Pap er Handli ng ❖ 2-5
Page 54

Loading Paper
Loading Paper
The DocuPrint N40 accepts paper from the following
input trays:
• Trays 1 (500 sheets) and 2 (500 sheets) in the printer
(see page 2-7)
• Tray 3 (500 sheets), the top tray in the optional 2,500
Sheet Feeder (also see page 2-7)
• Trays 4 (1,000 sheets), the lower left tray, and 5 (1,000
sheets), the lower right tray, in the optional 2,500
Sheet Feeder (see page 2-11)
• The 50 Sheet Bypass Feeder in the printer (see
page 2-14)
• The optional 100 Envelope Feeder (see page 2-19)
• Do not attempt to load paper during printing into a tray
that is currently in use.
• Do not overfill the trays.
• Use only the media specified in Table 2.1 on page 2-4 and
avoid using the media listed on page 2-2 and page 2-3.
The multiple trays of the DocuPrint N40 enable you to
dedicate specific trays to specific si zes and types of paper. For
example, if you have applications that require printing on
letterhead, you can dedicate one of the printer’s trays to that
paper stock.
2-6 ❖ DocuPrint N24, N32, and N40 Syste m Administra tor Guide
Page 55

Loading Paper
Using Trays 1, 2 and 3
(if installed)
Pull out the tray (Tray 1 is shown above)
1
until it stops.
Trays 1 and 2 in the printer, and Tray 3 in the optional
2,500 Sheet Feeder hold up to 500 sheets of 20 lb (80 g/
2
m
) paper each. Refer to the section “Selecting Paper”
(page 2-2) for acceptable paper sizes and weights.
Prepare a stack of paper, making sure the
2
tops of the sheets are aligned.
Gently lift up the width guide and slide it
3
all the way until it stops.
If you are replacing paper of the same
size, skip to Step 5 on page 2-8.
Press down the gray handle and slide the
4
side guide all the way until it stops.
Chapter 2: Pap er Handli ng ❖ 2-7
Page 56

Loading Paper
Place the paper in the tray, between the
5
guides (see Figure 2.1 on page 2-9 and
Figure 2.2 on page 2-10 for orientation).
Do not stack paper above the
indicated mark.
Align the edges of the paper stack.
7
Adjust the side guide to the paper length.
6
Adjust the width guide to the paper
8
width.
Make sure the guide is l ocked firmly
in the guide hole on t he bottom of
the tray, and that both the side and
width guides are set correctly for
the size of paper you are using.
2-8 ❖ DocuPrint N24, N32, and N40 Syste m Administra tor Guide
Page 57

Top View
1
Duplex printing
2
Simplex printing
Loading Paper
If changing paper size, you may want to
9
insert the correct paper size label in the
paper size slot on the front of the tray.
Push the tray all the way back into the
10
printer until it latches.
Figure 2.1 Trays 1/2/3 paper orientation (long edge feed)
Load the following paper sizes
with the long edge on the left
(leading into the printer):
Letter
Statement
Executive
A4
A5
Chapter 2: Pap er Handli ng ❖ 2-9
Page 58

Loading Paper
Top View
1
Duplex printing
2
Simplex printing
Load the following paper sizes
with the short edge on the left
(leading into the printer):
Legal
Folio
Ledger
A3
The paper in this illustra tion
looks like letter or A4 size
paper, but it is not. The
graphic is only a generic
representation of the
paper sizes listed above.
Figure 2.2 Trays 1/2/3 paper orientation (short edge feed)
2-10 ❖ DocuPrint N24, N32, and N40 System Administrator Guide
Page 59

Loading Paper
Using Trays 4 and 5
in the
2,500 Sheet Feeder
Pull out the tray until it stops.
1
Trays 4 and 5 in the optional 2,500 Sheet Feeder hold up
to 1,000 sheets of 20 lb (80 g/m
and Executive size only). The following procedure uses
Tray 4 as an example, but can be used for Tray 5 as well.
Prepare a stack of paper, making sure the
2
tops of the sheets are aligned.
2
) paper each (in A4, Letter
Chapter 2: Paper H andling ❖ 2-11
Page 60

Loading Paper
Place paper in the tray, against the left
3
side (refer to Figure 2.3 on page 2-13 for
orientation). Slide back the stop.
Do not stack paper above the
indicated mark.
Push the tray back in.
4
2-12 ❖ DocuPrint N24, N32, and N40 System Administrator Guide
Page 61

Top View Tray 4
1
Duplex printing
2
Simplex printing
Load the following sizes with the
long edge on the left (leading into
the printer):
Letter
Executive
A4
Loading Paper
Figure 2.3 Trays 4 and 5 paper orientation
Top View Tray 5
1
Duplex printing
2
Simplex printing
Load the following sizes with the
long edge on the left (leading into
the printer):
Letter
Executive
A4
Chapter 2: Paper H andling ❖ 2-13
Page 62

Loading Paper
Using the 50 Sheet
Bypass Feeder
If necessary , pull out the extension tray to
1
fit the length of paper to be used.
The DocuPrint N40’s 50 Sheet Bypass Feeder holds up to
50 sheets of 20 lb (80 g/m
“Selecting Paper” (page 2-2) for acceptable media sizes
and weights.
2
) paper. Refer to the section
Place the paper along the r ight side of the
2
Bypass Feeder (refer to Figure 2.4 on
page 2-16 and Figure 2.5 on page 2-17 for
paper orientation, and Figur e 2.6 on page
2-18 for envelope orientation).
2-14 ❖ DocuPrint N24, N32, and N40 System Administrator Guide
Page 63

Loading Paper
Push the paper guide to sligh tly touc h the
3
paper stack (to ensure contact with the
paper sensor).
Push the paper as far as it can go into the
4
printer.
When finished printing from the Bypass
5
Feeder, remove any remaining paper
from the tray and push bac k the extension
tray (if necessary), as paper will be fed
from the Bypass Feeder if it is selected in
the tray sequence.
Chapter 2: Paper H andling ❖ 2-15
Page 64

Loading Paper
Top View
1
Simplex printing
2
Duplex printing
Load the following pape r sizes with
the long edge leading into the
printer:
Letter
Statement
Executive
A4
A5
Figure 2.4 50 Sheet Bypass Feeder paper orientation
(long edge feed)
2-16 ❖ DocuPrint N24, N32, and N40 System Administrator Guide
Page 65

Top View
1
Simplex printing
2
Duplex printing
Load the following pape r sizes with
the short edge leading into the
printer:
Legal
Folio
Ledger
A3
A6
Loading Paper
Figure 2.5 50 Sheet Bypass Feeder paper orientation
(short edge feed)
Chapter 2: Paper H andling ❖ 2-17
Page 66

Loading Paper
Figure 2.6 50 Sheet Bypass Feeder envelope orientation
Top View
1
Envelope
2
DL Envelope
3
C5 Envelope
1
Some PostScript applications require tha t the envelopes be loaded with the return address corner on t he
right side of the stack and leading as the envelopes go into the printer. Test your application for proper
orientation.
1
2-18 ❖ DocuPrint N24, N32, and N40 System Administrator Guide
Page 67

Loading Paper
Using the
100 Envelope Feeder
Prepare a stack of envelopes, making
1
sure all flaps are closed and the
envelopes are not stuck together.
The 100 Envelope Feeder is an optional paper handling
device available for the DocuPrint N40. Refer to Table 2.1
on page 2-4 for acceptable envelope sizes.
Lift the envelope stopper and insert the
2
stack with the flap-side up and the long
edges leading into the printer.
Slide the side guide so that it lightly
3
touches the edges of the envelope stack.
To avoid paper jams, do not stack
envelopes above the paper limit
mark, and do not attempt to add
envelopes while printing.
Chapter 2: Paper H andling ❖ 2-19
Page 68

Automatic Tray Switching
Automatic Tray
Switching
Automatic tray switching, available for both PCL and
PostScript jobs, enables you to group two or more input
trays together into one logical tray, and in a specific order
in which the trays will be searched to satisfy an input
request. Tray switching is useful for:
• Increasing paper capacity.
When the current paper tray runs out of paper, the
printer automatically switches to the next tray in the
sequence, provided the paper si ze and type in the next
tray is the same size and type as that in the current
tray.
• Searching for the correct paper size and type.
If the paper size and type specified in your software
application does not match the paper loaded in the
current paper tray, the printer automatically searches
the next tray in the sequence f or a pape r size and ty pe
that matches.
• Loading paper in one tray while printing from another
tray (filling an empty tray while printing).
Tray switching is made possible via the Tray Sequence
item in the Control Panel’s Tray Menu. It enables
grouping of Trays 1 and 2 in the printer, the 50 Sheet
Bypass Feeder, and Trays 3, 4 and 5 in the 2,500 Sheet
Feeder (if installed) into a variety of sequence
combinations. Tray switching can also be turned off.
2-20 ❖ DocuPrint N24, N32, and N40 System Administrator Guide
Page 69

Automatic Tray Switching
The 50 Sheet Bypass Feed er i s re ferr ed to as the MBF (for
Multiple Bypass Feeder) in the Control Panel’s Tray
Sequence settings.
Following is a description of the settings and rules for
using the T ray Sequ ence function, along with examples of
its use. For more information on using the Control Panel
to set Tray Sequence, refer to Chapter 3: Using the
Control Panel.
Tray Sequence
Settings
The Tray Sequence item in the Co ntrol Panel’s Tray Men u
can be set to any of the settings sho wn in Table 2.2 below
(and to Off).
Table 2.2 Tray switching options in the Tray Menu
Tray Sequence Settings Description
MBF-1
MBF-1-2
1-2
Off
MBF-4-5
MBF-4-5-1
MBF-4-5-1-2
MBF-4-5-1-2-3
1-2-3
4-1
4-1-2
4-1-2-3
4-5-1
4-5-1-2
4-5-1-2-3
Tray Sequence settings available
with base configuration printer.
The default settings are either
MBF-1-2
Bypass Feeder is installed or
when the optional 100 Envelope
Feeder is installed.
Additional Tray Sequence settings
available when the 2,500 Sheet
Feeder is installed.
The default settings are either
MBF-4-5-1-2-3
Bypass Feeder is installed or
4-5-1-2-3
100 Envelope Feeder is installed.
when the 50 Sheet
when the 50 Sh eet
when the optional
1-2
Chapter 2: Paper H andling ❖ 2-21
Page 70

Automatic Tray Switching
Paper Handling
Exception Conditions
Table 2.3 describes the paper selection process based on
fully defined or partially defined paper selection
parameters. A paper request may include one or more of
the following parameters: paper tray, paper size, paper
type (e.g., plain, letterhead, etc.).
Specifying a paper source (a speci fic tra y) does no t guarante e
that paper will be fed from that tray if the type and size can
be satisfied from another source. The exception to this is a
manual feed request, which always from the 50 Sheet Bypass
Feeder unless overridden by the printer operator.
Table 2.3 Paper handling exception conditions
Paper Type Paper Size Paper Source Size/Type Used
Not specified Not specified Not specified Default size/Default type
Not specified Not specified Specified (not manual feed) Default size;
Type configured in specified tray
Not specified Not specified Specified (manual feed) Manual feed request; Default size
Not specified Specified Not specified Specified size/Default type
Not specified Specified Specified (not manual feed) Specified size;
Type configured in specified tray
Not specified Specified Specified (manual feed) Manual feed request;
Specified size
Specified Not specified Not specified Default size/Specified type
Specified Not specified Specified (not manual feed) Default size/Specified type
Specified Not specified Specified (manual feed) Manual feed request;
Default size/Specified type
Specified Specified Not specified Specified size/Specified type
Specified Specified Specified (not manual feed) Specified size/Specified type
Specified Specified Specified (manual feed) Manual feed request;
Specified size/Specified type
2-22 ❖ DocuPrint N24, N32, and N40 System Administrator Guide
Page 71

Automatic Tray Switching
The fourth column of Table 2.3 defines which paper size
and paper type to use based on fully o r pa rtially speci fied
paper selection parameters. After the type and size are
determined, the next step is to determine which paper
tray to use to satisfy the request. If the request can be
satisfied by one of the currently configured trays, then the
appropriate paper tray is used. (Note that the fourth
column of Table 2.3 does not list a paper source to use,
even though the paper source may be specified.)
• If the paper source is specified, and the other
parameters can be satisfied by that paper source, then
the specified source is used.
• If the specified source cannot satisfy the request, but
another source can satisfy the paper size and type
requested, then that alternate source is used, with no
operator intervention required.
• If the specified source cannot satisfy the request, but
another source can satisfy the request but is out of
paper, then the operator is prompted to load paper in
the empty tray that can satisfy the request.
Chapter 2: Paper H andling ❖ 2-23
Page 72

Automatic Tray Switching
Tray Sequence Rules
When you define a Tray Sequence, the printer searches
the input trays for the correct size and type of paper for
each job that is submitted.
• If you do not specify an input tray when sending a job
to the printer (e.g., no paper source command is sent,
or the paper source is set to “Auto” in PCL), the trays
included in the Tray Sequence are searched first (in
the sequence order), before other trays not in the
sequence.
• If you specify an input tray when sending a job to the
printer , and t hat tray is inclu ded in the Tray Sequence,
the printer will check that tray for the correct size and
type of paper.
— If the tray contains the c orrect pa per, then it is used.
— If the tray does not cont ain the correct paper (e.g., it
contains other paper or is empty), the other trays in
the sequence are searched.
- If any of these trays contains the correct paper,
then it is used.
- If any of these trays are set to the correct paper
size and type b ut al l of the tra ys in the seq uen ce
are empty, then the printer will prompt you to
load paper into the specified tray.
- If no trays in the sequence are set to the correct
paper size and type, then the remaining trays
are searched. If there are no trays that can
satisfy the request, then the printer will prompt
you to load paper into the specified tray.
• If you include “MBF” in the Tray Sequence setting, a
request to feed paper from any other tray in the
sequence will be overridden and the printer will
attempt to feed paper from the 50 Sheet Bypass Feeder
first. If the 50 Sheet Bypass Feeder is out of paper, then
the other trays in the sequence are searched.
2-24 ❖ DocuPrint N24, N32, and N40 System Administrator Guide
Page 73

Automatic Tray Switching
Tray Sequence
Examples
The examples in Table 2.4 discuss conditions and actions
that take place when various Tray Sequence settings are
used.
Table 2.4 Tray Sequence examples
Condition Action(s) Taken
Letter
4-5-1
.
paper.
1-2-3
.
1-2
.
Letter
paper, but both trays
The printer searches for letter paper in the tray
sequence order (4-5-1). The printer feeds paper from
Tray 4 until it becomes empty, and then from Tray 5.
When Tray 5 becomes empty, the printer prompts you
to load paper (since Tray 1 is empty).
Trays 2 and 3 also contain letter paper but
these trays are not searched because they are
not part of the Tray Sequence and the printer
found the requested pap er in at leas t one tray
in the sequence.
The printer feeds paper from Tray 2 because it meets
the size and type requested. When Tray 2 becomes
empty, the printer feeds from Trays 1 and 3.
The printer promp ts you to loa d le tter pa per in Tray 1
because it is configured for letter paper.
The Tray Sequence is set to
• All trays are set to
• There is no paper in Tray 1.
• Letter paper is requested with the source set to
Auto
.
The Tray Sequence is set to
• A Tray 2 paper source is requested.
• All trays meet the size/type requirement.
The Tray Sequence is set to
• T rays 1 a nd 2 ar e set to
are empty.
• Letter paper from Tray 2 is requested.
The Tray Sequence is set to
• The 50 Sheet Bypass Fee der is set to
and contains one sheet of paper.
• All other trays contain Letter paper.
• Letter paper from Tray 2 is requested.
The Tray Sequence is any setting.
• All trays contain Letter paper.
• Legal paper from Tray 2 is requested.
MBF-1-2
.
Letter
paper
The printer feeds the first page of the job from the
50 Sheet Bypass Tray (MBF) and subsequent pages
from Tray 2.
The printer prompts you to load legal paper in Tray 2.
Chapter 2: Paper H andling ❖ 2-25
Page 74

Automatic Tray Switching
Paper Size/Type
Mismatch
Paper size/type mismatch occurs when the requested size
is not available in the printer. This can be caused by
running out of paper in a tray that is configured for the
requested paper, or by requesting a paper that is not
configured in the printer. The printer goes off-line under
paper mismatch conditions. It automatically returns
on-line and continues printing after the paper mismatch
condition is resolved.
If a tray is configured for the reque sted paper, but the tray
is out of paper, the display prompts you to load the
requested paper (size and type) in the appropriate tray.
After the tray is loaded, printing continues.
If the request is for paper that is not configured in the
printer, you are prompted to load the requested paper in
the first tray of the Tray Sequence setting.
If you do not want to load paper in the first tray of the
Tray Sequence setting, two options are available:
• One of the trays m ay be lo aded with the re queste d size
paper and reconfigured via the Tray Menu to match
the requested paper type. (See Table 3.7 on page 3-23
for instructions on using the Tray Menu.)
Value Up
•
scroll through all the trays, displaying the size and
type paper in each tray. If one of these alternate papers
is acceptable, pressing
continue on the new paper. Trays are searched in the
order specified in the Tray Sequence setting.
Value Down
or
Enter
may be pressed to
will cause printing to
2-26 ❖ DocuPrint N24, N32, and N40 System Administrator Guide
Page 75

Offsettin g Output
Offsetting
Output
The 500 Sheet Face-down Bin supports offsetting output
between successive jobs or multiple collated sets of a
single job. Offsetting is controlled from the Control Panel
(see page 3-42) or via CentreWare DP.
The 200 Sheet Face-up Output Bin and the 10-bin Mailbox/
Collator do not support offsetting.
The following conditions must be met before offsetting
occurs between jobs:
• The offset function occurs only between successive
jobs that are both destined for the Face-down Bin.
For example, a print job may contain a banner sheet in
PCL that precedes a PostScript print job. If they are
both directed to the Face-down Bin, the banner sheet
is offset from the PostScript job. If the banner sheet is
directed to the Face-up Bin (no offset capability) and
the PostScript job is directed to the Face-down Bin,
offset does not occur between the banner sheet and
the PostScript job. If, however, the next job is directed
to the Face-down Bin, offset will occur between the
PostScript job and the next job.
• The offset function occurs between successive jobs
directed to the Face-down Bin only if the jobs contain
data that results in a sheet being printed a nd delivered
to the bin.
For example, if a PCL job contains <ESCAPE>E
sequences at the beginning of a job and there is no
printable data separating these commands, the offset
does not occur (even though these escape sequences
are valid job boundaries).
Chapter 2: Paper H andling ❖ 2-27
Page 76

Using the 10-bin Mailbox/Colla tor
Using the 10-bin
Mailbox/Collator
Printing to the
Mailbox/Collator
The 10-bin Mailbox/Collator, shown in Figure 1.2 on
page 1-7, is an optional output device available for the
DocuPrint N40. It handles all supported paper sizes,
except A6 and envelopes, in 10 individually addressable
bins at up to 100 sheets per bin.
(See Appendix A: DocuPrint N40 Ordering Information
for ordering information. See Appendix C: Installing and
Removing Printer Options for installation instructions.)
The Mailbox/Collator offers the following capabilities:
• Directing output to a specific mailbox bin.
• Sorting by sending individual copies (up to 10) of a
multiple set job to separate mailbox bins.
• Printing multiple collated sets (2 to 10 sets) of a job.
Click for Updated Information
Using a DocuPrint N40 printer driver, select a specific bin
for the paper output destination for your job, then print
your job. Selecting a bin enables you to send a job to that
bin.
For information on setting a Mailbox bin as the printer’s
default output bin, see page 3-42.
2-28 ❖ DocuPrint N24, N32, and N40 System Administrator Guide
Page 77

Duplex (Two-Sided) Printing
Duplex
(Two-Sided)
Printing
Once the optional Duplex Module i s insta lled and Duplex
printing is enabled in the Control Panel, you can print
two-sided (duplex) jobs. Duplex printing can also be
enabled from your printer driver.
(See Appendix A: DocuPrint N40 Ordering Information
for ordering the Duplex Module and Appendix
C: Installing and Removing Printer Options for
instructions on installing it.)
Use only the size paper listed in Table 2.5 for two-sided
jobs. Do not use envelopes, cardstock, transparencies, or
label paper for duplex jobs.
Table 2.5 Paper sizes that can be used with the Duplex
Module
Paper Size Weight
(297 x 420 mm)
A3
(210 x 297 mm)
A4
(148 x 210 mm)
A5
Statement
Executive
Letter
Folio
Legal
Ledger
(5.5 x 8.5” / 140 x 216 mm)
(7.25 x 10.5” / 216 x 279 mm)
(8.5 x 11” / 216 x 279 mm)
(8.5 x 13” / 216 x 330 mm)
(8.5 x 14” / 216 x 356 mm)
(11 x 17” / 279 x 432 mm)
17 lb (64 g/m2) to 24 lb (90 g/m2)
17 lb (64 g/m2) to 24 lb (90 g/m2)
17 lb (64 g/m2) to 24 lb (90 g/m2)
17 lb (64 g/m2) to 24 lb (90 g/m2)
17 lb (64 g/m2) to 24 lb (90 g/m2)
17 lb (64 g/m2) to 24 lb (90 g/m2)
17 lb (64 g/m2) to 24 lb (90 g/m2)
17 lb (64 g/m2) to 24 lb (90 g/m2)
17 lb (64 g/m2) to 24 lb (90 g/m2)
Refer to Figure 2.1 on page 2-9 and Figure 2.4 on page
2-16 for the proper orientation of drilled paper and
letterhead when printing duplex.
Chapter 2: Paper H andling ❖ 2-29
Page 78

Duplex (Two-Sided) Printing
Print Orientation and
Control Panel
Settings
Figure 2.7 Duplex binding orientation and Control Panel menu settings
To ensure that duplex jobs print in the proper orientation,
set the Duplex option (in the System Menu) to the
appropriate setting (see Figure 2.7). The Duplex settings
for both PC L an d PostScrip t ar e as follows:
Duplex = Off
Duplex = Short Edge, or
Duplex = Long Edge
Portrait Orientation: Set Duplex to
Landscape Orientation: Set Duplex to
2-30 ❖ DocuPrint N24, N32, and N40 System Administrator Guide
Long Edge.
Long Edge.
Portrait Orientation: Set Duplex to
Landscape Orientation: Set Duplex to
Short Edge.
Short Edge.
Page 79

Using the Control Panel
Control Panel Features ..................................... ............. . 3-3
The Display ............... ....... ...................................... ....... . 3-4
The Indicator Lights ...................... ....... ...... ....... ...... ........ 3-4
The Keys ............. ...... ....... ...... ...... ....... ...... ....... ...... ....... . 3-6
Navigating the Menu System ...................................... 3-10
Menu Indicators ........................................................... 3-11
Control Panel Locks ...................................................... 3-11
Setting a Menu Option ................................................ 3-13
Main Menu ................................................................... 3-15
Job Menu ...................................................................... 3-16
Password Menu ................................... ......................... 3-18
Tray Menu ......................... ...... ............. ............. ............ 3-21
PCL Menu ................... ................................................... 3-28
PostScript Menu ........................................................... 3-33
System Menu ................................ ................................ 3-35
Parallel Menu .......................... ............. ............. ...... ...... 3-44
Chapter3
Serial Menu ....................... ............ ............. ............. ...... 3-47
Ethernet Menu ............................................................. 3-50
Token Ring Menu ...................................... ................... 3-63
Novell Menu ................................................................. 3-77
Chapter 3: Usi ng the Co ntrol Pan el ❖ 3-1
Page 80

Using the Control Panel
Test Menu ......................... ............................................ 3-84
Reset Menu ................................... ................................ 3-89
3-2 ❖ DocuPrint N24, N32, and N40 Syste m Administra tor Guide
Page 81

Control Panel Features
Control Panel
Features
Figure 3.1 DocuPrint N40 Control Panel
The DocuPrint N40 Control Panel serves two purposes:
1. It displays information about the status of the printer
(or the job in process).
2. It provides the means for changing printer settings
and printer defaults to contr ol how the DocuPrint N40
operates.
As shown in Figure 3.1, your printer’s Control Panel will
either have icons and text, or icons only.
North America Control Panel
(Latin American machines will
have translated version)
1
Indicator lights
2
2-line by 16-character display
3
Control keys (8)
European Control Panel
Chapter 3: Usi ng the Co ntrol Pan el ❖ 3-3
Page 82

Control Panel Features
The Display
The Control Panel's display performs two functions.
1. It informs you of printer status conditions, such as
when toner is low , when a paper tray is e mpty , w hen a
job is in process, and so on. For example, when you
turn on the printer, you see the following message on
the display:
Ready
This message appears whenever the printer is online
and ready to accept print jobs. The display will also
show:
Processing
Waiting
2. It presents a hierarchy of menu options and settings to
configure and control the printer.
For example, when you press
Down
on the display:
, you will see the following two-line message
Menus
Item
Menu
when processing data.
when waiting for more data.
Menu Up
(such as
Job Menu
)
or
Menu
See the section “Menu Indicators” (page 3-11) for
more information on indicators.
See the section “Main Menu” (page 3-15) for information
on the Menu system hierarchy.
The Indicator Lights
3-4 ❖ DocuPrint N24, N32, and N40 Syste m Administra tor Guide
The four indicator lights provide inf or mation about the
operation of the printer.
Table 3.1 on page 3-5 describes the function of each
Indicator Light.
Page 83

Control Panel Features
Table 3.1 Indicator lights and their functions
Light Function
On Line (Green) When this light is On, it indicates the printer is online. The printer is
offline when the light is Off. When the light flashes, the printer is going
from online to offline.
Form Feed (Green) This light is On when the printer experiences a form feed timeout. A
form feed timeout is when a PCL job has formatted a partial page, the
printer is waiting for more data in order to continue processing the job,
and a 15 second timeout period has expired with no new data arriving in
the input buffer. This timeout applies to all ports.
When the Form Feed light is On, you can print a partial page by entering
the Job menu, scrolling to the Form Feed item and pressing Enter .
When not in the Menu system, a partial page can be printed by pressing
Enter . PostScript does not print partial pages and consequently the
Form Feed light is not turned On.
The Form Feed li ght is turned Off w hen either an actual Form Feed
character is received or the Form Feed function is invoked by pressing
Enter on the Job Menu when the Form Feed item is displayed.
Fault (Amber) The Error light is On whenever operator intervention is required in order
to allow printing to continue.
Data (Green) When online, this light flashes to indicate that data are being processed
by either PostScript, PCL or PJL, or is being spooled to the disk (e.g., a
proof or secure job). If data are not being processed, or either PostScript
or PCL is processing a job but waiting for data (input buffer empty), this
light is Off.
When the light flashes, d ata are being received by one of the e mulat ions
(i.e., PJL, PCL or PostScript). When a proof or secure job is sent to the
printer, this light flashes while the job is being received, even though
data are not being printed. At a later time, you can enter a password to
request printing the proof or secure jo b.
This light also flashes during processing of proof or secure jobs from the
disk.
Chapter 3: Usi ng the Co ntrol Pan el ❖ 3-5
Page 84

Control Panel Features
The Keys
The Control Panel keypad consists of eight keys,
identified with international symbols and/or labeled in
English. The keys are also numbered 0 - 7.
Table 3.2 describes the function of each key.
Table 3.2 Control Panel keys and their functions
Key Description
On Line Toggles between online and offline.
When online, the printer is a ble to r ecei ve and print pag es. When of fline , all pa ges curr ently
formatted and delivered a r e pri nted. No ne w pag es ar e form at ted an d pri nting p au ses un til
the printer is placed online.
The printer goes offline automatically when it has a fault condition such as a paper jam or
an open cover.
Pressing On Line under the following conditions results in the actions stated:
• If the printer is online and in the Menu system, the printer remains online and an exit
from the Menu system takes place.
• If the printer is offline and not in the Me nu system, the pri nter switches to on lin e as long
as operator intervention is not required. The printer remains offline if operator
intervention is required.
• If the printer is offline and in the Menu system, the printer switches to online and exits
the Menu system as long as operator intervention is not required. The printer remains
offline if operator intervention is required.
• If in the Password Menu, and the display indicates
this key causes a password digit “0” to be entered.
The printer comes online automatically after one minute of inactivity in the Menu
system.
Enter Passwor d
, pressing
3-6 ❖ DocuPrint N24, N32, and N40 Syste m Administra tor Guide
Table 3.2 Page 1 of 4
Page 85

Control Panel Features
Table 3.2 Control Panel keys and their functions
(continued)
Key Description
Menu Up Takes the printer offline and displays the first menu (if not already in the Menu system).
• Press this key repeatedly to scroll through the menus from bottom to top.
• If a higher priority message displays, it may preempt menu navigation.
• Menu scrolling is available without being offline. Scrolling wraps if the displayed menu is
the first menu.
• If an item, value or action displays, pressing this key returns to the top of the current
menu and removes the display of the item, value or action.
• If not in the Menu system, pressing this key enters the Menu system and displa ys the first
menu.
• If in the Password Menu, and the display indicates
this key causes a password digit “1” to be entered.
Menu Down Takes the printer offline and displays the last menu (if not already in the Menu system).
• Pressing this key repeatedly scrolls through the menus from top to bottom.
• If a higher priority message displays, it may preempt menu navigation.
• Menu scrolling is available without going offline. Menu scrolling wraps if the displayed
menu is the last menu.
• If not in the Menu system, pressing this key enters the Me nu system an d disp lays th e last
menu.
• If in the Password Menu, and the display indicates
this key causes a password digit “5” to be entered.
Enter Passwor d
Enter Password
, pressing
, pressing
Item Up When in the Menu system, scrolls through the items in the current menu from bottom to
top. When an ad dress value is displayed (such as Ethernet IP Address), pressing this key
moves the cursor through the valu e to the right (so that you can cha nge characters withi n a
string rather than having to reenter the entire string).
• If a higher priority message displays, it may preempt menu navigation.
• Scrolling wraps if the displayed item is the first item.
• Pressing this key returns to the current item in the current menu and removes the value
from the display.
• If not in the Menu system, this key is ignored.
• If in the Password Menu, and the display indicates
this key causes a password digit “2” to be entered.
Chapter 3: Usi ng the Co ntrol Pan el ❖ 3-7
Enter Passwor d
Table 3.2 Page 2 of 4
, pressing
Page 86

Control Panel Features
Table 3.2 Control Panel keys and their functions
(continued)
Key Description
Item Down When in the Menu system, scrolls through the items in the current menu from top to
bottom. When an address value is displayed (such as Ethernet IP Address), pressing this key
moves the cursor to the left (so that you can change characters within a string rather than
having to reenter the entire string).
• If a higher priority message displays, it may preempt menu navigation.
• Scrolling wraps if the displayed item is the last item.
• Pressing this key returns to the current item in the current menu and removes the value
from the display.
• If not in the Menu system, this key is ignored.
• If in the Password Menu, and the display indicates
this key causes a password digit “6” to be entered.
Value Up When in the Menu system, scrolls through the current list of values from bottom to top for
the current item.
• If a higher priority message displays, it may preempt menu navigation.
• Scrolling wraps if the displayed item is the first item.
• Press
• If no value for the current item is displayed (i.e., Item key was pressed but Value key not
• If not in the Menu system and a paper mismatch condition does not exist, this key is
• If a paper mismatch condition exists, pressing this key scro lls th r ou gh the alternate paper
• If in the Password Menu, and the display indicates
Valu e Up
values (for items that have numeric values, such as Font Number or Pitch).
yet pressed for this item), pressing
item. When a numeric value is displayed,
displayed value is alphanumeric, value is incremented alphabetically for alphabetic
characters and numerically for numeric characters. In some cases, holding the key down
increments the value greater than a single key press will.
ignored.
that may be used instead of the requested paper.
this key causes a password digit “3” to be entered.
for more than one second to scroll continuously through numeric
Value Up
Valu e Up
Enter Passwor d
displays the default value for the current
increments the value. If the
Enter Passwor d
, pressing
, pressing
3-8 ❖ DocuPrint N24, N32, and N40 Syste m Administra tor Guide
Table 3.2 Page 3 of 4
Page 87

Control Panel Features
Table 3.2 Control Panel keys and their functions
(continued)
Key Description
Value Down In the Menu system, scrolls through the current list of values from top to bottom for the
current item.
• If a higher priority message displays, it may preempt menu navigation.
• Scrolling wraps if the displayed value is the last value.
• Press
• If no value for the current item is displayed (i.e., Item key was pressed but Value key not
• If not in the Menu system, and a paper mismatch condition does not exist, this key is
• If a paper mismatch condition exists, pressing thi s key scro ll s down through the alternate
• If in the Password Menu, and the display indicates
Enter When in the Menu system, sets values, and invokes actions or functions.
• If the current display is a value for an item, pressing this key causes the value to be
• If the current display is an action to be invoked (e.g., “PCL Font List”), pressing this key
• If not in the Menu system and the FormFeed LED indicates that a partial page exists,
• If a paper mismatch condi tion exis ts and a request to use an alternate pape r is displ ay ed,
• If in the Password Menu and the display indicates
Value Down
values (for items that have numeric values, such as Font Number or Pitch).
yet pressed for this item), pressing
current item. When a numeric value is di splayed,
If the displayed value is alphanumeric, the value is decremented alphabetically for
alphabetic characters and numerically for numeric characters. In some cases, holding the
key down decrements the value greater than a single key press will.
ignored.
paper that may by used instead of the reques ted paper.
this key causes a password digit “7” to be entered.
entered as the default value for this item and it is immediately loaded in memory.
causes the action to be taken.
pressing this key causes an implied PCL reset and the partial page is printed.
pressing this key causes printing on the alternate paper.
this key causes a password digit “4” to be entered.
for more than one seco nd to scroll continuously thr ough nu meric
Value Down
displays the default value for the
Value Down
decrements the value.
Enter Passwor d
Enter Password
, pressing
, pressing
Table 3.2 Page 4 of 4
Chapter 3: Usi ng the Co ntrol Pan el ❖ 3-9
Page 88

Navigating the Menu System
Navigating the
Menu System
The Control Panel contains two menu structures .
• Main Menu and its submenus.
—Job Menu
— Password Menu (when the Hard Disk Drive is
installed)
—Tray Menu
—PCL Menu
—PostScript Menu
—System Menu
— Parallel Menu
— Serial Menu
— Ethernet Menu
— Token Ring Menu (requires the Token Ring Card)
— Novell Menu
—Test Menu
Menu Up
Press
Main Menu. Each of the submenus may have other
submenus, settings, actions or functions.
• Reset Menu and its functions.
— Language Menu
— Factory Defaults Menu Reset
— Network Defaults Menu Reset
— Demo Mode
— Delete Jobs
Menu Down
or
to access the
— Init Disk (requires the Hard Disk option).
The Reset Menu is included in the menu list by
simultaneously holding down On Line and Enter
when the printer is being powered up
Menu” (page 3-89) for more information.
3-10 ❖ DocuPrint N24, N32, and N40 System Administrator Guide
. See the section “Reset
Page 89

Navigating the Menu System
Menu Indicators
Two menu indicators (= and *) are used to furnish
information about menus and settings. The purpose of
each indicator is described in Table 3.3 below.
Table 3.3 Indicators found in the Control Panel Menu systems
Indicator Purpose Example
= This indicator only appears after options which take a specific
setting—it indicates that a value or setting follows the option.
The example at the right tells you that Language is an option that
takes a specific setting. One setting for the Language option is
Français. Another setting is English. (The list of available settings is
displayed one setting at a time on the bottom line of the display as
you press Value Up or Value Down .)
* This indicator identifies the current value setting.
The example at the right tells you that Language is currently set to
English.
Pressing Value Up or Value Down scrolls through the
possible values.
Control Panel Locks
Some of the menus in the Control Panel can be locked to
Language =
Français
Language =
English *
prevent unauthorized access to critica l system parameters
(refer to CentreWare DP documentation). If you scroll to a
locked menu, pressing either Item key causes the menu
name to appear on the top line of the display and “Menu
Locked” to appear on the second line.
Chapter 3: Using the Control Panel ❖ 3-11
Page 90

Navigating the Menu System
The following menus cannot be locked:
•Job Menu
• Password
•Tray Menu
•Test Menu
•Reset Menu
If you do not want users to have access to the Reset Menu,
power OFF and power ON the printer.
3-12 ❖ DocuPrint N24, N32, and N40 System Administrator Guide
Page 91

Navigating the Menu System
Setting a Menu
Option
To set an option or to invoke a function, follow the steps
below:
Press Menu Up or Menu Down to scroll through the
1
available submenus until you locate the one you want.
Y ou will see:
Menus
Menu Name
Where
Press Item Up or Item Down to scroll through the
2
items of the submenu (all submenus except the Password
Menu).
Y ou will see:
Menu Name
is the current submenu displayed.
Menu Name
Item Name
Where
Job, Test and Reset (with the exception of the Language
option) Menus, the bottom line of the display indicates the
action to be taken (e.g., Config. Sheet or PCL Font List).
Item Name
is the current item displayed. For the
Press Value Up or Value Down to select the
3
appropriate value for this item.
Y ou will see:
Item Name
Current Value
If a list of many values exists (e.g., 1 thro ugh 9 9 for n umbe r of
copies), you can scroll quickly by holding down
or
Value Down
When you see the v al ue yo u w an t, press
=
*
Value Up
.
Enter
Chapter 3: Using the Control Panel ❖ 3-13
to accept it.
Page 92

Navigating the Menu System
If necessary, repeat Step 2 and Step 3 to go through other
4
menus, options, actions, functions and values.
After you press
display:
Enter
to accept a value, the menu will
Menu Name
Item Name
You may either continue to work in the Menu system by
repeating the steps above, or exit and return to normal
operation by pressing
If you press On Line at any time prior to pressing
Enter the new value will not be saved and the
Menu system is exited.
The printer automatically exits the Menu system after
60 seconds of inactivity (i.e., no key has been pressed).
On Line
.
3-14 ❖ DocuPrint N24, N32, and N40 System Administrator Guide
Page 93

Main Menu
Main Menu
The Main Menu is a system of submenus, each containing
options designed to configure the printer for your
environment. The Main Menu hierarchy is depicted in
Table 3.4.
In this chapter, a
boldfaced
value for a menu item indicates
that value is a factory setting. A value followed by an asterisk
(*) indicates the factory default for that value. See the section
“Reset Menu” (page 3-89) for information on how to revert to
factory settings.
Table 3.4 Main Menu hierarchy
Main Menu Hierarchy and Factory Settings
“Job Menu”
Job Menu
Password Menu
Tray Menu
PCL Menu
PostScript Menu
See
1
“Password Menu”
See
“Tray Menu”
See
“PCL Menu”
See
“PostScript Menu”
See
(page 3-16).
(page 3-18).
(page 3-21).
(page 3-28).
(page 3-33).
“System Menu”
System Menu
Parallel Menu
Serial Menu
Ethernet Menu
Token Ring Menu
Novell Menu
3
Test Menu
Reset Menu
1
Appears only when the Hard Disk Drive is installed.
2
Appears only when the Token Ring Card is installed in the printer.
3
Appears only when Novell is enabled from the Ethernet or Token Ring Menu.
4
Appears only when On Line and Enter are simultaneously held down at power ON.
4
See
“Parallel Menu”
See
“Serial Menu”
See
“Ethernet Menu”
See
2
Chapter 3: Using the Control Panel ❖ 3-15
“Token Ring Menu”
See
“Novell Menu”
See
“Test Menu”
See
“Reset Menu”
See
(page 3-35).
(page 3-44).
(page 3-47).
(page 3-50).
(page 3-63)
(page 3-77).
(page 3-84).
(page 3-89).
.
Page 94

Job Menu
Job Menu
The Job Menu allows you to cancel the job currently
processed by one of the emulations, or to force a form
feed on a partially formatted job in PCL.
The Job Menu hierarchy is shown in Figure 3.2. Tasks
performed with Job Menu items are listed in Table 3.5 on
page 3-17.
Click for Updated Information
Figure 3.2 Job Menu hierarchy
Job Menu
Password Menu Form Feed
Tray Menu
PCL Menu
PostScript Menu
System Menu
Parallel Menu
Serial Menu
Ethernet Menu
Cancel Job
Token Ring Menu
Novell Menu
Test Menu
Reset Menu
3-16 ❖ DocuPrint N24, N32, and N40 System Administrator Guide
Page 95

Table 3.5 Job Menu functions
Menu Item and Function Keystrokes Display
Job Menu
Cancel Job
Cancel the Po stScript or PCL job
currently printing.
Form Feed
Force a form feed on a partially
formatted job in PCL.
1.Press
Down
2.Press
Down
3.Press
1.Press
Down
2.Press
Down
3.Press
Menu Up
until you see:
Item Up
until you see:
Enter
Menu Up
until you see:
Item Up
until you see:
Enter
Menu
or
Item
or
. You will see:
Menu
or
Item
or
. You will see:
Menus
Job Menu
Job Menu
Cancel Job
Ready
Menus
Job Menu
Job Menu
Form Feed
Ready
Chapter 3: Using the Control Panel ❖ 3-17
Page 96

Password Menu
Password Menu
The Password Menu (available only when the Hard Disk
Drive is installed) is used to print or delete secure or proof
jobs. Secure and proof jobs are enabled by drivers.
The Password Menu hierarchy is shown in Figure 3.3.
Tasks performed with the Password Menu are listed in
Table 3.6 on page 3-19.
Figure 3.3 Password Menu hierarchy with factory settings
Job Menu
Password Menu
Tray Menu _xxx
PCL Menu All Jobs Print
PostScript Menu Delete
System Menu
Parallel Menu Job n Print
Serial Menu Delete
Ethernet Menu
Token Ring Menu
Enter Password No Jobs Press Menu
Novell Menu
Test Menu
Reset Menu
Secure or proof job printing requires the use of a four-digit
password sent with the print job to the printer, as descr ibed in
the section “Using the Hard Disk Drive for Secure and Proof
Jobs” (page 5-8). Entering a password at the Control Panel
will provide access to only those jobs sent with that password.
If no jobs were sent with that password, the printer will
prompt you to press
Menu Up or Menu Down
returns you to the Main Menu.
3-18 ❖ DocuPrint N24, N32, and N40 System Administrator Guide
, which
Page 97

Password Menu
Table 3.6 Password Menu functions
Menu Item and Function Keystrokes Display
All Jobs
Print
Print all jobs or one job sent with a
specific password.
n
Job
Print
Print one or more jobs out of several
sent with a specific password.
A job with a name assigned to it will
replace the “Job n” with that name.
1.Press
2.Press
3.Enter four-digit password using
4.Press
1.Press
2.Press
3.Enter four-digit password using
4.Press
5.Press
Menu Up
Down
Down
the numbers on the Control
Panel keys. You will see:
Down
Down
the numbers on the Control
Panel keys. You will see:
Down
until you see:
Item Up
. You will see:
Enter
Menu Up
until you see:
Item Up
. You will see:
Item Up
until you see:
Enter
Menu
or
Item
or
. You will see:
Menu
or
Item
or
Item
or
. You will see:
Menus
Password Menu
Enter Password
_xxx
All Jobs
Print
Ready
Menus
Password Menu
Enter Password
_xxx
All Jobs
Print
Job
n
Print
All Jobs
Print
6.Repeat Steps and 5 until you
have printed all the jobs you
wish to print. When done, press
On Line
. You will see:
Chapter 3: Using the Control Panel ❖ 3-19
Ready
Table 3.6 Page 1 of 2
Page 98

Password Menu
Table 3.6 Password Menu functions
(continued)
Menu Item and Function Keystrokes Display
All Jobs
Delete
Delete all jobs or one job sent with a
specific password.
n
Job
Delete
Delete one or more jobs out of several
sent with a specific password.
1.Press
2.Press
3.Enter four-digit password using
4.Press
5.Press
1.Press
2.Press
3.Enter four-digit password using
Menu Up
Down
Down
the numbers on the Control
Panel keys. You will see:
Down
Down
Down
the numbers on the Control
Panel keys. You will see:
until you see:
Item Up
. You will see:
Valu e Up
until you see:
Enter
Menu Up
until you see:
Item Up
. You will see:
Menu
or
Item
or
Value
or
. You will see:
Menu
or
Item
or
Menus
Password Menu
Enter Password
_xxx
All Jobs
Print
All Jobs
Delete
Ready
Menus
Password Menu
Enter Password
_xxx
All Jobs
Print
4.Press
5.Press
6.Press
7.Repeat Steps to 6 until you have
3-20 ❖ DocuPrint N24, N32, and N40 System Administrator Guide
Item Up
Down
Down
deleted all the jobs you wish to
print. When done, press
Line
until you see:
Valu e Up
until you see:
Enter
. You will see:
Item
or
Value
or
. You will see:
On
Job
n
Print
Job
n
Delete
All Jobs
Print
Ready
Table 3.6 Page 2 of 2
Page 99

Tr ay M e nu
Tray Menu
The Tray Menu allows you to a cce s s t r ay se tt in gs that are
common to all system languages (PCL and PostScript).
The Tray Menu hierarchy is shown in Figure 3.4 on page
3-22. Tasks performed with the Tray Menu are listed in
Table 3.7 on page 3-23.
Click for Updated Information
Chapter 3: Using the Control Panel ❖ 3-21
Page 100

Tray Menu
Figure 3.4 Tray Menu hierarchy with factory settings
Job Menu Envelope Size
Password Menu
Tray Menu
PCL Menu MBF Size
1,4
1,2
Com10(4.125x9.5)*
C5(162x229)
Statmt(5.5x8.5) Ledger(11x17)
3
DL(110x220)
Monarc(3.87x7.5)
3
Com10(4.125x9.5)
PostScript Menu
System Menu
Parallel Menu
Serial Menu
Ethernet Menu
Token Ring MBF Type
Novell Men u Tray 1 Type
Test Menu Tray 2 Type
Reset Menu Tray 3 Type
Tray 4 Type
Tray 5 Type
Tray Sequence
Exec(7.25x10.5) A6(105x148) C5(162x229)
Letter(8.5x11)*
Legal (8.5x14) A4(210x297)
A5(148x210) DL(110x220)
Monarc(3.87x7.5)
Folio(8.5x13) A3(297x420)
Plain*
Preprinted Recycled
Letterhead Color
5
5
5
Transparency Cardstock
Prepunched User type 1
Labels
Off MBF-4-5-1-2
5
MBF-1
9
MBF-1-2
5
MBF-4-5
MBF-4-5-1
5
Bond
User type 3
User type 4
User type 5
6
User type 2
MBF-4-5-1-2-3
1-2
6
5
4-5-1-2
5
4-5-1-2-3
*
10
4-1
1-2-3 4-1-2
5
4-5-1
4-1-2-3
6
6
6
5
5,8
5
5
5
1
Envelope Size and MBF Size are mutually exclusive because the Envelope Feeder replaces the Multi Bypass Feeder.
2
Defaults to
3
The factory defaults for MBF size and Envelope size are a function of the default setting in the System Menu.
4
Defaults to
5
Appears only when the 2,500 Sheet Feeder is installed.
6
User-defined paper types appear only if loaded by Network Administration software (refer to CentreWare DP
Com10
if the Defaults item in the System Menu is set to
Letter
if the Defaults item in the System Menu is set to
USA
, and to DL if the Defaults item is set to
USA
, and to A4 if the Defaults item is set to
documentation). After a reset, or setting a User type to all spaces, these types will not appear as values.
7
Default if both the 50 Sheet Bypass Feeder (MBF) and the 2,500 Sheet Feeder are installed.
8
Default if both the 100 Envelope Feeder and the 2,500 Sheet Feeder are installed.
9
Default if the 50 Sheet Bypass Feeder (MBF) is installed and the 2,500 Sheet Feeder is not installed.
10
Default if the 100 Envelope Feeder is installed and the 2,500 Sheet Feeder is not installed.
3-22 ❖ DocuPrint N24, N32, and N40 System Administrator Guide
Europe
Europe
.
.
 Loading...