

Page 1
User Guide
Troubleshooting printer problems
Page 2

True Type fonts, AppleTalk, EtherTalk and Macintosh are trademarks of Apple Computer, Inc., registered in the
United States and other countries.
NetWare is a registered trademark of Novell, Inc., in the United States and other countries.
Microsoft, MS-DOS, Windows and Windows NT are either registered trademarks or trademarks of Microsoft
Corporation in the United States and/or other countries.
Permission has been obtained from Microsoft Corporation for use of software screen shots.
This software is based in part on the work of the Independent JPEG Group.
All product/brand names are trademarks or registered trademarks of the respective holders.
Important
This manual is copyrighted with all rights reserved. Under the copyright laws, this manual may not be copied,
in whole or part, without the written consent of the publisher.
Parts of this manual are subject to change without prior notice.
We welcome any comments on ambiguities, errors, omissions, or missing pages.
Never attempt any procedure on the machine that is not specifically described in this manual. Unauthorized
operation can cause faults or accidents. Fuji Xerox is not liable for any problems resulting from unauthorized
operation of the equipment.
Xerox is a registered trademark.
The Document Company and Ethernet are trademarks and may be registered in certain jurisdictions.
Page 3

Preface
Thank you for choosing DocuPrint C621.
This manual contains important information regarding printer operation, control panel operation, and
troubleshooting methods. To get the most out of your printer, read the manual carefully and completely.
Keep this manual handy for future reference.
This manual is written with the assumption that you are familiar with the basics of your personal
computer to be connected, the operating system used in your computer, and the respective software. You
can also refer to the respective manuals for information on basic knowledge and operation methods of the
product.
2
In this manual, safety instructions are described with the symbol . Always read and follow the
instructions before performing the required procedure. Make sure your read through the Safety Notes
section in the Setup Guide.
i
Page 4
2
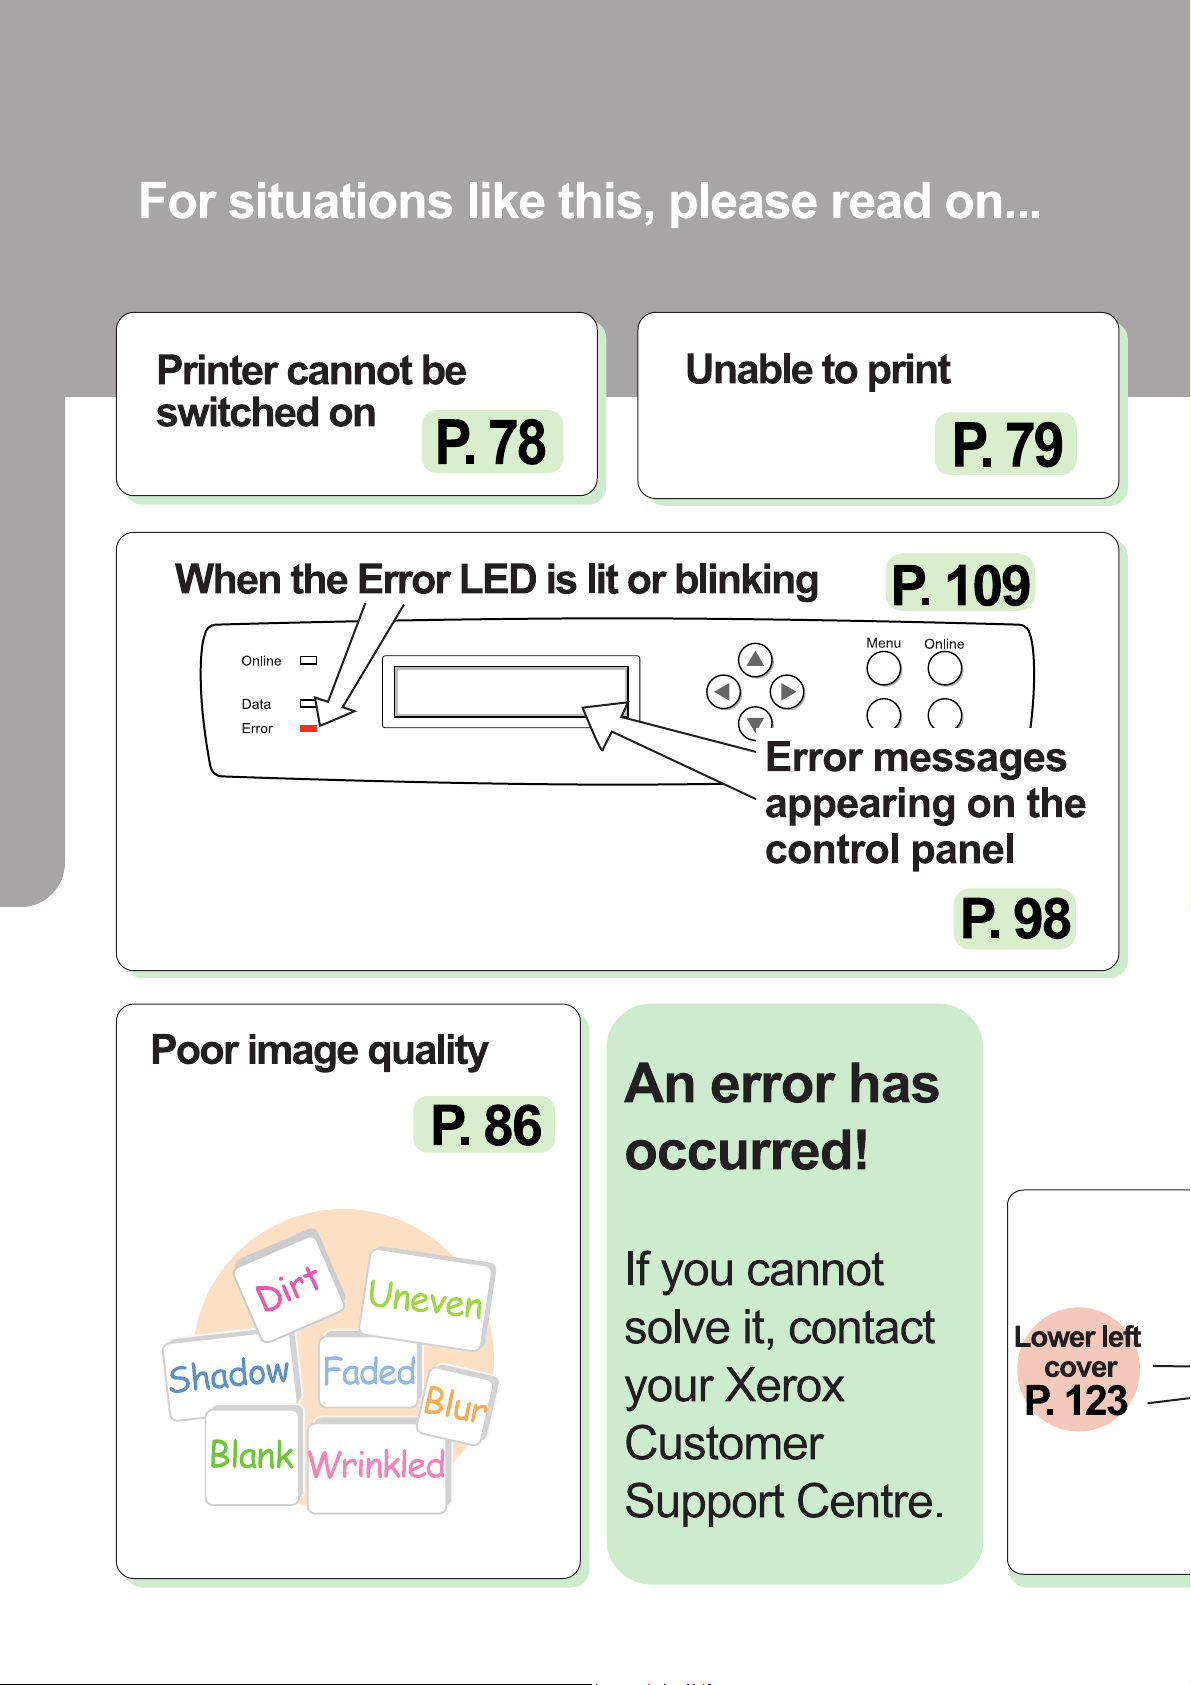
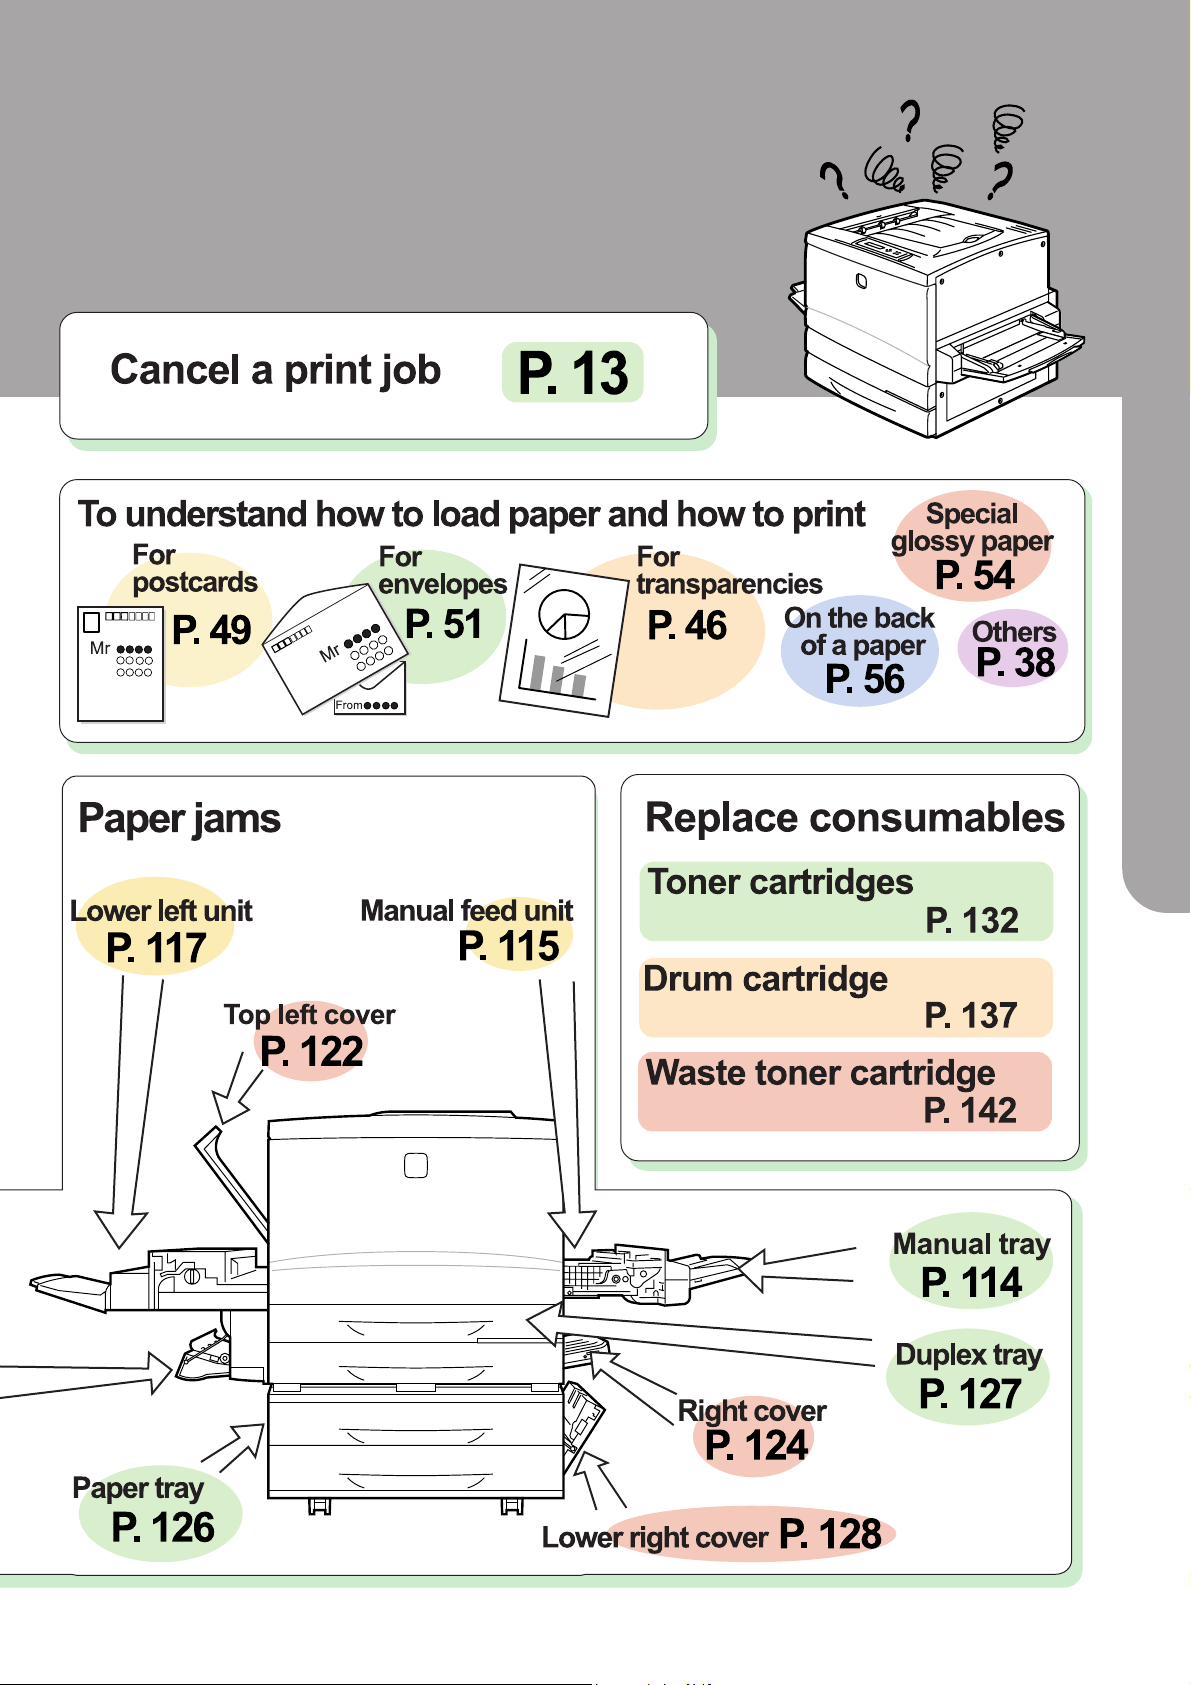
Trouble? Don't know how to operate! Problem occurred when using the
printer....
ii
Page 5
2
iii
Page 6
2
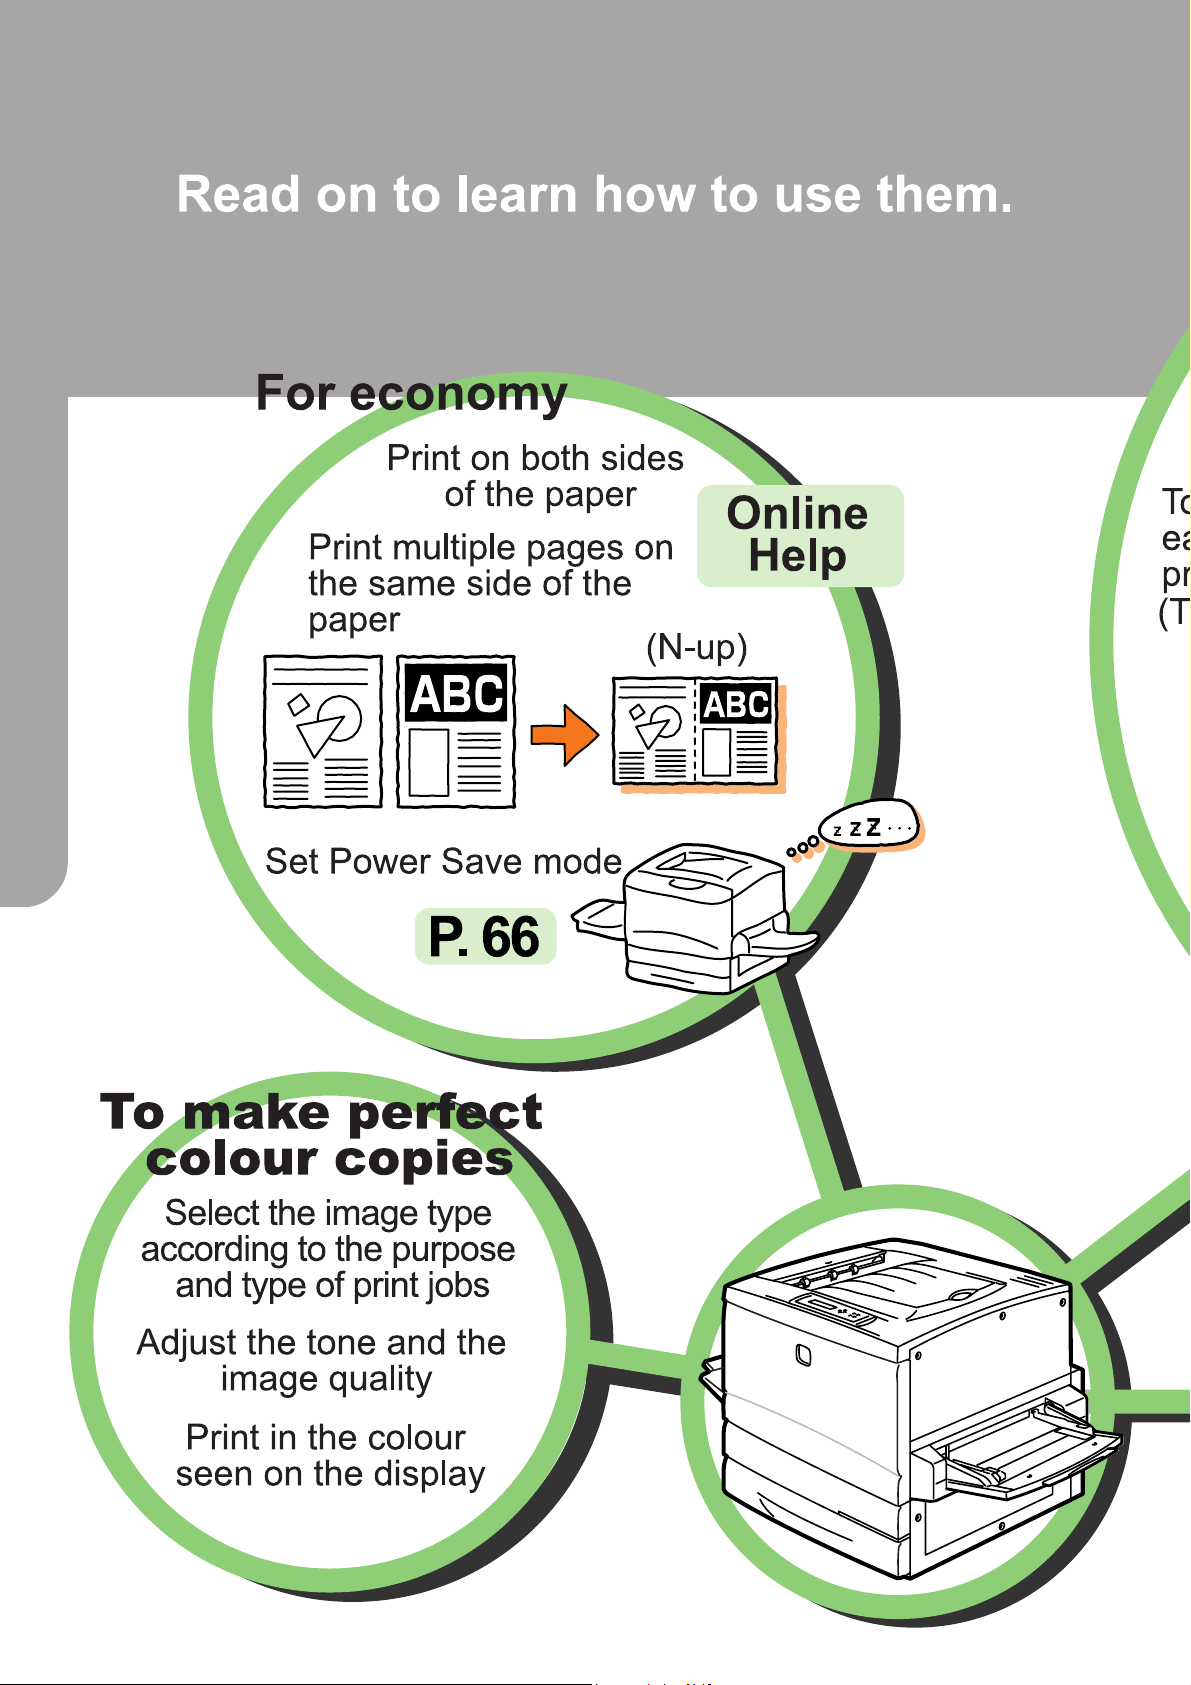
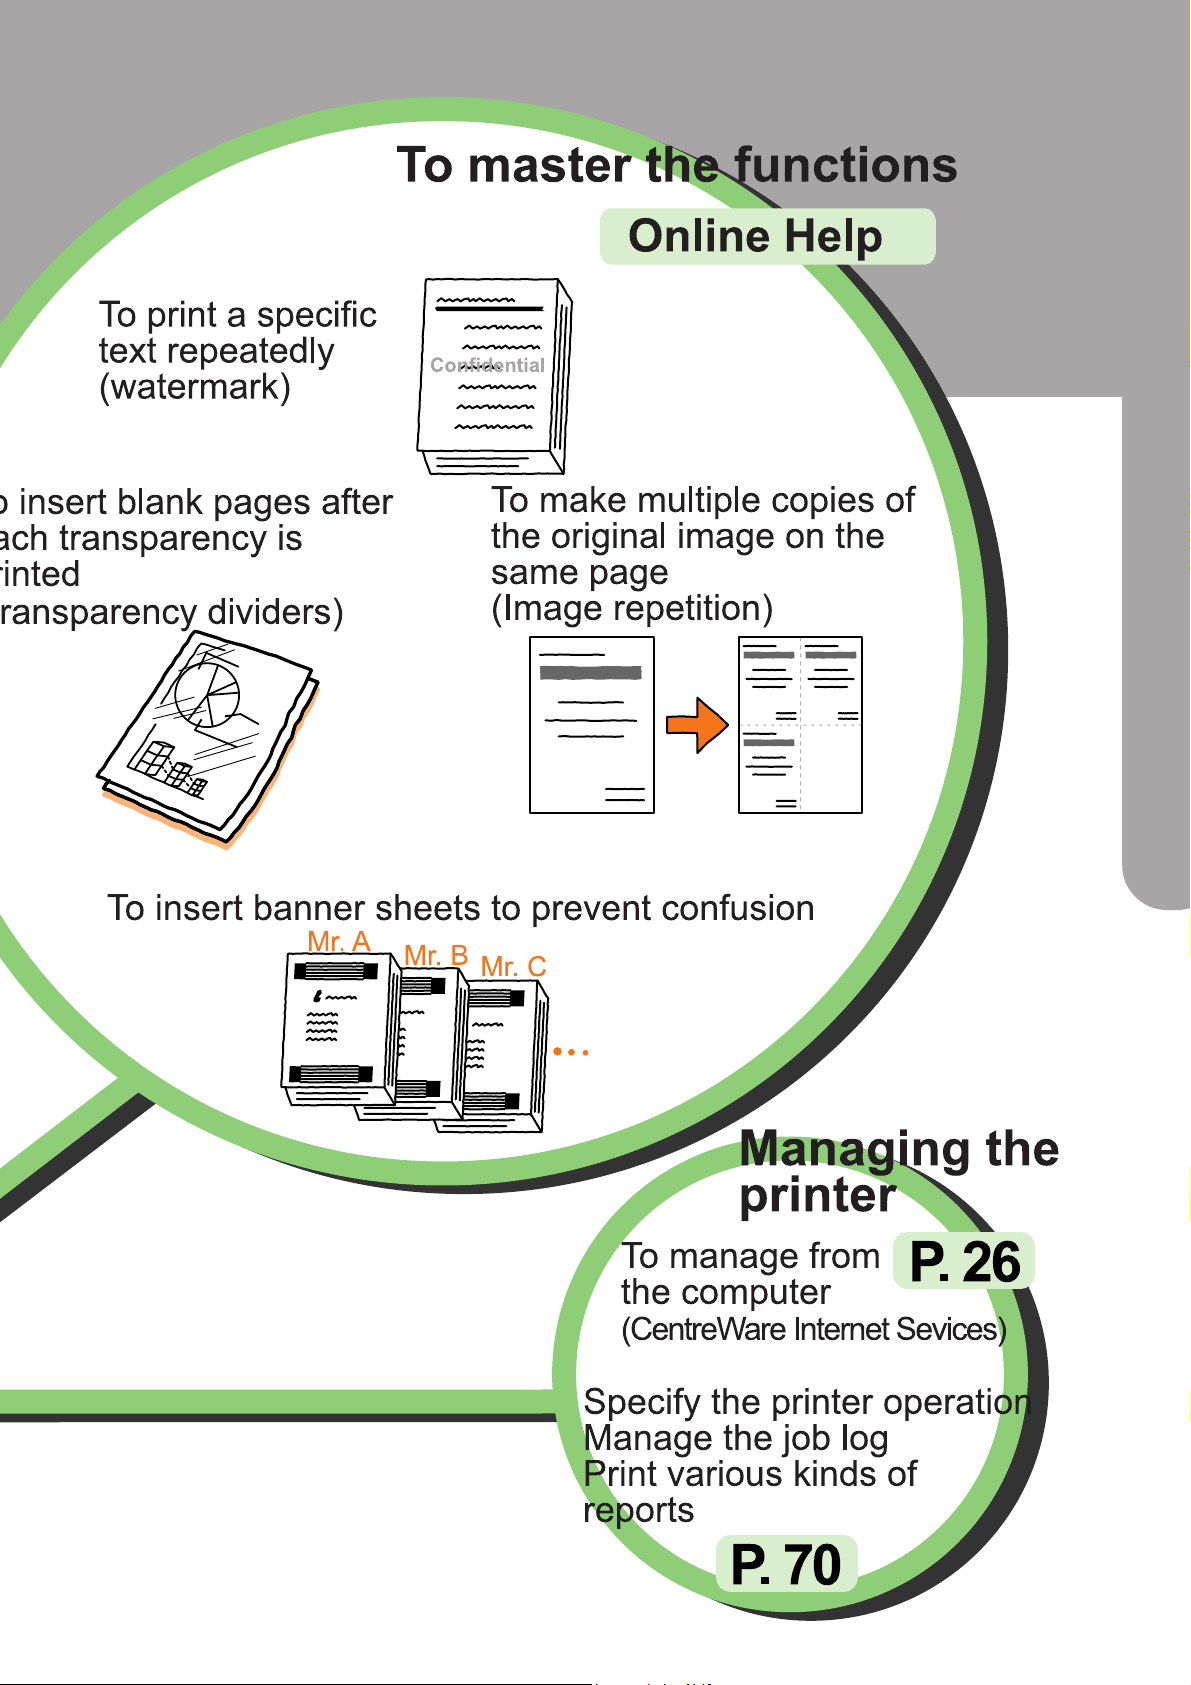
The following functions are possible with DocuPrint C621:
iv
Page 7
2
v
Page 8

Contents
Preface .......................................................................................................................... i
Contents ...................................................................................................................... vi
Types of Manuals ........................................................................................................... x
Using this Guide .......................................................................................................... xii
Organisation of this Guide ............................................................................................ xii
Conventions ................................................................................................................xiii
Chapter 1 Basic Printing Operations
1.1 Printer Parts and Functions ...................................................................................2
1.2 Switching the Power On/Off ..................................................................................5
1.2.1 Switching on ......................................................................................................... 5
1.2.2 Switching off ......................................................................................................... 6
1.3 Printing from Computers .......................................................................................7
1.4 Using Online Help ............................................................................................... 10
1.5 Cancelling a Print Job ......................................................................................... 13
1.5.1 Cancelling a Print Job on the Computer................................................... 13
1.5.2 Cancelling a Print Job on the Control Panel .............................................15
1.6 Forced Output of Data Still in the Printer .............................................................. 16
1.7 Changing the Printer Configuration ......................................................................17
1.8 Printing the Printer Settings List ...........................................................................21
1.9 Printing the Job Log Report .................................................................................23
1.10 Checking the Printer Status on the Computer ......................................................26
Chapter 2 Loading Paper
2.1 Paper Handling ................................................................................................... 32
2.1.1 Recommended Paper ............................................................................32
2.1.2 Unsuitable Paper .................................................................................... 36
2.1.3 Storing Paper ......................................................................................... 37
2.2 Loading Paper .................................................................................................... 38
2.2.1 Loading Paper in the Paper Trays ........................................................... 38
2.2.2 Loading Paper on the Manual Tray ..........................................................41
2.3 Replacing the Paper Tray with an Optional Tray ...................................................44
2.3.1 Removing the Paper Tray ....................................................................... 44
2.3.2 Installing the Paper Tray ......................................................................... 45
2.4 Printing On Special Media ................................................................................... 46
2.4.1 Printing on Transparencies ..................................................................... 46
vi
Page 9

2.4.2 Printing on Postcards ............................................................................. 49
2.4.3 Printing on Envelopes .............................................................................51
2.4.4 Printing on Glossy paper .........................................................................54
2.5 Printing on Side Two of Printed Sheets ................................................................ 56
Chapter 3 Control Panel
3.1 Control Panel Components and Functions ...........................................................60
3.1.1 LED ....................................................................................................... 60
3.1.2 Display ...................................................................................................61
3.1.3 Buttons ..................................................................................................62
3.2 Basic Operations of the Menu Screen.................................................................. 63
3.2.1 Menu Screen .......................................................................................... 63
3.2.2 Basic Menu Operations .......................................................................... 64
3.3 List of Items on the Menu Screen......................................................................... 66
3.3.1 System ..................................................................................................66
3.3.2 Maintenance Mode .................................................................................. 68
3.3.3 Parallel ...................................................................................................69
3.3.4 Report/List ............................................................................................. 70
3.3.5 Network ..................................................................................................71
Chapter 4 Troubleshooting
4.1 Types of Problems.............................................................................................. 76
4.2 Power Problems .................................................................................................78
4.3 Printing Problems ...............................................................................................79
4.3.1 LED is Lit, Blinking or Off ........................................................................ 79
4.3.2 Unable to Print from Windows................................................................. 82
4.3.3 Unable to Print from Macintosh ............................................................... 85
4.4 Print Quality Problems ........................................................................................86
4.4.1 Blank or Black Copies are Output ........................................................... 86
4.4.2 Faded, Dirty, Uneven, Shadowed or Wrinkled Output............................... 87
4.4.3 Output is Not Clear ................................................................................. 91
4.5 Paper Transport Problems .................................................................................. 93
4.6 Others ................................................................................................................95
4.6.1 Network-related Problems ...................................................................... 95
4.6.2 Other Problems ......................................................................................97
4.7 When An Error Message Appears ....................................................................... 98
vii
Page 10

4.8 When the Error LED is Lit or Blinking................................................................. 109
4.8.1 When the Error LED is Lit ..................................................................... 109
4.8.2 When the Error LED is Blinking .............................................................109
Chapter 5 Paper Jams
5.1 Clearing Paper Jams ........................................................................................ 112
5.1.1 Paper Jams at the Manual Tray ............................................................. 114
5.1.2 Paper Jams in the Manual Feed Unit ..................................................... 115
5.1.3 Paper Jams in the Lower Left Unit .........................................................117
5.1.4 Paper Jams at the Top Left Cover ......................................................... 122
5.1.5 Paper Jams at the Lower Left Cover ..................................................... 123
5.1.6 Paper Jams at the Right Cover ............................................................. 124
5.1.7 Paper Jams in the Paper Tray............................................................... 126
5.1.8 Paper Jams in the Duplex Tray ............................................................. 127
5.1.9 Paper Jams at the Lower Right Cover of the Tray Module ...................... 128
Chapter 6 Consumables
6.1 Replacing the Toner Cartridges ......................................................................... 130
6.1.1 Handling Precautions for Toner Cartridges ............................................ 131
6.1.2 Replacing the Toner Cartridges ............................................................ 132
6.2 Replacing the Drum Cartridge ........................................................................... 135
6.2.1 Handling Precautions for Drum Cartridges ............................................ 136
6.2.2 Replacing the Drum Cartridge............................................................... 137
6.3 Replacing the Waste Toner Cartridge ................................................................ 141
6.3.1 Handling Precautions for Waste Toner Cartridge ................................... 141
6.3.2 Replacing the Waste Toner Cartridge ................................................... 142
Chapter 7 Maintenance
7.1 Cleaning ........................................................................................................... 146
7.2 Storing the Printer ............................................................................................. 147
7.3 Transporting the Printer .....................................................................................148
7.3.1 Handling Precautions When Lifting the Printer ....................................... 148
7.3.2 Transporting the Printer ........................................................................ 149
7.3.3 Environmental Requirements for Installing the Printer ............................ 153
Appendices
viii
Page 11

A Optional Products and Consumables ................................................................ 158
Optional Products ............................................................................................. 158
Consumables ................................................................................................... 161
B Menu List on the Control Panel .......................................................................... 162
C Obtaining Product Information ........................................................................... 165
D Main Specifications ........................................................................................... 166
E Life Span of Consumables ................................................................................ 168
F Parallel Interface Specifications ......................................................................... 169
G Installing Additional Memory ............................................................................... 171
H Glossary ...........................................................................................................174
Index
ix
Page 12
Types of Manuals
The following manuals are bundled with DocuPrint C621. Please read the relevant manual to suit your
needs.
Some of these manuals are in PDF file formats. You will require Adobe
®
Acrobat® Reader to view or
print these manuals. A copy of the Adobe Acrobat Reader can be found in the Software Pack CD-ROM
bundled with the printer. You can use this CD-ROM to install the Acrobat Reader software on your
computer if necessary.
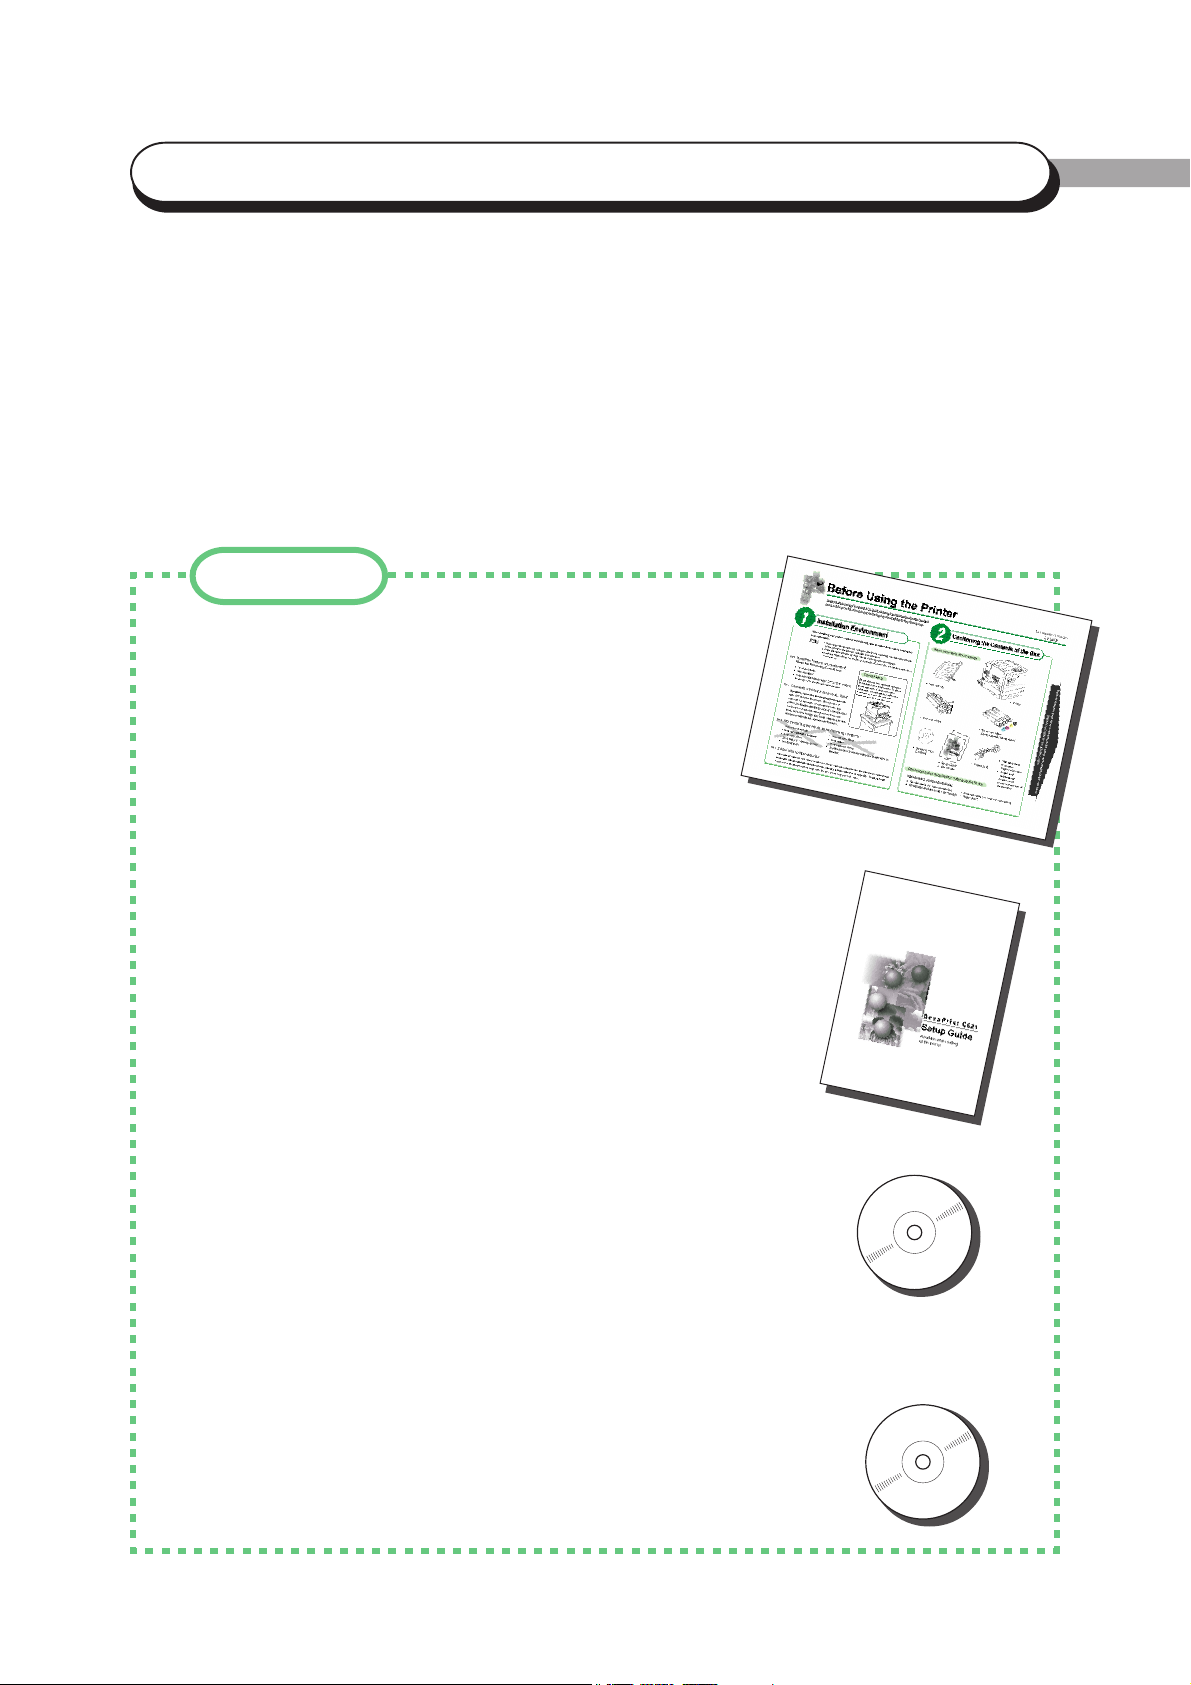
Setting Up
Before Using the Printer
This booklet provides an overview of the items that come
with the printer. It also provides a general description of
the procedures that guide you from opening the printer box
to getting your printer ready for printing.
Firstly, use this booklet to check the items bundled with the
printer. Then, refer to the Setup Guide to set up the
printer.
Setup Guide
This manual explains how to set up the printer and install
the necessary software. There are also examples to
illustrate how to use the printer as a network printer.
Software Pack Operation Guide
This manual explains how to use the DocuPrint C621
Software Pack CD-ROM (referred to as Software Pack
®
CD-ROM hereafter) on Windows
®
Windows NT
available in the Software Pack. Once you insert the
Software Pack CD-ROM in the CD-ROM drive of your
computer, the Fuji Xerox Setup Menu will appear
automatically. Click on the desired button to display this
manual on the screen.
, and how to install the various software
95, Windows® 98 and
Network Print Environment User Guide
This manual explains in detail the procedures to setup and
use the printer as a network printer in various networking
environments. This manual is a PDF file and can be found
in the Manual folder in the Software Pack CD-ROM. The
name of this file is net.pdf.
x
Page 13
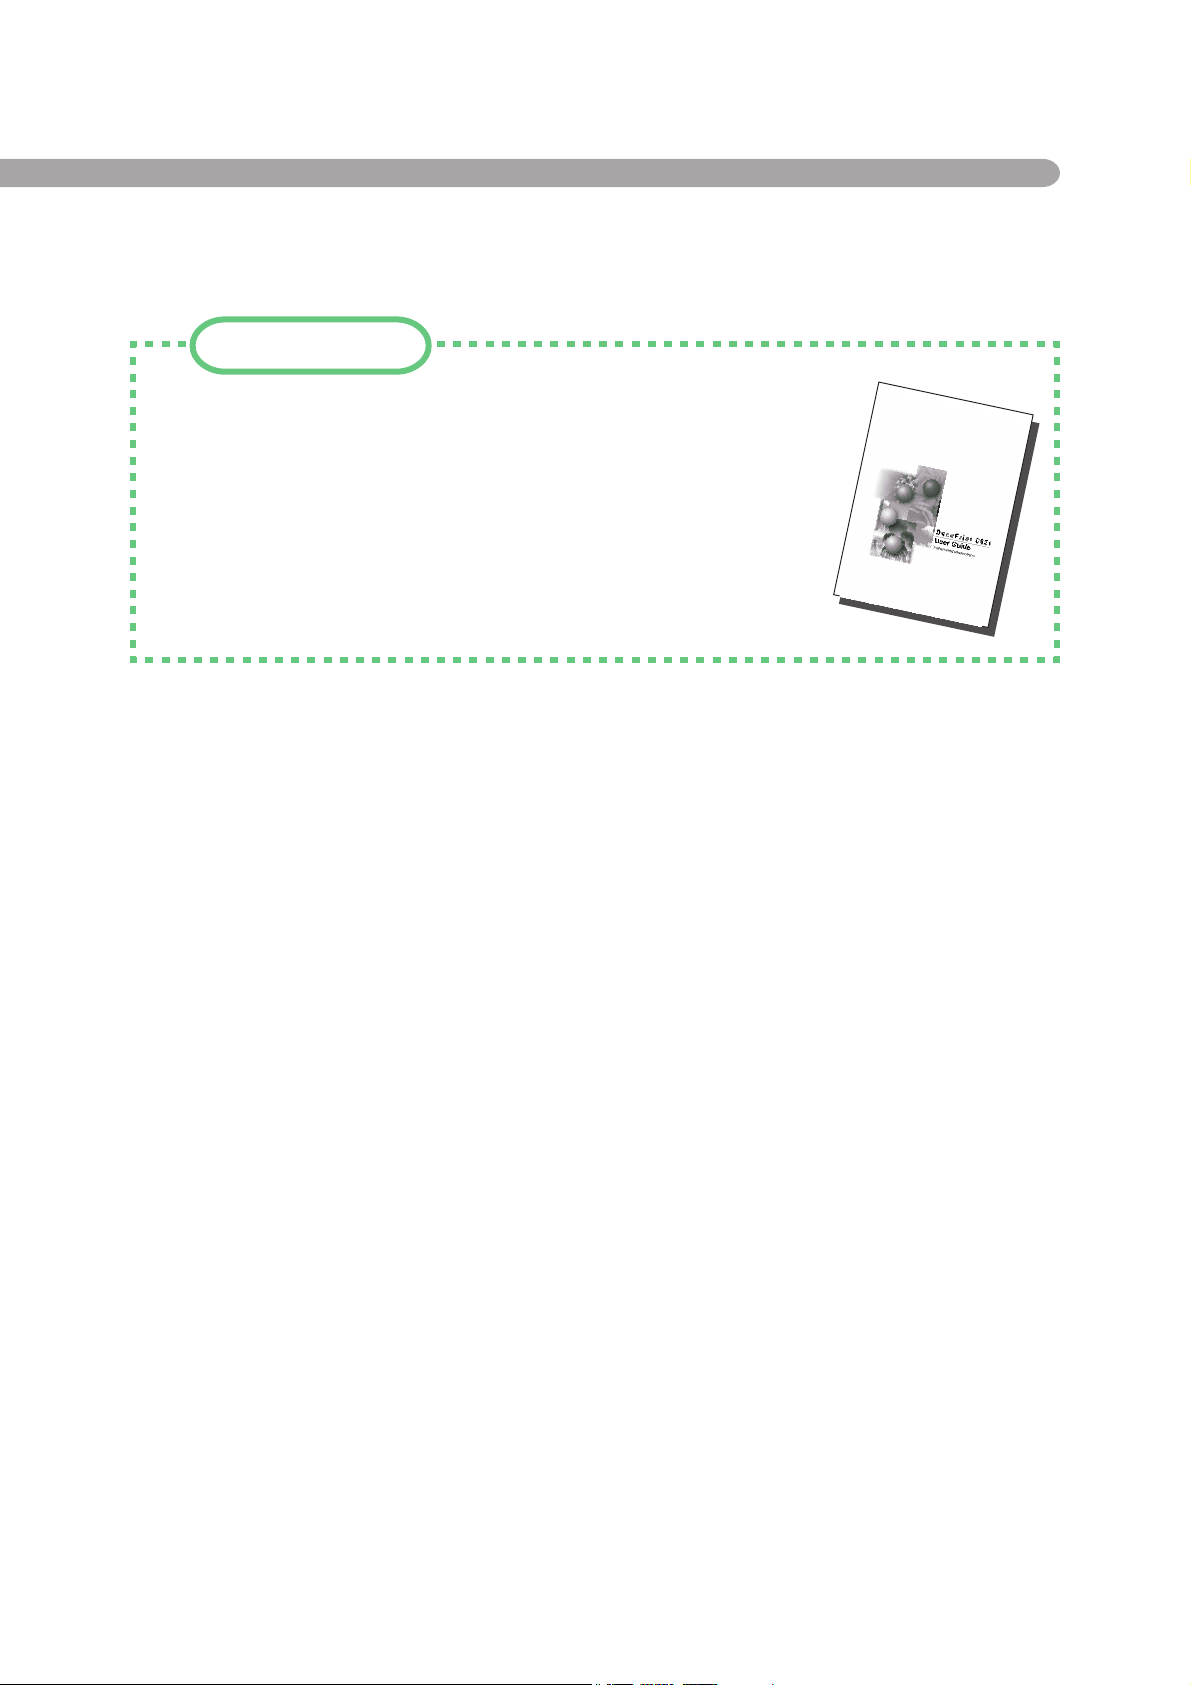
After Setup
User Guide (this manual)
This manual describes the capabilities of DocuPrint C621 and explains
what to do when you encountered a problem. It explains the methods of
operation as well as the solutions to troubleshoot the problems.
xi
Page 14

Using this Guide
Organisation of this Guide
This guide consists of eight chapters. A brief introduction of each chapter is provided
below.
Chapter 1 Basic Printing Operations
This chapter describes the basic functions of the printer and how to use these functions.
Chapter 2 Loading Paper
This chapter describes the types of paper that can be used with DocuPrint C621, how to
load the paper on the respective trays, and the procedure to switch to the optional paper
tray.
In addition, it describes the procedure to print on special media such as transparencies,
postcards, and envelopes.
Chapter 3 About the Control Panel
This chapter explains how to use the printer control panel and define the settings for the
individual functions by using the printer control panel.
Chapter 4 Troubleshooting
This chapter explains what each error message shown on the printer control panel means
and how to resolve them.
This chapter also describes the solutions to the common problems that you will encounter
when using the printer. Read this chapter to determine the nature of the problem when the
problem arose.
Chapter 5 Paper Jams
This chapter explains the procedures for dealing with paper jams.
Chapter 6 Consumables
This chapter provides information on handling and replacing the consumables.
Chapter 7 Maintenance
xii
This chapter provides information on cleaning, storing and transporting the printer.
Page 15
Appendices
This section contains the following information:
• Optional products and consumables
• Control panel menu list
• How to obtain product information
• Main specifications
• Life span of the consumables
• Parallel interface specifications
• Installing additional memory
• Glossary
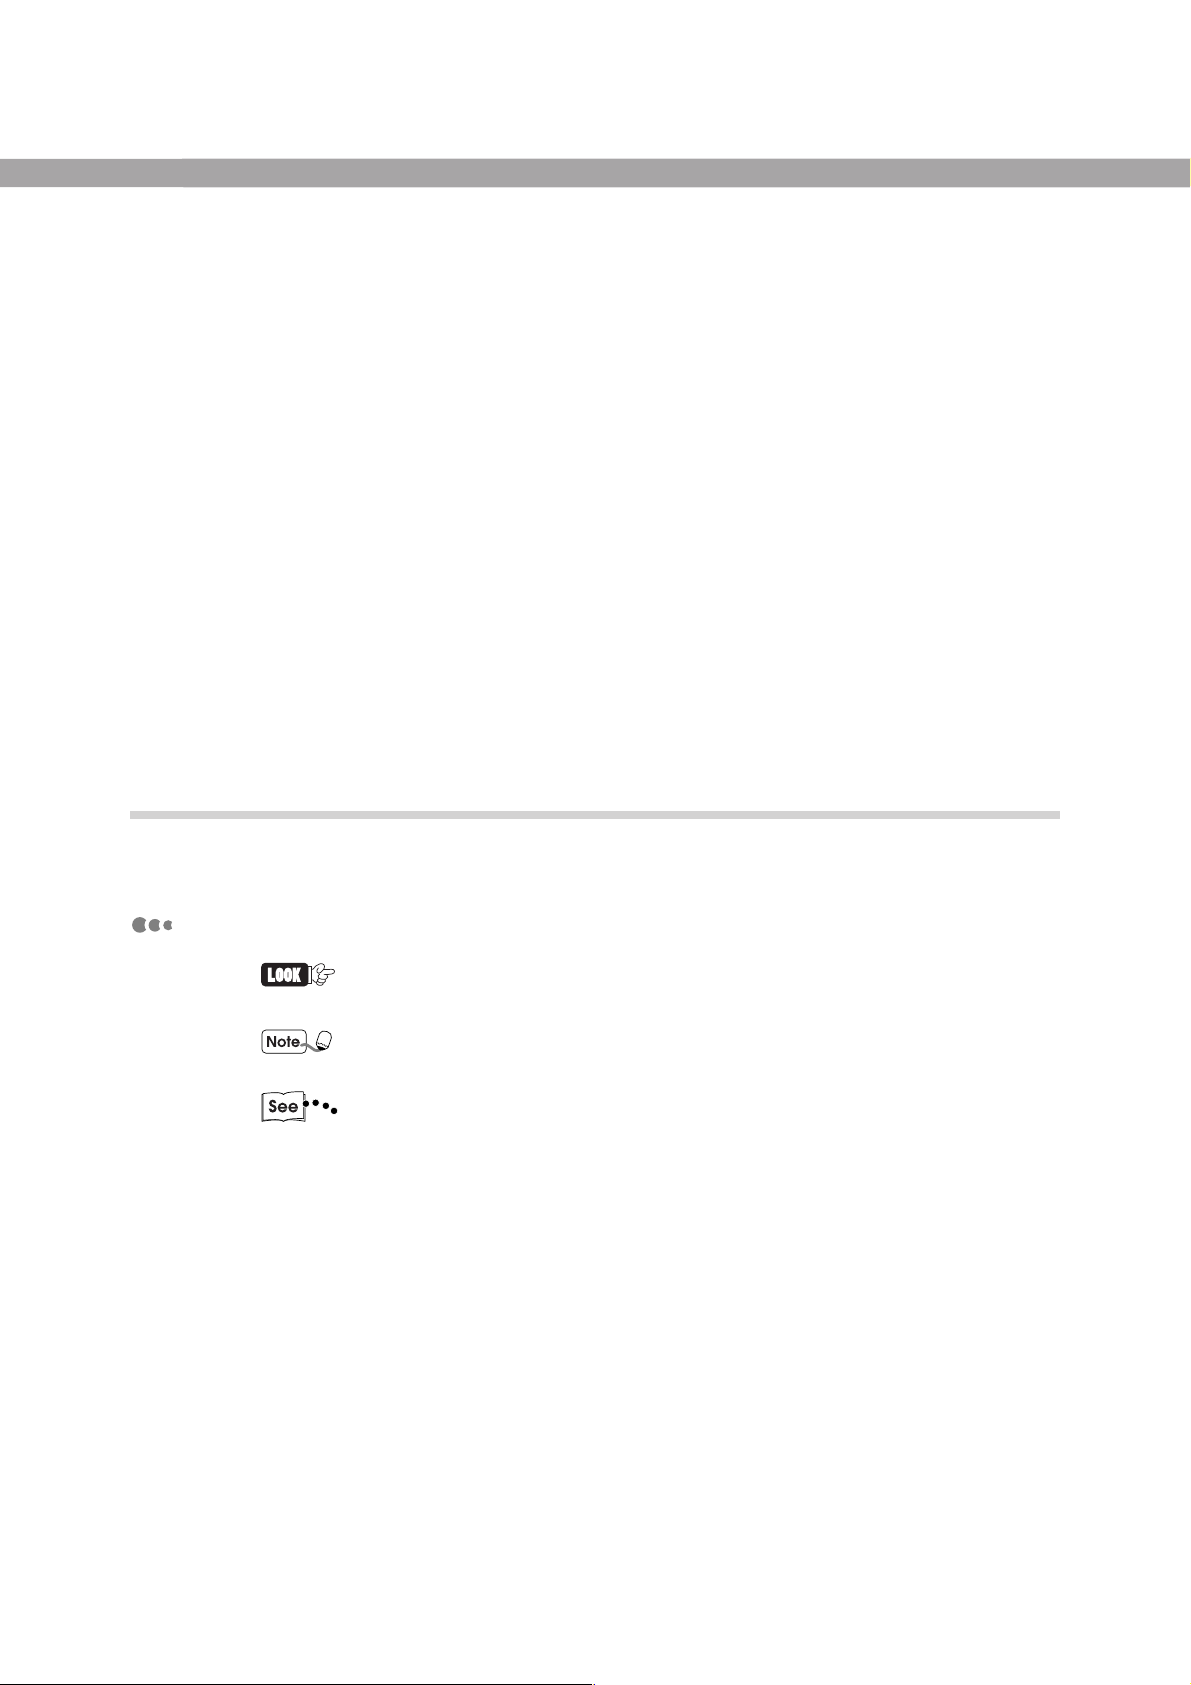
Conventions
This manual uses the following conventions:
Notation
Explains points to pay attention to. Be sure to read it.
Gives supplementary information for reference.
Indicates where to find related information.
" ": indicates that the source of reference is in this manual.
Italics: indicates that the source of reference is in another manual.
xiii
Page 16

Symbols
Symbol
Bold
" "
Initial Caps
+
Meaning
Indicates selections or all kinds of buttons.
Example: Click Next.
Indicates input contents.
Example: Enter "DocuPrint C621" in the text box.
Indicates the names of windows, menus, dialog boxes, list boxes, and
combo boxes.
Example: The Add Port dialog box is displayed.
Indicates that the key on the keyboard and the button on the control
panel should be pressed simultaneously.
Example: Press the ▲ + ▼ buttons.
xiv
Page 17

Basic
Printing
Operations
1.1 Printer Parts and Functions .................................................................. 2
1.2 Switching the Power On/Off ................................................................ 5
1.3 Printing from Computers ...................................................................... 7
1.4 Using Online Help ............................................................................. 10
When You Have Difficulties Setting the Print Properties
1.5 Cancelling a Print Job ........................................................................ 13
When Printing Stopped Halfway
1.6 Forced Output of Data Still in the Printer .......................................... 16
When Printing Stopped Halfway
1.7 Changing the Printer Configuration .................................................... 17
When Optional Products are Added
1.8 Printing the Printer Settings List ......................................................... 21
To Check the Printer Configuration and Network Settings
1.9 Printing the Job Log Report ............................................................... 23
Print Job Log
1.10 Checking the Printer Status on the Computer ...................................... 26
Page 18

1.1 Printer Parts and Functions
The names and functions for the various parts of the printer are as follows:
Front View
Name Description
1. Paper Tray
2. Front Cover
3. Printer Control Panel
4. Face-down Tray
5. Paper Stopper
6. Top Right Cover
7. Manual Tray
8. Manual Feed Unit
9. Right Cover
Load paper for normal printing here.
This is the cover at the front of the printer. Open it to install and replace
toner and drum cartridges.
The control panel consists of the respective LED and buttons, as well
as the display. Refer to "Chapter 3 Control Panel" for details.
Printed documents are delivered to this tray with the printed side facing
down.
Pull out the paper stopper to prevent printed paper from falling off the
printer.
This is the cover at the upper-right side of the printer. Open this cover
when you are installing additional memory or the hard disk.
Use this tray to manual feed media such as postcards and envelopes.
This is a pulled-out unit located on the right side of the printer. Open it to
remove jammed paper.
This is the cover at the lower-right side of the printer. Open it to remove
jammed paper.
10. Ethernet Interface
2
This is for the Ethernet cable when the printer is used as a network
printer.
Page 19
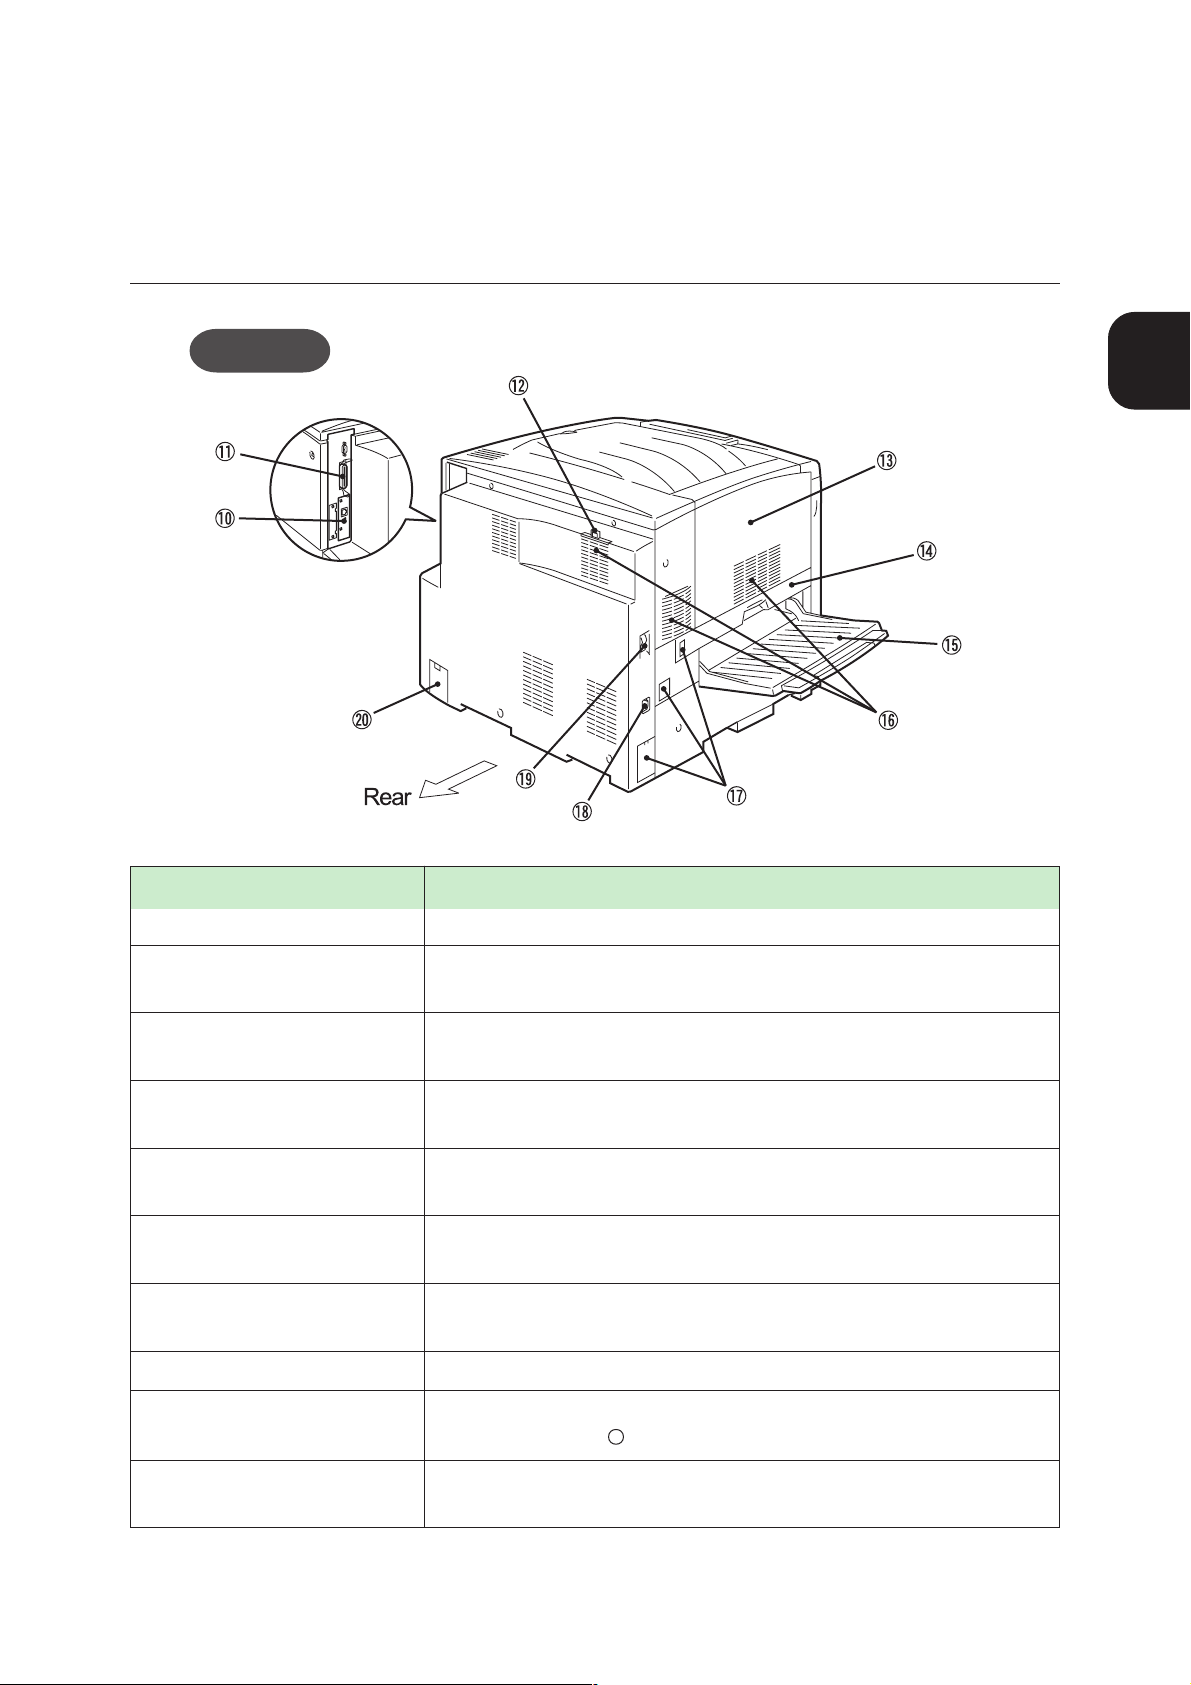
1.1 Printer Parts and Functions
Rear View
Name Description
11. Parallel Interface
1
Basic Printing Operations
This is for the parallel cable when the printer is used as a local printer.
12. Filter
13. Top Left Cover
14. Lower Left Unit
15. Face-up Tray
16. Ventilation Outlet
17. Duplex Print Module
Connector Cover
18.Power Cord Connector
19.Power Switch
20.Tray Module Connector
Cover
This prevents toner from being ejected out of the machine. Do not remove
the filter.
This is the cover at the left side of the printer. Open this cover to remove
jammed paper.
This is a pulled-out unit located on the left side of the printer. Open it to
remove jammed paper.
Printed documents are delivered to this tray with the printed side facing
up.
This vents heat from inside the printer. Make sure the outlet is never
obstructed.
This cover hides the connector that is used to connect the optional duplex
print module.
Connect the power cord here.
Switches the power on and off. Press the "|" side to switch on the
printer on, and the "
This cover hides the connector that is used to connect the optional tray
module.
" side to switch it off.
3
Page 20
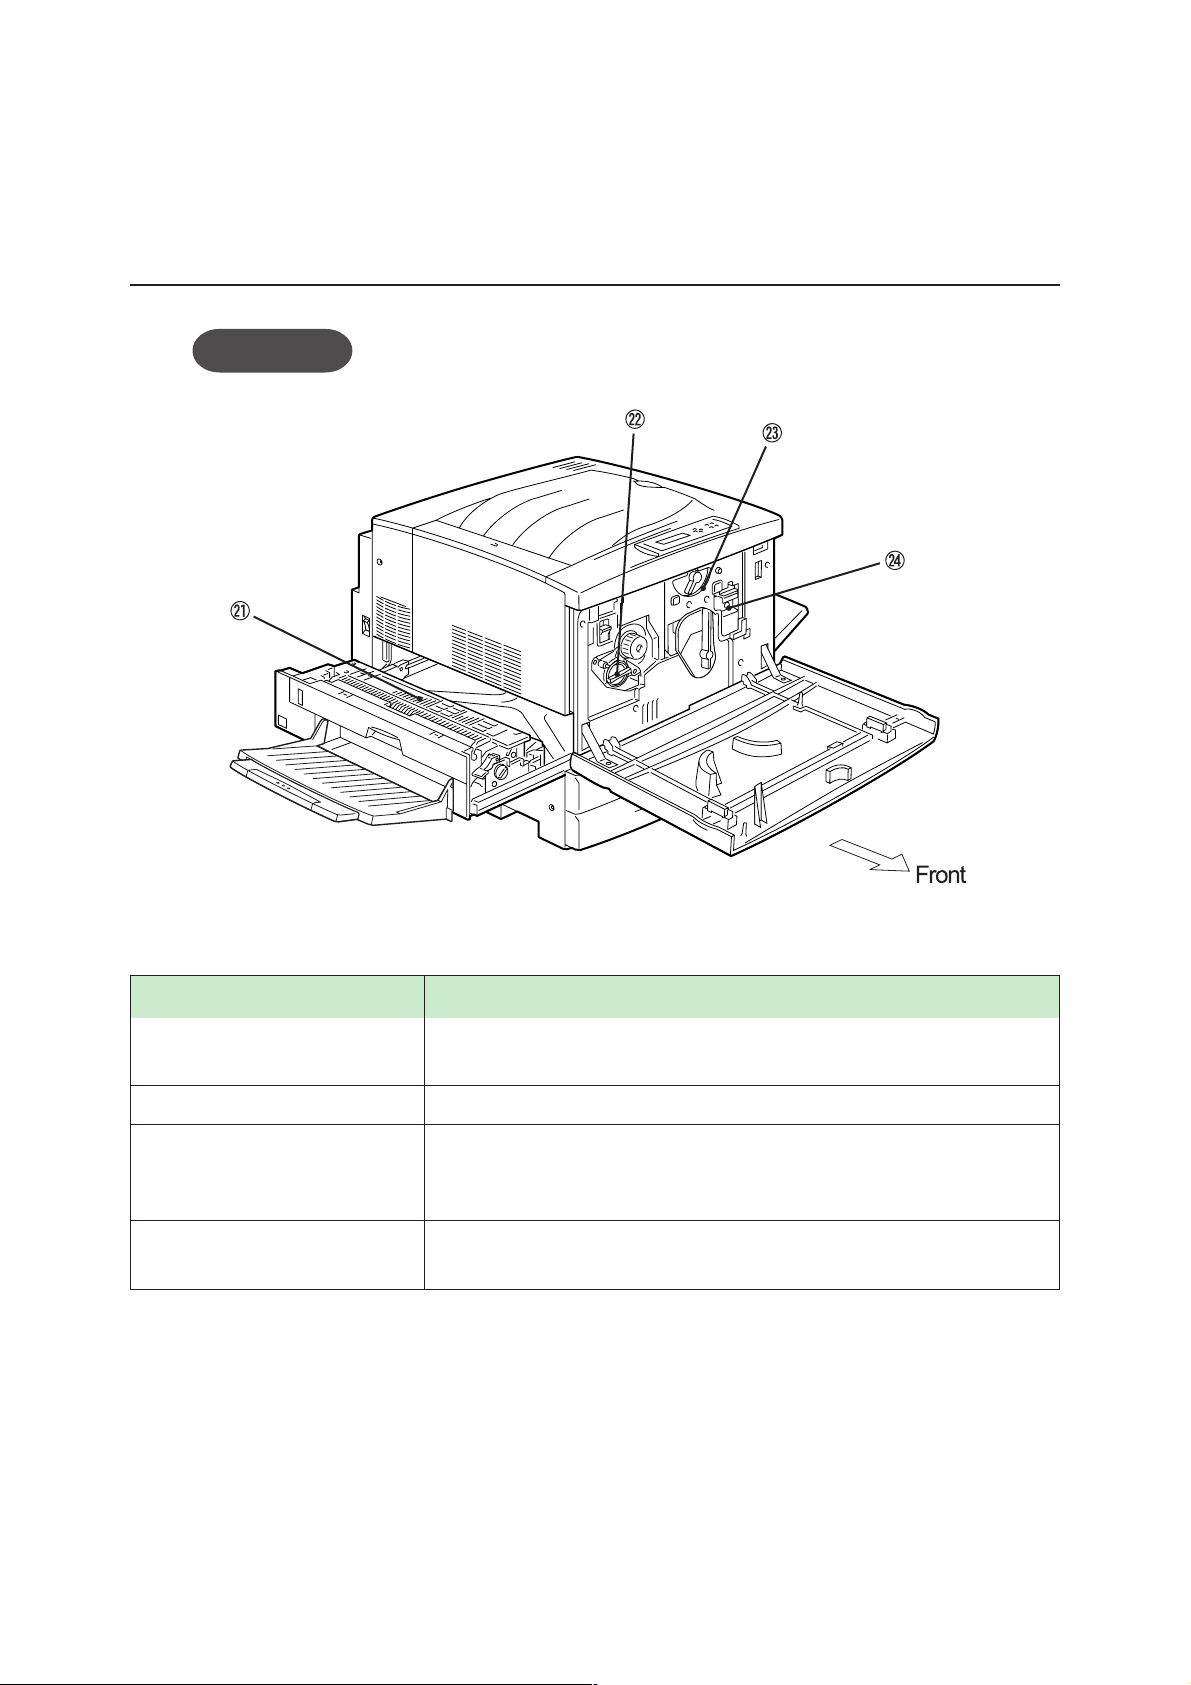
1.1 Printer Parts and Functions
Internal View
Name Description
21. Fuser Unit
22. Toner Cartridges
23. Drum Cartridge
24. Waste Toner Cartridge
This unit fuses the toner to the paper with heat. Do not touch the fuser,
as it gets hot during printing.
Black, yellow, magenta and cyan toner cartridges are provided.
This cartridge includes the light-sensitive drum, drum cleaner, and toner
collection cartridge. Images are initially created through an electric charge
on the surface of this drum.
Collects used toner. This cartridge is attached to the drum cartridge, but
can be replaced separately.
4
Page 21
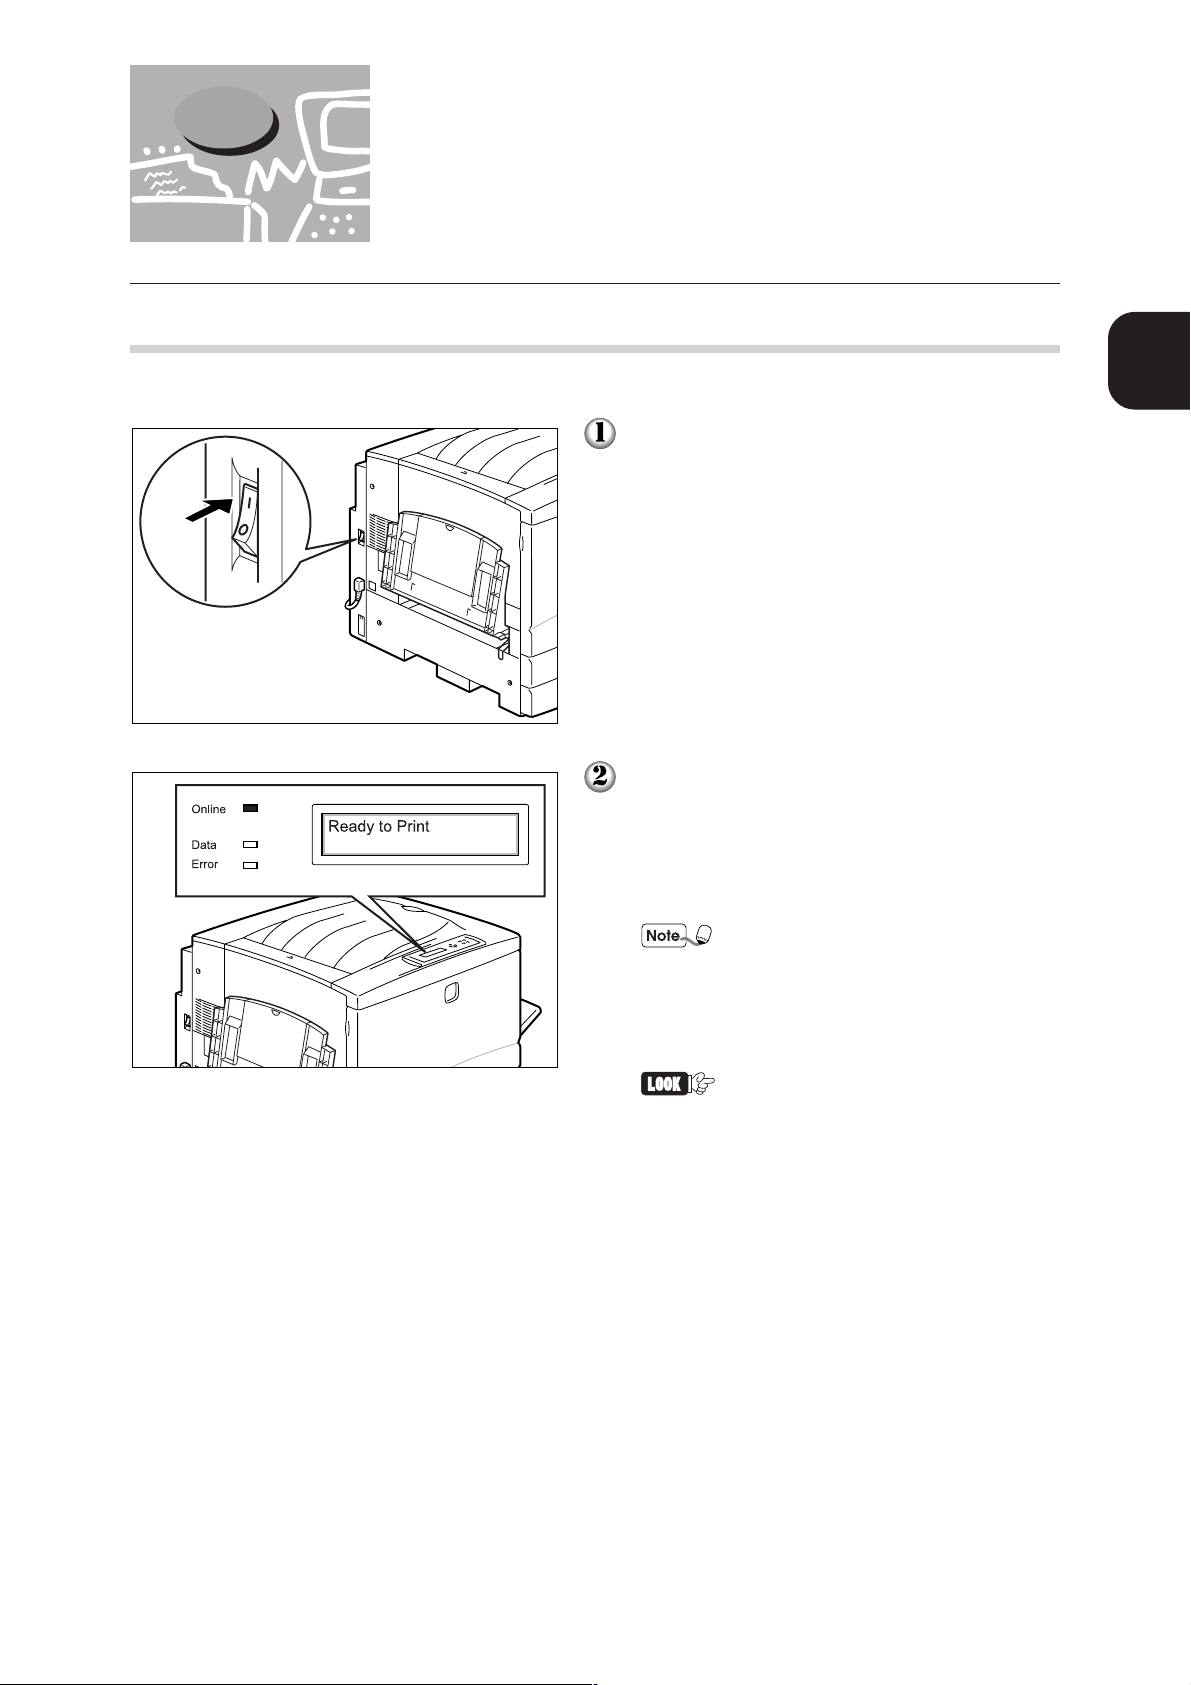
1.2 Switching the Power On/Off
1.2.1 Switching on
The procedure is as follows:
Press the "|" side of the power switch, located
on the left side of the printer, to switch on the
printer.
1
Basic Printing Operations
The message "Testing" appears on the display
of the control panel. The message will change
from "Please wait..." to "Ready to Print".
Check that the Online LED is lit when the
printer is ready.
The printer is warming up when
the "Please wait..." message is
shown on the display. The printer
cannot process any print job
during this time.
If an error message is shown on
the display of the control panel
refer to "4.7 When an Error
Message Appears" on how to
resolve the error.
5
Page 22
1.2 Switching the Power On/Off
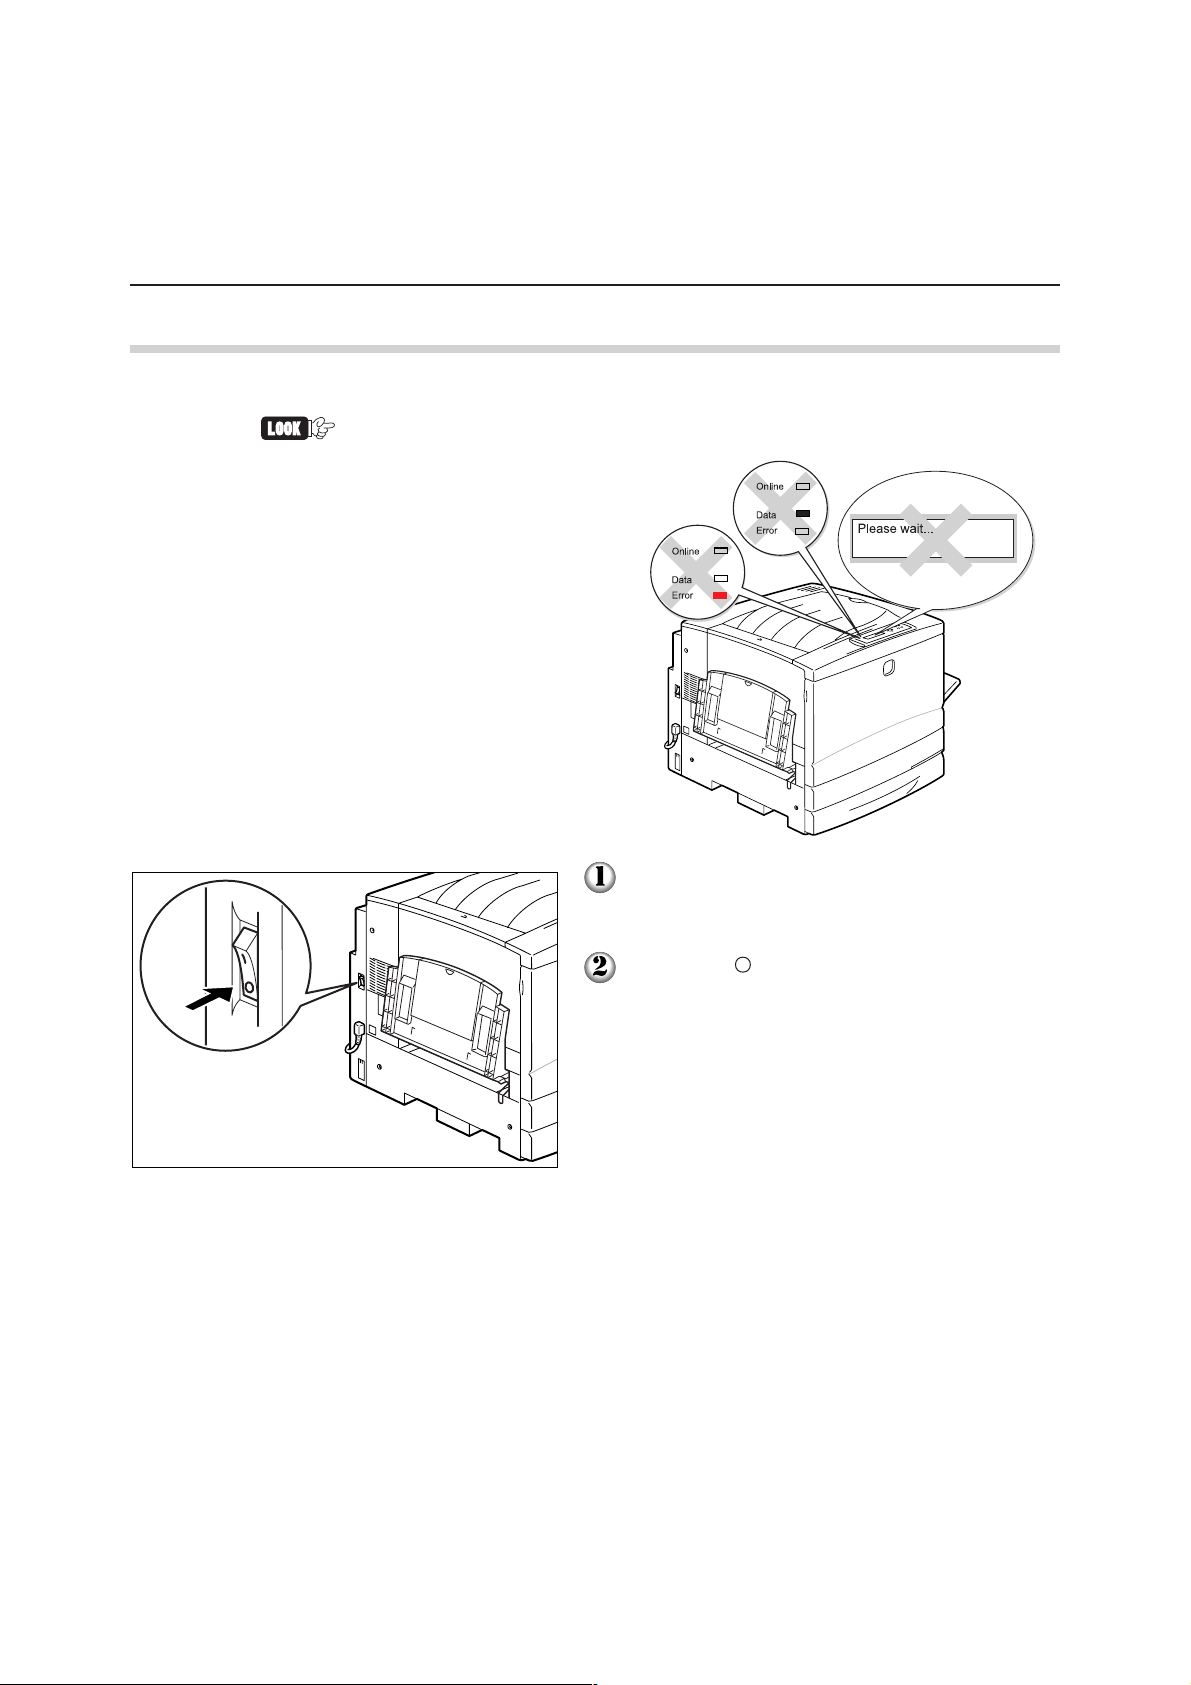
1.2.2 Switching off
Follow the procedure below to switch off the printer.
Do not switch off the power in the following situations:
• When "Please wait..." is
displayed.
• When the Data LED is lit.
• When the Error LED is lit.
Check that the message "Ready to Print" is
displayed.
Press the " " side of the power switch, located
at the left of the printer, to switch off the
printer.
6
Page 23
1.3 Printing from Computers
The procedures for printing from different computer operating systems (OS) are described
in the following sections.
1
Windows® 95, Windows® 98, Windows NT
You can simply select the Print command in almost all application software to send a print job
to the printer.
The following uses Microsoft
illustrate the printing procedure.
The method used to display the dialog box and the contents of the dialog
box differ amongst OS and application software. Refer to the manuals of
the respective software for reference.
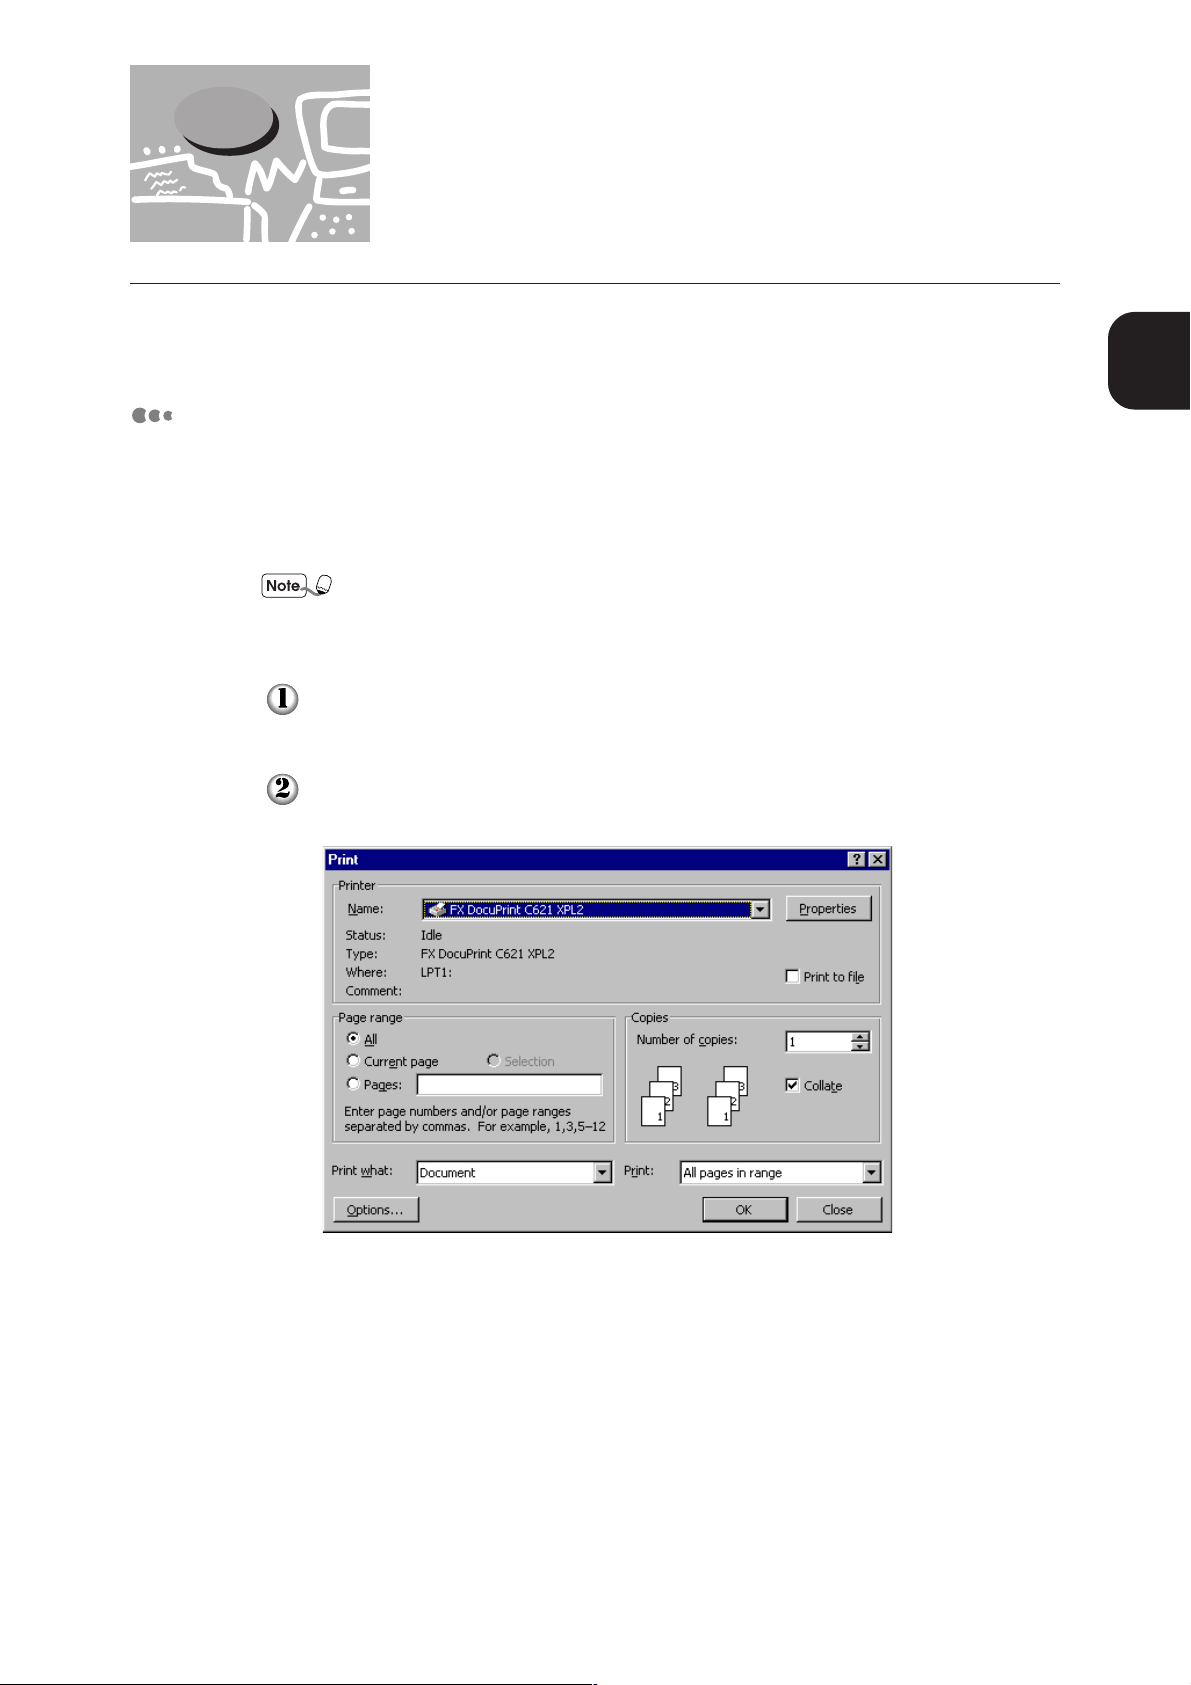
Select Print from the File menu.
The Print dialog box is displayed.
Select FX DocuPrint C621 XPL2 from the Printer Name list box. Then, click
Properties.
®
Word 97 application on Windows 98 OS as an example to
®
Basic Printing Operations
7
Page 24
1.3 Printing from Computers
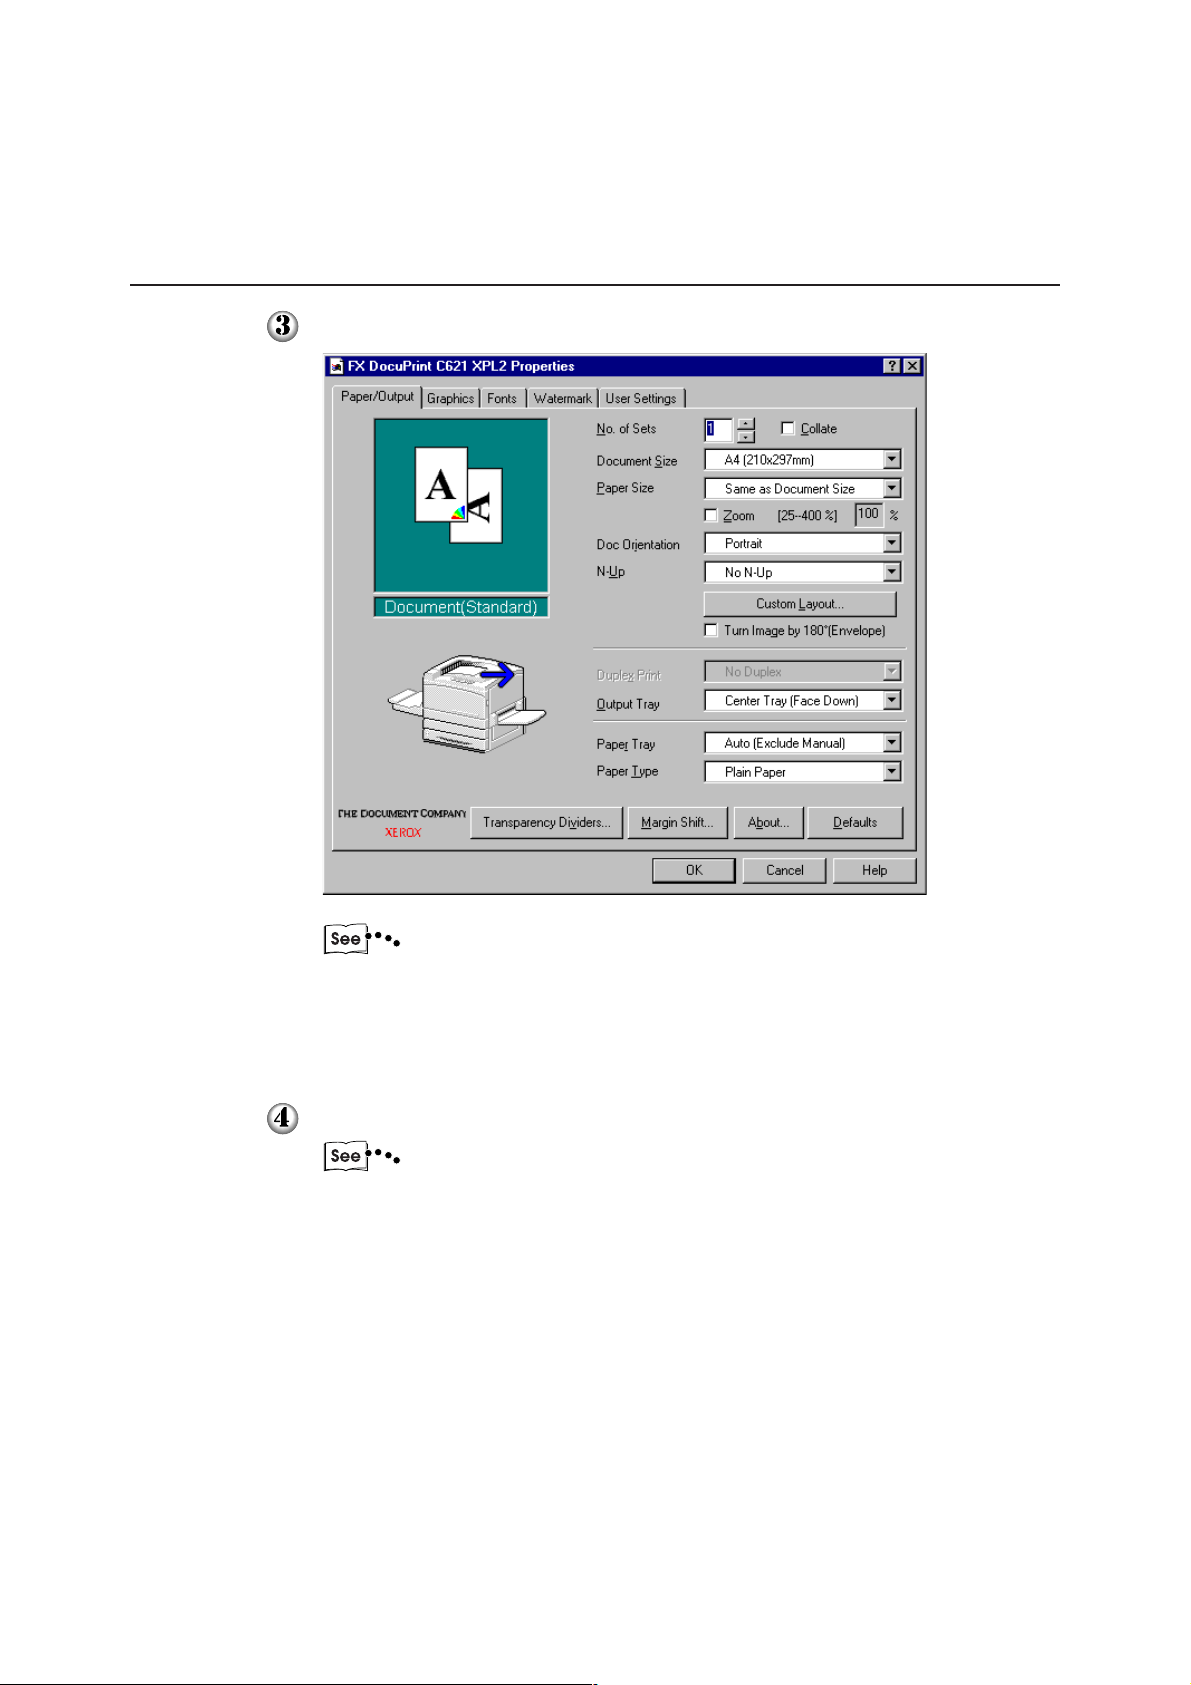
Specify the required settings on the respective tabs and click OK.
• Refer to the Online Help for details of each item within the tabs.
To learn how to use Online Help, refer to "1.4 Using Online
Help".
• You can make adjustments to the image or colour under the
Graphics tab to suit the type and purpose of the image.
Select an option from Page range in the Print dialog box and click OK.
"1.5 Cancelling a Print Job" on how to cancel printing
8
Page 25
1.3 Printing from Computers
Macintosh
In this section, Microsoft Office Word 98 is used to illustrate the printing procedure.
®
The method used to display the dialog box and the contents of the dialog
box differ amongst OS and application software. Refer to the manuals of
the respective software for reference.
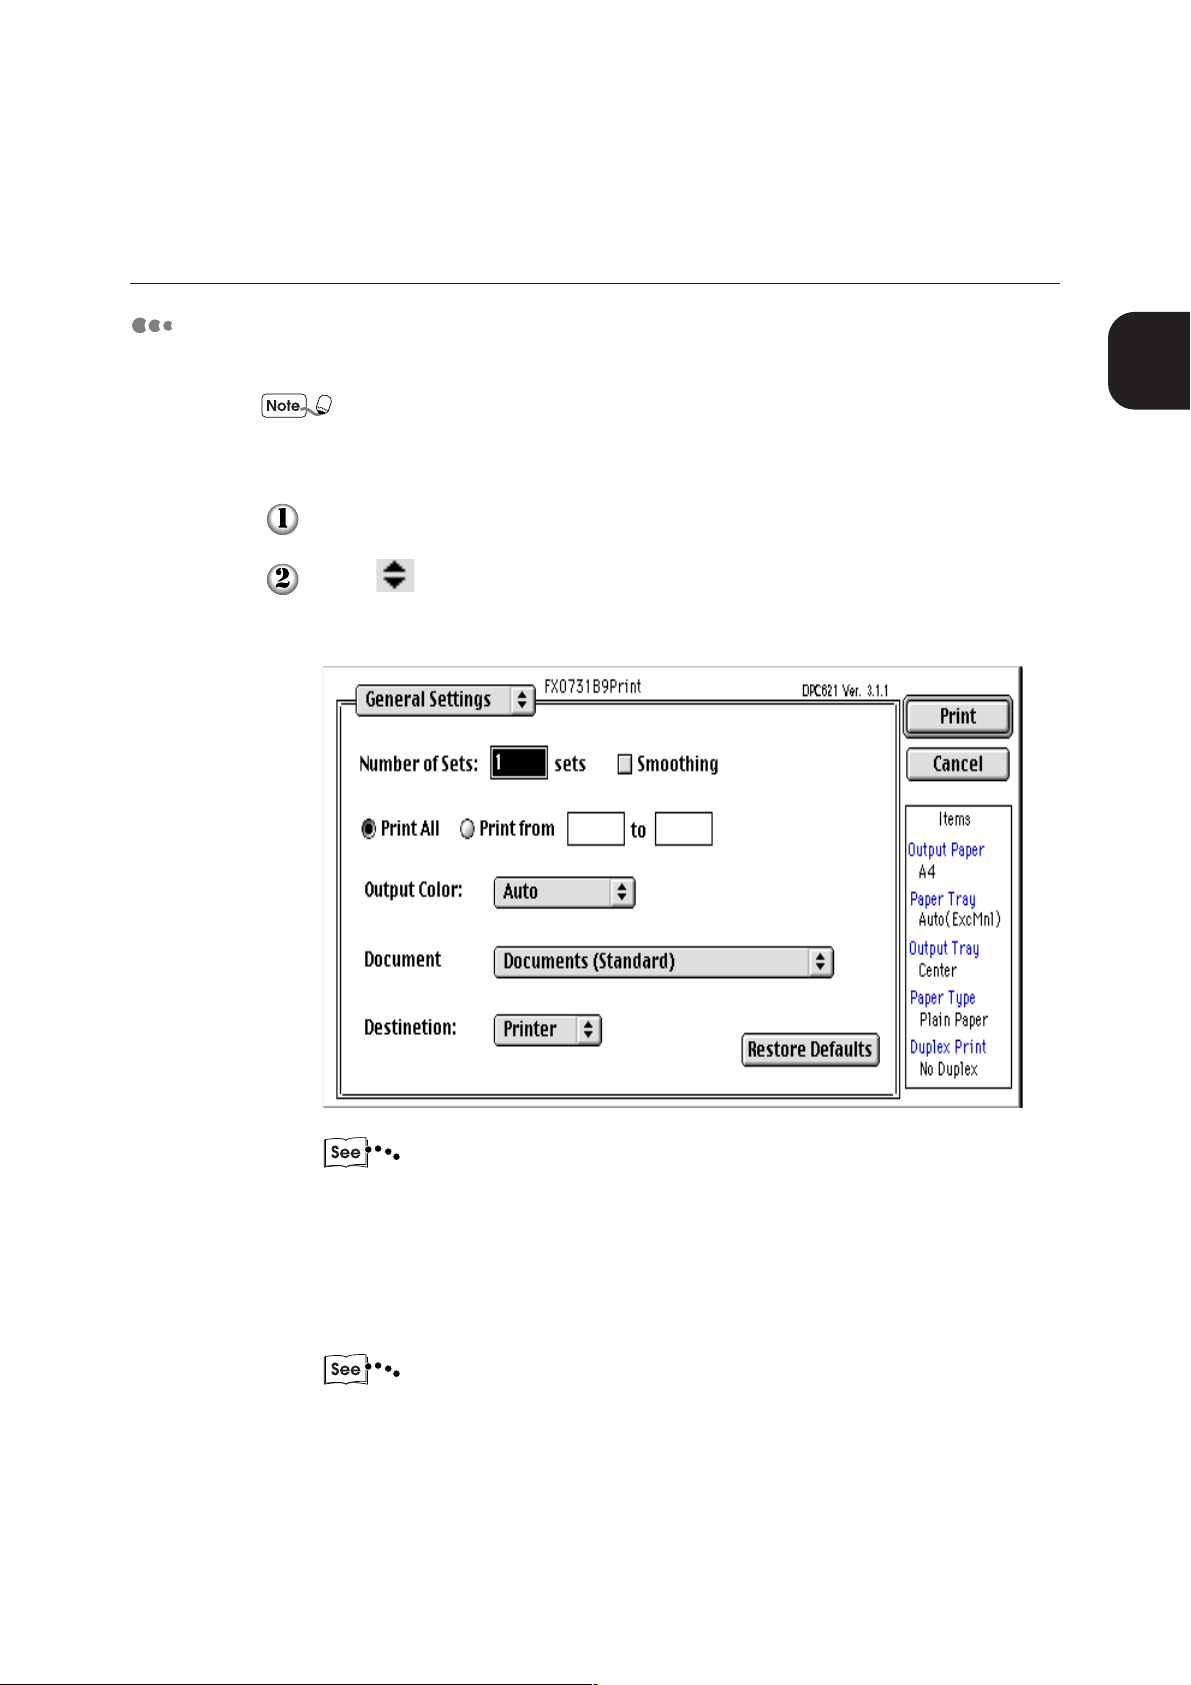
Select Print from the File menu.
Click on the General Settings bar. From the displayed list, select the items
that you want to change.
On the displayed dialog box, specify the necessary items and then click Print.
1
Basic Printing Operations
• Refer to the Online Help for details of each item within the tabs.
To learn how to use Online Help, refer to "1.4 Using Online
Help".
• You can make adjustments to the image or colour under the
Graphics tab to suit the type and purpose of the image.
The print data is sent to the printer.
"1.5 Cancelling a Print Job" on how to cancel printing.
9
Page 26
1.4 Using Online Help
When You Have Difficulties Setting the Print
Properties
Online Help is provided by the DocuPrint C621 printer driver. You can find explanations in
the Online Help on the function of each printer driver item and on how to print.
Online Help allows you to easily obtain the information you want without leaving the
computer.
The following is an explanation on how to use Online Help under different OS.
Windows 95, Windows 98, Windows NT
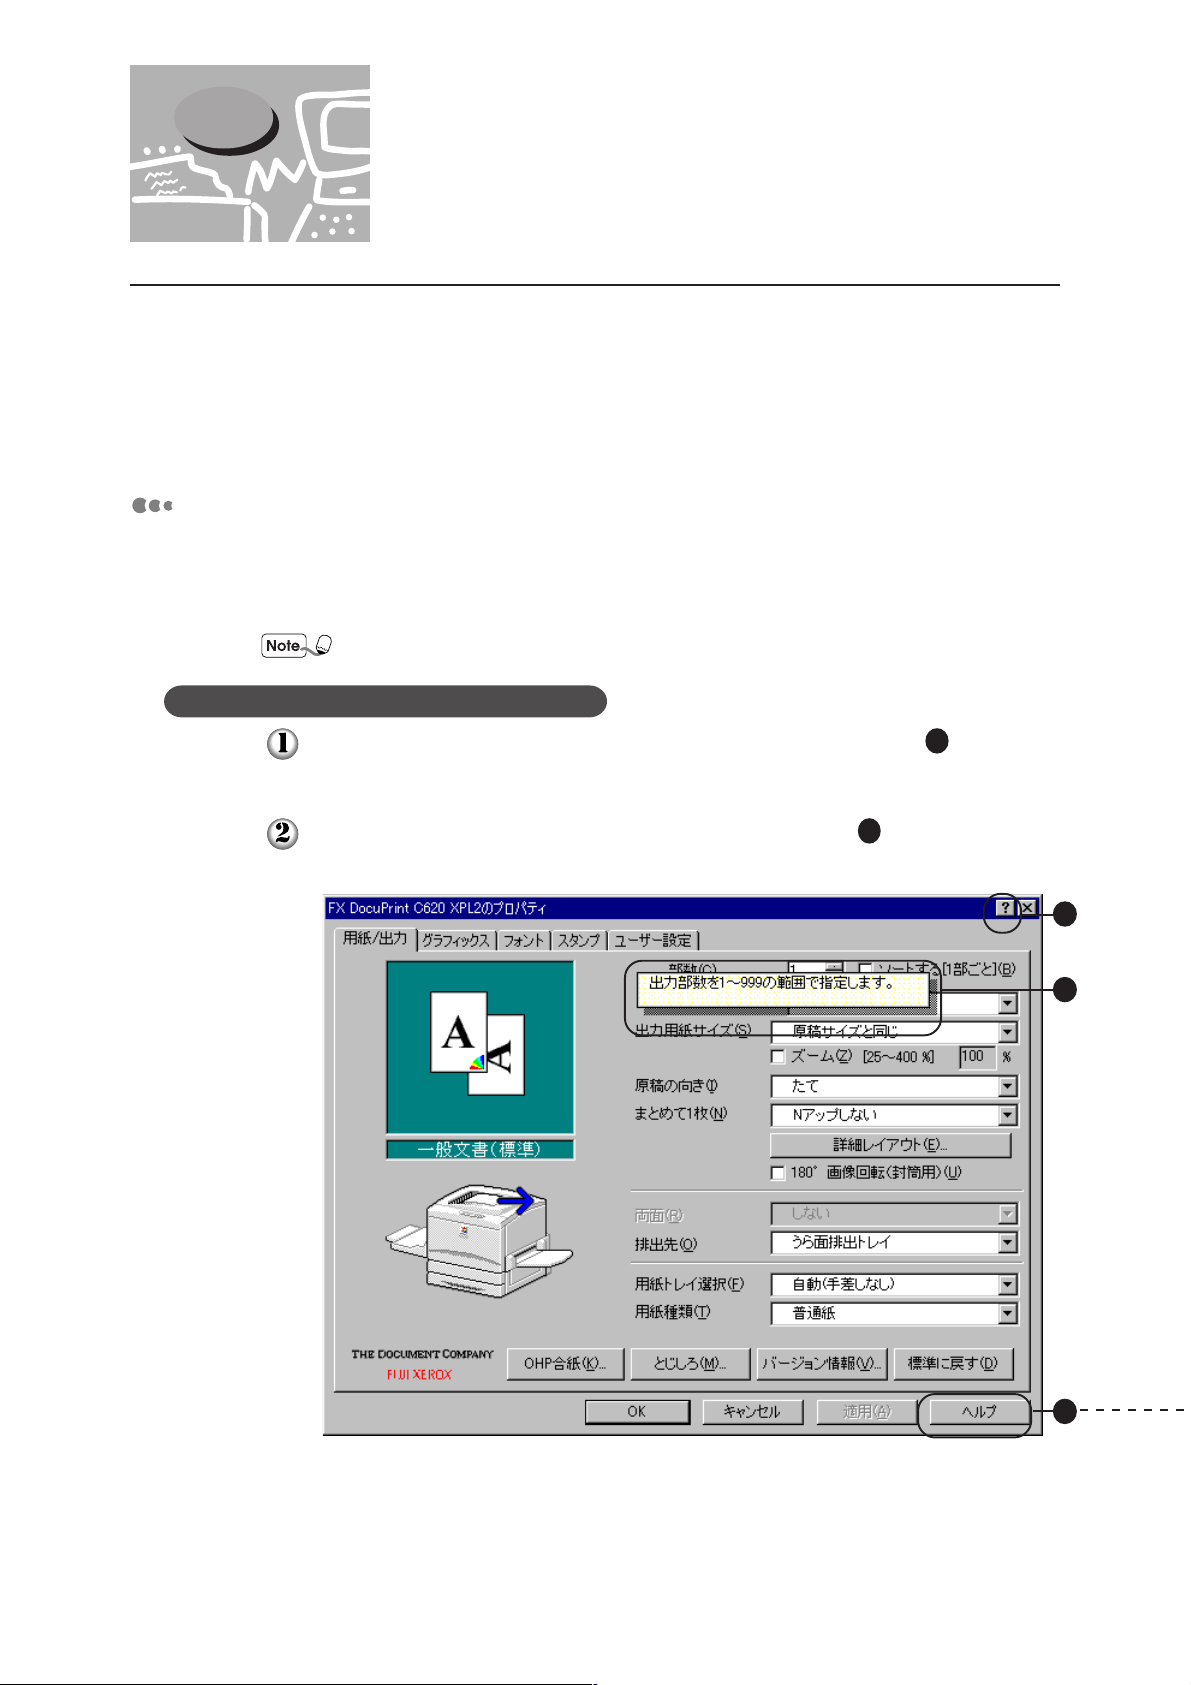
Display the Properties dialog box and select the tab containing the items that you want to
know in more details.
The following explanation uses the Paper/Output tab in Windows 98 as an example.
The Online Help items and contents vary according to the OS used.
To show the explanation of an item
Click on ? at the top right corner of the Properties dialog box. (See
diagram below.)
To get the explanation for any item, click on that item. (See
below.) This will display the explanation for the item.
2
in the diagram
1
in the
1.
2.
10
3.
Page 27
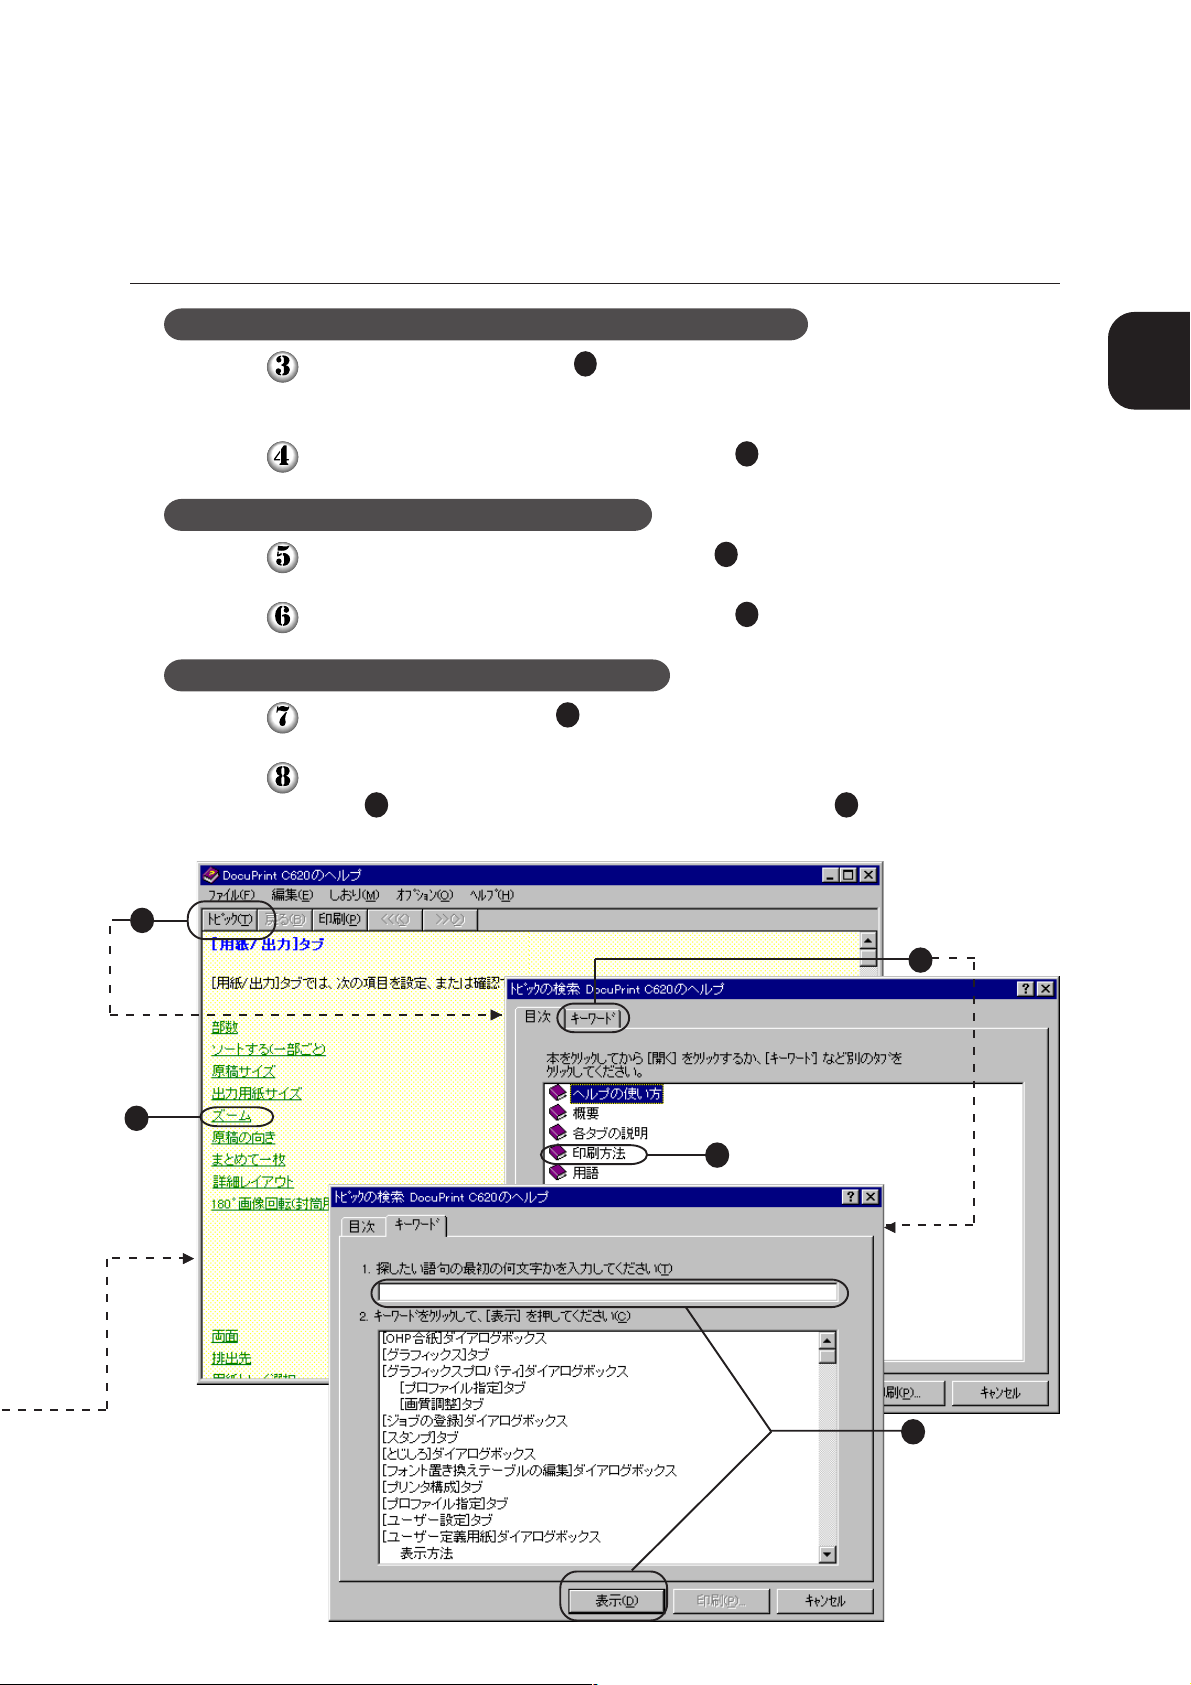
To display a detail explanation of an item within a tab
1.4 Using Online Help
Click the Help button. (See
bring up the Help window for the tabs.
Click on the item to learn more about it. (See
To display the table of contents in Help
Click Contents on the Help window. (See
Click on the item to learn more about it. (See
To search for information with keywords
Click the Index tab. (See
Enter the keywords in "Type the first few letters of the word you're looking for"
(see
8
in the diagram below). Then, click Display (see
below).
5.
3
in the diagram on the previous page.) This will
4
in the diagram below.)
5
in the diagram below.)
6
in the diagram below.)
7
in the diagram below.)
8
in the diagram
1
Basic Printing Operations
4.
7.
6.
8.
11
Page 28
1.4 Using Online Help
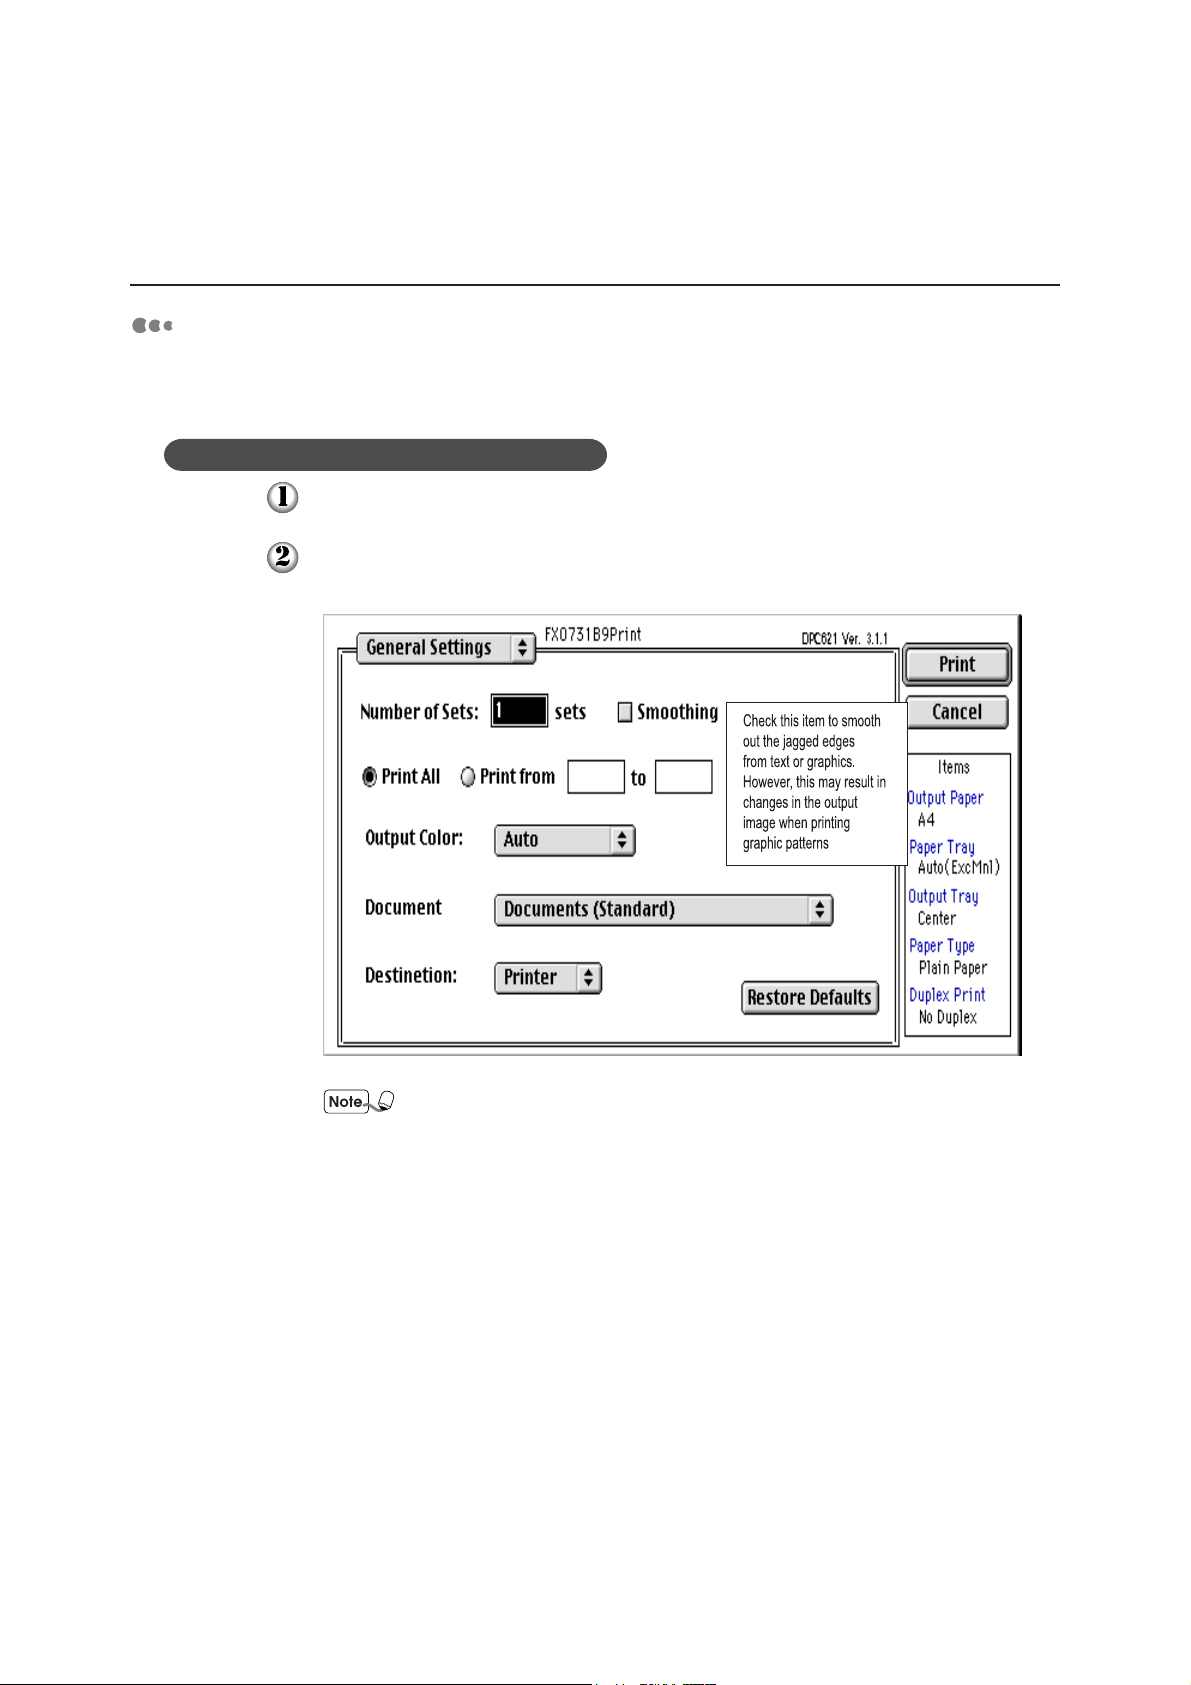
Macintosh
Display the dialog box that contains the items you want to know in more details.
The following explanation uses the General Settings dialog box as an example.
To show the explanation of an item
Click Help on the menu bar, and select Show Balloon Help.
Place your cursor on any item in the dialog box. The explanation for that item
appears.
12
When you do not need help on the items, select Hide Balloon Help
from the Help menu on the menu bar.
Page 29
1.5 Cancelling a Print Job
To cancel a print job, you have to first cancel the print command on the computer, and
then cancel the print data that is being processed in the printer using the control panel.
1
Basic Printing Operations
1.5.1 Cancelling a Print Job on the Computer
The procedures for cancelling a print job on the different OS are described in the following
sections.
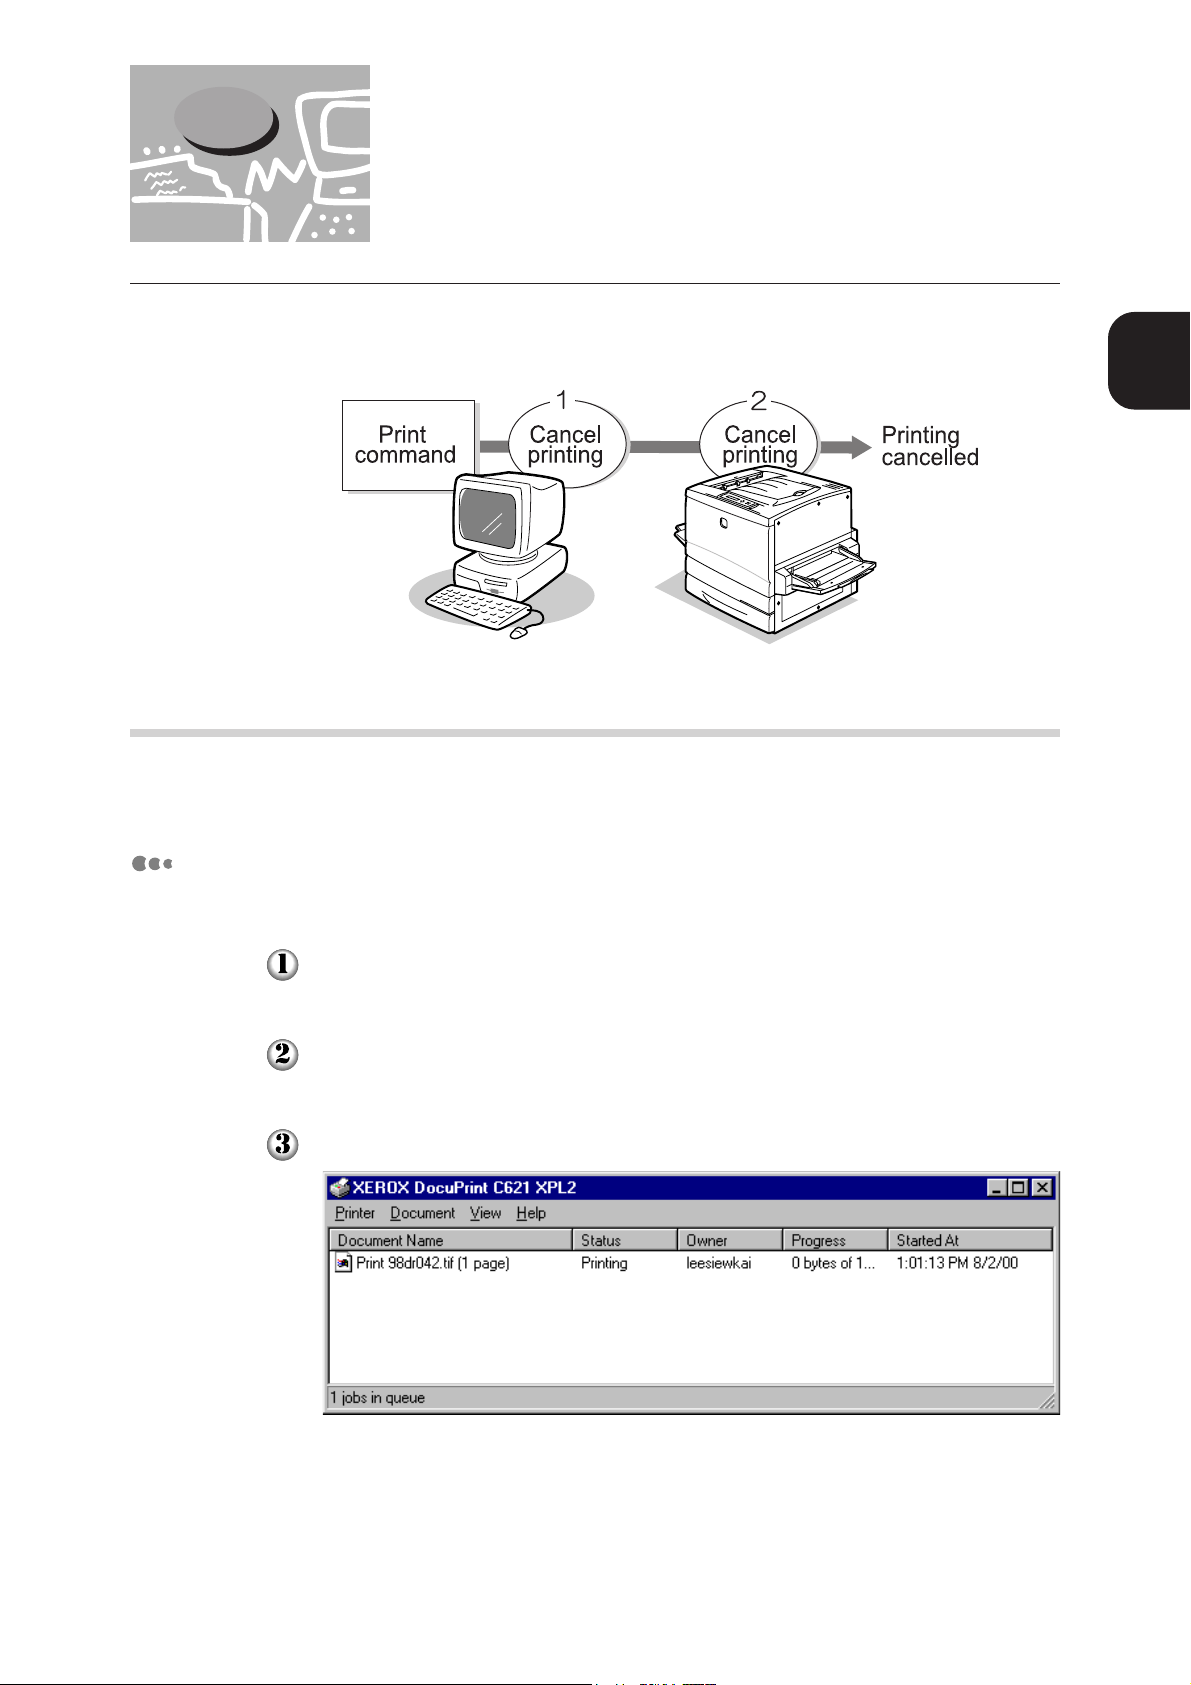
Windows 95, Windows 98, Windows NT
The procedure is as follows:
Click the Start menu and select Settings and Printers.
The Printers window is displayed.
Double-click on the printer icon for DocuPrint C621.
The Printer window for DocuPrint C621 appears.
Select the document to cancel, and press the Delete key on the keyboard.
Proceed to section "1.5.2 Cancelling a Print Job on the Control Panel" to continue.
13
Page 30
1.5 Cancelling a Print Job
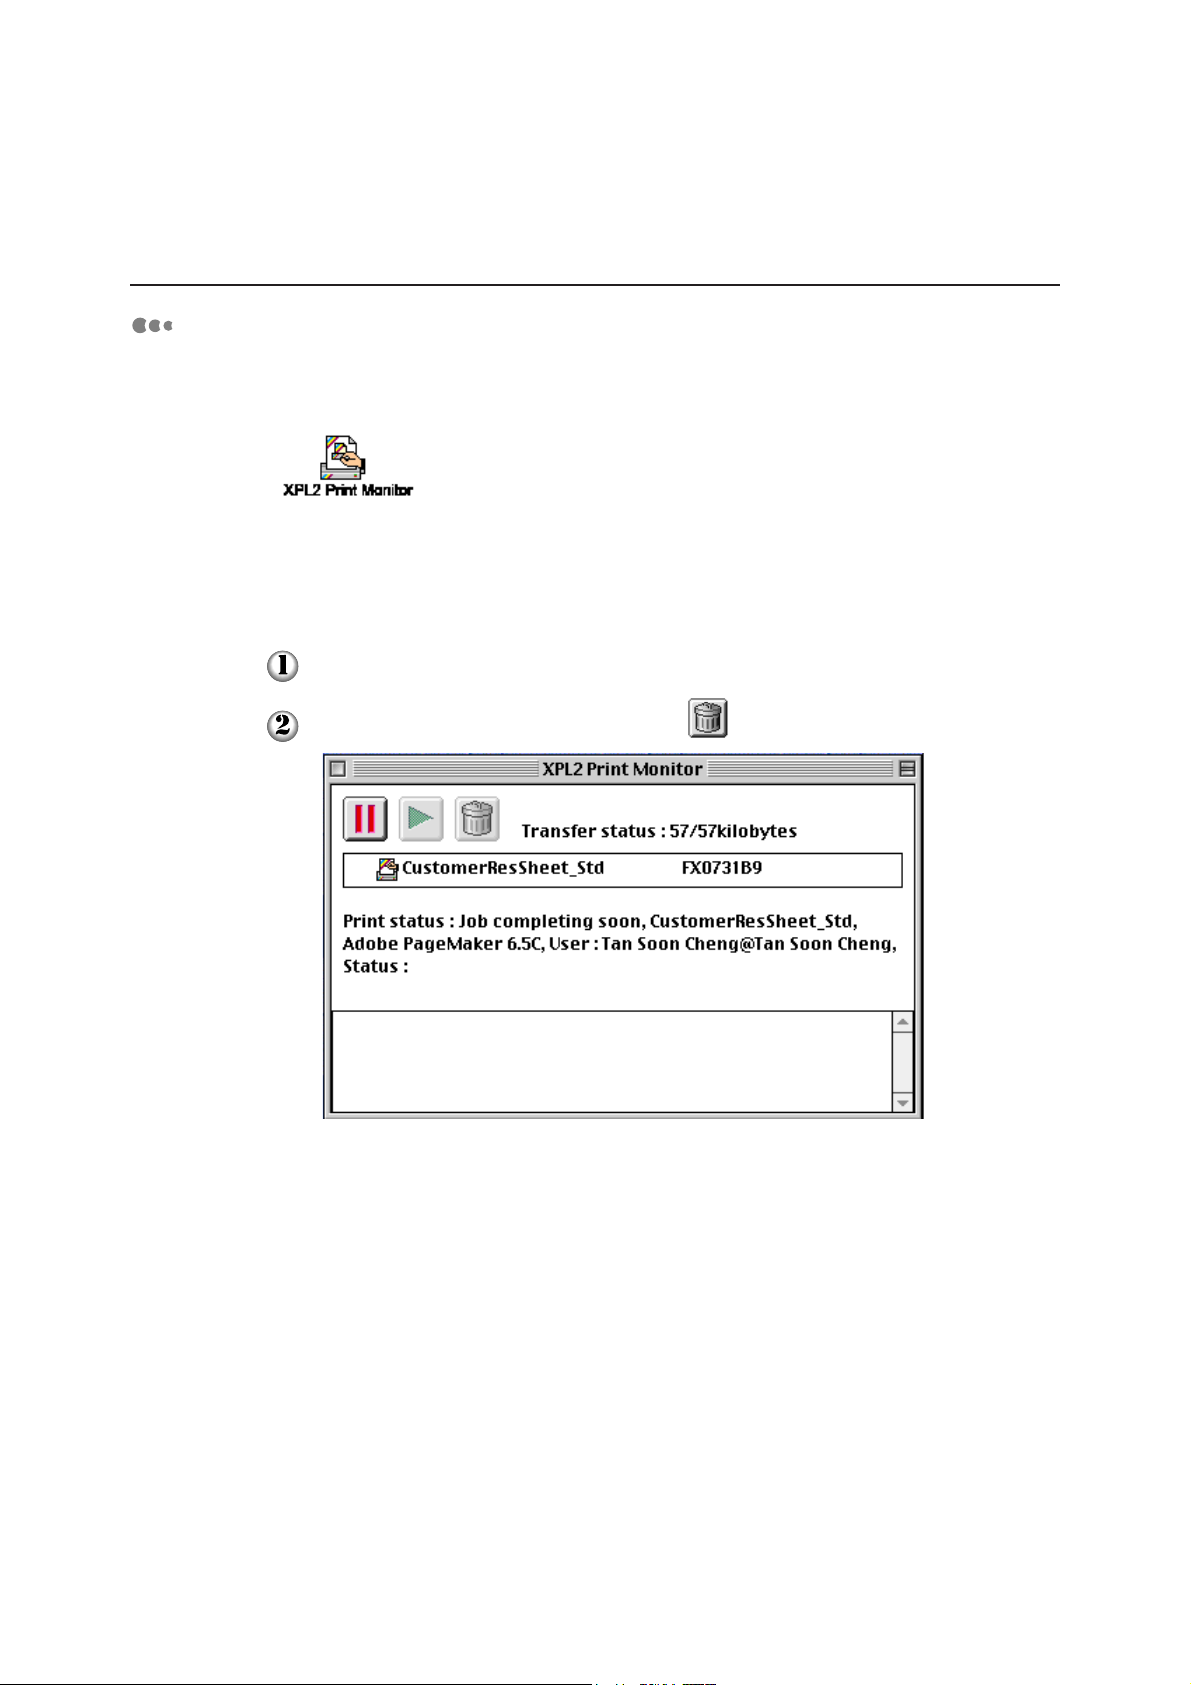
Macintosh
When Background Printing is selected in the Chooser window, you can cancel a print job
from the print monitor.
Once background printing is set, the print monitor will automatically be activated whenever a
print command is sent from an application.
To cancel a print job from the print monitor, follow the procedure below.
Switch to the XPL2 Print Monitor screen.
Select the document to cancel, and click .
Proceed to section "1.5.2 Cancelling a Print Job on the Control Panel" to continue.
14
Page 31

1.5 Cancelling a Print Job
1.5.2 Cancelling a Print Job on the Control Panel
After a print job is cancelled on the computer, the procedure described below will help you
cancel the data that is being processed on the printer. However, if there is a page printing on
the printer, that page will be printed in its entirety.
"3.2 Basic Operations of the Menu Screen" on how to use the control
panel
(Printer is processing data)
1
Basic Printing Operations
Press Online.
This message appears when the printer is
processing the data that is currently being
printed. The processing time differs according to
the size of the data printed. Please wait until the
message changes.
(The printer is offline)
Press Cancel once. The print operation will be cancelled.
Once the cancellation is completed, the Print screen is displayed.
(Print screen (when the printer is ready to print again))
15
Page 32

1.6 Forced Output of Data Still in
the Printer
When Printing Stopped Halfway
When a page at the end of a processing data is terminated halfway, the next data will have
to wait until job timeout occurred before it can be printed. The display panel will show the
message "Please wait...".
You can push forward the next job by forcing the data still remaining in the printer to be
printed, without waiting for the job timeout to occur.
This section describes the procedure to forcibly output the remaining data.
The factory setting for job timeout is 30 seconds.You can specify the
setting from 5 to 300 seconds. For job timeout details, refer to "3.3 List of
Items on the Menu Screen".
The procedure is as follows:
"3.2 Basic Operations of the Menu Screen" on how to use the control
panel
(Printer is processing data)
Press Online.
This message appears when the printer is
processing the data that is currently being
printed. The processing time differs according to
the size of the data printed. Please wait until the
message changes.
(The printer is offline)
Press Set/Eject. The remaining data will be printed.
Once the printing is done, the Print screen is displayed.
16
(Print screen (when the printer is ready to print again))
Page 33

1.7
Changing the Printer
Configuration
When Accessories are Added
If you are adding optional products to the printer after it is installed, you have to change the
printer configuration on the printer driver.
• Hard disk
• Duplex print module
• Additional memory
• 2-tray module
• A3 oversize tray
1
Basic Printing Operations
For installation procedure of these optional products, refer to their
respective booklets or the Setup Guide. This section will discuss how to
configure the printer drivers with the assumption that these products are
installed.
17
Page 34

1.7 Changing the Printer Configuration
Windows 95, Windows 98, Windows NT
The procedure is as followins. Windows 98 is used as an example here.
Click the Start menu, select Settings and followed by Printers.
The Printers window is displayed.
Select the DocuPrint C621 printer icon. Then select Properties from the File
menu.
The printer properties dialog box is displayed.
Select the Printer Configuration tab.
Select the optional products that were installed, and click OK.
18
Page 35

Macintosh
1.7 Changing the Printer Configuration
The procedure is as follows:
Select Chooser from the Apple menu. The Chooser window is displayed.
From the top left box of the Chooser window, click the DPC621 icon.
Click the printer zone in AppleTalk Zones when you are setting the printer zone.
1
Basic Printing Operations
In a network environment where the zone is not specified,
AppleTalk Zones will not be displayed.
19
Page 36

1.7 Changing the Printer Configuration
Select the printer to be set from Connect to, and click Setup.
Select the installed optional products in the Printer Settings dialog box, and click
OK.
Close the Chooser window.
20
Page 37

1.8 Printing the Printer Settings
List
To check the Printer Configuration and Network
Settings
You can simply use the printer control panel to print a copy of the Printer Settings List to
check what optional products are installed on the printer or what are the network settings.
1
Basic Printing Operations
Show
information
about the
optional
products.
21
Page 38

1.8 Printing the Printer Settings List
The Printer Settings List is printed in portrait orientation on A4-size
paper. Load A4-size paper in portrait orientation in the paper tray.
"3.2 Basic Operations of the Menu Screen" on how to use the control
panel
(Print screen (when the printer is ready to print))
Press Online.
(The printer is offline)
Press Menu. The Menu screen is displayed.
(Menu screen)
Press ▼ thrice.
Press Set/Eject once.
Press Set/Eject once.
Press Set/Eject once.
22
Once printing is done, the Print screen is displayed.
Page 39

1.9 Printing the Job Log Report
Print Job Log
If you have selected the store job log option, then you can print the Print Job Log report by
using the control panel. The Print Job Log report will show you a record of the 50 recently
printed jobs for you to check if they have been printed correctly or not.
This section will explain how to save the print job log and how to print the report.
If Yes is selected for Auto Log Print in 1 System, the printer will
automatically generate the Print Job Log report when the number of print
jobs done exceeds 50. The factory setting is No. For details, refer to "3.3
List of Items on the Menu Screen".
1
Basic Printing Operations
23
Page 40

1.9 Printing the Job Log Report
The following procedure explains how to save the print log of the printer.
"3.2 Basic Operations of the Menu Screen" on how to use the control
panel
Press Online.
Press Menu. The Menu screen is displayed.
(Print screen (when the printer is ready to print))
(The printer is offline)
Press Set/Eject once.
Press ▼ four times.
Press Set/Eject once.
Press ▼ once.
Press Set/Eject once.
(Menu screen)
24
Press ▼ once.
Press Set/Eject once.
Press Online once.
Page 41

1.9 Printing the Job Log Report
The following procedure explains how to print the Job Log report.
The printer prints the Job Log report on A4-size paper in portrait
orientation. Load A4-size paper in the paper tray in the portrait
orientation.
(Print screen (when the printer is ready to print))
Press Online.
(The printer is offline)
Press Menu. The Menu screen is displayed.
(Menu screen)
Press ▼ thrice.
Press Set/Eject once.
1
Basic Printing Operations
Press ▼ thrice.
Press Set/Eject once.
Press Set/Eject once.
The Print screen is displayed once printing is done.
25
Page 42

1.10 Checking the Printer Status
on the Computer
When DocuPrint C621 is installed in a TCP/IP environment, you can use the WWW
browser on the network computer to check the printer status or change any kind of printer
settings.
This feature is known as CentreWare Internet Services.
CentreWare Internet Services is a software that enables the user to display the printer
status or change the printer settings without leaving the computer.
You can also check how much of your consumables and paper is still available in the
printer.
26
The following procedure explains how to use the CentreWare Internet Services.
Switch on the computer and activate the WWW browser.
Here, we use Microsoft Internet Explorer 5.0 on Windows 98 as an example.
To ensure that CentreWare Internet Services is working correctly,
you need to change the following settings of the browser.
If the CentreWare Internet Services is not connected properly,
check these settings.
• setting to enable Java
(any options except Disable Java for Java permission)
• Set Check for newer versions of stored pages to Every visit to the
page or Every time you start Internet Explorer
For details on CentreWare Internet Services, refer to the Network
Print Environment User Guide (net.pdf) in the Software Pack CDROM.
Page 43

1.10 Checking the Printer Status on the Computer
Enter the IP address or the internet address of the printer in the address column of
the browser.
If you do not know the printer IP address, print out the Printer
Settings List to check. Refer to "1.8 Printing the Printer Settings
List" for information on printing the Printer Settings List.
If the network is using Domain Name System (DNS) and the printer
host name is registered in the DNS name server, you can use the
Internet address which has both host and domain names to access
the printer.
DNS allows you to obtain the IP address from the host name using
Internet. Check with your network administrator on whether DNS
is used on the network and the internet address of the printer.
1
Basic Printing Operations
Example: For IP address, "13.198.33.195", enter, "http://13.198.33.195/"
Example: For internet address, "dpc620.aaa.bbb.fujixerox.co.jp" (host name:
dpc620; document name: aaa.bbb.fujixerox.co.jp), enter, "http://
dpc620.aaa.bbb.fujixerox.co.jp/"
Press Enter on the keyboard.
The screen of CentreWare Internet Services is displayed.
27
Page 44

1.10 Checking the Printer Status on the Computer
Click Status to check printer status.
Printer information is displayed at the right side of the screen.
28
Page 45
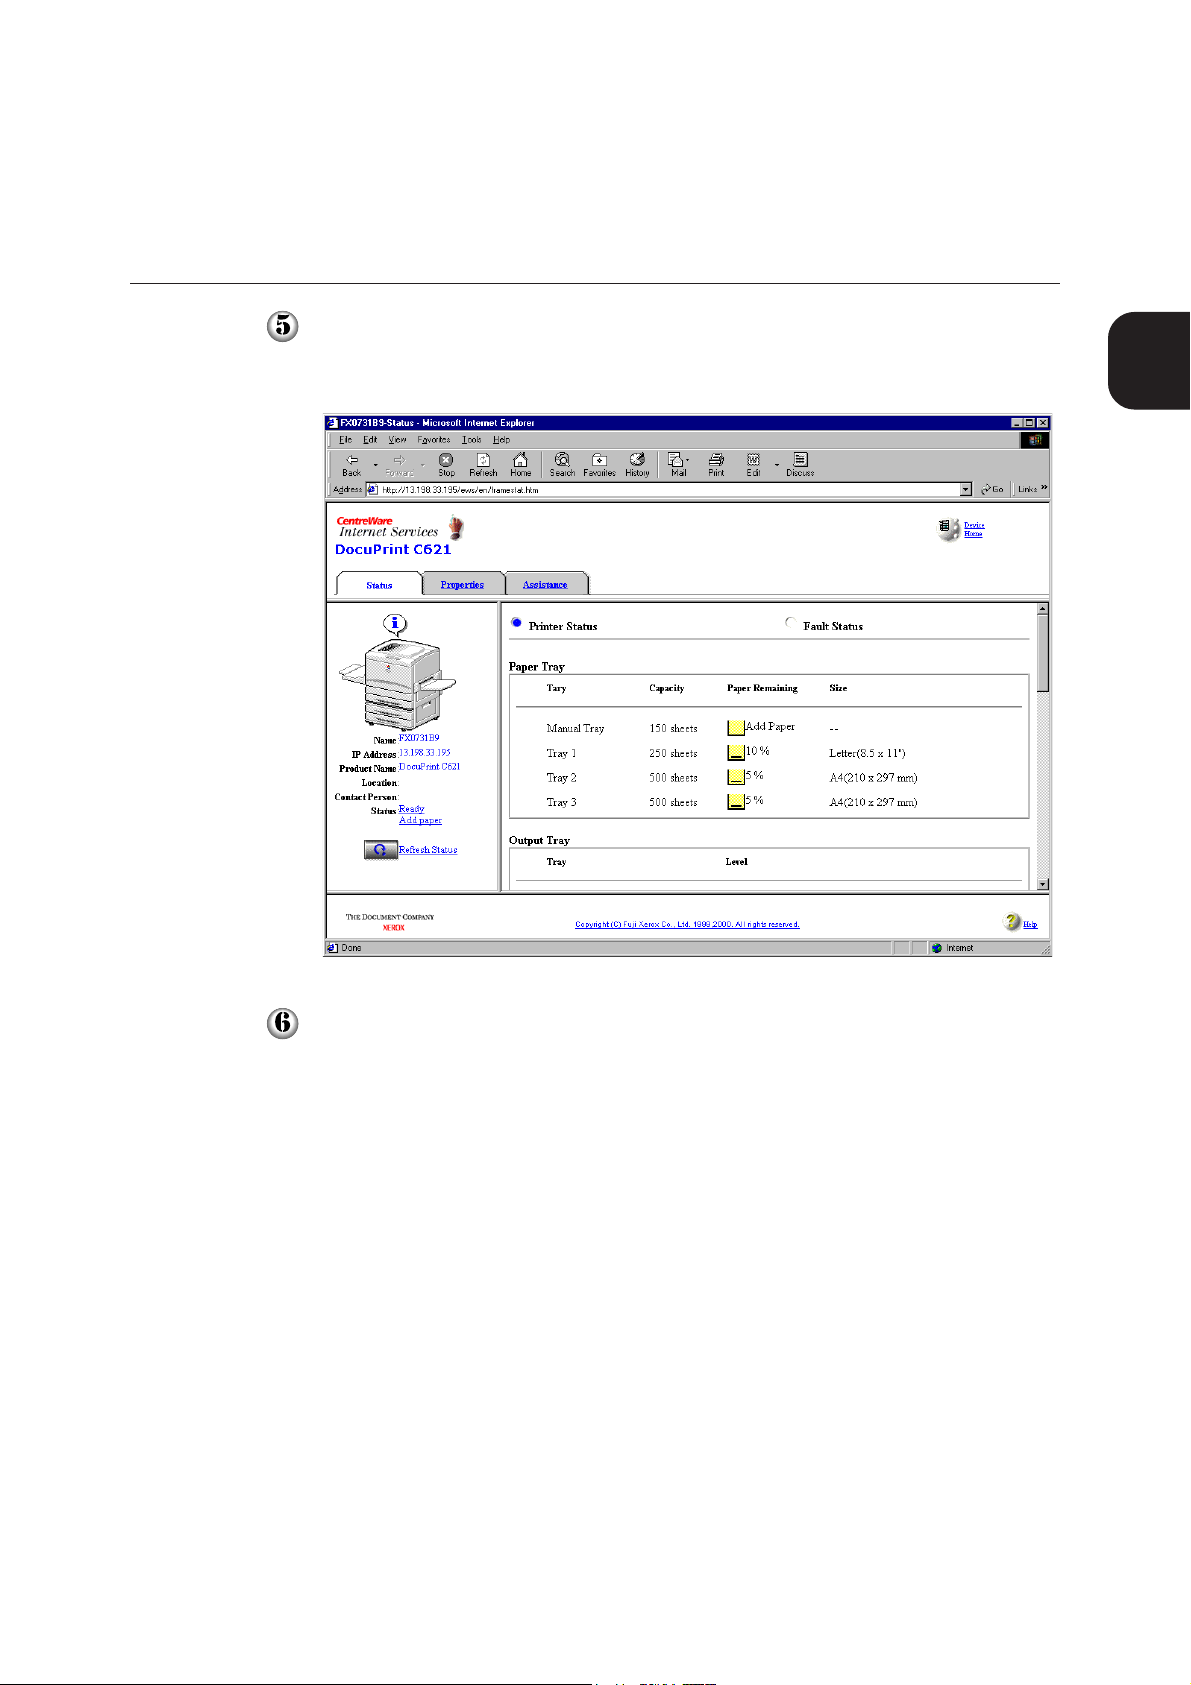
1.10 Checking the Printer Status on the Computer
Check the displayed content. You can check the status of the paper trays, output
tray, and covers; as well as information about the toner and other consumables;
and the output accounts.
1
Basic Printing Operations
To check if any error occurred, click on Fault Status.
The displayed content at the right of the screen changes to display the fault status.
29
Page 46

1.10 Checking the Printer Status on the Computer
Check the displayed content. You can also check the status of the printer control
panel here.
30
Page 47

Loading
Paper
2.1 Paper Handling .................................................................................. 32
2.2 Loading Paper .................................................................................... 38
2.3 Replacing the Paper Tray with an Optional Tray ............................... 44
2.4 Printing on Special Media ................................................................. 46
2.5 Printing on Side Two of Printed Sheets ............................................. 56
Page 48

2.1 Paper Handling
If you use paper that is unsuitable for printing, they may cause paper jams and
deterioration in print quality. We recommend you to use the types of paper listed below to
obtain the best results from your printer.
2.1.1 Recommended Paper
Plain Paper (general-purpose)
When you are printing on plain paper (general-purpose paper), the plain paper used should
meet the following standards. However, for better printing, standard paper is
recommended.
Paper Supply
Manual Tray
Trays 1, 2 and 3
G.S.M. or g/m2 is a measure of the substance of paper expressed in
grammes per square meter, which does not depend on the number of
sheets in the ream. Ream weight is the weight of a 788 x 1,091 mm ream
consisting of 1,000 sheets.
Plain Paper (Standard)
The types of standard paper for DocuPrint C621 are as follows:
Paper Type
FXJ Paper
(For colour, one-sided printing)
FXJD Paper
(For colour, two-sided printing)
FXP Paper
(For monochrome printing)
Standard
G.S.M.: 64 to 220 g/m
2
Ream weight: 55 to 189 kg
G.S.M.: 64 to 105 g/m
2
Ream weight: 55 to 90 kg
Standard
G.S.M.: 82 g/m
2
Ream weight: 70 kg
G.S.M.: 98 g/m
2
Ream weight: 84 kg
G.S.M.: 64 g/m
2
Ream weight: 55 kg
32
Page 49

Special Media
In addition to plain paper, the following types of special media can also be used:
2.1 Paper Handling
Paper Type
Transparencies
(XEROX FILM (no border))
Labels (A4)
Envelopes
• Type 2 162 ✕ 114 mm
• Type 3 148 ✕ 98 mm
• Type 4 235 ✕ 105 mm
• Type 3 Long 235 ✕ 120 mm
Postcards
Product
Code
V516
V862
-
-
Note
Do not use transparencies meant for fullcolour printing (with white border).
You may use any full-page and uncut label
sheets.
Do not use envelopes that have tape seals. If
you are using an envelope with a glue seal,
make sure it is dry before use.
Postcards that have been printed on one side
may be slightly bent, resulting in paper jams.
Use your hands to straighten all the bends
before use.
We do not recommend printing on multi-coloured
postcards.
2
Loading Paper
Heavy Weight Paper
(G.S.M.: 105 to 220 g/m
Coated Paper
Glossy Paper
• Mylar Film
157g/m
• NK Special Double-sided
Art Paper
(For two-sided printing)
2
(12 ✕ 18")
For plain paper, heavy weight paper, postcard, coated paper and glossy
paper, you can use the manual tray to print on side 2 (back) of the paper
only if side 1 (front) was printed using DocuPrint C621. For details, refer
to "2.5 Printing on Side Two of Printed Sheets".
2
)
(A4)
(A3)
(A4)
(A3)
-
V588
V589
V607
V608
V844
Image may slip when printing on heavy
weight paper.
Do not use coated paper for inkjet printers.
When printing on either coated paper or
glossy paper, load one sheet at a time.
Coated and glossy paper can stick together
due to moisture. If more sheets were loaded
together, more than one sheet may be fed at
the same time, causing damage to the
machine.
33
Page 50
2.1 Paper Handling
Paper Trays, Paper Types and Sizes
The following table shows you the type, size and quantity of paper that can be loaded onto
a specific tray.
Paper Supply
Manual Tray
Tray 1
250 sheets universal tray
(bundled or optional)
Paper Type
Plain paper
Postcards
Envelopes
Labels
Transparencies
(no border)
Heavy weight
Paper
Coated paper
Glossy paper
Plain paper
Maximum
Capacity
Up to 150 sheets
or 16 mm thick
1 sheet
Up to 250 sheets
or 26 mm thick
Paper Size
A5 portrait
B5 portrait
A4 portrait/landscape
B4 landscape
A3 landscape
8.5 ✕ 11" (Letter) portrait/
landscape
8.5
✕
14" (Legal) landscape
✕
17 " landscape
11
12
✕
18 " landscape
✕
453 mm landscape
328
Postcard
Envelope (Types 2/3/4 and Type 3
Long)
Custom Size
(Width: 90 to 330.2 mm,
Length: 144.8 to 457.2 mm)
B5 portrait
A4 portrait/landscape
B4 landscape
A3 landscape
✕
11" (Letter) portrait
8.5
✕
14" (Legal) landscape
8.5
11
✕
17 " portrait
✕
18 " portrait
12
A3 oversize tray
(optional)
Trays 2, 3
2-tray module
(optional)
34
Plain paper
Plain paper
The number of sheets that can be loaded varies according to the
thickness of paper.
Up to 250 sheets
or 26 mm thick
Up to 500 sheets
per tray or 53 mm
thick
✕
453 mm landscape
328
B5 portrait
A4 portrait/landscape
B4 landscape
A3 landscape
✕
11" (Letter) portrait
8.5
✕
14" (Legal) landscape
8.5
11
✕
17" landscape
Page 51

Paper Types and Sizes for Two-sided Printing
If you have installed the duplex print module (optional), you can perform two-sided
printing. The various paper types and sizes that can be used for two-sided pritned are as
follows:
2.1 Paper Handling
Paper type
Plain paper
Size
Plain paper
B4 portrait
A4 portrait/ landscape
B4 landscape
A3 landscape
8.5
✕
11 " (Letter) portrait/landscape
8.5
✕
14 " (Legal) landscape
11
✕
17 " landscape
12
✕
18 " landscape
Use FXJD paper if you are printing documents with high image resolution
in colour and two-sided.
The following are examples of width, length and landscape/portrait
orientations mentioned in the above tables.
2
Loading Paper
35
Page 52

2.1 Paper Handling
2.1.2 Unsuitable Paper
Paper with any of the following properties may cause apper jams, and therefore should not
be used.
• Fuji Xerox full colour transparency
• Inkjet paper
• Too thick or thin paper
• Pre-printed paper
• Folded, wrinkled or torn paper
• Damp or wet paper
• Curled paper
• Sheets adhered with static electricity
• Layered or adhesive paper
• Specially coated paper
• Treated-surface coloured paper
• Pre-printed with ink that is affected at 155 ºC
• Heat sensitive paper
• Carbon paper
• Paper with a rough surface, such as textured or fibre form paper
• If using acidic paper, characters may fade; in which case change to a neutral paper
• Rough envelopes or envelopes with
metal seals
• Paper with staples, clips, ribbon or tape attached
• Envelopes with sticky adhesive
• Non-full page labels or cut labels
36
Page 53

• T-shirt transfer paper (heat press use)
• Transfer paper (cold water use)
• Opaque film
• Digital coated glossy paper
2.1 Paper Handling
• Adhesive paper (transparent/colourless)
2.1.3 Storing Paper
If paper is not stored improperly, it could cause paper jams, degraded print quality, and
even damage to the printer. Paper should be stored in a location satisfying the following
conditions:
• Temperature Between 10 ºC and 30 ºC
• Relative Humidity Between 30 to 65%
• The location should have low humidity.
• After opening a package, re-pack the unused paper with the wrapping paper, and store in
a cabinet or at a place with low humidity.
• Paper should be stored on a flat surface.
• Make sure that the paper are not wrinkled, folded or curled.
• Do not store paper under direct sunlight.
2
Loading Paper
37
Page 54

2.2 Loading Paper
This section explains how to replenish the paper trays when paper has run out.
"2.1 Recommended Paper" for paper that can be loaded in the respective
trays
2.2.1 Loading Paper in the Paper Trays
When you have run out of paper in the trays or when you want to load a different paper on
to the trays, the procedure is as follows.
Here, we will explain how to load A4-size paper in the portrait orientation in tray 1.
You can load paper into the trays in the optional 2-tray module in the
same way.
Pull out the tray until it stops.
38
Page 55

2.2 Loading Pape
Push down the metal plate inside the paper tray
until it locks.
Move the paper guides towards the outer edges
of the tray by squeezing the horizontal and
vertical guide clips between your fingers.
Make sure you move the vertical paper guide
all the way to the left.
2
Loading Paper
Align the four corners of the paper stock and
load the paper with the side to be printed facedown.
Load paper under the tab on the front right
hand side as shown in the diagram.
• Do not use folded, wrinkled or
curled paper.
• Do not load beyond the
maximum (MAX) fill line
indicated at the side of the
tray.
• Make sure the top sheet is
under the tab.
If you are loading into trays of
the 2-tray module, you can load
up to the maximum (MAX) fill line
indicated at the far end of the
tray. Do not load all the way up
to the grey tab shown in the
illustration. This tab is to prevent
paper from being fed in the
slanted position.
39
Page 56

2.2 Loading Pape
Align the horizontal paper guide with the width
of the paper.
If the paper guide is pressed
tightly against the paper, a paper
jam may occur. However, if the
paper guide is too loose, the
paper may become warp.
After aligning the edges of the paper, align the
mark on the horizontal guide with the
appropriate paper size mark.
• Make sure that the vertical
paper guide stopper is in the
right hole.
• If the vertical paper guide is
out of position, the paper size
may not be detected. When this
happens, slide the vertical
guide to the left, and then realign it with the paper scale.
Push the paper tray firmly into the printer.
Do not push in the tray with
excessive force.
40
Page 57

2.2.2 Loading Paper on the Manual Tray
The procedure for loading paper on the manual tray is as follows.
To avoid paper jams, do not load different sizes of paper on the tray at
the same time, and do not add paper to the tray before it empties.
2.2 Loading Pape
• "2.4 Printing on Special Media" when loading postcards,
transparencies and glossy paper onto the manual tray.
• "2.5 Printing on Side Two of Printed Sheets" to print on side two
(back) of pre-printed paper.
Open the tray if it is folded.
To avoid damage, do not pull
hard on the tray or place heavy
objects on top of the tray.
Lift the guide in the A3 oversize tray if you are
using a paper size other than 328 x 453 mm.
This guide should only be folded down when
using A3 oversize paper (328 x 453 mm), or when
custom size exceeds 12.2 inch in width.
2
Loading Paper
If you attempt to print with the
guide folded down (when
printing on paper with width less
than 12.2 inch), the image
position may slip on the printed
page.
41
Page 58

2.2 Loading Pape
➀
➁
Align the paper guides to the size of the paper
to be loaded (
Pull out the tray extension (
on large paper such as A3-size paper.
When using special paper such as
transparencies, labels and envelopes, fan the
stack of paper to allow air to enter between the
sheets.
).
) when printing
When printing on larger paper
sizes, such as A3, pull out the
tray extension. Otherwise, paper
may fall out of the tray, or may
not be fed properly.
Fanning the sheets helps to
prevent several sheets feeding
together, and prevents paper
jams.
• You can load plain paper
without fanning it first.
• Load coated or glossy paper
one sheet at a time. If you load
more than one sheet, moisture
between the paper may cuase
them to be fed into the printer
together, causing paper jams.
• If the paper is poorly cut and
there are scraps around the
edges, remove these before
loading the paper on the tray.
Align the four corners of the paper stock, and
load the paper with the side to be printed faceup onto the manual tray. Insert the paper gently
into the feeding slot.
42
• Do not use folded, wrinkled or
curled paper.
• Do not load beyond the (MAX)
fill line indicated at the side of
the tray.
Page 59

2.2 Loading Pape
Incorrect Method of Loading Paper
Is the paper loaded properly?
Have you aligned the paper guides with the paper carefully?
Is the guide pushing against the paper too much? Or, is there too much gap between the paper and
the guide?
Are the edges of the stack aligned?
2
Loading Paper
If the paper is not loaded correctly, the printing position may shift, causing the page to printout
incorrectly.
43
Page 60

2.3 Replacing the Paper Tray with
an Optional Tray
You can install the optional 250-sheets universal tray or the A3 oversize tray to replace
tray 1. If you have purchaed the 250-sheets universal tray, you can load paper of a
different size in the tray. If necessary, you can also replace the tray.
This section explains how to remove and install the paper trays.
"Appendix A Optional Products and Consumables" for information on the
types of optional trays available.
2.3.1 Removing the Paper Tray
The procedure is as follows:
Pull out the tray until it stops.
44
Page 61
2.3 Replacing the Paper Tray with an Optional Tray
2.3.2 Installing the Paper Tray
Hold the paper tray with both hands, gently lift
the front of the tray and pull it out completely.
After removing the tray, place it
on a flat and level surface.
2
Loading Paper
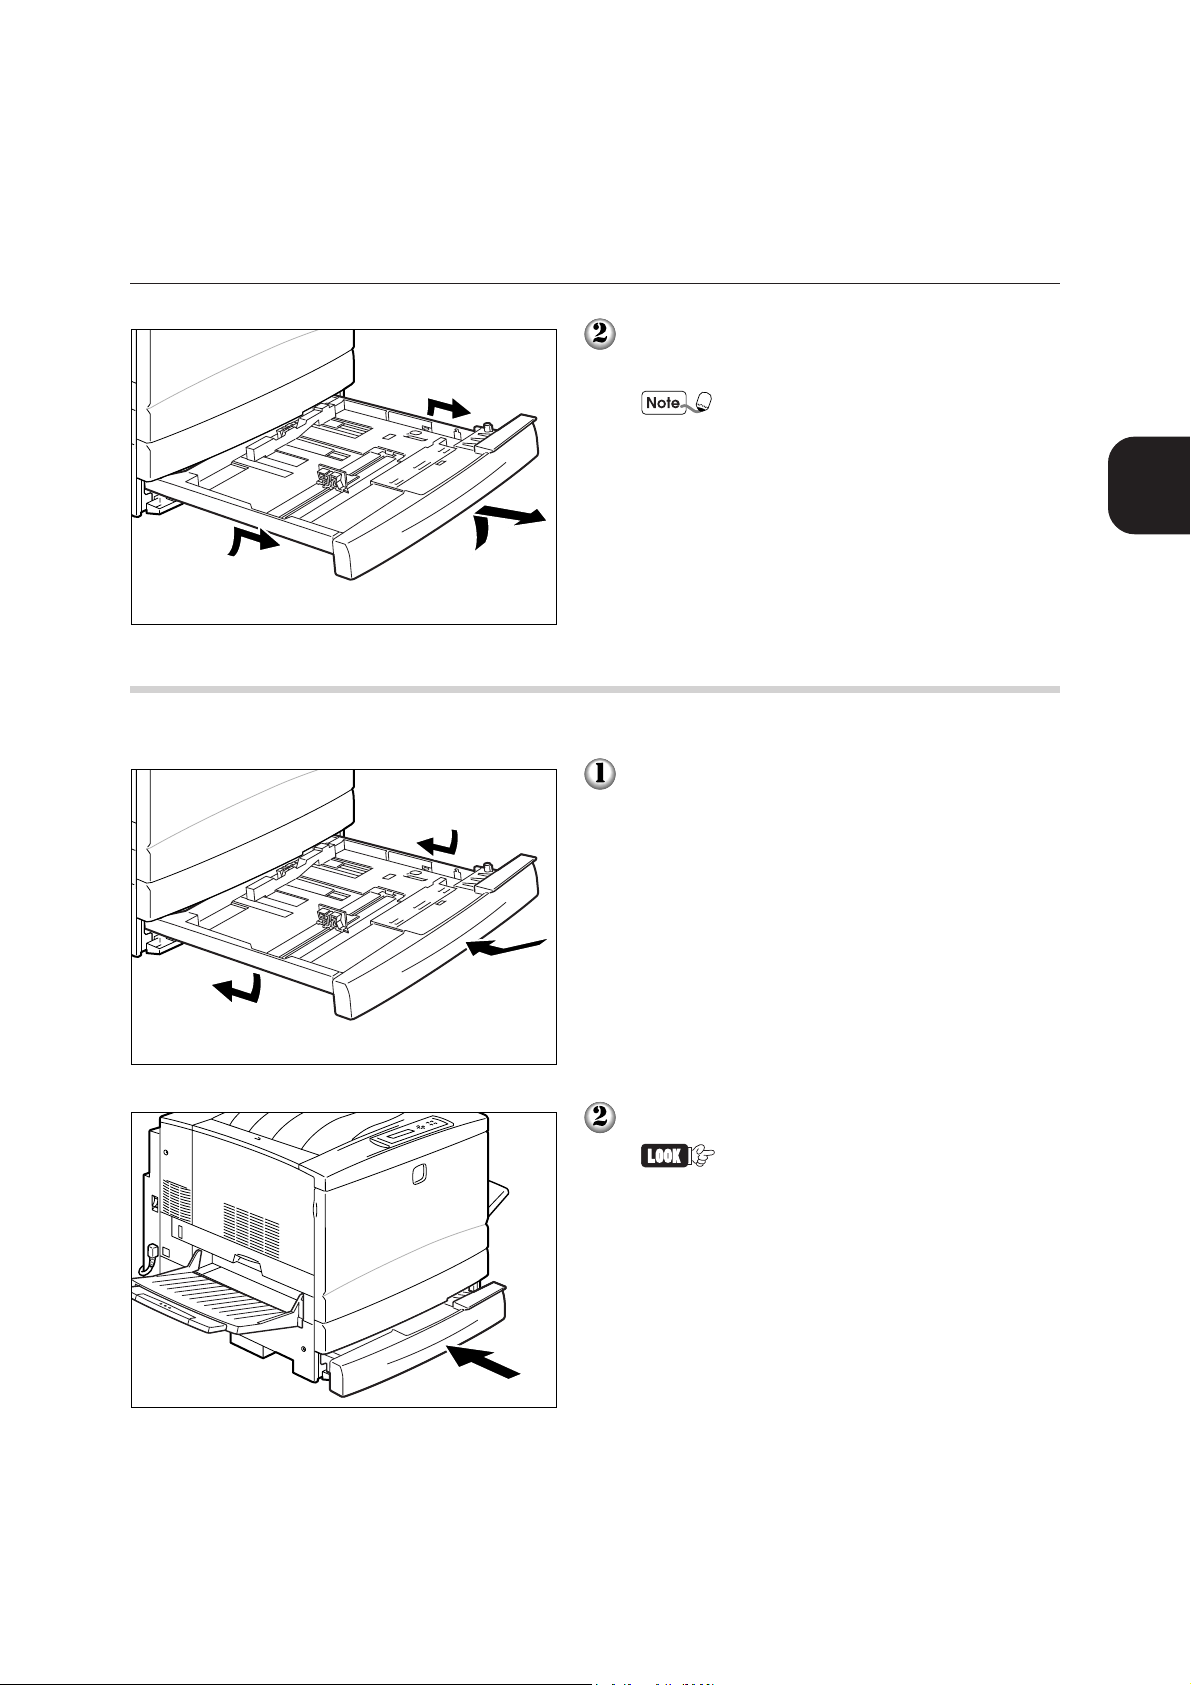
The procedure is as follows:
Hold the paper tray with both hands, and insert
it into the grooves for the paper tray inside the
printer.
Push the paper tray firmly into the printer.
Do not push in the tray with
excessive force.
45
Page 62
2.4 Printing On Special Media
When you are printing on postcards or envelopes, make sure that you have placed them
correctly on the tray. Otherwise, they will be printed on the wrong side or in the wrong
direction.
Also, if you are printing on special paper, you have to specify the type of paper and image
quality in the printer driver when you send a print command from the application software.
If you are printing on special paper frequently, you are recommended to
register the settings in the printer driver's User Settings tab. Once you
have register the settings, you do not have to go through the trouble of
specifying the settings each time you print. Refer to the Online Help on
User Settings tab.
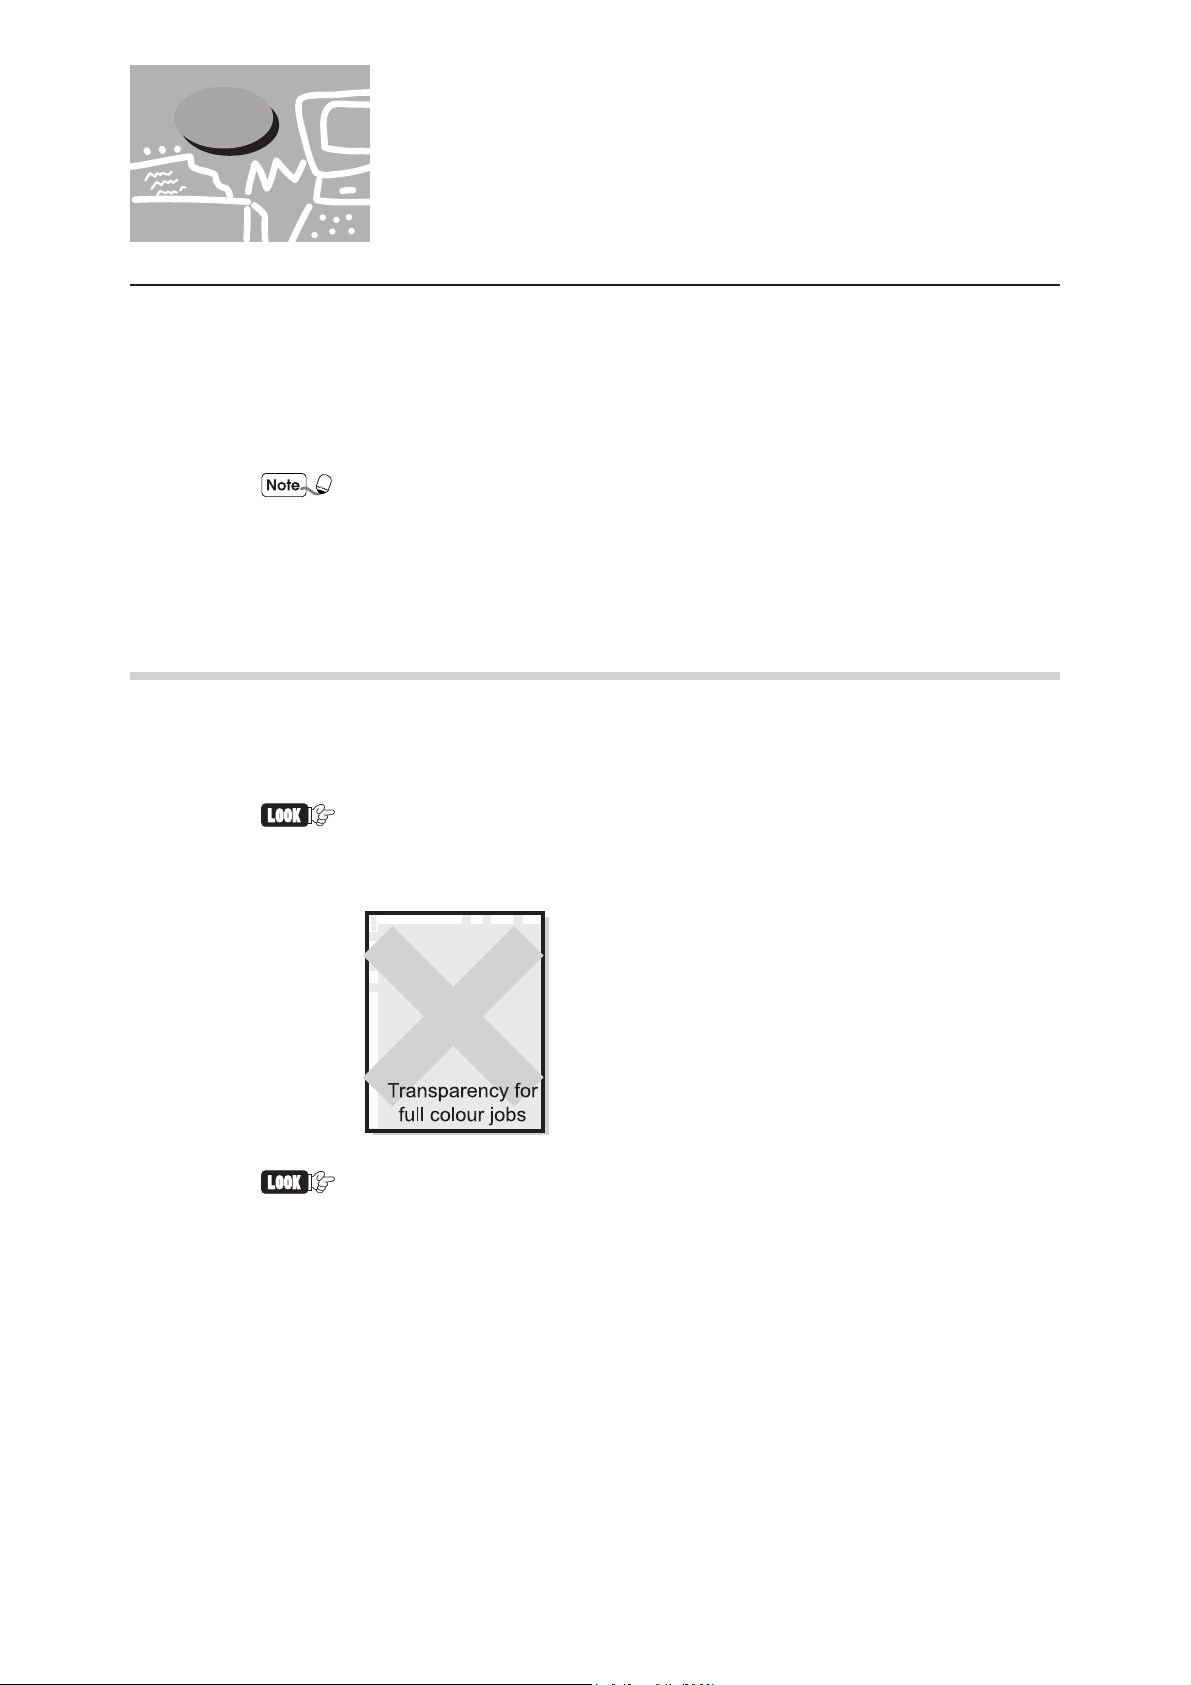
2.4.1 Printing on Transparencies
Transparencies must be fed from the manual tray.
You can use the Fuji Xerox transparencies (XEROX Film (no border)) for printing in
colour using DocuPrint C621.
Do not use transparencies for full colour jobs (that is, Fuji Xerox
transparency with a white border).
If you use unsuitable transparency, machine fault may occur.
FUJI XEROX full colour transparencies
cannot be used on DocuPrint C621.
If transparencies are allowed to accumulate in the output tray, static
electricity may result and cause a paper jam. Make sure you remove
every sheet of transparency once it is output.
46
Page 63

The procedure for loading transparencies is as follows:
Lift the A3 oversize guide and make sure that
the paper guide matches with the paper size
scale.
Fan the transparencies in small quantity.
2.4 Printing on Special Media
2
Loading Paper
Insert the transparency gently into the feeding
slot of the manual tray.
Do not use full colour
transparencies for full colour
jobs as this may cause paper jam
and fuser fault.
Once the transparency is set properly, send a
print command from your application software.
Specify the items shown in the next section
"Printer Driver Settings (when printing on
transparencies)" in the printer driver.
47
Page 64

2.4 Printing on Special Media
Printer Driver Settings (when printing on transparencies)
• Windows 95, Windows 98, Windows NT
Tab
Paper/Output
Graphics
• Macintosh
Dialog Box
Paper Settings
Item
Paper Size
Output Tray
Paper Tray
Manual Tray Paper
Orientation
Paper Type
Document Type
Item
Paper Size
Value
"A4" or "Same as Document Size" (when the
document size is A4)
"Side Tray (Face Up/Forward)" or
"Side Tray (Face Up/Reverse)"
"Manual Tray"
"Portrait" or "Landscape"
Transparency
Transparencies
Value
"A4" or "No change" (when the paper size is
A4)
General Settings
Printer Settings
48
Paper Type
Document Type
Paper Tray
Paper Orientation
Output Tray
When you are printing on transparencies, you can choose to insert dividers
between the transparencies. Refer to the Online Help on how to insert dividers and
the different functions of each printer driver item. To use Online Help, refer to
"1.4 Using Online Help".
Transparency
Transparencies
Manual Tray
"Portrait" or "Landscape"
"Side Tray (Face Up/Forward)" or
"Side Tray (Face Up/Reverse)"
Page 65

2.4.2 Printing on Postcards
Postcards must be fed from the manual tray.
• When printing on side 2 (back) of a pre-printed postcard (side 1 (front)
is pre-printed), even the slightest curl may cause paper to jam. Flatten
the postcard and load again.
• You are not recommended to print on multi-coloured postcards.
2.4 Printing on Special Media
2
Loading Paper
The example below shows you how to print an address on a postcard.
Example:
Lift the A3 oversize guide and make sure that
the paper guide matches with the postcard size
scale.
Load the postcard with the side to be printed
face-up and the pre-printed postal code boxes
at the far end as shown in the diagram.
Once the postcards are set properly, send a
print command from your application software.
Specify the items shown in the next section
"Printer Driver Settings (when printing on
postcards)" in the printer driver.
49
Page 66

2.4 Printing on Special Media
Printer Driver Settings (when printing on postcards)
• Windows 95, Windows 98, Windows NT
Tab
Paper/Output
• Macintosh
Dialog Box
Paper Settings
Printer Settings
Item
Paper Size
Output Tray
Paper Tray Selection
Manual Tray Paper
Orientation
Paper Type
Item
Output Size
Paper Type
Paper Tray
Value
"Postcard" or "Same as Document Size" (when
the document size is Postcard)
"Side Tray (Face Up/Forward)" or
"Side Tray (Face Up/Reverse)"
"Manual Tray"
"Landscape"
Postcard
Value
"Postcard" or "Same as Document Size" (when
the document size is Postcard)
"Postcard"
"Manual Tray"
50
Paper Orientation
Output Tray
Refer to Online Help regarding the different functions of each printer driver item.
To use Online Help, refer to "1.4 Using Online Help".
"Landscape"
"Side Tray (Face Up/Forward)" or
"Side Tray (Face Up/Reverse)"
Page 67

2.4.3 Printing on Envelopes
Envelopes must be fed from the manual tray.
You can use envelopes in the following sizes. Open the flap, and insert as shown in the
diagram.
2.4 Printing on Special Media
• Type 2 (162
• Type 3 (148
• Type 4 (235
• Type 3 Long (235 ✕ 120 mm)
✕
114 mm)
✕
98 mm)
✕
105 mm)
• Do not use envelopes that have tape seals. If you are using an
envelope with a glue seal, make sure it is dry before use.
• Use only landscape (horizontal) type envelopes (90 mm or wider, and
143 mm or longer with the flap open, as shown in the diagram).
Portrait (vertical) type envelopes cannot be used.
• Depending on the type of envelope, envelopes may sometimes crease or
not print properly.
2
Loading Paper
51
Page 68

2.4 Printing on Special Media
For example, when printing on an envelope in the following manner:
Example:
Lift the A3 oversize guide and make sure that
the paper guide matches the postcard size
scale.
Open the flap. Insert the envelope with the flap
open towards you.
Once the envelope is set properly, send a print
command from your application software.
Specify the items shown in the next section
"Printer Driver Settings (when printing on
envelopes)" in the printer driver.
52
Page 69

Printer Driver Settings (when printing on envelopes)
• Windows 95, Windows 98, Windows NT
2.4 Printing on Special Media
Tab
Paper/Output
• Macintosh
Dialog Box
Item
Paper Size
Doc Orientation
Turn Image by 180º
(Envelope)
Output Tray
Paper Tray
Manual Tray Paper
Orientation
Paper Type
Item
Value
Custom envelope size or "Same as Document Size"
(when the document size is one of the custom sizes)
"Landscape"
"On"
"Side Tray (Face Up/Forward)" or
"Side Tray (Face Up/Reverse)"
"Manual Tray"
"Portrait"
"Envelope"
Value
2
Loading Paper
Paper Settings
Printer Settings
Refer to Online Help regarding the different functions of each printer driver item.
To use Online Help, refer to "1.4 Using Online Help".
Paper Size
Doc Orientation
Turn Image by 180º
(Envelope)
Paper Type
Paper Tray
Paper Orientation
Output Tray
Custom envelope size or "Same as Document Size"
(when the document size is one of the custom sizes)
"Landscape"
"On"
"Envelope"
"Manual Tray"
"Portrait"
"Side Tray (Face Up/Forward)" or
"Side Tray (Face Up/Reverse)"
53
Page 70

2.4 Printing on Special Media
2.4.4 Printing on Glossy paper
Glossy paper must be fed one at a time from the manual tray.
You can use the following media with DocuPrint C621:
• Mylar film (157 g/m
• NK double-sided art paper
If media other than those mentioned above are used, paper jams may
result.
The procedure on how to print on glossy paper is as follows.
2
)
Lift the A3 oversize guide and make sure that
the paper guide matches with the paper size
scale.
Insert the paper gently into the feeding slot of
the manual tray, with the side to be printed
face-up.
Load glossy paper one sheet at a
time. If you load more than one
sheet, moisture between the
paper may cause them to be fed
into the printer together, causing
paper jams.
Once the glossy paper is set properly, send a
print command from your application software.
Specify the items shown in the next section
"Printer Driver Settings (when printing on
glossy paper)" in the printer driver.
54
Page 71

Printer Driver Settings (when printing on glossy paper)
• Windows 95, Windows 98, Windows NT
2.4 Printing on Special Media
Tab
Paper/Output
Graphics
• Macintosh
Dialog Box
Paper Settings
Item
Paper Size
Output Tray
Paper Tray
Manual Tray Paper
Orientation
Paper Type
Document Type
Item
Paper Size
Value
"A4", "A3", "12 x 18" " or "Same as Document
Size" (Specify the paper size used)
"Side Tray (Face Up/Forward)" or
"Side Tray (Face Up/Reverse)"
"Manual Tray"
"Portrait" or "Landscape"
"Coated Paper"
"Coated Paper"
Value
"A4", "A3", "12 x 18" " or No Change
(Specify the paper size used)
2
Loading Paper
General Settings
Printer Settings
Refer to Online Help regarding the different functions of each printer driver item.
To use Online Help, refer to "1.4 Using Online Help".
Paper Type
Document Type
Paper Tray
Paper Orientation
Output Tray
"Coated Paper"
"Coated Paper"
"Manual Tray"
"Portrait" or "Landscape"
"Side Tray (Face Up/Forward)" or
"Side Tray (Face Up/Reverse)"
55
Page 72

2.5 Printing on Side Two of
Printed Sheets
After the following media are printed once on one side, you can run them through the
printer again to print on the reverse side. This is possible only if the first side was printed
by DocuPrint C621.
• Plain paper
• Heavy weight paper
• Postcards
• Coated paper
• Special glossy paper
If the side 1 was printed by another printer, it may cause DocuPrint C621
to breakdown. Do not use paper not pre-printed by DocuPrint C621.
To print on side 2 of a printed paper, feed the paper from the manual tray. Place the paper
according to the document orientation and binding direction.
56
Page 73

2.5 Printing On Side Two of Printed Sheets
To print on the reverse side of the paper, simply send a print command from the printer
driver and make sure you have specified the following items.
Printer Driver Settings (when printing on side 2 of a printed paper)
• Windows 95, Windows 98, Windows NT
Tab
Item
Value
2
Loading Paper
Paper/Output
• Macintosh
Dialog Box
Paper Settings
Printer Settings
For special paper, you must also specify other items that are related to the paper
used. Refer to the previous sections and Online Help when you are performing all
these settings.
To use Online Help, refer to "1.4 Using Online Help".
Paper Tray
Paper Type
Item
Paper Type
Paper Tray
"Manual Tray"
"xxx (Side 2)" (xxx refers to the type of paper)
Value
"xxx (Side 2)" (xxx refers to the type of paper)
"Manual Tray"
57
Page 74

Page 75

Control
Panel
3.1 Control Panel Components and Functions .......................................... 60
3.2 Basic Operations of the Menu Screen ................................................ 63
3.3 List of Items on the Menu Screen ....................................................... 66
Page 76

3.1 Control Panel Components
and Functions
The control panel consists of LED, a display panel, and buttons. This section gives an
introduction of the components on the printer control panel and how they function.
3
LED ButtonsDisplayPanel
3.1.1 LED
The LED signals (on/blinking/off) illustrate the status of the printer.
Name Descriptions
Online LED
Data LED
Error LED
This LED is green in colour. It indicates the data processing status.
On Ready to receive print jobs
Off Unable to print
On This LED is green in colour. It indicates the printing status.
This indicates that the printer is not receiving data during a print operation.
This LED will also be lit when the printer is ejecting or cancelling data.
Blinking This indicates that the printer is receiving data during a print operation.
Off This indicates that the printer is not running any print operation.
On This LED is red in colour. It indicates that an error has occurred.
This indicates an error that can be rectified by the user, for example, a
paper jam, has occurred.
Blinking This indicates an error that cannot be rectified by the user has occurred.
Off This indicates that the printer is operating normally.
60
Page 77

3.1.2 Display
There are two major screens. One is the Print screen that displays the printer status and the
other is the Menu screen for printer-related settings.
Print Screen
The Print screen appears on the display panel when the printer is printing or is waiting for
data.
3.1 Control Panel Components and Functions
The contents displayed will differ depending on the optional products
installed on the printer and the settings at that moment.
3
Printer status
Input Port
Name Descriptions
Printer status
Mode
Input Port
Tray
This shows the printer status.
Example: "Please wait", "Printing", "Ready to Print"
This shows the print mode.
Example: "XPL2"
This shows the port used to receive data.
Example: "Parallel", "lpd", "NetWare", "AppleTalk", "SMB"
This shows the paper tray.
Example: "Tray 1", "Tray 2", "Tray 3", "Manual Tray"
Mode
Tray
Menu Screen
Control Panel
This screen shows settings related to the printer.
To get to this screen, press the Online button when the display panel is showing the Print
screen. Then, when the printer goes offline, press the Menu button. The first Menu screen
that you will see is the following screen.
"3.2 Basic Operations of the Menu Screen" on how to use the Menu screen.
61
Page 78

3
3.1 Control Panel Components and Functions
3.1.3 Buttons
The following eight buttons can be found on the control panel.
Each of these buttons has the following functions on the Print screen and on the Menu
screen.
Menu Print Screen Menu Screen
buttons
buttons
Menu button
Online button
Set/Eject button
Cancel button
-
-
Press this button when the printer is
offline to enter the Menu screen.
Press this button to switch between
online and offline.
Press this button to eject the data still
remaining in the printer. Refer to "1.6
Forced Output of Data Still in the
Printer" on how to perform the
operation.
Press this button when the printer is
offline, this will cancel a job in process.
Refer to "1.5 Cancelling a Print Job"
on how to perform this operation.
Display the menu and the options in
sequence.
Move the cursor (_) left and right to
select the value that you want.
-
Press this button to end the Menu
screen and to switch to online mode.
Use this button to select the displayed
menu or options. When a menu is
displayed, use this button to move to
the next level until the option that you
want appears. Press the button again
to confirm the setting.
Use this button to move the displayed
menu one level up.
62
Page 79

3.2 Basic Operations of the Menu
Screen
Settings related to the printer such as power saver mode, job timeout settings, network settings
can be done on the Menu screen.
3.2.1 Menu Screen
The menus and settings that can be performed with the control panel are listed below.
For details on each menu, refer to "3.3 List of Items on the Menu Screen".
Menu Description
1. System
2. Maintenance
Enables you to specify settings related to the basic operations of the
printer such as the power saver mode and job log.
Enables you to adjust the copy voltage according to the type of paper
used, and to initialise the NV memory of the printer.
3
Control Panel
3. Parallel
4. Report/List
5. Network
Main
menu
Sub
menu
Enables you to specify settings related to the parallel interface.
Enables you to print a copy of the Printer Settings List, XPL2 Font List,
Panel Settings List and Job Log report.
Enables you to specify the network settings.
The menu consists of several levels. By selecting the targeted menus and options, you have
configured the printer settings.
Some menus may be found
three levels (no options) down
the menu tree.
Items
Values
63
Page 80

3.2 Basic Operations of the Menu Screen
3.2.2 Basic Menu Operations
The following illustrates how to use the control panel. The example used below will show
you how to configure the job timeout settings.
(Print screen (printer is ready for printing))
Press Online.
3
(The printer is offline)
Press Menu.
Once the display has moved to the Menu
(Menu screen)
Press Set/Eject. The sub-menu a level down from the current menu will be displayed.
Press until the sub-menu you want appears.
Press Set/Eject. This will bring you to the next level down.
screen, the printer will automatically enter into
a state where it is unable to print.
An "*" will appear next to the current setting.
64
Press buttons several times to reach the desired value.
Press Set/Eject. This will confirm the setting.
A "*" will appear next to the specified
setting to confirm that the setting is
Press Online.
This will end the Menu screen and return to the Print screen.
currently selected.
Page 81

To Return to a Level Up
Press Cancel.
The Cancel button is used to return the menu only one level up. If you
press this button after the Set/Eject button is pressed to confirm a setting
("*" appears next to the option), the setting cannot be reversed.
3.2 Basic Operations of the Menu Screen
3
Control Panel
To Return to the Initial Values (Factory Settings)
Press together. The next screen appears.
After the changes, the factory setting values will be displayed.
Press Set/Eject to confirm the values.
65
Page 82

3.3 List of Items on the Menu
This section describes the settings and values available on the individual main menus.
3.3.1 System
Screen
Some items on the Menu screen can also be specified on the computer
when you are sending a print command from an application. When the
settings you specified on the computer differs from that set in the Menu
screen, the settings performed through the computer will take precedence.
The initial values refer to the values of the factory settings.
3
This section describes how to configure settings related to the printer itself, such as the
power saver mode and job log settings.
Power Saver
The power saver mode conserves energy when the printer is not in used. The power
saver mode settings consist of Power Save Mode 1 and Power Save Mode 2.
When the power saver mode is engaged, the "Ready/Standby" message is displayed on the
display panel. Also, the printer will take a longer time than usual to start printing after it
has received data.
You can set the duration that the printer will wait before it enters into the power saver mode.
• Power Save Mode 1 (Default: 15 minutes)
Specify a value from 1 to 120 minutes. When the printer is left idling for a predetermined period of time after a print job ended, it will enter into Power Save Mode 1.
If the power saver mode is set to "Off", Power Save Mode 1 will not be engaged.
• Power Save Mode 2 (Default: 30 minutes)
Specify a value from 1 to 120 minutes. When the printer is left idling for a predetermined period of time after a print job ended, it will enter into Power Save Mode 2.
If the power saver mode is set to "Off", Power Save Mode 2 will not be engaged.
The power saver mode is disengaged when the following situation occurs:
•
When the printer is receiving print data.
•
When the printer is printing reports or lists through 4 Report/List menu.
66
Page 83

Error Alarm
Specify whether error alarm will be sounded when an error occurred.
• Off
Do not sound the error alarm even if an error has occurred.
• On (Default)
Sound error alarm when an error has occurred.
3.3 List of Items on the Menu Screen
The volume cannot be adjusted.
Job Timeout
When a job timeout occurred, the printer will print only the data received up to that point of
time.
• You can specify any value from 5 to 300 seconds, in increments of 1 second, for job
timeout settings.
• Off
Job timeout will not be engaged.
Panel Language
You can indicate the display language here. The options are as follows:
• English (Default)
• Japanese
Job Log Setting
You can set whether you want the printer to store the past print log and automatically print
the job log or not.
3
Control Panel
You can also print the Job Log report using 4 Reports/Lists on the Menu
screen.
• Auto Log Print (Default: No)
If Yes is selected, the printer will automatically generate a Job Log report when the
number of print jobs processed has reached 50.
If No is selected, no Job Log report will be generated automatically even when the
number of print jobs processed has reached 50.
67
Page 84

3.3 List of Items on the Menu Screen
• Store Job Log (Default: No)
The printer will start storing information regarding each print job starting from the time
when Yes is selected. However, when the record of print jobs reached 50, the earliest
print job information will be deleted.
When No is selected, information regarding the print jobs will not be stored.
If there is a set of past printing job log stored in the printer, when you
change the setting to No, this set of printing history will remain and you
can print them using the Print Job Log command. However, if you
change the setting from No to Yes, this set of records will be cleared.
3
3.3.2 Maintenance Mode
This menu enables you to initialise the NV memory in the printer and adjust the copy
voltage according to the type of paper used.
Init NVM (NV Memory Initialisation)
NV memory refers to non-volatile memory that stores printer settings even when the
power is cut off.
• Yes
Initialises the NV memory. When the NV memory is initialised, all menu settings on the
control panel will be reset to their initial values.
In order for the selected settings to take effect, you must restart the
printer. After the setting, you have to switch off the printer and then
switch it on again.
• No
Return to the menu without initialising the NV memory.
Adjust Voltage
68
Adjust the copy voltage for each of the following settings. The ten levels are: -2, -1, 0, 1,
2, 3, 4, 5, 6 and 7.
• Plain paper (Default: 0)
• Transparency (Default: 0)
• Heavy weight (Default: 0)
• Label (Default: 0)
• Coated paper (Default: 0)
• Envelope (Default: 0)
• Postcard (Default: 0)
Page 85

3.3.3 Parallel
Specify the settings for parallel interface.
Busy-Ack
Specify the output timing for both the BUSY and the ACK signals of the parallel interface.
The BUSY signal indicates to the computer that the printer cannot receive data.
The ACK signal indicates to the computer that the printer is ready to receive data or it has
received data correctly.
• Ack-Busy (Default)
After ACK signal is received, the BUSY signal changes.
3.3 List of Items on the Menu Screen
You cannot change the settings on this menu if you entered the Menu
screen when the printer is printing.
3
Control Panel
ECP
• Ack-Busy-Ack
BUSY signal changes first and then ACK signal is output.
• Busy-Ack
BUSY signal changes when ACK signal is being output.
Ack-Busy Busy-Ack Ack-Busy-Ack
BUSY
In order for the selected settings to take effect, you must restart the
printer. After the setting, you have to switch off the printer and then
switch it on again.
This is the communications mode for the parallel interface. The following settings are
available:
• Enabled (Default)
Receive print data using ECP.
BUSY
ACK
BUSY
ACKACK
• Disabled
Do not receive print data with ECP.
69
Page 86

3
3.3 List of Items on the Menu Screen
3.3.4 Report/List
This menu allows you to print various kinds of reports and lists.
You cannot change the settings on this menu if you entered the Menu
screen when the printer is printing.
The lists and reports will be printed on A4-size paper in portrait
orientation. When there are no A4-size paper in portrait orientation
loaded in any of the paper trays, a message that says "Load A4 Portrait
Paper" will appear on the display panel. Once the A4-size paper is
loaded and in portrait orientation, printing starts.
Printer Settings List
Shows information regarding printer hardware components and the other settings.
"1.8 Printing the Printer Settings List" for examples.
Panel Settings List
Shows the contents of the settings for the individual control panel menu.
XPL2 Font List
Shows the information of the fonts that can be printed in XPL2 data.
Job Log Print
Shows information related to the print jobs processed (a maximum of 50 print jobs). You
can check if a particular print job has been printed successfully or not.
"1.9 Printing the Job Log Report" for examples.
70
Page 87

3.3.5 Network
This menu allows you to specify network-related settings.
3.3 List of Items on the Menu Screen
• You cannot change the settings on this menu if you entered the Menu
screen when the printer is printing.
• In order for the selected settings to take effect, you must restart the
printer. After the setting, you have to switch off the printer and then
switch it on again.
Ethernet Settings
Specify the Ethernet communications speed and mode.
• Auto (Default)
Switch automatically to 10Base/Half, 10Base/Full, 100Base/Half or 100Base/Full.
• 100Base/Full
• 100Base/Half
• 10Base/Full
• 10Base/Half
TCP/IP
Specify the essential settings for using the TCP/IP protocol. The following items are
available in this menu.
• IP Address Setup
Specify the methods to obtain IP address. The possible values are as follows:
"DHCP" (Default)
Obtains the IP address from the DHCP server on the network.
"Panel"
Specify the IP address on the control panel.
3
Control Panel
71
Page 88

3
3.3 List of Items on the Menu Screen
• IPAddress
Specify the IP address of the printer.
"aaa.bbb.ccc.ddd"
Specify a value from 0 to 255 for "aaa", "bbb", "ccc" and "ddd".
The following settings are incorrect:
224~255.xxx.xxx.xxx
127.xxx.xxx.xxx
• If "DHCP" is specified in IP Address Setup menu, the settings here
will be invalid. To enable settings on the control panel to be valid,
specify "Network" in "IP Address Setup".
• The IP address is controlled by the whole network system. If a
wrong IP address is set, the whole network might be affected.
Confirm the IP address assigned to you with the network
administrator.
• Subnet Mask
Specify the subnet mask settings.
"aaa.bbb.ccc.ddd"
Specify the value 0, 128, 192, 224, 240, 252, 254 or 255 for "aaa", "bbb", "ccc" and "ddd".
• Gateway Address
Specify the gateway address.
"aaa.bbb.ccc.ddd"
Specify a value from 0 to 255 for "aaa", "bbb", "ccc" and "ddd".
The following settings are incorrect:
224~255.xxx.xxx.xxx
127.xxx.xxx.xxx
IIP Frame Type
Specify the frame type when the printer is used in IPX/SPX (NetWare) environment.
• Auto (Default)
Specify the frame type automatically.
72
• Ethernet-II
Use the frame type for Ethernet-II specification.
Page 89

• SNAP
• 802.2
• 802.3
Protocol
For the following items, set as Enabled or Disabled to use or not use the protocol.
• lpd (Default: Enabled)
3.3 List of Items on the Menu Screen
Use the frame type for IEEE802.3/802.2/SNAP specification.
Use the frame type for IEEE802.3/802.2 specification.
Use the frame type for IEEE802.3 specification.
To use lpd (lpr) in TCP/IP environment to print, select Enabled. Otherwise, set as
Disabled.
3
Control Panel
• NetWare (Default: Enabled)
To print in NetWare environment, select Enabled. Otherwise, set as Disabled.
• EtherTalk (Default: Enabled)
To print in AppleTalk (EtherTalk) environment, select Enabled. Otherwise, set as
Disabled.
• SMB TCP/IP (Default: Enabled)
To print in SMB (Windows Network) environment that uses TCP/IP as the transport
protocol, select Enabled. Otherwise, set as Disabled.
To print in SMB (Windows Network) environment that uses NetBEUI as the transport
protocol, select Enabled. Otherwise, set as Disabled.
• SNMP UDP/IP (Default: Enabled)
If you are using SNMP agent features in TCP/IP environment, select Enabled.
Otherwise, set as Disabled.
• SNMP IPX (Default: Enabled)
If you are using SNMP agent features in NetWare environment, select Enabled.
Otherwise, set as Disabled.
• Internet Services (Default: Enabled)
If you are using CentreWare Internet Services, select Enabled. Otherwise, set as
Disabled.
73
Page 90

3
3.3 List of Items on the Menu Screen
Init NVM (NV Memory Initialisation)
Initialises the NV memory on the network card.
The NV memory refers to non-volatile memory that retains the content of the settings
even when the power is down.
• Yes
Initialise the NV memory. Once the NV memory is initialised, the settings in 5 Network
menu will be set to their initial values.
In order for the selected settings to take effect, you must restart the
printer. After the setting, you have to switch off the printer and then
switch it on again.
• No
Return to the menu without initialising the NV memory.
74
Page 91

Troubleshooting
4.1 Types of Problems ............................................................................. 76
4.2 Power Problems ................................................................................ 78
4.3 Printing Problems .............................................................................. 79
4.4 Print Quality Problems ....................................................................... 86
4.5 Paper Transport Problems ................................................................. 93
4.6 Others ................................................................................................ 95
4.7 When an Error Message Appears ...................................................... 98
4.8 When the Error LED is Lit or Blinking ............................................ 109
Page 92

4.1 Types of Problems
If a problem occurs with the printer, and you are not sure of the cause, check the following
categories. Find out the appropriate problem category and resolve the problem by referring to
the solution described there. You may also solve some of the problems by yourself.
Problem List
4
Power Problems
• No power ..................................................... 78
• Frequent power failures ................................ 78
Printing Problems
LED is Lit, Blinking or Off
• Error LED is lit ............................................. 79
• Error LED is blinking .................................... 79
• Error LED is blinking .................................... 79
• Online LED is off ......................................... 79
• Data LED is not blinking after print
command is sent ........................................... 79
• No output although the Data LED is lit or
blinking ......................................................... 81
Unable to Print from Windows
Unable to Print from Macintosh
• The printer selected in the Chooser
window is not displayed ................................ 85
• When an error message is displayed
on the computer ............................................85
Print Quality Problem
Blank or black copies are output
• A blank page is printed ................................. 86
• A completely black page is printed ................ 86
Faded, Dirty, Uneven, Shadowed or
Wrinkled Output
• The printed image is faded ............................ 87
• Black dots or stains are printed ..................... 87
• Black lines are printed .................................. 88
• Unable to print .............................................. 82
• Unable to print when TCP/IP protocol is
used ............................................................. 83
• Unable to print when TCP/IP Direct Print
Utility is used ................................................ 83
• Unable to print in SMB environment ............. 83
• Unable to print in NetWare environment ....... 84
• When an error message is displayed
on the computer ............................................84
76
• Recurring stains are found ............................ 88
• Hair-line marks appeared in or around
black half-tone printing .................................. 88
• Shadows appeared around areas of solid
black printing ................................................ 88
• White dots appeared in areas of solid
black printing ................................................ 89
• Some parts are not printed ............................ 89
• Vertical blanks are printed ............................ 89
• Wrinkled paper ............................................. 89
• Printing is smudged ....................................... 90
• Printing is slanted .......................................... 90
Page 93

4.1 Types of Problems
Output is Not Clear
• Transparency failed to print clearly ............... 91
• Postcard failed to print clearly ....................... 91
• Envelope failed to print clearly ...................... 92
• Failed to print clearly .................................... 92
Paper Transport Problems
• Paper is not fed/Paper jam/Several sheets
are fed at the same time/Paper slants when
fed ............................................................... 93
Others
Network-Related Problems
• IP address changes each time the
printer is switched on .................................... 95
• Unable to connect to CentreWare Internet
Services ....................................................... 95
• Unable to run CentreWare Internet Services . 96
Other Problems
• Unable to print in colour ................................ 97
• Unable to print from the specified tray .......... 97
• Printing is slow ............................................. 97
• Unusual sounds ............................................ 97
4
Troubleshooting
If you cannot find anything that matches the
description of the trouble you are facing, or
if you cannot solve the problem after you
have followed the solution described in this
manual....
If the symptom you are looking for is not
included in one of the above categories, or if
the problem cannot be solved using the
procedure described here, switch off the
printer, unplug the power cord from the AC
outlet, and contact your Xerox Customer
Support Centre.
Do not try to alter the machine configuration, or modify any parts. An
unauthorized modification can cause smoke or fire.
Be sure to switch off an unplug the machine before accessing the
interior of the machine for maintenance, or fault clearance. Access
to a live machine's interior can cause electric shocks.
77
Page 94

4.2 Power Problems
Description
No power
Frequent power failures
Possible Cause
Is the printer switched off?
Is the power cord loose or
unplugged?
Is the power cord connected to a
properly rated AC outlet (220 to
240 V, 10 A)?
The printer may be faulty.
Is the power cord loose or
unplugged?
Solution
Check the power switch.
"1.2.1 Swtiching on"
Switch off the power, and plug the
power cord firmly. Then, switch on the
power again.
Check that the AC outlet is properly
rated (220 to 240 V, 10 A). Do not
connect to the socket behind the
computer.
Switch off the power of the machine,
unplug the power plug and contact your
Xerox Customer Support Centre.
Switch off the power, and plug the
power cord firmly. Then, switch on the
power again.
78
Page 95

4.3 Printing Problems
4.3.1 LED is Lit, Blinking or Off
Description
Error LED is on
Error LED is blinking
Online LED is off
Data LED is not blinking
or lit after print command
is sent
Possible Cause
Is an error message shown on the
printer control panel display?
An error that the user is unable to
resolve has occurred.
Is the printer in the offline mode?
Is the parallel or Ethernet cable
loose or unplugged?
Solution
Refer to the error message and resolve
accordingly.
"4.7 When an Error
Message Appears"
Write down the displayed error
message or error code. Switch off the
power of the machine, unplug the
power plug and contact your Xerox
Customer Support Centre.
Press the Online button on the printer
control panel to switch to the online
mode.
"3.1.3 Buttons"
Switch off the power of the machine,
unplug the parallel and Ethernet cables,
and re-connect them again properly.
Chapter 2 Connecting
the Interface Cables in
the Setup Guide
4
Troubleshooting
79
Page 96

4
4.3 Printing Problems
Description Possible Cause Solution
(From previous page)
Data LED is not blinking
or lit after print command
is sent
Does the parallel or Ethernet
cable match the specifications of
the computer or machine?
DocuPrint C621 comes with the
recommended parallel cable for the
computer. Use this cable.
Also, this machine supports the
10BASE-T and 100BASE-TX Ethernet
intefaces. Use a twisted pair cable that
matches the network requirements.
You will also need a category 5 cable
for the 100BASE-TX interface.
"Appendix A Optional
Products and
Consumables" and
Chapter 2 Connecting
the Interface Cables in
the Setup Guide
Is the environment of the computer
correctly configured?
Is the correct IP address set for the
printer? (When TCP/IP is used)
Check the following settings of your
computer and correct them if
necessary:
• Is the printer driver of this machine
for the current computer OS
correctly installed?
• Is the destination port for printing set
correctly in the printer driver?
Chapter 2 Connecting
the Interface Cables in
the Setup Guide
Check with you network administrator
and specify the correct IP address.
Confirm your currently set IP address
with that shown on the Printer Settings
List.
"1.8 Printing the Printer
Settings List" and
3.2 Setting the IP
Address (When Using
TCP/IP protocol) in the
Setup Guide
80
Page 97

Description Possible Cause Solution
(From previous page)
Data LED is not blinking
or lit after print command
is sent
Is the network environment of the
printer configured correctly?
(When the network is used)
Print the Printer Settings List and
check if the network environment has
been configured correctly.
4.3 Printing Problems
"1.8 Printing the Printer
Settings List" and
Chapter 3 Network
Settings (Quick Setup) in
the Setup Guide
No output although the
Data LED is lit or blinking
A network error may have
occurred. (When the network is
used)
The printer is switched off
Data may still remain inside the
printer.
Check that the power of the machine has
been switched on. Send a print command
from the computer again. If the same
symptom persists, consult your network
administrator.
Press the "|" side of the power switch
to switch on the printer..
"1.2.1 Switching on"
Select to abort the print job or forcibly
output the remaining data.
"1.5.2 Cancelling a Print
Job on the Control
Panel" and
"1.6 Forced Output of
Data Still in the Printer"
4
Troubleshooting
81
Page 98

4.3 Printing Problems
4.3.2 Unable to Print from Windows
4
Description
Unable to print
Possible Cause
Is the status of the printer on the
Printer window shown as "Pause
Printing"?
Is the power of the machine
switched off?
Is the parallel or Ethernet cable
loose or unplugged?
Solution
The machine may be in the Pause
Printing state if printing is stopped or
aborted due to error. Perform the
following to release the machine from
the Pause Printing state:
Click Start and select Settings.
Then select Printers.
Double-click on the printer icon of
this machine.
Click on the File menu of the
Printer window.
If the Pause Printing option is
checked, click on it.
Press the "|" side of the power switch
to switch on the printer.
"1.2.1 Switching on"
Switch off the power of the machine,
unplug the parallel and Ethernet cables,
and re-connect them properly.
82
Chapter 2 Connecting
the Interface Cables in
the Setup Guide
Page 99

4.3 Printing Problems
Description Possible Cause Solution
Unable to print when the
TCP/IP protocol is used
Unable to print when the
TCP/IP Direct Print
Utility is used
Is the IP address set correctly?
Double-click the printer icon and
check the Details tab on the
printer properties window. Is the
spool setting option, Spool print
jobs so program finishes
faster selected? (When
Windows 95 is used.)
The IP address may be changed.
Check with your network administrator
and specify the correct IP address.
Check the currently specified IP
address with that shown on the Printer
Settings List.
"1.8 Printing the Printer
Settings List" and
3.2 Setting IP address
(When Using TCP/IP
protocol) in the Setup
Guide
Click Spool Settings on the Details
tab and select Spool print jobs so
program finishes faster from the
displayed dialog box.
4
Troubleshooting
Unable to print in the
SMB environment
Is "Printer Error" shown on the
status display of the Printer
window?
Is "No file storage area in server"
shown on the computer?
Refer to the Network Print
Environment User Guide if printing
cannot be done via the TCP/IP Direct
Print Utility.
7.1 For TCP/IP
Environment in the
Network Print
Environment User Guide
This message may be displayed if the
print requests are received from more
than one computer, or pritning is being
done from another protocol.
Before you send a print job, check the
Printer window to make sure that no data
is being processed, then send your data
for printing.
83
Page 100

4.3 Printing Problems
Description Possible Cause Solution
(From previous page)
Unable to print in the
SMB environment
Is "Write Error" shown on the
computer?
The message may be displayed if the
number of computers that can be
connected to the Windows network
simultaneously has exceeded the limit.
Before you send a print job, check the
Printer window to make sure that no
data is being processed, then send your
data for printing.
4
Unable to print in the
NetWare environment
Are the network configurations
such as the hub suitable for auto
setting of frame types?
Is the NetWare File Server or
print server (when using the
remote printer mode) started up?
Is the NetWare environment
correctly configured on the
NetWare File Server?
Check if the data link LED of the port
for network configured devices is lit.
If the LED is off, use the printer
control panel to set the value of the
frame type to be the same as those of
the NetWare File Server.
"3.3 List of Items on the
Menu Screen"
Start up the NetWare File Server and
the print server (if the remote printer
mode is used).
Use the Network Utility to check if
the network environment of the
machine has been configured
correctly.
4.3 Configuring Xerox
Network Utility and 7.3
For NetWare
Environment in the
Network Print
Environment User Guide
An error message is
shown on the computer
84
A printer error may have
occurred.
Refer to the error message and resolve
accordingly.
 Loading...