

Page 1
Setup Guide
Please read this when setting
up the printer
Page 2

TrueType fonts, AppleTalk, KanjiTalk, Macintosh, and EtherTalk are trademarks Apple Computer, Inc., registered in
the United States and other countries.
NetWare is a registered trademark of Novell, Inc., in the United States and other countries.
Microsoft, MS-DOS, Windows, and Windows NT are either registered trademarks or trademarks of
Microsoft Corporation in the United States and/or other countries.
Permission has been obtained from Microsoft Corporation for use of software screen shots
This software is based in part on the work of the Independent JPEG Group.
All product/brand names are trademarks or registered trademarks of the respective holders.
Important
This manual is copyrighted with all rights reserved. Under the copyright laws, this manual may not be copied,
in whole or part, without the written consent of the publisher.
Parts of this manual are subject to change without prior notice.
We welcome any comment on ambiguities, errors, omissions, or missing pages.
Never attempt any procedure on the machine that is not specifically described in this manual. Unauthorized
operation can cause faults or accidents. Fuji Xerox is not liable for any problems resulting from unauthorized
operation of the equipment.
Xerox is a registered trademark.
The Document Company and Ethernet are trademarks and may be registered in certain jurisdictions.
Page 3
Preface
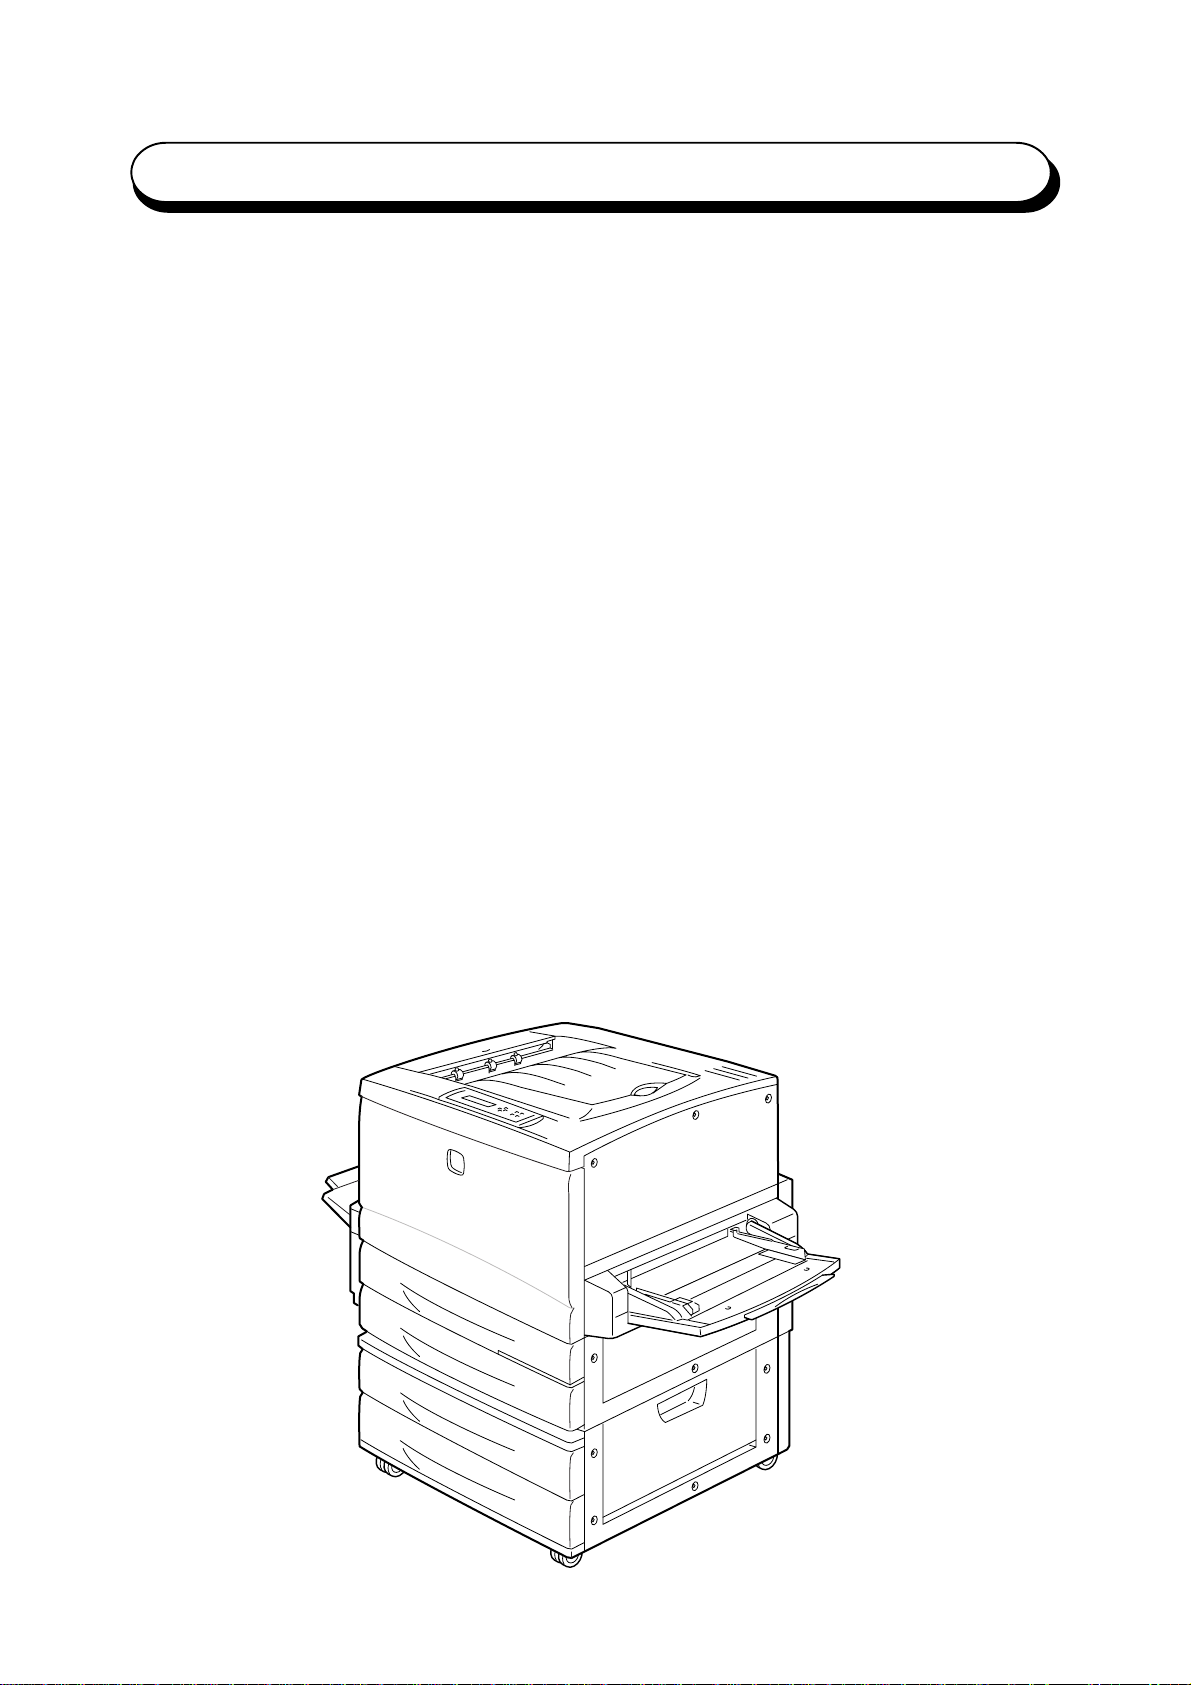
Thank you for choosing DocuPrint C621.
This manual aims to provide all the information necessary for effectively operating the printer together
with notes on safety precautions. To get the most out of your printer, read the manual carefully and
completely before using the machine. Keep this manual handy for future reference. This guide is written
with the assumption that you are familiar with the basics of your computer to be connected, the operating
system, and the respective application software. You can also refer to their respective manuals for
information on basic knowledge and operation methods of the product.
This equipment conforms to the guidelines of the Japan Business Machine Makers Association on the
harmonic effects by copiers and other reproduction devices. These guidelines conform to the guides on
the harmonic suppressors of electronic appliances and general-purpose machines.
In this manual, safety instructions are described with the symbol
instructions before performing the required procedures.
This equipment is certified as a Class 1 laser product under IEC825 (1984). This means that the machine
does not emit hazardous laser radiation. Since radiation emitted inside the machine is completely confined
within the protective housings and external covers, the laser beam cannot escape from the machine
during any phase of user operation.
This equipment is in the Class B category based on the standard of Voluntary Control Council for
Interference from Information Technology Equipment (VCCI)*. If the machine is used near a radio or
television receiver in a domestic environment, it may cause radio interference. Install and use the
machine according to the instructions.
*This regulation applies only to Japan.
As a member of the International Energy Star Program, Fuji Xerox confirms that this
product satisfies the Japanese requirements for International Energy Star Program
standards.
. Always read and follow the
i
Page 4

Contents
Preface ........................................................................................................................................ i
Contents ...................................................................................................................................... ii
Types of Manuals ....................................................................................................................... iv
Using this Guide.......................................................................................................................... vi
Organisation of this Guide ........................................................................................................... vi
Conventions ............................................................................................................................... vii
Printer Features........................................................................................................................ viii
Operating Environment ............................................................................................................... ix
Safety Notes .............................................................................................................................. xi
The Objective of the International Energy Star Program ............................................................. xx
Chapter 1 Setting up the Printer
1.1 Removing the Packing Tape and Spacers ........................................................................... 2
1.1.1 Removing the Packing Tape from Various Locations ............................................ 2
1.1.2 Removing the Spacers from Various Locations ..................................................... 4
1.2 Assembling the Optional Products (Part 1) ....................................................................... 12
1.2.1 Connecting the Tray Module Connector.............................................................. 12
1.3 Assembling the Face-up Tray........................................................................................... 14
1.4 Installing the Drum Cartridge ........................................................................................... 15
1.5 Installing the Toner Cartridges .......................................................................................... 18
1.6 Loading Paper ................................................................................................................ . 21
1.7 Assembling the Optional Products (Part 2) ....................................................................... 24
1.7.1 Installing Additional Memory .............................................................................. 24
1.8 Switching on the Power and Confirming the Operation ..................................................... 28
1.8.1 Connecting the Power Cord ............................................................................... 28
1.8.2 Switching on the Power ...................................................................................... 29
1.8.3 Printing the Printer Settings List.......................................................................... 30
1.8.4 Switching off the Power ..................................................................................... 33
Chapter 2 Connecting the Interface Cables
2.1 Connecting the Parallel Cable ........................................................................................... 36
2.2 Connecting the Ethernet Cable ......................................................................................... 38
Chapter 3 Network Settings (Quick Setup)
3.1 Network Environment and Printer Settings ....................................................................... 42
3.2 Setting the IP Address (When Using TCP/IP Protocol) .................................................... 43
3.3 Activating the Protocol ..................................................................................................... 47
3.4 Checking the Settings ....................................................................................................... 49
ii
Page 5

Chapter 4 Configuring the Computer
4.1 After Setting up the Printer .............................................................................................. 52
4.1.1 Printer Drivers ................................................................................................... 52
4.1.2 Using TCP/IP Direct Print Utility ....................................................................... 53
4.2 Installing the Printer Driver (Windows 95 or Windows 98) ................................................ 54
4.3 Configuring the TCP/IP Direct Print Utility ...................................................................... 61
4.3.1 Installing TCP/IP Direct Print Utility................................................................... 61
4.3.2 Setting the Port .................................................................................................. 64
4.4 Installing the Printer Driver (Windows NT) ...................................................................... 67
4.5 Installing the Printer Driver (Macintosh) ........................................................................... 75
Appendix
A Control Panel Menu (Abstract) ........................................................................................ 80
B About the Software Pack CD-ROM ................................................................................ 82
C When Using the Printer.................................................................................................... 84
D Glossary .......................................................................................................................... 85
Index ........................................................................................................................................ 90
iii
Page 6
Types of Manuals
The following manuals are bundled with DocuPrint C621. Please read the relevant manual to suit your
needs.
Some of these manuals are in PDF file formats. You will require Adobe
print these manuals. A copy of the Adobe Acrobat Reader can be found in the Software Pack CD-ROM
bundled with the printer. You can use this CD-ROM to install the Acrobat Reader software on your
computer if necessary.
Setting up
Before Using the Printer
This booklet provides an overview of the items that come
with the printer. It also provides a general description of
the procedures that guide you from opening the printer box
to getting your printer ready for printing.
Firstly, use this manual to check the items bundled with the
printer. Then, refer to the Setup Guide to set up the
printer.
®
Acrobat® Reader to view or
Setup Guide (this manual)
This guide explains how to set up the printer and install the necessary
software. There are also examples to illustrate how to use the printer as
a network printer.
Software Pack Operation Guide
This guide explains how to use the DocuPrint C621 Software Pack CDROM (referred to as Software Pack CD-ROM hereafter) on
®
Windows
various software available in the Software Pack. Once you insert the
Software Pack CD-ROM in CD-ROM drive of your computer, the Fuji
Xerox Setup Menu will appear automatically. Click on the desired button
to display this manual on the screen.
95, Windows® 98 and Windows NT®, and how to install the
Network Print Environment User Guide
This guide explains in detail the procedures to set up and use the printer
as a network printer in various networking environments. This manual is
a PDF file and can be found in the Manual folder in the Software Pack
CD-ROM. The name of this file is net.pdf.
iv
Page 7
After Setup
User Guide
This guide describes the capabilities of DocuPrint C621 and
explains what to do when you encountered a problem. It
explains the methods of operation as well as the solutions to
troubleshoot problems.
v
Page 8

Using this Guide
Organisation of this Guide
This manual consists of five chapters. A brief introduction of each chapter is provided
below.
Chapter 1 Setting up the Printer
This chapter explains how to look for a suitable installation environment, what to check for
the bundled products, and how to check that the printer has been properly set up.
Chapter 2 Connecting the Interface Cables
This chapter explains how to connect the printer to the computer (when using it as a local
printer) and how to connect the printer to a network (when using it as a network printer).
Chapter 3 Network Settings (Quick Setup)
This chapter describes the procedures to define the network settings so that the printer can
be used in the TCP/IP, SMB (Windows network) or AppleTalk environment.
Chapter 4 Configuring the Computer
This chapter explains how to install the necessary software to the computer so that the
printer can be used.
Appendix
This section contains the following information:
• Control Panel Menu (Abstract)
Explains the the control panel schematically.
• About the Software Pack CD-ROM
Explains the folder structure of the Software Pack CD-ROM bundled with the printer.
• When Using the Printer
Explains information that you can refer to after the printer is installed.
• Glossary
vi
Page 9
Conventions
This manual uses the following conventions:
Notation
Symbol
Explains points to pay attention to. Be sure to read it.
Gives supplementary information for reference.
Indicates where to find related information.
" ": indicates that the source of reference is in this manual.
Italics: indicates that the source of reference is in another manual.
Symbol
Bold
" "
Initial caps
+
Meaning
Indicates selections or all kinds of buttons.
Example: Click Next.
Indicates input contents.
Example: Enter "DocuPrint C621" in the text box.
Indicates the names of the window, menu, dialog box, list box, combo
box.
Example: The Add Port dialog box is displayed.
Indicates that the key on the keyboard and the button on the control
panel should be pressed simultaneously.
Example: Press the
+ buttons.
vii
Page 10
Printer Features
DocuPrint C621 has the following special features to satisfy a wide variety of printing requirements:
• High-quality, high-resolution and full-colour laser printing at 600 dpi.
• As the wax toner is used, the uneven gloss normally found on colour prints are suppresed.
Characters on printed copies are easy to read and uniform gloss can be achieved.
• High speed printing at 26 sheets (A4 size) per minute for black and white jobs and 6 sheets (A4
size) per minute for colour jobs (when printing from the same document continously with A4 size
paper in portrait orientation).
• Printing on a range of sizes from postcard, A5-A3 size to paper measuring 328 x 453 mm in size.
Moreover, normal paper, heavy weight paper, transparencies, labels and others can also be used
with the printer.
• If the optional 2-tray module is installed, you can increase printing efficiency by using multiple
paper trays. You can load up to 1400 sheets if the 2-tray module is installed.
• If the optional hard disk is installed, you can use the electronic collation feature. It is a feature that
allows you to import data into the hard disk so that any print job with more than one set can read
and print directly from the hard disk from the second set onwards. You can output numerous sets
of documents such as reports or presentation materials at high speed.
• If the optional duplex print module is installed, you can carry out duplex printing. Even if the duplex
print module is not available, you can still print on side 2 (back) of the a sheet of paper as long as
side 1 (front) was pre-printed by DocuPrint C621. Printing on both sides will help to save paper.
viii
Page 11
Operating Environment
DocuPrint C621 can be used in a variety of office environments.
Using As a Local Printer
In this manual, a local printer is one that is directly connected to the computer by using a
parallel cable.
DocuPrint C621 can be connected to a computer with the following specifications:
Item
CPU
Model
Memory
Interface
Target Operating System
(OS)
Feature
i486SX or above
IBM PC-AT and compatible machine (DOS/V)
NEC company PC-98 series (on sale after Nov 1993)
16 MB or more
Parallel interface
Windows 95
Windows
Windows NT
98
4.0
ix
Page 12
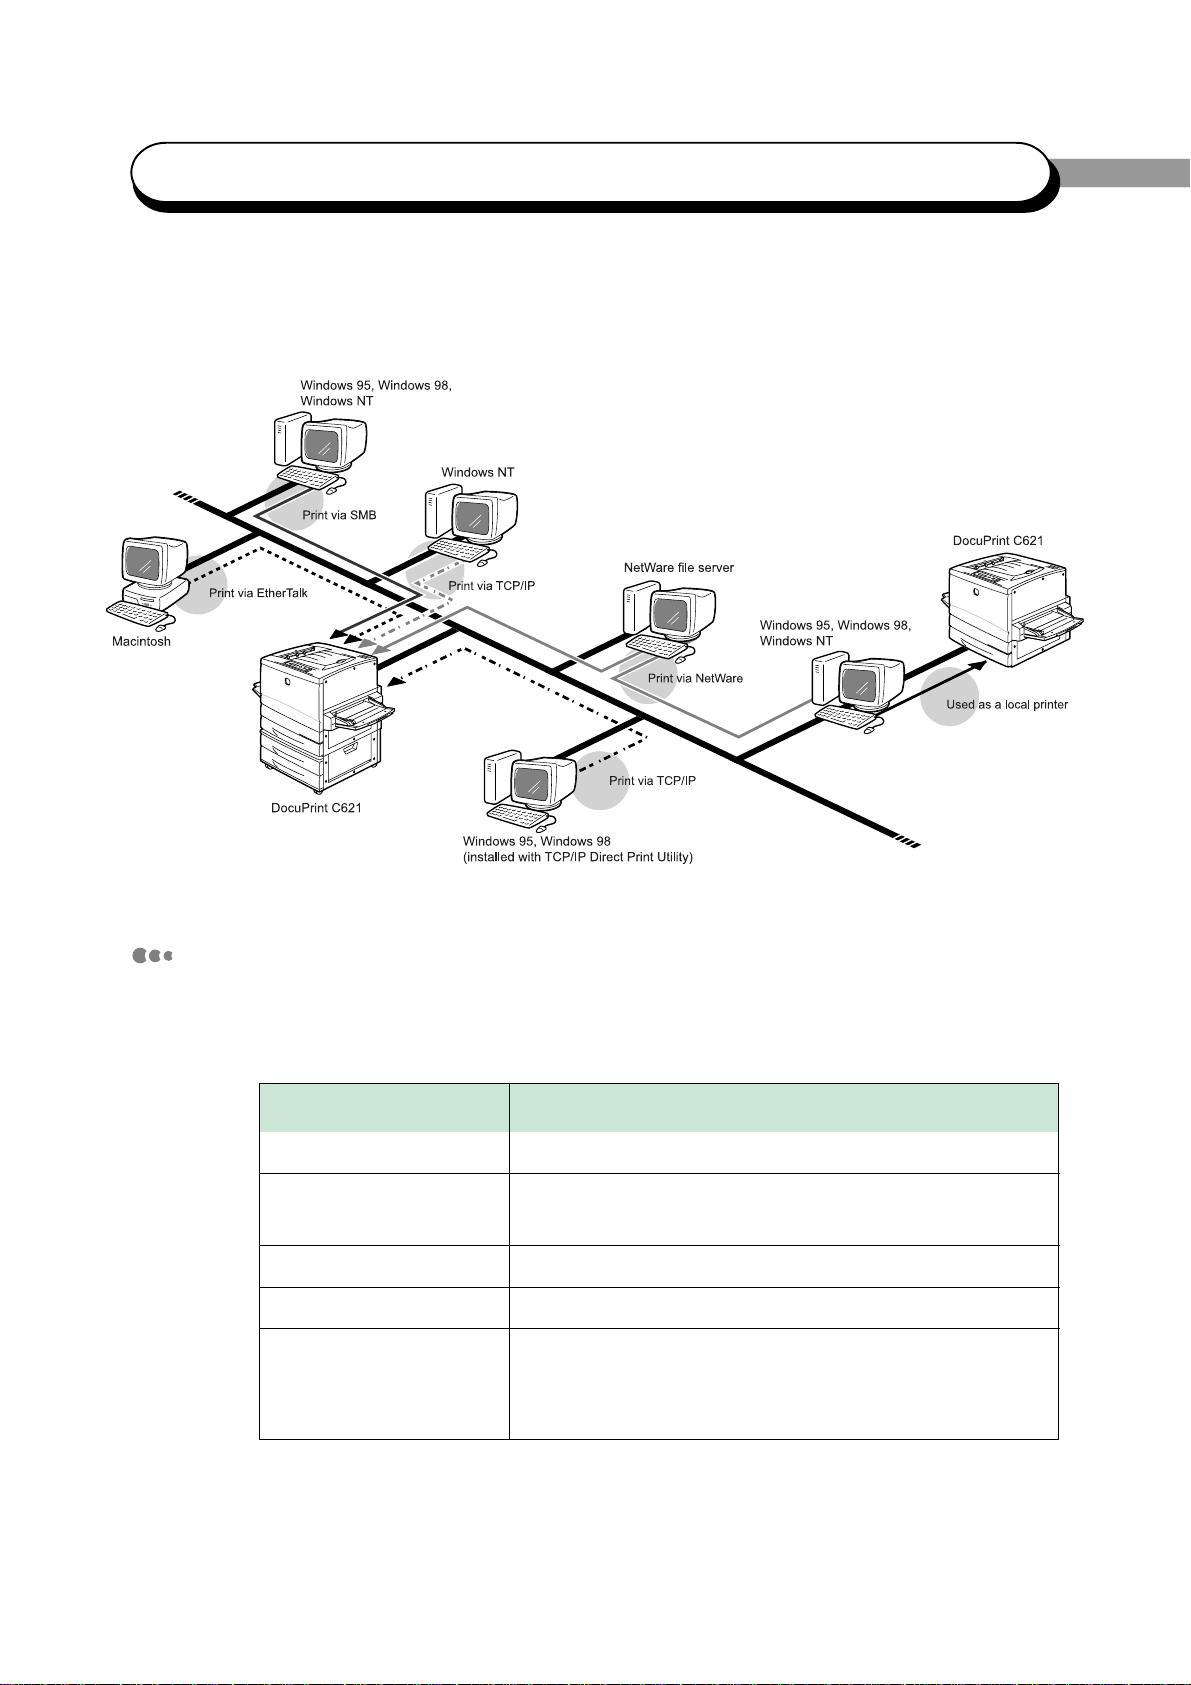
Using As a Network Printer
In this manual, a network printer is one that is connected to the network with an interface
cable.
DocuPrint C621 can be connected to the following kinds of environment. As a network
printer, print jobs can be sent from a client computer on the network.
Item
Physical interface
Target OS
Network
In addition, as the network card attached to the printer is loaded with HTTP server
feature, you can use the WWW browser on the network computer to check your network
settings or printer status.
10BASE-T
100BASE-TX
Windows 95
Windows 98
Windows NT 4.0
Macintosh Mac OS 7.6.1 or later (OpenTransport J1-1.1.2
or later)
TCP/IP (lpd)
In SMB (Windows network), TCP/IP is used in transport
protocol.
In SMB (Windows network), NetBEUI is used in transport
protocol.
IPX/SPX (NetWare 3.12J/3.2J/4.1J/4.11J/4.2J/5J)
AppleTalk (EtherTalk phase 2)
Feature
x
Page 13
Safety Notes
Read the safety notes in this section carefully before you begin to use this machine to ensure that you
operate the copier properly.
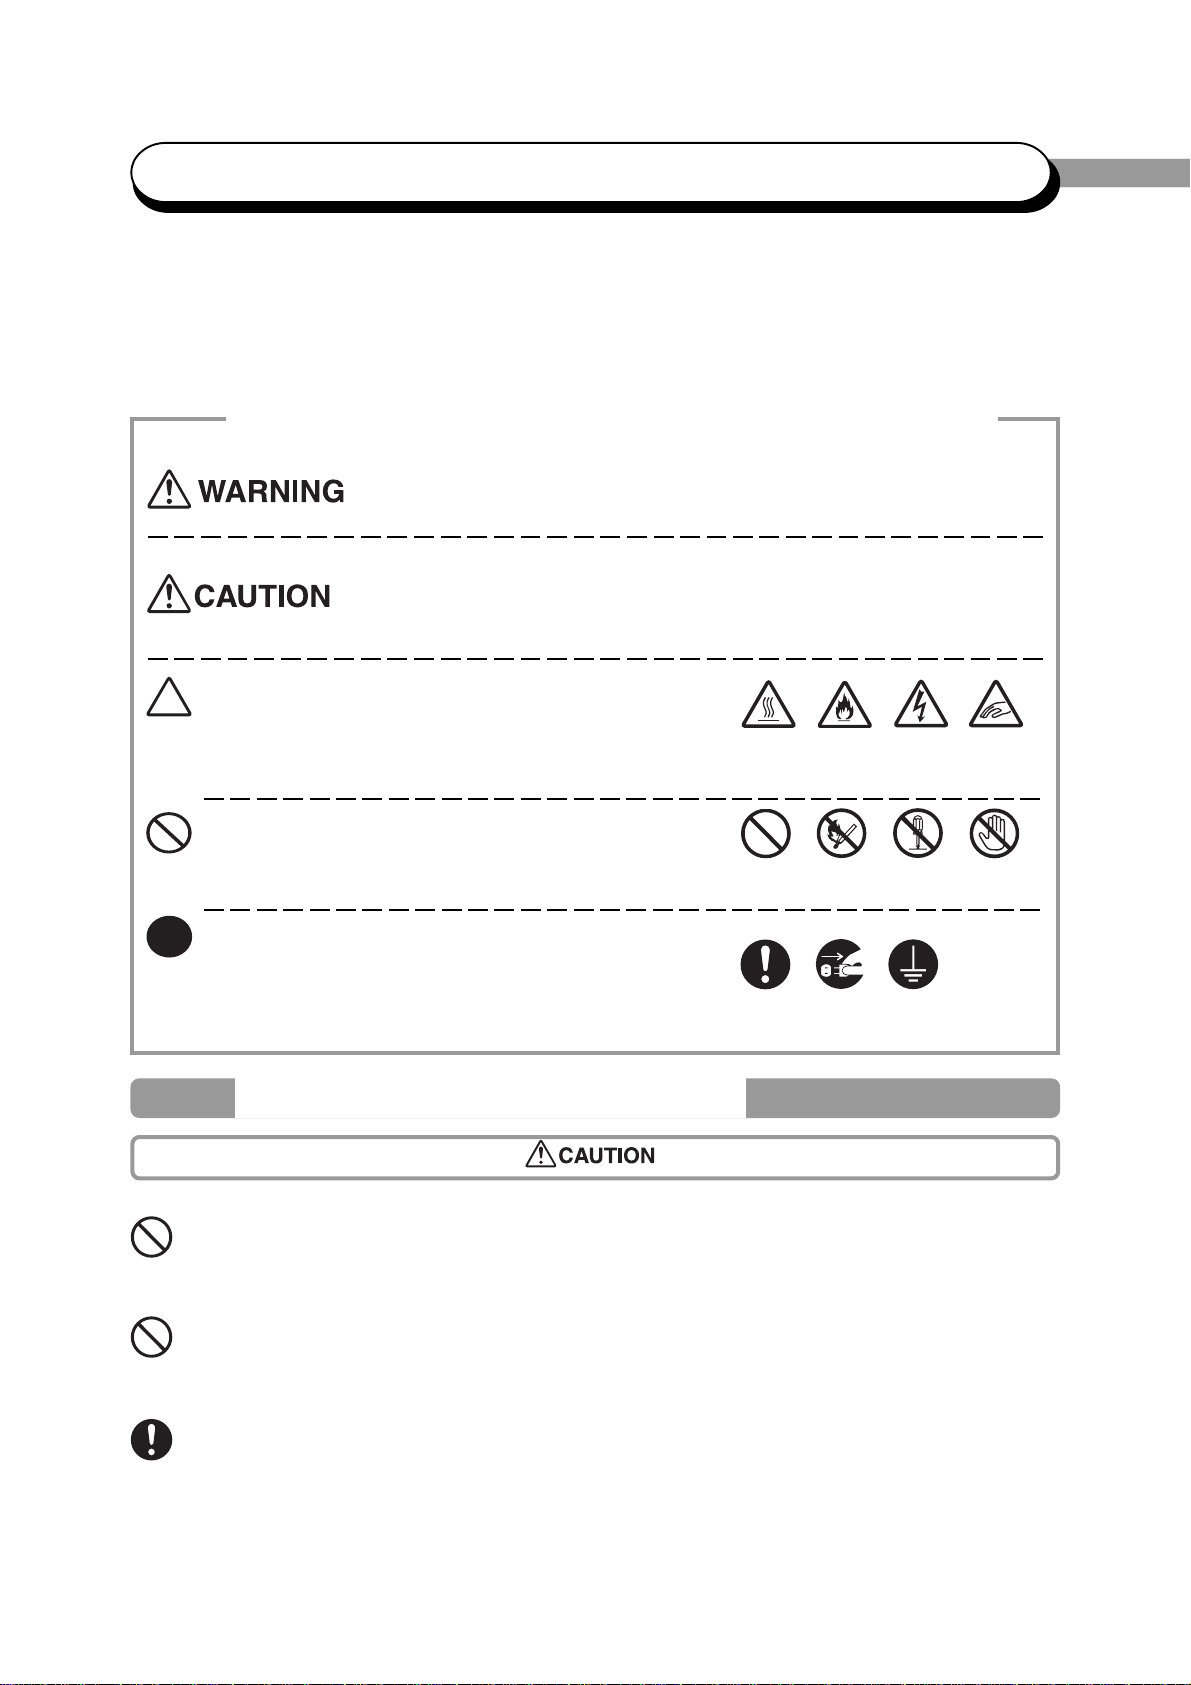
This section describes the graphic symbols used throughout this guide
is used to alert operators to an operating procedure, practice, or condition
that, if not strictly observed, may result in severe injury or loss of life.
is used to alert operator to an operating procedure, practice, or condition that,
if not strictly observed, might result in safety hazards to personnel or damage
to the equipment.
This symbol is used to alert operators to a specific
operating procedure that requires close attention. Read
and follow instructions carefully to ensure the task is
accomplished safely.
This symbol is used to alert operators to a specific
Heated Flammable Electric Pinched
surface shock fingers
operating procedure that must not be performed. Read
and follow the instructions carefully.
Prohibited No fire Do not Do not
tear down touch
This symbol is used to alert operators to a specific
operating procedure that should be emphasised for
operating safety. Read the instructions carefully before
Instructions Unplug Ground/Earth
performing the required procedure.
Precautions for Installation and Relocation
Do not place the machine in a hot, humid, dusty or poorly ventilated environment. Prolonged
exposure can cause a fire or shock.
Do not place the machine near heaters or volatile, flammable, or combustible materials such as
curtains that may catch fire.
Place the machine on a level and sturdy surface. If tilted, the machine can fall over and cause
injuries.
xi
Page 14
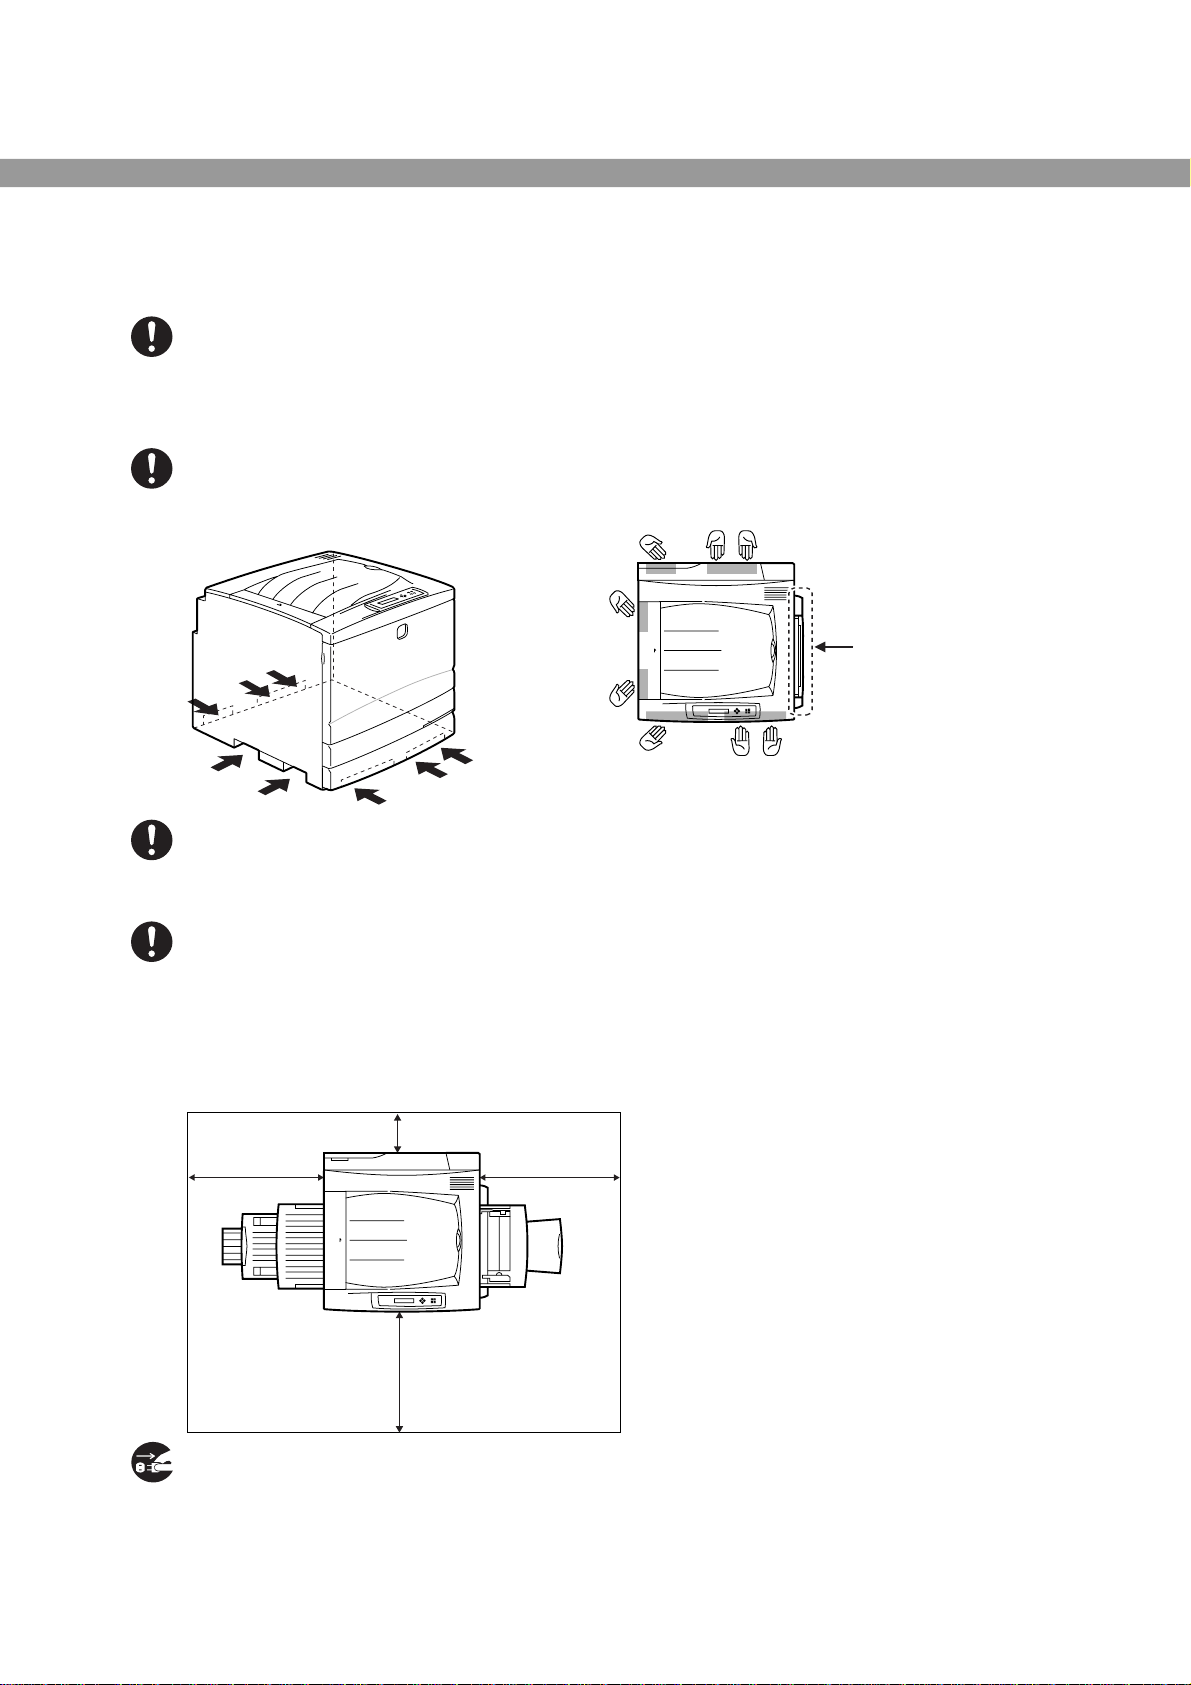
The machine weighs 71.2 kg when the consumables and paper trays are fully assembled.
When moving the printer, contact the transportation company and make sure that there are four or
more persons carrying it.
When lifting the machine, face the front panel and firmly grip the recessed areas provided under
the front, rear and left sides of the machine. Lfiting the machine by gripping any other areas can
cause to machine to fall and result in injuries.
Lifting here may
damage the
machine
When lifting the machine, get a firm footing and bend your knees to avoid possible injuries to your
back.
The machine has ventilation holes on the rear and side panels. Ensure that the machine is installed
with a minimum clearance of 150 mm from the rear vent to the wall. A poorly ventilated machine
can cause excessive internal heat and fire. The accompanying diagram shows the minimum
clearances required for normal operation, consumable replacement, and maintenance to ensure
your machine operates at peak performance.
150mm
730 mm
835 mm
780 mm
When moving the machine, be sure to unplug the power cord from the outlet. If the machine is
moved with the power cord connected, it can cause damage to the cord which could result in fire
or electric shocks.
xii
Page 15
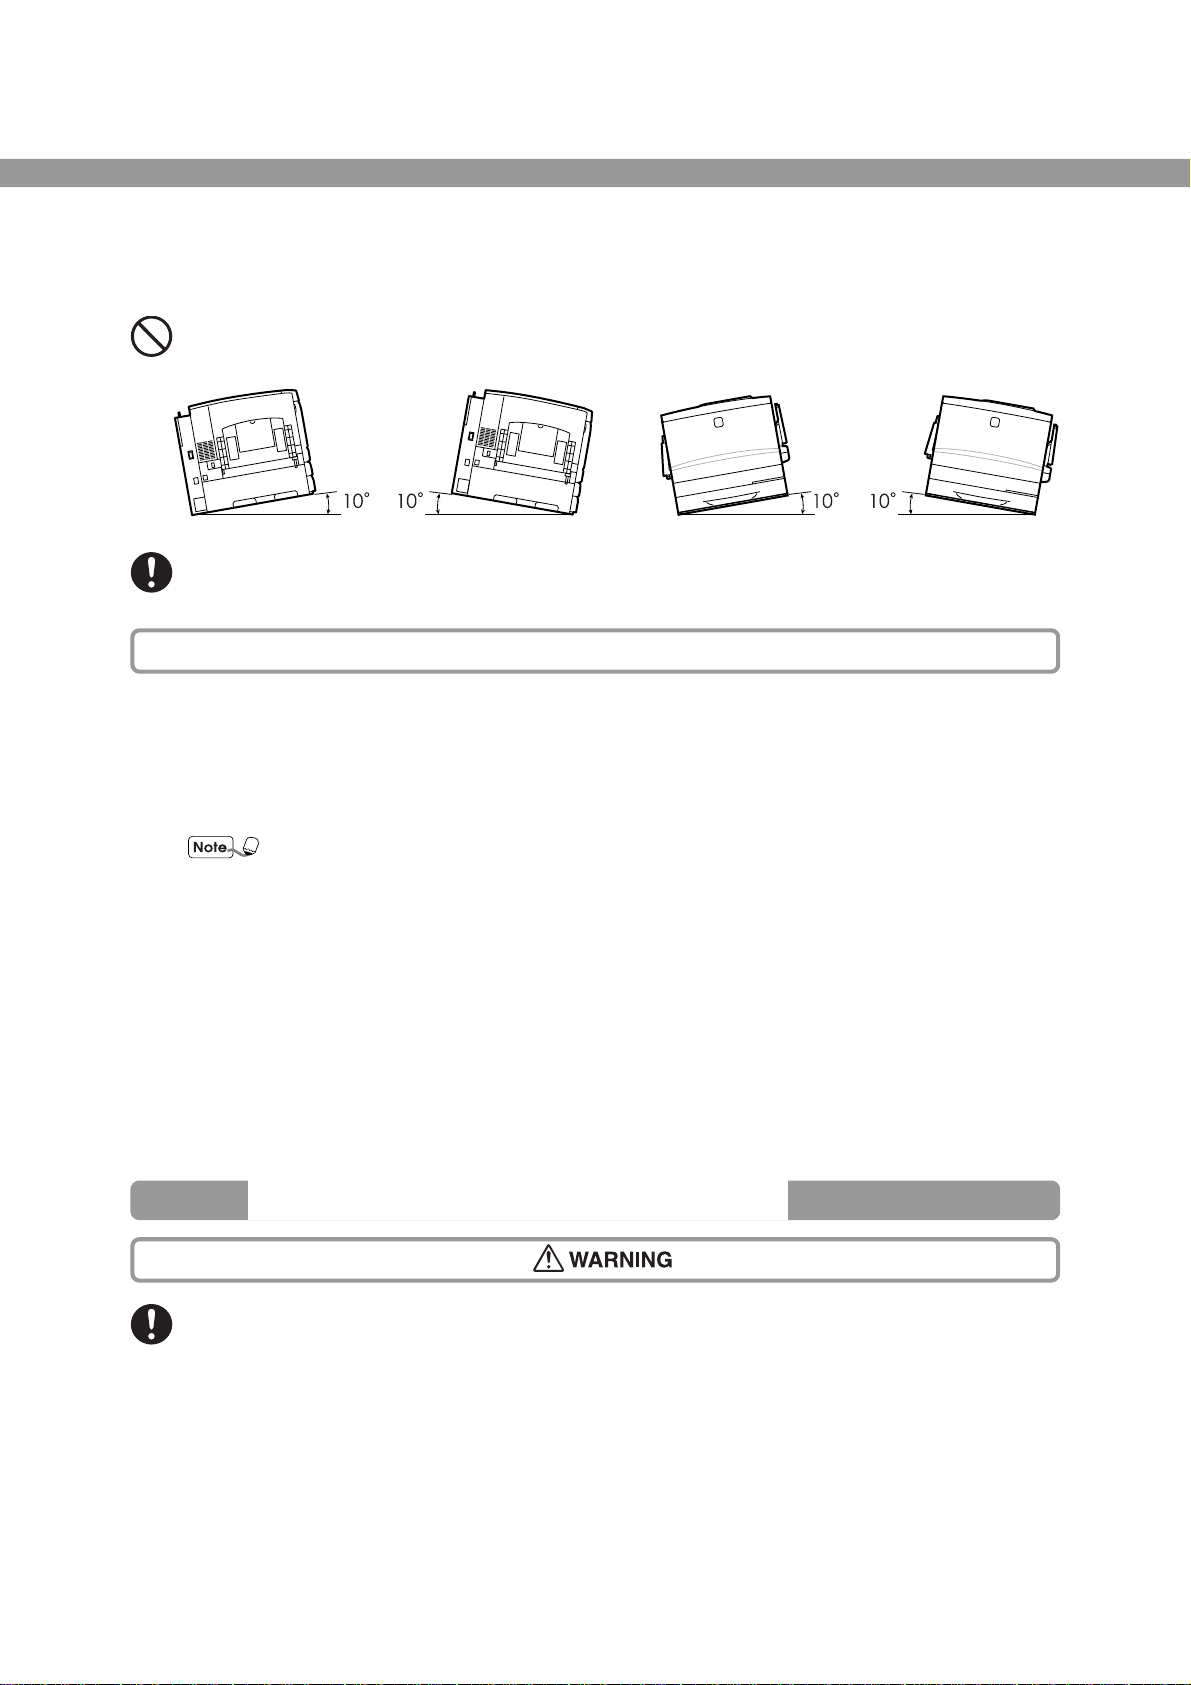
When moving the machine, do not tilt it more than 10o (as indicated below). If tilted excessively, the
machine may fall over and cause injuries.
After you have installed the optional 2-tray module, be sure to lock the caster stoppers at the base
of the tray module. An unlocked machine may fall over or slide and cause injuries.
Other Precautions
• Operate the printer in a location that meets the following conditions:
Temperature range 5-32
If operating the printer with a temperature of 32
the relative humidity reaches 85%, the temperature should not exceed 28
o
C, relative humidity 15-85% (no condensation)
o
C, the relative humidity should not exceed 48%. If
o
C.
Do not place the printer in a room where there are sudden fluctuations in temperature
as condensation may occur within the printer and print quality will deteriorate.
• Do not place the printer in direct sunlight, as this may damage the machine.
• Do not tilt the printer more than 5 mm front to back or more than 10 mm left to right, as the
consumables inside the printer may fall out and be damaged.
• Before moving the printer, remove the drum cartridge and waste toner cartridge, as spilt toner
could damage the interior of the printer.
• Do not place the printer directly next to an air conditioner or heater, as this affects the temperature
inside the machine, and could cause damage to the printer.
Precautions for Power and Earth Connections
The power specifications are listed below. The specifications that apply to your machine depend on
your machine configuration. Connect the power plug only to a properly rated power outlet.
Otherwise, it can cause fire or electric shocks. If in doubt, contact your Xerox Customer Support
Centre.
• Rated voltage (100 V) • Rated voltage (110 V) • Rated voltage (220-240 V)
Rated frequency (50/60 Hz) Rated frequency (60 Hz) Rated frequency (50/60 Hz)
Never use multi-plug adaptors to plug multiple power plugs in the same outlet. Be sure to operate
the machine on a sole-use receptable. Multiple connectors can cause the outlet to overheat and
cause fire.
xiii
Page 16
Ensure that the plug connection is free of dust. In a damp environment, a contaminated connector
can draw a non-negligible amount of current that can generate heat and eventually cause fire over
an extended period of time.
Always use the power cord provided with your machine. When an extension cord is required,
always use a properly rated cord.
• In Japan: "125 V/15 A"
• In other countries: Contact your Xerox Customer Support Centre
If you use a cord with an unspecified current rating, the machine or plug may emit smoke or
become hot to the touch.
Do not attempt to rework, pull, bend, chafe, or otherwise damage the power cord. Do not place a
heavy object on the cord. A damaged cord can cause fire or electric shocks.
Never touch a power cord with wet hands. Danger of electric shock exists.
Stop operation immediately if your machine produces smoke, excessive heat, unusual noise, or
smell, or if water is spilt onto the machine. Theses conditions can cause fire. Immediately switch
off and unplug the machine, and contact your Xerox Customer Support Centre.
To prevent fire or electric shocks, follow the instruction below based on your machine
configuration. If in doubt, contact your Xerox Customer Support Centre.
• If you machine is a 220-240 V model, there is no need to attach a separate earth line since the
earth connection is incorporated in the power line. Plug it inot a properly rated outlet.
• If your machine is a 100 V or 110 V model, use the green earth wire bundled with the power
cord, located at the rear of the machine.
The earth wire must be connected to one of the following conductors:
- Earth terminal of the specified power outlet
- A piece of copper buried in the earth 650 mm or deeper
- Earth terminal with Class D* earthing
* Class D is the regulation for Japan only.
Never connect the earth wire to any of the following:
• Gas pipe, which can be ignited and explode
• Telephone line earth wire or lightning rod, which can draw an excessive electric current if hit by
lightning
• Water faucet or pipe whose electrical conductivity is broken by a non-metal part
If the power cord is broken or insulated wires are exposed, ask your Xerox Customer Support
Centre for a replacement. Using a damaged cord can cause fire or electric shocks.
xiv
Page 17
Do not unplug or replug the machine while it is on. Unplugging a live connector can deform the plug
and cause fire.
When unplugging the machine, grasp the plug instead of the cord. Forcibly pulling on a cord can
damage it and cause fire or electric shocks.
Be sure to switch off and unplug the machine before accessing the interior of the machine for
cleaning, maintenance, or fault clearance. Access to a live machine's interior can cause electric
shocks.
Once a month, unplug the machine and check the power cord for the following:
• The power cord is plugged firmly into a receptacle
• The plug is not excessively heated, rusted, or bent
• The plug and receptacle are free of dust
• The cord is not cracked or frayed
If you notice any unusual conidtions, contact your Xerox Customer Support Centre.
When the machine is not used over an extended period of time, switch it off and unplug it. If an
unused machine is left connected to a power source for a long period, degraded insulation can
cause electric shocks, current leakages, or fire.
Switch off the machine before connecting the interface cable and any optional product. Connecting
the cable or optional product with a live machine can cause electric shocks.
Other Precautions
• Reception interference
When installed at a certain location, the machine may cause interference with radio and television
reception. If you notice flickering, or distorted images or noises on your audio-visual units, your
machine may be causing radio interference. Switch it off, and if the interference disappears, the
machine is the cause of radio interference. Perform the following procedures until the interference
is corrected.
• Move the machine and the TV and/or radio away from each other.
• Reposition or re-orientate the machine and/or the TV and radio.
• Unplug the machine, TV, and radio, and replug them into outlets that operate on different
circuits.
• Re-orientate the TV and/or radio antennas and cables until the interference stops. For an
outdoor antenna, you should ask your local electrician for support.
• Use coaxial cable antennas.
xv
Page 18
Operating Precautions
Do not place any liquid container such as a vase or coffee cup on the machine. Spilt water can
cause a fire or shock hazard.
Do not place any metal parts such as staples or clips on the machine. If metal and flammable parts
get into the machine, they can short-circuit internal components, and cause fire or electric shocks.
If debris (metal or liquid) gets into the machine, switch off and unplug the machine. Contact your
Xerox Customer Support Centre. Operating a debris-contaminated machine can cause fire or
electric shocks.
Never open or remove machine covers that are secured with screws unless specifically instructed
in this manual. A high voltage component can cause electric shocks.
Do not try to alter the machine configuration, or modify any parts. An unauthorized modification
can cause smoke or fire.
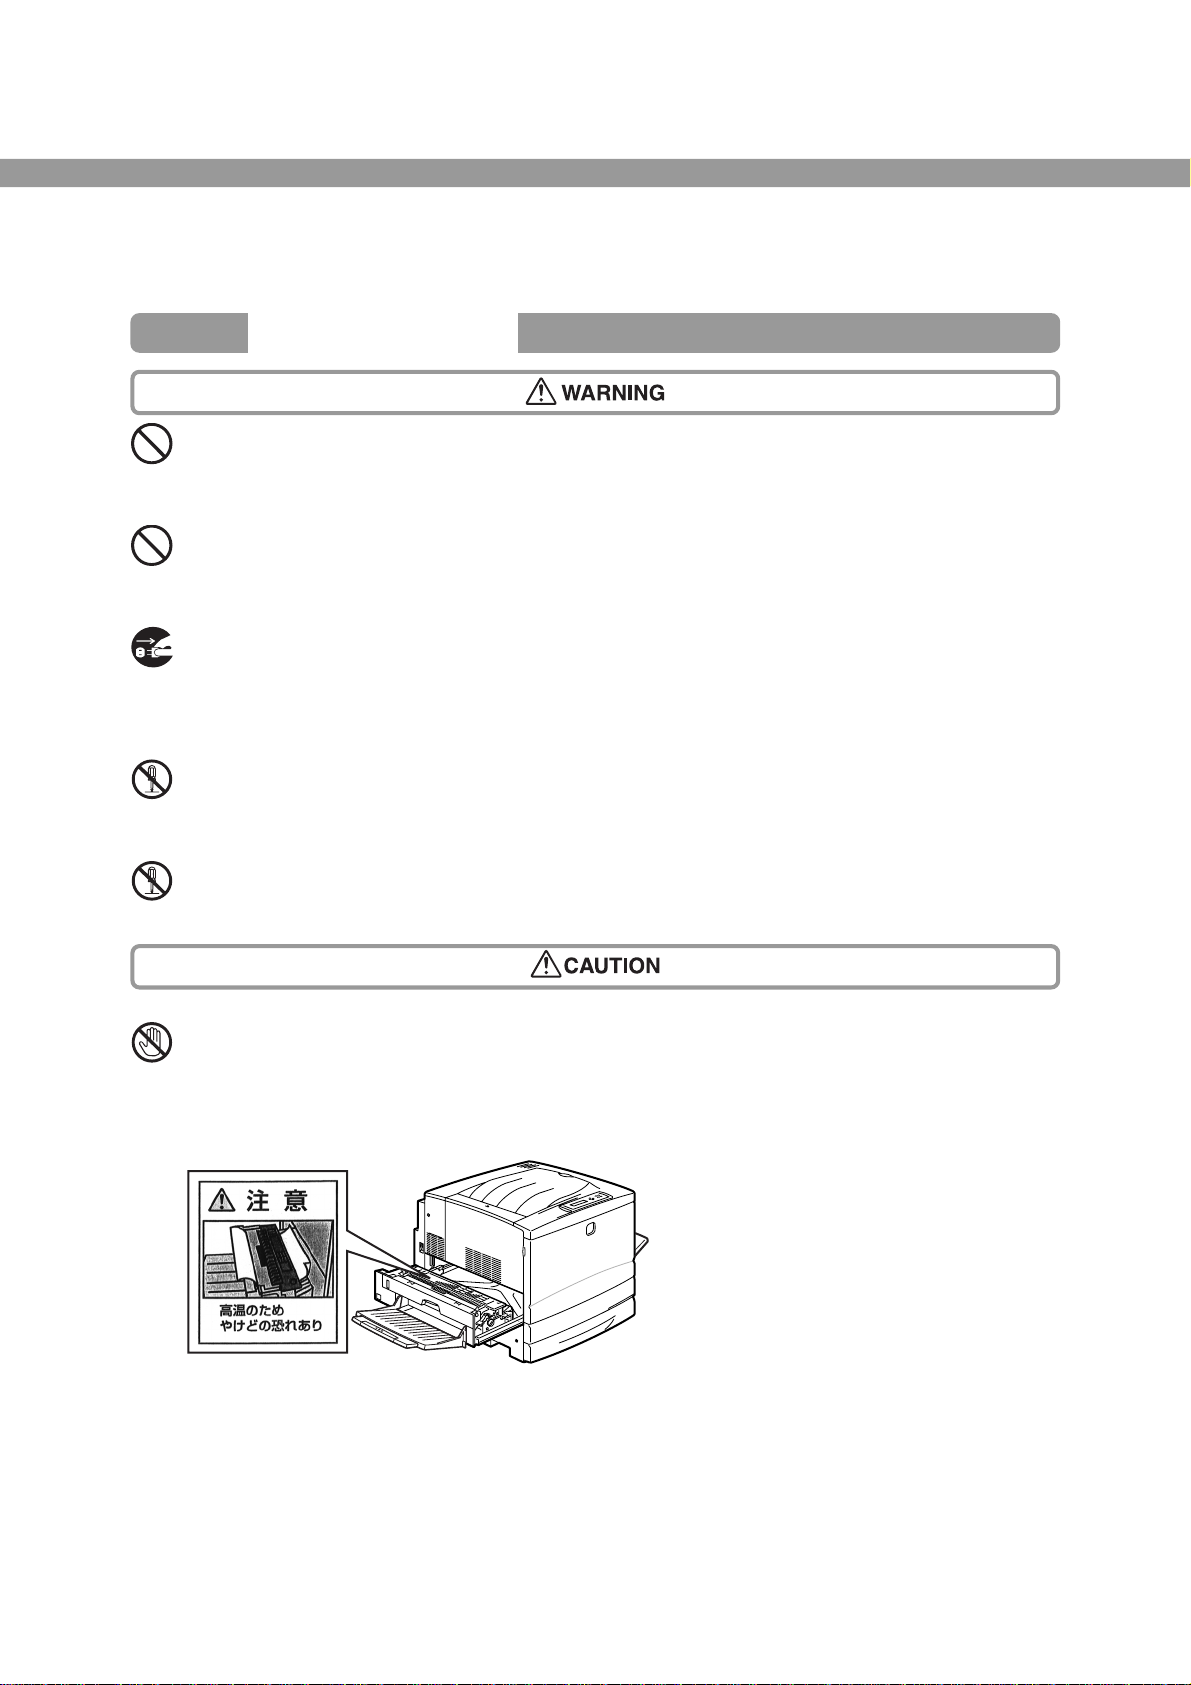
Never touch a labelled area found on or near the heat roller. You can get burnt.
If a sheet of paper is wrapped around the heat roller, do not try to remove it by yourself to avoid
injuries or burns. Switch off the machine immediately, and contact your Xerox Customer Support
Centre.
xvi
Page 19
This equipment is certifed as a Class 1 laser product under IEC825 (1984). This means that the
machine does not emit hazardous laser radiation. Since radiation emitted inside the machine is
completely confined within the protective housings and external covers, the laser beam cannot
escape from the machine during any phase of user operation. Do not remove any covers except
those that have been specifically instructed in the manual. This may result in unnecesary laser
radiation.
Do not place any heavy object on the machine. An off-balance machine can fall over or the heavy
object can fall, causing injuries.
Do not use a highly flammable spray or solvent near the machine. It can cause fire.
When removing jammed paper, make sure that no pieces of torn paper are left in the machine. A
piece of paper remaining in the machine can cause fire.
If a sheet of paper is wrapped around the heat roller, or when clearing a jammed paper that is
difficult or impossible to see, do not try to remove it by yourself. Doing so can cause injuries or
burns. Switch off the machine immediately, and contact your Xerox Customer Support Centre.
Other Precautions
• Refer to this manual for procedures on clearing paper jams, and how to resolve other troubles that
may occur.
Notes on Handling Consumables
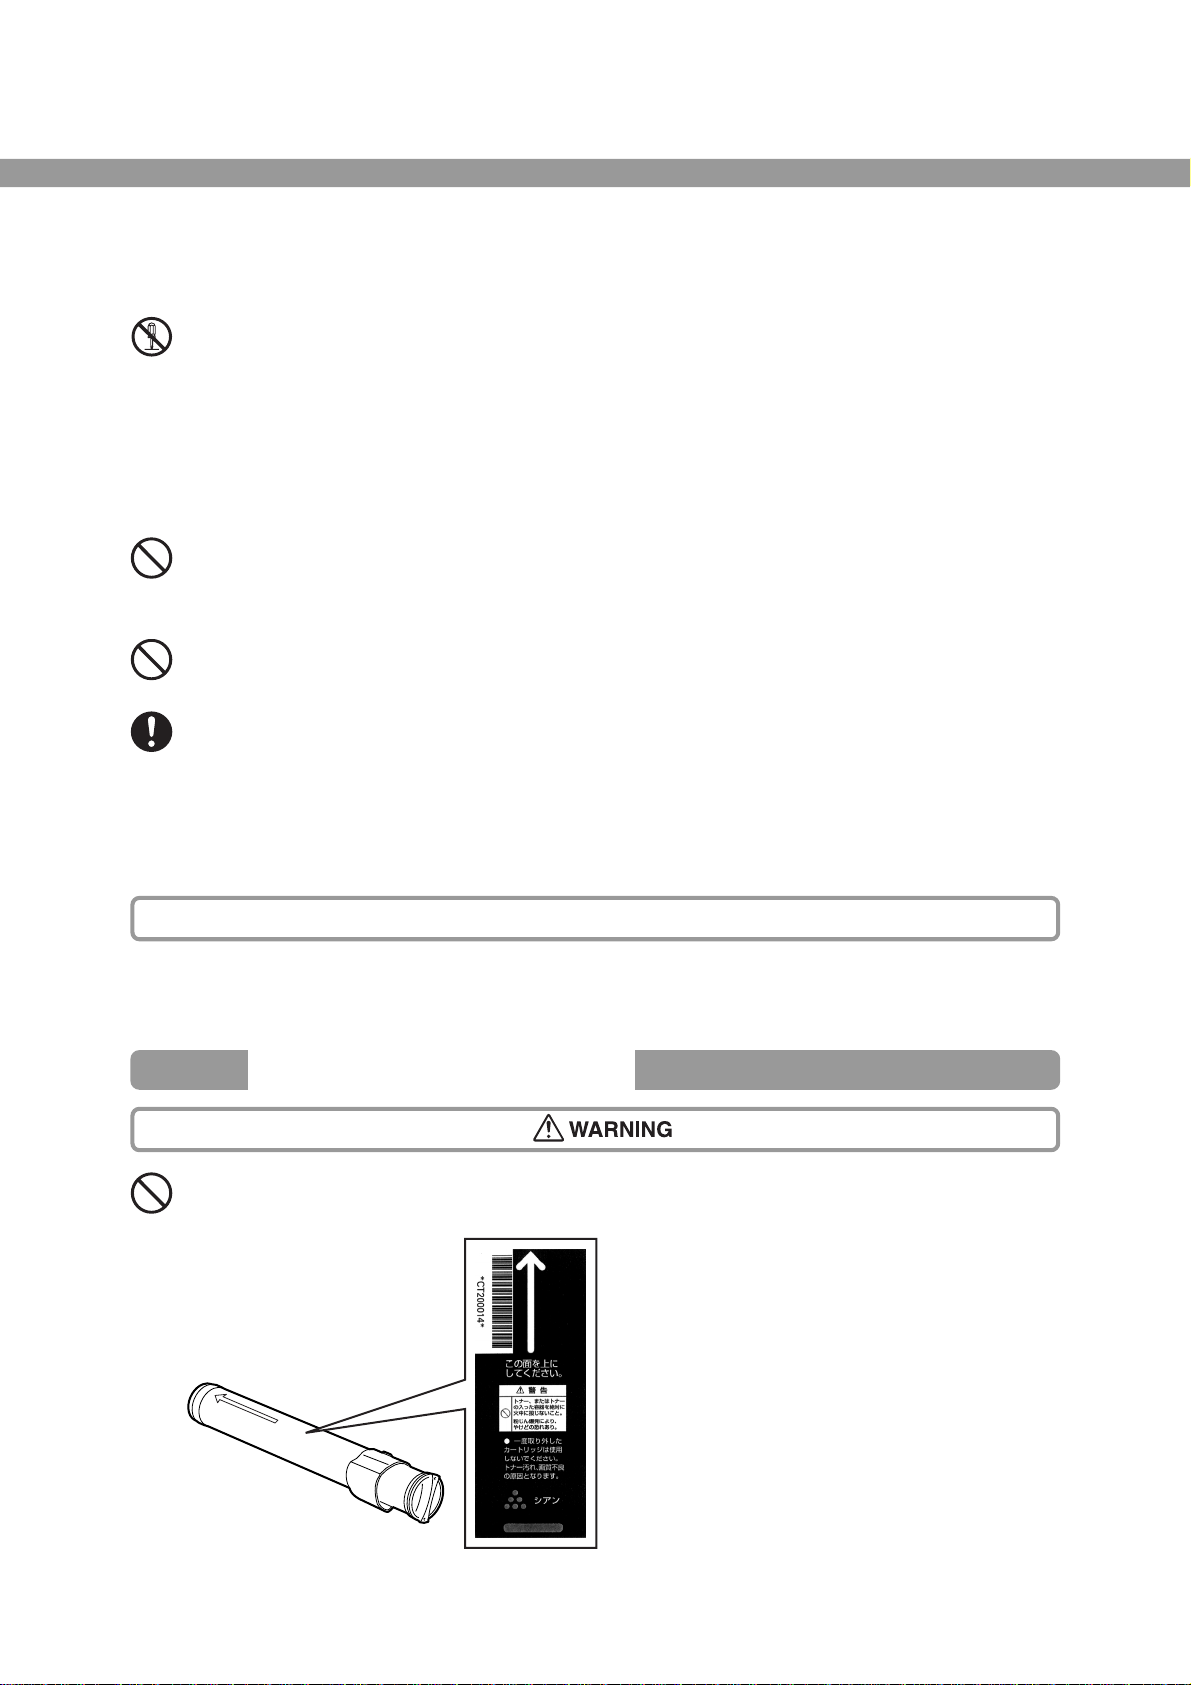
Never throw a toner cartridge into an open flame. Toner remaining in the cartridge can cause an
explosion and you can get burnt.
xvii
Page 20

Never throw a waste toner cartridge into an open flame. Toner in the cartridge can cause an
explosion and you can get burnt.
Never throw a drum cartridge into an open flame. Toner in the cartridge can cause an explosion
and you can get burnt.
xviii
Page 21

Other Precautions
• Open the consumables only when you want to use them. Do not store them in the following places:
• High temperature or humid places
• Near a fire
• Under direct sunlight
• Dusty places
• When using the consumables, read and observe operating instructions and safeguards written on
the package and container.
• Administer emergency treatment as follows:
• If toner gets into your eyes, rinse them well with plenty of clean water. Consult a doctor, if
necessary.
• If toner adheres to your skin, wash it with soap and water, then rinse it well.
• If you inhale toner, exit the area immediately and gargle with plenty of water.
• If you swallow toner, induce vomitting and consult a doctor immediately.
• Do not re-use the waste toner cartridge once it has been used. The toner may leak and cause
damage.
• Do not tilt or shake drum cartridges or waste toner cartridges that have been removed temporarily.
The toner may leak and cause damage.
xix
Page 22

The Objective of the International Energy
Star Program
To protect the global environment and conserve energy sources, the International Energy Star Program
encourages the following product features. Fuji Xerox confirms DocuPrint C621 satisfies the Japanese
requirements for this program.
Low Power Mode Feature
This product has a power-saving feature, which switches the machine to the low power
mode automatically if the machine is on and not operated for a certain period of time. In
this mode the machine lowers the fuser temperature and saves the power consumption.
The default low power mode start time is set at 30 minutes.You can change this setting
from 1 to 120 minutes. See Chapter 3 About the Control Panel in the User Guide for
details.
xx
Page 23

Setting up
the
Printer
1.1 Removing the Packing Tape and Spacers ............................................. 2
1.2 Assembling the Optional Products (Part 1) ........................................ 12
1.3 Assembling the Face-up Tray ............................................................ 14
1.4 Installing the Drum Cartridge ............................................................. 15
1.5 Installing the Toner Cartridges ........................................................... 18
1.6 Loading Paper .................................................................................... 21
1.7 Assembling the Optional Products (Part 2) ........................................ 24
1.8 Switching on the Power and Confirming the Operation ..................... 28
Page 24
1
1.1 Removing the Packing Tape
and Spacers
Spacers and packing tape are attached at various locations to protect the printer against
shock and vibration during transportation. When the printer is stationary, remove all the
packing tape and spacers.
The transportation company is responsible for the unpacking and the
transportation of the printer to the location specified by the customer.
If you start using the printer without removing the packing tape or
spacers, paper jams may occur. Be sure to remove all the packing tape
and spacers following the procedure below.
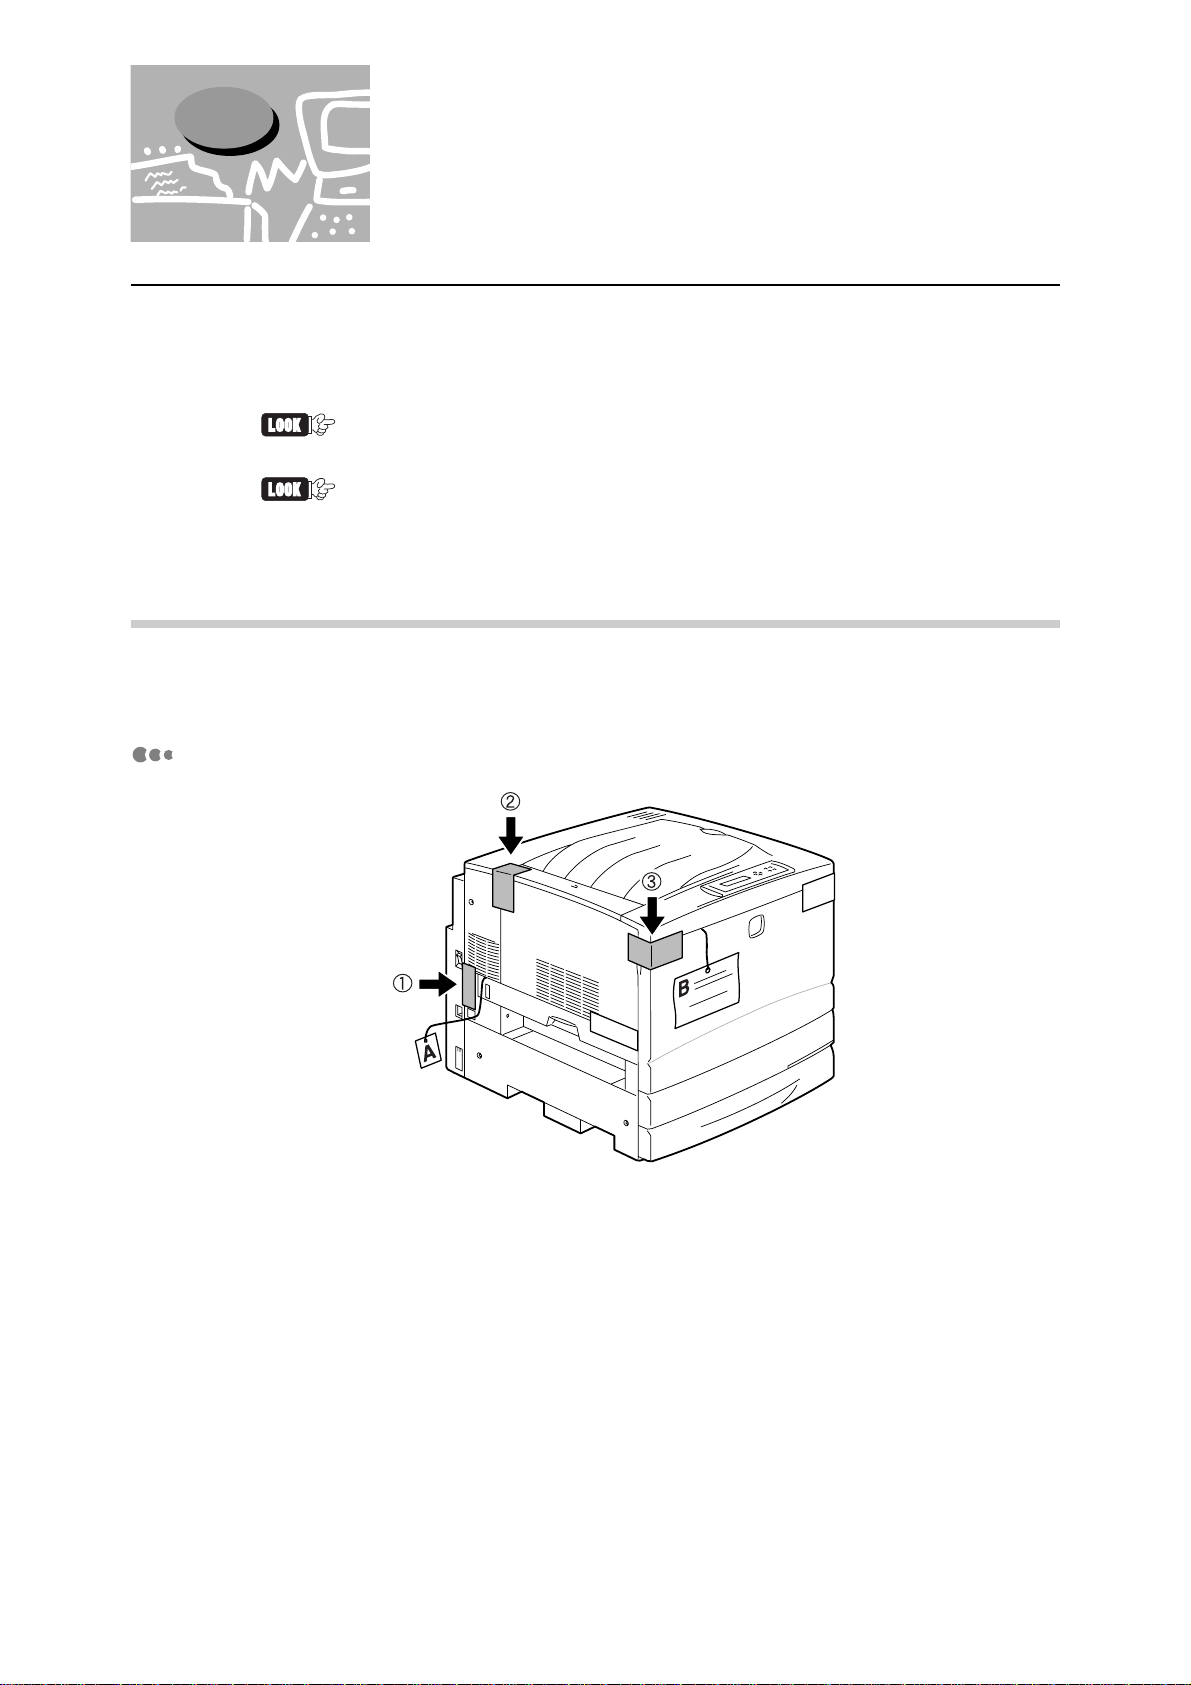
1.1.1 Removing the Packing Tape from Various Locations
The printer is taped at nine locations.
Refer to the following diagram to remove all pieces of packing tape.
On the Left Side of the Printer (Three Locations)
2
Page 25
1.1 Removing the Packing Tape and Spacers
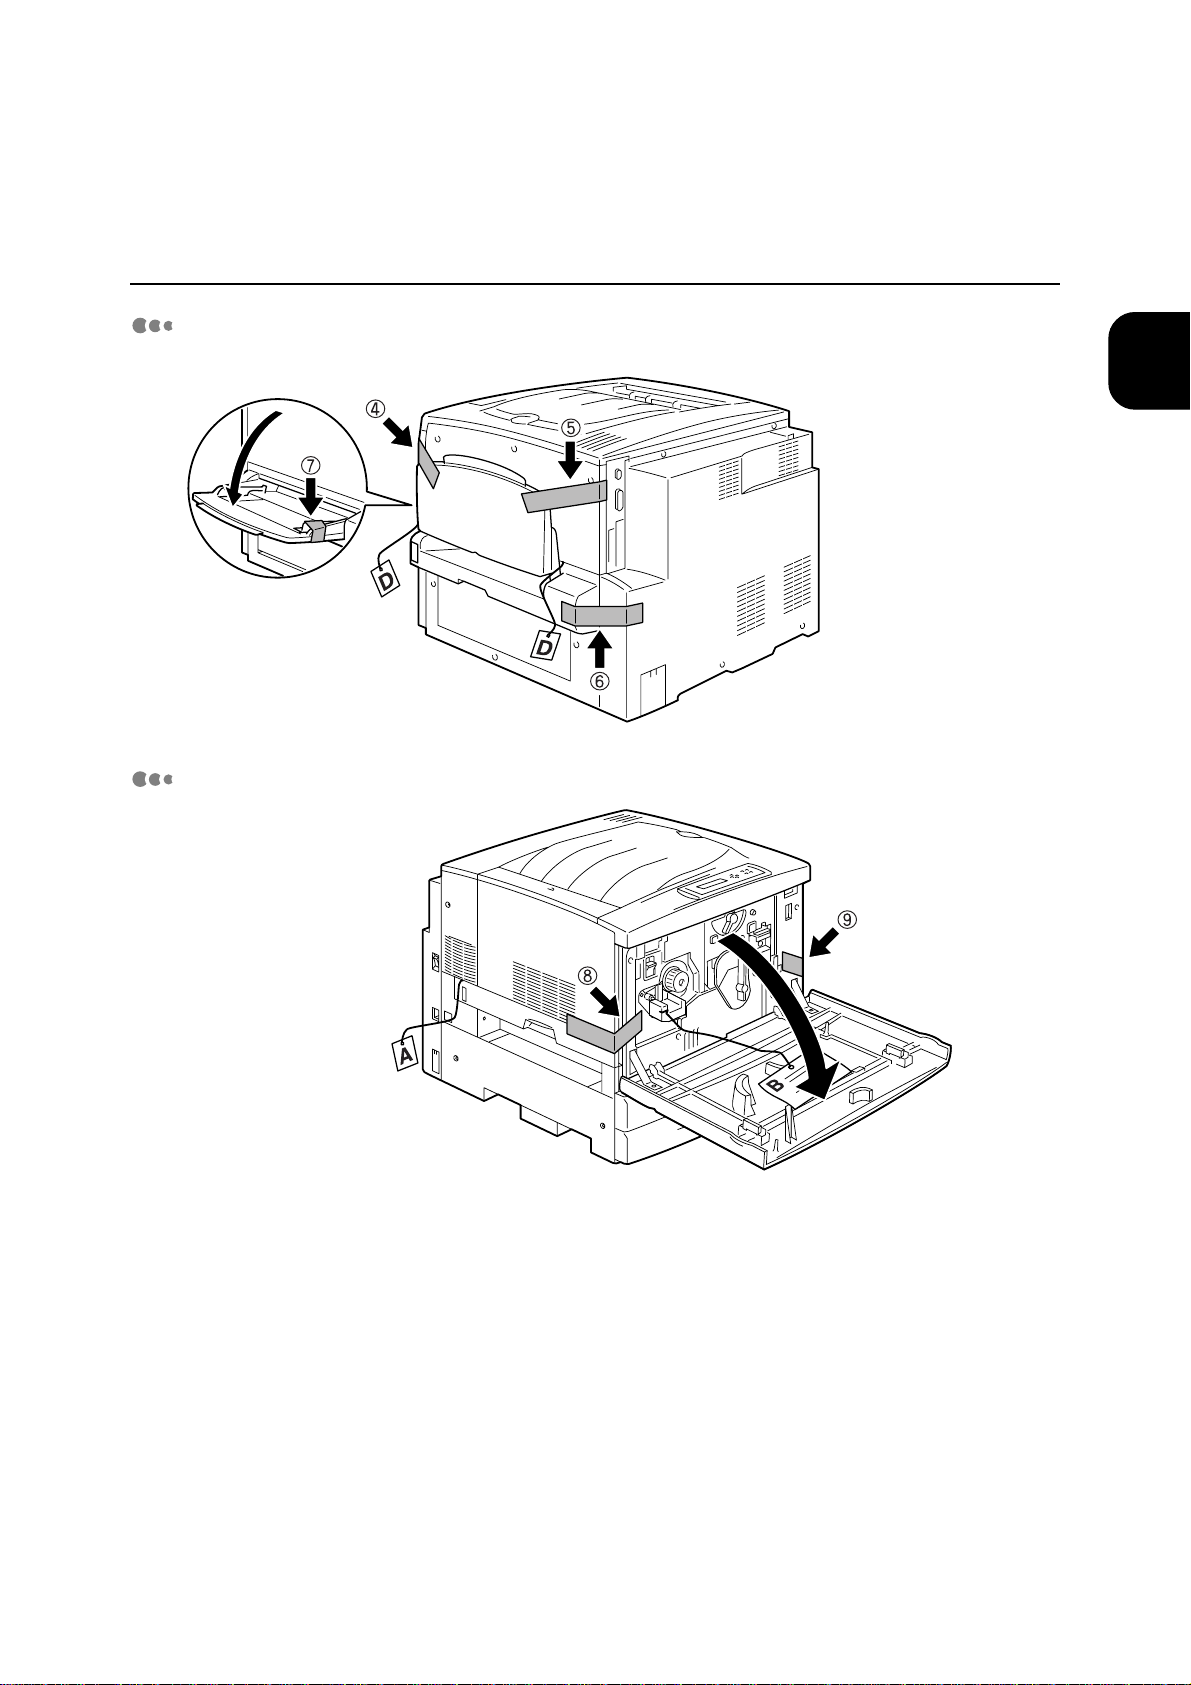
On the Right Side of the Printer (Four Locations)
1
Setting up the Printer
Inside the Front Cover (Two Locations)
3
Page 26
1.1 Removing the Packing Tape and Spacers
1.1.2 Removing the Spacers from Various Locations
1
The printer is protected from vibration during transportation by six types of spacers
(attached at seven locations) and four toner covers. Be sure to remove them.
If you expect to transport the printer over long distances in the future,
make sure you keep spacers B, C, D, E and F in a safe place.
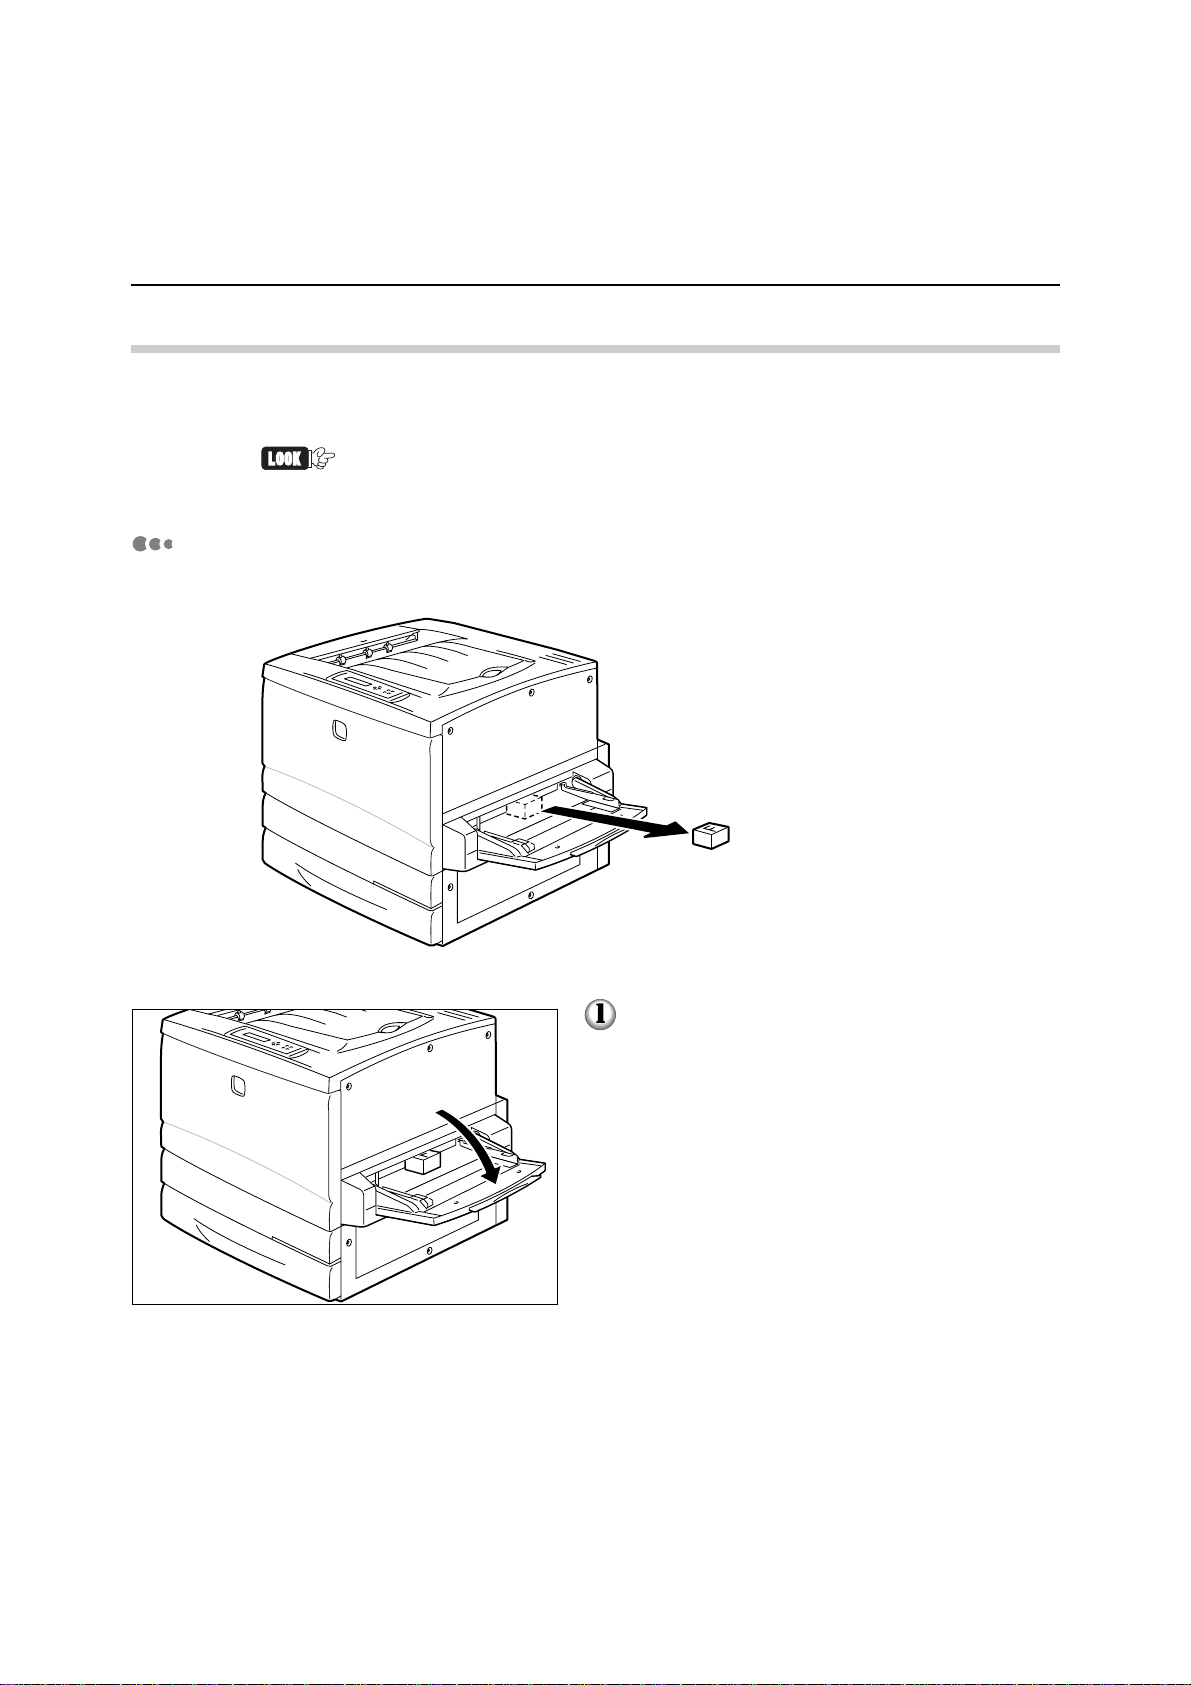
Removing the Spacer from the Manual Tray
Follow the procedure below to remove the spacer from the manual tray.
Open the manual tray.
4
Page 27
1.1 Removing the Packing Tape and Spacers
Remove the F spacer as shown in the diagram.
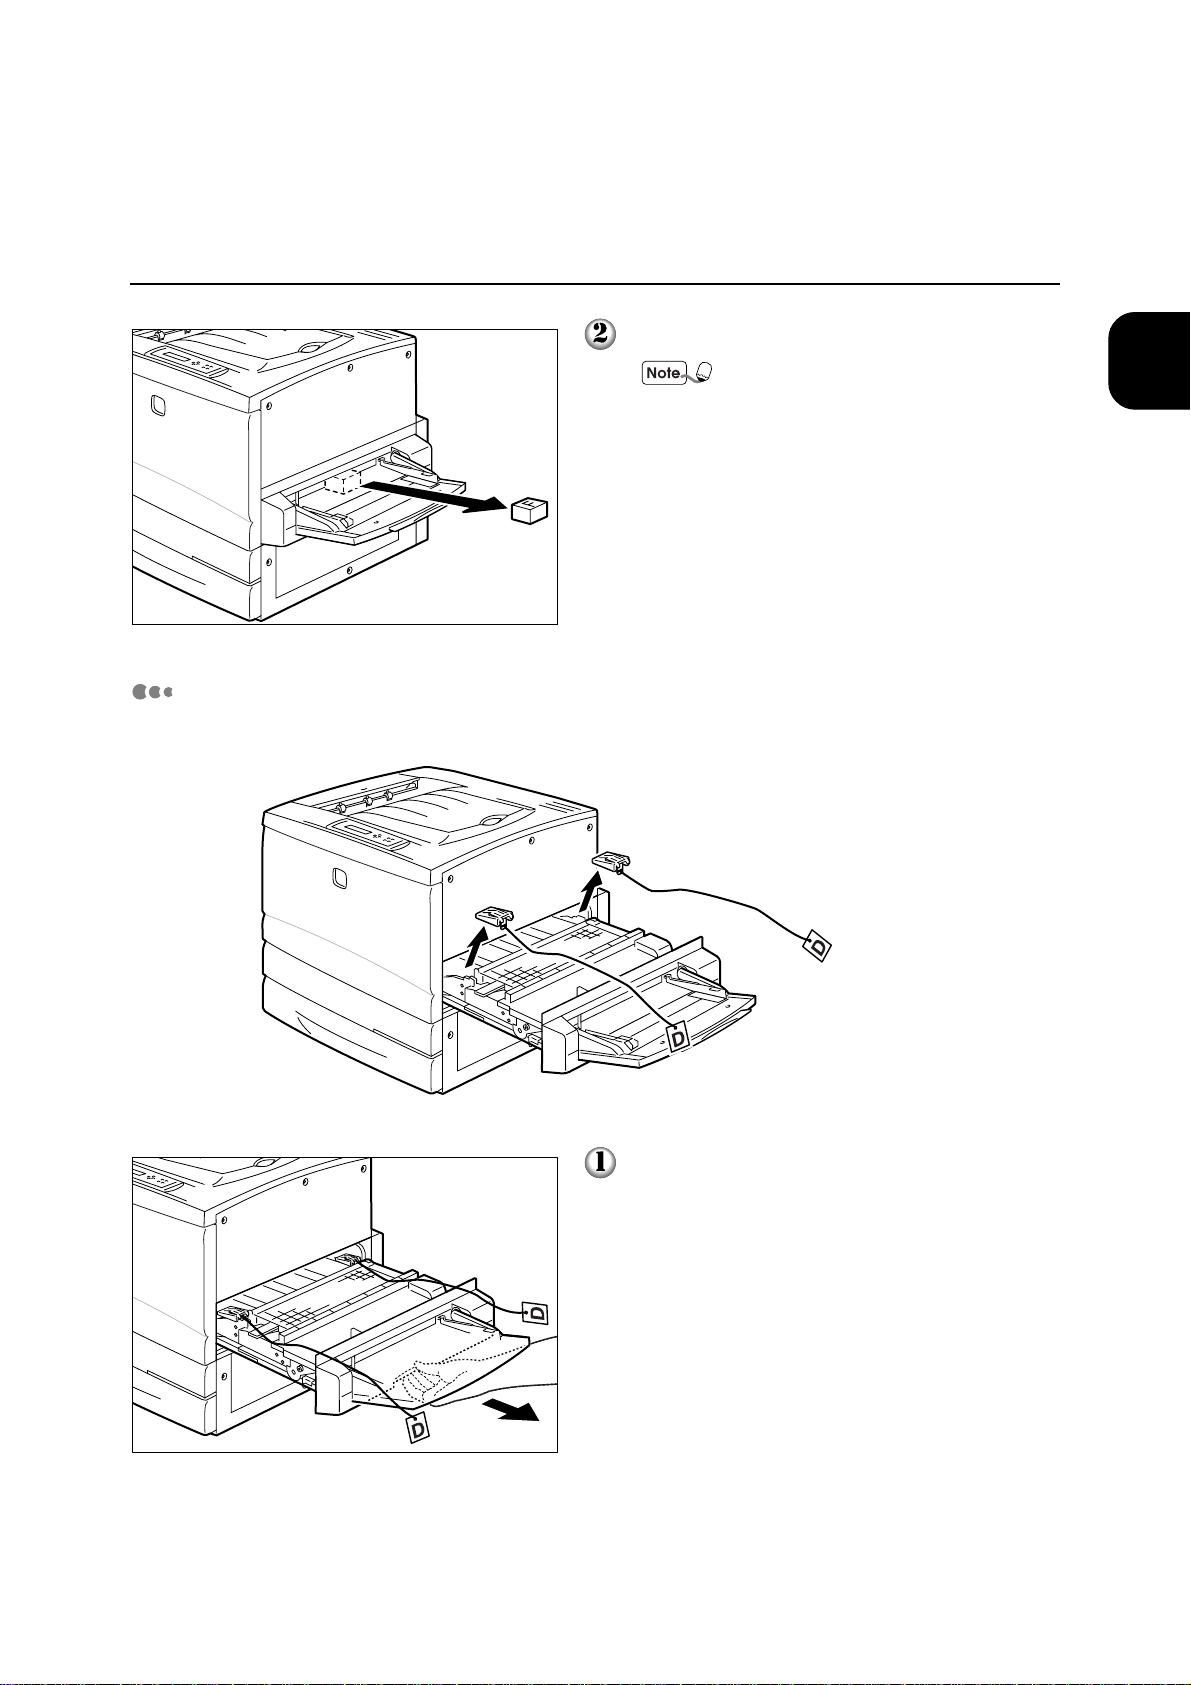
Removing the Spacers from the Manual Feed Unit
Follow the procedure below to remove the spacers from the manual feed unit.
You will need the F spacer if you
were to transport the printer over
long distances in the future.
Make sure you keep it in a safe
place.
1
Setting up the Printer
Gently pull out the manual feed unit until it
stops.
5
Page 28
1
1.1 Removing the Packing Tape and Spacers
Remove the orange spacers (D) as shown in
the diagram.
You will need the D spacers if
you were to transport the printer
over long distances in the future.
Make sure you keep it in a safe
place
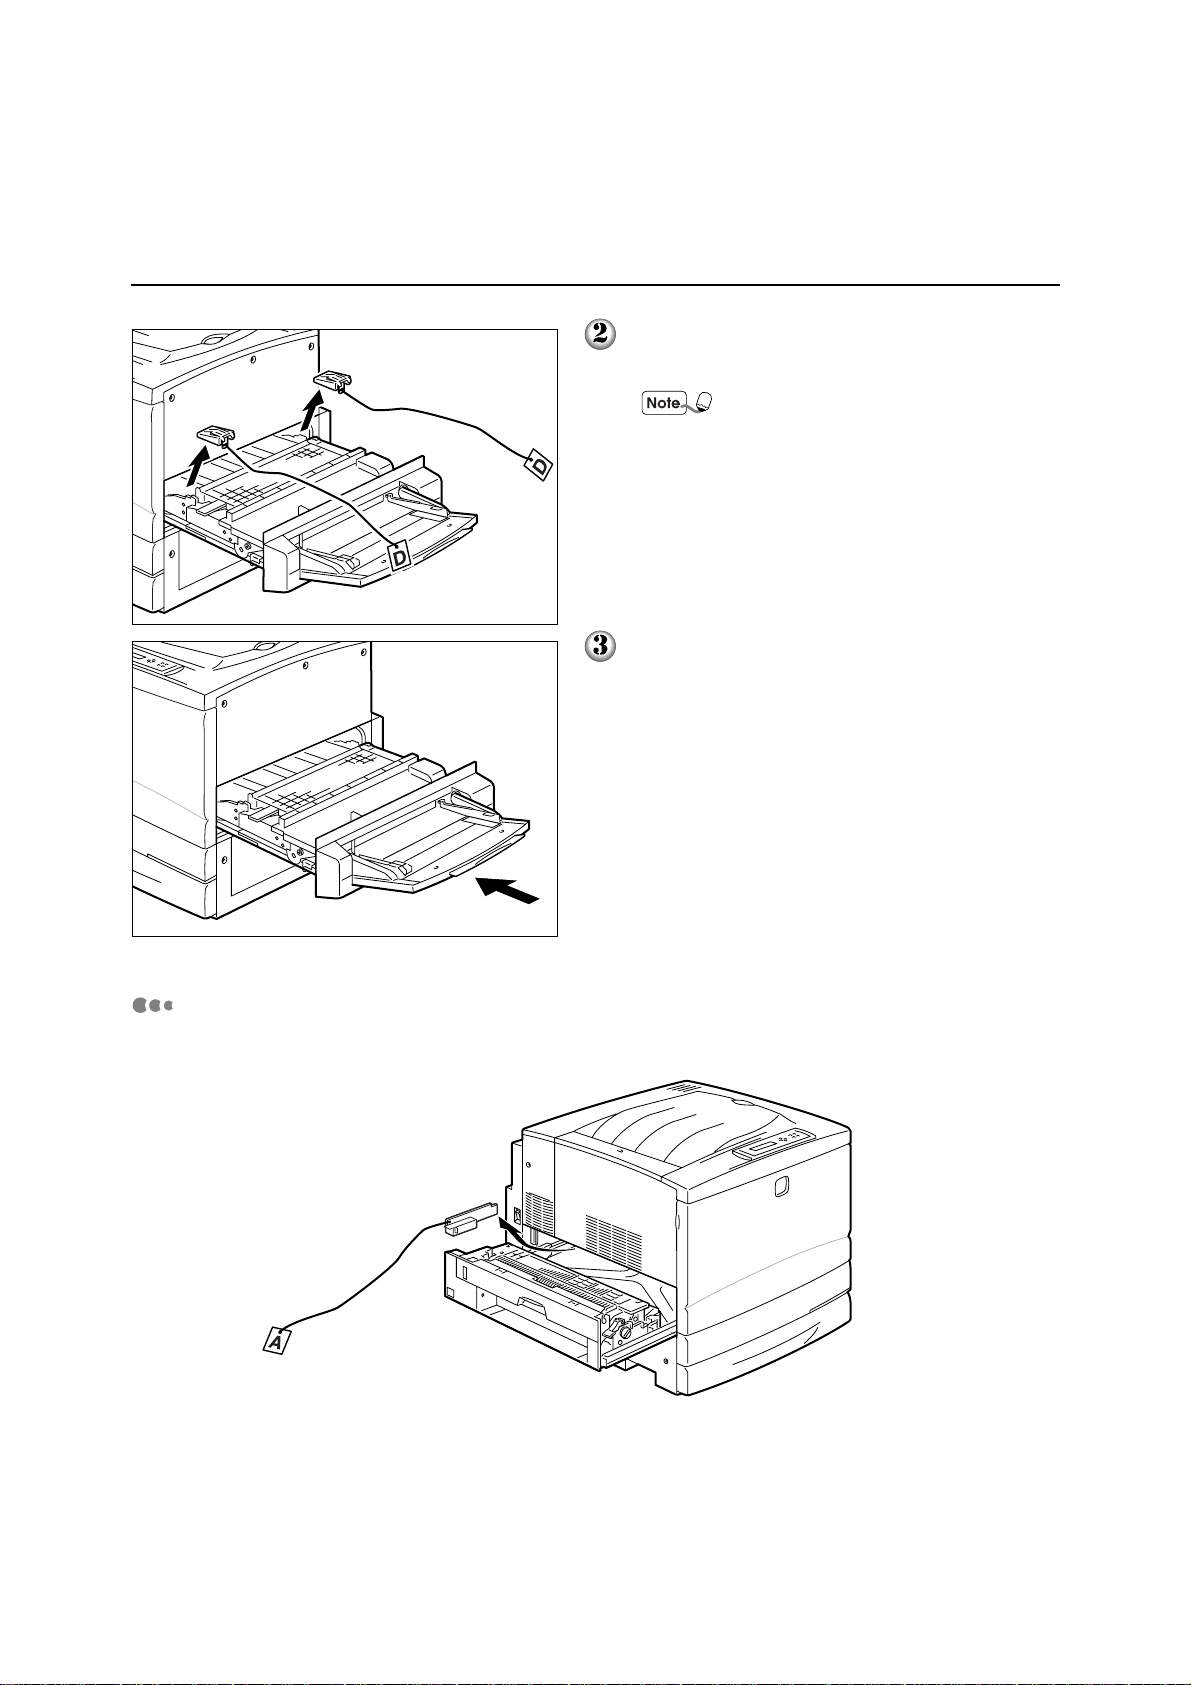
Push the manual feed unit firmly back into the
printer.
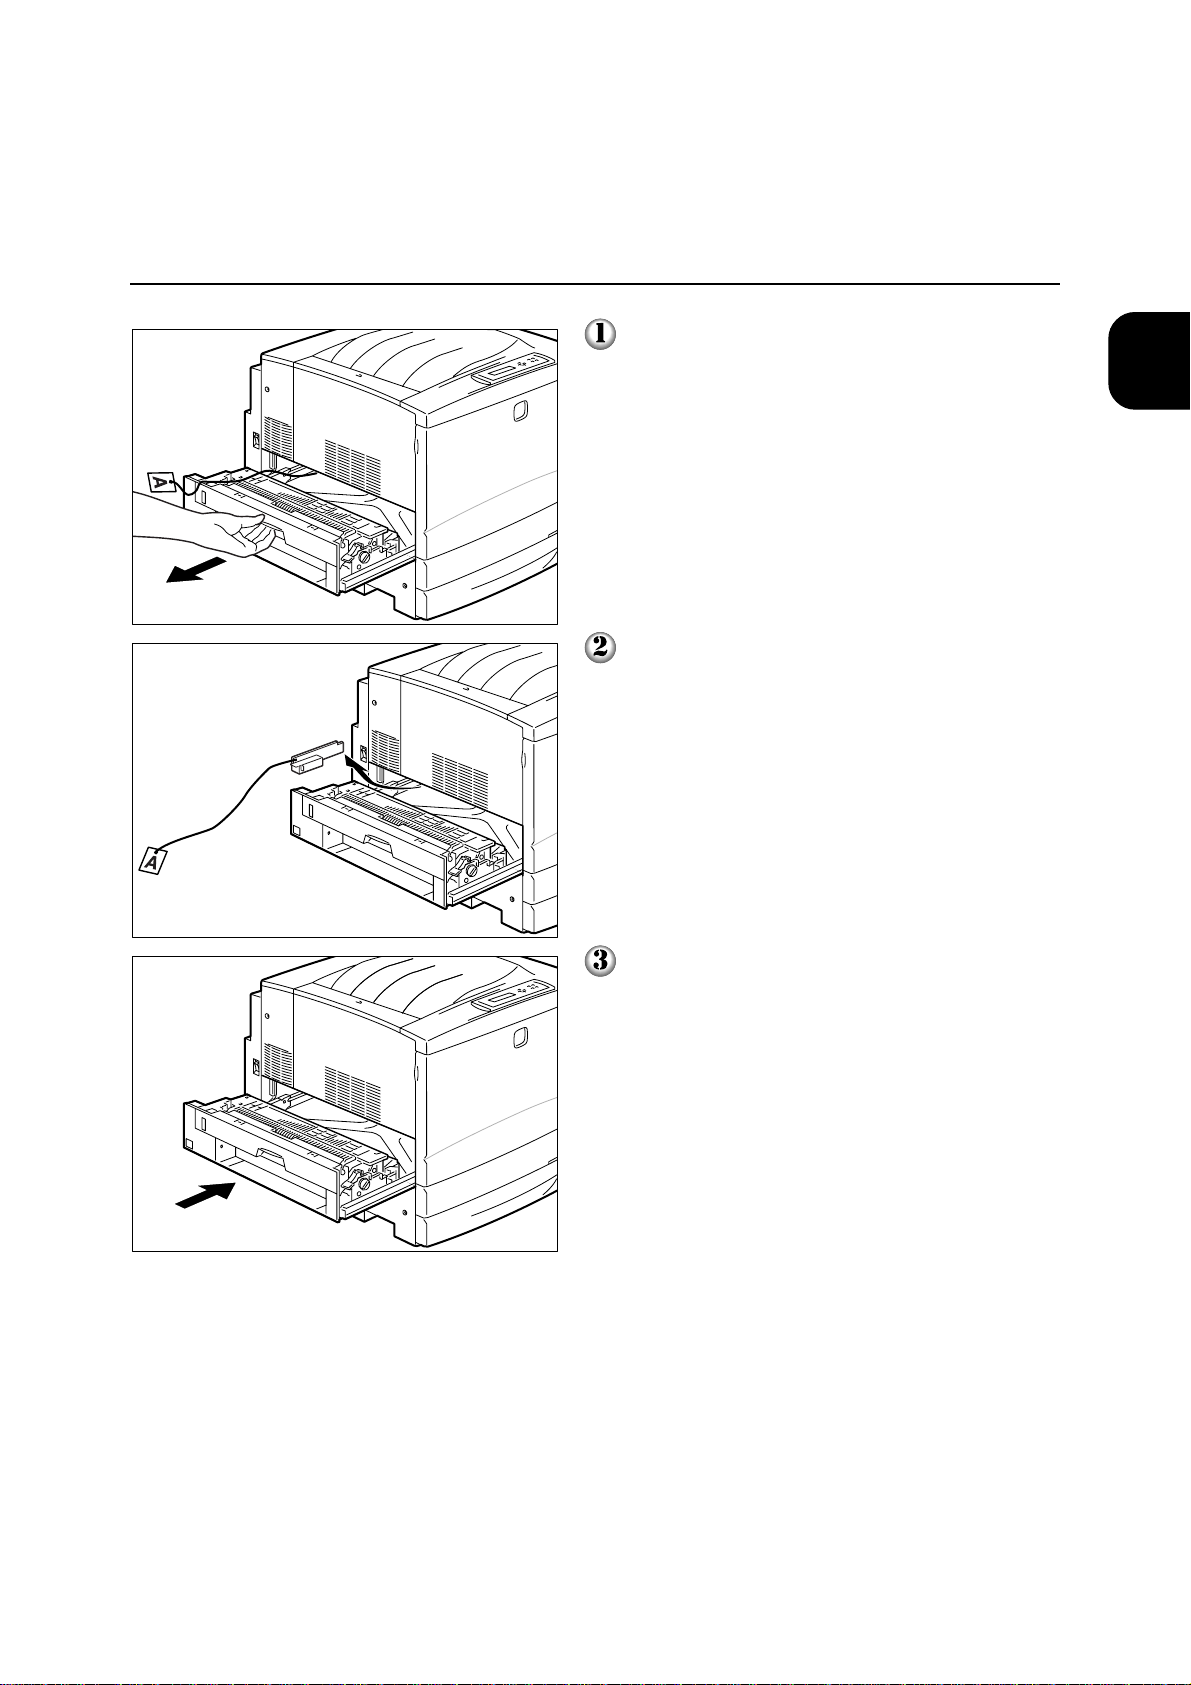
Removing the Spacer from the Lower Left Unit
Follow the procedure below to remove the spacer from the lower left unit.
6
Page 29
1.1 Removing the Packing Tape and Spacers
Pull out the lower left unit until it stops.
Remove the spacer at the rear of the unit (A
spacer) by pulling on the attached string.
1
Setting up the Printer
Push the lower left unit firmly back into the
printer.
7
Page 30
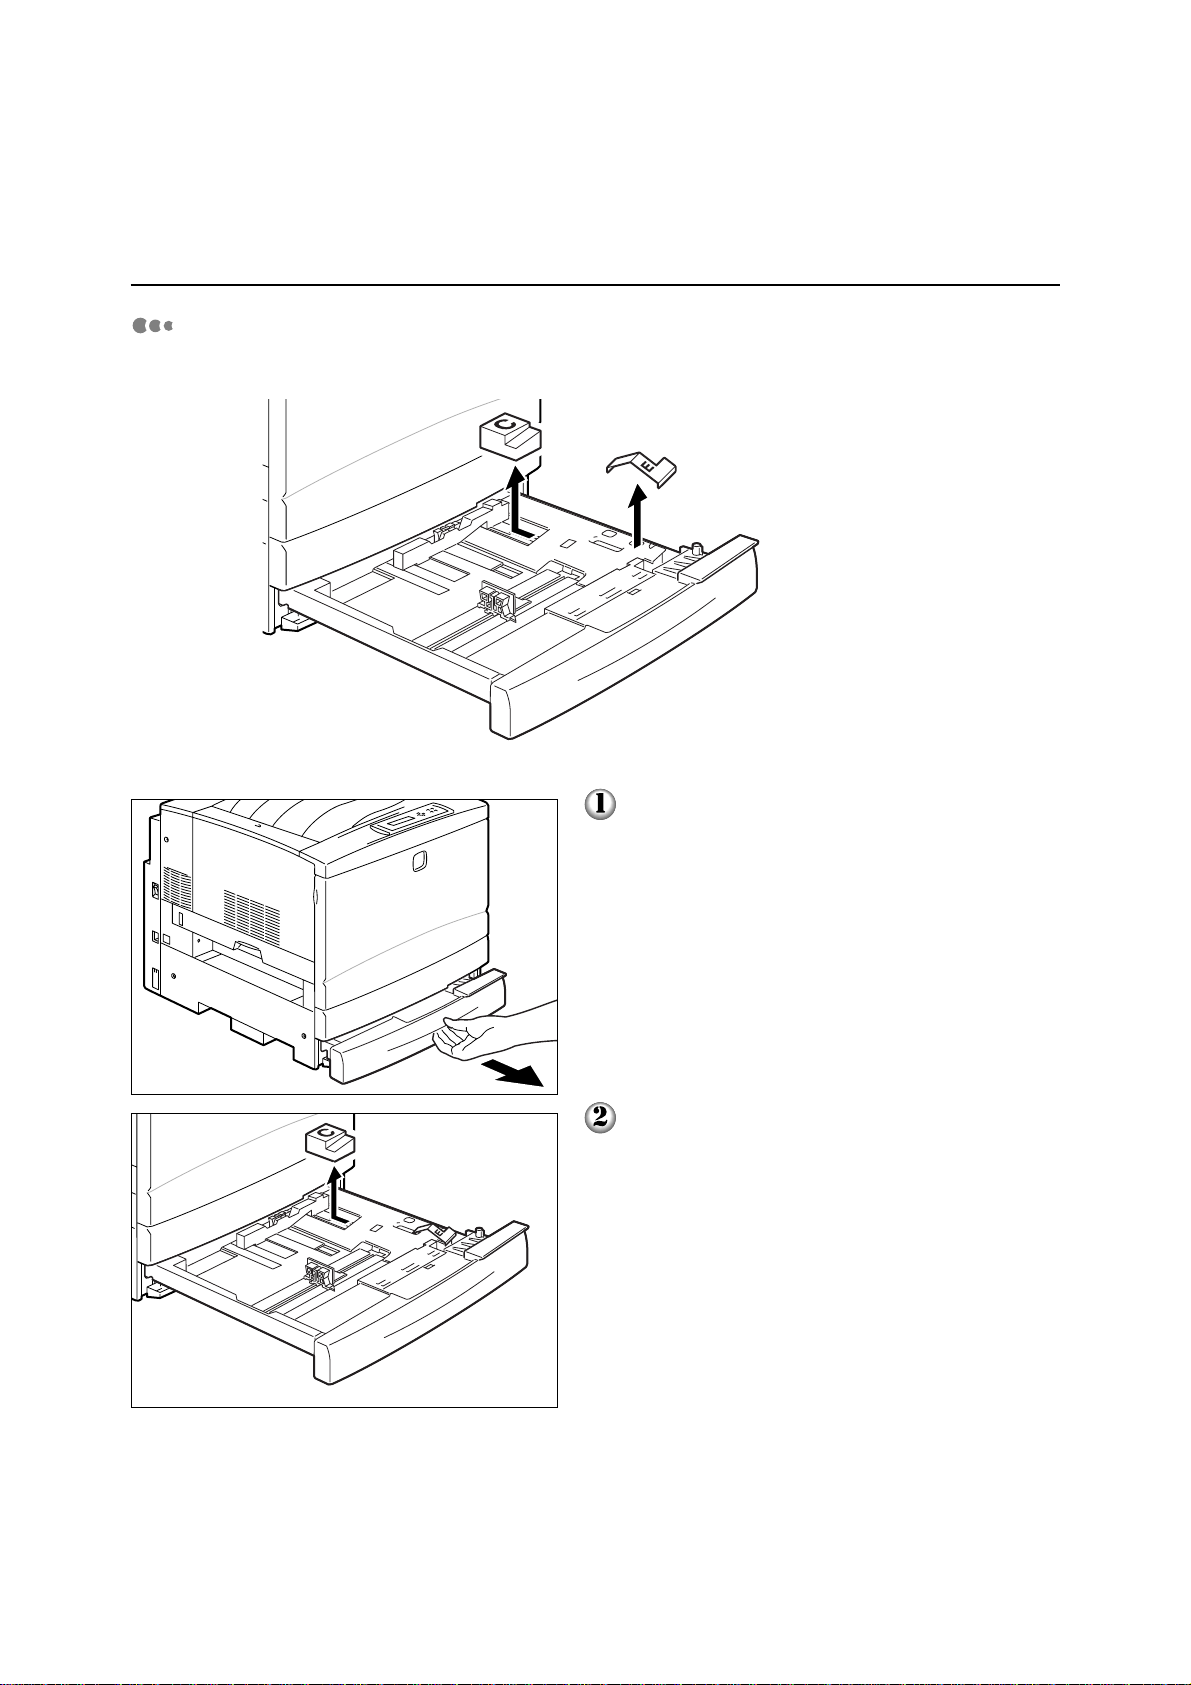
1.1 Removing the Packing Tape and Spacers
Removing the Spacers from the Paper Tray
1
Follow the procedure below to remove the spacer from the paper tray.
Pull out the paper tray until it stops.
8
Remove the C spacer as shown in the diagram.
This is a "L" shape spacer. Slide it to the back
and lift to remove it from the tray.
Page 31

1.1 Removing the Packing Tape and Spacers
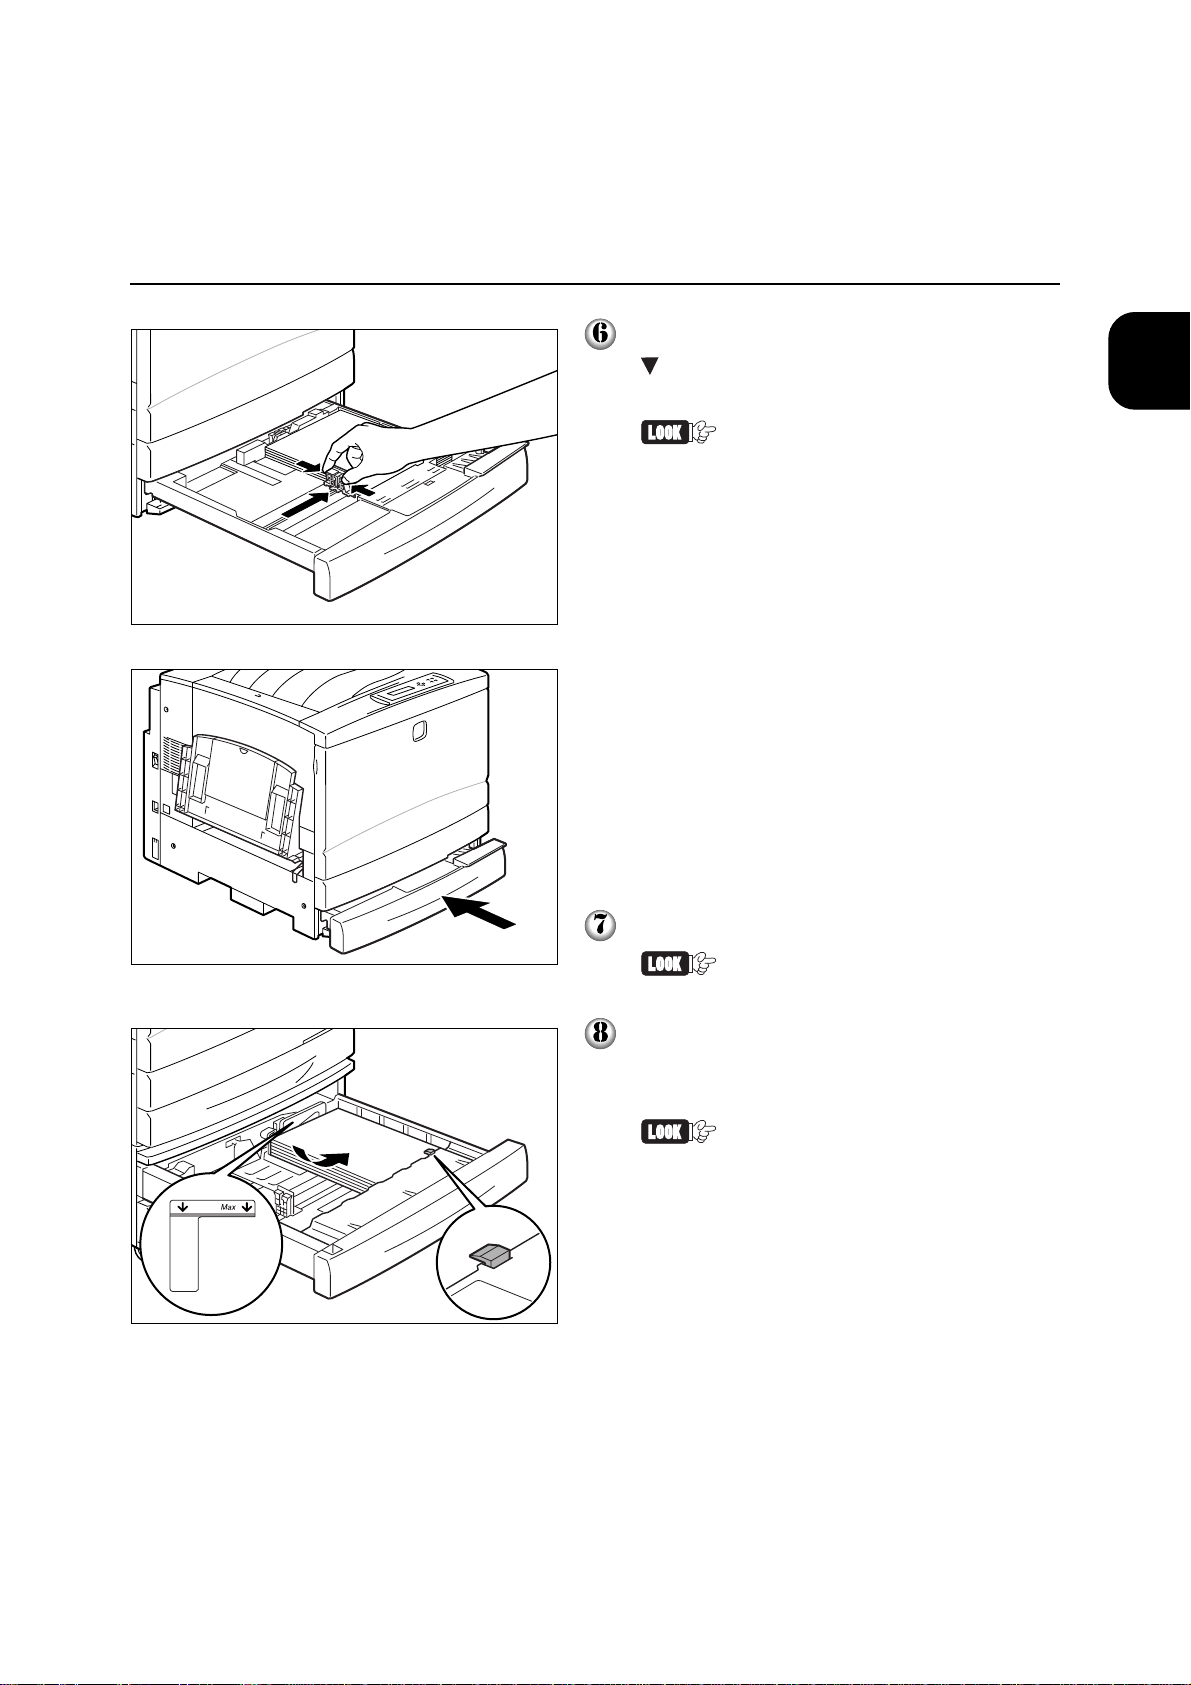
Remove the E spacer as shown in the diagram.
You will need the C and E
spacers if you were to transport
the printer over long distances in
the future. Make sure you keep
them in a safe place
Push the paper tray firmly back into the printer.
Do not push in the tray with
excessive force.
1
Setting up the Printer
Removing the Spacer and Toner Covers at the Toner Cartridge Window
Follow the procedure below to remove the spacer and toner covers at the toner cartridge
window.
9
Page 32

1
1.1 Removing the Packing Tape and Spacers
Open the front cover.
Remove the anti-rotational B spacer as shown
in the diagram.
You will need the B spacer if you
were to transport the printer over
long distances in the future.
Make sure you keep it in a safe
place
Pull at the end of the toner cover, located at the
toner cartridge window, to remove it.
There are four toner covers, one
for each of the four toner
cartridges. Repeat the procedure
three more times to remove all of
them.
Push up the anti-rotational switch.
10
The anti-rotational switch will be
lowered automatically when you
turn the knob in the next step.
Remove your hand after you
have pushed up the switch.
Page 33
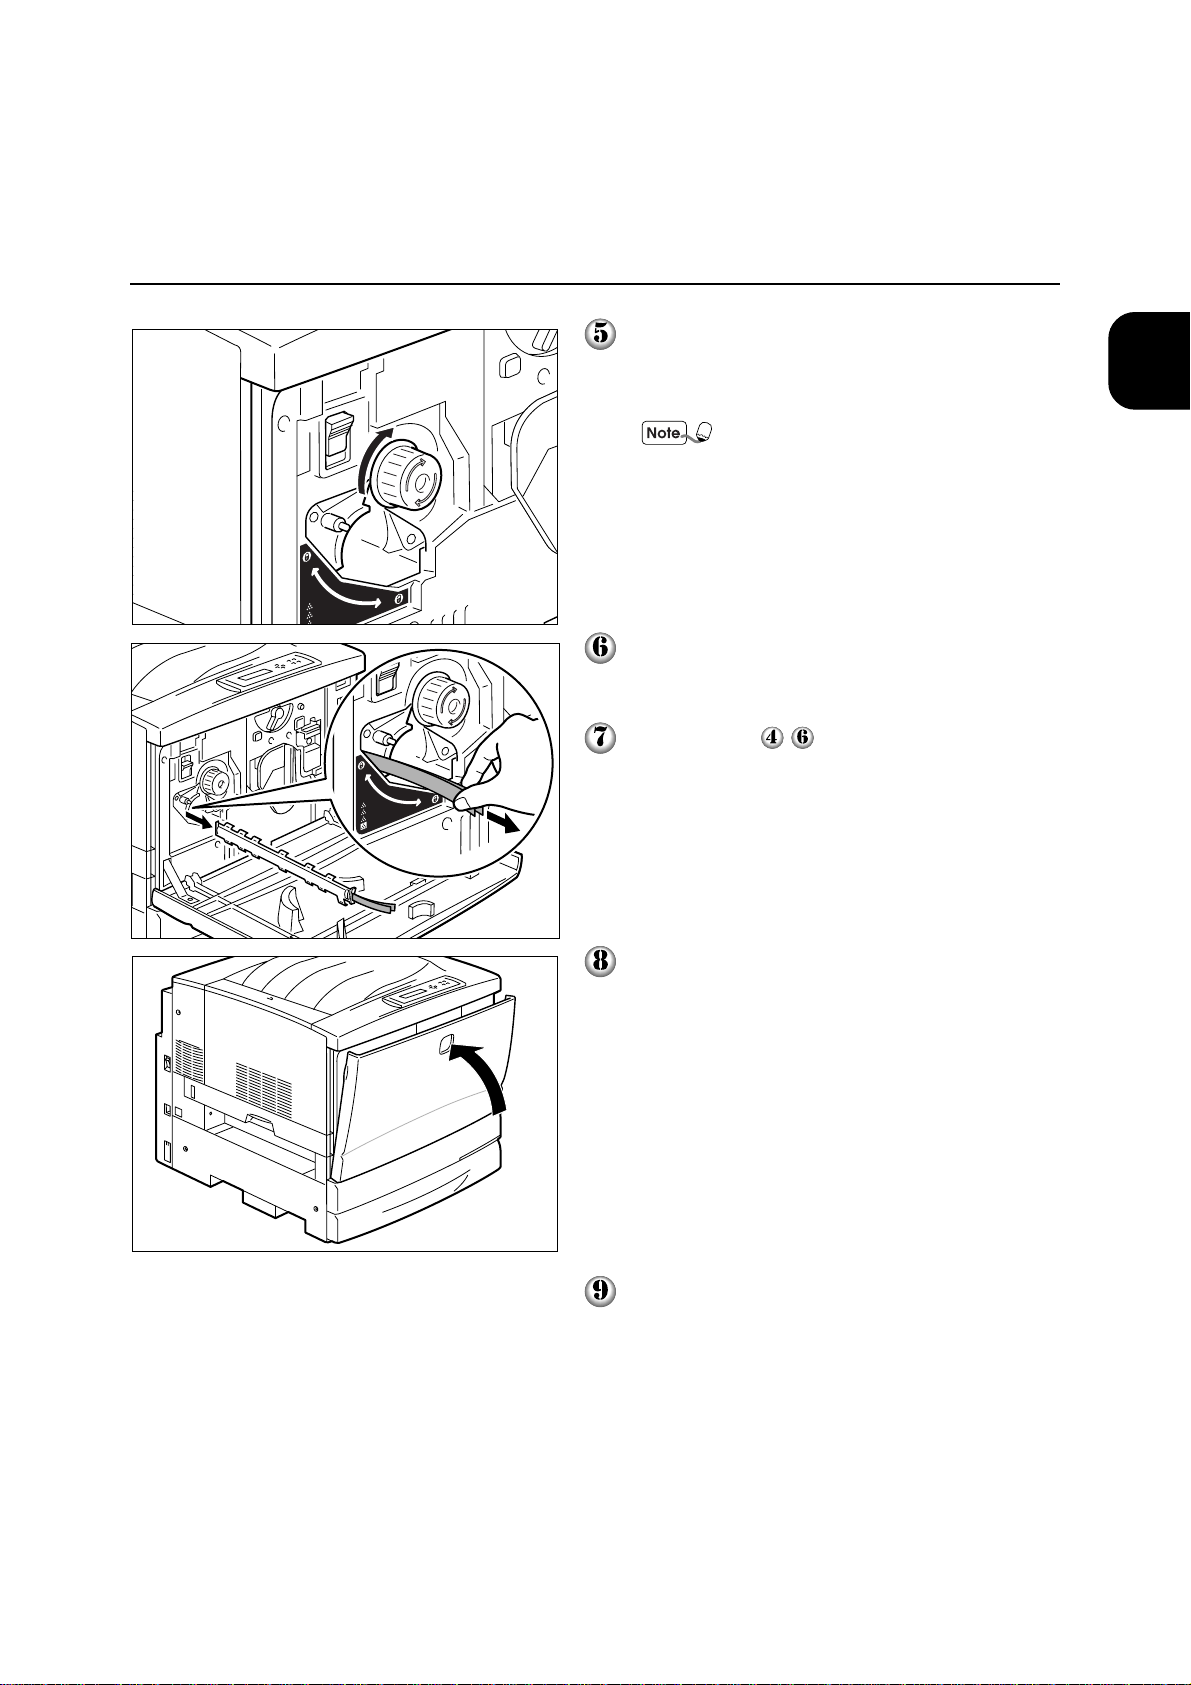
1.1 Removing the Packing Tape and Spacers
Rotate the knob in the direction of the arrow
until it stops so that the next toner cartridge
appears at the toner cartridge window.
Once you turn the knob, you will
hear a click indicating that the
anti-rotational switch has
returned to the down position.
Pull at the end of the toner cover that has
moved to the front to remove it.
1
Setting up the Printer
Repeat Steps - until all four of the toner
covers have been removed.
Close the front cover.
Paste the Repair and Maintenanc contact card
(bundled with the printer) at the front of the
printer.
11
Page 34

1
1.2 Assembling the Optional
Products (Part 1)
If you have purchased the optional products such as the 2-tray module, duplex print
mudule, and special cabinet, install them to the printer. Refer to the following booklets for
information on how to install them.
2-Tray Module
Booklet bundled with 2-tray
module or "1.2.1 Connecting the
Tray Module Connector"
Duplex Print Module
Booklet bundled with duplex print
module
Install the optional additional memory and hard disk after you have
assembled the accessories of this printer. Refer to "1.7 Assembling the
Optional Products (Part 2)" for more information.
Special cabinet
Booklet bundled with special
cabinet
1.2.1 Connecting the Tray Module Connector
If you have purchased the 2-tray module, the connector may sometimes be disconnected
for transportation purposes.
Confirm whether the two connectors from the 2-tray module are connected to the printer.
Follow the procedure on the next page if they are not connected.
12
Page 35
1.2 Assembling the Optional Products (Part 1)
The connector cover is located at the back of
the printer. Press the tab at the top of the cover
and pull to remove it.
Firmly connect the two cables dangling from
the 2-tray module to the two connector ports on
the printer.
1
Setting up the Printer
• The two connectors differ in
size. Make sure you connect
them to the correct ports as
shown in the diagram..
• Do not press too hard on the
connectors as you may hurt
your fingers.
Press the connector cover ( ) at the side of
the 2-tray module. While you are still pressing
on the connector cover of the 2-tray module,
push in the connector cover of the printer (
along the guides until it clicks.
Paste the label bundled with the 2-tray module
on the location as indicated in the diagram.
)
13
Page 36

1
1.3 Assembling the Face-up Tray
Follow the procedure below to attach the face-up tray.
Hold the face-up tray vertically and fit the tab
on the right of the tray into the hole in the
printer. Make sure that the metal part of the
tray remains outside from underneath the tray.
Fit the tab on the left of the face-up tray into
the hole in the printer.
Handle the tabs of the face-up
tray with care as they break
easily.
14
Page 37

1.4 Installing the Drum Cartridge
Follow the procedure below to install the drum cartridge.
1
Setting Up the Printer
Open the front cover.
Rotate the orange lever A in the direction of
the arrow until the "
"unlock" position (
" mark is aligned with the
).
15
Page 38

1
1.4 Installing the Drum Cartridge
Take out the new drum cartridge from its
packaging, and remove the protective sheet
that covers the drum cartridge by pulling the
part marked with the green arrow.
• Never hit, rub or touch the
surface (the blue part) of the
drum. The print quality will
deteriorate if the drum is
scratched or dirt from your
hands rubs off onto the drum.
• To maintain good print quality,
peel off the protective sheet
from the drum cartridge while
it is in a horizontal position.
Hold the handle on the drum cartridge, place it
on the left and right rails inside the printer, and
push it firmly into the printer.
• Make sure the drum cartridge
is seated properly on the rails.
Attempting to insert the drum
cartridge while it is not
properly seated could damage
the printer.
• Make sure the drum surface
(the blue part) does not come
into contact with anything.
Turn lever B in the direction as indicated by the
arrow in the diagram until it points to the "lock"
position (
).
The lever will not turn unless the
drum cartridge has been inserted
properly.
16
Page 39

1.4 Installing the Drum Cartridge
Align the " " mark on the cartridge by turning
lever A in the direction of the arrow until it
points to the "lock" position (
This completes the installation of the drum
cartridge.
Proceed to install the toner cartridges with the
front cover open.
) on the printer.
1
Setting up the Printer
17
Page 40

1.5 Installing the Toner Cartridges
Follow the procedure below to install the toner cartridges.
1
The toner is harmless but should still be washed off immediately if it
comes into contact with your hands or clothing.
Select a new toner cartridge that is the same
colour as that shown at the toner cartridge
window and remove it from its packaging.
18
Shake the toner cartridge seven to eight times
as shown in the diagram to distribute the toner
evenly.
Page 41

1.5 Installing the Toner Cartridges
Align the toner cartridge so that the arrow is as
shown in the diagram. Then insert and push the
cartridge firmly into the printer.
Align the " " mark on the cartridge by turning
the toner cartridge in the direction of the arrow
until it points to the "lock" position (
printer.
) on the
1
Setting up the Printer
Toner may spill if the toner
cartridge is not rotated
completely.
Push up the anti-rotational switch.
The anti-rotational switch will be
lowered automatically when you
turn the knob in the next step.
Remove your hand after you
have pushed up the switch.
19
Page 42

1
1.5 Installing the Toner Cartridges
Rotate the knob in the direction of the arrow,
as shown in the diagram, until it stops to
position the next toner cartridge at the toner
cartridge window.
The knob will not turn if the
toner cartridge is set incorrectly.
If the knob does not turn,check
that the toner cartridge is set
properly.
Once you turn the knob, you will
hear a click indicating that the
anti-rotational switch has
returned to the down position.
Install the three remaining toner cartridges by
repeating Steps
not necessary when installing the last toner
cartridge.)
Close the front cover.
You cannot close the front cover
if levers A and B are not returned
to their proper positions. When
this happens, check the position
of the two levers.
- . (Steps and are
20
Page 43

1.6 Loading Paper
Follow the procedure below to load paper onto the tray.
Here, we will load A4 size paper in portrait orientation as an example.
Chapter 2 Loading Paper in the User Guide for information on the types
of paper that can be used and how to load paper onto the manual tray.
1
Setting Up the Printer
Pull out the tray until it stops.
Push down the metal plate inside the tray until
it locks.
21
Page 44

1
1.6 Loading Paper
Move the paper guides towards the outer edges
of the tray by squeezing the horizontal and
vertical guide clips between your fingers. Make
sure you move the vertical guide all the way to
the left.
Align the four corners of the paper stock and,
placing the side you want to print on facedown, insert the stack under the tab on the
front right hand side.
• Do not use folded, wrinkled or
curled paper.
• Do not load beyond the
maximum (MAX) fill line
indicated at the side of the
tray.
• Make sure the top sheet is
under the tab.
Align the horizontal paper guide with the width
of the paper.
If the paper guide is pressed
tightly against the paper, paper
jam may occur. However, if the
paper guide is too loose, the
paper become warp.
22
Page 45
1.6 Loading Paper
After aligning the edges of the paper, align the
mark on the horizontal guide with the
appropriate paper size mark.
• Make sure that the vertical
paper guide stopper is in the
right hole.
• If the vertical paper guide is
out of position, the paper size
may not be detected. When this
happens, slide the vertical
guide to the left, then re-align
it with the paper scale.
1
Setting up the Printer
Push the paper tray firmly into the printer.
Do not push in the tray with
excessive force.
When installing the optional 2-tray module, load
paper in the paper tray following the same
procedure.
You can load up to the limit
shown on the maximum (MAX) fill
line found at the back of the tray.
Do not load paper on the grey
tab as shown in the diagram. The
tab prevents paper from being
fed in the slanted position.
Proceed to install the optional additional
memory or hard disk if you have purchased
them.
Otherwise, proceed to "1.8 Switching on the
Power and Confirming the Operation".
23
Page 46

1.7 Assembling the Optional
Products (Part 2)
Install the optional additional memory or hard disk to the printer if you have purchased
them.
Refer to the following booklets for information on how to install.
Open the right cover of the printer to install the addtional memory or hard disk. The
explanation on procedures in all manuals state that the cover should be closed after
installation. However, when both additional memory and hard disk are purchased, close the
cover only after you have installed both optional products.
Additional Memory
"1.7.1 Installing
Additional Memory"
Hard Disk
1.7.1 Installing Additional Memory
When you add memory to the printer, the memory capacity of the printer increases.
Additonal memory is recommended when printing large volume of data in colour.
DocuPrint C621 comes with the following additional memory. The
performance of the printer cannot be guaranteed if other nonrecommended additional memory is installed.
• Type: 168 pin DIMM SDRAM
• Capacity: 64/128 MB
Booklet bundled with
hard disk
24
Page 47

1.7 Assembling the Optional Products (Part 2)
There are two slots in the printer. Usually, 64 MB of memory is available
for the slot on the left. If you want to change to a larger capacity, the
maximum limit is 256 MB (128 MB x 2).
1
Setting up the Printer
Follow the procedure below to install the additional memory.
Switch off the machine before connecting the interface cable and
additional memory. Connecting the cable or memory with a live
machine can cause electric shocks.
After you have installed the optional product, proceed from Step with
the right cover open to install the other optional product.
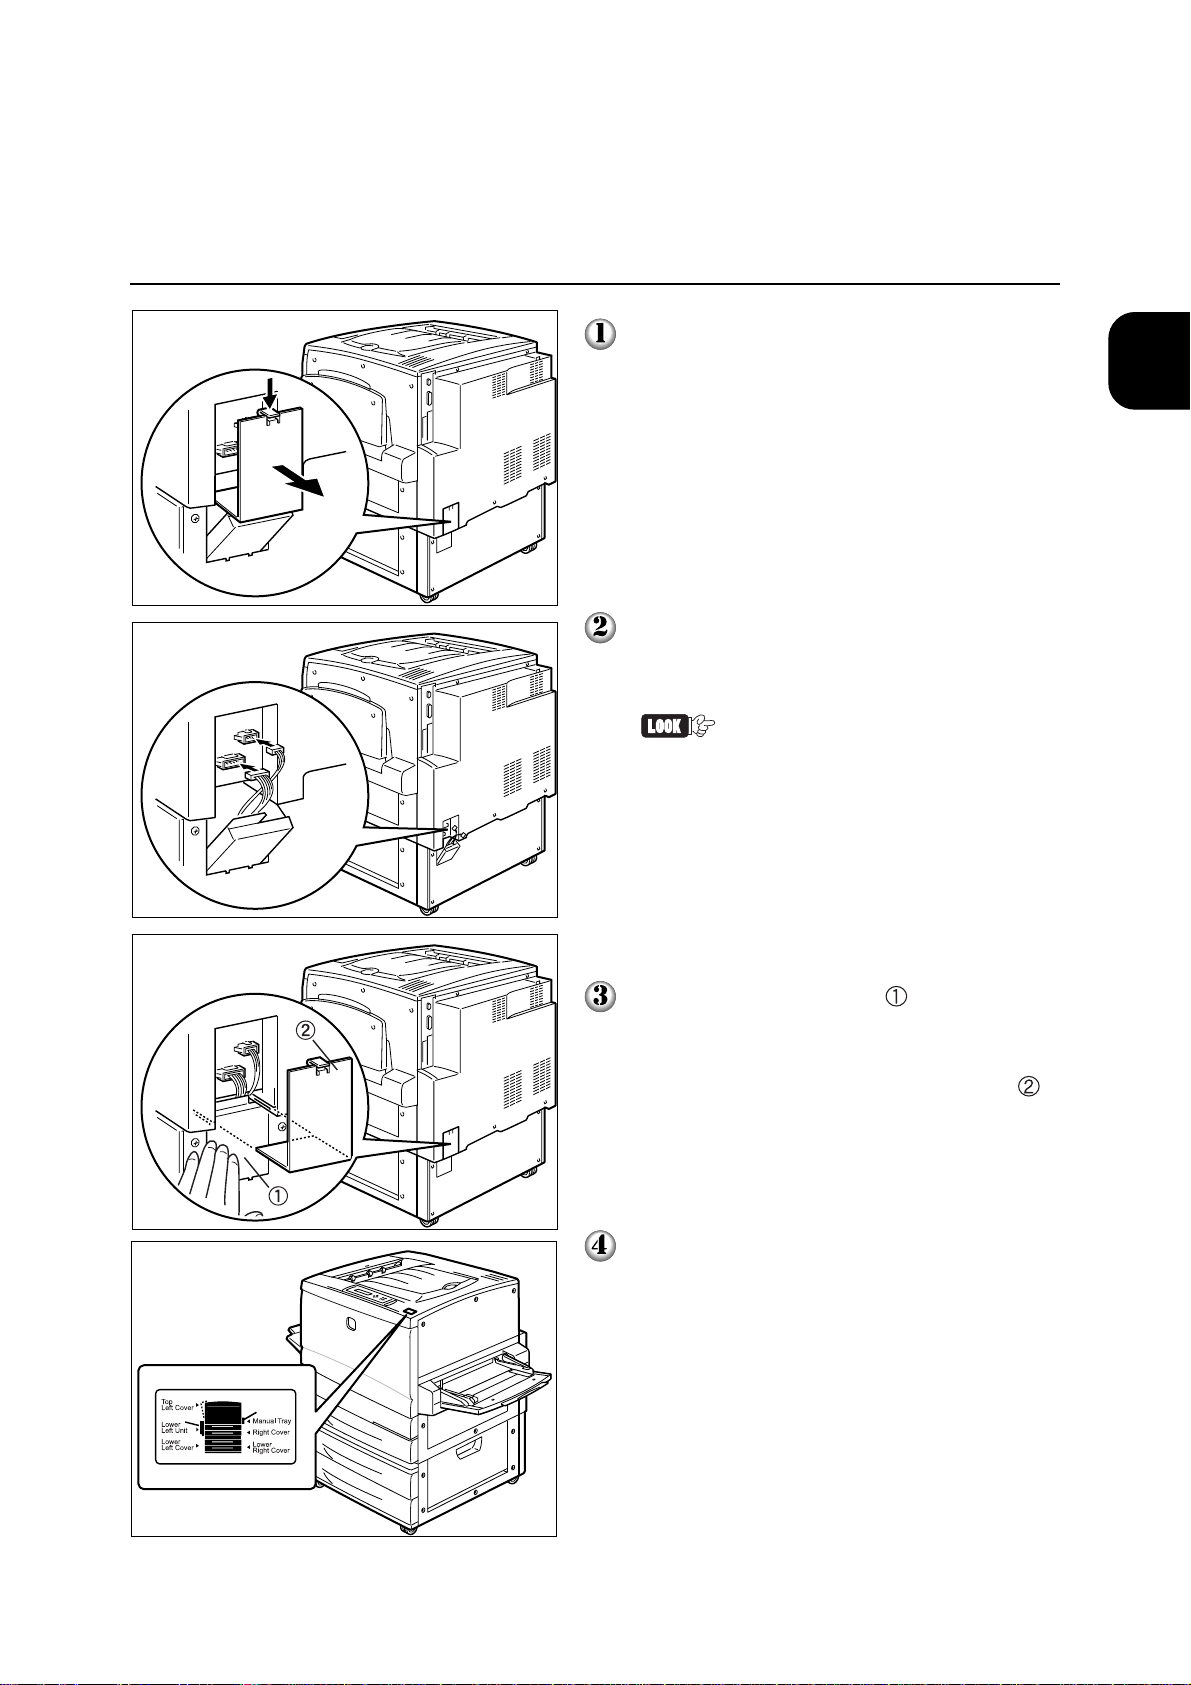
Open the front cover ( ) and pull out the
manual feed unit (
).
25
Page 48

1
1.7 Assembling the Optional Products (Part 2)
There are three screws near the top of the
right cover of the printer. Unscrew them.
Slide the right cover to the back of the printer
(
). Flip it down ( ) and remove it from the
printer.
Push out the ejector levers at the both ends of
the memory slot.
Hold the two sides of the memory and fit the
two cutouts with the two protruding parts on
the slot and push it straight in.
Some parts of the PCB may be
very hot. Do not touch the PCB
as this may damage the board.
After you have inserted the memory, push in
the ejector levers to fasten the memory to the
slot.
To install the hard disk, skip the
next two steps and proceed with
the installation.
26
Page 49

1.7 Assembling the Optional Products (Part 2)
Insert the tabs near the bottom of the right
cover into the holes in the printer (
close the cover (
Then slide the right cover toward the front of
the printer (
).
) and close the cover completely.
). Flip to
1
Setting up the Printer
Fasten the screws removed in Step ( )
and push the manual feed unit firmly into the
printer (
Close the front cover
).
.
27
Page 50

1.8 Switching on the Power and
Confirming the Operation
After assembling all the optional products to the printer, connect the power cord and
confirm that the printer is operating normally.
1.8.1 Connecting the Power Cord
The procedure is as follows:
The specifications for the AC outlet is 220-240 V and 10 A.
Connect the power plug only to a properly rated power outlet.
Otherwise, it can cause fire or electric shocks. If in doubt,
contact your Xerox Customer Support Centre. Also, never use
multi-plug adaptors to plug multiple power plugs in the same
outlet. Be sure to operate the machine on a sole-use receptacle.
Multiple connectors can cause the outlet to overheat and cause
fire.
There is no need to attach a separate earth line for your 220-240
V model since the earth connection is incorporated in the power
line. Plug it into a properly rated outlet. If in doubt, contact your
Xerox Customer Support Centre.
Connect the power cord to the connector on
the left side of the printer.
Plug the other end of the cord into the AC
outlet.
28
Page 51

1.8 Switching on the Power and Confirming the Operation
1.8.2 Switching on the Power
The procedure is as follows:
1
Setting up the Printer
Press the "|" side of the power switch, located
on the left side of the printer, to switch on the
printer.
The message "Testing" appears on the display
of the control panel. The message will change
from "Please wait..." to "Ready to Print".
Check that the Online LED is lit when the
printer is ready.
The printer is warming up when
the "Please wait..." message is
shown on the display. The
printer cannot process any print
job during this time.
If an error message is shown on
the display of the control panel
refer to 4.7 When an Error
Message Appears in the User
Guide on how to resolve the
error.
29
Page 52

1.8 Switching on the Power and Confirming the Operation
1.8.3 Printing the Printer Settings List
1
Use the control panel to print the Printer Settings List to check that the printer has been
installed correctly.
You can check that the printer will print correctly by printing the Printer
Settings List. Moreover, you can also check whether the optional
products are set up correctly.
Refer to "Control Panel Buttons and Basic Operations" and "Appendix A
Control Panel Menus (Abstract)" for basic operations and possible menus
on the control panel. Refer also to Chapter 3 About the Control Panel in
the User Guide for details on the control panel.
Control Panel Buttons and Basic Operations
Specify the printer settings by displaying the menu screens on the control panel display. There are a
few levels of menu screens. Use the following buttons for operations on the menu screen.
l To display menu screens
l To close menu screens after setting up
l To discontinue with setting up
l To start afresh when you are in confusion
l To display other menus or items
l To select the displayed menu and move to a lower level
l To return to the previous level
l To confirm setting (* indicates confirmed values)
l To return to default settings
Online Menu
Online
Set/Eject
Cancel
Set/Eject
+ (press together)
When you are confused as to which menu level is currently being displayed, refer to "Appendix A
Control Panel Menus (Abstract)" to confirm.
30
Page 53

1.8 Switching on the Power and Confirming the Operation
How to Print the Printer Settings List
The procedure is as follows:
The Printer Settings List is printed out in A4-sized paper and in portrait
orientation. Load paper of the correct size and orientation in the paper
tray.
(Print screen (printer in printing state))
Press Online.
(Screen of offline state)
Press Menu. The menu screen is displayed.
(Menu screen)
Press three times.
1
Setting up the Printer
Press Set/Eject once.
Press Set/Eject once.
Press Set/Eject once.
Once the printing is done, the display will return
to the Print screen.
Switch the power off, and on again if the Printer Settings List is not
printed. Print the Printer Settings List again when "Ready to Print"
appears on the control panel display. If it still cannot be printed, contact
your Xerox Customer Support Centre.
31
Page 54

1.8 Switching on the Power and Confirming the Operation
An example of the Printer Setings List
1
Check the contents if the optional products are installed.
The information on
the optional
products are
printed.
If the 2-tray
module is
installed, the trays
that can be used
will be printed.
32
Page 55

1.8 Switching on the Power and Confirming the Operation
1.8.4 Switching off the Power
The procedure is as follows:
Do not switch off the power in the following situations:
• When "Please Wait..." is displayed.
• When the Data LED is lit
• When the Error LED is lit
1
Setting up the Printer
Check that the message "Ready to Print" is
displayed.
Press the " " side of the power switch,
located at the left of the printer, to switch off
the printer.
The power is switched off.
33
Page 56

Page 57

Connecting
the Interface
Cables
2.1 Connecting the Parallel Cable ............................................................ 36
2.2 Connecting the Ethernet Cable ........................................................... 38
Page 58
2
2.1 Connecting the Parallel Cable
When using the printer as a local printer, connect the parallel interface of the printer and
the computer directly with a parallel cable.
When using the printer as a network printer, connect the printer to the network with an
Ethernet cable.
This section explains how to connect the parallel cable.
Get a parallel cable that is suitable for the printer and the computer.
"2.2 Connecting the Ethernet Cable" for information on how to use the
Ethernet cable
• For DocuPrint C621, you can connect and use both the parallel cable
and the Ethernet cable at the same time.
• The following parallel cable (optional products) are recommended for
connecting DocuPrint C621 to a computer:
1. Parallel interface cable (for PC98, 36 Pin)
2. Parallel interface cable (for PC/AT)
3. Connection cable for PC98MATE
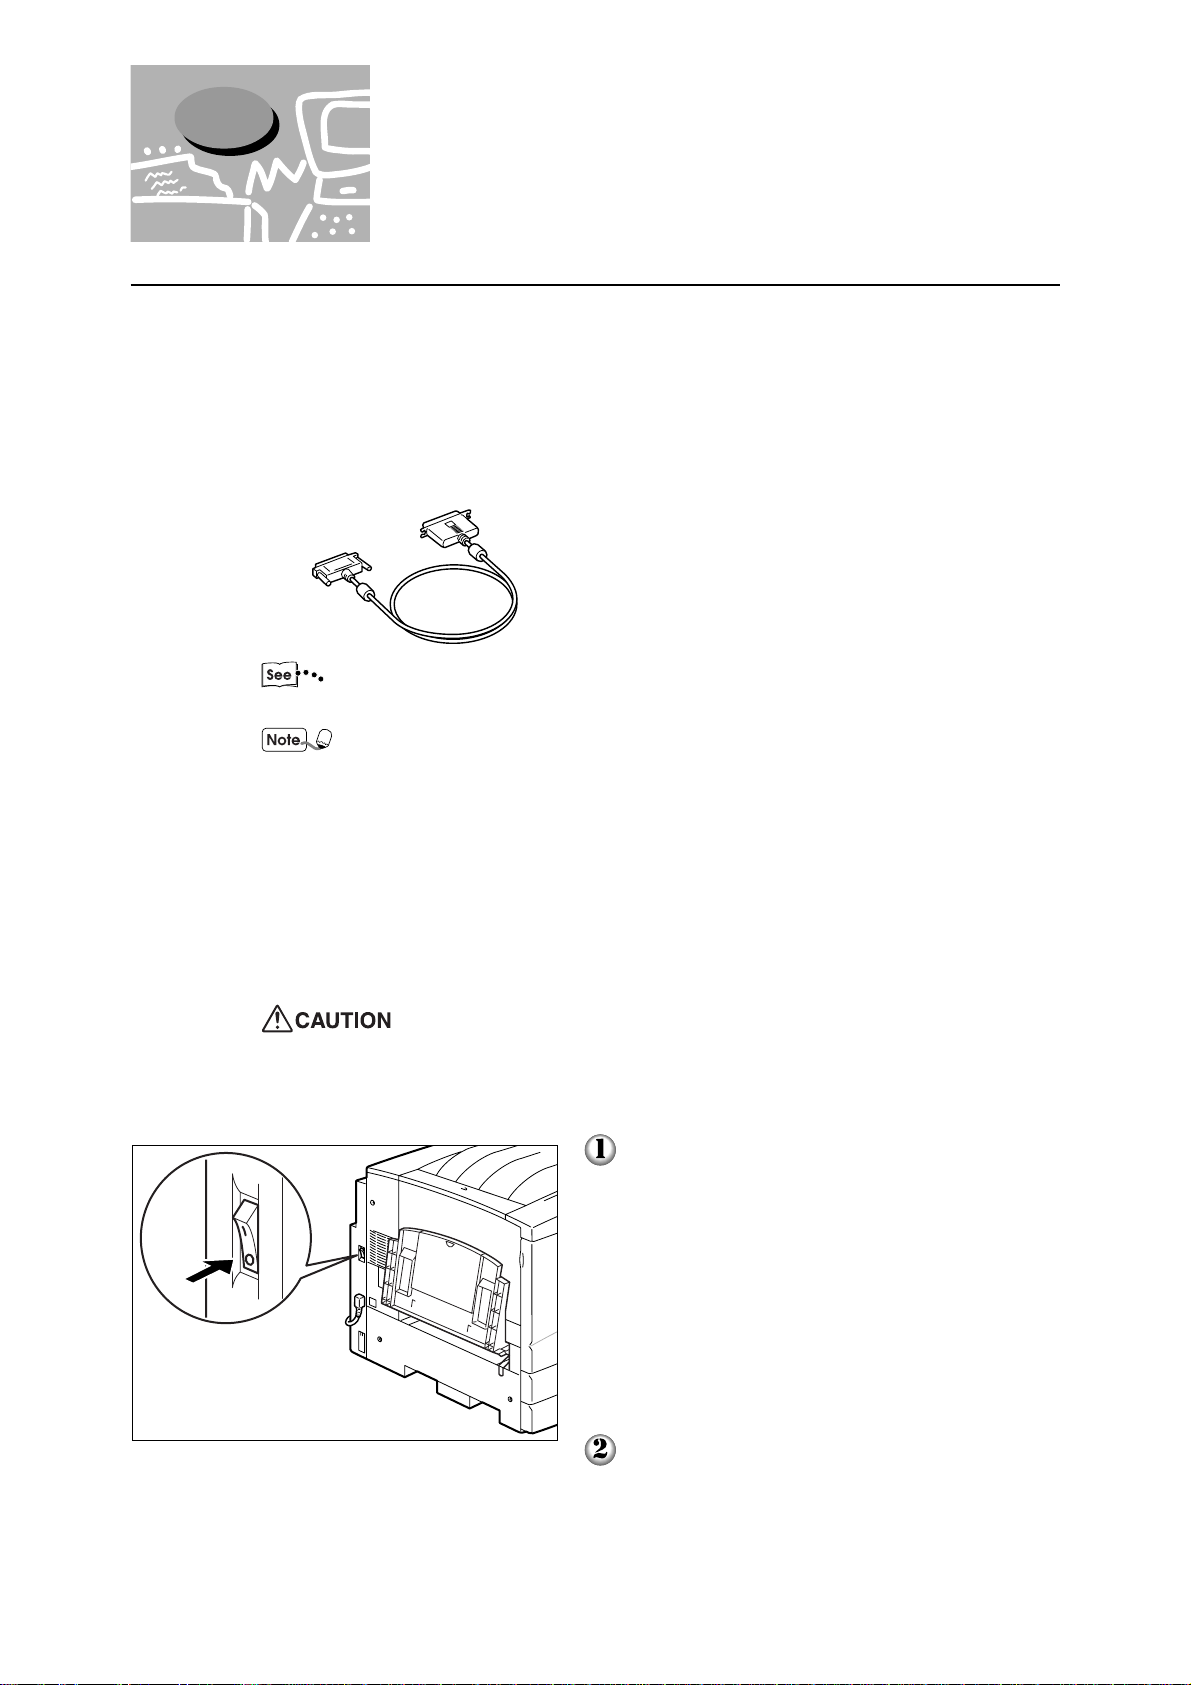
The procedure for connecting the parallel cable is as follows:
Switch off the machine before connecting the interface cable.
Connecting the cable with a live machine can cause electric
shocks.
Make sure that the printer is switched off.
36
Make sure that the computer is switched off.
Page 59

2.1 Connecting the Parallel Cable
Connect the parallel cable to the parallel
interface port at the back of the printer.
After it is plugged in, fasten both sides.
Connect the parallel cable to the parallel
interface port of the computer.
After it is plugged in, fasten the screws on both
sides.
2
Connecting the Interface Cable
Depending on the computer
model, the location of the
parallel interface port may differ.
Switch on the power of the computer.
Switch on the power of the printer.
This completes the setup at the printer side if
the printer will not be connected to the
network. Proceed to "Chapter 4 Configuring
the Computer".
37
Page 60

2
2.2 Connecting the Ethernet
Cable
This section explains the procedure of connecting the printer to the network using the
Ethernet cable.
The Ethernet interface for DocuPrint C621 is as follows:
• 10BASE-T (half duplex mode, full duplex mode)
• 100BASE-TX (half duplex mode, full duplex mode)
10BASE-T and 100BASE-TX will auto-switch. You can also use the
control panel to specify the type or mode. Refer to Chapter 3 About the
Control Panel in the User Guide on how to specify the Ethernet interface.
Prepare a twisted pair Ethernet cable that is suitable for connecting to the existing
network.
Catergory 5 cable is necessary for 100BASE-TX.
The procedure is as follows:
Switch off the machine before connecting the interface cable.
Connecting the cable with a live machine can cause electric
shocks.
Make sure that the printer is switched off.
38
Page 61

2.2 Connecting the Ethernet Cable
Connect the Ethernet cable to the Ethernet
interface port at the back of the printer.
Switch on the power of the printer.
2
Connecting the Interface Cable
39
Page 62

Page 63

Network
Settings
(Quick
Setup)
3.1 Network Environment and Printer Settings ........................................ 42
3.2 Setting the IP Address(When Using TCP/IP Protocol)....................... 43
3.3 Activating the Protocol ...................................................................... 47
3.4 Checking the Settings ......................................................................... 49
Page 64

3
3.1 Network Environment and
Printer Settings
If the printer is used as a network printer, you need to configure the approrpriate network
(protocol) environment after connecting the printer to the network with the Ethernet cable.
This section explains the representative setting methods for the printer to be used in the
following network environment:
• TCP/IP
• SMB (Windows network)
• AppleTalk (EtherTalk)
Refer to the Network Print Environment User Guide (PDF file "net.pdf")
in the Software Pack CD-ROM for details on using the printer as a
network printer.
Refer to the Network Print Environment User Guide
in the following situations:
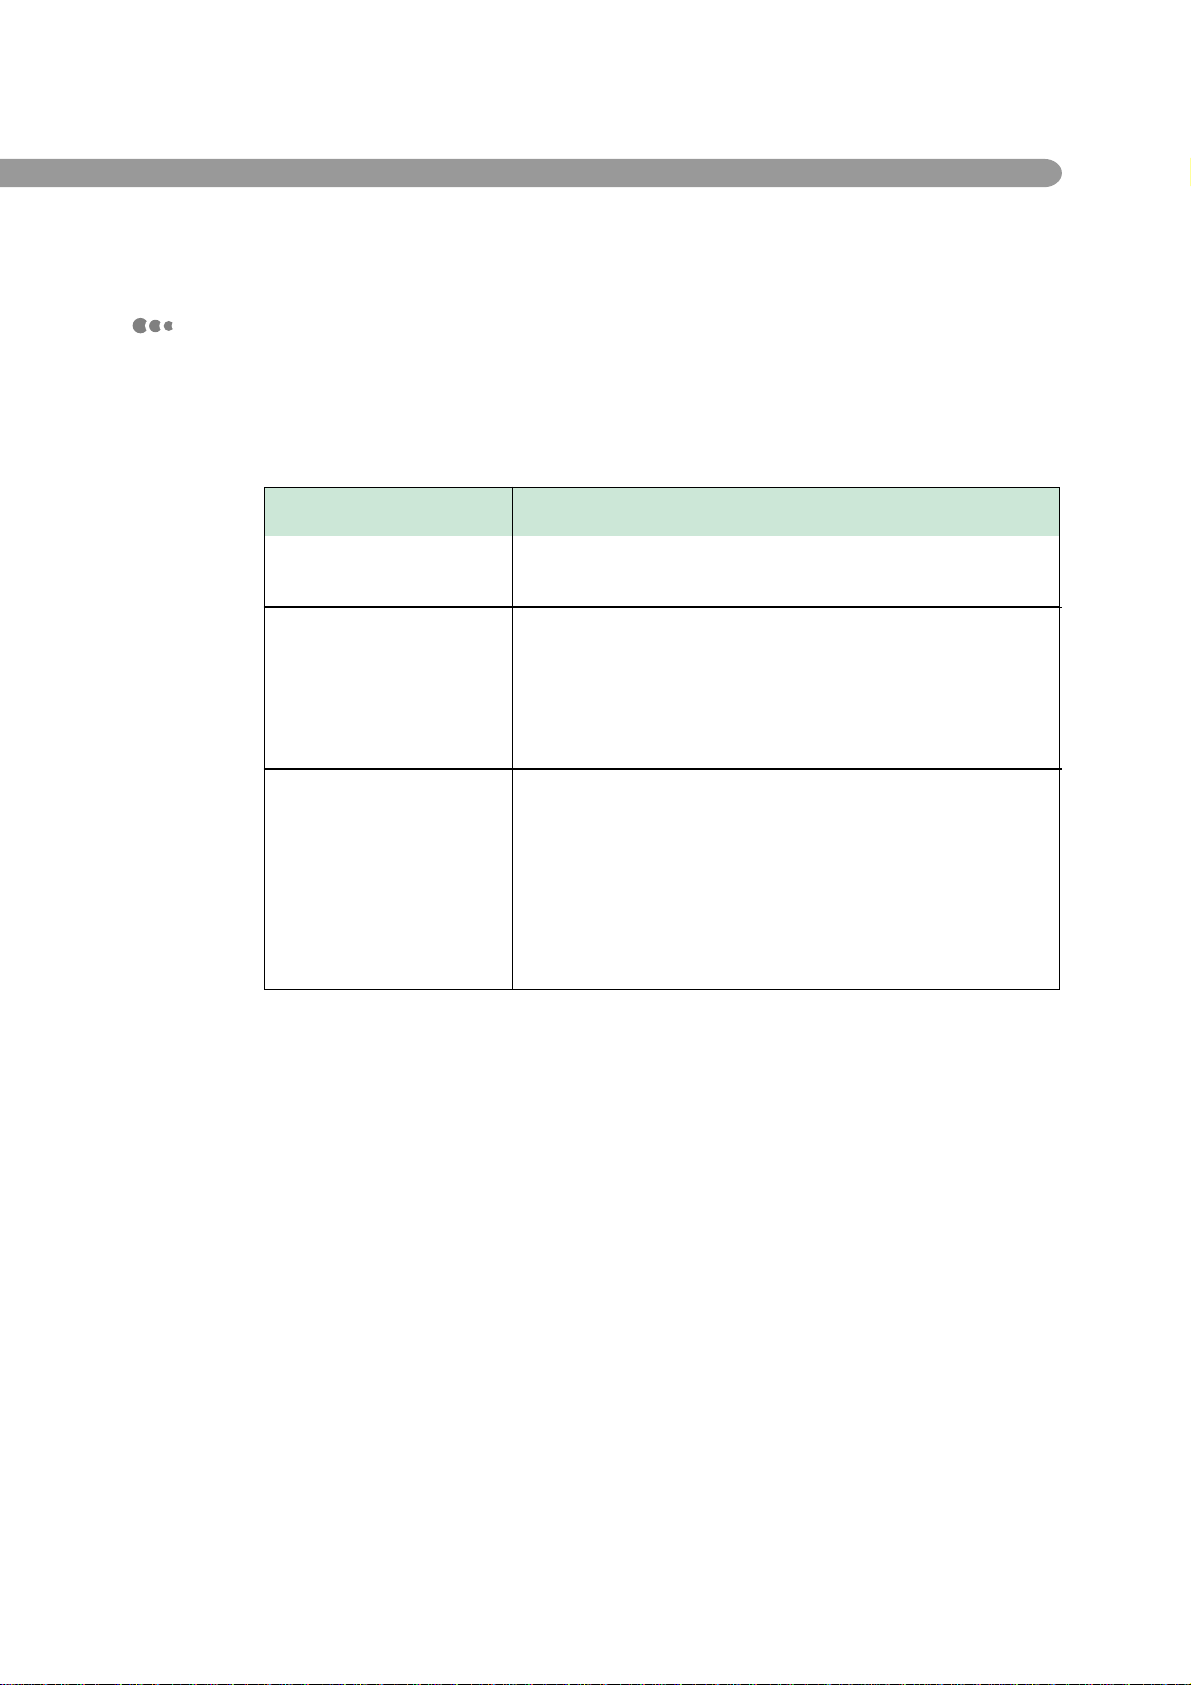
The printer has the following network features. Refer to the Network Print Environment User Guide
(PDF file "net.pdf") in the Software Pack CD-ROM for details.
You can also configure for the NetWare environment
1
To install the printer in the NetWare environment, besides the printer settings, you will also
need to specify the NetWare file server settings. DocuPrint C621 comes with the utility
for setting the NetWare environment.
You can have flexible application for various network environments.
2
l TCP/IP enviornment Manage the IP address of the printer at the DHCP server.
Register the printer in the WINS server.
l SMB environment When you want to change the host name or the workgroup
name.
l EtherTalk environment When you want to change the printer name.
When you want to set the zone.
42
You can use CentreWare Internet Services for the TCP/IP environment.
3
You can carry out various kinds of printer settings or check the status from the screen.
SNMP engine feature is available for TCP/IP and NetWare environment.
4
You can manage the printer from the various SNMP managers by starting the SNMP
agent feature.
Page 65

3.2 Setting the IP Address
(When Using TCP/IP Protocol)
To use the printer in the following network environment, it is necessary to set the IP
address, the subnet mask, and the gateway address:
• TCP/IP (lpd)
• When using TCP/IP in SMB environment (Windows network)
This section explains how to set the various addresses by using the printer control panel.
The procedure is as follows:
The IP address is controlled by the whole network system. If a wrong IP
address is set, the whole network might be affected. Confirm the IP
address assigned to you with the network administrator.
3
"Control Panel Buttons and Basic Operations" in "1.8.3 Printing the
Printer Settings List" or "Appendix A Control Panel Menu (Abstract)" for
the basic operations and possible menus on the control panel.
Setting subnetmask
address
Specifying the Way of Setting IP Address as Panel
(Print screen (printer in printing status))
Press Online.
(Screen of Offline state)
Press Menu. The menu screen is displayed.
(Menu screen)
Press four times.
Network Settings (Quick Setup)
Press Set/Eject once.
Press once.
Press Set/Eject once.
see next page...
43
Page 66

3
3.2 Setting the IP Address (When Using TCP/IP Protocol)
...from previous page
Press Set/Eject once.
* is added to the currently set
value
Press once.
Press Set/Eject once.
The following screen will appear after three seconds.
* is added to show that the
value is confirmed
Press Cancel once. The screen returns to the screen
of the next lower level where "IP Address Setup" is
displayed.
Switch off the printer, and then switch it on again
after the gateway address has been set. Proceed in
this condition.
44
Page 67

Setting the IP Address
Set the IP address with four sets of values (in decimal) separated with a period.
Set the numbers from 0 to 255.
3.2 Setting the IP Address (When Using TCP/IP Protocol)
...from previous section
Press once
Press Set/Eject once.
Press or a few times until the target value (e.g.13)
is reached. At this time, if you keep pressing the button,
the value will change in units of 10.
Press once to move the cursor (_) to the next value.
Setting example
• IP address 13.198.33.195
• Subnet mask 255.255.252.128
• Gateway address 13.198.32.1
3
Network Settings (Quick Setup)
If you are unsure of the
level of the menu
halfway through the
operation, refer to
"Appendix A Control
Panel Menu (Abstract)"
to confirm the overall
structure of the menu.
Repeat Steps and to specify the IP address.
Press Set/Eject once.
The following screen is displayed after three seconds.
Press Cancel once. The screen returns to the screen
of the next lower level where "IP Address" is displayed
returns on the lower level.
45
Page 68

3.2 Setting the IP Address (When Using TCP/IP Protocol)
3
Setting subnetmask
address
...from previous section
Press once.
Press Set/Eject once.
Set the subnet mask in the same way as the IP address.
You can keep pressing
continuously when setting the value.
Press Cancel once. The screen returns to the screen
of the next lower level where "Subnet Mask" is displayed.
or to change the value
Setting gateway
address
...from previous section
Press once.
Press Set/Eject once.
Set up the gateway address in the way as the IP
address.
You can keep pressing
continuously when setting the value.
or to change the value
46
Once this value has been set, switch off the printer,
and then switch it on again.
Page 69

3.3 Activating the Protocol
The factory setting of each protocol is set as Enabled. The following
procedure is not necessary when you set up the network for the first time
using a new printer.
This completes the printer settings. Proceed to "3.4 Checking the
Settings".
You need to start up the protocol corresponding to the network from the printer when
using it as a network printer.
• For TCP/IP(lpd) lpd protocol
• For AppleTalk EtherTalk protocol
• For SMB where TCP/IP is used SMB TCP/IP protocol
3
• For SMB where NetBEUI is used SMB NetBEUI protocol
The procedure is as follows:
"Control Panel Buttons and Basic Operations" in "1.8.3 Printing the
Printer Settings List" or "Appendix A Control Panel Menu (Abstract)" for
information on the basic oeprations and possible menus of the control
panel.
(Print screen (printer in printing state))
Press Offline.
(Screen of Offline status)
Press Menu. The Menu screen is displayed.
(Menu screen)
Network Settings (Quick Setup)
Press four times.
Press Set/Eject once.
Press three times.
...see next page
47
Page 70

3
3.3 Activating the Protocol
...from previous page
Press Set/Eject once.
Press twice.
Starting the Protocol
Press Set/Eject once. The
name of the protocol is
displayed in the position of xxx.
Press once.
Press once.
Press once.
Press Set/Eject once. The
following screen will be shown
three seconds after the
message "Reboot system to
take effect" is displayed.
To activate other protocols,
press Cancel once and proceed
to the following procedure.
Proceed to Step
setting is completed.
after the
48
Switch off the printer, and then
switch it on again.
Page 71

3.4 Checking the Settings
Print the Printer Settings List to check the settings..
The information necessary for confguration at the computer is also printed on the Printer
Settings List. Check it in advance.
"1.8.3 Printing the Printer Settings List" on how to print the list.
Printer Settings List (Example)
Check the contents by using the printed example on the next page as reference.
3
Network Settings (Quick Setup)
49
Page 72

3
3.4 Checking the Settings
Necessary to
configure on
the computer
50
Page 73

Configuring
the
Computer
4.1 After Setting up the Printer................................................................. 52
4.2 Installing the Printer Driver (Windows 95 or Windows 98).............. 54
4.3 Configuring the TCP/IP Direct Print Utility ....................................... 61
4.4 Installing the Printer Driver (Windows NT) ...................................... 67
4.5 Installing the Printer Driver (Macintosh) ............................................ 75
Page 74

4.1 After Setting up the Printer
Configure the computer after you have set up the printer.
When the printer is used as a local printer, install the printer driver to the computer
connected to the printer. If it is used as a network printer, install the printer driver to the
computer connected to the network.
To print directly to the printer from Windows 95/Windows 98 in TCP/IP environment,
install the printer driver and TCP/IP Direct Print Utility to the computer.
4.1.1 Printer Drivers
A printer driver is a software that converts print data or instructions from the computer to
data interpreted by the printer.
The drivers for the following operating systems (OS) are available for DocuPrint C621:
• Microsoft Windows 95 OS (English version)
4
• Microsoft Windows 98 OS (English version)
• Microsoft Windows NT OS Version 4.0 (English version)
• Macintosh
The printer drivers are stored inside the Software Pack CD-ROM. Use the Setup menu
(in the case of Windows) in the same CD-ROM or the installer (in the case of Macintosh)
to install.
• The printer driver for Windows NT 4.0 can be installed to Microsoft
Windows NT Server Network OS Version 4.0 Japanese version.
• Printer driver for Windows NT 4.0 is for Intel x86 version NT 4.0.
Obtaining the Latest Printer Driver
There may be new printer drivers with future upgrades and you can download the latest version of
printer driver from the Fuji Xerox home page.
URL: http://www.fujixerox.co.jp/
52
Page 75

4.1.2 Using TCP/IP Direct Print Utility
TCP/IP Direct Print Utility is a software for printing print data sent from a computer
directly to a printer on the network, without going through any server.
TCP/IP Direct Print Utility is available in the Software Pack CD-ROM.
This manual assumes that TCP/IP Direct Print Utility will be used when printing from
Windows 95 or Windows 98 in TCP/IP environment.
Chapter 2 Configuring in TCP/IP Environment in the Network Print
Environment User Guide (PDF file "net.pdf") in the Software Pack CDROM for information on TCP/IP Direct Print Utility.
4.1 After Setting up the Printer
Windows 95
or
Windows 98
To install TCP/IP Direct Print Utility, the computer must meet the following requirements:
• Set the computer name in ASCII characters (single-byte or
TCP/IP
Direct Print
+
Utility
alphanumeric letters in upper or lower case/numerals/hyphen (-)/
underscore (_)).
When the computer name includes non-ASCII characters, there might
be problems in printing. In this case, double-click the Network icon in
Control Panel to display its dialog box, and on the Identification tab,
change the entry in Computer name.
4
Configuring the Computer
• Installed with TCP/IP protocol
Double-click the Network icon in Control Panel to display its dialog
box, and on the Configuration tab, check that TCP/IP is available in
The following network components are installed. If TCP/IP is not
installed, refer to the Network Print Environment User Guide to add the
protocol.
53
Page 76

4.2 Installing the Printer Driver
(Windows 95 or Windows 98)
The procedure for installing printer driver to Windows 95 or Windows 98 is described in
this section.
Windows 98 will be used as an example. When the printer is used as a network printer, it
is assumed that network environment client settings to be used have been completed in the
computer.
Installing the Printer Driver
Switch on the power of the printer.
Switch on the power of the computer and start Windows 98.
If the printer and the computer are connected directly, the following dialog box will
be displayed after Windows 98 has been started up. In this case, click Cancel to
close the dialog box.
4
For NetWare environment, log in to the target file server.
54
Page 77

4.2 Installing the Printer Driver (Windows 95 or Windows 98)
Insert the Software Pack CD-ROM into the CD-ROM drive.
The Fuji Xerox Setup Menu dialogue box appears automatically.
If the Fuji Xerox Setup Menu dialogue box does not appear automatically, double-click the Install.exe icon.
Click Install Printer Driver.
The Driver Setup dialog box is displayed.
Confirm that FX DocuPrint C621 XPL2 is selected in Select a model, then click
Install printer driver.
4
Configuring the Computer
55
Page 78
4.2 Installing the Printer Driver (Windows 95 or Windows 98)
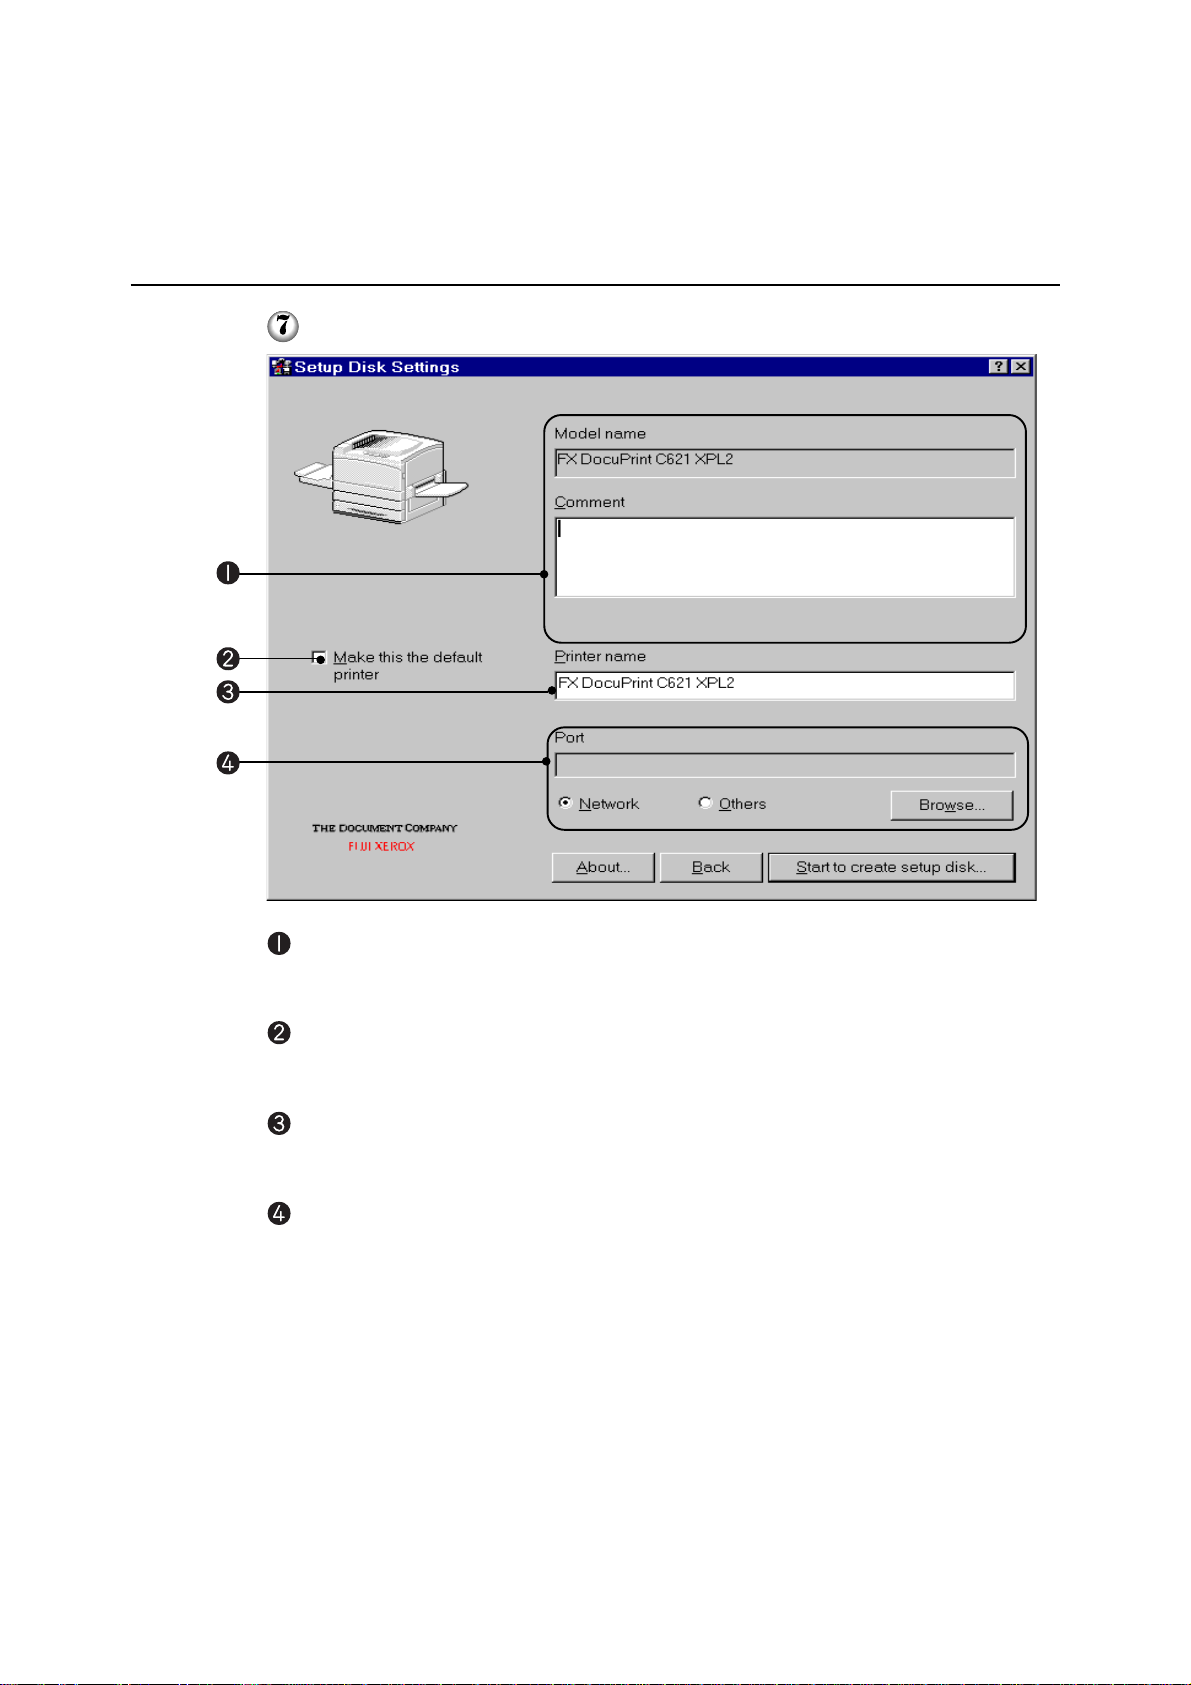
Specify the following:
4
Printer settings
Check the optional products that you have purchased and installed.
Make this the default printer
Check the check box if DocuPrint C621 is to be used as the default printer.
Printer name
Enter a name for the printer, if necessary.
Port (for output destination)
Select Others if the printer is to be used as a local printer (the printer and the
computer are directly connected by a cable) and when using TCP/IP Direct Print
Utility to print. When using the network printer in other SMB or NetWare
environment, select Network and click Browse.
On the displayed dialog box, select the port that matches the required environment.
56
When Others is selected:
Select LPT1 from the list and click OK.
Page 79

4.2 Installing the Printer Driver (Windows 95 or Windows 98)
When using the TCP/IP Direct Print Utility to print, set the port
later. Select LPT1 here.
When Network is selected:
Select a printer or print queue icon from the network list by following the
procedure described below.
• For SMB environemnt
From the network list, search and select the printer. The printer will be
displayed as "host-name-p" and will be under the host name icon. The
factory setting for the workgroup name and host name is "Workgroup" and
"FXnnnnnn" (nnnnnn: lower six digits of the Ethernet address of the printer)
respectively.
4
Configuring the Computer
57
Page 80

4.2 Installing the Printer Driver (Windows 95 or Windows 98)
When you do not know the workgroup name and host name of the
printer, either check with the network administrator, or print out
the Printer Settings List to confirm. Refer to "1.8.3 Printing the
Printer Settings List" on how to print the list.
Click OK .
• NetWare environment
From the network list, search and select the printer. The printer queue is
displayed under the NetWare file server icon.
4
When you do not know the print queue name, check with your
network administrator.
Click OK.
Confirm that the port name specified in Step for the output destination is shown
in the Port list box of the Printer Driver Installation dialog box. Then click Start to
install.
The installation of printer driver begins.
The following dialog box will appear when installation is completed.
Click OK .
58
Page 81
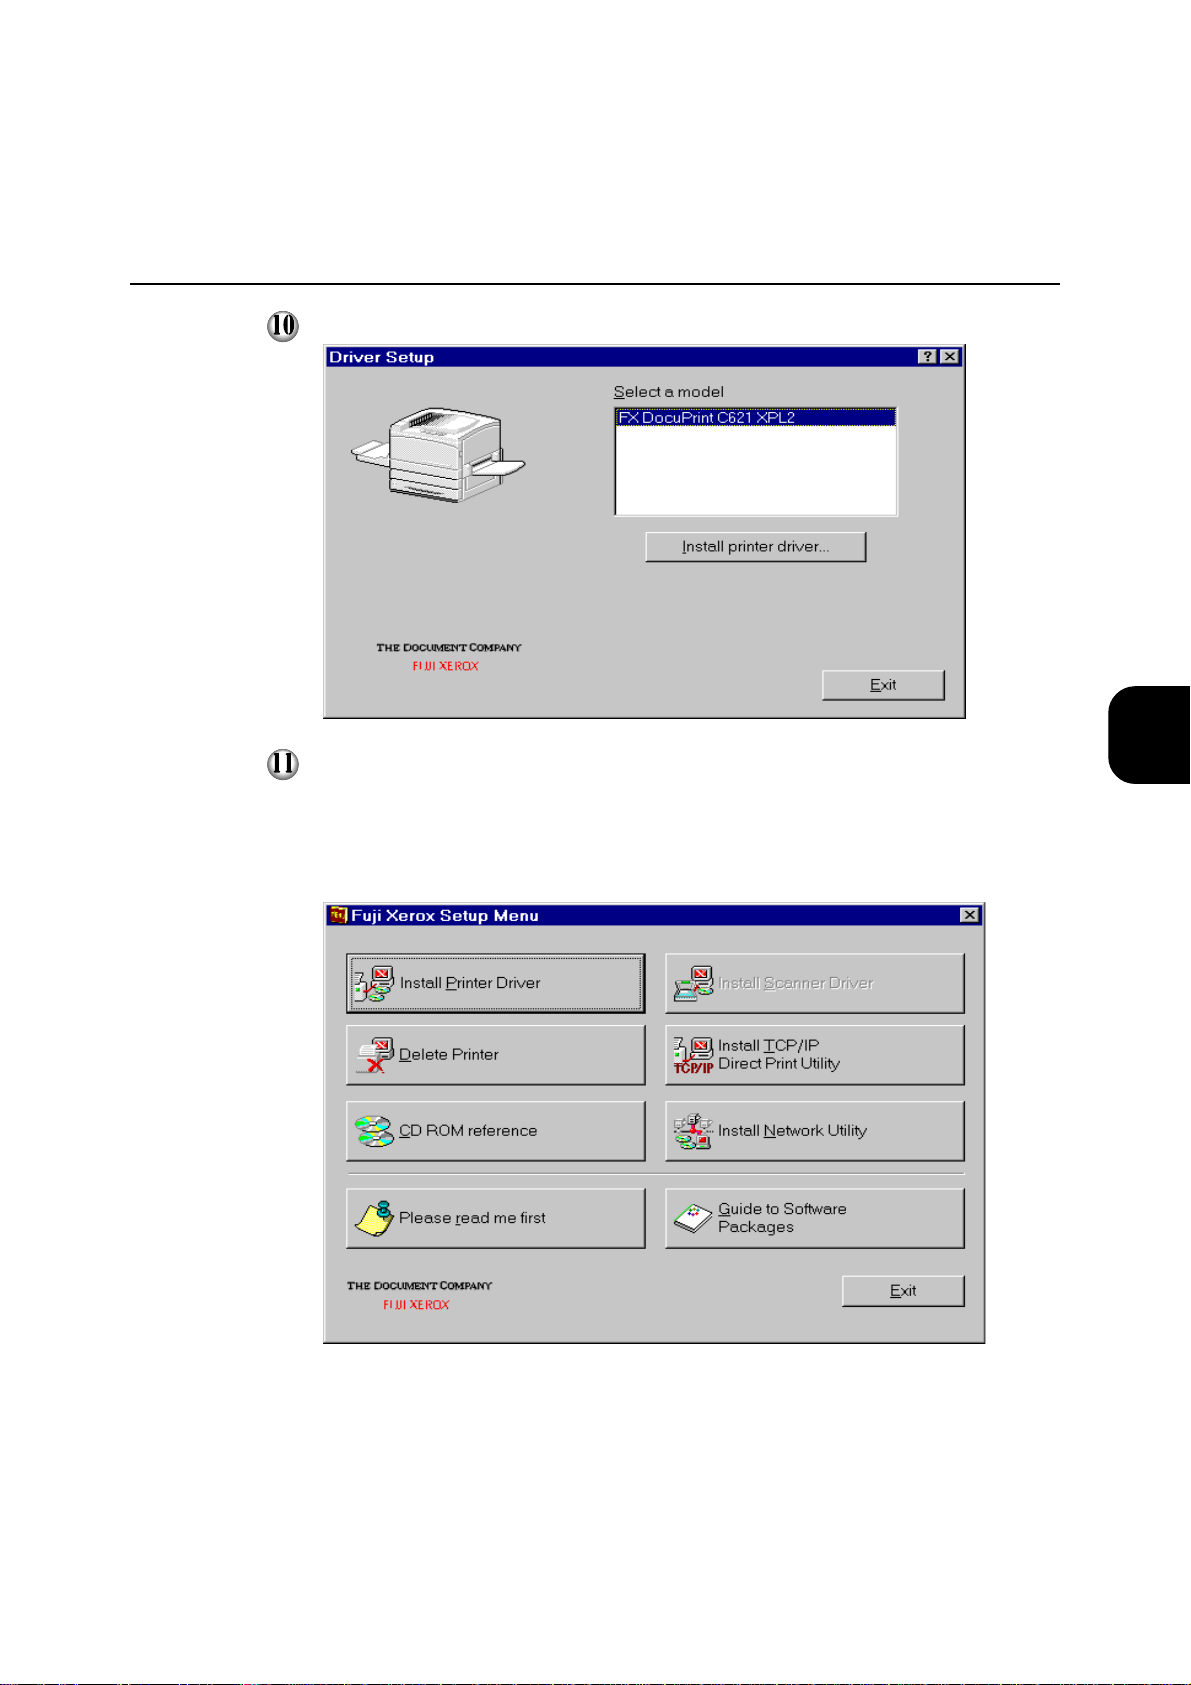
4.2 Installing the Printer Driver (Windows 95 or Windows 98)
Click Exit in the Driver Setup dialog box.
When using the TCP/IP Direct Print Utility to print, proceed to the next section
"4.3 Installing the TCP/IP Direct Print Utility".
Installation for the printer driver will be completed in other situations. Click Exit on
Fuji Xerox Setup Menu dialog box and proceed to the next section on "Test
Printing".
4
Configuring the Computer
59
Page 82

4.2 Installing the Printer Driver (Windows 95 or Windows 98)
Test Printing
To check the connection, print the test page.
The procedure is as follows:
Do not test print if you are using the TCP/IP Direct Print Utility to print
as the settings have not completed.
Click the Start menu, and select Settings and then Printers.
The Printers window is displayed.
The DocuPrint C621 printer icon has been added by the installation of the printer
driver. Double-click this added printer icon and click Properties from the Printer
menu.
The Properties dialog box is displayed.
4
Click Print Test Page in the General tab.
A dialog box to confirm whether or not the test page is printed correctly will be
displayed.
Check the print results, and if the test page is printed correctly, click Yes.
Click OK on the printer properties dialog box.
60
Page 83

4.3 Configuring the TCP/IP Direct
Print Utility
This section explains the settings required for using TCP/IP Direct Print Utility to print
from Windows 95 or Windows 98.
4.3.1 Installing TCP/IP Direct Print Utility
The procedure for installing TCP/IP Direct Print Utility to the computer is described
below. We will use Windows 98 in this procedure as an example.
If you are continuing with the procedure from the previous section, carry out the procedure
from Step
screen,
when the Fuji Xerox Setup menu dialog box is displayed on the computer
Switch on the computer and start Windows 98.
Insert the Software Pack CD-ROM into the CD-ROM drive.
The Fuji Xerox Setup Menu dialog box appears automatically.
If the Fuji Xerox Setup Menu dialogue box does not appear
automatically, double-click the Install.exe icon.
Click Install TCP/IP Direct Print Utility.
4
Configuring the Computer
61
Page 84

4.3 Configuring the TCP/IP Direct Print Utility
If the following message appears when Install TCP/IP Direct Print
Utility is clicked, click OK to stop the operation, and after you
have installed TCP/IP protocol to your computer, carry out the
installation again.
Read the contents on the screen carefully, and then click Next.
4
62
Page 85

4.3 Configuring the TCP/IP Direct Print Utility
Check Destination Folder, and if it is all right, click Next.
The installation of TCP/IP Direct Print Utility begins.
The following dialog box is displayed when the installation is completed. Take out
the CD-ROM from the CD-ROM drive. Select Yes, I want to restart my
computer now. and click Finish.
The settings will not take effect if you do not restart the system.
4
Configuring the Computer
63
Page 86

4.3 Configuring the TCP/IP Direct Print Utility
4.3.2 Setting the Port
After you have created the printer icon in the previous section, configure the TCP/IP
Direct Print Utility port for the printer The procedure is as follows:
After starting up your computer, run Windows 98. Click the Start menu, select
Settings and followed by Printers.
The Printers window is displayed.
The DocuPrint C621 printer icon has been added by the installation of the printer
driver. Double-click this added printer icon and from the Printer menu, select
Properties.
The printer properties dialog box is displayed.
4
Click Add Port in the Details tab.
64
Page 87

4.3 Configuring the TCP/IP Direct Print Utility
Select Other and click FX TCP/IP DPU Port from Click the type of port you
want to add.
Click OK.
The FX TCP/IP DPU Port Setup dialog box is displayed.
Enter the appropriate value for each item, and click OK.
Example: For port name, "Trans5" and IP address, "13.198.33.195".
Item
Port Name
IP Address
Enter a name of your choice to distinguish the
printer.
Enter the IP address of the printer. If the Domain
Name System (DNS) has been installed, the printer
host name can be entered.
Explanation
4
Configuring the Computer
If you do not know the IP address of the printer, check with your
network administrator, or print out the Printer Settings List to
confirm. Refer to "1.8.3 Printing the Printer Settings List" on how
to print the list.
65
Page 88

4.3 Configuring the TCP/IP Direct Print Utility
On the Details tab of the printer properties dialog box, check that "Trans5 (FX
TCP/IP DPU Port)" is added to the port name entered in Step
the following port list box.
in the Print to
4
To check the connection, print the test page.
After you have clicked Apply to confirm the settings, click Print Test Page on
the General tab.
A dialog box to confirm whether or not the test page is printed correctly will be
displayed.
Check the print results, and if the test page is printed correctly, and click Yes.
66
Click OK on the printer properties dialog box.
Page 89

4.4 Installing the Printer Driver
(Windows NT)
The procedure for installing printer driver to Windows NT is as follows. If the printer is
used as a network printer, it is assumed that the settings for the network environment
client in the computer has been completed.
Before installing the printer driver, it is necessary to set up TCP/IP
Protocol and Microsoft TCP/IP Printing on the Windows NT system. Refer
to the manuals on Windows NT for details.
Installing the Printer Driver
Switch on the printer.
Switch on the computer.
Activate Windows NT 4.0 and log in as a user of administrator group or as the
administrator.
Log in to the target file server for NetWare environment.
Insert the Software Pack CD-ROM into the CD-ROM drive.
The Fuji Xerox Setup Menu dialog box appears automatically.
If the Fuji Xerox Setup Menu does not appear automatically,
double-click the install.exe icon in the CD-ROM.
Click Install Printer Driver.
4
Configuring the Computer
The Driver Setup dialog box is displayed.
67
Page 90

4.4 Installing the Printer Driver (Windows NT)
Confirm that FX DocuPrint C621 XPL2 is selected in Select a model, then and
click Install printer driver.
4
Specify the following on the Printer Driver Installation dialog box.
68
Printer settings
Check the optional products that you have purchased and installed.
Page 91

4.4 Installing the Printer Driver (Windows NT)
Make this the default printer
Check the check box if the printer is to be used as a default printer.
Printer name
Enter a name for the printer if necessary.
Port (for output destination)
Select LPT1 from Port for local printer and proceed to Step
.
If the port to be used is not displayed in the Port list for network printer, click Add
Port.
The Add Port dialog box is displayed.
Refer to the following sections to select a port suitable for the environment.
4
Configuring the Computer
69
Page 92

4.4 Installing the Printer Driver (Windows NT)
For SMB environment
Select Network and click Browse.
4
From the network list, search and select the printer. The printer will be
displayed as "host-name-p" and will be under the host name icon. The factory
settings for the workgroup name and the host name is "Workgroup" and
"FXnnnnnn" (nnnnnn: lower six digits of the printer Ethernet address)
respectively.
70
When you do not know the workgroup name and host name of
the printer, either check with the network administrator, or print
out the Printer Settings List to confirm. Refer to "1.8.3 Printing
the Printer Settings List" on how to print the list.
Click OK .
Check that \\Host name\\Host name-P is displayed correctly in Printer
Network Path in Add Port dialog box and click OK.
Page 93

4.4 Installing the Printer Driver (Windows NT)
For NetWare environment
Select Network and click Browse.
From the network list, search and select the print queue. The printer queue is
displayed under the NetWare File Server icon.
When you do not know the print queue name, check with the
network administrator.
4
Configuring the Computer
Click OK.
Check that \\NetWare file server name\Print queue name-P is displayed
correctly in Printer Network Path in Add Port dialog box and click OK.
71
Page 94

4.4 Installing the Printer Driver (Windows NT)
For TCP/IP environment
Select Other and click LPR Port from Click the type of port you want to
add.
4
Click OK .
The ADD LPR compatible printer dialog box is displayed.
Enter the items for each text box.
Example: For Name or address of server providing lpd, "13.198.33.195",
and the Name of printer or print queue on that server, "Trans5"
72
Page 95

4.4 Installing the Printer Driver (Windows NT)
Item
1 Name or address of
server providing lpd
2 Name of printer or print
queue on that server
When you do not know the IP address of the printer, either check
with the network administrator, or print the Printer Settings List to
confirm. Refer to "1.8.3 Printing the Printer Settings List" on how
to print the list.
Click OK.
Confirm that the port name specified in Step for output destination is shown in
Enter the IP address of the printer. You can enter
the registered printer name when it is possible to use
name solving services like WINS.
When the IP address has numbers less
than three digits, do not enter "0" before
these numbers, e.g.
"XXX.XXX.00X.0XX". It will not work
properly.
Enter any name for DocuPrint C621.
Explanation
4
Configuring the Computer
the Port list box of the Printer Driver Installation dialog box. Then click Start to
install.
The installation begins.
The following dialog box will appear when installation is completed.
Click OK.
73
Page 96

4.4 Installing the Printer Driver (Windows NT)
Click Exit.
4
This completes the installation of the printer dirver. Click Exit on the Fuji Xerox
Setup Menu dialog box and proceed to the next section on "Test Printing".
Test Printing
To check the connection, print the test page.
The procedure is as follows:
Click the Start menu, and select Settings and then Printers.
The Printers window is displayed.
The DocuPrint C621 printer icon has been added by the installation of the printer
driver. Double-click this added printer icon and click Properties from Printer
menu.
The printer properties dialog box is displayed.
Click Print Test Page on the General tab.
A dialog box to confirm whether or not the test page is printed correctly will be
displayed.
74
Check the print results, and if the test page is printed correctly, click Yes.
Click OK on the printer properties dialog box.
Page 97
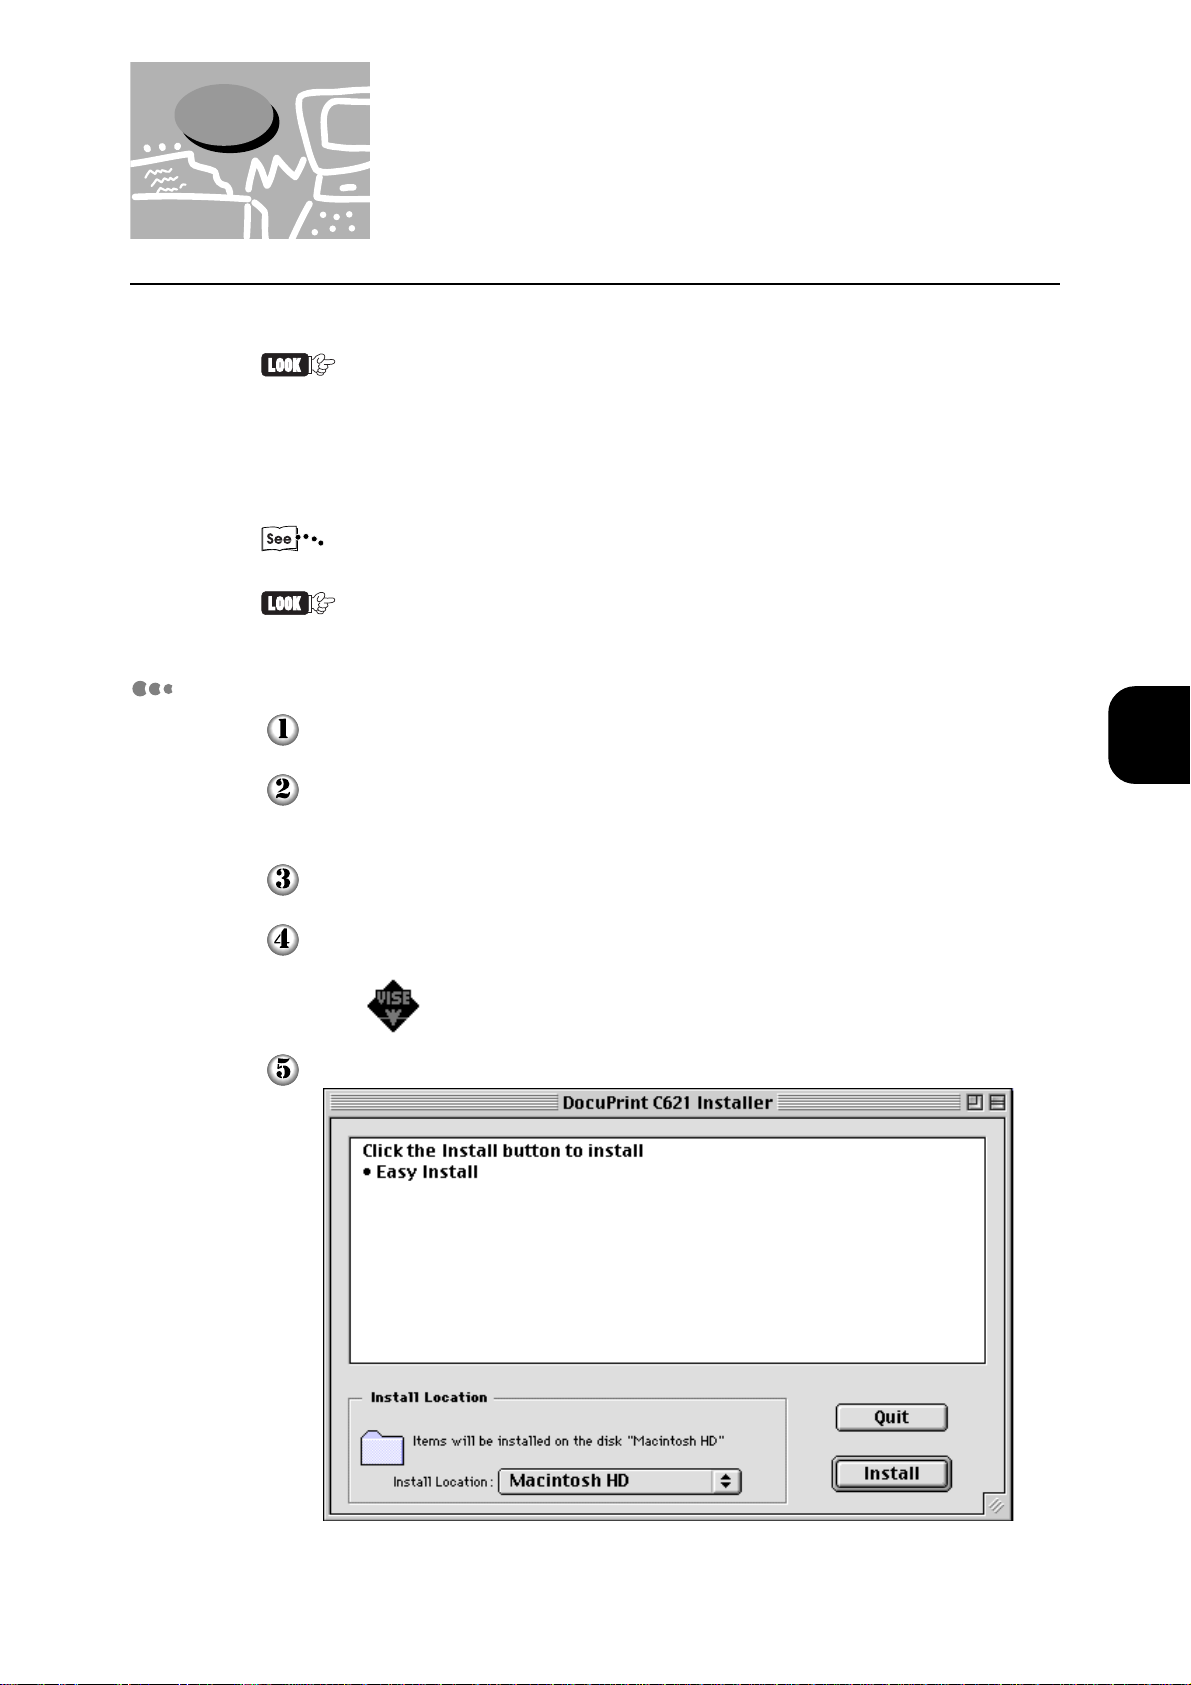
4.5 Installing the Printer Driver
(Macintosh)
The procedure for installing printer driver to Macintosh is as follows:
To install the printer driver, the Macintosh must meet the following
conditions:
• installed with Mac OS 7.6.1 or later
• installed with OpenTransport J1-1.1.2 or later
• EtherTalk client settings are completed
Refer to the manuals bundled with Macintosh for details on EtherTalk
client settings.
When you are using DocuPrint C621, the Apple QuickDraw GX on the
network cannot be activated.
Installing the Printer Driver
Uninstall or disable the Virus Scan software, if it is installed.
Insert the Software Pack CD-ROM into the CD-ROM drive.
The CD-ROM icon is displayed on the desktop.
Double-click the CD-ROM icon.
Double-click the installer icon.
Click Install.
4
Configuring the Computer
75
Page 98

4.5 Installing the Printer Driver (Macintosh)
Click Continue.
The installation begins.
The following dialog box is displayed when the installation is completed.
Click Restart.
76
Page 99

Configuring the Printer
Check if the installation is correctly done. Also, change the printer configuration when
adding optional products to the printer.
Activate the computer, and then select Chooser from the Apple menu.
The Chooser window is displayed.
From the top left box of the Chooser window, click the DPC 621 icon. Click the
printer zone in AppleTalk Zones when you are setting the printer zone.
AppleTalk Zones will not be displayed for network environment
with no zone set.
4.5 Installing the Printer Driver (Macintosh)
The printers within the zone will be displayed in Connect to.
4
Configuring the Computer
77
Page 100

4.5 Installing the Printer Driver (Macintosh)
Select the printer to be set from Connect to.
Click On for Background Printing when you want to perform other operations on
the computer during printing.
When Off is selected for Background Printing, the sorting and
face-up printing features will be disabled.
Click Setup when you want to specify settings for optional products.
The Printer Settings dialog box will be displayed.
Select the items corresponding to the printer configuration, and click OK.
78
Close the Chooser window.
 Loading...