

Page 1
Preface
Thank you for choosing DocuColor 1256 GA Series.
This manual aims to provide all the information necessary for effectively operating the copier together with
notes on safety precautions and maintenance tips. To get the most out of your copier, please read the manual
carefully and completely before using the machine.
Keep this manual handy as a quick reference should you encounter any difficulties when using the copier.
The samples that are used in this manual include the procedures for easier understanding of the machine. The
illustrations in this manual include the DocuColor 1256 GA with the Duplex Automatic Document Feeder.
As the copier contains a feature designed for preventing the forging of certain documents such as currency
notes, there may be instances where copies do not achieve the desired results because the originals you wish
to copy are assumed by the copier to be such documents.
In this manual, safety instructions are preceded by the symbol . Always read and follow the instructions
before performing the required procedures.
As a member of the International Energy Star Program, Fuji Xerox confirms this product satisfies
the requirements for International Energy Star Program standards.
Fuji Xerox shares the global concern about environmental conservation and has integrated that concern in
its business activities-from research and development to disposal. We have implemented a number of programs to lessen the burden on the environment. For example, we have totally eliminated ozone-depleting
chlorofluorocarbons from our manufacturing facilities.
We are committed to leadership in the conservation of resources by reusing and recycling post-consumer
waste material such as paper, cartridges, and parts from our customer's copiers and printers. Along with our
efforts to make environmental values a part of the Fuji Xerox culture, DocuColor 1256 GA adopts recycled
components that satisfy our strict quality standards.
This equipment is certified as a Class 1 laser product under IEC825-1 (1998). This means that the machine
does not emit hazardous laser radiation. Since radiation emitted inside the machine is completely confined
within the protective housings and external covers, the laser beam cannot escape from the machine during
any phase of user operation.
Important
(1) This manual is copyrighted with all rights reserved. Under the copyright laws, this manual may not be
copied or modified in whole or part, without the written consent of the publisher.
(2) Parts of this manual are subject to change without prior notice.
(3) We welcome any comments on ambiguities, errors, omissions, or missing pages.
(4) Never attempt any procedure on the machine that is not specifically described in this manual. Unautho-
rized operation can cause faults or accidents. Fuji Xerox is not liable for any problems resulting from
unauthorized operation of the equipment.
An export of this product is strictly controlled in accordance with Laws concerning Foreign Exchange and
Foreign Trade of Japan and/or the export control regulations of the United States.
XEROX, The Document Company and Ethernet are registered trademark.
i
Page 2

Fuji Xerox shares the global concern about environmental conservation and has integrated that concern in its
business activities from research and development to disposal. We have implemented a number of programs
to lessen the burden on the environment. For example, we have totally eliminated ozone-depleting
chloroflurocarbons from our manufacturing facilities.
We are committed to leadership in the conservation of resources by reusing and recycling postconsumer waste material such as paper, cartridges, and parts from our customers’ copiers and printers.
Along with our efforts to make environmental values a part of the Fuji Xerox culture, DocuColor 1256 GA
adopts recycled components that satisfy our strict quality standards.
Reception interference
When installed at a certain location, the machine may cause interference with radio and television
reception. If you notice flickering, or distorted images or noises on your audio-visual units, your
machine may be causing radio interference. Switch it off, and if the interference disappears, the
machine is the cause of radio interference. Perform the following procedures until the interference is
corrected.
• Move the machine and the TV and/or radio away from each other.
• Reposition or re-orientate the machine and/or the TV and radio.
• Unplug the machine, TV, and radio, and replug them into outlets that operate on different circuits.
• Re-orientate the TV and/or radio antennas and cables until the interference stops. For an outdoor
antenna, you should ask your local electrician for support.
• Use coaxial cable antennas.
The equipment is certified by UL (Underwriters Laboratories Inc.) in compliance with IEC950 (AS/NZS
3260). The equipment is manufactured under a ISO9002 Quality System certified by the British
Standards Institution. The equipment is also certified in compliance with applicable standards by
various national bodies.
This equipment is tested and is certified by the New Zealand Ministry of Commerce
in conformance with CISPR pub. 14 (1993) AS/NZS 1044 (1995), which relates to
radio frequency interference regulations.
Note: Machines intended for use in South Korea and Taiwan have been certified
separately in compliance with the their requirements.
Any unauthorized alteration which includes the addition of new functions or the
connection of external devices may impact this certification.
Contact your local Xerox representative for a list of approved accessories.
ii
Page 3

Table of Contents
Preface ................................................................................................................................ i
Table of Contents .............................................................................................................. iii
Using this Guide ............................................................................................................... vii
Conventions ..................................................................................................................... viii
Safety Notes ...................................................................................................................... ix
The Objective of the International .................................................................................... xv
Energy Star Program........................................................................................................ xv
Illegal Copies and Printouts ............................................................................................ xvi
Chapter 1 Knowing Your Copier
1.1 Parts of the Copier ..................................................................................................... 2
1.2 Switching On/Off the Power ....................................................................................... 7
1.2.1 Switching on/off the power ...............................................................................7
1.2.2 Saving energy ................................................................................................ 10
1.3 Using the Touch Panel Display ................................................................................. 11
1.4 Entering Password ................................................................................................... 14
1.5 Using the Copylyzer (Optional) ................................................................................ 15
Chapter 2 Basic Copy Procedure
2.1 Basic Copy Procedure ............................................................................................. 18
2.2 Interrupting a Copy Job............................................................................................ 22
2.3 Copying onto Postcards ........................................................................................... 24
2.4 Copying onto Transparencies ................................................................................... 26
2.5 Copying onto Heavy Weight Paper........................................................................... 30
Chapter 3 Loading Paper
3.1 What Paper to Use ...................................................................................................34
3.2 Checking/Changing Paper Supply Settings ............................................................. 36
3.3 Loading Paper .......................................................................................................... 39
3.3.1 Loading paper in trays 1, 2, 3, and 4..............................................................39
3.3.2 Loading paper in tray 5 (bypass)....................................................................40
3.4 Changing the Paper Tray Size ..................................................................................43
Chapter 4 Loading Documents
4.1 Types of Documents.................................................................................................46
4.1.1 Types of documents ....................................................................................... 46
4.1.2 Automatic document size sensing..................................................................46
4.1.3 Points to note when loading documents.................................................................47
iii
Page 4

Table of Contents
4.2 Loading Documents ................................................................................................. 48
4.2.1 Placing documents on document glass.......................................................... 48
4.2.2 Loading documents in DADF ......................................................................... 49
Chapter 5 Making Copies
5.1 Switching Screen Display......................................................................................... 52
5.2 Selecting the Output Colour (Output Colour) ........................................................... 55
5.3 Making One-Sided/Two-Sided Copies (2-Sided)...................................................... 58
5.3.1 Copying on one side ...................................................................................... 58
5.3.2 Copying on two sides ..................................................................................... 60
5.4 Reducing/Enlarging Copies (Reduce/Enlarge) ........................................................ 64
5.4.1 Same R/E % for length and width .................................................................. 64
5.4.2 Different R/E% for length and width ...............................................................68
5.5 Selecting a Paper Tray (Paper Supply)..................................................................... 72
5.6 Erasing the Edges (Edge Erase).............................................................................. 77
5.7 Shifting the Image (Image Shift)............................................................................... 80
5.8 Selecting the Document Size (Original Size) ........................................................... 83
5.9 Copying Facing Pages onto Separate Sheets (Book Copying) ................................ 85
5.5.1 Selecting Auto for Paper Supply ..................................................................... 72
5.5.2 Selecting a paper tray .................................................................................... 73
5.10 Copying Mixed Size Originals (Mixed Size Originals) .............................................. 87
5.11 Selecting the Document Type (Original Type) .......................................................... 90
5.12 Adjusting the Copy Density (Lighter/Darker) ............................................................93
5.13 Enhancing Sharpness (Sharpness) ......................................................................... 95
5.14 Adjusting Image Quality (Image Quality Presets) .................................................... 97
5.15 Adjusting Colour Shift & Saturation (Colour Shift & Colour Saturation) ................... 99
5.15.1 Adjusting the colour shift .............................................................................. 99
5.15.2 Adjusting the colour saturation ................................................................... 101
5.16 Adjusting Colour Control (Colour Control) .............................................................. 103
5.17 Copying Several Documents onto One Copy (Multi-Up) ........................................ 105
5.18 Interleaving Transparencies (Transparency Separators) ........................................ 108
5.19 Creating Mirror/Negative-like Images (Mirror Image/Negative Image) ................... 111
5.19.1 Creating mirror images............................................................................... 111
5.19.2 Creating negative-like images .................................................................... 112
5.20 Repeating an Image (Image Repeat) .....................................................................114
5.21 Making copies as covers (Covers) ......................................................................... 117
5.22 Enlarging and dividing into multiple copies (Poster)............................................... 120
5.23 Storing Frequently-used Job Settings (Stored Programming)................................ 123
5.23.1 Storing a routine job ...................................................................................123
5.23.2 Retrieving a job in stored programming ..................................................... 124
5.23.3 Deleting a stored job .................................................................................. 125
5.24 Selecting the Document Orientation (Original Orientation) .................................... 127
5.25 Using the Sorter for Copying .................................................................................... 12
iv
Page 5

Chapter 6 Tools Mode Settings
6.1 Entering Tools Mode............................................................................................... 132
6.2 Overview of Tools Mode ......................................................................................... 134
6.3 Setting the Feature Defaults ................................................................................... 143
6.4 Changing the Tools Password ................................................................................ 145
6.5 Automatic Gradation Adjustment............................................................................ 147
Chapter 7 Troubleshooting
7.1 Troubleshooting ...................................................................................................... 154
7.1.1 When an error message is displayed ........................................................... 154
7.1.2 When other problems occurred .................................................................... 155
7.2 Clearing Paper Jams .............................................................................................. 158
7.2.1 Paper jam at a paper tray ............................................................................. 158
7.2.2 Paper jam at the lower left cover .................................................................. 161
7.2.3 Paper jam at output tray/lower right cover .................................................... 162
7.2.4 Paper jam inside the machine ...................................................................... 164
7.2.5 Paper jam between the copier and sorter .................................................... 166
7.2.6 Paper jam inside the sorter .......................................................................... 169
7.2.7 Paper jam between the copier and finisher ................................................. 172
7.2.8 Paper jam inside the finisher ...................................................................... 175
7.3 Clearing Document Jams ....................................................................................... 179
7.4 Pausing the Finisher............................................................................................... 183
Table of Contents
Chapter 8 Daily Care
8.1 Cleaning the Copier ............................................................................................... 188
8.2 Consumables ......................................................................................................... 189
8.3 Replacing the Toner Cartridge ............................................................................... 191
8.4 Replacing the Waste Toner Bottle A ....................................................................... 193
8.5 Replacing the Developer Collector C ..................................................................... 195
8.6 Replacing the Oil Cartridge D ................................................................................ 197
8.7 Replacing the Drum Cartridge B ............................................................................ 199
8.8 Replacing the Staple Cartridge .............................................................................. 202
8.9 Replacing the Cleaning Cartridge E ....................................................................... 204
v
Page 6

Table of Contents
Chapter 9 Using the Auditron Administration Mode
9.1 Overview of Auditron Administration Features .......................................................212
9.2 Entering the Auditron Administration Mode............................................................ 214
9.3 Setting the Auditron Features................................................................................. 216
9.3.1 Reviewing account data ...............................................................................216
9.3.2 Creating/Modifying account data.................................................................. 217
9.3.3 Deleting all account data .............................................................................. 220
9.3.4 Enabling the Auditron Mode ......................................................................... 222
9.3.5 Changing the administrator password.......................................................... 224
Appendix
A Specifications .........................................................................................................228
B Possible Combinations of Features ........................................................................ 233
vi
Page 7

Using this Guide
The organisation of this manual is as listed below.
This manual uses the example of a two-sided copying model of DocuColor1256 GA with ADF installed to explain the
features of this machine. Features and parts of the display contents may differ depending on the model.
Chapter 1 Knowing your Copier
This chapter contains operating instructions about your copier like information on the major components,
the methods of switching the power ON and OFF and how to use the touch panel display.
After the copier has been properly installed, be sure to read this chapter completely before operating the
machine.
Chapter 2 Basic Copy Procedure
This chapter explains the basic knowledge of making copies like copying onto postcards, copying onto
transparencies and interrupting a copy job.
Chapter 3 Loading Paper
This chapter covers the types of paper that can be used on this copier, the precautions on paper handling and the
methods on how to load paper in the respective trays. Read this chapter when loading paper in the trays.
Chapter 4 Loading Documents
This chapter covers the types of original documents that can be used on this copier, the precautions on document
handling and how to load the documents. Read this chapter when loading the documents on the copier.
Chapter 5 Making Copies
This chapter explains the Basic Features, Added Features and Image Quality when making copies. The
common copying procedures are explained in this chapter. Read this chapter when making copies.
Chapter 6 Tools Mode Settings
This chapter describes the methods of changing feature, and other default settings related to tones, timeouts,
and so on to suit your copying needs and for the ease of operations. Read this chapter when you need to
change the settings.
Chapter 7 Troubleshooting
This chapter guides you step-by-step through a series of remedial procedures for dealing with problems,
such as, paper and document jams, when error messages are displayed and when the image quality is low.
Read this chapter when you encounter problems.
Chpater 8 Daily Care
This chapter provides information on daily care of the copier, such as, the replacing of consumables, how to
read the meter and the cleaning of the machine. Read chapter when necessary.
Chapter 9 Using the Auditron Administration Mode
This chapter spells out the use of the Auditron features to create user accounts and passwords in regulating the
use of the copier. Read this chapter when you wish to create accounts to count the copies you made.
Appendix
This section lists the important tips on specifications and the possible combinations of features.
vii
Page 8
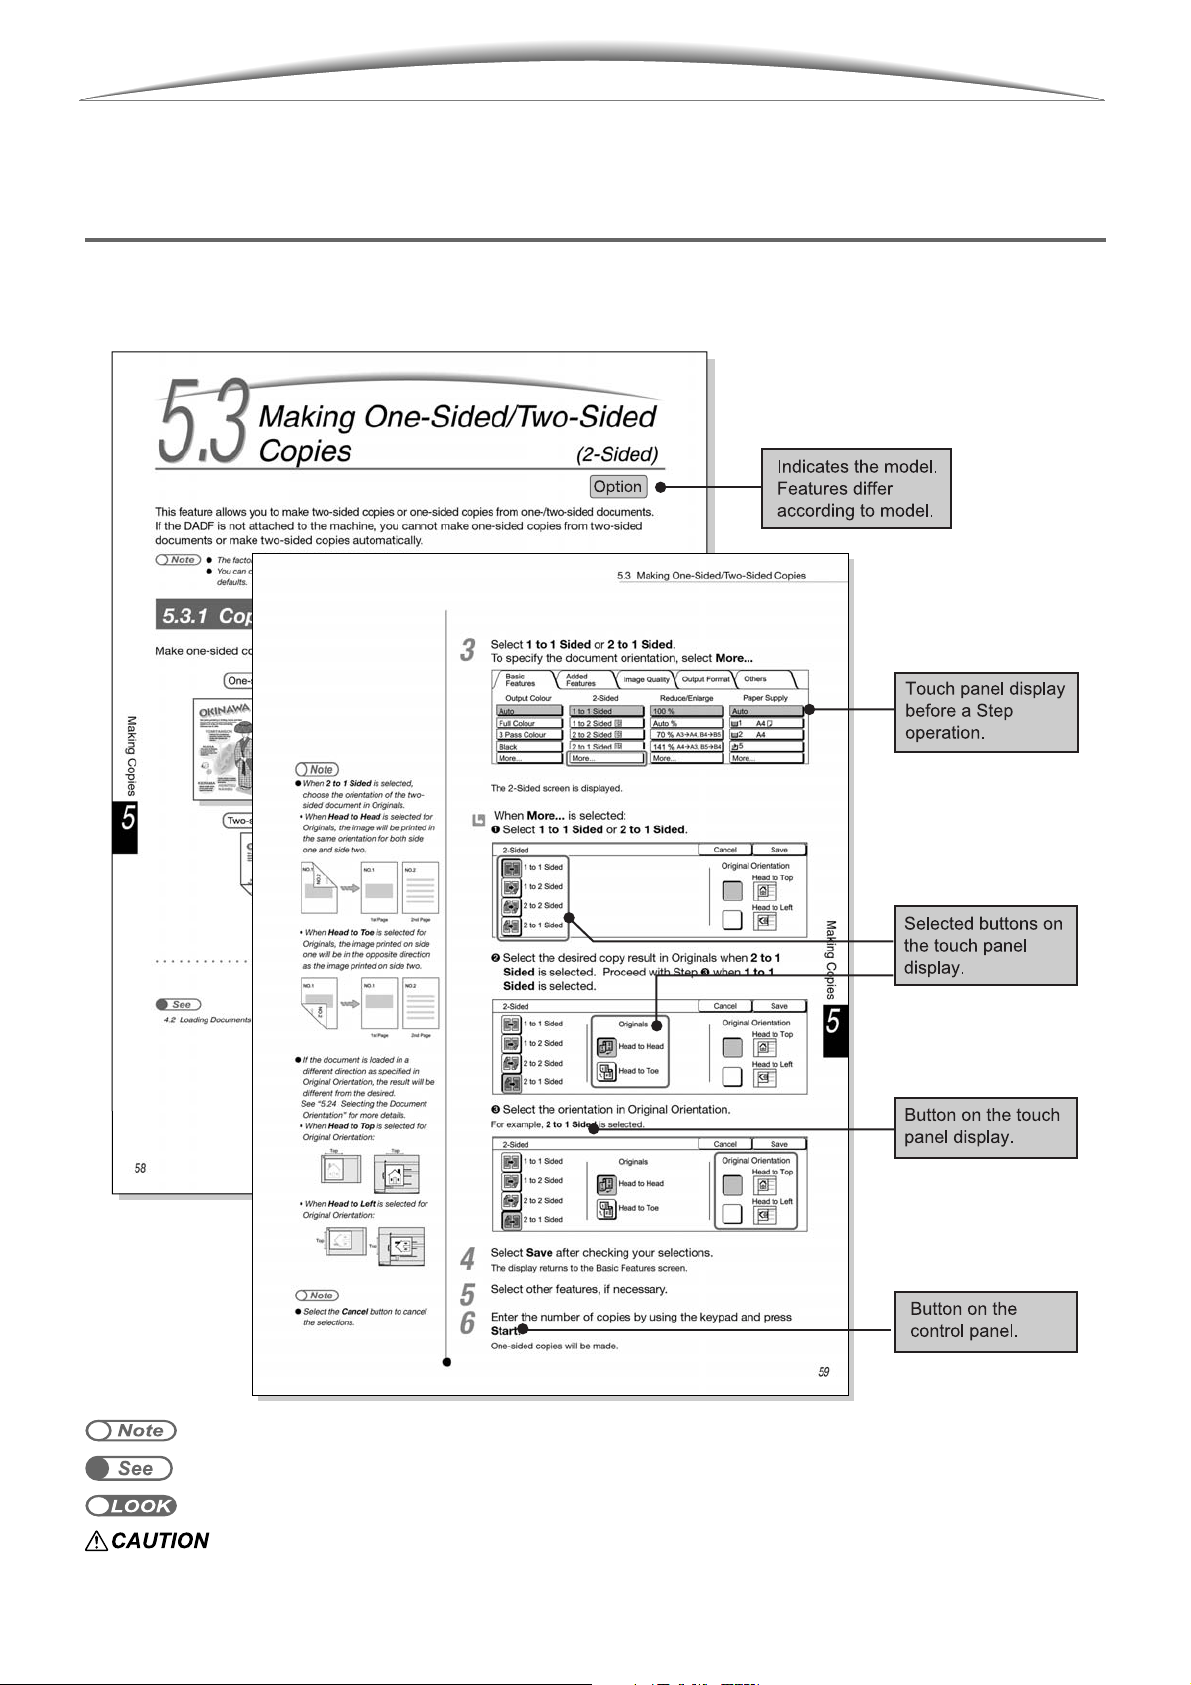
Conventions
The following conventions are used throughout this manual.
viii
Additional information about operations/features.
Indicates reference sources.
Points to pay attention to.
Safety precautions.
Page 9
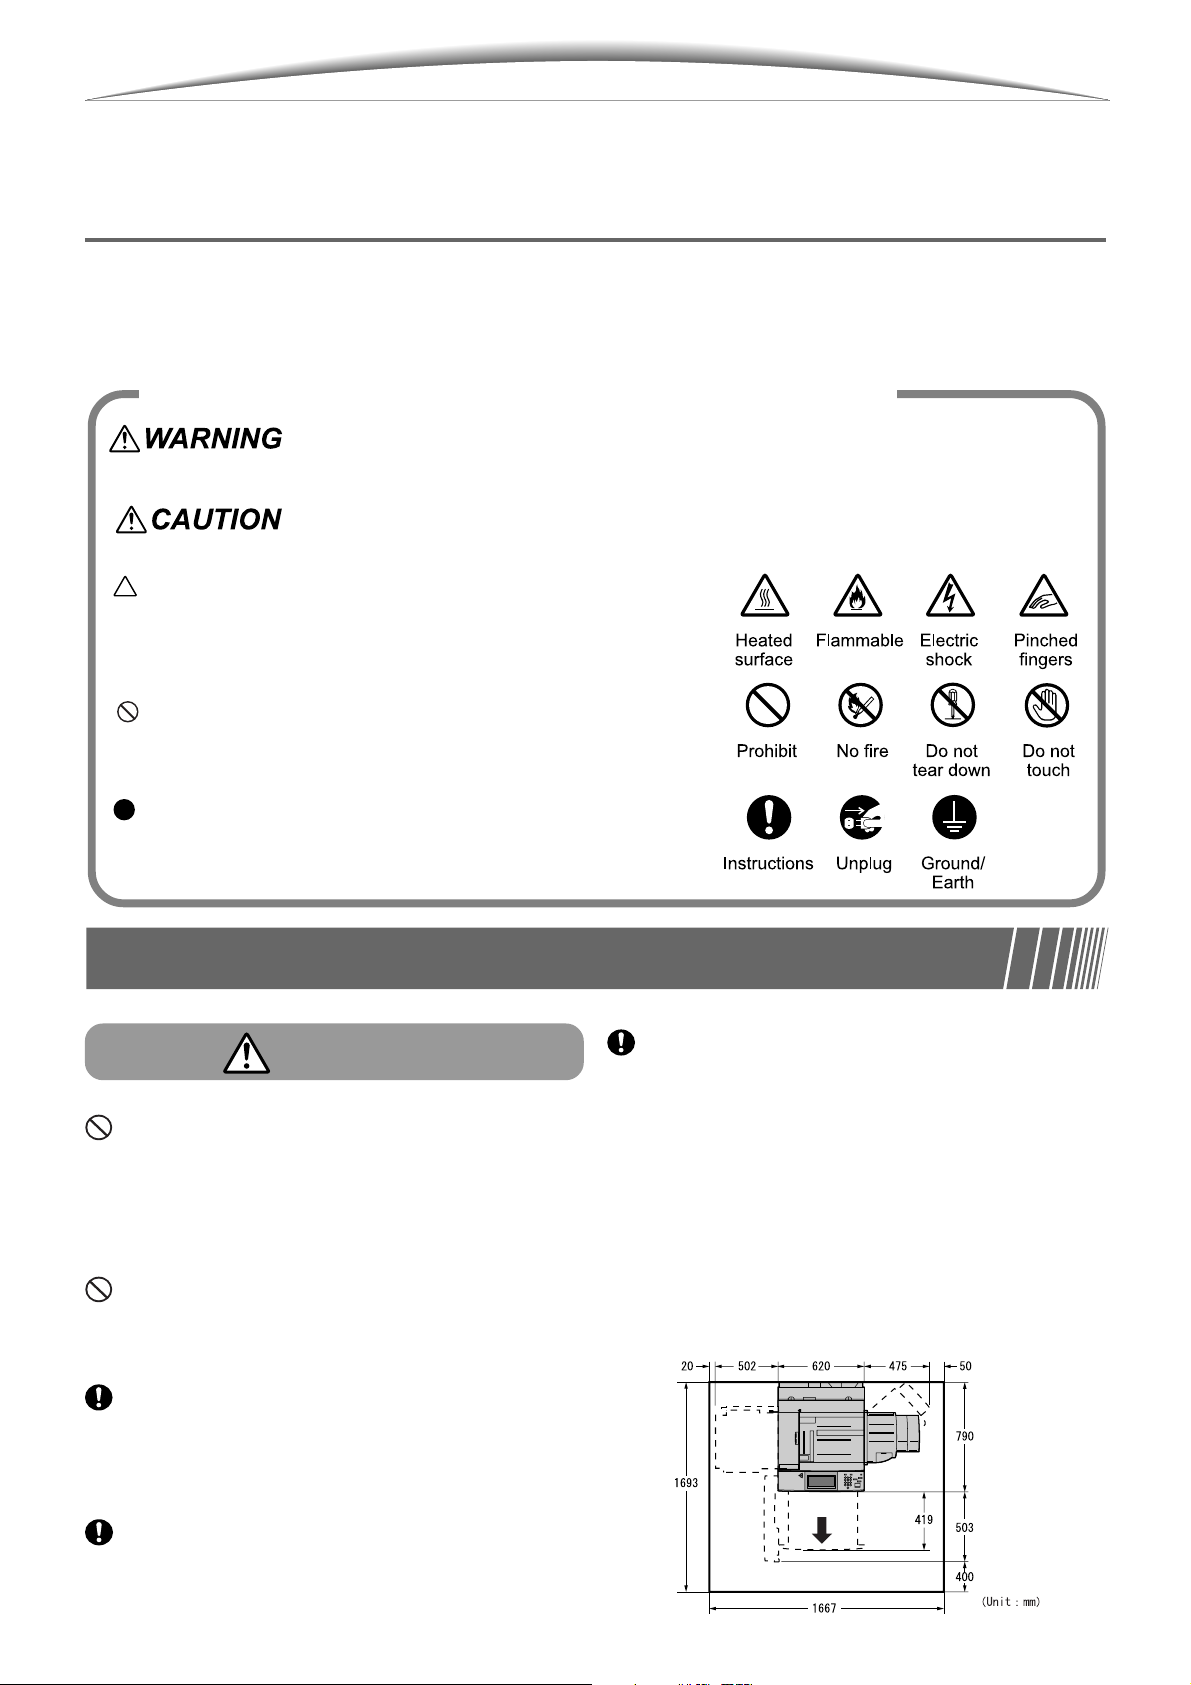
Safety Notes
Read these safety notes carefully before using DocuColor 1256 GA to ensure you operate the machine safely.
This section explains the safety symbols used throughout the manual
is used to alert operators to an operating procedure, practice, or condition
that, if not strictly observed, can result in severe injury or loss of life.
is used to alert operators to an operating procedure, practice, or condition
that, if not strictly observed, might result in safety hazards to personnel or
damage to the equipment.
This symbol is used to alert operators to a specific
operating procedure that requires close attention.
Read and follow instructions carefully to insure the task
is accomplished safely.
This symbol is used to alert operators to a specific
operating procedure that must not be performed. Read
and follow instructions carefully.
This symbol is used to alert operators to a specific
operating procedure that should be emphasized for
operating safety. Read and follow instructions carefully.
Precautions for installation and relocation
CAUTION
Do not place the machine in a hot, humid,
dusty, or poorly ventilated environment.
Prolonged explosure to these adverse
conditions can cause a fire or a shock
hazard.
Do not place the machine near heaters or
volatile, flammable, or combustible materials
such as curtains that may catch fire.
The machine has ventilation holes on its
bottom. A poorly ventilated machine can
cause excessive internal heat and a fire.
The accompanying diagram shows the
minimum clearances required for normal
operation, consumables replacement, and
maintenance to ensure your machine
operates at peak performance. Our Xerox
Representative will provide necessary
support for the proper installation of the
machine.
Place the machine on a level and sturdy
surface that can withstand the machine
weight of 218 kg. If tilted, the machine may
fall over and cause injuries.
When relocating the machine, contact your
Xerox Customer Support Centre.
ix
Page 10
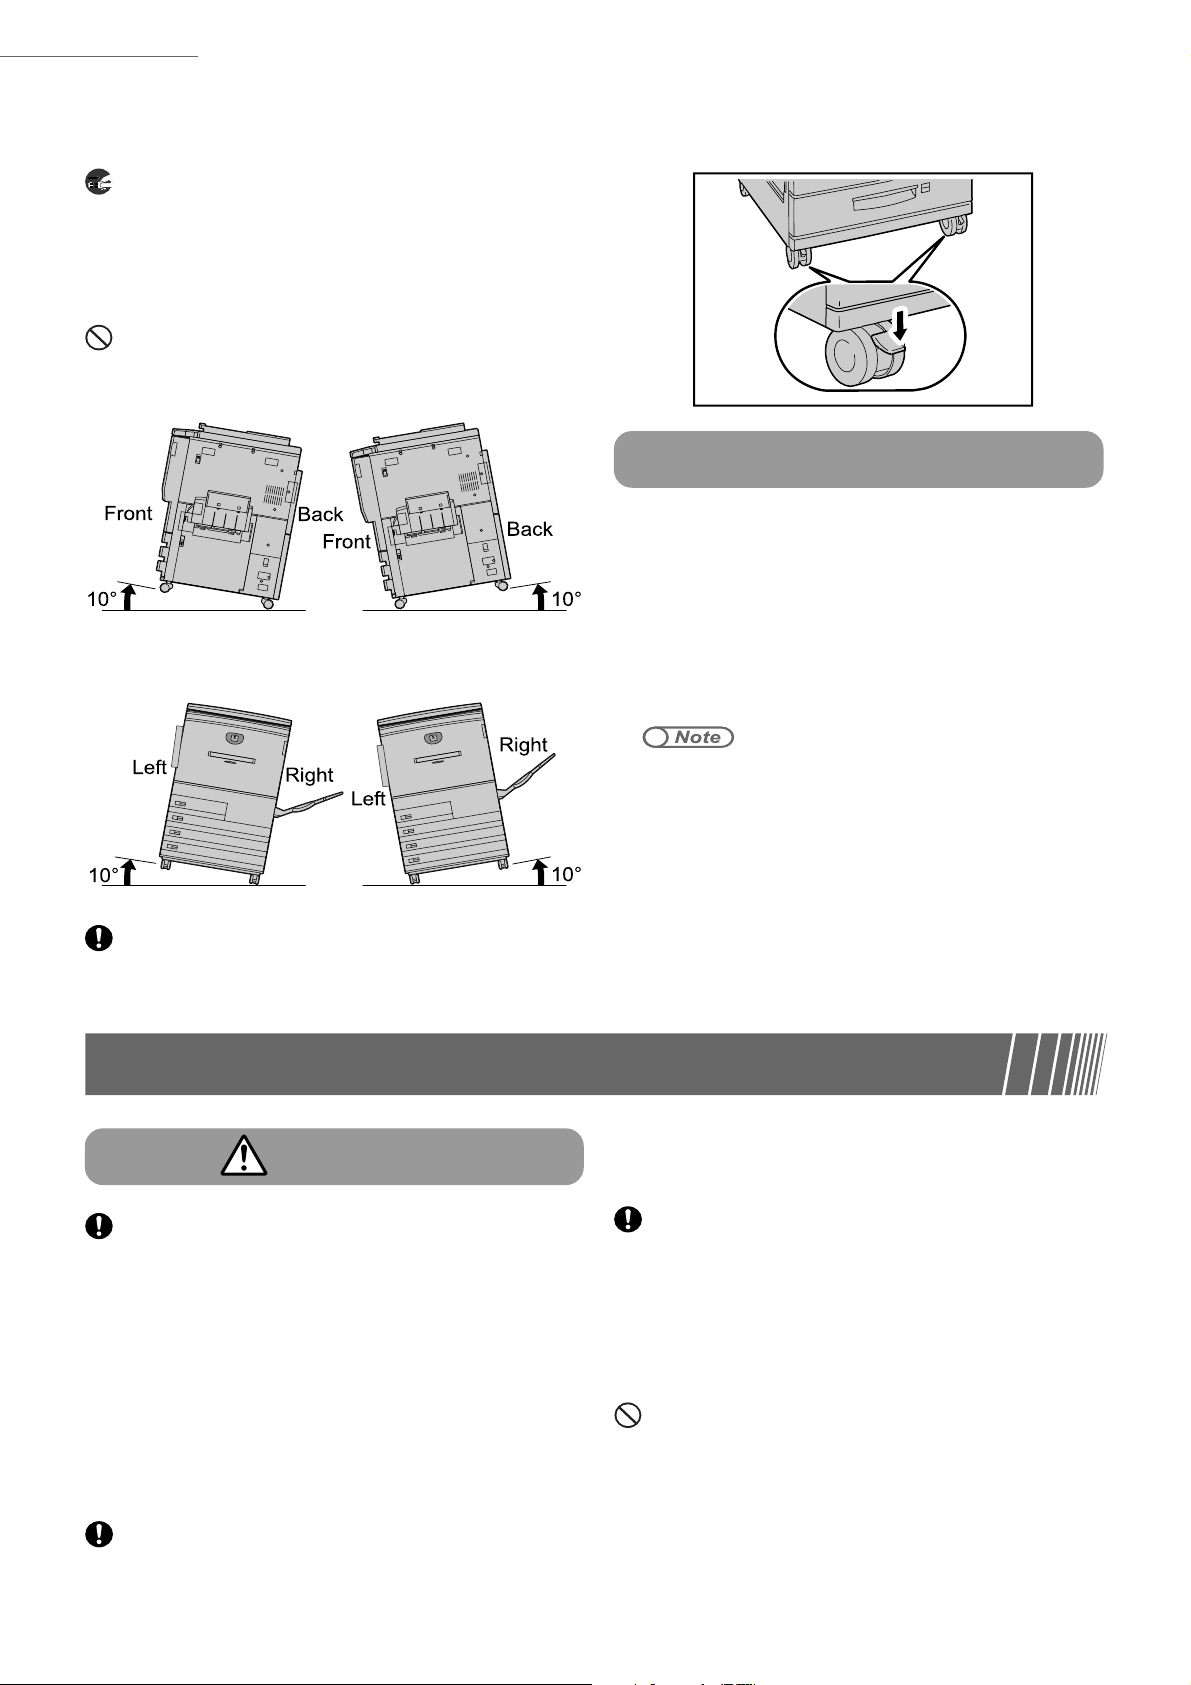
Safety Notes
When moving the machine, be sure to unplug
the power cord from the outlet. If the machine
is moved with the power cord connected, it can
cause damage to the cord which could result
in a fire or a shock hazard.
When moving the machine, do not tilt it more
than indicated below. If tilted excessively, the
machine may fall over and cause injuries.
Other precautions
● The machine is capable of operating normally
within the following recommended
environmental limits. Temperature range 1032°C, humidity range 15-85% (without
condensation). Humidity should be 61% or
below at 32°C, and temperature should be
28°C or below at 85%.
Sudden temperature fluctuations can affect copy quality. Rapid
heating of a cold room can cause water vapour to condense inside the machine, which can interfere directly with image transfer.
● Do not expose the machine to direct sunlight.
Exposure to direct sunlight can adversely
When the machine is installed, be sure to lock
the caster stoppers. An unlocked machine may
fall over and cause injuries.
affect the performance of the machine.
Precautions on power and earth connections
WARNING
The specifications that apply to your machine
depend on your machine configuration.
Connect the power plug only to a properly
rated power outlet. Otherwise, it can cause a
fire or shock hazard. If in doubt, contact your
Xerox Customer Support Centre.
• Rated voltage 100V
Rated frequency 50/60Hz
• Rated voltage 220-240V
Rated frequency 50/60Hz
Never use multi-plug adaptors to plug
multiple power plugs in the same outlet. Be
sure to operate the machine on a sole-use
receptacle. Multiple conductors can cause
the outlet to overheat and cause a fire.
Ensure that the plug connection is free of
dust. In a damp environment, a
contaminated connector can draw a nonnegligible amount of current that can
generate heat and eventually cause a fire
over an extended period of time.
Always use the power cord provided with
your machine. When an extension power
cord is required, always use a properly rated
cord. Contact your Xerox Customer Support
Centre. If you use a cord with an unspecified
current rating, the machine or plug may emit
smoke or necome hot to the touch externally.
x
Page 11
Safety Notes
Do not attempt to rework, pull, bend, chafe,
or otherwise damage the power cord. Do
not place a heavy object on the cord. A
damaged cord can cause a fire or shock
hazard.
Never touch a power cord with wet hands.
Danger of electric shock exists.
Stop the operation immediately if the
following happens. These conditions can
result in a fire. Immediately unplug the
machine and contact your Xerox Customer
Support Centre.
● If the machine emits smoke and becomes
very hot to touch.
● If it produces strange sounds or smell.
● If water is spilt into the machine.
To prevent a fire or a shock hazard, follow the
instruction below based on your machine
configuration. If in doubt, contact your Xerox
Customer Support Centre.
● If your machine is a 220-240V model, there
is no need to attach a separate earth line
since the earth connection in incorporated
in the power line. Plug it into a properly
rated outlet.
● If your machine is a 100 or 110V model,
use the green earth wire bundled with the
wire cord, located at the rear of the
machine.
The earth wire must be connected to one
of the following conductors.
• Earth terminal of the specified power
outlet
• A piece of copper buried in the earth
650mm or deeper
• Earth terminal with Class 3* earthing.
* Class 3 is the regulation for Japan only.
Never connect the earth wire to any of the
following:
● Gas pipe, which can cause ignition or an
explosion
● Telephone line earth wire or lighting rod,
which can draw an excessive electric
current if hit by lighting
● Water faucet or pipe whose electrical
conductivity is broken by a non-metal part
CAUTION
Do not unplug or replug the machine while it
is on. Unplugging a live connector can
deform the plug and cause a fire.
When uplugging the machine, grasp the plug
instead of the cord. Forcibly pulling on a
cord can damage it and cause a shock
hazard.
Once a month, unplug the machine and
check the power cord for the following.
Contact your Xerox Customer Support Centre
if you notice any unusual conditions.
● The power cord is plugged firmly into a
receptacle.
● The plug is not excessively heated, rusted
or bent.
● The plug and receptacle are free of dust.
● The cord is not cracked or frayed.
When the machine is not used over an
extended period of time, switch it off and
unplug it. If an unused machine is left
connected to a power source for a long
period, degraded insulation can cause a
shock, leak current, or fire hazard.
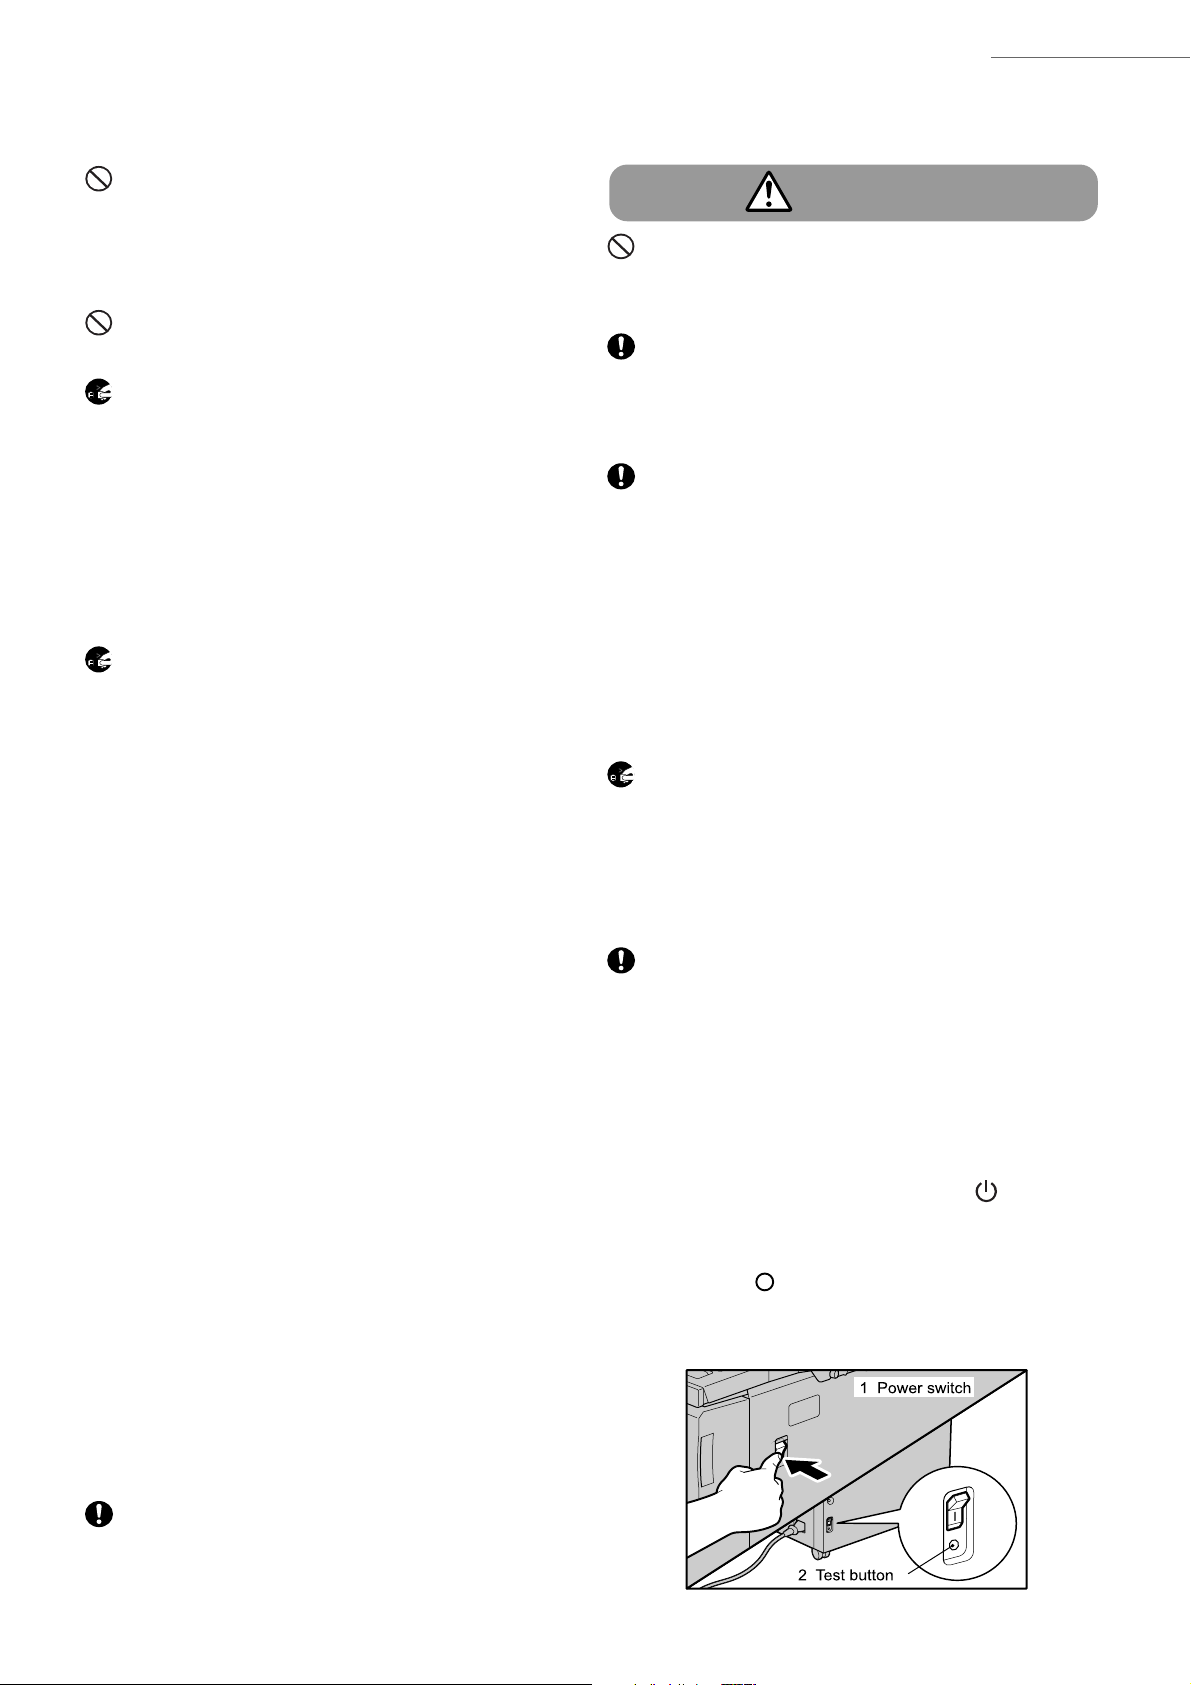
This machine has a earth fault interrupter.
Once a month, check the protection circuit
for correction operations using the following
procedure. If the circuit does not operate, an
electric shock can occur on a poorly earthed
component. If you notice any unusual
conditions, contact your Xerox Customer
Support Centre.
1. Press the power switch to the
2. Press the test button below the breaker
switch. When the breaker switch is turned
from | to
3. Turn the breaker switch, then the power
switch to the | position.
, the circuit is all OK.
position.
If the power cord is broken or insulated wires
are exposed, ask your Xerox Customer
Support Centre for a replacement. Using a
damaged cord can cause a fire or shock
hazard.
xi
Page 12
Safety Notes
Be sure to switch off and unplug the
machine before accessing the interior of the
Operating safeguards
machine for cleaning, maintenance, or fault
clearance. Access to a live machine’s
interior can cause a shock hazard.
Operating safeguards
WARNING
Do not place any liquid container such as a
vase or coffee cup on the machine. Split
water can cause a fire or shock hazard.
Do not place any metal parts such as staples
or clips on the machine. If metal and
flammable parts entered the machine, they
can short internal components, and cause a
fire or shock hazard.
If debris (metal or liquid) entered the machine,
switch off and unplug the machine. Contact
your Xerox Customer Support Centre.
Operating a debris-contaminated machine
can cause a fire or shock hazard.
Never open or remove machine covers that
are secured with screws unless specifically
instructed in this manual. A high voltage
component can cause a shock hazard.
Do not try to alter the machine configuration,
or modify any parts. An unauthorised
modification can cause smoke or fire.
This equipment is certified as a Class 1 laser
product under IEC825-1 (1998). This means
that the machine does not emit hazardous
laser radiation. Since radiation emitted inside
the machine is completely confined within the
protective housings and external covers, the
laser beam cannot escape from the machine
during any phrase of user operation. Do not
perform any operation apart from the
instructions given in the manual. There may
be a danger of laser beam leakage.
Other precaution
● This machine has a protection circuit against
surge current during lightning. During lightning
and thunder, switch off the power supply and
remove the cord until the lightning is over.
CAUTION
If you make copies with the document cover
open, avoid looking directly at the copy lamp.
Direct eye exposure can cause eye fatigue or
damage.
Do not place a magnet near safety switches
of the machine. A magnet can activate the
machine accidentally, resulting in injuries.
Do not use a highly flammable spray near the
machine. It can cause a fire.
When copying a thick document, do not use
excessive force to press it against the
document glass. The glass may break and
cause injuries.
Do not place a heavy object or lean your
elbow on the touch panel display. Broken
glass can cause injuries.
Do not use paper that are good electricity
conductors (origami paper, carbon paper,
coated paper, etc.). If the paper is jammed in
the machine, it can result in a short circuit or
fire.
Do not touch the areas that are affixed with
the label “High Voltage”. You may get an
electric shock.
Do not touch the areas on or near the fuser
unit that are affixed with the label “Hot
Surface”. You can get burnt as a result.
Do not forcefully remove paper that are in the
fuser unit or wrapped around the heat roller.
You can get burnt as a result. Switch off the
machine, and contact your Xerox Customer
Support Centre.
xii
When sliding out a paper tray, pull it out
slowly. If it is pulled out with too much force,
the tray can hit and injure your knees.
Page 13
Safety Notes
When removing jammed paper, make sure
that no pieces of torn paper are left in the
machine. A piece of paper remaining in the
machine can cause a fire.
If a sheet of paper cannot be removed or
wrapped around the heat roller, do not try to
remove it by yourself. Doing so can cause
injuries. Switch off the machine immediately,
and contact your Xerox Customer Support
Centre.
Consumable Safeguards
WARNING
Never throw a toner cartridge into an open
fire. Toner remaining in the cartridge can
cause an explosion and you can get burnt.
Never throw toner or a waste toner bottle into
an open fire. It can cause an explosion and
you can get burnt.
Never throw a developer or a used developer
container into an open fire. It can cause an
explosion and you can get burnt.
CAUTION
Do not pull out the drum cartridge with force.
It may hit you and injure you.
The cleaning cartridge is very hot. Make sure
you cool it considerably before you proceed.
The handle at the centre of the cleaning
cartridge will a reach a safe temperature
(about 70°C) 20 minutes after the transfer
module is pulled out.
The inside of the machine is very hot even
after removing the cleaning cartridge from it.
Make sure you do not place your hand inside
the shutter. Also, when things fall from the
inside of the machine, do not try to take them
out. When this happens, switch off the
power and contact your Xerox Customer
Support Centre.
It is recommended to ventilate the room to
keep the environment comfortable and free
you from getting a headache during
continuous copying runs in a small room.
Other precautions
● When clearing a paper jam or other fault,
follow the appropriate procedures given in this
manual.
● Make sure that the output tray is properly
installed. Otherwise it may result in faults like
paper jams.
The cleaning cartridge remains very hot on
the inside even though its exterior has cooled
down. Do not to touch the areas other than
the handle.
Other precautions
● Open the consumables only when you want
to use them. Do not store them in the following places.
• High temperature, humid places
• Near a fire
• Under direct sunlight
• Dusty places
● When using consumables, read and observe
operating instructions and safeguards written
on the package and container.
● Used toner cartridges and drum cartridges
are recycled for resource conservation.
—Handling instructions—
Used toner cartridges and drum cartridges
should be properly disposed of. Contact
your Xerox Customer Support Centre.
❃ Administer emergency treatment as follows:
● If toner gets into your eyes, rinse them well
with plenty of clean water. Consult a doctor,
if necessary.
● If toner adheres to your skin, wash it with
soap and water then rinse it well.
● If you inhale toner, exit the area immediately
and gargle with plenty of water.
● If you swallow toner, induce vomiting and
consult a doctor immediately.
xiii
Page 14
Safety Notes
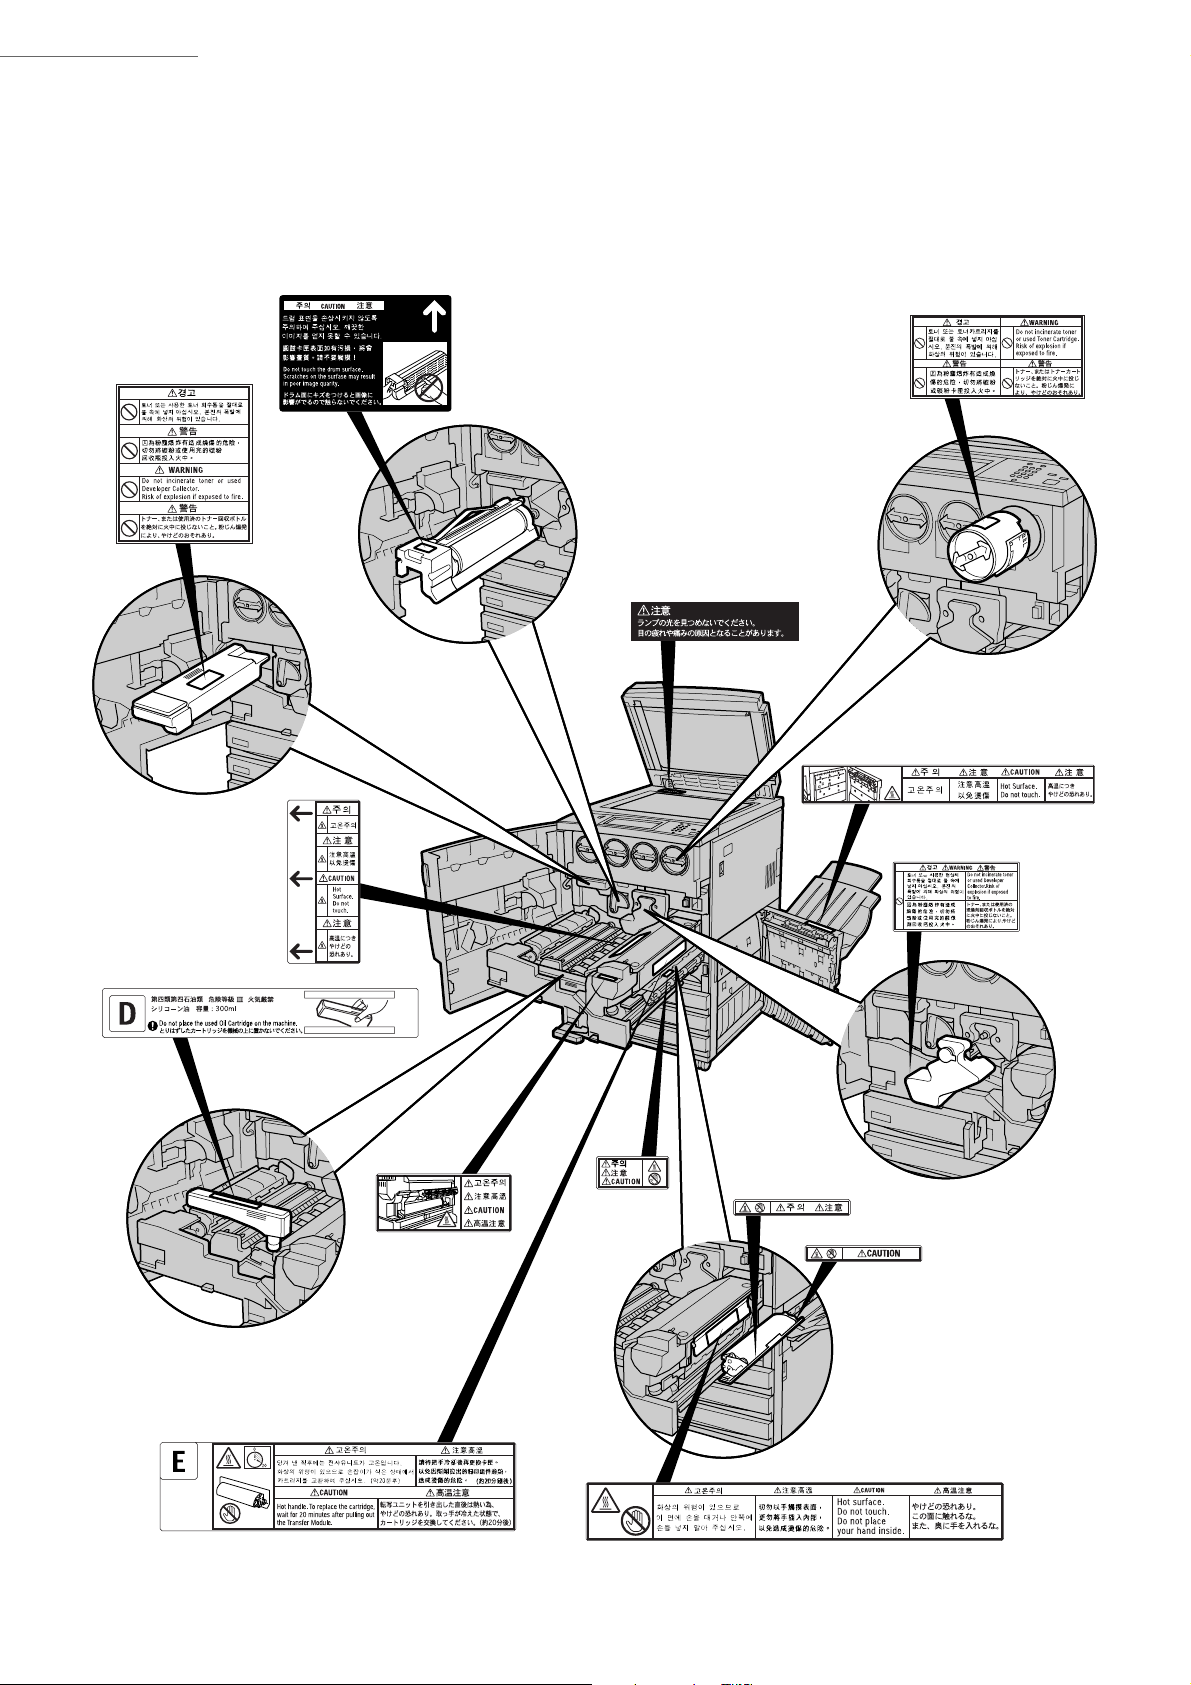
■ Locations of warning and caution labels
To ensure your safety in operating the copier, please read the warning and caution labels pasted on
the internal parts of the machine carefully.
xiv
Page 15

The Objective of the International
Energy Star Program
To protect the global environment and conserve energy resources, the International Energy Star Program encourages the following product features. Fuji Xerox confirms this product satisfies the Japanese
requirements for this program.
Two-sided copying feature
To reduce the volume of copy paper used, this product has a two-sided copying feature. You can copy two
single-sided originals on both sides of a sheet of paper. You can also make single-sided copies. See “5.3.2
Copying on two sides” of this guide for details.
Low power mode feature
This product has a power-saving feature, which switches the machine to the low power mode automatically if
the machine is on and not operated for a certain period of time. In this mode the machine lowers the fuser
temperature and saves the power consumption. The default low power mode start time is set at 15 minutes.
The recovery time from low power mode is 4 minutes and 30 seconds (provided that one hour has passed after
the machine entered Low Power mode).See ““Setting the timers” in 6.2 Overview of Tools Mode” of this guide
for details.
Sleep mode feature
This product has a power-saving feature, which allows the machine to minimize the power consumption if it is
on and not operated for a certain period of time. By default, the machine enters Sleep Mode after 60 minutes of
inactivity.
xv
Page 16

Illegal Copies and Printouts
Copying or printing certain documents may be illegal in your country. Penalties of fines or imprisonment may be
imposed on those found guilty. The following are examples of items that may be illegal to copy or print in your
country.
• Currency
• Banknotes and checks
• Bank and government bonds and securities
• Passports and identification cards
• Copyright material or trademarks without the consent of the owner
• Postage stamps and other negotiable instruments
This list is not inclusive and no liability is assumed for either its completeness or accuracy. In case of doubt,
contact your legal counsel.
Notice:
This machine is provided with the recognition function to prevent the copying of currency. Also, in case currency or securities are copied, the forgery tracing function can identify a machine used for the copy.
Note that the recognition function prevents a limited range of illegal copies. Always put your machine under
careful charge to prevent illegal copies from being made.
xvi
Page 17

Knowing Your Copier
1.1 Parts of the Copier ................................................. 2
1.2 Switching On/Off the Power ................................... 7
1.3 Using the Touch Panel Display ............................. 11
1.4 Entering Password ............................................... 14
1.5 Using the Copylyzer (Optional) ............................ 15
Page 18
Knowing Your Copier
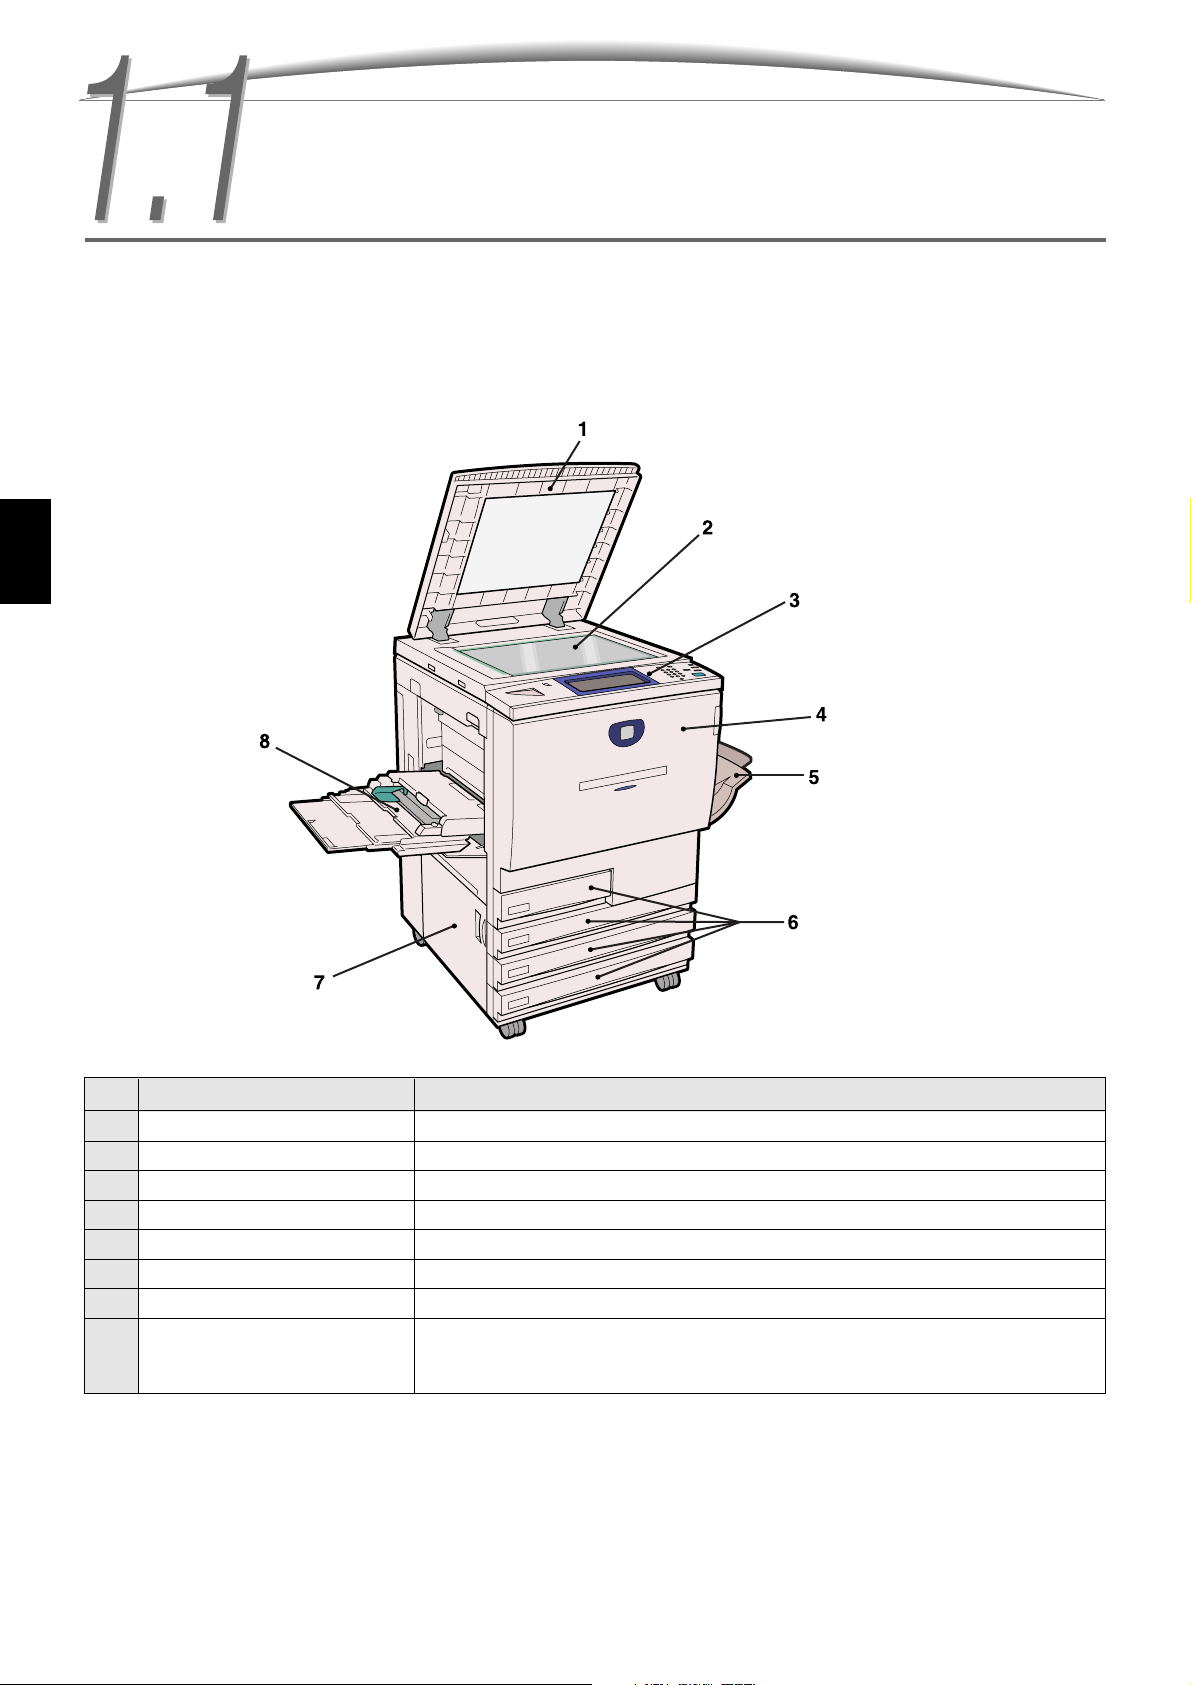
This section explains the machine components.
[Appearance]
1
Parts of the Copier
No. Name Feature
1 Document cover Used to press down the document that is placed on the document glass.
2 Document glass Place the document to be copied here.
3 Control panel Contains operating buttons, indicator lights and the touch panel display.
4 Front door Open this door to clear paper jams or to replace the drum/toner cartridge.
5 Output tray Receives copies made from the machine.
6 Trays 1, 2, 3, and 4 Load paper stock into trays 1, 2, 3, and 4.
7 Lower left cover Open this cover to clear paper jams.
8 Tray 5 (bypass) Load non-standard-size paper stock that cannot be loaded in trays 1, 2, 3,
and 4 (e.g. special paper such as transparencies and heavy weight paper)
in this tray in order to make copies on them.
2
Page 19
1.1 Parts of the Copier
Knowing Your Copier
1
No. Name Feature
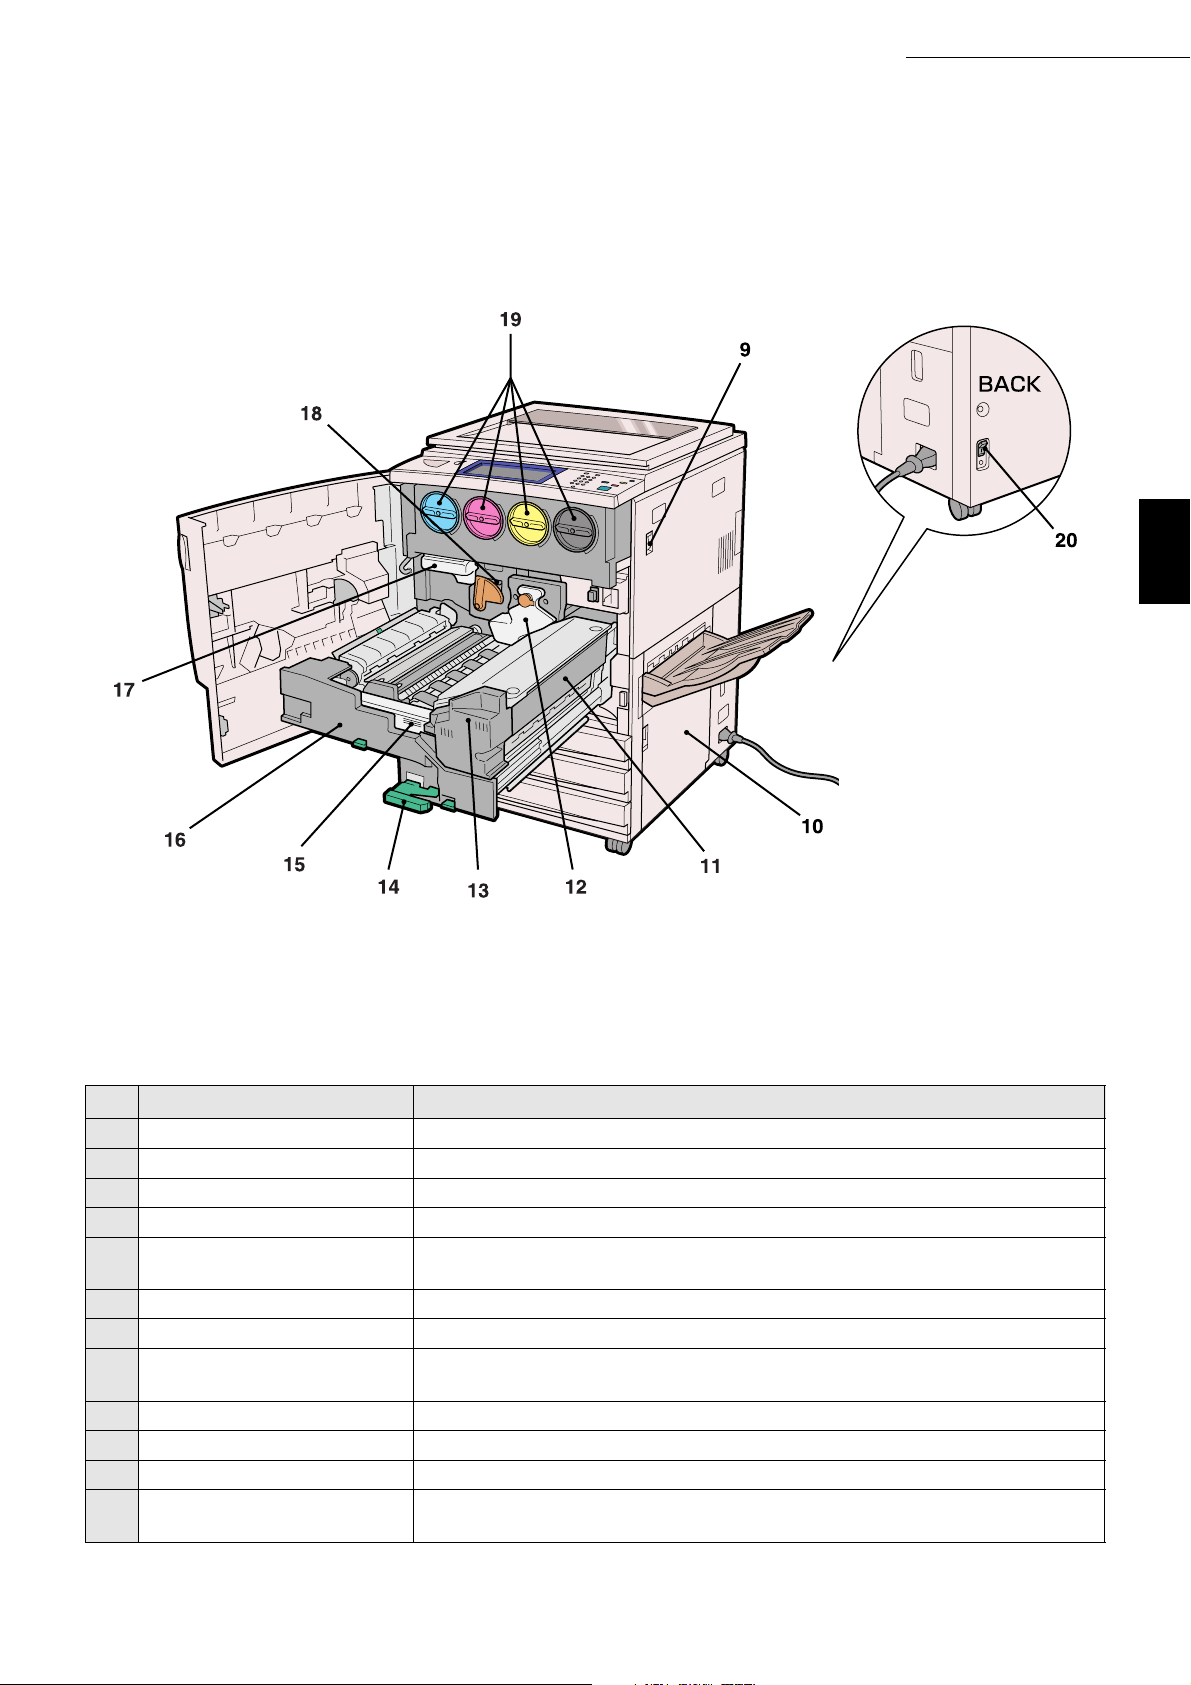
9 Power switch Switches on/off the power of the machine.
10 Lower right cover Open this cover to clear paper jams.
11 Cleaning cartridge (E) Sheet for cleaning the internal section of the fuser unit.
12 Developer collector (C) Collects used developer.
13 Fuser unit Fixes the printed image on the paper by fusing the toner. Do not touch this
unit as it is extremely hot.
14 Lever Lever for pulling out the transfer module.
15 Oil cartridge (D) Supplies oil to the fuser unit.
16 Transfer module Transfers the toner image from the drum to the paper by fusing the toner.
Pull this out when replacing consumable E or clearing a paper jam.
17 Waste toner bottle (A) Collects used toner.
18 Drum cartridge (B) Comprises devices such as the photoreceptor.
19 Toner cartridge Contains toner of cyan (C), magenta (M), yellow (Y), and black (K).
20 Breaker switch Controls the power supply to the machine. Once leakage is detected, this
switch will automatically interrupt the power supply to the machine.
3
Page 20
Knowing Your Copier
1
1.1 Parts of the Copier
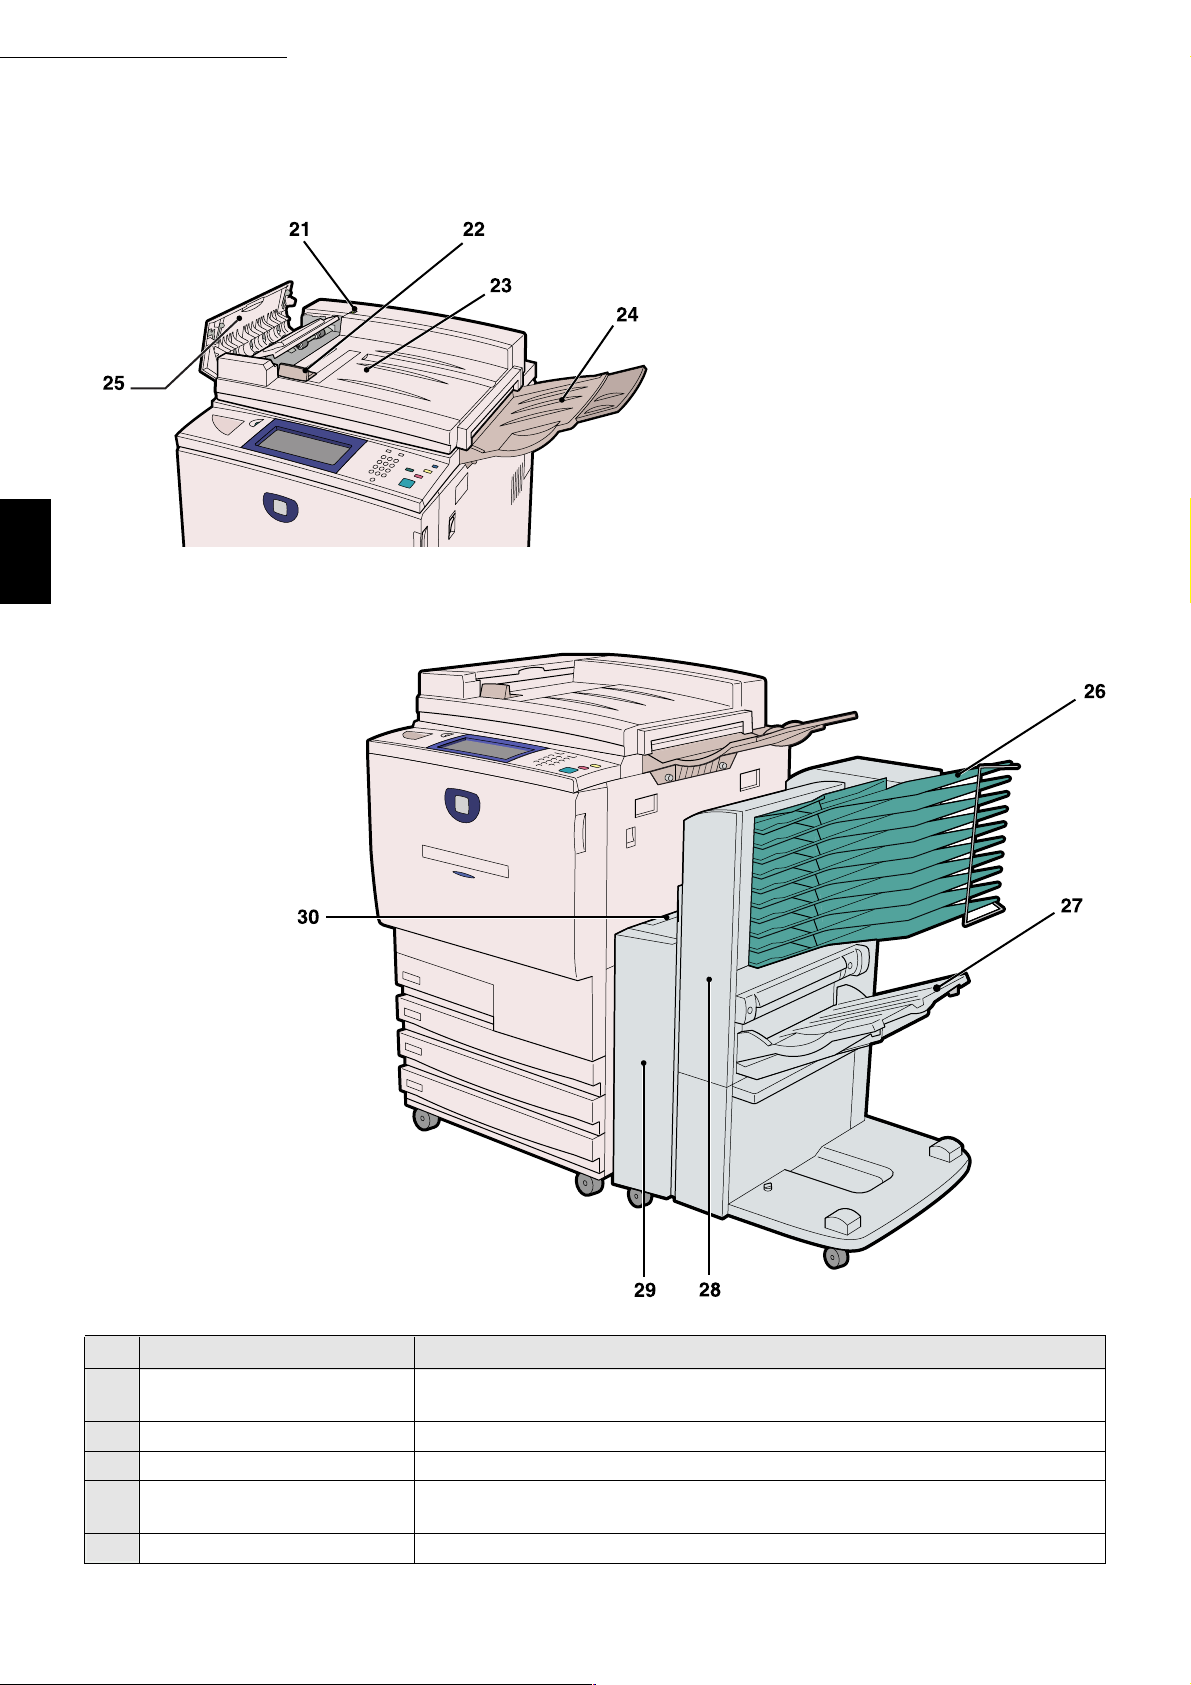
● Duplex Automatic Document Feeder (DADF) (Optional)
● Sorter (Optional)
No. Name Feature
21 Document check light Check light used to indicate that documents have been loaded properly in
the DADF.
22 Document guide Used to align the edges of documents loaded in the DADF.
23 Document input tray Documents are fed from this tray into the machine for scanning.
24 Document output tray Receives documents output from the machine after they have been
scanned.
25 Left cover Open this cover to clear paper jams.
4
Page 21
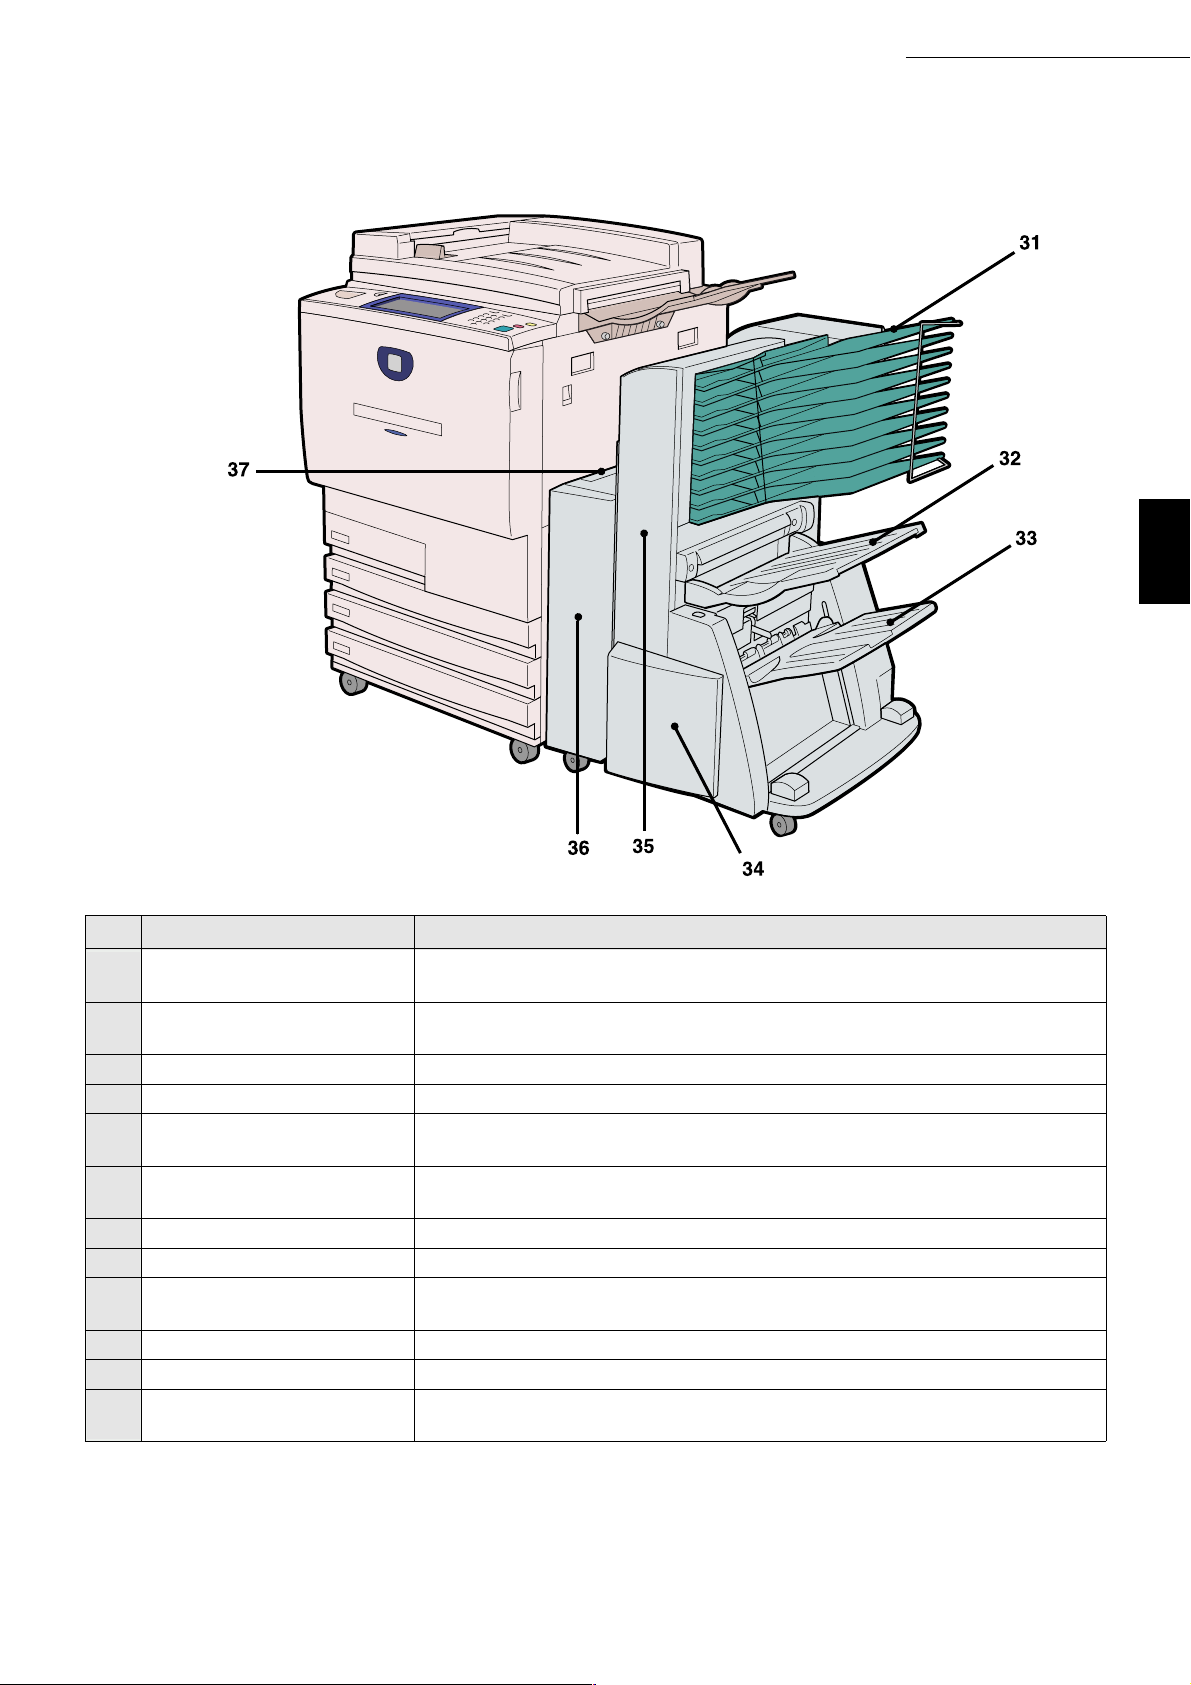
Finisher (Optional)
1.1 Parts of the Copier
Knowing Your Copier
1
No. Name Feature
26 Sorter bins Copies are output to these bins when Collated or Uncollated is selected
from the Copy Output options.
27 Output tray Copies are output to this tray when Output Tray is selected from the Copy
Output options.
28 Right door Open the door in the event of a paper jam.
29 Left door Open the door in the event of a paper jam.
30 Sorter release lever Hold the lever to move the sorter to the right to separate it from the main
unit.
31 Sorter bins Copies are output to these bins when Collated or Uncollated is selected
from the Copy Output options.
32 Output tray Copies and printouts are usually delivered to this tray.
33 Finisher tray Stapled or offset printouts are delivered to this tray.
34 Lower right door Open this door when replacing staple cartridges or when staple faults
occur.
35 Right door Open the door in the event of a paper jam.
36 Left door Open the door in the event of a paper jam.
37 Finisher release lever Hold the lever to move the finisher to the right to separate it from the main
unit.
• For paper sizes that the sorter bins can accommodate, see "■ Sorter (Optional)" in "Appendix A
Specifications".
• These bins are used as sorter bins (for copier) or mail box bins (for printer) depending on the setting of the
machine. For details on the setting, contact your Xerox Customer Support Centre.
5
Page 22
Knowing Your Copier
1
1.1 Parts of the Copier
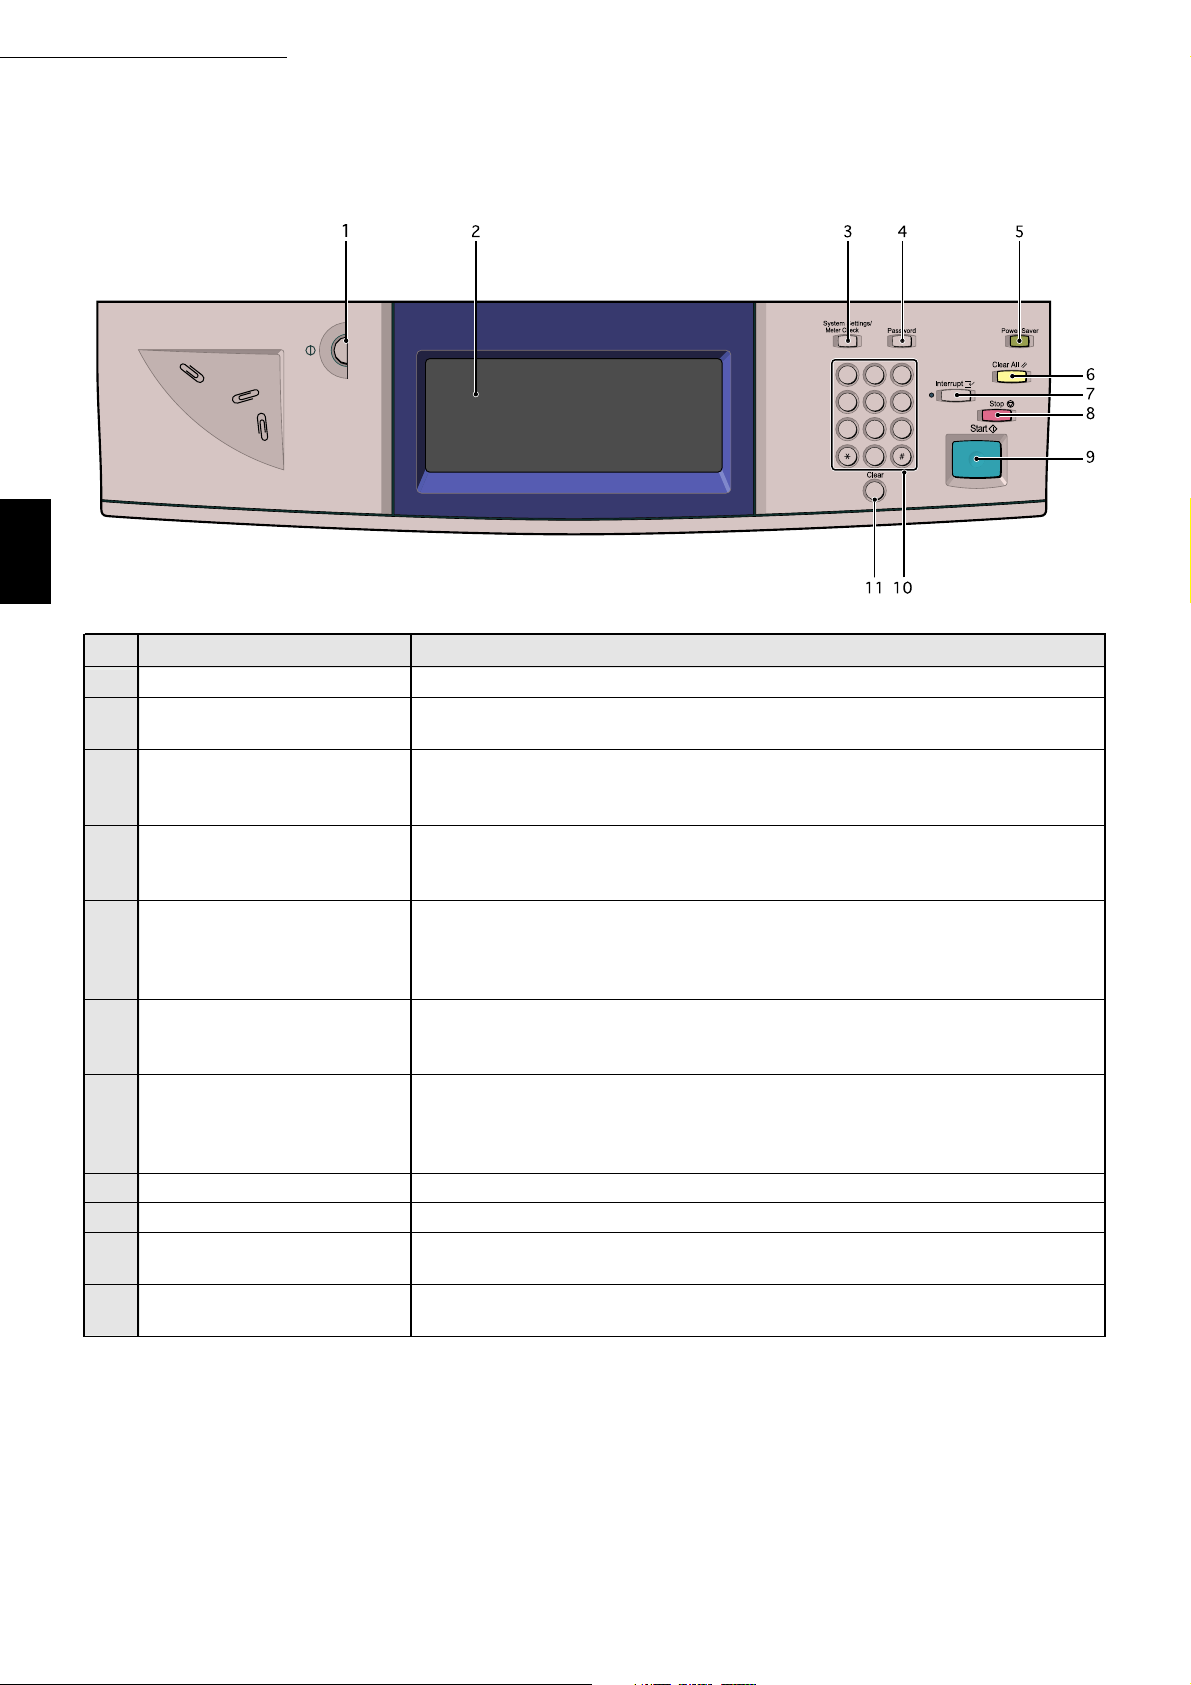
Control Panel
1 2 3
4 5 6
7 8 9
0
C
No. Name Function
1 Brightness adjustment dial Adjusts the brightness of the touch panel display.
2 Touch panel display Displays the respective features and machine status. Touch the feature
buttons on this panel to select the desired options for a copy job.
3 System Settings/Meter Press this button to display the System Settings/Meter Check screen. You
Check button can define the specifications of the features by using the options available.
You can also check the meter reading, or status of the consumables.
4 Password button Press this button to display the User Password Entry screen if the Auditron
Mode is enabled. Use of the machine can be controlled by requiring each
user to enter his password (by department/user).
5 Power Saver button Press this button to reduce the power consumption of the machine and
put it in the Power Saver mode if the machine will not be used for a while.
The Power Saver indicator light will be lit. To return to the Ready (Copy)
mode, press the button again.
6 Clear All button Press this button to clear all settings and return to the default screen. The
default screen is the screen that is displayed when the machine is
switched on.
7 Interrupt button/indicator Press this button to interrupt the current copy job for an urgent job. The
indicator light at the upper left lights up when this button is pressed. Press
this button again to cancel the interrupt copy job and return to the original
copy job.
8 Stop button Press this button to stop the current copy job.
9 Start button Press this button to start copying.
10 Keypad Use the keys on this keypad to enter the number of sets to be copied , or
the numeric values for feature settings, for example, the password.
11 C (Clear) button Press this button to delete or correct a wrong entry made by using the
keypad.
6
Page 23
Switching On/Off the Power
Switch on the power of the copier before you begin copying. After the copier is switched on,
it takes about 8 minutes and 30 seconds for it to warm up before you can start making
copies. Switch off the power of the copier at the end of the day, or when it will not be used
for a long time. You can make use of the Power Saver feature if the copier is left idling for a
while. The Power Saver feature reduces the power consumption of the machine, thereby
helps to conserve energy.
1.2.2 Saving energy
1.2.1Switchingon/off the power
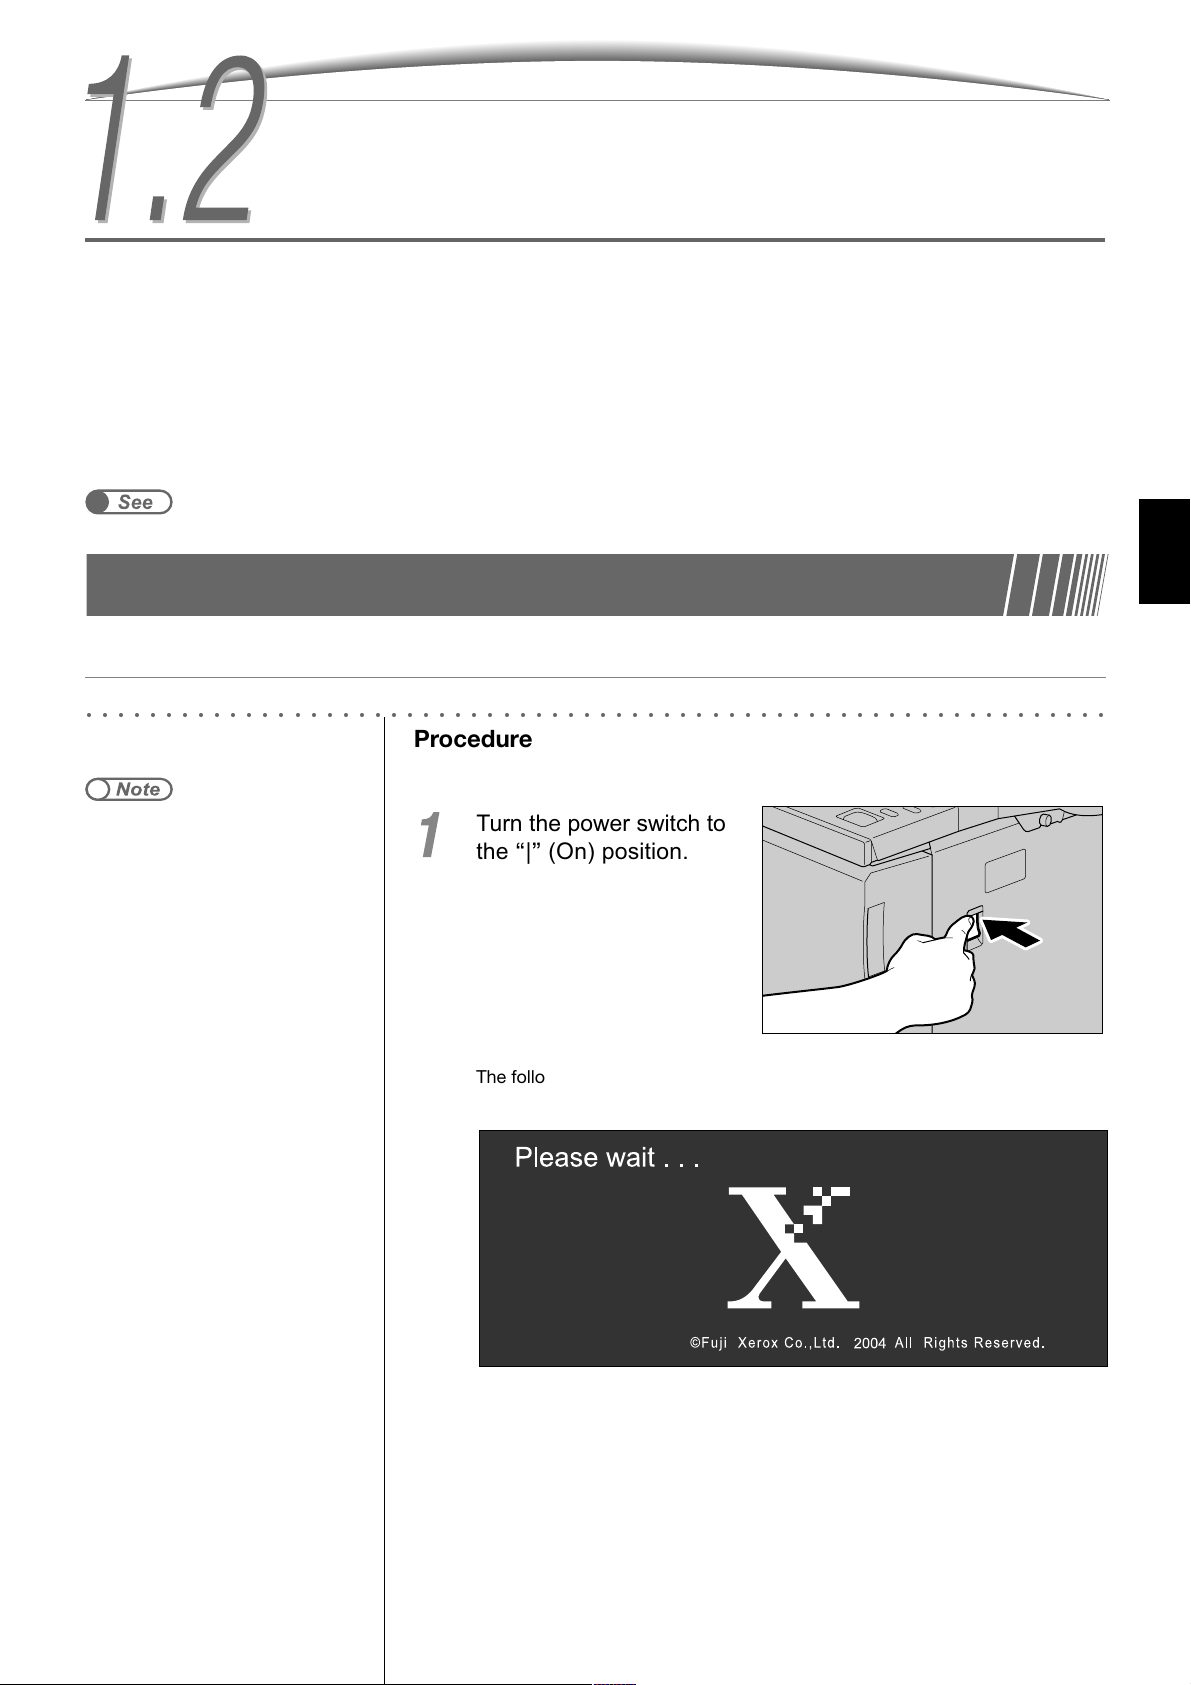
■ Switching on the power
○○○○○○○○○○○○○○○○○○○○○○○○○○○○○○○○○○○○○○○○○○○○○○○○○○○○○○○○○○○○○○○○
Procedure
Knowing Your Copier
1
● It takes more than three seconds for
the machine to warm up if you switch
on the machine immediately after it
has just been switched off.
Turn the power switch to
the “|” (On) position.
The following screen will appear on the touch panel display for about 10
seconds.
If you have enabled the Auditron Mode, the User Password Entry screen will
be displayed.
7
Page 24
1.2 Switching On/Off the Power
Knowing Your Copier
1
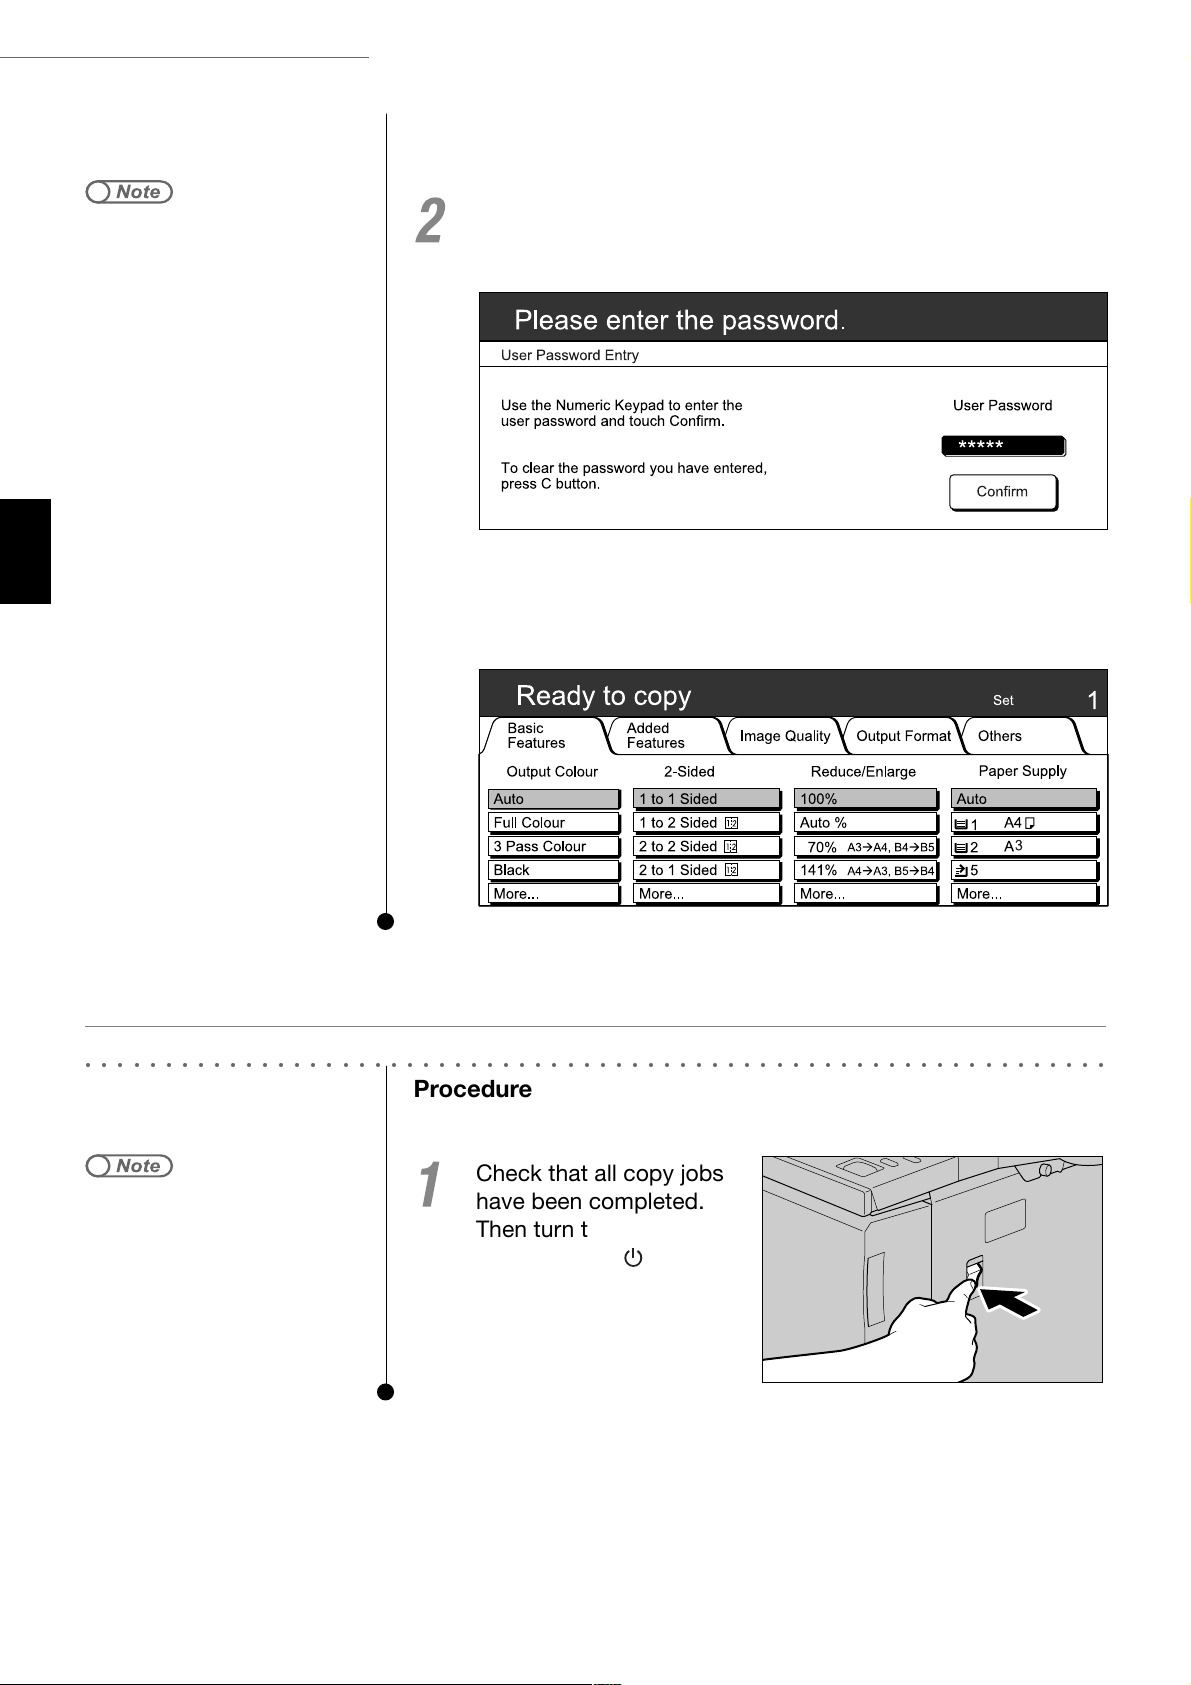
● The User Password Entry screen will
only be displayed if the Auditron
Mode is enabled.
● If you made a mistake while entering
the password, press the C button to
clear and re-enter.
Enter the password (by department/user) by using the keypad
and press Confirm.
Each input digit is represented by an asterisk.
The message “Please wait for X minute(s).” (X refers to the numeric value) is
displayed. The message displayed changes to “Ready to copy” after X
minutes have elapsed.
■ Switching off the power
○○○○○○○○○○○○○○○○○○○○○○○○○○○○○○○○○○○○○○○○○○○○○○○○○○○○○○○○○○○○○○○○
Procedure
Check that all copy jobs
● The fan in the machine will continue
to operate for about one hour after
you have switched off the power.
have been completed.
Then turn the power
switch to the “
” (Off)
position.
The display on the screen
disappears and the power is
switched off.
8
Page 25
1.2 Switching On/Off the Power
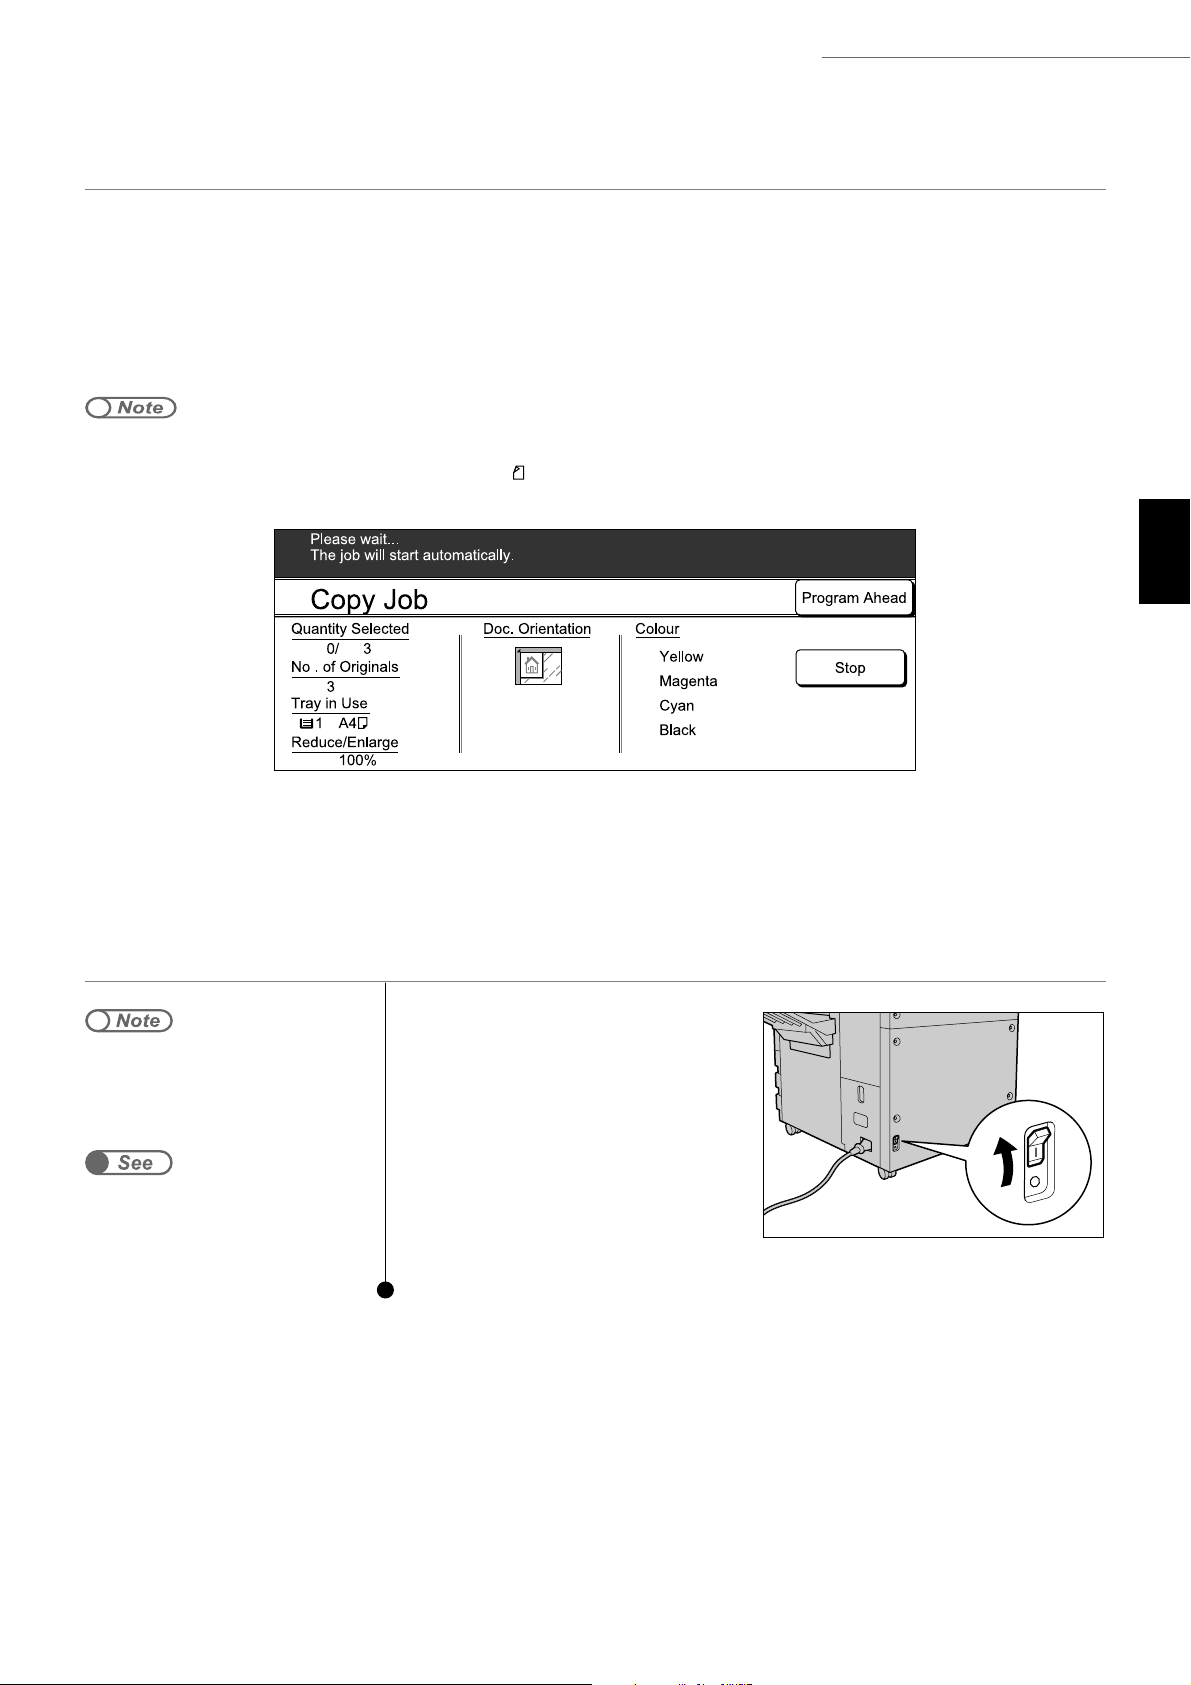
■ Auto start
You can enable the Auto Start feature by pressing the Start button while waiting for the machine to
warm up after the power is switched on.
● Enabling Auto Start
To use the Auto Start feature, load the document, select the desired features and press the Start button.
The message “Please wait ... The job will start automatically.” will be displayed. Once the machine is
ready, the document will automatically be scanned and the desired copies will be output.
● If you have set the machine ready tone in Tools Mode, you will hear the tone when the machine has warmed up and is ready
to accept copy jobs. You can then proceed to set an auto start job after the tone. See “6.3 Setting the Feature Defaults” on
how to set the tones and change their volumes.
Auto Start screen: When an A4 document is placed on the document glass and three
copies of the document are to be made at 100% magnification.
Knowing Your Copier
1
● Cancelling Auto Start
To cancel an Auto Start job, firstly, select Stop on the screen before the document is scanned.
Alternatively, press the Stop button on the control panel. Then press the C button and the Auto Start job
will be cancelled.
■ Breaker switch
The breaker switch is
● The power will automatically be cut
off once the breaker switch detects a
power leakage. Do not use the
machine in such a case.
Safety Notes
usually pushed to the
top, as shown in the
diagram on the right.
If the machine will not be
used for a long time or
when moving the
machine, push the
switch down.
9
Page 26
Knowing Your Copier
1
1.2 Switching On/Off the Power
1.2.2Savingenergy
This machine has a Power Saver feature that reduces the power consumption of the machine in
two stages, namely, the Low Power Mode and Sleep Mode. Each stage differs in the amount of
power consumed.
Low Power Mode (140 W or less)
The power to the control panel and fuser unit is reduced. The display disappears while the power saver
indicator light is lit. If you need to make copies, press the Power Saver button. The indicator light is off
and the Power Saver mode is cancelled.
Power Saver Sleep Mode (8 W or less)
The Sleep Mode has a reduced power consumption compared to Low Power Mode. In this mode, the
display is turned off, and the Power Saver light is on. For copying, press the Power Saver button. The
Power Saver light goes out and the power saver mode is cancelled.
■ Entering the Power Saver Mode automatically
This machine automatically enters the Low Power Mode if it has been left idling after a fixed period
of time. If the machine continues to be left unused, it will shift to the Power Saver Sleep Mode and
the power will be cut off.
●
The default time for the machine to enter the Low Power Mode and Sleep mode are 15 minutes and 60 minutes respectively.
That is, the machine enters into the Low Power Mode 15 minutes after the last copy or action. If you do not want the machine
to enter the Power Saver Sleep Mode automatically, you can choose to disable this feature. See Åg6.3 Setting the Feature
DefaultsÅh on how to change these settings.
■ Entering the Power Saver Mode manually
You can switch to the Power Saver Mode when necessary.
○○○○○○○○○○○○○○○○○○○○○○○○○○○○○○○○○○○○○○○○○○○○○○○○○○○○○○○○○○○○○○○○
Procedure
● Once the machine is in the Low
Power Mode, it will enter the Power
Saver Sleep Mode if the machine
continues to idle for a fixed period of
time.
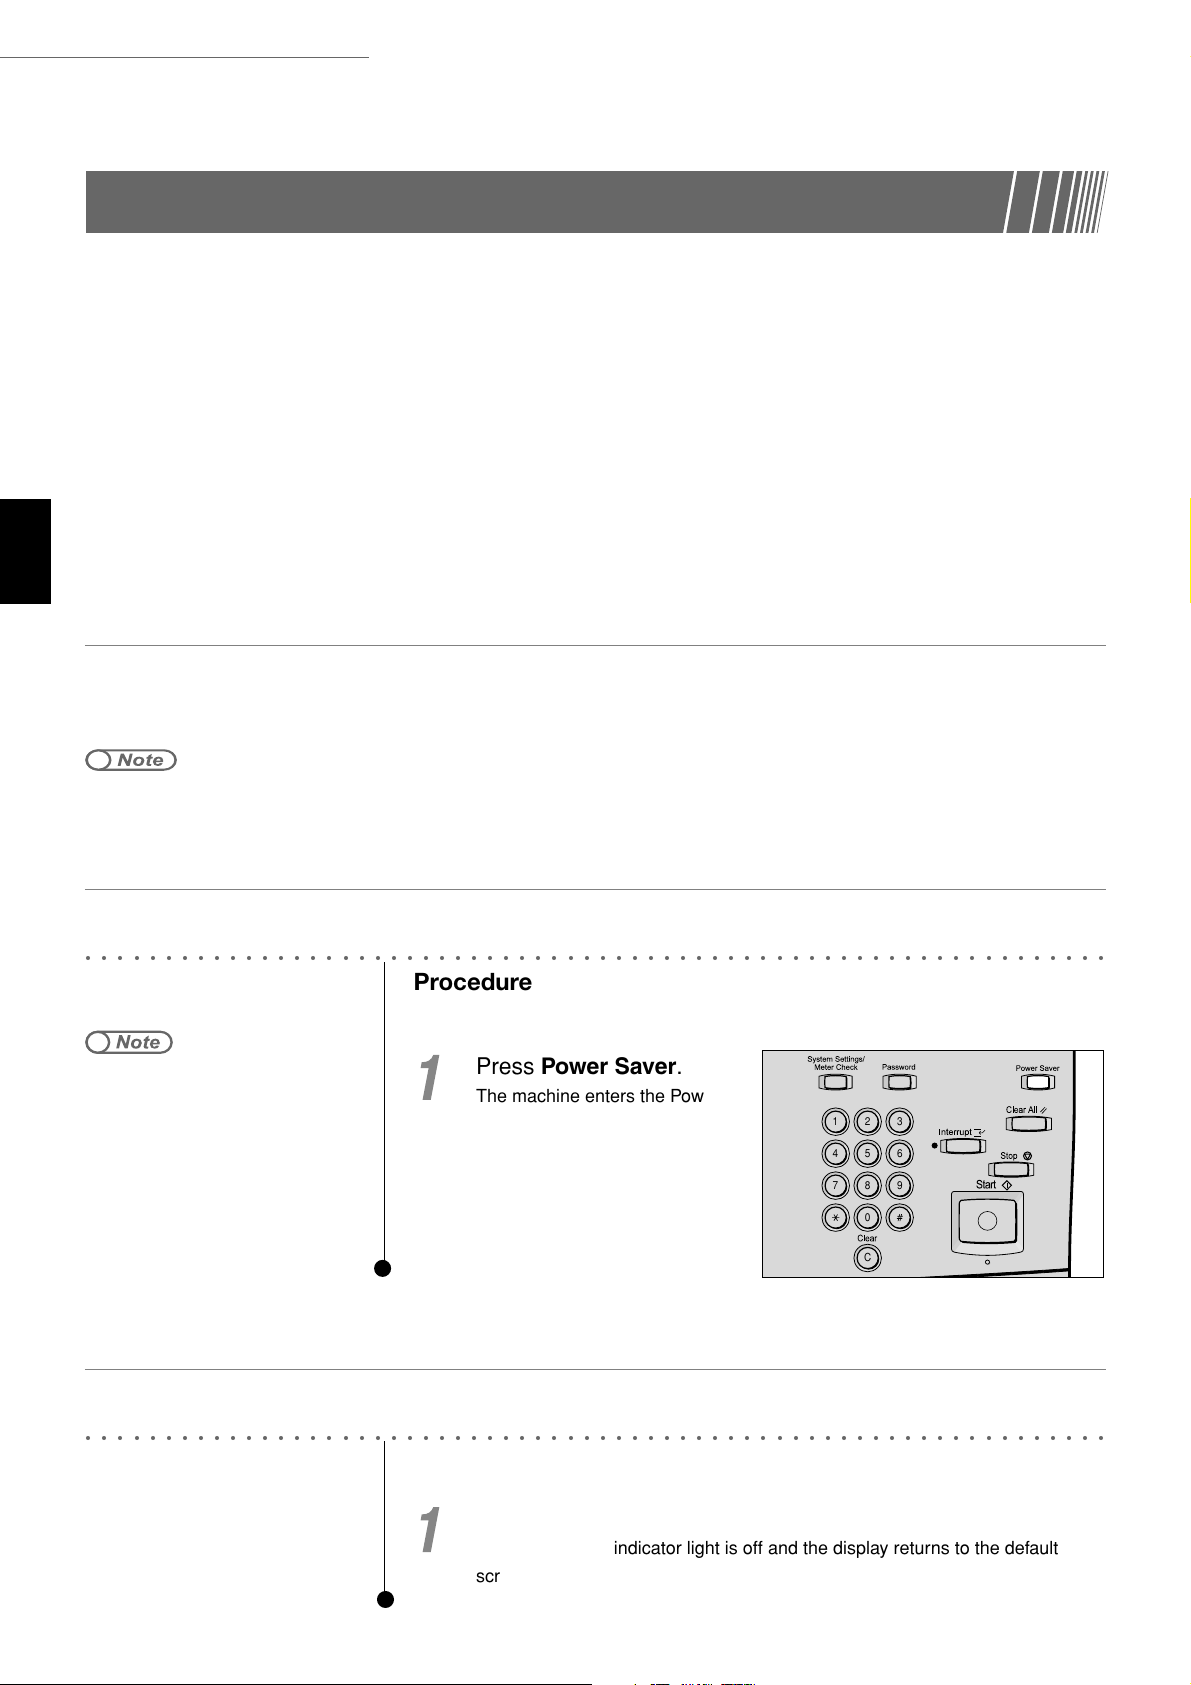
Press Power Saver.
The machine enters the Power
Saver mode. To make copies,
press Power Saver again.
1 2 3
4 5 6
7 8 9
0
C
■ Cancelling the Power Saver Mode
○○○○○○○○○○○○○○○○○○○○○○○○○○○○○○○○○○○○○○○○○○○○○○○○○○○○○○○○○○○○○○○○
Procedure
Touch the display or press Power Saver.
The power saver indicator light is off and the display returns to the default
screen.
10
Page 27
Using the Touch Panel Display
The touch panel display is located at the centre of the control panel. It displays the messages and
feature buttons required for performing a copy job.
You can select a feature directly by touching the feature button on the display. In the following
section, the main screens will be used to explain the screen contents, as well as how to select the
feature buttons.
The touch panel display will be referred to as the display hereafter. The contents shown on the
display will be referred to as the screen.
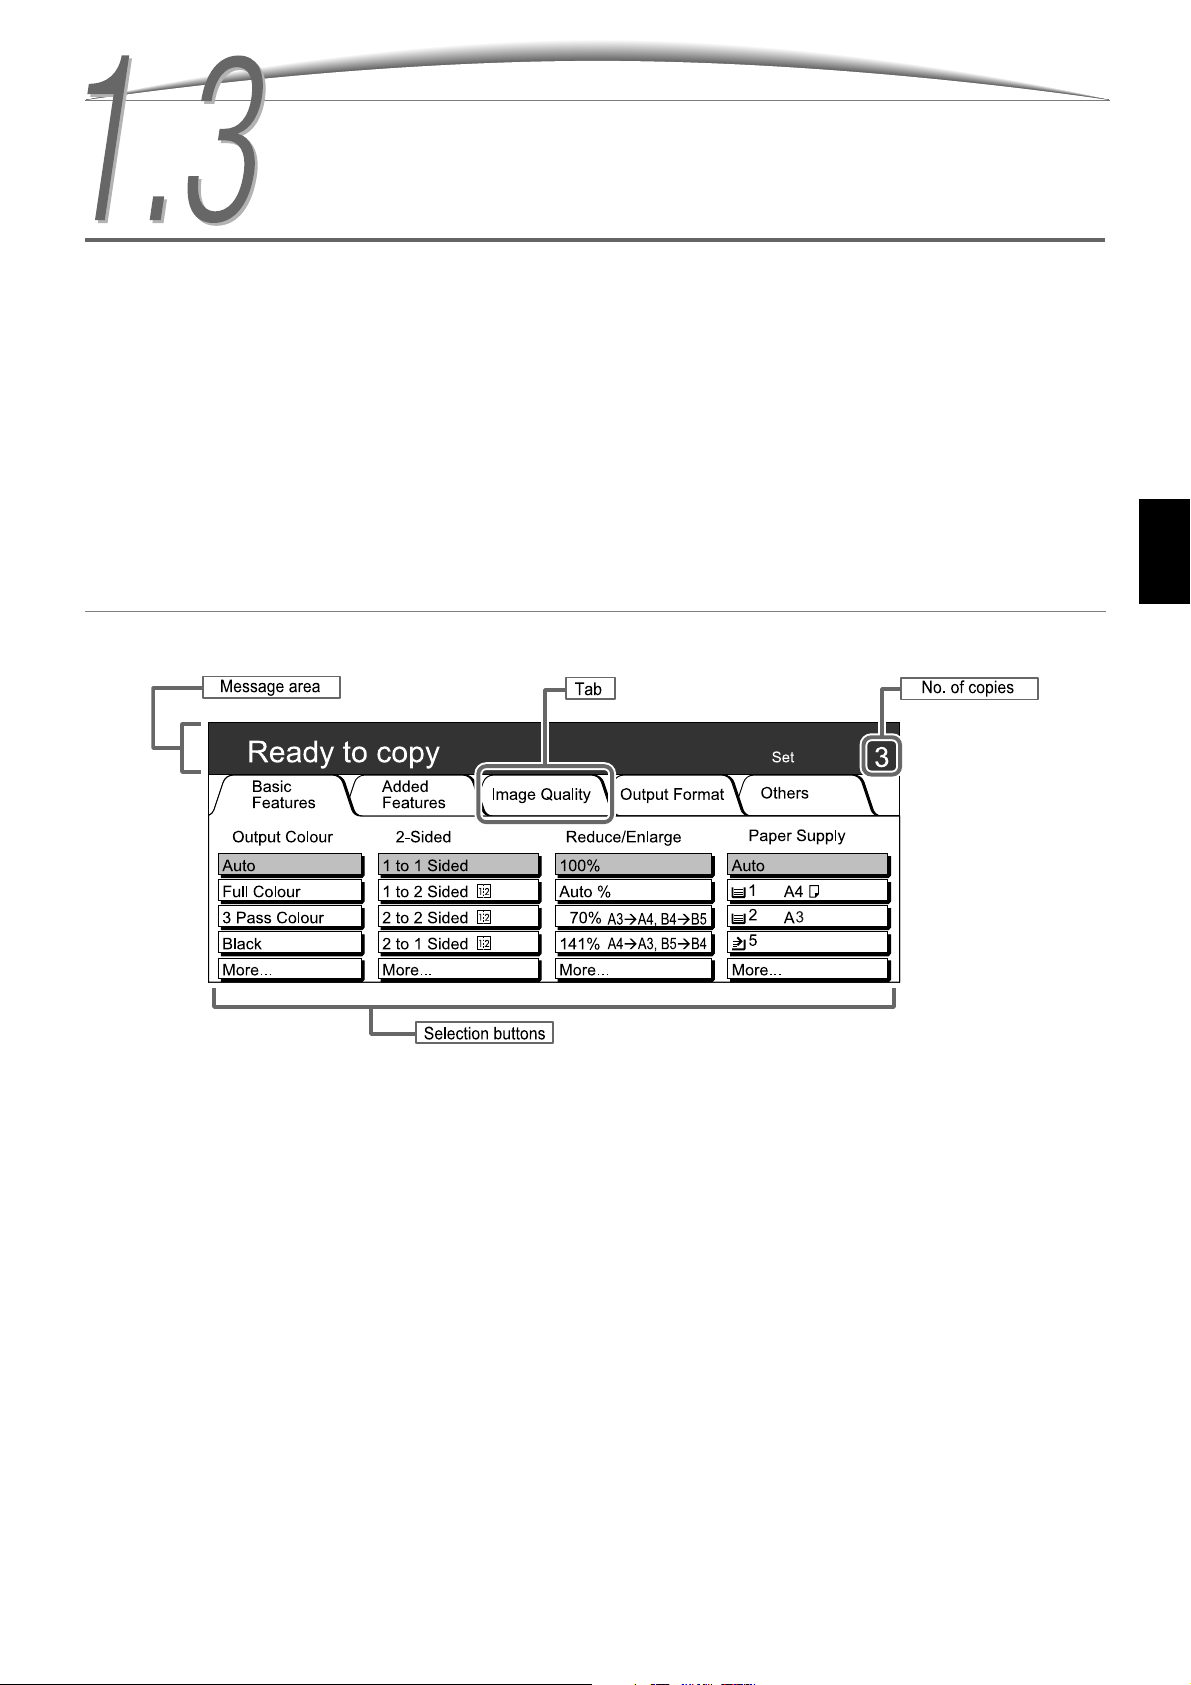
■ Screen layout (default screen)
Knowing Your Copier
1
● Message area
Displays machine status, operation messages, and so forth.
● Tab
Select by touching a tab to display its corresponding screen. The tabs available are Basic Features,
Added Features, Image Quality, Output Format, and Others.
● No. of copies
Indicates the number of sets of copies to make. Enter a value by using the keypad. You can set a value
between 1 to 999. To reset the value to “1”, press the C button.
● Selection buttons
Select by touching a selection button. The button will be highlighted to indicate that it has been selected.
“...” indicates that there are more setting screens.
11
Page 28
Knowling Your Copier
1
1.3 Using the Touch Panel Display
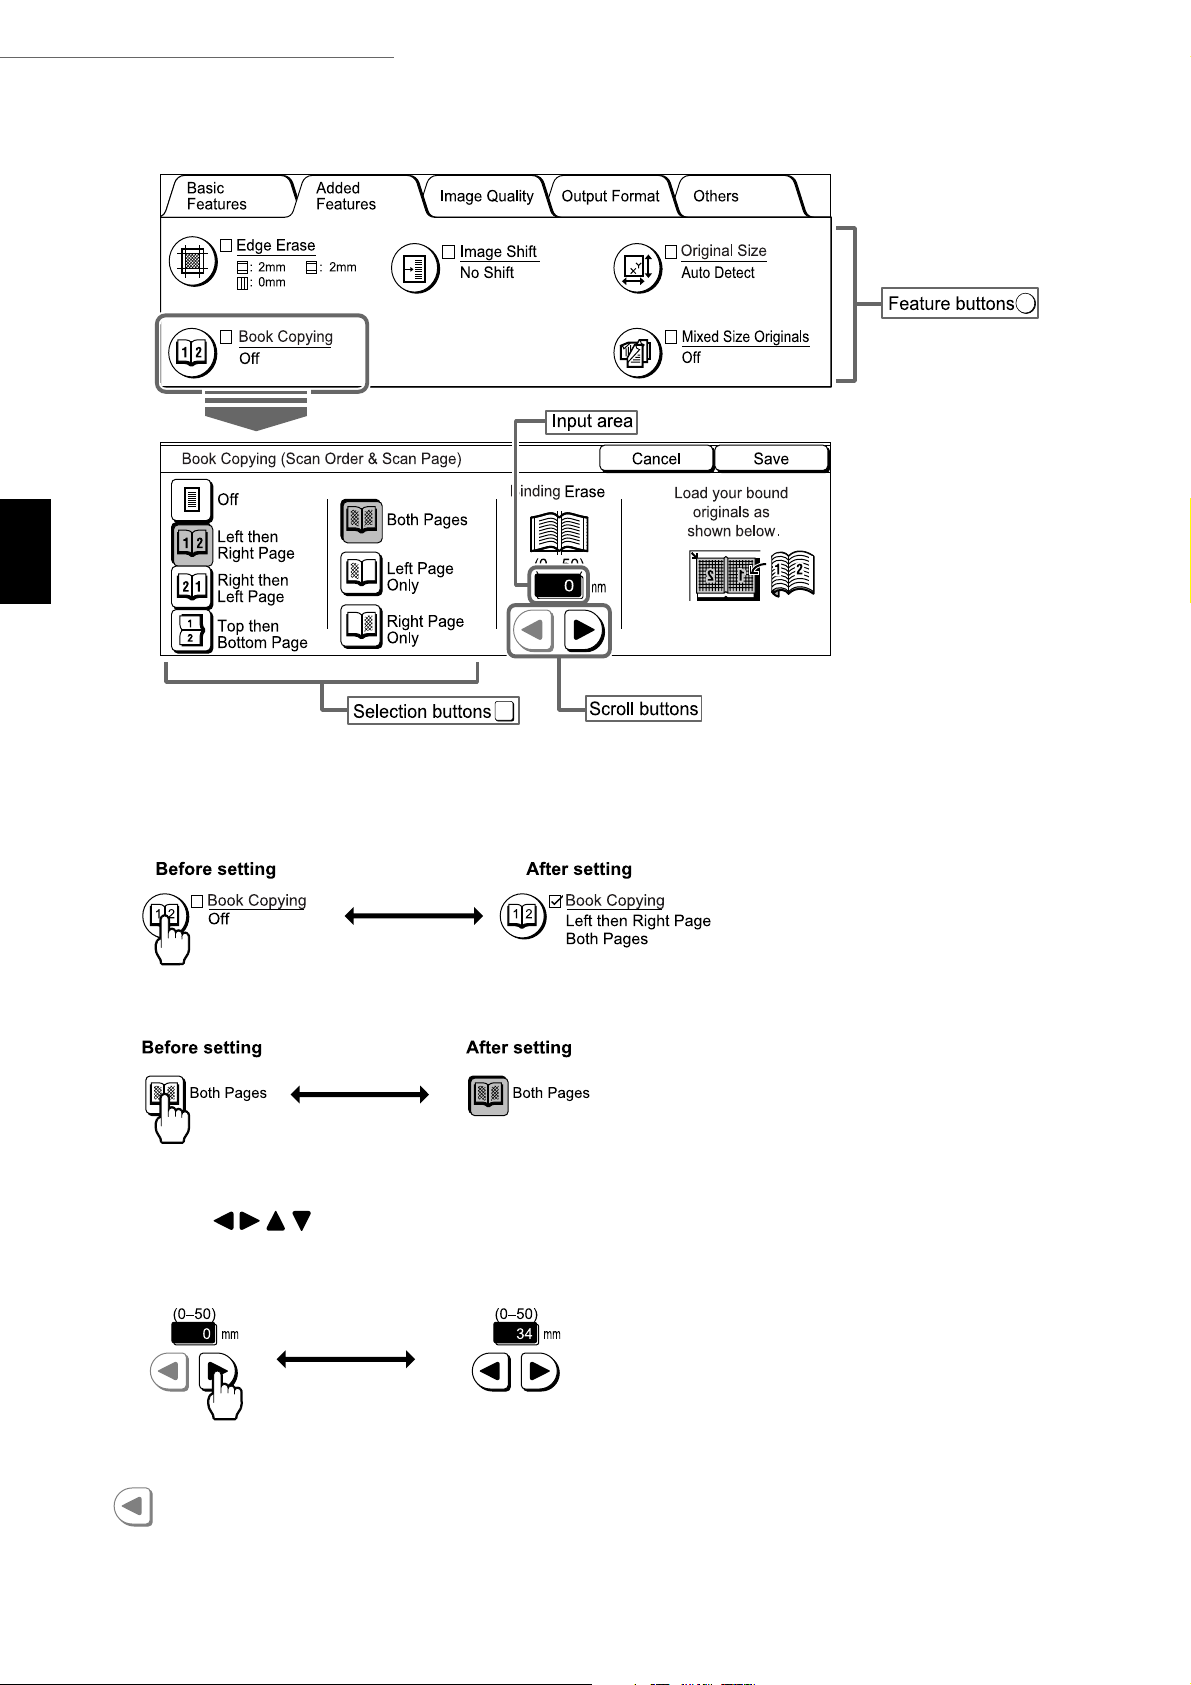
● Feature buttons
Select by touching a feature button to display its corresponding feature setting screen. A (3) check mark
will be assigned to the feature that you have selected.
These are buttons for defining a feature. A button becomes highlighted once you have selected it.
● Scroll buttons, input area
Touch the buttons to scroll or define a numeric value. When defining a numeric value, touch
the button continuously and the display will change rapidly. The range is displayed within the
parentheses ( ). The value that you have set will be shown in the input area.
● Invalid buttons
These are buttons that cannot be selected with some other features. They can also be buttons that
are not within the range of the settings. They are in grey and dim display.
12
Page 29
1.3 Using the Touch Panel Display
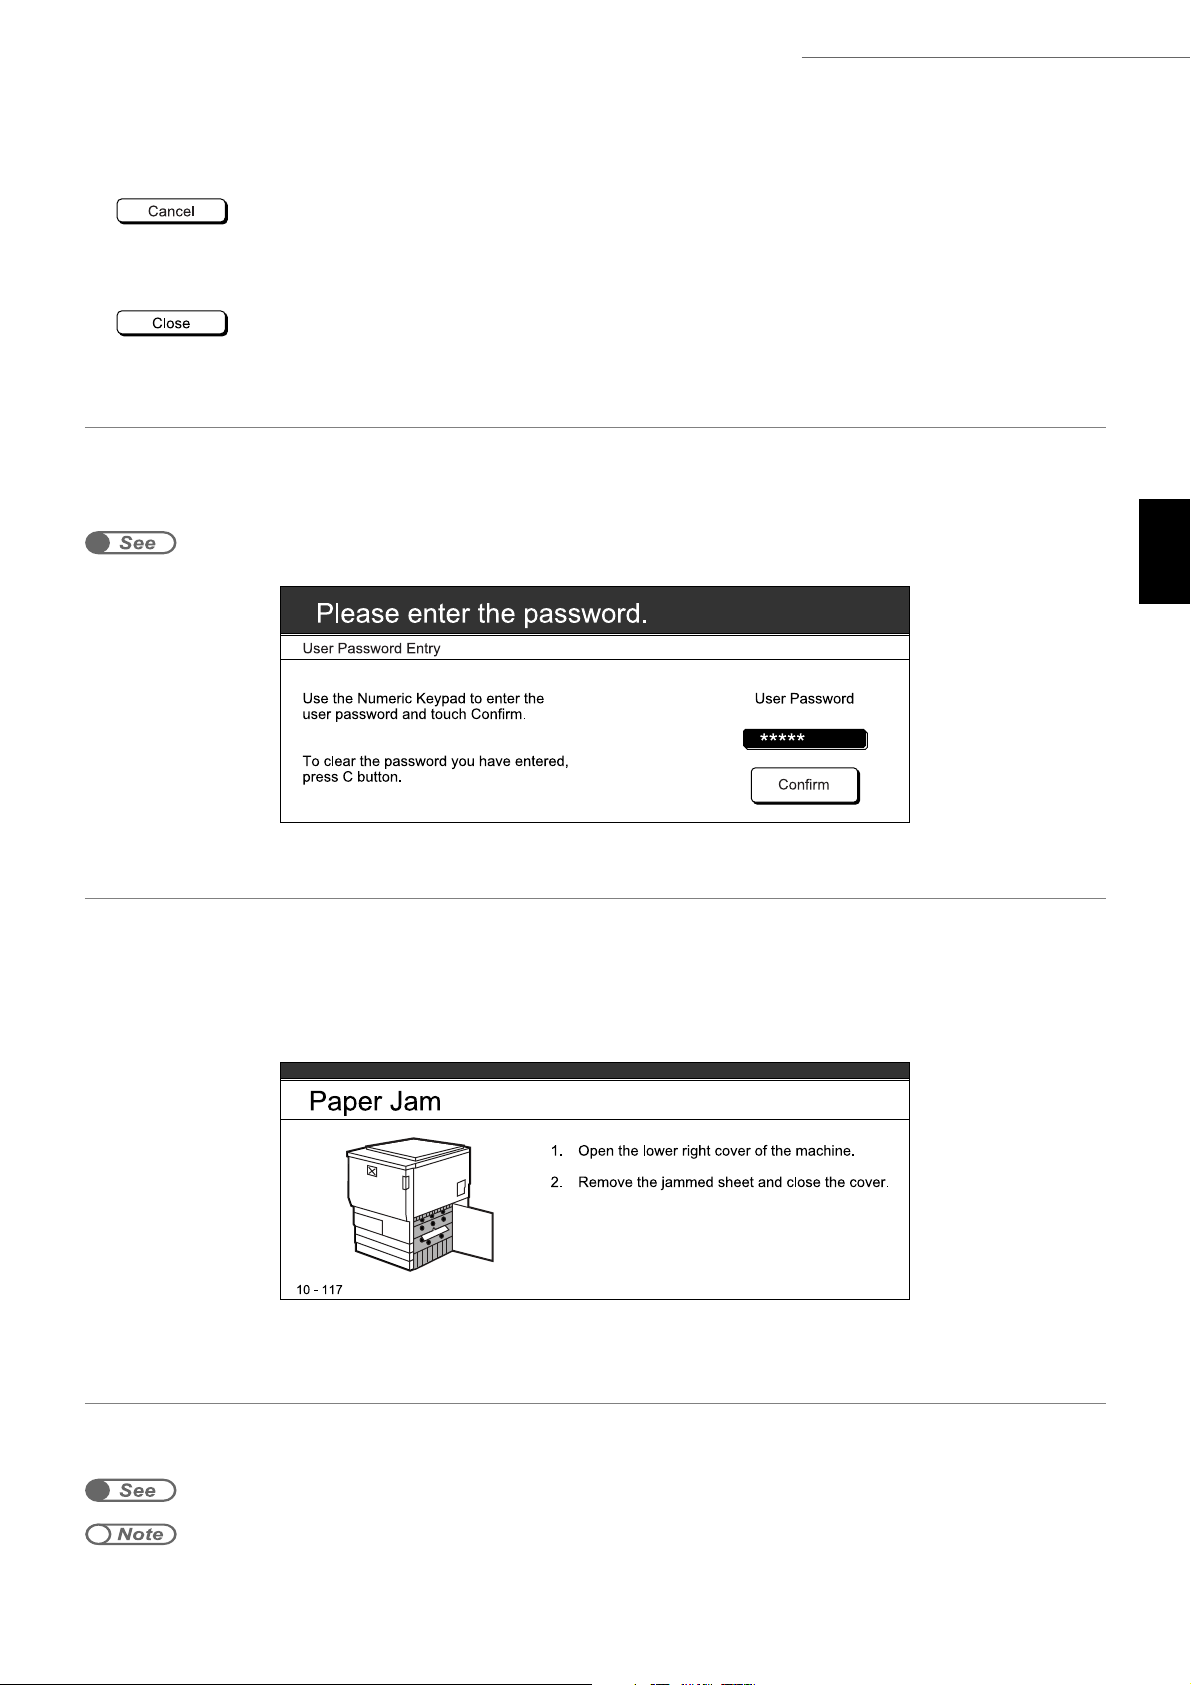
● Cancel button
Select this button to cancel a selected setting or value. When this button is selected, the
screen where you did the settings disappears.
● Save/Close button
Select this button to save a selected setting or value. When this button is selected, the
settings will be saved and the screen disappears.
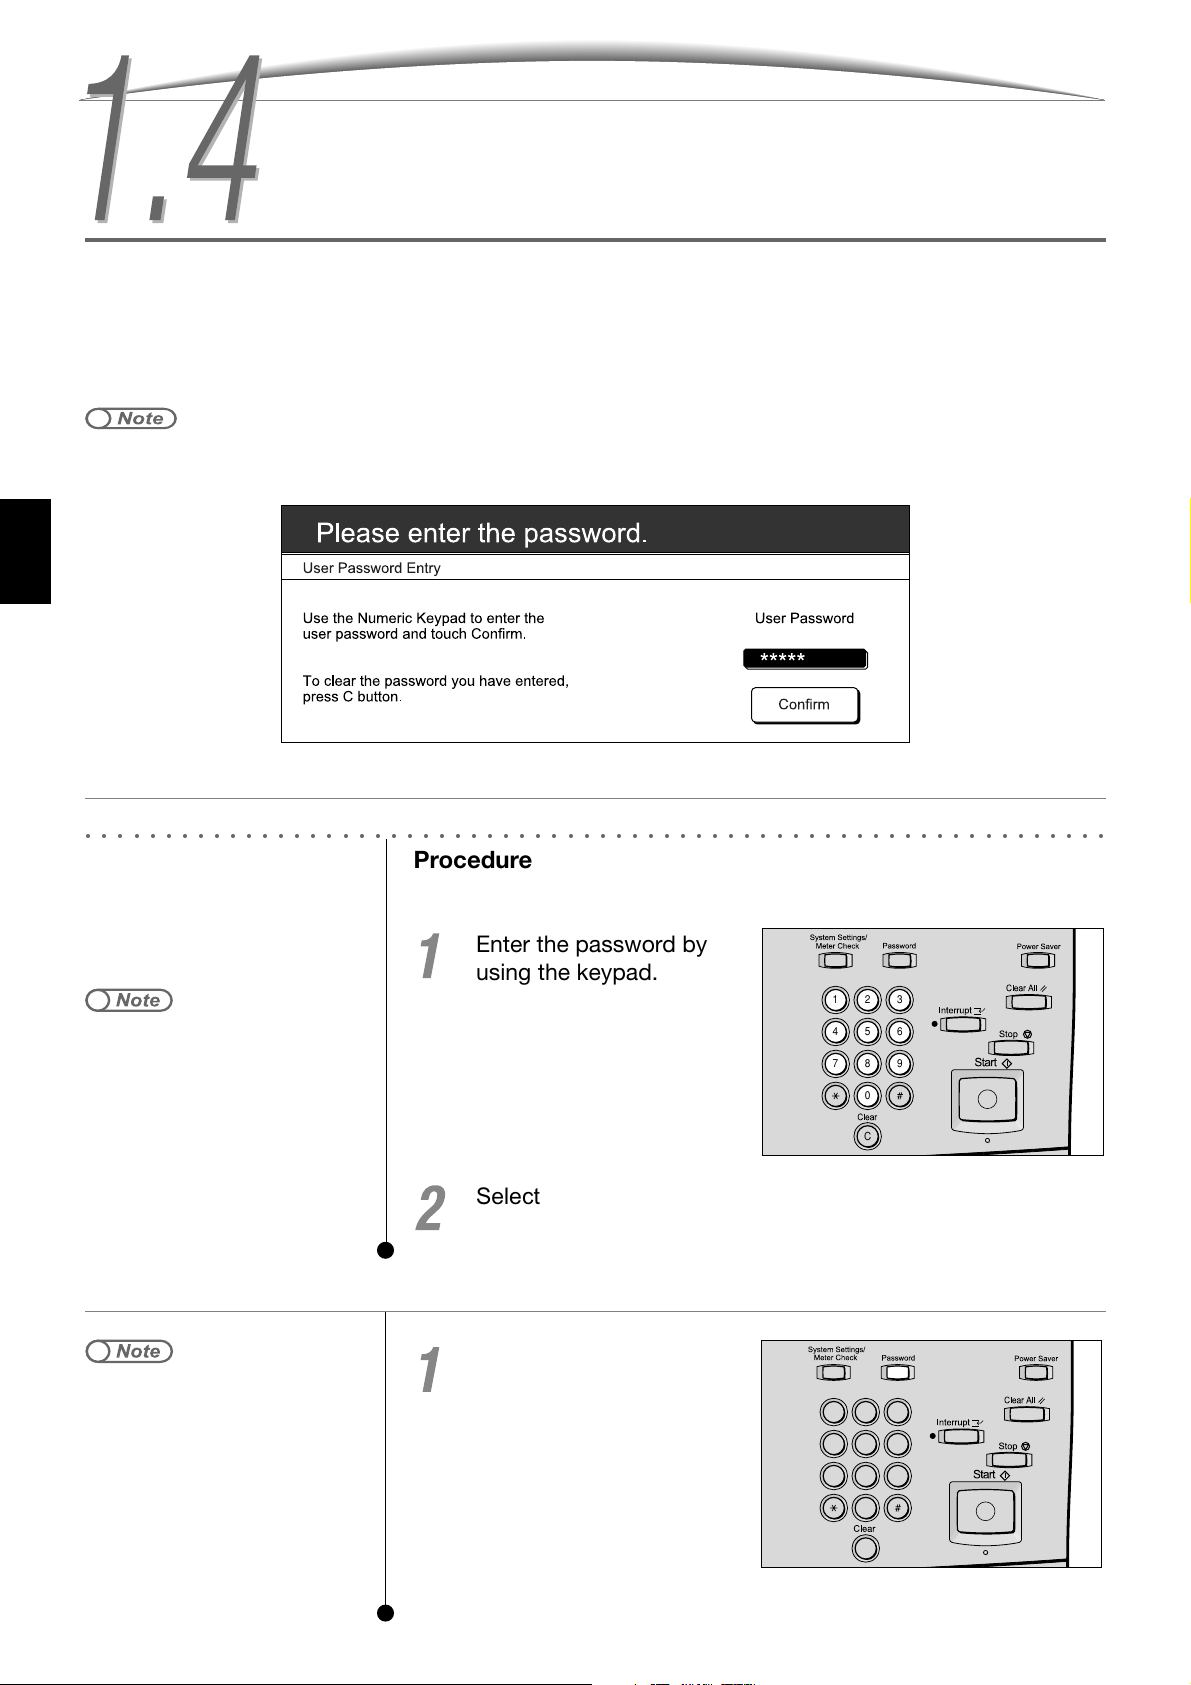
■ User Password Entry screen
When the Auditron mode is enabled, the following screen will be displayed. Enter the password by
using the keypad. Once you have entered the password correctly, the default screen will be
displayed.
Knowing Your Copier
1.4 Entering Password
■ Error message screen
When a job cannot be continued due to a paper jam or fault with the machine, or when a
consumable is being replaced, a message such as the following will be displayed. Follow the
instructions shown on the screen to troubleshoot. Once the error is resolved, the default screen will
be displayed.
1
■ Power Saver screen
The display disappears once the machine enters the Power Saver Mode while the power saver
indicator light is lit. You can return to the default screen by pressing the Power Saver button.
1.2.2 Saving energy
● Sometimes there is no display even though the power saver indicator light is not on. This is because the power may be
switched off, or the brightness dial has been adjusted to the darker side. Check the power switch and brightness dial.
13
Page 30
Knowing Your Copier
If the Auditron Mode is enabled, you need to enter your password (by department/user) before you
can make copies. This section explains the method of entering the password and how to display the
User Password Entry screen. Approach your Auditron Administrator if you need a user password.
1
■ Entering the password
Entering Password
● The Auditron Mode allows you to control the number of copies that each account (by department/user) can make, and the
type of colour access that it can have. The assignment and change of passwords are handled by the Auditron Administrator
via Auditron Administration Mode.
○○○○○○○○○○○○○○○○○○○○○○○○○○○○○○○○○○○○○○○○○○○○○○○○○○○○○○○○○○○○○○○○
Procedure
Enter the password by
using the keypad.
1 2 3
●
If you made a mistake while entering
the password, press the C button to
clear and re-enter.
4 5 6
7 8 9
0
C
Select Confirm on the screen.
The default screen appears once you have entered the correct password.
■ Displaying the User Password Entry screen
Press Password.
● The display will return to the User
Password Entry screen once copies
are made to disallow users without a
password to use the machine.
● If you have set a timeout period for
the Password Entry Screen timeout,
the display will return to the User
Password Entry screen even if you
did not press the Password button.
See “9.3.4 Enabling the Auditron
Mode”.
The User Password Entry
screen is displayed.
1 2 3
4 5 6
7 8 9
0
C
14
Page 31

Using the Copylyzer
Optional
The following screen will be displayed if the Copylyzer (optional) is installed. Follow the
instructions displayed on the screen.
If another type of copy control device is used, follow the instructions displayed on the screen.
● When a copy control device is used, you cannot use the Auditron Administration features. See “Chapter 9 Using the Auditron
Administration Mode” for more details about the features.
● When COPYLYZER-610N650N is used, a Customer Engineer can set the accessibility of Free Access, Colour Only, and Black
Only for each card. Contact your Xerox Customer Support Centre for more details.
Knowing Your Copier
1
15
Page 32

Page 33

Basic Copy Procedure
2.1 Basic Copy Procedure ......................................... 18
2.2 Interrupting a Copy Job ....................................... 22
2.3 Copying onto Postcards ...................................... 24
2.4 Copying onto Transparencies .............................. 26
2.5 Copying onto Heavy Weight Paper...................... 30
Page 34

Basic Copy Procedure
This section explains about the basic copy procedure of this machine. The factory defaults are
Basic Copy Procedure
Output Colour = Auto, 2-Sided = 1 to 1 Sided, Reduce/Enlarge = 100%, Paper Supply = Auto, and
Original Type = Photo & Text (Magazine Photo). If you make copies by using the factory defaults,
then copies made will depend on the document in terms of colour, size and magnification.
● The factory defaults can be changed in Tools Mode. See “Chapter 6 Tools Mode Settings” on how to change the factory
defaults.
If you make copies with the document cover open, do not look directly at the copy lamp.
Direct eye exposure can cause eye fatigue or damage.
2
○○○○○○○○○○○○○○○○○○○○○○○○○○○○○○○○○○○○○○○○○○○○○○○○○○○○○○○○○○○○○○○○
Procedure
Load the document.
● Document glass:
Chapter 4 Loading Documents
●
Enter your password if the message
“Please enter your password.” is
shown on the display. If you do not
have a password, check with your
administrator. See “1.4 Entering
Password” on how to enter a
password.
●
Press the Clear All button to return
to the default screen (when the
power is switched on) if you wish to
cancel the features that you have
selected.
●
The options on the Basic Features
screen vary according to the machine
models.
Lift the document cover and
place document face down
on document glass. Align
document with the top left
corner. Close the cover.
● Duplex Automatic Document
Feeder (DADF):
Load the document face up.
Adjust the document guide to
align the document.
Check that the Basic Features screen is displayed.
With DADF:
18
Without DADF:
Page 35

5.2 Selecting the Output Colour
5.4 Reducing/Enlarging Copies
●
If Auto % is selected for Reduce/
Enlarge, or Auto for Paper Supply,
the document image will be rotated
and copied in the correct orientation
even if the document and paper
orientations are different. However,
this applies to documents loaded in
the horizontal orientation, and paper
that are in A4 or smaller. Images of
non-standard size documents will
not be rotated.
2.1 Basic Copy Procedure
Select a colour option from Output Colour.
More options are available if you select More...
Basic Copy Procedure
Select a magnification ratio from Reduce/Enlarge.
More options are available if you select More...
2
Select a paper tray from Paper Supply.
If you select Auto, then a paper size matching the size of the document will
automatically be selected for the output. More options are available if you
select More...
5.5 Selecting a Paper Tray
5.11 Selecting the Document Type
●
You can choose from seven levels of
copy density to adjust the density of
your output. The factory default is
Auto. See “5.12 Adjusting the Copy
Density” on how to do the
adjustments.
Select an option from the Image Quality screen.
➊ Select Original Type.
19
Page 36

Basic Copy Procedure
2
2.1 Basic Copy Procedure
●
If you made a mistake while entering
the number of copies, press the C
button to reset to “1”. Other settings
will remain unchanged.
➋ Make a selection according to your document Type.
Enter the number of
copies by using the
keypad.
The number of copies will be
displayed at the top right corner
of the screen.
1 2 3
4 5 6
7 8 9
0
Press Start.
The document is scanned and
the copies are output to the
output tray.
If you make copies with the
document cover open, do not
look directly at the copy lamp.
Direct eye exposure can cause
eye fatigue or damage.
C
1 2 3
4 5 6
7 8 9
0
C
20
Page 37

2.1 Basic Copy Procedure
● Stopping a copy job — Stop button
Press the Stop button on the control panel to terminate a copy job that is in progress. Once you have
pressed the Stop button, the copy job will be suspended and the message “Press Start to continue or
C button to cancel.” will be displayed. You can also select Stop on the display to terminate a copy
job.
To resume the copy job, press the Start button again. To stop the job, press the C button.
● Cancelling a feature setting — Clear All button
To clear all the settings of the selected features, press the Clear All button on the control panel. Once
you have pressed the Clear All button, all settings will return to their defaults when the power of the
machine is switched on.
The settings can automatically return to their defaults by setting a timer. See “Chapter 6 Tools Mode
Settings” on how to set the timer.
● Correcting the number of sets to copy — C (Clear) button
Press the C button on the control panel to clear if you have made an error when entering the number
of sets to be copied. Once you have pressed the C button, the number of sets will return to “1”. No
other settings will be changed.
Basic Copy Procedure
2
■ Automatic Tray Switching
This feature allows the machine to continue with the copy job by automatically switching to another
tray when paper in the specified tray runs out. This tray contains paper that are the same in size and
type (normal paper) as the specified tray. This feature is called Automatic Tray Switching (ATS).
The setting of this feature is done by the Tools Administrator in Tools Mode.
All trays have this feature enabled as the factory default. If all trays have this feature enabled with
paper in the same size, type (normal paper) and orientation, then the priority of paper supply will be
in the order of tray 1, tray 2, tray 3, and followed by tray 4.
●
The factory defaults can be changed in Tools Mode. See “Chapter 6 Tools Mode Settings” on how to change the factory
defaults.
21
Page 38

Interrupting a Copy Job
You can interrupt the current copy job and proceed with a more urgent job by pressing the Interrupt
Basic Copy Procedure
button. Once you have pressed the Interrupt button, the current copy job will be temporarily suspended for a fixed period of time. You can resume the copy job that was interrupted once the Interrupt Copy mode is cancelled.
● You cannot press the Interrupt button if there is an Auto Start job. In addition, the Interrupt Copy mode cannot be used
during copy jobs that have the Multi-Up (N Up), Image Repeat, or Poster feature selected.
● The DADF cannot be used for a job using the Interrupt Mode.
○○○○○○○○○○○○○○○○○○○○○○○○○○○○○○○○○○○○○○○○○○○○○○○○○○○○○○○○○○○○○○○○
Procedure
2
Chapter 5 Making Copies
Press Interrupt.
The interrupt indicator lights up
and the machine stops. If you
press Interrupt during
document scanning, or while a
copy job is being done, the
machine prepares itself for the
interrupt job and the indicator
light starts to blink. Once the
machine stops, the light is lit.
1 2 3
4 5 6
7 8 9
0
C
Replace the document.
Select other features if necessary.
Select options from Output Colour, Original Type, Reduce/Enlarge, or other
features, if necessary.
22
Page 39

Enter the number of
copies by using the
keypad and press Start.
The documents are scanned
and the copies are output onto
the output tray.
If you make copies with the
document cover open, do not
look directly at the copy lamp.
Direct eye exposure can cause
eye fatigue or damage.
2.2 Interrupting a Copy Job
1 2 3
4 5 6
7 8 9
0
C
Basic Copy Procedure
●
If the paper size has been changed
during the urgent copy job, revert to
the original paper size used before
the interruption.
After the urgent job has
been done, press
Interrupt.
The interrupt indicator is off and
the Interrupt Copy Mode is
cancelled.
Replace with the
document of the original
job before the
interruption and press
Start.
The job interrupted in Step 1
resumes.
If you make copies with the
document cover open, do not
look directly at the copy lamp.
Direct eye exposure can cause
eye fatigue or damage.
2
1 2 3
4 5 6
7 8 9
0
C
1 2 3
4 5 6
7 8 9
0
C
23
Page 40

Basic Copy Procedure
2
Copying onto Postcards
You can make copies onto postcards by using tray 5 (bypass). Select Postcard for Paper Supply and
Heavy Wt 2 for Paper Type. Make sure that you load the postcards horizontally in tray 5 (bypass).
Only 105 x 148 mm size postcards can be used. Some postcards cannot be used. The use of
postcards will depend on the weight and the paper type. Contact your Xerox Customer Support
Centre for more information.
●
Do not load postcards in tray 1, 2, 3, or 4 because this may cause paper jams and other faults.
○○○○○○○○○○○○○○○○○○○○○○○○○○○○○○○○○○○○○○○○○○○○○○○○○○○○○○○○○○○○○○○○
Procedure
Place the document.
Align the top of the document
4.2 Loading Documents
against the left guide of the
document glass.
Load postcards in tray 5
(bypass).
3.3.2 Loading paper in tray 5
(bypass)
Set the postcards with the side
where image is to be copied
facing upward and the top of
the postcard is on the right.
Adjust the guide gently to align
the postcards. The Tray 5
(Bypass) screen is shown on the
display.
24
Page 41

●
If the Tray 5 (Bypass) screen is not
displayed, select More... in Paper
Supply on the Basic Features screen.
Then select 5 Bypass.
2.3 Copying onto Postcards
Select a paper size and paper type.
➊ Select A/B Series Size for paper size.
➋ Select Postcard for paper size and HeavyWt 2 (163-256
2
) for paper type.
g/m
Basic Copying Procedure
Chapter 5 Making Copies
2
Select Save.
The display returns to the Paper Supply screen and 5 Bypass... Postcard is
displayed.
Select other features if necessary.
Select options from Output Colour, Original Type, Reduce/Enlarge, and other
features, if necessary.
Enter the number of
copies by using the
keypad and press Start.
The copies are output to the
output tray.
If you make copies with the
document cover open, do not
look directly at the copy lamp.
Direct eye exposure can cause
eye fatigue or damage.
1 2 3
4 5 6
7 8 9
0
C
25
Page 42

Basic Copy Procedure
2
Copying onto Transparencies
You can make copies onto transparencies by using tray 5 (bypass). Select A3 or A4 for the paper
size, and Transparency/Opaque Film for the paper type.
● Do not load transparencies in tray 1, 2, 3, or 4 because this may cause paper jams and other faults. Use only the
recommended transparencies. Other types of transparencies may result in paper jams.
If you select Transparency Separators on the Output Format screen, the machine will insert a piece
of blank A4 paper after each transparency copy made. In this case, you must load A4 paper in either
tray 1, 2, 3, or 4 beforehand. The A4 paper used as interleaves must be set in the same orientation as
the documents.
● Nothing will be copied onto the interleaves and they will not be counted by the meter as copies made by the machine.
● If you put a stack of documents in the DADF and make copies of them onto transparencies, the page sequence will be
reversed because the copies are output facing upward.
5.18 Interleaving Transparencies
○○○○○○○○○○○○○○○○○○○○○○○○○○○○○○○○○○○○○○○○○○○○○○○○○○○○○○○○○○○○○○○○
Procedure
Chapter 4 Loading Documents
● If you are using transparencies with
white border, place the front side on
top and load the transparencies with
the white borders at the feeding
point of the tray 5 (bypass).
● When making copies onto opaque
films (A3 transparencies), load the
films one by one.
● If the Tray 5 (Bypass) screen is not
displayed, select More... in Paper
Supply on the Basic Features screen.
Then select 5 Bypass.
Place the document.
Load transparencies in
tray 5 (bypass).
Adjust the guide gently to align
the transparencies. The Tray 5
(Bypass) screen is shown on the
display.
Select Transparency/Opaque Film from Paper Type.
26
Page 43

2.4 Copying onto Transparencies
Select Save.
The display returns to the Paper Supply screen.
Load paper as
interleaves if you want to
insert interleaves
between the
transparencies. Proceed
to Step 6 if no
interleaves are required.
Load the paper in tray 1, 2, 3 or
4, and in the same orientation
as the transparencies.
Basic Copy Procedure
2
5.18 Interleaving Transparencies
Inserting interleaves:
➊ Select Output Format. Then select Transparency
Separators.
The Transparency Separators screen is displayed.
➋ Select Blank Separators.
Paper Tray Settings appears on the right of the screen.
27
Page 44

2.4 Copying onto Transparencies
Basic Copy Procedure
➌ Select Paper Tray Settings.
The Paper Tray Settings screen is displayed.
➍ In Separators Tray, select the tray that is loaded with
interleaves in Step 5.
2
➎ Select Save.
The display returns to the Transparency Separators screen.
➏ Select Save.
28
The display returns to the Output Format screen.
Page 45

Chapter 5 Making Copies
● When copying on transparencies,
you can copy only one set at one
time.
2.4 Copying onto Transparencies
Select other features if necessary.
Select options from Output Colour, Original Type, Reduce/Enlarge, and other
features, if necessary.
Press Start.
The document is scanned and
the copies are output to the
output tray.
If you make copies with the
document cover open, do not
look directly at the copy lamp.
Direct eye exposure can cause
eye fatigue or damage.
1 2 3
4 5 6
7 8 9
0
C
Basic Copy Procedure
2
29
Page 46

Copying onto Heavy Weight
Paper
Use tray 5 (bypass) to load your paper stock when you need to make copies onto special paper such
Basic Copy Procedure
as heavy weight paper and so forth. Then select the paper type. See “3.1 What Paper to Use” on the
types of paper that can be used.
● Contact your Xerox Customer Support Centre when you need to make duplex copies on heavy weight paper stock using tray
5 (bypass). Our Customer Engineer will be able to replace Adhesive Paper and Labels with two of Adhesive Paper, Labels,
Heavy Weight 1 (Side 2), Heavy Weight 2 (Side 2), and Tracing Paper.
● If you put a stack of documents in the DADF and make copies of them onto paper of HeavyWt2, SRA3 (320x450 mm/12.6 x
17.7"), or 12 x 18", the page sequence will be reversed because the copies are output facing upward.
○○○○○○○○○○○○○○○○○○○○○○○○○○○○○○○○○○○○○○○○○○○○○○○○○○○○○○○○○○○○○○○○
Procedure
2
4.2 Loading Documents
3.3.2 Loading paper in tray 5
(bypass)
● Load heavy weight paper horizontally
into the feeding point. (For example,
do not load A4 paper as A4
● If the Tray 5 (Bypass) screen is not
displayed, select More... in Paper
Supply on the Basic Features screen.
Then select 5 Bypass...
● The Auto Detect feature can only
detect standard paper size like A3,
B4, A4 , A4, B5, A5, 8.5 x 11" ,
and 11 x 17". Select the desired
paper size if you wish to make copies
onto paper besides those mentioned
earlier.
.)
Load the documents.
Load paper with the side
where image is to be
copied facing upward.
Use the paper guide to
align the paper and
insert the paper all the
way into the feeding
point.
Once you have loaded the
paper properly, the Tray 5
(Bypass) screen will be
displayed.
Select the paper type.
30
Page 47

● The preferred way of loading A4
paper in tray 5 (bypass) is A4 instead
of A4 .
2.5 Copying onto Heavy Weight Paper
Select Save to confirm your selections.
Basic Copy Procedure
The display returns to the Basic Features screen.
Select other features if necessary.
Select options from Output Colour, Original Type, Reduce/Enlarge, and other
features, if necessary.
Enter the number of
copies by using the
keypad and press Start.
The document is scanned and
the copies are output to the
output tray.
If you make copies with the
document cover open, do not
look directly at the copy lamp.
Direct eye exposure can cause
eye fatigue or damage.
2
1 2 3
4 5 6
7 8 9
0
C
31
Page 48

Page 49

Loading Paper
3.1 What Paper to Use .............................................. 34
3.2 Checking/Changing Paper Supply Settings ........ 36
3.3 Loading Paper ..................................................... 39
3.4 Changing the Paper Tray Size ............................. 43
Page 50

What Paper to Use
This chapter describes the types of paper stock that can be used on this machine. Use the
recommended paper for best image quality. Contact your Xerox Customer Support Centre if you
are using a paper stock besides those recommended here.
■ Recommended paper
Purple Wrap, Business, Colour Copy 90 g/m2, Fuji Xerox J paper
The following types of paper can also be used besides the recommended paper stock. However,
Loading Paper
you have to follow the instructions in this manual when loading the paper stock, and select the
paper size and paper type when you make copies.
●
Blue wrap, green wrap, postcards (105 x 148 mm), tracing paper, opaque films, adhesive paper, and so forth.
●
Contact your Xerox Customer Support Centre if you wish to use paper types that are not mentioned above.
● Do not use paper and transparencies exclusive for an ink jet printer. It can cause a fault.
3
■ Paper stock that can be used
The following table shows the types of paper stock that can be loaded in each tray.
Tr ay
Tray 1 A 4
B5
Tr ay s
2, 3, 4
Tray 5
(Bypass)
8 x 10”
8.5 x 11”, 8.5 x 13”, 8.5 x 14”,
11 x 17”, 267 x 388 mm,
194 x 267 mm
Auto Detect
The machine detects the
following sizes automatically.
A3, B4, A4
8.5 x 11”
Non-standard size:
Y = 148–297 mm
X = 148, 200–57 mm
Standard size:
Postcard (105 x 148 mm),
A5, B5, A4
SRA3
5.5 x 8.5”, 8 x 10” ,
8.5 x 11”
8.5 x 14”, 11 x 17”,
12 x 18”
Paper size
*3
, B5, A4 , A4, B4, A3,
, 8.5 x 11” ,
*5
:
, A4, B5, A5,
, 11 x 17”
, A4, B4, A3,
*6
, 8.5 x 11”,
*7
Paper weight
*1
GSM.
64–less than
2
105 g/m
64–128 g/m
64–256 g/m
Ream
weight
55–less than
90 kg
2
55–110 kg
2
55–220 kg
*2
Paper type
Normal
Normal
64–less than 105 g/m
Heavy weight 1
105–128 g/m
Normal
64–less than 105 g/m
Heavy weight 1
105–less than 162 g/m
Heavy weight 2
163–256 g/m
Transparency/opaque
*8
film
Adhesive paper
Labels
2
*4
2
2
*4
2
*4
2
Main
classification
Purple wrap/blue wrap/
green wrap, Business,
Colour Copy 90 g/m
Fuji Xerox J paper
Purple wrap/blue wrap/
green wrap, Business,
Colour Copy 90 g/m
Fuji Xerox J paper
Purple wrap/blue wrap/
green wrap, Business,
Colour Copy 90 g/m2,
Fuji Xerox J paper
Postcard
(105 x 148 mm)
Adhesive film
*9
2
2
Paper tray capacity
560 sheets
(Fuji Xerox P paper: 65 g/m
530 sheets
,
(Fuji Xerox J paper: 82 g/m
620 sheets (Fuji Xerox P paper:
,
65 g/m2)
580 sheets (Fuji Xerox J paper:
82 g/m
Up to 15 mm
150 sheets
(Fuji Xerox P paper: 65 g/m
140 sheets
(Fuji Xerox J paper: 82 g/m
2
)
2
)
2
)
2
)
2
)
34
Tracing paper
Page 51

3.1 What Paper to Use
*1*2
GSM or g/m2 is a measure of the substance of paper expressed in grammes per square metre, which does not depend on the number of
sheets in the ream. Ream weight is the weight of a 788 x 1,091 mm ream consisting of 1,000 sheets.
*3
The B5 tray is only for normal weight paper stock. Load heavy weight paper stock in B5 orientation.
*4
Load the paper stock horizontally when copying onto heavy weight 1 or 2 paper. (For example, load as A4 for A4 size and not A4 .)
*5
The paper sizes that the Bypass Tray Auto Detect feature can detect will depend on the settings made by the Customer Engineer like
A5→5.5 x 8.5", A4→8.5 x 11", 8.5 x 13", 8.5 x 14" and B4→8 x 10" . Contact your Xerox Customer Support Centre for more details.
*6*7
To make copies on 12 x 18” and SRA3 (320 x 450 mm/12.6 x 17.7”) paper, adjust the paper guide first before you load the paper.
*8
The sizes of transparencies/opaque films are only A4 , A4 and A3. When making copies onto opaque films (A3 transparencies), load the
films one by one.
*9
Paper size may differ depending on the brand.
● If you put a stack of documents in the DADF and make copies of them onto paper of HeavyWt2, Transparency/Opaque Film,
SRA3 (320 x 450 mm/12.6 x 17.7") or 12 x 18", the page sequence will be reversed because the copies are output facing
upward.
● Contact your Xerox Customer Support Centre when you need to make duplex copies on heavy weight paper stock using tray
5 (bypass). Our Customer Engineer will be able to replace Adhesive Paper and Labels with Heavy Weight 1 (Side 2) and
Heavy Weight 2 (Side 2). In this case, you will not be able to make copies onto adhesive paper or Labels.
● Paper tray sizes can be changed by the Cusomer Engineer. Tray 1 can be changed to either A5, B5 , or 8.5 x 11" . Trays
2 to 4 can be changed to 12 x 18" or any non-standard sizes which are within the range of 182-297 mm (vertically) and 200432 mm (horizontally). Contact your Xerox Customer Support Centre.
● Paper jams may result if you make copies on paper that are different in size and type from those selected on the display, or if
you load the paper stock in the wrong tray. To make copies properly, select the correct paper size, type, and tray.
Loading Paper
■ Storing and handling paper
Take note of the following when storing paper:
● Always store paper in a cabinet or at a place with low humidity. Damp paper may cause jams or affect
the image quality.
● Always re-pack unused paper, preferably with desiccant.
● Always store paper on a flat surface to prevent bending or curling.
Take note of the following when loading paper:
● Do not combine and load paper left over from different reams into a tray.
● Do not use folded or wrinkled paper.
● Do not load mixed size paper into a tray.
● Always fan transparencies or labels before loading to prevent jamming or multi-sheet feeding.
● When using coated paper, fan the paper stack well and load one sheet at a time.
3
35
Page 52

Checking/Changing Paper
Supply Settings
The types of paper stock loaded in the respective trays are shown on the screen. The displayed
information includes the paper size, orientation, and paper type. This section explains how to
check and change the paper supply settings.
● If you make copies on paper that is different from the displayed information, paper jam may result. To make copies onto the
correct paper size, change the paper supply settings if the paper stock has been changed.
■ Checking the paper supply settings
Loading Paper
You can check the paper supply settings in Paper Supply on the Basic Features screen. Once you
select More... in Paper Supply, the Paper Supply screen appears. The screen shows the paper
tray numbers, the paper stock loaded in the respective trays, their paper orientations and types.
● In the case of tray 5 (bypass), you have to set the paper type each time you load paper in it.
3
■ Changing the paper supply settings
The display of paper sizes and orientation of trays 2, 3, and 4 will automatically be changed once
you have changed the paper size in these trays. In the case of paper type, you need to ask your
administrator to change the settings in Tools Mode. The following section will show you how to
change the paper type.
3.4 Changing the Paper Tray Size
○○○○○○○○○○○○○○○○○○○○○○○○○○○○○○○○○○○○○○○○○○○○○○○○○○○○○○○○○○○○○○○○
Procedure
36
Press System Settings/
Meter Check.
The System Settings/Meter
Check Screen is displayed.
Page 53

● Accounts Meter Check will only be
displayed on the System Settings/
Meter Check Screen if the Auditron
Mode is enabled. See “Chapter 9
Using the Auditron Administration
Mode” for the details.
3.2 Checking/Changing Paper Supply Settings
Select Tools Mode.
● Each input digit is represented by an
asterisk.
● If you made a mistake while entering
the password, press the C button to
clear and re-enter.
● The factory default Tools password is
11111. See “6.4 Changing the Tools
Password” on how to change the
password.
The Tools Password Entry screen is displayed.
Enter the tools password by using the keypad and select
Confirm.
Select Paper Tray Attributes.
Loading Paper
3
The Paper Tray Attributes screen is displayed.
Select Paper Type.
The Paper Type screen is displayed.
37
Page 54

3.2 Checking/Changing Paper Supply Settings
Use to select the tray to change and select Change
Settings.
Loading Paper
● Disable the ATS/APS setting of all
the trays in Tools Mode if you want to
set the Paper Type as Heavy Weight
3
1. See “6.2 Overview of Tools
Mode” for the details.
The screen of the selected tray is displayed. For example, Tray 2 is selected.
The button of the selected paper type is highlighted.
Select the desired paper type.
Select Save after checking your selections.
The display returns to the screen for setting the paper type.
Select Close.
The display returns to the Paper Tray Attributes screen.
Select Close.
The display returns to the Tools Menu screen,
38
Select Exit Tools.
The default screen or the User Password Entry screen is displayed. With this,
you have changed the paper type of tray 2.
Page 55

Loading Paper
This section explains how to load paper into trays 1, 2, 3, 4, and 5 (bypass).
● The type of paper stock that can be loaded depends on the tray used. See “3.1 What Paper to Use” for the details.
3.3.1 Loading paper in trays 1, 2, 3, and 4
This section explains how to load paper in trays 1, 2, 3, and 4. If paper runs out during a copy job,
the message “Tray X has run out of paper. Please add XX size paper.” (X is the tray number while XX
is the paper size) will be displayed. Add paper to the tray according to the instructions shown on
the screen. Press the Start button after you have replenished the tray. The copy job will resume.
● You can add paper to a tray not used for the current copy job. This section explains how to load paper that is the same size
and in the same orientation as the paper that has been used up. See “3.4 Changing the Paper Tray Size” on how to change
the paper size and orientation.
○○○○○○○○○○○○○○○○○○○○○○○○○○○○○○○○○○○○○○○○○○○○○○○○○○○○○○○○○○○○○○○○
Procedure
Pull out the paper tray
until it stops.
Always pull out a tray slowly.
The tray may hit and hurt your
knees if it is pulled out too
quickly with excessive force.
Loading Paper
3
● When loading paper, do not exceed
the maximum fill line found at the
side of the tray. Overloading the
paper tray may result in faults like
paper jam.
Load and align the paper
to the bottom left corner
with the side where
image is to be copied
facing downward.
Push in the tray slowly
until it stops.
Once you have replenished the
tray, the message “Press Start
button to continue.” will be
displayed.
39
Page 56

3.3 Loading Paper
3.3.2 Loading paper in tray 5 (bypass)
When making copies on paper stock not supported by trays 1, 2, 3, and 4, such as transparencies,
postcards (105 x 148 mm only), heavy weight paper and other special and non-standard size paper
stock, you can load them in tray 5 (bypass).
If you use tray 5 (bypass) to make your copies, you must select the paper type. In addition, if you
are copying onto paper sizes SRA3 (320 x 450 mm/12.6 x 17.7”) or 12 x 18”, you need to move the
paper guide to the position concerned. This section explains how to load paper in tray 5 (bypass)
and how to adjust its paper guide.
■ Loading paper in tray 5 (bypass)
Loading Paper
○○○○○○○○○○○○○○○○○○○○○○○○○○○○○○○○○○○○○○○○○○○○○○○○○○○○○○○○○○○○○○○○
Procedure
3
● IIf the paper guide has been moved
to the 12"/305 mm or 12.6"/320 mm
position, return it to the original
position as shown in the diagram on
the right.
Adjust the paper guide when you
make copies onto paper like SRA3
(320 x 450mm/12.6 x 17.7") or 12 x
18" paper. See the next section
“Adjusting the position of the paper
guide” on how to move the paper
guide.
● You cannot load mixed size paper in
this tray.
● You have to load A3 transparencies,
coated paper, and art films one by
one.
● Load the paper stock horizontally
when copying onto heavy weight
paper. For example, load as A4 for
A4 size and not A4 .
Open tray 5 (bypass).
You can extend the tray, if
necessary, by pulling out the
extension flap. The extension
flap can be pulled out in two
steps.
Check that the paper
guide is located at the
position shown in the
diagram on the right.
The paper guide should be at
“Standard” position usually.
Place the paper with the
side where image is to be
copied facing upward.
Align the paper with the
paper guide and insert
the paper.
Once you have loaded paper in
tray 5 (bypass), the Tray 5
screen is displayed.
Adjust the paper guide
gently to align the paper.
40
Page 57

●
If the Tray 5 (Bypass) screen is not
displayed, select More... in Paper
Supply on the Basic Features screen.
Then select 5 Bypass...
●
The Auto Detect feature can only
detect standard paper size like A3,
B4, A4
and 11 x 17". Select the desired
paper size if you wish to make copies
onto paper besides those mentioned
earlier.
5.5 Selecting a Paper Tray
●
When you make copies onto SRA3
(320 x 450mm/12.6 x 17.7") paper,
adjust the paper guide to
12.6"/320 mm position. See the next
section “Adjusting the position of the
paper guide” on how to move the
paper guide.
, A4, B5, A5, 8.5 x 11" ,
3.3 Loading Paper
Select a paper type from the Tray 5 (Bypass) screen.
When selecting a paper size:
<A/B Series Size>
Loading Paper
●
When you make copies onto 12 x 18"
paper, adjust the paper guide to
12"/305 mm position. See the next
section “Adjusting the position of the
paper guide” on how to move the
paper guide.
<Inch Size>
<Non-Standard Size>
Use
and to specify the size.
3
Return tray 5 (bypass) to
its original position after
you have completed the
copy job.
Remove any paper still
remaining on tray 5 (bypass). If
you have pulled out the
extension flap, push it back to
its original position and close
the tray.
41
Page 58

3.3 Loading Paper
12"
305mm
12.6"
320mm
Standard
標準
12"
305mm
12.6"
320mm
Standard
標準
12"
305mm
12.6"
320mm
Standard
標準
■ Adjusting the position of the paper guide
When making copies onto SRA3 (320 x 450 mm/12.6 x 17.7”) or 12 x 18” paper, adjust the position
of the paper guide located on the bypass tray.
Always remember to return the paper guide to the “Standard” position after you have completed
your copy job.
○○○○○○○○○○○○○○○○○○○○○○○○○○○○○○○○○○○○○○○○○○○○○○○○○○○○○○○○○○○○○○○○
Procedure
Open tray 5 (bypass).
● Keep the paper guide at “Standard”
Loading Paper
position except when copying onto
SRA3 (320 x 450mm/12.6 x 17.7") or
12 x 18" paper.
Loosen the screw on the
right of the paper guide.
3
Lift the paper guide and
adjust its position.
Paper guide position: Usually at
Standard; 12"/305 mm for 12 x
18" paper; and 12.6"/320 mm
for SRA3 (320 x 450 mm/12.6 x
17.7") paper.
Fasten the screw.
After you have completed your copy job, return the paper
guide to the “Standard” position by following Steps 2 to 4.
42
Page 59

.
Changing the Paper Tray Size
You can change the size and orientation of the paper that you load in trays 2, 3 and 4. However,
only standard paper sizes can be loaded. Use tray 5 (bypass) if you need to make copies onto nonstandard size paper. In the case of tray 1, no change is allowed because it has been fixed at A4
● The size of paper that can be loaded differs for each tray. See “3.1 What Paper to Use” for the details.
● Change the paper size setting if you change the paper type. The setting change has to be done by the administrator. See
“3.2 Checking/Changing the Paper Supply Settings” for information on how to change the paper type setting.
● Paper tray sizes can be changed by the Cusomer Engineer. Tray 1 can be changed to either A5, B5 , or 8.5 x 11" . Trays 2
to 4 can be changed to 12 x 18" or any non-standard sizes which are within the range of 182-297 mm (vertically) and 200-432
mm (horizontally). When 12 x 18" paper stock is loaded, however, two-sided copying is not available. When the DADF is used
to copy several sheets of documents, the output page sequence will be reversed.
○○○○○○○○○○○○○○○○○○○○○○○○○○○○○○○○○○○○○○○○○○○○○○○○○○○○○○○○○○○○○○○○
Procedure
Pull out the tray until it
stops.
.
Loading Paper
● Our Customer Engineer can also set
the paper tray size of tray 1 to letter
size.
3
Always pull out a tray slowly.
The tray may hit and hurt your
knees if it is pulled out too
quickly with excessive force.
Remove any paper still
loaded in the tray.
Pinch lever A and push
the guide backward.
Pinch lever B and move
the guide to the right.
43
Page 60

3.4 Changing the Paper Tray Size
● Do not load different types of paper
Loading Paper
in the same tray. This may result in
paper jam.
● Do not load paper beyond the
maximum fill line found at the side of
the paper tray.
Load and align the paper
to the bottom left corner
with the side where
image is to be copied
facing downward.
Adjust levers A and B
respectively so that they
gently touch the edge of
the paper stock.
You will hear a click sound if the
guide is adjusted to the correct
position.
3
● Change the paper type if it is
different from that prior to the
change of paper size. The paper
type setting has to be done by the
adminstrator. See “3.2 Checking/
Changing Paper Supply Settings” on
how to change the paper size setting.
Paste the paper size
label on the front of the
tray.
Push in the tray slowly
until it stops.
Select More... in Paper Supply from the Basic Features
screen. Check that the correct paper size is displayed.
If the changed paper size is not displayed, repeat Step 6 and check that
levers A and B have been moved to the correct positions.
44
Page 61

Loading Documents
4.1 Types of Documents ............................................ 46
4.2 Loading Documents ............................................ 48
Page 62

Types of Documents
You can load your document either on the document glass or in the optional Duplex Automatic
Document Feeder (DADF). The DADF allows you to load a stack of documents for copying. This
section explains about the types of documents that can be placed on the document glass or
loaded in the DADF.
4.1.1 Types of documents
The types of documents that can be loaded are shown in the following table:
Loading Documents
Document glass DADF
4
Minimum: No limit
Maximum: 297 x 432 mm (A3, 11 x 17”)
Document size
Document weight
(GSM.*1)
Document feeder
capacity
*1
GSM or g/m2 is a measure of the substance of paper expressed in grammes per square metre, which does not depend on the
number of sheets in the ream.
*2
This value is the value when copying 2 to 2 sided or 2 to 1 sided.
—
1 sheet
Minimum: 148.5 x 210 mm (A5, A5 )
Maximum: 297 x 432 mm (A3, 11 x 17”)
38–128 g/m
50–110 g/m
50 sheets
(light weight/normal paper: 38–100 g/m
40 sheets
(heavy weight paper: 101–128 g/m
2
(one-sided document)
2
(two-sided document*2)
2
)
2
)
4.1.2 Automatic document size sensing
This machine can automatically sense the size of the document that you want to copy. You do not
need to specify the size of your document if it is in one of the sizes listed below.
● If you are making copies onto non-standard paper, specify the document size by selecting Original Size from the Added
Features screen. See “5.8 Selecting the Document Size” on how to input the document size.
Document glass DADF
Automatic
document size
sensing
46
A6, B6, B6 , A5, A5 , 5.5 x 8.5”, 5.5 x 8.5” ,
B5, B5 , A4, A4 , 8.5 x 11”, 8.5 x 11” ,
8.5 x 13”, B4, 267 x 388 mm, A3, 11 x 17”
A5, A5 , B5, B5 , A4, A4 , 8.5 x 11”,
8.5 x 11” , 8.5 x 13”, 8.5 x 14”, B4,
A3,11 x 17”
Page 63

4.1 Types of Documents
4.1.3 Points to note when loading documents
■ Document glass
Sometimes, automatic document size sensing cannot be carried out for the following types of
documents, thus leading to image loss. Resolve the problem by following the method described
below:
● Non-standard size documents
Specify the document size by selecting Original Size from the Added Features screen.
● Highly transparent documents (e.g. transparencies)
Place a piece of white paper of the same size on the transparent document. Alternatively, specify the
document size by selecting Original Size from the Added Features screen.
● Glossy documents
Specify the document size by selecting Original Size from the Added Features screen.
Loading Documents
● Thick documents (e.g. books)
Specify the document size by selecting Original Size from the Added Features screen.
5.8 Selecting the Document Size
■ Duplex automatic document feeder (DADF)
The following types of documents will cause document jams if loaded in the DADF. Place them on
the document glass:
● Torn, wrinkled, punched-hole, curled documents
● Clipped, stapled or glued paper
● Paste-up documents
● Folded documents
● Documents with carbon on the reverse side
● Highly transparent documents (e.g. transparencies)
● Glossy documents (e.g. photographs)
● Heat-sensitive paper
● Thick documents
● Light weight documents
4
47
Page 64

Loading Documents
4.2.1 Placing documents on document glass
This section explains how to place a document on the document glass.
○○○○○○○○○○○○○○○○○○○○○○○○○○○○○○○○○○○○○○○○○○○○○○○○○○○○○○○○○○○○○○○○
Procedure
Loading Documents
4
● Place a sheet of white paper on the
document if the document is a piece
of highly transparent material like
transparency or tracing paper.
Lift the document cover.
Place the document face
down and align it with the
upper left corner of the
document glass.
Lower the document
cover.
48
● When copying a thick document, do not use excessive
force to press it against the
document glass. The glass
may break and cause injuries.
● If you make copies with the
document cover open, do not
look directly at the copy lamp.
Direct eye exposure can cause
eye fatigue or damage.
Page 65

4.2 Loading Documents
4.2.2 Loading documents in DADF
The DADF feature allows you to load up to 50 sheets of documents, measuring 148.5 x 210 mm to
297 x 432 mm, in it. Scanning will begin with the topmost sheet of document and the copies will be
output facing downward. This section explains how to make copies by loading your documents in
the DADF.
● You can load up to 40 sheets of heavy weight documents (101 g/m2 to 128 g/m2).
● If you use the DADF to make copies, you cannot select features such as Book Copying, Image Repeat, Poster, and Mirror
Image/Negative Image.
○○○○○○○○○○○○○○○○○○○○○○○○○○○○○○○○○○○○○○○○○○○○○○○○○○○○○○○○○○○○○○○○
Procedure
Aligntheleadedgesofthedocuments.
Remove all clips or staples from the documents.
Loading Documents
● Pull out the extension tray if you are
loading large documents.
● Take note of the following as they
may result in document jams or
damage your documents:
● Do not press the documents in the
DADF while the documents are being
fed into the feeder.
● Do not allow scanned documents to
over-stack on the document output
tray.
● Do not place any object on the
document output tray.
Load the documents face
up in the DADF (side one
should face up in the
case of two-sided
copying) and insert them
properly into the feeder
as indicated by the arrow
in the diagram.
The confirmation indicator lights
up.
Adjust the document
guide lightly to the edge
of the document stack.
4
● You can load both colour, and black and white documents in the DADF at the same time. In this case,
select Auto in Output Colour on the Basic Features screen. See “5.2 Selecting the Output Colour”
for the details.
● Mixed size documents can be loaded in the DADF (however, only A5 for A5 size paper). In this case,
arrange the same side of the documents and insert them into the feeding point of the DADF. Then
select Mixed Size Originals on the Added Features screen to make copies. Document jams may
result if this setting is not done. See “5.10 Copying Mixed Size Originals” for the details.
49
Page 66

4.2 Loading Documents
■ Document orientation
This machine comes with the Image Shift feature that allows you to adjust the position of the image
by adjusting its top/bottom/left/right position. In this case, if the orientation of the document is not
specified correctly in Original Orientation, then copies cannot be done properly. The document
orientation is set by using the Original Orientation feature. The machine will then be able to
determine the top, bottom, left, and right positions and move the image to the specified position.
Then copies will be made.
There are two types of document orientations, namely, Head to Top and Head to Left. As Head to
Top is set as the factory default, load your documents in the vertical orientation. Depending on the
types of documents, some documents cannot be loaded in the Head to Top orientation. Change
the Original Orientation on the Others screen to Head to Left and load the document horizontally
accordingly.
Loading Documents
4
5.24 Selecting the Document Orientation
● Features related to setting the document orientation are 2 to 1 Sided, Image Shift, Mixed Size Originals, Multi-Up (N Up),
Image Repeat, and Independent XY%. Take note of these when you set the document orientation.
● You can change the factory default of the document orientation to Head to Left in Tools Mode. See “Chapter 6 Tools Mode
Settings” for the details.
● Labels affixed on the document glass and DADF show the Head to Top setting. If the default value has been changed in Tools
Mode, then what is shown on the display and the labels will differ.
■ Automatic image rotation
The machine will automatically rotate the image of the document and make the correct copies even
if the document and the specified paper tray are not in the same orientation. This feature is called
Automatic Image Rotation.
This feature will be effective if Auto % is selected for Reduce/Enlarge, or Auto for Paper Supply;
while the document size is standard and copies are to be made on standard size paper of A4 or
smaller.
50
Page 67

Making Copies
5.1 Switching Screen Display .................................... 52
5.2 Selecting the Output Colour (Output Colour) ...... 55
5.3 Making One-Sided/Two-Sided Copies
(2-Sided) .............................................................. 58
5.4 Reducing/Enlarging Copies (Reduce/Enlarge)..... 64
5.5 Selecting a Paper Tray (Paper Supply) ................ 72
5.6 Erasing the Edges (Edge Erase) .......................... 77
5.7 Shifting the Image (Image Shift) ........................... 80
5.8 Selecting the Document Size (Original Size)........ 83
5.9 Copying Facing Pages onto Separate Sheets
(Book Copying) .................................................... 85
5.10 Copying Mixed Size Originals
(Mixed Size Originals) .......................................... 87
5.11 Selecting the Document Type (Original Type) ...... 90
5.12 Adjusting the Copy Density (Lighter/Darker) ....... 93
5.13 Enhancing Sharpness (Sharpness) ...................... 95
5.14 Adjusting Image Quality
(Image Quality Presets) ........................................ 97
5.15 Adjusting Colour Shift & Saturation
(Colour Shift & Colour Saturation) ....................... 99
5.16 Adjusting Colour Control (Colour Control) ......... 103
5.17 Copying Several Documents onto One Copy
(Multi-Up) ........................................................... 105
5.18 Interleaving Transparencies
(Transparency Separators) ................................. 108
5.19 Creating Mirror/Negative-like Images
(Mirror Image/Negative Image) .......................... 111
5.20 Repeating an Image (Image Repeat) ................. 114
5.21 Making copies as covers
(Covers) .............................................................. 117
5.22 Enlarging and dividing into multiple copies
(Poster) ............................................................... 120
5.23 Storing Frequently-used Job Settings
(Stored Programming)........................................ 123
5.24 Selecting the Document Orientation
(Original Orientation) .......................................... 127
5.25 Using the Sorter for Copying ............................. 129
Page 68

Switching Screen Display
This section explains the displaying of screens that are necessary for making copies and the
methods to switch those screen displays.
Selections for a copy job are made in the copy screen. The features in the copy screen are
displayed on the buttons.
■ Switching screen display on Basic Screen
The Basic Screen is displayed when a copy job is in progress. There are five tabs on the Basic
Screen, namely, Basic Features, Added Features, Image Quality, Output Format and Others.
Each screen indicated by the tabs contains some feature buttons. The feature buttons on each
screen differ according to the model and the option that are installed. You can also relocate features
on the screen display by using Tools Mode.
Each feature has a factory default. You can change the factory default via Tools Mode. See
Making Copies
“Chapter 6 Tools Mode Settings”
on how to change the factory defaults.
5
This section explains this general rule with the two-sided copying model that is attached with the
DADF.
Basic Features
When DADF is attached:
When DADF is not attached:
52
●
There are four features displayed on the Basic Features screen. Unlike other screens, the frequently used features displayed
on the Basic Features screen are represented by the rectangular buttons for fast selections.
Page 69

Added Features
5.1 Switching Screen Display
When DADF is attached:
When DADF is not attached:
Image Quality
Output Format
Making Copies
5
When DADF and sorter are attached:
Others
53
Page 70

5.1 Switching Screen Display
■ Button display in each screen
When a button is selected, the screen displaying the settings for that selected button will be shown.
After the selections are made in this screen, select the Save button to confirm those selections and
exit that screen. Select the Cancel button to cancel the selections halfway.
Making Copies
5
54
Page 71

Selecting the Output Colour
(Output Colour)
You can choose to copy in full colour or in black and white. You can also select single colour
copying.
The types of colour mode are listed below.
Auto
The machine will automatically copy in full colour if it detects a colour document or copy in black and
white if it detects a black and white document.
Full Colour
Documents are copied in four colours—yellow, magenta, cyan and black.
Compared to 3 Pass Colour, copies look sharper, especially the text in black.
3 Pass Colour
Documents are copied in three colours—yellow, magenta and cyan.
Black
Documents are copied in black regardless of their colours.
Single Colour
Documents are copied in a selected colour regardless of their colours.
Making Copies
5
55
Page 72

5.2 Selecting the Output Colour
●
The factory default for Output Colour is Auto.
● You can change the factory default in Tools Mode. See “Chapter 6 Tools Mode Settings” on how to change the factory
defaults.
○○○○○○○○○○○○○○○○○○○○○○○○○○○○○○○○○○○○○○○○○○○○○○○○○○○○○○○○○○○○○○○○
Procedure
Load the documents.
4.2 Loading Documents
Display the Basic Features screen.
Making Copies
5
Select the desired colour mode in Output Colour.
Select More... if your desired colour mode is not displayed
on the screen.
When More... is selected:
➊ Select Single Colour.
56
➋ Select your desired colour.
Page 73

●
When optional edit pad is equipped
with your machine, select a colour
from the colour palette on the edit
pad. See DocuColor 1256 GA Series
Edit Pad User Guide for more details.
●
Select the Cancel button to cancel
the selections.
5.2 Selecting the Output Colour
➌ Select Save after checking your selections.
The display returns to the Basic Features screen.
Select other features, if necessary.
Enter the number of copies by using the keypad and press
Start.
Copies will be made in the selected colour mode.
Making Copies
5
57
Page 74

Making One-Sided/Two-Sided
Copies
This feature allows you to make two-sided copies or one-sided copies from one-/two-sided documents.
If the DADF is not attached to the machine, you cannot make one-sided copies from two-sided
documents or make two-sided copies automatically.
● The factory default setting for 2-Sided is 1 to 1 Sided.
● You can change the default setting in Tools Mode. See “Chapter 6 Tools Mode Settings” on how to change the factory
defaults.
(2-Sided)
5.3.1 Copying on one side
Make one-sided copies from one/two-sided documents.
Making Copies
5
○○○○○○○○○○○○○○○○○○○○○○○○○○○○○○○○○○○○○○○○○○○○○○○○○○○○○○○○○○○○○○○○
Procedure
Load the documents.
4.2 Loading Documents
Display the Basic Features screen.
58
Page 75

5.3 Making One-Sided/Two-Sided Copies
Select 1 to 1 Sided or 2 to 1 Sided.
To specify the document orientation, select More...
● When 2 to 1 Sided is selected,
choose the orientation of the twosided document in Originals.
• When Head to Head is selected for
Originals, the image will be printed in
the same orientation for both side
one and side two.
• When Head to Toe is selected for
Originals, the image printed on side
one will be in the opposite direction
as the image printed on side two.
● If the document is loaded in a
different direction as specified in
Original Orientation, the result will be
different from the desired.
See “5.24 Selecting the Document
Orientation” for more details.
• When Head to Top is selected for
Original Orientation:
The 2-Sided screen is displayed.
When More... is selected:
➊ Select 1 to 1 Sided or 2 to 1 Sided.
Making Copies
➋ Select the desired copy result in Originals when 2 to 1
Sided is selected. Proceed with Step ➌ when 1 to 1
Sided is selected.
5
➌ Select the orientation in Original Orientation.
For example, 2 to 1 Sided is selected.
• When Head to Left is selected for
Original Orientation:
●
Select the Cancel button to cancel
the selections.
Select Save after checking your selections.
The display returns to the Basic Features screen.
Select other features, if necessary.
Enter the number of copies by using the keypad and press
Start.
One-sided copies will be made.
59
Page 76

5.3 Making One-Sided/Two-Sided Copies
5.3.2 Copying on two sides
You can make two-sided copies from one- or two-sided documents.
Making Copies
■ Making two-sided copies from one-sided documents
5
Make two-sided copies from one-sided documents.
○○○○○○○○○○○○○○○○○○○○○○○○○○○○○○○○○○○○○○○○○○○○○○○○○○○○○○○○○○○○○○○○
4.2 Loading Documents
Procedure
Load the documents.
Display the Basic Features screen.
60
Page 77

5.3 Making One-Sided/Two-Sided Copies
●
When the DADF is not attached,
select the document orientation
according to the desired copy result.
When Head to Head is selected for
Copies:
When Head to Toe is selected for
Copies:
●
When 1 to 2 Sided is selected,
choose the orientation of the twosided copy in Copies.
● When Head to Head is selected for
Copies, the image will be printed in
the same orientation for both side 1
and side 2.
Select 1 to 2 Sided.
To specify the document orientation, select More...
2-Sided screen is displayed.
When More... is selected.
➊ Select the desired copy result in Copies.
Making Copies
●When Head to Toe is selected for
Copies, the image printed on side 1
will be in the opposite direction as the
image printed on side 2.
●
If the document is loaded in a
different direction as specified in
Original Orientation, the result will be
different from the desired.
See “5.24 Selecting the Document
Orientation” for more details.
● When Head to Top is selected for
Original Orientation:
• When Head to Left is selected for
Original Orientation:
➋ Select the orientation in Original Orientation.
5
Select Save after checking your selections.
The display returns to the Basic Features screen.
Select other features, if necessary.
Enter the number of copies by using the keypad and press
Start.
Two-sided copies will be made.
●
Select the Cancel button to cancel
the selections halfway.
61
Page 78

5.3 Making One-Sided/Two-Sided Copies
■ Making two-sided copies from two-sided originals
Make two-sided copies from two-sided originals.
○○○○○○○○○○○○○○○○○○○○○○○○○○○○○○○○○○○○○○○○○○○○○○○○○○○○○○○○○○○○○○○○
Procedure
Load the documents.
4.2 Loading Documents
Display the Basic Features screen.
Making Copies
5
Select 2 to 2 Sided in 2-Sided.
To specify the copy result and the document orientation,
select More...
The 2-Sidedy screen is displayed.
When More... is selected:
➊ Select 2 to 2 Sided.
62
Page 79

●When 2 to 2 Sided is selected,
choose the orientation of the twosided copy and two-sided document
in Copies and Originals..
• When Head to Head is selected for
Copies and Originals, the image will
be printed in the same orientation for
both side one and side two.
• When Head to Toe is selected for
Copies and Originals, the image
printed on side one will be in the
opposite direction as the image
printed on side two.
5.3 Making One-Sided/Two-Sided Copies
➋ Select Copy Result.
The Copy Result screen is displayed.
➌ Select an option each from Originals and Copies.
● If the document is loaded in a
different direction as specified in
Original Orientation, the result will be
different from the desired.
See “5.24 Selecting the Document
Orientation” for more details.
• When Head to Top is selected for
Original Orientation:
• When Head to Left is selected for
Original Orientation:
● Select the Cancel button to cancel
the selections.
Making Copies
➍ Specify the orientation of the document in Original
Orientation.
5
Select Save after checking your selections.
The display returns to the 2-Sided screen.
Select Save after checking your selections.
The display returns to the Basic Features screen.
Select other features, if necessary.
Enter the number of copies by using the keypad and press
Start.
Two-sided copies will be made.
63
Page 80

Reducing/Enlarging Copies
(Reduce/Enlarge)
This feature allows you to adjust the size of your copy image by specifying the ratio for
enlargement/reduction. You can make an exact copy of the original by selecting the exact ratio
value, or, you can enlarge/reduce the copy image by specifying the enlargement/reduction ratio for
the length and width.
● The factory default value for Reduce/Enlarge is 100%.
● You can change the factory default in Tools Mode. See “Chapter 6 Tools Mode Settings” on how to change the factory
defaults.
5.4.1 Same R/E % for length and width
There are two methods to make copies by specifying the ratio:
•Selecting from preset fixed ratios.
•Entering your own variable ratios.
Making Copies
5
■ Selecting from preset ratios
You can reduce/enlarge your copies by selecting the preset ratios.
Auto %
Reduces or enlarges the copy automatically based on the size of the selected paper. Do not select Auto
for Paper Supply.
● When Auto is selected for Reduce/Enlarge and Paper Supply, the machine will automatically rotate the image of the original
to fit onto the orientation of the copy paper. However, this is only applicable when the original is load in the Head to Left
orientation and the copy paper is smaller than A4 . The image cannot be automatically rotated if non-standard size paper is
used.
100 %
The copied image is the same size as the original.
● You can fine-tune the value for 100% between 98 to 102% in the Tools Mode. See “6.2 Overview of Tools Mode” for more
details.
R/E Presets
There are seven fixed percentages that you can choose from:
•400%
•200% A5➝A3
•141% A4➝A3 / B5➝B4
•97% A4➝8.5x11”
•70% A3➝A4 / B4➝B5
•50% A3➝A5
•25%
64
Copy All
In the case where the image of the document extents to the edge of the paper, an image loss at the
border of the paper will occur if it is copied at 100%. By selecting Copy All, the machine will reduce the
size of the document image by a little so that there will be no image loss. Copy All can be combined
with 100% or Auto % in R/E Presets or any other of the seven preset values. Do not select Auto for
Paper Supply.
Page 81

5.4 Reducing/Enlarging Copies
○○○○○○○○○○○○○○○○○○○○○○○○○○○○○○○○○○○○○○○○○○○○○○○○○○○○○○○○○○○○○○○○
Procedure
Load the documents.
4.2 Loading Documents
Display the Basic Features screen.
Select a reduce/enlarge value in Reduce/Enlarge.
Select More... if the reduce/enlarge value that you want is
not displayed on the screen.
Making Copies
5
The Reduce/Enlarge screen is displayed.
65
Page 82

5.4 Reducing/Enlarging Copies
When More... is selected:
➊ Select R/E Preset.
➋ Select a R/E preset value.
Making Copies
5
● Select the Cancel button to cancel
the selections.
➌ Select Copy All to make copies that are slightly smaller
than the document.
➍ Select Save.
The display returns to the Basic Features screen.
Select other features, if necessary.
Enter the number of copies by using the keypad and press
Start.
66
Page 83

5.4 Reducing/Enlarging Copies
■ Specifying a variable percentage change (Variable %)
You can make copies by specifying a variable percentage within 25–400% in 1% increments.
Copy
Original
A6
B6
A5
B5
A4
B4
A3
○○○○○○○○○○○○○○○○○○○○○○○○○○○○○○○○○○○○○○○○○○○○○○○○○○○○○○○○○○○○○○○○
A5 B5
141%
115%
100%
81%
70%
58%
50%
173%
141%
122%
100%
86%
70%
61%
A4 B4
200%
163%
141%
115%
100%
81%
70%
245%
200%
173%
141%
122%
100%
86%
A3
282%
231%
200%
163%
141%
115%
100%
8.5 x 11”
—
—
—
—
97%
—
—
Procedure
Load the documents.
4.2 Loading Documents
Display the Basic Features screen.
Making Copies
Select More... from Reduce/Enlarge.
The Reduce/Enlarge screen is displayed.
Select Variable %.
5
67
Page 84

5.4 Reducing/Enlarging Copies
● To change the specified value, select
the C button and re-enter a value.
● Select the Cancel button to cancel
the selections.
Specify the percentage by using the keypad on the screen or
use the
Select Save after checking your selections.
The display returns to the Basic Features screen.
Select the other features, if necessary.
buttons.
Making Copies
5.4.2 Different R/E% for length and width
This feature allows you to make copies with irregular length or width of the original. There are three
methods available.
5
Variable XY%
You can select the R/E ratio for the length and width between 25 to 400% in 1 % increments.
Auto fit
The machine will automatically adjust the R/E ratio of the length and width to fit the image onto the size of
the copy paper.
Calculator %
You can specify the document size and the desired paper size.
Enter the number of copies by using the keypad and press
Start.
Copies will be made based on the selected reduce/enlarge ratio.
68
Page 85

5.4 Reducing/Enlarging Copies
○○○○○○○○○○○○○○○○○○○○○○○○○○○○○○○○○○○○○○○○○○○○○○○○○○○○○○○○○○○○○○○○
Procedure
Load the documents.
4.2 Loading Documents
Display the Basic Features screen.
Select a paper tray with the desired paper size in Paper
● Do not select Auto for Paper Supply
when you wish to select a reduce/
enlarge value in Independent XY%.
Supply.
Making Copies
Select More... in Reduce/Enlarge.
The Reduce/Enlarge screen is displayed.
Select Independent XY%.
5
The Independent XY% screen is displayed.
69
Page 86

5.4 Reducing/Enlarging Copies
Select a reduce/enlarge method.
● Use for XY to adjust the values
of X and Y at the same time.
Making Copies
5
When Variable XY% is selected:
➊ Use
When Auto fit is selected:
➊ Proceed to Step 7.
to adjust the percentages of X and Y.
●To change the R/E value, select
Confirm/Next and move to the
desired location and re-enter the
value by using the keypad.
70
When Calculator % is selected:
➊ Input the measurements of Y in Orig. Length by using the
keypad and select Confirm/Next.
is shifted to Copy Length for Y.
Page 87

5.4 Reducing/Enlarging Copies
➋ Input the measurement of Y in Copy Length by using the
keypad and select Confirm/Next.
The calculated ratio is displayed in Y and on the left is shifted to the top
right.
➌ Repeat Steps ➊ and ➋ to input the measurement for X in
Orig. Length and Copy Length.
● Select the Cancel button to cancel
the selections.
● If the document is loaded in a
different direction as specified in
Original Orientation, the position of
the reduce/enlarge percentages of X
and Y will be different from the
desired.
See “5.24 Selecting the Document
Orientation” for more details.
• When Head to Top is selected for
Original Orientation:
➍ Select Save after checking your selections.
The display returns to the Independent XY% screen.
Select the orientation in Original Orientation.
For example, Variable XY % is selected.
Select Save after checking your selections.
The display returns to the Reduce/Enlarge screen.
Making Copies
5
When Head to Left is selected for
Original Orientation:
Select Save after checking your selections.
The display returns to the Basic Features screen.
Select other features, if necessary.
Enter the number of copies by using the keypad and press
Start.
Copies will be made with the selected reduce/enlarge value.
71
Page 88

Selecting a Paper Tray
(Paper Supply)
Select a paper tray with the required paper size before starting a copy job. You can specify a paper
tray to be used or select Auto for the machine to automatically select a tray that fits the size of the
document.
● The factory default for Paper Supply is Auto.
● When a paper tray runs out of paper during a copy job, it will switch to another paper tray loaded with paper of the same size
and paper type (Normal) (Auto Tray Switching). You can specify this setting in the Tools Mode. When all the trays are
loaded with paper of the same size and paper type (Normal), the priority of the tray switching will be in the order of tray 1, tray
2, tray 3, and tray 4.
● You can change the factory default in the Tools Mode screen. See “Chapter 6 Tools Mode Settings” on how to change the
factory defaults.
5.5.1 Selecting Auto for Paper Supply
Auto
Making Copies
The machine will automatically select a paper tray based on the detected document size and the
magnification settings in Reduce/Enlarge.
5
● When paper is not loaded in the selected tray or when the document size cannot be detected, a message will be displayed on
the screen. Follow the instructions
● When Auto % for Reduce/Enlarge or Auto for Paper Supply is selected, the image will automatically rotate to fit the copy
paper even when the document is loaded in a different orientation as the copy paper. However, this is only applicable
when the document is loaded in the Head to Left orientation and the copy paper is smaller than A4 . The image will not
be automatically rotated for non-standard size paper.
○○○○○○○○○○○○○○○○○○○○○○○○○○○○○○○○○○○○○○○○○○○○○○○○○○○○○○○○○○○○○○○○
Procedure
Load the documents.
4.2 Loading Documents
Display the Basic Features Screen.
Select a magnification value in Reduce/Enlarge other than
● You cannot use Auto % for Reduce/
Enlarge and Auto for Paper Supply
at the same time. See “5.4
Reducing/Enlarging Copies” on how
to specify the magnification ratio.
Auto %.
72
Page 89

5.5 Selecting a Paper Tray
Check that Auto is selected in Paper Supply.
Select other features, if necessary.
Enter the number of copies by using the keypad and press
Start.
Copies will be made using the paper in the selected tray.
5.5.2 Selecting a paper tray
You can select the paper tray which is loaded with your desired paper size to make copies. You
can use tray 5 (bypass) to load paper that cannot be loaded into trays 1, 2, 3, and 4.
Trays 1, 2, 3, and 4
You can select one of these paper trays that is loaded with your desired paper size to make copies.
Tray 5 (Bypass)
You can select this tray to load documents that cannot be loaded into tray 1, 2, 3,and 4.
■ Selecting trays 1, 2, 3, or 4
You can select paper from trays 1, 2, 3, or 4 that is loaded with your desired paper size.
● When paper is not loaded in the selected tray or when the orientation of the document and the copy paper differs, a message
will be displayed on the screen. Follow the instructions.
○○○○○○○○○○○○○○○○○○○○○○○○○○○○○○○○○○○○○○○○○○○○○○○○○○○○○○○○○○○○○○○○
Procedure
Load the documents.
Making Copies
5
4.2 Loading Documents
Display the Basic Features screen.
73
Page 90

5.5 Selecting a Paper Tray
Select a paper tray loaded with paper of your desired size in
Paper Supply. Select More... if the tray you want is not
displayed on the screen.
When More... is selected:
➊ Select a tray from trays 1, 2, 3, and 4.
Making Copies
● Select the Cancel button to cancel
the selections halfway.
5
■ Selecting tray 5 (bypass)
You can select a paper tray from tray 5 when you cannot load documents into trays 1, 2, 3, and 4.
You must specify the paper type if you wish to use tray 5 (bypass).
○○○○○○○○○○○○○○○○○○○○○○○○○○○○○○○○○○○○○○○○○○○○○○○○○○○○○○○○○○○○○○○○
➋ Select Save after checking your selections.
The display returns to the Basic Features screen.
Select other features, if necessary.
Enter the number of copies by using the keypad and press
Start.
Copies will be made using the selected paper tray.
● See “3.3 Loading Paper” on how to load paper into tray 5 (bypass).
Procedure
4.2 Loading Documents
74
Load the documents.
Display the Basic Features screen.
Page 91

● The default setting of Tray 5 is Auto
Detect for paper size and Normal
Paper for paper type. Select
when you change the setting.
More...
5.5 Selecting a Paper Tray
Select Tray 5 or More...
When Tray 5 is selected:
➊ Proceed to Step 8. If you need to change paper size and
type, proceed to Step 4.
When More... is selected:
➊ Select Bypass...
● Once paper is set correctly in tray 5
(bypass), the Tray 5 (Bypass) screen
will be displayed.
The Tray 5 (Bypass) screen is displayed.
Select the paper size.
When selecting Auto Detect:
➊ Proceed to Step 5.
When selecting the paper size:
➊ Select the desired size series.
Making Copies
5
● When you make copies onto SRA3
(320 x 450mm/12.6 x 17.7") paper,
adjust the paper guide to
12.6"/320 mm position. See
“Adjusting the position of the paper
guide” in “3.3.2 Loading paper in tray
5 (bypass)” on how to move the
paper guide.
➋ Select the specific paper size.
When A/B Series Size is selected:
75
Page 92

5.5 Selecting a Paper Tray
● When you make copies onto 12 x 18"
paper, adjust the paper guide to
12"/305 mm position. See
“Adjusting the position of the paper
guide” in “3.3.2 Loading paper in tray
5 (bypass)” on how to move the
paper guide.
When Inch Size is selected:
When Non-standard Size is selected:
Making Copies
5
● Select the Cancel button to cancel
the selections.
● Once paper is set correctly in tray 5
(bypass), the Tray 5 (Bypass) screen
will be displayed.
Select a paper type.
Select Save after checking your selections.
The display returns to the Paper Supply screen.
Select Save after checking your selections.
The display returns to the Basic Features screen.
Load paper into Tray 5 (Bypass).
Select other features, if necessary.
76
Enter the number of copies by using the keypad and press
Start.
Copies will be made using the selected paper tray.
Page 93

Erasing the Edges
(Edge Erase)
This feature allows you to erase the shadows or the marks found at the edges or the centre of the
copies made when copying bound originals.
The types of Edge Erase are listed below.
Top and Bottom Erase
Erases the top and the bottom edges of the document loaded. You can specify the width of the edge
erase within 0-50 mm in 1 mm increments.
Left and Right Erase
Erases the left and right edges of the document loaded. You can specify the width of the edge erase
within 0-50 mm in 1 mm increments.
Binding Erase
Erases the shadows found at the centre of the copies made when copying with the document cover open
or when copying bound originals. You can specify the width of the Binding Erase within 0–50 mm in 1
mm increments.
● Multi-Up (N Up) cannot be used together with Binding Erase.
● When Binding Erase is selected for Book Copying, the centre border will be erased based on half of the Binding Edge Erase
value.
Making Copies
5
● The edges will not be correctly erased if the document is not loaded in the direction specified in Original Orientation. See
“5.24 Selecting the Document Orientation” for more details.
● This feature cannot be combined with Image Repeat. Binding Erase cannot be combined with Poster.
● If Multi-Up (N-Up) is selected together with Top and Bottom Erase or Left and Right Erase, the erase value will be applied
to the individual documents before they are copied onto one sheet.
● When Reduce/Enlarge is selected, the edge erase value will be adjusted according to the reduce/enlarge percentage.
● When 2-Sided is selected, the edge erase applies to both side one and side two of the document.
● There will be an image loss of approximately 3 mm off the leading edge regardless of the edge erase value.
● The factory default is 2 mm for Top and Bottom Erase, 2 mm for Left and Right Erase and 0 mm for Binding Erase.
● You can change the factory default for Top and Bottom Erase and Left and Right Erase in Tools Mode. See “Chapter 6 Tools
Mode Settings” on how to change the factory defaults. You cannot change the default for Binding Erase on the Tools Mode
screen.
77
Page 94

5.6 Erasing the Edges
○○○○○○○○○○○○○○○○○○○○○○○○○○○○○○○○○○○○○○○○○○○○○○○○○○○○○○○○○○○○○○○○
Procedure
Load the documents.
Select Edge Erase on the Added Features screen.
The Edge Erase screen is displayed.
● If the document is loaded in a
Making Copies
different direction as specified in
Original Orientation, the position of
the top and bottom erase and the left
and right erase will be different from
the desired result.
See “5.24 Select the Document
Orientation” for more details.
• When Head to Top is selected for
Original Orientation:
5
• When Head to Left is selected for
Original Orientation:
Select Variable Erase...
The Variable Erase screen is displayed.
Use to specify the values for Top and Bottom Erase,
Left and Right Erase and Binding Erase.
78
Check the orientation of the document in Original Orientation.
Page 95

● Select the Cancel button to cancel
the selections.
5.6 Erasing the Edges
Select Save after checking your selections.
The display returns to Edge Erase screen.
Select Save after checking your selections.
The display returns to the Added Features screen.
Select other features, if necessary.
Enter the number of copies by using the keypad and press
Start.
Copies will be made with the selected edge erase values.
Making Copies
5
79
Page 96

Shifting the Image
(Image Shift)
This feature allows you to move the position of the original image up, down, left, right or centre.
Also, it allows you to set a margin to create a white space on your copy.
The types of image shifts are listed below.
No Shift
The copies are made without any shifts in the image of the document.
Auto Centre
The centre of the document is copied on the centre of the paper.
Corner Shift
The image of the document is copied on the selected corner of the paper.
Variable Shift
You can shift the image of the document to the top, bottom, left or centre by 0–432 mm in 1 mm
increments.
Making Copies
5
● When Mixed Size Originals is selected, the image shift will be based on the image position of the first document.
● If the document has a border, select Corner Shift or Variable Shift to adjust the image to be copied on the paper.
80
● The image shift is based on the orientation of the loaded document. If the orientation of the loaded document is different
from that specified in Original Orientation, the direction of the shift will also be different. See “5.24 Selecting the Document
Orientation” for more details.
● The image shift value is based on the paper size. It will not be affected by the percentage changes in Reduce/Enlarge.
● The factory default for this feature is No Shift. You can change the factory defaults of Corner Shift and Variable Shift in Tools
Mode. See “Chapter 6 Tools Mode Settings” on how to change the factory defaults.
● This feature cannot be combined with Poster.
Page 97

5.7 Shifting the Image
○○○○○○○○○○○○○○○○○○○○○○○○○○○○○○○○○○○○○○○○○○○○○○○○○○○○○○○○○○○○○○○○
Procedure
Load the documents.
4.2LoadingDocuments
Select Image Shift on the Added Features screen.
The Image Shift screen is displayed.
Select Side 1.
The Side 1 screen is displayed.
Select the type of image shift.
Making Copies
5
When Auto Centre is selected:
➊ Proceed to Step 5.
81
Page 98

5.7 Shifting the Image
When Corner Shift is selected:
➊ Select the position for the image shift.
When Variable Shift is selected:
● If the document is loaded in a
different direction as specified in
Original Orientation, the original point
and the position of the shift will be
different from the desired result.
See “5.24 Selecting the Document
Orientation” for more details .
• When Head to Top is selected for
Making Copies
Original Orientation:
• When Head to Left is selected for
Original Orientation:
5
● Select the Cancel button to cancel
the selections.
➊ Use
to specify the values for Horizontal Shift and
Vertical Shift.
Check the orientation of the document in Original Orientation.
Select Save after checking your selections.
The display returns to the Image Shift screen.
To adjust the image shift for side two, select Side 2 and repeat
Steps 4 to 6.
82
Select Save after checking your selections.
The display returns to the Added Features screen.
Select other features, if necessary.
Page 99

Selecting the Document Size
(Original Size)
This feature allows you to specify the document size to copy if you wish to copy a non-standard size
document or when the size of the copy paper differs from the document.
The method to specify the document size is as below.
Auto Detect
The size of the document is automatically detected.
Fixed Size
You can select from the 11 preset fixed sizes for documents (A3, B4, A4, A4 , A5, A5 , 8.5x11” , 89 x
127 mm, 102 x 152 mm, 127 x 178 mm, 203 x 254 mm).
●
The factory default for the document sizes are A3, B4, A4, A4 , A5, A5 , 8.5 x 11” , 89 x 127 mm, 102 x 152 mm,
127 x 178 mm, 207 x 254 mm.
●
You can change the factory default in Tools Mode. See “Chapter 6 Tools Mode Settings” on how to change the factory defaults.
Variable
Youcanselectthedocumentsizewithin10-432mmforXand10-297mmforY.Youcanusethe
measuringtapeatthesidesofthedocumentglasstohelpyouwiththeinputofthedocumentsize.
Making Copies
5
83
Page 100

5.8 Selecting the Document Size
○○○○○○○○○○○○○○○○○○○○○○○○○○○○○○○○○○○○○○○○○○○○○○○○○○○○○○○○○○○○○○○○
Procedure
Load the documents.
4.2 Loading Documents
Select Original Size on the Added Features screen.
The Original Size screen is displayed.
Making Copies
5
Specify the region of the document to be scanned.
When specifying a fixed size:
➊ Select the size of the document to be scanned.
When specifying a non-standard size:
➊ Use
to specify the values for X and Y.
● Select the Cancel button to cancel
the selections.
84
Select Save after checking your selections.
The display will return to the Added Features screen.
Select other features, if necessary.
Enter the number of copies by using the keypad and press
Start.
The documents will be scanned according to the size input.
 Loading...