

Page 1

Xerox DocuColor 12 Digital
Colour Printer/Copier
System Administration Guide
Page 2

Prepared by:
Xerox Europe Technical Centre
Global Knowledge & Language Services
Bessemer Road
Welwyn Garden City
Hertfordshire
AL7 1HE
ENGLAND
©
1999 Xerox Corporation. All rights reserved.
Copyright protection claimed includes all forms and m at t ers of
copyrightable material an d inf ormation now allowed by statutory or
judicial law or hereinafte r granted, including without lim itation,
material generated fro m the software programs that are displayed
on the screen such as styles, templates, icons, screen displays,
looks, etc.
®
Xerox
, The Document Company®, the stylized X, and all Xerox
product names and prod uc t numbers mentioned in this publication
are registered tradema rk s of Xe rox C orporation. Other company
brands and product names may be trademarks or regis t ered
trademarks of their respec t iv e c ompanies and are also
acknowledged.
PANTONE
®
* Colours generated by t he D oc uColor 12 are fourcolour process simulations and may not match PANTONE identified
solid colour standards. Use current PANTONE Colour Reference
Manuals for accurate colour.
PANTONE Colour simulations are only obtainable on this product
when driven by qualified Pantone-licensed software packages.
Contact Pantone, Inc. for a current list of qualified licensees.
*Pantone, Inc.’s check-standa rd t rademark for colour.
©Pantone, Inc., 1988.
Changes are periodically made to this document. Technical updates
will be included in subseq uent editions.
Printed in the United Kingdom.
Part Number: 708P834 45
Page 3

Safety Notes
1
The Xerox DocuColor 12 c opier/printer and the
recommended maint enance supplies have been
designed and tested to meet strict safety
requirements. Attention to the f ollowing notes will
ensure the continued saf e operation of your
copier/printer.
Electrical safety
• Use only the power cord supplied with this
equipment.
• Plug the power cord directly int o a c orrectly
grounded electrical out let . Do
extension cord. If you do not know whether or
not an outlet is grounded, co ns ult a qualified
electrician
• Do not use a ground adapte r plug to connect
this equipment to an electrica l outlet that la cks
a ground connection terminal.
WARNING: You may get a severe electrical shock if the outlet is not correct ly grounded.
not
use an
2
3
4
• Do not place the copier/pri nt er w here people
may step on or trip on the power c ord. Do not
place objects on the power cord.
• Do not override or disable el ec tr ic al or
mechanical interlocks.
• Do not obstruct the ventilat ion openings.
These openings are prov ided to prevent
overheating of the machine.
DOCUCOLOR 12 USER GUIDE I
5
6
7
Page 4

WARNING: Never push objects of any kind int o
slots or openings on this equipment. Making a
1
contact with a voltage point or shorting out a part
could result in fire or electrical s hock.
• If any of the following conditions occur, switch
off the power to the machine immediately and
disconnect the power cord from the electrical
outlet. Call an authorized Xerox service
representative to correct the problem.
2
3
– The machine emits unusual noises or
odors.
– The power cord is damaged or frayed.
– A wall panel circuit breaker, fuse, or other
safety device has been tripped.
– Liquid is spilled into the copier/printer.
– The machine is exposed to water.
– Any part of the machine is dam aged.
Disconnect Device
The power cable is the disconnect device for this
equipment. It is attached to the bac k of th e
4
machine as a plug-in device. To remove all
electrical power from the machine, disconnect the
power cable from the electric al outlet.
5
6
7
II DOCUCOLOR 12 USER GUIDE
Page 5

Laser safety
CAUTION: Use of controls, adjustm ents, or
procedures other than thos e specified in this
documentation may result in a h az ardous
exposure to laser radiation.
This equipment complie s wit h international safety
standards. With specific regard to laser safety, the
equipment complies with performance standards
for laser products set by governm ent, national,
and international agencies as a Class 1 laser
product. It does not emit hazardous light, as the
beam is totally enclosed during all phases of
customer operation and m aintenance.
1
2
Maintenance safety
• Do not attempt any maintenance procedure
that is not specifically described in the
documentation that is supplie d w it h y our
copier/printer.
• Do not use aerosol cleaners . Th e us e of
supplies that are not approv ed may cause
poor performance of the co pier/printer, and
could create a dangerous co ndition.
• Use the supplies and clean ing materials only
as directed in this manual. Keep all of these
materials out of the reach of children.
• Do not remove the covers or guards that are
fastened with screws. There are no parts
behind these covers that y ou c an maintain or
service.
Do not perform any maint enance procedures
unless you have been trained to do them by a
Xerox representative or unless a procedure is
specifically described in one of the copier/printer
manuals.
3
4
5
DOCUCOLOR 12 USER GUIDE III
6
7
Page 6

Operational safety
1
Your Xerox equipment and sup plies were
designed and tested to meet strict safety
requirements. These include s af et y agency
examination, approval, and compliance with
established environmental standard s .
Your attention to the following sa fe ty guidelines
2
will help ensure the continued safe operation of
your copier/printer:
• Use the materials and supplies specifically
designed for your copier/printer. The use of
unsuitable materials may result in poor
performance of the machine and possibly a
hazardous situation.
3
• Follow all warnings and inst ruc t ions that are
marked on or supplied wit h t he m ac hine.
• Place the machine in a room t hat provides
adequate space for ventilation and servicing.
• Place the machine on a level, s olid surface
(not on a thick pile carpet) that has adequate
strength to support the we ight of th e m ac hine.
4
• Do not attempt to move the machine. A
leveling device that was low ered when your
machine was installed may dam age the
carpet or floor.
• Do not locate the machine near a heat source.
• Do not locate the machine in direct sunlight.
5
• Do not locate the machine in line with the cold
air flow from an air conditioning system.
• Do not place containers of coffee or other
liquid on the machine.
• Do not block or cover the slots and op enings
on the machine. Without adequate ventilation,
6
the machine may overhe at .
• Do not attempt to override a ny elec t ric al or
mechanical interlock devices.
WARNING:Be careful when working in areas
identified with this warning s y m bol. These areas
may be very hot and could caus e personal injury.
7
If you need any additional s af et y in fo rm at ion
concerning the machine or materials, contact your
Xerox representative.
IV DOCUCOLOR 12 USER GUIDE
Page 7

Ozone safety
This product produces ozone during normal
operation. The ozone is heavier than air, and the
quantity is dependent on c opy v olume. Providing
the correct environmental parame t ers , as
specified in the Xerox installati on procedures,
ensures that concentrat ion levels meet safe limits.
1
If you need additional information about ozone,
request the Xerox publicat ion,
600P83222, by calling 1-800-828-6571 in the
USA. For a French language version, call 1-800828-6571 in the USA, then pres s 2.
OZONE
,
2
3
4
DOCUCOLOR 12 USER GUIDE V
5
6
7
Page 8

1
2
3
4
5
6
7
VI DOCUCOLOR 12 USER GUIDE
Page 9

Notices
This equipment has been test ed and found to comply with
the limits for a Class B digital device, pursuant to Part 15 of
the FCC Rules. These limits are designed to provide
reasonable protection against harmful interference in a
residential installation. This equipment generates, uses,
and can radiate radio frequency energy and, if not installed
and used in accordance wit h t he instructions, may cause
harmful interference to ra dio communications. How ev er,
there is no guarantee that int erf erence will not occur in a
particular installation. If this equipment does cause harmful
interference to radio or television reception, which can be
determined by turning the equipment off and on, the user
is encouraged to try to correc t the int erf erence by one or
more of the following meas ures:
• Reorient or relocate the receiving antenna.
1
2
Radio Frequency Emissions
3
FCC
4
5
• Increase the separation between the
equipment and receive r.
• Connect the equipment int o an outlet on a
circuit different from that to which the receiver
is connected.
• Consult the dealer or an experienced radio/TV
technician for help.
Changes or modification s to this equipment not
specifically approved by t he Xerox Corporation may void
the authority granted by the FCC to operate this
equipment.
DOCUCOLOR 12 USER GUIDE IX
6
7
Page 10

Shielded cables must be us ed with this equipment to
maintain compliance with FCC regulations.
1
In Canada
This digital apparatus does not exceed the Class
B limits for radio noise emissions fr om digital
apparatus as defined in the Rad io int erference
regulations of Industry Ca nada.
2
FCC
The following applies to the product when
equipped with the Token Ring or Banyan Vines
connectivity options:
3
4
5
This equipment has been t es t ed and found to
comply with the limits for a Class A digital de v ic e,
pursuant to Part 15 of the FCC Rules. These limits
are designed to provide reasonable protection
against harmful interference when the equipmen t
is operated in a commercial environment. This
equipment generates, uses, and can radiate radio
frequency energy and, if n ot ins talled and used in
accordance with the instruction manual, may
cause harmful interferen c e to radio
communications. Operation of this equipment in a
residential area is likely to cause harmful
interference in which case t he user will be
required to correct the inte rfe rence at his/her own
expense.
Changes or modification s to this equipment not
specifically approved by t he Xerox Corporation
may void the user’s authority to operate this
equipment.
Shielded cables must be used with this equipment
to maintain compliance with FCC regulations.
In Canada
6
This digital apparatus does not exceed the Class
A limits for radio noise emissions fr om digital
apparatus as defined in the Rad io int erference
regulations of Industry Ca nada.
7
X DOCUCOLOR 12 USER GUIDE
Page 11

Safety Extra Low Voltage Approval
The Xerox DocuColor 12 c opier/printer is in
compliance with various governmental agencies
and national safety regulations. All system ports
meet the Safety Extra Low Voltage (SEL V) circuits
for connection to customer-owned devices and
networks. Additions of cus t om er-owned or thirdparty accessories that are attached to the copier/
printer must meet or excee d th e requirements
listed above. All modules tha t re quire external
connection must be installed per the DocuColor
12 installation procedure.
1
2
3
4
5
6
DOCUCOLOR 12 USER GUIDE XI
7
Page 12

Certifications . . . in Europe
1
The CE marking that is applied to this product
symbolizes Xerox Europ e’s Decl aration of
Conformity with the following applicable Directives
of the European Union as o f the dates indicated:
January 1, 1995: - Council Dire c tive 73/23/EEC
amended by Council Direc t iv e 93/ 68/EEC,
2
3
approximation of the laws of th e member states
related to low voltage equipme nt .
January 1, 1996: - Council Dire c tive 89/336/EEC,
approximation of the laws of th e member states
related to electromagnet ic co m patib ilit y.
Changes or modification s to this equipment not
specifically approved by Xerox Europe may void
the user’s authority to operate the equipment.
Shielded cables must be used with this equipment
to maintain compliance with the EMC Directive 89/
336/EEC.
This equipment is not primarily intended for use in
a domestic environment.
4
A full declaration, defining t he relevant Directives
and referenced standards, can be obtained from
your Xerox Europe representative.
WARNING: In order to allow this equipm ent to
operate in proximity to Industrial, Scientific and
Medical (ISM) equipm ent , the ex te rnal radiation
from ISM equipment ma y hav e t o be lim ited or
5
special mitigation meas ures taken.
6
7
XII DOCUCOLOR 12 USER GUIDE
Page 13

The following applies to the product when
equipped with Token Ring or Banyan Vines
connectivity options:
WARNING:This is a Class A product. In a
domestic environment , th is product may cause
radio interference, in whic h c as e t he us er may be
required to take adequate meas ures.
Changes or modification s to this equipment not
specifically approved by Xerox Europe may void
the user’s authority to operate the equipment.
Shielded cables must be used with this equipment
to maintain compliance with the EMC Directive 89/
336/EEC.
1
2
3
4
5
6
DOCUCOLOR 12 USER GUIDE XIII
7
Page 14

It’s Illegal . . . in the USA
1
Congress, by statute, h as forbidden t he copying of
the following subjects under ce rtain
circumstances. Penalties of f ine or imprisonment
may be imposed on those guilty of making such
copies.
1. Obligations or Securities of th e U nit ed States Govern-
2
ment, such as:
Certificates of Indebtedness National Bank Curren cy
Coupons from Bonds Federal Reserve Ban k Not es
Silver Certificates Gold Certificates
United States Bonds Treasury Notes
3
Federal Reserve Notes Fractional Notes
Certificates of Deposit Paper Money
Bonds and Obligations of ce rtain ag encies of the
government, such as FHA, etc.
Bonds. (U.S. Savings Bonds may be photo-
4
graphed only for publicity purpose s in connection with the campaign for the sale of such
bonds.)
Internal Revenue Stamps. (If necessary to
copy a legal document on w hic h t here is a
canceled revenue stamp, this m ay be done,
provided the reproducti on of t he document is
performed for legal purposes.)
5
Postage Stamps, canceled or uncanceled.
(For philatelic purposes, Postage Stamps may
be photographed, provided the reproduction is
in black and white and is less th an 75% or
more than 150% of the linea r dimensions of
the original.)
Postal Money Orders.
6
Bills, Checks, or Drafts of money drawn by or
upon authorized officers of the United States.
Stamps and other representatives of value, of
whatever denomination, which have been or
may be issued under any Ac t of C ongress.
7
XIV DOCUCOLOR 12 USER GUIDE
Page 15

2. Adjusted Compensation Certific at es f or Veterans of the World Wars.
3. Obligations or Securities of any For eign Government, Bank, or Corpo rat ion.
4. Copyrighted material, unless pe rm is sion of
the copyright owner has be en obtained or the
copying falls within the “fair us e” or library
reproduction rights provisions of the copyright
law. Further information of these provisions
may be obtained from the Copyr ight Office,
Library of Congress, Washington, D.C. 20559.
Ask for Circular R21.
5. Certificates of Citizenship or Naturalization.
(Foreign Naturalization C ertificates may be
photographed.)
6. Passports. (Foreign Passports may be pho to graphed.)
7. Immigration Papers.
8. Draft Registration Cards.
9. Selective Service Induction Pap ers th at bear any of the following Regist rant’s information:
1
2
3
Earnings or Income Dependency Status
Court Record Previous military service
Physical or mental condition
Exception: U.S. Army and Navy discharge
certificates may be photographed.
10. Badges, Identification C ards, Passes, or
Insignia carried by Military or Naval personnel,
or by members of the various Fe deral Departments, such as FBI, Treasury, etc. (unless
photograph is ordered by t he head of such
department or bureau.)
Copying the following is also prohibited in
certain states:
Automobile Licenses - Drivers’ Licenses Automobile Certificates of Title.
The above list is not all inclusive, and no
liability is assumed for its complet eness or
accuracy. In case of doubt, consult your
attorney.
4
5
6
DOCUCOLOR 12 USER GUIDE XV
7
Page 16

It’s Illegal . . . in Canada
1
Parliament, by statute, has forbidden the copying
of the following subjects under ce rtain
circumstances. Penalties of fines or imprisonment
may be imposed on those guilty of making such
copies.
1. Current bank notes or current paper mon ey.
2
3
4
2. Obligations or securities of a government or bank.
3. Exchequer bill paper or revenue paper.
4. The public seal of Canada or of a province, or the seal
of a public body or authority in Canada, or of a court of
law.
5. Proclamations, orders, regulations or appointments, or
notices thereof (with inten t to fals ely cause same to
purport to have been print ed by t he Queen’s Printer
for Canada, or the equivalent printer for a province).
6. Marks, brands, seals, wrappers or designs used by or
on behalf of the Government of Canada or of a province, the government of a state other than Canada or
a department, board, Commission or agency established by the Government of Ca nada or of a province
or of a government of a state other th an Canada.
7. Impressed or adhesive stamps used for the purpose
of revenue by the Government of Canada or of a province or by the government of a state other than Canada.
8. Documents, registers or records kept by public offi-
5
6
cials charged with the duty of mak ing or issuing certified copies thereof, wher e th e co py fal se ly purports to
be a certified copy thereof.
9. Copyrighted material or tradem ark s of any m anner or
kind without the consent of the copyright or trademark
owner.
10. The above list is provided for y our convenience and
assistance, but it is not all inclusive, and no liability is
assumed for its completeness or accuracy. In case of
doubt, consult your solici to r.
7
XVI DOCUCOLOR 12 USER GUIDE
Page 17

Environmental Notices . . . in the USA and Europe
As an ENERGY STAR® partner, Xerox
Corporation has determined that this copier/printer
model meets the ENERGY STAR
energy efficiency.
®
guidelines for
1
ENERGY STAR
The ENERGY STAR program is a team effort
between the Environment Protection Agency and
the office equipment industry to promote energyefficient personal computers, monitors, printers,
fax machines and copiers. R educing the energy
consumption of this equipm ent will help combat
smog, acid rain and long-term c hanges to the
climate by decreasing the emissions that result
from generating elect ric ity.
®
is a US registered trademark.
Environmental Notices . . . in Canada
As a participant in the Environmental Choic e
program, Xerox Corpora ti on has determined that
this copier/printer model meets the Environmental
Choice guidelines for ene rgy efficie nc y.
Environment Canada establis hed the
Environmental Choice program in 1988 to help
consumers identify envi ronmentally responsible
products and services. Copier, printer and fax
products must meet energy efficiency and
emissions criteria, and ex hibit compatibility with
recycled supplies. Currently, Environmental
Choice has more than 1600 approved products
and 140 licensees. Xerox has been a leader in
offering EcoLogo approved pr oducts. In 1996,
Xerox became the first company lic ensed to use
the Environmental Choice EcoLogo for its copiers
printers, and fax machines .
2
3
4
5
DOCUCOLOR 12 USER GUIDE XVII
6
7
Page 18

1
2
3
4
5
6
7
XVIII DOCUCOLOR 12 USER GUIDE
Page 19

Content s
Safety Notes............................................ ..... ......................................... I
Notices................................................................................................ VII
Electrical safety..........................................................................................I
Disconnect Device.....................................................................................II
Laser safety..............................................................................................III
Maintenance safety..................................................................................III
Operational safety.................................. .................................................IV
Ozone safety............................................................................................V
Radio Frequency Emissions...................................................................VII
FCC ..........................................................................VII
In Canada................................................................VIII
FCC .........................................................................VIII
In Canada................................................................VIII
Safety Extra Low Voltage Approval.........................................................IX
Certifications . . . in Europe ......................................................................X
It’s Illegal . . . in the USA ........................................................................XII
It’s Illegal . . . in Canada........................................................................ X IV
Environmental Notices . . . in the USA ................................................... XV
Environmental Notices . . . in Canada....................................................XV
1
2
3
1. About this manual.........................................................................1-1
Conventions used in this manual...........................................................1-2
2. Managing Counts and Accounts..................................................2-1
Overview............................................................................................... 2-1
Meter Check.......................................................................................... 2-2
Confirm Consumables...........................................................................2-3
Auditron Administration mode................................. .............................. 2-4
Entering the Auditron Administration mode............. 2-5
Exiting the Auditron Administration mode................ 2-6
Create/Modify User Accounts ..................................2-7
Edit Accounts....................................................... .... 2-8
Reset Accounts......................................................2-10
Auditron Access..................................................... 2-11
Change of Auditron Administrator Password......... 2-12
3. Tools Mode.....................................................................................3-1
Overview............................................................................................... 3-1
Entering and Exiting Tools Mode...................................... .....................3-3
Entering Tools Mode................................................3-3
Exiting Tools Mode..................................................3-4
Tray Management ................................................................................. 3-5
Paper Type......................... ....................... ..............3-5
Auto Tray Setup....................................................... 3-7
Feature Defaults.................................................................................... 3-9
Basic procedure for setting Feature Defaults ........ 3-10
Paper Supply............................................. ............3-11
4
5
6
7
DOCUCOLOR 12 USER GUIDE XVII
Page 20

Reduce/Enlarge. ....................................................3-11
Original Type .........................................................3-12
1
2
3
Machine Set-up................................................................................... 3 -25
Audio Tones ........................................................................................ 3-27
Customise Screens............................................................................. 3-29
System Image Quality .........................................................................3-31
4
Machine Timeouts...............................................................................3-36
Reduce/Enlarge Defaults.....................................................................3-38
Change Tools Access Number................................... ....................... ..3-40
Original Size Presets........................................................................... 3-41
Photo Type – Photo & Text.................................... 3-13
Photo Type – Photo Type......................................3-14
Text Type......................................................... ...... 3-15
Lighten/Darken................................... ...................3-16
Output Colour ........................................................3-16
Colour Shift............................................................3-17
Saturation ..............................................................3-17
Variable Colour Balance (Yellow, Magenta, Cyan, Black)
3-18
Sharpness.................... .................................... ...... 3-19
Margin Shifts for Side 1 and Side 2 ....................... 3-20
Corner Shift............................................................ 3-21
Variable Shift .........................................................3-21
Edge Erase................................................... ......... 3-22
Original Orientation................................................3-23
2 Sided Copy.........................................................3-23
Side 2 Rotate.........................................................3-23
Multiple-Up............................................................. 3-24
2 Pages Up............................................................3-24
4 & 8 Pages Up......................................................3-24
Adjusting Image Recognition settings....................3-32
Auto Screening Adjust........................................... 3 -34
4. Maintenance...................................................................................4-1
Overview............................................................................................... 4-1
5
6
Cleaning the Touch Screen...................................................................4-2
Cleaning the Document Glass....................................................... ........ 4-3
Cleaning the Document Glass Cover ...................................... .............. 4-4
Cleaning the Edit Pad............................................................................ 4-5
Supply replacement............................................................................... 4-6
Replacing the Dry Ink (Toner) Cartridge.................. 4-6
Replacing the Dry Ink Waste Container...................4-9
Replacing the Developer Waste Container............4-12
Replacing the Copy/Print Cartridge ....................... 4-15
Replacing the Fuser Oil Cartridge .........................4-19
Replacing the Cleaning Web .................................4-24
Calling for Service ...............................................................................4-27
Ordering supplies ................................................................................4-29
Supplies to keep on hand......................................4-30
Recommended papers and transparencies........... 4-31
Replacement Manuals (USA market only)............. 4-31
7
XVIII DOCUCOLOR 12 USER GUIDE
Page 21

1. About this manual
1
The System Administration screens enable the
system administrator to check meters,
consumables, and output counts. It also enables
the system administrator to access the Tools
Mode.
In the Tools Mode, the System Administrator can
set the default values for a variety of copy output
and copier/printer features, register custom
colours, and relocate/ad d or delete features from
screens.
Finally, the System Administrator is generally the
one person trained to perform maintenance tasks,
order supplies, and perfo rm removal/replacement
procedures.
The System Administration guide therefore is
divided into three parts:
• Checking meters, consum ables, and output
counts
• Tools mode
2
3
4
• Maintenance
This guide should be used in co njunction with the
DocuColor 12 User Guide
Materials for the DocuColor 12
information about the Do cu C olor 12 with External
Digital Front End (DFE), refer to the
Printer User Guide
For planning information , ref er to th e
12 Customer Site Planning Guide
DOCUCOLOR 12 SYSTEM ADMINISTRATION GUIDE 1–1 ABOUT THIS MANUAL
.
and the
. For more
Recommended
DocuColor 12
DocuColor
.
5
6
7
Page 22
Conventions used in this manual
1
Descriptions of features and options generally
precede procedure steps. You may need to
combine several procedures to achieve
desired results.
This manual uses a numbe r of symbols to
help you identify various kinds of information.
2
3
These symbols are described below.
The 1, 2, 3 symbol indicates th e beginning of
a procedure. Be sure to follow s te ps caref ully
in the order given.
NOTE: Notes provide extra informat ion that
may be helpful to your unders tand ing or
performance of procedures.
KEY POINT: The key symbol draws your
attention to important additio nal information,
hints, or tips.
4
WARNING:This symbol alerts you to an oper-
ating or maintenance pro ce dure, practice, or
condition, that, if not strictly observed, could
result in injury or loss of life.
WARNING:This Hot Surface symbol w arns
5
6
you of an area that may be very hot and would
cause personal injury if tou ch ed.
CAUTION: T his symbol alerts you to an
operating or maintenance procedure, practice,
or condition that, if not strictly observed, could
result in damage to or destru c tio n of
equipment or loss of data.
7
ABOUT THIS MANUAL 1–2 DOCUCOLOR 12 SYSTEM ADMINISTRATION GUIDE
Page 23
2. Managing Counts and Accounts
1
Overview
The System Administrator is responsible for
periodically checking the current counts for output
and consumables such as dry ink (toner) or fuser
oil. Any user can check these c ounts.
The System Administrator also confirms and edit s
accounts, and has the option to delete accounts or
change the system administration password.
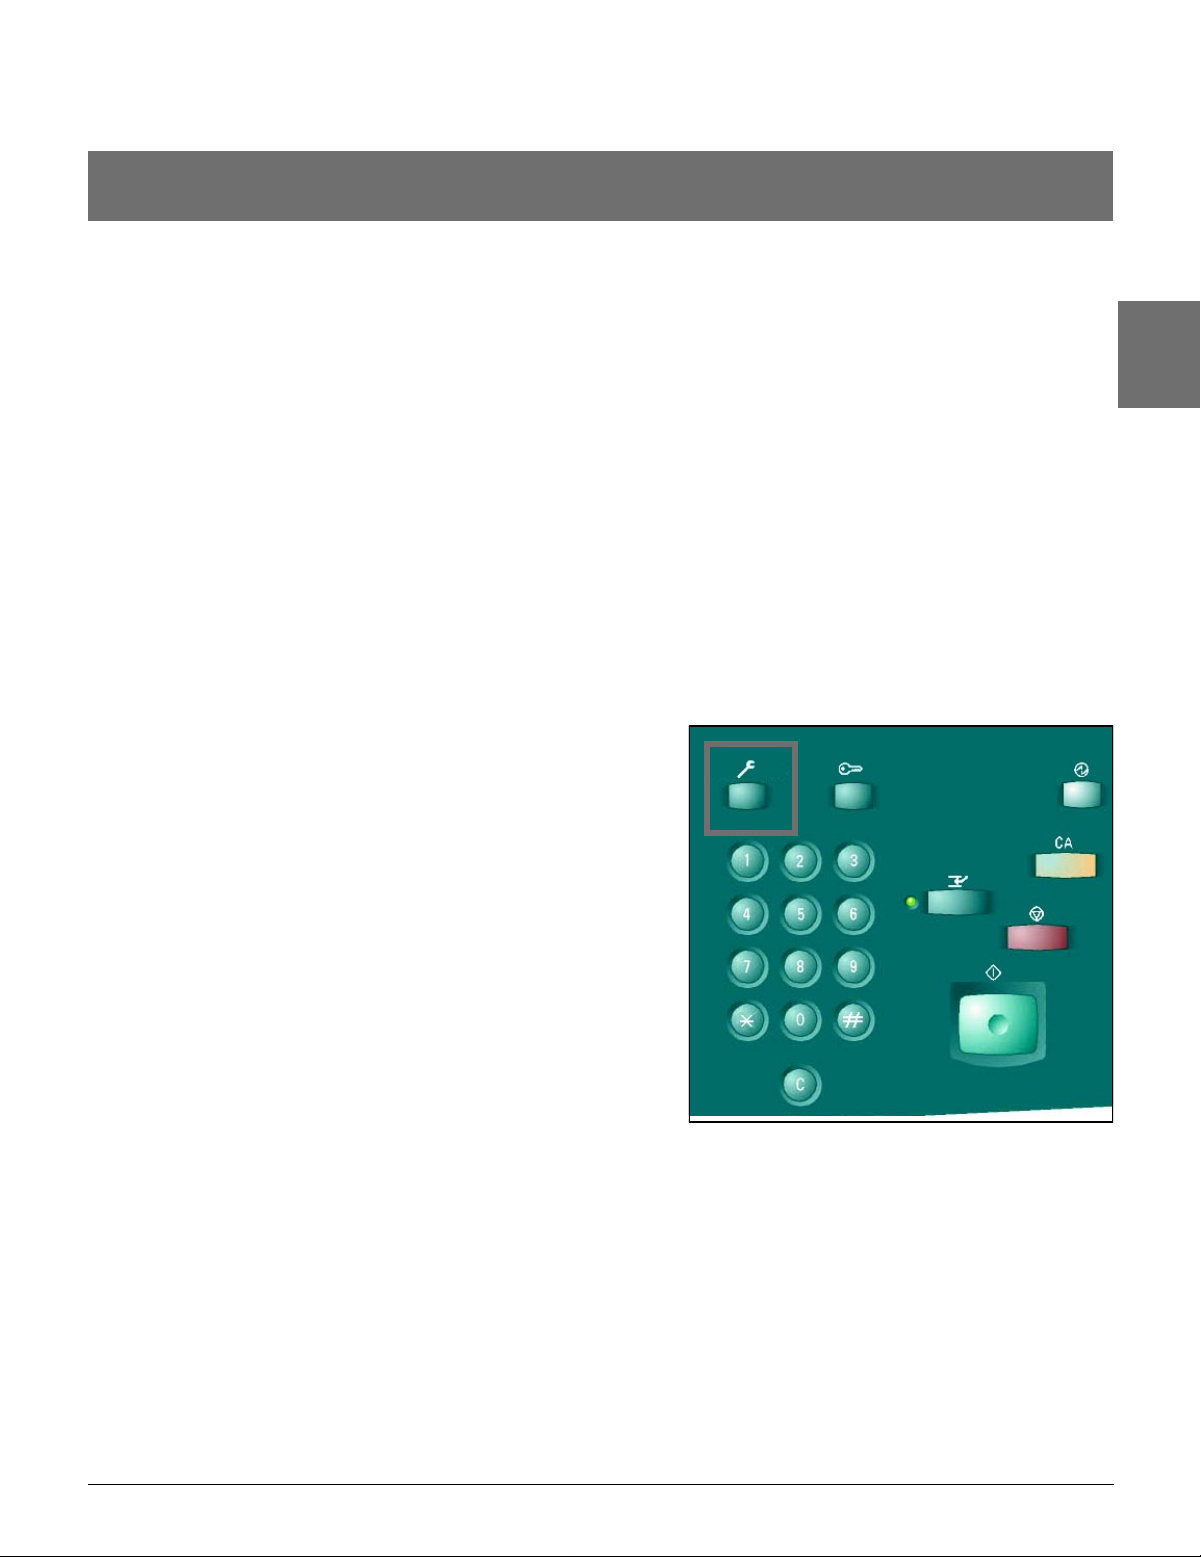
Use the Administration button, illustrated in Figure
1, above the numeric keypad and the procedures
in this chapter to perform these activities.
2
3
4
Figure 1: Administration button
DOCUCOLOR 12 SYSTEM ADMINISTRATION GUIDE 2–1 MANAGING COUNTS AND ACCOUNTS
5
6
7
Page 24
Meter Check
1
With the Meter Check feature, any user can check
the current copy volume fo r blac k and white, fullcolour, three-colour, or single colour copies.
2
1
3
2
4
3
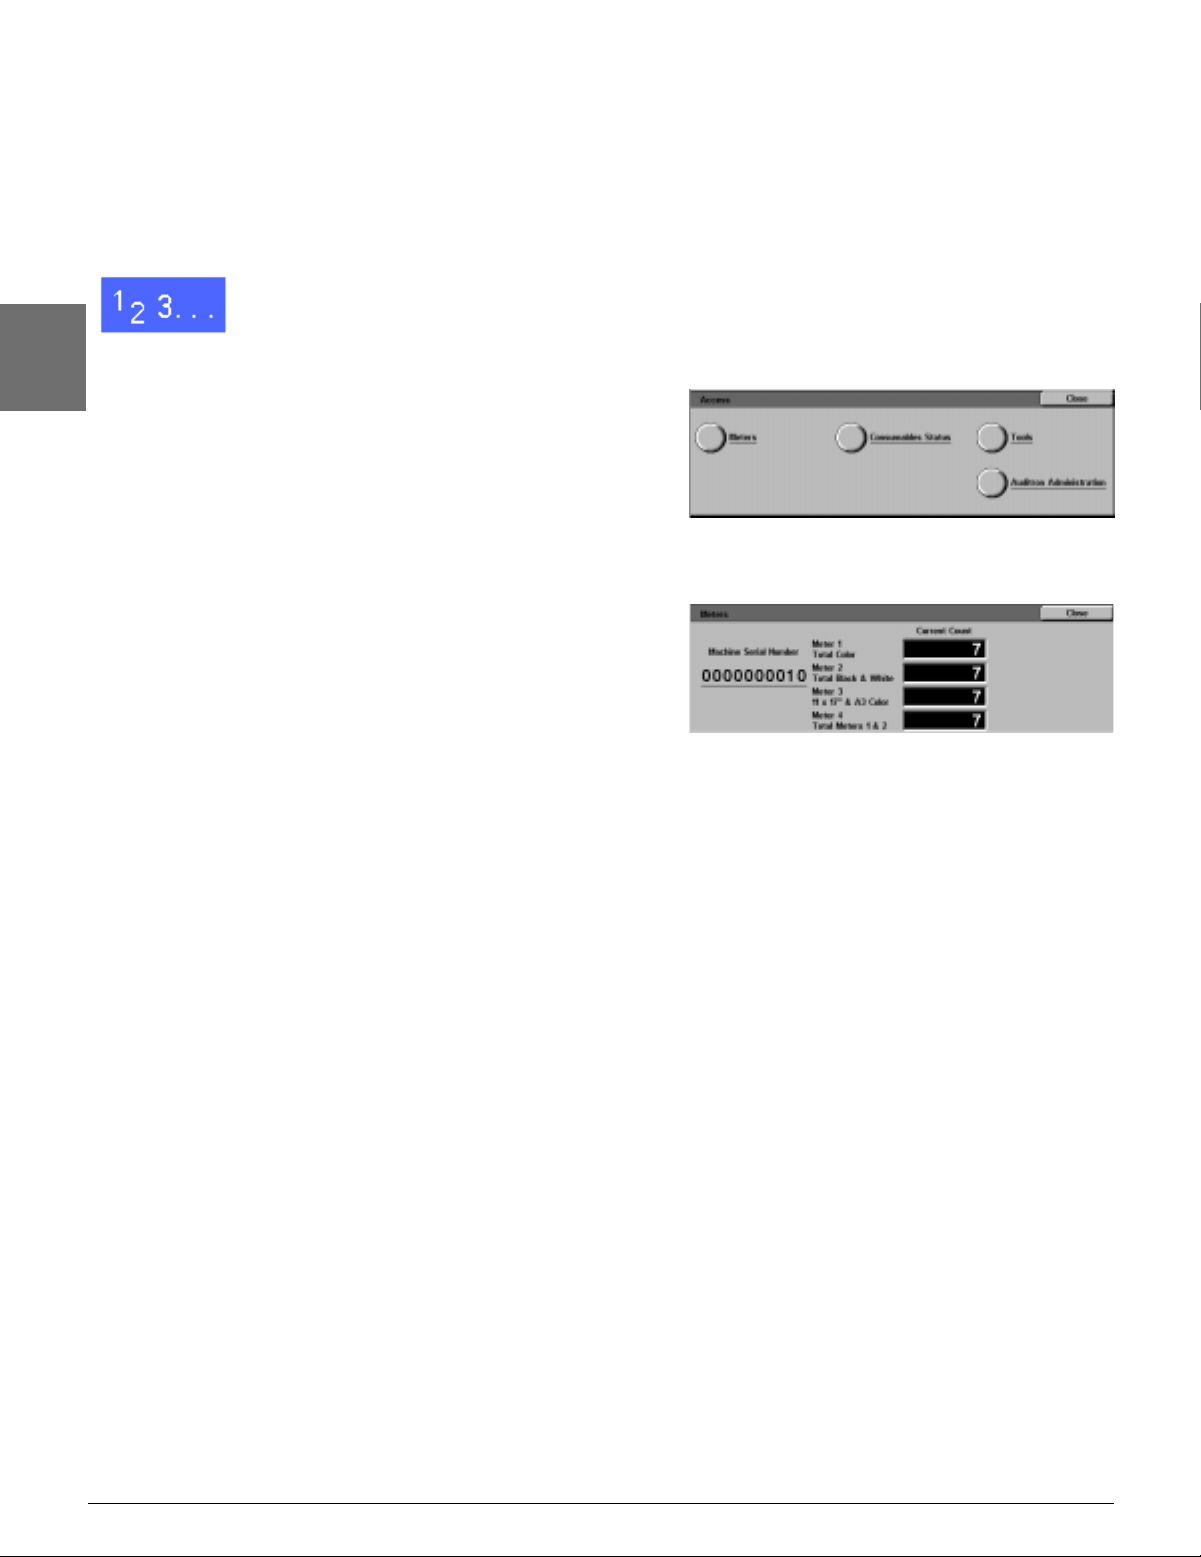
Press the Administration button above the
numeric keypad to display the A ccess screen, as
illustrated in Figure 2.
Touc h t he Meters icon to display the Meters
screen, as illustrated in Fig ure 3.
Note the current counts for the various document
types.
Figure 2: Access screen
Figure 3: Meters screen
4
5
Touch Close to display the Access screen.
Touch Close to exit Administration mode and
display the operator tabs.
5
6
7
MANAGING COUNTS AND ACCOUNTS 2–2 DOCUCOLOR 12 SYSTEM ADMINISTRATION GUIDE
Page 25
Confirm Consumables
With the Confirm Consum ables feature, any user
can check the state of DocuColor 12 consumables
to determine whether any of them needs
replacing.
1
2
1
2
3
4
5
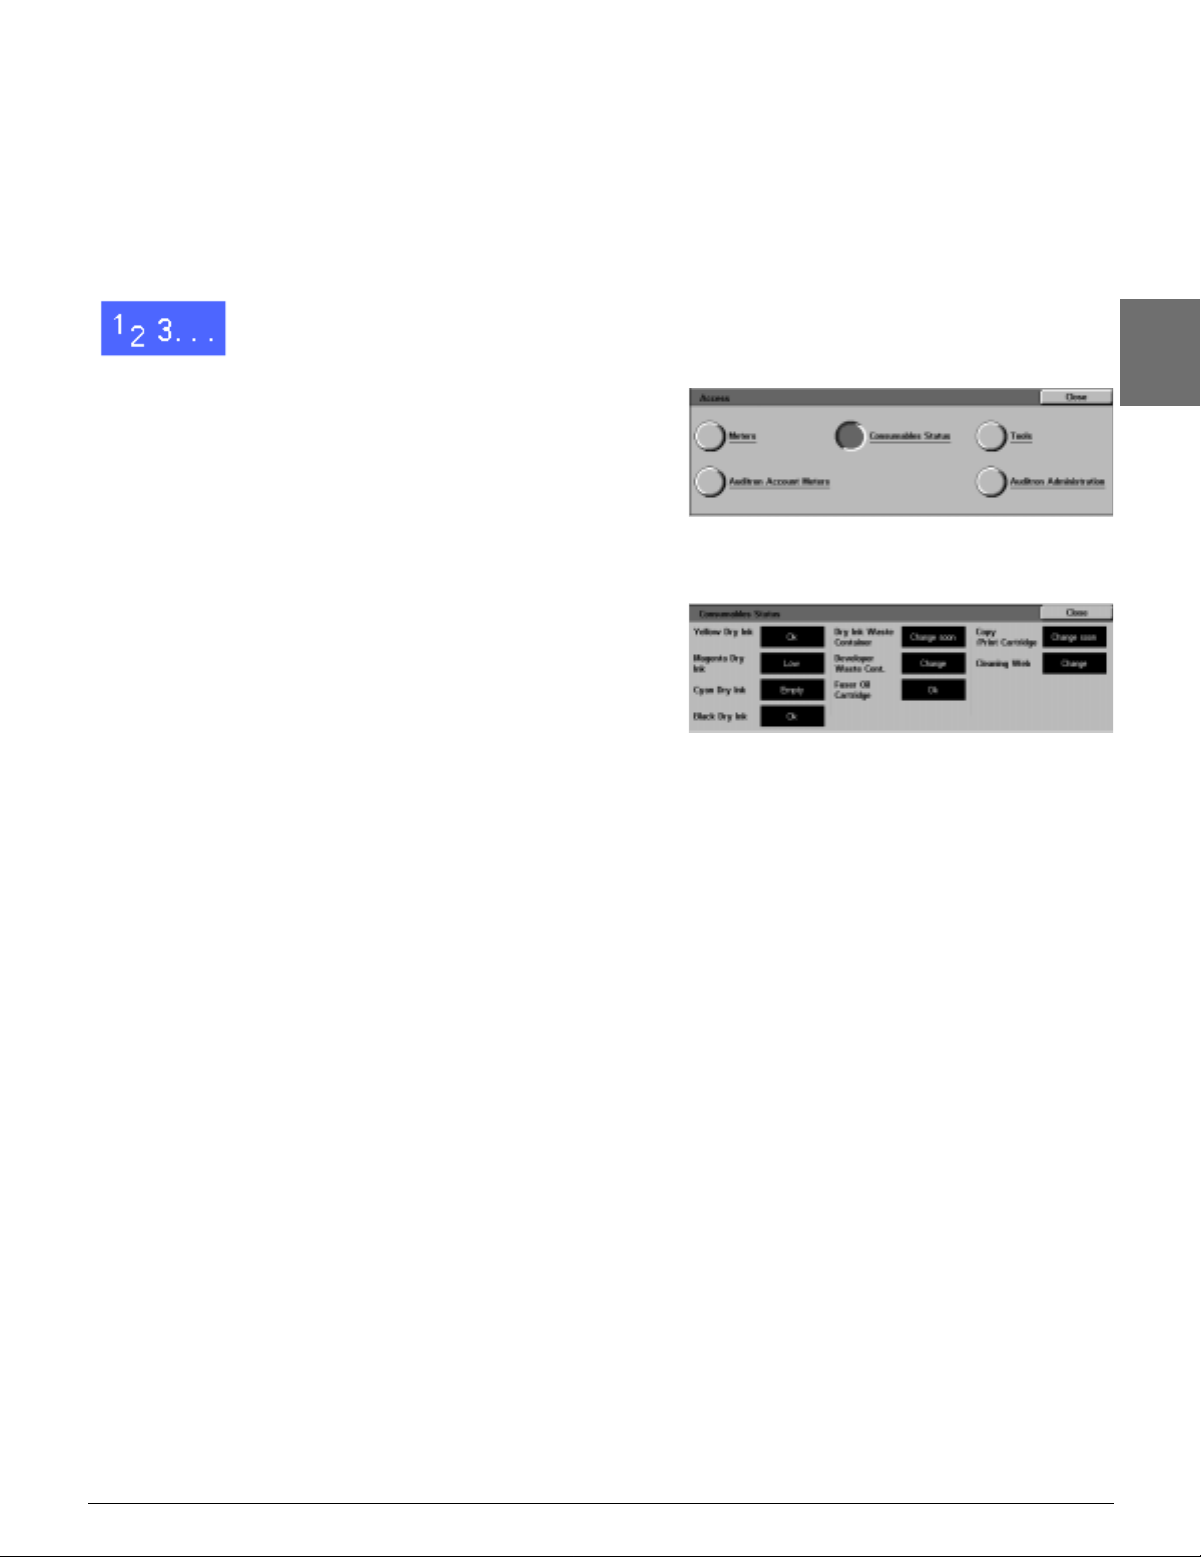
Press the Administration button above the
numeric keypad to display the A ccess screen, as
illustrated in Figure 4.
Touc h t he Consumables Status icon to display
the Consumables Status screen, as illustrated in
Figure 5.
Note the current state for the various
consumables. “OK” indic at es no replacement is
necessary.
Touch Close to display the Access screen.
Touch Close to exit Administration mode and
display the operator tabs.
Figure 4: Access screen
Figure 5: Consumables Status screen
3
4
5
DOCUCOLOR 12 SYSTEM ADMINISTRATION GUIDE 2–3 MANAGING COUNTS AND ACCOUNTS
6
7
Page 26

Auditron Administration mode
1
When enabled, the Audit ron Administration mode
keeps a count of the copy volume for eac h
registered account.
The System Administrator can perform the
following tasks in the Auditron A dministration
Mode:
2
• Create/Modify User Acc ounts
• Auditron Access
• Edit Accounts
• Reset Accounts
3
• Auditron Administrator Password
NOTE: To access any of the screens on which
you perform these functio ns , yo u m us t first ent er
the System Administrator password.
This section leads you through the procedures for
entering and exiting Auditron Administration mode
and for the tasks described above.
4
5
6
7
MANAGING COUNTS AND ACCOUNTS 2–4 DOCUCOLOR 12 SYSTEM ADMINISTRATION GUIDE
Page 27

Entering the Auditron Administration mode
1
1
2
3
Press the Administration button above the
numeric keypad to display the A ccess screen.
T o uch the Auditro n Administration button on the
screen to display the Enter Password screen, as
illustrated in Figure 6.
Use the numeric keypad to enter t he c orrect
password and touch Enter on the Touch Screen to
display the Auditron Administration screen, as
illustrated in Figure 7.
NOTE: The default password is 1111 1. Be sure to
change the password so that un aut horized
individuals do not have acc es s to the Auditron
Administration mode.
To close the window without entering a password,
touch Close.
2
Figure 6: Enter Password screen
3
Figure 7: Auditron Administration screen
4
DOCUCOLOR 12 SYSTEM ADMINISTRATION GUIDE 2–5 MANAGING COUNTS AND ACCOUNTS
5
6
7
Page 28
KEY POINT:
1
• All previous programmin g s elections are
cancelled when you press the Clear All
button in the Auditron Administration mode.
• Y ou cannot program jobs while in the Auditron
Administration mode.
2
3
Exiting the Auditron Administration mode
To exit the Auditron Administration mode, touch
the Close button on the A udit ron Administration
screen.
Touch Close to exit any screen within the Auditron
Administration mode without making changes and
to display the previous scre en.
4
5
6
7
MANAGING COUNTS AND ACCOUNTS 2–6 DOCUCOLOR 12 SYSTEM ADMINISTRATION GUIDE
Page 29

Create/Modify User Accoun ts
1
2
Use the Create/Modify User Accounts feature to
create user accounts for count administration
purposes
KEY POINT: You mu s t create an account before
you edit (enter or change) its password, ac c ount
limit, or restrictions.
On the Auditron Administration screen, touch
Create/Modify User Accounts to display the
Create/Modify User Acc ounts screen, as
illustrated in Figure 8.
Perform one of the followin g:
• Use the up and down arrows to enter a new
account numb er.
• T ouch the Input Number With Keyp ad button
and type in the new account number using the
keypad.
1
2
3
Figure 8: Create/Modify User Accounts
screen
4
3
Touch the Enter button.
Touch Close to display th e Auditron
Administration screen .
5
6
7
DOCUCOLOR 12 SYSTEM ADMINISTRATION GUIDE 2–7 MANAGING COUNTS AND ACCOUNTS
Page 30
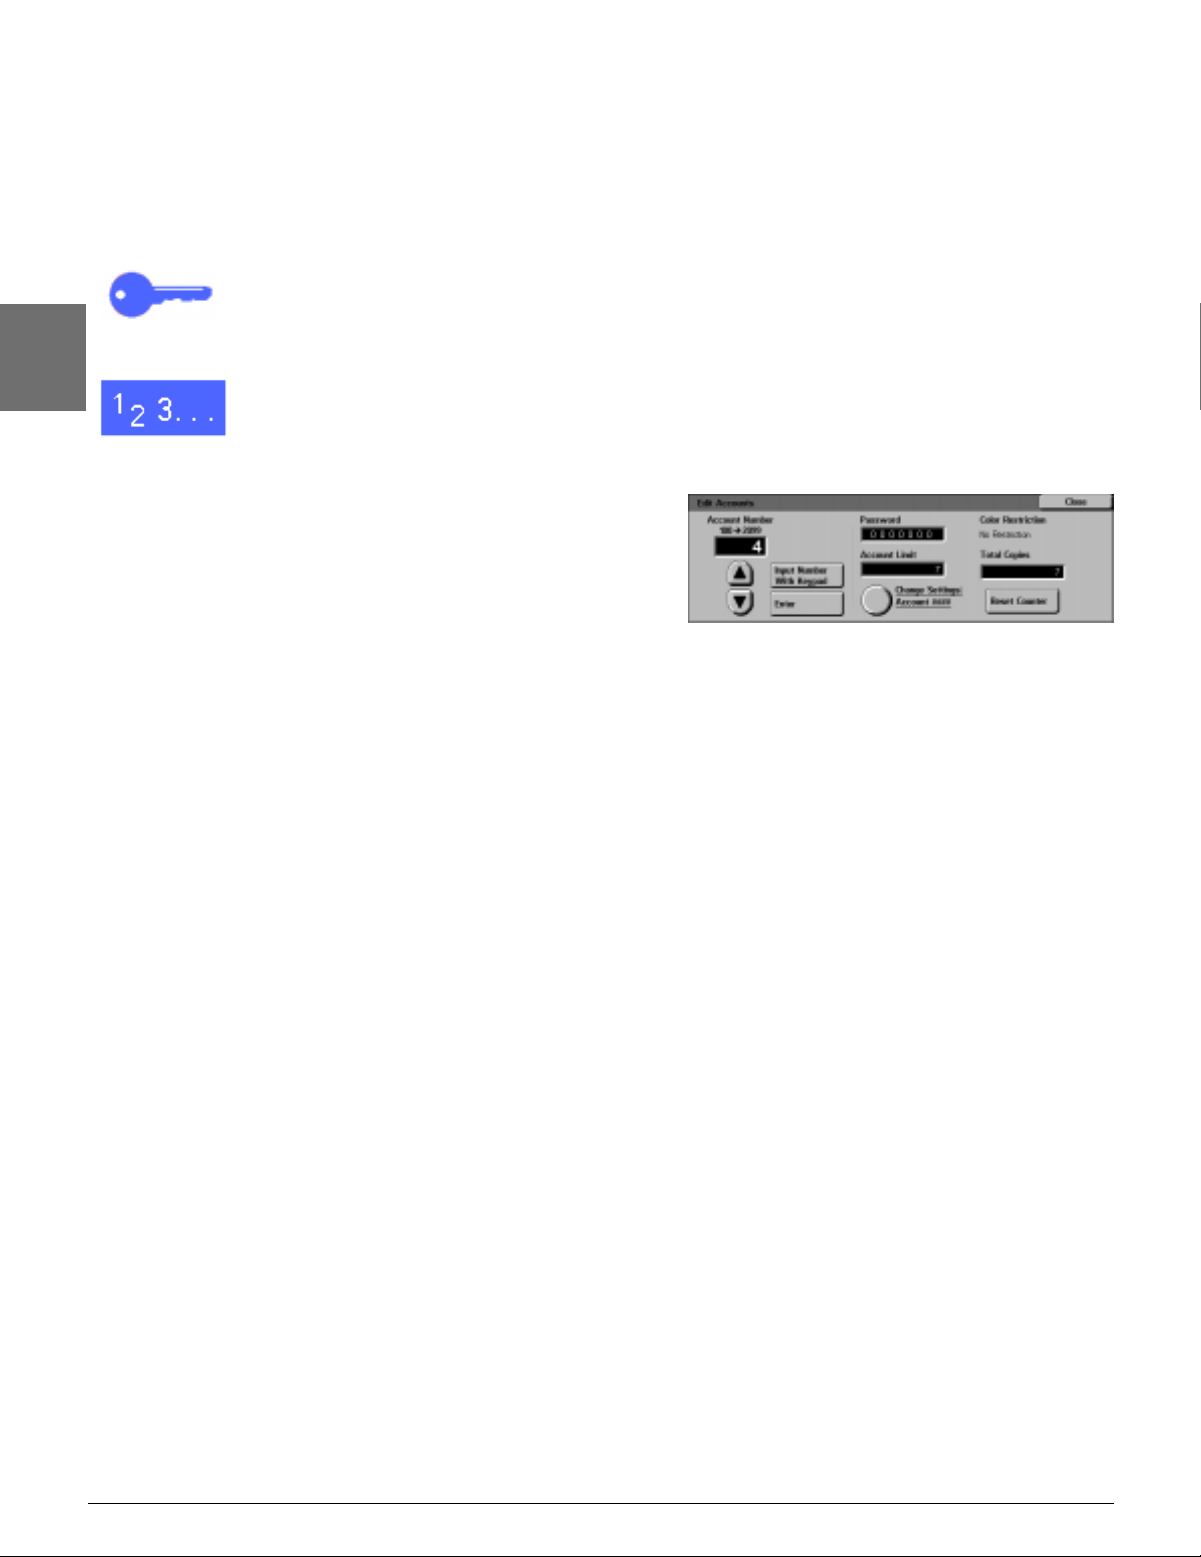
Edit Accounts
1
Use the Edit Accounts feature to c hange settings
or reset the counter for an account that was
previously created.
KEY POINT: You mu s t create an account before
you edit (enter or change) its password, ac c ount
limit, or restrictions.
2
1
3
2
3
On the Auditron Administration screen, touch Edit
Accounts to display the Edit Accounts screen, as
illustrated in Figure 9.
T o uch the Input Number with Keypa d button and
type in an account number for an existing account
using the keypad.
Figure 9: Edit Accounts screen
Touch the Enter button.
Touch the Change Settings: Account #### icon
to display the Change Settings screen.
4
5
6
7
MANAGING COUNTS AND ACCOUNTS 2–8 DOCUCOLOR 12 SYSTEM ADMINISTRATION GUIDE
Page 31

4
Perform one or more of the following:
• Enter the Account Passw ord.
Under the Account Passw ord box, touch the
Input Number with Keypa d button.
Type in a password for the account. The
password must be at least four digits long.
Touch the Enter button. The password is
displayed.
• Enter the Account Limit.
Under the Account Limit box , to uc h t he Input
Number with Keypad button.
1
Figure 10: Change Settings screen
2
5
6
7
8
Touch the Enter button. The account limit is
displayed.
• Assign Restrictions.
Touch the appropriate button to indicate
whether the account has No Restrictions,
can make Colour Only copies, or can make
Black & White Only copies.
Touch Close to display th e Edit Accounts screen.
View the settings for the password, acc ount limit,
and restrictions. If necessary, repeat step 3 to
change the values.
If you want to reset the number of T otal Copies for
the account to zero, touch the Reset Counter
button.
Repeat steps 2-5 for other accounts.
Touch Close to display th e Auditron
Administration screen .
3
4
5
DOCUCOLOR 12 SYSTEM ADMINISTRATION GUIDE 2–9 MANAGING COUNTS AND ACCOUNTS
6
7
Page 32

Reset Accounts
1
Use the Reset Accounts featur e to delete current
accounts, reset copy counts to zero , disable copy
limits, or remove colour restrictions.
2
1
2
On the Auditron Administration screen, touch
Reset Accounts to display the Reset Accounts
screen, as illustrated in Fig ure 11.
Perform one of the followin g:
• To delete all current Auditron accounts, touch
3
Delete All Accounts.
Figure 11: Reset Accounts screen
• To reset curre nt co py co unts for all accounts
to zero, touch Reset Copy Counters.
• To remove co py co unt limits, touch Disable
All Copy Limits.
• To remove co lour restrictions, enabling both
4
Black & White and Colour co py ing and
printing for all users, touch Remove Colour
Restrictions.
A confirmation screen displays.
3
Perform one of the followin g:
• To confirm the ac t ion, touch Yes.
5
4
• To cancel the action, touch No.
The Reset Accounts screen displays.
Touch Close to display th e Auditron
Administration screen .
6
7
MANAGING COUNTS AND ACCOUNTS 2–10 DOCUCOLOR 12 SYSTEM ADMINISTRATION GUIDE
Page 33

Auditron Access
1
2
Use the Auditron Access fea tu re t o enable the
Auditron feature, which tra cks cu rrent copy
counts, copy limits, colour limits, or accounts. You
can also set User Account Timeouts from the
Auditron Access screen.
KEY POINT: When the Auditron is ena bled,
users must enter passwords in order to use the
copier. Therefore, the System Administrato r m us t
ensure that at least one acc ount is created and
assigned a password. Otherw is e, th e
Administration screen s ar e ac c es s ible and the
general user screens are inac c es s ible.
On the Auditron Administration screen, touch
Auditron Access to display the Auditron Access
screen, as illustrated in Fig ure 12.
Perform one of the followin g:
1
2
3
3
• To use the Audit ron feature, touch the
Enabled button.
• To exit the Aud it ron feature, touch the
Disabled button.
• To set a timeout fo r us er ac c ounts, touch the
User Account Timeout icon to display the
User Accounts Timeout screen, as illustrate d
in Figure 13. Perform one of th e f ollowing:
• Use the up and down arrows to se t the
timeout (from 1 second to 10 m inutes)
• Touch the Disable icon to remove any
timeout restrictions.
Touch Save to display the Auditron Access
screen.
Touch Save to display the Auditron Administration
screen.
Figure 12: Auditron Access screen
Figure 13: User Accounts Timeout screen
4
5
6
DOCUCOLOR 12 SYSTEM ADMINISTRATION GUIDE 2–11 MANAGING COUNTS AND ACCOUNTS
7
Page 34

Change of Auditron Administrator Password
1
Use the Auditron Adminis tr at or Password feature
to change the password used by th e Sy s te m or
Auditron Administrator t o ent er Auditron
Administration and Tools modes.
2
1
2
3
3
On the Auditron Administration screen, touch
Auditron Administrator Password t o display the
Auditron Administrator Password screen, as
illustrated in Figure 14.
Enter a value from the numeric keypad into the
New password box. Press the Enter button.
Enter the same number i n th e C onf irm pas sword
box. Press the Enter button.
NOTE: If you make a mistake in entering a value,
press Reset, type the number again, and press
the Enter button.
Figure 14: Auditron Administrator Password
screen
4
4
Touch Close to display th e Auditron
Administration screen .
5
6
7
MANAGING COUNTS AND ACCOUNTS 2–12 DOCUCOLOR 12 SYSTEM ADMINISTRATION GUIDE
Page 35

3. Tools Mode
1
Overview
In the Tools Mode, the system administrator can
set the default values for a variety of copy output
and copier/printer features, or register custom
colours.
The Tools screen, illustrated in Figure 1, is
displayed when you enter t he Tools Mode. From
this screen, you can acces s an d c hange options
for the following features:
• Tray Management
• Feature Defaults
• Machine Set-up
• Audio Tones
2
3
4
Figure 1: Tools screen
• Customise Screens
• System Image Quality
• Machine Timeouts
• Reduce/Enlarge Defaults
• Change To ols Ac c es s Nu m ber
• Original Size Presets
DOCUCOLOR 12 SYSTEM ADMINISTRATION GUIDE 3–1 TOOLS MODE
5
6
7
Page 36

This chapter helps you enter and exit Tools Mode,
and provides information and procedures for each
1
of the features listed above to help you customise
the DocuColor 12.
KEY POINT: Touch Close on the Tools screen to
return to the operator tabs.
2
3
4
5
6
7
TOOLS MODE 3–2 DOCUCOLOR 12 SYSTEM ADMINISTRATION GUIDE
Page 37
Entering and Exiting Tools Mode
Entering Tools Mode
KEY POINT:
• All previous programmin g s elections are
canceled when you press the Clear All button
in the Tools Mo de.
• You cannot program jobs while in the Tools
Mode.
1
2
3
1
2
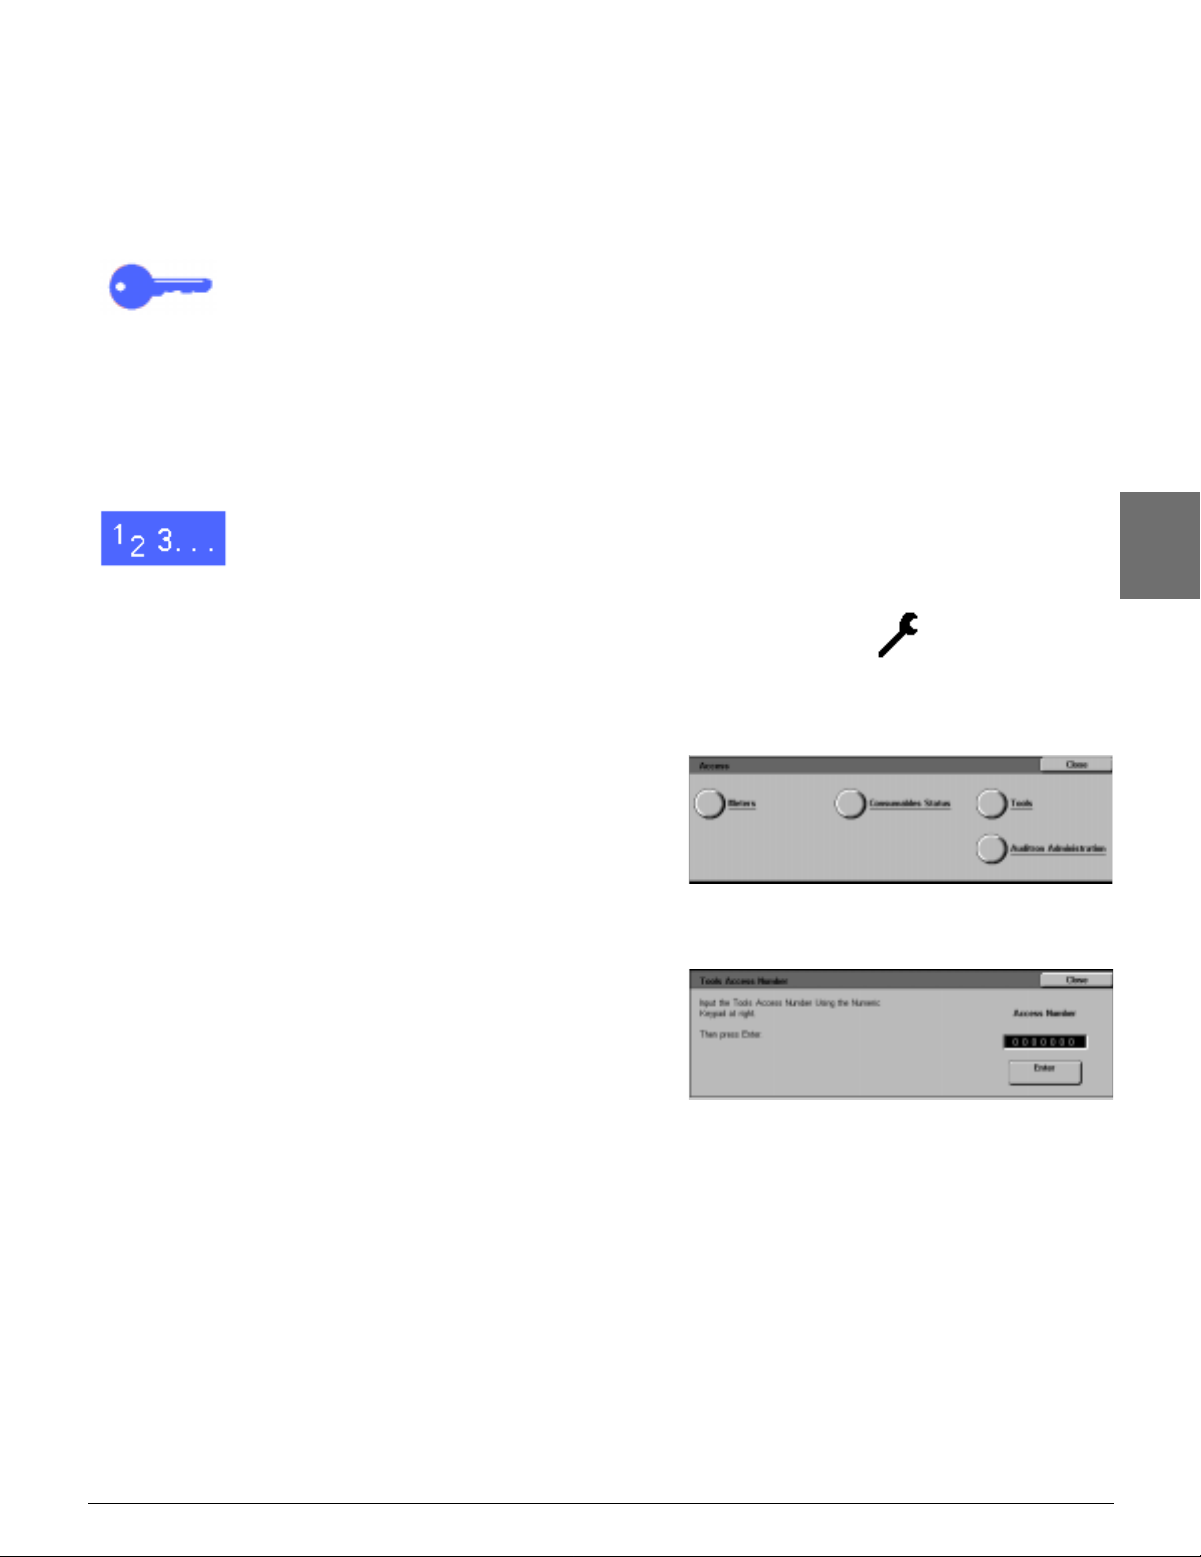
Press the Administration button (Figure 2) above
the numeric keypad to display th e Acce ss screen,
illustrated in Figure 3.
Figure 2: Administration symbol
4
Figure 3: Access screen
5
Touch the Tools button to display the Tools
Access Number screen, as illustrated in Figure 4.
Figure 4: Tools Access Number screen
6
DOCUCOLOR 12 SYSTEM ADMINISTRATION GUIDE 3–3 TOOLS MODE
7
Page 38

3
Use the numeric keypad to enter t he c orrect
password and touch Enter on the Touch Screen.
1
NOTE: The default password is 1111 1. Be sure to
change the password so that un aut horized
individuals do not have acc es s to Tools Mode.
To close the window without entering a password,
touch Close.
After you have entered the co rrec t passw ord, the
2
Tools scree n dis plays, as illustrated in Figure 5.
Figure 5: Tools screen
3
Exiting Tools Mode
To exit the T ools Mode, touch the Close button on
the System Administration Items screen.
4
Touch Close to exit any screen within Tools Mode
without making change s an d t o dis play the
previous screen.
5
6
7
TOOLS MODE 3–4 DOCUCOLOR 12 SYSTEM ADMINISTRATION GUIDE
Page 39

Tray Management
The Tray Management screen display s the Paper
Type and Auto Tray Setup features.
Paper Type
The Paper Type screen displays Paper Trays 1, 2,
3 and 4 and the current type of stoc k (normal,
heavyweight, or transparenc y se parat ors ) t hat is
in each tray.
NOTE: Do not run heavyweight paper from Paper
Tray 1.
1
2
3
1
2
On the T ools screen, touch the Tray Management
icon to display the Tray Management scr een, as
illustrated in Figure 6.
4
Figure 6: Tray Management screen
Touch the Paper Type icon to display the Paper
Type screen, as illustrated in Figure 7.
5
Figure 7: Paper T y pe screen
6
DOCUCOLOR 12 SYSTEM ADMINISTRATION GUIDE 3–5 TOOLS MODE
7
Page 40

3
1
Review the current settings f or each tray. Use the
up and down arrows to highlight the desired paper
tray and touch the Change Settings button to
display the detail screen for the tray. A sample
detail screen for Trays 2, 3, and 4 is illustrated in
Figure 8.
NOTE:
Figure 8: Sample Tray detail screen
• You can not run heavyweight paper from
2
Paper Tray 1. The only option on the Tray 1
detail screen is Normal.
• The Auto Tray Setup - Switching option, set
through Auto Paper Sele c t, m us t b e dis abled
before you can select the Heavyweight option
for Trays 2, 3, or 4.
4
3
5
6
7
Touch the but t on f or t he s et t ing that best
describes the paper type for the tra y.
Touch Save to display the Paper Type screen.
If necessary, repeat steps 3 through 5 for another
paper tray.
Touch Close to display th e Tray Manage m ent
screen.
4
8
Touch Close to display th e Tools screen.
5
6
7
TOOLS MODE 3–6 DOCUCOLOR 12 SYSTEM ADMINISTRATION GUIDE
Page 41

Auto Tray Setup
1
Touching A u to Tray Setup on the Tray
Management screen displays the Auto Tray Setup
screen.
On this screen, you can enable Auto Tray
Switching for Paper Trays 1, 2, 3, and 4.
Enabling Auto Tray Switching allows the copier/
printer to switch automatica lly to an ot her tray with
the same size and type of paper when the first tray
runs out of paper.
NOTE: To enable Aut o Tray Switchin g, ens ure
that more than one tray is configured for the same
size paper and feeding orientation (long edge feed
or short edge feed).
On the T ools screen, touch the Tray Management
icon to display the Tray Management scr een, as
illustrated in Figure 9.
1
2
3
2
Touch the Auto Tray Setup icon to display the
Auto Tray Setup screen, as illustrated in F igure
10.
4
Figure 9: Tray Management screen
5
Figure 10: Auto Tray Setup screen
6
DOCUCOLOR 12 SYSTEM ADMINISTRATION GUIDE 3–7 TOOLS MODE
7
Page 42

3
Review the current settings f or each tray and the
Auto Tray Switching option.
1
4
To enable or disable Auto Tray Switching, use the
up and down arrows to highlight the desired paper
tray, and touch the Change Settings button to
display the tray detail screen, as illustrated in
Figure 11.
Touch Enable Auto Paper or Disable Auto
2
5
3
6
Paper.
Touch Save to display the Auto Tray Setup
screen.
If necessary, repeat steps 3 and 4 for another
paper tray.
To enable or dis able Auto Tray switching, use the
up and down arrows to highl ight the Auto Tray
Switching option. Touch the Change Settings
button to display the Auto Tray Switching screen,
as illustrated in Figure 12.
Touch Switching Enabled, Switch-Auto Paper
Only, or Switching Disabled.
Figure 11: Sample Tray detail screen
Figure 12: Auto Tray Switching scre en
4
7
8
Touch Save to return to the Auto Tray Setup
screen.
Touch Close to display th e Tray Manage m ent
screen.
9
Touch Close to display th e Tools screen.
5
6
7
TOOLS MODE 3–8 DOCUCOLOR 12 SYSTEM ADMINISTRATION GUIDE
Page 43

Feature Defaults
The Feature Defaults options enable you to
change factory default se ttings for a number of
features, including Paper Supply, Reduce/
Enlarge, Original Type, Image Quality Settings,
Margin Shift, Edge Erase, Original Orientation, 2
Sided Copy, and Multiple-Up. The first Feature
Defaults screen is illustrated in Fig ure 13
Because these procedures are very similar, use
the basic procedure that follows to set new
defaults. Any differences are noted in the
descriptions provided fo r eac h default and its
settings.
Figure 13: Feature Defaults screen
(page 1 of 4)
1
2
3
4
5
6
DOCUCOLOR 12 SYSTEM ADMINISTRATION GUIDE 3–9 TOOLS MODE
7
Page 44

Basic procedure for setting Feature Defaults
1
1
On the Tools s cr een, touch the Feature Defaults
icon to display the Feature D ef aults screen, as
illustrated in Figure 14.
2
2
3
3
4
Review feature default ite m s and t heir current
settings.
KEY POINT: There are multiple scree ns or
pages for Feature Defaults. The numbers in the
box at the top right of the screen indicate which
Feature Defaults screen you are viewing and the
total number of screens. For exa m ple, 1/4
indicates you are viewing the first of fo ur F eat ure
Defaults screens.
To display items on other screens, touch the Next
Page button or Previous Page button.
To change the current setting of a feature, use the
up and down arrows to highl ight the desired
feature.
Touch the Change Settings button to display the
feature detail screen.
Figure 14: Feature Defaults screen
4
5
Touch the but t on f or t he desired default.
Touch Save to display the Feature Defa ults
screen.
5
6
7
If necessary, select another feature and change its
settings using steps 2-5. Refer to the sections that
follow for more informat ion about individual
features.
Touch Close to display th e Tools screen.
6
7
TOOLS MODE 3–10 DOCUCOLOR 12 SYSTEM ADMINISTRATION GUIDE
Page 45
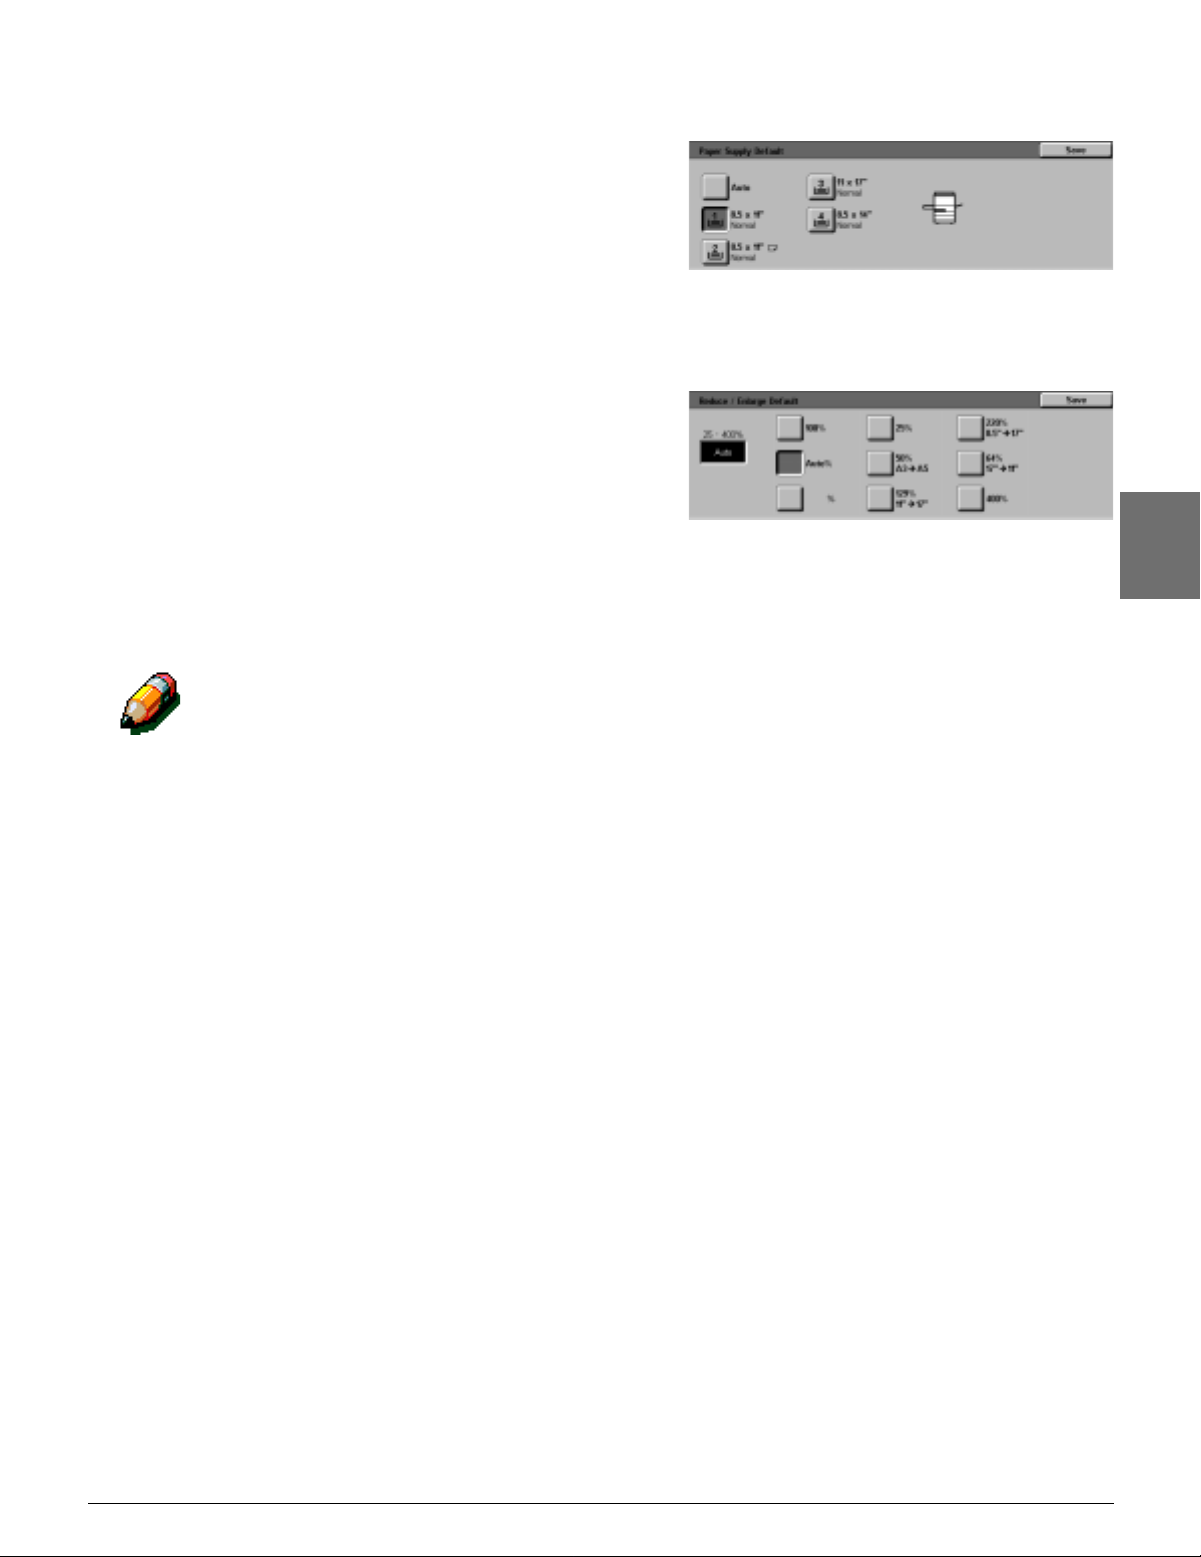
Paper Supply
This option allows you to des ignate the default
paper tray. Selecting Auto (Figure 15) enables the
copier/printer to determ ine t he paper tray to use
based on the size of the origin al document.
Reduce/Enlarge
This option allows you to des ignate the default
reduction or enlargement. Selecting Auto enables
the copier/printer to dete rmine the reduction or
enlargement percentage to use based on the size
of the original document and the selected paper
tray.
The selected value is display ed in the percentage
box of the Reduce/Enlarge screen, as illustrated in
Figure 16.
NOTE: Auto% cannot be used wi th Aut o Paper
Supply.
Figure 15: Paper Tray Default screen
Figure 16: Reduce/Enlarge screen
1
2
3
4
5
6
DOCUCOLOR 12 SYSTEM ADMINISTRATION GUIDE 3–11 TOOLS MODE
7
Page 46

Original Type
1
2
This option allows you to set th e original type for
the majority of the original do c um ents you will be
copying or printing. Based on your selection, the
copier/printer automat ic ally m ak es f ine
adjustments to optimize the copy sharpness
based on the type of original selected. As
illustrated in Figure 17, original types include:
Figure 17: Original Type screen
• Photo & Text — Most original documents
consist of both text and graphics.
• Text — Most original documents consist of
words with few detailed graphic s .
• Photo — Most original documents contain
halftones or photograp hs .
3
• Graphics & Maps — Most original documents
contain intricate drawings tha t re quire a
number of details to be copied wit h ut m os t
precision.
If you select one of the first thre e options, you
should also select the detail for that original type
using the appropriate Original Type screens that
follow this option.
4
5
6
7
TOOLS MODE 3–12 DOCUCOLOR 12 SYSTEM ADMINISTRATION GUIDE
Page 47

Photo Type – Photo & Text
Photo Type–Photo & Text is the bes t se lec t ion for
original documents that contain pict ures and
printed text, such as magaz ines or professional
journals with pictures and text .
Output copies are made us ing the sharpness and
density levels that combine the best levels for
picture, chart, and text areas t o provide optimum
image quality.
As illustrated in Figure 18, this option allows you
to specify the default for the kind of photograph or
picture originals you will be copying.
• Halftone — Use this option when most
original documents will be images that are
created using a fine screen th at va ries th e
darkness and density of dots that make up the
image. Examples of halftone images can be
found in magazines and n ew s papers .
• Photograph — Use this option when most
original documents will be photographs or
extremely fine halftones.
1
2
Figure 18: Photo Type–Photo & Text screen
3
• Xerographic Copy — Use this option when
most jobs will use a xerographic reproduction
(copy) as the original document.
The Photo & Tex t opt ion applies the best
sharpness and density levels automatically for
optimum colour quality on all colour copies
4
5
6
DOCUCOLOR 12 SYSTEM ADMINISTRATION GUIDE 3–13 TOOLS MODE
7
Page 48

Photo Type – Photo Type
1
The Photo Type–Photo Type option is the best
selection for photographs, lithographs, or graphics
that contain a variety of pastel colours.
This option provides the following advantages:
• The most accurate colour and density copy for
2
continuous tone docum ents that contain a
wide range of densities from very dark to very
light images
• The best selection when tr ue reproduction of
light skin colours, light colo urs , or grey areas
is important
• The best option for very high quality halftone
3
4
documents.
As illustrated in Figure 19, this option allows you
to specify the default for the kind of Photo originals
you will be copying.
• Halftone — Use this option when most
original documents will be images that are
created using a fine screen th at va ries th e
darkness and density of dots that make up the
image. Examples of halftone images can be
found in magazines and n ew s papers .
Figure 19: Photo Type–Photo Type screen
• Photograph — Use this option when most
original documents will be photographs or
extremely fine halftones.
• Xerographic Copy — Use this option when
5
most jobs will use a xerographic reproduction
(copy) as the original document.
6
7
TOOLS MODE 3–14 DOCUCOLOR 12 SYSTEM ADMINISTRATION GUIDE
Page 49

Text Type
The Text Type option is the best sele c tio n fo r
documents composed of fine line characters or
other high contrast documents with bright, dense
colours. For documents in which priority is given
to the text, this selection produces the clearest
output text. Selecting this option suppresses
background colour.
As illustrated in Figure 20, this option allows you
to specify the default for the kin d of te xt originals
you will be copying.
• Standard Text — Most original documents
will be of standard darkness.
• Light Text — Most original documents will be
lighter than normal or consist of lines that vary
in thickness and darkness, suc h as those that
are written in pencil.
1
2
Figure 20: Text Type screen
3
4
5
6
DOCUCOLOR 12 SYSTEM ADMINISTRATION GUIDE 3–15 TOOLS MODE
7
Page 50

Lighten/Darken
1
2
The Lighten/Darken feature enables you to adjust
the overall lightness or dark ness (density) of the
output copy.
Select darker settings for light originals and light
settings for dark originals, as illus t rat ed in
Figure 21.
Selecting Auto Contrast enables the copier/printer
to determine the lightne s s or dark ness to use
based on its scan of the original document.
Figure 21: Lighten/Darken screen
Output Colour
3
The Output Colour option allows you to set the
default to Auto Colour , Full Colour (using Black,
Yellow, Cyan and Magenta), 3 Pass Colour (using
Yello w, Cyan and Magenta), or Bla c k , as
illustrated in Figure 22.
Selecting Auto Colour en ables the copier/printer
to determine the output colour to use based on its
4
scan of the original docum ent .
Figure 22: Output Colour screen
5
6
7
TOOLS MODE 3–16 DOCUCOLOR 12 SYSTEM ADMINISTRATION GUIDE
Page 51
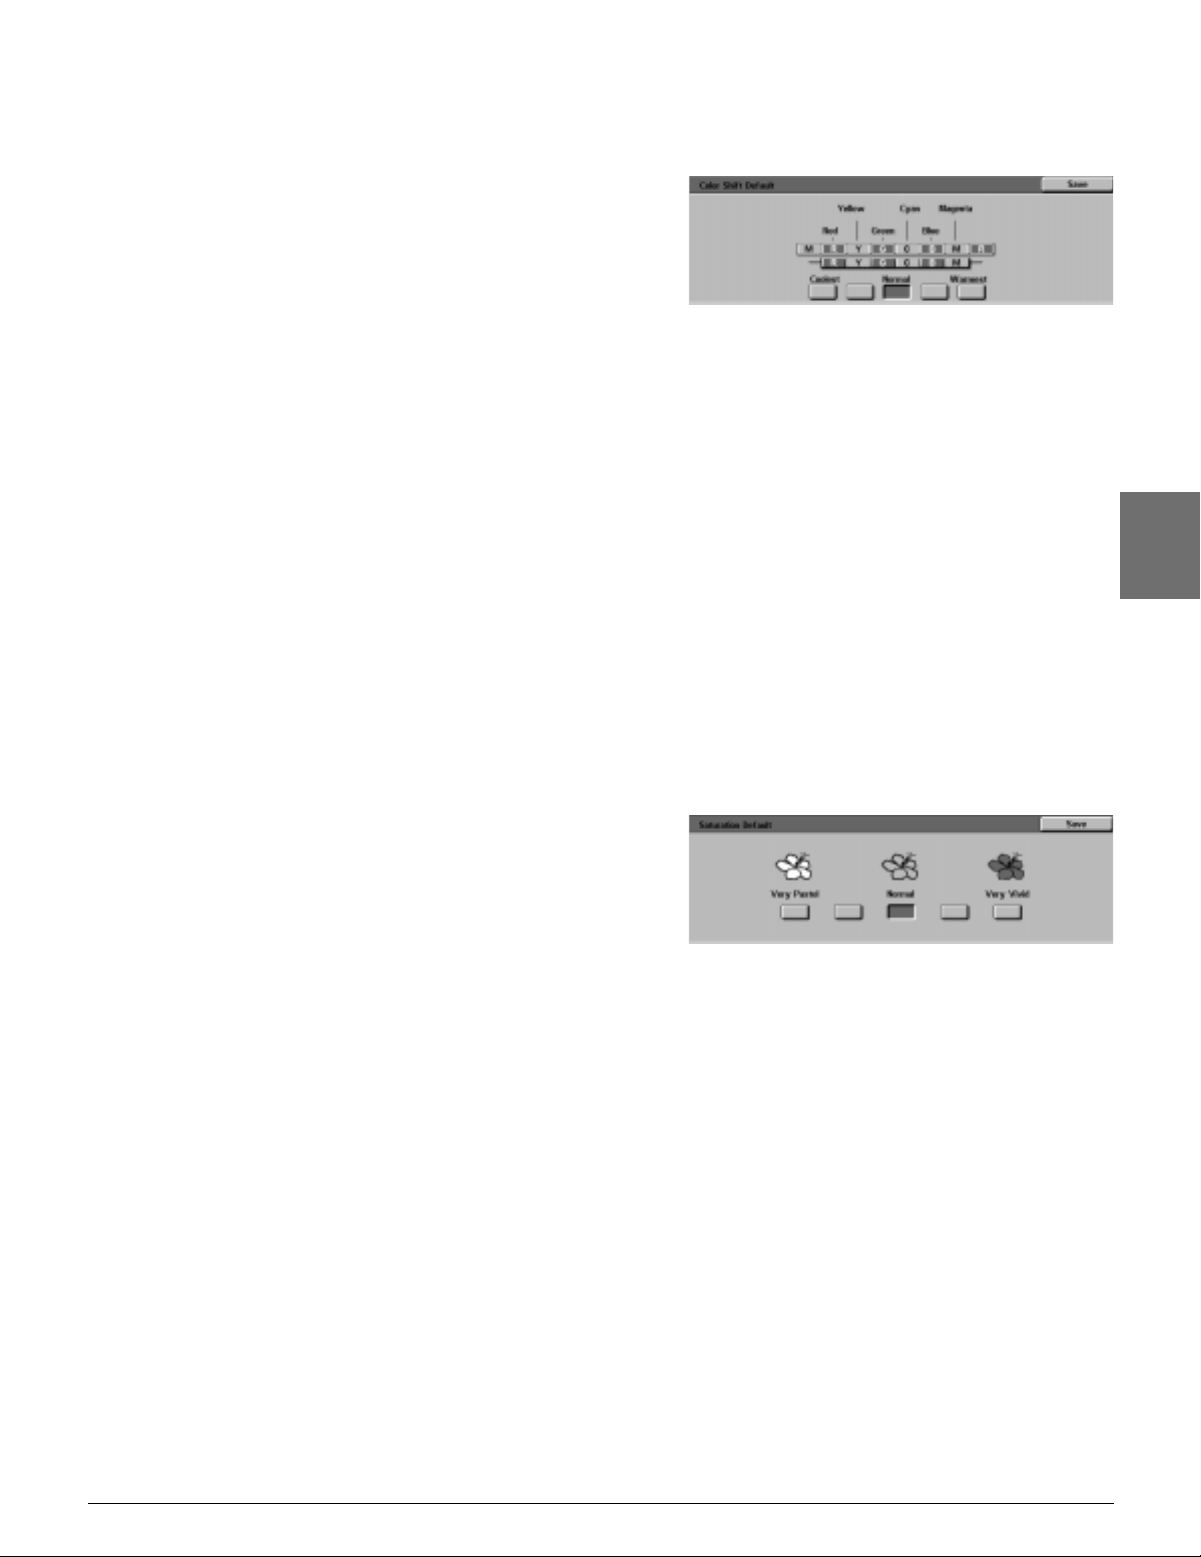
Colour Shift
This option allows you to shi ft th e output colour
from blue (coolest) to red (warmest), as illustrated
in Figure 23.
If you select a shift toward red (a w arm colour),
the red colours shift toward s the ye llow hue, the
green colours towards the cya n hue, and the blue
colours towards the magenta hue. The lower bar
shifts toward the right. All colours in between
these original colours also s hif t in th e s ame
direction.
If you select a shift toward blue (a cool colour), the
red colours shift towards the magenta hue, the
blue colours toward the cyan hue, and the green
colours toward the yellow hue. The lower bar
shifts toward the left. Again, all colours in between
these original documen t colours also shift in the
same direction.
Saturation
This option allows you to adjus t th e ov erall
richness of colour on the output copy. Colours with
high saturation are somet im es c alled vivid
colours, while those with low saturation are
sometimes called pastel col ours.
1
Figure 23: Colour Shift screen
2
3
4
Use the flower illustrations on the Saturation
screen (Figure 24) to ant ici pate the results of the
shift. The left flower illustr at es th e m os t pastel
setting of saturation. The right flower illustrates the
richest or most vivid saturation. The centre flower
represents the factory default No rm al saturation.
Selections do not cause any changes to the flower
illustrations.
Figure 24: Saturation screen
5
6
7
DOCUCOLOR 12 SYSTEM ADMINISTRATION GUIDE 3–17 TOOLS MODE
Page 52

Variable Colour Balance
(Yellow, Magenta, Cyan, Black)
1
2
These options allow you to adjust the default
levels of all four process colours (Yellow, Magenta,
Cyan, and Black) for areas of high, medium, and
low density on the copies.
Three higher settings, three lower settings, and
the normal (medium) se ttings are available for
each density level of each co lour, as illustrated in
Figure 25.
Y ou can adjust each density level and each colour
independently in any combination.
KEY POINT: Remember that adjusting the
amount of any of the proces s colours affects the
complementary colours that us e t hat colour.
Figure 25: Sample Colour Balance screen
3
4
5
6
7
TOOLS MODE 3–18 DOCUCOLOR 12 SYSTEM ADMINISTRATION GUIDE
Page 53

Sharpness
The Sharpness option al low s yo u to adjust the
amount of image edge def inition on the copies.
NOTE: For optimum sharpness, select the correct
Original Type in the Image Quality tab.
Use the Sharp levels (Figu re 26) to increase the
amount of edge definition f or original documents
such as maps, line art, or graphics that have crisp
lines.
Use the Soft levels (Figure 26) t o dec rease the
amount of edge definition t o c opy photographs or
any other documents for which s of te r, less
focused, output copies are desired. This option is
especially useful when copying very coarse dot
screens.
1
2
Figure 26: Sharpness screen
3
4
5
6
DOCUCOLOR 12 SYSTEM ADMINISTRATION GUIDE 3–19 TOOLS MODE
7
Page 54

Margin Shifts for Side 1 and Side 2
1
This option controls the def ault Margin Shift. You
can set separate defaults for Side 1 and Side 2
images on the output copy.
You can set the following options:
• No Shift
2
• Auto Centre
• Corner Shift
If you select this option, you should also select
the Corner Shift option for the appropriate
side.
3
• Variable Shift
If you select this option, you should also select
the Variable Shift option for the appropriate
side.
4
5
6
7
TOOLS MODE 3–20 DOCUCOLOR 12 SYSTEM ADMINISTRATION GUIDE
Page 55

Corner Shift
Use this option if you selected the Corner Shift
option for Margin Shifts for eithe r Side 1 or
Side 2.
Touch the desired corner shift position (Figure
27) and then touch Save to return to the
Feature Defaults screen.
Variable Shift
Use this option, illustrated in Figure 28, if you
selected the Variable Shift option for Margin
Shifts for either Side 1 or Side 2.
To set a horizontal shift, touch the right arrow
to shift the image to the right edge, or touch
the left arrow to shift the image to the left
edge from 0 to 432 mm.
To set a vertica l sh if t, to uc h t he up arrow to
shift the image to the top edge, or touch the
bottom arrow to shift the image to the lower
edge from 0 to 432 mm.
Figure 27: Sample Corner Shift Default
screen
Figure 28: Sample Var iab le Shif t Default
screen
1
2
3
Touch Save to ret urn to the Feature Defaults
screen.
4
5
6
DOCUCOLOR 12 SYSTEM ADMINISTRATION GUIDE 3–21 TOOLS MODE
7
Page 56

Edge Erase
1
2
This option allows you to set th e Edge Erase
default to eliminate the shadows that are caused
by the document edges du ring the copying
process.
This feature offers two options, as illustrated in
Figure 29:
• No Erase — Uses 2 mm default
• V ariable Erase to display an additional screen
with variable shift settings .
Under the Top & Bottom icon, touch the up
arrow to increase the amount of erasu re at
the top and bottom edges . Touch the down
3
arrow to decrease the amount of eras ure at
the top and bottom edges .
Under the Left & Right icon, touch the up
arrow to increase the amount of erasu re at
the left and right edges. Touch the down
arrow to decrease the amount of eras ure at
the left and right edges.
Figure 29: Edge Erase screen with
Input Erase Value selected
4
When you are making 2-sided copies, Edge Erase
is applied to both sides of the out put.
5
6
7
TOOLS MODE 3–22 DOCUCOLOR 12 SYSTEM ADMINISTRATION GUIDE
Page 57
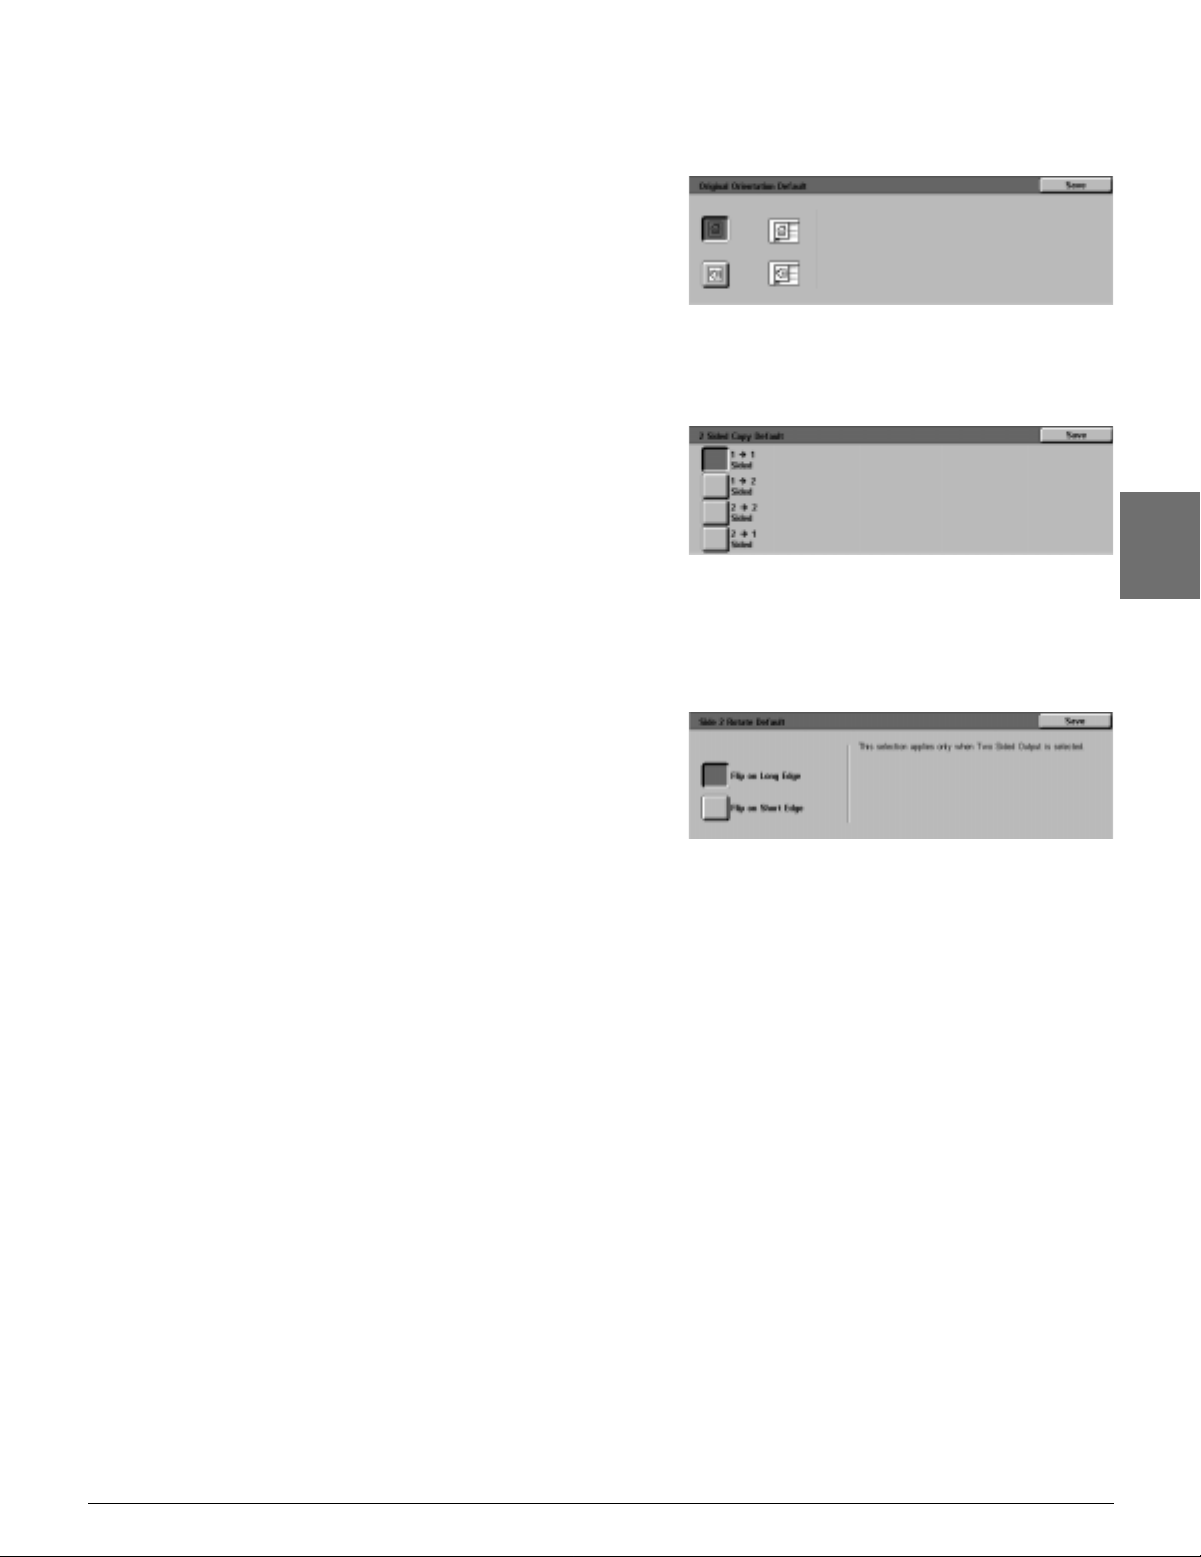
Original Orientation
This option allows you to indicate the position of
most original documents on the Document Glass,
as illustrated in Figure 30. An original document
may be placed with its image upright or with the
top of its image positioned towards the side.
The diagrams on this scre en illustrate the correct
positioning of documents on th e D oc um ent Glass.
2 Sided Copy
This option allows you to set default copying for 1
to 1 Sided, 1 to 2 Sided, 2 to 2 Sided, or 2 t o 1
Sided, as illustrated in Figu re 31.
Side 2 Rotate
This option should be used if yo u s et the def ault
copying for 2-Sided outp ut . Wit h t his opt ion, you
can specify whether the 2- sid ed copy should be
made with Flip on Long Edge (head-to-head, book
style) or Flip on Short Edge (head-to-toe, calendar
style), as illustrated in Figure 32.
1
Figure 30: Original Orientation Default screen
2
3
Figure 31: 2 Sided Copying Default screen
4
Figure 32: Side 2 Rotate Default screen
DOCUCOLOR 12 SYSTEM ADMINISTRATION GUIDE 3–23 TOOLS MODE
5
6
7
Page 58

Multiple-Up
1
2
The Multiple-Up feature (Fig ure 33) enables you
to specify whether 1, 2, 4, or 8 images from
multiple originals are copied onto a single page.
Each image is centred in its space.
If you select 2 Pages Up, use the 2 Pages Up
Copy Layout feature desc ribed below.
Figure 33: Multiple-Up Defaults screen
If you select 4 Pages Up or 8 Pages Up, use the 4
& 8 Pages Up Copy Layout feature described
below.
2 Pages Up
3
This option (Figure 34) allo w s you to specify how
two images will be placed on a single sheet of
paper:
• Left-to-right / top-to-bot to m
• Right-to-left / top-to-bott om
Figure 34: 2 Pages Up Default screen
4
4 & 8 Pages Up
This option allows you to specify how four or eight
images will be placed on a s ingle sheet of paper,
as illustrated in Figure 35:
5
• Horizontally, beginning from upper left corner
• Horizontally, beginning from upper right corner
Figure 35: 4 Pages Up Default screen
• Vertically, beginning from upper left corner
• Vertically, beginn ing from upper right corner
6
7
TOOLS MODE 3–24 DOCUCOLOR 12 SYSTEM ADMINISTRATION GUIDE
Page 59

Machine Set-up
Use these settings to limit the number of copy sets
and to disable/enable Aut o Power Off Prohibition.
KEY POINT: If Auto Power Off Prohibition is
enabled, use the Timeouts feature to set the
number of minutes requ ired before the copier/
printer powers off.
1
2
1
2
On the Tools s cr een, touch the Machine Set-up
icon to display the Machine Set-up screen, as
illustrated in Figure 36.
Review the current settings f or each item. To
change a setting, use the up and down arrows to
highlight the desired item and touch the Change
Settings button to display th e detail screen.
3
Figure 36: Machine Setup screen
4
5
DOCUCOLOR 12 SYSTEM ADMINISTRATION GUIDE 3–25 TOOLS MODE
6
7
Page 60

3
Perform one of the followin g:
1
• On the Copy Quantity Limit screen (Figure
37), use the numeric keypad to en te r th e
maximum number (1— 999) of copies/sets
allowed.
Figure 37: Copy Quantity Limit screen
2
• On the Auto Power Off screen (Fig ure 38),
touch either the Enabled or Disabled button.
3
4
5
Touch Save to display the Machine Set-up screen.
If necessary, repeat steps 2 through 4 for a
different item.
Figure 38: Auto Power Off screen
4
6
Touch Close to display th e Tools screen.
5
6
7
TOOLS MODE 3–26 DOCUCOLOR 12 SYSTEM ADMINISTRATION GUIDE
Page 61

Audio Tones
You can change the Audio Tones settings for the
following options:
• Selection T one
• Conflict Tone
1
1
2
• Control Panel Input Tone
• Machine Ready Tone
• End of Job Tone
• Fault Tone
You can turn the Control Panel Input Tone on or
off. For all other options, you can turn t he tone off
or set its volume to soft, normal or lou d.
On the Tools screen, tou ch the Audio Tones icon
to display the Audio Tones screen, as illustrated in
Figure 39.
Review the current settings f or each tone. To
change a setting, use the up and down arrows to
highlight the desired tone and touch the Change
Settings button to display th e detail screen.
2
3
4
Figure 39: Audio Tones screen
5
DOCUCOLOR 12 SYSTEM ADMINISTRATION GUIDE 3–27 TOOLS MODE
6
7
Page 62

3
Perform one of the followin g:
1
2
• For the Control Panel Input Tone (Figure 40),
touch No Tone or Tone.
Figure 40: Control Panel Input Tone screen
• For other tones (Figure 41), to uc h No Tone,
Softer, Normal, or Louder.
Figure 41: Sample audio tone setting screen
3
4
5
6
Touch Save to display the Audio Tones screen.
If necessary, repeat steps 2 through 4 for other
tones.
Touch Close to display th e Tools screen.
4
5
6
7
TOOLS MODE 3–28 DOCUCOLOR 12 SYSTEM ADMINISTRATION GUIDE
Page 63
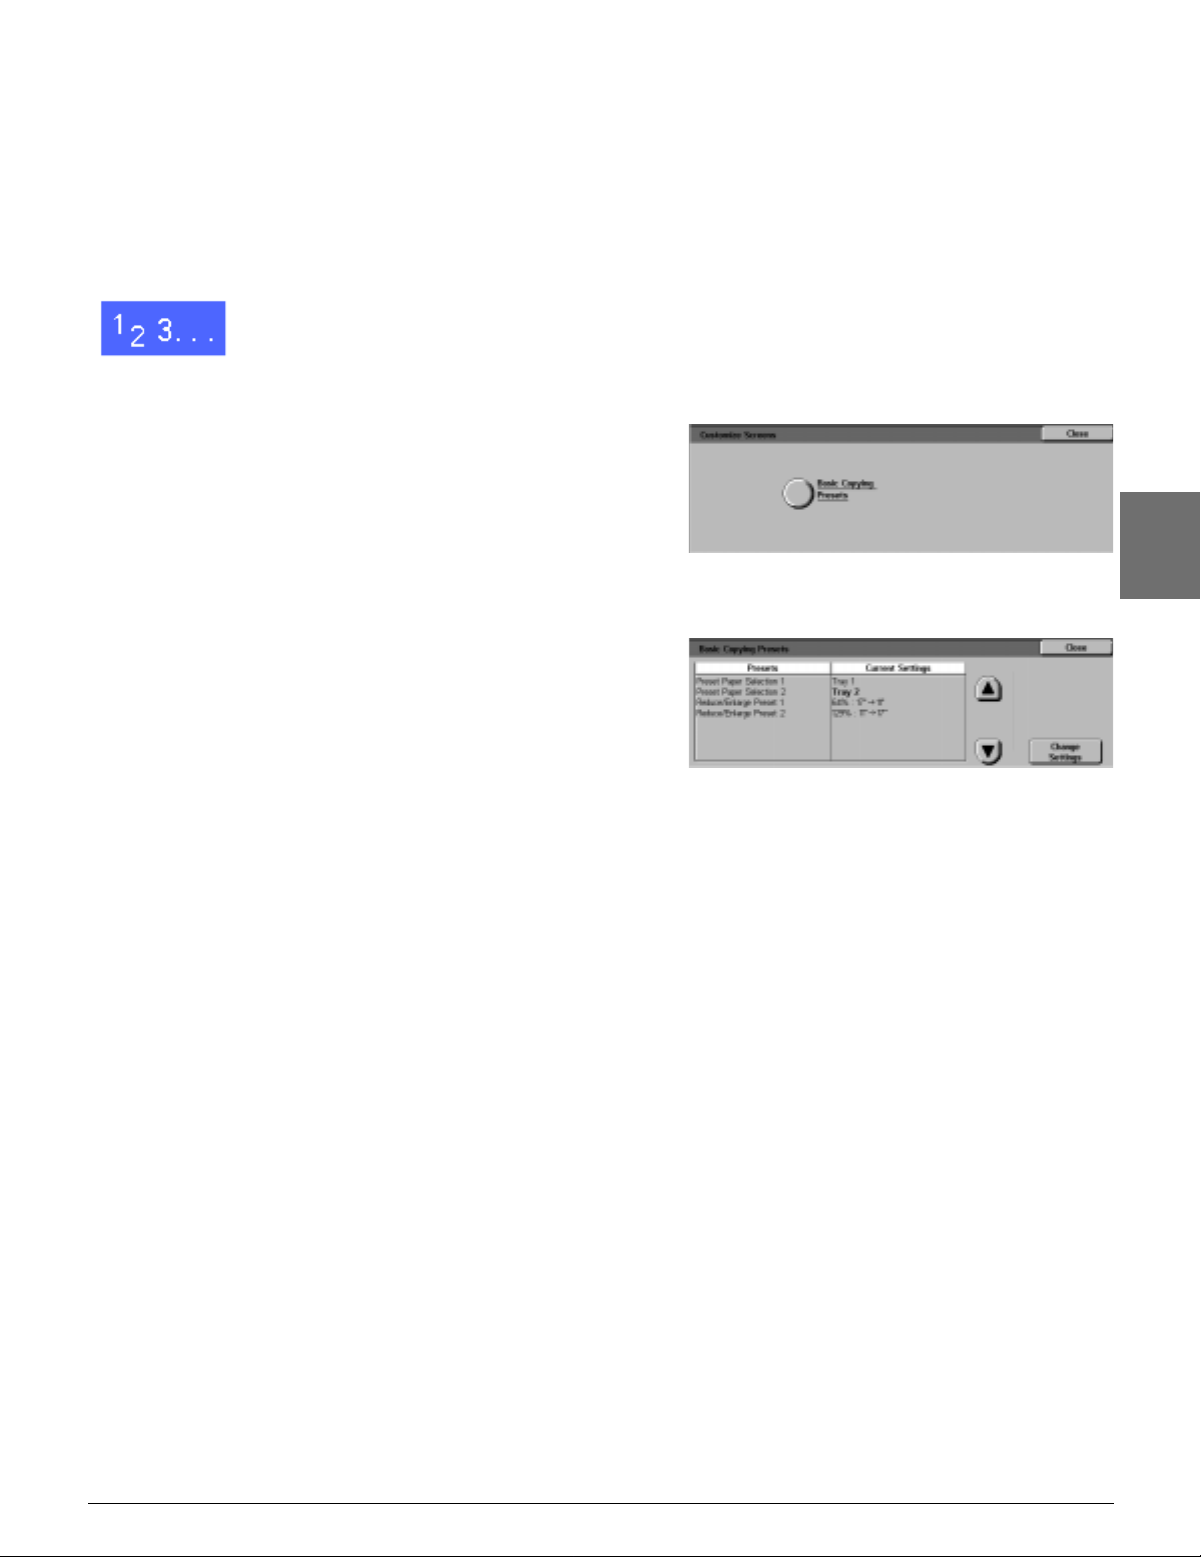
Customise Screens
The Customise Screens fe at ure enables you to
set two paper trays and two reduction/
enlargement values to dis play on the Basic
Copying tab.
1
2
1
2
3
On the Tools s cr een, touch the Customise
Screens icon to display the C us t om is e Screens
screen, as illustrated in Fig ure 42.
Touch the Basic Copying Presets button to
display the Basic Copying Presets screen, as
illustrated in Figure 43.
Review the current settings. Use the up and down
arrows to highlight the de s ired item and touch the
Change Settings button to display the detail
screen for the item.
3
Figure 42: Customise Screens screen
4
Figure 43: Basic Copying Presets screen
5
DOCUCOLOR 12 SYSTEM ADMINISTRATION GUIDE 3–29 TOOLS MODE
6
7
Page 64

4
Perform one of the followin g:
1
2
• If you selected a Preset Pap er Selection
option, touch the desired tra y icon on the
Preset Paper Selection screen (Figure 44).
The copier/printer illustr at ion highlights your
selection.
Figure 44: Preset Tray screen
• If you selected a Reduce/Enlarge Preset
option, touch the desired reduction/
enlargement percentage butto n on th e Pres et
Reduce/Enlarge Selec t ion s c reen (Figure 45).
Figure 45: Preset Reduce/Enlarge Selection
screen
3
5
6
7
Touch Save to display the Basic Copyin g Presets
screen.
If necessary, repeat steps 3 through 5 for another
item.
Touch Close to display the Customise Screens
screen.
4
8
Touch Close to display th e Tools screen.
5
6
7
TOOLS MODE 3–30 DOCUCOLOR 12 SYSTEM ADMINISTRATION GUIDE
Page 65

System Image Quality
This feature enables you to control a number of
system image quality options.
With the Image Recognit ion s c reen, you can
adjust the following optio ns :
• T ext & Photo Recognition for text and photo
separation levels
• Auto Colour Recognition for black/white and
colour separation levels
• T ext & Photo Balance to lower or raise levels
of density, optimizing text or photo settings
• Screening Adjustment to apply settings to
both copy and print modes , copy mode only,
or to disable this option
With the Auto Screening Adjust screen, you can
select the following options :
• Halftone Screen to indicate the level of detail/
resolution to use, ranging from halftones (200
line screen) to photographs (200 dpi) to prints
(150 dpi).
1
2
3
4
• Print Test Original to produ ce a Print Test
Original and enter the adjustment mode.
• Adjustment Completed to print a final test
after the adjustment proc es s is completed.
5
6
7
DOCUCOLOR 12 SYSTEM ADMINISTRATION GUIDE 3–31 TOOLS MODE
Page 66

Adjusting Image Recognition settings
1
1
On the Tools s cr een, touch the System Image
Quality icon to displa y the System Image Quality
screen, as illustrated in Fig ure 46.
2
Figure 46: System Image Quality screen
2
3
3
Touch the Image Recognition icon to display the
Image Recognition screen, as illustrated in
Figure 47.
Review the current settings f or each item. To
change a setting, use the up and down arrows to
highlight the desired item and touch the Change
Settings button to display the image quality detail
screen.
Figure 47: Image Recognition screen
4
5
6
7
TOOLS MODE 3–32 DOCUCOLOR 12 SYSTEM ADMINISTRATION GUIDE
Page 67

4
Perform one of the followin g:
• Touch the box that indicates the appropriate
image quality level setting for T ext & Photo, as
illustrated in Figure 48.
• Touch the box that indicates the appropriate
image quality level setting f or Auto Colour
Recognition, as illustrat ed in Figure 49.
• Touch the box that indicates the appropriate
image quality level setting f or Text & Photo
Balance, as illustrated in Figure 50.
1
Figure 48: Text & Photo settings
2
Figure 49: Colour Recognition settings
3
5
6
7
8
• For Screening Adjustment, touch the box that
indicates the appropria te application for the
adjustment, as illustrated in Figure 51.
Touch Save to display the Image Recog nit ion
screen.
If necessary, repeat steps 2 through 5 for other
image recognition items .
Touch Close to display the System Image Quality
screen.
Touch Close to display th e Tools screen.
Figure 50: Text & Photo settings
4
Figure 51: Screening Adjustment screen
5
6
DOCUCOLOR 12 SYSTEM ADMINISTRATION GUIDE 3–33 TOOLS MODE
7
Page 68

Auto Screening Adjust
1
1
On the Tools s cr een, touch the System Image
Quality icon to displa y the System Image Quality
screen.
2
2
Touch the Auto Screening Adjust icon to display
the Auto Screening Adjust screen, as illustrated in
Figure 52.
Figure 52: Auto Screening Adjust screen
3
4
5
6
7
TOOLS MODE 3–34 DOCUCOLOR 12 SYSTEM ADMINISTRATION GUIDE
Page 69

3
Perform one of the followin g:
• T ouch the Halftone Screen icon to access the
Halftone Screen, as illustrated in Figure 53.
Touch the appropriate setting and touch Save
to return to the Auto Screen ing Adjust screen.
1
4
5
• Touch Print Test Origi nal to print a sample of
the settings. Follow the direc t ions on the
Touch Screen to print the test original and
enable the adjustment.
NOTE: Test originals are printed from Paper
Tray 5.
When the adjustment process is complete,
touch Adjustment Completed to print
another test pattern and confir m the se ttings.
Touch Close to display the System Image Quality
screen.
Touch Close to display th e Tools screen.
Figure 53: Halftone screen
2
3
4
DOCUCOLOR 12 SYSTEM ADMINISTRATION GUIDE 3–35 TOOLS MODE
5
6
7
Page 70

Machine Timeouts
1
The Machine Timeouts feature allows you to
change the length of time the copier/printer waits
before returning to the default settings after a job
is complete or only partially programmed, entering
Power Saver mode, powering off, or exiting
System Administration mode. You may also
disable or enable a timeout opt ion through the
2
1
3
2
Timeouts feature screens.
On the Tools s cr een, touch the Machine
Timeouts icon to display the Timeouts screen, as
illustrated in Figure 54.
Review the current settings f or each tone. To
change a setting, use the up and down arrows to
highlight the desired item and touch the Change
Settings button to display th e detail screen.
Figure 54: Timeouts screen
4
5
6
7
TOOLS MODE 3–36 DOCUCOLOR 12 SYSTEM ADMINISTRATION GUIDE
Page 71

3
Perform one of the followin g:
• Use the up and down arrows (Figure 55) to
increase or decrease the desired time before
returning to the default settings after a job is
complete or only partially programmed,
entering Low Power mode, powering off, or
exiting System Administration mode. Be sure
to stay within the stated minimum an d
maximum times.
• Touch the Timeout Disabled button to
prevent the machine from t im ing out.
NOTE: The disable option is not available on
the Low Power Timeout or Auto Power Off
screen. If the copier/printer is not used for
over four hours (default se tting), it must enter
Low Power mode.
To re-enable an option that was previously
disabled, use the up arrow t o se t a new time.
1
Figure 55: Sample timeout setting screen
2
3
4
5
6
Touch Close to display th e Timeouts screen.
If necessary, repeat steps 2 through 4 for other
timeout settings.
4
Touch Close to display th e Tools screen.
5
6
DOCUCOLOR 12 SYSTEM ADMINISTRATION GUIDE 3–37 TOOLS MODE
7
Page 72

Reduce/Enlarge Defaults
1
Selecting values on the Reduce / Enlarge Presets
screen enables you to spe ci fy s ix standard
reduction/enlargeme nt percentages to display as
defaults on the Reduce/Enlarge screen.
2
1
2
3
On the Tools s cr een, touch the Reduce/Enlarge
Defaults icon to display the Reduc e/Enlarge
Presets screen, as illustrated in Figure 56.
Review the current settings f or each item. To
change a setting, use the up and down arrows to
highlight the desired item and touch the Change
Settings button to display th e preset reduction/
enlargement detail screen.
Figure 56: Reduce/Enlarge Presets screen
4
5
6
7
TOOLS MODE 3–38 DOCUCOLOR 12 SYSTEM ADMINISTRATION GUIDE
Page 73

3
Touch the ico n w it h th e desired reduction/
enlargement percentage, as illus t rated in
Figure 57.
1
4
5
6
Touch Save to display the Reduce/Enlarge
Presets screen.
If necessary, repeat steps 2 through 4 for other
reduction/enlargeme nt ite ms.
Touch Close to display th e Tools screen.
Figure 57: Sample Preset screen
2
3
4
DOCUCOLOR 12 SYSTEM ADMINISTRATION GUIDE 3–39 TOOLS MODE
5
6
7
Page 74

Change Tools Access Number
1
Access numbers (some tim es called passwords)
are used to ensure that unaut horized individuals
do not have access to System Administration
Tools. For maximum security, set your Access
Number to a number other th an the default
(11111), and change it periodically (for example,
quarterly).
2
KEY POINT: In choosing a new access nu m ber,
avoid known values such as birt hdates or phone
numbers, simple combinations, or five repeated
numbers.
3
1
2
4
3
On the Tools s cr een, touch the Change Tools
Access Number icon to display the Change T ools
Access Number screen, as illustrated in Figure 58.
Enter a value from the numeric keypad in the New
Number box. Touch the Enter button.
Enter the same number i n th e C onf irm N ew
Number box. Touch the Enter button.
Figure 58: Change Tools Access
Number screen
NOTE: If you make a mistake in entering a value,
touch the Clear button, retype the num ber and
touch the Enter button again.
5
4
Touch Close to display th e Tools screen.
6
7
TOOLS MODE 3–40 DOCUCOLOR 12 SYSTEM ADMINISTRATION GUIDE
Page 75

Original Size Presets
Selecting values on the Original Size Presets
screen enables you to spe ci fy eleven sizes to
display to users as preset defaults on the Original
Size screen.
1
2
1
2
On the Tools s cr een, touch the Original Size
Presets icon to display the Original S ize Presets
screen, as illustrated in Fig ure 59.
Review the current settings f or each preset item.
NOTE: There are two Original Size Presets
screens. Check both to set or c hange all options.
To display additional original size items, touch the
Next Page or Previous Page button.
To change a set t ing, use the up and down arrows
to highlight the desired item and touch the
Change Settings button to display the original
size detail screen.
Figure 59: Original Size Presets screen
(page 1)
3
4
5
DOCUCOLOR 12 SYSTEM ADMINISTRATION GUIDE 3–41 TOOLS MODE
6
7
Page 76

3
Perform one of the followin g:
1
• Touch the International Sizes button and
touch one of the displayed int ernational sizes
• Touch the Inch Siz es button and touch one of
the standard US sizes (Figure 60 )
• Touch the V ariable Size button. Use the right
and left arrows to set th e X dimensions and
2
4
5
the up and down arrows to set the Y
dimensions for a customised preset original
document size.
Touch Save to display the Original Size Presets
screen.
If necessary, repeat steps 2 through 4 for other
original size items.
Figure 60: Setting Original Size screen
with Inch Sizes option selected
3
6
Touch Close to display th e Tools screen.
4
5
6
7
TOOLS MODE 3–42 DOCUCOLOR 12 SYSTEM ADMINISTRATION GUIDE
Page 77

4. Maintenance
1
Overview
Some areas of the copier/printer require periodic
cleaning or supply replac em ent to keep it
operating reliably.
This chapter specifies the areas of the copier/
printer that require customer maintenance and
provides procedures for m aintaining those areas.
Problems that cannot be sol ve d by th e operator
need to be referred to the Xer ox se rv ic e
representative. Use the procedure, “Calling For
Service,” in this chapter wh en it bec omes
necessary to request a ser vi ce ca ll.
The procedures for ordering the supplies for the
copier/printer and a list of the s upplies are also
included at the end of the chapter.
2
3
4
5
DOCUCOLOR 12 SYSTEM ADMINISTRATION GUIDE 4–1 MAINTENANCE
6
7
Page 78

Cleaning the Touch Screen
1
Clean the Touch Screen before the warm up cycle
at the start of each day. Remove all dust and
fingerprints.
Wipe the Touc h Sc reen with a clean, lint-free
cloth.
2
CAUTION: To avoid damage to the Touc h Sc reen
system, do not use any Xerox c leaner, water, or
any commercial cleaner on the Touch Sc reen or
on the hard button Control Panel, as illustrated in
Figure 1.
3
Figure 1: Cleaning the Touch Screen
4
5
6
7
MAINTENANCE 4–2 DOCUCOLOR 12 SYSTEM ADMINISTRATION GUIDE
Page 79

Cleaning the Document Glass
Keep the Document Glas s cle an t o ensure clean
copies and acceptable copy quality.
Clean the Document Glass at the beginning of the
day and during the day, as needed.
1
2
1
2
3
4
Slightly dampen a clean lin t- fre e c lot h (F igure 2)
with a small amount of Xer ox Lens and Mirror
Cleaner or a glass cleaner that is not abrasive,
such as Windex or Glass Plus .
CAUTION: To avoid damage to the copier/printer,
do not pour or spray the cleaner directly onto the
Document Glass.
Clean the Document Gla ss by w iping the glass in
the lengthwise direction, as illustrated in Figure 3.
Keep your fingers off the glass.
Use a clean, dry, lint-free cloth to wipe off any
excess moisture.
Repeat these steps, as required, until the
Document Glass has no visible marks or streaks.
3
4
Figure 2: Dampening a lint-free cloth
5
Figure 3: Cleaning the Document Glass
DOCUCOLOR 12 SYSTEM ADMINISTRATION GUIDE 4–3 MAINTENANCE
6
7
Page 80

Cleaning the Document Glass Cover
1
1
2
2
3
3
4
4
Lift the Document Glass Cover.
Slightly dampen a clean, lint -f ree cloth with a
small amount of Film Rem ov er.
Wipe the underside of the Document Glass Cover
until it is clean and dry, as illustrated in Figure 4.
If Film Remover gets on the Document Glass,
perform the procedure for c leaning the Document
Glass.
Close the Document Glass Cover.
KEY POINT: Periodically inspect the Document
Glass Cover for foreign materials to keep the
surface clean at all times. Any w hit e, fo reign
substance on the surface of the cushion may
cause the copier/printer to incorrectly calculate the
actual document size or i ts positio n, wh ic h might
result in an unsatisfactory c opy.
Figure 4: Cleaning the
Document Glass Cover
5
6
7
MAINTENANCE 4–4 DOCUCOLOR 12 SYSTEM ADMINISTRATION GUIDE
Page 81

Cleaning the Edit Pad
If your copier/printer is equipped with an Edit Pad,
clean the Edit Pad as neces sa ry.
1
1
2
3
4
Slightly dampen a clean, dry, lint-free cloth with a
small amount of Xerox Lens and Mirror Cleaner.
Lift the Clear Plastic Overlay and wipe the top
surface of the Edit Pad until it is clean and dry, as
illustrated in Figure 5.
CAUTION: Do not crease or fold the Clear Plastic
Overlay; permanent damage to the material may
result.
Lower the Clear Plastic Overlay.
Wipe the top surface of the Clear Plastic Overlay
until it is clean and dry, as illustrated in Figure 6.
2
3
4
Figure 5: Cleaning the Edit Pad
Figure 6: Cleaning the Top Surface of the
Clear Plas tic Overlay
DOCUCOLOR 12 SYSTEM ADMINISTRATION GUIDE 4–5 MAINTENANCE
5
6
7
Page 82

Supply replacement
1
Replacing the Dry Ink (Toner) Cartridge
When a message is displayed to replace a Dry Ink
Cartridge (Figure 7), follow th e ins t ruc t ions
provided here in addition to those on the labels
surrounding the cartridg es and affixed to the
2
3
copier/printer.
CAUTION: To prevent dry ink (toner) spillage,
remove the Dry Ink Cartridge only when the
“Cartridge is Empty" mess age appears on the
Touch Screen.
Figure 7: Add Dry Ink message
1
4
2
Open the Front Door of the copier/printer and
locate the Dry Ink Cartridges, as illustrated in
Figure 8. From left to right the D ry Ink C art ridge
colours are Cyan, Magen ta, Yellow, and Black.
Place a few sheets of paper on the floor under the
Dry Ink Cartridge to catch any dry ink (toner) that
may spill.
5
Figure 8: Locating the Dry Ink Cartridge
6
7
MAINTENANCE 4–6 DOCUCOLOR 12 SYSTEM ADMINISTRATION GUIDE
Page 83

3
Remove the empty cartridge by rotating it anticlockwise until the large dot on the cartridge is
aligned with the small dot on the copier/printer, as
illustrated in Figure 9.
1
2
Figure 9: Rotating the Dry Ink Cartridge
4
5
6
Pull the cartridge complet ely out of th e c opier/
printer, as illustrated in Figure 10. Dispose of the
cartridge according to loc al regulations.
Remove the new cartridge f rom t he box.
Shake the cartridge from sid e to sid e, as
illustrated in Figure 11.
3
4
Figure 10: Pulling the Cartridge out of the
copier/printer
5
Figure 11: Shaking the Cartridge
DOCUCOLOR 12 SYSTEM ADMINISTRATION GUIDE 4–7 MAINTENANCE
6
7
Page 84

7
1
Align the arrow on the cartridge with the raised
arrow at the top of the openin g, and slide the
cartridge into the copier/p rint er, as illustrated in
Figure 12.
2
Figure 12: Aligning the Cartridge arrow and
sliding the Cartridge into the copier/printer
8
3
9
4
10
5
Rotate the cartridge clockwise until the dot on the
cartridge is aligned with the dot on t he copier/
printer and the arrows on the c art ridge are
horizontal, as illustrated in Figu re 13
Close the Front Door of the copier/printer.
Remove the sheets of paper on the floor under the
Dry Ink Cartridge, and disp os e of th e s heets
according to local regulations.
CAUTION: Do not use warm or hot water, or
cleaning solvents, to remove dry ink (t oner) from
your skin or clothing. This will s et th e dry ink
(toner) and make it difficult to remove. If any dry
ink (toner) gets on your skin or clothing, use a
brush to remove the dry ink (toner), blow it off, or
wash it off with cold water and mild soa p.
CAUTION: I f mo re t han one Dry Ink Cartridge
needs to be replaced at the same time, be careful
to place the new cartridges in t heir correct colour
locations.
Figure 13: Rotating and securing
the Cartridge
6
7
MAINTENANCE 4–8 DOCUCOLOR 12 SYSTEM ADMINISTRATION GUIDE
Page 85

Replacing the Dry Ink Waste Container
1
2
3
When a message is displayed to replace a Dry Ink
Waste Container (Figure 14), follow the
instructions provided on th is page in addition to
those on the labels surrounding the Dry Ink Waste
Container and affixed to the copier/printer.
CAUTION: To prevent spilling dry ink (toner),
remove the Dry Ink Waste Container only when
the “Dry Ink Waste Container is Full" message
appears on the Touch Screen.
Open the Front Door of the copier/printer.
Place a few sheets of paper on the floor under the
Dry Ink Waste Container to catch any dry ink
(toner) that may spill.
Locate the Waste Container (area A in Figure 15)
in the upper left of the printer/c opier.
1
2
Figure 14: Dry Ink Wa ste Container message
3
Figure 15: Locating the old
Dry Ink Waste Container
4
5
6
DOCUCOLOR 12 SYSTEM ADMINISTRATION GUIDE 4–9 MAINTENANCE
7
Page 86

4
1
Grasp the Dry Ink Waste Container with your right
hand, as illustrated in Figu re 16, and pull the Dry
Ink Waste Container completely out of the copier/
printer.
2
Figure 16: Removing the old
Dry Ink Waste Container
5
3
Place the Dry Ink Waste Container in a plastic
bag, as illustrated in Figure 17, and dispose of the
used container according to lo ca l regulations.
4
Figure 17: Disposing of the old
Dry Ink Waste Container
6
5
Remove the new Dry Ink Waste Container from
the box and bag, as illustrated in Figure 18.
6
Figure 18: Removing the new Dry Ink Waste
Container from the bag
7
MAINTENANCE 4–10 DOCUCOLOR 12 SYSTEM ADMINISTRATION GUIDE
Page 87

7
Align the new Dry Ink Waste Container with the
arrow on the copier/printer, and slide the Dry Ink
Waste Container into the copier/printer, as
illustrated in Figure 19.
1
8
9
Close the Front Door of the copier/printer.
Remove the sheets of paper on the floor under the
Dry Ink Waste Container, and dispose of the
sheets according to local regulat ions.
CAUTION: Do not use warm or hot water, or
cleaning solvents, to remove dry ink (t oner) from
your skin or clothing. This will s et th e dry ink
(toner) and make it difficult to remove. If any dry
ink (toner) gets on your skin or clothing, use a
brush to remove the dry ink (toner), blow it off, or
wash it off with cold water and mild soa p.
2
Figure 19: Inserting the new
Dry Ink Waste Container
3
4
DOCUCOLOR 12 SYSTEM ADMINISTRATION GUIDE 4–11 MAINTENANCE
5
6
7
Page 88

Replacing the Developer Waste Container
1
2
3
1
2
3
When a message is displayed to replace a
Developer Waste Container, follow the instructions
provided on this page in addition to tho s e on t he
labels surrounding the Developer Waste
Container and affixed to the copier/printer.
CAUTION: To prevent developer spillage, remove
the Developer Waste Container only when the
“Developer Waste Container is Full" messag e
appears on the Touch Screen.
Open the Front Door of the copier/printer.
Place a few sheets of paper on the floor under the
Developer Waste Container to catch any
developer that may spill.
Locate the Developer Waste container (area C in
Figure 20).
4
Figure 20: Locating the old
Developer Waste Container
5
6
7
MAINTENANCE 4–12 DOCUCOLOR 12 SYSTEM ADMINISTRATION GUIDE
Page 89

4
Grasp the Developer Waste Container with y our
right hand. Pull the Developer Waste Container
completely out of the copie r/ printer, as illustrated
in Figure 21.
1
2
Figure 21: Removing the old
Developer Waste Container
5
6
Remove the gold cap from th e f ront of the used
Developer Waste Container, as illustrated in
Figure 22.
Securely push the gold cap ov er the opening on
the back of the waste container, as illustrated in
Figure 23, to prevent deve loper beads from
spilling out.
3
4
Figure 22: Removing the cap
5
Figure 23: Placing the cap on
the waste container
DOCUCOLOR 12 SYSTEM ADMINISTRATION GUIDE 4–13 MAINTENANCE
6
7
Page 90

7
1
Place the used Developer Waste Containe r in a
plastic bag, as illustrated in Figure 24, and
dispose of it according to loc al regulations.
2
Figure 24: Disposing of the new
Developer Waste Container
8
Remove the new Developer Ink Waste Container
from the box and bag, as illus t rat ed in Figure 25.
3
4
Figure 25: Removing the new
container from the bag
9
5
10
11
Align the new Developer Waste Container with the
arrow on the copier/printer, then slide the
Developer Waste Container into the copier/printer,
as illustrated in Figure 26.
Close the Front Door of the copier/printer.
Remove the sheets of paper on the floor under the
Developer Waste Container and dispose of th e
sheets according to local regulat ions.
6
Figure 26: Inserting the new
Developer Waste Container
7
MAINTENANCE 4–14 DOCUCOLOR 12 SYSTEM ADMINISTRATION GUIDE
Page 91

Replacing the Copy/Print Cartridge
When a message is displayed to replace a Copy/
Print Cartridge (Figure 27 ), follow the instructions
provided on this page in addition to tho s e on t he
labels surrounding the Co py / Print Cartridge and
affixed to the copier/printer.
CAUTION:To preven t an y dam age to the new
Copy/Print Cartridge, remove the Copy/Print
Cartridge only when the “R eplace the Copy/Print
Cartridge” message appears on the Touch
Screen.
CAUTION:Do not pull out the Dry Ink Waste
Container when the Copy/Print C art ridge has
been pulled out. Damage to the Copy/Print
Cartridge may occur.
Figure 27: Replace the Copy/Print Cartridge
message
1
2
3
4
5
6
DOCUCOLOR 12 SYSTEM ADMINISTRATION GUIDE 4–15 MAINTENANCE
7
Page 92

1
1
2
Open the Front Door of the copier/printer.
Rotate the Copy/Print Cartridge gold latch release
(area B) anti-clockwise to its unlocked position, as
illustrated in Figure 28 and Fig ure 29.
2
NOTE: The “B” pictured on the releas e in Figure
28 is actually on the cartridge.
3
Figure 28: The gold latch release (B)
4
5
Figure 29: Unlocking the Copy/Pr int Cart ridge
6
7
MAINTENANCE 4–16 DOCUCOLOR 12 SYSTEM ADMINISTRATION GUIDE
Page 93

3
Grasp the Copy/Print Cart ridge gold handle
release with your right hand and push up to
release the latch, as illustra te d in F igure 30. Pull
the cartridge out slowly until the strap on top of the
Copy/Print Cartridge is visible.
1
4
5
6
Grasp the strap with your lef t ha nd and remove
the cartridge completely out of the copier/printer,
as illustrated in Figure 30.
Remove the new Copy/P rint C art ridge from the
box.
Grab the tab on the Protective Inst ruc t ion Sheet
and pull the sheet out slowly anti-clockwise from
the Copy/Print Cartridge, as illus t rat ed in Figure
31.
2
Figure 30: Removing the Copy/Print Cartridge
and grasping the Strap
3
4
Figure 31: Removing the Protective
Instruction Sheet from the Cartridge
DOCUCOLOR 12 SYSTEM ADMINISTRATION GUIDE 4–17 MAINTENANCE
5
6
7
Page 94

CAUTION:To preven t an y dam age to the new
Copy/Print Cartridge, ens ure the cartridge
1
alignment is correct before sliding it into the
copier/printer.
7
Align the new Copy/Print Ca rtr idge with the arrow
on the copier/printer, then slide the new Copy/
Print Cartridge into the copier/printer, as illustrated
in Figure 32.
2
3
8
9
Press the new Copy/Print Ca rt ridge in very firmly
until the gold handle clicks down.
Figure 32: Inserting the new
Copy/Print Cartridge
Rotate the Copy/Print Cartridge gold latch release
clockwise to its locked position, as illustrated in
Figure 33.
4
5
10
11
Close the Front Door of the copier/printer.
Place the old Copy/Print Cartridge in the box that
contained the new cartridge an d ret urn it to Xerox
according to the instructio ns on the box.
Figure 33: Locking the Copy/Print Cartridge
6
7
MAINTENANCE 4–18 DOCUCOLOR 12 SYSTEM ADMINISTRATION GUIDE
Page 95

Replacing the Fuser Oil Cartridge
When a message is displayed to replace the
Fuser Oil, follow the instruct ions provided on this
page in addition to those on the labels
surrounding the Fuser Oil area (Figure 34) and
affixed to the copier/printer.
WARNING:The fuser can be very hot. To avoid
personal injury, do not touch any component other
than those indicated in the following procedure.
CAUTION:Fuser oil can be slippery. If any fuser
oil is spilled on the floor, thoroughly clean the
area.
WARNING:Do not place the fuser oil cartridge on
the copier/printer. If any fuser oil is spilled on the
copier/printer, thoroughly clean it.
WARNING:Fuser oil may cause irritation to y our
eyes. Thoroughly wash your hands with soap and
water after handling the fu se r oil c art ridge.
Figure 34: Check the Fus er Oi l m essage
1
2
3
1
2
3
Open the Front Door of the copier/printer.
Place a few sheets of paper on the floor to ca tch
any fuser oil that may spill.
Rotate the green handle clockwise, to the down
position.
4
5
6
DOCUCOLOR 12 SYSTEM ADMINISTRATION GUIDE 4–19 MAINTENANCE
7
Page 96

4
1
Grasp the Paper Path Mod ule and firmly pull the
module out of the copier/p rint er until it is fully
open, as illustrated in Figu re 35.
2
Figure 35: Pulling out the Paper Path Module
5
3
6
Locate the Fuser Oil Cartridge in the front of the
Paper Path Module (area D).
Lift the Fuser Oil Cartridge straight up off the
module, as illustrated in Figure 36. Hold it steady
in this position until any exce s s oi l has dripped off
the cartridge and into the fuser oil reservoir. Hold a
sheet of paper under the bottle no z z le to ca tch
any drips while removing the cart ridge from the
machine.
D
4
Figure 36: Removing the old
Fuser Oil Cartridge (D)
5
6
7
MAINTENANCE 4–20 DOCUCOLOR 12 SYSTEM ADMINISTRATION GUIDE
Page 97

WARNING:Do not place the fuser oil cartridge on
the copier/printer. If any fuser oil is spilled on the
copier/printer, thoroughly clean it.
1
7
8
Place the old cartridge in a pla s tic bag, as
illustrated in Figure 37, and dispose of it according
to local regulations.
Remove the new cartridge f rom t he box and bag,
as illustrated in Figure 38.
2
Figure 37: Disposing of the old cartridge
3
4
Figure 38: Removing the new cartridge
from the box and bag
DOCUCOLOR 12 SYSTEM ADMINISTRATION GUIDE 4–21 MAINTENANCE
5
6
7
Page 98

9
Remove the cap at the end of the Fu s er Oil
Cartridge, as illustrated in F igure 39.
1
2
Figure 39: Removing the Fuser Oil
Cartridge Cap
10
3
Align the cartridge in the pro per position on the
Paper Path Module. Pr es s it carefully into place,
as illustrated in Figure 40.
4
11
Grasp the Paper Path Module and firmly push the
module into the copier/printer.
Figure 40: Installing the Fuser Oil Cartridg e
5
6
7
MAINTENANCE 4–22 DOCUCOLOR 12 SYSTEM ADMINISTRATION GUIDE
Page 99

12
Rotate the Paper Path Module Ha ndle anticlockwise, to the up position, until it is in a locked
position.
1
13
14
Close the Front Door of the copier/printer.
Remove the sheets of paper on the floor under the
Paper Path Module and dispose of the sheets
according to local regulations.
CAUTION: F user oil can be slippery. If any fuser
oil has been spilled on the floo r, thoroughly clean
the area.
WARNING:Do not place the fuser oil cartridge on
the copier/printer. If any fuser oil is spilled on the
copier/printer, thoroughly clean it.
WARNING:Fuser oil may cause irritation to y our
eyes. Thoroughly wash your hands with soap and
water after handling the fu se r oil c art ridge.
2
3
4
DOCUCOLOR 12 SYSTEM ADMINISTRATION GUIDE 4–23 MAINTENANCE
5
6
7
Page 100

Replacing the Cleaning Web
1
2
When a message is displayed to replace the
Cleaning Web (Figure 41), follow th e ins t ruc t ions
provided on this page in addition to tho s e on t he
labels near the Cleaning Web affixed to the copier/
printer.
Figure 41: Check the Cleaning Web message
WARNING:The fuser can be very hot. To avoid
personal injury, do not touch any components
other than those indicate d in t he f ollowing procedure.
3
1
Open the Front Door of the copier/printer.
4
2
3
Rotate the Paper Path Module Handle clockwise,
to the down position.
Pull the Paper Path Module out of the copier/
printer until it is fully open, as illu s tra t ed in
Figure 42.
5
Figure 42: Pulling out the Paper Path Module
6
7
MAINTENANCE 4–24 DOCUCOLOR 12 SYSTEM ADMINISTRATION GUIDE
 Loading...