

Page 1

Getting Started
This
Getting Started
Color Server™. After completing the tasks outlined in this guide, you can explore the
features of the Splash G640 Color Server and add client computers to the printing
environment.
explains how to unpack, install, and connect the Splash G640
The Splash G640 Color Server does
connect, and set up the hardware and software.
N
:
OTE
The term “Splash G640” is used in this guide to refer to the Splash G640
Color Server.
This guide explains the installation instructions for both the Splash G640 System and
the Splash G640 Board Kit. If you have purchased the Splash G640 System, see the
installation instructions that begin on page 3. If you have purchased the Splash G640
Board Kit, see the installation instructions that begin on page 20.
not
require a qualified technician to install,
Overview of the Splash G640
The following sections describe the software and documentation included in the
Splash G640 package. The information in these sections pertain to both the
Splash G640 System and the Splash G640 Board Kit.
For a detailed list of contents in the Splash G640 System package, see page 3. For a
detailed list of contents in the Splash G640 Board Kit, see page 20.
About the Splash G640 software
The User Software CD, included in the Splash G640 package, contains installers for
the following server and client software:
Splash G640 server software
•
jobs and managing color output. This software also includes two special features:
Drop Printing allows you to print files by copying the files to a folder linked to the
Splash G640, and the Web Queue Manager allows you to remotely manage jobs and
download installers and other files from the Splash G640.
—Enables Splash G640 functions, such as monitoring
Part number: 450294272002 Electronics For Imaging, Inc.
Page 2

2 Getting Started
•
Splash Macintosh Client
—Enables you to print to the Splash G640 from Mac OS
client computers.
Splash Windows Client
•
—Enables you to print to the Splash G640 from Windows
client computers.
For instructions on installing the Splash G640 server software for the Splash G640
Board Kit, see page 31. The Splash G640 System is shipped from the factory with
server software pre-installed.
For instructions on installing the Splash Macintosh Client and Splash Windows
Client, see the
User Guide
.
About the documentation
The Splash G640 documentation consists of the following:
• The printed
Splash G640 server computer.
• The online
Splash G640 features. It also explains how to configure the Splash G640 for a
network environment and how to set up client computers for printing to the
Splash G640.
Getting Started
User Guide
provides complete information on how to use the
provides instructions for installing and connecting the
The
User Guide
is provided in Acrobat PDF (Portable Document Format) form in
the documentation folder on the User Software CD. To view the manual, download
the free Acrobat Reader application from www.adobe.com.
•Printed
Release Notes
provide last-minute product information and workarounds for
some of the problems you may encounter.
Page 3

3 Server system requirements
Getting started with the Splash G640 System
The following sections explain how to unpack, install, and connect the Splash G640 if
you have purchased the Splash G640 System.
Contents of the Splash G640 System package
The Splash G640 System is assembled and shipped from the factory with all necessary
cables and documentation. Individual boxes contain the following:
•Splash G640 server computer, keyboard, mouse, and GFI power cable adapter
• 15-inch flat-panel monitor
•Printer and scanner interface cables
•Mouse pad, warranty card, and media pack (User Software CD,
Release Notes
, Adobe ICC Profile Agreement, Kodak Gray Scale)
Getting Started,
Server system requirements
The Splash G640 Color Server requires the following minimum system configuration:
•Apple Blue G3 or Gray G4 (or later) Power Macintosh computer
•Mac OS X (version 10.1 or later)
• 5GB of free hard disk space
• 768MB of installed RAM
•A monitor and video memory that support 16-bit color at a minimum resolution of
1024x768 pixels
•A built-in or attached CD-ROM or DVD-ROM drive (for software installation)
If you have purchased the external scanner option for the DC 12 LP printer, the
Splash G640 also requires an available USB connector (for connection to the scanner).
Page 4

4 Getting Started
Overview of the Splash G640 server installation
To install the Splash G640 server, complete the following tasks in the listed order:
•Unpack the Splash G640 System (see the following section).
• Connect the monitor, keyboard, and mouse (see page 5).
• Connect power (see page 7).
• Connect the Splash G640 to the printer (see page 8).
• Connect the Splash G640 to the network (see page 9).
•Start up and verify the Splash G640 connection (see page 10).
Unpacking the Splash G640 System
The Splash G640 System package contains four individual boxes. For a description of
the contents of each box, see page 3.
TO
UNPACK THE SPLASH
1. Open the large box containing the Splash G640 components.
2. Unpack the box that contains the Splash G640 server computer, keyboard, mouse, and
GFI power cable adapter. Set aside the components.
3. Unpack the box that contains the monitor.
4. Position the Splash G640 and monitor near the printer.
5. Unpack the box that contains the printer and scanner interface cables and set aside
the cables.
6. Unpack the box that contains the mouse pad, warranty card, and media pack. Set aside
the components.
G640
Page 5

5 Server system requirements
Connecting the monitor, keyboard, and mouse
You are now ready to connect the monitor, keyboard, and mouse to the Splash G640.
TO
CONNECT THE MONITOR, KEYBOARD, AND MOUSE
1. Locate the monitor cable and connect one end to the monitor port on the back of the
Splash G640.
Splash G640 monitor
2. If the monitor cable is not already attached to the monitor, attach it according to the
instructions provided with the Power Macintosh.
3. Locate the keyboard and mouse and connect the mouse cable to the USB port on
the keyboard.
Page 6

Keyboard USB port
6 Getting Started
4. Connect the keyboard cable to the USB port on the back of the Splash G640.
N
OTE
The keyboard and mouse cables must be connected to the correct ports on the
:
back of the Splash G640 or the system will not start up properly. Look for
identifying icons on the back panel and cable connectors. The keyboard and mouse
ports are not interchangeable.
Page 7

TO
CONNECT POWER
1. Make sure that the red voltage switch on the back of the Splash G640 is properly set.
7 Server system requirements
Connecting power
You are now ready to connect the Splash G640 to a power outlet.
Voltage switch
Power connector
Use the following guidelines:
•If your power outlet supplies a 220 to 240 Volt current, set the voltage switch to
“230.”
•If your power outlet supplies a 100 to 130 Volt current, set the voltage switch to
“115.”
2. Locate the GFI power cable adapter and connect the adapter to the power connector on
the back of the Splash G640.
3. Locate the Splash G640 power cable and connect the recessed end of the cable to the
GFI power cable adapter.
GFI power
cable adapter
4. Connect the other end of the Splash G640 power cable to the power outlet.
Connect Splash G640 power
Page 8

8 Getting Started
Connecting to the printer
You are now ready to connect the Splash G640 to the supported printer.
N
OTE
:
The Splash G640 supports native scanning with the DC 12 CP copier, and
calibration for the DC 12 LP printer through an external scanner. For information on
installing and setting up the external scanner, see the documentation included with the
scanner.
TO
CONNECT THE SPLASH
1. If necessary, shut down the Splash G640.
2. Locate the Splash G640 printer interface cable. Connect one end of the cable to the
printer interface port on the printer.
For information about exact port locations on the printer, see the documentation that
came with the printer.
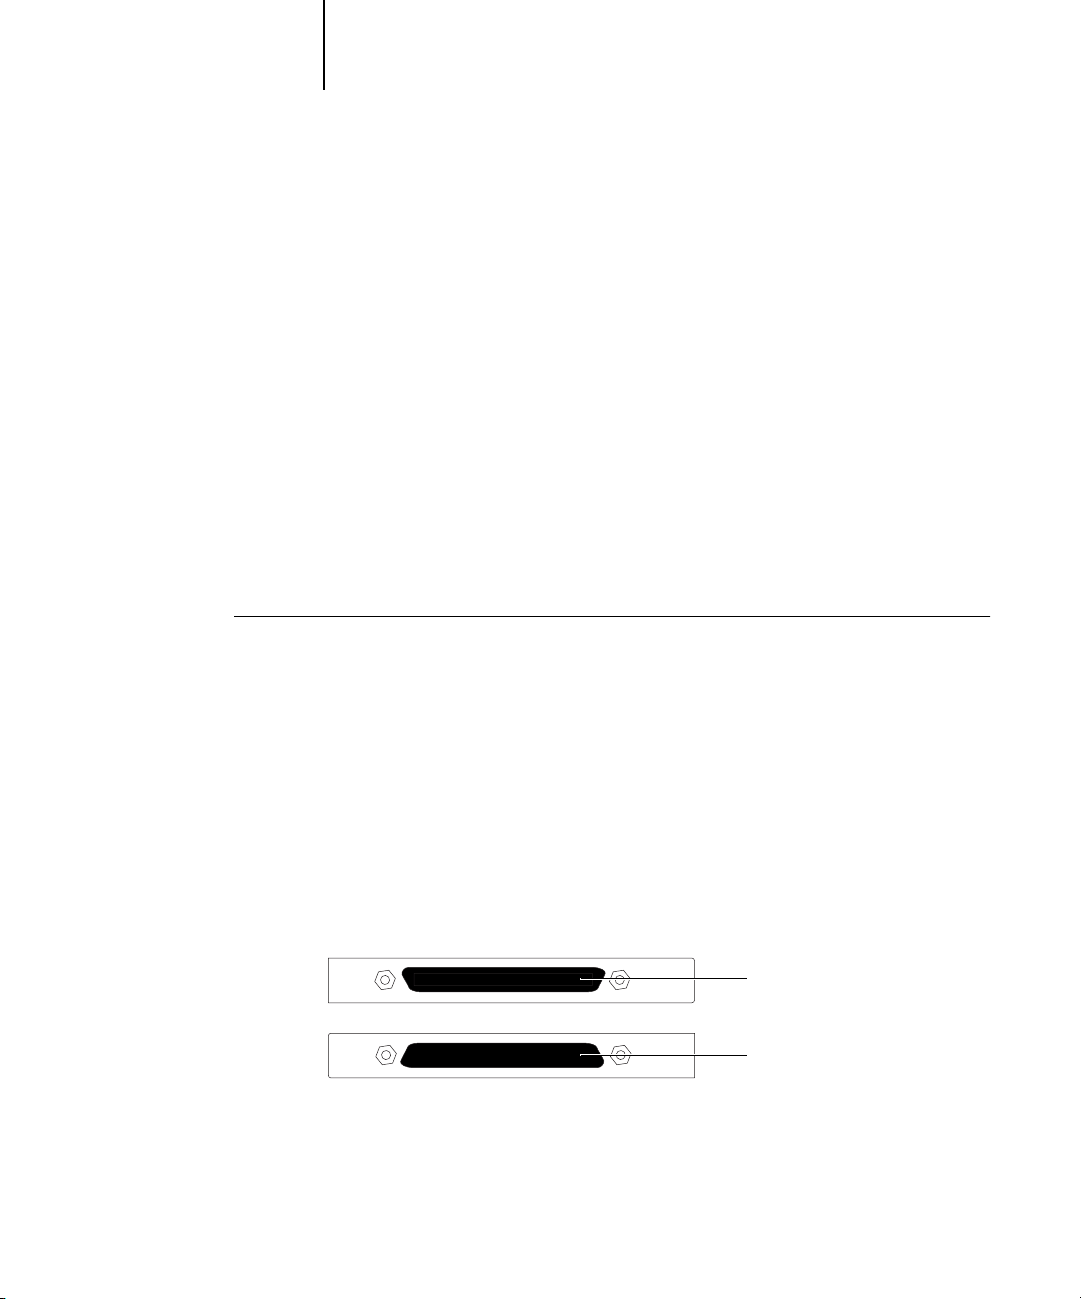
3. Connect the other end of the printer interface cable to the printer interface connector
on the back of the Splash G640.
The printer interface connector is below the scanner interface connector on the back of
the Splash G640.
G640 TO
THE PRINTER
Splash G640 scanner interface
Splash G640 printer interface
Page 9

9 Server system requirements
4. If you are using the DC 12 CP copier, locate the Splash G640 scanner interface cable.
Connect one end of the cable to the scanner interface port on the copier. Connect the
other end of the cable to the scanner interface connector on the back of the
Splash G640.
The scanner interface connector is above the printer interface connector on the back of
the Splash G640.
5. If you are using the external scanner for the DC 12 LP printer, locate the USB cable
included with the scanner. Connect one end of the cable to the USB port on the
external scanner. Connect the other end of the cable to the USB port on the back of
the Splash G640.
Scanner USB port
Connecting to the network
You are now ready to connect the Splash G640 physically to a functioning network. To
add the Splash G640 to your network, contact your network administrator.
N
:
OTE
It is assumed that a network administrator has already installed a network
cabling system and connected client computers and servers to the network.
Page 10

10 Getting Started
Starting up the Splash G640
You are now ready to start up the Splash G640 and verify the Splash G640 connection.
TO
START UP THE SPLASH
1. Turn on the printer.
2. Turn on the Splash G640 by pressing the power button on the front of the computer,
and turn on the monitor.
Wait approximately 1 minute while the Splash G640 starts up. The Splash G640 server
software should automatically start up on the monitor and print a startup page on the
printer, indicating a successful Splash G640 connection.
G640
AND VERIFY THE CONNECTION
Page 11

11 Installing Mac OS X
Use the following guidelines to troubleshoot problems that may arise:
•If the message “No Splash Card Found” is displayed on the monitor, the connection
between the Splash G640 board and the motherboard may be loose. To fix the
problem, proceed to “Reseating the Splash G640 board” on page 18.
•If the startup page fails to print, the cable connections between the Splash G640 and
the printer may be faulty. Shut down the Splash G640 and the printer, check and
reseat the cable connections, and repeat the startup process. If the problem persists,
contact your authorized service/support center.
If you have successfully started up the Splash G640 and verified the connection, the
Splash G640 System installation is complete. Proceed to “What’s next?” on page 33.
Installing Mac OS X
Once you have connected the Splash G640 physically to a functioning network, verify
that the Splash G640 is running Mac OS X (version 10.1 or later). If the Splash G640
is running an earlier version of Mac OS, you must upgrade to Mac OS X before
installing the Splash G640 server software.
N
:
OTE
The Splash G640 media pack
does not
include installer CDs for any Mac OS
version. This guide assumes that you have already obtained the installer CDs required
to upgrade to Mac OS X.
Use the following guidelines to upgrade and configure your operating system:
•If the Splash G640 is already running Mac OS X, proceed to “Configuring Mac OS
X for the Splash G640” on page 27.
•If the Splash G640 is running Mac OS 9.2.x or later, install Mac OS X according to
the instructions provided with the Mac OS X installer CD. Then proceed to
“Configuring Mac OS X for the Splash G640” on page 27.
•If the Splash G640 is running Mac OS 9.1 or earlier, first install Mac OS 9.2.x and
then install Mac OS X, according to the following procedure.
Page 12

12 Getting Started
TO
UPGRADE A SPLASH
1. Insert the Mac OS 9.2.x installer CD into the CD-ROM drive of the Splash G640.
2. To reboot the Splash G640 off the installer CD, hold down the C key as you choose
3. Double-click the icon for the Mac OS 9.2.x installer CD to display the contents of the
4. Select your hard drive in the list and click Initialize.
5. When the drive initialization is complete, double-click the installer icon on the root
6. Follow the on-screen instructions to install Mac OS 9.2.x on your newly initialized hard
G640
RUNNING MAC
Restart from the Special menu.
OS 9.1 OR
EARLIER
Continue to hold down the C key until the Splash G640 reboots and the CD
background is displayed on the desktop.
CD, double-click the Utilities folder, and then double-click the Drive Setup icon.
The Drive Setup utility window is displayed.
N
OTE
:
Initializing the hard drive erases all of the contents on the drive. Before
initializing the hard drive, create backup copies of any files that you want to keep.
level of the Mac OS 9.2.x installer CD.
drive. When the installation is complete, restart the Splash G640.
Allow the Splash G640 to reboot off the hard drive.
7. Remove the Mac OS 9.2.x installer CD.
8. Install Mac OS X according to the instructions provided with the Mac OS X installer CD.
9. Proceed to “Configuring Mac OS X for the Splash G640”.
Page 13

13 Installing Mac OS X
Configuring Mac OS X for the Splash G640
To set up Mac OS X for use with the Splash G640, complete the following tasks:
•Personalize Mac OS X by entering identity and network settings.
If you have just finished installing Mac OS X, follow the procedure “To personalize
Mac OS X for the first time”. If your system is already personalized, follow the
procedure “To edit personalization settings for Mac OS X” on page 15.
• Configure additional System Preferences to optimize the efficiency of the
Splash G640 server software.
TO
PERSONALIZE MAC
1. If you have just finished installing Mac OS X, wait while the short welcome movie
2. Select your country from the list and click Continue.
3. Specify your preferred keyboard layout and click Continue.
4. Enter your name, address, and other contact information and click Continue.
5. Specify whether you want to receive information from Apple Computer, Inc. and other
6. Click Continue again.
7. Enter account login and password information and click Continue.
OS X
FOR THE FIRST TIME
plays and leads into the personalization screens.
If your country is not included in the short list, select Show All to display the complete
list.
Keyboard layouts usually vary by country. If your preferred layout is not included in
the list, select Show All to display the complete list.
software developers, and click Continue.
To make it easy for users to access the Splash G640, use the following settings:
• Leave the Your Name field unchanged. This field is set by default to the name you
entered in step 4.
•Enter
splash
(all lowercase letters) for each of the remaining fields: Short Name,
Password, Verify Password, and Password Hint.
Page 14

14 Getting Started
To restrict access to the Splash G640, you can set the Short Name and Password to a
standard administrator login and a standard administrator password, respectively, for
your network.
8. Specify your existing Internet service, or set up a new Internet service to use, and
click Continue.
9. Specify LAN as your Internet connection and click Continue.
10. If your network has a DHCP server, specify whether or not to use the configuration for
that server and click Continue.
Use the following guidelines:
•To use a static IP address, select the Manual option. Enter the appropriate IP
address, mask, and any other network information provided by the network
administrator.
NOTE: To use the Web Queue Manager, you must configure the Splash G640 using a
static IP address.
•To use a dynamic IP address, select the option to use the existing DHCP
configuration.
11. Select the “I’m not ready for iTools” option and click Continue.
You can add iTools after configuration is finished.
12. Click Continue again.
A progress screen displays as the Splash G640 connects to the network.
13. Select “Add my existing account” and click Continue.
You can change your e-mail account information after configuration is finished.
14. Specify your time zone and click Continue.
15. Specify software that you want updated. If you do not want to update software, select
Quit Software Update.
16. Eject the Mac OS X installer CD and click Go.
Allow the Splash G640 to reboot off the hard drive.
17. Proceed to “To configure additional System Preferences” on page 30.
Page 15

15 Installing Mac OS X
TO EDIT PERSONALIZATION SETTINGS FOR MAC OS X
1. Choose System Preferences from the Apple menu.
The System Preferences window is displayed.
2. Click Show All.
3. Click the Users icon, select the main user in the list, and then click Edit User.
To make it easy for users to access the Splash G640, use the following settings:
• Leave the user name unchanged.
•For the Short Name and Password, enter splash (all lowercase letters).
To restrict access to the Splash G640, you can set the Short Name and Password to a
standard administrator login and a standard administrator password, respectively, for
your network.
When you have finished configuring the user settings, click Show All.
4. Click the Network icon and choose Built-in Ethernet from the Show menu.
The current Ethernet settings are displayed.
5. Click the TCP/IP tab and configure TCP/IP settings.
Use the following guidelines:
•To use a static IP address, choose Manually from the Configure menu. Enter the
appropriate IP address, mask, and any other network information provided by the
network administrator.
NOTE: To use the Web Queue Manager, you must configure the Splash G640 using a
static IP address.
•To use a dynamic IP address, choose DHCP from the Configure menu.
6. Proceed to configuring additional System Preferences, as outlined in the following
procedure.
Page 16
16 Getting Started
TO CONFIGURE ADDITIONAL SYSTEM PREFERENCES
1. To display the System Preferences window, choose System Preferences from the Apple
menu.
2. Click Show All, and then click the Network icon.
3. Choose Built-in Ethernet from the Show menu.
The current Ethernet settings are displayed.
4. Click the AppleTalk tab, select the Make AppleTalk Active option, and then click
Apply Now.
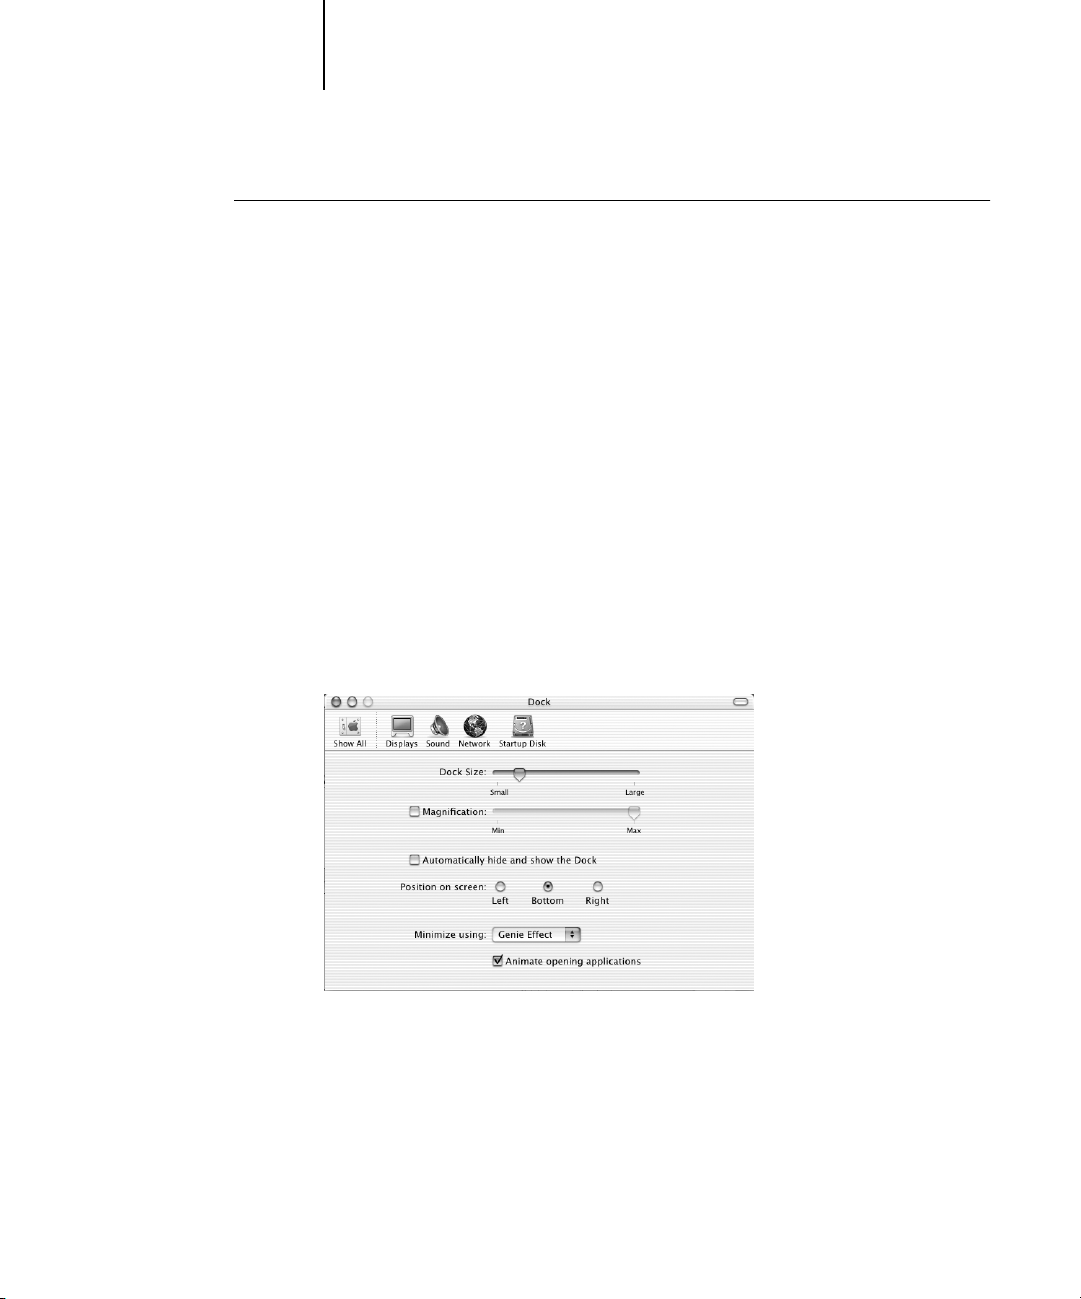
5. Click Show All, and then click the Dock icon.
The Dock window appears. By default, the Dock Size is set to Large when you install
Mac OS X. At this size, the Dock will obscure the bottom of the Splash G640 server
window when it is displayed on the desktop.
6. Drag the Dock Size slider to the approximate position shown in the following
illustration.
7. Click Show All, and then click the Energy Saver icon.
8. Under “Put system to sleep whenever it is inactive for,” drag the slider to Never.
9. Click the red button at the top of the Energy Saver window to close the window.
Page 17

17 Installing the Splash G640 server software
TO CONFIGURE NETWORK SETTINGS
1. Choose Location from the Apple menu, and then choose Network Preferences.
2. Set up and activate TCP/IP and AppleTalk.
Installing the Splash G640 server software
Once you have installed and configured Mac OS X, install the Splash G640 server
software. The User Software CD includes an installer application that installs all the
necessary server software components, including the required PostScript fonts.
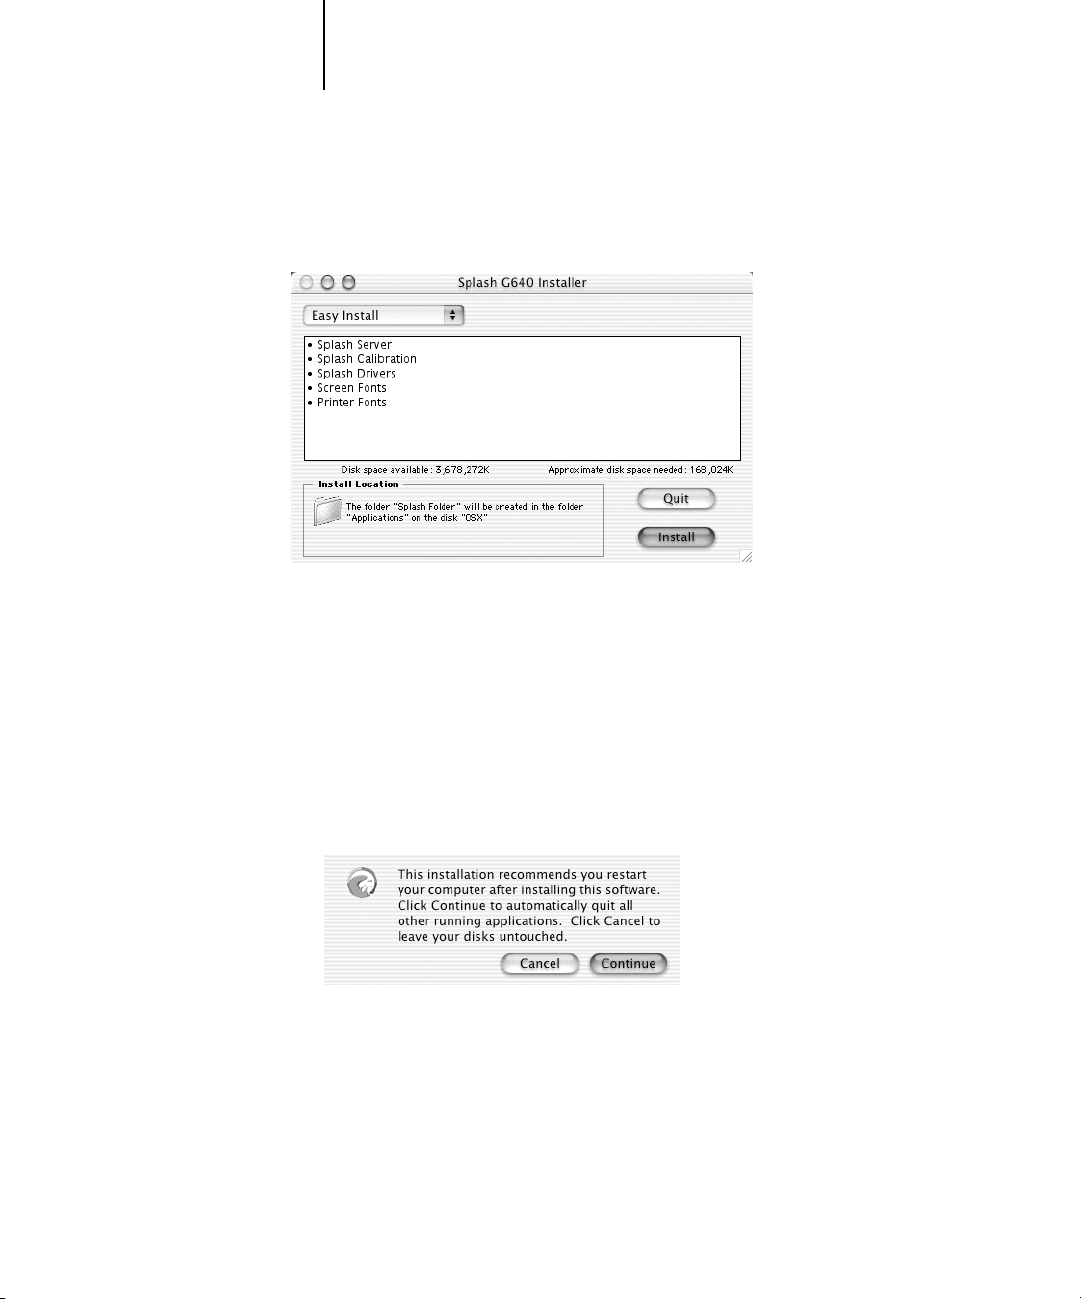
TO INSTALL THE SPLASH G640 SERVER SOFTWARE
1. Insert the User Software CD into the CD-ROM drive of the Splash G640.
2. Double-click the icon for the User Software CD. Open the Splash Network Install folder,
and double-click the Installer icon.
The installer welcome screen appears.
3. Click Continue.
The Easy Install dialog box appears.
4. If the Splash G640 has more than one hard drive, choose the desired hard drive for the
software installation from the Install Location menu.
N
OTE: Make sure that slash characters (“/”) are not included in the hard drive name or
any folder names in the path of the Splash G640 folder. If a slash is included, the
Splash G640 server software will not start.
5. Click Install and follow the instructions displayed on the screen.
6. When prompted, click Restart to restart the Splash G640.
NOTE: The Splash Installer places an alias for the server application in the Startup Items
folder in the server Macintosh System Folder. This causes the Splash server application
to start automatically each time you start the computer. The Installer also places aliases
for the Splash server application and the ColorCal application in the server’s Apple
Menu Items folder, and on the computer desktop.
You are now ready to use the Splash G640 server.
Page 18
To the faceplate
Printer interface connector
18 Getting Started
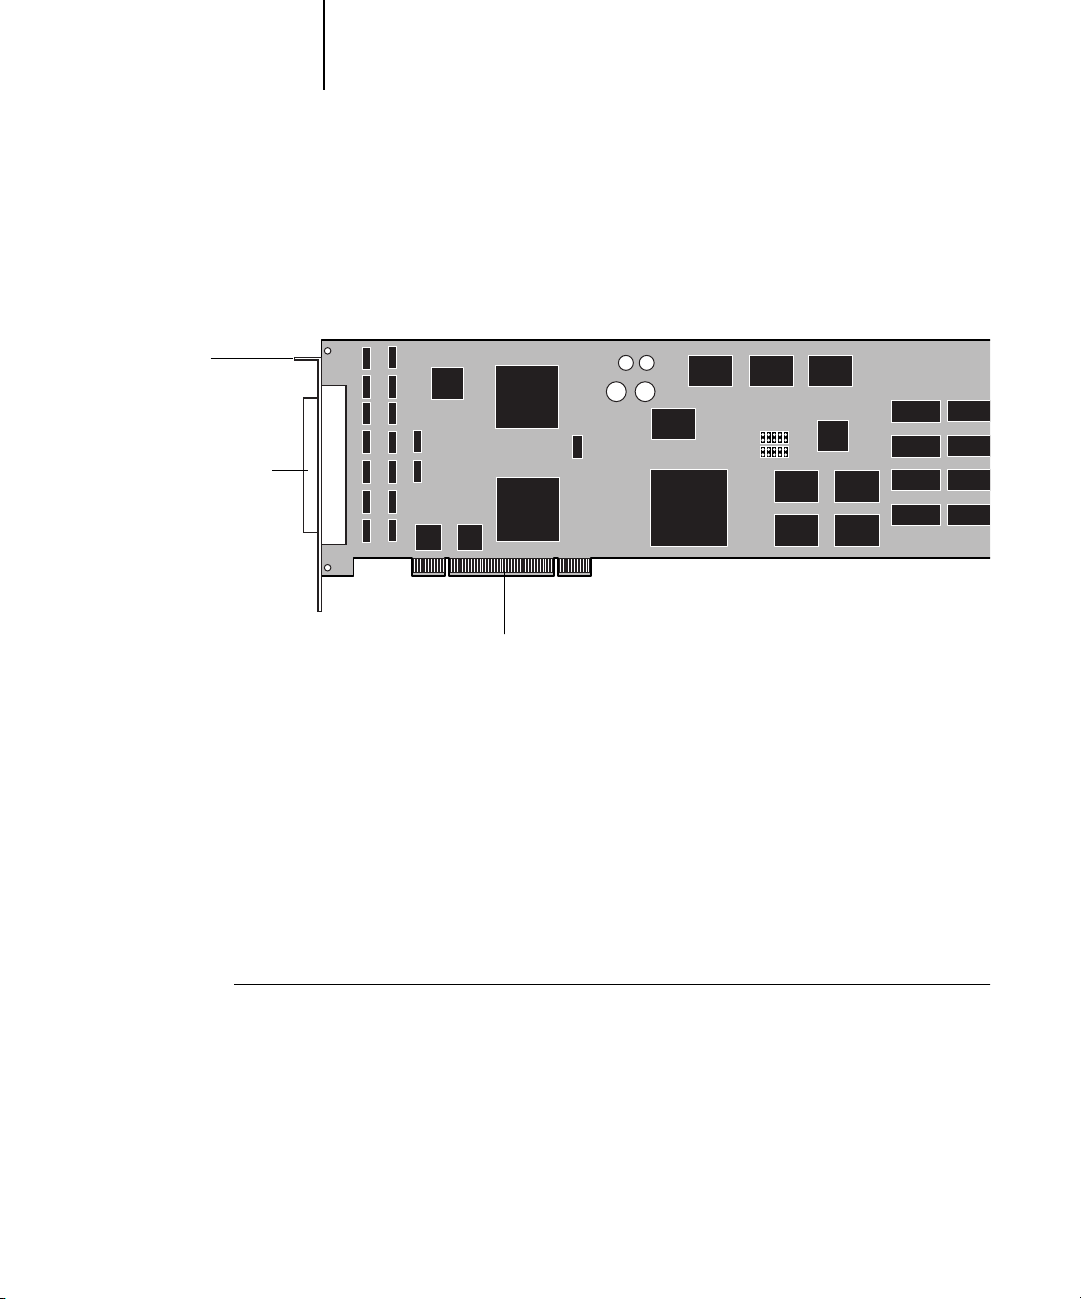
Reseating the Splash G640 board
The Splash G640 board provides the necessary hardware for carrying out the functions
of the Splash G640 server and communicating with the printer. The Splash G640 is
shipped from the factory with the Splash G640 board installed on the motherboard.
Not pictured:
Scanner interface connector,
located behind the printer
interface connector
TO RESEAT THE SPLASH G640 BOARD
1. Shut down the Splash G640 computer and remove all cables from the back.
2. Open the Splash G640.
To the PCI connector on the Splash G640
If the message “No Splash Card Found” is displayed on the monitor when you start up
the Splash G640, the connection between the Splash G640 board and the
motherboard may be loose. To fix this problem, open the Splash G640 and reseat the
Splash G640 board.
If reseating the Splash G640 board does not fix the problem, it may be necessary to
replace the board. For more information, contact your authorized service/support
center.
For instructions on how to open the Splash G640, see the Power Macintosh
documentation provided with the Splash G640.
Page 19

19 Installing the Splash G640 server software
3. Secure the ESD wrist grounding strap around your wrist and attach the other end of the
strap to the metal chassis of the computer.
4. Locate two PCI connectors that are empty and adjacent to each other.
Although the Splash G640 board will be inserted in just one PCI connector, both PCI
faceplate slots are required to accommodate the printer and scanner interface
connectors on the board.
5. Touch the metal chassis of the Splash G640 to discharge any electrical static that may
have accumulated on your clothing or skin.
6. Using a Phillips screwdriver, remove the two mounting screws that secure the
Splash G640 board to the metal faceplate.
Set aside the mounting screws for use later in this procedure.
7. Carefully pull the Splash G640 board out of its PCI connector on the motherboard.
If it is present, clip and remove the tie wrap that secures the board to the chassis.
Discard the tie wrap after removing it.
NOTE: Grasp the Splash G640 board at its edges, avoiding contact with the circuits
etched in the board. Also, take care to avoid contact with nearby components on the
motherboard.
8. Carefully reinsert the board into its PCI connector on the motherboard.
When the computer is open and the panel with the motherboard is resting in
horizontal position, the lower PCI connector is located closer to the hinge of the panel.
This PCI connector corresponds to the lower faceplate slot when the computer is
closed and the motherboard restored to vertical position.
When the board is installed correctly, the Splash G640 interface connectors fits easily
through the two open slots in the faceplate.
9. Secure the Splash G640 board to the faceplate using the mounting screws you
removed earlier.
10. Remove the wrist grounding strap from your wrist and the metal chassis.
11. Close the Splash G640.
12. Replace any cables that you removed earlier, such as the keyboard and mouse cables,
the power cable, and any other cables previously connected to the back of the
computer.
Page 20

20 Getting Started
Getting started with the Splash G640 Board Kit
The following sections explain how to install and set up your Power Macintosh
computer as a Splash G640 Color Server. Use the instructions in these sections if you
have purchased the Splash G640 Board Kit.
Contents of the Splash G640 Board Kit
Individual boxes in the Splash G640 Board Kit contain the following:
•Splash G640 board, mouse pad, warranty card, Xerox asset tag, server logo labels,
ESD (electrostatic discharge) wrist grounding strap, and media pack (User Software
CD, Getting Started, Release Notes, Adobe ICC Profile Agreement, Kodak Gray
Scale)
•Printer and scanner interface cables
Server system requirements
The Splash G640 Color Server requires the following minimum system configuration:
•Apple Blue G3 (400MHz or faster) or Gray G4 (or later) Power Macintosh
computer
•Mac OS X (version 10.1.5 or later)
• 5GB of free hard disk space
• 768MB of installed RAM
•A monitor and video memory that support 16-bit color at a minimum resolution of
1024 x 768 pixels
•A built-in or attached CD-ROM or DVD-ROM drive (for software installation)
If you have purchased the external scanner option for the DC 12 LP printer, the
Splash G640 also requires an available USB connector (for connection to the scanner).
Page 21
21 Installing the Splash G640 server software
Overview of the Splash G640 server installation
To install and set up your Power Macintosh computer for use as a Splash G640 server,
complete the following tasks in the listed order:
•Install the Splash G640 board in the Splash G640 server computer (see the
following section).
• Connect the Splash G640 to the printer (see page 23).
• Connect the Splash G640 to the network (see page 24).
•Install Mac OS X (version 10.1.5 or later), if needed (see page 24).
• Configure Mac OS X (see page 27).
•Install the Splash G640 server software (see page 31).
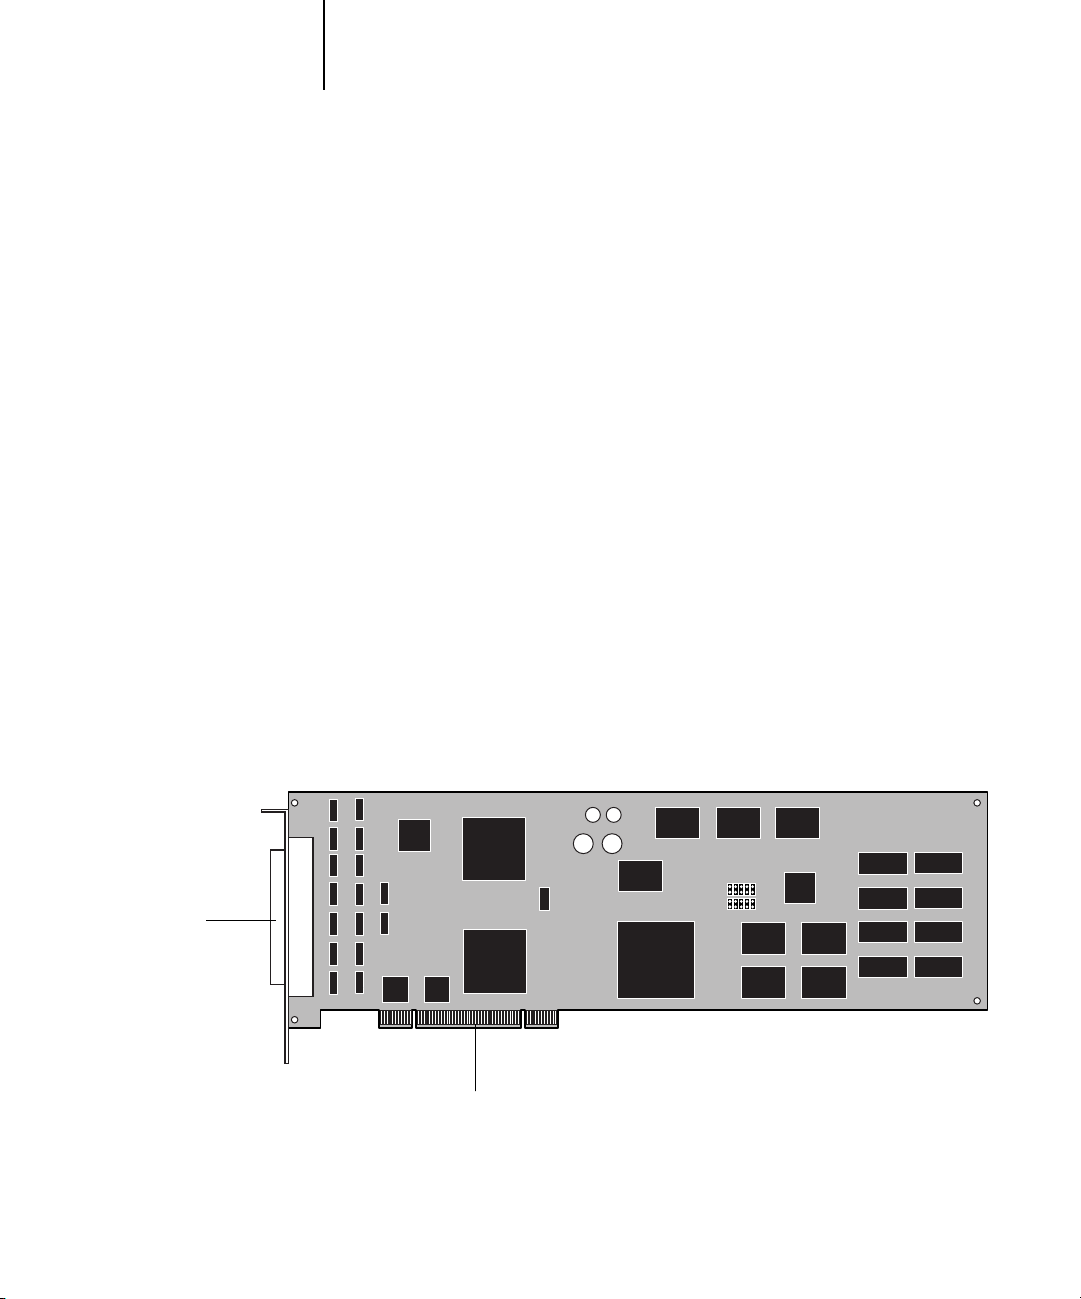
Installing the Splash G640 board
When installed in the server computer, the Splash G640 board provides the necessary
hardware for carrying out the functions of the Splash G640 server and for sending data
to the printer.
Printer interface
Not pictured:
Scanner interface connector,
located behind the printer
interface connector
To install the Splash G640 board, open the server computer and insert the board in an
available PCI connector on the motherboard.
To the PCI connector on the Splash G640
Page 22

22 Getting Started
TO INSTALL THE SPLASH G640 BOARD
1. Shut down the computer that you will be using as the Splash G640 server and remove
all cables from the back.
2. Open the computer.
For instructions on how to open the computer, see the Power Macintosh
documentation that came with the computer.
NOTE: The Splash G640 board requires a minimum of 768MB of installed RAM. If
necessary, install the required memory before installing the Splash G640 board.
3. Secure the ESD wrist grounding strap around your wrist and attach the other end of the
strap to the metal chassis of the computer.
4. Locate two PCI connectors that are empty and adjacent to each other.
Although the Splash G640 board will be inserted in just one PCI connector, both PCI
faceplate slots are required to accommodate the printer and scanner interface
connectors on the board.
5. Using a Phillips screwdriver, remove the covers from the two faceplate slots that
correspond to the PCI connectors that you identified in step 4.
Set aside the cover mounting screws for use later in this procedure.
6. Unpack the Splash G640 board and insert the board into the lower of the two empty
PCI connectors.
When the computer is open and the panel with the motherboard is resting in
horizontal position, the lower PCI connector is located closer to the hinge of the panel.
This PCI connector corresponds to the lower faceplate slot when the computer is
closed and the motherboard restored to vertical position.
When the board is installed correctly, the Splash G640 interface connectors fits easily
through the two open slots in the faceplate.
NOTE: Take care to avoid contact with nearby components on the motherboard when
installing the Splash G640 board.
7. Secure the Splash G640 board to the faceplate using the mounting screws that secured
the slot covers.
Page 23
23 Installing the Splash G640 server software
8. Remove the wrist grounding strap from your wrist and the metal chassis.
9. Close the computer.
10. Replace any cables that you removed earlier, such as the keyboard and mouse cables,
the power cable, and any other cables previously connected to the back of
the computer.
Connecting to the printer
Once the Splash G640 board is installed in the Splash G640 server computer, you can
connect the Splash G640 to the supported printer.
NOTE: The Splash G640 supports native scanning with the DC12 CP copier, and
calibration for the DC12 LP printer through an external scanner. For information on
installing and setting up the external scanner, see the documentation included with
the scanner.
TO CONNECT THE SPLASH G640 TO THE PRINTER
1. If necessary, shut down the Splash G640.
2. Locate the Splash G640 printer interface cable and connect one end of the cable to
the printer interface port on the printer.
For information about exact port locations on the printer, see the documentation that
came with the printer.
3. Connect the other end of the printer interface cable to the printer interface connector
on the back of the Splash G640.
The printer interface connector is below the scanner interface connector on the back of
the Splash G640.
Splash G640 scanner interface
Splash G640 printer interface
Page 24

24 Getting Started
4. If you are using the DC12 CP copier, locate the Splash G640 scanner interface cable.
Connect one end of the cable to the scanner interface port on the copier. Connect the
other end of the cable to the scanner interface connector on the back of the
Splash G640.
The scanner interface connector is above the printer interface connector on the back of
the Splash G640.
5. If you are using the external scanner for the DC12 LP printer, locate the USB cable
included with the scanner. Connect one end of the cable to the USB port on the
external scanner. Connect the other end of the cable to the USB port on the back of
the Splash G640.
Connecting to the network
Once you have completed the connection between the Splash G640 and the printer,
you are ready to connect the Splash G640 physically to a functioning network. To add
the Splash G640 to your network, contact your network administrator.
NOTE: It is assumed that a network administrator has already installed a network
cabling system and connected client computers and servers to the network.
Installing Mac OS X
Once you have connected the Splash G640 physically to a functioning network, verify
that the Splash G640 is running Mac OS X (version 10.1.5 or later). If the
Splash G640 is running an earlier version of Mac OS, you must upgrade to Mac OS X
before installing the Splash G640 server software.
NOTE: The Splash G640 media pack does not include installer CDs for any Mac OS
version. This guide assumes that you have already obtained the installers required to
upgrade to Mac OS 10.1.5.
Use the following guidelines to upgrade and configure your operating system:
•If the Splash G640 is already running Mac OS 10.1.5 or later, proceed to
“Configuring Mac OS X for the Splash G640” on page 27.
•If the Splash G640 is running a Mac OS X version earlier than 10.1.5, install the
Mac OS 10.1.5 update, as described on page 26.
Page 25

25 Installing the Splash G640 server software
•If the Splash G640 is running Mac OS 9.2.x or later, first install Mac OS X
according to the instructions provided with the Mac OS X installer CD. Then install
the Mac OS 10.1.5 update, as described on page 26.
•If the Splash G640 is running Mac OS 9.1 or earlier, first install Mac OS 9.2.x and
then install Mac OS X, according to the following procedure.
TO UPGRADE A SPLASH G640 RUNNING MAC OS 9.1 OR EARLIER
1. If you are installing Mac OS 9.2.x from a CD, insert the Mac OS 9.2.x installer CD into
the CD-ROM drive of the Splash G640. Hold down the C key as you choose Restart from
the Special menu.
Continue to hold down the C key until the Splash G640 reboots from the installer CD
and the CD background is displayed on the desktop.
2. Double-click the icon for the Mac OS 9.2.x installer CD to display the contents of the
CD. Or, if you have downloaded the Mac OS 9.2.x installer from www.apple.com,
double-click the icon for the installer folder to display its contents.
3. Double-click the Utilities folder, and then double-click the Drive Setup icon.
The Drive Setup utility window appears.
4. Select your hard drive in the list and click Initialize.
N
OTE: Initializing the hard drive erases all of the contents on the drive. Before
initializing the hard drive, create backup copies of any files that you want to keep.
5. When the drive initialization is complete, double-click the installer icon on the root
level of the Mac OS 9.2.x installer CD or the Mac OS 9.2.x installer folder.
6. Follow the on-screen instructions to install Mac OS 9.2.x on your newly initialized
hard drive.
7. When the installation is complete, choose Control Panels>Startup Disk from the
Apple menu, select your hard drive in the list, and then click Restart.
Allow the Splash G640 to reboot off the hard drive.
8. If necessary, remove the Mac OS 9.2.x installer CD.
9. Install Mac OS X according to the instructions provided with the Mac OS X installer CD.
10. Install the Mac OS 10.1.5 update, as described in the following procedure.
Page 26

26 Getting Started
TO INSTALL THE MAC OS 10.1.5 UPDATE
1. Download the Mac OS 10.1.5 update from www.apple.com.
2. Double-click the downloaded .bin file on the desktop to extract the file.
3. Double-click the extracted .dmg file on the desktop, and then double-click the drive
icon for the Mac OS 10.1.5 update that appears on the desktop.
4. Double-click the .pkg file in the Mac OS 10.1.5 update folder and follow the on-screen
instructions to install the update.
Page 27

27 Installing the Splash G640 server software
Configuring Mac OS X for the Splash G640
To set up Mac OS X for use with the Splash G640, complete the following tasks:
•Personalize Mac OS X by entering identity and network settings.
If you have just finished installing Mac OS X, follow the procedure “To personalize
Mac OS X for the first time”. If your system is already personalized, follow the
procedure “To edit personalization settings for Mac OS X” on page 29.
• Configure additional System Preferences to optimize the efficiency of the
Splash G640 server software.
TO PERSONALIZE MAC OS X FOR THE FIRST TIME
1. If you have just finished installing Mac OS X, wait while the short welcome movie
plays and leads into the personalization screens.
2. Select your country from the list and click Continue.
If your country is not included in the short list, select Show All to display the
complete list.
3. Specify your preferred keyboard layout and click Continue.
Keyboard layouts usually vary by country. If your preferred layout is not included in
the list, select Show All to display the complete list.
4. Enter your name, address, and other contact information and click Continue.
5. Specify whether you want to receive information from Apple Computer, Inc. and other
software developers, and click Continue.
6. Click Continue again.
7. Enter account login and password information and click Continue.
To make it easy for users to access the Splash G640, use the following settings:
• Leave the Your Name field unchanged. This field is set by default to the name you
entered in step 4.
•Enter
splash (all lowercase letters) for each of the remaining fields: Short Name,
Password, Verify Password, and Password Hint.
Page 28

28 Getting Started
To restrict access to the Splash G640, you can set the Short Name and Password to a
standard administrator login and a standard administrator password, respectively, for
your network.
8. Specify your existing Internet service, or set up a new Internet service to use, and
click Continue.
9. Specify LAN as your Internet connection and click Continue.
10. If your network has a DHCP server, specify whether or not to use the configuration for
that server and click Continue.
Use the following guidelines:
•To use a static IP address, select the Manual option. Enter the appropriate IP
address, mask, and any other network information provided by the network
administrator.
NOTE: To use the Web Queue Manager, you must configure the Splash G640 using a
static IP address.
•To use a dynamic IP address, select the option to use the existing DHCP
configuration.
11. Select the “I’m not ready for iTools” option and click Continue.
You can add iTools after configuration is finished.
12. Click Continue once again.
A progress screen displays as the Splash G640 connects to the network.
13. Select “Add my existing account” and click Continue.
You can change your e-mail account information after configuration is finished.
14. Specify your time zone and click Continue.
15. Specify software that you want updated. If you do not want to update software, select
Quit Software Update.
16. Eject the Mac OS X installer CD and click Go.
Allow the Splash G640 to reboot off the hard drive.
17. Proceed to “To configure additional System Preferences” on page 30.
Page 29

29 Installing the Splash G640 server software
TO EDIT PERSONALIZATION SETTINGS FOR MAC OS X
1. Choose System Preferences from the Apple menu.
The System Preferences window appears.
2. Click Show All.
3. Click the Users icon select the main user in the list, and then click Edit User.
To make it easy for users to access the Splash G640, use the following settings:
• Leave the user name unchanged.
•For the Short Name and Password, enter splash (all lowercase letters).
To restrict access to the Splash G640, you can set the Short Name and Password to a
standard administrator login and a standard administrator password, respectively, for
your network.
When you have finished configuring the user settings, click Show All.
4. Click the Network icon and choose Built-in Ethernet from the Show menu.
The current Ethernet settings are displayed.
5. Click the TCP/IP tab and configure TCP/IP settings.
Use the following guidelines:
•To use a static IP address, choose Manually from the Configure menu. Enter the
appropriate IP address, mask, and any other network information provided by the
network administrator.
NOTE: To use the Web Queue Manager, you must configure the Splash G640 using a
static IP address.
•To use a dynamic IP address, choose DHCP from the Configure menu.
6. Proceed to configuring additional System Preferences, as outlined in the following
procedure.
Page 30

30 Getting Started
TO CONFIGURE ADDITIONAL SYSTEM PREFERENCES
1. To display the System Preferences window, choose System Preferences from the
Apple menu.
2. Click Show All and then click the Network icon. Choose Built-in Ethernet from the
Show menu.
The current Ethernet settings are displayed.
3. Click the AppleTalk tab, select the Make AppleTalk Active option, and then click Apply
Now.
4. Click Show All, and then click the Dock icon.
The Dock window appears. By default, the Dock Size is set to Large when you install
Mac OS X. At this size, the Dock will obscure the bottom of the Splash G640 server
window when it is displayed on the desktop.
5. Drag the Dock Size slider to the approximate position shown in the following
illustration.
6. Click Show All and then click the Energy Saver icon.
7. Under “Put system to sleep whenever it is inactive for,” drag the slider to Never.
8. Click the red button at the top of the Energy Saver window to close the window.
Page 31

31 Installing the Splash G640 server software
TO CONFIGURE NETWORK SETTINGS
1. Choose Location from the Apple menu, and then choose Network Preferences.
2. Set up and activate TCP/IP and AppleTalk.
Installing the Splash G640 server software
Once you have installed and configured Mac OS X, install the Splash G640 server
software. The User Software CD includes an installer application that installs all the
necessary server software components, including the required PostScript fonts.
TO INSTALL THE SPLASH G640 SERVER SOFTWARE
1. Insert the User Software CD into the CD-ROM drive of the Splash G640.
2. Double-click the icon for the User Software CD. Open the Splash Network Install folder,
and double-click the Installer icon.
The installer welcome screen appears.
Page 32
32 Getting Started
3. Click Continue.
The Easy Install dialog box appears.
The Splash folder will be installed automatically in the Applications folder on the
startup hard drive.
4. If the Splash G640 has more than one hard drive, choose the desired hard drive for the
software installation from the Install Location menu.
N
OTE: Make sure that slash characters (“/”) are not included in the hard drive name or
any folder names in the path of the Splash G640 folder. If a slash is included, the
Splash G640 server software will not start.
5. Click Install.
6. To proceed with the installation, click Continue and follow any instructions that
appear on the screen.
7. When the installation is complete, restart the Splash G640.
Page 33

33 What’s next?
NOTE: The Splash Installer places an alias for the server application in the Startup Items
folder in the server Macintosh System Folder. This causes the Splash server application
to start automatically each time you start the computer. The Installer also places aliases
for the Splash server application and the ColorCal application in the server’s Apple
Menu Items folder, and on the computer desktop.
This concludes the installation of the Splash G640 server.
What’s next?
Now that you have completed the installation of the Splash G640 server, you are ready
to explore the Splash G640 features and install additional software for client
computers. For instructions, see the appropriate chapter of the User Guide:
•To configure network settings for the Splash G640 printing environment, see
Chapter 1.
•To configure server settings for Drop Printing, see Chapter 5.
•To install software on client computers, see Chapters 2 and 3.
•To download installers or files from the Splash Web Queue Manager, see Chapter 6.
Page 34

 Loading...