

Page 1

DocuCentre S2420
DocuCentre S2220
Basic Operation Guide
This manual describes the basic operations for using this machine.
Page 2
About Quick-Buttons
Copy
Photo & Text
Text
Photo
1
Copy
Photo & Text
Text
Photo
1
111
111
Paper Supply
...
Copy
Auto
Reduce/Enlarge
...
Off
Pages per Side
...
Auto
1
111
Copy
Photo & Text
Text
Photo
1
111
py
py
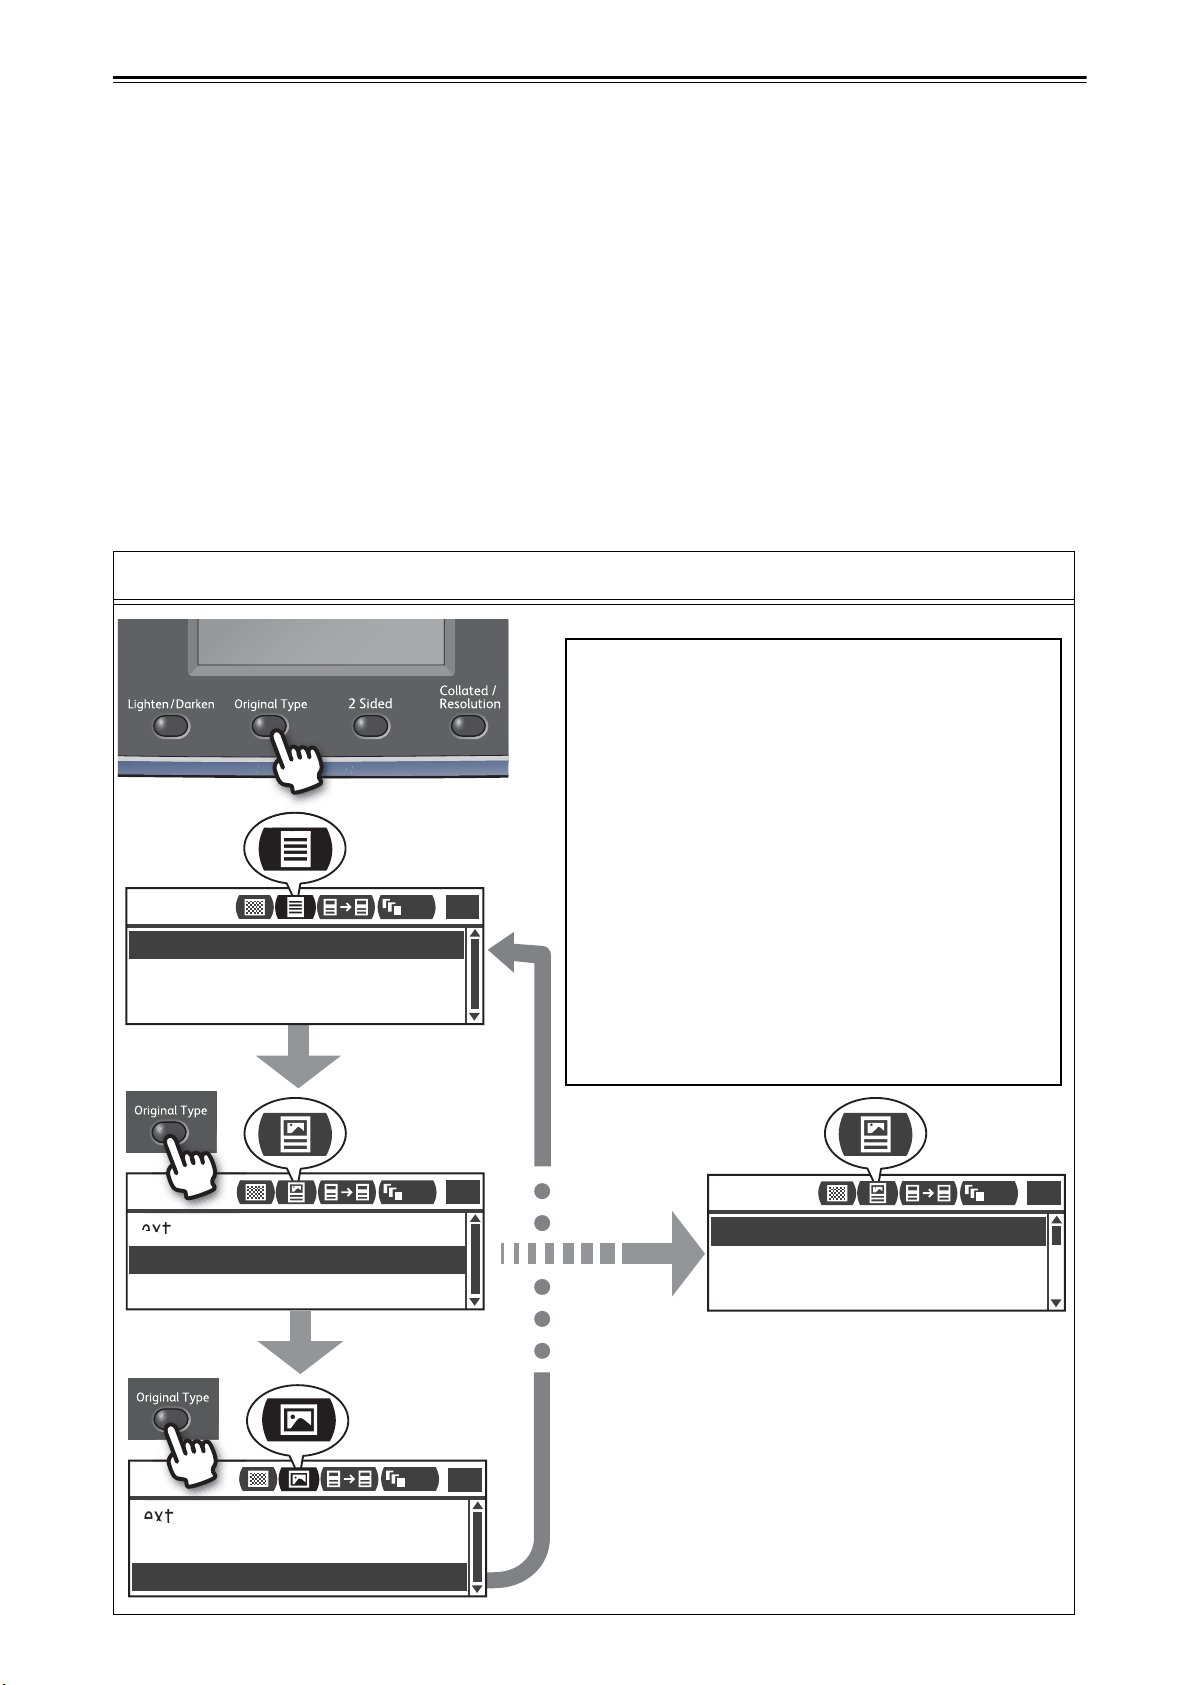
The process of the Quick-Button operation
by pressing one single button (QuickButton):
New setting is applied when:
- 2 seconds passed after pressing the button and the
Quick-Button setting screen is exited.
- Pressing another Quick-Button.
- Pressing the <Start> button. In this case, a job,
such as copying in Copy mode, is proceeded.
- In Scan mode, pressing the <Address Book>. You
can also change the address by pressing the single
button continuously.
[Photo&Text] is applied
automatically.
* The Quick-Button setting screen
is exited 2 seconds after the
button is pressed, and the new
setting is applied.
2 sec.*
Current setting:
[Text]
Current selection:
[Photo&Text]
Current selection:
[Photo]
Just simply pressing a Quick-Button allows you to:
- Directly access to the setting screen and check the current setting value.
- Easily moves your selection from one item to another by pressing the single button. As a new setting is applied, its
icon changes accordingly on the screen.
- Just 2 seconds after pressing the button, the setting screen is closed and the last selected item is applied.
- With the [Quick-Button Selection Timer] from the <Machine Status> button, you can change the displayed time for
up to 5 seconds.
Practical use of Quick-Buttons:
- Keep pressing the button while you calmly decide your setting value.
- Stop pressing the button when your desired setting is being selected.
Once you get used to the Quick-Button operation, you can easily change the settings. By using the
<OK> and the arrow buttons also changes the settings, but this operation is generally not
recommended.
Example) Copy > Original Type
Page 3

Windows is trademark or registered trademark of Microsoft Corporation in the United States and/or other
countries.
All product/brand names are trademarks or registered trademarks of the respective holders.
Microsoft product screen shot(s) reprinted with permission from Microsoft Corporation.
In this manual, safety instructions are preceded by the symbol .
Always read and follow the instructions before performing the required procedures.
The data saved in the hard disk of the machine may be lost if there is any problem in the hard disk.
Fuji Xerox is not responsible for any direct and indirect damages arising from or caused by such data loss.
Fuji Xerox is not responsible for any breakdown of machines due to infection of computer virus or computer
hacking.
Important
1.This manual is copyrighted with all rights reserved. Under the copyright laws, this manual may not be
copied or modified in whole or part, without the written consent of the publisher.
2.Parts of this manual are subject to change without prior notice.
3.We welcome any comments on ambiguities, errors, omissions, or missing pages.
4.Never attempt any procedure on the machine that is not specifically described in this manual. Unauthorized operation can cause faults or accidents. Fuji Xerox is not liable for any problems resulting from
unauthorized operation of the equipment.
An export of this product is strictly controlled in accordance with Laws concerning Foreign Exchange and
Foreign Trade of Japan and/or the export control regulations of the United States.
XEROX, the sphere of connectivity design, and CentreWare are trademarks or registered trademarks of Xerox
Corporation in the U.S. or Fuji Xerox Co., Ltd.
Page 4

Table of Contents
About Quick-Buttons .......................................................................................................................... 2
Table of Contents................................................................................................................................ 4
Preface ..................................................................................................................................................... 5
Preface ................................................................................................................................... 5
Types of Manuals .............................................................................................................. 5
Main Features on the Control Panel ............................................................................................ 6
Informative Pointers .......................................................................................................................... 8
Before Using This Machine............................................................................................................10
Safety Notes ......................................................................................................................10
Regulations.........................................................................................................................17
Environment.......................................................................................................................17
Legal Notice .......................................................................................................................17
Preparations.........................................................................................................................................18
Paper Types........................................................................................................................
Loading Paper .................................................
Placing Document ...........................................................................................................21
Copy ........................................................................................................................................................23
How to Copy ......................................................................................................................23
Copying an ID Card ........................................................................................................24
Making 2 Sided Copies ..................................................................................................25
Collating Output...............................................................................................................26
Making Reduced or Enlarged Copies .......................................................................27
Copying Two/Four Pages onto One Sheet.............................................................28
Print.........................................................................................................................................................29
How to Print .......................................................................................................................29
Scan.........................................................................................................................................................30
Importing Scanned Data via Application..............................................................30
Sending Scanned Data via E-mail.............................................................................
Sending Scanned Data to PC (Network) ................................................................
..................................................................19
18
31
32
Fax ...........................................................................................................................................................33
How to Fax..........................................................................................................................33
Registering Phone Book ................................................................................................35
Problem Solving..................................................................................................................................36
Paper Jams .........................................................................................................................36
Document Jams................................................................................................................39
Error Code ...........................................................................................................................40
Index.......................................................................................................................................................51
4
Page 5

Preface
Preface
Thank you for choosing the DocuCentre S2420/S2220 (hereafter referred to as "the machine".
This guide describes how to operate the machine and the precautions you should follow during
operation. To get the most out of the machine and to use it effectively, be sure to read this guide
before use.
This guide assumes that you have a basic knowledge of the operating environment of the personal
computer in use and networking environments. For information on the environment of the
personal computer in use and the basic knowledge and operations of networking environments,
refer to the manuals provided with the personal computer, operating system, and network system.
After reading this guide, be sure to keep it handy for quick reference. It will be useful in case you
forget how to perform operations or if a problem occurs with the machine.
For detailed information of this machine, refer to the "User Guide" included on the Driver CD Kit
provided with this machine.
Types of Manuals
The following guides are provided with the machine.
Accompanying Manuals
Basic Operation Guide (this guide) (Booklet) (Driver CD Kit)
The guide describes a quick reference for the basic operations, daily maintenance,
and problem solving for this machine. (The Indonesian version of this guide is
included in the Driver CD Kit.)
User Guide (Driver CD Kit)
The guide describes how to use the copy, print, fax and scan features as well as show
to set the paper, perform everyday maintenance, make machine status settings,
perform troubleshooting, and set up a network.
Manual (HTML)
The manual describes installation and configuration procedures for print drivers and
the printer environment. This manual is included in the Driver CD Kit.
Print Driver Help
The help describes print features and operations.
5
Page 6
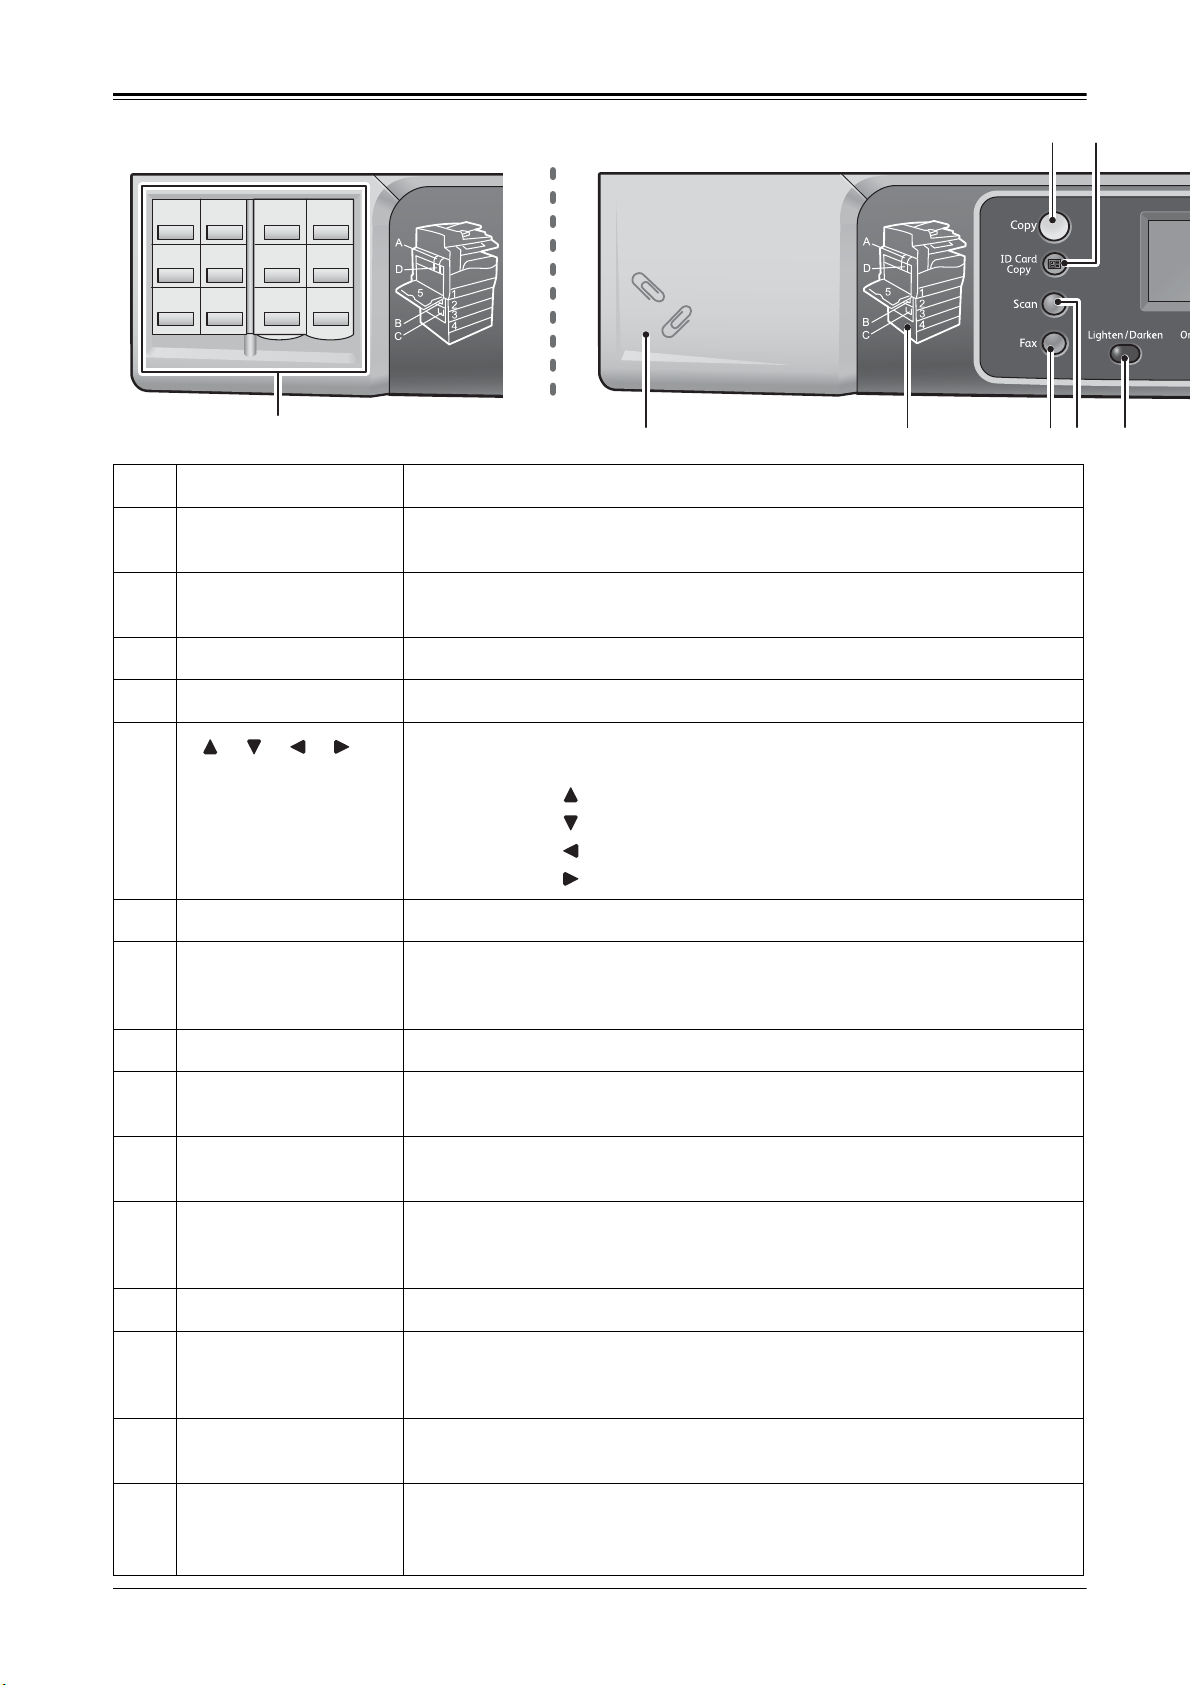
Main Features on the Control Panel
2425262728
12
29
12
34
56
78
9 10
11 1 2
No. Component Function
1 <Copy> button Press this button to use the Copy feature. When the Copy feature is selected,
this button lights up.
2 <ID Card Copy> button Press this button to use the ID Card Copy feature. When the ID Card Copy fea-
ture is selected, this button lights up.
3 Display Displays the operation menus and machine status messages.
4 <Job Status> button Press this button to check/cancel a current job or pending job.
5
<><><><>
buttons
Press these buttons to select a menu item on the menu screen, and to change
settings.
Note • The < > button allows you to select the previous menu item.
• The < > button allows you to select the next menu item.
• The < > button allows you to go to the next menu screen.
• The < > button allows you to return to the previous screen.
6 <OK> button Press this button and the arrow buttons to change settings.
7 <Log In/Out> button Press this button to enter or exit System Administration mode (for at least for 4
seconds) or Account mode. This button lights up when the machine is in the
System Administration mode.
8 Numeric keypad Press this button to enter numbers (such as number of copies) or text.
9 <Dial Pause> button Press this button to insert a pause between numbers while entering a recipi-
ent’s number.
10 <Machine Status>
button
Press this button to print reports and check the machine information such as
the status of consumables and the machine’s the IP address.
11 <Energy Saver> button Lights up when the machine enters Energy Saver mode to conserve power
when the machine is left idle for a while. You can also press this button to enter
or exit the Energy Saver mode.
12 <Stop> button Press this button to cancel a current job or failed job.
13 <ClearAll> button Press this button to reset the displayed settings of each feature to default val-
ues or clear the entered numbers. The setting returns to the same condition as
the machine is powered on.
14 <Start> button Press this button to start scanning documents or confirm the value of each set-
ting.
15 <Error> indicator Blinks if a system error occurs.
This indicator lights up when a problem other than a system error occurs with
the machine, including paper jams and running out of paper.
6
Page 7
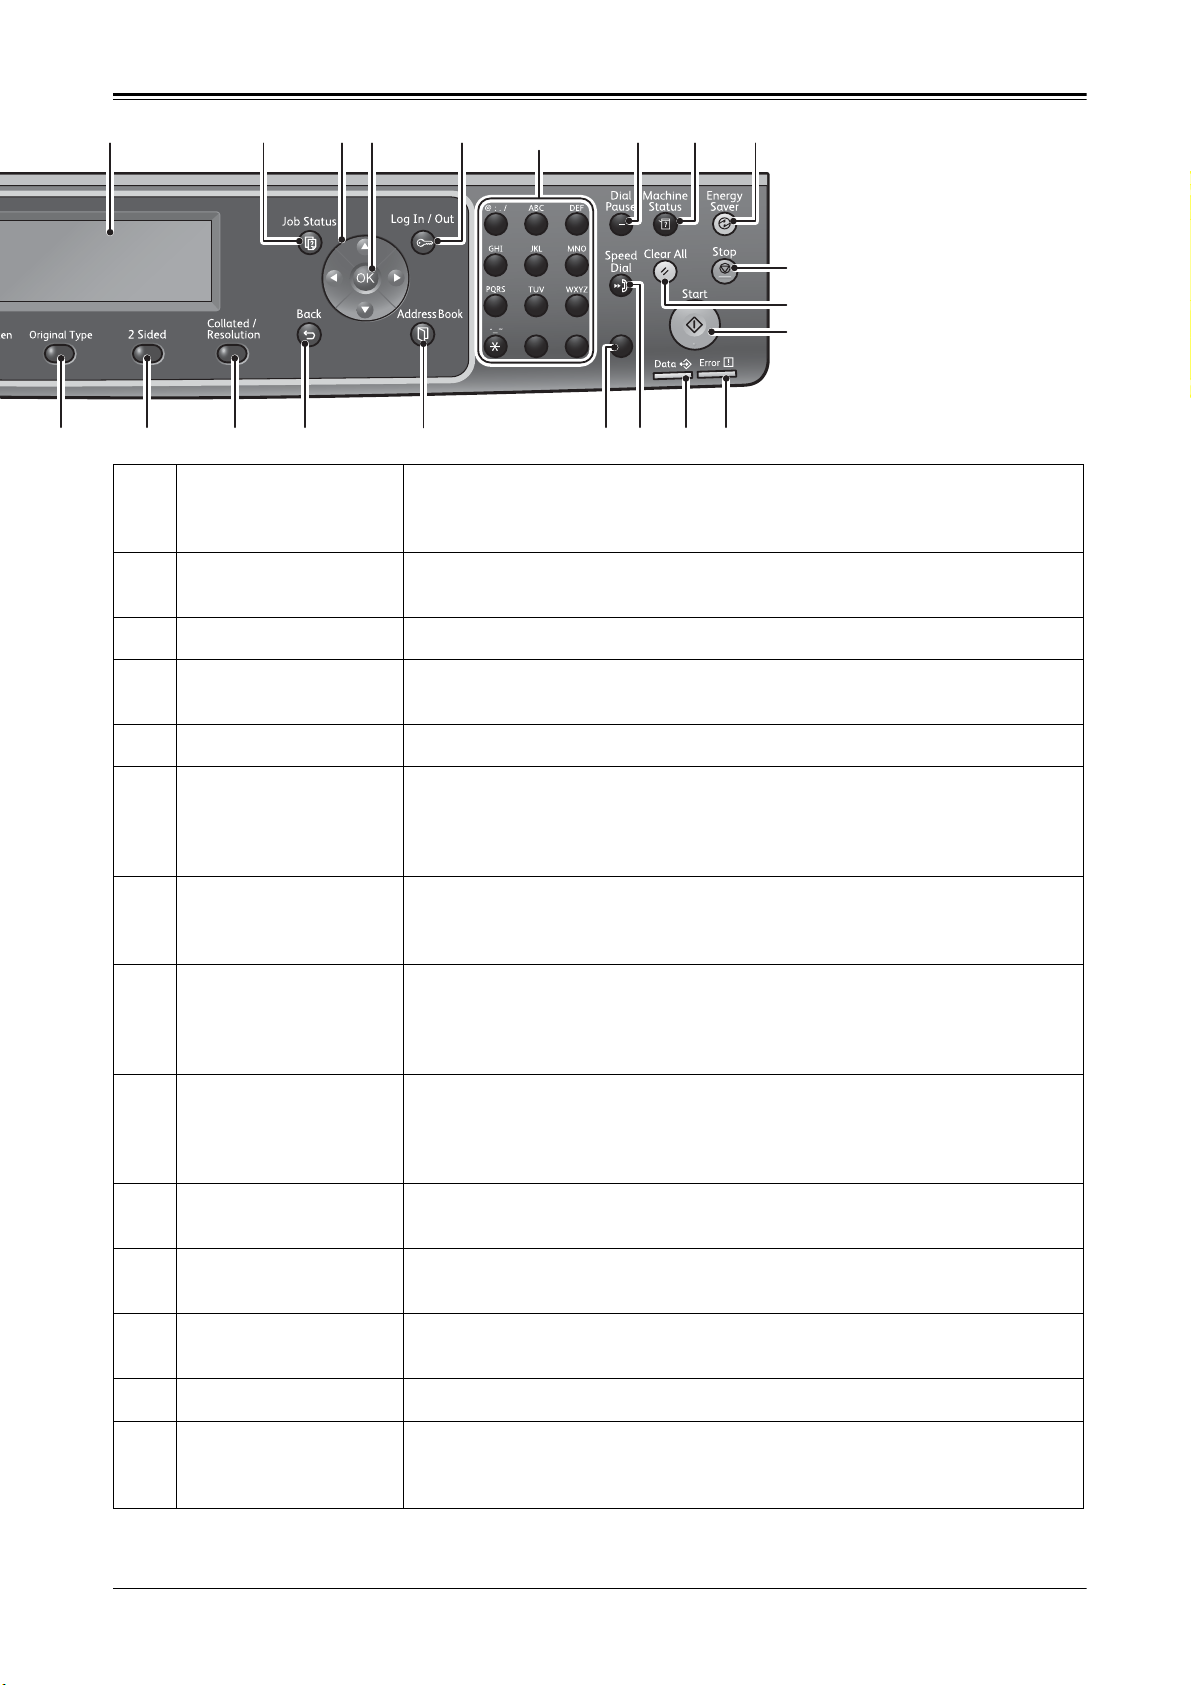
Main Features on the Control Panel
1
23
456
789
0#
C
12
13
14
151617181920212223
3457891011
6
16 <Data> indicator Blinks when the machine is sending or receiving data to or from a client. This
indicator lights up when data is stored in the machine's memory or when
received faxes waiting to be printed.
17 <Speed Dial> button Press this button to specify a recipient with entering a Speed Dial number when
sending a fax.
18 <C> (Clear) button Press this button to delete one numerical value that you have entered.
19 <Address Book> button Press this button to display the recipients registered for the Address Book when
sending data by fax, e-mail, or network.
20 <Back> button Press this button to return the display to the previous screen.
21 <Collated/Resolution>
button
(Quick-Button)
22 <2 Sided> button
(Quick-Button)
23 <Original Type> button
(Quick-Button)
21 <Lighten/Darken> but-
ton
(Quick-Button)
25 <Scan> button Press this button to use the Scan feature. When the Scan feature is selected,
Press this button to display the setting screen for the Collated or Resolution
function that lets you change the output method for Copy feature and the resolution for Scan feature.
The button lights up when this function is available.
Press this button to display the setting screen for the 2 Sided function that lets
you select 2 sided printing for Copy and Scan features.
The button lights up when this function is available.
Press this button to display the setting screen for the Original Type function
that lets you change the type of document for Copy, ID Card Copy, and Scan
features.
The button lights up when this function is available.
Press this button to display the setting screen for the Lighten/Darken function
that lets you adjust the brightness for Copy, ID Card Copy, and Scan features.
Also, the Toner Saver setting is available for Copy feature.
The button lights up when this function is available.
this button lights up.
26 <Fax> button Press this button to use the Fax feature. When the Fax feature is selected, this
button lights up.
27 Outline view Used to verify the location indicated in an error message appears on the dis-
28 Paper clip tray Used as a place to store paper clips, staples, etc.
29 One touch panels (Only
available for machines
with the Fax Kit)
play.
Used to specify the recipient when sending a fax.
The recipients registered for the one touch buttons 01 to 36 correspond to the
Speed Dial numbers 001 to 036.
7
Page 8

Informative Pointers
With regularly using multifunctional machines, knowing few things can help you avoid having
troubles and make use of the machine more comfortable.
Please read this guide before using the machine.
Load only paper inside a tray
Make sure there is no object except paper inside of the trays.
Do not place any guides or
objects in the empty space
(outside of the paper
guides).
You can prevent the following problem situation:
Cause noise on the left side of the machine.
Using the correct printer driver?
When you use the new multifunctional machine, you need to install the new printer driver.
Install the new driver for this machine (DocuCentre S2420 or DocuCentre S2220).
Check the printer
driver installed in
your computer.
You can prevent the following problem situations:
Unreadable characters are printed.
OK!
OK!
8
Unnecessary lines are printed.
A part of the image is missing.
Encounters an error and cannot print.
The images having different tones are printed.
Page 9
Informative Pointers
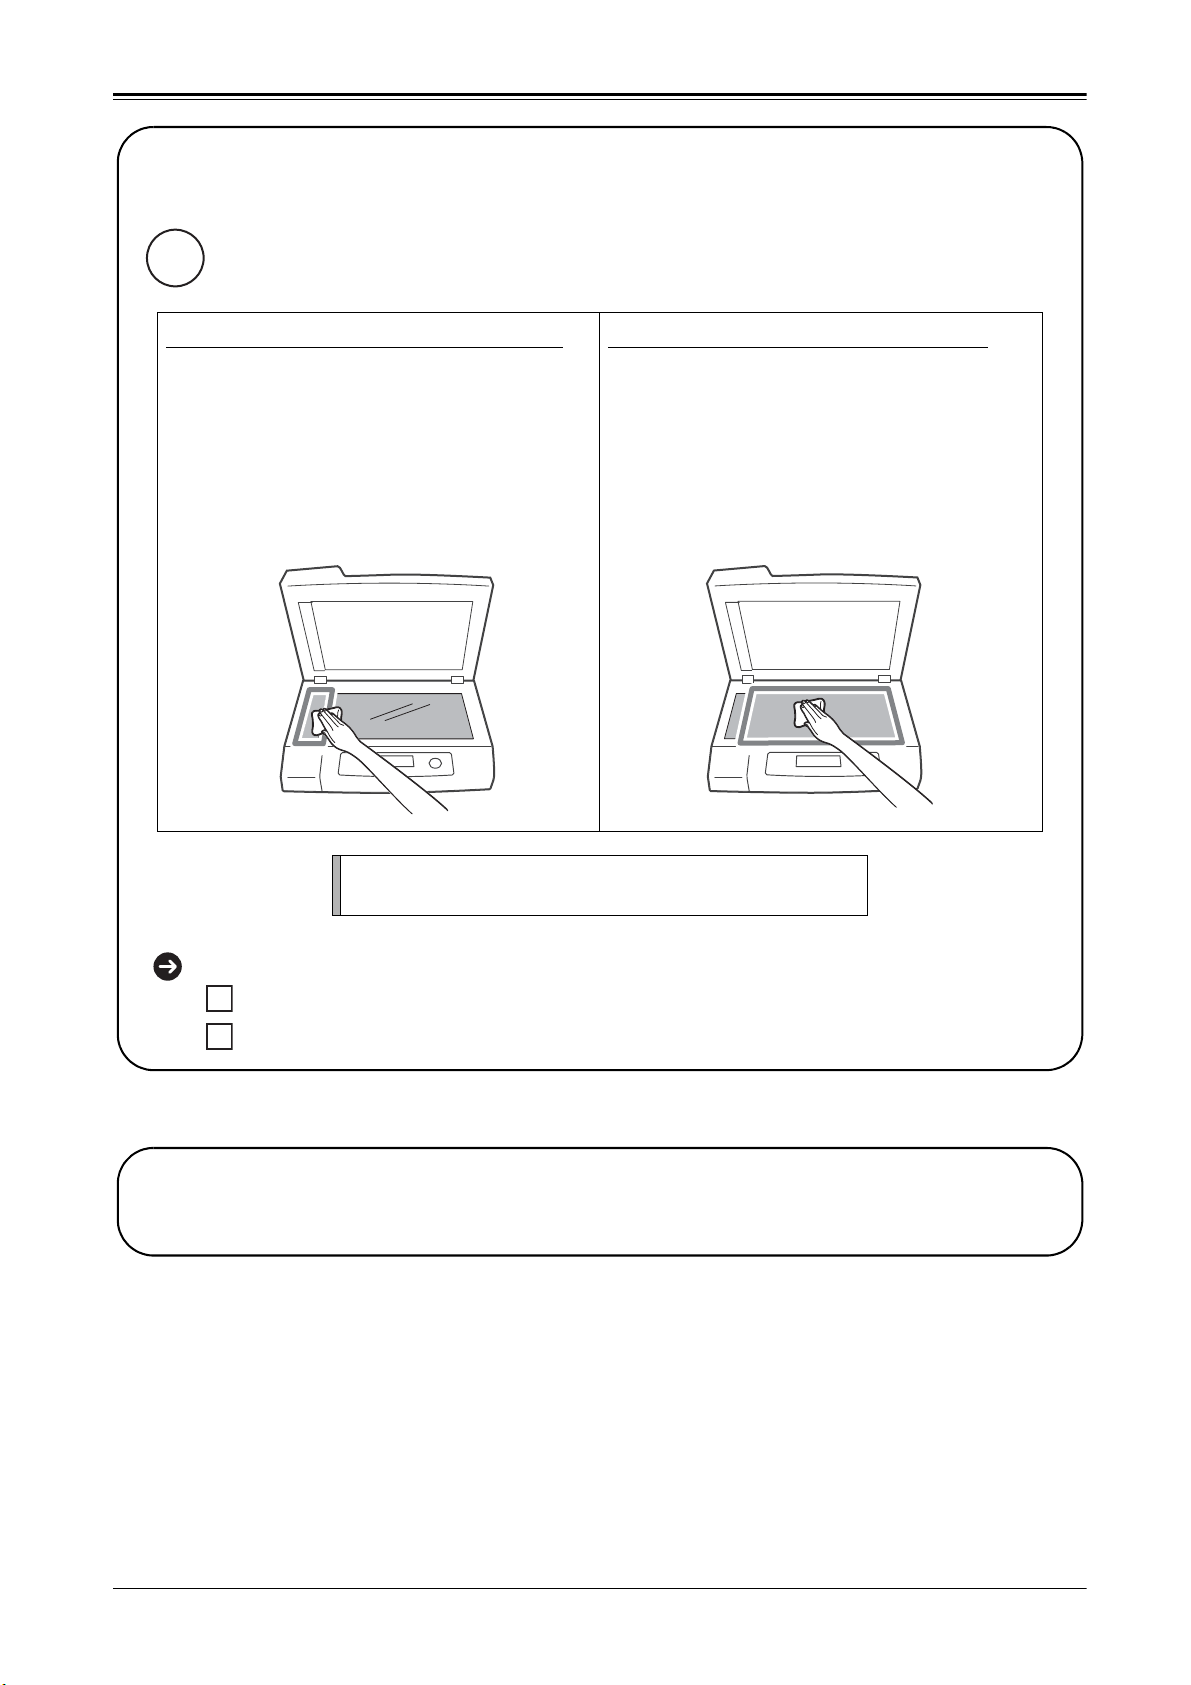
Clean the glass for clear copy!
Check the glass before starting to copy.
Even when you use the document feeder, dirt of the glass may cause unsatisfactory
Point
result.
When using the document feeder: When using the document glass:
Clean the narrow glass strip on the
left side of the document glass. Wipe
the glass with a soft cloth moistened
with water first, and then wipe it with
a soft dry cloth.
Looking over the glass from the front and angles helps you
find any dirt.
You can prevent the following problem situations:
Clean the document glass. Wipe the
glass with a soft cloth moistened
with water first, and then wipe it with
a soft dry cloth.
The copy has black lines when using the document feeder.
The copy has black dots when using the document glass.
Notes on Switching ON/OFF the Power
When restarting the machine, wait for 10 seconds before switching the power on.
9
Page 10
Before Using This Machine
WARNING
Caution Flammable Explodable Electric
shock
Heated
surface
Moving
object
Pinched
fingers
Prohibited No fire Do not
touch
Do not use
in bathroom
Do not
tear down
Keep away
from wet
Never touch
with wet hand
Instructions Unplug Ground/
Earth
Safety Notes
Before using this product, read "Safety Notes" carefully for safety use.
This product and recommended supplies have been tested and found to comply with strict
safety requirements including safety agency approvals and compliance with environmental
standards. Follow the following instructions for safety use.
Any unauthorized alteration including an addition of new functions or connection to
external devices may not be covered by the product warranty. Contact your local Fuji
Xerox representative for more information.
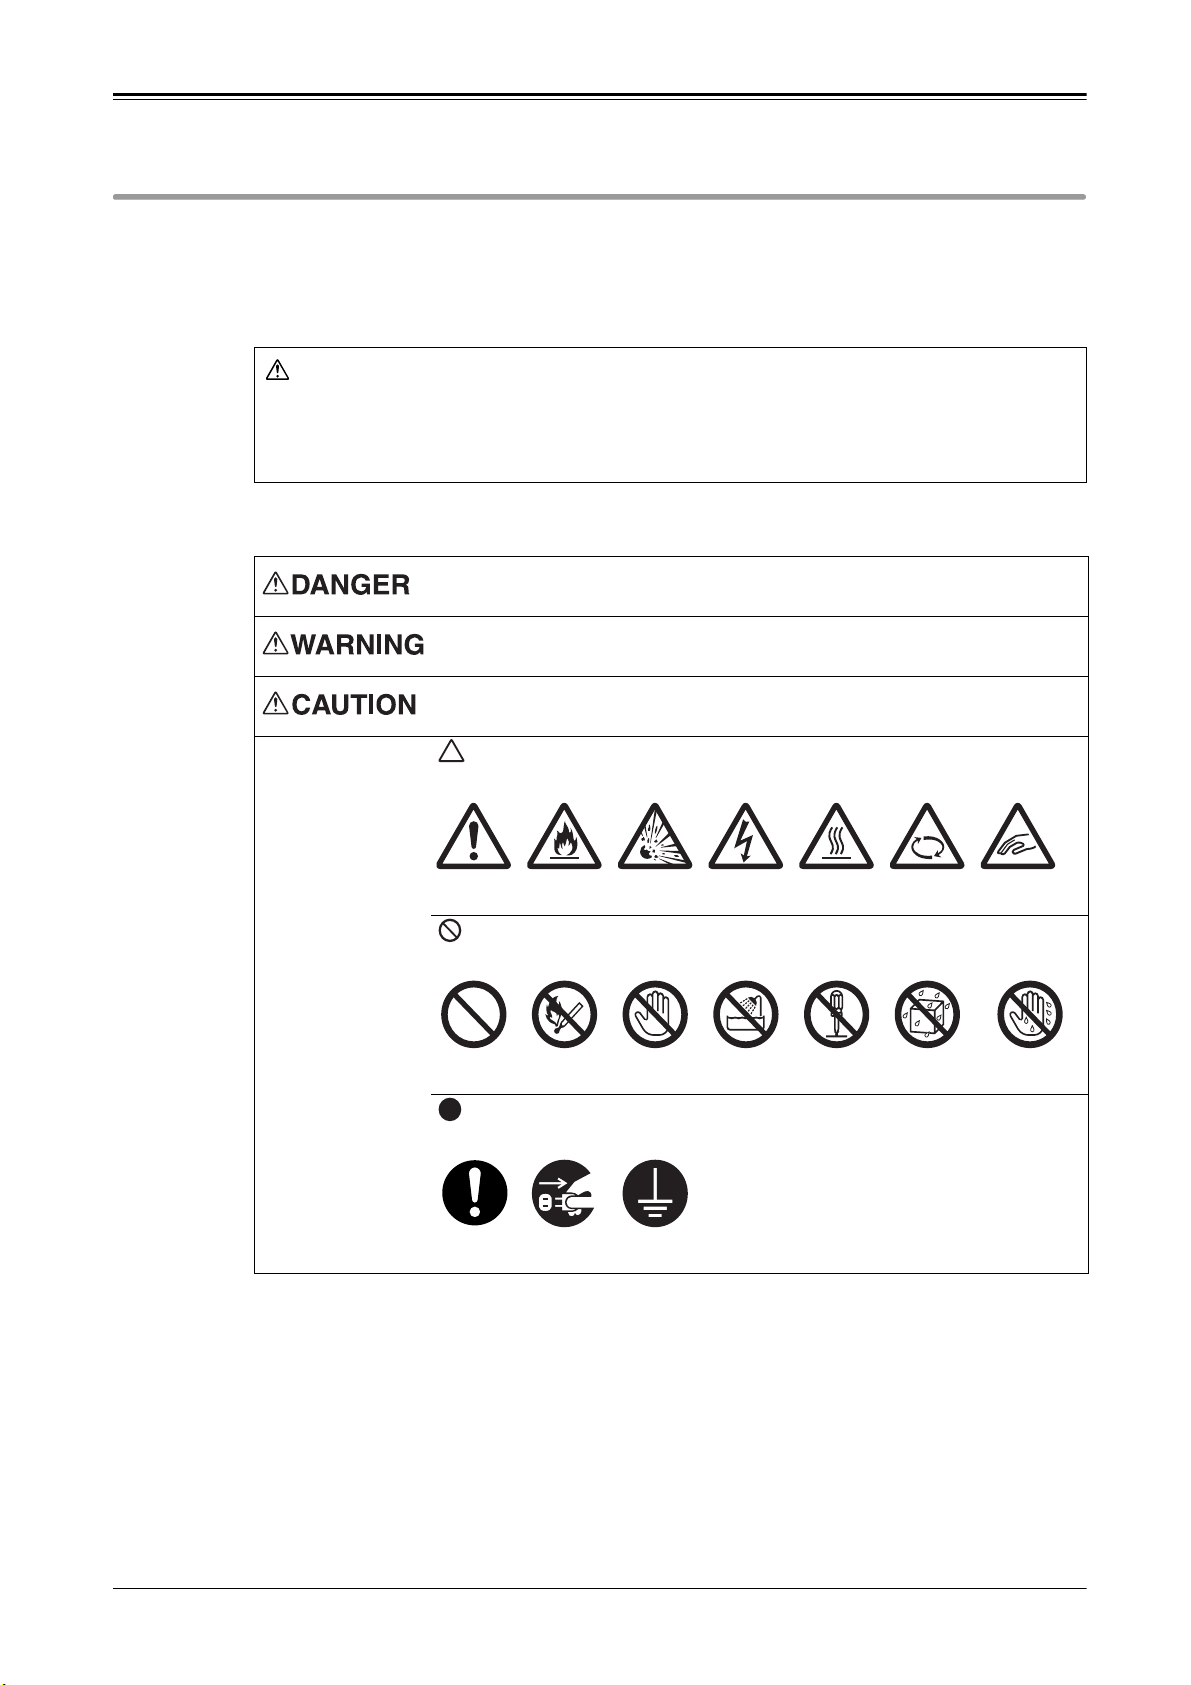
Follow all warning instructions marked on this product. The warning marks stand for the
followings:
Used for item that if not followed strictly, can lead death or severe or fatal
injuries and the possibility to do it is comparatively high.
Used for items that if not followed strictly, can lead to severe or fatal injuries.
Used for items that if not followed strictly, can cause injuries to user or
damages to machine.
: A symbol for items to pay attention to when handling machine. Follow
instructions carefully to use machine safely.
: A symbol for prohibited items. Follow instructions carefully to avoid any
dangerous acts.
: A symbol for items that must be performed. Follow instructions carefully
to carry out these essential tasks.
10
Page 11
Electrical Safety
This product shall be operated by the power source as indicated on the product's data plate.
Consult your local power company to check if your power source meets the requirements.
Before Using This Machine
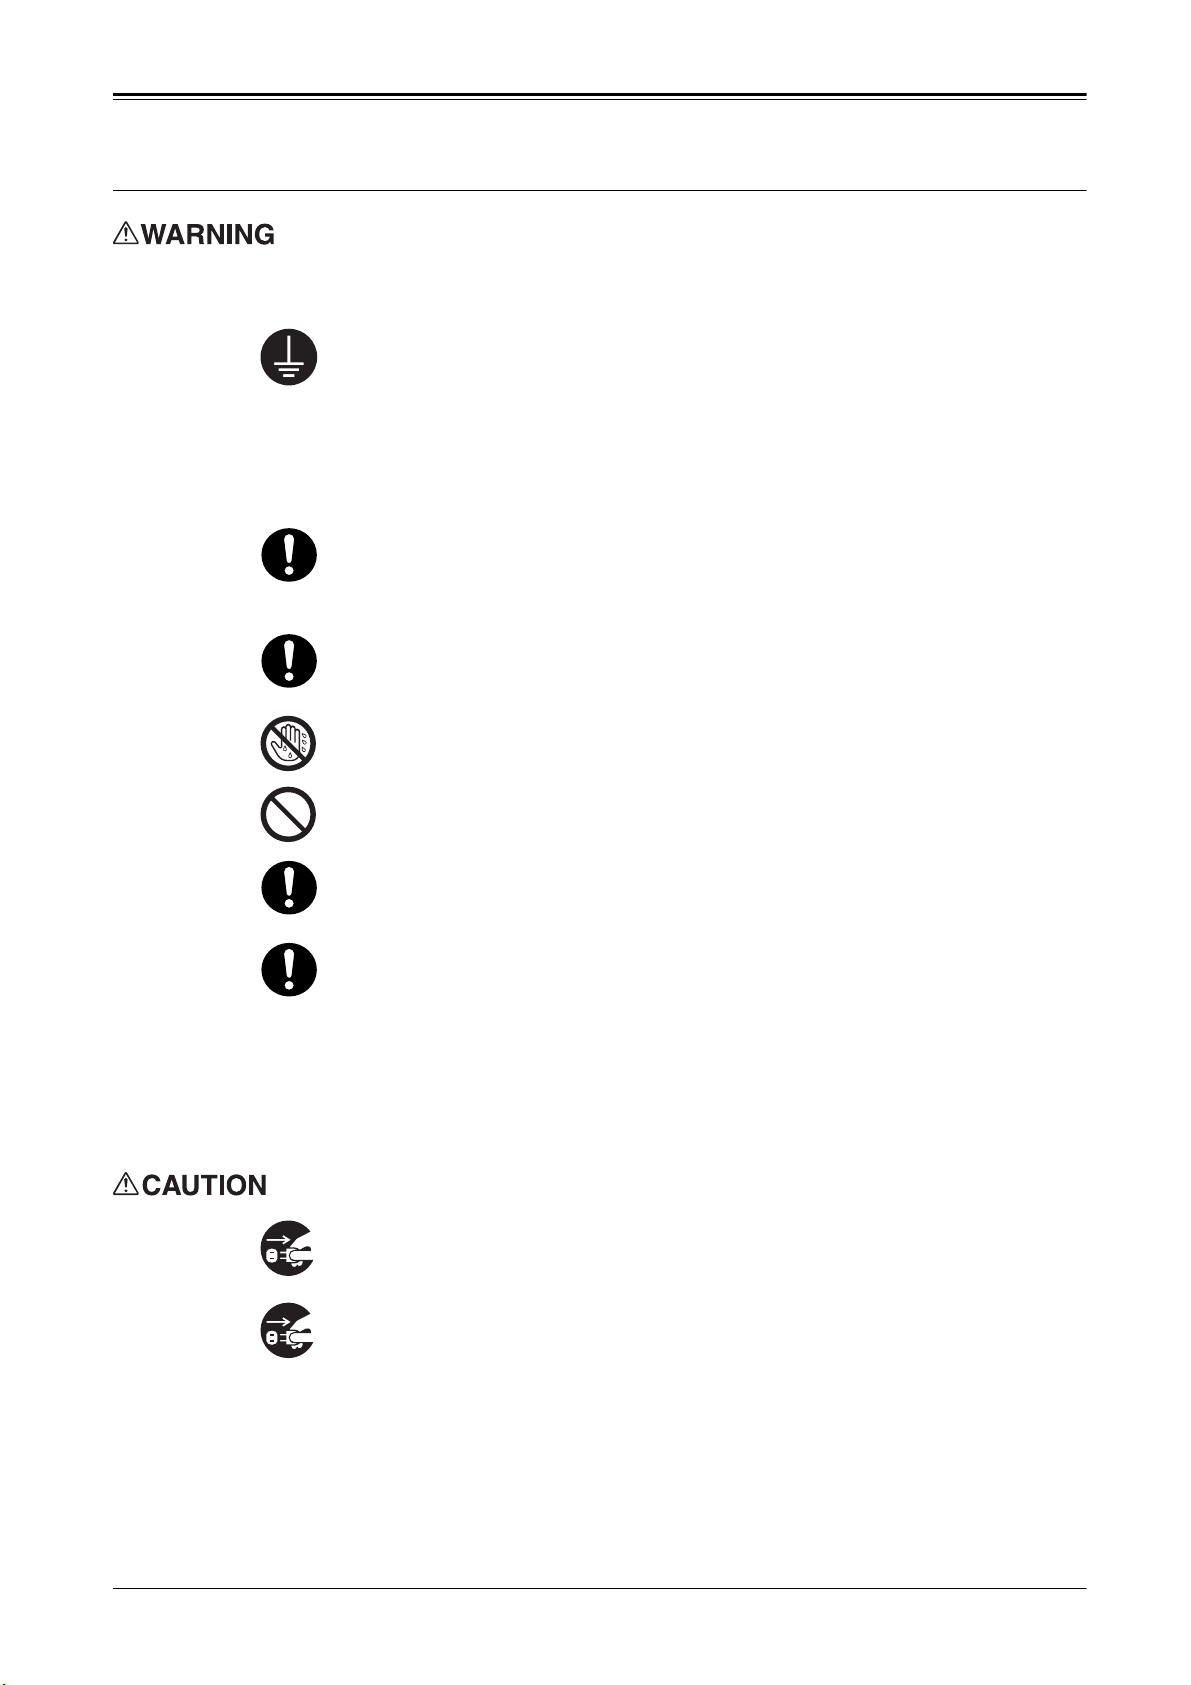
WARNING: Connect this product to a protective earth circuit.
This product is supplied with a plug that has a protective earth pin. The plug fits
only into an earthed electrical outlet. This is a safety feature. If the plug doesn't fit
to the outlet, contact an electrician to replace the outlet to avoid risk of electric
shock. Never use an earthed adapter plug to connect the product to the electrical
outlet that has no earth connection terminal.
Improper connection of a grounding conductor may cause electric shock.
Plug the power cord directly into a grounded electrical outlet. To prevent overheat
and a fire accident, do not use an extension cord, a multi-plug adaptor or a multiple
connector. Consult your local Fuji Xerox representative to check if an outlet is
grounded.
Connect this product to a branch circuit or an outlet that has larger capacity than
the rated ampere and voltage of this product. See the data plate on the rear panel
of this product for its rated ampere and voltage.
Never touch the power cord with wet hands. It may cause electric shock.
Do not put an object on the power cord.
Always keep the plug connection free of dust. The dusty and damp environment
may bring about minute electric current in a connector. It may generate heat and
eventually cause a fire accident.
To avoid the risk of electric shock and a fire accident, only use the power cord
supplied with this product or the ones designated by Fuji Xerox.
The power cord is exclusive use for this product. Do not use it for any other product.
Do not damage or alter the power cord. Damage and alteration may generate heat
and eventually cause electric shock or a fire accident.
If the power cord is damaged or insulated wires are exposed, contact your local Fuji
Xerox representative for its replacement. Do not use a damaged or uninsulated
cord to avoid the risk of electric shock and a fire accident.
When cleaning this product, always switch off and unplug it. Access to a live
machine interior may cause electric shock.
Switch off and unplug the product when it (i.e., fax function) is not used over
weekends or long holidays. Please note that it cannot receive fax message during
switch-off.
11
Page 12
Before Using This Machine
Once a month, switch off this product and check if
z
the power cord is plugged firmly into an electrical outlet;
z
the plug is not excessively heated, rusted or bent;
z
the plug and electrical outlet are free of dust; and
z
the power cord is not cracked or worn down.
Once you notice any unusual condition, switch off and unplug this product first and
contact your local Fuji Xerox representative.
Machine Installation
Do not locate this product where people might step on or trip over the power cord.
Friction or excessive pressure may generate heat and eventually cause electric
shock or a fire accident.
Never locate this product in the following places:
z
Near radiators or any other heat sources
z
Near volatile flammable materials such as curtains
z
In the hot, humid, dusty or poorly ventilated environment
z
In the place receiving direct sunlight
z
Near cookers or humidifiers
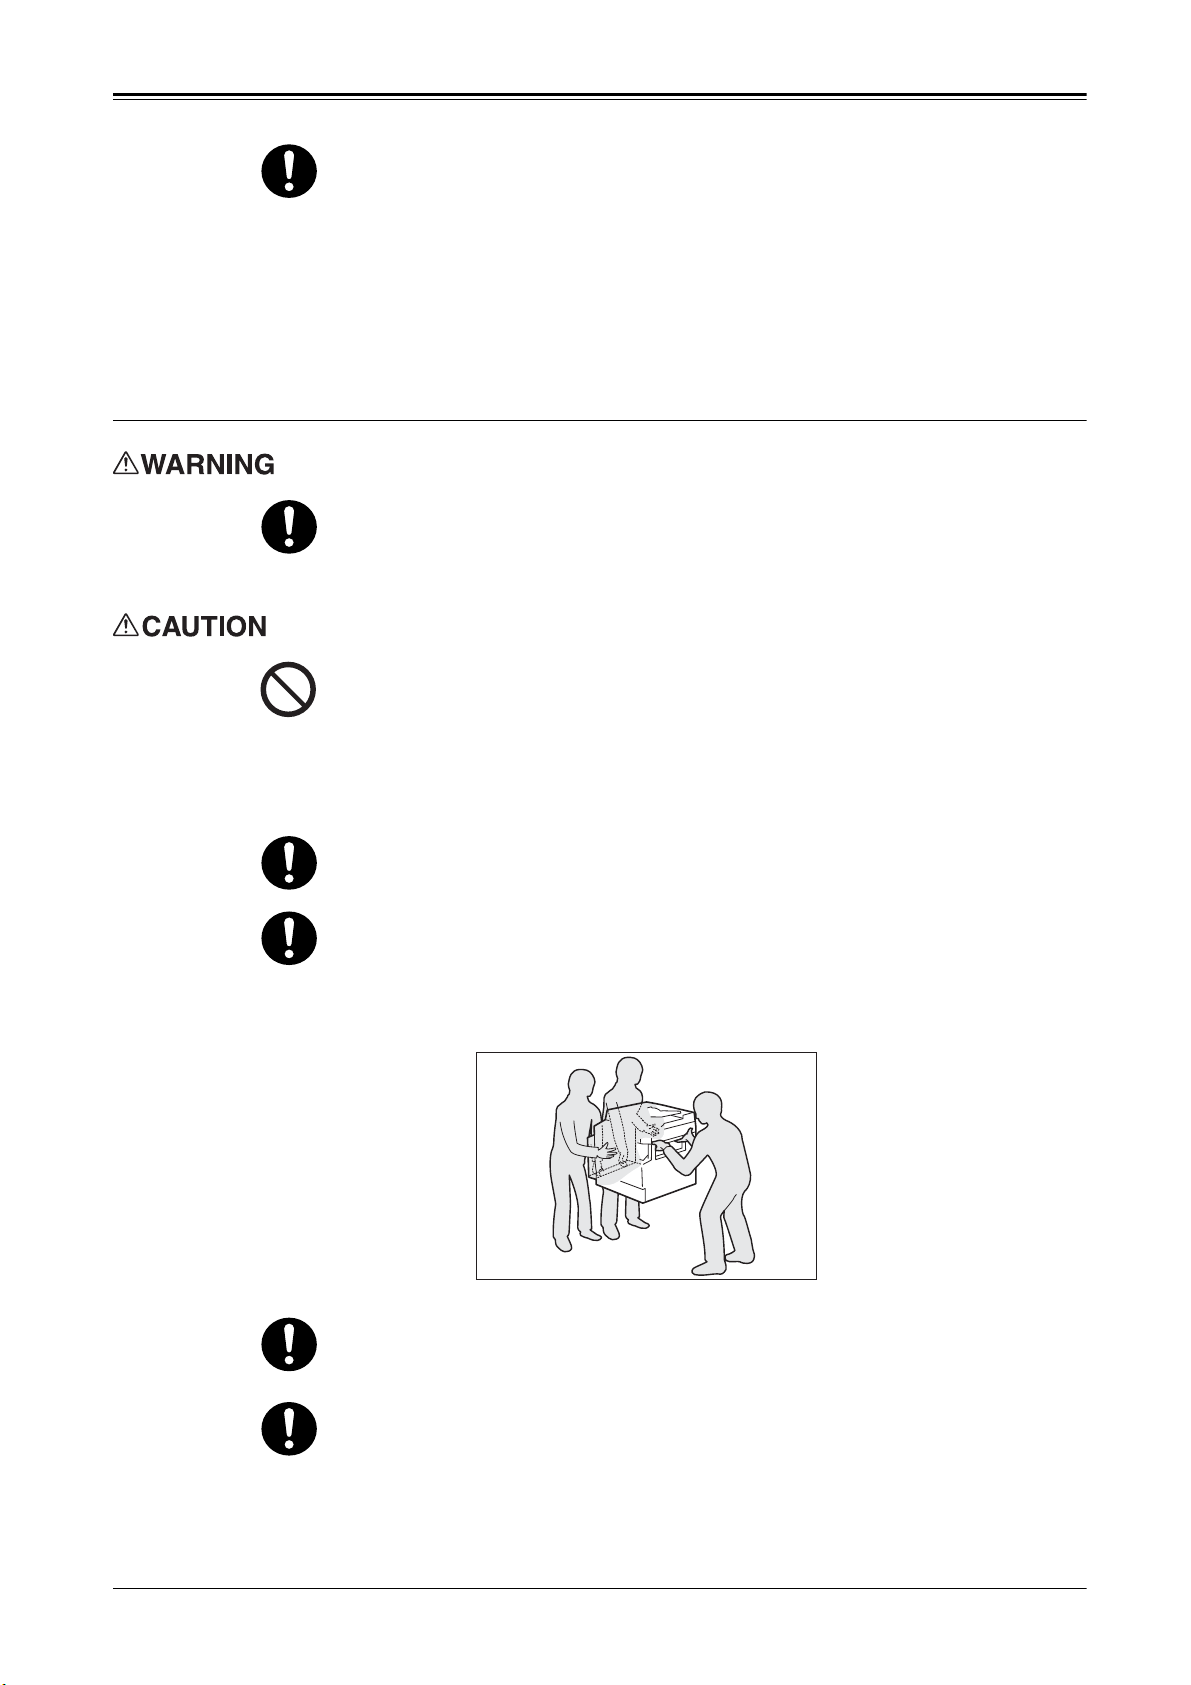
This product weighs 37 kg. When moving it, always carry it by a team of three or
more persons to avoid mishandling or injury.
When lifting this product, the first two persons to hold the bottom of the folded
bypass tray on the left side of the product and the third person to hold the
handhold provided on the right side of the product. Never lift it by gripping any
other areas. It will prevent you from dropping the product and getting back ache or
injuries.
12
Locate this product on a level and sturdy surface that can withstand its weight.
Otherwise, if tilted, the product may fall over and cause injuries.
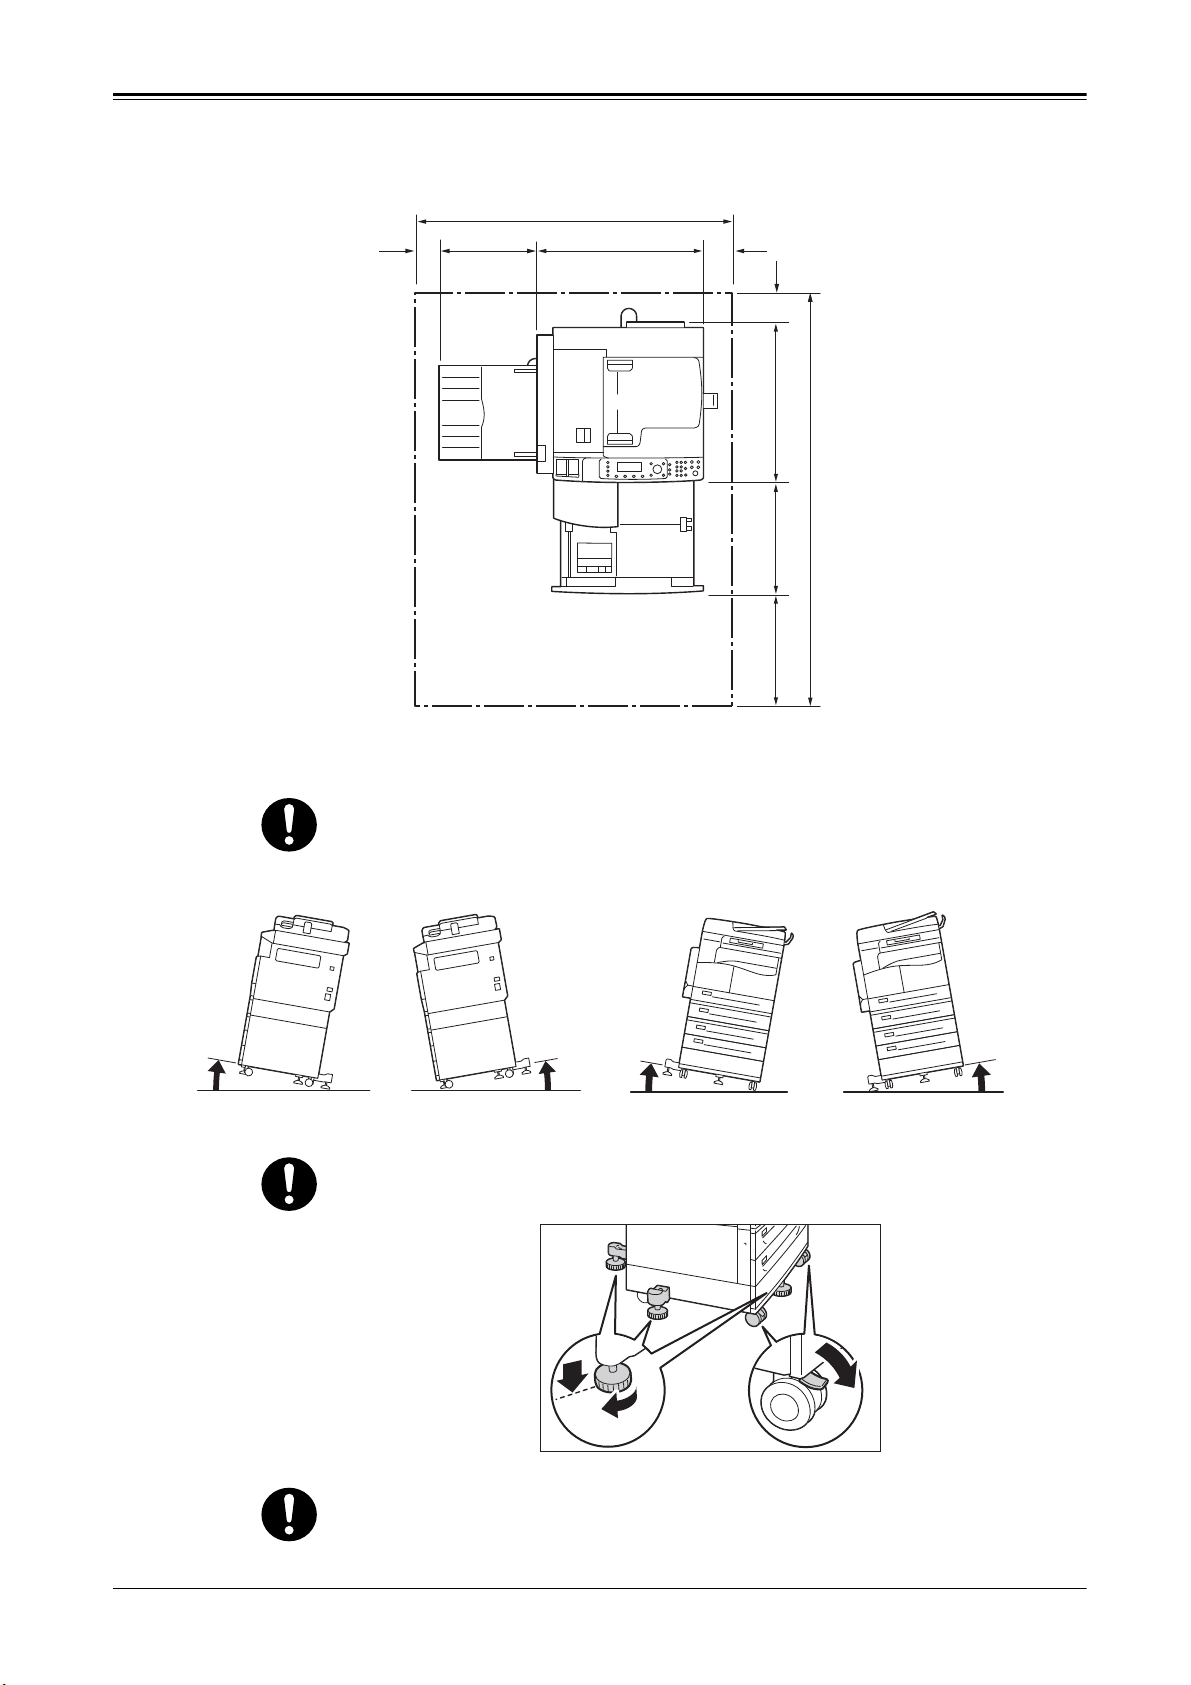
Locate this product in a well-ventilated area. Do not obstruct ventilation openings
of the product.
Keep the minimum clearance as follows for ventilation and an access to the power
plug. Unplug the product if an abnormal condition is noted.
Page 13
Before Using This Machine
front leftfront left
back back right right
With Duplex Automatic Document Feeder
110 0.9
100595325.980
100
587.6387
1474.6
10
(Unit: mm)
Do not incline the product at more than 10 degr ee angle. Otherwise, it may fall over
and cause injuries.
°
Always lock the wheels of this product after installation. Otherwise, it may fall over
or slide and cause injuries.
10
400
°
°
10
10
°
To bundle wires and cables, always use the cable ties and spiral tubes that Fuji
Xerox supplies. Otherwise, it may cause some defects.
13
Page 14
Before Using This Machine
To keep this product in a good performance and condition, always use it in the
following environment:
Operational Safety
Temperature: 10
Humidity: 35 - 85%
When the product is left in a chilly room and the room is rapidly warmed up by
heater, dew condensation may form inside the product and cause a partial deletion
on printing.
The operator's product maintenance procedures are described in the customer
documentation supplied with this product. Do not carry out any other maintenance
procedures not described in the documentation.
This product features safety design not to allow operators access to hazard areas.
The hazard areas are isolated from operators by covers or protectors which require
a tool to remove. To prevent electric shock and injuries, never remove those covers
and protectors.
To avoid the risk of electric shock and a fire accident, switch off and unplug the
product promptly in the following conditions, then contact your local Fuji Xerox
representative.
z
The product emits smoke or its surface is unusually hot.
z
The product emits unusual noise or odor.
z
The power cord is cracked or worn down.
z
A circuit breaker, fuse or any other safety device becomes activated.
z
Any liquid is spilled into the product.
z
The product is soaked in water.
z
Any part of the product is damaged.
- 32°C
Do not insert any object into slots or openings of this product.
Do not put any of the followings on the product:
z
Liquid container such as flower vases or coffee cups
z
Metal parts such as staples or clips
z
Heavy objects
If liquid is spilled over or metal parts are slipped into the product, it may cause
electric shock or a fire accident.
Do not use conductive paper such as origami paper, carbonic paper or conductivelycoated paper. When paper jam occurs, it may cause short-circuit and eventually a
fire accident.
When cleaning this product, use the designated cleaning materials exclusive to it.
Other cleaning materials may result in poor performance of the product. Never use
aerosol cleaners to avoid catching fire and explosion.
If you need to pull out a tray to remove paper jam, contact your local Fuji Xerox
representative. Do not pull out a tray, otherwise it may cause injuries.
Never play the CD-ROM supplied with the product on an audio player. Always use
a CD-ROM player. Otherwise, large sound may damage audio players or your ears.
14
Page 15
Before Using This Machine
Laser Safety
CAUTION: Any operations or adjustments not stated in the operation manual may
cause hazardous light exposure and eventually burn injuries or loss of eyesight.
This product has been tested and found to comply with the Class 1 Laser
Equipment requirements defined by the international standard IEC60825 and has
no light exposure hazard. The product has no hazardous light emission as it
features light protection components and covers to shut in all light beam during
operation and maintenance.
Keep electrical and mechanical safety interlocks active. Keep the safety interlocks
away from magnetic materials. Magnetic materials may accidentally activate the
product and cause injuries or electric shock.
Do not attempt to remove a paper deeply jammed inside the product, particularly
a paper wrapped around the fusing unit or the heat roller. Otherwise, it may cause
injuries or burns. Switch off the product immediately and contact your local Fuji
Xerox representative.
Do not apply excessive force to hold thick document on the document glass. It may
break the glass and cause injuries.
Consumable
Ventilate well during extended operation or mass copying. It may affect the office
air environment due to odor such as ozone in a poorly ventilated room.
Provide proper ventilation to ensure the comfortable and safe environment.
Store all consumables in accordance with the instructions given on its package or
container.
Never use a vacuum cleaner for spilled toner and residual toner in this product,
toner cartridge or toner bottle.
It may catch fire by electric sparks inside a vacuum cleaner and cause explosion.
Use a broom or a wet cloth to wipe off spill. If you spill a large volume of toner,
contact your local Fuji Xerox representative.
Never throw a toner cartridge into an open flame. Remaining toner in the cartridge
may catch fire and cause burn injuries or explosion.
If you have a used toner cartridge no longer needed, contact your local Fuji Xerox
representative for its disposal.
CAUTION: RISK OF EXPLOSION IF BATTERY IS REPLACED BY AN INCORRECT
TYPE. DISPOSE OF USED BATTERIES ACCORDING TO THE INSTRUCTIONS.
Keep drum cartridges and toner cartridges out of the reach of children. If a child
accidentally swallows toner, spit it out, rinse mouth with water, drink water and
consult a physician immediately.
15
Page 16
Before Using This Machine
When replacing drum cartridges and toner cartridges, be careful not to spill the
toner. In case of any toner spills, avoid contact with clothes, skin, eyes and mouth
as well as inhalation.
If toner spills onto your skin or clothing, wash it off with soap and water.
If you get toner particles in the eyes, wash it out with plenty of water for at least
15 minutes until irritation is gone. Consult a physician if necessary.
If you inhale toner particles, move to a fresh air location and rinse your mouth with
water.
If you swallow toner, spit it out, rinse your mouth with water, drink plenty of water
and consult a physician immediately.
Fusing Unit Safety
When removing the fusing unit, always switch off first and wait for 40 minutes until
it cools off.
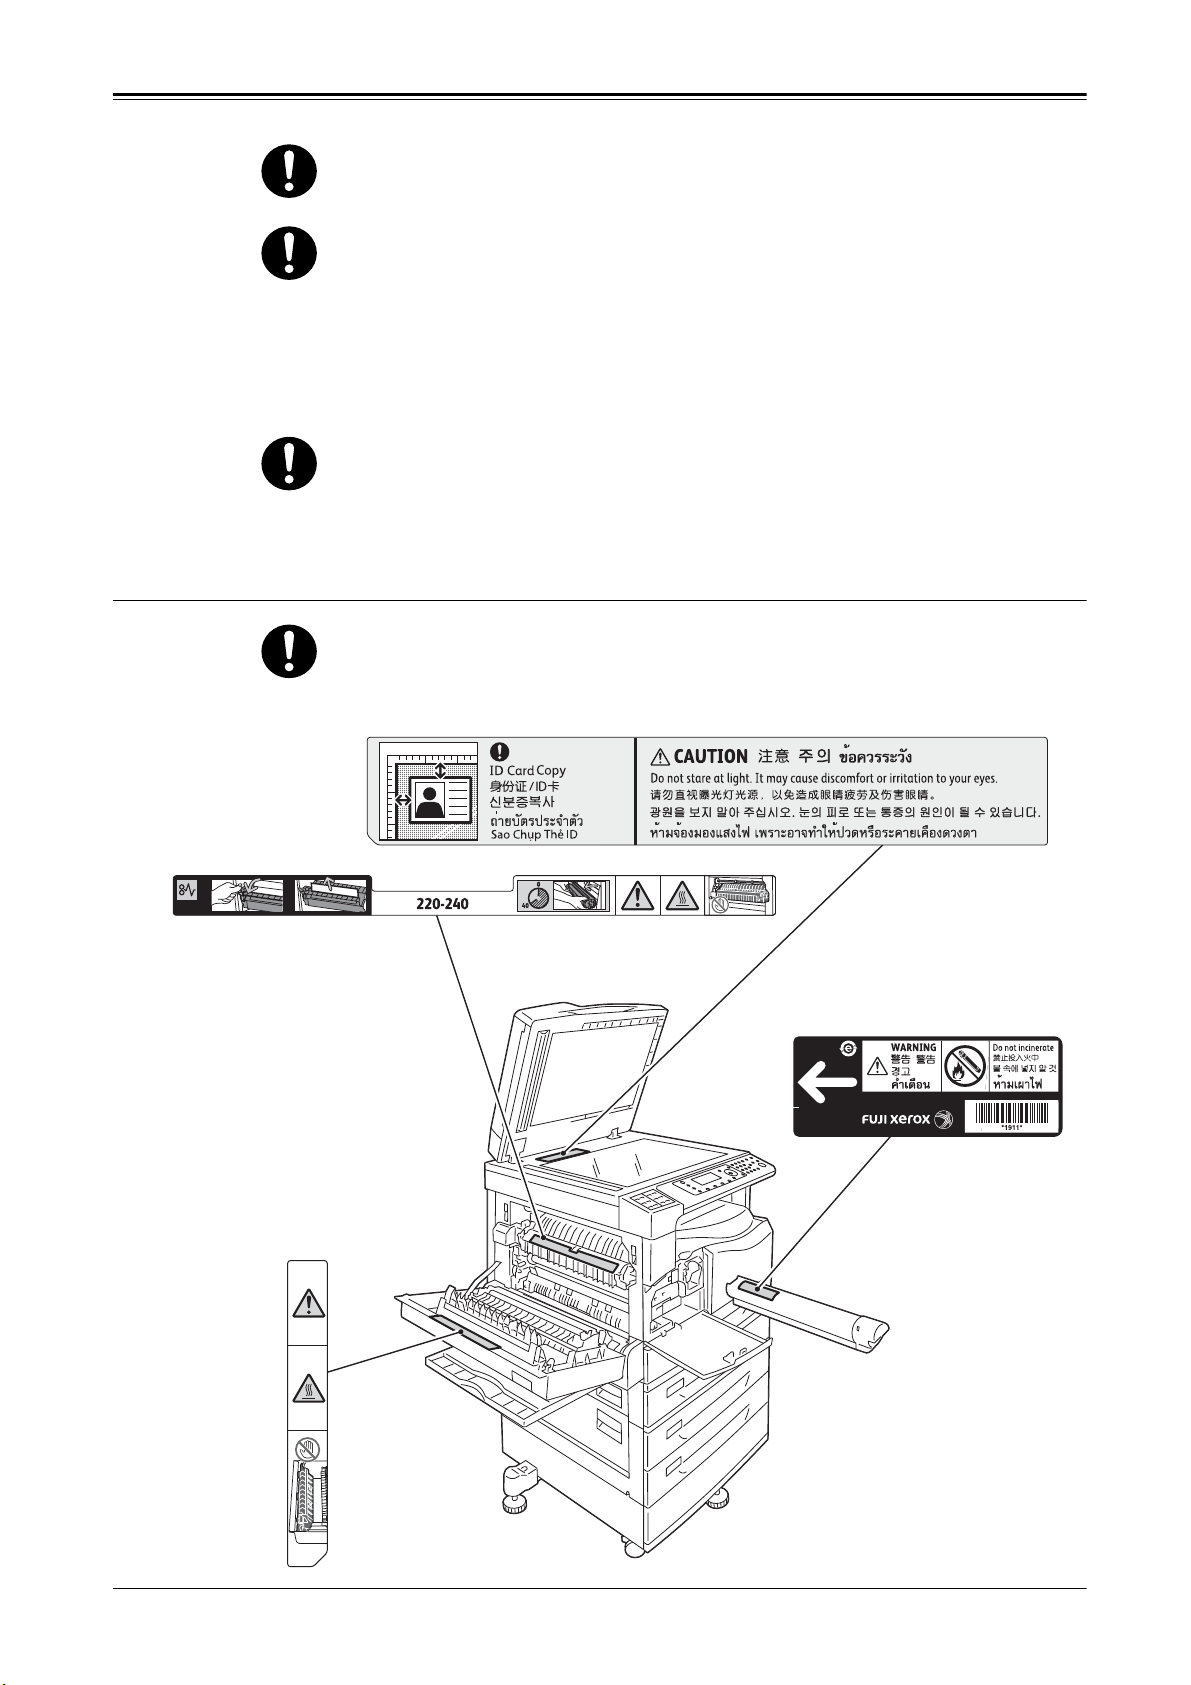
Location of Warning and Caution Labels
Always follow all warning instructions marked on or supplied with this product.
To avoid the risk of burn injuries and electric shock, never touch the area with the
"High Temperature" or "High Voltage" marks on.
16
Page 17

Regulations
Radio Frequency Emissions (Class A)
This product has been tested and found to comply with the limits for a class A digital device,
pursuant to International Standard for Electromagnetic Interference (CISPR Publ. 22) and
Radiocommunication Act 1992 in Australia/New Zealand. These limits are designed to
provide reasonable protection against harmful interference when the product is operated in
a commercial environment. This product generates, uses, and can radiate radio frequency
energy and, if not installed and used in accordance with the customer documentation, may
cause harmful interference to radio communications. Operation of this product in a
residential area is likely to cause harmful interference in which case the user is required to
correct the interference at their own expense.
Changes and modifications to this product not specifically approved by Fuji Xerox may void
the user's authority to operate this equipment.
Product Safety Certification (UL, CB)
Before Using This Machine
This product is certified by the following agency using the safety standards listed.
Agency
TUV IEC60950-1:ed. 2
Standard
Environment
For environmental protection and efficient use of resources, Fuji Xerox reuses returned toner
cartridges and drum cartridges to make recycle parts, recycle materials or energy recovery.
Proper disposal is required for toner cartridge and drum cartridge no longer needed. Do not
open toner cartridge and drum cartridge. Return them to your local Fuji Xerox
representative.
Legal Notice
Copying or printing certain documents may be illegal in your country. Penalties of fines or
imprisonment may be imposed on those found guilty. The following are examples of items
that may be illegal to copy or print in your country.
z
Currency
z
Banknotes and checks
z
Bank and government bonds and securities
z
Passports and identification cards
z
Copyright material or trademarks without the consent of the owner
z
Postage stamps and other negotiable instruments
This list is not inclusive and no liability is assumed for either its completeness or accuracy. In
case of doubt, contact your legal counsel.
17
Page 18

Preparations
Paper Types
Supported Paper Weights and Sheet Counts
Paper Trays Basis Weight/Ream Weight
Tray 1 (Standard) 60 to 90 gsm
Ream weight: 51.6 to 77.4 kg
Tray 2
(One Tray Module
(Optional))
Tray 3, 4
(Two Tray Module
(Optional))
Tray 5 (Bypass) 60 to 216 gsm
*1 When using 80 gsm paper
2
*
When using Fuji Xerox standard paper
60 to 216 gsm
Ream weight: 51.6 to 186 kg
Ream weight: 51.6 to 186 kg
Unusable Paper
z
Damp or wet paper
z
Paper pre-printed with other printer or copying machine
z
Wrinkled, creased, or ripped paper
z
Envelopes that are not flat, or that have clasps
z
Color paper with surface treatments
z
Paper with rough surface, such as pulp paper or fibrous paper
z
Punched paper
z
Transparency paper
Loadable
Quantity
250 sheets *
(Up to 27 mm)
500 sheets *
(Up to 54 mm)
100 sheets *
(Up to 10 mm)
1
1
2
Paper Type
Lightweight (60 - 63 gsm)
Plain 1 (64 - 79 gsm)
Plain 2 (80 - 90 gsm)
Lightweight (60 - 63 gsm)
Plain 1 (64 - 79 gsm)
Plain 2 (80 - 90 gsm)
Heavyweight (91 - 169 gsm)
Extra-HW (170 - 216 gsm)
18
Page 19

Loading Paper
Trays 1 to 4
Tray 5 (bypass)
* Only Tray 1
Loading Paper in Trays 1 to 4 and 5
Preparations
Point
Load paper with the side to be copied or printed:
•For Trays 1 to 4: Face up
•For Tray 5: Face down
19
Page 20

Preparations
<Log In/Out> button
[ ]
System Admin. Passcode
Plain2
Paper Type
Plain1
Lightweight
A4 (297x210mm)
A4 (210x297mm)
Paper Size
A3 (297x420mm)
Changing the Paper Setting
1 Enter the System Administration mode.
Press and hold the <Log In/Out> button for more than four seconds, and enter the passcode.
2
1
45
78
0
Use the numeric keypad to enter the passcode. The
passcode is initially set to "11111" (five "1" digits).
2 Select [Tray Settings], then press the <OK> button.
Tray 1 to 4 Tray 5*
Paper Type Paper Size
Tray 1
Paper Type
...
Plain1
Tools
Default Settings
Device Information
Tray Settings
...
...
...
Tray Settings
Tray 1
Tray 2
Tray 3
...
...
...
Tray 5
Paper Size
Paper Type
...
A3
...
Plain1
Paper Type
Tray 5
Paper Size
Paper Type
...
A3
...
Plain1
* When you load non-standard size paper in the Tray 5, select [Paper Size] > [Custom Size], and then set the size in the X (width)
direction between 98 and 432 mm and in the Y (length) direction between 127 and 297 mm.
20
Paper Type
Plain1
Plain2
Lightweight
Page 21

Placing Document
When the side of document to
be fed is too large, place the
short edge of the document to
be fed first.
When document does not fit on
the document glass, rotate the
document.
Placing the document in the document feeder
Upright position (top edge of the document)
* Only the standard sizes are supported.
* Place document face up in the center of the
document feeder by adjusting the document
guides to each side of the document.
* When using 2-sided document, make sure to
properly set [Original - Binding Position] when
copying and [2 Sided] when scanning.
Preparations
Point
Mixed size Lightweight
* If you can flatten the curled document, you can use the document.
You cannot use the following documents using the document feeder. Use the document glass.
smaller than A5 Cut-and-pasted Folded, wrinkled,
(2 sided)
Placing the document on the document glass
Upright position (top edge of the document)
Carbon-backed
curled*
Place document face down slightly away
from the top left corner of the document
glass.
21
Page 22

Preparations
Off
Pages per Side
...
Auto
Reduce/Enlarge
...
Auto
Original Size
...
Copy
1
111
Placing the non-standard size document
When placing a non-standard size document, specify the document size in [Original Size] from the
menu items.
Sample screens:
Original Size
Auto
A3 (297x420mm)
A4 (210x297mm)
When [Original Size] is set to [Auto]:
Point
An error screen appears when you place a non-standard size document on the document
glass. In this case, select the document size manually by selecting [Original Size] from the
menu items.
Depending on the selected document size, the printout may be too large for the paper or
may have shadow at the edges.
Qty.
1
22
Page 23

How to Copy
<Copy> button
Point
<Start> button
Basic Copy Procedure (100% zoom ratio)
1 Place document.
Refer to "Placing Document" (P.21).
Copy
******************************************************************************************************
2 Press the <Copy> button.
******************************************************************************************************
3 Make advanced settings as needed.
You can change the [Lighten/Darken], [Original Type],
[2 Sided], and [Collated] settings by pressing the
buttons. Refer to "About Quick-Buttons" (P.2).
******************************************************************************************************
Copy
Paper Supply
Reduce/Enlarge
Pages per Side
Auto
...
Auto
...
Off
...
111
1
4 Press the <Start> button.
23
1
456
789
0#
C
23
Page 24

Copy
<ID Card Copy> button
Copying an ID Card
This function allows you to copy both sides of an ID card (name card, employee card, etc.) on one
side of paper.
The default zoom ratio is set to 100%. You can also change the zoom ratio.
1 Place an ID card face down at least 5mm away
from the top left corner of the document glass,
and then close the document cover.
•Placing the ID card too close to the corner of the document
Point
******************************************************************************************************
glass may not copy the edge of the ID card properly.
•Place an ID card in the upright position.
2 Press the <ID Card Copy> button.
Point
******************************************************************************************************
Make advanced settings as needed.
3 Press the <Start> button.
To finish scanning to print only one side of the ID card, select [Cancel], and then press the <OK> button.
******************************************************************************************************
4 To continue scanning the other side of the ID card, place the other side of the ID
card face down slightly away from the top left corner of the document glass, and
then close the document cover.
******************************************************************************************************
5 Select [Continue], and then press the <OK> button to start printing the scanned two
sides of the ID card.
24
Page 25

Copy
<Copy> button
<2 Sided> button
Point
Making 2 Sided Copies
This function allows you to copy 1 Sided or 2 Sided document on one side or both sides of paper.
Report
A
B
Report
A
A
B
1
Report
A
1 Place document.
Refer to "Placing Document" (P.21).
******************************************************************************************************
2 Press the <Copy> button.
******************************************************************************************************
3 Press the <2 Sided> button.
You can change the displayed time length of the
setting screen. For more information on changing the
displayed time length of the setting screen, refer to the
User Guide.
******************************************************************************************************
4 The selected copy method changes everytime the
<2 Sided> button is pressed. The selection is
applied when the screen is returned to the main
menu screen without pressing the <OK> button.
Point
******************************************************************************************************
You cannot select [2 -> 1 Sided] or [2 -> 2 Sided] when
document is sitting on the document glass. Place document in the document feeder.
Copy
→
1
→
1
→
2
1 Sided
2 Sided
1 Sided
111
5 Press the <Start> button.
1
25
Page 26

Copy
<Copy> button
<Collated/Resolution> button
Collating Output
This function allows you to output sheets sorted into sets that are arranged in page order for
copying multiple pages of a document.
1 Place document.
Refer to "Placing Document" (P.21).
******************************************************************************************************
2 Press the <Copy> button.
******************************************************************************************************
3 Press the <Collated/Resolution> button.
You can change the displayed time length of the
Point
******************************************************************************************************
setting screen. For more information on changing the
displayed time length of the setting screen, refer to the
User Guide.
4 The selected output method changes everytime
the <Collated/Resolution> button is pressed. The
selection is applied when the screen is returned to
the main menu screen without pressing the <OK>
button.
Point
******************************************************************************************************
Selecting [On (Rotate)] will output sheets sorted into sets that are arranged in page order by
alternating between landscape and portrait orientations.
Copy
Off
On
On(Rotate)
111
5 Press the <Start> button.
26
1
Page 27

Copy
<Copy> button
Making Reduced or Enlarged Copies
This function allows you to select a zoom ratio to reduce or enlarge the size of copies.
1 Place document.
Refer to "Placing Document" (P.21).
******************************************************************************************************
2 Press the <Copy> button.
******************************************************************************************************
3 Select [Reduce/Enlarge], and then press the
<OK> button.
You can select one of the preset zoom ratio or use the
Point
numeric keypad or < > and < > buttons to set
the desired reduction/enlargement zoom ratio.
Copy
Paper Supply
Reduce/Enlarge
Pages per Side
Reduce/Enlarge
[25-400]
Auto
+
-
Auto
...
Auto
...
Off
...
Auto
50% A3 → A5
70% A3 → A4,B4 → B5
111
Qty. 1
1
******************************************************************************************************
4 Press the <Start> button.
27
Page 28

Copy
<Copy> button
Copying Two/Four Pages onto One Sheet
This function allows you to copy two or four pages of a document together onto one side of a single
sheet of paper.
The machine automatically sets the zoom ratio to fit on a page.
Report
A
B
C
D
Point
A
A
Report
B
•Place document in upright position.
•When using 2-sided document placed in the document feeder, make sure to set [Original - Binding Position]
properly.
B
Report
A
B
C
D
1 Place document.
Refer to "Placing Document" (P.21).
******************************************************************************************************
2 Press the <Copy> button.
******************************************************************************************************
3 Select [Pages per Side], and then press the <OK>
button.
******************************************************************************************************
4 Select the number of document pages to be
Copy
Paper Supply
Reduce/Enlarge
Pages per Side
...
Auto
Auto
...
Off
...
Pages per Side
111
Qty.
1
printed in one side of paper, and then press the
Off
<OK> button.
******************************************************************************************************
2 Pages
4 Pages
5 Press the <Start> button.
28
1
Page 29

Point
How to Print
This section describes the basic printing procedure and how to cancel the currently printing job.
Before using this feature, the print driver included in the Driver CD Kit CD-ROM must be installed to
the computer. For the instruction, click the "CD-ROM Documentation (HTML)" on the
[Documentation] tab in the Driver CD Kit .
1 Select [Print] from the application's [File] menu.
******************************************************************************************************
2 Select [FX DocuCentre XXXXX].
XXXXX: "S2420" or "S2220"
******************************************************************************************************
3 Make advanced settings by clicking
[Properties] if needed.
******************************************************************************************************
4 Click [OK].
******************************************************************************************************
5 Click [OK] in the [Print] dialog box.
How to stop printing
Double-click the printer icon appeared on the task bar in the lower right corner of the screen.
Select the document name that you desire to cancel, and then press the <Delete> key.
If there is no document within the window, cancel it manually on the machine.
29
Page 30

Scan
Importing Scanned Data via Application
This function allows you to load scan data via a TWAIN-compatible application or a Windows®
Imaging Acquisition (WIA)-compatible application installed on the computer. You can specify the
document load conditions while checking the preview of the scan results displayed on the PC
screen.
•Before using this function, the scan driver included in the Driver CD Kit CD-ROM must be installed to the
Point
computer.
•This function is available using the USB connection. Scanning using a network is not supported.
1 Place document.
Refer to "Placing Document" (P.21).
******************************************************************************************************
2 Start an application to scan the document.
******************************************************************************************************
3 Select the menu item for selecting a scanner (source).
******************************************************************************************************
4 Select [DocuCentre S2420/S2220].
******************************************************************************************************
5 Make advanced settings if needed.
******************************************************************************************************
6 Click [Scan].
30
Page 31

Scan
<Scan> button <Address Book> button
Sending Scanned Data via E-mail
This function allows you to send scanned data via e-mail. You can send the monochrome scanned
data in PDF or TIFF or the color scanned data in PDF or JPEG attached to an e-mail. The SMTP
protocol is used for the e-mail transmission.
•You can select an e-mail address only from the Address Book. Register the e-mail addresses using CentreWare
Internet Services in advance. For more information, refer to the User Guide included in the Driver CD Kit CD-
Point
ROM.
•When using 2-sided document placed in the document feeder, make sure to set [Original -Binding Position]
properly. If it is not specified and the orientation of the scanned data needs to be changed, rotate it on your
computer.
1 Place document.
Refer to "Placing Document" (P.21).
******************************************************************************************************
2 Press the <Scan> button,
and specify the registered
recipient by pressing the
<Address Book> button.
You can also enter a two-
digit number of registered
Point
******************************************************************************************************
3 Select the desired recipient, and then press the
<OK> button.
******************************************************************************************************
4 Make advanced settings as needed.
recipient using the
numeric keypad, and then
go to step 4.
E-mail
01 pc1
02 Smith
03 pc2
Scan to [02]
Color Mode
File Format
Original Size
[#]:Info Jump to [_ ]
...
Color
...
PDF
...
A4
200
******************************************************************************************************
5 Press the <Start> button.
31
Page 32

Scan
<Scan> button <Address Book> button
File Format
...
PDF
Color Mode
...
Color
Scan to [01]
Original Size
...
A4
200
Sending Scanned Data to PC (Network)
This function allows you to send scanned data to a network-based computer. You can send the
monochrome scanned data in PDF or TIFF or the color scanned data in PDF or JPEG to the specified
PC. The SMB protocol is used for the data transmission.
•You can select a PC address only from the Address Book. Register the PC addresses using CentreWare Internet
Services in advance. For more information, refer to the User Guide included in the Driver CD Kit CD-ROM.
Point
•When using 2-sided document placed in the document feeder, make sure to set [Original -Binding Position]
properly. If it is not specified and the orientation of the scanned data needs to be changed, rotate it on your
computer.
1 Place document.
Refer to "Placing Document" (P.21).
******************************************************************************************************
2 Press the <Scan> button.
Specify the registered PC by
pressing the <Address
Book> button.
You can also enter a two-
digit number of the
Point
******************************************************************************************************
3 Select the desired address of PC, and then press
the <OK> button.
******************************************************************************************************
registered PC using the
numeric keypad, and then
go to step 4.
PC(Network) [#]:Info Jump to [_ ]
01 pc1
02 Smith
03 pc2
4 Make advanced settings as needed.
******************************************************************************************************
5 Press the <Start> button.
32
Page 33

How to Fax
<Fax> button
<Address Book> button
Group
...
Recipient
All Entries
...
<Speed Dial> button
Speed Dial (001-099)
[_ ]
Using the Address Book Using the Speed Dial
Fax
You can select a recipient from the Phone
Book entries that you have registered.
You can select a recipient by entering a
Speed Dial number directly on the Speed
Dial input screen.
1 Place document.
Refer to "Placing Document" (P.21).
******************************************************************************************************
2 Press the <Fax> button.
******************************************************************************************************
3 Specify a recipient.
P r e s s t h e < A d d r e s s B o o k > b u t t o n .
2
1
45
78
0
Select [All Entries], then press the <OK> button.
Point
Select [Group] when specifying the
multiple recipients.
P r e s s t h e < S p e e d D i a l > b u t t o n .
23
1
456
789
0#
Use the numeric keypad to enter the desired Speed Dial
C
number
.
******************************************************************************************************
4 Press the <Start> button.
33
Page 34

Fax
<Fax> button
Numeric keypad
One Touch Buttons
Entering the Fax Number Using the One Touch Buttons
You can specify a recipient by pressing the
recipient’s fax number using the numeric
keypad.
You can specify a recipient by pressing a
One Touch Button (1 to 36) that
corresponds to the Speed Dial entry (001 to
036).
1 Place document.
Refer to "Placing Document" (P.21).
******************************************************************************************************
2 Press the <Fax> button.
******************************************************************************************************
3 Specify a recipient.
U s e t h e n u m e r i c k e y p a d . P r e s s a O n e T o u c h B u t t o n .
23
1
456
789
0#
12
34
56
C
ex.) Pressing the <1> One Touch Button will select the
001 recipient registered for Speed Dial.
78
910
11 12
******************************************************************************************************
4 Press the <Start> button.
•To use the <Address Book> button, the <Speed Dial> button, and the One Touch Buttons, the recipients’ fax
Point
numbers must be registered in advance.
•This machine does not support broadcast transmission.
•To specify multiple recipients, register the recipients’ fax numbers as a group in the Phone Book beforehand.
34
Page 35

Fax
Fax Number
Speed Dial 001 [C]:Delete
Name
Apply Settings
Point
Registering Phone Book
This section describes how to register a fax recipient to the Phone Book. You can register up to 99
Speed Dial entries. You can register up to 99 Speed Dial entries in each group.
Point
The recipients registered on the Speed Dial numbers 001 to 036 correspond to the one touch buttons
1 to 36. Pressing a one touch button is a handy way to quickly specify a fax recipient.
1 Enter the System Administration mode.
Refer to "Enter the System Administration mode." (P.20).
******************************************************************************************************
2 Select [Tools], and follow the steps below.
Tools
Control Panel Language
Default Display
Phone Book
...
...
...
Speed Dial 001 [C]:Delete
Name Fuji Hanako
Fax Number
Apply Settings
Phone Book
Speed Dial
Group
Speed Dial
001 (Not in Use)
002 Smith
003 (Not in Use)
001:Enter Name
_
...
...
001:Enter Phone Number
_
Speed Dial 001 [C]:Delete
Name
...
Fuji Hanako
Fax Number
Apply Settings
Apply Settings [Are You Sure?]
Yes
No
...
030123456789
...
To exit System Administration mode, press the <Log In/Out> button.
35
Page 36

Problem Solving
Paper Jams
When a paper jam occurred, the machine stops and an alarm beeps. An error code and a message
will be displayed on the screen.
Error Code Area to Check
071-105
072-102
072-105
073-102
073-104
073-105
074-101
074-102
074-104
074-105
075-135
077-101
1. Left cover [A]
2. Tray 1
1. One tray module cover [B]
2. Tray 2
One tray module cover [B]
1. Two tray module cover [C]
2. Tray 3
1. One tray module cover [B]
2. Two tray module cover [C]
One tray module cover [B]
1. Two tray module cover [C]
2. Tray 4
1. One tray module cover [B]
2. Two tray module cover [C]
One tray module cover [B]
1. Left cover [A]
2. Tray 5
Left cover [A]
077-103
077-104
077-106
077-129
077-900
077-901
077-904
077-905
077-906
One tray module cover [B]
1. One tray module cover [B]
2. Two tray module cover [C]
36
Page 37

Problem Solving
Left Cover [A]
z
If the paper is jammed around the fusing
unit:
z
If the paper is jammed within the left side
cover:
One Tray Module Cover [B] Two Tray Module Cover [C]
37
Page 38

Problem Solving
Tray 1 Tray 2 to 4
z
Operated after checking the left cover [A]:
Tray 5
z
Operated after checking the left cover [A]:
z
Operated after checking the one tray
module cover [B]:
38
Page 39

Problem Solving
Handle
Document Jams
When a document jam occurred in the document feeder, the machine stops and an alarm beeps.
An error code and a message will be displayed on the screen.
Error Code Remedy
005-122
005-123
005-125
005-131
005-132
005-134
005-135
005-136
005-139
005-145
005-147
005-196
005-197
005-198
005-199
005-907
005-908
005-913
39
Page 40

Problem Solving
Error Code
An error code (xxx-xxx) and a message will be displayed if a printing is terminated abnormally
because of an error, or a malfunction occurred in the machine.
Refer to the error codes in the following table to resolve problems.
Error Code Cause and Remedy
003-500
003-754
003-795
003-942
003-963
003-972
003-973
Cause) When using the Pages per Side function, the printout doesn't fit in
the paper with the specified reduction/enlargement factor.
Remedy) Press the control panel's <Stop> button, and change the setting.
Cause) An IPS error occurred.
Remedy) Press the control panel's <Stop> button, and cancel the job.
Cause) When enlarging/reducing a scanned document to the paper size
specified, the reduction/enlargement ratio exceeds the allowed
range.
Remedy) Press the control panel's <Stop> button, and change the setting.
Cause) A document with a nonstandard size is set in the document feeder.
Remedy) Press the control panel's <Stop> button, and check the document.
Cause) When [Auto] is set for [Paper Supply] for a copy job, the size of the
scan document is larger than the paper size that can be copied.
Remedy) Press the control panel's <Stop> button, and change the setting.
Cause) Exceeded the maximum pages that can be scanned during a copy/
scan job.
Remedy) Press the control panel's <Start> button to redo the operation or
press the <Stop> button to cancel the operation.
Cause) The image size is too large when enlarging/reducing a scanned
document that does not match the orientation of paper.
Remedy) Take one of the following measures.
* Reduce the magnification with [Reduce/Enlarge].
* Change the orientation of paper or document.
004-345
005-122
005-123
005-125
005-131
005-132
005-134
005-135
005-136
005-139
005-145
005-147
005-196
005-197
005-198
005-199
Cause) An error occurred.
Remedy) Switch off the machine power, make sure that the display is blank,
and then switch on the machine power. If the same message is
displayed again, contact our Customer Support Center.
Cause) A document jam occurred in the document feeder.
Remedy) Remove the jammed document.
40
Page 41

Problem Solving
005-210
005-275
005-280
005-305
005-500
005-907
005-908
005-913
005-940
005-948
007-270
Cause) An error occurred in the document feeder.
Remedy) Switch off the machine power, make sure that the display is blank,
and then switch on the machine power. If the same message is
displayed again, contact our Customer Support Center.
Cause) The document feeder's left cover is open.
Remedy) Close the document feeder's left cover.
Cause) An error occurred in the document feeder.
Remedy) Switch off the machine power, make sure that the display is blank,
and then switch on the machine power.
Cause) A document jam occurred in the document feeder.
Remedy) Remove the jammed document.
Cause) An error occurred in the document feeder.
Remedy) Press the control panel's <Stop> button, and set the document on
the document feeder again.
Cause) A document size mismatch error occurred in the document feeder.
Remedy) Press the control panel's <Stop> button, and cancel the job.
Cause) Tray 1 malfunction.
Remedy) Switch off the machine power, make sure that the display is blank,
and then switch on the machine power. If the same message is
displayed again, contact our Customer Support Center. You can use
a tray other than Tray 1.
007-272
007-273
010-311
010-312
010-320
010-327
010-379
010-392
010-602
016-346
016-372
Cause) Tray 3 malfunction.
Remedy) Switch off the machine power, make sure that the display is blank,
and then switch on the machine power. If the same message is
displayed again, contact our Customer Support Center. You can use
a tray other than Tray 3.
Cause) Tray 4 malfunction.
Remedy) Switch off the machine power, make sure that the display is blank,
and then switch on the machine power. If the same message is
displayed again, contact our Customer Support Center. You can use
a tray other than Tray 4.
Cause) An error occurred.
Remedy) Switch off the machine power, make sure that the display is blank,
and then switch on the machine power. If the same message is
displayed again, contact our Customer Support Center.
Cause) Temperature sensor of the machine detected abnormality.
Remedy) The machine will automatically recover when the machine cools
down. Wait for a while, and try again.
Cause) An error occurred.
Remedy) Switch off the machine power, make sure that the display is blank,
and then switch on the machine power. If the same message is
displayed again, contact our Customer Support Center.
016-500
016-501
016-502
016-504
Cause) An error occurred.
Remedy) Switch off the machine power, make sure that the display is blank,
and then switch on the machine power.
41
Page 42

Problem Solving
016-570
016-571
016-598
016-742
016-744
016-749
016-759
016-764
016-765
016-766
Cause) A communication error occurred while printing.
Remedy) Press the control panel's <Stop> button, and cancel the job.
Cause) A communication error occurred during print processing.
Remedy) The machine will automatically recover. Wait a moment, and try
again.
Cause) The size of an e-mail page exceeds the maximum message size
because of page splitting.
Remedy) Press the control panel's <Start> button to redo the operation, or
press the <Stop> button to cancel the operation.
Cause) An error occurred.
Remedy) Switch off the machine power, make sure that the display is blank,
and then switch on the machine power.
Cause) An error occurred.
Remedy) Press the control panel's <Stop> button, and cancel the job.
Cause) A setting has been entered for the maximum number of permitted
copies, and has been reached. Alternatively, a user who has
reached their maximum number of copies logged in.
Remedy) Press the control panel's <Stop> button, and cancel the job.
Cause) An error occurred on the network.
Remedy) Press the control panel's <Stop> button and cancel the job.
Cause) The SMTP server's memory area for incoming e-mail is full.
Remedy) Press the control panel's <Stop> button, and cancel the job.
016-767
016-768
016-776
016-781
016-791
016-799
016-981
016-982
Cause) Unable to send the e-mail because the address is not correct
Remedy) Press the control panel's <Stop> button, and cancel the job.
Cause) E-mail data creation failed.
Remedy) Press the control panel's <Stop> button, and cancel the job.
Cause) A job is canceled.
Remedy) Press the control panel's <Stop> button, and cancel the job.
Cause) Unable to resolve the SMTP server name when sending e-mail.
Remedy) Press the control panel's <Stop> button, and cancel the job.
Cause) The machine couldn't send data when executing the Scan to PC
(Network) or Scan to E-mail function.
Remedy) Press the control panel's <Stop> button, and cancel the job.
Cause) An invalid print parameter is included in the print data of the
application, or the print data and the Print Setup settings may not
match.
Remedy) Press the control panel's <Stop> button, and cancel the job.
Cause) The EPC memory is full.
Remedy) Press the control panel's <Start> button to redo the operation, or
press the <Stop> button to cancel the operation.
Cause) The memory is full while scanning the first page with Scan to PC
service.
Remedy) Press the control panel's <Stop> button, and cancel the job.
42
016-985
Cause) The attachment size using the Scan to E-mail service exceeds the
maximum size.
Remedy) Press the control panel's <Start> button to redo the operation, or
press the <Stop> button to cancel the operation.
Page 43

Problem Solving
017-745
024-910
024-911
024-912
024-913
024-915
Cause) Exceeded the maximum storage size using SMB of the Scan to PC
service.
Remedy) Press the control panel's <Start> button to redo the operation, or
press the <Stop> button to cancel the operation.
Cause) The paper size set for Tray 1 and the paper size specified for the job
are not the same.
Remedy) Press the control panel's <Stop> button to cancel the job or change
the paper to the specified paper size.
Cause) The paper size set for Tray 2 and the paper size specified for the job
are not the same.
Remedy) Press the control panel's <Stop> button to cancel the job or change
the paper to the specified paper size.
Cause) The paper size set for Tray 3 and the paper size specified for the job
are not the same.
Remedy) Press the control panel's <Stop> button to cancel the job or change
the paper to the specified paper size.
Cause) The paper size set for Tray 4 and the paper size specified for the job
are not the same.
Remedy) Press the control panel's <Stop> button to cancel the job or change
the paper to the specified paper size.
Cause) The paper size set for Tray 5 (bypass) and the paper size specified
for the job are not the same.
Remedy) Reload paper to match the paper setting or press the control
panel's <Stop> button.
024-950
024-951
024-952
024-953
024-954
024-958
024-959
Cause) There is no paper in Tray 1 and another tray cannot be selected.
Remedy) Load more paper, or press the control panel's <Stop> button to
cancel the job.
Cause) There is no paper in Tray 2 and another tray cannot be selected.
Remedy) Load more paper, or press the control panel's <Stop> button to
cancel the job.
Cause) There is no paper in Tray 3 and another tray cannot be selected.
Remedy) Load more paper, or press the control panel's <Stop> button to
cancel the job.
Cause) There is no paper in Tray 4 and another tray cannot be selected.
Remedy) Load more paper, or press the control panel's <Stop> button to
cancel the job.
Cause) There is no paper in Tray 5 and another tray cannot be selected.
Remedy) Load more paper, or press the control panel's <Stop> button to
cancel the job.
Cause) The paper setting specified in the control panel does not match the
size or type of paper loaded in the Tray 5 (bypass).
Remedy) Reload paper to match the paper setting or press the control
panel's <Stop> button.
Cause) Tray 1 has not been inserted or the paper guides are in an
unsupported position.
Remedy) Press the control panel's <Stop> button and insert Tray 1, or check
the position of the paper guides.
024-960
Cause) Tray 2 has not been inserted or the paper guides are in an
unsupported position.
Remedy) Press the control panel's <Stop> button and insert Tray 2, or check
the position of the paper guides.
43
Page 44

Problem Solving
024-961
024-962
024-965
024-966
024-718
026-737
027-518
Cause) Tray 3 has not been inserted or the paper guides are in an
unsupported position.
Remedy) Press the control panel's <Stop> button and insert Tray 3, or check
the position of the paper guides.
Cause) Tray 4 has not been inserted or the paper guides are in an
unsupported position.
Remedy) Press the control panel's <Stop> button and insert Tray 4, or check
the position of the paper guides.
Cause) The paper specified for the job is not loaded into any of the trays.
Remedy) Load the specified paper, or press the control panel's <Stop>
button to cancel the job.
Cause) Attempted to select a tray automatically although all trays except
the Tray 5 (bypass) are not selectable for auto selection.
Remedy) Press the control panel's <Stop> button, and try again.
Cause) Incompatible print parameters are used. The combination of the
specified functions such as Document Size, Paper Size, Paper Tray,
2 sided printing, and Output Tray is incompatible.
Remedy) Confirm the print data, and try printing again.
Cause) A network error occurred.
Remedy) Consult your network administrator whether the network or the
server have any problem.
Cause) Failed to login the forwarding destination.
Remedy) Press the control panel's <Stop> button, and cancel the job.
027-520
027-522
027-528
027-543
027-779
033-313
033-316
033-325
033-326
Cause) Invalid characters are used or the specified path is not found.
Remedy) Press the control panel's <Stop> button, and cancel the job.
Cause) Unable to write in the forwarding destination.
Remedy) Press the control panel's <Stop> button, and cancel the job.
Cause) Data could not be written to the shared folder because the PC's
hard disk is full.
Remedy) Press the control panel's <Stop> button, and delete any unneeded
data to create room on the hard disk.
Cause) The SMB server (NetBIOS) name is invalid.
Remedy) Check whether the server name of the SMB server is correct, or
press the control panel's <Stop> button to cancel the job.
Cause) Failed to authenticate the SMTP server.
Remedy) Press the control panel's <Stop> button, and cancel the job.
Cause) An error occurred while sending a fax.
Remedy) Press the control panel's <Stop> button, and check the settings.
Cause) An error occurred.
Remedy) Switch off the machine power, make sure that the touch screen is
blank, and then switch on the machine power. If the same message
is displayed again, contact our Customer Support Center.
Cause) The sender for the Scan to E-mail function has not been entered.
Remedy) Press the control panel's <Stop> button, and check the settings.
44
Page 45

Problem Solving
033-503
033-504
033-505
033-506
033-507
033-509
033-510
033-517
033-526
033-529
033-531
033-532
033-541
033-547
033-548
Cause) An error occurred during fax transmission.
Remedy) The machine will automatically recover. Wait for a while, and try
again.
Cause) The recipient of the specified number is not registered.
Remedy) Specify the recipient correctly, or press the control panel's <Stop>
button, and cancel the job.
Cause) Communication was terminated by a cause such as pressing the
<Stop> button.
Remedy) The machine will automatically recover. Press the control panel's
<Stop> button, and try again.
Cause) Cannot transmit manually because a line is unavailable.
Remedy) Press the control panel's <Stop> button, and cancel the job.
033-549
033-550
033-567
033-572
033-577
033-578
033-712
033-725
033-753
Cause) Cannot use the Fax service because of causes such as memory is
insufficient a fax in the queue.
Remedy) The machine will automatically recover. Wait for a while, and try
again.
Cause) Unable to register in the Address Book.
Remedy) The machine will automatically recover. Wait for a while, and try
again.
Cause) The data received is not printed.
Remedy) The machine will automatically recover. Wait for a while, and try
again.
Cause) An error occurred during fax transmission.
Remedy) The machine will automatically recover. Wait for a while, and try
again.
Cause) Unable to process because of insufficient memory.
Remedy) Delete unnecessary data. If the same message is displayed again,
contact our Customer Support Center.
Cause) The hard disk is full.
Remedy) The machine will automatically recover. Wait for a while, and try
again.
Cause) An error occurred during fax transmission.
Remedy) Press the control panel's <Stop> button, and cancel the job.
034-522
034-550
Cause) Cannot transmit manually because a line is unavailable.
Remedy) Confirm the completion of the job, or press the control panel's
<Stop> button, and cancel the job.
Cause) An error occurred during fax transmission.
Remedy) Switch off the machine power, make sure that the display is blank,
and then switch on the machine power. If the same message is
displayed again, contact our Customer Support Center.
45
Page 46

Problem Solving
034-711
034-726
034-746
034-752
034-757
034-761
034-765
035-550
035-703
Cause) An error occurred during fax transmission.
Remedy) The machine will automatically recover. Wait for a while, and try
again.
Cause) Exceeded the limit of jobs.
Remedy) The machine will automatically recover. Wait for a while, and try
again.
Cause) The line is not connected correctly.
Remedy) Press the control panel's <Stop> button, and cancel the job.
Cause) The recipient`s line is busy.
Remedy) Press the control panel's <Stop> button, and cancel the job.
Cause) An error occurred during fax transmission.
Remedy) The machine will automatically recover. Wait for a while, and try
again.
Cause) The recipient in the Address Book is incorrect.
Remedy) Confirm the recipient`s address, and try again. If the same
message is displayed again, contact our Customer Support Center.
Cause) An error occurred during fax transmission.
Remedy) Switch off the machine power, make sure that the display is blank,
and then switch on the machine power.
Cause) An error occurred during fax transmission.
Remedy) The machine will automatically recover. Wait for a while, and try
again.
035-704
035-708
035-728
035-741
035-748
035-758
035-759
035-761
036-506
036-550
036-700
Cause) An error occurred while sending a fax.
Remedy) The machine will automatically recover. Wait for a while, and try
again.
Cause) An error occurred while sending a fax during fax transmission.
Remedy) The machine will automatically recover. Wait a moment, and try
again.
Cause) An error occurred during fax transmission.
Remedy) Switch off the machine power, make sure that the display is blank,
and then switch on the machine power. If the same message is
displayed again, contact our Customer Support Center.
Cause) An error occurred during fax transmission.
Remedy) The machine will automatically recover. Wait for a while, and try
again.
Cause) An error occurred during fax transmission.
Remedy) Switch off the machine power, make sure that the display is blank,
and then switch on the machine power.
Cause) An error occurred during fax transmission.
Remedy) The machine will automatically recover. Wait for a while, and try
again.
46
036-740
036-777
036-796
Cause) An error occurred during fax transmission.
Remedy) Press the control panel's <Stop> button, and cancel the job.
Cause) An error occurred during fax transmission.
Remedy) The machine will automatically recover. Wait for a while and try
again.
Page 47

Problem Solving
041-210
041-211
042-325
042-400
042-608
042-614
042-614
045-310
045-313
045-218
061-321
061-325
Cause) An error occurred in Tray 1.
Remedy) Switch off the machine power, make sure that the display is blank,
and then switch on the machine power. If the same message is
displayed again, contact our Customer Support Center.
Cause) An error occurred.
Remedy) Switch off the machine power, make sure that the display is blank,
and then switch on the machine power. If the same message is
displayed again, contact our Customer Support Center.
Cause) The odor filter life is over.
Remedy) Contact our Customer Support Center.
Cause) The Voc filer life is over.
Remedy) Contact our Customer Support Center.
Cause) An error occurred.
Remedy) Switch off the machine power, make sure that the display is blank,
and then switch on the machine power.
Cause) An error occurred.
Remedy) Removed the jammed paper.
Cause) An error occurred.
Remedy) Switch off the machine power, make sure that the display is blank,
and then switch on the machine power. If the same message is
displayed again, contact our Customer Support Center.
062-277
062-300
062-311
062-360
062-371
062-380
062-386
062-389
062-396
071-105
072-102
Cause) An error occurred in the document feeder.
Remedy) Switch off the machine power, make sure that the display is blank,
and then switch on the machine power. If the same message is
displayed again, contact our Customer Support Center.
Cause) The cover was open when a document was placed in the document
feeder.
Remedy) Close the cover.
Cause) An error occurred.
Remedy) Switch off the machine power, make sure that the display is blank,
and then switch on the machine power. If the same message is
displayed again, contact our Customer Support Center.
Cause) An error occurred.
Remedy) Switch off the machine power, make sure that the display is blank,
and then switch on the machine power. If the same message is
displayed again, contact our Customer Support Center.
Cause) An error occurred in the left cover [A] or Tray 1.
Remedy) Remove the jammed paper.
Cause) An error occurred in the one tray module cover [B] or Tray 2.
Remedy) Remove the jammed paper.
072-105
072-210
072-212
072-215
Cause) A paper jam occurred in the one tray module cover [B].
Remedy) Remove the jammed paper.
Cause) An error occurred in Tray 2 (One Tray Module).
Remedy) Switch off the machine power, make sure that the display is blank,
and then switch on the machine power. If the same message is
displayed again, contact our Customer Support Center.
47
Page 48

Problem Solving
073-102
073-104
073-105
073-210
074-101
074-102
074-104
074-105
074-210
Cause) A paper jam occurred in the two tray module cover [C] or Tray 3.
Remedy) Remove the jammed paper.
Cause) A paper jam occurred in the one tray module cover [B] or the two
tray module cover [C].
Remedy) Remove the jammed paper.
Cause) A paper jam occurred in the one tray module cover [B].
Remedy) Remove the jammed paper.
Cause) An error occurred in Tray 3 (Two Tray Module).
Remedy) Switch off the machine power, make sure that the display is blank,
and then switch on the machine power. If the same message is
displayed again, contact our Customer Support Center.
Cause) A paper jam occurred in the two tray module cover [C] or Tray 4.
Cause) Remove the jammed paper.
Cause) A paper jam occurred in the one tray module cover [B] or the two
tray module cover [C].
Remedy) Remove the jammed paper.
Cause) A paper jam occurred in the one tray module cover [B].
Remedy) Remove the jammed paper.
Cause) An error occurred in Tray 4 (Two Tray Module).
Remedy) Switch off the machine power, make sure that the display is blank,
and then switch on the machine power. If the same message is
displayed again, contact our Customer Support Center.
075-135
077-101
077-103
077-104
077-106
077-129
077-211
077-212
077-300
077-301
077-305
Cause) A paper jam occurred in the left cover [A].
Remedy) Remove the jammed paper.
Cause) A paper jam occurred in the left cover [A].
Remedy) Remove the jammed paper.
Cause) An error occurred in the Two Tray Module.
Remedy) Switch off the machine power, make sure that the display is blank,
and then switch on the machine power. If the same message is
displayed again, contact our Customer Support Center.
Cause) An error occurred in the One Tray Module.
Remedy) Switch off the machine power, make sure that the display is blank,
and then switch on the machine power. If the same message is
displayed again, contact our Customer Support Center.
Cause) The front cover is open.
Remedy) Close the front cover.
Cause) The left cover [A] is open.
Remedy) Close the left cover [A].
Cause) The two tray module cover [C] is open.
Remedy) Close the two tray module cover [C].
48
077-309
077-900
077-901
Cause) The one tray module cover [B] is open.
Remedy) Close the one tray module cover [B].
Cause) A paper jam occurred in the left cover [A].
Remedy) Remove the jammed paper.
Page 49

Problem Solving
077-904
077-905
077-906
091-313
091-401
091-402
091-406
091-424
091-430
Cause) A paper jam occurred in the one tray module cover [B].
Remedy) Remove the jammed paper.
Cause) A paper jam occurred in the two tray module cover [B] or [C].
Remedy) Remove the jammed paper.
Cause) An error occurred.
Remedy) Switch off the machine power, make sure that the display is blank,
and then switch on the machine power. If the same message is
displayed again, contact our Customer Support Center.
Cause) The drum cartridge needs to be replaced soon.
Remedy) Replace the drum cartridge soon.
Cause) The drum cartridge needs to be replaced soon.
Remedy) Replace the drum cartridge.
Cause) The drum cartridge life is over.
Remedy) Replace the drum cartridge. Contact your local Fuji Xerox
representative or sales representative.
Cause) The drum cartridge life is over.
Remedy) Replace the drum cartridge immediately. Contact your local Fuji
Xerox representative or sales representative.
Cause) The drum cartridge life is over.
Remedy) Switch off the machine power, make sure that the display is blank,
and then switch on the machine power. If the same message is
displayed again, contact our Customer Support Center.
091-440
091-441
091-914
091-915
091-916
091-921
092-660
092-661
092-668
Cause) The drum cartridge need to be replaced soon.
Remedy) Prepare a new drum cartridge.
Cause) The drum cartridge need to be replaced soon.
Remedy) Replace the drum cartridge. Contact your local Fuji Xerox
representative or sales representative.
Cause) An error occurred with the drum cartridge.
Remedy) Switch off the machine power, make sure that the display is blank,
and then switch on the machine power. If the same message is
displayed again, contact our Customer Support Center.
Cause) An error occurred with the drum cartridge.
Remedy) Replace the drum cartridge. Contact your local Fuji Xerox
representative or sales representative.
Cause) A drum cartridge error occurred.
Remedy) Switch off the machine power, make sure that the display is blank,
and then switch on the machine power.
Cause) Temperature SNR (in CRU) value is out of range.
Remedy) Exchange the Sensor unit, and switch off the machine power, make
sure that the display is blank, and then switch on the machine
power.
Cause) ATC SNR (in drum cartridge) value is out of range.
Remedy) Switch off the machine power, make sure that the display is blank,
and then switch on the machine power.
092-910
Cause) An error occurred.
Remedy) Switch off the machine power, make sure that the display is blank,
and then switch on the machine power.
49
Page 50

Problem Solving
093-312
093-400
093-406
093-912
093-956
093-959
116-321
116-323
116-324
116-334
116-377
Cause) An error occurred with the toner cartridge.
Remedy) Switch off the machine power, make sure that the display is blank,
and then switch on the machine power. If the same message is
displayed again, contact our Customer Support Center.
Cause) There is no more toner in the toner cartridge.
Remedy) Replace the toner cartridge.
Cause) The toner cartridge needs to be replaced soon.
Remedy) Prepare a new toner cartridge.
Cause) There is no more toner in the toner cartridge.
Remedy) Replace the toner cartridge.
Cause) There is no more toner in the toner cartridge.
Remedy) Remove the seal on the drum cartridge.
Cause) An error occurred with the drum cartridge.
Remedy) Replace the drum cartridge. Contact your local Fuji Xerox
representative or sales representative.
Cause) An error occurred.
Remedy) Switch off the machine power, make sure that the display is blank,
and then switch on the machine power. If the same message is
displayed again, contact our Customer Support Center.
116-386
116-747
117-326
117-327
123-314
127-396
133-226
134-210
134-211
Cause) The fax cable is not connected correctly.
Remedy) Connect the cable securely, and then switch off the machine power,
make sure that the display is blank, and then switch on the
machine power. If the same message is displayed again, contact
our Customer Support Center.
Cause) Unable to complete scanning due to the scanning area being too
small.
Remedy) Decrease the value of the Erase Frame or reduce the zoom ratio.
Cause) An error occurred.
Remedy) Switch off the machine power, make sure that the display is blank,
and then switch on the machine power. If the same message is
displayed again, contact our Customer Support Center.
Cause) Failed to create a e-mail data.
Remedy) Press the control panel's <Stop> button, and try again.
Cause) The country code specified is not supported by the machine or the
time is not set.
Remedy) Set the country code or time again.
Cause) An error occurred during fax transmission.
Remedy) Connect the cable securely, and then switch off the machine power,
make sure that the display is blank, and then switch on the
machine power. If the same message is displayed again, contact
our Customer Support Center.
50
Page 51

Index
Numerics
2 Sided button ....................................................... 7
A
Address Book button ............................................. 7
arrow buttons ........................................................ 6
B
Back button ........................................................... 7
C
C (Clear) button .................................................... 7
changing the paper setting .................................. 20
cleaning ................................................................. 9
ClearAll button ...................................................... 6
Collated/Resolution button .................................... 7
collating output .................................................... 26
control panel ......................................................... 6
Copy button ........................................................... 6
copying ID card ................................................... 24
copying two/four pages onto one sheet .............. 28
D
Data indicator ........................................................ 7
Dial Pause button .................................................. 6
Display .................................................................. 6
document jams .................................................... 39
E
Energy Saver button ............................................. 6
error code ............................................................ 40
Error indicator ....................................................... 6
F
Fax button ............................................................. 7
H
how to copy ......................................................... 23
how to fax ............................................................ 33
how to print ......................................................... 29
how to scan ......................................................... 30
I
ID card copy button ............................................... 6
importing scanned data via application ............... 30
L
Lighten/Darken button ........................................... 7
loading paper ....................................................... 19
Log In/Out button ................................................... 6
M
Machine Status button ........................................... 6
making 2 sided copies ......................................... 25
making reduced or enlarged copies .................... 27
N
non-standard size document ............................... 22
non-standard size paper ...................................... 20
Numeric keypad ..................................................... 6
O
OK button .............................................................. 6
One touch panels .................................................. 7
Original Type button .............................................. 7
Outline view ........................................................... 7
P
Paper clip tray ........................................................ 7
paper jams ........................................................... 36
paper types .......................................................... 18
placing document ................................................ 21
power on/off ........................................................... 9
printer driver .......................................................... 8
R
registering phone book ........................................ 35
S
safety notes ......................................................... 10
Scan button ........................................................... 7
sending scanned data to PC (network) ............... 32
sending scanned data via e-mail ......................... 31
Speed Dial button .................................................. 7
Start button ............................................................ 6
Stop button ............................................................ 6
supported paper .................................................. 18
U
unusable paper .................................................... 18
J
Job Status button .................................................. 6
51
Page 52

52
Page 53

53
Page 54

54
Page 55

DocuCentre S2420/S2220
Basic Operation Guide
DE5144E2-1 (Edition 1)
April 2013
Copyright © 2013 by Fuji Xerox Co., Ltd.
Fuji Xerox Co., Ltd. Printed in China
Page 56

DocuCentre S2420
DocuCentre S2220
Basic Operation Guide
April 2013 DE5144E2-1 Edition 1
 Loading...