

Page 1

DocuCentre-II C3000
User Guide
Page 2

Microsoft, MS-DOS, Windows NT, Microsoft Network are trademarks or registered trademarks of
Microsoft Corporation in the U.S. and other countries.
Novell, NetWare, IntranetWare, NDS are registered trademarks of Novell, Inc. in the United States.
and other countries.
Adobe, Acrobat, PostScript, Adobe PostScript 3, and the PostScript logo are trademarks of Adobe
Systems Incorporated.
EtherTalk, Macintosh, Mac OS, TrueType are registered trademarks of Apple Computer, Inc.
Intel and Pentium are trademarks or registered trademarks of Intel Corporation.
UNIX is a registered trademark in the United States and other countries, licensed exclusively through
X/Open Company Ltd.
Solaris, Sun OS, and NIS (Network Information Services) are trademarks or registered trademarks of
Sun Microsystems Inc. in the United States.
PCL, HP-GL, and HP-GL/2 are registered trademarks of Hewlett-Packard Corporation.
RSA and BSAFE are either registered trademarks or trademarks of RSA Security Inc. in the U.S. and/
or other countries.
All product/brand names are trademarks or registered trademarks of the respective holders.
Permission has been obtained from Microsoft Corporation for use of software screen shots.
For information on license, refer to About License.
The data saved in the hard disk of the machine may be lost if there is any problem in the hard disk.
Fuji Xerox is not responsible for any direct and indirect damages arising from or caused by such data
loss.
Fuji Xerox is not responsible for any breakdown of machines due to infection of computer virus or
computer hacking.
Important
1. This manual is copyrighted with all rights reserved. Under the copyright laws, this manual may not
be copied or modified in whole or part, without the written consent of the publisher.
2. Parts of this manual are subject to change without prior notice.
3. We welcome any comments on ambiguities, errors, omissions, or missing pages.
4. Never attempt any procedure on the machine that is not specifically described in this manual.
Unauthorized operation can cause faults or accidents. Fuji Xerox is not liable for any problems
resulting from unauthorized operation of the equipment.
An export of this product is strictly controlled in accordance with Laws concerning Foreign
Exchange and Foreign Trade of Japan and/or the export control regulations of the United States.
Xerox, The Document Company, Ethernet, CentreWare, and the digital X are trademarks of Xerox
Corporation. All Xerox and Fuji Xerox product names are either registered trademarks or trademarks
of Xerox Corporation and Fuji Xerox Co., Ltd.
DocuWorks is a trademark.
Page 3

Table of Contents
Table of Contents ........................................................................................................ 1
1 Before Using the Machine ...................................................................................... 13
Preface ...................................................................................................................... 14
Using This Guide ....................................................................................................... 15
Related Information Sources ................................................................................ 15
Organization of this Guide .................................................................................... 16
Conventions .......................................................................................................... 17
Safety Notes .............................................................................................................. 18
WARNING - Electrical Safety Information............................................................. 19
Laser Safety Information....................................................................................... 19
Operational Safety Information ............................................................................. 20
Maintenance Information ...................................................................................... 21
Ozone Safety Information ..................................................................................... 21
For Consumables.................................................................................................. 21
Radio Frequency Emissions ................................................................................. 21
Product Safety Certification .................................................................................. 22
Table of Contents
About License............................................................................................................ 23
RSA BSAFE.......................................................................................................... 23
Heimdal................................................................................................................. 23
JPEG Code ........................................................................................................... 23
Legal Notice............................................................................................................... 24
2 Product Overview .................................................................................................... 25
Machine Components................................................................................................ 26
Power On / Off........................................................................................................... 30
Powering On ......................................................................................................... 30
Powering Off ......................................................................................................... 31
Circuit Breaker........................................................................................................... 32
Power Saver mode .................................................................................................... 33
Changing the Power Saver Mode Change Interval............................................... 33
Exiting the Power Saver Mode.............................................................................. 35
Control Panel............................................................................................................. 36
Customizing the Control Panel ............................................................................. 38
3 Copy.......................................................................................................................... 43
Copying Procedure.................................................................................................... 44
Step 1 Loading Documents................................................................................... 44
Step 2 Selecting Features..................................................................................... 46
Step 3 Entering the Quantity................................................................................. 46
Step 4 Starting the Copy Job ................................................................................ 47
Step 5 Confirming the Copy Job in the Job Status ............................................... 48
1
Page 4

Operations during Copying.........................................................................................49
Stopping the Copy Job ..........................................................................................49
Changing the Number of Copies ...........................................................................50
Interrupting the Copy Job ......................................................................................50
Copy ...........................................................................................................................52
Reduce/Enlarge (Making Enlarged/Reduced Copies) ...........................................52
Paper Supply (Selecting the Paper for Copying)...................................................54
Output Color (Selecting the Color to Copy) ...........................................................56
Image Shift (Shifting the Image Copy Position).....................................................59
Edge Erase (Erasing Edges and Margin Shadows in the Document) ...................59
Lighten/Darken (Adjusting the Copy Density)........................................................59
Image Quality .............................................................................................................60
Color Effects (Selecting Image Quality).................................................................60
Original Type (Selecting the Document Type).......................................................61
Image Options (Adjusting Copy Density / Sharpness / Color Saturation of Images)
...............................................................................................................................62
Image Enhancement (Erasing the Background Color of Documents/Adjusting
contrast).................................................................................................................63
Color Balance (Adjusting Color Balance) ..............................................................63
Color Shift (Adjusting Color Tone) .........................................................................64
Layout Adjustment......................................................................................................65
2 Sided Copying (Making 2 sided Copies).............................................................65
Book Copying (Copying Facing Pages onto Separate Sheets).............................66
2 Sided Book Copy (Making 2 Sided Copies of Facing Pages).............................67
Original Size (Specifying the Scan Size for the Document)...................................68
Mixed Sized Originals (Scanning Different Size Documents Simultaneously) ......69
Edge Erase (Erasing Edges and Margin Shadows of the Document)...................70
Image Shift (Shifting the Image Copy Position).....................................................70
Image Rotation (Making Copies with the Image Rotated Vertically or Horizontally)
...............................................................................................................................72
Invert Image (Making Reversed Copies of Images) ..............................................73
Original Orientation (Specify the Orientation of Loaded Documents)....................73
Output Format ............................................................................................................75
2 Sided Copying (Making 2-sided Copies) ............................................................75
Copy Output / Stapling (Outputting by Specifying Finishing).................................75
Booklet Creation (Creating a Booklet) ...................................................................77
Covers (Attaching a Cover to Copies) ...................................................................78
Transparency Separators (Inserting Blank Sheets between Transparencies) ......80
Multiple-Up (Copying Multiple Sheets onto One Sheet) ........................................80
Poster (Making Enlarged Copies Spread over Multiple Sheets)............................81
Repeat Image (Making Multiple Copies on One Sheet) ........................................82
Annotation (Adding Stamp/Date/Page Number to Copies)....................................83
Watermark (Printing Control Number on the Background) ....................................86
Preset Repeat Image (Making Multiple Copies on a Single Sheet).......................89
Job Assembly .............................................................................................................91
2
Page 5

Table of Contents
Build Job (Making Copies of Documents with Different Settings in a Single
Operation) ............................................................................................................. 91
Sample Set (Checking the Finished Output of the Copy) ..................................... 93
Combine Original Sets (Adding Originals) ............................................................ 94
Delete Outside/Delete Inside
(Deleting Outside or Inside of the Selected Area when Copying)......................... 95
4 Fax ............................................................................................................................97
Fax Procedure ........................................................................................................... 98
Step 1 Loading Documents................................................................................... 98
Step 2 Selecting Features................................................................................... 100
Step 3 Specifying the Destination ....................................................................... 101
Step 4 Starting the Fax Job ................................................................................ 102
Step 5 Confirming the Fax Job in the Job Status................................................ 103
Stopping the Fax Job............................................................................................... 104
About Internet Fax ................................................................................................... 105
Internet Fax Overview......................................................................................... 105
Sending iFax (iFax Transmission) ...................................................................... 107
Useful Features................................................................................................... 109
Fax/Internet Fax ...................................................................................................... 112
iFax/Fax (Sending iFax/Fax)............................................................................... 112
Next Recipient (Sending Faxes to Multiple Recipients)...................................... 112
Specifying a Destination Using the Address Book.............................................. 113
Speed Dialing (Entering Numbers using Address Number)................................ 114
Specifying a Destination using One Touch Buttons............................................ 114
Specifying a Destination using the Keyboard Screen......................................... 115
Entering Specific Symbols .................................................................................. 115
Removing/Confirming Specified Recipient.......................................................... 116
General Settings...................................................................................................... 117
Lighten/Darken (Adjusting Density Level)........................................................... 117
2 Sided Originals (Transmitting 2-sided Originals) ............................................. 117
Original Type (Selecting the Image Quality Type for the Document).................. 118
Resolution (Specifying the Scanning Resolution)............................................... 119
Layout Adjustment................................................................................................... 120
2 Sided Originals (Transmitting 2-sided Originals) ............................................. 120
Book Scanning (Transmitting Facing Pages on Separate Sheets)..................... 120
Original Size (Specifying the Original Size for the Original)................................ 121
Mixed Sized Originals (Scanning Different Size Documents Simultaneously).... 122
Reduce/Enlarge (Specifying the Scan Ratio for the Original) ............................. 122
Stamp (Adding a Stamp when Scanning a Document)....................................... 123
Transmission Options.............................................................................................. 125
Communication Mode (Selecting a Communication Mode)................................ 125
Priority Send / Delayed Start (Specifying Send Priority/Send Time)................... 126
Send Header (Adding Sender Name and Phone Number to Faxes).................. 127
Cover Note (Transmitting Documents With a Cover Page) ................................ 128
3
Page 6

iFax Comment (Inserting Comments in Body Text).............................................130
Transmission Report/Read Receipts/Delivery Receipts (Confirming Transmission
Results)................................................................................................................132
Recipient Print Sets (Printing Multiple Copies at the Remote Machine)..............133
Remote Mailbox (Using Remote Mailbox) ...........................................................133
F Code (Using F Code Transmission) .................................................................135
iFax Profile (Specifying iFax Profiles) ..................................................................137
Multiple-Up (Sending Multiple Documents with Combining in 1 sheet) ...............139
Encryption (Sending iFax Encrypted by S/MIME)................................................139
Digital Signature (Sending iFax with a Digital Signature by S/MIME)..................139
Advanced Fax Features ...........................................................................................140
Polling (Retrieving Documents from Remote Machines) .....................................140
Store for Polling (Allowing Remote Machines to Retrieve Documents from Your
Machine) ..............................................................................................................141
On-hook (Confirming Remote Machine Response Prior to Transmission)..........143
Broadcast .................................................................................................................144
Broadcast Send (Transmitting to Multiple Recipients).........................................144
Relay Broadcast (Transmitting Documents Through a Relay Station) ................144
Remote Relay Broadcast (Performing Relay Broadcast to Remote Locations) ..148
Receiving Faxes.......................................................................................................153
Switching between Auto Receive and Manual Receive.......................................153
Using Auto Receive .............................................................................................153
Using Manual Receive.........................................................................................154
Facsimile Information Services ................................................................................155
Using the Receiver ..............................................................................................155
When Not Using an External Telephone .............................................................156
5 Scan.........................................................................................................................157
Scanning Procedure.................................................................................................158
Step 1 Loading Documents .................................................................................158
Step 2 Selecting Features ...................................................................................160
Step 3 Starting the Scan Job ...............................................................................162
Step 4 Confirming the Scan Job in Job Status ....................................................163
Step 5 Saving the Scanned Data.........................................................................163
Stopping the Scan Job .............................................................................................164
E-mail .......................................................................................................................165
Address Book ......................................................................................................165
Keyboard .............................................................................................................167
Adding the Sender's Address ..............................................................................168
Recipient(s)..........................................................................................................168
[Edit Recipient] Screen ........................................................................................169
From ....................................................................................................................169
Subject.................................................................................................................170
Message ..............................................................................................................170
Scan to Mailbox........................................................................................................171
4
Page 7

Table of Contents
Network Scanning ................................................................................................... 172
Scan to FTP/SMB.................................................................................................... 173
Transfer Protocol ................................................................................................ 173
Address Book...................................................................................................... 173
Browse... ............................................................................................................. 174
Forwarding Specification..................................................................................... 174
General Settings...................................................................................................... 176
Scanning Color (Selecting the Color to Scan) .................................................... 176
2 Sided Originals (Scanning Both Sides of a Document) ................................... 177
Original Type (Selecting the Document Type).................................................... 178
File Format (Selecting the Format of Scanned Data) ......................................... 178
Image Quality .......................................................................................................... 184
Photographs (Scanning a Color Photograph)..................................................... 184
Image Options (Adjusting Scan Density and Image Sharpness)........................ 184
Image Enhancement (Erasing the Background Color of Documents/Adjusting
contrast) .............................................................................................................. 185
Shadow Suppression (Suppressing the Document Background)....................... 185
Color Space (Specifying Color Space) ............................................................... 185
Layout Adjustment................................................................................................... 187
Scan Resolution (Specifying a Scanning Resolution)......................................... 187
2 Sided Originals (Scanning Both Sides of a Document) ................................... 187
Book Scanning (Scanning Facing Pages on Separate Sheets).......................... 188
Original Size (Specifying a Scanning Size)......................................................... 189
Mixed Sized Originals (Scanning Different Size Documents Simultaneously).... 189
Edge Erase (Erasing Edges and Margin Shadows in the Document) ................ 190
Reduce/Enlarge (Specifying a Scanning Ratio).................................................. 191
Output Format ......................................................................................................... 192
Image Compression (Specifying an Image Compression Ratio When Scanning)
............................................................................................................................ 192
Read Receipts .................................................................................................... 193
Split Send (Sending in Sections) ........................................................................ 193
File Name (Specifying the Filename to be Sent) ................................................ 193
Reply To (Set the Address for Reply) ................................................................. 194
File Name Conflict (Setting Procedures When a File Name conflicts with others)
............................................................................................................................ 194
Document Name (Specifying the Filename to be Saved) ................................... 195
Encryption (Sending E-mail Encrypted by S/MIME) ........................................... 195
Digital Signature (Sending E-mail with a Digital Signature by S/MIME) ............. 195
6 Check Mailbox ....................................................................................................... 197
Mailbox Operating Procedure.................................................................................. 198
Step 1 Opening the [Check Mailbox] Screen ...................................................... 198
Step 2 Selecting a Mailbox ................................................................................. 198
Step 3 Checking/Selecting Mailbox Documents ................................................. 198
Step 4 Operating Mailbox Documents ................................................................ 199
5
Page 8

Selecting a Mailbox ..................................................................................................200
Checking/Selecting Mailbox Documents ..................................................................201
Printing/Deleting Documents in the Mailbox.............................................................202
[Mailbox - Print Settings] Screen .........................................................................202
Configuring/Starting Job Flow ..................................................................................205
Job Flow Restrictions...........................................................................................208
7 Stored Programming..............................................................................................209
Stored Programming Overview ................................................................................210
Registering/Deleting/Renaming Stored Programs ...................................................211
Registering Stored Program ................................................................................212
Deleting a Stored Program ..................................................................................212
Entering/Changing Stored Program Name..........................................................213
Assigning/Changing Icons for Stored Programs..................................................213
Calling Stored Programs ..........................................................................................214
8 Job Flow Sheets .....................................................................................................215
Job Flow Procedure .................................................................................................216
Step 1 Opening the [Job Flow Sheets] Screen....................................................216
Step 2 Selecting a Job Flow Sheet......................................................................216
Step 3 Confirming/Changing the Job Flow Sheet................................................217
Step 4 Starting the Job Flow Sheet .....................................................................217
Selecting/Changing a Job Flow Sheet .....................................................................218
9 Computer Operations ............................................................................................221
Features Overview ...................................................................................................222
Print Driver...........................................................................................................222
Network Scanner Utility2 .....................................................................................224
CentreWare Internet Services .............................................................................224
Printing .....................................................................................................................228
E-mail Printing ..........................................................................................................229
Setup ...................................................................................................................229
Sending E-Mail ....................................................................................................229
Importing Scanned Data...........................................................................................231
Importing to a TWAIN Compatible Application ....................................................231
Importing Using Mailbox Viewer2 ........................................................................233
Importing Using CentreWare Internet Services ...................................................235
Importing with the WebDAV protocol...................................................................236
Sending Fax .............................................................................................................237
Registering Destinations......................................................................................237
10 Paper and Other Media ..........................................................................................239
Paper Types .............................................................................................................240
Supported Paper Types.......................................................................................240
6
Page 9

Table of Contents
Loading Paper ......................................................................................................... 242
Loading Paper in the Trays 1 to 3....................................................................... 242
Loading Paper in the Tray 5 (Bypass) ................................................................ 243
Tandem Tray Module (TTM) ............................................................................... 244
Changing the Paper Size for the Trays ................................................................... 245
Changing the Paper Settings................................................................................... 247
11 System Settings..................................................................................................... 249
System Settings Procedure ..................................................................................... 250
Step 1 Entering System Administration Mode .................................................... 250
Step 2 Entering the System Administrator User ID and Password ..................... 250
Step 3 Selecting the Operation Mode from the System Administrator Menu...... 251
Step 4 Selecting an Item on the [System Settings] Screen ................................ 251
Step 5 Setting a Feature ..................................................................................... 252
Step 6 Exiting the System Administration Mode ................................................. 252
System Settings Menu List ...................................................................................... 253
Entering Text ........................................................................................................... 265
Common Settings .................................................................................................... 266
Machine Clock/Timers ........................................................................................ 266
Audio Tones........................................................................................................ 268
Screen/Button Settings ....................................................................................... 270
Paper Tray Settings ............................................................................................ 271
Watermark .......................................................................................................... 273
Image Quality Adjustment................................................................................... 275
Reports ............................................................................................................... 277
Maintenance ....................................................................................................... 278
Other Settings ..................................................................................................... 279
Copy Mode Settings ................................................................................................ 286
Copy Tab ............................................................................................................ 286
Copy Defaults ..................................................................................................... 287
Copy Control ....................................................................................................... 291
Original Size Defaults ......................................................................................... 293
Reduce/Enlarge Presets..................................................................................... 293
Custom Colors .................................................................................................... 293
Annotation - Create Stamps................................................................................ 293
Network Settings ..................................................................................................... 294
Port Settings ....................................................................................................... 294
Protocol Settings................................................................................................. 294
Machine’s E-mail Address/Host Name ............................................................... 295
Proxy Server Settings ......................................................................................... 295
Outgoing / Incoming E-mail Settings................................................................... 296
Remote Authentication Server/Directory Service................................................ 296
PKI (Public Key) Settings.................................................................................... 300
Other Settings ..................................................................................................... 302
7
Page 10

Print Mode Settings ..................................................................................................303
Allocate Memory ..................................................................................................303
Delete Form .........................................................................................................305
Other Settings......................................................................................................305
Scan Mode Settings .................................................................................................308
General Settings Tab...........................................................................................308
Scan Defaults ......................................................................................................308
Scan-to-FTP/SMB Defaults .................................................................................310
Original Size Defaults ..........................................................................................310
Output Size Defaults............................................................................................310
Reduce/Enlarge Presets......................................................................................311
Other Settings......................................................................................................311
Fax Mode Settings ...................................................................................................313
Screen Defaults ...................................................................................................313
Fax Defaults.........................................................................................................313
Fax Control ..........................................................................................................315
File Destination/Output Destination .....................................................................318
Reduce/Enlarge Presets......................................................................................319
Original Size Defaults ..........................................................................................319
Local Terminal Information ..................................................................................319
iFax Control .........................................................................................................320
E-mail/Internet Fax Settings .....................................................................................322
E-mail Defaults ....................................................................................................322
E-mail Control ......................................................................................................322
Mailbox/Stored Document Settings ..........................................................................325
Mailbox Settings ..................................................................................................325
Stored Document Settings...................................................................................326
Job Flow Settings .....................................................................................................327
Setup Menu ..............................................................................................................328
Mailbox ................................................................................................................328
Job Flow Sheets ..................................................................................................330
Job Flow Sheet Keywords ...................................................................................335
Address Book (Address Number) ........................................................................336
Group Send .........................................................................................................342
Comments ...........................................................................................................343
System Administrator Settings .................................................................................344
System Administrator Login ID ............................................................................344
System Administrator Password..........................................................................344
Maximum Login Attempts ....................................................................................345
Login Setup/Auditron Administration........................................................................346
Create/Check User Accounts ..............................................................................346
Account Details....................................................................................................348
Reset User Accounts ...........................................................................................348
System Administrator's Meter (Copy Jobs)..........................................................349
8
Page 11

Table of Contents
User Details Setup .............................................................................................. 349
Charge Print Settings.......................................................................................... 350
Fax Billing Data................................................................................................... 352
Password Entry from Control Panel.................................................................... 352
Login Setup/Auditron Mode ................................................................................ 352
12 Job Status .............................................................................................................. 355
Job Status Overview................................................................................................ 356
Checking Current/Pending Jobs.............................................................................. 357
Checking Completed Jobs....................................................................................... 358
Printing and Deleting Stored Documents ................................................................ 359
Private Charge Print............................................................................................ 359
Charge Print........................................................................................................ 361
Secure Print ........................................................................................................ 362
Sample Print ....................................................................................................... 364
Delayed Print ...................................................................................................... 365
Public Mailbox..................................................................................................... 366
Undelivered Faxes.............................................................................................. 367
Printing Pending Jobs.............................................................................................. 369
Handling Error Terminations.................................................................................... 370
13 Machine Status ...................................................................................................... 371
Overview of Machine Status.................................................................................... 372
Machine Status........................................................................................................ 373
Machine Information ........................................................................................... 373
Paper Tray .......................................................................................................... 374
Overwrite Hard Disk............................................................................................ 375
Print Mode........................................................................................................... 375
Fax Receiving Mode ........................................................................................... 377
Billing Meter/Print Report......................................................................................... 378
Billing Meter ........................................................................................................ 378
User Account Billing Meter.................................................................................. 379
Print Report/List .................................................................................................. 380
Automatically Printed Reports/Lists .................................................................... 387
Supplies................................................................................................................... 389
Faults....................................................................................................................... 390
14 Authentication and Auditron Administration...................................................... 391
Overview of Authentication...................................................................................... 392
Users Controlled by Authentication..................................................................... 392
Types of Authentication ...................................................................................... 392
Features Controlled by Authentication................................................................ 393
Authentication for Job Flow Sheets and Mailboxes................................................. 396
Job Flow Sheet Types ........................................................................................ 396
9
Page 12

Types of Mailboxes..............................................................................................399
Linking Job Flow Sheets to Mailboxes.................................................................401
Overview of Auditron Administration ........................................................................403
Authentication and Auditron Administration.........................................................403
Manageable Features and Services....................................................................404
15 Maintenance............................................................................................................411
Replacing Consumables ..........................................................................................412
Replacing the Toner Cartridge.............................................................................412
Replacing the Black (K) Toner Cartridge.............................................................413
Replacing the Color (CMY) Toner Cartridges......................................................414
Replacing the Waste Toner Container.................................................................415
Replacing the Drum Cartridge .............................................................................417
Replacing the Second Bias Transfer Roll Unit.....................................................419
Replacing the Fuser Unit .....................................................................................420
Replacing the Transfer Belt Cleaner....................................................................422
Replacing the Staple Cartridge (For B Finisher)..................................................424
Replacing the Staple Cartridge (For A Finisher)..................................................426
Replacing the Stamp Cartridge............................................................................428
Cleaning the Machine...............................................................................................429
Cleaning the Exterior ...........................................................................................429
Cleaning the Document Cover and Document Glass ..........................................429
Cleaning the Film and Constant Velocity Transport Glass ..................................430
Cleaning the Document Feeder Roller ................................................................431
Executing Auto Gradation Adjustment .....................................................................432
Printing a Report/List................................................................................................435
16 Problem Solving .....................................................................................................437
Troubleshooting........................................................................................................438
Machine Trouble.......................................................................................................440
Image Quality Trouble ..............................................................................................444
Trouble during Copying ............................................................................................450
Unable to Copy....................................................................................................450
The Copy Result is Not What was Expected .......................................................450
Trouble during Printing .............................................................................................454
Unable to Print .....................................................................................................454
The Print Result is Not What was Expected ........................................................455
10
Trouble during Faxing ..............................................................................................457
Sending Problems ...............................................................................................457
Receiving Problems.............................................................................................458
Trouble during Scanning ..........................................................................................461
Unable to Scan with the Machine ........................................................................461
Unable to Import Scanned Documents to the Computer.....................................461
Unable to Send a Scanned Document over the Network (FTP/SMB) .................462
Page 13

Table of Contents
Unable to Send E-mail........................................................................................ 463
The Image is not What was Expected ................................................................ 463
Error Code ............................................................................................................... 465
Other Errors ........................................................................................................ 507
Paper Jams ............................................................................................................. 508
Paper Jams in the Top Left Cover [A]................................................................. 509
Paper Jams in the Bottom Left Cover [B]............................................................ 510
Paper Jams in the Bottom Left Cover [C] ........................................................... 511
Paper Jams in the Top Cover [E]........................................................................ 511
Paper Jams in the Trays 1 to 3 ........................................................................... 512
Paper Jams in the Tandem Tray Module............................................................ 512
Paper Jams in the Tray 5 (Bypass)..................................................................... 512
Paper Jams in the Duplex Kit.............................................................................. 513
Paper Jams in the B Finisher.............................................................................. 513
Paper Jams in the A Finisher.............................................................................. 514
Document Jams....................................................................................................... 515
Stapler Faults .......................................................................................................... 517
Staple Jams in the Staple Cartridge (For B Finisher) ......................................... 518
Staple Jams in the Staple Cartridge (For A Finisher) ......................................... 519
17 Appendix ................................................................................................................ 523
Specifications .......................................................................................................... 524
Printable Area.......................................................................................................... 531
Standard Printable Area...................................................................................... 531
Extended Printable Area ..................................................................................... 531
ESC/P Emulation..................................................................................................... 532
Emulation ............................................................................................................ 532
Fonts ................................................................................................................... 533
Output Feature.................................................................................................... 533
ESC/P Emulation Print Features......................................................................... 534
ESC/P Emulation Settings .................................................................................. 534
Magnification Table............................................................................................. 541
Paper Size and Number of Printable Characters................................................ 545
PDF Direct Print....................................................................................................... 547
PDF Direct Print Settings .................................................................................... 547
PCL Emulation......................................................................................................... 549
HP-GL2 Emulation................................................................................................... 552
Hard Clip Area .................................................................................................... 556
Printable Area ..................................................................................................... 557
Auto Layout......................................................................................................... 558
Optional Components.............................................................................................. 565
Notes and Restrictions ............................................................................................ 566
Notes and Restrictions on the Use of the Machine............................................. 566
Notes and Restrictions in the Interrupt Mode...................................................... 567
11
Page 14

Notes and Restrictions on the Use of the iFax Feature .......................................569
Using the Telephone ................................................................................................572
Placing a Call.......................................................................................................572
Simple Operating Procedures ..................................................................................574
Fax Settings.........................................................................................................574
Scan Settings.......................................................................................................575
Copy Settings ......................................................................................................575
Common Settings ................................................................................................576
Removing the A Finisher ..........................................................................................578
Opening/Closing the Back Cover .............................................................................579
18 Glossary ..................................................................................................................581
Glossary ...................................................................................................................582
Index...............................................................................................................................587
12
Page 15

1 Before Using the Machine
This chapter describes how to use this guide, as well as cautions on using the
product safely and legally.
z
Preface ....................................................................................................... 14
z
Using This Guide ........................................................................................ 15
z
Safety Notes ...............................................................................................18
z
About License .............................................................................................23
z
Legal Notice................................................................................................24
Page 16

1 Before Using the Machine
Preface
Before Using the Machine
1
Thank you for selecting the Fuji Xerox DocuCentre-II C3000 (hereafter referred to as
“the machine”).
This guide provides all the necessary copy/print/scan/fax operating procedures,
maintenance information like how to clear paper jams, daily care, setting various items,
and precautions.
This guide assumes that an operator has a basic knowledge of the operating
environment of the personal computer in use, networking environments, and how to
operate a personal computer. For information on the environment of the personal
computer in use, basic knowledge of networking environments, and how to operate a
personal computer, refer to the manuals provided with the personal computer,
operating system, and network system.
Please read this guide thoroughly to obtain the best performance on this product. After
reading this guide, be sure to keep it handy for quick reference. It will be useful in case
you forget how to perform operations or if a problem occurs with the machine.
For instructions on configuring your network environment, refer to the Network
Administrator Guide. For information about optional accessories for the printer
functionality, also refer to the guide provided with each optional accessory.
14
In this manual, safety instructions are preceded by the symbol .
Always read and follow the instructions before performing the required procedures.
The equipment is certified by NEMKO in compliance with [IEC60950-1 (AS/NZS
3260)]. The equipment is manufactured under an ISO 9001 Quality System. The
equipment is also certified in compliance with applicable standards by various
national bodies.
The equipment was tested and is certified by the New Zealand Ministry of Commerce
in conformance with CISPR publ. 22 (AS/NZISS CISPR22:2002) which relates to
radio frequency interference regulations, and also complies with the Australian
Communication Authority requirements.
NOTE: Machines intended for use in South Korea and Taiwan have been certified
separately in compliance with their requirements.
Any unauthorized alteration, which includes the addition of new functions or the
connection of external devices, may impact this certification.
Contact your local Xerox representative for a list of approved accessories.
Page 17

Using This Guide
Using This Guide
This section describes the organization of this guide.
Related Information Sources
We provide the following guides for optimum usage of the machine.
Included Manuals
Several manuals are included with this product. They are referred to as accompanying
manuals.
These accompanying manuals include descriptions on configurations and operation of
the product.
The following manuals are included with the machine.
User Guide (this guide)
Describes all the necessary steps for copy/print/scan/fax, clearing paper jams, daily
care, setting the various items and safety information.
Network Administrator Guide
Aimed toward network administrators, as a guide to setting up the network
environment.
Before Using the Machine
1
Quick Reference Guide
Introduces the basic operations of the machine, as well as daily management and
maintenance.
Manual (HTML)
A guide for installing print drivers, configuring the printer environment, etc. This manual
is included in the CentreWare Utilities CD-ROM.
Guides for Optional Accessories
Optional accessories are also available for the machine. User Guides are provided with
the optional accessories exclusively for DocuCentre-II C3000. These User Guides are
referred to as "guides for optional accessories". Guides for optional accessories are
provided in two forms, as printed or as On-line Help.
Guides for optional accessories describe all the necessary steps for operating optional
accessories and installing software.
15
Page 18

1 Before Using the Machine
Organization of this Guide
Before Using the Machine
1
This guide consists of the following chapters.
1 Before Using the Machine
Describes how to use this document, as well as cautions on using the product safely
and legally.
2 Product Overview
Describes basic information such as identifying the major components, how to switch
the machine on and off, how to use the touch screen, and how to set the power saver
feature.
3 Copy
Describes the copy features and operations.
4Fax
Describes the fax features and operations.
5Scan
Describes the scan features and operations.
6 Check Mailbox
Describes the mailbox features and how to work with mailboxes.
7 Stored Programming
Describes the stored programming feature.
8 Job Flow Sheets
Describes operations using a job flow created by a remote system.
9 Computer Operations
Describes operations performed from a computer, such as printing documents,
importing scanned documents, sending fax, as well as using CentreWare Internet
Services.
10 Paper and Other Media
Describes the types of paper that can be used on the machine, precautions when
handling paper, and how to load paper in trays.
11 System Settings
Describes how to use the system settings.
12 Job Status
Describes how to confirm the job status and delete jobs.
13 Machine Status
16
Describes how to confirm the machine configurations and error information.
14 Authentication and Auditron Administration
Describes the authorization feature for restricting use of the machine, as well as the
administration feature for monitoring usage statuses for each feature using the
authorization feature.
Page 19
Using This Guide
15 Maintenance
Describes procedures for replacing consumables, cleaning the machine, performing
auto gradation adjustment, and printing reports/lists.
16 Problem Solving
Describes measures for paper jams, and actions when an error message appears.
17 Appendix
Describes the machine specifications, optional accessories, and cautions/restrictions.
18 Glossary
A glossary of terms used in this guide.
Before Using the Machine
Conventions
z
z
z
z
1
In this document, “Computer” refers to a personal computer or workstation.
The following icons are used in this guide.
Important : Indicates important information that you should read.
Note : Indicates additional information on operations or features.
The following conventions are used in this guide:
" " : A cross-reference included in this guide.
" " : Refers to the names of CD-ROM, features, and touch screen
messages and input text.
[ ] : Refers to folders, files, applications, button or menu names
displayed in the touch screen, as well as the names of menus,
commands, windows, or dialog boxes displayed on the
computer screen and their buttons and menu names.
< > button : Indicates a hardware button on the computer.
< > key : Indicates a key on the keyboard of the computer.
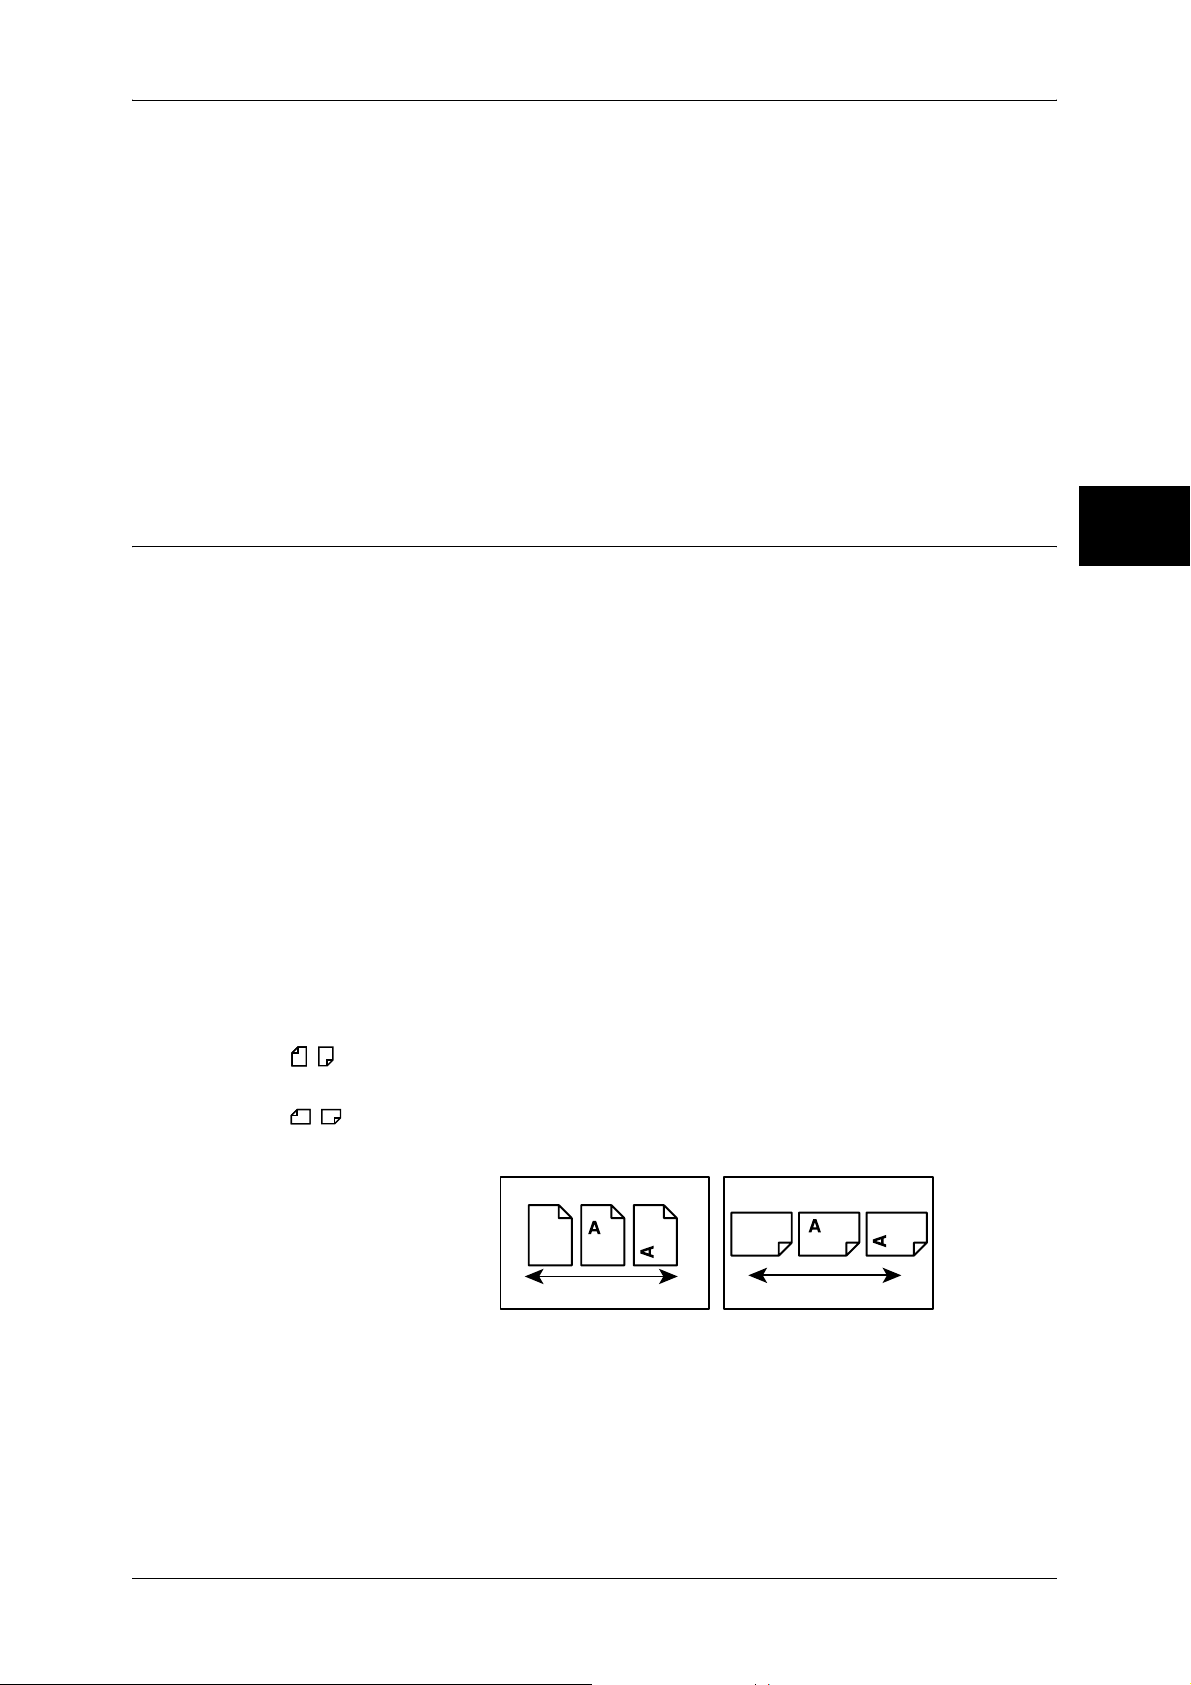
Orientation of documents or paper is described in this guide as follows:
, ,Long Edge Feed (LEF) : Loading with one of the long edges of the document
or paper.
, ,Short Edge Feed (SEF): Loading with one of the short edges of the document
or paper.
LEF Orientation SEF Orientation
Paper feed direction
Paper feed direction
17
Page 20

1 Before Using the Machine
Safety Notes
Before Using the Machine
1
Read these safety notes carefully before using this product to make sure you operate
the equipment safely.
Your Fuji Xerox product and recommended supplies have been designed and tested
to meet strict safety requirements. These include safety agency approval, and
compliance to established environmental standards. Please read the following
instructions carefully before operating the product and refer to them as needed to
ensure the continued safe operation of your product.
The safety and environment testing and performance of this product have been verified
using Fuji Xerox materials only.
WARNING: Any unauthorized alteration, which may include the addition of new
functions or connection of external devices, may impact the product
certification. Please contact your authorized Service Provider for more
information.
Warning Markings
All warning instructions marked on or supplied with the product should be followed.
Warning This WARNING alerts users to areas of the product where there is
the possibility of personal injury.
Warning This WARNING alerts users to areas of the product where there
are heated surfaces, which should not be touched.
Electrical Supply
This product shall be operated from the type of electrical supply indicated on the
product data plate label. If you are not sure that your electrical supply meets the
requirements, please consult your local power company for advice.
WARNING: This product must be connected to a protective earth
circuit.
This product is supplied with a plug that has a protective earth pin. This plug
will fit only into an earthed electrical outlet. This is a safety feature. To avoid
risk of electric shock, contact your electrician to replace the electrical outlet if you are
unable to insert the plug into it. Never use an earthed adapter plug to connect the
product to an electrical outlet that lacks an earth connection terminal.
Operator Accessible Areas
This equipment has been designed to restrict operator access to safe areas only.
Operator access to hazardous areas is restricted with covers or guards, which would
require a tool to remove. Never remove these covers or guards.
Maintenance
Any operator product maintenance procedures will be described in the customer
documentation supplied with the product. Do not carry out any maintenance
procedures on this product which are not described in the customer documentation.
18
Page 21

Cleaning Your Product
Before cleaning this product, unplug the product from the electrical outlet. Always use
materials specified for this product. The use of other materials may result in poor
performance and may create a hazardous situation. Do not use aerosol cleaners, they
may be explosive and flammable under certain circumstances.
WARNING - Electrical Safety Information
Z Only use the power cord supplied with the equipment.
Z Plug the power cord directly into a grounded electrical outlet easily accessible. Do
not use an extension cord. If you do not know whether an outlet is grounded, consult
a qualified electrician.
Z This equipment is to be used on a branch circuit that has larger capacity than rated
ampere and voltage of the machine. See data plate on the rear panel for the rated
ampere and voltage of this equipment. If the machine needs to be moved to a
different location, contact a Fuji Xerox Service Representative or your authorized
local representative or service support organization.
Z Improper connection of the equipment-grounding conductor can result in an electric
shock.
X Do not place this equipment where people might step on or trip over the power cord.
X Do not place objects on the power cord.
X Do not override or disable electrical or mechanical interlocks.
X Do not obstruct the ventilation openings.
X Never push objects of any kind into slots or openings on the equipment.
Z If any of the following conditions occur, switch off the power to the machine
immediately and disconnect the power cord from the electrical outlet. Call an
authorized local service representative to correct the problem.
- The equipment emits unusual noises or odors.
- The power cord is damaged or frayed.
- A wall panel circuit breaker, fuse, or other safety device has been tripped.
- Liquid has spilled into the equipment.
- The equipment is exposed to water.
- Any part of the equipment is damaged.
Safety Notes
Before Using the Machine
1
Disconnect Device
The power cable is the disconnect device for this equipment. It is attached to the back
of the machine as a plug-in device. To remove all electrical power from the equipment,
disconnect the power cable from the electrical outlet.
Laser Safety Information
CAUTION: Use of controls, adjustments or performance of procedures other
than those specified herein may result in hazardous light exposure.
With specific regard to laser safety, the equipment complies with performance
standards for laser products set by government, national and international agencies as
a Class 1 laser product. It does not emit hazardous light, as the beam is totally enclosed
during all phases of customer operation and maintenance.
19
Page 22

1 Before Using the Machine
Operational Safety Information
Before Using the Machine
safety guidelines at all times.
Do These:
z
Always connect equipment to a correctly grounded power outlet. If in doubt, have
the outlet checked by a qualified electrician.
Z This equipment must be connected to a protective earth circuit.
This equipment is supplied with a plug that has a protective earth pin. This plug will
fit only into an earthed electrical outlet. This is a safety feature. To avoid risk of
electric shock, contact your electrician to replace the electrical outlet if you are
unable to insert the plug into it. Never use a plug that lacks an earth connection
terminal to connect the product to an electrical outlet.
To ensure the continued safe operation of your Fuji Xerox equipment, follow these
1
z
Always follow all warnings and instructions that are marked on or supplied with the
equipment.
z
Always exercise care when moving or relocating equipment. Please contact your
local Fuji Xerox Service Department, or your local support organization to arrange
relocation of the product to a location outside of your building.
z
Always locate the equipment in an area that has adequate ventilation, and space for
servicing. See installation instructions for minimum dimensions.
z
Always use materials and supplies specifically designed for your Fuji Xerox
equipment. Use of unsuitable materials may result in poor performance.
z
Always unplug this equipment from the electrical outlet before cleaning.
Do Not Do These:
z
Never use a plug that lacks an earth connection terminal to connect the product to
an electrical outlet.
z
Never attempt any maintenance procedures that are not specifically described in the
customer documentation.
z
This equipment should not be placed in a built-in unit unless proper ventilation is
provided. Please contact your authorized local dealer for further information.
z
Never remove covers or guards that are fastened with screws. There are no
operator serviceable areas within these covers.
z
Never locate the equipment near a radiator or any other heat source.
z
Never push objects of any kind into the ventilation openings.
z
Never override or “cheat” any of the electrical or mechanical interlock devices.
z
Never operate the equipment if you notice unusual noises or odors. Disconnect the
power cord from the electrical outlet and contact your local Fuji Xerox Service
Representative or Service Provider immediately.
20
Page 23

Maintenance Information
Safety Notes
Do not attempt any maintenance procedures that are not specifically described in the
customer documentation supplied with the machine.
z
Do not use aerosol cleaners. The use of cleaners that are not approved may cause
poor performance of the equipment, and could create a dangerous condition.
z
Use supplies and cleaning materials only as directed in the customer
documentation. Keep all these materials out of the reach of children.
z
Do not remove covers or guards that are fastened with screws. There are no parts
behind these covers that you can maintain or service.
z
Do not perform any maintenance procedures unless you have been trained to do
them by an authorized local dealer or unless a procedure is specifically described in
the customer documentation.
Ozone Safety Information
This product will produce ozone during normal operation. The ozone produced is
heavier than air and is dependent on copy volume. Adhering to the correct
environmental conditions as specified in the installation instructions will ensure that the
concentration levels meet safe limits.
If you need additional information about ozone, please request the Fuji Xerox
publication Ozone from your Service Provider.
For Consumables
Before Using the Machine
1
Store all consumables in accordance with the instructions given on the package or
container.
Z Keep all consumables away from the reach of children.
Z Never throw toner, toner cartridges or toner containers into an open flame.
Z Never use a vacuum cleaner when you clean spilled toner. It can cause explosion
as the toner fills the vacuum cleaner and gets sparks. Use a broom or a wet cloth.
Radio Frequency Emissions
This equipment has been tested and found to comply with the limits for a Class B digital
device, pursuant to the International Standard for Electromagnetic Interference (CISPR
Publ. 22) and Radiocommunication Act 1992 in Australia/New Zealand. These limits
are designed to provide reasonable protection against harmful interference in a
residential installation. This equipment generates, uses and can radiate radio
frequency energy and, if not installed and used in accordance with the instructions, may
cause harmful interference to radio communications. However, there is no guarantee
that interference will not occur in a particular installation. If this equipment does cause
harmful interference to radio or television reception, which can be determined by
turning the equipment off and on, the user is encouraged to try to correct the
interference by one or more of the following measures:
- Reorient or relocate the receiving antenna.
- Increase the separation between the equipment and receiver.
- Connect the equipment into an outlet on a circuit different from that to which the
receiver is connected.
- Consult the dealer or an experienced radio/TV technician for help.
Changes and modifications to this equipment not specifically approved by Fuji Xerox
may void the user’s authority to operate this equipment.
Shielded interface cables must be used with this equipment to maintain compliance
with CISPR Publ. 22 and Radiocommunications Act 1992 in Australia/New Zealand.
21
Page 24

1 Before Using the Machine
Product Safety Certification
Before Using the Machine
This product is certified by the following Agency using the Safety standards listed.
Agency Standard
NEMKO IEC60950-1 Edition 1 (2001)
This product was manufactured under a registered ISO9001 Quality system.
1
22
Page 25

About License
RSA BSAFE
This product includes RSA BSAFE encryption software from RSA Security Inc.
Heimdal
About License
Before Using the Machine
Copyright (c)2000 Kungliga Tekniska Högskolan (Royal Institute of Technology,
Stockholm, Sweden). All rights reserved.
Redistribution and use in source and binary forms, with or without modification, are
permitted provided that the following conditions are met:
1. Redistributions of source code must retain the above copyright notice, this list of
conditions and the following disclaimer.
2. Redistributions in binary form must reproduce the above copyright notice, this list of
conditions and the following disclaimer in the documentation and/or other materials
provided with the distribution.
3. Neither the name of the Institute nor the names of its contributors may be used to
endorse or promote products derived from this software without specific prior written
permission.
THIS SOFTWARE IS PROVIDED BY THE INSTITUTE AND CONTRIBUTORS ``AS
IS'' AND ANY EXPRESS OR IMPLIED WARRANTIES, INCLUDING, BUT NOT
LIMITED TO, THE IMPLIED WARRANTIES OF MERCHANTABILITY AND FITNESS
FOR A PARTICULAR PURPOSE ARE DISCLAIMED. IN NO EVENT SHALL THE
INSTITUTE OR CONTRIBUTORS BE LIABLE FOR ANY DIRECT, INDIRECT,
INCIDENTAL, SPECIAL, EXEMPLARY, OR CONSEQUENTIAL DAMAGES
(INCLUDING, BUT NOT LIMITED TO, PROCUREMENT OF SUBSTITUTE GOODS
OR SERVICES; LOSS OF USE, DATA, OR PROFITS; OR BUSINESS
INTERRUPTION) HOWEVER CAUSED AND ON ANY THEORY OF LIABILITY,
WHETHER IN CONTRACT, STRICT LIABILITY, OR TORT (INCLUDING
NEGLIGENCE OR OTHERWISE) ARISING IN ANY WAY OUT OF THE USE OF THIS
SOFTWARE, EVEN IF ADVISED OF THE POSSIBILITY OF SUCH DAMAGE.
1
JPEG Code
Our printer software uses some of the codes defined by the Independent JPEG Group.
23
Page 26

1 Before Using the Machine
Legal Notice
Before Using the Machine
Copying or printing certain documents may be illegal in your country. Penalties of fines
or imprisonment may be imposed on those found guilty. The following are examples of
items that may be illegal to copy or print in your country.
z
Currency
z
Banknotes and checks
z
Bank and government bonds and securities
z
Passports and identification cards
z
Copyright material or trademarks without the consent of the owner
z
Postage stamps and other negotiable instruments
1
This list is not inclusive and no liability is assumed for either its completeness or
accuracy. In case of doubt, contact your legal counsel.
24
Page 27

2 Product Overview
This chapter describes the names of each component, features and tools,
switching on and off of the machine, cable connections, and the operation of the
touch screen.
z
Machine Components.................................................................................26
z
Power On / Off ............................................................................................30
z
Circuit Breaker ............................................................................................ 32
z
Power Saver mode .....................................................................................33
z
Control Panel .............................................................................................. 36
Page 28
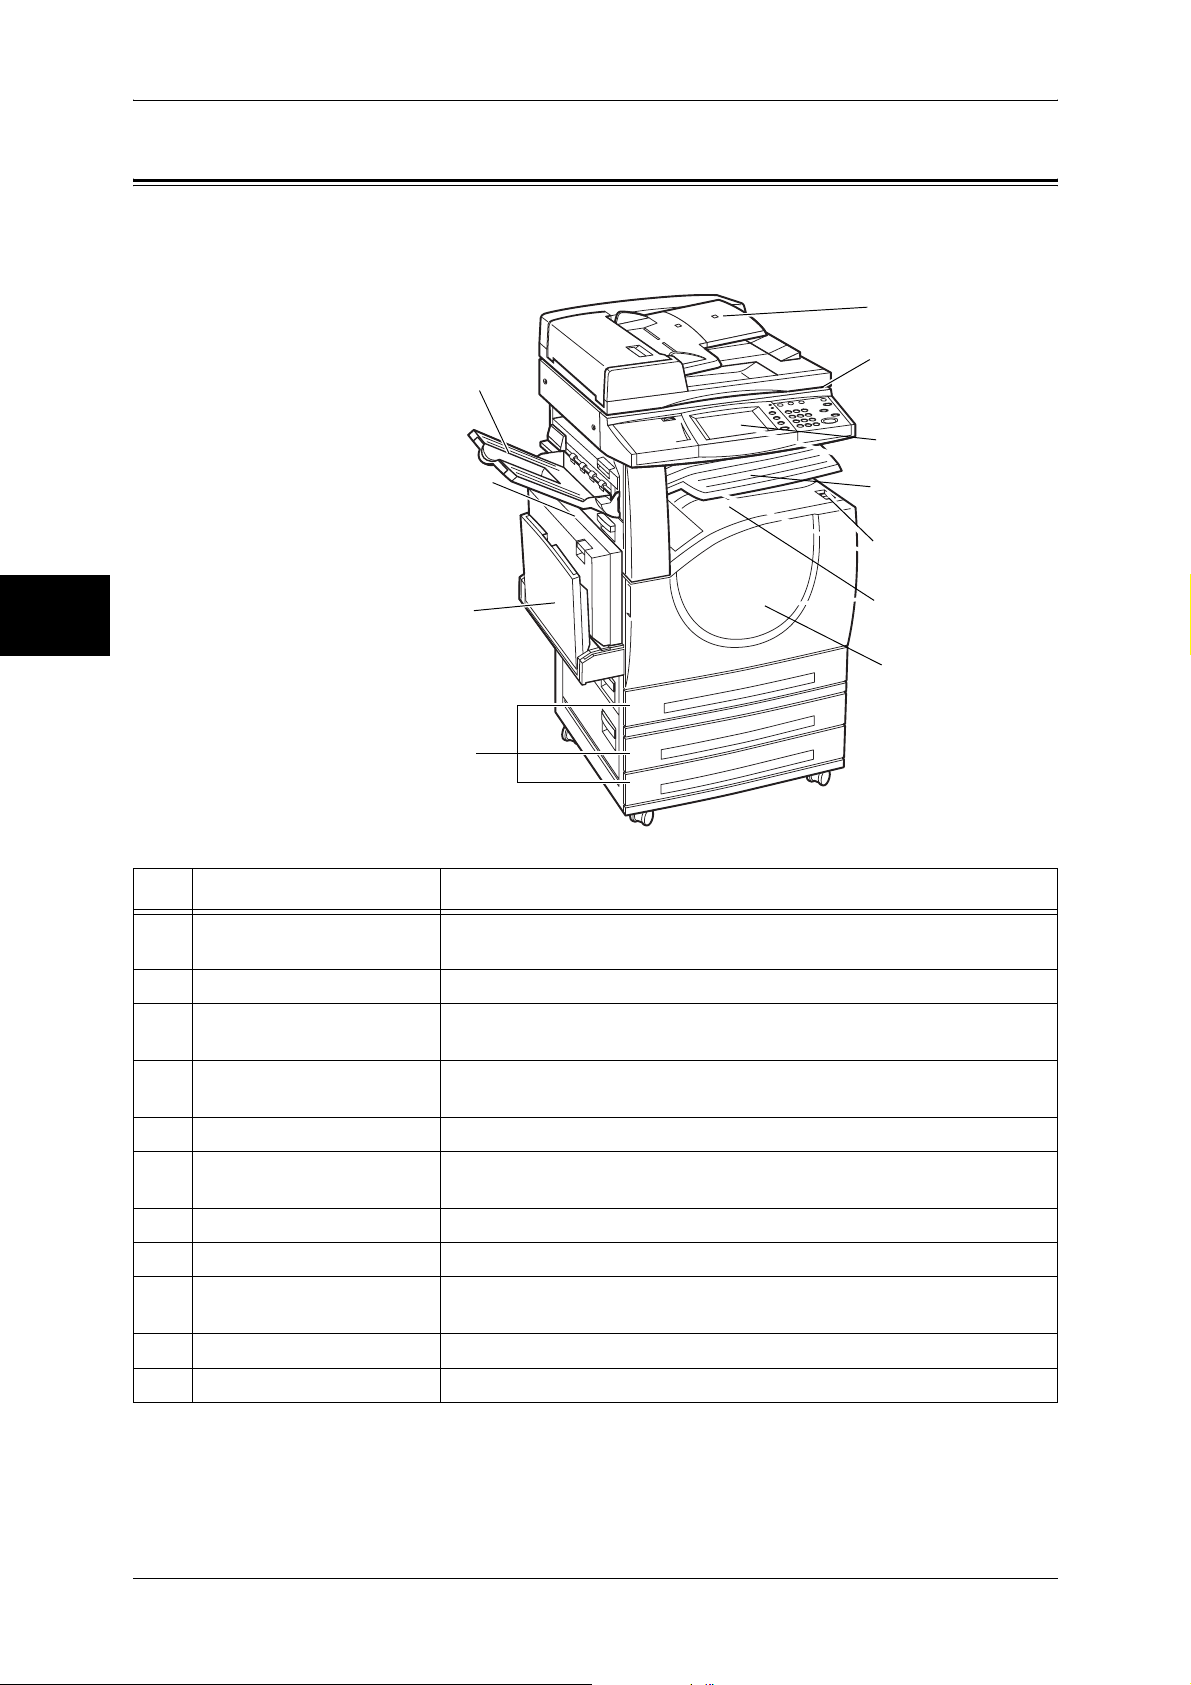
2 Product Overview
Machine Components
This section describes the machine components and functions of the machine.
Product Overview
1
2
11
3
2
10
9
8
4
5
6
7
No. Component Function
1 Duplex automatic
document feeder
2 Document glass Originals are loaded here.
3 Control panel Consists of operation buttons, LED indicators and a touch screen.
Holds the document down.
Refer to "Control Panel" (P.36).
4 Exit 2 tray Printed or copied documents are delivered with the printed side facing
down.
5 Power switch Switches the power of the machine on/off.
6 Center output tray Printed or copied documents are delivered with the printed side facing
down.
7 Front cover Open this cover to replace consumables.
8 Tray 1, 2, 3 Accommodates paper.
9 Tray 5 (Bypass) Used for loading non-standard paper (thick-stock paper, and other
special media) that cannot be loaded in the Trays 1 to 3.
10 Auto duplex module Allows you to make double-sided copies or prints automatically.
11 Side output tray (optional) Copies and prints are delivered here facing up.
Note • In text descriptions, the duplex automatic document feeder is abbreviated as
"document feeder".
26
Page 29
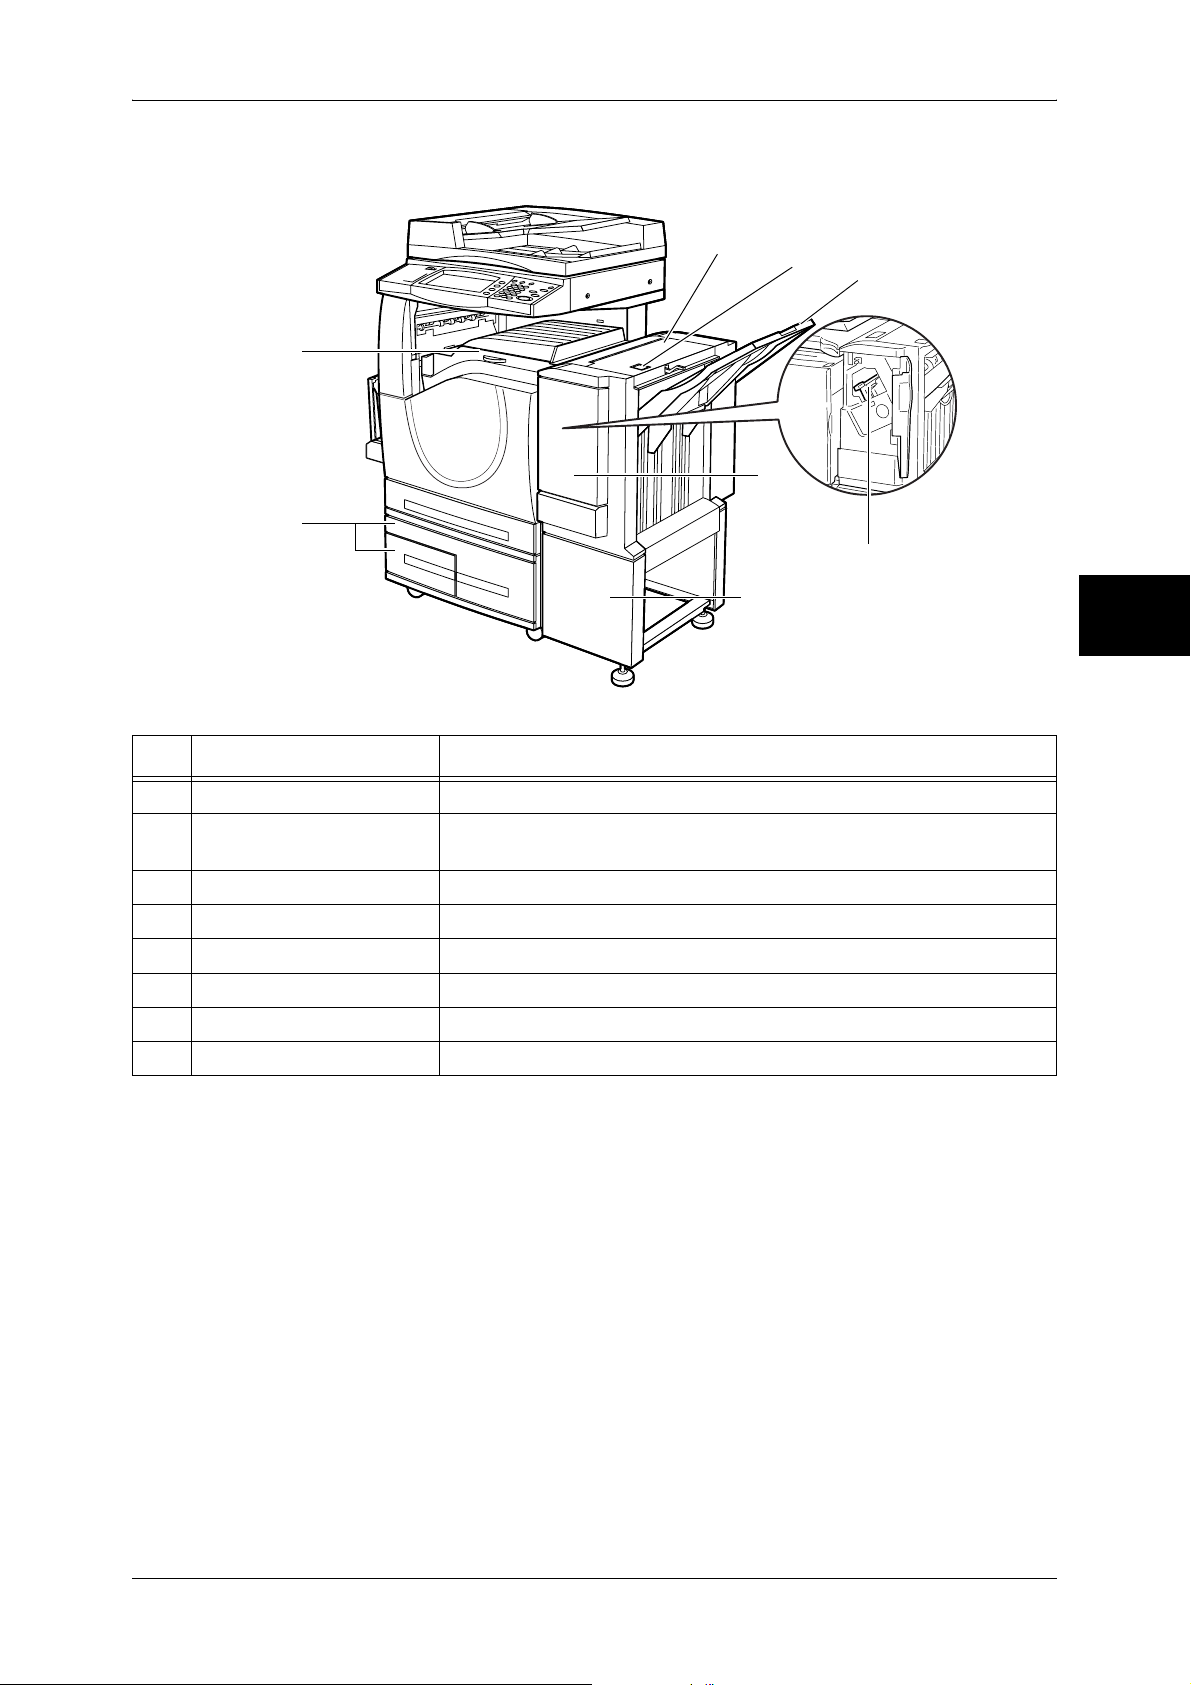
Tandem Tray Module + B Finisher
Machine Components
1
7
8
2
4
6
No. Component Function
1 B Finisher (optional) Allows you to staple printed or copied documents.
3
Product Overview
5
2
2 Finisher top cover button Pressed to open the upper cover of the finisher when clearing paper
jams.
3 Finisher tray Stapled documents are delivered.
4 Front cover Opened to clear staple jams, or replace staples.
5 Staple cartridge Contains staples.
6 Finisher stand Connects the machine to the finisher.
7 Finisher transport cover Opened to clear paper jams.
8 Tray 2 - 3 (optional) Accommodates paper.
Note • The B Finisher is optional. In text descriptions, the B Finisher is abbreviated as
"finisher".
27
Page 30
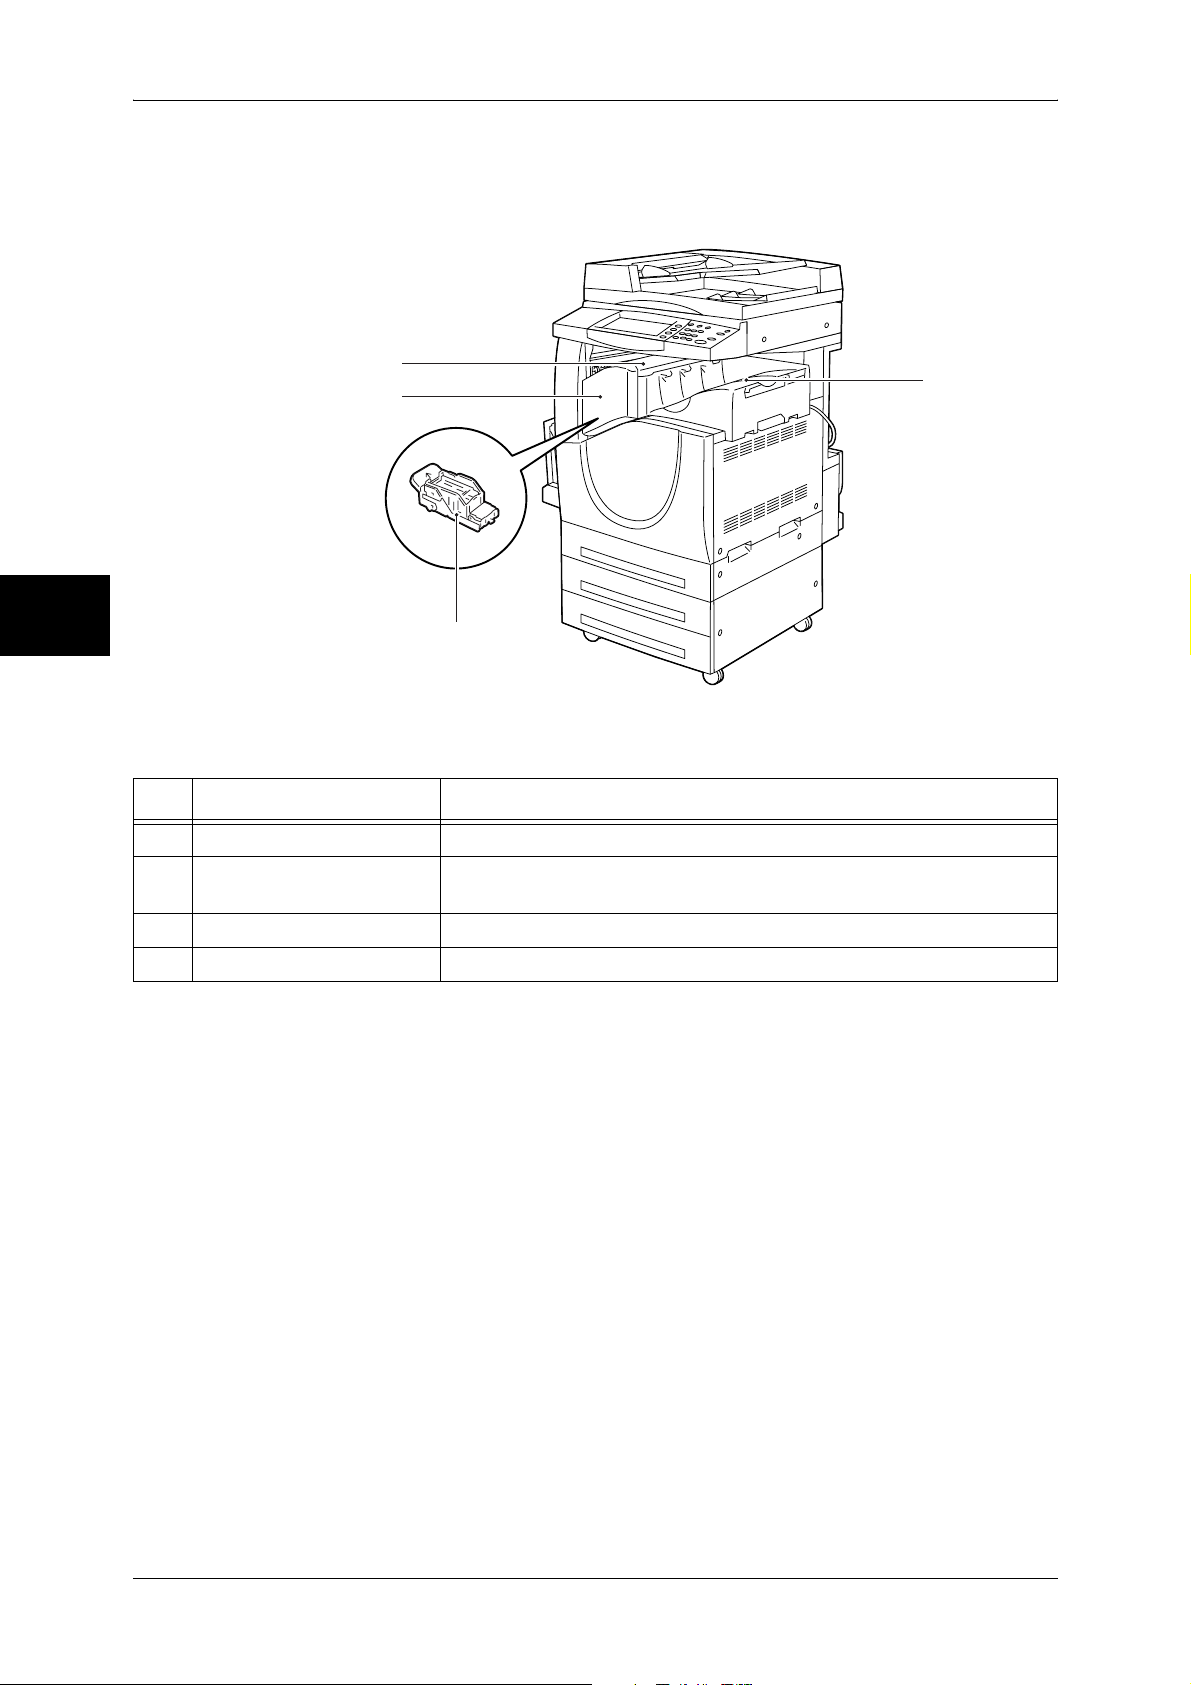
2 Product Overview
A Finisher
Product Overview
2
1
4
2
3
No. Component Function
1 Finisher top cover Open this cover when clearing paper jams.
2 Front cover Open this cover when replacing the staple cartridge or clearing staple
jams.
3 Staple cartridge Contains staples.
4 Center tray Holds printed or copied documents.
Note • The A Finisher is optional. In text descriptions, the A Finisher is abbreviated as
"finisher".
28
Page 31

Machine Components
7
6
5
4
LINE4
LINE2
Product Overview
1
TEL
LINE1
2
3
No. Component Function
1 10BASE-T / 100BASE-TX
connector
2 USB 2.0 interface
connector
3 <RESET> button Automatically turns the power off when detecting current leakage.
Connected to a network cable.
Connected to a USB cable.
Telephone Line Connectors
2
No.
Name on the
machine cover
4 TEL - Used to connect an external telephone.
5 LINE 1 Line 1 Connected to a public telephone network.
6LINE 2
(optional)
7LINE 4
(optional)
Note • Fax features are not available for some models. An optional package is required. For
Name on the
touch screen
Note • Do not connect other fax machines.
Line 2 Connected to a public telephone network.
Line 4 Connected to a public telephone network.
information, contact our Customer Support Center.
Function
29
Page 32

2 Product Overview
Power On / Off
Product Overview
Powering On
Turn on the power before operating the machine.
The machine is ready for operation within 42 seconds after the power is turned on. The
time may vary depending on the machine configuration.
Turn the machine off at the end of the day or when it is not in use for a long period of
time. Also, you can use the power saving feature when not in use for a while to reduce
the power consumption.
Important • Switching off the power of the machine may cause loss of data being processed.
For information on the power saving feature, refer to "Power Saver mode" (P.33).
Note • When the power is turned off, all functions of the machine will stop. Do not turn the
machine off if it is used all day for receiving faxes.
2
The procedure for turning on the power is as follows.
1 Press the power switch to the [ | ]
position to turn the power on.
Note • The “Please wait...”
message indicates that the
machine is warming up.
The machine cannot be
used during warming up.
The machine will be ready
for operation within 42
seconds. The time may
vary depending on the
machine configuration.
Note • When the power does not
come on, check if the
power cord is plugged into
the power outlet and the
<RESET> button is in a
reset state (button is
pressed in).
30
Page 33

Powering Off
The procedure for turning the power off is as follows.
Important • Turning off the power of the machine may cause loss of data being processed.
1 Before turning the power off, make sure that all copy or print jobs have completely
finished. Also, make sure that the <Online> indicator and the <Job in Memory>
indicator are not lit.
Important • Never turn the power off in the following instances:
2 Press the power switch to the [ ] position.
Important • Power off processing is performed internally on the machine for a while after the power
Power On / Off
-While data is being received
-While jobs are being printed
-While jobs are being copied
-While jobs are being scanned
-While jobs are being faxed
• Turn off the power in 5 seconds after paper is delivered.
switch is turned off. Therefore, do not unplug the power cord from the power outlet
immediately after turning the power switch off.
• Before you turn the power back on after turning it off, wait 20 seconds.
Product Overview
2
31
Page 34

Product Overview
2
2 Product Overview
Circuit Breaker
The machine is provided with a
circuit breaker.
In the event of a current leakage,
the breaker will automatically cut off
the power circuit to prevent any
leakage or fire from occurring.
The <RESET> button is normally in
a pressed-in state as shown in the
figure on the right. When the
machine is to be left unused for a
long period of time or is to be
moved, lightly press the <TEST>
button with the tip of a ball-pen or
other fine-tipped object to cancel
the pressed-in state of the
<RESET> button.
Once a month, check the breaker for correct operation. Also, make sure that it is
earthed. If not, the breaker cannot detect current leakage which can cause electric
shock.
If you notice any unusual conditions, contact our Customer Support Center.
Note • The <RESET> button automatically turns the power off when current leakage is detected.
Normally, do not operate this button.
• Before you cancel the pressed-in state of the <RESET> button, first make sure that the
power switch is off.
32
Page 35

Power Saver mode
The machine is installed with a Power Saver feature that will automatically cut off the
electricity to the machine if no copy or print data is received for a certain duration.
The Power Saver feature has two modes, [Low Power mode] and [Sleep mode].
The machine enters the Low Power mode after the preset time has elapsed if the
machine is left unused for a fixed period of time.
The machine then enters the Sleep mode if a further preset time elapses.
Low Power mode
In this mode, the power to the control panel and fuser unit is lowered to save power.
The touch screen goes out, and the <Power Saver> button on the control panel lights.
To use the machine, press the <Power Saver> button. The <Power Saver> button goes
out to indicate that the Power Saver feature is canceled.
Sleep Mode
Power Saver mode
Product Overview
In this mode, the power is lowered more than in the Low Power mode.
The touch screen goes out, and the <Power Saver> button on the control panel lights.
To use the machine, press the <Power Saver> button. The <Power Saver> button goes
out to indicate that the Power Saver feature is canceled.
Changing the Power Saver Mode Change Interval
The procedure for setting the Power Saver feature is as follows.
To activate the Power Saver feature, set both the times until the activation of Low
Power Mode and Sleep Mode.
1 Press the <Log In/Out> button.
2 Enter the user ID with the numeric
keypad, and select [Confirm].
Note • The default User ID is
"11111". When using the
Authentication feature, a
password is required. The
default password is "x-admin".
2
<Log In/Out>
button
3 Select [System Settings].
33
Page 36

2 Product Overview
Product Overview
4 Select [System Settings].
5 Select [Common Settings].
6 Select [Machine Clock/Timers].
2
7 Select [ ].
8 Select [Auto Power Saver], and select [Change Settings].
9 Using [ ] and [ ], configure a
power saver mode migration time
in 1 minute increments.
From Last Selection to Low Power Mode
Set the time to move to the [Low Power Mode] after the last operation.
Note • The default for [From Last Selection to Low Power Mode] is [15] minutes. The Low Power
Mode cannot be disabled.
From Last Selection to Sleep Mode
Set the time to move to the [Sleep Mode] after the last operation.
Note • The default for [From Last Selection to Sleep Mode] is [60] minutes. Configure the [From
Last Selection to Sleep Mode] time to be longer than the [From Last Selection to Low Power
Mode] time.
10 Select [Save].
11 Select [Close] repeatedly until the [System Settings] screen is displayed.
34
12 Select [Exit] to exit the System Administration mode.
Page 37

Exiting the Power Saver Mode
The following describes how to exit the Power Saver mode.
The Power Saver mode is exited in the following instances:
z
Pressing the <Power Saver> button
z
Receiving data
z
Selecting [Apply New Settings] in CentreWare Internet Services
Power Saver mode
1 Press the <Power Saver> button.
<Power Saver>
button
Product Overview
2
35
Page 38

2 Product Overview
Control Panel
The following describes the names and functions of components on the control panel.
Product Overview
2
2 3
5 6 7 8
123
456
78
9
0
#
C
16
1517 141819
001 002 003
004 005 006
007 008 009
010 011 012
013 014 015
1 4
016 017 018
019 020 021
022 023 024
025 026 027
028 029
030
2021
No. Component Function
1 Contrast dial Adjusts the contrast of the touch screen. Use this dial to enhance or
decrease the contrast.
2 Touch screen Displays messages required for operation and buttons for various
features. You can directly touch the touch screen to instruct operations
in screens and set features.
3 <Online> indicator Lights when the machine is sending or receiving data to or from a client.
4 <Job in Memory> indicator Lights when data is stored in the machine's memory.
You can check stored documents in [Stored Documents List]. For information
on [Stored Documents List], refer to "Stored Document List" (P.381).
9
10
11
12
13
5 <Job Status> button Press this button to confirm or cancel currently executing or completed
jobs, or to confirm or print saved documents.
In this manual, this button is indicated as the <Job Status> button.
6 <Review> button Press this button to open the [Review] screen. In this screen, you can
check a list of the status of copy, fax and scan features whose settings
have changed from the defaults. You can also check the destination
information for sending faxes and e-mail.
In this manual, this button is indicated as the <Review> button.
7 <Machine Status> button Press this button to confirm the machine status and meters, check the
state of consumables, and print reports.
In this manual, this button is indicated as the <Machine Status> button.
8 <Log In/Out> button Press this button to display the user ID input screen for System
Administration mode or Login Setup/Auditron Administration.
In this manual, this button is indicated as the <Log In/Out> button.
9 <Power Saver> button If the machine is not operated for a while, the machine's power
consumption is lowered to enter the power saver mode. In the power
saver mode, this button lights up. To cancel the power saver mode,
press this button again.
In this manual, this button is indicated as the <Power Saver> button.
10 <Clear All> button Returns the statuses of all displayed services to their default values.
The machine will be reset to this state after it is turned on.
In this manual, this button is indicated as the <Clear All> button.
36
Page 39

Control Panel
No. Component Function
11 <Interrupt> button/indicator Press this button to temporarily stop a continuous copy job or printing to
give another job higher priority. During an interrupt, the interrupt
indicator lights up. Pressing the <Interrupt> button again cancels the
interrupt and the previous operation is resumed.
In this manual, this button is indicated as the <Interrupt> button.
Some jobs cannot be executed during the interruption. For detail information,
refer to "Notes and Restrictions in the Interrupt Mode" (P.567).
12 <Stop> button Press this button to stop the current copy job or communications.
In this manual, this button is indicated as the <Stop> button.
13 <Start> button Press this button to start copying or scanning.
In this manual, this button is indicated as the <Start> button.
14 Numeric keypad Press these buttons to enter the number of copies, passwords and other
numerical values.
In this manual, these buttons are indicated as the “numeric keypad”.
15 <Speed Dial> button Used to specify a destination phone number for fax or e-mail.
In this manual, this button is indicated as the <Speed Dial> button.
16 <C (Clear)> button Press this button if you have entered the wrong numerical value with the
numeric keypad.
In this manual, this button is indicated as the <C> button.
17 <Dial Pause> button Used to insert a pause into a destination number.
In this manual, this button is indicated as the <Dial Pause> button.
18 <Custom> buttons
(<Copy>, <Custom 2>,
<Custom 3> buttons)
19 <All Services> button Used to display the [All Services] screen.
Used to call a custom feature.
You can assign a feature to the buttons selected from the features
displayed on the [All Services] screen and [Language].
For information on registering a feature with a button, refer to "Screen/Button
Settings" (P.270).
In this manual, this button is indicated as the <All Services> button.
You can change the features that appear in the <All Services> screen. For detail
information, refer to "Screen/Button Settings" (P.270).
Product Overview
2
20 One touch button panels Panels for one touch buttons.
You can leaf through panels to display 001 to 030, 031 to 060, and 061
to 070. M01 to M20 are reserved for the stored programming feature.
These buttons correspond to jobs registered in 01 to 20.
Note • This feature is not available for some models. An optional package
is necessary. For more information, contact our Customer Support
Center.
21 One touch buttons Specify a recipient with one button. These buttons are available for fax
and iFax.
Registered preset recipient numbers 001 to 070 are supported.
37
Page 40

Product Overview
2
2 Product Overview
Customizing the Control Panel
You can customize items displayed on the screen when turning the machine on or
canceling the power saver mode, items displayed on the screen after auto clear, the
<Custom> buttons, and items on the [All Services] screen.
1 Press the <Log In/Out> button.
<Log In/Out>
button
2 Enter the user ID with the numeric
keypad, and select [Confirm].
Note • The default User ID is
"11111". When using the
Authentication feature, a
password is required. The
default password is "x-admin".
3 Select [System Settings].
4 Select [System Settings].
5 Select [Common Settings].
6 Select [Screen/Button Settings].
7 Select the item to be set or
changed.
38
Page 41

Customizing the Screen Default
Set the features displayed on the screen that appears after turning the machine on or
canceling the Power Saver mode. This section describes how to set the [Check
Mailbox] screen as the initial screen, as an example.
1 Select [Screen Default], and select
[Change Settings].
2 Select [Check Mailbox].
Note • Select [ ] to return to the
previous screen or [ ] to
move to the next screen.
Customizing the Screen after Auto Clear
Customize items displayed on the screen after Auto Clear. You can select from [Last
Selection Screen] and [All Services].
1 Select [Screen After Auto Clear],
and select [Change Settings].
2 Select [Last Selection Screen] or
[All Services].
Control Panel
Product Overview
2
Customizing the [All Services] Screen
You can customize the types of features and the location of buttons on the [All
Services] screen when pressing the <All Services> button on the control panel.
The following is the factory default settings.
Note • When the feature is not available, the button will not be displayed. Also, if the feature is
unavailable due to hardware problems, the button will be grayed out.
z
Copy
z
Fax/Internet Fax
z
E-mail
z
Scan to Mailbox
z
Network Scanning
z
Scan to FTP/SMB
z
Check Mailbox
z
Stored Programming
z
Job Flow Sheets
z
Language
z
Setup Menu
z
Auto Gradation Adjustment
z
Print Mode
z
Fax Receiving Mode
z
Activity Report
The following is the procedure to change the [Language] button displayed at the upper
right corner of the first page of the [All Services] screen to the [Stored Programming]
button, as an example.
39
Page 42
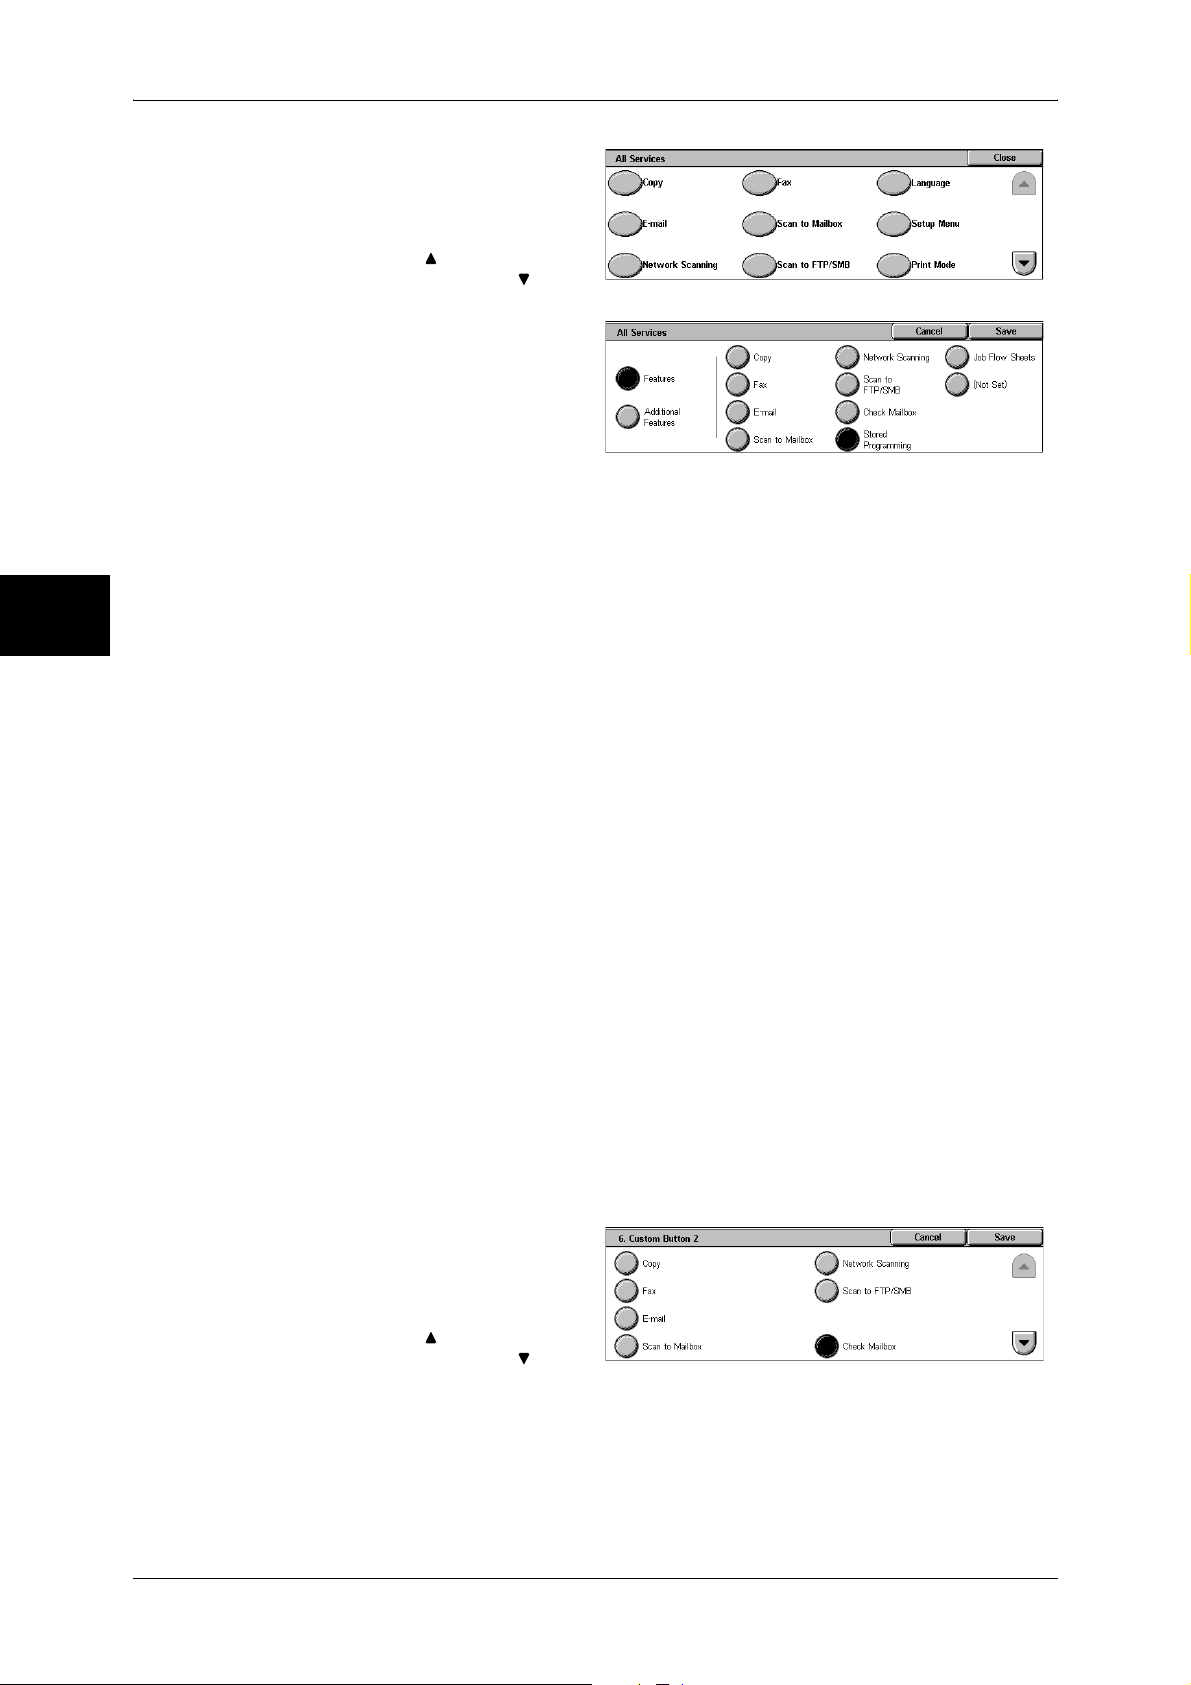
2 Product Overview
1 Select [All Services], and select
[Change Settings].
2 Select [Language].
Note • Select [ ] to return to the
3 Select [Features].
previous screen or [ ] to
move to the next screen.
Product Overview
2
4 Select [Stored Programming].
Note • The layout of buttons in this
screen is corresponding to the
layout of those on the [All
Services] screen when
pressing the <All Services> button.
• You cannot assign the same feature to more than one button.
Features
You can select a feature button. The feature buttons are the oval buttons in the [All
Services] screen.
If you select [Not Set], the selected button position will remain empty.
Additional Features
You can select an additional feature button. The auxiliary features appear in the [All
Services] screen as rectangular buttons.
If you select [Not Set], the selected button position will remain empty.
Assigning Features to <Custom> Buttons
Assign features to the <Custom> buttons on the control panel: Custom 1 to Custom 3.
By assigning features to the <Custom> buttons, you can switch to the features without
returning to the [All Services] screen. To leave a feature unassigned, select [Not Set].
As the factory defaults, [Copy] is assigned to the <Copy> button. No feature is assigned
to the <Custom 2> and <Custom 3> buttons. The features assigned to the buttons are
selected from the features displayed on the [All Services] screen and [Language].
Attach the labels included in this product when you have changed the assignment. If
you have used a feature for which no label is provided, use a blank label and write down
the feature using a permanent marker, and then attach the label to the appropriate
button.
40
The following is the procedure to assign [Check Mailbox] to the <Custom 2> button, as
an example. The same procedure can be applied to the <Custom 3> button.
1 Select [Custom Button 2], and
select [Change Settings].
2 Select [Check Mailbox].
Note • Select [ ] to return to the
previous screen or [ ] to
move to the next screen.
Page 43

Changing the Feature Screen
You can customize the selectable feature display of the setting screen for the following
features on the [All Services] screen.
z
Copy
z
Fax/Internet Fax
z
E-mail
z
Scan to Mailbox
z
Network Scanning
z
Scan to FTP/SMB
For information on how to change the settings, refer to "Copy Tab" (P.286), "General Settings Tab"
(P.308), and "Screen Defaults" (P.313).
Control Panel
Product Overview
2
41
Page 44

Page 45

3Copy
This chapter describes the copy features provided by the machine.
z
Copying Procedure ..................................................................................... 44
z
Operations during Copying .........................................................................49
z
Copy ...........................................................................................................52
z
Image Quality..............................................................................................60
z
Layout Adjustment ...................................................................................... 65
z
Output Format............................................................................................. 75
z
Job Assembly .............................................................................................91
Page 46

3 Copy
Copying Procedure
This section describes the basic copy procedures. The following shows the reference
section for each procedure.
Step 1 Loading Documents.........................................................................................................44
Step 2 Selecting Features ............................................................................................................46
Step 3 Entering the Quantity.......................................................................................................46
Step 4 Starting the Copy Job.......................................................................................................47
Step 5 Confirming the Copy Job in the Job Status .....................................................................48
Step 1 Loading Documents
There are two methods for loading documents:
Copy
3
Document Feeder
z
Single sheet
z
Multiple sheets
Document Glass
z
Single sheet
z
Bound documents, such as books
Document Feeder
The document feeder supports single and multiple sheet documents with sizes from
115 x 125 mm to 297 x 432 mm (A3, 11 x 17 inches).
The document feeder automatically detects standard size documents. For nonstandard size documents, input the size in the [Original Size] screen.
For information on entering document sizes, refer to "Original Size (Specifying the Scan Size for the
Document)" (P.68).
Note • The standard document sizes that can be detected automatically depend on the [Paper Size
The document feeder accepts the following number of sheets.
Settings] in the System Administration mode. For information about paper size settings, refer
to "Paper Size Settings" (P.280).
Document Type (Weight)
Number of
Sheets
44
Lightweight paper (38 - 49 g/m2) 75 sheets
2
Plain paper (50 - 80 g/m
Heavyweight paper (81 - 128 g/m
For information about copying documents of mixed size, refer to "Mixed Sized Originals (Scanning
Different Size Documents Simultaneously)" (P.69).
Important • Place folded or creased documents on the document glass to avoid paper jams.
• Two sided scanning of lightweight paper 38 - 49 g/m
) 75 sheets
2
) 50 sheets
2
is not supported.
Page 47

1 Remove any paper clips and
staples before loading the
document.
2 Place the document (the front side
of 2-sided document) face up in the
center of the document feeder.
Note • The indicator lights when the
document is loaded correctly.
If the indicator does not light
up, the document glass
detects the document. Press
the <C> button, and then
reload the document.
3 Adjust the movable document
guides to just touch the edges of
the document loaded.
Copying Procedure
Copy
Document Glass
The document glass supports a single sheet, a book, or other similar documents up to
297 x 432 mm (A3, 11 x 17 inches).
Important • Close the document cover after the job is completed when the document glass is used.
The document feeder automatically detects standard size documents. For nonstandard size documents, input the size in the [Original Size] screen.
For information on entering document sizes, refer to "Original Size (Specifying the Scan Size for the
Document)" (P.68).
Note • The standard document sizes that can be detected automatically depend on the [Paper Size
1 Open the document cover.
Important • Check that the screen of the
3
Settings] in the System Administration mode. For information on the paper size settings,
refer to "Paper Size Settings" (P.280).
control panel is displayed
correctly and then load the
document. When the
document is loaded before the
screen is displayed, the
machine may not properly
detect document sizes.
2 Place the document face down,
and align it against the top left
corner of the document glass.
3 Close the document cover.
Note • When a standard size
document is placed on the
document glass, the size of
the document is displayed in
the message area.
45
Page 48

3 Copy
Step 2 Selecting Features
You can select the features from the [Copy] tab.
Note • Features displayed may vary depending on the model you are using.
• To use the Login Setup feature or Auditron Administration feature, a user ID and password
may be required. Ask your system administrator for the user ID and password.
1 Press the <All Services> button.
<All Services>
button
Copy
3
2 Select [Copy].
3 If the previous settings still remain,
press the <Clear All> button.
<Clear All>
button
4 Select the features to set from each
tab as necessary.
The following shows the reference section for each feature.
"Copy" (P.52)
"Image Quality" (P.60)
"Layout Adjustment" (P.65)
"Output Format" (P.75)
"Job Assembly" (P.91)
Step 3 Entering the Quantity
You can enter up to 999 for the number of copies.
46
Page 49

1 Enter the number of copies using
the numeric keypad. The number
of copies entered appears on the
upper right of the touch screen.
2 If you enter an incorrect value,
press the <C> button and then
enter the correct value.
Step 4 Starting the Copy Job
Press the <Start> button.
1
Important • If the document has been set
in the document feeder, do not
hold down the document while
it is being conveyed.
Note • If a problem occurs, an error
message appears in the touch
screen. Solve the problem in
accordance with the message.
• You can set the next job
during copying.
Copying Procedure
Numeric keypad
<C> button
Copy
3
<Start> button
If you have more documents
If you have another document, select [Next Original] on the touch screen while the
current document is being scanned. You can scan multiple documents for later output.
2 Select [Next Original] while
scanning is in progress.
Note • When using the document feeder, load the next document after the machine has finished
scanning the first document.
• When the above screen is displayed and no operation is performed during a certain period
of time, the machine automatically assumes that there are no more documents.
47
Page 50

3 Copy
3 Load the next document.
4 Press the <Start> button.
If you have more documents, repeat Steps 3 and 4.
5 When all documents have been
scanned, select [Last Original].
Copy
Step 5 Confirming the Copy Job in the Job Status
3
Press the <Job Status> button.
1
2 Confirm the job status.
Note • Select [ ] to return to the
previous screen or [ ] to
move to the next screen.
<Job Status>
button
48
Page 51

Operations during Copying
This section describes available operations during copying. The following shows the
reference section for each feature.
Stopping the Copy Job ............................................................................................................... 49
Changing the Number of Copies................................................................................................ 50
Interrupting the Copy Job........................................................................................................... 50
Stopping the Copy Job
To cancel copying, follow the procedure below.
1 Press either [Stop] on the touch
screen or the <Stop> button on the
control panel.
Operations during Copying
Copy
<Stop> button
2 Select [Cancel].
When the screen in Step 1 does not appear
1 Press the <Job Status> button.
3
<Job Status>
button
2 Select the job to cancel, and then
select [Stop].
49
Page 52

3 Copy
Changing the Number of Copies
You can change the number of copies that is set initially during scanning or copying the
document.
1 Press either [Stop] on the touch
screen or the <Stop> button on the
control panel.
Copy
<Stop> button
3
2 Select [Change Quantity...].
3 Set the number of copies with the numeric keypad. The new quantity must include the
number of copies that have already been printed. When reducing the quantity, you
cannot enter a number less than the number of copies that have already been printed.
4 Press the <Start> button.
Interrupting the Copy Job
You can temporarily suspend the current continuous copy job to give another job higher
priority.
1 Press the <Interrupt> button.
Note • The interrupt indicator lights
up to indicate that the
machine is in the job interrupt
mode.
<Interrupt>
button
50
2 Load the interrupt document and set features if necessary.
3 Set the number of copies with the numeric keypad.
4 Press the <Start> button.
Page 53

Operations during Copying
5 After you have finished making the interrupt copy, press the <Interrupt> button.
Note • The interrupt indicator goes out to indicate that the interrupt is canceled.
• Remove the interrupt document from the document glass when using the document glass.
6 Press the <Start> button. The suspended copy job is resumed.
Copy
3
51
Page 54

Copy
3 Copy
Copy
You can set the basic features on the [Copy] screen. The following shows the reference
section for each feature.
Reduce/Enlarge (Making Enlarged/Reduced Copies) ................................................................52
Paper Supply (Selecting the Paper for Copying) ........................................................................54
Output Color (Selecting the Color to Copy)...............................................................................56
Image Shift (Shifting the Image Copy Position).........................................................................59
Edge Erase (Erasing Edges and Margin Shadows in the Document) .........................................59
Lighten/Darken (Adjusting the Copy Density) ...........................................................................59
1 On the [All Services] screen, select
[Copy].
2 Select features on the [Copy]
screen that appears first.
3
Reduce/Enlarge (Making Enlarged/Reduced Copies)
You can select a ratio to make enlarged or reduced copies.
1 Select the copy ratio from [Reduce/
Enlarge].
100%
Copies are made at the same size as the original document.
Auto %
The copy ratio is automatically set based upon the document and paper sizes specified
in [Paper Supply], and the document is copied to fit in the specified paper size.
Note • If you select [Auto %], specify a value other than [Auto] for [Paper Supply].
Ratio (3rd and 4th buttons)
Select from preset ratios.
You can change the indicated ratios. For information on the settings, refer to "Reduce/Enlarge - Buttons
3 and 4" (P.287).
52
More...
Displays the [Reduce/Enlarge] screen.
Refer to "When [Preset %] is Selected" (P.53), "When [Variable %] is Selected" (P.53), "When
[Independent X-Y%] is Selected" (P.53), or "When [Calculator %] is Selected" (P.54).
Page 55

When [Preset %] is Selected
You can select a ratio from preset standard copy ratios.
1 Select the copy ratio from [Reduce/
Enlarge].
100%
Copies are made at the same size as the original document.
Auto %
The copy ratio is automatically set based upon the document and paper sizes specified
in [Paper Supply], and the document is copied to fit in the specified paper size.
Note • If you select [Auto %], specify a value other than [Auto] for [Paper Supply].
Copy
Presets % (7 types)
Select from 7 preset ratios.
You can change the indicated ratios. For information on the settings, refer to "Reduce/Enlarge Presets"
(P.293).
Copy All X-Y%
The document is copied at a slightly reduced size to prevent image loss at the edge of
the original. If this option is selected, a check mark is added.
Important • If you select [Copy All X-Y%], when you do not want to erase the edges of the document, set
the amount of edge erase to 0 mm. Note that if the amount is set to 0 mm, the edges of the
copied document may get dirty or the image loss may occur.
When [Variable %] is Selected
You can enter any ratio for copying. Set the ratio within the range from 25 to 400% in
1% increments.
1 Specify the ratio with the numeric
keypad or [ ] and [ ].
Note • If you enter an incorrect value,
press the <C> button.
When [Independent X-Y%] is Selected
Copy
3
You can specify different length and width ratios to scale the height and width
independently.
1 Select any item.
Auto
Copies are made with the length and width ratios set automatically to match the paper
size. If this option is selected, a check mark is added.
53
Page 56

Copy
3
3 Copy
Copy All X-Y%
The length and width ratios are set automatically to match the paper size and the
document is copied at a slightly reduced size to prevent image loss at the edge of the
original. If this option is selected, a check mark is added.
Width X% / Length Y%
Set the length and width ratios within the range from 25 to 400% in 1% increments.
XY
You can simultaneously change the numerical values of the height and width by the
same amount.
When [Calculator %] is Selected
You can specify a different size for the length and width.
If you specify both the original document size and the copy size, the copy ratios for the
length and width are calculated automatically within the range from 25 to 400%
according to the sizes that you entered.
1 Enter the value for the original
document width in [Original Size] of
[X] (width) using the numeric
keypad, and select [Next].
2 Enter the value for the copy size
width in [Copy Size] of [X] (width)
using the numeric keypad, and
select [Next].
3 In the same way, enter the original document height value and copy size length value
in the [Original Size] and [Copy Size] of [Y] (length), and select [Next].
Note • To change the copy ratios you have entered, select [Next], move the mark, and enter the
new values.
X:width Y:length
The automatically calculated ratios based on the values entered in [Original Size] and
[Copy Size] are displayed.
Original Size
Set the length and width of the original size from 1 to 999 mm in 1 mm increments.
Copy Size
Set the length and width of the copy size from 1 to 999 mm in 1 mm increments.
Paper Supply (Selecting the Paper for Copying)
You can select the tray loaded with the copy paper you want to use.
54
1 Select the paper tray.
Page 57

Auto
Based on the original document size and set ratios, the machine automatically selects
the tray loaded with the appropriate paper.
Note • If you select [Auto], specify a value other than [Auto %] for [Reduce/Enlarge].
Trays (2nd to 4th Buttons)
Select from preset paper trays.
You can change the paper trays to display. For information on the settings, refer to "Paper Supply Buttons 2 to 4" (P.287).
More...
Displays the [Paper Supply] screen.
Refer to "[Paper Supply] Screen" (P.55).
[Paper Supply] Screen
Copy
You can select a paper tray that does not appear on the [Copy] screen.
1 Select the paper tray.
Auto
Based on the original document size and set ratios, the machine automatically selects
the tray loaded with the appropriate paper.
Trays 1 to 3
Select paper from 3 trays.
Bypass...
The [Tray 5 (Bypass)] screen is displayed.
Refer to "[Tray 5 (Bypass)] Screen" (P.55).
[Tray 5 (Bypass)] Screen
If you want to make copies on paper that cannot be loaded in the Trays 1 to 3, use the
Tray 5 (bypass).
1 Select the paper type.
Note • Select [ ] to return to the
previous screen or [ ] to
move to the next screen.
Copy
3
Paper Size
Select from [Auto Size Detect], [Standard Size], and [Non-standard Size].
When [Auto Size Detect] is selected, the paper size is identified automatically.
When selecting [Standard Size] or [Non-standard Size], refer to "When [Standard Size] is Selected"
(P.56) and "When [Non-standard Size] is Selected" (P.56).
Note • [Auto Size Detect] can only detect standard sizes.
Paper Type
Select the paper type.
55
Page 58

3 Copy
When [Standard Size] is Selected
Select the paper size from standard sizes and then select the paper type.
1 Select the paper size and paper
type.
Note • Select [ ] to return to the
previous screen or [ ] to
move to the next screen.
When [Non-standard Size] is Selected
Set the X (width) within the range from 99 to 432 mm, and the Y (height) within the
range from 89 to 297 mm in 1 mm increments.
Important • If the X (width) of non-standard size paper is less than 140 mm, documents may not be
printed properly.
• When copying both sides on non-standard size paper, specify the size within the range from
139 to 432 mm for the X (width) direction and from 128 to 297 mm for the Y (height)
Copy
direction.
1 Enter the paper size using [ ],
[ ], [ ], and [ ].
3
2 Select the paper type.
Note • Select [ ] to return to the
previous screen or [ ] to
move to the next screen.
Output Color (Selecting the Color to Copy)
You can set the output color to use when copying.
Note • If output color restrictions have been set, there are restrictions on which colors are available
for copying. For information about output color restrictions, refer to "Account Limit" (P.347).
1 Select the [Output Color].
Auto Detect
The machine automatically determines the color of the original document and makes
copies in full color if the original document is color and in a single color (black) if the
document is black-and-white.
Note • The machine may make copies in black and white in the case of the following documents. In
this case change the level at which the machine distinguishes documents (5 levels) in
reference to "Output Color Recognition" (P.275).
- Colored area is very small
- In light color
56
Color
Copies are made in full color using all the four colors of toner: yellow, magenta, cyan,
and black.
Black
The machine makes copies in black and white regardless of the colors in the original
document.
Page 59

Dual
The machine makes copies of color documents in two preset colors.
You can change the colors to display. For information on the setting procedures, refer to "Dual - Target
Area Color" (P.288) and "Dual - Non-target Area Color" (P.288).
More...
Displays the [Output Color] screen.
[Output Color] Screen
You can copy in full color, dual color, and single color.
1 Select [More...].
2 Select the desired output color type
for copying.
Copy
Auto Detect
The machine automatically determines the color of the original document and makes
copies in full color if the original document is color and in a single color (black) if the
document is black-and-white.
Color
Copies are made in full color using all the four colors of toner: yellow, magenta, cyan,
and black.
Black
The machine makes copies in black and white regardless of the colors in the original
document.
Dual Color
The document is separated into specified source colors and unspecified colors and
then copied in the specified dual colors. If you select [Dual Color], you can set the
following items:
z
Source Color
The [Source Color] screen is displayed.
Refer to "[Source Color] Screen" (P.57).
z
Target Area Color
Copy
3
The [Target Area Color] screen is displayed.
Refer to "[Target Area Color] Screen" (P.58).
z
Non-target Area Color
The [Non-target Area Color] screen is displayed.
Refer to "[Non-target Area Color] Screen" (P.58).
Single Color
The [Color] screen is displayed.
Refer to "[Color] Screen" (P.58).
[Source Color] Screen
Select the color to scan (extract) from the document.
57
Page 60

3 Copy
1 Select [Dual Color].
2 Select [Source Color].
3 Select [Other than Black] or [Color].
4 If you selected [Color], select the
color to scan.
Other than Black
Colors other than black are scanned.
Color
From 6 predetermined colors, you can specify single or multiple colors to scan.
[Target Area Color] Screen
You can change the color that was extracted by [Source Color] to one of the 7
Copy
predetermined colors and 6 custom colors. From the displayed [Target Area Color]
screen, select a color.
For information about how to set custom colors, refer to "Custom Colors" (P.293).
3
1 Select [Dual Color].
2 Select [Target Area Color].
Select a color.
3
[Non-target Area Color] Screen
You can change a color that was not extracted to one of the 7 fixed colors and 6 custom
colors. From the displayed [Non-target Area Color] screen, select one color.
For information about how to set custom colors, refer to "Custom Colors" (P.293).
1 Select [Dual Color].
2 Select [Non-target Area Color].
3 Select a color.
[Color] Screen
The machine makes copies in the single specified color regardless of the colors in the
document.
You can select a color from 6 predetermined colors and 6 custom colors. From the
displayed [Color] screen, select a color.
For information about how to set custom colors, refer to "Custom Colors" (P.293).
58
1 Select [Single Color].
Page 61

2 Select [Color].
3 Select a color.
Image Shift (Shifting the Image Copy Position)
This feature is the same as [Image Shift] of the [Layout Adjustment] screen. Refer to "Image Shift
(Shifting the Image Copy Position)" (P.70).
Edge Erase (Erasing Edges and Margin Shadows in the Document)
This feature is the same as [Edge Erase] of the [Layout Adjustment] screen. Refer to "Edge Erase
(Erasing Edges and Margin Shadows of the Document)" (P.70).
Lighten/Darken (Adjusting the Copy Density)
Copy
Copy
You can adjust the copy density to one of 7 levels. The copy density becomes darker
when you move [ ] to the left and lighter when you move it to the right.
Note • [Lighten/Darken] of the [Copy] screen and [Lighten/Darken] of [Lighten/Darken/Contrast] in
the [Image Quality] screen are the same.
1 Use [ ] and [ ] to select from 7
density levels.
3
59
Page 62

Copy
3
3 Copy
Image Quality
On the [Image Quality] screen, you can configure the document image quality features.
The following shows the reference section for each feature.
Color Effects (Selecting Image Quality).....................................................................................60
Original Type (Selecting the Document Type)...........................................................................61
Image Options (Adjusting Copy Density / Sharpness / Color Saturation of Images)62
Image Enhancement (Erasing the Background Color of Documents/Adjusting contrast) .........63
Color Balance (Adjusting Color Balance) ..................................................................................63
Color Shift (Adjusting Color Tone)............................................................................................64
1 On the [All Services] screen, select
[Copy].
2 Select the [Image Quality] tab and
then select a feature on the [Image
Quality] screen that appears.
If color reproducibility is poor, perform auto gradation adjustment. For information about auto gradation
adjustment, refer to "Executing Auto Gradation Adjustment" (P.432).
Color Effects (Selecting Image Quality)
If you select an image quality of [Color Effects], the [Image Enhancement], [Image
Options], [Color Shift], and [Color Balance] settings are automatically adjusted and
copies are made at a quality that matches the images.
Note • If the settings of other image quality features are changed after selecting an image quality in
[Color Effects], the Color Effects setting will return to its default (state of nothing being
selected).
1 Select [Color Effects].
2 Select the image quality.
Normal
Copies are made with the [Sharpness], [Saturation], [Color Shift], [Color Balance],
[Lighten/Darken] and [Background Suppression/Contrast] settings at their defaults.
Lively
The color saturation is raised to reproduce images that appear fresher and livelier.
Bright
Reproduces images that have a brighter appearance with enhanced contrast. Select
this item to make copies of documents such as posters that are intended to attract
people's attention.
60
Page 63

Warm
Reproduces colors that have a slightly low density as brighter and warmer colors with
more dominant red in them. Select this item when, for example, you wish skin to appear
pinker or subdued warm colors to have more warmth.
Cool
Reproduces blue colors that appear even clearer. Select this item, for example to make
water or sky bluer or to reproduce subdued cold colors more clearly.
Shadow Suppression
This setting suppresses document shadows.
Original Type (Selecting the Document Type)
When making copies of photographs, text and other documents, you can make copies
at the image quality corresponding to each type of document. Copies of the document
can be reproduced at a more faithful image quality by selecting the document type that
matches the document.
1 Select [Original Type].
Image Quality
Copy
Select the original type.
2
Auto
This item sets [Output Color] of the [Copy] screen according to the document type
preset in the System Administration mode.
For information about the auto setting of [Original Type], refer to "Copy Defaults" (P.287).
Photo & Text
Select to make copies of documents containing both text and photos. The machine
automatically distinguishes the text and photo areas and sets the appropriate image
quality for each area of the document. For photo areas, specify the photo type from
[Printed Original], [Photograph], and [Photocopy].
z
Printed Original
Select when photo areas of the document is printed matter such as a pamphlet.
z
Photograph
Select when photos have been pasted on document. This prevents the copy from
being reproduced bluish.
z
Photocopy
Select this item for documents that are copies or prints made on a color copier such
as the machine. This prevents colors from being reproduced faint.
3
Text
Select to make sharp copies of text. Sharp copies of graphs, illustrations, etc. are also
made in this mode.
z
Normal Text
Select this item for printed documents, inked text documents, etc.
61
Page 64

Copy
3
3 Copy
z
Light Text
Select for documents with light image density such as a document written in pencil
to increase the copy density.
z
Lightweight Originals
Select to reduce blurs of tracing paper and background suppression for lightweight
documents.
Note • Whether [Lightweight Originals] is displayed depends on the specifications. For information,
refer to "Original Type - Lightweight Originals" (P.292).
Photo
Select to make copies of photos. In the same way as for Text and Photo, specify the
photo type from [Printed Original], [Photograph] and [Photocopy].
Map
Select this item for making copies of documents that have text on colored backgrounds
such as maps.
Image Options (Adjusting Copy Density / Sharpness / Color Saturation of Images)
You can make copies with adjusting the copy density, sharpness and color saturation.
Note • [Lighten/Darken] of [Image Options] and [Lighten/Darken] of [Copy] are the same.
• If [Lighten/Darken], [Sharpness] or [Saturation] is selected when the Color Effects is set, the
values set in the Color Effects are cleared.
1 Select [Image Options].
2 Adjust with [ ] and [ ].
Lighten/Darken
You can select from seven copy density levels between [Lighten] and [Darken].
The copy color density increases the nearer the level is to [Darken] and the copy color
density decreases the nearer the level is to [Lighten].
Sharpness
You can select from five sharpness levels between [Soften] and [Sharpen].
The nearer the level is to [Sharpen], the sharper the contours of images. The nearer
the level is to [Soften], the softer the contours of images.
Saturation
You can select from five color saturation levels between [Vivid] and [Pastel].
The brightness of color in documents increases the nearer the level is to [Vivid] and the
brightness of color in documents decreases the nearer the level is to [Pastel].
62
Page 65

Image Quality
Image Enhancement (Erasing the Background Color of Documents/ Adjusting contrast)
The background color of documents such as newspaper and colored paper can be
erased. You can also make copies with adjusting contrast.
Note • When [Original Type] is set to [Photo], the [Background Suppression] feature does not work.
• If [Background Suppression] or [Contrast] is selected when the Color Effects is set, the
values set in the Color Effects are cleared.
1 Select [Image Enhancement].
2 Select [Background Suppression]
and [Contrast]. Adjust contrast with
[ ] and [ ].
Background Suppression
z
No Suppression
Scans the document backgrounds with no filtering.
z
Auto Suppression
When copies are made with [Black] of Output Color, the background color of
documents such as newspaper and colored paper documents is erased.
When copies are made with [Color], [Dual Color], or [Single Color] of [Output Color],
the background of white documents is erased.
Copy
3
Contrast
z
Auto Correction
This setting sharpens the image by adjusting the brightness and hue of the original.
z
Manual Contrast
You can select from 5 contrast levels between [More Contrast] and [Less Contrast].
The nearer the level is to [More Contrast], the greater the difference between light
parts and dark parts as light parts become lighter and dark parts become darker.
[Less Contrast] contrasts decrease the difference between light and dark areas.
Color Balance (Adjusting Color Balance)
The strength of the four colors (yellow, magenta, cyan, and black) can be adjusted in 7
levels for each of their low, medium, and high density ranges.
Note • If [Color Balance] is selected when the Color Effects is set, the values set in the Color
Effects are cleared.
1 Select [Color Balance].
2 Select the button for the color you
want to adjust.
3 Use [ ] and [ ] to adjust the color
balance for each density.
Low Density
Use this item to adjust the strength of the low density.
63
Page 66

Copy
3
3 Copy
Medium Density
Use this item to adjust the strength of the medium density.
High Density
Use this item to adjust the strength of the high density.
Color Shift (Adjusting Color Tone)
The tone of color documents can be adjusted to make subtle changes to the overall
tone of the document. You can adjust the tone 4 levels by moving the bar to the left or
right.
The lower bar of the [Color Shift] screen indicates the tone of the document and the
upper bar indicates the tone after adjustment. If you press a color shift button, you can
move the lower bar to change the overall tone of the document to the tone of the upper
bar.
For example, if Y (yellow) on the lower bar is moved to the left towards R (red) on the
upper bar, the yellow in fruit becomes reddish to give an apple a riper-looking tone. This
changes all colors. For example, R (red) becomes more M (magenta) and G (green)
becomes more Y (yellow).
If Y (yellow) on the lower bar is moved to the right towards G (green) on the upper bar,
the yellow in fruit becomes greener. This changes all colors. For example, M (magenta)
becomes more R (red) and R (red) becomes more Y (yellow).
Note • Confirm that [Color] is selected in [Output Color] of the [Copy] screen. Tone adjustment is
not available when [Output Color] is set to [Black].
• If [Color Shift] is selected when Color Effects is set, the values set in the Color Effects are
cleared.
1 Select [Color Shift].
2 Select the color shift buttons.
64
Page 67

Layout Adjustment
On the [Layout Adjustment] screen, you can configure features for scanning
documents.
The following shows the reference section for each feature.
2 Sided Copying (Making 2 sided Copies) ................................................................................ 65
Book Copying (Copying Facing Pages onto Separate Sheets) .................................................. 66
2 Sided Book Copy (Making 2 Sided Copies of Facing Pages)................................................. 67
Original Size (Specifying the Scan Size for the Document)...................................................... 68
Mixed Sized Originals (Scanning Different Size Documents Simultaneously) ........................ 69
Edge Erase (Erasing Edges and Margin Shadows of the Document) ........................................ 70
Image Shift (Shifting the Image Copy Position)........................................................................ 70
Image Rotation (Making Copies with the Image Rotated Vertically or Horizontally).............. 72
Invert Image (Making Reversed Copies of Images) .................................................................. 73
Original Orientation (Specify the Orientation of Loaded Documents)...................................... 73
1 On the [All Services] screen, select
[Copy].
Layout Adjustment
Copy
2 Select the [Layout Adjustment] tab
and then select a feature on the
[Layout Adjustment] screen that
appears.
2 Sided Copying (Making 2 sided Copies)
Copies of 1-sided and 2-sided documents can be made on one side or both sides of
paper.
Important • Confirm that the orientation of the document and the [Original Orientation] setting of the
[Layout Adjustment] screen are the same.
Note • This feature does not appear for some models. An optional package is necessary. For more
information, contact our Customer Support Center.
1 Select [2 Sided Copying].
2 Select any item.
3
1 J 1 Sided
Makes a copy of a 1-sided document on one side of the paper.
1 J 2 Sided
Makes a copy of a 1-sided document on both sides of the paper.
2 J 2 Sided
Makes a copy of a 2-sided document on both sides of the paper.
65
Page 68

3 Copy
2 J 1 Sided
Makes a copy of a 2-sided document on one side of the paper.
Originals
z
Head to Head
Select this item when the first and second sides of the document are of the same
orientation.
z
Head to Toe
Select this item when the first and second sides of the document are of the opposite
orientation.
This appears when [2 J 2 Sided] or [2 J 1 Sided] is selected.
Copies
z
Head to Head
Copy
3
Select this item when you want the orientation of the first and second sides of the
copy to be the same as that of the document.
z
Head to Toe
Select this item when you want the orientation of the first and second sides of the
copy to be the opposite of that of the document.
It appears when [1 J 2 Sided] or [2 J 2 Sided] is selected.
Book Copying (Copying Facing Pages onto Separate Sheets)
The book copying feature allows you to copy facing pages of a document on separate
sheets of paper in page order.
It is useful if you need to make separate copies from facing pages of bound documents
such as a booklet.
Note • When sending faxes using this feature, place the document on the document glass.
• Non-standard sized documents will not be separated into two accurately.
1 Select [Book Copying].
2 Select any item.
Off
66
Not scans as a bound document.
Left Page then Right
Copies are made from the left page of facing pages in a document starting from the left
page.
Right Page then Left
Copies are made from the right page of facing pages in a document starting from the
right page.
Top Page then Bottom
Copies are made from the top page of facing pages in a document starting from the top
page.
Page 69

Layout Adjustment
Both Pages
Copies are made of both pages of facing pages in page order.
Left Page Only
Copies are made of the left page only. You can select this item when [Left Page then
Right] or [Right Page then Left] is selected.
Right Page Only
Copies are made of the right page only. You can select this item when [Left Page then
Right] or [Right Page then Left] is selected.
Top Page Only
Copies are made of the top page only. You can select this item when [Top Page then
Bottom] is selected.
Bottom Page Only
Copies are made of the bottom page only. You can select this item when [Top Page
then Bottom] is selected.
Binding Erase
Erases the shadow from the center section of the document. You can set the binding
erase width within the range from 0 to 50 mm in 1 mm increments.
2 Sided Book Copy (Making 2 Sided Copies of Facing Pages)
You can assign pages when making copies of facing pages in a bound document so
that pages face each other in the same way as the document. You can also specify the
start page and the end page from the left and right facing pages.
Note • This feature does not appear for some models. An optional package is necessary. For more
information, contact our Customer Support Center.
• Non-standard sized documents will not be separated into two accurately.
1 Select [2 Sided Book Copy].
2 Select any item.
Off
Copy
3
The document is not copied as 2-sided book copy.
Left Page then Right
Copies are made of both pages from the left page of facing pages in a document
starting from the left page.
Right Page then Left
Copies are made of both pages from the right page of facing pages in a document
starting from the right page.
Top Page then Bottom
Copies are made of both pages from the top page of facing pages in a document
starting from the top page.
67
Page 70

3 Copy
Start Page & End Page
Displays the [2 Sided Book Copy-Start Page & End Page] screen.
Refer to "[2 Sided Book Copy-Start Page & End Page] Screen" (P.68).
Binding Erase
Erases the shadow from the center section of the document. You can set the binding
erase width within the range from 0 to 50 mm in 1 mm increments.
[2 Sided Book Copy-Start Page & End Page] Screen
You can set the copy start page and end page.
1 Set [Start Page] and [End Page].
Copy
3
Start Page
Select the copy start page from the following items.
z
[Left Page] / [Right Page]
You can select these items when [Left Page then Right] or [Right Page then Left] is
selected.
z
[Top Page] / [Bottom Page]
You can select these items when [Top Page then Bottom] is selected.
End Page
Select the copy end page from the following items.
z
[Left Page] / [Right Page]
You can select these items when [Left Page then Right] or [Right Page then Left] is
selected.
z
[Top Page] / [Bottom Page]
You can select these items when [Top Page then Bottom] is selected.
Original Size (Specifying the Scan Size for the Document)
You can set the scan size for the document.
Specify the size of the document when scanning non-standard size documents or when
making copies at a size different from that of the currently loaded document.
When a document size is specified, it is scanned at the specified size regardless of the
size of the loaded document. This feature allows you to copy the document with adding
or deleting the margin.
68
1 Select [Original Size].
2 Select the size of the document.
If you select a non-standard size,
specify values for the X and Y
directions.
Auto Size Detect
Detects the document size automatically.
Page 71

Note • If the document size cannot be detected automatically, a screen to input the document size
appears.
Standard Size
Select a document size from 11 pre-configured types.
You can change the indicated document sizes. For information on the settings, refer to "Original Size
Defaults" (P.293).
Variable Size
Enter the desired scan size when scanning non-standard size documents or when
making copies at a size different from that of the currently loaded document. Set the
size in the document glass X (width) direction within the range 15 to 432 mm and in the
Y (height) direction within the range 15 to 297 mm in 1 mm increments. The scale on
the outside of the document glass is a useful reference for specifying the document
size.
Important • When the document is loaded on the document feeder, the base point in the Y (height)
direction is the center of the edge. If you specify 100 mm, the scan size becomes from 50
mm above to 50 mm below the center of the document.
Mixed Sized Originals (Scanning Different Size Documents Simultaneously)
Layout Adjustment
Copy
3
When using the document feeder, you can simultaneously scan different size
documents and make copies onto paper that matches the respective sizes of the
documents. You can also specify the size of the paper to make copies on so that copies
are made on the same size of paper.
Important • Confirm that the orientation of the first sheet of the document and the [Original Orientation]
setting of the [Layout Adjustment] screen are the same.
• Always load the A5-size documents vertically.
• When loading a B5 size document with A3 or A4 size documents in a vertical direction, place
the B5 document also in vertical orientation.
• The recommended document size combinations are A4 portrait and A3 landscape, or B5
portrait and B4 landscape. If the combination of the document sizes is not our
recommendation, the documents can be fed at an angle and may not be copied properly.
Note • This feature does not appear for some models. An optional package is necessary. For more
information, contact our Customer Support Center.
• [Original Orientation] is set in reference to the direction set for the first page of the document.
Load the rest of the document from the second page onwards in the same direction as that
of the first page of the document.
1 Select [Mixed Sized Originals].
2 Select [On].
Off
Select this item when all documents are of the same size.
On
When documents of different sizes are copied, the machine automatically detects the
size of each document.
69
Page 72

3 Copy
Edge Erase (Erasing Edges and Margin Shadows of the Document)
When you make copies with the document cover open or make copies from a book,
black shadows sometimes appear along the edges and center margin of the paper. If
this happens, you can make copies with the shadows erased.
Important • Confirm that the orientation of the document and the [Original Orientation] setting of the
[Layout Adjustment] screen are the same.
Note • For 2-sided originals, the same edge erase amounts are set for the front and back sides.
• If you set [Reduce/Enlarge], the edge erase amounts will be reduced or enlarged in
proportion to the ratio you configured.
For information on the areas that can actually be printed, refer to "Printable Area" (P.531).
1 Select [Edge Erase].
2 Select [Edge Erase].
3 Use [ ] and [ ] to set the width to
erase for each of the top and
Copy
bottom, left and right, and center.
Normal
3
The border erase amount is set to 2 mm for the top and bottom, and left and right. If
you do not want to erase edges, set each [Edge Erase] value to 0 mm.
Edge Erase
You can erase only the necessary amount.
z
Top & Bottom Erase
Shadows at the top and bottom of the document are erased. Edges at the top and
bottom are erased in accordance with the direction that the document was loaded.
You can set the edge erase width within the range from 0 to 50 mm in 1 mm
increments.
z
Left & Right Erase
Shadows on the left and right of the document are erased. Edges on the left and right
are erased in accordance with the direction that the document was loaded. You can
set the edge erase width within the range from 0 to 50 mm in 1 mm increments.
z
Binding Erase
Shadows in the center of documents such as booklets or documents with facing
pages are erased. You can set the binding erase width within the range from 0 to 50
mm in 1mm increments.
Image Shift (Shifting the Image Copy Position)
70
Copies can be made with the document image position shifted to the left, right, top, or
bottom of the paper, or with the document center shifted to the center of the paper. You
can also make copies with a margin added to the top, bottom, left, or right. When
making 2-sided prints, you can set the shift positions for both [Side 1] and [Side 2].
Important • Confirm that the orientation of the document and the [Original Orientation] setting of the
[Layout Adjustment] screen are the same.
Note • The image shift amount is set in accordance with the paper. Even if you set copies to be
enlarged or reduced in [Reduce/Enlarge], the image shift amount is not affected.
Page 73

Layout Adjustment
1 Select [Image Shift].
2 Select any item.
No Shift
The position of the document image is not shifted.
Auto Center
The center of the document is shifted to match the center of the paper.
Margin Shift
You can set the margin amount. Set the top & bottom, and left & right values within the
range from 0 to 50 mm in 1 mm increments.
z
Side 1
Displays the [Image Shift - Side 1] screen.
Refer to "[Image Shift - Side 1] Screen" (P.71).
z
Side 2
Displays the [Image Shift - Side 2] screen.
Refer to "[Image Shift - Side 2] Screen" (P.72).
Mirror Shift
Select this item when you want the positioning of Side 2 to match the positioning of
Side 1.
[Image Shift - Side 1] Screen
You can set the image shift of Side 1.
1 Select any item.
No Shift
The position of the document image is not shifted.
Auto Center
Copy
3
The center of the document is shifted to match the center of the paper.
When adjusting the margin amount, set the top and bottom, and left and right values
within the range from 0 to 50 mm in 1 mm increments.
Corner Shift
The document image is shifted to the edges or corners of the paper. You can select
from 8 shift directions.
When adjusting the margin amount, set the top and bottom, and left and right values
within the range from 0 to 50 mm in 1 mm increments.
Variable Shift
You can set the margin amount. Set the top and bottom, and left and right values within
the range from 0 to 50 mm in 1 mm increments.
71
Page 74

Copy
3
3 Copy
[Image Shift - Side 2] Screen
You can set the image shift of Side 2.
1 Select any item.
No Shift
The position of the document image is not shifted.
Auto Center
The center of the document is shifted to match the center of the paper.
When adjusting the margin amount, set the top and bottom, and left and right values
within the range from 0 to 50 mm in 1 mm increments.
Corner Shift
The document image is shifted to the edges or corners of the paper. You can select
from 8 shift directions.
When adjusting the margin amount, set the top and bottom, and left and right values
within the range from 0 to 50 mm in 1 mm increments.
Variable Shift
You can set the margin amount. Set the top and bottom, and left and right values within
the range from 0 to 50 mm in 1 mm increments.
Image Rotation (Making Copies with the Image Rotated Vertically or Horizontally)
If the orientation of the paper currently loaded in the tray differs from that of the
document loaded, the machine automatically rotates the document image to make
copies with the document and paper orientations matched. You can also select where
to use as a reference for image rotation if documents are of mixed orientations.
The image rotation feature can only be used to make copies to paper of A4 and 8.5 x
11 inches or smaller.
1 Select [Image Rotation].
2 Select any item.
Off
Copies of documents are made as they are, even if they are orientated differently.
72
Always On
The document image is automatically rotated so that the orientation of the document
matches that of the paper.
On during Auto
The document image is automatically rotated so that the orientation of the document
matches that of the paper when [Auto %] of [Reduce/Enlarge] or [Auto] of [Paper
Supply] is selected.
Page 75

Rotation Direction
Displays the [Image Rotation - Rotation Direction] screen.
Refer to "[Image Rotation - Rotation Direction] Screen" (P.73).
[Image Rotation - Rotation Direction] Screen
You can set the reference position for rotation.
1 Select any item.
Staple Position
When the finisher is installed, [Staple Position] is displayed.
If documents are of mixed orientations, images will be rotated to match the stapling
edge based on the staple feature settings.
Portrait Original - Left Edge
If documents are of mixed orientations, images will be rotated so that the top edge of a
landscape document is aligned with the left edge of a portrait document.
Portrait Original - Right Edge
Layout Adjustment
Copy
3
If documents are of mixed orientations, the image will be rotated so that the top edge
of a landscape document is aligned with the right edge of a portrait document.
Invert Image (Making Reversed Copies of Images)
Copies can be made with the left and right sides of the document image reversed or
the colors reversed in Output Color of the document image.
Note • When Output Color is set to Black or Single Color, the density (contrast) is reversed for black
and white.
• When Output Color is set to Color, the complementary colors are reversed.
• When [Negative Image] and [Edge Erase] are set simultaneously, the edge erase area turns
to white.
1 Select [Invert Image].
2 Select any item.
Mirror Image
The left and right sides of the document image are reversed.
Negative Image
The density (contrast) of the document image is reversed.
Original Orientation (Specify the Orientation of Loaded Documents)
In order to identify the top of the document, the orientation of the set document must
be configured.
73
Page 76

Copy
3 Copy
Note • If the [Original Orientation] differs from the actual document orientation, then the machine
may mistakenly detect the head of the document.
1 Select [Original Orientation].
2 Select [Head to Top] or [Head to
Left] in accordance with the
orientation of the document loaded.
Head to Top
Select this item when placing the top of the document facing the inner side of the
document glass or document feeder.
Head to Left
Select this item when placing the top of the document facing the left side of the
document glass or document feeder. Be sure to select [Head to Left] when the top of
the document is placed facing the left side (horizontal text).
3
74
Page 77
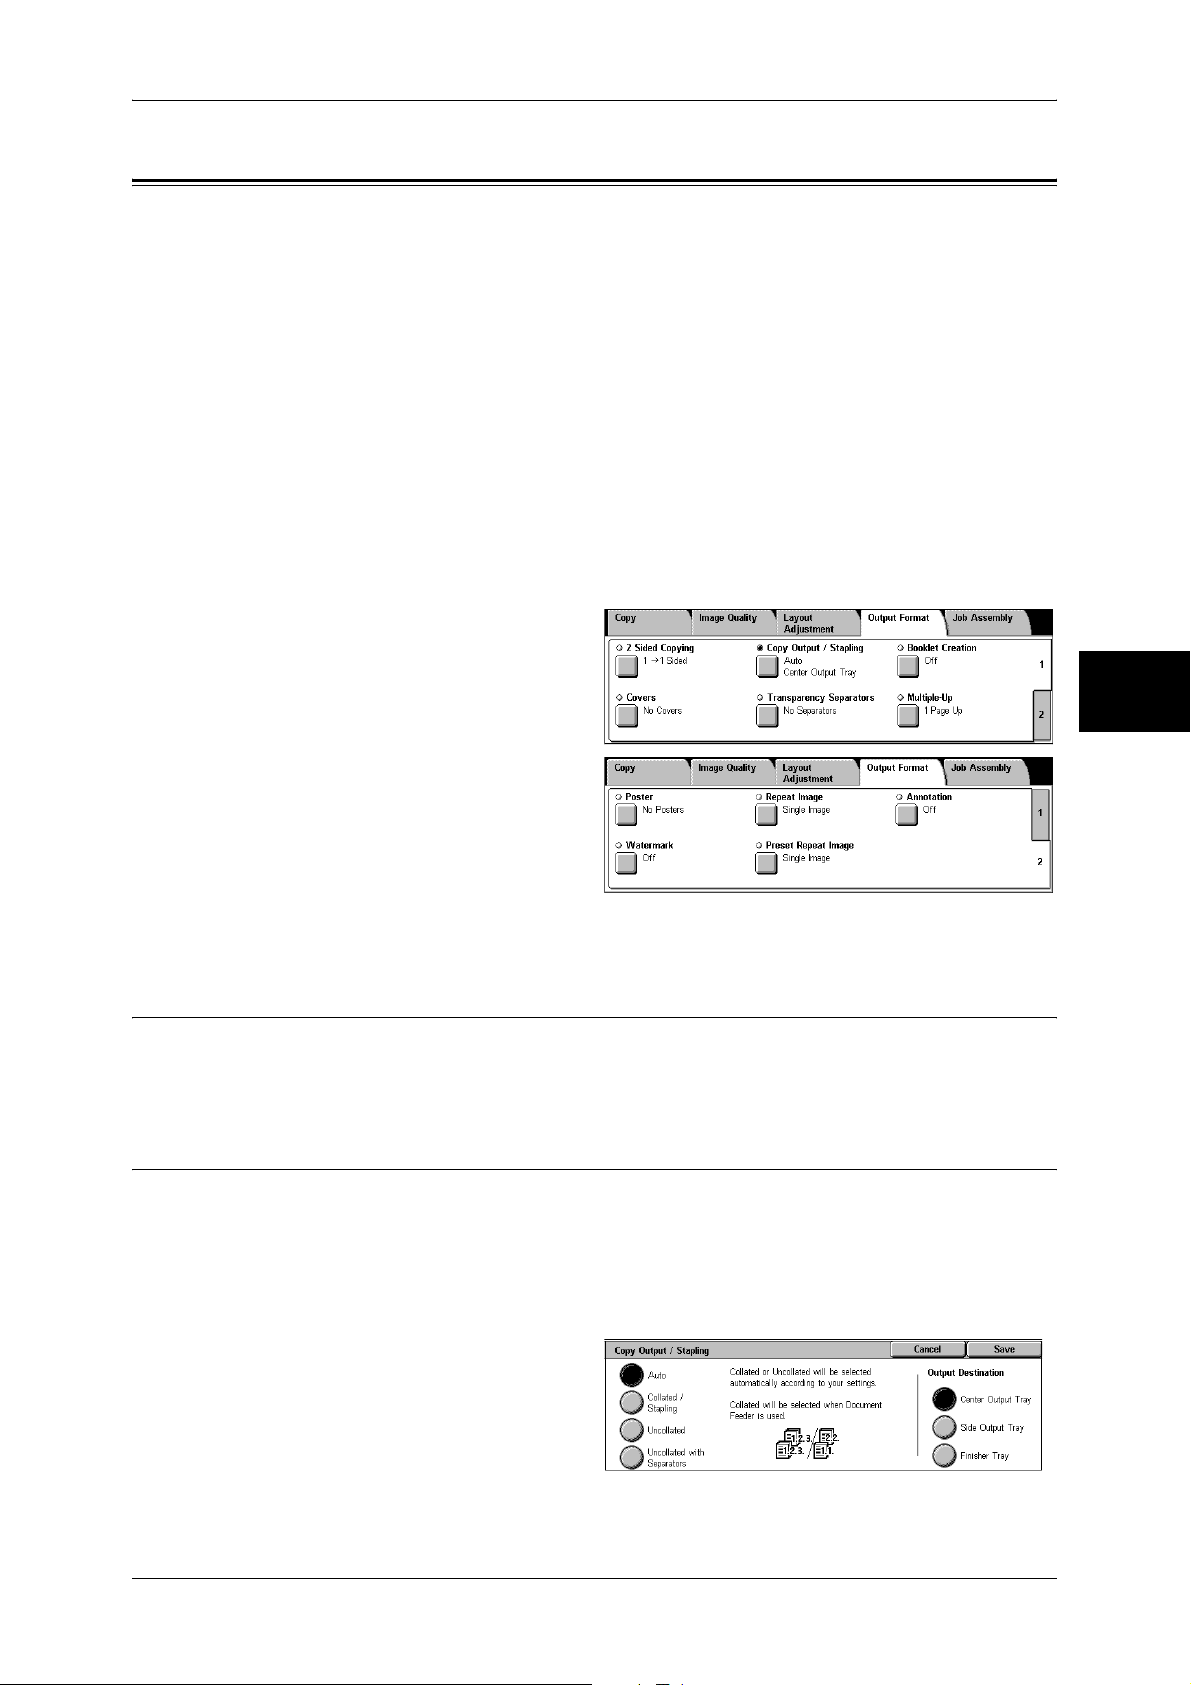
Output Format
On the [Output Format] screen, you can configure features for outputting documents.
The following shows the reference section for each feature.
2 Sided Copying (Making 2-sided Copies)................................................................................ 75
Copy Output / Stapling (Outputting by Specifying Finishing) .................................................. 75
Booklet Creation (Creating a Booklet)....................................................................................... 77
Covers (Attaching a Cover to Copies) ....................................................................................... 78
Transparency Separators (Inserting Blank Sheets between Transparencies)............................. 80
Multiple-Up (Copying Multiple Sheets onto One Sheet)........................................................... 80
Poster (Making Enlarged Copies Spread over Multiple Sheets)................................................ 81
Repeat Image (Making Multiple Copies on One Sheet) ............................................................ 82
Annotation (Adding Stamp/Date/Page Number to Copies) ....................................................... 83
Watermark (Printing Control Number on the Background)....................................................... 86
Preset Repeat Image (Making Multiple Copies on a Single Sheet) ........................................... 89
1 On the [All Services] screen, select
[Copy].
Output Format
Copy
2 Select the [Output Format] tab, and
then select a feature on the screen.
2 Sided Copying (Making 2-sided Copies)
This feature is the same as [2 Sided Copying] of the [Layout Adjustment] screen.
Refer to "2 Sided Copying (Making 2 sided Copies)" (P.65).
Copy Output / Stapling (Outputting by Specifying Finishing)
You can specify the copy output method.
Note • This feature does not appear for some models. An optional package is necessary. For more
information, contact our Customer Support Center.
If the offset stacking module is installed, the output position of copies is offset
alternately to distinguish each set of copies.
3
Select [Finishing].
1
2 Select any item.
Auto
According to the set feature, the machine automatically select [Collated] or
[Uncollated].
75
Page 78

3 Copy
Copies are output collated when auto document feeder, 2 Sided Book Copy, Covers,
[Blank Separators & Handouts] or [Transparency Set & Handouts] of [Transparency
Separators], Booklet Creation, Stapling, Build Job, Sample Set, and [Combine Original
Sets] are set.
When the settings other than the above-mentioned settings are configured, copies are
output uncollated.
Collated/Stapling
The machine outputs sheets sorted into sets that are arranged in page order.
Uncollated
The machine outputs the specified number of copies and sort sheets by page.
Uncollated with Separators
The machine outputs copies with inserting blank sheets as a separator and sorts
sheets by page.
Copy
3
Stapling
Displays the [Copy Output-Stapling] screen.
Refer to "[Copy Output/Stapling] Screen" (P.76).
Output Destination
Select the output destination. Select from the following trays.
Note • This feature does not appear for some models. An optional package is necessary. And also
the displayed items may be different, depending on the options installed. For more
information, contact our Customer Support Center.
z
Center Output Tray
z
Side Output Tray
z
Finisher tray
[Copy Output/Stapling] Screen
Sets the position for stapling. The number of pages that can be stapled is 2 to 50 (P
paper and J paper). Paper types that can be stapled are bond paper
recycled paper, and User 1 to User 5 paper.
Important • Confirm that the orientation of the document and the [Original Orientation] setting of the
[Layout Adjustment] screen are the same.
• When A Finisher is installed on the machine, the following two options are available: 1
Staple, Top Left; 1 Staple, Top Right.
, plain paper,
76
1 Select the stapling position.
No Staple
Stapling is not performed.
Staple Position
Select from 5 staple positions: 1 Staple, Top Left; 2 Staples, Left; 2 Staples, Top; 1
Staple, Top Right; and 2 Staples, Right.
Important • The staple direction appearing on the screen and the direction in which staples are actually
stapled may differ depending on the combination of the document size and orientation in the
following cases:
When placing documents in Head to Top orientation and staples on the top right
When placing documents in Head to Left orientation and staples on the top left
Page 79

Booklet Creation (Creating a Booklet)
The machine can copy pages laid out so as when multiple-page sheets are overlaid
and folded along the center (gutter), a booklet is created in page order. You can also
set the binding shift and attach a cover when making booklets.
Important • Confirm that the orientation of the document and the [Original Orientation] setting of the
[Layout Adjustment] screen are the same.
Note • This feature does not appear for some models. An optional package is necessary. For more
information, contact our Customer Support Center.
• If the number of pages in the booklet is not a multiple of four, the remaining pages will be
output as blank pages.
1 Select [Booklet Creation].
2 Select any item.
Output Format
Off
Booklet Creation is not applied to copies.
Left Bind/Top Bind
Copies are made to enable left binding or top binding.
Right Bind
Copies are made to enable right binding.
Binding Shift
Displays the [Booklet Creation-Binding Shift] screen.
Refer to "[Booklet Creation-Binding Shift] Screen" (P.77).
Covers
Displays the [Booklet Creation-Covers] screen.
Refer to "[Booklet Creation-Covers] Screen" (P.78).
Divide Output
Displays the [Booklet Creation-Divide Output] screen.
Refer to "[Booklet Creation-Divide Output] screen" (P.78).
Last Page on Back Cover
Copy
3
The last page of the original is used as the back cover of the booklet. Select the check
box to use the last page as the back cover. When using [Divide Output] to separate
booklets, the cover will be made on the last page of the last subset.
Note • Depending on the number of pages in the original, a blank sheet may be inserted before the
last page.
[Booklet Creation-Binding Shift] Screen
You can set the value within the range from 0 to 50 mm in 1 mm increments.
1 Use [ ] and [ ] to specify a
binding shift value.
77
Page 80

3 Copy
[Booklet Creation-Covers] Screen
You can attach a cover to a booklet.
1 Select [On].
2 Select any item.
Covers
z
Blank Covers
A blank sheet of paper is attached as the cover.
z
Printed Covers
Copy
3
The first page of the document is copied on the cover. When you only want to copy
to the outside of the cover, insert a blank sheet of paper for the page that will become
the inside of the cover.
Paper Tray Settings
Displays the [Booklet Creation-Covers-Paper Tray Settings] screen.
Select the tray to use from [Main Body Tray] and [Covers Tray]. Select trays with paper
of the same size and orientation for the copy paper and the cover.
When [Bypass...] is selected, the [Tray 5 (Bypass)] screen appears. Refer to "[Tray 5 (Bypass)] Screen"
(P.55).
[Booklet Creation-Divide Output] screen
When you have a large number of originals, the originals are divided to create subsets
to reduce the thickness of each booklet. The machine folds copies in half, and piles
them up to form a booklet. This feature can be set to from 1 to 50 pages in 1 page
increments.
Note • When specifying [Folding], set the dividing number of sheets in the range from 1 to 15.
1 Select [On].
2 Set the number of copies using [ ]
and [ ] or with the numeric
keypad.
Covers (Attaching a Cover to Copies)
You can make copies with a cover attached.
The front cover can be output before the first page of the document on a different type
of paper (e.g. colored paper or heavyweight paper).
Note • This feature does not appear for some models. An optional package is necessary. For more
information, contact our Customer Support Center.
• When making 2-sided copies, copies are made on both sides of the top cover/back cover in
accordance with the page order of the document.
78
Page 81
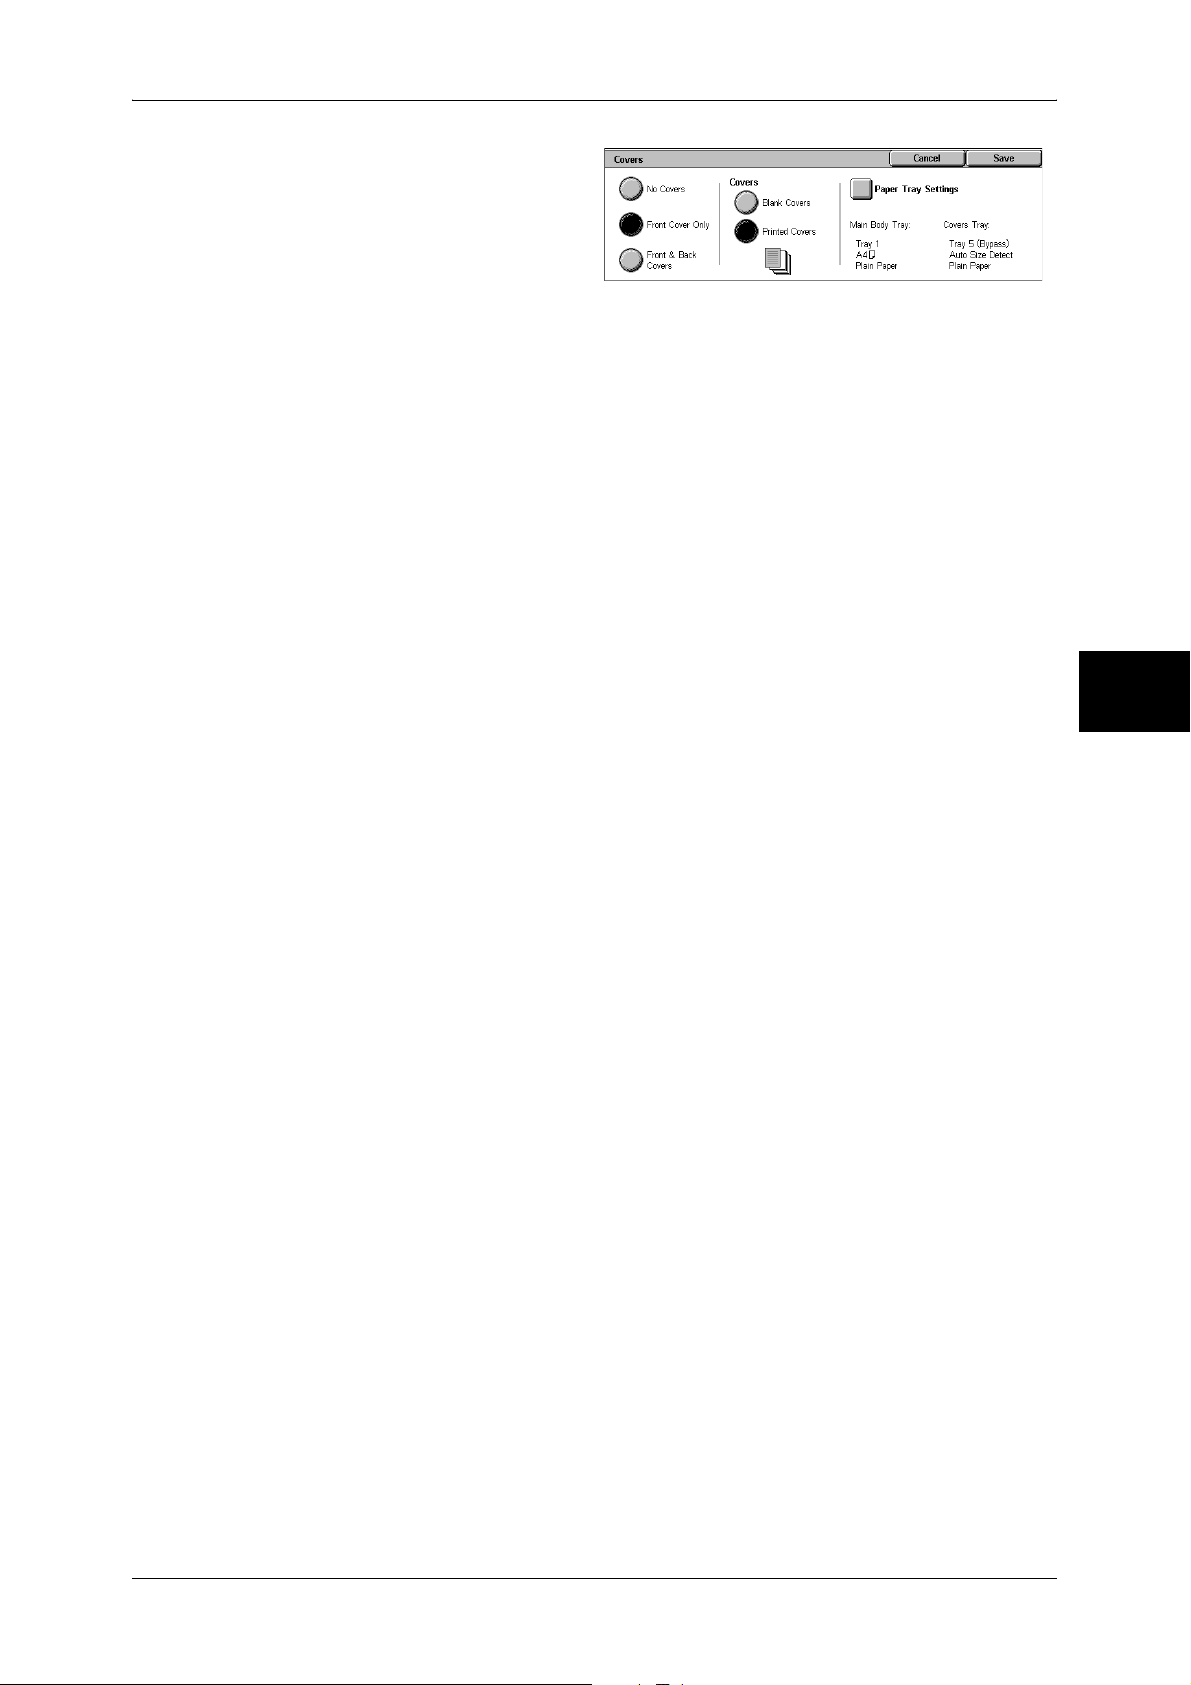
Output Format
1 Select [Covers].
2 Select any item.
No Covers
No cover is added.
Front Cover Only
Make copies with a cover output on a different type of paper before the first page of the
document. Also, if [On] of [Printed Covers] is selected, the first page of the document
can be copied on the different type of paper added as a front cover.
Front & Back Covers
Outputs covers on a different type of paper before the first page and after the last page
of the document. Also, if [On] of [Printed Covers] is selected, copies can be made on a
different type of paper for the cover on the first page and last page of the document.
Covers
z
Blank Covers
A blank sheet of paper is attached as the cover.
z
Printed Covers
The first page of the document is copied on the cover. When you only want to copy
to the outside of the cover, insert a blank sheet of paper in the second page of the
document.
Paper Tray Settings
Displays the [Covers-Paper Tray Settings] screen.
Select the tray to use from [Main Body Tray] and [Covers Tray]. Select trays with paper
of the same size/orientation for the copy paper and the cover.
When [Bypass...] is selected, the [Tray 5 (Bypass)] screen appears. For more information, refer to "[Tray
5 (Bypass)] Screen" (P.55).
Important • [Auto Size Detect] of [Tray 5 (Bypass)] cannot be selected as [Covers Tray].
Copy
3
79
Page 82

3 Copy
Transparency Separators (Inserting Blank Sheets between Transparencies)
A blank sheet can be inserted as a separator between copied transparencies. At the
same time, the required number of copies for distribution is printed. When loading
transparencies, make sure that the paper for the separators (or for distribution) is
loaded at the same orientation as that of the transparencies.
Important • Use V516 (Xerox film [no border]) transparency sheets. Using transparency sheets for color
(V556/V558 [with white border]) may cause a malfunction or paper jam.
Note • When loading A4 size transparencies on Tray 5 (bypass), we recommend loading them
vertically.
1 Select [Transparency Separators].
2 Select any item.
Copy
3
No Separators
Separators are not inserted.
Blank Separators
A separator is inserted each time a transparency is copied. Only one set of copies can
be made.
Blank Separators & Handouts
A separator is inserted each time a transparency is copied. At the same time, the
required number of copies for distribution is printed.
Note • This feature does not appear for some models. An optional package is necessary. For more
information, contact our Customer Support Center.
Transparency Set & Handouts
Copies are made on transparencies and the required number of copies for distribution
is printed.
Note • This feature does not appear for some models. An optional package is necessary. For more
information, contact our Customer Support Center.
Paper Tray Settings
Displays the [Transparency Separators-Paper Tray Settings] screen. Select the tray to
use.
When [Bypass...] is selected, the [Tray 5 (Bypass)] screen appears. Refer to "[Tray 5 (Bypass)] Screen"
(P.55).
Multiple-Up (Copying Multiple Sheets onto One Sheet)
When the machine is equipped with a document feeder, 2, 4, or 8 sheets of documents
can be copied together onto a single sheet of paper.
When you select [Multiple-Up], [Auto %] of [Reduce/Enlarge] is selected automatically.
The machine automatically sets the copy ratio and makes copies of the images so that
they fit on the selected paper.
Important • Confirm that the orientation of the document and the [Original Orientation] setting of the
[Layout Adjustment] screen are the same.
Note • When [Auto %] of [Reduce/Enlarge] is canceled (a new copy ratio is selected), image loss
may occur depending on the document image size of the document.
80
Page 83

• When Image Shift is set, shift is executed on the whole document. For this reason, image
loss at the edge of the original may occur depending on the document image size of the
document.
• When Edge Erase is set, edges are erased for each document copied to the whole
document.
• Select an item other than [Auto] for the paper tray of [Paper Supply] on the [Copy] screen.
1 Select [Multiple-Up].
2 Select any item.
1 Page Up
Multiple Up is not applied.
2 Pages Up
Output Format
Two document sheets are copied together onto a single sheet of paper.
4 Pages Up
Four document sheets can be copied together onto a single sheet of paper.
8 Pages Up
Eight document sheets can be copied together onto a single sheet of paper.
Image Order
You can select the layout for copying the documents together.
Poster (Making Enlarged Copies Spread over Multiple Sheets)
An enlarged copy of a document can be made spread over multiple sheets.
This feature allows you to create a large poster by pasting together the copies spread
over multiple sheets. Copied sheets are provided with a paste margin so that they can
be pasted together. The paste margin is fixed to 10 mm.
Important • Confirm that the orientation of the document and the [Original Orientation] setting of the
[Layout Adjustment] screen are the same.
1 Select [Poster].
2 Select any item.
Copy
3
No Posters
No enlarged copies are made.
Output Size
You can select from 7 paper sizes.
Enlargement %
Refer to "When [Enlargement %] is Selected" (P.82).
Paper Tray Settings
Displays the [Poster-Paper Tray Settings] screen.
81
Page 84

3 Copy
Select the paper tray to use.
When [Bypass...] is selected, the [Tray 5 (Bypass)] screen appears. Refer to "[Tray 5 (Bypass)] Screen"
(P.55).
When [Enlargement %] is Selected
You can specify a different ratio for the height and width.
1 Use [ ] and [ ] to specify the
height and width ratios.
Width X / Length Y
Set the height and width ratios within the range from 100 to 400% in 1% increments.
XY
Copy
You can simultaneously change the numerical values of the height and width by the
same amount.
3
Repeat Image (Making Multiple Copies on One Sheet)
A document image can be copied on one sheet of paper repeatedly for a specified
number of times.
When the copy ratio is set to [Auto], the repeated copies of the image are reduced to
fit on the selected paper. You can also specify how the repeated copies of the image
are arranged.
Note • When making repeat copies at the same size as the document image, specify a number of
repeats that will fit on the paper.
1 Select [Repeat Image].
2 Select any item.
Single Image
Image Repeat is not applied.
Auto Repeat
The machine automatically sets the number of copies according to the document size,
paper size, and copy ratio, and then repeatedly copies the document image onto the
paper.
Note • Copies cannot be made when the document image is larger than the specified paper size.
82
Variable Repeat
Specify the number of times to repeatedly copy the document image along each of the
long and short sides of the paper. You can specify from 1 to 23 repeats along the long
side (Y) and from 1 to 33 repeats along the short side (X).
Image Layout
z
Evenly Spaced
The specified number of images are evenly arranged on the paper.
z
Side by Side
Page 85
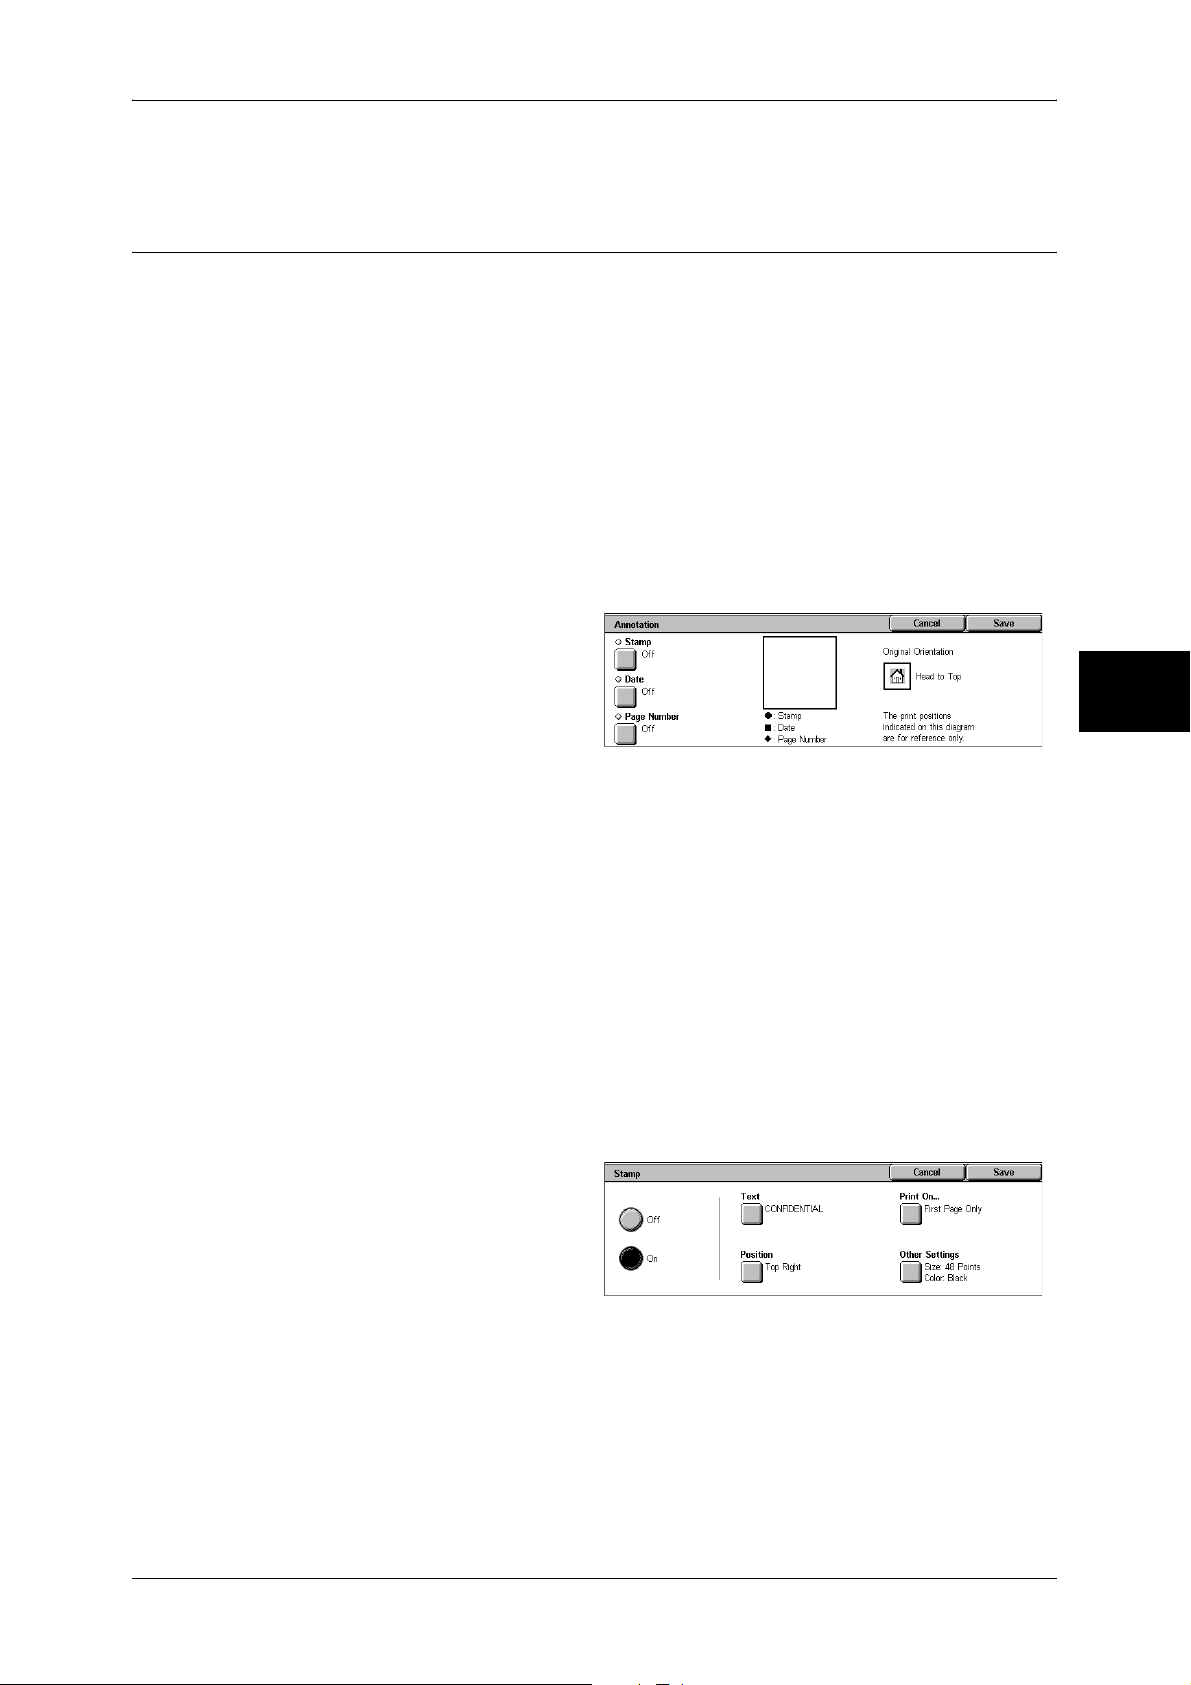
The specified number of images are arranged with no clearance on the paper.
Annotation (Adding Stamp/Date/Page Number to Copies)
You can add a stamp, date, and page number not included on the document to copy
paper when outputting copies.
You can select from already provided formats for the stamp type, date, page number,
and printing position.
Note • This feature does not appear for some models. An optional package is necessary. For more
information, contact our Customer Support Center.
• The annotation image and character size is not changed even if you set the enlarge/reduce
setting.
• If Stamp, Date, and Page Number are specified at the same time, we recommend confirming
that none of the positions overlap before making copies.
• If [Multiple-Up] is set, the annotation is added to the combined image.
• If [Repeat Image] or [Booklet Creation] is set, the annotation is added to each individual
image.
1 Select [Annotation].
2 Select any item.
Output Format
Copy
3
Stamp
Displays the [Stamp] screen.
Refer to "[Stamp] Screen" (P.83).
Date
Displays the [Date] screen.
Refer to "[Date] Screen" (P.84).
Page Number
Displays the [Page Number] screen.
Refer to "[Page Number] Screen" (P.84).
[Stamp] Screen
You can set the style and position of the stamp.
1 Select any item.
Off
No stamp is added.
On
A stamp is added.
83
Page 86

Copy
3 Copy
Text
Displays the [Stamp-Text] screen.
You can select the text for stamp. You can specify text from 8 preset text or the text set
in the System Administration mode.
For information on how to register text, refer to [System Settings] > [Custom Text].
Position
Displays the [Stamp-Position] screen.
You can select from 9 positions for the stamp.
Print On...
Displays the [Stamp-Print On] screen.
You can select the page(s) to print the stamp from [First Page Only] and [All Pages].
Other Settings
Displays the [Stamp-Other Settings] screen.
You can select from 3 sizes and 4 colors for the stamp. You can set the stamp size in
the range from 6 to 64 points in 1 point increments.
Note • If [Date] and [Page Number] are both set, specify [Black] for stamp color.
3
[Date] Screen
You can make copies with a date added. The printed date is the date and time that the
printing was started.
The format of the date printed on can be changed. For more information, refer to "Date Format" (P.273).
1 Select any item.
Off
No date is added.
On
A date is added.
Print On...
Displays the [Date-Print On] screen.
You can select the page(s) to print the date from [First Page Only] and [All Pages].
Position
Displays the [Date-Position] screen.
You can select from 6 positions for the date.
Size
Displays the [Stamp - Size] screen. You can select a stamp size from the three preset
values or enter a value within the range of 6 to 24 points in 1 point increments.
[Page Number] Screen
You can add a page number to copies.
84
Page 87

1 Select any item.
Off
No page number is added.
On
A page number is added.
Style
Displays the [Page Number-Style] screen.
Refer to "[Page Number-Style] Screen" (P.85).
Position
Displays the [Page Number-Position] screen.
You can select from 6 positions for the page number.
Print On...
Displays the [Page Number-Print On] screen.
Refer to "[Page Number-Print On] Screen" (P.86).
Output Format
Copy
3
Size
Displays the [Page Number-Size] screen.
You can select from 3 sizes for the page number. You can set size in the range from 6
to 24 points in 1 point increments.
[Page Number-Style] Screen
You can set the style for the page number.
1 Select the style for the page
number.
1, 2, 3
A page number is added.
-1- , -2-, -3-
A hyphen is added to the left and right of the page number. (Example: -1-)
1/N , 2/N, 3/N
The total number of pages is added to the right side of the page number.
(Example: 1/50, 2/50)
If [1/N, 2/N, 3/N] is selected, you can select the following items:
z
Auto
The number of pages of the document is automatically counted as the total number
of pages.
85
Page 88

Copy
3
3 Copy
z
Enter Number
You can specify the total number of pages within the range from 1 to 999.
Page1, Page2, Page3
"Page" is added in front of the page number. (Example: Page1, Page2)
[Page Number-Print On] Screen
You can specify the page(s) to add a page number.
1 Select any item.
All Pages
A page number is added to all pages.
Enter First Page Number
Refer to "When [Enter First Page Number] is Selected" (P.86).
Include Covers
Add a check to include a cover.
Start Number
Specify the starting number for adding page numbers within the range from 1 to 999.
To enter the number with the numeric keypad, select [Enter Number using Keypad] and
then enter the number.
When [Enter First Page Number] is Selected
Specify the start page for adding page numbers within the range from 1 to 999.
1 Use [ ] and [ ] or select [Enter
Number using Keypad] and enter
the start page number.
Watermark (Printing Control Number on the Background)
You can faintly print a sequential control number on the background of each copy set.
For example, if you set 1 as the starting number, 1 is printed on all pages of the first
copy set and 2 is printed on all pages of the second set.
To prevent, for instance, the duplication of confidential documents for distribution at
conferences, you can use sequential numbering to associate distribution copies to
people.
Note • This feature does not appear for some models. An optional package is necessary. For more
information, contact our Customer Support Center.
86
Page 89

1 Select [Watermark].
2 Select any item.
Control Number
Displays the [Watermark - Control Number] screen.
Refer to "[Watermark - Control Number] Screen" (P.87).
Text
Displays the [Watermark - Text] screen.
Refer to "[Watermark - Text] Screen" (P.87).
User Account Number
Displays the [Watermark - User Account Number] screen.
Refer to "[Watermark - User Account Number] Screen" (P.88).
Date & Time
Displays the [Watermark - Date & Time] screen.
Refer to "[Watermark - Date & Time] Screen" (P.88).
Output Format
Copy
3
Serial Number
Displays the [Watermark - Serial Number] screen.
Refer to "[Watermark - Serial Number] Screen" (P.88).
Text Effect
Displays the [Watermark - Text Effect] screen.
Refer to "[Watermark - Text Effect] Screen" (P.89).
[Watermark - Control Number] Screen
You can set a control number within the range from 1 to 999.
1 Select [On].
2 Set the start number using [ ] and
[ ] or with the numeric keypad.
Off
No control number is printed.
On
A control number is printed. Enter the starting number of the control number.
[Watermark - Text] Screen
Select the text to print on the copy.
87
Page 90

Copy
3
3 Copy
1 Select [On].
Select any text.
Off
No text is printed.
On
Text is printed. You can select the text for stamp. You can specify text from 3 preset
text or the text set in the System Administration mode.
For information on how to register text, refer to "Custom Text 1 to 3" (P.274).
[Watermark - User Account Number] Screen
When using User Administration or Auditron Administration, a user account number is
printed.
Note • [User Account Number] is the No. (User Administration Number) registered by users in
Login Setup/Auditron Administration.
• Displays when using Auditron Administration. If the Login Setup/Auditron Administration
feature is used, [User Account Number] is displayed even when no data is collected. In this
case, even if [On] is selected for [User Account Number], the No. registered by users (User
Administration Number) is not printed on.
1 Select [On].
Off
The user account number is not printed.
On
The user account number is printed. However, nothing will be printed if user
authorization has not taken place.
[Watermark - Date & Time] Screen
You can print the date and time that copying was started.
For information about the format for the date, refer to "Date Format" (P.273).
1 Select [On].
Off
No date or time is printed.
On
The date and time are printed.
[Watermark - Serial Number] Screen
The serial number of the machine is printed.
88
Page 91

1 Select [On].
Off
No serial number is printed.
On
The serial number is printed.
[Watermark - Text Effect] Screen
You can set the text effect.
If you set a text effect and make a copy, text strings specified in [Control Number],
[Text], [User Account Number], [Date & Time], and [Serial Number] of the [Watermark]
screen are embedded in the background. When making a copy of a document that has
been copied with Text Effect, the embedded text on the output copy is either printed in
an embossed or outline state.
Note • This feature does not appear for some models. An optional package is necessary. For more
information, contact our Customer Support Center.
1 Select any item.
Output Format
Copy
3
Off
Print the specified text as it is.
Embossed
When making a copy of a document that has been copied with the text effect, the
embedded text on the output copy is printed in an embossed state.
Outline
When making a copy of a document that has been copied with the text effect, the
embedded text on the output copy is printed in an outline state.
For information on the background patterns, refer to "Background Pattern" (P.274).
You can also set the color, character size, density, and other Watermark print settings in the System
Administration mode. For information about other advanced settings, refer to "Watermark" (P.273).
Preset Repeat Image (Making Multiple Copies on a Single Sheet)
Repeatedly copies one original onto equally divided areas according to the specified
number of copies.
Note • When anything other than [Auto %] is selected for [Reduce/Enlarge], image loss may occur
at edges depending on the image size of the document.
89
Page 92

3 Copy
1 Select [Preset Repeat Image].
2 Select any item.
Single Image
Preset Repeat Image is not applied.
2 images
Two copies of the document image are made on a single sheet of paper.
4 images
Four copies of the document image are made on a single sheet of paper.
8 images
Copy
3
Eight copies of the document image are made on a single sheet of paper.
90
Page 93

Job Assembly
Job Assembly
On the [Job Assembly] screen, you can configure the Build Job features. The following
shows the reference section for each feature.
Build Job (Making Copies of Documents with Different Settings in a Single Operation)........ 91
Sample Set (Checking the Finished Output of the Copy) .......................................................... 93
Combine Original Sets (Adding Originals)................................................................................ 94
Delete Outside/Delete Inside (Deleting Outside or Inside of the Selected Area when Copying)..
95
1 On the [All Services] screen, select
[Copy].
2 Select the [Job Assembly] tab and
then select a feature on the [Job
Assembly] screen that appears.
Build Job (Making Copies of Documents with Different Settings in a Single Operation)
This feature allows you to change and save settings individually for each document
page or stack and then to finally make copies of documents with different settings as
one job.
Note • This feature does not appear for some models. An optional package is necessary. For more
information, contact our Customer Support Center.
Copy
3
Select [Build Job].
1
2 Select [On].
3 When [On] is selected, then select
print settings.
Note • Select [ ] to return to the
previous screen or [ ] to
move to the next screen.
Off
Build Job is not applied.
On
Build Job is applied. The feature buttons appear. Set any item if necessary.
For the features that can be set here, refer to "Features that can be set in Build Job" (P.91).
Features that can be set in Build Job
Copy Output
For information on the feature, refer to "Copy Output / Stapling (Outputting by Specifying Finishing)"
(P.75).
91
Page 94

3 Copy
[Copy Job] screen
Copy
Booklet Creation
For information on the feature, refer to "Booklet Creation (Creating a Booklet)" (P.77).
Covers
For information on the feature, refer to "Covers (Attaching a Cover to Copies)" (P.78).
Annotation
For information on the feature, refer to "Annotation (Adding Stamp/Date/Page Number to Copies)"
(P.83).
Watermark
For information about the feature, refer to "Watermark (Printing Control Number on the Background)"
(P.86).
The following describes the screen that appears while the Build Job is being executed.
3
Chapter Start...
Displays the [Build Job - Chapter Start/Separators] screen.
Refer to "Build Job (Making Copies of Documents with Different Settings in a Single Operation)"
(P.91).
Change Settings...
The Copy screen appears and you can change the settings for the loaded document.
After setting the features, press the <Start> button on the control panel to start
scanning of the document.
Cancel
The document data stored by the Build Job feature is cleared and the job is canceled.
Note • The same operation is performed if you press the <C (Clear)> button or <Clear All> button
on the control panel.
Last Original
Select this to end scanning of documents. The build job starts.
Next Original
Select this when you have another document. This item is selected when using the
Build Job feature.
Start
When loading the next document and select [Start], the next documents are scanned.
Note • The same operation is performed if you press the <Start> button on the control panel.
[Build Job - Chapter Start/Separators] Screen
You can set the chapter start and separators.
92
Page 95

Job Assembly
1 Select any item.
Off
The next stack of documents is copied after the previous stack.
Chapter Start
The next stack of documents is copied from Side 1 of a new sheet of paper.
If [Chapter Start] is not selected and copying of the first loaded document ends on Side
1, copying for the next document will begin on Side 2 of the last page of the first
document. When [Chapter Start] is selected and [Multiple-Up] is marked, even if all
documents are divided for every chapter before all of them are assembled in [MultipleUp] feature, the next stack of document is copied from Side 2 of a paper.
Separators
Separators can be inserted. Select the paper tray to use for the separators from
[Separators Tray].
Sample Set (Checking the Finished Output of the Copy)
When making multiple sets of copies, you can make a proof set to check the finished
output and then print the remaining copies. You can select to continue or cancel the job
after the confirmation. The number of sets to be copied can also be changed. The
sample is included in the total number of sets.
Note • This feature does not appear for some models. An optional package is necessary. For more
information, contact our Customer Support Center.
1 Select [Sample Set].
2 Select [On].
Off
No sample set is made.
On
Copy
3
A sample set is made.
[Copy Job] screen
The machine pauses and displays the [Copy Job] screen after a proof set is copied.
Setting Change
The [Setting Change] screen is displayed. Uncheck the settings you want to cancel.
This button is displayed only when the settings that can be cancelled.
93
Page 96

Copy
3
3 Copy
Change Quantity...
The [Change Quantity] screen appears and you can change the number of copies
entered before. Enter a new quantity using the numeric keypad. The new value must
include the number of the sample set that has already been printed. When reducing the
quantity, you cannot enter a number less than the number of copies that have already
been printed.
Note • When you enter 1 for the number of sets and then press the <Start> button, the machine
does not start copying.
Cancel
The remaining copies are canceled.
Start
The remaining copies are made.
Note • The same operation is performed if you press the <Start> button on the control panel.
Combine Original Sets (Adding Originals)
This feature allows you to copy sheets of documents that cannot be loaded into the
document feeder at one time. This feature also enables to copy multiple documents as
one job by the document glass.
[Next Original] that is usually displayed while scanning documents with the document
feeder is always selected in this mode. In addition, when using the document glass to
scan documents, [Next Original] is also selected during scanning. If the [Finishing] is
set to [Auto], the output is automatically sorted.
When all documents have been scanned, select [Last Original].
Note • This feature does not appear for some models. An optional package is necessary. For more
information, contact our Customer Support Center.
1 Select [Combine Original Sets].
2 Select [On].
Off
In the screen displayed during scanning documents with the document feeder with
specifying Collated, [Last Original] is selected.
On
In the screen displayed during scanning documents with the document feeder with
specifying Collated, [Next Original] is selected.
[Copy Job] screen
The [Copy Job] screen is displayed when copying begins.
94
Page 97

Cancel
The document data stored by [Combine Original Sets] is cleared and the copying is
canceled.
Note • The same operation is performed if you press the <C> button or <Clear All> button on the
control panel.
Last Original
Select this to end scanning of documents.
Next Original
Select this when you have another document. This is on when using the [Combine
Original Sets] feature.
Start
When loading the next document and select [Start], the next documents are scanned.
Note • The same operation is performed if you press the <Start> button on the control panel.
Delete Outside/Delete Inside (Deleting Outside or Inside of the Selected Area when Copying)
Specify an area to delete everything outside or inside of when copying. Up to 3 areas
can be specified.
Job Assembly
Copy
3
1 Select [Delete Outside/Delete
Inside].
2 Select any item.
Off
Nothing is deleted.
Delete Outside
Delete the outside of the selected area when copying.
Delete Inside
Delete the inside of the selected area when copying.
Area Settings
The [Delete Outside/Delete Inside - Area X] screen is displayed. Select up to 3 areas,
from [Area 1] to [Area 3].
Refer to "[Delete Outside/Delete Inside - Area X] screen" (P.96).
Note • X represents the number of the area displayed.
Originals
For 2 sided documents, specify the side of the area you want to delete outside of or
inside of.
z
Both Sides
The setting is applied to both sides of the document.
z
Side 1 Only
The setting is applied to only to Side 1 of the document.
95
Page 98

Copy
3
3 Copy
z
Side 2 Only
The setting is applied to only to Side 2 of the document.
[Delete Outside/Delete Inside - Area X] screen
Set the area to delete outside of or inside of. The quadrangle with a diagonal line and
4 straight sides connecting the coordinates, X1/Y1 and X2/Y2 is a deleted or extracted
area. By making the top right corner of a document into the starting point, the X-axis is
set as the direction of width, and the Y-axis is set as the direction of length.
You can specify a value of 0 to 432 mm for the width (X) and the length (Y) in 1
increments.
Note • Specify the 2 coordinates from the top right corner of the document.
• When specifying multiple areas, the specified areas can overlap each other.
• When [Reduce/Enlarge] is enabled, the specified area will be reduced/enlarged accordingly.
1 Select [Area X].
Note • X represents the number of
the area displayed.
2 Enter the value for X1 in [X1] using
the numeric keypad, and select
[Next].
3 Enter the value for Y1 in [Y1] using the numeric keypad, and select [Next].
4 Enter the value for X2 in [X2] using the numeric keypad, and select [Next].
5 Enter the value for Y2 in [Y2] using the numeric keypad, and select [Next].
Note • To change the coordinates you have entered, select [Next], move , and then enter the
value again.
• If all of [X1], [Y1], [X2], and [Y2] are set to [0], the area will be invalid. If no other area is
specified, the Delete Outside/Delete Inside feature cannot be used.
• If you select <C> button, values that the mark indicates is cleared.
Clear Area X
Clear the specified area.
Note • X represents the number of the area displayed.
Next
The mark moves to the next coordinate.
96
Page 99

4Fax
This chapter describes the basic operations and features for fax provided by the
machine.
Important • The fax features are not available for some models. An optional package is
z
Fax Procedure ............................................................................................ 98
z
Stopping the Fax Job................................................................................ 104
z
About Internet Fax ....................................................................................105
z
Fax/Internet Fax........................................................................................112
z
General Settings ....................................................................................... 117
z
Layout Adjustment .................................................................................... 120
z
Transmission Options ............................................................................... 125
z
Advanced Fax Features............................................................................140
z
Broadcast.................................................................................................. 144
z
Receiving Faxes .......................................................................................153
z
Facsimile Information Services.................................................................155
necessary. For more information, contact our Customer Support Center.
Page 100

4 Fax
Fax Procedure
This section describes the basic fax operations. The following shows the fax flow and
reference sections.
Step 1 Loading Documents.........................................................................................................98
Step 2 Selecting Features ..........................................................................................................100
Step 3 Specifying the Destination.............................................................................................101
Step 4 Starting the Fax Job .......................................................................................................102
Step 5 Confirming the Fax Job in the Job Status ......................................................................103
Step 1 Loading Documents
There are two methods for loading documents:
Document Feeder
z
Single sheet
z
Multiple sheets
Fax
4
Document Glass
z
Single sheet
z
Bound documents, such as books
Document Feeder
The document feeder supports single and multiple sheet documents with sizes from
115 x 125 mm to 297 x 600 mm (long) (A3, 11 x 17 inches).
The document feeder automatically detects documents of standard-size widths.
Note • The standard document sizes that can be detected automatically depend on the [Paper Size
The sizes on the left are converted into sizes shown on the right.
z
8-inch width document J B5 width document
z
10-inch width document J B4 width document
The document feeder accepts the following number of sheets.
Document Type (Weight)
Lightweight paper (38 - 49 g/m2) 75 sheets
Plain paper (50 - 80 g/m
Heavyweight paper (81 - 128 g/m
Settings] in the System Administration mode. For information on the paper size settings,
refer to "Paper Size Settings" (P.280).
Number of
Sheets
2
) 75 sheets
2
) 50 sheets
98
For information on faxing mixed size documents, refer to "Mixed Sized Originals (Scanning Different
Size Documents Simultaneously)" (P.122).
Important • Place folded or creased documents on the document glass to avoid paper jams.
• 2-sided scanning of lightweight paper (38 - 48 g/m
2
) is not supported.
 Loading...