

Xerox DocuCentre-II 2005, DocuCentre-II 2055, DocuCentre-II 3005 Network Administrator Guide
Page 1

DocuCentre-II 3005/2055/2005
Network Administrator Guide
Page 2

Microsoft, Windows NT, and Microsoft Network are trademarks or registered trademarks of
Microsoft Corporation in the U.S. and other countries.
Novell, NetWare, and NDS are registered trademarks of Novell, Inc. in the United States. and
other countries.
Adobe, PostScript, and Adobe PostScript 3 are trademarks of Adobe Systems Incorporated.
EtherTalk, Macintosh, and Mac OS are registered trademarks of Apple Computer, Inc.
Intel is a trademark or registered trademark of Intel Corporation.
UNIX is a registered trademark in the United States and other countries, licensed exclusively
through X/Open Company Ltd.
NIS (Network Information Services) is a trademark or registered trademark of Sun
Microsystems Inc. in the United States.
PCL and HP-GL/2 are registered trademarks of Hewlett-Packard Corporation.
All product/brand names are trademarks or registered trademarks of the respective holders.
Permission has been obtained from Microsoft Corporation for use of software screen shots.
The data saved in the hard disk of the machine may be lost if there is any problem in the
hard disk. Fuji Xerox is not responsible for any direct and indirect damages arising from or
caused by such data loss.
Fuji Xerox is not responsible for any breakdown of machines due to infection of computer
virus or computer hacking.
Important
1. This manual is copyrighted with all rights reserved. Under the copyright laws, this manual
may not be copied or modified in whole or part, without the written consent of the
publisher.
2. Parts of this manual are subject to change without prior notice.
3. We welcome any comments on ambiguities, errors, omissions, or missing pages.
4. Never attempt any procedure on the machine that is not specifically described in this
manual. Unauthorized operation can cause faults or accidents. Fuji Xerox is not liable for
any problems resulting from unauthorized operation of the equipment.
An export of this product is strictly controlled in accordance with Laws concerning Foreign
Exchange and Foreign Trade of Japan and/or the export control regulations of the United
States.
XEROX, THE DOCUMENT COMPANY, Ethernet, CentreWare, and the stylized X are
registered trademarks of Xerox Corporation. All Xerox and Fuji Xerox product names are either
registered trademarks or trademarks of Xerox Corporation and Fuji Xerox Co., Ltd.
DocuWorks is a trademark.
Page 3

Table of Contents
Table of Contents ..............................................................................................1
1 Before Using the Machine .............................................................................. 7
Preface ..............................................................................................................8
Using This Guide............................................................................................... 9
Related Information Sources ........................................................................9
Organization of This Guide......................................................................... 10
Conventions................................................................................................ 11
2 Product Overview.......................................................................................... 13
Machine Components .....................................................................................14
Overview of Features ......................................................................................18
Print ............................................................................................................ 18
CentreWare Internet Services ....................................................................19
Scan ...........................................................................................................20
E-mail..........................................................................................................21
iFax .............................................................................................................21
Table of Contents
Tools................................................................................................................ 22
Power On / Off.................................................................................................24
Powering On ............................................................................................... 24
Powering Off ...............................................................................................25
Interface Cables .............................................................................................. 26
Using the Parallel Interface......................................................................... 26
Using the USB Interface ............................................................................. 26
Using the Ethernet Interface ....................................................................... 27
Control Panel................................................................................................... 28
Internal Fonts .................................................................................................. 30
3 Installation When Using Parallel Port.......................................................... 33
Preparations ....................................................................................................34
Installation Procedure......................................................................................34
Installation Overview................................................................................... 34
Configuration on the Machine..................................................................... 34
Configuration on the Computer................................................................... 35
4 Installation When Using USB Port...............................................................37
Preparations ....................................................................................................38
Installation Procedure......................................................................................38
Installation Overview................................................................................... 38
Configuration on the Machine..................................................................... 38
Configuration on the Computer................................................................... 39
1
Page 4

5 Installation When Using TCP/IP (LPD/Port 9100)....................................... 41
Preparations.................................................................................................... 42
Installation Procedure ..................................................................................... 42
Installation Overview .................................................................................. 42
Configuration on the Machine..................................................................... 42
Configuration on the Computer ..................................................................44
6 Installation When Using NetWare................................................................ 45
Preparations.................................................................................................... 46
Installation Procedure ..................................................................................... 46
Installation Overview .................................................................................. 46
Configuration on the Machine..................................................................... 47
Configuration on the Computer ..................................................................49
7 Installation When Using Microsoft Network (SMB).................................... 51
Preparations.................................................................................................... 52
Installation Procedure ..................................................................................... 52
Installation Overview .................................................................................. 52
Configuration on the Machine..................................................................... 52
Configuration on the Computer ..................................................................53
8 Installation When Using Internet Printing Protocol (IPP) .......................... 55
Preparations.................................................................................................... 56
Installation Procedure ..................................................................................... 56
Installation Overview .................................................................................. 56
Configuration on the Machine..................................................................... 56
Configuration on the Computer ..................................................................57
9 Installation When Using EtherTalk .............................................................. 59
Preparations.................................................................................................... 60
Installation Procedure ..................................................................................... 60
Installation Overview .................................................................................. 60
Configuration on the Machine..................................................................... 60
Configuration on the Computer ..................................................................61
10 Using CentreWare Internet Services ........................................................... 63
Preparations.................................................................................................... 64
Installation Procedure ..................................................................................... 64
Installation Overview .................................................................................. 64
Configuration on the Machine..................................................................... 64
Confirmation of the Configuration............................................................... 66
Network Setting Items (Port/Protocol) for CentreWare Internet Services ....... 67
Ethernet ...................................................................................................... 68
Parallel........................................................................................................ 69
USB ............................................................................................................ 70
2
Page 5

Table of Contents
EtherTalk .................................................................................................... 71
SMB............................................................................................................72
NetWare......................................................................................................73
TCP/IP ........................................................................................................ 74
LPD............................................................................................................. 76
SNMP ......................................................................................................... 77
IPP..............................................................................................................79
Port 9100 .................................................................................................... 80
E-mail..........................................................................................................81
SMTP.......................................................................................................... 86
POP3 .......................................................................................................... 87
HTTP .......................................................................................................... 88
WebDAV.....................................................................................................89
Bonjour ....................................................................................................... 90
11 E-mail..............................................................................................................93
E-mail Overview .............................................................................................. 94
Preparations ....................................................................................................95
Installation Procedure......................................................................................97
Installation Overview................................................................................... 97
Enabling Port and Setting TCP/IP ..............................................................97
Configuring E-mail Environment.................................................................98
12 Using the Scan Service............................................................................... 103
Scan Service Overview .................................................................................104
Configuration of E-mail..................................................................................105
Preparations ............................................................................................. 105
Installation Overview................................................................................. 105
Enabling Port and Setting TCP/IP ............................................................105
Configuring E-mail Environment...............................................................106
Configuration of Scan to Mailbox ..................................................................111
Installation Overview................................................................................. 111
Enabling Port and Setting TCP/IP ............................................................111
Registering a Mailbox ...............................................................................113
Configuration of Network Scanning (Job Template Scanning)......................116
Preparations ............................................................................................. 116
Installation Overview................................................................................. 116
Enabling Port and Setting TCP/IP ............................................................116
Configuring the SNMP Port ......................................................................117
Configuration on a Computer.................................................................... 118
Configuration of Scan to PC..........................................................................119
Preparations ............................................................................................. 119
Installation Overview................................................................................. 119
Enabling Port and Setting TCP/IP ............................................................120
Configuration on the Computer................................................................. 121
3
Page 6

Configuration of the Job Flow ....................................................................... 122
Installation Overview ................................................................................ 122
Enabling Port and Setting TCP/IP ............................................................ 122
Configuring the SNMP Port ...................................................................... 123
Configuration on the Computer ................................................................ 124
13 Using the iFax Service................................................................................ 125
iFax Overview ............................................................................................... 126
Preparations.................................................................................................. 126
System Requirements for the Machine .................................................... 126
Installation Procedure ................................................................................... 127
Installation Overview ................................................................................ 127
Enabling the Port and Setting TCP/IP ...................................................... 127
Configuring the E-mail Environment......................................................... 128
Testing iFax .............................................................................................. 132
14 Using the Server Fax Service..................................................................... 133
Server Fax Overview..................................................................................... 134
Preparations.................................................................................................. 134
System Requirements for the Machine .................................................... 134
Installation Procedure ................................................................................... 135
Installation Overview ................................................................................ 135
Fax Settings.............................................................................................. 135
Setting the Server Fax Feature ................................................................ 136
15 Security ........................................................................................................ 139
Security Service Overview ............................................................................ 140
Communication Security Service.............................................................. 140
Scan File Security Services...................................................................... 140
Configuration of HTTP Communication Encryption ...................................... 141
Installation Overview ................................................................................ 141
Configuration on the Machine................................................................... 141
Configuration on a Computer ................................................................... 142
Configuration of E-mail Encryption/Digital Signature .................................... 144
Installation Overview ................................................................................ 144
Configuration on the Machine................................................................... 144
Configuration on a Computer ................................................................... 146
Configuration of Scan File Signature (PDF/DocuWorks Signature).............. 147
Installation Overview ................................................................................ 147
Configuration on the Machine................................................................... 147
Configuration on a Computer ................................................................... 148
16 Problem Solving.......................................................................................... 149
SMB .............................................................................................................. 150
Troubleshooting........................................................................................ 150
4
Page 7

Table of Contents
Notes and Restrictions.............................................................................. 151
NetWare ........................................................................................................ 154
When you cannot print.............................................................................. 154
When "Switch the machine off" is displayed............................................. 156
When the print output is not as you expected........................................... 156
When no notification is received............................................................... 157
TCP/IP........................................................................................................... 158
Troubleshooting........................................................................................ 158
Notes and Restrictions.............................................................................. 160
EtherTalk .......................................................................................................162
Troubleshooting........................................................................................ 162
Notes and Restrictions.............................................................................. 162
Bonjour..........................................................................................................164
Notes and Restrictions.............................................................................. 164
CentreWare Internet Services ....................................................................... 165
Troubleshooting........................................................................................ 165
Scanner Features..........................................................................................166
Troubleshooting........................................................................................ 166
Notes and Restrictions.............................................................................. 166
E-Mail Features .............................................................................................168
Troubleshooting........................................................................................ 168
Internet/Intranet Connection.......................................................................... 169
Troubleshooting........................................................................................ 169
Notes and Restrictions.............................................................................. 171
Index ...................................................................................................................173
5
Page 8

Page 9

1 Before Using the Machine
This chapter describes how to use this guide.
z
Preface .........................................................................................................8
z
Using This Guide ..........................................................................................9
Page 10

1 Before Using the Machine
Preface
Before Using the Machine
1
Thank you for selecting the Fuji Xerox DocuCentre-II 3005/2055/2005 (hereafter
referred to as "the machine").
This guide describes a number of configuration procedures for using this machine on
a network.
This guide assumes that the operator has a basic knowledge of the operating
environment of the personal computer in use, networking environments, and how to
operate a personal computer. Please read this guide thoroughly to obtain the best
performance on the machine. After reading this guide, be sure to keep it handy for quick
reference. It will be useful in case you forget how to perform operations or if a problem
occurs with the machine.
Refer to the User Guide for the machine operation, clearing paper jams, daily
maintenance, setting various items and safety information. For details about optional
accessories, also refer to the guide provided with each optional accessory.
8
Page 11

Using This Guide
Using This Guide
This section describes the organization of this guide.
Related Information Sources
We provide the following guides for optimum usage of the machine.
Included Manuals
Several manuals are included with this product. They are referred to as accompanying
manuals.
These accompanying manuals include descriptions on configurations and operation of
the product.
The following manuals are included with the machine.
User Guide
Describes all the necessary steps for copy/print/scan/fax, clearing paper jams, daily
care, setting the various items and safety information.
Network Administrator Guide (this guide)
Aimed toward network administrators, as a guide to setting up the network
environment.
Before Using the Machine
1
Quick Reference Guide
Introduces the basic operations of the machine, as well as daily management and
maintenance.
Manual (HTML)
A guide to installing print drivers, configuring the printer environment, etc. This manual
is included in the CD-ROM of the Driver CD Kit.
Guides for Optional Accessories
Optional accessories are also available for the machine. User Guides are provided with
the optional accessories exclusively for the DocuCentre-II 3005/2055/2005. These
User Guides are referred to as "guides for optional accessories". Guides for optional
accessories are provided in two forms, as printed or as On-line Help.
Guides for optional accessories describe all the necessary steps for operating optional
accessories and installing software.
9
Page 12

1 Before Using the Machine
Organization of This Guide
This guide consists of the following chapters.
Before Using the Machine
1 Before Using the Machine
Describes the organization of this guide.
2 Product Overview
Describes basic information such as identifying the major components, how to switch
the machine on and off, and how to use the touch screen.
3 Installation When Using Parallel Port
Describes how to install the machine using a parallel interface.
1
4 Installation When Using USB Port
Describes how to install the machine using a USB interface.
5 Installation When Using TCP/IP (LPD/Port 9100)
Describes how to install the machine using the TCP/IP (LPD/Port 9100) protocol.
6 Installation When Using NetWare
Describes how to install the machine to a NetWare network.
7 Installation When Using Microsoft Network (SMB)
Describes how to install the machine to a Microsoft Networks (SMB).
8 Installation When Using Internet Printing Protocol (IPP)
Describes how to install the machine to enable Internet printing.
9 Installation When Using EtherTalk
Describes how to install the machine to an EtherTalk network.
10 Using CentreWare Internet Services
Describes how to use the CentreWare Internet Services.
11 E-mail
10
Describes how to use the E-mail feature on this machine.
12 Using the Scan Service
Describes how to use the scan service on this machine.
13 Using the iFax Service
Describes how to use the iFax service on this machine.
14 Using the Server Fax Service
Describes how to use the Server Fax service on this machine.
15 Security
Describes how to use services using the communication security function on this
machine.
16 Problem Solving
Describes how to solve the problems you may encounter.
Page 13
Conventions
z
z
z
z
Using This Guide
In this document, “Computer” refers to a personal computer or workstation.
The following terms are used in this guide.
Important Indicates important information that you should read.
Note Indicates additional information on operations or features.
The following symbols are used in this guide:
" " : Cross-references in this guide, messages displayed on the
touch screen, and input strings
[ ] : • The names of the screens, tabs, buttons, features, and
options displayed on the touch screen
• The names of the menus, windows, dialog boxes, buttons
and other items displayed on computer monitors
< > button : Hardware buttons on the control panel
< > key : Keys on computer keyboards
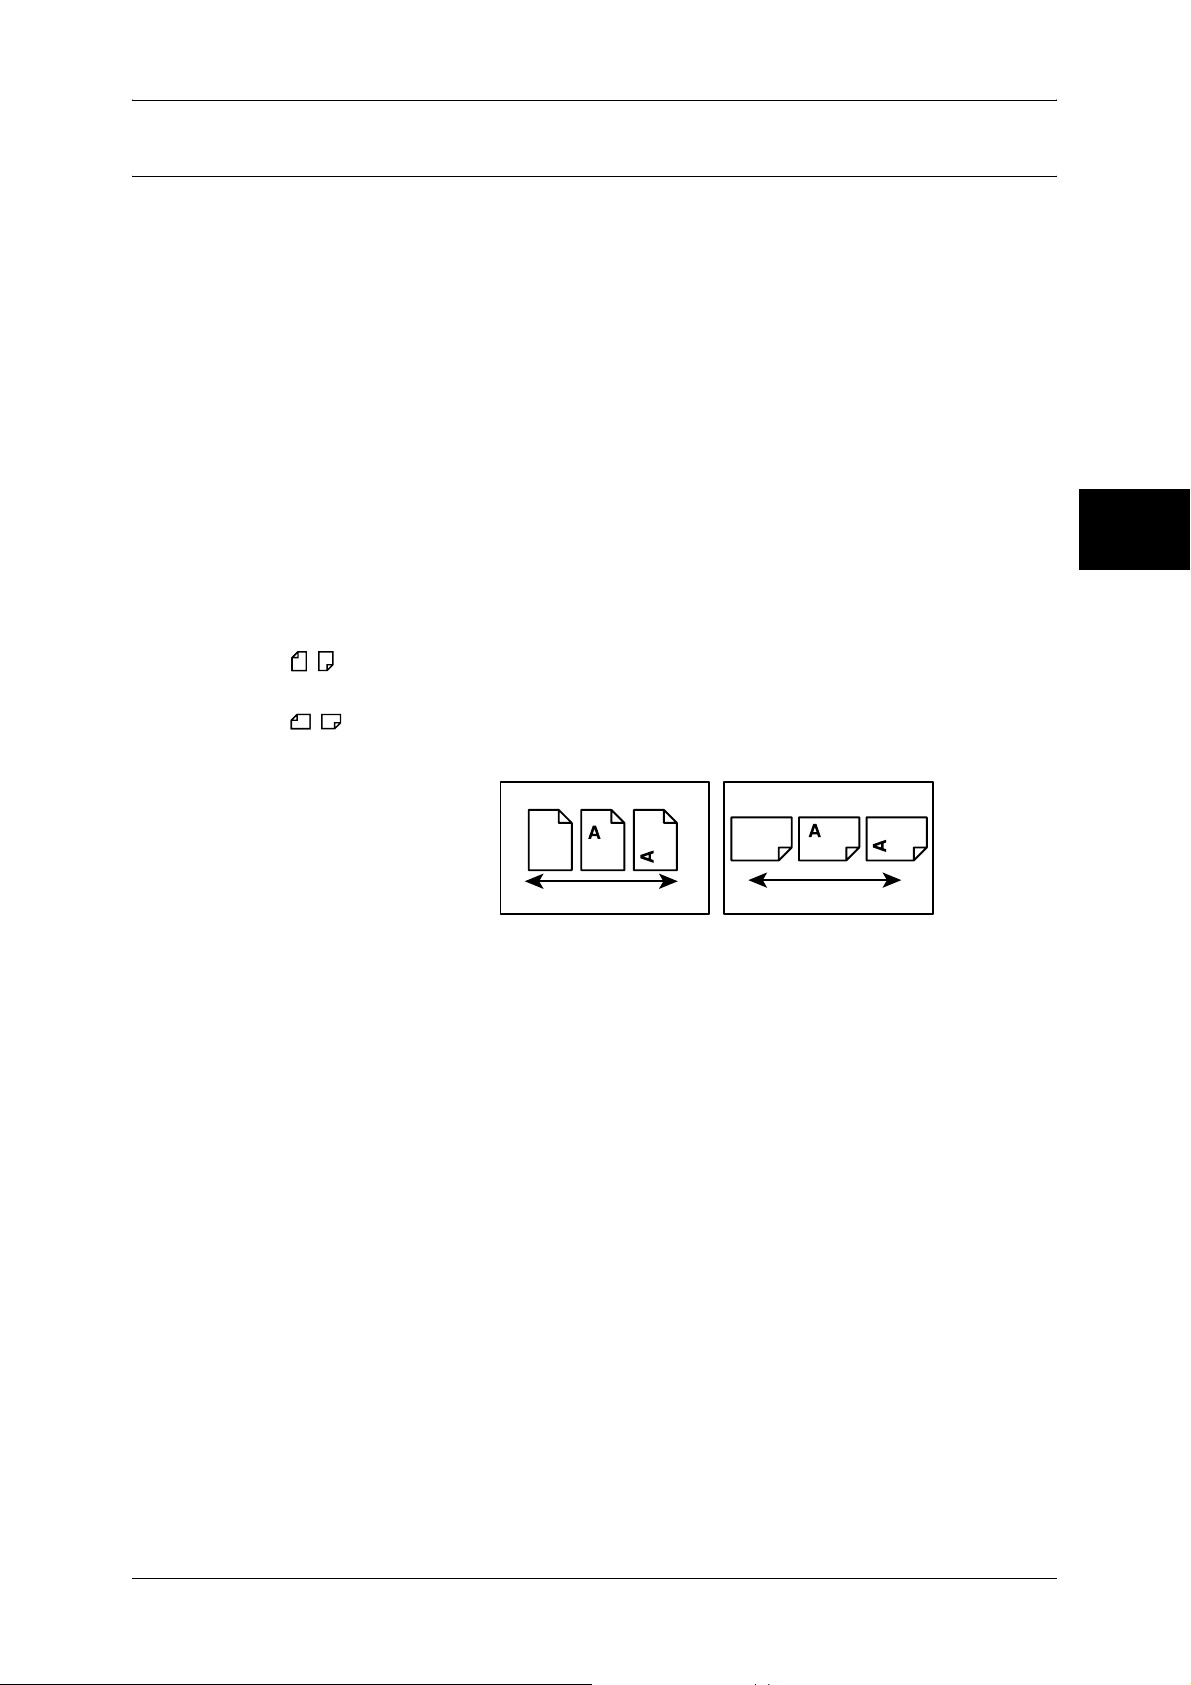
Orientation of documents or paper is described in this guide as follows:
, ,Long Edge Feed (LEF) : Loading with one of the long edges of the document
or paper.
Before Using the Machine
1
, ,Short Edge Feed (SEF): Loading with one of the short edges of the document
or paper.
LEF Orientation SEF Orientation
Paper feed direction Paper feed direction
11
Page 14

Page 15

2 Product Overview
This chapter describes machine’s basic information such as component names,
available features and tools, how to switch on and off, cable connections, and
how to use the touch screen.
z
Machine Components.................................................................................14
z
Overview of Features..................................................................................18
z
Tools ...........................................................................................................22
z
Power On / Off ............................................................................................24
z
Interface Cables..........................................................................................26
z
Control Panel ..............................................................................................28
z
Internal Fonts.............................................................................................. 30
Page 16
2 Product Overview
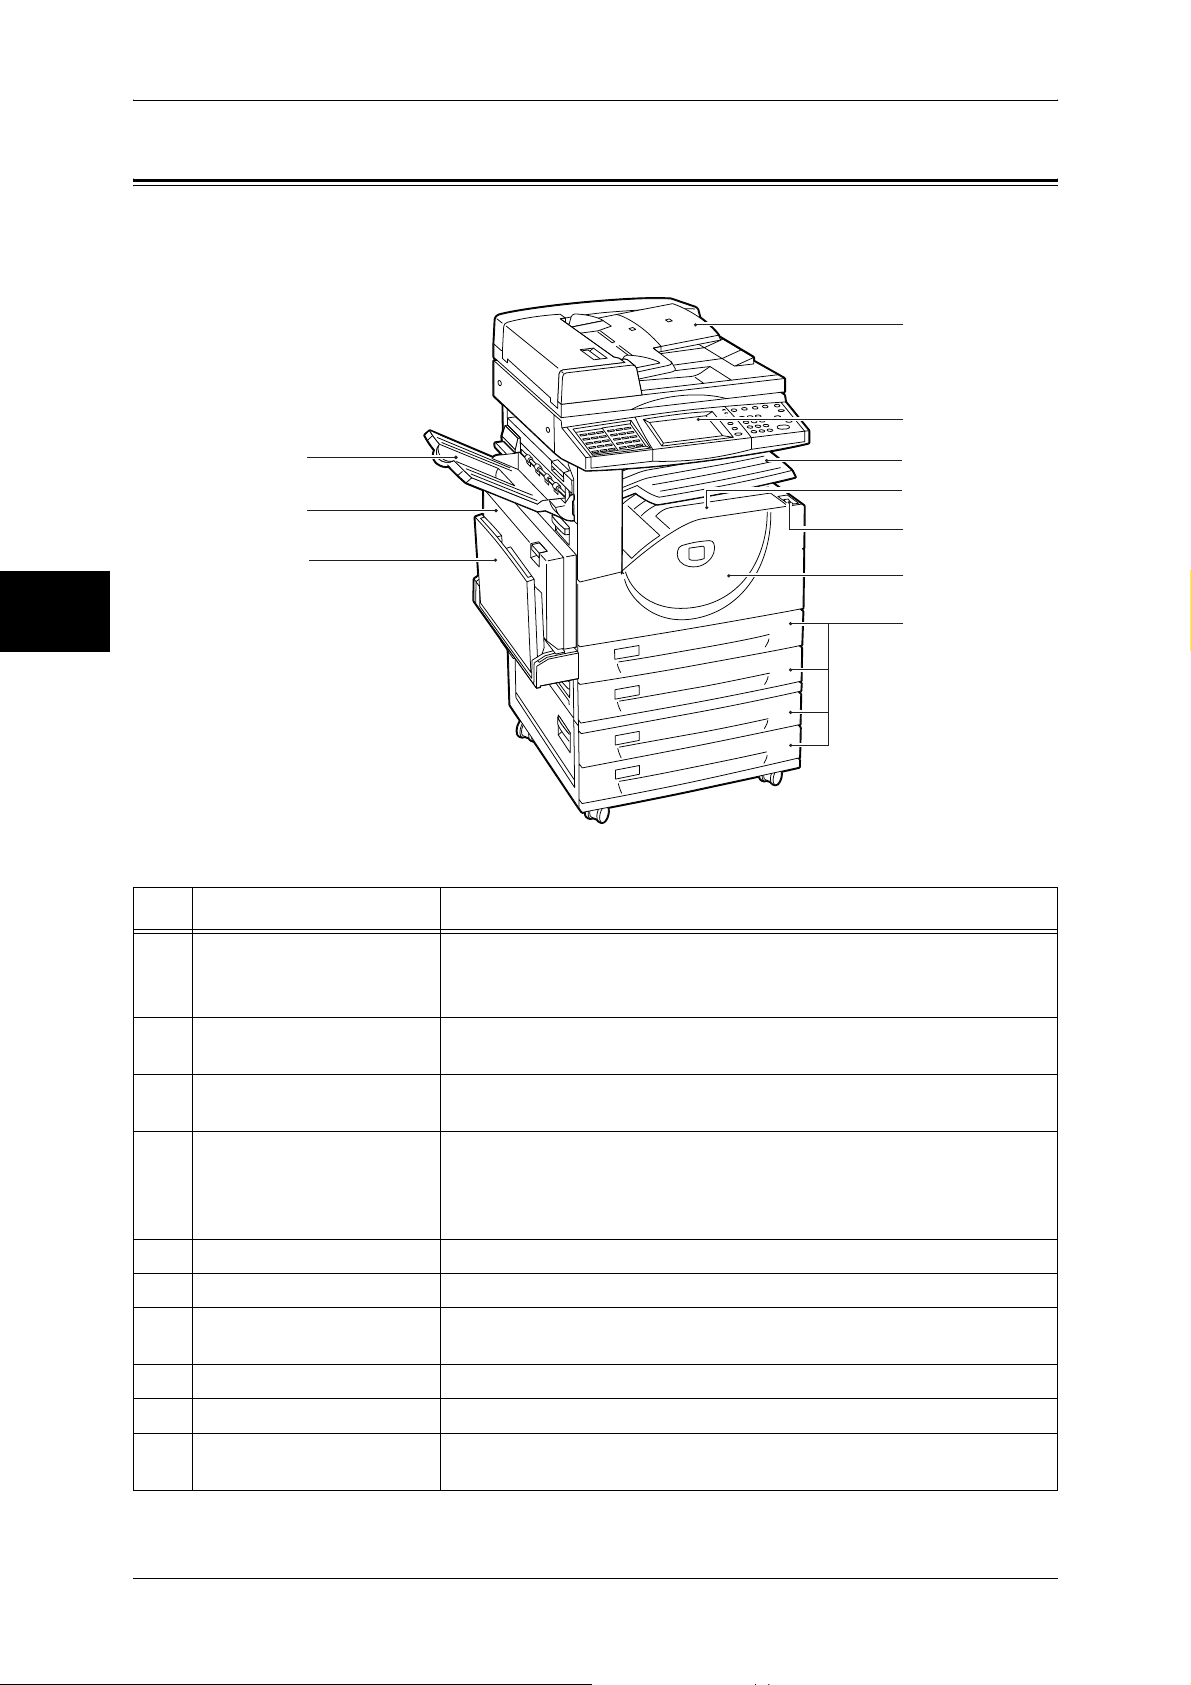
Machine Components
This section describes the main components and functions of the machine.
Product Overview
1
2
2
8
9
10
3
4
5
6
7
No. Component Function
1 Duplex automatic
document feeder (optional)
2 Control panel Consists of operation buttons, LED indicators and a touch screen.
Automatically feeds 2 sided originals from a stack.
Note • In this manual, the duplex automatic document feeder is abbreviated as
“document feeder”.
Refer to "Control Panel" (P.28).
3 Exit 2 Tray (optional) Printed or copied documents are delivered with the printed side facing
down.
4 Center output tray Printed or copied documents are delivered with the printed side facing
down.
Note • When the Exit 2 Tray is installed on the machine, the center output tray
is referred to as "center tray - lower".
5 Power switch Switches the power of the machine on/off.
6 Front cover Opened to replace consumables.
7 Tray 1 - 2
Tray 3 - 4 (optional)
8 Side Tray (optional) Printed or copied documents are delivered with the printed side facing up.
9 Duplex module (optional) Automatically prints or copies on the both sides of paper.
10 Tray 5 (Bypass) Used for loading non-standard paper (thick-stock paper, and other
Accommodates papers.
special media) that cannot be loaded in the Trays 1 to 4.
14
Page 17
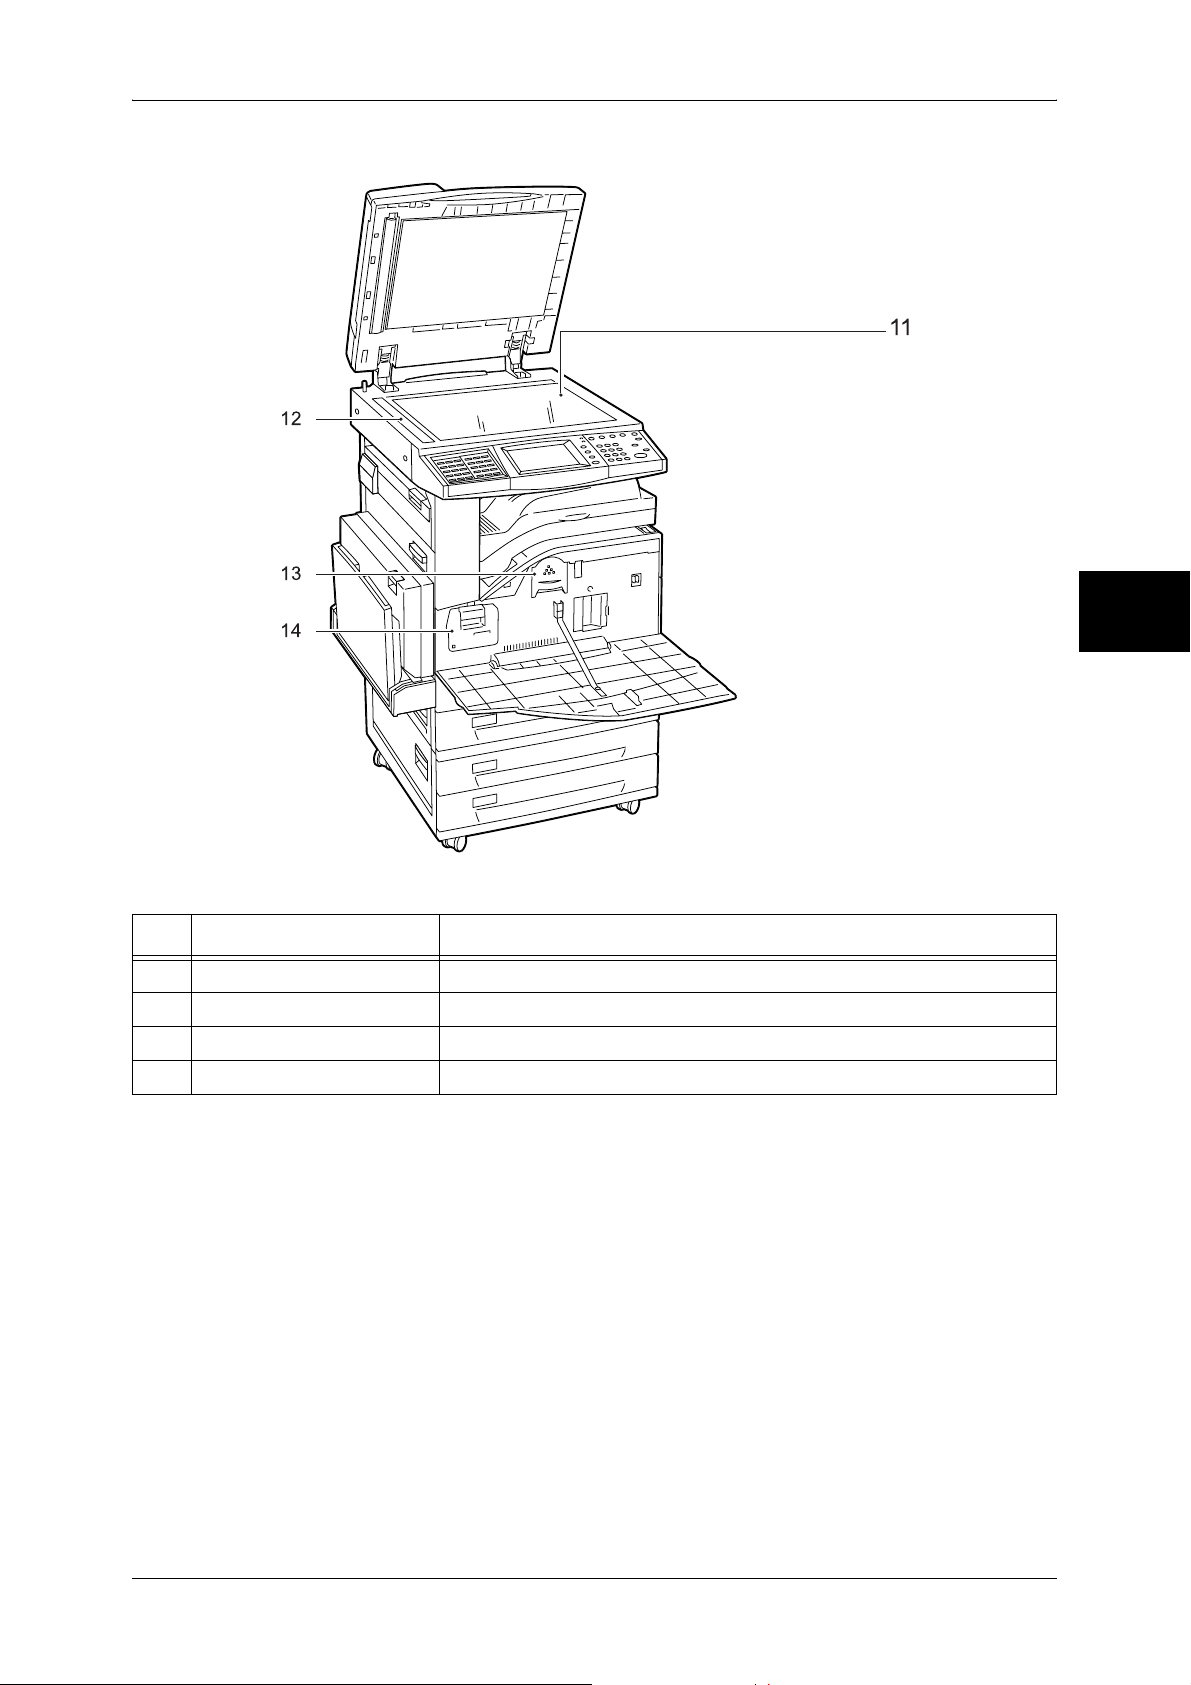
Internal Components
!
Machine Components
Product Overview
"
No. Component Function
11 Document glass Originals are loaded.
12 Document feeder glass Scans documents loaded on the document feeder.
13 Toner cartridge Contains toner (image forming powder).
14 Drum cartridge Contains a photo conductor for transfer toner.
2
15
Page 18
Product Overview
2
2 Product Overview
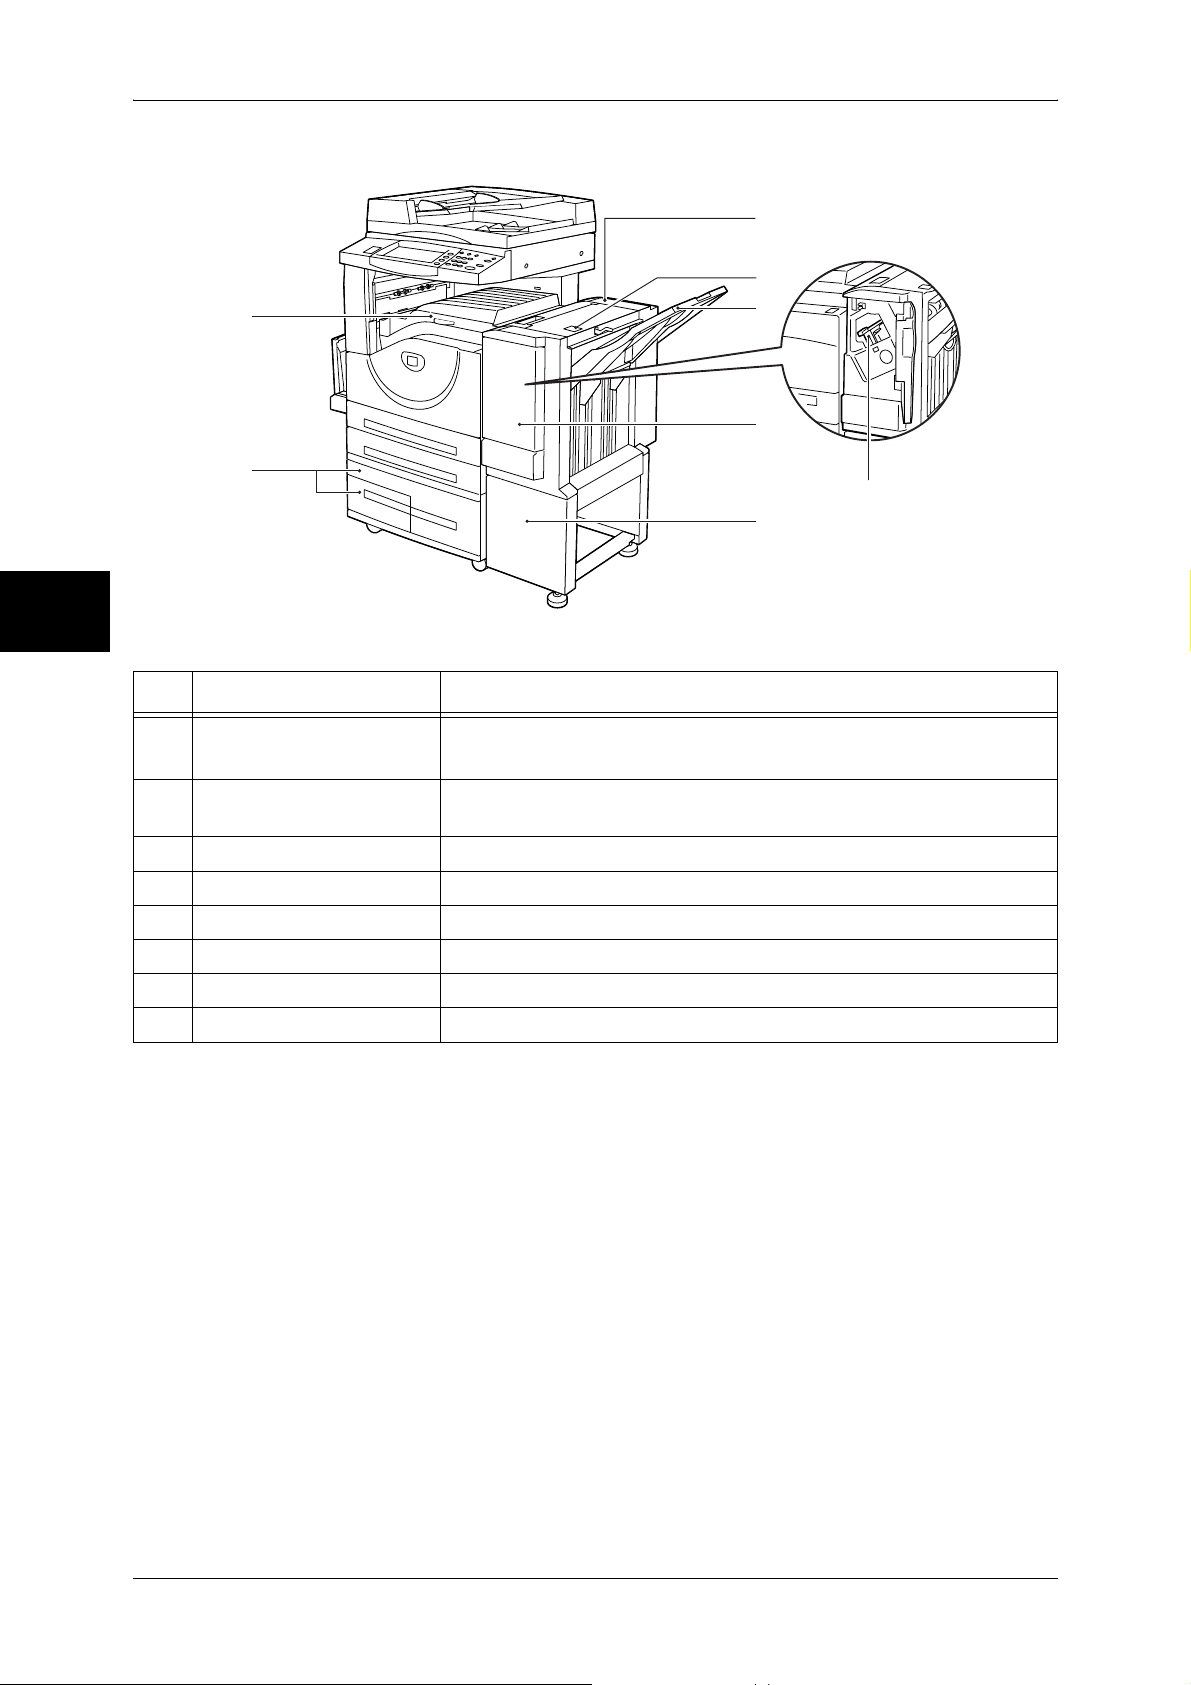
Tandem Tray Module + B-Finisher
21
22
15
16
17
18
19
20
No. Component Function
15 B-Finisher (optional) Allows you to staple printed or copied documents.
Note • In this manual, the B-Finisher is abbreviated as “finisher”.
16 Finisher top cover button Pressed to open the upper cover of the finisher when clearing paper
jams.
17 Finisher tray Stapled documents are delivered.
18 Front cover Opened to clear staple jams, or replace staples.
19 Staple cartridge Contains staples.
20 Stand Connects the machine and the finisher.
21 Finisher transport cover Opened to clear paper jams.
22 Tray 3 - 4 (optional) Accommodates papers.
16
Page 19
TEL
Machine Components
LINE4
30
LINE2
29
LINE1
28
27
23
24
26
25
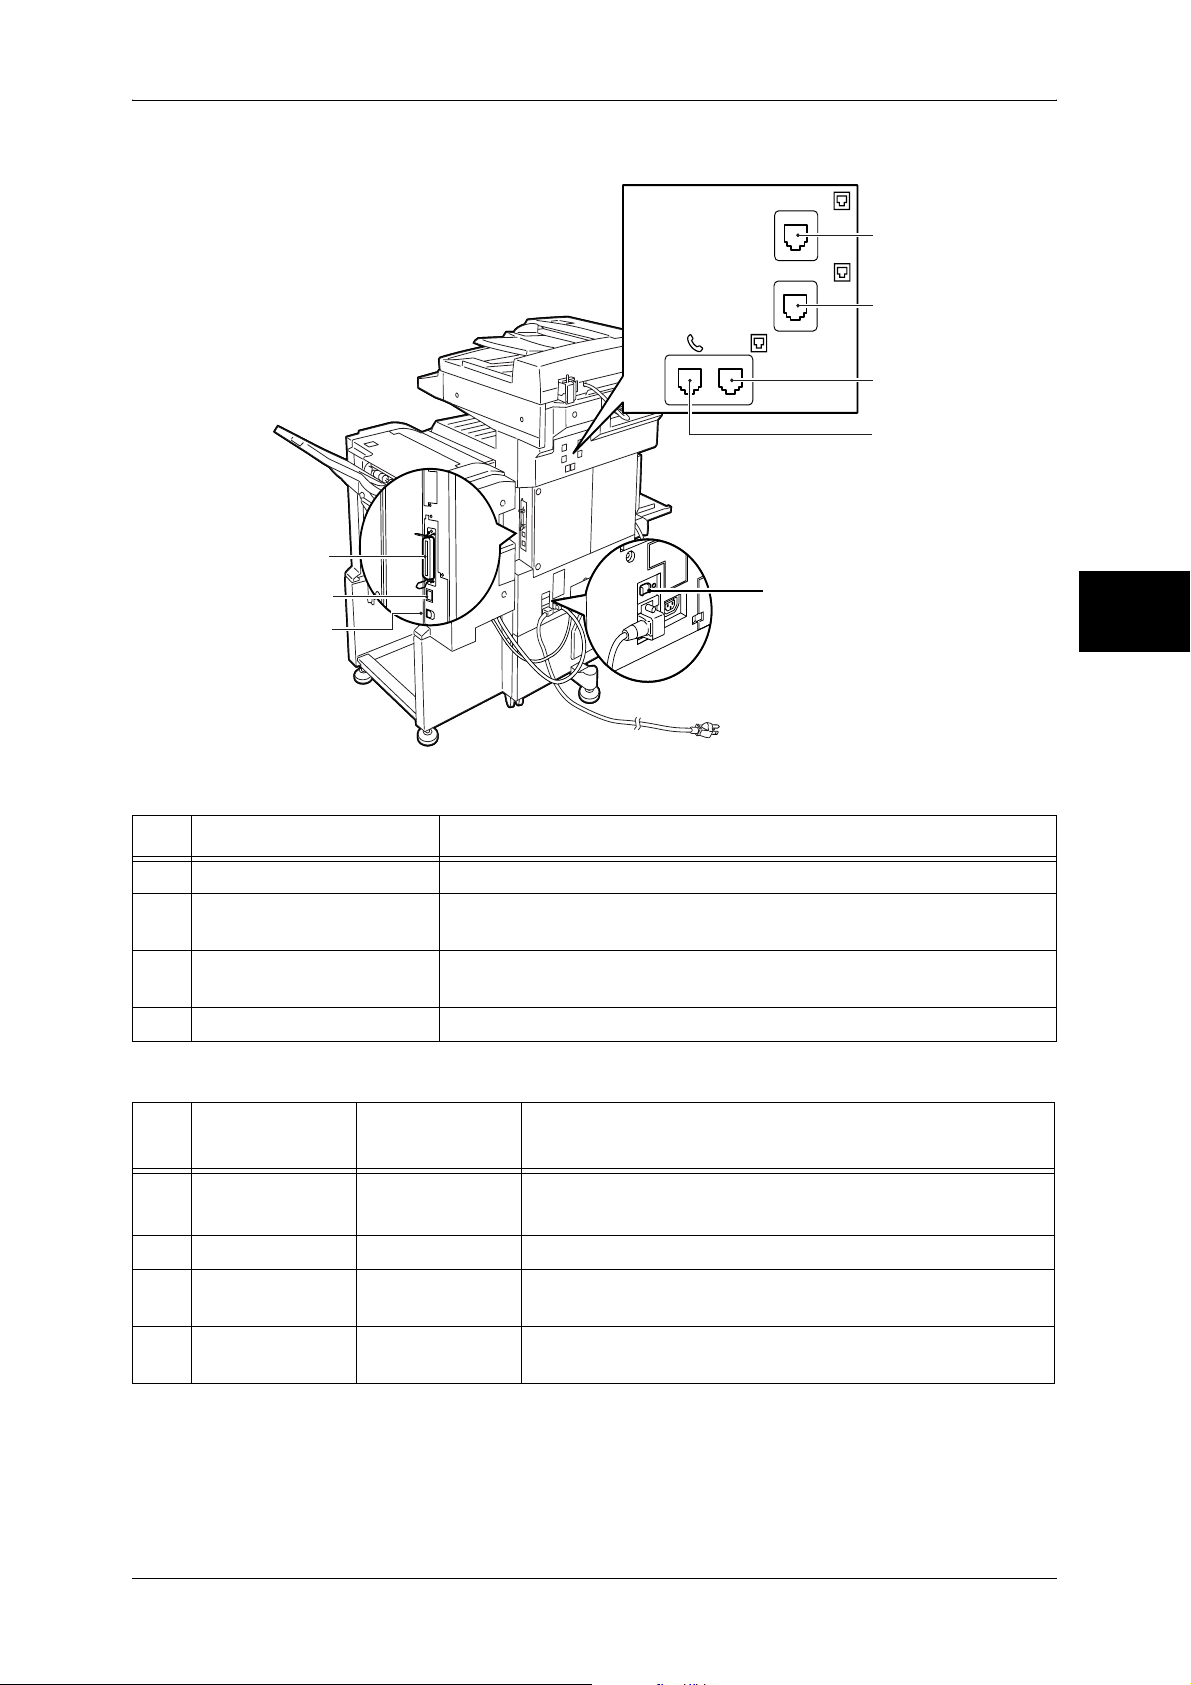
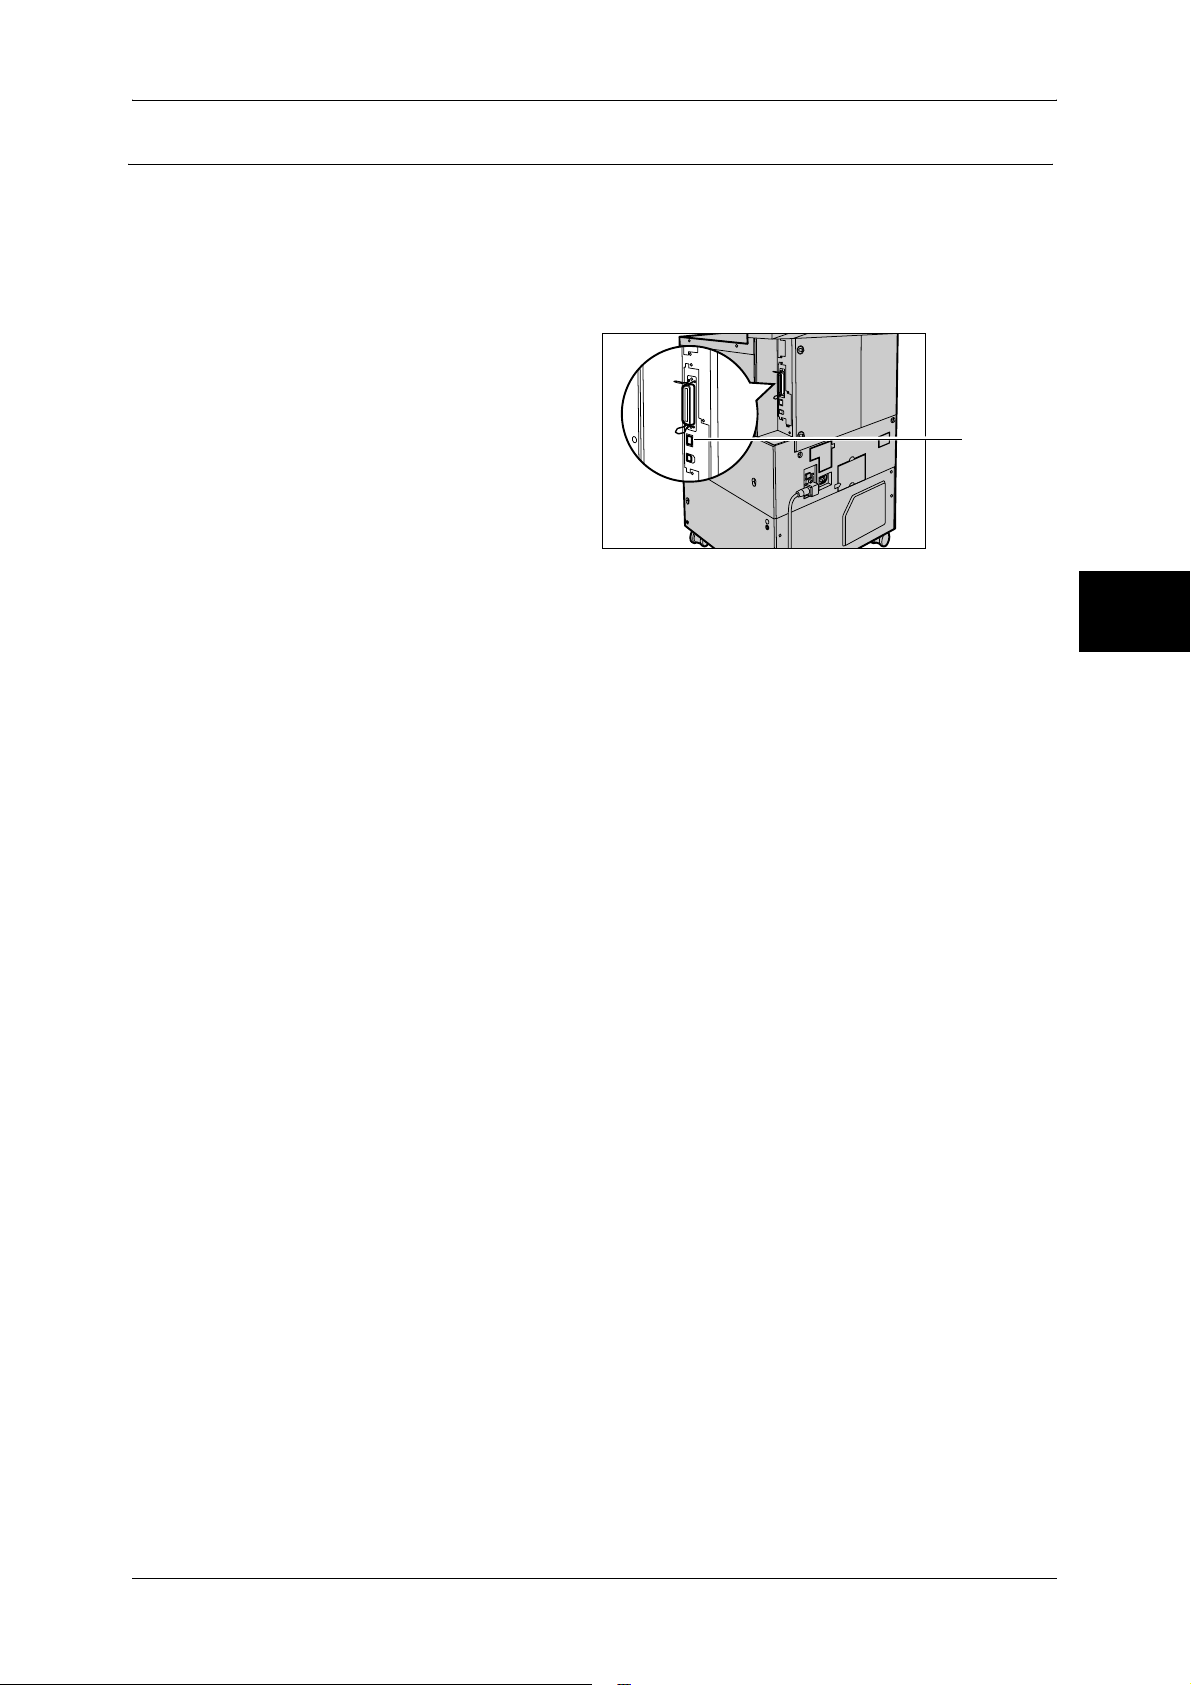
No. Component Function
23 Parallel interface connector Connected to a computer using a Centronics standard interface cable.
24 10BASE-T / 100BASE-TX
connector
Connected to a network cable.
Product Overview
2
25 USB 2.0 interface
connector
26 <RESET> button Automatically turns the power off when detecting current leakage.
Connected to a USB cable.
Telephone Line Connectors
No.
Name on the
machine cover
27 TEL - Used to connect an external telephone.
28 LINE 1 Line 1 Connected to a public telephone network.
29 LINE 2
(optional)
30 LINE 4
(optional)
Note • Fax features are not available for some models. An optional package is required. For
Name on the
touch screen
Note • Do not connect other fax machines.
Line 2 Connected to a public telephone network.
Line 4 Connected to a public telephone network.
information, contact our Customer Support Center.
Function
17
Page 20
Product Overview
2
2 Product Overview
Overview of Features
The following features are provided in a network environment.
z
z
CentreWare Internet Services
z
Scan
z
E-mail
z
iFax
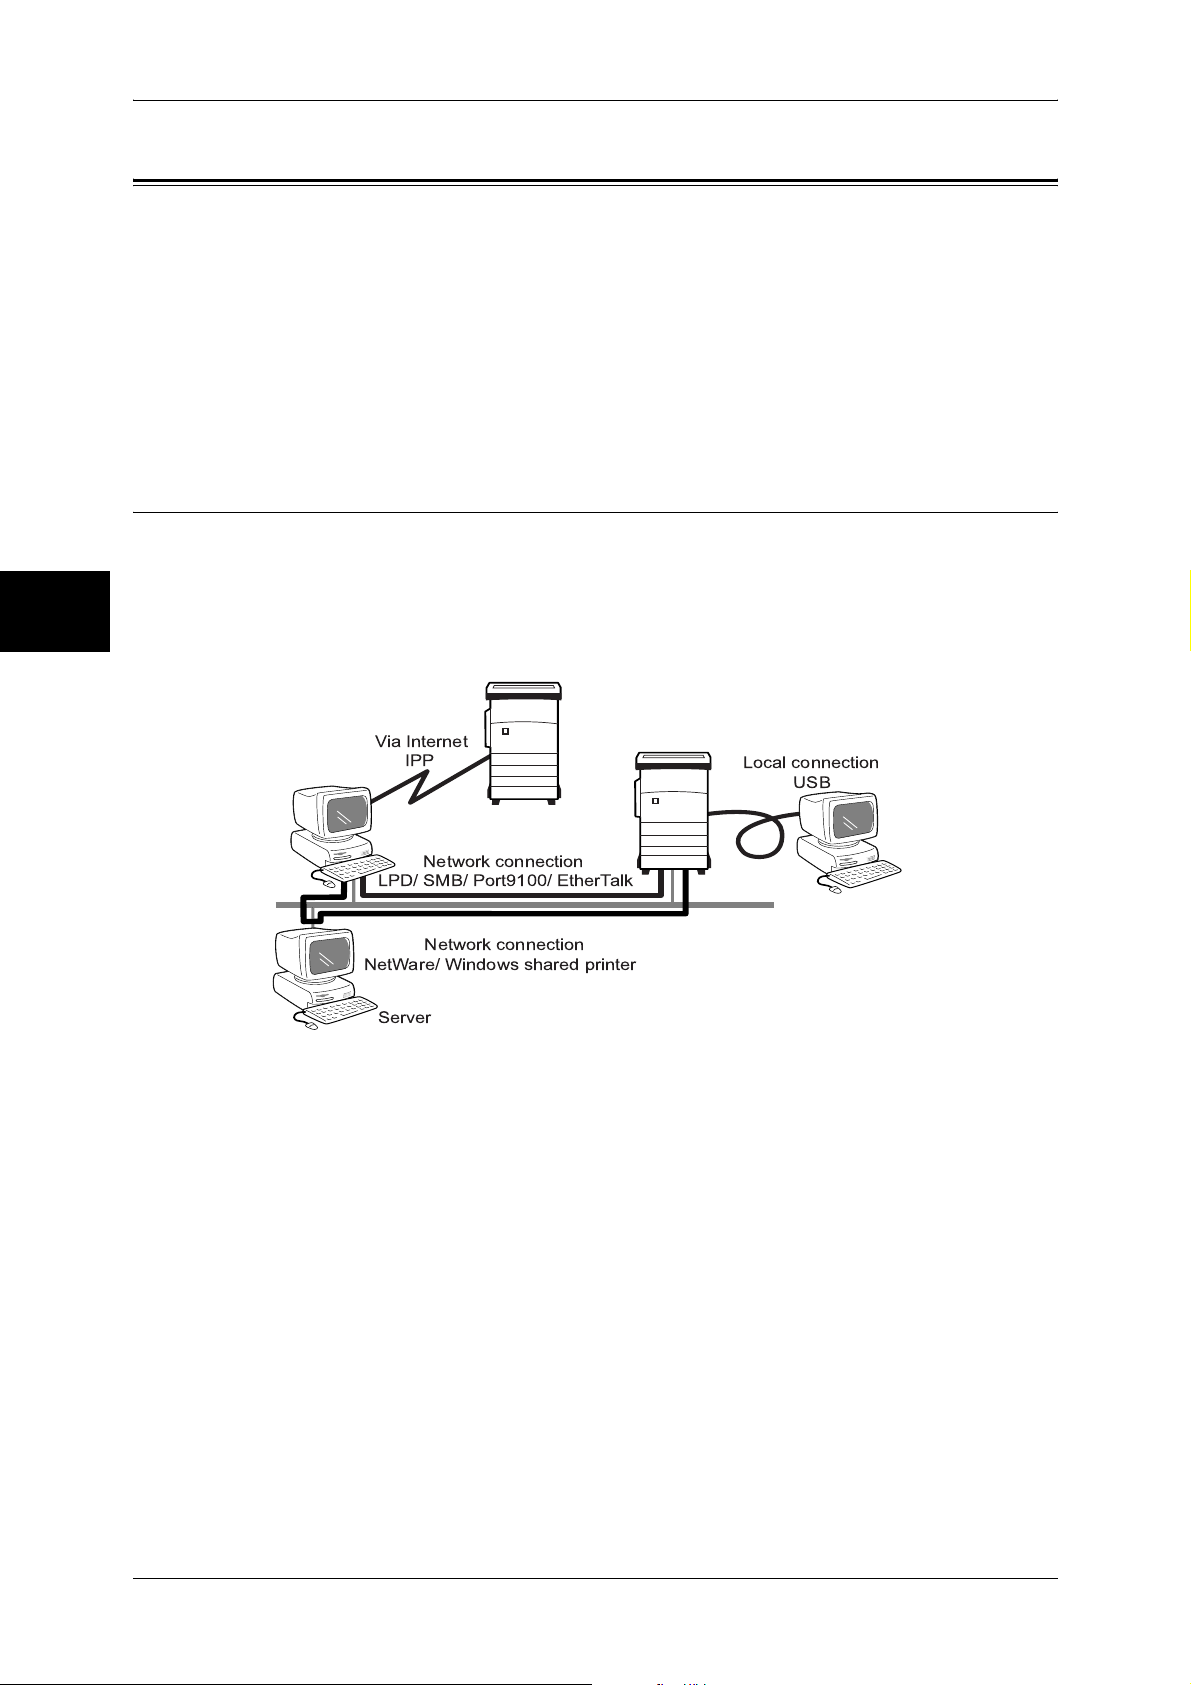
Print
This section describes the environment where the machine is able to provide print
services.
This machine can be used as a local printer by directly connecting to a computer, or as
a network printer when connecting to a network.
Enable the necessary port using the control panel.
Via Internet
IPP
LPD/ SMB/ Port9100/ EtherTalk
NetWare/ Windows shared printer
Server
Using as a Local Printer
When using as a local printer, the machine can be connected by the following methods.
z
Parallel : Used to connect the machine with a computer using a parallel interface
cable.
z
USB : Used to connect the machine with a computer using a USB interface
cable.
Using as a Network Printer
When using as a network printer, the machine can be connected by the following
methods.
z
LPD : Used when communicating with the machine using the TCP/IP protocol.
z
NetWare : Used when sharing the machine using a NetWare server.
The NetWare Kit (optional) or Adobe PostScript 3 Kit (optional) is
required.
z
SMB : Used when printing through Microsoft Networks.
Local connection
USB
Network connection
Network connection
18
Page 21

z
IPP : Used when printing through the Internet.
z
Port 9100:Used when using the port 9100 port.
z
EtherTalk:Used when printing from Macintosh machines. Adobe PostScript 3 Kit
(optional) is required.
Supported Operating Systems
Overview of Features
Connection
method
Port
Protocol - -
Windows 95 O O
Windows 98 O O
Windows Me O O
Windows NT
4.0
O
Windows
2000
S
Windows XP O O
Windows
Server 2003
UNIX O
Macintosh O
Local
connection
Parallel
USB
2.0
*1, 7
*1
LPD
TCP/IPTCP/IPIPX/
O
O
NetWare
*2
OOOO O
*2
OOOO O
*2
OOOOOO
Network connection
*8
SPX
SMB IPP
Net
TCP/IPTCP/IPTCP/IPApple
BEUI
O OOOOO
OO
OO
*1
*1
*1
*1,3,6
OOOOOOO
OOO OOO
OOO OOO
*4
*3,5
O
Port
9100
*1: The computer must be equipped with a USB 2.0 port.
*2: Use our TCP/IP Direct Print Utility for Windows 95/98 and Windows Me.
*3: Adobe PostScript 3 Kit (optional) is required.
*4: Adobe PostScript 3 Kit (optional) and a Unix filter are required to print PostScript
data.
*5: Supports Mac OS X 10.2.x/10.3.3 to 10.4.3 only.
*6: Supports Mac OS 8.6 to 9.2.2, and Mac OS X 10.2.x/10.3.9/10.4 to 10.4.6 only.
*7: Supports Windows 98SE or later.
*8: NetWare Kit (optional) or Adobe PostScript 3 Kit (optional) is required.
Product Overview
Ether
Talk
Talk
*2
*2
*2
*3
O
2
For detail information on network environments, refer to the manual in the CD-ROM of the Driver CD
Kit.
CentreWare Internet Services
CentreWare Internet Services provides services such as displaying the status of the
machine and jobs, and altering configurations using a web browser in a TCP/IP
environment.
For setting as a printer, the properties screen of the services allows users to configure
the system settings and port settings for each network that are otherwise operated on
the touch screen on the machine.
19
Page 22

2 Product Overview
The following are functions offered under each tab within CentreWare Internet Services
when the machine is enabled with the Internet Services (HTTP) port.
Tab name Main function
Product Overview
2
Status
Jobs
Print/Scan
Properties
Support
z
Displaying the machine status
Displaying the status of the paper trays, output trays and consumables
such as toner cartridges.
z
Linking to the copyright screen.
z
Displaying a list of jobs and job history, and deleting jobs.
z
Job Submission
Allows you to specify and print a file stored on your computer.
z
Mailbox
Allows you to register and set mailboxes.
z
Job Flow Sheets
Allows you to register and set job flow sheets.
z
Job Template
Allows you to create, edit, and delete job templates.
z
Displaying and setting the following items:
Machine information and configuration such as memory and a print
language, usage counters, paper trays, paper, power saver mode,
Address Book, PKI (Public Key), mail notice, authentication/auditron
administration, user details, Xerox Standard Accounting, remote
authentication server/directory service, Internet Services, proxy server,
and port status.
z
Port settings
z
Protocol settings
z
Emulation settings
z
Memory settings
z
Report settings
z
Displaying support information
z
Displaying error history information
z
System administrator settings
z
Pool server settings
z
Audit log
Scan
20
The following scan services are available:
Note • This feature does not appear for some models. An optional package is necessary. For
details, contact our Customer Support Center.
E-mail
Scanned documents can be converted into an electronic format and transmitted via email.
Scan to Mailbox
Scanned documents are saved into a mailbox.
When the machine is connected to a TCP/IP network, scanned documents in a mailbox
can be retrieved from a computer connected to the network.
Network Scanning (Job Template Scanning)
A job template is a configuration file for defining scanning conditions. You can apply a
template to a scanned document on the machine. The scanned document will be saved
Page 23

Overview of Features
as files on the machine and then sent automatically to computers (servers) such as
SMB servers connected to the network.
Scan to PC
When the machine is connected to a network which can use either the FTP or SMB
protocol, the scanned documents can be saved on a network computer.
Job Flow Sheet
Scanning is performed according to a job flow.
The following E-mail services are available:
Note • This feature does not appear for some models. An optional package is necessary. For
details, contact our Customer Support Center.
E-mail
Scanned documents can be converted into an electronic format and transmitted via email.
E-mail Printing
E-mail with attachments in either TIFF, JPEG, or PDF format can be sent to the
machine from computers. Received e-mail will be automatically printed.
Consumables Status Notice
E-mail containing contents (status of consumables, paper, and replaceable parts, etc.)
set in [Mail Notice Settings] of CentreWare Internet Services is sent to a specified
recipient. You can properly determine when to replace toner and drum cartridges by
receiving their status periodically.
Job Completion Notice
Product Overview
2
iFax
When a computer has submitted a job to the machine, its completion can be notified by
e-mail.
You can send and receive data scanned by the machine as e-mail attachments via a
corporate network or the Internet. This feature differs from regular faxes in that you do
not need to transmit data via a telephone line.
Note • This feature does not appear for some models. An optional package is necessary. For
details, contact our Customer Support Center.
21
Page 24

Product Overview
2
2 Product Overview
Tools
The following tools are provided with this machine. Available settings vary depending on
the tool.
Control Panel
The control panel is located at the center on top of the machine. It consists of operation
buttons, LED indicators and a touch screen.
The touch screen is located at the center of the control panel. Messages required for
operation and feature buttons are displayed on this display. You can directly touch the
buttons and tabs displayed in the touch screen to set features or to instruct operations
in screens.
CentreWare Internet Services
CentreWare Internet Services provides services such as displaying the status of this
machine as a printer and its print data, altering configurations and operating on
mailboxes using a web browser in a TCP/IP environment.
For setting as a printer, the properties screen of the services allow users to configure
the system settings and port settings for each network that are otherwise operated on
the touch screen on the machine.
Tools in the Driver CD Kit
Various tools such as print drivers and software for easy installation of print drivers are
included in the CD-ROM of the Driver CD Kit.
EasyOperator allows you to print or send documents via fax by dragging and dropping
files with a mouse. Also, this tool enables the remote operation of mailbox registration
and scan configuration.
If you use Document Monitor, when a print job is submitted from a computer, the
machine status such as out of paper, toner low, paper jams, starting and completing
the job, will be displayed. It also allows the users to confirm the print data processing
status, and to pause, restart, and stop the print jobs.
ApeosWare EasyAdmin
ApeosWare EasyAdmin is a tool to reduce the management tasks for printers, faxes,
and scanners. It allows users to centrally configure multiple items on multiple devices
from a computer.
Note • ApeosWare EasyAdmin is an optional.
22
Page 25

Tools
The relation of the tools and their configurable items are as follows:
Note that the description in this manual is focused on the configuration from the
control panel.
CentreWare
Item Control Panel
Enabling a port
OO
Setting an IP
address
Configuring the email environment
Registering a
mailbox
Address book O U XO
Confirming printer
status
Confirming print
data (job) status
Setting
authentication
Setting personal
authentication
information
O
U OXU
OO
U O
XOOX
O U XO
OOX O
Internet
Services
O
(change only)
Tools in the
Driver CD Kit
U (IP Address
Setting Tool/
LPD only)
O (IP Address
Setting Tool)
O
(EasyOperator)
O (Document
Monitor)
ApeosWare
EasyAdmin
U
O
(change only)
O
2
X
Product Overview
O : Configurable U : Partly configurable X : Not configurable
23
Page 26
2 Product Overview
Power On / Off
Product Overview
Powering On
Turn on the power before operating the machine.
The machine is ready for operation within 24 seconds after the power is turned on. The
time may vary depending on the machine configuration.
Turn the machine off at the end of the day or when it is not in use for a long period of
time. If you want to reduce power consumption, use the power saving feature.
Important • Switching off the power of the machine may cause loss of data being processed.
For information on the power saving feature, refer to "Power Saver Mode" in Chapter 2 of the User
Guide.
Note • When the power is turned off, all functions of the machine will stop. Do not turn the
machine off if it is used all day for receiving faxes.
2
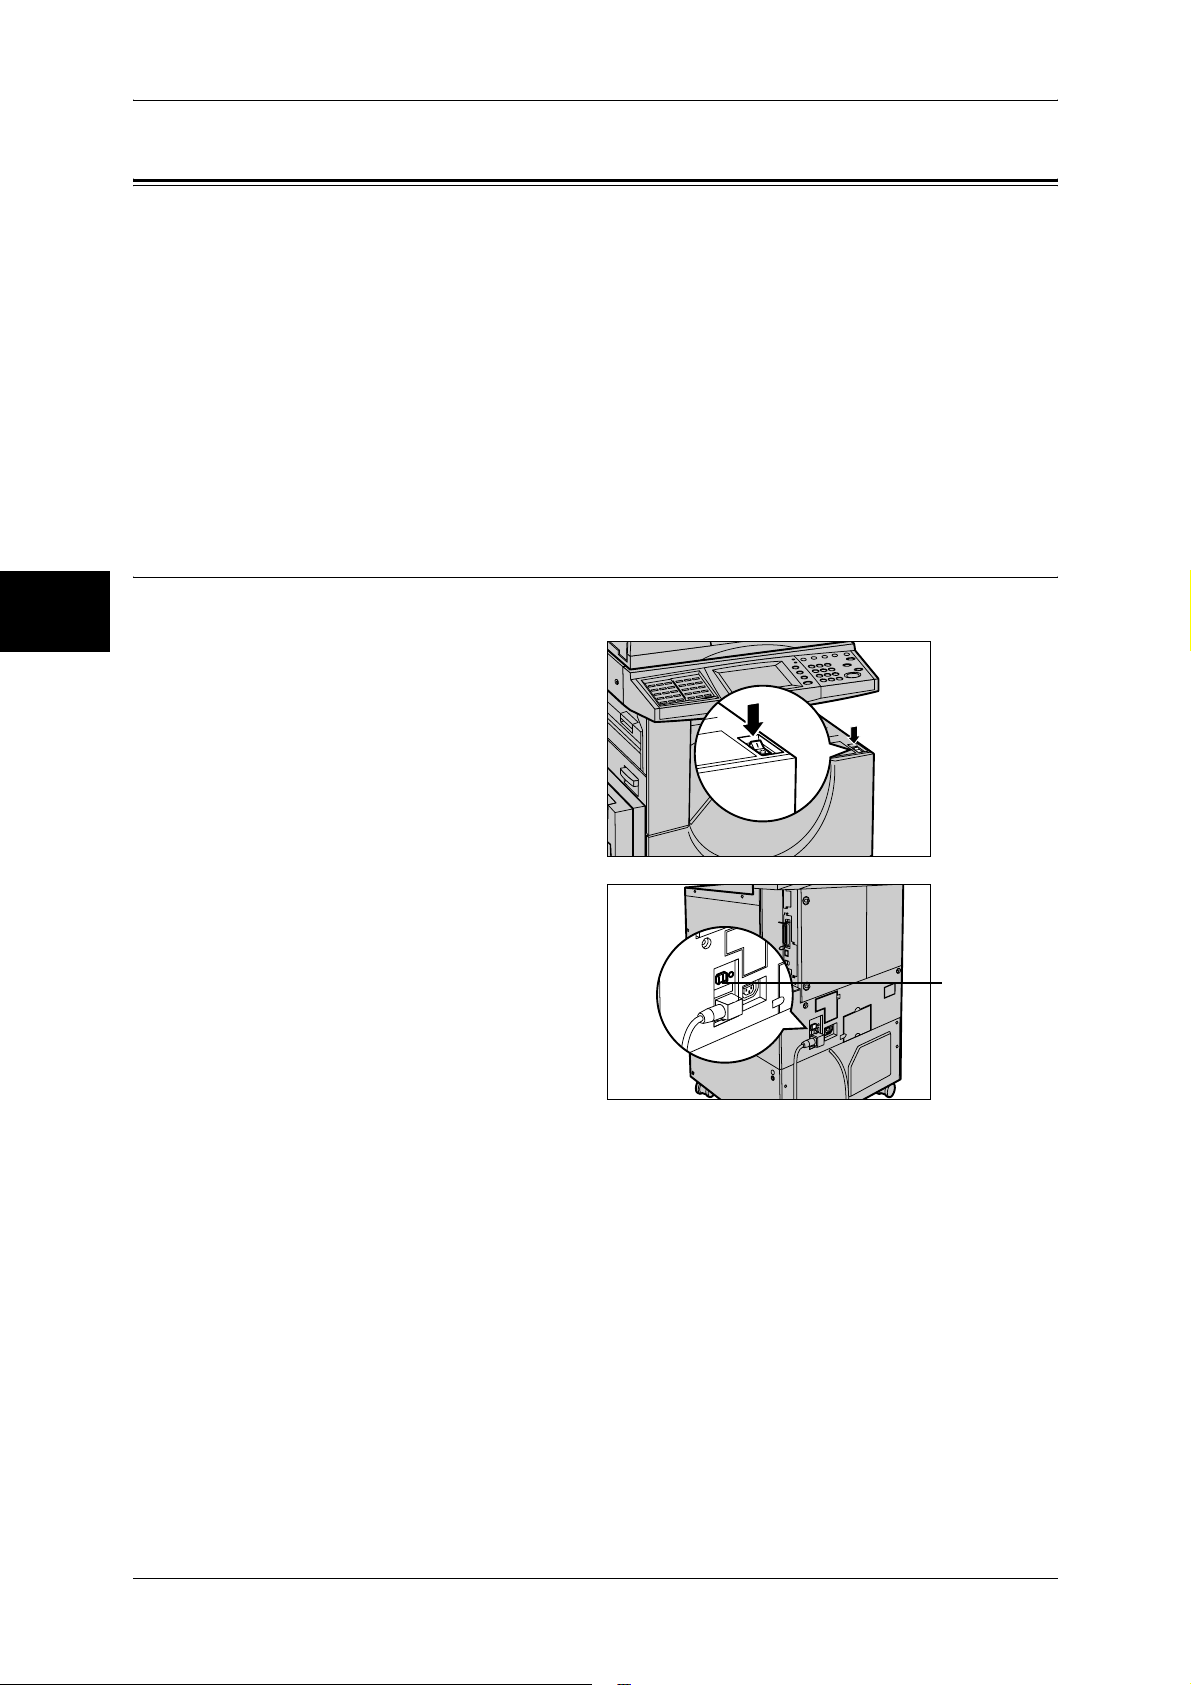
The procedure for turning on the power is as follows.
1 Press the power switch to the [ | ]
position to turn the power on.
Note • The “Please wait...”
message indicates that the
machine is warming up.
The machine cannot be
used during warming up.
Note • When the power does not
come on, check if the
power cord is plugged into
the power outlet and the
<RESET> button is in a
reset state (button is
pressed in).
<RESET> button
24
Page 27

Powering Off
The procedure for turning the power off is as follows.
Important • Turning off the power of the machine may cause loss of data being processed.
1 Before turning the power off, make sure that all copy or print jobs have completely
finished. Also, make sure that the <Online> indicator is not lit.
Important • Never turn the power off in the following instances:
2 Press the power switch to the [ ] position.
Important • Power off processing is performed internally on the machine for a while after the power
Note • Before you turn the power back on after turning it off, wait 20 seconds.
Power On / Off
- While data is being received
- While jobs are being printed
- While jobs are being copied
- While jobs are being scanned
switch is turned off. Therefore, do not unplug the power cord from the power outlet
immediately after turning the power switch off.
Product Overview
2
25
Page 28
2 Product Overview
Interface Cables
When connecting the machine directly to a computer, use either the parallel interface
or USB interface. When connecting to a network, use the Ethernet interface.
Using the Parallel Interface
Product Overview
2
This section describes the installation procedure for the parallel interface.
Note • When connecting with a computer using parallel interface, our parallel interface cable
(optional) is required. For information on accessories, refer to "Optional Components" in
"Chapter 17 Appendix" in the User Guide.
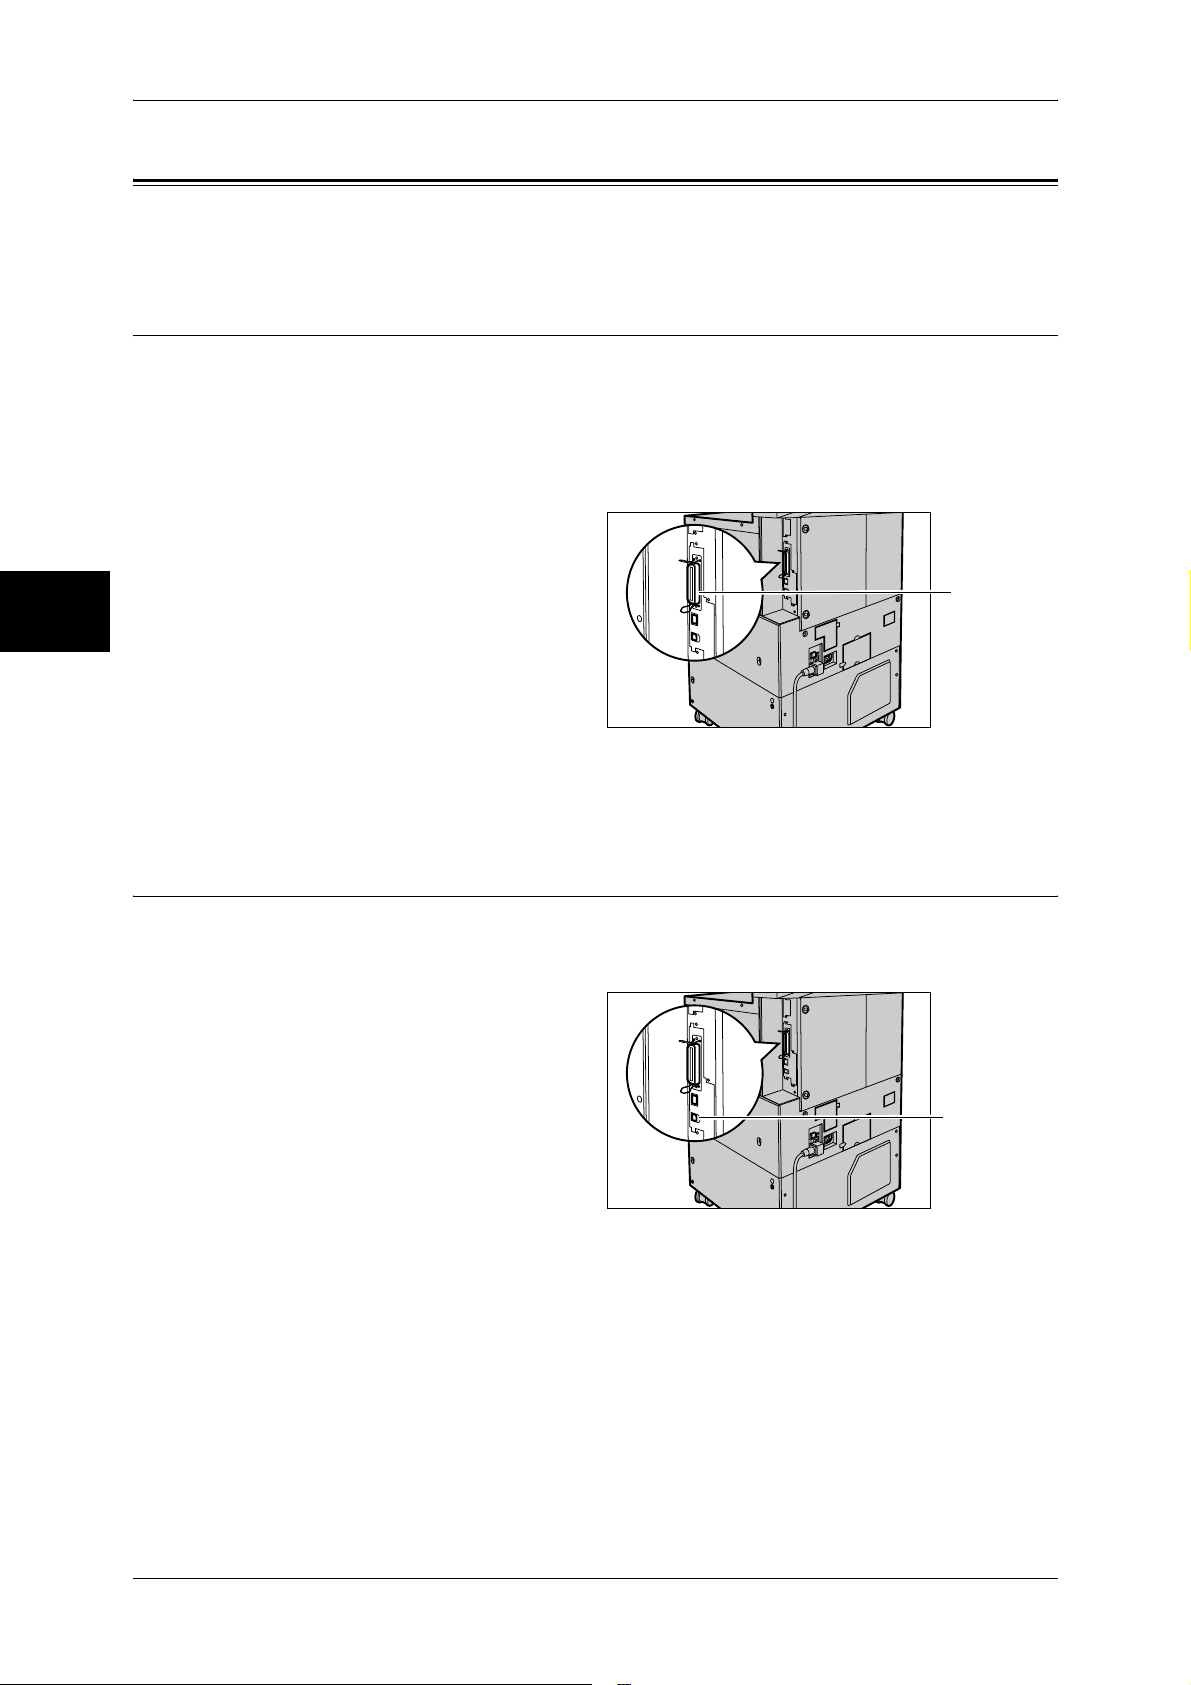
1 Ensure that the machine is off.
2 Insert the connector of the interface
cable into the machine’s parallel
interface connector and fasten it
with the clips on either side of the
connector.
3 Connect the other end of the
interface cable to a computer.
4 Switch on the machine.
5 Restart the computer.
For details of setting items, refer to "Installation When Using Parallel Port" (P.33).
Using the USB Interface
The USB interface supports USB 2.0.
This section describes the installation procedure for the USB interface.
Parallel
1 Ensure that the machine is off.
2 Connect the USB interface cable to
the USB 2.0 interface connector on
the side of the machine.
3 Connect the other end of the USB
interface cable to a computer.
4 Switch on the machine.
5 Restart the computer.
For details of setting items, refer to "Installation When Using USB Port" (P.37).
USB 2.0
26
Page 29
Using the Ethernet Interface
The Ethernet interface supports the following 2 types.
z
100BASE-TX
z
10BASE-T
This section describes the installation procedure for the Ethernet interface.
1 Ensure that the machine is off.
Interface Cables
2 Connect the network cable to the
Ethernet interface connector.
Note • Prepare a network cable
suitable for your network
connection. When changing
the network cable, consult our
customer engineers.
3 Switch on the machine.
Product Overview
Ethernet
2
27
Page 30

2 Product Overview
Control Panel
The following describes the names and functions of components on the control panel.
Product Overview
2
2 3
5 6 7 8
123
456
78
9
0
#
C
16
1517 141819
001 002 003
004 005 006
007 008 009
010 011 012
013 014 015
1 4
016 017 018
019 020 021
022 023 024
025 026 027
030
028 029
2021
No. Component Function
1 Contrast dial Adjusts the contrast of the touch screen. Use this dial to enhance or
decrease the contrast.
2 Touch screen Displays messages required for operation and buttons for various
features. You can directly touch the touch screen to instruct operations
and set features.
3 <Online> indicator Lights when the machine is sending or receiving data to or from a client.
4 <Job in Memory> indicator Lights when data is stored in the machine's memory.
You can check stored documents in [Stored Documents List]. For
information on [Stored Documents List], refer to "Print Report/List"
under "Chapter 13 Machine Status" in the User Guide.
9
10
11
12
13
5 <Job Status> button Press this button to confirm or cancel currently executing or completed
jobs, or to confirm or print saved documents.
In this manual, this button is indicated as the <Job Status> button.
6 <Review> button Press this button to open the [Review] screen. In this screen, you can
check a list of the status of copy, fax and scan features whose settings
have changed from the defaults. You can also check the destination
information for sending faxes and e-mail.
In this manual, this button is indicated as the <Review> button.
7 <Machine Status> button Press this button to confirm the machine status and meters, check the
state of consumables, and print reports.
In this manual, this button is indicated as the <Machine Status> button.
8 <Log In/Out> button Press this button to display the user ID input screen for System
Administration mode or Login Setup/Auditron Administration.
In this manual, this button is indicated as the <Log In/Out> button.
9 <Power Saver> button If the machine is not operated for a while, the machine's power
consumption is lowered to enter the power saver mode. In the power
saver mode, this button lights up. To cancel the power saver mode,
press this button again.
In this manual, this button is indicated as the <Power Saver> button.
28
Page 31

Control Panel
No. Component Function
10 <Clear All> button Returns the statuses of all displayed services to their default values.
The machine will be reset to this state after it is turned on.
In this manual, this button is indicated as the <Clear All> button.
11 <Interrupt> button/indicator Press this button to temporarily stop a continuous copy job or printing to
give another job higher priority. During an interrupt, the interrupt
indicator lights up. Pressing the <Interrupt> button again cancels the
interrupt and the previous operation is resumed.
In this manual, this button is indicated as the <Interrupt> button.
Some jobs cannot be executed during the interruption. For detail
information, refer to "Notes and Restrictions on the Interrupt Mode"
under "Chapter 17 Appendix" in the User Guide.
12 <Stop> button Press this button to stop the current copy job or communications.
In this manual, this button is indicated as the <Stop> button.
13 <Start> button Press this button to start copying or scanning.
In this manual, this button is indicated as the <Start> button.
Product Overview
14 Numeric keypad Press these buttons to enter the number of copies, passwords and other
numerical values.
In this manual, these buttons are indicated as the “numeric keypad”.
15 <Speed Dial> button Used to specify a destination phone number for fax or e-mail.
In this manual, this button is indicated as the <Speed Dial> button.
16 <C (Clear)> button Press this button if you have entered the wrong numerical value with the
numeric keypad.
In this manual, this button is indicated as the <C> button.
17 <Dial Pause> button Used to insert a pause into a destination number.
In this manual, this button is indicated as the <Dial Pause> button.
18 <Custom> buttons
(<Copy>, <Custom 2>,
<Custom 3> buttons)
19 <All Services> button Used to display the [All Services] screen.
20 One touch button panels Panels for one touch buttons.
21 One touch buttons Used to specify a destination in one operation. These buttons are
Used to call their associated features.
To the buttons, you can assign [Language] or any features displayed on
the [All Services] screen.
For information on assigning features to buttons, refer to "Screen/Button
Settings" under "Chapter 11 System Settings" in the User Guide.
In this manual, this button is indicated as the <All Services> button.
You can change the features that appear in the <All Services> screen.
For detail information, refer to "Screen Defaults" in "Chapter 11 System
Settings" in the User Guide.
You can leaf through panels to display 001 to 030, 031 to 060, and 061
to 070. M01 to M20 are reserved for the stored programming feature.
These buttons correspond to jobs registered in 01 to 20.
Note • This feature is not available for some models. An optional package is
necessary. For more information, contact our Customer Support
Center.
available for fax and iFax.
The one touch buttons are associated with address numbers 001 to
070.
2
29
Page 32

2 Product Overview
Internal Fonts
The following fonts are available as standard.
Refer to the manual in the PostScript Driver Library CD-ROM for the PostScript fonts.
Product Overview
2
Stroke fonts
(for PCL5 and HP-GL/2)
Outline
fonts
European
ESC/P Roman
PDF Arial
PCL CG Times
• European Stroke fonts
Sans Serif
Arial Italic
Arial Bold
Arial Bold Italic
Courier
Courier Italic
Courier Bold
CG Times Italic
CG Times Bold
CG Times Bold Italic
Univers Medium
Univers Medium Italic
Univers Bold
Univers Bold Italic
Univers Medium Condensed
Univers Medium Condensed
Italic
Univers Bold Condensed
Univers Bold Condensed Italic
Antique Olive
Antique Olive Italic
Antique Olive Bold
CG Omega
CG Omega Italic
CG Omega Bold
CG Omega Bold Italic
Garamond Antiqua
Garamond Kursiv
Garamond Halbfett
Garamond Kursiv Halbfett
(Default): Courier
Courier Italic
Courier Bold
Courier Bold Italic
Letter Gothic
Letter Gothic Italic
Letter Gothic Bold
Albertus Medium
Albertus Extra Bold
Clarendon Condensed
Coronet
Marigold
Arial
Arial Italic
Arial Bold
Arial Bold Italic
Times New
Times New Italic
Courier Bold Italic
Symbol
Times New Roman
Times New Roman Bold Italic
ITC Zapf Dingbats
GoldSEMM
Gold SAMM
Times New Bold
Times New Bold Italic
Symbol
Wingdings
Line Printer
Times Roman
Times Italic
Times Bold
Times Bold Italic
Helvetica
Helvetica Oblique
Helvetica Bold
Helvetica Bold Oblique
CourierPS
CourierPS Oblique
CourierPS Bold
CourierPS Bold Oblique
SymbolPS
Palatino Roman
Palatino Italic
Palatino Bold
Palatino Bold Italic
ITC Bookman Light
ITC Bookman Light Italic
ITC Bookman Demi
ITC Bookman Demi Italic
Helvetica Narrow
Helvetica Narrow Oblique
Helvetica Narrow Bold
Helvetica Narrow Bold Oblique
New Century Schoolbook Roman
New Century Schoolbook Italic
New Century Schoolbook Bold
New Century Schoolbook Bold Italic
ITC Avant Garde Book
ITC Avant Garde Book Oblique
ITC Avant Garde Demi
ITC Avant Garde Demi Oblique
ITC Zapf Chancery Medium Italic
ITC Zapf Dingbats
30
Page 33

Internal Fonts
KO PCL5 Muyngio
Gothic
R- Gothic
KS Muyngio
Gothic
R- Gothic
Graphic
Kungso
Saemmul
TC PCL5 ShuSong
SC PCL5
ESC/P-K
ShuSong
Graphic
Kungso
Saemmul
T-Myungio
T-Gothic
TR-Gothic
T-Graphic
T-Kungso
T-Saemmul
Product Overview
2
31
Page 34

Page 35

3 Installation When Using
Parallel Port
This chapter describes how to install the machine when using the parallel
interface.
z
Preparations ...............................................................................................34
z
Installation Procedure ................................................................................. 34
Page 36

Installation When Using Parallel Port
3
3 Installation When Using Parallel Port
Preparations
Prepare the following items to install the machine when using a parallel interface.
z
Parallel interface cable
z
Parallel port
z
CD-ROM of the Driver CD Kit (provided with the machine)
Installation Procedure
Installation Overview
The machine can be connected directly to a computer using a parallel interface cable.
Other computers on the same network can also print via the computer that the machine
is connected to.
The following is the configuration procedure to use a parallel interface.
z
Configuration on the machine
Configuring the parallel port on the machine.
z
Configuration on the computer
Installing a print driver.
Configuration on the Machine
The following describes the configuration procedure to use a parallel interface on the
machine.
Note • The configuration can also be performed using CentreWare Internet Services.
For information on how to use CentreWare Internet Services, refer to "Using CentreWare Internet
Services" (P.63).
1 Connect a parallel interface cable to the parallel interface connector on the machine.
2 Display the [System Administrator Menu] screen.
1) Press the <Log In/Out> button.
2) Enter the user ID with the numeric keypad or a keyboard displayed by pressing
[Keyboard], and select [Confirm].
Note • The default user ID is "11111". When using the Authentication feature, a passcode is
required. The default passcode is "x-admin".
3) Select [System Settings].
3 Enable the parallel port.
1) Select [System Settings].
34
2) Select [Network Settings].
3) Select [Port Settings].
4) Select [Parallel], and select [Change Settings].
5) Select [Port Status], and select [Change Settings].
6) Select [Enabled], then select [Save].
Page 37

Installation Procedure
4 Configure the following items as necessary.
z
Print Mode
Configure the print language on the machine to match the received data.
z
PJL
Enable when receiving a job using PJL commands.
The PJL commands are independent of any print languages. A print language used
in the next data can be set independently of the current print language.
z
Auto Eject Time
Configure the time that the data so far received by the machine will automatically be
printed since data is no longer sent to the printer.
z
Adobe Communication Protocol
Configure the protocol defining the communication method between PostScript
printers and a host.
z
Bi-directional Communication
Configure the parallel port for either half duplex transmission or full duplex
transmission.
Note • Adobe Communication Protocol can be configured when Adobe PostScript 3 Kit (optional) is
installed.
• Leave the default settings unchanged for general use. Some items, however, may be
required to be changed depending on the operating system on the computer.
5 Select [Close] repeatedly until the [System Settings] screen is displayed.
Installation When Using Parallel Port
3
6 Select [Exit].
7 After the machine is restarted, print out a settings list to confirm that the parallel port is
enabled.
For information on how to print a settings list, refer to "Print Report/List" under "Chapter 13 Machine
Status" in the User Guide.
8 Turn off the computer.
9 Connect a parallel interface cable to the parallel interface on the computer.
10 Restart the computer.
Configuration on the Computer
The following describes the configuration procedure for the computer.
In order to print from the machine, the computer needs to have a print driver installed.
For information on the supported OS, refer to "Supported Operating Systems" (P.19).
For information on the driver installation procedure, refer to the manual contained in the CD-ROM of
the Driver CD Kit.
35
Page 38

Page 39

4 Installation When Using USB
Port
This chapter describes how to install the machine when using a USB interface.
z
Preparations ...............................................................................................38
z
Installation Procedure ................................................................................. 38
Page 40

4 Installation When Using USB Port
Preparations
Prepare the following items to install the machine when using a USB interface.
z
USB cable
z
CD-ROM of the Driver CD Kit (provided with the machine)
z
USB port
z
Installation When Using USB Port
Adobe PostScript 3 Kit (optional: when using Macintosh)
Installation Procedure
Installation Overview
The machine can be connected directly to a computer using a USB cable.
The following is the procedure to use a USB interface.
z
Configuration on the machine
4
Configuring the USB port on the machine.
z
Configuration on the computer
Installing a print driver.
Configuration on the Machine
The following describes the configuration procedure to use a USB interface on the
machine.
Note • The configuration can also be performed using CentreWare Internet Services.
• To print binary data by using a USB interface, set [Adobe Communication Protocol] to
[RAW].
For information on how to use CentreWare Internet Services, refer to "Using CentreWare Internet
Services" (P.63).
1 Display the [System Administrator Menu] screen.
1) Press the <Log In/Out> button.
2) Enter the user ID with the numeric keypad or a keyboard displayed by pressing
[Keyboard], and select [Confirm].
Note • The default user ID is “11111”. When using the Authentication feature, a passcode is
required. The default passcode is “x-admin”.
3) Select [System Settings].
38
2 Display the USB port configuration screen.
1) Select [System Settings].
2) Select [Network Settings].
3) Select [Port Settings].
4) Select [USB], and select [Change Settings].
5) Select [Port Status], and select [Change Settings].
6) Select [Enabled], then select [Save].
Page 41

Installation Procedure
3 Configure the following items as necessary.
z
Print Mode
Configure the print language on the machine to match the received data.
z
PJL
Enable when receiving a job using PJL commands.
The PJL commands are independent of any print languages. A print language used
in the next data can be set independently of the current print language.
z
Auto Eject Time
Configure the time that the data so far received by the machine will automatically be
printed since data is no longer sent to the printer.
z
Adobe Communication Protocol
Configure the protocol defining the communication method between PostScript
printers and a host.
4 Select [Close] repeatedly until the [System Settings] screen is displayed.
5 Select [Exit].
Installation When Using USB Port
6 After the machine is restarted, print out a settings list to confirm that the USB port is
enabled.
For information on how to print a settings list, refer to "Print Report/List" under "Chapter 13 Machine
Status" in the User Guide.
Configuration on the Computer
The following describes the configuration procedure for the computer.
In order to print from the machine, the computer needs to have a print driver installed.
For information on the supported operating systems, refer to "Supported Operating Systems" (P.19).
For information on the driver installation procedure, refer to the manual contained in the CD-ROM of
the Driver CD Kit.
You can also print from a Macintosh using USB. You will need optional Adobe PostScript 3 Kit. Refer
to the manual contained in the CD-ROM provided with the kit for the print driver installation procedure.
4
39
Page 42

Page 43

5 Installation When Using
TCP/IP (LPD/Port 9100)
This chapter describes how to install the machine when using a TCP/IP (LPD/
Port 9100) protocol.
z
Preparations ...............................................................................................42
z
Installation Procedure ................................................................................. 42
Page 44

5 Installation When Using TCP/IP (LPD/Port 9100)
Preparations
Prepare the following items to install the machine when using a TCP/IP (LPD/Port
9100) protocol.
z
TCP/IP network environment
z
Installation When Using TCP/IP (LPD/Port 9100)
CD-ROM of the Driver CD Kit (provided with the machine)
z
Adobe PostScript 3 Kit (optional: when using Macintosh)
Installation Procedure
Installation Overview
The machine can be connected to a computer using a TCP/IP (LPD/Port 9100)
protocol.
The following is the procedure to use a TCP/IP(LPD/Port 9100) protocol.
z
Configuration on the machine
5
Configuring TCP/IP (LPD/Port 9100) on the machine.
z
Configuration on the computer
Installing a print driver.
Configuration on the Machine
The following describes the configuration procedure to use a TCP/IP (LPD/Port 9100)
protocol on the machine. Enable a LPD Port/Port 9100 port, then assign an IP address.
Note • The configuration can also be performed using CentreWare Internet Services or IP Address
Setting Tool included in the CD-ROM of the Driver CD Kit.
For information on how to use CentreWare Internet Services, refer to "Using CentreWare Internet
Services" (P.63).
1 Display the [System Administrator Menu] screen.
1) Press the <Log In/Out> button.
2) Enter the user ID with the numeric keypad or a keyboard displayed by pressing
[Keyboard], and select [Confirm].
Note • The default user ID is “11111”. When using the Authentication feature, a passcode is
required. The default passcode is “x-admin”.
3) Select [System Settings].
42
2 Enable either the LPD port or the Port 9100 port as appropriate. In this example, the
LPD port is enabled.
1) Select [System Settings].
2) Select [Network Settings].
3) Select [Port Settings].
4) Select [LPD], and select [Change Settings].
5) Select [Port Status], and select [Change Settings].
6) Select [Enabled], then select [Save].
7) Select [Close] repeatedly until the [Network Settings] screen is displayed.
Page 45

Installation Procedure
3 Set an IP address.
If an IP address is already set, this step is not necessary. Also, in an environment with
DHCP or BOOTP, configure the way to obtain an IP address. Either the address
cannot be obtained automatically or manual configuration is preferred, configure an IP
address, a subnet mask, and a gateway address.
1) Select [Protocol Settings].
2) Select [TCP/IP - Get IP Address] and then select [Change Settings].
3) Select one from [DHCP], [BOOTP], [RARP], [DHCP/Autonet] and [Manual], and
then select [Save]. If you select anything other than [Manual], proceed to Step 4.
Note • When using a DHCP server, also configure the WINS (Windows Internet Name Service)
server. To set a DHCP server, use CentreWare Internet Services. For details, refer to "Using
CentreWare Internet Services" (P.63).
4) Select [TCP/IP - IP Address] and select [Change Settings].
5) Enter the IP address using the numeric keypad.
Note • Enter the IP address in the format “xxx.xxx.xxx.xxx”. The "xxx" must be a numeric value in
the range from 0 to 255. However, 224-255.xxx.xxx.xxx, and 127.xxx.xxx.xxx cannot be
used.
• When you make an entry mistake, press the <C> (clear) button and enter again.
• When you want to move to the next value without entering all 3 digits, select [save/select
next].
6) Select [Save].
7) Configure [TCP/IP - Subnet Mask] and [TCP/IP - Gateway Address] as the above.
Note • Enter gateway address in the format “xxx.xxx.xxx.xxx”. The "xxx" must be a numeric value in
the range from 0 to 255. However, 224-255.xxx.xxx.xxx, and 127.xxx.xxx.xxx cannot be
used.
• Specify the subnet mask by a combination of the numbers 0, 128, 192, 224, 240, 248, 252,
254, and 255. However, you cannot use 0 between non-zero values.
• If you do not want to set the gateway address, enter "0.0.0.0".
8) Select [Close] repeatedly until the [Network Settings] screen is displayed.
Installation When Using TCP/IP (LPD/Port 9100)
5
4 If the operating system on the client is MacOS X v10.2 or later, the discovery feature
that automatically detects printers on the IP network can be enabled.
Note • [Bonjour] can be set when Adobe PostScript 3 Kit is installed.
• In order to print from a printer detected by [Bonjour], the LPD
advance.
port must be activated in
1) Select [Port Settings].
2) Select [Bonjour] and then select [Change Settings].
3) Select [Port Status] and select [Change Settings].
4) Select [Enabled] then select [Save].
5) Select [Close] repeatedly until the [Network Settings] screen is displayed.
5 Select [Close] repeatedly until the [System Settings] screen is displayed.
6 Select [Exit].
7 After the machine is restarted, print out a settings list to confirm that the LPD port is
enabled and TCP/IP is configured.
For information on how to print a settings list, refer to "Print Report/List" under "Chapter 13 Machine
Status" in the User Guide.
Configure other LPD settings as necessary. Refer to "LPD" (P.76) for the LPD configuration. Also if
using Port 9100, configure the Port 9100 as necessary. Refer to "Port 9100" (P.80) for the Port 9100
configuration.
43
Page 46

5 Installation When Using TCP/IP (LPD/Port 9100)
Configuration on the Computer
The following describes the configuration procedure for the computer.
In order to print from the machine, the computer needs to have a print driver installed.
For information on the supported operating systems, refer to "Supported Operating Systems" (P.19).
For information on the driver installation procedure, refer to the manual contained in the CD-ROM of
the Driver CD Kit.
Installation When Using TCP/IP (LPD/Port 9100)
You can also print from a Macintosh using TCP/IP (LPD). You will need optional Adobe PostScript 3
Kit. Refer to the manual contained in the CD-ROM provided with the kit for the print driver installation
procedure.
5
44
Page 47

6 Installation When Using
NetWare
This chapter describes how to use the machine when using a NetWare network.
z
Preparations ...............................................................................................46
z
Installation Procedure ................................................................................. 46
Page 48

6 Installation When Using NetWare
Preparations
Prepare the following items to install the machine when using a NetWare network.
z
NetWare server
z
TCP/IP or IPX/SPX network environment
z
CD-ROM of the Driver CD Kit (provided with the machine)
z
NetWare Kit (optional) or Adobe PostScript 3 Kit (optional)
Installation Procedure
Installation Overview
Installation When Using NetWare
The machine supports a PServer mode both for the NetWare Directory Service and
Bindery Service. The PServer mode enables the machine to function as a print server
and to capture print jobs in the print queue to output. The printer created for the
machine consumes one file server license.
Note • The machine does not support a Remote Printer (RPrinter) mode.
• You can use the machine as a printer in a NDPS environment by using a Novell NDPS
Gateway. When using in a NDPS environment, settings of the machine to be used under a
NetWare print environment are required. Or, you need to enable LPD in advance and set it
as a gateway destination in a Novell NDPS Gateway setup. However, attribute information
that can be set or captured by NDPS is not supported.
6
Supported interfaces
z
100BASE-TX
z
10BASE-T
Supported frame types
z
Ethernet II specification
z
IEEE802.3 specification
z
IEEE802.3 / IEEE802.2 specification
z
IEEE802.3 / IEEE802.2 / SNAP specification
Note • The machine will send packets of each frame type on the network, and will initialize for the
same frame type as the first reply packet received. You can fix a frame type in use.
However, if there are multiple protocols running on the same network, use Ethernet II
specification.
• Some network equipment (hubs, etc.) may not support the automatic frame type detection. If
a data link indicator corresponding to the port of the network equipment connected with the
machine does not light up, change the settings of the frame type of the machine to the frame
type of the file server. Configuration can also be performed using CentreWare Internet
Services.
The following describes the configuration procedure to connect the machine to a
NetWare network.
z
Configuration on the Machine
- To use IPX/SPX, configure the machine using the CD-ROM of the Driver CD Kit
after enabling the NetWare port of the machine.
- To use a LPD port in NDPS, configure the machine using the CD-ROM of the
Driver CD Kit after enabling the LPD port of the machine and setting TCP/IP.
46
Page 49

z
Configuration on the computer
Installing a print driver.
Configuration on the Machine
The following describes the configuration procedure to connect the machine to a
NetWare network.
Note • The configuration can also be performed using CentreWare Internet Services or IP Address
Setting Tool included in the CD-ROM of the Driver CD Kit.
For information on how to use CentreWare Internet Services, refer to "Using CentreWare Internet
Services" (P.63).
Using IPX/SPX
1 Display the [System Administrator Menu] screen.
1) Press the <Log In/Out> button.
2) Enter the user ID with the numeric keypad or a keyboard displayed by pressing
[Keyboard], and select [Confirm].
Note • The default user ID is “11111”. When using the Authentication feature, a passcode is
required. The default passcode is “x-admin”.
3) Select [System Settings].
Installation Procedure
Installation When Using NetWare
2 Enable the NetWare port.
1) Select [System Settings].
2) Select [Network Settings].
3) Select [Port Settings].
4) Select [NetWare], and select [Change Settings].
5) Select [Port Status], and select [Change Settings].
6) Select [Enabled], then select [Save].
3 Select [Close] repeatedly until the [System Settings] screen is displayed.
4 Select [Exit].
5 After the machine is restarted, print out a settings list to confirm that the NetWare port
is enabled, the NetWare device name and the network address.
For information on how to print a settings list, refer to "Print Report/List" under "Chapter 13 Machine
Status" in the User Guide.
6 Configure the machine using the CD-ROM of the Driver CD Kit.
Refer to the manual contained in the CD-ROM of the Driver CD Kit for the configuration procedure.
Using a LPD Port in NDPS
1 Display the [System Administrator Menu] screen.
6
1) Press the <Log In/Out> button.
2) Enter the user ID with the numeric keypad or a keyboard displayed by pressing
[Keyboard], and select [Confirm].
Note • The default user ID is “11111”. When using the Authentication feature, a passcode is
required. The default passcode is “x-admin”.
3) Select [System Settings].
47
Page 50

6 Installation When Using NetWare
2 Enable the LPD port.
1) Select [System Settings].
2) Select [Network Settings].
3) Select [Port Settings].
4) Select [LPD] and then select [Change Settings].
5) Select [Port Status] and select [Change Settings].
6) Select [Enabled] then select [Save].
7) Select [Close] repeatedly until the [Network Settings] screen is displayed.
3 Set an IP address.
If an IP address is already set, this step is not necessary. Also, in an environment with
DHCP or BOOTP, configure the way to obtain an IP address. Either the address
cannot be obtained automatically or manual configuration is preferred, configure an IP
address, a subnet mask, and a gateway address.
Installation When Using NetWare
1) Select [Protocol Settings].
2) Select [TCP/IP - Get IP Address] and then select [Change Settings].
3) Select one from [DHCP], [BOOTP], [RARP], [DHCP/Autonet] and [Manual], and
then select [Save]. If you select anything other than [Manual], proceed to Step 4.
Note • When using a DHCP server, also configure the WINS (Windows Internet Name Service)
4) Select [TCP/IP - IP Address] and select [Change Settings].
server. To set a DHCP server, use CentreWare Internet Services. For details, refer to "Using
CentreWare Internet Services" (P.63).
6
5) Enter the IP address using the numeric keypad.
Note • Enter the IP address in the format “xxx.xxx.xxx.xxx”. The "xxx" must be a numeric value in
the range from 0 to 255. However, 224-255.xxx.xxx.xxx, and 127.xxx.xxx.xxx cannot be
used.
• When you make an entry mistake, press the <C> (Clear) button and enter again.
• When moving to the next value without entering all 3 digits, select [Next].
6) Select [Save].
7) Configure [TCP/IP - Subnet Mask] and [TCP/IP - Gateway Address] as the above.
Note • Enter the gateway address in the format “xxx.xxx.xxx.xxx”. The "xxx" must be a numeric
value in the range from 0 to 255. However, 224-255.xxx.xxx.xxx, and 127.xxx.xxx.xxx
cannot be used.
• Specify the subnet mask by a combination of the numbers 0, 128, 192, 224, 240, 248, 252,
254, and 255. However, you cannot use 0 between non-zero values.
• If you do not want to set the gateway address, enter "0.0.0.0".
4 Select [Close] repeatedly until the [System Settings] screen is displayed.
5 Select [Exit].
6 After the machine is restarted, print out a settings list to confirm that the LPD port is
enabled and TCP/IP is configured.
For information on how to print a settings list, refer to "Print Report/List" under "Chapter 13 Machine
Status" in the User Guide.
Configure other LPD settings as necessary. Refer to "LPD" (P.76) for the LPD configuration.
7 Configure the machine using the CD-ROM of the Driver CD Kit.
48
Refer to the manual contained in the CD-ROM of the Driver CD Kit for the configuration procedure.
Page 51

Configuration on the Computer
The following describes the configuration procedure for the computer.
In order to print from the machine, the computer needs to have a print driver installed.
For information on the supported operating systems, refer to "Supported Operating Systems" (P.19).
For information on the driver installation procedure, refer to the manual contained in the CD-ROM of
the Driver CD Kit.
Installation Procedure
Installation When Using NetWare
6
49
Page 52

Page 53

7 Installation When Using
Microsoft Network (SMB)
This chapter describes how to install the machine when using a Microsoft
Network (SMB).
z
Preparations ...............................................................................................52
z
Installation Procedure ................................................................................. 52
Page 54

7 Installation When Using Microsoft Network (SMB)
Preparations
Prepare the following items to use the machine when using a Microsoft Network (SMB).
z
TCP/IP or NetBEUI network environment
z
CD-ROM of the Driver CD Kit (provided with the machine)
Installation Procedure
Installation Overview
Installation When Using Microsoft Network (SMB)
The machine can be connected to computers using Microsoft Networks (SMB).
Depending on the network environment, the machine may need to be configured with
an IP address, subnet mask and gateway address. Confirm with the network
administrator and set up the necessary items.
The following is the procedure to connect the machine to a Microsoft Network (SMB).
z
Configuration on the machine
7
Enabling the SMB port on the machine and configuring TCP/IP.
z
Configuration on the computer
Installing a print driver.
Configuration on the Machine
The following describes the configuration procedure to connect the machine to
Microsoft Networks (SMB). First enable the SMB port, then set the TCP/IP settings.
Note • The configuration can also be performed using CentreWare Internet Services or IP Address
Setting Tool included in the CD-ROM of the Driver CD Kit.
For information on how to use CentreWare Internet Services, refer to "Using CentreWare Internet
Services" (P.63).
1 Display the [System Administrator Menu] screen.
1) Press the <Log In/Out> button.
2) Enter the user ID with the numeric keypad or a keyboard displayed by pressing
[Keyboard], and select [Confirm].
Note • The default user ID is “11111”. When using the Authentication feature, a passcode is
required. The default passcode is “x-admin”.
3) Select [System Settings].
52
2 Enable the SMB port.
1) Select [System Settings].
2) Select [Network Settings].
3) Select [Port Settings].
4) Select [SMB], and select [Change Settings].
5) Select [Port Status], and select [Change Settings].
6) Select [Enabled], then select [Save].
7) Select [Close] repeatedly until the [Network Settings] screen is displayed.
Page 55

Installation Procedure
3 Set an IP address.
If an IP address is already set, this step is not necessary. Also, in an environment with
DHCP or BOOTP, configure the way to obtain an IP address. Either the address
cannot be obtained automatically or manual configuration is preferred, configure an IP
address, a subnet mask, and a gateway address.
1) Select [Protocol Settings].
2) Select [TCP/IP - Get IP Address] and then select [Change Settings].
3) Select one from [DHCP], [BOOTP], [RARP], [DHCP/Autonet] and [Manual], and
then select [Save]. If you select anything other than [Manual], proceed to Step 4.
Note • When using a DHCP server, also configure the WINS (Windows Internet Name Service)
server. To set a DHCP server, use CentreWare Internet Services. For details, refer to "Using
CentreWare Internet Services" (P.63).
4) Select [TCP/IP - IP Address] and select [Change Settings].
5) Enter the IP address using the numeric keypad.
Note • Enter the IP address in the format “xxx.xxx.xxx.xxx”. The "xxx" must be a numeric value in
the range from 0 to 255. However, 224-255.xxx.xxx.xxx, and 127.xxx.xxx.xxx cannot be
used.
• When you make an entry mistake, press the <C> (Clear) button and enter again.
• When moving to the next value without entering all 3 digits, select [Next].
6) Select [Save].
Installation When Using Microsoft Network (SMB)
7) Configure [TCP/IP - Subnet Mask] and [TCP/IP - Gateway Address] as the above.
Note • Enter the gateway address in the format “xxx.xxx.xxx.xxx”. The "xxx" must be a numeric
value in the range from 0 to 255. However, 224-255.xxx.xxx.xxx, and 127.xxx.xxx.xxx
cannot be used.
• Specify the subnet mask by a combination of the numbers 0, 128, 192, 224, 240, 248, 252,
254, and 255. However, you cannot use 0 between non-zero values.
• If you do not want to set the gateway address, enter "0.0.0.0".
4 Select [Close] repeatedly until the [System Settings] screen is displayed.
5 Select [Exit].
6 After the machine is restarted, print out a settings list to confirm that the SMB port is
enabled and TCP/IP is configured.
For information on how to print a settings list, refer to "Print Report/List" under "Chapter 13 Machine
Status" in the User Guide.
Note • If using the NetBEUI protocol, select [NetBEUI] as the protocol used by SMB for the port
configuration using CentreWare Internet Services.
Configure other SMB settings as necessary. Refer to "SMB" (P.72) for the SMB configuration.
Configuration on the Computer
The following describes the configuration procedure for the computer.
In order to print from the machine, the computer needs to have a print driver installed.
For information on the supported operating systems, refer to "Supported Operating Systems" (P.19).
For information on the driver installation procedure, refer to the manual contained in the CD-ROM of
the Driver CD Kit.
7
53
Page 56

Page 57

8 Installation When Using
Internet Printing Protocol
(IPP)
This chapter describes how to install the machine when using an Internet
Printing Protocol (IPP).
z
Preparations ...............................................................................................56
z
Installation Procedure ................................................................................. 56
Page 58

8 Installation When Using Internet Printing Protocol (IPP)
Preparations
Prepare the following items to install the machine when using a Internet Printing
Protocol (IPP).
z
TCP/IP network environment
z
CD-ROM of the Driver CD Kit (provided with the machine)
Installation Procedure
Installation Overview
Installation When Using Internet Printing Protocol (IPP)
The machine can be connected to computers using IPP.
The following is the procedure to enable Internet Printing (IPP).
z
Configuration on the machine
Enabling an IPP port on the machine and configuring TCP/IP.
z
Configuration on the computer
8
Installing a print driver.
Configuration on the Machine
The following describes the configuration procedure to enable Internet Printing (IPP)
on the machine. First enable the IPP port, then set the TCP/IP.
Note • The configuration can also be performed using CentreWare Internet Services or IP Address
Setting Tool included in the CD-ROM of the Driver CD Kit.
For information on how to use CentreWare Internet Services, refer to "Using CentreWare Internet
Services" (P.63).
1 Display the [System Administrator Menu] screen.
1) Press the <Log In/Out> button.
2) Enter the user ID with the numeric keypad or a keyboard displayed by pressing
[Keyboard], and select [Confirm].
Note • The default user ID is “11111”. When using the Authentication feature, a passcode is
required. The default passcode is “x-admin”.
3) Select [System Settings].
2 Enable the IPP port.
1) Select [System Settings].
56
2) Select [Network Settings].
3) Select [Port Settings].
4) Select [IPP], and select [Change Settings].
5) Select [Port Status], and select [Change Settings].
6) Select [Enabled], then select [Save].
7) Select [Close] repeatedly until the [Network Settings] screen is displayed.
Page 59

Installation Procedure
3 Set an IP address.
If an IP address is already set, this step is not necessary. Also, in an environment with
DHCP or BOOTP, configure the way to obtain an IP address. Either the address
cannot be obtained automatically or manual configuration is preferred, configure an IP
address, a subnet mask, and a gateway address.
1) Select [Protocol Settings].
2) Select [TCP/IP - Get IP Address] and then select [Change Settings].
3) Select one from [DHCP], [BOOTP], [RARP], [DHCP/Autonet] and [Manual], and
then select [Save]. If you select anything other than [Manual], proceed to step 4.
Note • When using a DHCP server, also configure the WINS (Windows Internet Name Service)
server. To set a DHCP server, use CentreWare Internet Services. For details, refer to "Using
CentreWare Internet Services" (P.63).
4) Select [TCP/IP - IP Address] and select [Change Settings].
5) Enter the IP address using the numeric keypad.
Note • Enter the IP address in the format “xxx.xxx.xxx.xxx”. The "xxx" must be a numeric value in
the range from 0 to 255. However, 224-255.xxx.xxx.xxx, and 127.xxx.xxx.xxx cannot be
used.
• When you make an entry mistake, press the <C> (Clear) button and enter again.
• When moving to the next value without entering all 3 digits, select [Next].
6) Select [Save].
Installation When Using Internet Printing Protocol (IPP)
7) Configure [TCP/IP - Subnet Mask] and [TCP/IP - Gateway Address] as the above.
Note • Enter the gateway address in the format “xxx.xxx.xxx.xxx”. The "xxx" must be a numeric
value in the range from 0 to 255. However, 224-255.xxx.xxx.xxx, and 127.xxx.xxx.xxx
cannot be used.
• Specify the subnet mask by a combination of the numbers 0, 128, 192, 224, 240, 248, 252,
254, and 255. However, you cannot use 0 between non-zero values.
• If you do not want to set the gateway address, enter "0.0.0.0".
4 Select [Close] repeatedly until the [System Settings] screen is displayed.
5 Select [Exit].
6 After the machine is restarted, print out a settings list to confirm that the IPP port is
enabled and TCP/IP is configured.
For information on how to print a settings list, refer to "Print Report/List" under "Chapter 13 Machine
Status" in the User Guide.
Configure other IPP settings as necessary. Refer to "IPP" (P.79) for the IPP configuration.
Configuration on the Computer
The following describes the configuration procedure for the computer.
In order to print from the machine, the computer needs to have a print driver installed.
For information on the supported operating systems, refer to "Supported Operating Systems" (P.19).
For information on the driver installation procedure, refer to the manual contained in the CD-ROM of
the Driver CD Kit.
8
57
Page 60

Page 61

9 Installation When Using
EtherTalk
This chapter describes how to install the machine when using an EtherTalk
network.
z
Preparations ...............................................................................................60
z
Installation Procedure ................................................................................. 60
Page 62

9 Installation When Using EtherTalk
Preparations
Prepare the following items to install the machine when using EtherTalk interface.
z
EtherTalk network environment
z
Adobe PostScript 3 Kit (optional)
Installation Procedure
Installation Overview
The machine can be connected to computers using an EtherTalk network.
The following is the procedure to use EtherTalk.
z
Configuration on the machine
Setting EtherTalk on the machine.
z
Configuration on the computer
Installation When Using EtherTalk
9
Installing a print driver.
Configuration on the Machine
The following describes the configuration procedure to connect the machine to an
EtherTalk network.
Enable the EtherTalk port.
Note • EtherTalk can be configured when Adobe PostScript 3 Kit (optional) is installed.
• The configuration can also be performed using CentreWare Internet Services.
For information on how to use CentreWare Internet Services, refer to "Using CentreWare Internet
Services" (P.63).
1 Display the [System Administrator Menu] screen.
1) Press the <Log In/Out> button.
2) Enter the user ID with the numeric keypad or a keyboard displayed by pressing
[Keyboard], and select [Confirm].
Note • The default user ID is “11111”. When using the Authentication feature, a passcode is
required. The default passcode is “x-admin”.
3) Select [System Settings].
2 Enable the EtherTalk port.
60
1) Select [System Settings].
2) Select [Network Settings].
3) Select [Port Settings].
4) Select [EtherTalk], and select [Change Settings].
5) Select [Port Status], and select [Change Settings].
6) Select [Enabled], then select [Save].
3 Select [Close] repeatedly until the [System Settings] screen is displayed.
4 Select [Exit].
Page 63

5 After the machine is restarted, print out [Settings List] to confirm that the EtherTalk
port is enabled.
For information on how to print a settings list, refer to "Print Report/List" under "Chapter 13 Machine
Status" in the User Guide.
Configure other EtherTalk settings as necessary. Refer to "EtherTalk" (P.71) for EtherTalk
configuration.
Configuration on the Computer
The following describes the configuration procedure for the computer.
In order to print from the machine, the computer needs to have a print driver installed.
For information on the supported operating systems, refer to "Supported Operating Systems" (P.19).
For information on how to install a print driver, refer to the manual contained in the CD-ROM included
in Adobe PostScript 3 Kit.
Installation Procedure
Installation When Using EtherTalk
9
61
Page 64

Page 65

10 Using CentreWare Internet
Services
This chapter describes how to use CentreWare Internet Services.
z
Preparations ...............................................................................................64
z
Installation Procedure ................................................................................. 64
z
Network Setting Items (Port/Protocol) for CentreWare Internet Services... 67
Page 66

10 Using CentreWare Internet Services
Preparations
Prepare the following items to use CentreWare Internet Services.
z
Computer supporting the TCP/IP protocol
z
Configuration on the machine
- IP address
- Subnet mask
Refer to "Problem Solving" (P.149) when any troubles occur during the configuration.
Installation Procedure
Installation Overview
CentreWare Internet Services provides services such as displaying the status of the
machine as a printer and jobs, and altering configurations using a web browser in a
TCP/IP environment.
For setting as a printer, the properties screen of the services allows users to configure
the system settings and port settings for each network that are otherwise operated on
the touch screen on the machine.
Follow the procedure below to use CentreWare Internet Services.
z
Configuration on the Machine
Using CentreWare Internet Services
Configuration on the Machine
10
Configuring the machine to be able to use CentreWare Internet Services. First
enable the Internet Service (HTTP) port, then set the IP address.
z
Confirmation of the Configuration
Confirming whether the machine is set to use CentreWare Internet Services.
The following describes the configuration procedure for using CentreWare Internet
Services on the machine.
First enable the Internet Service (HTTP) port, then set the IP address.
1 Display the [System Administrator Menu] screen.
1) Press the <Log In/Out> button.
2) Enter the user ID with the numeric keypad or a keyboard displayed by pressing
[Keyboard], and select [Confirm].
Note • The default user ID is “11111”. When using the Authentication feature, a passcode is
required. The default passcode is “x-admin”.
3) Select [System Settings].
2 Enabling the Internet service (HTTP) port on the machine.
1) Select [System Settings].
2) Select [Network Settings].
3) Select [Port Settings].
4) Select [Internet Services (HTTP)] and then select [Change Settings].
5) Select [Port Status] and then select [Change Settings].
64
Page 67

Installation Procedure
6) Select [Enabled] then select [Save].
7) Select [Close] repeatedly until the [Network Settings] screen is displayed.
3 Set an IP address.
If an IP address is already set, this step is not necessary. Also, in an environment with
DHCP or BOOTP, configure the way to obtain an IP address. Either the address
cannot be obtained automatically or manual configuration is preferred, configure an IP
address, a subnet mask, and a gateway address.
1) Select [Protocol Settings].
2) Select [TCP/IP - Get IP Address] and then select [Change Settings].
3) Select one from [DHCP], [BOOTP], [RARP], [DHCP/Autonet] and [Manual], and
then select [Save]. If you select anything other than [Manual], proceed to Step 4.
Note • When using a DHCP server, also configure the WINS (Windows Internet Name Service)
server. To set a DHCP server, use CentreWare Internet Services. For details, refer to "Using
CentreWare Internet Services" (P.63).
4) Select [TCP/IP - IP Address] and select [Change Settings].
5) Enter the IP address using the numeric keypad.
Note • Enter the IP address in the format “xxx.xxx.xxx.xxx”. The "xxx" must be a numeric value in
the range from 0 to 255. However, 224-255.xxx.xxx.xxx, and 127.xxx.xxx.xxx cannot be
used.
• When you make an entry mistake, press the <C> (Clear) button and enter again.
• When moving to the next value without entering all 3 digits, select [Next].
6) Select [Save].
7) Configure [TCP/IP - Subnet Mask] and [TCP/IP - Gateway Address] as the above.
Note • Enter the gateway address in the format “xxx.xxx.xxx.xxx”. The "xxx" must be a numeric
value in the range from 0 to 255. However, 224-255.xxx.xxx.xxx, and 127.xxx.xxx.xxx
cannot be used.
• Specify the subnet mask by a combination of the numbers 0, 128, 192, 224, 240, 248, 252,
254, and 255. However, you cannot use 0 between non-zero values.
• If you do not want to set the gateway address, enter "0.0.0.0".
4 Select [Close] repeatedly until the [System Settings] screen is displayed.
Using CentreWare Internet Services
5 Select [Exit].
6 After the machine is restarted, print out a settings list to confirm that the port for
CentreWare Internet Services is enabled and TCP/IP is configured.
For information on how to print a settings list, refer to "Print Report/List" under "Chapter 13 Machine
Status" in the User Guide.
10
65
Page 68

10 Using CentreWare Internet Services
Confirmation of the Configuration
Connect to CentreWare Internet Services from a computer.
1 Start a web browser.
2 Enter the machine's IP address or the Internet address to the address box on the web
browser, and press the <Enter> key.
z
Example of the IP address entry (when the machine's IP address is 192.168.1.1)
http://192.168.1.1/
z
Example of the Internet address entry (when the machine's Internet address is
myhost.example.com)
http://myhost.example.com/
Using CentreWare Internet Services
10
Note • If your network uses DNS (Domain Name System) and the machine's host name is
registered with the domain name server, you can access the device using a combination of
the host name and the domain name as the “Internet address”. For example, if the host
name is “myhost”, and the domain name is “example.com”, then the “Internet address”
becomes “myhost.example.com”.
• When specifying a port number, add “:” and the port number to the end of the Internet
address.
• If the Logon Setup feature is enabled on the machine, enter a user ID and a passcode in
[User ID] and [Password]. Contact your System Administrator about the user ID and
passcode.
• If you have encrypted communication by selecting [Enable] under [Properties] > [PKI
Settings] > [SSL/TSL Settings] > [SSL/TSL Communication], enter an address beginning
with “https” instead of "http” into the address box in the web browser.
Example of the IP address entry
https://192.168.1.1/
Example of the Internet address entry
https://myhost.example.com/
Refer to "Problem Solving" (P.149) if CentreWare Internet Services is not displayed.
66
Page 69

Network Setting Items (Port/Protocol) for CentreWare Internet Services
Network Setting Items (Port/Protocol) for CentreWare Internet
Services
CentreWare Internet Services enable you to alter various settings on the machine from
a computer.
Note • Confirm that the port in use is enabled in [Start Port] of the [Properties] tab, if an item that
you want to set is not displayed.
• When a setting is changed from CentreWare Internet Services while operating the control
panel, the setting items changed on the screen of the control panel are not displayed. Switch
the machine off and on in this case.
This section describes about the settings of ports and protocols.
Ethernet ...................................................................................................................................... 68
Parallel........................................................................................................................................ 69
USB ............................................................................................................................................ 70
EtherTalk.................................................................................................................................... 71
SMB ........................................................................................................................................... 72
NetWare ..................................................................................................................................... 73
TCP/IP........................................................................................................................................ 74
LPD ............................................................................................................................................ 76
SNMP......................................................................................................................................... 77
IPP .............................................................................................................................................. 79
Port 9100 .................................................................................................................................... 80
E-mail......................................................................................................................................... 81
SMTP ......................................................................................................................................... 86
POP3........................................................................................................................................... 87
HTTP.......................................................................................................................................... 88
WebDAV.................................................................................................................................... 89
Bonjour....................................................................................................................................... 90
Note • Click [Help] at the top right of the CentreWare Internet Services screen for details on the
setting items.
Using CentreWare Internet Services
The following browsers have been confirmed to operate with CentreWare Internet
Services.
For Windows
z
Microsoft Internet Explorer 6.0 Service Pack1 or later
z
Netscape Navigator 7.0 or later
For MacOS X 10.2 or later
z
Microsoft Internet Explorer 5.2 or later
z
Netscape Navigator 7.0 or later
For MacOS X 10.3.9 or later
z
Netscape Navigator 7.1 or later
z
Safari 1.3 or later
10
67
Page 70

10 Using CentreWare Internet Services
Ethernet
This section describes the settings for the Ethernet interface.
Using CentreWare Internet Services
10
1 Start a web browser.
2 Enter the machine’s IP address or the Internet address to the address box on the web
browser, and press the <Enter> key.
z
Example of the IP address entry
http://192.168.1.1/
z
Example of the Internet address entry
http://myhost.example.com/
Note • When specifying a port number, add “:” and the port number to the end of the Internet
address.
3 Click the [Properties] tab.
4 Click [+] on the left of [Port Settings] to display the items in the folder.
5 Click [Ethernet].
6 Set the communication speed for the Ethernet interface using the [Ethernet Settings]
pull-down menu.
7 Reflect the values as the machine's setting values.
1) Click [Apply]. A screen to enter the user name and passcode will be displayed.
2) Enter the System Administrator user ID and passcode into [User Name] and
[Password], and then click [OK].
Note • The default user ID is “11111” and passcode is “x-admin”.
3) The right frame on the web browser will change to the machine reboot display.
4) Click [Reboot Machine]. The machine will reboot and the setting values will be
reflected.
68
Page 71

Parallel
Network Setting Items (Port/Protocol) for CentreWare Internet Services
This section describes the settings for the parallel interface.
1 Start a web browser.
2 Enter the machine's IP address or the Internet address to the address box on the web
browser, and press the <Enter> key.
z
Example of the IP address entry
http://192.168.1.1/
z
Example of the Internet address entry
http://myhost.example.com/
Note • When specifying a port number, add “:” and the port number to the end of the Internet
address.
3 Click the [Properties] tab.
4 Click [+] on the left of [Port Settings] to display the items in the folder.
5 Click [Parallel].
6 Select the [Enable] check box to enable [Bi-Directional Communication].
7 Set [Auto Eject Time].
8 Set the protocol using the [Adobe Communication Protocol] pull-down menu.
Note • Adobe Communication Protocol can be set only when optional Adobe PostScript 3 Kit is
connected.
9 Reflect the values as the machine's setting values.
Using CentreWare Internet Services
10
1) Click [Apply]. A screen to enter the user name and passcode will be displayed.
2) Enter the System Administrator user ID and passcode into [User Name] and
[Password], and then click [OK].
Note • The default user ID is “11111” and passcode is “x-admin”.
3) The right frame on the web browser will change to the machine reboot display.
4) Click [Reboot Machine]. The machine will reboot and the setting value will be
reflected.
69
Page 72

10 Using CentreWare Internet Services
USB
This section describes the settings for the USB interface.
Using CentreWare Internet Services
10
1 Start a web browser.
2 Enter the machine's IP address or the Internet address to the address box on the web
browser, and press the <Enter> key.
z
Example of the IP address entry
http://192.168.1.1/
z
Example of the Internet address entry
http://myhost.example.com/
Note • When specifying a port number, add “:” and the port number to the end of the Internet
address.
3 Click the [Properties] tab.
4 Click [+] on the left of [Port Settings] to display the items in the folder.
5 Click [USB].
6 Set [Auto Eject Time].
7 Set the protocol using the [Adobe Communication Protocol] pull-down menu.
Note • Adobe Communication Protocol can be set only when optional Adobe PostScript 3 Kit is
installed.
8 Reflect the values as the machine's setting values.
1) Click [Apply]. A screen to enter the user name and passcode will be displayed.
2) Enter the System Administrator user ID and passcode into [User Name] and
[Password], and then click [OK].
Note • The default user ID is “11111” and passcode is “x-admin”.
3) The right frame on the web browser will change to the machine reboot display.
4) Click [Reboot Machine]. The machine will reboot and the setting value will be
reflected.
70
Page 73

EtherTalk
Network Setting Items (Port/Protocol) for CentreWare Internet Services
This section describes the settings for EtherTalk.
Note • EtherTalk can be set only when optional Adobe PostScript 3 Kit is installed.
1 Start a web browser.
2 Enter the machine's IP address or the Internet address to the address box on the web
browser, and press the <Enter> key.
z
Example of the IP address entry
http://192.168.1.1/
z
Example of the Internet address entry
http://myhost.example.com/
Note • When specifying a port number, add “:” and the port number to the end of the Internet
address.
3 Click the [Properties] tab.
4 Click [+] on the left of [Protocol Settings] to display the items in the folder.
5 Click [EtherTalk].
6 Set [Printer Name].
7 Set [Zone Name].
8 Reflect the values as the machine's setting values.
1) Click [Apply]. A screen to enter the user name and passcode will be displayed.
2) Enter the System Administrator user ID and passcode into [User Name] and
[Password], and then click [OK].
Note • The default user ID is “11111” and passcode is “x-admin”.
3) The right frame on the web browser will change to the machine reboot display.
4) Click [Reboot Machine]. The machine will reboot and the setting value will be
reflected.
Using CentreWare Internet Services
10
71
Page 74

10 Using CentreWare Internet Services
SMB
This section describes the settings for SMB.
Using CentreWare Internet Services
10
1 Start a web browser.
2 Enter the machine's IP address or the Internet address to the address box on the web
browser, and press the <Enter> key.
z
Example of the IP address entry
http://192.168.1.1/
z
Example of the Internet address entry
http://myhost.example.com/
Note • When specifying a port number, add “:” and the port number to the end of the Internet
address.
3 Click the [Properties] tab.
4 Click [+] on the left of [Protocol Settings] to display the items in the folder.
5 Click [SMB].
6 Set [Workgroup].
7 Set [Host Name].
8 Set [Maximum Number of Sessions].
9 Select the [Enable] check box to enable [TBCP Filter].
Note • The TBCP filter is set only when optional Adobe PostScript 3 Kit is installed.
10 Select the [Enable] check box to enable [Unicode Support].
72
11 Select the [On] check box when using [Auto Master Mode].
12 Select the [On] check box when using [Password Encryption].
13 Reflect the values as the machine's setting values.
1) Click [Apply]. A screen to enter the user name and passcode will be displayed.
2) Enter the System Administrator user ID and passcode into [User Name] and
[Password], and then click [OK].
Note • The default user ID is “11111” and passcode is “x-admin”.
Page 75

NetWare
Network Setting Items (Port/Protocol) for CentreWare Internet Services
3) The right frame on the web browser will change to the machine reboot display.
4) Click [Reboot Machine]. The machine will reboot and the setting value will be
reflected.
This section describes the settings for NetWare.
1 Start a web browser.
2 Enter the machine's IP address or the Internet address to the address box on the web
browser, and press the <Enter> key.
z
Example of the IP address entry
http://192.168.1.1/
z
Example of the Internet address entry
http://myhost.example.com/
Note • When specifying a port number, add “:” and the port number to the end of the Internet
address.
3 Click the [Properties] tab.
4 Click [+] on the left of [Protocol Settings] to display the items in the folder.
5 Click [NetWare].
6 Set [Host Name].
7 Select an operation mode from the [Active Mode] pull-down menu.
8 Set [File Server Name].
Note • The File Server Name is set only when the operation mode is in Bindery Service.
9 Set [Polling Interval].
Using CentreWare Internet Services
10
10 Set [Number of Searches].
11 Set [Password].
1) Enter [Password].
73
Page 76

10 Using CentreWare Internet Services
2) Re-enter the same password in [Re-enter Password].
Select the [Enable] check box to enable [TBCP Filter].
12
Note • The TBCP filter is set only when optional Adobe PostScript 3 Kit is installed.
13 Set the NDS.
Note • The tree name is set only when used in the Directory Service.
1) Enter a tree name into [Tree Name].
2) Enter a context name into [Context Name].
14 Select a frame type from the [Frame Type] pull-down menu under [Transport Protocol
(IPX/SPX) ].
15 Select the [Enable] check box to enable [Active Discovery] under [SLP].
16 Reflect the values as the machine's setting values.
1) Click [Apply]. A screen to enter the user name and passcode will be displayed.
2) Enter the System Administrator user ID and passcode into [User Name] and
[Password], and then click [OK].
Note • The default user ID is “11111” and passcode is “x-admin”.
3) The right frame on the web browser will change to the machine reboot display.
4) Click [Reboot Machine]. The machine will reboot and the setting value will be
reflected.
TCP/IP
Using CentreWare Internet Services
10
This section describes the settings for TCP/IP.
1 Start a web browser.
2 Enter the machine's IP address or the Internet address to the address box on the
browser, and press the <Enter> key.
z
Example of the IP address entry
74
http://192.168.1.1/
z
Example of the Internet address entry
http://myhost.example.com/
Page 77

Network Setting Items (Port/Protocol) for CentreWare Internet Services
Note • When specifying a port number, add “:” and the port number to the end of the Internet
address.
3 Click the [Properties] tab.
4 Click [+] on the left of [Protocol Settings] to display the items in the folder.
5 Click [TCP/IP].
6 Set [Host Name].
7 Select how to obtain an IP address from the [Get IP Address] pull-down menu.
8 Set [Machine IP Address].
Note • This item is not necessary if either [DHCP], [BOOTP], [RARP], or [DHCP/Autonet] has been
selected from the [Get IP Address] pull-down menu.
9 Set [Subnet Mask] and [Gateway Address].
Note • This item is not necessary if either [DHCP], [BOOTP], [RARP], or [DHCP/Autonet] has been
selected from the [Get IP Address] pull-down menu.
10 Set the DNS information.
1) Select the [DHCP] check box if using DHCP for [Get DNS Server Address].
2) Set [DNS Server Address 1 - 3].
Note • This item is not necessary if [DHCP] has been specified for [Method to Get the DNS
Address].
3) Set [DNS Domain Name].
4) Select the [On] check box when using [Generate Domain Search List Automatically].
5) Set [Domain Name 1 - 3].
6) Set [Connection Time-out].
7) Select the [On] check box to enable [Dynamic DNS Update].
Using CentreWare Internet Services
11 Set the WINS information.
1) Select the [DHCP] check box if using DHCP for [Get WINS Server Address].
2) Set [Primary WINS Server Address].
Note • This item is not necessary if [DHCP] has been specified for [Get WINS Server Address].
3) Set [Secondary WINS Server Address].
Note • This item is not necessary if [DHCP] has been specified for [Get WINS Server Address].
12 Set the IP Address List information.
1) Select the [Enable] check box for [IP Filter].
2) Click the [Edit] button. A screen to enter the user name and passcode will be displayed.
3) Enter the System Administrator user ID and passcode into [User Name] and
[Password], and click [OK].
Note • The default user ID is “11111” and passcode is “x-admin”.
4) Set [Permitted IP Address].
5) Set [IP Mask].
6) Click [Apply]. A screen to enter the user name and passcode will be displayed.
Enter the System Administrator user ID and passcode into [User Name] and
[Password], and click [OK].
Note • The default user ID is “11111” and the default passcode is “x-admin”.
7) The right frame on the web browser will change to the machine reboot display.
10
13 Click [TCP/IP] in the [Protocol Settings] folder.
14 Reflect the values as the machine's setting values.
75
Page 78

10 Using CentreWare Internet Services
1) Click [Apply]. A screen to enter the user name and passcode will be displayed.
Enter the System Administrator user ID and passcode into [User Name] and
[Password], and click [OK].
Note • The default user ID is “11111” and the default passcode is “x-admin”.
2) The right frame on the web browser will change to the machine reboot display.
3) Click [Reboot Machine]. The machine will reboot and the setting value will be
reflected.
LPD
This section describes the settings for LPD.
Using CentreWare Internet Services
10
1 Start a web browser.
2 Enter the machine's IP address or the Internet address to the address box on the
browser, and press the <Enter> key.
z
Example of the IP address entry
http://192.168.1.1/
z
Example of the Internet address entry
http://myhost.example.com/
Note • When specifying a port number, add “:” and the port number to the end of the Internet
address.
3 Click the [Properties] tab.
4 Click [+] on the left of [Protocol Settings] to display the items in the folder.
5 Click [LPD].
6 Set [Port Number].
7 Select the [Enable] check box to enable [TBCP Filter].
Note • The TBCP Filter is set only when optional Adobe PostScript 3 Kit is installed.
8 Set [Connection Time-Out].
76
9 Set [Maximum Number of Sessions].
10 Reflect the values as the machine's setting values.
Page 79

SNMP
Network Setting Items (Port/Protocol) for CentreWare Internet Services
1) Click [Apply]. A screen to enter the user name and passcode will be displayed.
2) Enter the System Administrator user ID and passcode into [User Name] and
[Password], and click [OK].
Note • The default user ID is “11111” and the default passcode is “x-admin”.
3) The right frame on the web browser will change to the machine reboot display.
4) Click [Reboot Machine]. The machine will reboot and the setting value will be
reflected.
This section describes the settings for SNMP.
Note • When managing the machine using software such as the CentreWare, enable the SNMP
port.
1 Start a web browser.
2 Enter the machine's IP address or the Internet address to the address box on the
browser, and press the <Enter> key.
z
Example of the IP address entry
http://192.168.1.1/
z
Example of the Internet address entry
http://myhost.example.com/
Note • When specifying a port number, add “:” and the port number to the end of the Internet
address.
3 Click the [Properties] tab.
4 Click [+] on the left of [Protocol Settings] to display the items in the folder.
5 Click [SNMP].
6 When changing the community name, set [Community Name (Read Only)],
[Community Name (Read/Write)], and [Community Name (Trap Notification)].
Using CentreWare Internet Services
10
7 Set [System Administrator].
8 Specify a destination for trap notification as necessary.
77
Page 80

10 Using CentreWare Internet Services
When selecting an existing destination
Use the [Trap Notification] pull-down menu to select a destination, and proceed to step
9.
When registering a new destination or when modifying the settings for an
existing destination
1) Use the [Trap Notification] pull-down menu to register a new destination or to select
an existing destination.
2) Click [Edit]. A window appears prompting you to enter the user name and
passcode.
3) Enter the system administrator’s user ID and passcode into [User Name] and
[Password] respectively, and then click [OK].
Note • The factory default user ID and passcode are [11111] and [x-admin] respectively.
4) Select a transport protocol from [Transport].
5) If you selected [IPX] under [Transport], set [Network Number (IPX)], [MAC Address
(IPX)], [Socket Number (IPX)], [Trap Version], [Community String (Trap
Notification)], and [Notification Event].
6) If you selected [UDP] under [Transport], set [IP Address (UDP)], [Port Number
(UDP)], [Trap Version], [Community String (Trap Notification)], and [Notification
Event].
Note • Do not use the existing port numbers.
7) Click [Apply].
8) The right frame on the web browser will change to the machine reboot display.
9) Click [Reboot Machine]. The machine will reboot and the setting value will be
reflected.
Using CentreWare Internet Services
9 Reflect the values as the machine's setting values.
10
1) Click [Apply]. A screen to enter the user name and passcode will be displayed.
2) Enter the System Administrator user ID and passcode into [User Name] and
[Password], and click [OK].
Note • The default user ID is “11111” and the default passcode is “x-admin”.
3) The right frame on the web browser will change to the machine reboot display.
4) Click [Reboot Machine]. The machine will reboot and the setting value will be
reflected.
78
Page 81

IPP
Network Setting Items (Port/Protocol) for CentreWare Internet Services
This section describes the settings for the IPP port.
1 Start a web browser.
2 Enter the machine's IP address or the Internet address to the address box on the
browser, and press the <Enter> key.
z
Example of the IP address entry
http://192.168.1.1/
z
Example of the Internet address entry
http://myhost.example.com/
Note • When specifying a port number, add “:” and the port number to the end of the Internet
address.
3 Click the [Properties] tab.
4 Click [+] on the left of [Protocol Settings] to display the items in the folder.
5 Click [IPP].
6 Set [Add Port Number].
7 Select the [Enable] check box to enable [TBCP Filter].
Note • The TBCP Filter is set only when optional Adobe PostScript 3 Kit is installed.
8 Select the [Enable] check box to enable [Administrator Mode].
9 Select the [Enable] check box to enable [DNS].
10 Set [Connection Time-Out].
Using CentreWare Internet Services
10
11 Reflect the values as the machine's setting values.
1) Click [Apply]. A screen to enter the user name and passcode will be displayed.
2) Enter the System Administrator user ID and passcode into [User Name] and
[Password], and click [OK].
Note • The default user ID is “11111” and the default passcode is “x-admin”.
3) The right frame on the web browser will change to the machine reboot display.
79
Page 82

10 Using CentreWare Internet Services
4) Click [Reboot Machine]. The machine will reboot and the setting value will be
reflected.
Port 9100
This section describes the settings for the Port 9100 port.
Note • Enable the Port 9100 port when using HP-UX.
Using CentreWare Internet Services
10
1 Start a web browser.
2 Enter the machine's IP address or the Internet address to the address box on the
browser, and press the <Enter> key.
z
Example of the IP address entry
http://192.168.1.1/
z
Example of the Internet address entry
http://myhost.example.com/
Note • When specifying a port number, add “:” and the port number to the end of the Internet
address.
3 Click the [Properties] tab.
4 Click [+] on the left of [Protocol Settings] to display the items in the folder.
5 Click [Port 9100].
6 Set [Port Number].
7 Select the [Enable] check box to enable [TBCP Filter].
Note • The TBCP Filter is set only when optional Adobe PostScript 3 Kit is installed.
8 Set [Connection Time-Out].
9 Reflect the values as the machine's setting values.
80
1) Click [Apply]. A screen to enter the user name and passcode will be displayed.
2) Enter the System Administrator user ID and passcode into [User Name] and
[Password], and click [OK].
Note • The default user ID is “11111” and the default passcode is “x-admin”.
3) The right frame on the web browser will change to the machine reboot display.
Page 83

4) Click [Reboot Machine]. The machine will reboot and the setting value will be
reflected.
Enabling the Ports
This section describes the procedure to enable the ports that are used for the E-mail
and iFax features.
Network Setting Items (Port/Protocol) for CentreWare Internet Services
1 Start a web browser.
2 Enter the machine's IP address or the Internet address to the address box on the
browser, and press the <Enter> key.
z
Example of the IP address entry
http://192.168.1.1/
z
Example of the Internet address entry
http://myhost.example.com/
Note • When specifying a port number, add “:” and the port number to the end of the Internet
address.
3 Click the [Properties] tab.
4 Click [Port Status].
5 Enable the ports which are used for the E-mail feature.
1) Select the [Enable] check box for [Receive E-Mail] when using the E-mail Printing
or iFax feature.
2) Select the [Enable] check box for [Mail Notice Service] when using the mail notice
or job completion notice feature.
6 Reflect the values as the machine's setting values.
1) Click [Apply]. A screen to enter the user name and passcode will be displayed.
2) Enter the System Administrator user ID and passcode into [User Name] and
[Password], and click [OK].
Note • The default user ID is “11111” and the default passcode is “x-admin”.
Using CentreWare Internet Services
10
81
Page 84

10 Using CentreWare Internet Services
3) The right frame on the web browser will change to the machine reboot display.
4) Click [Reboot Machine]. The machine will reboot and the setting value will be
reflected.
Using CentreWare Internet Services
10
82
Page 85

Setting Items
Network Setting Items (Port/Protocol) for CentreWare Internet Services
This section describes the setting items for the E-mail and iFax features.
Using CentreWare Internet Services
10
Note • Click [Help] at the top right of the CentreWare Internet Services screen for details on the
setting items.
83
Page 86

10 Using CentreWare Internet Services
1 Start a web browser.
2 Enter the machine's IP address or the Internet address to the address box on the
browser, and press the <Enter> key.
z
Example of the IP address entry
http://192.168.1.1/
z
Example of the Internet address entry
http://myhost.example.com/
Note • When specifying a port number, add “:” and the port number to the end of the Internet
address.
3 Click the [Properties] tab.
4 Set the e-mail addresses for the machine and administrator.
1) Click [Description].
2) Set [Administrator’s E-mail Address].
3) Set [Machine’s E-mail Address].
5 Reflect the values as the machine's setting values.
1) Click [Apply]. A screen to enter the user name and passcode will be displayed.
2) Enter the System Administrator user ID and passcode into [User Name] and
[Password], and click [OK].
Note • The default user ID is “11111” and the default passcode is “x-admin”.
6 Click [+] on the left of [Protocol Settings] to display the items in the folder.
Using CentreWare Internet Services
10
7 Click [TCP/IP].
8 Set [Host Name].
9 Set the DNS information.
Note • The DNS settings are required when the addresses for a POP3 server and a SMTP server
are set with the domain name instead of their IP addresses.
1) Select the [DHCP] check box if using DHCP for [Get DNS Server Address].
2) Set [DNS Server Address 1 - 3].
Note • This item is not necessary if [DHCP] has been specified for [Get DNS Server Address].
3) Set [DNS Domain Name].
4) Select the [On] check box when using [Generate Domain Search List
Automatically].
5) Set [Domain Name 1 - 3].
6) Set [Connection Time-Out].
7) Select the [On] check box to enable [Dynamic DNS Update].
10 Reflect the values as the machine's setting values.
1) Click [Apply].
2) The right frame of the web browser will change to the machine reboot display.
3) Click [Reboot Machine]. The machine will reboot, and the setting value will be
reflected.
84
11 Click [E-mail] in the [Protocol Settings] folder.
12 Set the protocol using the [Receiving Protocol] pull-down menu.
Note • Set this item when using the E-mail Printing or iFax feature.
Page 87

Network Setting Items (Port/Protocol) for CentreWare Internet Services
13 Set the print method using the [Incoming E-mail Print Options] pull-down menu.
Note • Set this item when using the E-mail Printing feature.
14 Set the print method using the [Incoming iFAX Print Option] pull-down menu.
Note • Set this item when using the iFax feature.
15 Set the print method using the [Output Destination for Incoming E-mail] pull-down
menu.
Note • This item appears only when the machine has two or more output destinations by being
equipped with optional components, such as a finisher.
16 Set the print method using the [Auto Print Delivery Confirmation Mail] pull-down menu.
Note • Set this item when using the E-mail Printing feature.
17 Select the [Enable] check box to enable [Print Error Notification E-mail].
18 Select the [Enable] check box to enable [Response to Read Receipts].
Note • Set this item when using the E-mail Printing or iFax feature.
19 Click [E-mail] in the [Protocol Settings] folder.
20 Set the e-mail sending/receiving restriction.
Note • Set this item when using the iFax or E-mail Printing feature.
1) Select either [Enable Receive] or [Disable Receive] from the [Domain Filtering] pulldown menu.
2) Click [Edit].
3) Specify the domain to be permitted if you permitted the receiving transmission, or
specify the domain to be rejected if you rejected the receiving transmission.
4) Click [Apply].
21 Set the sender.
Using CentreWare Internet Services
1) If enabling [Allow Authenticated Users to Edit "From:" Field when: ], select either
one of the [Address Book (LDAP) Search Successful] or [Address Book (LDAP)
Search Failure] check boxes.
2) If enabling [Allow Guest Users to Edit "From:" Field], select the [Enable] check box.
3) If enabling [Allow Authenticated Users to send Email despite Search Failure],
select the [Enable] check box.
4) If enabling [Edit "From:" Field when Authentication is not Required], select the
[Enable] check box.
22 Set the default subject to [Default] under [Subject].
23 Set the message.
1) Set the default message to [Default] under [Message Body].
2) If enabling [User], select the check boxes to be enabled.
3) If enabling [Attachment], select the check boxes to be enabled.
4) If enabling [Device Information], select the check boxes to be enabled.
24 Set the default signature to [Default] in [Signature].
25 Reflect the values as the machine's setting values.
1) Click [Apply].
2) The right frame on the web browser will change to the machine reboot display.
3) Click [Reboot Machine]. The machine will reboot and the setting values will be
reflected.
10
85
Page 88

10 Using CentreWare Internet Services
26 Set the SMTP server.
For information on the settings, refer to "SMTP" (P.86).
Note • Set this item when using the E-mail, iFax, Mail Notice, or Job Completion Notice feature.
27 Set the POP3 server.
For information on the settings, refer to "POP3" (P.87).
Note • Set this item when using the iFAX or E-mail Printing feature and [Receiving Protocol] is set
to [POP3].
SMTP
This section describes the SMTP server settings.
Note • Set this item when using the E-mail, iFAX, Mail Notice, or Job Completion Notice feature.
Using CentreWare Internet Services
10
1 Start a web browser.
2 Enter the machine's IP address or the Internet address to the address box on the
browser, and press the <Enter> key.
z
Example of the IP address entry
http://192.168.1.1/
z
Example of the Internet address entry
http://myhost.example.com/
Note • When specifying a port number, add ":" and the port number after the Internet address.
3 Click the [Properties] tab.
4 Click [+] at the left of [Protocol Settings] to display the items in the folder.
5 Click [SMTP].
6 Set the SMTP server.
1) Set [Server Address].
2) Set [Port Number].
Note • Do not use the numbers of any other ports.
3) Set the SMTP authentication method using the [Send Authentication] pull-down
menu.
86
Page 89

Network Setting Items (Port/Protocol) for CentreWare Internet Services
4) Set [Login Name].
5) Set [Password].
7 Configure the settings for sending e-mail.
1) Specify a maximum size (capacity) for sending e-mail in [Maximum E-mail Size].
Note • Set this item when using the E-mail or iFax feature.
2) Specify the number of pages to be split for sending e-mail in [Max. Number of
Pages for Split Send].
Note • Set this item when using the E-mail or iFax feature.
8 Reflect the values as the machine's setting values.
1) Click [Apply]. A screen to enter the user name and passcode will be displayed.
2) Enter the System Administrator user ID and passcode into [User Name] and
[Password], and click [OK].
Note • The default user ID is "11111" and the default passcode is "x-admin".
3) The right frame on the web browser will change to the machine reboot display.
4) Click [Reboot Machine]. The machine will reboot and the setting values will be
reflected.
POP3
This section describes the POP3 server settings.
Note • Set this item when using the E-mail Printing or iFax feature and [POP3] is specified for
[Receiving Protocol].
1 Start a web browser.
Using CentreWare Internet Services
10
2 Enter the machine's IP address or the Internet address to the address box on the
browser, and press the <Enter> key.
z
Example of the IP address entry
http://192.168.1.1/
z
Example of the Internet address entry
http://myhost.example.com/
Note • When specifying a port number, add ":" and the port number after the Internet
address.
87
Page 90

10 Using CentreWare Internet Services
3 Click the [Properties] tab.
4 Click [+] at the left of [Protocol Settings] to display the items in the folder.
5 Click [POP 3].
6 Set the POP3 server.
1) Set [Server Address].
2) Set [Port Number].
Note • Do not use the numbers of any other ports.
3) Set [POP Receive Password Encryption].
4) Set [User Name].
5) Enter [User Password].
7 Set [POP3 Server Check Interval] of [Incoming E-mail Settings].
8 Reflect the values as the machine's setting values.
1) Click [Apply]. A screen to enter the user name and passcode will be displayed.
2) Enter the System Administrator user ID and passcode into [User Name] and
[Password], and click [OK].
Note • The default user ID is "11111" and the default passcode is "x-admin".
3) The right frame on the web browser will change to the machine reboot display.
4) Click [Reboot Machine]. The machine will reboot and the setting values will be
reflected.
HTTP
Using CentreWare Internet Services
10
This section describes the settings for the HTTP port.
1 Start a web browser.
2 Enter the machine's IP address or the Internet address to the address box on the
browser, and press the <Enter> key.
88
Page 91

Network Setting Items (Port/Protocol) for CentreWare Internet Services
z
Example of the IP address entry
http://192.168.1.1/
z
Example of the Internet address entry
http://myhost.example.com/
Note • When specifying a port number, add “:” and the port number to the end of the Internet
address.
3 Click the [Properties] tab.
4 Click [+] on the left of [Protocol Settings] to display the items in the folder.
5 Click [HTTP].
6 Set [Port Number].
7 Set [Maximum Number of Sessions].
8 Set [Connection Time-Out].
9 Reflect the values as the machine's setting values.
1) Click [Apply]. A screen to enter the user name and passcode will be displayed.
2) Enter the System Administrator user ID and passcode into [User Name] and
[Password], and click [OK].
Note • The default user ID is “11111” and the default passcode is “x-admin”.
3) The right frame on the web browser will change to the machine reboot display.
4) Click [Reboot Machine]. The machine will reboot and the setting value will be
reflected.
WebDAV
Using CentreWare Internet Services
This section describes the settings for the WebDAV port.
10
1 Start a web browser.
2 Enter the machine’s IP address or the Internet address to the address box on the
browser, and press the <Enter> key.
89
Page 92

10 Using CentreWare Internet Services
z
Example of the IP address entry
http://192.168.1.1/
z
Example of the Internet address entry
http://myhost.example.com/
Note • When specifying a port number, add “:” and the port number to the end of the Internet
address.
3 Click the [Properties] tab.
4 Click [+] on the left of [Protocol Settings] to display the items in the folder.
5 Click [WebDAV].
6 Set [Port Number].
7 Set [Connection Time-Out].
8 Reflect the values as the machine's setting values.
1) Click [Apply]. A screen to enter the user name and passcode will be displayed.
2) Enter the System Administrator user ID and passcode into [User Name] and
[Password], and click [OK].
Note • The default user ID is “11111” and the default passcode is “x-admin”.
3) The right frame on the web browser will change to the machine reboot display.
4) Click [Reboot Machine]. The machine will reboot and the setting value will be
reflected.
Bonjour
Using CentreWare Internet Services
10
This section describes the settings for the Bonjour port.
Note • Bonjour can be set only when optional Adobe PostScript 3 Kit is installed.
1 Start a web browser.
90
2 Enter the machine's IP address or the Internet address to the address box on the
browser, and press the <Enter> key.
Page 93

Network Setting Items (Port/Protocol) for CentreWare Internet Services
z
Example of the IP address entry
http://192.168.1.1/
z
Example of the Internet address entry
http://myhost.example.com/
Note • When specifying a port number, add “:” and the port number to the end of the Internet
address.
3 Click the [Properties] tab.
4 Click [+] on the left of [Protocol Settings] to display the items in the folder.
5 Click [Bonjour].
6 Set [Host Name].
Note • It is recommended that you use the default host name. Note the following if you use another
host name.
• Do not append "(<number>)" to the printer name. Example: FX (2)
• The host name can be up to 32 characters; however, using 26 characters or less is
recommended.
7 Set [Printer Name].
Note • It is recommended that you use the default printer name. Note the following if you use
another printer name.
• Do not append "(<number>)" to the printer name. Example: FX (2)
• The printer name can be up to 62 characters; however, using 54 characters or less is
recommended.
8 Reflect the values as the machine's setting values.
1) Click [Apply]. A screen to enter the user name and passcode will be displayed.
2) Enter the System Administrator user ID and passcode into [User Name] and
[Password], and click [OK].
Note • The default user ID is “11111” and the default passcode is “x-admin”.
3) The right frame on the web browser will change to the machine reboot display.
4) Click [Reboot Machine]. The machine will reboot and the setting value will be
reflected.
Using CentreWare Internet Services
10
91
Page 94

Page 95

11 E-mail
This chapter describes the configuration to utilize the services using e-mail on
the machine.
z
E-mail Overview..........................................................................................94
z
Preparations ...............................................................................................95
z
Installation Procedure ................................................................................. 97
Page 96

E-mail
11
11 E-mail
E-mail Overview
The machine is capable of exchanging e-mails.
The following features are available by exchanging e-mails.
z
E-mail
z
iFax
z
E-mail Printing
z
Consumables Status Notice
z
Job Completion Notice
E-mail
Scanned documents can be converted into an electronic format and transmitted via email.
iFax
Unlike conventional fax machines which utilize public phone lines, the machine can
transmit or receive scanned data as e-mail attachments using either corporate
networks or the Internet.
Contents of e-mail are processed according to the settings of [Incoming Internet Fax
Print Options] in CentreWare Internet Services.
E-mail Printing
E-mail with attachments in either TIFF, JPEG, or PDF format can be sent to the
machine from computers. Received e-mail will automatically be printed.
Contents of e-mail are processed according to the settings of [Incoming E-mail Print
Options] in CentreWare Internet Services.
Consumables Status Notice
E-mail containing contents (status of consumables, paper, and replaceable parts, etc.)
set in [Mail Notice Settings] of CentreWare Internet Services is sent to a specified
recipient. You can properly determine when to replace toner and drum cartridges by
receiving their status periodically.
It is recommended that you register the address of a network administrator or a shared
address.
Job Completion Notice
When a computer has submitted a job to the machine, its completion can be notified by
e-mail.
Register the address of a network administrator or a shared address as necessary.
94
Page 97

Preparations
The following items are required in order to use the E-mail feature.
Preparations
Item Description
TCP/IP
address
Subnet mask
Gateway
address
Administrator
e-mail
address
Machine email address
DNS server
address
SMTP server
address
SMTP AUTH
Login Name
and password
POP3 server
POP user
name and
password
S/MIME
settings
The TCP/IP address for the
machine.
TCP/IP is used for e-mail.
Required when the network
is divided into subnets.
Required when multiple
networks are connected by
gateways.
Set the e-mail address for
the machine administrator.
Used as a sender address
when the machine sends email.
Required when the
addresses for a POP3
server and a SMTP server
are set with a domain name
format instead of their IP
addresses.
The machine uses a SMTP
server to send e-mail. The
SMTP server can also be
used for receiving e-mail.
If an SMTP server requires
authentication, specify the
authentication user name.
Also specify a password as
required.
If a POP3 server is used to
receive e-mails, register the
machine's e-mail address
and a user to the POP3
server.
Also, it is necessary to set
the POP3 server address
on the machine.
Set the POP receiving user
address.
Also specify a password as
required.
Set the S/MIME information.
E-mail iFax
via
SMTP
via
POP3
via
SMTP
via
POP3
iFAX
Direct
via
SMTP
*1
E-mail
Print-
ing
Consum-
ables
Status
Notice
Job
Completion
Notice
OOOO O OOO
UUUU U UUU
UUUU U UUU
OOOO O OOO
OOOO O OOO
UUUU U UUU
OOOO - OOO
UUUU
-
-O-O -
-O-O -
UUUU U U
UUU
UUU
UUU
××
E-mail
11
*
1: When you use iFAX Direct, select [System Settings] > [Fax Mode Settings] > [iFAX Control], and then select [Direct
O : Necessary to set U : Set as required -: Not required to set × : Not supported
(P2P)] under [iFAX Path].
95
Page 98

E-mail
11
11 E-mail
Registering E-mail account
A mail account for the machine needs to be registered to a mail server.
Note • Information on mail account registration, contact your System Administrator.
Configuring E-mail Environment
Enable the port and configure the machine e-mail address, TCP/IP environment, and
e-mail server from the machine.
Note • The configuration can also be performed using CentreWare Internet Services.
Information on how to use CentreWare Internet Services, refer to "Using CentreWare Internet Services"
(P.63).
96
Page 99

Installation Procedure
Installation Overview
This section describes the configuration procedure to use the E-mail feature on the
machine.
The following two steps are necessary to use the E-mail feature.
z
Enabling port and setting TCP/IP
Set the machine to be able to use TCP/IP.
z
Configuring E-mail Environment
Set the items for e-mail on the machine.
Enabling Port and Setting TCP/IP
The following describes the configuration procedure to use TCP/IP on the machine.
First enable the E-mail port, then set the IP address.
Note • The configuration can also be performed using CentreWare Internet Services.
For information on how to use CentreWare Internet Services, refer to "Using CentreWare Internet
Services" (P.63).
Installation Procedure
E-mail
11
1 Display the [System Administrator Menu] screen.
1) Press the <Log In/Out> button.
2) Enter the user ID with the numeric keypad or a keyboard displayed by pressing
[Keyboard], and select [Confirm].
Note • The default user ID is “11111”. When using the Authentication feature, a passcode is
required. The default passcode is “x-admin”.
3) Select [System Settings].
2 Enable a port which is used for the E-mail feature.
1) Select [System Settings].
2) Select [Network Settings].
3) Select [Port Settings].
4) Select [Send E-mail], and then select [Change Settings].
5) Select [Port Status], and select [Change Settings].
6) Select [Enabled], then select [Save].
7) Select [Close].
8) Enable [Receive E-Mail] in the [Receive E-mail - Port Status] screen as above to
use E-mail Printing.
9) Enable [Mail Notice Service] in the [Mail Notice Service - Port Status] screen as
above to use mail notice or job completion notice.
10)Select [Close] repeatedly until the [Network Settings] screen is displayed.
3 Set an IP address.
If an IP address is already set, this step is not necessary. Also, in an environment with
DHCP or BOOTP, configure the way to obtain an IP address. Either the address
cannot be obtained automatically or manual configuration is preferred, configure an IP
address, a subnet mask, and a gateway address.
97
Page 100

E-mail
11
11 E-mail
1) Select [Protocol Settings].
2) Select [TCP/IP - Get IP Address] and then select [Change Settings].
3) Select one from [DHCP], [BOOTP], [RARP], [DHCP/Autonet] or [Manual] and then
select [Save]. If you select anything other than [Manual], proceed to Step 4.
Note • When using a DHCP server, also configure the WINS (Windows Internet Name Service)
server. To set a DHCP server, use CentreWare Internet Services. For details, refer to "Using
CentreWare Internet Services" (P.63)
4) Select [TCP/IP - IP Address] and select [Change Settings].
5) Enter the IP address using the numeric keypad.
Note • Enter the IP address in the format “xxx.xxx.xxx.xxx”. The "xxx" must be a numeric value in
the range from 0 to 255. However, 224-255.xxx.xxx.xxx, and 127.xxx.xxx.xxx cannot be
used.
• When you make an entry mistake, press the <C> (Clear) button and enter again.
• When moving to the next value without entering all 3 digits, select [Next].
6) Select [Save].
7) Configure [TCP/IP - Subnet Mask] and [TCP/IP - Gateway Address] as the above.
Note • Enter the gateway address in the format “xxx.xxx.xxx.xxx”. The "xxx" must be a numeric
value in the range from 0 to 255. However, 224-255.xxx.xxx.xxx, and 127.xxx.xxx.xxx
cannot be used.
• Specify the subnet mask by a combination of the numbers 0, 128, 192, 224, 240, 248, 252,
254, and 255. However, you cannot use 0 between non-zero values.
• If you do not set the gateway address, enter "0.0.0.0".
4 Select [Close] repeatedly until the [System Settings] screen is displayed.
5 Select [Exit].
6 After the machine is restarted, print out a settings list to confirm that the ports are
enabled and TCP/IP is configured.
For information on how to print a settings list, refer to "Print Report/List" under "Chapter 13 Machine
Status" in the User Guide.
Configuring E-mail Environment
The following describes the configuration procedure to use the E-mail feature.
Note • The configuration can also be performed using CentreWare Internet Services.
For information on how to use CentreWare Internet Services, refer to "Using CentreWare Internet
Services" (P.63).
1 Display the [System Administrator Menu] screen.
1) Press the <Log In/Out> button.
2) Enter the user ID with the numeric keypad or a keyboard displayed by pressing
[Keyboard], and select [Confirm].
Note • The default user ID is “11111”. When using the Authentication feature, a passcode is
required. The default passcode is “x-admin”.
3) Select [System Settings].
98
2 Set the e-mail address, host name, and domain name.
1) Select [System Settings].
2) Select [Network Settings].
3) Select [Machine’s E-mail Address/Host Name].
4) Select [E-mail Address] and then select [Change Settings].
 Loading...