

Xerox ApeosPort C5540 I, ApeosPort C6550 I, DocuCentre C5540 I, DocuCentre C6550 I Quick Reference Guide
Page 1

ApeosPort C6550 I/C5540 I, DocuCentre C6550 I/C5540 I
Quick Reference Guide
Page 2

Microsoft, MS-DOS, Windows, Windows NT, Microsoft Network, and Windows Server are
either trademarks or registered trademarks of Microsoft Corporation in the United States and/or other
countries.
Novell, NetWa r e, Intran etWare and NDS are
registered trademarks of Novell, Inc. in the United States and other countries.
Adobe, Acrobat, PostScript, PostScript3, and PostScript Logo are
trademarks of Adobe Systems Incorporated.
Apple, AppleTalk, EtherTalk, LocalTalk, Macintosh, MacOS and TrueType are
trademarks of Apple Computer, Inc., registered in the U.S. and other countries.
HP, HPGL, HPGL/2, and HP-UX are registered trademarks of Hewlett-Packard Corporation.
All product/brand names are trademarks or registered trademarks of the respective holders.
The data sav ed in th e h ar d dis k of t he mach ine ma y b e l ost if th er e is a ny p r oblem in th e h ard d is k. Fu ji
Xerox is not responsible for any direct and indirect damages arising from or c aused by such data loss.
Fuji Xerox is not responsible for any breakdown of machines due to infection of computer virus or
computer hac ki n g.
Important
(1) This manual is copyrighted with all rights reserved. Under the copyright laws, this manual may not be copied or
modified in whole or part, without the written consent of the publisher.
(2) Parts of this manual are subject to change without prior notice.
(3) We welcome any comments on ambiguities, errors, omissions, or missing pages.
(4) Never attempt any procedure on the machine that is not specif ically described in this manual. Unauthorized
operation can cause faults or accidents. Fuji Xerox is not liable for any problems resulting from unauthorized
operation of the equipment.
An export of this product is strictly controlled in accordance with Laws concerning Foreign Exchange and Foreign
Trade of Japan and/or the export control regulations of the United States.
Xerox, The Document Company and Ethernet are registered trademarks.
DocuWorks and CentreWare are trademarks.
Page 3

Table of Contents
Table of Contents..........................................................1
1 Before Using the Machine .................................................3
Preface...................................................................4
Using This Guide ..........................................................5
Organization of this Guide ................................................5
Conventions ............................................................6
2 Product Overview.........................................................7
Machine Components ......................................................8
Power On / Off............................................................12
Powering On...........................................................12
Powering Off...........................................................12
Table of Contents
Circuit Breaker............................................................13
Power Saver Mode........................................................14
Changing the Power Saver Mode Change Interval ..........................14
Exiting the Power Saver Mode ...........................................16
Control panel.............................................................17
3 Basic Operations ........................................................19
Copying .................................................................20
Step 1 Loading Documents ..............................................20
Step 2 Selecting Features ...............................................22
Step 3 Entering the Quantity .............................................22
Step 4 Starting the Copy Job.............................................23
Step 5 Confirming the Copy Job in the Job Status ..........................24
Operations during Copying ..............................................24
Printing..................................................................26
Scanning ................................................................27
Step 1 Loading Documents ..............................................27
Step 2 Selecting Features ...............................................29
Step 3 Starting the Scan Job.............................................30
Step 4 Confirming the Scan Job in the Job Status ..........................31
Step 5 Saving the Scanned Data .........................................31
Stopping the Scan Job ..................................................32
Mailbox..................................................................33
System Settings Procedure.................................................34
4 Paper and Other Media ...................................................37
Paper Types .............................................................38
Paper Type............................................................38
Loading Paper............................................................41
1
Page 4

Loading Paper in the Trays 1 to 2.........................................41
Loading Paper in the Tray 3 .............................................42
Loading Paper in the Tray 4 .............................................43
Loading Paper in the Tray 5 (Bypass).....................................43
Loading Paper in the Tray 6 .............................................44
Loading Tab Paper .....................................................45
Changing the Paper Size ..................................................46
Changing the Paper Size for the Trays 1 to 2...............................46
Changing the Paper Size for the Trays 3 to 4...............................47
Changing the Paper Size for the Tray 6 ...................................49
5 Maintenance............................................................. 51
Replacing Consumables ................................................... 52
Replacing Toner Cartridges..............................................52
Replacing the Waste Toner Container.....................................54
Replacing Drum Cartridge R1............................................55
Replacing Drum Cartridge R2/R3/R4......................................59
Replacing the Staple Cartridge (Finisher C or Booklet finisher C) .............63
Replacing the Booklet Staple Cartridge (Booklet finisher C) ..................64
Emptying Punch Scrap Container (Finisher C or Booklet finisher C)...........66
Executing Auto Gradation Adjustment .......................................67
6 Problem Solving......................................................... 71
Fault Clearance Procedure.................................................72
Image Quality Problems ...................................................73
Paper Jams ..............................................................74
Paper Jams in the Trays 1 to 2...........................................75
Paper Jams in the Tray 3................................................75
Paper Jams in the Tray 4................................................76
Paper Jams in the Tray 5 (Bypass) .......................................76
Paper Jams in the Tray 6................................................77
Paper Jams in the Transfer Module.......................................79
Paper jams in the Bottom Left Cover......................................80
Paper jams in the Bottom Right Cover.....................................81
Paper jams in the Output Tray ...........................................82
Paper jams in the Finisher C and the Booklet finisher C .....................83
Document Jams ..........................................................94
Stapler Faults ............................................................97
Staple Jams in the Staple Cartridge (Finisher C or Booklet fi nisher C) ......... 98
Staple Jams in the Booklet Staple Cartridge (Booklet finisher C).............. 99
Index...................................................................101
2
Page 5

1 Before Using the Machine
This chapter contains descriptions about how to use this document, as well as
cautions on using the product safely and legally.
z
Preface .........................................................................................................4
z
Using This Guid e ......... .. ............................. ............................ ................ ......5
Page 6
1 Before Using the Machine
Preface
Before Using the Machine
1
Thank you for selecting the Fuji Xerox ApeosPort C6550 I/C5540 I, DocuCentre C6550
I/C5540 I.
This guide provides all the necessary copy/p rint/scan operating procedures,
maintenance information like clearing paper jams, daily care, and precautions.
Please read this guide thoroughly to obtain the best per formance on this product. After
reading this guide, be sure to keep it handy for quick reference.
Since the machine is equipped with anti-counterf eit features, in some rare cases,
certain kinds of documents may be unable to copy.
February 2005
Fuji Xerox
In this manual, safety instructions are preceded by the symbol .
Always read and follow the instructions before performing the required procedures.
As a member of the International Energy Star Program, Fuji Xerox confirms this
product satisfies the requirements for International Energy Star Program
standards.
Fuji Xerox shares the global concern about environmental conservation and has integrated
that concern in its business activities–from research and development to disposal. We have
implemented a number of programs to lessen the burden on the environment. For example,
we have totally eliminated ozone-depleting chlorofluorocarbons from our manufacturing
facilities.
We are committed to leadership in the conservation of resources by reusing and recycling
post-consumer waste material such as paper, cartridges, and parts from our customer's
copiers and printers. Along with our efforts to make environmental values a part of the Fuji
Xerox culture, ApeosPort C6550 I/C5540 I, DocuCentre C6550 I/C5540 I adopts recycled
components that satisfy our strict quality standards.
Important Note:
This equipment will be inoperable when main power fails.
4
Page 7

Using This Guide
Using This Guide
This section describes the organization of this guide.
This guide has been produced for people who operate the ApeosPort C6550 I/C5540
I, DocuCentre C6550 I/C5540 I on a regular daily bas is. When reading t his guide, read
the chapter that is of particular relevanc e to the operation you are performing.
Organization of this Guide
This guide consists of the following chapters.
1 Before Using the Machine
Describes how to use this document, as well as cautions on using the product safely
and legally.
2 Product Overview
Describes basic information such as identifying the major components, how to switch
the machine on and off, how to use the touch screen, and how to set t he power saver
feature.
3 Basic Operations
Describes the basic operations of the machine including copying, printing and
scanning.
Before Using the Machine
1
4 Paper and Other Media
Describes the types of paper that can be used on the machine, precautions when
handling paper, and how to load paper in trays.
5 Maintenance
Describes how to replace consumables and perform auto gradation adjustment.
6 Problem Solving
Describes troubles that may occur with the machine and their solutions.
5
Page 8
Before Using the Machine
1
1 Before Using the Machine
Conventions
z
In this document, “Computer” refers to a personal computer or workstation.
z
The following icons are used in this guide.
ImportantIndicates important information that you should read.
Note Indicates additional information on operations or featur es.
z
The following conventions are used in this guide:
" " : The cross-reference is within this guide.
" " : Ref ers to names of CD-ROM, features, and touch screen
[ ] : Refers to folders, files, applications, button or menu names
< > button: Indicates a hardware button on the computer.
< > key: Indicates a key on the keyboard of the computer.
z
Orientation of documents or paper is described in this guide as follows:
messages and input text.
displayed in the touch screen, as well as th e names of menus,
commands, windows, or dialog boxes displayed on the
computer screen and their buttons and menu names.
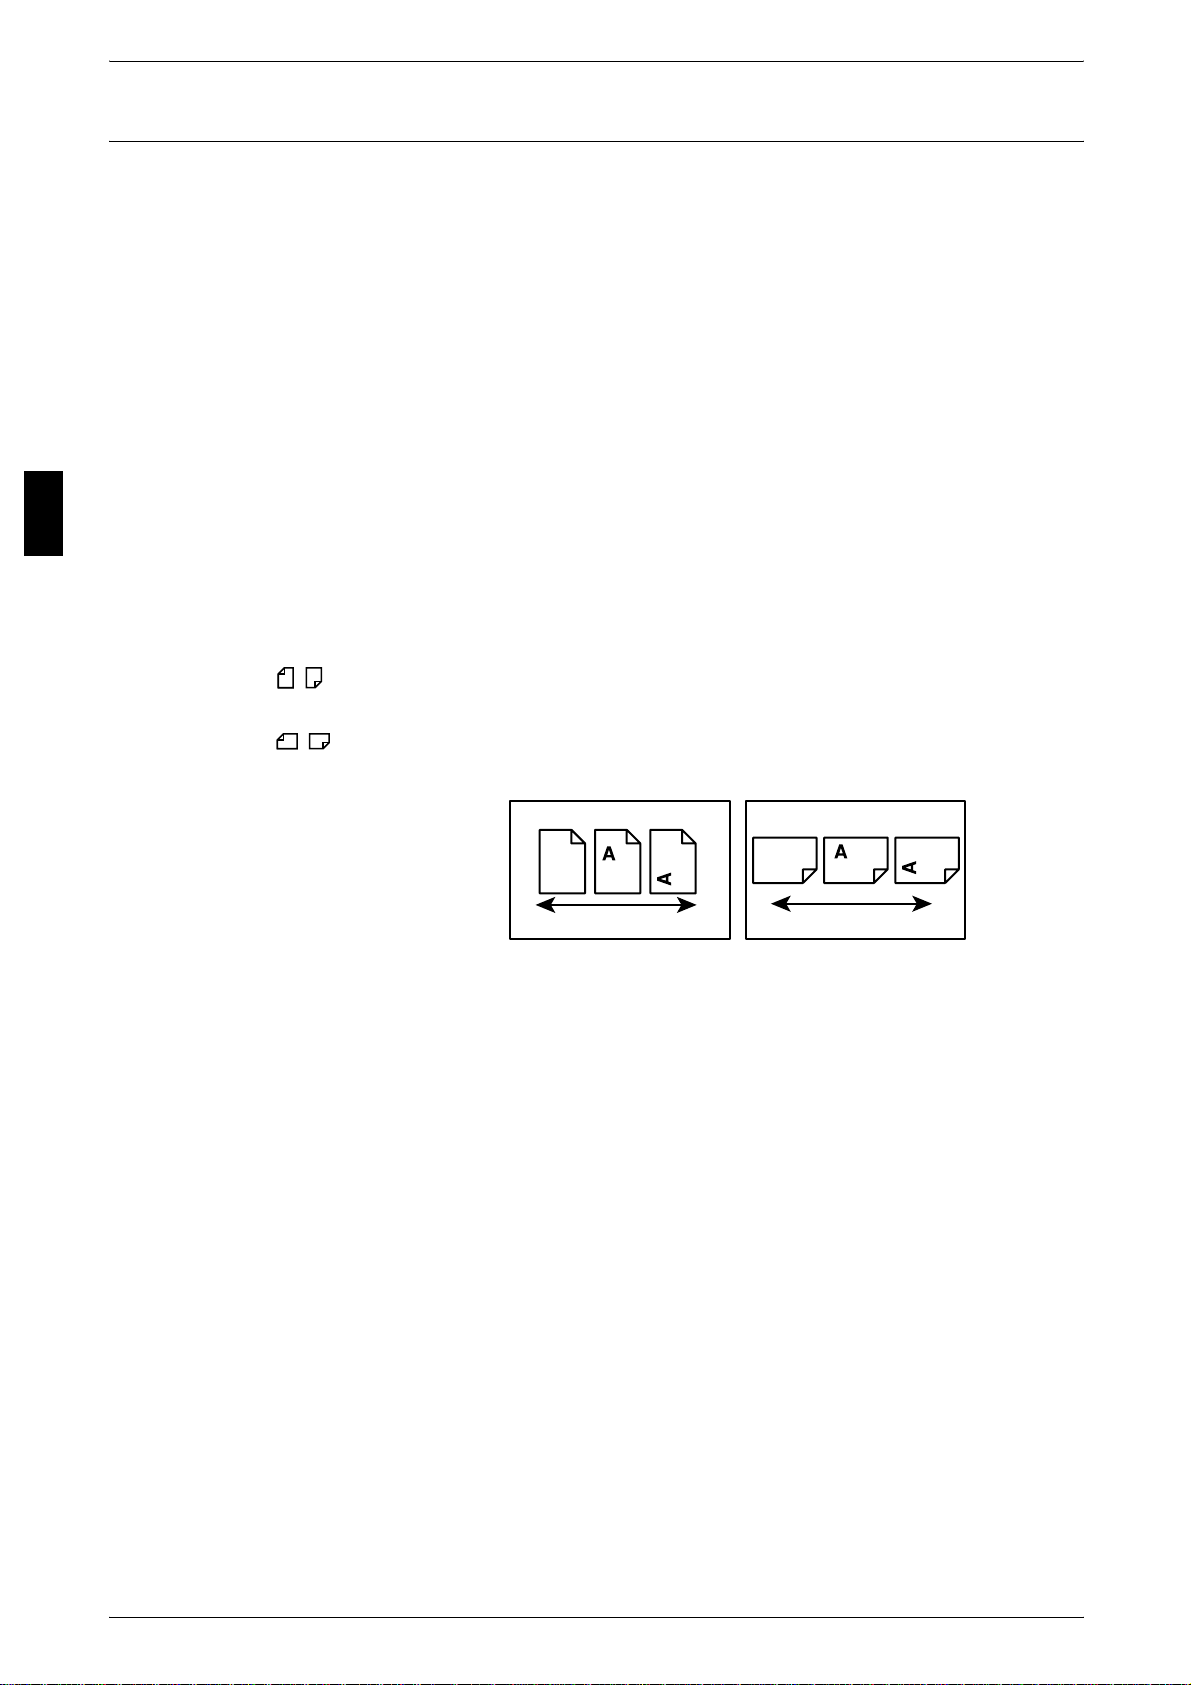
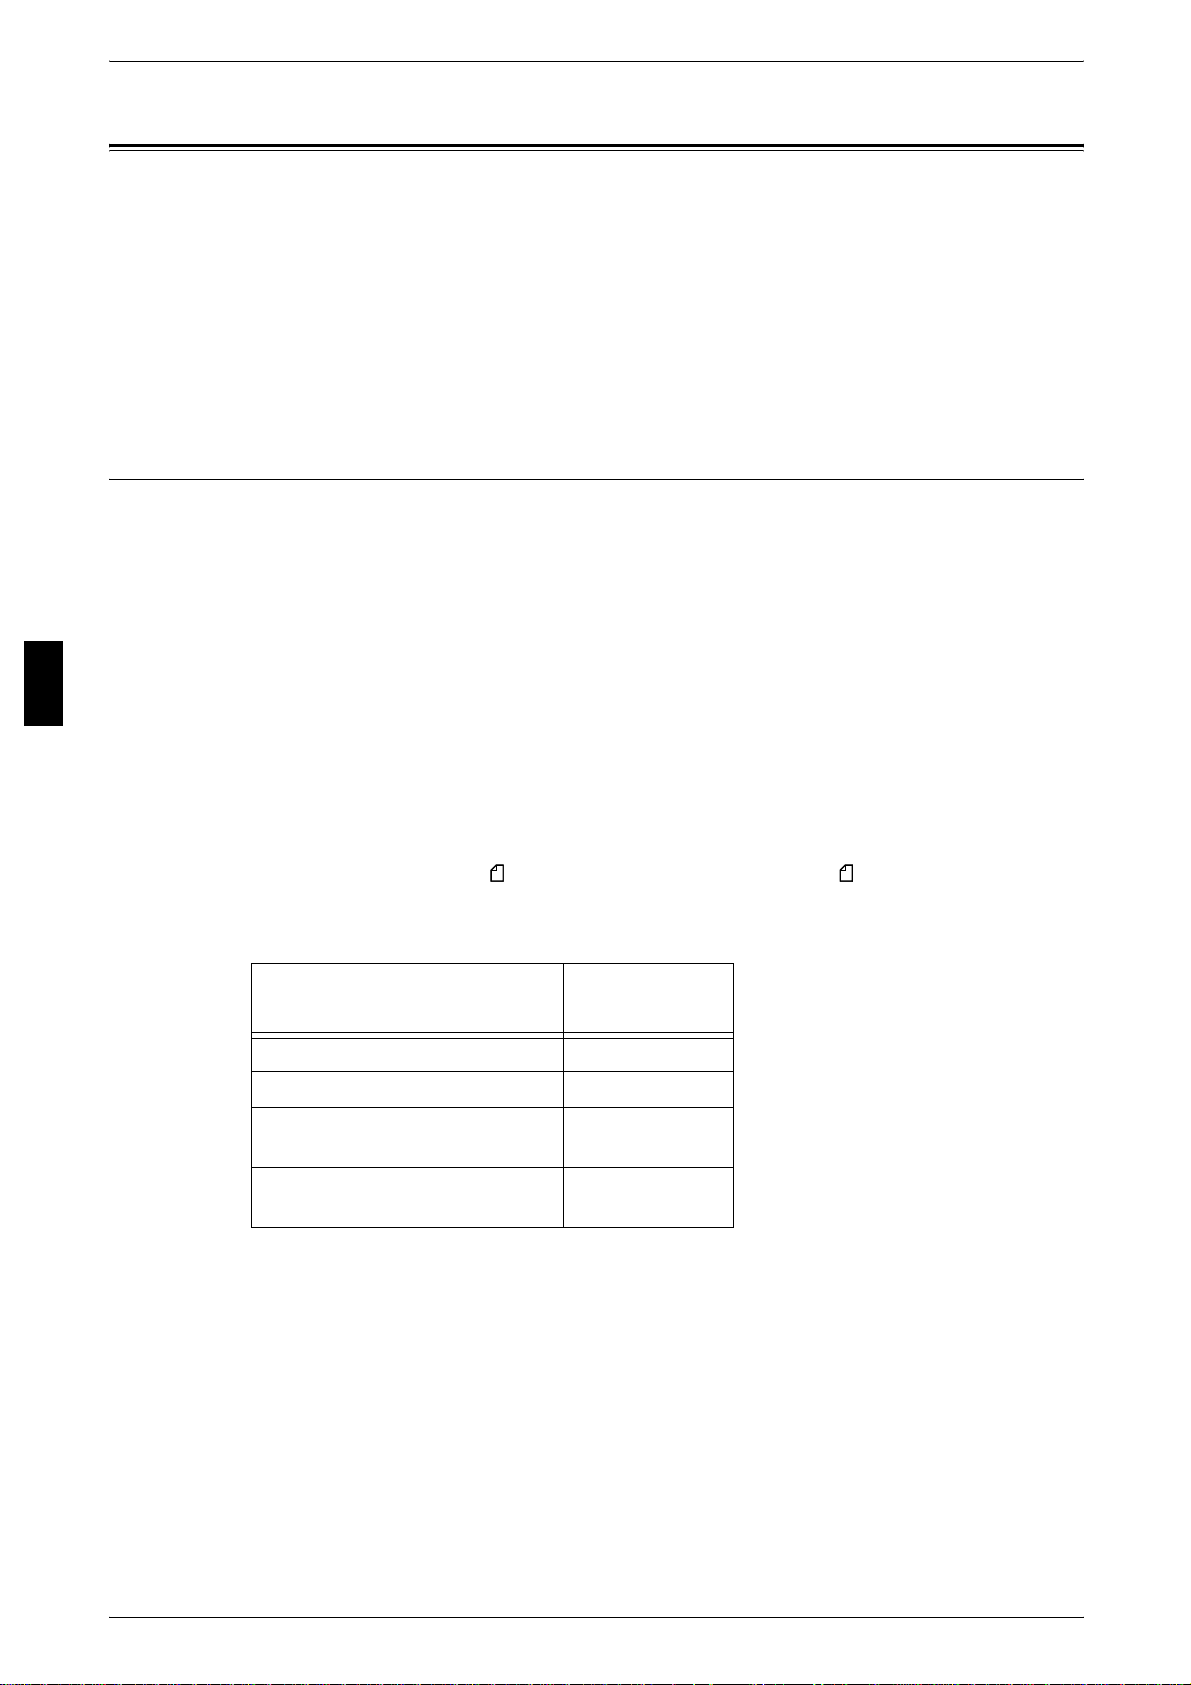
, ,Long Edge Feed (LEF): Loading with one of the long edges of the document
or paper.
, ,Short Edge Feed (SEF): Loading with one of the short edges of the doc ument
or paper.
LEF Orientation SEF Orientation
Paper feed direction Paper feed direction
6
Page 9

2 Product Overview
This chapter describes basic operation about the machine, such as the names
of each component, switching on and off of the machine, and the operation of
the touch screen and power saving settings.
z
Machine Components ...................................................................................8
z
Power On / Off...... ............................. ............................. ............... .............12
z
Circuit Breaker............................................................................................13
z
Power Saver Mode .....................................................................................14
z
Control panel ................. .. ............................. ............... ............................. ..17
Page 10
Product Overview
Warning
5
6
2 Product Overview
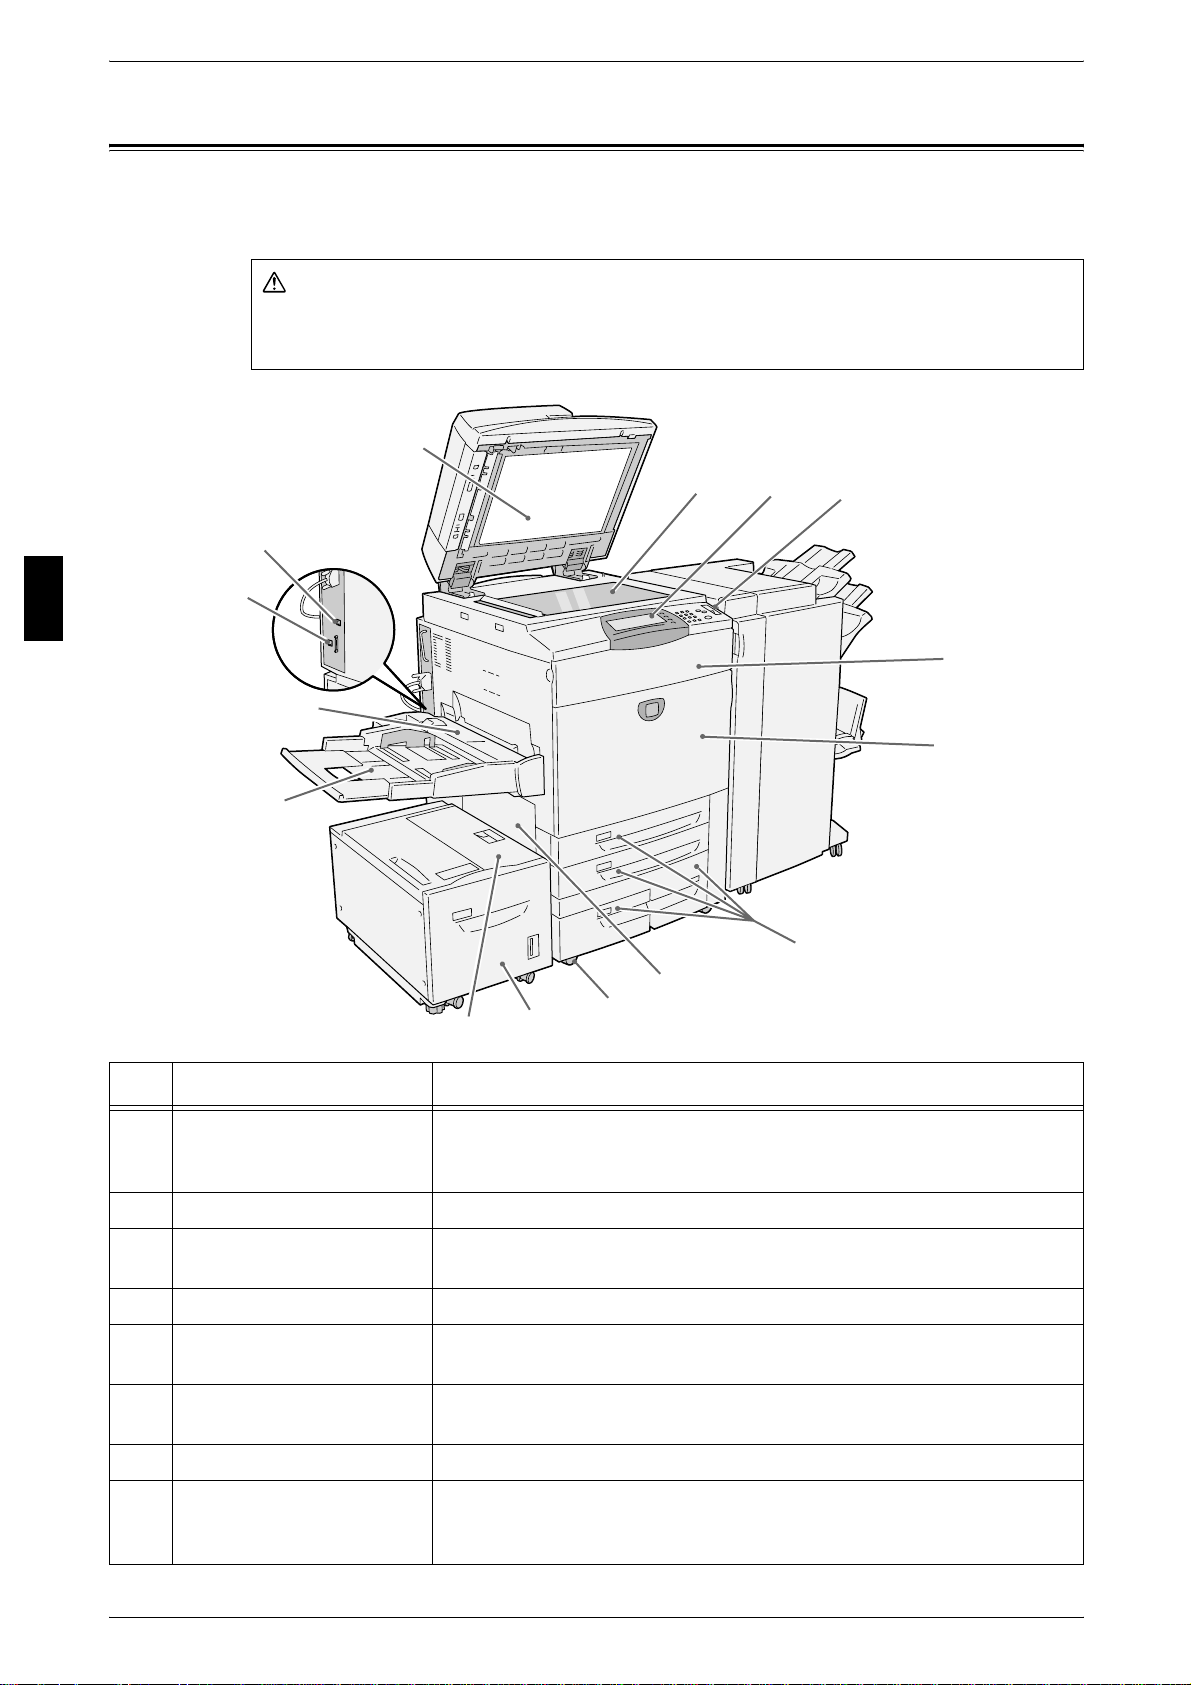
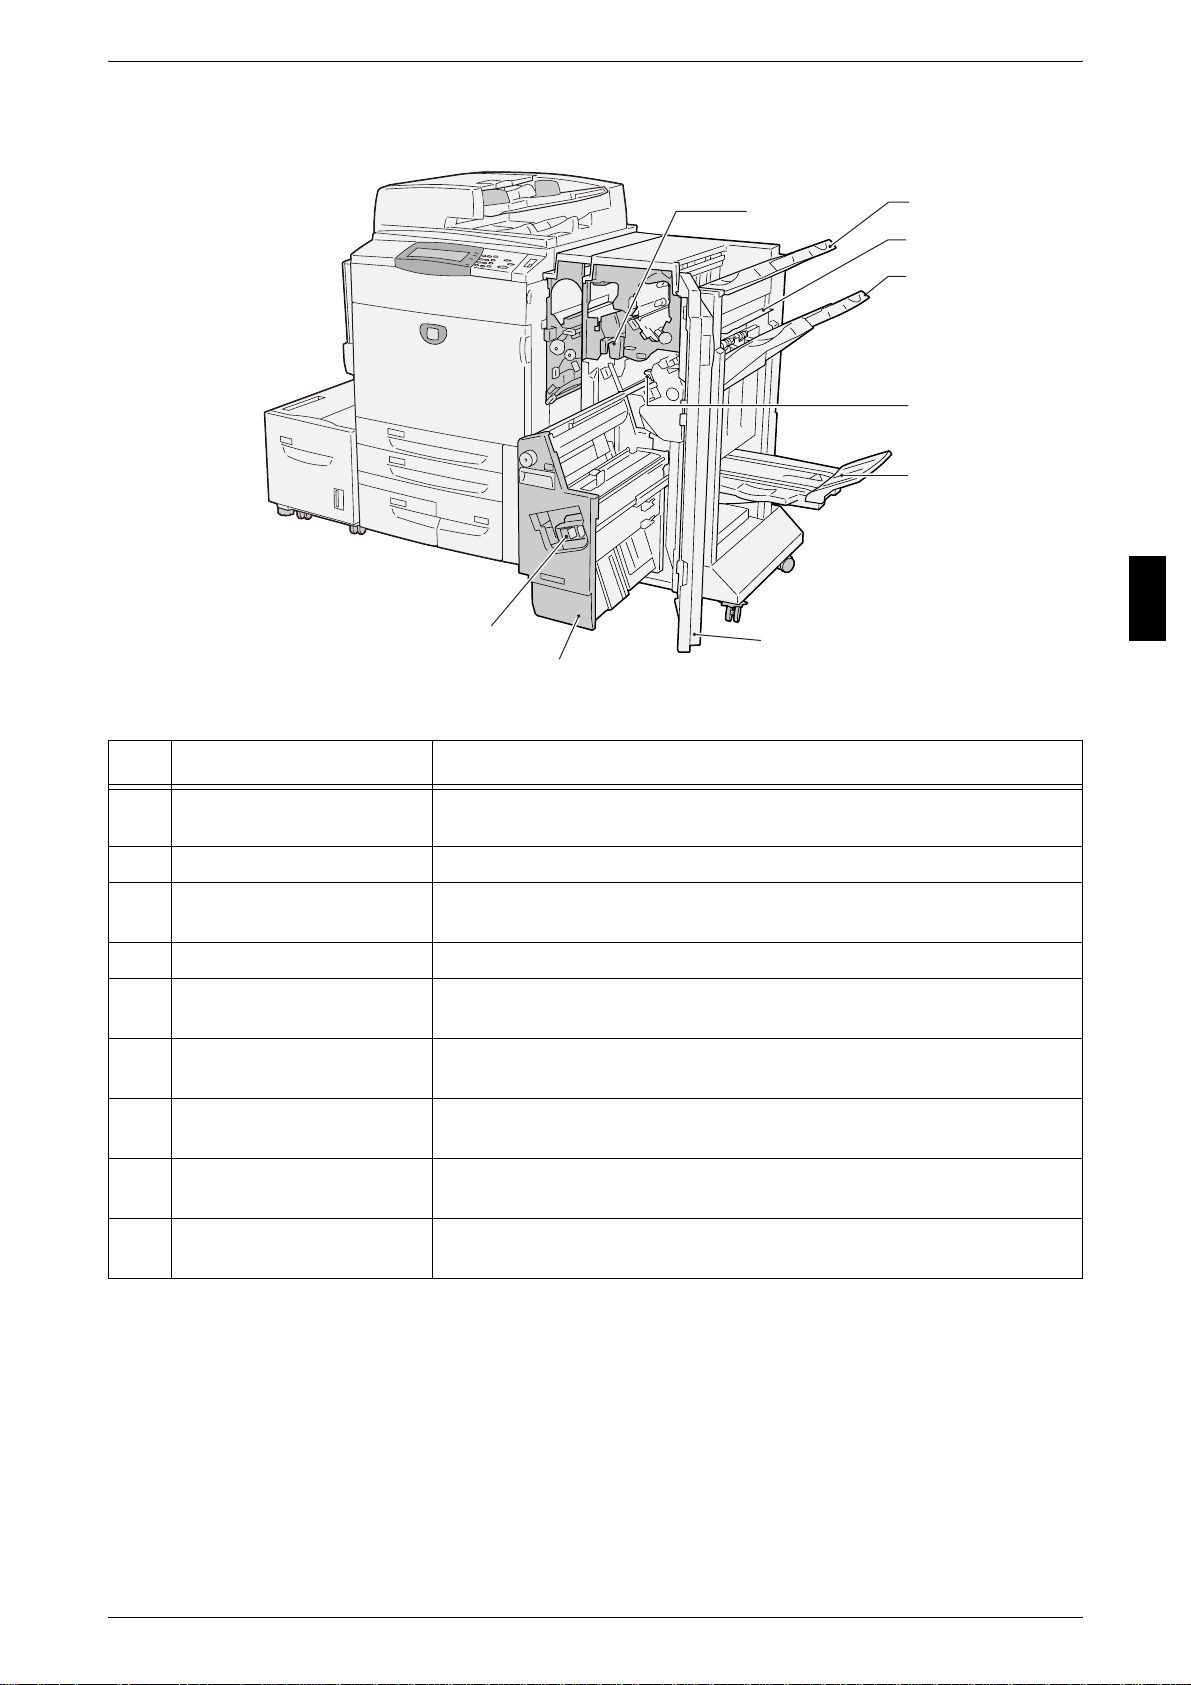
Machine Components
This section describes the main components and their functions of the ApeosPort
C6550 I/C5540 I, DocuCentre C6550 I/C5540 I (hereinafter called “the machine”).
Do not touch areas with warning labels indicating high temperature. You may get
burned.
1
2
14
15
12
13
11
10
2
8
9
3
4
7
No. Component Function
1 Duplex automatic
document feeder
(250 sheets)
2 Document glass Load documents here.
3 Control panel It consists of operation buttons, LED indicators and a touch screen.
4 Power switch Switches the power of the machine on/off.
5 Toner cover Open this cover to access the insides of the machine to replace the
6 Front cover Open this cover to access the insides of the machine to clear paper
7 Tray 1, 2, 3, 4 Load papers here.
8 Bottom left cover Open this cover to access the insides of the machine to clear paper
This automatically feeds 2 sided originals from a stack.
Refer to "Control panel" (P.17).
toner cartridge.
jams or replace consumables.
jams.
If the Tray 6 is installed in the machine, move the Tray 6 to the left first.
8
Page 11
Machine Components
3
4
No. Component Function
9 Locking casters Used for locking the wheels of the machine. Lock these casters afte r
moving the machine to its installation site.
10 Tray 6 (optional) Load papers here.
11 Tray 6 top cover Move the Tray 6 to the left and then open the top cover to clear paper
jams.
12 Tray 5 (Bypass) Used for loading non-standard paper (thick-stock paper, and other
special media) that cannot be loaded in the Trays 1 to 4, and 6.
13 Tray 5 (Bypass)
Top cover
Open this cover to access the insides of the machine to clear paper
jams.
Product Overview
14 USB2.0 interface
connector (optional)
15 Ethernet 10Base-T /
100Base-TX connector
31
32
Use to connect a USB cable.
Use to connect a network cable.
17
20
18
16
19
2
21
22
2
2
30
29
28
27
26
25
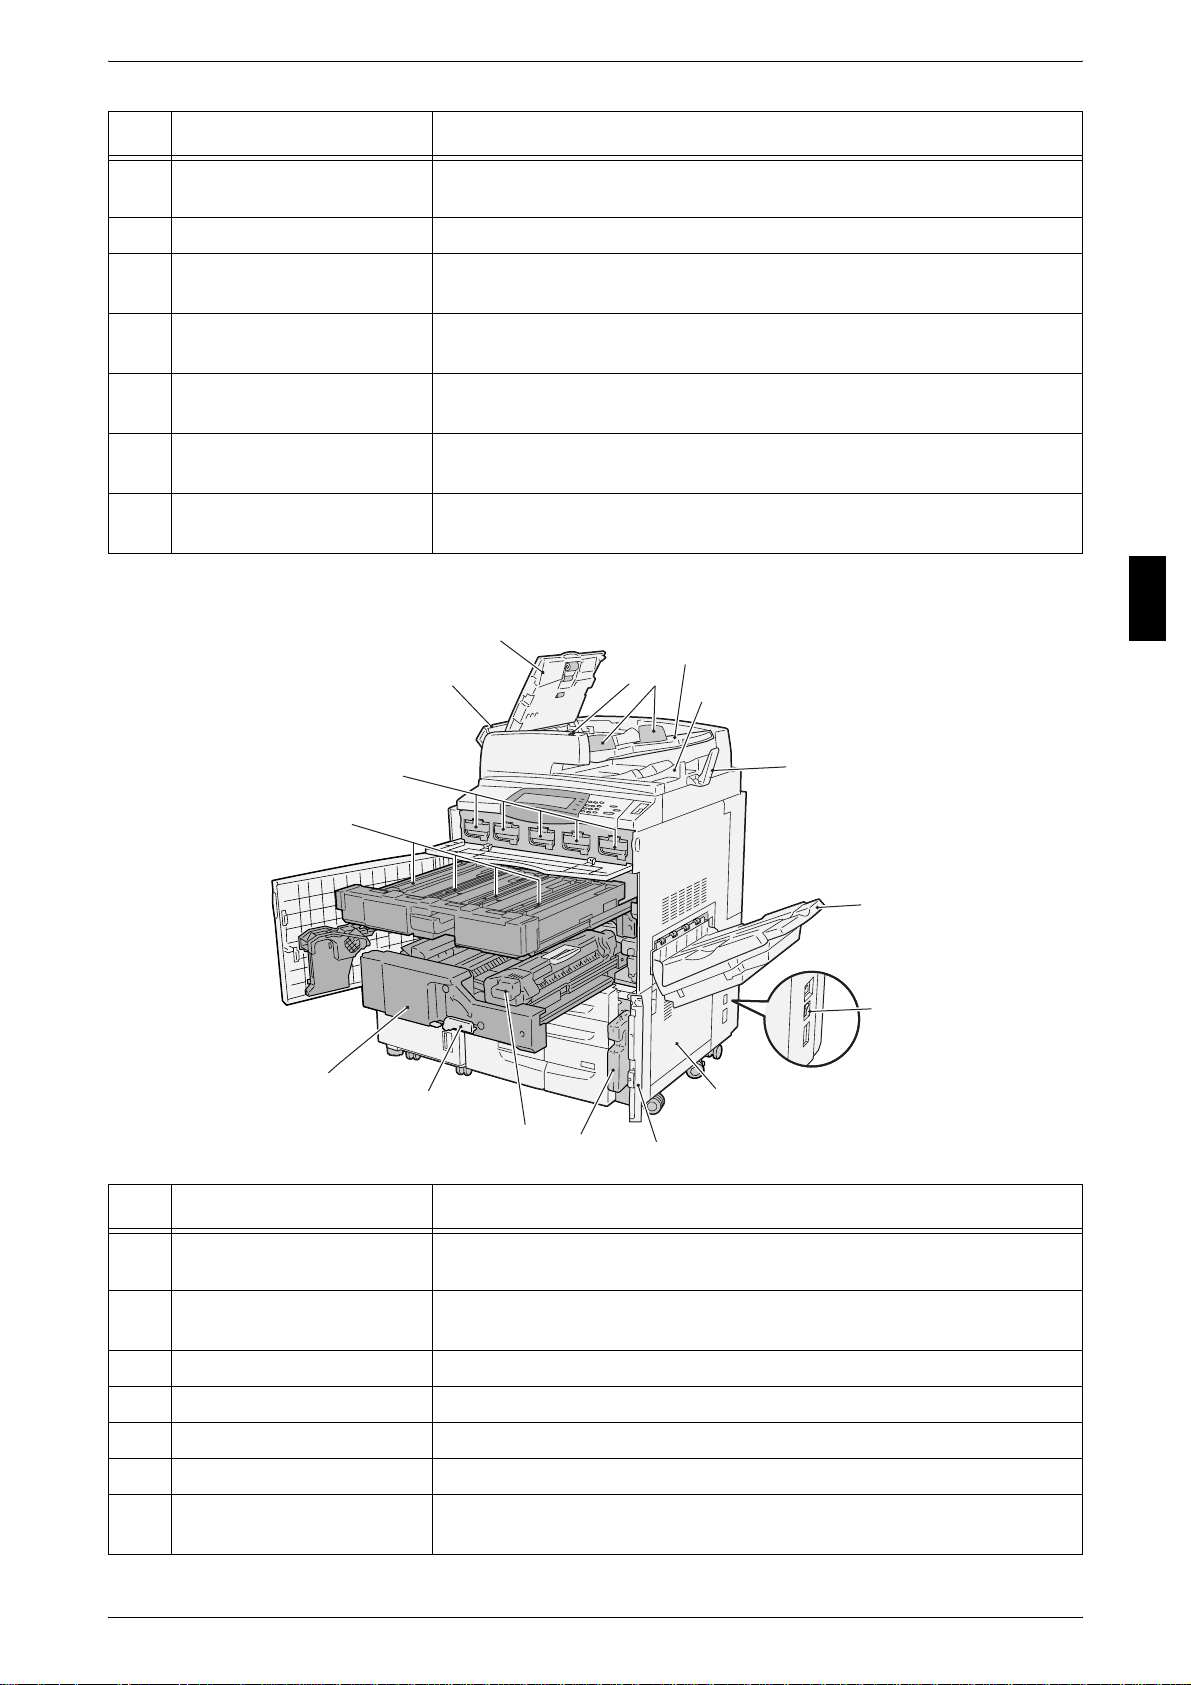
No. Component Function
16 Left cover The left cover slightly opens when the top cover is opened. Open this
cover widely to clear paper jams.
17 Top cover Open this cover to access the insides of the machine to clear paper
jams.
18 <Confirmation> indicator This indicator lights to confirm that the document is loaded correctly.
19 Document guides Use this guides to align the edges of the document.
20 Document feeder tray Load documents here.
21 Document output tray Receives scanned documents.
22 Document stopper Used when copying or scanning large size documents such as A3.
Open the stopper rightward when using it.
9
Page 12

Product Overview
2 Product Overview
No. Component Function
23 Output tray Receives documents.
Two types of trays are available: a normal output tray and an optional
offset stacking tray.
Note • When paper whose size is less than A4 is output from the
machine with an output stacking unit, push in the extension flap.
24 Circuit breaker Circuit breaker automatically turns the machine off when a current
leakage is detected.
25 Bottom right cover Open this cover to access the insides of the machine to clear paper
jams.
If a finisher is installed in the machine, open the front cover of the
finisher first.
2
26 Waste toner container
cover
27 Waste toner container Used to collect waste toner.
28 Fuser Fuses the printed image on the paper by fusing the toner. Do not touch
29 Lever Used to draw out the transfer unit.
30 Transfer unit Transfers toner images on the drum to paper. Open this cover to access
31 Drum cartridges A drum cartridge comprises of photosensitive elements. Drum cartridges
32 Toner cartridges Four toner (image forming powder) cartridges are provided: Black (K1,
Open this cover to access the insides of the machine to replace the
waste toner container.
this unit as it is extremely hot.
the insides of the machine to clear paper jams.
are arranged in ord er R1, R2, R3 and R4 from the left as y ou face the
main body.
K2), Cyan (C), Magenta (M) and Yellow (Y).
10
Page 13
Finisher C, Booklet finisher C
6
4
5
3
2
Machine Components
1
Product Overview
2
9
8
7
No. Component Function
1 Punch scrap container Collects the scraps from the puncher. Draw out the box when throwing
the dust away.
2 Output tray Receives documents.
3 Exit cover Open this cover to access the insides of the machine to clear paper
jams.
4 Finisher tray Receives documents, when stapling or punching is selected.
5 Staple cartridge Staples are stored. Remove this cartridge to replace staples or clear
staple jams.
6 Booklet tray
(Booklet finisher C only)
7 Front cover Open this cover to access the insides of the machine to clear paper or
8 Booklet unit
(Booklet finisher C only)
9 Booklet staple cartridge Two staple cartridge for booklet creation (gutter) are installed. Remove
Note • a finisher C and a booklet finisher C are optional. In text descriptions, the finisher C or
booklet finisher C is abbreviated as "finisher".
Receives documents, when folding is selected in the Booklet Creation.
staple jams, replace staples, or throw punch dust away.
This unit is for folding documents in half and stapling the folded
documents.
this cartridge to replace staples or clear staple jams.
11
Page 14
Product Overview
2 Product Overview
Power On / Off
Switch on the power before operating the machine.
The machine is ready for operation wi thin 150 seco nds after t he power is s witched o n.
It may take longer due to the image quality adjustment according to the machine
condition.
Turn the machine off at the end of the day or when it is not in use for a long period of
time. Also, use [Power Saving] feature when not in use for a while to reduce the power
consumption.
Important • Switching off the power of the machine may cause loss of data being processed.
For information about power saving feature, refer to "Power Saver Mode" (P.14).
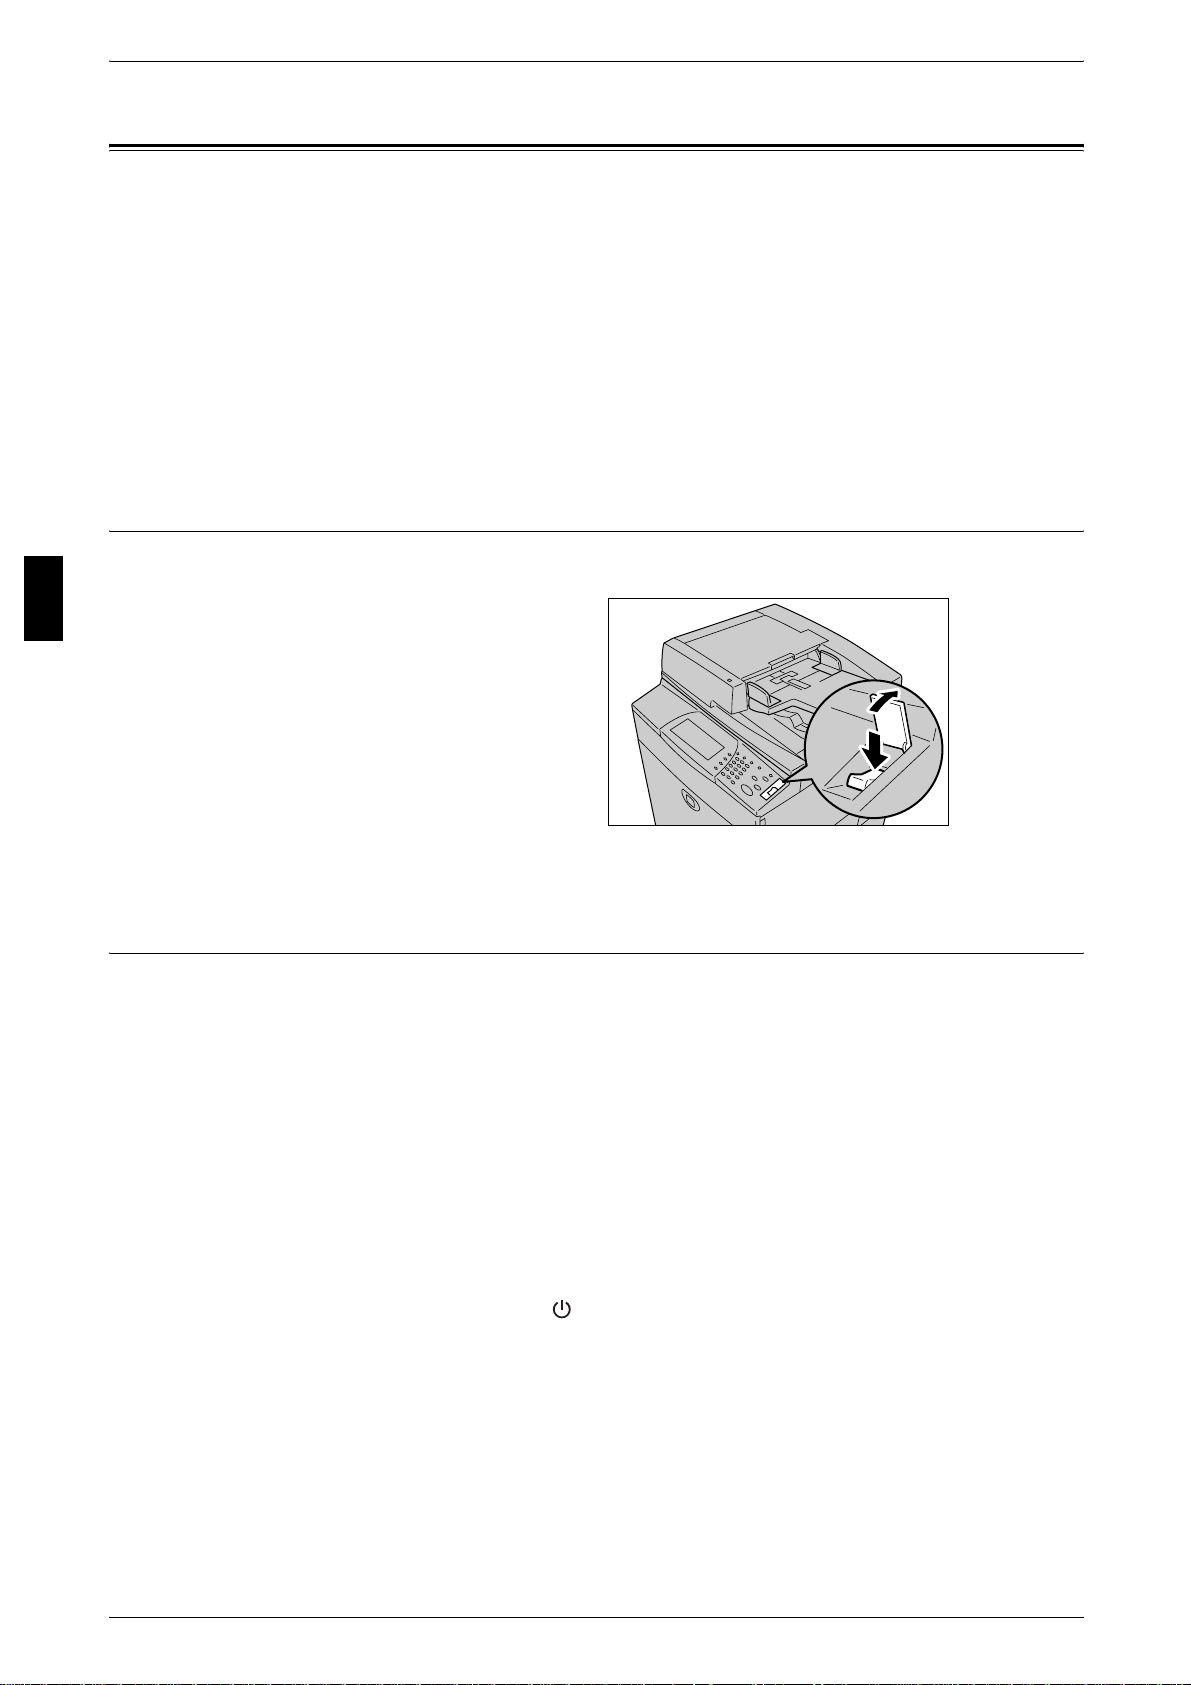
Powering On
The procedure for turning on the power is as follows.
2
1 Open the cover and press the
power switch to the [ | ] position to
turn the power on.
Note • The “Please wait...” message
indicates that the machine is
warming up. The machine
cannot be used while it is
warming up.
Powering Off
The procedure for turning the power off is as follows.
Important • Switching off the power of the machine during data processing stored in the memory may
cause loss of data being processed.
1 Before turning the power off, make sure that all copy or print jobs have completely
finished. Also, make sure that the Online indicator is not lit.
Important • Never turn the power off in the following instances:
• While data is being received
• While jobs are being printed
• While jobs are being copied
• While a scan is being executed
12
2 Press the power switch to the [ ] position.
Important • Power off processing is performed internally on the machine for a while after the power
switch is turned off. Therefore, do not unplug the power cord from the power outlet
immediately after turning the power switch off.
Note • Before you turn the power back on after turning it off, first make sure that the touch screen
has gone out.
Page 15

Circuit Breaker
The machine is provided with a
circuit breaker.
In the event of a current leakage,
the breaker will automatically cut off
the power circuit to prevent any
leakage or fire from occurring.
The circuit breaker is normally
pressed to the upper side,
respectively, as shown in the figur e
on the right.
If the circuit breaker is pressed to
the lower sides, respectively,
unusual conditions may occur.
Please contact our Customer
Support Center.
Circuit Breaker
Product Overview
2
13
Page 16
Product Overview
on
2
2 Product Overview
Power Saver Mode
The machine is installed with a Power Saver feature that will automatically cut off the
electricity to the machine if no copy or print data is received for a certain duration.
The Power Saver feature has two modes, a [Low Power mode] and [Sleep mode].
The machine enters the [Low Power mode] after the preset time has elapsed if the
machine is left unused for a fixed period of time.
The machine then enters the [Sleep mode] if a further preset time elapses.
Low Power Mode
(
Power consumption: ApeosPort C6550 I/DocuCentre C6550 I142.7W
In this mode, the power to the control panel and fuser unit is lowered to save power.
The touch screen goes o ut, and t he <Power Save r> butt on on the c ontr ol pa nel ligh ts.
To use the machine, press the <Power Saver> button. The <Power Saver> button goes
out to indicate that the Power Saver feature is canceled.
Sleep Mode
ApeosPort C5540 I/DocuCentre C5540 I134.5W)
(
Power consumption: ApeosPort C6550 I/DocuCentre C6550 I5.7W
ApeosPort C5540 I/DocuCentre C5540 I3.8W)
In this mode, the power is lowered more than in the Low Power mode.
The touch screen goes o ut, and t he <Power Save r> butt on on the c ontr ol pa nel ligh ts.
To use the machine, press the <Power Saver> button. The <Power Saver> button goes
out to indicate that the Power Saver feature is canceled.
Changing the Power Saver Mode Change Interval
The procedure for setting the Power Saver feature is as follows.
To activate the Power Saver feature, set the Sleep Mode button to Enabled, and set
both the times until the activation of Low Power Mode and Sleep Mode.
Note • The time to activation of Low Power Mode and Sleep Mode can each be specified in 1
minute increments, from 1 to 240 minutes.
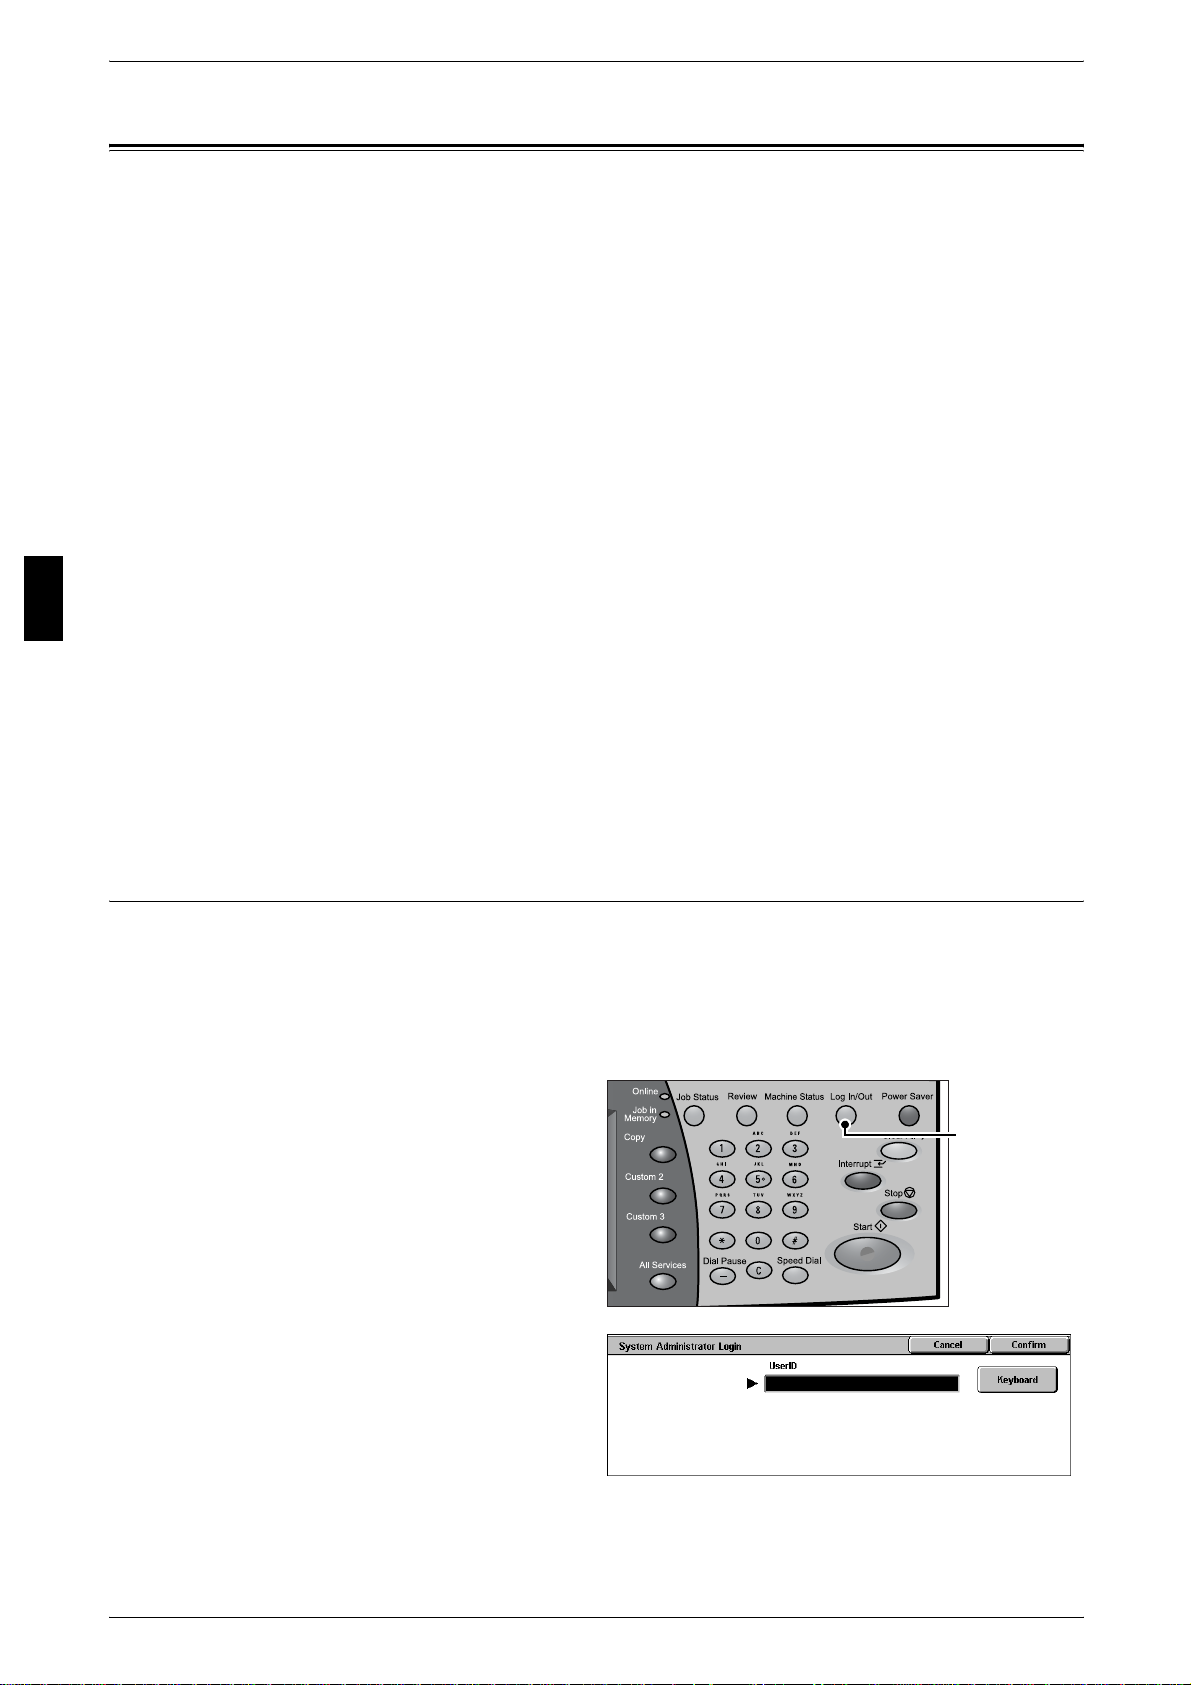
1 Press the <Log In/Out> button.
<Log In/Out> butt
14
2 Enter the UserID with the numeric
keypad or a keyboard display ed by
selecting [Keyboard], and select
[Confirm].
Note • The default UserID is “11111”. When using the Authentication feature, a password is
required. The default password is “x-admin”.
Page 17
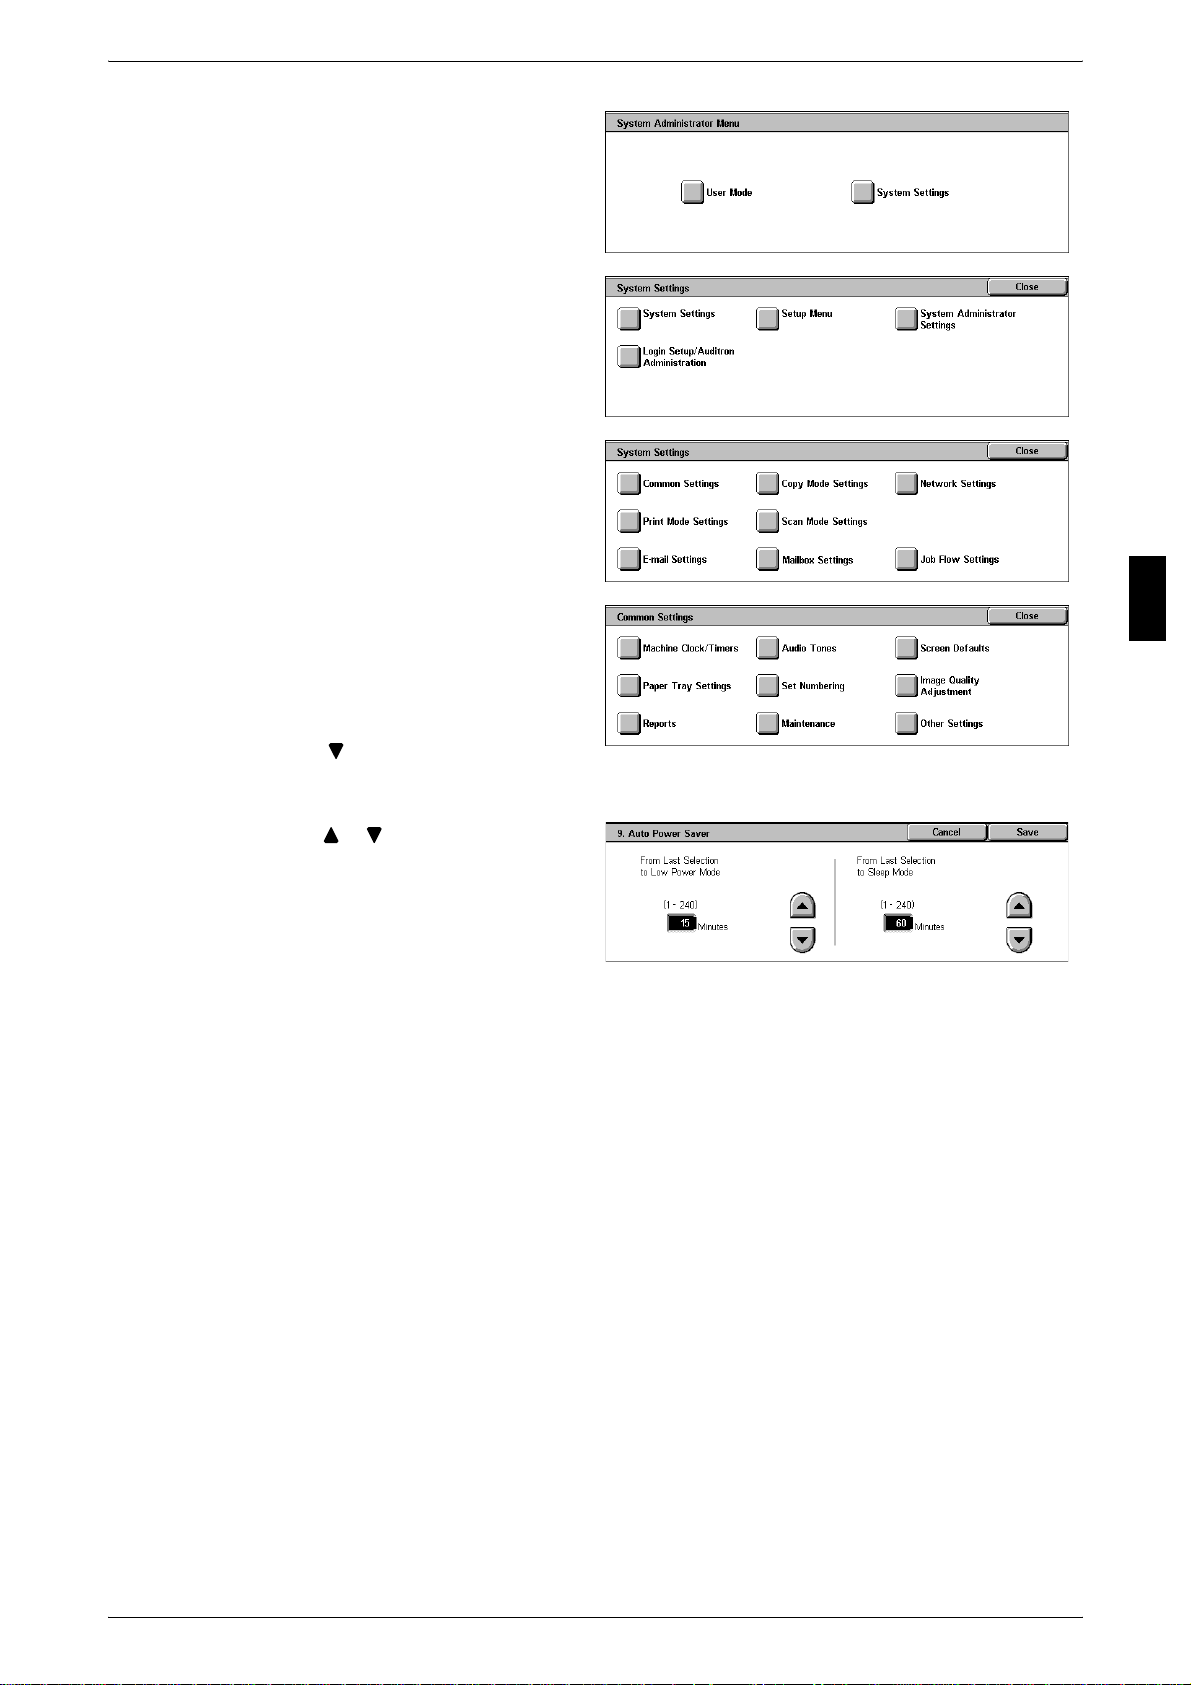
3 Select [System Settings]
4 Select [System Settings].
5 Select [Common Settings].
Power Saver Mode
Product Overview
6 Select [Machine Clock/Timers].
7 Select [ ].
8 Select [Auto Power Saver], and select [Change Settings].
9 Using [ ] [ ], configure a power
saver mode migration time from 1
to 240 minutes, in 1 minute
increments.
From Last Selection to Low Power Mode
Set the time to move to the [Low Power Mode] after the last operation.
Note • The default for [From Last Selection to Low Power Mode] is [15] minutes. The Low Power
Mode cannot be set to [Disabled] .
From Last Selection to Sleep Mode
2
Set the time to move to the [Sleep Mode] after the last operation.
Note • The default for [From Last Selection to Sleep Mode] is [60] minutes. Configure the [From
Last Selection to Sle ep Mode] tim e to be lo nger tha n the [From Last Sel ection to L ow Power
Mode] time.
10 Select [Save].
11 Select [Close] repeatedly until the [System Settings] screen is displayed.
12 Select [Exit] to exit the System Administration mode.
15
Page 18

2 Product Overview
Exiting the Power Saver Mode
The following describes how to exit the Power Saver mode.
The Power Saver mode is cancelled in the following instances:
z
Pressing the <Power Saver> button
z
Receiving data
Product Overview
2
1 Press the <Power Saver> button.
<Power Saver>
button
16
Page 19
Control panel
11
12
13
14
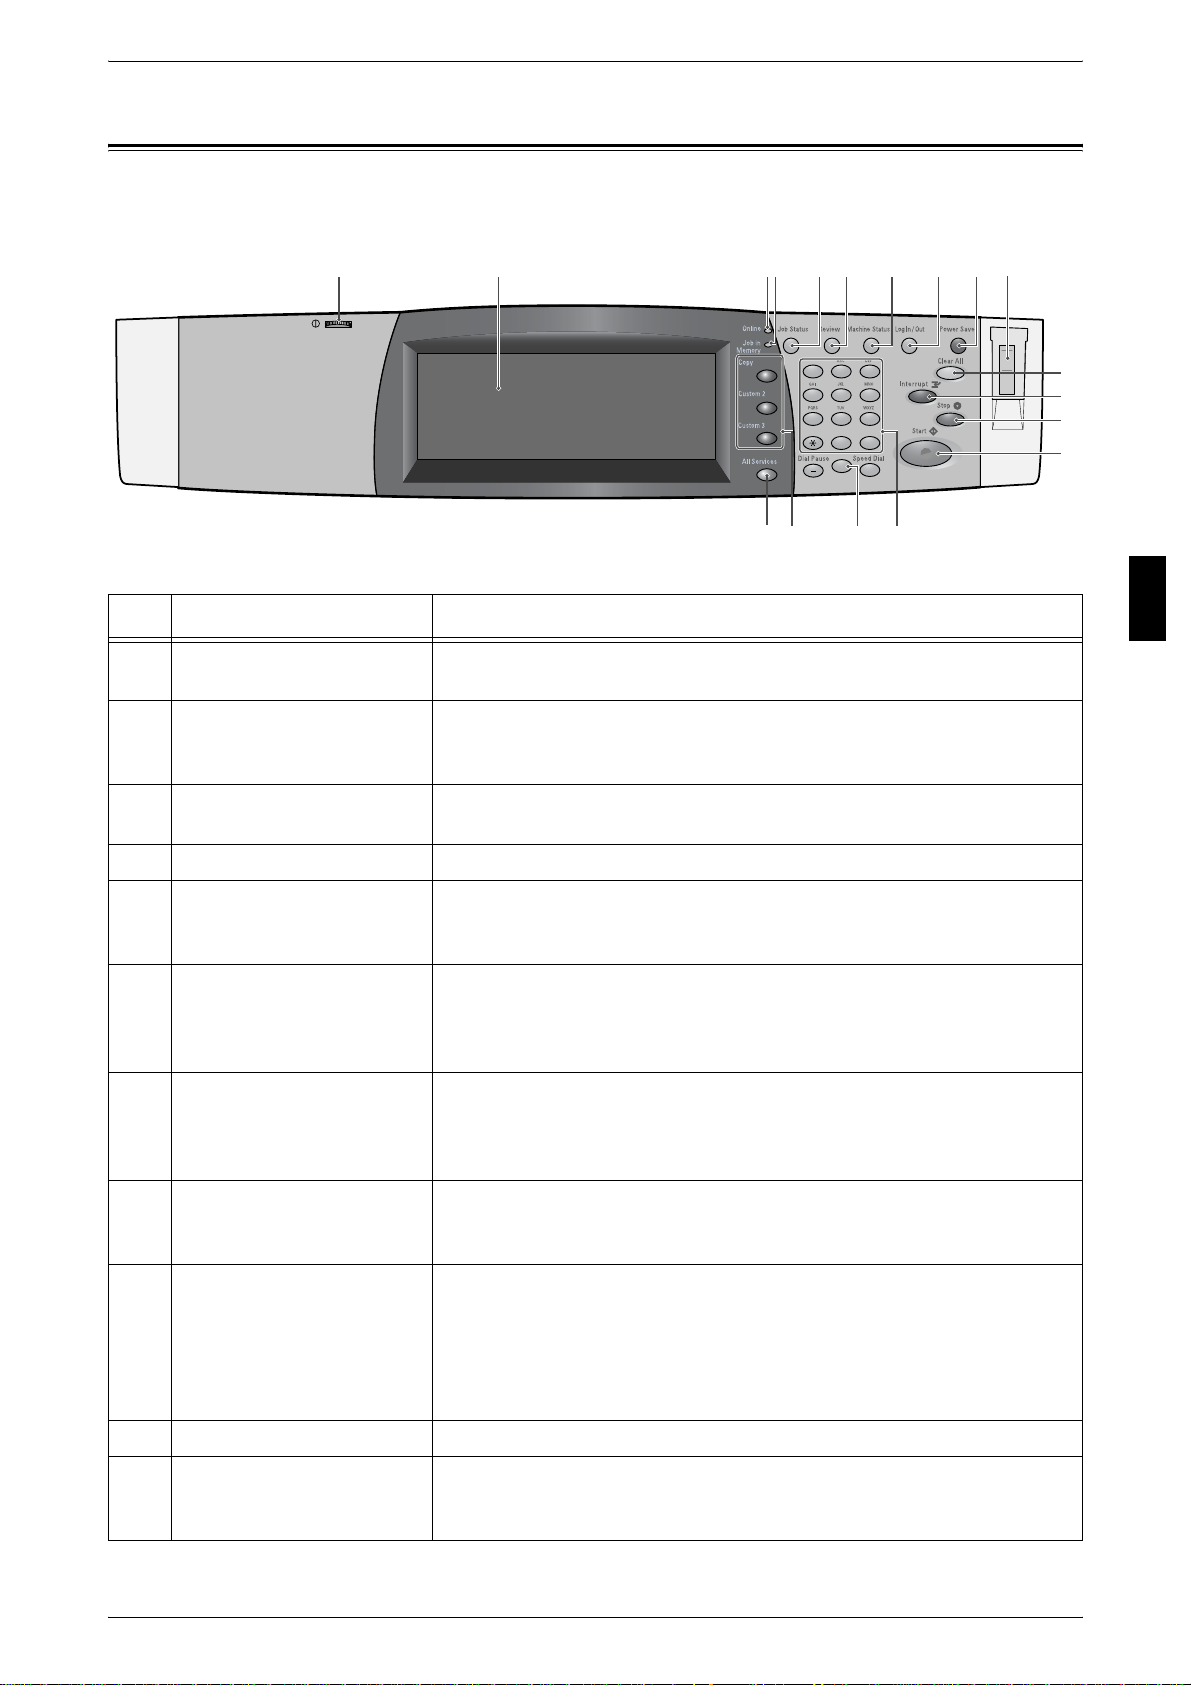
The following describes the names and functions of components on the control panel.
Control panel
1 4 9
2 3
5 6 7 8
123
456
789
0#
C
16
151718
10
No. Component Function
1 Brightness dial Adjusts the brightness of the touch screen. Use this dial to adjust the
brightness of touch screen when it is too dark to read.
2 Touch screen This touch screen displays messages required for operation and buttons
for various features. You can directly touch the touch screen to instruct
operations in screens and set features.
3 <Online> indicator This indicator lights when the machine is sending or receiving data to or
from a client.
Product Overview
2
4 <Job in Memory> indicator This indicator lights when data is stored in the machine's memory.
5 <Job Status> button Pressing this button allows you to confirm or cancel currently executing
or completed jobs, or to confirm or print saved documents.
In text descriptions, this button is indicated as the <Job Status> button.
6 <Review> button Press this button to open the [Review] screen. In this screen, you can
check a list of the status of copy and scan features whose settings have
changed from the defaults.
In text descriptions, this button is indicated as the <Review> button.
7 <Machine Status> button Pressing this button allows you to confirm the machine status and
meters, check the state of consumables, and print reports.
In text descriptions, this button is indicated as the <Machine Status>
button.
8 <Log In/Out> button When this button is pressed, the UserID input screen is displayed for
System Administration mode or Login Setup/Auditron Administration.
In text descriptions, this button is indicated as the <Log In/Out> button.
9 <Power Saver> button If the machine is not operated for a while, the machine's power
consumption is lowered to enter the Power Saver mode. In the Power
Saver mode, this button lights up. To cancel the Power Saver mode,
press this button again.
In text descriptions, this button is indicated as the <Power Saver>
button.
10 Power switch Switches the power of the machine on/off.
11 <Clear All> button Returns the statuses of all displayed services to their default values.
The machine will be reset to this state after it is turned on.
In text descriptions, this button is indicated as the <Clear All> button.
17
Page 20

Product Overview
2
2 Product Overview
No. Component Function
12 <Interrupt> button Select this button to temporarily stop a continuous copy job or printing to
give another job higher priority. During an interrupt, the interrupt
indicator lights up. Pressing the <Interrupt> button again cancels the
interrupt and the previous operation is resumed.
In text descriptions, this button is indicated as the <Interrupt> button.
13 <Stop> button Press this button to stop the current copy job or communications.
In text descriptions, this button is indicated as the <Stop> button.
14 <Start> button Press this button to start copying or scanning.
In text descriptions, this button is indicated as the <Start> button.
15 Numeric keypad Press these buttons to enter the number of copies, passwords and other
numerical values.
In text descriptions, these buttons are indicated as the “numeric
keypad”.
16 <C> (Clear) button Press this button if you have entered the wrong numerical value with the
numeric keypad.
In text descriptions, this button is indicated as the <C> button.
17 <Copy>
<Custom 2>
<Custom 3> buttons
Used to call a custom feature.
You can assign a feature to the buttons selected from the features
displayed on the [Menu] screen and [Language].
18 <All Services> button Used to display the [Menu] screen.
In text descriptions, these buttons are indicated as the <All Services>
button.
18
Page 21

3 Basic Operations
This chapter describes the basic operations of the machine.
z
Copying.......................................................................................................20
z
Printing........................................................................................................26
z
Scanning.....................................................................................................27
z
Mailbox .......................................................................................................33
z
System Settings Procedure........................................................................34
Page 22
3 Basic Operations
Copying
This section describes the basic copy procedures. The following shows the reference
section for each procedure.
Step 1 Loading Documents.........................................................................................................20
Step 2 Selecting Features............................................................................................................22
Step 3 Entering the Quantity.......................................................................................................22
Step 4 Starting the Copy Job.......................................................................................................23
Step 5 Confirming the Copy Job in the Job Status.....................................................................24
Basic Operat io ns
3
Step 1 Loading Documents
There are two methods for loading documents:
Document Feeder
z
Single sheet
z
Multiple sheets
Document Glass
z
Single sheet
z
Bound documents, such as books
Document Feeder
The document feeder supports single and multiple sheet documents with sizes from
139.7 x 210 mm (A5, A5 , 5.5 x 8.5 inches, 5.5 x 8.5 inches ) to 297 x 432 mm (A3,
11 x 17 inches).
The document feeder accepts the following number of sheets.
Document type (weight)
Number of
sheets
Lightweight paper (38 - 49 g/m2)250
Plain paper (50 - 80 g/m
Heavyweight paper
(81 - 128 g/m
Heavyweight paper
(129 - 200 g/m
2
)
2
)
2
)250
150
100
The document feeder automatically detects standard size documents. For nonstandard size documents, input the size in the [Original Size] field.
Important • Place folded or creased documents on the document glass to avoid paper jams in the
document feeder.
• 2 sided scanning of lightweight paper (38 - 49 g/m2) is not supported.
20
Page 23
1 Remove any paper clips and
Warning
staples before loading the
documents.
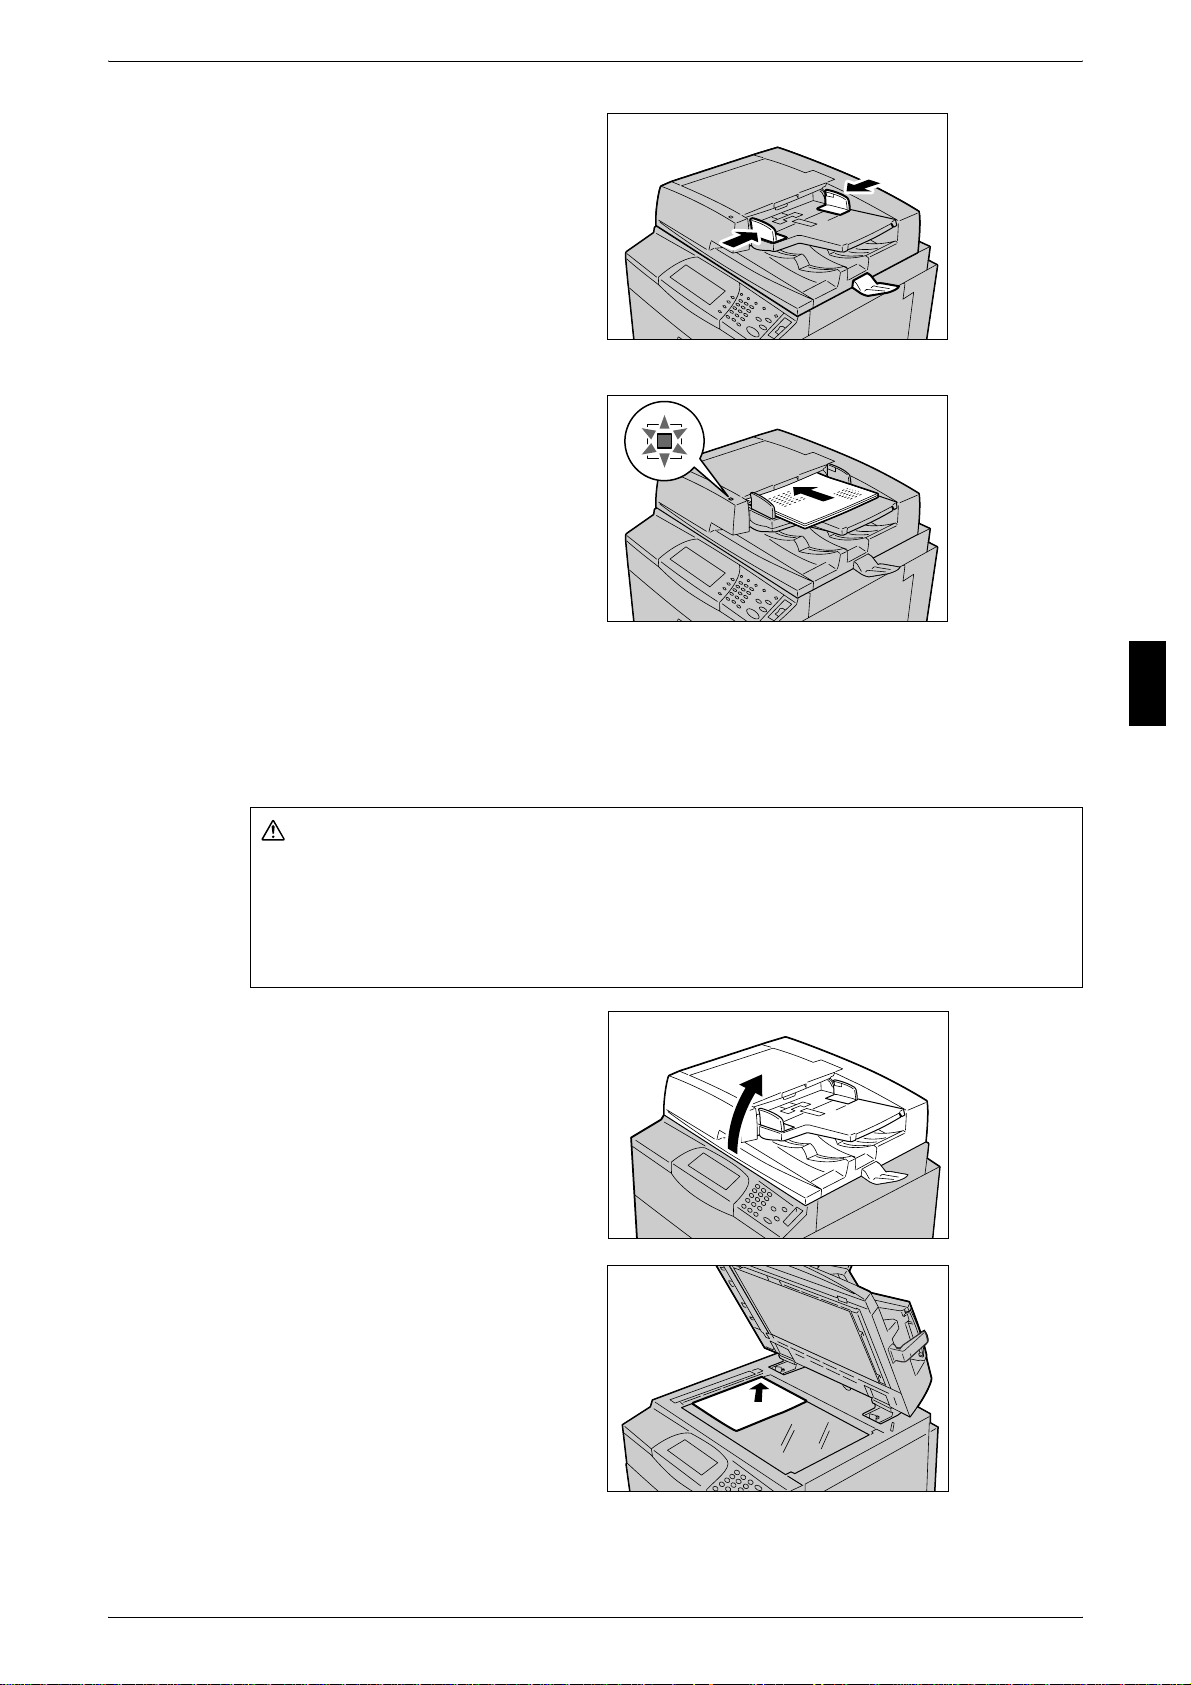
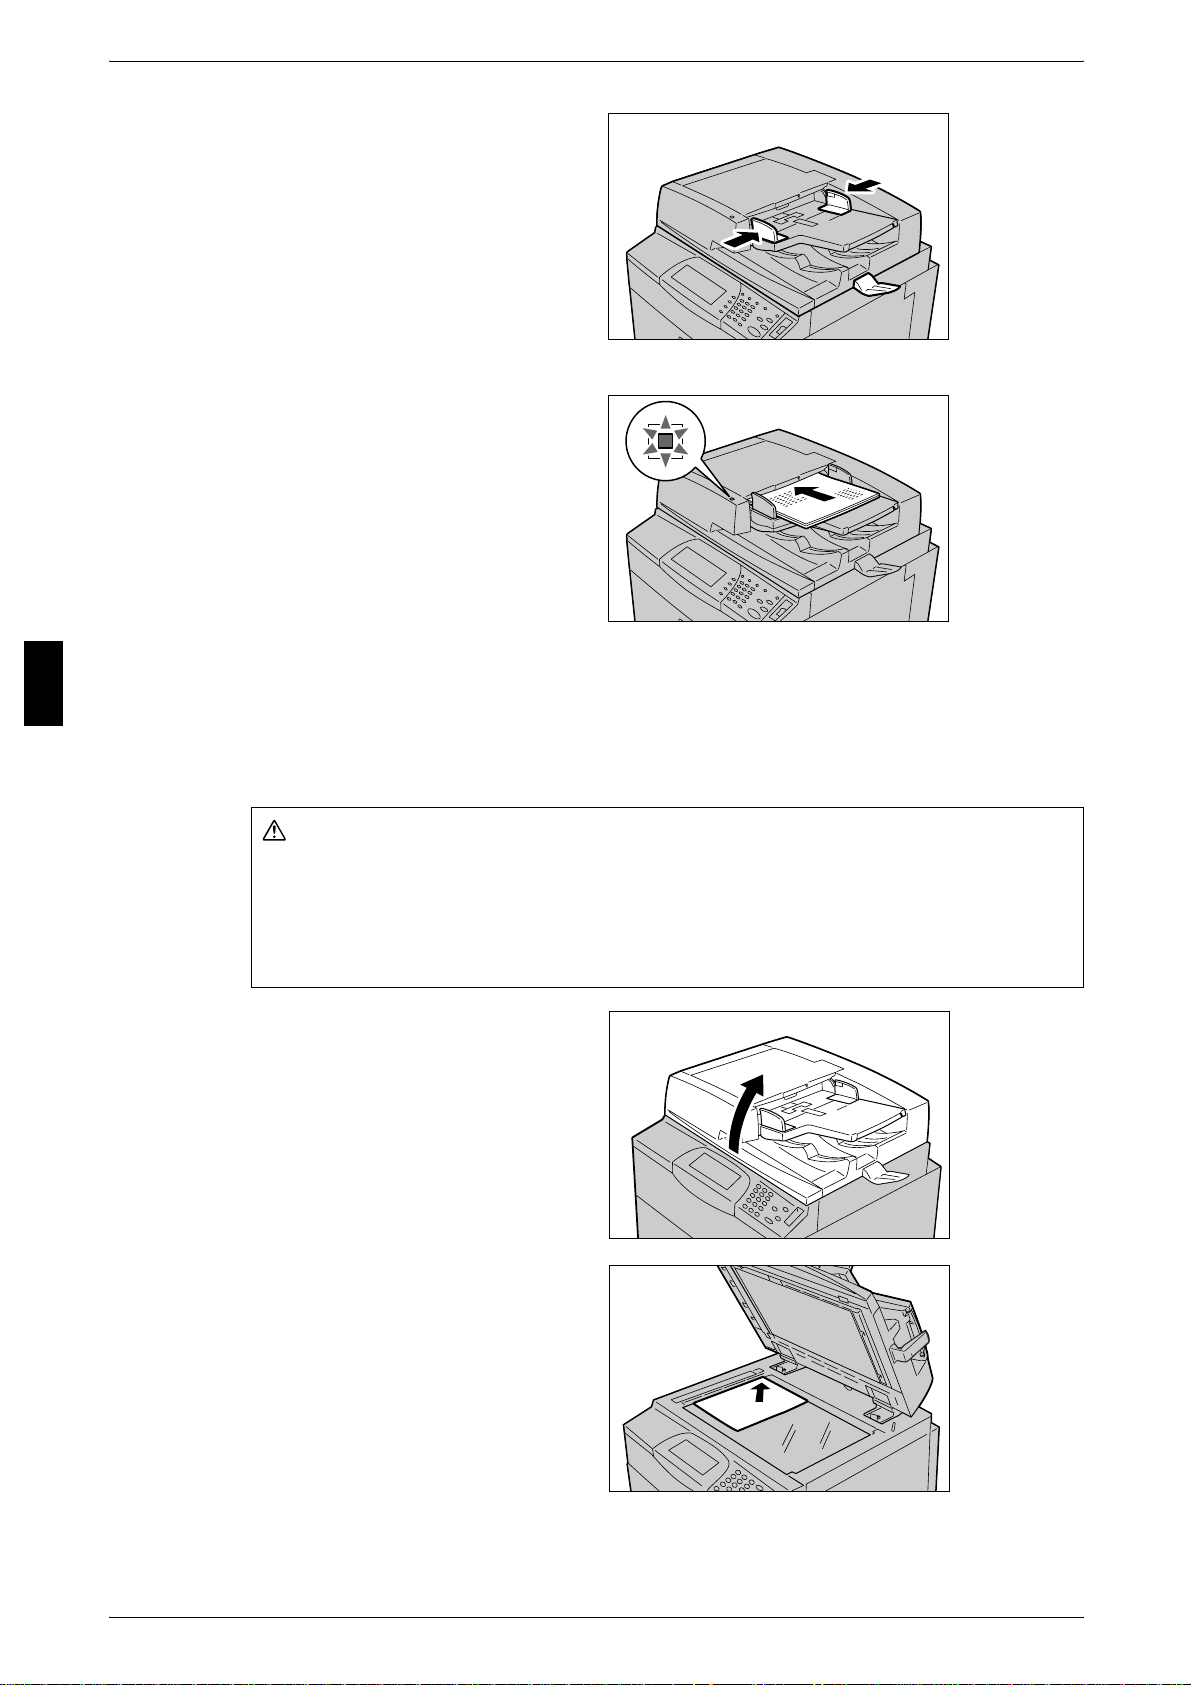
2 Adjust the movable document
guides to match the size of the
document loaded.
Note • When loading a large
document such as A3, open
the document stopper
rightward.
3 Place the document face up (the
face of 2 sided document up) in the
center of the document feeder.
Note • The <Confirmation> indicator
lights up when the document
is loaded correctly.
Copying
Basic Operat io ns
Document glass
You can place a single sheet, a book or other similar documents up to 297 x 432 mm
(A3, 11 x 17 inches) on the document glass.
The document feeder automatically detects standard size documents. For nonstandard size documents, input the size in the [Original Size] field.
z
z
1 Open the document cover.
3
Do not press the document with excessive force when copying heavy w eight
documents. A broken document glass may injure you.
Do not look on the light during copying, when you make copies with the document
cover open. It may cause eyestrain or pains in your eyes.
2 Place the document face down,
and align it against the top left
corner of the document glass.
3 Close the document cover.
Note • When a standard size
document is placed on the
document glass, the size of
the document is displayed in
the message area.
21
Page 24
Basic Operat io ns
n
3 Basic Operations
Step 2 Selecting Features
You can select the features from the [Copy] tab.
Note • Features displayed may vary depending on the model you are using.
• To use the Login Setup feature or Auditron Administration feature, you need a UserID and
Password, or just a UserID. Ask the system administrator for the UserID and Password.
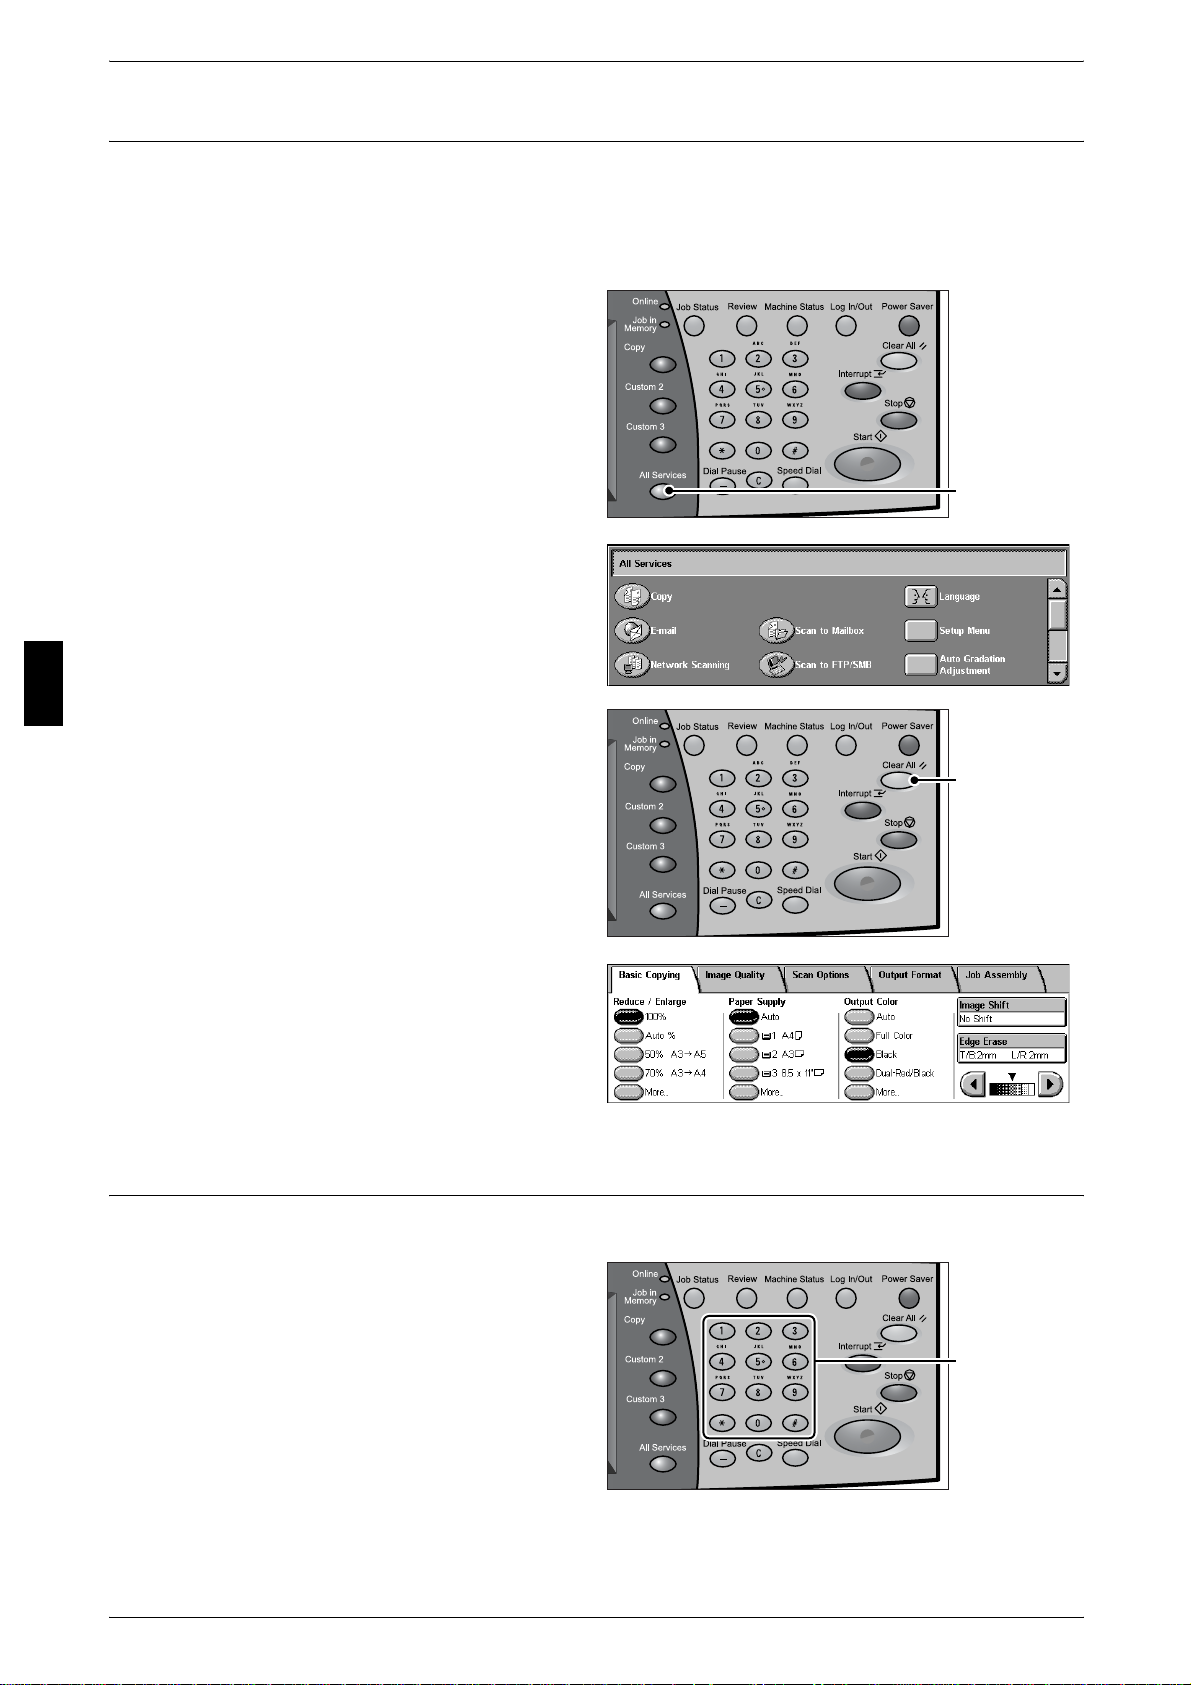
1 Press the <All Services> button.
<All Services> butto
2 Select [Copy].
3
3 If the previous settings still remain,
press the <Clear All> button.
<Clear All> button
4 Select the features to set from each
tab as necessary.
Step 3 Entering the Quantity
You can enter up to 9999 for the number of copies.
22
1 Enter the number of copies using
the numeric keypad. The number
of copies entered appears on the
upper right of the touch screen.
numeric keypad
Page 25
2 If you enter an incorrect value,
press the <C> button an d enter the
correct value.
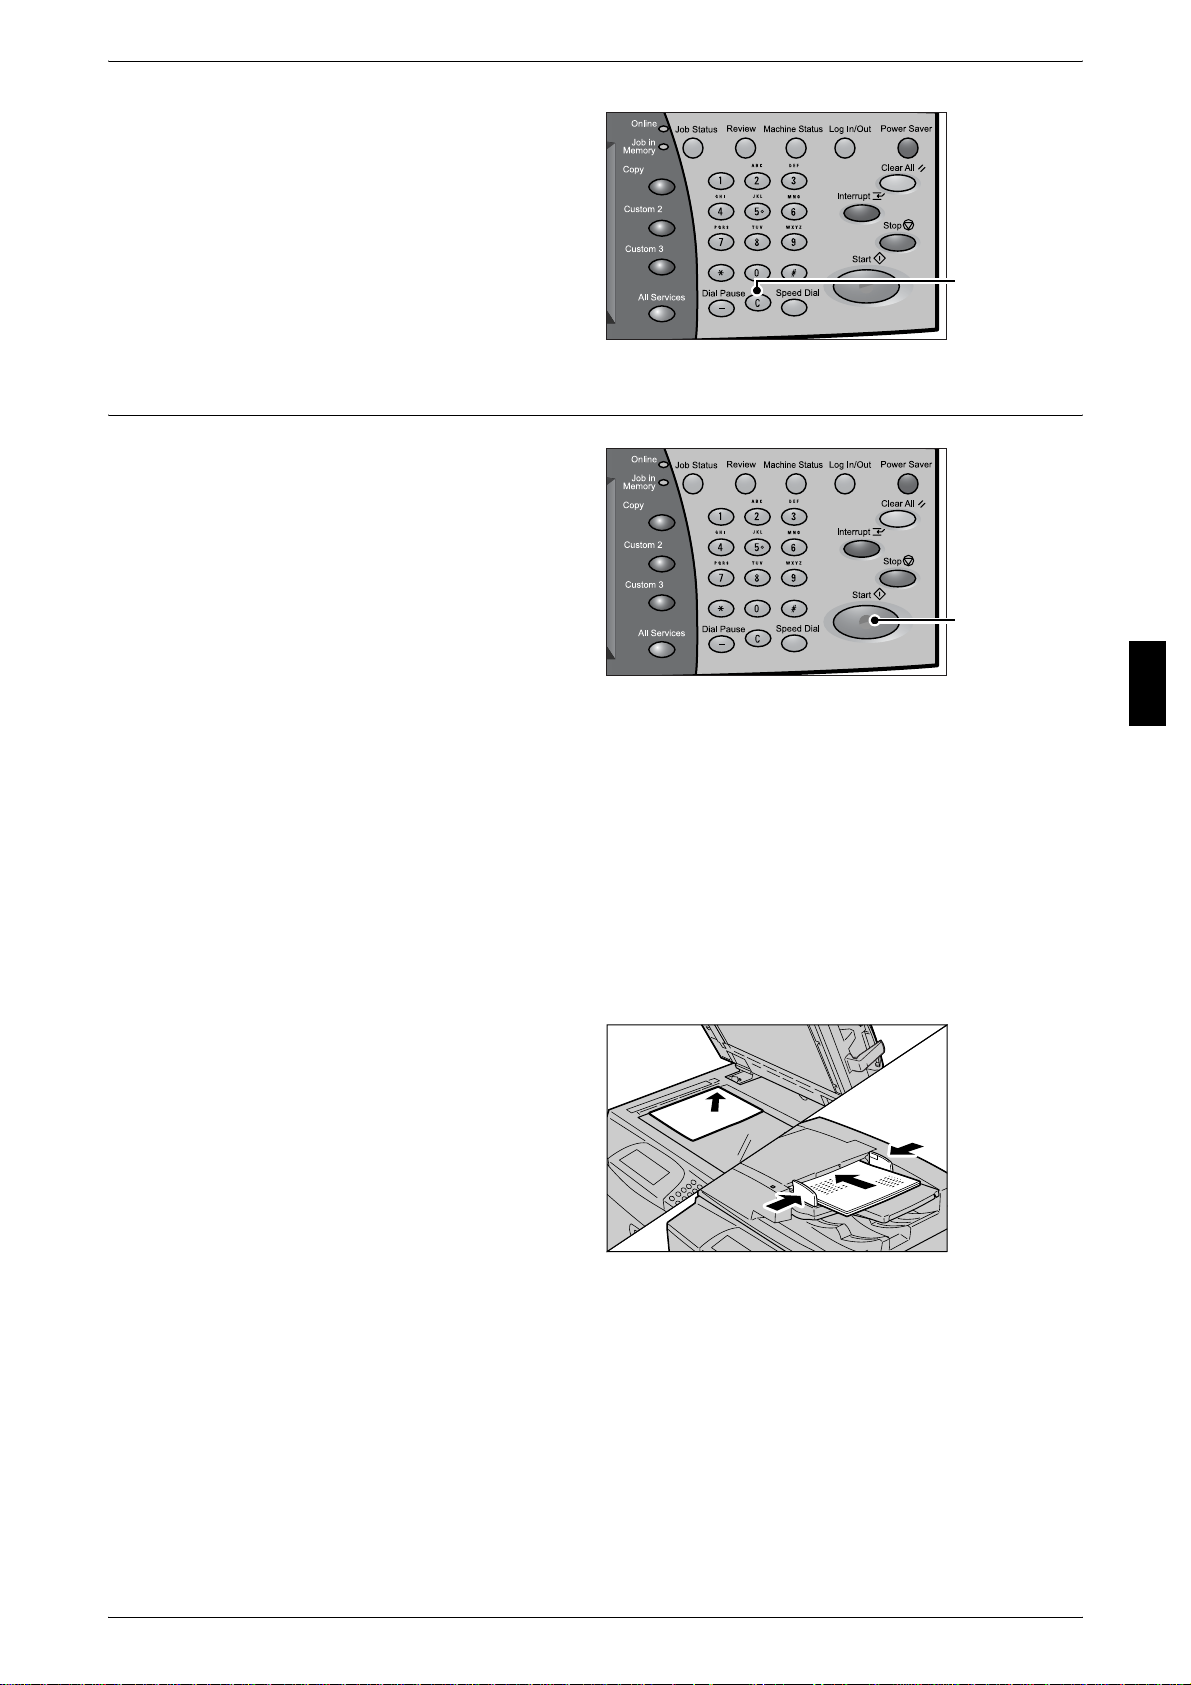
Step 4 Starting the Copy Job
Copying
<C> button
1
Press the <Start> button.
Important • If the document has been set
in the document fe eder, do not
press the document while it is
being conveyed.
Note • If a problem occurs, an error
message appears in th e touch
screen. Solve the problem in
accordance with the m essage.
• You can set the next job
during copying.
If You Have More Documents
If you have another document, select t he [Next Origi nal] on the t ouch screen while the
current document is being scanned . You can scan mul tipl e documen ts for later out put.
<Start> button
1 Select [Next Original] while scanning is in progress.
Note • When using the document feeder, load the next document after the machine has finished
scanning the first document.
• When the above screen is displayed and no operation is performed during a certain period
of time, the machine automatically assumes that there are no more documents.
2 Load the next document.
Basic Operat io ns
3
3 Press the <Start> button.
If you still have more documents, load the next document and press the <St a rt>
button.
4 When all documents have been scanned, select [Last Original].
23
Page 26
3 Basic Operations
n
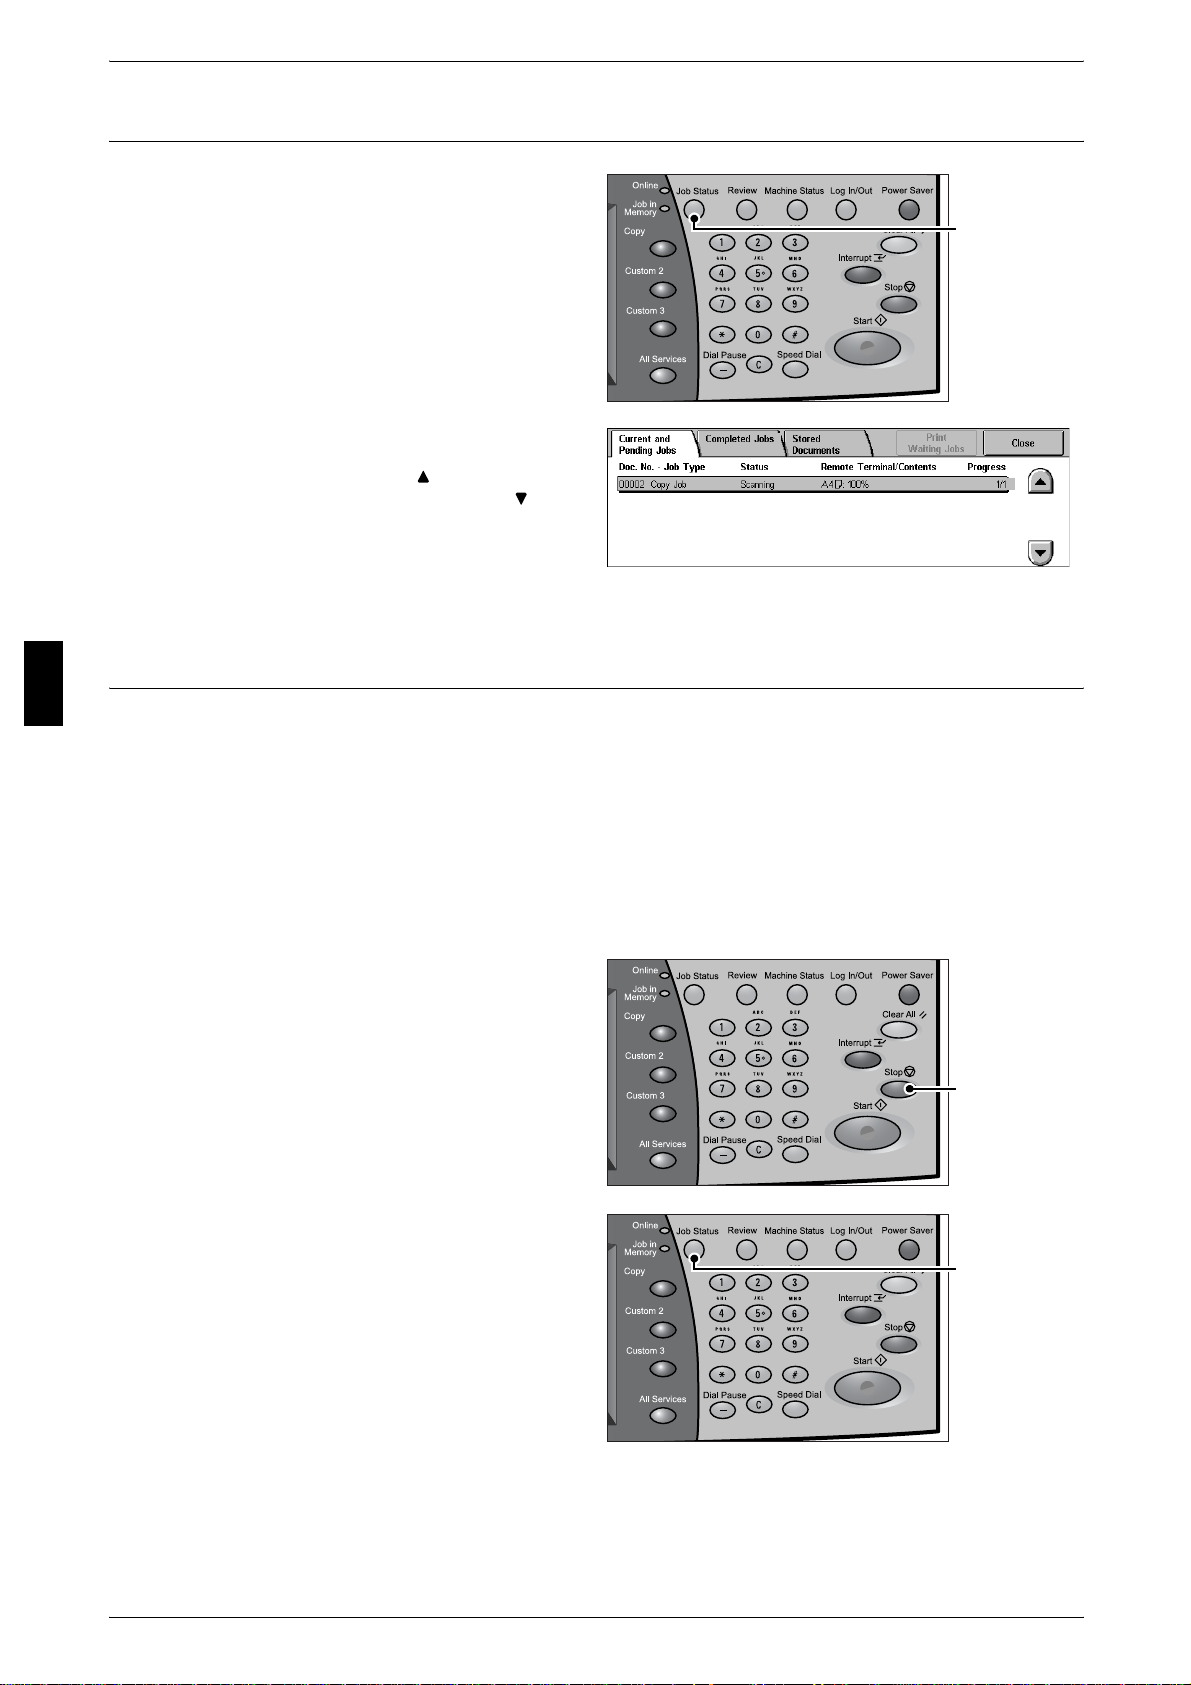
Step 5 Confirming the Copy Job in the Job Status
1
Press the <Job Status> button.
<Job Status>
button
Basic Operat io ns
3
2 Confirm the job status.
Note • Select [ ] to return to the
previous screen or [ ] to
move to the next screen.
Operations during Copying
This section describes available operat ions during copying. The following shows the
reference section for each feature.
Stopping the Copy Job................................................................................................................24
Changing the Number of Copies.................................................................................................25
Interrupting the Copy Job...........................................................................................................25
Stopping the Copy Job
To cancel copying, follow the procedure below.
1 Press either [Stop] on the touch
screen or the <Stop> button on the
Control Panel.
24
2 Select [Stop].
3 If the screen of step 1 does not
appear, press the <Job Status>
button.
<Stop> button
<Job Status> butto
Page 27

4 Select the job to cancel, and then
select [Stop].
Changing the Number of Copies
You can change the number of copies during scanning or copying the document.
1 Press either [Stop] on the touch
screen or the <Stop> button on the
Control Panel.
2 Select [Change Quantity].
3 Set the number of copies with the
numeric keypad.
Copying
Basic Operat io ns
<Stop> button
4 Press the <Start> button.
Note • You can set the values greater than the number of copies that have already copied. If you
set the same value as the number of copies that have already copied, the copy job is not
executed.
Interrupting the Copy Job
You can temporarily suspend the current con tinuous copy job to give another job higher
priority.
1 Press the <Interrupt> button.
Note • The interrupt indicator lights
up to indicate the machine is
in the job interrupt mode.
2 Load the interrupt document and set features if necessary.
3 Set the number of copies with the numeric keypad.
3
<Interrupt> button
4 Press the <Start> button.
5 After you have finished making the interrupt copy, press the <Interrupt> button.
Note • The interrupt indicator goes out to indicate the interrupt is canceled.
• Remove the interrupt document from the document glass when using the document glass.
6 Press the <Start> button.
25
Page 28
Basic Operat io ns
3 Basic Operations
Printing
This section describes basic print procedures.
Print procedures vary depending on the application software you are using. For more information, refer
to the documentation provided with each application.
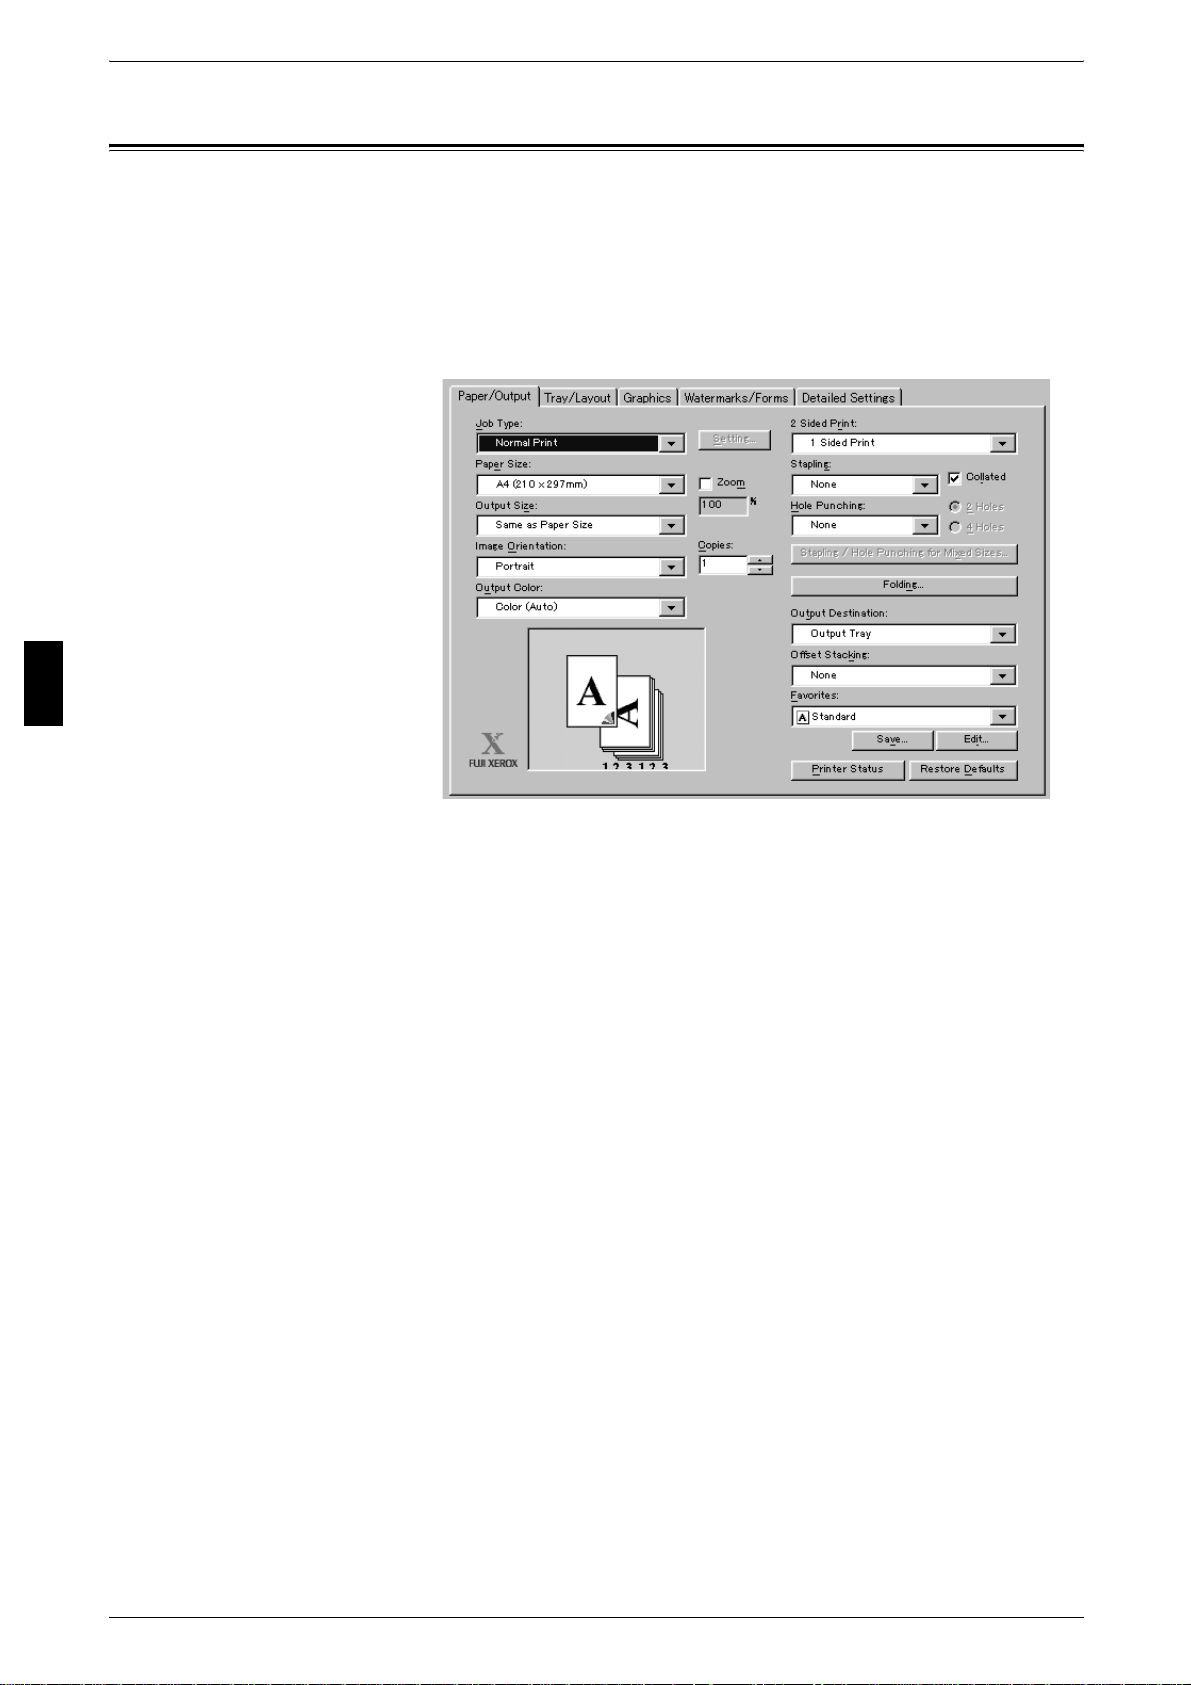
1 Select [Print] from the application's [File] menu.
2 Confirm the [Printer Name] and click [Properties] if necessary.
3 Configure the
properties if
necessary.
4 Click [OK].
5 Click [OK] in the
[Print] dialog box.
3
26
Page 29
Scanning
Scanning
This section describes basic scan procedures . The following shows the reference
section for each procedure.
Step 1 Loading Documents........................................................................................................20
Step 2 Selecting Features...........................................................................................................22
Step 4 Starting the Copy Job.................................................... ...... .................................. ..... .. ...23
Step 4 Confirming the Scan Job in the Job Status...................................................................... 31
Step 5 Saving the Scanned Data................................................................................................. 31
Step 1 Loading Documents
There are two methods for loading documents:
Document Feeder
z
Single sheet
z
Multiple sheets
Document Glass
z
Single sheet
z
Bound documents, such as books
Document Feeder
The document feeder supports single and multiple sheet documents with sizes from
140 x 210 mm (A5, A5 , 5.5 x 8.5 inches, 5.5 x 8.5 inches ) to 297 x 432 mm (A3, 11
x 17 inches).
The document feeder accepts the following number of sheets.
Document type (weight)
Basic Operat io ns
3
Number of
sheets
Lightweight paper (38 - 49 g/m2)250
Plain paper (50 - 80 g/m
Heavyweight paper
(81 - 128 g/m
Heavyweight paper
(129 - 200 g/m
2
)
2
)
2
)250
150
100
The document feeder automatically detects standard size documents. For nonstandard size documents, input the size in the [Original Size] field.
Important • Place folded or creased documents on the document glass to avoid paper jams in the
document feeder.
• 2 sided scanning of lightweight paper documents (38 - 48 g/m
2
) is not supported.
27
Page 30
Basic Operat io ns
Warning
3 Basic Operations
1 Remove any paper clips and
staples before loading the
documents.
2 Adjust the movable document
guides to match the size of the
document loaded.
Note • When loading a large
document such as A3, open
the document stopper
rightward.
3 Place the document face up (the
face of 2 sided doc ument up) in the
center of the document feeder.
Note • The <Confirmation> indicator
lights up when the document
is loaded correctly.
3
Document Glass
The document glass accepts single-sheet or book form documents of sizes up to 297
x 432mm (A3, 11 x 17 inches).
The document feeder automatically detects standard size documents. For nonstandard size documents, input the size in the [Scan Size] field.
z
z
1 Open the document cover.
Do not press the document with excessive force when scanning heavyweight
documents. A broken document glass may injure you.
Do not look on the light during scanning, when you scan documents with the
document cover open. It may cause eyestrain or pains in your eyes.
2 Place the document face down,
and align it against the top left
corner of the document glass.
3 Close the document cover.
Note • When a standard size
document is placed on the
document glass, the size of
the document is displayed in
the message area.
28
Page 31

Step 2 Selecting Features
n
You can select features from the [Basic Scanning] tab.
From the [Menu] tab, you can select from 4 scan modes: E-mail, Scan to Mailbox, Job
Template, and Scan to FTP/SMB.
E-mail
Scans a document and sends the scanned data as an e-mail attachment.
Scan to Mailbox
Scans a document and saves the scanned data to a mailbox of the machine.
You need to create a mailbox in advance. For information on how to create a mailbox, refer to
"Mailbox" (P.33).
Network Scanning
Scans a document after specifying the f ile (job templa te) set with scanning condit ions,
information about the forwarding destination server and others.
Scan to FTP/SMB
Scanning
Basic Operat io ns
Scans a document and sends the scanned data t o a network compute r via t he FTP or
SMB protocols.
Note • Features displayed may vary depending on the model you are using.
• When usin g the Auditron mode , a U serID an d pas sword m ight b e requ ired. As k the mach ine
administrator for the UserID and password.
• The network settings of the machine must be configured in order to use the scan features.
For information about network settings, refer to the Network Administrator Guide.
Below is an explanation of how to use the Scan to Mailbox feature.
1 Press the <All Services> button.
<All Services> butto
2 Select [Scan to Mailbox].
3
29
Page 32

Basic Operat io ns
3 Basic Operations
3 If the previous settings still remain,
press the <Clear All> button.
<Clear All> button
4 Specify the mailbox to save to.
5 Select the features to set from each
tab as necessary.
3
Step 3 Starting the Scan Job
1
Press the <Start> button.
Important • If the document has been set
in the document feeder, do not
press the document while it is
being conveyed.
Note • If a problem occurs, an error
message appears in the touch
screen. Solve the problem in
accordance with the m ess age.
• The following job
configurations can be
performed while scanning.
If You Have More Documents
If you have another document, select the [Next Origi nal] on the t ouch screen whil e the
current document is being scanned. This a llows you to scan several documents as one
set of data.
Up to 999 pages can be stored.
Note • If the number of document pages exceeds this maximum, then scanning stops. Follow the
displayed message, and either abort the operation, or save the scanned document data.
<Start> button
30
1 While documents are being scanned, select [Next Original].
Note • When using the document feeder, the machine waits for the next sets of documents after it
has finished scanning the first set.
• You can change the scan settin gs for the next docu me nt by se lec ting [Change Scan
Settings] displayed after selecting the [Next Original].
• When the above screen is displayed and no operation is performed during a certain period
of time, the machine automatically assumes that there are no more documents.
Page 33

2 Load the next document.
3 Press the <Start> button.
If you still have more documents, load the next document and press the <St a rt>
button.
4 When all documents have been scanned, select [Last Original].
Step 4 Confirming the Scan Job in the Job Status
1
Press the <Job Status> button.
Scanning
Basic Operat io ns
2 Confirm the job status.
Note • Select [ ] to return to the
previous screen or [ ] to
move to the next screen.
Step 5 Saving the Scanned Data
When you select Scan to Mailbox , the document st ored i n a mailbox of t he machine is
imported into your computer. Importing can be done in the following ways:
Import using application
Uses a network scan driver.
<Job Status>
button
3
Import using Mailbox Viewer 2
Uses Mailbox Viewer 2 (application software ) produced by Fuji Xerox.
Import using CentreWare Internet Services
Uses CentreWare Internet Services.
Import using WebDAV protocol
Uses application supporting the WebDAV protocol produced by Fuji Xerox, such as
CentreWare EasyOperator.
31
Page 34

Basic Operat io ns
3 Basic Operations
Stopping the Scan Job
Follow the procedure below to cancel a scan.
1 Press either [Stop] on the touch
screen or the <Stop> button on the
Control Panel.
2 Select [Stop].
3 If the screen in procedure 1 does
not appear, press the <Job Status >
button.
<Stop> button
<Job Status>
button
3
4 Select the job to cancel, and then
select [Stop].
Note • When a scan is cancelled,
scan data already stored in a
mailbox is deleted.
32
Page 35

Mailbox
Mailbox
You can create mailboxes to s tore print and scan documents. Up t o 500 mailboxes can
be registered.
1 Select [Setup Menu] in the [All
Services] screen.
2 Select [Mailbox].
3 Select the mailbox to be registered,
and select [Create/Delete].
Note • Select [ ] to return to the
previous screen or [ ] to
move to the next screen.
• By entering a three-digit
number with the numeric
keypad, you can specify the
mailbox directl y.
4 When creating a new mailbox, the
password setting screen appears.
z
Not setting a password
1) Select [Off], and then select
[Save].
z
Setting a password
1) Select [On], and then enter a
password.
Basic Operat io ns
3
2) Select [Save].
5 Select the item to be set, and
select [Change Settings].
6 Select the setting value.
7 Select [Save].
33
Page 36

Basic Operat io ns
on
3
3 Basic Operations
System Settings Procedure
To make or change the system settings, it is necessary to be in the System
Administration mode.
This section describes the basic procedures for system settings.
1 Press the <Log In/Out> button.
<Log In/Out> butt
2 Enter the UserID with the numeric
keypad or a keyboard display ed by
selecting [Keyboard], and select
[Confirm].
Note • The default UserID value is
“11111”. When using the
Authentication feature, a
password is required. The
default password value is “xadmin”.
3 Select [System Settings].
User Mode
While still in the System Administration mode, you can carry out normal operations
such as copying and scanning.
Note • To exit a mode entered from [User Mode], use the following procedure.
(1) Press the <Log In/Out> button.
(2) In the [System Administrator Login] screen, select [Cancel].
System Settings
You can set or register the system settings.
4 Select the item to be set.
34
5 Set any feature.
6 After setting the feature, select [Save].
Page 37

7 When the settings are completed,
select [Close] until the [System
Settings] screen appears.
8 Select [Exit].
System Settings Procedu r e
Basic Operat io ns
3
35
Page 38

Page 39

4 Paper and Other Media
This chapter describes the types of paper that can be used on the machine,
precautions when handling paper, and how to load paper in trays.
z
Paper Types ...............................................................................................38
z
Loading Paper ............................................. .......................... .....................41
z
Changing the Paper Size........................ .. .................... .................... .. ........46
Page 40

4 Paper and Other Media
Paper Types
This section describes the kinds of paper available for this device.
Use of inappropriate paper may result in paper jams, cause reduced print quality,
malfunctions and other trouble. To make full and effe ct use of the machine's
performance, we recommend using only paper recommended by Fuji Xerox.
If you want to use paper not recommended by Fuji Xerox, contact our Customer
Support Center.
Important • The printed image may fade due to moisture such as water, rain or vapor. For more
information, contact our Customer Support Center.
Paper and Other Media
4
Paper Type
Plain Paper (Printable Paper)
When using supplier paper (known as printable paper) for copying or printing, make
sure that it complies with t he following specifi cations. However, it is recommended that
you use the standard paper types introduced on the next page, to achieve clear copy
and print results.
Paper tray Weight Loadable quantity
Trays 1 to 2 64 to 176 g/m
Tray 3 980 sheets
Tray 4 1,280 sheets
Tray 5 (bypass) 64 to 280 g/m
Tray 6 (high capacity)
(optional)
2
Ream Weight: 55 - 151 kg
2
Ream Weight: 55 - 240 kg
64 to 176 g/m
Ream Weight: 55 - 151 kg
2
560 sheets
(Xerox P paper)
(Xerox P paper)
(Xerox P paper)
Up to 27mm 250 sheets
(Xerox P paper)
2,300 sheets
(Xerox P paper)
38
Important • Printing with paper whose type or size differs from the paper specified by the printer driver,
or printing from a tray not supporting the loaded paper can result in paper jams. To ensure
correct printing, select the correct paper size, paper type, and paper tray.
Note • Basic weight means a weight of 1 m
• Ream weight means weight of 1,000 sheets of paper in duodecimo size (788x 1,091mm).
• When paper smaller than B5 in size such as postcards are continuously printed, the
temperature of the non-paper passage side on the fuser unit increases. consequently the
message “Please wai t” appea rs and t he pr int job is su spend ed. The printin g resum es aft er 1
to 2 minutes. When pri nti ng on a s in gle sheet of paper small er than A5 in size, the m es sag e
“Please wait” may appear and the print job is suspended more than 30 seconds.
2
of a paper sheet.
Page 41

Standard
Recommended paper
Paper GSM
FX P Paper 64 g/m
Colotech+ 90 g/m
FX J Paper 80 g/m
FX JD Paper 98 g/m
OHP (V516) FXK-X(A704 A4) 75 g/m
AG KXPI Blue(A3) 80 g/m
Paper Q 80 g/m
Premier(3R91720) 80 g/m
Purple Wrap 80 g/m
No.1 (Xerox Brand) 80 g/m
No2. (Package Green) 80 g/m
Purple Wrap (212A00297) 80 g/m
Premier(Black) 80 g/m
Business(3R91820) 80 g/m
Paper Types
2
2
2
2
2
2
2
2
2
2
2
2
2
2
Paper and Other Media
4
Usable paper
Paper stock that can be used
Special Media
Copy or print can be made on the following paper by using tray 5 (bypass). These
papers are called Special Media. The types of the special media that can be used are
as follows.
Paper
GSM (Unit g/m2)
and Paper type
FXK-H(H804 A4) 80 g/m2 : Plain A (64 - 80 g/m2)
Indagiat(K704 A4) 75 g/m
Paper N 80 g/m
Performer (3R90649) 80 g/m
AG KXPI Red 80 g/m
No. GA(Package:Orange) 70 g/m
2
: Plain A (64 - 80 g/m2)
2
: Plain A (64 - 80 g/m2)
2
: Plain A (64 - 80 g/m2)
2
: Plain A (64 - 80 g/m2)
2
: Plain A (64 - 80 g/m2)
Paper Paper Type
Labels 3R97408 Label 1 (105 - 176 g/m2)
Note • For more information about other heavyweight or special media, contact our Customer
Support Center.
39
Page 42

Paper and Other Media
4 Paper and Other Media
Storing and Handling Paper
Please keep the following points in mind when storing paper
z
Store paper inside a cabinet or other dry place. Paper that has absorbed moisture
can cause paper jams and image quality defects.
z
After opening a package of paper, wrap up the remaining paper to store it. It is
recommended that you include moisture prevention packets.
z
Paper should be stored flat to prevent bends or warping.
Please adhere to the following when setting paper into the tray
z
Align the stack of paper neatly before setting it in the tray.
z
Do not use paper that is folded, creased, or heavily warped.
z
Do not use waved or curled paper.
z
Do not load paper of mixed size together into the tray.
z
Transparency paper and label paper can cause paper jams, and multiple sheets can
be fed to the printer at once. Be sure to carefull y fan these types of paper.
z
When continuously outputting onto transparencies, transparency sheets sometimes
will stick to each other. Remove transparencies from the output tray every 20 or so
sheets, and fan them to cool them down.
4
40
Page 43

Loading Paper
Warning
This section describes how to load paper.
Types of paper loaded in trays
The machine automatically detects the size and orientation of loaded paper in trays.
You need to set a paper type, however. Norma lly, each of the trays is set to pl ain paper.
When loading paper other than plain paper in trays, change the paper type setting.
Plain paper, recycled paper and bond paper can also be named and set as userdefined paper. Up to five paper types can be set as user-defined paper.
Automatic Tray Selection
Loading Paper
If you set paper source on the [Paper/Output] tab to [Paper Tray] in the PCL print
driver's properties screen when making prints, the machine automatically selects the
corresponding paper tray according to the size and orientation of the document to print.
This is called [Automatic Tray Selection].
When making copies, automatic tray selection is active if [Auto] is selected for [Paper
Select]. If the machine judges that there are two or more corresponding trays in
automatic tray selection, the mac hine gives higher priorit y to the tray having the highest
[Paper Type Priority] set at [Tray Paper Type]. During automatic tray selection, trays
whose [Paper Type Priority] setting is set to [Off] are not targeted in [Automatic Tray
Selection]. Also, if the [Paper Priority] setting is exactly the same, automatic tray
selection is determined by [Tray Priority].
Adding paper
When the machine runs out of paper during copy ing or printing, a message is displayed
on the control panel. Add paper according to the displayed instructions. Copying or
Printing is automatically resumed when paper is added.
Note • Fan the paper well before loading paper in a tray. It prevents paper from adhering to each
other and reduces paper jams.
• Tray 5 (bypass) cannot be selected in the automatic tray selection.
• When the m achine ru ns out of paper duri ng copyi ng or print ing, sele ct the tray contain ing the
paper of the same size and orientation that was being used for copying or printing, and
continue copying or printing (Auto Tray Switch feature). During this operation, a tray
containing paper of type whose [Paper Priority] setting is set to [Off] cannot be switched to.
Paper and Other Media
4
Loading Paper in the Trays 1 to 2
Following describes the procedure for loading paper in the Trays 1 to 2.
For information about changing the paper size and orientation, refer to "Changing the Paper Size"
(P.46).
1 Pull out the tray towards you until it
stops.
When pulling out the paper tray,
do it slowly. If pulled out with too
much force, the tray can hit and
injure your knees.
41
Page 44

Paper and Other Media
Warning
4 Paper and Other Media
Important • While the machine processes a job, do not pull the tray out that the job uses.
• Do not add new paper to the paper on the tray in order to prevent paper jams or making
mistakes of paper loadin g. Remove any paper re main in g i n t he tray a nd then load the paper
on newly loaded paper.
2 Load and align the edge of the
paper against the left edge of the
tray with the side to be copied or
printed on facing up.
Important • Do not load paper exceeding
the maximum fill line. It may
cause paper jams or machine
malfunctions.
• Do not place any paper or
things in the empty space on
the right side of the Tray 1 or 2.
It may cause paper jams or
machine malfunctions.
3 Push the tray in gently until it comes to a stop.
4
Loading Paper in the Tray 3
Following describes the procedure for loadi ng paper in the Tray 3.
For information about changing the paper size and orientation, refer to "Changing the Paper Size"
(P.46).
1 Pull out the Tray 3 towards you until
it stops.
When pulling out the paper tray,
do it slowly. If pulled out with too
much force, the tray can hit and
injure your knees.
Important • While the machine processes a job, do not pull the tray out that the job uses.
• Do not add new paper to the paper on the tray in order to prevent paper jams or making
mistakes of paper loadin g. Remove any paper re main in g i n t he tray a nd then load the paper
on newly loaded paper.
2 Load and align the edge of the
paper against the left edge of the
tray with the side to be copied or
printed on facing up.
Important • Do not load paper exceeding
the maximum fill line. It might
cause paper jams or machine
malfunctions.
3 Push the tray in gently until it comes to a stop.
42
Page 45

Loading Paper in the Tray 4
Warning
Following describes the procedure for loading paper in the Tray 4.
For information about changing the paper size and orientation, refer to "Changing the Paper Size"
(P.46).
1 Pull out the Tray 4 towards you until
it stops.
When pulling out the paper tray,
do it slowly. If pulled out with too
much force, the tray can hit and
injure your knees.
Important • While the machine processes a job, do not pull the tray out that the job uses.
• Do not add new paper to the paper on the tray in order to prevent paper jams or making
mistakes of pape r l oading. Remove an y paper remaining in th e t r ay and then load th e p ape r
on newly loaded paper.
Loading Paper
Paper and Other Media
2 Load and align the edge of the
paper against the left edge of the
tray with the side to be copied or
printed on facing up.
Important • Do not load paper exceeding
the maximum fill line. It might
cause paper jams or machine
malfunctions.
3 Push the tray in gently until it comes to a stop.
Loading Paper in the Tray 5 (Bypass)
When printing or copying with paper sizes or t ypes that can not be set in the Tra ys 1 to
4 and 6, use the Tray 5 (bypass).
The following describes how to load paper into the Tray 5 (bypass).
To make detailed instructions during printings, specify the instructions using the [Tray/
Output] tab in the print driver. When doing this, also specify the type of paper to load.
Important • Do not supply new paper until the loaded paper run out in order to prevent paper jams or
making mistakes of paper loading.
4
1 Open the Tray 5 (bypass) as
necessary.
Note • If necessary, extend the
extension flap. The extension
flap can be extended in two
stages. When pulling out the
extension flap, do it gently.
43
Page 46

Paper and Other Media
Warning
4 Paper and Other Media
2 Hold the center of the paper guides
and slide them to the desired paper
size.
3 Load paper with the side to be
copied or printed on facing up, and
insert the paper lightly along the
paper guide until it comes to a stop.
Important • Do not load m ix ed pa per ty pes
into the tray.
• Do not load paper exceeding
the maximum fill line. It might
cause paper jams or machine
malfunctions.
4 When loading a non-standard paper size on the Tray 5 (bypass), move the paper
guides to accommodate the paper.
4
Loading Paper in the Tray 6
Following describes the procedure for loadi ng paper in the optional Tray 6.
For information about changing the paper size and orientation, refer to "Changing the Paper Size"
(P.46).
1 Pull out the Tray 6 towards you until
it stops.
When pulling out the paper tray,
do it slowly. If pulled out with too
much force, the tray can hit and
injure your knees.
Important • Do not pull the tray out while the machine processes the job.
• Do not add new paper to the paper on the tray in order to prevent paper jams or making
mistakes of paper loadin g. Remove any paper re main in g i n t he tray a nd then load the paper
on newly loaded paper.
2 Load and align the edge of the
paper against the right edge of the
tray with the side to be copied or
printed on facing up.
Important • Do not load paper exceeding
the maximum fill line. It might
cause paper jams or machine
malfunctions.
3 Push the tray in gently until it comes to a stop.
44
Page 47

Loading Tab Paper
Following describes the procedure for loading tab paper in the Tray 5.
Important • Tab paper cannot be loaded on the Trays 1 to 4 and 6.
• Tab paper can be used only for [Tab Margined Shift], and [Covers/Separators].
1 Open the Tray 5 (bypass).
Note • If necessary, extend the
2 Hold the center of the paper guides
and slide them to the desired paper
size.
Loading Paper
extension flap. The extension
flap can be extended in two
stages. When pulling out the
extension flap, do it gently.
Paper and Other Media
3 Load paper with the side to be
copied or printed on facing up and
the top edge frontward, and insert
the paper lightly along the paper
guide until it comes to a stop.
Important • Do not load mixed paper types
into the tray.
• Do not load paper exceeding
the maximum fill line. It may
cause paper jams or machine
malfunctions.
4
45
Page 48

4 Paper and Other Media
Warning
Changing the Paper Size
The following describes how to change the paper size for the Trays 1 to 4.
Note • The paper qualities for the Trays 1 to 4 and 6 a r e pre se t. Norm al ly , pla in p ap er is se t. Wh en
changing the setting to a different paper quality, change the paper quality settings to match
the type of paper to be loaded to maintain high print quality.
Changing the Paper Size for the Trays 1 to 2
Following describes how to change the paper size for the Trays 1 to 2.
Paper and Other Media
4
1 Pull out the tray towards you until it
stops.
When pulling out the paper tray,
do it slowly. If pulled out with too
much force, the tray can hit and
injure your knees.
Important • While the machine processes a job, do not pull the tray out that the job uses.
• Do not add new paper to the paper on the tray in order to prevent paper jams or making
mistakes of paper loadin g. Remove any paper re main in g i n t he tray a nd then load the paper
on newly loaded paper.
2 Remove any paper loaded on the tray.
3 Hold the long-side paper guide and
slide it to the desired paper si ze (1).
Hold the short-side paper guide on
the right side and slide it to the
desired paper size (2).
2
4 Check the position of the paper
guides and then release them.
1
5 Load and align the edge of the
paper against the left edge of the
tray with the side to be copied or
printed on facing up.
Important • Do not load paper exceeding
the maximum fill line. It might
cause paper jams or machine
malfunctions.
• Do not place any paper or
things in the empty space on
the right side of the Tray 1 or 2.
It may cause paper jams or machine malfunctions.
46
Page 49

6 Move the two paper guides while
Warning
holding their grips so that they
lightly contact the edges of the
paper.
7 Push the tray in gently until it comes
to a stop.
Note • Affix the paper size label to the
front of the paper tray.
Changing the Paper Size for the Trays 3 to 4
Changing the Paper Size
Following describes how to change the paper size for the Trays 3 to 4.
Changing the Size of Paper for the Tray 3
1 Pull out the Tray 3 towards you until
it stops.
When pulling out the paper tray,
do it slowly. If pulled out with too
much force, the tray can hit and
injure your knees.
Important • While the machine processes a job, do not pull the tray out that the job uses.
• Do not add new paper to the paper on the tray in order to prevent paper jams or making
mistakes of pape r l oading. Remove an y paper remaining in th e t r ay and then load th e p ape r
on newly loaded paper.
2 Remove any paper loaded on the tray.
3 Hold the paper guide and slide it to
the desired paper size.
Paper and Other Media
4
4 Check the position of the paper
guides and then release them.
5 Load and align the edge of the
paper against the left edge of the
tray with the side to be copied or
printed on facing up.
Important • Do not load paper exceeding
the maximum fill line. It might
cause paper jams or machine
malfunctions.
47
Page 50

Paper and Other Media
Warning
4 Paper and Other Media
6 Hold the paper guide and move it to gently touch the edge of the paper.
7 Push the tray in gently until it comes to a stop.
Note • Affix the paper size label to the front of the paper tray.
Changing the Paper Size for the Tray 4
1 Pull out the Tray 4 towards you until
it stops.
When pulling out the paper tray,
do it slowly. If pulled out with too
much force, the tray can hit and
injure your knees.
Important • While the machine processes a job, do not pull the tray out that the job uses.
• Do not add new paper to the paper on the tray in order to prevent paper jams or making
mistakes of paper loadin g. Remove any paper re main in g i n t he tray a nd then load the paper
on newly loaded paper.
4
2 Remove any paper loaded on the tray.
3 Hold the paper guide and slide it to
the desired paper size.
4 Check the position of the paper
guides and then release them.
5 Load and align the edge of the
paper against the left edge of the
tray with the side to be copied or
printed on facing up.
Important • Do not load paper exceeding
the maximum fill line. It might
cause paper jams or machine
malfunctions.
6 Hold the paper guide and move it to gently touch the edge of the paper.
7 Push the tray in gently until it comes to a stop.
Note • Affix the paper size label to the front of the paper tray.
48
Page 51

Changing the Paper Size for the Tray 6
Warning
Following describes how to change the paper size for the Tray 6.
1 Pull out the Tray 6 towards you until
it stops.
When pulling out the paper tray,
do it slowly. If pulled out with too
much force, the tray can hit and
injure your knees.
Important • While the machine processes a job, do not pull the tray out that the job uses.
• Do not add new paper to the paper on the tray in order to prevent paper jams or making
mistakes of pape r l oading. Remove an y paper remaining in th e t r ay and then load th e p ape r
on newly loaded paper.
2 Remove any paper loaded on the tray.
Changing the Paper Size
Paper and Other Media
3 Open the end guide and unscrew
the screw. Then remove the guide
from the Tray.
4 Insert the small protrusions at the bottom of the guide into holes corresponding to the
paper size (1). Insert the scre w into a hole corresponding to the paper size on the top
of the guide and screw up (2).
2
1
4
5 Unscrew the screw of the front
guide and remove the guide from
the Tray.
49
Page 52

Paper and Other Media
4 Paper and Other Media
6 Insert the small protrusions at the bottom of the guide into holes corr esponding to the
paper size (1). Insert the screw int o a hole corresponding to the paper size on the top
of the guide and screw up (2).
2
1
4
7 Pull the lever up of the end guide
and move it along the slot (1). Set
the lever at the position
corresponding to the paper size (2)
and press the lever down (3).
Note • The slot on the left of 8.5” is
not used.
8 Open the end guide and load and
align the edge of the paper against
the right edge of the tray with the
side to be copied or printed on
facing up.
Note • Do not load paper exceeding
the maximum fill line (MAX in
the figure) or the maximum
capacity of the Tray.
9 Close the end guide tightly.
Note • Set the guide to gently touch
the edge of the paper. If the
position of the guide is not
correct, the paper may not be
fed properly and cause paper
jams.
1
3
2
50
10 Push the tray in gently until it comes to a stop.
Page 53

5 Maintenance
This chapter describes how to replace consumables, clean the machine, and
perform auto gradation adjustment.
z
Replacing C o n sumables.................... ............................. ............................52
z
Executing Auto Gradation Adjustment........................................................67
Page 54

5 Maintenance
Warning
Replacing Consumables
The following describes how to replace consumables .
Replacing Toner Cartridges
When it is time to replace a toner, a message appears on the display.
If you continue copying or printing without replacing the toner , a message appears and
the machine stops after copying or printing around 1,800 pages with black or 1,200
pages with yellow/magenta/cyan.
Note • You can make copies or print on plain paper even when the color toners have run out.
• The number of pages is for when A4 ( ) paper is used. The number of pages that you can
copy or print is only an estimate and varies depending on conditions such as the content,
paper size, paper type, and the computer environment.
z
Toner remaining in the cartridge can cause an explosion and you can get burnt .
Never throw a toner cartridge into an open flame.
z
Maintenance
Never use a vacuum cleaner wh en you clean spilled toner. It can ca use explosio n
as the toner fills the vacuum cleaner and gets sparks. Use a broom or a cloth
moistened with a neutral detergent.
5
Important • When replacing toner cartridges, toner may spill and dirty the floor. We recommend laying
paper on the floor beforehand.
• Used toner cartridges require special processing during disposal. Return them to our
Customer Support Center.
• The use of toner cartridges not recommended by Fuji Xerox may impair quality and
performance. Use only toner cartridges recommended by Fuji Xerox for the machine.
• When only a small amount of toner remains in a toner cartridge, the machine may stop
during printing and display a message. If this happens, replace the toner cartridge to
continue copying or printing.
• Replace toner cartridges while the machine is on.
• If a partial ly use d toner c artridg e is used ,
that you can copy or print displayed on the screen may differ considerably.
a message appears and the number of pages
1 Open the toner cover.
2 Hold the lower part of the toner
cartridge of the color indicated in
the message and gently pull it out.
Note • “Y” is for yellow, “M” is for
magenta, “C” is for cyan, and
“K1” and “K2” is for black.
52
Page 55

Replacing Consumables
Warning
3 Remove the toner cartridge by
holding the handle on the top of the
cartridge while gently pulling it out.
Toner remaining in the cartridge
can cause an explosion and you
can get burnt. Never throw a
toner cartridge into an open
flame.
Important • Pull out the toner cartridge gently. Otherwise, toner may fly out of the cartridge.
• Return used toner cartridges to our Customer Support Center for disposal.
4 Take out the new toner cartridge of
the same color as the old one fr om
its box, and gently tilt the cartridge
up and down, and then left and
right several times.
5 Insert the toner cartridge in gently
until it comes to a stop.
Note • Be sure to insert the toner
cartridge until you hear it cl ic k
into place.
6 Close the toner cover.
Maintenance
5
53
Page 56

5 Maintenance
Warning
Replacing the Waste Toner Container
When the waste toner container bec omes full, a message appears on the touch screen.
If you continue copying or printing wit hout replacing the waste toner container, a
message appears and the machine st ops after copying or printing around 3,000 pag es.
z
Never throw toner, a waste toner container, or a toner ca rtridge into a fire. Toner
can cause an explosion and you can get burnt.
z
Never use a vacuum cleaner wh en you clean spilled toner. It can ca use explosio n
as the toner fills the vacuum cleaner and gets sparks. Use a broom or a cloth
moistened with a neutral detergent.
Important • When replacing the waste toner container, toner may spill and dirty the floor. We
recommend laying paper on the floor beforehand.
• Used waste tone r co ntai ne rs re qui re s pec ia l pro ce ss in g du ring di spo sa l. Re turn them to our
Customer Support Center.
• The use of waste toner containers not recommended by Xerox may impair quality and
performance. Use only waste toner containers recommended by Xerox for the machine.
• Replace the waste toner container while the machine is on.
Maintenance
Note • The number of pages is for when A4 ( ) paper is used.
• The number of pages th at you ca n copy o r pri nt is only a n esti mate a nd va ries de pendi ng on
conditions such as the content, paper size, paper type, and the computer environment.
5
1 Make sure that the machine has
stopped before opening the front
cover.
2 Open the waste toner container
cover.
3 Grip the handle of the waste toner
container and pull out about half of
it.
54
Page 57

4 Hold the center part on the top of
Warning
the container, and then remove it.
5 Hold the used waste toner
container firmly with both hands
and put it into the provided plastic
bag.
Never throw toner, a waste toner
container, or a toner cartridge
into a fire. Toner can cause an
explosion and you can get burnt.
Replacing Consumables
Important • Return used waste toner containers to our Customer Support Center for disposal.
• Place the used waste toner container into the special bag and then close it firmly using ring
rubber provided with the bag. If the zipper is left open, the toner may leak out during
disposal.
6 Hold the center part on the top of a
new container and insert it until it
comes to a stop.
Important • When inserting the waste
toner container, do not grip
the handle of the container.
7 Close the waste toner container cover.
8 Close the front cover.
Note • A message will be displayed and the machine will not operate if the front cover is even
slightly open.
Maintenance
5
55
Page 58

5 Maintenance
Warning
Replacing Drum Cartridge R1
When it is time to replace a drum cartridge, a message “Replace the drum cartridge
R1”appears on the touch screen. When t his message appears, contact our Customer
Support Center.
If you have concluded a spot maintenance contract, refer to this se ction, then confirm
the indicated drum cartridge position (R1) and replace the drum cartridge.
If you continue to use the machine without replacing the dru m cartridge after the
message appears, the machine will stop and copying or printing will no longer be
possible once the following number of pages have been copied or printed.
z
For ApeosPort C6550 I/DocuCentre C6550 I
About 1,700 pages
z
For ApeosPort C5540 I/DocuCentre C5540 I
About 1,500 pages
Do not heat drum cartridges or scr atch the surface of the cartridges. It may harm your
health.
Maintenance
5
Important • Before replacing a drum cartridge, you need to receive instruction for how to replace it from
our customer engineer.
• Place a black s hee t s upp lie d w i th a new drum cartridge onto the whol e unit within 2 minute s
after pulling out a unit in which drum cartridges are placed. Image quality may deteriorate
when the drum cartridges are exposed to light.
• The use of drum cartridges not recommended by Xerox may impair quality and
performance. Use only drum cartridges recommended by Xerox for the machine.
Note • Do not expose drum cartridges to direct sunlight or strong light from indoor fluorescent
lighting. Do not touch or scratch the surface of the drum. Doing so may result in
unsatisfactory printing.
• Used drum cartridges require special processing during disposal. Return them to our
Customer Support Center.
• Replace drum cartridges while the machine is on. When the power is turned off, all
information stored to the machine's memory will be erased.
• The number of pages is for when A4 ( ) paper is used.
• The number of pages th at you ca n copy o r pri nt is only a n esti mate a nd va ries de pendi ng on
conditions such as the content, paper size, paper type, and the computer environment.
• After the massage “Replace the drum cartridge R1” appears, image quality of printed
documents or copies may deteriorate.
1 Take out a new drum cartridge and
a black sheet from its container.
Important • Put the drum cartridge on a
flat place.
• Do not place the new drum
cartridge in an upright
position.
56
Page 59

2 Make sure that the machine has
stopped before opening the front
cover.
3 Pull down the R1-R4 lever.
Replacing Consumables
4 Grip the handle of the unit and pull
out it.
5 Place a black sheet supplied with
the new drum cartridge onto the
unit other than the drum cartridge
R1.
Important • Make sure to place the black
sheet. It may affect image
quality.
6 Remove the drum cartridge upward
while holding rings provided at the
both ends of the drum cartridge.
Maintenance
5
7 Place the replaced drum cartridge into the empty container.
57
Page 60

5 Maintenance
8 Open a bag including a new drum
9 Unwrap a sheet covering the drum
cartridge and take it out.
Important • Do not touch or scratch the
surface of the drum when you
take it out from the bag.
cartridge and place it under the
cartridge.
Maintenance
5
10 Grip rings provided at the both
ends of the drum cartridge to uplift.
Important • Do not touch the surface of
the drum cartridge.
11 Place the drum cartridge along with
the guide with the side marked with
( ) frontward.
12 Press the both ends of the drum
cartridge to place it in a horizontal
position.
Note • Make sure that the marks
( ) and ( ) face each
other.
58
13 Remove the black sheet from the unit.
Page 61

14 Insert the unit completely and
Warning
return the handle to the original
position.
15 Return the lever R1-R4 to the
original position.
Replacing Consumables
16 Close the front cover.
Note • A message will be displayed and the machine will not operate if the front cover is even
slightly open.
Replacing Drum Cartridge R2/R3/R4
When it is time to replace a drum cartridge, a message “Replace the drum cartridge
RX” appears on the touch screen. When this message appears, contact our Customer
Support Center.
If you have concluded a spot maintenance contract, refer to this secti on, then confirm
the indicated drum cartridge position (R2, R3, or R4) and replace the corresponding
drum cartridge.
If you continue to use the machine without replacing the cartridge after the message
appears, the machine will stop and copying or printing will no longer be possi ble once
the following number of pages have been copied or printed.
z
For ApeosPort C6550 I/DocuCentre C6550 I
About 1,100 pages
z
For ApeosPort C5540 I/DocuCentre C5540 I
About 1,000 pages
Maintenance
5
Do not heat drum cartridges or scratc h the surface of the cartridges. I t may harm your
health.
Important • Before replacing a drum cartridge, you need to receive instruction for how to replace it from
our customer engineer.
• Place a bla ck sh ee t su ppl ied w ith a n ew dru m cartridge onto the whole un it w i thin 2 m in ute s
after pulling out a unit in which drum cartridges are placed. Image quality may deteriorate
when the drum cartridges are exposed to ligh t.
• The use of drum cartridges not recommended by Xerox may impair quality and
performance. Use only drum cartridges recommended by Xerox for the machine.
Note • Do not expose drum cartridges to direct sunlight or strong light from indoor fluorescent
lighting. Do not touch or scratch the surface of the drum. Doing so may result in
unsatisfactory printin g.
59
Page 62

5 Maintenance
• Used drum cartridges require special processing during disposal. Return them to our
Customer Support Center.
• Replace drum cartridges while the machine is on. When the power is turned off, all
information stored to the machine's memory will be erased.
• The number of pages is for when A4 ( ) paper is used.
• The number of pages th at you ca n copy o r pri nt is only a n esti mate a nd va ries de pendi ng on
conditions such as the content, paper size, paper type, and the computer environment.
• After the massage “Replace the drum cartridge RX” appears, image quality of printed
documents or copies may deteriorate.
1 Take out a new drum cartridge and
a black sheet from its container.
Important • Put the drum cartridge on a
flat place.
• Do not place the new drum
cartridge in an upright
position.
2 Make sure that the machine has
Maintenance
stopped before opening the front
cover.
5
3 Pull down the R1-R4 lever.
4 Grip the handle of the unit and pull
out it.
60
Page 63

5 Remove the drum cartridge upward
while holding rings provided at the
both ends of the drum cartridge.
Note • The following example shows
how to replace drum R2.
6 Place the replaced drum cartridge into the empty container.
7 Place a black sheet supplied with
the new drum cartridge onto the
unit.
Important • Make sure to place the black
sheet. It may affect image
quality.
Replacing Consumables
8 Open a bag including a new drum
cartridge and take it out.
Important • Do not touch or scratch the
surface of the drum when you
take it out from the bag.
9 Unwrap a sheet covering the drum
cartridge and place it under the
cartridge.
10 Remove the black sheet from the unit.
11 Grip rings provided at the both
ends of the drum cartridge to uplift.
Important • Do not touch the surface of
the drum cartridge.
Maintenance
5
61
Page 64

5 Maintenance
12 Place the drum c artridge along with
13 Press the both ends of the drum
the guide with the side marked with
( ) frontward.
cartridge to place it in a horizontal
position.
Note • Make sure that the marks ( )
and ( ) face each other.
Maintenance
5
14 Remove the film on the drum
cartridge.
15 Insert the unit completely and
return the handle to the original
position.
16 Return the lever R1-R 4 to th e
original position.
62
17 Close the front cover.
Note • A message will be displayed and the machine will not operate if the front cover is even
slightly open.
Page 65

Replacing Consumables
Replacing the Staple Cartridge (Finisher C or Booklet finisher C)
When the finisher C or boo klet f inis her C (o ptional ) is i nstall ed an d it i s ti me t o repla ce
the staple cartridge, a message appears on the touch screen. When this message
appears, replace the staple cartrid ge with a new one.
The following example shows how to replace the staple cartr idge in the booklet finisher
C. The procedure is the same as for the finisher C.
Important • The use of staple cartridges not recommended by Fuji Xerox may impair quality and
performance. Use only staple cartridges recommended by Fuji Xerox for the machine.
Note • To order a staple ca rtridge, contact ou r C u st om er Su pport Center.
1 Make sure that the machine has
stopped before opening the front
cover of the finisher.
2 Grip the lever R1 of the staple
cartridge holder, and pull out the
holder to the right towards you.
3 Remove the staple cartridge holder
by gripping the orange lever.
Note • The staple cartri dge is firmly
held. When remove th e stap le
cartridge, strongly pull the
cartridge.
4 Pick the empty staple case with
your fingers (1), and then remove
the case from the cartridge (2) as
shown in the figure.
Maintenance
5
2
1
1
63
Page 66

5 Maintenance
5 Prepare a new staple case. Insert
the front of the staple case into the
staple cartridge (1), and push the
rear of the case to set (2).
2
1
6 Insert the staple cartridge while
gripping the orange lever until you
hear it click into place.
7 Close the front cover of the finisher.
Maintenance
Note • A message will be displayed and the machine w ill not op erate if the fro nt cover of th e finishe r
is even slightly open.
5
Replacing the Booklet Staple Cartridge (Booklet finisher C)
When a booklet finisher (optional) is installed and it is t ime to replace the booklet staple
cartridge, a message appears on the display. When this message appears, repla ce the
staple cartridge with a new one.
Important • The use of staple cartridges not recommended by Fuji Xerox may impair quality and
performance. Use only staple cartridges recommended by Fuji Xerox for the machine.
Note • To order a staple cartridge, contact our Customer Support Center.
1 Make sure that the machine has
stopped before opening the front
cover of the finisher.
2 Press the levers R2 and R3 to the
right, and pull out the unit.
R3
R2
64
Page 67

3 Hold the tabs of the booklet staple
cartridge, and then lift to remove it.
4 Holding the tabs of a new booklet
staple cartridge, return the
cartridge to the original position
and gently push it until you hear it
click into place.
Replacing Consumables
5 Return the unit to its original
position.
6 Close the front cover of the finisher.
Note • A message will be displayed and the mac hine will no t operate if th e front cove r of the finis her
is even slightly open.
Maintenance
5
65
Page 68

5 Maintenance
Emptying Punch Scrap Container (Finisher C or Booklet finisher C)
When the finisher C or booklet finisher C (optional) i s installed and the punch scrap
container becomes full, a message appears on the touch screen. Discard the scraps
according to the message.
The following example shows how to repla ce the staple cartridge in t he booklet finisher
C. The procedure is the same as for the finisher C.
When pulling the punch scrap container out to dispose the punch scraps, ensure that
all scraps are discarded. If there are s craps remaining, the containe r may be full bef ore
the next message is displayed. It may cause machine malfunct ions.
Important • Pull the container out while the power is on. If you switch off the power when emptying the
scrap container, the machine will not be able to detect that the scraps have been disposed.
1 Make sure that the machine has
stopped before opening the front
cover of the finisher.
Maintenance
5
2 Pull out the punch scrap container
R4.
3 Discard all the scraps.
4 Insert the empty punch scrap
container until it comes to a stop.
66
5 Close the front cover of the finisher.
Note • A message will be displayed and the machine w ill not op erate if the fro nt cover of th e finishe r
is even slightly open.
Page 69

Executing Auto Gradation Adjustment
on
The machine can automatically adjust gradation when the reproducibility of density or
color in copies and prints has deteriorated. The machine can adjust the gradation for
each screen type.
The following three types of screen is available.
z
Copy Job
Adjusts the gradation for copying documents.
z
Print Job 1
Basic screen for printing.
For PCL printer drivers
Adjusts the gradation for items other t han [CAD] and [Presentat ion] of [I mage Type]
in the [Graphics] tab.
For PostScript printers
Adjusts the gradation for [Auto] and [Standard] of [Screen] in the [Graphics] tab.
Note • Displayed Screen may differ corresponding to settings of [Image Type], [RGB Correction]
and [CMYK Correction], when [Auto] is selected.
z
Print Job 2
Executing Auto Gradation Adjustment
Maintenance
For PCL printer drivers
Adjusts the gradation for [Presentation] at [Image Type] in the [Graphics] tab.
For PostScript printers
Adjusts the gradation for [Auto] and [Gradation] of [Screen] in the [Graphics] tab.
Note • Displayed Screen may differ corresponding to settings of [Image Type], [RGB Correction]
and [CMYK Correction], when [Auto] is selected.
The following paper sizes ar e available for the gradati on adjustment: A3, A4 , 11 x 17
inches, and 8.5 x 11 inches .
Note • We recommend executing aut o gradat ion adj ustme nt for all three of th e scree n types . When
the adjustment for one screen ty pe is co mp lete , specify the next screen typ e and repea t the
procedure.
• If color shift is not compensated for despite the periodic execution of auto gradation
adjustment, contact our Customer Support Center.
• The auto gradation adjustment does not execute when [Text] or [Map] is selected for
[Original Type] in the [Image Quality] tab for copying.
• To make sure that [Copy Defaults] in the System Administration mode is set as following
before executing auto gradation adjustment:
Lighten/Darken/Cont rast: Normal, Colo r Shif t: Normal, Sharpnes s/Colo r Saturation: N orma l,
Color Balance: 0. Afte r finis hing the au to grad ation adjus tment , chan ge the setti ngs o f [C opy
Defaults] if necessary.
1 Press the <All Services> button.
5
<All Services>butt
67
Page 70

Maintenance
n
5
5 Maintenance
2 Select [Auto Gradation Adjustment],
and then go to Step 10.
If [Auto Gradation Adjustment] is
not displayed on the [All Services]
screen, then go to Step 3.
3 Press the <Log In/Out> button.
<Log In/Out>butto
4 Enter the UserID with the numeric
keypad or a keyboard display ed by
selecting [Keyboard], and select
[Confirm].
Note • The default UserID value is
“11111”. When using the
Authentication feature, a
password is required. The
default password value is “xadmin”.
5 Select [System Settings]
6 Select [System Settings].
7 Select [Common Settings].
8 Select [Image Quality Adjustment].
68
Page 71

Executing Auto Gradation Adjustment
9 Select [Auto Gradation
Adjustment].
10 Load paper.
11 Select the screen type for
gradation adjustment.
Note • The example describ ed here
is for the [Copy Job] screen.
12 Select the tray that you loaded paper in the procedure 8 for [Paper Supply], and then
select [Close].
Note • Paper Type can be set when you select the Tray 5(bypass).
13 Select [Applicable Area] t o set an are a for applyin g the gradation adjustment , and then
select [Close].
Note • Normally, select [Copy/Print] for [Applicable Area]. When using external calibration for print
output, set [Applicable Area] if necessary.
14 Select [Start].
Note • The message “Printing the Gradation Adjustment Chart. [Copy Job]” appears and the
document for gradation adjustment (Gradation Adjustment Chart) is printed.
15 Align the magenta patch of the
printed Gradation Adjustment
Chart against the left side of the
document glass.
Note • Place the Gradation
Adjustment Chart on the
document glass.
16 Place at least five sheets of white
paper on the Gradation Adjustment
Chart to cover the Chart and close
the document cover.
Maintenance
5
69
Page 72

5 Maintenance
17 Select [Start].
The message “Gradation adjustment is in progress. [Copy Job]” appears and the
machine automatically adjusts the gradation. It takes about 30 seconds to complete
gradation adjustment.
If the adjustment complet es successful ly, a completion message appears on the [Auto
Gradation Adjustment] screen. I f there is a problem, the machine stop s the adj ustment
and displays an error message. Follow the displayed message.
18 Select [Confirm].
19 To continue aut omatic gradation adjustment for other screen types, repeat steps 11 to
17.
20 When you started the adjustment from the <All Services> menu, select [Close] and
then go to Step 21. When you started the adjustment in the System Administration
Maintenance
mode, select [Close] until the [System Sett ings] screen appears.
21 Select [Exit] to exit the System Administration mode.
5
22 Make a copy or print to confirm the image quality.
70
Page 73

6 Problem Solving
This chapter describes troubles that may occur wit h the mac hine and their
solutions.
z
Fault Clearance Procedure............... .. .................... .. .................... ..............72
z
Image Quality Problems ............................ .................................................73
z
Paper Jams.................................................................................................74
z
Document Jams...... ............................. ............................. ..........................94
z
Stapler Faul ts...... ............... ................ ............................. ............................97
Page 74

6 Problem Solvin g
Fault Clearance Procedure
If a fault or problem occurs, there are severa l ways in which you can identify the type
of fault. Once a fault or problem is identified, establish the probable cause, and then
apply the appropriate solution.
z
If a fault occurs, first refer to the screen me ssages and animated graphi cs and clear
the fault in the order specified.
z
If the problem is not solved by foll owing the scr een messa ges and graphi cs, cont act
the System Administrator for assistance.
z
Alternatively, contact the System Administrator for assistance.
z
In some cases, it may be necessary to switch the machine off and then on. For
information of switching power on and off, refer to "Power On / Off" (P.12).
Problem Solving
6
72
Page 75

Image Quality Problems
Various situations can aff ect the quality of the output. Check the following con ditions to
ensure optimum copy performance. I f you sti ll cannot resolve th e problem, contact the
System Administrator.
z
Do not locate the machine in direct sunlight or near a radiator.
z
Follow regular maintenance schedules for cleaning areas, such as the document
glass and output trays.
Image Quality Problems
Problem Solving
6
73
Page 76

Problem Solving
Warning
6
6 Problem Solvin g
Paper Jams
When paper jams inside the machine, the machine stops and an alarm sounds. A
message is also displayed on the touch screen. Follow the instructions displayed and
remove the jammed paper.
Gently remove the paper taking care not to tear i t. If paper is torn while it is being
removed from the machine, remove all torn pieces making sure that none remain insi de
the machine.
If a paper jam message is displayed aga in after you have cleared th e paper jam, paper
is probably jammed at another location. Clear this by following the message.
When you have finished clearing a paper jam, printing is automatically resumed from
the state before the paper jam occurred.
If a paper jam occurred during copying, press the <Start > button. Copying is re sumed
from the state before the paper jam occurred.
When removing jammed paper, make sure that no bits and pieces of jammed paper
are left in the machi ne. A piec e of pap er remaini ng in t he machine may cause fi re . If
a piece of paper is stuck in a hidden area or paper is wrapped around the fuser unit
or rollers, do not remove it forcefully. You can get injured or burnt. Switch off the
machine immediately, and contact our Customer Support Center.
This section describes how to clear paper jams at the followi ng locations:
The references are described below.
Paper Jams in the Trays 1 to 2....................................................................................................75
Paper Jams in the Tray 3.............................................................................................................75
Paper Jams in the Tray 4.............................................................................................................76
Paper Jams in the Tray 5 (Bypass)..............................................................................................76
Paper Jams in the Tray 6.............................................................................................................77
Paper Jams in the Transfer Module.............................................................................................79
Paper jams in the Bottom Left Cover..........................................................................................80
Paper jams in the Bottom Right Cover.......................................................................................81
Paper jams in the Output Tray....................................................................................................82
Paper jams in the Finisher C and the Booklet finisher C............................................................83
Important • When a paper jam occurs, paper is sometimes torn and remains inside the machine if you
pull out a paper tray without checking the paper jam position. This may cause machine
malfunctions. Check where the paper jam occurred first.
• If a piece of jammed paper remains inside the machine, the paper jam message will not
disappear from the touch screen.
• Clear the paper jams while the machine is on. When the power is turned off, all information
stored to the machine's memory will be erased.
• Do not touch components inside the machine. This may cause print defects.
74
Page 77

Paper Jams in the Trays 1 to 2
The following describes how to clear paper jams in the Trays 1 to 2.
1 Pull out the tray where the paper
jam occurred.
Important • Paper is sometimes torn and
remains inside the machine if
you pull out a tray without
checking the paper jam
position. This may cause
machine malfunct ion . Check
where the paper jam occu rred
first.
2 Remove the jammed paper.
Note • If paper is torn, check for any
torn pieces of pa per insid e the
machine.
Paper Jams
3 Push the tray in gently until it comes to a stop.
Paper Jams in the Tray 3
The following describes how to clear paper jams in the Tray 3.
1 Pull out the Tray 3.
Important • Paper is sometimes torn and
remains inside the machine if
you pull out a tray without
checking the paper jam
position. This may cause
machine malfunct ion . Check
where the paper jam occu rred
first.
2 Remove the jammed paper.
Note • If paper is torn, check for any
torn pieces of pa per insid e the
machine.
Problem Solving
6
3 Push the tray in gently until it comes to a stop.
75
Page 78

6 Problem Solvin g
Paper Jams in the Tray 4
The following describes how to clear paper jams in the Tray 4.
1 Pull out the Tray 4.
Important • Paper is sometimes torn and
remains inside the machine if
you pull out a tray without
checking the paper jam
position. This may cause
machine malfunction. Check
where the paper jam oc curred
first.
2 Remove the jammed paper.
Note • If paper is torn, check for any
torn pieces of pape r inside the
machine.
Problem Solving
6
3 If paper is jammed in the paper
feed section, open the inner cover
and remove the paper.
4 Push the tray in gently until it comes to a stop.
Paper Jams in the Tray 5 (Bypass)
The following describes how to clear paper jams in the Tray 5 (bypass ).
1 Open the Tray 5 (bypass) top cover
to remove the jammed paper.
Note • If paper is torn, check for any
torn pieces of pape r inside the
machine.
76
Page 79

Paper Jams
2 Remove all paper loaded in the
Tray 5 (bypass).
Important • When two or more sheets of
paper are loaded, remove all
of the sheets from the tray.
Note • If paper is torn, check for any
torn pieces of pa per insid e the
machine.
3 Close the top cover.
4 Fan the paper you removed making sure that all four corners are neatly aligned.
5 Insert the paper into the tray with
the printing side facing up until its
leading edge lightly comes up
against the paper feed entrance.
Paper Jams in the Tray 6
The following describes how to clear paper jams in the Tray 6.
This section describes how to clear paper jams at the following locations:
The references are described below.
Paper Jams in the Tray 6 Exit.....................................................................................................77
Paper Jams in the Tray 6 Top Cover.......................................................................................... 78
Paper Jams in the Tray 6............................................................................................................78
Paper Jams in the Tray 6 Exit
1 Gently move the Tray 6 to the left
until it stops by gripping t he handle
on the top left side of the Tray 6.
2 Remove the jammed paper.
Problem Solving
6
Note • If paper is torn, check for any
torn pieces of pa per insid e the
machine.
3 Gently put the Tray 6 back into position.
77
Page 80

6 Problem Solvin g
Paper Jams in the Tray 6 Top Cover
1 Gently move the Tray 6 to the left
until it stops by gripping the handle
on the top left side of the Tray 6.
2 Open the Tray 6 top cover.
1
2
Problem Solving
6
3 Remove the jammed paper.
Note • If paper is torn, check for any
torn pieces of pape r inside the
machine.
4 Close the top cover.
5 Gently put the Tray 6 back into position.
Paper Jams in the Tray 6
1 Pull out the Tray 6.
78
2 Remove the jammed paper.
Note • If paper is torn, check for any
torn pieces of pape r inside the
machine.
3 Push the tray in gently until it
comes to a stop.
Page 81

Paper Jams in the Transfer Module
Warning
Following describes how to clear paper jams in the transfer module.
1 Make sure that the machine has
stopped before opening the front
cover.
2 Turn the green lever 2 at the center
of the transfer module to the right
until it is in the horizontal position
and then pull the transfer module
out to the end.
Paper Jams
3 Remove the visible jammed paper.
Never touch a labeled area
(found on the fuser unit or
nearby) indicating “High
Temperature” and “Caution”. You
may get burned.
4 Move lever 2a to the right and
remove the jammed paper.
5 Pull down the lever 2b and remove
the jammed paper.
Problem Solving
6
79
Page 82

6 Problem Solvin g
6 Return the lever 2a and 2b to the original position.
7 Insert the transfer module
completely and turn the green lever
2 to the left.
Note • If you cannot turn the lever,
pull the transfer mo dul e to the
middle and insert it again.
8 Close the front cover.
Note • A message will be displayed and the machine will not operate if the front cover is even
slightly open.
Paper jams in the Bottom Left Cover
Following describes how to clear paper jams in the bottom lef t cover.
Problem Solving
6
1 If the Tray 6 is installed, gently
move the Tray 6 to the left until it
stops by gripping the handl e on the
top left side of the Tray 6.
2 Open the bottom left cover while
gripping the release lever.
3 Remove the upper jammed paper.
Note • If paper is torn, check for any
torn pieces of pape r inside the
machine.
80
Page 83

4 Remove the lower jammed paper.
Note • If paper is torn, check for any
torn pieces of pa per insid e the
machine.
5 Close the bottom left cover.
Note • A message will be disp layed and th e machi ne wi ll not operate if the bot tom left c over i s eve n
slightly open.
6 If the Tray 6 is installed in the machine, gently put the Tray 6 back into position.
Paper jams in the Bottom Right Cover
Following describes how to clear paper jams in the bott o m rig h t cover.
1 If the finisher is installed, open the
front cover of the finisher and then
pull down the lever 1a.
Paper Jams
2 Open the bottom right cover while
pressing the downward arrow
button.
3 Remove the upper jammed paper.
Note • If paper is torn, check for any
torn pieces of pa per insid e the
machine.
Problem Solving
6
81
Page 84

6 Problem Solvin g
4 Remove the lower jammed paper.
Note • If paper is torn, check for any
5 Check the lower parts of the
machine. If there is jammed paper, remove it.
Note • If paper is torn, check for any torn pieces of paper inside the machine.
6 Close the bottom right cover.
Note • A message will be displayed and the machine will not operate if the bottom right cover is
7 If the finisher is installed, return the lever 1a to the ori gina l posit ion and then cl ose the
front cover of the finisher.
Note • A message will be displayed and the machine w ill not op erate if the fro nt cover of th e finishe r
torn pieces of pape r inside the
machine.
even slightly open.
is even slightly open.
Problem Solving
6
Paper jams in the Output Tray
Following describes how to clear paper jams in the output tray.
1 Remove jammed paper from the
output tray.
Note • If paper is torn, check for any
torn pieces of pape r inside the
machine.
82
Page 85

Paper jams in the Finisher C and the Booklet finisher C
The following describes how to clear paper jams in the finisher when the finisher C or
the booklet finisher C (optional) is installed.
This section describes how to clear paper jams at the following locations:
The references are described below.
Paper Jams at the Lever 1a.........................................................................................................83
Paper Jams at the Lever 1d and the Wheel 1c............................................................................84
Paper Jams at the Levers 1a and 1b............................................................................................84
Paper Jams at the Lever 2a.........................................................................................................86
Paper Jams at the Lever 2a (Using the Wheel 2c)......................................................................87
Paper Jams at the Lever 2b.........................................................................................................88
Paper Jams at the Lever 2b (Using the Wheel 2c) ..................................................................... 88
Paper Jams at the Lever 3...........................................................................................................89
Paper Jams at the Lever 5...........................................................................................................90
Paper Jams at the 4a (for the Booklet finisher C)......................................................................90
Paper Jams at the Lever 4b (for the Booklet finisher C)............................................................91
Paper Jams at the Booklet Tray (for the Booklet finisher C).....................................................92
Paper Jams
The following example shows how to clear paper jams in the booklet finisher C. The
procedure is the same as for the finisher C.
Paper Jams at the Lever 1a
1 Open the front cover of the finisher.
2 Move the lever 1a to the right.
Problem Solving
6
3 Remove the jammed paper.
4 Return the lever 1a to the original position.
83
Page 86

6 Problem Solvin g
5 Close the front cover of the finisher.
Note • A message will be displayed and the machine w ill not op erate if the fro nt cover of th e finishe r
is even slightly open.
Paper Jams at the Lever 1d and the Wheel 1c
1 Open the front cover of the finisher.
2 Move the lever 1d to the left, and
then move the lever 6 upward.
Problem Solving
6
3 Turn the wheel 1c to the direction
indicated by the arrow, and then
remove the jammed paper.
4 Return the lever 1d and 6 to the original position.
5 Close the front cover of the finisher.
Note • A message will be displayed and the machine w ill not op erate if the fro nt cover of th e finishe r
is even slightly open.
Paper Jams at the Levers 1a and 1b
1 Open the front cover of the finisher.
84
Page 87

2 Move the lever 1a to the right.
3 Remove the jammed paper.
Paper Jams
4 If the paper cannot be removed,
return the lever 1a to the original
position and move the lever 1b to
the right
.
5 Gently pull out the paper to
remove.
6 Return the levers 1b and 1a to the original positions.
7 Close the front cover of the finisher.
Note • A message will be displayed and the mac hine will no t operate if th e front cove r of the finis her
is even slightly open.
Problem Solving
6
Paper Jams at the Lever 2a
1 If the edge of the jammed paper
comes out from the exit of the
output tray, gently pull out the
paper to remove.
85
Page 88

6 Problem Solvin g
2 Open the front cover of the finisher.
3 Move the lever 2a to the right.
Problem Solving
6
4 Remove the jammed paper.
5 Return the lever 2a to the original position.
6 Close the front cover of the finisher.
Note • A message will be displayed and the machine w ill not op erate if the fro nt cover of th e finishe r
is even slightly open.
Paper Jams at the Lever 2a (Using the Wheel 2c)
1 If the edge of the jammed paper
comes out from the exit of the
output tray, gently pull out the
paper to remove.
86
2 Open the front cover of the finisher.
Page 89

3 Move the lever 2a to the right.
4 Turn the wheel 2c to the direction
indicated by the arrow, and then
remove the jammed paper.
Paper Jams
5 Gently pull out the paper to
remove.
6 Return the lever 2a to the original position.
7 Close the front cover of the finisher.
Note • A message will be displayed and the mac hine will no t operate if th e front cove r of the finis her
is even slightly open.
Paper Jams at the Lever 2b
1 Open the front cover of the finisher.
Problem Solving
6
2 Move the lever 2b to the right and
remove the jammed paper.
2b
87
Page 90

6 Problem Solvin g
3 Return the lever 2b to the original position.
4 Close the front cover of the finisher.
Note • A message will be displayed and the machine w ill not op erate if the fro nt cover of th e finishe r
is even slightly open.
Paper Jams at the Lever 2b (Using the Wheel 2c)
1 Open the front cover of the finisher.
2 Move the lever 2b to the right.
Problem Solving
6
2b
3 Turn the wheel 2c to the direction
indicated by the arrow, and then
remove the jammed paper.
4 Gently pull out the paper to
remove.
88
5 Return the lever 2b to the original position.
6 Close the front cover of the finisher.
Note • A message will be displayed and the machine w ill not op erate if the fro nt cover of th e finishe r
is even slightly open.
Page 91

Paper Jams at the Lever 3
1 Open the front cover of the finisher.
2 Pull down the lever 3.
Paper Jams
3 Remove the jammed paper.
4 Return the lever 3 to the original position.
5 Close the front cover of the finisher.
Note • A message will be displayed and the mac hine will no t operate if th e front cove r of the finis her
is even slightly open.
Paper Jams at the Lever 5
1 Open the exit cover 5 of the finisher
upward.
Problem Solving
6
89
Page 92

6 Problem Solvin g
2 Gently pull out the paper to
remove.
3 Return the exit cover 5 to the original position.
Paper Jams at the 4a (for the Booklet finisher C)
1 Open the front cover of the finisher.
Problem Solving
6
2 Pull out the unit 4.
3 Turn the wheel 4a to the left and
remove the jammed paper.
4 Return the unit 4 to the original position.
5 Close the front cover of the finisher.
90
Note • A message will be displayed and the machine w ill not op erate if the fro nt cover of th e finishe r
is even slightly open.
Page 93

Paper Jams at the Lever 4b (for the Booklet finisher C)
1 Open the front cover of the finisher.
2 Move the lever 4b to the left.
Paper Jams
3 Remove the jammed paper if there
is.
4 Pull out the unit 4.
5 Remove all jammed paper that
comes out from the left upper side
and inside the unit.
Problem Solving
6
6 Return the unit 4 to the original position.
7 Return the lever 4b to the original position.
91
Page 94

6 Problem Solvin g
8 Close the front cover of the finisher.
Note • A message will be displayed and the machine w ill not op erate if the fro nt cover of th e finishe r
is even slightly open.
Paper Jams at the Booklet Tray (for the Booklet finisher C)
1 Open the front cover of the finisher.
2 Turn the wheel 4a to the right to
eject the jammed paper onto the
booklet tray.
Problem Solving
6
3 Remove the jammed paper.
4 Close the front cover of the finisher.
Note • A message will be displayed and the machine w ill not op erate if the fro nt cover of th e finishe r
is even slightly open.
92
Page 95

Document Jams
If a document jams in the document feeder, the machine st ops, and an error message
is displayed on the screen. Clear the document jam according to the instructions
displayed, and then load the document again on the documen t feeder.
This section describes how to clear document jams at the following locations:
Document jams at the covers ........................................................................................... ..... .....94
Document jams at the Document Cover....................................................................................96
Note • Remedy differs depending on where the document jam occurs. Follow the instructions
displayed and remove the jammed paper.
Document jams at the covers
1 Grip the handle of the top cover of
the document feeder, and open the
top cover until it comes to a stop.
Note • When you fully open the
cover, it enters a fixed
position. Open the cover
gently.
Document Jams
2 Open the left cover until it comes to
a stop.
3 If the document is not caught in the
entry of the document feeder, pull
out the document.
4 If there are instructions to open the
inner cover , lif t up the le ver with the
green label on it, and open the
inner cover. Then remove the
jammed paper.
Important • If the document is stuck, do
not pull on it directly. The
document could be damaged.
Problem Solving
6
93
Page 96

6 Problem Solvin g
5 When the inside of the left cover is
indicated, remove the jammed
document.
6 Close the top cover of the inner cover until you hear it click into place.
7 Close the left cover of the document feeder until you hear it click into place.
8 If the document cannot be found, pick up the doc ument feeder sl owly, and remove t he
document if it is there, then close the document feeder.
9 If the document is not found in step
8, then pick up the document
feeder tray and remove the
document.
Problem Solving
6
10 Gently return the document feeder tray.
11 Make sure that the document is not torn, wrinkled or folded, and load the document
again following the instructions displayed on the screen.
Note • After removing the jammed document, load the entire document again following the
instructions displayed on the screen. Already scanned document sheets will automatically
be skipped, and scanning will resume from the unscanned document sheet.
• Torn, wrinkled or folded documents may cause document jams and damage. To scan such
documents, directly place the document on the document glass to make copies.
94
Page 97

Document jams at the Document Cover
1 Open the document cover.
2 Open the belt of the document
cover while gripping the lever, and
remove the jammed document.
Document Jams
3 Gently return the belt to the original
position.
4 Return the document cover to the original position.
5 Make sure that the document is not torn, wrinkled or folded, and load the document
again following the instructions displayed on the screen.
Note • After removing the jammed document, load the entire document again following the
instructions displayed on the screen. Already scanned document sheets will automatically
be skipped, and scanning will resume from the unscanned document sheet.
• Torn, wrinkled or folded documents may cause document jams and damage. To scan such
documents, directly place the document on the document glass to make copies.
Problem Solving
6
95
Page 98

6 Problem Solvin g
Stapler Faults
The following describes stapler troubles when the finisher (optional) is instal led.
Follow the procedures on the following pages when copies are not stapled or staples
are bent. Contact our Customer Support Center i f the problem persists after you have
tried the following solutions.
Unstapled
If staples are stapled on the copies in the manner shown in the figures below, contact
our Customer Support Center.
One side of staple rising up Staple bent in reverse direction
Problem Solving
Bent staple
6
Flattened staple Entire staple rising up
Staple rising up with
center pressed in
96
Page 99

Stapler Faults
Staple Jams in the Staple Cartridge (Finisher C or Booklet finisher C)
The following describes how to clear staple jams in the staple cartridge when the
finisher C or the booklet finisher C (optional) is installed.
The following example shows how to replace the staple cartr idge in the booklet finisher
C. The procedure is the same as for the finisher C.
1 Make sure that the machine has
stopped before opening the front
cover of the finisher.
2 Grip the lever R1 of the staple
cartridge holder, and pull out the
holder to the right towards you.
3 Remove the staple cartridge holder
by gripping the orange lever.
Note • The staple cartri dge is firmly
held. When remove th e stap le
cartridge, strongly pull the
cartridge.
4 After removing the staple cartridge,
check the inside of the finisher for
any remaining staples.
Problem Solving
6
5 Pull up the metal part of the staple
cartridge shown in the figure.
97
Page 100

6 Problem Solvin g
Warning
6 Remove the jammed staples (1),
and return the metal part pulled up
in step 5 to the original position (2).
7 Insert the staple cartridge while
gripping the orange lever until you
hear it click into place.
Be careful when removing
jammed staples to avoid hurting
your fingers.
2
1
Problem Solving
6
8 Close the front cover of the finisher.
Note • A message will be displayed and the machine w ill not op erate if the fro nt cover of th e finishe r
is even slightly open.
If the staples cannot be removed after carryi ng out the abov e procedures, contact our
Customer Support Center.
Staple Jams in the Booklet Staple Cartridge (Booklet finisher C)
The following describes how to clear staple jams in the book let staple cartridge when
the booklet finisher C (optional) is installed.
1 Make sure that the machine has
stopped before opening the front
cover of the finisher.
98
2 Press the levers R2 and R3 to the
right, and pull out the unit.
R3
R2
 Loading...