

Page 1

Version 2.0.XX
A
October 2016
®
Xerox
Digital Alternatives
dministration Guide
Page 2

©2016 Xerox Corporation. All rights reserved. Xerox®, and Xerox and Design®, and
CompleteView
®
are trademarks of Xerox Corporation in the United States and/or other
countries. BR17779
IOS is a trademark or registered trademark of Cisco in the United States and other
countries and is used under license.
Microsoft
Microsoft
®
, Windows® operating system, SQL Server®, Windows Server®, and
®
.NET are registered trademarks or trademarks of Microsoft Corporation in the
United States and/or other countries.
Macintosh
®
, iPad®, Retina®, iWork®, Pages®, Numbers®, and Keynote® are trademarks of
Apple Inc., registered in the U.S, and other countries.
iPad mini™ and iPad Air™ are trademarks of Apple Inc.
Revision History
Version Date Description
2.0.XX October 2016 Added requirem ent for HTTPS enablement for local servers
2.0 January 2016 Updated to include 2.0 features including support for Macs and
Android tablets
1.1 May 2015 • Updated application name in text and images
• Updated trademark attributions
• Updated screen caps to reflect changed name
Added support for 1.1 features ( cloud, iOS 8 support, and .NET
framework update)
1.0 August 2014 Initial release.
Page 3

Table of Contents
Introduction ................................................................................ 1
General Purpose and Audience ................................................................... 1
®
Xerox
Glossary of Terms ........................................................................................ 2
Minimum Requirements ............................................................. 3
Server Requirement ..................................................................................... 3
Minimum Hardware Requirements by Deployment Size .............................. 3
Minimum Software and System Requirements ............................................ 5
Local Server Administrator User Interface Browser Requirement ................ 5
Prerequisites for the Local Server Installation ........................... 7
Determine the Maximum Number of End Users ........................................... 8
Assess the End User Platform Software ...................................................... 9
Assess the DA Server Configuration ............................................................ 9
Obtain Client IT Infrastructure Information ................................................. 10
Obtain the Global Catalog Path .................................................................. 13
Obtain the Required Credentials ................................................................ 13
Obtain the Customer Account ID ................................................................ 13
Obtain the Service Account User Name and Password ............................. 14
Define Server Roles ................................................................................... 16
Configure the Proxy Server ........................................................................ 18
DocuShare Integration Considerations ...................................................... 19
Install the Software ..................................................................................... 19
DA Relay Service ....................................................................................... 22
Digital Alternatives Solution .............................................................. 1
Licensing in the DA Central Server ..................................................... 8
Storage Requirements for Licensed Users .......................................... 8
Multiple DA Servers for Appropriate Network Loading ........................ 9
Network (IP) Address .......................................................................... 9
Web Server Installed ........................................................................... 9
Client Authentication Domains .......................................................... 10
Email Server Information ................................................................... 11
Select the PC Client Software Distribution Method ........................... 12
Required Windows Server Features Enablement ............................. 17
Hardware Platforms for End User Client Software ............................ 18
Configuring the DA Local Server ............................................. 23
®
Xerox
Digital Alternatives Administration Guide i
Page 4

Table of Contents
Logging into the DA Local Server ............................................................... 23
Setting Parameters in Configuration Tabs ................................................. 24
Summary Tab .................................................................................... 24
Settings Tab ...................................................................................... 25
EFSS Providers Tab .......................................................................... 28
Workflows Tab ................................................................................... 29
Tasks Tab .......................................................................................... 30
Users Tab .......................................................................................... 32
Status Tab ......................................................................................... 33
Domains Tab ..................................................................................... 33
Settings for Email ....................................................................................... 35
Outgoing Mail Server Uses Service Account Username / Password 35
From Email Address .......................................................................... 35
Proxy Server Information ............................................................................ 35
Access to Central Server from Local Server and Client Software
through the Proxy Server ................................................................... 36
Manually Configuring Proxy Server Settings on Local Server ........... 36
Licensed Customer ID Process ............................................... 39
Purpose of Customer ID within the Server Installation Process ................. 40
Obtaining Digital Alternatives Licensed Customer ID Process ................... 40
Local Server Components ....................................................... 43
Multiple Server Configuration................................................... 45
Multi-node Example .................................................................................... 45
Setting Up the DA Local Servers ....................................................... 46
Prioritizing the Server in the List ................................................................. 46
Disabling an Application Server ................................................................. 46
Software Maintenance, Troubleshooting, and Support ............ 47
Software Maintenance ................................................................................ 47
Backup and Restore .......................................................................... 47
Removing the Software ..................................................................... 47
Migrating an Installed Local Server to a New Host .................................... 47
Troubleshooting .......................................................................................... 49
Client / Server Connectivity ............................................................... 49
Identifying Issues ............................................................................... 50
Admin and Implementation Support Contact ........................... 55
ii Xerox
®
Digital Alternatives Administration Guide
Page 5

Introduction
General Purpose and Audience
This document is written for Customer IT Administrators (or customer employees
representing this role) and Xerox Client Account Managers.
Xerox® Digital Alternatives Solution
Xerox® Digital Alternatives (DA) is a personal productivity and collaboration tool that
provides an alternative to using paper documents. DA allows users to read, annotate,
save, and share documents within a single application.
DA uses client/server architecture. A DA server is installed either on a private cloud or
locally on the client’s network environment and a DA client is installed on a user’s PC
and/or iPad.
In the on premises local server installation, the DA server and clients each have their own
local database to store document metadata. Documents that are created or updated are
automatically replicated to the DA server and from there to all of a user’s devices.
For the private cloud installation, you allow us to connect to your network via a VPN, but
Xerox owns the servers and provides set up and maintenance. Please refer to the Private
Cloud Installation section of the Appendix for the basic installation steps and architecture
overview.
Figure 1 Components for an installation with the local server on premises.
Xerox® Digital Alternatives Administration Guide 1
Page 6

Introduction
The steps to create a Xerox® Digital Alternatives solution in a customer’s network
environment are:
Step Responsible Person/Group
1. Create the customer account in the cloud-based DA
Central Server.
2. Create a Service User Account for use by the
maintenance service on the local server as well as the
IIS app pools. The service user account needs to:
• Be a domain account
• Have administrative rights on the DTA Local Server
node(s)
• Be exempt from password expiration
See Obtain the Service Account for more information.
3. Install and configure DA local server software within the
customer environment.
4. Create and upload the initial licenses to the DA central
server.
5. Review the DA Support Go Live/Operations Readiness. Global Delivery Center /
6. Distribute PC and iPad client software in the customer’s
environment.
MPS Application Support
Customer IT Department
Service delivery
MPS Application Support
MPS Application Support
Service delivery
Glossary of Terms
Term/Acronym Definition
DA Xerox® Digital Alternatives
GDC Global Delivery Center
FQDN Fully Qualified Domain Name
MSMQ Microsoft® Message Queuing
NFIT NewField IT
Onboarding The process of a new user successfully logging into the DA client software
(from PC, tablet, or iPad) which registers the user with the solution, sets up
their workspace, and counts against the overall volume licensing.
An onboarded user account occurs when a user logs into any DA client (PC
or iPad) for the first time after installing the client in the implementation.
VPN Virtual Private Network
2 Xerox
®
Digital Alternatives Administration Guide
Page 7

Minimum Requirements
Xerox® Digital Alternatives (DA) system performance requirements vary by customer
depending on the scope of implementation (including number of clients, number of
documents, network connectivity). This chapter identifies:
• Server Requirement
• Minimum Hardware Requirements by Deployment Size
• Minimum Software and System Requirements
• Local Server Administrator User Interface Browser Requirement
Server Requirement
Server software needs to be installed on a dedicated server that is separate from the
server that hosts the SQL Server system (with the exception of small pilot installations).
This dedicated server may be on a virtual server.
DA server software should not be installed on a server that has other Xerox
Print Services software already installed.
®
Managed
Minimum Hardware Requirements
by Deployment Size
Component
Server Pilot only: application
Processor Quad Core Processor
Pilot Deployment
(1-20 Users)
(web) server,
document server, and
SQL Server can be on
same host
(i7)
Small -Medium
Deployments (100 5000 Users)
Requires separate
servers for SQL
Server,
Web/Application
Server, and
Document (File)
Server.
Quad Core Processor
(i7)
Full Enterprise
Deployments (5000+
Users)
Requires multiple servers
for one or more
Application Server(s), a
separate SQL Server,
and a separate Document
Server.
Multi-Processor VMs
(recommend minimum 4
CPUs per VM)
®
Xerox
Digital Alternatives Administration Guide 3
Page 8

Minimum Requirements
Component
Pilot Deployment
(1-20 Users)
Small -Medium
Deployments (100 5000 Users)
RAM Minimum 8GB RAM Minimum 8GB RAM
for application and
SQL Server hosts
(SQL Server
application
performance
improves with
additional memory on
DB server host)
Hard Drive
Minimum 40GB Minimum 40GB Minimum 40GB (each
Space for
Applications
Hard Drive
Space for
Document
Storage
Minimum 20 - 30 GB
(assuming 20 people
using 1GB storage
each)
Space required
depends on number
of DA users, and total
documents storage
capacity (quota)
allowed for each user
(per user total
document storage
capacity quota can be
adjusted downward,
maximum 5GB per
user)
Windows
2008 R2 or 2012 2008 R2 or 2012 2008 R2 or 2012
Server
SQL Server 2008 R2, or 2012
(SQL Server 2008
Express may be
2008 R2 or 2012 on
separate database
server
acceptable for Pilot
set-up)
Environment for
Email and
Microsoft Outlook /
Exchange
Microsoft Outlook /
Exchange
Calendar
Integration
Full Enterprise
Deployments (5000+
Users)
Minimum 8GB RAM per
VM
application server node)
Separate Server for
documents, configured
with high IO (example:
RAID 1 or 5 configured
drives with Fibre
Channel).
Space required depends
on number of DA users,
and total documents
storage capacity (quota)
allowed for each user
(per user total document
storage capacity quota
can be adjusted
downward, m aximum
5GB per user)
2008 R2 or 2012 on
separate database server
Multi-node server
deployment, high
performance
configuration with load
balancer
4 Xerox
®
Digital Alternatives Administration Guide
Page 9

Minimum Requirements
Minimum Software and System
Requirements
Component Minimum Recommended
Operating System Windows Server® 2008 R2 Windows Server 2008 R2 or
Windows Server 2012
Web Server IIS version 7.5 IIS version 7.5 for Server 2008 R2
or IIS version 8 for Server 2012
Virtual Memory
/RAM
Network COM+
Access
Network DTC
Access
Access
Components
Microsoft .NET
Framework
Database Server Microsoft SQL Server® 2008 R2 SQL Server 2012
SQL
Authentication
Server
Administrative
Rights
8GB 16 GB
Not needed Not needed
Not needed Not needed
Required (bundled w/Microsoft®
.NET 4.5.2 Framework) *
4.5.2 4.5.2
Windows Authentication required
with admin account access for
installer and run as accounts
Required Required
Required (bundled w/Microsoft®
.NET 4.5.2 Framework) *
Windows Authentication required
with admin account access for
installer and run as accounts
*Windows Server 2008 R2 is initially bundled with .NET Framework version 3.5. The only
certain method of determining which version of .NET framework is installed on a given
Windows computer is to inspect the computer’s Registry. How this is performed can be
found in the following article:
net-framework-versions-and-service-packs-are-installed?lq=1
http://stackoverflow.com/questions/199080/how-to-detect-what-
Local Server Administrator User
Interface Browser Requirement
The Local Server user interface for the Administrator is accessed using a compatible web
browser such as Internet Explorer. The security settings defined in the browser must
enable Active Scripting to allow JavaScript to function within the DA local server user
interface.
®
Xerox
Digital Alternatives Administration Guide 5
Page 10

Page 11

Prerequisites for the Local
Server Installation
The following prerequisite tasks must be completed prior to implementing and configuring
the local Xerox
• MPS Application Support needs to create a customer account in the cloud-based DA
Central Server which generates a Customer Account ID. See Obtain the Customer
Account ID for more information.
• The Customer IT department needs to create a Service User Account for use by the
maintenance service on the local server as well as the IIS app pools. See Obtain the
Service Account for more information.
• The Administrator needs to complete the following.
– Determine the Maximum Number of End Users
– Assess the End User Platform Software
– Assess the DA Server Configuration
– Obtain Client IT Infrastructure Information
– Select the PC Client Software Distribution Method
– Obtain the Global Catalog Path
If the customer has the Global Catalog enabled and wants to use a specific
global catalog rather than using our auto-discover method, obtain the full path for
configuration after installation
®
Digital Alternatives (DA) server:
– Obtain the Required Credentials
– Obtain the Customer Account ID
– Obtain the Service Account User Name and Password
– Define Server Roles
– The Digital Alternatives local server requires a number of server roles be enabled
to operate. The table below describes the roles needed.
Role Category Settings
Role Services • .NET Framework 3.5.1
• Web Server (IIS) Support
• TCP Port Sharing
• Windows Process Activation Service Support
®
Xerox
Digital Alternatives Administration Guide 7
Page 12

Prerequisites for the Local Server Installation
Role Category Settings
Application Server • Message Queuing
• Remote Server Administration Tools
• SNMP Services
• Telnet Client
• Windows Process Activation Service
• .NET Framework 3.5.1 Features
Web Server • Common HTT P Features (WebDAV Publishing role not required)
• Application Development
• Health and Diagnostics (ODBC logging role is not required)
• Security
• Management Tools
• IIS Hostable Web Core
• Configure IIS to allow HTTPS traffic to site
Determine the Maximum Number of
End Users
The expected maximum number of end users must be identified to:
• Implement the appropriate licensing in the DA Central Server
• Estimate the storage requirements of the server document repository
• Assess requirements for multiple DA servers for appropriate network loading
Licensing in the DA Central Server
The DA Central Server manages the client licensing for each implementation. Each end
user counts against the licensing allocation defined for a particular DA solution. If you
expect to have 500 end users, then the DA solution needs to account for 500 users by
having the appropriate licensing implemented in the DA Central Server. Users after the
first 500 need additional licenses obtained for the account.
The number of licensed users is accounted for by the onboarded users who are recorded
in the DA local server. Licenses are decremented as users are onboarded. A user who
uses multiple devices (such as a PC and an iPad) only counts as 1 user against the
licensing pool. In the example of 500 users in the implemented license, the first 500 client
end users who successfully log into the DA client server the first time are permitted to use
the system. Additional users require additional licenses.
Storage Requirements for Licensed Users
The maximum number of end users is used to determine the storage requirements of the
server document repository. Each onboarded user receives an allocation of document
storage space, configurable within the local DA server with the default set at 5 GB per
8 Xerox
®
Digital Alternatives Administration Guide
Page 13

Prerequisites for the Local Server Installation
user account. If you have 500 users with a maximum of 5 GB of storage space, 2.5 TB of
storage capacity is required in the resource planning for the solution.
Multiple DA Servers for Appropriate Network Loading
The maximum number of end users and the amount of data they will access are factors
in determining whether or not additional DA servers need to be implemented.
As new documents are entered into the system, they are automatically made available to
other devices associated with the licensed users. Document replication sends co pies of
the initial document to the server and then to the various devices associated with the
user. If there is a significant portion of the documents shared to other users within the
same DA server network, they too receive copies of the documents.
If there is an excessive number of users allocated to a single server implementation, the
network associated with the DA server could become congested and begin to have
issues contending with other client demands. Multiple DA servers may need to be
implemented to account for server and network loading.
Assess the End User Platform
Software
The platforms used to access DA need to be assessed with the following requirements in
mind:
Platform
PC • Windows 7
iPAD 2, 3, 4, Air,
mini (non-retina), mini (retina)
Software Version Required to use
DA
• Windows 8 or Windows 8.1
iOS 7.0, iOS 7.1, iOS 8, iOS 9 not applicable
.NET Framework for DA
Client Software
automatically installed
Assess the DA Server Configuration
Network (IP) Address
The DA Server needs to be installed on a server with a fixed (static) IP address.
Web Server Installed
The DA server provides a Web-based Administrator interface and uses some of the
capabilities of the Microsoft IIS web server system being installed on the same server for
communication between servers and with clients via REST Web Interface. The correct IIS
version for server and host implementations are as follows:
®
Xerox
Digital Alternatives Administration Guide 9
Page 14

Prerequisites for the Local Server Installation
• For Windows Server 2008 R2 server implementation, IIS version 7.5 is needed.
• For Windows Server 2012 and Windows Server 2012 R2 host implementation, the
default IIS version 8 is needed.
Make sure IIS is configured to allow HTTPS traffic to site. Follow the steps below on the
Local Server after deploying the HTTPS Certificate.
1. Go to Control Panel>All Control Panel Items>Administrative Tools>Internet
Information Service (IIS)Manager.
2. Open the Default Web site.
3. In the Actions menu, select Bindings. (Displayed on the right side of the screen.)
4. In the Site Bindings window click Add.
5. Complete the following fields in the Add Site Binding window.
a. Type: Select https.
b. IP Address: Set as All Unassigned.
c. Port: Use the default (443).
d. SSL certificate: Choose a certificate from the drop down list
6. Click OK and close the Site Bindings window.
Obtain Client IT Infrastructure
Information
• Authentication domain: information to add manually
• Email servers: SMTP server and port
Client Authentication Domains
Authentication domains validate the user’s credentials within the client’s network domain.
All users who access DA (through the PC or iPad software clients) need authentication
using a Microsoft Windows Network Domain.
User authentication requests are sent to the DA local server by the client. The DA server
uses its configuration with the customer’s network user management system
LDAP/Active Directory. Authentication domains receive the customer’s domain user
credentials entered into the client software by the end user and forwarded to the DA local
server.
The DA server’s interaction with authentication domains must be configured using the
Server Admin individually for each domain. Therefore, the DA server needs to be joined
to the client’s network domain but is not installed on the domain controller.
The following information is required to add a domain that is not automatically detected:
10 Xerox
®
Digital Alternatives Administration Guide
Page 15

Prerequisites for the Local Server Installation
• Domain name (label)
• FQDN authentication domain name
• Port number the authentication server monitors for authentication requests
• Determine if LDAP server supports SSL connection
Email Server Information
Simple Mail Transfer Protocol (SMTP) Server
The DA server is responsible for emailing documents to recipients that are requested by
end users from their DA client software as email attachments. When an end user using
DA client software requests a document be emailed to an email address, the DA local
server attaches a copy of the document to the email and sends it to the email recipient.
Other email interfaces are not supported. Examples: Microsoft Exchange, POP3, IMAP.
The following information is required for the Outgoing Mail Server (SMTP) setup:
• Name or IP address and port number of the SMTP mail server that the application
will use for e-mail messages. This information is available from the client’s IT group
where the server is being installed.
Customer Email Domains
During the initial configuration of the customer account in the DA Central Server prior to
installing the local server in the customer network environment, the customer’s email
domain is configured into the customer’s account by Xerox support. This email domain
will be used during the end user onboarding process with the central server where users
will supply their company email address as part of their login credentials.
It is important that end users only use the customer email address domain associated
with the customer’s DA account. Public email addresses such as gmail.com are not
supported.
Each customer account within the Central Server can have multiple email domains valid
for the customer’s email network domain. For example, xerox.com and usa.xerox.com
can be added to supported email domains for a given customer company where users
with either email domain will be granted access to their account.
Customer Address Book Lookup
The DA local server provides the end user client applications with the ability to look up
another user’s email address through the customer’s IT global address book. This is
performed using the LDAP/Active Directory lookup by the local server. See Manually
Adding a Domain and Editing a Domain for information on configuring LDAP connections.
®
Xerox
Digital Alternatives Administration Guide 11
Page 16

Prerequisites for the Local Server Installation
Select the PC Client Software Distribution Method
When deciding how to distribute the PC client software, consider whether the end user
has administrative rights to their own PC. The answer will guide the implementation of the
PC software client.
PC Client Software
Distribution Method
End Users Login
Script
Customer IT
Administration
Script Push
Inclusion within PC
Image Distribution
Self-extracting
Installation
End User
Has Admin
Rights to PC
Yes The client installer is pushed through interactive mode
No The customer’s IT department creates a script that
Yes or No The OS image is maintained centrally and copied to an end
Yes The PC client installation software can be provided in a
Description
under the user context, meaning that it is running the
command as the logged in user. A log on script is created
by the customer’s IT department to execute the PC installer
upon the end user’s next login session, using the PC Client
Silent Installation syntax listed in the next section of this
document.
executes as an administrator of the PC client using the PC
Client Silent Installation Instructions.
user’s computer as part of the PC regular software update
cycle that includes the installation of the PC client.
single, self-extracting installation executable that can be
placed within a centrally available folder on a fileserver
within the customer’s network where users can be directed
to download the software to self-install.
PC Client Silent Installation Instructions
The Digital Alternatives PC client software installation package can be executed from the command
line using the following method1:
C:\> XeroxDigitalAlternativesTool[SoftwareVersionNumber].exe /s /l<language code>
Where <language code> can be identified in the table below:
Language Language Code
English - United States (en-US) 1033
French – France (fr-FR) 1036
French – Canada (fr-CA) 3084
German – Germany (de-DE) 1031
Italian (it-IT) 1040
Spanish International (es-ES) 1034
Japanese 1041
1
Local server administrative rights are needed to execute silent installation.
12 Xerox
®
Digital Alternatives Administration Guide
Page 17

Prerequisites for the Local Server Installation
Language Language Code
Portuguese – Brazilian (pt-BR) 1046
Table 1: Language Code
Obtain the Global Catalog Path
If the customer has the Global Catalog enabled and wants to use a specific global
catalog rather than using our auto-discover method, obtain the full path for configuration
after installation.
Obtain the Required Credentials
The administrator installing the DA server must also have all of the following:
• Administrative access to the DB server host
• Administrative access to the SQL Server installed on the DB host
Obtain the Customer Account ID
A customer account ID is created by MPS Application Support in the DA Central Server
system (implemented in the Microsoft Azure cloud network infrastructure). When a
customer account is created in the central server, the central server generates a unique
Customer ID. This Customer ID is used:
• By the Client Licensing System (CLS) which generates a license key used in the
central server to enable client DA seat licenses
• When installing the local server software to:
– Register a given DA local server with a central server
– Uniquely identify a given DA local server among the local servers associated with
the central server
®
Xerox
Digital Alternatives Administration Guide 13
Page 18

Prerequisites for the Local Server Installation
The Customer ID (also called the Company ID) is found in the following screens:
– Central Server Customers Listing
– DA Local Server System Summary
Obtain the Service Account User
Name and Password
A Service user account (created by the customer IT department) is used by the
maintenance service on the local server as well as the IIS app pools. The account user
name and password are required at Local Server installation time.
If the SMTP server used requires user authentication, the username and password for
the service account will be used for SMTP server authentication.
The service user account needs to:
• Be a domain account and have administrative rights on the DA Local Server node(s).
• Be exempt from password expiration as an expired password will impact the
operation of the local server when it attempts to start the service.
• Have proper access and permissions to send email on behalf of DA.
• Comply with the following:
14 Xerox
®
Digital Alternatives Administration Guide
Page 19

Prerequisites for the Local Server Installation
Security Area Installer User Account
Install IT Group policies
should allow the user
account to install
software
Registry access Read an d write
access
SQL Server Need full access,
including ability to
create databases (db
creator and admin
roles)
IIS and .NET • Permissions to
create IIS
applications and
applications pools
• Permissions to
configure IIS (IIS
metabase, etc.)
Windows Services (only installing
services)
Ability to reach
Needed
SMTP server as
configured
Run as (Service)
Comments
Account
In a typical setup, being
a member of the
Administrator group
gives you all permissions
needed, otherwise refer
to policies setup
documentation
Read and write
access
Including our own keys at
HKEY_LOCAL_MACHIN
E\SOFTWARE\Wow643
2Node\
Need read/write
access to Main and
Reporting DA
databases created
by Installer. All
communication with
The Installer has a Test
button to verify that it can
access the Server
Instance specified with
the current Installer
identity.
SQL server is
performed when
connected with that
user Windows
Identity (Windows
Authentication
mode).
This identity must
have permissions
to the Access
Control Lists as
specified here:
http://msdn.microso
ft.com/enus/library/vstudio/k
wzs111e(v=vs.100)
.aspx
Will be used as
Service Run As
account, need to
make sure
permissions for it
can be given
®
Xerox
Digital Alternatives Administration Guide 15
Page 20

Prerequisites for the Local Server Installation
Security Area Installer User Account
Ability to reach
active directory per
configuration
Azure Central
Server services:
Internet access with
ports open to reach
central server
Proxy settings if
needed (either per
user or per machine)
Global Catalog Read access
File access Ability to create and
MSMQ Ability to access
Needed Though this account
Needed Needed Need access to central
drop files/ folders as
part of the Installer
Run as (Service)
Account
Full access to our
Documents and
Logs
locations(C:\Progra
m Files
(x86)\Xerox\Xerox
Digital Alternative
Tool Server\Data
by default)
and create private
MSMQ queues
Comments
does not need any
special permissions (we
use actual user’s
credentials), it should be
able to reach; also
should be able to
discover Ads in Admin UI
server, HTTPS
production URL.
Per user proxy settings
can be setup via
IE/Tools/Internet
Options/Connections.
Otherwise group policies
must be used.
Define Server Roles
The Digital Alternatives local server requires a number of server roles be enabled to
operate. The table below describes the roles needed.
Role Category Settings
Role Services • .NET Framework 3.5.1
• Web Server (IIS) Support
• TCP Port Sharing
• Windows Process Activation Service Support
16 Xerox
®
Digital Alternatives Administration Guide
Page 21

Prerequisites for the Local Server Installation
Role Category Settings
Application Server • Message Queuing
• Remote Server Administration Tools
• SNMP Services
• Telnet Client
• Windows Process Activation Service
• .NET Framework 3.5.1 Features
Web Server • Common HTT P Features (WebDAV Publishing role not required)
• Application Development
• Health and Diagnostics (ODBC logging role is not required)
• Security
• Management Tools
• IIS Hostable Web Core
Required Windows Server Features Enablement
• Message Queuing
– Message Queuing Services
– Message Queuing Server
• Remote Server Administration Tools
– Role Administration
• Web Server (ISS) tools
• SNMP Services
– SNMP Service
– SNMP WMI Provider
• Telnet Client
• Windows Process Activation Service
– Process Model
– .NET Environment
– Configuration APIs
• .NET Framework 3.5.1 Features
– .NET Framework 3.5.1
– WCF Activation
• HTTP Activation
• Non-HTTP Activation
®
Xerox
Digital Alternatives Administration Guide 17
Page 22

Prerequisites for the Local Server Installation
Configure the Proxy Server
The installation of the DA local server uses the Proxy Server settings defined in Internet
Explorer to access the Internet.
To configure Internet Explorer Proxy settings:
1. Open Internet Explorer on the local server.
2. Select Tools > Internet Options.
3. On the Connections tab, click LAN settings.
4. Check the Proxy server box and click Advanced.
5. Set values as needed.
6. Click OK.
Note
The Administrator installing the Xerox
administrative access to the DB server host as well as the SQL Server installed on the
DB host. The SQL Server must allow Windows authentication for user access.
®
Digital Alternatives (DA) server must also have
Hardware Platforms for End User Client Software
Windows PC
• What version of Windows do the expected users of DA on their PC have?
– Windows 7
– Windows 8 or Windows 8.1
– Windows 10
• What version of Microsoft .NET framework is installed on the PCs which will run the
client software? Specific minimum requirements of which version of .NET for client
PCs are in the Digital Alternatives Client User Guide.
Apple iPad
• What version of iPad and iOS do the expected users of DA have on their devices?
– iOS 9.0, iOS 8.0, iOS 7.0, iOS 7.1, iPad 2, 3, 4, Air, mini (non-retina), mini
(retina)
– Digital Alternatives is not supported on the Apple iPhone.
Apple Macintosh
There is a Digital Alternatives client application that can be available on and downloaded
from the Apple Macintosh App Store. Supported Macintosh operating systems version
start at OS X 10.10 (Yosemite) and higher.
18 Xerox
®
Digital Alternatives Administration Guide
Page 23

Prerequisites for the Local Server Installation
Android
Supported Android tablet manufacturer and OS versions (Android OS version 4.4 or
higher):
Device OS Versions Supported
Asus Memo Pad 7 v4.4.2 (KitKat®)
Google (Asus) Nexus 9 v5.0 and v5.1.1(Lollipop)
Google (Asus) Nexus 7 v4.1(Jelly Bean), v4.4.2 (KitKat®),
v5.0/5.1/5.1.1 (Lollipop)
Samsung Galaxy Tab 4 v4.4.2 (KitKat®)
Samsung Galaxy Tab S v4.4.2 (KitKat®), v5.0/5.1/5.1.1 (Lollipop)
DocuShare Integration
Considerations
Digital Alternatives provides built-in integration with Xerox® DocuShare. To enable this
integration, you need one of the DocuShare versions with the software patches listed
below.
DocuShare Version Patch Level*
6.6.1 Ds661update3p2
7.0 Ds700ps
* You can download the patches free from Xerox Support.
Install the Software
1. Confirm that the prerequisites identified in the previous chapter are complete.
2. On the local host, start the local server installer as an administrator. The
Bootstrapper Welcome screen displays with the version of the software.
3. Click Install. The Server Setup Wizard screen displays.
4. Click Next. The DA Server License Agreement screen displays.
5. Select “I accept the terms in the license agreement” and click Next. The Database
Server screen displays.
6. Enter the network location of the SQL Server database server in the format:
ServerName\DBInstanceName,Port
where:
ServerName is either the shortname for the host or FQDN name or IP address.
DBInstanceName is the particular name of the SQL Server instance within the host.
®
Xerox
Digital Alternatives Administration Guide 19
Page 24

Prerequisites for the Local Server Installation
Port is a port number other than the standard SQL Server browser listener port ID
(default of 1433 or 1434) if the SQL Server host is so configured.
7. To verify the database server path is valid and you have access, click Test.
8. When the test passes, click Next. The SQL Database Creation screen displays.
9. Create a new database or select an existing database from the list.
– Database Name
Enter a unique database name in less than 64 characters (letters and numbers
with no spaces)
– Use existing database
Select an existing database from the drop-down list.
Note
We recommend that you back up the database you select before continuing with
the installation.
10. To verify the specified database is valid, click Test.
11. When the test passes, click Next. The Database Server screen displays.
12. Enter the path of the second database instance for use by the DA reporting system
(provided by Xerox
®
CompleteView® Pro reporting). This is a data warehouse
database instance. Format: ServerName\DBInstanceName,Port
13. To verify the database server path is valid and you have access, click Test.
14. When the test passes, click Next. The SQL Database Creation screen displays.
15. For reporting, create a new database or select an existing database from the list.
– Database Name
Enter a unique database name in less than 64 characters (letters and numbers
with no spaces)
20 Xerox
®
Digital Alternatives Administration Guide
Page 25

Prerequisites for the Local Server Installation
– Use existing database
Select an existing database from the drop-down list.
Note
It is recommended that you back up the database you select before continuing
with the installation.
16. To verify the specified database is valid, click Test.
17. When the test passes, click Next. The Enter Customer ID Information screen
displays.
18. Enter the Customer ID number. (For information, see Obtain the Customer Account
ID.)
19. Click Next. The Service Account screen displays.
20. Enter the Service Account user name and password. (For information, see Obtain the
Service Account.)
21. To verify the user credentials supplied can be used for the DA server, click Test.
22. When the test passes, click Next. The Server IP Address screen displays.
23. Enter either the IP address of the local server or the full path URL of the server.
24. Click Next. The Destination Folder screen displays the default installation path for the
DA server software.
25. To change the default installation path (Program Files\Xerox\Xerox Digital
Alternatives Server), click Change.
Note:
Depending on where you install the software you may need to use the
ASPNET_IISREG command line fix.
26. Select a new directory, click OK, and then click Next. The Web sites screen displays.
®
Xerox
Digital Alternatives Administration Guide 21
Page 26

Prerequisites for the Local Server Installation
27. Select the appropriate Web site from the drop-down list of Web sites defined on the
DA local that the virtual directory will be displayed in.
The port ID of the virtual directory is displayed.
28. Click Next. The Ready to Install screen displays.
29. Click Install. A DA Server message displays.
To cancel the installation, click Cancel. All installation files are removed from the
local server.
30. When the DA Server Bootstrapper Setup screen displays with Setup Successful, click
Close.
The DA local server software is now installed and the required databases are on the
database server.
The next step in the process is to login into the local server instance and start configuring
the local server for use.
DA Relay Service
The DA Local Server installation software creates a Windows service called the Xerox®
Digital Alternatives Relay Service. The relay service executes using the service account
credentials described earlier in this document. If there are multiple application servers
within the implementation, each application host executes this service.
The relay service connects the internal local DA server with the Internet-based Central
Server using Microsoft’s Azure relay service bus connection technology. It enables a
remote client’s application connection when outside the customer’s IT network to allow
the client application to access the customer’s internal IT authentication functionality.
The relay service provides login and initial account onboarding functionality and all other
local server functions such as document syncing, document sharing, and address book
lookup when working remotely.
22 Xerox
®
Digital Alternatives Administration Guide
Page 27

Configuring the DA Local
Server
The Xerox® Digital Alternatives (DA) local server provides several important functions
within the DA solution.
Administrator Ability Location
View a summary of the account information Summary Tab
Configure customer-specific parameters and network settings such as the
SMTP (outbound email) server, default user file space quota, and LDAP server
Configure integration with customer’s DocuShare server EFSS Providers
Configure enablement of simple workflows interface within Clients Workflows Tab
Configure tasks to be performed by the DA local server scheduler Tasks Tab
Settings Tab
Tab
Manage individual onboarded user accounts
Users Tab
View DA local server tasks’ current status and if a given task is in error, the
details of the error
Define and configure the Authentication Domains the local server interacts
with in the customer environment
Status Tab
Domains Tab
Logging into the DA Local Server
Administrators are authenticated by the local server using Windows domain
authentication security when the administrator provides Windows credentials.
Administrative access to the DA local server is available to anyone whose Windows user
account (either local or domain defined) is configured in the Windows Administrators user
group on the application server that is hosting the DA local server application.
®
Xerox
Digital Alternatives Administration Guide 23
Page 28

Configuring the DA Local Server
To access the DA local server’s Administration application by browsing one of the
following on the local server with administrator credentials:
• https://<servername>/Admin
• https://IPaddress/Admin
Setting Parameters in Configuration
Tabs
Configuration tabs contain parameters and settings that can be configured by the DA
Administrator.
Summary Tab
The System Summary displays account information for the local server.
Field Description
Company Name Name defined in the DA Central Server for the customer’s DA
implementation license.
Company Unique ID Unique identifier generated by the Central Server used in the client
seat licensing and the installation of the local server.
Total Users Registered Number of onboarded customer users accounted for in the overall
client seat license capacity configured for the customer.
User License Current maximum client seat licenses allocated for the customer.
License Expiration Date the current client seat license set expires.
Total Documents in
System
User Quota Default file space for a given user.
24 Xerox
Total number of documents currently in the DA local server file
storage for all users.
®
Digital Alternatives Administration Guide
Page 29

Configuring the DA Local Server
Server Names All the DA application (web) servers configured in the single customer
implementation. This information is useful when configuri ng a
clustered server implementation where multiple application servers
are tied together.
Settings Tab
The Settings tab contains system settings. To edit a setting, click the Edit (pencil ) icon
beside the setting name.
Setting Description Comments
AD Filter Using the Active Directory (AD)
search filter, the DA server can
more efficiently look up user emails
through the LDAP server
Deleted File Lifetime Length of time deleted files are
kept in the system before being
automatically purged
Email Attachment
Size
Enable XDA User
Email Attachments
Default maximum document size
that will be sent to shared
recipients
Specifies if Digital Alternatives
users receive separate email with
attachments when a document is
shared with them.
Default provided by server
installer should work in most
environments. Site-specific
modification is best performed
by someone familiar with LDAP
Search Filters syntax.
Measured in days. Documents
with a last modified date older
than the setting value are
deleted.
Measured in MB. Server
attempts to obtain maximum
size permitted from mail server.
If mail server doesn’t provide
the information, use the setting
size as the maximum
attachment size.
If enabled, email attachment is
sent to all recipients,
®
Xerox
Digital Alternatives Administration Guide 25
Page 30

Configuring the DA Local Server
Setting Description Comments
Error Email Sender Specifies the default email address
of error notifications generated by
the application. The name is
Set this to a name that is
meaningful to the deployment or
company.
typically set to a value that
identifies the application such
Xerox® Digital Alternatives using a
system e-mail account such as
No.Reply@xerox.com.
Global Catalog The customer-preferred Global
catalog path.
If this value is empty, the Local
Server will auto-discover the
global catalog path. If enabled,
the client server performs a
search at each sync to see if
Global Address Lookup (GAL)
is supported.
Internal End Point Internal URL for local server
(FQDN or IP address) access that
DA clients use to send and retrieve
documents
Used for central server
registration. Used by DA client
software for onboarding.
Defined during installation. For
single application server (node)
implementation, it is the FQDN
of the local server. In a multi-
node installation, this can be the
URL to the load balancer.
LDAP Server Primary customer user dir ectory
lookup server. Used to access user
Uses Local Server Service
Account to access.
email addresses from customer IT
systems.
Quota Default maximum server file space
allotment for a given user
Measured in bytes (displayed in
GB). Will not truncate last
document when reaching quota.
Send Logs Email Not used
SMTP Server Outbound email server used to
send shared documents to users
XDA Shared
Document Folder
(XDA = Xerox® Digital
Alternatives)
Location of directory where shared
documents are stored on the DA
server. Can be specified as either a
drive:\path or UNC
\\servername\shareddirectory
26 Xerox
Uses the Local Server Service
Account to access. Setting
Value is server FQDN, port. For
example: SERVER, port
Default = subfolder of the
installation folder.
®
Digital Alternatives Administration Guide
Page 31

Configuring the DA Local Server
Editing the SMTP Server Setting for Outgoing Mail
The SMTP Server setting enables the application to generate email share messages and
system failure notifications.
1. On the Settings Details screen, click the edit (pencil ) icon beside SMTP Server.
The Update the existing Setting screen displays.
2. Enter the following:
Option Description
Setting Name Name of the SMTP mail server provided by the customer.
Setting Value Name or IP address and port number of the SMTP mail server that the
application will use for e-mail messages. (This information is available
from the customer’s IT group where the server is being installed)
Format: FQDN Server, port
3. Click Update.
Overriding the Default Port for the Outgoing Mail Server
Although the default port number of 25 can be used for identifying which port the SMTP
outbound email server will receive email messages through, the DA administrator has the
option of using a specific port number that the client’s IT organization requires DA to send
outgoing email messages to the SMTP server.
Updating the Global Catalog Settings
By default the global catalog setting is auto-discovered; however, the customer can
specify a different global catalog.
1. On the Settings Details screen, click the edit (pencil ) icon beside Global Catalog.
The Update the existing Setting screen displays.
®
Xerox
Digital Alternatives Administration Guide 27
Page 32

Configuring the DA Local Server
2. Enter the following:
Option Description
Setting Name Name of the Global Catalog provided by the customer.
Setting Value Refers to the name or IP address and port number of the SMTP mail
server that the application will use for e-mail messages. (This
information is available from the customer’s IT group where the server
is being installed.)
Format: FQDN Server, port
Enabled When this field is checked, the client server performs a search at each
sync to see if the Global Address Lookup (GAL) is supported. By
default, this is checked.
3. Click Update.
EFSS Providers Tab
From the EFSS (Enterprise File Sync and Share) tab within the Administration portal, the
local server can be configured to enable or disable Digital Alternatives’ integration with
DocuShare.
To configure the integration with DocuShare, click on the edit (pencil ) icon. By
default, the EFSS DocuShare integration is disabled.
28 Xerox
®
Digital Alternatives Administration Guide
Page 33
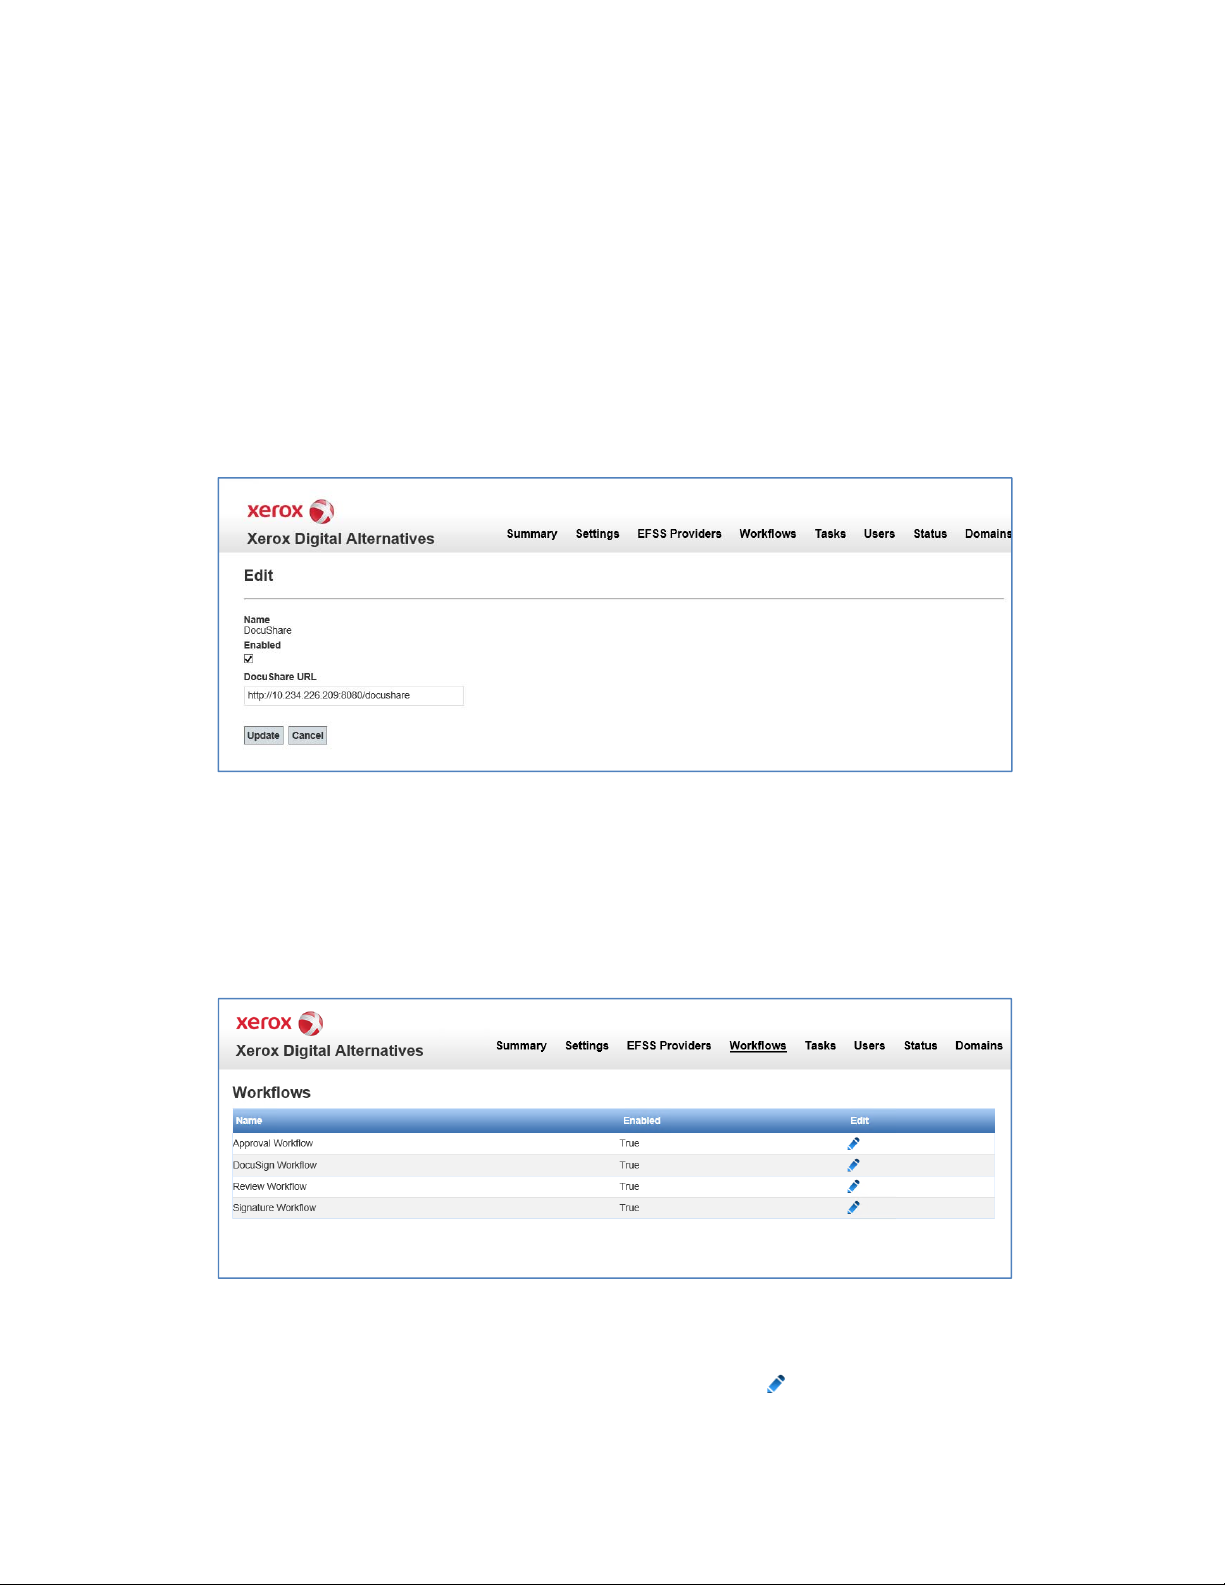
Configuring the DA Local Server
DocuShare
In the DocuShare provider tab, the administrator can enable Digital Alternatives client
applications to interact with a single DocuShare server in order to upload and downl oad
documents. The local server does not directly interact with the DocuShare server, but
rather provide the DocuShare URL to the client applications when the integration is
enabled. In order for the client applications to interact with DocuShare, the client
application must have direct network connectivity to the DocuShare server; this is usually
accomplished by the user being within the customer’s network environment.
To enable the DocuShare integration, check Enable. In the DocuShare URL textbox,
enter the base URL address to the DocuShare server. Press Update to save the settings
or Cancel to discard any changes.
Workflows Tab
Digital Alternatives includes four workflow processes that allow users to submit a
document to another user for review, signature, or approval. Additionally, with the
DocuSign workflow capability, users can send a document to someone to be digi tally
signed within the user’s DocuSign account. By default, all workflows are disabled.
Approval Workflow
1. To enable the Approval Workflow click on the edit (pencil ) icon.
2. In the Edit panel, click on the Enabled checkbox.
®
Xerox
Digital Alternatives Administration Guide 29
Page 34

Configuring the DA Local Server
3. Select Update. To discard any changes, select Cancel.
DocuSign Workflow
1. To enable the DocuSign Workflow click on the edit (pencil ) icon.
2. In the Edit panel, click on the Enabled checkbox.
3. Select Update. To discard any changes, select Cancel.
Review Workflow
1. To enable the Review Workflow click on the edit (pencil ) icon.
2. In the Edit panel, click on the Enabled checkbox.
3. Select Update. To discard any changes, select Cancel.
Signature Workflow
1. To enable the Signature Workflow click on the edit (pencil ) icon.
2. In the Edit panel, click on the Enabled checkbox.
3. Select Update. To discard any changes, select Cancel.
Tasks Tab
The Tasks tab lists related servers. Click Maintenance Tasks beside a server in the
Server Tasks list to display the Time Scheduler Tasks List which provides editing access
to the associated server tasks:
®
• Update Reporting Task: Reporting (Xerox
the local server system database to the reporting database
• Document Storage Cleanup Task: Documents that have been identified by user to
be deleted are processed with this task
Editing Server Tasks
1. On the Time Scheduler Tasks List screen, click the edit (pencil ) icon beside a
task. The Maintenance Service Time Scheduler opens.
CompleteView® Pro) data is copied from
30 Xerox
®
Digital Alternatives Administration Guide
Page 35

Configuring the DA Local Server
2. Modify settings as needed.
Option Description
Set Values for
All Servers
Enable Check the box to enable the scheduled execution of the selected task.
Scheduled Check the box to modify the execution schedule of the task. Screen
Time Period Click the radio button to select
Check the box to apply the same settings to all application servers as
those that are set for the currently selected server. Changes do not
occur until you click Submit.
refreshes to display the Time Period options.
• Daily
• Weekly
• Monthly
• Run Once
(runs when Submit is clicked)
• Custom
(specify a scheduling period from 1 minute to 11 hours and 59
minutes for the task to execute).
3. Click Submit.
®
Xerox
Digital Alternatives Administration Guide 31
Page 36
Configuring the DA Local Server
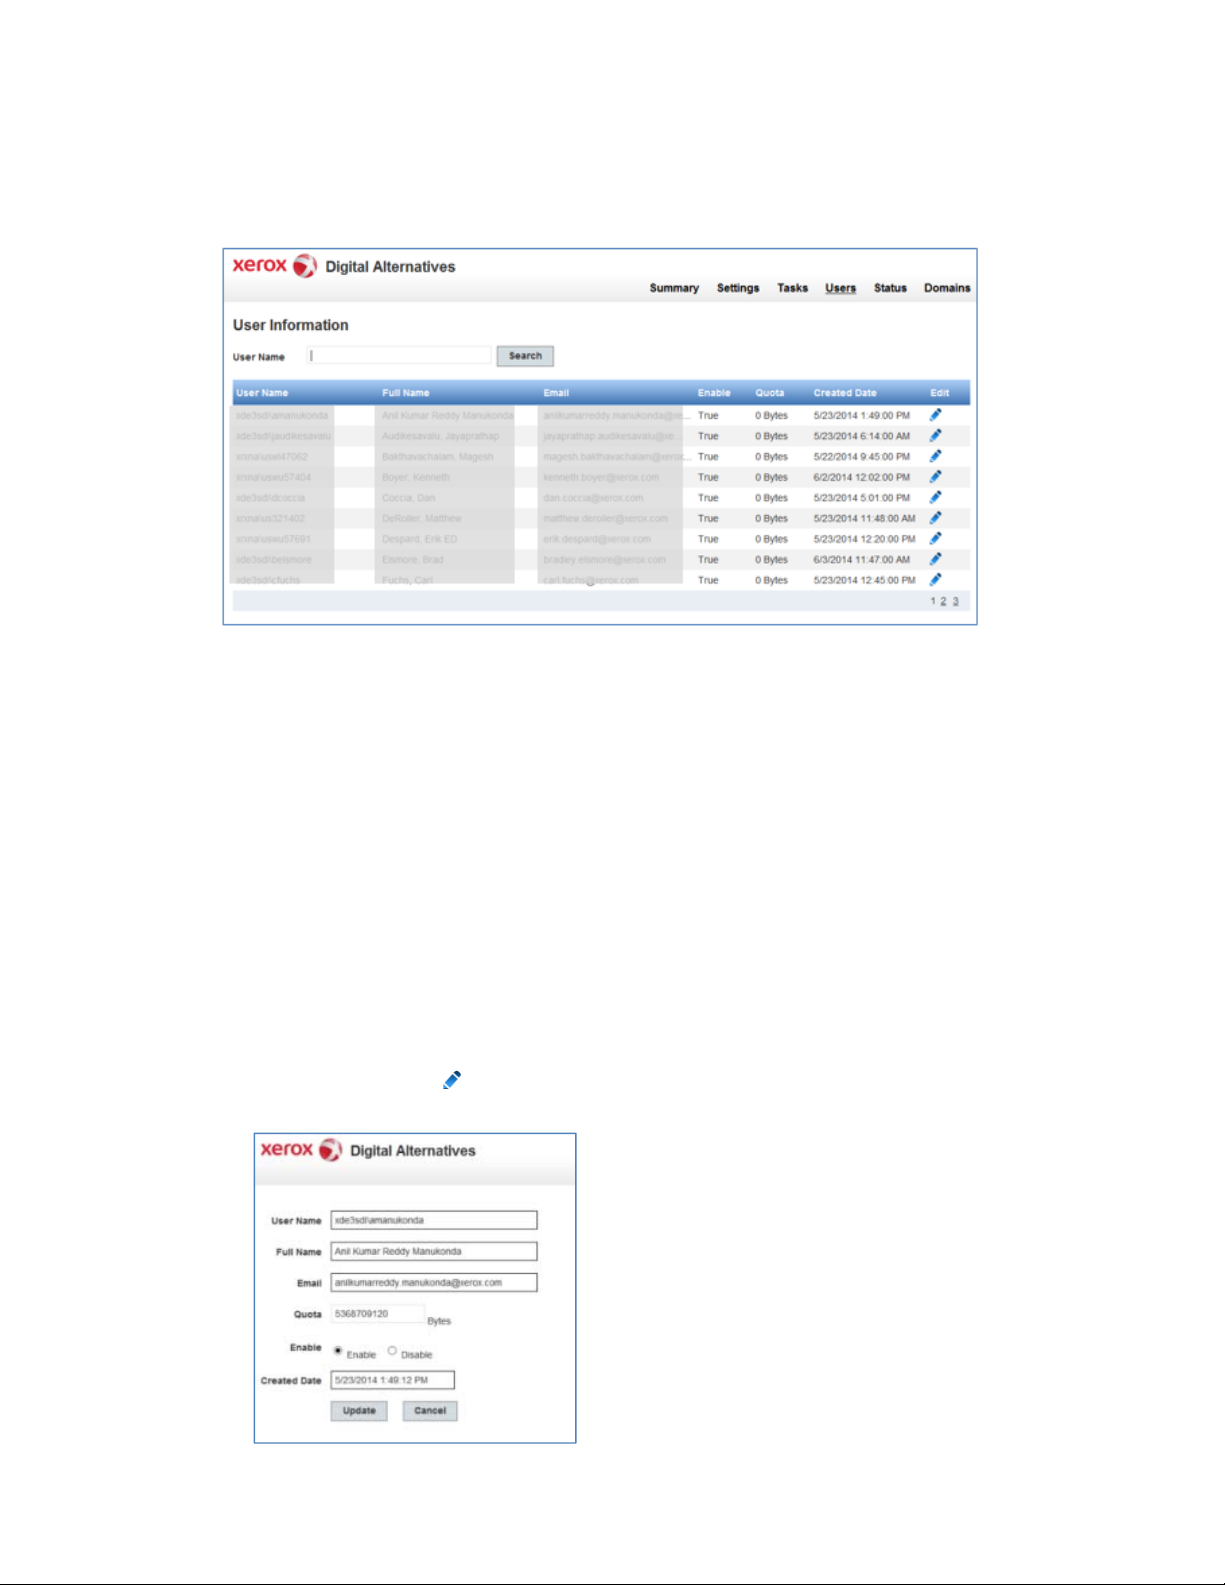
Users Tab
The Users tab lists all onboarded end users.
Sorting the List
Sort the list of users by clicking the column header. Click again to reverse the order.
Searching the List
Enter part of a user name and click search. Screen refreshes with search results.
Viewing the List
Up to 10 users are listed. Additional users are listed on subsequent pages. Click the
number in the bottom, right corner to view another page.
Editing a User Record
1. Click the edit (pencil ) icon beside a user. The user’s account details are
displayed.
32 Xerox
®
Digital Alternatives Administration Guide
Page 37

Configuring the DA Local Server
2. Edit one or more fields, enable or disable the user, or update the Created Date.
3. Click Update to save your changes.
Status Tab
The Status tab displays the status of the DA local server’s tasks.
Information includes:
• System Task Name
• Server Name
• Last Start Time (when the task was last executed)
• Last End Time (when the execution of the task ended)
• Status (result of task execution)
• Details (error message if the last execution of a task resulted in an exception)
Domains Tab
The Domains tab lists the authentication domains.
The DA server’s interaction with authentication domains must be configured individually
for each domain.
Sorting the List
Sort the list of domains by clicking the column header. Click again to reverse the order.
®
Xerox
Digital Alternatives Administration Guide 33
Page 38

Configuring the DA Local Server
Viewing the List
Up to 10 domains are listed. Additional domains are listed on subsequent pages. Click
the number in the bottom, right corner to view another page.
Automatic Detection of Domains
The local server’s membership in a given client network domain is detected automatically
using the same service account that the local server uses to run the three DA local server
tasks. Domains and Servers automatically appear in this list.
To refresh the list select Refresh LDAP Connections.
Manually Adding a Domain
If there are DA users whose Windows authentication credentials are provided by a
Windows network domain system that is not automatically detected, the administrator
needs to manually create the Authentication Domain entry.
1. Click Create New LDAP Connections above the list of domains. The Edit
Authentication Domain screen is displayed.
2. Enter/select the following:
Field Description
Enabled Enables/disables the domain
Domain Name Domain name (label)
Server Name FQDN authentication domain name
Port port number that the authenticat ion server is listening for
authentication requests upon
Use SSL if the authentication server requires SSL connection
3. Check the Enabled box at the top.
4. Click Update to create the new Authentication Domain. The domain is added to the
list.
Editing a Domain
1. Click the Edit (pencil ) icon beside a domain. The Edit Authentication Domain
screen displays.
34 Xerox
®
Digital Alternatives Administration Guide
Page 39

Configuring the DA Local Server
2. Enable or disable the domain, edit one or more fields, or check/uncheck the Use SSL
box.
3. Click Update to save your changes.
Settings for Email
Outgoing Mail Server Uses Service Account Username /
Password
If the SMTP server used requires user authentication, the username and password for
the service account is used for SMTP server authentication. This service account must
have proper access and permissions to send email on behalf of DA.
From Email Address
The email sender for shared document emails from the server will be the email address
of the user account’s email address that is sending the document.
Proxy Server Information
The installation of Digital Alternatives local server uses the Proxy Server settings defined
by Internet Explorer that the run as user account executing the local server processes
and services uses. This run as user account must be a domain user account, with
administration access rights to the local server and the SQL Server database server. Use
this account to install the local server application and have access to the Internet.
Configure Internet Explorer for this user account to be able to browse external websites,
even if the user normally uses another browser and if need be having customer’s Proxy
Server settings defined in Internet Explorer.
®
Xerox
Digital Alternatives Administration Guide 35
Page 40

Configuring the DA Local Server
Access to Central Server from Local Server and Client
Software through the Proxy Server
At various times, components of the Digital Alternatives solution need to interact with the
Internet-based Digital Alternatives Central Server hosted in the Microsoft Azure cloud
maintained by Xerox. The Local Server interacts with the Central Server during new
customer user onboarding. Users that perform the tasks listed below while not within the
customer’s network also interact with t he Central Server as a relay to the local server.
• import a new document or
• modify an existing document or when they
• share a document
In some cases, a customer’s Information Technology (IT) policy restricts network traffi c t o
sites such as the Azure cloud, which in turn will prevent Digital Alternatives from
functioning. In this case, an exception needs to be registered with the customer’s IT
administration governance to add the following URL sites to their Proxy Server’s site
exception list:
• “xdatcentralserver.services.xerox.com” for port 44 3 (TCP)
• “*.servicebus.windows.net” for port 443 (TCP)
Manually Configuring Proxy Server Settings on Local
Server
If you are going to install the local server application using a different user account than
what the Service User (Run As) account will be, then the Proxy Server settings need to
be defined for the Run As service account. In some cases, the service user account is
provided as a non-interactive account, so setting the Internet Explorer proxy server
settings for the run as service account may not be possible.
In that case, you can set the proxy server settings for the run as service account
manually within the local server configuration files.
Follow the steps below to set manual proxy server settings:
1. In Windows Explorer or PowerShell, find the server software installation directory,
usually found in “Program Files (x86)\Xerox\Xerox Digital Alternatives Tool Server”.
2. In the Xerox.Digital.Admin folder, locate the Web.Config file.
– In the web.config file, find the section started with <system.net> statement. In
that section, two statements identifying the Proxy (commented out) will be visible.
Depending upon how the customer’s Proxy configuration is set up to use either a
URL or a Proxy AutoConfiguration (PAC) file, you will uncomment the applicable
statement (by removing the preceding “<!—“ and ending “-->” comment
characters on either end of the proxy statement.
– For example, if the customer’s proxy setting uses a PAC script file such as
http://pac.proxy.customername.com:8001/proxy.pac, which is the URL location
for the PAC file and port number to use to access the PAC, you would
uncomment the proxy scriptLocation statement.
36 Xerox
®
Digital Alternatives Administration Guide
Page 41

Configuring the DA Local Server
Note: Microsoft components use this web.config, and the system will ignore
incorrectly edited proxy definition statements. Additionally the http:// portion of the
statement is needed as well as the port number.
– Once the proxy server statement has been edited and uncommented, the
web.config file can be saved.
3. In the Xerox.Digital.AuthenticationService directory, locate the Web.Config file. See
step 2 above for how to edit the Web.config file with the proxy server setting needed.
4. Within the Xerox.Digital.LocationServices directory, locate the Web.Config file. See
step 2 above for how to edit the Web.config file with the proxy server setting needed.
5. In the Xerox.Digital.MaintenanceService directory, find the file named
Xerox.Digital.MaintenanceService.exe.config. In this case, there is no commented
out statements for proxy server settings. You will insert one of the lines listed below
between the “<defaultProxy enabled="true">” and “</defaultProxy>” statements
editing for their network specific proxy location.
e. If the customer’s proxy server uses an URL address enter <proxy
scriptLocation="http://pac.proxy. customername.com:8001/proxy.pac" />
f. If the customer’s proxy server uses a proxy pac file enter <proxy
proxyaddress="http://proxy.customergateway. customername.com:8000/" />
6. In the Xerox.Digital.QueueService directory, find the file named
Xerox.Digital.QueueService.exe.config. See step 2 above for how to edit the
Xerox.Digital.QueueService.exe.config file with the proxy server setting needed.
®
Xerox
Digital Alternatives Administration Guide 37
Page 42

Configuring the DA Local Server
7. In the Xerox.Digital.RelayService directory, find the file named
Xerox.Digital.RelayService.exe.config. See step 2 above for how to edit the
Xerox.Digital.RelayService.exe.config file with the proxy server setting needed.
8. After all the configuration files have been edited, reboot the server to ensure that all
of the services and processes using these files implement the changes.
38 Xerox
®
Digital Alternatives Administration Guide
Page 43

Licensed Customer ID
Process
The local server itself does not require a specific license to operate; licenses are
allocated to the client end users that access the system through their Xerox
Alternative Client software. The Digital Alternatives software client is installed onto each
client user’s PC or iPad that will be using the solution. A site license that provides
licensing for a specified number of users is sold to the Digital Alternatives client as part of
the contract. The total number of available licenses decrements as new client end users
become users of the Digital Alternatives solution. The license pool decrement by one for
each onboarded user, regardless of how many PCs or iPads they use to access their
Digital Alternatives account.
®
Digital
Figure 2 Onsite Implementation
®
Xerox
Digital Alternatives Administration Guide 39
Page 44

Licensed Customer ID Process
Purpose of Customer ID within the
Server Installation Process
During the installation process of the Digital Alternatives Local Server within the
customer’s network environment, the implementation team enters a Digital Alternative
Licensed Customer ID into one of the server’s installation software screens. Prior to
installing the Local Server, the implementation team requests the Licensed Customer ID
from Xerox
supplies the customer name, email domains expected to be used by the customer, and a
Digital Alternatives license activation key. The overall process for obtaining the Licensed
Customer ID is shown in the diagram below.
®
MPS Application Support’s request portal. The implementation team
Figure 3: Customer ID Creation and Licensing Process
Obtaining Digital Alternatives
Licensed Customer ID Process
The implementation team follows the steps below to obtain a Licensed Customer ID for a
given customer
1. The implementation team receives a Digital Alternatives License Activation Key. The
key can be in the form of an email message with a link or a spreadsheet.
Important! If the activation key is provided as an email link, do not click on the link.
The email message or the spreadsheet with the activation key must be provided to
MPS Application Support as it was received.
2
Details on the process for obtaining the Licensed Customer ID can be found in the “Digital Alternatives
License Request Process” document.
2
:
40 Xerox
®
Digital Alternatives Administration Guide
Page 45

Licensed Customer ID Process
2. The implementation team completes the request form found on the MPS Application
Support Request portal to request the License Customer . Provide the following
information with your request:
– Customer Xerox
®
Services Manager account name
– Email domain that the customer will use for authentication with Digital
Alternatives.
3. MPS Application Support creates a new Customer ID within the Digital Alternatives
Central Server, converts the license activation key into a license, and then uploads
the newly created license within the Customer ID within the Digital Alternatives
Central Server.
4. MPS Application Support emails the License Customer ID to the Implementation
team who originally submitted the request.
5. The implementation team can use the licensed Customer ID when installing the
Digital Alternatives Local Server.
®
Xerox
Digital Alternatives Administration Guide 41
Page 46

Page 47

Local Server Components
The list below covers all currently known server components that need to be deployed as
part of official install process or that require special development setup instructions.
Component / Project Description / Pa th
Xerox.Digital.RelayService
REST Web API
Xerox.Digital.QueueService
REST Web API
Xerox.Digital.AuthenticationService
REST Web API
Xerox.Digital.AuthenticationWindService
REST Web API
Xerox.Digital.LocalServices
REST Web API
Admin UI Web application
Main Database Deployed at install time, at specified SQL server
%InstallPath%\Xerox.Digital.RelayService
Anonymous Authentication
%InstallPath%\ Xerox.Digital.QueueService
Anonymous Authentication
%InstallPath%\ Xerox.Digital.AuthenticationService
Anonymous Authentication
%InstallPath%\AuthenticationWindService
Windows Authentication
%InstallPath%\ Xerox.Digital.LocalServices
Anonymous Authentication
%InstallPath%\ Xerox.Digital.Admin
Accessible via http://<host address>/Admin
instance. SQL Server must be installed and
configured prior to DA installation.
Reporting Database Will deploy at install time, wherever main database is
deployed.
Xerox.Digital.Maintenance Service Windows service, no elevated access needed at this
point. Must have full access to Logs and User
Documents below.
Logs %InstallPath%\Data\Logs – Maintenance service and
all IIS applications need to have read/write access to
this folder
User Documents %InstallPath%\Data\Documents Documents and has
to be changed via Admin UI if needed
Maintenance service and TBD IIS app need to have
full access.
®
Xerox
Digital Alternatives Administration Guide 43
Page 48

Page 49

Multiple Server
Configuration
If the Xerox® Digital Alternatives (DA) application server is expected to have higher
demands on its services than can reasonably be supported by a single web application
server, the DA local server can be installed on multiple application hosts and configured
collectively to behave as a single web application. This spreading of the hosting workload
across multiple physical or virtual machines or nodes can increase the scalability of the
application while mitigating the risk that a single node failure will severely degrade the
application’s availability from the DA client software perspective.
This chapter describes how the DA local server can be hosted on multiple application
server nodes.
This chapter does not consider how multiple SQL Server DBs clustered together can be
configured with the DA local server because the DA implementation in this guide
assumes a single node SQL Server application host.
Multi-node Example
In this example, there are five hosts to support the DA local server:
• One host with SQL Server 2012 installed
• One host acting as a Document server
• Two hosts with DA local server software installed act as application server s
• One host is the clustered web server load balancer
When installing the DA local server onto a client’s network, the installer requests the base
URL of the server machine that is used for the implementation. For multiple servers, the
base URL is the load balancer’s base URL for the cluster. Once installation is complete,
the server reports the two URLs defined, one being the Primary Authentication URL and
the other being the Primary Services URL to the DA Central Server for updating the
customer configuration definition.
®
Xerox
Digital Alternatives Administration Guide 45
Page 50

Multiple Server Configuration
Setting Up the DA Local Servers
When installing the DA local server software onto both web servers, use the IP address
of the load balancer for the Server IP address.
A given local server will operate two maintenance tasks:
• Share Documents task: Enable on both local servers
• Update Reporting task and the Document Storage Cleanup task: Enable on one of
the two servers. These tasks can execute on differing hosts if need be, but only one
instance of each task per installatio n.
Because the document files folder are located on a differing machine, the
XDADocumentFolder setting and XDASharedDocumentFolder setting (where XDA =
®
Xerox
reflect the separate host and folder location on that host.
Digital Alternatives) on the admin user interface for both applications may need to
Prioritizing the Server in the List
Prioritizing the server in the list is completely controlled by the load balancer.
Disabling an Application Server
• Remove the application host server from the pool of hosts communicating with the
load balancer to end the flow of requests from internal user clients.
• Using Windows Task Manager, stop the Relay Service configured for the specific
host to prevent external communication with the server from outside the IT network.
46 Xerox
®
Digital Alternatives Administration Guide
Page 51

Software Maintenance,
Troubleshooting, and
Support
Software Maintenance
Backup and Restore
The provider of the database server is responsible for providing:
• Maintenance of the SQL Server system
• Backup of the database files
• Disaster recovery restoration of database files
Removing the Software
Deleting an application server from a multiple application server implementation
effectively removes the particular application server from the collection of application
servers.
To completely remove the Xerox
host:
1. Use the Windows Add/Remove programs capability within the Windows Control
Panel and select the “Xerox Digital Alternatives Bootstrapper” software component.
Removing the bootstrapper also removes the Xerox Digital Alternatives software.
2. After removing the software, reboot the server to terminate any residual services
marked for deletion but awaiting rebooting.
®
Digital Alternatives (DA) local server software from a
Migrating an Installed Local Server
to a New Host
In some cases, it may be necessary to migrate an existing local server implementation
from the Windows host it was installed on to another host. Reasons vary from hardware
failure to general hardware lifecycle requirements. As installing the server software
requires certain Xerox provided information, your customer IT department should contact
the Xerox
Xerox
®
Global Customer Contact Help Desk to engage an authorized Xerox support
®
Digital Alternatives Administration Guide 47
Page 52

Software Maintenance, Troubleshooting, and Support
representative to process this request. This section describes the steps to make this
change. These instructions cover all three server functions of the Local Server-application server, database server and documents repository server. If one or more
component is not required to change server hosts, the instructions covering their
migration can be omitted and will be identified.
1. Disable client software access to the Digital Alternatives Local Server, making sure to
disable both IIS and Relay services
®
– Xerox
– Xerox
– Xerox
Digital Alternatives Queue Service
®
Digital Alternatives Tool Maintenance Service
®
Digital Alternatives Tool Relay Service
2. Back up existing Digital Alternatives Local Server and Reporting databases.
3. Restore databases to new server host (if migrating SQL Server to new host).
4. Copy documents and shared documents folder contents to their new document
repository locations. Make sure service account has full permissions to these
locations (if migrating document server to new host)
5. Within the SQL Server instance, modify the XDADocumentFolder and
XDASharedDocumentFolder settings in the [xda].[AdminSetting] table to point to the
new respective folder locations:
a. Execute the SQL script:
UPDATE [xda].[AdminSetting]
SET Value = 'C:\example_documents_folder\' (file path to new document
repository directory)
WHERE Name = 'XDADocumentFolder'
b. Execute the SQL script:
UPDATE [xda].[AdminSetting]
SET Value = 'C:\example_shared_documents_folder\' (file path to new share
document repository directory)
WHERE Name = 'XDASharedDocumentFolder'
6. Modify the InternalEndPoint setting in the [xda].[AdminSetting] table to reflect the new
primary endpoint (application server or load balancer if multiple application servers
are used) of the server:
UPDATE [xda].[AdminSetting]
SET Value = 'https://example_load_balancer_endpoint/'
WHERE Name = 'InternalEndPoint'
7. Run the following SQL commands to clear out entries corresponding to the old
servers:
48 Xerox
®
Digital Alternatives Administration Guide
Page 53

Software Maintenance, Troubleshooting, and Support
– DELETE FROM [xda].[AdminSetting] WHERE ServerId IS NOT NULL
– DELETE FROM [xda].[Server]
8. Make sure the service account has permissions to read/write from new databases.
9. Configure proxy on new server(s) for the service account, either by logging in as the
service account and configuring it in the IE settings, or manually modifying the
web.config and app.config files in the program subfolders.
10. Make sure IIS is configured to allow HTTPS traffic to site.
11. Install Xerox
pointing to restored databases.
12. If not logged in with service account, make sure service account has permissions to
read/write/modify program files directories, especially data/logs.
13. Log into admin portal at http://localhost/admin and verify that everything is configured
appropriately. (Browser must be run as administrator.) In particular, maintenance
service task settings will be reset to defaults and should be configured as per this
guide.
14. Verify that the installed clients can interact with the new server by having users verify
that they can share documents with each other and that client synchronization
performs as expected.
®
Device Agent Server on new server(s) using same customer ID and
15. Once the new server has been verified as operational, then the former servers can
be decommissioned.
Troubleshooting
Client / Server Connectivity
If the DA client software appears unconnected to the client’s local server, symptoms can
include a delay in:
• Synchronizing local documents to server
• Receiving new shared documents
• Delay or failure to send documents via email
• Not seeing all user local documents on all of the user’s devices (PCs/Laptop/iPad)
PC Troubleshooting
Since client users do not allow direct access to the local server, there are other ways a
user can help detect that their client is not completely connected to the server. These
methods are:
• In the Tray icon that is accessible in the lower right corner of the main window, the
user can hover their mouse pointer over the DA icon to see a variety of statuses:
– Up to date
®
Xerox
Digital Alternatives Administration Guide 49
Page 54

Software Maintenance, Troubleshooting, and Support
– Sync in progress
– No network connection
– Sync failed
• Similar status is visible when you click the tray icon
iPad Troubleshooting
If a user suspects the connectivity of their iPad application to the client’s DA server is not
working, the user can inspect the upper right corner of the DA’s application by clicking on
the Sync icon to view server connectivity.
Examples of server connectivity messages include:
Identifying Issues
Component Area Description
Local Server Service Account A Service account needs to be created by the customer
IT to be used by maintenance service on the local
server as well as the IIS app pools. In addition this
account is used to access customer SMTP and LDAP
resources. This account should have admin rights on
the local server machine, have domain right. Document
provided that shows correct configuration for service
account. If SMTP server used requires user
authentication, the username and password for the
service account will be used for SMTP server
authentication.
Local Server Installer User needs to enter correct IP address or FQDN path of
local server. In the case of a scale-out configuration
with a load balancer, the correct URL will be the load
balancer itself.
Local Server Admin UI Document Folder Paths should not be changed after
users have on-boarded the system. Doing so will break
paths to existing users files in the system and orphan
them.
Local Server Admin UI A JavaScript enabled browser is required. Not having
JavaScript enabled will cause certain buttons not to
work in the user interface.
50 Xerox
®
Digital Alternatives Administration Guide
Page 55

Software Maintenance, Troubleshooting, and Support
Component Area Description
Local Server Admin Lifetime e x piration where clients will renew connection
to server if time expires automatically. Set to 20
minutes, cannot be changed via UI.
Local Server Installation Local Server can be installed when License File is not
yet applied to company at Central Server. But users will
not be able to onboard until the license file is uploaded
to central server for that company.
Local Server Share Email
Attachment Size
Even if the email attachment size is exceeded (email
attachment size parameter), the local server will still
share a document within DA with the target users (if
they are DA users).
Local Server Time Zone If the time zone of the host that the local server is
modified, the DA maintenance tasks need to be
restarted. The easiest method is to reboot the host if the
time zone is changed.
Local Server Security Configure HTTPS. Steps on how HTTPS should be set-
up on local server. These steps can be followed on
Local Server after deploying HTTPS Certificate.
If you are using Windows Server 2008 or Windows
Server 2008 R2:
1. Control Panel\All Control Panel
Items\Administrative Tools\Internet Information
Service Manager
2. Select Default W ebsite
3. Select Binding s from the Actions menu (displayed
on the right side of the screen)
4. Click Add from Site Bind ings window
5. Select Https as the Type
6. IP Address as All Unassig ned
7. Port 443 (Default)
8. Select the SSL Certificate from the list
9. Click Ok
10. Close Site Bindings Window
Local Server LDAP Settings Ensure the LDAP server being used allows GAL lookup
for all user account domains being used by system.
PC Client
Software
Proxy Settings PC Proxy Client settings use the system default proxy
server settings that are defined in Internet Explorer.
If a proxy server is in play on the customer
environment, they must account for it in their Internet
Explorer settings whether or not they use Internet
Explorer.
iPad Proxy Client settings are defined in the Settings
page of the iPad for each Wi-Fi network connection.
Local Server Installation If installation fails, the local server will not rollback the
database (uninstall the database).
®
Xerox
Digital Alternatives Administration Guide 51
Page 56

Software Maintenance, Troubleshooting, and Support
Component Area Description
Local Server Licensing Disabling users in the Admin UI has no impact on the
licensing and number of users in the system e.g. if 2
users are disabled from the system, this does not
decrement the # of licensed consumed users by 2.
Local Server Admin UI Active Directory (AD) Filter. This is used in
conjunction with the LDAP Server setting. Allows the
admin to adjust the filter settings if necessary. Default
settings should be fine, should only be adjusted by
someone who is familiar with AD filters.
Local Server Admin UI Email Attachment Size: How the system works in
processing order
1. Attempts to get the max attachment size from the
SMTP server
– if this is successful it returns the value
2. If the system can’t automatically get the value from
the server it checks that admin setting
– if there is a value then it returns that value
3. If the admin setting isn't set it returns null and the
system just tries to send the email and see what
happens.
Local Server Admin UI Deleted File Life Cycle: When a user deletes a
document from their client software, it is marked for
deletion on the server but isn't physically deleted from
the server until deleted file lifetime has elapsed and
processed by the DocumentsStorageCleanup task.
Local Server User Management Disabling users via the Local Server’s Admin UI will
cause login failure for those affected users next time
they have to authenticate. There is no UI feedback from
the DA client software to the user as to why login is
failing.
Local Server User Management User Quota: If an end user’s quota is set explicitly (by
editing a user within the Local Server’s Admin UI), then
this user’s storage restriction will no longer be
controlled by the default quota set within the Local
Server’s Admin UI on the Settings page. The end user
will have their own quota restriction parameter.
Local Server Installation Uninstallation of Local Server: In some cases, the
Xerox Digital Alternatives Relay Service executing on
the Local server’s application server node(s) may show
as still installed after uninstalling the local server
software. The installer uninstalls the services but if the
service is accessing a system resource during
uninstalling the local server software, Windows cannot
remove the service but rather marks the service for
deletion when the host is next rebooted.
Recommendation is after uninstalling the local server
software from a host, reboot the server to reset any
residual settings that can only occur when rebooted.
52 Xerox
®
Digital Alternatives Administration Guide
Page 57

Software Maintenance, Troubleshooting, and Support
Component Area Description
Local Server Installation Uninstallation of Local Server: The BootStrapper
does not get uninstalled with the Local Server software.
This needs to be uninstalled separately.
Recommendation: Uninstalling the Local Admin’s
installation of the DA Server bootstrapper application
using add/remove programs will automatically uninstall
both the bootstrapper and the local admin package from
the host.
Local Server Installation Uninstallation of local Server: The installation folder
where the local server software is installed to during
installation is not deleted upon uninstallation. This
should not cause subsequent reinstallation issues.
Local Server Browser Internet Explorer Compatibility View: While using
compatibility view within Internet Explorer, some of the
client side browser scripts may not work correctly,
causing local server admin UI errors within the browser.
Recommendation: Do not use compatibility view when
accessing local server.
PC Client
Software
Account
Onboarding
Email address used during onboarding: The PC
client software does not remove HTML text from email
addresses when an end-user onboards. An example of
an incompatible email specification when initially
logging in for the first time <user@company.com>
which has embedded HTML text.
PC Client
Software
Installation Silent Installation: Users may still briefly see a pop-up
showing installation status while the PC client is being
pushed/installed on their machine. But on the
installation status window the cancellation button will be
disabled. No user intervention is needed.
PC Client
Software
Documents Document File name length (applies to iPad as
well): File names are limited to 80 characters (not
including “.” and file extension). The remainder of the
filename is truncated automatically.
PC Client
Software
Local Document
Storage
Local Hard Drive Space: The local PC client as well as
the iPad client stores all local copies of document to
user’s PC or iPad. Disk space and memory space in the
case of the iPad is finite. The DA application does not
warn when the user’s hard drive becomes full and the
application may become unusable. Users are
responsible for managing their PC / iPad storage space.
®
Xerox
Digital Alternatives Administration Guide 53
Page 58

Software Maintenance, Troubleshooting, and Support
Component Area Description
PC Client
Software
File Import Support File types import support: The following document
format (with file extension) that are supported by the DA
Client for importing are:
• Microsoft Word: .doc, .docx
• Microsoft PowerPoint: .ppt, .pptx
• Microsoft Excel: .xls, .xlsx
• PDF: .pdf
• Text: .txt, .rtf
• Image: .png, .jpeg, .jpg, .bmp
The Digital Alternatives client software file selector will
only show files with these extensions.
PC Client
Software
GAL integration Global Address Lookup integration: The PC client
does not require that the user have Microsoft Outlook or
any other mail client installed on their PCs to access the
user’s global address book provided by their IT
department for email and calendar sharing functions.
54 Xerox
®
Digital Alternatives Administration Guide
Page 59

Admin and Implementation
Support Contact
For implementation and local admin support, contact MPS Application Support by
submitting a support request at:
http://www.support.xerox.com/_common/external/forms/MPSApplication/default.asp
®
Xerox
Digital Alternatives Administration Guide 55
Page 60

Page 61

 Loading...