

Page 1
EN
More Information
FR
Informations supplémentaires
IT
Ulteriori informazioni
DE
Weitere Informationen
ES
Más información
PT
Mais informações
NL
Meer informatie
Xerox ColorQube 8700/8900
Color Multifunction Printer
Imprimante multifonction couleur
www.xerox.com/office/CQ8700support
www.xerox.com/office/CQ8900support
www.xerox.com/msds (U.S./Canada)
www.xerox.com/environment_europe
www.xerox.com/office/businessresourcecenter
www.xerox.com/office/CQ8700support
www.xerox.com/office/CQ8900support
EN
• Print drivers and utilities
• Videos
• User manuals and instructions
• Online Support Assistant
• Safety specifications (in User Guide)
FR
• Pilotes d'imprimante et utilitaires
• Vidéos
• Manuels d'utilisation et instructions
• Assistant de support en ligne
• Spécifications de sécurité (dans le Guide de
l'utilisateur)
IT
• Utilità e driver di stampa
• Video
• Manuali dell'utente e istruzioni
• Supporto in linea
• Specifiche di sicurezza (nella Guida per l'utente)
DE
• Treiber und Dienstprogramme für Drucker
• Videos
• Benutzerhandbücher und -anleitungen
• Online-Support-Assistent
• Sicherheitsspezifikationen (im Benutzerhandbuch)
ES
• Utilidades y controladores de impresión
• Vídeos
• Manuales de usuario e instrucciones
• Asistente de Ayuda en línea
• Especificaciones de seguridad (en Guía del usuario)
PT
• Drivers de impressão e utilitários
• Vídeos
• Manuais e instruções do usuário
• Assistente de suporte on-line
• Especificações de segurança (no Guia do Usuário)
NL
• Printerdrivers en hulpprogramma's
• Video's
• Handleidingen voor de gebruiker en instructies
• Online Support Assistant (Online Support-assistent)
• Veiligheidsspecificaties (in Handleiding voor de
gebruiker)
www.xerox.com/msds (U.S./Canada)
www.xerox.com/environment_europe
EN
Material Safety Data Sheets
FR
Fiches de données de sécurité
IT
Schede sulla sicurezza dei materiali
DE
Material-Sicherheitsdatenblätter
ES
Fichas de datos de seguridad
PT
Fichas de informações de segurança de produtos
químicos
NL
Veiligheidsinformatiebladen
www.xerox.com/office/
businessresourcecenter
EN
Templates, tips, and tutorials
FR
Modèles, conseils et didacticiels
IT
Modelli, suggerimenti ed esercitazioni
DE
Vorlagen, Tipps und Lehrgänge
ES
Plantillas, consejos y lecciones prácticas
PT
Modelos, dicas e tutoriais
NL
Sjablonen, tips en zelfstudies
DE
Lärmemission
Maschinenlärminformations-Verordnung 3.
GPSGV: Der höchste Schalldruckpegel beträgt
70 dB(A) oder weniger gemäß EN ISO 7779.
Importeur
Xerox GmbH
Hellersbergstraße 2-4
41460 Neuss
Deutschland
Xerox® ColorQube®
8700/8900
Quick Use Guide
Guide d'utilisation rapide
IT
Italiano
DE
Deutsch
ES
Español
PT
Português
NL
Nederlands
604E65550 Rev A
© 2012 Xerox Corporation. All Rights Reserved. XEROX® and XEROX and Design®
are trademarks of Xerox Corporation in the United States and/or other countries.
Guida rapida
Kurzübersicht
Guía de uso rápido
Guia de utilização rápida
Beknopte gebruikshandleiding
Page 2
EN
Contents
FR
Sommaire
IT
Indice generale
DE
Inhalt
ES
Contenido
PT
Conteúdo
NL
Inhoud
EN
Printer Basics ............................................................... 3
FR
Généralités
IT
Nozioni di base sulla stampante
DE
Drucker – Grundlagen
ES
Fundamentos de la impresora
PT
Introdução à impressora
NL
Eenvoudige printertaken
EN
Printer Tour...................................................................3
FR
Présentation de l'imprimante
IT
Presentazione della stampante
DE
Druckerübersicht
ES
Recorrido por la impresora
PT
Roteiro da impressora
NL
Kennismaking met de printer
EN
Control Panel................................................................5
FR
Panneau de commande
IT
Pannello comandi
DE
Steuerpult
ES
Panel de control
PT
Painel de controle
NL
Bedieningspaneel
EN
Administrator Access.................................................. 6
FR
Accès administrateur
IT
Accesso amministratore
DE
Administratorzugriff
ES
Acceso de administrador
PT
Acesso de administrador
NL
Beheerderstoegang
EN
Printing......................................................................... 7
FR
Impression
IT
Stampa
DE
Drucken
ES
Impresión
PT
Impressão
NL
Afdrukken
EN
Supported Paper..........................................................7
FR
Papier pris en charge
IT
Carta supportata
DE
Unterstütztes Material
ES
Papeles admitidos
PT
Papel suportado
NL
Ondersteund papier
EN
Loading Paper............................................................. 8
FR
Chargement du papier
IT
Caricamento della carta
DE
Einlegen von Material
ES
Colocación de papel
PT
Colocação de papel
NL
Papier plaatsen
EN
Printing from USB ......................................................9
FR
Impression depuis un lecteur USB
IT
Stampa da USB
DE
Druck aus USB
ES
Impresión desde USB
PT
Impressão USB
NL
Afdrukken via USB
EN
Copying.......................................................................11
FR
Copie
IT
Copia
DE
Kopieren
ES
Copia
PT
Cópia
NL
Kopiëren
EN
Basic Copying............................................................11
FR
Procédure de base
IT
Nozioni di base sulla copia
DE
Einfaches Kopieren
ES
Copia básica
PT
Cópia básica
NL
Eenvoudige kopieertaken
EN
Scanning.....................................................................13
FR
Numérisation
IT
Scansione
DE
Scannen
ES
Escaneado
PT
Digitalização
NL
Scannen
EN
Scanning to the Public Folder................................ 13
FR
Numérisation vers le dossier public
IT
Scansione nella cartella pubblica
DE
Scanablage im öffentlichen Ordner
ES
Escaneado a la carpeta pública
PT
Digitalização para a pasta pública
NL
Scannen naar de openbare map
EN
Faxing..........................................................................16
FR
Télécopie
IT
Fax
DE
Fax
ES
Fax
PT
Envio de fax
NL
Faxen
EN
Basic Faxing............................................................... 16
FR
Télécopie de base
IT
Nozioni di base sul fax
DE
Einfaches Faxen
ES
Fax básico
PT
Envio de fax básico
NL
Eenvoudige faxtaken
EN
Troubleshooting........................................................18
FR
Dépannage
IT
Risoluzione dei problemi
DE
Fehlerbeseitigung
ES
Solución de problemas
PT
Solução de problemas
NL
Problemen oplossen
EN
Paper Jams................................................................. 18
FR
Incidents papier
IT
Inceppamenti della carta
DE
Materialstaus
ES
Atascos de papel
PT
Atolamentos de papel
NL
Papierstoringen
EN
CentreWare Internet Services................................... 6
FR
Services Internet CentreWare
IT
Servizi Internet CentreWare
DE
CentreWare Internet Services
ES
Servicios de Internet de CentreWare
PT
Serviços do CentreWare na Internet
NL
CentreWare Internet Services
www.xerox.com/office/CQ8700support
www.xerox.com/office/CQ8900support
EN
More Information ...................................... Back cover
FR
Informations supplémentaires
IT
Ulteriori informazioni
DE
Weitere Informationen
ES
Más información
PT
Mais informações
NL
Meer informatie
2
Page 3
EN
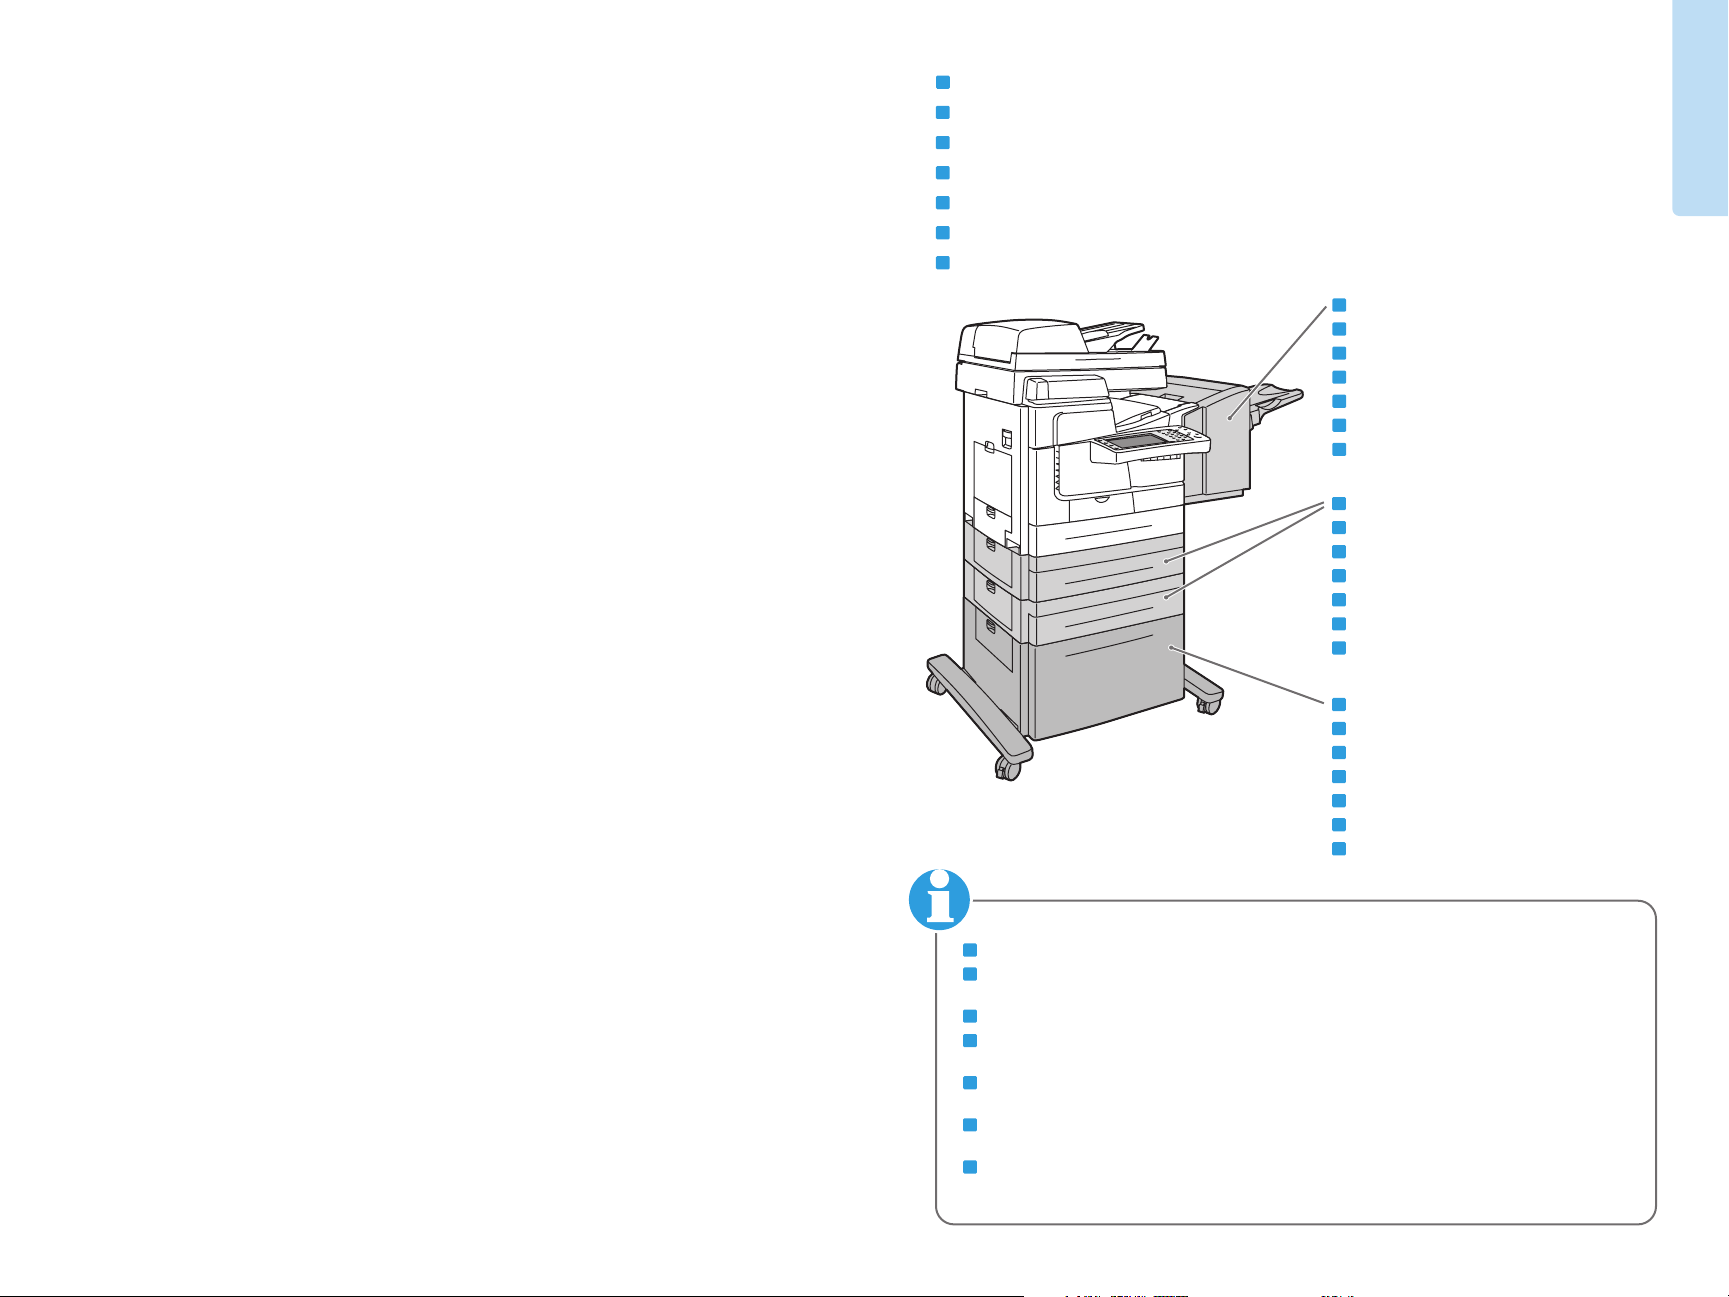
Printer Tour
FR
Présentation de l'imprimante
IT
Presentazione della stampante
DE
Druckerübersicht
ES
Recorrido por la impresora
PT
Roteiro da impressora
NL
Kennismaking met de printer
EN
650-Sheet Finisher
FR
Module de finition 650 feuilles
IT
Stazione di finitura (max 650 fogli)
DE
650-Blatt-Finisher
ES
Acabadora de 650 hojas
PT
Módulo de acabamento para 650 folhas
NL
Afwerkeenheid voor 650 vel
EN
525-Sheet Feeders
FR
Chargeurs 525 feuilles
IT
Alimentatori da 525 fogli
DE
525-Blatt-Behälter
ES
Alimentadores de 525 hojas
PT
Alimentadores de 525 folhas
NL
Invoerladen voor 525 vel
Printer Basics
Gén éralités
www.xerox.com/office/CQ8700support
www.xerox.com/office/CQ8900support
EN
1800-Sheet High-Capacity Feeder
FR
Chargeur grande capacité 1 800 feuilles
IT
Alimentatore ad alta capacità da 1800 fogli
DE
1800-Blatt-Großraumbehälter
ES
Alimentador de alta capacidad de 1800 hojas
PT
Alimentador de alta capacidade para 1800 folhas
NL
Grote papierlade voor 1800 vel
EN
Optional accessories may be part of your printer setup. Fax is included in the X and XF configurations only.
FR
Votre imprimante peut être configurée avec des accessoires en option. Seules les configurations X et XF
incluent un fax.
IT
La propria stampante potrebbe includere accessori opzionali. Il fax è incluso solo nelle configurazioni X e XF.
DE
Der Drucker ist u. U. mit optionalem Zubehör ausgestattet. Fax ist nur in den Konfigurationen X und XF
enthalten.
ES
La configuración de su impresora puede contener accesorios opcionales. Fax solo está incluido en
configuraciones X y XF.
PT
Os acessórios opcionais podem fazer parte da configuração da sua impressora. O Fax está incluído somente
nas configurações X e XF.
NL
Uw printerconfiguratie bevat mogelijk optionele accessoires. Fax is alleen bij X- en XF-configuraties
inbegrepen.
3
Page 4
1
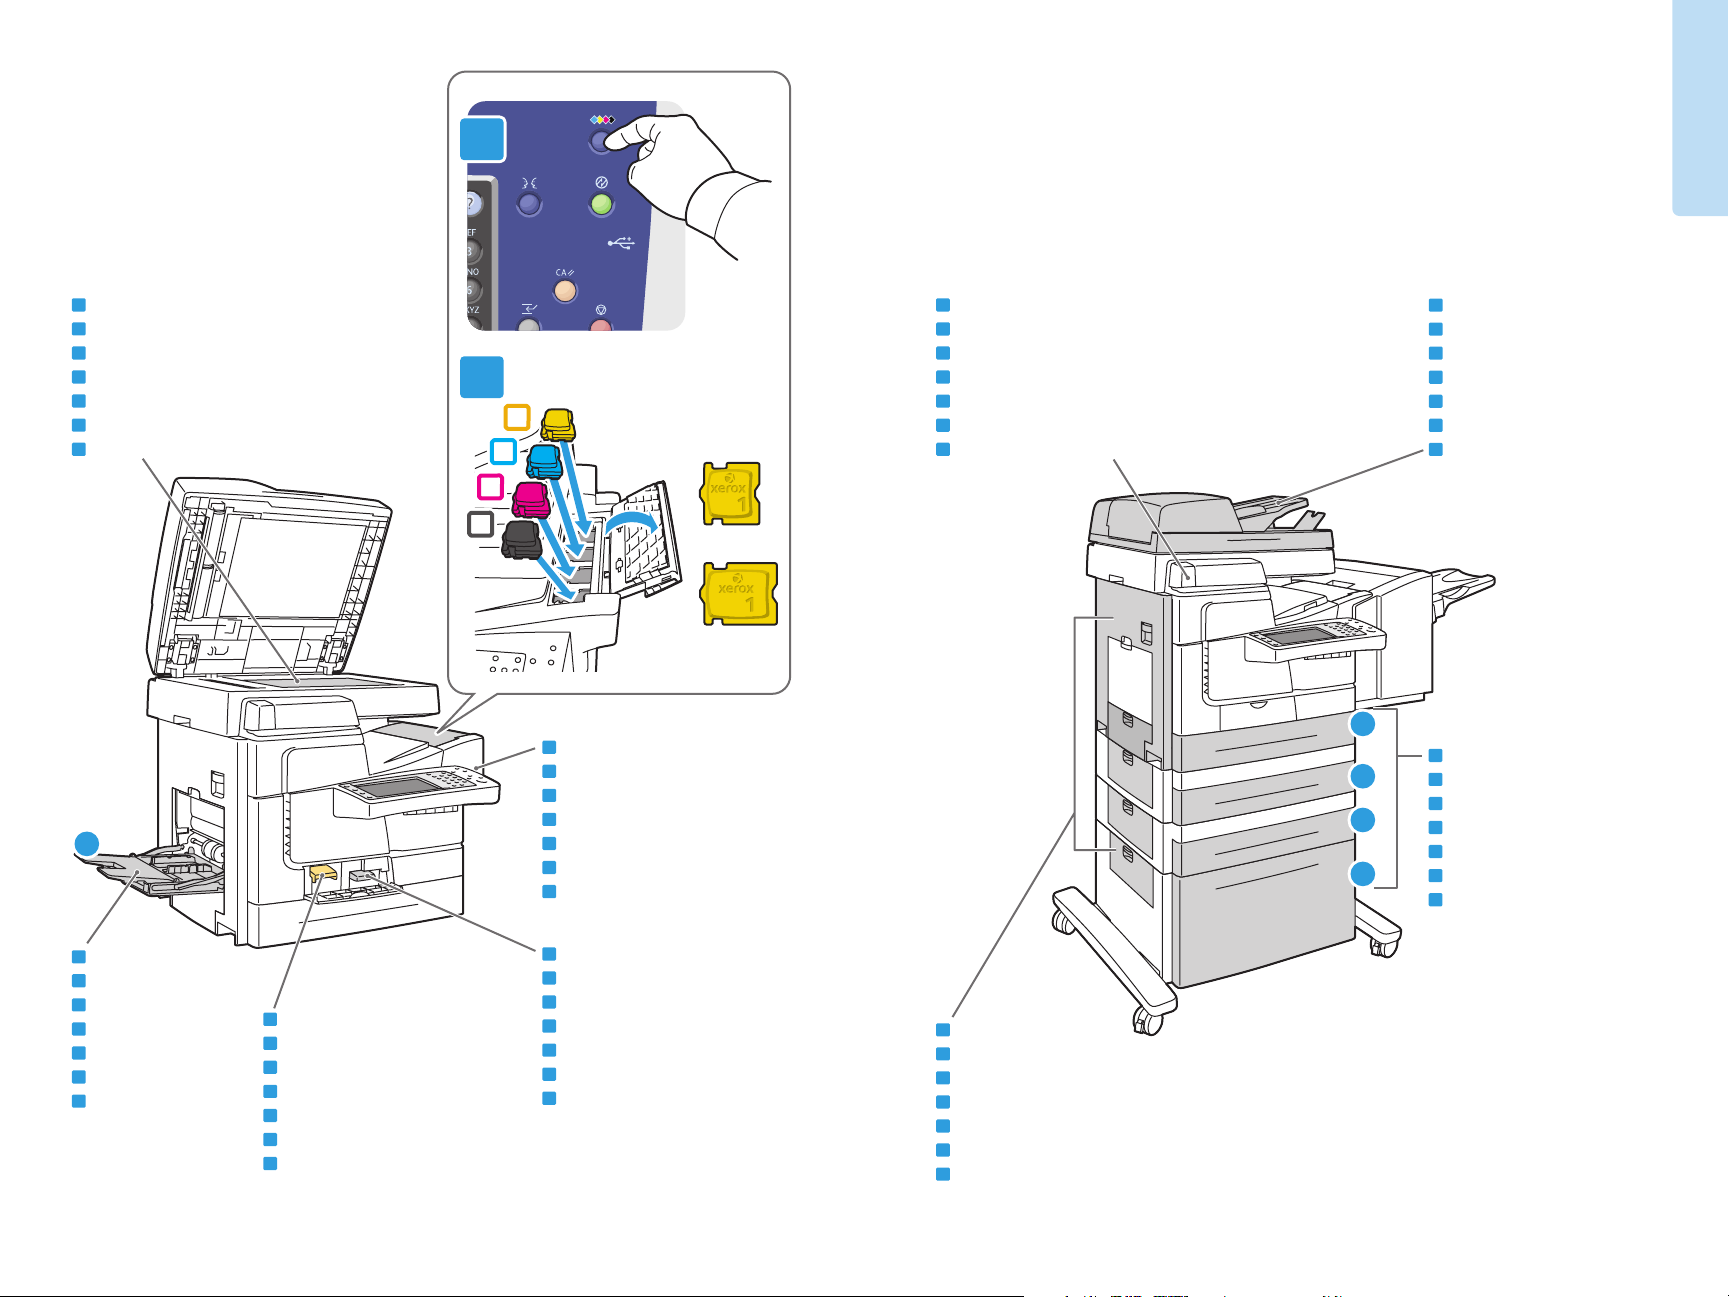
Printer Basics
Gén éralités
EN
FR
IT
DE
ES
PT
NL
1
Scanner
Scanner
Scanner
Scanner
Escáner
Scanner
Scanner
2
EN
Convenience Stapler
FR
Agrafeuse externe
IT
Pinzatrice
DE
Offline-Hefter
ES
1
2
CQ8700
Grapadora auxiliar
PT
Grampeador de conveniência
NL
Handmatig nietapparaat
EN
Document Feeder
FR
Chargeur de documents
IT
Alimentatore documenti
DE
Vorlageneinzug
ES
Alimentador de documentos
PT
Alimentador de originais
NL
Documentinvoer
3
4
CQ8900
2
EN
USB Port
FR
Port USB
IT
Porta USB
DE
USB-Anschluss
ES
Puerto USB
PT
Porta USB
NL
USB-poort
3
4
5
EN
Trays 2–5
FR
Magasins 2–5
IT
Vassoi 2–5
DE
Behälter 2–5
ES
Puertas izquierda
PT
Bandejas 2–5
NL
Lade 2–5
EN
Tray 1
FR
Magasin 1
IT
Vassoio 1
DE
Behälter 1
ES
Bandeja 1
PT
Bandeja 1
NL
Lade 1
EN
Cleaning Unit
FR
Unité de nettoyage
IT
Unità di pulizia
DE
Reinigungseinheit
ES
Unidad de limpieza
PT
Bandeja de resíduos
NL
Reinigingseenheid
www.xerox.com/office/CQ8700support
www.xerox.com/office/CQ8900support
EN
Waste Tray
FR
Bac à déchets
IT
Vassoio di scarto
DE
Abfallfach
ES
Bandeja de desechos
PT
Bandeja de cera
NL
Afvallade
EN
Left Side Doors
FR
Capots latéraux (côté gauche)
IT
Sportelli laterali sinistri
DE
Linke Abdeckungen
ES
Puertas izquierda
PT
Portas laterais esquerdas
NL
Zijdeuren links
4
Page 5
EN
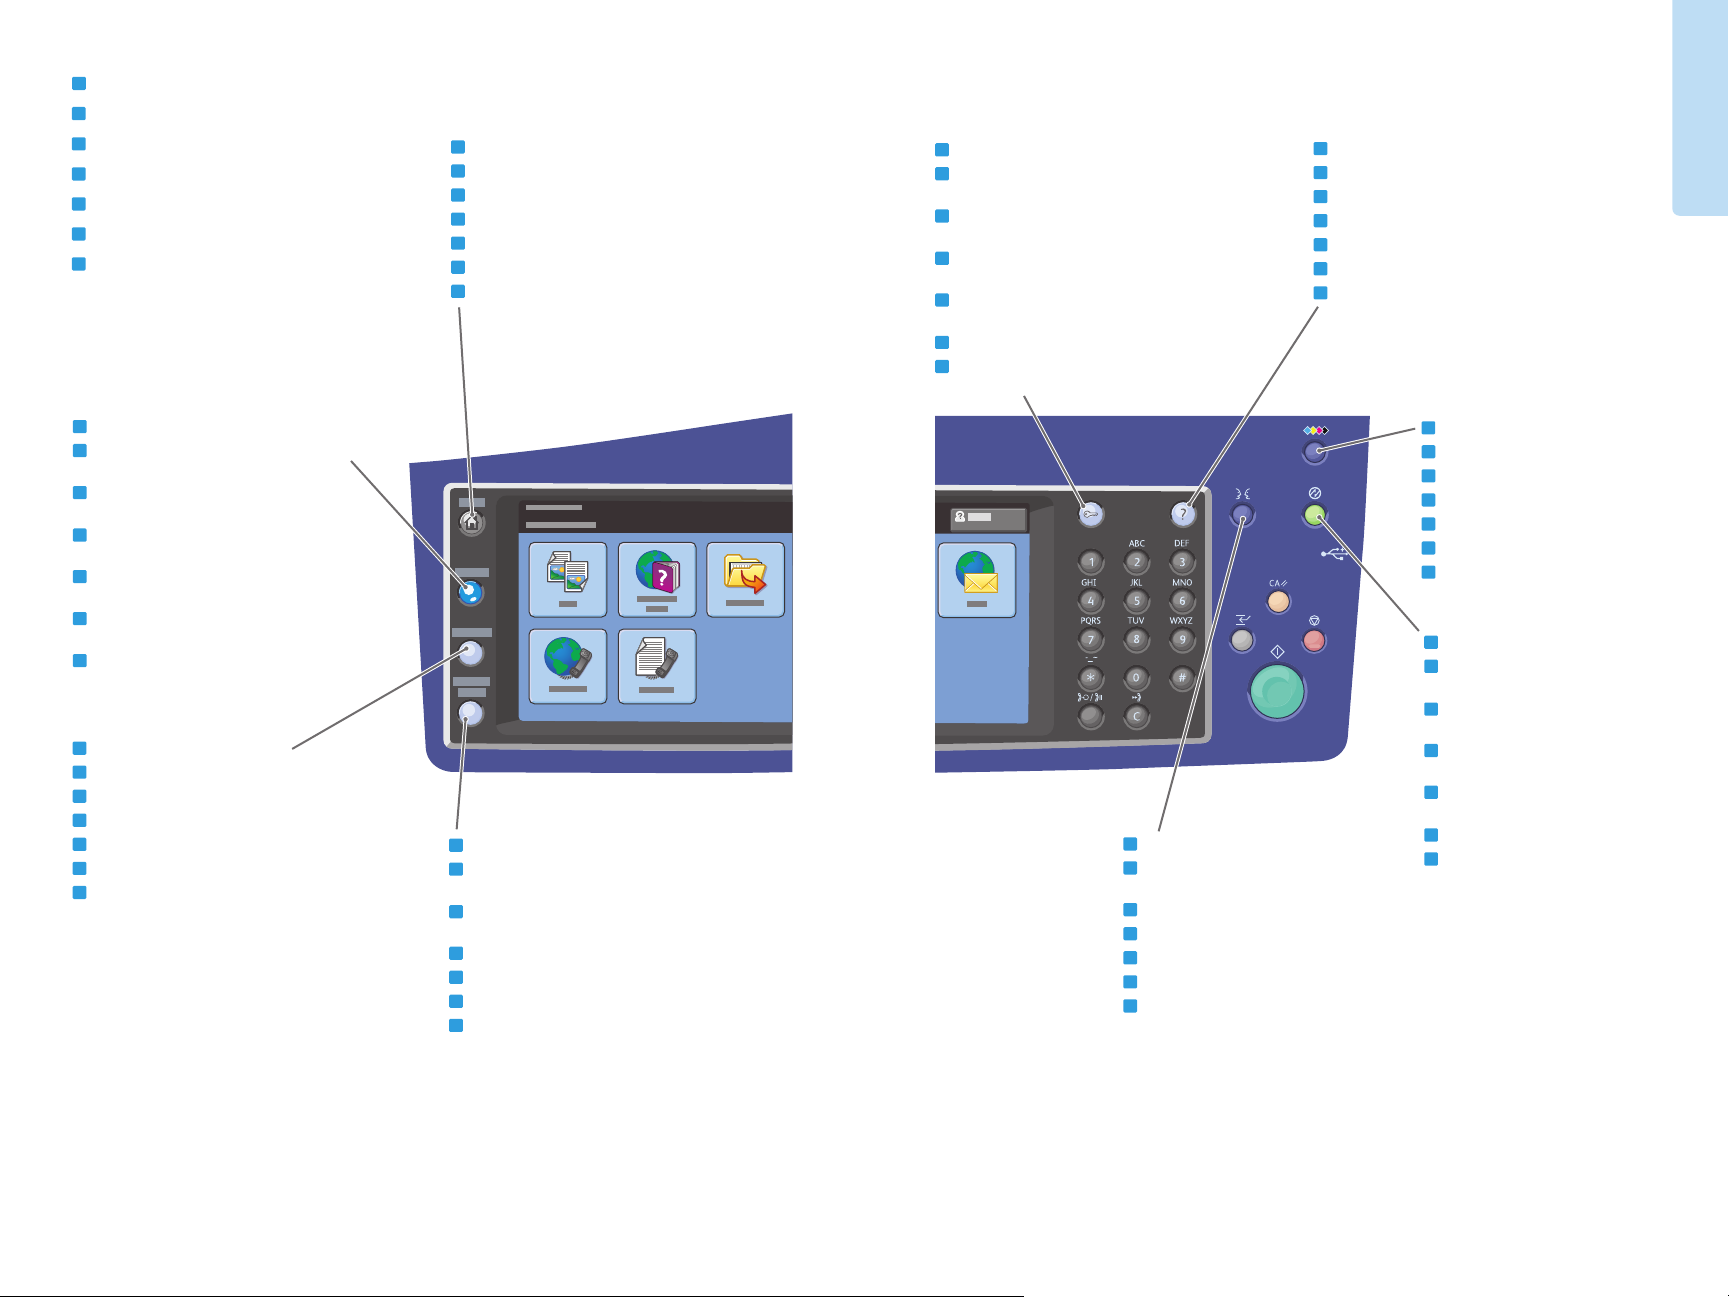
Control Panel
FR
Panneau de commande
IT
Pannello comandi
DE
Steuerpult
ES
Panel de control
PT
Painel de controle
NL
Bedieningspaneel
EN
Show main services screen
FR
Affichage de l'écran principal des services
IT
Mostra la schermata Servizi principale
DE
Betriebsarten-Hauptanzeige einblenden
ES
Mostrar pantalla principal de Servicios
PT
Mostrar tela principal de Serviços
NL
Hoofdscherm functies tonen
EN
Log in/out of password protected features
FR
Connexion/déconnexion lors de l'utilisation des
fonctions protégées par mot de passe
IT
Accesso/uscita per le funzioni protette mediante
password
DE
Bei kennwortgeschützten Funktionen an- und
abmelden
ES
Conectar/desconectar a funciones protegidas
mediante clave
PT
Login/Logout de recursos protegidos por senha
NL
Aan-/afmelden bij functies die met een
toegangscode zijn beveiligd
EN
View information about the current screen
FR
Affichage d'informations sur l'écran actuel
IT
Visualizza le informazioni sulla schermata corrente
DE
Informationen zur aktuellen Anzeige einblenden
ES
Ver información sobre pantalla actual
PT
Visualizar informações sobre a tela atual
NL
Informatie over het huidige scherm bekijken
Printer Basics
Gén éralités
EN
Show Services Home or last used screen
FR
Affichage de l'écran Accueil Services ou du
dernier écran utilisé
IT
Mostra la Home page Servizi o l'ultima
schermata utilizzata
DE
Betriebsartenstartseite oder zuletzt benutzte
Anzeige einblenden
ES
Mostrar página principal de Servicios o la
última pantalla utilizada
PT
Mostrar Página inicial de serviços ou última
tela usada
NL
Startpagina Functies of het laatst gebruikte
scherm tonen
EN
Show active and completed jobs
FR
Affichage des travaux actifs et terminés
IT
Mostra i lavori attivi e quelli completati
DE
Aktive und abgeschlossene Aufträge anzeigen
ES
Mostrar trabajos activos y terminados
PT
Mostrar trabalhos ativos e concluídos
NL
Actieve en voltooide opdrachten tonen
Home
Services
Job Status
Machine
Status
EN
Show printer settings and information
FR
Affichage des paramètres de l'imprimante, ainsi que
des informations la concernant
IT
Mostra le impostazioni e le informazioni della
stampante
DE
Druckereinstellungen und -informationen anzeigen
ES
Mostrar configuración e información de impresora
PT
Mostrar configurações e informações da impressora
NL
Printerinstellingen en -informatie tonen
English
Français
Italiano
Deutsch
Español
Português
Nederlands
Svenska
Norsk
Dansk
Suomi
Čeština
Polski
Magyar
Русский
Türkçe
฿ᇖ
EN
Set the control panel language
FR
Sélection de la langue affichée sur le
panneau de commande
IT
Imposta la lingua del pannello comandi
DE
Anzeigesprache wählen
ES
Configurar idioma del panel de control
PT
Definir o idioma do painel de controle
NL
Taal voor bedieningspaneel instellen
EN
Open the ink loader
FR
Ouverture du chargeur d'encre
IT
Aprire il caricatore dell'inchiostro
DE
Tintenladefach öffnen
ES
Abrir cargador de tinta
PT
Abrir o carregador de tinta
NL
Inktlader openen
EN
Turn Energy Saver on/off
FR
Activation/Désactivation du mode
Économie d'énergie
IT
Attiva/disattiva il Risparmio
energetico
DE
Energiesparbetrieb ein- und
ausschalten
ES
Activar/desactivar ahorro de
energía
PT
Ligar/desligar Economia de energia
NL
Energiebesparing in-/uitschakelen
www.xerox.com/office/CQ8700support
www.xerox.com/office/CQ8900support
5
Page 6
Printer Basics
http://xxx.xxx.xxx.xxx
Home
Services
Job Status
Gén éralités
EN
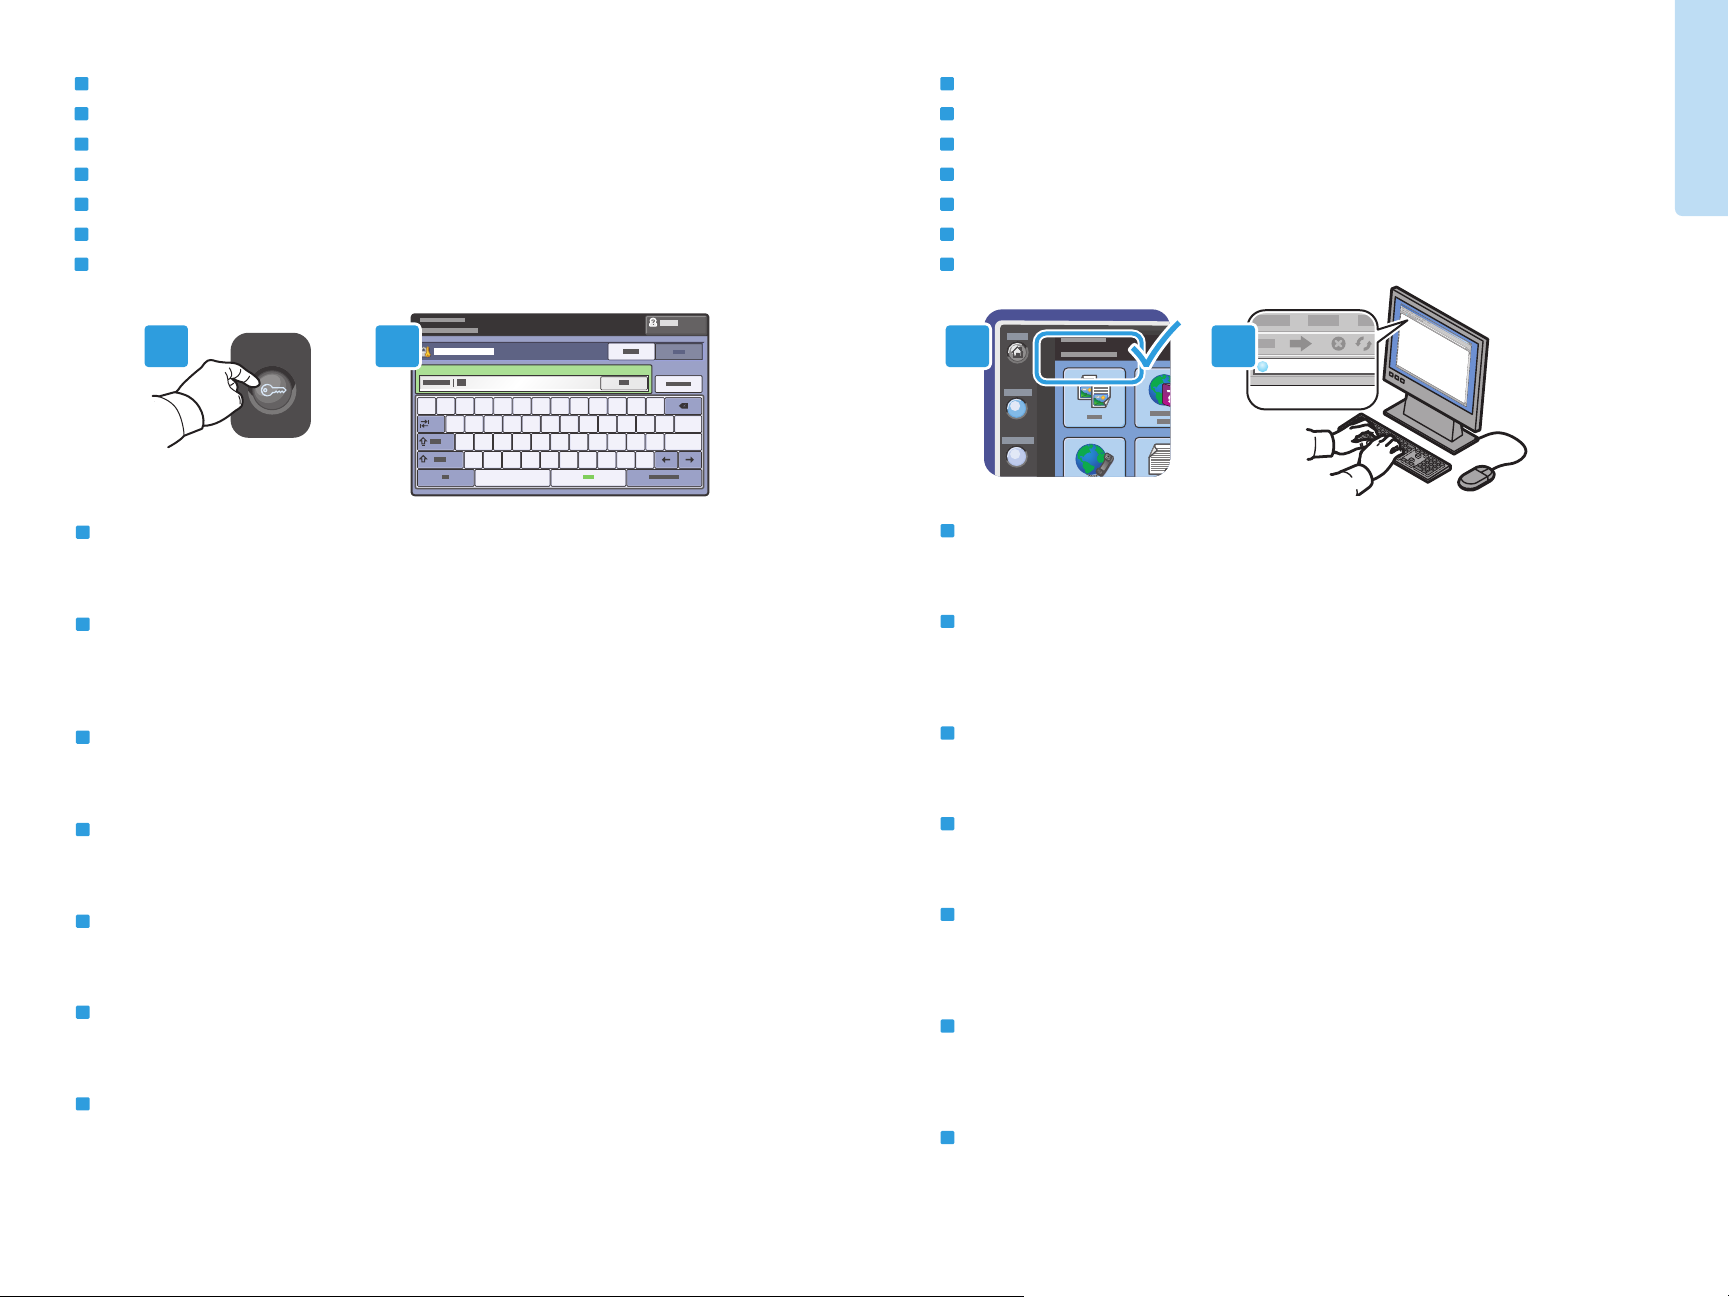
Administrator Access
FR
Accès administrateur
IT
Accesso amministratore
DE
Administratorzugriff
ES
Acceso de administrador
PT
Acesso de administrador
NL
Beheerderstoegang
1 2
EN
Many of the printer configuration settings accessed through Machine Status > Tools can be password
protected. To access all of the printer features you may need to log in as an administrator. The default login
user name is admin, and the password is 1111.
FR
De nombreux paramètres de configuration de l'imprimante accessibles via État machine > Outils peuvent
être protégés par mot de passe. Pour accéder à l'ensemble des fonctions de l'imprimante, vous devrez
peut-être vous connecter en tant qu'administrateur. Le nom de connexion par défaut et le mot de passe
correspondent respectivement à admin et 1111.
IT
Molte impostazioni di configurazione della stampante, accessibili tramite Stato macchina > Strumenti,
potrebbero essere protette da una password. Per avere accesso a tutte le funzioni della stampante, potrebbe
essere necessario connettersi come amministratore. Il nome utente predefinito è admin, la password è 1111.
DE
Viele der Druckerkonfigurationseinstellungen, die über Gerätestatus > Verwaltung aufgerufen werden,
können durch ein Kennwort geschützt werden. Zum Zugriff auf alle Druckerfunktionen ist u. U. die Anmeldung
als Administrator erforderlich. Der Standardbenutzername ist „admin“, das Kennwort lautet „1111“.
ES
Puede proteger mediante clave muchas opciones de configuración de la impresora a las que se accede a través
de Estado de la máquina > Herramientas. Para acceder a todas las funciones de la impresora, puede tener
que iniciar la sesión como administrador. El nombre de usuario es "admin" y la clave es "1111".
PT
A maioria das definições de configuração da impressora acessada por meio de Status da máquina >
Ferramentas pode ser protegida por senha. Para acessar todos os recursos da impressora é necessário efetuar
login como administrador. O nome de usuário de login padrão é admin e a senha é 1111.
NL
Veel van de printerconfiguratieinstellingen die via Apparaatstatus > Hulpprogramma's toegankelijk zijn,
zijn mogelijk met een toegangscode beveiligd. U moet zich mogelijk als beheerder aanmelden voor toegang
tot alle printerfuncties. De standaard aanmeldingsnaam van de gebruiker is admin en de toegangscode
is 1111.
www.xerox.com/office/CQ8700support
www.xerox.com/office/CQ8900support
@
~
`
$
%
#
1!2
4
5
3
q w e r t y u i o
a s d f g h j
z x c v b n m
EN
CentreWare Internet Services
FR
Services Internet CentreWare
IT
Servizi Internet CentreWare
DE
CentreWare Internet Services
ES
Servicios de Internet de CentreWare
PT
Serviços do CentreWare na Internet
NL
CentreWare Internet Services
English
Français
1 2
Italiano
Deutsch
*
^
6
7&8
(
9
k l
,<.
)
+
0
-_=
|
}
p
\
[{]
:
@
‘“;
>
?
/
EN
You can access printer configuration, security settings and diagnostic functions, and manage address books
Español
Português
Nederlands
Svenska
Norsk
Dansk
Suomi
Русский
฿ᇖ
and scanning over a TCP/IP network using CentreWare Internet Services.
To connect, type the printer IP address in your computer Web browser. The IP address is available on the
printer touch screen.
FR
Vous pouvez accéder aux paramètres de configuration, de sécurité et aux fonctions de diagnostic de
l'imprimante au moyen des Services Internet CentreWare. Ces services permettent également de gérer les
carnets d'adresses et la numérisation via un réseau TCP/IP.
Pour vous connecter, entrez l'adresse IP de l'imprimante dans le navigateur Web de votre ordinateur.
L'adresse IP est indiquée sur l'écran tactile de l'imprimante.
IT
Servizi Internet CentreWare consente di accedere a configurazione, impostazioni di sicurezza e funzioni di
diagnostica della stampante, nonché di gestire rubriche e scansire su una rete TCP/IP.
Per collegarsi, digitare l'indirizzo IP della stampante nel Web browser del computer. L'indirizzo IP è disponibile
sullo schermo sensibile della stampante.
DE
Auf die Druckerkonfiguration, Sicherheitseinstellungen und Diagnosefunktionen, die Verwaltung von
Adressbüchern und den Scanbetrieb besteht über CentreWare Internet Services Zugriff.
Zum Aufrufen von CentreWare Internet Services am Computer die IP-Adresse des Druckers in den Webbrowser
eingeben. Die IP-Adresse ist auf dem Touchscreen des Druckers zu finden.
ES
Puede utilizar Servicios de Internet de CentreWare para acceder a la configuración, los parámetros de
seguridad y las funciones de diagnóstico de la impresora, así como administrar libretas de direcciones y
trabajos de escaneado a través de una red TCP/IP.
Para conectarse, introduzca la dirección IP de la impresora en el navegador web del PC. La dirección IP figura
en la pantalla táctil de la impresora.
PT
Você pode acessar a configuração da impressora, as configurações de segurança e as funções de diagnóstico, e
gerenciar catálogos de endereço e digitalização através de uma rede TCP/IP usando os Serviços do
CentreWare na Internet.
Para conectar, digite o endereço IP da impressora no navegador da Web de seu computador. O endereço IP
está disponível na tela de seleção por toque da impressora.
NL
Via CentreWare Internet Services hebt u toegang tot de printerconfiguratie, beveiligingsinstellingen en
diagnostische functies en kunt u adresboeken en scannen over een TCP/IP-netwerk beheren.
Typ het IP-adres van de printer in uw webbrowser om een verbinding te maken. Het IP-adres vindt u op het
aanraakscherm van de printer.
6
Page 7

EN
Supported Paper
FR
Papier pris en charge
IT
Carta supportata
DE
Unterstütztes Material
ES
Papeles admitidos
PT
Papel suportado
NL
Ondersteund papier
1
60–220 g/m
(16 lb. Bond–80 lb. Cover)
Postcard................. 3.0 x 5.0 in.
Statement............. 5.5 x 8.5 in.
Executive............... 7.25 x 10.5 in.
A/Letter.................. 8.5 x 11.0 in.
US Folio.................. 8.5 x 13.0 in.
Legal....................... 8.5 x 14.0 in.
ISO B5 ....................176 x 250 mm
B5 JIS ..................... 182 x 257 mm
A6 ............................105 x 148 mm
A5 ............................148 x 210 mm
A4 ............................210 x 297 mm
#6 3/4..................... 3.6 x 6.5 in.
Monarch ................3.9 x 7.5 in.
#5 1/2..................... 4.4 x 5.75 in.
A7 ............................5.25 x 7.25 in.
#10 Commercial.. 4.12 x 9.5 in.
6 x 9 ........................6.0 x 9.0 in.
DL ............................ 110 x 220 mm
C5 ............................ 162 x 229 mm
Choukei 4 .............. 90 x 205 mm
Choukei 3 .............. 120 x 235 mm
EN
Custom
FR
Personnalisé
IT
Personalizzato
DE
Benutzerdefiniert
ES
Personalizado
PT
Personalizado
NL
Aangepast
W: 75–216 mm (3.0–8.5 in.)
L: 122–356 mm (5.0–14.0 in.)
1 2 3 4 5
60–66 g/m
2
Printing
Impression
(16 lb.–18 lb. Bond)
EN
Lightweight
FR
Papier fin
IT
1
2
2
5
Carta leggera
DE
Dünnes Papier
ES
Ligero
PT
Baixa gramatura
NL
Licht papier
3
4
2 3 4
60–220 g/m
(16 lb. Bond–80 lb. Cover)
Statement............. 5.5 x 8.5 in.
Executive............... 7.25 x 10.5 in.
A/Letter.................. 8.5 x 11.0 in.
US Folio.................. 8.5 x 13.0 in.
Legal....................... 8.5 x 14.0 in.
ISO B5 ....................176 x 250 mm
B5 JIS ..................... 182 x 257 mm
A5 ............................148 x 210 mm
A4 ............................210 x 297 mm
#10 Commercial.. 4.12 x 9.5 in.
DL ............................ 110 x 220 mm
C5 ............................ 162 x 229 mm
W
L
2
EN
FR
IT
DE
ES
PT
NL
5
60–122 g/m
(16 lb.–32 lb. Bond)
A/Letter.................. 8.5 x 11.0 in.
Legal....................... 8.5 x 14.0 in.
A4 ............................210 x 297 mm
www.xerox.com/office/CQ8700docs
www.xerox.com/office/CQ8900docs
See: User Guide > Paper and Media
Voir : Guide de l'utilisateur > Papier et supports
Vedere: Guida per l'utente > Carta e supporti
Siehe: Benutzerhandbuch > Druckmedien.
Consulte: Guía del usuario > Papel y soportes
de impresión
Consulte: Guia do Usuário > Papel e Material
Zie: Handleiding voor de gebruiker > Papier en
media
2
67–122 g/m
(18 lb.–32 lb. Bond)
EN
Plain
FR
Papier ordinaire
IT
Carta normale
DE
Normalpapier
ES
Normal
PT
Comum
NL
Gewoon papier
1 2 3 4
123–199 g/m
(32 lb. Bond–65 lb. Cover)
EN
Light Cardstock
FR
Support cartonné fin
IT
Cartoncino leggero
DE
Leichtkarton
ES
Cartulina ligera
PT
Cartão de baixa gramatura
NL
Licht karton
200–220 g/m
(65 lb.–80 lb. Cover)
EN
Cardstock
FR
Support cartonné
IT
Cartoncino
DE
Karton
ES
Cartulina
PT
Cartão
NL
Karton
2
2
2
www.xerox.com/office/CQ8700support
www.xerox.com/office/CQ8900support
7
Page 8

EN
Loading Paper
FR
Chargement du papier
IT
Caricamento della carta
DE
Einlegen von Material
ES
Colocación de papel
PT
Colocação de papel
NL
Papier plaatsen
1 2 3 4
2
Windows
Macintosh
Printing
Impression
www.xerox.com/office/CQ8700support
www.xerox.com/office/CQ8900support
EN
When loading paper, confirm or select the correct
type and size on the control panel
FR
Lors du chargement du papier, confirmez ou
sélectionnez le type et le format corrects sur le
panneau de commande
IT
Quando si carica la carta, confermare o selezionare
il tipo e il formato corretti sul pannello comandi
DE
Nach dem Einlegen von Druckmaterial Materialart
und -format am Steuerpult bestätigen oder
einstellen
ES
Al colocar papel, confirme o seleccione el tipo y
tamaño adecuados en el panel de control
PT
Ao colocar papel, confirme ou selecione o tipo e
tamanho corretos no painel de controle
NL
Wanneer u papier plaatst, moet u de juiste
papiersoort en het juiste papierformaat bevestigen
of selecteren op het bedieningspaneel
EN
Select printing options in the Xerox® print driver
FR
Sélectionnez les options d'impression dans le pilote
d'imprimante Xerox
IT
Selezionare le opzioni di stampa nel driver di
stampa Xerox
DE
Druckoptionen im Xerox®-Druckertreiber festlegen
ES
Seleccione opciones de impresión en el controlador
de impresión de Xerox
PT
Selecione as opções de impressão no driver de
impressão Xerox
NL
Selecteer afdrukopties in de Xerox®-printerdriver
®
®
®
®
8
Page 9

EN
Printing from USB
FR
Impression depuis un lecteur USB
IT
Stampa da USB
DE
Druck aus USB
ES
Impresión desde USB
PT
Impressão USB
NL
Afdrukken via USB
1
2
EN
Touch Print from USB
FR
Appuyez sur Imprimer depuis USB
IT
Selezionare Stampa da USB
DE
Druck aus USB antippen
ES
Tocar Imprimir desde USB
PT
Toque em Imprimir de USB
NL
Druk op Afdrukken via USB
Printing
Impression
EN
Insert the USB Flash drive in the USB port
FR
Insérez le lecteur Flash USB dans le port USB
IT
Inserire l'unità flash USB nella porta USB
DE
USB-Stick in den USB-Anschluss einstecken
ES
Insertar unidad Flash USB en puerto USB
PT
Insira a unidade flash USB na porta USB
NL
Plaats de USB-flashdrive in de USB-poort
EN
Do not remove the USB Flash drive during reading. Files can be damaged.
FR
Ne retirez pas le lecteur Flash USB au cours de la lecture, sous peine d'altérer les fichiers.
IT
Non rimuovere l'unità flash USB durante la lettura per evitare di danneggiare i file.
DE
Datenträger während des Lesevorgangs nicht entfernen. Andernfalls können Daten beschädigt werden.
ES
Los archivos pueden dañarse. No extraiga la unidad Flash USB durante la lectura.
PT
Não remova a unidade flash USB durante a leitura. Os arquivos poderão ser danificados.
NL
Verwijder de USB-flashdrive niet terwijl deze wordt gelezen. Hierdoor kunnen bestanden beschadigd raken.
www.xerox.com/office/CQ8700support
www.xerox.com/office/CQ8900support
3
EN
Select a file or folder
FR
Sélectionnez un fichier ou un dossier
IT
Selezionare un file oppure una cartella
DE
Datei oder Ordner wählen
ES
Seleccionar archivo o carpeta
PT
Selecione um arquivo ou pasta
NL
Selecteer een bestand of map
9
Page 10

4
4.3
4.1
4.2
EN
Once the desired file is selected, select settings on the touch screen and select the quantity using
the alphanumeric keypad
FR
Après avoir choisi le fichier requis, sélectionnez les paramètres voulus sur l'écran tactile,
puis indiquez le nombre d'exemplaires à l'aide du pavé alphanumérique
IT
Una volta scelto il file, selezionare le impostazioni sullo schermo sensibile nonché la quantità
di stampa utilizzando la tastiera alfanumerica
DE
Nach Wahl der gewünschten Datei die Einstellungen über den Touchscreen vornehmen und über
den Tastenblock die Auflage wählen
ES
Una vez seleccionado el archivo adecuado, seleccionar opciones en la pantalla táctil y ajustar
la cantidad mediante el teclado alfanumérico
PT
Após selecionar o arquivo desejado, escolha as configurações na tela de seleção por toque
e digite a quantidade usando o teclado alfanumérico
NL
Als het gewenste bestand is geselecteerd, selecteert u instellingen op het aanraakscherm
en selecteert u het aantal via het alfanumerieke toetsenbord
5
Printing
Impression
EN
Stop: Pause or cancel job
FR
EN
Press Start
FR
Appuyez sur Démarrer
IT
Premere Avvio
DE
Taste Start drücken
ES
Pulsar Comenzar
PT
Pressione Iniciar
NL
Druk op Start
Arrêt / Pause : permet de mettre en pause ou
d'annuler un travail
IT
Arresta: sospende o annulla il lavoro
DE
Stopp: Auftrag unterbrechen oder abbrechen
ES
Parar: pausa o cancela el trabajo.
PT
Parar: faz pausa ou cancela o trabalho
NL
Stoppen: een opdracht tijdelijk stopzetten of
annuleren
EN
Interrupt: Interrupt printing jobs
FR
Interruption : permet d'interrompre les
travaux d'impression
IT
Interruzione: interrompe i lavori di stampa
DE
Unterbrechen: Druckaufträge unterbrechen
ES
Interrumpir: interrumpe la impresión de
trabajos.
PT
Interromper: interrompe os trabalhos de
impressão
NL
Onderbreken: afdrukopdrachten onderbreken
www.xerox.com/office/CQ8700support
www.xerox.com/office/CQ8900support
10
Page 11

EN
Copying
FR
Copie
IT
Copia
DE
Kopieren
ES
Copia
PT
Cópia
NL
Kopiëren
EN
Basic Copying
FR
Procédure de base
IT
Nozioni di base sulla copia
DE
Einfaches Kopieren
ES
Copia básica
PT
Cópia básica
NL
Eenvoudige kopieertaken
1
www.xerox.com/office/CQ8700docs
www.xerox.com/office/CQ8900docs
EN
For details on settings and advanced procedures, see the User Guide > Copying located on your Software and
Documentation disc or online.
FR
Pour en savoir plus sur les paramètres et les procédures avancées, consultez le document suivant : Guide de
l'utilisateur > Copie, en ligne ou sur le CD-ROM Logiciel et documentation.
IT
Per ulteriori informazioni su impostazioni e procedure avanzate, vedere Guida per l'utente > Copia. La guida
è disponibile in linea oppure sul disco Software and Documentation (CD software e documentazione).
DE
Informationen über Einstellungen und weitere Verfahrensweisen siehe Benutzerhandbuch > Kopieren auf dem
Software and Documentation disc (Datenträger mit Software und Dokumentation) oder online.
ES
Para obtener más datos sobre opciones y procedimientos avanzados, consulte la Guía del usuario > Copia
en el Software and Documentation disc (disco software y documentación) o en línea.
PT
Para obter detalhes sobre configurações e procedimentos avançados, consulte o Guia do Usuário > Cópia
localizado no Software and Documentation disc (CD de software e documentação) ou on-line.
NL
Zie de Handleiding voor de gebruiker > Kopiëren op de Software and Documentation disc (cd met software
en documentatie) of online voor informatie over instellingen en geavanceerde procedures.
www.xerox.com/office/CQ8700support
www.xerox.com/office/CQ8900support
60–120 g/m
2
(16–32 lb. Bond)
X: 148–216 mm (5.8–8.5 in.)
X
Y: 210–355.6 mm (8.3–14.0 in.)
Y
EN
Load original
FR
Chargez le document
IT
Caricare l'originale
DE
Vorlage einlegen
ES
Colocar original
PT
Coloque o original
NL
Plaats het origineel
2
2.1
EN
Press Services Home, then touch Copy
FR
Appuyez sur Accueil Services, puis sur Copie
IT
Selezionare Home page Servizi, quindi Copia
DE
Betrieb Start drücken und Kopieren antippen
ES
Pulsar Página principal de Servicios y tocar Copia
PT
Pressione Página inicial de serviços e toque em Cópia
NL
Druk op Startpagina Functies en druk vervolgens op
Kopiëren
2.2
EN
Clear All: clears previous settings
FR
Annuler tout : annule tous les paramètres
sélectionnés précédemment
IT
Cancella tutto: cancella le impostazioni
precedenti
DE
Alles löschen: löscht zuvor gewählte
Einstellungen
ES
Borrar todo: borra los valores anteriores.
PT
Limpar tudo: exclui as configurações
anteriores
NL
Alle wissen: alle vorige instellingen worden
gewist
11
Copying
Copie
Page 12

3
3.1
EN
Select settings on the touch screen and select the quantity using the
alphanumeric keypad.
FR
Sélectionnez les paramètres voulus sur l'écran tactile, puis indiquez le nombre
d'exemplaires requis à l'aide du pavé alphanumérique.
IT
Selezionare le impostazioni sullo schermo sensibile nonché la quantità di stampa
utilizzando la tastiera alfanumerica.
DE
Die Einstellungen am Touchscreen wählen und über den Tastenblock die Auflage
eingeben.
ES
Seleccione las opciones en la pantalla táctil y ajuste la cantidad mediante el teclado
alfanumérico.
PT
Selecione as configurações na tela de seleção por toque e digite a quantidade usando
o teclado alfanumérico.
NL
Selecteer instellingen op het aanraakscherm en selecteer het aantal via het
alfanumerieke toetsenbord.
4
EN
Stop: Pause or cancel job
FR
3.2
EN
Press Start
FR
Appuyez sur Démarrer
IT
Premere Avvio
DE
Taste Start drücken
ES
Pulsar Comenzar
PT
Pressione Iniciar
NL
Druk op Start
Arrêt / Pause : permet de mettre en pause ou
d'annuler un travail
IT
Arresta: sospende o annulla il lavoro
DE
Stopp: Auftrag unterbrechen oder abbrechen
ES
Parar: pausa o cancela el trabajo.
PT
Parar: faz pausa ou cancela o trabalho
NL
Stoppen: een opdracht tijdelijk stopzetten of
annuleren
EN
Interrupt: Interrupt printing jobs
FR
Interruption : permet d'interrompre les
travaux d'impression
IT
Interruzione: interrompe i lavori di stampa
DE
Unterbrechen: Druckaufträge unterbrechen
ES
Interrumpir: interrumpe la impresión de
trabajos.
PT
Interromper: interrompe os trabalhos de
impressão
NL
Onderbreken: afdrukopdrachten onderbreken
Copying
Copie
www.xerox.com/office/CQ8700support
www.xerox.com/office/CQ8900support
12
Page 13

EN
Scanning
FR
Numérisation
IT
Scansione
DE
Scannen
ES
Escaneado
PT
Digitalização
NL
Scannen
EN
Scanning to the Public Folder
FR
Numérisation vers le dossier public
IT
Scansione nella cartella pubblica
DE
Scanablage im öffentlichen Ordner
ES
Escaneado a la carpeta pública
PT
Digitalização para a pasta pública
NL
Scannen naar de openbare map
1
www.xerox.com/office/CQ8700docs
www.xerox.com/office/CQ8900docs
EN
For more information, see the User Guide > Scanning located on your Software and Documentation disc or
online.
Also see the System Administrator Guide to set up scan workflows.
FR
Pour en savoir plus, consultez le document suivant : Guide de l'utilisateur > Numérisation, en ligne ou sur
le CD-ROM Logiciel et documentation.
Pour savoir comment configurer les flux de travail de numérisation, consultez le document suivant : Guide de
l'administrateur système.
IT
Per ulteriori informazioni, vedere Guida per l'utente > Scansione. La guida è disponibile in linea oppure sul disco
Software and Documentation (CD software e documentazione).
Vedere anche la System Administrator Guide (Guida per l'amministratore del sistema) per impostare i flussi
di lavoro di scansione.
DE
Weitere Informationen siehe Benutzerhandbuch > Scannen auf dem Software and Documentation disc
(Datenträger mit Software und Dokumentation) oder online..
Zum Einrichten von Scan-Workflows siehe auch System Administrator Guide (Systemadministratorhandbuch).
ES
Para obtener más información, consulte la Guía del usuario > Escaneado en el Software and Documentation
disc (disco software y documentación) o en línea.
Consulte también la System Administrator Guide (Guía del administrador del sistema) para configurar los
flujos de trabajo de escaneado.
PT
Para obter mais informações, consulte o Guia do Usuário > Digitalização localizado no Software and
Documentation disc (CD de software e documentação) ou on-line.
Consulte também o System Administrator Guide (Guia do Administrador do Sistema) para configurar os fluxos
de trabalho de digitalização.
NL
Zie de Handleiding voor de gebruiker > Scannen op de Software and Documentation disc (cd met software en
documentatie) of online voor meer informatie.
Zie ook de System Administrator Guide (Handleiding voor de systeembeheerder) voor het instellen van
scanwerkstromen.
www.xerox.com/office/CQ8700support
www.xerox.com/office/CQ8900support
60–120 g/m
2
(16–32 lb. Bond)
X: 148–216 mm (5.8–8.5 in.)
X
Y: 210–355.6 mm (8.3–14.0 in.)
Y
EN
Load original
FR
Chargez le document
IT
Caricare l'originale
DE
Vorlage einlegen
ES
Colocar original
PT
Coloque o original
NL
Plaats het origineel
2
2.1
EN
Press Services Home, then touch Workflow Scanning
FR
Appuyez sur Accueil Services, puis sur Numérisation flux de travail
IT
Selezionare Home page Servizi, quindi Scansione flusso di lavoro
DE
Betrieb Start drücken und Workflow-Scan antippen
ES
Pulsar Página principal de Servicios y tocar Escaneado de trabajos
PT
Pressione Página inicial de serviços e toque em Digitalização de fluxo de trabalho
NL
Druk op Startpagina Functies en druk vervolgens op Werkstroomscannen
2.2
13
Scanning
Numérisation
Page 14

3
Home
Services
Job Status
Machine
Status
3.3
3.1
3.2
EN
Touch _PUBLIC. If desired, use the touch screen to override the default settings.
FR
Appuyez sur_PUBLIC. Au besoin, remplacez les paramètres par défaut à partir de l'écran tactile.
IT
Selezionare _PUBBLICA. Se prescelto, utilizzare lo schermo sensibile per sostituire le impostazioni predefinite.
DE
_ÖFFENTLICH antippen. Falls gewünscht, Standardeinstellungen am Touchscreen überschreiben.
ES
Tocar _PÚBLICA. Puede usar la pantalla táctil para sustituir las opciones prefijadas.
PT
Toque em _PÚBLICO. Se desejar, use a tela de seleção por toque para substituir as configurações padrão.
NL
Druk op _PUBLIC. Onderdruk desgewenst de standaardinstellingen via het aanraakscherm.
EN
Use CentreWare Internet Services to retrieve the scan from the Public folder on the printer hard drive.
FR
Utilisez les Services Internet CentreWare pour récupérer le document numérisé dans le dossier public du
disque dur de l'imprimante.
IT
Utilizzare Servizi Internet CentreWare per recuperare la scansione dalla cartella pubblica sul disco rigido della
stampante.
DE
Mit CentreWare Internet Services die Scandatei aus dem öffentlichen Order auf der Druckerfestplatte abrufen.
ES
Usar Servicios de Internet de CentreWare para recuperar los trabajos escaneados de la carpeta pública
ubicada en la unidad de disco de la impresora.
PT
Use os Serviços do CentreWare na Internet para recuperar a digitalização da pasta Pública no disco rígido
da impressora.
NL
Gebruik CentreWare Internet Services om de scan uit de openbare map op de harde schijf van de printer
op te halen.
5
Scanning
Numérisation
4
EN
Press Start
FR
Appuyez sur Démarrer
IT
Premere Avvio
DE
Taste Start drücken
ES
Pulsar Comenzar
PT
Pressione Iniciar
NL
Druk op Start
www.xerox.com/office/CQ8700support
www.xerox.com/office/CQ8900support
EN
Note the printer IP address on the touch screen
FR
Prenez note de l'adresse IP de l'imprimante indiquée sur l'écran tactile
IT
Prendere nota dell'indirizzo IP della stampante sullo schermo sensibile
DE
IP-Adresse des Druckers am Touchscreen notieren
ES
Observar dirección IP de impresora en pantalla táctil
PT
Observe o endereço IP da impressora na tela de seleção por toque
NL
Let op het IP-adres van de printer op het aanraakscherm
14
Page 15

6
http://xxx.xxx.xxx.xxx
CentreWare
®
Internet Services
EN
Enter the printer IP address in a Web browser, then press Enter or Return
FR
Entrez l'adresse IP de l'imprimante dans un navigateur Web, puis appuyez sur Entrée ou Retour
IT
Inserire l'indirizzo IP della stampante nel Web browser, quindi selezionare Invio oppure premere il tasto Invio
DE
IP-Adresse des Druckers in einen Webbrowser eingeben und Eingabe- oder Return-Taste drücken
ES
Escribir dirección IP de impresora en navegador web y, después, pulsar Intro o Retorno
PT
Digite o endereço IP da impressora em um navegador da Web e pressione Enter ou Retornar
NL
Voer het IP-adres van de printer in een webbrowser in en druk vervolgens op Enter of Return
8
®
CentreWare
Internet Services
EN
Select the Default Public Folder, then click Go to download the scan
FR
Sélectionnez le dossier public par défaut, puis cliquez sur Lancer pour télécharger le document numérisé
IT
Selezionare la cartella pubblica di default, quindi fare clic su Vai per scaricare la scansione
DE
Den öffentlichen Standardordner wählen und auf Start klicken, um die Scandatei herunterzuladen
ES
Seleccionar la Carpeta pública prefijada y hacer clic en Ir para descargar el trabajo de escaneado
PT
Selecione a Pasta pública padrão e clique em Ir para fazer download da digitalização
NL
Selecteer de standaard openbare map en klik vervolgens op Start om de scan te downloaden
Scanning
Numérisation
7
EN
Click the Scan tab
FR
Cliquez sur l'onglet Numérisation
IT
Fare clic sulla scheda Scansione
DE
Auf die Registerkarte Scannen klicken
ES
Hacer clic en la ficha Escaneado
PT
Clique na guia Digitalizar
NL
Klik op het tabblad Scannen
www.xerox.com/office/CQ8700support
www.xerox.com/office/CQ8900support
English
Français
Italiano
Deutsch
Español
Português
Nederlands
Svenska
Norsk
Dansk
Suomi
Русский
฿ᇖ
EN
Update View: refresh the list
FR
Vue de la mise à jour : permet
d'actualiser la liste
IT
Aggiorna la vista: consente di
aggiornare l'elenco
DE
Ansicht aktualisieren: Liste
aktualisieren
ES
Actualizar vista: actualiza la lista.
PT
Atualizar exibição: atualiza a
lista
NL
Weergave bijwerken: de lijst
bijwerken
EN
Download: download the scan, Reprint: print the scan,
Delete: delete the scan
FR
Télécharger : permet de télécharger le document numérisé,
Réimprimer : permet de réimprimer le document numérisé,
Supprimer : permet de supprimer le document numérisé
IT
Download consente di scaricare la scansione, Ristampa consente di
ristampare la scansione, Elimina consente di cancellare la scansione.
DE
Laden: Die Scandatei herunterladen, Nachdrucken: Scan erneut
drucken, Löschen: Scan löschen
ES
Descargar: descarga el trabajo escaneado. Reimprimir: vuelve a
imprimir el trabajo escaneado. Eliminar: elimina el trabajo
escaneado.
PT
Download: faz download da digitalização, Reimprimir: reimprime a
digitalização, Excluir: exclui a digitalização
NL
Downloaden: de scan downloaden, Opnieuw afdrukken: de scan
opnieuw afdrukken, Verwijderen: de scan verwijderen
15
Page 16

EN
Faxing
FR
Télécopie
IT
Fax
DE
Fax
ES
Fax
PT
Envio de fax
NL
Faxen
EN
Basic Faxing
FR
Télécopie de base
IT
Nozioni di base sul fax
DE
Einfaches Faxen
ES
Fax básico
PT
Envio de fax básico
NL
Eenvoudige faxtaken
1
www.xerox.com/office/CQ8700docs
www.xerox.com/office/CQ8900docs
EN
For more information, see the User Guide > Faxing located on your Software and Documentation disc or online.
Also see the System Administrator Guide for information about setting up faxing and advanced settings.
FR
Pour en savoir plus, consultez le document suivant : Guide de l'utilisateur > Télécopie, en ligne ou sur le
CD-ROM Logiciel et documentation.
Pour savoir comment configurer le service de télécopie et les paramètres avancés, consultez le document
suivant : Guide de l'administrateur système.
IT
Per ulteriori informazioni, vedere Guida per l'utente > Fax. La guida è disponibile in linea oppure sul disco
Software and Documentation (CD software e documentazione).
Vedere anche la System Administrator Guide (Guida per l'amministratore del sistema) per informazioni su
impostazioni avanzate e configurazione del fax.
DE
Weitere Informationen siehe Benutzerhandbuch > Fax auf dem Software and Documentation disc
(Datenträger mit Software und Dokumentation) oder online.
Informationen zu Faxeinrichtung und erweiterten Einstellungen siehe auch System Administrator Guide
(Systemadministratorhandbuch).
ES
Para obtener más información, consulte la Guía del usuario > Fax en el Software and Documentation disc
(disco software y documentación) o en línea.
Consulte también la System Administrator Guide (Guía del administrador del sistema) para obtener
información sobre la configuración del fax y las opciones avanzadas.
X
EN
Load original
FR
Chargez le document
IT
Caricare l'originale
DE
Vorlage einlegen
ES
Colocar original
PT
Coloque o original
NL
Plaats het origineel
2
2.1
60–120 g/m
2
(16–32 lb. Bond)
X: 148–216 mm (5.8–8.5 in.)
Y: 210–355.6 mm (8.3–14.0 in.)
Y
2.2
Faxing
Télécopie
PT
Para obter mais informações, consulte o Guia do Usuário > Envio de fax localizado no Software and
Documentation disc (CD de software e documentação) ou on-line.
Consulte também o System Administrator Guide (Guia do Administrador do Sistema) para obter informações
sobre a configuração de fax e as configurações avançadas.
NL
Zie de Handleiding voor de gebruiker > Faxen op de Software and Documentation disc (cd met software en
documentatie) of online voor meer informatie.
Raadpleeg ook de System Administrator Guide (Handleiding voor de systeembeheerder) voor informatie over
faxinstellingen en geavanceerde instellingen.
www.xerox.com/office/CQ8700support
www.xerox.com/office/CQ8900support
EN
Press Services Home, then touch Fax
FR
Appuyez sur Accueil Services, puis sur Fax
IT
Selezionare Home page Servizi, quindi Fax
DE
Betrieb Start drücken und Fax antippen
ES
Pulsar Página principal de Servicios y tocar Fax
PT
Pressione Página inicial de serviços e toque em Fax
NL
Druk op Startpagina Functies en druk vervolgens op Faxen
16
Page 17

3
EN
Touch Dialing Characters to use special characters
and see descriptions.
FR
Appuyez sur Caractères de composition pour utiliser
des caractères spéciaux et afficher des descriptions.
IT
Selezionare Caratteri selezione per utilizzare i
caratteri speciali e visualizzare le descrizioni.
DE
Wählzeichen antippen, um Sonderzeichen und
Beschreibungen aufzurufen.
ES
Tocar Caracteres de marcación para utilizar
caracteres especiales y ver su descripción
PT
Toque em Caracteres de discagem para usar
caracteres especiais e ver as descrições
NL
Druk op Kiestekens om speciale tekens te gebruiken
en beschrijvingen te zien
EN
Clear the Speed Dial check box to enter a new fax number, or select it to enter the speed dial number or select it
from the list
FR
Désactivez la case à cocher Numérotation abrégée pour saisir un nouveau numéro de fax ou activez-la pour
indiquer un numéro abrégé ou le sélectionner dans la liste
IT
Deselezionare la casella di controllo Selezione veloce per immettere un nuovo numero fax. In alternativa,
selezionare la casella di controllo per immettere il numero di selezione veloce oppure scegliere il numero dall'elenco
DE
Die Option Kurzwahl deaktivieren, wenn eine neue Faxnummer eingegeben werden soll, oder aktivieren, um eine
Kurzwahlnummer einzugeben oder aus der Liste zu wählen
ES
Quitar la marca de selección de la casilla de verificación Marcación rápidao seleccionarla para introducir el número
de marcación rápida o escogerlo de la lista
PT
Desmarque a caixa de seleção Discagem rápida para digitar um novo número de fax, ou opte por digitar o número
de discagem rápida ou selecioná-lo na lista
NL
Schakel het selectievakje Snelkiezen uit om een nieuw faxnummer in te voeren, of schakel het vakje in om het
snelkiesnummer in te voeren of het uit de lijst te kiezen
www.xerox.com/office/CQ8700support
www.xerox.com/office/CQ8900support
EN
To add more fax or speed dial numbers, touch +Add
FR
Pour ajouter des numéros de fax ou des numéros abrégés, sélectionnez +Ajouter
IT
Per aggiungere altri numeri di selezione veloce o fax, selezionare +Aggiungi
DE
Zum Hinzufügen weiterer Fax- oder Kurzwahlnummern +Hinzufügen antippen.
ES
Para añadir más números de fax o de marcación rápida, tocar +Agregar
PT
Para adicionar mais números de fax ou de discagem rápida, toque em Adicionar+.
NL
Druk op +Toevoegen om meer faxnummers of snelkiesnummers toe te voegen
4
EN
Select settings
FR
Sélectionnez les paramètres
IT
Selezionare le impostazioni
DE
Einstellungen wählen
ES
Seleccionar opciones
PT
Selecione as configuraçõess
NL
Selecteer instellingen
5
EN
Stop: Pause or cancel job
FR
Arrêt / Pause : permet de mettre en pause ou
EN
Press Start
FR
Appuyez sur Démarrer
IT
Premere Avvio
DE
Taste Start drücken
ES
Pulsar Comenzar
PT
Pressione Iniciar
NL
Druk op Start
d'annuler un travail
IT
Arresta: sospende o annulla il lavoro
DE
Stopp: Auftrag unterbrechen oder abbrechen
ES
Parar: pausa o cancela el trabajo.
PT
Parar: faz pausa ou cancela o trabalho
NL
Stoppen: een opdracht tijdelijk stopzetten of
annuleren
17
Faxing
Télécopie
Page 18

EN
Paper Jams
FR
Incidents papier
IT
Inceppamenti della carta
DE
Materialstaus
ES
Atascos de papel
PT
Atolamentos de papel
NL
Papierstoringen
EN
When a jam occurs, the control panel touch screen displays an animated graphic showing how to clear the jam.
www.xerox.com/office/CQ8700docs
www.xerox.com/office/CQ8900docs
Also see the User Guide > Troubleshooting > Jams for more information.
EN
CAUTION: To avoid damage, remove misfed paper gently and avoid tearing it. Try to remove the
paper in the direction that it would normally feed. Any pieces left in the printer can cause further
misfeeds. Do not reload paper that has misfed.
FR
ATTENTION : pour éviter tout dommage, dégagez le papier délicatement, sans le déchirer. Essayez
de tirer le papier dans le sens d'alimentation normale. Tout morceau de papier coincé dans
l'imprimante pourrait entraîner d'autres faux départs. Ne rechargez pas le papier à l'origine de
l'incident.
IT
ATTENZIONE: per evitare danni, rimuovere con cautela la carta inceppata evitando di strapparla.
Provare a rimuovere la carta nella direzione di alimentazione. Eventuali residui rimasti nella
stampante possono causare ulteriori inceppamenti. Non ricaricare la carta che ha causato problemi
di alimentazione.
FR
Lorsqu'un incident papier survient, l'écran tactile du panneau de commande affiche un graphique animé
indiquant comment résoudre l'incident.
Pour en savoir plus, consultez également le document suivant : Guide de l'utilisateur > Dépannage > Incidents
papier.
IT
Quando si verifica un inceppamento, sullo schermo sensibile del pannello comandi viene visualizzato un grafico
animato che mostra come eliminare l'inceppamento.
Per ulteriori informazioni, vedere Guida per l'utente > Risoluzione dei problemi > Inceppamenti.
DE
Bei Auftreten eines Staus werden am Steuerpult Animationen zur Staubeseitigung angezeigt.
Weitere Informationen siehe Benutzerhandbuch > Fehlerbehebung > Staus.
ES
Cuando se produce un atasco de papel, la pantalla táctil del panel de control muestra un gráfico animado que
indica cómo eliminar el atasco.
Consulte también la Guía del usuario > Solución de problemas > Atascos para obtener más información.
PT
Quando ocorre um atolamento, a tela de seleção por toque do painel de controle exibe um gráfico com
animação indicando como remover o atolamento.
Consulte também o Guia do Usuário > Solução de problemas > Atolamentos para obter mais informações.
NL
In het geval van een papierstoring wordt op het aanraakscherm van het bedieningspaneel via een animatie
aangegeven hoe u de storing kunt verhelpen.
Zie ook de Handleiding voor de gebruiker > Problemen oplossen > Papierstoringen voor meer informatie.
www.xerox.com/office/CQ8700support
www.xerox.com/office/CQ8900support
DE
ACHTUNG: Um Schäden zu vermeiden, gestautes Druckmaterial stets vorsichtig entfernen, damit
es nicht zerreißt. Das Material wenn möglich stets in Zufuhrrichtung herausziehen. Im Gerät
verbleibende Papierreste können zu weiteren Staus führen. Material, das einmal falsch eingezogen
wurde, nicht mehr im Drucker verwenden.
ES
PRECAUCIÓN: para evitar daños, retire el papel atascado con cuidado intentando no romperlo.
Intente extraer el papel en la misma dirección en que suele entrar en la impresora. Los fragmentos
de papel que queden en la impresora pueden provocar otros problemas de alimentación. No vuelva
a utilizar papel atascado con anterioridad.
PT
CUIDADO: Para evitar danos, remova com cuidado o papel alimentado incorretamente e evite
rasgá-lo. Tente remover o papel na direção em que ele seria alimentado normalmente. Qualquer
pedaço deixado na impressora pode causar atolamentos posteriormente. Não recoloque o papel
que foi alimentado incorretamente.
NL
VOORZICHTIG: verwijder papier altijd voorzichtig, zonder scheuren, uit het apparaat om schade te
voorkomen. Probeer het papier te verwijderen in de richting waarin het normaal gesproken wordt
ingevoerd. Papierresten die in de printer achterblijven kunnen later papierstoringen veroorzaken.
Plaats vastgelopen papier niet opnieuw.
18
Résolution des incidents
Troubleshooting
 Loading...